

Page 1
Lexmark
T420
User’s Reference
June 2002
www.lexmark.com
Page 2

Page 3

Table of contents
Chapter 1: Printer overview ..............................................................7
Chapter 2: Tips for successful printing ..........................................8
Tips on storing print media ................................................................................... 8
Avoiding jams ....................................................................................................... 8
Chapter 3: Sending a job to print ...................................................10
Printing from a Windows environment ............................................................... 10
Printing from a Macintosh computer .................................................................. 10
Chapter 4: Canceling a print job ....................................................11
From the printer operator panel ......................................................................... 11
From a Windows computer ................................................................................ 11
From a Macintosh computer .............................................................................. 11
Chapter 5: Printing Print Quality Test Pages ................................12
Chapter 6: Understanding fonts ....................................................13
Chapter 7: Printing the menu settings page .................................18
Chapter 8: Print media sources and specifications .....................19
Chapter 9: Storing print media .......................................................23
Chapter 10: Clearing jams ..............................................................24
Chapter 11: Loading trays ..............................................................37
Using the optional label tray ............................................................................... 37
Loading the standard tray, the optional 250-sheet tray,
or the optional label tray ..................................................................................... 37
Loading the optional 500-sheet tray ................................................................... 42
iii
Page 4

Chapter 12: Using and loading the multipurpose feeder ............48
Opening the multipurpose feeder ....................................................................... 49
Loading the multipurpose feeder ........................................................................ 51
Chapter 13: Using the duplex function .........................................57
Duplex printing on letterhead ............................................................................. 57
Using Duplex Bind .............................................................................................. 57
Chapter 14: Using the output bins .................................................59
Using the standard output bin ............................................................................ 59
Using the rear output bin .................................................................................... 60
Chapter 15: Determining the status of supplies ...........................63
Chapter 16: Conserving supplies ..................................................65
Chapter 17: Maintaining your printer ............................................66
Chapter 18: Ordering supplies .......................................................67
Ordering a print cartridge ................................................................................... 67
Chapter 19: Storing the print cartridge .........................................68
Chapter 20: Replacing the print cartridge .....................................69
Removing the used print cartridge ..................................................................... 69
Cleaning the printer .................. ...... .................................................................... 71
Installing the new print cartridge ....................... ....... ...... ....... ...... ....... ...... .......... 7 1
Chapter 21: Cleaning the printhead lens ......................................74
Chapter 22: Solving basic printer problems .................................75
Chapter 23: Solving printing problems .........................................76
Chapter 24: Solving print quality problems ..................................80
Chapter 25: Solving option problems ...........................................85
Chapter 26: Solving network printing problems ..........................86
iv
Page 5

Chapter 27: Solving other problems .............................................87
Chapter 28: Print media guidelines ...............................................88
Paper ........................... ................... ............. ................... .................... ................ 88
Letterhead ......................... ................................................................................. 88
Transparencies .................................................................................................. 89
Envelopes .......................................................................................................... 90
Labels ................................ .................... ................... ................... .................... ... 90
Card stock .......................................................................................................... 92
Chapter 29: Linking trays ...............................................................93
Chapter 30: Using MarkVision to manage the printer ..................94
Chapter 31: Using the operator panel ...........................................95
Chapter 32: Understanding the operator panel lights .................96
Chapter 33: Understanding the printer configuration menus ...125
Accessing the printer menus .......... ....... ...... ...... ....... ...... ....... ...... ....... ...... ....... . 125
Printing the Printer Settings Configuration sheet ............................................. 125
Advancing in the menus and menu items, and selecting and saving values ... 126
Exiting the menus ............................................................................................. 126
Menus overview ............................................................................................... 126
Chapter 34: Restoring factory defaults .......................................131
Chapter 35: Using Hex Trace mode .............................................133
Chapter 36: Using the Local Printer Setup Utility ......................134
Chapter 37: Removing the printer from an optional drawer .....136
Chapter 38: Removing an optional memory card ......................137
Accessing the system board ............................................................................ 137
Removing optional memory cards .................................................................... 140
Reinstalling the shield ...................................................................................... 140
Reattaching the side door ................................................................................ 141
v
Page 6

Notices ............................................................................................143
Trademarks ...................................................................................................... 144
Licensing notice ............................................................................................... 146
Safety information ............................................................................................ 146
Cautions and warnings ...... ....... ...... ....... ...... ............................................. ........ 147
Electronic emission notices ...... ...... ....... ...... ...... ............................................... 147
Noise emission levels ....................................................................................... 149
Energy Star ...................................................................................................... 149
Laser notices .................................................................................................... 150
Laser advisory label ......................................................................................... 150
Laser notice ...................................................................................................... 150
Statement of limited warranty ........................................................................... 150
Index ................................................................................................ 153
vi
Page 7
1
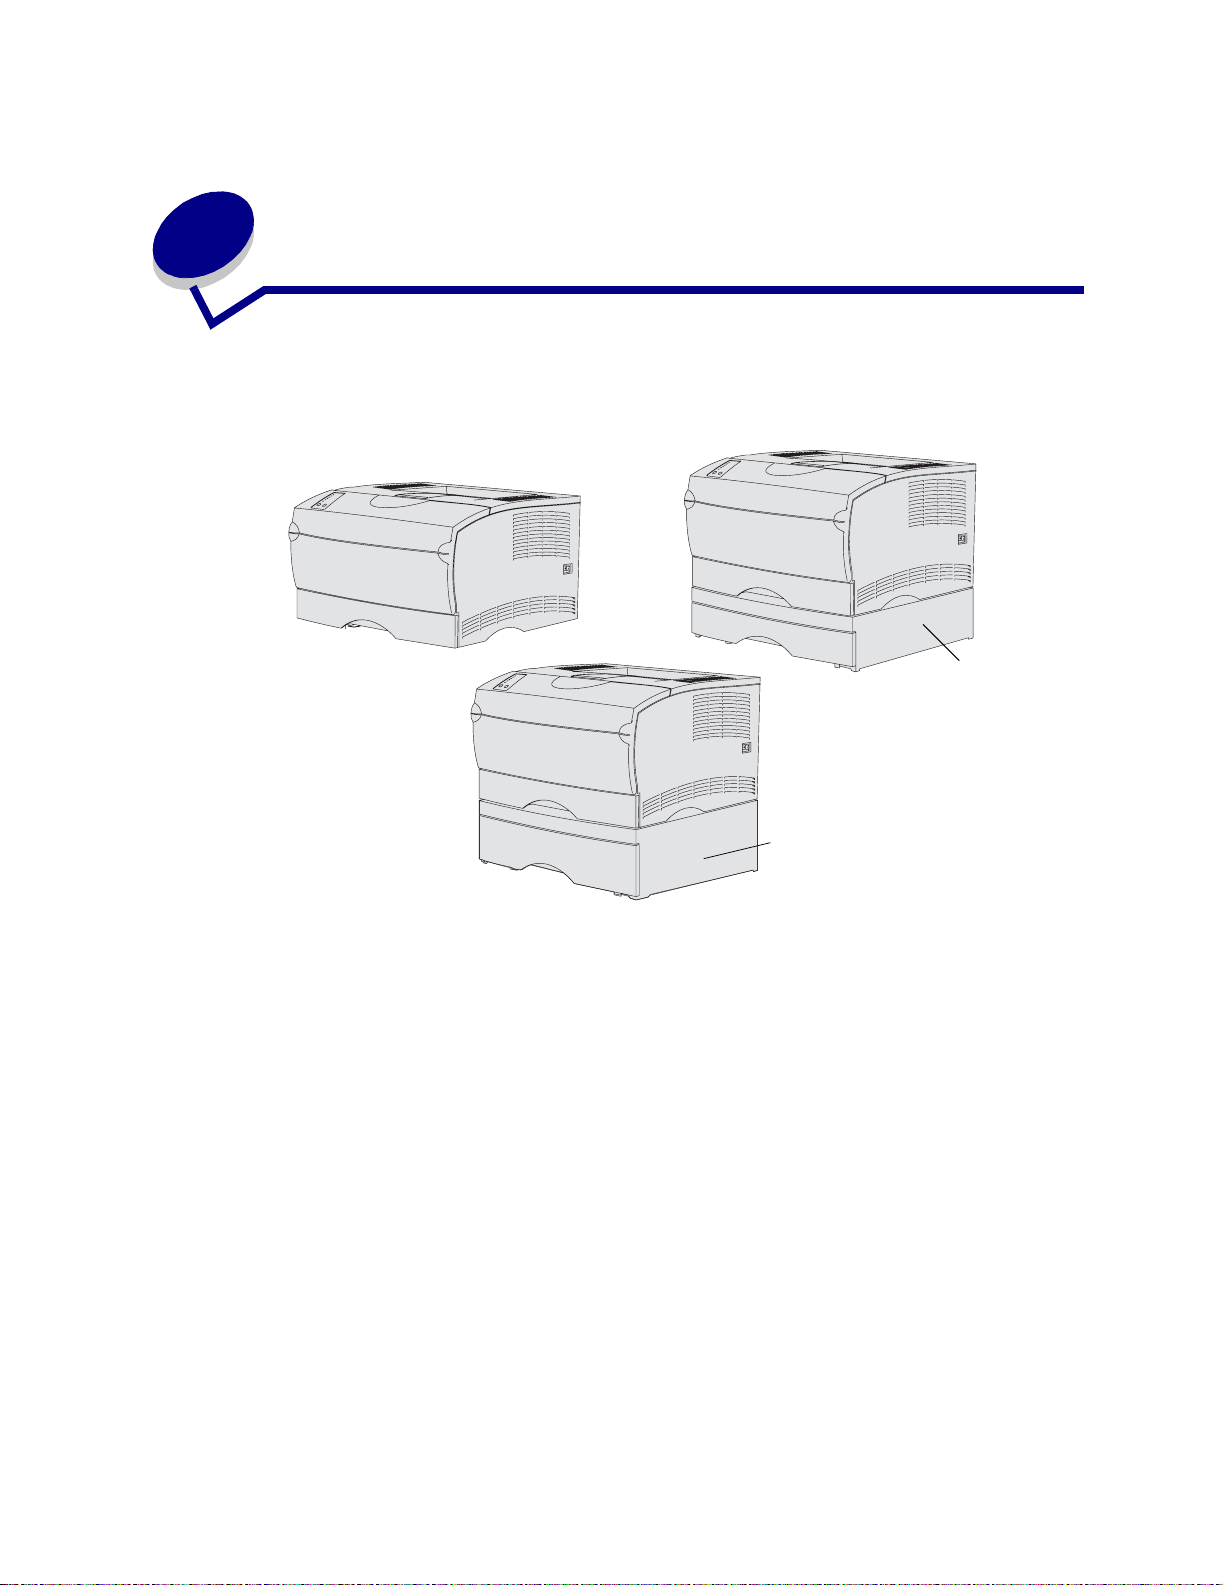
Printer overview
The following illustrations show the standard Lexmark T420, the printer configured with a 250-sheet
drawer, and the printer configured with a 500-sheet drawer.
Optional
250-sheet
drawer
Optional 500-sheet
drawer
7
Page 8

2
Tips for successful printing
Tips on storing print media
Store your print media properly. For more information, see Storing print media.
Avoiding jams
If you select appropriate print media (paper, transparencies, labels, and card stock) for your printer,
you’ll be well on your way to trouble-free printing. See Print media guidelines for more information.
Note: We recommend that you try a limited sample of any print media you are considering
using with the printer before purchasing large quantities.
By carefully selecting print media and loading it properly, you should be able to avoid most jams. See
the following for instructions on loading print media:
• Loading trays (including the standard tray, optional 250-sheet tray, and optional label tray)
• Loading the optional 500-sheet tray
• Using and loading the multipurpose feeder
If you do experience a jam, see Clearing jams for instructions.
8
Page 9

The following hints can help you avoid jams:
• Use only recommended print media. See Print media guidelines for more information. Refer
to the Card Stock & Label Guide available on Lexmark’s Web site at www.lexmark.com/
publications for more information about which print media will provide optimum results for your
printing environment.
• If you need detailed information before purchasing large quantities of customized print media,
refer to the Card Stock & Label Guide.
• Do not load wrinkled, creased, damp, or curled print media.
• Flex, fan, and straighten print media before you load it. If jams do occur with print media, try
feeding one sheet at a time through the multipurpose feeder.
• Do not overload the print media sources. Make sure the stack height does not exceed the
maximum height indicated by the labels in the sources.
• Do not use print media that you have cut or trimmed yourself.
• Do not mix print media sizes, weights, or types in the same print media source.
• Make sure the recommended print side is face down when loading all trays and the
recommended print side is face up when loading the multipurpose feeder.
• Keep print media stored in an acceptable environment. See Storing print media.
• Do not remove trays during a print job.
• Push all trays in firmly after loading them.
• Make sure the guides in the trays are properly positioned for the size print media you have
loaded. Make sure the guides are not placed too tightly against the stack of print media.
• Card stock must exit to the rear output bin. See Using the rear output bin for more
information.
• Envelopes may be sent to the standard output bin; however, if the envelopes exit to the rear
output bin there is less curl.
• Make sure all cables that connect to the printer are correctly attached. Refer to the Setup
Guide for more information.
9
Page 10

3
Sending a job to print
Printing from a Windows environment
1 Load print media. (See Loading trays.)
2 From your software application, open the file you want to print.
3 From the File menu, select Print Setup.
4 Verify the correct printer is selected in the Print Setup dialog box.
5 In the Print Setup dialog box, select Properties, Options, or Setup (depending on the
application), sele ct the print media type and size, and then select OK.
6 Select OK or Print.
Printing from a Macintosh computer
1 Load print media. (See Loading trays.)
2 From your software application, open the file you want to print.
3 From the File menu, select Page Setup.
4 Verify the correct printer is selected in the dialog box.
5 From the Paper menu, select the print media type you are using, and then select OK.
6 From the File menu, select Print.
10
Page 11

4
Canceling a print job
From the printer operator panel
If the job you want to cancel is printing and the Ready/Data light is blinking, press and release the
Cancel button. All the lights come on indicating the print job is canceled.
From a Windows computer
1 Minimize all programs to display the desktop.
2 Double-click the My Computer icon.
3 Double-click the Printer icon.
A list of available printers appears.
4 Double-click the printer you are using to print the job.
A list of print jobs appears.
5 Select the job you want to cancel.
6 Press the Delete key.
From a Macintosh computer
1 Double-click the printer icon on your desktop.
A list of print jobs appears.
2 Press Ctrl, and then click the print job you want to cancel.
3 Select Stop Queue from the pop-up menu.
11
Page 12

5
Printing Print Quality Test Pages
To help isolate print quality problems, print the Print Quality Test Pages:
1 Turn the printer off and open the upper front door.
2 Press and hold Continue as you turn the printer on. All the lights cycle.
3 Release Continue.
4 Close the upper front door. The light sequence that represents the Home menu is displayed.
Note: If the Error light is displayed, close the upper front door.
The Printer Settings Configuration sheet prints.
5 Press and release Cancel until you see the operator panel light sequence for Print Quality
Test Pages, as indicated on the Printer Settings Configuration sheet.
6 Press and hold Continue until all the lights cycle.
The Print Quality Test Pages print. The pages include:
• An information page containing printer information, cartridge information, current margin
settings, and a graphic to use to evaluate the print quality
• Two pages with graphics to use to evaluate how well the printer is capable of printing various
types of graphics
7 Examine the pages to determine the quality of printing. If there are problems, see Solving
print quality problems.
To return to the Home menu, press and hold Cancel until all the lights cycle. To exit the menus, turn
the printer off.
12
Page 13
6
Understanding f onts
Your printer has resident fonts stored permanently its memory . Diff erent f onts may be av ailable in PCL
and PostScript emulations.
Your printer supports the following scalable fonts.
Supported fonts
PostScript 3 font names PCL 6 font names
AlbertusMT Albertus Medium
AlbertusMT-Italic
AlbertusMT-Light
Albertus Extra Bold
AntiqueOlive-Roman Antique Olive
AntiqueOlive-Italic Antique Olive Italic
AntiqueOlive-Bold Antique Olive Bold
AntiqueOlive-Compact
ArialMT Arial
Arial-ItalicMT Arial Italic
Arial-BoldMT Arial Bold
Arial-BoldItalicMT Arial Bold Italic
AvantGarde-Book I TC Avant Garde Book
AvantGarde-BookOblique ITC Avant Garde Book Oblique
AvantGarde-Demi ITC Avant Garde Demi
AvantGarde-DemiOblique ITC Avant Garde Demi Oblique
Bookman-Light ITC Bookman Light
Bookman-LightItalic ITC Bookman Light Italic
Bookman-Demi ITC Bookman D emi
Bookman-DemiItalic ITC Bookman Demi Italic
Clarendon Condensed Bold
Coronet-Regular Coronet
Courier CourierPS
Courier-Oblique CourierPS Oblique
Courier-Bold CourierPS Bold
13
Page 14

Supported fonts (continued)
PostScript 3 font names PCL 6 font names
Courier-BoldOblique CourierPS Bold Oblique
CG Omega
CG Omega Bold
CG Omega Italic
CG Omega Bold Italic
Garamond-Antiqua Garamond Antiqua
Garamond-Halbfett Garamond Halbfett
Garamond-Kursiv Garamond Kursiv
Garamond-KursivHalbfett Garamond Kursiv Halbfett
Helvetica-Light Helvetica Light
Helvetica-LightOblique Helvetica Light Oblique
Helvetica-Black Hel vetica Black
Helvetica-BlackOblique Helvetica Black Oblique
Helvetica Helvetica
Helvetica-Oblique Helvetica Italic
Helvetica-Bold Helvetica Bold
Helvetica-Bo ldOblique Helvetica Bold Italic
Helvetica-Narrow Helvetica Narrow
Helvetica-Narrow-Oblique Helvetica Narrow Italic
Helvetica-Narrow-Bold Helvetica Narrow Bold
Helvetica-Narrow-BoldOblique Helvetica Narrow Bold Italic
Intl-CG-Times CG Times
Intl-CG-Times-Italic CG Times Italic
Intl-CG-Times-Bold CG Times Bold
Intl-CG-Times-BoldItalic CG Times Bold Italic
Intl-Univers-Medium Univers Medium
Intl-Univers-MediumItalic Univers Medium Italic
Intl-Univers-Bold Univers Bold
Intl-Univers-BoldItalic Univers Bold Italic
Intl-Courier Courier
Intl-Courier-Oblique Courier Italic
Intl-Courier-Bold Courier Bold
Intl-Courier-BoldOblique Courier Bold Italic
LetterGothic Letter Gothic
LetterGothic-Slanted Letter Gothic Italic
LetterGothic-Bold Letter Gothic Bold
14
Page 15

Supported fonts (continued)
PostScript 3 font names PCL 6 font names
LetterGothic-BoldSlanted
Marigold Marigold
NewCenturySchlbk-Ro man Century Schoolbook Roman
NewCenturySchlbk-I tali c Century Schoolbook Italic
NewCenturySchlbk-Bold Century Schoolbook Bold
NewCenturySchlbk-Bold Ital ic Century Schoolbook Bold Italic
Optima
Optima-Bold
Optima-BoldItalic
Optima-Italic
Palatino-Roman Palatino Roman
Palatino-Italic Palatino Italic
Palatino-Bold Palatino Bold
Palatino-BoldItalic Palatino Bold Italic
Symbol SymbolPS
Symbol
Times-Roman Times Roman
Times-Italic Times Italic
Times-Bold Times Bold
Times-BoldItalic Times Bold Italic
TimesNewRomanPSMT Times New Roman
TimesNewRomanPS-ItalicMT Times New Roman Italic
TimesNewRomanPS-BoldMT Times New Roman Bold
TimesNewRomanPS-BoldItalicMT Times New Roman Bold Italic
Univers
Univers-Oblique
Univers-Bold
Univers-BoldOblique
Univers-Condensed Univers Condensed Medium
Univers-CondensedOblique Univers Condensed Medium Italic
Univers-CondensedBold Univers Condensed Bold
Univers-CondensedBoldOblique Univers Condensed Bold Italic
Wingdings-Regular Wingdings
ZapfChancery-MediumItalic ITC Zapf Chancery Medium Italic
ZapfDingbats ITC Zapf Dingbats
OCR-A
15
Page 16

Supported fonts (continued)
PostScript 3 font names PCL 6 font names
OCR-B
C39 Narrow
C39 Regular
C39 Wide
Your printer also supports the following PCL 6 bitmapped fonts:
• Line Printer 16
• POSTNET Bar Code
Your printer supports the following PCL 6 symbol sets.
Supported symbol sets
ABICOMP Brazil/Portugal Wingdings ISO 25: F r e nc h
ABICOMP International POSTNET Bar Code ISO 57: Chinese
DeskTop ISO : German ISO 60: Norw egi an version 1
Legal ISO : Spanish ISO 61: Norwegian vers io n 2
MC Text ISO 2: IRV (Int'l Ref Version) ISO 69: French
Microsoft Publishing ISO 4: United Kingdom ISO 84: Portuguese
Russian-GOST ISO 6: ASCII ISO 85: Spanish
Ukrainian ISO 10: Swedish ISO 8859-1 Latin 1 (ECMA-94)
PCL ITC Zapf Dingbats ISO 11: Swedish for Names ISO 8859-2 Latin 2
PS ITC Zapf Dingbats ISO 14: JIS ASCII ISO 8859-5 Latin/Cyrillic
PS Math ISO 15: Italian ISO 8859-7 Latin/Greek
PS Text ISO 16: Portuguese ISO 8859-9 Latin 5
Pi Font ISO 17: Spanish ISO 8859-10 Latin 6
Symbol ISO 21: German ISO 8859-15 Latin 9
PC-8 Bulgarian PC-855 Cyrillic Roman-9
PC-8 Danish/Norwegian (437N) PC-857 Latin 5 (Turkish) Roman Extension
PC-8 Greek Alternate (437G) PC-858 Multilingual Euro Ventura ITC Zapf Dingbats
PC-8 Turkish (437T) PC-860 Portugal Ventura International
PC-8 Latin/Greek PC-861 Iceland Ventura Math
PC-8 PC Nova PC-863 Canadian French Ventura US
PC-8 Polish Mazovia PC-865 Nordic Windows 3.0 Latin 1
PC-8 Code Page 437 PC-866 Cyrillic Windows Cyrillic
PC-1004 OS/2 PC-869 Greece Windows Greek
PC-775 Baltic (PC-8 Latin 6) PC-911 Katakana Windows Latin 1
PC-850 Multilingual Math-8 Windows Latin 2
16
Page 17

Supported symbol sets (continued)
PC-851 Greec e Gr eek-8 Windows Latin 5
PC-852 Latin 2 Turkish-8 Windows Lati n 6 (Baltic)
PC-853 Latin 3 (Turkish) Roman-8 OCR-A
OCR-B 109Y Bar Code
9Y Bar Code 209Y Bar Code
Refer to the Technical Reference on Lexmark’s Web site for more information about font and symbol
set support.
17
Page 18
7
Printing the menu settings page
The menu settings page shows information including:
• Current settings for the Paper Menu, Finishing Menu, Utilities Menu, Quality Menu, Setup
Menu, PCL Emul Menu (Emul stands for emulation), PostScript Menu, Parallel Menu, Network
Menu, and USB Menu
• Cartridge information
• A list of installed options and features
• Available printer memory
If your printer has a network port, an additional page prints to indicate more about network settings.
The Network Menu and network settings are only shown if you are using the network printer model,
Lexmark T420n.
Settings for menu items can be set through the Local Printer Setup Utility. The Local Printer Setup
Utility is available on Lexmark’s Web site at www.lexmark.com. It may also be provided on the
drivers CD for the printer. Check the drivers CD booklet to verify this. Settings for menu items can also
be made using Print Job Language (PJL) commands. Refer to the Technical Reference on Lexmark’s
Web site for information about PJL.
You can use the menu settings page to verify that all printer options are properly installed and that
printer settings are set correctly.
The following steps explain how to print a menu settings page.
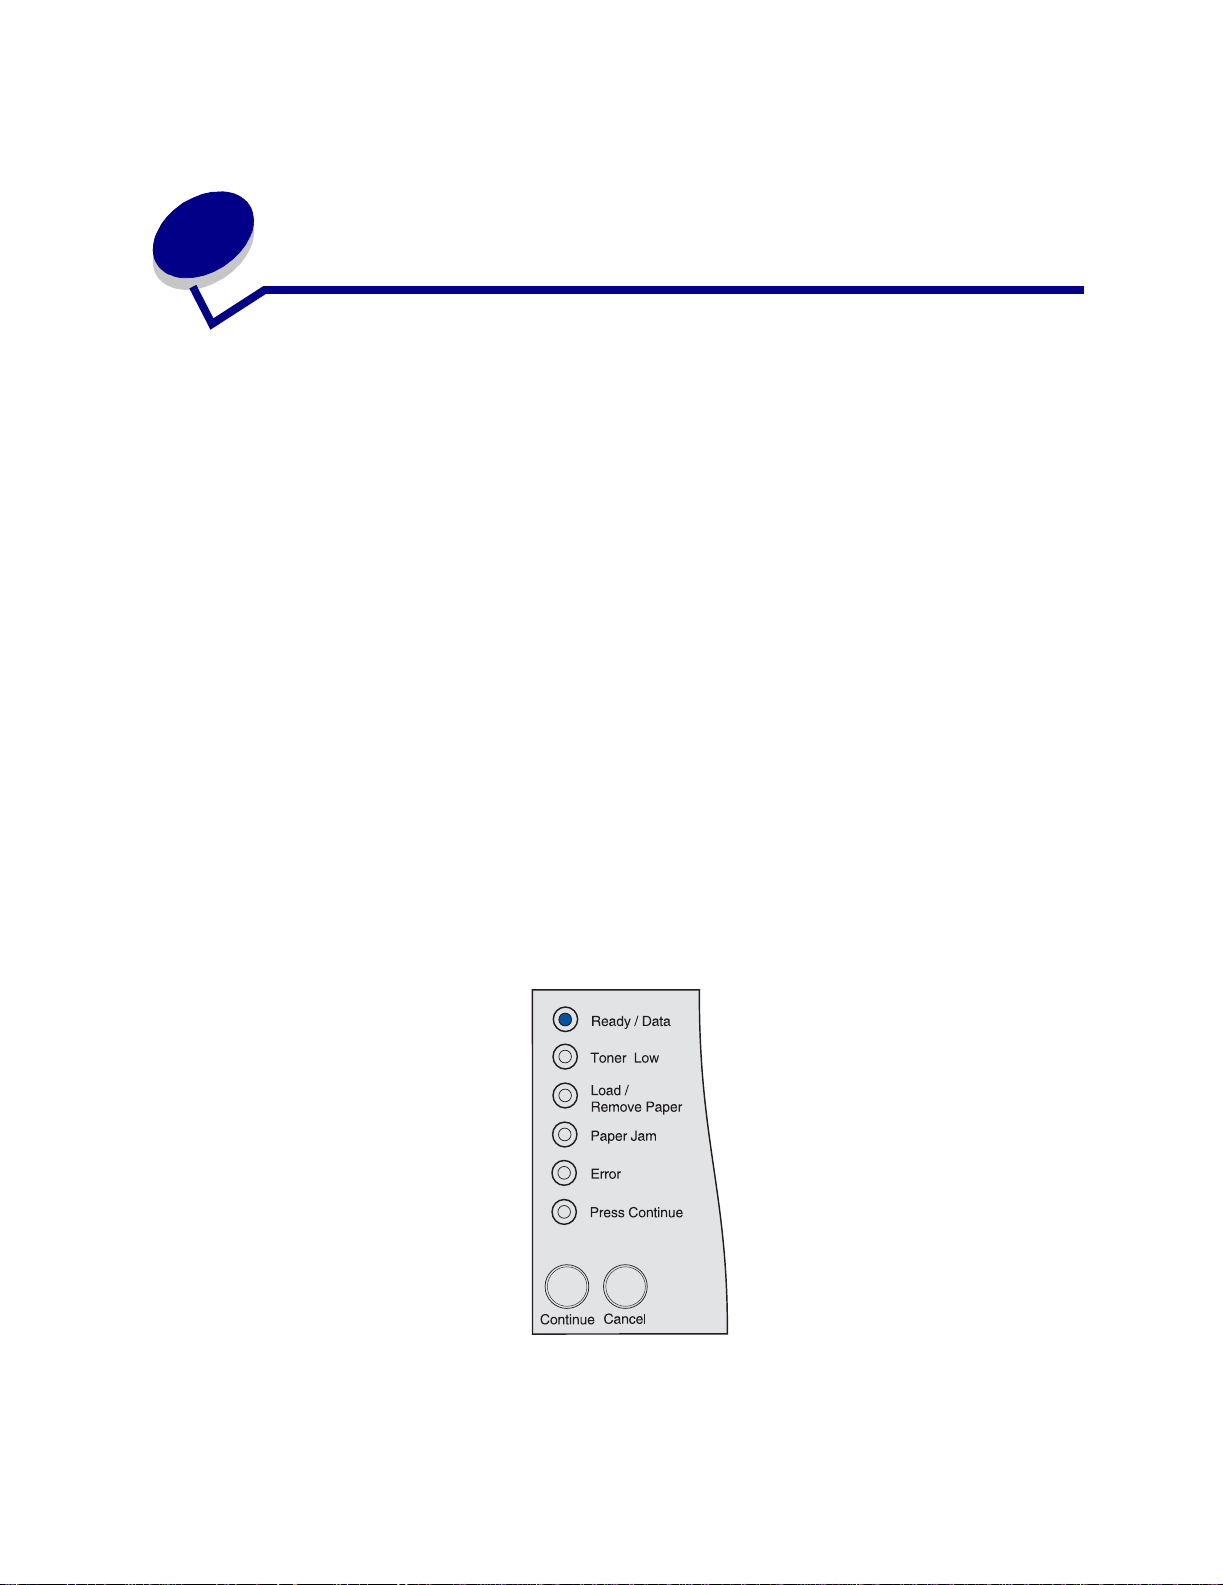
1 Make sure the printer is on and the light sequence indicating that the printer is in the Ready
mode is displayed:
2 Press and release Continue.
The menu settings page prints.
18
Page 19

Print media sources and
8
specifications
This topic provides specifications for each type of print media that can be used with your printer, as
well as important information about the print media sources and the output bins.
For detailed information about print media characteristics, refer to the Card Stock & Label Guide
available on Lexmark’s Web site at www.lexmark.com/publications.
Print media source specifications details the types and quantities of print media you can load in
each of the sources. For more information on selecting specific print media, see Print media
guidelines.
We recommend that you try a limited sample of any print media you are considering using with the
printer before purchasing large quantities.
The following information refers to items in the Print media source specifications table and provides
helpful tips about print media and sources:
• For weights of print media other than paper, refer to the Card Stock & Label Guide.
• Capacities are for 20 lb paper, unless otherwise noted.
• For more information about printing labels from tray 1 (standard tray), refer to the Card Stock &
Label Guide.
• The optional tray (tray 1) is designed to handle 100 sheets of heavy labels, but its capacity
may be reduced due to the thickness of some labels.
• You can send labels and transparencies to the standard output bin; however, they may print
more successfully when sent to the rear output bin.
• The following sizes or types of print media must exit to the rear output bin:
– Print media 165.1 mm (6.5 in.) or less in length
– 3 x 5 in. and 4 x 6 in. index cards and card stock
• Envelopes may curl less if they exit to the rear output bin.
19
Page 20
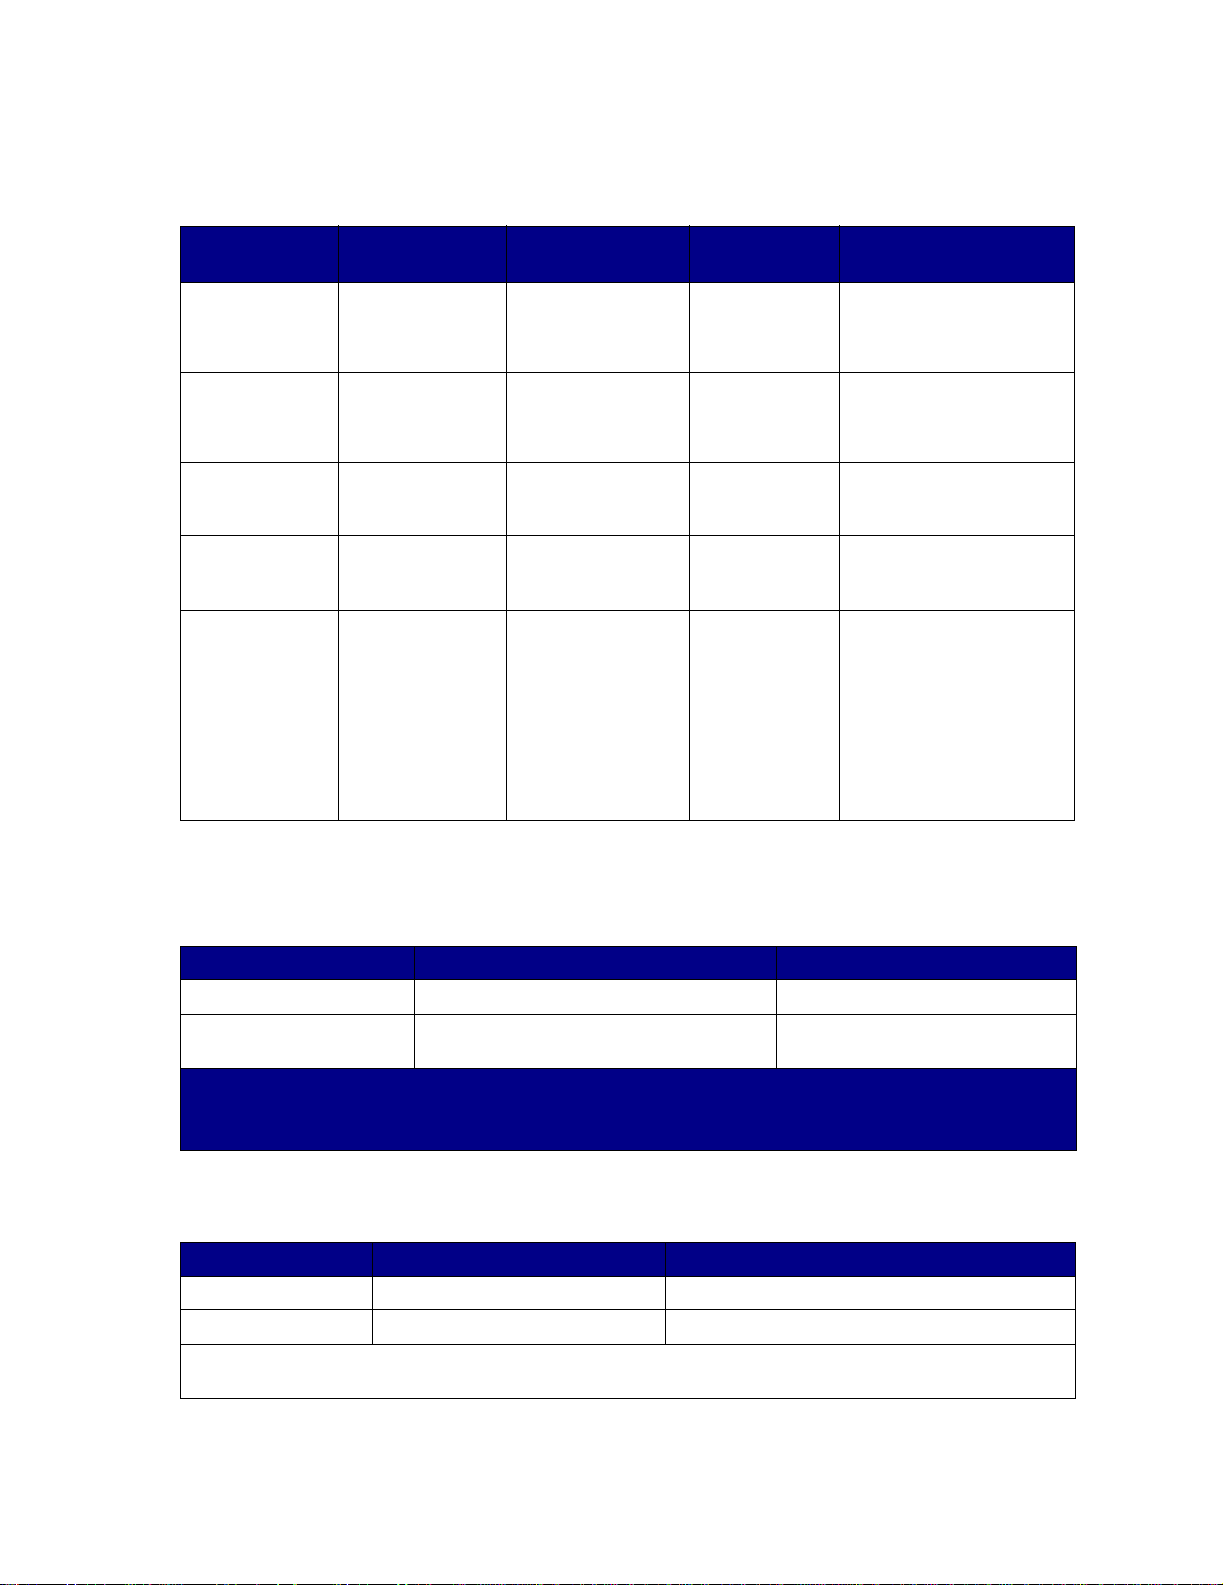
Print media source specifications
Print media
Source
Tray 1
(standard
250-sheet tray)
Tray 1 (optional
label tray)
Tray 2 (optional
250-sheet tray)
Tray 2 (optional
500-sheet tray)
Multipurpose
feeder
supported
Paper, paper
labels,
transparencies
Heavy labels,
paper,
transparencies
Paper only A4, A5, JIS B5, folio ,
Paper only A4, JIS B5, folio,
Paper, envelopes,
labels,
transparencies,
card stock
Sizes supported Weight Capacity
A4, A5, JIS B5, folio,
letter, legal,
executive, statement
A4, A5, JIS B5, folio,
letter, legal,
executive, statement
letter, legal,
60–90 g/m
(16–24 lb)
75–90 g/m
(20–24 lb)
60–90 g/m
(16–24 lb)
2
250 sheets of paper
50 transparencies
100 sheets of labels
2
250 sheets of paper
50 transparencies
100 sheets of labels
2
250 sheets of paper
executive, statement
2
500 sheets of paper
letter, legal,
60–90 g/m
(16–24 lb)
executive
2
Minimum:
76.2 x 127 mm
(3 x 5 in.)
Maximum:
216 x 355.6 mm
(8.5 x 14 in.)
60–199 g/m
(16–53 lb)
100 sheets of paper
10 envelop es
30 sheets of labels
20 transparencies
10 sheets of card stock
Supports all sizes
listed in Supported
print media sizes.
Note: Print duplex jobs only on paper weighing 16–24 lb.
Duplex unit specifications
Exits to the standard output bin Exits to the rear output bin
Sizes supported A4, JIS B5, folio, letter, legal A4, folio, letter, legal
Weight 60–90 g/m
2
(16–24 lb)
1
Print media exits to the rear output bin if it is open.
2
Legal size paper sent to the rear output bin stacks improperly when too many sheets accumulate. Remove
75–90 g/m
(20–24 lb)
2
paper often from this bin.
The multipurpose feeder accepts print media within the following dimensions:
Minimum Maximum
Width 76.2 mm (3 in.) 216 mm (8.5 in.)
Length 127 mm (5 in.) 355.6 mm (14 in.)
The multipurpose feeder accepts print media within a weight range of 60–199 g/m
(16–53 lb).
2
2
1
20
Page 21

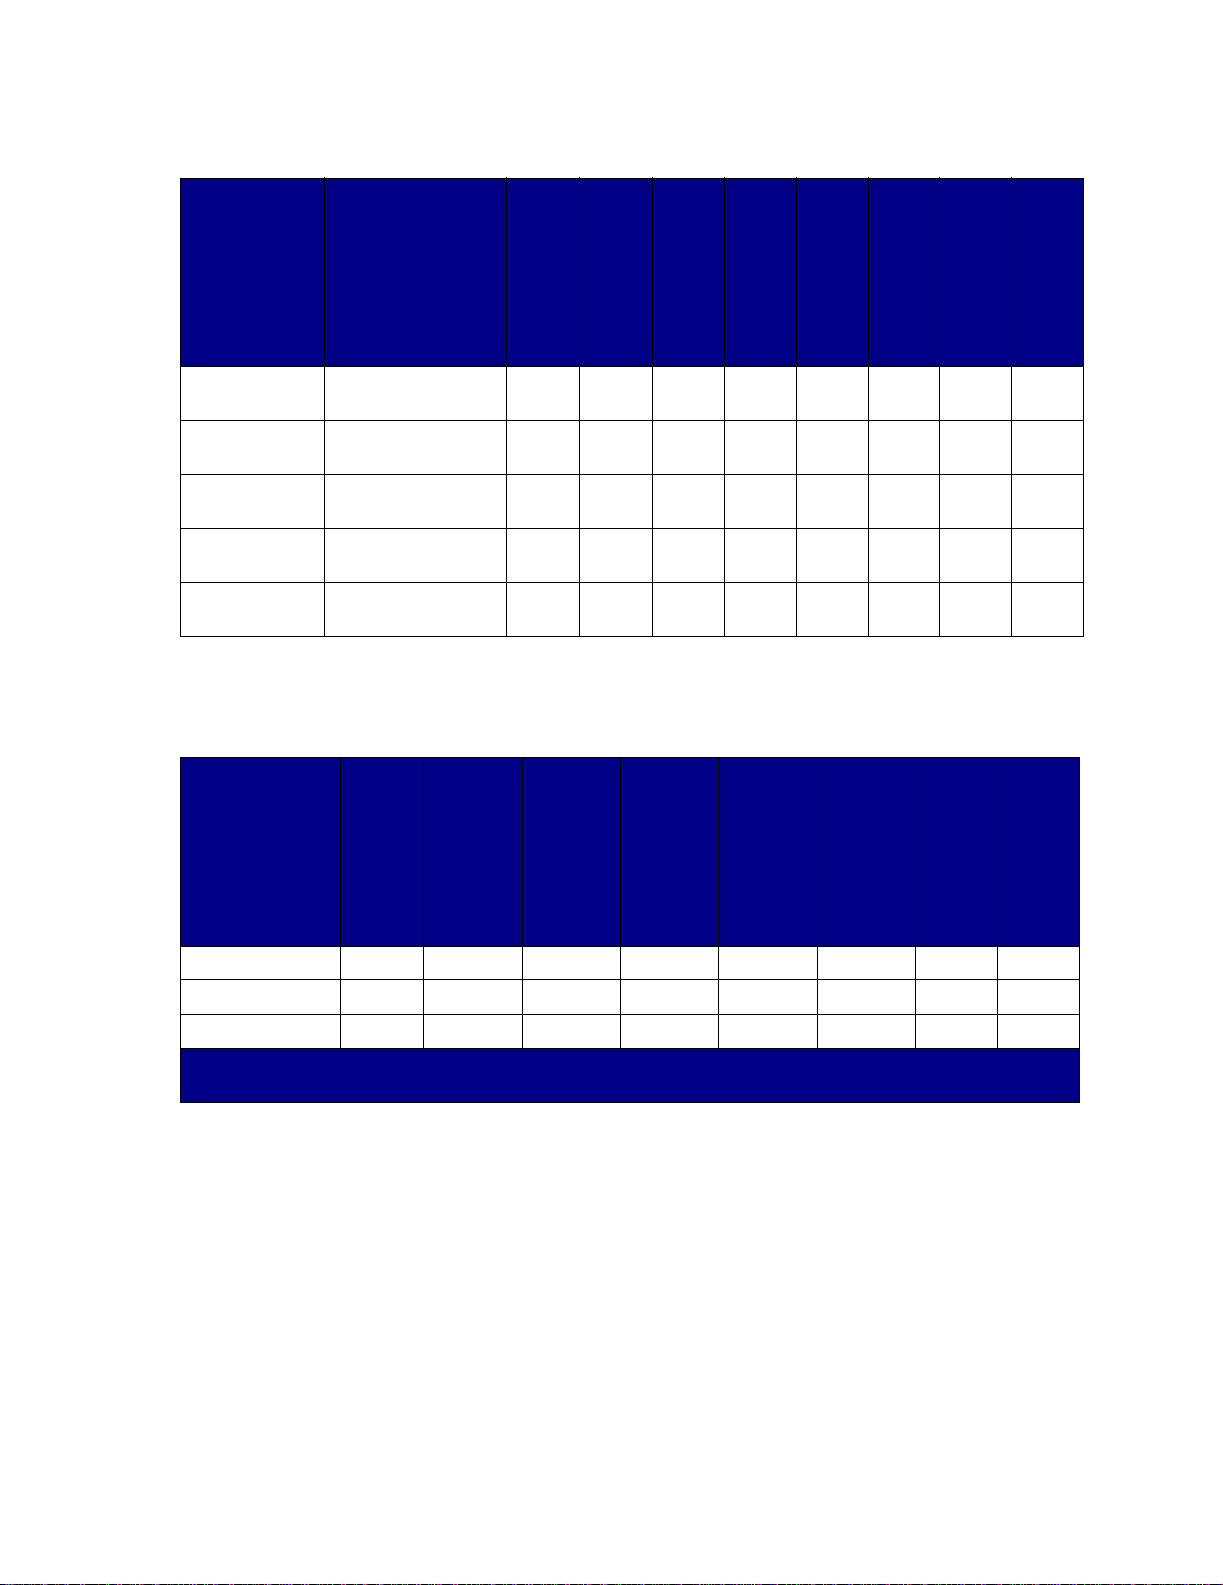
The following information refers to items in the Supported print media sizes table and provides
helpful tips about print media sizes your printer supports.
• Legal size paper sent to the rear exit bin stacks improperly when too many sheets accumulate.
Remove the paper often from this bin.
• Select Universal size when using a nonstandard size sheet of print media. The printer formats
the page for the maximum size (8.5 x 14 in.). Set the actual size from your software
application.
• Envelopes may be sent to the standard output bin; however, they may curl less if sent to the
rear output bin.
• Select Universal size when using a nonstandard size of envelope. The printer formats the
envelope for the maximum size (9.02 x 14 in.). Set the actual size from your software
application.
Supported print media sizes
✓ - indicates
support
✕ - indicates
no support
Print media
A4 210 x 297 mm
A5 148 x 210 mm
JIS B5 182 x 257 mm
Letter 215.9 x 279.4 mm
Legal 215.9 x 356 mm
Executive 184.2 x 266.7 mm
Folio 215.9 x 330 mm
Statement 139.7 x 215.9 mm
Universal 216 x 356 mm
Dimensions
(8.27 x 11.7 in.)
(5.83 x 8.27 in.)
(7.17 x 10.12 in.)
(8.5 x 11 in.)
(8.5 x 14 in.)
(7.25 x 10.5 in.)
(8.5 x 13 in.)
(5.5 x 8.5 in.)
(8.5 x 14 in.)
Tray 1 (250-sheet
tray)
Tray 1 (optional
label tray)
Tray 2 (optional
250-sheet drawer)
Tray 2 (optional
500-sheet drawer)
Paper
✓✓✓✓✓✓✓✓
✓✓✓✕✓✓✓✕
✓✓✓✓✓✓✓✓
✓✓✓✓✓✓✓✓
✓✓✓✓✓✓✓✓
✓✓✓✓✓✓✓✕
✓✓✓✓✓✓✓✓
✓✓✓✕✓✓✓✕
✓✓✓✕✓✓✓✓
Envelopes
Multipurpose feeder
Standard output bin
Rear output bin
Duplex
7 3/4 Envelope
(Monarch)
9 Envelope 98.4 x 225.4 mm
98.4 x 190.5 mm
(3.875 x 7.5 in.)
(3.875 x 8.875 in.)
✕✕✕✕✓✓✓✕
✕✕✕✕✓✓✓✕
21
Page 22
Supported print media sizes (continued)
✓ - indicates
support
✕ - indicates
no support
Print media
10 Envelope
(Com-10)
DL Envelope 110 x 220 mm
C5 Envelope 162 x 229 mm
B5 Envelope 176 x 250 mm
Other Envelope
(Universal)
Dimensions
104.8 x 241.3 mm
(4.125 x 9.5 in.)
(4.33 x 8.66 in.)
(6.38 x 9.01 in.)
(6.93 x 9.84 in.)
536 x 216 mm
(14 x 8.5 in.)
Supported print media types
✓ - indicates
support
✕ - indicates no
support
Tray 1 (250-sheet
tray)
Tray 1 (optional
label tray)
Tray 2 (optional
250-sheet drawer)
Tray 2 (optional
500-sheet drawer)
✕✕✕✕✓✓✓✕
✕✕✕✕✓✓✓✕
✕✕✕✕✓✓✓✕
✕✕✕✕✓✓✓✕
✕✕✕✕✓✓✓✕
Multipurpose feeder
Standard output bin
Rear output bin
Duplex
Print media
Card stock ✕✕✕✕✓✕✓✕
Labels ✓✓✕✕✓✓* ✓✕
Transparencies ✓✓✕✕✓✓* ✓✕
* Labels and transparenc ie s may be sent to the standard output bin ; ho w ever, they may print more succ es sfu ll y
when sent to the rear output bin.
Tray 1 (250-sheet
tray)
Tray 1 (optional
label tray)
Tray 2 (optional
250-sheet drawer)
Tray 2 (optional
500-sheet drawer)
Multipurpose feeder
Standard output bin
Rear output bin
Duplex
22
Page 23

9
Storing print media
Use the following guidelines for proper print media storage. These help avoid paper feeding problems
and uneven print quality:
• For best results, store print media in an environment where the temperature is approximately
21°C (70°F) and the relative humidity is 40%.
• Store cartons of print media on a pallet or shelf, rather than directly on the floor.
• If you store individual packages of print media out of the original carton, make sure they rest
on a flat surface so the edges do not buckle or curl.
• Do not place anything on top of the print media packages.
23
Page 24
10
Clearing jams
By carefully selecting print media and loading it properly, you should be able to avoid most jams. If
jams do occur, complete the steps in the following sections. If jams occur frequently, see Avoiding
jams.
Note: To clear the Paper Jam error light message, you must remove all jammed print
media from the entire paper path. Press and release the Continue button to clear
the message and resume printing. A new copy of the page that jammed prints if
Jam Recovery is set to On in the printer driver or in the Local Printer Setup Utility.
Setting Jam Recovery to Auto does not guarantee that a new copy of the page will
print.
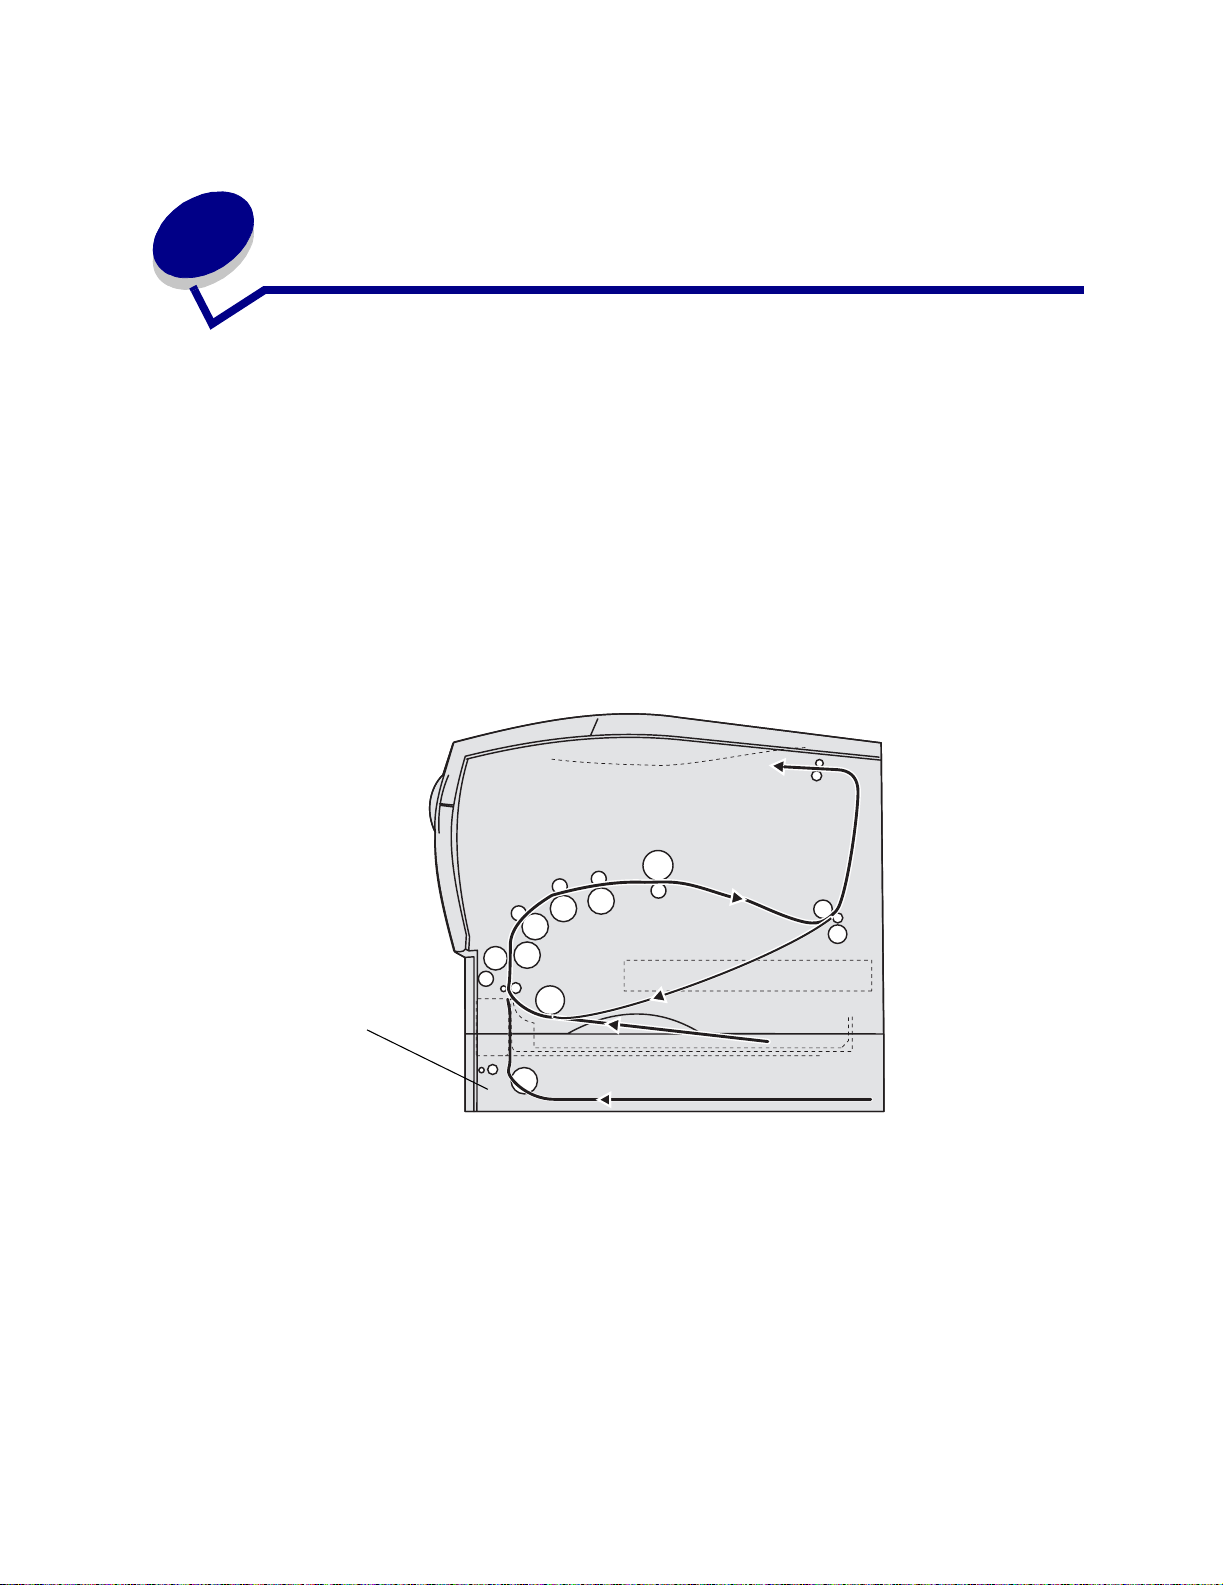
The following illustration shows the path that print media travels through the printer. The path varies
depending on the input source (trays and multipurpose feeder) and output bin you are using.
Optional drawer
Right side view of the printer
24
Page 25
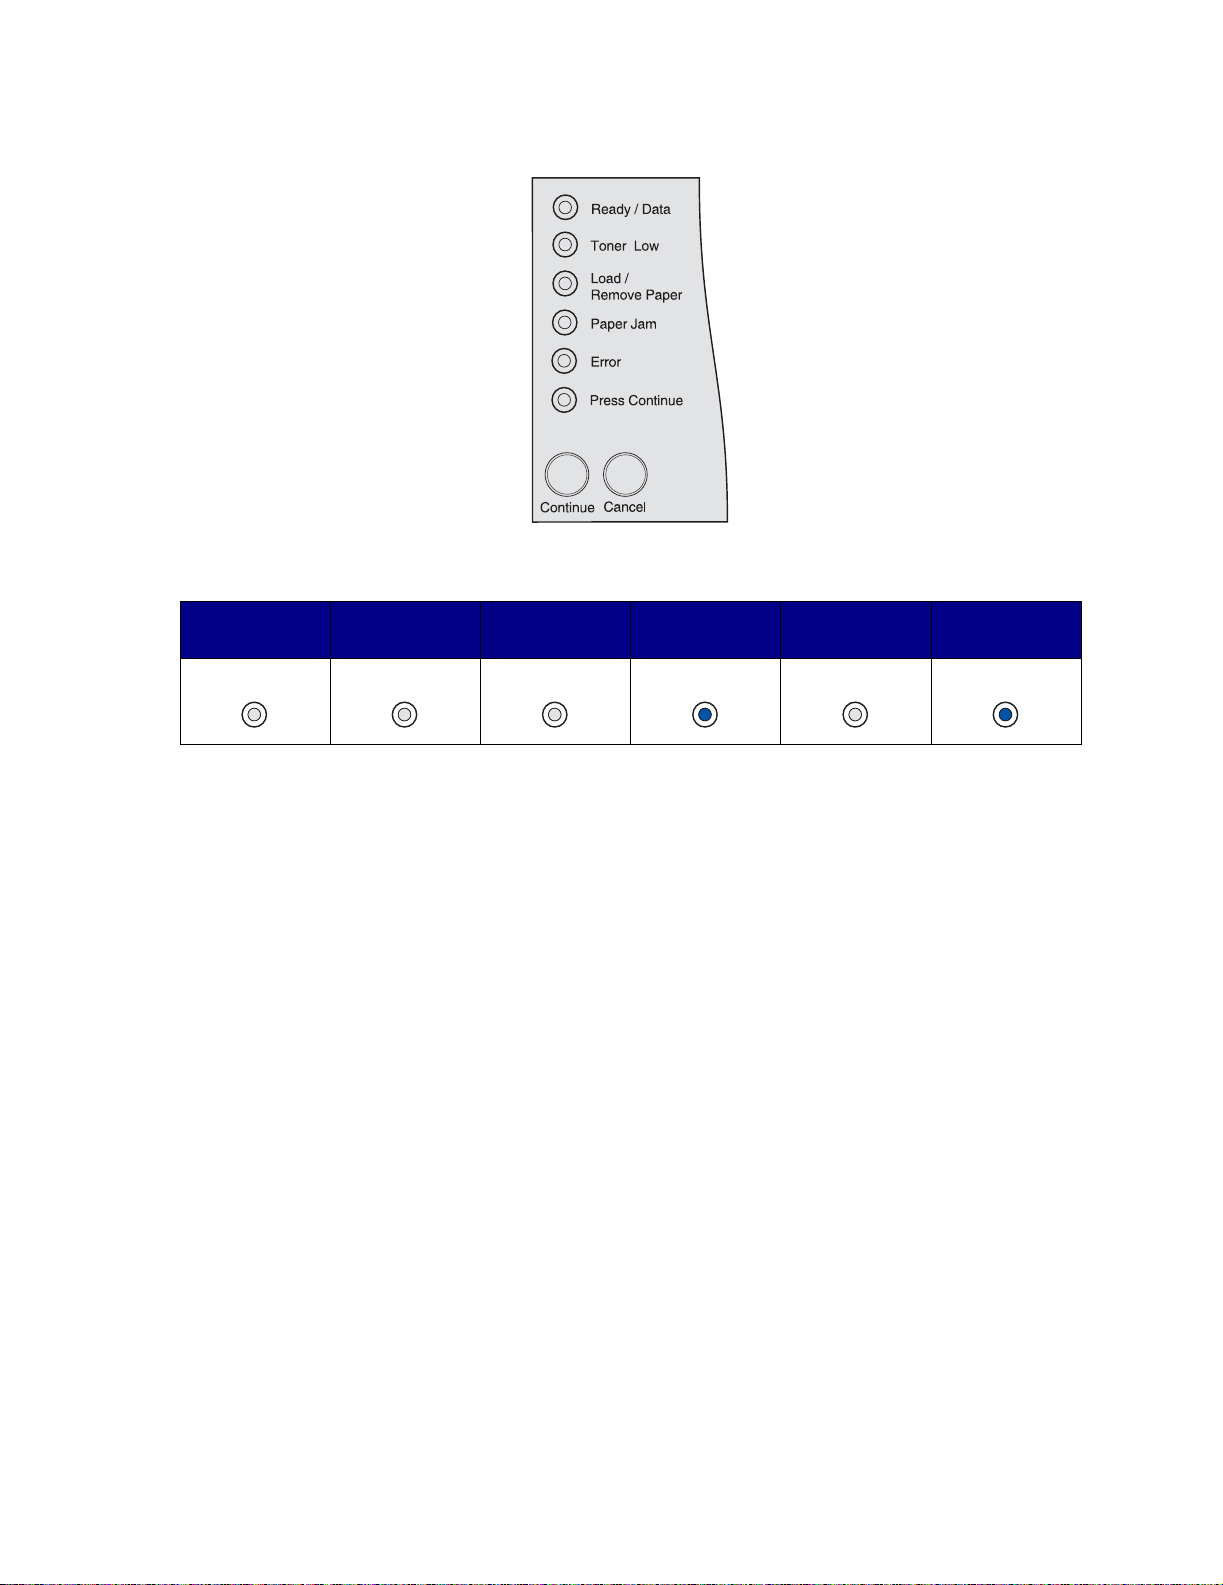
The operator panel has six lights.
The following light sequence indicates a jam:
Ready/
Data
Toner
Low
Load/Remove
Paper
Paper
Jam
Error
Press
Continue
When you see this light sequence, press and release the Continue button twice quickly. A secondary
jam light sequence displays.
Use the table on the following page to locate instructions for clearing the jam causing the secondary
light sequence.
Note: Make sure to clear the entire paper path. After the path is clear, press and release
Continue to clear the message and resume printing. If the Paper Jam light
remains on after you remove a jam, and press and release Continue, check the
duplex area for a jam.
25
Page 26

Ready/
Data
Toner
Low
Load/
Remove
Paper
Paper
Jam
Error
Press
Continue
Printer
condition
See:
Jam in input
area
(An input area is
where print
media enters the
printer from a
source.)
Jam between
the input area
and the exit area
(An input area is
where print
media enters the
printer from a
source. An exit
area is where a
printed job exits
to an output bin.)
Jam in exit area
(An exit area is
where a printed
job exits to an
output bin.)
• Jams in the tray 1
area on page 33
• Jams in the tray 2
area on page 34
• Jams inside a
tray after clearing
the metal stop on
page 34
• Jams under the
print cartridge on
page 27
• Exiting to the
standard output
bin on page 31
Jams under the print
cartridge on page 27
• Jams under the
printer on
page 35
• Before reaching
the standard
output bin on
page 29
• Exiting to the
standard output
bin on page 31
• Jams behind the
rear output bin
door on page 32
Jam in the
internal duplex
unit
Jam in the
multipurpose
feeder
Jams under the
printer on page 35
Jams in the
multipurpose feeder
on page 33
Note: To avoid tearing print media, pull all jams out gently and slowly.
26
Page 27
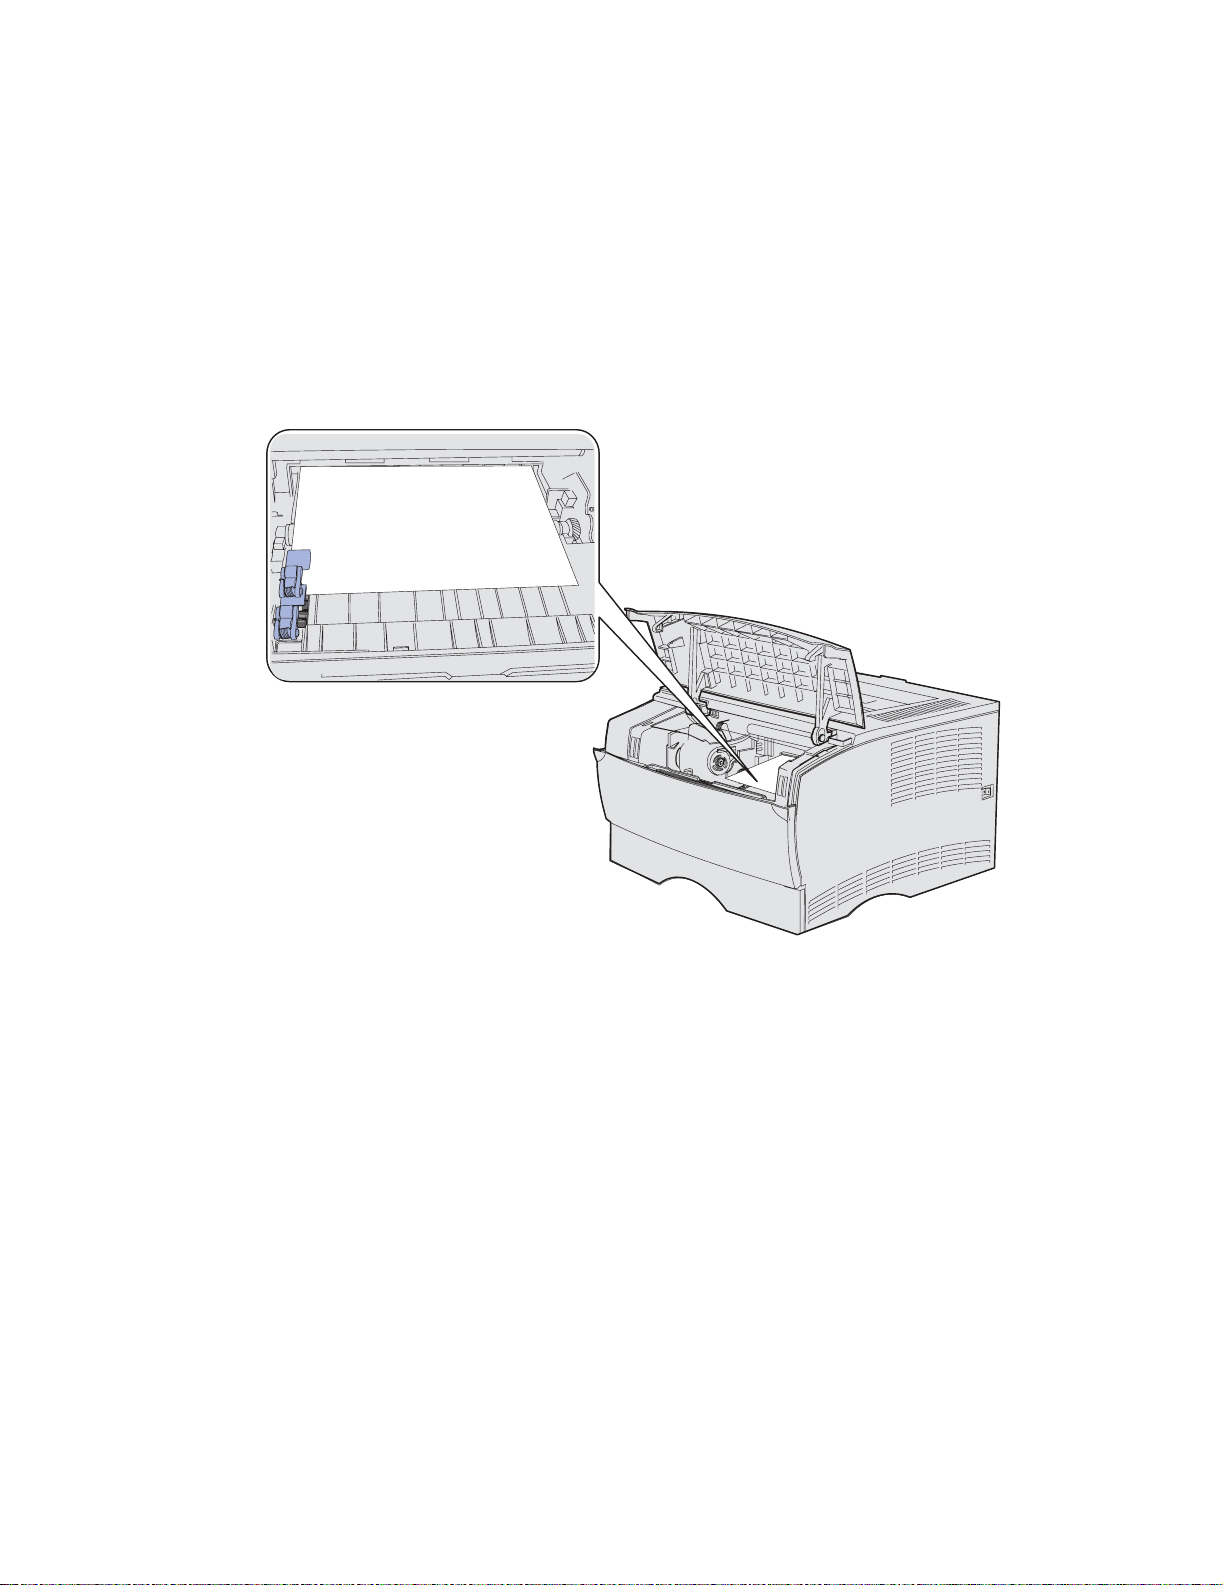
Jams under the print cartridge
Since the jam may occur farther back in the printer behind the print cartridge area, you may need to
reach in farther to remove the jam.
1 Open the upper front door.
2 Remove the print cartridge. (See Removing the used print cartridge for instructions.)
CAUTION: The rear portion of the inside of the printer may be hot.
Note: The ends of the print media may not be visible.
27
Page 28
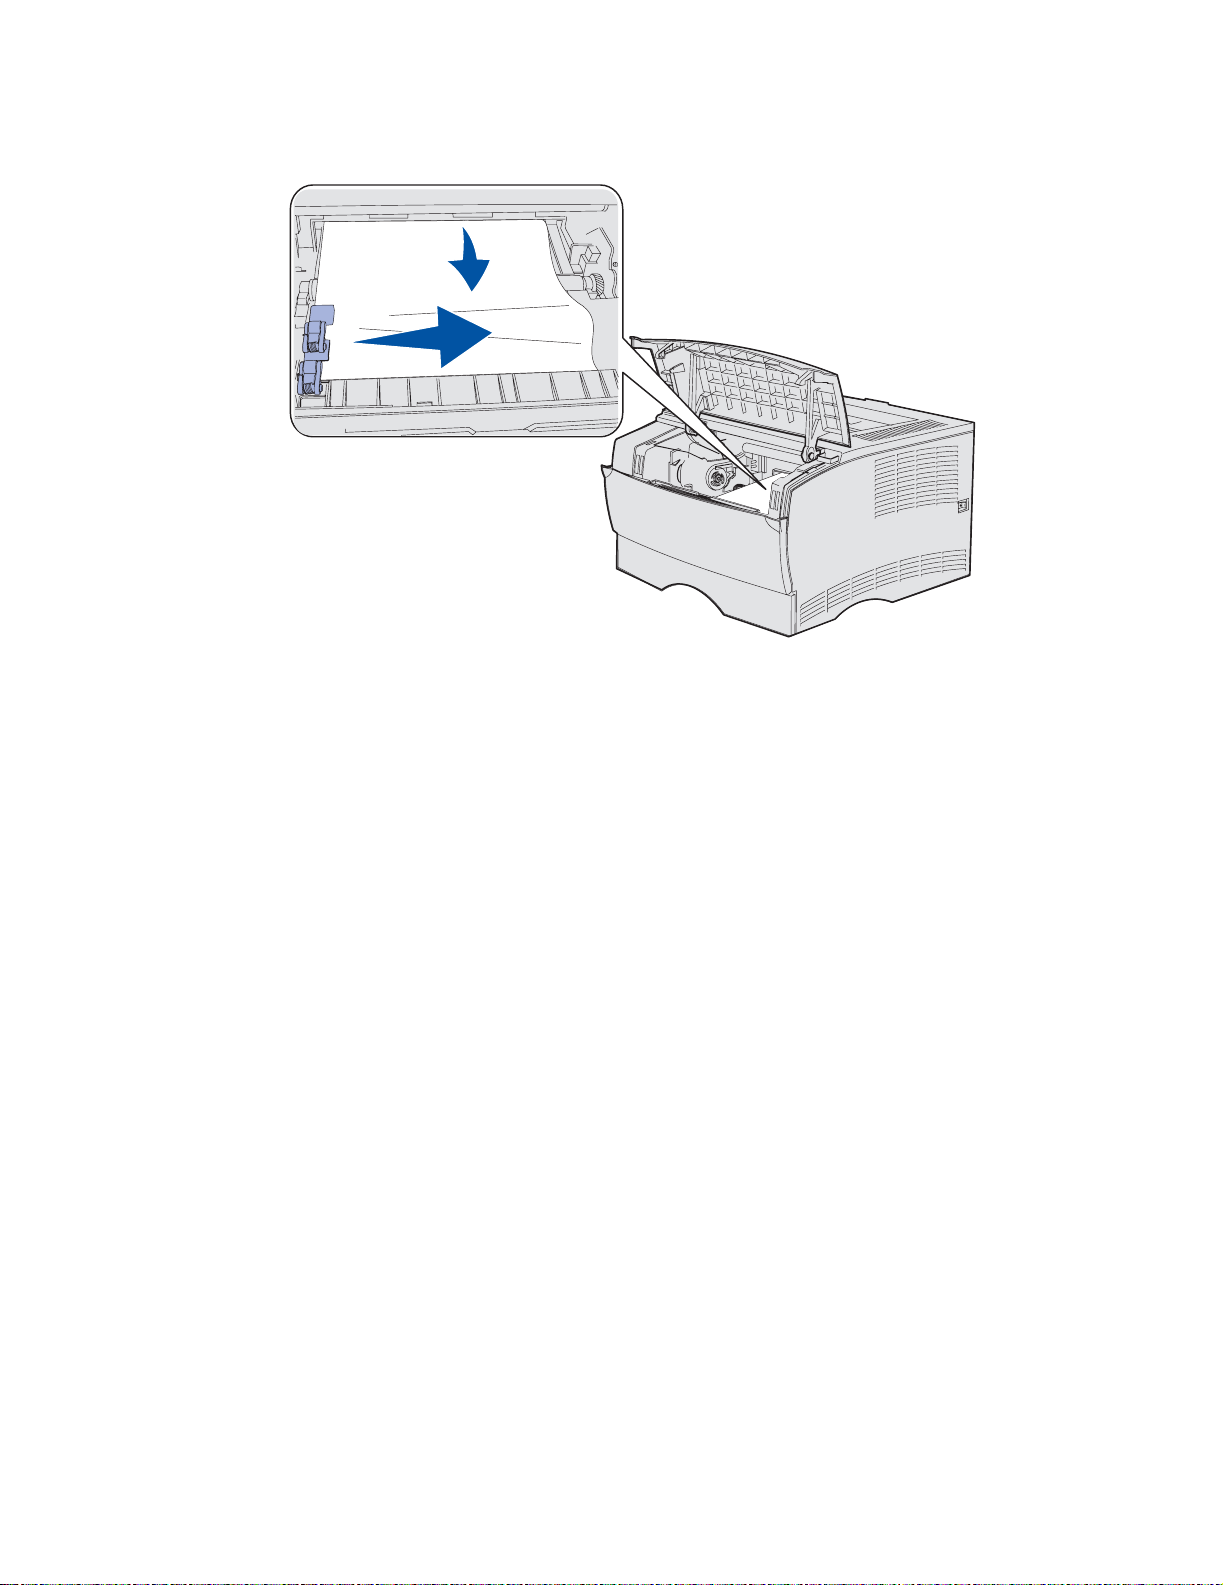
3
With both hands, pull the print media to the right, and then out.
Note: If the print media resists, stop pulling and access it from the rear output bin door.
See Jams behind the upper front door and the rear output bin door to
continue.
4 Reinstall the print cartridge. (See pages 72 through 73 of Installing the new print cartridge
for instructions.)
5 Close the upper front door.
Jams behind the upper front door and the rear output bin door
Jams in these areas require opening the rear output bin door and the upper front door:
• The print media jams before reaching the standard output bin. See Before reaching the
standard output bin.
• The print media jams before exiting completely into the standard output bin. See Exiting to
the standard output bin.
28
Page 29
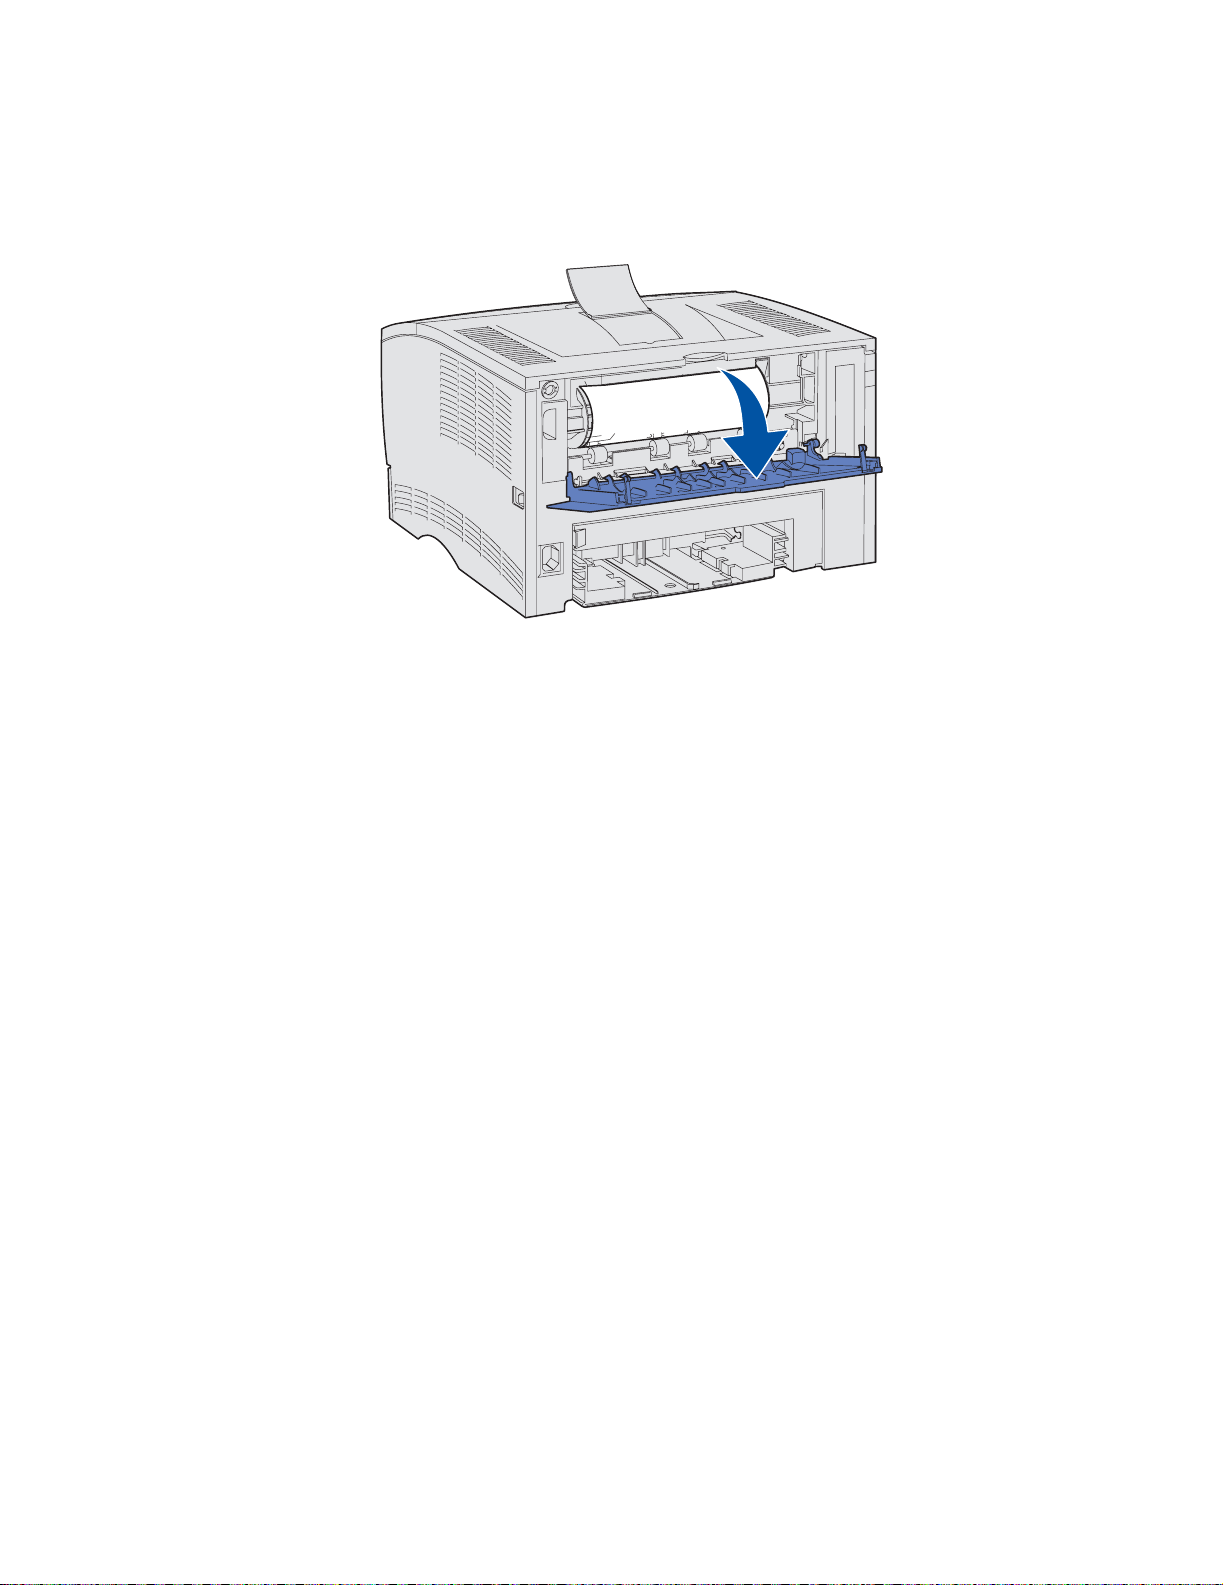
Before reaching the standard output bin
The print media jams before reaching the standard output bin.
1 Open the rear output bin door.
29
Page 30
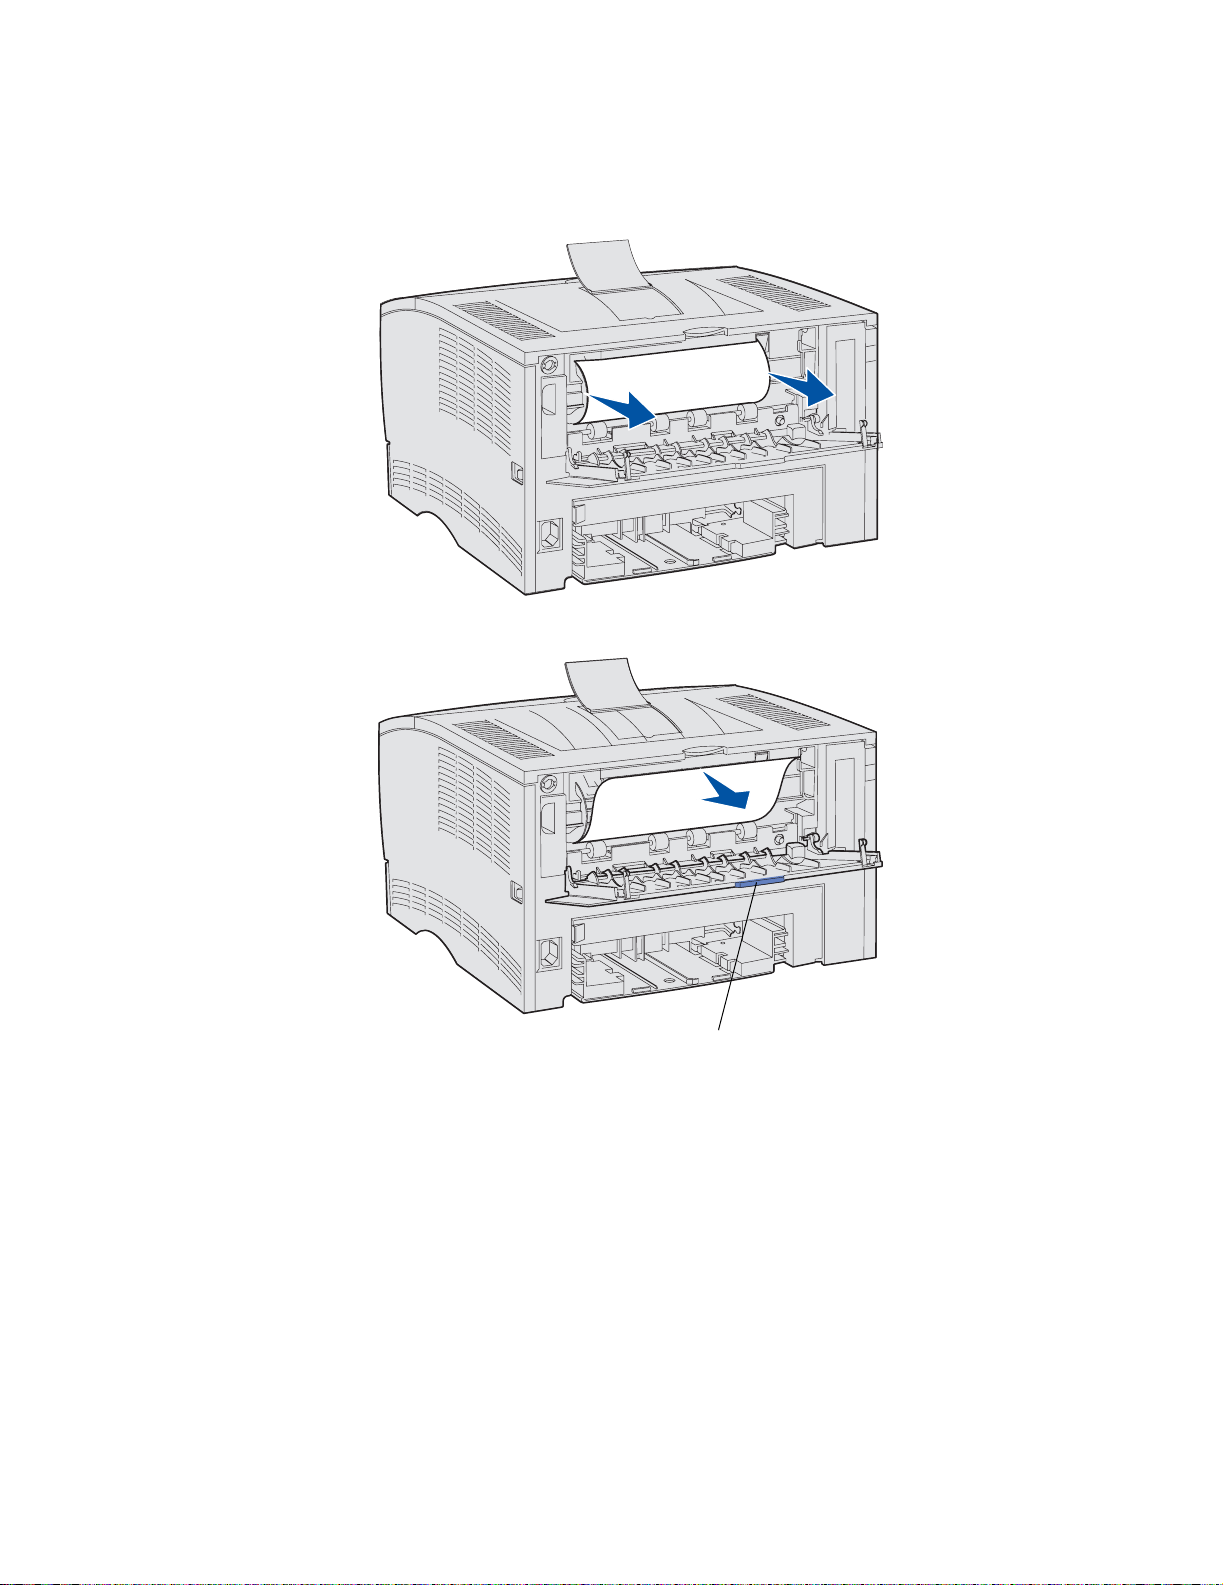
2
Gently remove the jam based on how much is visible.
• If the middle of the sheet of print media is visible, but not the ends, grasp the print media on
both sides and gently pull it straight out toward you.
• If an end of the jam is visible, pull it straight out toward you.
Tab
3 Close the rear output bin door by pushing it in the middle under the tab.
Note: Make sure the door closes on both sides.
Jams in the fuser
1
Open the upper front door. (See page 69 in Removing the used print cartridge if you need
instructions.)
2 Remove the print cartridge. (See page 70 in Removing the used print cartridge if you need
instructions.)
CAUTION: The inside rear of the printer may be hot.
30
Page 31

3
Locate the jam inside the printer.
4 Gently pull the jam straight out and then up.
5 Reinstall the print cartridge.
6 Close the upper front door.
Exiting to the standard output bin
1 Gently pull the jam straight out.
2 If the print media does not pull easily from here, continue with Jams behind the rear output
bin door on page 32.
31
Page 32

Jams behind the rear output bin door
This jam occurs when print media less than 152.4 mm (6 in.) in length has attempted to exit to the
standard output bin.
1 Open the rear output bin door.
2 Gently remove the jam.
If the print media resists, stop pulling. Remove the print cartridge, and then pull the jam out.
Note: If you cannot find the jam inside the printer, check to see if the print job has exited
to the standard output bin.
3 Leave the rear output bin door open to finish printing any additional pages less than 152.4 mm
(6 in.) in length. Also, set the Paper Length to Short.
32
Page 33

Jams in the multipurpose feeder
Gently pull the jam straight out of the multipurpose feeder.
Jams in the tray 1 area
Print media is jammed in the area under the print cartridge, but the jam is not visible.
1 Gently pull tray 1 (standard tray or optional label tray) out.
2 Pull the jam straight out.
3 Push the tray in.
33
Page 34

Jams in the tray 2 area
1
Gently pull tray 2 (250-sheet or 500-sheet tray) out.
2 Pull the jam straight out.
3 Push the tray in.
Jams inside a tray after clearing the metal stop
The print media jams as it releases from under the metal stop, but it has not completely exited the tray.
This can occur in any of the trays. You need to check each tray.
1 Pull the tray completely out.
2 Reposition the print media under the metal stop.
Note: If the sheet of print media is damaged, remove it. Do not reposition it.
34
Page 35

3
Press down on the print media until the metal plate below it locks into place.
4 Insert the tray. See page 42 in Loading trays for an illustration on how to insert the tray.
Jams under the printer
Print media can jam under the printer and above tray 1 when the duplex function is in use. To clear this
type of jam:
1 Pull tray 1 (standard tray or optional label tray) completely out.
2 Look under the printer on the left side to locate a green lever.
3 Press down on the green lever.
Lever
4 Look for the jam. If it is not visible from the front, continue with step 6.
5 Gently pull the jam toward you.
Note: If the jam does not come out easily , continue with step 6.
35
Page 36

6
From the back of the printer, open the rear door using the tab.
7 Look under the printer on the right side to locate a green lever.
8 Push down on the lever.
Tab
9 Gently pull the jam toward you.
10 Close the rear door.
11 Insert the tray.
Lever
36
Page 37

11
Loading trays
Your printer has two standard sources, the 250-sheet tray (standard tray) and the multipurpose feeder.
For more information, see Using and loading the multipurpose feeder. Load the print media you
use for the majority of your print jobs in the standard 250-sheet tray.
Proper print media loading helps prevent jams and helps make your printing
trouble-free.
Before loading print media, know the recommended print side of the print media you are using. This
information is usually indicated on the print media package.
Do not remove trays while a job prints or while the Ready/Data light blinks on the operator panel.
Doing so may cause a jam.
Using the optional label tray
The optional label tray is inserted in place of the standard tray if you plan on using it.
See Print media source specifications for more information on tray 1 (optional label tray).
Print media is loaded in the optional label tray exactly like print media is loaded in the standard tray.
Loading the standard tray, the optional 250-sheet tray, or the optional label tray
The following instructions work for loading the standard tray, the optional label tray, or the tray for the
optional 250-sheet drawer.
Your printer has one standard 250-sheet tray. The optional label tray fits in the printer in place of the
standard tray.
You may use the optional 250-sheet drawer or the optional 500-sheet drawer as a print media source;
however, you may use only one of these options at a time. See your Setup Guide for installation
information.
For the sizes and types of print media these trays support, see Print media source specifications.
To load the tray for the optional 500-sheet drawer, see Loading the optional 500-sheet tray.
37
Page 38

To load print media in a tray:
1 Pull the tray out. Remove the tray completely.
2 Press down on the metal plate until it locks into place.
38
Page 39

3
Locate the tabs on both of the guides.
Tab
Tab
4 Squeeze the length guide tab and the length guide together, and then slide the guide to the
back of the tray.
5 Squeeze the width guide tab and the width guide together, and then slide the guide all the way
to the right.
Length guide
Width guide
39
Page 40

6
Flex the sheets back and forth to loosen them, then fan them. Do not fold or crease the print
media. Straighten the edges on a level surface.
Hold the print media so the side you want to print on is face down, and the front edge of the
stack is toward the front of the tray.
For information on loading letterhead, see Printing on letterhead.
7 Place the stack of print media against the left side of the tray and insert it under the metal stop.
Make sure the print media fits easily under the metal stop and is not bent or wrinkled. Do not
raise the metal stop or force print media under it.
Note: Do not exceed the maximum stack height indicated by the maximum stack height
indicator. Overfilling the tray may cause jams.
Metal stop
Maximum stack height indicator
40
Page 41

8
Squeeze the width guide tab and the width guide together, and then slide the guide to the
edge of the print media.
9 Squeeze the length guide tab and the length guide together, and then slide the guide to the
edge of the print media.
Note: Sliding the guides too tightly against the print media may cause misfeeds.
41
Page 42

10
Insert the tray.
Loading the optional 500-sheet tray
The optional 500-sheet tray only accepts paper. It is designed with a special cover at the back of the
tray to shield legal size paper. The cover protects legal size paper from exposure to dust.
To load paper in the tray:
1 Pull the tray out. Remove the tray completely.
42
Page 43

2
Raise the cover.
3 Press down on the metal plate until it locks into place.
43
Page 44

4
Locate the tabs on both of the guides.
Tab
Tab
5 Squeeze the length guide tab and the length guide together, and then slide the guide to the
back of the tray.
6 Squeeze the width guide tab and the width guide together, and then slide the guide all the way
to the right.
Length guide
44
Width guide
Page 45

7
Flex the sheets back and forth to loosen them, then fan them. Do not fold or crease the paper.
Straighten the edges on a level surface.
Hold the paper so the side you want to print on is face down, and the front edge of the stack is
toward the front of the tray.
For information on loading letterhead, see Printing on letterhead.
8 Place the stack of paper against the left side of the tray and insert it under the metal stop.
Make sure the paper fits easily under the metal stop and is not bent or wrinkled. Do not raise
the metal stop or force paper under it.
Note: Do not exceed the maximum stack height indicated by the maximum stack height
indicator. Overfilling the tray may cause jams.
Metal stop
Maximum stack
height indicator
45
Page 46

9
Squeeze the width guide tab and the width guide together, and then slide the guide to the
edge of the paper.
10 Squeeze the length guide tab and the length guide together, and then slide the guide to the
edge of the paper.
Note: Sliding the guides too tightly against the paper may cause misfeeds.
46
Page 47

11
Close the cover.
12 Insert the tray.
47
Page 48

Using and loading the multipurpose
12
feeder
Your printer has a multipurpose feeder that holds several sizes and types of print media. It is located on
the front of your printer and can be closed when you are not using it. Reserve the multipurpose feeder
for when you print on different sizes and types of print media, such as card stock, transparencies,
postcards, note cards, and envelopes. You can load a stack of print media, or you can load single
sheets you do not keep in a tray.
If the printer displays a light sequence indicating you should load the multipurpose feeder, load the
print media, and then press and release Continue. If you load a single sheet, the light sequence is
displayed again to prompt you to load the next sheet. See Load the multipurpose feeder for more
information.
See page 20 of Print media sources and specifications for a listing of supported types and sizes.
Note: When printing from the multipurpose feeder, be sure to set the Paper Size and
Paper Type.
Follow these guidelines when using the multipurpose feeder:
• Load only one size and type of print media at a time.
• To achieve the best possible print quality , use only high-quality print media that is designed for
use in laser printers. See Print media guidelines for information on selecting types of print
media.
• To prevent jams, do not add print media to the multipurpose feeder when it already contains
print media.
• Do not close the multipurpose feeder while a job is printing or while Ready/Data blinks on the
operator panel. Doing so may cause a jam.
• Load print media with the top edge going into the multipurpose feeder first.
• Do not place objects on the multipurpose feeder. Also, avoid applying excessive force to it.
48
Page 49

Opening the multipurpose feeder
1 Locate the finger grips on the multipurpose feeder door.
Finger grips
2 Use the finger grips to pull the door open.
49
Page 50

3
Pull the extension out.
4 Gently press down on the ridge. The extension unfolds.
Ridge
50
Page 51

5
Guide the extension down gently so the multipurpose feeder is extended fully.
Loading the multipurpose feeder
See Print media source specifications for information on sizes and types of print media you can load
in the multipurpose feeder.
1 Slide the width guide all the way to the right.
51
Page 52

2
Prepare print media for loading.
Note: Do not load different sizes or types of print media in the multipurpose feeder at the
same time. Doing so may cause a jam.
• Flex sheets of paper back and forth to loosen them, then fan them. Do not fold or crease the
print media. Straighten the edges on a level surface.
• Hold transparencies by the edges and fan them to prevent feeding failures.
Note: Avoid touching the print side of the transparencies. Be careful not to scratch them.
• Fan env elopes back and forth to loosen them. Do not fold or crease the envelopes. Straighten
the edges on a level surface.
52
Page 53

3
Locate the stack height limiter. Do not exceed the maximum stack height by forcing print media
under the stack height limiter. The maximum stack height for any print media is 10 mm (0.4
in.). Overfilling the multipurpose feeder could cause jams.
Stack height limiter
53
Page 54

4
Load the print media.
• Load paper, card stock, and labels with the recommended print side face up and the top edge
going in first.
• Load letterhead with the logo face up and the top edge entering the printer first.
Note: If you load letterhead for duplex printing, load the sheets with the logo face down
and entering the printer last.
• Load transparencies with the recommended print side face up and the top edge going in first.
54
Page 55

WARNING: Never use envelopes with clasps, snaps, windows, coated linings, or self-stick
adhesives. These envelopes may severely damage the printer.
• Load envelopes with the flap side down and the stamp area going in last.
Note: For best results, peel-and-stick envelopes should exit to the rear output bin. Open
the rear output bin when printing on these envelopes.
Do not feed stamped envelopes into the multipurpose feeder. The stamp and addresses are
shown for envelope orientation only.
5 Slide the print media into the multipurpose feeder slot as far as it will go without damaging the
print media.
55
Page 56

6
Slide the width guide to the left until it lightly touches the edge of the stack.
Stack height limiter
Make sure the print media fits loosely in the multipurpose feeder and is not bent or wrinkled.
56
Page 57

13
Using the duplex function
Duplex printing (or two-sided printing) lets you print on both sides of a sheet of paper. For paper sizes
that are acceptable for duplex printing, see Duplex unit specifications.
Note: Print duplex jobs only on paper weighing 16–24 lb.
Select Duplex from your printer driver to print individual duplex jobs, or from the Local Printer Setup
Utility to duplex all print jobs. See Using the Local Printer Setup Utility for more information.
WARNING: As the printer processes a duplex print job, it partially ejects a sheet to the standard
output bin, and then pulls the sheet back inside. Do not touch the sheet while it is
partially ejected. Doing so could damage the printer or cause a jam. Remove pages
only after they have fully exited the printer to a bin.
For more information on bins, see Using the output bins.
Duplex printing on letterhead
When duplex printing on letterhead from the multipurpose feeder, load it with the logo face down and
entering the printer last.
When duplex printing on letterhead from the trays, load it with the logo face up and facing toward the
rear of the printer.
Using Duplex Bind
When you select duplex bind printing in the printer driver or Duplex Bind in the Finishing Settings in the
Local Printer Setup Utility you must select either long edge or short edge binding which are the values
for this setting. The purpose of Duplex Bind is to define the way duplexed pages are bound, and how
the printing on the back of the sheet (even-numbered pages) is oriented in relation to the printing on
the front (odd-numbered pages).
57
Page 58

The two values for Duplex Bind are:
Long Edge*
The asterisk (*)
indicates this is t he
factory def aul t
setting
Short Edge Assumes binding along the short edge of the page (top edge f or portrait orient ation
Assumes binding along the long end of the page (left edge for portrait orientation
and top edge for landscape orientation). The following illustration shows long-edge
binding for portrait and landscape pages:
Binding
Back of
sheet
Portrait
and left edge fo r landscap e orientation) . The foll owing il lustr ation sho ws short-edge
binding for portrait and landscape pages:
Back of
sheet
Front of
next sheet
Binding
Binding
Back of sheet
Front of next
sheet
Landscape
Binding
Front of
next sheet
Portrait
Back of
sheet
Front of
next sheet
Landscape
58
Page 59

14
Using the output bins
Using the standard output bin
The standard output bin holds 250 sheets of print media. The printer automatically sends print jobs to
the standard output bin. Pr int jobs co ll ate face down in this bin.
Standard output bin
59
Page 60

Raising the paper rest
The paper rest holds printed jobs at an angle to keep them from sliding out of the bin. Pull the paper
rest forward to raise it.
Using the rear output bin
The printer automatically sends print jobs to the rear output bin when you open it. The rear output bin
reverse collates (pages 4, 3, 2, 1) print jobs face up. The rear output bin holds 20 sheets of paper.
You may want to use the rear output bin when you print on different sizes and types of print media,
such as paper, transparencies, postcards, note cards, and envelopes.
• Labels and transparencies may print more successfully when sent to the rear output bin.
• Envelopes may curl less if sent to the rear output bin.
• Card stock must always exit to the rear output bin.
Print media that is 165.1 mm (6.5 in.) or less in length must exit to the rear output bin.
Note: Legal size print media sent to the rear exit bin stacks improperly when too many
sheets accumulate. You must remove print media often from this bin.
60
Page 61

To use the rear output bin:
1 Grasp the tab in the recessed area of the rear output bin door.
2 Pull the door down.
61
Page 62

3
Pull the extension straight out using the tab.
4 Close the rear output bin door when you finish using it.
Note: Make sure the door closes properly on both sides to prevent jams.
62
Page 63

15
Determining the status of supplies
The printer operator panel light sequences tell you about the status of your supplies.
If the print cartridge becomes low on toner, one of the following light sequences is displayed:
Toner Low light
message when
the T oner Alarm
is set to On.
When the printer issues one of these messages, you can continue to print a few hundred pages. For
more information, see Ordering supplies.
If tray 1 or tray 2 becomes empty, the following light sequence is displayed:
Toner Low light
warning when
the T one r Alarm
is set to Off.
63
Page 64

If the multipurpose feeder become empty, the following light sequence is displayed:
64
Page 65

16
Conserving supplies
Conserving supplies lowers printing costs.
• When printing drafts, conserve toner by changing the Toner Darkness setting to a value less
than 8 in the Local Printer Setup Utility or in the printer driver. For more information, see Using
the Local Printer Setup Utility.
• Reduce paper consumption by using the duplex feature to print on both sides of the paper. Set
the printer to Duplex in the printer driver for individual print jobs or in the Local Printer Setup
Utility for all print jobs.
65
Page 66

17
Maintaining your printer
Periodically, you need to replace the print cartridge and clean the printer to maintain optimum print
quality. See Replacing the print cartridge and Cleaning the printer for more information.
If several people are using the printer, you may want to designate a key operator to do the setup and
maintenance of your printer. Refer printing problems and maintenance tasks to this key operator.
In the U.S., contact Lexmark at 1-800-539-6275 for information about Lexmark Authorized Supplies
Dealers in your area. In other countries or regions, visit the Lexmark Web site at www.lexmark.com or
contact the place where you bought your printer.
66
Page 67

18
Ordering supplies
To order supplies in the U.S., contact Lexmark at 1-800-539-6275 for information about Lexmark
Authorized Supplies Dealers in your area. In other countries or regions, visit the Lexmark Web site at
www.lexmark.com or contact the place where you bought your printer.
Ordering a print cartridge
When the Toner Low light comes on, you should order a new print cartridge. You can print a few
hundred pages after the Toner Lo w light comes on.
To use the remaining toner, remove the print cartridge, and then shake it gently back and forth.
You need to have a new print cartridge available when the current one no longer prints satisfactorily.
The recommended print cartridges specifically designed for your printer are:
Part number Average yield Approximate coverage
Prebate™ print cartridges
12A7410 5,000 pages 5%
12A7415 10,000 pages 5%
Regular ca rtridg es without Prebate terms and conditions
12A7310 5,000 pages 5%
12A7315 10,000 pages 5%
67
Page 68

19
Storing the print cartridge
Store the print cartridge in the original packaging until you are ready to install it.
Do not store the print cartridge in:
• Temperatures greater than 40°C (104°F).
• An environment with extreme changes in humidity or temperature.
• Direct sunlight.
• Dusty places.
• A car for a long period of time.
• An environment where corrosive gases are present.
• An environment with salty air.
68
Page 69

20
Replacing the print cartridge
Note: The manufacturer does not recommend that you use print cartridges from a third-
party refiller. Print quality and printer reliability cannot be guaranteed if you do. For
best results, use genuine supplies.
Removing the used print cartridge
1 Turn the printer off.
2 Open the upper front door using the finger grips.
Finger grips
69
Page 70

3
Grasp the print cartridge by the handle.
4 Lift the print cartridge up and out.
5 Set it aside.
70
Page 71

Cleaning the printer
Using a clean, lint-free cloth, gently clean the shaded areas by wiping toward the front of the printer.
WARNING: Do not touch the transfer roller or the plastic sensors.
Transfer rollerPlastic sensor Plastic sensor
Installing the new print cartridge
1 Remove the new cartridge from the packaging. Remove the red plastic piece and foam. Save
the packaging and foam to return the used print cartridge. For more information, see
step 6 on page 73.
Red plastic piece
Foam
Packaging
WARNING: Do not touch the photoconductor drum on the bottom of the print cartridge.
71
Page 72

2
Hold the print cartridge by the handle and gently shake it side-to-side to distribute the toner.
Handle
3 Hold the print cartridge by the handle and insert it into the printer:
a Align the tabs on each side of the print cartridge with the slots on each side of the print
cartridge cradle.
Cradle
Tab
72
Page 73

b Slide the print cartridge into the printer until it snaps into place.
4 Close the upper front door.
Make sure the door snaps closed on both sides, or the printer will not function properly.
5 Turn the printer on.
6 Follow the instructions on the new print cartridge box to recycle the used print cartridge.
When you return a used print cartridge, you contribute to a worldwide recycling effort at no cost to you.
For best results, use Lexmark supplies with the printer.
73
Page 74

21
Cleaning the printhead lens
You can solve some print quality problems by cleaning the printhead lens.
1 Turn the printer off.
2 Open the upper front door and the multipurpose feeder door.
3 Remove the print cartridge. See Replacing the print cartridge.
4 Locate the glass printhead lens.
5 Gently wipe the printhead lens with a clean, dry, lint-free cloth.
Printhead lens
6 Reinstall the print cartridge.
7 Close the upper front door, and then the multipurpose feeder door.
8 Turn the printer on.
74
Page 75

22
Solving basic printer problems
Sometimes printer problems are very easy to solve. When you have a problem, first make sure that:
• If an error light blinks, see Understanding the operator panel lights.
• The printer power cord is plugged into the printer and a properly grounded electrical outlet.
• The printer power switch is on.
• The electrical outlet is not turned off by any switch or breaker.
• Other electrical equipment plugged into the outlet is working.
• All options are properly installed.
• If you have check ed all of the above and still hav e a problem, turn the printer power off, wait for
about 10 seconds, and then turn the printer power on. This often fixes the problem.
Note: If any of these do not solve your problem, see the other topics listed in
Troubleshooting.
75
Page 76

23
Solving printing prob lems
Problem Solution
The printer does not print at all or
prints black splotches down the right
side of a page.
Job did not print or incorrect
characters printed.
Make sure that the upper front door is fully closed on both sides.
If the left side of the door is not fully closed, the printer will not print.
If the right side of the door is not fully closed, black splotches may print
down the right side of a page.
• Make sure the Ready/Data light is on before you send a job to
print. Press the Continue button to return the printer to the
Ready state.
• Make sure print media is loaded in the printer. See Loading
trays and Using and loading the multipurpose feeder.
Press Continue.
• Verify that the printer is using the correct printer language.
• Verify that the correct printer driver is being used.
• Make sure the parallel cable or USB cable is firmly plugged in
at the back of the printer.
• Check the cable connections.
• Make sure you are using the correct cable. If you use the
parallel port, we recommend an IEEE 1284-compliant parallel
cable such as Lexmark part number 1329605 (10 ft) or
1427498 (20 ft). If you use the USB port, we recommend the
cable with Lexmark part number 12A2405 (2M).
• If the printer is connected through a switch box, try a direct
connection.
• V erify that the correct print media size is selected in the printer
driver or in the Local Printer Setup Utility.
Job did not print or incorrect
characters printed (continued).
• Make sure PCL SmartSwitch and PS SmartSwitch are set to
On in the printer driver or in the Local Printer Setup Utility.
• If a print spooler is used, verify that the spooler is not stalled.
• If you print across a network or on a Macintosh, see Solving
network printing problems.
• Determine which host interface you are using.
76
Page 77

Problem Solution
You are connected to the USB port,
but the printer did not print.
Print media misfe eds or multiple fee ds
occur.
Job prints from the wrong source or
on the wrong print media.
Make sure you are using a USB-capable operating system supported
by your printer.
• Make sure the print media you are using meets the
specifications for your printer. See Print media guidelines for
more information.
• Flex print media before loading it in any of the sources.
• Make sure the print media is loaded correctly.
• Make sure the paper width and length guides on the print
media sources are adjusted correctly and are not too tight.
• Do not overfill the print media sources. Use the maximum
stack height indicators to avoid overfilling sources.
• Do not force print media into the multipurpose feeder.
• Remove any curled print media from print media sources.
• If the print media has a recommended print side, load the print
media as described in Loading trays and Using and loading
the multipurpose feeder.
• Load less print media in the sources.
• Turn the print media over or around and try printing again to
see if feeding improves.
• Do not mix print media types in the same source.
• Do not mix reams of print media.
• Remove the top and bottom sheets of a ream before loading
the print media.
• Load a print media source only when it is empty.
Check the P a per Type setting in the printer driv e r or in the Local Printer
Setup Utility.
Print media does not stack neatly in
an output bin.
• Turn the print media stack over in the tray or multipurpose
feeder.
• Lift the paper rest in the standard output bin. (See Raising
the paper rest for more information. ) The print media stacks
more neatly.
Note: Legal size paper sent to the rear exit bin stacks improperly when
too many sheets accumulate. You must remove the paper often from
this bin.
The printer has missing or damaged
parts.
The operator pa nel ligh ts do not come
on when the printer is turned on.
Contact the place where you purchased your printer.
• The lights may take a few seconds to come on.
• Make sure the power cord is firmly plugged in at the back of
the printer and at the wall outlet.
You cannot close the upper front door. Make sure the print cartridge is positioned correctly.
The printer is on, but nothing prints.
• Make sure the print cartridge is installed.
• Make sure the parallel, USB, or Ethernet cable is firmly
plugged into its corresponding connector on the back of the
printer.
77
Page 78

Problem Solution
The T oner Low l ight is on and printing
stops.
The Error light is on.
Jobs are not printing and the Error
light is on.
The print media skews or buckles.
The print media sticks together or the
printer feeds multiple sheets of print
media.
If the Toner Low alarm is enabled, the printer stops printing until you:
• Press and r elease Continue. You can continue printing for a
short time before the print begins to fade.
• Remove the print cartridge. To utilize the remaining toner,
shake the print cartridge gently, and then reinstall it. See
page 72 in Replacing the print cartridge for an illust rati on of
how to shake the print cartridge.
• Replace the used print cartridge with a new one to ensure the
print quality is not degraded. See Replacing the print
cartridge for instructions.
Note: To change the Toner Low Alarm setting, download the Local
Printer Setup Utility available on Lexmark’s Web site at
www.lexmark.com. It may also be provided on t he drivers CD for the
printer. Check the drivers CD booklet to verify this. For more
information, see Using the Local Printer Setup Utility.
• Make sure the print cartridge is installed.
• Make sure the printer upper front door is closed.
• Do not overfill the standard tray, the optional label tray, or the
optional 250-sheet or 500-sheet tray . See print media capacity
levels in Print media sources and specifications.
• Make sure the guides are flush against the edges of the print
media.
• Remove the print media from the tray and fan it.
• Do not overfill trays. See print media capacity levels in Print
media sources and specifications.
The paper fails to feed from tray 1
(standard tray or optional label tray).
The paper fails to feed from the
optional tray 2 (250-sheet tray or 500sheet tray).
Note: Optional trays support paper
only.
The Load/Remove Paper light is on
even though there is paper loaded in
tray 1 (standard tray or optional label
tray) or the optional tray 2 (optional
250- or 500-sheet tray).
• Remove the paper and fan it.
• Make sure Tray 1 is selected from the printer driver or in the
Local Printer Setup Utility. For more information, see Using
the Local Printer Setup Utility.
• Do not overfill the tray.
• Make sure the width and length guides on the print media
sources are adjusted correctly and are not too tight.
• Make sure the optional tray 2 is selected from the printer
driver or in the Local Printer Setup Utility.
• Make sure the tray is pushed in completely.
• Make sure the metal plate inside the tray is pressed down
before inserting it into the printer.
Note: After the tray is inserted, the metal plate springs back up.
• Make sure the paper does not exceed the stack height
indicator.
• Make sure the paper is under the paper stop. See Loading
trays.
• Make sure the width and length guides on the print media
sources are adjusted correctly and are not too tight.
• Remove the paper from the optional tray 2 and fan it.
Make sure the tray is pushed all the way in.
78
Page 79

Problem Solution
The Paper Jam light is still on eve n
though you cleared the jam.
While in PostScript 3 emulation, the
printer is flushing data (Ready/Data
and Error lights are blinking).
• Make sure you cleared the entire paper path.
•Press Continue or open and close the upper front door to
restart the printer.
• Make sure the print cartridge is installed.
• Make sure you are using the correct PostScript driver.
• The printer does not have enough memory to print the job.
Install more memory. Refer to the Setup Guide for information
about installing optional memory cards.
79
Page 80

24
Solving print quality prob lems
You may be able to correct many print quality problems by replacing a supply or maintenance item that
has reached the end of its intended life.
See Determining the status of supplies for information about other ways to identify consumables
that need to be replaced.
Use the following table to find solutions to print quality problems you encounter. If you cannot fix the
problem, contact the place where you bought your printer.
Problem Solution
Light or blurred characters.
• If the Toner Low light is on, remove the print cartridge. To
utilize the remaining toner, shake the print cartridge gently,
and then reinstall it. See page 72 in Replacing the print
cartridge for an illustration of how to shake the print
cartridge.
• Change the Toner Darkness setting to a value greater than 8
in the Local Printer Setup Utility.
• If you are printing on transparencies, card stock, or labels, be
sure you selected the correct Paper Type in the printer driver
or in the Local Printer Setup Utility.
Note: For more information, see Using the Local Printer Setup
Utility.
• If you are printing on an uneven print surface, adjust the
Paper Weight
• Use recommended paper and other print media. Refer to the
Card Stock & Label Guide available on the Lexmark Web site
at www.lexmark.com for detailed specifications.
• The printer detects a print cartridge error. Replace it.
• Make sure print media you load in the sources is not damp.
and Paper Texture settings.
Toner smudges appear on the front or
back of the page.
• Make sure the print media is straight and unwrinkled.
• Replace the used print cartridge with a new one.
• Toner is on the transfer roller. To help prevent this, do not load
print media that is smaller than the page size of the job to be
printed. Specify the correct page size in your driver or in the
Local Printer Setup Utility. For more information, see Using
the Local Printer Setup Utility.
• To clean the transfer roller, open and close the printer upper
front door. The printer automatically runs its setup cycle.
80
Page 81

Problem Solution
Toner smears or rubs off the page.
Vertical or horizontal streaks appear
on the page.
• Try changing the Media Weight to a heavier setting and the
Media Texture to a rougher setting. To change these settings,
use the Local Printer Setup Utility available on Lexmark’s
Web site at www.lexmark.com. It may also be provided on the
drivers CD for the printer. Check the drivers CD booklet to
verify this. For more information, see Using the Local
Printer Setup Utility.
• If you are printing on an uneven print surface, change the
Paper Texture and Paper Weight settings.
• Verify that the print media is within the printer specifications.
See Print media sources and specifications for more
information. If the problem continues, contact the Lexmark
Customer Support Center at 1-859-232-3000 or http://
support.lexmark.com.
• If you are printing on transparencies, card stock, or labels, be
sure you selected the correct Paper Type in the printer driver
or in the Local Printer Setup Utility. For more information, see
Using the Local Printer Setup Utility.
• Try a different kind of paper. Paper designed for copiers
provides the best quality.
• The toner may be low. Remove the print cartridge. To utilize
the remaining toner, shake the print cartridge gently , and then
reinstall i t . Se e page 72 in Replacing the print cartridge for
an illustration of how to shake the print cartridge.
• If you are using preprinted forms, make sure the ink can
withstand temperatures of 200
°C (392°F).
• Clean the printhead lens. See Cleaning the printhead lens
for instructions.
Vertical streaks of various widths
appear on print jobs with grayscale
graphics, such as a pie chart or bar
graph.
Contaminates, such as paper dust or lint, have accumulated on the
printhead lens. Clean the printhead lens. See Cleaning the printhead
lens for instructions.
81
Page 82

Problem Solution
The print is light but the Toner Low
light is not on.
The Toner Low light is on.
Solid black areas or white streaks
appear on transparencies or paper.
• Remove the print cartridge and shake it from side to side to
redistribute the toner to extend the life of the cartridge, and
then reinstall it. See page 72 in Replacing the print
cartridge for an illustration of how to shake the print
cartridge.
• Replace the used print cartridge with a new one. See
Replacing the print cartridge for instructions.
• Choose a different fill pattern in your software application.
• Try a different type of print media. Print media designed for
copiers provides the best quality.
• Remove the print cartridge and shake it from side to side to
redistribute the toner to extend the life of the cartridge, and
then reinstall it. See page 72 in Replacing the print
cartridge for an illustration of how to shake the print
cartridge.
• Replace the used print cartridge with a new one. See
Replacing the print cartridge for instructions.
Faint images or repetitive spots
appear on the page.
• Try a different type of print media. Print media designed for
copiers provides the best quality.
• Replace the used print cartridge with a new one. See
Replacing the print cartridge for instructions.
82
Page 83

Problem Solution
Characters have jagged or uneven
edges, or image quality is poor.
The job prints, but the left and top
margins are incorrect.
• Change the Print Resol utio n setting in the printer driver or in
the Local Printer Setup Utility. Use a print resolution higher
than 300 dots per inch (dpi). For more information, see Using
the Local Printer Setup Utility.
• If you are using downloaded fonts, verify that the fonts are
supported by the printer, the host computer, and the software
application.
• Resolution was automatically reduced. Reduce the
complexity of the print job or add printer memory.
• Make sure the Paper Size setting is set correctly in the printer
driver or in the Local Printer Setup Utility.
• Verify that the Print Area setting in the printer driver or in the
Local Printer Setup Utility is correct. Print a menu settings
page to verify this. For more information, see Printing the
menu settings page and Using the Local Printer Setup
Utility.
• Make sure the margins are set correctly in your software
application.
Printing is too dark. Change the Toner Darkness setting in the printer driver or in the Local
Printer Setup Utility. For more information, see Using the Loca l
Printer Setup Utility.
For Macintosh users: Make sure the lines per inch (lpi) setting is not set
too high in the software application.
Pages are blank.
• The print cartridge may be out of toner or defective. Replace
the used print cartridge with a new one. See Replacing the
print cartridge for instructions.
• You may have a software error. Try turning the printer off and
back on.
• Make sure the packaging material is removed from the print
cartridge. See page 71 of Replacing the print cartridge for
information about removing the packaging.
• Check the print cartridge to be sure it is installed correctly.
See Replacing the print cartridge for more information.
83
Page 84

Problem Solution
Part or all of the page is printed in
black.
Toner fog or background shading
appears on the page.
Check the print cartridge to see if it is installed correctly. See
Replacing the print cartridge for more information.
• Check the print cartridge to make sure it is installed correctly.
See Replacing the print cartridge for more information.
• Change the print cartridge. See Replacing the print
cartridge for more information.
Unexpected characters print or
characters are missing.
• Make sure you are using the correct printer driver.
• Turn the printer off and on.
• Make sure the parallel, USB, or Ethernet cable is firmly
plugged into its corresponding connector on the back of the
printer.
• Access the menus by following the instructions on the Printer
Settings Configuration sheet:
–Select Hex Trace mode to determine what the problem is. For
more information, see Printing the Printer Settings
Configuration sheet and Using Hex Trace mode.
–Select Restore Factory Defaults. For more information, see
Printing the Printer Settings Configuration sheet and
Restoring factory defaults.
84
Page 85

25
Solving option problems
Problem Solution
Option does not operate correctly
after it is installed, or it quits working.
• Turn the printer power off, wait for about 10 seconds, and turn
the printer power on. If this does not fix the problem, unplug
the printer and check the connection between the drawer and
printer.
• Make sure the option is installed and selected in the printer
driver you are using.
• For Macintosh users: Make sure the printer is set up in
Chooser.
• Optional drawer: Make sure the connection between the
optional drawer and the printer is secure. Refer to the
Setup Guide.
• Make sure the print media is loaded correctly. See Loading
trays for more information.
• Optional flash memory card: Make sure the flash memory
card is securely connected to the printer system board.
• Optional printer memory card: Make sure the printer
memory card is securely connected to the printer system
board.
85
Page 86

26
Solving network printing pr oblems
Problem Solution
Job did not print or incorrect
characters printed.
If you are using a Lexmark print server, verify that it is set up properly
and the network cable is connected.
Note: Refer to the documentation that came with your print server for
more information.
For Nove ll users:
• Make sure the netware.drv file is dated October 24, 1994, or later.
• Make sure the NT (no tabs) flag is included in the capture statement.
For Macintosh users, verify that the printer is set up correctly in
Chooser.
86
Page 87

27
Solving other pr ob lems
Problem Solution
How do I get u pdated printer driv ers or
utilities?
Where are the printer escape codes
listed?
Refer to the Lexmark Web site at www.lexmark.com for printer drivers
and the Local Printer Setup Utility.
The drivers CD that was shipped with your printer contains an Adobe
Acrobat file with a complete list of Printer Command Language (PCL)
escape code s.
87
Page 88

28
Print media guidelines
Selecting the appropriate print media (paper, transparencies, envelopes, labels, and card stock) for
your printer helps you avoid printing problems.
The following sections contain guidelines for choosing the correct print media for your printer.
For detailed information about print media characteristics, refer to the Card Stock & Label Guide
available on Lexmark’s Web site at www.lexmark.com/publications.
Paper
For the best print quality, use 75 g/m2 (20 lb) xerographic, grain long paper. Try a sample of any paper
you are considering using with the printer before buying large quantities.
When loading paper, note the recommended print side on the paper package, and load paper
accordingly. See Loading trays and page 54 of Using and loading the multipurpose feeder for
detailed loading instr uc tions.
The following papers are not recommended for use with your printer:
• Paper with a rough or heavily textured surface
• Coated papers, such as erasable bond
• Preprinted papers manufactured with chemicals that may contaminate the printer
• Multiple-part forms
• Synthetic papers
• Thermal papers
• Recycled paper having a weight less than 75 g/m
2
(20 lb)
Letterhead
Preprinted papers such as letterhead must be able to withstand temperatures up to 200°C (392°F)
without melting or releasing hazardous emissions. Use inks that are not affected by the resin in toner
or the silicone in the fuser. Inks that are oxidation-set or oil-based should meet these requirements;
latex inks might not.
Printing on letterhead
Check with the manufacturer or vendor to determine whether the preprinted letterhead you have
chosen is acceptable for laser printers.
88
Page 89

Page orientation is important when printing on letterhead. Use the following table for help when loading
letterhead in the print media sources.
Print media source or
process
Tray 1
(standard tray or optional
label tray)
Tray 2
(optional 250-sheet or
500-sheet drawer)
Duplex prin ting using tray
1 or tray 2
Multipurpose feeder
(including fee din g
individual sheets)
Duplex prin ting using the
multipurpose feeder
Print side Portrait Landscape
Face down Front of tray Left side of tray
Face up Logo faces rear of tray Not applicable
Face up Logo enters the printer first Left side of tray
Face down Logo enters the printer last Not applicable
Top of page
Transparencies
You can feed transparencies from the standard 250-sheet tray or the multipurpose feeder. Try a sample
of any transparencies you are considering using with the printer before buying large quantities.
Do not load transparencies in the optional 250-sheet or 500-sheet drawer. To load transparencies in
the multipurpose feeder, see page 54 of Using and loading the multipurpose feeder.
When printing on transparencies:
• Be sure to set the Paper Type to Transparency from the printer driver, in the Local Printer
Setup Utility, or from MarkVision™ to avoid damaging your printer.
• Use transparencies designed specifically for laser printers. Transparencies must be able to
withstand temperatures of 175°C (347°F) without melting, discoloring, or releasing hazardous
emissions.
• To prevent print quality problems, avoid getting fingerprints on the transparencies.
• Before loading transparencies, fan the stack to prevent sheets from sticking together.
89
Page 90

Envelopes
You can load up to 10 envelopes in the multipurpose feeder. Try a sample of any envelopes you are
considering using with the printer before buying large quantities. See page 55 of Using and loading
the multipurpose feeder for loading an envelope instructions.
When printing on envelopes:
• Set the Paper Source to MP Feeder or Manual Env, set the paper type to Envelope, and select
the correct envelope size from the printer driver, in the Local Printer Setup Utility, or from
MarkVision.
• Use envelopes made from 75 to 105 g/m
fewer print media jams, do not use envelopes that:
– Have excessive curl.
– Ar e stu ck together.
– Are damaged in any way.
– Contain windows, holes, perforations, cutouts or embossing.
– Use metal clasps, string ties, or metal folding bars.
– Have postage stamps attached.
– Have any exposed adhesive when the flap is in the sealed or closed position.
• Use envelopes that can withstand temperatures of 205°C (401°F) without sealing, excessive
curling, wrinkling, or releasing hazardous emissions.
• Adjust the right paper guide to fit the width of the envelopes.
• Load envelopes with the flap side down, and position the short edge nearest the return
address to enter the printer first. See page 55 of Using and loading the multipurpose
feeder for loading an envelope instructions.
• If you are feeding self-sealing envelopes, open the rear output bin door so envelopes feed
straight out the back of the printer. The rear output bin holds about 10 envelopes.
2
(20 to 28 lb) bond paper. For best performance and
Labels
Your printer can print on many labels designed for use with laser printers. These labels are supplied in
letter size and A4 size sheets. Label adhesives, face sheet (printable stock), and topcoats must be able
to withstand temperatures of 205°C (401°F) and pressure of 25 pounds per square inch (psi).
Try a sample of any labels you are considering using with the printer before purchasing a large
quantity.
For detailed information on label printing, characteristics and design, refer to the Card Stock & Label
Guide available on Lexmark’s Web site at www.lexmark.com/publications.
90
Page 91

When printing on labels:
• Set the Paper Type to Labels from the printer driver, in the Local Printer Setup Utility, or from
MarkVision.
• You may feed vinyl labels from the 250-sheet tray and the multipurpose feeder.
• Do not load labels together with paper or transparencies in the same paper source.
• Do not use label sheets with a slick backing material.
• Do not print within 1 mm (0.04 in.) of the die cut.
• Use full label sheets. Partial sheets may cause labels to peel off during printing, resulting in a
jam. Partial sheets also contaminate your printer and your cartridge with adhesive, and could
void your printer and cartr id ge warrantie s.
• Use labels that can withstand temperatures of 205°C (401°F) without sealing, excessive
curling, wrinkling, or releasing hazardous emissions.
• Do not print within 1 mm (0.04 in.) of the edge of the label, of the perforations, or between die-
cuts of the label.
• Do not use label sheets that have adhesive to the edge of the sheet. We recommend zone
coating of the adhesive at least 1 mm (0.04 in.) away from edges. Adhesive material
contaminates your printer and could void your warranty.
• If zone coating of the adhesive is not possible, a 3 mm (0.125 in.) strip should be removed on
the leading and driver edge, and a non-oozing adhesive should be used.
• Remove a 3 mm (0.125 in.) strip from the leading edge to prevent labels from peeling inside
the printer.
• Portrait orientation is preferred, especially when printing bar codes.
• Do not use labels that have exposed adhesive.
Printer maintenance when printing on labels
After continuously printing approximately 10,000 pages of labels (or each time you replace the print
cartridge), complete the following steps to maintain printer feeding reliability:
1 Print 5 sheets of paper.
2 Wait approximately 5 seconds.
3 Print 5 more sheets of paper.
91
Page 92

Card stock
Card stock is single ply, and has a large array of properties, such as the orientation of paper fibers and
texture, that can significantly affect the print quality.
You may only print card stock from the multipurpose feeder. Card stock must always exit to the rear
output bin.
Try a sample of any card stock you are considering using with the printer before purchasing a large
quantity.
See Print media source specifications for information on the preferred weight of print media.
When printing on card stock:
• Set the Paper Type to Card Stock from the printer driver, in the Local Printer Setup Utility, or
from MarkVision.
• Do not use pr eprinted card stock manufactured with chem icals that may contaminate th e
printer. Preprinting introduces semi-liquid and volatile components in the printer.
• Do not use card stock that is perforated or creased. It may cause print media jams.
• We recommend the use of grain short card stock.
Printer maintenance when printing on card stock
After printing approximately 10,000 pages of card stock (or each time you replace the print cartridge),
complete the following steps to maintain printer feeding reliability:
1 Print 5 sheets of paper.
2 Wait approximately 5 seconds.
3 Print 5 more sheets of paper.
For detailed information on card stock printing, characteristics, and design, refer to the Card Stock &
Label Guide available on Lexmark’s Web site at www.lexmark.com/publications.
92
Page 93

29
Linking trays
If you use the same size and type of print media in two or more sources (standard tray, optional tray,
and the multipurpose feeder), the automatic tray linking feature is enabled. When trays are linked in
this way, the printer selects print media from a second tray when the first becomes empty.
To verify Paper Size and Paper Type settings, print a menu settings page (see Printing the menu
settings page). Change the Paper Size and Paper Type settings in the Local Printer Setup Utility so
the settings match.
If you load the same size print media in each tray, make sure the print media is all the same type, also.
Disabling tray linking
If you use different print media in the sources, each source with a different print media must have the
Paper Type set to a unique value to disable the automatic tray linking feature. You set the Paper Type
setting in the Local Printer Setup Utility.
For more information, see Using the Local Printer Setup Utility.
93
Page 94

Using MarkVision to manage the
30
printer
To understand how MarkVision can help you manage the printer, refer to the drivers CD.
94
Page 95

31
Using the operator panel
The operator panel has six lights and two operator panel buttons. Lights that are on, off, or blinking
indicate different printer conditions.
Ready/Data light is on
Toner Low light is off
Load/Remove Paper light is blinking
Paper Jam light is blinking slowly
Error light is off
Press Continue light is off
Continue button
Cancel button
Common light sequences and their meaning
Light status Printer status
Ready/Data light is on Ready to receive and process data.
Ready/Data light is blinking Busy receiving or processing data.
Toner Low light is on Toner is low in the pri nt cartridge.
Load/Remove Paper light is onWaiting for you to:
• Load print media in a tray or the multipurpose feeder.
• Remove paper from an output bin.
Paper Jam light is on Detects a jam.
Error light is on Detects an open door or problem with the print cartr idge.
Press Continue light is on Waiting for you to press the Continue button.
For a complete list of light messages, see Understanding the operator panel lights.
95
Page 96

Understanding the operator panel
32
lights
Operator panel lights that are off, on, or blinking (fast or slowly) indicate printer conditions such as
printer status, intervention (for example, out of paper), or service.
Ready/Data light is on
Toner Low light is off
Load/Remove Paper light is blinking
Paper Jam light is blinking slowly
Error light is off
Press Continue light is off
Continue button
Cancel button
Some light sequences prompt you to press the Continue button to clear a printer condition:
• Press and release Continue briefly to restart the printer.
• Press and release Continue twice quickly to display an error code.
• Press and release Continue twice quickly to display additional error codes.
Press and hold Cancel until all the lights come on to reset the printer.
Press and release Cancel to cancel a print job.
96
Page 97

The following table shows the most common light sequences. Click the indicated page for more
information.
Common light sequences
Load/
Ready/
Data
Toner
Low
Remove
Paper
Paper
Jam
Error
Press
Continue
Printer status/Message
Go to
page:
•Busy
102
• Defragmenting flash
• Formatting flash
• Programming flash
• Printing a directory
• Printing a font list
• Printing menu settings
page(s)
• Printing Print Quality
Test Pages
Programming network code 103
Load the multipurpose
feeder.
Load tray 1 or tray 2. 104
Upper front door is open. 105
103
97
• Print cartridge not
installed
• Unsupported print
cartridge
• Defective print
cartridge
Tray 1 is missing when tray
2 is installed. (Insert tray 1.)
Invalid refill cartridge
(Change the print
cartridge.)
Toner Low when the Toner
Alarm is set to Off
Toner Low when the Toner
Alarm is set to On
105
107
107
108
108
Page 98

Common light sequences (continued)
Load/
Ready/
Data
Toner
Low
Remove
Paper
Paper
Jam
Error
Press
Continue
Go to
Printer status/Message
Standard output bin is full. 109
page:
Not Ready (also
referred to as offline)
• Ready
109
110
•Power Saver
Hex Trace Ready 111
Waiting 111
Ready with Toner Low 112
Hex Trace Ready with Toner
Low
Busy with Toner Low 113
112
All lights cycle (each light blinks in sequence from the top to the bottom,
and then the cycle starts again).
98
Waiting with Toner Low 113
• Flushing buffer
114
• Resolution reduced
• Canceling job
114
• Resetting printer
• Activating menu
115
changes
• Performing self test
• Restoring factory
defaults
Page 99

When the following light sequences are displayed, press and release Continue twice quic kly t o see its
secondary light sequence:
Common light sequences with secondary sequences
Load/
Ready/
Data
Toner
Low
Remove
Paper
Paper
Jam
Error
Press
Continue
Printer status
Go to
page:
Secondary error
code
Print media jam 104
Invalid network code 115
Service error 110
106
The following table shows the secondary error codes that are displayed when you press and release
Continue twice quickly. Click on the indicated page for more information.
Secondary error code light sequences
Load/
Ready/
Data
Toner
Low
Remove
Paper
Paper
Jam
Error
Press
Continue
Go to
Printer status/Message
Insufficient colla tio n area 106
page:
99
Memory full 116
Complex page 116
Short paper 117
Font error 117
Page 100

Secondary error code light sequences (continued)
Load/
Ready/
Data
Toner
Low
Remove
Paper
Paper
Jam
Error
Press
Continue
Go to
Printer status/Message
Deficient printer memory 118
Insufficient defra g memory 118
page:
External network adapter (ENA)
connection lost
Inval id netw ork code 119
Defective flash 120
Unformatted flash 120
Network interface error 121
Flash full 121
Too many flash options 122
119
100
 Loading...