

Lexmark S310 Series Quick Reference Manual

S310 Series Quick Reference Guide
October 2011 www.lexmark.com
Important Message About Cartridge Recycling!
Please Read Before Opening Your Inkjet Cartridge Box
At Lexmark, we take our commitment to the environment seriously, and we encourage our customers
to participate in our easy, no-cost method for returning empty Lexmark cartridges to Lexmark for proper
recycling. We will insure that cartridges are properly handled with zero waste to landfills.
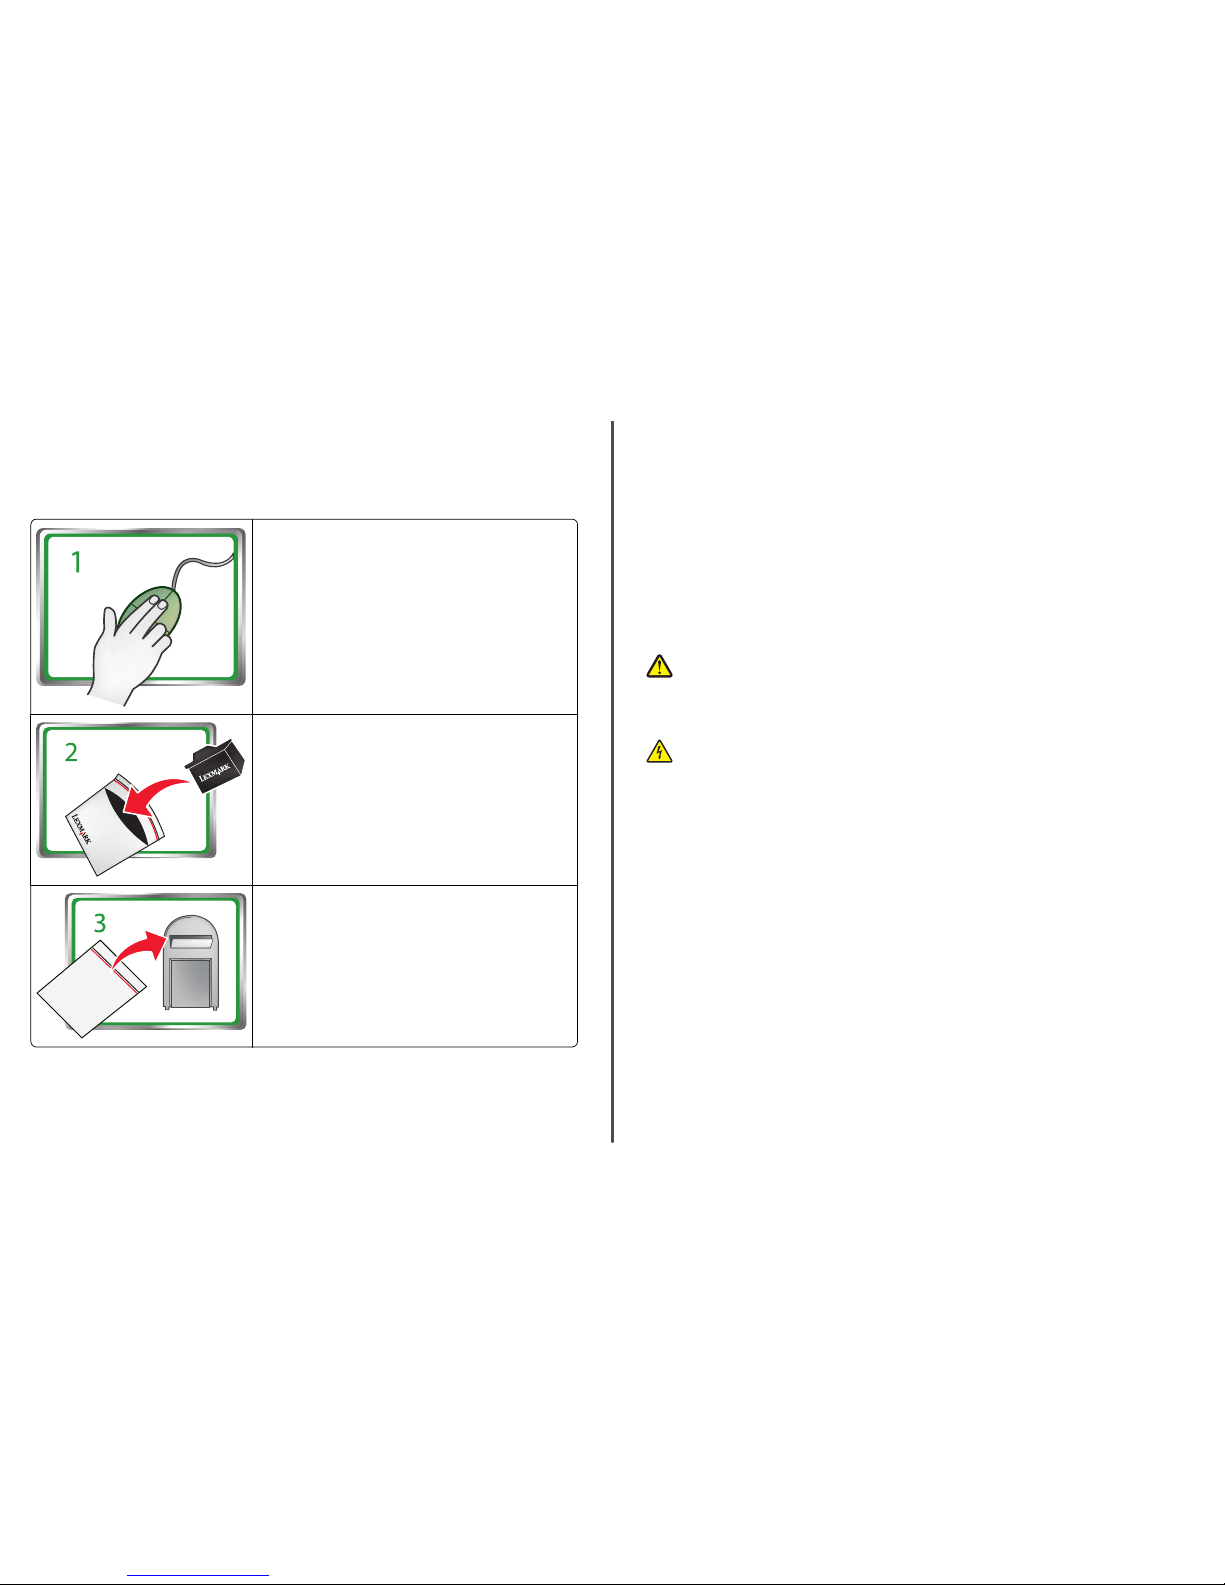
Go to www. lexmark.com/r ecycle. Follow instructions to
request postage-paid bags. Bags usually arrive within 7–10 days.
Place the empty Lexmark-branded inkjet cartridge(s) in the
po st a ge -p a id re t ur n ba g, a nd th e n s ea l th e b a g. If y ou ’r e se nd i ng
single-color tanks, we recommend that you send at least two at
a time to maximize the environmental benefits.
Mail the bag to Lexmark’s recycling partner. The bag is preaddressed.
Visit www.lexmark.com/recycle to learn more about recycling.
Lexmark-branded cartridges are always made with all new parts, though components may contain
recycled material. For warranty returns, call 1-800-332-4120.
This patented printer is licensed for, and designed to work with, only genuine Lexmark inkjet cartridges
for the life of the patented printer. You agree to: (1) use only genuine Lexmark inkjet cartridges with this
printer except as otherwise provided below, and (2) pass this license/agreement to any subsequent user
of this printer. The patented Lexmark inkjet cartridges and their contents are licensed subject to a
restriction that they may be used only once. After this single use, the license to use the print cartridges
and their contents terminates, and you agree to return them only to Lexmark for recycling. Replacement
inkjet cartridge(s) sold without these terms are available through www.lexmark.com and may be refilled
by you, or a third party, as the only cartridge alternative to be used with the licensed printer.
Important safety information
Connect the power cord to a properly grounded electrical outlet that is near the product and easily
accessible.
Do not place or use this product near water or wet locations.
Use only the power supply and power cord provided with this product or the manufacturer's authorized
replacements.
CAUTION—POTENTIAL INJURY: Do not cut, twist, bind, crush, or place heavy objects on the
power cord. Do not subject the power cord to abrasion or stress. Do not pinch the power cord
between objects such as furniture and walls. If any of these things happen, a risk of fire or
electrical shock results. Inspect the power cord regularly for signs of such problems. Remove the
power cord from the electrical outlet before inspecting it.
CAUTION—SHOCK HAZARD: Do not use the fax feature during a lightning storm. Do not set up
this product or make any electrical or cabling connections, such as the fax feature, power cord,
or telephone, during a lightning storm.

Contents
Important safety information.........................................................2
About your printer..........................................................................4
Finding information about the printer.................................................................................4
Minimizing your printer's environmental impact.................................................................4
Printer models......................................................................................................................5
Printer features....................................................................................................................5
Setting up the printer...........................................................................................................5
Understanding the parts of the printer..............................................................................11
Using the printer control panel..........................................................................................12
Using flash drives................................................................................................................13
Ordering and replacing ink cartridges............................................14
Ordering ink cartridges.......................................................................................................14
Replacing ink cartridges......................................................................................................14
Maintaining ink cartridges..................................................................................................15
Using the printer software............................................................17
Minimum system requirements.........................................................................................17
Installing the printer software............................................................................................17
Using the Windows printer software.................................................................................17
Using the Macintosh printer software...............................................................................18
Printing.........................................................................................20
Printing a document...........................................................................................................20
Printing on both sides of the paper (duplexing) automatically..........................................20
Printing photos from a flash drive......................................................................................21
Canceling print jobs............................................................................................................21
Printing from a mobile device............................................................................................21
Copying.........................................................................................22
Tips for copying..................................................................................................................22
Making copies.....................................................................................................................22
Making a two‑sided (duplex) copy automatically...............................................................22
Canceling copy jobs............................................................................................................23
Scanning.......................................................................................24
Tips for scanning.................................................................................................................24
Scanning to a local computer.............................................................................................24
Scanning to a flash drive or memory card..........................................................................24
Scanning directly to e‑mail using the printer software......................................................24
Scanning to a PDF...............................................................................................................25
Canceling scan jobs.............................................................................................................25
E-mailing.......................................................................................26
Sending e-mail....................................................................................................................26
Canceling an e‑mail............................................................................................................26
Wireless networking.....................................................................27
Information you will need to set up the printer on a wireless network.............................27
Installing the printer on a wireless network.......................................................................27
What is Wi‑Fi Protected Setup?.........................................................................................27
Configuring Wi‑Fi Protected Setup manually.....................................................................28
Troubleshooting............................................................................29
Notices.........................................................................................36
Edition notice.....................................................................................................................36
Index............................................................................................37
Contents 3

About your printer
Finding information about the printer
The Quick Reference Guide contains instructions on adding your printer to a wi reless network, setting up
a fax connection, and accomplishing c ommon printer tasks like printing, cop ying, scanning, and faxing. It
also includes information o n troubleshooting printer setup issues as well as solving basic networking and
faxing problems.
For additional information, see the following:
What are you looking for? Find it here
Initial setup instructions
• Quick Setup Sheet
• Hardware Setup Wizard
1
Additional setup and instructions for using the
printer
Comprehen sive User's Guide installed automatically with
the printer software.
2
For Windows users
After installing your printer, you can access the User's
Guide from the printer program folder:
1 Click or Start.
2 Click A ll Programs or Programs, and then select the
printer program folder from the list.
3 Select User's Guide.
For Macintosh users
1 From the Finder, navigate to:
Applications > select your printer folder
2 Double‑click User's G uide.
Help using the printer software Software Help installed automatically with the printer
software.
2
Click Help from any printer software program or
application.
The latest supplementa l information, updates,
online customer support, and telephone
support
Support Web site—http://support.lexmark.com
1
Available on the installation software CD.
2
Available on the installation software CD and on the Lexmark Support Web site at
http://support.lexmark.com.
Minimizing your printer's environmental impact
We are committed to protecting the env ironment and are continually improving our printers to reduce
their environmental impact. By selecting certain printer settings or tasks, you may be able to reduce your
printer's environmental impact even further.
Conserving energy
• Activate Eco-Mode. This feature sets the screen brigh tness to low and sets the printer to change to
Sleep mode after the printer is left idle for 10 minut es.
• Select the lowest Sleep timeout. The Sleep feature puts t he printer in a minimum‑power standby
mode after the printer has been idle for a set amount of time (the Sleep timeout ).
• Shar e your print er. Wireless/network printers allow you to share a single printer among multiple
computers, thus conserving energy and other resources.
Conserving paper
• Print more than one page image on one side of the paper. The Pages per Sheet feature allows you
to print multiple pages on one shee t. You can print up to 16 page images on one side of a sheet of
paper.
• Print on both sides of the paper. Duplexing lets you print on both sides of the paper manually or
automatically (depending on your prin ter model).
• Preview print jobs before printing. Use the preview features found in Tool bars, the Print or Print
Preview dialog, or the printer display ( depending on your printer model).
• Use re cycled paper.
• Reduce the margins of documents to be printed.
• Scan and save. To avoid print ing multiple copies, you can sc an documents or photographs and s ave
them to a computer program, application , or flash drive for presentat ion.
Conserving ink
• Use Quick Print or Draft Mode. These modes can be used to print document s using less ink than
normal and are ideal for printing docum ents that are mostly text.
• Use font types and font settings that requires less ink. Most programs or applications let you adjust
the darkness of the colors.
• Use high yield ca rtridges. Inks in high yield cartridges allow y ou to print more pages.
Recycling
• Return ink cartridges f or reuse or recy cling through t he Lexmark Cartr idge Collection Program. To
return an ink cartridge, go to www.lex mark.com/recycl e. Follow the instructions to request a
postage‑paid bag.
• Recycle the product packaging.
• Recycle your old printer instead of throwing it away.
• Recyc le paper from disca rded prin t jobs.
• Use re cycled paper.
About your printer 4

To read the Lexmark Environmental Sustainability Report, see www.lexmark.com/environment.
Note: Your printer may not come with some of these programs or some of the f unctions of these
programs, depending on the fea tures of the printer that you purchase d.
Printer models
The installation software CD that came with your printer works for the following printer models:
• Lexma rk S315
• Lexma rk S319
Printer features
Depending on the model, your printer comes with features that will help you manage and accomplish
printing and imaging tasks:
• Wireless or Ethernet networking—Print and scan from anywhere in your home or office ov er a secure
wireless or Ethernet network, as well as share the printer among multiple computers.
• Intuit ive touch scr een—Use the full‑featured color touch screen for fast, easy acces s to all the printer
menus. The large screen als o allows you to view and print photos directly f rom your digital camera or
memory device without using a com puter.
• Print —Print documents and PDFs quickly from a c omputer or from a USB flash drive. Built‑in two‑sided
printing lets you save money and t he environment.
• Copy—Copy documents and photos with on e‑touch, computer‑free black or color copying. Enjoy 25%
to 400% reduction and enlargeme nt capacity.
• Scan—Scan doc uments and photos fast and easily with the high‑resolution scanner. Easily scan to a
memory device or to multip le laptops or computers ove r a secure wireless network wi th up to 1200 dpi
optical resolution.
• Fax—Do standalone blac k and color faxing at 33.6Kbps mo dem speed. Other fax features include 99
speed dials, automatic redial, junk fax blocking, and caller ID.
• Photo pr inting—Print high‑quality, long‑last ing photos directly from digi tal memory cards,
PictBridge‑enabled digital cameras, or USB flash drives .
• SmartSo lutions—Simplify printer tasks that you frequently repeat by creating a nd customizing your
printer solutions. Using the SmartSolutions toolkit on the Web, you can choose the printer tasks that
you often perform, apply your custom settin gs, and download them to your printer as shortcuts that
you can easily access anytime. You can also customize your prin ter with solutions that displa y your
online calendars, online pho to albums, RSS feeds, and more.
• Shortcu ts—Save a set of frequently used printer settings available for a given task and then assign a
shortcut name and shortcut numbe r to it. When you want to perform a task with tho se settings, you
can simply select the shortcut num ber on the printer instead of going through the usual proces s of
adjusting the settings and options.
• Eco‑Mode—Save energy by activating Eco‑Mode. It automatically dims the printer display light and
puts the printer into Sleep mode after a s pecified period of inactivity.
Setting up the printer
1 Unpa ck the printer.
P
R
I
O
R
I
T
Y
C
o
m
e
s
f
r
e
e
w
i
t
h
y
o
u
r
n
e
w
L
e
x
m
a
r
k
P
r
o
f
e
s
s
i
o
n
a
l
S
e
r
i
e
s
P
r
i
n
t
e
r
1
.
8
0
0
.
3
9
5
.
4
0
3
9
P
H
O
N
E
S
U
P
P
O
R
T
Notes:
• Do not attach the USB cable until prompted to do so.
• Place the printer near the computer during setup. If you are setting up on a wireless network ,
then you may move the prin ter after setup is compl ete.
• Contents may vary by mode l and region.
About your printer 5
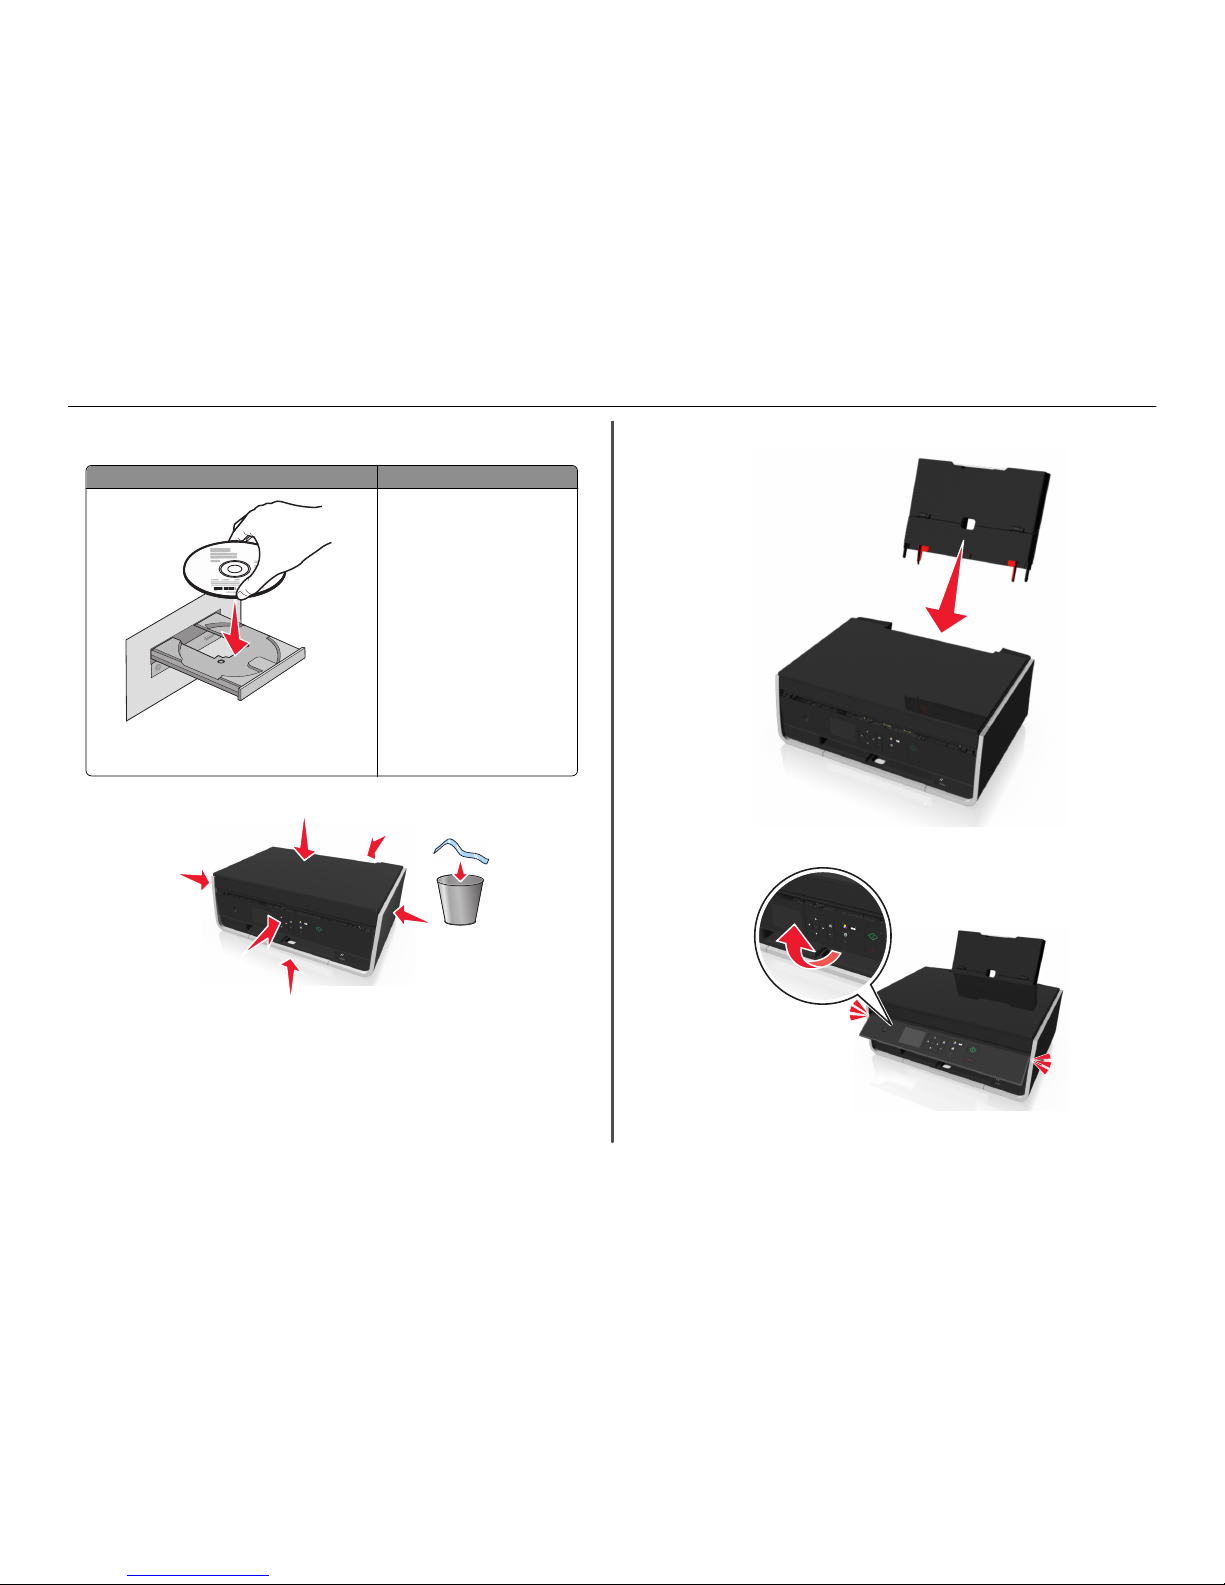
2 To initiate printer setup using a computer, insert the installation software CD, or download the printer
driver.
With a CD or DVD drive (Windows/Macintosh) Without a CD or DVD d rive or for Li nux
Note: If the installation screen does not appear after a
minute, then see “Inst allation screen did not appear during
installation” on page 29.
Download the printer driver from
www.lexmar k.com.
3 Remove tape and packing material from all areas of the printer.
4 Attach the paper support.
5 Raise the printer control panel until it clicks into place.
About your printer 6

6 Open the paper feed gua rd.
7 Use the paper guide adjustment lever to extend the paper guid es.
8 Load paper.
1
2
Notes:
• Use the paper guide ad justment lever to adjust the paper gui des.
• Do not load more than 100 shee ts in the paper support.
9 Close the paper feed guard.
About your printer 7
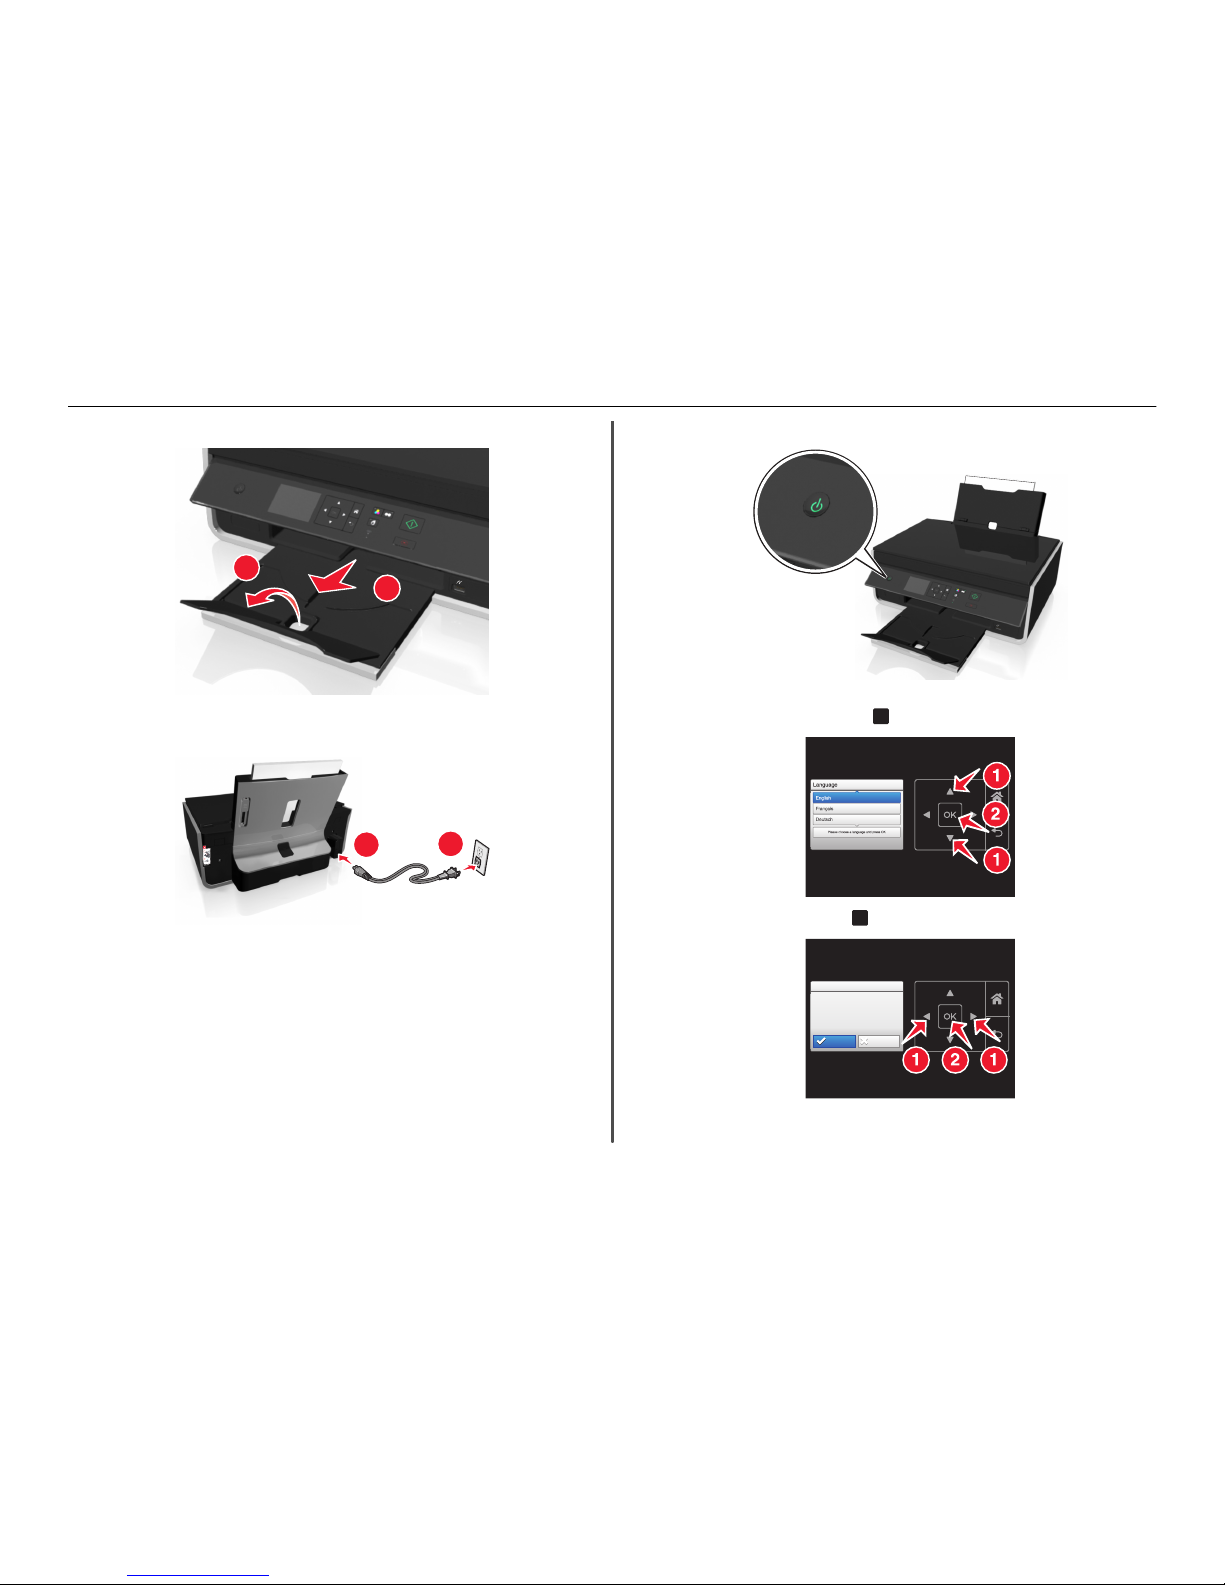
10 Exte nd the pape r exit tray.
2
1
11 Connect the power c ord only.
Note: Do not attach the USB cabl e yet.
2
1
12 Make sure the printer is on.
13 Using the printer control panel , press the up or down arrow button unti l the language you want is
highlighted on the display, and t hen press
OK
.
14 Confirm the language, an d then press
OK
.
Language Selection
Language Selection
You have chosen English
as the language for your
Printer
Are you sure?
Yes
No
About your printer 8
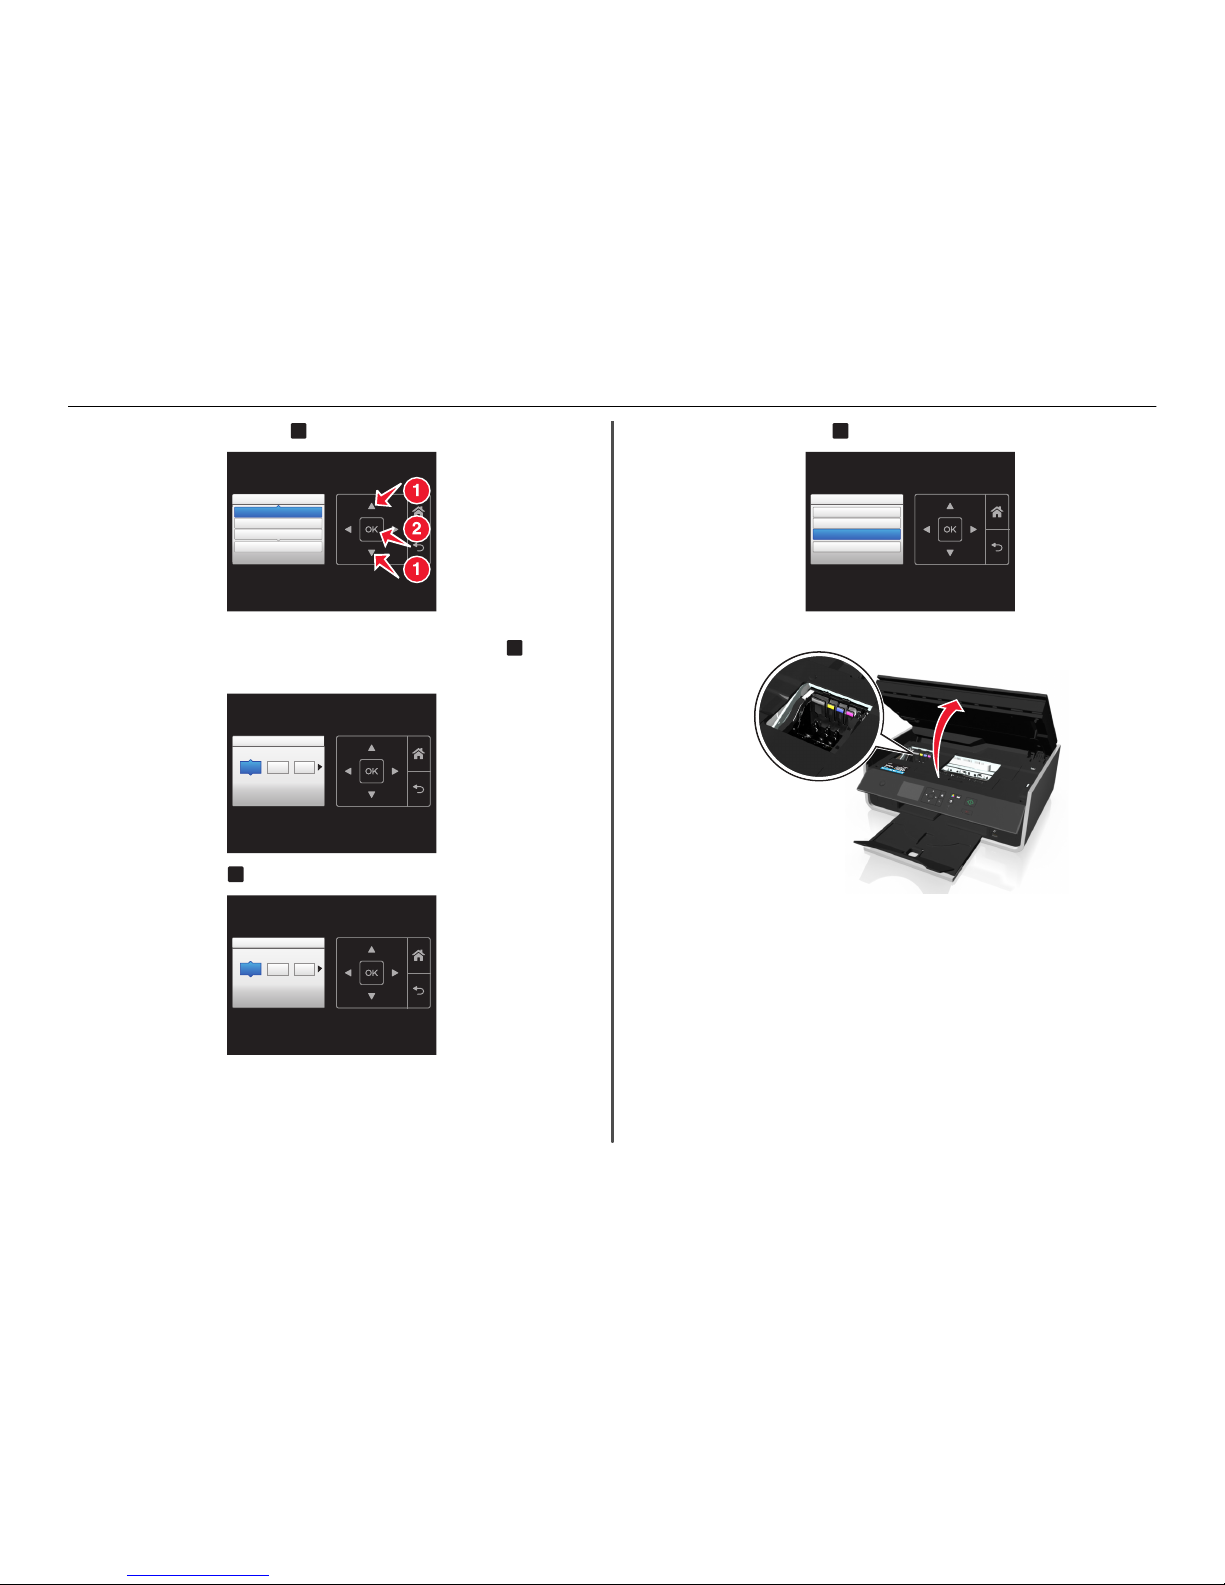
15 Set the country or region, and then press
OK
.
Country/Region
Country/Region
United States
Albania
Algeria
Please choose a country or region and press OK
16 Set the date. Press t he up or down arrow button until the num ber you want appears on the displ ay.
Press the left or right arrow button to scroll between the month, day, and year. Press
OK
.
Note: The date format varies, depending on the selected country or region.
Set Date
Set Date
Press OK when complete.
//
18 01 2011
17 Set the time, and then press
OK
.
SetTime
SetTime
Press OK when
complete.
:
05 55 AM
18 Set the time zone, and then press
OK
.
Time Zone
Time Zone
Please choose a time zone and press OK
(UTC-05:00) EasternTime (USA/Ca..
(UTC-06:00) CentralTime (USA/Ca...
.
(UTC-07:00) MountainTime (USA/C...
19 Open the printer.
Note: The printhead moves to the cartridge installa tion position.
About your printer 9

20 Unpack the ink cartridg es, and then remove the protect ive caps from the cartridges.
1 2 3
21 Insert each ink cartri dge. Slide your finger along the i nk cartridge until the cartridge clicks into place.
2
1
3
Notes:
• Insert the color cartridges first, and then the black cartridge.
• Insert the new ink cartridg es immediately after removi ng the protective cap to avoid exp osing
the ink to air.
22 Close the printe r.
23 Press
OK
to print an alignment page.
Notes:
• The alignment page prints.
• Do not remove the page until printing is finished. The alignment page may take a while to print
and will move in and out during the process.
• Streaks on the alignm ent page are normal and not an indica tion of a problem.
• The alignment page t hat prints may differ from the one shown.
• Recycle the alignment page.
About your printer 10
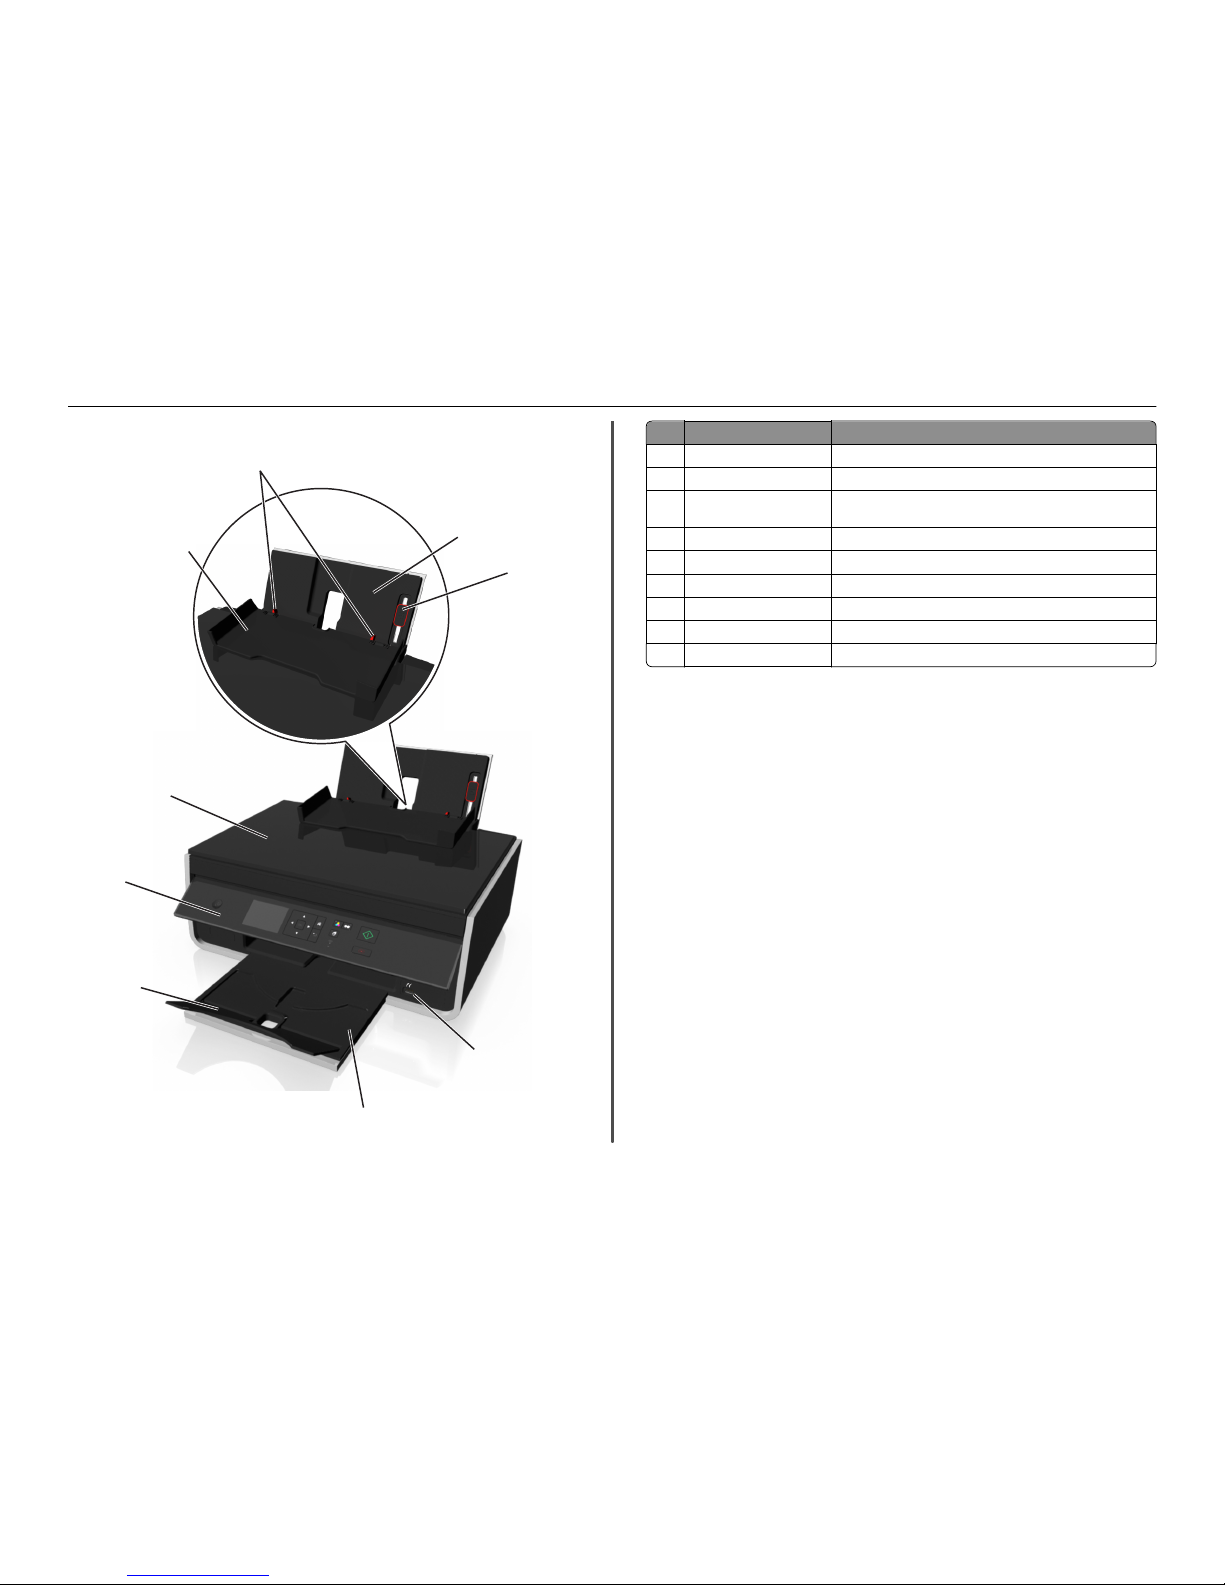
Understanding the parts of the printer
7
5
4
6
1
2
8
9
3
Use the To
1 Paper support Load paper.
2 Paper guide adjustment lever Adjust the paper guides .
3 PictBridge and USB p ort Connect a Pi ctBridge-enabled digital c amera or a flash drive to the
printer.
4 Paper exit tray Hold paper as it exits.
5 Tray extension Keep the pape r in place as it exits.
6 Printer control pane l Operate the pr inter.
7 Scanner cover Access the scanner glass.
8 Paper feed gua rd Prevent item s from falling in to the paper slot .
9 Paper guides Keep pape r straight when f eeding.
About your printer 11
10
12
13
17
16
14
15
11
Use the To
10 Scanner glass Scan or copy pho tos and documents.
11 Power supply with port Connect the pri nter to the power cord.
12 Duplex unit
• Print on both sides of a sheet of pa per.
• Clear paper jams.
13 USB port Connect the printer to a co mputer using a USB cabl e.
Warning—Potential Damage: Do not touc h the USB port except wh en
plugging in or removing a USB cable o r installation cable.
14 Printhead access area Install the printhead.
Note: The carrier moves to the printhead access area when no printhead
is install ed in the prin ter.
15 Jam clearance cover Access and clear paper jams.
16 Ink cartridge access area Install, replace, or remove ink cartridges.
17 Scanner unit
• Access the ink cartridges and printhead.
• Clear paper jams.
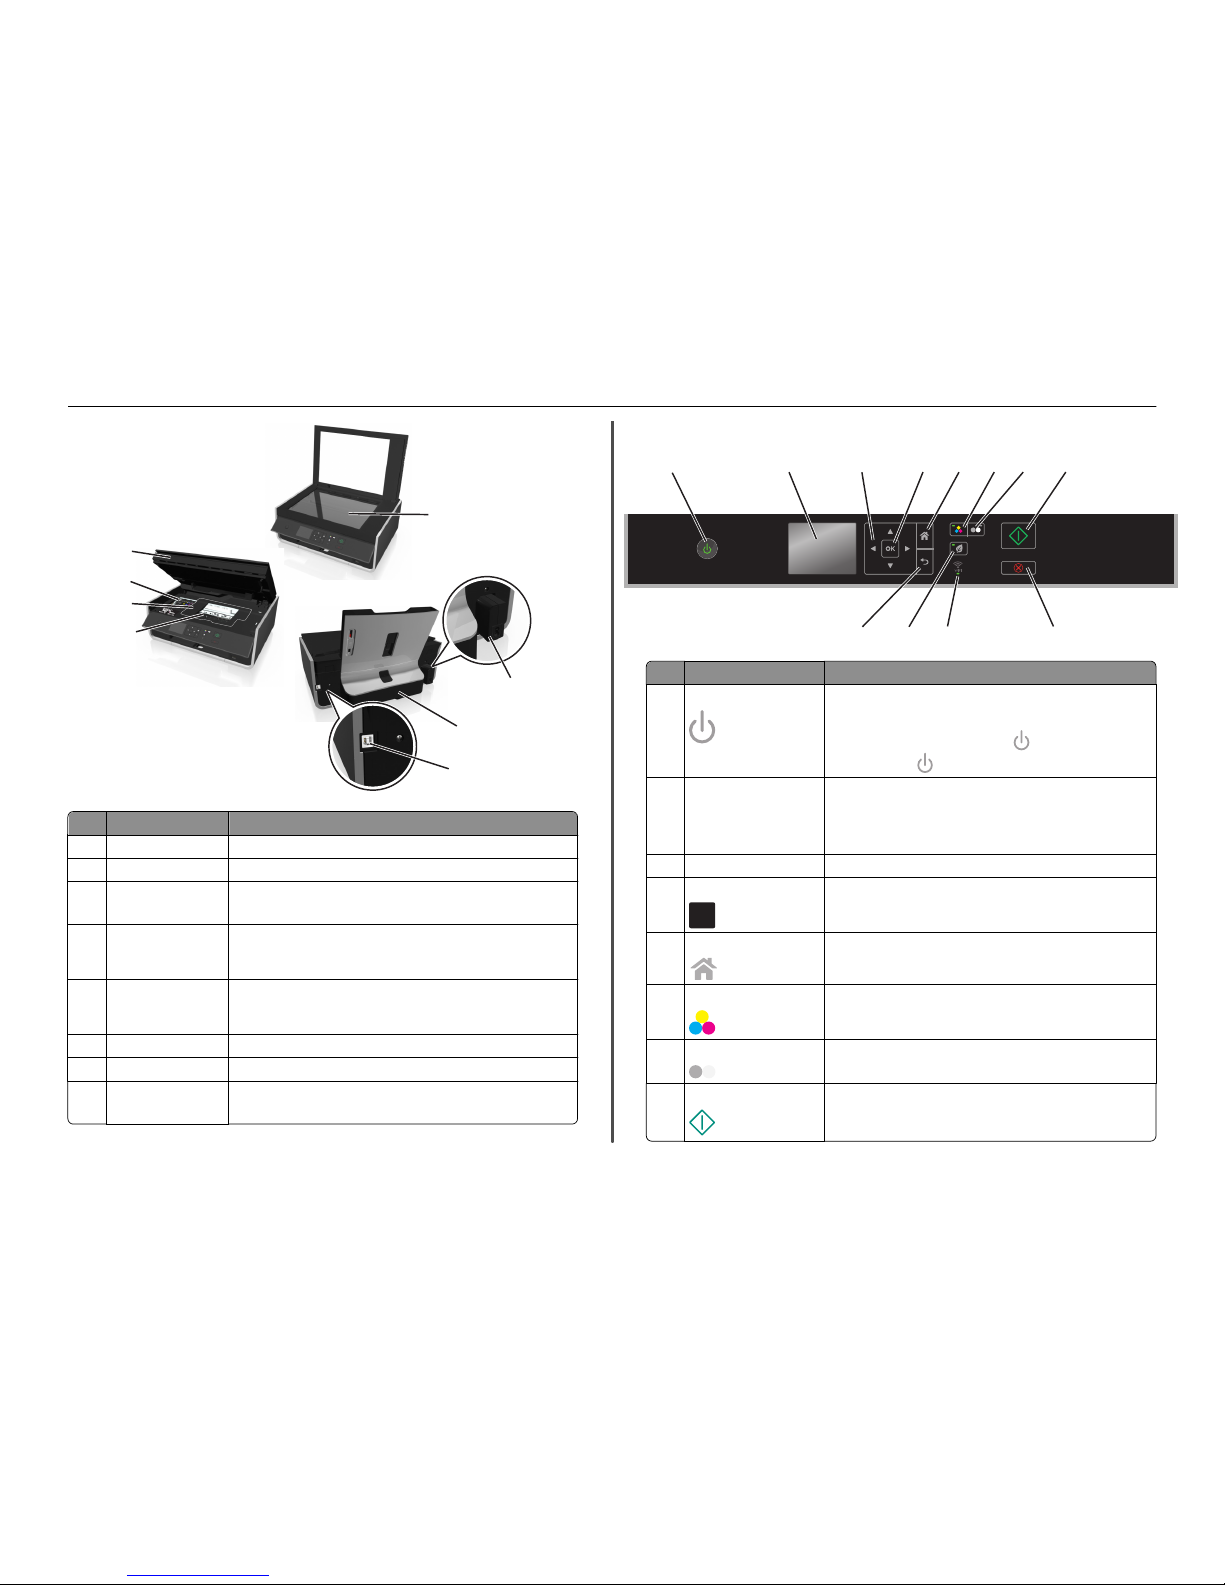
Using the printer control panel
9
101112
1
34567 8
2
Use To
1 Power
• Turn the pri nter on and off.
• Switch to Sleep mode.
Note: When the printer is on, press
to switch to Sleep mode.
Press and hol d
for three seconds to turn off the printer.
2 Display
Note: The display is turned
off in Slee p mode.
View:
• Printer status
• Messages
• Menus
3 Arrow buttons Navigate through menu items that appear on the display.
4 Select
OK
• Select menu options.
• Save settings.
5 Home
Return to the home screen.
6 Color
Switch to color mode.
7 Black
Switch to black‑and‑white mode.
8 Start
Start a job, depending on which mode is se lected.
About your printer 12
 Loading...