

Page 1
M410
M412
Page 2

Edition: May 2000
The following paragraph doesnotapplyto any country where such provisions are inconsistent with local law: LEXMARK INTERNATIONAL,INC.,
PROVIDES THIS PUBLICATION“AS IS” WITHOUT WARRANTY OF ANY KIND, EITHER EXPRESS OR IMPLIED, INCLUDING, BUT NOT
LIMITED TO, THE IMPLIED WARRANTIESOF MERCHANTABILITY OR FITNESS FOR A PARTICULARPURPOSE. Some states do not allow
disclaimer of express or implied warranties in certain transactions; therefore, this statement may not apply to you.
This publication could include technical inaccuracies or typographical errors. Changes are periodically made to the information herein; these changes
will be incorporated in later editions. Improvements or changes in the products or the programs described may be made at any time.
A form for the reader’s comments is provided at the back of this publication. If the form has been removed, comments may be addressed to Lexmark
International, Inc., Department F95/035-3, 740 WestNew Circle Road, Lexington, Kentucky 40550, U.S.A. In the United Kingdom and Eire, send to
Lexmark International Ltd., Marketing and Services Department, WesthorpeHouse, Westhorpe,Marlow Bucks SL7 3RQ. Lexmark may use or distribute
any of the information you supply in any way it believes appropriate without incurring any obligation to you. You can purchase additional copies of
publications related to this product by calling 1-800-553-9727. In the United Kingdom and Eire, call 0628-481500. In other countries, contact your point of
purchase.
References in this publication to products, programs, or services do not imply that the manufacturer intends to make these available in all countries in
which it operates. Any reference to a product, program, or service is not intended to state or imply that only that product, program, or service may be
used. Any functionally equivalent product, program, or service that does not infringe any existing intellectual property right may be used instead.
Evaluation and verification of operation in conjunction with other products, programs, or services, except those expressly designated by the
manufacturer,are the user’s responsibility.
© Copyright 1999, 2000 Lexmark International, Inc.
All rights reserved.
UNITED STATES GOVERNMENT RESTRICTED RIGHTS
This software and documentation are provided with RESTRICTED RIGHTS. Use, duplication or disclosure by the Government is subject to restrictions
as set forth in subparagraph (c)(1)(ii) of the Rights in TechnicalData and Computer Software clause at DFARS252.227-7013 and in applicable FAR
provisions: Lexmark International, Inc., Lexington, KY 40550.
Page 3

Table of
Contents
Introduction.............................. ix
AboutThisBook .............................................. ix
OtherInformation..............................................x
OnlineDocuments...........................................x
Trademarks .............................. xi
1 SettingUpYourPrinter....................1
UnpackingYourPrinter.........................................1
RemovingPrintCartridgePackaging .............................2
InstallingthePrintCartridge.....................................5
LoadingtheStandardInputTray.................................6
InstallingthePaperBail ........................................11
ConnectingYourPrintertoaComputer ..........................12
UsingaParallelCable.......................................12
UsingaUSBCable..........................................14
PluggingthePrinterIn.........................................20
TurningthePrinterPowerOn...................................20
PrintingtheMenuSettingsPage.................................21
InstallingtheOperatorPanelOverlay............................22
ChangingtheOperatorPanelDisplayLanguage...................23
Installing Printer Drivers and Utilities . . . . . . . . . . . . . . . . . . . . . . . . . . . . 24
Table of Contents
iii
Page 4

2 MarkVision .............................25
MarkVisionPrinterManagementSoftware .......................25
OperatingSystemsSupported................................25
IntroducingMarkVision.....................................25
MarkVisionforIntranetServers .................................26
IntroducingMarkVisionforIntranetServers ...................26
MarkVisionforUNIXNetworks.................................27
LexmarkMarkTrack ...........................................28
LexmarkNetPnP ..............................................29
SoftwareInstallationandDistributionTools ......................29
OptraForms ..................................................30
SolarisReadyPrintersforSunCustomers.........................31
3 Using the Operator Panel and Menus . . . . . . . 33
UsingtheOperatorPanel.......................................34
PrinterIndicatorLight ......................................34
OperatorPanelButtons .....................................35
PrinterMessages ..............................................37
StatusMessages ............................................37
AttendanceMessages .......................................37
ServiceMessages ...........................................37
OperatorPanelMenus .........................................38
PrintingtheMenuSettingsPage..............................39
ChangingMenuSettings ....................................40
DisablingtheOperatorPanelMenus ..........................41
OverviewofPrinterMenus ..................................43
PaperMenu ...............................................44
FinishingMenu ............................................53
Utilities Menu . . . . . . . . . . . . . . . . . . . . . . . . . . . . . . . . . . . . . . . . . . . . . 57
JobMenu..................................................59
QualityMenu..............................................71
SetupMenu ...............................................73
PCLEmulMenu ...........................................79
PostScriptMenu............................................83
ParallelMenu..............................................84
SerialMenu................................................87
NetworkMenu.............................................91
iv
Table of Contents
Page 5

InfraredMenu .............................................93
LocalTalkMenu............................................96
USBMenu.................................................99
FaxMenu ................................................102
ConfigMenu .............................................106
UnderstandingPrintandHoldJobs.............................108
ConfidentialJobs ..........................................108
HeldJobs.................................................109
PrintingandDeletingHeldJobs .............................111
EnteringaPersonalIdentificationNumber(PIN) .................111
PrintandHoldFormattingErrors ..............................113
4 UsingPrintMaterials....................115
PaperSourcesandSizes .......................................116
PrintMaterialGuidelines......................................118
Paper ....................................................118
Letterhead................................................118
Transparencies............................................119
Envelopes ................................................119
Labels ...................................................120
CardStockGuidelines ........................................122
StoringPrintMaterial .........................................123
LoadingPrintMaterial ........................................124
LoadinganInputTray .....................................124
LoadingtheMultipurposeFeeder ...........................130
UsingthePaperExits(OutputBins).............................133
UsingtheStandardOutputBin..............................133
UsingtheRearOutputBin..................................134
PrintingonLetterhead ........................................135
TrayLinking.................................................135
ManualDuplexPrinting.......................................136
DuplexPrintingfromtheMultipurposeFeeder................136
DuplexPrintingfromtheTrays .............................136
AvoidingPaperJams .........................................137
5 MultipurposeFeeder ....................139
Table of Contents
v
Page 6

MultipurposeFeederGuidelines ...............................140
OpeningtheMultipurposeFeeder ..............................141
LoadingtheMultipurposeFeeder ..............................143
LoadingPrintMaterial .....................................143
UsingtheMultipurposeFeeder ................................149
ClosingtheMultipurposeFeeder ...............................150
6 Understanding Printer Messages . . . . . . . . . . 151
StatusMessages ..............................................151
Line1Messages ..........................................152
WarningMessages ........................................158
AttendanceMessages .........................................159
7 SolvingPrinterProblems.................173
DisplayProblems ............................................175
PrintingProblems ............................................176
PrintQualityProblems........................................178
OptionProblems .............................................180
NetworkPrintingProblems....................................181
OtherProblemsandQuestions .................................182
vi
8 ClearingJams ..........................183
PossiblePaperJamAreas......................................184
200and201PaperJam-RemoveCartridge ...................184
202PaperJam-OpenRearDoor ............................186
203PaperJam-ShortPaper.................................190
250PaperJam-CheckMPFeeder ...........................192
9 MaintainingYourPrinter ................193
OrderingaPrintCartridge.....................................193
StoringthePrintCartridge.....................................194
ReplacingthePrintCartridge ..................................194
CleaningthePrintheadLens ...................................195
OrderingaChargeRollKit ....................................195
Table of Contents
Page 7

10Fax....................................197
UnderstandingtheFaxPort....................................197
ChoosingHardware ..........................................197
SettingUpaFaxPort .........................................198
ResettingaFaxPort...........................................199
DisablingaFaxPort ..........................................200
11MemoryandOptionCards...............201
AccessingthePrinterSystemBoard.............................201
UnderstandingMemoryOptions ...............................206
PrinterMemory ...........................................206
FlashMemory ............................................206
InstallingMemoryOptions ....................................207
RemovingMemoryOptions ...................................210
UnderstandingOptionCards ..................................211
Internal Print Server (Internal Network Adapter or INA) . . . . . . . 211
Tri-PortInterfaceOptionCard ..............................212
HardDiskOption .........................................212
Parallel/USBInterfaceOptionCard..........................215
InstallinganOptionCard .....................................216
RemovinganOptionCard.....................................219
ClosingthePrinterSystemBoard...............................220
12Optional500-SheetDrawer...............223
InstallingtheOptionalDrawer .................................223
13InfraredAdapter........................227
ConnectingtheCableandUsingtheInfraredAdapter.............227
14Verifying the Installation of Options . . . . . . . 229
PrintingtheMenuSettingsPage................................229
Appendix A: Understanding Fonts . . . . . . . . . 231
Table of Contents
vii
Page 8

TypefacesandFonts ..........................................231
WeightandStyle ..........................................231
PitchandPointSize........................................232
BitmappedandScalableFonts .................................234
ResidentFonts ...............................................235
SymbolSets .................................................239
SymbolSetsforPCL6Emulation............................239
DownloadableFonts ..........................................241
PrintingaFontSampleList ....................................242
AppendixB:Notices......................243
AppendixC:SafetyInformation............253
AppendixD:Warranty....................265
Glossary ................................269
viii
Index ...................................285
Table of Contents
Page 9

Introduction
About This Book This User’s Guide contains information about the Lexmark
OptraM410andM412laserprinters.Itprovidessetup
instructions for the printer and printer options as well as
information about loading print material, changing
printer settings, replacing printer supplies, and troubleshooting problems.
Keep this book in a handy place and use it as a reference
when you h ave a question about printer function or if you
encounter a printing problem.
It may be helpful for you to recognize the following conventions used throughout this book:
Note: A note provides informa-
tion you may find useful.
Warning! A warning identifies
something that could damage
your printer hardware or software.
Caution! A caution identifies
something that could cause you
harm.
• Notes, warnings, and cautions appear in the left col-
umn for easy reference.
• Operator panel buttons are printed in boldface type:
Press
Go after changing a menu setting.
• Messages, menu names, menu items, and menu set-
tings that appear on the operator panel display are
also printed in boldface type:
If
Load Tray 1 appears on the operator panel dis-
play, you must load print material in tray 1 and
press
Go before you can resume printing.
Introduction
ix
Page 10

The Paper Source setting is available in the PAPER
MENU
.
Other Information In addition to this User’sGuide, Lexmark offers the follow-
ing sources of information about your printer and other
Lexmark products and services.
Online Documents
The Drivers, MarkVision and Utilities compact disc (CD)
that comes with your printer contains several online documents. Refer to the booklet that comes with the CD for
launching instructions. Once you launch the CD, click
View Documentation to display a list of available documents.
The CD includes:
The MarkVision printer utility information, which pro-
vides step-by-step instructions for installing MarkVision
for Windows 95/98/2000, Windows NT 4.0, Macintosh,
and OS/2 on several different networks. It also describes
some of the most popular MarkVision features.
• Documents which provide general information
about setting up an optional print server after
installing it in your printer.
• Documents which describe font options and avail-
able resources.
• A Card Stock & Label Guide which provides detailed
information about selecting print material appropriate for your printer.
• A Technical Reference which includes information
about printer languages and commands, interface
specification, and printer memory management.
x
Introduction
Page 11

Trademarks
Lexmark, Lexmark with diamond design, MarkNet,
MarkVision, and Optra are trademarks of Lexmark International, Inc., registered in the United States and/or other
countries.
MarkTrack, Optra Forms, and PictureGrade are trademarks of Lexmark International, Inc.
Operation ReSource is a service mark of Lexmark International, Inc.
®
PCL
is a registered trademark of the Hewlett-Packard
Company. PCL 6 is Hewlett-Packard Company’sdesignationsofasetofprintercommands(language)andfunctions included in its printer products. This printer is
intended to be compatible with the PCL 6 language. This
means the printer recognizes PCL 6 commands used in
various application programs, and that the printer emulates the functions corresponding to the commands.
PostScript
Incorporated. PostScript 3 is Adobe Systems’ designation
of a set of printer commands (language), fonts, and functions included in its software products. This printer is
intended to be compatible with the PostScript 3 language.
This means the printer recognizes PostScript 3 commands
used in various application programs, and that the printer
emulates the functions corresponding to the commands.
Details relating to compatibility are included in the
Technical Reference.
®
is a registered trademark of Adobe Systems
Trademarks
xi
Page 12

The following terms are trademarks or registered trademarks of these companies.
Albertus The Monotype Corporation plc.
Antique Olive Monsieur Marcel OLIVE
Arial The Monotype Corporation plc.
CG Omega A product of Bayer Corporation
CG Times Based on Times New Roman under
license from The Monotype
Corporation plc, is a product of
Bayer Corporation
Helvetica Linotype-Hell AG and/or its
subsidiaries
Intellifont Bayer Corporation
ITC Bookman International Typeface Corporation
ITC Zapf Chancery International Typeface Corporation
LocalTalk Apple Computer, Inc.
Macintosh Apple Computer, Inc.
Marigold AlphaOmega Typography, Inc.
xii
Palatino Linotype-Hell AG and/or its
subsidiaries
Pantone Pantone, Inc.
PostScript Adobe Systems Incorporated
Times New Roman The Monotype Corporation plc.
TrueType Apple Computer, Inc.
Univers Linotype-Hell AG and/or its
subsidiaries
Wingdings Microsoft Corporation
Other trademarks are the property of their respective
owners.
Trademarks
Page 13
1
Setting Up
Your Printer
Complete the following sections to set up your Lexmark™
Optra™ M410 and M412 printers.
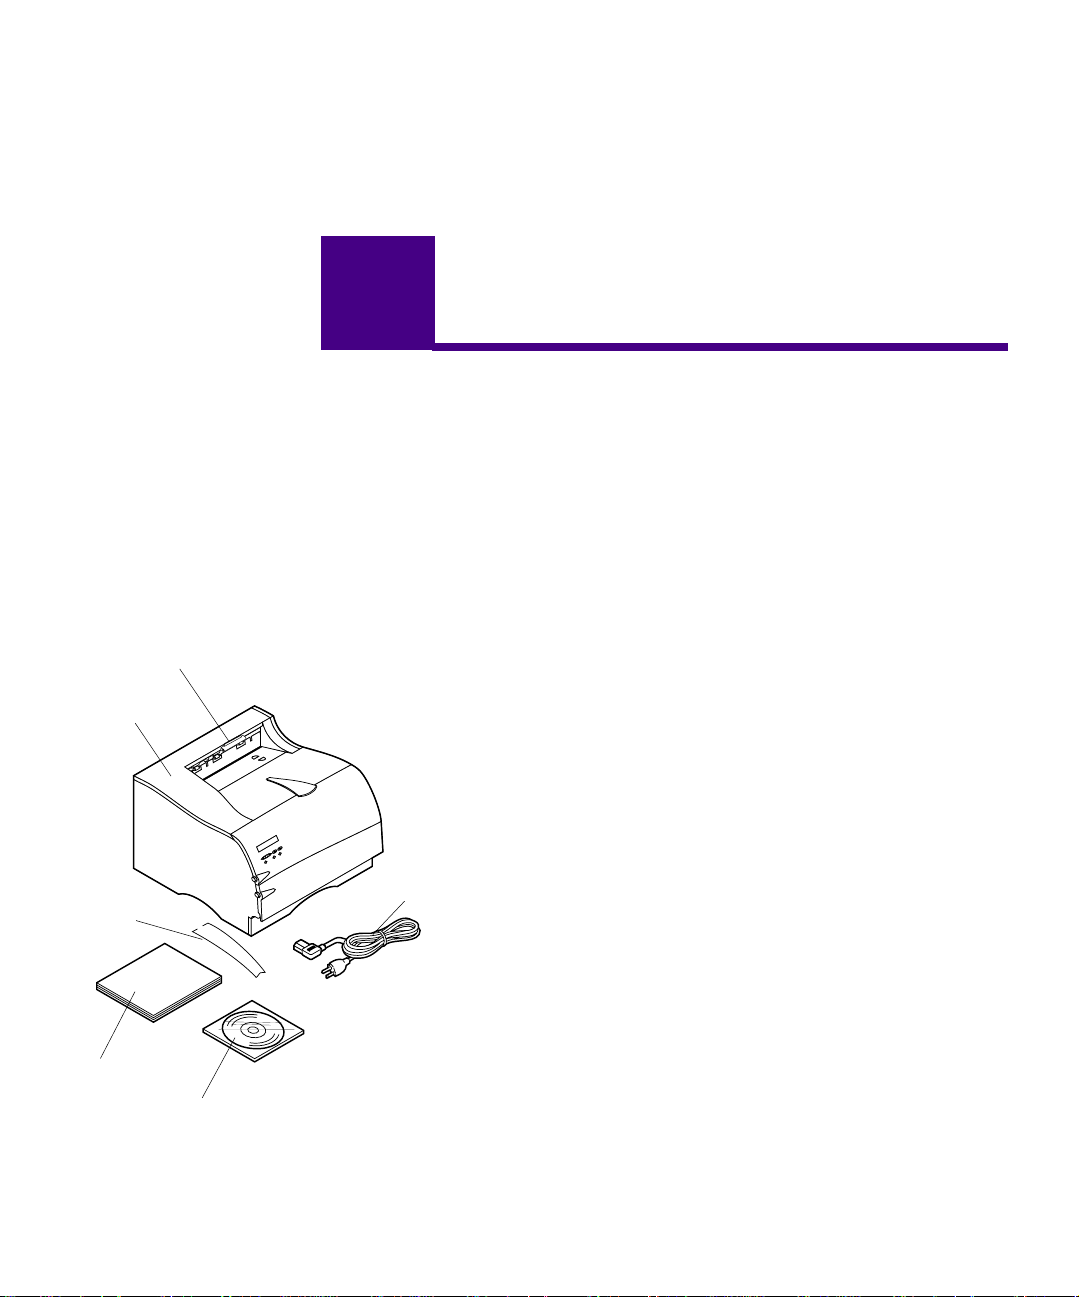
Metal
Bail
User’s
Guide
Plastic Bracket
Printer
CD
Unpacking
Your Printer
Power
Cord
1 Remove the printer and all items from the packag-
ing carton.
Save the carton and packing materials in case you
need to repack the printer for service or storage.
2 Make sure you have the items shown.
If any items are missing, contact the place where
you bought your printer.
3 Place the printer on a flat, sturdy surface in a well-
ventilated area.
Allow at least 304.8 mm (12 in.) of clearance on all
sides of the printer. Since you may want to install
the optional 500-sheet drawer, leave at least
129.6 mm (5.1 in.) clearance above the printer. Leave
enough space in front of the printer to allow for
easy paper access.
Unpacking Your Printer
1
Page 14
Use the following information to help determine
where to place your printer.
Characteristic Measurement
Depth 435 mm (17.1 in.)
Height 314 mm (12.4 in.)
Width 405 mm (15.9 in.)
Weight
Footprint 246 sq. in.
1
1
Weight of printer includes print cartridge.
14.8 kg (32.6 lb)
Do not place the printer:
– In direct sunlight.
– Near heat sources or air conditioners.
– In dusty or dirty environments.
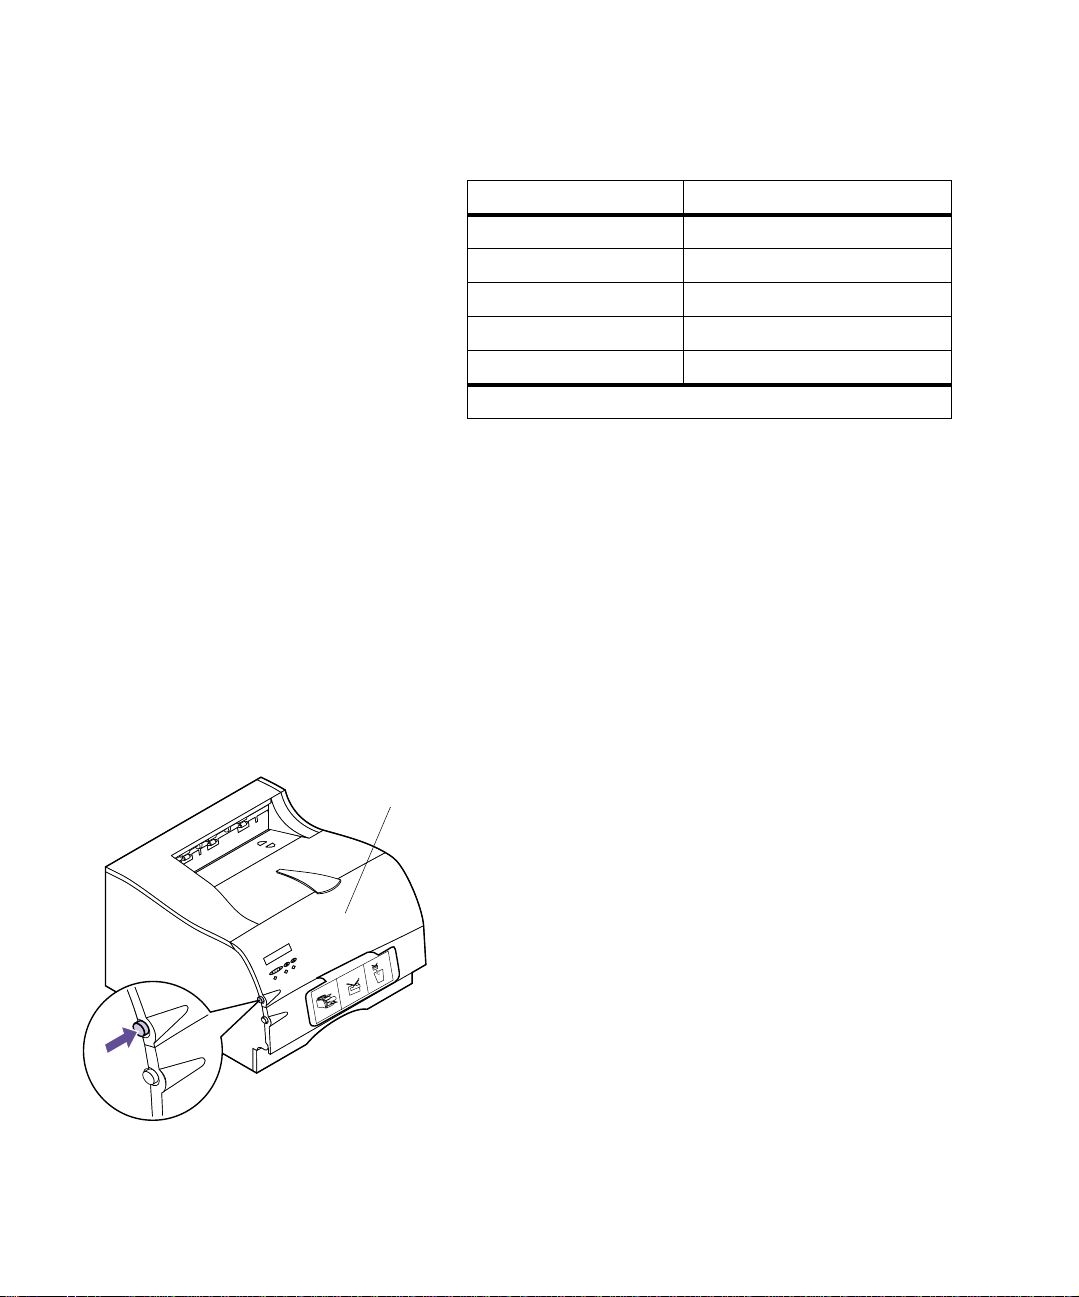
Removing Print
Cartridge
Packaging
Upper
Front Door
To remove the print cartridge packaging:
1 Push the upper release latch to release the upper
front door.
2
Chapter 1: Setting Up Your Printer
Page 15
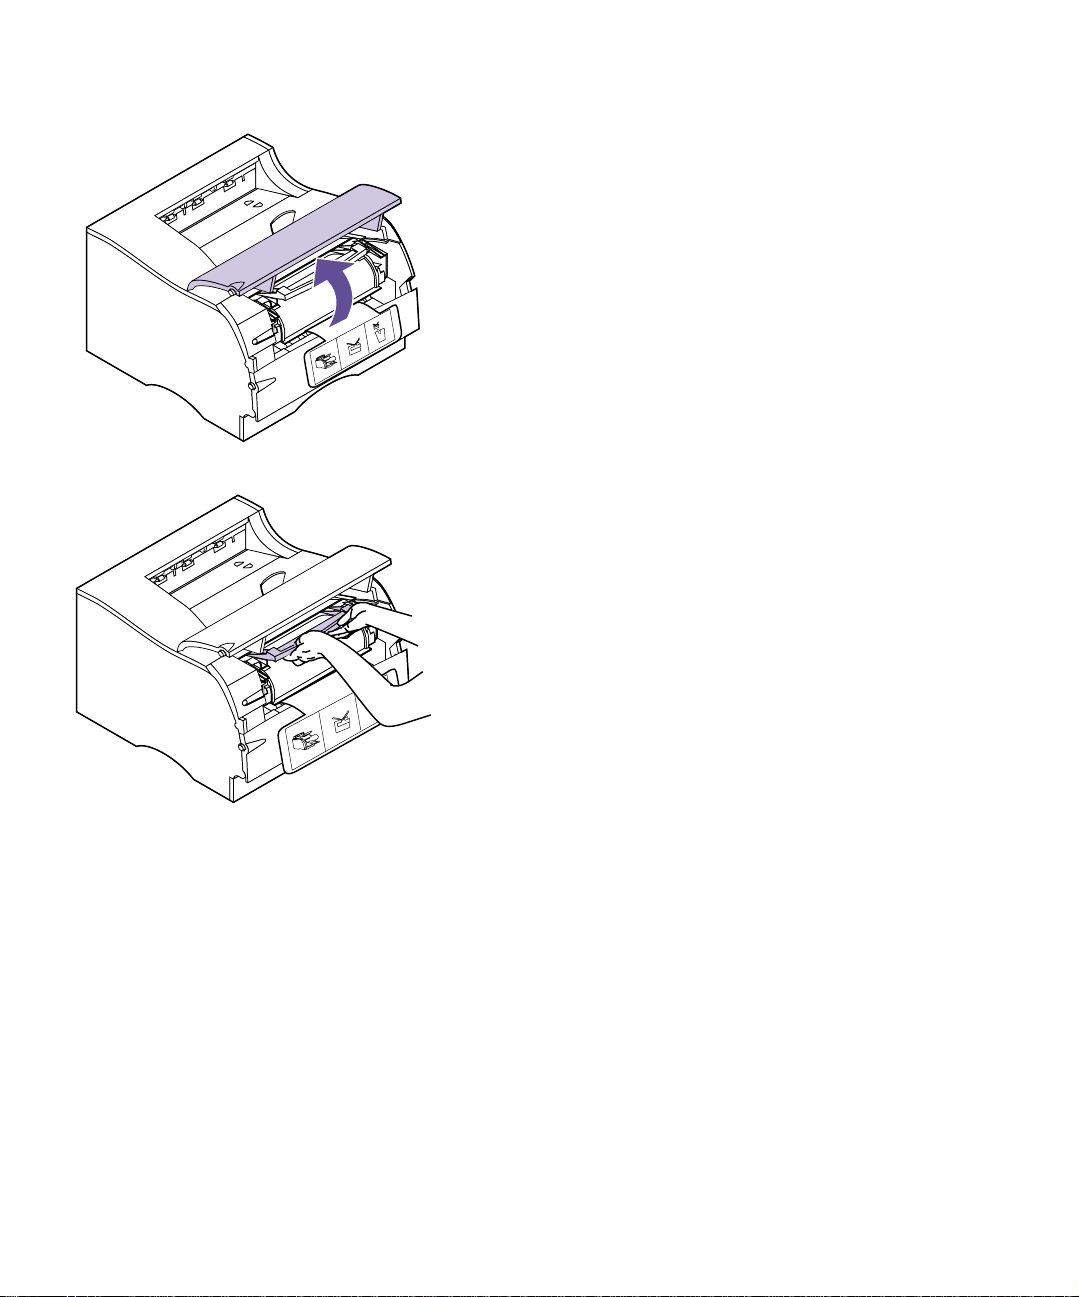
2 Raise the upper front door.
It remains in place.
3 Grasp the print cartridge by the handgrip.
Removing Print Cartridge Packaging
3
Page 16
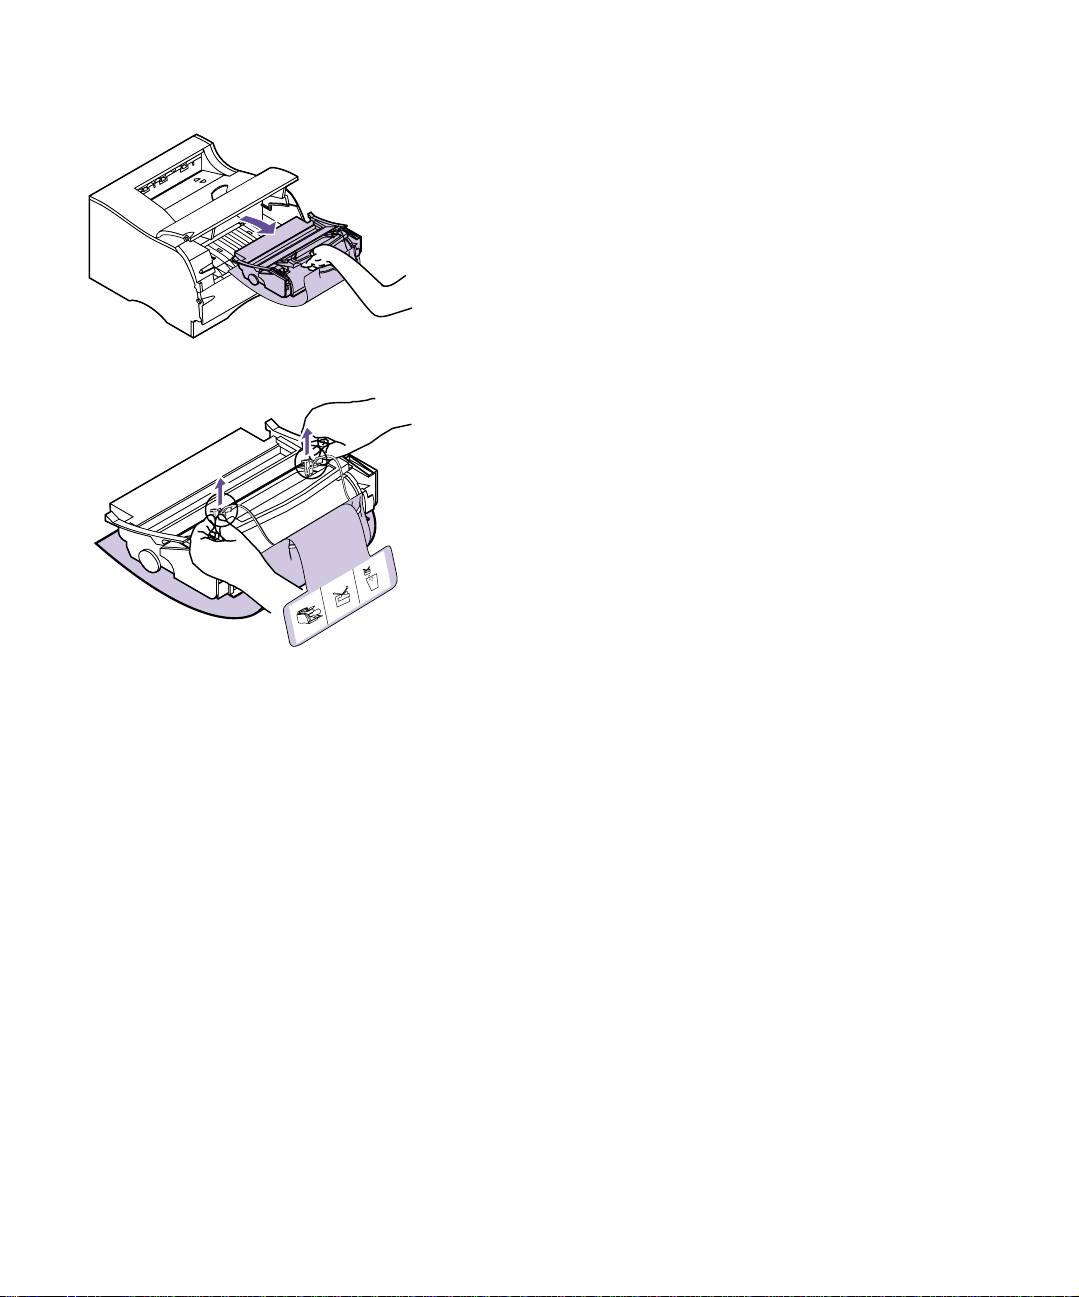
4 Lift the print cartridge up a nd pull out.
5 Pull up on each end of the plastic piece and then
remove the packaging material.
Discard all packaging material: the plastic piece, the
foam, and the paper connected to the foam.
6 Continue with “Installing the Print Cartridge” on
page 5.
4
Chapter 1: Setting Up Your Printer
Page 17
Installing the
Print Cartridge
To prepare the print cartridge for printing:
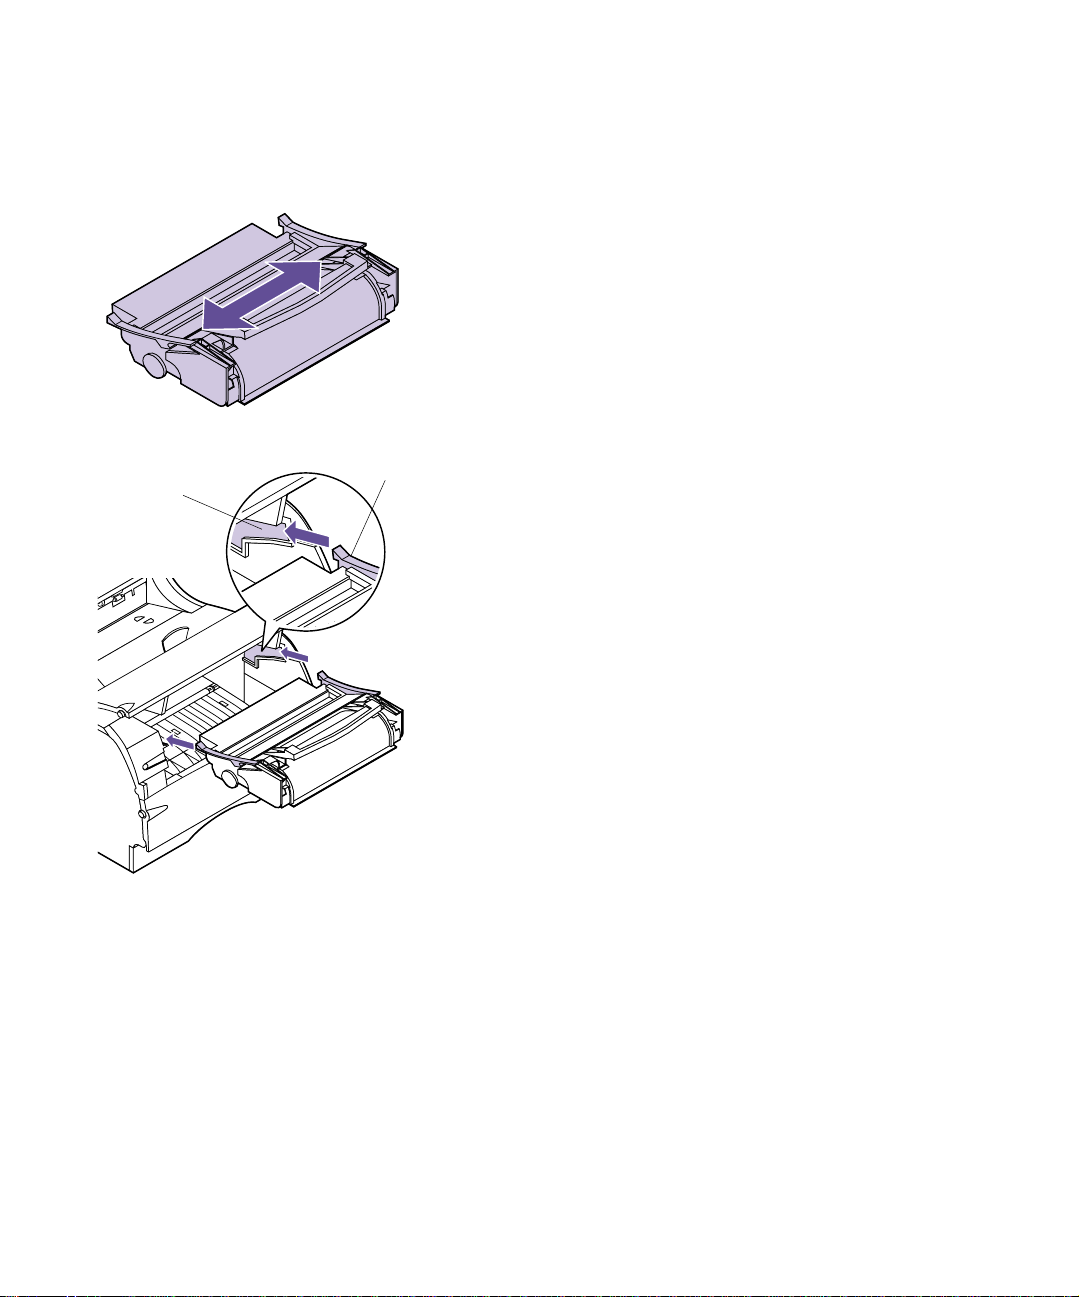
1 Gently shake the print cartridge side-to-side to
distribute the toner.
Slot
Tab
2 Insert the print cartridge:
a Alignthetabslocatedoneachsideoftheprint
cartridge with the slots on either side of the
print cartridge cradle as shown.
Use the colored arrows inside the printer for
placement.
Installing the Print Cartridge
5
Page 18
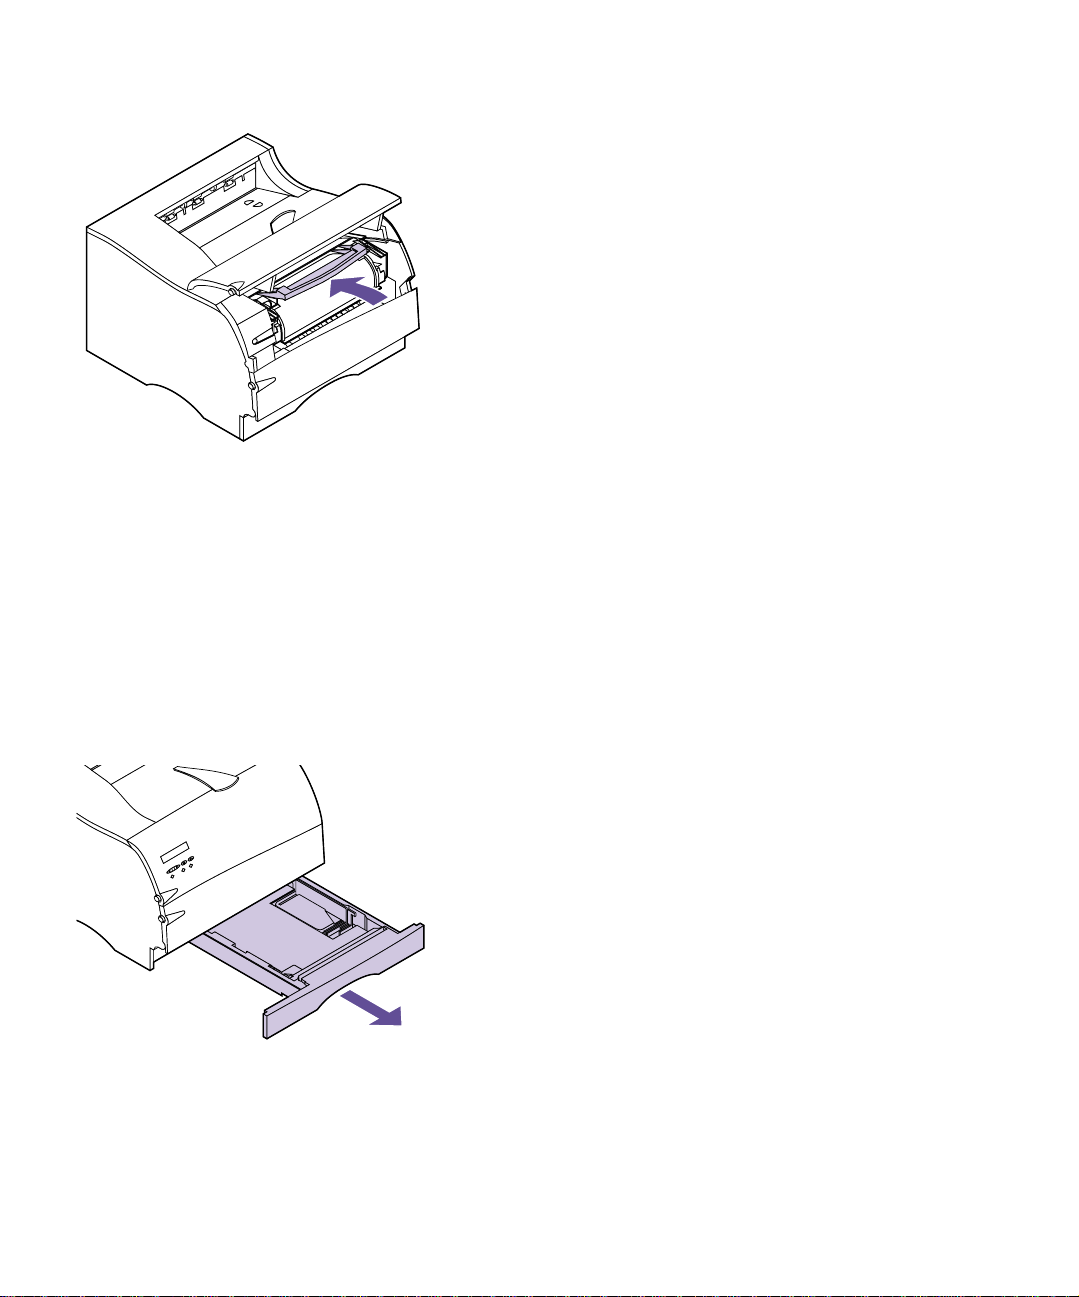
b Slide the print cartridge straight back into the
printer until it snaps into place.
3 Close the upper front door.
You cannot close the door completely if the print
cartridge is not installed correctly.
Loading the
Standard
Input Tray
Your printer has one standard 250-sheet input tray that
holds five paper sizes. For information on the different
sizes and types of print material you can use with your
printer, see “Using Print Materials” on page 115.
For information on loading envelopes and other types of
print material, see “Multipurpose Feeder” on page 139.
To load paper:
1 Pull the input tray straight out of the printer.
Remove the input tray completely from the printer.
6
Chapter 1: Setting Up Your Printer
Page 19
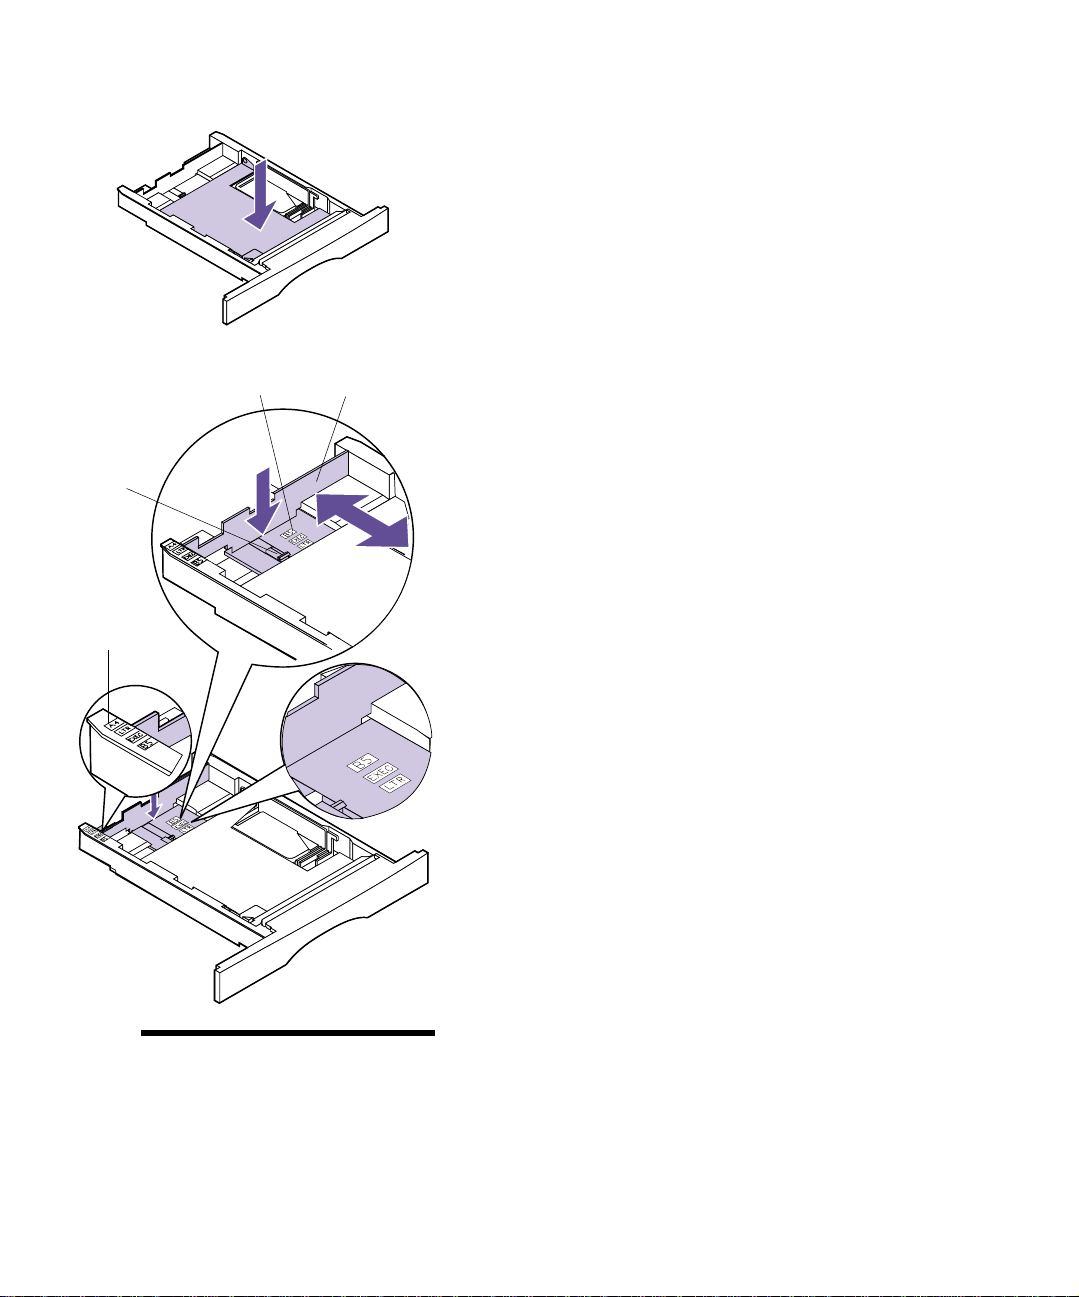
2 Press down on the metal plate until it locks into
place.
The metal plate remains stationary on the inside
bottom of the input tray.
Length
Guide
Tab
Paper Size
Indicators
Paper Size
Indicators
Length Guide
3 Press down on the length guide tab with one
hand, and with the other hand slide the length
guide to the correct position for the size paper you
are loading.
Use the paper size indicators to adjust the length
guide for one of the following five paper sizes: A4,
B5, LTR (Letter), LGL (Legal), and EXEC (Executive).
Note: The paper size indica-
tors are paper size abbreviations
used for the placement of the
length guide as shown. This
exampleshows how to adjust for
letter-size paper (LTR).
Loading the Standard Input Tray
7
Page 20

Width Guide
Width Guide Tab
4 Press down on the width guide tab and slide the
width guide to the far right side of the input tray
as shown.
5 Flex the sheets back and forth to loosen them, then
fan them. Do not fold or crease the paper.
Straighten the edges on a level surface.
For this setup, load letter-size paper.
8
Chapter 1: Setting Up Your Printer
Page 21
Metal Stop
Note: Make sure the paper fits
easily under the metal stop and
is not bent or wr inkled. Do not
raise the metal stop or force
paper under the metal stop.
Overfilling the input tray may
cause paper jams.
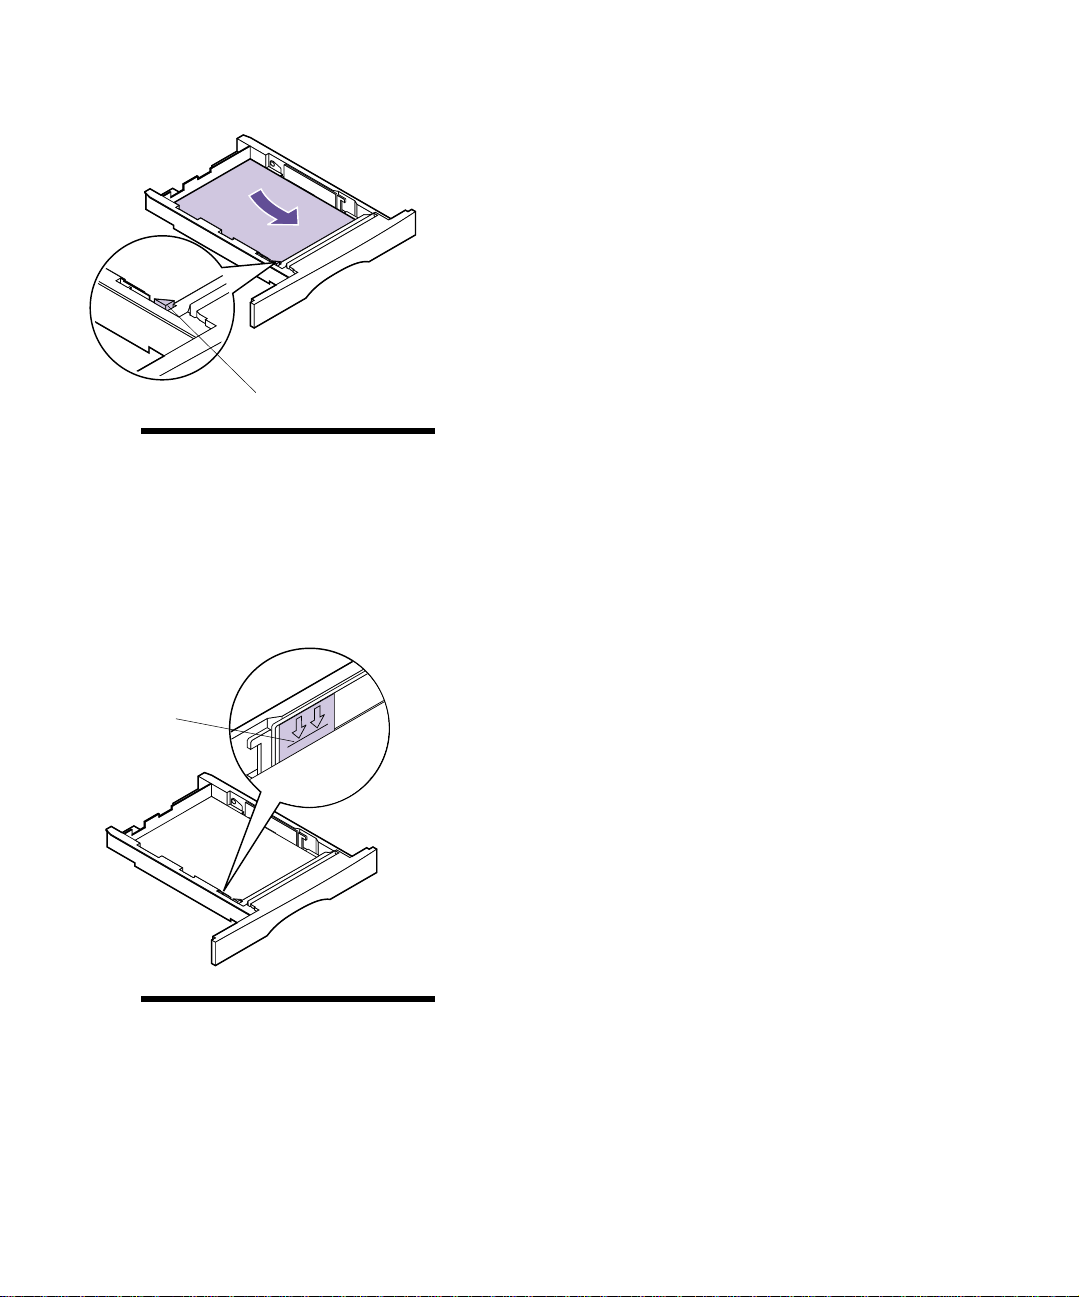
6 Place the paper against the left side of the input
tray and insert it under the metal stop.
Makesuretherecommendedprintsideisfacedown
andthefrontedgeisplacedtowardthefrontofthe
input tray.
For information on how to load letterhead, see
“Printing on Letterhead” on page 135.
7 Do not exceed the maximum stack height indi-
cated by the line under the arrows.
Stack Height
Indicator
Note: Overfilling the input tray
may cause paper jams.
Loading the Standard Input Tray
9
Page 22
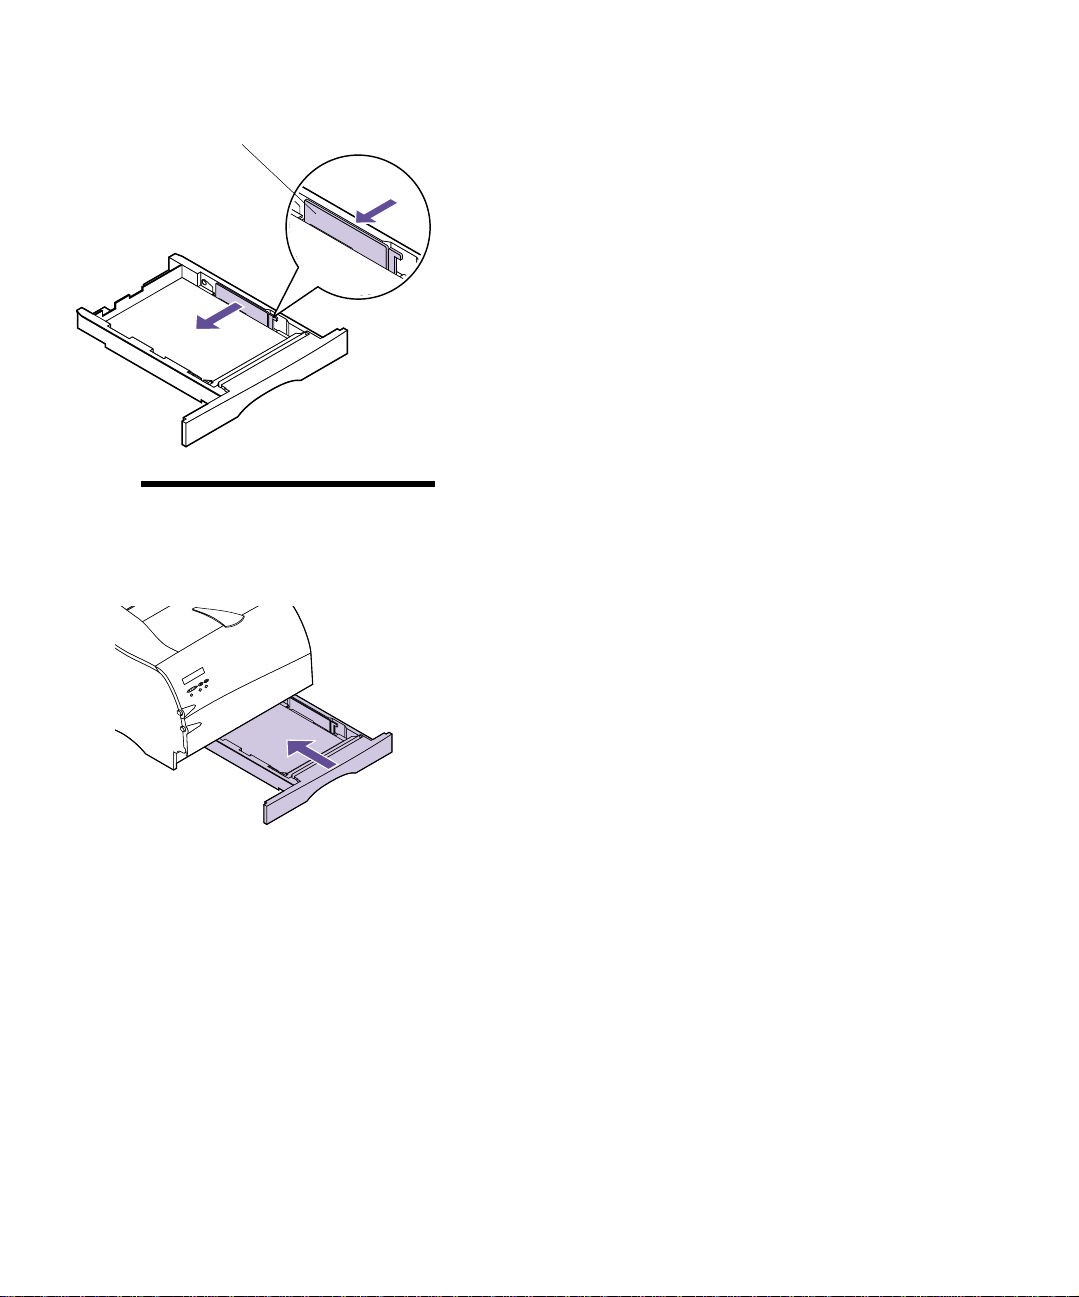
Width Guide
Note: Sliding the width guide
too tight against the paper may
cause misfeeds.
8 Push on the right side of the width guide to move
it to the left until it lightly touches the edge of the
paper.
9 Slide the input tray all the way into the printer
until it snaps into place.
10
Chapter 1: Setting Up Your Printer
Page 23
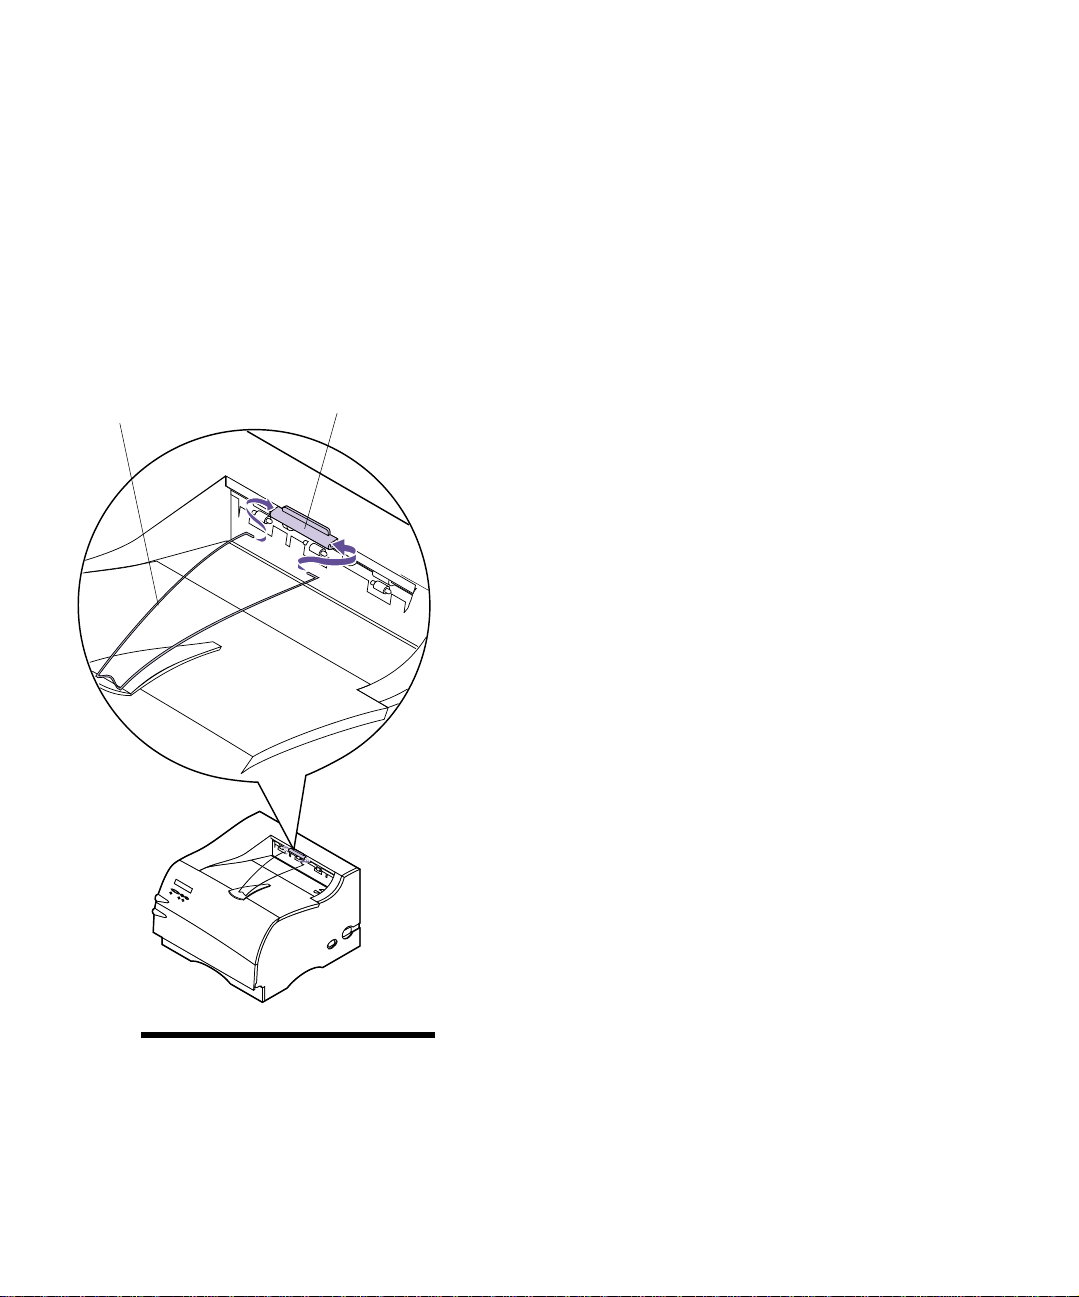
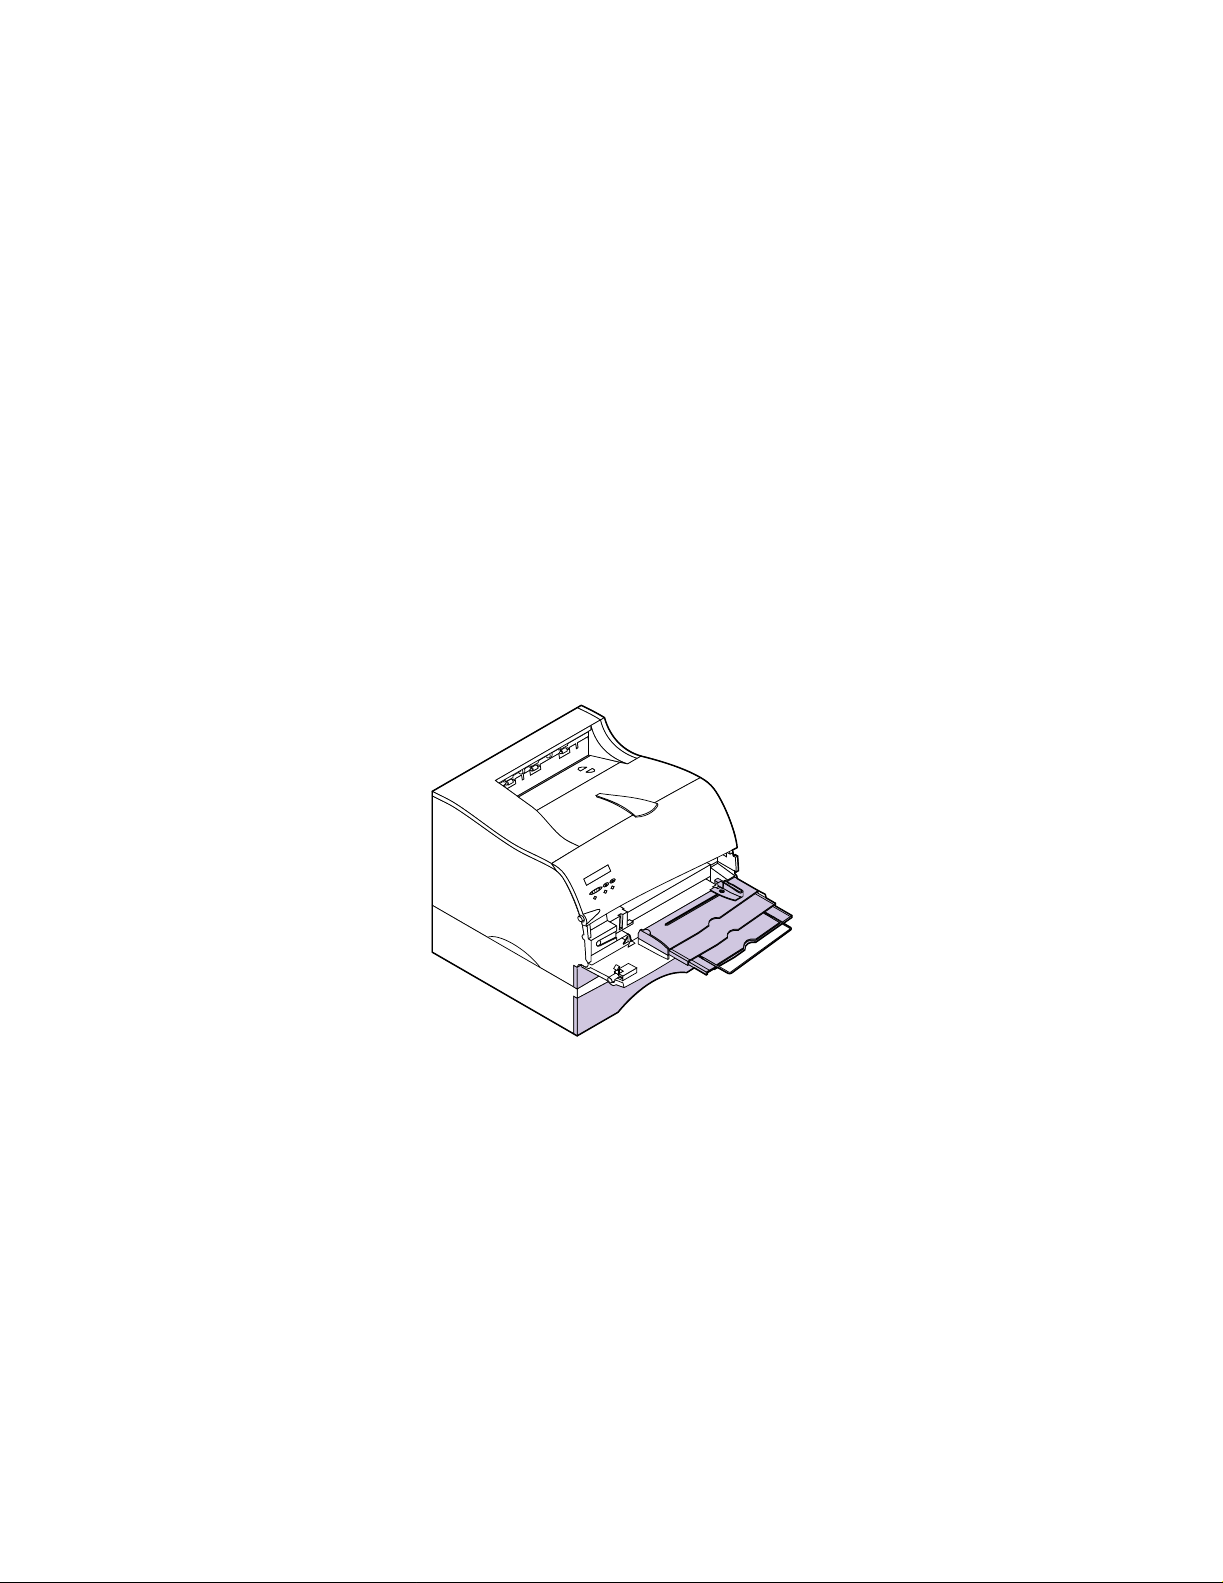
Installing the
Paper Bail
The paper bail helps prevent offset bin stacking by guiding print material into the standard output bin.
The paper bail consists of two parts: a plastic bracket
already installed on the printer and a metal bail.
Complete the following steps to install the metal bail:
1 Locate the metal bail that comes with your printer.
2 Orient the metal bail as shown.
Metal Bail
Plastic Bracket
3 Place the tips of the metal bail into the holes
located on either end of the plastic bracket as
shown.
Note: The paper bail is
depicted in other illustrations
throughout this book now that
youhaveinstalledit.
not
Installing the Paper Bail
11
Page 24

Connecting Your
Printer to a
Computer
To print from your computer, you need to connect your
printer to your computer with either a parallel interface
cable or a Universal Serial Bus (USB) cable.
Parallel Cable
Caution! To avoid electrical
shock hazards, make sure your
computer power is Off (O) and
unplug all computer equipment
before connecting cables.
Parallel
Cable
Using a
Your printer uses an IEEE 1284-compliant parallel cable
that supports bidirectional communication. We recommend Lexmark part number 1329605 (10 ft) or
1427498 (20 ft). If you use a cable other than an IEEE-compliant cable, you may not be able to access all of your
printer functions.
1 Turn the printer power Off (O) and unplug the
printer power cord from the electrical outlet.
2 Align and plug the parallel cable into the parallel
connector as shown.
12
Parallel Connector
Chapter 1: Setting Up Your Printer
Page 25
3 Push the clips at each end of the connector down
into the notches on the plug as s hown. The clips
snap into the notches.
4 Connect the other end of the parallel cable to the
back of your computer. Tighten the screws on the
parallel cable to the computer.
5 Check the parallel cable connections to make sure
they are completely secured.
Clips
6 Continue with “Plugging the Printer In” on
page 20.
Connecting Your Printer to a Computer
13
Page 26
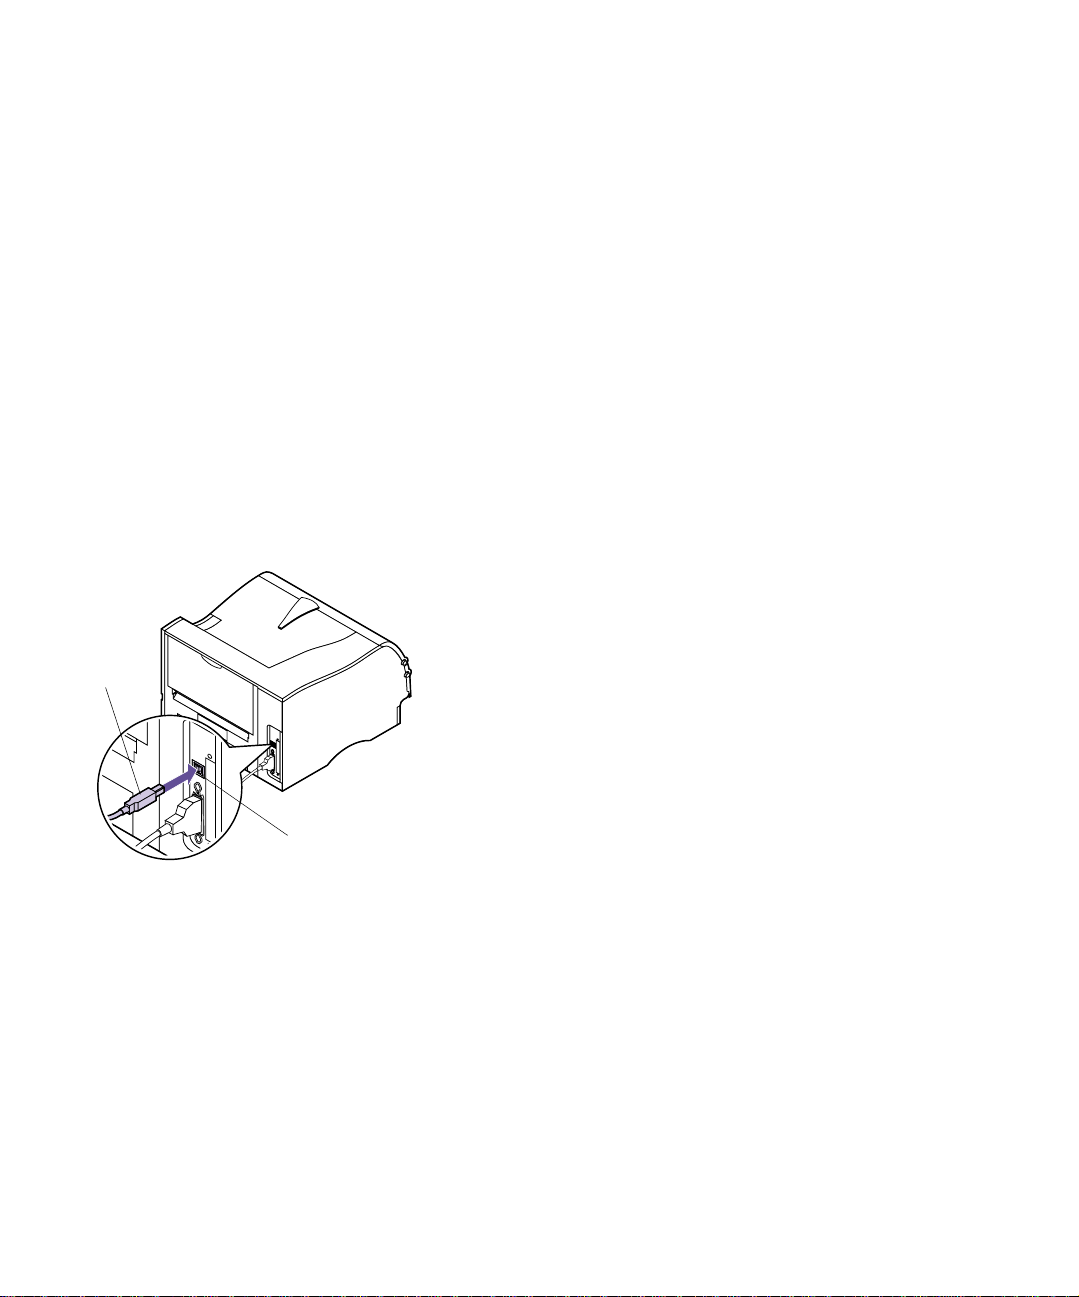
USB
Cable
Using a USB Cable
Your printer has one standard USB port located on the
printer system board.
Complete the following steps to connect your printer
using a USB cable.
For Windows 2000 users:
1 Make sure the computer and printer power are Off
(O) and the printer power cord is unplugged from
the electrical outlet.
2 Connect the USB cable to the port on the back of
your computer.
3 Connect the other end of the cable to the USB port
on the back of your printer.
4 Turn on your computer and your printer.
5 When the Found New Hardware Wizard screen
appears, select
Cancel to close the wizard.
6 Insert the CD that came with your printer and
select
Start.
14
USB Port
Chapter 1: Setting Up Your Printer
7 From the Start menu, select Run,thenclickBrowse.
8 ClickontheMy Computer shortcut in the Browse
window, double-click on the CD icon, and doubleclickontheSetupicon.
9 Click OK to start the printer driver installation
program.
10 Follow the installation instructions in the printer
drivers dialog box.
11 In the Print to the following port check box, select
the USB port that best describes the order you’ve
connected USB printers to your computer (for
example, the first USB printer is USB001, the secondUSB002,andsoon).
Page 27
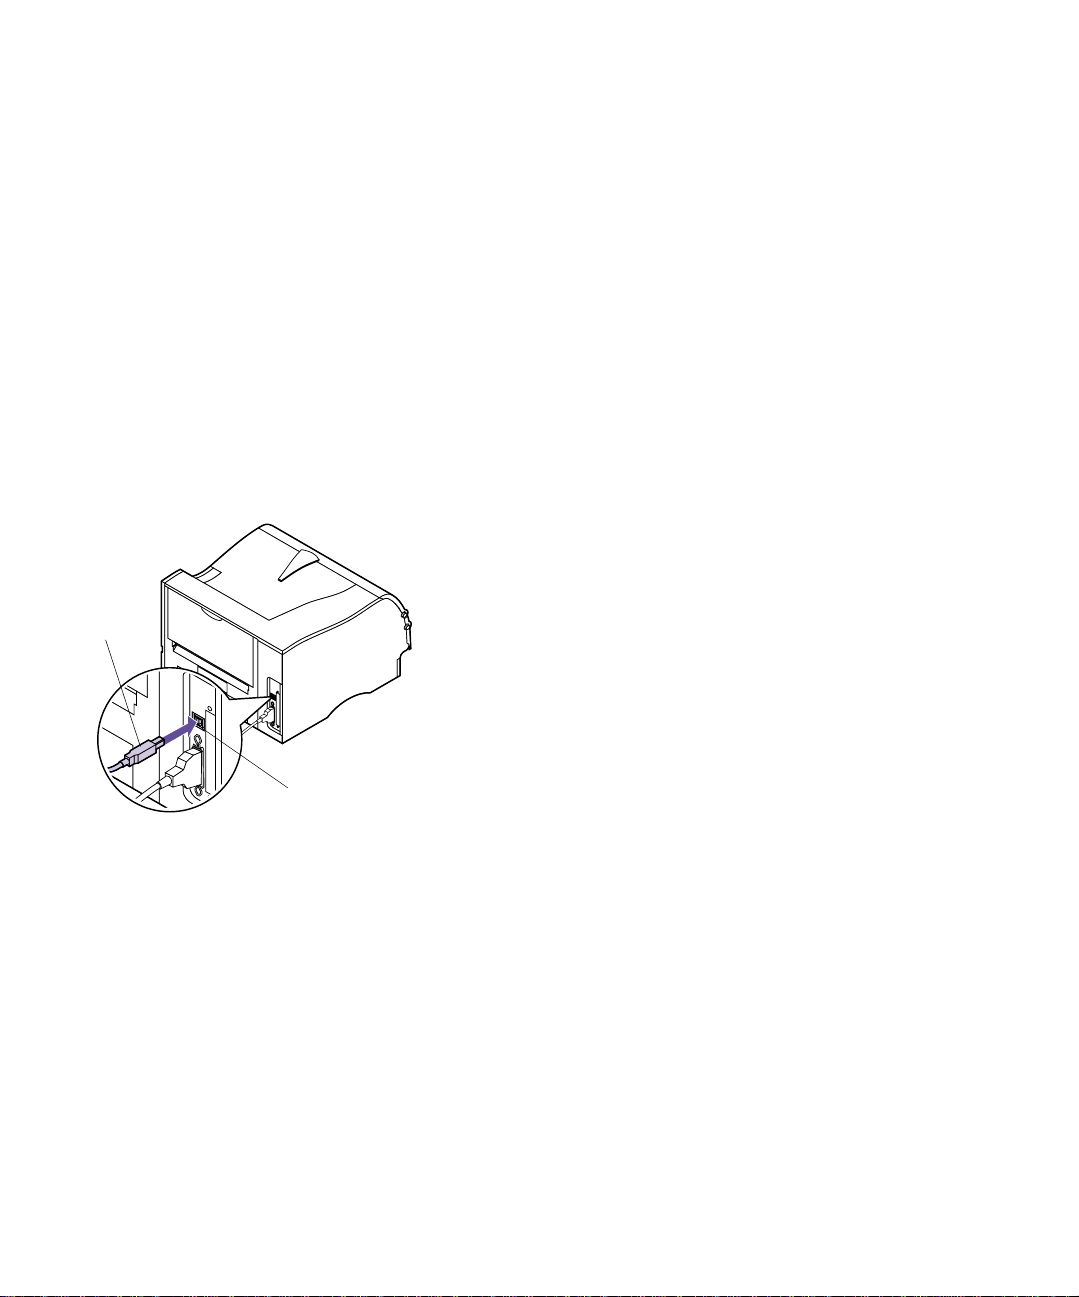
USB
Cable
12 In the Select a port for this printer check box, select
the USB port that best describes the order
you’ve connected USB printers to your computer (for example, the first USB printer is
USB001, the second USB002, and so on).
13 When you finish, exit the setup program and
remove the CD from your computer.
For Windows 98 users:
1 Make sure the printer power is Off (O) and the
printer power cord is unplugged from the electrical outlet.
2 Align and plug the USB cable into the USB port on
the back of your printer as shown.
3 Connect the other end of the USB cable to the back
of your computer.
4 Check the cable connections to make sure they are
completely secured.
USB Port
5 Follow the steps under “Plugging the Printer In”
on page 20.
6 Follow the steps under “Turning the Printer Power
On” on page 20.
7 Complete the following steps to setup the printer
port and install the correct drivers.
When you turn the printer power On (|), the
New Hardware Wizard
puter.
screen appears on your com-
a Click Next.
b Click the default to search for the best driver.
Click
Next.
c Click to clear the check boxes for Floppy Disk or
CD-ROM.
Connecting Your Printer to a Computer
Add
15
Page 28

d Insert the compact disc (CD) that came with
your printer.
e Click Specify a location.
f Click Browse.
g Scroll down until you locate your CD-ROM
drive. Double-click to select it.
h Highlight the folder for WIN98USB and click
OK.
i Click Next.
A screen displays indicating the application is
looking for this laser printer to verify the driver
for the printer.
j Click Next.
Wait as the information processes. When the next
screen appears that tells you the software is
installed, click
install the printer driver.
Finish. Complete the following to
k Click Install Software.
16
Chapter 1: Setting Up Your Printer
l Click Printer Software.
The
Choose your Installation Path screen
displays.
m Select Install from this CD.
The License Agreement displays.
n Click Agree once you have read the agreement.
o Select Custom Install and click Next.
Printer Drivers is selected as the default on the
next screen.
p Click Next.
q Scroll through the list of printers on the left of
thescreenandclickthecheckboxtoselect
Optra M410 or Optra M412.
Page 29

r Click the Add button.
Thenameofyourprintermovestotheboxon
therightofthescreen.
s Click Next.
The Drivers tab screen displays.
t HighlightLPT1 in the top window of the screen
for the PostScript language.
u Scroll to USB001 in the bottom window of the
screen and select it.
v Return to the top window of the screen and
select
LPT1 for the PCL language.
w Scroll to USB001 in the bottom window of the
screen and select it.
x Click Finish Installation.
Wait as the information processes.
y Click Yes to restart Windows.
z Click OK.
Connecting Your Printer to a Computer
17
Page 30
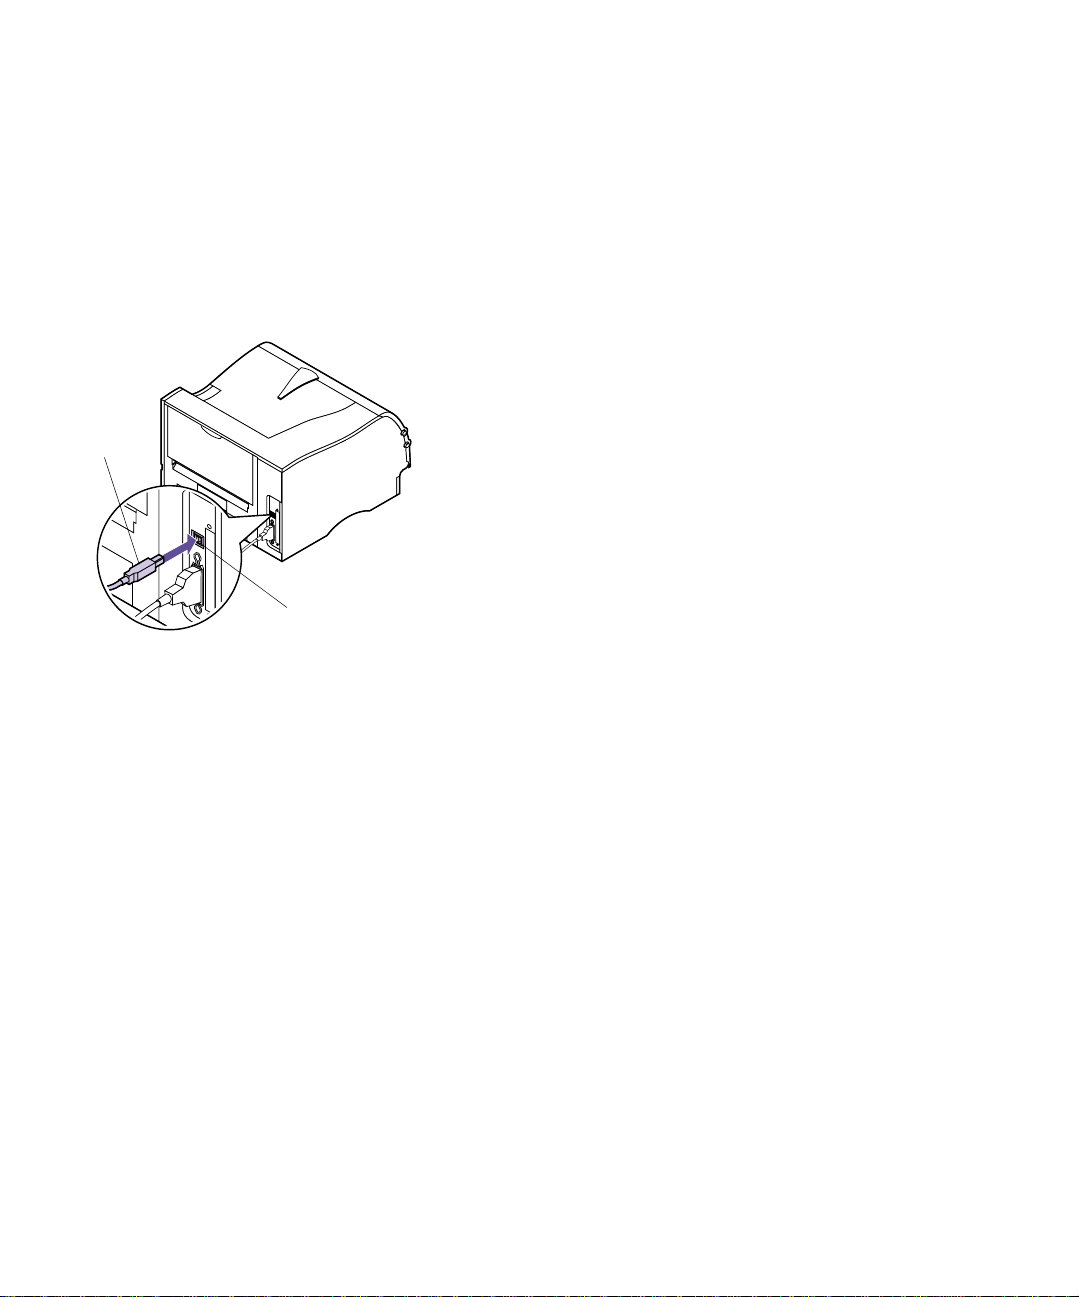
USB
Cable
USB Port
For Macintosh users:
1 Make sure the printer power is Off (O) and the
printer power cord is unplugged from the electrical outlet.
2 Connect the end of the USB cable to the port on
your computer.
3 Align and plug the other end of the USB cable into
the port on the back of your printer as shown.
4 Follow the steps under “Plugging the Printer In”
on page 20.
5 Follow the steps under “Turning the Printer Power
On” on page 20.
6 Launch the CD to install the necessary items.
Instructions to launch the CD are in the CD
booklet.
7 Restart the computer.
8 Open the Apples Extras folder.
18
Chapter 1: Setting Up Your Printer
9 Open the Apple LaserWriter Software folder.
10 Open the Desktop Printer Utility application.
11 The New Desktop Printer screen displays.
12 Select Printer (USB) from the list and click OK.
13 In the USB printer selection area, click Change.
The USB printer dialog box displays.
14 Select Optra M410 or Optra M412 and click OK.
The previous screen displays. Notice the new
printer icon.
15 In the PostScript printer description (PPD) file,
Auto Setup.
click
Wait for the information to process.
Page 31

The previous screen displays. Notice the new
printer icon.
Note: Both areas of the printer
dialog box show the Optra M410
or Optra M412 printer icons.
16 Click Create.
A window appears for you to name the printer.
17 Type in the name of the printer or accept the
default name.
18 Click Save.
19 Quit the Desktop Printer Utility application.
The printer icon displays on your Desktop.
20 Click the new desktop printer icon.
The Printing menu appears on the menu bar.
21 Scroll down in the Printing menu and select Set
Default Printer
A dark line appears around the printer in the
printer icon to indicate it is selected as the default
printer.
.
Connecting Your Printer to a Computer
19
Page 32

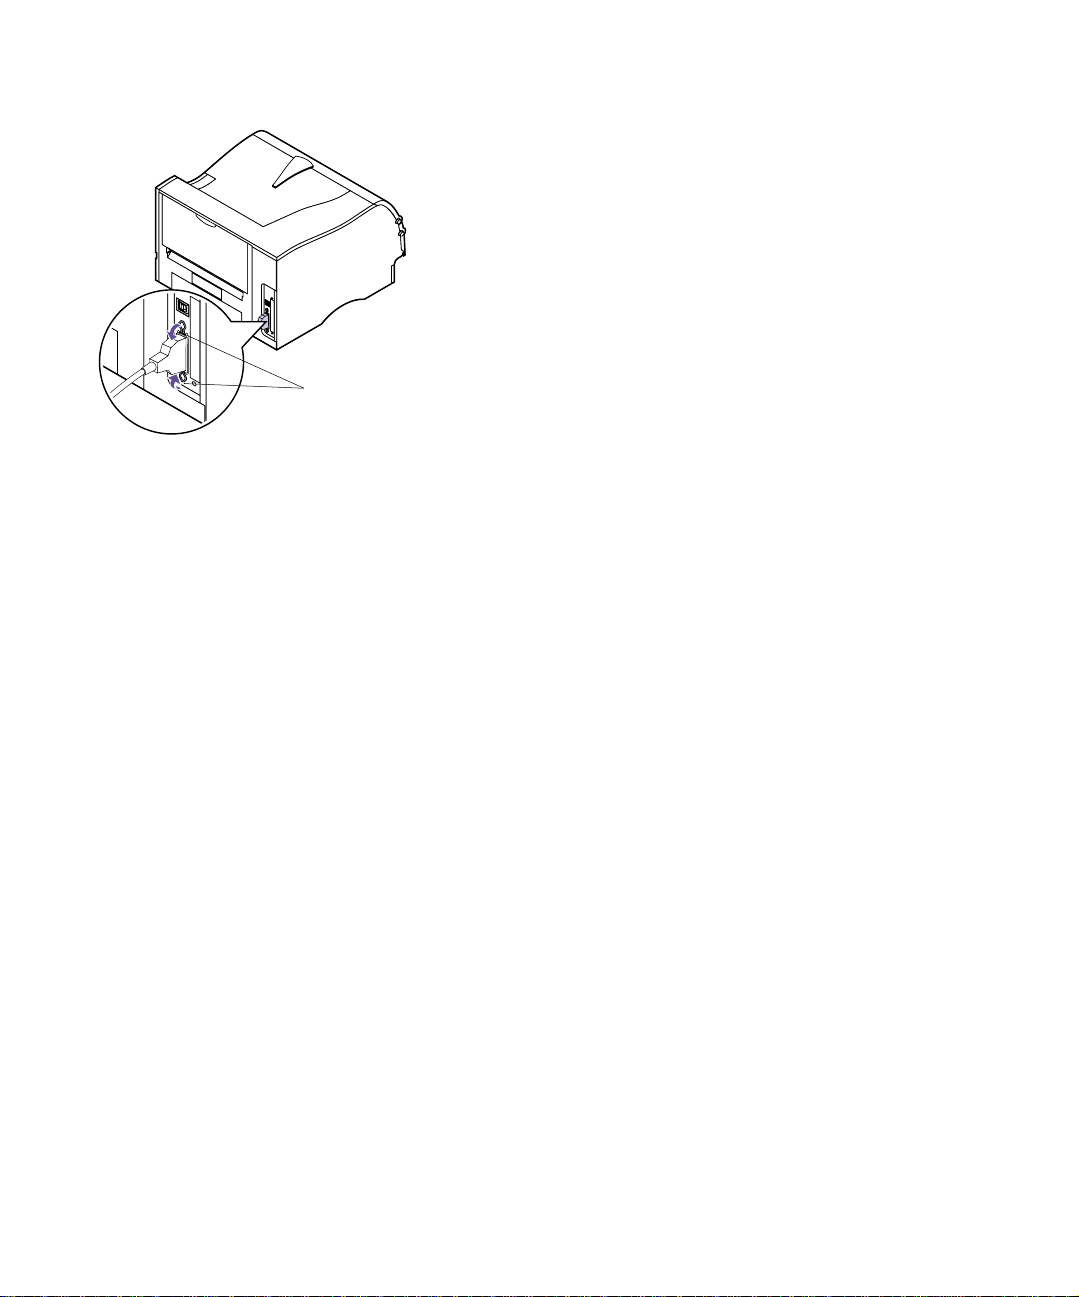
Plugging the
Printer In
Printer
Power Cord
1 Plug the printer power cord into the connector as
shown.
2 Plug the other end of the printer power cord into a
properly grounded electrical outlet.
3 Continue with “Turning the Printer Power On” on
page 20.
Turning the Printer
Power On
Turn the printer power On (|).
If an error message displays, see “Understanding Printer
Messages” on page 151 for more information.
20
Chapter 1: Setting Up Your Printer
Page 33

Printing the Menu
Settings Page
The menu settings page shows current settings for the
menus, a list of installed options, and available printer
memory. You can use this page to verify that all printer
options are properly installed and the printer settings are
settowhatyouwant.
Warning! Complete“Removing
Print Cartridge Packaging” on
page 2 before printing a page.
Note: See “Using the
Operator Panel” on page 34 to
identify the display and operator
panel buttons if you need help.
1 Make sure the printer power is On (|) and the
Ready status message appears on the display.
2 Press Menu> or <Menu to enter the menus.
3 Continue to press and release Menu> or <Menu until
you see
display.
UTILITIES MENU on the second line of the
4 Press Select.
5 Press Menu> until Print Menus appears on the sec-
ond line of the display.
6 Press Select.
The message
remains on the operator panel display until the
page prints. The printer returns to the
after the menu settings page prints.
If an error message appears, see “Understanding Printer
Messages” on page 151 for more information.
Printing Menu Settings appears and
Ready state
Printing the Menu Settings Page
21
Page 34

Installing the
Operator Panel
Overlay
If English is your preferred language, continue with
“Installing Printer Drivers and Utilities” on page 24.
If English is not your preferred language, complete the following steps to customize the operator panel.
1 Locate the operator panel overlay.
If this User’sGuideis printed in a language other
than English, an overlay for the operator panel is
included with the printer. The overlay has translated names for the operator panel buttons.
2 Peel the protective backing off the overlay.
3 Align the operator panel overlay on the operator
panel and press it into place as shown.
Rub the overlay firmly to make sure that it adheres
securely.
22
4 Peel the protective covering away from the top of
the overlay.
5 Continue with “Changing the Operator Panel Dis-
play Language” on page 23 to change the display
language to match the overlay.
Chapter 1: Setting Up Your Printer
Page 35

Changing the
Operator Panel
Display Language
Complete the following steps to change the language of
the menus and messages that appear on the operator
panel display:
1 Press the Menu> or <Menu button to enter the
menus.
2 Continue to press and release Menu> or <Menu until
SETUP MENU appears on the second line of the dis-
play.
Note: The Select button acts
upon information that appears
on the second line of the operator panel display.
Note: See “Using the
Operator Panel” on page 34 to
identify the display and operator
panel buttons if you need help.
3 Press the Select button.
4 Press Menu> until Display Language appears on the
second line of the display.
5 Press Select.
6 Press Menu> until your preferred language appears
on the second line of the display.
7 Press Select.
The printer resets and displays text in the requested
language.
Changing the Operator Panel Display Language
23
Page 36

Installing Printer
Drivers and
Utilities
1 Locate the Drivers, MarkVision and Utilities CD
that comes with your printer.
If your computer does not have a CD-ROM drive,
you can transfer the information on the CD to diskettes. Locate a computer with a CD-ROM drive,
start the CD-ROM utility, and follow the instructions presented to create diskettes.
Note: Consult your network
software documentation for
more information. Also, see
“Introducing MarkVision” on
page 25 for more information.
2 Follow the instructions in the booklet included
with the CD to start the printer setup utility.
The setup utility lets you install printer drivers and
utilities to manage Lexmark printers attached to
your network. See “Introducing MarkVision” on
page 25 for more information.
3 If necessary, use standard network software to
identify the printer to the LAN and to complete
any other setup that may be needed.
24
Chapter 1: Setting Up Your Printer
Page 37

2
MarkVision
MarkVision Printer
Management
Software
Operating Systems
Supported
Introducing
MarkVision
This section provides a brief overview of the MarkVision
printer utility and some of its key features. For more information on MarkVision, refer to the online Help or the documentation on the Drivers, MarkVisionand Utilities CD that
comes with your printer:
• Introduction to MarkVision
• Installation Tips
MarkVision for Windows 95/98/2000, Windows NT 4.0,
Macintosh, and OS/2 Warp is shipped with your printer
on the Drivers, MarkVision and Utilities CD.
The MarkVision graphical user interface provides
advanced, real-time, centralized management capabilities
for Lexmark printers connected locally or attached
directly to a network. Network users and administrators
can also use the following MarkVision features to increase
productivity:
• Centralized setup capabilities let you quickly con-
figure and install multiple printers.
– Youcanconfiguremultipleprinterssimulta-
neouslyfromoneworkstation.
– Automatic network printer discovery and multi-
adapter flash update let you set up and configure
MarkVision Printer Management Software
25
Page 38

Lexmark network printers and change network
addresses from one workstation.
Note: You can integrate
MarkVision directly into your
favorite network management
software.
Note: Management capabili-
ties for multivendor printers are
available in some versions of
MarkVision.
MarkVision for
Intranet Servers
• Use MarkVision to easily manage and monitor your
Lexmark printers.
– Messages on the MarkVision remote operator
panel reflect printer real-time status.
– The dynamic printer graphic provides a visual
confirmation of installed options.
– A list of installed features shows you printer
capabilities.
• MarkVision provides the tools to make printer-
related administrative tasks effortless.
– Monitor network print jobs, change their print-
ing order, and hold or delete specific jobs.
– Use asset management options to maintain
printer inventory, assign property tags, track
page counts, and gather job statistics.
– Download and manage resources such as fonts,
demo pages, and overlays.
This section provides a brief overview of MarkVision for
Intranet Servers and some of its key features. For more
information on MarkVision for Intranet Servers, refer to
the documentation installed with the software:
26
Introducing
MarkVision for
Intranet Servers
Chapter 2: MarkVision
• MarkVision for Intranets User’sGuide.
• MarkVision Installation and Configuration Guide.
This document is also located on the Drivers,
MarkVision and Utilities CD that comes with your
printer.
MarkVision for Intranet Servers is a Web-based printer
management utility that:
• Lets you monitor and manage devices using a Web
browser from any PC with intranet access.
Page 39

• Enables print management over your existing intra-
net infrastructure using TCP/IP.
• Offers a cross-platform solution for Windows and
UNIX users.
• Lets you manage multivendor printers.
Network users and administrators can also use the following MarkVision features to increase productivity.
Maps
Locate printers quickly in your organization by positioning printer icons on a map to show not only printer status,
but also actual printer location.
Filters
Search for devices using criteria such as printer status and
installed features.
Filters automatically organize printers into groups based
on real-time status information.
MarkVision for
UNIX Networks
Remote Updates
Remotely update firmware on multiple Lexmark print
servers simultaneously.
MarkVision for UNIX/Sun offers enterprise scalability,
reliability, and performance that helps you easily set up,
manage, and maintain printers across networks. Ultimately, this reduces help desk costs and increases network
administrator productivity using:
• Centralized Lexmark printer setup capabilities.
• Remote monitoring and management.
• Proactive status alerts on Lexmark printers.
• Tools that allocate printing expenses, balance work-
load, and access printing resources.
MarkVision for UNIX Networks
27
Page 40

MarkVision Simple Network Management Protocol
(SNMP) Services let administrators manage popular multivendor printers.
MarkVision for UNIX Networks and Intranet Servers is
recommended to assist in remote printer setup for UNIX
platforms.
To purchase MarkVision for UNIX, contact the place
where you bought your printer or visit the Lexmark Web
site at www.lexmark.com.
Lexmark
MarkTrack
MarkTrack™ is a network printer reporting software
package that helps administrators manage printing environments more efficiently. Administrators can use MarkTrack to:
• Retrieve and analyze network printer information
from a Web browser.
• Allocate printing resources more efficiently.
• Make better purchasing decisions.
• Allocate printing costs to different departments.
• Provide statistical information on employee print-
ing habits.
• Track Lexmark and SNMP-compliant printers.
• Collect, analyze, and create reports using MarkVi-
sion Printer Inventory and Job Statistics data or
SNMP MIB data.
• Create reports using a Web server.
• View reports using a Web browser.
• Create an inventory of network printer assets auto-
matically.
28
• Analyze printing for the enterprise.
• Plan ahead for supplies purchases, maintenance
schedules, and printer replacement.
For more information on MarkTrack, refer to the product
information, contact the place where you bought your
Chapter 2: MarkVision
Page 41

printer, or visit the Lexmark Web site at
www.lexmark.com.
Lexmark NetPnP NetPnP automates the configuration and installation of
Lexmark printers on a network. NetPnP senses when a
new printer is attached to the network, automatically creates a shared printer object on a Windows NT 4.0 system,
and notifies users by e-mail that the printer is available for
printing. It also notifies IT administrators by e-mail when
a new printer is detected or when an error occurs during
automatic printer installation.
• Lets administrators make printers available to users
within seconds.
• Extends network printer installation to include the
end user by installing all necessary components that
enable printing to workstations across the network.
• Provides huge productivity gains when rolling out
large numbers of network printers.
• Supports a wide range of printer installation
options for IT administrators, from fully automatic
installation to prompted confirmations.
Software
Installation and
Distribution Tools
• Lets you customize network printer installation in
Windows NT environments running TCP/IP.
• Automates the setup of Lexmark network printers,
eliminating more than a dozen steps in the process.
On the Drivers, MarkVision and Utilities CD, Lexmark's allin-one software installation utility provides IT administrators with time-saving installation and distribution tools
that enhance productivity and improve efficiency.
• Software installation and updates by way of the
Lexmark Web site.
Users can initiate Web updates or schedule updates
to run periodically. This ensures that users have the
most recent version of Lexmark software and driv-
Lexmark NetPnP
29
Page 42

ers on their workstations with the least amount of
effort.
• Scripting capability to distribute software to users
on the network.
IT administrators can store software and driver
installation settings in a file. This file can then be
used to automatically distribute the software to
multiple workstations simultaneously.
• Distribution of drivers with custom settings to
users.
IT administrators can remotely install, update, and
distribute drivers with custom settings to users on
the network, eliminating time-consuming workstation driver installation and configuration.
Optra Forms Optra Forms combines data from a customer’s application
with printer-resident electronic forms to produce completed forms such as invoices, statements, pick slips,
labels, and purchase orders. Support for bar codes, specialized graphics and other options is included.
30
The same data can be sent to several remote printers with
different resident forms so that the completed forms can
be customized for the specific printer location. For example, the same purchase order information can be sent to
differentprinters and printed with differentaddressesand
logos.
Optra Forms:
• Requires no server-based or host-based merge pro-
gram or software.
• Can be used:
– With virtually any ASCII text print file from any
platform, mainframe, AS/400, UNIX or workstation.
– Over Coax, Twinax, parallel, serial or LAN
(TCP/IP).
• Generally makes no changes to database applications.
Chapter 2: MarkVision
Page 43

• Prints different forms at different locations from the
same database.
• Globally updates forms quickly and easily over the
LAN.
• Provides support for bar codes, color, duplex, multipage form sets, and more.
• Stores forms as efficient, compact forms in flash.
• Works with Optra M410 and M412 printers and the
Optra T and Optra W laser printer families using
the Optra Forms™ 1, 2, 4, 8, and 16MB Flash
DIMMs or Optra Forms Hard Disk.
Solaris Ready
Printers for Sun
Customers
Solaris Ready printers are specially configured for Sun
users. They are Ethernet-ready and include Sun-specific
documentation as well as MarkVision for Sun Systems
and Intranet Servers. These applications provide seamless
installation in Sun Solaris network environments.
Solaris Ready Printers for Sun Customers
31
Page 44

32
Chapter 2: MarkVision
Page 45

3
Using the
Operator Panel
and Menus
This chapter contains information about using the
operator panel, changing printer settings, and understanding operator panel menus.
You can change most printer settings from your software
application or printer driver.Settings you change from the
application or driver apply only to the job you are preparingtosendtotheprinter.
Note: Changes made to
printer settings from a software
application override changes
made from the operator panel.
If there is a setting you cannot change from your software
application, use the operator panel or the remote operator
panel available from the MarkVision utility. See “MarkVision” on page 25 for information about MarkVision.
Changing a printer setting from the operator panel or
from MarkVision makes that setting the user default.
If you are familiar with using an operator panel similar to
this, you may want to skip to “Overview of
Printer Menus” on page 43.
Using the Operator Panel and Menus
33
Page 46

LCD
Using the
Operator Panel
The operator panel, on the front left-side of your printer,
has a 2-line by 16-character liquid crystal display (LCD),
one printer indicator light, and six buttons. Notice the
Menu button is split into two functioning halves; therefore, it works like two buttons.
The numbers on the operator panel by the names of the
buttons are only used for entering your Personal Identification Number (PIN) if you send a print job that is confidential. For more information, see
CONFIDENTIAL JOB on
page 60 and “Entering a Personal Identification Number
(PIN)” on page 111.
Menu
Printer Indicator Light
Select
Go
Return
Stop
Printer Indicator
Light
The printer indicator light gives information about the
status of your printer.
Light State Meaning
On Solid The printer is On (|) and in the
Blinking The printer is On (|) and
Off The printer is Off (O).
Ready state.
Busy.
34
Chapter 3: Using the Operator Panel and Menus
Page 47

Operator Panel
Buttons
Use the operator panel buttons to open a menu, scroll
through a list of values, change printer settings, respond
to printer messages, temporarily stop all print activity,
and key in a PIN. The following table describes the functions of each button.
Note: Buttons act upon the
information that displays on the
second line of the operator
panel except when using the
buttons to key in a PIN.
Operator Panel B uttons
Button Function
Go Press the Go button to:
Ready state if the printer is in an offline situation (the Ready message does not
Ready message, to take the printer offline (out of the Ready state) and enter the
Menu> takes you to the first menu in the menus. <Menu takes you to the last menu in
Busy message, to list the menu items in the JOB MENU.
Menu> to go to the next item in the menus, or
<Menu to go to the previous item in the menus.
<Menu to scroll backward. Release the button when the number you want
Menu> and
<Menu
• Return to the
appear on the display).
• Exit printer menus and return to the
• Clear operator panel error messages.
• Resume printing after loading print material and clearing paper jams.
Power Saver.
• Exit
If you have changed printer settings from the operator panel menus, press
job to print. The printer must display
Each end of the button has a function. Press the Menu> or <Menu button:
• At the
menus.
the menus.
• At the
• When the printer is offline:
-Press
-Press
• For menu items that have numerical values, such as
forward, or
displays.
If this User’sGuideis printed in a language other than
English, an operator panel overlay with translated buttons
and light names is included with your printer. See “Installing the Operator Panel Overlay” on page 22 for more
information.
Ready state.
Go before sending a
Ready for jobs to print.
Copies, press and hold Menu> to scroll
Using the Operator Panel
35
Page 48

Operator Panel B uttons (continued)
Button Function
Select Press the Select button to:
• Selectthe menu shown on the second line of the display.Depending on the type of menu, this
action:
- Opens the menu and displays the first item in the menu.
- Opens the menu item and displays the default setting.
• Save the displayedmenu item as the new default setting. The printer displays the
message briefly and returns to the menu item.
• Clear certain messages from the operator panel display.
• Continue printing after the
source>
Return Press the Return button to return to the previous menu level or menu item.
Stop Press the Stop button at the Ready, Busy,orWaiting message to temporarily stop all activity
and take the printer offline. The operator panel status message changes to
is lost.
Press
1, 2, 3, 4, 5, 6 The numbers located next to the names of the buttons are only used for entering your Personal
Identification Number (PIN) after you send a Confidential Job. For more information, see
“Entering a Personal Identification Number (PIN)” on page 111.
on page 167 for more information.
Go to return the printer to the Ready, Busy,orWaiting state.
Change <input source> message displays. See Change <input
Not Ready.Nodata
Saved
36
Chapter 3: Using the Operator Panel and Menus
Page 49

Printer Messages The operator panel displays three types of messages:
Note: See “Understanding
Printer Messages” on page 151
for a complete listing of all the
printer messages.
Status Messages
Busy PCL
Parallel
• Status messages provide information about the
current state of the printer.
• Attendance messages report printer errors that you
must resolve.
• Service messages indicate printer failures that may
require servicing.
When the Ready status message displays, the printer is
ready t o receive a print job. While a job is processing or
printing, the
sage appears on the first line of the operator panel display.
The screen to the left is an example of an operator panel
message. The printer status appears on the first line of the
display. The second line displays messages, such as warning messages, that give more information about printer
status.
The
Busy message identifies the printer language
(PCL emulation) used for the print job. The
sage tells you that the printer is processing data received
by the parallel port.
Busy status message or a customized mes-
Parallel mes-
Attendance
Messages
200 Paper Jam
Remove Cartridge
Service Messages
Attendance messages help you solve printer problems.
For example, if print material is jammed in the printer, the
message
display.
This message tells you to open the printer upper front
door and check for jammed print material.
Service messages notify you of printer failures that may
require a service call.
200 Paper Jam Remove Cartridge appears on the
Printer Messages
37
Page 50

Operator Panel
Menus
A number of menus are available to make it easy for you
to change printer settings. The diagram on page 43 shows
the menus and all of the menu items available in each
menu. The items in each menu and the values you can
select are described in more detail in the tables beginning
on page 44.
Some menus appear only if a specific option is installed in
the printer. Other menu items may only be effective for a
particular printer language. You can select these values at
any time, but they only affect printer function when you
use the specified printer language.
Note: Changes made from a
software application or driver
overridethe user defaultsettings
made from the operator panel.
An asterisk (*) next to a value in the tables indicates the
factory default setting. These settings are the original printer
settings. (Factory defaults may vary for different countries.) See
more information.
When you select a new setting from the operator panel,
the asterisk moves next to the selected setting to identify it
as the current user default setting. These settings are active
until new ones are stored or the factory defaults are
restored. See “Changing Menu Settings” on page 40 for
more information.
Factory Defaults on page 57 or on page 107 for
38
Chapter 3: Using the Operator Panel and Menus
Page 51

Printing the Menu
Settings Page
The menu settings page shows current settings for the
menus, a list of installed options, and available printer
memory. You can use this page to verify that the printer
options are properly installed and the printer settings are
settowhatyouwant.
See “Using the Operator Panel” on page 34 to identify the
display and operator panel buttons if you need help.
Note: Before printing the
menu settings page, make sure
the selected paper source holds
letter-, legal-, or A4-size paper,
PAPER SIZE setting is set to
the
the correct size, and the
setting for the paper
TYPE
source is
Plain Paper.
PAPER
To print a menu settings page:
1 Make sure the printer power is On (|) and the
Ready status message appears on the display.
2 Press Menu> or <Menu to enter the menus.
3 Continue to press and release Menu> or <Menu until
you see
display.
UTILITIES MENU on the second line of the
4 Press Select.
5 Press Menu> until Print Menus appears on the sec-
ond line of the display.
6 Press Select.
The message
remains on the operator panel display until the
page prints. The printer returns to the
after the menu settings page prints.
If an error message appears on the display, see
“Understanding Printer Messages” on page 151.
Printing Menu Settings appears and
Ready state
7 If you installed options, verify that they are listed
on the menu settings page under “Installed Features.”
If an option you installed does not appear on the
page, turn the printer power Off (O), unplug the
printer power cord, reinstall the option, and print
the menu settings page again.
Operator Panel Menus
39
Page 52

Changing
Menu Settings
You can use the operator panel to change printer settings
and customize your printer to meet your specific needs.
To select a new value as the default setting:
1 From the Ready state, press Menu> or <Menu to enter
the menus.
Note: Changes made from a
softwareapplication override the
user default settings made from
the operator panel.
2 Continue to press and release Menu> or <Menu until
the menu you need appears on the second line of
the display.
See “Overview of Printer Menus” on page 43 for a
list of the menus and their menu items.
3 Press Select.
The menu opens and the first menu i tem in the
menu appears on the second line of the display.
4 Press Menu> or <Menu until the menu item you
need appears on the second line of the display.
5 Press Select.
An asterisk (*) appears beside the current user
default setting for that menu item.
Some menu items have submenus. For example, if
you select
TYPE
(such as
play.
Avaluecanbe:
PAPER MENU, and then select the PAPER
menu item, you must select another menu
Tray 1 Type) before the available values dis-
40
– An On or Off setting.
– A phrase or word that describes a setting.
– A numerical value that you can increase or
decrease.
6 Press Menu> or <Menu until the value you need
appears on the second line of the display.
Chapter 3: Using the Operator Panel and Menus
Page 53

Note: User default settings
remain in effect until you save
new settings or restore the factory defaults.
7 Press Select.
An asterisk (*) appears beside the value to indicate
that it is now the user default setting. The display
shows the new setting for one second and then
clears. The
ous list of menu items appears on the operator
panel display.
Saved message displays, then the previ-
8 Press Return to go back to previous menus or menu
items and set new default settings.
9 Press Go to return to Ready if this is the last printer
setting you want to change.
Disabling the
Operator Panel
Menus
Note: When the operator
panel menus a re disabled,
access to the
mitted from the
states. Access to the CON-
Saver
FIDENTIAL JOB
menu items is permitted from
Ready state only.
the
JOB MENU is per-
Ready and Power
and HELD JOBS
To disable the menus so that changes cannot be made to
the printer default settings:
1 Turn the printer power Off (O).
2 Press and hold the Select and Return buttons and
turn the printer power On (|).
3 Release the buttons when Performing Self Test
appears on the operator panel display.
When the printer self test completes, the
MENU
displays.
CONFIG
4 Press Menu> until Panel Menus displays on the sec-
ond line.
5 Press Select.
6 Press Menu> until Disable displays on the second
line of the display.
7 Press Select.
Operator Panel Menus
41
Page 54

8 The Saved message briefly appears, then Disabling
Menus
The
on the second line.
displays.
CONFIG MENU displays again with Panel Menus
9 Press Menu> until Exit Config Menu displays on the
second line.
10 Press Select.
Activating Menu Changes briefly appears, and then
Performing Self Test briefly appears. The printer
returns to the
To enable the menus, repeat the previous steps and select
Enable instead of Disable.
Ready state.
42
Chapter 3: Using the Operator Panel and Menus
Page 55

Overview of
Printer Menus
Menus or menu items in
italics
only appear on the display if the
corresponding option is installed. Capitalized menu items (for
example, PAPER SIZE) have submenus. See the tables on the
following pages for a list of the values for each menu item.
PAPER MENU
(page 44)
Paper Source
PAPER SIZE
PAPER TYPE
CUSTOM TYPES
Substitute Size
Configure MP
PAPER TEXTURE
PAPER WEIGHT
PAPER LENGTH
SETUP MENU
(page 73)
Printer Language
Power Saver
Resource Save
Download Target
Print Timeout
Wait Timeout
Auto Continue
Jam Recovery
Page Protect
Print Area
Display Language
Alarm C ontrol
Job Buffer Size
Job Accounting
Job Acct Limit
1
FINISHING MENU
(page 53)
Copies
Blank Pages
Collation
Separator Sheets
Separator Source
Multipage Print
Multipage Order
Multipage View
Multipage Border
PCL EMUL MENU
(page 79)
Font Source
Font Name
Point Size
Pitch
Symbol Set
Orientation
Lines Per Page
A4 Width
TRAY RENUMBER
Auto CR after LF
Auto LF after CR
UTILITIES MENU
(page 57)
Print Menus
Print Net1 Setup
Print Fonts
Print Directory
Factory Defaults
Format Flash
Defragment Flash
Format Disk
Job Acct Stat
Hex Trace
POSTSCRIPT
MENU (page 83)
Print PS Error
Font Priority
JOB MENU
(page 59)
Cancel Job
CONFIDENTIAL JOB
HELD JOBS
Reset Printer
Print Buffer
PARALLEL MENU
(page 84)
STD PARALLEL
PARALLEL OPT 1
PCL SmartSwitch
PS SmartSwitch
NPA Mode
Parallel Buffer
Job Buffering
Advanced Status
Protocol
Honor Init
Parallel Mode 1
Parallel Mode 2
2
QUALITY MENU
(page 71)
Print Resolution
Toner Darkness
PQET
PictureGrade
SERIAL MENU
(page 87)
SERIAL OPTION 1
PCL SmartSwitch
PS SmartSwitch
NPA Mode
Serial Buffer
RS-232/RS-422
RS-422 Polarity
Serial Protocol
Robust XON
Baud
Data Bits
Parity
Honor DSR
NETWORK MENU
(page 91)
NETWORKOPTION1
PCL SmartSwitch
PS SmartSwitch
NPA Mode
Network Buffer
Network 1 Setup
1
Some pr inter models released in the year 2000 or later designated as Energy Star printers cannot
INFRARED MENU
(page 93)
Infrared Port
PCL SmartSwitch
PS SmartSwitch
NPA Mode
Infrared Buffer
Window Size
Transmit Delay
Max Baud Rate
LOCALTALK MENU
(page 96)
LocalTalk Port
PCL SmartSwitch
PS SmartSwitch
NPA Mode
LocalTalk Buffer
NPA Hosts
LocalTalk Name
LocalTalk Addr
LocalTalk Zone
USB MENU
(page 99)
STANDARD USB
USBOPTION1
PCL SmartSwitch
PS SmartSwitch
NPA Mode
USB Buffer
Job Buffering
have Power Saver disabled.
2
Parallel Mode 1 is not supported on the Optra M412 printer.
For all menus:
– Press Menu> or <Menu to enter the menus and scroll through the options.
– Press Select to choose a menu, menu item, or value.
– Press Return to back up to the previous menu level.
For all menus except CONFIG MENU:
– Press Go to return to Ready.
Operator Panel Menus
FAX MENU
(page 102)
Fax Port
Fax Baud
Fax Data Bits
Fax Parity
Fax Buffer
Fax Paper Size
Fax Paper Type
CONFIG MENU
(page 106)
Prt Quality Pgs
Panel Menus
Buffered Jobs
Factory Defaults
NARROW MEDIA
Exit Config Menu
43
Page 56

Paper Menu
Menu Item Values
Paper Source Tray 1*
Tray 2
MP Feeder
Manual Paper
Manual Env
The Paper Source setting identifies the default paper source.
Tray 2 is availableonly if the optional 500-sheet drawer is installed. See “Optional 500-Sheet
Drawer” on page 223 for more information.
Select
through the multipurpose feeder.
Select
MP Feeder displays only if Configure MP is set to Cassette.IfPaper Source is set to
MP Feeder and Configure MP is set to First,thePaper Source setting automatically changes
Tray 1.
to
If you are using the same size and type of print material in two paper sources (and the
Size
paper source is empty,print material automatically feeds from the other paper source. See
“Tray Linking” on page 135 for more information.
Paper Menu
UsethePAPERMENUtodefineallsettingsrelatingto
print material input and output, as well as the specific
print material you are using with your printer.
Manual Paper when manually feeding a sheet of print material other than an envelope
Manual Env when manually feeding an envelope through the multipurpose feeder.
Paper
and Paper Type settings are correctly set), the trays are automatically linked. When one
*Factory default
44
Chapter 3: Using the Operator Panel and Menus
Page 57

Paper Menu (continued)
Menu Item Values
PAPER SIZE Tray 1 Size
Tray 2 Size
Each of the above menu items support the following values as a second menu:
A4* (Country specific)
JIS B5
Letter* (Country specific)
Legal
Executive
MP Feeder Size
A4* (Country specific)
A5
JIS B5
Letter* (Country specific)
Legal
Executive
Universal
7 ¾ Envelope
9Envelope
10 Envelope
DL Envelope
C5 Envelope
B5 Envelope
Other Envelope
*Factory default
Operator Panel Menus
45
Page 58

Paper Menu (continued)
Menu Item Values
PAPER SIZE
(continued)
Manual Pap Size
A4* (Country specific)
A5
JIS B5
Letter* (Country specific)
Legal
Executive
Universal
Manual Env Size
7 ¾ Envelope
9Envelope
10 Envelope* (Country specific)
DL Envelope* (Country specific)
C5 Envelope
B5 Envelope
Other Envelope
The PAPER SIZE setting identifies the default formatting size for each paper source. See the
tables beginning on page 116 for a list of the dimensions for each paper and envelope size.
Note: Before loading print mater ial in any paper source, make sure you select the
PAPER SIZE, PAPER TYPE, PAPER TEXTURE, PAPER WEIGHT, and PAPER LENGTH from
the operator panel for the paper source. Also, select the paper size and type from your
software application for the print material you are loading.
Manual Pap Size when manually feeding a single sheet of print material other than an
Select
envelope through the multipurpose feeder.
Manual Env Size when manually feeding a single envelope through the multipurpose
Select
feeder.
Universal refers to any size that is not considered a standard size. Select Universal from the
PAPER SIZE menu when you load print material that does not match any of the other available
sizes.The printer automatically formats the page for the maximum possible size. You can then
set the actual page size from your application.
Other Envelope from the PAPER SIZE menu when you load envelopes that do not
Select
match any of the other available sizes. The printer automatically formats for the maximum
possible envelope size. You can then set the actual envelope size from your application.
*Factory default
46
Chapter 3: Using the Operator Panel and Menus
Page 59

Paper Menu (continued)
Menu Item Values
PAPER TYPE Tray 1 Type
Tray 2 Type
Manual Pap Type
Each of the above menu items support the following values as a second menu:
Plain Paper*
Card Stock
Transparency
Labels
Bond
Letterhead
Preprinted
Colored Paper
Custom Type 1
Custom Type 2*
Custom Type 3
Custom Type 4
Custom Type 5
Custom Type 6
Plain Paper is the default setting for Tray1Typeand Manual Pap Type.Custom Type 2
Note:
is the default for Tray 2 Type.
MP Feeder Type
Plain Paper
Card Stock
Transparency
Labels
Bond
Envelope
Letterhead
Preprinted
Colored Paper
Custom Type 1
Custom Type 2
Custom Type 3
Custom Type 4
Custom Type 5
Custom Type 6*
*Factory default
Operator Panel Menus
47
Page 60

Paper Menu (continued)
Menu Item Values
PAPER TYPE
(continued)
Manual Env Type
Envelope*
Custom Type 1
Custom Type 2
Custom Type 3
Custom Type 4
Custom Type 5
Custom Type 6
The PAPER TYPE setting lets you specify the type of print material installed in each paper
source. This setting is used by the printer in the following ways:
• Enables the printer to optimize print quality for the specified print material.
• Enables you to select paper sources through your software application by selecting only a
type and size. A source selection is unnecessary.
• Enablesthe printer to automatically link paper sources. Any sources that contain the same
type and size of print material are automatically linked by the printer if you have set the
PAPER SIZE and the PAPER TYPE to the correct settings for the paper sources. See “Tray
Linking” on page 135 for more information.
Manual Pap Type when manually feeding a single sheet of print material through the
Select
multipurpose feeder.
Manual Env Type when manually feeding an envelope through the multipurpose feeder.
Select
Note: Before loading print mater ial in any paper source, make sure you select the
PAPER SIZE, PAPER TYPE, PAPER TEXTURE, PAPER WEIGHT, and PAPER LENGTH from
the operator panel for the paper source. Also, select the paper size and the type from your
application for the print material you are loading.
Custom Type1 through 6 refers to special types of print materials. Youcan change the names
through a utility, such as MarkVision. For more information on setting the Custom Type
names, see
If you are using different print material in the paper sources, each source with a different print
material must have the
automatic tray linking feature.Otherwise, if a paper source becomes empty,the printer selects
print material from another source since the printer sees the trays as linked. This might cause
a one-page letter to print on a sheet of labels or on a transparency. See “Tray Linking” on
page 135 for more information.
CUSTOM TYPES on page 49.
PAPER SIZE and PAPER TYPE set to a unique value to disable the
*Factory default
48
Chapter 3: Using the Operator Panel and Menus
Page 61

Paper Menu (continued)
Menu Item Values
CUSTOM TYPES Custom Typex(wherexrepresents a custom type from 1 to 6)
Paper*
Card Stock
Transparency
Labels
Envelope
The CUSTOM TYPES setting identifies the kind of print material used for each of the Custom
Types availablein the
quality settings when you select print material from a paper source when the type is set to
Custom Type
Custom Type
truncated to 14 characters.
Substitute Size Off
Letter/A4*
Select Letter/A4 to let the printer automatically print A4-size jobs on letter-size paper and
letter-size jobs on A4-size paper, if the requested size is not currently installed in the paper
source.
Configure MP Cassette*
Manual
First
x
x
PAPER TYPE menu item. This print material designation optimizes print
. If a user-defined name is available, the name displays instead of
,wherexrepresents a number 1 through 6. The user-defined name is
*Factory default
When the multipurpose feeder is set to Cassette and the PAPER SIZE and PAPER TYPE
settings are set correctly, the printer treats the multipurpose feeder like any other paper
source. If a print job requests a size print material that is only loaded in the multipurpose
feeder, the printer selects the print material from the multipurpose feeder for the print job.
Manual to manually feed single sheets of print material through the multipurpose
Select
feeder. The multipurpose feeder acts like a manual feed slot and you can feed only one sheet
of print material through at a time.
If you set
until it is empty, regardless of the paper source or paper size requested for the job.
Configure MP to First, the printer feeds print material from the multipurpose feeder
Operator Panel Menus
49
Page 62

Paper Menu (continued)
Menu Item Values
PAPER TEXTURE Plain Texture
Card Stock Text
Trnsprncy Text
Labels Texture
Bond Texture
Envelope Texture
Ltrhead Texture
Preprint Texture
Colored Texture
Custom 1 Texture
Custom 2 Texture
Custom 3 Texture
Custom 4 Texture
Custom 5 Texture
Custom 6 Texture
Each of the above menu items support the following three values as a second menu:
• Smooth
• Normal*
• Rough
Rough is the factory default for Bond Texture.
Note:
Select the appropriate PAPER TEXTURE value (Smooth, Normal,orRough) for each
PAPER TYPE, including the Custom Types,that you are using. Set the correct
PAPER TEXTURE value for your print material to make sure characters print clearly, without
dropouts or voids. If the characters on your printed page appear broken or poorly-formed, set
PAPER TEXTURE to Rough. If characters on your printed page appear smeared, set
PAPER TEXTURE to Smooth or Normal.
PAPER TEXTURE setting works in connection with the PAPERTYPE and PAPERWEIGHT
The
settings. You may need to change those settings to optimize print quality for your specific pr int
material.
If a user-defined texture is available, its name displays as a value instead of
CustomxTexture,where
truncated to 14 characters.
x
represents a number 1 through 6. The user-defined name is
*Factory default
50
Chapter 3: Using the Operator Panel and Menus
Page 63

Paper Menu (continued)
Menu Item Values
PAPER WEIGHT Plain Weight
CardStock Weight
Trnsprncy Weight
Labels Weight
Bond Weight
Envelope Weight
Ltrhead Weight
Preprint Weight
Colored Weight
Custom 1 Weight
Custom 2 Weight
Custom 3 Weight
Custom 4 Weight
Custom 5 Weight
Custom 6 Weight
Each of the above menu items support the following three values as a second menu:
• Light
• Normal*
• Heavy
Select the appropriate PAPER WEIGHT value (Light, Normal,orHeavy) for each
PAPER TYPE, including the Custom Types,that you are using. Set the correct
PAPER WEIGHT value for your print material to make sure the toner adheres properly to the
page. If you have trouble with toner rubbing off the page, set
printed pages are curling excessively, set
PAPER WEIGHT setting works in connection with the PAPERTYPE and PAPER TEXTURE
The
settings. You may need to change those settings to optimize print quality for your specific print
material.
If a user-defined weight is available,its name displays as a value instead of
x
where
characters.
represents a number 1 through 6. The user-defined name is truncated to 14
PAPER WEIGHT to Heavy.Ifyour
PAPER WEIGHT to Normal or Light.
CustomxWeight,
*Factory default
Operator Panel Menus
51
Page 64

Paper Menu (continued)
Menu Item Values
PAPER LENGTH Plain Length
CardStock Length
Trnsprncy Length
Labels Length
Bond Length
Envelope Length
Ltrhead Length
Preprint Length
Colored Length
Custom 1 Length
Custom 2 Length
Custom 3 Length
Custom 4 Length
Custom 5 Length
Custom 6 Length
Each of the above menu items support the following values as a second menu:
• Short
• Normal*
Select the appropriate PAPER LENGTH value (Normal or Short) for each printer paper type.
Set the
length. Set the
Print material 152.4 mm (6 in.) or less in length can only be fed through the multipurpose
feeder and must exit to the rear output bin.
Note: If
not print. See
If a user-defined length is available, its name displays as a value instead of
where
characters.
PAPER LENGTH value to Short if your print material i s 152.4 mm (6 in.) or less in
PAPER LENGTH is set to Short and the rear output bin door is not open, your job will
x
represents a number 1 through 6. The user-defined name is truncated to 14
PAPER LENGTH value to Normal for all other print material.
Open Rear Door on page 172 for more information.
CustomxLength,
*Factory default
52
Chapter 3: Using the Operator Panel and Menus
Page 65

Finishing Menu
Finishing Menu
Menu Item Values
Copies 1*…999
The Copies setting determines the number of copies printed for each page. The printer does
not automatically collate the copies. For example, if you send three pages to print and set
Copies to 2, the printer prints page 1, page 1, page 2, page 2, page 3, page 3.
For information about how to use the
as follows.
Blank Pages Do Not Print*
Print
Select Print to include application-generated blank pages with your print job.
Do Not Print if you do not want the printer to print any application-generated blank
Select
pages that appear in your document.
Collation Off*
On
When Collation is set to Off, the printer prints each page of a job the number of times as
specified by the
to 2, the printer prints page 1, page 1, page 2, page 2, page 3, page 3.
Collation is set to On, the printer prints the entire job the number of times as specified
When
Copies setting. For example, if you send three pages to print and set Copies to 2,the
by the
printer prints page 1, page 2, page 3, page 1, page 2, page 3.
Many applications collate documents by repeatedly sending the file to the printer. As a result,
the printer must process each print job until the correct number of copies has printed. This
requires additional time since the printer must process the same pages over again. By using
Collation, the printer processes the file only once, saves the file in printer memory, and prints
the multiple copies. This saves processing time for the printer and for the application, and
overall printing time may be reduced.
Collation to work effectively, your software application must recognize this printer feature
For
and not send the job to the printer multiple times. Your application must also let you specify
the number of copies needed
Collation from the operator panel or from the printer driver. For best results, select
Select
Collated
Uncollated
If the job is complex or exceeds the memory capacity of your printer, you may receive a
37 Insufficient Collation Area message. Press Go to clear the message. The printer collates
the remaining pages in memory. If you reset the printer, the printer discards the job. See
37 Insufficient Collation Area on page 160 for more information.
in the printer driver and set the number of copies to one. In your application, select
Use the FINISHING MENU to define all settings relating
to printer output.
Copies setting with the Collation setting, see Collation
Copies setting. For example, if you send three pages to print and set Copies
or
let you use the printer default setting for Copies.
(if the option is available) and then select the number of copies you want.
*Factory default
Operator Panel Menus
53
Page 66

Finishing Menu (continued)
Menu Item Values
Separator Sheets None*
Between Copies
Between Jobs
Between Pages
You can have the printer insert blank separator sheets between jobs, between multiple copies
of a job, or between each page of a job. Separator sheets are pulled from the source specified
Separator Source menu item.
in the
Between Copies for multiple copy jobs. If Collation is set to Off, a blank page is
Select
inserted between sets of each printed page. If
between each copy of the job.
Between Jobs to insert a blank page after each print job. This may be helpful when
Select
several people are using the printer.
Between Pages to insert a blank page between each page of a job. This is useful if you
Select
are printing transparencies and want to reduce static build-up when stacking transparencies
in the output bin.
Separator S ource Tray 1*
Tray 2
MP Feeder
If you are using separator sheets, Separator Source lets you specify the paper source that
holds the separator sheets.
Only installed paper sources display as values. Youcan only select
separator source if
and Configure MP is set to First,theSeparator Source setting automatically changes to
Tray 1.See“Configure MP” on page 49 for more information.
Collation is set to On, a blank page is inserted
MP Feeder as the
Configure MP is set to Cassette.IfSeparator Source is set to MP Feeder
Multipage Print Off*
*Factory default
54
Chapter 3: Using the Operator Panel and Menus
2-Up
3-Up
4-Up
6-Up
9-Up
12-Up
16-Up
Use the Multipage Print (N-up) setting to print multiple page images on a single page. For
example,
images are printed on one page, and so forth.
The printer uses the
determine the order and orientation of the page images and if a border is printed around each
page image.
Printer setting changes within a print job may affect the results you get when using
Multipage Print.
2-Up means two page images are printed on one page, 3-Up means three page
Multipage Order, Multipage View,andMultipage Border settings to
Page 67

Finishing Menu (continued)
Menu Item Values
Multipage Order Horizontal*
Vertical
Rev Horizontal
Rev Vertical
The Multipage Order setting determines the positioning of multiple page images on pages
printed using
page images depends on if the pages are sent to the printer as portrait or landscape images.
The following examples show the result of using each
job.
Multipage Print. You may choose one of four different orders. The positioning of
Multipage Order settingona4-Upprint
Horizontal
Portrait Landscape
Portrait Landscape
Vertical
*Factory default
Page 1
Page 3 Page 4
Page 2
Page 1 Page 2
Rev Horizontal
Portrait Landscape
Page 2
Page 4 Page 3
Page 1
Page 2 Page 1
Page 1
Page 4Page 3
Page 2 Page 4
Page 3
Page 4Page 2
Page 1 Page 3
Rev Vertical
Portrait Landscape
Page 3
Page 3Page 4
Page 4 Page 2
Page 1
Page 2Page 4
Page 3 Page 1
Operator Panel Menus
55
Page 68

Finishing Menu (continued)
Menu Item Values
Multipage View Auto*
Long Edge
Short Edge
Use the Multipage View setting to select the orientation of the printed page with respect to the
page images during
Auto to allow the printer to choose between portrait and landscape positioning.
Select
Long Edge to position the long edge of the print material as the top of the page.
Select
Short Edge to position the short edge of the print material as the top of the page.
Select
Note: For PostScript 3 emulation print jobs, the
Multipage Border None*
Solid
Use the Multipage Border setting to specify if a border is printed around each page image
Multipage Print.
during
None if you do not want to print a border around each page image.
Select
Solid to print a solid line border around each page image.
Select
*Factory default
Multipage Print.
Auto setting is always in portrait orientation.
56
Chapter 3: Using the Operator Panel and Menus
Page 69

Utilities Menu
Utilities Menu
Menu Item Values
Use the UTILITIES MENU to print a variety of listings
relating to available printer resources, printer settings, and
print jobs. Additional menu items let you set up printer
hardware and troubleshoot printer problems.
Print Menus Press
Print Net1 Setup Press
Print Fonts PCL Fonts
Print Directory Press
Factory Defaults Restore
Select to print the menu settings page.
The menu settings page is a list of the user default settings, the installed options, and the
amount of available printer memory. This list also shows you the order of menu items.
Note: The menu settings page must be printed on letter-, legal-, or A4-size paper.
Select to print the internal print server settings page.
The internal print server settings page contains information on your network setup and the
printer settings for your network as defined by the
NETWORK MENU.See“Network 1 Setup” on page 92 for more information.
Print Net1 Setup displays only if an internal print server is installed in your printer.
Note:
PS Fonts
Press Select to print a font sample list that shows all the fonts currently available in the
selected printer language,
Sample List” on page 242.
Select to print a list of all the resources stored in flash memory or on the hard disk
option.
Print Directory menu item is available only if at least one of the options is installed and
The
formatted. Refer to the
Do Not Restore
If you choose Restore:
• All downloaded resources (fonts, macros, symbol sets) in printer memory (RAM) are
deleted. (Resources residing in flash memory or on the hard disk option are unaffected.)
• All menu settings are returned to the factory default values except:
Display Language (SETUP MENU) which is the operator panel display language.
–
– All settings in the PARALLEL MENU, SERIAL MENU, NETWORK MENU, INFRARED
MENU, LOCALTALK MENU, USB MENU, and FAX MENU.
The message
default settings. See
Network 1 Setup menu item in the
PCL Fonts or PS Fonts. For more information, see “PrintingaFont
Technical Reference
Restoring Factory Defaults briefly appears while the printer restores the factory
Restoring Factory Defaults on page 157 for more information.
for details.
Operator Panel Menus
57
Page 70

Utilities Menu (continued)
Menu Item Values
Format Flash Yes
No
Formatting the flash memory option deletes all resources (fonts, macros, symbol sets) stored
in flash memory and prepares the flash memory card to receive new resources.
Format Flash menu item only displays if the installed flash memory option is
The
or Read/Write or Write protected.
on, or during flash format and write operations. See
information.
Warning: If you select
Do not turn off the printer while the flash is formatting
Defragment Flash Yes
No
Defragmenting the flash memory option transfers all undeleted resources stored in flash
memory to printer memory and then reformats the flash memory option. When the format
operation is complete, the undeleted resources are loaded back into flash memory.
Defragment Flash menu item only displays if the installed flash memory option is
The
defectiveor Read/Write or Write protected. 51 Defective Flash may display when the printer is
turned on, or during flash format and write operations. See
for more information.
37 Insufficient Defrag Memory displays if printer memory is too full to perform the Flash
Memory Defragment operation. See
information.
Warning:
51 Defective Flash may display when the printer is turned
51 Defective Flash on page 161 for more
Format Flash and press Go, anydatastoredinflashmemoryislost.
.
51 Defective Flash on page 161
37 Insufficient Defrag Memory on page 160 for more
Do not turn off the printer while the flash is defragmenting
not
defective
not
.
Format Disk Yes
58
Chapter 3: Using the Operator Panel and Menus
No
Formatting the hard disk option deletes all resources stored on the hard disk and prepares it
to receive new resources.
Format Disk menu item only displays if the installed hard disk option is
The
Read/Write or Write protected.
during disk format and write operations. See
mation.
Format Disk does
page 77 for more information.
Warning: If you select
Do not turn off the printer while the hard disk is formatting.
lost.
not
display if Job Buffer Size is set to 100%.SeeJob Buffer Size on
Format Disk and press Go, any data stored on the hard disk option is
61 Defective Disk may display when the printer is turned on, or
61 Defective Disk on page 165 for more infor-
not
defective or
Page 71

Utilities Menu (continued)
Menu Item Values
Job Acct Stat Print
Clear
The Job Acct Stat menu item only displays if a hard disk option is installed in your printer and
not
defective or Read/Write or Write protected. Job Accounting in the SETUP MENU must
is
be set to
Select
number of jobs is determined by the value of the
SETUP MENU). The statistics include if the job printed with or without errors, the time required
to print the job, the size (in bytes) of the job, the requested paper size and paper type, the total
number of printed pages, and the number of copies requested.
Select
Accounting Stat
page 152 for more information.
On.
Print to print a list of statistics for a defined number of the most recent print jobs. (The
Job Acct Limit menu item in the
Clear to delete all accumulated job statistics from the hard disk option. Clearing Job
displays until the process completes. See Clearing Job Accounting Stat on
Hex Trace Press
Hex Trace helps isolate the source of a print job problem. With Hex Trace selected, all data
sent to the printer is printed in hexadecimal and character representation. Control codes are
not run.
To exit
Menu> or <Menu. JOB MENU displays. Press Menu> or <Menu until Reset Printer appears on
the second line of the operator panel display. Press
Note: Resetting the printer deletes all current data from the print buffer,including all Print and
Hold jobs. See
Note: For documentation pur-
poses,
to any of the following jobs: Confidential Job, Reserve Print Job,
Repeat Print Job, and Verify
Print Job. See page 108 for
more information on Print and
Hold jobs.
Print and Hold jobs
Select to enter Hex Trace mode.
Hex Trace,turn the printer power Off (O), or reset the printer. To reset the printer, press
Select.
Reset Printer on page 70 for more information.
Job Menu
Some JOB MENU menu items are available when the
printer displays the
Ready message and is idle since it is
not accepting, formatting, or printing a job. Other menu
items in JOB MENU are only available when the printer is
busy processing or printing a job, when a printer message
other than
Trace
Ready displays, or when the printer is in Hex
mode.
refers
Operator Panel Menus
59
Page 72

Job Menu
Menu Item Values
Cancel Job Press
Cancel Job displays only when the printer is processing a print job.
CONFIDENTIAL
JOB
This menu item is
not
displayed in the
JOB MENU until the
printer has
processed at least
one Confidential
Job.
Note: Use your
software application
orprinterdriverto
create and send a
Confidential Job.
Enter PIN
Once a correct Personal Identification Number (PIN) is entered, the following values are
available as second and third sub-menus. See “Entering a Personal Identification Number
(PIN)” on page 111 for more information.
Print All Jobs
PRINT A JOB
<Job #1 Username> <Job #1 Jobname>
<Job #2 Username> <Job #2 Jobname>
<Job #3 Username> <Job #3 Jobname>
<Job #n Username> <Job #n Jobname>
Delete All Jobs
DELETE A JOB
<Job #1 Username> <Job #1 Jobname>
<Job #2 Username> <Job #2 Jobname>
<Job #3 Username> <Job #3 Jobname>
<Job #n Username> <Job #n Jobname>
PRINT COPIES
<Job #1 Username> <Job #1 Jobname>
<Job #2 Username> <Job #2 Jobname>
<Job #3 Username> <Job #3 Jobname>
<Job #n Username> <Job #n Jobname>
Note: In the sub-menu values listed above, the Username field is based on the username
field in your driver. By default, this is the user name or user ID you type to log on to your
operating system. You can change the name in this field to another name in the driver before
you send the job. The Jobname field contains a title name for your file as defined by your
application software when the job was sent. Youcannot change this field. If one or both of the
fields is empty, the name was not defined by the application. For example, if your last name is
Smith and your file is called timesheet, the operator panel may display
Username and Jobname fields are truncated to 16 characters.
Select to cancel the current print job.
...
...
...
smith timesheet.The
60
When you create a Confidential Job, the printer formats your job and holds the job in memory.
The printer delays the printing of your job until you enter a PIN assigned to the job. You enter
the number through the operator panel. See“Entering a PersonalIdentification Number (PIN)”
on page 111 for more information.
Chapter 3: Using the Operator Panel and Menus
Page 73

Job Menu (continued)
Menu Item Values
CONFIDENTIAL
JOB
(continued)
Once a valid PIN is entered, the operator panel displays:
CONFIDENTIAL JOB
Print All Jobs
You have several print or delete options to choose from:
• print all jobs
• print a job
• print copies
• delete all jobs
• delete a job
Menu> or <Menu until the menu item you need appears on the second line of the
Press
display.
Press
Select.
While in the values for this menu item, the following button actions are possible:
• Press
• Press
• Press
Note: While in the
JOB
MENU
Go to exit the selection and the menu group, and return to the previous screen.
Menu> or <Menu to choose the next or previous option in the list.
Return to exit the operation, but remain in the JOB MENU or to return to the previous
screen after scrolling through a list of print jobs.
CONFIDENTIAL JOB menu item, you can make selections in both PRINT A
and DELETE A JOB values. Then, both actions occur when you press Go to exit the JOB
.
Operator Panel Menus
61
Page 74

Job Menu (continued)
Menu Item Values
CONFIDENTIAL
JOB
(continued)
Print All Jobs
If you press Select to choose this value, printing starts and the operator panel exits this
operation.
All Confidential Jobs associated with your assigned PIN are printed.
The message
page 156.
PRINT A JOB
If you press Select to choose this value, a list of jobs available for printing is displayed.The
first job is displayed on the second line.
PRINT A JOB
<Job #1 Username> <Job #1 Jobname>
All Confidential Jobs associated with your assigned PIN are listed. Use
scroll through the list of available jobs.
PRINT A JOB
<Job #2 Username> <Job #2 Jobname>
See the note on page 60 for an explanation of Username and Jobname.
Menu> or <Menu to scroll to the job you want to print. When the job is on the second
Press
line of the display,press
job for printing. You may select additional jobs to print by marking them with an asterisk.
Note: If you make a mistake and mark the wrong job, press
The asterisk beside the print job is removed.
When a job has been marked for printing, the job is removed from the list of available print
jobs in the
Return until you exit the menus or press Go to exit the menus. The message Queuing
Press
Jobs
displays; however,the message Queuing and Deleting Jobs displays if you previously
selected some print jobs for deletion. Once the printer exits the menus and returns to an
online state, the job starts printing. For more information, see
Deleting Jobs
Queuing Jobs displays. For more information, see “Queuing Jobs” on
Menu> or <Menu to
Select to mark the job for printing. An asterisk (*) appears to mark the
Select again to unmark the job.
DELETE A JOB list. See DELETE A JOB on page 63 for more information.
Queuing Jobs and Queuing and
on page 156.
62
Chapter 3: Using the Operator Panel and Menus
Page 75

Job Menu (continued)
Menu Item Values
CONFIDENTIAL
JOB
(continued)
Delete All Jobs
If you press Select to choose this value, the message Delete All Jobs. Go/Stop? displays. You
have one chance to stop the deletion of all the confidential jobs associated with your PIN.
Note: All Confidential Jobs associated with your assigned PIN are deleted.
Stop if you do not want to delete all jobs. The operator panel returns to the following
Press
screen, and you may choose to exit the
value using
CONFIDENTIAL JOB
Delete All Jobs
Press
Menu> or <Menu.
Go to delete all jobs. The message Deleting Jobs displays. The jobs are deleted and
CONFIDENTIAL JOB menu item or scroll to another
the printer exits the menus.
DELETE A JOB
If you press Select to choose this value, a list of jobs held in printer memory is displayed as
shown. The first job is displayed on the second line.
DELETE A JOB
<Job #1 Username> <Job #1 Jobname>
All Confidential Jobs associated with your assigned PIN are listed. Use
Menu> or <Menu to
scroll through the list of available jobs.
DELETE A JOB
<Job #2 Username> <Job #2 Jobname>
See the note on page 60 for an explanation of Username and Jobname.
Menu> or <Menu to scroll to the job you want to delete. When the job is on the second
Press
line of the display, press
Select to mark a job for deletion. An asterisk (*) appears to mark the
job for deletion. You may select additional jobs to delete by marking them with an asterisk.
Note: If you make a mistake and mark the wrong job, press
Select again to unmark the job.
The asterisk beside the print job is removed.
When a job has been marked for deletion, the job is removed from the list of available print
jobs in the
PRINT COPIES on page 64 for more information.
Press
PRINT A JOB list and the PRINT COPIES list. See PRINT A JOB on page 62 and
Return until you exit the menus or press Go to exit the menus. Once the printer exits the
menus and returns to an online state, the jobs you selected are deleted. The message
Deleting Jobs displays; however, the message Queuing and Deleting Jobs displays if you
previously selected some jobs to print. For more information, see
and Deleting Jobs
on page 153.
Deleting Jobs and Queuing
Operator Panel Menus
63
Page 76

Job Menu (continued)
Menu Item Values
CONFIDENTIAL
JOB
(continued)
PRINT COPIES
If you press Select to choose this value, a list of jobs held in printer memory is displayed as
shown. The first job is displayed on the second line.
PRINT COPIES
<Job #1 Username> <Job #1 Jobname>
All Confidential Jobs associated with your assigned PIN are listed. Use
Menu> or <Menu to
scroll through the list of available jobs.
PRINT COPIES
<Job #2 Username> <Job #2 Jobname>
See the note on page 60 for an explanation of Username and Jobname.
You may select one or more jobs to print and you may change the number of copies for each
jobtobeprinted.
Menu> or <Menu to scroll to the one job you want to print. When the job is on the
Press
second line of the display, press
Select.
The following prompt displays:
Copies
=x*
The setting for the current number of copies is indicated by the asterisk (*). Press
<Menu to increase or decrease the number of copies as specified by the
x
Menu> or
value. Y ou may
choose to print from 1 to 999 copies of a single job at a time.
Select to save the setting for the number of copies you need. The Saved message
Press
displays and then the list of jobs displays. An asterisk (*) appears beside the job name to
indicate it is selected for printing. You may select other jobs to print and change the number of
copies required.
When a job has been marked for printing, the job is removed from the list of available print
jobs in the
When you finish making selections and change the number of copies, press
exit the menus or press
the message
DELETE A JOB list. See DELETE A JOB on page 63 for more information.
Return until you
Go to exit the menus. The message Queuing Jobs displays; however,
Queuing and Deleting Jobs displays if you previously selected some jobs for
deletion. Once the printer exits the menus and returns to an online state, the remaining copies
print. Once all copies are printed, the job is deleted from printer memory. For more information, see
Queuing Jobs and Queuing and Deleting Jobs on page 156.
64
Chapter 3: Using the Operator Panel and Menus
Page 77

Job Menu (continued)
Menu Item Values
HELD JOBS
This menu item is
not
displayed in the
JOB MENU until the
printer has
processed at least
one Repeat Print,
Reserve Print, or
Verify Print job.
Note: Use your
software application
orprinterdriverto
create and send a
Repeat Print,
Reserve Print, or
Verify Print job.
Print All Jobs
PRINT A JOB
<Job #1 Username> <Job #1 Jobname>
<Job #2 Username> <Job #2 Jobname>
<Job #3 Username> <Job #3 Jobname>
...
<Job #n Username> <Job #n Jobname>
Delete All Jobs
DELETE A JOB
<Job #1 Username> <Job #1 Jobname>
<Job #2 Username> <Job #2 Jobname>
<Job #3 Username> <Job #3 Jobname>
...
<Job #n Username> <Job #n Jobname>
PRINT COPIES
<Job #1 Username> <Job #1 Jobname>
<Job #2 Username> <Job #2 Jobname>
<Job #3 Username> <Job #3 Jobname>
...
<Job #n Username> <Job #n Jobname>
Note: In the sub-menu values listed above, the Username field is based on the username
field in your driver. By default, this is the user name or user ID you type in to log on to your
operating system. You can change the name in this field to another name in the driver before
you send the job. The Jobname field contains a title name for your file as defined by your
application software when the job was sent. Youcannot change this field. If one or both of the
fields is empty, the name was not defined by the application. For example, if your last name is
Smith and your file is called timesheet, the operator panel may display
Username and Jobname fields are truncated to 16 characters.
smith timesheet.The
Unlike a Confidential Job, you do not enter a PIN to access the values once you enter the
HELD JOBS menu item.
When you create a Repeat Print job, the job formats and prints, but the printer stores the job
in memory so you can print additional copies of the job at a later time. As long as the job
remains stored in memory, you may print additional copies. Repeat Jobs are automatically
deleted when the printer requires extra memory to process additional jobs or when the
number of Repeat Jobs stored exceeds the value of the set limit for
Job Limit
When you create a Reserve Print job, the job formats, but does not print. The printer stores
the job in memory so you can print the job at a later time. All pages in the job are held in
memory until you activate printing by using the operator panel to select
PRINT A JOB. Reserve Print jobs are not deleted from memory when the job prints. To delete
a Reserve Print job, you must request
. For more information about this setting, refer to the
DELETE A JOB using the operator panel.
Operator Panel Menus
Print and Hold Repeat
Technical Reference
Print All Jobs or
.
65
Page 78

Job Menu (continued)
Menu Item Values
HELD JOBS
(continued)
When you create a Verify Print job, the job formats, and one copy of the job prints. Additional
requested copies are held in printer memory. You specify the number of copies you want
when you send the job from the printer driver. This allows you to examine the first copy to be
sure it is satisfactory before you print the other copies.
If the job is unsatisfactory,you would not want the other copies to print. Select the
DELETE A J OB value, and select the job to delete it. See DELETE A JOB on page 68 for more
information.
To print the remaining copies, you can:
• Changethe number of remaining copies to print. Select
job. At the
printer driver and press
Copies prompt, change the number of copies to print from the number set in the
Select.PressReturn until you exit the menus or press Go to exit
PRINT COPIES. Select the specific
the menus. Once the printer exits the menus and returns to an online state, the remaining
copies print. Once all copies are printed, the job is deleted from printer memory. For more
information, see
• Print the number of copies set in the printer driver.Select
PRINT COPIES on page 69.
PRINT A JOB. Select the specific
job. The remaining copies print. Once all copies are printed, the job is deleted from printer
memory.For more information, see PRINT A JOB on page 67.
Once you select
HELD JOBS
Print All Jobs
HELD JOBS, the operator panel displays:
You have several print or delete options to choose from:
• print all jobs
• print a job
• print copies
• delete all jobs
• delete a job
Menu> or <Menu until the menu item you need appears on the second line of the
Press
display.
Select.
Press
While in the values for this menu item, the following button actions are possible:
• Press
• Press
• Press
Go to exit the selection, the menu group, and return to the previous screen.
Menu> or <Menu to choose the next or previous option in the list.
Return to exit the operation, but remain in the JOB MENU or to return to the previous
screen after scrolling through a list of print jobs.
Note: Whileinthe
PRINT A JOB and DELETE A JOB values. Then, both actions occur when you press Go to exit
JOB MENU.
the
HELD JOBS menu item, you can make selections in both
66
Chapter 3: Using the Operator Panel and Menus
Page 79

Job Menu (continued)
Menu Item Values
HELD JOBS
(continued)
Print All Jobs
If you press Select to choose this value, printing starts and the operator panel exits this
operation.
All Repeat Print, Reserve Print, and Verify Print jobs are printed.
The message
page 156.
PRINT A JOB
If you press Select to choose this value, a list of jobs available for printing is displayed.The
first job is displayed on the second line.
PRINT A JOB
<Job #1 Username> <Job #1 Jobname>
Queuing Jobs displays. For more information, see “Queuing Jobs” on
All Repeat Print, Reserve Print, and Verify Print jobs are listed. Use
through the list of available jobs.
PRINT A JOB
<Job #2 Username> <Job #2 Jobname>
See the note on page 65 for an explanation of Username and Jobname.
Menu> or <Menu to scroll to the one job you want to print. When the job is on the
Press
second line of the display, press
mark the job for printing. You may select additional jobs to print by marking them with an
asterisk.
Note: If you make a mistake and mark the wrong job, press
The asterisk beside the print job is removed.
When a job has been marked for printing, the job is removed from the list of available print
jobs in the
Press
Jobs
selected some jobs for deletion. Once the printer exits the menus and returns to an online
state, the jobs you selected start printing. For more information, see
Queuing and Deleting Jobs on page 156.
DELETE A JOB list. See DELETE A JOB on page 68 for more information.
Return until you exit the menus or press Go to exit the menus. The message Queuing
displays; however,the message Queuing and Deleting Jobs displays if you previously
Select to mark a job for printing. An asterisk (*) appears to
Select again to unmark the job.
Menu> or <Menu to scroll
Queuing Jobs and
Operator Panel Menus
67
Page 80

Job Menu (continued)
Menu Item Values
HELD JOBS
(continued)
Delete All Jobs
If you press Select to choose this value, the message Delete All Jobs. Go/Stop? displays so
you have one chance to stop the deletion of all the print jobs you have sent.
Note: All Repeat Print, Reserve Print, and Verify Print jobs will be deleted.
Stop if you do not want to delete all jobs. The operator panel returns to the following
Press
screen, and you may choose to exit the
value using
CONFIDENTIAL JOB
Delete All Jobs
Press
Menu> or <Menu.
Go to delete all jobs. The message Deleting Jobs displays. The jobs are deleted and
CONFIDENTIAL JOB menu item or scroll to another
the printer exits the menus.
DELETE A JOB
If you press Select to choose this value, a list of jobs held in printer memory is displayed as
shown. The first job is displayed on the second line.
DELETE A JOB
<Job #1 Username> <Job #1 Jobname>
All Repeat Print, Reserve Print, and Verify Print jobs are listed. Use
Menu> or <Menu to scroll
through the list of available jobs.
DELETE A JOB
<Job #2 Username> <Job #2 Jobname>
68
See the note on page 65 for an explanation of Username and Jobname.
Menu> or <Menu to scroll to the one job you want to delete. When the job you want to
Press
delete is on the second line of the display, press
(*) appears to mark the job for deletion. You may select additional jobs to delete by marking
them with an asterisk.
Note: If you make a mistake and mark the wrong job, press
The asterisk beside the job is removed.
When a job has been marked for deletion, the job is removed from the list of available jobs in
PRINT A JOB list and the PRINT COPIES list. See PRINT A JOB on page 67 and PRINT
the
COPIES
Press
on page 69 for more information.
Return until you exit the menus or press Go to exit the menus. Once the printer exits the
menus and returns to an online state, the job is deleted. The message
however, the message
Queuing and Deleting Jobs displays if you previously selected some
jobs to print. For more information, see
page 153.
Chapter 3: Using the Operator Panel and Menus
Select to mark a job for deletion. An asterisk
Select again to unmark the job.
Deleting Jobs displays;
Deleting Jobs and Queuing and Deleting Jobs on
Page 81

Job Menu (continued)
Menu Item Values
HELD JOBS
(continued)
PRINT COPIES
If you press Select to choose this value, a list of jobs held in printer memory is displayed as
shown. The first job is displayed on the second line.
PRINT COPIES
<Job #1 Username> <Job #1 Jobname>
All Repeat Print, Reserve Print, and Verify Print jobs are listed. Use
through the list of available jobs.
PRINT COPIES
<Job #2 Username> <Job #2 Jobname>
See the note on page 65 for an explanation of Username and Jobname.
You may select one or more jobs to print and you may change the number of copies for each
jobtobeprinted.
Menu> or <Menu to scroll to the job you want to print. When the job is on the second
Press
line of the display, press
The following prompt displays:
Copies
=x*
The setting for the current number of copies is indicated by the asterisk (*). Press
<Menu to increase or decrease the number of copies as specified by the
choose to print from 1 to 999 copies of a single job at a time.
Note: You specify a certain number when you send a Verify Print Job. For more information,
see “Verify Print Job” on page 110.
Select to save the setting for the number of copies you need. The Saved message
Press
displays and then the list of jobs displays. There is now an asterisk beside the job name to
indicate it is selected for printing. You may select other jobs to print and change the number of
copies required.
When a job has been marked for printing, the job is removed from the list of available jobs in
DELETE A JOB list. See DELETE A JOB on page 68 for more information.
the
When you are finished making selections and changing the number of copies, press
until you exit the menus or press Go to exit the menus. The message Queuing Jobs displays;
however, the message
jobs for deletion. Once the printer exits the menus and returns to an online state, the
remaining copies print. For more information, see
on page 156.
Select.
Queuing and Deleting Jobs displays if you previously selected some
Queuing Jobs and Queuing and Deleting
Menu> or <Menu to scroll
Menu> or
x
value. Y ou may
Return
Operator Panel Menus
69
Page 82

Job Menu (continued)
Menu Item Values
Reset Printer Press Select to reset the printer.
Note: Before selecting
When you select
item. All downloaded resources (fonts, macros, symbol sets) in printer memory (RAM) are
deleted. All data on the currently selected host interface is deleted from the interface link
buffer. All Print and Hold jobs are deleted.
Reset Printer, exit the software application you are using.
Reset Printer, the printer resets to the user default setting for each menu
Print Buffer Press
This menu item is only available when you enter the
displayed.The
is being printed. Examples include sending a print screen command from your host computer
or copying a DOS file.
Select to print any data stored in the print buffer.
JOB MENU while the Waiting message is
Waiting state occurs if an incomplete job is sent to the printer or if an ASCII job
70
Chapter 3: Using the Operator Panel and Menus
Page 83

Quality Menu
Quality Menu
Menu Item Values
Print Resolution 300 dpi
600 dpi*
1200 Image Q
The Print Resolution setting defines the number of dots printed per inch (dpi). The higher the
setting, the sharper the clar ity of printed characters and graphics.
If your print jobs are mostly text, select
1200 Image Q (1200 Image Quality) when your job contains bitmapped images, such as
scanned photos or some business graphics, that will benefit from enhanced line screening.
Toner Darkness 1
2
3
4
5
6
7
8*
9
10
Use the QUALITY MENU to change settings affecting the
quality of the printed characters and images.
600 dpi for the highest quality output. Select
*Factory default
Use the Toner Darkness menu item to lighten or darken the image appearance in your print
jobs and get the most from your toner supply.
If you want finer line width, higher definition in graphics, and lighter gray-scale images, set
Toner Darkness to 6 or 7.
If you want a bolder line width, emphasis in graphics, or darker gray-scale images, set
Toner Darkness to 9 or 10. Use the 10 value to emphasize line width, produce the boldest text,
and the darkest images.
If you want to help conserve the printer toner supply, use the
1 to 5 values.
Operator Panel Menus
71
Page 84

Quality Menu (continued)
Menu Item Values
Toner Darkness
When you first enter Toner Darkness, the operator panel displays:
(continued)
Notice the periods (
represents one of the numbers 1 through 10 from left to right. A symbol like a
points to the location of the
A minus sign (
numbers in the string. A plus sign (
scrolling to the higher numbers in the string. If you decide to change the setting to
example, use
As you scroll backward toward the minus sign (
arrow symbol moves on the operator panel as you press the
place of the sixth period. Notice the numeral
selection. A vertical bar (
unless 8 is selected. Then, the arrow covers the vertical bar.
Press
PQET Off
On*
When printed characters appear to have jagged or uneven edges, set PQET (Print Quality
Enhancement Technology) to
characters appear smoother.
Toner Darkness
=8 -.......v..+*
.) displayed across the second line of the operator panel. Each period
v or an arrow
8 value, which is the factory default.
-) at the left end of the string of periods indicates you are scrolling to the lower
+) at the right end of the string of periods indicates you are
6,for
<Menu to scroll back to the 6.
Toner Darkness
=6 -.....v.|..+
-) indicating lower numbers, notice the v or
<Menu button. It now appears in
6 displays next to the equal sign to indicate your
|) indicates the factory default of 8. The vertical bar remains at 8
Select to select 6 as your current setting. The Saved message displays.
On to improve the print quality of your text and make the
PictureGrade Off
*Factory default
72
Chapter 3: Using the Operator Panel and Menus
On*
Use the PictureGrade™ menu item to improve the quality of gray-scale printing at 300 and
600 dpi resolutions in PostScript 3 emulation.
If you select
Off, the printer uses the standard screening parameters. If you select On,
different default screening parameters are used to improve the print quality of graphics.
Page 85

Setup Menu
Setup Menu
Menu Item Values
Printer Language PCL Emulation*
PS Emulation
The printer language defines how the computer communicates with the printer. Your computer
uses printer languages, such as PCL emulation and PostScript 3 emulation, to send print data
to the printer. Setting a printer language as the default does not prevent the software application from sending print jobs that use the other printer language.
Power Saver Disabled
1…120 (20*) [Optra M410]
1…240 (15*) [Optra M412]
The Power Saver menu item lets you reduce power usage when the printer is idle by determining the length of time (in minutes) the printer waits after a job is printed before it goes to a
reduced power state.
If you have selected a
message and becomes the new printer default when the printer is in a Ready state. Both
messages indicate the printer is ready to receive jobs.
If your printer is in constant use, select a high setting, such as 120. Under most circumstances, this keeps the printer ready to print with minimum warm-up time. However, a high
setting also uses more energy.
PowerSaver to 1 to put the printer in Power Saver mode one minute after it finishes a print
Set
job.This uses much less energy,but requires more warm-up time for the printer. If your printer
shares an electrical circuit with room lighting and you notice lights flickering, you may want to
Power Saver to 1.
set
If you want a balance between energy consumption and a shorter warm-up period, select a
Power Saver value between 1 and 120 minutes or 1 and 240 minutes depending on your
printer model.
Note: Some printer models released in the year 2000 or later designated as Energy Star
printers cannot have Power Saver disabled.
Use the SETUP MENU to configure a variety of printer
features.
Power Saver value, the Power Saver message replaces the Ready
Resource Save Off*
On
The Resource Save setting determines what the printer does with downloaded resources,
such as fonts and macros, if it receives a job that requires more memory than is available.
Resource Save is set to On, the printer retains all permanent downloaded resources for all
If
printer languages during language changes and printer resets. If the printer runs out of
memory,
Resource Save is set to Off, the printer retains permanent downloaded resources only until
If
memory is needed. Then it deletes those resources stored for the inactive printer language.
*Factory default
Memory Full appears on the operator panel display.
Operator Panel Menus
73
Page 86

SetupMenu(continued)
Menu Item Values
Download Target RAM*
Flash
Disk
The Download Target menu item specifies the storage location for downloaded resources,
such as fonts and macros.
Storing downloaded resources in flash memory or hard disk is permanent storage rather than
the temporary storage that RAM provides. You can add resources to flash memory or to the
hard disk until the option is full. Use your software application or the printer Toolkit to
download resources to the printer.
Download Targetmenu item only displays if a formatted flash memory option or hard disk
The
option is installed in the printer and is
51 Defective Flash or 61 Defective Disk may display when the printer is turned on, or during
format and write operations. See
page 165 for more information.
Disk does
Size
on page 77 for more information.
If neither option is installed,
are automatically stored in printer memory (RAM).
Print Timeout Disabled
1…255 (90*)
The Print Timeout setting determines the time (in seconds) the printer waits before printing
the last page of a print job that does not end with a command to print the page. The print
timeout counter does not start until the
When a print timeout occurs, the printer stores the page in the print buffer.
Select
print the last page of a print job until one of the following occurs:
• The printer receives enough information to fill the page.
• The printer receives a Form Feed command.
• You select
not
defective or Read/Write or Write protected.
51 Defective Flash on page 161 or 61 Defective Disk on
not
display for Download Target if Job Buffer Size is set to 100%.SeeJob Buffer
Download Target does
Waiting message displays.
Disabled to turn Print Timeout off. When Print Timeout is disabled, the printer does not
Print Buffer from the JOB MENU. See page 70 for more information.
not
display and all downloaded resources
Wait Timeout Disabled
*Factory default
74
Chapter 3: Using the Operator Panel and Menus
15…65535 (40*)
The Wait Timeout setting determines the amount of time (in seconds) the printer waits to
receive additional bytes of data from the computer. When this timeout expires, the print job is
canceled.
Select
Wait Timeout is only available when using PostScript 3 emulation. The setting has no effect
on PCL emulation print jobs.
Disabled to turn Wait Timeout off.
Page 87

SetupMenu(continued)
Menu Item Values
Auto Continue Disabled*
5…255
Set Auto Continue to a value between 5 seconds and 255 seconds to have the printer
continue printing after it detects one of the following errors:
34 Short Paper
35 Res Save Off Deficient Memory
37 Insufficient Collation Area
37 Insufficient Defrag Memory
37 Insufficient Memory
38 Memory Full
39 Complex Page
51 Defective Flash
52 Flash Full
53 Unformatted Flash
54 Serial Option 1 Error
54 Std Par ENA Connection Lost
54 Par 1 ENA Connection Lost
54 Ser 1 Fax Connection Lost
54 Network 1 Software Error
55 Insufficient Fax Buffer
56 Serial Port 1 Disabled
56 Std Parallel Port Disabled
56 Parallel Port 1 Disabled
58 Too Many Flash Options
61 Defective Disk
62 Disk Full
63 Unformatted Disk
Print Jobs on Disk? Go/Stop?
If one of these errors occurs and
for operator intervention. When
the specified length of time and then automatically resumes processing.
This setting is also used as a timer. After an inactive period in the menus, the printer automatically exits the menus and returns to the
Auto Continue is set to Disabled, the printer stops and waits
Auto Continue is set to a numerical value, the printer waits for
Ready state.
Jam Recovery On
Off
Auto*
When Jam Recovery is set to Off, the printer does not reprint a page that has jammed.
When
printer signals that the page has successfully exited the printer. The printer reprints all
jammed pages.
If
memory required to hold the page is needed for other printer tasks.
*Factory default
Jam Recovery is set to On, the printer keeps the image for a printed page until the
Jam Recovery is set to Auto, the printer keeps the image and reprints the page unless the
Operator Panel Menus
75
Page 88

SetupMenu(continued)
Menu Item Values
Page Protect Off*
On
Set Page Protect to On to make sure an entire page is processed before it is printed. This may
be helpful if you are having trouble printing a page properly because of complex page errors.
If you still cannot print the page, your printer may not have enough memory to process the
page. Youmay have to reduce the size and number of fonts on the page, or increase the
installed printer memory.
For most print jobs, you do not need to set
On, printing may be slowed.
Print Area Normal*
Whole Page
The Print Area setting lets you modify the PCL formatting area and the printer physical print
area. Refer to the
Display Language English*
French
German
Italian
Spanish
Danish
Norwegian
Dutch
Swedish
Portuguese
Finnish
The following languages appear as a menu item value on some operator panels:
Japanese
Russian
Polish
Hungarian
Turkish
Czech
Technical Reference
Page Protect to On.WhenPage Protect is set to
for more information about printable areas.
*Factory default
76
Chapter 3: Using the Operator Panel and Menus
The Display Language setting determines the language of the text that appears on the
operator panel display.
Page 89

SetupMenu(continued)
Menu Item Values
Alarm Control Off
Single*
Continuous
If you want the printer alarm to sound any time the printer requires intervention, select Single
or Continuous. If you select Single, the printer sounds three quick beeps to let you know
operator intervention is required. If you select
every ten seconds.
Select
Job Buffer Size Disabled*
10…100%
If you have a hard disk option installed in your printer, you can allocate a portion of the
available hard disk space for processing print jobs. The job is temporarily stored on the hard
disk before being printed, usually freeing the host computer while the job prints.
Job Buffer Size menu item lets you select the amount of hard disk space allocated to job
The
buffering for all ports that have
between 10% and 100%. You must select a
Job Buffering menu item On in the PARALLEL MENU or USB MENU.SeeJob Buffering on
page 85 and on page 101 for more information.
Job Buffer Size menu item only displays if the installed hard disk option is formatted and
The
not
is
printer is turned on, or during disk format and write operations. See
page 165 for more information.
To password protect the hard disk option and use
following steps in order:
• Set the
• Download the files you want to the hard disk option.
• Password protect the disk.
Refer to the
disk option.
Warning: If you change the job buffer size, the printer formats the hard disk, and all resources
stored on the disk are deleted.
Continuous, the printer repeats the three beeps
Off if you do not want the alarm to sound.
Job Buffering set to On. Youcan choose any 1% increment
Job Buffer Size before you can set the
defective or Read/Write or Write protected. 61 Defective Disk may display when the
61 Defective Disk on
Job Buffering simultaneously, perform the
Job Buffer Size for the hard disk option.
Technical Reference
for detailed information on how to password protect the hard
*Factory default
Operator Panel Menus
77
Page 90

SetupMenu(continued)
Menu Item Values
Job Accounting Off*
On
If Job Accounting is set to On, the installed hard disk option stores statistical information
about the most recent printer jobs. The statistics include whether the job printed with or
without errors, the time required to print the job, the size (in bytes) of the job, the requested
paper size and paper type, the total number of printed pages, and the number of copies
requested.
To print a listing of all the accumulated statistics, select
item in the
Job Accounting menu item does
The
Read/Write or Write protected, or if
page 77 for more information.
Print from the Job Acct Stat menu
UTILITIES MENU.SeeJob Acct Stat on page 59 for more information.
not
display if the installed disk option is defective or
Job Buffer Size is set to 100%.SeeJob Buffer Size on
Job Acct Limit Disabled
*Factory default
10…1000* (in increments of 1 job)
If a hard disk option is installed in your printer, you can use the hard disk to store statistical
information about a specified number of jobs. The value you select from the
menu item determines the number of jobs for which statistics are stored. Once you reach the
job limit, statistics for the oldest job are deleted as new statistics are stored, maintaining
statistics for the specified number of jobs.
If you select
memoryavailableontheharddisk.
Job Acct Limit menu item does
The
Read/Write or Write protected, or if
page 77 for more information.
Warning: When you change the
disk option is discarded.
Job Acct Limit
Disabled, the number of jobs for which statistics are stored is limited to the
not
display if the installed hard disk option is defective or
Job Buffer Size is set to 100%.SeeJob Buffer Size on
Job Acct Limit value, all statistical information stored on the
78
Chapter 3: Using the Operator Panel and Menus
Page 91

PCL Emul Menu
Use the PCL EMUL MENU to change printer settings that
only affect jobs printed using the PCL emulation printer
language.
PCL Emul Menu
Menu Item Values
Font Source Resident*
Download
Flash
Disk
All
The Font Source setting determines which fonts appear in the Font Name menu.
If a font source is not installed or does not contain any fonts, it is not listed as a value. Fonts
are loaded and stored on the flash memory option.
See “Understanding Fonts” on page 231 for more information.
Font Name Font position and font name for all fonts in the selected font source (displays on both lines of
the operator panel)
(R0 Courier*)
After you select a font source, choose the specific font from the Font Name menu item. The
printer displays the font source abbreviation, font ID, and font name for each font. The font
source abbreviation is
Note: Always select the correct
To print a font sample list showing all the fonts available for PCL emulation, see “Printing a
Font Sample List” on page 242.
R for resident, F for flash, K for disk, and D for download.
Font Source before you select the Font Name.
Point Size
(only displays for
PostScript or
typographic fonts)
*Factory default
1…1008 (in increments of 0.25)
(12*)
Point size
1/72 of an inch.
If you chose a scalable typographic font, you can select the point size for the font. You can
select point sizes from 1 to 1008 in increments of 0.25 points. See “Pitch and Point Size” on
page 232 for more information.
refers to the height of the characters in the font. One point equals approximately
Operator Panel Menus
79
Page 92

PCL Emul Menu (continued)
Menu Item Values
Pitch
(only displays for
fixed or
monospaced fonts)
0.08…100 (in increments of 0.01)
(10*)
Pitch
refers to the number of fixed-space characters in a horizontal inch of type.
If you chose a scalable monospaced font, you can select the font pitch. You can select a pitch
from 0.08 to 100 characters per inch (cpi) in increments of 0.01 cpi. For non-scalable
monospaced fonts, the pitch displays, but it cannot be changed. See “Pitch and Point Size” on
page 232 for more information.
Symbol Set List of Symbol Set IDs and Symbol Set names (displays on both lines of the operator panel)
10U PC-8* (Country specific)
12U PC-850* (Country specific)
A symbol set is a set of alphabetic and numeric characters, punctuation, and special symbols
used when printing with a selected font. Symbol sets support the different requirements for
languages or specific applications, such as math symbols for scientific text. The printer
displays only the symbol sets supported for the selected font name.
Orientation Portrait*
Landscape
The Orientation setting determines how the printing is oriented on the page.
Portrait to print parallel to the short edge of the print material.
Select
This is
PORTRAIT
orientation.
This is
PORTRAIT
orientation.
This is
*Factory default
80
Chapter 3: Using the Operator Panel and Menus
Landscape to print parallel to the long edge of the print material.
Select
This is
LANDSCAPE
orientation. This
is LANDSCAPE
orientation.
Page 93

PCL Emul Menu (continued)
Menu Item Values
Lines per Page 1…255
60* (Country specific)
64* (Country specific)
Use the Lines per Page menu item to change the number of lines that print on each page.
Lines per Page setting can range from 1 to 255 lines per page. The printer sets the
The
amount of space between each line (vertical line spacing) based on the
PAPER SIZE,andOrientation settings. Select the correct PAPER SIZE from the PAPER MENU
and Orientation before setting Lines per Page.SeePAPER SIZE on page 45 and Orientation
on page 80 for more information.
A4 Width 198 mm*
203 mm
The A4 Width menu item lets you select the width of the logical page for A4 paper.
When you select
Hewlett-Packard LaserJet 5 printer.When you select
wide enough to print eighty 10-pitch characters.
*Factory default
Lines per Page,
198 mm, the width of the logical page is compatible with that of the
203 mm, the width of the logical page is
Operator Panel Menus
81
Page 94

PCL Emul Menu (continued)
Menu Item Values
TRAY RENUMBER Assign MP Feeder
Assign Tray 1
Assign Tray 2
Assign Man Paper
Assign Man Env
Each of the above menu items supports the following three values:
Off*
0...199
None
VIEW FACTORY DEF
Restore Defaults
Yes
No
Assign Tray 2 only displays if the optional 500-sheet drawer is installed.
Note:
Assign MP Feeder only displays when Configure MP is set to Cassette.
Only installed paper sources display on the operator panel as values. However, you may set
TRAY RENUMBER to uninstalled sources.
TRAY RENUMBER menu item lets you configure your printer to work with printer drivers
The
or applications that use different source assignments to request a given input source.
Off to use the factory default paper source assignments.
Select
Select a numeric value (
VIEW FACTORY DEF to view the factory default values assigned to each paper source.
Select
Restore Defaults menu item, select Yes to return all tray assignments to factory default
In the
values.
See “Paper Sources and Sizes” on page 116 for information on available paper sources for
your printer.
Refer to the
Technical Reference
0 ... 199)toassignacustomvaluetoapapersource.
for more information about assigning source numbers.
Auto CR after LF Off*
Auto LF after CR Off*
*Factory default
82
Chapter 3: Using the Operator Panel and Menus
On
The Auto CR after LF setting determines if the printer automatically performs a carriagereturn
after a line feed control command.
On
The Auto LF after CR setting determines if the printer automatically performs a line feed after
a carriage return control command.
Page 95

PostScript Menu
PostScript Menu
Menu Item Values
Print PS Error Off*
On
Select On to print PostScript 3 emulation errors. If an error occurs, the job stops processing,
the error message prints, and the printer discards the job.
Print PS Error is set to Off and an error occurs, the job is discarded but no error message
If
prints.
Use the POSTSCRIPT MENU to change settings that only
affect jobs printed using the PostScript 3 emulation printer
language.
Font Priority Resident*
Flash / Disk
The Font Priority menu item only displays if a flash memory or disk option is installed,
formatted and is
100%.SeeJob Buffer Size on page 77 for more information.
*Factory default
not
defective,Read/Write or Write protected and Job Buffer Size is
not
set to
Operator Panel Menus
83
Page 96

Parallel Menu
Parallel Menu
Menu Item Values
PCL SmartSwitch Off
On*
If PCL SmartSwitch is set to On, the printer examines the data on the parallel interface
connection and selects PCL emulation if the data indicates that is the printer language.
If both
specifiedinthe
Off, the printer uses the language that has its SmartSwitch setting set to On as the default.
to
PS SmartSwitch Off
On*
Use the PARALLEL MENU to change settings affecting
jobs sent to the printer through the parallel interface connection. PARALLELMENU displays as a standard feature
or as an option, and appears as one of the following:
• STD PARALLEL
• PARALLEL OPT 1
PARALLEL OPT 1 is only available if a parallel/USB
interface option card is installed. The following menu
items set the configuration of the parallel interface connection.
PCL SmartSwitch and PS SmartSwitch are set to Off, the printer uses the language
Printer Language menu as the default. If only one SmartSwitch setting is set
*Factory default
84
Chapter 3: Using the Operator Panel and Menus
If PS SmartSwitch is set to On, the printer examines the data on the parallel interface
connection and selects PostScript 3 emulation if the data indicates that is the printer
language.
PCL SmartSwitch and PS SmartSwitch are set to Off, the printer uses the language
If both
specifiedinthe
Off, the printer uses the language that has its SmartSwitch setting set to On as the default.
to
Printer Language menu as the default. If only one SmartSwitch setting is set
Page 97

Parallel Menu (continued)
Menu Item Values
NPA Mode On
Off
Auto*
NPA is a mode of bidirectional communication that followsthe conventions defined in
Printing Alliance Protocol, A Printer/Host Control Specification Developed by the NPA
mode requires special processing of the print data.
NPA Mode is set to On, the data received must be in NPA format. If not, it is rejected as bad
If
data. If
is set to Auto, the printer examines the data to determine the format and then processes it in
either format.
NPA Mode setting in the PARALLEL MENU applies only to the parallel interface
The
connection.
Note: Changing the
Parallel Buffer Disabled
Job Buffering Off*
Auto*
3K to maximum size allowed
You can configure the size of the parallel input buffer to meet the requirements of your system.
The maximum size available for modification depends on the amount of memory in your
printer, the size of the other link buffers, and whether
maximize the range for the parallel buffersize, you can disable or reduce the size of the serial,
network, infrared, LocalTalk, and Universal Serial Bus (USB) buffers.
Choose
availableprinter memory. In most cases,
Note: Changing the
On
Network
.NPA
NPA Mode is set to Off, the printer does not perform any NPA processing. If NPA Mode
NPA Mode setting automatically resets the printer.
Resource Save is set to On or Off.To
Auto to let the printer calculate a buffer size proportional to the total amount of
Auto is the recommended setting.
Parallel Buffer setting automatically resets the printer.
*Factory default
Job buffering lets you delay processing of a print job. The job is temporarily stored on a hard
disk option before being printed, usually freeing the host computer while the job prints.
Job Buffering menu item only displays if the installed hard disk option is formatted and is
The
not
defective,Read/Writeor Write protected, and if Job Buffer Size is
Job Buffer Size on page 77 for more information. 61 Defective Disk may display when the
printer is turned on, or during disk format and write operations. See
page 165 for more information.
Job Buffering is set to On, print jobs are buffered to the hard disk option. If Job Buffering is
If
Off, print jobs are not buffered.
set to
Note: Changing the
Job Buffering setting automatically resets the printer.
not
set to Disabled.See
61 Defective Disk on
Operator Panel Menus
85
Page 98

Parallel Menu (continued)
Menu Item Values
Advanced Status Off
On*
If Advanced Status is set to On, bidirectional communication is enabled through the parallel
interface.
Protocol Standard
Fastbytes*
You can select Standard or Fastbytes protocol for the parallel interface. Fastbytes is
compatible with most existing parallel interface implementations. Use
experience parallel interface problems.
Refer to the
Honor Init Off*
On
The Honor Init setting determines whether the printer honors hardware initialization requests
from the computer. The computer requests initialization by activating the INIT signal on the
parallel interface. Many personal computers activate the INIT signal each time the computer is
turned on and off.
Parallel Mode 1 Off
On*
Technical Reference
Standard only if you
for more information about the parallel interface.
Parallel Mode 2 Off
*Factory default
86
Chapter 3: Using the Operator Panel and Menus
The Parallel Mode 1 setting controls the pull up resistors on the parallel port signals. It is
useful for personal computers that have open collector outputs on the parallel port signals.
Parallel Mode 1 to On to disable the resistors or to Off to enable the resistors.
Set
Note: This menu item is not available on the Optra M412.
On*
The Parallel Mode 2 setting determines if the parallel port data is sampled on the leading or
trailing edge of strobe.
Parallel Mode 2 is set to On, the parallel port data is sampled on the leading edge of strobe.
If
Parallel Mode 2 is set to Off, the parallel port data is sampled on the trailing edge of strobe.
If
Page 99

Serial Menu
Menu Item Values
PCL SmartSwitch Off
On*
If PCL SmartSwitch is set to On, the printer examines the data on the serial interface
connection and selects PCL emulation if the data indicates that is the printer language.
If both
specifiedinthe
Off, the printer uses the language that has its SmartSwitch setting set to On as the default.
to
PS SmartSwitch Off
On*
If PS SmartSwitch is set to On, the printer examines the data on the serial interface
connection and selects PostScript 3 emulation if the data indicates that is the printer
language.
If both
specifiedinthe
Off, the printer uses the language that has its SmartSwitch setting set to On as the default.
to
Serial Menu
Use the SERIAL MENU to change settings affecting jobs
sent to the printer through the serial interface port.
SERIAL MENU displays as an option, and appears as
SERIAL OPTION 1. SERIAL OPTION 1 is only available if
the Tri-Port interface option card is installed and
is set to disabled.
PCL SmartSwitch and PS SmartSwitch are set to Off, the printer uses the language
Printer Language menu as the default. If only one SmartSwitch setting is set
PCL Smartswitch and PS Smartswitch are set to Off, the printer uses the language
Printer Language menu as the default. If only one SmartSwitch setting is set
Fax Port
NPA Mode On
Off
Auto*
NPA is a mode of bidirectional communication that followsthe conventions defined in
Printing Alliance Protocol, A Printer/Host Control Specification Developed by the NPA
mode requires special processing of the print data.
If
data. If
is set to Auto, the printer examines the data to determine the format and then processes it in
either format.
The
Note: Changing the
*Factory default
Network
.NPA
NPA Mode is set to On, the data received must be in NPA format. If not, it is rejected as bad
NPA Mode is set to Off, the printer does not perform any NPA processing. If NPA Mode
NPA Mode setting in the SERIAL MENU applies only to the serial interface connection.
NPA Mode setting automatically resets the printer.
Operator Panel Menus
87
Page 100

Serial Menu (continued)
Menu Item Values
Serial Buffer Disabled
Auto*
3K to maximum size allowed
You can configure the size of the serial input buffer to meet the requirements of your system.
If the limited size of the serial buffer is preventing you from continuing work in your software
application each time you send a job to the printer, you may want to increase the buffer size.
The maximum size depends on the amount of memory in your printer, the size of the other link
buffers and whether the
the serial buffer size, you can disable or reduce the size of the parallel, infrared, LocalTalk,
and USB buffers. Choose
amount of available printer memory. In most cases,
Note: Changing the
Resource Save setting is set to On or Off. To maximize the range for
Auto to let the printer calculate a buffer size proportional to the total
Auto is the recommended setting.
Serial Buffer setting automatically resets the printer.
RS-232/RS-422 RS-232*
RS-422 Polarity Normal*
Serial Protocol DTR* (hardware handshaking)
Robust XON Off*
RS-422
Choose the serial communication configuration for your printer. Selecting RS-422 automatically sets
Reverse
Select Normal or Reverse polarity.
This setting is only available if the serial communication configuration is set to
this, select
DTR/DSR (hardware handshaking)
XON/XOFF (software handshaking)
XON/XOFF/DTR (combined handshaking)
XON/XOFF/DTR/DSR (combined handshaking)
Handshaking
This printer supports hardware handshaking, software handshaking, and combined hardware
and software handshaking.
Refer to the
On
Robust XON only applies to the serial port if Serial Protocol is set to XON/XOFF.
When
computer to indicate that the serial port is ready to receive more data.
Serial Protocol to XON/XOFF.
SERIAL MENU, SERIAL OPTION 1, RS-232/RS-422, and RS-422.
is the exchange of predetermined signals when a connection is established.
Technical Reference
Robust XON is set to On, the printer sends a continuous stream of XONs to the host
RS-422.Todo
for more information about serial interface.
*Factory default
88
Chapter 3: Using the Operator Panel and Menus
 Loading...