

Page 1
OPTRA E310
Page 2

First Edition (January 1999)
The following paragraph does not apply to any country where such provisions are inconsistent with local law:
LEXMARK INTERNATIONAL, INC. PROVIDES THIS PUBLICATION “AS IS” WITHOUT WARRANTY OF ANY
KIND, EITHER EXPRESS OR IMPLIED, INCLUDING, BUT NOT LIMITED TO, THE IMPLIED WARRANTIES OF
MERCHANTABILITY OR FITNESS FOR A PARTICULAR PURPOSE. Some states do not allow disclaimer of express
or implied warranties in certain transactions, therefore, this statement may not apply to you.
This publication could include technical inaccuracies or typographical errors. Changes are periodically made to the
information herein; these changes will be incorporated in later editions. Improvements or changes in the products or
the programs described may be made at any time.
A form for reader’s comments is provided at the back of this publication. If the form has been removed, comments
may be addressed to Lexmark International, Inc., Department F95/035-3, 740 New Circle Road N.W., Lexington,
Kentucky 40550, U.S.A. In the United Kingdom and Eire, send to Lexmark International Ltd., Marketing and Services
Department, Westhorpe House, Westhorpe, Marlow Bucks SL7 3RQ. Lexmark may use or distribute any of the
information you supply in any w ay it believ es a ppr opriate without incurri ng a ny ob lig at ion to you. You can purchase
additional copies of public ations related to this product by calling 1-800-553-9727. In the United Kingdom and Eire,
call 0628-48150 0. In other countries, contact your point of purchase.
Lexmark, MarkVision and Optra are trad emar ks of Lexm ark In terna ti onal, In c., r eg ister e d in the Uni ted State s and/or
other countri es. FontVision is a registered trademark of Lexmark International, Inc. Operation ReSource is a service
mark of Lexmark International, Inc.
Macintosh is a trademark of Apple Computer, Inc., registered in th e U.S . and o the r count rie s. TrueType is a trademark
of Apple Computer, Inc.
®
is a registered trademark of the Hewlett-Packard Company. PCL 5 and PCL 6 are Hewlett-Packard Company’s
PCL
designations of a set of printer commands (language) and functions included in its printer products. This printer is
intended by Lexmark International, Inc. to be compatib le w it h the PCL 5 and PCL 6 languages. This means the printer
recognizes PCL 5 and PCL 6 commands used in various application programs, and that the printer emulates the
functions correspon ding to the commands.
Details relating to compatibility are included in the Technical Reference.
Other trademarks are the property of their respective owners.
© Copyright Lexmark International, Inc. 1999.
All rights reserved.
UNITED STATES GOVERNMENT RESTRICTED RIGHTS
This software and documentation are provided with RESTRICTED RIGHTS. Use, duplication or disclosure by the
Government is subject to restrictions as set forth in subparagraph (c)(1)(ii) of the Rights in Technical Data and
Computer Software clause at DFARS 252.227-7013 and in applicable FAR provisions: Lexmark International, Inc.,
Lexington, KY 4055 0.
Page 3

Table of
contents
1 About your printer . . . . . . . . . . . . . . . . . . . . . . . . . v
Performance . . . . . . . . . . . . . . . . . . . . . . . . . . . . . . . . . . . . . . . . . . . . . . . . . . . . vi
Print quality . . . . . . . . . . . . . . . . . . . . . . . . . . . . . . . . . . . . . . . . . . . . . . . . . . . . vi
Ease of use . . . . . . . . . . . . . . . . . . . . . . . . . . . . . . . . . . . . . . . . . . . . . . . . . . . . . vi
Other information sources . . . . . . . . . . . . . . . . . . . . . . . . . . . . . . . . . . . . . . . . . x
2 The basics . . . . . . . . . . . . . . . . . . . . . . . . . . . . . . . . . 1
What’s in the box . . . . . . . . . . . . . . . . . . . . . . . . . . . . . . . . . . . . . . . . . . . . . . . . . 1
Installing the print cartridge . . . . . . . . . . . . . . . . . . . . . . . . . . . . . . . . . . . . . . . 2
Connecting the printer to your computer . . . . . . . . . . . . . . . . . . . . . . . . . . . 4
Loading paper . . . . . . . . . . . . . . . . . . . . . . . . . . . . . . . . . . . . . . . . . . . . . . . . . . . 9
Printing a test page . . . . . . . . . . . . . . . . . . . . . . . . . . . . . . . . . . . . . . . . . . . . . . 11
Attaching a new operator panel overlay . . . . . . . . . . . . . . . . . . . . . . . . . . . . 12
Installing memory . . . . . . . . . . . . . . . . . . . . . . . . . . . . . . . . . . . . . . . . . . . . . . . 13
3 Printer drivers . . . . . . . . . . . . . . . . . . . . . . . . . . . . 19
Printer drivers . . . . . . . . . . . . . . . . . . . . . . . . . . . . . . . . . . . . . . . . . . . . . . . . . . 19
MarkVision . . . . . . . . . . . . . . . . . . . . . . . . . . . . . . . . . . . . . . . . . . . . . . . . . . . . 21
4 Paper handling . . . . . . . . . . . . . . . . . . . . . . . . . . . 23
Paper types and sizes . . . . . . . . . . . . . . . . . . . . . . . . . . . . . . . . . . . . . . . . . . . . 24
Loading paper, other media in the automatic feeder . . . . . . . . . . . . . . . . . 28
Loading paper, other media in the manual feeder . . . . . . . . . . . . . . . . . . . 31
Table of contents
iii
Page 4

Clearing paper jams . . . . . . . . . . . . . . . . . . . . . . . . . . . . . . . . . . . . . . . . . . . . . 32
5 Troubleshooting . . . . . . . . . . . . . . . . . . . . . . . . . . 35
Indicator lights . . . . . . . . . . . . . . . . . . . . . . . . . . . . . . . . . . . . . . . . . . . . . . . . . 37
6 Supplies . . . . . . . . . . . . . . . . . . . . . . . . . . . . . . . . . 57
Print cartridge maintenance . . . . . . . . . . . . . . . . . . . . . . . . . . . . . . . . . . . . . . 57
Appendix A: Printer specif i cati o ns . . . . . . . . . . 59
Printer features . . . . . . . . . . . . . . . . . . . . . . . . . . . . . . . . . . . . . . . . . . . . . . . . . 59
Printer dimensions . . . . . . . . . . . . . . . . . . . . . . . . . . . . . . . . . . . . . . . . . . . . . . 60
Appendix B: Advanced troubleshooting . . . . . . 61
Appendix C: Safety information . . . . . . . . . . . . . 73
iv
Appendix D: Notices . . . . . . . . . . . . . . . . . . . . . . 79
Glossary . . . . . . . . . . . . . . . . . . . . . . . . . . . . . . . . X-1
Index . . . . . . . . . . . . . . . . . . . . . . . . . . . . . . . . . . . X-5
Table of contents
Page 5
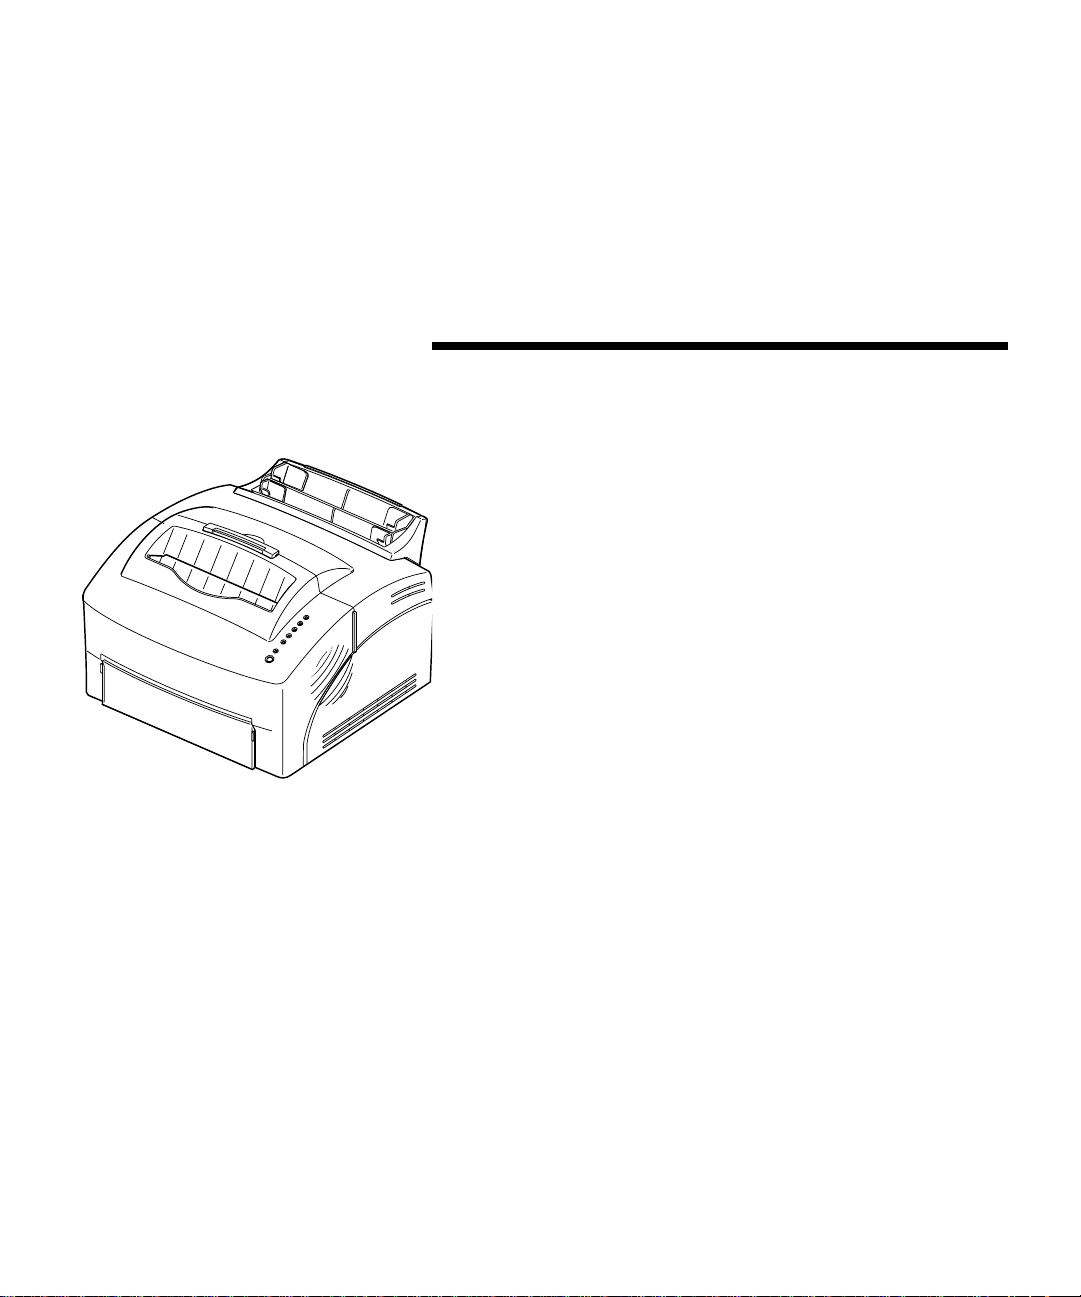
About y our
printer
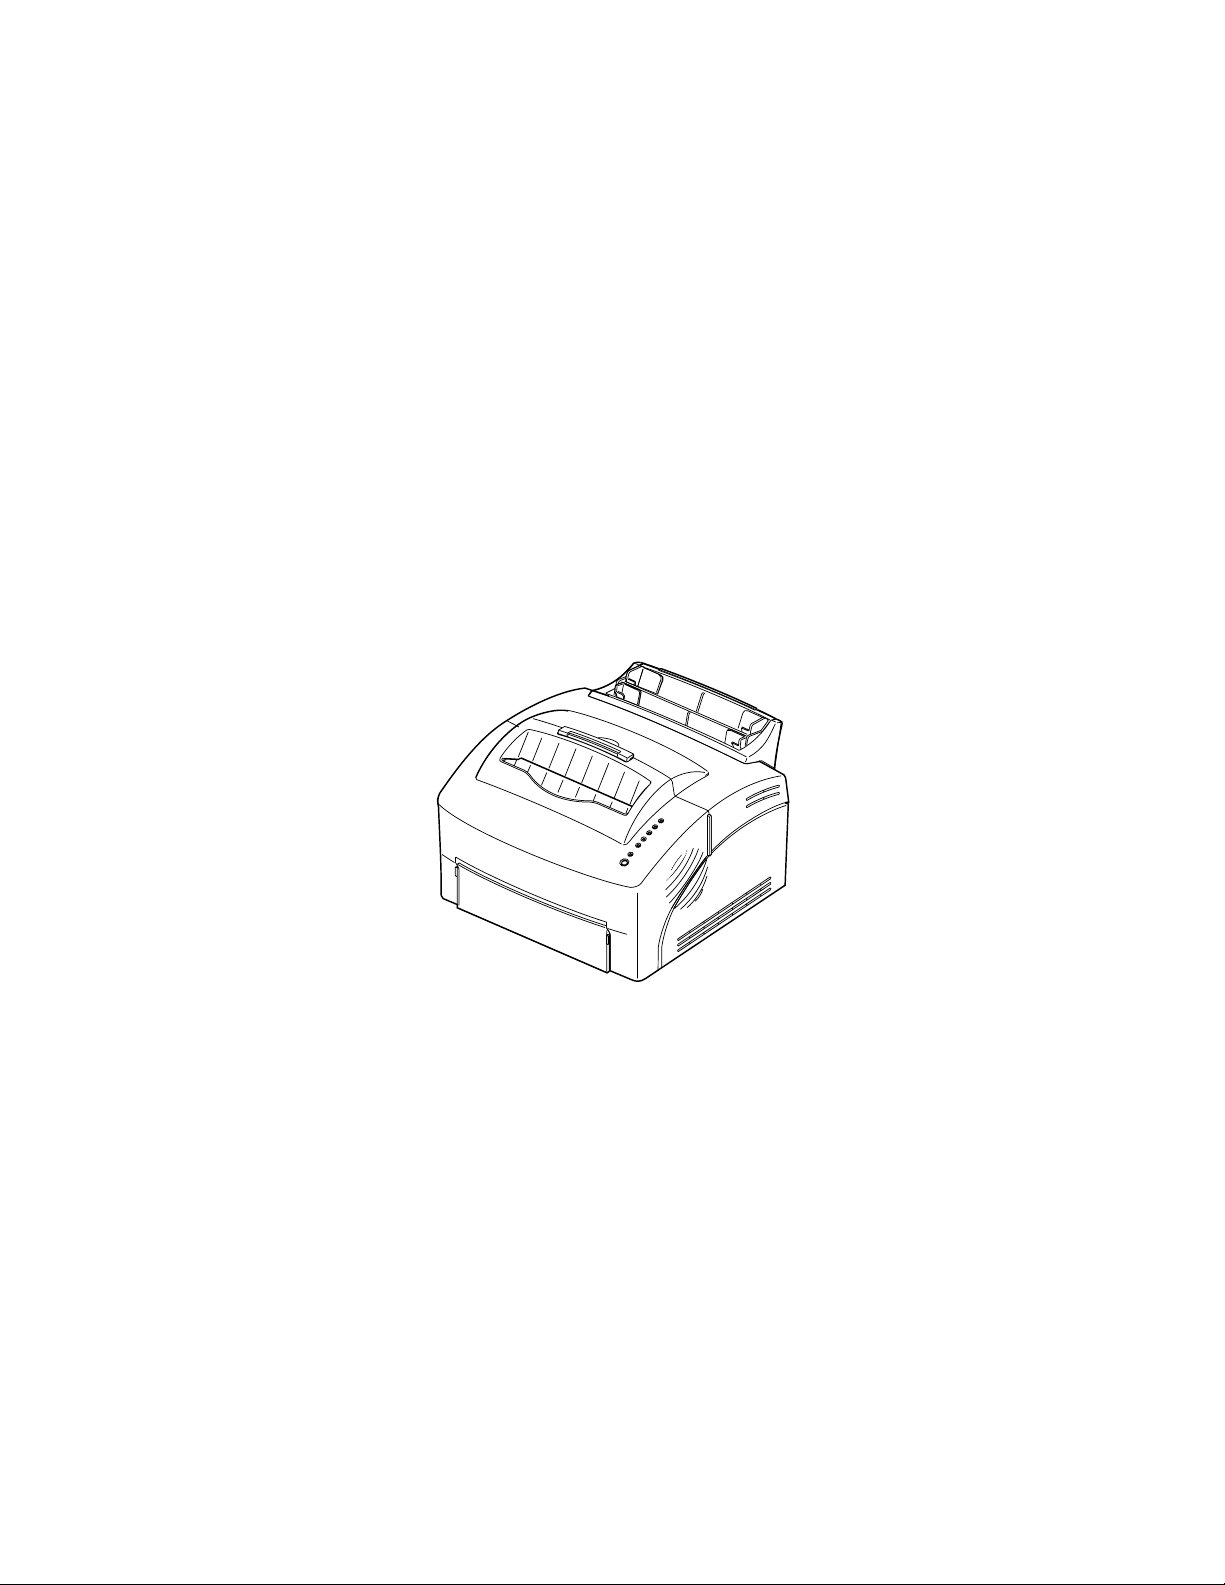
The Optra E310 printer combines the quality of a laser
printer with a conveniently small footprint for a perfect
fit.
With its easy setup, you’ll be printing in no time. Use
this book for information on:
• installi ng printer memory options
• installing printer drivers
• loading paper
• solving printing problems
• understanding the operator panel light sequences
• maintaining your printer
We’d like to keep you informed of upgrades for your
printer and new products as they become available, so
be sure to fill out the printer registration card and mail
it in.
If you have any comments about the printer
documentation, use the Reader’s Comment Form in the
back of this book. We’d like to hear your suggestions.
v
Page 6

Performance The Optra E310 printer prints up to 8 pages per minute
for quick job turnaround. It comes with 2MB of
memory, expandable to 66MB to print complex jobs
quickly. You can also install an optional flash memory
card to store forms, macros and downloaded fonts.
PostScript Level 2 and PCL 6 emulation datastreams
give you application flexibility.
Print quality Selectable print resolution to optimize printer/job
performance: true 600 x 600 dpi resolution for crisp
images and graphics; 1200 Image Quality to print
sharper scanned or bitmapped print images; 300 dpi
with the Toner Saver setting selected from your printer
driver to conserve toner when printing drafts.
Ease of use A variety of fonts for printing flexibility: 45 Laser-Jet
compatible scalable fonts, 39 Optra- compatib le scalab le
TM
fonts, 36 PostScript scalable fonts a nd FontV ision
manager utility with 110 fonts and world-class font
support, including the new Euro currency symbol.
font
vi
The MarkVision printer utility that ships with your
printer lets you:
• view and change your printer settings
• view your operator panel status
• view printer error messages
• use on-line Help
Page 7
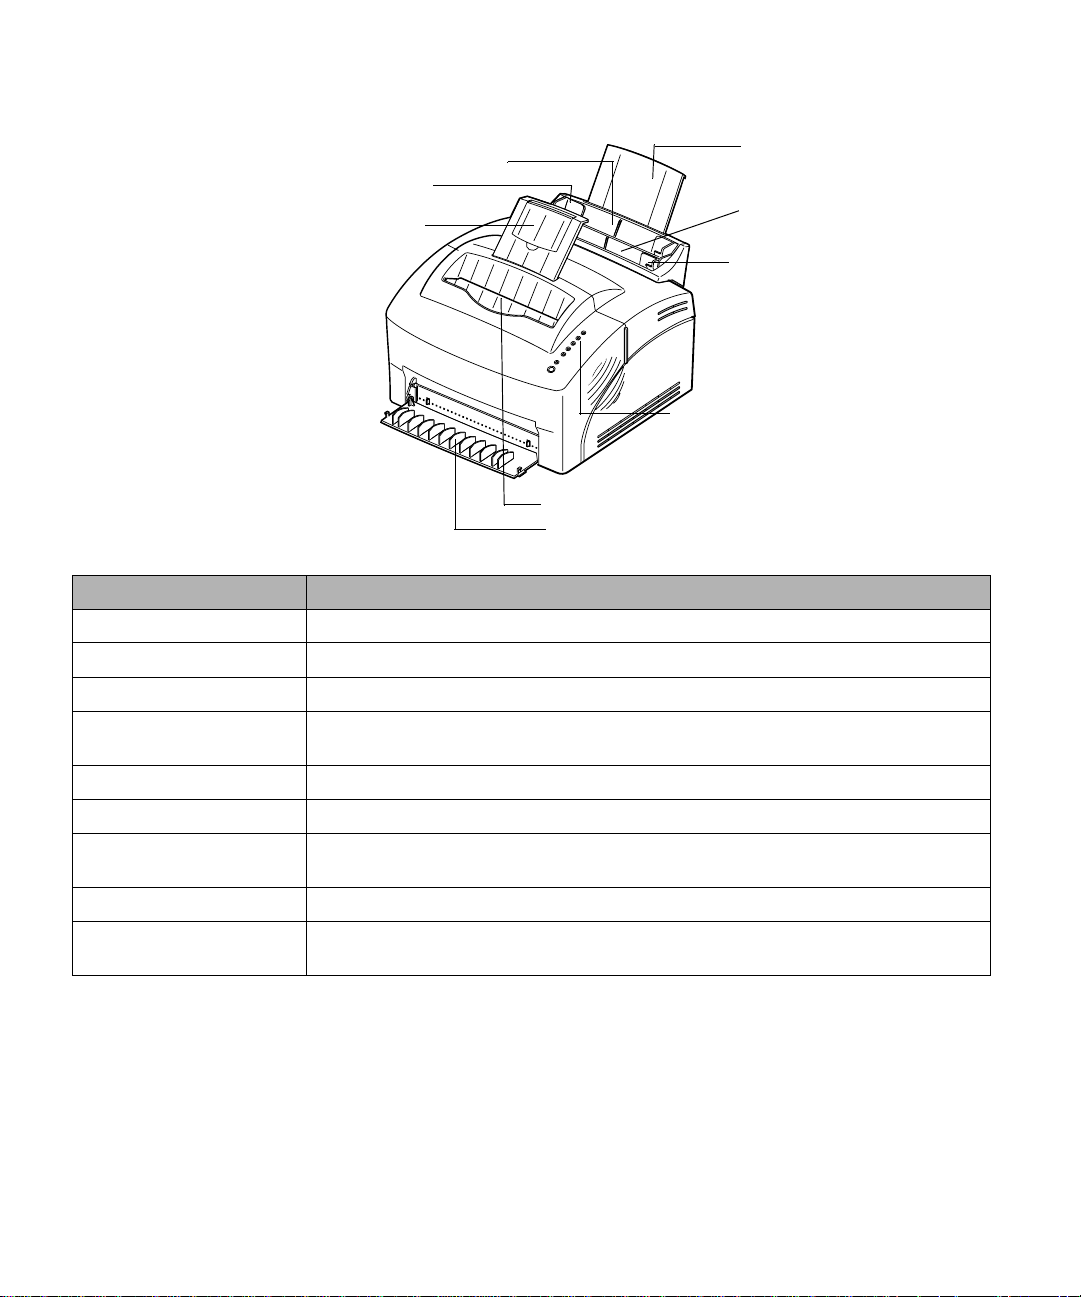
Printer Features
Front View
1 Automatic paper feeder
3 Paper guides
5 Paper support
7 Indicator l ights
8 Paper output bin
9 Front output door
2 Paper
support
4 Manual
sheet feeder
6 Paper
guides
Use the: When you want to:
1 Automatic paper feeder Load paper/other media (up to 150 sheets of paper or 10 sheets of other media).
2 Paper support Stack media in the automatic paper feeder.
3 Paper guides Adjust the width of the paper in the automatic paper feeder.
4 Manual sheet feeder Load a single sheet of pap er/o ther media. Use for tr ansparencies, labels, env e lo pes
and card stock.
5 Paper support Stack media in the paper output bin.
6 Paper guides Adjust the width of the paper in the manual sheet feeder.
7 Indicator lights Check the status of your printer. For information, see ”Printer status information” on
page 38.
8 Paper output bin Stack printed documents, face down.
9 Front output door For single sheet output. Use the front exit when printing on card stock. To minimize
curl, use when printing labels, envelopes and transparencies.
vii
Page 8
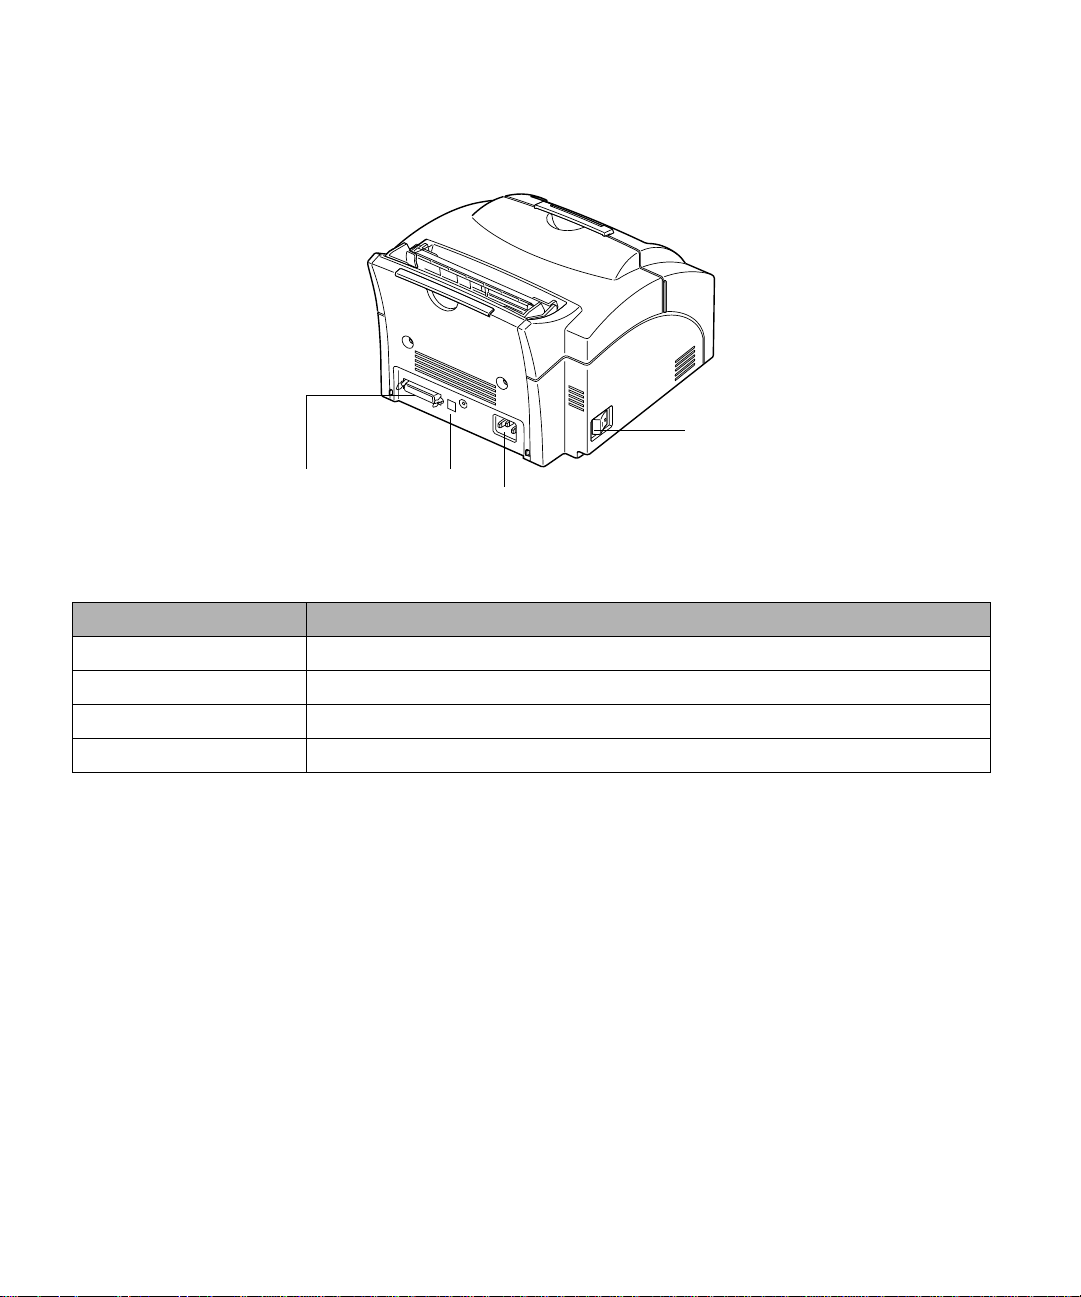
Rear view
13 Power switch
10 Printer cable
connector
11 USB
connector
12 Power cord connector
Use the: When you want to:
10 Printer cable connector Connect your computer to the printer’s parallel port with a parallel interface cable.
11 USB connector Connect your computer to the printer’s USB port with a Universal Serial Bus cable.
12 Power cord connector Connect your printer to a properly grounded wall outlet with a power cord.
13 Power switch Turn your printer on or off.
viii
Page 9
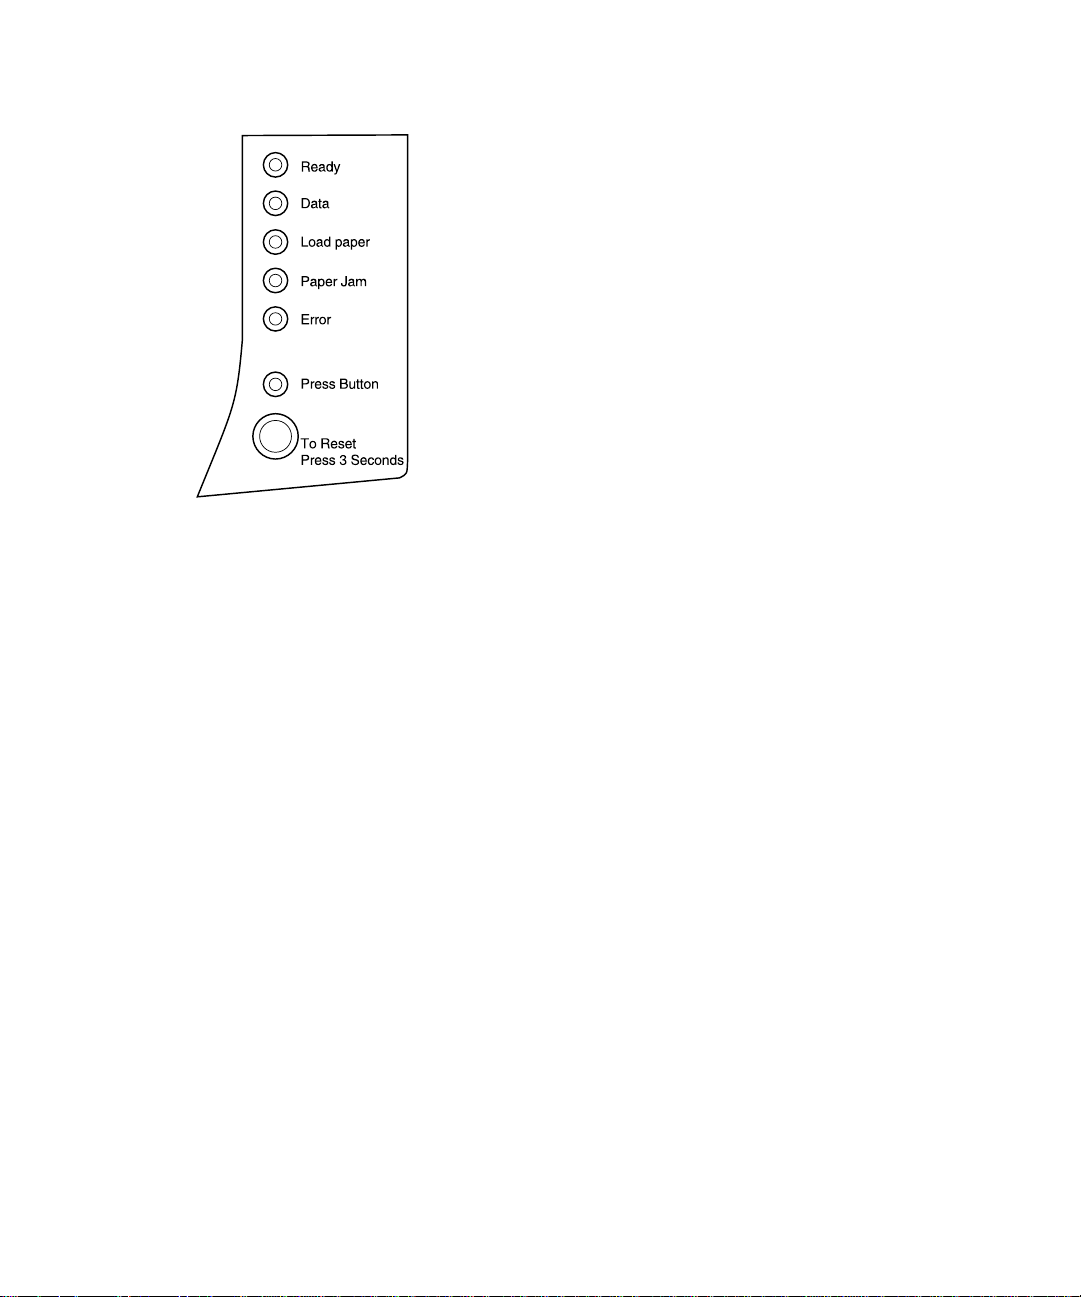
Operator panel lights
The operator panel has 6 lights and 1 button. Different
light sequences provide status, attendance and service
information.
Depending on the light sequence, briefly
(approximately one second) pushing the Op erator
Panel button activates different printer functions, such
as restarting the printer, printing data or displaying an
error code.
Press and hold the Operator Panel button for 3 seconds
only when you want to reset the printer to the user defaults.
When resetting the printer to the user defaults, all print job
data is lost.
The different light sequences are explained in the
Troubleshooting chapter beginning on page 35.
Use MarkVision, your software application driver or
the Printer Toolkit provided with your setup diskette to
change printer settings such as paper source, paper size
and orientation.
To set up your printer, turn to the next chapter.
ix
Page 10

Other information
sources
In addition to this User’s Guide, Lexmark offers other
sources of information about your printer or about
Lexmark products and services.
On-line documents The CD that was shipped with your printer contains
several on-line documents. Refer to the booklet that
came with the CD for launching instructions. Once you
have launched the CD, click the View On-line
Documentation icon to display a list of the available
documents. All on-line documents are in English only.
The CD includes:
• Getting Started with MarkVision, which provides
step-by-step instructions for installing MarkVision
for Wi ndows 95, Windows 98 and Windows NT 4.0.
It also describes some of the most popular
MarkVision features.
• Card Stock & Label Guide, which provides detail ed
information about selecting media appropriate for
your printer .
Technical Reference For more information about printer languages and
commands, you can purchase a Lexmark Technica l
Reference. Just fill out the order form included with the
printer registration card and drop it in the mail.
x
Page 11
Diskettes
Po wer cord
The basics
1
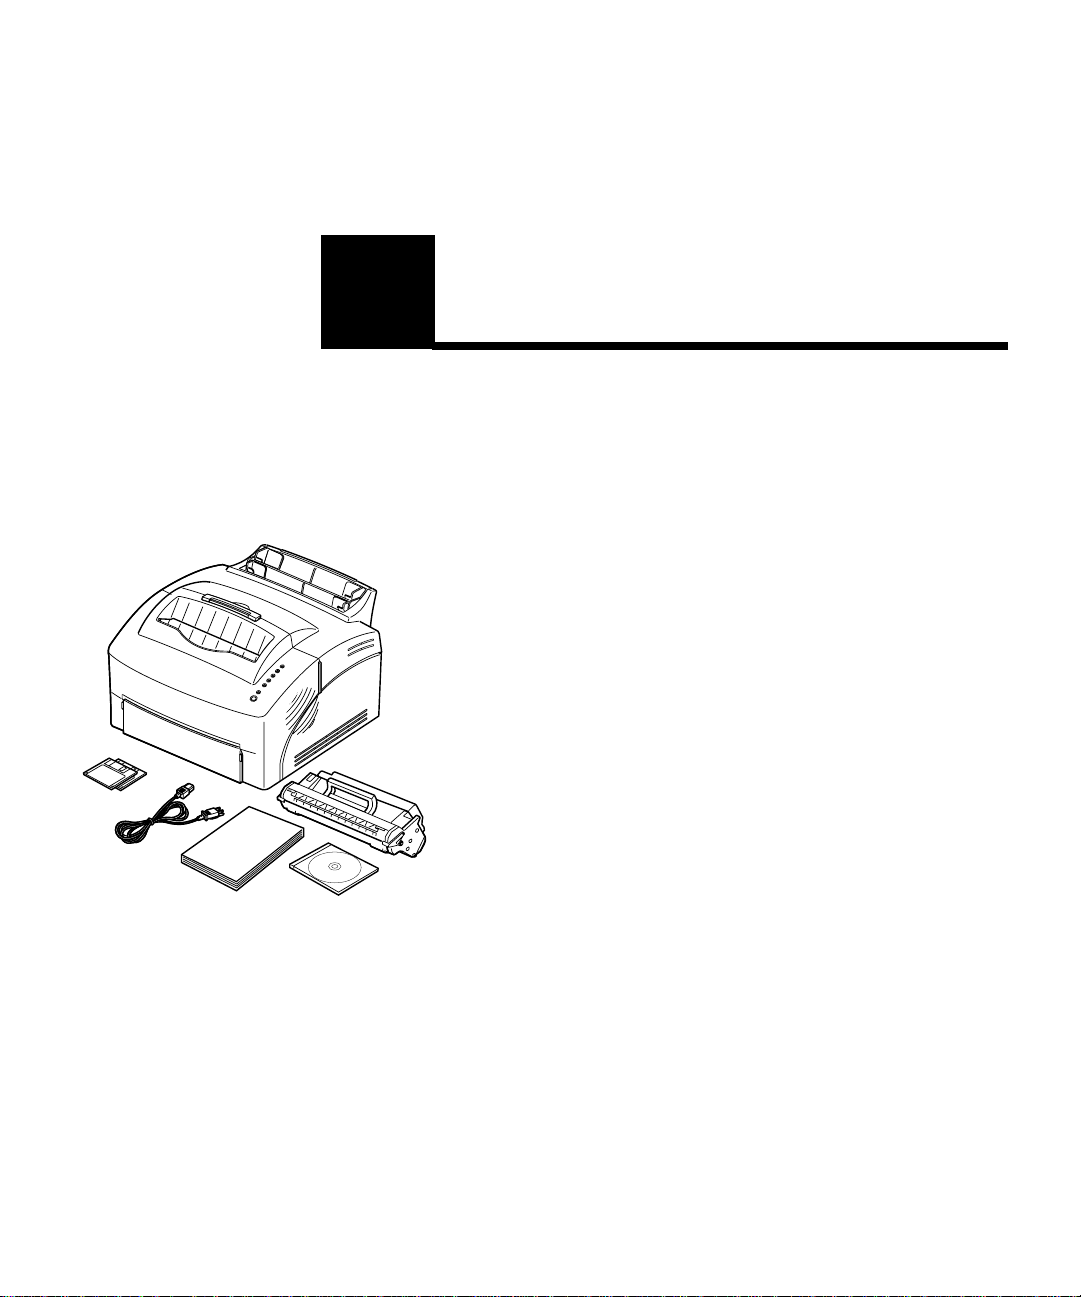
What’s in the box 1 Remove the printer and all accessories from the
packaging carton.
Save the carton and packing materials in case you
need to repack the printer for service or storage.
2 Make sure you have the items listed below:
– User’s Guide and printer registration card
– printer
– print cartridge
– power cord
– CD
– Windows 3.1 diskettes (not shipped to all
countries)
If you need help during setup, or if any items are
missing or damaged, refer to the registration card
for the designated Lexmark phone number for your
country.
3 Place the printer on a flat, stable surface in a
well-ventilated area near your workstation.
User’s Guide
Print cartridge
CD
Do not place the printer:
– in direct sunlight
– near heat sources or air conditioners
– in dusty or dirty environments
What’s in the box
1
Page 12
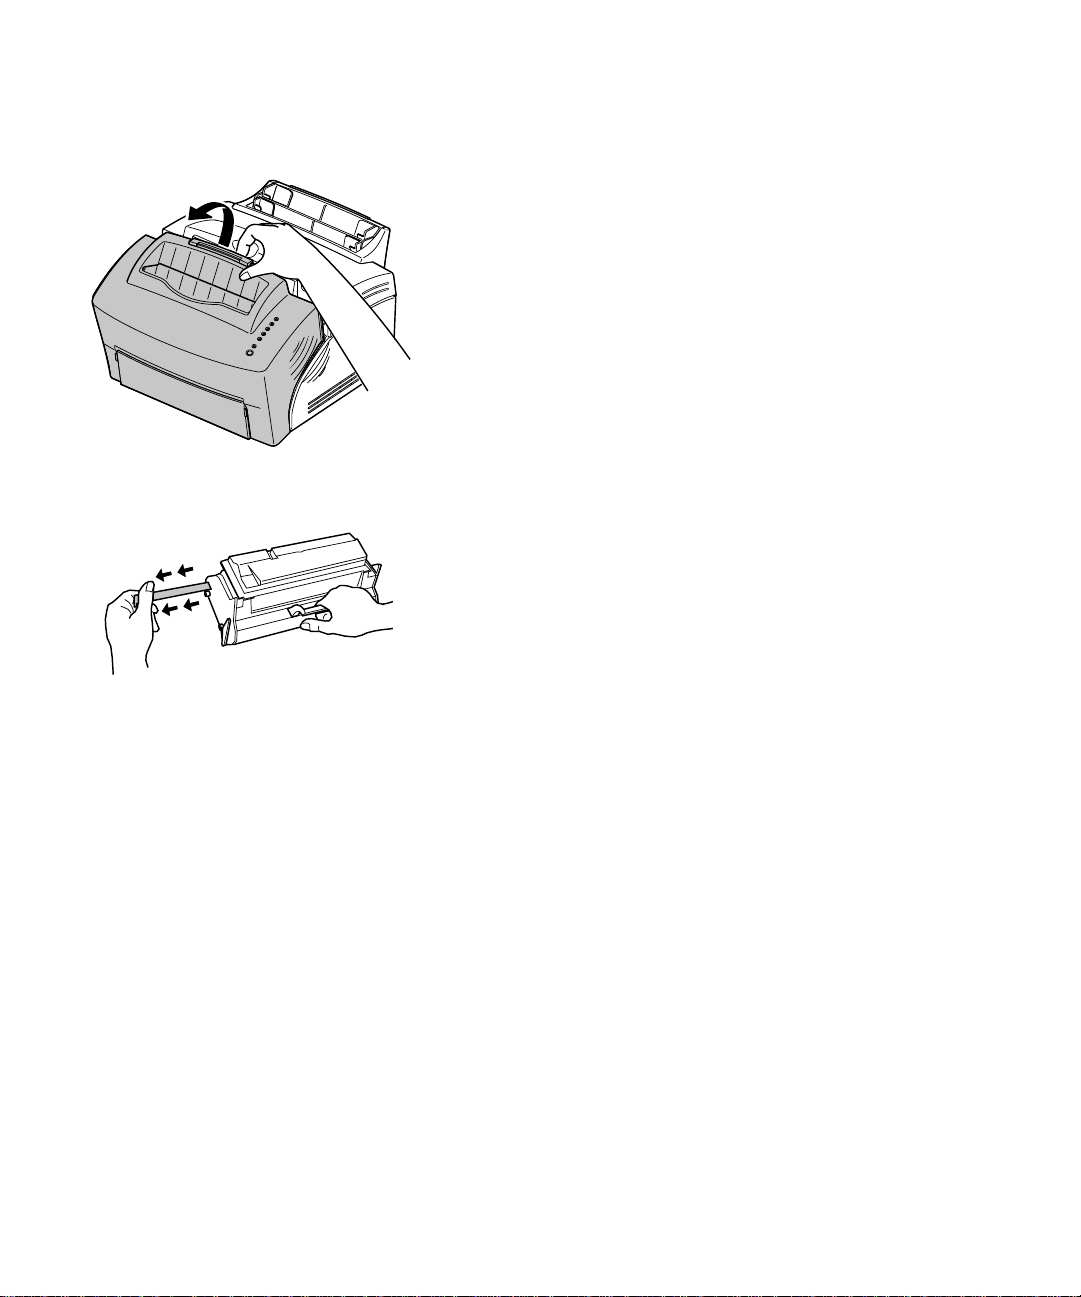
Installing the print
cartridge
1 Use the finger tab to pull down the printer
cover.
2 Unpack the print cartridge.
3 Holding the cartridge level, pull out the sealing
tape.
2
Chapter 1: T he basics
Page 13
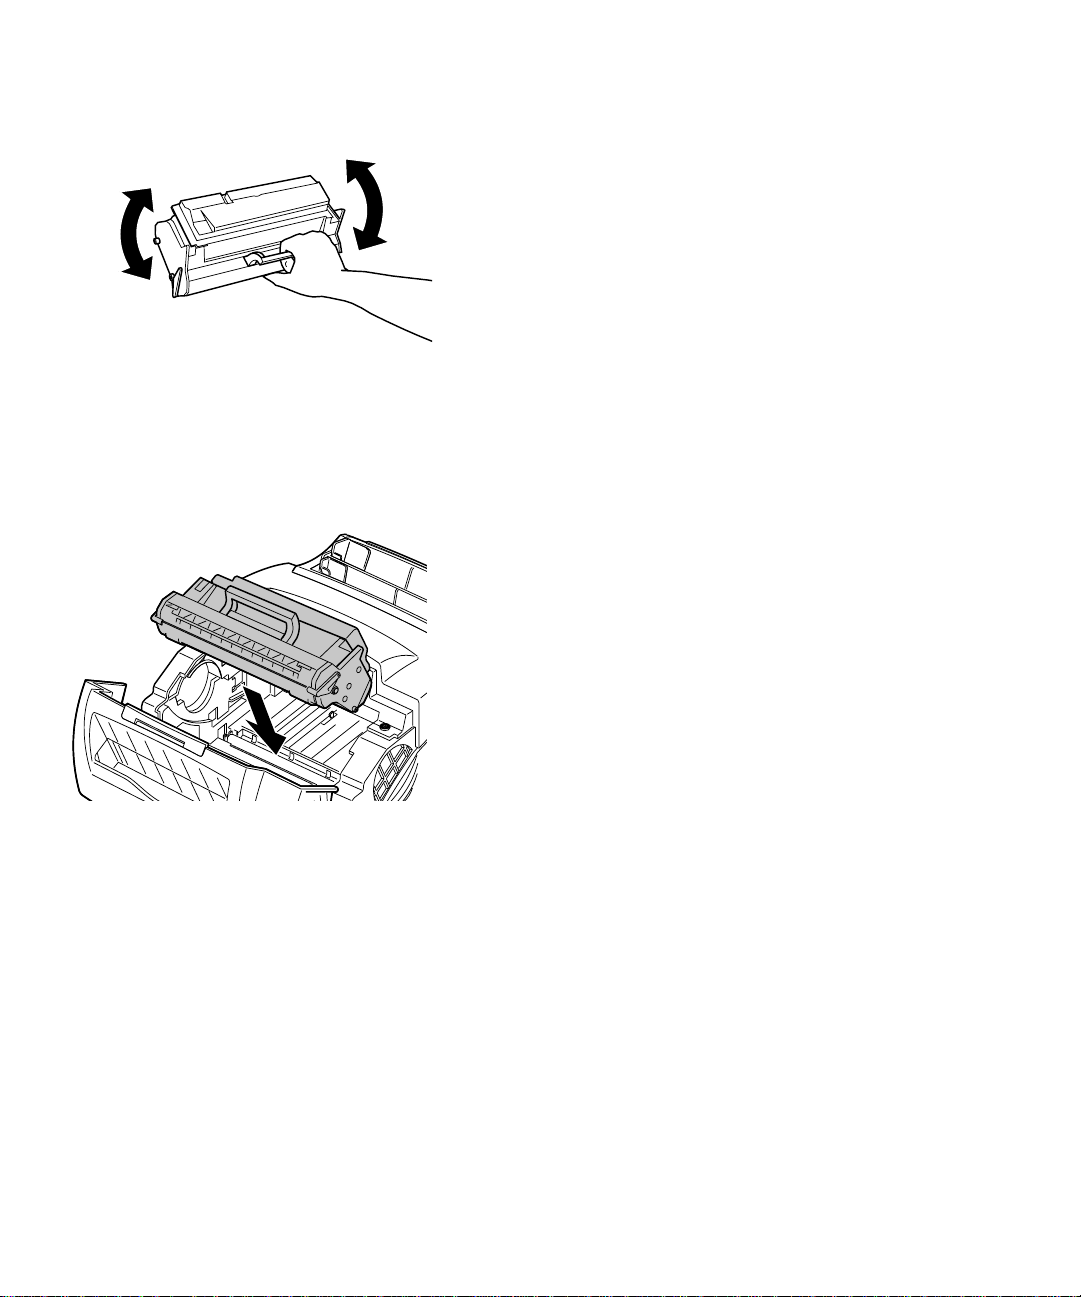
4 Gently shake the cartridge to distribute the
toner evenly.
5 Insert the print cartridge:
a Slide the print cartridge down between the
print cartridge slots.
b Gently push down on the cartridge until it
drops into place.
Installing the print cartridge
3
Page 14
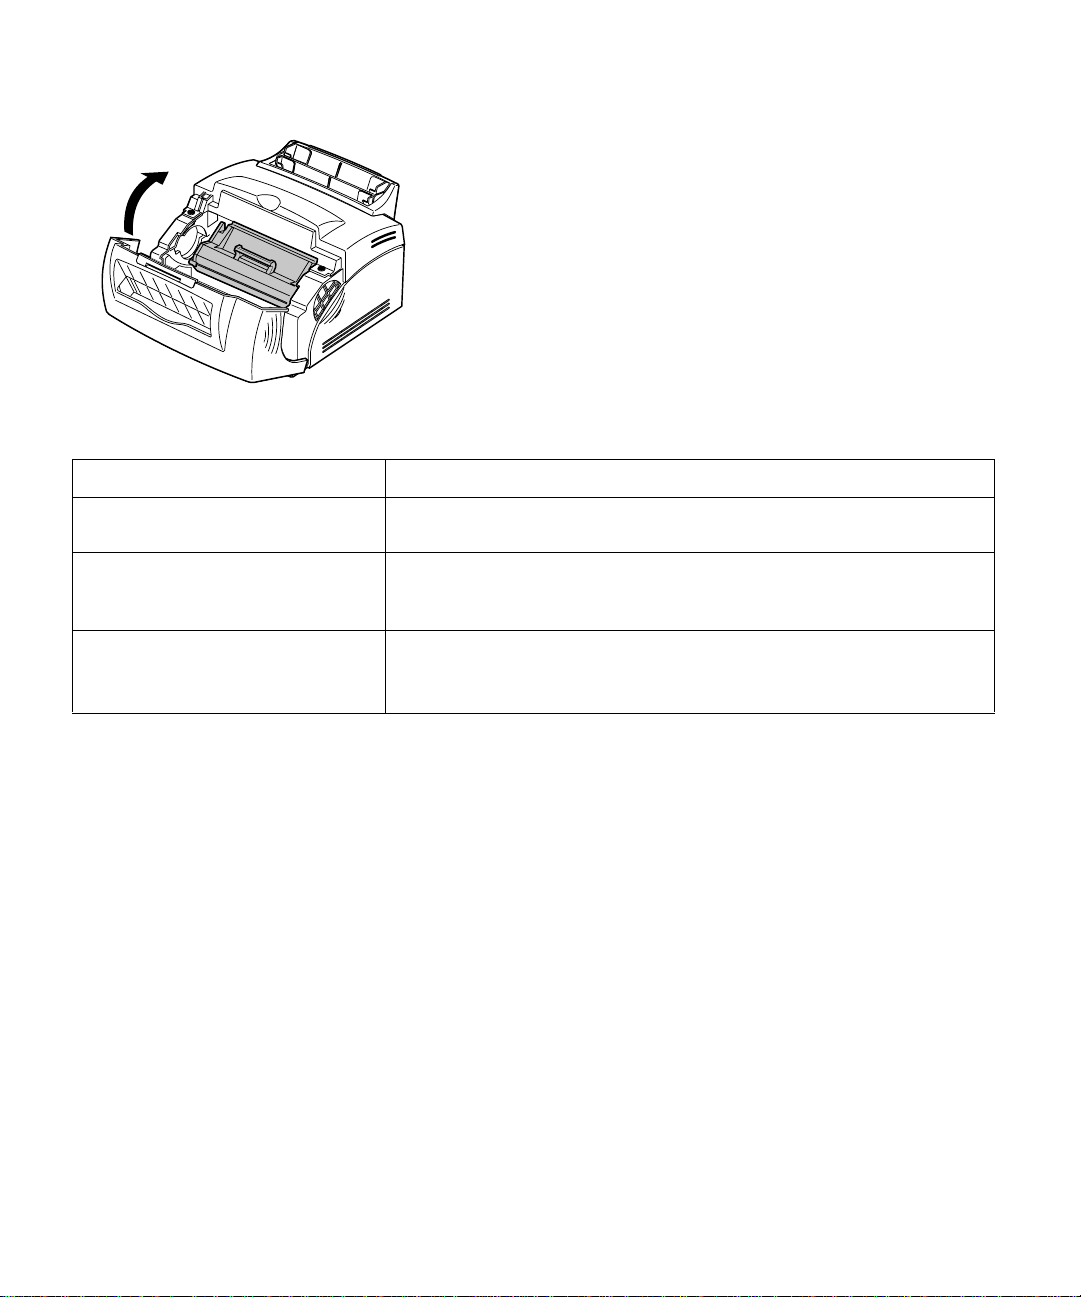
6 Close the printer cover.
Troubles ho otin g Tip s
Problem: What to do:
Characters appear light or b lu rred. • Make sure you removed the sealing tape from the print cartridge.
• Replace the print cartridge.
Printer seems to be printing, but
pages are blank.
Printer is on, but nothing prints.
Jobs are not printing and the Error
light is on solid.
Connecting the
printer to your
computer
Using a parallel
interface cable
• The print car tridge may be out of toner. Replace the cartridge.
• The print car tridge may be defective. Replace the cartridge.
• Make sure you removed the sealing tape from the print cartridge.
• Make sure the print cartridge is installed.
To print from software loaded on your computer, your
printer needs to be connected to your computer with
either a parallel interface cable or a USB cable.
Your printer requires an IEEE-1284 compliant parallel
cable. We recommend Lexmark part number 1329605
(10 ft) or 1427498 (20 ft). If you use something other
than an IEEE-compliant cable, you may not be able to
use all of your printer’s functions.
4
Chapter 1: T he basics
Page 15
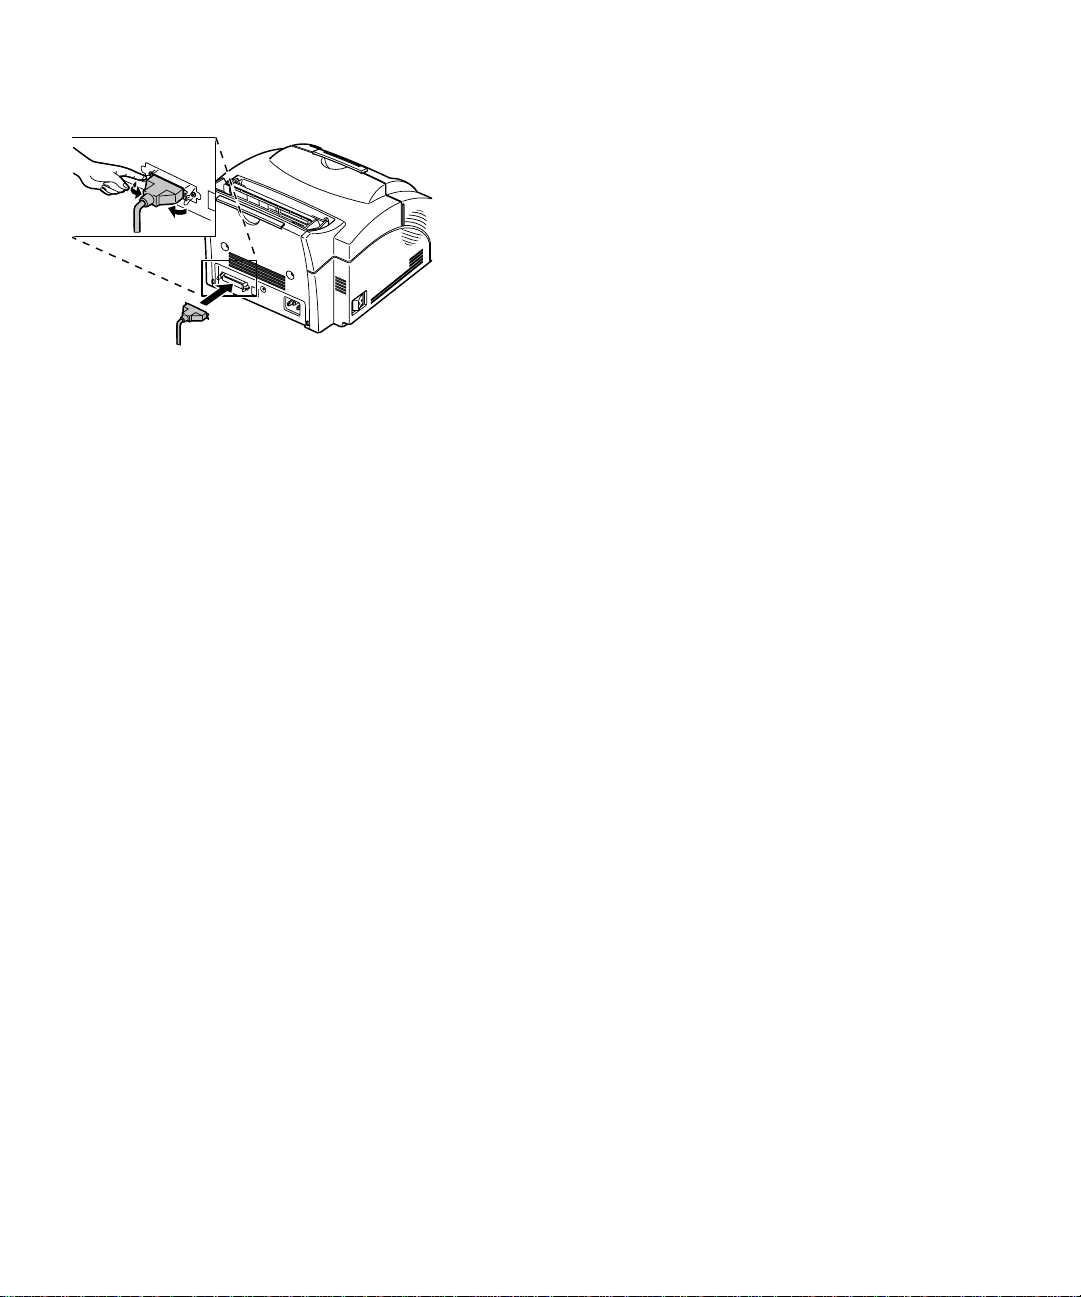
1 Make sure your printer is turned off.
2 Plug the parallel interface cable into the
connector on the back of the printer.
3 Push the metal clips toward the plug until they
snap in the notches on the plug.
4 Attach the other end of the parallel cable to your
computer.
5 Turn on the printer.
Connecting the printer to your computer
5
Page 16
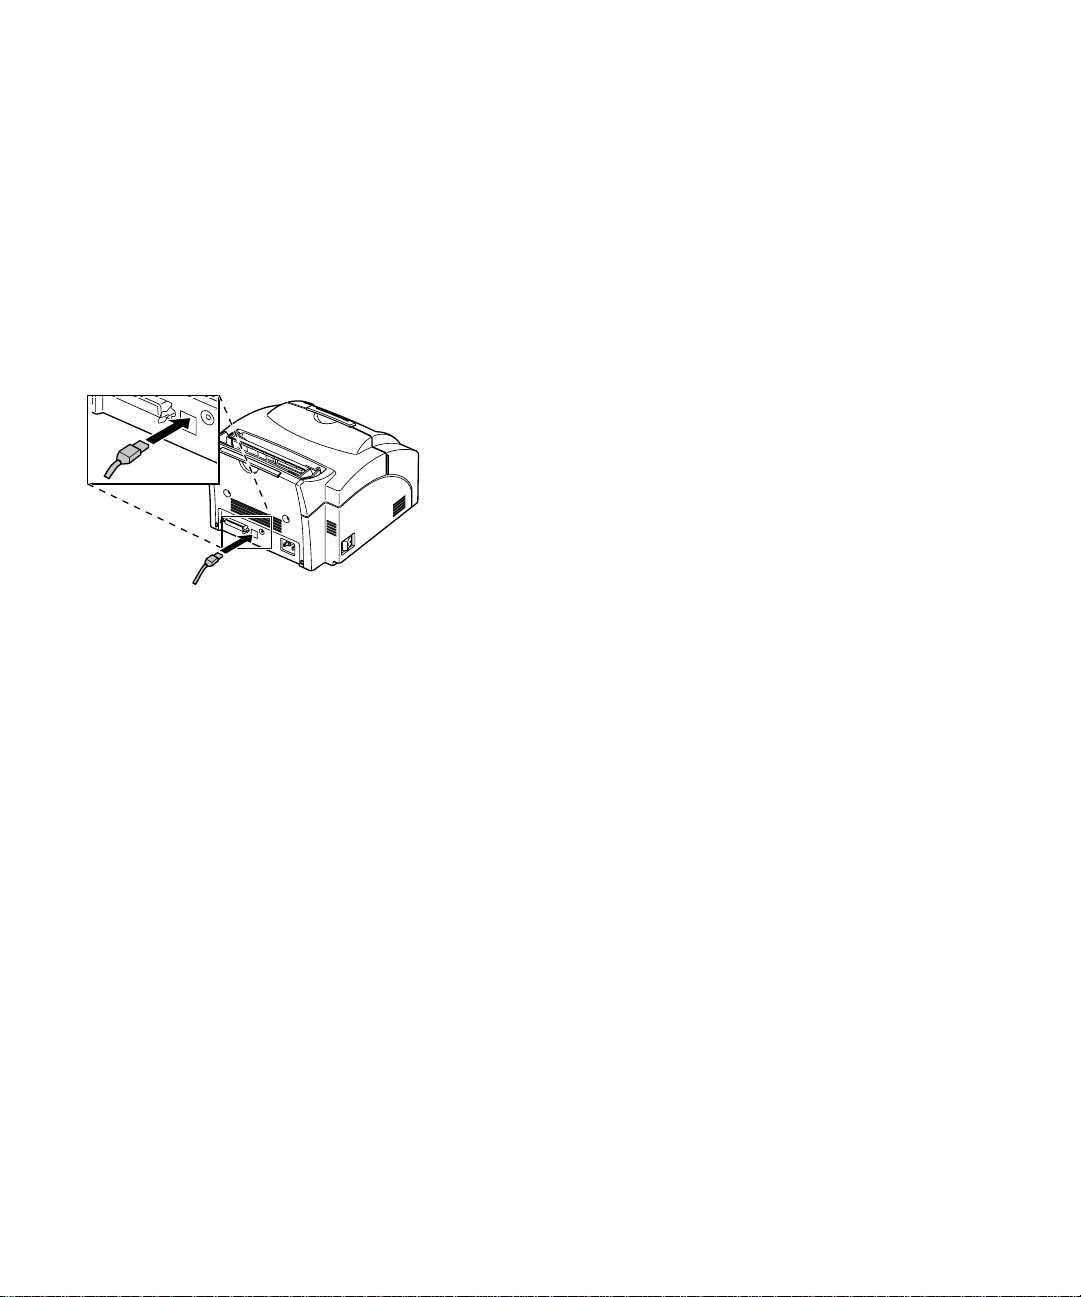
Using a USB cable If you are connecting your printer to a PC with a USB
(Universal Serial Bus) cable, follow the instructions
below.
1 Make sure your computer and printer are turne d
off.
2 Connect the USB cable to t he port on the back of
your computer.
3 Connect the other end of the cable to the USB
port on the back of your printer.
4 Turn on your computer and your printer.
5 When the Add New Hardware Wizard screen
appears:
a Select Next to begin searching for new drivers.
b Select Next to search for best driver.
c At the next screen, deselect the floppy disk
drives box and Microsoft Windows update
box and select the Specify Location box.
d Insert the CD that came with your printer, then
select Browse.
e Select the letter of your CD drive and highlight
the Win98USB folder.
f Select OK, Next, Next.
g When the hardware is loaded, click Finish.
The CD is autom atically launched.
6 Follow the installation instructions on the
printer drivers screen.
7 Select the LPT1 port as your default printer port.
8 When you are finished, exit the CD.
9 Restart your computer.
6
Chapter 1: T he basics
Page 17

10 To select the USB port, choose Settings, then
choose Printers from the Start menu.
11 From the Printers folde r, highlight the Optra
E310 icon.
12 Open the File menu and click Properties.
13 Select the Details tab.
14 In the Print to the following port bo x, select
USB port USB001 (Lexmark USB port).
15 Click OK.
Connecting the printer to your computer
7
Page 18
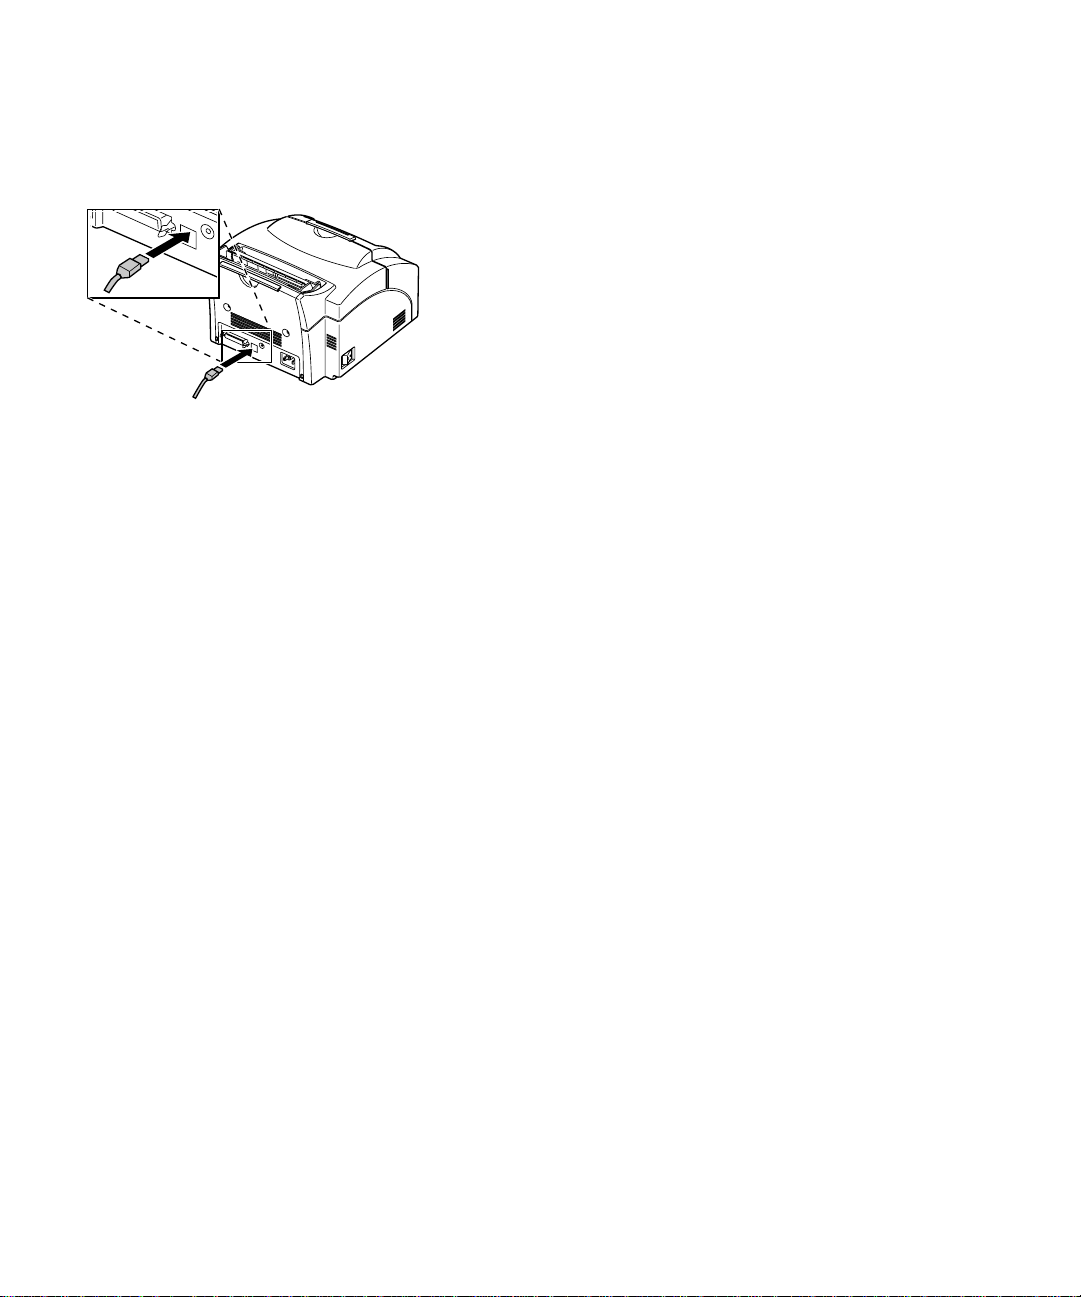
If you are connecting your printer to a Macintosh with a
USB cable, follow the instructions below.
1 Connect the USB cable to t he port on the back of
your computer.
2 Connect the other end of the cable to the USB
port on the back of your printer.
3 Launch the CD to install the printer drivers and
utilities (instructions to launch the CD are in the
CD booklet).
4 Restart your computer.
5 Open the Apples Extras folder.
6 Open the Apple LaserWriter Software folder.
7 Start the Desktop Printer Utility application.
8 Select Printer (USB) from the list, then click OK.
9 When the next dialog appears:
a Click the Change button in the PPD File box.
b Scroll through the list of printer descriptions,
select the Optra E310 PPD, and click Select.
c Click the Change button in t he USB Printer
Selection box.
d Scroll through the list of printer models, select
the Optra E310 and click OK.
e Open the File menu and click Save.
10 When the Save dialog appears, you can give the
printer another name or keep the same name,
then click the Save button.
After a short delay, the new desktop printer icon
appears.
8
Chapter 1: T he basics
Page 19
Troubles ho otin g Tip s
Problem: What to do:
11 Quit the Desktop Printer Utility application.
12 Select the new desktop printer icon. A Printing
menu appears.
13 If you want to use this pr inter as your d efault
printer, select Set Default Pri nter from the
Printing menu.
Unexpected characters print or
characters are missing.
You are connected to the USB port,
but the printer will not print.
Loading paper
Automatic paper feeder
Manual paper feeder
• Make sure the parallel cable or USB cable is firmly plugged in at the
back of the printer.
• If you are connected to a PC, make sure you are using Windows 98.
You can load paper in the automatic paper feeder,
which holds up to 150 sheets, or the manual feeder,
which holds 1 sheet at a time.
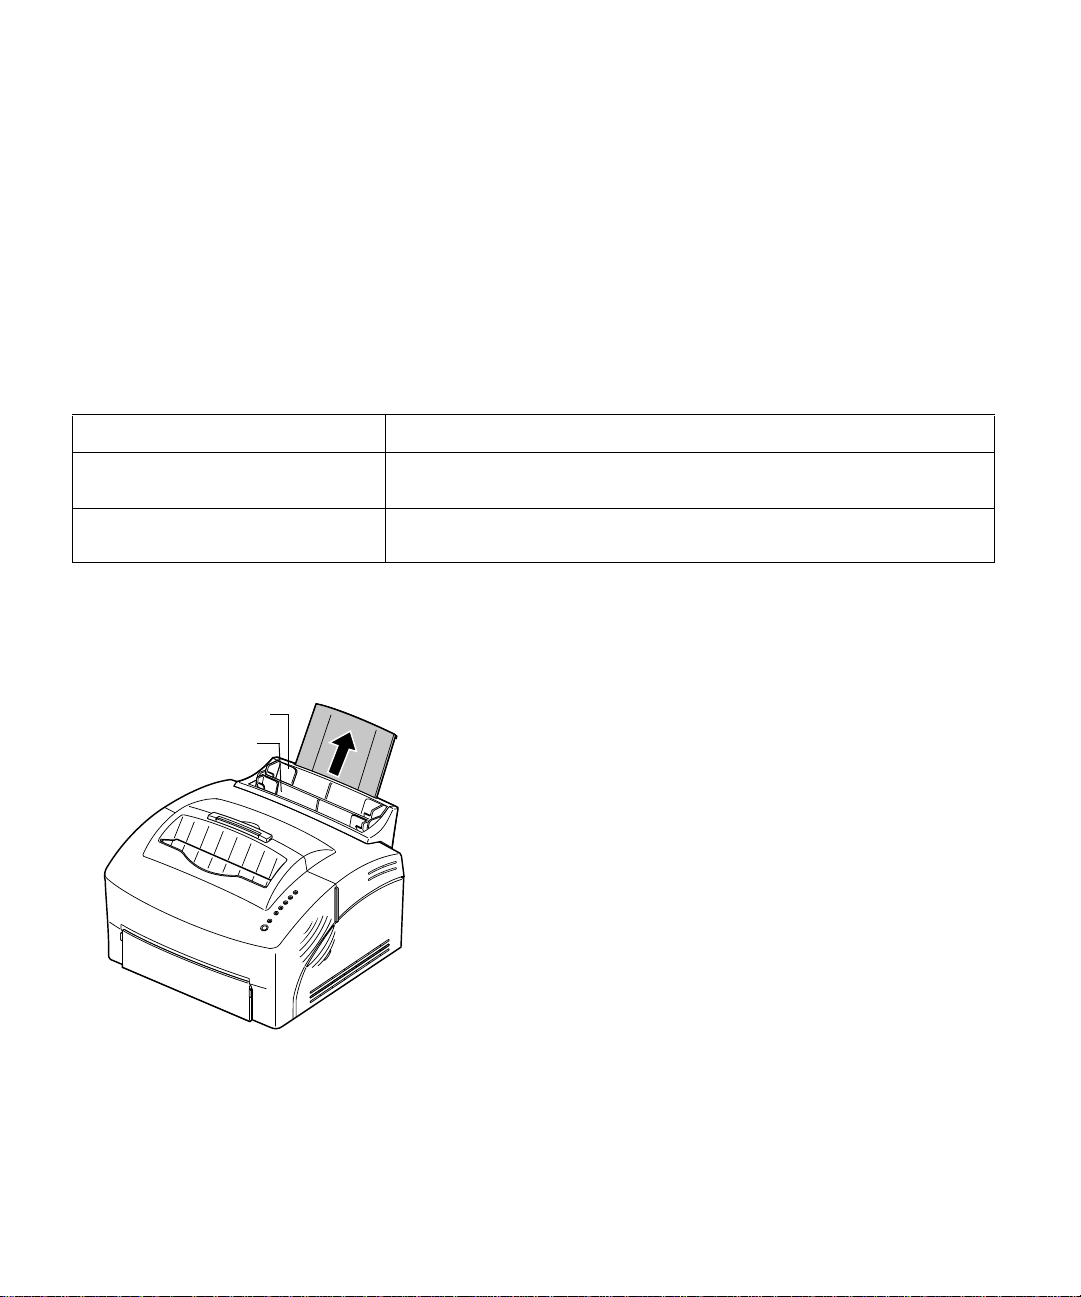
1 To print from the automatic paper fe eder , extend
the paper support.
2 Before loading paper, flex the sheets back and
forth to loosen them, then fan them.
Loading paper
9
Page 20
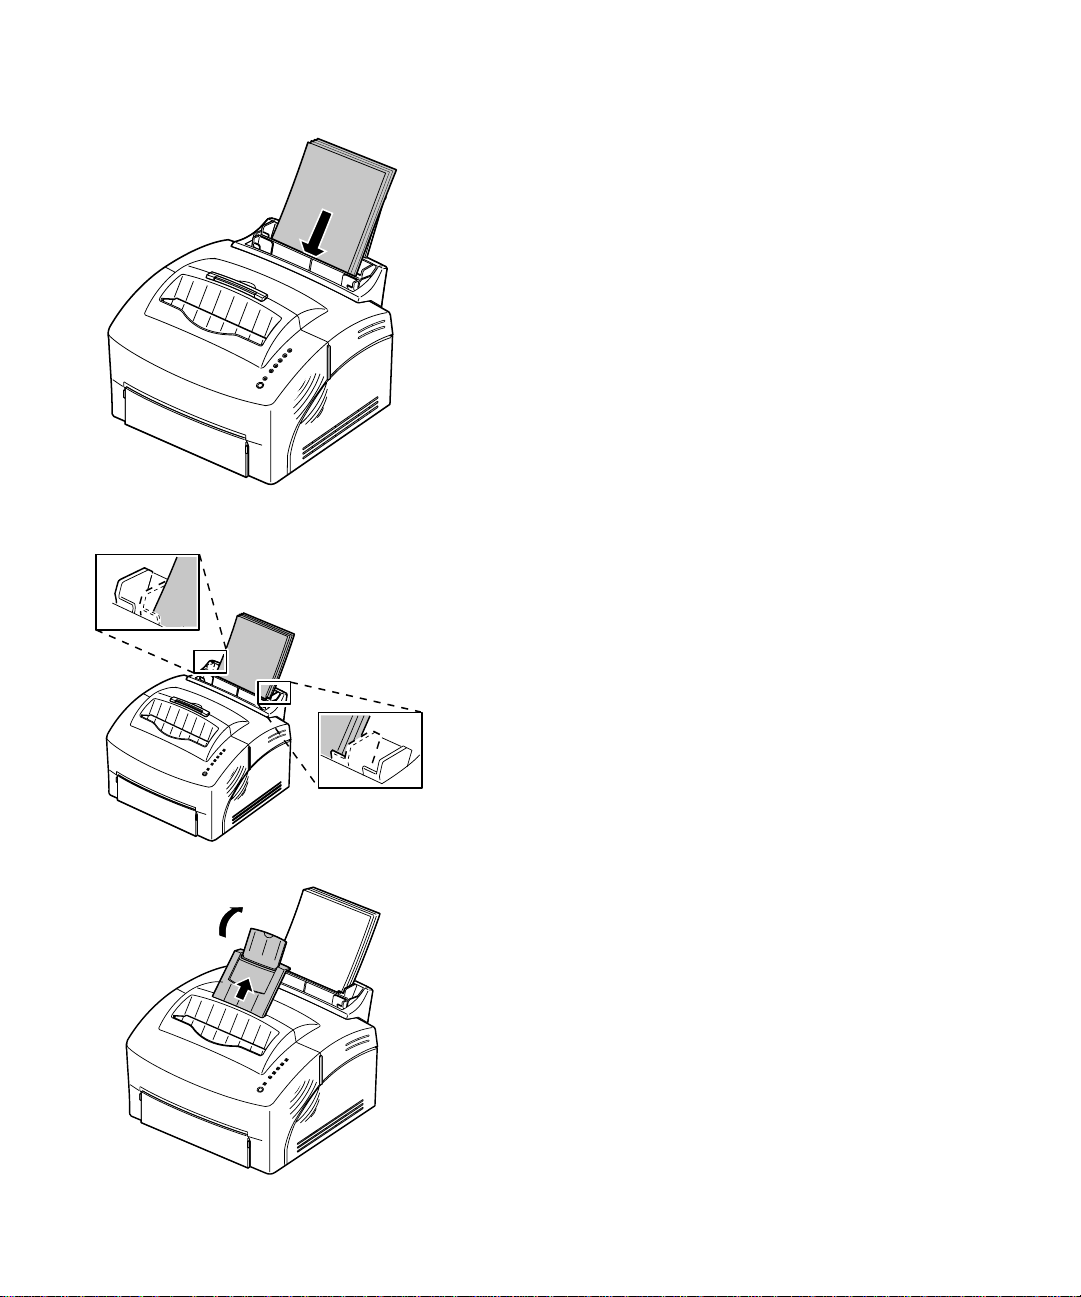
3 If the paper has a preferred print si de, insert the
paper with the print side facing you .
If you are loading letterhead paper, insert letterhead
with the top of the page pointing down.
4 Slide the paper guides against the edges of the
paper.
10
5 Extend the paper support on the paper output
bin.
6 Select the paper size from your software
application.
7 Start your print job.
Chapter 1: T he basics
Page 21

Troubles ho otin g Tip s
Problem: What to do:
T oner s mudges appear on th e front or
back of the page.
Paper sticks together/printer feeds
multiple sheets of paper.
Paper f ails to feed from the automatic
paper feeder.
Paper skews or buckles. • Make sure there isn’t too much paper in the pa per f eeder. The automatic
Printing a test
• Make sure the paper is straight and unwrinkled.
• Remove the paper from the paper feeder and fan the paper.
• Make sure there isn’t too much paper in the pa per f eeder. The automatic
paper feeder holds up to 150 sheets, depending on the thickness of the
paper.
• Remove the paper from the paper feeder and fan the paper.
paper feeder holds up to 150 sheets, depending on the thickness of the
paper.
• Make sure the paper guides are properly positioned against the edges
of the paper.
To check that your printer is working correctly, print a
page
test page.
To print a test page, the print cartridge must be
installed (see page 2).
Printing a test page
11
Page 22
Troubles ho otin g Tip s
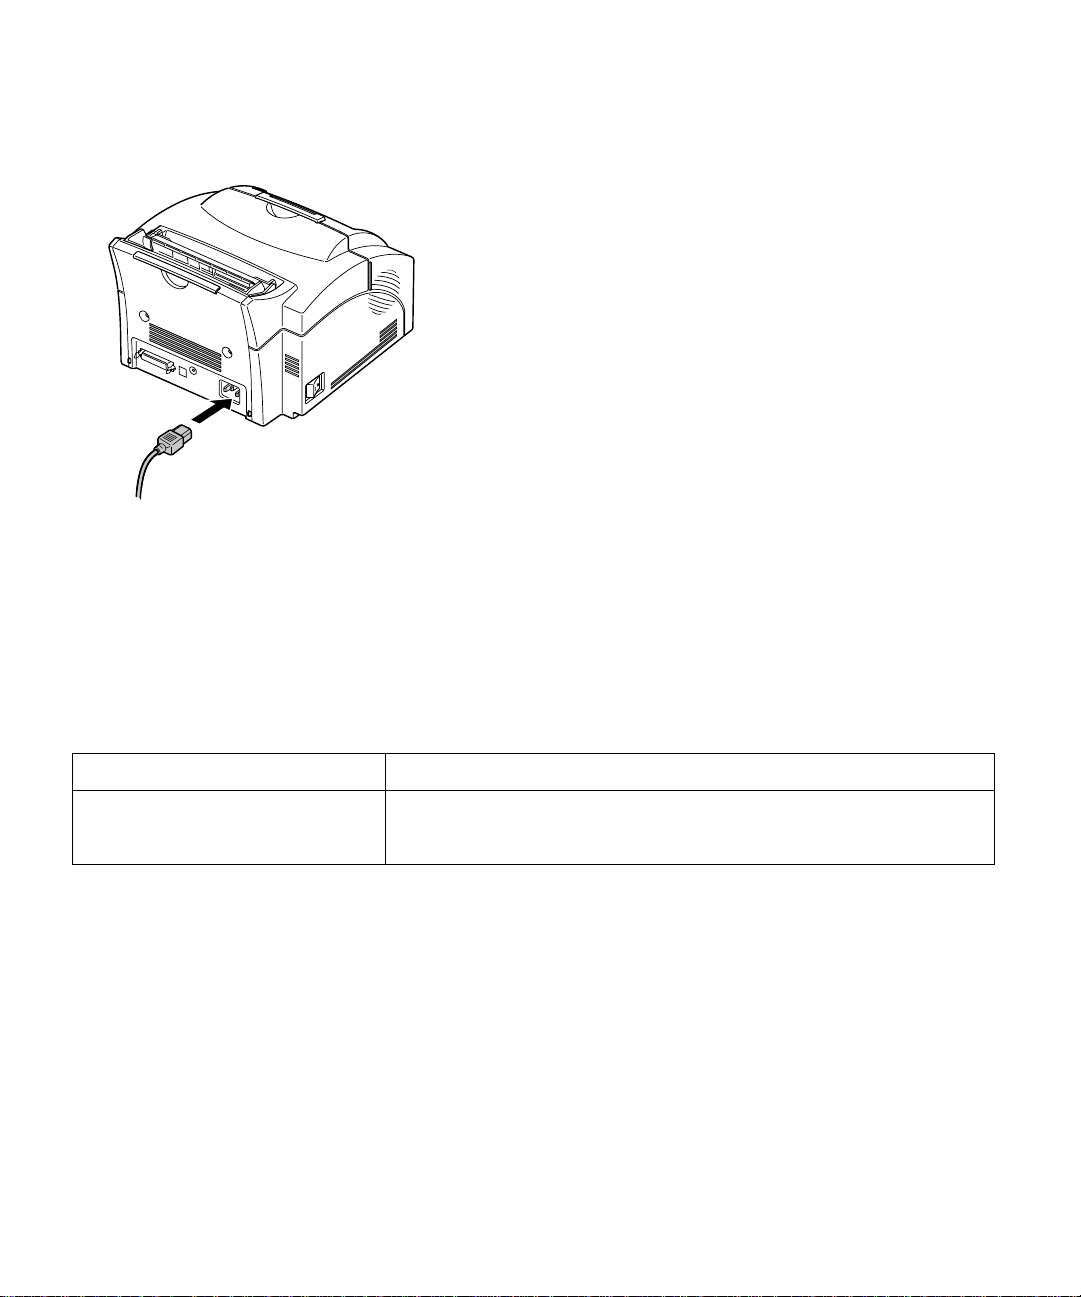
1 Turn the printer off.
2 Plug one end of the power cord into the power
cord connector on the back of the printer and
the other end into a properly grounded wall
outlet.
3 Turn on the printer.
As the printer powers up, each operator panel light
turns on and off, starting with Press Button and
ending with the Ready light. If this does not
happen, see “Printing problems” on page 36.
4 When the Data light stops blinking and Ready
is the only light on, briefly press the operator
panel button.
A test page listing your printer model and default
settings should print out. If it doesn’t, ch eck
“Printing problems” on page 36.
Problem: What to do:
The operator panel lights do not
come on when the printer is turned
on.
Attaching a new
operator panel
overlay
12
Chapter 1: T he basics
• Make sure the power cord is firmly plugged in at the back of the printer
and at the wall outlet.
If you have a non-English overlay sheet in your printer
box and wish to use it, peel it off and place it over the
overlay currently on your printer.
Page 23

Installing memory To install a memory card or a flash memory card, go on
to the next section. Otherwise, you are ready to set up
your application software and install the appropriate
printer driver. Refer to the booklet that came with the
CD for installation instructions. Turn to Chapter 2 for
more information about the printer utilit ies and dri vers.
Your printer comes with 2MB of printer memory. You
can buy and install a 4MB, 8MB, 16MB, 32MB or 64MB
optional memory card for a total of 66MB of printer
memory.
You can also install a 1MB, 2MB or 4MB optional flash
memory card for storing downloaded fonts or macros.
Removing the
system board shield
Before installing any of these option cards, you will
need a small Phillips screwdriver to
shield covering the printer system board.
remove the metal
1 Turn off the printer and unplug the power cord
from the printer.
2 Disconnect the printer cable (if attached) from
the printer.
3 Remove the print cartridge and cover it.
Installing memory
13
Page 24
Note: Exposing the
photoconductor to light may
damage the print cartridge. After
you remove the cartridge from
the printer , co ve r it or stor e it in a
clean, dark place.
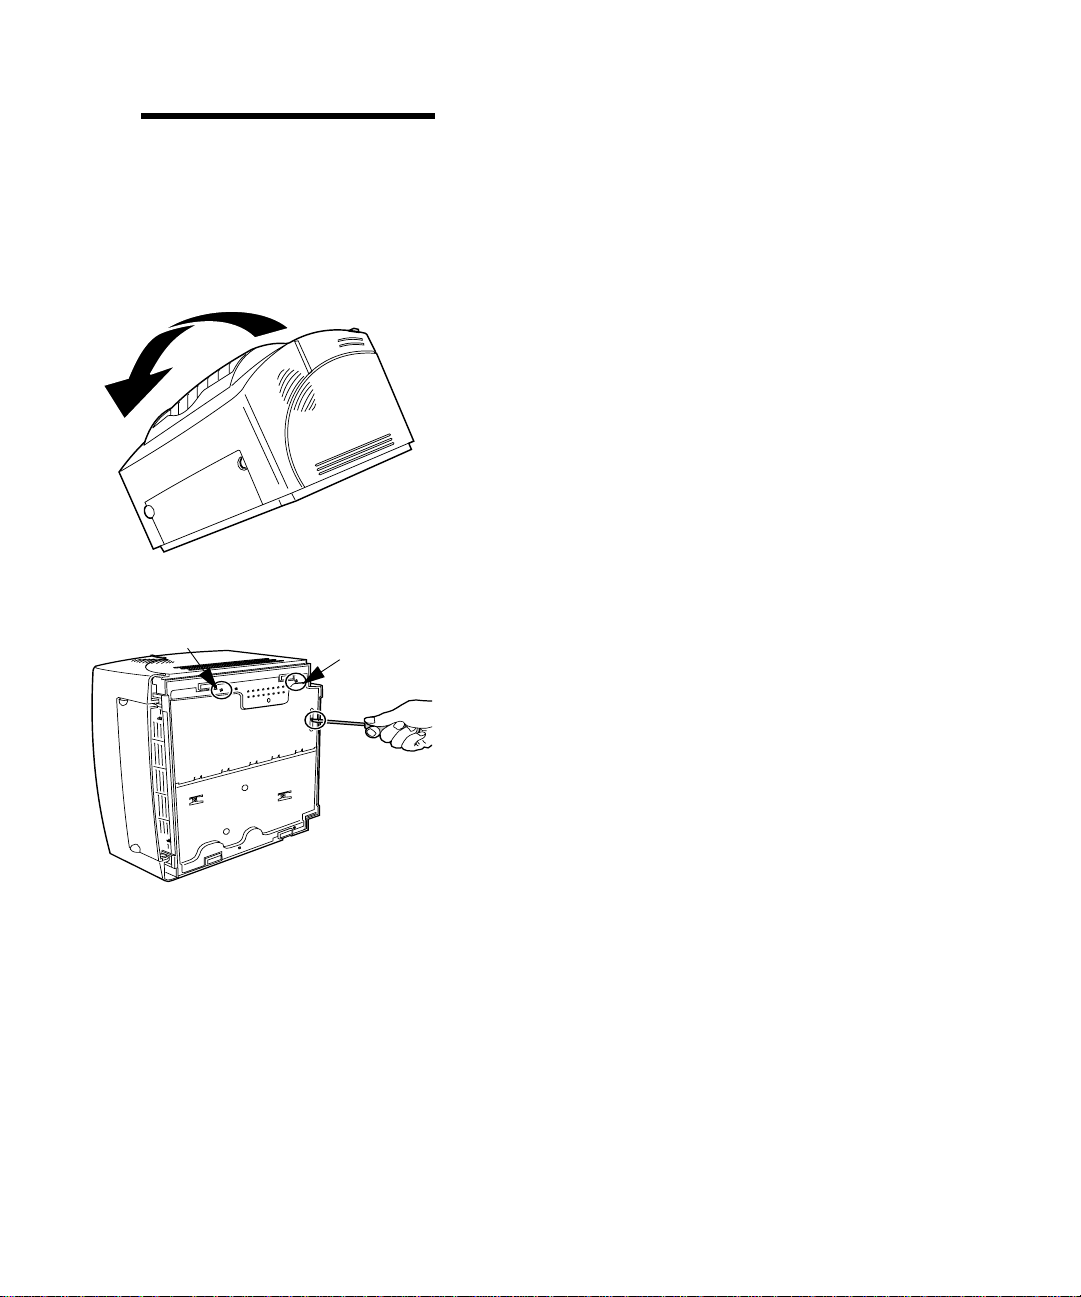
4 With the printer fa cing you, place it on its left
side.
5 Turn the printer around so the bottom of the
printer is facing you.
6 Locate and remove the 3 screws on the metal
shield.
14
Chapter 1: T he basics
Page 25

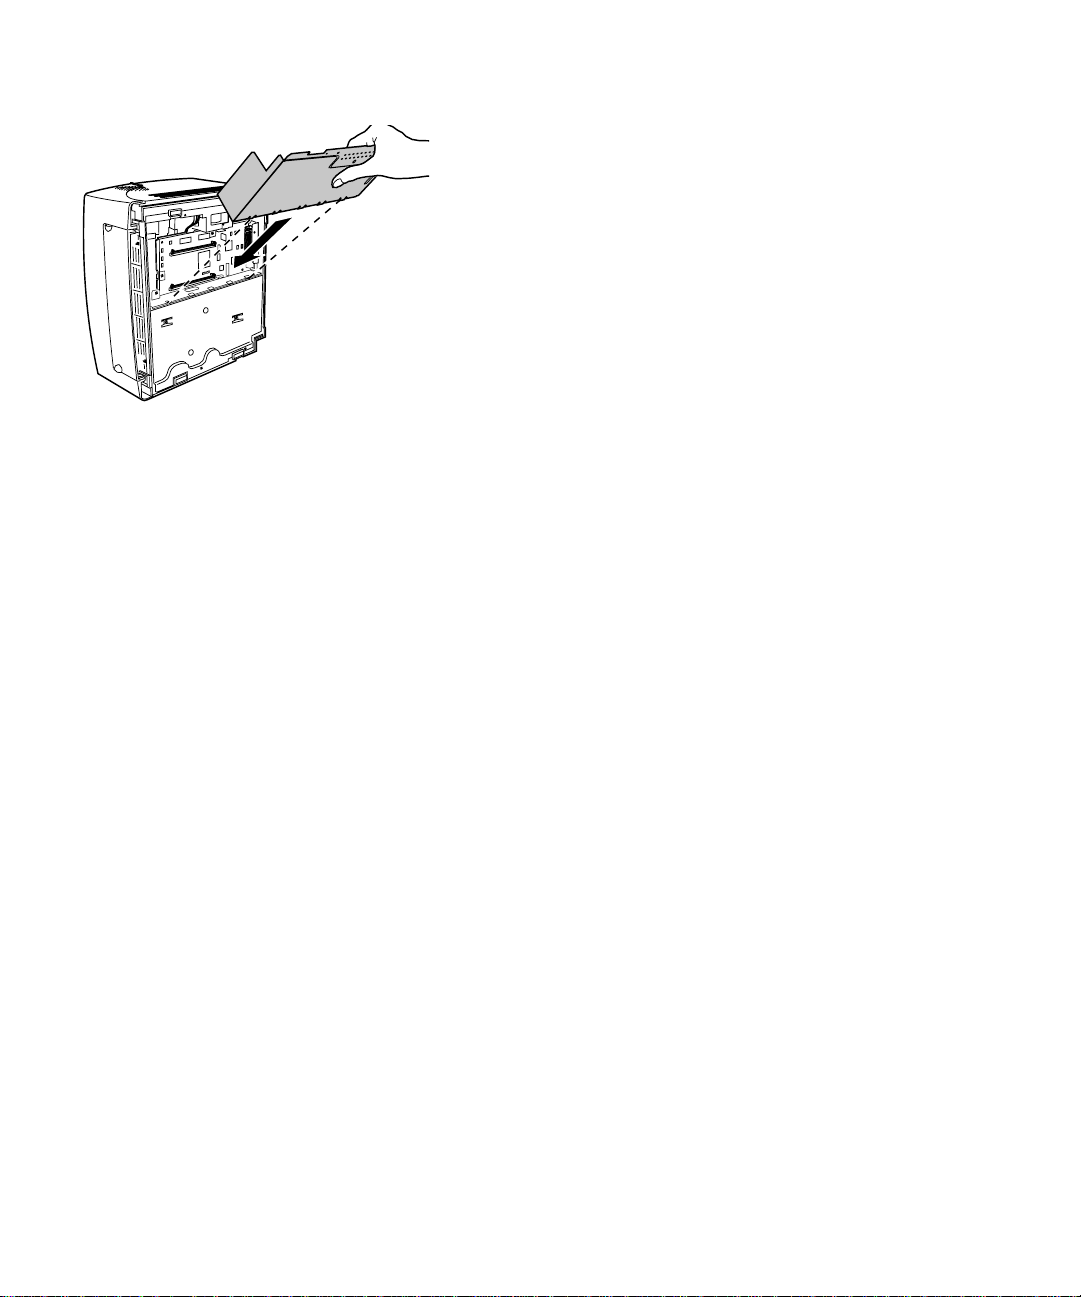
7 Grasp the corner of the shield and gently pull it
out, then do wn.
8 Pull the shield away from th e printer.
Installing memory
15
Page 26
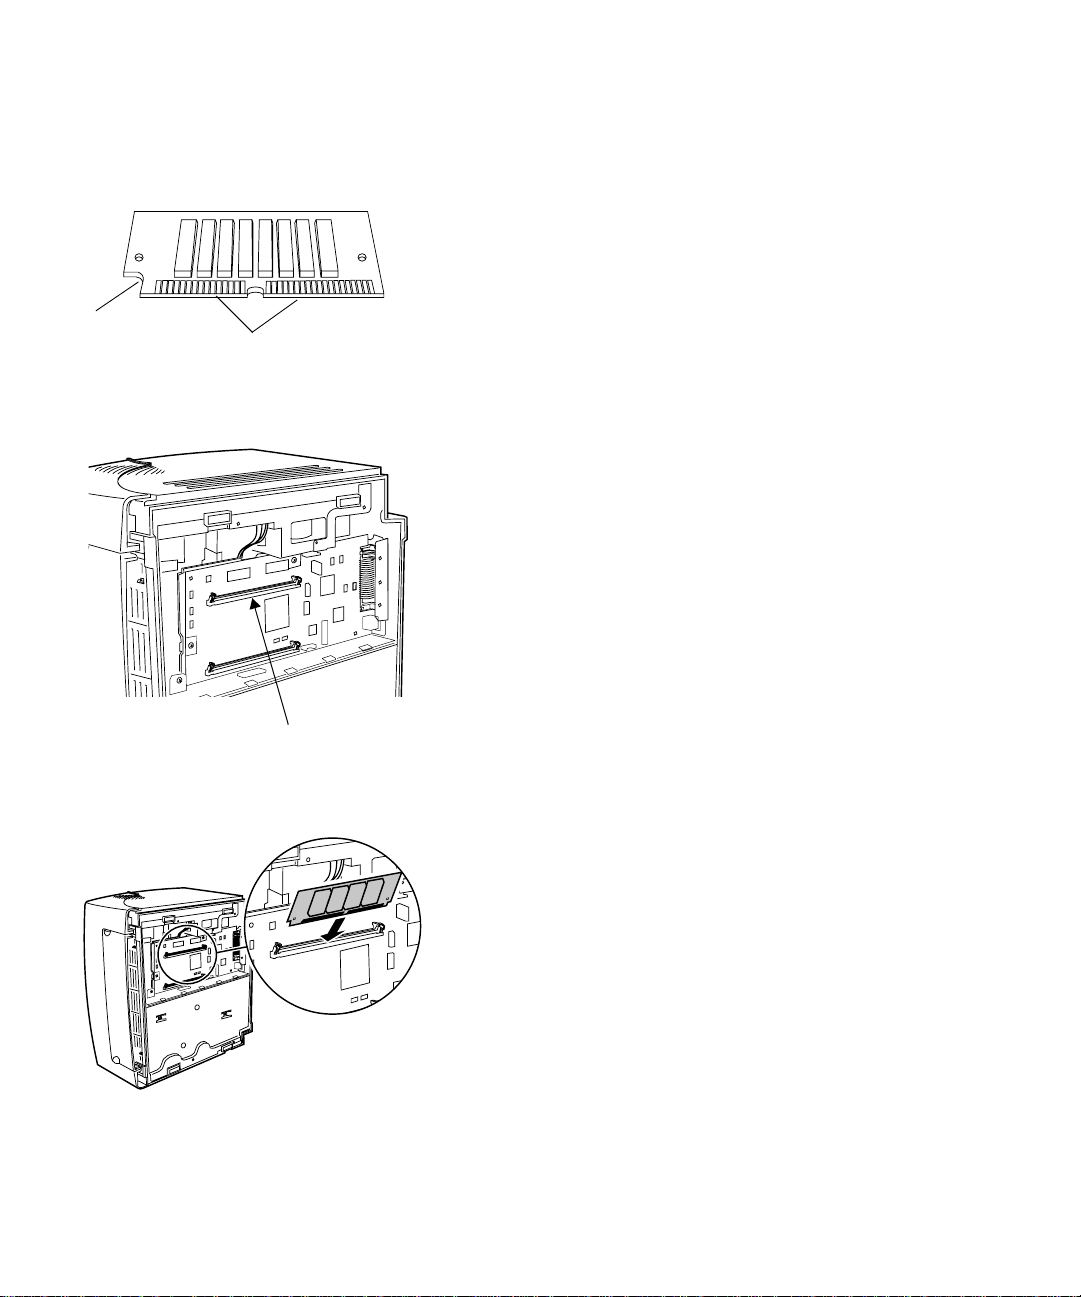
Notch
Installing a printer
memory card
Connection points
To install an optional printer memory card, follow the
instructions below.
1 Remove the printer memory card from its
packaging.
Avoid touching the connection points along the
edge of the card.
2 Locate the printer memory connector.
16
Printer memory connector
3 Hold the option card with the connection points
facing toward the system board, with the notch
pointing down and to the left.
4 Insert the c ard into the printer memory
connector at a 45 degree angle.
Chapter 1: T he basics
Page 27
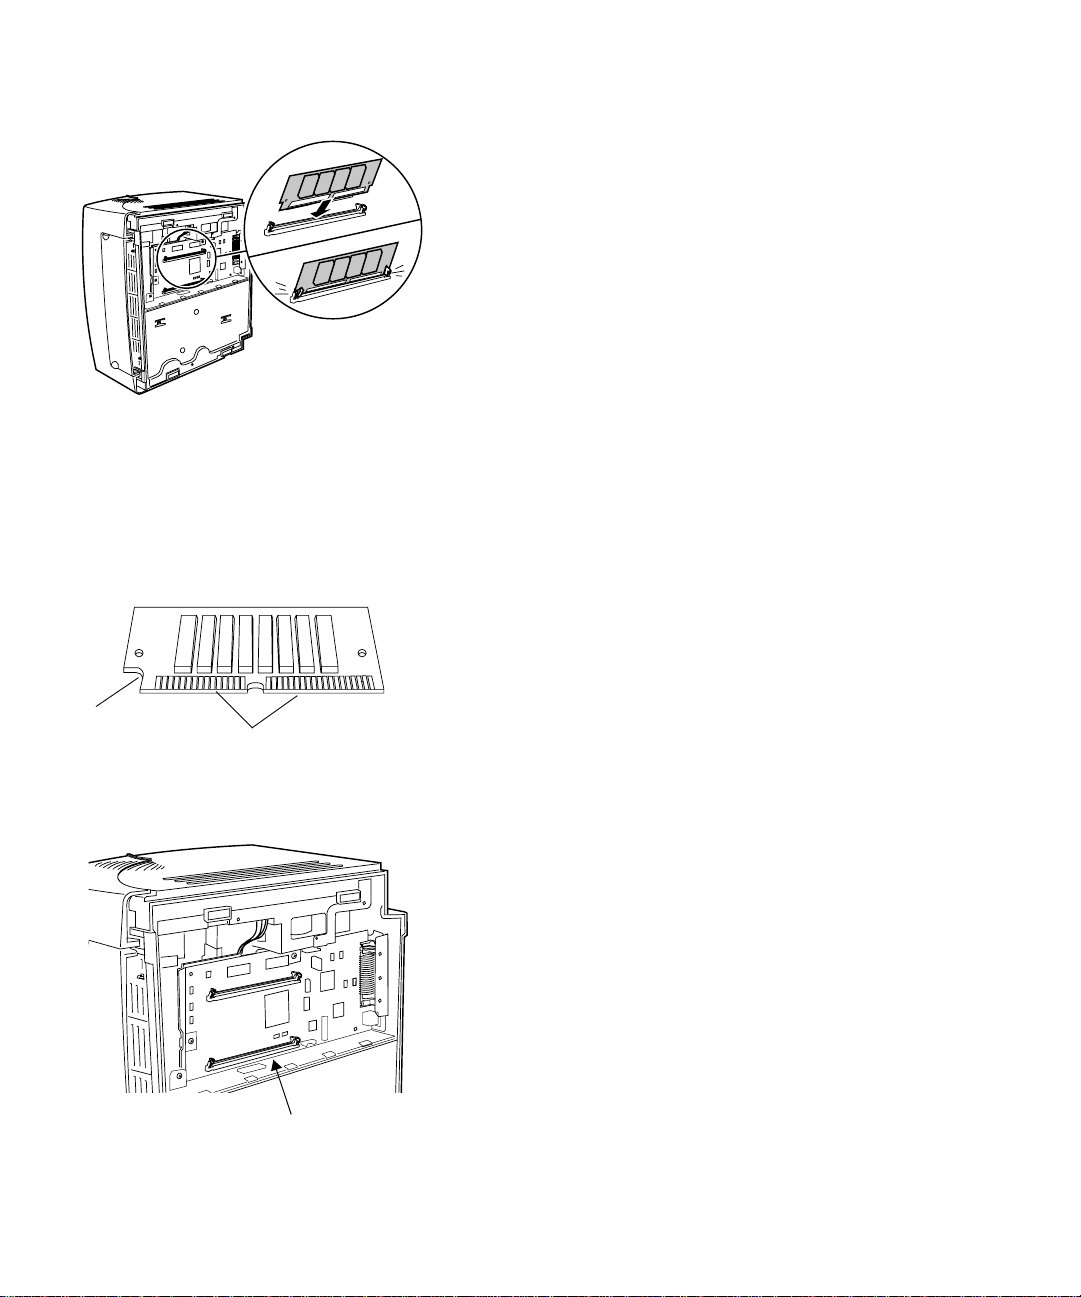
5 Gently push the card all the way in.
6 Push the card back with your thumbs until it
snaps into place.
Notch
Installing a flash
memory card
Connection points
To install an optional flash memory card:
1 Remove the printer memory card from its
packaging.
Avoid touching the connection points along the
edge of the card.
2 Locate the option card connector.
Option card connector
Installing memory
17
Page 28
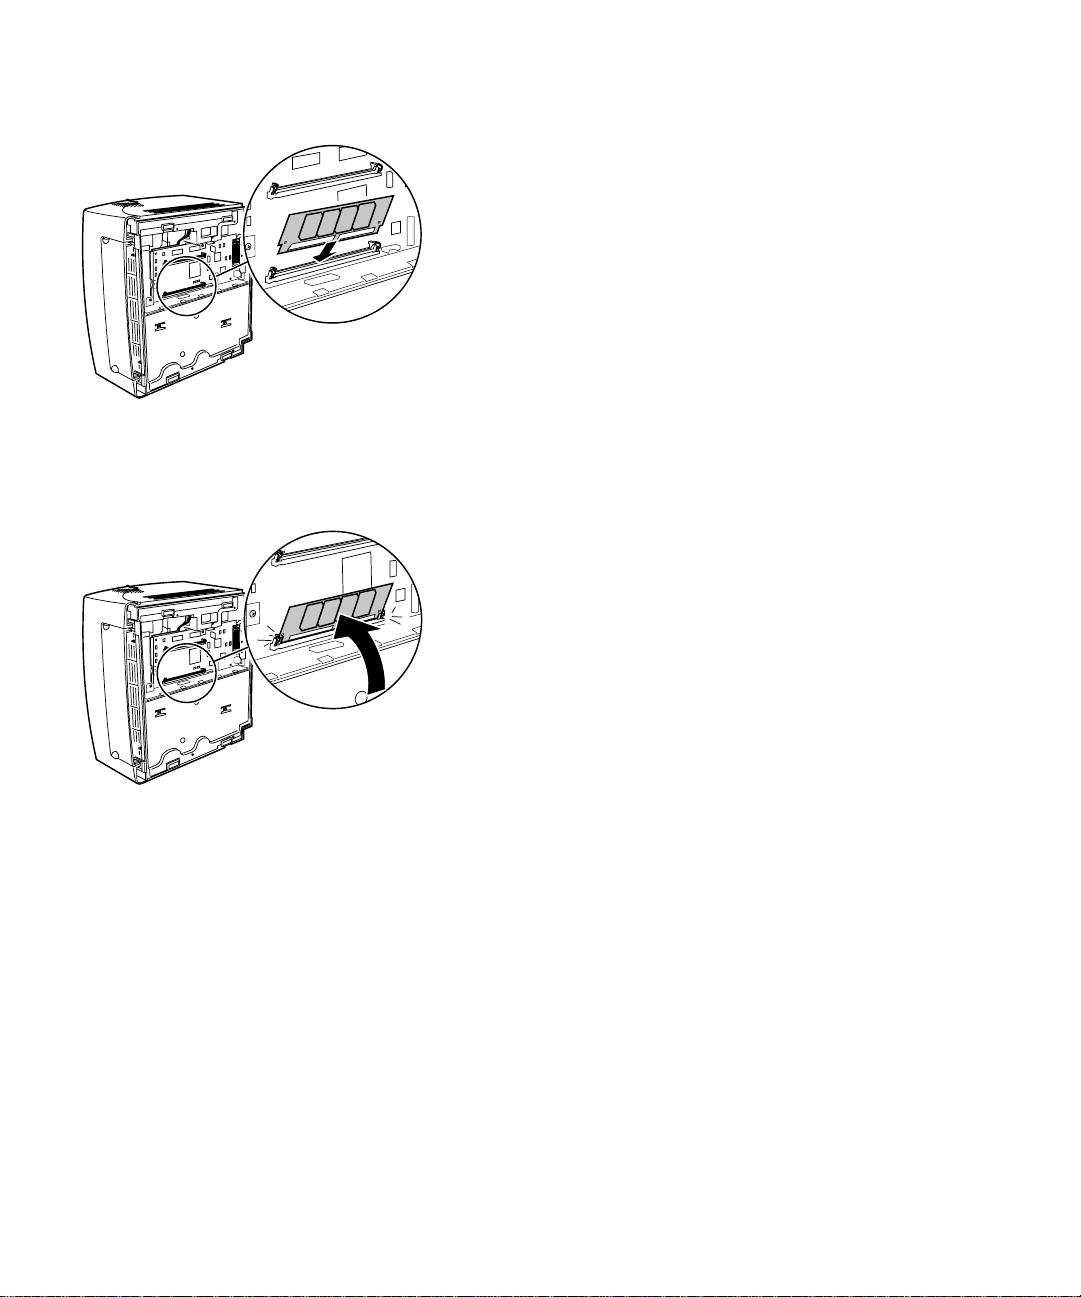
3 Hold the option card with the connection points
facing toward the system board and the notch
pointing down and to the left.
4 Insert the card into the option card connector at
a 45 degree angle.
5 Gently push the card all the way in.
6 Push the card back with your thumbs until it
snaps into place.
18
Chapter 1: T he basics
Page 29
When you have finished installing the option card(s):
1 Fit the metal shield into the slots and reattach
the screws.
2 Put the printer back to its original upright
position.
3 Re-install the print cartridge.
4 Reconnect the computer cable and latch the
metal clips.
5 Plug the power cord into the printer.
6 Turn the printer on.
As the printer powers up and the operator panel
lights begin cycling on and off, there is a pause
while the new memory is tested, then the lights
continue cycling.
7 When the Ready light comes on, press the
operator panel button briefly and print a test
page to verify that printer memory or addi tional
flash mem ory is installed.
If the Ready light does not come on, see “Printing
problems” on page 36.
Installing memory
19
Page 30

20
Chapter 1: T he basics
Page 31

2
Printer drivers
Included with your printer is a compact disc (CD)
containing printer drivers and utilities for Windows 95,
Windows 98, Windows NT 4.0, Windows 3.1x,
Macintosh, OS/2 and DOS operating systems. Refer to
the CD booklet for information about launching the CD
program for your operating system. When the CD
program is running, press F1 for on-line Help at any
time.
Diskettes containing a setup utility and Windows 3.1x
drivers are included with the printer for some
countries. You can also create diskettes from the CD or
visit our website at http://www.lexmark.com to
download a printer driver to your computer.
Printer drivers Printer drivers for the following operating systems
and applications are included on the CD:
• Windows 9 5
• Windows 9 8
• Windows N T 4.0
• Windows for Workgroups 3.11
• Windows 3.1x
• Macintosh System 7
• OS/2 Warp
• OS/2, 2.1 or later
• WIN-OS/2 for OS/2, 2.1 or later
Printer drivers
19
Page 32

• DOS applications:
– WordPefect 5.1, 6.0
– Lotus 1-2-3 2.x, 3.x
Additional printer drivers may have been developed
since this book was printed. Refer to the CD README
for a complete list of all the drivers included on the CD.
Automated fax
system
In the U.S. and Canada, you can get a list of available
drivers by calling the Lexmark Automated Fax System.
The system is available 24 hours a day, 7 days a week.
Just call (606) 232-2380 from a touchtone phone and
follow the voice prompts.
If you have a modem attached to your computer, you
can download printer drivers from the Lexmark
Bulletin Board System (BBS). In the U.S. and Canada
call (606) 232-5238. For all other countries, refer to the
Contacting Lexmark information on the CD or the
printer registration card.
Printer utilities The CD also includes printer utilities. If you’re using
Windows 95, Windows 98, Windows NT 4.0, Macintosh
or OS/2 Warp, you can install the MarkVision utility.
20
Chapter 2: Printer drivers
Page 33

MarkVision With its easy-to-use tabs, MarkVision provides a quick
and easy way to view and change printer settings right
from your computer. You can:
• select the status tab to view up-to-the-minute
printer status
• use Quick Setup to save your printer settings and
set up one or more printers with your printer
configuration
• download fonts and overlays with the Windows
Toolkit
• use Printer Job Management to view and manage
printer jobs
To install MarkVision, refer to the MarkVision on-line
documentation on the Drivers, MarkV ision and Utiliti es
CD that came with your printer.
On-line help On-line Help is available from all MarkVision screens.
MarkVision for Windows 95, Windows 98 and
Windows NT 4.0 includes step-by-step instructions for
using many MarkVision functions.
MarkVision
21
Page 34

22
Chapter 2: Printer drivers
Page 35

Automatic Paper Feeder
3
Manual
Sheet
Feeder
Paper handling
Your printer has two standard paper sources: an
automatic paper feeder, which holds up to 150 sheets of
plain paper and a single sheet manual feeder. Use the
automatic paper feeder for the print jobs you do most
often. Use the manual sheet feeder to feed a single page,
transparency, envelope, label or index card.
Your printer also has an output bin on top of the printer
that collates up to 100 sheets (face down), and the single
sheet front output door, which lets you feed media
straight out the front of the printer, reducing curling
and potential paper jams when using special media
such as transparencies, envelopes, labels, card stock or
index cards.
Paper Output Bin
Front Output Door
Paper handling
23
Page 36

Paper types and
sizes
Selecting the right paper type reduces printing
problems. For best print quality, use 20 lb (75 g/m2)
xerographic paper.
If the paper has a preferred print side, load it with the
print side facing you.
Media Size Weight Capacity
Paper A4, A5, B5, letter, legal,
Transparencies Minimum: 3.875 x 5.9 in.
Envelopes Minimum: 3.875 x 5.9 in.
Labels Minimum: 3.875 x 5.9 in.
Index Cards Minimum: 3 x 5 in.
Index Bristol /
Tag Card Stock
executive
(98 mm x 152 mm)
Maximum: 8.5 x 14 in.
(216 mm x 356 mm)
(98 mm x 152 mm)
Maximum: 8.5 x 14 in.
(216 mm x 356 mm)
(98 mm x 152 mm)
Maximum: 8.5 x 14 in.
(216 mm x 356 mm)
(76.2 x 127.0 mm)
Minimum: 3 x 5 in.
(76.2 x 127.0 mm)
Maximum: 8.5 x 14 in.
(216 mm x 356 mm)
16 - 24 lb
(60-90 g/m
16 - 43 lb
(60-163 g/m
16 - 43 lb
(60-163 g/m
16 - 43 lb
(60-163 g/m
16 - 43 lb
(60-163 g/m
67 - 90 lb Index Bristol
(120 - 163 g/m
50 - 100 lb tag
(75 - 163 g/m
2
)
2
)
2
)
2
)
2
)
2
)
2
)
Automatic Paper Feeder: 150 sheets
Manual Sheet Feeder: 1 sheet
Automatic Paper Feeder: 10 sheets
Manual Sheet Feeder: 1 sheet
Automatic Paper Feeder: 10 envelopes
Manual Sheet Feeder: 1 envelope
Automatic Paper Feeder: 10 sheets
Manual Sheet Feeder: 1 sheet
Automatic Paper Feeder: 10 cards
Manual Sheet Feeder: 1 card
Automatic Paper Feeder - 10 cards
Manual Sheet Feeder: 1 card
24
Chapter 3: Paper handling
Page 37

Paper Load A4, A5, B5, letterhead, legal and executive-size
paper one at a time from the manual feeder or load up
to 150 sheets in the automatic paper feeder.
Preprinted papers such as letterhead must be able to
withstand temperatures up to 190°C (374°F) without
melting or releasing hazardous emissions.
Load letterhead with the top of the page pointing
down, facing you.
Transparencies If you occasionally print transparencies:
• Use transparencies designed for laser printers.
We recommend Lexmark Laser Printer
Transparencies: for letter size transpar enc ies, part
number 70X7240; for A4 size transparencies, part
number 12A5010. Transparencies must be able to
withstand temperatures of 190° C (374° F)
without melting or releasing hazardous
emissions.
• Test the print quality before buying large
quantities.
• Load transparencies with a removable stripe so
the stripe is away from you and pointing down.
Envelopes For occasional envelope printing, feed envelo pes one at
a time from the manual feeder, or load up to 10
envelopes in the automatic paper feeder.
Paper types and sizes
25
Page 38

Load envelopes in the center of the manual feeder or
automatic paper feeder and slide the paper guides
snugly against the sides of the envelopes.
When printing on envelopes:
• Try a sample of any envelopes you are
considering using with the printer before buying
large quantities.
2
• Use envelopes made from 75 to 105 g/m
(20 to
28 lb) bond paper. For best performance and
fewer paper jams, do not use envelopes that:
– have excessive curl
– are stuck together
– are damaged in any way
– contain windows, holes, perforations, cutouts
or embossing
– use metal clasps, string ties or metal folding
bars
– have postage stamps attached
– have any exposed adhesive when the flap is in
the sealed position
26
• Use envelopes that can withstand temperatures
of 190°C (374°F) without sealing, excessive
curling, wrinkling or releasing hazardous
emissions.
Chapter 3: Paper handling
Page 39

• Load envelopes vertically, flap side down so the
stamp area is in the top left corner.
• Adjust the left and right paper guides to fit the
width of the envelopes.
Labels For occasional label printing, use paper labels desig ned
for laser printers. You can feed labels one at a time from
the manual feeder , or you can load up to 10 labels in the
automatic paper feeder.
When printing on labels:
• Test the print quality before buying large
quantities of labels.
• Use labels with a pressure of 25 psi that can
withstand temperatures of 190° C (374° F)
without releasing hazardous emissi ons. For more
information on label printing, refer to the Card
Stock & Label Guide on the CD.
• Do not print a large number of labels
continuously.
• Do not use labels that have exposed adhesive on
the sheets.
Card Stock For occasional printing on index Bristol or tag card
stock, feed 1 card at a time in the manual paper feeder.
Use card stock with a maximum weight of 163 g/m
a minimum size of 76.2 x 127 mm (3 x 5 in.).
and
Paper types and sizes
2
27
Page 40

For best results, open the single-sheet front output door
so the card stock exits out the front.
Loading paper,
other media in the
automatic feeder
Automatic paper feeder
Use the automatic paper feeder, which is behind the
manual feeder,
transparencies, envelopes, labels and card stock.
To avoid curling and potential jams when printing on
special media, open the front output door to feed the
media straight out the front of the printer.
to feed paper and special media such as
1 Extend the paper support on the automatic
paper feeder.
2 Before loading media, flex the sheets back and
forth to loosen them, then fan them.
The automatic paper feeder holds up to 150
sheets of paper, 10 sheets of transparencies or
labels, 10 envelopes, 10 index cards.
28
Chapter 3: Paper handling
Page 41

3 If loading:
• A4, A5, B5, legal or executive-size paper, insert
the paper with the print side facing you
• letterhead paper, insert letterhead with the top of
the page pointing down, facing you
• transparencies with a removable stripe, insert
them so the stripe is pointing away from you and
pointing down
• envelopes, insert them vertically, flap side down
so the stamp area is in the top left corner
4 Slide the paper guides flush against the edges
of the media.
Loading paper, other media in the automatic feeder
29
Page 42

5 Extend the paper support on the paper output
bin or open the front output door if you’re
printing on special media.
6 Select the automatic paper feeder from your
software application.
7 Start your pr int job.
30
Chapter 3: Paper handling
Page 43

Loading paper,
other media in the
manual feeder
Use the manual feeder to feed paper or special media,
one sheet at a time, into your printer.
If you experience problems feeding envelopes or index
cards in the automatic paper feeder, try printing them
one at a time from the manual feeder.
To avoid curling or potential jams when printing on
special media, open the front output door to feed media
straight out the front of the printer.
1 Extend the paper support on the paper output
bin or open the front output door if you’re
printing on special media.
Manual feeder
2 If loading:
• paper, insert one sheet of paper with the print
side facing you
• letterhead paper, insert one sheet of letterhead
with the top of the page pointing down, facing
you
• transparencies with a removab le stripe, insert one
transparency so the stripe is pointing away from
you and pointing down
• envelopes, insert one envelope vertically, flap
side down so the stamp area is in the top left
corner
• card stock, insert o ne card vertically
3 Slide the paper guides flush against the edges
of the media.
4 Briefly (approximately one second) push Press
Button to st art printing .
5 When the Load Paper light blinks and the Press
Button light comes on, place another sheet/ot her
media in the manual feeder. If you are using
MarkVision, you will get a load manual paper/
envelope message.
Loading paper, other media in the manual feeder
31
Page 44

Clearing paper
jams
If you get a paper jam, the Paper Jam indicator light
prompts you to clear the paper path.
If the paper has just started to feed from the paper
feeder when the jam occurs:
1 Pull the paper straight up out of the paper
feeder.
2 Open and close the printer cover to resume
printing.
If the paper jam occurs inside the printer:
1 Remove the paper from the output bin.
2 Turn the printer off, then on.
32
Note:
photoconductor to light may
damage the print cartridge. After
you remove the cartridge from
the printer , co ve r it or stor e it in a
clean, dark place.
Chapter 3: Paper handling
Exposing the
If this doesn’t clear the jam:
3 Open the printer cover.
4 Remove the print cartridge and cover it.
Page 45

5 Grasp the paper on both sides and pull the
paper toward you.
6 Make sure there is no more paper in the printer.
7 Re-insert the print cartridge.
8 Close the printer cover to resume printing.
Note:
fuser, try opening and closing
the cover. Each time you open
and close the cover, the paper
advances until you can pull it
out.
Note:
printer may occur if adhesive
labels remain in the fusing unit.
Call for service.
If the paper jam is in the
Serious damage to your
If a paper jam occurs while printing labels:
1 Be sure the labels remain attached to the
backing sheet after clearing the paper jam.
2 Feed 10 or more sheets of plain paper through
the printer before resuming label printing. The
plain paper will remove any remaining
adhesive in or on the fusing unit.
Clearing paper jams
33
Page 46

Troubles ho otin g Tip s
Problem: What to do:
Paper sticks together/printer feeds
multiple sheets of paper.
Paper skews or buckles.
Envelopes fail to feed correctly. • Make sure the envelopes are loaded in the center of the feeder.
• Make sure you are using recommended paper/other media (see “Paper
types and sizes” on page 24).
• Try a different kind. Envelopes designed for laser printers produce better
results.
34
Chapter 3: Paper handling
Page 47

Troubleshooting
4
For help solving printing problems, refer to the
following tables. If you cannot fix the problem, contact
your point of purchase for assistance. You may have a
printer part that requires cleaning or replacement by a
service technician.
Print qualit y prob lems
Problem: What to do:
Light or blurred characters. • Make sure you removed the sealing tape from the print cartridge.
• Hot/humid or cold/dry weather conditions may affect how well toner
adheres to paper. Select the next darker print setting.
• If Toner Saver is on, turn it off using MarkVision or your printer driver.
• Remove the print cartridge, shake it from side-to-side to redistribute the
toner, and reinsert it.
• Run Engine Clean Cycle to remove any toner that may have
accumulated (see ”Engine clean cycle ” on page 56).
• Make sure you are using recommended paper/other media (see ”Paper
types and sizes” on page 24).
• Use MarkVision to define the Custom Type setting for media type, media
texture or media weight.
• Replace the print cartridge.
T oner s mudges appear on th e front or
back of the page.
Vertical or horizontal streaks appear
on the page.
• Run Engine Clean Cycle to remove any toner that may have
accumulated (see ”Engine clean cycle ” on page 56).
• Make sure the paper is straight and unwrinkled.
• Replace the print cartridge.
• Run Engine Clean Cycle to remove any toner that may have
accumulated (see ”Engine clean cycle ” on page 56).
• Replace the print cartridge.
Troubleshooting
35
Page 48

Print qualit y prob lems
Toner smears or rubs off the page. • Run Engine Clean Cycle to remove any toner that may have
accumulated (see ”Engine clean cycle ” on page 56).
• Select a different Media Type or Form Type setting from your Lexmark
printer driver.
• Try a different kind of xerographic bond paper.
Solid black areas on transparencies
or paper contains white streaks.
Faint images or repetitive spots
appear on the page.
• Choose a different fill pattern in your software appli ca tion .
• Try a different type of paper. Paper designed for copiers give the best
quality.
• Replace the print cartridge.
• Select a different Media Type or Form Type setting from your Lexmark
printer driver.
• Try a different kind of xerographic bond paper.
• Replace the print cartridge.
Printing problems
Problem: What to do:
Printer has missing or damaged
parts.
Power is turned on at a power strip
but the Ready light is not on.
Printer is on, but nothing prints. • Make sure the print cartridge is installed.
• Inside the U.S., call the number listed on your printer registration card.
• Outside the U.S., contact your point of purchase.
• Be sure the printer power switch is on too.
• Make sure the parallel cable is firmly plugged into the connector on the
back of the printer.
• Pr int a test page (do a brief button press) to determ ine if the problem is
with the printer or the computer.
– If you can print a test page, the problem is in the computer or the
software application.
– If you cannot print a tes t page, call the Lexmark service number listed
on the printer registration card.
Printer does not print even though a
paper jam has been cleared.
Unexpected characters print or
characters are missing.
While in P ostScript Le vel 2 emulation,
the printer is flushing data (Data and
Error indicator lights are blinking.)
While in MarkVision, the Press
Button light is on.
36
Chapter 4: Troubleshooting
• Open and close the printer cover to restart the printer.
• Make sure you are using the correct printer driver.
• Select Hex Trace Mode from the Special Function Menu to determine
what the problem is.
• Restore factory defaults (see ”Reset user defaults” on page 55).
• Make sure you are using the correct PostScript driver.
• The printer doesn’t have enough memory to print the job. Install more
memory (see ”Installing a printer memory card” on page 16).
• The printer is off-line. Press and hold the operator panel button for 3
seconds to reset the printer.
Page 49

Indicator lights
Operator panel terms
The next section explains the various light sequences
with a corresponding illustration.
The indicator lights mean different things, depending
on their sequence. They indicate that the printer is
Ready to print (printer status information); the printer
needs attention (printer attendance information); or the
printer needs servicing (printer service information).
Light is on
Light is off
Light is blin king
Press Button
• Br ief button press (push the button once for no more than 3
seconds)
• Long button press (hold until all the lights come on)
• Double click button press (push and release the button twice
quickly)
Indicator lights
37
Page 50

Printer status
information
If your printer lights look like this: Then your printer:
is Ready to receive and process data.
• Pr int a test page by pushing the operator panel button with a
brief button press, or
• reset the printer by pushing the operator panel button with a
long button pres s. Each time the printe r is rese t, the print j ob i n
process is terminated.
38
Chapter 4: Troubleshooting
Page 51

If your printer lights look like this: Then your printer:
is Busy receiving data, processing data, the print engine is running,
or processing/printing a test page.
• If you want to reset the printer , push the oper ator panel butto n with
a long button press.
Indicator lights
39
Page 52

If your printer lights look like this: Then your printer:
is Waiting until a Print Timeout occurs or until additional data is
received.
• Pr int data stored in the printer buffer by pushing the operator
panel button with a brief button press or
• reset the printer by pushing the operator panel button with a long
button press.
40
Chapter 4: Troubleshooting
Page 53

If your printer lights look like this: Then your printer:
is Resetting settings to their power-on default settings or saving
settings changed in Configuration Mode.
Indicator lights
41
Page 54

If your printer lights look like this: Then your printer:
is Flushing corrupted print data.
42
Chapter 4: Troubleshooting
Page 55

Printer attendance
information
If your printer lights look like this: Then your printer:
detects a Paper Jam.
• Open the printer cover, clear all paper from the paper path and
close the cover to resume printing.
Indicator lights
43
Page 56

If your printer lights look like this: Then your printer:
is prompting you to load media for manual feed. The printer stops
and displays thi s lig ht se que nc e for each piece of media you want to
print.
• Load media, with the side to be printed facing the front of the
printer, into the man ual feeder and push the operator panel b utt on
to resume printing, or
• reset the printer by pushing the operator panel button with a long
button press.
If your printer lights look like this: Then your printer:
is alerting you that the printer is out of paper/envelopes or that the
paper did not feed properly from the automatic paper feeder.
44
• Load media into the automatic paper fe eder and push the operator
panel button to resume printing or
• reset the printer by pushing the operator panel button with a long
button press.
Chapter 4: Troubleshooting
Page 57

If your printer lights look like this: Then your printer:
top cover is open or the print cartridge is not installed.
• Close the cover to displa y the ligh t sequenc e that ap peared be fore
the cover was opened.
• Install the print cartridge.
If your printer lights look like this: Then your printer:
flash memory is full (Memory Full)
• Pr int data without saving it in flash memory by pushing the
operator panel button with a brief button press or
• reset the front panel by pushing the operator panel button with a
long button press.
Indicator lights
45
Page 58

If your printer lights look like this: Then your printer:
• memory is full, or
• received a page that is too complex to print, or
• reduces the resolution of a formatted page to 300 dpi before
printing, or
• has a PPDS font error, or
• doesn’t have enough memory to save what is in the buffer
(resource save off), or
• doesn’t have enough memory to defragment flash memory
(insufficient defrag memory), or
• cannot communicate with the host computer (host interface
error).
Each of the errors described above has a unique, secondary error
code. Display the secondary error code by double-clicking the
operator panel button.
46
Chapter 4: Troubleshooting
Page 59

Secondary Error
Codes
If your printer lights look like this
when you double-click the operator
panel button:
Then your printer:
memory is full (Memory Full).
• Reduce the complexity of the job and/or the resolution, or
• press the operator panel button with a brief button press to
resume printing, or
• reset the printer by pushing the operator panel button with a long
button press.
Indicator lights
47
Page 60

If your printer lights look like this
when you double-click the operator
panel button:
Then your printer:
has received a page that is too complex to print (Complex Page).
• Switch the printing mode to a different printing mode via the
Lexmark driver for Windows, or
• press the operator panel button with a brief button press to
resume printing, or
• reset the printer by pushing the operator panel button with a long
button press.
48
Chapter 4: Troubleshooting
Page 61

If your printer lights look like this
when you double-click the operator
panel button:
Then your printer:
is out of memory while formatting a page an d is forced to reduce the
resolution to 300 dpi before printing it (Resolution Reduction
Warning).
• Push the operator panel button to resume printing, or
• reset the printer by pushing the operator panel button with a long
button press.
Indicator lights
49
Page 62

If your printer lights look like this
when you double-click the operator
panel button:
Then your printer:
has received a request for a PPDS font which is not installed (Font
Error).
• Reset the front panel by pushing the operator panel button with a
long button press.
50
Chapter 4: Troubleshooting
Page 63

If your printer lights look like this
when you double-click the operator
panel button:
Then your printer:
doesn’t have enough memory to save what is in the buffer
(Resource Save Off).
• Install additional memory or
• push the operator panel button to resume printing, or
• reset the front panel by pushing the operator panel button with a
long button press.
Indicator lights
51
Page 64

If your printer lights look like this
when you double-click the operator
panel button:
Then your printer:
has insufficient memory to free up unused space in flash memory
(Insufficient Defrag Memory).
• Delete fonts, macros and other data in RAM, or install additional
printer memory, then issue a PJL command to begin freeing up
unused space in flash memory.
52
Chapter 4: Troubleshooting
Page 65

If your printer lights look like this
when you double-click the operator
panel button:
Then your printer:
has an error communicating with the host computer (Host Interface
Error).
This error is displayed if:
• you have an external network adapter (ENA) connected to your
printer, but your printer can’t detect it when you first turn the
printer on, or
• the computer attempts to communicate with the printer through
the parallel port, but the port setting has been disabled in
configuration mode, or
• the computer attempts to communicate with the printer through
the USB port, but the po rt has been disabled in configuration
mode.
• If this error occurs when you turn on the printer, double check that
the ENA is still plugged in to the printer.
• If you want to print through the parallel port, print a menu se ttings
page (see ”Printing a test page” on page 11) to verify that the
parallel buffer setting is disabled. Re-enable the parallel port in
configuration mode (see page 63).
• If you’re printing through the USB port, print a menu setti ngs pa ge
(see ”Printing a test page” on page 11) to verify that the USB
buffer s ett ing is dis abled. Re-enable the USB port in configuration
mode (see page 70).
Indicator lights
53
Page 66

54
Chapter 4: Troubleshooting
Page 67

Printer service
information
If your printer lights look like this: Then your printer:
has a service error and printing stops immediately.
Turn the printer off and back on. If the lights are still b lin ki ng, c onta ct
your point of purchase, or call the Lexmark service number listed on
your printer registration card.
Reset user defaults When formatting problems occur or unexpected
characters print, try resetting the printer default
settings to your user defaults. Press and hold the
operator panel button until all indicator lights are on.
Once the default settings are reset, the Ready light
comes on.
Indicator lights
55
Page 68

Engine clean cycle For print quality problems, such as stray toner marks
appearing on the paper, select the Engine Clean Cycle
setting to remove any toner that may have
accumulated.
1 Turn off the pr inter.
2 Open the top cover.
3 Turn the printer back on.
4 Load paper into the paper feeder.
5 When the Error light comes on, indicating the
top cover is open, do a double button press.
6 When the Error light and Press Button light
blink, close the cover.
The Special Function Menu is activated.
Engine Clean Cycle is the first menu sele ction in the
Special Function Menu. The operator panel Ready
light is on solid, the Error light is blinking and the
Press Button light is blinking.
56
7 Do a long button press to start Engine Clean
Cycle.
a The printer feeds one sheet of plain paper
through the paper path to remove any
accumulated toner.
b Once the paper exits into the output bin, the
printer returns to the Ready state.
8 If necessary, repeat this process two or three
times until all of the excess toner is removed.
Chapter 4: Troubleshooting
Page 69

Print quality test
pages
To help isolate print quality problems, like streaking,
select the Print Quality Test Pages setting.
1 Turn off the pr inter.
2 Open the top cover.
3 Turn the printer back on.
4 Load paper into the paper feeder.
5 When the Error light comes on, indicating the
top cover is open, do a double button press.
6 When the Error light and Press Button light
blink, close the cover.
7 Do a double button press 4 times to scroll down
to Print Quality Test Pages.
The operator panel Paper Jam light is on solid, the
Error light is blinking and the Press Button light is
blinking.
8 Do a long button press to start Print Quality Test
Pages.
a Three pages print out to help you evaluate
print quality. The first page has registration
marks, the second page is gray and the third
page is black.
b Once the paper exits into the output bin, the
printer returns to the Ready state.
When
light, toner streaks, etc ., refer to the troubleshooting
tables beginning on page 35.
you’ve isolated the problem, i.e., print is too
Indicator lights
57
Page 70

Enter Hex Trace
mode
When unexpected characters print or characters are
missing, use Hex Trace to help you determine if there is
a problem with the language interpreter or the cable.
Hex Trace isolates p rinting prob lems by telling you
what information your printer is receiving.
To enter Hex Trace Mode:
1 Turn off the pr inter.
2 Open the top cover.
3 Turn the printer back on.
4 When the Error light comes on, indicating the
top cover is open, do a double button press.
5 When the Error light and Press Button light
blink, close the cover.
6 Do a double button press 3 times to scroll down
to Enter Hex Trace.
When the Enter Hex Trace setting is selected, the
operator panel Ready light is on solid, the Data
light is on solid, the Error light is blinking and the
Press Button light is blinking.
58
7 Do a long button press to start Hex Trace.
Data sent to the printer is printed out in
hexadecimal and character representation to help
isolate the source of the problem.
8 To exit Hex Trace, turn off the printer or press
the operator panel button to reset the printer.
Chapter 4: Troubleshooting
Page 71

Restore factory
defaults
If changing the printer user default settings do not
solve formatting problems, reset the printer to the
original factory default settings.
1 Turn off the pr inter.
2 Open the top cover.
3 Turn the printer back on.
4 Load paper into the paper feeder.
5 When the Error light comes on, indicating the
top cover is open, do a double button press.
6 When the Error light and Press Button light
blink, close the cover.
7 Do a double button press 1 time to scroll down
to Reset Defaults.
The operator panel Data light is on solid, the Error
light is blinkin g and the Press Button light is
blinking.
Note: When you restore
factory default settings, all
downloaded fonts, macros and
symbol sets in printer memory
are deleted. (Resources in flash
memory are unaffected.)
8 Do a long button press to reset the printer to the
original factory defaults.
Once the settings ar e returned to the factory default
values, the printer returns to the Ready state.
Indicator lights
59
Page 72

Before you call for
service
If you can’t solve your printer pr oblems, it’s time to call
for service. Before you call, however, check the
following:
• Is the power cord plugged into the printer?
• Is the power cord plugged directly into a properly
grounded wall outlet?
• Is your printer properly connected to your
computer?
• Are all other devices attached to your printer
plugged in and turned on?
• Is the wall outlet turned off by any switches?
• Did a fuse blow?
• Has a power outage occurred in your area?
• Is a print cartridge installed in your printer?
• Is the printer cover closed completely?
Once you’ve checked these things, turn your printer off
and back on again. If your printer is still not operating
properly, call the Lexmark service number listed on the
printer registration card or contact your point of
service.
60
If the Ready indicator light is on, briefly press the
operator panel button to print a test page. It lists your
printer model, printer memory installed and your user
default settings. The service representative will
probably ask for this information.
Chapter 4: Troubleshooting
Page 73

5
Supplies
Within the U.S. or Canada, you can order Lexmark
supplies from any Lexmark Authorized Supplies
Dealer . To locate the dealer near est you, ca ll the number
on the printer registration card that came with your
printer. In other countries, contact the place where you
bought your printer.
Print cartridge
maintenance
To get the maximum benefit from your print cartridge:
• Do not remove the print cartridge from its
packaging until you are ready to install it.
• Do not refill print cartridges. The printer
warranty does not cover damage caused by
using refilled cartridges.
• Store print cartridges in the same envir onment as
the printer.
• Do not remove a print cartridge from the printer
except to replace it or to clear a paper jam.
Print cartridge maintenance
57
Page 74

58
Chapter 5: Supplies
Page 75

Troubles ho otin g Tip s
Problem Action
Characters appear light or b lu rred. • Make sure you removed the sealing tape from the print cartridge.
• Replace the print cartridge.
Printer seems to be printing, but
pages are blank.
Printer is on, but nothing prints.
Jobs are not printing and the Error
light is on solid.
Recycling used
supplies
• The print car tridge may be out of toner. Replace the cartridge.
• The print car tridge may be defective. Replace the cartridge.
• Make sure you removed the sealing tape from the print cartridge.
• Make sure the print cartridge is installed.
Lexmark’s Operation ReSourceSM program lets you
participate in worldwide recycling at no cost to you.
Some shipping cartons have printed instructions for
participating in Operation ReSource. Other supplies
come packaged with a prepaid shipping label that you
may use in the specified country. If the shipping label i s
not appropriate for your country, or if you need
additional recycling instructions, contact the place
where you bought your printer.
Print cartridge maintenance
59
Page 76

60
Chapter 5: Supplies
Page 77

Printer
specifications
A
Printer features • Prints up to 8 pages per minute
• 600 and 300 dpi print resolutions
• 1200 Image Quality
• PostScript Level 2 emulation standard
• PCL 6 and PCL 5e emulations standard
• 45 LaserJet-compatible scalable fonts
• 39 Optra-compatible scalable fonts plus 36
additional PostScript scalable fonts
• 150-sheet automatic paper input tray and a
single-sheet manual input tray
• 100-sheet paper output tray and a single-sheet
output door
• 2MB printer memory
• 4MB, 8MB, 16MB, 32MB and 64MB memory
options for 66MB maximum memory expansion
• 1MB, 2MB and 4MB flash memory options
• USB capability
• Single element print cartridge for easy, clean-
hands installation
Appendix A: Printer specif ic ations
59
Page 78

Printer
dimensions
Height: 8.8” (224mm)
Width: 13.6” (345mm)
Depth: 14.4” (365mm)
Weight: 16.5 lbs (7.5kg) with print cartridge
60
Appendix A: Printer specifications
Page 79

B
Advanced
troubleshooting
If you contact the Lexmark Technical Support Center to
help you resolve a printing problem, they may guide
you through configuration mode to change a default
setting (i.e., turning on the PPDS Activated setting if
your job application uses the PPDS datastream).
Use the operator panel or the MarkVision remote
operator panel to set or change specific printer
functions in configuration mode.
The following settings may be selected while in
configuration mode:
• Parallel Port Settings
– Enable Port
– NPA Mode
– Protocol
– Mode 1
– Mode 2
– Strobe Adjust
• USB Settings
– Enable Port
– NPA Mode
• PPDS Activated
• Auto LFCR after CRLF
Appendix B: Advanced troubleshooting
61
Page 80

To enter configuration mode you must be in the Special
Function Menu:
1 Turn off the pr inter.
2 Open the top cover.
3 Turn the printer back on.
4 When the Error light comes on, indicating the
top cover is open, do a double button press.
5 When the Error light and Press Button light
blink, close the cover.
6 Do a double button press twice to scroll down to
Enter Configuration Mode.
When the Enter Configuration Mode setting is
selected, the operator panel Load Paper light is on
solid, the Error light is blinking and the Press
Button light is blinking.
7 Do a long button press to initiate Configuration
Mode.
62
This illustration represents the operator panel
settings
is on solid .
When the printer is in configuration mode, the
indicator lights take on new meanings based on their
function.
each of these settings.
Appendix B: Advanced troubleshooting
in configuration mode when an indicator light
The following tables describe the function of
Page 81

If your printer lights look like
this in configuration mode:
Then your printer: Factory
Default
If your printer lights look like
this in configuration mode:
Parallel Port Enabled setting is set to Auto, the factory
default.
If your printer encounters a memory shortage when trying
to print a job and you are not using the par alle l port, turn off
Parallel Port Enabled to free up a little more memory.
There are three settings for Parallel Port Enabled: Off, On
and Auto.
• Do a brief button press to sc roll thro ugh the settings (Off ,
On, Auto) for this menu item.
• Do a double button press to scroll to the ne xt m enu item ,
NPA Mode (Parallel).
• Do a long button press to select and save a setting for
this menu. As the setting is saved, all operator panel
indicator lights remain on for approximately 2 seconds.
Turn off the printer to exit Configuration Mode.
Auto
Then your printer: Factory
Default
Parallel NPA Mode setting is set to A ut o , the f actory def au lt.
When NPA Mode is enabled, your computer can send print
jobs to the printer and query printer status information
simultaneously.
There are three settings for NPA Mode (Parallel): Off, On
and Auto.
• Do a brief button press to sc roll thro ugh the settings (Off ,
On, Auto) for this menu item.
• Do a double button press to scroll to the ne xt m enu item ,
Parallel Protocol.
• Do a long button press to select and save a setting for
this menu. As the setting is saved, all operator panel
indicator lights remain on for approximately 2 seconds.
Turn off the printer to exit Configuration Mode.
• Auto
Appendix B: Advanced troubleshooting
63
Page 82

If your printer lights look like
this in configuration mode:
Then your printer: Factory
Default
Parallel Protocol setting is set to Fastbytes, the factory
default.
When the protocol is set to Fastbytes, the printer receives
information at a m uch f aster transm ission ra te, prov ided the
host computer supports Fastbytes.
When the protocol is set to Standard, the printer receives
information at a normal transmission rate. The Press
Button light is off when Parallel Protocol is set to Standard.
• Do a brief button press to change the setting (Fastbytes,
Standard).
• Do a double button press to scroll to the ne xt m enu item ,
PPDS Activated.
• Do a long button press to select and save a setting for
this menu. As the setting is saved, all operator panel
indicator lights remain on for approximately 2 seconds.
Turn off the printer to exit Configuration Mode.
Fastbytes
64
Appendix B: Advanced troubleshooting
Page 83

If your printer lights look like
this in configuration mode:
Then your printer: Factory
Default
PPDS Activated setting is off, the factory default.
Turn PPDS Activated on when working in applications
using the PPDS datastream.
There are two settings for PPDS Activated: On and Off.
• Do a brief button press to change the setting (On, Off).
• Do a double button press to scroll to the ne xt m enu item ,
Auto CRLF/LFCR.
• Do a long button press to select and save a setting for
this menu. As the setting is saved, all operator panel
indicator lights remain on for approximately 2 seconds.
Turn off the printer to exit Configuration Mode.
Off
Appendix B: Advanced troubleshooting
65
Page 84

If your printer lights look like
this in configuration mode:
Then your printer: Factory
Default
CRLF/LFCR Auto CRLF/LFCR setting is off, the factory default.
How the printer formats the end of a line depends on the
computer system being use d. Use this setti ng to select
whether or not the printer a utomatically performs a c arriage
return (CR) after a line feed or a line feed (LF) after a
carriage return (CR).
• If the Press Button light is off, Auto CR after LF is Off
and Auto LF after CR is Off
• If the Press Button light is on, Auto CR after LF is On
and Auto LF after CR is Off
• If the Press Button light is blinking, Auto CR after LF is
Off and Auto LF after CR is On
• Do a brief button press to scroll through the settings for
this menu it em.
• Do a double button press to scroll to the ne xt m enu item ,
Parallel Mode 1.
• Do a long button press to select and save a setting for
this menu. As the setting is saved, all operator panel
indicator lights remain on for approximately 2 seconds.
Turn off the printer to exit Configuration Mode.
Off
66
Appendix B: Advanced troubleshooting
Page 85

This illustration represents the operator panel
settings in configuration mode when an indicator light
is blinking. The following tables describe the function
of each setting.
If your printer lights look like
this in configuration mode:
Then your printer: Factory
Default
Parallel Mode 1 setting is on, the factory default.
This setting enables or disables the pull u p resistors on the
parallel port signals. It is use ful fo r personal co mputers tha t
have op en colle ctor outpu ts on the par allel port signals . Set
Parallel Mode 1 On to disable the resistors or O ff to ena ble
the resistors.
• Do a brief button press to scroll through the settin gs (On,
Off) for this menu item.
• Do a double button press to scroll to the ne xt m enu item ,
Parallel Mode 2.
• Do a long button press to select and save a setting for
this menu. As the setting is saved, all operator panel
indicator lights remain on for approximately 2 seconds.
Turn off the printer to exit Configuration Mode.
On
Appendix B: Advanced troubleshooting
67
Page 86

If your printer lights look like
this in configuration mode:
Then your printer: Factory
Default
Parallel Mode 2 setting is on, the factory default.
This setting determines if the parallel port data is sampled
on the leading or trailing edge of strobe. If Parallel Mode 2
is set On, the parallel port data is sampled on the leading
edge of strobe. The parallel port data is sampled on the
trailing edge of strobe if Parallel Mode 2
• Do a brief button press to scroll through the settin gs (On,
Off) for this menu item.
• Do a double button press to scroll to the ne xt m enu item ,
Parallel Strobe Adjust.
• Do a long button press to select and save a setting for
this menu. As the setting is saved, all operator panel
indicator lights remain on for approximately 2 seconds.
Turn off the printer to exit Configuration Mode.
is set Off.
On
68
Appendix B: Advanced troubleshooting
Page 87

If your printer lights look like
this in configuration mode:
Then your printer: Factory
Default
Parallel Strobe Adjust setting is off (0), the factory default.
This setting lets you increase the amount of time strobe is
sampled to determine that valid data is available on the
parallel port.
• Do a brief button press to scroll through the settings
(0ff=0, On=+1, Auto=+2) for this menu item.
• Do a double button press to scroll to the ne xt m enu item ,
USB Port Enabled.
• Do a long button press to select and save a setting for
this menu. As the setting is saved, all operator panel
indicator lights remain on for approximately 2 seconds.
Turn off the printer to exit Configuration Mode.
0
Appendix B: Advanced troubleshooting
69
Page 88

If your printer lights look like
this in configuration mode:
Then your printer: Factory
Default
USB Port Enabled setting is set to Auto, the factory default.
The Universal Serial Bus (USB) lets you connect a variety
of devices, i.e., a printer, to your computer with a si ngle
cable.
• Do a brief button press to sc roll thro ugh the settings (Off ,
On, Auto) for this menu item.
• Do a double button press to scroll to the ne xt m enu item ,
USB NPA Mode.
• Do a long button press to select and save a setting for
this menu. As the setting is saved, all operator panel
indicator lights remain on for approximately 2 seconds.
Turn off the printer to exit Configuration Mode.
Auto
70
Appendix B: Advanced troubleshooting
Page 89

If your printer lights look like
this in configuration mode:
Then your printer: Factory
Default
USB NPA Mode setting is set to Au to, the factory default.
When USB NPA Mode is enabled, y o ur comp uter ca n send
print jobs to the printer and query printer stat us information
simultaneously.
• Do a brief button press to sc roll thro ugh the settings (Off ,
On, Auto) for this menu item.
• Do a double button press to scroll to the ne xt m enu item ,
Parallel Port Enabled.
• Do a long button press to select and save a setting for
this menu. As the setting is saved, all operator panel
indicator lights remain on for approximately 2 seconds.
Turn off the printer to exit Configuration Mode.
Auto
Appendix B: Advanced troubleshooting
71
Page 90

72
Appendix B: Advanced troubleshooting
Page 91

C
Safety
information
• If your product is NOT marked with this symbol , it MUST
be connected to an electrical outlet that is properly grounded.
• The power cord must be connected to an electrical outlet that is
near the product and easily accessible.
• Refer service or repairs, other than those described in the oper-
ating instructions, to a professional service person.
• This product is designed, tested and approved to meet strict
global safe t y st andards with t he use of speci f i c Lexmark components. The safety features of some parts may not always be
obvious. Lexmark is not responsible for the use of other replacement parts.
• Your product uses a laser, exercise
CAUTION: Use of controls or adjustments or performance of
procedures othe r than those specified herein may result in
hazardous radiation exposure.
• Your product uses a printing process that heats the print media,
and the heat may cause the media to release emissions. You
must understand the section in your operating instructions that
discusses the guidelines for selecting print media to avoid the
possibility of harmful emissions.
Consignes de sécurité
• Si le symbole n'apparaît P A S sur votr e prod uit, ce dernier
DOIT être branché sur une prise de courant mise à la terre.
• Le câble d'alimentation doit être connecté à une prise de
courant placée près du produit et facilement accessible.
• L'entretien et les réparations autres que ceux décrits dans les
instructions d'emploi doivent être effectués par le personnel de
maintenance qualifié.
• Ce produit a été conçu, testé et approuvé pour respecter les
normes strictes de sécurité globale lors de l'utilisation de
composants Lexmark spécifiques. Les caractéristiques de
sécurité de certains éléments ne sont pas toujours évidentes.
Lexmark ne peut être tenu responsable de l'utilisation d'autres
pièces de rech ange.
• Le produit utilise un laser :
ATTENTION : Les commandes, les réglages et l'exécution de
toute autre procédure que celle indiquée dans le présent
document peuvent entraîner des risques de radia tions.
• Le produit utilise un système d'impression qui chauffe le
support d'impression duquel peuvent alors se dégager des
émissions. Vous devez consulter les directives générales dans la
section appropriée des instructions d'emploi pour savoir
comment empêcher que ces émissions ne se produisent.
Norme di sicurezza
• Se il prodotto NON è contrassegnato con questo simbolo
DEVE essere collegato lo stesso ad una presa elettrica con messa
a terra.
• Il cavo di alimentazione deve essere collegato ad una presa
elettrica posta nelle vicinanze del prodotto e facilmente
raggiungibile.
• Per la manutenzione o le riparazioni, escluse quelle descritte
nelle istruzioni operative, consultare il personale di assistenza
autorizzato.
• Il prodotto è stato progettato, testato e approvato in conformità
a severi standard di sicurezza e per l’utilizzo con componenti
Lexmark specifici. Le caratteristiche di sicurezza di alcune parti
non sempre sono di immediata comprensione. Lexmark non è
responsabile per l’utilizzo di parti di ricambio di altri
produttori.
• Poiché il prodotto in questione utilizza il laser, considerare il
seguente avvertimento:
ATTENZIONE: L’uso di dispositivi di controllo o di
regolazione, o l’esecuzione di procedure non incluse tra
quelle descritte in questa documentazione, può provoc ar e
una pericolosa esposizione alle radiazioni.
• Il prodotto in questione utilizza un processo di stampa che
riscalda i supporti di stampa; il calore generato può
determinare l'emissione di sostanze dannose da parte dei
supporti. Leggere attentamente la sezione riportata nelle
istruzioni riguardante le operazioni di selezione dei supporti di
stampa in modo da evitare la possibilità di emissioni dannose.
Appendix C: Safety information
73
Page 92

Sicherheitshinweise
• Falls der Drucker nicht mit diesem Symbol markiert ist,
muß er an eine ordnungsgemäß geerdete Steckdose
angeschlossen werden.
• Das Netzkabel muß an eine Steckdose angeschlossen werden,
die sich in de r N ähe des Geräts befindet und leicht zugänglich
ist.
• Wartungsarbeiten und Reparaturen, mit Ausnahme der in der
Betriebsanleitung näher beschriebenen, sollten Fachleuten
überlassen werden.
• Dieses Produkt und die zugehörigen Komponenten wurden
entworfen und getestet, um beim Einsatz die weltweit gültigen
Sicherheitsanforderungen zu erfüllen. Die s icherheitsr elevanten
Funktionen der Bauteile und Optionen sind nicht immer
offensichtlich. Sofern Teile eingesetzt werden, die nicht von
Lexmark sind, wird von Lexmark keinerlei Verantwortung oder
Haftung für dieses Produkt übernommen.
• Dieses Produkt verwendet einen Laser. Wenden Sie daher
besondere
VORSICHT an: Die Verwendung von Kontrollen bzw. die
Regulierung von Vorgän gen mit Au snah m e derjenige n, die
in dieser Betrieb sanleitung behan de lt werden, kann Sie
gefährlicher Bestrahlung aussetzen.
• Dieses Produkt verwendet ein Druckverfahren, bei dem das
Druckmedium erhitzt wird. Diese Erwärmung kann zu einer
Freigabe von Emissionen des Druckmediums führen. Es ist
daher wichtig, daß Sie in der Betriebsanleitung den Abschnitt,
der sich mit der Auswahl geeigneter Druckmedien befaßt,
sorgfältig durchlesen und die dor t a ufgeführten Richtlinien
befolgen, um der Gefahr schädlicher Emissionen vorzubeugen.
Pautas de Seguridad
• Si su producto NO tiene este símbolo, , es
IMPRESCINDIBLE conectarlo a una toma de corriente eléctrica
con toma de tierra correcta.
• El cable de alimentación deberá conectarse a una toma de
corriente situada cerca del producto y de fácil acceso.
• Cualquier servicio o reparación deberá realizarse por parte del
personal cualificado, a menos que se trate de las averías
descritas en las instrucciones de utilización.
• Este producto se ha diseñado, verificado y a p robado para
cumplir los más estrictos estándare s de se g uridad global
usando los componentes específicos de Lexmark. Puede que las
características de seguridad de algunas piezas no sean siempre
evidentes. Lexmark no se hace responsable del uso de otras
piezas de recambio.
• El producto utiliza un láser. Actúe con
PRECAUCION: El uso de los controles o ajustes o el llevar a
cabo procedimientos distintos a los especificados aquí puede
causar niveles de radiación peligrosos .
• Durante el proceso de impresión que utiliza este producto se
calienta el medio de impresión, y el calor puede pr ovocar que el
medio emita gases. Para evitar emisiones peligrosas, el usuario
deberá comprender y seguir lo expuesto en la sección de las
instrucciones de utilización donde se describen las directrices
para selecc ionar el medio de impresión.
Veiligheidsvoorschriften
• Zorg ervoor dat uw produkt is aangesloten op een geaard
stopcontact als het produkt NIET is gemarkeerd met det
symbool .
• Het netsnoer moet worden aangesloten op een gemakkelijk
bereikbaar stopcontact in de buurt van het produkt.
• Neem contact op met een professionele onderhoudstechnicus
voor onderhoud en reparaties die niet in de bij het produkt
geleverde instructies beschreven worden.
• Dit product is ontworpen, getest en goedgekeurd om te
voldoen aan strenge internationale veiligheidsvoorschriften.
Deveiligheidsvoorzieningen van bepaalde onderdelen zullen
niet altijd duidelijk zichtbaar zijn. Lexmark is niet
verantwoordelijk voor het gebruik van andere vervangende
onderdelen.
• Uw produkt maakt gebruik van een laser, wees
VOORZICHTIG: Instellen van het controlepaneel of,
aanpassingen of uitvoering van procedures op andere wijze
dan hier is gespecificeerd kunnen leiden tot blootstelling aan
gevaarlijke straling.
• Uw produkt gebruikt een afdrukproces waarbij het
afdrukmateriaal verhit raakt. Hierdoor kan straling vrijkomen.
Lees het gedeelte in de bij het produkt geleverde instructies,
waarin richtlijnen voor de keuze van afdrukmateriaal worden
beschreven, zorgvuldig door, zodat u mogelijke schadelijke
straling ku n t voorkomen .
Sikkerhedsoplysninger
• Hvis dit produkt IKKE er markeret med dette symbol ,
SKAL det sluttes til en stikkontakt med jordforbindelse.
• Ledningen skal sluttes til en stikkontakt, der er tæt på
produktet og som er let tilgængelig.
• Service og reparationer, som ikke er beskrevet i
brugsanvisningen, skal udføres af en kvalificeret tekniker.
• Dette produkt er udviklet, testet og godkendt i
overensstemmelse med Lexmarks verdensomspændende
standarder for sikkerhed. Delenes sikkerhedsfunktioner kan
være skjulte. Lexmark påtager sig intet ansvar for brugen af
uoriginale reservedele.
• Dit produkt bruger en laser og du skal være
FORSIGTIG: Bru g a f s tyremekanismer, indstillinger eller
fremgangsmåder, som ikke er beskrevet her, kan resultere i
farlig radioaktiv bestråling.
• Produktet benytter en udskrivningsproces, der opvarmer
skrivemediet og denne varme kan føre til at udskriftmedier
afgiver dampe. Det er vigtigt at du forstår den de l a f
brugsanvisningen, der omhandler valg af udskriftsmedium, så
du kan undgå farlige dampe.
Sikkerhetsinformasjon
• Hvis produktet ditt ikke er merket med dette symbolet, ,
må det bare kobles til en stikkontakt som er jordet.
74
Appendix C: Safety information
Page 93

• Ledningen må være koblet til en stikkontakt nær produktet.
Stikkontakten må være lett tilgjengelig.
• La bare kvalifisert personale ta seg av service og reparasjon som
ikke er direkte beskrevet i bruksanvisningen.
• Dette produktet er utviklet, testet og godkjent i
overensstemmelse med strenge verdensomspennende
sikkerhets st a n darder for beste mte Lexmark -deler. Delenes
sikkerhetsfunksjoner kan være skjulte. Lexmark er ikke
ansvarlig for bruk av uoriginale reservedeler.
• Produktet ditt bruker en laser.
ADVARSEL: Bruk av styremekanismer, innstillinger eller
fremgangsmåter som ikke er beskrevet her, kan resultere i
farlig utstr åling.
• Produktet ditt bruker en utskriftsprosess som varmer opp
skrivemediet, og varmen kan føre til utslipp. Forsikre deg om at
du forstår den delen av bruksanvisningen som omhandler valg
av utskriftsmedium, slik at du kan unngå farlige utslipp.
Säkerhetsanvisningar
• Om produkten INTE är märkt med denna symbol MÅSTE
den anslutas till ett jordat vägguttag.
• Nätkabeln måste anslutas till ett lättåtkomligt vägguttag i
närheten av maskinen.
• Låt endast utbildad servicepersonal utföra sådan service och
sådana reparationer som inte beskrivs i handledningen.
• Denna produkt är utformad, testad och godkänd för att
uppfylla internationella säkerhetsbestämmelser när den
används tillsammans med andra Lexmark-produkter.
Säkerhetsegenskaperna för vissa delar är inte helt uppenbara.
Lexmark frånsäger sig ansvaret om delar av ett annat fabrikat
används.
• Var f örsiktig - maskinen använder laser.
VARNING! Det finns risk att du utsätter dig för hälsovådlig
strålning om du använder andra reglage eller justeringar,
eller om du utför andra procedurer än de som beskrivs här.
• Maskinen använder en utskriftsmetod som upphettar
utskriftsmaterialet. Hettan kan i vissa fall leda till att materialet
avger partiklar. Undvik skadliga partiklar genom att noga läsa
det avsnitt i handledningen som beskriver hur man väljer
utskriftsmaterial.
Informació de Seguretat
• Si el vostre producte NO està marcat amb el símbol ,
S’HAURÀ de connectar a una presa elèctrica de terra.
• El cable de potència s’haurà de connectar a una presa de corre nt
propera al producte i fàcilment access ible.
• Si heu de fer una reparació que no figuri entre les descrites a les
instruccions de funcionament, confieu-la a un professional.
• Aquest producte està dissenyat, comprovat i aprovat per tal
d'acomplir les estrictes normes de seguretat globals amb la
utililització de components específics de Lex mark. Les
característiques de seguretat d'algunes peces pot ser que no
sempre siguin òbvies. Lexmark no es responsabilitza de l'us
d'altres peces de reca n vi.
• El vostre producte funciona amb un làser. Procediu amb
PRECAUCIÓ: La utilització de controls, els ajustaments o la
realització de procedimen ts dis tints dels especificats aquí
poden donar lloc a una exposició a ra diacions perillos a .
• El vostre producte fa servir un procediment d’impressió que
escalfa el mitjà d’impressió, i la calor pot fer que aquest mitjà
alliberi emissions. Llegiu atentament l’apartat de les
instruccions de funcionament on s’exposen les directrius de
selecció del mitjà d’emissió per tal d’evitar la possibilitat
d’emissions nocives.
Tur vaohjeet
• Jos tuotteessa ei ole tätä tunnusta, , sen saa kytkeä vain
maadoitettuun pistorasiaan.
• Tuotteen verkkojohto on kytkettävä sitä lähellä olevaan
pistorasiaan. Varmista, että kulku pistorasian luo on esteetön.
• Muut kuin käyttöohjeissa mainitut huolto- tai korjaustoimet on
jätettävä huoltoedustajalle.
• Tämä tuote on testattu ja hyväksytty. Se täyttää korkeat
maailmanlaajuiset turvallisuusvaatimukset, kun siinä
käytetään tiettyjä Lexmarkin valmistusosia. Joidenkin osien
turvallisuusominaisuudet eivät aina ole itsestään selviä.
Lexmark ei vastaa muiden kuin alkuperäisten osien käytöstä.
• Laite sisältää lasertuotteen.
Varoitus: Muiden kuin tässä mainittujen säätöjen tai toimien
teko voi saattaa käyttäjän alttiiksi vaaralliselle säteilylle.
• Tulostusmateriaali kuumenee tulostusprosessin aikana.
Lämmön vaikutuksesta materiaalista saattaa irrota haitallisia
aineita. Voit välttää haitallis et päästöt noudattamalla
käyttöohjeissa annettuja tulostusmateriaalien valintaohjeita.
Informações de Segurança
• Se o produto NÃO estiver marcado com este símbolo, , é
necessário ligá-lo a uma tomada com ligação à terra.
• O cabo deve ser ligado a uma tomada localizada perto do
produto e facilmente acessível.
• Para todos os serviços ou reparações não referidos nas
instruções de operação, deve contactar um técnico dos serviços
de assistência.
• Este produto foi concebido, testado e aprovado para satisfazer
os padrões globais de segurança na utilização de componentes
específicos da Lexma rk. As f un ções de segurança de alguns dos
componentes podem não ser sempre óbvias. A Lexmark não é
responsável pela utilização de outros componentes de
substituição.
• O produto utiliza raios laser, tome
CUIDADO: O uso de controlos, ajustamentos ou a execução
de procedimentos diferentes dos especificados podem
ocasionar exposição perigosa a radiações.
• O produto utiliza um processo de impressão que aquece os
materiais de impressão. Devido ao aquecimento, estes podem
libertar emissões radioactivas. É necessário compreender as
instruções de operação relativas à escolha dos materiais de
impressão a fim de evitar emissões perigosas.
Appendix C: Safety information
75
Page 94

Informações de Segurança
• Se o produto NÃO estiver marcado com este símbolo, , ele
DEVE SER conectado a uma tomada elétrica com ligação à
terra.
• O cabo de alimentação deve ser conectado a uma tomada
elétrica localizada perto do produto e de fácil acesso.
• Para todos os serviços ou reparações não descritos nas
instruções de operação, entre em contato com um técnico dos
serviços de assistência.
• Este produto está projetado, testado e aprovado para satisfazer
os padrões globais de segurança para uso de componentes
específicos da Lexmark. Os recursos de segurança de alguns
componentes podem não ser sempre óbvios. A Lexmark não é
responsável pelo uso de outros componentes de substituição.
• O produto usa raios lase r, tome
CUIDADO: O uso de controles, ajustes ou a execução de
procedimentos diferentes dos especificados podem resultar
em exposição perigosa a radiações.
• O produto usa um processo de impressão que aquece o meio de
impressão. Devido ao aquecimento, o meio pode liberar
emissões. É necessário que você entenda as instruções de
operação sobre a escolha do meio de impressão, para evitar
emissões perigosas.
76
Appendix C: Safety information
Page 95

Appendix C: Safety information
77
Page 96

78
Appendix C: Safety information
Page 97

D
Notices
Energy Star
The EPA ENERGY ST AR Computers pr ogram is a partnership effort with
computer manufacturers to promote the introduction of energy-efficient
products and to reduce air pollution caused by power generation.
Companies participating in this program introduce personal computers,
printers, monitors, or fax machines that power down when they are not
being used. This feature will cut the energ y used by up to 50 percent.
Lexmark is proud to be a participant in this program.
As an Energy Star Partner, Lexmark International, Inc. has determined
that this product meets the Energy Star guidelines for energy efficiency.
German acoustics statement
The following measurements were made in accordance with ISO 7779
and reported in conformance with ISO 9296.
Acoustics
1-Meter Average Sound Pressure, dBa
Printing 47 dBa
Idling 30 dBa
Electronic emissions n otices
Electronic emission information for your printer varies, depending on
whether or not you have an optional network adapter installed.
Without a network adapter installed
Federal Communications Commission (FCC)
compliance information statement
The Optra E laser printer, type 855, has been tested and found to comply
with the limits for a Class B digital device, pursuant to Part 15 of the FCC
Rules. Operation is subject to the following two conditions: (1) this
device may not cause harmful interference, and (2) this device must
accept any interference received, including interference that may cause
undesired oper a t i on.
The FCC Class B limits are designed to provide reasonable protection
against harmful interference in a residential installation. This equipment
generates, uses and can radiate radio frequency energy and, if not
installed and used in accordance with the instructions, may cause harmful interference to radio communications. However , ther e is no guarantee
that interference will not occur in a particular installation. If this equipment does cause harmful interference to radio or television reception,
which can be determined by turning the equipment off and on, the user
is encouraged to try to correct the interference by one or more of the following measures:
• Reorient or relocate the receiving antenna.
• Increase the separation between the equipment and receiver.
• Connect the equipment into an outlet on a circuit differ ent fro m
that to which the receiver is connected .
• Consult your point of purchase or service representative for
additional suggestions.
The manufacturer is not responsible for any radio or television interference caused by using other than recommended cables or by unauthorized changes or modifications to this equipment. Unauthorized changes
or modifications could void the user’s authority to operate this equipment.
Appendix D: Notices
79
Page 98

To assure compliance with FCC regulations on electromagnetic interference for a Class B computing device, use a properly shielded and
grounded cable such as Lexmark part number 1329605. Use of a substitute cable not properly shielded and ground ed may result in a violation
of FCC regulations.
Any questions regarding this compliance information statement should
be directed to:
Director of Lab Operations
Lexmark International, Inc.
740 New Circle Road NW
Lexington, KY 40550
(606) 232-3000
Industry Canada compliance statement
This Class B digital apparatus meets all requirements of the Canadian
Interference-Causing Equipment Regulations.
Avis de conformité aux normes d’Industrie
Canada
Cet appareil numérique de la classe B respecte toutes les exigences du
Règlement sur le matériel brouilleur du Canada.
Japanese VCCI notice
Class 1 laser statement label
Laser notice
The printer is certified in the U.S. to conform to the requirements of
DHHS 21 CFR Subchapter J for Class I (1) laser products, and elsewhere
is certified as a Class I laser product conforming to the requirements of
IEC 825.
Class I laser products are not considered to be hazardous. The printer
contains internally a Class IIIb (3b) laser that is nominally a 5 milliwatt
gallium arsenide laser operating in the wavelength region of 700-810
nanometers. The laser system and printer are designed so there is never
any human access to laser radiation above a Class I level during normal
operation, user maintenance, or prescrib ed service condition.
European Community (EC) directives conformity
This product is in conformity with the protection requirements of EC
Council directives 89/336/EEC and 73/23/EEC on the approximation
and harmonization of the laws of the Member States relating to electromagnetic compatibility and safety of electrical equipment designed for
use within certain voltage limits.
A declaration of conformity with the requirements of the Directive has
been signed by the Director of Manufacturing and Technical Support,
Lexmark International, S.A., Boigny, France.
This product satisfies the Class B limits of EN 55022 and safety requirements of EN 60950.
Laser notices
The following laser notice label may be affixed to this printer:
80
Appendix D: Notices
Laser
Der Drucker erfüllt gemäß amtlicher Bestätigung der USA die
Anforderungen der Bestimmung DHHS (Department of Health and
Human Services) 21 CFR Teil J für Laserprodukte der Klasse I (1). In
anderen Ländern gilt der Druc ke r a l s Laserprodukt der K l a sse I, der die
Anforderungen der IEC (International Electrotechnical Commission) 825
gemäß amtlicher Bestätigung erfüllt.
Laserprodukte der Klasse I gelten als unschädlich. Im Inneren des
Druckers befindet sich ein Laser der Klasse IIIb (3b), bei dem es sich um
einen Galliumarsenlaser mit 5 Milliw att handelt, der Wellen der Länge
700-810 Nanometer ausstrahlt. Das Lasersystem und der Drucker sind
so konzipiert, daß im Normalbetrieb, bei der Wartung durch den
Benutzer oder bei ordnungsgemäßer Wa rtung dur ch den Kundendienst
Laserbestrahlung, die die Klasse I übersteigen würde, Menschen keinesfalls erreicht.
Avis relatif à l’utilisation de laser
Pour les Etats-Unis : cette imprimante est certifiée conforme aux provisions DHHS 21 CFR alinéa J concernant les produits laser de Classe I (1).
Page 99

Pour les autres pays : cette imprimante répond aux normes IEC 825 relatives aux produits laser de Classe I.
Les produits laser de Classe I sont considérés comme des produits non
dangereux. Cette imprimante est équipée d’un laser de Classe IIIb (3b)
(arséniure de gallium d’une puissance nominale de 5 milliwatts) émettant sur des longueurs d’onde comprises entre 700 et 810 nanomètres.
L’imprimante e t son système laser sont conçus pour impossib le, dans de s
conditions normales d’utilisation, d’entretien par l’utilisateur ou de révi-
sion, l’exposition à des rayonnements laser supérieurs à des rayonnements de Classe I .
Avvertenze sui prodotti laser
Questa stampante è certificata negli Stati Uniti per essere conforme ai
requisiti del DHHS 21 CFR Sottocapitolo J per i prodotti laser di classe 1
ed è certificata negli altri Paesi come prodotto laser di classe 1 conforme
ai requisiti della norma CEI 825.
I prodotti laser di classe non sono considerati pericolosi. La stampante
contiene al suo interno un laser di classe IIIb (3b) all’arseniuro di gallio
della potenza di 5mW che opera sulla lunghezza d’onda compresa tra
700 e 810 nanometri. Il sistema laser e la stampante sono stati progettati
in modo tale che le persone a contatto con la stampante, durante il normale funzionamento, le operazioni di servizio o quelle d i assistenza tecnica, non ricevano radiazioni laser superiori al livello della classe 1.
Laserinformatie
De printer voldoet aan de eisen die gesteld worden aan een laserprodukt
van klasse I. Voor de Verenigde Staten zijn d eze eisen vastgelegd in
DHHS 21 CFR Subchapter J, voor andere landen in IEC 825.
Laserprodukten van klasse I worden niet als ongevaarlijk aangemerkt.
De printer is voorzien van een laser van klasse IIIb (3b), dat wil zeggen
een gallium arsenide-laser van 5 milliwatt met een golflengte van 700810 nanometer. Het lasergedeelte en de printer zijn zo ontworpen dat bij
normaal gebruik, bij onderhoud of re para tie conform de voorschriften,
nooit blootstelling mogelijk is aan laserstraling boven een niveau zoals
voorgeschreven is voor klasse 1.
Lasermeddelelse
Printeren er godkendt som et Klasse I-laserprodukt, i overenstemmelse
med kravene i IEC 825.
Klasse I-laserprodukter betragtes ikke som farlige. Printeren indeholder
internt en Klasse IIIB (3b)-laser, der nominelt er en 5 milliwatt galliumarsenid laser, som arbejder på bølgelængdeområdet 700-810 nanometer. Lasersystemet og printer en er udformet således, at mennesker aldrig
udsættes for en laserstråling over Klasse I-niveau ved normal drift,
brugervedligeholdelse eller obligatoriske servicebetingelser.
Avisos sobre el láser
Se certifica que, en los EE.UU., esta impres ora cumple los requisitos para
los productos láser de Clase I (1) establecidos en el subcapítulo J de la
norma CFR 21 del DHHS (Departamento de Sanidad y Servicios) y , en los
demás países, reúne todas las condiciones expuestas en la norma IEC 825
para productos láser de Clase I (1).
Los productos láser de Clase I no se consideran peligros os. La impr esora
contiene en su interior un láser de Clase II Ib ( 3b) de a rsen iur o de gal io de
funcionamiento nominal a 5 milivatios en una longitud de onda de 700 a
810 nanómetros. El sistema láser y la impresora están diseñados de forma
que ninguna persona pueda verse afectada por ningún tipo de radiación
láser superior al nivel de la Clase I durante su uso normal, el mantenimiento realizado por el usuario o cualquier otra s ituación de servicio
técnico.
Declaração sobre laser
A impressora está certifi cada nos E.U.A. em confor mi dade com os requisitos da regulamentação DHHS 21 CFR Subcapítulo J para a Classe I (1)
de produtos laser. Em outros locais, está certificada como um produto
laser da Classe I, em conformidade com os requisitos da norma IEC 825.
Os produtos laser da Classe I não são considerados perigosos . Internamente, a impressora contém um produto laser da Classe IIIb (3b), designado laser de arseneto de potássio, de 5 milliwatts ,operando numa faixa
de comprimento de onda entre 700 e 810 nanómetros. O sistema e a
impressora laser foram concebidos de forma a nunca existir qualquer
possiblidade de acesso humano a radiação laser superior a um nível de
Classe I durante a operação normal, a manutenção feita pelo utilizador
ou condições de assistência prescritas.
Huomautus laserlaitteesta
Tämä kirjoitin on Yhdysvalloissa luokan I (1) laserlaitteiden DHHS 21
CFR Subchapter J -määrityksen mukainen ja muualla luokan I laserlait-
teiden IEC 825 -määrityksen mukainen.
Luokan I laserlaitteiden ei katsota olevan vaarallisia käyttäjälle. Kirjoittimessa on sisäinen luokan IIIb (3b) 5 milliwatin galliumarsenidilaser,
joka toimii aaltoalueella 700 - 810 nanometriä. Laserjärjestelmä ja kirjoitin
on suunniteltu siten, että käyttäjä ei altistu luokan I määrityksiä voimakkaammalle säteilylle kirjoittimen normaalin toiminnan, käyttäjän tekemien huoltotoimien tai muiden huoltotoimien yhteydessä.
LUOKAN 1 LASERLAITE
VA R OITUS ! Laitteen käyttäminen muulla kuin tässä käyttöohjeessa
mainitulla tavalla saattaa altistaa käyttäjän turvallisuusluokan 1 ylittävälle näkymättömälle lasersäteilylle.
KLASS 1 LASER APPARAT
VARNING! Om apparaten används på annat sätt än i denna bruksan-
visning specificerats, kan användaren utsättas för osynlig laserstrålning,
som överskrider gränsen för laserklass 1.
Laser-notis
Denna skrivare är i USA certifierad att motsvara kraven i DHHS 21 CFR,
underparagraf J för laserprodukter av Klass I (1). I andra länder uppfyller skrivaren kraven för laserprodukter av Klass I enligt kraven i IEC
825.
Laserprodukter i Klass I anses ej hälsovådliga. Skrivaren har en inbyggd
laser av Klass IIIb (3b) som består av en laserenhet av gallium-arsenid på
5 milliwatt som arbetar i våglängdsområdet 700-810 nanometer. Lasersystemet och skrivaren är utformade så att det aldrig finns risk för att
någon person utsätts för laserstrålning över Klass I-nivå vid normal
Appendix D: Notices
81
Page 100

användning, underhåll som utförs av användaren eller annan
föreskriven serviceåtgärd.
Laser-melding
Skriveren er godkjent i USA etter kravene i DHHS 21 CFR, underkapittel
J, for klasse I (1) laserprodukter , og er i andre land godkjent som et Klasse
I-laserprodukt i samsvar med kravene i IEC 825.
Klasse I-laserprodukter er ikke å betrakte som farlige. Skriveren inneholder internt en klasse IIIb (3b)-laser, som består av en gallium -arsenlaserenhet som avgir stråling i bølgelengdeområdet 700-810 nanometer.
Lasersystemet og skriveren er utformet slik at personer aldri utsettes for
laserstråling ut over klasse I-nivå under vanlig bruk, vedlikehold som
utføres av brukeren, eller foreskrevne serviceoperasjoner.
Avís sobre el làser
Segons ha estat certificat als Estats Units, aquesta impressora compleix
els requisits de DHHS 21 CFR, apartat J, pels productes làser de classe I
(1), i segons ha estat certificat en altres llocs, és un producte làser de
classe I que compleix els requisits d’IEC 825.
Els producte s làser de classe I no es consideren perillosos. Aquesta
impressora conté un làser de classe IIIb (3b) d’arseniür de gal.li,
nominalment de 5 mil.liwats, i funciona a la regió de longitud d’ona de
700-810 nanòmetres. El sistema làser i la impressora han sigut concebuts
de manera que mai hi hagi exposició a la rad iació làser per sobre d’un
nivell de classe I durant una operació normal, durant les tasques de
manteniment d’usuari ni durant els serveis que satisfacin les condicions
prescrites.
Chinese laser notice
Korean laser notice
Japanese laser notice
82
Appendix D: Notices
 Loading...