

Page 1

Optra Color 45
User’s Guide
<
<
<
<
<
Page 2

First Edition (May 1998)
The following paragraph does not apply to any country where such provisions are inconsistent
with local law: LEXMARK INTERNATIONAL, INC. PROVIDES THIS PUBLICATION “AS IS”
WITHOUT WARRANTY OF ANY KIND, EITHER EXPRESS OR IMPLIED, INCLUDING, BUT
NOT LIMITED TO, THE IMPLIED WARRANTIES OF MERCHANTABILITY OR FITNESS FOR A
PARTICULAR PURPOSE. Some states do not allow disclaimer of express or implied warranties in
certain transactions, therefore, this statement may not apply to you.
This publication could include technical inaccuracies or typographical errors. Changes are
periodically made to the information herein; these changes will be incorporated in later editions.
Improvements or changes in the products or the programs described may be made at any time.
A form for reader’s comments is provided at the back of this publication. If the form has been
removed, comments may be addressed to Lexmark International, Inc., Department F95/035-3, 740
New Circle Road N.W., Lexington, Kentucky 40550, U.S.A. In the United Kingdom and Eire, send to
Lexmark International Ltd., Marketing and Services Department, Westhorpe House, Westhorpe,
Marlow Bucks SL7 3RQ. Lexmark may use or distribute any of the information you supply in any
way it believes appropriate without incurring any obligation to you. You can purchase additional
copies of publications related to this product by calling 1-800-553-9727. In the United Kingdom and
Eire, call 0628-481500. In other countries, contact your point of purchase.
© Copyright Lexmark International, Inc. 1998.
All rights reserved.
UNITED STATES GOVERNMENT RESTRICTED RIGHTS
This software and documentation are provided with RESTRICTED RIGHTS. Use, duplication or
disclosure by the Government is subject to restrictions as set forth in subparagraph (c)(1)(ii) of the
Rights in Technical Data and Computer Software clause at DFARS 252.227-7013 and in applicable
FAR provisions: Lexmark International, Inc., Lexington, KY 40550.
Page 3

Page 4

Table of Contents
Introduction . . . . . . . . . . . . . . . . . . . . . . . . . . . . . xi
Trademarks . . . . . . . . . . . . . . . . . . . . . . . . . . . . . xiii
Getting Started
Setting Up Your Printer . . . . . . . . . . . . . . . . . . . . 1
Unpacking Your Printer . . . . . . . . . . . . . . . . . . . . . . . . . . . . . . . . . . . . . 1
Installing the Input Tray and Output Bin Unit . . . . . . . . . . . . . . . . . . 3
Loading the Input Tray . . . . . . . . . . . . . . . . . . . . . . . . . . . . . . . . . . . . . 7
Attaching the Parallel Cable . . . . . . . . . . . . . . . . . . . . . . . . . . . . . . . . 12
Plugging the Printer In . . . . . . . . . . . . . . . . . . . . . . . . . . . . . . . . . . . . . 14
Installing the Print Cartridges . . . . . . . . . . . . . . . . . . . . . . . . . . . . . . . 15
Aligning the Print Cartridges . . . . . . . . . . . . . . . . . . . . . . . . . 19
Installing the Operator Panel Overlay . . . . . . . . . . . . . . . . . . . . . . . . 21
Printing the Menu Settings Page . . . . . . . . . . . . . . . . . . . . . . . . . . . . 24
Installing the Printer Drivers and Utilities . . . . . . . . . . . . . . . . . . . . 25
Table of Contents
Using the Printer Utilities . . . . . . . . . . . . . . . . . 27
Setup Utility . . . . . . . . . . . . . . . . . . . . . . . . . . . . . . . . . . . . . . . . . . . . . . 27
Installing Printer Utilities . . . . . . . . . . . . . . . . . . . . . . . . . . . . 27
Printer Drivers . . . . . . . . . . . . . . . . . . . . . . . . . . . . . . . . . . . . . . 30
Bidirectional Communication . . . . . . . . . . . . . . . . . . . . . . . . . . . . . . . 32
MarkVision . . . . . . . . . . . . . . . . . . . . . . . . . . . . . . . . . . . . . . . . . . . . . . 32
MarkVision Windows . . . . . . . . . . . . . . . . . . . . . . . . . . . . . . . 34
MarkVision Support in Various Environments . . . . . . . . . . 34
MarkVision Online Help . . . . . . . . . . . . . . . . . . . . . . . . . . . . . 42
Toolkit . . . . . . . . . . . . . . . . . . . . . . . . . . . . . . . . . . . . . . . . . . . . . . . . . . . 43
Network Printer Utility . . . . . . . . . . . . . . . . . . . . . . . . . . . . . . . . . . . . 44
Table of Contents
iii
Page 5

Table of Contents
Getting Updated Drivers and Utilities . . . . . . . . . . . . . . . . . . . . . . . . 44
Online Services . . . . . . . . . . . . . . . . . . . . . . . . . . . . . . . . . . . . . 44
Automated FAX System . . . . . . . . . . . . . . . . . . . . . . . . . . . . . 45
Using Your Printer
Using the Operator Panel and Menus . . . . . . . 49
Using the Operator Panel . . . . . . . . . . . . . . . . . . . . . . . . . . . . . . . . . . 50
Printer Indicator Light . . . . . . . . . . . . . . . . . . . . . . . . . . . . . . . 50
Operator Panel Buttons . . . . . . . . . . . . . . . . . . . . . . . . . . . . . . 51
Printer Messages . . . . . . . . . . . . . . . . . . . . . . . . . . . . . . . . . . . . . . . . . . 53
Operator Panel Menus . . . . . . . . . . . . . . . . . . . . . . . . . . . . . . . . . . . . . 54
Printing the Menu Settings Page . . . . . . . . . . . . . . . . . . . . . . 55
Changing Printer Settings . . . . . . . . . . . . . . . . . . . . . . . . . . . . 56
Disabling the Operator Panel Menus . . . . . . . . . . . . . . . . . . . 57
Overview of Printer Menus . . . . . . . . . . . . . . . . . . . . . . . . . . . . . . . . . 58
Supplies Menu . . . . . . . . . . . . . . . . . . . . . . . . . . . . . . . . . . . . . . . . . . . . 59
Color Menu . . . . . . . . . . . . . . . . . . . . . . . . . . . . . . . . . . . . . . . . . . . . . . 60
Paper Menu . . . . . . . . . . . . . . . . . . . . . . . . . . . . . . . . . . . . . . . . . . . . . . 61
Finishing Menu . . . . . . . . . . . . . . . . . . . . . . . . . . . . . . . . . . . . . . . . . . . 68
Tests Menu . . . . . . . . . . . . . . . . . . . . . . . . . . . . . . . . . . . . . . . . . . . . . . . 73
Job Menu . . . . . . . . . . . . . . . . . . . . . . . . . . . . . . . . . . . . . . . . . . . . . . . . 77
Setup Menu . . . . . . . . . . . . . . . . . . . . . . . . . . . . . . . . . . . . . . . . . . . . . . 78
PCL Emul Menu . . . . . . . . . . . . . . . . . . . . . . . . . . . . . . . . . . . . . . . . . . 85
PostScript Menu . . . . . . . . . . . . . . . . . . . . . . . . . . . . . . . . . . . . . . . . . . 90
Parallel Menu . . . . . . . . . . . . . . . . . . . . . . . . . . . . . . . . . . . . . . . . . . . . . 91
Serial Menu . . . . . . . . . . . . . . . . . . . . . . . . . . . . . . . . . . . . . . . . . . . . . . 95
Network Menu . . . . . . . . . . . . . . . . . . . . . . . . . . . . . . . . . . . . . . . . . . . 99
Infrared Menu . . . . . . . . . . . . . . . . . . . . . . . . . . . . . . . . . . . . . . . . . . . 101
LocalTalk Menu . . . . . . . . . . . . . . . . . . . . . . . . . . . . . . . . . . . . . . . . . . 104
Table of Contents
iv
Page 6

Using Print Materials . . . . . . . . . . . . . . . . . . . . 107
Print Materials . . . . . . . . . . . . . . . . . . . . . . . . . . . . . . . . . . . . . . . . . . . 108
Print Material Characteristics . . . . . . . . . . . . . . . . . . . . . . . . 109
Paper Guidelines . . . . . . . . . . . . . . . . . . . . . . . . . . . . . . . . . . . 111
Envelope Guidelines . . . . . . . . . . . . . . . . . . . . . . . . . . . . . . . . 113
Label Guidelines . . . . . . . . . . . . . . . . . . . . . . . . . . . . . . . . . . . 114
Card Stock Guidelines . . . . . . . . . . . . . . . . . . . . . . . . . . . . . . 115
Transparency Guidelines . . . . . . . . . . . . . . . . . . . . . . . . . . . . 115
Paper Handling Specifications . . . . . . . . . . . . . . . . . . . . . . . . . . . . . 116
Paper Source . . . . . . . . . . . . . . . . . . . . . . . . . . . . . . . . . . . . . . 117
Output Bin . . . . . . . . . . . . . . . . . . . . . . . . . . . . . . . . . . . . . . . . 118
Paper Size . . . . . . . . . . . . . . . . . . . . . . . . . . . . . . . . . . . . . . . . . 119
Envelope Size . . . . . . . . . . . . . . . . . . . . . . . . . . . . . . . . . . . . . . 120
Paper Loading . . . . . . . . . . . . . . . . . . . . . . . . . . . . . . . . . . . . . . . . . . . 121
Loading the Input Tray . . . . . . . . . . . . . . . . . . . . . . . . . . . . . 121
Loading Paper in the Manual Feed Slot . . . . . . . . . . . . . . . 126
Loading Envelopes in the Input Tray . . . . . . . . . . . . . . . . . 131
Loading Envelopes in the Manual Feed Slot . . . . . . . . . . . 135
Printing on Large-size Paper . . . . . . . . . . . . . . . . . . . . . . . . . 139
Printing on Letterhead . . . . . . . . . . . . . . . . . . . . . . . . . . . . . . 141
Tray Linking . . . . . . . . . . . . . . . . . . . . . . . . . . . . . . . . . . . . . . 141
Tips for Avoiding Paper Jams . . . . . . . . . . . . . . . . . . . . . . . . . . . . . . 142
Table of Contents
Caring for Your Printer
Understanding Printer Messages . . . . . . . . . . 145
Status Messages . . . . . . . . . . . . . . . . . . . . . . . . . . . . . . . . . . . . . . . . . . 145
Line 1 Messages . . . . . . . . . . . . . . . . . . . . . . . . . . . . . . . . . . . . 146
Line 2 Messages . . . . . . . . . . . . . . . . . . . . . . . . . . . . . . . . . . . . 152
Attendance Messages . . . . . . . . . . . . . . . . . . . . . . . . . . . . . . . . . . . . . 153
Table of Contents
v
Page 7

Table of Contents
Solving Printer Problems . . . . . . . . . . . . . . . . . 163
Display Problems . . . . . . . . . . . . . . . . . . . . . . . . . . . . . . . . . . . . . . . . 164
Printing Problems . . . . . . . . . . . . . . . . . . . . . . . . . . . . . . . . . . . . . . . . 165
Print Quality Problems . . . . . . . . . . . . . . . . . . . . . . . . . . . . . . . . . . . . 168
Option Problems . . . . . . . . . . . . . . . . . . . . . . . . . . . . . . . . . . . . . . . . . 170
Network Printing Problems . . . . . . . . . . . . . . . . . . . . . . . . . . . . . . . 173
Other Problems and Questions . . . . . . . . . . . . . . . . . . . . . . . . . . . . . 173
Clearing Jams . . . . . . . . . . . . . . . . . . . . . . . . . . . 175
Possible Paper Jam Areas . . . . . . . . . . . . . . . . . . . . . . . . . . . . . . . . . . 175
200 Paper Jam . . . . . . . . . . . . . . . . . . . . . . . . . . . . . . . . . . . . . . . . . . . 176
Accessing Paper Jam Areas . . . . . . . . . . . . . . . . . . . . . . . . . . . . . . . . 176
Input Tray . . . . . . . . . . . . . . . . . . . . . . . . . . . . . . . . . . . . . . . . 177
Manual Feed Slot . . . . . . . . . . . . . . . . . . . . . . . . . . . . . . . . . . . 179
Output Bin . . . . . . . . . . . . . . . . . . . . . . . . . . . . . . . . . . . . . . . . 180
Maintaining Your Printer . . . . . . . . . . . . . . . . . 183
Replacing Print Cartridges . . . . . . . . . . . . . . . . . . . . . . . . . . . . . . . . 184
Removing Print Cartridges . . . . . . . . . . . . . . . . . . . . . . . . . . 184
Installing Print Cartridges . . . . . . . . . . . . . . . . . . . . . . . . . . . 186
Aligning the Print Cartridges . . . . . . . . . . . . . . . . . . . . . . . . 190
Cleaning Your Printer . . . . . . . . . . . . . . . . . . . . . . . . . . . . . . . . . . . . 193
Cleaning the Printheads . . . . . . . . . . . . . . . . . . . . . . . . . . . . . 193
Wiping the Printheads . . . . . . . . . . . . . . . . . . . . . . . . . . . . . . 195
Cleaning the Print Cartridge Carrier Contacts . . . . . . . . . . 198
Storing Print Cartridges . . . . . . . . . . . . . . . . . . . . . . . . . . . . . . . . . . . 201
Disposing of Used Print Cartridges . . . . . . . . . . . . . . . . . . . . . . . . . 201
Table of Contents
vi
Page 8

Ordering Supplies . . . . . . . . . . . . . . . . . . . . . . . . . . . . . . . . . . . . . . . . 202
Print Cartridges . . . . . . . . . . . . . . . . . . . . . . . . . . . . . . . . . . . . 202
Print Cartridge Storage Unit . . . . . . . . . . . . . . . . . . . . . . . . . 202
Parallel Cable . . . . . . . . . . . . . . . . . . . . . . . . . . . . . . . . . . . . . . 203
Serial Cable . . . . . . . . . . . . . . . . . . . . . . . . . . . . . . . . . . . . . . . 203
Coated Paper . . . . . . . . . . . . . . . . . . . . . . . . . . . . . . . . . . . . . . 203
Glossy Paper . . . . . . . . . . . . . . . . . . . . . . . . . . . . . . . . . . . . . . 204
Transparencies . . . . . . . . . . . . . . . . . . . . . . . . . . . . . . . . . . . . . 204
Photo Paper . . . . . . . . . . . . . . . . . . . . . . . . . . . . . . . . . . . . . . . 204
Labels . . . . . . . . . . . . . . . . . . . . . . . . . . . . . . . . . . . . . . . . . . . . 205
Iron-on Transfers for T-shirts . . . . . . . . . . . . . . . . . . . . . . . . 205
Greeting Cards . . . . . . . . . . . . . . . . . . . . . . . . . . . . . . . . . . . . 205
Installing Options
Memory and Option Cards . . . . . . . . . . . . . . . 209
Printer Memory . . . . . . . . . . . . . . . . . . . . . . . . . . . . . . . . . . . . . . . . . . 210
Accessing the Printer System Board
under the Input Tray . . . . . . . . . . . . . . . . . . . . . . . . . . . . . . . 210
Installing a Printer Memory Option . . . . . . . . . . . . . . . . . . . 213
Removing the Printer Memory Option . . . . . . . . . . . . . . . . 216
Closing the Printer System Board
under the Input Tray . . . . . . . . . . . . . . . . . . . . . . . . . . . . . . . 218
Flash Memory . . . . . . . . . . . . . . . . . . . . . . . . . . . . . . . . . . . . . . . . . . . 219
Accessing the Printer System Board
on the Back of the Printer . . . . . . . . . . . . . . . . . . . . . . . . . . . . 219
Installing a Flash Memory Option . . . . . . . . . . . . . . . . . . . . 222
Removing a Flash Memory Option . . . . . . . . . . . . . . . . . . . 226
Closing the Printer System Board
on the Back of the Printer . . . . . . . . . . . . . . . . . . . . . . . . . . . . 228
Table of Contents
Table of Contents
vii
Page 9

Option Cards . . . . . . . . . . . . . . . . . . . . . . . . . . . . . . . . . . . . . . . . . . . . 230
Hard Disk Option Card . . . . . . . . . . . . . . . . . . . . . . . . . . . . . 230
INA (Internal Network Adapter) Option Card . . . . . . . . . 233
Tri-Port Interface Option Card . . . . . . . . . . . . . . . . . . . . . . . 234
Parallel 1284-C Adapter Option Card . . . . . . . . . . . . . . . . . 235
Accessing the Printer System Board
on the Right Side of the Printer . . . . . . . . . . . . . . . . . . . . . . . 236
Installing an Option Card . . . . . . . . . . . . . . . . . . . . . . . . . . . 237
Removing an Option Card . . . . . . . . . . . . . . . . . . . . . . . . . . 241
Closing the Printer System Board
on the Right Side of the Printer . . . . . . . . . . . . . . . . . . . . . . . 243
Infrared Adapter . . . . . . . . . . . . . . . . . . . . . . . . 245
Connecting the Cable and Using the Infrared Adapter . . 245
Verifying the Installation of Options . . . . . . 249
Printing the Menu Settings Page . . . . . . . . . . . . . . . . . . . . . . . . . . . 249
Table of Contents
viii
Appendix
Understanding Fonts . . . . . . . . . . . . . . . . . . . . . 253
Typefaces and Fonts . . . . . . . . . . . . . . . . . . . . . . . . . . . . . . . . . . . . . . 253
Weight and Style . . . . . . . . . . . . . . . . . . . . . . . . . . . . . . . . . . . 253
Pitch and Point Size . . . . . . . . . . . . . . . . . . . . . . . . . . . . . . . . 255
Symbol Sets . . . . . . . . . . . . . . . . . . . . . . . . . . . . . . . . . . . . . . . 256
Bitmapped and Scalable Fonts . . . . . . . . . . . . . . . . . . . . . . . 257
Resident Fonts . . . . . . . . . . . . . . . . . . . . . . . . . . . . . . . . . . . . . . . . . . . 258
Printing a Font Sample List . . . . . . . . . . . . . . . . . . . . . . . . . . . . . . . . 263
Table of Contents
Page 10

Reference
Notices . . . . . . . . . . . . . . . . . . . . . . . . . . . . . . . . . 267
Safety . . . . . . . . . . . . . . . . . . . . . . . . . . . . . . . . . . 273
Warranty . . . . . . . . . . . . . . . . . . . . . . . . . . . . . . . 283
Glossary . . . . . . . . . . . . . . . . . . . . . . . . . . . . . . . . 287
Index . . . . . . . . . . . . . . . . . . . . . . . . . . . . . . . . . . . 299
Table of Contents
Table of Contents
ix
Page 11

Table of Contents
Table of Contents
x
Page 12

Introduction
This User’s Guide contains information about the Optra Color 45
inkjet printer. This information includes printer menus and
settings, printer messages, paper handling features, and print
material specifications. Keep this book in a handy place and use it
as a reference when you have a question about printer function or
if you encounter a printing problem.
The User’s Guide is divided into the following sections:
Getting Started
This section begins with detailed steps for setting up your printer.
Introduction
Using Your Printer
This section helps you understand printer functions and explains
the operation of your printer.
Caring for Your Printer
This section explains how to solve printer problems, clear paper
jams, and replace supplies.
Introduction
xi
Page 13

Introduction
Installing Options
This section provides step-by-step instructions to install options
available for your printer.
If you need information about the optional tray 2, refer to the
documentation that comes with the tray 2 option or contact
Lexmark.
Appendix
This section provides information on fonts.
Reference
This section contains notices, safety information, the warranty, the
glossary, and the index.
If you need more technical information about printer languages
and commands, interface specification, or managing printer
memory, contact Lexmark for technical information.
xii
Introduction
Page 14

Trademarks
Lexmark, FontVision, MarkNet, MarkVision, and Optra are
trademarks of Lexmark International, Inc., registered in the United
States and/or other countries.
The following terms are trademarks or registered trademarks of
these companies.
Albertus The Monotype Corporation plc.
Antique Olive Monsieur Marcel OLIVE
Arial The Monotype Corporation plc.
CG Omega A product of Bayer Corporation
CG Times Based on Times New Roman under
license from The Monotype
Corporation plc, is a product of Bayer
Corporation
Helvetica Linotype-Hell AG and/or its
subsidiaries
Intellifont Bayer Corporation
ITC Bookman International Typeface Corporation
ITC Zapf Chancery International Typeface Corporation
Marigold AlphaOmega Typography, Inc.
Palatino Linotype-Hell AG and/or its
subsidiaries
Times New Roman The Monotype Corporation plc.
Trademarks
Trademarks
xiii
Page 15

Univers Linotype-Hell AG and/or its
subsidiaries
Wingdings Microsoft Corporation
AppleTalk, LocalTalk, and Macintosh are trademarks of Apple
Computer, Inc., registered in the U.S. and other countries.
TrueType is a trademark of Apple Computer, Inc.
®
is a registered trademark of the Hewlett-Packard Company.
PCL
PCL 5 is Hewlett-Packard Company’s designation of a set of
printer commands (language) and functions included in its printer
products. This printer is designed to be compatible with the PCL 5
language. This means the printer recognizes PCL 5 commands
used in various application programs, and that the printer
emulates the functions corresponding to the commands.
®
PostScript
is a registered trademark of Adobe Systems
Incorporated. PostScript Level 2 is Adobe Systems’ designation of
a set of printer commands (language) and functions included in its
software products. This printer is intended by Lexmark
International, Inc., to be compatible with the PostScript Level 2
language. This means the printer recognizes PostScript Level 2
Trademarks
commands used in various application programs, and that the
printer emulates the functions corresponding to the commands.
xiv
Sun is a trademark or registered trademark of Sun Microsystems,
Inc., in the United States or other countries.
Other trademarks are the property of their respective owners.
Trademarks
Page 16

Getting
Started
Page 17

Page 18
Setting Up Your Printer
Getting Started
Complete the following sections in this chapter to set up your
Optra™ Color 45 inkjet printer.
Unpacking Your Printer
1
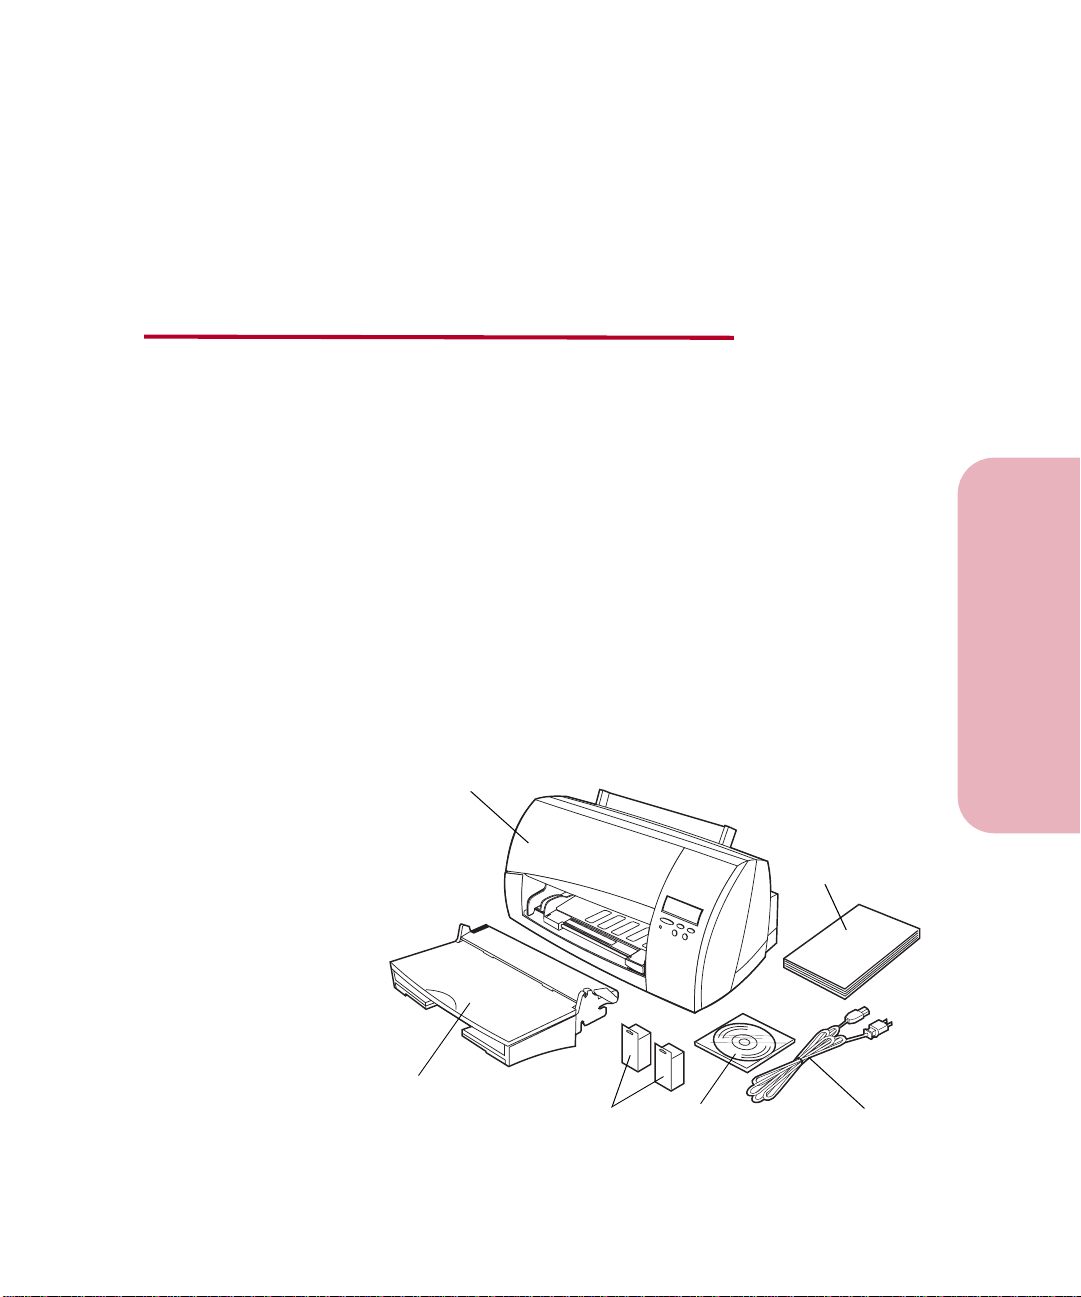
Remove the printer and all items from the packaging
carton.
Note: Save the carton and packing materials in case you
need to repack the printer for service or storage.
2
Make sure you have the items shown.
If any items are missing or damaged, contact the place
where you bought the printer.
Printer
Chapter
User’s Guide
1
Setting Up Your Printer
Input Tray and
Output Bin Unit
Print
Cartridges
CD
Chapter 1: Setting Up Your Printer
Power Cord
1
Page 19
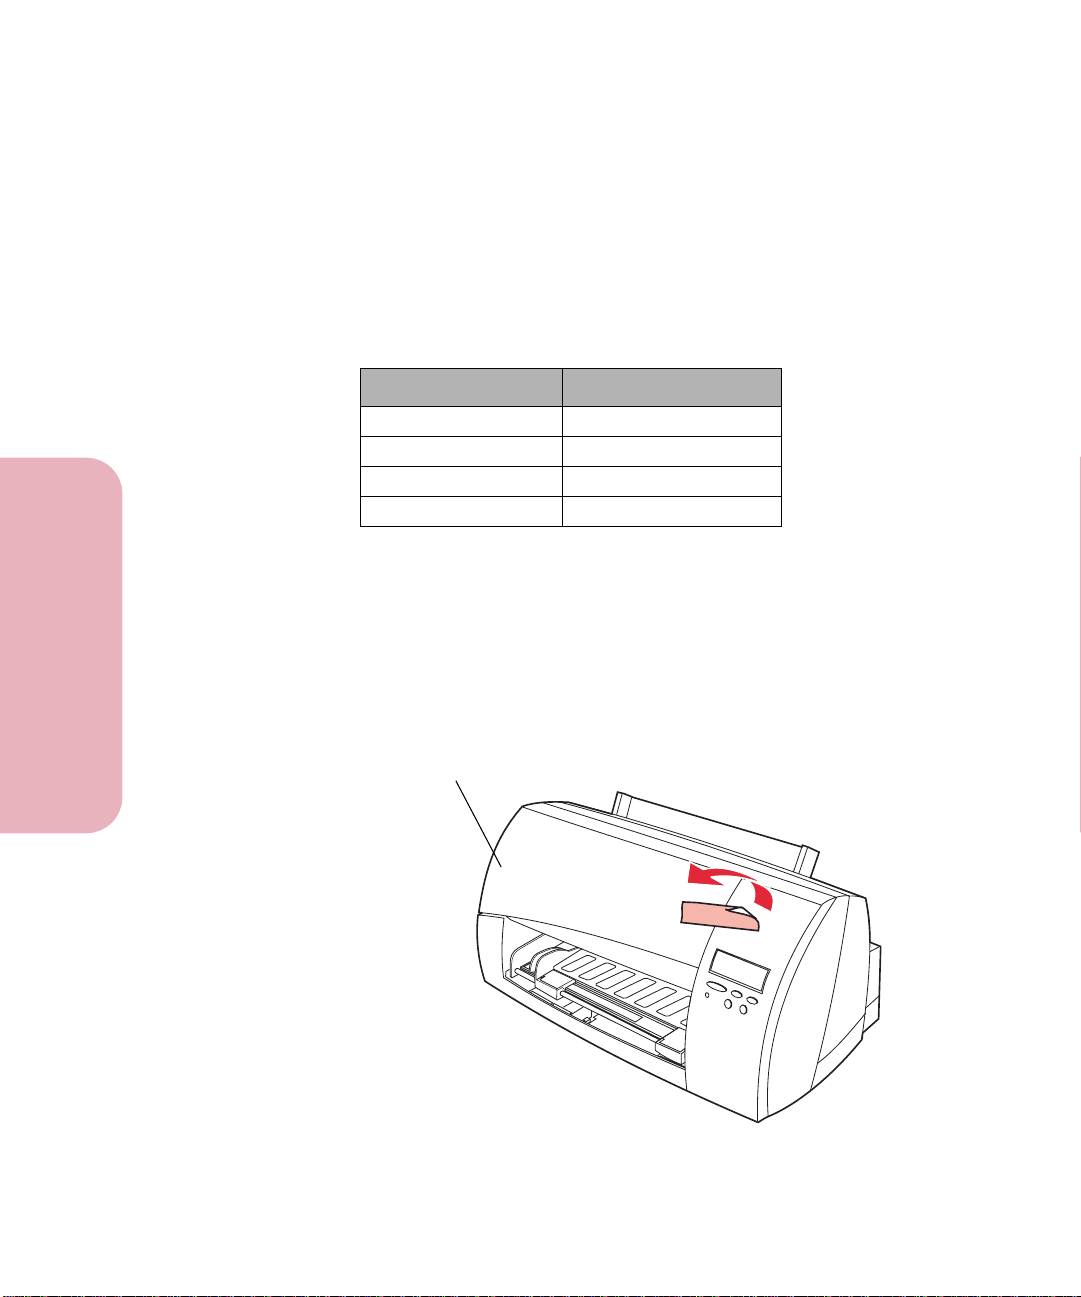
Getting Started
3 Place the printer on a flat, sturdy surface in a
well-ventilated area.
Allow at least 50 mm (2 in.) of clearance on all sides of the
printer. Leave enough space in front of and above the
printer to allow for easy paper access.
Use the following information to help determine where to
place your printer.
Characteristic Dimension
Depth 277 mm (10.9 in.)
Height 247 mm (9.7 in.)
Weight 9.1 kg (20 lb)
Width 563 mm (22.2 in.)
Do not place the printer:
In direct sunlight
•
Near heat sources or air conditioners
•
In dusty or dirty environments
•
Setting Up Your Printer
2
4 Remove the tape from the printer top cover.
Printer Top Cover
Chapter 1: Setting Up Your Printer
Page 20
Installing the Input Tray and
Output Bin Unit
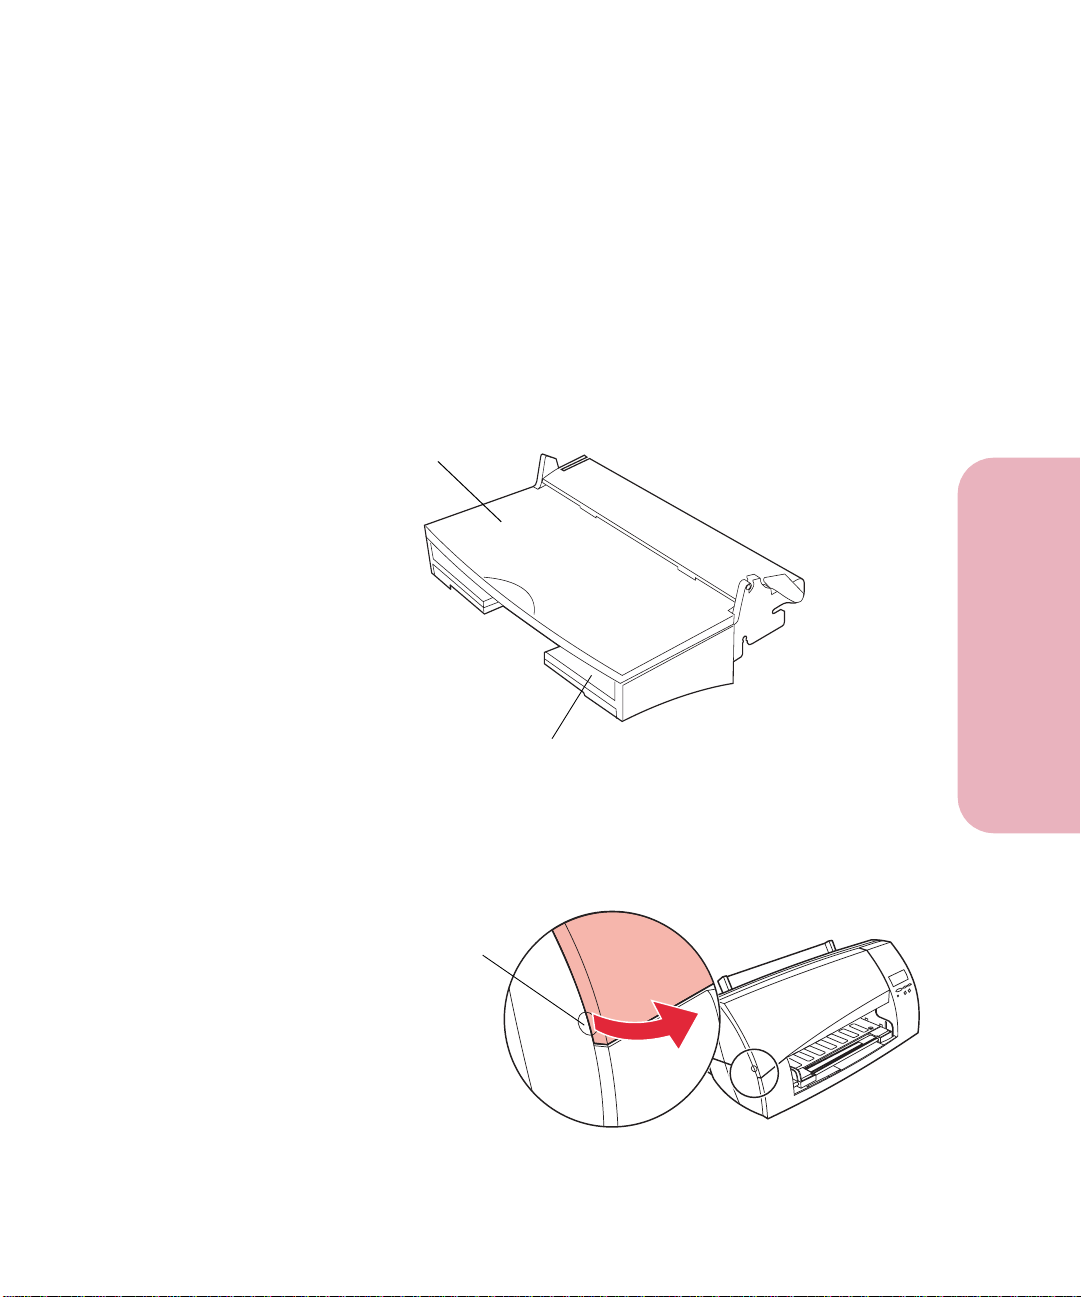
The input tray and output bin are combined as one unit. The input
tray is located on the bottom of the unit, and the output bin is
located on the top.
The output bin is also a cover for the input tray. The input tray and
output bin unit installs in the front of the printer underneath the
printer top cover.
Output Bin
Getting Started
Setting Up Your Printer
Input Tray
To install the input tray and output bin unit:
1 Locate the finger grip on the left side of the printer.
Finger Grip
Chapter 1: Setting Up Your Printer
3
Page 21
Getting Started
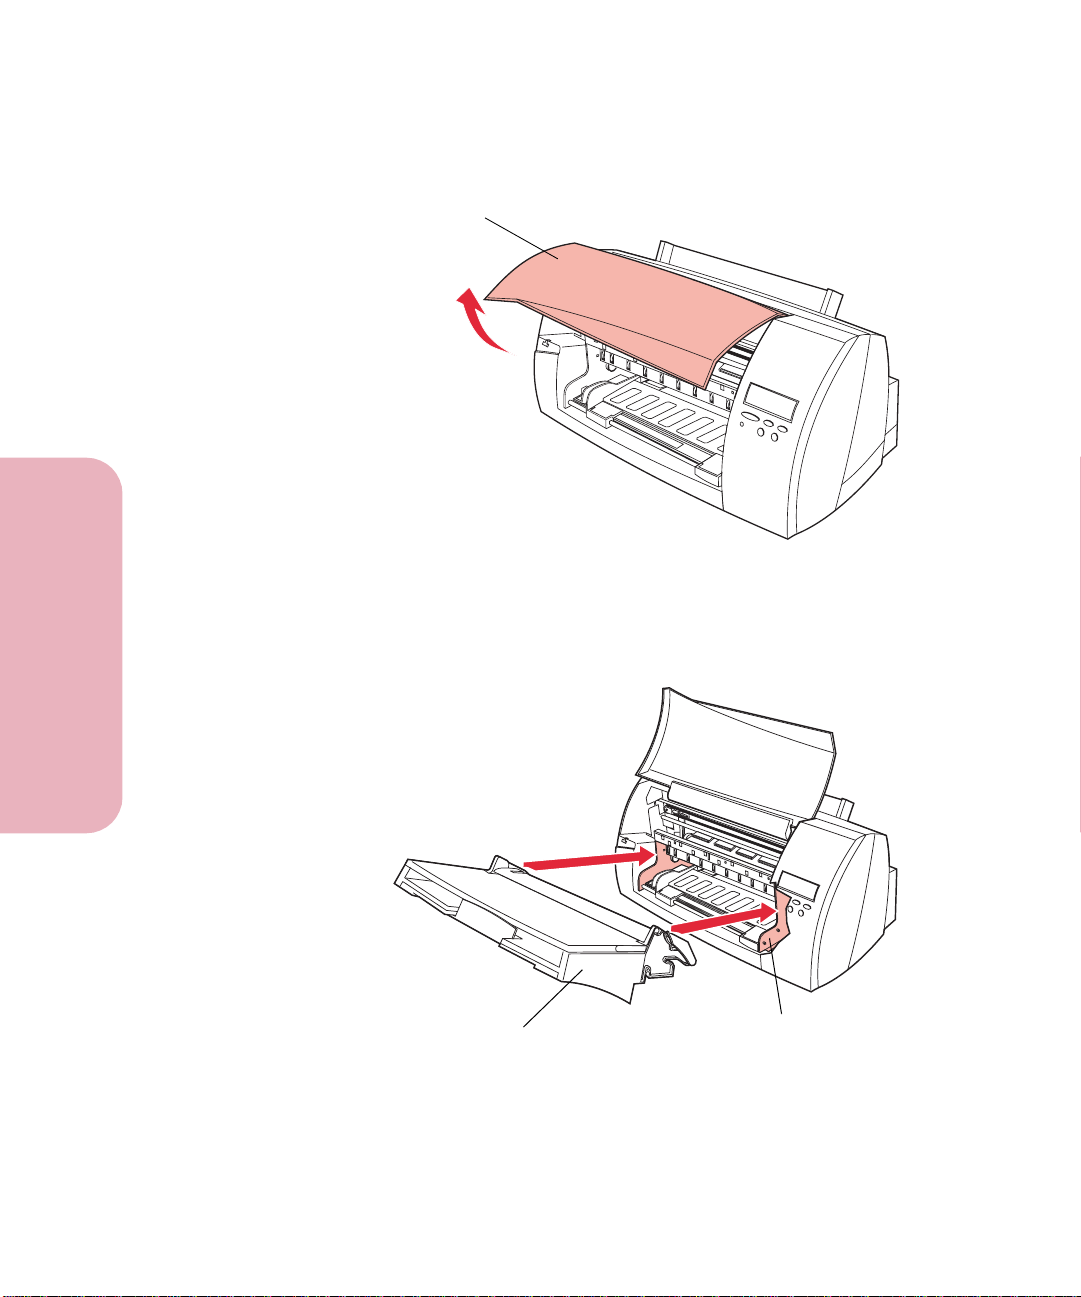
2 Pull up on the finger grip to lift the printer top cover.
Top Cover
3 Align the unit at a 45° angle with the metal side rails
inside the front of the printer.
Setting Up Your Printer
4
Input Tray and
Output Bin Unit
Chapter 1: Setting Up Your Printer
Side Rail
Page 22
Getting Started
4 Slide the slots on either side of the top of the unit into the
metal side rails. The hooks located underneath the slots
fit over the corresponding pegs on the metal side rail.
Slot
Hooks
Side Rail
Pegs
5 Press down firmly on the end of the unit until it snaps
into place.
Setting Up Your Printer
When the unit is properly installed, it remains stationary in
the slot.
Chapter 1: Setting Up Your Printer
5
Page 23
Getting Started
6 Close the printer top cover.
Top Cover
Setting Up Your Printer
6
Chapter 1: Setting Up Your Printer
Page 24
Loading the Input Tray
Your printer has one standard input tray that can hold up to 150
sheets of 20 lb letter-size paper. For information on other paper
sizes that you can use with your printer, see “Using Print
Materials” on page 107.
For information on loading envelopes and other print materials,
see “Using Print Materials” on page 107.
Getting Started
Note: The input tray is designated as
display.
To load paper:
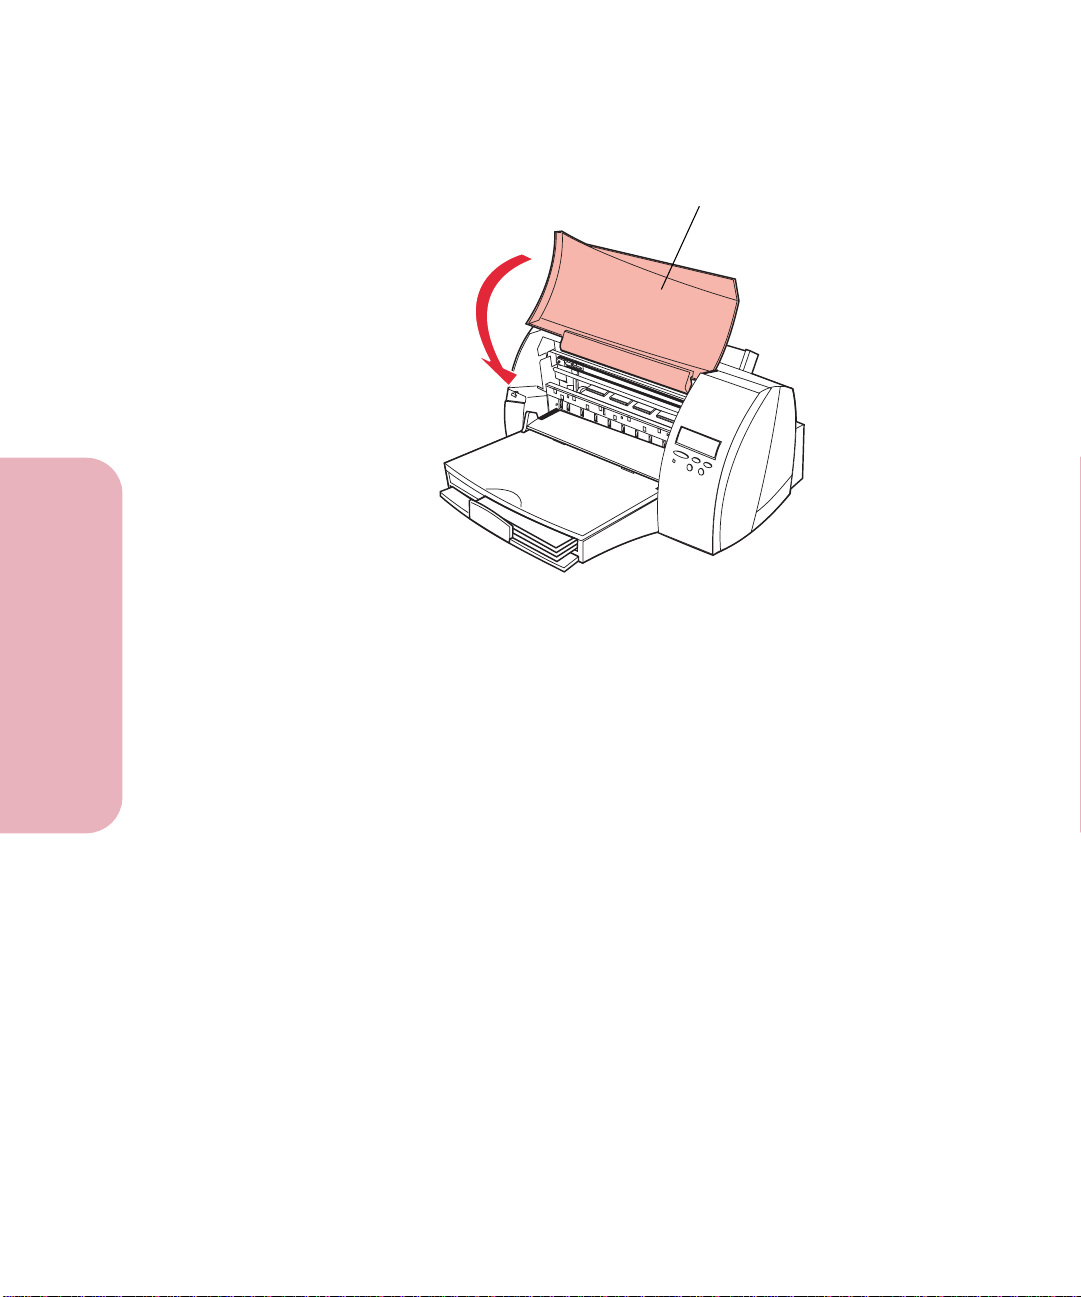
1 Lift the output bin.
Output Bin
Tray 1
on the operator panel
Setting Up Your Printer
Chapter 1: Setting Up Your Printer
7
Page 25
Getting Started
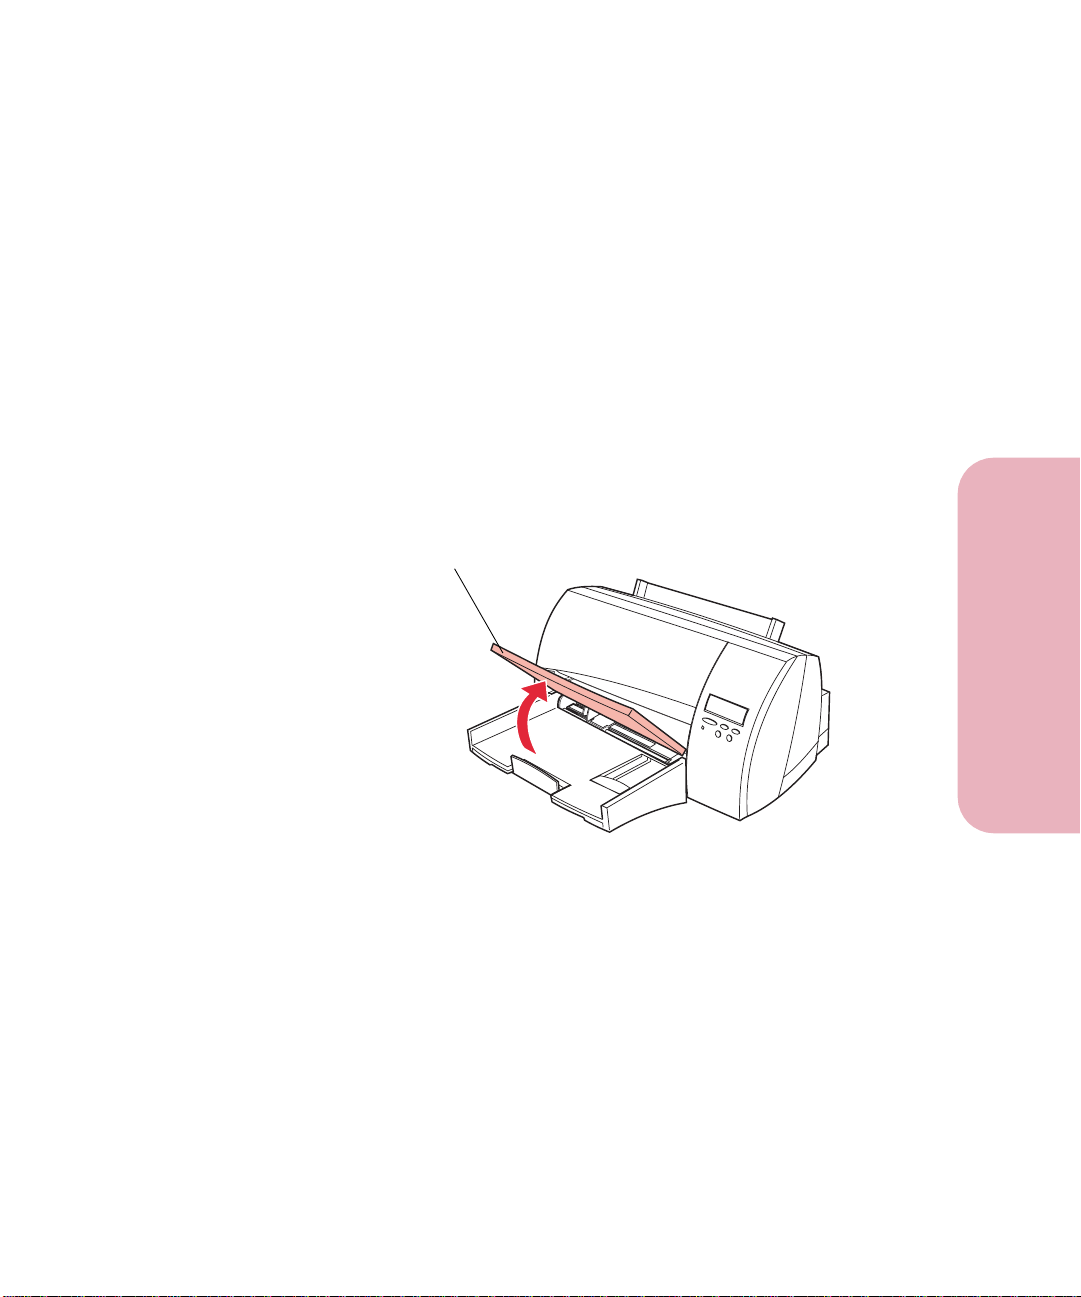
2 Squeeze the width guide lever and slide it to the far left
side of the tray.
Width Guide
3 Slide the length guide out toward you.
Setting Up Your Printer
8
Length Guide
Chapter 1: Setting Up Your Printer
Page 26
Getting Started
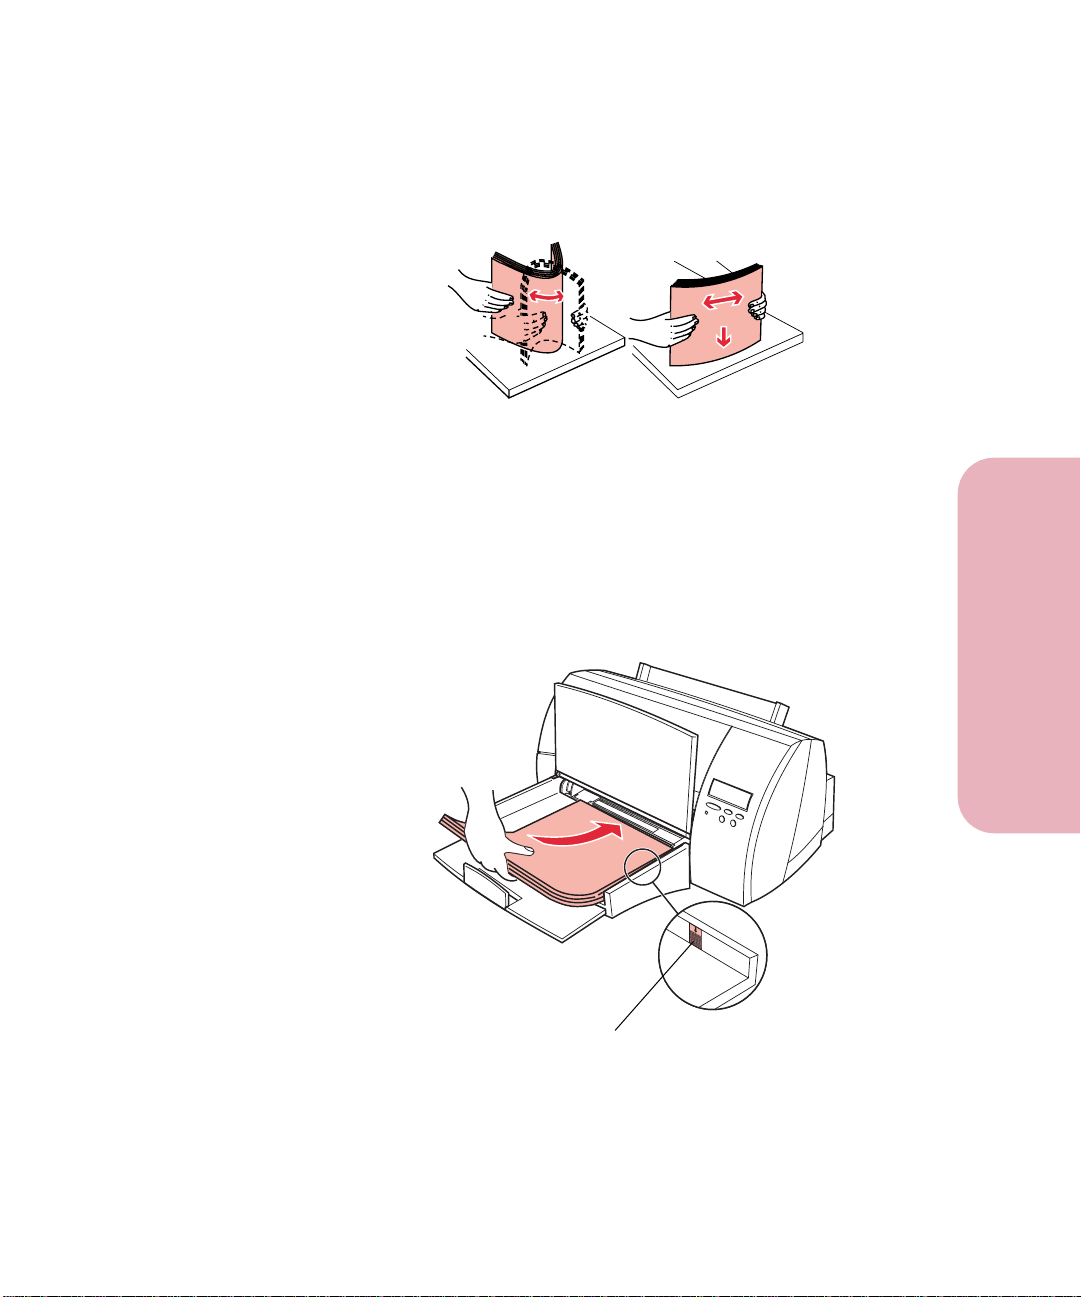
4 Flex the sheets back and forth to loosen them, then fan
them. Do not fold or crease the paper. Straighten the edges
on a level surface.
Note: For this setup, load letter-size paper.
5 Place the paper against the right side of the input tray
with the recommended print side face down and the top
edge going in first toward the back of the input tray as
shown.
For information on how to load letterhead, see “Printing on
Letterhead” on page 141.
Stack Height Indicator
Setting Up Your Printer
Note: Do not exceed the maximum stack height indicated
by the arrow on the right side of the input bin.
Chapter 1: Setting Up Your Printer
9
Page 27
Getting Started
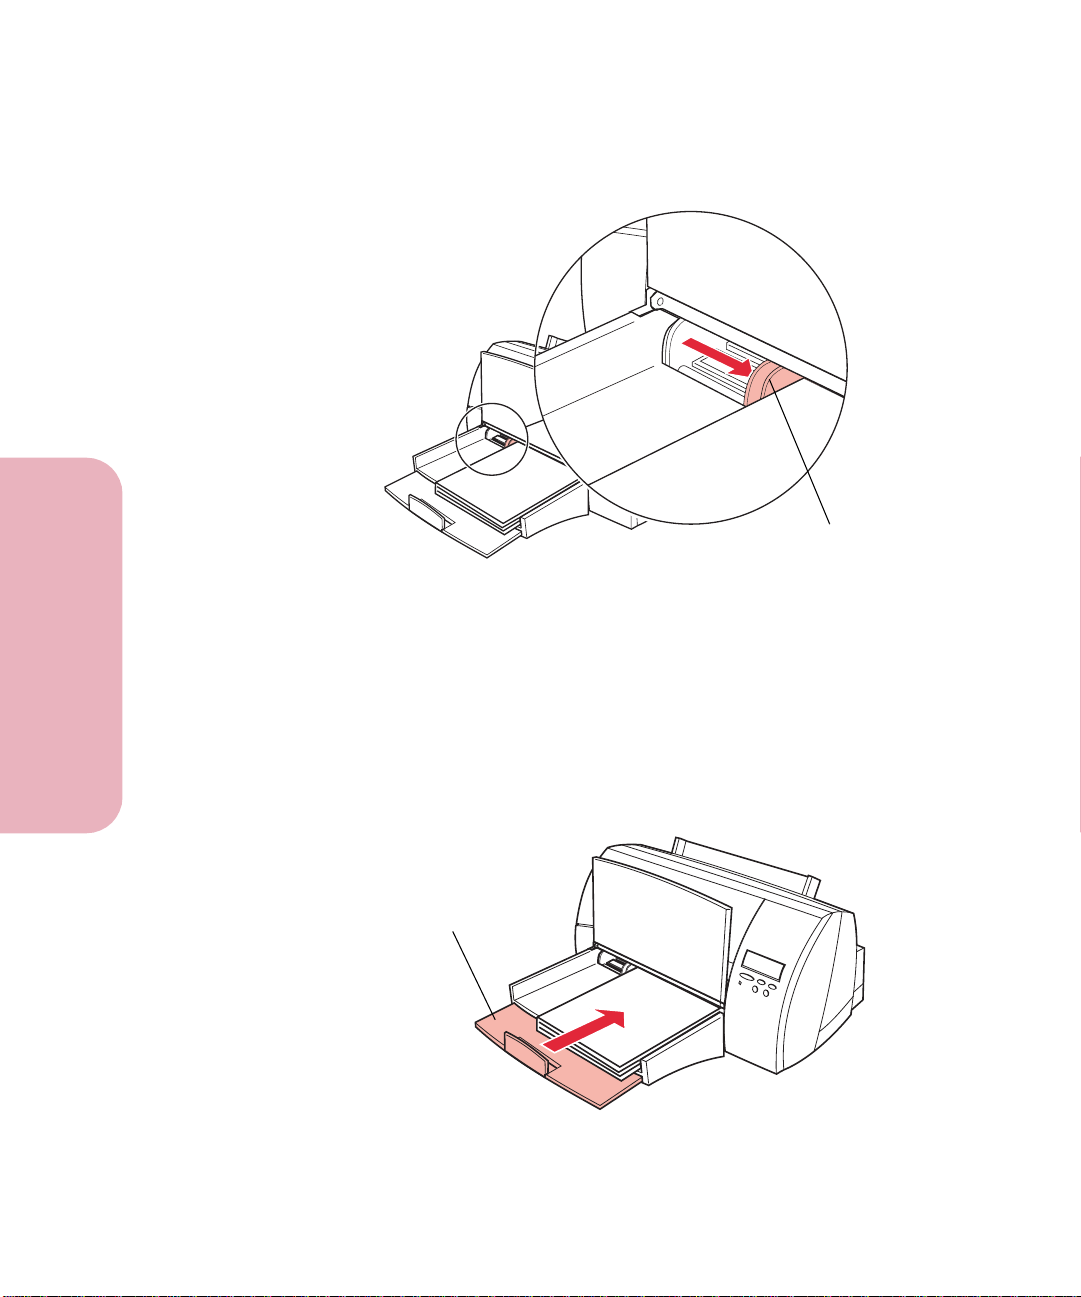
6 Squeeze the width guide lever and slide it to the right
until it touches the edge of the paper.
Width Guide
Note: This example shows how to adjust for letter-size
paper (LTR). The paper size indicators, printed on
the top surface of the bin, are paper size
abbreviations used for placement of the length and
width guides.
Setting Up Your Printer
10
7 Slide the length guide up until it touches the bottom edge
of the paper.
Length Guide
Chapter 1: Setting Up Your Printer
Page 28
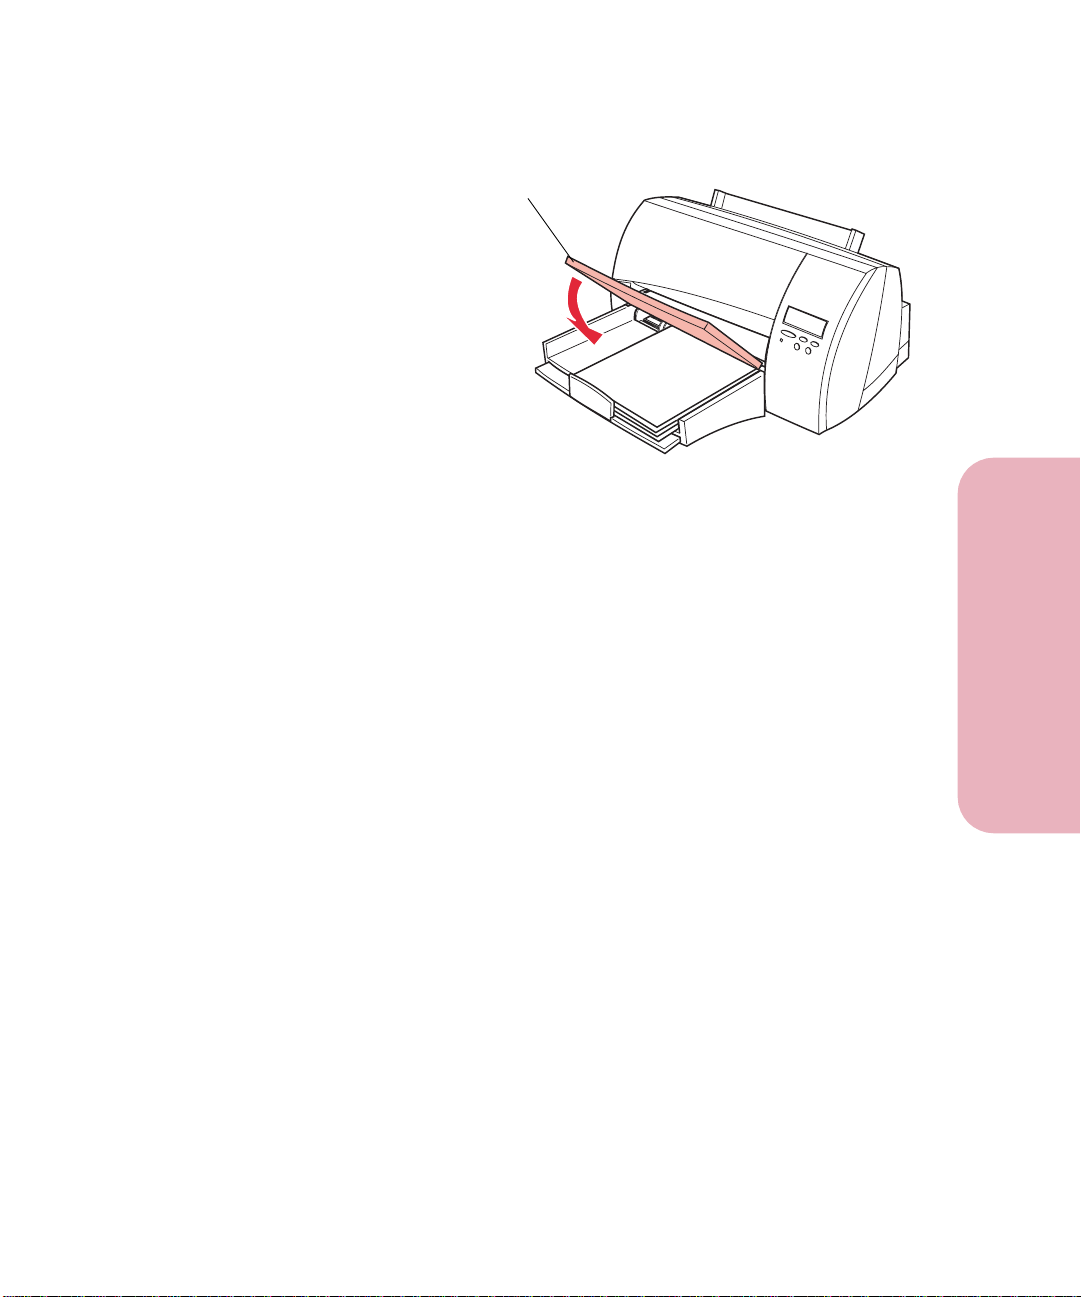
8 Lower the output bin.
Output Bin
Getting Started
Setting Up Your Printer
Chapter 1: Setting Up Your Printer
11
Page 29
Getting Started
Attaching the Parallel Cable
To print from your computer, you need to connect your printer to
your computer with a parallel interface cable.
Your printer requires an IEEE 1284-compliant parallel cable that
supports bidirectional communication. We recommend Lexmark
part number 1329605 (10 ft) or 1427498 (20 ft). If you use something
other than an IEEE-compliant cable, you may not be able to access
all of your printer functions.
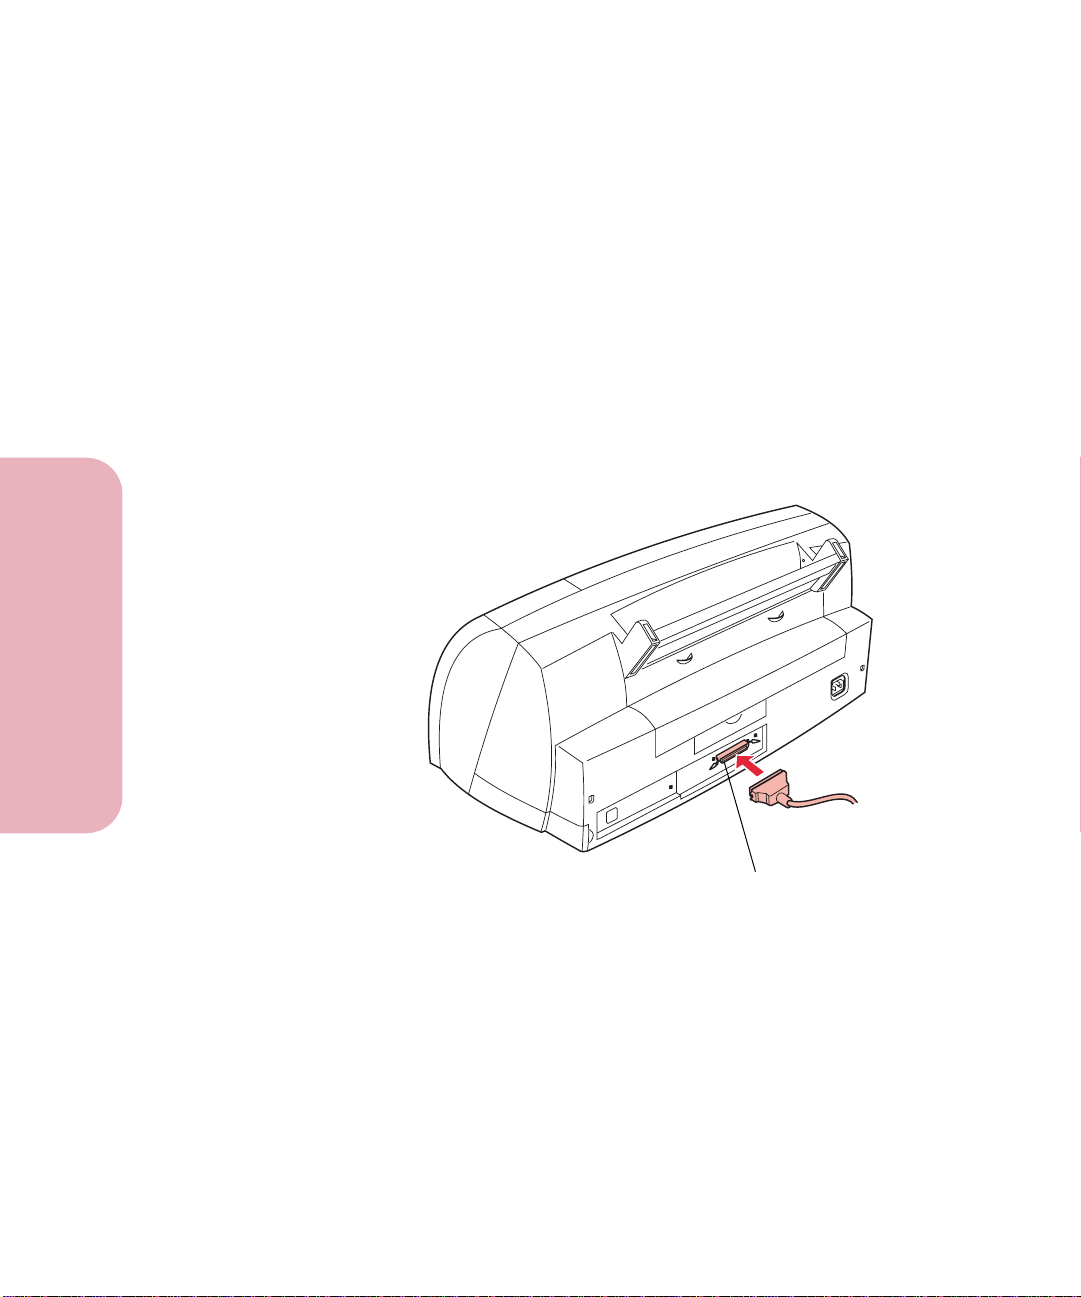
1 Align and plug the cable into the parallel connector as
shown.
Setting Up Your Printer
12
Chapter 1: Setting Up Your Printer
(Rear View)
Parallel Connector
Page 30
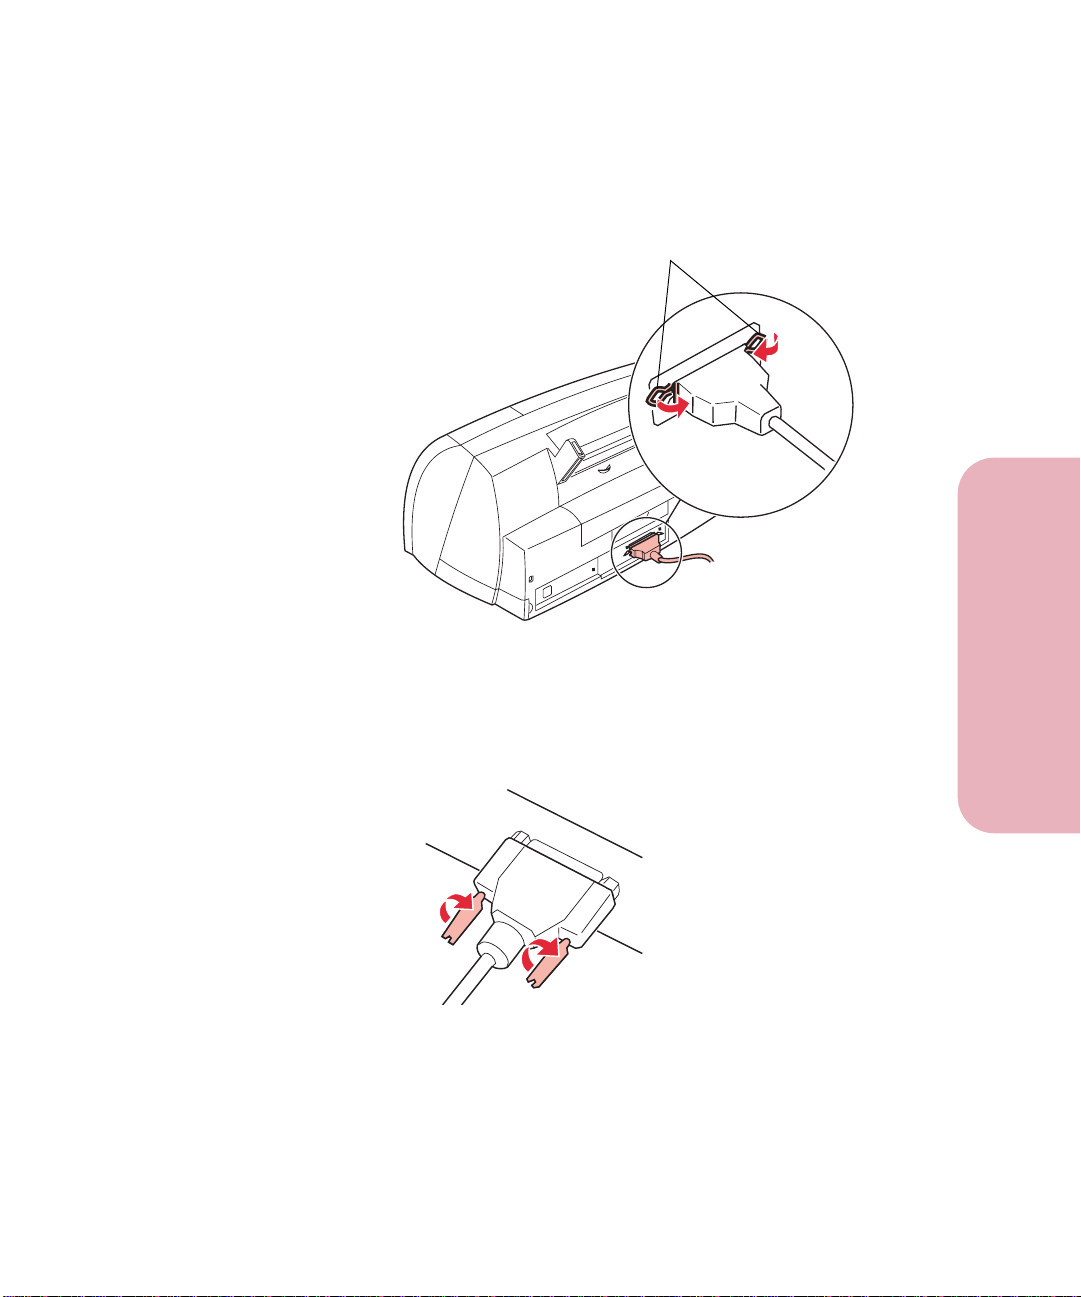
Getting Started
2 Push the clips at each end of the connector down into the
notches on the plug as shown. The clips snap when
pushed into the notches.
Clips
Setting Up Your Printer
3 Connect the other end of the parallel cable to the back of
your computer. Tighten the screws on the parallel cable to
the computer.
4 Check the parallel cable connections to make sure they
are completely secured.
Chapter 1: Setting Up Your Printer
13
Page 31

Getting Started
Plugging the Printer In
1 Plug the printer power cord into the connector at the back
of the printer.
Power Cord
Setting Up Your Printer
14
2 Plug the other end of the printer power cord into a
properly grounded electrical outlet.
You hear some movement inside the printer when you first plug it
in. The printer indicator light turns on and the printer enters the
Ready
information.
If an error message is displayed, see “Understanding Printer
Messages” on page 145 for more information.
Chapter 1: Setting Up Your Printer
state. See“Printer Indicator Light” on page 50 for more
Page 32

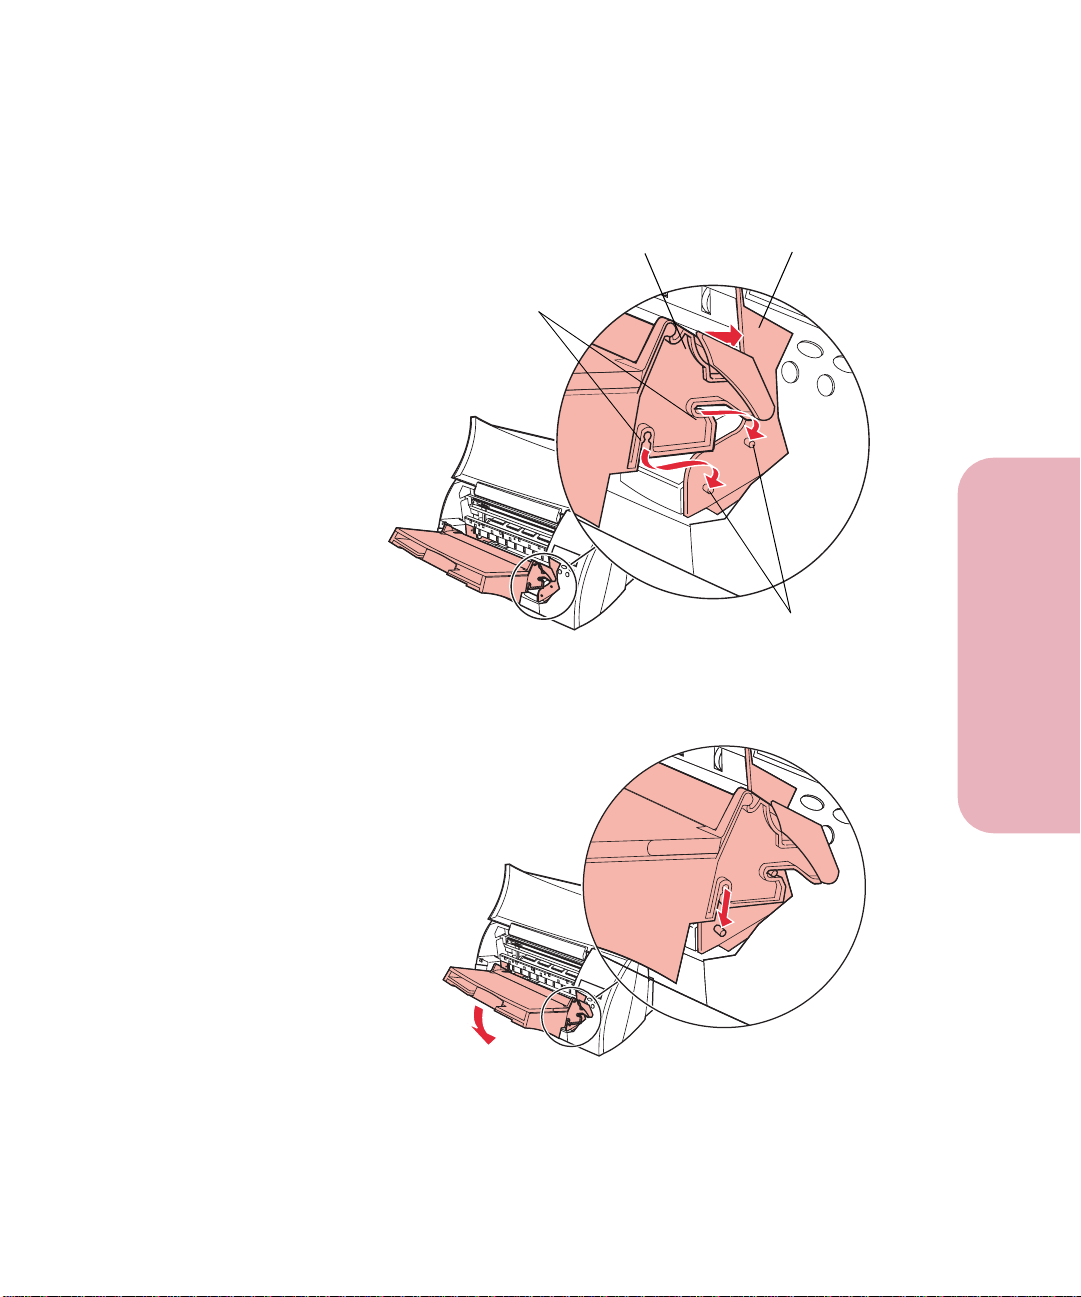
Installing the Print Cartridges
When you unpack the printer, the print cartridge carrier is hidden
on the right side of the printer behind the operator panel. The print
cartridge carrier slides horizontally across a track inside the
printer. It must move into the installation position on the far left
side of the printer before you can install the print cartridges.
Getting Started
W
ARNING
The following section steps you through the process of moving the
print cartridge carrier into the proper position and installing print
cartridges.
To install the print cartridges:
:
Do not pull the print cartridge carrier by hand.
Manually moving the print cartridge carrier
may damage the printer.
1 Complete the following steps to move the print cartridge
carrier into the installation position.
a Press
Menu>
b Continue to press and release
you see
c Press
d Press
second line of the display.
e Press
The print cartridge carrier moves to the far left side of the
printer and
display. You are now ready to install print cartridges.
TESTS MENU
Select
Menu>
Select
Change Print Cartridges
or
.
until
.
<Menu
to enter the menus.
Menu>
.
Change Cartridge
<Menu
or
appears on the
appears on the
until
Setting Up Your Printer
2 Lift the printer top cover.
Chapter 1: Setting Up Your Printer
15
Page 33

Getting Started
You receive two print cartridges, one black and one color:
Setting Up Your Printer
Cartridge
Cartridge Type
Black Left 8
Color Right 4
Carrier Slot
Maximum Print Speed/
pages per minute (ppm)
3 Remove the sticker and the transparent tape covering the
copper contact area on one of the cartridges.
Copper Contact Area
W
ARNING
:
Do not touch the copper contact area.
4 Insert the cartridge.
Black Cartridge
Chapter 1: Setting Up Your Printer
16
Page 34

Getting Started
5 Push back on the cartridge until it snaps securely into
place.
6 Repeat steps 3 through 5 for the second cartridge.
When you finish, the print cartridge carrier should look
like the following illustration.
Color Cartridge
Black or Photo
Cartridge
Setting Up Your Printer
7 Close the printer top cover.
Note: Do not print with the top cover open.
8 Press
Select
.
Chapter 1: Setting Up Your Printer
17
Page 35

Getting Started
LEFT CART TYPE
9
operator panel display and
second.
appears on the first line of the
Not Changed
appears on the
Setting Up Your Printer
If a black cartridge is installed, press
•
Black Cartridge
display. Press
If a photo cartridge is installed, press
•
Photo Cartridge
display. Press
New Standard
panel display.
10 Press
11 Press
12 Press
13 Press
Menu>
second line of the display.
Select
Saved
The
appears on the first line of the operator panel display and
Not Changed
Menu>
line of the display.
Select
New Standard
panel display.
appears on the second line of the operator
until
to choose
message displays, then
appears on the second.
until
to choose
appears on the second line of the operator
appears on the second line of the
Select
Select
New Hi Capacity
Color Cartridge
to choose
appears on the second line of the
to choose
appears on the
New Hi Capacity
RIGHT CART TYPE
appears on the second
Color Cartridge
Menu>
Black Cartridge
Menu>
Photo Cartridge
.
.
until
.
until
.
14 Press
15 Press
16 Continue with “Aligning the Print Cartridges” on
For more information about installing or replacing print cartridges,
see “Replacing Print Cartridges” on page 184.
Chapter 1: Setting Up Your Printer
18
Menu>
second line of the display.
Select
Saved
The
Alignment Page
The printer automatically prints an alignment test page.
page 19.
to choose
message displays, then the message
New Hi Capacity
until
New Hi Capacity
appears on the operator panel display.
appears on the
.
Printing
Page 36

Aligning the Print Cartridges
When you finish installing the print cartridges, the message
Printing Alignment Pa ge
and the printer automatically prints a test page of alignment
patterns. If you need to print an alignment test page, see “Printing
the Test Page for Verifying Alignment” on page 192.
The following illustrations are examples of the alignment test
patterns. Each pattern has a letter above it (A, B, C, and D). These
letters represent the Horizontal Alignment, Vertical Alignment,
Bidirectional Black Alignment, and Bidirectional Color Alignment,
respectively.
appears on the operator panel display
Getting Started
The number or appearance of your alignment patterns may vary
from those shown.
Setting Up Your Printer
Chapter 1: Setting Up Your Printer
19
Page 37

Getting Started
Once the cartridge alignment test page has printed, the operator
panel display looks like this:
The current alignment value appears on the second line. To change
the alignment value:
Test A Alignment
=15*
1 From the Test A alignment group on the test page, locate
the number under the alignment pattern that comes
closest to forming a perfectly straight line.
For example, in sample group A on page 19, number 5
comes closest to forming a straight line.
Setting Up Your Printer
2 Press and release
alignment value based on the printed test page.
3 Press
Select
The next Test Alignment screen appears on the display.
>Menu
to choose the correct alignment value.
or
<Menu
to display the correct
4 Repeat steps 1 through 3 to select the alignment values
for Tests B, C, and D.
Once you press
the printer returns to the
Select
for the correct value for Test D Alignment,
Ready
state.
Chapter 1: Setting Up Your Printer
20
Page 38

Getting Started
Installing the Operator Panel Overlay
If English is not your preferred language, complete the following
steps to customize the operator panel and the display language to
meet your requirements.
Operator Panel
Display
Printer
Indicator Light
Menu
Select
Go
Return
Stop
1 Locate the operator panel overlay.
If this User’s Guide is printed in a language other than
English, an overlay for the printer operator panel is
included with the printer. The overlay has translated names
for the operator panel buttons.
2 Peel the protective backing off the overlay.
Setting Up Your Printer
Chapter 1: Setting Up Your Printer
21
Page 39

Getting Started
3 Align the holes in the overlay with the buttons on the
operator panel and press it into place.
Rub the overlay firmly to make sure that it adheres securely
to the operator panel.
Setting Up Your Printer
22
Operator Panel Overlay
4 Peel the protective covering away from the overlay.
Chapter 1: Setting Up Your Printer
Page 40

Getting Started
5 Complete the following steps to change the language of
the menus and messages that appear on the printer
display:
a Press the
Menu>
b Continue to press and release
you see
operator panel display.
c Press the
Note: The
d Press
second line of the display.
e Press
f Press
the second line of the display.
g Press
The printer resets and displays text in the requested
language.
SETUP MENU
Select
Select
displayed on the second line of the operator panel
display.
<Menu
Select
Menu>
Select
until
.
until the language you prefer appears on
.
<Menu
or
button.
button acts upon the information
Display Language
button to enter the menus.
Menu>
on the second line of the
<Menu
or
appears on the
until
Setting Up Your Printer
Chapter 1: Setting Up Your Printer
23
Page 41

Getting Started
Printing the Menu Settings Page
The menu settings page shows current settings for the menus and
a list of installed options. You can use this page to verify that all
the printer options are properly installed and the printer settings
are set to what you want.
To print a menu settings page:
Setting Up Your Printer
1 Make sure the printer is plugged in and the
message appears on the display.
See “Using the Operator Panel” on page 50 to identify the
display and operator panel buttons if you need help.
2 Press
Menu>
3 Continue to press and release
TESTS MENU
see
4 Press
5 Press
If an error message appears, see “Understanding Printer
Messages” on page 145.
See “Using the Operator Panel and Menus” on page 49 for more
information about using the printer operator panel and changing
settings from the menus.
Select
TESTS MENU
on the second line.
Select
The message
on the operator panel display until the page prints. The
printer returns to the
page prints.
<Menu
or
.
appears on the first line and
to select
Printing Menu Settings
to enter the menus.
Menu>
.
Print Menus
Ready
state after the menu settings
.
appears and remains
or
Ready
<Menu
until you
Print Menus
status
is
Chapter 1: Setting Up Your Printer
24
Page 42

Getting Started
Installing the Printer Drivers and Utilities
1 Locate the compact disc (CD) that was shipped with your
printer.
Note: If you do not have access to a CD-ROM drive, you
can transfer the information on the CD to diskettes.
Locate a computer with a CD-ROM drive, start the
CD utility, and then follow the instructions on the
screen to create diskettes.
2 Follow the instructions in the booklet included with the
CD to start the printer setup utility appropriate for your
operating system.
The setup utility installs printer drivers and utilities that let
you manage Lexmark printers attached to your network.
See “Using the Printer Utilities” on page 27 for details
about the printer drivers and the network management
tools available with MarkVision™ and the other printer
utilities.
Setting Up Your Printer
3 If necessary, use standard network software to identify
the printer to the LAN and to complete any other setup
that may be needed.
Consult your network software documentation for more
information. Also, see “Using the Printer Utilities” on
page 27 for more information.
Chapter 1: Setting Up Your Printer
25
Page 43

Getting Started
Setting Up Your Printer
26
Chapter 1: Setting Up Your Printer
Page 44

Using the Printer Utilities
Getting Started
Setup Utility
The compact disc (CD) shipped with your printer contains setup
utilities for Windows 3.1x, Windows 95, Windows NT 4.0,
Macintosh, OS/2, and DOS environments. The setup utility lets
you quickly install printer drivers as well as the MarkVision
printer utility.
Note: See the documentation that comes with the CD for
installation instructions.
Help is available from each screen of the utility. Highlight the item
you want to know more about, then press F1. Press ESC to exit the
online Help.
Installing Printer Utilities
The setup utility installs printer utilities that help you manage
your printer or your network of printers. The utilities it installs
depend on your operating system. If you’re using Windows 3.1,
Windows 95, Windows NT 4.0, Macintosh, or OS/2 Warp, you can
install the MarkVision utility. If you’re using other versions of
OS/2 or if you’re using DOS, you can install the printer Toolkit.
Chapter
2
Using the Printer Utilities
Note: MarkVision for UNIX Networks and Intranet Servers and
MarkVision for Sun™ Systems and Sun Intranet Servers are
available on a separate CD and may be purchased
separately.
Chapter 2: Using the Printer Utilities
27
Page 45

Getting Started
For details about the utilities, refer to the pages indicated in the
following table:
Utility See page…
MarkVision 32
Toolkit 43
Network Printer Utility 44
MarkVision for a Certain Network
The following table defines which workstation operating systems
can support MarkVision in various network environments.
Depending on your network configuration, all of the utilities
necessary to install MarkVision on your workstations are included
on the CD. See page 44 for more information about the Network
Printer Utility.
Using the Printer Utilities
Chapter 2: Using the Printer Utilities
28
Page 46

MarkVision Network Support
Workstation Operating System
Getting Started
Network Operating
System
Novell NetWare 3.x, 4.x Yes
Windows NT
Server 3.51
Windows NT
Server 4.x
Windows 95
(Peer-to-Peer)
OS/2 LAN Server and
OS/2 Warp
TCP/IP
AppleTalk NoNoNoNoNoYes
1 To set up the Windows NT server to support clients using Windows operating systems, select “Server
Utilities” from the Install window when running the Network Printer Utility.
2 Requires a bidirectional print spooler. Request the latest FixPak from IBM.
3 To set up the OS/2 server to support clients using Windows operating systems, select “Server and
Workstation Utilities” from the Install window when running the Network Printer Utility.
4 Requires a 32-bit Requester from Novell.
5 To set up the Windows NT server, use the MarkVision installation procedures from the CD for network
support. Select “MarkVision Server Agent” and install it.
6 Server/Network operating system independent.
6
5
2
Server
Windows
95
4
1
Ye s
Yes Yes Ye s No No No
YesNoNoNoNoNo
3
Ye s
Ye s Ye s Ye s Ye s Ye s N o
Windows
NT 4.0
Yes Yes No No No
Ye s Ye s
Ye s Ye s
Windows
3.1x
1
3
OS/2
Warp
No No No
Ye s N o N o
UNIX
2
/AIX
Mac
Note: You may install MarkVision for Windows NT Intranet
Servers on a computer running Windows NT with a
supported web server. MarkVision for Windows NT
Intranet Servers lets you run a MarkVision client from any
operating system using a supported web browser, such as
Netscape Navigator or Microsoft Internet Explorer.
Using the Printer Utilities
Chapter 2: Using the Printer Utilities
29
Page 47

Getting Started
Printer Drivers
Printer drivers for the following operating systems and
applications are included on the CD:
• Windows 3.1
• Windows for Workgroups 3.11
• Windows 95
• Windows NT 4.0
• Macintosh
• OS/2 Warp
• OS/2 2.1 or later
• WIN-OS/2 for OS/2 2.1 or later
• DOS applications:
- WordPerfect 5.1, 6.0
- Lotus 1-2-3 2.x, 3.x
Note: All drivers are also available electronically from online
services. See page 44 for more information.
If you select the “Server” installation method when you run the
Windows setup utilities, the MarkVision utility for Windows
environments that is installed on your system can help ensure that
all network users have the latest printer drivers. When launched,
MarkVision compares the drivers on the local workstation to those
Using the Printer Utilities
stored on the network. If the workstation drivers are not as current
as those available on the network, you can have MarkVision
automatically update the workstation drivers.
Getting Other Printer Drivers
Additional printer drivers may have been developed since this
book was printed. If the driver you need for your operating system
or your DOS application is not included on the CD, it may be
available from Lexmark or from the software developer. Lexmark
maintains several resources for obtaining current drivers. See
“Getting Updated Drivers and Utilities” on page 44.
Chapter 2: Using the Printer Utilities
30
Page 48

If the drivers you need are not available with your software
application, contact the software company or a representative at
your point of purchase. You can find a list of major software
publishers and their technical support phone numbers in the
Information menu of the DOS Setup Utility and Toolkit or the
Install MarkVision and Drivers selection in OS/2. If you install
MarkVision for 3.1, a separate Lexmark Support icon is included in
the MarkVision Printer Utility group on the Windows desktop. If
you are using MarkVision for Windows 95, the phone numbers are
included in the online Help.
If you cannot locate a driver for your DOS application, you can use
one of the drivers listed in the following table. When you use these
alternate printer drivers, your printer supports only those
functions provided by the driver and may not support the total
functions possible with your printer.
Alternate printer drivers
Printer language Printer (in preferred order)
Getting Started
Using the Printer Utilities
PCL 5 emulation HP 500C
PostScript Level 2 emulation Lexmark Optra SC 1275
Lexmark Optra S
Lexmark Optra C
Lexmark Optra plus
Lexmark Optra
HP LaserJet 5Si
Chapter 2: Using the Printer Utilities
31
Page 49

Getting Started
Bidirectional Communication
Your printer is capable of intelligent communication with your
computer and the network. Not only can it receive information
from software applications, but it can also send back messages
about the work it’s doing and what it needs to complete the task.
This intelligent bidirectional communication standard, Network
Printing Alliance Protocol (NPAP) 1.0, is part of the printer design.
The utilities and drivers that are shipped with the printer take
advantage of this advanced communication capability.
MarkVision
The MarkVision graphical user interface provides ongoing status
for Lexmark printers connected locally or attached directly to the
network by way of an optional network adapter. The status
reported includes all messages appearing on the operator panel
display if you are administrating the remote operator panel, as
well as information about options installed on the printer and
printer default settings. Workgroup administrators or key
operators can monitor only those printers they are responsible for
Using the Printer Utilities
by using a helpful list of print queues that can be listed through
MarkVision.
When minimized on your screen, the MarkVision icon flashes to let
you know there is a problem with a printer. You can maximize the
window to see a graphic of the printer and detailed information
about the problem.
MarkVision can save you a lot of time setting up a network of
Lexmark printers. The Quick Setup function lets you create a
printer configuration file at your workstation, save the printer
settings in the file, and then send the settings to other printers on
the network.
Chapter 2: Using the Printer Utilities
32
Page 50

Getting Started
By using the MarkVision job statistics utility, you can also keep
track of network printer activity. MarkVision helps you collect
printer usage statistics and create charge-back reports, including
information about total jobs printed, total pages, and average print
time. MarkVision can also provide information about jobs
currently in the print buffer.
Using the Printer Utilities
Chapter 2: Using the Printer Utilities
33
Page 51

Getting Started
MarkVision Windows
The appearance of the MarkVision window on your computer
display varies, depending on your operating system and your
network and printer configuration.
MarkVision Support in Various Environments
Refer to the following MarkVision support table to determine the
features available in the MarkVision utility installed on your
workstation operating system. Summaries of each of the features
follow. Scroll through the online Help included with MarkVision
for more information about its various features.
MarkVision utilities for Windows 95, Windows 3.1x, Windows NT
4.0, Macintosh, and OS/2 Warp were shipped with your printer.
You can purchase MarkVision for UNIX Networks from Lexmark.
Contact a representative at the place where you bought the printer
for more information.
Lexmark is continually updating printer utilities to provide you
optimum printer control. To get information about the newest
versions of MarkVision, which may include new features or
Using the Printer Utilities
Chapter 2: Using the Printer Utilities
34
enhanced functions, use the Lexmark resources listed under
“Getting Updated Drivers and Utilities” on page 44.
Page 52

Getting Started
Feature Support
Windows
95 and NT
Feature
Printer configuration:
control and visual status
Remote operator panel Yes Yes Yes Yes Yes
Status and alerts Yes Yes Yes Yes Yes
Auto driver update Yes Yes
Toolkit Yes
Basic resource
management
Enhanced resource
management
Hard disk partitioning
Printer inventory Yes Yes Yes Yes Yes
Jo b st ati sti cs Yes Yes Ye s Yes Yes
Job queue management Yes Yes
Print buffer management Yes Yes Yes No Yes
Drag-and-drop printing
through MarkVision
Dynamic Data Exchange
(DDE)
Printer Access Security Yes Yes
Dial up support
(TCP/IP)
Media Type Control Yes Yes Yes No No
Printer Password Access
Security Control
Uninstaller for
MarkVision
Management Infor-
mation Format (MIF) File
Creation from Printer
Inventory
1 Not supported for TCP/IP networks.
2 Support for this feature provided by the operating system.
3 Toolkit functions are available, although they are not identified by the “Toolkit” name.
4 If supported by the printer
5 Limited function
4.0
Ye s Ye s Ye s Ye s Ye s
3
Ye s Ye s Ye s Ye s Ye s
Ye s Ye s Ye s Ye s Ye s
4
Ye s Ye s Ye s Ye s N o
No Yes
No Yes No No No
Ye s Ye s N o Ye s N o
Ye s Ye s Ye s N o N o
Ye s Ye s Ye s Ye s Ye s
Yes No Yes No No
Windows
3.1
1
Ye s Ye s
1
5
5
OS/2
Warp
No No No
3
2
Ye s
No No No
Ye s Ye s N o
UNIX Mac
Ye s Ye s
Ye s N o
3
Using the Printer Utilities
Chapter 2: Using the Printer Utilities
35
Page 53

Getting Started
Feature Support
Windows
95 and NT
Feature
Property Tag Support Yes Yes
Printer Inventory
Summary Page
Menus Yes No Yes No No
1 Not supported for TCP/IP networks.
2 Support for this feature provided by the operating system.
3 Toolkit functions are available, although they are not identified by the “Toolkit” name.
4 If supported by the printer
5 Limited function
4.0
Ye s N o Ye s Ye s N o
Windows
3.1
5
OS/2
Warp
Ye s Ye s N o
UNIX Mac
Printer Configuration
The MarkVision Quick Setup features let you configure multiple
printers simultaneously. Simply set up one printer, save the
settings into a file, and send that file to all the other printers you
want to update through MarkVision.
Remote Operator Panel
Using the Printer Utilities
Chapter 2: Using the Printer Utilities
36
The MarkVision remote operator panel provides an exact replica of
the selected printer operator panel. The menus and messages
appear just as they do on the printer display. You can then use the
operator panel buttons to step through the menus and change
printer settings. In addition, for Windows 95 and OS/2, a fullmenu display of the operator panel is available. It allows a
window-like graphical user interface.
Page 54

Status and Alerts
You can determine the current status for each printer and see a
graphic of the options installed on each printer. With this
information, you can then easily identify the printer best suited for
a particular print job.
Unlike other network printer management software, the
MarkVision alert-driven architecture lets you actively monitor the
status of multiple printers on a real-time basis without polling. If
an error occurs on a printer attached to your network, MarkVision
immediately provides a visual and audible alert without excess
network traffic.
Auto Driver Update
If you select the “Server” installation method when you run the
Windows 3.1, Windows 95, or Windows NT 4.0 setup utility,
MarkVision for Windows can compare the drivers on a local
workstation to those stored on the network. If the workstation
drivers are not as current as those available on the network, you
can have MarkVision automatically update the workstation
drivers.
Getting Started
Using the Printer Utilities
Toolkit
MarkVision for Windows 3.1 groups several resource management
tools in the printer Toolkit. Use the Toolkit to download fonts,
overlays, and forms to the printers, as well as manage the
resources once they are stored in flash memory or hard disk.
MarkVision for Windows 95, MarkVision for OS/2 Warp,
MarkVision for Macintosh, and MarkVision for UNIX Networks
offer the same tools, although they are not grouped in a “Toolkit”
form.
Chapter 2: Using the Printer Utilities
37
Page 55

Getting Started
Basic Resource Management
MarkVision provides a directory of all the fonts, overlays, and
forms stored in flash memory or hard disk. The directory also lists
the amount of available memory for each storage device. You can
then use MarkVision to delete, move, or copy files from one
storage device to another on the same printer.
Enhanced Resource Management
Use MarkVision to copy or move files stored on flash memory or
hard disk from one printer to another. MarkVision also lets you
recover or defragment space on flash memory after deleting files.
In addition, you can use MarkVision to password protect resources
on the storage devices.
Hard Disk Partitioning
Use MarkVision to designate a percentage of the optional hard
disk memory for job buffering to hard disk. You can then enable or
disable job buffering for parallel interface.
Using the Printer Utilities
Printer Inventory
MarkVision can collect information about the printers on your
network and print a report listing the printer models, serial
numbers, code versions, and installed options. The report can be
saved in two ways: comma delimited format or a MIF format.
Chapter 2: Using the Printer Utilities
38
Page 56

MIF File Creation from Printer Inventory
Data is stored in MarkVision in three ways: a print list, a comma
delimited format, or a MIF format. MIF and comma delimited are
the newest ways to store data.
Printer MIF lets you gather detailed information about each printer
on the network. For each printer you select, you create one .mif file.
The .mif files can be imported to use in various Network
Management Tools for creating reports, such as asset management.
The .mif file format is based on the standard layout approved by
the Desktop Management Task Force (DMTF).
Getting Started
Printer Inventory Summary Page
MarkVision collects information about the printers on your
network which includes the printer models, serial numbers, code
versions, and installed options. MarkVision lets you print a one
page summary report listing of all the items associated with a
printer for all the printers on a network.
Job Statistics
MarkVision can collect data about network printer activity,
including user names, job duration, printer capabilities used,
number of pages printed, and problems encountered.
Job Queue Management
Network administrators using MarkVision for Windows 3.1,
Windows 95, and Windows NT 4.0 can view, release, reorder, and
cancel print jobs in server queues.
Using the Printer Utilities
Chapter 2: Using the Printer Utilities
39
Page 57

Getting Started
Print Buffer Management
Network administrators using MarkVision for Windows 3.1,
Windows 95, Windows NT 4.0, MarkVision for OS/2 Warp, or
MarkVision for Macintosh can also view and cancel print jobs
already stored in the print buffer.
Drag-and-drop Printing
Users of MarkVision for Windows 3.1 can simply drag and drop
files they want to print onto the minimized MarkVision icon.
MarkVision automatically starts the application associated with
the file.
Dynamic Data Exchange (DDE)
Software developers writing DDE-enabled Windows applications
can use DDE as a means of accessing printer information from
MarkVision for Windows 3.1x. For example, Lexmark offers an
application that transmits printer status alerts through a wireless
messaging service to network administrators away from their
workstations.
Using the Printer Utilities
Security
MarkVision has access to the logon authority granted each LAN
user within the network operating system. MarkVision honors this
logon authority when granting access to MarkVision functions.
Dial Up Support (TCP/IP)
MarkVision for TCP/IP and MarkVision for UNIX Networks lets
you use SLIP or PPP protocols to view and control network
printers from a remote site.
Chapter 2: Using the Printer Utilities
40
Page 58

Media Type Control
MarkVision lets you manipulate media type names to allow for
personalized naming of media types. This is a separate function
from the operator panel Custom Type x name that allows for a
user-defined name.
Printer Password Access Security Control
MarkVision provides access to two new passwords in the printer.
The passwords help in network environments without built-in
security, such as TCP/IP. The network administrator assigns a
password to the printer to restrict users from printing or from
having MarkVision access. This new security function does not
override existing security functions on the network if they exist.
Uninstaller for MarkVision
Getting Started
Using the Printer Utilities
This function lets you remove MarkVision from your personal
computer if you need to do so.
Property Tag Support
MarkVision lets your company define valuable information about
the printer, such as, a unique name, the name of the person using
the printer, the printer location in a building, and so on. This
information is specified in the Property Tag field and the
information is stored in non-volatile random access memory
(NVRAM). The information is accessible when you request a
Printer Inventory through MarkVision.
Chapter 2: Using the Printer Utilities
41
Page 59

Getting Started
Menus (A New Remote Operator Panel)
MarkVision lets you view the menus and the menu items in a
different way from the printer operator panel. It brings up dialog
boxes for different menus. For instance, you may view all the
menu items for the Paper Menu on one screen. Click to select the
menu item you want. This selection method lets you set values for
menu items faster than using the printer operator panel.
This feature is only available in Windows 95, Windows NT 4.0,
and OS/2.
MarkVision Online Help
Context-sensitive online Help is available from all MarkVision
screens.
MarkVision for Windows 95 includes step-by-step procedures for
many MarkVision functions. To view these procedures, select
from the MarkVision
Topics
.
Printer Window
menu bar and click
Help
Help
MarkVision for OS/2 Warp and MarkVision for Macintosh also
offer task-oriented information. The online Help in MarkVision for
Using the Printer Utilities
Chapter 2: Using the Printer Utilities
42
Macintosh includes full-color illustrations.
Page 60

Toolkit
Getting Started
If you’re using DOS or OS/2 2.x, install the Toolkit when you run
the setup utility.
If you’re using Windows 3.1, the Toolkit is included as part of the
MarkVision utility. In MarkVision for Windows 95 and Windows
NT 4.0, Toolkit functions are grouped under the Resource
Management tab. MarkVision for OS/2 Warp, MarkVision for
Macintosh, and MarkVision for UNIX Networks also offer the
Toolkit functions, although they do not identify them as part of a
“Toolkit” utility.
There are some features of the DOS Toolkit that are not available in
the MarkVision utilities. If these features are useful in managing
your printers, you may want to install the DOS Toolkit on your
system.
The DOS Toolkit and OS/2 Toolkit let you:
• Format optional flash memory and hard disk
• Download PostScript emulation language programs and
PCL 5 macros
• Download PostScript Type 1 format and PCL 5 format
bitmapped and scalable fonts
• View, file, and send printer commands
The DOS Toolkit alone lets you:
• Download symbol sets
• Print the code point-to-character mapping for each
available symbol set
For more details about the Toolkit functions, refer to the README
file included with the utilities and to the online Help.
Using the Printer Utilities
Chapter 2: Using the Printer Utilities
43
Page 61

Getting Started
Network Printer Utility
For information on network adapters and the Network Printer
Utility, refer to the network adapter documentation and to the CD
online documentation.
Getting Updated Drivers and Utilities
There are a number of ways you can get information about the
latest Lexmark drivers and utilities. If you live outside the U.S. or
Canada, refer to the README files included with the DOS,
Windows 3.1, and OS/2 printer utilities for a listing of technical
support resources. MarkVision for Windows 95 and Windows NT
4.0 includes similar information in its online Help.
Online Services
If you have access to an online service, you can download printer
drivers from Lexmark 24 hours a day, 7 days a week. The
addresses are:
Using the Printer Utilities
Chapter 2: Using the Printer Utilities
44
• Internet server: ftp.lexmark.com
(driver files are located at /pub/driver)
• World Wide Web (WWW): http://www.lexmark.com
• CompuServe: go lexmark
Page 62

Automated FAX System
In the U.S. and Canada, you can get a list of available drivers by
dialing the Lexmark Automated Fax System. The system is
available 24 hours a day, 7 days a week.
To access the Automated Fax System from the U.S. or Canada, call
(606) 232-2380 from a touchtone phone and follow the voice
prompts. You can request information on how to use the system,
request a catalog of documents available, or choose a specific
document you want sent to you. The system prompts you for the
phone number of the fax machine that will receive the information
you requested.
Getting Started
Using the Printer Utilities
Chapter 2: Using the Printer Utilities
45
Page 63

Getting Started
Using the Printer Utilities
Chapter 2: Using the Printer Utilities
46
Page 64

Using Your
Printer
Page 65

Page 66

Using Your Printer
Using the Operator P anel and Menus
Chapter
This chapter contains information about using the printer operator
panel, changing printer settings, and understanding operator
panel menus.
You can change printer settings from your software application or
printer driver. Settings you change from the application or driver
apply only to the job you are preparing to send to the printer.
If there is a setting you cannot change from your application or
printer driver, use the operator panel menu or the remote operator
panel available from the MarkVision utility. See “Remote Operator
Panel” on page 36 for more information. Changing a printer
setting from the operator panel or from MarkVision makes that
setting the user default.
Note: Changes made to printer settings from a software
application override changes made from the operator panel.
If you are familiar with using an operator panel similar to this, you
may want to skip to “Overview of Printer Menus” on page 58.
3
Using the Operator Panel and
Menus
Chapter 3: Using the Operator Panel and Menus
49
Page 67

Using Your Printer
Using the Operator Panel
The operator panel, on the front right side of your printer, has a 2line by 16-character liquid crystal display (LCD), five buttons, and
one indicator light.
Operator Panel
Display
Menus
Using the Operator Panel and
Printer Indicator Light
Printer Indicator Light
The printer indicator light gives information about the status of
your printer.
Light State Meaning
On solid Powered On and in the
Blinking Powered On and
Off Unplugged from the power source
Menu
Menu
Select
Go
Busy
Stop
Ready
Return
state
Chapter 3: Using the Operator Panel and Menus
50
Page 68

Operator Panel Buttons
Use the five operator panel buttons to open a menu, scroll through
a list of values, change printer settings, and respond to printer
messages. The following table describes the functions of each
button.
If this User’s Guide is printed in a language other than English, an
operator panel overlay with translated buttons and light names is
included with your printer. See “Installing the Operator Panel
Overlay” on page 21 for more information.
Note: Buttons act upon the information that displays on the
second line of the operator panel.
Button Function
Go
Menu>
<Menu
Select
and
Press the Go button to:
• Return the printer to the
(
• Exit printer menus displayed on the operator panel.
• Clear operator panel error messages.
Note:
press Go before you send a job to print. The printer must display
jobs to print.
Each end of the button has a function. Press the
•At the
and enter the menus.
•At the
• When the printer is offline:
- Press
- Press
• For menu items that have numerical values, such as
hold
button when the number you want displays.
Press the
• Select the menu item shown on the second line of the display. Depending
on the type of menu, this action:
- Opens the menu and displays the first item in the menu.
- Opens the menu item and displays the default setting.
• Save the displayed menu item as the new default setting. The printer
displays the
message does not appear on the display).
Ready
If you’ve changed printer settings from the operator panel menus,
message, to take the printer
Ready
message, to take the printer to the
Busy
to go to the next item in the menus, or
Menu>
to go to the previous item in the menus.
<Menu
to scroll forward, or
Menu>
button to:
Select
message and then returns to the menu item.
Saved
Using Your Printer
state if the printer is in an offline situation
Ready
Menu>
offline
to scroll backward. Release the
<Menu
or
<Menu
(out of the
JOB MENU
Copies
Ready
button:
state
Ready
.
, press and
Using the Operator Panel and
Menus
for
)
Chapter 3: Using the Operator Panel and Menus
51
Page 69

Using Your Printer
Button Function
Return
Stop
Press the
Press the
•At the
and take the printer offline. The printer operator panel status message
changes to
Note: Press Go to return the printer to the
button to return to the previous menu level.
Return
button:
Stop
Ready, Busy
Not Ready
, or
Waiting
.
message to temporarily stop all activity
Ready
state.
Menus
Using the Operator Panel and
Chapter 3: Using the Operator Panel and Menus
52
Page 70

Printer Messages
The operator panel displays three types of messages:
• Status messages provide information about the current state
of the printer.
• Attendance messages indicate printer errors that you must
resolve.
• Service messages indicate printer failures that may require
servicing.
Using Your Printer
When the
receive a print job. While a job is prin
appears on the first line of the operator panel display. The
following screen is an example of an operator panel message:
The printer status appears on the first line of the display. The
second line displays messages that give more information about
printer status. The
(PCL 5 emulation) used for the print job. The
tells you that one of the print cartridges is low.
Attendance messages help you solve printer problems. For
example, if paper is jammed in the printer, the message
200 Paper Jam
This message tells you to open the printer top cover or to check the
paper sources for jammed paper.
Ready
status message displays, the printer is ready to
Busy PCL
Supplies
Busy
message identifies the printer language
appears on the display:
200 Paper Jam
t
ing, the
Busy
status message
Supplies
message
Using the Operator Panel and
Menus
Service messages notify you of printer failures that may require a
service call.
See “Understanding Printer Messages” on page 145 for a complete
listing of all the printer messages.
Chapter 3: Using the Operator Panel and Menus
53
Page 71

Menus
Using Your Printer
Operator Panel Menus
A number of menus are available to make it easy for you to change
printer settings. The diagram on page 58 shows the menus and all
of the menu items available in each menu. The items in each menu
and the values you can select are described in more detail in the
tables beginning on page 59.
Some menus appear only if a specific option is installed in the
printer. Other menu items may only be effective for a particular
printer language. You can select these values at any time, but they
only affect printer function when you use the specified printer
language.
An asterisk (*) next to a value indicates the factory default setting.
These settings are the original printer settings. (Factory defaults
may vary for different countries.) See
for more information.
When you select a new setting from the operator panel, the asterisk
moves next to the selected setting to identify it as the current user
default setting. These settings are active until new ones are stored or
the factory defaults are restored. See “Changing Printer Settings”
on page 56 for more information.
Factory Defaults
on page 75
Using the Operator Panel and
Note: Changes made from a software application or driver
override the user default settings made from the printer
operator panel.
Chapter 3: Using the Operator Panel and Menus
54
Page 72

Printing the Menu Settings Page
The menu settings page shows current settings for the menus and
a list of installed options. You can use this page to verify that the
printer options are properly installed and the printer settings are
set to what you want.
Note: Before printing the menu settings page, make sure the Paper
Type setting for the source is Plain Paper.
To print a menu settings page:
Using Your Printer
1 Make sure the printer is plugged in and the
message appears on the display.
See “Using the Operator Panel” on page 50 to identify the
display and operator panel buttons if you need help.
2 Press
Menu>
3 Continue to press and release
TESTS MENU.
4 Press
5 Press
Select
TESTS MENU
on the second line.
Select
The message
on the operator panel display until the page prints. The
printer returns to the
page prints.
If an error message appears, see “Understanding Printer
Messages” on page 145.
<Menu
or
.
appears on the first line and
to select
Printing Menu Settings
to enter the menus.
Menu>
Print Menus.
Ready
state after the menu settings
appears and remains
until you see
Ready
Print Menus
status
is
6 If you installed options, verify that they are listed on the
menu settings page under “Installed Features.”
Using the Operator Panel and
Menus
If an option you installed does not appear on the page,
unplug the power cord and reinstall the option.
Chapter 3: Using the Operator Panel and Menus
55
Page 73

Using Your Printer
Changing Printer Settings
You can use the operator panel to change printer settings and
customize your printer to meet your specific needs.
To select a new value as the default setting:
Menus
Using the Operator Panel and
1 From the
menus.
Ready
state, press
2 Continue to press and release
menu you need appears on the second line of the display.
See “Overview of Printer Menus” on page 58 for a list of
the menus and their menu items.
3 Press
4 Press
5 Press
Select
The menu opens and the first menu item in the menu
appears on the second line of the display.
Menu>
appears on the display.
Select
An asterisk (*) appears beside the current user default
setting for that menu item.
Some menu items have submenus. For example, if you
select
menu item, you must select another menu (such as
Type
PAPER MENU
) before the available values display.
.
or
.
<Menu
, and then select the
Menu>
Menu>
until the menu item you need
<Menu
or
<Menu
or
PAPER TYPE
to enter the
until the
Tr ay 1
A value can be:
A phrase or word that describes a setting.
•
A numerical value that you can increase or
•
decrease.
An On or Off setting.
•
Chapter 3: Using the Operator Panel and Menus
56
Page 74

Using Your Printer
6 Press
7 Press
8 Press
9 Press
User default settings remain in effect until you save new settings
or restore the factory defaults.
Note: Changes made from a software application override the
Menu>
on the second line of the display.
Select
An asterisk (*) appears beside the value to indicate that it is
now the user default setting. The display shows the new
setting for one second and then clears. The
displays, then the previous list of menu items appears on
the operator panel display.
Return
and set new default settings.
Go
to return to
setting you want to change.
user default settings made from the printer operator panel.
<Menu
or
.
to go back to previous menus or menu items
until the value you need appears
Ready
if this is the last printer
Disabling the Operator Panel Menus
Saved
message
Using the Operator Panel and
Menus
To disable the menus so that changes cannot be made to the printer
default settings:
1 Unplug the printer.
2 While pressing
Go
3 Release the buttons when
When the printer self test completes, the
message appears.
If you press
message displays.
To enable the menus, repeat the previous steps.
Menu>
Chapter 3: Using the Operator Panel and Menus
and
or
Stop
, plug in the printer.
Performing Self Test
Menus Disabled
<Menu
, the
Ready
displays.
status
57
Page 75

Using Your Printer
Overview of Printer Menus
SUPPLIES MENU
(page 59)
Color Cartridge
Black Cartridge
Photo Cartridge
COLOR MENU
(page 60)
Color Correctio n
Print Quality
PAPER MENU
(page 61)
Paper Source
PA P ER SI ZE
PAPER TYPE
CUSTOM TYPES
Substitute Size
FINISHING
MENU (page 68)
Copies
Blank Pages
Collation
Multipage Printing
Multipage Order
Multipage View
Multipage Border
TESTS MENU
(page 73)
Print Menus
Change Cartr id ge
Align Cartrid ges
Clean Heads
Print Fonts
Print Directory
Print Demo
Color Samples
Factory Defaults
Format Flash
Format Disk
Job Acct Stat
Hex Trace
Menus
Using the Operator Panel and
JOB MENU
(page 77)
Cancel Job
Reset Printer
Print Buffer
SERIAL MENU (page 95)
PCL SmartSwitch
PS SmartSwitch
NPA Mode
Serial Buffer
RS-232/RS-422
RS-422 Pola rity
Serial Protocol
Robust XON
Baud
Data Bits
Parity
Honor DSR
SETUP MENU
(page 78)
Printer Language
Resource Save
Download Target
Print Timeout
Wait Timeout
Auto Continue
Jam Recovery
Display Language
Job Buffer Size
Job Accounting
Job Acct Limit
PCL EMUL
MENU (page 85)
Font Source
Font Name
Point Size
Pitch
Symbol Set
Orientation
Lines per Page
A4 Width
Tray Renumber
Auto CR after LF
Auto LF after CR
NETWORK MENU (page 99)
PCL SmartSwitch
PS SmartSwitch
NPA Mode
Network Buffe r
NETWORK 1 SETUP
POSTSCRIPT MENU
(page 90)
Print PS Error
Font Prior ity
Image Smoothing
INFRARED MENU
(page 101)
Infrared Port
PCL SmartSwitch
PS SmartSwitch
NPA Mode
Infrared Buffer
Window Size
Transmit Delay
Max Baud Rate
PARALLEL MENU
(page 91)
STD PARALLEL
PARALLEL OPT 1
Each menu contains
the following items
as the valu e l is t:
PCL SmartSwitch
PS SmartSwitch
NPA Mode
Parallel Buffer
Job Buffering
Advanced Status
Protocol
Honor Init
Parallel Mode 1
Parallel Mode 2
LOCALTALK MENU
(page 104)
LocalTalk Port
PCL SmartSwitch
PS SmartSwitch
NPA Mode
LocalTalk Buffer
NPA Hosts
LocalTalk Name
LocalTalk Addr
LocalTalk Zone
Note: Menus or menu items in italics only appear on the
operator panel display if an option is installed. For all menus:
•Press
Menu>
or
to enter the menus and scroll
<Menu
through the options.
•Press
•Press
•Press Go to return to
to select a menu, menu item, or value.
Select
Return
to back up to the previous menu level.
.
Ready
Chapter 3: Using the Operator Panel and Menus
58
Page 76

Supplies Menu
Using Your Printer
The SUPPLIES MENU is accessible from the
message and the
Supplies
The
when at least one of the supply items listed in the following table is
low. When you select
that are low appear on the display as menu items.
Ready
message only appears on the printer operator panel
state.
SUPPLIES MENU
Supplies Menu Selections
Menu Item Values
Color Cartridge Low
Black Cartridge Low
Photo Cartridge Low
Busy/Waitin g
, only the supply items
display
Using the Operator Panel and
Menus
Chapter 3: Using the Operator Panel and Menus
59
Page 77

Menus
Using the Operator Panel and
Using Your Printer
Color Menu
Use the COLOR MENU to define all printer settings relating to
print color selection and quality.
Color Menu Selections
Menu Item Values and Functions of th e Menu Items
Color Correction RGB
CYMK
Black & White
Display
Viv id *
The
Color Correction
unique needs.
Select
RGB
and blue.
Select
CYMK
yellow, magenta, and black.
Select
Black & White
gray.
Select
Display
computer screen.
Select
Vivid
Print Quality Quick Print
Normal*
Presentation
1200 Image Q
The
Print Quality
cartridge makes while printing the page. The process of
multi-pass modes. In these modes, the print quality usually improves, but
the print speed declines.
* Factory default
if you want to print in colors using combinations of red, green,
if you want to print in colors using combinations of cyan,
if you want to print in colors that simulate the colors on your
if you want to print in colors that are bright and well saturated.
setting lets you adjust your print colors to meet
if you want to print in black, white, and shades of
setting determines the number of passes the print
shingling
is used for
Chapter 3: Using the Operator Panel and Menus
60
Page 78

Paper Menu
Use the PAPER MENU to define all settings relating to printer
input, as well as the specific print materials you are using with
your printer.
Paper Menu Selections
Menu Item Values and Functions of th e Menu Items
Paper Source Tray 1*
Tra y 2
Manual Paper
Manual Env
* Factory default
The
Paper Source
installed paper sources display.
is available only if the optional tray 2 is installed. Refer to the
Tray 2
documentation that comes with the tray 2 option for more information.
Use the
material through the manual feed slot.
Use the
the manual feed slot.
If you are using the same size and type of print material in tray 1 and the
optional tray 2, the trays are automatically linked. When one paper source
is empty, paper feeds from the other source. See “Tray Linking” on page 141
for more information.
Note:
page 121.
Manual Paper
Manual Env
For more information about Tray 1, see “Loading the Input Tray” on
setting identifies the default paper source. Only
selection when manually feeding a sheet of print
selection when manually feeding an envelope through
Using Your Printer
Using the Operator Panel and
Menus
Chapter 3: Using the Operator Panel and Menus
61
Page 79

Menus
Using the Operator Panel and
Using Your Printer
Paper Menu Selections (Continued)
Menu Item Values and Functions of th e Menu Items
PAPER SIZE • Tray 1 Size
- A4* (Country specific)
- Letter* (Country specific)
- Legal
- Executive
- B5
- A5
- A3
- 11x17
- Universal
- 7 3/4 Envelope
- 9 Envelope
- 10 Envelope
- DL Envelope
- C5 Envelope
- B5 Envelope
- Other Envelope
•Tray 2 Size
- A4* (Country specific)
- Letter* (Country specific)
- Legal
- Executive
- B5
- A5
- Universal
- 7 3/4 Envelope
- 9 Envelope
- 10 Envelope
- DL Envelope
- C5 Envelope
- B5 Envelope
- Other Envelope
* Factory default
Chapter 3: Using the Operator Panel and Menus
62
Page 80

Using Your Printer
Paper Menu Selections (Continued)
Menu Item Values and Functions of th e Menu Items
PAPER SIZE • Manual Pap Size
- A4* (Country specific)
- Letter* (Country specific)
- Legal
- Executive
- B5
- A5
- A3
- 11x17
- Universal
• Manual Env Size
- 7 3/4 Envelope
- 9 Envelope
- 10 Envelope
- DL Envelope
- C5 Envelope
- B5 Envelope
- Other Envelope
* Factory default
The
PAPER SIZE
paper source. See the tables beginning on page 119 for a list of the
dimensions for each paper and envelope size.
It is important to select the correct paper size from the menu when using
paper sources. The factory default is country specific.
Use the
of print material through the manual feed slot.
Use the
envelope through the manual feed slot.
Universal size refers to any size that is not considered a standard size.
Select
that doesn’t match any of the other available sizes. The printer automatically formats the page for the maximum possible page size. You can then
set the actual page size from your software.
Select
envelopes that do not match any of the other available sizes. The printer
automatically formats for the maximum possible envelope size. You can
then set the actual envelope size from your software.
Manual Pap Size
Manual Env Size
Universal
Other Envelope
setting identifies the default formatting size for each
selection when manually feeding a single sheet
selection when manually feeding a single
from the
from the
P APER SIZ E
menu when you load print material
PAPER SIZE
menu when you load
Using the Operator Panel and
Menus
Chapter 3: Using the Operator Panel and Menus
63
Page 81

Menus
Using the Operator Panel and
Using Your Printer
Paper Menu Selections (Continued)
Menu Item Values and Functions of th e Menu Items
PAPER TYPE • Tray 1 Type
- Plain Paper*
- Coated Paper
- Glossy Paper
- Photo Paper
- Greeting Card
- Card Stock
- Transparency
- Labels
- Iron On
- Bond
- Letterhead
- Preprinted
- Colored Paper
- Custom Type 1
- Custom Type 2
- Custom Type 3
•Tray 2 Type
- Plain Paper
- Coated Paper
- Glossy Paper
- Photo Paper
- Greeting Card
- Card Stock
- Transparency
- Labels
- Iron On
- Bond
- Letterhead
- Preprinted
- Colored Paper
- Custom Type 1
- Custom Type 2*
- Custom Type 3
* Factory default
Chapter 3: Using the Operator Panel and Menus
64
Page 82

Using Your Printer
Paper Menu Selections (Continued)
Menu Item Values and Functions of th e Menu Items
PAPER TYPE • Manual Pap Type
- Plain Paper*
- Coated Paper
- Glossy Paper
- Photo Paper
- Greeting Card
- Card Stock
- Transparency
- Labels
- Iron On
- Bond
- Letterhead
- Preprinted
- Colored Paper
- Custom Type 1
- Custom Type 2
- Custom Type 3
* Factory default
Using the Operator Panel and
Menus
Chapter 3: Using the Operator Panel and Menus
65
Page 83

Menus
Using the Operator Panel and
Using Your Printer
Paper Menu Selections (Continued)
Menu Item Values and Functions of th e Menu Items
PAPER TYPE • Manual Env Type
- Envelope*
- Custom Type 1
- Custom Type 2
- Custom Type 3
* Factory default
The
PAPER TYPE
installed in each paper source. This setting is used by the printer in the
following ways:
• Enables the printer to optimize print quality for the specified print
material.
• Enables you to select paper sources through your software application
by selecting only a type and size. A source selection is unnecessary.
• Enables the printer to automatically link paper sources. Any sources that
contain the same type and size of print material are automatically linked
by the printer.
Use the
of print material through the manual feed slot.
Use the
envelope through the manual feed slot.
Custom Type 1 - 3 refers to special types of print materials. You can change
the names through a utility, such as MarkVision. For more information on
setting the Custom Type names, see
If you are using different print material in the paper sources, each source
with a different print material must have the
value to disable the automatic linking feature. For example, if you have
plain paper, labels, and transparencies loaded in the printer, you need to set
the paper type for each source. Otherwise, if paper source becomes empty,
the printer selects print material from another source since the printer sees
the trays as linked. This might cause a one-page letter to print on a sheet of
labels or on a transparency.
Manual Pap Type
Manual Env Type
setting lets you specify the type of print material
selection when manually feeding a single sheet
selection when manually feeding a single
CUSTOM TYPES
PAPER TYPE
on page 67.
set to a unique
Chapter 3: Using the Operator Panel and Menus
66
Page 84

Using Your Printer
Paper Menu Selections (Continued)
Menu Item Values and Functions of th e Menu Items
CUSTOM TYPES Custom Type x (x represents a custom type from 1 to 3)
- Plain Paper*
- Coated Paper
- Glossy Paper
- Card Stock
- Transparency
- Labels
- Iron On
The
each of the Custom Types available in the
print material designation optimizes print quality settings when you select
print material from a source when the type is set to
user-defined name is available, this name displays instead of Custom Type
x, where x represents a number 1 through 3. The user-defined name is
truncated to 14 characters.
Substitute Size Off*
Letter/A4
11x1 7/ A3
All listed
Select
in the printer, if the requested size is not currently installed.
Select
in the printer, if the requested size is not currently installed.
Select
in the printer, if the requested size is not currently installed.
Note: When a size substitution is performed, the page image is
automatically clipped to fit on the substituted size, possibly resulting in
data loss.
* Factory default
CUSTOM TYPES
Letter/A4
11x17/A3
All listed
setting identifies the kind of print material used for
PAPER TYPE
to automatically print a letter or A4 job on any size paper
to automatically print an 11x17 or A3 job on any size paper
to automatically print any page-size job on any size paper
menu item. This
Custom Type x
Using the Operator Panel and
. If a
Menus
Chapter 3: Using the Operator Panel and Menus
67
Page 85

Menus
Using Your Printer
Finishing Menu
Use the FINISHING MENU to define all settings relating to printer
output.
Finishing Menu Selections
Menu Item Values and Functions of th e Menu Items
Copies 1 to 999 (1*)
The
The printer does not automatically collate the copies. For example, if you
send three pages to print and set
page 1, page 2, page 2, page 3, page 3.
For information about how to use the
setting set to On or set to
Blank Pages Do Not Print*
Print
Select
job.
Select
generated blank pages that appear in your document.
* Factory default
setting determines the number of copies printed for each page.
Copies
to 2, the printer prints page 1,
Copies
Copies
, see
Off
to include application-generated blank pages with your print
Print
Do Not Print
if you do not want the printer to print any application-
Collation
setting with the
on page 69.
Collation
Using the Operator Panel and
Chapter 3: Using the Operator Panel and Menus
68
Page 86

Using Your Printer
Finishing Menu Selections (Continued)
Menu Item Values and Functions of th e Menu Items
Collation Off*
On
* Factory default
When
Collation
number of times as specified by the
send a three-page job to print and set
page 1, page 2, page 2, page 3, page 3.
When
Collation
of times as specified in the
page job to print and set
page 3, page 1, page 2, page 3.
Many applications collate documents by repeatedly sending the file to the
printer. As a result, the printer must process each print job until the correct
number of copies has printed. This requires additional time since the
printer must process the same pages over again. By using
printer processes the file only once, saves this file in the printer memory,
and prints the multiple copies. This saves processing time for the printer
and for the application, and overall printing time may be reduced.
For collation to work effectively, your software application must recognize
this printer feature and not send the job to the printer multiple times. Your
application must also let you specify the number of copies needed or let
you use the printer default setting for
Collation
driver. For best results, select Collated in the print driver and set the number
of copies to one. In your application, select Uncollated (if the option is
available) and then select the number of copies you want.
If the job is complex or exceeds the memory capacity of your printer, you
may receive a
clear the message. The printer collates the remaining pages in the memory.
If you reset the printer, the printer stops printing the job.
is set to
is set to On, the printer prints each job again, the number
can be selected from the operator panel or from the printer
37 Insufficient Collation Memory
, the printer prints each page of a job the
Off
setting. For example, if you
Copies
to 2, the printer prints page 1,
.
Copies
message. Press
Collation
Copies
Copies
Copies
setting. For example, if you send a three-
to 2, the printer prints page 1, page 2,
Go
Using the Operator Panel and
, the
Menus
to
Chapter 3: Using the Operator Panel and Menus
69
Page 87

Using Your Printer
Finishing Menu Selections (Continued)
Menu Item Values and Functions of th e Menu Items
Multipage
Printing
* Factory default
Off*
2 Up
3 Up
4 Up
6 Up
9 Up
12 Up
16 Up
Use the
on a single page. For example, 2-Up means two page images are printed on
one page, 3-up means three page images are printed on one page, and so
forth. The printer uses the
Multipage Border
page images and whether a border is printed around each page image.
Note: Printer setting changes within a print job may affect the results you
get when using
Multipage Printing
settings to determine the order and orientation of the
Multipage Printing
(N-up) setting to print multiple page images
Multipage Order, Multipage View
.
and
Menus
Using the Operator Panel and
Chapter 3: Using the Operator Panel and Menus
70
Page 88

Using Your Printer
Finishing Menu Selections (Continued)
Menu Item Values and Functions of th e Menu Items
Multipage Order Horizontal*
Ve r t i c a l
Rev Horizontal (Reverse)
Rev Vertical (Reverse)
The
Multipage Order
images on pages printed using
four different orders. The positioning of page images depends on whether
they are sent to the printer as portrait or landscape images. The examples
below show the result of using each
print job:
setting determines the positioning of multiple page
Multipage Printing
Multipage Order
. You may choose one of
setting on a 4-up
Using the Operator Panel and
* Factory default
Horizontal
Portrait Landscape
Page 1
Page 3 Page 4
Page 2
Page 4 Page 3
Page 2
Reverse Horizontal
Portrait Landscape
Page 1
Page 1 Page 2
Page 2 Page 1
Page 4Page 3
Page 3Page 4
Vertical
Portrait Landscape
Page 1
Page 2 Page 4
Page 3
Page 4 Page 2
Page 3
Reverse Vertical
Portrait Landscape
Page 1
Page 1 Page 3
Page 3 Page 1
Page 4Page 2
Page 2Page 4
Menus
Chapter 3: Using the Operator Panel and Menus
71
Page 89

Menus
Using Your Printer
Finishing Menu Selections (Continued)
Menu Item Values and Functions of th e Menu Items
Multipage View Auto*
Long Edge
Short Edge
Use the
with respect to the page images during
The
Auto
landscape positioning.
The
Long Edge
long edge is the top of the page.
The
Short Edge
the short edge is the top of the page.
Note: For PostScript emulation jobs, the
orientation.
Multipage Border None*
Solid
Use the
around each page image during
* Factory default
Multipage View
setting allows the printer to choose between portrait and
setting positions the printed page for reading assuming the
setting positions the printed page for reading assuming
Multipage Border
setting to select the orientation of the printed page
Multipage Printing
setting is always in Portrait
Auto
setting to specify whether a border is printed
Multipage Printing
.
.
Using the Operator Panel and
Chapter 3: Using the Operator Panel and Menus
72
Page 90

Using Your Printer
Tests Menu
Use the TESTS MENU to print a variety of listings relating to
available printer resources, printer settings, and print jobs.
Additional menu items let you set up printer hardware and
troubleshoot printer problems.
Tests Menu Selections
Menu Item Values and Functions of th e Menu Items
Print Menus Press
A list of the user default settings, the installed options, and the amount of
printer memory available prints. This list also shows you the order of menu
items.
Change Cartridge LEFT CART TYPE (This menu item is automatic. Press
of the following three sub-menus.)
- Not Changed
- Black Cartridge
•New Standard
• Old Standard
•New Hi Capacity
•Old Hi Capacity
- Photo Cartridge
•New Standard
• Old Standard
•New Hi Capacity
•Old Hi Capacity
RIGHT CART TYPE (This menu item is automatic. Press
one of the following two sub-menus.)
- Not Changed
- Color Cartridge
•New Standard
• Old Standard
•New Hi Capacity
•Old Hi Capacity
Select
install a new one. You can select the type of cartridge you are installing. For
more information, see “Installing the Print Cartridges” on page 15.
* Factory default
to print the menu settings page.
Select
Change Cartridge
when you need to change a print cartridge or
Select
Select
Using the Operator Panel and
to choose one
Menus
to choose
Chapter 3: Using the Operator Panel and Menus
73
Page 91

Menus
Using the Operator Panel and
Using Your Printer
Tests Menu Selections (Continued)
Menu Item Values and Functions of th e Menu Items
Align Cartridges Press
From the
alignment values. For more information, see “Aligning the Print
Cartridges” on page 19.
Clean Heads Yes
No
Select
printheads test page.
Select No to return to the previous TESTS MENU item.
For more information, see “Cleaning the Printheads” on page 193.
Print Fonts PCL Fonts
PS 2 Fonts
Press
available in the selected printer language. For more information, see
“Printing a Font Sample List” on page 263.
Print Directory Press
hard disk option.
The
Print Directory
options is installed and formatted.
Print Demo Demo Page (resident demonstration page)
List of other demo files on flash or disk.
Select
Select
Press
printer.
Color Samples Print the Color Sample test pages to use as a reference to select colors for
applications. All of the following default values appear on the test pages:
• Print Quality (Normal)
• Color Screen (Stochastic)
• Color Correction (Vivid)
• Resolution (600 dpi)
RGB and CYMK percentages are printed on the pages for easy reference.
* Factory default
to print the cartridge alignment test page.
Select
Align Cartridges
to perform the cleaning cycle on the printheads and print a
Yes
to print a font sample that shows all the fonts currently
Select
to print a list of all the resources stored in flash memory or
Select
Print Demo
Demo Page
Menu>
to see a list of the demo files stored in your printer.
to print the standard demonstration page.
to scroll through the list of other demo pages stored in your
menu, you can set the proper print cartridge
Cleaning Heads
menu item is available only if at least one of the
appears on the display.
Chapter 3: Using the Operator Panel and Menus
74
Page 92

Using Your Printer
Tests Menu Selections (Continued)
Menu Item Values and Functions of th e Menu Items
Factory Defaults Restore
Do Not Restore
If you choose
• All downloaded resources (fonts, macros, symbol sets) in printer
• All menu settings are returned to the factory default values except:
Format Flash Yes
No
Formatting the flash memory option deletes all resources (fonts, macros,
symbol sets) stored in flash memory and prepares the flash memory card to
receive new resources.
The
option is not defective or Read/Write or Write protected.
Flash
and write operations. See
mation.
Warning: If you select
flash memory is lost. Do not turn off the printer when the flash is formatting.
Format Disk Yes
No
Formatting the hard disk option deletes all resources stored on the hard
disk and prepares it to receive new resources.
The
is not defective or Read/Write or Write protected.
display when the printer is plugged in, or during disk format and write
operations. See
Format Disk
Warning: If you select
the hard disk option is lost. Do not turn off the printer when the hard disk is
formatting.
* Factory default
Restore
memory (RAM) are deleted. (Resources residing in the flash memory
option or on the hard disk option are unaffected.)
-
Display Language
display language
- All settings in the PARALLEL MENU, SERIAL MENU, NETWORK
MENU, INFRARED MENU, and LOCALTALK MENU.
Format Flash
may display when the printer is plugged in, or during flash format
Format Disk
does not display if Job Buffer Size is set to 100%.
:
(SETUP MENU) which is the operator panel
menu item only displays if the installed flash memory
51 Defective Flash
Format Flash
menu item only displays if the installed hard disk option
61 Defective Disk
Format Disk
and then press
on page 157 for more information.
and then press Go, any data stored on
on page 155 for more infor-
61 Defective Disk
51 Defective
any data stored in
Go,
Using the Operator Panel and
Menus
may
Chapter 3: Using the Operator Panel and Menus
75
Page 93

Menus
Using the Operator Panel and
Using Your Printer
Tests Menu Selections (Continued)
Menu Item Values and Functions of th e Menu Items
Job Acct Stat Print
Clear
The
installed in your printer and is not defective or Read/Write or Write
protected.
Select
recent print jobs. (The number of jobs is determined by the value of the
Acct Limit
the job printed with or without errors, the time required to print the job, the
size (in bytes) of the job, the requested paper size and paper type, the total
number of printed pages, and the number of copies requested.
Select
option.
completes. For more information, see
page 146.
Hex Trace Press
Hex Trace
selected, all data sent to the printer is printed in hexadecimal and character
representation. Control codes are not executed.
To e xit
Menu>
Reset Printer
Press
* Factory default
Job Acct Stat
Print
menu item in the SETUP MENU.) The statistics include whether
Clear
Clearing Job Accounting Stat
Select
helps isolate the source of a print job problem. With Hex Trace
Hex Trace
or
<Menu
Select
menu item only displays if a hard disk option is
to print a list of statistics for a defined number of the most
to delete all accumulated job statistics from the hard disk
displays until the process
Clearing Job Accounting Stat
to enter Hex Trace mode.
, reset or unplug the printer. To reset the printer, press
. The
Job Menu
appears on the second line of the operator panel display.
.
displays. Press
Menu>
or
<Menu
Job
on
until
Chapter 3: Using the Operator Panel and Menus
76
Page 94

Job Menu
JOB MENU is only available when the printer is busy processing
or printing a job, when a printer message displays, or when the
printer is in Hex Trace mode. Press Menu< or >Menu to open the
JOB MENU.
Job Menu Selections
Menu Item Values and Functions of th e Menu Items
Cancel Job Press
Cancel Job
Reset Printer Press
When you select
for each menu item. All downloaded resources (fonts, macros, symbol sets)
in printer memory (RAM) are deleted. All data on the currently selected
host interface is deleted from the interface link buffer.
Note:
using.
Print Buffer Press
Print Buffer
Waiting
sent to the printer or if an ASCII job is being printed. Examples include
sending a print screen command from your host computer or copying a
DOS file.
* Factory default
to cancel the current print job.
Select
displays only when the printer is processing a print job.
to reset the printer.
Select
Reset Printer
Before selecting
to print any data stored in the print buffer.
Select
is only available when you enter the JOB MENU while the
message displays. The Waiting state occurs if an incomplete job is
Reset Printer
, the printer resets to the user default setting
, exit the software application you are
Using Your Printer
Using the Operator Panel and
Menus
Chapter 3: Using the Operator Panel and Menus
77
Page 95

Menus
Using the Operator Panel and
Using Your Printer
Setup Menu
Use the SETUP MENU to configure a variety of printer features.
Setup Menu Selections
Menu Item Values and Functions of th e Menu Items
Printer Language PCL Emulation
PS 2 Emulation*
The printer language defines how the computer communicates with the
printer. Your computer uses printer languages, such as PCL 5 emulation
and PostScript Level 2 emulation, to send print data to the printer. Setting a
printer language as the default does not prevent the software application
from sending print jobs that use the other printer language.
Resource Save Off*
On
* Factory default
The
Resource Save
downloaded resources if it receives a job that requires more memory than is
available.
If
Resource Save
downloaded resources, such as fonts and macros, for all printer languages
during language changes and printer resets. If the printer runs out of
memory,
If
resources only until memory is needed. Then it deletes those resources
stored for the inactive printer language.
38 Memory Full
Resource Save
setting determines what the printer does with
is set to On, the printer retains all permanent
appears on the display.
is set to
, the printer retains permanent downloaded
Off
Chapter 3: Using the Operator Panel and Menus
78
Page 96

Using Your Printer
Setup Menu Selections (Continued)
Menu Item Values and Functions of th e Menu Items
Download Target RAM*
Flash
Disk
The
Download Target
downloaded resources, such as fonts and macros.
Storing downloaded resources in flash memory or hard disk is permanent
storage rather than the temporary storage that RAM provides. You can add
resources to flash memory or to the hard disk until the option is full. Use
your software application or the printer Toolkit to download resources to
the printer.
The
Download Target
memory option or hard disk option is installed in the printer and is not
defective or Read/Write or Write protected.
Defective Disk
format and write operations. See
Defective Disk
does not display for
Disk
100%.
If neither option is installed,
downloaded resources are automatically stored in printer memory (
Print Timeout Disabled
1 to 255 (90*)
The
Print Timeout
waits before printing the last page of a print job that does not end with a
command to print the page. The print timeout counter does not start until
the
Waiting
When a print timeout occurs, the printer stores the page in the print buffer
and prints the page.
Select
Disabled
the printer does not print the last page of a print job until one of the
following occurs:
• The printer receives enough information to fill the page.
• The printer receives a Form Feed command.
• You select
information.
* Factory default
message displays.
Print Buffer
menu item specifies the storage location for
menu item only displays if a formatted flash
51 Defective Flash
may display when the printer is plugged in, or during
51 Defective Flash
on page 157 for more information.
Download Target
Download Target
setting determines the time (in seconds) the printer
to turn
Print Timeout
from the
JOB MENU
if
Job Buffer Size
does not display and all
off. When Print Timeout is disabled,
. See page 77 for more
or
on page 155 or
is set to
61
61
RAM
Using the Operator Panel and
Menus
).
Chapter 3: Using the Operator Panel and Menus
79
Page 97

Using Your Printer
Setup Menu Selections (Continued)
Menu Item Values and Functions of th e Menu Items
Wait Timeout Disabled
15 ... 65535 (40*)
* Factory default
The
Wait Timeout
printer waits to receive additional bytes of data from the computer. When
this timeout expires, the print job is canceled.
Select
Disabled
Wait Timeout is only available when using PostScript Level 2 emulation.
The setting has no effect on PCL 5 emulation print jobs.
setting determines the amount of time (in seconds) the
to turn
Wait Timeout
off.
Menus
Using the Operator Panel and
Chapter 3: Using the Operator Panel and Menus
80
Page 98

Using Your Printer
Setup Menu Selections (Continued)
Menu Item Values and Functions of th e Menu Items
Auto Continue Disabled*
5 ... 255
* Factory default
Set
Auto Continue
printer continue printing after it detects one of the following errors:
30 Black Ink Cart Missing
30 Color Ink Cart Missing
30 Photo Ink Cart Missing
35 Res Save Off Deficient Memory
37 Insufficient Collation Memory
38 Memory Full
51 Defective Flash
52 Flash Full
53 Unformatted Flash
54 Serial Option 1 Error
54 Parallel Error
56 Serial 1 Port Disabled
56 Parallel Port Disabled
61 Defective Disk
62 Disk Full
63 Unformatted Disk
88 Black Ink Low
88 Color Ink Low
88 Photo Ink Low
Print Jobs on Disk?
If one of these errors occurs and
printer stops and waits for operator intervention. When
set to a numerical value, the printer waits for the specified length of time
and then automatically resumes processing.
This setting is also used as a timer. After an inactive period in the menus,
the printer automatically exits the menus and returns to the
to a value between 5 and 255 seconds to have the
Auto Continue
is set to
Ready
, the
state.
Disabled
Auto Continue
Using the Operator Panel and
Menus
is
Chapter 3: Using the Operator Panel and Menus
81
Page 99

Menus
Using the Operator Panel and
Using Your Printer
Setup Menu Selections (Continued)
Menu Item Values and Functions of th e Menu Items
Jam Recovery On
Off
Auto*
Display Language
(Default set by
country)
* Factory default
When
Jam Recovery
has jammed.
When
Jam Recovery
page until the printer signals that the page has successfully exited the
printer. The printer reprints all jammed pages.
If
Jam Recovery
the page unless the memory required to hold the page is needed for other
printer tasks.
English
French
German
Italian
Spanish
Danish
Norwegian
Dutch
Swedish
Portuguese
Finnish
The
Display Language
appears on the operator panel display.
is set to
is set to On, the printer keeps the image for a printed
is set to
Auto
setting determines the language of the text that
, the printer does not reprint a page that
Off
, the printer keeps the image and reprints
Chapter 3: Using the Operator Panel and Menus
82
Page 100

Using Your Printer
Setup Menu Selections (Continued)
Menu Item Values and Functions of th e Menu Items
Job Buffer Size Disabled*
10 ... 100%
If you have a hard disk option installed in your printer, you can allocate a
portion of the available hard disk space for processing print jobs. The job is
temporarily stored on the hard disk before being printed, usually freeing
the host computer while the job prints.
* Factory default
The
Job Buffer Size
space allocated to job buffering for all ports that have job buffering set to
. You can choose any 1% increment between
On
select a
item On in the
The
option is formatted and is not defective or Read/Write or Write protected.
61 Defective Disk
disk format and write operations. See
more information.
Warning: If you change the job buffer size, the printer formats the hard
disk option, and all stored resources (such as fonts and macros) are deleted.
Job Buffering Size
Job Buffer Size
menu item lets you select the amount of hard disk
and
10%
before you can set the
Parallel Menu
menu item only displays if the installed hard disk
may display when the printer is plugged in, or during
.
61 Defective Disk
Job Buffering
. You must
100%
menu
on page 157 for
Using the Operator Panel and
Menus
Chapter 3: Using the Operator Panel and Menus
83
 Loading...