

Page 1

Page 2

First Edition (September 1999)
The following paragraph does not apply to any country where such provisions are inconsistent with local law: LEXMARK INTERNATIONAL, INC.
PROVIDES THIS PUBLICATION “AS IS” WITHOUT WARRANTY OF ANY KIND, EITHER EXPRESS OR IMPLIED, INCLUDING, BUT NOT
LIMITED TO, THE IMPLIED WARRANTIES OF MERCHANTABILITY OR FITNESS FOR A PARTICULAR PURPOSE. Some states do not allow
disclaimer of express or implied warranties in certain transactions; therefore, this statement may not apply to you.
This publication could include technical inaccuracies or typographical errors. Changes are periodically made to the information herein; these changes
will be incorporated in later editions. Improvements or changes in the products or the programs described may be made at any time.
A form for reader’s comments is provided at the back of this publication. If the form has been removed, comments may be addressed to Lexmark
International, Inc., Department F95/035-3, 740 West New Circle Road, Lexington, Kentucky 40550, U.S.A. In the United Kingdom and Eire, send to
Lexmark International Ltd., Marketing and Services Department, Westhorpe House, Westhorpe, Marlow Bucks SL7 3RQ. Lexmark may use or distribute
any of the information you supply in any way it believes appropriate without incurring any obligation to you. You can purchase additional copies of
publications related to this product by calling 1-800-553-9727. In the United Kingdom and Eire, call 0628-481500. In other countries, contact your point of
purchase.
References in this publication to products, programs, or services do not imply that the manufacturer intends to make these available in all countries in
which it operates. Any reference to a product, program, or service is not intended to state or imply that only that product, program, or service may be
used. Any functionally equivalent product, program, or service that does not infringe any existing intellectual property right may be used instead.
Evaluation and verification of operation in conjunction with other products, programs, or services, except those expressly designated by the
manufacturer, are the user’s responsibility.
© Copyright Lexmark International, Inc. 1999.
All rights reserved.
UNITED STATES GOVERNMENT RESTRICTED RIGHTS
This software and documentation are provided with RESTRICTED RIGHTS. Use, duplication or disclosure by the Government is subject to restrictions
as set forth in subparagraph (c)(1)(ii) of the Rights in Technical Data and Computer Software clause at DFARS 252.227-7013 and in applicable FAR
provisions: Lexmark International, Inc., Lexington, KY 40550.
Page 3

Table of
contents
Using your documentation . . . . . . . . . . . . . . . . . . . . ix
About the manuals . . . . . . . . . . . . . . . . . . . . . . . . . . . . . . . . . . . . . . . . . . . . . . ix
Conventions . . . . . . . . . . . . . . . . . . . . . . . . . . . . . . . . . . . . . . . . . . . . . . . . . . x
Other sources of information . . . . . . . . . . . . . . . . . . . . . . . . . . . . . . . . . . . . . xi
Online documents . . . . . . . . . . . . . . . . . . . . . . . . . . . . . . . . . . . . . . . . . . . . xi
Lexmark Web site . . . . . . . . . . . . . . . . . . . . . . . . . . . . . . . . . . . . . . . . . . . . xii
Automated fax system . . . . . . . . . . . . . . . . . . . . . . . . . . . . . . . . . . . . . . . . xii
Trademarks . . . . . . . . . . . . . . . . . . . . . . . . . . . . . . . . xiii
1 Introducing your printer . . . . . . . . . . . . . . . . . . . . 1
Print speed . . . . . . . . . . . . . . . . . . . . . . . . . . . . . . . . . . . . . . . . . . . . . . . . . . . . . . 2
Memory . . . . . . . . . . . . . . . . . . . . . . . . . . . . . . . . . . . . . . . . . . . . . . . . . . . . . . . . 2
Color quality . . . . . . . . . . . . . . . . . . . . . . . . . . . . . . . . . . . . . . . . . . . . . . . . . . . . 2
Printer drivers . . . . . . . . . . . . . . . . . . . . . . . . . . . . . . . . . . . . . . . . . . . . . . . . . . . 3
MarkVision . . . . . . . . . . . . . . . . . . . . . . . . . . . . . . . . . . . . . . . . . . . . . . . . . . . . . 3
Paper handling . . . . . . . . . . . . . . . . . . . . . . . . . . . . . . . . . . . . . . . . . . . . . . . . . . 3
2 Using printer drivers . . . . . . . . . . . . . . . . . . . . . . . 5
3 Changing printer settings . . . . . . . . . . . . . . . . . . . 7
Using the operator panel . . . . . . . . . . . . . . . . . . . . . . . . . . . . . . . . . . . . . . . . . . 8
Table of contents
iii
Page 4

MarkVision’s remote operator panel . . . . . . . . . . . . . . . . . . . . . . . . . . . . . 9
Menus . . . . . . . . . . . . . . . . . . . . . . . . . . . . . . . . . . . . . . . . . . . . . . . . . . . . . . . . . 10
Printing current menu settings . . . . . . . . . . . . . . . . . . . . . . . . . . . . . . . . . 10
Changing menu settings . . . . . . . . . . . . . . . . . . . . . . . . . . . . . . . . . . . . . . 12
Locking the menus . . . . . . . . . . . . . . . . . . . . . . . . . . . . . . . . . . . . . . . . . . . 14
Fax Status Messages . . . . . . . . . . . . . . . . . . . . . . . . . . . . . . . . . . . . . . . . . . 15
Menu overview . . . . . . . . . . . . . . . . . . . . . . . . . . . . . . . . . . . . . . . . . . . . . . 16
Supplies Menu . . . . . . . . . . . . . . . . . . . . . . . . . . . . . . . . . . . . . . . . . . . . . . . 17
Color Menu . . . . . . . . . . . . . . . . . . . . . . . . . . . . . . . . . . . . . . . . . . . . . . . . . 19
Paper Menu . . . . . . . . . . . . . . . . . . . . . . . . . . . . . . . . . . . . . . . . . . . . . . . . . 20
Finishing Menu . . . . . . . . . . . . . . . . . . . . . . . . . . . . . . . . . . . . . . . . . . . . . . 27
Utilities Menu . . . . . . . . . . . . . . . . . . . . . . . . . . . . . . . . . . . . . . . . . . . . . . . 32
Job Menu . . . . . . . . . . . . . . . . . . . . . . . . . . . . . . . . . . . . . . . . . . . . . . . . . . . 35
Setup Menu . . . . . . . . . . . . . . . . . . . . . . . . . . . . . . . . . . . . . . . . . . . . . . . . . 38
PCL Emul Menu . . . . . . . . . . . . . . . . . . . . . . . . . . . . . . . . . . . . . . . . . . . . . 44
PostScript Menu . . . . . . . . . . . . . . . . . . . . . . . . . . . . . . . . . . . . . . . . . . . . . 48
Parallel Menu . . . . . . . . . . . . . . . . . . . . . . . . . . . . . . . . . . . . . . . . . . . . . . . . 49
Serial Menu . . . . . . . . . . . . . . . . . . . . . . . . . . . . . . . . . . . . . . . . . . . . . . . . . 52
Network Menu . . . . . . . . . . . . . . . . . . . . . . . . . . . . . . . . . . . . . . . . . . . . . . 56
Infrared Menu . . . . . . . . . . . . . . . . . . . . . . . . . . . . . . . . . . . . . . . . . . . . . . . 59
LocalTalk Menu . . . . . . . . . . . . . . . . . . . . . . . . . . . . . . . . . . . . . . . . . . . . . . 62
USB Menu . . . . . . . . . . . . . . . . . . . . . . . . . . . . . . . . . . . . . . . . . . . . . . . . . . 65
Fax Menu . . . . . . . . . . . . . . . . . . . . . . . . . . . . . . . . . . . . . . . . . . . . . . . . . . . 67
iv
Using color . . . . . . . . . . . . . . . . . . . . . . . . . . . . . . . 75
4
Understanding color . . . . . . . . . . . . . . . . . . . . . . . . . . . . . . . . . . . . . . . . . . . . . 75
Types of color . . . . . . . . . . . . . . . . . . . . . . . . . . . . . . . . . . . . . . . . . . . . . . . 75
How we see color . . . . . . . . . . . . . . . . . . . . . . . . . . . . . . . . . . . . . . . . . . . . 76
Primary colors . . . . . . . . . . . . . . . . . . . . . . . . . . . . . . . . . . . . . . . . . . . . . . . 76
Color difference . . . . . . . . . . . . . . . . . . . . . . . . . . . . . . . . . . . . . . . . . . . . . . 77
Managing color . . . . . . . . . . . . . . . . . . . . . . . . . . . . . . . . . . . . . . . . . . . . . . . . . 78
Color management systems . . . . . . . . . . . . . . . . . . . . . . . . . . . . . . . . . . . 78
Popular color management systems . . . . . . . . . . . . . . . . . . . . . . . . . . . . 79
Controlling your printer . . . . . . . . . . . . . . . . . . . . . . . . . . . . . . . . . . . . . . . . . 80
Screening methods . . . . . . . . . . . . . . . . . . . . . . . . . . . . . . . . . . . . . . . . . . . 80
Halftone screens . . . . . . . . . . . . . . . . . . . . . . . . . . . . . . . . . . . . . . . . . . . . . 82
Attributes . . . . . . . . . . . . . . . . . . . . . . . . . . . . . . . . . . . . . . . . . . . . . . . . . . . 82
Table of contents
Page 5

Screen frequency . . . . . . . . . . . . . . . . . . . . . . . . . . . . . . . . . . . . . . . . . . . . . 82
Screen angle . . . . . . . . . . . . . . . . . . . . . . . . . . . . . . . . . . . . . . . . . . . . . . . . . 83
Spot function . . . . . . . . . . . . . . . . . . . . . . . . . . . . . . . . . . . . . . . . . . . . . . . . 83
Image Smoothing . . . . . . . . . . . . . . . . . . . . . . . . . . . . . . . . . . . . . . . . . . . . 83
Printing text . . . . . . . . . . . . . . . . . . . . . . . . . . . . . . . . . . . . . . . . . . . . . . . . . 83
Color Correction . . . . . . . . . . . . . . . . . . . . . . . . . . . . . . . . . . . . . . . . . . . . . . . . 84
Auto . . . . . . . . . . . . . . . . . . . . . . . . . . . . . . . . . . . . . . . . . . . . . . . . . . . . . . . 84
Vivid . . . . . . . . . . . . . . . . . . . . . . . . . . . . . . . . . . . . . . . . . . . . . . . . . . . . . . . 84
Off . . . . . . . . . . . . . . . . . . . . . . . . . . . . . . . . . . . . . . . . . . . . . . . . . . . . . . . . . 84
CMYK . . . . . . . . . . . . . . . . . . . . . . . . . . . . . . . . . . . . . . . . . . . . . . . . . . . . . . 85
Black and White . . . . . . . . . . . . . . . . . . . . . . . . . . . . . . . . . . . . . . . . . . . . . 85
Display . . . . . . . . . . . . . . . . . . . . . . . . . . . . . . . . . . . . . . . . . . . . . . . . . . . . . 85
2-Color Draft . . . . . . . . . . . . . . . . . . . . . . . . . . . . . . . . . . . . . . . . . . . . . . . . 86
Avoiding print quality problems . . . . . . . . . . . . . . . . . . . . . . . . . . . . . . . . . . 86
Media and supplies . . . . . . . . . . . . . . . . . . . . . . . . . . . . . . . . . . . . . . . . . . . 86
Transparencies . . . . . . . . . . . . . . . . . . . . . . . . . . . . . . . . . . . . . . . . . . . . . . . 86
Printer drivers . . . . . . . . . . . . . . . . . . . . . . . . . . . . . . . . . . . . . . . . . . . . . . . 87
Managing memory . . . . . . . . . . . . . . . . . . . . . . . . 89
5
Printer memory . . . . . . . . . . . . . . . . . . . . . . . . . . . . . . . . . . . . . . . . . . . . . . . . . 89
Adding memory . . . . . . . . . . . . . . . . . . . . . . . . . . . . . . . . . . . . . . . . . . . . . . . . 90
Solving memory problems . . . . . . . . . . . . . . . . . . . . . . . . . . . . . . . . . . . . 90
Allocating memory . . . . . . . . . . . . . . . . . . . . . . . . . . . . . . . . . . . . . . . . . . . 91
Flash memory . . . . . . . . . . . . . . . . . . . . . . . . . . . . . . . . . . . . . . . . . . . . . . . . . . 92
Hard disk . . . . . . . . . . . . . . . . . . . . . . . . . . . . . . . . . . . . . . . . . . . . . . . . . . . . . . 92
Job buffering . . . . . . . . . . . . . . . . . . . . . . . . . . . . . . . . . . . . . . . . . . . . . . . . 92
Collating jobs . . . . . . . . . . . . . . . . . . . . . . . . . . . . . . . . . . . . . . . . . . . . . . . . 92
Storing job statistics . . . . . . . . . . . . . . . . . . . . . . . . . . . . . . . . . . . . . . . . . . 93
Managing resources downloaded to flash or disk . . . . . . . . . . . . . . . . . . . . 93
Handling paper . . . . . . . . . . . . . . . . . . . . . . . . . . . 95
6
Paper sources and output bins . . . . . . . . . . . . . . . . . . . . . . . . . . . . . . . . . . . . 95
Paper sizes . . . . . . . . . . . . . . . . . . . . . . . . . . . . . . . . . . . . . . . . . . . . . . . . . . . . . 96
Media guidelines . . . . . . . . . . . . . . . . . . . . . . . . . . . . . . . . . . . . . . . . . . . . . . . . 98
Paper . . . . . . . . . . . . . . . . . . . . . . . . . . . . . . . . . . . . . . . . . . . . . . . . . . . . . . . 98
Letterhead . . . . . . . . . . . . . . . . . . . . . . . . . . . . . . . . . . . . . . . . . . . . . . . . . . 99
Table of contents
v
Page 6

Transparencies . . . . . . . . . . . . . . . . . . . . . . . . . . . . . . . . . . . . . . . . . . . . . . 100
Envelopes . . . . . . . . . . . . . . . . . . . . . . . . . . . . . . . . . . . . . . . . . . . . . . . . . . 102
Labels . . . . . . . . . . . . . . . . . . . . . . . . . . . . . . . . . . . . . . . . . . . . . . . . . . . . . 103
Card stock . . . . . . . . . . . . . . . . . . . . . . . . . . . . . . . . . . . . . . . . . . . . . . . . . 103
Storing media . . . . . . . . . . . . . . . . . . . . . . . . . . . . . . . . . . . . . . . . . . . . . . . . . . 104
Avoiding paper jams . . . . . . . . . . . . . . . . . . . . . . . . . . . . . . . . . . . . . . . . . . . 104
Loading paper in the trays . . . . . . . . . . . . . . . . . . . . . . . . . . . . . . . . . . . . . . . 105
Tray linking . . . . . . . . . . . . . . . . . . . . . . . . . . . . . . . . . . . . . . . . . . . . . . . . . . . 109
Using the multipurpose feeder . . . . . . . . . . . . . . . . . . . . . . . . . . . . . . . . . . . 110
Printing from the multipurpose feeder . . . . . . . . . . . . . . . . . . . . . . . . . 111
Replacing supplies . . . . . . . . . . . . . . . . . . . . . . . 113
7
Ordering supplies . . . . . . . . . . . . . . . . . . . . . . . . . . . . . . . . . . . . . . . . . . . . . . 113
Storing supplies . . . . . . . . . . . . . . . . . . . . . . . . . . . . . . . . . . . . . . . . . . . . . . . . 115
When to replace supplies . . . . . . . . . . . . . . . . . . . . . . . . . . . . . . . . . . . . . . . . 116
Print cartridges . . . . . . . . . . . . . . . . . . . . . . . . . . . . . . . . . . . . . . . . . . . . . 117
Coating roll . . . . . . . . . . . . . . . . . . . . . . . . . . . . . . . . . . . . . . . . . . . . . . . . 118
Recycling used supplies . . . . . . . . . . . . . . . . . . . . . . . . . . . . . . . . . . . . . . . . . 119
Conserving supplies . . . . . . . . . . . . . . . . . . . . . . . . . . . . . . . . . . . . . . . . . . . . 119
2-Color Draft . . . . . . . . . . . . . . . . . . . . . . . . . . . . . . . . . . . . . . . . . . . . . . . 119
Black and White . . . . . . . . . . . . . . . . . . . . . . . . . . . . . . . . . . . . . . . . . . . . 119
Replacing supply items . . . . . . . . . . . . . . . . . . . . . . . . . . . . . . . . . . . . . . . . . 120
Replacing print cartridges . . . . . . . . . . . . . . . . . . . . . . . . . . . . . . . . . . . . . . . 121
Replacing the coating roll . . . . . . . . . . . . . . . . . . . . . . . . . . . . . . . . . . . . . . . 126
Replacing the fuser kit . . . . . . . . . . . . . . . . . . . . . . . . . . . . . . . . . . . . . . . . . . 131
Replacing the transfer kit . . . . . . . . . . . . . . . . . . . . . . . . . . . . . . . . . . . . . . . . 138
vi
Solving printer problems . . . . . . . . . . . . . . . . . . 145
8
Printer problems . . . . . . . . . . . . . . . . . . . . . . . . . . . . . . . . . . . . . . . . . . . . . . . 145
Theory of operation . . . . . . . . . . . . . . . . . . . . . . . . . . . . . . . . . . . . . . . . . . . . 146
Understanding printer messages . . . . . . . . . . . . . . . . . . . . . . . . . . . . . . . . . 147
Status messages . . . . . . . . . . . . . . . . . . . . . . . . . . . . . . . . . . . . . . . . . . . . . 147
Attendance messages . . . . . . . . . . . . . . . . . . . . . . . . . . . . . . . . . . . . . . . . 150
Service messages . . . . . . . . . . . . . . . . . . . . . . . . . . . . . . . . . . . . . . . . . . . . 158
Identifying other problems . . . . . . . . . . . . . . . . . . . . . . . . . . . . . . . . . . . . . . 161
Clearing printer paper jams . . . . . . . . . . . . . . . . . . . . . . . . . . . . . . . . . . . . . . 168
Table of contents
Page 7

Clearing duplex unit paper jams . . . . . . . . . . . . . . . . . . . . . . . . . . . . . . . . . 175
Cleaning the print cartridge dust collector . . . . . . . . . . . . . . . . . . . . . . . . . 181
Cleaning the waste toner sensor . . . . . . . . . . . . . . . . . . . . . . . . . . . . . . . . . . 184
Calling for customer support . . . . . . . . . . . . . . . . . . . . . . . . . . . . . . . . . . . . 188
Appendix A: MarkVision . . . . . . . . . . . . . . . . . . . . . 189
Operating systems supported . . . . . . . . . . . . . . . . . . . . . . . . . . . . . . . . . . . . 189
Introducing MarkVision . . . . . . . . . . . . . . . . . . . . . . . . . . . . . . . . . . . . . . . . 190
Features . . . . . . . . . . . . . . . . . . . . . . . . . . . . . . . . . . . . . . . . . . . . . . . . . . . 191
MarkVision online Help . . . . . . . . . . . . . . . . . . . . . . . . . . . . . . . . . . . . . . 197
Installing MarkVision on a network . . . . . . . . . . . . . . . . . . . . . . . . . . . . . . 198
Getting updated utilities and drivers . . . . . . . . . . . . . . . . . . . . . . . . . . . . . . 199
Online services . . . . . . . . . . . . . . . . . . . . . . . . . . . . . . . . . . . . . . . . . . . . . 199
Automated fax system . . . . . . . . . . . . . . . . . . . . . . . . . . . . . . . . . . . . . . . 199
Appendix B: Printer specifications . . . . . . . . . . . . . 201
Appendix C: Fonts . . . . . . . . . . . . . . . . . . . . . . . . . . 205
Printing font samples . . . . . . . . . . . . . . . . . . . . . . . . . . . . . . . . . . . . . . . . . . . 205
Resident fonts . . . . . . . . . . . . . . . . . . . . . . . . . . . . . . . . . . . . . . . . . . . . . . . . . 206
PCL scalable fonts . . . . . . . . . . . . . . . . . . . . . . . . . . . . . . . . . . . . . . . . . . . 206
PostScript scalable fonts . . . . . . . . . . . . . . . . . . . . . . . . . . . . . . . . . . . . . . 208
Bitmapped fonts . . . . . . . . . . . . . . . . . . . . . . . . . . . . . . . . . . . . . . . . . . . . 211
Symbol Sets . . . . . . . . . . . . . . . . . . . . . . . . . . . . . . . . . . . . . . . . . . . . . . . . . . . 211
Symbol Sets for PCL 6 Emulation . . . . . . . . . . . . . . . . . . . . . . . . . . . . . . 211
Downloadable fonts . . . . . . . . . . . . . . . . . . . . . . . . . . . . . . . . . . . . . . . . . . . . 213
Appendix D: Safety information . . . . . . . . . . . . . . . 215
Appendix E: Notices . . . . . . . . . . . . . . . . . . . . . . . . . 227
Laser notices . . . . . . . . . . . . . . . . . . . . . . . . . . . . . . . . . . . . . . . . . . . . . . . . . . 231
Table of contents
vii
Page 8

Appendix F: Warranty . . . . . . . . . . . . . . . . . . . . . . . 239
Glossary . . . . . . . . . . . . . . . . . . . . . . . . . . . . . . . . . . . 241
Index . . . . . . . . . . . . . . . . . . . . . . . . . . . . . . . . . . . . . . 255
viii
Table of contents
Page 9

Using you r
docum entation
About the manuals
This User’s Guide provides detailed information about
color functions, media specifications, printer supplies,
memory requirements, using the printer operator panel,
changing printer settings, and solving printer problems.
The book is intended for users who need information
about printer configuration, printer default settings, troubleshooting printer problems, and those who may be
responsible for ordering printer supplies.
A handy feature included with your manual is the chapter
or procedural information located next to the page number. When searching for a chapter or topic, use this feature
to quickly locate the information you need.
The Quick Reference Card offers an overview of the printer
menu structure and tips for loading paper, and clearing
paper jams. You may want to keep the Quick Reference Card
near the printer so all users have access to it.
Refer to the Setup Guide for detailed instructions on setting
up the printer hardware, installing options, and launching
the CD to install printer drivers and utilities.
About the manuals
ix
Page 10

Conventions
It may help you to recognize the conventions we have
used in this book:
• Operator panel buttons are printed in a boldface
type:
Go
Press
after changing a menu setting.
• Messages on the operator panel display are also
printed in a boldface type:
88 Cyan Toner Low
If
appears on the operator
panel display, you should order a new Cyan
print cartridge.
• Notes, warnings, and cautions appear in the left column for easy reference.
Note:
iary information you may find
useful.
Warning!
something that might damage
your printer hardware or software.
Caution!
something that might cause you
harm.
A note provides auxil-
A warning identifies
A caution identifies
x
About the manuals
Page 11

Other sources
of information
In addition to the User’s Guide, Quick Reference Card, and
Setup Guide, Lexmark offers other sources of information
about your printer or about Lexmark products and services.
Online documents
The Drivers, MarkVision and Utilities compact disc (CD)
that comes with your printer contains several online documents. Refer to the booklet that comes with the CD for
launching instructions. Once you launch the CD, click
View Documentation to display a list of available documents.
The CD includes:
• The MarkVision printer utility information, which
provides step-by-step instructions for installing
MarkVision for Windows 95/98 and Windows NT
4.0 on several different networks. It also describes
some of the most popular MarkVision features.
• Documents which provide general information
about setting up an optional print server after
installing it in your printer.
• Documents which describe font options and available resources.
• A Card Stock & Label Guide which provides detailed
information about selecting print material appropriate for your printer.
A Technical Reference which includes information about
printer languages and commands, interface specification,
and printer memory management.
Other sou rces ofinformation
xi
Page 12

Lexmark Web site
Access our site on the World Wide Web for up-to-date
information about Lexmark and Lexmark products:
http://www.lexmark.com
If you need help with your printer, you can visit our Web
site at:
http://www.lexmark.com/service/service.html
Automated
fax system
If you’re in the U.S. or Canada, you can use the Lexmark
automated fax system to request information about Lexmark products, available printer drivers, or other related
topics.
week.
To request a catalog of the information available, simply
dial (606) 232-2380 from a touchtone phone and follow the
voice prompts. Have your fax number ready.
LEXFAX
SM
is available 24 hours a day, 7 days a
xii
Other sources of information
Page 13

Trademarks
Lexmark, MarkNet, MarkVision, and Optra are trademarks of Lexmark International, Inc., registered in the
United States and/or other countries. LexExpress, LEX-
FA X , and Operation ReSource are service marks of Lexmark International, Inc.
AppleTalk, LocalTalk, Macintosh, System 7.1, and TrueType, are trademarks of Apple Computer, Inc., registered
in the U.S. and other countries.
PANTONE Colors generated by the Optra C710 color
printer are four-color process simulations and may not
match PANTONE-identified solid color standards. Use
current PANTONE Color Reference manuals for accurate
color.
PANTONE Color simulations are only obtainable on this
product when driven by qualified Pantone-licensed software packages. Contact Pantone, Inc. for a current list of
qualified licensees.
®
PA N T O N E
property of Pantone, Inc. © Pantone, Inc., 1988
®
PCL
is a registered trademark of the Hewlett-Packard
Company. PCL 5 and PCL 6 are Hewlett-Packard Company’s designations of a set of printer commands (language) and functions included in its printer products. This
printer is intended to be compatible with the PCL 5 and
PCL 6 languages. This means the printer recognizes PCL 5
and PCL 6 commands used in various application programs, and the printer emulates the functions corresponding to the commands.
and other Pantone, Inc. trademarks are the
Trademarks
xiii
Page 14

PostScript® is a registered trademark of Adobe Systems
Incorporated. PostScript is Adobe Systems’ designation of
a set of printer commands (language) and functions
included in its printer products. This printer is intended to
be compatible with the PostScript language. This means
the printer recognizes PostScript commands used in various application programs, and the printer emulates the
functions corresponding to the commands.
Details relating to compatibility are included in the Techni-
cal Reference.
The following terms are trademarks or registered trademarks of these companies:
Albertus The Monotype Corporation plc
Antique Olive Monsieur Marcel OLIVE
Arial The Monotype Corporation plc
CG Omega A product of Bayer Corporation
CG Times Based on Times New Roman under lic ense
from The Monotype Corporation plc, is a
product of Bay er Corporation
Helvetic a Linotype-Hell AG and/or its subsi diaries
Intellif ont Bayer Corporation
xiv
ITC Bookman International Typeface Corporation
ITC Zapf Chancery International Typeface Corporation
Marigold AlphaOmega Typography, Inc.
Palatino Linotype-Hell AG and/or its subsi diaries
Times New Roman The Monotype Corporation pl c
Univers Linotype-Hell AG and/or its subsi diaries
Wingdings Microsoft Corporation
Other trademarks are the property of their respective
owners.
Trademarks
Page 15
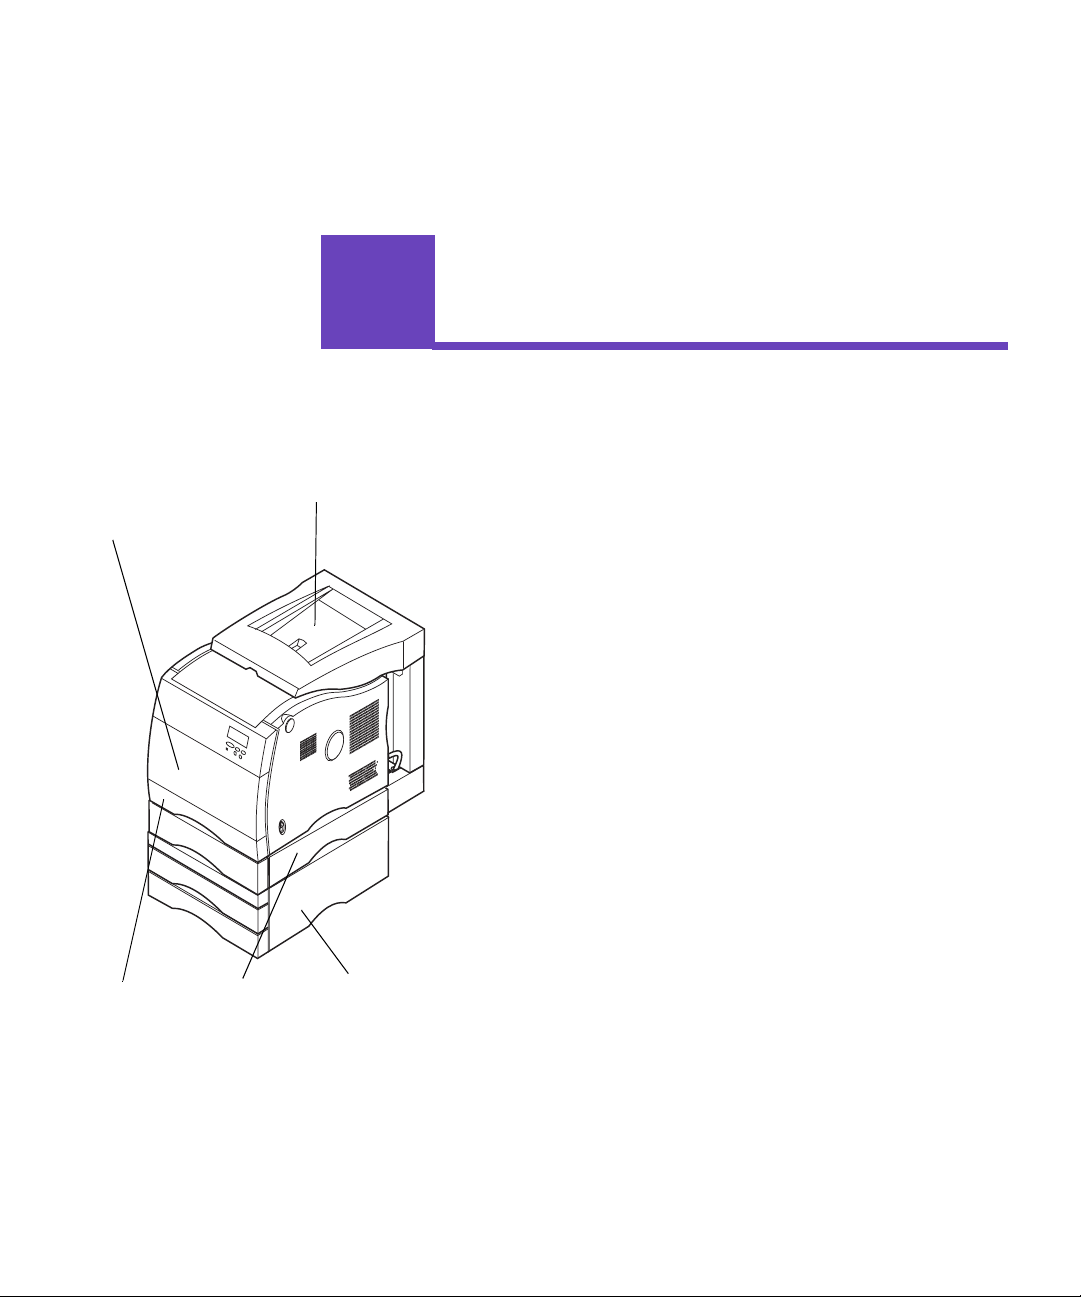
Multipurpose
feeder
1
Duplex unit output bin,
printer output bin
Introducing
your printer
You r L ex ma rk Op tr aTM C710 color printer is the ideal
printer for presentations, business graphics, line art, and
text. Your printer uses laser diode electrophotographic
technology to deliver remarkable quality print images and
text. You can print up to 16 pages per minute (ppm) for
monochrome print jobs and 3 ppm for color print jobs.
You can use your printer as a shared network or desktop
printer.
A variety of connectivity options makes your printer an
excellent choice for all types of system environments. You
can install up to three internal adapters to support network configurations requiring Ethernet, Token-Ring,
LocalTalk, serial, or additional parallel ports. You can even
attach a class 1-fax modem to the serial port and send
faxes directly to your printer.
250-sheet
standard tr ay
Duplex unit
Optional
drawer unit
Your printer also offers flexible paper handling. It supports a variety of paper sizes and has a standard multipurpose feeder that makes it easy to print envelopes,
transparencies, paper, labels, and non-standard size paper.
You can add an optional duplex unit so you can print on
both sides of the paper. You can also add an optional
drawer unit consisting of two 250-sheet trays that can
increase the printer's total paper capacity to 800 sheets.
Your Lexmark printer software enables you to easily master advanced color management techniques such as levels
of brightness, contrast, and saturation. You can easily
print professional color graphics, exceptional gray-scale
images, or razor sharp black printing for text and detailed
line art.
Chapter 1: Introducing your printer
1
Page 16

The modular design of your printer lets you perform routine printer maintenance procedures without the aid of a
service technician. This includes replacing the photoconductor, transfer belt, coating roll, fuser, and all four color
print cartridges.
Print speed
Memory
Color quality
Your printer can print four-color and mono jobs at up to 16
ppm for monochrome print jobs and 3 ppm for color print
jobs. If you install an optional duplex unit, you can print
duplex jobs at up to 5 ppm for monochrome print jobs and
1.5 ppm for color print jobs. Print speed varies depending
on specific characteristics of the job, such as the size of the
formatted page, the number of fonts, the number and
complexity of images and graphics, and so on.
Your printer ships with at least 32MB of standard printer
memory for fast, efficient processing of color jobs. (Some
models and Ethernet equipped printers may ship with
more memory.) If you typically print large, complex jobs,
you can install optional memory cards to increase the total
usable memory to a maximum of 384MB.
In addition, you can install an optional hard disk for storing downloaded resources, job statistics, and for spooling
or collating print jobs.
Your printer is set to provide you with high quality business graphics. It also has several print quality settings to
accommodate your many printing needs. These settings
can provide you with superb quality presentation or draft
printouts.
2
Chapter 1: Introducing your printer
Page 17

Printer drivers
The printer drivers included on the Driver, MarkVision,
and Utilities CD shipped with your new printer were specially designed for this printer. Using these printer drivers
gives you the greatest control over the features and functions of your printer. Your printer drivers have been
designed to work efficiently with your printer and provide you with the best possible print quality. Using these
print drivers is fast and easy.
MarkVision
Pa pe r ha ndling
The MarkVisionTM printer utility, included on the Driver,
MarkVision, and Utilities CD shipped with your printer,
provides numerous printer management and color management tools you can access directly from your computer. MarkVision can display a graphic of your printer
indicating the options installed and the location of any
printer problems. If your printer is attached to a network
and located some distance from your workstation, you
can view printer status and change printer settings without leaving your desk. You can also use MarkVision to
gather statistics about the jobs you print, or download
resources.
Your printer comes equipped with a 250-sheet paper tray
and a 50 sheet multipurpose feeder. The multipurpose
feeder lets you load envelopes, transparencies, paper,
labels, or card stock for a variety of print jobs. To increase
paper feeding capacity, you can add an optional drawer
unit consisting of two 250-sheet trays. These paper handling options allow you to use four different types of
media or link the trays together and use the same paper
throughout to reduce the number of times you reload
paper.
Printer drivers
3
Page 18

4
Chapter 1: Introducing your printer
Page 19

2
Using printer
drivers
This chapter contains information about your printer driver settings so you can use them to control printer functions.
Using the printer drivers supplied with your printer gives you
the greatest control over the features and functions of your
printer. These printer drivers have been designed to work efficiently with your printer and provide you with the best possible
print quality. Using and accessing these drivers from your computer is fast, easy, and convenient.
Note:
selected from a software application or driver override default
settings selected from the operator panel.
Printer se tt in gs
Most Windows software packages let you modify common
printer settings through the use of their print dialog box. To
modify your printer settings this way, select File from the menu
bar and Print or Printer Settings. This opens a print or printer
settings window that allows you to modify some or all of the
many printer settings.
Many software printer dialog boxes have a printer setup or
printer properties button. Select this button to access your
printer driver window. Changing the printer settings through the
software package or printer driver is the fastest and most convenient method for controlling your printer.
Using the printer driver window lets you print a test page that
describes your printer driver and port settings. You can also use
it to control things such as user identification pages, paper size,
and overlays. If you encounter an item on the printer driver window you are not sure about, use your online Help for the latest
information on that feature.
Chapter 2: Using printer drivers
5
Page 20

Lexmark confidential
The method to access your printer driver window depends on
your operating system, personal preferences, and how your
operating system is configured.
If you encounter a printer feature you cannot control from the
printer driver or application software, use the printer operator
panel or the remote operator panel available from MarkVision.
Changing a printer setting from the operator panel or from
MarkVision makes that setting the user default for all subsequent jobs sen t to the printer. You can override these operato r
panel settings through the software application or printer driver.
In most cases, settings you change from your software application or printer driver apply only to the job you are preparing to
send to the printer.
6
Chapter 2: Using printer drivers
Page 21

3
Changing
printer settings
This chapter contains details about printer settings you can use
to control printer functions. This chapter is organized according
to the structur e of the print er operator panel menus. You can also
change many o f t he se sett i ngs f rom yo ur a ppl icat i on, a Lexmark
printer driver, or from the MarkVision printer utility.
Note:
selected from a software application or driver override default
settings selected from the operator panel.
Printer se tt in gs
If there is a printer feature you cannot control from the application or printer dr i ver, use th e printer ope rato r panel or the re mote
operator panel available from MarkVision. Changing a printer
setting from the operator panel or from MarkVision makes that
setting the user default for all subsequent jobs sent to the printer.
In most ca ses, s etti ngs you change fr om t he a ppl ica ti on or dr iver
apply only to the job you are preparing to send to the printer.
Chapter 3: Changing printer settings
7
Page 22
1 Menu 2
Using the
operator panel
Select 3
Return 4
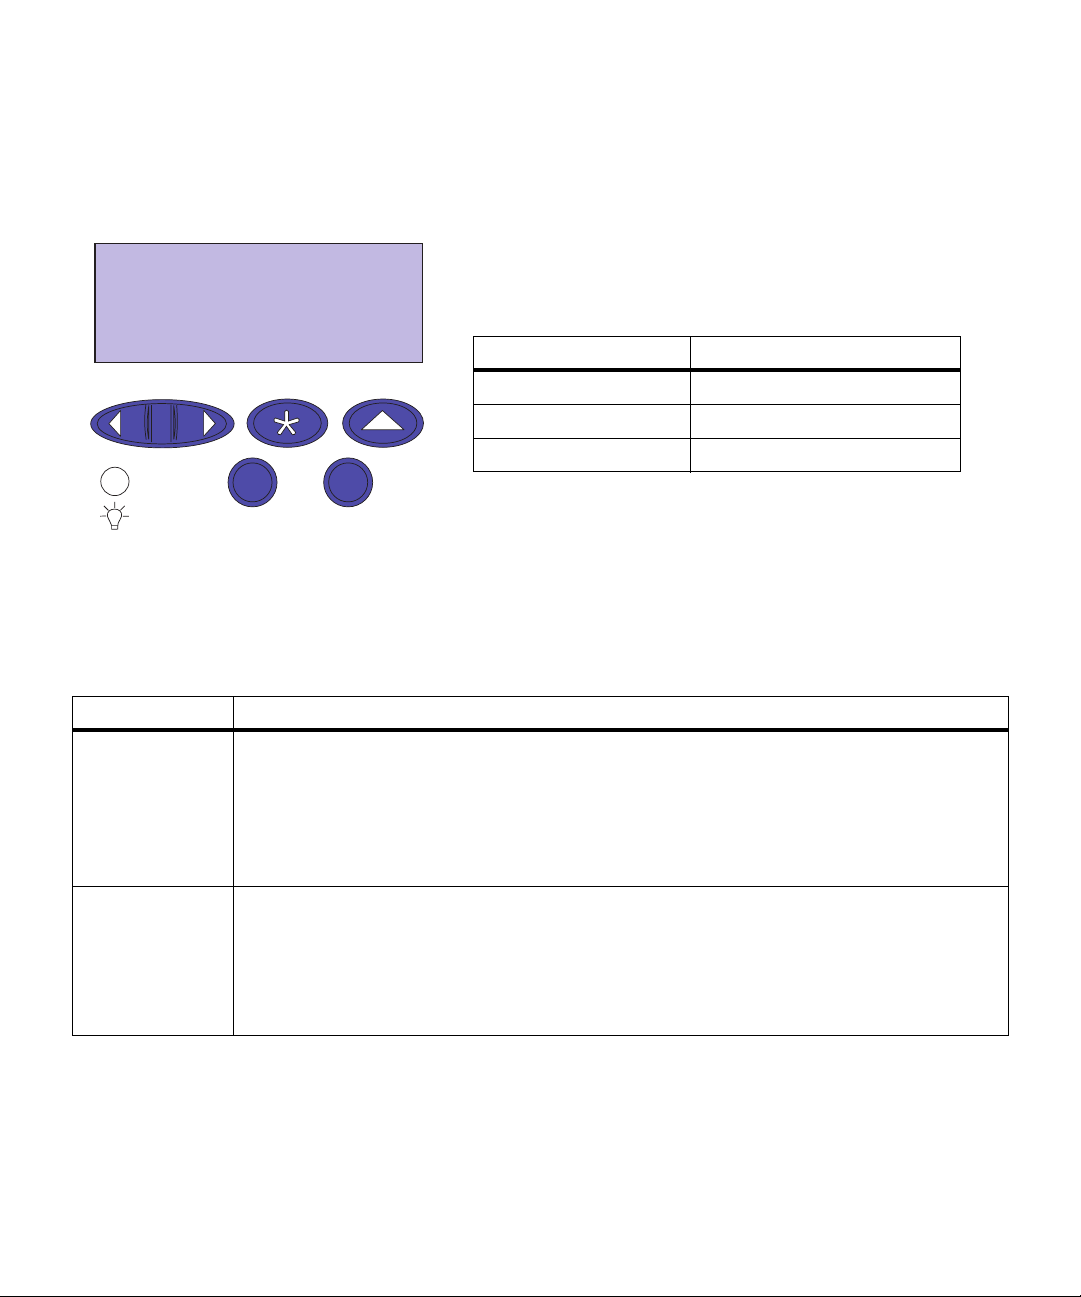
The operator panel on the upper right corner of your printer has
a 2-line by 16-character Liquid Crystal Display (LCD), five buttons, and one indicator light.
The light indicates whether the printer power is on and whether
the printer is idle or busy processing a job.
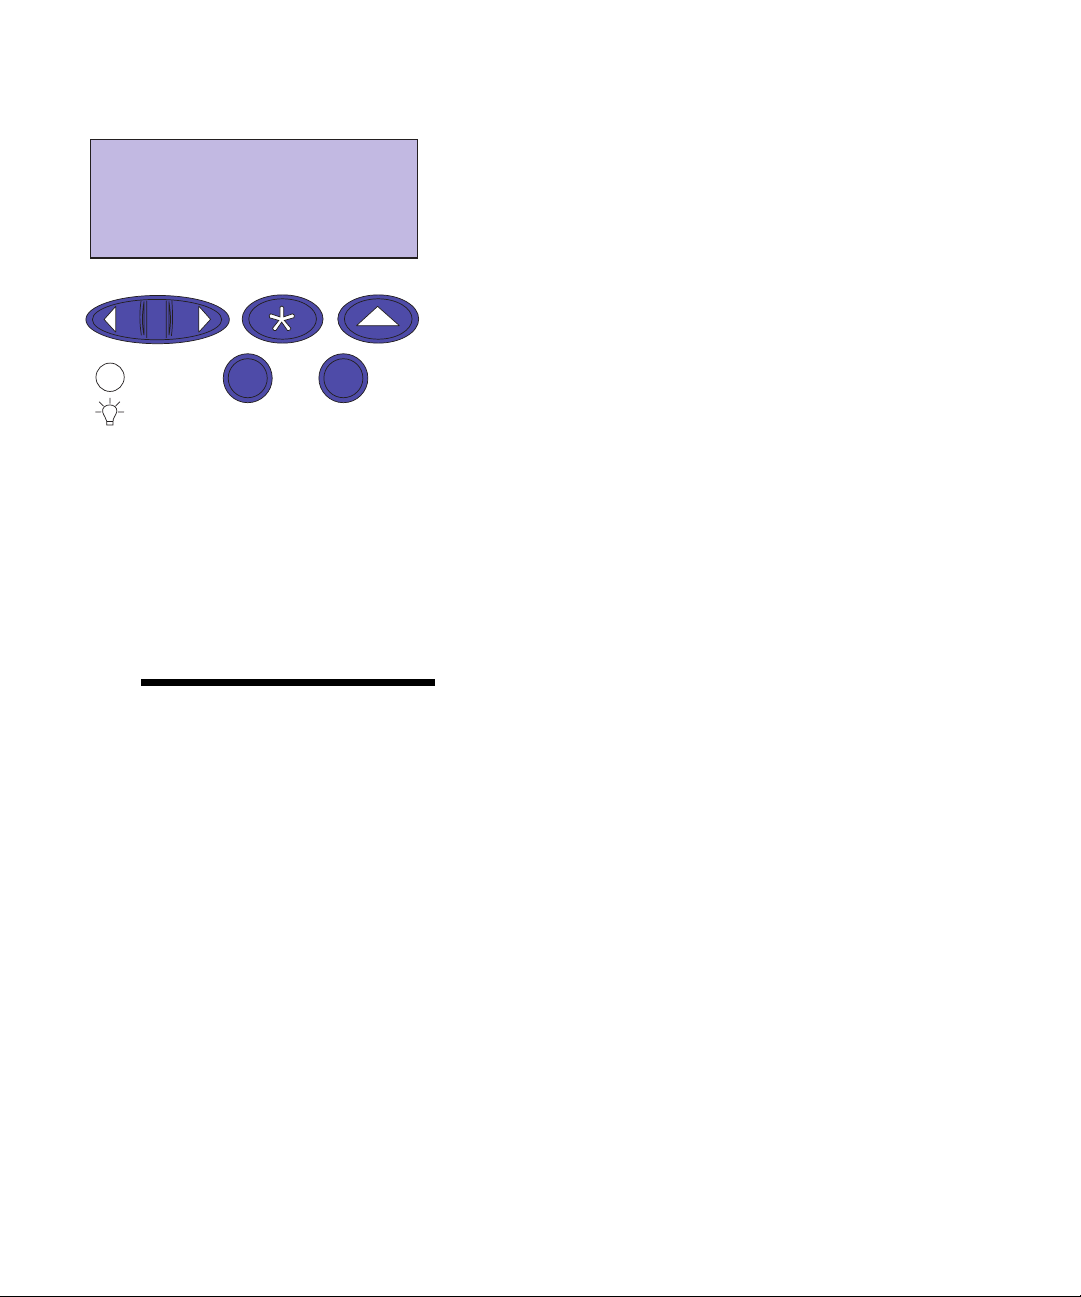
Indicator light
Status Indicates
Off Printer power is of f.
On Pr in t er is o n, but idle.
Flashing Printer is busy processing a job.
Go 5
Operator panel buttons
Button Function
Go 5
1 Menu >
<Menu 2
and
Press the Go button to:
• Exit printer menus and return the printer to the ready state
• Clear certain messages from the display
• When entering a number 5 as part of a PIN for confidential or print and hold printing
If you’ve changed printer settings from the operator panel, press Go before you send a job to
print.
Press the
• Enter the menus from the
• Scroll to the ne xt (
• Increase or decrease a numerical value for a menu item setting
•Display the Job Me nu or the S u pp lies M e nu whil e t he prin te r is busy
• When entering a number 1 or 2 as part of a PIN for confiden ti al or print and hold printing
Stop 6
Menu>
or
<Menu
Menu>
Use the five operator panel buttons to open a menu, scroll
through a list of values, select printer settings, and clear error
messages. Detailed instr uctions for changing a printer setting
begin on page12.
butto n to:
ready
state
) or previo us (
<Menu
) menu, menu item, or value
8
Chapter 3: Using the operator panel
Page 23

Operator panel buttons (continued)
Button Function
Select 3
Return 4
Stop 6
Press the
• Select the menu show n on the second line of the display and view the available menu items
• Select the menu it em shown on the second line of the d isplay an d view the a vailable value or
• Save the v alue displayed on the second line of the display as the ne w user default setting
• Clear certain messages from the display
• When entering a number 5 as part of a PIN for confidential or print and hold printing
Press the
a new menu item or value.
Also press
printing.
Press the
stop all activity. The message
activity.
For e xample, if you need to load paper in a tray while a job is printing, press
the printer motors to idle before removing the tray. Reinsert the loaded tray, and then press
Also press
printing.
Select
button to:
current user default setting for that menu item
Return
button to back up to the previous lev el of the menu structure without selecting
Return
when entering a number 4 as part of a PIN for confidential or print and hold
Stop
button when the printer displays the
Stop
when entering a number 6 as part of a PIN for confidential or print and hold
Not Ready
Busy
is then di splayed until y ou press Go to contin ue printer
or
Waiting
message to temporarily
Stop
and wait fo r
Go
.
MarkVision’s remote
operator panel
The MarkV isi on utility has a re mote operat or panel that displays
an exact replica of the printer operator panel on your computer
screen. You can use the remote operator panel to check printer
status and change print er setti ngs just as you would on the a ctual
printer operator panel. If the printer is located some dista nce
from your computer, it may be more convenient to use the
remote operator panel on your computer.
In addition to the remote operator panel, some versions of
MarkVision also pro vi de a way to view many of the menu items
for one menu on a single screen. If you need to make several
changes to settings in the Paper Menu, for example, you may
find it easier to make those changes when you can see all of the
menu items and their available values at one time. Usin g this
option eliminates the time required to scroll through the various
menu items and values when using the operator panel and its
two-line display.
For additional information about MarkVision, see page 189.
Chapter 3: Using the operator panel
9
Page 24
Menus
A number of menus are available to make it easy for you to
change printer set tings. The diagr am on page 16 sho ws all of the
menus and items a v ailable unde r each menu. Items in eac h menu
and the values you can select are described in more detail in the
tables beginning on page 17.
Some of the menu items or values are displayed only if a specific option is installed on the printer. Other menu items may
only be effe cti ve for a partic ular print er language . You can select
these values at any time, but they only affect print er function
when you have the optional equipment or the specified printer
language.
Note:
value in the tables in this book
indicates the original factory settings. Factory defaults may di ffer
for different countries (for example, letter/A4 paper).
An asterisk (*) next to a
Printing current
menu settings
Note:
menu settings page, ensure the
selected paper source holds
A4, B5, letter, or legal size
paper.
Before printing the
PAPER MENU
Paper Source
1 Menu 2
Select 3
Return 4
An asterisk (*) next to a value on the operator panel indicates the
current setting. When you select a new setting, the asterisk
moves to the selecte d setting to identify it as the curr ent user
default. These settings remain active until new ones are selected
or the factory defaults are restored.
You can print a list of the current user default settings at any
time.
1 From the operator panel, press
enter the menus.
If you do not need to verify the paper source and paper
type, go to step 11 on page 12.
2 Continue to press and release
you see
PAPER MENU
.
Menu>
Menu>
or
or
<Menu
<Menu
to
until
3 Press Sele ct.
PAPER MENU
Source
is on the second line.
is displayed on th e first line, and
Paper
10
Go 5
Chapter 3: Menus
Stop 6
Page 25
4 Press Sele ct.
Paper Source
= Tray 1*
1 Menu 2 Select 3
Go 5
PAPER TYPE
Tray 1 Type
1 Menu 2
Select 3
Return 4
Stop 6
Return 4
Paper Source
rent paper source is on the second line.
If you want to select a different paper source, press and
release Menu> or <Men u u ntil the source you want
appears on the second line.
is displayed on the first line, and the cur-
5 Press Sele ct.
PAPER MENU ap pears on the f i rst li ne and Paper Sour ce
appears on the second.
6 Press and release
PAPER TYP E.
Menu>
or
<Menu
until you see
7 Press Sele ct.
PAPER TYPE
source is displayed on the second line.
If you want to select a different paper source, press and
release Menu> or <Men u u ntil the source you want
appears on the second line.
is displayed on the first line, and the paper
Go 5
Tray 1 Type
= Plain Paper*
1 Menu 2
Sele ct 3
Go 5
Stop 6
Return 4
Stop 6
8 Press Sele ct.
The paper source is displayed on the first line and the
paper type is displayed on the second line.
If you want to select a different paper type, press and
release Menu> or <Men u u ntil the type you want
appears on the second line.
9 Press Sele ct.
Chapter 3: Menus
11
Page 26
10 Press the Return button twice.
UTILITIES MENU
Print Menus
1 Menu 2
Note:
choose from your software application or printer driver change
the user default settings you set
on the operator panel.
Select 3
Go 5
Stop 6
Changing
menu settings
Remember, settings you
Return 4
11 Press and release
TIES MENU
.
Menu>
or
<Menu
until you see
12 Press Select.
UTILITIES MENU
13
Menus
is on the second line.
14 Press
Select
15 The message
printer returns to the ready state after the list of user
default settings prints.
If an error message appears on the display, see “Understanding printer messages” on page147.
To change the user default settings from the menus:
1 From the operator panel, press
2 Continue to press and release
the menu you want appears on th e second line of the
display.
The menus and their items are listed on page 16.
is displayed on the first line, and
again to print the page.
Printing Menu Settings
is displayed. The
Menu>
or
Menu>
or
<Menu
<Menu
UTILI-
Print
.
until
12
Chapter 3: Menus
3 Press
4 Press
5 Press
Select
to display the list of items for the selected
menu.
Menu>
on the second line.
Select
menu item.
Some menu items have submenus. For example, if you
select the Paper Menu, and then select the Paper Type
menu item, you mus t s ele ct anothe r menu (such as Tray 1
Type) befor e the available values are displayed.
<Menu
or
to display a list of available values for the
until the item you need appears
Page 27

A value can be:
– An On or Off se tting
– A phrase or word that describes a setting
– A numerical value that you can increase or decrease
Note:
need to go back to previous
menus or menu items without
changing the current setting.
Note:
remain in effect until you s ave
new settings or restore factory
defaults
Press
Return
User default settings
.
if you
6 Press
ues.
Menu>
or
<Menu
to scroll through the list of val-
7 When the value you want appears o n the second line
Select
of the display, press
user default setting.
An asterisk appears besid e th e val ue to indicate that it is
now the user default setting. The display shows the new
setting for one second and then clears and shows the
Saved
word
items.
8 Press
. It then displays the previous list of menu
Go
if you have finished changing menu settings.
to make the value the new
Chapter 3: Menus
13
Page 28

Locking the menus
To lock menus so changes cannot be made to user default settings:
1 Turn the p rinter off.
Note:
<Menu
sage is displayed
If you press
Menus Disabled
, the
.
Menu>
or
mes-
2 Press and hold the
printer on.
Go
3 Release both buttons when
played.
Busy
appears o n the display. When the printer self test is
Ready
complete, th e
To unlock the menus, repeat steps 1 through 3.
If you want t o dis abl e the button sequence so user s c ann ot ea si ly
lock or unlock the menus from the printer operator panel,
change the password variable of the PJL JOB command. Select
any non-zero value for the password variable to prevent the button sequence from unlocking (or locking) the menus. Refer to
the Technical Reference for more information about PJL com-
mands.
message is displayed.
Stop
and
buttons and turn the
Performing Self Test
is dis-
14
Chapter 3: Menus
Page 29
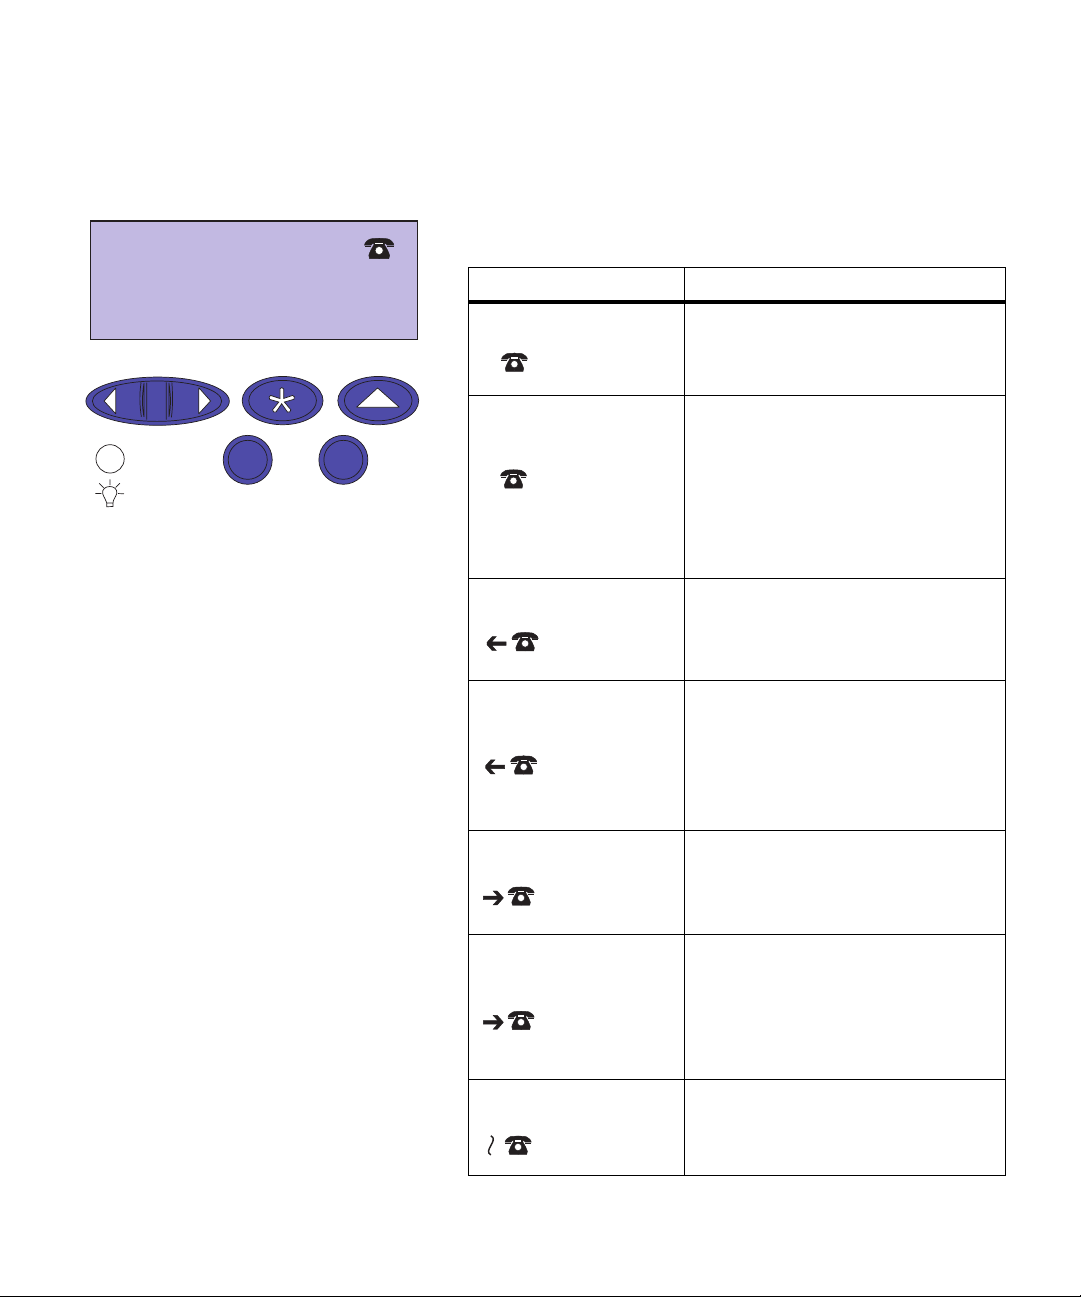
Ready
1 Menu 2
Fax Status Messages
Sele ct 3
Return 4
If an internal fax modem adapter card is installed and the printer
is confi gured t o proc ess f ax data , t he opera to r panel will dis play
different icons to indicate the current fax status.
The following table shows the icons and a description of the
icon meaning.
Status icon Description
Fax Ready The fax processing system is idle and
the modem has the phone line on the
hook. The modem is ready to send or
receive a f ax.
Go 5
Stop 6
Fax Send
Formatting:
(Blinking)
Fax Sending The modem and fax processing
Formatting &
Fax Sending:
(Blinking)
Fax Receiving The modem and fax processing
Fax Formatting &
Fax Receiving:
(Blinking)
The printer has received a job to be
faxed instead of printed. The job is
being formatted. At this time, the
modem has not been instructed t o
make the call to send the job.
Note:
The call to transm it the fax data
is not initiated until the entire job is
formatted and ready for transmission.
system is busy sending a fax.
The printer is sending a job and has
received another job to be faxed. As
one fax j ob is bei ng formatted, anot her
job is being sent by the fax processing
system.
system is busy receiving a fax.
The printer is receiving a fax and has
another job to be fa x ed. As o ne f ax j ob
is being formatted, the other fax is
being receiv ed by the fax processing
system.
Fax Error An error occurred during the sending
or receiving of the curr ent fax job.
Chapter 3: Menus
15
Page 30
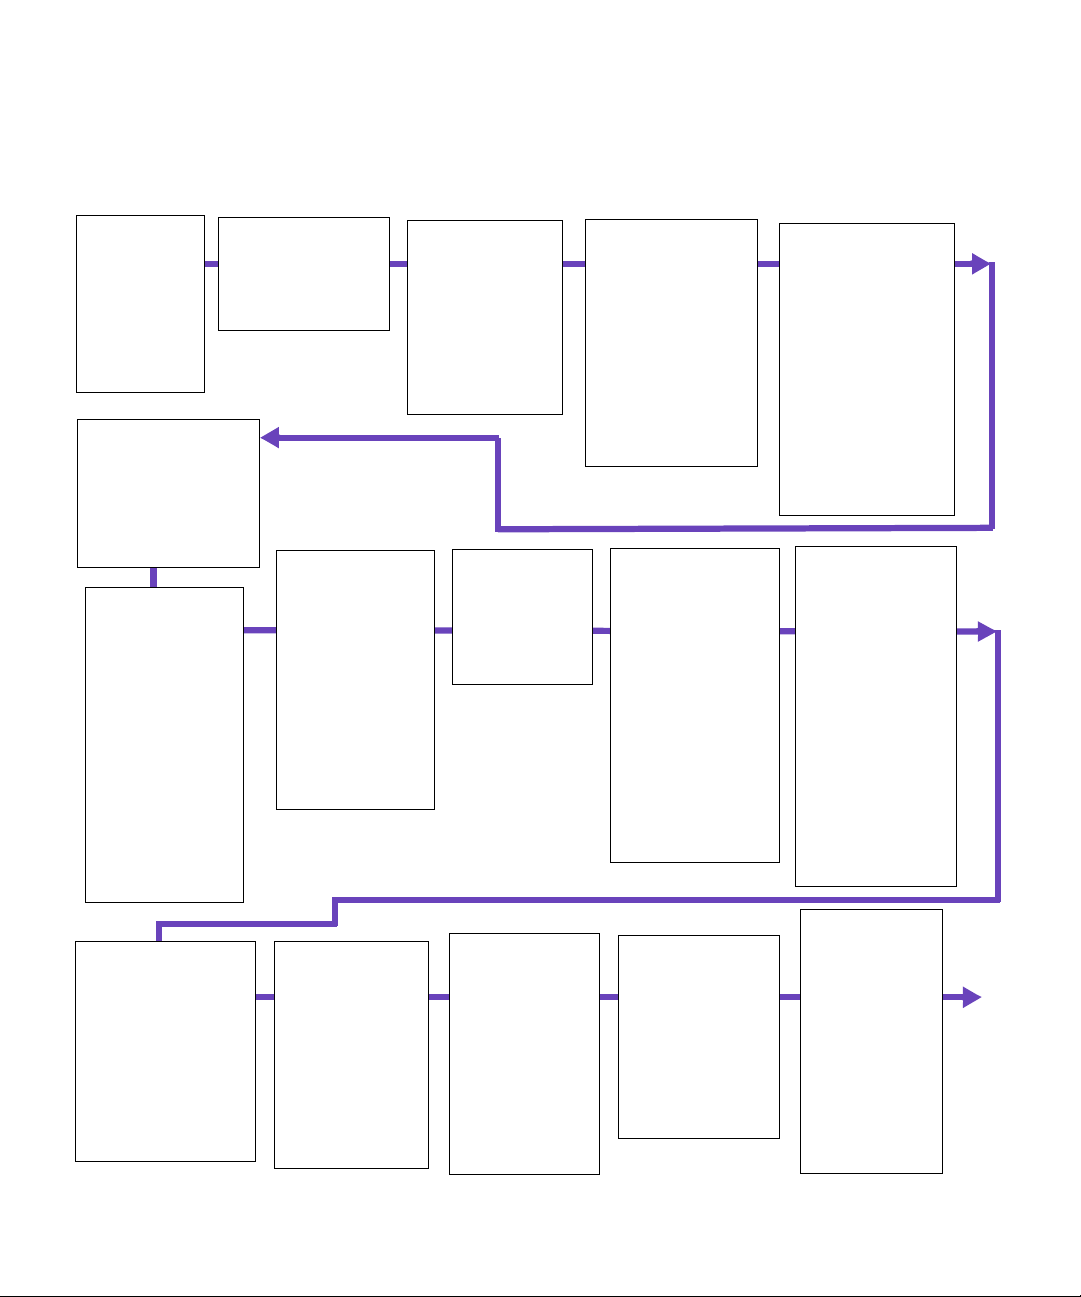
Menu overvie w
Menus or menu items in
are displayed only when the required
italics
option is installed. Capitalized menu items (for example, PAPER
SIZE) have submenus. Refer to the tables o n the f ollowing pages for
a listing of the values for each menu item.
SUPPLIES
MENU
(page 17)
<color> Toner
Tray 1 Status
Tray 2 St atus
Tray 3 St atus
Coating Roll
Transfer Belt
JOB MENU
(page 35)
Cancel Job
Reset Printer
Print Buffer
CONFIDENTIAL JOB
HELD JOBS
SETUP MENU
(page 38)
Print er La ng uage
Power S aver
Resource Save
Download Targe t
Print Timeout
Auto Continue
Wait Timeout
Jam Recovery
Page Protect
Print Area
Display Language
Alarm Control
Job Buf fer Size
Job Acco unting
Job Acct Limit
COLOR MENU
(page 19)
Color Correction
Image Enhancement
Print Res oluti on
PCL EMUL
MENU
(page 44)
Font Source
Font Name
Point Size
Pitch
Symbol Set
Orientation
Lines per Page
A4 Width
Auto CR after LF
Auto LF after CR
TRAY RENUMBER
PAPER MENU
(page 20)
Paper Source
PAPER SIZE
PAPER TYPE
PAPER WEIGHT
Custom Typ es
Substitute Size
Configure MP
Paper Loading
POSTSCRIPT
MENU
(page 48)
Print PS Error
Font Priority
Image Sm oo thing
FINISHING MENU
(page 27)
Duplex
Duplex Bind
Copies
Blank Pages
Collation
Separator Sheets
Separator Source
Multipage Print
Multi page Order
Multipage View
Multipage Border
PARALLEL
MENU
(page 49)
STD PARA LLEL
PARALLEL OPT 1
PARALLEL OPT 2
PARALLEL OPT 3
PCL SmartSwitch
PS SmartSwitch
NPA Mode
Parallel Buffer
Job Buffer in g
Advanced Status
Protocol
Honor Init
Parallel Mode 1
Parallel Mode 2
UTILITIES MENU
(page 32)
Change Cartridge
Print Menus
Print Net1 Setup
Print Net2 Setup
Print Net3 Setup
Print Fonts
Print Directory
Factor y Defa ul ts
Forma t Fla sh
Defragment Flash
Forma t Dis k
Job Acct Stat
Hex Trace
SERIAL MENU
(page 52)
STANDARD SERIAL
SERIAL OPTION 1
SERIAL OPTION 2
SERIAL OPTION 3
PCL SmartSwitch
PS SmartSwi tc h
NPA Mode
Serial Buffer
Job Buffering
RS-232/RS-422
RS-422 Polarity
Serial Protocol
Robust XON
Baud
Data Bits
Parity
Honor DSR
NETWORK MENU
(page 56)
NETWORK OPTION 1
NETWORK OPTION 2
NETWORK OPTION 3
PCL SmartSwitch
PS SmartSwi tc h
NPA Mode
Network Buffer
Job Buffering
NETWORK x Setup
16
Chapter 3: Menus
INFRARED
MENU
(page 59)
Infrared Port
PCL SmartSwi tc h
PS SmartSwi tch
NPA Mode
Infrared Buffer
Job Buffer in g
Window Size
Tra nsmit De lay
Max Baud Rate
LOCALTALK
MENU
(page 62)
LocalTalk Port
PCL SmartSwitch
PS SmartSwitch
NPA Mode
LocalTalk Buffer
Job Buffering
NPA Hosts
LocalTalk Name
LocalTalk Addr
LocalTalk Zone
USB MENU
(page 65)
USB OPTION 1
USB OPTION 2
USB OPTION 3
SmartSwitch
PCL
PS SmartSwi tch
NPA Mode
USB Buffer
Job Buffer in g
F AX MENU
(page 67)
Fax Port
Fax Baud
Fax Data Bits
Fax Parity
Fax Buffer
Job Buffering
Fax Paper Size
Fax Paper Type
FAX SETUP
FAX LOGS
FAX SEND
FAX RECEIVE
Page 31

Supplies Menu
Supplies Menu
Menu item Valu es
Tone r Low
Color
Empty
When a print cartridge nears the end of its usab le l if e, the print er ident ifies th e low cartridge in
the Supplies Menu (for example,
empty it displays
unit. This reduces operator maintenance and enhances print quality. See page116 or
page 157 for more informati on.
Tray
Status Missing
x
Low
Empty
The Supplies Menu provides information about printer supplies
that require at tention. It is only a va ilable when a supp ly is lo w or
needs replacement.
You can view the Suppl ies Menu when the printer is id le or
when the printer is busy processing or printing a job. Press
Menu>
or
<Menu
the menu chang es a s th e s uppli es’ st atus changes, e ven after you
have op ened the m enu.
88 Color Cartridge Empty
88 Cyan Low
to open the S uppli e s Menu. The infor mati on i n
). When the printer determines a cartridge is
. The photoconductor and print cartridge are one
Your printer can detect if a tray is mis sing, low on paper (less than 50 sheets), or the tray is
empty. The Supplies Menu lists any of the installed trays (tray 1, tray 2, or tray 3) that meets
any of these conditions.
Coating Roll Life Warning
When a coati ng roll is nearing its l ife en d, the printer displa ys
the operator panel. You can press
warning will be visible on the operator panel.
Note:
Continued use of the coa ting roll after the warning has been displayed may resul t i n
poor toner adhesion to print media, other print quality problems, and paper jams.
See page 126 for more information.
85 Coating Roll Life Warning
GO
to clear the error message, however the
Chapter 3: Menus
Supplies
on
17
Page 32

Supplies Menu (continu ed)
Menu item Valu es
Transfer Belt Missing
Life Warning
Exhausted
When the transfer belt is nearing its life end, the printer identifies the transfer belt as close to
being exhausted. The printer displays
You can press
the operator panel.
When the transfer belt is exhausted, the printer stops printing and displays
Life Exhausted
message.
See “Replacing the transfer kit ” on page138 for more information.
Note:
The error message 83 Transfer Belt Life Warning indi cates the waste toner area i s ful l.
If you suspect a false waste toner full condition has occ urred, you can clean th e w aste toner
sensor. See “Cleaning the wast e toner sensor” on page 184
Note:
The error 86 Transfer Belt Missing indicates the transfer belt is not installed in the
printer . See “Installi ng the Transfer Belt” in your Setup Guide or “Replacing the transfer kit” on
page 138
Fuser Exhausted
When the fuser reaches it s li fe end, the printer identifies the fuser as being exhaust ed. The
printer displays
error message, however the
See “Replacing the fuser ki t” on page 131 for more information.
84 Transfer Belt Life Warning
GO
to clear the e rror message, however the
on the operator panel. Yo u m ust replace the tran sfer belt to clear this
87 Fuser Exhausted
Supplies
on the operator panel. You can press GO to clear the
warning will be visible on the operator panel.
Supplies
on the operator panel.
warning will be visib le on
84 Transfer Belt
18
Chapter 3: Menus
Page 33

Color Menu
Menu item Valu es
Color Correction Auto*
Vivid
Off
CMYK
Black and White
Display
2-Color Draft
The Color Correction set ting lets you adjust the printed color to better match the colors of
other output de vices or standard color systems. F or example , if you want your printed colors
to simulat e the colors on your computer screen, choose Display. The A uto setting (the default)
uses diffe rent col or profil es on each object on the page (text, graph ics or image s). The default
setting produce s brigh t and well saturated colors for transparencies and gene ral business
graphics.
For more information, see page 84.
Note:
printer can produce that a re impossible to duplica te on your m onitor and ther e are colors your
monitor can displa y that cannot be dupli cated on an y printer. F or mor e inf ormation , see “Colo r
differ ence” on page 77.
Color Menu
The Color Menu adjusts p rint quality and customizes c olor
printing.
Due to the difference between additi ve and subtrac ti ve colors, t here are colors your
Image
Enhancement
Print Resolution 600*
*Factory default
Off
On*
All
The default setti ng, On, pro vide s hig h quality col or o utput f or tex t and b usin ess g raphi cs , such
as line art and electronically generated charts.
See page 81 for more information.
1200
The default setting, 600 dpi, uses halftoning to provide high quality output for text and
business graphics, such as line art and electronically generated charts.
The 1200 dpi provides the hi ghest resolution output.
See page 81 for more informati on.
Chapter 3: Menus
19
Page 34

Paper Menu
Paper Menu
Menu item Valu es
Paper Source Tray 1*
Tray 2
Tray 3
MP Feeder
Manual P aper
Manual Env
The Paper Source s etti ng ident ifi es the de f ault paper s ource . Onl y inst alle d pape r sourc es are
displayed.
The MP Feeder (mul tipurpose feeder) value is displayed only if the Configure MP menu item
is set to Cassette. If Paper Source is set to MP Feeder and Configure MP is th en changed to
Manual or First, the Paper Source setting automatically changes to Tray 1.
If you are usi ng the same si z e and type of media in t wo or more pap er sou rces (an d the P ape r
Type settings are correct), the trays are automatically link ed. When one tray is empty, pape r
feeds from the other tray.
PAPER SIZE Tray 1 Size
Tray 2 Siz e
Tray 3 Siz e
A4* (Country specific)
JIS B5
Letter* (Country specif ic)
Legal
Executiv e
(Select the tray paper size setting by adjusting the rear paper guide in the tray)
The Paper Menu configures the printer for the source, size, and
type of media you load.
*Factory default
20
Chapter 3: Menus
MP Feeder Size
A4* (Country specific)
JIS B5
Letter* (Country specif ic)
Legal
Executiv e
Universal
(Envelope sizes are the same as
Manual Env Size
)
Page 35

Paper Menu (continued)
Menu item Valu es
PAPER SIZE
(continued)
Manual P ap Size
A4* (Country specific)
JIS B5
Letter* (Country specif ic)
Legal
Executiv e
Universal
(Envelope sizes are the same as
Manual Env Size
7 3/4 Envelope
9 Envelope
10 Envelope* (Country specific)
DL Envelope* (Country specific)
C5 Envelope
B5 Envelope
Other Envel op
The Paper Size setting identif ies the default formatting size for each paper source. See
page 97 for a list of the dimensions for each paper and envelope size.
Trays 1, 2, and 3 have size sensing. The printer uses the rear paper guide to automatically
determine the size of the p aper ins talled i n th e tray and displa ys
the Paper Size menu. You cannot change the def ault paper size f or these trays from the
operator panel . To set the paper si ze , ad just t he rear pap er guid e to th e appropri ate posi tio n in
the tray. See page 96 for a listing of the paper sizes the trays support.
You must decide which paper size you want your tr ay to support. Use only A4, Letter, B5,
Legal, or Executive Paper sizes in the trays. Other size paper must be placed in the multipurpose feeder.
For paper and envelope sources without size sensing (manual feed and the multipurpose
feeder), it is important to select the correct paper size from the menu. The MP Feeder Size
menu item is displayed only if the Configure MP menu item is set to Cassette.
Manual Env Size
)
that size as t he default in
only
*Factory default
Chapter 3: Menus
21
Page 36

Paper Menu (continued)
Menu item Valu es
PAPER TYPE Tray 1 Type
Plain Paper *
Transparency
Bond
Letterhead
Preprinted
Colored Paper
Custom Type 1
Custom Type 2
Custom Type 3
Custom Type 4
Tray 2 Type
Plain Paper
Bond
Letterhead
Preprinted
Colored Paper
Custom Type 1
Custom Type 2*
Custom Type 3
Custom Type 4
Tray 3 Type
Plain Paper
Bond
Letterhead
Preprinted
Colored Paper
Custom Type 1
Custom Type 2
Custom Type 3*
Custom Type 4
*Factory default
22
Chapter 3: Menus
Page 37

Paper Menu (continued)
Menu item Valu es
PAPER TYPE
(continued)
MP Feeder Type
Plain Paper
Card Stock
Transparency
Labels
Bond
Envelope
Letterhead
Preprinted
Colored Paper
Custom Type 1
Custom Type 2
Custom Type 3
Custom Type 4*
Manual P ap Type
Plain Paper *
Card Stock
Transparency
Labels
Bond
Envelope
Letterhead
Preprinted
Colored Paper
Custom Type 1
Custom Type 2
Custom Type 3
Custom Type 4
Manual Env Type
Envelope*
Custom Type 1
Custom Type 2
Custom Type 3
Custom Type 4
*Factory default
Chapter 3: Menus
23
Page 38

Paper Menu (continued)
Menu item Valu es
PAPER TYPE
(continued)
PAPER WEIGHT Plain Paper
The Paper Type setting let s you speci fy the type of media installed in each source. The printer
uses the Pa per Type setting to optimiz e print quality for the media you speci fied.
For e xample, if you set Tray 1 Type to Transpar ency, the printer heats the fuser to a higher
temperature and sl ows printing to produc e the best transparency possible. If you change
Tray 1 Type to Plain Paper, there is a slight delay while the printer cools to the appropriate
temperature for printing paper.
You can also select paper so urc es from your sof twar e appli cati on sim ply b y specif ying a p aper
type and siz e. Or, use the MarkVisio n ut ility to defin e nam e s for up to four Cu s to m Types
identifying special print materials. For exam ple, if you are using names for three different
letterheads for different individual s in your workplace, you can define a custom type for each
individual’s letterhead. If you’re not sure which source contains the letterhead you need, you
can specify the Custom Type from the software appl ication or driver, and the printer wi ll feed
paper from the proper source.
The correct Paper Type setting, along with the Paper Size setting, is also critical for the
automatic tray linking funct ion. If you have the same paper loaded i n two paper sources and
want to enable tray linking, set the Paper Type for each source to the same value. When one
tray is empt y, the printer then automaticall y feeds paper from the other tray.
A simple way to di sable tray linking is to set Tray 1 Type to Custom Type 1, Tray 2 Type to
Custom Type 2, and Tray 3 Type to Custom Type 3 (if those three custom types ar e not
predefined for other special media).
The MP Feeder Type menu item is displayed only if the Configure MP menu item is set to
Cassette.
Ltrhead Weight
Preprint Weight
Color Weight
Custom 1 Weight
Custom 2 Weight
Custom 3 Weight
Custom 4 Weight
Light
Normal*
*Factory default
24
Chapter 3: Menus
This menu item allows you to increase your quality output when usi ng lighter paper wei ghts
such as 60 g/m
2
(16 lb) paper.
Page 39

Paper Menu (continued)
Menu item Valu es
Custom Types Custom Type x (where x represents a custo m type from 1 to 4)
Paper*
Card Stock
Transparency
Labels
Envelopes
The Custom Type x setting specifies the print material for each of the Custom Types (1
through 4) defined i n the P ap er Type menu item. If a user- defi ned name is a v ail ab le , the nam e
is displa yed instead of Custom Type
Substitute Size Off*
Letter/A4
The value of this setting determines whether the printer operating sys tem may or may not
substitute another size if the requested size is not currently installed in any of the printer’s
input sources . For example, if Substitute Si ze is set to Letter/A4 on a printer with onl y letter
size installed, and the printer receives a request to print a job on A4, the print er will automatically print the job on letter instead of posting a change request to the user for A4 paper.
The Off value indicates no size substitutions are performed.
Note:
When a size su bstitution is performed, the page i m age is automatically clipped to fi t on
the substituted size. This means data loss may result.
Configure MP Cassette*
Manual
First
Note:
If the Paper Source or Separator Source is set to MP F eeder when Configure MP is
changed to Manual or Fir st, then the setting is cha nged to Tray 1.
.
x
*Factory default
Chapter 3: Menus
25
Page 40

Paper Menu (continued)
Menu item Valu es
Paper Loa ding
*Factory default
Off*
Duplex
Bond Loading
Ltrhead Loading
Preprint Loading
Colored Loading
Custom 1 Loading
Custom 2 Loading
Custom 3 Loading
Custom 4 Loading
This setting is useful when usi ng preprinted duple xed forms where you may want to print
some information for those f orms duplex ed and som e information si mp lexed (single sided).
Note:
Only displayed if duplex unit is installed.
Note:
If a user-defined name is available for a Custom Type, then the name will be displayed
instead of “Custom x Load ing”. The name will be truncated to 14 characters.
26
Chapter 3: Menus
Page 41

Finishing Menu
Finishing Menu
Menu item Valu es
Use the Finishing Menu to specify the final output of your jobs,
including the number of copies, whether you want to insert separator pages between j obs, and how many page image s you want
to print on each sheet of paper.
Duplex
Duplex Bind
Copies 1*…999
Blank Pages Do Not Print*
*Factory default
Off*
On
Note:
Only displayed if duplex unit is installed.
Long Edge*
Short Edge
Note:
Only displayed if duplex unit is installed.
The Copies setting determines the number of copies printed for each page. The printer does
not automatically collate the printed copies unl ess Collation is On, then the copies will be
collated. F or example , i f you send a three-page jo b to prin t and set Co pies to 2, the printer
prints page 1, page 1, page 2, page 2, page 3, page 3.
Note:
Selecting the number of copies from the opera tor panel changes the printer default and
affects all subsequent jobs.
Print
Set Blank Pages to Print to include applicat ion-generated blank pages with your print job.
Chapter 3: Menus
27
Page 42

Finishing Menu (continued)
Menu item Valu es
Collation Off*
On
Set Collation On to collate multiple copies of a job. For example, if you send a three-page job
to print and set Copies to 2, t he printer print s page 1, page 2, page3, page 1, page 2, page 3.
When Collation is Off, the printer prints each page of a job the num ber of times specified by
the Copies sett ing. For example, if you sen d a three-page job t o pri nt and set Copies to 2, the
printer prints page 1, page 1, page 2, page 2, page 3, page 3.
Collation can be performed by most software applications. Jobs collated by software appli cations general ly take longer to print since the application must send the print job again f or
each copy desir ed. Thi s ma y ha v e lit tle impact on t he pers on who uses print mana ger or s ome
other job spooling or job buffering capability. However, when the data is transferred over the
LAN, it may tak e a significant amount of time for large collated copies. Also, the multipl e
collated copies of very large jobs require huge amounts of disk space to buffer the job effectively.
If you set Collation O n fr om the printer operator panel or from MarkVisi on, the printer
processes the file only once, saves the file in printer me mo ry (or on the optional hard disk, if
installed), and t hen pri nts the specified number of copies. This sa ves processing ti m e for the
printer and the application, and may redu ce overall printing time.
For Collat ion to work effectively, your software appl ication must recognize this printer feature
and not send the job to the printer multiple times. Your application m ust also let you spe cify
the number of copies needed
You can select Collation from the printer oper ator panel or from the printer driver. For best
resu lts, sel e ct
cation, select
If the jo b is comple x or exceeds the pri nter’s storage capacity, you may receive an
Collation Area
pages in memory. If you reset the printer, the printer discards the job.
Collated
Uncollated
message. Press
in the printer driver and set the number of copies to one. In your appli-
(if the option i s available) and the number of copies you want.
recognize th e print er default set ti ng for Copies.
or
Go
to clear the message. The prin ter collates the remaining
Insufficient
*Factory default
28
Chapter 3: Menus
Page 43

Finishing Menu (continued)
Menu item Valu es
Separator Sheets None*
Between Copies
Between Jobs
Between P ages
You can have the printer insert bl ank separator sheets between jobs, between mult iple copies
of a job, or betw een eac h page of a j ob . Sep ar ator sh eets are pulled from the s ource i dent ified
in the Separator Source menu item.
Select Between Copies for multiple copy jobs. If Collation is Off, a blank page is inserted
between sets of each printed page. If Collatio n is On, a blank page is inserted between each
copy o f t h e job.
If you select Between Jobs, a blank page is inserted after each print job. This may be helpful
when sev eral people are using the prin ter in a net work environment.
When you select Between P ages, a blank page is inserted between each page of a job. This
may be useful if you are printing transparencies and want to r educe static build-up when
stacking transparencies in the output bin.
Separator Source Tray 1*
*Factory default
Tray 2
Tray 3
MP Feeder
If you’ r e usi ng separ ator she ets , the Separat or Sourc e menu i tem let s you s peci fy the tr a y that
holds the separat or sheets.
Only installed paper sources are displayed as values. You can only select MP Feeder as the
separator sour ce if the Configure M P men u item is set to Casset te. If Separ ator Source is set
to MP Feeder and Configure MP is set to Manual or First, th e Separator Source sett ing
automatically changes to Tray 1.
Chapter 3: Menus
29
Page 44
Finishing Menu (continued)
Menu item Valu es
Multipage Print Off*
2-Up
3-Up
4-Up
6-Up
9-Up
12-Up
16-Up
Choose a Multipage Print v alu e to print images of the speci fie d numb er of pa ges o n one sheet
of paper. The printer automatical ly reduces the image of each page so the specified number
of images fits on one sheet.
For exam ple, select 4-Up to print reduced images of pages 1 through 4 of your document on
the first sheet of paper, pages 5 through 8 on the second sheet, and so on.
Note:
Multipage Printing is not supported by PPDS and PCL XL.
Note:
Multipage Printing is not recommended when images and gray fills are dithered on the
host. The print quality of the page may be severely affected when the printer scales a host
dithered artifac t.
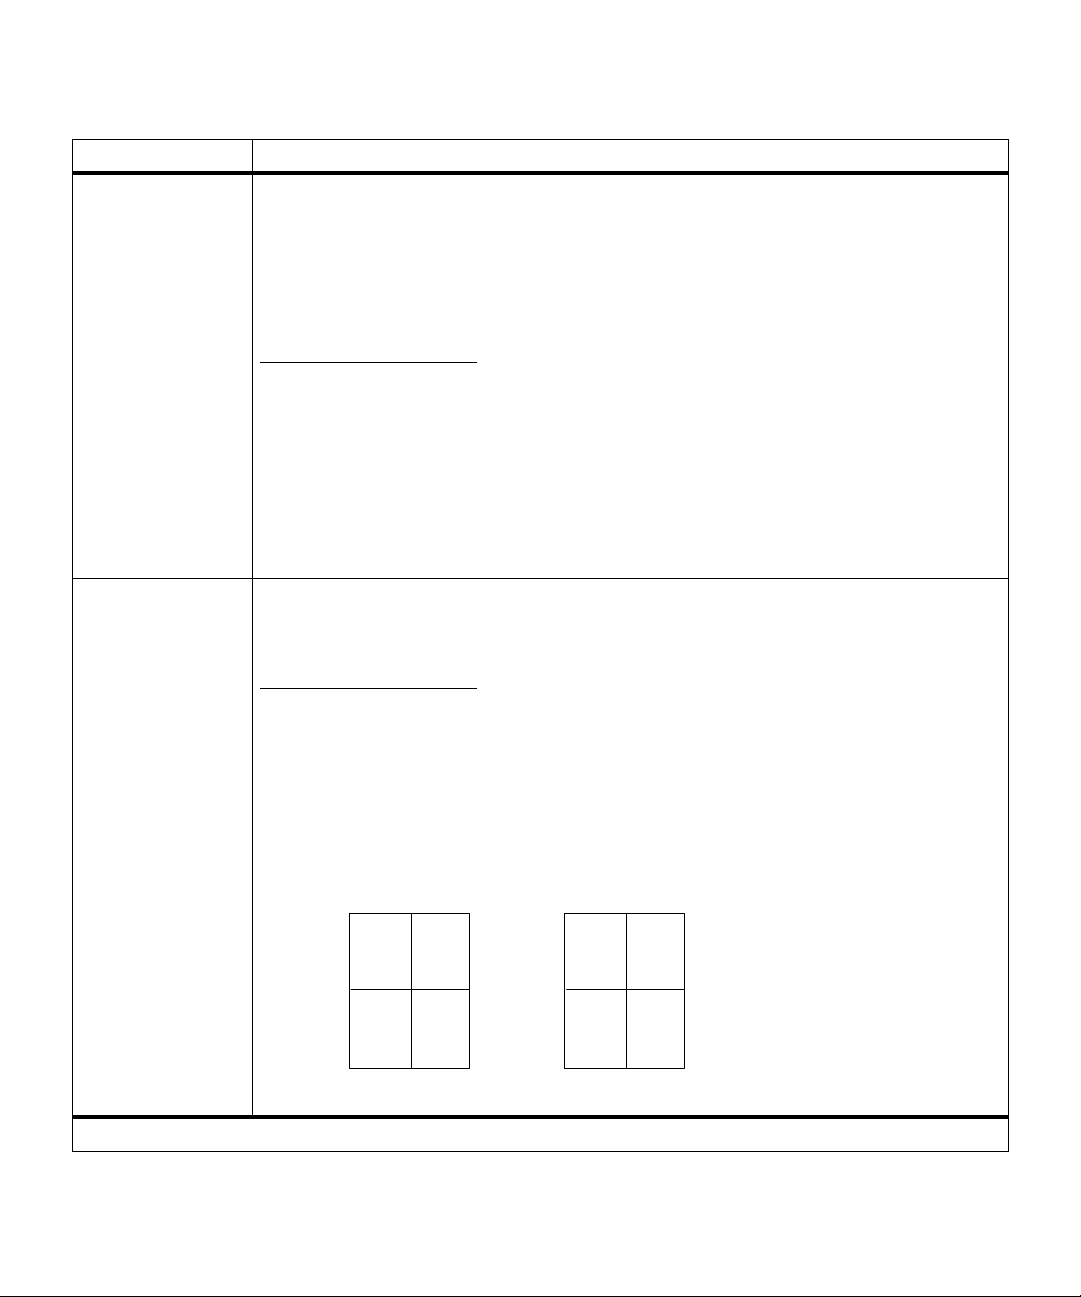
Multipage Order Horizontal*
Vertical
Rev Horizontal
Rev Vertical
*Factory default
30
Chapter 3: Menus
Use the Multipage Order setting to determine the sequence of the page images on each
sheet of a multipage pri nt job. The order of the pages de pends on whether the in divid ual page
images use portrait or landsc ape orie ntation.
For e xample, choose Horizontal to position portrait images in rows from left to right, from the
top of the page to the bottom. Choos e Vertical to position th e images in columns from top to
bottom, left to right.
4-up print job (portrait orientation)
Horizontal Vertical
Page 1 Page 2
Page 3 Page 4
Page 1 Page 3
Page 2 Page 4
Page 45

Finishing Menu (continued)
Menu item Valu es
Multipage View Auto*
Long Edge
Short Edge
When using multipage printing, the printer by default automatically chooses whether to
position the top of each page image along the long edge of the sheet or along the short edge,
depending on how it can bes t fit the selected number of images on the sheet. For example,
when printing portrait pages 2-up with Horizontal order selec ted, the printer positions the top
edge of the images along the long edge of the page. When printing the same job 4-up, the
printer positions the to p edge of the images along the short edge of the page.
Auto setting (horizontal order)
2-up 4-up
Page 1 Page 2
Page 2
Page 3 Page 4
Page 1
If you pref er to have the page i m ages always oriented along the long edge or along the short
edge of the sheet, select Long Edge or Short Edge as the user default.
Multipage Border None*
Solid
The Multipage Border setting may be used to specify whether a border is or is not printed
around each page image.
Select Solid to print a border around each page image when using multi page printing.
*Factory default
Chapter 3: Menus
31
Page 46

Utilities Menu
Utilities Menu
Menu item Valu es
Change Cartridge Press
scroll through the color choices. Press
cartridge you want to remove.
The Utilitie s Menu provides a variety o f m enu items and value
settings relatin g to available printer resources, printer settings,
and print jobs. Additional menu items let you set up printer
hardware and troubleshoot printer problems.
Select
to show the cartridge with the lowe st supply level. Press
Select
to have the carousel rotate and align the color
Menu>
or
<Menu
to
Once the carousel has completed rotating and stopped in the appropriate posit ion for
cartridge installation, the operator panel displays
(second line).
Print Menus Press
Print Net1 Setup Press
Print Net2 Setup Press
Print Net3 Setup Press
Print Fonts PCL Fonts
Print Directory Press
Select
options, the amount of installed printer memory, the printer software code levels, the total
count of printed pages, and the printer serial number.
Select
Note:
Only displayed when a network card is inst alled in PCI slot 1.
Select
Note:
Only displayed when a network card is inst alled in PCI slot 2.
Select
Note:
Only displayed when a network card is inst alled in PCI slot 3.
PS 2 Fonts
Select PCL Fonts or PS 2 Fonts to print a sample and other information of all the fonts
currently a vailable in the specified printer l anguage.
Select
Technical Reference
Note:
This operation is di splaye d whether or not either device is password protected
(including Write or Read/W rite).
Open Cove r
to print a page detailing the us er def ault setti ng f or each menu item, t he insta lled
to print a page detailing the net work 1 settings fo r your printer.
to print a page detailing the net work 2 settings fo r your printer.
to print a page detailing the net work 3 settings fo r your printer.
to print a list of all the resources stored in flash memory or on disk. Refer to the
for details.
(first line),
Replace Toner
32
Chapter 3: Menus
Page 47

Utilities Menu (continued)
Menu item Valu es
Factory Defaults Restore
Do Not Restore
This menu item is used to return most of the control panel settings back to their factory
settings.
When you choose to restore the factory default settings:
• All downloaded resources (fonts, macros, symbol sets) in printer memory (RAM) are
deleted. (Resources residing in flash memory or on hard disk are unaffected.)
• All me nu settings are returned to the factory defa ult values
– Display Language
– Job Buffer Si ze
– All settings in the Parallel Menu, Serial Menu, Fax Menu, Network Menu, USB Menu,
Infrared Menu, and LocalTalk Menu.
Note:
An asterisk (*) appears next to the f actory default v alue for each of the menu items
listed in this chapt er.
except
:
Format Flash
Defragment Flash
Yes
No
Formatting flash m em ory deletes all resources (fonts, macro s) stored in flash memory and
prepares flash memory to receive new resources. You may want to select Print Direc tory
before you format the flash memory to determine what resources, if any, are stored in flash.
The Format Flash menu item is not displayed if the flash memory is Read/Write or Write
protected.
Warning:
lost.
Yes
No
Defragmentati on off er s a met hod where t he us er can re claim t he sp ace occupi ed b y a del eted
resource without reformatting the enti re flash memory device. During def ragmentation the
printer firmware copie s all undeleted resources to print er mem ory, and then reformats the
flash. Once the format operation is complete, the firmware loads all the undeleted resources
back on the flash memory.
The defragment fl ash menu item is not displayed if the i nstalled option is defective or is Read/
Write or Write protected.
If you select Format Flash and then press
Do not turn the printer off while the flash is formatting.
,
Go
any data stored in flash memory is
Chapter 3: Menus
33
Page 48

Utilities Menu (continued)
Menu item Valu es
Format Disk
Job Acct Stat Print
Hex Trace Press
Yes
No
Formatting th e hard di sk o ption delete s all reso urc es stor ed on t he hard disk and prep ares th e
disk to receive new resources. You ma y want to select Print Directory before you format the
disk to determine what resourc es, if any, are stored on the disk.
The Format Disk menu item is not dis pla y ed if the ins tall ed opti on is def ec tiv e or is Read/ Write
or Write protected. F ormat Dis k is also not displayed if Job Buff er Size is set to 100%.
Warning:
lost.
Clear
If you have an optional disk installed in your printer and you are using the printer’s Job
Accounting funct ion, you can choose to print a li st of statistics f or a defined number of the
most recent print jobs. (The number of jobs is determin ed by the value of the Job Acct Limit
menu item in the Setup Menu. ) The statistics include whether the job printed with or without
errors, the ti me requ ired to print the job , the siz e (in b yt es) of the job , t he request ed pap er siz e
and paper type, the tota l number of printed pages, and the number of copies requested.
Select Clear to delete all accumulated job statistics from the optional disk.
Note:
job statistics from the disk if the disk is write protected or read/write protected.
Hex Trace helps isolate the source of a print j ob problem. With Hex Trace selected, all data
sent to the printer is printed in hexadecimal and character representation. Control codes are
not run.
To e xit Hex Trace, turn the printer off, or reset the printer. To reset the printer, press
<Menu
second line. Pr ess
If you select Format Disk and then press Go, any data store d on the hard disk is
Do not turn the printer off while the hard disk is formatting.
You cannot print a list of statistics if the disk is read/write protected. You cannot clear
Select
to enter Hex Trace mode.
Menu>
. The Job Menu is displayed. Press
Select
.
Menu>
or
<Menu
until Reset Printer is on the
or
34
Chapter 3: Menus
Page 49

Job Menu
Menu item Valu es
Job Menu
The Job Menu is available when the printer is id le, the printer is
busy process ing or printing a job, a printer message is displa yed,
or when the printer is in Hex Trace mode. Press
<Menu
to open the Job Menu.
Menu>
or
Cancel Job If the printer is processing a job , press
Select
to cancel the job.
Reset P rinter Pre ss
The printer resets t o the printer default setting for each menu item . All downloaded resources
(fonts, macros, symbol sets) in printer memory (RAM) are deleted. All data on the currently
selected host interface is deleted from the interface link buf fer.
Note:
fax data associated with the fax job is discarded. All fax jobs received and queu ed for printing
are also discarded .
Note:
Print Buffer Press
This menu item is only availabl e when you enter the Job Men u whil e the
display ed . The W aiti ng st ate occur s if an incom plet e job is sent to the printer or if an ASCI I job
is being printed. Examples include sending a print screen command from your host com puter
or copying a DOS file.
Cancel Fax R
D
If you have an internal fax mod em inst alled, you can cancel outgoing fa xes before they are
transmitte d or cancel incoming faxes before they fini sh printing.
If you want to can cel an incoming fax, enter the Cancel Fax command through the Job Menu
and select
cancel the incoming fax.
If you want to can cel an outgoing fax , enter the Cancel Fax command through the Job Men u
and select
<Menu or Menu> until the number of the outgoing fax you want to cancel is displayed. When
the fax num ber of the outgoing fax you want to cance l i s displayed, press
The printer can store up to five outgoing fax numbers in the outgoing fax queue. Any time
more than fiv e outgoi ng f axes are in th e queue , the next one will e nter the di spla y queue as an
outgoing fax is transmitted or cancelled.
Menu>
If the printer is curr ently sending or receiving a fax, the connection is terminated and all
Before selec ti ng Reset Printer , exit the software application you are using.
Select
<Menu
or
to print any data stored in the print buffer.
R
. The fax number for the sending machine will be displayed. Press
D
. If the telephone number of the fax you want to cancel is not dis played, press
to open the Job Menu, and press
Menu>
or
<Menu
to open the Job Menu, and press
Select
to reset the printer.
Waiting
message is
Select
to
Select
.
Chapter 3: Menus
35
Page 50

Job Menu
Menu item Valu es
CONFIDENTIAL
JOBS
Enter PIN
Print All Jobs
PRINT A JOB
Delete A ll Jobs
DELETE A JOB
COPIES
If you send a Confidenti al Job, the printer formats your job and holds the job in memory. The
printer delays the printing of your job until you enter a PIN assigned to the job. You enter the
number through the oper ator panel. When printed, the job is automatically deleted.
For this operation, th e control panel buttons have been redefined to facilitate ent ry of the PIN.
The numeric definiti on of each button is sho w n below.
1 Menu 2
Select 3
Go 5
Return 4
Stop 6
36
After entering your PIN number, the operating system checks the PIN associated wi th each
stored Confidenti al Print j ob. If the entered PIN matches a PIN associated with any job, you
are granted access to those jobs associated with that PIN number.
Select
Select
job will be displa yed on the second line of the operator panel. Press
choose the next or previous print job in the list. Press
Select
Select
print job will be displ ayed on the second line of the oper ator panel. Press
choose the next or previous print job in the list. Press
print queue.
Select
be displayed on the second line of the operator panel. Press
next or previous print job in the list. Press
second line. Pr ess
printed. Press
Chapter 3: Menus
Print All Jobs
PRINT A JOB
Delete All Jobs
DELETE A JOB
COPIES
for a listing of all store d confidential jobs under your PIN number . A print
to change the number of copies for each con fi dential print job. A print job will
Menu
Select
to print all jobs associat ed with your PIN number.
Select
to print the document.
Menu
> or
Menu
< to
to delete all jobs associated with your PIN number.
for a listi ng of all stored confidential jobs under your PIN number. A
> or
> or
Menu
Menu
Select
to delete the document from the
Menu
Select
Menu
< to increase or decrease the number of copies to be
when the print job you want appears on the
Menu
> or
< to choose the
to send the document to print.
< to
Page 51

Job Menu
Menu item Valu es
HELD JOBS Print All Jobs
PRINT A JOB
Delete A ll Jobs
DELETE A JOB
COPIES
The Held Jobs setting permits the user to delay the printi ng of a job and/or print additional
copies of a job. If you send a Reserve Print, Repeat Print or Verify Print Job, the printer holds
the job in memory.
Print All Jobs
Select
PRINT A JOB
Select
A print job will be displa yed on the second line of the oper ator panel. Press
to choose the next or previous print job i n the l ist. Press
Delete All Jobs
Select
DELETE A JOB
Select
A print job will be displa yed on the second line of the oper ator panel. Press
to choose the next or previous print job i n the l ist. Press
the print queue.
COPIES
Select
Print job. A print job will be displayed on the second line of the operat or panel. Press
Menu
or
you want appears on the second line. Press
number of copies to be printed. Press
Note:
the
Note:
least one Repeat Print, Reserve Print, or Verify Print job.
< to choose the next or previous print job i n the l ist. Press
Unlike a Confidenti al Job, you do not enter a PIN to access the values once you enter
HELD JOBS
This menu item is not displ ayed in the
to print all jobs being held for Reserve Print, Repeat Print or Verify Print.
for a listing of all stored Reserve Print, Repeat Print or Verify Print jobs.
Select
to print the document.
Menu
> or
Menu
to delete all Reserve Print, Repeat Print or Verify Print jobs.
for a list ing of all stored Reserv e Print, Repe at Print or Verify Print jobs .
Menu
Select
to delete the document from
> or
Menu
to change the number of copies for each Reserve Print, Repeat Print or V erify
Menu
>
Menu
Select
to send the document to print.
> or
Menu
Select
when the print job
< to increase or decrease the
menu item.
JOB MENU
until the printer has p rocessed at
<
<
Chapter 3: Menus
37
Page 52

Setup Menu
Menu item Valu es
Setup Menu
The Setup Menu is used to configure printer features.
Printer Language PCL Emulation
Power Saver 1…240 (20*)
PS Emulation*
The printer language define s ho w the com puter comm unicat es with the prin ter. Your computer
uses printer languages , such as PCL em ula tion and P ost Script 3 emul ation , to send print data
to the printer. Setting a printer language as the default does not prevent the software appl ication from sendin g print jobs that use the other printer language.
The Power Saver menu item lets you reduce power usage when the printer is i dle. The Power
Saver setting determines the length of time (in minutes) the printer waits after a job is printed
before it goes to a red uced power state.
When the Power Saver value you have selec ted has elapsed, the message
replaces the
state. This is the printer default . Both messages indicate t he prin ter is ready to receive jobs.
If your printer is in constant use, sele ct a hi gh setting, such as 240. Under mos t ci rcumstances, this keeps the printer ready to print with minimum warm-up time. Howev er, it al so
uses more energy.
Setting Power Saver to 1 puts the printer in Power Saver mode one minute after it finishes
printing each job. This uses much less energy, but requires more warm-up time for the printer.
If your printer shares an ele ctrical cir cui t with room l ighti ng and y ou no tice l ights flic k ering, y ou
may want to set Po wer Sa ver to 1.
If you want a balance between energy consumption and a shorter warm-up period, select a
Power Saver value between 1 and 240 min utes.
Note:
Screen is displayed which includes a fa x status field to provide quick fax status information to
the user.
Ready
If the printer has been configured to send or receive fax data, the Power Saver/Fax
Power Saver
message on the operator panel displa y when the printer is in a ready
*Factory default
38
Chapter 3: Menus
Page 53

Setup Menu (continued)
Menu item Valu es
Resource Save Off*
On
The Resource Save setting determines what the printer does with resources downl oaded to
RAM if the printer receives a job that requires more memory than is availabl e.
If Resource Save is On, the pri nter retains all permanent downloaded resources for all printer
languages during language changes and printer reset s. If the printer runs out of memory, the
message
If Resource Save is Off, the print er retains permanent downl oaded resources only unti l
memory is needed. Your printer deletes those resour ces stored for the inactive printe r
language.
See page 90 for informati on about adding memory to your printer.
Note:
sufficient memory available, the printer posts
Resource Save to off.
Memory Full
Resource Sav e requires a minimum amou nt of available memory. If there is not
appears on the display.
insufficient memory
and automatically sets
Download Target RAM*
Flash
Disk
The Download Target menu item specifies where you want t o store downloaded resour ces.
Storing downloaded resour ces in flash memory or an optional hard di sk is permanent st orage
rather than the t empor ary stor age that RAM pr ovid es . You can add resour ces to f lash mem ory
or disk until the device is full. Use your software appl ication or the MarkVision printer utility to
download resources to the printer.
The Download Target menu item is only displayed if the flash memory or hard disk is not
defecti ve or Read/Write or Write protected. Disk is not an available value for Download Target
if Job Buffer Siz e is set to 100%.
Print Tim eout Disabled
1…255 (90*)
The Print Timeout sett ing de termines t he time ( from 1 t o 255 seconds) th e printe r wai ts before
printing the last page of a print job th at does not end with a command to print the page. The
print timeout counter does not start until the printer displays the
When a print timeout occurs, the printer stores the pag e in the print buffer.
When Print Timeout is disabled, the printer does not pri nt the last page of a pri nt job until one
of the following occurs:
• The prin ter receives enoug h information to fill the page.
• The prin ter receives a F orm Feed command.
• You select Print Buff er from the Job Menu. See page 35 for more information.
*Factory default
Waiting
message.
Chapter 3: Menus
39
Page 54

Setup Menu (continued)
Menu item Valu es
Auto Continue Disabled*
5…255
Set Auto Contin ue to a value between 5 seconds and 255 seconds to ha ve the printer
automatically continue operating after it detects one of t he following errors:
35 Res Save Off Deficient Memory
37 Insufficient Collation Area
37 Insufficient Defrag Memory
37 Insufficient Memory
38 Memory Full
39 Complex P age
51 Defective Flash
52 Flash Full
53 Unformatted Flash
54 Serial Option x Error
54 Std Par ENA Connection Lost
54 Par x ENA Connection Lost
54 Ser x Fax Conn ection Lost
55 Insufficient Fax Buffer
56 Std Paral lel Port Disabled
56 Parallel Port
56 Serial
61 Defective Disk
62 Disk Full
63 Unformatted Disk
84 Transfer Belt Life Warning
85 Coating Roll Lif e Warning
87 Fuser Exhausted
88 Yellow Toner Lo w
88 Magenta Toner Low
88 Cyan Toner Low
88 Black Toner Low
Print Jobs on Disk?
If one of these errors occurs and Auto Conti nue is disabled, the pri nter stops and waits for
operator intervention. When Auto Continue is set to a numerical value, the printer waits for
operator intervention for the specified length of time and then automatically resumes
processing.
The Auto Continue value has one other purpose. If the operator panel has displayed menu
information for the specified peri od of time without a button bei ng pressed, the printer
automatically exits the men us and returns to the ready state.
Disabled
x
Port Disabled
x
*Factory default
40
Chapter 3: Menus
Page 55

Setup Menu (continued)
Menu item Valu es
Wait Timeout Disabled
15…65535 (40*)
The Wait Timeout setting determines the amount of time in seconds the printer waits to
receive addi ti onal bytes of PostScript dat a fro m the com puter . When this timeout ex pires, the
print job is canceled. Selec t Dis abled to turn Wait Timeout off.
The Wait Timeout menu i tem is only available when using PostScript 3 emulation. T he setting
has no effect on PCL emul ation print jobs.
Jam Re covery O n
Off
Auto*
Jam recov ery allows you to select whether jammed pages are reprinted or not.
When Jam Recovery is set Off, the printer does not reprint a page that has jammed.
When Jam Recovery is set On, the printer keep s the image f or a printed page unt il the printer
signals the page has successfully e xited the printer. The printer reprint s all jammed pages.
If Jam Recovery is set to Auto , the printer keeps the i m age and reprints the page unless the
memory required to hold the page is needed for other printer task s.
Note:
Page Protect O ff*
On
You can save printer memory by turning Jam Recovery Off.
*Factory default
Set Page Protect On to make sure an entire page is processed befor e it is printed. This may
be helpful if you are having troub le printing a page properly becaus e of complex page errors .
If you still can not print the page after setting Page Protect On, y our printer may not have
enough memory to process the page. You may have to reduce the size and number of fonts
on the page, change the Print Quality setting, or increase the installed pri nter memory.
For most print jobs, you do not need to set Page Protect On. When P age Protect is On,
printing may sl ow.
Chapter 3: Menus
41
Page 56

Setup Menu (continued)
Menu item Valu es
Print Area Normal*
Whole Page
Select Whole Page to modify the PCL formatting area and the printer print area. Refer to the
Technical Reference
When Normal is selected the printer uses the print area of the paper indicated by the paper
tray or operator panel input. If you try to print any data in the non-printable area defined by
Normal Print Area, the printer will clip the image at the boundary defined by the Normal
defined printable area.
The Whole Page set ting only affects pages printed using PCL 5 interpreter. This set ting has
no effect on pages printed using the PCL XL or PostScript interpreters. If you try to print any
data in the non-printable area defined by Normal Print Area, th e printer will clip the image at
the boundary defined by the Normal defined printable area.
Display Language English*
French
German
Italian
Spanish
Danish
Norwegian
Dutch
Swedish
Portuguese
Finnish
Japanese
Russian
Polish
Hungarian
Turkish
Czech
The Display Language setting determines the language of the text th at appears on the
operator panel display.
for more information about printable areas.
Alarm C o ntrol Off
*Factory default
42
Chapter 3: Menus
Single*
Continuous
If you want the printer alarm to sound any time the printer requires intervention, select Single
or Continuous. If you select Single , the printer sounds three qui ck beeps to let you know
operator i ntervention is required. If you sele ct Continuous, the printe r repeats the t hree beeps
every t e n se conds .
If you do not want the alarm to sound, select Off.
Page 57

Setup Menu (continued)
Menu item Valu es
Job Buffer Size Disabled*
10…100%
If you have an optional disk i nstalled in your printer, y ou can allocate a portion of the available
disk space for spooling jobs. You can choose any 1% increm ent between 10 and 100%. You
must select a Job Buffer Size before you can set the Job Buf fer menu to On f or a particular
port.
Warning:
stored on the disk are delet ed.
The Job Buffer Size men u item is only displayed if the installed disk option is formatted and is
not defective or Read/Write or Write protected.
If you cha nge t he job b uffer size , the prin ter f ormats t he hard di sk , and al l resou rces
Job Accounting Off*
On
If you have an optional disk installed in your printer, set Job Accounting On to use the disk to
store statisti cal information about your printer’s most recent jobs. The stati stics include
whether the job printed with or without errors, time required to print the job , si ze (in bytes) of
the job, r equested paper size and paper type, color settings used, total num ber of printed
pages, and the number of copies requested.
To print a listing of all accumulated statis ti cs, select Print fr om the Job Acct Stat menu item in
the Utilities Menu.
The Job Accounting menu it em is not displayed if the installed di sk option is defec ti ve or
Read/Write or Write protected, or if the Job Buffer Size menu item is set to 100%.
Job Acct Limit Disabled
10…1000*
If you have an optional disk installed in your printer, you can use the disk to store statistical
information about a specified number of jobs. The value you select from the Job Acct Limit
menu item determines the number of jobs for which st atistics are stored. Once you reach the
job limit, statistics for the oldest job are deleted as new statistics are stored, maintaining
statistics for the specified number of jobs.
If you selec t Di sabled, the only limit to the number of jobs f or whi ch statistics are stored is the
memory available on the disk.
Warning:
disk is discarded.
The Job Acct Limit menu item is not displayed if the installed disk option is defec ti ve or Read/
Write or Write protected, or if the Job Buffer Size menu item is set to 100%.
When you change the Jo b Acct Li m it value, al l statistical information stored on the
*Factory default
Chapter 3: Menus
43
Page 58

PCL Emul Menu
The PCL Emul Menu changes printer settings that affect jobs
printed using the PCL emulation printer language. For information about the PCL emulation commands supported by your
printer, refer to the Technical Reference.
PCL Emul Menu
Menu item Valu es
Font Source Resident*
Download
Flash
Disk
All
This printer setting allows you to select the source which contains the default font selection.
The value list only consists of font sources which exist on the printer. In other words, if no
download fonts ex ist in the printer’s memory and no fla sh or disk is install ed, then Resident i s
the only valid value for the Font Source.
Note:
If a flash or di sk de vi ce is i nstal le d but it i s read/wri te pro tected , then i t is a lso not a v ali d
selection.
Note:
Saving Font Source, Font Name, Point Size, Pitch, or Symb ol Set has the affect of
saving the sel e cted font as the default.
Font Name Font positi on and font name for all font s in the selected f ont source
(R0 Courier 10*)
Always select the font source before you select a font name. After you select a font source,
choose the specific font from the Font Name menu item. The printer displays the font source
abbreviation, fo nt ID , and font name for each font. The font source abbreviation is R for
resident, F for flash, K for disk, and D for download.
To print a font sample list showing all the fonts available for PCL emulation, select Print Fonts
and then PCL Fonts from the Utilities Menu.
Note:
Saving Font Source, Fo nt Name, Point Size, Pitch, or Symbol Set will sav e the selected
font as the default.
Point Si ze 1…1008 (in increments of 0.25)
(12*)
If you chose a scalable typogr aphic font, you can select the poi nt si ze for the font. Point size
refers to the height of the characters in the font. One point equals approximately 1/72 of an
inch. You can select point sizes from 1 to 1008 in increments of 0.25 points.
Note:
Saving Font Source, Fo nt Name, Point Size, Pitch, or Symbol Set will sav e the selected
font as the default.
*Factory default
44
Chapter 3: Menus
Page 59

PCL Emul Menu (continued)
Menu item Valu es
Pitch 0.08…100 (in increments of 0.01)
(10*)
If you chose a scalable monospaced font, you can select the font pitch. Pitch refers to the
number of fixed-space characters in a hori zontal inch of type. You can select a pitch from 0.08
to 100 charact er s per i nch (cpi ) in incre ments of 0.0 1 cpi. F or non -sc alab le monospa ced f on ts,
the pitch is displayed, but it cannot be changed.
Note:
Saving Font Source, Fo nt Name, Point Size, Pitch, or Symbol Set will sav e the selected
font as the default.
Symbol Set List of symbol set IDs and symbol set names
10U PC-8* (Country specific)
12U PC-850* (Country specific)
A symbol set is a set of alphabe tic and numeric characters, punctuation, and special symb ols
used when printing with a selected font. Symbol sets support the different requirements for
languages or specif ic applications, such as math symbols for scientific text. The printer
displays only the symbol sets suppo rted f or the selected font name.
Note:
Saving Font Source, Fo nt Name, Point Size, Pitch, or Symbol Set will save the selected
font as the default.
Orientation Portrait*
Landscape
*Factory default
The Orientation setting determines how printing is oriented on th e page.
In Po rtrait
In Landscape
orientation, the printing runs parallel to the short edge of the paper.
This is
PORTRAIT
orientation.
This is
PORTRAIT
orientation.
This is
orientation, the printing runs parallel to the long edge of the paper.
This is
LANDSCAPE
orientation. This is
LANDSCAPE
orientation.
Chapter 3: Menus
45
Page 60

PCL Emul Menu (continued)
Menu item Valu es
Lines per Page 1…255
60* (U. S.)
64* (EMEA)
The Lines per Page setting determines the number of lines that print on each page. The
setting can range from 1 to 255 lines per page. The printer s ets the amount of space bet ween
each line (vertical li ne spacing) based on the Lines per Page, Paper Size, and Orientation
settings. Select the correct Paper Size and Orientation before sett ing Lines per Page.
A4 Width 198 mm*
203 mm
The A4 Width menu item let s you select the wid th of the logical page f or A4 paper . When you
select 198 mm, the width of the logical page is compatib le with current European ISO
standards. When you select 203 mm, the width of the logical page is wide enough to print
eighty 10-pitch characters.
Auto CR after LF Off*
*Factory default
On
The Auto CR after LF set ting determines whether the printer aut om atically performs a
carriage return after a line feed control command.
46
Chapter 3: Menus
Page 61

PCL Emul Menu (continued)
Menu item Valu es
Auto LF after CR Off*
On
The Auto LF after CR setti ng determines whether the printer automatically performs a line
feed after a carri age ret u rn cont rol command.
TRAY RENUMBER Assign MP Feeder
Assign Tray 1
Assign Tray 2
Assign Tray 3
Assign Man Pap e r
Assign Man Env
Off*
0…199
VIEW FACTORY DEF
MPF Defaul t = 8
T1 Default = 1
T2 Default = 4
T3 Default = 5
MPap Default = 2
MEnv Default = 3
*Factory default
Restore Defaults
Yes
No
The Tray Renumber menu i tem provides softw are compatibility with other printers. This ma y
be helpful if you have print jobs or applications previously set up for other printers.
For exam ple, if you wa nt t o use a dif ferent printer driver with your printer and have optional
drawers installed, use the Tray Renumber men u item to set the tra y values. You can then
successfully choose the correct paper source with the different printer driver.
Refer to the
Technical Reference
for more information about assigning source numbers.
Chapter 3: Menus
47
Page 62

PostScript Menu
PostScrip t Menu
Menu item Valu es
Print PS Error Off*
On
Set Print PS Error On to print PostScript 3 emulation errors. If an error occurs , the job stops
processing, the error message prints, and the printer flushes the job.
If Print PS Error is set Off
message.
Font Priority Resident*
Flash/Disk
Use the Font Priority menu item to establish the font search order. Select Resident to search
the printer’s internal memory (ROM) f or the requested font before searching flash memory or
an optional hard disk. Select Flash/Disk to sea rch the hard disk, if install ed, and then search
flash memory, bef ore searching for the requested fonts in printer memory.
Note:
Memory). In other words, if f onts exist i n VM , it is always searched be fore any external device
or the internal ROM storage device regardless of the setting of Font Priority.
Note:
password protected (Write or Read/Write) flash option is installed; a formatted, not defective,
nor password protected (Write or Read/Write) disk option is install ed and Job Buffer Size is
not set to 100%.
The PostScript Menu changes settings that affect jobs printed
using the PostScript 3 emulation printer language. For information about the PostScript commands supported by your printer,
refer t o the Technical Reference.
and an error occurs , th e job flushes without printing t he error
This printer setting does not affect the searching for fonts downloaded to VM (Virtual
Only displa yed when at least one of f ollowing exists: a formatted , not defective, nor
Image Smoothing Off*
On
When you are printing low resolution images, such as images you download from the World
Wide Web at 72 dpi, set Image Smoothing On. Image Smoothing enhances the contrast and
sharpness of bitmapped images and smooths color transitions. The setting has no effect on
images downloaded at 300 dpi or higher resolution.
*Factory default
48
Chapter 3: Menus
Page 63

Parallel Menu
Parallel Menu
Menu item Valu es
PCL Sm a rtSwi tc h Off
On*
Setting PCL SmartSwitch On lets the printer e xamine the data on the paralle l i nter face
connection and select PCL emulation if the data indicates that is the printer language.
If both PCL SmartSwitch and PS SmartSwitch are set Off, the printer uses the language
specified in the Printer Lan guage menu as the defau lt. If only one SmartSwitch setting is set
Off, the printer uses the language that has its SmartSwitch sett ing set On as the defaul t.
PS Sma rtSwi tc h O ff
On*
The Parallel Menu changes settings affecting jobs sent to the
printer via a p arallel interface port.
When you select Pa ra lle l Men u fro m th e opera t or p ane l , Std Par-
Select
allel appears on the second line of the display. Press
if
you want to chan ge the settin g s lis ted in the following tab le for
the standard p arallel port.
If you have an optional parallel port insta lled, select Paralle l
Menu, and the n pr ess
Menu>
or
<Menu
to scroll to Parallel Opt 1
or Parallel Opt 2. When the correct option is displayed, press
Select
to view the menu items listed in the following table.
NPA Mode
(Network Printing
Alliance)
*Factory default
Setting PS SmartSwitch On lets the printer examine the data on th e parallel interface
connection and sele ct PostSc ript 3 em ulation if the data ind icates that is the printer la nguage.
If both PCL SmartSwitch and PS SmartSwitch are set Off, the printer uses the language
specified in the Printer Lan guage menu as the defau lt. If only one SmartSwitch setting is set
Off, the printer uses the language that has its SmartSwitch sett ing set On as the defaul t.
On
Off
Auto*
NPA is a mode of bidirec tiona l commu nication t hat fol lows the conventions def ined in
Printing Alliance Proto col , A Printer /Host Control Specificati on
NPA mode requires special processing of the print data. If NPA Mode is set On, the data
received must be in NPA format. If not, it is rejected as bad dat a. If NPA Mode is set Off, the
printer does not perf o rm any NPA processing. If NPA Mode is set to Au to , the prin ter e xam ines
the data to determine the format and then processes it in either format.
The NPA Mode setting in the Par all el Menu applies only to the parallel interface connection.
Note:
Changing the NPA Mode setting automatically resets the printer.
Dev eloped by the NPA
Chapter 3: Menus
Network
.
49
Page 64

Parallel Menu (continued)
Menu item Valu es
Parall el Buffer Disabled
Auto*
3K to maximum size allowed
You can configure the size of the pa r allel input buf f er t o meet the req uirement s of y our system.
If the limited size of the input buffer is preventing you from continuing work in your application
each time you send a job to the printer, you may want to increase the b uffer size.
The maximum siz e depend s on t he a mount of memory in y our print er, the siz e o f the ot her l in k
buffers, and whether the Resource Save set ti ng is On or Off. To maximize the range f or the
Par allel Buf fe r si ze , y ou can di sab le or reduce t he si ze of the seria l, f ax, netw ork, Infr ar ed, and
LocalTalk buffers. Choose the Auto setting to let the printer automati cally calculate a buffer
size proportional to the total amount of available printer me mo ry. In most cases, A uto is the
recommended setting.
See page 91 for a listing of the default buf fer sizes for all the inter face ports.
Note:
Job Buffering Off*
On
If you have an optional disk installe d in your pri nter, you can choose to ha ve jobs that are sent
to the parallel port spool to the disk. Spooling jobs to disk may decrease the time requi red for
the printer to accept data from an application, and ther efore free the application faster for
other work. Since disk memory provides permanent storage, job buffering to disk also
prevents the loss of print job data if the printer loses power.
The Job Bufferin g men u it em is not displayed if the formatted hard di sk is defective, is Read/
Write or Write protected, or if Job Buffer Size is set to Disabled in the Setup Menu.
See page 92 for more informati on about job buffering.
Note:
Changing the Parallel Buffer setting automatically resets the printer.
Changing the Job Buff eri ng setting automati cally resets the printer.
Advanced Status Off
*Factory default
50
Chapter 3: Menus
On*
If Advanced Status is set On, bidirectional communication is enabled through the parallel
interface.
When advanced status is set to Off, bidirectional communication is disabled and all data in the
parallel output buffer is immediately flushed. Since parallel port negoti ation is dis abled, a host
trying to negotiate with the printer may find the parallel port to be non-compliant.
Page 65

Parallel Menu (continued)
Menu item Valu es
Protocol Standard
Fastbytes*
You can select Standard or Fastbytes protocol for the parallel interface. Fastbyt es is
compatible wi th most existin g parallel interface implementations. Use Standard onl y if you
experience parallel inter face prob lems. Refer to the
about the parallel interface.
Techn ical Referenc e
for more information
Honor Init Off*
On
The Honor Init setting determines whether the printer honors hardware initialization requests
from the computer. The computer requests initialization by activating the INIT signal on the
parallel int erface. Many personal co mputers act iv ate the INI T signa l each t i me the com puter is
turned on and off.
Par all el Mode 1 Off
On*
This setting enabl es or disabl es the pul l up resistor s on the para llel port signals. I t is useful f or
personal computers that have open coll ector outputs on the par allel port signals. Set Parallel
Mode 1 On to disable the res istors or Off to enable t he resistors.
Refer to the
Par all el Mode 2 Off
On*
This setting determines if th e parallel port data is sampled on the leading or trailing edge of
strobe. If Parallel Mode 2 is set On, the parallel port data is sampled on the leadi ng edge of
strobe. The parallel port data is sampled on the trailing edge of strobe if Par all el Mode 2
Off.
Refer to the
*Factory default
Technical Reference
Technical Reference
for more information about this setting.
for more information about this setting.
is set
Chapter 3: Menus
51
Page 66

Serial Menu
Menu item Valu es
PCL Sm a rtSwi tc h Off
On*
Setting PCL SmartSwitch On lets the printer e xamine the data on the serial interface
connection and select PCL emulation if the data indicates that is the printer language.
If both PCL SmartSwitch and PS SmartSwitch are set Off, the printer uses the language
specified in the Printer Lan guage menu as the defau lt. If only one SmartSwitch setting is set
Off, the printer uses the language that has its Sma rtSwitch sett ing set On as the default.
PS Sma rtSwi tc h O ff
On*
Serial Menu
The Serial Menu changes settings affecting jobs sent to the
printer via th e s erial interface p o rt. This menu i s only availa ble
if an optional tri-port adapter is installed in your printer.
When you select Serial Menu from the operator panel, Serial
Option 1 or Serial Option 2 appears on the second line of the
display, depending on whether a tri-port adapter is installed in
connector 1, connector 2, or both. When the correct option is
Select
displayed, press
to view the men u items listed in the fol-
lowing table.
NPA Mode
(Network Printing
Alliance)
*Factory default
52
Chapter 3: Menus
Setting PS SmartSwitch On lets the printer examine the data on the serial interface
connection and sele ct PostSc ript 3 em ulation if the data ind icates that is the printer la nguage.
If both PCL Smartswitch and PS Smartswitch are set Off, the printer uses the language
specified in the Printer Lan guage menu as the defau lt. If only one SmartSwitch setting is set
Off, the printer uses the language that has its Sma rtSwitch sett ing set On as the default.
On
Off
Auto*
NPA is a mode of bidirec tiona l commu nication t hat fol lows the conventions def ined in
Printing Alliance Proto col , A Printer /Host Control Specificati on
NPA mode requires special processing of the print data. If NPA Mode is set On, the data
received must be in NPA format. If not, it is rejected as bad dat a. If NPA Mode is set Off, the
printer does not perf o rm any NPA processing. If NPA Mode is set to Au to , the prin ter e xam ines
the data to determine the format and then processes it in either format.
The NPA Mode setting in the Serial Menu applies only to the serial interface connection.
Note:
Changing the NPA Mode setting automatically resets the printer.
Dev eloped by the NPA
Network
.
Page 67

Serial Menu (continued)
Menu item Valu es
Serial Buffer Disabled
Auto*
3K to maximum size allowed
You can configure the size of the se rial i nput b uf f er to m eet the requir ements of y our sys tem. If
the limited size of the input buffer is preventing you from continuin g w ork in y our application
each time you send a job to the printer, you may want to increase the b uffer size.
The maximum siz e depend s on t he a mount of memory in y our print er, the siz e o f the ot her l in k
buffers, and whether the Resource Save set ti ng is On or Off. To maximize the range f or the
Serial Buffer si ze, you can disable or reduce the si ze of the parallel, network, infrared,
LocalTalk, fax, or other serial buffer. Choose the A uto setting to let the print er aut om atically
calculate a buffer size proportional to the total amount of available printer memory. In most
cases, A uto is the recommended setti ng.
See page 91 for a listing of the default buf fer sizes for all the inter face ports.
Note:
Job Buffering Off*
On
If you have an optional disk installe d in your pri nter, you can choose to ha ve jobs that are sent
to the serial port spool to the disk. Spooling jobs to disk may decrease the time require d for
the printer to accept data from an application, and ther efore free the application faster for
other work. Since disk memory provides permanent storage, job buffering to disk also
prevents the loss of print job data if the printer loses power.
The Job Bufferin g men u it em is not displayed if the formatted hard di sk is defective, is Read/
Write or Write protected, or if Job Buffer Size is set to Disabled in the Setup Menu.
See page 92 for more informati on about job buffering.
Note:
Changing the Serial Buff er setting automat ically resets the printer.
Changing the Job Buff eri ng setting automati cally resets the printer.
RS-232/RS-422 RS-232*
RS-422
Choose the serial communication configuration for your printer. If RS-422 is selected, Serial
Protocol is automatically set to XON/XOFF.
RS-422 Polarity Normal*
Reverse
If you select RS-422 for the serial comm unication configu ration, you can th en select Normal
or
Rev erse polarity.
*Factory default
Chapter 3: Menus
53
Page 68

Serial Menu (continued)
Menu item Valu es
Serial Protocol DTR* (hardw are handshaking)
DTR/DSR (hardware handsh aking)
XON/XOFF (software han dshaking)
XON/XOFF/DTR (combined handshaking)
XON/XOFF/DTR/DSR (combined handshaking)
The printer supports hardware handshaking, software handshaking, and combined hardware
and software handshaking, as indica ted i n the list of values for this menu it em .
Refer to the
Robust X O N Off*
On
This printer setting only applies to the serial port if Serial Prot ocol is set to XON/XOFF. When
Robust XON is set On, the printer sends a continuous stream of XONs to the host computer
to indicate the serial port is ready to receive more data.
Technical Reference
for more information about serial inte rface.
Baud 1200
2400
4800
9600*
19200
38400
57600
115200
If you use a serial interface, you must select the rate at which data is being sent to or from
your computer. Refer to the
values.
Data Bits 7
8*
If you use serial interface, select the number of data bits that are sent in each transmission
frame. Refer to the
*Factory default
Technical Reference
Technical Reference
for information about the range of baud
for more information about data bi ts.
54
Chapter 3: Menus
Page 69

Serial Menu (continued)
Menu item Valu es
Parity Even
Odd
None*
Ignore
This setting lets y ou select the parity f or seri al input and output data fr am es. Refer to the
Technical Reference
Honor DSR O ff*
On
The Honor DSR setting det ermines whethe r the print er uses i ts Data Set Ready ( DSR) signa l.
DSR is one of the handshaking signal s for most serial int erface cables. The serial inter face
uses DSR to distingui sh data sen t b y the co mpute r from dat a creat ed b y elec trical noi se in t he
serial cable. This electrical noise can cause stray characters to print. Set Honor DSR On to
prevent stra y characters from prin ti ng.
*Factory default
for more information about parity.
Chapter 3: Menus
55
Page 70

Network Me nu
Network Menu
Menu item Valu es
PCL Sm a rtSwi tc h Off
On*
Setting PCL SmartSwitch On lets the printer e xamine the data on the network interface
connection and select PCL emulation if the data indicates that is the printer language.
If both PCL SmartSwitch and PS SmartSwitch are set Off, the printer uses the language
specified in the Printer Lan guage menu as the defau lt. If only one SmartSwitch setting is set
Off, the printer uses the language that has its SmartSwitch set On as the default.
PS Sma rtSwi tc h O ff
On*
The Network Menu changes settings affecting jobs sent to the
printer via the network port. This menu is only available if an
optional network adapter is installed in your printer.
When you select Network Menu from the operator panel, Network Option 1, Network Option 2
or Network Option 3 appears
on the second line of the display, depending on whether a network adapter is installed in connector 1, connector 2, Network
Option 3 or all connect ors. When the corre ct opt ion is dis pla yed
Select
on the second line, press
to view the menu items listed in
the following ta ble.
NPA Mode
(Network Printing
Alliance)
*Factory default
56
Chapter 3: Menus
Setting PS SmartSwitch On lets the printer examine the data on the network interface
connection and sele ct PostSc ript 3 em ulation if the data ind icates that is the printer la nguage.
If both PCL SmartSwitch and PS SmartSwitch are set Off, the printer uses the language
specified in the Printer Lan guage menu as the defau lt. If only one SmartSwitch setting is set
Off, the printer uses the language that has its SmartSwitch sett ing set On as the defaul t.
Off
Auto*
NPA is a mode of bidirec tiona l commu nication t hat fol lows the conventions def ined in
Printing Alliance Proto col , A Printer /Host Control Specificati on
NPA mode requires special processing of the print data. If NPA Mode is set On, the data
received must be in NPA format. If not, it is rejected as bad dat a. If NPA Mode is set Off, the
printer does not perf o rm any NPA processing. If NPA Mode is set to Au to , the prin ter e xam ines
the data to determine the format and then processes it in either format.
The NPA Mode setti ng in the Network Menu applies only to the network interf ace connection.
Note:
Changing the NPA Mode setting automatically resets the printer.
Dev eloped by the NPA
Network
.
Page 71

Network Menu (continued)
Menu item Valu es
Network B u ffe r Auto*
3K to maximum size allowed
You can configure the size of the network input buff er to meet the requirement s of your
system. If the limit ed size of the input buffer i s prevent ing you from continuing work in your
application each ti m e you send a job to the printer, you may want to increa se the buffer size.
The maximum siz e depend s on t he a mount of memory in y our print er, the siz e o f the ot her lin k
buffers, and whether the Resource Save set ti ng is On or Off. To maximize the range f or the
Network Buffer size, y ou can disable or reduce t he size of the parallel, serial, fax, infrared,
LocalTalk, or other network buffer. Choose the Auto setting to let the printer automatically
calculate a buffer size proportional to the total amount of available printer memory. In most
cases, A uto is the recommended setti ng.
See page 91 for a listing of the default buf fer sizes for all the inter face ports.
Note:
Changing the Network Buffer setting automatically resets the printer.
Job Buffering Off*
On
If you have an optional disk installe d in your pri nter, you can choose to ha ve jobs that are sent
to the network port spool to the disk. Spooling jobs to disk ma y decr ease the time requi red f or
the printer to accept data from an application, and ther efore free the application faster for
other work. Since disk memory provides permanent storage, job buffering to disk also
prevents the loss of print job data if the printer loses power.
The Job Bufferin g men u it em is not displayed if the formatted hard di sk is defective, is Read/
Write or Write protected, or if Job Buffer Size is set to Disabled in the Setup Menu.
See page 92 for more informati on about job buffering.
Note:
Changing the Job Buff eri ng setting automati cally resets the printer.
*Factory default
Chapter 3: Menus
57
Page 72

Network Menu (continued)
Menu item Valu es
Network x Setup Values for this m enu item are supplied by the spec ific network adapter. Open the m enu to see
the available values.
For more information, refer to the documentation that came with your netw ork adapter.
The follo w ing settings are used to configure your clo ck settings on your internal fax modem .
This menu item is only available if an optional inte rnal fax modem is installed in your printer.
Time Server IP*
IPX
None
*Factory default
Set IP Address w.x.y.z (0.0.0.0*)
Set Date and Time / / : (display val ues = mm/ dd/yyyy hh:mm)
Daylight Savings =Enable*
Country/Zone =Not Set*
w, x, y and z represent each of the four segments of the Time Server’s
IP address. The r ange of each segment is from 0 to 255.
Note:
Only displayed when Time Server is set to IP.
mm represents the month in two digits, dd the day is represented in two
digits and yyyy the year is represented in four digits. The example 02/
09/0001 indica tes the date is February 9, 2001.
hh represents th e hour in European or military format: 0 to 23 and mm
represents t he m inute: 0 to 59. Th e example 18:3 5 indicates the tim e is
6:35 PM.
Note:
Set Date and Time is only displayed when Time Serv er i s set to
None.
=Disable
=US Hawaii
=US Alaska
=US/Can Pacific
=US/Can Mountain
=US/Can Central
=US/Can Eastern
=Canada Atlantic
58
Chapter 3: Menus
Page 73

Infrared Menu
Infrared Menu
Menu item Valu es
Infrared Port Disabled*
IR Option 1
IR Option 2
IR Option 3
Select IR Option 1, IR Optio n 2, or I R Option 3 to activate the infrared port on the optional triport adapter. If you have a tri-port adapter installed in connector 1, connector 2, and
connector 3, you can only activate one infrared port. If you select Disabled, all of the other
menu items in the Infrared Menu are hidden.
PCL Sm a rtSwi tc h Off
On*
Setting PCL SmartSwitch On lets the printer e xamine the data on the network interface
connection and select PCL emulation if the data indicates that is the printer language.
If both PCL SmartSwitch and PS SmartSwitch are set Off, the printer uses the language
specified in the Printer Lan guage menu as the defau lt. If only one SmartSwitch setting is set
Off, the printer uses the language that has its SmartSwitch set On as the default.
The Infrared Menu changes settings affecting jobs sent to the
printer via th e infrared interface port. This m en u is only available if an optional tri-port ad apter is installed in your printer.
If the Infrared Po rt menu item is set to Disabled, all of the other
menu items in the Infrared Menu are hidden.
PS Sma rtSwi tc h O ff
On*
Setting PS SmartSwitch On lets the printer examine the data on the network interface
connection and sele ct PostSc ript 3 em ulation if the data ind icates that is the printer la nguage.
If both PCL SmartSwitch and PS SmartSwitch are set Off, the printer uses the language
specified in the Printer Lan guage menu as the defau lt. If only one SmartSwitch setting is set
Off, the printer uses the language that has its SmartSwitch sett ing set On as the defaul t.
*Factory default
Chapter 3: Menus
59
Page 74

Infrared Menu (continued)
Menu item Valu es
NPA Mode
(Network Printing
Alliance)
Off
Auto*
NPA is a mode of bidirec tiona l commu nication t hat fol lows the conventions def ined in
Printing Alliance Proto col , A Printer /Host Control Specificati on
NPA mode requires special processing of the print data. If NPA Mode is set On, the data
received must be in NPA format. If not, it is rejected as bad dat a. If NPA Mode is set Off, the
printer does not perf o rm any NPA processing. If NPA Mode is set to Au to , the prin ter e xam ines
the data to determine the format and then processes it in either format.
The NPA Mode setting in the Serial Menu applies only to the serial interface connection.
Note:
Changing the NPA Mode setting automatically resets the printer.
Infrared Buffer Disabled
Auto*
5K to maximum size allowed
You can configure the size of the infr ared input buffer to meet the requirements of your
system. If the limit ed size of the input buffer i s prevent ing you from continuing work in your
application each ti m e you send a job to the printer, you may want to increa se the buffer size.
The maximum siz e depend s on t he a mount of memory in y our print er, the siz e o f the ot her lin k
buffers, and whether the Resource Save set ti ng is On or Off. To maximize the range f or the
Infrared Buff e r siz e , you ca n disab le or reduce t he siz e of the par all el, net work, serial , f ax, and
LocalTalk buffers. Choose the Auto setting to let the printer automati cally calculate a buffer
size proportional to the total amount of available printer me mo ry. In most cases, A uto is the
recommended setting.
See page 91 for a listing of the default buf fer sizes for all the inter face ports.
Note:
Changing the Infrared Buffer setting automatically resets the printer.
Job Buffering Off*
On
Dev eloped by the NPA
Network
.
*Factory default
60
Chapter 3: Menus
If you have an optional disk installe d in your pri nter, you can choose to ha ve jobs that are sent
to the infrared port spool to the disk. Spooling j obs to disk may decrease t he time required for
the printer to accept data from an application, and ther efore free the application faster for
other work. Since disk memory provides permanent storage, job buffering to disk also
prevents the loss of print job data if the printer loses power.
The Job Bufferin g men u it em is not displayed if the formatted hard di sk is defective, is Read/
Write or Write protected, or if Job Buffer Size is set to Disabled in the Setup Menu.
See page 92 for more informati on about job buffering.
Note:
Changing the Job Buff eri ng setting automati cally resets the printer.
Page 75

Infrared Menu (continued)
Menu item Valu es
Window Size Auto*
1
The Window Size sett ing specifies the maxim um number of infrared fr am es the printer can
receive before it must send an acknowledgment to the host computer. If Auto is selected, the
printer automatically sets the window size during power-on to maximize link performance.
In most cases, A uto i s the r eco mmended s etti ng. If you ha v e tr oub le printi ng usi ng t he inf rare d
port, changing the Window Size setting to 1 may resol ve the problem.
Transmit Delay Auto*
None
1…15
The Transmit Delay sett ing defines the amount of time t he print er must wait before transmitting meaningful infrared data to the host computer, as well as the amount of time the
printer requests the host comp uter to wait before it transmits infrared dat a. If Auto i s selected,
the printer automatically sets the Transmit Delay value during power-on to maximize link
performance.
In most cases, A uto i s the r eco mmended s etti ng. If you ha v e tr oub le printi ng using t he inf rare d
port, selecting a high Transmit Delay set ti ng, such as 15, may re solve the problem.
Max Baud Rate 2400
9600
19200
38400
57600
115200
576000
1152000*
4000000
*Factory default
The maximum baud rate possible for both the printer and the infrare d adapter is automatically
set during power-on. However, if your printer is situated in a bright or highly reflective
environmen t, you may experience intermittent communication problems. If you do, select a
lower baud rat e for the infrared connection.
Chapter 3: Menus
61
Page 76

LocalT a lk Menu
LocalTalk Menu
Menu item Valu es
LocalTalk Port Disabled*
LTalk Option 1
LTalk Option 2
LTalk Option 3
Select LTalk Option 1, LT alk Option 2, or LT alk Option 3 to activate the LocalTalk port on the
optional tri-port adapter. If you have a tri-port adapter installed in connector 1, connector 2,
and connector 3, you can only activate one LocalTalk port. If you sel ect Disabled, all of the
other menu items in the LocalTalk Menu are hidden.
PCL Sm a rtSwi tc h Off
On*
Setting PCL SmartSwitch On lets the printer e xamine the data on the network interface
connection and select PCL emulation if the data indicates that is the printer language.
If both PCL SmartSwitch and PS SmartSwitch are set Off, the printer uses the language
specified in the Printer Lan guage menu as the defau lt. If only one SmartSwitch setting is set
Off, the printer uses the language that has its SmartSwitch set On as the default.
The LocalTalk Menu changes settings affecting jobs sent to the
printer via the LocalTalk port. This menu is only available if an
optional tri- port adapter is in s talled in your p rinter.
If the LocalTalk Port menu ite m is set to Disabled, all of the
other menu items in the LocalTalk Menu are hidden.
PS Sma rtSwi tc h O ff
*Factory default
62
Chapter 3: Menus
On*
Setting PS SmartSwitch On lets the printer examine the data on the network interface
connection and sele ct PostSc ript 3 em ulation if the data ind icates that is the printer la nguage.
If both PCL SmartSwitch and PS SmartSwitch are set Off, the printer uses the language
specified in the Printer Lan guage menu as the defau lt. If only one SmartSwitch setting is set
Off, the printer uses the language that has its SmartSwitch sett ing set On as the defaul t.
Page 77

LocalTalk Menu (continued)
Menu item Valu es
NPA Mode
(Network Printing
Alliance)
Off
Auto*
NPA is a mode of bidirec tiona l commu nication t hat fol lows the conventions def ined in
Printing Alliance Proto col , A Printer /Host Control Specificati on
NPA mode requires special processing of the print data. If NPA Mode is set On, the data
received must be in NPA format. If not, it is rejected as bad dat a. If NPA Mode is set Off, the
printer does not perf o rm any NPA processing. If NPA Mode is set to Au to , the prin ter e xam ines
the data to determine the format and then processes it in either format.
The NPA Mode setting in the LocalTalk Menu applies only to the LocalTalk interf ace
connection.
Note:
Changing the NPA Mode setting automatically resets the printer.
LocalTalk Buffer Disabled
Auto*
6K to maximum size allowed
You can configure the size of the LocalTalk input buffer to meet the requir em ents of your
system. If the limit ed size of the input buffer i s prevent ing you from continuing work in your
application each ti m e you send a job to the printer, you may want to increa se the buffer size.
The maximum siz e depend s on t he a mount of memory in y our print er, the siz e o f the ot her lin k
buffers, and whether the Resource Save set ti ng is On or Off. To maximize the range f or the
LocalTalk Buffer size , you can disable or reduce the size of the par allel, serial, fax, network,
and infrared b uffers. Choose the Auto setting to let the printer automaticall y calculate a buffer
size proportional to the total amount of available printer me mo ry. In most cases, A uto is the
recommended setting.
See page 91 for a listing of the default buf fer sizes for all the inter face ports.
Note:
Changing the LocalTalk Buffer setting automatical ly resets the printer.
Dev eloped by the NPA
Network
.
Job Buffering Off*
On
If you have an optional disk installe d in your pri nter, you can choose to ha ve jobs that are sent
to the LocalTalk port spool to the disk. Spooling jobs to disk may decrease the time required
for the printer to accept data from an applicat ion, and theref ore free the applicati on faster for
other work. Since disk memory provides permanent storage, job buffering to disk also
prevents the loss of print job data if the printer loses power.
The Job Bufferin g men u it em is not displayed if the formatted hard di sk is defective, is Read/
Write or Write protected, or if Job Buffer Size is set to Disabled in the Setup Menu.
See page 92 for more informati on about job buffering.
Note:
*Factory default
Changing the Job Buff eri ng setting automati cally resets the printer.
Chapter 3: Menus
63
Page 78

LocalTalk Menu (continued)
Menu item Valu es
NPA Hosts 1…10 (2*)
Use this setting to sp ecify the maximum n umber of NPA hosts that can register fo r NPA printer
alerts. When the number of hosts r egistered for NPA alerts exceeds the quantity specified by
the NPA Hosts menu item, any additional hosts attempting to register for alerts are ignored.
Note:
Changing the NPA Hosts setting automatically resets the printer.
LocalTalk Name Lexmark (Default Name)
This setting ident if ies the printer model name stored i n print er memory. It cannot be modified
from the printer operator panel.
LocalTalk Addr 0.0.0 (LocalTalk Node Number)
The LocalTalk Address identifies the LocalTalk Node number. It is negotiated between the
network and the printer and then assigned to the printer. It cannot be modified from the
printer . The LocalTalk Node number value is between 0 and 255.
LocalTalk Zone *
(Zone name provided by LocalTalk network)
This setting identifies the LocalTalk Zone. The setting * indicates that no particular zone is
specified, and therefore all zones are valid. This setting cannot be modified from the printer
operator panel.
*Factory default
64
Chapter 3: Menus
Page 79

USB Menu
Menu item Valu es
PCL Sm a rtSwi tc h Off
On*
Setting PCL SmartSwitch On lets the printer e xamine the data on the network interface
connection and select PCL emulation if the data indicates that is the printer language.
If both PCL SmartSwitch and PS SmartSwitch are set Off, the printer uses the language
specified in the Printer Lan guage menu as the defau lt. If only one SmartSwitch setting is set
Off, the printer uses the language that has its SmartSwitch set On as the default.
PS Sma rtSwi tc h O ff
On*
Setting PS SmartSwitch On lets the printer examine the data on the network interface
connection and sele ct PostSc ript 3 em ulation if the data ind icates that is the printer la nguage.
If both PCL SmartSwitch and PS SmartSwitch are set Off, the printer uses the language
specified in the Printer Lan guage menu as the defau lt. If only one SmartSwitch setting is set
Off, the printer uses the language that has its SmartSwitch sett ing set On as the defaul t.
USB Men u
The Universal Serial Bus (USB) Menu changes settings affecting jobs sent to the printer via th e USB port. Th is menu is only
available if an optional USB adapter is installe d in your printe r.
If the USB P ort menu item is set to Disabled, all of the other
menu items in the USB Menu are hidden.
NPA Mode
(Network Printing
Alliance)
*Factory default
Off
Auto*
NPA is a mode of bidirec tiona l commu nication t hat fol lows the conventions def ined in
Printing Alliance Proto col , A Printer /Host Control Specificati on
NPA mode requires special processing of the print data. If NPA Mode is set On, the data
received must be in NPA format. If not, it is rejected as bad dat a. If NPA Mode is set Off, the
printer does not perf o rm any NPA processing. If NPA Mode is set to Au to , the prin ter e xam ines
the data to determine the format and then processes it in either format.
The NPA Mode setting in the LocalTalk Menu applies only to the LocalTalk interf ace
connection.
Note:
Changing the NPA Mode setting automatically resets the printer.
Dev eloped by the NPA
Chapter 3: Menus
Network
.
65
Page 80

USB Menu (continued)
Menu item Valu es
USB B uffer Di sabled
Auto*
3K to maximum size allowed
You can configure the size of the USB input buffer to meet the requir eme nts of your system. If
the limited size of the input buffer is preventing you from continuin g w ork in y our application
each time you send a job to the printer, you may want to increase the b uffer size.
The maximum siz e depend s on t he a mount of memory in y our print er, the siz e o f the ot her l in k
buffers, and whether the Resource Save set ti ng is On or Off. To maximize the range f or the
USB Buffer size, you can disable or reduce the size of the parallel, serial, fax, network, and
infrared b uffers. Choose the A uto setting t o let the printer automatically calculate a buffer size
proportional to the total amount of available printer m em ory. In most cases, Auto is the recommended setting.
See page 91 for a listing of the default buf fer sizes for all the inter face ports.
Note:
Job Buffering Off*
On
If you have an optional disk installe d in your pri nter, you can choose to ha ve jobs that are sent
to the LocalTalk port spool to the disk. Spooling jobs to disk may decrease the time required
for the printer to accept data from an applicat ion, and theref ore free the applicati on faster for
other work. Since disk memory provides permanent storage, job buffering to disk also
prevents the loss of print job data if the printer loses power.
The Job Bufferin g men u it em is not displayed if the formatted hard di sk is defective, is Read/
Write or Write protected, or if Job Buffer Size is set to Disabled in the Setup Menu.
See page 92 for more informati on about job buffering.
Note:
Changing the USB Buff er set ting automatically resets the printer.
Changing the Job Buff eri ng setting automati cally resets the printer.
*Factory default
66
Chapter 3: Menus
Page 81

Fax Menu
The Fax Menu configures a serial port to receive faxes from a
class 1 fax modem connected to the port. This menu is only
available if an optional tri-port adapter or internal fax modem is
installed in your printer.
Note:
If the Fax Port menu
item is set to Disabled, all of the
other menu items in the Fax
Menu are hidden.
Fax Menu
Menu item Valu es
Fax Port Disabled*
Standard Serial
Ser Option 1
Ser Option 2
Ser Option 3
Select Standard Serial, Ser Option 1, Ser Opti on 2, or Ser Option 3 to activ ate the f ax funct i on
for the spec ifi ed serial port. If y ou ha v e a tri-port adapter i nstal led in co nnector 1, con nector 2,
and connector 3, you can only activate one fax port. If you selec t Dis abled, all of the other
menu items in the Fax Menu are hidden.
Fax Baud 1200
2400
4800
9600
19200*
38400
57600
115200
Select the baud appropriat e for the fax modem you attached to the serial port.
Fax Data Bits 7
8*
Select the number of data bi ts the fax modem sends in each tr ansmission fram e.
Fax Parity Even
Odd
None*
Ignore
This setting lets y ou select the parity f or the input and output data fr am es. Refer to th e
Technical Reference
*Factory default
for more information about parity.
Chapter 3: Menus
67
Page 82

Fax Menu (continued)
Menu item Valu es
Fax Buffer Disabled
Auto*
3K to maximum size allowed
You can configure the size of the fax input buffer to meet the requirements of your system. If
the limited size of the input buffer is preventing you from continuin g w ork in y our application
each time you receive a fax, you may want to increase the b uffer size.
The maximum siz e depend s on t he a mount of memory in y our print er, the siz e o f the ot her l in k
buffers, and whether the Resource Save set ti ng is On or Off. To maximize the range f or the
Fax Buf fer size, you can disable or reduce the size of the parallel, seria l, network, infrare d, or
LocalTalk buffer. Choose the Aut o setti ng to let the pri nter autom atica lly calcul ate a buf f er size
proportional to the total amount of available printer m em ory. In most cases, Auto is the recommended setting.
See page 91 for a listing of the default buf fer sizes for all the inter face ports.
Note:
Job Buffering Off*
On
If you have an optional disk installe d in your pri nter, you can choose to ha ve jobs that are sent
to the LocalTalk port spool to the disk. Spooling jobs to disk may decrease the time required
for the printer to accept data from an applicat ion, and theref ore free the applicati on faster for
other work. Since disk memory provides permanent storage, job buffering to disk also
prevents the loss of print job data if the printer loses power.
The Job Bufferin g men u it em is not displayed if the formatted hard di sk is defective, is Read/
Write or Write protected, or if Job Buffer Size is set to Disabled in the Setup Menu.
See page 92 for more informati on about job buffering.
Note:
Changing the Fax Buffe r set ting automatically resets the printer.
Changing the Job Buff eri ng setting automati cally resets the printer.
*Factory default
68
Chapter 3: Menus
Page 83

Fax Menu (continued)
Menu item Valu es
Fax Paper Size A4*
B5
Letter*
Legal
Executiv e
Universal
The Fax Paper Size set ti ng allows the user to designate the formatting paper size for faxes .
When an incoming f ax is processed, the f ax image is formatted for printing on the size
indicated by Fax Paper Si ze .
If no source is contains the Fax Paper Size, t he user is prompted to change a sele cted
source’s installed media to the size and type designated by Fax Paper Size.
Note:
When Auto Reduct ion is set to On, and the receiving fax page image is too large to fit
on the media size desi gnated by the F ax Paper Si ze, the printer automatically reduces the
image size to fit on the pa ge if the Fax Auto Reduction is set to On. If Fax Auto Reduction is
set to Off.
Fax Paper Type Plain Paper
Card Stock
Transparency
Labels
Bond
Envelope
Letterhead
Preprinted
Colored Paper
Custom Type 1
Custom Type 2
Custom Type 3
Custom Type 4
The Fax Paper Type setting allows the user to des ignate on which paper type faxes are
printed. When an incoming fax is processed, t he fax image is formatted to be printed on the
type indicated by the Fax Paper Type.
If no source contains the F ax Paper Size and Fax Paper Type, the user i s prompted t o change
the selected source’s installed media to the type designated by Fax Paper Type.
*Factory default
Chapter 3: Menus
69
Page 84

Fax Menu (continued)
Menu item Valu es
F AX SETUP Station Name
Station Number
Speaker
Off
On*
If you install an optional internal fax modem, it will need to be configured. You can use these
Fax Setup values to configure your internal fax modem.
The Station Name is an identification string f or t he printer or fax station. The Station Name is
printed as part of the header information which is transmitted with every faxed page.The
Station Name should be an alphanumeric value not more than 20 characters in length.
The Station Number is the phone number of the line connected to the printer’s modem. This
value is printed as part of the header information which is tr ansm itted with every faxed
page.The Stati on Number should be a value not more t han 20 characters in length. The
following characters are supported with the station number value.
Character Description
“0” - “9” numbers z ero through nine
“-” minus sign
“ ” blank space
“+” plus sign
“.” period
“(” left parenthesis
“)” right parenthesis
Note:
The value for the Station Name or Station Number setting may not fit on a single line of
the operator panel. If the number of characters for the Station Nam e or Station Number
exceeds 15, the
Menu>
and
Menu<
may be used to scroll the value left or right.
*Factory default
70
Chapter 3: Menus
Page 85

Fax Menu (continued)
Menu item Valu es
F AX LO GS Print Send Log
Print Rcv Log
Auto Prin t Lo g
No
Yes*
Clear Logs
Yes
Transmission Log
Print Always
Print Never
Print on Error*
Log Paper Siz e
A4* (NonUS)
A5
JIS B5
Letter* (US)
Legal
Executiv e
Universal
Log Paper Type
Plain Paper *
Card Stock
Transparency
Labels
Bond
Letterhead
Preprinted
Colored Paper
Custom Type 1
Custom Type 2
Custom Type 3
Custom Type 4
*Factory default
If you install an optional internal fax modem the Fax Log information will need to be
configured. You can use these val ues to configure your internal fax modem.
When the Auto Print Log is set On and th e Send or Recei ve Fax Log is full, the printer
automatically prin ts the contents of the associated log and then clears the associated log to
make room for the new entry.
When the Auto Print Log is set Off and the Send or Receive Fax Log is full, the printer
automatically discards the oldest entry in the associated log to make room for the new entry.
Note:
If a user-defined name is available for a Custom Type, then the name will be displayed
instead of “Custom Type x”. The name will be truncated to 14 char acters.
Chapter 3: Menus
71
Page 86

Fax Menu (continued)
Menu item Valu es
F AX SEND Automati c Redial
0 ... 15 (5*)
Redial Frequency
1 ... 200 (3*)
Fax Resolution
Standard*
Fine
Super Fine
Ultra Fine
Dialing Mode
Tone*
Pulse
If you install an optional internal fax modem the Fax Send information will need to be
configured. You can use these val ues to configure your internal fax modem.
Note:
The Automatic Redi al value 0 indica tes Automatic Redial is set to Disabled.
Note:
If this command is received and the printer is NOT configured for fax send capability,
the document will only be printed.
*Factory default
72
Chapter 3: Menus
Page 87

Fax Menu (continued)
Menu item Valu es
F AX RECEIVE Fax Storage
Off
On*
Fax Paper Size
A4* (NonUS)
A5
JIS B5
Letter* (US)
Legal
Executiv e
Universal
Fax Paper Type
Plain Paper *
Card Stock
Transparency
Labels
Bond
Letterhead
Preprinted
Colored Paper
Custom Type 1
Custom Type 2
Custom Type 3
Custom Type 4
*Factory default
If you install an optional internal fax modem the Fax Receive information will need to be
configured. You can use these val ues to configure your internal fax modem.
Note:
If a user-defined name is available for a Custom Type, then the name will be displayed
instead of “Custom Type x”. The name will be truncated to 14 char acters.
Chapter 3: Menus
73
Page 88

74
Chapter 3: Menus
Page 89

4
Using color
Your printer gives you the power to communicate in color. Color
attracts attention, commands respect, and adds value to y our
printed material or information. Using color increas es readership and is re ad more often th an the same material printe d in
black and white. Color can be used to moti v ate pe ople and speed
the analysis of complex data. When you print on-demand color,
you save money.
Understanding
color
Types of color
To enhance your u se a nd un der standi ng about c ol or print i ng thi s
chapter pro vi des inf orma t io n abou t color a nd how to select, use,
and adjust color for your network and desktop printing
To be effe c ti ve, the use of color needs to be planne d. The re ason
for this is how the human eye sees color. When lig ht is used to
produce color , i t uses three prima ry colors. T hey a re Red, Gre en,
and Blue also known as RGB color. All printed output such as
newspapers, magazines, brochures and of course your documents u se the col ors Cyan, Ma g e n t a, Yello w, and Black t hey ar e
known as CMYK color. Because the colors a re p resented to the
human eye differently, what you see on your monitor may look
different than what you have printed. By understanding how we
see color on the screen and how we see color in printed documents, we can better plan the use of color.
Chapter 4: Understanding color
75
Page 90

How we see color
Red
Green
Blue
Primary colors
When we see color, we actually see light that is passed through
or reflected from an object. What our eyes perceive as visible
light are wavelengths. Our eyes are sen sitive to three specific
wavelengths. They are the colors red, green, and blue.
When you view your monitor, you see red, green, and blue light
that is projected into your eyes. This is known as additive color.
Additive color begins with black and adds red, green, and blue
to produce the colors you can see. If you add equal amounts of
red, green, and blue, you produce white. The images and colors
you see on your screen are created usi ng var ious amounts of red,
green, and blue.
Notice the three primary additive colors red, green, and blue in
the illustra tion. You can see that when all three colors are combined, you get white. However, look at the area where any two
colors overlap. What you see is cyan, magenta, or yellow. Equal
amounts of green and bl ue p roduce c ya n. Equa l a mount s of b lu e
and red produce magenta, and equal amounts of red and green
produce yellow. The inks used to place color on your printed
material are cyan, magenta, yellow, and blac k.
76
The colors in newspapers, magazines, and the documents you
print are based on the light being reflected from the printed
material and into your eyes. The color you see is subtractive
color. Subtractive color begins with white light. Portions of the
white light wavelength are then subtracted based on the colors
present on the printed page. What this means is the lig ht reaching your document i s par tial l y abso rbe d b y t he ink pl aced o n th e
page. For e xa mpl e, when whi t e light encount e rs c y an, it ab sorbs
the red wavelength in the light and reflects blue and green
towa rd your ey es.
If you add equal amounts of cy an, magent a, and yel low , you create black. When you combine these colors equally in your
printed material you create what is known as processed black.
Processed black when printed looks like a very dirty or muddy
brown. Because of this, your printer has a black print cartridge
to provide you with true black for all your printing needs.
Chapter 4: Using color
Page 91

Color differen c e
Most software appl ica tion s today pr ov id e us with a WYSIWYG
(What You See Is What You Get) environment. This helps us
develop the look of our document. However, the difference
between the additive and subtractive colors may sometimes
cause a probl em be t ween what you see and what you g et. T his is
due to the difference between additive and subtractive colors.
The reason fo r this lies in th e color spectru m of the different
devices.
Your printer is capable o f delivering over 16 million colors.
With such a large variety of colors to choose from, you'll probably be able to closely match most of your screen designs. There
are how ever , c ol ors your printer can pr oduc e tha t are i mpossi bl e
to duplicate on your monitor and there are colors your monitor
can display that cannot be duplicated on any printer.
There are many ways you can ensur e the c olor on the screen a nd
the color you print are the same or at least a very close match.
When you create a swatch like the one to the left, you can
choose and compare your printed and screen colors.
The easiest wa y for you t o get co nsi ste nt col or fr om your sc re en
to your printer is to select standard colors. When you produce
color on you r s c reen , i t i s produced usin g a col or mode l . A co lo r
model is a system that defines color according to a set of basic
properties. Mos t s oftware applications can use this color model
to closely match the colors you have on your screen.
As we said earlier, one simple method to aid in planning the use
of color is to produce a color swatch of the colors you plan to
use. Then, you can see how these colors will look when printed .
As your monitor ages, the colors on the screen also change.
Changing the print cartridges and paper in your printer will also
have a major impact on the color in your printed document.
Always print a new swatch of the colors you plan on using
before you invest a lot of time creating your screen designs.
Chapter 4: Understanding color
77
Page 92

Managing co lo r
Color man agement
systems
There are many color mana gement syst ems on t he marke t t oday.
They range from simple swatchbooks to specially designed and
designated color servers. Color Management Systems (CMS)
help you match colors across a number of devices, including
scanners, monitors, and printers. A CMS ensures what you see
at every step of the publishing process matches the printed output. Color management s ystems compensate for device limitations by taking into account the varying capabilities of different
brands of monitors and printers. There are three major elements
of a CMS; they are the device profile, color calibration, and
translation.
Device profile
Each piece of equipmen t is characte rized or profile d. The prof ile
reveals the color capabilities o f the equipment being profiled.
The profile includes details about which colors the device is
capable of detecting, displaying, or printing. The device profile
is used to convert different color values from one device to
another.
Color calibrat ion
78
Even the be st equipme nt ag es ov e r ti me . F or e x ample , a moni tor
capable of displaying very accurate colors when first purchased
eventually dims as it ages. Calibration ensures cons is tency by
returning colors to their origi na l s pecifications. To be effective,
you should calibrate your equipment at the interval your CMS
specif ies. Without cal ibra t ion, your output ma y be dif f er en t tha n
you expected.
Chapter 4: Using color
Page 93

Translation between color models
Translation is the most complex element of a CMS. Because
each device is based on a device-dependent color model, such as
RGB or CMYK, the range of colors each device supports is different. It is difficult and sometimes impossible to produce a particular color on different devices when each device uses a
different col or model.
Translation requires a device-independent color model. Most
color management systems are based on the CIE color space
model. This in terpretation of color space was devised by the
Commission Internationale de l'Eclairage (C IE). Rather tha n
translating RGB to CIE and CIE to CMYK, most Color Management Systems translate directly from RGB to CMYK using
the CIE color space as a reference.
Popular color
management
systems
There are many color management systems for you to choose
from. The type of CMS you choose will impact your printed
output. Choose a CMS that best meets your cost and performance needs. Some popular color management systems are
listed below:
Windows ICM
Microsoft Windows 95/98, and Windows NT support Image
Color Management (ICM). ICM is an operating system-level
CMS based on th e CIE independent color mo de l. It helps to
translate color values between RGB and CMY K.
ColorSync 2.1
ColorSync 2.1 is an operating system-level CMS developed by
Apple. It also uses the CIE independent model to translate
between RGB and C M YK va lues.
Agfa FotoTune
Agfa FotoTune also uses the CIE independent color model to
translate between RGB and CMYK values. It is, however, application-depende nt a nd onl y w or ks w ith ce rta i n appl i cat ions , suc h
as Adobe Photoshop™.
Chapter 4: Managing color
79
Page 94

Contr olling your
printer
Your printer driver i s designe d t o pro vi de you with the be s t quality output f or various t ype s of printing n eeds. Howeve r, you may
want more control over how your printed document will look.
You can control the screening methods, halftone settings, graphics effects, and fill resolution used during the printing of your
documents. These setting adjustments can easily be made
through your printer driver or operator panel. Adjusting any of
these settings affects the output of your printed documents.
You can always return your printer driver to the factory default
settings by selecting the defaults button on the pri nter driver
screen or restoring the default setting at the operator panel.
Screening methods
Your printer is a four-color process printer that uses the CMYK
color model. O ne of t he most important issue s fo r pr i nt in g usi ng
the CMYK m odel is how the pr inter combines each of the f our
colors on the page. The process use d to produce this high qual ity
print is known as screening.
When printing in color, you use four different color planes or
screens. A separate dot pattern is created for each of these color
planes. These sepa rate dot pattern s are then combined (effectively laid on top of each other) to produce your final full color
image.
Your color printer uses different screening methods depending
on the material to be printed.
On
The defa ult Image E nhancement
mum balance for most printing needs. You can change these settings through the color tab on your printer driver or the Color
Menu on the operator panel.
setting provides an opti-
80
Chapter 4: Using color
Page 95

A quick overview of the Color settings and their applications are
described in the table below:
Color setting Screening method Applications
Auto*
Vivid
Off
CMYK
Black and White
Display
2-Color Draft
Image Enhancement The default setting, On, produces high
Print Resolution These two resolution settin gs are used to
Note:
Regardless of the
These settings al lows you to adjust t he
printed color to bette r match the colors of
other output devices or standard color
systems.
The default setting, Au to, uses different
color profiles on each object on the page
(text, graphics or images).
quality color output by allowing the printer
to decide which images to enhance based
on the material being printed.
produce high quality or high resolution.
The default setting, 600, uses halftoning to
produce high quality output.
The 1200 setting pro vides the highest
resolution output.
screening method used, the
printer applies a unique screening algorithm to small text (less
than 24 points in size). This
ensures the text characters have
smooth, crisp edges.
To adjust the brightness and saturation of
your text and business graphics.
Use 2-Color Draft or Black and White to
save toner when printing drafts of your
document.
Use Black and White f or documents that
will be reproduced on a copier.
Any time you prefer the printer to decide
which images to enhance using the Image
Enhancement screening methods.
Use the 1200 dpi setting anytime you have
a need for great er text, line, and image
detail.
The 1200 dpi setting greatly reduces the
print speed but provides fou r tim es the
resolution as the 600 dpi setting.
Chapter 4: Controlling your printer
81
Page 96

Halftone screens
The term half tone screen, refer s to the pattern of dots applied to
an image. If you look closely at a bl ack an d white phot ogra ph in
a magazine, it appears to contain many shades of gray. If you
place the same picture under a magnifying glass, you see that it
is actually composed of a number of dots. These dots, also
known as pels, may be of varying sizes or varying tones. They
may also be the same sized dots applied to a tint of color. Without halftoning, it would not be possible to produce quality photographic images on a page printer. This process of representing
an image as a series of halftones, is known as halftone screening.
Note:
cannot change the screen angle
settings. The r eason for this is the
angles have been set to prevent
one color from over printing
another color.
Frequency
(cells per inch)
When printing color, you
Attributes
Spot function
Angle
You can control the attributes for halftone screens by changing
the values to your halftone screen frequency and screen angle
settings. You can change these settings through the graphics tab
on your printer driver.
Halftone scr eens have three main attributes. They are: sc reen
frequency, screen angle, and spot function. The halftone screen
is further divided into halftone cells. These cells contain the
individual pel spaces. The screen frequency and angle attributes
determine both the number of halftone cells that make up a halftone screen and the orientation of the cell.
The spot function determines which of the individual pels in the
halftone cell is turned on to represent a particular gray l evel or
color tone. The illustration shows a halftone screen and halftone
cells rotated 45 degrees.
82
Screen frequency
Chapter 4: Using color
The screen fre que nc y is the numb er of half t one ce lls pe r i nch . A
larger number in the screen frequency increases the number of
halftone cells per inch. Increasing the number of halftone cells
per inch will not necessarily give you better quality. The reason
for this is the higher settings may make the colors or halftones
seem to run together or bleed.
Page 97

Screen angle
Different printing needs do require different screen frequency
settings, for example, offset printing requires a higher setting,
whereas newsprint generally requires a lower setting. Your
printer defa ult is set t o giv e you th e best screen frequenc y setting
for high qua lity business graphics .
Note:
change the screen an gle is when
the use color option has been
deselect ed. The reaso n for this is
the default angle ensures no color
is overprinted by another color.
The only time you can
Spot function
Image S mo othing
The defaul t ang le of t he hal f tone scr een a nd c ells pla ces the dot s
so they are the least noticeab le to the human eye . It als o ensures
the alignment of color t hrough all four color planes. By av oiding
the placement of halftone cells at an angle of 90 degrees, the
eyes of the viewer are focused on your image and not on the
dots.
The spot function determines the shape of the dots by controlling the order in which the pels in the halftone cell are turned on.
The printer cod e defi nes the order by assigning a prio rity to eac h
individual pel within the h alftone cell. By turning on or printing
a portion of th e pels withi n th e hal ftone cell a nd then combini ng
the different halftone screens, your printer is able to print millions of colors.
You can turn Image Smoothing On from the graphics tab of your
printer dr iver or through the PostS cr ipt Menu. T his inc re ase s th e
contrast and sharpness of bitmapped images and smooths color
transitions. This setting is useful for images downloaded from
the World Wide Web at 72 dpi. The setting has no effect on
images downloaded at 300 dpi resolution or higher.
Printing te xt
In both PostScript and PCL emulations, 100% black text prints
using black toner (K of CMYK). This res ult s in sha rp, cr i sp te xt
characters. As mentioned before, the printer applies a unique
screening algorithm to small text (less than 24 points in size).
This helps ensure that all text has smooth, crisp edges.
Black text included as part of a color bitmap image is printed as
a composite black. The result may be fuzzy characters or per-
Chapter 4: Controlling your printer
83
Page 98

ceptible white gaps as the p rinter attempts to overlay the CMY
colors.
When printing any text (black or colored), we recommend setting your color cor re ction t o automa ti c and your pr i nt reso lution
to 600 dpi. Because colored text is also a composite of two or
more colors, you may notice some blurring or distortion in colored text.
Color Correction
Auto
Vivid
Color correction allows you to mod ify the color settin gs us ed to
print your documents. There are seven color correction settings
you can choose from; they are Auto, Vivid, Off, CMYK, Black
and White, Display, and 2-color draft. Auto is the default setting
when shipped from the factory.
When your color correction is set to Auto, the printer applies
different color p rofiles to each object o n the printed page. This
setting provides high quality output for text, graphics, images,
line art, and ch arts. This setting is especially useful when
switching from one media type to another, such as paper and
transparencies.
This setti ng can he lp you pr i nt bright e r col ors. T he Vivid setting
adjusts the CMYK components, resulting in more saturate d colors. You may want to use this setting when creating overhead
transparencies to enhance or sharpen your colors if they seem
faded. This setting is especially useful if your blues seem a bit
purple. To change this setting , use your printer dr iver color tab
or operator panel color menu.
84
Chapter 4: Using color
Off
When you select Of f as your color corre ction, the printe r expec ts
to receive the necessary color correction from your software.
This setting is used when you have software that manages its
own color c orre ction or you a re using a nother c olor management
tool.
If you use this setting without the necessary color management
software or your application does not provide the correct information, your printed output may have a variety of unexpected
Page 99

results. You can access and change this setting through your
printer driver color tab or the operator panel color menu.
CMYK
Black and White
Display
When you select CMYK as your color correction, the printer
expects to receive CMYK color values from your software. You
will want to use this setting when attempting to reproduce standard CMYK colors such as Pantone or when printing CMYK
images.
If you use this setting without the necessary color management
software or your application does not provide the correct information, your printed output may have a variety of unexpected
results. You can access and change this setting through your
printer driver color tab or the operator panel color menu.
This setting conver ts any colors in your document to soli d black.
This setting can speed up the print of color documents used for
edit or review where the use of color may not be needed. This
setting prints color in gray sc ale shades.
This setting is especially useful if you are going to produce
black and whit e photoco pies of the document a fter pr inting. This
setting can be changed through your printer driver graphics tab
or the operator panel color menu.
Note:
between additive and subtractive colors, there are colors your
printer can produce that are
impossible to duplicate on your
monitor and there are colors
your monitor can display that
cannot be duplicated on any
printer. F or more information,
see “Color differen ce” o n
page 77.
Due to the difference
You can use this setti ng to print color that approximates the colors on your computer screen. This setting uses common color
tables to translate the color settings displayed on your monitor
into the col or values used by the printer’s CMYK color mod el.
This setting i s ge ner ally us e d when yo ur a ppl icat i on does not do
its o wn col or corre c tion and def i ne s co lors a s RGB ( Red, Gr een,
Blue), HLS (Hue, Lightness, Saturation), or HSB (Hue, Saturation, Brightness). You can change this setting through your
printer driver color tab or the operator panel color menu.
Chapter 4: Color Correction
85
Page 100

2-Color Draft
You can select 2-Color Draft to reduce the amount of toner you
use when printing color drafts. Selecting 2-Color Draft
decreases the amount of toner by using only two colors of toner
instead of four colors.
Avoiding print
quality problems
Media and supplies
Transparencies
To prevent print quality problems, do not touch the print cartridge photoconductors, the transfer belt, or the fus er rollers.
Scratches or fingerprints on any of these surfaces can adversely
affect print quality.
Always use media that meets the recommended guidelines.
Refer to “Media guidelines” on page 98 for more information.
Feeding media that is too heavy, too light, damp, damaged, or
otherwise una cceptable for th is p rinter may result in print quality problems.
Some print q uality problems may indicate it is time to replace
certain printer supplies. Check the operator panel display, the
Supplies Menu, or MarkVision for an indication of any supply
items that may need to be replaced.
Depending on the type of jobs you print and the media you use,
some parts or supplies may wear or become expended faster
than anticipated. See “When to replace supplies” on page 116
for more informat i on.
To ensure high qua lity out put on tra nspar en cie s, we rec ommend
using the following Lexmark transparencies. They have been
designed specifically for your printer:
86
P/N 12A5150 (letter size)
P/N 12A5151 (A4 size)
These transparencies have characteristics that minimize curl and
optimize tone r transf er in a wide range of pr inting e n viro nments.
If you use oth er transparencie s , you may find the print q ua lity
unacceptable.
Handle transparencies carefully. The reason for thi s i s that fingerprints may affect the adhesion of toner on your transparency.
Always set the Pap er Type to Transparency before p rinting
Chapter 4: Using color
 Loading...