

Page 1

MarkNet™ N8050 Internal
Wireless Print Server
User’s Guide
Lexmark and Lexmark with diamond design are trademarks of Lexmark International, Inc.,
registered in the United States and/or other countries.
© 2005 Lexmark International, Inc.
All rights reserved.
740 West New Circle Road
Lexington, Kentucky 40550
www.lexmark.comMay 2005
Page 2

Edition: May 2005
The following paragraph does not apply to any country where such provisions are inconsistent with local law: LEXMARK
INTERNATIONAL, INC., PROVIDES THIS PUBLICATION “AS IS” WITHOUT WARRANTY OF ANY KIND, EITHER EXPRESS OR
IMPLIED, INCLUDING, BUT NOT LIMITED TO, THE IMPLIED WARRANTIES OF MERCHANTABILITY OR FITNESS FOR A
PARTICULAR PURPOSE. Some states do not allow disclaimer of express or implied warranties in certain transactions; therefore, this
statement may not apply to you.
This publication could include technical inaccuracies or typographical errors. Changes are periodically made to the information herein;
these changes will be incorporated in later editions. Improvements or changes in the products or the programs described may be made
at any time.
Comments about this publication may be addressed to Lexmark International, Inc., Department F95/032-2, 740 West New Circle Road,
Lexington, Kentucky 40550, U.S.A. In the United Kingdom and Eire, send to Lexmark International Ltd., Marketing and Services
Department, Westhorpe House, Westhorpe, Marlow Bucks SL7 3RQ. Lexmark may use or distribute any of the information you supply
in any way it believes appropriate without incurring any obligation to you. You can purchase additional copies of publications related to
this product by calling 1-800-553-9727. In the United Kingdom and Eire, call 0628-481500. In other countries, contact your point of
purchase.
References in this publication to products, programs, or services do not imply that the manufacturer intends to make these available in
all countries in which it operates. Any reference to a product, program, or service is not intended to state or imply that only that product,
program, or service may be used. Any functionally equivalent product, program, or service that does not infringe any existing intellectual
property right may be used instead. Evaluation and verification of operation in conjunction with other products, programs, or services,
except those expressly designated by the manufacturer, are the user’s responsibility.
Lexmark, Lexmark with diamond design, and MarkNet are trademarks of Lexmark International, Inc., registered in the United States and/
or other countries.
Wi-Fi® is a registered certification mark of the Wi-Fi Alliance.
Wi-Fi Protected Access™ is a certification mark of the Wi-Fi Alliance.
Other trademarks are the property of their respective owners.
© 2005 Lexmark International, Inc.
All rights reserved.
UNITED STATES GOVERNMENT RIGHTS
This software and any accompanying documentation provided under this agreement are commercial computer software and
documentation developed exclusively at private expense.
Safety information
• Make sure that the printer is powered off before attempting an installation of the wireless print server option card in the printer.
• Refer service or repairs, other than those described in the user documentation, to a professional service person.
CAUTION: Do not set up this product or make any electrical or cabling connections during a lightning storm.
Electronic emission notices
Wireless notice and FCC statement
ii
Page 3

Contents
Chapter 1: Getting started............................................................. 1
Unpacking your print server ........................................................................... 1
Installing the internal wireless print server in your printer .............................. 1
Safety informa tion ... .............. .. ............. .. .. .............. .. ............. .. .............. .. .. ..... 2
Minimum requirements for setup............................. .. ........................ .. ........... 3
Wireless network settings............................................................................... 3
Chapter 2: Configuring the internal wireless print server.......... 4
Configuratio n o ve r view....... .............. .. ............. .. ............. ... .. ............. .. ............ 4
Using the Wireless Setup Utility ..................................................................... 5
Installing the printer on the network ............................................................. 11
Chapter 3: Changing the wireless print server settings........... 13
Chapter 4: Troubleshooting........................................................ 14
The MarkNet N8050 Utilities CD does not launch automatically.................. 14
The Wireless Setup Utility was not able to communicate wit h the
printer........................................................................................................... 14
The network key was invalid ........................................................................ 14
The printer was unable to join the network............................... .................... 15
The internal print server was configured wit h the correct
settings, but cannot be found on the network... ...................... ...................... 15
My network printer does not print....................................... .................... ...... 16
Chapter 5: Manual configuration................................................ 17
Configuring the print server in Ad-Hoc mode............................................... 17
Configuring the print server using the prin ter operator panel....................... 20
Installing the printer on the network ............................................................. 20
Contents
iii
Page 4

Glossary......................................................................................... 21
Contents
iv
Page 5
1
Getting started
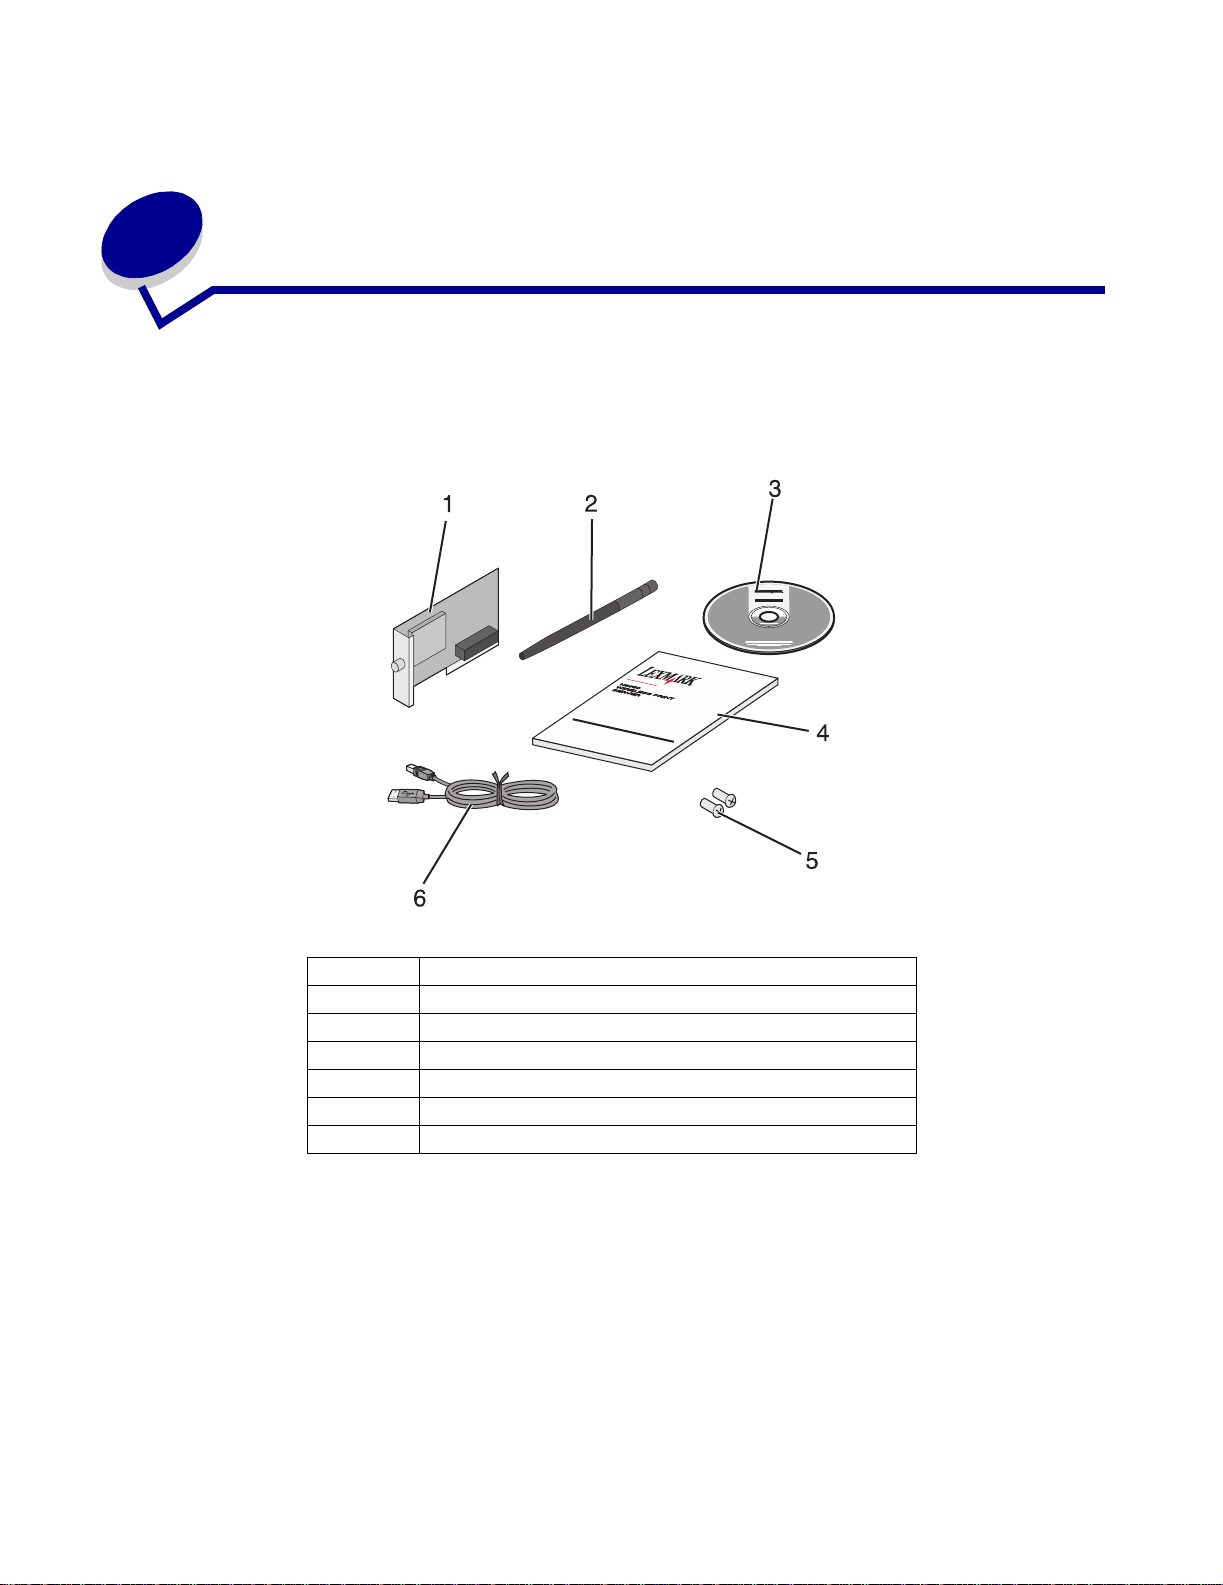
Unpacking your print server
Number Description
1 MarkNet™ N8050 Internal Wireless Print Server
2 Antenna
3 MarkNet N8050 Utilities CD
4 Setup Guide
5 Installation screws
6 USB cable
Installing the internal wireless print server in your printer
Before installing the wireless print server, make sure the printer has been set up correctly.
• The toner or print cartridges are instal led.
• Paper is loaded.
Getting started
1
Page 6
• The printer is powered off.
Note: The process used for installing the internal wireless print server in your print er may
vary between different printers. See the “Installing Options” section of the printer
documentation for informati on on installing wireless print server opti on cards.
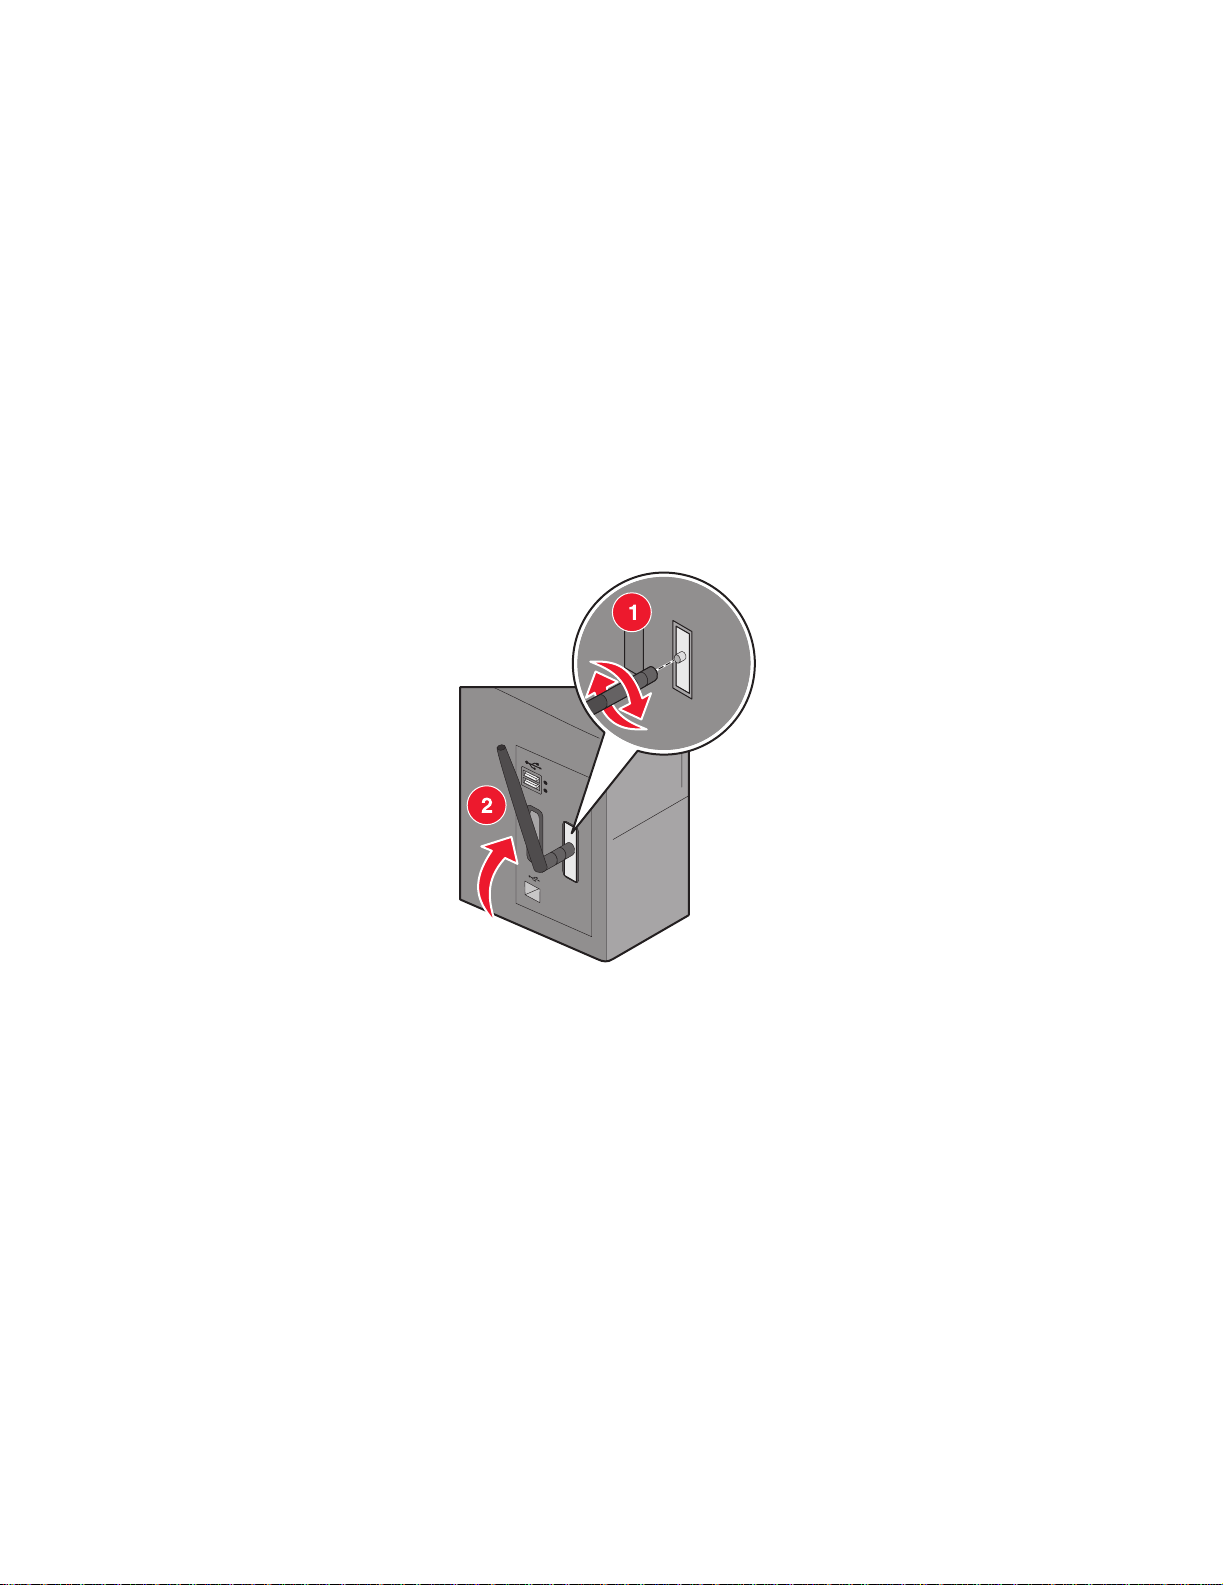
Attaching the wireless print server antenna
Once the print server is installed, attach the antenna to the option card. Make sure to tighten the
connector until the antenna is attached securely, as a loose connec tion can result in a poor wireless
signal. Then, bend the joint until the antenna is pointing up.
Note: Some printer configurations create space restrictions that may require the antenna
be attached before installing the option card.
Safety information
• Make sure that the printer is powered off before attempting an ins tallation of the wir eless print
server option card in the printer.
• Refer service or repairs, other than those described in the user documentation, to a
professional service person.
CAUTION: Do not set up this product or make any electrical or cabling connections during a
lightning storm.
Safety information
2
Page 7

Minimum requirements for setup
• The MarkNet N8050 Internal Wireless Print Server
• An existing wireless network
• A supported printer
• The drivers or printer software CD that came with your printer
When configuring the print server with the Lexmark Wireless Setup Utility (recommended)
• A USB cable
• The MarkNet N8050 Utilities CD
• A computer that utilizes one of the following operati ng systems:
• Windows 2000
• Windows XP
• Windows XP Professional x64 edition
• Windows 2000 Server, Windows Advanced Server, Windows DataCenter Server
• Windows Server 2003
• Windows Server standard 2003 x64 edition
Note: Use of the print server is not restricted to these operating syst ems. See your printer
documentation for a list of supported oper ating systems.
Wireless network settings
Some wireless network settings may be needed in order to configure the wireless print server that
has been installed in the printer. Here are some of the settings that may be needed:
• Network Name, also known as SSID (Service Set ID)
• BSS (Basic Service Set) Type (the type of wireless network you use–Ad-Hoc or
Infrastructure)
• Wireless Channel Number
• Network authentication and encrypti on type
• Security Key(s)
• Signed Certificate or CA Certificate
Minimum requ ir e me n ts for se tup
3
Page 8

Configuring the internal wireless print
2
server
Configuration overview
After the internal wireless print server has been installed in a printer, there are two ways the print
server can be configured for use on a wireless network: Configuring the print server using the
Wireless Setup Utility, or by manual configuration.
Configuring the print server using the Lexmark Wireless Setup Utility involves connecting the printer
in which the internal wireless print server has been installed to a computer by USB cable and
launching the MarkNet N8050 Utilities CD. The Lexmark Wireless Setup Utility then provides both a
Wizard mode and an Advanced mode of operation. The Wizard mode steps the user through the
configuration process. The Advanced mode provides an int erface through which the user can direct ly
enter and apply the appropriate wireless configuration settings for the wireless network that the
printer will be used on.
Note: When configuring with the Lexmark Wireless Setup Utility, 802.1x–RADIUS
authentication is only available through the Advanced mode of operation.
Manual configuration is intended for advanced users and involves communicating with the print
server over an Ad-Hoc wireles s connection witho ut the use of the Lexmark Wireless Setup Utilit y or a
direct USB connection. Users who prefer to perform the manual configuration method require an
in-depth understanding of the wireless set ti ngs for the network. For instructions on manually
configuring the internal wir eless print server, see Manual configuration.
Before configuring the wireless print server, make sure your printer has been set up corr ectly
• The internal wireless print server option card has been installed correctly in the printer.
• All access panels and printer doors have been replaced or closed.
• The toner or print cartridges are installed correctly.
• Paper has been loaded into the printer.
• The printer is turned on and ready to be installed.
For help setting up your printer, see your printer documentation.
Configuring the internal wireless print server
4
Page 9
Using the Wireless Setup Utility
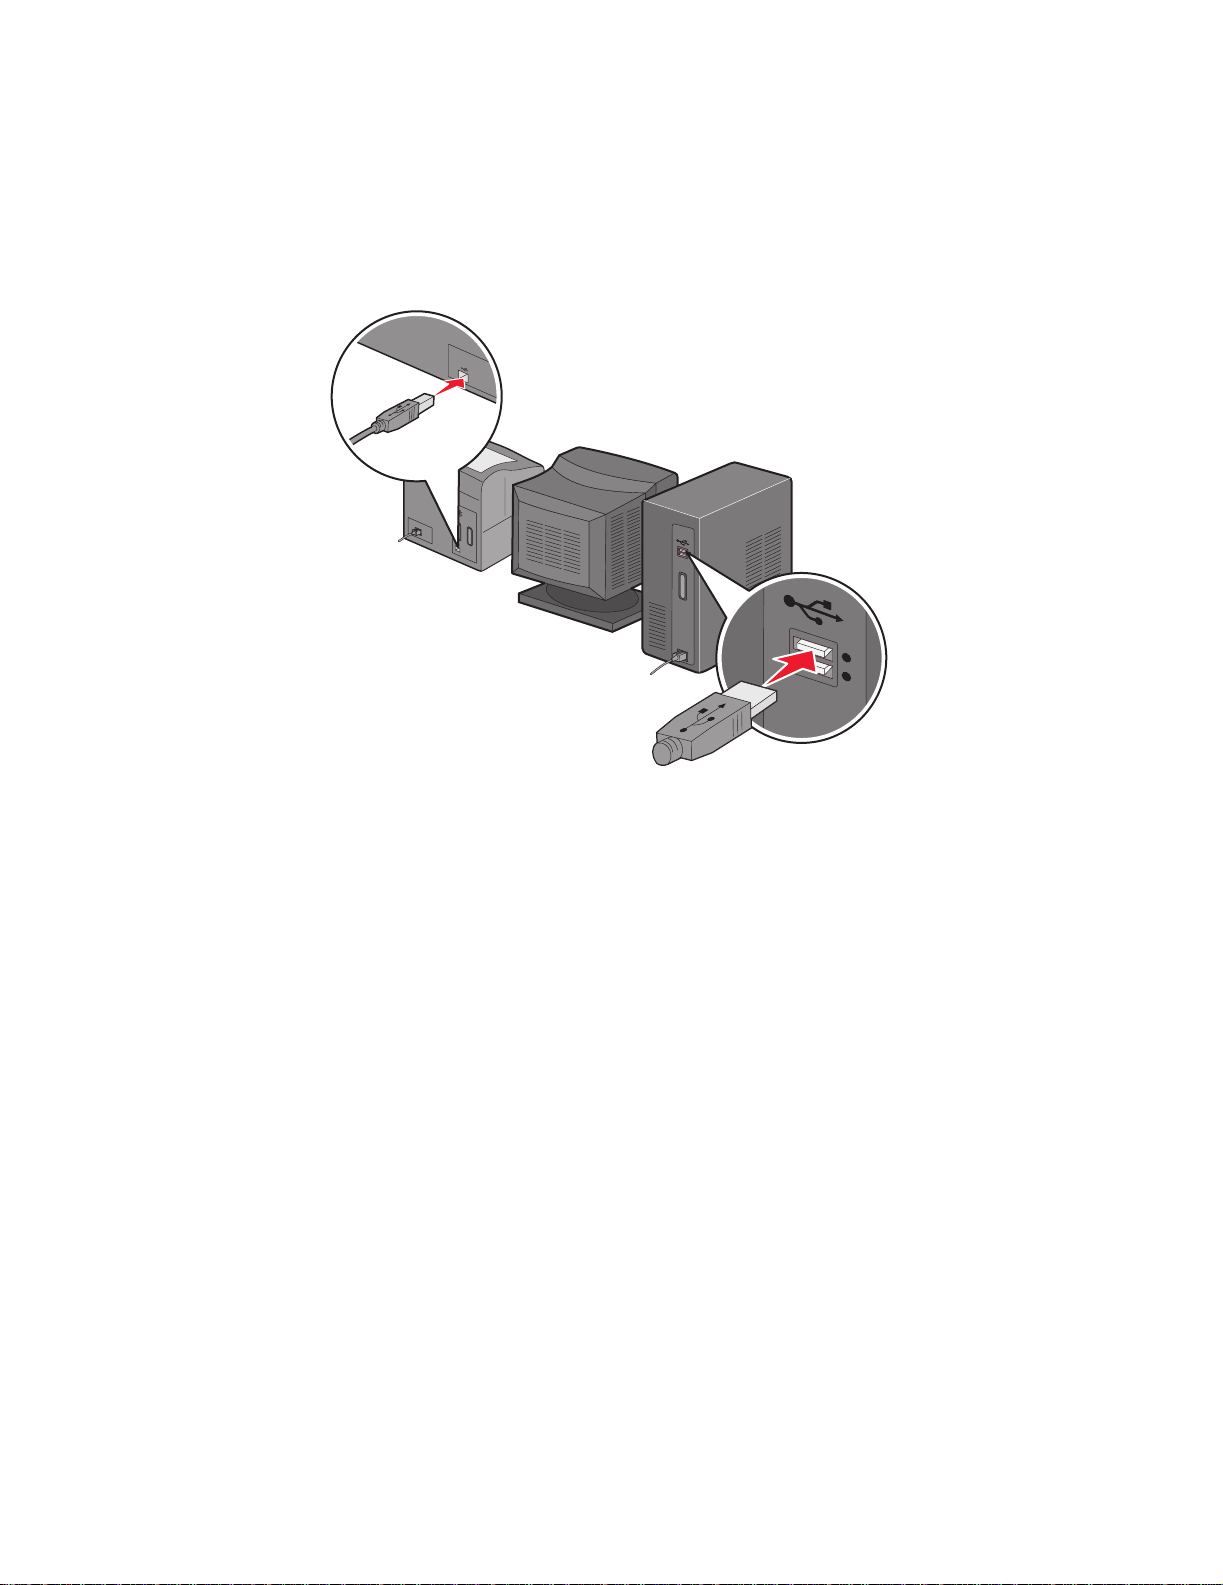
1 Make sure the printer is turned on and has power.
2 Connect the printer to your computer using a USB cable.
3 When the New Hardware Wizard appears, click Cancel.
4 Insert the MarkNet N8050 Utilities CD. The CD launches automatically.
5 Click Install MarkNet N8050 Utilities.
6 Click Agree to accept the license agreement.
7 Click Finish to install the files and launch the setup utility.
8 Select either Wizard Mode or Advanced Mode.
9 Click Next, and follow the instructions for either Wizard Mode or Advanced Mode.
Using the Wireless Setup Utility
5
Page 10

For Wizard Mode
In Wizard mode, the Lexmark Wireless Setup Utility gath ers wireless information from the computer
the printer is connected to. The results of this query determine the process for selecting the correct
SSID.
1 Select the appropriate Network Name (SSID).
Wireless Configurations Found on Your Computer
• If existing wireless configurati ons are found on the computer, select the appropriate
Network Name (SSID) from the list, click Next, and go to step 2.
• If the correct network name is not in the list, sel ect the I want to enter a different
configuration radio button, click Next, and go to Wireless Networks Available in Your
Area.
Wireless Networks Available in Your Area
• If existing wireless configurations are not found on the computer, the setup utility scans
for available wireless networks. Select the appropriate Network Name (SSID) from the
list, click Next, and go to step 2.
• If the correct network name is not in the list, sel ect the I want to enter a different
network name radio button, click Next, and go to step 3 under Entering alternate
network settings.
2 Select the appropriate security method, and then click Next. If no securi ty was detected, go
to step 4.
3 Enter the appropriate security key(s) for the network, and then click Next.
4 Check each network attribute on the summary screen to make sure that the settings are
correct. If the settings are correct, click Next to apply these settings to the print se rver.
Note: Clicking Next will prompt the setup utilit y to verify wireless communicati on with the
printer. This verification proces s can take up to 120 seconds. If you are sure that
the wireless settings displayed on the screen are correct, and you do not want to
initiate the wireless veri fication process, or if the pr int server is being config ured for
use on a network that is not immediately available to either the printer or the
configuring computer, click the Do not verify the print server can join the
network check box to skip the wireless verification test, and go to step 6.
5 Verify that the print server can communicate over the network.
• If the print server was successfu lly configured and is available on the network, click
Finish to close the Setup Utility.
• If the print server was not able to join the wireless network, click View Settings to verify
that the wireless settings are correct, select the appropriate option, and click Next.
6 Disconnect the USB cable from both the computer and the printer.
7 Remove the MarkNet N8050 Utilities CD from your computer, insert your printer drivers CD or
printer software CD, and proceed to Installing the printer on the network.
Using the Wireless Setup Utility
6
Page 11

Entering alternate network settings
Once the Wireless Setup Utility has collected and displayed the existing wireless settings, if the
network configuration you want to use is not avai lable, you have the option to enter a differ ent
network configuration.
1 After the Setup Wizard performs the site surve y, select the option to enter a different
configuration.
• If wireless network configurations were found on your computer:
From the Wireless Configurations Found on your Computer screen, select the I want to
enter a different configuration radio button, click Next, and then go to step 2.
• If no wireless network configurations were found on your computer:
From the Wireless Networks Available in Your Area screen, select the I want to enter a
different network name radio button, click Next, and then skip to step 3.
2 From the Wireless Networks Available in Your Area screen, select the I want to enter a
different network name radio button, and then click Next.
3 Select the wireless mode for your network (Infrastructure or Ad-Hoc mode).
4 Enter the Network Name (SSID) of the network that you want to use.
Note: The SSID must be entered exactly as it is used on the network. SSID’s are
case-sensitive, so if t he SSID is entered incor rectly, the print server will not be abl e
to communicate on the network, and the configuration process must be repeated.
5 Select the appropriate channel for the network (if applicable).
6 Click Next.
7 Select the type of security that your network uses, and then click Next.
8 If security was selected, enter the appropriate security key(s), and then click Next. If no
security was selected, proceed to step 9.
9 Check each network attribute on the summary screen to make sure that the settings are
correct. If the settings are correct, click Next to apply these settings to your print server .
Note: Clicking Next will prompt the setup utilit y to verify wireless communicati on with the
printer. This verification process can take up to 120 seconds. If you are sure that
the wireless settings displayed on the screen are correct, and you do not want to
initiate the wireless veri fication process, or if the pr int server is being config ured for
use on a network that is not immediately available to either the printer or the
configuring computer, click the Do not verify the print server can join the
network check box to skip the wireless verification test, and go to step 11.
Using the Wireless Setup Utility
7
Page 12

10 Verif y that the print server can communicate over the network.
• If the print server was successfu lly configured and is available on the network, click
Finish to close the Setup Utility.
• If the print server was not able to join the wireless network, click View Settings to verify
that the wireless settings are correct, select the appropriate option, and click Next.
11 Disconnect the USB cable from both the computer and the print server.
12 Remove the MarkNet N8050 Utilities CD from the computer, insert the printer drivers CD or
printer software CD, and proceed to Install ing the printer on the network.
For Advanced Mode
The Advanced Mode home screen provides additional optio ns for using the Lexmar k Wireless Setup
Utility. Clicking Wizard Mode will revert the Wireless Setup Utilit y to Wizard Mode. Clic king Options
provides the following management options:
• Select either Wizard Mode or Advanced Mode as the default startup mode for the Utility.
• Select the Do not verify the print server can join the network check box to bypass the
wireless communication verification process. The verification process can take up to 120
seconds. If the print server is being configured for use on a network that is not immediately
available to either the printer or the configuring computer, or you simply do not want to verify
wireless communication with the printer, select this check box, and go to step 1.
1 Select the wireless mode that the network uses (Infrastructure or Ad-Hoc mode).
2 Enter the Network Name (SSID) of the network for which the printer will be used.
Note: The SSID must be entered exactly as it is used on the network. SSID’s are
case-sensitive, so if t he SSID is entered incor rectly, the print server will not be abl e
to communicate on the net work, and the configuration process must be repeated.
3 Select the appropriate channel for the network.
4 Select the appropriate authentication type for the network. The authentication type options
are dependent on the wireless mode that was se lected in step 1, and will d etermine the types
of encryption that will be available.
For Infrastructure mode:
• Open
• Shared
• WPA Personal
• 802.1x–RADIUS
For Ad-Hoc mode:
• Open
Using the Wireless Setup Utility
8
Page 13

5 Select the appropriate encrypti on for the network. The type of encryption that can be used is
dependent on the authentication type that was sele cted in step 4.
For Open:
• No Encryption
• WEP
For Shared:
• WEP
For WPA Personal:
• TKIP
For 802.1x–RADIUS:
• No Encryption
• WEP (dynamic keys)
• WEP (static keys)
• WPA-TKIP
6 If 802.1x–RADIUS using EAP-TLS is the intended authentication type, a certificate request
is needed to obtain a signed certificate for the device. For instructions on requesting a new
signed certificate, see Creating a certificate request. If a different 802.1x–RADIUS
authentication mechanism is used, skip to step 7.
7 Configure authentication and encryption. If none of the following options are selected,
continue to step 8.
If 802.1x–RADIUS was selected as the authentication type, click Configure
Authentication, and follow the Configuring the authentication mechanism instructions.
If WPA Personal was selected as the encryption type, click Configure Encryption, and
follow the Configuring WPA Personal encryption instructions.
If WEP or WEP (static keys) was selected as the encryption type, click Configure
Encryption, and follow the Configuring WEP encryption instructi ons.
8 Click Apply.
9 Click OK.
10 Click OK to close the utility.
Configuring the authentication mechanism
• If EAP-MD5, MSCHAPv2, or LEAP is selected as the authentication mechanism:
1 Enter an appropriate username and password for the 802.1x–RADIUS authentication
server.
2 Confirm the password.
Using the Wireless Setup Utility
9
Page 14

3 Click OK to return to the Advanced Mode home screen, and continue with step 7 of the
advanced mode instructions.
• If PEAP is selected as the authentication mechanism:
1 Enter an appropriate username and password for the 802.1x–RADIUS authentication
server.
2 Confirm the password.
3 Click Install CA Certificate.
4 Enter the path to the correct CA certificate, or click Browse to select the certificat e. Click
OK to install the certific ate, or click Cancel to cancel the action.
5 Click OK to return to the Advanced Mode home screen, and continue with step 7 of the
advanced mode instructions.
• If EAP-TLS is selected as the authentication mechanism:
1 Enter an appropriate username for the 802.1x–RADIUS authentication server.
2 Click Install Signed Certificate.
3 Enter the path to the correct signed certi ficate, or click Browse to select the certif icate.
Click OK to install the certificate, or click Cancel to cancel the action.
4 Click Install CA Certificate.
5 Enter the path to the correct CA certificate, or click Browse to select the certificat e. Click
OK to install the certific ate, or click Cancel to cancel the action.
6 Click OK to return to the Advanced Mode home screen, and continue with step 7 of the
advanced mode instructions.
• If EAP-TTLS is selected as the authentication mechanism:
1 Select the appropriate Inner Authentication to be used in conjunction with EAP-TTLS.
2 Enter an appropriate username and password for the 802.1x–RADIUS authentication
server.
3 Confirm the password.
4 Click Install CA Certificate.
5 Enter the path to the correct CA certificate, or click Browse to select the certificat e. Click
OK to install the certific ate, or click Cancel to exit the certificate dialog.
6 Click OK to return to the Advanced Mode home screen, and continue with step 7 of the
advanced mode instructions.
Using the Wireless Setup Utility
10
Page 15

Configuring WEP encryption
1 Enter the appropriate WEP key(s). WEP encrypti on requires at least one WEP key, but can
include up to four.
2 Select the default WEP transmit key.
3 Click OK to return to the Advanced Mode home screen, and proceed to step 8 of the
advanced mode instructions.
Configuring WPA Personal encryption
1 Enter the appropriate Pre-Shared key.
2 Click OK to return to the Advanced Mode home screen, and proceed to step 8 of the
advanced mode instructions.
Creating a certificate request
Some authentication mechanisms require certificates to work properly. In situations in which a
signed certificate is required, a certificate request must be initiated in order to create a new signed
certificate.
To create a certificate request
1 Go to Certificates Æ Create Certificate Request.
2 Enter the appropriate certificate information.
3 Click Browse to navigate to the location where the certificate is to be saved.
4 Click OK to return to the Advanced Mode home screen, and proceed to step 7 of the
advanced mode instructions.
Installing the printer on the network
Once the print server has been configured, use the printer drivers or printer software CD that came
with the printer to install the network printer on the network.
• Make sure that your printer drivers CD or prin ter software CD is inserted into the computer
you want to install the printer on.
• When installing the printer, follow the Suggested
can vary between different printers.
For more information on installing the printer on the network, see the printer documentation.
Æ Network installation path. This process
Installing the printer on the networ k
11
Page 16

Installing a network printer on additional network computers
If you are installing the network printer for use with multiple computers on the network, repeat the
Installing the printer on the network process for each computer that will have access to the
printer. The wireless print server does not need to be reconfigured for each successive installation.
Installing the printer on the networ k
12
Page 17

Changing the wireless print server
3
settings
The easiest way to change settings in the wi reless pr int server is through the embedded W eb serv er.
For this to work, the printer must be successfully installed on the network.
1 Enter the IP address of the printer in a browser window. The embedded Web page for the
print server appears.
For information on locating the IP address of the pri nter, see Finding the network printer IP
address.
2 Select the settings you want to change, such as IP address.
3 Enter the changes, and then click Submit.
Finding the network printer IP address
The network printer IP address can be found by either accessing the IP Setup Utility or by printing a
network setup page.
Using the IP Setup Utility
The IP Setup Utility is ins talled in additi on to the Lexmark Wirele ss Setup Utility Wizar d when you run
the MarkNet N8050 Utilities CD. You can use this utility to find the IP address of your pri nt server .
1 Launch the IP Setup Utility. For example:
In Windows operating systems, go to Start
The IP Setup Utility discovers all Lexmark printers and print servers on the network. A list of
printers, including their MAC and IP addresses, appears.
2 Select the printer from the list.
3 Click Launch Web Page.
Printing a network setup page
The process for printi ng a network setup page can vary between d iffer ent printers. For informati on on
printing a network setup page, see the printer documentation.
Note: If you have not successfully completed the installation of this product on the
wireless network, the IP address may not be listed on the network setup page.
Æ Programs Æ Lexmark Æ IP Setup Utility.
Changing the wireless print server settings
13
Page 18

4
Troubleshooting
Use this section to solve problems you may have while setting up the internal wireless print server.
The MarkNet N8050 Utilities CD does not launch automatically
1 Close all open software programs.
2 Reinsert the MarkNet N8050 Utilities CD. If the setup uti lity screen appears, continue your
setup instructions.
If the setup utility screen does not appear, do the following:
a From your desktop, double-click My Computer.
b Double-click the CD-ROM drive icon.
c If necessary, double-click setup.exe.
The Wireless Setup Utility was not able to communicate with the printer
• Verify that the printer has power.
• Verify that the USB cable is properly connected to both the computer and the printer .
• Connect the printer to a different USB port on your computer.
• If repeated attempts to connect the pri nter to the comput er using a USB cable fai l, preventing
you from using the Wireless Setup Utility, you can use the Manual configuration method to
configure the print server for use on the network.
The network key was invalid
A network key is like a password and should follow this criteria:
• WEP key
— Exactly 5 or 13 ASCII characters
Or
— Exactly 10 or 26 Hexadecimal characters (using A—F and 0—9 only)
Troubleshooting
14
Page 19

• Pre-Shared key (for infrastructure mode only)
— Between 8 and 63 ASCII characters
The printer was unable to join the network
There are many factors that can prevent the print server from joining the network. Here are some of
the most common troubleshooting options:
• Verify that the wireless settings match those used by the wireless network.
• Verify that the printer is within range of the net work.
• Verify that the wireless print server option card antenna is securely attached.
• Verify that the network is working and that the computer used to configure the print server
can communicate with the network.
• If the network uses MAC address filtering, provide the MAC address for the printer to your
network. The MAC address can be found on the network setup page. See the printer
documentation for information on printing a network setup page.
If the print server was configured for use on a network that is not immediately available to either the
printer or the configuring computer, and the Do not verify the print server can join the network
check box was not selected during the configurat ion process, the Connection Failed screen will
appear.
The Connection Failed screen provides three management options:
• Select the Verify the print server is available on the network radio button to re-verify
wireless communication.
• Select the Accept the current settings even though the print server was unable to join
the network radio button to keep the current settings.
• Select the Reconfigure the wireless print server radio button to re-start the configuration
process.
The internal print server was configured with the correct
settings, but cannot be found on the network
• Verify that the printer has power and that the power indicator light is on.
• Verify that the printer is within range of the wireless network.
• Ver ify that the printe r is located away from other electroni c devices that may interfer e with the
wireless signal.
• Verify that your wireless network is using a unique network name (SSID). If not, it is possible
that the printer is c ommunicating over a di ffere nt, nearby network that uses the same n etwork
name.
• Verify that the printer has a valid IP address on the network.
• Verify that the wireless print server option card antenna is securely attached.
The printer was unable to join the network
15
Page 20

My network printer does not print
• Make sure the printer power is on.
• Check the printer status.
• Make sure the network is operating properly.
See the network documentation, or contact your network support person if you are not sure
that your network is operating correctly.
• Make sure the printer driver is instal led on the computer fr om which you are sending t he print
job.
Note: The printer driver must be installed on each computer that uses the network pr inter .
• Make sure the correct printer port is selected.
• Restart the computer.
• Uninstall and then reinstall the pri nter software.
If the printer still does not print , see the printer documentation for help.
• Make sure there is not a problem with the printer itself.
Attach the printer directly to the computer with a USB cable, and perform a local printer
installation. If you are able to print when the printer is directly attached, the re ma y be a
problem with the network. See the network documentation, or contact your network support
person.
My network printer does not print
16
Page 21

5
Manual configuration
The MarkNet N8050 internal wireless pri nt server is shipped with default setting s that let you
configure it in Ad-Hoc mode by accessing the embedded Web page of the print server.
Because this configuration method does not use the Wire less Setup Utility or a direct USB
connection to the computer, several of the wireless settings on both the computer and the network
will need to be accessed. As a result, extensive knowledge of wireless network and computer
settings will be needed to complete the configuration process.
Note: To confi gure the wir eless pr int server by t his method, the comput er that i s used to
facilitate the configur ation process must have a wireless network card.
Before configuring the wireless print server, make sure your printer has been set up correctly
• The internal wireless print server option card has been installed correctly in the printer.
• The toner or print cartridges are installed correctly.
• Paper has been loaded into the printer.
• The printer is turned on and ready to be installed.
For help setting up your printer, see your printer documentation.
Configuring the print server in Ad-Hoc mode
1 Make sure the printer power light is on.
2 Access and record the computer’s current wireless network parameters.
For information on accessing the current wireless network parameters, see the wireless
network documentation, or contact your net wo rk support person.
Manual configuration
17
Page 22

3 Change the current wireless network parameters to the following values:
Wireless network
parameter
Set to
SSID (Network Name
or Service Set ID)
Basic Service Set
Type (BSST)
Data Encryption Mode None
WEP Key None
print server
Ad-Hoc
4 Check the IP address of the printer.
The printer will be assigned an IP address through the AutoIP method. This address should
be in the range of 169.254. Access the printer IP address by one of the following methods:
• Print a network setup page. For more information on printing a network setup page, see
Printing a network setup page, or see the printer documentation.
• Use the IP Setup Utility located on the MarkNet N8050 Utilities CD to display the print
server IP address.
5 Make sure the PC has assigned itself an IP address that is dif ferent t han the printer, but is still
within the same IP range. For example:
Device IP address
Computer 169.254.10.40
Print server 169.254.10.41
If the computer IP address is not within the same range as t he print server, the IP address will
need to changed so that it is within the appropriate range.
For information on locating and changing the computer IP address, see the computer or
operating system documentation.
6 Open a Web browser, and enter the print server IP address as the URL to access the
embedded Web page of the print server.
Note: If 802.1x–RADIUS is the intended Wireless Security Mode for the networ k, and a
signed certificate and/or CA certificate is required for the authentication method,
see Certificate management to establish the necessary certificates before
continuing with the configuration process.
7 Click Configuration on the left side of the Web page.
8 Under Other Settings, click Network/Ports.
Configuring the print server in Ad-Ho c mode
18
Page 23

9 Under Network/Ports, click Wireless.
10 Change the listed network setti ngs to mat ch the wir eless ne twor k that t he pr inter will be u sed
on, including:
• SSID
• BSS type
• Channel Number (Ad-Hoc only)
• Wireless Security Mode
• Encryption Mode (If applicable)
The SSID must be entered exactly as i t is use d on th e network. SSIDs ar e case-se nsi tive, so
if the SSID is entered incorrectly, the print server will not be able to communicate on the
network, and the configuration process must be repeated.
Note: If WEP is selected as the security mode, click Advanced Settings for the option to
enter additional WEP security keys.
11 Click Submit.
12 Restore the computer’s wireless network settings back to the original values that were
recorded in step 3.
Certificate management
Some authentication mechanisms associated wit h the 802.1x–RADIUS Wireless Security mode
require the use of either a CA Certificate (PEAP and EAP-TTLS), or both a Signed Certificate and a
CA Certificate (EAP-TLS).
To manage certificates for use with 802.1x–RADIUS
1 From the print server embedded Web page, click Configuration on the left side of the page.
2 Click Certificate Management.
3 Complete the appropriate management option (s) .
4 Return to the embedded Web page home screen and go to step 7 of the Conf iguring the
print server in Ad-Hoc mode instructions.
To install a new CA Certificate
1 Under Certificate Configuration, click Install A New Certificate Authority Certi ficate.
2 Browse to the correct certificate loc ation, and click Submit.
Configuring the print server in Ad-Ho c mode
19
Page 24

To request and install a new Signed Certificate
1 Under Certificate Configuration, click Update The Certificate Signing Request.
2 Enter the appropriate certificate information.
3 Click Update Certificate Signing Request.
4 Under Certificate Signing Request, click Download The Certificate Signing Request.
5 Use your certificate authority to sign the Certificate. For more information on signe d
certificates, see your 802.1x–RADIUS documentation.
6 Under Certificate Configuration, click Install New Certificate.
Configuring the print server using the printer operator panel
The option to set the Network Name (SSID) and Network Mode (Ad-Hoc or Infrastructure) using the
printer operator panel is availabl e for certain printer models. See your printer documentat ion for
information on navigating t he printer menus to help locat e the appropriate menu option. Menu names
pertaining to wireless settings may vary between different printer models.
Note: This configuration method is not recommended for networks that include wireless
security as the Network Name and Network Mode are the only configurable
wireless settings available through the printer operator panel.
Installing the printer on the network
Once the print server has been configured, use the print er drivers CD or printer software CD that
came with your printer to install the printer on the computers attached to the network.
• Make sure that the printer dr ivers CD or prin ter s oft ware CD is i nserte d int o the comput er the
printer is being installed on.
• When installing the printer, follow the Suggested
may vary between different printer s.
Installing your network printer on additional network computers
If you are installing yo ur network print er for use wit h multiple computer s on the network, you will need
to repeat the Installing your printer on the network process for each computer you want to have
access to the printer. The wireless print server does not need to be reconfigu red for ea ch successive
installation.
Æ Network installation path. This process
Configuring the print server using the printer operator panel
20
Page 25

Glossary
802.1x–RADIUS. A user authentication protocol used in conjunction with a RADIUS authentication server.
Ad-Hoc network. A stand-alone or peer-to-peer network in which wireless devices communicate directly
with one another without using a wireless access point or base station.
ASCII. A standard character set consisting of 96 uppercase and lowercase letters, plus 32 nonprinting control
characters.
Authentication. The process of verifying the identity of a user or device in a network environment through
the use of passwords, certificates, or tokens.
Authentication mechanism. The method or mechanism through which an authentication protocol is
carried out or performed. 802.1x–RADIUS authentication uses the following authentication mechanisms:
•EAP-MD5
•EAP-TLS
• EAP-TTLS
•LEAP
• MSCHAPv2
•PEAP
BSS type. Basic Service Set, the type of wireless network that you are using. The BSS type can be one of the
following:
• Infrastructure network
• Ad-Hoc network
CA Certificate. Certificate Authority Certificate, a file that is used to verify the signature presented by a
certific ate holder.
Certificat e A u th ority. The entity that signs a certificate to verify the identity of the certificate holder.
Channel number . A number associated with the radio frequency at which an 802.11 device operates. The
channel numbers available vary by geographical region.
Data Encryption mode. The security protocol that is used to protect data that is transferred across your
wireless network and provide network authentication.
21
Page 26

DHCP. Dynamic Host Configuration Protocol, a protocol for assigning dynamic IP addresses to devices on a
network. With dynamic addressing, a device can automatically request an IP address every time it connects to
the network. This means that a new device can be added to a network without having to manually assign a
unique IP address.
Dynamic key. A security key that is randomly generated and assigned to a device or user by a server for
security purposes.
Encryption. the conversion of data into a specific code to protect it from being compromised while being
transmitted over a network.
Hexadecimal. A numbering system that is used as a representation of binary numbers using a base of 16
digits.
Infrastructure network. A network in which your wireless devices communicate through a central wireless
access point or base station. An infrastructure network can contain multiple wireless access points.
IP address. A number that identifies each device connected to the network. For example, 192.168.0.1.
MAC address. A 12-character identifier that is unique for each network hardware device. For example,
0002001008e8.
Network authentication type. The data encryption mode that is used on your network to prevent
unauthorized users or devices from connecting to or accessing your wireless network.
Network-capable printer. A printing device that does not need to be locally attached to a computer.
Option card. An optional piece of hardware that can be installed in another device to provide additional
functionality.
Printer port. Windows terminology for a physical or logical connection to a printer. For example:
• LPT1 indicates the printer is attached to a physical parallel port with a parallel cable.
• USB001 indicates the printer is attached to a physical USB port with a USB cable.
• Print_Server_E320_0020000035D0 indicates a logical connection to the printer across your network.
PSK. Pre-Shared Key, a permanent security key or password that a user enters to establish security keys in a
WPA environment.
Security key. A security key is like a password used with either WPA or WEP security protocols and must
meet the following criteria:
• For WPA keys, if using Hexadecimal characters, valid keys are at least 64 characters long; if using ASCII,
valid keys are between 8 and 63 characters long. WPA authentication is not supported for Ad-Hoc
configurations.
• For WEP keys, if using Hex characters, valid keys are either 10 or 26 characters long; if using ASCII, valid
keys are either 5 or 13 characters long.
Signed Certificate. A certificate that is issued by a certificate authority that guarantees the authenticity of
the certificate holder.
Glossary
22
Page 27

Static key. A pre-determined security key that is assigned to a device or user for authentication purposes.
Subnet. A portion of a network that shares a common address component. On TCP/IP networks, subnets are
defined as all devices whose IP addresses have the same prefix. For example, all devices with IP addresses
that start with 192.168.0. would typically be part of the same subnet.
SSID. Service Set ID, also known as Network name, is a unique identifier used to distinguish one wireless
network from another. Wireless devices must use the same SSID to communicate. SSIDs are up to 32
characters long, and are case-sensitive.
TCP/IP. The Transmission Control Protocol (TCP) and the Internet Protocol (IP) are protocols that let different
types of computers communicate with each other. The Internet is based on this suite of protocols.
TKIP. Temporal Key Integrity Protocol, a protocol used with the WPA data encryption mode that scrambles
security keys using a hashing algorithm and adds an integrity-checking feature that ensures the keys haven’t
been tampered with.
WEP. Wired Equivalency Protocol, a security protocol defined in the original 802.11b specification that is used
to provide data encryption and user authentication.
WPA. Wi-Fi Protected Access, a security protocol for wireless networks defined by the Wi-Fi Alliance that was
designed to improve upon the WEP security protocol through improved data encryption and user
authentication.
Glossary
23
Page 28

Statement of Limited Warranty
for MarkNet N8050
Lexmark International, Inc. Lexington,
KY
This limited warranty applies to the United
States and Canada. For customers outside
the U.S., refer to the country-specific
warranty information that came with your
product.
This limited warranty applies to this product
only if it was originally purchased for your
use, and not for resale, from Lexmark or a
Lexmark Remarketer, referred to in this
statement as “Remarketer.”
Limited warranty
Lexmark warrants that this product:
• Is manufactured from new parts, or
new and serviceable used parts,
which perform like new parts
• Is, during normal use, free from
defects in material and workmanship
If this product does not function as
warranted during the warranty period,
contact a Remarketer or Lexmark for repair
or replacement (at Lexmark's option).
If this product is a feature or option, this
statement applies only when that feature or
option is used with the product for which it
was intended. T o obtain warranty service,
you may be required to present the feature
or option with the product.
If you transfer this product to another user,
warranty service under the terms of this
statement is available to that user for the
remainder of the warranty period. You
should transfer proof of original purchase
and this statement to that user.
Limited warranty service
The warranty period is 12 months and
starts on the date of original purchase as
shown on the purchase receipt.
To obtain warranty serv ice you may be
required to present proof of original
purchase. You may be required to deliver
your product to the Remarketer or
Lexmark, or ship it prepaid and suitably
packaged to a Lexmark designated
location. You are responsible for loss of, or
damage to, a product in transit to the
Remarketer or the Lexmark designated
location.
When warranty service involves the
exchange of a product or part, the item
replaced becomes the property of the
Remarketer or Lexmark. The replacement
may be a new or repaired item.
The replacement item assumes the
remaining warranty period of the original
product.
Replacement is not available to you if the
product you present for exchange is
defaced, altered, in need of a repair not
included in warranty service, damaged
beyond repair, or if the product is not free
of all legal obligations, restrictions, liens,
and encumbrances.
Before you present this product for
warranty service, remove all print
cartridges, programs, data, and removable
storage media (unless directed otherwise
by Lexmark).
For further explanation of your warranty
alternatives and the nearest Lexmark
authorized servicer in your area contact
Lexmark on the World Wide Web at http://
support.lexmark.com.
Remote technical support is provided for
this product throughout its warranty period.
For products no longer covered by a
Lexmark warranty, technical support may
not be available or only be available for a
fee.
Extent of limited warranty
Lexmark does not warrant uninterrupted or
error-free operation of any product or the
durability or longevity of prints produced by
any product.
Warranty service does not include repair of
failures caused by:
• Modification or unauthorized
attachments
• Accidents, misuse, abuse or use
inconsistent with Lexmark user’s
guides, manuals, instructions or
guidance
• Unsuitable physical or operating
environment
• Maintenance by anyone other than
Lexmark or a Lexmark authorized
servicer
• Operation of a product beyond the
limit of its duty cycle
• Use of printing media outside of
Lexmark specifications
• Refurbishment, repair, refilling or
remanufacture by a third party of
products, supplies or parts
• Products, supplies, parts, materials
(such as toners and inks), software,
or interfaces not furnished by
Lexmark
TO THE EXTENT PERMITTED BY
APPLICABLE LAW, NEITHER
LEXMARK NOR ITS THIRD PARTY
SUPPLIERS OR REMARKETERS MAKE
ANY OTHER WARRANTY OR
CONDITION OF ANY KIND, WHETHER
EXPRESS OR IMPLIE D, WITH RESPECT
TO THIS PRODUCT, AND
SPECIFICALLY DISCLAIM THE IMPLIED
WARRANTIES OR CONDITIONS OF
MERCHANTABILITY, FITNESS FOR A
PARTICULAR PURPOSE, AND
SATIS FACTORY QUALITY. ANY
WARRANTIES THAT MAY NOT BE
DISCLAIMED UNDER APPLICABLE
LAW ARE LIMITED IN DURATION TO
THE WARRANTY PERIOD. NO
WARRANTIES, EXPRESS OR IMPLIED,
WILL APPL Y AFTER THIS PERIOD. ALL
INFORMATION, SPECIFICATIONS,
PRICES, AND SERVICES ARE
SUBJECT TO CHANGE AT ANY TIME
WITHOUT NOTICE.
Limitation of liability
Your sole remedy under this limited
warranty is set forth in this document. For
any claim concerning performance or
nonperformance of Lexmark or a
Remarketer for this product under this
limited warranty, you may recover actual
damages up to the limit set forth in the
following paragraph.
Lexmark's liability for actual damages from
any cause whatsoever will be limited to the
amount you paid for the product that
caused the damages. This limitation of
liability will not apply to claims by you for
bodily injury or damage to real property or
tangible personal property for which
Lexmark is legally liable. IN NO EVENT
WILL LEXMARK BE LIABLE FOR ANY
LOST PROFITS, LOST SAVINGS,
INCIDENTAL DAMAGE, OR OTHER
ECONOMIC OR CONSEQUENTIAL
DAMAGES. This is true even if you advise
Lexmark or a Remarketer of the possibility
of such damages. Lexmark is not liable for
any claim by you based on a third party
claim.
This limitation of remedies also applies to
claims against any Suppliers and
Remarketers of Lexmark. Lexmark's and
its Suppliers' and Remarketers' limitations
of remedies are not cumulative. Such
Suppliers and Remarketers are intended
beneficiaries of this limitation.
Additional rights
Some states do not allow limitations on
how long an implied warranty lasts, or do
not allow the exclusion or limitation of
incidental or consequential damages, so
the limitations or exclusions contained
above may not apply to you.
This limited warranty gives you specific
legal rights. You may also have other rights
that vary from state to state.
Page 29

This certificate represents the capabilities and features that have passed the interoperability testing
governed by the Wi-Fi Alliance. Detailed descriptions of these features can be found at
www.wi-fi.org/certificate
Certification Date: March 30, 2005
Category: Wireless Printers and Print Servers
Company: Lexmark International, Inc.
Product: MarkNet N8050
This product has passed Wi-Fi certification testing for the following standards:
IEEE Standard Security
Certification ID: W003404
802.11b
802.11g
WPA™ - Personal
WPA™ - Enterprise
For more information: www.wi-fi.org/certified_products
 Loading...