

Page 1

MFP X4500 Option
Setup Guide
April 2002
Page 2

English
Page 3

Edition: January 2002
The following paragraph does not apply to any country where such provisions are inconsistent with local law:
LEXMARK INTERNATIONAL, INC., PROVIDES THIS PUBLICATION “AS IS” WITHOUT WARRANTY OF ANY KIND,
EITHER EXPRESS OR IMPLIED, INCLUDING, BUT NOT LIMITED TO, THE IMPLIED WARRANTIES OF
MERCHANTABILITY OR FITNESS FOR A PARTICULAR PURPOSE. Some states do not allow disclaimer of express
or implied warranties in certain transactions; therefore, this statement may not apply to you.
This publication could include technical inaccuracies or typographical errors. Changes are periodically made to the
information herein; these changes will be incorporated in later editions. Improvements or changes in the products or
the programs described may be made at any time.
Comments about this publication may be addressed to Lexmark International, Inc., Department F95/032-2, 740 West
New Circle Road, Lexington, Kentucky 40550, U.S.A. In the United Kingdom and Eire, send to Lexmark International
Ltd., Marketing and Services Department, Westhorpe House, Westhorpe, Marlow Bucks SL7 3RQ. Lexmark may use
or distribute any of the information you supply in any way it believes appropriate without incurring any obligation to you.
You can purchase additional copies of publications related to this product by calling 1-800-553-9727. In the United
Kingdom and Eire, call 0628-481500. In other countries, contact your point of purchase.
References in this publication to products, programs, or services do not imply that the manufacturer intends to make
these available in all countries in which it operates. Any reference to a product, program, or service is not intended to
state or imply that only that product, program, or service may be used. Any functionally equivalent product, program, or
service that does not infringe any existing intellectual property right may be used instead. Evaluation and verification of
operation in conjunction with other products, programs, or services, except those expressly designated by the
manufacturer, are the user’s responsibility.
Lexmark and Lexmark with diamond design are trademarks of Lexmark International, Inc., registered in the United
States and/or other countries. ScanBack is a trademark of Lexmark International, Inc.
Copyright advisory
It may be illegal to copy certain materials without permission or license, including documents, images, and currency. If
you are not sure whether you have permission, seek legal advice.
© Copyright 2002 Lexmark International, Inc.
All rights reserved.
UNITED STATES GOVERNMENT RESTRICTED RIGHTS
This software and documentation are provided with RESTRICTED RIGHTS. Use, duplication or disclosure by the
Government is subject to restrictions as set forth in subparagraph (c)(1)(ii) of the Rights in Technical Data and
Computer Software clause at DFARS 252.227-7013 and in applicable FAR provisions: Lexmark International, Inc.,
Lexington, KY 40550.
Page 4

v
Table of contents
Table of contents
Step 1: Set up your printer, stand, and scanner . . . . . . . . 1
Unpacking the scanner . . . . . . . . . . . . . . . . . . . . . . . . . . . . . . .1
Setting up your printer . . . . . . . . . . . . . . . . . . . . . . . . . . . . . . .2
Verifying your printer firmware level . . . . . . . . . . . . . . . . . . . . .2
Setting up your stand . . . . . . . . . . . . . . . . . . . . . . . . . . . . . . . .3
Unlocking the scanner . . . . . . . . . . . . . . . . . . . . . . . . . . . . . . .3
Step 2: Set up the trays . . . . . . . . . . . . . . . . . . . . . . . . . . . . 4
Step 3: Attach cables and cords . . . . . . . . . . . . . . . . . . . . .5
Step 4: Complete the hardware setup . . . . . . . . . . . . . . . . . 6
Attaching the Quick Reference . . . . . . . . . . . . . . . . . . . . . . . . .6
Installing the printer operator panel cover . . . . . . . . . . . . . . . .6
Turning on the scanner and printer . . . . . . . . . . . . . . . . . . . . . .7
Step 5: Configure your MFP . . . . . . . . . . . . . . . . . . . . . . . . . 8
Setting the IP address . . . . . . . . . . . . . . . . . . . . . . . . . . . . . . .8
Configuring Scan to E-mail . . . . . . . . . . . . . . . . . . . . . . . . . . . .9
Configuring Fax Setup . . . . . . . . . . . . . . . . . . . . . . . . . . . . . . .9
Registering with a Windows NT domain server . . . . . . . . . . .10
Page 5

vi
Table of contents
Step 6: Verify setup . . . . . . . . . . . . . . . . . . . . . . . . . . . . . . 11
Making a test copy . . . . . . . . . . . . . . . . . . . . . . . . . . . . . . . . .11
Sending a test fax . . . . . . . . . . . . . . . . . . . . . . . . . . . . . . . . . .11
Sending a test e-mail . . . . . . . . . . . . . . . . . . . . . . . . . . . . . . .12
Sending a network print job to the MFP . . . . . . . . . . . . . . . . .12
Maintaining your MFP . . . . . . . . . . . . . . . . . . . . . . . . . . . . . 13
Cleaning the touch screen . . . . . . . . . . . . . . . . . . . . . . . . . . .13
Cleaning the scanner bed . . . . . . . . . . . . . . . . . . . . . . . . . . . .13
Paper feeding problems . . . . . . . . . . . . . . . . . . . . . . . . . . . . .14
Cleaning the feeding rollers and pick pad . . . . . . . . . . . . . . . .15
Replacing the pick pad assembly . . . . . . . . . . . . . . . . . . . . . .16
Moving the scanner . . . . . . . . . . . . . . . . . . . . . . . . . . . . . . . .17
Document Distributor . . . . . . . . . . . . . . . . . . . . . . . . . . . . . 18
Troubleshooting . . . . . . . . . . . . . . . . . . . . . . . . . . . . . . . . . 19
Notices . . . . . . . . . . . . . . . . . . . . . . . . . . . . . . . . . . . . . . . . 20
Safety information . . . . . . . . . . . . . . . . . . . . . . . . . . . . . . . . . .20
Emission notices . . . . . . . . . . . . . . . . . . . . . . . . . . . . . . . . . . .21
Telecommunications notices . . . . . . . . . . . . . . . . . . . . . . . . .22
Page 6

1
Set up your printer, stand, and scanner
Step 1: Set up your printer,
stand, and scanner
Unpacking the scanner
Unpack the Lexmark X4500 MFP
Option. Make sure you have the
following items:
•
Scanner
•
Ethernet cable (RJ-45)
•
Telephone fax line cable
(RJ-11)
•
Folder with Setup Guide (includes
the MFP CD in the back of the
book), and Quick Reference
guides
•
Power supply
•
Power supply line cord
•
Output paper bin
Save the packing material until the
system is completely set up and working
correctly.
Folder
Scanner
Output
paper bin
Power supply
line cord
Power
supply
Ethernet cable
Telephone fax
line cable
Page 7

2
Set up your printer, stand, and scanner
Setting up your printer
1
Set up the printer according to the
instructions in the documentation
shipped with your printer. This
includes setting up all bins and
trays, duplex hardware, and any
other options purchased.
2
Before and during MFP setup,
unplug all power cords, fax and
phone cables, and network cables
from their outlets.
3
Following setup, you may plug all
equipment into properly grounded
outlets and turn them on.
Verifying your printer
firmware level
To check the minimum firmware level
needed for your MFP to function:
1
Go to http://support.lexmark.com.
2
Select your country and language.
3
Under Multifunction Printers,
select X4500 MFP option.
4
Click Go.
5
Select X4500 Minimum
Requirements.
Verify that the firmware level listed
matches your printer firmware.
If they do not match, follow the
instructions on the Web site to upgrade
your firmware.
Page 8

3
Set up your printer, stand, and scanner
Setting up your stand
Your printer comes with several stand
options, depending on your needs.
To assemble the stand and attach it to
the printer, refer to the instructions that
came with the stand.
If you did not purchase a stand and you
plan to position the scanner on top of the
Lexmark™ C750 Finisher for MFP, refer
to the instructions that came with the
finisher.
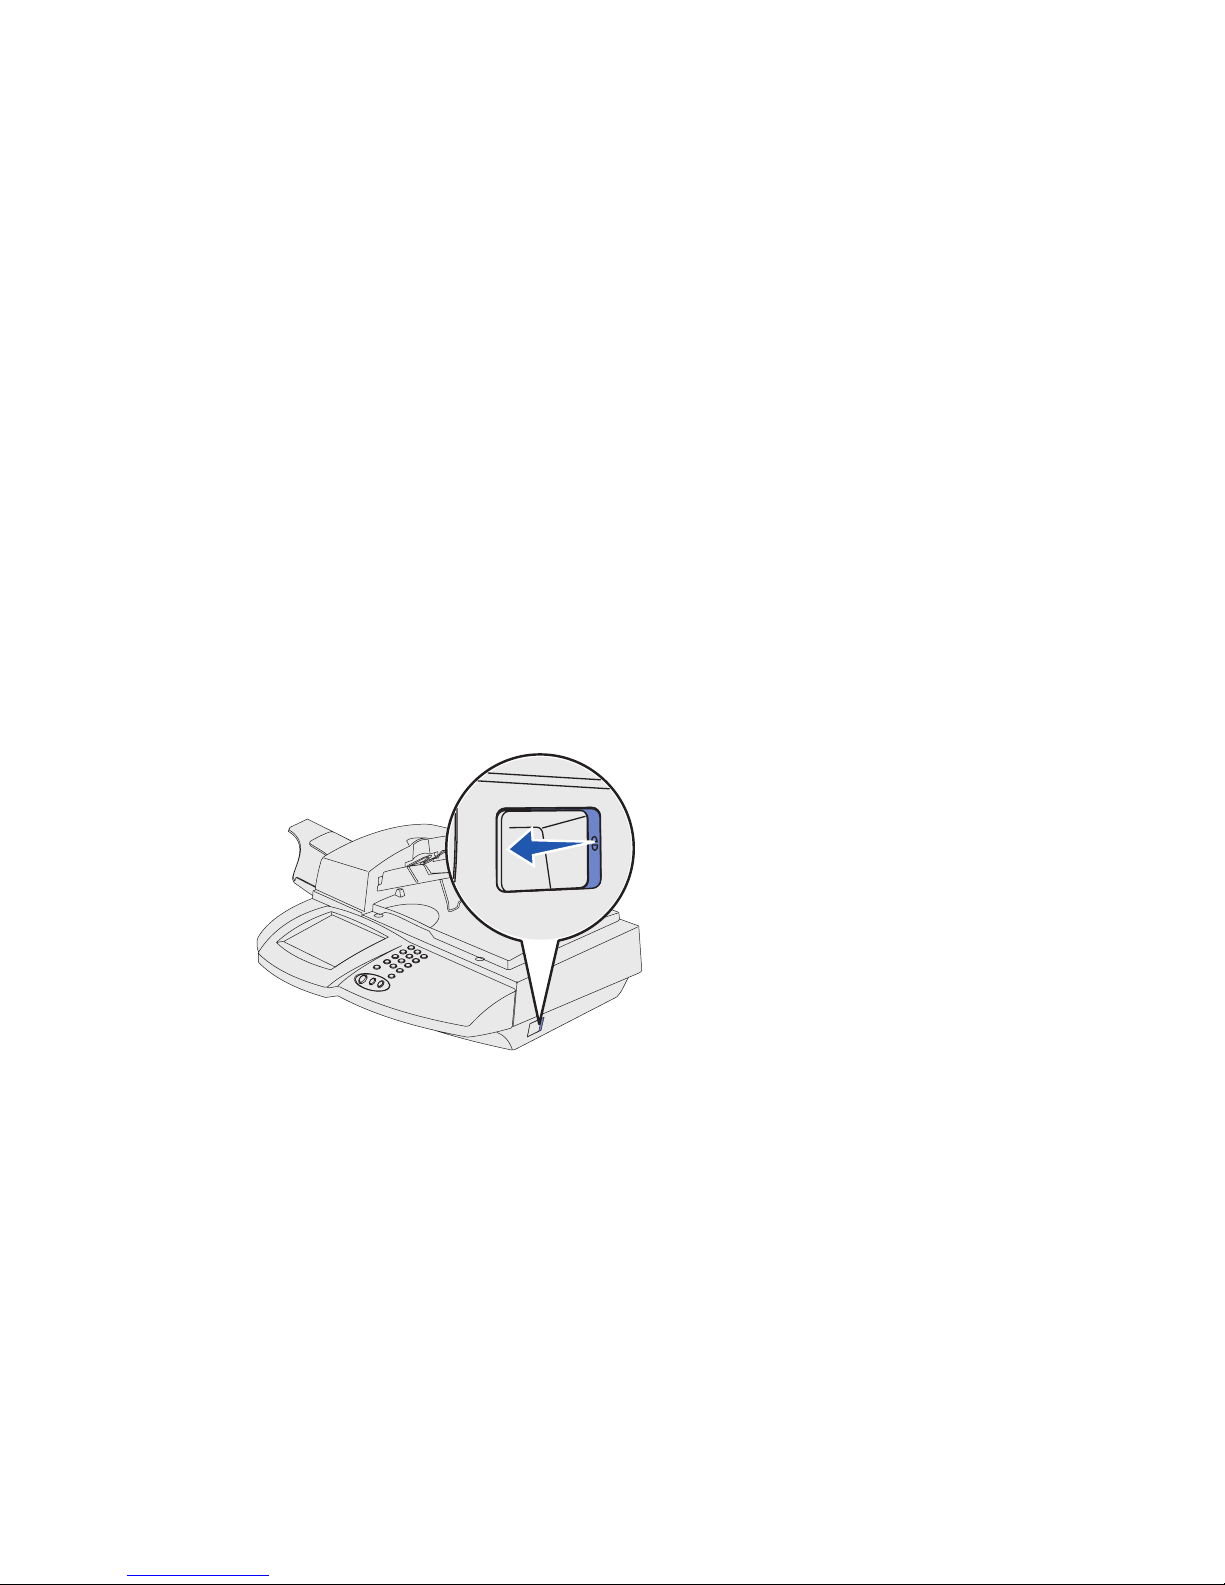
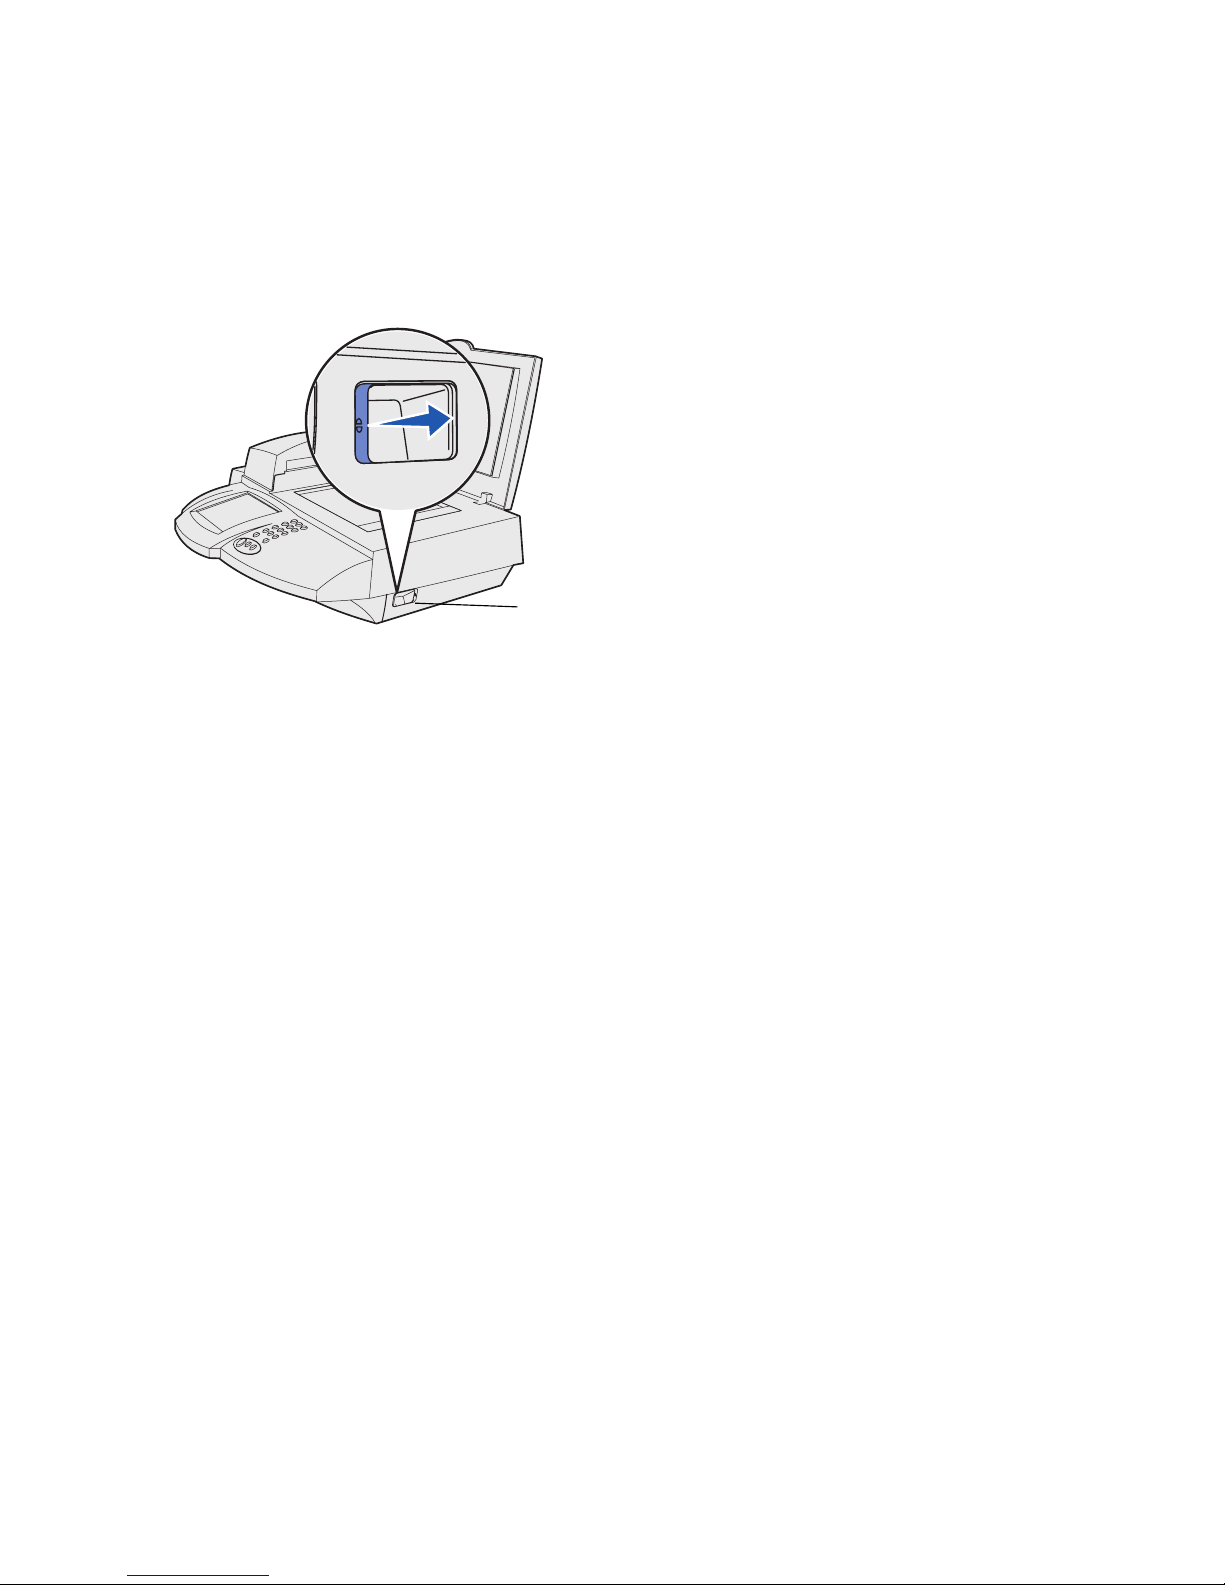
Unlocking the scanner
1
Make sure the printer is turned off
and unplugged.
2
Unlock your scanner:
a
Locate the lock switch on the
right side of the scanner.
b
Push the switch to the
unlocked position.
Page 9

4
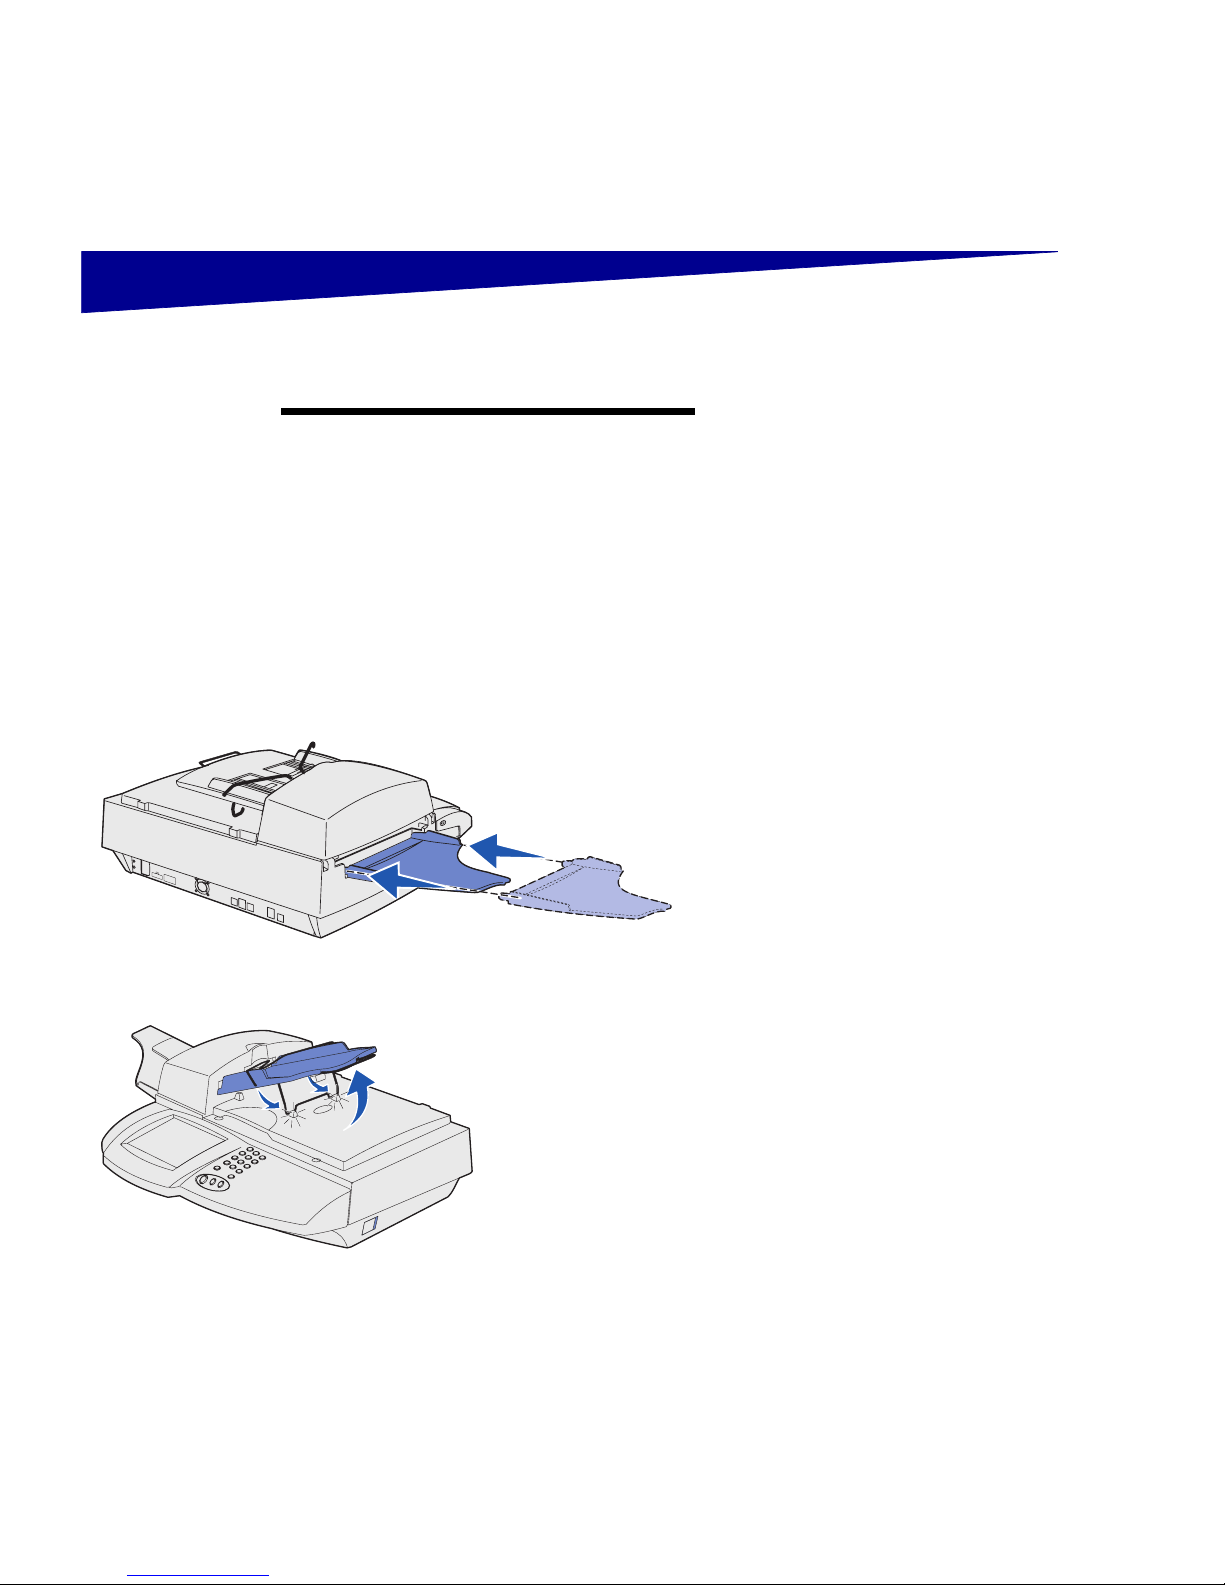
Set up the trays
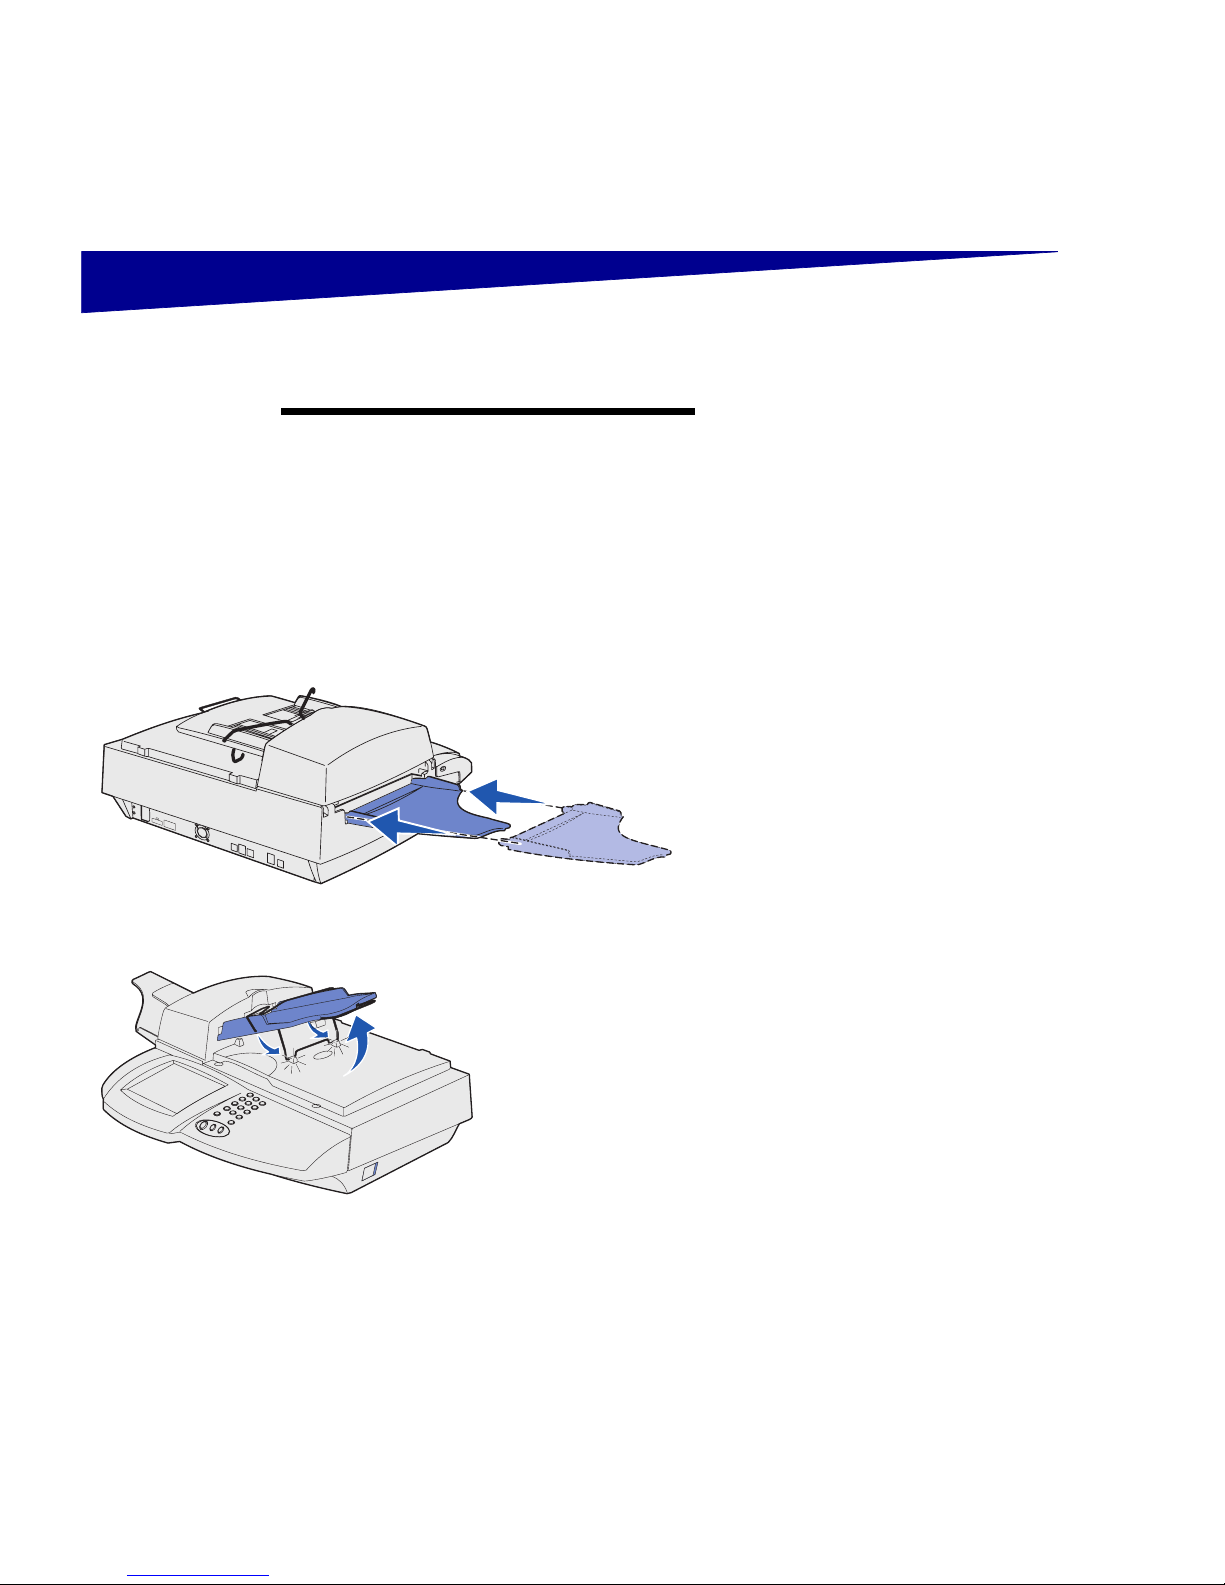
Step 2: Set up the trays
Note:
The automatic document feeder
and the document feed tray are attached
to the scanner before it is shipped.
1
Attach the output paper bin to the
automatic document feeder.
2
Lift the document feed tray and
snap the support bar into the top
of the scanner lid.
Document feed tray
Output paper bin
Page 10

5
Attach cables and cords
Step 3: Attach cables and cords
CAUTION!
Do not plug the power
supply line cord into an outlet at this
time.
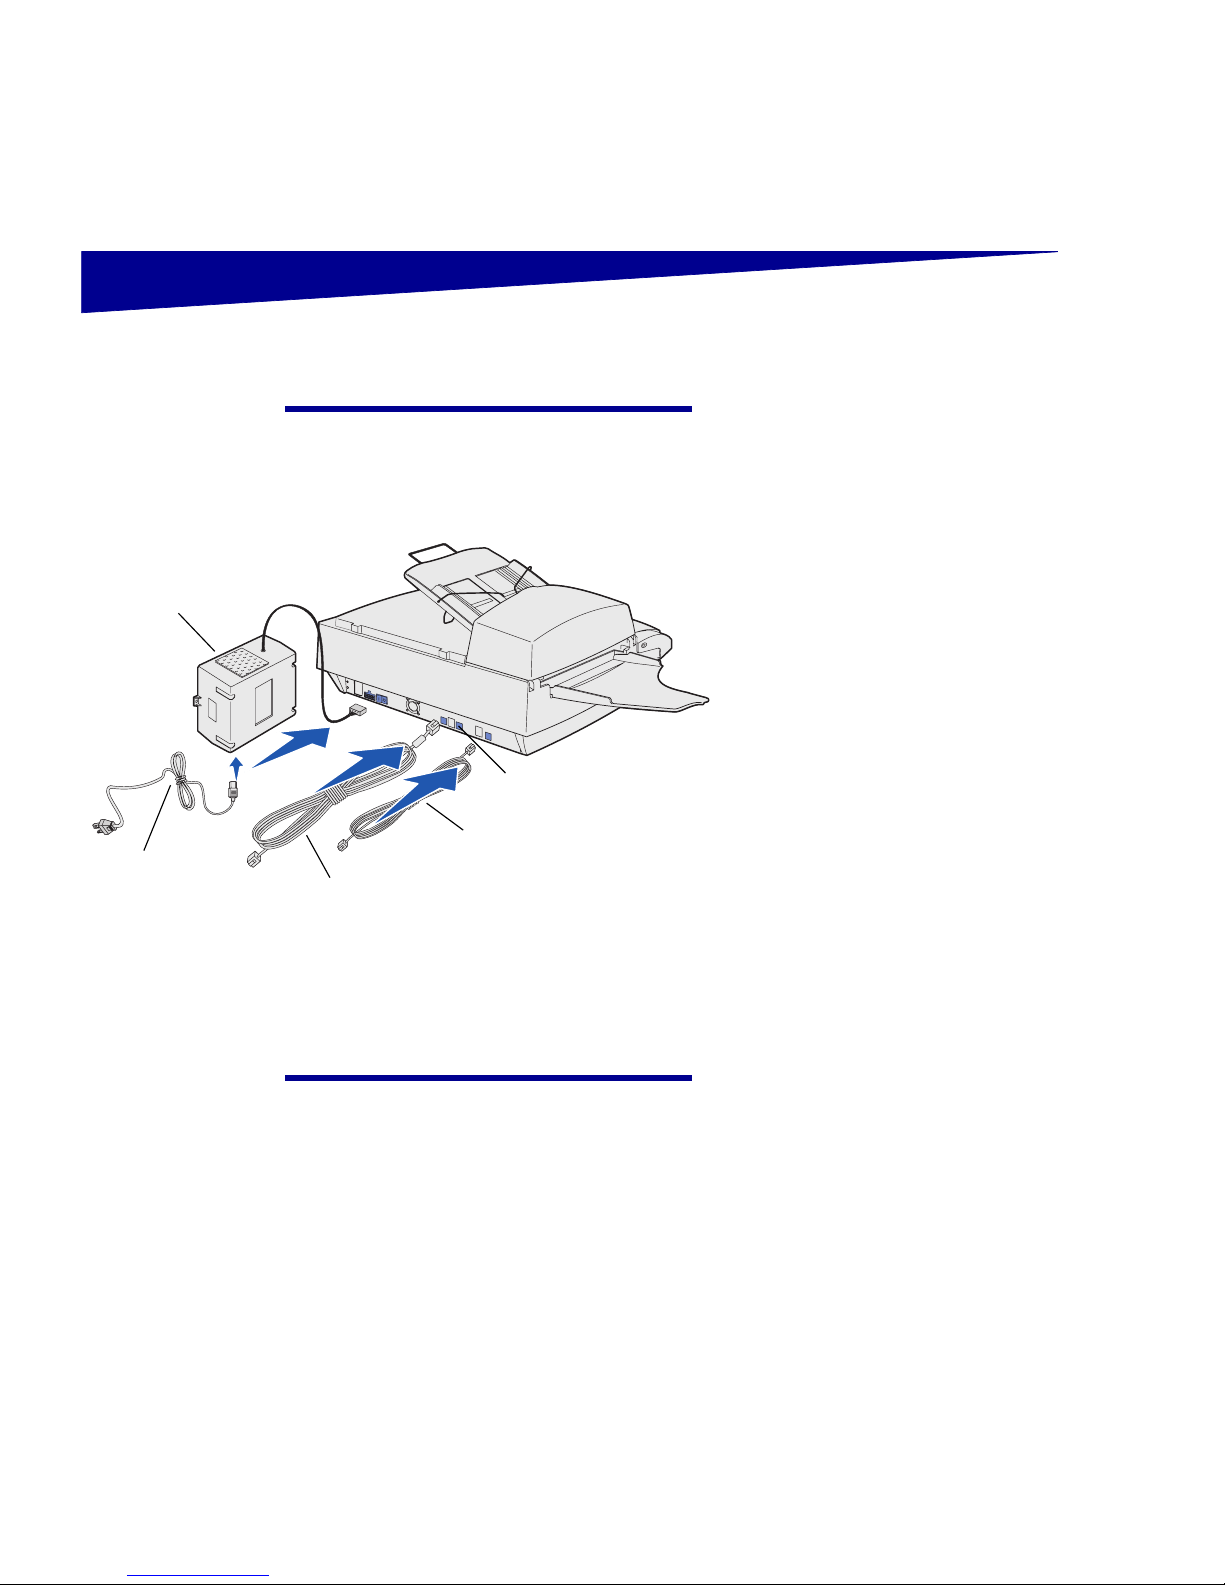
1
Make sure the printer and scanner
are turned off and unplugged.
2
Connect the end of the Ethernet
cable with the toroid to Ethernet
port 1 on the scanner. Connect
the other end to the printer.
3
Connect the telephone fax line
cable to the scanner and then to a
phone jack using a telephone line
adapter, if necessary.
4
Connect standard cabling
compatible with your network to
Ethernet port 2 on the scanner,
and then to a network connection.
This cable is not provided by
Lexmark.
5
Connect the power supply to the
scanner.
Warning!
Never connect or disconnect
the Ethernet cable when the scanner is
turned on.
6
Connect the power supply line
cord to the power supply, but
do
not
plug the other end into an
electrical outlet at this time.
Power
supply line
cord
Ethernet cable
Telephone fax line cable
Power supply
Ethernet port 2
Page 11

6
Complete the hardware setup
Step 4: Complete the
hardware setup
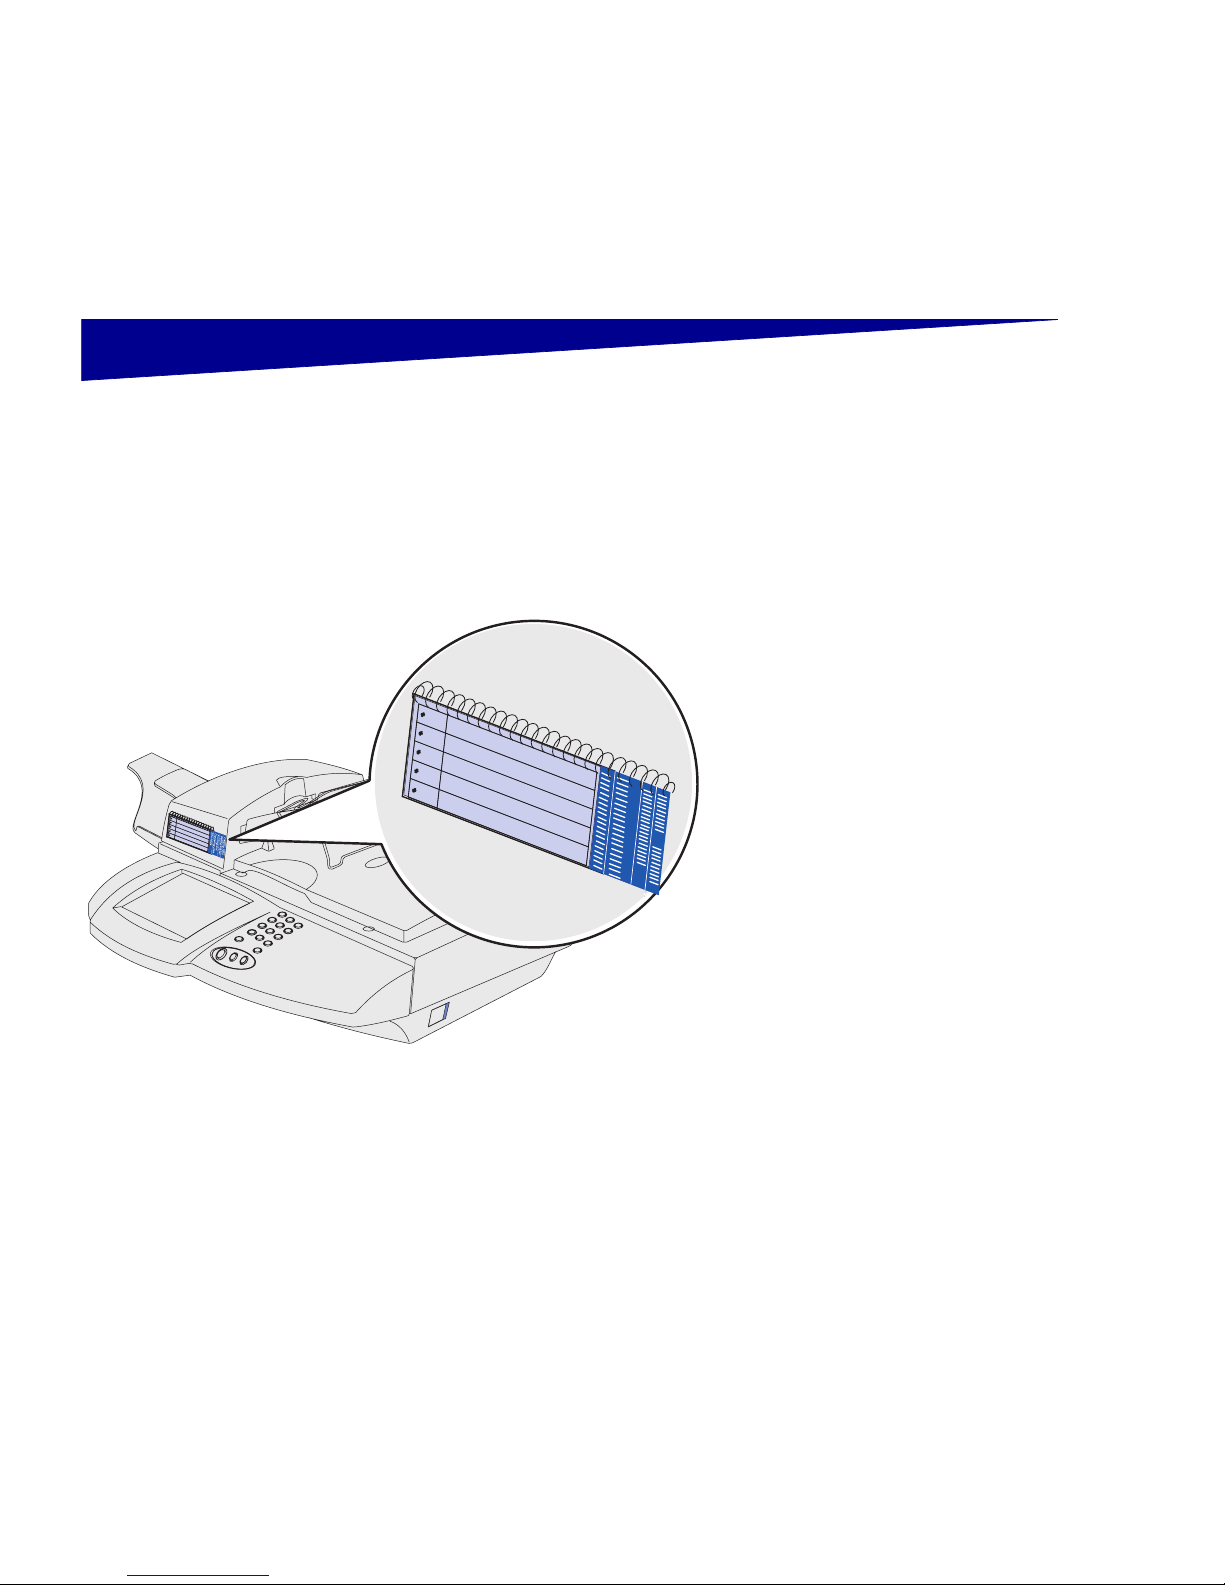
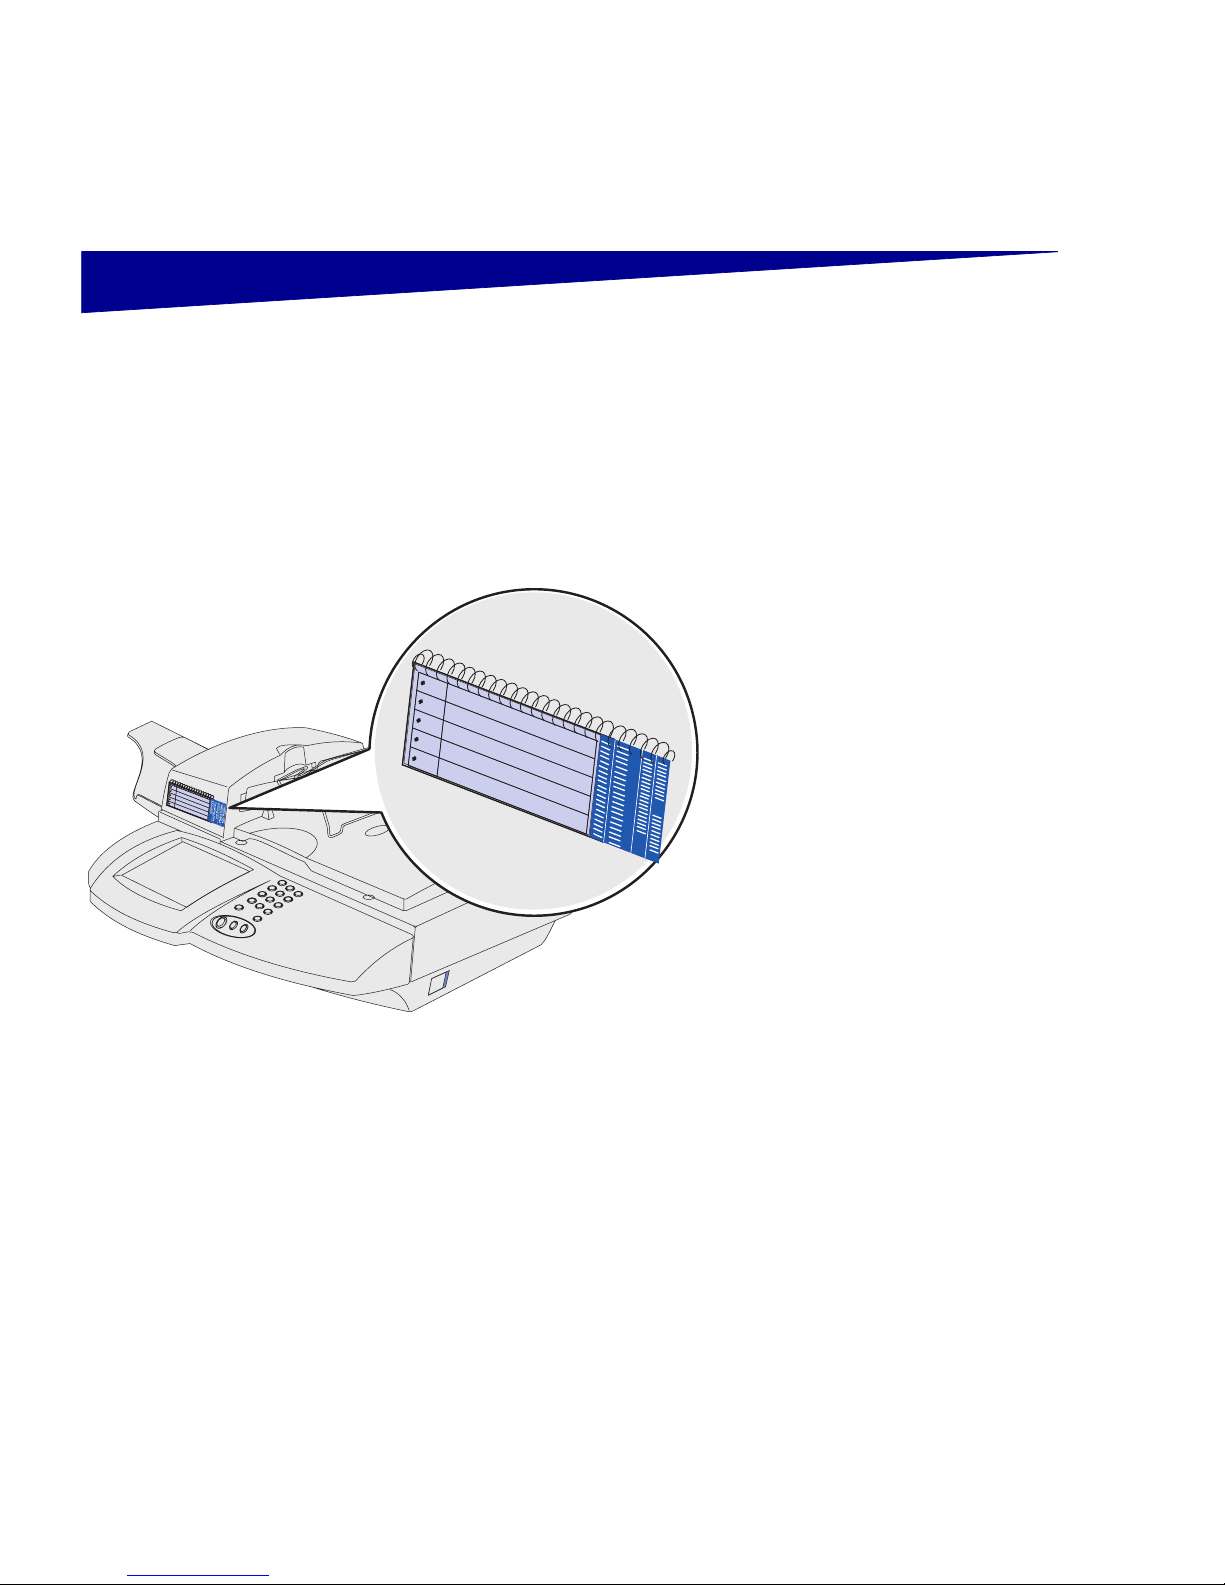
Attaching the
Quick Reference
1
Peel the backing off of the
adhesive strip on the back of the
Quick Reference.
2
Press the Quick Reference into
place above the touch screen.
Installing the printer
operator panel cover
Please refer to the instructions that came
with operator panel cover.
Page 12

7
Complete the hardware setup
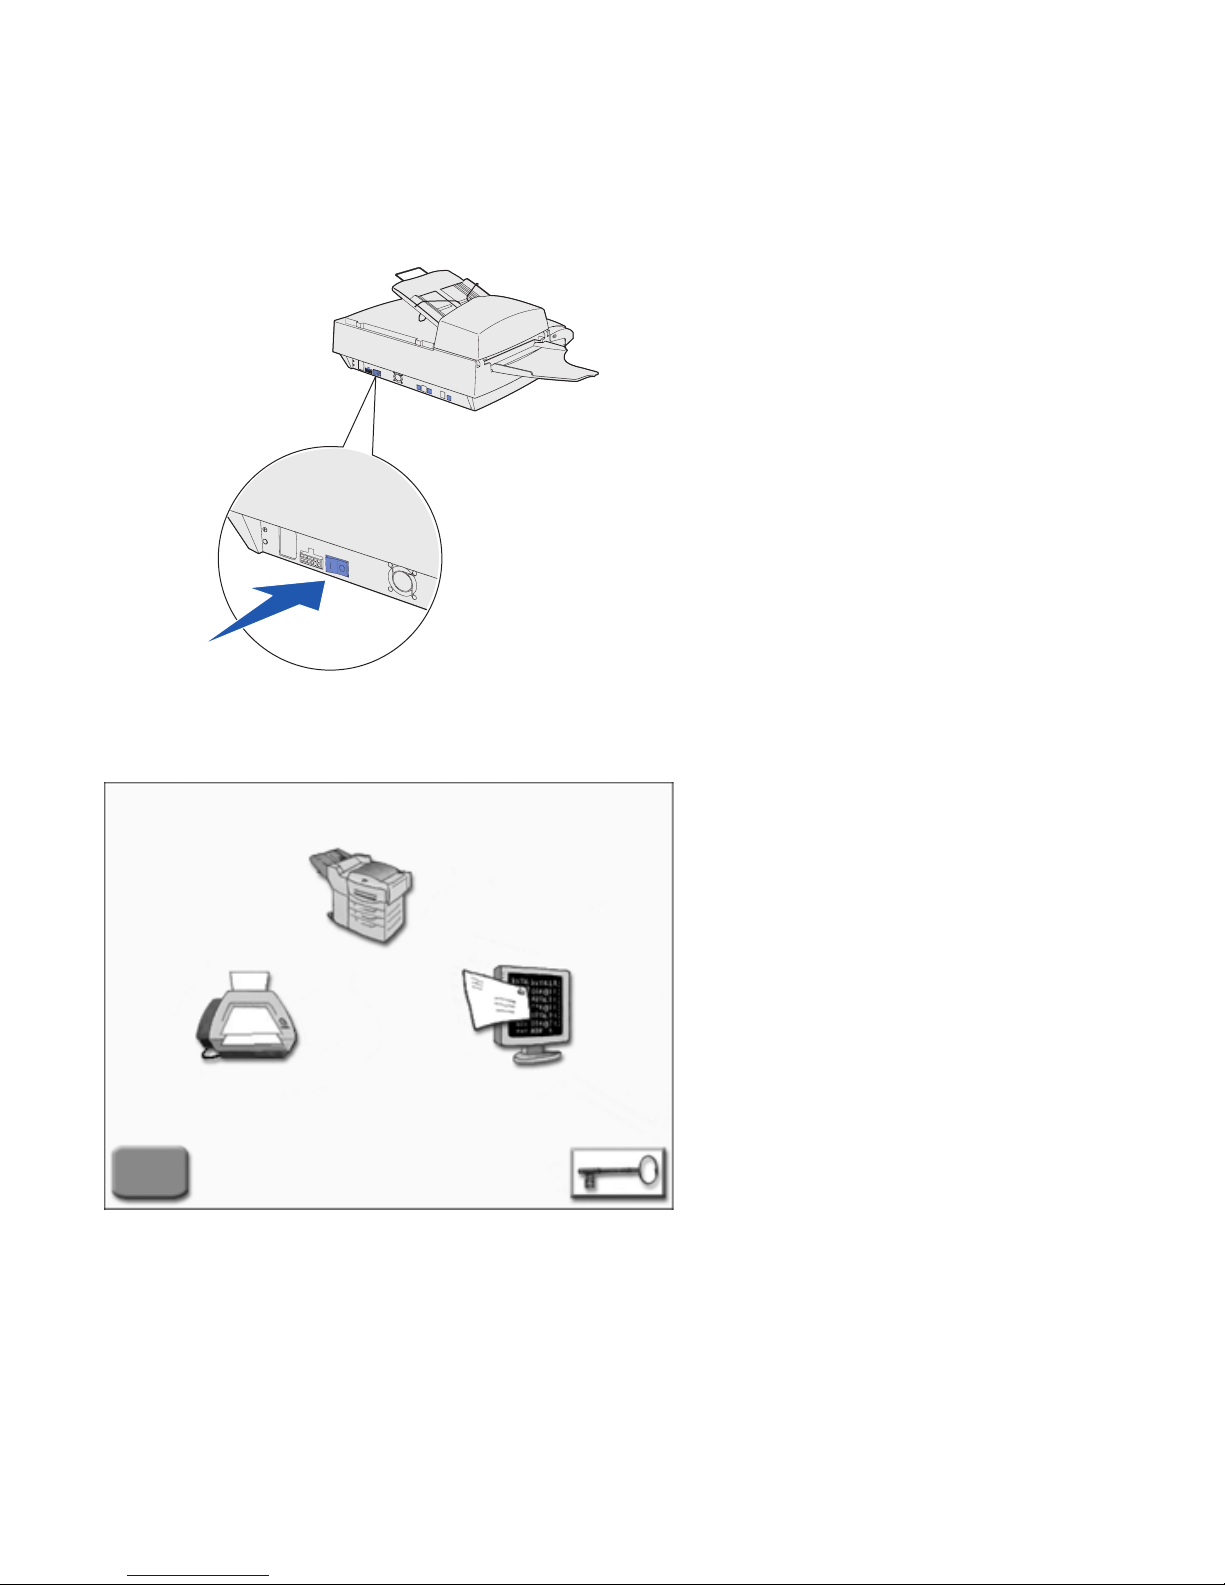
Turning on the scanner
and printer
1
Plug the printer and the power
supply line cord into properly
grounded electrical outlets.
2
Turn the printer on.
3
Turn on the scanner.
The MFP requires time to warm up after
you turn it on.
After the MFP completes its tests, the
Home screen is displayed on the touch
screen.
Page 13

8
Configure your MFP
Step 5: Configure your MFP
The following settings are the minimum required to perform basic
functions such as print, copy, fax, or e-mail. Some of these settings
may require assistance from your network administrator.
Setting the
IP address
You must have an IP address for network devices to find the MFP on
the network. If you have DHCP, the proper address values are
automatically assigned.
To check your IP address, or to assign one manually if you do not
have DHCP:
1
From the Home screen, touch the Key icon, and then touch
System Configuration.
2
Under Printer/Print Server, touch Setup and Configuration.
3
Under the Print Server, touch TCP/IP.
4
Address, Netmask, and Gateway are required fields, and
should have nonzero values. If necessary, use the virtual
keyboard and enter the appropriate information for your
network. Set any additional information you want.
5
Touch Submit when you are finished entering information.
6
Wait for the configuration page to refresh, and then verify the
parameters are as intended.
After configuring the IP address, you can use your Web browser to
remotely view and manage the MFP. Type the IP address in the URL
field of the browser (for example, http://192.168.236.24), and then
press Enter.
Page 14

9
Configure your MFP
Configuring
Scan to E-mail
1
Type the MFP IP address in your browser URL field (for
example, http://192.168.236.24), and then press Enter.
2
Click Configuration.
3
Click Scan to E-mail General Setup.
4
Type the SMTP gateway of your network or Internet service
provider in the appropriate field. Specify a default e-mail
address for the message reply line.
5
Click Submit.
Configuring
Fax Setup
The Telephone Consumer Protection Act of 1991 requires all
outgoing faxes to contain specific information in a margin at the top or
bottom of each transmitted page, or on the first page of the
transmission.
Use your Web browser to set the required fax information:
1
Type the MFP IP address in your browser URL field (for
example, http://192.168.236.24), and then press Enter.
2
Click Configuration, and then click Fax Setup
:
— If Analog doesn’t appear in the drop-down menu, select it
now. Click Submit.
— If Analog does appear in the drop-down menu, click
Configuration.
3
After the configuration page refreshes, enter the required FCC
information:
— Station Name (a personal name or company name)
— Station Number (the fax phone number)
Set or change any additional fax settings, and then click
Submit.
4
Check the current date and time;
a
Click Configuration.
b
Click Setup and Configuration.
c
Click Date and Time.
Page 15

10
Configure your MFP
5
Check the date and time:
— If they are correct, you are done.
— If they are not correct, click the Set Date and Time link
under the Current Date and Time. Enter the date and time
information in a numerical format (YYYY-MM-DD-HH:MM),
and then click Submit.
If you want to configure for the Fax Server mode, return to the Fax
Setup configuration page and switch modes.
Registering with a
Windows NT
domain server
To use Windows NT Authentication as a way of restricting or tracking
access to your MFP, you must first register the device with a Windows
NT domain. Contact your network administrator for assistance with
registering with a Windows NT domain.
Note:
In order to register the
MFP with a Windows NT
domain, you must have an
administrator account name and
password for the intended
domain.
Touch the Key icon on the Home screen, and then touch Windows NT
Domain Registration. Tips are on the screens to help you with the
registration process.
Page 16

11
Verify setup
Step 6: Verify setup
Making a test copy
Make a one-page copy and test the automatic document feeder:
1
Place your document face down in the automatic document
feeder.
2
Press the green Start button to the right of the touch screen,
(Copy is the default setting for the MFP).
3
Touch Done.
Sending a test fax
Send a one-page test fax to a known fax machine:
1
From the Home screen, touch the Fax icon.
2
In the Fax destination screen, enter a fax number using the
virtual keypad.
3
Place your document face down on the scanner bed.
4
Touch Fax It or press Start to send the fax.
5
Touch Done.
Page 17

12
Verify setup
Sending a
test e-mail
Send a one-page test e-mail to a known e-mail address:
1
From the Home screen, touch the E-mail icon.
2
In the E-mail destination screen, enter an e-mail address using
the virtual keypad.
3
Place your document face down on the scanner bed.
4
Touch Send It or press Start to scan and send the document.
5
Touch Done.
Sending a
network print
job to the MFP
Use a computer application to send a network print job to your MFP.
Consult your printer documentation for assistance with setting up a
computer for network printing.
Page 18

13
Maintaining your MFP
Maintaining your MFP
Cleaning the
touch screen
1
Dampen a clean, lint-free cotton
cloth with water.
Warning!
Do not spray the touch
screen with water or glass cleaner.
Liquid can damage the MFP.
2
Wipe the touch screen.
Cleaning the
scanner bed
1
Dampen a clean, lint-free cotton
cloth with water.
2
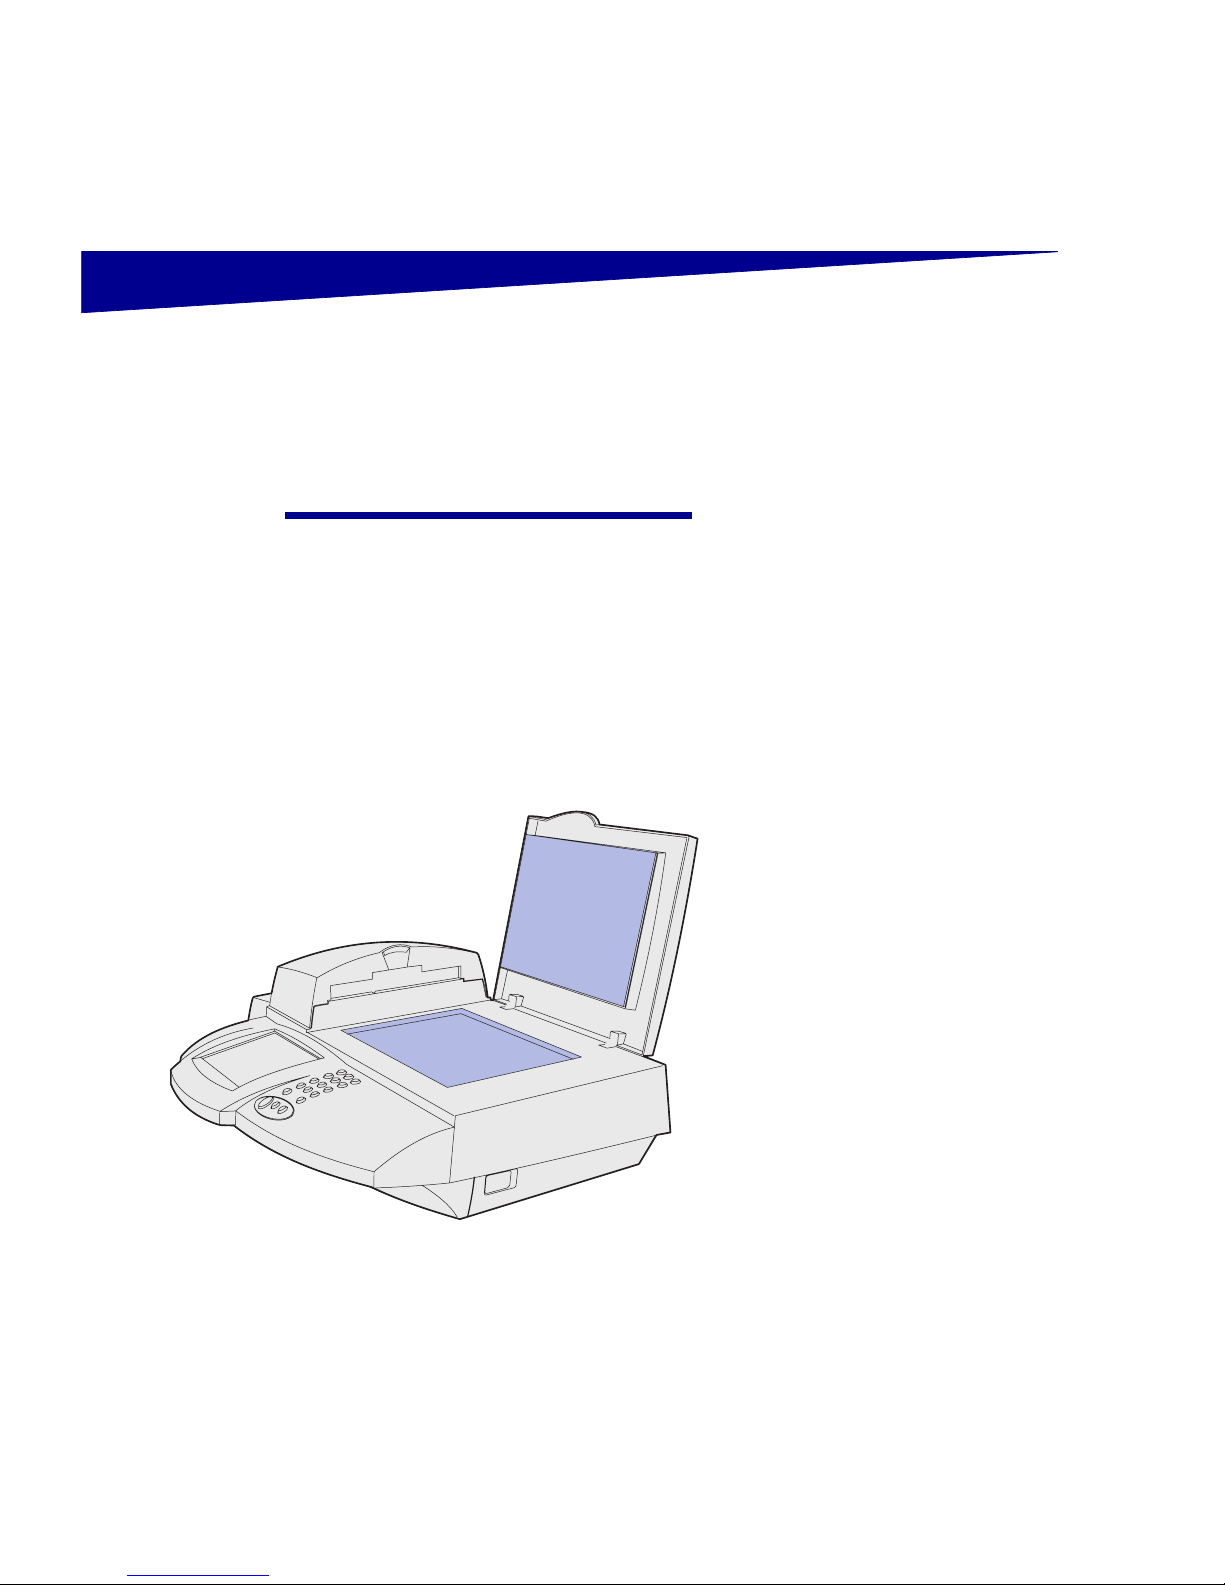
Open the cover.
3
Wipe the scanner bed glass.
Page 19

14
Maintaining your MFP
Paper feeding
problems
If you are experiencing paper feed
problems, such as:
•
The scanner is double-picking
(two sheets feed through at the
same time), or;
•
The scanner is not picking (no
paper feeds through)
You should try cleaning the automatic
document feeder first. See “Cleaning
the feeding rollers and pick pad” on
page 15. If this does not solve the feed
problems, you may have to replace the
pick pad, see “Replacing the pick pad
assembly” on page 16.
If you are still having problems after
replacing the pick pad assembly, go to
the Lexmark support Web site at
http://support.lexmark.com for more
information.
Page 20

15
Maintaining your MFP
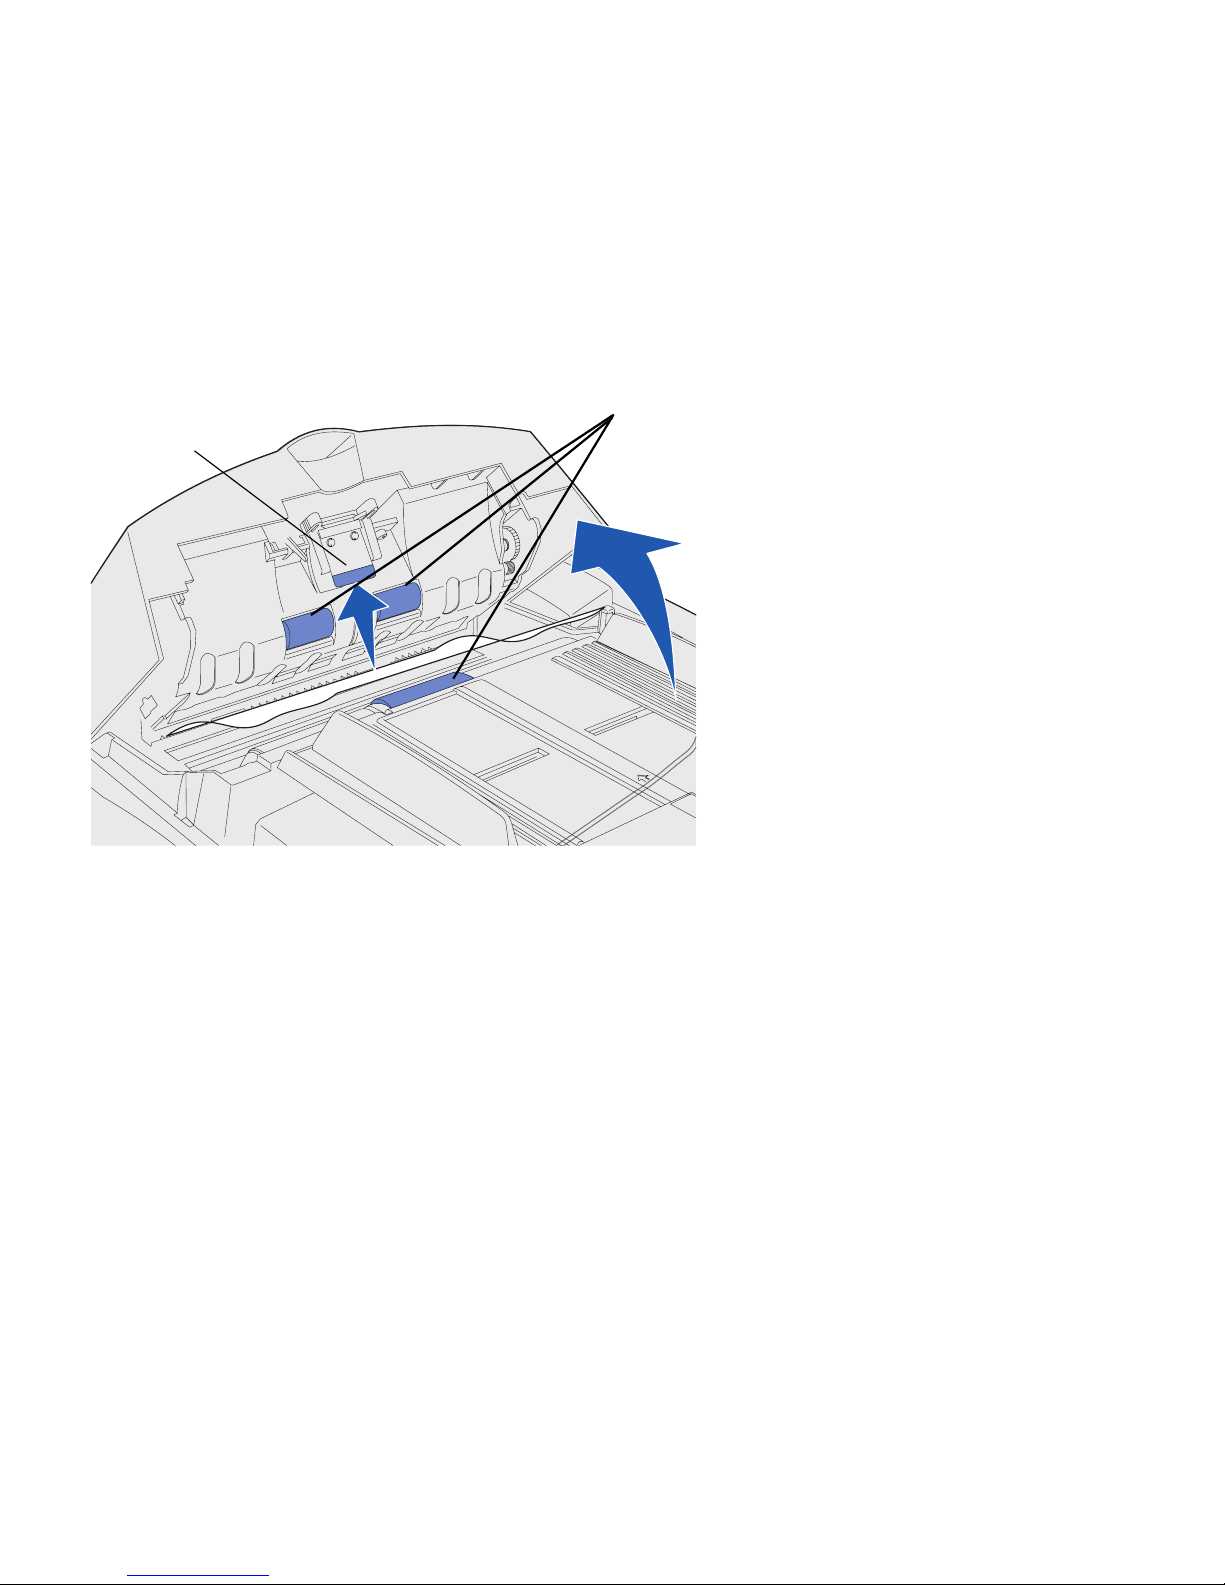
Cleaning the feeding
rollers and pick pad
1
Turn off the scanner and
disconnect the power.
2
Dampen a clean, lint-free cotton
cloth with water.
3
Open the automatic document
feeder, and then wipe the feeding
rollers by moving the cloth from
side to side.
4
Rotate each roller forward with
your finger and wipe with the cloth
until the entire roller is cleaned.
5
Gently wipe the pick pad face with
the damp cloth
6
Close the automatic document
feeder.
7
Plug in the scanner and turn it
back on.
Feeding rollers
Pick pad
Page 21

16
Maintaining your MFP
Replacing the pick pad
assembly
If you still experience problems with
multiple sheets of paper feeding through
the automatic document feeder, you may
need to replace the pick pad assembly.
To order a replacement pick pad
assembly, go to the Lexmark support
Web site at http://support.lexmark.com.
The part number for the replacement
pick pad assembly is
12G3758
.
1
Turn the scanner off and unplug it.
2
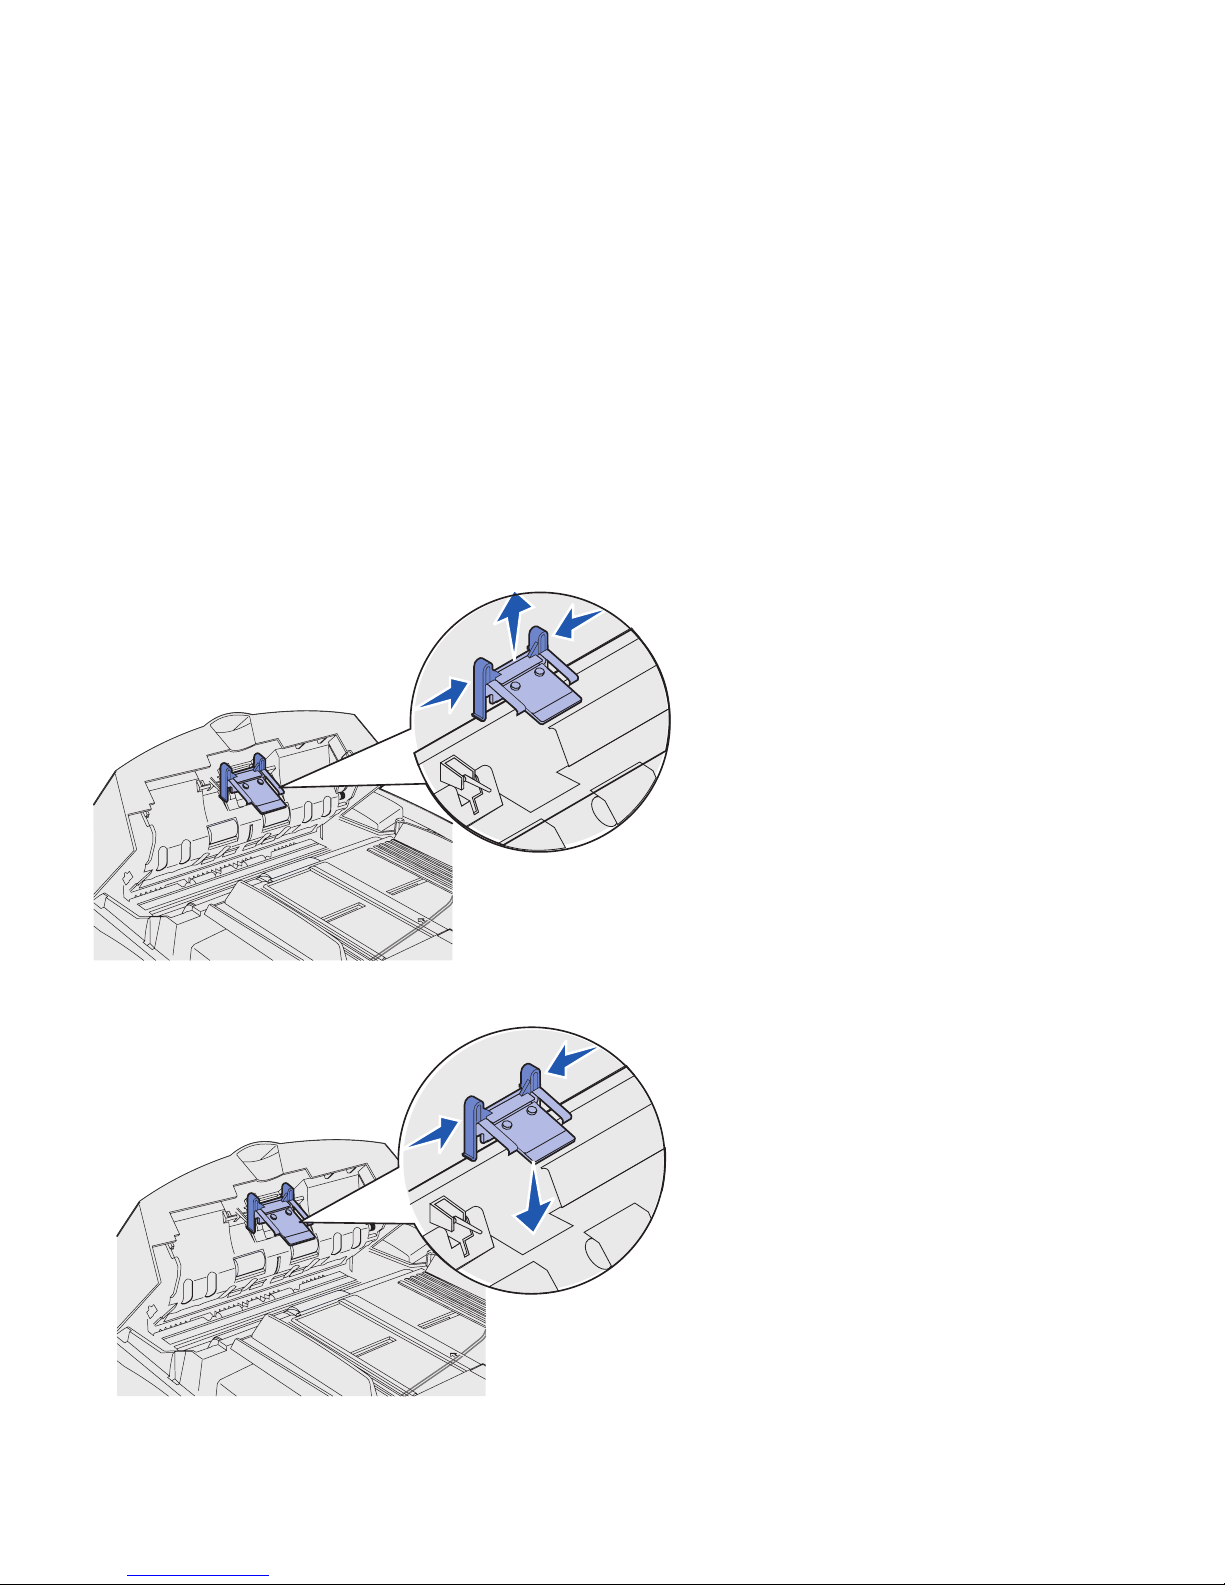
Open the automatic document
feeder.
3
Remove the pad assembly by
squeezing and pulling out the pad
clamp.
4
Squeeze the new clamp and place
it gently in the pad holder.
5
Close the automatic document
feeder.
6
Plug the scanner in and turn it
back on.
Page 22

17
Maintaining your MFP
Moving the scanner
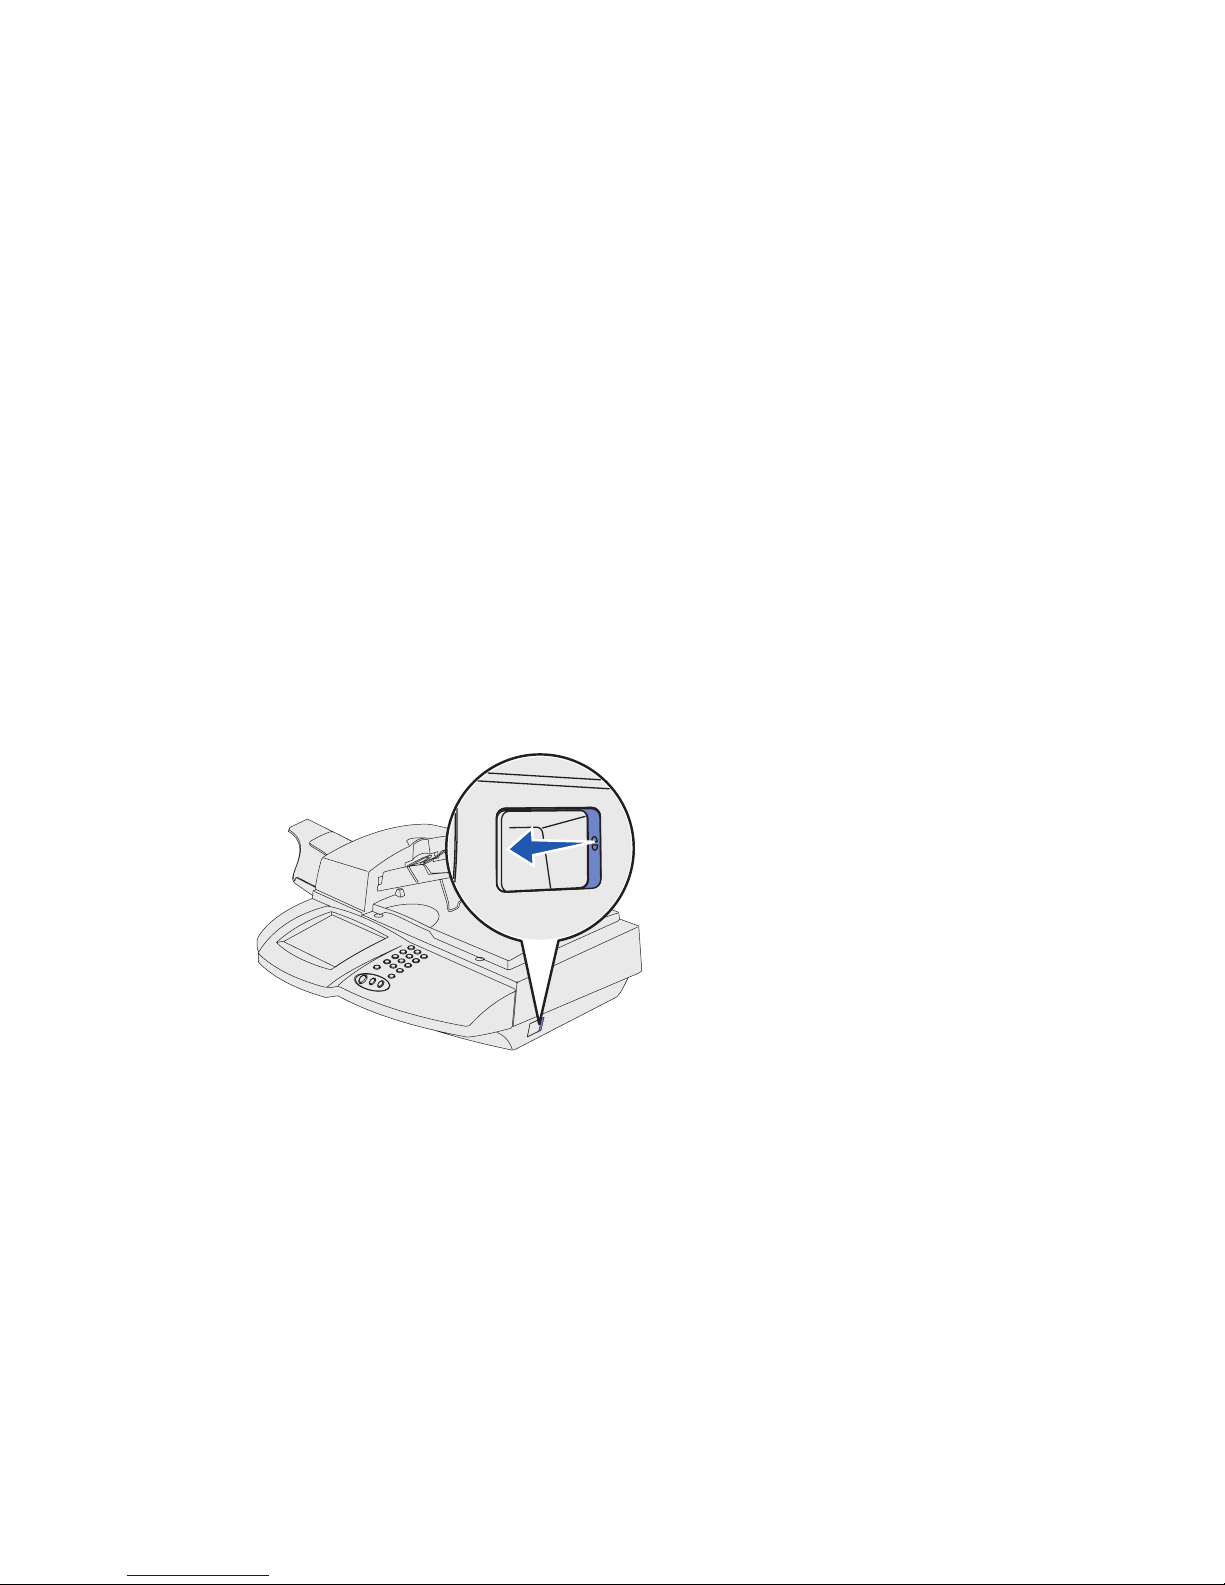
If you need to transport the scanner, lock
it to prevent damage to the scanning
mechanism.
1
Open the scanner lid, and then
turn the scanner on.
2
When the scanning mechanism
reaches the far right side of the
scanner glass, turn the scanner
off.
3
Move the locking switch on the
right side of the scanner to the
locked position and close the
scanner lid.
Locking switch
Page 23

18
Lexmark Document Distributor
Document Distributor
Your MFP comes with a CD containing the ScanBack Utility. The
ScanBack Utility is a Windows-based wizard for creating desktop
shortcuts with your personal scan settings so you can quickly scan
documents back to your computer.
Document Distributor is a software package available from Lexmark
for use with your MFP.
The Document Distributor software lets you automate the scanning
process and streamline your document workflow.
Page 24

19
Troubleshooting
Troubleshooting
If you need more help, launch the drivers CD that came with your
printer, and then click Contact Lexmark.
Problem Solution
The touch screen is blank and does not
respond to touches.
• Make sure the scanner is plugged in.
• Make sure the electrical outlets have power.
• Make sure contrast control knob is not set to the darkest setting.
• Make sure all cables and cords are properly connected. For more
information, see “Attach cables and cords” on page 5.
• Turn the scanner off and then back on.
• If you are still having problems, contact Lexmark customer support
at http://support.lexmark.com.
A red exclamation point appears over the
Copy icon on the Home screen.
• Touch the Copy icon. Follow the instructions on the screen.
• Make sure the printer is plugged in and turned on.
• Make sure the Ethernet cables are connected to the correct ports.
For more information, see “Attach cables and cords” on page 5.
• Turn off the printer and the scanner. Turn the printer on, and then
turn the scanner on.
The paper will not feed through the
automatic document feeder.
• Clean the feeder rollers and pick pad, and then try again. For more
information, see “Maintaining your MFP” on page 13.
• Open automatic document feeder door. Make sure pick pad is
seated correctly, and then close door.
• Make sure paper is inserted far enough.
• If you are still having problems, contact Lexmark customer support
at http://support.lexmark.com.
My network print job does not print. 1 Print a network setup page:
a From the Home screen, touch the Key icon, and then touch Print
Reports.
b Touch Network Setup Page.
2 Verify the IP address and settings.
I cannot send or receive analog faxes. • Make sure the telephone fax line cable is properly connected to the
port on the scanner and to the phone jack.
• Verify the phone line is analog.
Page 25

20
Notices
Notices
Safety information
To reduce the risk of fire and electric shock when installing or using
telephone equipment, always follow all safety precautions, including
the following:
•
If your product is NOT marked with this symbol , it MUST be
connected to an electrical outlet that is properly grounded.
•
The power cord must be connected to an electrical outlet that
is near the product and easily accessible.
•
Refer service or repairs, other than those described in the
operating instructions, to a professional service person.
•
This product is designed, tested, and approved to meet strict
global safety standards with the use of specific Lexmark
components. The safety features of some parts may not always
be obvious. Lexmark is not responsible for the use of other
replacement parts.
Fax and telephone
safety information
•
Never perform the setup procedures in this guide during a
lightning storm.
•
Never install or use this equipment in wet locations.
Cautions and warnings
CAUTION!
A caution identifies something that might cause you harm.
Warning:
A warning identifies something that might damage your
MFP system hardware or software.
Page 26

21
Notices
Emission notices
The following notices apply to those machines in which the X4500 is
installed.
Federal
Communications
Commission (FCC)
compliance information
statement
This device has been tested and found to comply with the limits for a
Class A digital device, pursuant to Part 15 of the FCC Rules.
Operation is subject to the following two conditions: (1) this device
may not cause harmful interference, and (2) this device must accept
any interference received, including interference that may cause
undesired operation.
Note:
To assure compliance
with FCC regulations on
electromagnetic interference for
a Class A computing device, use
a cable with an attached toroid.
Use of a substitute cable that
does not have a toroid may
result in a violation of FCC
regulations.
The FCC Class A limits are designed to provide reasonable
protection against harmful interference when the equipment is
operated in a commercial environment. This equipment generates,
uses, and can radiate radio frequency energy and, if not installed and
used in accordance with the instruction manual, may cause harmful
interference to radio communications. Operation of this equipment in
a residential area is likely to cause harmful interference, in which case
the user will be required to correct the interference at his own
expense.
The manufacturer is not responsible for any radio or television
interference caused by using other than recommended cables or by
unauthorized changes or modifications to this equipment.
Unauthorized changes or modifications could void the user’s authority
to operate this equipment.
Industry Canada
compliance statement
This Class A digital apparatus meets all requirements of the
Canadian Interference-Causing Equipment Regulations.
Avis de conformité aux
normes d’Industrie
Canada
Cet appareil numérique de la classe A respecte toutes les exigences
du Règlement sur le matériel brouilleur du Canada.
European Community
(EC) directives
conformity
This product is in conformity with the protection requirements of EC
Council directives 89/336/EEC and 73/23/EEC on the approximation
and harmonization of the laws of the Member States relating to
electromagnetic compatibility and safety of electrical equipment
designed for use within certain voltage limits.
Page 27

22
Notices
Warning!
This is a Class A
product. In a domestic
environment, this product may
cause radio interference, in
which case, the user may be
required to take adequate
measures.
A declaration of conformity with the requirements of the directives has
been signed by the Director of Manufacturing and Technical Support,
Lexmark International, S.A., Boigny, France.
This product satisfies the Class A limits of EN 55022 and safety
requirements of EN 60950.
Telecommunica-
tions notices
This equipment complies with Part 68 of the FCC Rules. A label on
the back of the equipment shows its FCC registration number and
ringer equivalence number (REN).
Your telephone company may ask you for these numbers in order to
determine how many devices may be connected to your telephone
line (in most areas, no more than five). If too many RENs are
assigned to your telephone line, this device may not ring in response
to an incoming call. Contact the telephone company to determine the
maximum RENs for your calling area.
This equipment uses an RJ-11C Universal Service Order Code
(USOC) jack, and is designed to be connected to the telephone
network or premises wiring using a compatible jack that is FCC Part
68 compliant. An FCC compliant telephone cord is provided with this
equipment. Refer to the setup documentation for instructions about
connecting the fax telephone cable.
If you experience problems with this equipment that you cannot
resolve, contact Lexmark International, Inc., for repair and warranty
information. If the problems are causing harm to the telephone
network, the telephone company may ask you to disconnect the
equipment from the network until the problem is resolved. If the
equipment causes harm to the telephone network, the telephone
company will notify you in advance, or as soon as possible, that
temporary discontinuance of service may be required. You will also be
notified of your right to file a complaint with the FCC if you believe it is
necessary.
The telephone company may make changes to its facilities,
equipment, operations, or procedures that could affect the operation
of this equipment. If this happens, the telephone company will notify
you in advance so you can make necessary adjustments in order to
maintain uninterrupted service.
Page 28

23
Notices
This equipment cannot be used on telephone company-provided coin
service.
Connection to party lines is subject to state tariffs.
To avoid damage caused by lightning strikes and other electrical
surges, we recommend that you install an ac surge protector in the
outlet to which this device is connected.
The Telephone Consumer Protection Act of 1991 makes it unlawful to
send a fax unless the following information is included (1) in a margin
at the top or bottom of each transmitted page, or (2) on the first page
of the transmission:
•
Date and time the fax is sent
•
Identification of the business, other entity, or individual sending
the fax
•
Telephone number of the sending machine or such business,
other entity, or individual
Industry Canada
CS-03 Notice
The Industry Canada label identifies certified equipment. This
certification means that the equipment meets certain
telecommunications network protective operational and safety
requirements in the appropriate Terminal Equipment Technical
Requirements documents. The Department does not guarantee the
equipment will operate to the user’s satisfaction.
Before installing this equipment, users should ensure that it is
permissible to be connected to the facilities of the local
telecommunications company. The equipment must also be installed
using an acceptable method of connection. The customer should be
aware that compliance with the above conditions may not prevent
degradation of service in some situations.
Repairs to certified equipment should be coordinated by a
representative designated by the supplier. Any repairs or alterations
made by the user to this equipment, or equipment malfunctions, may
give the telecommunications company cause to request the user to
disconnect the equipment.
Page 29

24
Notices
CAUTION!
Do not make
electrical ground connections
yourself. Contact the appropriate
electric inspection authority, or
electrician, as appropriate.
Users should ensure for their own protection that the electrical ground
connections of the power utility, telephone lines, and internal metallic
water pipe system, if present, are connected together. This
precaution may be particularly important in rural areas.
The REN of this device is 0.4.
The REN assigned to each terminal device provides an indication of
the maximum number of terminals allowed to be connected to a
telephone interface. The termination of an interface may consist of
any combination of devices subject only to the requirement that the
sum of the RENs of all the devices does not exceed 5.
This equipment uses the following jack: CA11A.
Network compatibility
notices
This equipment has been designed, tested, and found to be compliant
with the European technical standard TBR 21 for pan-European
single terminal connection to the Public Switched Telephone Network
(PSTN).
This applies to all X4500 MFP Options which bear the following mark:
This equipment is designed to work with PSTN networks that accept
analog signals.
However, due to differences between the individual PSTNs provided
in different countries, the TBR 21 certification does not, in itself, give
an unconditional assurance of successful operation on every PSTN
network termination point. In the event of problems, you should
contact your equipment supplier.
Lexmark does not currently know of interoperating difficulties for the
following countries:
Austria Belgium Denmark Finland
France Germany Luxemburg Netherlands
Greece Iceland Ireland Italy
Portugal Sweden United Kingdom Switzerland
Spain Norway
Page 30

25
Notices
New Zealand Telecom
Warning Notice
The grant of a Telepermit for any item of terminal equipment indicates
only that Telecom has accepted that the item complies with minimum
conditions for connection to its network. It indicates no endorsement
of the product by Telecom, nor does it provide any sort of warranty.
Above all, it provides no assurance that any item will work correctly in
all respects with another item of Telepermitted equipment of a
different make or model, nor does it imply that any product is
compatible with all of Telecom’s network services.
Warning!
No “111” or other
calls can be made from this
device during a main power
failure.
This equipment may provide for the effective transfer of a call to
another device connected to the same line.
Some parameters required for compliance with Telecom’s Telepermit
requirements are dependent on the equipment associated with this
device. In order to operate within the limits for compliance with
Te l e c o m ’s Specifications, the associated equipment shall be set to
ensure that calls are answered between 3 and 30 seconds of receipt
of ringing.
If a charge for local calls is unacceptable, the Dial button should
not
be used for local calls.
Only the seven digits of the local number should be dialed from your
telephone.
Do not
dial the area code digit or “0” prefix.
This equipment is not capable under all operating conditions of
correct operation at the higher speeds for which it is designed.
Telecom will accept no responsibility should difficulties arise in such
circumstances.
The decadic (or pulse) dialing on this device is unsuitable for use on
the Telecom network in New Zealand.
South Africa
Telecommunications
Notice
This modem must be used in conjunction with an approved surge
protection device when connected to the PSTN network.
Page 31

26
Notices
Page 32

Português
Page 33

Edição: Janeiro de 2002
O parágrafo a seguir não se aplica a nenhum outro país onde tais provisões sejam inconsistentes com a lei
local:
A LEXMARK INTERNATIONAL, INC. FORNECE ESTA PUBLICAÇÃO NA PRESENTE FORMA, SEM
GARANTIAS DE QUALQUER NATUREZA, EXPRESSAS OU IMPLÍCITAS, INCLUINDO MAS NÃO SE LIMITANDO A
GARANTIAS IMPLÍCITAS DE COMERCIALIZAÇÃO OU ADEQUAÇÃO PARA UMA FINALIDADE ESPECÍFICA.
Alguns estados não permitem o limite de garantia expressa ou implícita em determinadas transações; portanto, pode
ser que essa declaração não se aplique a você.
Esta publicação pode apresentar informações técnicas não precisas ou erros tipográficos. São feitas alterações
periódicas nas informações aqui contidas; tais alterações serão incorporadas em edições posteriores.
Aprimoramentos ou alterações nos produtos ou programas descritos podem ser feitas a qualquer momento.
Comentários sobre esta publicação podem ser encaminhados para a Lexmark International, Inc., Department F95/
032-2, 740 West New Circle Road, Lexington, Kentucky 40550, USA. No Reino Unido e na Irlanda, envie os
comentários para Lexmark International Ltd., Marketing and Services Department, Westhorpe House, Westhorpe,
Marlow Bucks SL7 3RQ. A Lexmark poderá utilizar ou distribuir informações por você fornecidas na forma que
considerar apropriada, sem que lhe seja atribuída qualquer tipo de responsabilidade. Para adquirir cópias adicionais
de publicações relacionadas a este produto, ligue para 1-800-553-9727. No Reino Unido e na Irlanda, ligue para 0628-
481500. Nos demais países, entre em contato com o representante local.
As referências a produtos, programas ou serviços presentes nesta publicação não implicam que o fabricante pretenda
disponibilizá-los em todos os países nos quais atua. Quaisquer referências a um produto, programa ou serviço não
têm a intenção de afirmar ou indicar que somente tal produto, programa ou serviço possa ser utilizado. Em vez disso,
poderão ser utilizados quaisquer produtos, programas ou serviços que tenham uma funcionalidade equivalente e que
não infrinjam direitos de propriedade intelectual. A avaliação e verificação de funcionamento do produto feitas em
conjunto com outros produtos, programas ou serviços são de responsabilidade do usuário, com exceção daqueles
expressamente desenvolvidos pelo fabricante.
Lexmark e Lexmark com o desenho de um diamante são marcas registradas da Lexmark International, Inc.
registradas nos Estados Unidos e/ou em outros países. ScanBack é uma marca comercial da Lexmark International,
Inc.
Aviso de copyright
Pode ser ilegal copiar determinado material sem a permissão ou licença, incluindo documentos, imagens e moeda. Se
não tiver certeza de que tem permissão, procure por orientação legal.
© Copyright 2002, 2000 Lexmark International, Inc.
Todos os direitos reservados.
DIREITOS RESTRITOS DO GOVERNO DOS ESTADOS UNIDOS
Este software e sua documentação são fornecidos com DIREITOS RESTRITOS. O uso, a duplicação ou a divulgação
pelo governo está sujeita a restrições, conforme determinado no subparágrafo (c)(1)(ii) da cláusula Rights in Technical
Data and Computer Software (Direitos em dados técnicos e software computacional) do DFARS 252.227-7013 e em
disposições aplicáveis do FAR: Lexmark International, Inc., Lexington, KY 40550.
Page 34

v
Índice
Índice
Etapa 1: Instalar a impressora, o suporte e o digitalizador 1
Desembalando o digitalizador . . . . . . . . . . . . . . . . . . . . . . . . .1
Instalando a impressora . . . . . . . . . . . . . . . . . . . . . . . . . . . . . .2
Verificando o nível de firmware da impressora . . . . . . . . . . . . .2
Instalando o suporte . . . . . . . . . . . . . . . . . . . . . . . . . . . . . . . . .2
Destravando o digitalizador . . . . . . . . . . . . . . . . . . . . . . . . . . .3
Etapa 2: Instalar as bandejas . . . . . . . . . . . . . . . . . . . . . . . . .4
Etapa 3: Conectar cabos e cabos de força . . . . . . . . . . . . . .5
Etapa 4: Concluir a instalação de hardware . . . . . . . . . . . . .6
Colando a Referência rápida . . . . . . . . . . . . . . . . . . . . . . . . . .6
Instalando a tampa do painel do operador da impressora . . . .6
Ligando o digitalizador e a impressora . . . . . . . . . . . . . . . . . . .7
Etapa 5: Configurar o MFP . . . . . . . . . . . . . . . . . . . . . . . . . . . 8
Configurando o endereço IP . . . . . . . . . . . . . . . . . . . . . . . . . .8
Configurando Digitalização para email . . . . . . . . . . . . . . . . . .9
Configurando a instalação do fax . . . . . . . . . . . . . . . . . . . . . . .9
Registrando com um servidor de domínio Windows NT . . . . .10
Page 35

vi
Índice
Etapa 6: Verificar configuração . . . . . . . . . . . . . . . . . . . . . . 11
Fazendo uma cópia de teste . . . . . . . . . . . . . . . . . . . . . . . . .11
Enviando um fax de teste . . . . . . . . . . . . . . . . . . . . . . . . . . . .11
Enviando um e-mail de teste . . . . . . . . . . . . . . . . . . . . . . . . .12
Enviando um trabalho de impressão de rede para o MFP . . .12
Fazendo a manutenção do MFP. . . . . . . . . . . . . . . . . . . . . . 13
Limpando a tela de toque . . . . . . . . . . . . . . . . . . . . . . . . . . .13
Limpando a mesa do digitalizador . . . . . . . . . . . . . . . . . . . . .13
Problemas com a alimentação de papel . . . . . . . . . . . . . . . . .14
Limpando os roletes de alimentação e o protetor de
tracionamento . . . . . . . . . . . . . . . . . . . . . . . . . . . . . . . . . . .15
Recolocando o conjunto do protetor de tracionamento . . . . .16
Movendo o digitalizador . . . . . . . . . . . . . . . . . . . . . . . . . . . . .17
Distribuidor de documentos. . . . . . . . . . . . . . . . . . . . . . . . . 18
Solucionando problemas . . . . . . . . . . . . . . . . . . . . . . . . . . . 19
Avisos . . . . . . . . . . . . . . . . . . . . . . . . . . . . . . . . . . . . . . . . 20
Informações de segurança . . . . . . . . . . . . . . . . . . . . . . . . . . .20
Avisos de emissão . . . . . . . . . . . . . . . . . . . . . . . . . . . . . . . . .21
Page 36

1
Instalar a impressora, o suporte e o digitalizador
Etapa 1: Instalar a impressora, o
suporte e o digitalizador
Desembalando o
digitalizador
Desembale a opção MFP da Lexmark
X4500. Verifique se você tem os
seguintes itens:
•
Digitalizador
•
Cabo Ethernet (RJ-45)
•
Cabo da linha telefônica do fax
(RJ-11)
•
Pasta com
Guia de instalação
(inclui o CD do
MFP
na parte de
trás do livro) e os guias de
Referência rápida
•
Fonte de alimentação
•
Cabo da fonte de alimentação
•
Bandeja de saída de papel
Guarde o material de embalagem até
que o sistema esteja completamente
instalado e funcionando corretamente.
Pasta
Digitalizador
Bandeja
de saída
de papel
Cabo da fonte
de
alimentação
Fonte de
alimentação
Cabo Ethernet
Cabo da linha
telefônica do
fax
Page 37

2
Instalar a impressora, o suporte e o digitalizador
Instalando a
impressora
1
Configure a impressora seguindo
as instruções apresentadas na
documentação que acompanha
sua impressora. Esse
procedimento inclui a instalação
de todas as bandejas, duplex e de
todas as demais opções que você
adquiriu.
2
Antes e durante a instalação do
MFP, retire todos os cabos de
força, cabos de fax e telefone e
cabos de rede das respectivas
tomadas elétricas da parede.
3
Após a instalação, você poderá
conectar todos os equipamentos
a tomadas adequadamente
aterradas e ligá-los.
Verificando o nível de
firmware da impressora
Para verificar o nível mínimo de firmware
necessário para que o MFP funcione:
1
Vá para
http://support.lexmark.com.
2
Selecione seu país e idioma.
3
Em Impressoras multifuncionais,
selecione a opção MFP da
X4500.
4
Clique em Prosseguir.
5
Selecione os Requisitos Mínimos
do X4500.
Verifique se o nível de firmware
listado corresponde ao firmware
da impressora.
Se não corresponder, siga as instruções
fornecidas no site da Web para fazer a
atualização do firmware.
Page 38
3
Instalar a impressora, o suporte e o digitalizador
Instalando o suporte
A impressora vem com diversas opções
de suporte, dependendo de suas
necessidades.
Para montar o suporte e anexá-lo à
impressora, consulte as instruções que
acompanham o suporte.
Se você não comprou um suporte e
planeja posicionar o digitalizador na
parte superior do Encadernador
Lexmark™ C750 para MFP, consulte as
instruções fornecidas com o
encadernador.
Destravando o
digitalizador
1
Verifique se a impressora está
desligada e desconectada.
2
Destrave o digitalizador.
a
Localize a trava no lado direito
do digitalizador.
b
Empurre a trava para a
posição de destrave.
Page 39
4
Instalar as bandejas
Etapa 2: Instalar as bandejas
Observação:
O alimentador
automático de documentos e a bandeja
de alimentação de documentos são
fixados ao digitalizador antes de ser
transportado.
1
Fixe a bandeja de saída de papel
ao alimentador automático de
documentos.
2
Levante a bandeja de alimentação
de documentos e encaixe a barra
de suporte na parte superior da
tampa do digitalizador.
Bandeja de alimentação
de documentos
Bandeja de saída
de papel
Page 40

5
Conectar cabos e cabos de força
Etapa 3: Conectar cabos e cabos
de força
CUIDADO!
Não conecte agora o cabo
da fonte de alimentação em uma
tomada.
1
Verifique se a impressora e o
digitalizador estão desligados e
desconectados.
2
Conecte a ponta do cabo Ethernet
com o toróide à porta 1 Ethernet
no digitalizador. Conecte a outra
ponta à impressora.
3
Conecte o cabo da linha
telefônica do fax ao digitalizador
e, a seguir, à tomada do telefone
utilizando um adaptador de linha
telefônica, se necessário.
4
Conecte o cabo padrão
compatível com a sua rede à
porta 2 Ethernet do digitalizador
e, a seguir, à conexão da rede.
Este cabo não é fornecido pela
Lexmark.
5
Conecte a fonte de alimentação
ao digitalizador.
Aviso!
Nunca conecte nem desconecte
o cabo Ethernet quando o digitalizador
estiver ligado.
6
Conecte o cabo da fonte de
alimentação à fonte de
alimentação, mas
não
conecte a
outra ponta em uma tomada
elétrica por enquanto.
Cabo da fonte
de alimentação
Cabo Ethernet
Cabo da linha telefônica do fax
Fonte de
alimentação
Porta 2 Ethernet
Page 41
6
Concluir a instalação de hardware
Etapa 4: Concluir a instalação
de hardware
Colando a
Referência rápida
1
Retire a proteção da faixa adesiva
atrás da
Referência rápida
.
2
Pressione a
Referência rápida
no
local acima da tela de toque.
Instalando a tampa do
painel do operador da
impressora
Consulte as instruções que
acompanham a tampa do painel do
operador.
Page 42
7
Concluir a instalação de hardware
Ligando o digitalizador
e a impressora
1
Conecte o cabo de força da
impressora a uma tomada elétrica
adequadamente aterrada.
2
Ligue a impressora.
3
Ligue o digitalizador.
O MFP demora algum tempo para
aquecer-se após ter sido ligado.
Depois que o MFP termina seus testes,
a tela inicial é exibida na tela de toque.
Page 43
8
Configurar o MFP
Etapa 5: Configurar o MFP
As seguintes configurações mínimas são exigidas para executar
funções básicas como impressão, cópia, fax ou e-mail. Algumas
dessas configurações podem exigir assistência do administrador de
rede.
Configurando o
endereço IP
Você precisa ter um endereço IP para que os dispositivos de rede
encontrem o MFP na rede. Se sua rede tiver DHCP ativo, os valores
apropriados de endereço serão atribuídos automaticamente.
Para confirmar o seu endereço IP ou para atribuir um manualmente
se você não tiver DHCP:
1
A partir da tela inicial, toque o ícone Chave e, a seguir, em
Configuração do sistema.
2
Em Impressora/Servidor de impressão, toque em Instalação e
configuração.
3
Em Servidor de impressão, toque em TCP/IP.
4
Os campos Endereço, Máscara de rede e Gateway são
exigidos e devem ter valores diferentes de zero. Se necessário,
utilize o teclado virtual e insira as informações apropriadas
para a sua rede. Configure as informações adicionais que
desejar.
5
Toque em Enviar quando tiver terminado de inserir as
informações.
6
Espere até que a página de configuração seja atualizada e, a
seguir, verifique se os parâmetros estão corretos.
Depois de configurar o endereço IP, você poderá utilizar o seu
navegador da Web para examinar e gerenciar remotamente o MFP.
Digite o endereço IP no campo de URL do navegador da Web (por
exemplo, http://192.168.236.24) e pressione Enter.
Page 44

9
Configurar o MFP
Configurando
Digitalização para
email
1
Digite o endereço IP do MFP no campo de URL do navegador
da Web (por exemplo, http://192.168.236.24) e pressione
Enter.
2
Clique em Configuração.
3
Clique em Configuração geral de digitalização para e-mail.
4
Digite o gateway SMTP de sua rede ou do provedor de
serviços da Internet no campo apropriado. Especifique o
endereço padrão de e-mail para a linha de resposta da
mensagem.
5
Clique em Enviar.
Configurando a
instalação do fax
O Telephone Consumer Protection Act (Ato de proteção do
consumidor de produtos e serviços de telefonia) de 1991 exige que
todos os faxes enviados contenham informações específicas em uma
margem na parte inferior ou superior de cada página transmitida ou
na primeira página da transmissão.
Utilize o navegador da Web para configurar as informações
necessárias para o fax:
1
Digite o endereço IP do MFP no campo de URL do navegador
(por exemplo, http://192.168.236.24) e pressione Enter.
2
Clique em Configuração e, a seguir, clique em Configuração
do fax
:
— Se não aparecer Analógico no menu suspenso,
selecione-o. Clique em Enviar.
— Se aparecer Analógico no menu suspenso, clique em
Configuração.
3
Depois que a página de configuração for atualizada, insira as
informações exigidas pela FCC:
— Nome da estação (um nome pessoal ou nome de empresa)
— Número da estação (número da linha telefônica do fax)
Defina ou altere quaisquer configurações adicionais de fax e
clique em Enviar.
4
Verifique a data e hora atuais;
a
Clique em Configuração.
b
Clique em Instalação e configuração.
c
Clique em Data e hora.
Page 45

10
Configurar o MFP
5
Verifique a data e hora:
— Se estiverem corretas, você já terá terminado.
— Se não estiverem corretas, clique no link Definir data e hora
em Data e hora atuais. Digite as informações de data e
hora em um formato numérico (AAAA-MM-DD-HH:MM) e, a
seguir, clique em Enviar.
Se você desejar configurar para o modo Servidor de fax, volte para a
página de Configuração de fax e mude de modo.
Registrando com
um servidor de
domínio
Windows NT
Para utilizar a autenticação do Windows NT como maneira de
restringir ou controlar o acesso ao seu MFP, em primeiro lugar você
deve registrar o aparelho com um domínio Windows NT. Entre em
contato com o administrador de rede para obter assistência com o
registro no domínio do Windows NT.
Observação:
Para registrar o
MFP com um domínio
Windows NT, você precisa ter
um nome de conta de
administrador e uma senha para
o domínio desejado.
Toque no ícone Chave na tela inicial e, a seguir, toque em Registro de
domínio Windows NT. Nas telas, há dicas para ajudá-lo no processo
de registro.
Page 46

11
Verificar configuração
Etapa 6: Verificar configuração
Fazendo uma
cópia de teste
Faça uma cópia de uma página e teste o Alimentador automático de
documentos:
1
Coloque o documento virado para baixo no alimentador
automático de documentos.
2
Pressione o botão verde Iniciar à direita da tela de toque
(Cópia é a configuração padrão para o MFP).
3
Toque Concluído.
Enviando um fax
de teste
Envie um fax de teste de uma página para um número de fax
conhecido:
1
Na tela inicial, toque o ícone Fax.
2
Na tela Destino do fax, informe um número de fax, utilizando o
teclado virtual.
3
Coloque o seu documento com a face virada para baixo na
mesa do digitalizador.
4
Toque Enviar fax ou pressione Iniciar para enviar o fax.
5
Toque Concluído.
Page 47

12
Verificar configuração
Enviando
um e-mail de teste
Envie um e-mail de teste de uma página para um endereço de e-mail
conhecido:
1
Na tela inicial, toque o ícone E-mail.
2
Na tela Destino do e-mail, informe um endereço de e-mail,
utilizando o teclado virtual.
3
Coloque o seu documento com a face virada para baixo na
mesa do digitalizador.
4
Toque Enviar ou pressione Iniciar para enviar o documento.
5
Toque Concluído.
Enviando um
trabalho de
impressão de
rede para o MFP
Utilize uma aplicação de computador para enviar um trabalho de
impressão de rede para o seu MFP. Consulte a documentação da
impressora para obter assistência ao configurar um computador para
impressão em rede.
Page 48
13
Fazendo a manutenção do MFP
Fazendo a manutenção do MFP
Limpando a tela de
toque
1
Umedeça com água um pano de
algodão limpo e sem fiapos.
Aviso!
Não borrife água ou limpa-vidros
na tela de toque. O líquido pode
danificar o MFP.
2
Limpe a tela de toque.
Limpando a mesa
do digitalizador
1
Umedeça com água um pano de
algodão limpo e sem fiapos.
2
Abra a tampa.
3
Limpe o vidro da mesa do
digitalizador.
Page 49

14
Fazendo a manutenção do MFP
Problemas com a
alimentação de papel
Se estiver tendo problemas com a
alimentação de papel, como:
•
O digitalizador está puxando duas
folhas (duas folhas são
alimentadas ao mesmo tempo) ou
•
O digitalizador não está puxando
(nenhum papel é alimentado)
Tente limpar o alimentador automático
de documentos primeiro. Consulte
“Limpando os roletes de alimentação e o
protetor de tracionamento” na página 15.
Se isso não resolver os problemas de
alimentação, poderá ser necessário
substituir o protetor de tracionamento,
consulte “Recolocando o conjunto do
protetor de tracionamento” na página 16.
Se ainda estiver tendo problemas depois
de substituir o conjunto do protetor de
tracionamento, vá para o suporte da
Lexmark no site da Web em
http://support.lexmark.com para obter
mais informações.
Page 50
15
Fazendo a manutenção do MFP
Limpando os roletes de
alimentação e o
protetor de
tracionamento
1
Desligue o digitalizador e
desconecte a energia.
2
Umedeça com água um pano de
algodão limpo e sem fiapos.
3
Abra o alimentador automático de
documento e limpe os roletes de
alimentação movendo o pano de
um lado para outro.
4
Gire cada rolete para a frente com
seu dedo e esfregue-os com o
pano até que fique limpo.
5
Limpe cuidadosamente o protetor
de tracionamento com o pano
úmido
6
Feche o alimentador automático
de documentos.
7
Conecte o digitalizador e ligue-o.
Roletes de
alimentação
Protetor de
tracionamento
Page 51
16
Fazendo a manutenção do MFP
Recolocando o
conjunto do protetor de
tracionamento
Se estiver tendo problemas porque
diversas folhas de papel estão sendo
alimentadas no alimentador automático
de documentos, poderá ser necessário
substituir o conjunto de protetor de
tracionamento.
Para solicitar uma reposição do conjunto
de protetor de tracionamento, vá para o
site de suporte da Lexmark na Web em
http://support.lexmark.com. O código da
peça para o conjunto de protetor de
tracionamento é
12G3758
.
1
Desligue o digitalizador e
desconecte-o.
2
Abra o alimentador automático de
documentos.
3
Remova o conjunto do protetor
pressionando e puxando para fora
a presilha do protetor.
4
Segure a nova presilha e coloquea cuidadosamente no recipiente
do protetor.
5
Feche o alimentador automático
de documentos.
6
Conecte o digitalizador e ligue-o.
Page 52
17
Fazendo a manutenção do MFP
Movendo o
digitalizador
Se você precisar transportar o
digitalizador, trave-o para evitar danos
ao mecanismo de digitalização.
1
Abra a tampa do digitalizador e
ligue-o.
2
Quando o mecanismo de
digitalização atingir o lado
extremo direito do vidro do
digitalizador, desligue-o.
3
Mova a trava do lado direito do
digitalizador para a posição
travada e feche a tampa.
Tr a va
Page 53

18
Distribuidor de documentos Lexmark
Distribuidor de documentos
Lexmark
Seu MFP vem com um CD que contém o ScanBack Utility. O
ScanBack Utility é um assistente baseado em Windows para criação
de atalhos de área de trabalho com suas configurações de
digitalização pessoais para que você possa digitalizar rapidamente
documentos de volta para o computador.
O Document Distributor é um pacote de software disponível a partir
da Lexmark para uso com o seu MFP. O software Document
Distributor permite que você automatize o processo de digitalização e
simplifique o seu fluxo de trabalho com documentos.
Page 54

19
Solucionando problemas
Solucionando problemas
Se precisar de mais ajuda, consulte o CD de drivers que acompanha
sua impressora e clique em Contatar a Lexmark.
Problema Solução
A tela de toque está apagada e não
responde aos toques.
• Verifique se o digitalizador está conectado.
• Verifique se há energia nas tomadas.
• Verifique se o botão de controle de contraste está definido para a
configuração mais escura.
• Verifique se todos os cabos estão conectados adequadamente.
Para obter mais informações, consulte “Conectar cabos e cabos
de força” na página 5.
• Desligue o digitalizador e, a seguir, ligue-o novamente.
• Se ainda tiver problemas, entre em contato com o suporte ao
cliente Lexmark em http://support.lexmark.com.
Aparece um ponto de exclamação
vermelho sobre o ícone Copiar na tela
inicial.
• Toque no ícone Copiar. Siga as instruções que aparecem na tela.
• Verifique se a impressora está conectada e ligada.
• Verifique se os cabos Ethernet estão conectados nas portas
corretas. Para obter mais informações, consulte “Conectar cabos
e cabos de força” na página 5.
• Desligue a impressora e o digitalizador. Ligue a impressora e, a
seguir, o digitalizador.
O papel não é alimentado pelo
alimentador automático de documentos.
• Limpe os rolos do alimentador e o protetor de tracionamento e
tente novamente. Para obter mais informações, consulte
“Fazendo a manutenção do MFP” na página 13.
• Abra a porta do alimentador automático de documentos. Verifique
se o protetor de tracionamento está colocado corretamente e
feche a porta.
• Verifique se o papel foi inserido com a distância adequada.
• Se ainda tiver problemas, entre em contato com o suporte ao
cliente Lexmark em http://support.lexmark.com.
Meu trabalho de impressão na rede não
está sendo impresso.
1
Imprima uma página de configuração da rede:
a
A partir da tela inicial, toque o ícone Chave e, a seguir, toque
em Imprimir relatórios.
b
Toque em Página de configuração da rede.
2
Verifique o endereço IP e as configurações.
Não consigo enviar nem receber faxes
analógicos.
• Verifique se o cabo da linha de fax do telefone está conectado
adequadamente à porta do digitalizador e à tomada do telefone.
• Verifique se a linha telefônica é analógica.
Page 55

20
Avisos
Avisos
Informações de
segurança
Para reduzir o risco de incêndio e choque elétrico ao instalar ou
utilizar equipamentos telefônicos, tome sempre todas as precauções
relacionadas à segurança, incluindo as seguintes:
•
Se o produto NÃO estiver marcado com este símbolo ,
DEVERÁ ser conectado a uma tomada elétrica
adequadamente aterrada.
•
O cabo de força deve ser conectado a uma tomada elétrica
que esteja próxima ao produto e deve ser facilmente acessado.
•
Serviços ou reparos, diferentes daqueles descritos nas
instruções de operação, devem ser solicitados a um técnico
profissional.
•
Este produto foi desenvolvido, testado e aprovado para
atender aos rígidos padrões internacionais de segurança
relacionados ao uso de componentes específicos da Lexmark.
Nem sempre os recursos de segurança de algumas peças são
claramente indicados. A Lexmark não se responsabiliza pela
utilização de peças de reposição que não sejam as suas.
Informações de
segurança relacionadas
a fax e telefone
•
Nunca execute o procedimento de instalação apresentado
neste guia durante uma tempestade de raios.
•
Nunca instale ou utilize este equipamento em locais úmidos.
Cuidados e avisos
CUIDADO!
Um cuidado identifica algo que pode causar ferimentos.
Aviso:
Um aviso identifica algo que pode danificar o hardware ou o
software do sistema MFP.
Page 56

21
Avisos
Avisos de emissão
Os avisos a seguir se aplicam às máquinas nas quais o X4500 está
instalado.
Avisos de
compatibilidade com a
rede
Este equipamento foi desenvolvido, testado e considerado em
conformidade com o padrão técnico europeu TBR 21 para conexão
pan-européia de terminal único à rede telefônica pública comutada
(PSTN, Public Switched Telephone Network).
Isso se aplica a todos os MFPs da X4500 que possuem a seguinte
marca:
Este equipamento foi projetado para trabalhar em redes PSTN que
aceitam sinais analógicos.
No entanto, devido às diferenças entre as PSTNs fornecidas nos
diversos países, a certificação TBR 21 não oferece, por si só, uma
garantia incondicional de êxito operacional em cada ponto de
terminação da rede PSTN. Em caso de problemas, entre em contato
com o fornecedor do equipamento.
A Lexmark atualmente não tem conhecimento de dificuldades
interoperacionais para os seguintes países:
Áustria Bélgica Dinamarca Finlândia
França Alemanha Luxemburgo Países Baixos
Grécia Islândia Irlanda Itália
Portugal Suécia Reino Unido Suíça
Espanha Noruega
Page 57

22
Avisos
Page 58

Français
Page 59

Edition : Janvier 2002
Le paragraphe suivant ne s'applique pas aux pays dans lesquels lesdites clauses ne sont pas conformes à la
législation en vigueur :
LEXMARK INTERNATIONAL, INC., FOURNIT CETTE PUBLICATION « TELLE QUELLE »
SANS GARANTIE D'AUCUNE SORTE, EXPLICITE OU IMPLICITE, Y COMPRIS, MAIS SANS SE LIMITER AUX
GARANTIES IMPLICITES DE QUALITE MARCHANDE OU D'ADEQUATION A UN USAGE SPECIFIQUE. Certains
Etats n'admettent pas la renonciation aux garanties implicites ou explicites pour certaines transactions ; il se peut donc
que cette déclaration ne vous concerne pas.
Cette publication peut contenir des imprécisions techniques ou des erreurs typographiques. Des modifications sont
périodiquement apportées aux informations qu'elle renferme ; ces modifications seront intégrées dans les éditions
ultérieures de la publication. Des améliorations ou modifications des produits ou des programmes décrits dans cette
publication peuvent intervenir à tout moment.
Vous pouvez envoyer vos remarques à Lexmark International, Inc., Department F95/032-2, 740 West New Circle
Road, Lexington, Kentucky 40550, Etats-Unis. Au Royaume-Uni et en République d'Irlande, adressez vos
commentaires à Lexmark International Ltd., Marketing and Services Department, Westhorpe House, Westhorpe,
Marlow Bucks SL7 3RQ. Lexmark est libre d'utiliser ou de diffuser les informations qui lui sont communiquées de la
manière qu'il juge appropriée sans aucune obligation à votre égard. Pour vous procurer d'autres copies des documents
relatifs à ce produit, appelez le 1-800-553-9727. Au Royaume-Uni et en République d'Irlande, appelez le 0628-
481500. Dans les autres pays, contactez votre revendeur.
Toute référence dans cette publication à des produits, programmes ou services ne signifie pas que le fabricant ait
l'intention de les commercialiser dans tous ses pays d'activité. Toute référence à un produit, un programme ou un
service ne signifie pas que seul ce produit, programme ou service peut être utilisé. Tout produit, programme ou service
équivalent au niveau fonctionnel ne violant aucun droit de propriété intellectuelle existant peut être utilisé en
remplacement. L'évaluation et la vérification du fonctionnement en association avec d'autres produits, programmes ou
services, à l'exception de ceux expressément désignés par le fabricant, incombent à l'utilisateur.
Lexmark et Lexmark avec le logo du diamant sont des marques de Lexmark International, Inc., déposées aux
Etats-Unis et/ou dans d'autres pays. ScanBack est une marque commerciale de Lexmark International, Inc.
Avis de copyright
Il peut être illégal de copier certaines données sans permission ou licence, notamment des documents, des images et
des monnaies. Si vous n'êtes pas certain de disposer des permissions nécessaires, demandez un avis juridique.
© Copyright 2002 Lexmark International, Inc.
Tous droits réservés.
DROITS LIMITES DU GOUVERNEMENT DES ETATS-UNIS
Ce logiciel et cette documentation sont fournis avec des DROITS LIMITES. L'utilisation, la reproduction ou la
divulgation par le gouvernement sont soumises aux restrictions définies dans le sous-paragraphe (c)(1)(ii) de la clause
Rights in Technical Data and Computer Software du DFARS 252.227-7013 et dans les dispositions FAR applicables :
Lexmark International, Inc., Lexington, KY 40550, Etats-Unis.
Page 60

v
Table des matières
Table des matières
Etape 1 : Installation de l'imprimante, du support et du scanner 1
Déballage du scanner . . . . . . . . . . . . . . . . . . . . . . . . . . . . . . . .1
Installation de votre imprimante . . . . . . . . . . . . . . . . . . . . . . . .2
Vérification de la version du microcode de l'imprimante . . . . . .2
Installation du support . . . . . . . . . . . . . . . . . . . . . . . . . . . . . . . .3
Déverrouillage du scanner . . . . . . . . . . . . . . . . . . . . . . . . . . . .3
Etape 2 : Installation des tiroirs . . . . . . . . . . . . . . . . . . . . . . . . . . 4
Etape 3 : Connexion des câbles . . . . . . . . . . . . . . . . . . . . . . . . . . 5
Etape 4 : Installation du matériel . . . . . . . . . . . . . . . . . . . . . . . . . 6
Installation de la Carte de référence rapide . . . . . . . . . . . . . . .6
Installation du cache du panneau de commandes de
l'imprimante . . . . . . . . . . . . . . . . . . . . . . . . . . . . . . . . . . . . .6
Mise sous tension de l'imprimante et du scanner . . . . . . . . . . .7
Etape 5 : Configuration de l’imprimante MFP . . . . . . . . . . . . . . . 8
Définition de l'adresse IP . . . . . . . . . . . . . . . . . . . . . . . . . . . . .8
Configuration de la numérisation vers e-mail . . . . . . . . . . . . . .9
Configuration du mode Config. fax . . . . . . . . . . . . . . . . . . . . . .9
Enregistrement auprès d’un serveur de domaine Windows NT 10
Page 61

vi
Table des matières
Etape 6 : Vérification de la configuration . . . . . . . . . . . . . . . . . 11
Exécution d'une copie de test . . . . . . . . . . . . . . . . . . . . . . . . .11
Envoi d'un fax de test . . . . . . . . . . . . . . . . . . . . . . . . . . . . . . .11
Envoi d'un e-mail de test . . . . . . . . . . . . . . . . . . . . . . . . . . . . .12
Envoi d'un travail d'impression réseau à l'imprimante MFP . .12
Maintenance de l’imprimante MFP. . . . . . . . . . . . . . . . . . . 13
Nettoyage de l'écran tactile . . . . . . . . . . . . . . . . . . . . . . . . . . .13
Nettoyage de la surface de numérisation du scanner . . . . . .13
Problèmes d'alimentation de papier . . . . . . . . . . . . . . . . . . . .14
Nettoyage des rouleaux et du tampon . . . . . . . . . . . . . . . . . .15
Remplacement du tampon . . . . . . . . . . . . . . . . . . . . . . . . . . .16
Déplacement du scanner . . . . . . . . . . . . . . . . . . . . . . . . . . . .17
Répartiteur de documents . . . . . . . . . . . . . . . . . . . . . . . . . 18
Dépannage . . . . . . . . . . . . . . . . . . . . . . . . . . . . . . . . . . . . . . 19
Avis . . . . . . . . . . . . . . . . . . . . . . . . . . . . . . . . . . . . . . . . 20
Consignes de sécurité . . . . . . . . . . . . . . . . . . . . . . . . . . . . . .20
Avis relatifs aux émissions électroniques . . . . . . . . . . . . . . . .21
Page 62

1
Installation de l'imprimante, du support et du scanner
Etape 1 :
Installation de l'imprimante,
du support et du scanner
Déballage du scanner
Déballez l'option X4500 de l'imprimante
MFP. Vérifiez que vous disposez des
éléments suivants :
•
Scanner
•
Câble Ethernet (RJ-45)
•
Câble téléphonique du fax
(RJ-11)
•
Pochette avec le
Guide
d'installation
(comprend le CD
de
l'imprimante
MFP
au dos du
livret) et plusieurs
cartes de
référence rapide
•
Bloc d’alimentation
•
Cordon d'alimentation
•
Réceptacle de sortie du papier
Conservez les matériaux d'emballage
tant que vous n'avez pas entièrement
configuré le système et vérifié son
fonctionnement.
Pochette
Scanner
Réceptacle
de sortie du
papier
Cordon
d'alimentation
Bloc
d’alimentation
Câble Ethernet
Câble
téléphonique
du fax
Page 63

2
Installation de l'imprimante, du support et du scanner
Installation de votre
imprimante
1
Installez votre imprimante
conformément aux instructions
décrites dans la documentation
afférente, notamment les
réceptacles et plateaux, les unités
recto verso et toute autre option
dont vous avez fait l'acquisition.
2
Avant et pendant l'installation de
l'imprimante MFP, débranchez
tous les câbles réseau,
d'alimentation et de ligne
3
Au terme de l'installation, vous
pourrez rebrancher tous vos
équipements et les remettre sous
tension, en veillant à utiliser des
prises de terre.
Vérification de la
version du microcode
de l'imprimante
Procédez comme suit pour vérifier la
version de microcode minimum à utiliser
afin que votre imprimante MFP
fonctionne correctement :
1
Consultez le site Web de Lexmark
à l'adresse suivante :
http://support.lexmark.com.
2
Sélectionnez le pays et la langue
souhaités.
3
Sous Imprimantes multifonction,
sélectionnez l'option X4500 pour
imprimante MFP.
4
Cliquez sur Go.
5
Sélectionnez la configuration
minimale requise pour l'option
X4500.
Vérifiez que la version du
microcode répertoriée correspond
avec celle de votre imprimante.
Si tel n’est pas le cas, suivez les
instructions figurant sur le site Web pour
mettre à niveau votre microcode.
Page 64
3
Installation de l'imprimante, du support et du scanner
Installation du support
Votre imprimante est livrée avec
plusieurs options de support selon vos
besoins.
Pour assembler et fixer le support à
l'imprimante, reportez-vous aux
instructions fournies avec ce support.
Si vous ne vous êtes pas procuré de
support et que vous pensez placer le
scanner sur l'unité de finition Lexmark™
C750 pour imprimante MFP,
reportez-vous aux instructions fournies
avec cette unité de finition.
Déverrouillage du
scanner
1
Assurez-vous que l'imprimante
est hors tension et débranchée.
2
Déverrouillez votre scanner :
a
Repérez le bouton de
verrouillage situé sur le côté
droit du scanner.
b
Poussez ce bouton en position
non verrouillée.
Page 65
4
Installation des tiroirs
Etape 2 : Installation des tiroirs
Remarque :
Le scanner est livré avec
le dispositif d'alimentation automatique
de document et le plateau d'alimentation
installés.
1
Fixez le réceptacle de sortie du
papier sur le dispositif
d'alimentation automatique de
document.
2
Soulevez le plateau
d'alimentation, puis faites glisser
la barre de soutien sur le capot du
scanner, dans la position
appropriée.
Plateau d'alimentation
de document
Réceptacle de
sortie du papier
Page 66
5
Connexion des câbles
Etape 3 : Connexion des câbles
ATTE NT IO N !
Ne branchez pas le
cordon d'alimentation pour l’instant.
1
Vérifiez que l'imprimante et le
scanner sont hors tension et
débranchés.
2
Branchez l'extrémité du câble
Ethernet de forme toroïdale sur le
port Ethernet 1 du scanner.
Branchez l'autre extrémité sur
l'imprimante.
3
Branchez le câble téléphonique
du fax sur le scanner, puis sur une
prise téléphonique avec un
adaptateur, le cas échéant.
4
Utilisez un câblage standard
compatible avec votre réseau pour
le port Ethernet 2 du scanner,
puis branchez l'autre extrémité du
câble sur un connecteur réseau.
Ce câble n'est pas fourni par
Lexmark.
5
Branchez le bloc d'alimentation
sur le scanner.
Avertissement !
Ne branchez ou ne
débranchez jamais le câble Ethernet
lorsque le scanner est sous tension.
6
Branchez le cordon sur le bloc
d'alimentation, mais
ne branchez
pas
l'autre extrémité sur une prise
électrique pour l'instant.
Cordon
d'alimentation
Câble Ethernet
Câble téléphonique du fax
Bloc
d’alimentation
Por t Ethernet 2
Page 67
6
Installation du matériel
Etape 4 : Installation du matériel
Installation de
la Carte de
référence rapide
1
Retirez la protection de la face
adhésive de la
Carte de référence
rapide
.
2
Appuyez sur la
Carte de référence
rapide
pour la positionner
correctement au-dessus de
l'écran tactile.
Installation du cache
du panneau de
commandes de
l'imprimante
Reportez-vous aux instructions fournies
avec le cache du panneau de
commandes.
Page 68
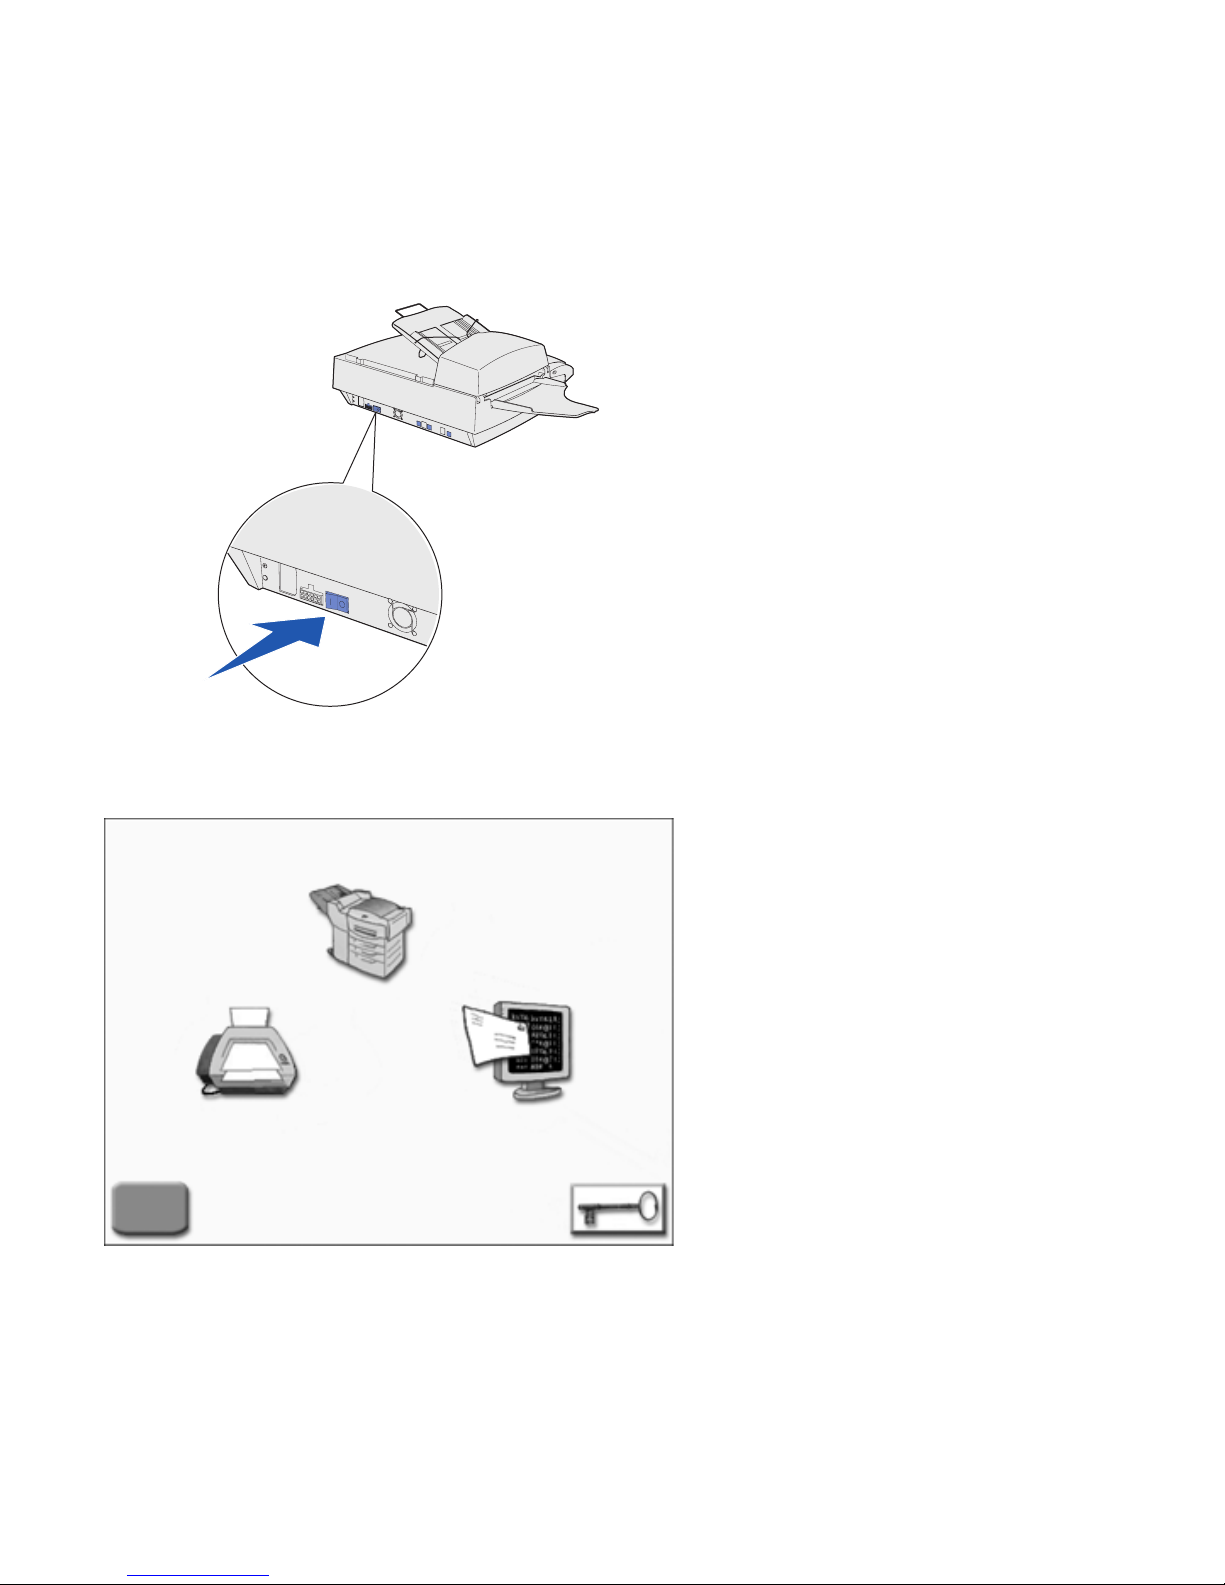
7
Installation du matériel
Mise sous tension de
l'imprimante et du
scanner
1
Branchez l'imprimante et le
cordon d'alimentation sur une
prise électrique correctement
reliée à la terre.
2
Mettez l'imprimante sous tension.
3
Mettez le scanner sous tension.
L'imprimante MFP nécessite un temps
de préchauffage après sa mise sous
tension.
Lorsque l'imprimante a terminé ses
tests, l'écran Accueil s'affiche.
Page 69
8
Configuration de l’imprimante MFP
Etape 5 : Configuration de
l’imprimante MFP
Vous trouverez ci-dessous la configuration minimale requise pour
l’exécution des fonctions de base, telles que l'impression, la copie,
l'utilisation du fax ou du courrier électronique. Certains de ces
paramètres nécessitent l'aide de votre administrateur réseau.
Définition de
l'adresse IP
Vous devez disposer d'une adresse IP pour les périphériques réseau
afin de localiser l'imprimante MFP sur le réseau. Si vous disposez du
protocole DHCP, les valeurs spécifiques à l'adresse sont
automatiquement attribuées.
Pour vérifier votre adresse IP ou pour en attribuer une manuellement
si vous ne disposez pas du protocole DHCP, procédez comme suit :
1
A partir de l'écran Accueil, appuyez sur l'icône représentant
une clé, puis sur Configuration système.
2
Sous Imprimante/Serveur d'impression, appuyez sur
Installation et Configuration.
3
Sous Serveur d'impression, appuyez sur TCP/IP.
4
Les champs Adresse, Masque de réseau et Passerelle doivent
obligatoirement être remplis et contenir des valeurs non nulles.
Si nécessaire, utilisez le clavier virtuel pour saisir les
informations appropriées à votre réseau. Définissez toute autre
information de votre choix.
5
Appuyez sur Envoyer lorsque vous avez entré toutes les
informations.
6
Après actualisation de la page de configuration, vérifiez si les
paramètres sont corrects.
Lorsque vous avez configuré l'adresse IP, vous pouvez utiliser votre
navigateur Web pour visualiser et gérer à distance votre imprimante.
Tapez l'adresse IP dans la zone d'adresse du navigateur (par
exemple, http://192.168.236.24), puis appuyez sur Entrée.
Page 70

9
Configuration de l’imprimante MFP
Configuration de
la numérisation
vers e-mail
1
Tapez l'adresse IP de votre imprimante MFP dans la zone
d'adresse du navigateur (par exemple, http://192.168.236.24),
puis appuyez sur Entrée.
2
Cliquez sur Configuration.
3
Cliquez sur Configuration générale de la numérisation vers
e-mail.
4
Indiquez la passerelle SMTP de votre fournisseur d'accès au
réseau ou à Internet dans le champ approprié. Indiquez une
adresse électronique par défaut pour la réponse au message.
5
Cliquez sur Envoyer.
Configuration du
mode Config. fax
La loi sur la protection des consommateurs en matière de téléphonie
(Telephone Consumer Protection Act) de 1991 exige que tous les fax
émis contiennent des informations spécifiques en haut ou au bas de
chaque page ou sur la première page transmise.
Utilisez votre navigateur Web pour définir les informations requises
relatives au fax.
1
Tapez l'adresse IP de votre imprimante MFP dans la zone
d'adresse du navigateur (par exemple, http://192.168.236.24),
puis appuyez sur Entrée.
2
Cliquez sur Configuration, puis sur Config. fax
:
— Si l'option Analogique ne figure pas dans le menu
déroulant, sélectionnez-la dès à présent. Cliquez sur
Envoyer.
— Si l'option Analogique figure dans le menu déroulant,
cliquez sur Configuration.
3
Après actualisation de la page de configuration, entrez les
informations requises par la FCC :
— nom du poste (nom de l'entreprise ou de l'individu),
— numéro du poste (numéro du fax).
Définissez ou modifiez tout autre paramètre de fax, puis
cliquez sur Envoyer.
Page 71

10
Configuration de l’imprimante MFP
4
Réglez la date et l'heure.
a
Cliquez sur Configuration.
b
Cliquez sur Installation et Configuration.
c
Cliquez sur Date et heure.
5
Réglez la date et l'heure.
— Si ces paramètres sont corrects, vous avez terminé.
— Sinon, cliquez sur le lien Défin heure/date sous Date et
heure actuelles. Entrez la date et l'heure dans un format
numérique (AAAA-MM-JJ-HH:MM), puis cliquez sur
Envoyer.
Si vous souhaitez configurer le mode Serveur fax, retournez à la
page de configuration Config. fax et changez de mode.
Enregistrement
auprès d’un
serveur de
domaine
Windows NT
Si vous souhaitez utiliser l'authentification Windows NT pour limiter
l'accès à votre imprimante MFP ou consigner ces événements, vous
devez au préalable enregistrer ce périphérique auprès d’un domaine
Windows NT. Contactez votre administrateur réseau pour obtenir de
l'aide sur l'enregistrement auprès d'un domaine Windows NT.
Remarque :
Pour enregistrer
l'imprimante MFP auprès d'un
domaine Windows NT, vous
devez disposer d'un compte
d'administrateur et d'un mot de
passe pour ce domaine.
Appuyez sur l'icône représentant une clé sur l'écran Accueil, puis
appuyez sur Enregistrement de domaine Windows NT. Des astuces
s'affichent à l'écran afin de vous aider lors de l'enregistrement.
Page 72

11
Vérification de la configuration
Etape 6 : Vérification de la
configuration
Exécution d'une
copie de test
Effectuez une copie d'une page et testez le dispositif d'alimentation
automatique de document :
1
Placez votre document face imprimée vers le bas dans le
dispositif d'alimentation automatique.
2
Appuyez sur la touche verte Démarrer située à droite de
l'écran tactile (le mode Copie est le paramètre par défaut pour
l'imprimante MFP).
3
Appuyez sur Terminé.
Envoi d'un fax
de test
Envoyez un fax d'une page en guise de test à un numéro de fax
souvent utilisé.
1
Sur l'écran Accueil, appuyez sur l'icône représentant un fax.
2
Sur l'écran Destination du fax, entrez un numéro de fax à l'aide
du clavier virtuel.
3
Placez votre document face imprimée vers le bas, contre
la surface de numérisation du scanner.
4
Appuyez sur Faxer ou sur la touche Démarrer pour envoyer
le fax.
5
Appuyez sur Terminé.
Page 73

12
Vérification de la configuration
Envoi d'un e-mail
de test
Envoyez un courrier électronique d'une page en guise de test à une
adresse électronique connue.
1
Sur l'écran Accueil, appuyez sur l'icône représentant un
courrier électronique.
2
Sur l'écran Destination de l'e-mail, entrez une adresse
électronique à l'aide du clavier virtuel.
3
Placez votre document face imprimée vers le bas, contre la
surface de numérisation du scanner.
4
Appuyez sur Envoyer ou sur la touche Démarrer pour
numériser et envoyer le document.
5
Appuyez sur Terminé.
Envoi d'un travail
d'impression
réseau à
l'imprimante MFP
Utilisez une application logicielle pour envoyer un travail d'impression
réseau à votre imprimante MFP. Consultez la documentation de votre
imprimante pour obtenir de plus amples informations sur la
configuration d'un ordinateur pour une impression réseau.
Page 74
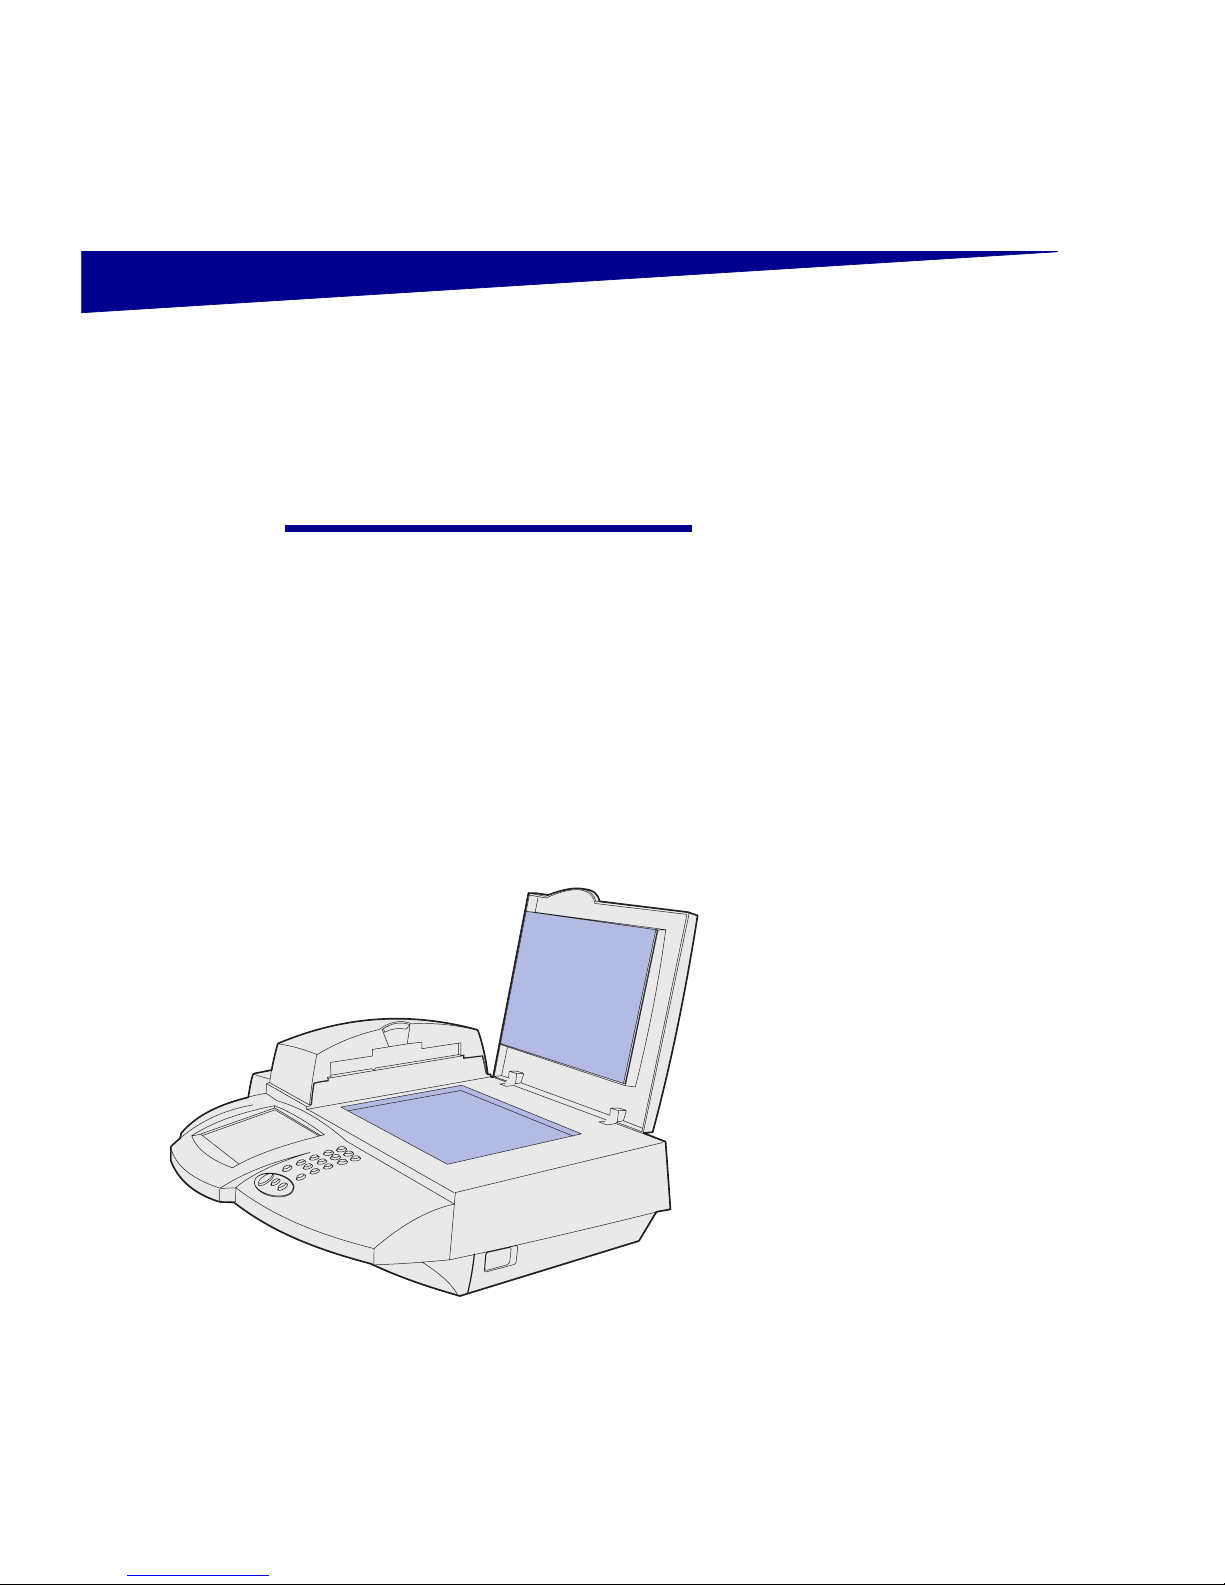
13
Maintenance de l’imprimante MFP
Maintenance de l’imprimante MFP
Nettoyage de l'écran
tactile
1
Utilisez un chiffon propre, non
pelucheux et légèrement
humidifié avec de l'eau.
Avertissement !
Ne vaporisez ni eau
ni nettoyant pour vitres sur l'écran tactile
au risque d'endommager votre
imprimante MFP.
2
Nettoyez l'écran tactile.
Nettoyage de la surface
de numérisation
du scanner
1
Utilisez un chiffon propre, non
pelucheux et légèrement
humidifié avec de l'eau.
2
Relevez le capot.
3
Nettoyez la vitre de la surface de
numérisation.
Page 75

14
Maintenance de l’imprimante MFP
Problèmes
d'alimentation de
papier
Si vous rencontrez les problèmes
d'alimentation suivants :
•
Deux feuilles de papier sont
chargées simultanément ou
•
Le papier n'est pas entraîné.
Nettoyez tout d'abord le dispositif
d'alimentation automatique de
document. Reportez-vous à la section
« Nettoyage des rouleaux et du
tampon » page 15. Si vous ne parvenez
toujours pas à résoudre les problèmes
d'alimentation, remplacez le tampon en
vous reportant à la section
« Remplacement du tampon » page 16.
Si les problèmes persistent après avoir
remplacé le tampon, consultez le site
Web du support Lexmark à l'adresse
suivante :
http://support.lexmark.com.
Page 76
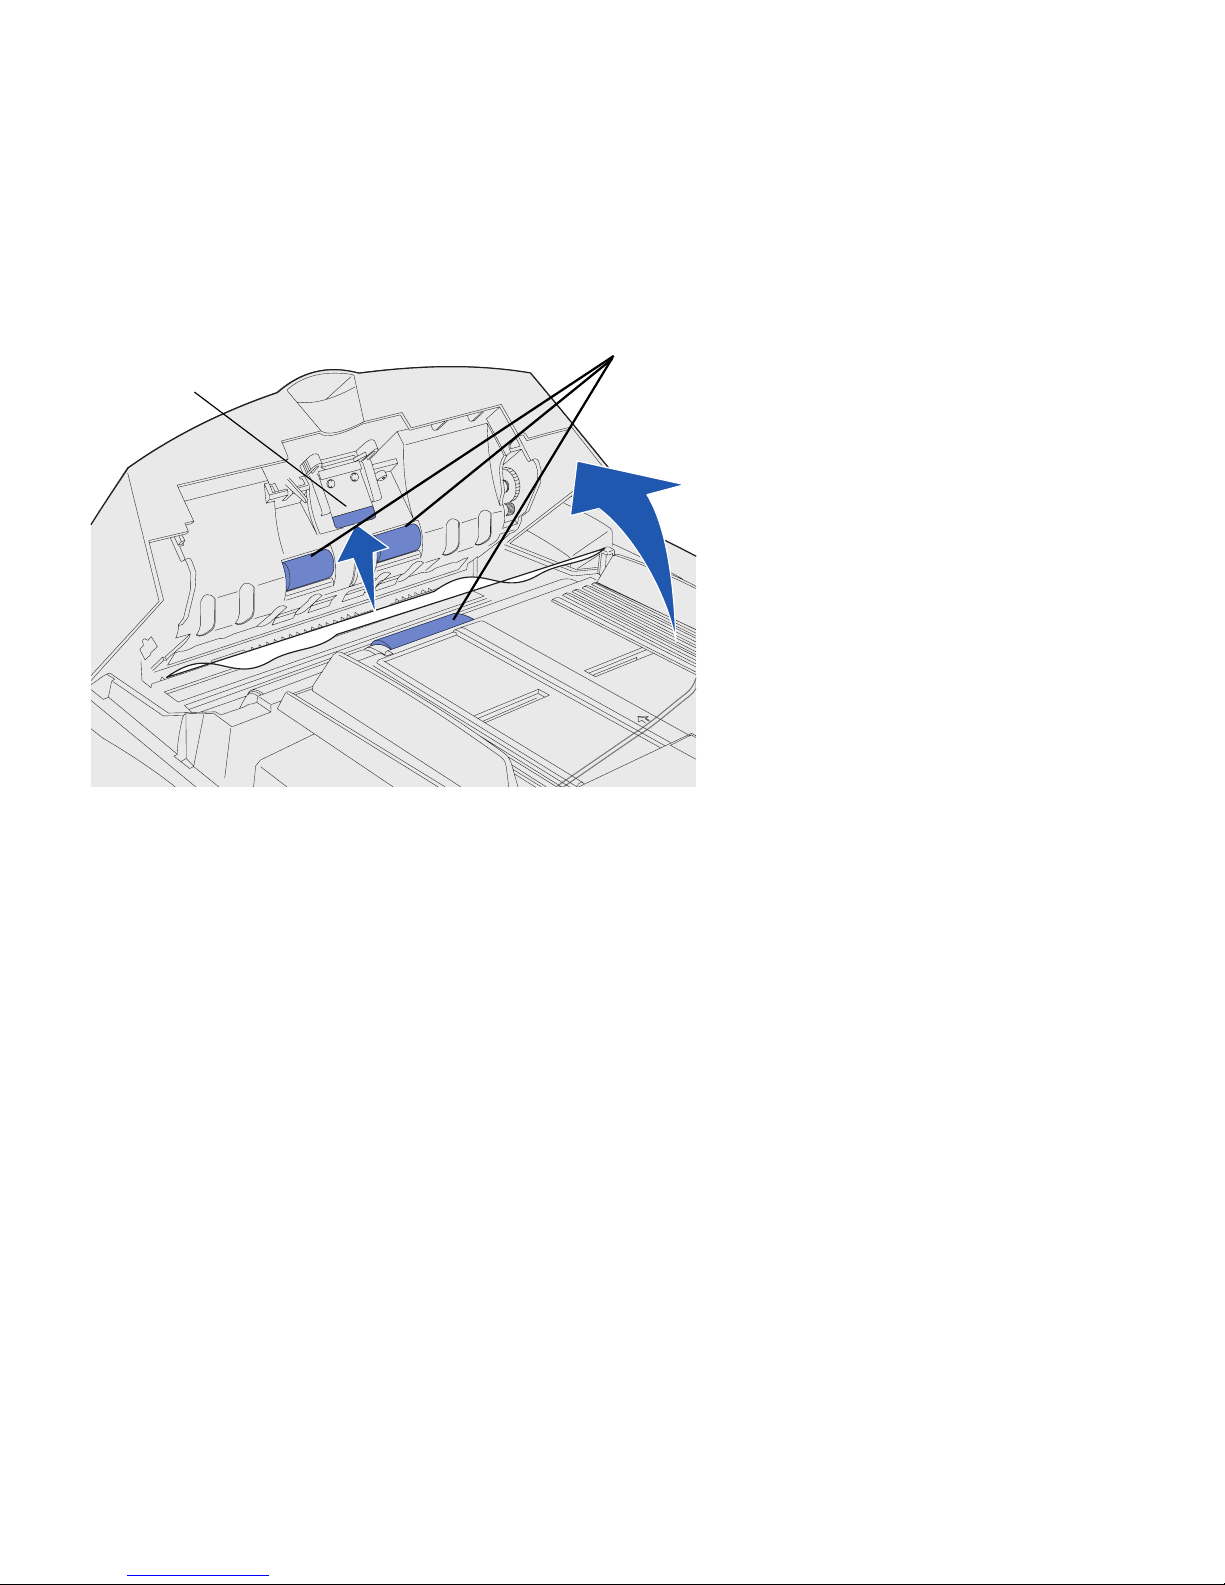
15
Maintenance de l’imprimante MFP
Nettoyage des rouleaux
et du tampon
1
Mettez le scanner hors tension et
débranchez le cordon
d'alimentation.
2
Utilisez un chiffon propre, non
pelucheux et légèrement
humidifié avec de l'eau.
3
Ouvrez le dispositif d'alimentation
automatique de document, puis
essuyez les rouleaux en
déplaçant le chiffon d'un bord à
l'autre.
4
Faites pivoter chaque rouleau
avec les doigts et nettoyez-les
jusqu'à ce qu'ils soient
entièrement propres.
5
Essuyez avec précaution le
tampon à l'aide d'un chiffon
humide.
6
Fermez le dispositif d'alimentation
automatique de document.
7
Rebranchez le scanner, puis
remettez-le sous tension.
Rouleaux
Tampon
Page 77
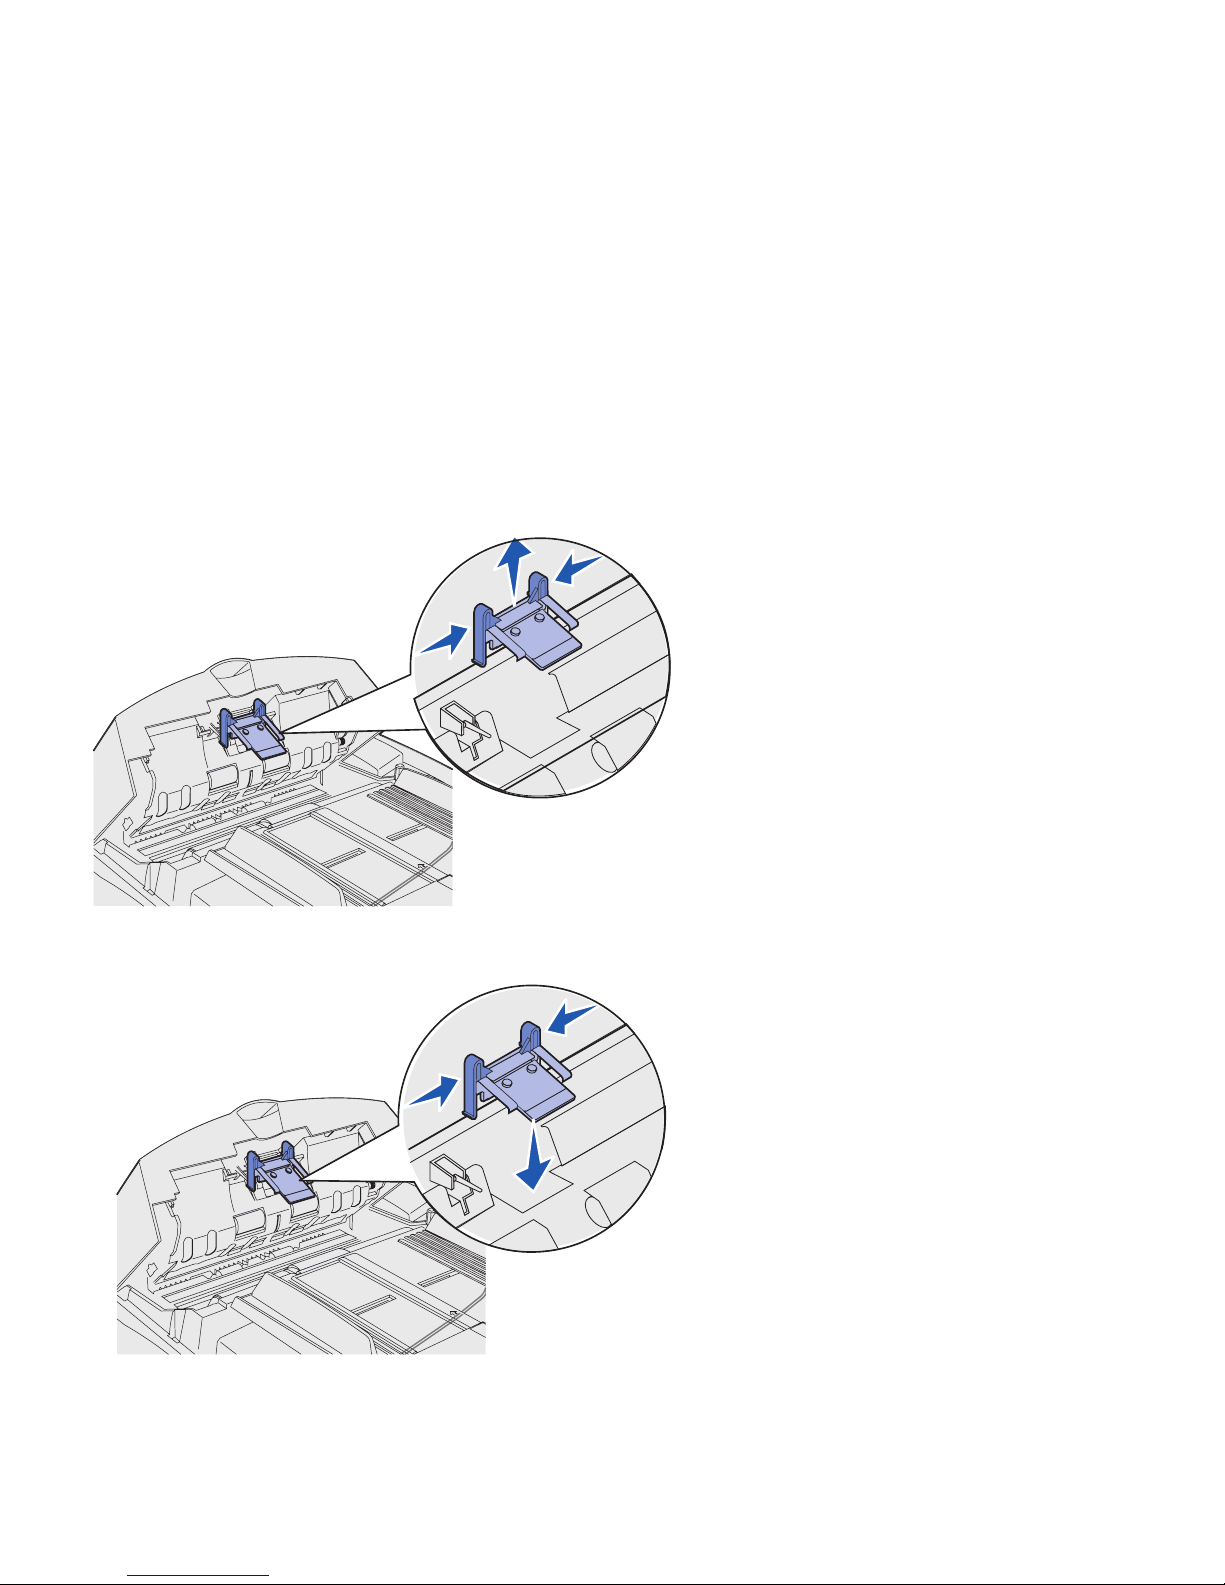
16
Maintenance de l’imprimante MFP
Remplacement du
tampon
Si vous rencontrez des problèmes
d'alimentation de papier avec le dispositif
d'alimentation automatique de
document, vous devez peut-être
remplacé le tampon.
Pour commander un tampon de
rechange, consultez le site Web du
support Lexmark à l'adresse suivante :
http://support.lexmark.com. La référence
du tampon de rechange est
12G3758
.
1
Mettez le scanner hors tension,
puis débranchez-le.
2
Ouvrez le dispositif d'alimentation
automatique de document.
3
Appuyez sur les pinces du tampon
pour le retirer.
4
Tenez le nouveau tampon par les
pinces, puis placez-le avec
précaution dans le support prévu
à cet effet.
5
Fermez le dispositif d'alimentation
automatique de document.
6
Rebranchez le scanner, puis
remettez-le sous tension.
Page 78
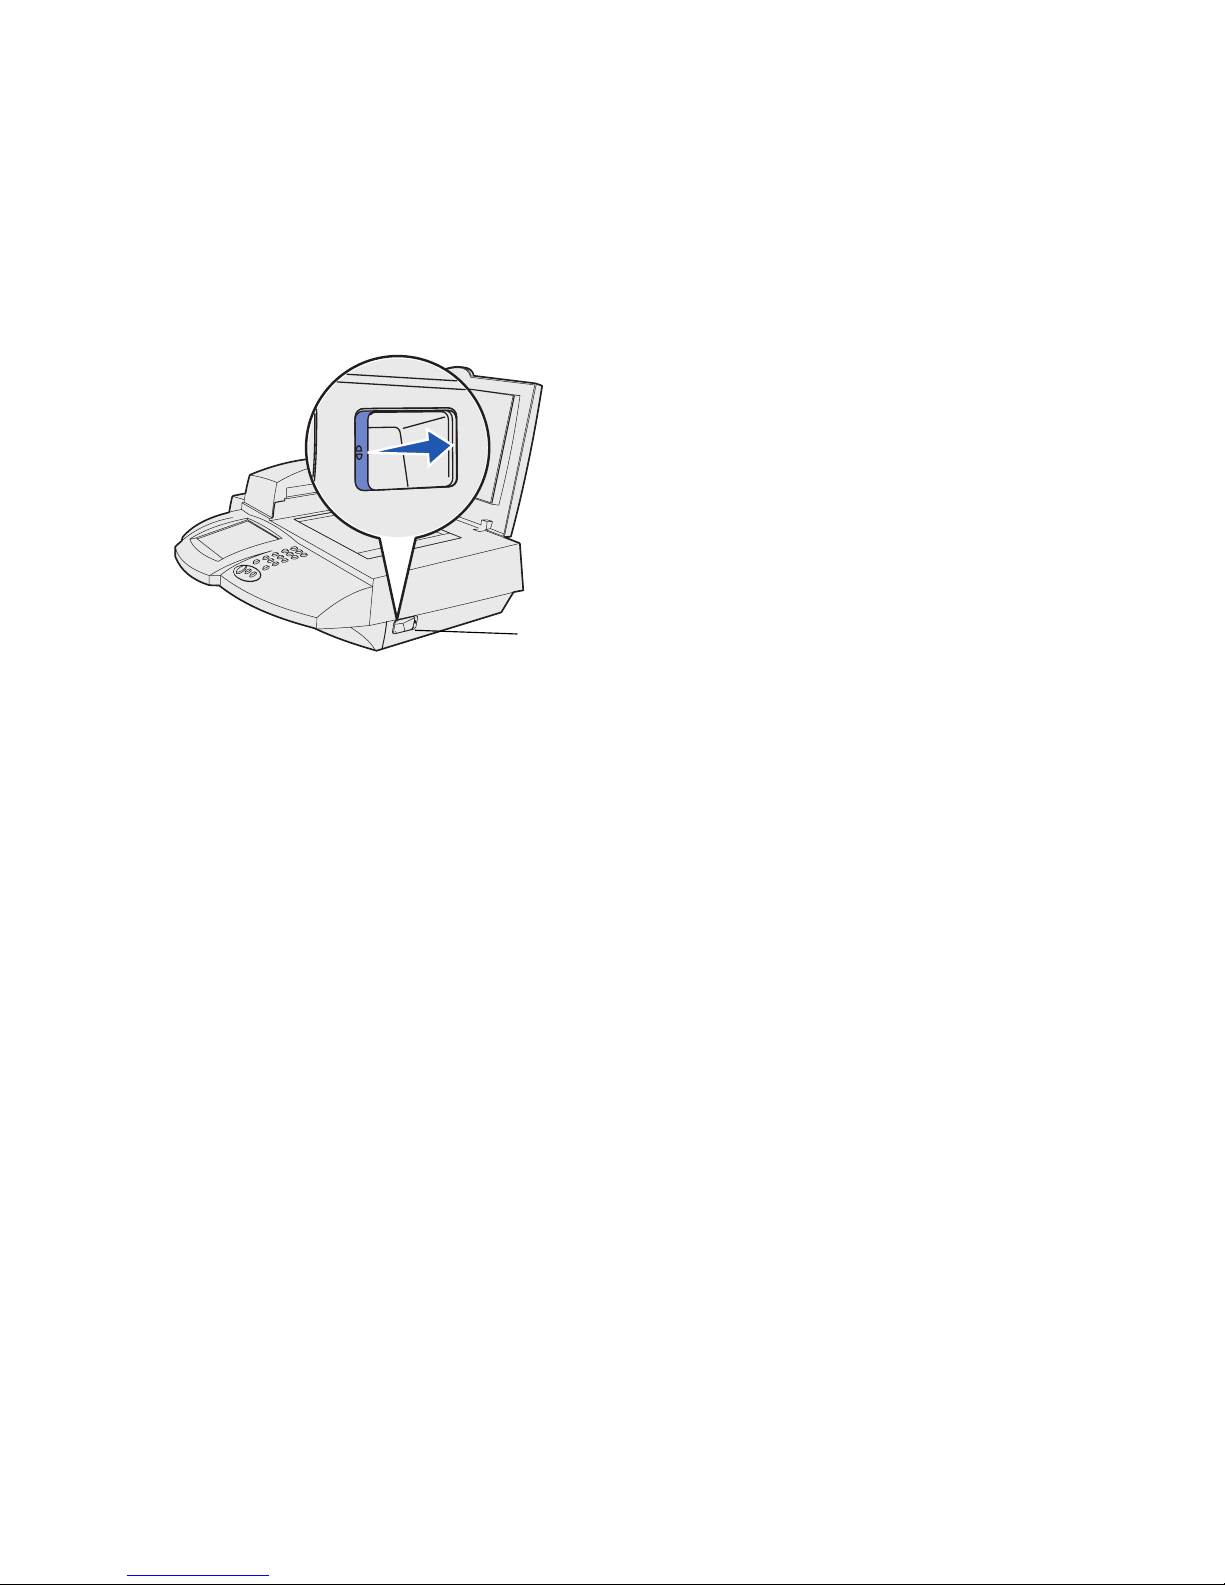
17
Maintenance de l’imprimante MFP
Déplacement du
scanner
Si vous souhaitez transporter le scanner,
vous devez le verrouiller pour éviter
d'endommager le dispositif de
numérisation.
1
Ouvrez le capot du scanner, puis
mettez le scanner sous tension.
2
Lorsque le dispositif de
numérisation atteint l'extrémité
droite de la vitre du scanner,
mettez ce dernier hors tension.
3
Déplacez le bouton de
verrouillage vers la droite du
scanner pour verrouiller ce
dernier, puis refermez le capot.
Bouton de
verrouillage
Page 79

18
Répartiteur de documents Lexmark
Répartiteur de documents
Lexmark
Votre MFP est fourni avec un CD contenant l'utilitaire ScanBack.
L'utilitaire ScanBack est un Assistant Windows de création de
raccourcis bureau reprenant vos paramètres de numérisation
personnels afin que vous puissiez rapidement numériser des
documents vers votre ordinateur.
Document Distributor est un logiciel destiné à votre MFP disponible
auprès de Lexmark.
Le logiciel Document Distributor vous permet d'automatiser le
processus de numérisation et de simplifier le traitement des
documents.
Page 80

19
Dépannage
Dépannage
Pour obtenir de l'aide supplémentaire, lancer le CD Pilotes fourni
avec votre imprimante, puis cliquez sur Contacter Lexmark.
Problème Solution
L'écran tactile n'affiche rien et ne répond
pas.
• Assurez-vous que le scanner est branché.
• Assurez-vous que les prises électriques sont alimentées.
• Assurez-vous que la molette de réglage du contraste n'est
pas définie sur le paramètre le plus foncé.
• Assurez-vous que tous les câbles et cordons sont correctement
connectés. Pour de plus amples informations, reportez-vous
à la section « Connexion des câbles » page 5.
• Mettez le scanner hors tension, puis sous tension.
• Si les problèmes persistent, contactez le support client de
Lexmark à l'adresse suivante : http://support.lexmark.com.
Un point d'exclamation rouge s'affiche sur
l'icône représentant une copie sur l'écran
Accueil.
• Appuyez sur l'icône représentant une copie. Suivez les instructions
à l'écran.
• Assurez-vous que votre imprimante est branchée et sous tension.
• Assurez-vous que les câbles Ethernet sont connectés aux ports
appropriés. Pour de plus amples informations, reportez-vous
à la section « Connexion des câbles » page 5.
• Mettez l'imprimante et le scanner hors tension. Mettez
l'imprimante, puis le scanner sous tension.
Le papier n'est pas entraîné dans le
dispositif d'alimentation automatique de
document.
• Nettoyez les rouleaux et le tampon du scanner, puis essayez de
nouveau. Pour de plus amples informations, reportez-vous
à la section « Maintenance de l’imprimante MFP » page 13.
• Ouvrez la porte du dispositif d'alimentation automatique de
document. Assurez-vous que le tampon est positionné
correctement, puis refermez la porte.
• Assurez-vous que le papier est inséré correctement.
• Si les problèmes persistent, contactez le support client de
Lexmark à l'adresse suivante : http://support.lexmark.com.
Le travail d'impression réseau ne
s'imprime pas.
1
Imprimez une page de configuration du réseau :
a
A partir de l'écran Accueil, appuyez sur l'icône représentant une
clé, puis sur Imprimer les rapports.
b
Appuyez sur Page de configuration du réseau.
2
Vérifiez l'adresse IP et les paramètres.
Je ne peux ni envoyer ni recevoir de fax
analogiques.
• Assurez-vous que le câble de la ligne téléphonique du fax est
correctement connecté au port du scanner et à la prise
téléphonique.
• Vérifiez qu'il s'agit d'une ligne téléphonique analogique.
Page 81

20
Avis
Avis
Consignes de
sécurité
Afin de réduire les risques d'incendie ou d'électrocution lors de
l'installation ou de l'utilisation de matériel téléphonique, suivez
toujours les consignes de sécurité, notamment celles décrites cidessous :
•
Si le symbole ne figure pas sur votre produit, celui-ci doit
IMPERATIVEMENT être branché sur une prise électrique
correctement reliée à la terre.
•
Utilisez une prise située à proximité de l'appareil et facile
d'accès.
•
Pour tout dépannage ou réparation autres que ceux décrits
dans le guide d'utilisation, adressez-vous à un technicien
spécialisé.
•
Ce produit est conçu, testé et approuvé pour répondre à des
normes de sécurité globales strictes lors de son utilisation avec
des composants Lexmark spécifiques. Les fonctions de
sécurité de certaines pièces ne sont pas toujours évidentes.
Lexmark n'est pas responsable en cas d'utilisation de pièces
de rechange d'autres fabricants.
Consignes de sécurité
relatives au fax et au
téléphone
•
Ne procédez jamais à cette installation par temps d'orage.
•
N'installez ou n'utilisez jamais cet équipement dans des lieux
humides.
Avertissements et
mises en garde
ATTE N TI ON !
Les mises en garde signalent un risque de blessure
pour l'utilisateur.
Avertissement :
Les avertissements signalent un risque de
dommage matériel ou logiciel de l'imprimante MFP.
Page 82

21
Avis
Avis relatifs aux
émissions
électroniques
Les avis suivants concernent les imprimantes sur lesquelles est
installée l'option X4500.
Industry Canada
compliance statement
This Class A digital apparatus meets all requirements of the
Canadian Interference-Causing Equipment Regulations.
Avis de conformité aux
normes d’Industrie
Canada
Cet appareil numérique de la classe A respecte toutes les exigences
du Règlement sur le matériel brouilleur du Canada.
Avis de conformité aux
directives de la
Communauté
européenne (CE)
Ce produit est conforme aux normes de sécurité des directives 89/
336/EEC et 73/23/EEC du Conseil européen sur le rapprochement et
l'harmonisation des législations des Etats membres en matière de
compatibilité électromagnétique et de sécurité électrique à utiliser
dans certaines plages de tension.
Avertissement !
Ce produit
figure dans la Classe A. Dans un
environnement domestique, ce
produit peut causer des
interférences radio, auquel cas
l'utilisateur peut être invité à
prendre les mesures
nécessaires pour y remédier.
Une déclaration de conformité à la Directive a été signée par le
Directeur de la fabrication et du support technique, Lexmark
International, S.A., Boigny, France.
Ce produit satisfait aux limites de Classe A EN 55022 et aux
exigences de sécurité EN 60950.
Homologation
Industry Canada CS-03
L'étiquette Industry Canada identifie les équipements homologués.
Un équipement homologué signifie qu'il répond à certaines normes
de sécurité et de protection du réseau des télécommunications
stipulées dans les documents Terminal Equipment Technical
Requirements appropriés. Le Département des Télécommunications
ne garantit pas que le fonctionnement de cet équipement satisfera
l'utilisateur.
Page 83

22
Avis
Avant d'installer celui-ci, les utilisateurs doivent s'assurer qu'il peut
être connecté aux équipements de leur opérateur local et doivent
utiliser une méthode de connexion appropriée. Vous devez être
conscient que le respect des conditions ci-dessus n'empêche pas
la dégradation du service dans certains cas.
Toute réparation d'un équipement homologué doit être effectuée par
un professionnel désigné par le fournisseur. Toute réparation ou
modification effectuée par l'utilisateur peut conduire l'opérateur à
demander à l'utilisateur de déconnecter son équipement.
ATTE NT IO N !
N'effectuez pas
les branchements sur prise de
terre vous-même. Contactez la
compagnie d'électricité ou un
électricien selon le cas.
Les utilisateurs doivent s'assurer pour leur propre sécurité que les
prises de terre de leurs installations électriques, les lignes
téléphoniques et, le cas échéant, les systèmes d'évacuation d'eau
sont tous correctement connectés. Les utilisateurs dans les zones
rurales doivent se montrer particulièrement vigilants.
Le REN de ce périphérique est fixé à 0,4.
Le REN affecté à chaque périphérique indique le nombre maximal de
terminaux qui peuvent être connectés à une interface téléphonique.
La terminaison d'une interface peut consister en n'importe quelle
combinaison de périphériques à la seule condition que la somme des
REN ne dépasse pas 5.
Cet équipement utilise la fiche suivante : CA11A.
Avis de compatibilité
réseau
Cet appareil a été conçu, testé et déclaré conforme à la norme
technique européenne TBR 21 pour une connexion de terminal
unique paneuropéen au réseau téléphonique public commuté
(RTPC).
Il s'applique à toutes les imprimantes MFP avec option X4500 qui
portent la marque suivante :
Cet appareil est conçu pour fonctionner avec les réseaux PSTN qui
acceptent les signaux analogiques.
Toutefois, étant donné les différences entre les réseaux PSTN d'un
pays à l'autre, l'homologation TBR 21 ne garantit pas, par elle-même,
un fonctionnement sans problème à chaque extrémité d'un réseau
PSTN. En cas de problèmes, contactez votre revendeur.
Page 84

23
Avis
Aucun problème d'interopérabilité n'a été rapporté à Lexmark jusqu'à
présent pour les pays suivants :
Utilisation de
l'imprimante MFP avec
option X4500 en Suisse
L'imprimante MFP avec option X4500 requiert l'installation d'un filtre
de tonalité de taxation suisse (Réf. 14B5109) sur tout appareil utilisé
en Suisse car les impulsions de compteur sont présentes sur toutes
les lignes analogiques.
Autriche Belgique Danemark Finlande
France Allemagne Luxembourg Pays-Bas
Grèce Islande Irlande Italie
Portugal Suède Royaume-Uni Suisse
Espagne Norvège
Page 85

24
Avis
Page 86

Deutsch
Page 87

Ausgabe: Januar 2002
Der folgende Abschnitt gilt nicht für Länder, in denen die nachfolgenden Bestimmungen nicht mit dem
geltenden Recht vereinbar sind:
LEXMARK INTERNATIONAL, INC. ÜBERNIMMT FÜR DIE VORLIEGENDE
DOKUMENTATION KEINERLEI GEWÄHRLEISTUNG IRGENDWELCHER ART, WEDER AUSDRÜCKLICH NOCH
STILLSCHWEIGEND, EINSCHLIESSLICH, JEDOCH NICHT AUSSCHLIESSLICH DER STILLSCHWEIGENDEN
GEWÄHRLEISTUNG FÜR DIE HANDELSÜBLICHKEIT ODER DIE EIGNUNG FÜR EINEN BESTIMMTEN ZWECK.
In einigen Ländern sind ausdrückliche oder stillschweigende Gewährleistungsausschlüsse für bestimmte
Transaktionen nicht zulässig. Diese Erklärung betrifft Sie deshalb möglicherweise nicht.
Diese Dokumentation enthält möglicherweise technische Ungenauigkeiten oder typografische Fehler. An den
enthaltenen Informationen werden in regelmäßigen Abständen Änderungen vorgenommen. Diese Änderungen
werden in späteren Ausgaben berücksichtigt. Verbesserungen oder Änderungen an den beschriebenen Produkten
oder Programmen können jederzeit vorgenommen werden.
Kommentare zu dieser Dokumentation können an folgende Adresse gerichtet werden: Lexmark International, Inc.,
Department F95/032-2, 740 New Circle Road N.W., Lexington, Kentucky 40550, USA. Im Vereinigten Königreich und
Irland richten Sie Ihre Kommentare an Lexmark International Ltd., Marketing and Services Department, Westhorpe
House, Westhorpe, Marlow Bucks SL7 3RQ. Lexmark darf alle von Ihnen bereitgestellten Informationen in jeder von
Lexmark als angemessen erachteten Weise verwenden oder verbreiten, ohne daß Lexmark daraus Verpflichtungen
gegenüber Ihrer Person entstehen. Unter der Telefonnummer 1-800-553-9727 können Sie zusätzliche
produktbezogene Dokumentationen erwerben. Im Vereinigten Königreich und Irland wählen Sie 0628-481500. In allen
anderen Ländern wenden Sie sich bitte an Ihren Händler.
Durch Bezugnahme auf bestimmte Produkte, Programme oder Dienstleistungen in der vorliegenden Dokumentation
übernimmt der Hersteller keine Gewährleistung für die Verfügbarkeit dieser Produkte, Programme oder
Dienstleistungen in allen Ländern seines Tätigkeitsbereichs. Die Nennung eines Produkts, eines Programms oder
einer Dienstleistung besagt weder ausdrücklich noch stillschweigend, daß ausschließlich dieses Produkt, dieses
Programm oder diese Dienstleistung verwendet werden kann. Andere Produkte, Programme bzw. Dienstleistungen mit
vergleichbarer Funktionalität können ebenfalls verwendet werden, sofern kein Verstoß gegen das Urheberrecht
vorliegt. Die Bewertung und Überprüfung des Betriebs mit anderen als den vom Hersteller ausdrücklich genannten
Produkten, Programmen oder Dienstleistungen durch den Benutzer erfolgt auf eigene Verantwortung.
Lexmark und Lexmark mit der roten Raute sind Marken von Lexmark International, Inc., eingetragen in den USA und/
oder anderen Ländern. ScanBack ist eine Marke von Lexmark International, Inc.
Copyright-Hinweis
Das Kopieren bestimmter Materialien, einschließlich Dokumente, Bilder und Banknoten, ohne Genehmigung oder
Lizenz ist möglicherweise gesetzwidrig. Wenn Sie sich nicht sicher sind, ob Sie über die erforderliche Genehmigung
verfügen, wenden Sie sich an einen Rechtsbeistand.
© Copyright 2002 Lexmark International, Inc.
Alle Rechte vorbehalten.
EINGESCHRÄNKTE RECHTE DER REGIERUNG DER VEREINIGTEN STAATEN VON AMERIKA
Die vorliegende Software und Dokumentation werden mit EINGESCHRÄNKTEN RECHTEN zur Verfügung gestellt.
Die Verwendung, Vervielfältigung oder Offenlegung seitens der Regierung unterliegt den Einschränkungen, die in
Absatz (c)(1)(ii) der Klausel “Rights in Technical Data and Computer Software” unter DFARS 252.227-7013 und in
anwendbaren FAR-Bestimmungen festgelegt sind: Lexmark International, Inc., Lexington, KY 40550, USA.
Page 88

v
Inhalt
Inhalt
Schritt 1: Einrichten von Drucker, Gestell und Scanner . . . . 1
Auspacken des Scanners . . . . . . . . . . . . . . . . . . . . . . . . . . . . .1
Einrichten des Druckers . . . . . . . . . . . . . . . . . . . . . . . . . . . . . .2
Überprüfen der Version der Drucker-Firmware . . . . . . . . . . . .2
Aufstellen des Gestells . . . . . . . . . . . . . . . . . . . . . . . . . . . . . . .3
Entsperren des Scanners . . . . . . . . . . . . . . . . . . . . . . . . . . . . .3
Schritt 2: Anbringen der Fächer . . . . . . . . . . . . . . . . . . . . . . . 4
Schritt 3: Anschließen von Kabeln und Netzkabeln . . . . . . . 5
Schritt 4: Abschließen der Hardwarekonfiguration . . . . . . . . 6
Anbringen der Kurzanleitung . . . . . . . . . . . . . . . . . . . . . . . . . .6
Anbringen der Bedienerkonsolenabdeckung . . . . . . . . . . . . . .6
Einschalten von Scanner und Drucker . . . . . . . . . . . . . . . . . . .7
Schritt 5: Konfigurieren des MFP . . . . . . . . . . . . . . . . . . . . . . 8
Festlegen der IP-Adresse . . . . . . . . . . . . . . . . . . . . . . . . . . . . .8
Konfigurieren der Funktion „Scannen an E-Mail“ . . . . . . . . . . .9
Konfigurieren der Faxfunktion . . . . . . . . . . . . . . . . . . . . . . . . . .9
Registrieren bei einem Windows NT-Domänenserver . . . . . .10
Page 89

vi
Inhalt
Schritt 6: Überprüfen der Konfiguration . . . . . . . . . . . . . . . 11
Anfertigen einer Testkopie . . . . . . . . . . . . . . . . . . . . . . . . . . .11
Senden eines Testfaxes . . . . . . . . . . . . . . . . . . . . . . . . . . . . .11
Senden einer Test-E-Mail . . . . . . . . . . . . . . . . . . . . . . . . . . . .12
Senden eines Netzwerkdruckauftrags an den MFP . . . . . . . .12
Wartung des MFP . . . . . . . . . . . . . . . . . . . . . . . . . . . . . . . . 13
Reinigen des Touchscreens . . . . . . . . . . . . . . . . . . . . . . . . . .13
Reinigen des Scanner-Flachbetts . . . . . . . . . . . . . . . . . . . . . .13
Probleme beim Papiereinzug . . . . . . . . . . . . . . . . . . . . . . . . .14
Reinigen der Transportrollen und des Einzugspolsters . . . . .15
Austauschen des Einzugspolsters . . . . . . . . . . . . . . . . . . . . .16
Transportieren des Scanners . . . . . . . . . . . . . . . . . . . . . . . . .17
Dokumentverteilung . . . . . . . . . . . . . . . . . . . . . . . . . . . . . . 18
Problemlösung. . . . . . . . . . . . . . . . . . . . . . . . . . . . . . . . . . . 19
Hinweise . . . . . . . . . . . . . . . . . . . . . . . . . . . . . . . . . . . . . . . . 21
Sicherheit . . . . . . . . . . . . . . . . . . . . . . . . . . . . . . . . . . . . . . . .21
Hinweise zu Emissionen . . . . . . . . . . . . . . . . . . . . . . . . . . . . .22
Page 90

1
Einrichten von Drucker, Gestell und Scanner
Schritt 1: Einrichten von Drucker,
Gestell und Scanner
Auspacken des
Scanners
Packen Sie die Lexmark X4500 MFPOption aus. Überprüfen Sie, ob folgende
Teile vorhanden sind:
•
Scanner
•
Ethernet-Kabel (RJ-45)
•
Fax-/Telefonkabel
(RJ-11)
•
Umschlag mit
Installationshandbuch
(hinten im
Buch ist die
MFP
-CD eingelegt)
und
Kurzanleitungen
•
Netzteil
•
Netzkabel
•
Papierablage
Bewahren Sie das Verpackungsmaterial
auf, bis das System vollständig
eingerichtet ist und einwandfrei
funktioniert.
Umschlag
Scanner
Papierablage
Netzkabel
Netzteil
Ethernet-Kabel
Fax-/
Telefonkabel
Page 91

2
Einrichten von Drucker, Gestell und Scanner
Einrichten des
Druckers
1
Richten Sie den Drucker
entsprechend den Anweisungen
in der Dokumentation ein, die im
Lieferumfang des Druckers
enthalten ist. Zur Einrichtung des
Druckers gehört die Anbringung
aller Ablagen und Fächer, der
Duplexeinheit sowie aller weiteren
Optionen, die Sie erworben
haben.
2
Ziehen Sie vor und während der
MFP-Einrichtung alle Netzkabel,
Fax-/Telefonkabel und
Netzwerkkabel aus der Steckdose
bzw. Anschlußdose.
3
Nach der Einrichtung können Sie
den Netzstecker aller Geräte in
ordnungsgemäß geerdete
Steckdosen stecken und die
Geräte einschalten.
Überprüfen der Version
der Drucker-Firmware
So ermitteln Sie die für die Funktion des
MFP erforderliche MindestFirmwareversion:
1
Wechseln Sie zur URL
http://support.lexmark.com.
2
Wählen Sie Ihr Land und Ihre
Sprache aus.
3
Wählen Sie unter
Multifunktionale Lösungen
den
X4500 MFP aus.
4
Klicken Sie auf die Schaltfläche
zum Fortfahren.
5
Wählen Sie
X4500 -
Mindestvoraussetzungen
.
Überprüfen Sie, ob die
aufgeführte Firmwareversion mit
der Version Ihrer DruckerFirmware übereinstimmt.
Page 92
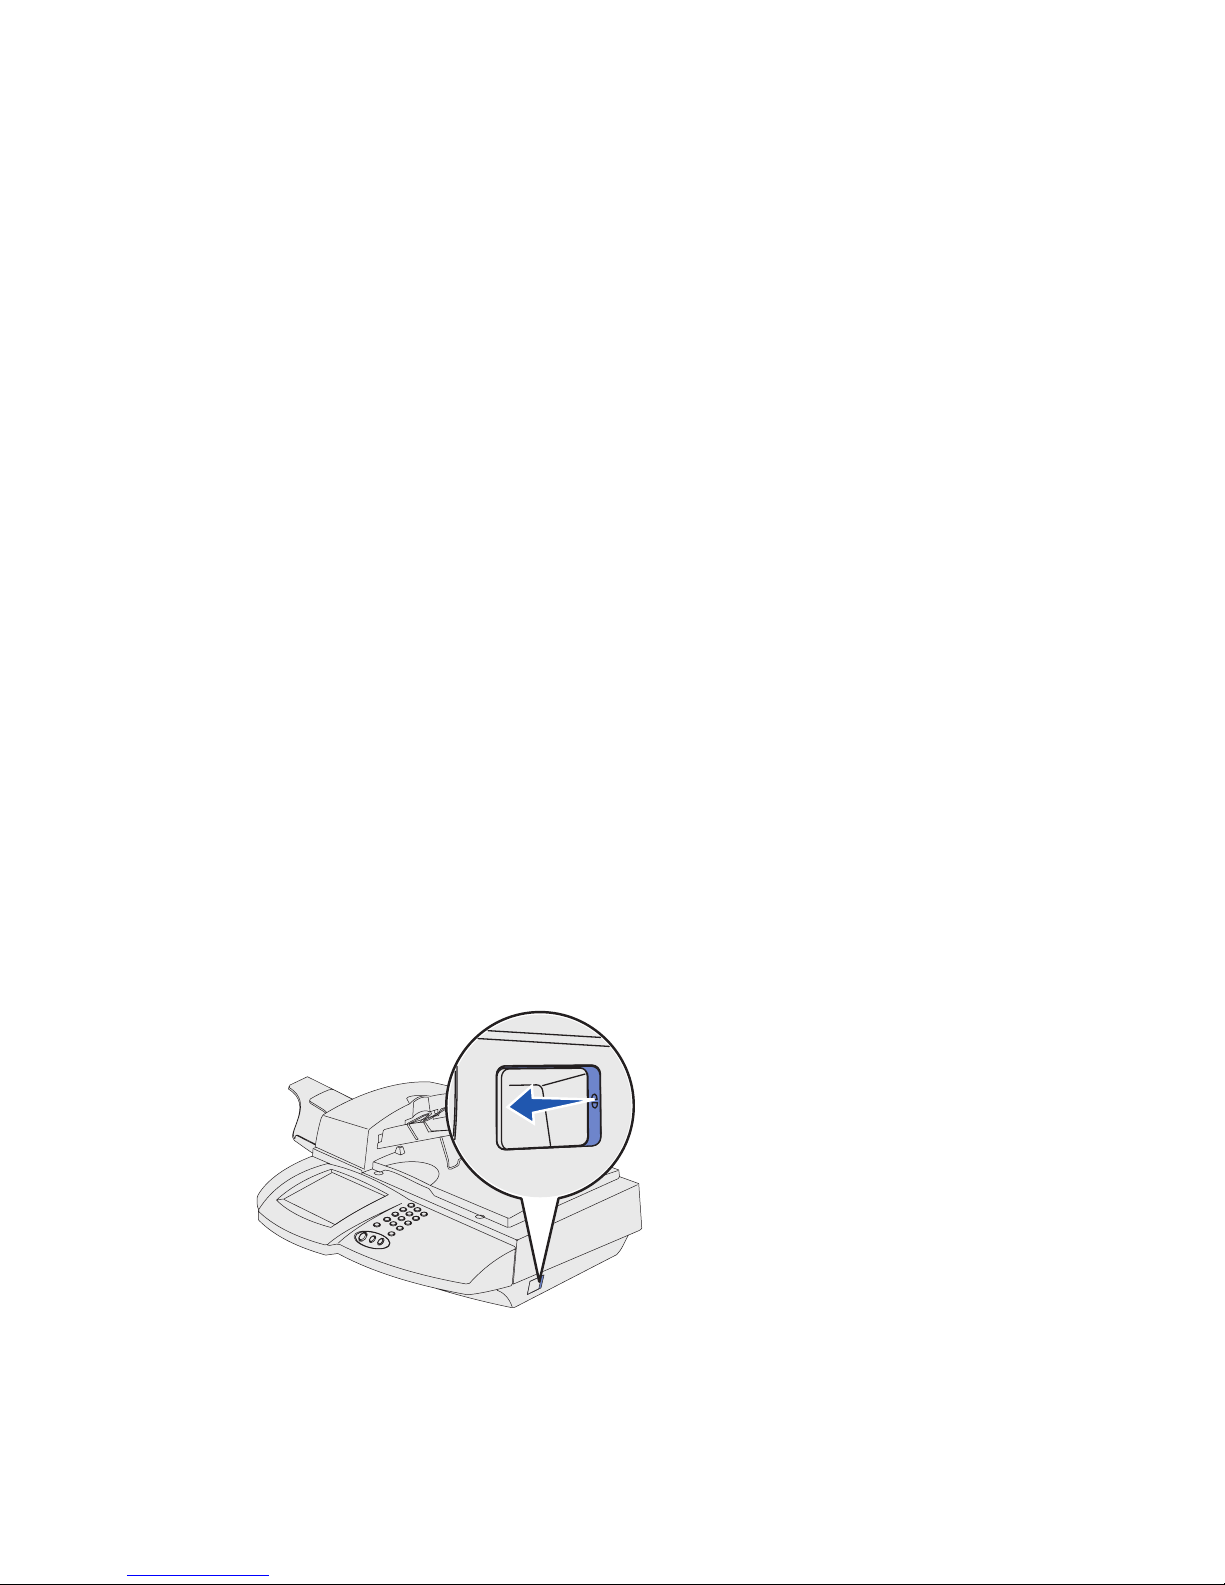
3
Einrichten von Drucker, Gestell und Scanner
Wenn die Versionen nicht
übereinstimmen, befolgen Sie die
Anweisungen auf der Website zum
Aktualisieren der Firmware.
Aufstellen des Gestells
Im Lieferumfang Ihres Druckers sind
verschiedene Gestelloptionen für
unterschiedliche Anforderungen
enthalten.
Anweisungen zum Zusammensetzen
des Gestells und zur Anbringung am
Drucker finden Sie im Lieferumfang des
Gestells.
Wenn Sie kein Gestell erworben haben
und den Scanner oben auf dem
Lexmark™ C750 Finisher für MFP
anbringen möchten, lesen Sie die im
Lieferumfang des Finishers enthaltenen
Anweisungen.
Entsperren des
Scanners
1
Vergewissern Sie sich, daß der
Drucker ausgeschaltet und der
Netzstecker gezogen ist.
2
Entsperren Sie den Scanner:
a
Suchen Sie den Sperrschalter
auf der rechten Seite des
Scanners.
b
Schieben Sie den Schalter in
die entriegelte Position.
Page 93
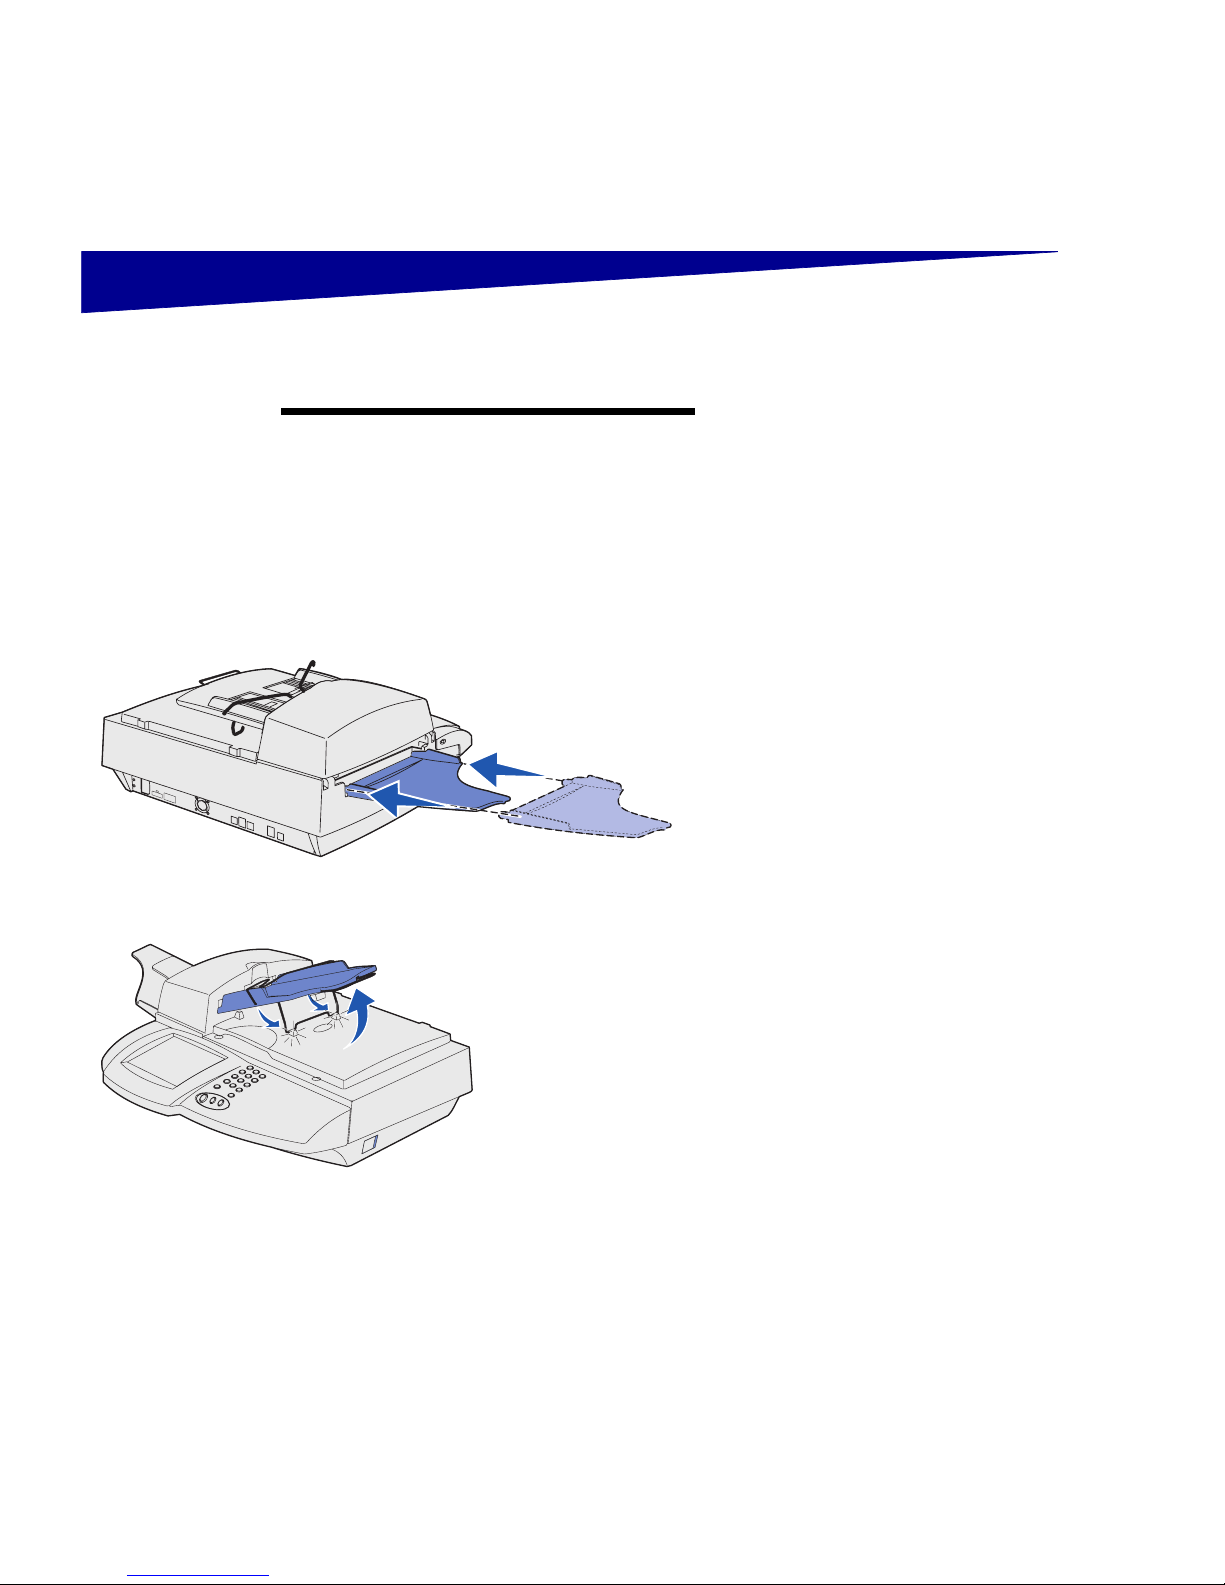
4
Anbringen der Fächer
Schritt 2: Anbringen der Fächer
Hinweis:
Die automatische
Dokumentzuführung und das Papierfach
werden bereits vor Auslieferung am
Scanner angebracht.
1
Bringen Sie die Papierablage an
der automatischen
Dokumentzuführung an.
2
Heben Sie das Papierfach an, und
lassen Sie die Stütze oben an der
Scanner-Klappe einrasten.
Papierfach
Papierablage
Page 94

5
Anschließen von Kabeln und Netzkabeln
Schritt 3:Anschließen von
Kabeln und Netzkabeln
ACHTUNG!
Schließen Sie das
Netzkabel noch nicht an eine Steckdose
an.
1
Stellen Sie sicher, daß der
Drucker und der Scanner
ausgeschaltet und die
Netzstecker gezogen sind.
2
Schließen Sie das Ende des
Ethernet-Kables mit dem
Ferritkern an den EthernetAnschluß 1 des Scanners an.
Schließen Sie das andere Ende
an den Drucker an.
3
Schließen Sie das Fax-/
Telefonkabel an den Scanner und
dann, gegebenenfalls unter
Verwendung eines
Telefonadapters, an eine
Telefonanschlußdose an.
4
Schließen Sie ein mit Ihrem
Netzwerk kompatibles
Standardkabel an den EthernetAnschluß 2 des Scanners und
dann an einen Netzwerkanschluß
an. Dieses Kabel wird nicht von
Lexmark bereitgestellt.
5
Schließen Sie das Netzteil an den
Scanner an.
Warnung!
Wenn der Scanner
eingeschaltet ist, darf niemals das
Ethernet-Kabel angeschlossen oder
getrennt werden.
6
Schließen Sie das Netzkabel an
das Netzteil an, stecken Sie aber
das andere Ende jetzt
noch nicht
in eine Steckdose.
Netzkabel
Ethernet-Kabel
Fax-/Telefonkabel
Netzteil
Ethernet-Anschluß 2
Page 95
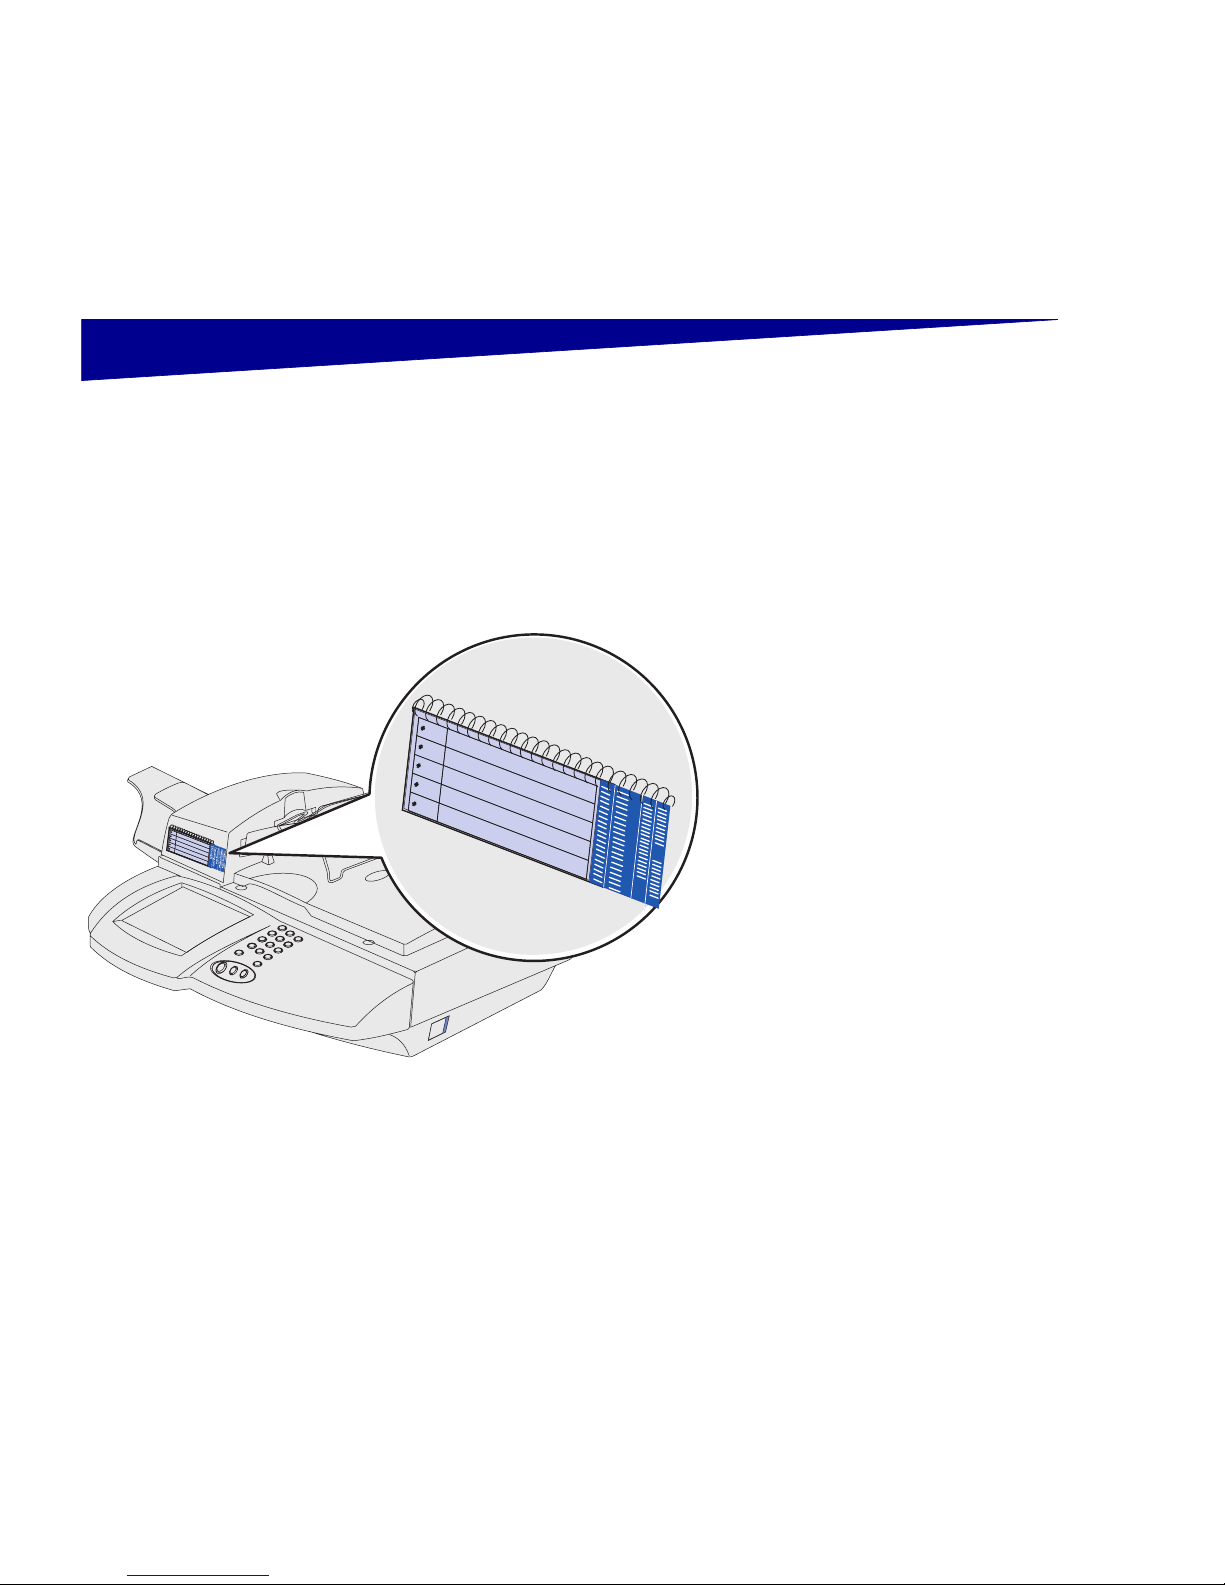
6
Abschließen der Hardwarekonfiguration
Schritt 4:Abschließen der
Hardwarekonfiguration
Anbringen der
Kurzanleitung
1
Lösen Sie die Schutzfolie von
dem selbstklebenden Streifen auf
der Rückseite der
Kurzanleitung
.
2
Plazieren Sie die
Kurzanleitung
über dem Touchscreen, und
drücken Sie sie fest an.
Anbringen der
Bedienerkonsolen-
abdeckung
Lesen Sie die Anweisungen, die im
Lieferumfang der Bedienerkonsolenabdeckung enthalten sind.
Page 96
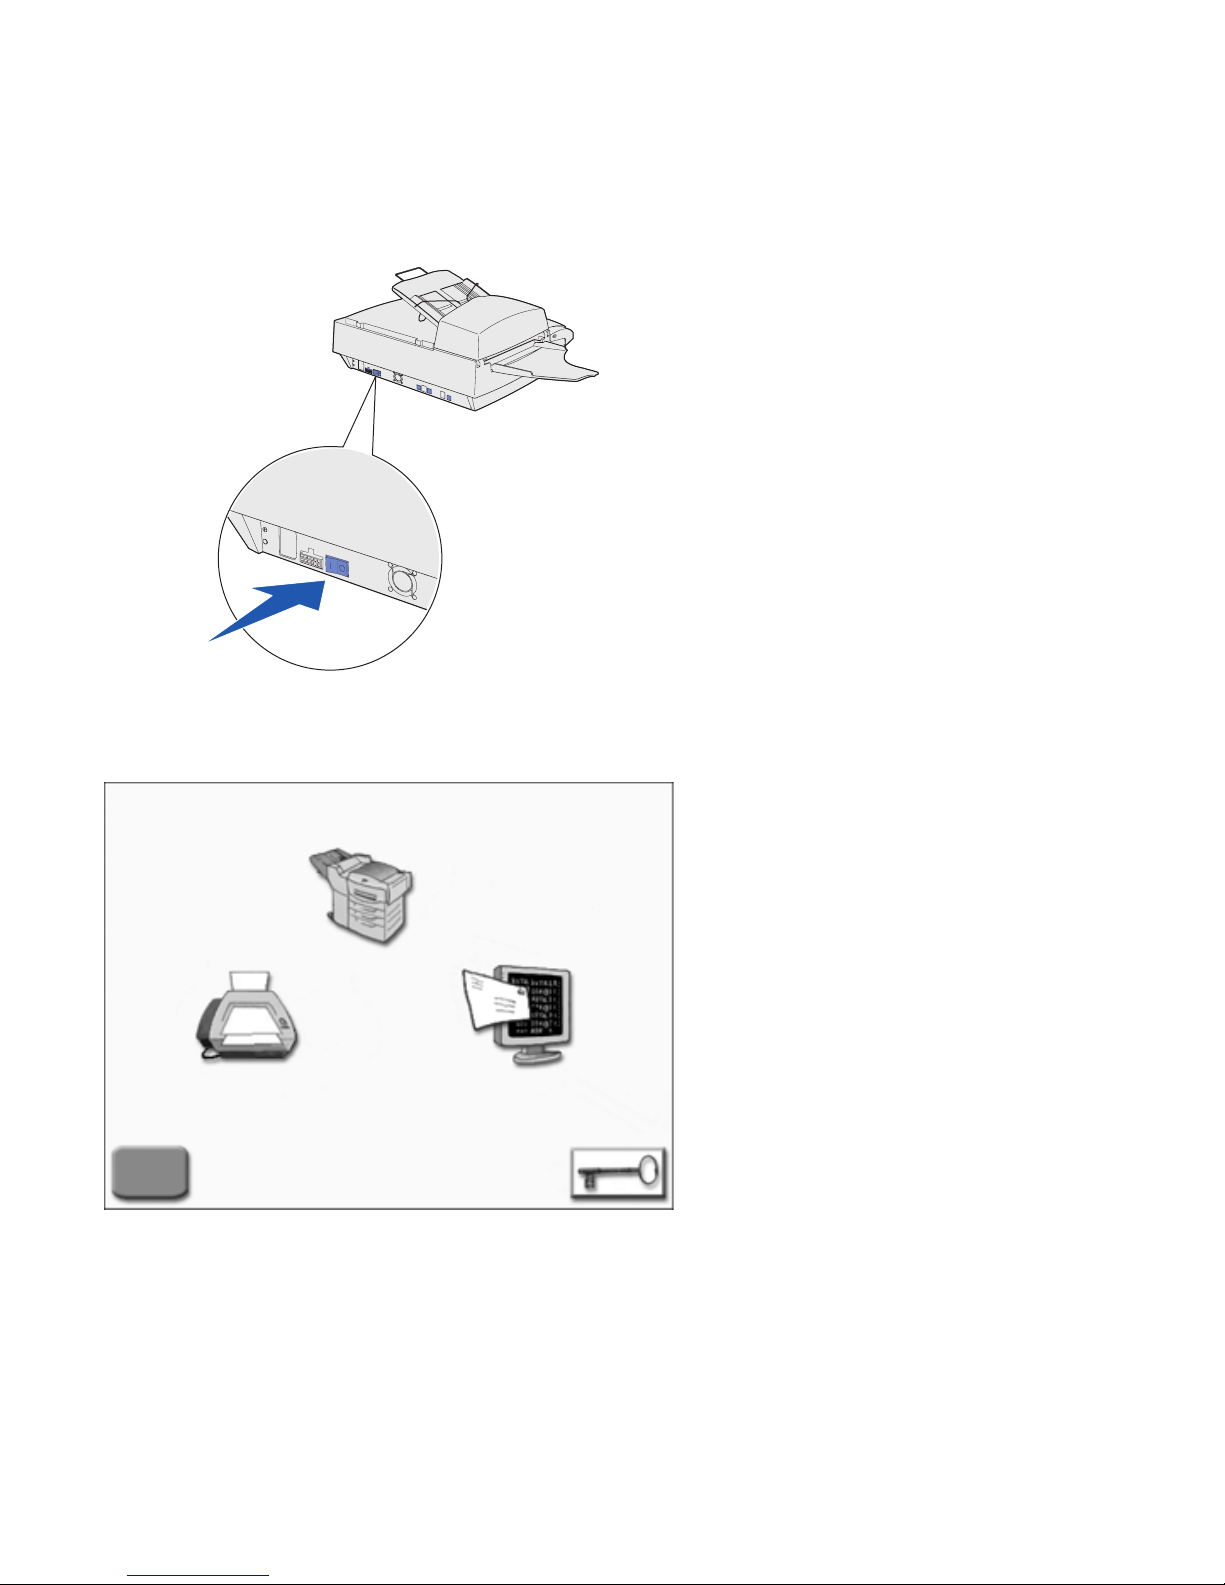
7
Abschließen der Hardwarekonfiguration
Einschalten von
Scanner und Drucker
1
Schließen Sie das Netzkabel des
Druckers und das des Netzteils an
ordnungsgemäß geerdete
Steckdosen an.
2
Schalten Sie den Drucker ein.
3
Schalten Sie den Scanner ein.
Der MFP benötigt nach dem Einschalten
eine gewisse Zeit zum Aufwärmen.
Nachdem der MFP seine Selbsttests
abgeschlossen hat, wird am
Touchscreen der Anfangsbildschirm
angezeigt.
Page 97
8
Konfigurieren des MFP
Schritt 5: Konfigurieren des MFP
Die folgenden Einstellungen müssen mindestens vorgenommen
werden, um Grundfunktionen wie Drucken, Kopieren, Faxen oder
E-Mail-Kommunikation durchführen zu können. Bei einigen dieser
Einstellungen benötigen Sie möglicherweise Unterstützung von Ihrem
Netzwerkverwalter.
Festlegen der IP-
Adresse
Eine IP-Adresse ist erforderlich, damit Netzwerkgeräte den MFP im
Netzwerk finden können. Wenn Sie mit DHCP arbeiten, werden die
richtigen Adreßwerte automatisch zugewiesen.
So überprüfen Sie die IP-Adresse oder weisen eine Adresse manuell
zu, wenn Sie nicht mit DHCP arbeiten:
1
Berühren Sie auf dem Anfangsbildschirm das
Schlüsselsymbol, und wählen Sie dann
Systemkonfiguration
.
2
Wählen Sie unter
Drucker/Druckserver
die Option
Einrichtung und Konfiguration
.
3
Wählen Sie unter
Druckserver
die Option
TCP/IP
.
4
Die Felder
Adresse, Netzmaske
und
Gateway
sind
erforderlich und dürfen nicht den Wert Null enthalten. Geben
Sie gegebenenfalls die entsprechenden Informationen für Ihr
Netzwerk über die virtuelle Tastatur ein. Geben Sie beliebige
zusätzliche Informationen an.
5
Wählen Sie
Übernehmen
, nachdem Sie alle Informationen
eingegeben haben.
6
Warten Sie, bis die Konfigurationsseite aktualisiert wird, und
überprüfen Sie anschließend, ob die gewünschten Parameter
angegeben sind.
Nachdem Sie die IP-Adresse konfiguriert haben, können Sie über
Ihren Web-Browser auf den MFP zugreifen und diesen verwalten.
Geben Sie die IP-Adresse in das URL-Feld des Browsers ein (z. B.
http://192.168.236.24), und drücken Sie dann die Eingabetaste.
Page 98

9
Konfigurieren des MFP
Konfigurieren der
Funktion
„Scannen an
E-Mail“
1
Geben Sie die IP-Adresse des MFP in das URL-Feld des
Browsers ein (z. B. http://192.168.236.24), und drücken Sie
dann die Eingabetaste.
2
Klicken Sie auf
Konfiguration
.
3
Klicken Sie auf
Scannen an E-Mail - Grundkonfiguration
.
4
Geben Sie das SMTP-Gateway für Ihr Netzwerk oder den
Internet-Dienstanbieter in das entsprechende Feld ein. Geben
Sie eine E-Mail-Adresse als Voreinstellung für die AntwortAdreßzeile an.
5
Klicken Sie auf
Übernehmen
.
Konfigurieren der
Faxfunktion
Gemäß dem Telephone Consumer Protection Act von 1991 müssen
alle ausgehenden Faxe spezifische Informationen enthalten,
entweder in der Kopf- oder Fußzeile jeder übertragenen Seite oder
auf der ersten Seite der Faxübertragung.
Geben Sie mit Ihrem Web-Browser die folgenden erforderlichen
Faxinformationen an:
1
Geben Sie die IP-Adresse des MFP in das URL-Feld des
Browsers ein (z. B. http://192.168.236.24), und drücken Sie
dann die Eingabetaste.
2
Klicken Sie auf
Konfiguration
und dann auf
Fax-
Konfiguration
:
— Wenn die Option
Analog
nicht im Dropdown-Menü
angezeigt wird, wählen Sie sie jetzt aus. Klicken Sie auf
Übernehmen
.
— Wenn die Option
Analog
im Dropdown-Menü angezeigt
wird, klicken Sie auf
Konfiguration
.
3
Nachdem die Konfigurationsseite aktualisiert wurde, geben Sie
die erforderlichen FCC-Informationen ein:
— Stationsname (Name einer Person oder eines
Unternehmens)
— Stationsnummer (Faxnummer)
Bei Bedarf können Sie zusätzliche Faxeinstellungen festlegen
oder ändern. Klicken Sie anschließend auf
Übernehmen
.
Page 99

10
Konfigurieren des MFP
4
Überprüfen Sie das aktuelle Datum und die Uhrzeit:
a
Klicken Sie auf
Konfiguration
.
b
Klicken Sie auf
Einrichtung und Konfiguration
.
c
Klicken Sie auf
Datum und Uhrzeit
.
5
Überprüfen Sie das Datum und die Uhrzeit:
— Wenn die Angaben stimmen, sind Sie fertig.
— Wenn die Angaben nicht stimmen, klicken Sie auf die
Verknüpfung
Datum & Uhrzeit einstellen
unter
Aktuelle(s) Datum und Uhrzeit
. Geben Sie Datum und
Uhrzeit im numerischen Format ein (JJJJ-MM-TT-HH:MM),
und klicken Sie auf
Übernehmen
.
Wenn Sie den Faxserver-Modus konfigurieren möchten, kehren Sie
zur Konfigurationsseite
Fax-Konfiguration
zurück und wechseln den
Modus.
Registrieren
bei einem
Windows NT-
Domänenserver
Wenn Sie die Windows NT-Authentifizierung einsetzen möchten, um
den Zugriff auf den MFP einzuschränken oder zu protokollieren,
müssen Sie das Gerät zuerst bei einer Windows NT-Domäne
registrieren. Bitten Sie Ihren Netzwerkverwalter zur Registrierung bei
einer Windows NT-Domäne um Unterstützung.
Hinweis:
Für die Registrierung
des MFP bei einer Windows NTDomäne benötigen Sie einen
Administrator-Kontonamen für
diese Domäne.
Berühren Sie das Schlüsselsymbol auf dem Anfangsbildschirm, und
wählen Sie dann
NT-Domänenregistrierung
. Hinweise am
Bildschirm helfen Ihnen bei der Registrierung.
Page 100

11
Überprüfen der Konfiguration
Schritt 6:Überprüfen der
Konfiguration
Anfertigen einer
Testkopie
Fertigen Sie eine Ein-Seiten-Kopie an, und testen Sie die
automatische Dokumentzuführung.
1
Legen Sie ein Dokument mit der bedruckten Seite nach unten
in die automatische Dokumentzuführung.
2
Drücken Sie die grüne Taste
Start
rechts neben dem
Touchscreen (Kopieren ist die Standardfunktion des MFP).
3
Berühren Sie
Fertig
.
Senden eines
Testfaxes
Senden Sie ein Testfax von einer Seite Länge an ein bekanntes
Faxgerät:
1
Berühren Sie auf dem Anfangsbildschirm das Fax-Symbol.
2
Geben Sie im Bildschirm für Faxadressen eine Faxnummer
über die virtuelle Tastatur ein.
3
Legen Sie ein Dokument mit der bedruckten Seite nach unten
auf das Flachbett des Scanners.
4
Berühren Sie
Faxen
, oder drücken Sie
Start
, um das Fax zu
senden.
5
Berühren Sie
Fertig
.
 Loading...