

Page 1

Markvision Enterprise
User's Guide
April 2012 www.lexmark.com
Page 2

Edition notice
April 2012
The following paragraph does not apply to any country where such provisions are inconsistent with local law: LEXMARK INTERNATIONAL,
INC., PROVIDES THIS PUBLICATION “AS IS” WITHOUT WARRANTY OF ANY KIND, EITHER EXPRESS OR IMPLIED, INCLUDING, BUT NOT LIMITED
TO, THE IMPLIED WARRANTIES OF MERCHANTABILITY OR FITNESS FOR A PARTICULAR PURPOSE. Some states do not allow disclaimer of
express or implied warranties in certain transactions; therefore, this statement may not apply to you.
This publication could include technical inaccuracies or typographical errors. Changes are periodically made to the information herein; these
changes will be incorporated in later editions. Improvements or changes in the products or the programs described may be made at any
time.
References in this publication to products, programs, or services do not imply that the manufacturer intends to make these available in all
countries in which it operates. Any reference to a product, program, or service is not intended to state or imply that only that product,
program, or service may be used. Any functionally equivalent product, program, or service that does not infringe any existing intellectual
property right may be used instead. Evaluation and verification of operation in conjunction with other products, programs, or services,
except those expressly designated by the manufacturer, are the user’s responsibility.
For Lexmark technical support, visit support.lexmark.com.
For information on supplies and downloads, visit www.lexmark.com.
If you don't have access to the Internet, you can contact Lexmark by mail:
Lexmark International, Inc.
Bldg 004-2/CSC
740 New Circle Road NW
Lexington, KY 40550
USA
© 2012 Lexmark International, Inc.
All rights reserved.
Trademarks
Lexmark, Lexmark with diamond design, and MarkVision are trademarks of Lexmark International, Inc., registered in the United States and/or
other countries.
All other trademarks are the property of their respective owners.
GOVERNMENT END USERS
The Software Program and any related documentation are "Commercial Items," as that term is defined in 48 C.F.R. 2.101, "Computer
Software" and "Commercial Computer Software Documentation," as such terms are used in 48 C.F.R. 12.212 or 48 C.F.R. 227.7202, as
applicable. Consistent with 48 C.F.R. 12.212 or 48 C.F.R. 227.7202-1 through 227.7207-4, as applicable, the Commercial Computer Software
and Commercial Software Documentation are licensed to the U.S. Government end users (a) only as Commerical Items and (b) with only
those rights as are granted to all other end users pursuant to the terms and conditions herein.
Licensing notices
All licensing notices associated with this product can be viewed from the root directory of the installation software CD.
Page 3

Contents 3
Contents
Edition notice...............................................................................................2
Overview.....................................................................................................7
What is Markvision Enterprise?................................................................................................................7
Getting started.............................................................................................8
Support statements...................................................................................................................................8
System requirements.......................................................................................................................................... 8
Supported database servers ............................................................................................................................... 8
Installing Markvision.................................................................................................................................8
Upgrading to the latest version of Markvision..........................................................................................9
Backing up and restoring the Firebird database.......................................................................................9
Accessing Markvision..............................................................................................................................10
Migrating from MarkVision Professional to Markvision Enterprise........................................................10
Using Markvision.....................................................................................................................................12
Understanding the home screen.............................................................................................................13
Understanding ports and protocols........................................................................................................14
Managing assets.........................................................................................17
Discovering devices.................................................................................................................................17
Creating a discovery profile ..............................................................................................................................17
Editing or deleting a discovery profile ..............................................................................................................18
Importing devices from a file .................................................................................................. .......................... 19
Managing devices....................................................................................................................................20
Setting the device life cycle state ..................................................................................................................... 20
Auditing a device ..............................................................................................................................................20
Viewing device properties ................................................................................................................................ 21
Locating and organizing devices within the system.....................................23
Searching for devices within the system.................................................................................................23
Working with bookmarks......................................................................................................... ...............26
Creating bookmarks.......................................................................................................................................... 26
Accessing bookmarks........................................................................................................................................ 26
Deleting bookmarks ..........................................................................................................................................26
Using categories and keywords...............................................................................................................26
Adding, editing, or deleting categories ............................................................................................................. 27
Adding, editing, or deleting keywords .............................................................................................................. 27
Page 4

Contents 4
Assigning keywords to a device ........................................................................................................................27
Removing an assigned keyword from a device................................................................................................. 28
Managing policies......................................................................................29
Creating a policy......................................................................................................................................29
Creating a new policy........................................................................................................................................29
Creating a policy from a device.........................................................................................................................29
Understanding the security policy...........................................................................................................30
Understanding secured devices........................................................................................................................ 30
Understanding settings for security policies..................................................................................................... 32
Creating a security policy.................................................................................................................................. 33
Changing the communication credentials of a restricted device ..................................................................... 38
Editing or deleting a policy......................................................................................................................39
Assigning a policy....................................................................................................................................39
Checking conformity with a policy..........................................................................................................39
Enforcing a policy....................................................................................................................................40
Removing a policy...................................................................................................................................40
Managing the Service Desk.........................................................................41
Working with policies..............................................................................................................................41
Checking device conformity with policies.........................................................................................................41
Enforcing policies ............................................................................................................. ................................. 41
Working with a device.............................................................................................................................41
Checking the status of a device ........................................................................................................................ 41
Viewing a device remotely...................................................................................................... .......................... 42
Viewing the embedded Web page ...................................................................................................................42
Managing device events.............................................................................43
Creating a destination.............................................................................................................................43
Editing or deleting a destination.............................................................................................................43
Creating an event.............................................................................................................. ......................44
Editing or deleting an event....................................................................................................................44
Assigning an event to a device................................................................................................. ...............44
Removing an event from a device...........................................................................................................45
Displaying event details...........................................................................................................................45
Performing other administrative tasks.......................................................46
Downloading generic files.......................................................................................................................46
Configuring e‑mail settings.................................................................................................................. ....46
Configuring system settings....................................................................................................................47
Page 5

Contents 5
Adding, editing, or deleting a user in the system....................................................................................47
Enabling LDAP server authentication......................................................................................................48
Generating reports..................................................................................................................................53
Scheduling tasks......................................................................................................................................54
Viewing the system log...........................................................................................................................54
Frequently asked questions........................................................................56
Troubleshooting.........................................................................................57
User has forgotten the password............................................................................................................57
The application is unable to discover a network device.........................................................................57
Check the printer connections.......................................................................................................................... 57
Make sure the internal print server is properly installed and enabled ............................................................57
Make sure the device name in the application is the same as the one set in the print server ........................ 57
Make sure the print server is communicating on the network ........................................................................ 58
Device information is incorrect...............................................................................................................58
Glossary of Security Terms.........................................................................59
Index..........................................................................................................60
Page 6

Contents 6
Page 7

Overview 7
Overview
What is Markvision Enterprise?
MarkvisionTM Enterprise (MVE) is a Web-enabled device management utility designed for IT professionals. MVE works
as a client/server application. The server discovers and communicates with devices on the network and provides
information about them to the client. The client displays device information and provides a user interface to manage
those devices. Each Markvision Server can manage thousands of devices at one time.
Built-in security provisions prevent unauthorized access to the application, and only authorized users can use the client
to access management options.
Markvision lets you monitor and manage your entire print fleet, which is composed of printers and print servers. In
Information Technology Infrastructure Library (ITIL), printers and print servers are also known as Configuration Items
(CIs). Within this document, CIs, printers, or print servers are sometimes called devices.
Page 8

Getting started 8
Getting started
Support statements
For a complete list of supported operating systems and Web browsers, see the Release Notes.
System requirements
RAM
•
Required: 1GB
• Recommended: 2GB+
Processor speed
•
Required: 1 physical 2GHz or higher (Hyper‑Threaded/Dual Core)
• Recommended: 1+ physical 3+GHz (Hyper-Threaded/Dual Core+)
Computer hard disk drive space
•
At least 60GB available storage space
Screen resolution
•
At least 1024 x 768 pixels (for MVE clients only)
Supported database servers
• Firebird
• Microsoft SQL Server 2008
• Microsoft SQL Server 2005
Notes:
– The application supports only the 32-bit versions, and comes with a preconfigured Firebird database.
– The database server where MVE is installed must have only one network interface card (NIC).
Installing Markvision
With Markvision, you can use either Firebird or Microsoft SQL Server as the back-end database.
If you are using Microsoft SQL Server, then do the following before installing Markvision:
• Enable mixed mode authentication and Auto Run.
• Set the Network Libraries to use a static port and TCP/IP sockets.
• Create a user account that Markvision will use to create the database schema and any database connections.
Page 9

Getting started 9
• Create the following databases:
– FRAMEWORK
– MONITOR
– QUARTZ
Note: Make sure that the user account you created is either the owner of these databases or has the
appropriate privileges to create a schema and perform Data Manipulation Language (DML) operations.
1 Unzip the install files into a path that does not contain any spaces.
2 Launch setup.exe, and then follow the instructions on the computer screen.
Upgrading to the latest version of Markvision
Upgrading is designed to work only from the immediately preceding version.
1 Back up your database.
Notes:
• If you are using a Firebird database, then see “Backing up the Firebird database” on page 9 for more
information.
• If you are using MS SQL Server, then contact your MS SQL administrator.
2 Unzip the install files into a temporary location, and make sure the path does not contain any spaces.
3 Launch setup.exe, and then follow the instructions on the computer screen.
Backing up and restoring the Firebird database
Backing up the Firebird database
Note: If you are using MS SQL Server as your database, then contact your MS SQL administrator.
1 Stop the Markvision Enterprise service.
a Click , or click Start > Settings.
b Select Control Panel, and then if necessary, click System & Security.
c Double-click Administrative Tools.
d If necessary, double-click Component Services.
e Double-click Services.
f From the Services pane, select Markvision Enterprise, and then click Stop.
2 Locate the folder where Markvision Enterprise is installed, and then navigate to firebird\data.
For example, C:\Program Files\Lexmark\Markvision Enterprise\firebird\data
3 Copy the following databases to a safe repository.
• FRAMEWORK.FDB
• MONITOR.FDB
• QUARTZ.FDB
Page 10

Getting started 10
4 Restart the Markvision Enterprise service.
a Repeat steps 1a through 1e.
b From the Services pane, select Markvision Enterprise, and then click Restart.
Restoring the Firebird database
1 Make sure you have completed the backup process for the Firebird database.
2 Stop the Markvision Enterprise service.
For more information, see step 1 of “Backing up the Firebird database” on page 9.
3 Locate the folder where Markvision Enterprise is installed, and then navigate to firebird\data.
For example, C:\Program Files\Lexmark\Markvision Enterprise\firebird\data
4 Replace the following databases with the databases you saved when you were completing the backup process.
• FRAMEWORK.FDB
• MONITOR.FDB
• QUARTZ.FDB
5 Restart the Markvision Enterprise service.
For more information, see step 4 of “Backing up the Firebird database” on page 9.
Accessing Markvision
1 Open a Web browser, and then type http://MVE_SERVER:9788/mve/ in the URL field.
Note: Replace MVE_SERVER with the host name or IP address of the machine hosting Markvision.
2 In the User field, type admin.
3 In the Password field, type Administrator1, and then click Login.
Note: To change your password, click Change Password from the upper-right corner of the home screen.
If Markvision is idle for more than 30 minutes, then it automatically logs out. You will need to log in again to access
Markvision.
Migrating from MarkVision Professional to Markvision Enterprise
Note: Markvision Enterprise (MVE) only supports migration of data from MarkVision Professional (MVP) v11.2.1.
Exporting data from MVP
Using the MVP Server Web page
1
Open a Web browser, and then type http://MVP_SERVER:9180/~MvServer in the URL field.
Note: Replace MVP_SERVER with the IP address or host name of the MVP Server.
2 From the MarkVision Server Web page, click Data Dir.
Page 11
Getting started 11
3 Enter your user name and password if prompted.
4 From the Download Data Directory page, click to download your MVP data as a zip file.
5 Save the zip file.
Using the file system
1
On the system running the MVP Server, navigate to the location where the MVP Server is installed.
2 Compress the Data folder into a zip file.
Importing data into MVE
1 Log in to Markvision Enterprise.
2 In the “Import data from MarkVision Professional” dialog, click Yes, and then click Browse.
Notes:
• If you click Yes, then the dialog does not appear the next time you log in to MVE.
• If you click No and you do not want to see the dialog again, then select Do not show this message again.
3 Navigate to the location where your zip file is stored, and then click Open.
4 From the “Data to Import” area, select the type of data that you want to import.
Data Details
Users
Devices
• In MarkVision Professional, users are given privileges for individual functions.
• In Markvision Enterprise, users are assigned roles associated with different functions.
• All users imported from MVP are automatically assigned to all roles except ROLE_ADMIN.
• If an MVP user's password does not meet the MVE password criteria, then the string
Administrator1 is appended into the user's current password.
• MVE only imports basic device information from MVP, including model name, serial number, MAC
address, and IP address.
• If a printer already exists in MVE, then that printer is ignored during import.
• During import, MVE disregards printers connected to External Network Adapters (ENAs), since MVE
currently does not support ENAs.
• The imported devices are automatically set to the Managed (Normal) life cycle state.
• MVP manages printers and print servers. MVE only manages printers. Therefore, two entries in MVP
become a single entry in MVE.
Page 12

Getting started 12
Data Details
Discovery
Profiles
• When MVP profiles are imported into the MVE system, only the following details are imported:
– SNMP Community Name
– Retries
– Timeout
– Exclude Address
– Include Address
• In MVP, each Include/Exclude entry contains an SNMP Read/Write Community Name set. A profile that
contains multiple Include/Exclude entries may also contain multiple unique Read/Write Community
Name sets. In MVE, the Read/Write Community Name set belongs to the profile itself. Each profile can
contain only one Read/Write Community Name set. Therefore, one discovery profile in MVP (containing
multiple unique Read/Write Community Name sets) is broken into multiple discovery profiles when
imported into MVE (each containing one Read/Write Community Name set). The number of profiles
in MVE is equal to the number of unique Read/Write Community Name sets in the original MVP profile.
• For Timeout, MVE converts the MVP Timeout to milliseconds by multiplying the MVP value (in seconds)
by 1000.
• The Automatically Manage option is set to False during import.
5 Click Import.
Using Markvision
The features and functions of Markvision are divided into four service areas. This provides greater ease of use by making
sure the view of the interface is populated with only the features and functions needed for the task at hand. Each
service area is accessible by way of a tab on the home screen and corresponds to a service life cycle stage in the
Information Technology Infrastructure Library (ITIL) version 3. The ITIL disciplin e is globally recognized for its compilation
of best practices for managing IT resources within an organization.
Use this tab To
Assets Locate, identify, catalog, organize, and track the physical assets (printers and multifunction devices) that
comprise your print fleet. Here, you can gather and maintain information about the fleet models, capabilities,
installed options, and life cycle.
In ITIL, this fits into the Service Transition area.
If one of your responsibilities includes management of IT assets, then go to “Managing assets” on page 17.
Policies Define and manage the software configuration of the print fleet. Here, you can assign a defined policy that
specifies the particular configuration settings for each model. You can monitor whether the print fleet
conforms with the policies, and enforce these policies when necessary.
In ITIL, this fits into the Service Transition area.
If one of your responsibilities includes administration and maintenance of configuration management tools,
then go to “Managing policies” on page 29.
Service
Desk
Directly interact with a single device in the print fleet. Here, you can remotely manage the device, check policy
conformance and enforce policies, and customize configuration settings through the device embedded Web
server.
In ITIL, this fits into the Service Operation area.
If one of your responsibilities includes management or administration of customer IT support service, then
go to “Managing the Service Desk” on page 41.
Page 13
Getting started 13
Use this tab To
Event
Manager
Create an automated event when a device sends an alert to the network. You can choose to send an e-mail
or perform other scripted actions to notify identified personnel.
In ITIL, this fits into the Service Operation area.
If one of your responsibilities includes problem management or incident handling, then go to “Managing
device events” on page 43.
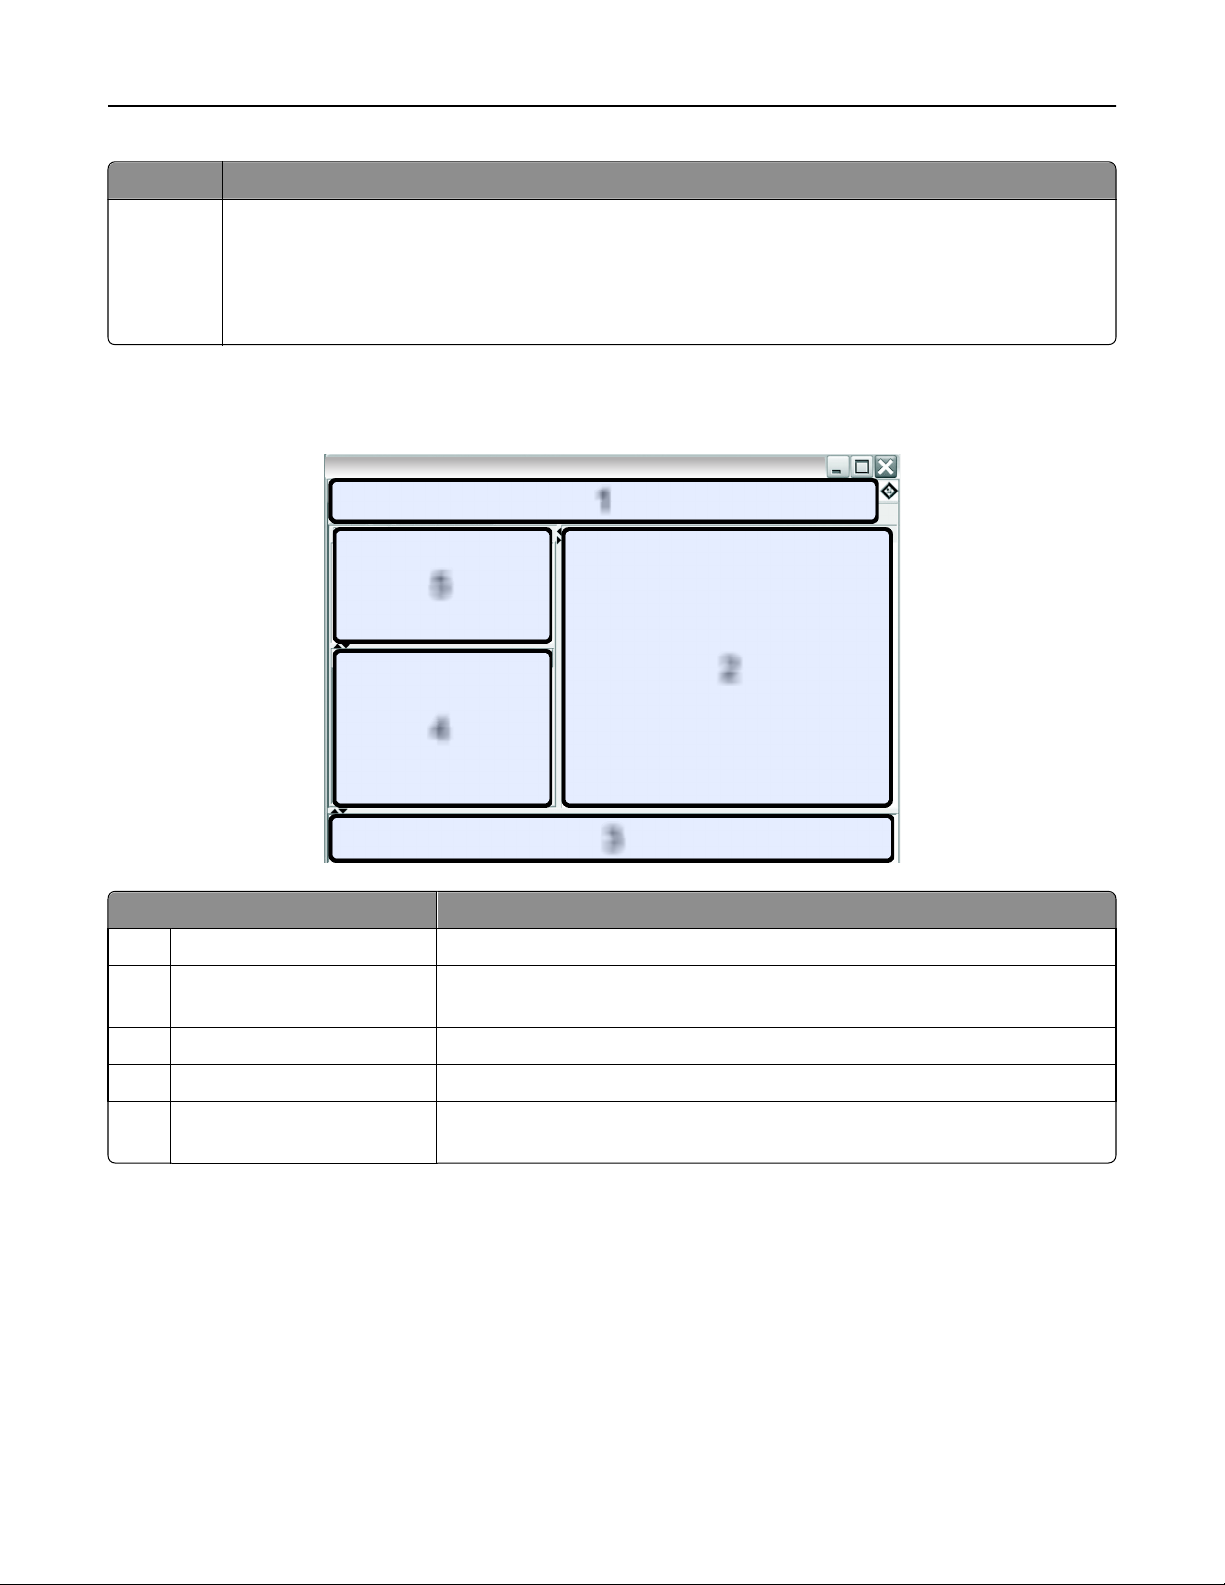
Understanding the home screen
Markvision
1
5
4
2
3
Use this area To
1 Header Access the four service area tabs and perform other administrative tasks.
2 Search Results View the full, paged list of devices matching the currently selected bookmark or
search.
3 Task Information View the status of the most recent activity.
4 Search Results Summary View a categorized summary of the currently selected bookmark or search.
5 Bookmarks and Advanced
Search
Manage and select bookmarks, and refine search queries.
Page 14
Getting started 14
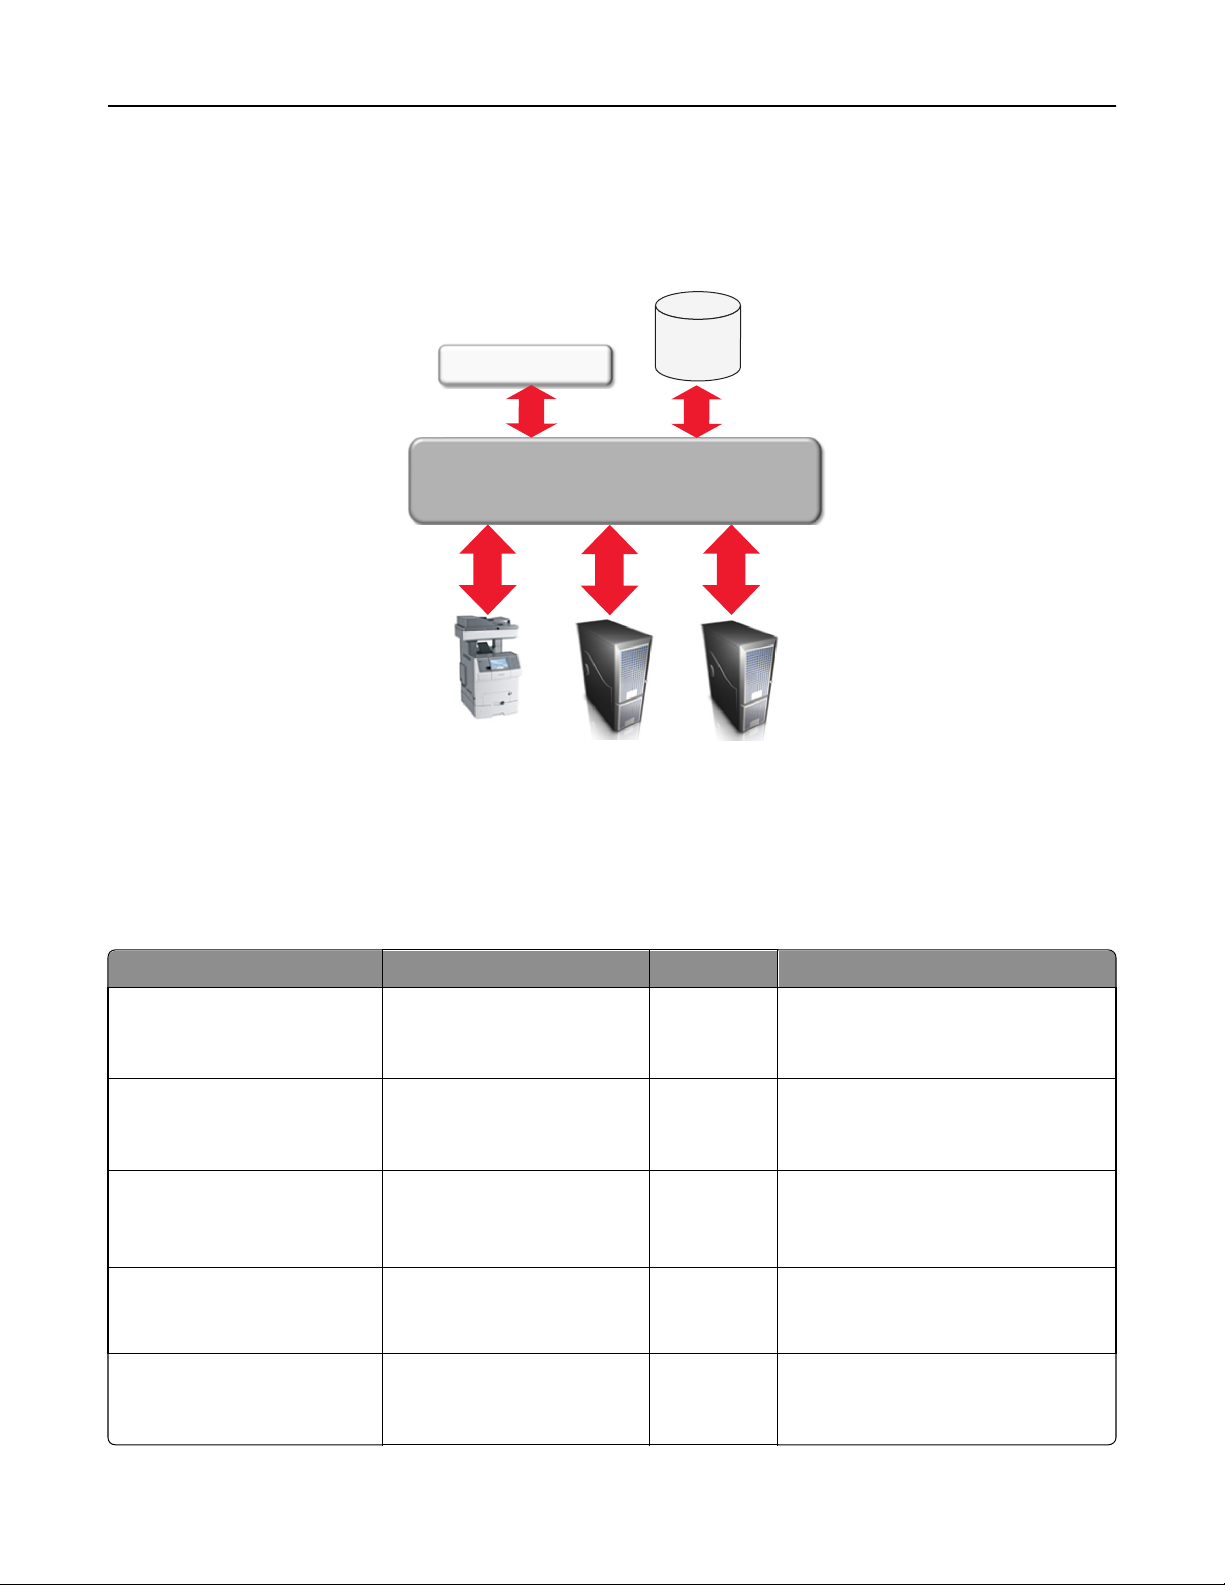
Understanding ports and protocols
Markvision uses different ports and protocols for the various types of network communication, as shown in the following
diagram.
SQL and
Firebird
Flex/Browser Client
DBs
TCP 9788
TCP 1433,
3050
MVE SERVER
UDP 69 , 161,
5353,6000,
6100,9187,
9300
TCP 21, 80,
5000, 6 110
9100
,
Network
Devices
UDP 88
TCP 389,
636
LDAP/Kerberos Server
TCP 25
Mail Server
Note: The ports are bidirectional and must be open or active for Markvision to function properly. Make sure all
device ports are set to either Secure and Unsecure or Enabled, depending on the device.
Server to device communication
These are the ports and protocols used during communication from the Markvision Server to network devices.
Protocol Markvision Server Device Used for
NPAP
Network Printer Alliance
Protocol
XMLNT
XML Network Transport (Object
Store)
LST
Lexmark Secure Transport
mDNS
Multicast Domain Name System
SNMP
Simple Network Management
Protocol
Ephemeral User Datagram
Protocol (UDP) port
Ephemeral UDP and
Transmission Control Protocol
UDP 9300 Communication with Lexmark network
printers
UDP 6000
TCP 5000
Communication with Lexmark network
printers
(TCP) ports
UDP 6100
Ephemeral TCP port
(handshaking)
UDP 6100
TCP 6110
(handshaking)
Encrypted communication with Lexmark
network printers
Ephemeral UDP port UDP 5353 Discovery of certain Lexmark network
printers and determining the security
capabilities of devices
Ephemeral UDP port UDP 161 Discovery of and communication with
Lexmark and third-party network
printers
Page 15

Getting started 15
Protocol Markvision Server Device Used for
FTP
File Transfer Protocol
TFTP
Trivial File Transfer Protocol
HTTP
Hypertext Transfer Protocol
Raw Print Port Ephemeral TCP port TCP 9100 Generic file downloads
Ephemeral TCP port TCP 21 Generic file downloads
Ephemeral UDP port UDP 69 Firmware updates and generic file
downloads
Ephemeral TCP port TCP 80 Generic file downloads
Device to server communication
This is the port and protocol used during communication from network devices to the Markvision Server.
Protocol Device Markvision Server Used for
NPAP UDP 9300 UDP 9187 Generating and receiving alerts
Server to database communication
These are the ports used during communication from the Markvision Server to databases.
Markvision Server Database Used for
Ephemeral TCP port TCP 1433 (SQL Server)
This is the default port and can be configured by the
user.
Ephemeral TCP port TCP 3050 Communication with a Firebird database
Communication with an SQL Server database
Client to server communication
This is the port and protocol used during communication from the flex/browser client to the Markvision Server.
Protocol Flex/Browser Client Markvision Server
AMF
ActionScript Message Format
TCP port TCP 9788
Messaging and alerts
This is the port and protocol used during communication from the Markvision Server to a mail server.
Protocol Markvision Server SMTP Server Used for
SMTP
Simple Mail Transfer
Protocol
Ephemeral TCP port TCP 25
This is the default port and can be
configured by the user.
Providing the e‑mail functionality
used to receive alerts from devices
Page 16

Getting started 16
Markvision server to LDAP server communication
These are the ports and protocols used during communication involving user groups and authentication functionality.
Protocol Markvision server LDAP server Used for
LDAP
Lightweight
Directory Access
Protocol
LDAPS
Secure Lightweight
Directory Access
Protocol
Kerberos Ephemeral UDP
Ephemeral TCP
port
Ephemeral TCP
port
port
TCP 389, or the port to which the LDAP server
has been configured to listen
Transport Layer Security (TLS), or the port to
which the LDAP server has been configured to
listen
This is for TLS‑encrypted connections.
UDP 88
This is the default Kerberos Authentication
Service port.
Authentication of Markvision
Enterprise users using an LDAP
server
Authentication of Markvision
Enterprise users using an LDAP
server through a secure channel
that uses TLS
Kerberos authentication
Page 17

Managing assets 17
Managing assets
Discovering devices
The application lets you search the network for devices. When devices are discovered, their identification information
is stored in the system. Use bookmarks or searches to display devices in the Search Results area.
Discovered devices are, by default, set to New and are not managed by the system. Before any action can be done on
a device, you need to set it to Managed. For more information, see “Managing devices” on page 20.
There are two ways of adding devices to the system:
• Using a discovery profile—Discover devices in the network using customized parameters.
• Importing devices from a file—Use a comma
Note: You can use only one of these two ways. Performing both procedures to add devices into the system results in
duplicate devices.
After adding a device into the system, perform an audit of the device immediately. Performing an audit provides
additional information about the device, which is required to successfully complete some tasks. For more information
about auditing a device, see “Auditing a device” on page 20.
‑
separated value (CSV) file to import devices.
Note: Note: This applies only to unrestricted devices. For restricted devices, first assign a security policy and then
enforce it on the restricted devices before performing an audit. Failure to do so results in an audit failure and sets
the state of the restricted devices to (Managed) Missing. For more information about restricted devices, see
“Understanding secured devices” on page 30.
Creating a discovery profile
1 If necessary, from the Assets tab, click Discovery Profiles to show the Discovery Profiles section.
2 Click , and then type the name of the new discovery profile.
3 From the Addresses tab, select Include or Exclude.
4 To import a list of items from a file to include or exclude, do the following:
a Click .
b Navigate to the folder where the file is saved.
c Select the file, and then click Open.
Note: The file can contain any of the patterns that can be entered in the text field above Address/Range. To view
examples of a valid pattern, mouse over the text field.
5 Beside , type the IP address, fully qualified DNS host name, subnets with wildcard characters, or address ranges
you want, and then click
.
Notes:
• You can type only one entry at a time. To view examples of a valid entry, mouse over the text field above
Address/Range.
• When typing address ranges, do not use wildcard characters.
• To delete an entry, select it, and then click .
Page 18

Managing assets 18
6 Click the SNMP tab, and then select Version 1,2c or Version 3.
Note: If you are not sure which version of the SNMP you are using, then contact your system support person.
7 If you selected Version 1,2c in step 6, then from the Community Names area, set the privacy profile.
If you selected Version 3, then from the Security area, set the security profile.
Note: If you are not sure how to configure your SNMP Version 3 security profile, then contact your system
support person.
8 Click the General tab, and then from the Performance area, do the following:
• In the Timeout field, specify the amount of time (in milliseconds) to wait for the devices to respond.
• In the Retries field, specify the number of retries before the system stops attempting to communicate with a
device.
9 Select whether to include secured devices in the discovery.
Notes:
• If you do not have a secured device, then do not select this option. Doing so incurs a performance penalty,
which results to a much longer time in discovering devices.
• When a device is secured, one or both of the following conditions apply: (a) communication ports are
disabled, and (b) authentication is required to obtain information from the device.
10 Select whether the discovery profile should automatically manage the discovered devices.
Note: If you select this option, then all discovered devices are automatically set to the Managed life cycle state.
11 Click Save > Close.
Notes:
• Clicking executes the discovery profile and does not save it.
• A new discovery profile gathers just enough information to reliably identify a device. To gather the complete
information from a device, set the device state to Managed, and then perform an audit of the device.
• To make sure that the device information is current, a discovery can be scheduled to occur on a regular
basis. For more information, see “Scheduling tasks” on page 54.
Editing or deleting a discovery profile
1 If necessary, from the Assets tab, click Discovery Profiles to show the Discovery Profiles section.
2 Select a profile, and then click to edit or to delete the discovery profile.
3 Follow the instructions on the computer screen.
Page 19

Managing assets 19
Importing devices from a file
Use a comma-separated values (CSV) file to import devices.
Note: In preparation for a deployment, Markvision lets you add devices into the system even before these are
available on the network.
1 From the Assets tab, click Import, and then click Browse.
2 Navigate to the folder where the CSV file is stored.
Note: Make sure that each line of the CSV file represents a single device.
3 Select the CSV file, and then click Open.
4 From the Possible Columns section, select the columns to match the values in your CSV file.
5 If you are using SNMP V3 protocol to communicate with the device, then you must select the following columns:
• SNMP V3 Read/Write User
• SNMP V3 Read/Write Password
• SNMP V3 Minimum Authentication Level
• SNMP V3 Authentication Hash
• SNMP V3 Privacy Algorithm
Note: In the CSV file that you selected in step 3, make sure the following parameters contain any one of the
values specified below them:
• Minimum Authentication Level
– NO_AUTHENTICATION_NO_PRIVACY
– AUTHENTICATION_NO_PRIVACY
– AUTHENTICATION_PRIVACY
• Authentication Hash
– MD5
– SHA1
• Privacy Algorithm
– DES
– AES_128
– AES_192
– AES_256
Note: If your CSV file does not contain the exact values specified, then MVE cannot discover the device.
6 Click Add to move the selected columns into the CSV File Columns section.
• If you want the system to ignore a column in your CSV file, then select Ignore. Do this for each column in your
CSV file that is not listed in the Possible Columns section.
• To change the order of the columns you selected to match your CSV file, select a column from the CSV File
Columns section, and then use the arrows to move the headings up or down.
7 Select whether the first row in your CSV file contains a header.
8 Select whether the imported devices should be automatically set to the Managed life cycle state.
9 Click OK.
Page 20

Managing assets 20
Managing devices
A device can be assigned three different life cycle states:
• Managed—This includes the device in all activities that can be performed in the system.
– Managed (Normal)—The device is in its steady state.
– Managed (Changed)—There are changes in the physical property of the device since the last audit. The next
time the system communicates with the device and there are no more changes in its physical properties, the
device reverts to Managed (Normal) state.
– Managed (Missing)—The system cannot successfully communicate with the device. The next time the system
is able to successfully communicate with the device and there is no change in its physical properties, the device
reverts to Managed (Found) state.
– Managed (Found)—The device is previously missing, but is able to successfully communicate with the system
in its most recent attempt. The next time the system is able to successfully communicate with the device and
there are no changes in its physical properties, the device reverts to Managed (Normal) state.
• Unmanaged—This excludes the device from all activities performed in the system.
• Retired—The device is previously in Managed state, but has now been removed from the network. The system
retains the device information, but does not expect to see the device on the network again. If the device appears
again in the network, then the system sets its state to New.
Setting the device life cycle state
Before any action can be done on a device, make sure the device is set to Managed.
1 From the Assets tab, select New Printers from the Bookmarks and Searches drop-down menu.
2 Select the check box beside the IP address of the device.
Note: You may select multiple or all devices.
3 From the “Set State To” drop-down menu, select Managed, and then click Yes.
Auditing a device
An audit collects information from any currently Managed device on the network, and then stores the device
information in the system. To make sure the information in your system is current, perform an audit regularly.
1 From the Search Results area, select the check box beside the IP address of a device.
Notes:
• If you do not know the IP address of the device, then locate the device under the System Name or Hostname
column.
• To audit multiple devices, select the check boxes beside the IP addresses of the devices.
• To audit all devices, select the check box beside “IP Address.”
2 Click Audit.
The audit status appears in the Task Information area.
3 When the audit is complete, click in the Header area.
Results of the most recent audit appear in the Log dialog.
Page 21

Managing assets 21
After devices are audited, the following instances may prompt the system to set a device to a Managed (Changed)
state:
• There are changes to any of these device identification values or device capabilities:
– Property tag
– Host name
– Contact name
– Contact location
– IP address
– Memory size
– Copier option name
– Duplex
• There are additions to, or removals of, any of these device hardware options:
– Supplies
– Input options
– Output options
– Ports
• There are additions to, or removals of, any of these device functions or applications:
– Fonts
– eSF applications
Note: An audit can be scheduled to occur at a predetermined time or on a regular basis. For more information, see
“Scheduling tasks” on page 54.
Viewing device properties
To see the complete list of information on the device, make sure that you have already performed an audit of the
device.
1 From the Assets tab, select Managed Printers in the Bookmarks and Searches drop-down menu.
2 From the All Printers section, select the IP address of the device.
Note: If you do not know the IP address of the device, then locate the device under the System Name column.
3 From the Asset Properties dialog:
Click To view
Identification The device network identification information.
Dates The list of device events. This includes date added to system, discovery date, and the most recent
audit date.
Firmware The device firmware code levels.
Capabilities The device features.
Ports The available ports on the device.
Supplies The device supply levels and details.
Font Cartridges Information about any installed font cartridges.
Page 22

Managing assets 22
Click To view
Options Information about the device options, such as the device hard disk and its remaining free space.
Input Options Settings for the available paper trays and other device inputs.
Output Options Settings for the available paper exit trays.
eSF Applications Information about the installed Embedded Solutions Framework (eSF) applications on the device,
such as version number and status.
Device Statistics Specific values for each of the device properties.
Change Details Information about the changes in the device.
Note: This applies only to devices that are set in the Managed (Changed) state.
Page 23

Locating and organizing devices within the system 23
Locating and organizing devices within the system
Searching for devices within the system
Using default bookmarks
Bookmarks denote a saved device search. When selecting a bookmark, the devices that are shown match the criteria
of the search.
The default bookmarks are based on the device life cycle state.
1 From the Bookmarks and Searches drop‑down menu, select a bookmark:
Select To
Managed Printers Search for active devices in the system.
Note: Devices that appear when selecting this bookmark can be in any of the following
states:
• Managed (Normal)
• Managed (Changed)
• Managed (Missing)
• Managed (Found)
Managed (Normal)
Printers
Managed (Changed)
Printers
Managed (Missing)
Printers
Managed (Found)
Printers
New Printers Search for devices that are newly added to the system.
Unmanaged Printers Search for devices that have been marked for exclusion from activities performed in the
Retired Printers Search for devices that are no longer active in the system.
Search for active devices in the system with device properties remaining the same since the
last audit.
Search for active devices in the system with device properties that have changed since the
last audit.
Search for devices that the system was unable to establish communication with.
Search for devices that are reported as missing from previous search queries, but have now
been found.
system.
2 From the Search Results Summary area, select a criterion to quickly and easily refine the results of your bookmarked
search.
Using Advanced Search
The Advanced Search feature lets you quickly perform complex searches based on one or multiple parameters.
1 From the Bookmarks and Searches drop‑down menu, select Advanced Search.
2 Select whether all or at least one criterion should be met.
Page 24

Locating and organizing devices within the system 24
3 To add a search criterion, click .
To group search criteria together, click
, and then click to add individual criterion.
Note: If you group the search criteria, then the system treats all the defined criteria that are grouped together
into one criterion.
4 From the Parameter drop‑down menu, select a parameter:
Select To
Asset Tag Search for devices that have an assigned asset tag.
Color Capability Search for devices by their capability to print in color.
Contact Location Search for devices that have a specified location.
Contact Name Search for devices that have a specified contact name.
Copy Capability Search for devices by their capability to copy files.
Duplex Capability Search for devices by their capability to perform two-sided printing.
ESF Capability Search for devices by their capability to manage an Embedded Solutions Framework (eSF)
application.
eSF Application(Name) Search for devices by the specific name of the eSF application currently installed.
eSF Application(State) Search for devices by the current state of their installed eSF application.
eSF Application(Version) Search for devices by the version of their installed eSF application.
Firmware Version Search for devices by their firmware version.
Firmware:AIO Search for devices by the AIO value of their firmware.
Firmware:Base Search for devices by the base version of their firmware.
Firmware:Engine Search for devices by the engine of their firmware.
Firmware:Fax Search for devices by the fax value of their firmware.
Firmware:Font Search for devices by the font value of their firmware.
Firmware:Kernel Search for devices by the kernel value of their firmware.
Firmware:Loader Search for devices by the loader value of their firmware.
Firmware:Network Search for devices by the network value of their firmware.
Firmware:Network Driver Search for devices by the network driver value of their firmware.
Firmware:Panel Search for devices by the panel version of their firmware.
Firmware:Scanner Search for devices by the scanner version of their firmware.
Hostname Search for devices by their host names.
IP Address Search for devices by their IP addresses.
Note: You may use an asterisk (*) as a wildcard character in the last three octets of the
IP address to find all matching IP addresses. If an asterisk is used in an octet, then the
remaining octets must also contain asterisks.
• Valid examples are 157.184.32.*, 157.184.*.*, and 157.*.*.*.
• An invalid example is 157.184.*.10.
Keyword Search for devices by their assigned keywords, if any.
Page 25

Locating and organizing devices within the system 25
Select To
Lifetime Page Count Search for devices by their lifetime page count values.
MAC Address Search for devices by their MAC addresses.
Maintenance Counter Search for devices by the value of their maintenance counter.
Manufacturer Search for devices by the name of their manufacturer.
MFP Capability Search for devices by their capability to be a multifunction printer (MFP).
Marking Technology Search for devices by the value of the marking technology that they support.
Model Search for devices by their model names.
Printer Status
Profile Capability Search for devices by their supported profile capability.
Receive Fax Capability Search for devices by their capability to receive incoming fax.
Scan to E-mail Capability Search for devices by their capability to perform a Scan to E-mail task.
Scan to Fax Capability Search for devices by their capability to perform a Scan to Fax task.
Scan to Network Capability Search for devices by their capability to perform a Scan to Network task.
Serial Number Search for devices by their serial number.
State Search for devices by their current state in the database.
Supply Status Search for devices by the current status of their supplies.
System Name Search for devices by their system names.
Search for devices by their current status (for example: Ready, Paper Jam, Tray 1
Missing).
5 From the Operation drop-down menu, select an operator:
Select To
Contains Search for devices with a parameter that contains a specific value.
Does not contain Search for devices with a parameter that does not contain a specific value.
Does not equal Search for devices with a parameter that is not equivalent to an exact value.
Ends with Search for devices with a parameter that ends with a specific value.
Equals Search for devices with a parameter that is equivalent to an exact value.
Starts with Search for devices with a parameter that begins with a specific value.
6 From the Value field or drop-down menu, enter the value of the parameter.
Note: If you want to delete the criterion, then click X.
7 Click OK to begin the search.
The located devices appear in the Search Results area.
8 From the Search Results Summary area, select a criterion to quickly and easily refine the results of your bookmarked
search.
Page 26

Locating and organizing devices within the system 26
Working with bookmarks
Bookmarks denote a saved search.
When a device enters the system and meets the criteria specified for a bookmark, the device is included in the search
results whenever the bookmark is selected.
Creating bookmarks
1 From the Bookmarks and Searches drop-down menu, select the bookmark that represents the group of devices
from which you would like to begin your search.
To refine the search, click Advanced Search.
2 If necessary, under Search Results Summary, click the available subcategories to further refine the search.
3 When the device or group of devices that you want appears in the search window, click .
4 Enter a name for the bookmark, and then click OK.
Accessing bookmarks
1 From the Bookmarks and Searches drop‑down menu, select the bookmark you want to view.
2 If necessary, under Search Results Summary, click the available subcategories to further refine the search.
Deleting bookmarks
1 From the Bookmarks and Searches drop‑down menu, select Manage bookmarks.
2 Select the bookmark(s) you want to delete, and then click .
3 Click Yes, and then click Close.
Using categories and keywords
Keywords let you assign custom tags to devices, providing additional flexibility in locating and organizing devices in the
system. Group keywords into categories, and then assign multiple keywords from multiple categories to a device.
Before you can create a keyword, first create a category to which the keyword belongs.
For example, you can create a category called Location, and then create keywords within that category. Examples
of keywords within the Location category might be Building 1, Building 2, or something more specific for your
business needs.
After creating the categories and keywords, you can then assign the keywords to multiple devices. You can search for
devices based on keywords assigned to them, and then bookmark the results of your search for future use.
Page 27

Locating and organizing devices within the system 27
Adding, editing, or deleting categories
1 If necessary, from the Assets tab, click Keywords to show the Keywords section.
2 From the Category pane, click to add, to edit, or to delete a category.
Note: Deleting a category also deletes its keywords and removes them from the devices to which the keywords
are assigned.
3 Follow the instructions on the computer screen.
Adding, editing, or deleting keywords
1 If necessary, from the Assets tab, click Keywords to show the Keywords section.
2 From the Keywords pane, do one of the following:
• To add a keyword:
a From the Category pane, select a category where the keyword belongs.
b From the Keyword pane, click .
c Type the name of the new keyword, and then press Enter.
• To edit a keyword:
a Select an existing keyword, and then click .
b Edit the name, and then press Enter.
• To delete a keyword:
a Select an existing keyword, and then click .
b Click Yes.
Note: Deleting a keyword removes it from the devices to which it is assigned.
Assigning keywords to a device
1 If necessary, from the Assets tab, click Keywords to show the Keywords section, and then select a keyword.
Note: To select multiple keywords, use Shift + click or Ctrl + click.
2 Select the check box beside the IP address of the device where you want the keyword assigned.
Note: You can select multiple or all devices.
3 Click .
4 From the Task Information area, verify that the task is complete.
5 To verify if the keyword is successfully assigned to the device, see the device properties by selecting the IP address
of the device.
From the Identification Property section, the new value of the keyword for the device appears.
Page 28

Locating and organizing devices within the system 28
Removing an assigned keyword from a device
1 From the Assets tab, select the check box beside the IP address of the device from which you want to remove a
keyword.
2 If necessary, click Keywords to show the Keywords section.
3 Select a keyword, and then click .
4 Select the keyword you want to remove, and then click OK.
Note: To select multiple keywords, use Shift + click or Ctrl + click.
5 From the Task Information area, verify that the task is complete.
6 To verify if the keyword is successfully removed from the device, do this:
a Select the IP address of the device.
b From the Identification Property section, make sure the keyword no longer appears.
Page 29

Managing policies 29
Managing policies
A policy is a collection of configuration information that can be assigned to a device or a group of devices of the same
model. Verify that the configuration information for a device or group of devices matches the particular policy by
performing a conformance check. If the conformance check indicates that the device is not in conformance with the
policy, then you can choose to enforce the policy on the device or group of devices.
Create policies by a preset functional type:
• Copy
• Email/FTP
• Fax
• Flash Drive
• Firmware
Each type of policy contains exclusive settings that guarantee that conflicting settings do not occur when assigning
multiple types of policies to a device.
• General
• Network
• Paper
• Print
• Security
Note: For more information about the security policy, see “Understanding the security policy” on
page 30.
Creating a policy
Creating a new policy
1 If necessary, from the Policies tab, click Device Policies to show the Device Policies section.
2 Click , and then type the name of the new policy.
Note: Make sure the policy name for each device model is unique and does not yet exist in the database.
3 From the Supported Models list, select a device.
4 From the Type drop-down menu, select a type of policy and then click OK.
5 From the New Policy dialog, select the Setting Name check box.
All settings are automatically selected, enabling you to customize each setting.
6 Clear the check box beside a setting to exclude it when running a policy conformance check or policy enforcement
task.
7 Select a value for each setting that you want to include when running a policy conformance check or policy
enforcement task.
8 Click Save.
Creating a policy from a device
1 From the Policies tab, select the check box beside the IP address of the device.
2 Click Device Policies to show the Device Policies section, and then click .
Page 30

Managing policies 30
3 In the Name field, type the name of the new policy.
4 Select the policy type, and then click OK.
Note: You may also select multiple or all policy types.
5 If necessary, edit the settings of the newly created policy.
a From the Device Policies section, select the name of the newly created policy, and then click .
b Select a value for each setting that you want to include when running a policy conformance check or policy
enforcement task.
c Clear the check box beside a setting to exclude it when running a policy confor mance check or policy enforcement
task.
d Click Save.
6 Make sure the settings in the newly‑created policy contain valid values.
If the policy appears in red text and its name begins with an exclamation point, then it cannot be assigned to a
device. This means that one or more settings in the policy contain an invalid value, and therefore cannot be enforced
on a device in its current state.
To make a policy assignable to a device, do the following:
a Select the policy, and then click .
b Enter a valid value for the settings, and then click Save.
c If a warning message appears, then take note of the settings with invalid values.
d Click No, and then enter a valid value for each of the specified settings.
e Click Save.
f If necessary, repeat step c through step e until the warning message no longer appears.
Understanding the security policy
Markvision can configure the setup of security-enabled Lexmark devices, including the security settings of the various
device functions as well as how remote communication is done.
When using the security policy, make sure you are using only Markvision to manage the security settings in your devices.
If you are using some other system along with Markvision, then this will result in unexpected behavior.
The security policy can be assigned only to a specific sub-set of devices. To view the complete list of supported devices,
see the Release Notes.
Understanding secured devices
There may be various configurations for a secured device. However, Markvision currently supports only devices that
are fully unrestricted or fully restricted.
Page 31

Managing policies 31
Configurations for fully unrestricted and fully restricted devices
Fully unrestricted Fully restricted
Device
settings
Remote Management
Function Access Control
(RM FAC) or advanced
password
Note: For a list of devices
that support the RM FAC,
see “Lexmark printers
that support the security
policy” in the Release
Notes.
Significant ports The following ports are open:
No security or no p assword RM FAC is set using a security template,
• UDP 161 (SNMP)
• UDP 9300/9301/9302 (NPAP)
Security‑related ports The following ports are open:
• UDP 5353 (mDNS)
• TCP 6110
• TCP/UDP 6100 (LST)
or a password is configured
Closed
The following ports are open:
• UDP 5353 (mDNS)
• TCP 6110
• TCP/UDP 6100 (LST)
Page 32

Managing policies 32
Fully unrestricted Fully restricted
Markvision
settings
Discovery profile Make sure the Include secured printers
in the discovery option is cleared.
Are secure channels used
for communication
between Markvision and
the network devices?
No
Notes:
• This type of configuration is
recommended, unless you are
particularly concerned about the
security of your network
communication.
• An exception to this is if there are
certain settings that can be
read/written only by way of
secure channels.
How do I determine the
security configuration of
the devices in my
network?
In the main data grid in Markvision, an
open padlock icon appears beside the IP
address of a fully unrestricted device.
Make sure the Include secured
printers in the discovery option is
selected.
Yes
In the main data grid in Markvision, a
closed padlock icon appears beside the
IP address of a fully restricted device.
Note: If Markvision does not know
the communication credentials of the
device, then the closed padlock icon
has a red slash through it. This means
that Markvision cannot currently
communicate, beyond this minimal
discovery, with the device.
How do I search for
devices that have this type
of configuration?
1 From the “Bookmarks and
Advanced Search” area, select All
Printers.
2 From the Search Results Summary
area, scroll down to the
Communications category, and
then select Unsecured.
1 From the “Bookmarks and
Advanced Search” area, select All
Printers.
2 From the Search Results Summary
area, scroll down to the
Communications category, and
then select Secured.
Notes:
• If the device or discovery profile does not adhere to one of these scenarios, then there will likely be an
unexpected or undefined behavior.
• Make sure that the device is in the proper state and the discovery profile is configured correctly before
discovering the device. Changing one or the other after executing the discovery profile will likely result in
unexpected or undefined behavior.
Understanding settings for security policies
Use the security policy to customize the security settings of a network device.
Page 33

Managing policies 33
For Markvisio n to effectively perform remote management functions on a network device, make sure the security policy
adheres to the following parameters:
• From the General Settings section of the security policy, the following port access settings are set to Enabled or
Secure and Unsecure:
– Port Access: mDNS (UDP 5353)
– Port Access: TCP/UDP (6110/6100)
• From the Access Controls section (if available for the device model), the NPA Network Adapter Setting Changes and
Firmware Updates settings are set to No Security.
• The following sections (if available for the device model) are read-only and cannot be edited:
– Access Controls
– Security Templates
Note: Building blocks under the Authentication Setup column may need the credentials provided.
– Miscellaneous Settings
Note: The Access Controls, Security Templates, and Miscellaneous Settings sections are not available for all
device models. For more information, see "Lexmark printers that support the security policy" in the Release
Notes.
Using building blocks from an eSF application
If you want to use the building block from an Embedded Solutions Framework (eSF) application for the security policy,
then first make sure that the eSF application is manually installed on all affected devices. Markvision does not enforce
installation of the application when enforcing a security policy.
Note: Only the internal settings available to all eSF applications will be cloned, checked for conformance, or enforced
by way of the security policy.
Creating a security policy
To create a security policy, first clone an existing policy from a preconfigured, master device.
Cloning a security policy to restrict devices
Step 1. Configure a device to be restricted using its Embedded Web Server.
After configuring a device to be restricted, use that device as the master device that you will clone for a security policy.
1 If the device model supports the Remote Management access control, then set the access control to an existing
security template. If the device does not support the Remote Management access control, then configure an
advanced password. Do one of the following:
Note: For a list of devices that support the Remote Management access control, see "Lexmark printers that
support the security policy" in the Release Notes.
Configuring the Remote Management access control
a From Markvision, click Service Desk.
b Locate the device that you want to configure, and then select its IP address.
c Click Embedded Web Page > Settings > Security > Security Setup.
d From the Advanced Security Setup section, click Access Controls.
Page 34

Managing policies 34
e Scroll to Remote Management, and then from its drop‑down menu, select a security template.
Note: The security template must specify authentication only.
f Click Submit.
Configuring an advanced password
a From Markvision, click Service Desk.
b Locate the device that you want to configure, and then select its IP address.
c Click Embedded Web Page > Configuration > Security.
d Click Create/Change Password or Create Password.
e If necessary, click Create Advanced Password, and then type a password.
f Confirm the password by typing it again in the next field, and then click Submit.
2 Make sure the significant ports are closed and the security ports are open.
Note: If applicable, you may select Secure Mode, and then skip to step 3.
a From the Embedded Web Server, click Settings or Configuration, and then click Security > TCP/IP Port Access.
b Locate the following significant po rts, and then if necessary, clear the check boxes beside them or select Disabled
from the drop‑down menus.
• UDP 161 (SNMP)
• UDP 9300/9301/9302 (NPAP)
c Locate the following security ports, and then make sure the check boxes beside them are selected or that Secure
and Unsecure is selected from the drop‑down menus.
• UDP 5353 (mDNS)
• TCP 6110
• TCP/UDP 6100 (LST)
d Click Submit.
3 Configure other security settings.
a From the Embedded Web Server, click Settings or Configuration, and then click Security.
b Make other changes to the security settings as necessary.
c After making other changes, click Settings or Configuration, and then click Security > View Security Summary
(if available on the device model).
d Verify that your changes are reflected in the summary page.
Note: If you are using an advanced password instead of the Remote Management access control, then you do not
have to use the Embedded Web Server to restrict the master device. You can use Markvision to create a security
policy from any device, and then configure the Advance Password and port settings from the General Settings
section of the policy.
Step 2. Make sure Markvision recognizes your master restricted device.
1 Create a discovery profile. For more information about creating a discovery profile, see “Creating a discovery profile”
on page 17.
2 From the “Discovery Profile – Add” dialog, make sure Include secured printers in the discovery is selected.
Page 35

Managing policies 35
3 To execute the discovery profile, click .
Note: At this point, the device is “partially discovered.” This means that Markvision has discovered the device
with limited information, but will not be able to perform additional functions with the device such as policy
conformance, policy enforcement, and audit. To acquire its complete information, you need to supply the
communication credentials of the device.
Step 3. Start the cloning process.
1 From Markvision, click Policies.
2 Locate your master restricted device, and then select the check box beside its IP address.
3 If necessary, click Device Policies, and then click .
4 In the Name field, type the name of the new security policy.
5 Make sure the Security policy type is selected.
6 Enter the required credentials to authenticate with the device, and then click OK.
Note: Use the credentials from the security template that you set in the Remote Management access control, or
use the advanced password that you configured.
7 Allow the cloning process to complete.
If the policy appears in red text, then it means there are missing credentials, and therefore cannot be assigned to
a device in its current state. To make the policy assignable to a device, enter the correct credentials for the device.
8 Edit the settings of the new security policy, and make sure the settings in the policy contain valid values.
a From the Device Policies section, select the name of the policy, and then click .
b Select a value for each setting that you want to include when running a policy conformance check or policy
enforcement task.
c Clear the check box beside a setting to exclude it when running a policy confor mance check or policy enforcement
task.
d Type the security password, and then click Save.
Note: For more information about valid settings for a security policy, see “Understanding settings for security
policies” on page 32.
9 Assign the security policy to unrestricted devices that are of the same model as the master restricted device.
For more information about assigning a policy to multiple devices, see “Assigning a policy” on page 39.
10 Enforce the security policy to the selected devices.
For more information about enforcing a policy, see “Enforcing a policy” on page 40.
11 Rediscover the devices.
The devices are now restricted. In addition, Markvision now knows the device communication credentials and can use
these credentials to execute tasks in both the Assets and Policies service areas.
Page 36

Managing policies 36
Cloning a security policy to unrestrict devices
Step 1. Configure a device to be unrestricted using its Embedded Web Server.
After configuring a device to be unrestricted, use that device as the master device that you will clone for a security
policy.
1 If the device model supports the Remote Management access control, then set the access control to No Security.
If the device does not support the Remote Management access control, then remove the advanced password. Do
one of the following:
Note: For a list of devices that support the Remote Management access control, see "Lexmark printers that
support the security policy" in the Release Notes.
Configuring the Remote Management access control
a From Markvision, click Service Desk.
b Locate the device that you want to configure, and then select its IP address.
c Click Embedded Web Page > Settings > Security > Security Setup.
d From the Advanced Security Setup section, click Access Controls.
e Scroll to Remote Management, and then from the drop‑down menu, select No Security.
f Click Submit.
Removing the advanced password
a From Markvision, click Service Desk.
b Locate the device that you want to configure, and then select its IP address.
c Click Embedded Web Page > Configuration > Security.
d Click Create/Change Password or Create Password.
e If necessary, click Create Advanced Password.
f Clear the Password fields, and then click Submit.
2 Make sure the significant ports and security ports are open.
a From the Embedded Web Server, click Settings or Configuration, and then click Security > TCP/IP Port Access.
b Locate the following ports, and then make sure they are selected or set to Secure and Unsecure.
Significant ports
• UDP 161 (SNMP)
• UDP 9300/9301/9302 (NPAP)
Security ports
• UDP 5353 (mDNS)
• TCP 6110
• TCP/UDP 6100 (LST)
c Click Submit.
3 Configure other security settings.
a From the Embedded Web Server, click Settings or Configuration, and then click Security.
b Make other changes to the security settings as necessary.
Page 37

Managing policies 37
c After making other changes, click Settings or Configuration, and then click Security > View Security Summary
(if available on the device model).
d Verify that your changes are reflected in the summary page.
Note: If you are using an advanced password instead of the Remote Management access control, then you do not
have to use the Embedded Web Server to unrestrict the master device. You can use Markvision to create a security
policy from any device, and then configure the Advance Password and port settings from the General Settings
section of the policy.
Step 2. Make sure Markvision recognizes your master unrestricted device.
1 Create a discovery profile. For more information about creating a discovery profile, see “Creating a discovery profile”
on page 17.
2 From the “Discovery Profile – Add” dialog, make sure the Include secured printers in the discovery check box is
cleared.
3 To execute the discovery profile, click .
Step 3. Start the cloning process.
1 From Markvision, click Policies.
2 Locate your unrestricted device, and then select the check box beside its IP address.
3 If necessary, click Device Policies, and then click .
4 In the Name field, type the name of the new security policy.
5 Make sure the Security policy type is selected.
6 Enter the required credentials to authenticate with the device, and then click OK.
Note: Use the credentials from the security template that you set in the Remote Management access control, or
use the advanced password that you configured.
7 Allow the cloning process to complete.
If the policy appears in red text, then it means there are missing credentials, and therefore cannot be assigned to
a device in its current state. To make the policy assignable to a device, enter the correct credentials for the device.
8 Edit the settings of the new security policy, and then make sure the settings in the policy contain valid values.
a From the Device Policies section, select the name of the policy, and then click .
b Select a value for each setting that you want to include when running a policy conformance check or policy
enforcement task.
c Clear the check box beside a setting to exclude it when running a policy confor mance check or policy enforcement
task.
d Click Save.
Note: For more information about valid settings for a security policy, see “Understanding settings for
security policies” on page 32.
9 Assign the security policy to unrestricted devices that are of the same model as the master unrestricted device.
Notes:
• For more information about assigning a policy to multiple devices, see “Assigning a policy” on page 39.
Page 38

Managing policies 38
• If one of the selected devices is restricted, then it will become unrestricted after policy enforcement.
10 Enforce the security policy to the selected devices.
For more information about enforcing a policy, see “Enforcing a policy” on page 40.
11 Rediscover the devices.
The devices are now unrestricted and can be used by all the service areas.
Changing the communication credentials of a restricted device
Communication credentials are needed to authenticate with a network device by way of Lexmark Secure Transport
(LST). Communication credentials can be a combination of any of the following: user name, realm, password, and
personal identification number (PIN).
Note: Some device models support passwords only. For more information, see "Lexmark printers that support the
security policy" in the Release Notes.
There are two types of communication credentials building blocks:
• Final authority—The building block is the final authority when it comes to credential authentication or
authorization. Some examples are passwords or PINs.
• Pass-through authority—The building block passes the credentials along to an external authority for authentication
or authorization. Some examples of an external authority are Lightweight Directory Access Protocol (LDAP) and
Kerberos.
Changing the credentials of a final authority building block
Note: The Access Controls and Security Templates security policy options are not available for all device models. For
more information, see "Lexmark printers that support the security policy" in the Release Notes.
1 If necessary, from the policies tab, click Device Policies to show the Device Policies section.
2 Select the restricted security policy that you want, and then click > Access Controls.
3 Locate Remote Management, and then note its value.
4 Click Security Templates.
5 From the Authentication Setup column, select the building block beside the value you noted in step 3.
6 In the Password field, type the new password.
7 Confirm the password by typing it again in the next field, and then click Save.
8 Enforce the restricted security policy to its assigned devices.
When the enforcement task successfully completes, the device communication credentials are then updated.
Changing the credentials of a pass‑through authority building block
1
From the external authority that you are using, make the changes to the credentials.
2 From the Markvision Web page, click Policies > Device Policies to show the Device Policies section.
3 Select the restricted security policy that you want, and then click > Device Credentials.
4 From the Device Credentials section, update the current values to the new values you entered in the external
authority.
Page 39

Managing policies 39
5 Click Save.
6 Enforce the restricted security policy to its assigned devices.
When the enforcement task successfully completes, Markvision can communicate with the devices again.
Editing or deleting a policy
1 If necessary, from the Policies tab, click Device Policies to show the Device Policies section.
2 Select a policy, and then do one of the following:
• To edit the policy, click .
a In the Policy Name field, type the new name of the policy, if applicable.
b Select a value for each setting that you want to include when running a policy conformance check or policy
enforcement task.
c Clear the check box beside a setting to exclude it when running a policy conformance check or policy
enforcement task.
d Click Save.
• To delete the policy, click , and then click Yes.
Assigning a policy
1 If necessary, from the Policies tab, click Device Policies to show the Device Policies section.
2 Select a policy.
Notes:
• To select multiple policies, use Shift + click or Ctrl + click.
• You may assign multiple types of policies to a device at the same time, but you can only use one policy for
each policy type.
3 Select the check box beside the IP address of the device to which you want the policy assigned.
Note: You may also select multiple or all devices.
4 Click .
In the Policy Type column, a question mark appears beside the device you selected.
The question mark indicates that the device is not yet verified to be in conformance with the assigned policy.
Checking conformity with a policy
1 From the Policies tab, select the check box beside the IP address of the device.
Note: You may also select multiple or all devices.
2 Click Conformance.
3 From the Conformance Check Policies dialog, select a policy type, and then click OK.
Page 40

Managing policies 40
4 From the Policy Type column, verify that a check mark appears beside the device you selected.
5 If a question mark or X appears, then click to view specific details.
Note: A policy conformity check can be scheduled to occur at a predetermined time or on a regular basis. For more
information, see “Scheduling tasks” on page 54.
Enforcing a policy
1 From the Policies tab, select the check box beside the IP address of the device.
Note: You may also select multiple or all devices.
2 Click Enforce.
3 From the Enforce Policies dialog, select a policy type, and then click OK.
4 Click to check that the policy enforcement is complete.
Note: A policy enforcement task can be scheduled to occur at a predetermined time or on a regular basis. For more
information, see “Scheduling tasks” on page 54.
Removing a policy
1 From the Policies tab, select the check box beside the IP address of the device.
2 If necessary, click Device Policies to show the Device Policies section, and then click .
3 From the Remove Policy dialog, select a policy, and then click OK.
Note: You may also select multiple policies.
Page 41

Managing the Service Desk 41
Managing the Service Desk
Working with policies
Before attempting to resolve a problem on a device, first make sure the device is in conformance with its assigned
policies.
Checking device conformity with policies
1 From the Service Desk tab, select the check box beside the IP address of the device.
Note: You may also select multiple or all devices.
2 Click Conformance.
3 From the Conformance Check Policies dialog, select a policy type, and then click OK.
4 From the Task Information area, wait for the task to complete.
5 Click to view results of the conformity check.
Enforcing policies
1 From the Service Desk tab, select the check box beside the IP address of the device.
Note: You may also select multiple or all devices.
2 Click Enforce.
3 From the Enforce Policies dialog, select a policy type, and then click OK.
4 From the Task Information area, wait for the task to complete.
5 Click to verify that the policy enforcement is complete.
Working with a device
Checking the status of a device
1 Locate a device using Bookmarks or Advanced Search.
Note: You can use the categories in the Search Results Summary area to narrow down the list of devices found.
2 Select the check box beside the IP address of the device, and then click Collect current status.
3 From the Printer Status and Supply Status columns, take note of the icon beside the device.
Page 42

Managing the Service Desk 42
Icon Status
OK—The device is ready and supplies are sufficient.
Warning—The device is working, but supplies may be low or may require attention at a later time.
Error—The device or supplies need immediate attention.
4 Click Work with Device to view details on the status of the device.
Viewing a device remotely
Note: This feature is only available for devices that support remote viewing.
1 From the Service Desk tab, select the check box beside the IP address of the device.
2 Click Work with Device.
A dialog appears, showing the device details and a picture of the device.
3 Click Remote Operator Panel > Click here to continue.
Another dialog appears, remotely showing a dynamic display of the device control panel in its current state.
4 From the lower left side, refer to the keyboard key equivalent for each of the device button commands.
Note: The location of the keyboard key equivalent may differ depending on the device model.
Viewing the embedded Web page
Note: This feature is only available for devices that support remote viewing of its embedded Web page.
1 From the Service Desk tab, select the check box beside the IP address of the device.
2 Click Work with Device.
A dialog appears, showing the device details and a picture of the device.
3 Click Embedded Web Page.
Note: From the bottom part of the dialog, you can also select the language that you want to use.
Page 43

Managing device events 43
Managing device events
Event Manager lets you proactively monitor and manage your print fleet. Set a destination to notify yourself or other
specified users when a particular incident occurs. Create an automated event when a device sends an alert to the
network.
Creating a destination
A destination is a predefined action that executes a set command whenever a specified event occurs across a group of
devices. A destination can either be an e-mail notification or a command line prompt for when a custom action is
required.
1 If necessary, from the Event Manager tab, click Destinations to show the Destinations section.
2 Click , and then type a unique name for the destination.
3 Do one of the following:
• Select Command, and then click Next.
a Type the name of an executable command into the Command Path box.
b Add keyword(s) to the Command Parameters by selecting a keyword from the Place Holders list, and then
click
• Select E-mail, and then click Next.
a Make sure you have properly configured the e‑mail settings in the System Configuration dialog.
For more information, see “Configuring e‑mail settings” on page 46.
b Enter values in the appropriate fields:
.
– From—Type the e‑mail address of the sender.
– To—Type the e‑mail address of the recipient.
– CC—Type the e‑mail addresses of other recipients who will receive a carbon copy of the e‑mail.
– Subject—Type a subject title if you want the e‑mail to contain a subject title.
– Body—Type the default e‑mail message.
Note: From the Place Holders column, you can use the available placeholders as the part of or as the entire
subject title. You can also use placeholders as part of an e‑mail message. Placeholders represent the variable
elements that, when used, will be replaced by the actual value.
4 Click Finish.
Editing or deleting a destination
1 If necessary, from the Event Manager tab, click Destinations to show the active destinations.
2 Select a destination, and then do one of the following:
• To edit the destination, click .
a If necessary, edit the destination name, and then click Next.
b If necessary, edit the name of the executable command in the Command Path box.
Page 44

Managing device events 44
c To delete a keyword from the Command Parameters box, double-click the keyword, and then press
Delete.
d To add more keyword(s) to the Command Parameters box, select a keyword from the Place Holders list, and
then click
• To delete the destination, click , and then click Yes.
Warning—Potential Damage: When you delete a destination, the events associated with it are also
deleted.
3 Click Finish.
.
Creating an event
1 If necessary, from the Event Manager tab, click Events to show the Events section.
2 Click , and then enter a unique name for the event and its description.
3 From the Alerts section, select an alert, and then click Next.
Note: You can select multiple or all alerts
4 Select a destination, and then do one of the following:
• To trigger the event when the alert becomes active, select On Active Only.
• To trigger the event when the alert becomes active and cleared, select On Active and Clear.
5 Click Finish.
Editing or deleting an event
1 If necessary, from the Event Manager tab, click Events to show the active events.
2 Select an event, and then do one of the following:
• To edit the event, click .
a If necessary, edit the event name and description.
b From the Alerts section, add more alerts by selecting them, or remove an alert by clearing the check box
beside it.
c Click Next.
d From the Destinations section, add more destinations by selecting them, or remove a destination by clearing
the check box beside it.
e Select a trigger destination, and then click Finish.
• To delete the event, click , and then click Yes.
Assigning an event to a device
1 From the Event Manager tab, select the check box beside the IP address of the device.
2 If necessary, click Events to show the active events.
3 Select an event, and then click .
Page 45

Managing device events 45
Removing an event from a device
1 From the Event Manager tab, select the check box beside the IP address of the device.
2 If necessary, click Events to show the active events.
3 Select an event, and then click .
Displaying event details
1 From the Event Manager tab, locate a device using Bookmarks or Advanced search.
Note: You can use the categories in the Search Results Summary area to narrow down the list of devices found.
2 From the Search Results area, select the check box beside the IP address of a device.
Note: If you do not know the IP address of the device, then locate the device under the System Name column.
3 Click Properties.
A dialog appears, showing the current active conditions and event details assigned to the device.
Page 46

Performing other administrative tasks 46
Performing other administrative tasks
Downloading generic files
The application lets you download miscellaneous files from the Markvision Server to one or more devices on a network.
This allows for the instant distribution of various file types including universal configuration files (UCF) to any devices
that the application manages.
1 From the Header area, click .
2 From the Include Printers drop‑down menu, select a device group or an available bookmark.
3 Click Browse, and then navigate to the folder where the file is saved.
4 Select the file you want to download, and then click Open.
5 From the Destination drop‑down menu, select one of the following:
• Configuration (HTTP)—This downloads a printer UCF.
• Configuration (FTP)—This downloads a network UCF.
• Firmware Update—This downloads a firmware update for the devices.
• Print (FTP)—This downloads a printable file over an FTP network.
• Print (raw socket)—This downloads a printable file from the computer.
6 Click Download.
Notes:
• The Generic File Download task will not be available when the Printer Lockdown option is enabled.
• A Generic File Download task can be scheduled to occur at a predetermined time or on a regular basis. For more
information, see “Scheduling tasks” on page 54.
Configuring e‑mail settings
Notes:
• You need to configure the Simple Mail Transfer Protocol (SMTP) settings so Markvision can send e-mail
notifications for alerts and error messages.
• If you enable the SMTP configuration now, and then disable it later, then Markvision will no longer be able to
send e‑mail notifications for alerts and error messages.
1 From the Header area, click > E-mail tab.
2 Select the Enable SMTP Configuration check box, and then enter values in the appropriate fields:
• SMTP Mail Server—Type the mail server information.
• Port—Type the port number of the SMTP mail server.
• From—Type the e‑mail address of the sender.
Page 47

Performing other administrative tasks 47
3 If a user needs to log in before sending the e-mail, then select the Login Required check box.
a Type the login information and password.
b Confirm the password by typing it again.
4 Click Apply > Close.
Configuring system settings
1 From the Header area, click > General tab.
2 From the Hostname Source section, select the source for the system where to acquire the host name for a device,
and then click Apply.
3 From the Event Manager section, set the interval the system should wait before reregistering with devices for alerts,
and then click Apply.
Adding, editing, or deleting a user in the system
1 From the Header area, click > User tab.
2 Do one of the following:
• To add a user, click .
a Enter the necessary details.
b From the Roles section, select the role of the new user, and then click OK.
A user may be assigned any one or multiple roles:
– Admin—The user can access and perform tasks in all tabs. Only users assigned to this role have
administrative privileges, such as adding more users to the system or configuring system settings.
– Assets—The user can only access and perform tasks found in the Assets tab.
– Event Manager—The user can only access and perform tasks found in the Event Manager tab.
– Policies—The user can only access and perform tasks found in the Policies tab.
– Service Desk—The user can only access and perform tasks found in the Service Desk tab.
• Select an existing user, and then click to edit, or to delete.
3 Follow the instructions on the computer screen.
Note: Three consecutive failed login attempts disable the user account; and it can only be re‑enabled by an
Administrator. However, if the user is the only user in the system with Admin role, then the account is suspended
temporarily for only about five minutes.
Page 48

Performing other administrative tasks 48
Enabling LDAP server authentication
Lightweight Dir ectory Access Pro tocol (LDAP) is a standards-ba sed, cross-platform, extensible protocol that runs directly
on top of TCP/IP and is used to access specialized databases called directories.
Markvision administrators can use the company LDAP server to authenticate user IDs and passwords. This eliminates
the need for users to maintain a separate login ID and password just for Markvision.
Markvision first attempts authentication against the valid user credentials present in the system. If Markvision is unable
to authenticate the user on its first attempt, then it attempts authentication against users registered in the LDAP server.
However, if a user has the same user name in both the internal Markvision server and external LDAP Directory server,
then Markvision will use the credentials stored in its internal server. This means that the user needs to use the Markvision
password and not the LDAP password.
As a prerequisite, the LDAP server must contain user groups that correspond to roles defined in “Adding, editing, or
deleting a user in the system” on page 47.
Step 1. Configure the authentication settings
1 From the Header area, click > LDAP tab.
2 From the Authentication Information section, type the values in the appropriate fields.
• Server—Type the IP address or the host name of the LDAP Directory server where the authentication will be
performed.
If you want to use encrypted communication between the MVE server and the LDAP Directory server, then do
the following:
a Use the fully qualified domain name (FQDN) of the server host.
b Access the network host file, and then create an entry to map the server host name to its IP address.
Notes:
– In a UNIX/Linux operating system, the network host file is typically found at /etc/hosts.
– In a Windows operating system, the network host file is typically found
at %SystemRoot%\system32\drivers\etc.
– The Transport Layer Security (TLS) protocol requires that the server host name matches the name of
the “Issued To” host specified in the TLS certificate.
• Port—Enter the port number that will be used by the local computer to communicate with the LDAP Community
server.
The default port number is 389.
Page 49

Performing other administrative tasks 49
• Root DN—Type the base‑distinguished name of the root node. In the LDAP Community server hierarchy, this
should be the direct ancestor of the user node and group node. In this illustration, you would type
dc=mvptest,dc=com in the Root DN field.
Note: When specifying the Root DN, make sure that only dc and o are part of the Root DN expression. If
either ou or cn stands as the common ancestor of the user node and group node, then use ou or cn in the
User Search Base and Group Search Base expressions.
3 If you want Markvision to search for nested users within the LDAP Community server, then select Enable Nested
User Search.
To further refine the search query, type the values in the appropriate fields.
• User Search Base—Type the node in the LDAP Community server where the user object exists. This is also the
node under the Root DN where all the User nodes are listed. In this illustration, you would type ou=people
in the User Search Base field.
If the users are at multiple directory hierarchical levels in the LDAP Community server, then do the following:
a Calculate any common upstream hierarchy of all the possible locations of the User node.
b Include the configuration in the User Search Base field.
Note: As an alternative, you can also select Enable Nested User Search and then leave the User Search Base field
blank. This tells Markvision to search the entire LDAP tree starting at the Base/Root DN for users.
Page 50

Performing other administrative tasks 50
• User Search Filter—Type the parameter for locating a user object in the LDAP Community server. In this
illustration, you would type (uid={0}) in the User Search Filter field.
The User Search Filter function can accommodate multiple conditions and complex expressions, as illustrated
in the following table.
If you want the user to log in using the Then type this in the User Search Filter field
Common Name
Login Name
Telephone Number
Login Name or Common Name
Notes:
(CN={0})
(sAMAccountName={0})
(telephoneNumber={0})
(|(sAMAccountName={0})(CN={0}))
– These expressions apply only to the Windows Active Directory LDAP server.
– For User Search Filter, the only valid pattern is {0}, which means MVE will search for the MVE user login
name.
4 If you want Markvision to search for nested groups within the LDAP Community server, then select Enable Nested
Group Search.
To further refine the search query, type the values in the appropriate fields.
• Group Search Base—Type the node in the LDAP Community server where the user groups corresponding to
the Markvision roles exist. This is also the node under the Root DN where all the Group (Role) nodes are listed.
Page 51

Performing other administrative tasks 51
In this illustration, you would type ou=group in the Group Search Base field.
Note: A Search Base consists of multiple attributes separated by commas, such as cn (common name), ou
(organizational unit), o (organization), c (country), and dc (domain).
• Group Search Filter—Type the parameter for locating a user within a group that corresponds to a role in
Markvision.
Note: You may use the patterns {0} and {1}, depending on the schema configuration of your back-end
LDAP Community server. If you use {0}, then MVE will search for the LDAP User DN (Distinguished Name).
The User DN is retrieved internally during the user authentication process. If you use {1}, then MVE will
search for the MVE user login name.
• Group Role Attribute—Type the attribute that contains the full name of the group (role).
In this illustration, you would type cn in the Group Role Attribute field.
Note: Selecting Enable Nested User Search and Enable Nested Group Search specifies the depth of the LDAP
Community server. By default, the LDAP User Search and LDAP Group Search occur at a maximum of one level
below the specified User Search Base and Group Search Base, respectively. Therefore, Nested Search (SubTree)
is used to indicate searching of all entries at all nested levels under and including the specified User Search Base
and Group Search Base.
Step 2. Configure the binding settings
This section determines the protocol that the MVE server will use to communicate with the external LDAP Directory
server.
1 Click Binding Information.
Notes:
• If there is no LDAP configuration stored in Markvision, then by default, Anonymous LDAP Bind is
automatically selected. This means that the MVE server does not produce its identity or credential to the
Page 52

Performing other administrative tasks 52
LDAP server for using the LDAP server lookup facility. The follow-up LDAP lookup session will be unencrypted
communication only.
• The Windows Active Directory LDAP does not support the Anonymous Bind option.
2 If you want the MVE server to produce its identity to the LDAP server to be able to use the LDAP server lookup
facility, then configure the Simple Bind option.
a Select Simple Bind.
b In the Bind DN field, type the bind‑distinguished name.
c Type the binding password, and then confirm the password by typing it again.
Notes:
• The Bind Password is dependent on the Bind User settings in the LDAP Directory server. If the Bind User
is set as Non-Empty in the LDAP, then a Bind Password is required. If the Bind User is set as Empty in
the LDAP, then a Bind Password is not required. For information about the Bind User settings in the
LDAP, contact your LDAP Administrator.
• The Simple Bind option uses unencrypted communication between MVE and LDAP.
3 If you want to use encrypted communication between the MVE server and the LDAP Directory server, then select
TLS (Transport Layer Security) or Kerberos V5 (Windows Active Directory).
If you selected TLS, then the MVE server will have to fully authenticate itself to the LDAP Directory server using the
MVE server identity (Bind DN) and credentials (Bind Password).
a In the Bind DN field, type the bind-distinguished name.
b Type the binding password, and then confirm the password by typing it again.
Note: The Bind Password is required.
For self‑signed certificates, the TLS fingerprint must be made available to the system‑wide Java Virtual Machine
(JVM) keystore named cacerts. This keystore exists in the [mve.home]/jre/lib/security folder, where [mve.home]
is the installation folder of Markvision.
If you selected Kerberos V5 (Windows Active Directory), then do the following:
a In the KDC Username field, type the Key Distribution Center (KDC) name.
b Type the KDC password, and then confirm the password by typing it again.
c Click Browse, and then navigate to the folder where the krb5.conf file is stored.
Notes:
• For more information about the Kerberos configuration file, see the documentation that came with your
Kerberos security protocol.
• The Kerberos security protocol is supported only in Windows Active Directory that has GSS-API support
endorsement.
d Select the file, and then click Open.
Step 3. Configure the Role Mapping settings
1 Click Role Mapping.
2 Type the values in the appropriate fields.
• Admin—Type the existing role in LDAP that will have Administrative rights in MVE.
• Assets—Type the existing role in LDAP that will manage the Assets module in MVE.
• Policies—Type the existing role in LDAP that will manage the Policies module in MVE.
Page 53

Performing other administrative tasks 53
• Service Desk—Type the existing role in LDAP that will manage the Service Desk module in MVE.
• Event Manager—Type the existing role in LDAP that will manage the Event Manager module in MVE.
Notes:
• MVE will automatically map the specified LDAP Group (Role) to its corresponding MVE Role.
• You can assign one LDAP Group to multiple MVE Roles, and you may also type more than one LDAP Group in
an MVE Role field.
• When typing multiple LDAP Groups in the role fields, use the vertical bar character (|) to separate multiple
LDAP groups. For example, if you want to include the admin and assets groups for the Admin role, then
type admin|assets in the Admin field.
3 If you choose to not use some of the MVE roles, then you may leave the corresponding fields blank.
Note: This applies to all other roles except the Admin role.
4 To validate your configuration, click Test.
5 Type your LDAP user name and password, and then click Test Login.
The Test LDAP Configuration Results dialog appears. If there are any errors, then do the following:
a Review the information in the dialog to determine the cause of the errors.
b Update the entries you made in the Authentication Information, Binding Information, and Role Mapping tabs.
c Repeat step 4 through step 5 until there are no more errors from the Test LDAP Configuration Results dialog.
6 Click Apply > Close.
Generating reports
1 From the Header area, click .
2 From the Include Printers drop-down menu, select a device group based on your previously bookmarked searches.
3 From the Report Type drop-down menu, select the type of data you want to view.
Select To view
Lifecycle State - Summary A summarized report of the life cycle states of the devices.
Printer Manufacturer - Summary A summarized report of device manufacturers.
Printer Model - Summary A summarized report of device model names and numbers.
Printer Capabilities A spreadsheet listing device capabilities.
Printer Capabilities - Summary A summarized report of device capabilities.
Lifecycle State A spreadsheet listing the life cycle states of devices.
Lifetime Page Count A spreadsheet listing the lifetime page count of devices.
Maintenance Count A spreadsheet listing the maintenance count of devices.
Firmware Versions A spreadsheet listing the firmware versions of devices.
eSF Solutions A spreadsheet listing the different Embedded Server Framework (eSF) solutions
installed on the devices.
Statistics:Jobs by Printed Sheets A spreadsheet listing the number of print jobs performed by the devices.
Page 54

Performing other administrative tasks 54
Select To view
Statistics:Jobs by Media Sides
Count
Statistics:Jobs by Scan Usage A spreadsheet listing the number of scan jobs performed by the devices.
Statistics:Jobs by Fax Usage A spreadsheet listing the number of fax jobs performed by the devices.
Statistics:Jobs by Supply
Information
A spreadsheet listing the number of pick counts for print, fax, and copy jobs
performed by the devices.
A spreadsheet listing important details for each of the supply item in the devices.
4 From the Report Format drop-down menu, select PDF or CSV.
5 If you select PDF, then in the Title field, you can choose to customize the title of the report.
6 If applicable, from the Group drop-down menu, select a group.
7 Click Generate.
Scheduling tasks
1 From the Header area, click .
2 From the Add drop-down menu, do one of the following:
• Select Audit, and then select a device group.
• Select Discovery, and then select a discovery profile.
• Select Conformance, and then select a device group and policy type.
• Select Enforcement, and then select a device group and policy type.
• Select Generic File Download, and then select a device group, file, and destination. Only users with the Admin
role can use this option.
3 Click Next.
4 In the Name field, type the name of the new scheduled event.
5 Select your settings, and then click Finish.
Viewing the system log
1 From the Header area, click .
By default, the last activity in the database is listed first.
2 If you want to view the activities by category, then do the following:
a Click Filter.
b From the Time Period section, select the start and end dates.
c In the ID(s) field, type the task ID numbers.
Note: This is an optional field.
d From the Task Name section, clear the check box beside the task that you do not want to include in the log file.
Page 55

Performing other administrative tasks 55
e From the Categories section, clear the check box beside the category that you do not want to include in the log
file.
f Click OK.
3 Click Prepare to Export > Finalize Export.
4 From the “Save in” drop-down menu, navigate to the folder where you want to save the log file.
5 In the “File name” field, type the name of the file, and then click Save.
6 Navigate to the folder where the log file is saved, and then open the file to view the system log.
Page 56

Frequently asked questions 56
Frequently asked questions
What devices are supported by the application?
For a complete list of supported devices, see the Release Notes.
How do I change my password?
From the Header area, click Change Password, and then follow the instructions on the computer screen.
Why can’t I choose multiple devices in the Supported Models
list in the Create a New Policy dialog?
Configuration settings and commands differ between models. A setting command that works on one model may not
work on another. Policies are limited to one model at a time to eliminate the possibility of creating a policy that will
not work properly.
The best way to avoid creating an ineffective policy is to create a new policy first, and then assign the newly created
policy to multiple devices.
Can other users access my bookmarks?
Yes. Bookmarks are global and can be seen and managed by any user.
Where can I find the log files?
Navigate to this directory to locate the following installer log files: %TEMP%\
• mve-*.log
• *.isf
Navigate to this directory to locate the application log files:
<INSTALL_DIR>\tomcat\logs, where <INSTALL_DIR> is the installation folder of Markvision.
Files in this directory that have the *.log format are the application log files.
Page 57

Troubleshooting 57
Troubleshooting
User has forgotten the password
To reset the user password, you need to have administrator privileges.
1 From the Header area, click .
2 From the User tab, select a user, and then click .
3 Change the password.
4 Click OK, and then click Close.
5 Ask the user to log in again.
The application is unable to discover a network device
CHECK THE PRINTER CONNECTIONS
• Make sure the power cord is securely plugged into the printer and into a properly grounded electrical outlet.
• Make sure the printer is turned on.
• Make sure other electrical equipment plugged into the outlet are working.
• Make sure the LAN cable is plugged into both the print server and into the LAN.
• Make sure the LAN cable is working properly.
• Restart the printer and the print server.
MAKE SURE THE INTERNAL PRINT SERVER IS PROPERLY INSTALLED AND ENABLED
• Print a setup page for the printer. The print server should appear in the list of attachments on the setup page.
• Make sure the TCP/IP on the print server is activated. The protocol must be active for the print server and the
application to work. From the printer control panel, make sure the protocol is active.
• See your print server documentation.
MAKE SURE THE DEVICE NAME IN THE APPLICATION IS THE SAME AS THE ONE SET IN THE PRINT
SERVER
1 Check the device name set in the application.
From the Search Results area, locate the IP address of the printer.
The name of the device appears beside its IP address. This is the application device name and not the print server
device name.
2 Check the device name set in the print server. For more information, see the print server documentation.
Page 58

Troubleshooting 58
MAKE SURE THE PRINT SERVER IS COMMUNICATING ON THE NETWORK
1 Ping the print server.
2 If the ping works, check the IP address, netmask, and gateway of the print server to make sure they are correct.
3 Turn the printer off, and then ping again to check for duplicate IP addresses.
If the ping does not work, then print a setup page and check if the IP is enabled.
4 If TCP/IP is enabled, check the IP address, netmask, and gateway to make sure they are correct.
5 Make sure bridges and routers are functioning and configured correctly.
6 Make sure all the physical connections among the print server, the printer, and the network are working.
Device information is incorrect
If the application displays device information that appears to be incorrect, then perform an audit on the device.
Page 59

Glossary of Security Terms 59
Glossary of Security Terms
Access Controls Settings that control whether individual device menus, functions, and settings
are available, and to whom. Also referred to as Function Access Controls on some
devices.
Authentication A method for securely identifying a user.
Authorization A method for specifying which functions are available to a user, i.e. what the user
is allowed to do.
Building Block Authentication and Authorization tools used in the Embedded Web Server. They
include: password, PIN, Internal accounts, LDAP, LDAP+GSSAPI, Kerberos 5, and
NTLM.
Group A collection of users sharing common characteristics.
Security Template A profile created and stored in the Embedded Web Server, used in conjunction
with Access Controls to manage device functions.
Page 60

Index 60
Index
A
adding a user 47
advanced search, using 23
application log files
locating 56
assets tab
using 12
assigning a policy 39
assigning an event to a device 44
assigning keywords to a device 27
auditing a device 20
B
backing up Firebird database 9
bookmarks
accessing 26
creating 26
deleting 26
Bookmarks and Advanced Searches
area 13
C
categories
adding 27
deleting 27
editing 27
using 26
changing passwords 56
checking conformity with a
policy 39
checking device conformity with
policies 41
checking device status 41
computer RAM 8
configuring system settings 47
creating a discovery profile 17
creating a new policy 29
creating a policy from a device 29
creating an event 44
creating bookmarks 26
D
database servers
supported 8
default bookmarks, using 23
deleting a destination 43
deleting a discovery profile 18
deleting a policy 39
deleting a user 47
deleting an event 44
deleting bookmarks 26
destination
creating 43
deleting 43
editing 43
device
assigning an event 44
assigning keywords 27
auditing 20
checking status 41
displaying event details 45
importing from a file 19
removing an assigned keyword 28
removing an event 45
viewing properties 21
viewing remotely 42
device life cycle state
Managed 20
Managed (Changed) 20
Managed (Found) 20
Managed (Missing) 20
Managed (Normal) 20
Retired 20
setting 20
Unmanaged 20
device status
checking 41
device, alerts
receiving 47
device, host name
acquiring 47
devices
discovering 17
searching for 23
discovering devices 17
discovery profile
creating 17
deleting 18
editing 18
displaying event details 45
downloading generic files 46
E
editing a destination 43
editing a discovery profile 18
editing a policy 39
editing a user 47
editing an event 44
embedded Web page
viewing 42
enabling LDAP server
authentication 48
enforcing a policy 40
enforcing policies 41
event
creating 44
deleting 44
displaying details 45
editing 44
removing from a device 45
event manager tab
using 12
F
files
downloading 46
Firebird database
backing up 9
restoring 10
forgotten user password 57
G
General tab
using 47
generating reports 53
getting started
home screen 13
H
Header area 13
home screen
understanding 13
I
importing devices from a file 19
incorrect device information 58
installer log files
locating 56
K
keywords
adding 27
Page 61

Index 61
assigning to a device 27
deleting 27
editing 27
removing from a device 28
using 26
L
LDAP server
enabling authentication 48
log files
locating 56
M
Markvision
accessing 10
installing 8
using 12
Markvision Enterprise
definition 7
upgrading to latest version 9
MarkVision Professional
migrating to Markvision
Enterprise 10
migrating from MarkVision
Professional to Markvision
Enterprise 10
MVE
migrating to 10
MVP
importing to Markvision
Enterprise 10
migrating to Markvision
Enterprise 10
N
notices 2
O
overview 7
P
password, user
resetting 57
placeholders 43
policies
checking device conformity 41
enforcing 41
managing 29
policies tab
using 12
policy
assigning 39
checking conformity 39
creating 29
creating from a device 29
deleting 39
editing 39
enforcing 40
removing 40
types 29
ports
understanding 14
Printer Status 41
processor speed 8
properties, device
viewing 21
protocols
understanding 14
R
receiving alerts from devices 47
removing a policy 40
removing an assigned keyword
from a device 28
removing an event from a
device 45
reports
generating 53
resetting user password 57
restoring Firebird database 10
S
scheduling tasks 54
Search Results area 13
Search Results Summary area 13
searching for devices 23
service desk tab
using 12
Supply Status 41
supported database servers 8
supported devices 56
supported models list 56
system log
viewing 54
system names
verifying 57
system requirements
computer hard disk drive space 8
processor speed 8
RAM 8
screen resolution 8
system settings
configuring 47
T
Task Information area 13
tasks
scheduling 54
troubleshooting
incorrect device information 58
resetting user password 57
unable to discover a network
device 57
U
unable to discover a network
device 57
understanding ports 14
understanding protocols 14
understanding the home screen 13
upgrading to the latest version of
Markvision 9
user
adding 47
deleting 47
editing 47
using categories 26
using keywords 26
V
viewing a device remotely 42
viewing device properties 21
viewing the embedded Web
page 42
viewing the system log 54
 Loading...