

Page 1

Lexmark Intelligent Capture
Administrator's Guide
May 2012 www.lexmark.com
Page 2

Contents 2
Contents
Lexmark Intelligent Capture overview..........................................................8
Understanding the stages of a job............................................................................................................8
Document classification ...................................................................................................................................... 8
Document extraction ..........................................................................................................................................8
Document capture ..............................................................................................................................................8
Document processing ......................................................................................................................................... 9
Document routing...............................................................................................................................................9
Confirmation .......................................................................................................................................................9
Understanding the Lexmark Intelligent Capture system...........................................................................9
System components ........................................................................................................................................... 9
Reliability, scalability, and disaster recovery .................................................................................................... 10
Workflow solutions ...........................................................................................................................................10
Client software..................................................................................................................................................11
Lexmark Management Console ........................................................................................................................ 12
Security overview....................................................................................................................................12
System setup overview...........................................................................................................................13
Supported printers..................................................................................................................................13
Supported ECM platforms.......................................................................................................................17
Installing Lexmark Intelligent Capture........................................................18
Minimum and recommended system requirements..............................................................................18
Avoiding conflicts with other software...................................................................................................21
Ports used by the Lexmark Intelligent Capture system...........................................................................21
Activating Lexmark Intelligent Capture licenses......................................................................................22
Understanding installation types............................................................................................................26
Installing a workgroup system.................................................................................................................27
Configuration type for workgroup systems ...................................................................................................... 27
Installation overview for a workgroup system .................................................................................................27
Installing system components in a workgroup system..................................................................................... 27
Installing an enterprise system...............................................................................................................28
Configuration types for enterprise systems...................................................................................................... 28
System sizing guidelines ...................................................................................................................................31
Installation overview for an enterprise system ................................................................................................ 32
Using Oracle database with Lexmark Intelligent Capture................................................................................. 33
Installing the database and load balancer without clustering (configurations 1, 1‑N, and 1‑1‑N)................... 34
Installing the database and load balancer with clustering (configurations X‑N, and X‑Y‑N) ............................35
Installing servers ...............................................................................................................................................38
Antivirus policy requirements and recommendations............................................................................39
Page 3

Contents 3
Installing Lexmark Intelligent Capture components silently...................................................................40
Using Kerberos authentication................................................................................................................41
Configuring Kerberos authentication on printers ............................................................................................. 41
Configuring Lexmark Intelligent Capture servers for Kerberos authentication ................................................43
Monitoring and maintaining the system.....................................................44
Using Lexmark Management Console.....................................................................................................44
Accessing Lexmark Management Console........................................................................................................ 44
Changing the administrator user name ............................................................................................................ 45
Changing the administrator password..............................................................................................................45
Enabling LDAP server authentication for LMC ..................................................................................................45
Assigning privileges to groups .......................................................................................................................... 46
Device Groups tab tasks ................................................................................................................................... 48
Software Client Groups tab tasks......................................................................................................................49
Devices tab tasks.............................................................................................................. ................................. 49
Solutions tab tasks ............................................................................................................................................50
E‑Forms tab tasks..............................................................................................................................................51
Services tab tasks..............................................................................................................................................51
System tab tasks ............................................................................................................................................... 52
Finding basic information........................................................................................................................52
Understanding the Home tab ...........................................................................................................................52
Understanding the status bar ...........................................................................................................................53
System status information on the status bar and Home tab............................................................................ 53
Viewing information summaries for Lexmark Intelligent Capture elements .................................................... 54
Viewing jobs or system logs..............................................................................................................................54
Customizing columns for jobs and system logs ................................................................................................ 55
Viewing device group profile settings...............................................................................................................55
Viewing software client group profiles .............................................................................................................55
Viewing forms associated with a solution ........................................................................................................ 55
Viewing version information.............................................................................................................................56
Managing the Lexmark Intelligent Capture system.................................................................................56
Viewing and changing server status ................................................................................................................. 56
Viewing and managing scheduled tasks ...........................................................................................................56
Configuring the confirmation page................................................................................................................... 58
Adding servers to the system after initial installation ...................................................................................... 58
Changing the IP address on a configuration 1 system ...................................................................................... 59
Rebooting the Lexmark Intelligent Capture system .........................................................................................59
Restarting the Lexmark Solutions Application Server.......................................................................................60
Uninstalling Lexmark Intelligent Capture components..................................................................................... 61
Updating the Advanced Prompting Bundle ......................................................................................................62
Managing the e‑mail watcher service...............................................................................................................62
Managing system performance...............................................................................................................63
Accessing the System Health dashboard .......................................................................................................... 63
Page 4

Contents 4
Monitoring system health.................................................................................................................................63
Adjusting limits on concurrent jobs .................................................................................................................. 64
Tuning the load balancer for unequal servers ..................................................................................................65
Assigning servers to only run LMC or process jobs........................................................................................... 65
Configuring chunk size for device discovery and policy updates...................................................................... 66
Configuring communications..................................................................................................................66
Configuring connection to an SMTP server ...................................................................................................... 66
Configuring NPA device communication .......................................................................................................... 67
Configuring SNMP for discovering printers ...................................................................................................... 67
Configuring device security............................................................................................................................... 67
Managing licenses...................................................................................................................................68
Finding the host ID............................................................................................................................................ 68
Viewing or downloading existing licenses ........................................................................................................68
Upgrading the license of an existing server ...................................................................................................... 69
Adding an MFP, e‑forms virtual printer, or software client license to an existing server ................................ 71
Re‑hosting licenses ........................................................................................................................................... 73
Using the Solution Status Page................................................................................................................74
Accessing the Solution Status Page ..................................................................................................................74
Understanding status information.................................................................................................................... 74
Repairing common server problems.................................................................................................................77
Adding printers to a server ...............................................................................................................................77
Adding licenses to a server ...............................................................................................................................78
Removing printers ............................................................................................................................................ 79
Managing reports....................................................................................................................................79
Running a report ............................................................................................................................................... 79
Scheduling a report...........................................................................................................................................80
Using built‑in reports........................................................................................................................................81
Adding a report ................................................................................................................................................. 82
Editing report settings ......................................................................................................................................83
Removing a report ............................................................................................................................................ 83
Configuring default report options ................................................................................................................... 83
Creating custom reports ...................................................................................................................................84
Backup and disaster recovery.................................................................................................................86
Scheduling automatic backups .........................................................................................................................86
Recovering backup data with a new installation ..............................................................................................87
Installing new servers during recovery .............................................................................................................88
Connecting existing servers during recovery .................................................................................................... 88
Recreating Lexmark Intelligent Capture printer ports after an address change...............................................89
Manually backing up databases........................................................................................................................ 90
Managing solutions....................................................................................91
Understanding the solution deployment process...................................................................................91
Understanding solution settings.............................................................................................................91
Page 5

Contents 5
Uploading solutions to the Lexmark Intelligent Capture system............................................................91
Configuring global solution settings........................................................................................... .............92
Editing local settings for a deployed or assigned solution......................................................................92
Configuring an eSF application associated with a solution.....................................................................93
Managing solution‑related files..............................................................................................................93
Removing solutions.................................................................................................................................93
Managing device groups and devices.........................................................95
Creating and populating device groups...................................................................................................95
Understanding device groups ........................................................................................................................... 95
Creating a device group .................................................................................................................................... 95
Creating a device group from an existing device group....................................................................................96
Configuring policy updates ............................................................................................................................... 96
Creating a new discovery profile ...................................................................................................................... 96
Importing a list of printers to a device group ................................................................................................... 97
Discovering printers .......................................................................................................................................... 98
Discovering missing printers ................................................................................................... .......................... 99
Viewing all printers with outdated policies ......................................................................................................99
Scheduling a discovery task .............................................................................................................................. 99
Deploying solutions to a device group..................................................................................................100
Customizing the home screen for a device group.................................................................................100
Updating policies for device groups............................................................................................ ..........105
Scheduling policy updates.....................................................................................................................105
Enabling secure communication between servers and printers in a device group...............................106
Disabling validation of eSF application deployment.............................................................................106
Using the Devices tab............................................................................................................................107
Searching for devices .......................................................................................................... ............................ 107
Editing the home screen layout on specific devices .......................................................................................107
Viewing device profiles ................................................................................................................................... 108
Updating device policies .................................................................................................................................108
Removing devices from the system................................................................................................................ 108
Managing software clients.......................................................................110
Understanding software clients and software client groups................................................................110
Understanding dynamic prompting support........................................................................................ .111
Understanding software client setup....................................................................................................112
Creating and populating software client groups...................................................................................113
Creating a software client group ....................................................................................................................113
Adding software clients to a software client group........................................................................................113
Importing software clients to a software client group ................................................................................... 113
Page 6

Contents 6
Assigning solutions to a software client group......................................................................................114
Installing client software.......................................................................................................................114
Installing client software on a Microsoft Cluster Server.......................................................................115
Adding Lexmark Intelligent Capture printers on a client workstation or print server..........................115
Configuring a Lexmark Document Server port in Windows 7, Windows Vista, Windows Server
2008, or Windows Server 2008 R2................................................................................................ ....117
Increasing Lexmark Intelligent Capture print queue availability using printer pooling........................118
Testing and using Intelligent Capture solutions.........................................119
Using a solution from a printer.............................................................................................................119
Using Lexmark Intelligent Capture print queues...................................................................................120
Using Select'N'Send...............................................................................................................................120
Using the Select'N'Send GUI ...........................................................................................................................120
Using Select'N'Send from the command line ................................................................................................. 123
Scheduling scripts..................................................................................................................................123
Viewing logs.............................................................................................125
Viewing installation logs........................................................................................................................125
Viewing the server log...........................................................................................................................125
Viewing the Embedded Solutions Diagnostic Log.................................................................................126
Troubleshooting.......................................................................................127
Solving problems with LMC...................................................................................................................127
The browser displays a 5yy error when accessing LMC .................................................................................. 127
LMC responds very slowly ..............................................................................................................................127
LMC does not finish loading or data is missing............................................................................................... 128
An error occurs when uploading a formset .................................................................................................... 128
Reports are not displayed when run .............................................................................................................. 128
User cannot access some tasks in LMC........................................................................................................... 128
User can still access tasks even after privileges are removed ........................................................................128
The Solutions tab and the eSF Configuration task for device groups do not function ................................... 128
Jobs do not respond after an error occurred .................................................................................................128
Solving problems with discovery...........................................................................................................129
Discovery and policy updates running slowly .................................................................................................129
Discoveries frequently time out .....................................................................................................................129
Some printers on the network cannot be discovered .................................................................................... 129
Solving server and printer problems.....................................................................................................130
One or more servers cannot be set online .....................................................................................................130
One or more servers cannot be set offline .....................................................................................................130
Error in importing a license............................................................................................................................. 130
LDSS Server is unavailable message appears on the printer control panel ................................131
Page 7

Contents 7
The server log contains Quartz errors ............................................................................................................ 131
Kerberos authentication is not working ......................................................................................................... 132
An expected icon does not appear on the home screen after solution deployment .....................................132
Policy updates failed for a printer ..................................................................................................................133
The printer only returns to the home screen after attempting to execute an Lexmark Intelligent
Capture profile ...........................................................................................................................................134
The solution stops responding........................................................................................................................135
The solution cannot connect to the network .................................................................................................135
Solving problems with client software..................................................................................................135
Cannot create new Lexmark Document Server ports ..................................................................................... 135
System processes terminate unexpectedly when creating a Lexmark Document Server port ...................... 136
Cannot create or configure a Lexmark Document Server port in Windows 7, Windows Vista,
Windows Server 2008, or Windows Server 2008 R2 ..................................................................................136
Jobs are not sent to the Lexmark Intelligent Capture system ........................................................................136
Select'N'Send cannot send files to Lexmark Intelligent Capture .................................................................... 137
Solutions are receiving inaccurate page counts ............................................................................................. 137
Notices.....................................................................................................138
Edition notice........................................................................................................................................138
Index........................................................................................................142
Page 8

Lexmark Intelligent Capture overview 8
Lexmark Intelligent Capture overview
LexmarkTM Intelligent Capture is a system for classifying and extracting documents, capturing and converting them to
digital format, or capturing existing digital documents and then processing and routing these documents according to
your business processes. Users can submit paper documents from multifunction printers (MFPs), or they can submit
digital documents from individual computers. Additionally, some functions may be accessed from select single‑function
printers, such as print release.
The Lexmark Intelligent Capture system has two parts:
• Intelligent Data Extraction (IDE) engine—This is composed of the project and learnset created from the distiller.
• Distributed Capture Platform—This is the workflow solution created from the Software Development Kit (SDK).
Note: For more information on the integration of these parts, see the Lexmark Intelligent Capture Integration Guide.
Each Lexmark multifunction printer has the ability to print, copy, scan, e‑mail, FTP, and fax. In addition to controlling
and adjusting settings for these native functions, Intelligent Capture can add the following functions through the use
of scripts:
• Display messages and prompt the user for input.
• Authenticate through prompts or card swipes.
• Combine scanned documents.
• Read bar codes.
• Use optical character recognition (OCR) to store the text from scanned documents.
• Check or validate information in documents against templates.
• Automatically fill fields on a form template from a database or user input.
• Convert documents to specific formats, such as PDF documents, TIF images, and plain text.
• Route and store documents in a database, network location, or enterprise content management (ECM) system.
• Provide a user confirmation of actions taken.
• Use Intelligent Data Extraction to classify and extract data from digital or scanned documents.
• Use optical mark recognition (OMR) to store human‑mark data from document forms such as surveys.
Understanding the stages of a job
Document classification
A document is classified by a set of rules defined in the Intelligent Data Extraction engine.
Document extraction
When a document is classified, a data extractor is assigned to it based on a set of rules defined in the Intelligent Data
Extraction engine.
Page 9

Lexmark Intelligent Capture overview 9
Document capture
The paper document is converted into a digital document from a Lexmark printer, or a digital document is selected on
a user's computer. Documents are also captured using the new functions such as the directory watcher and e‑mail
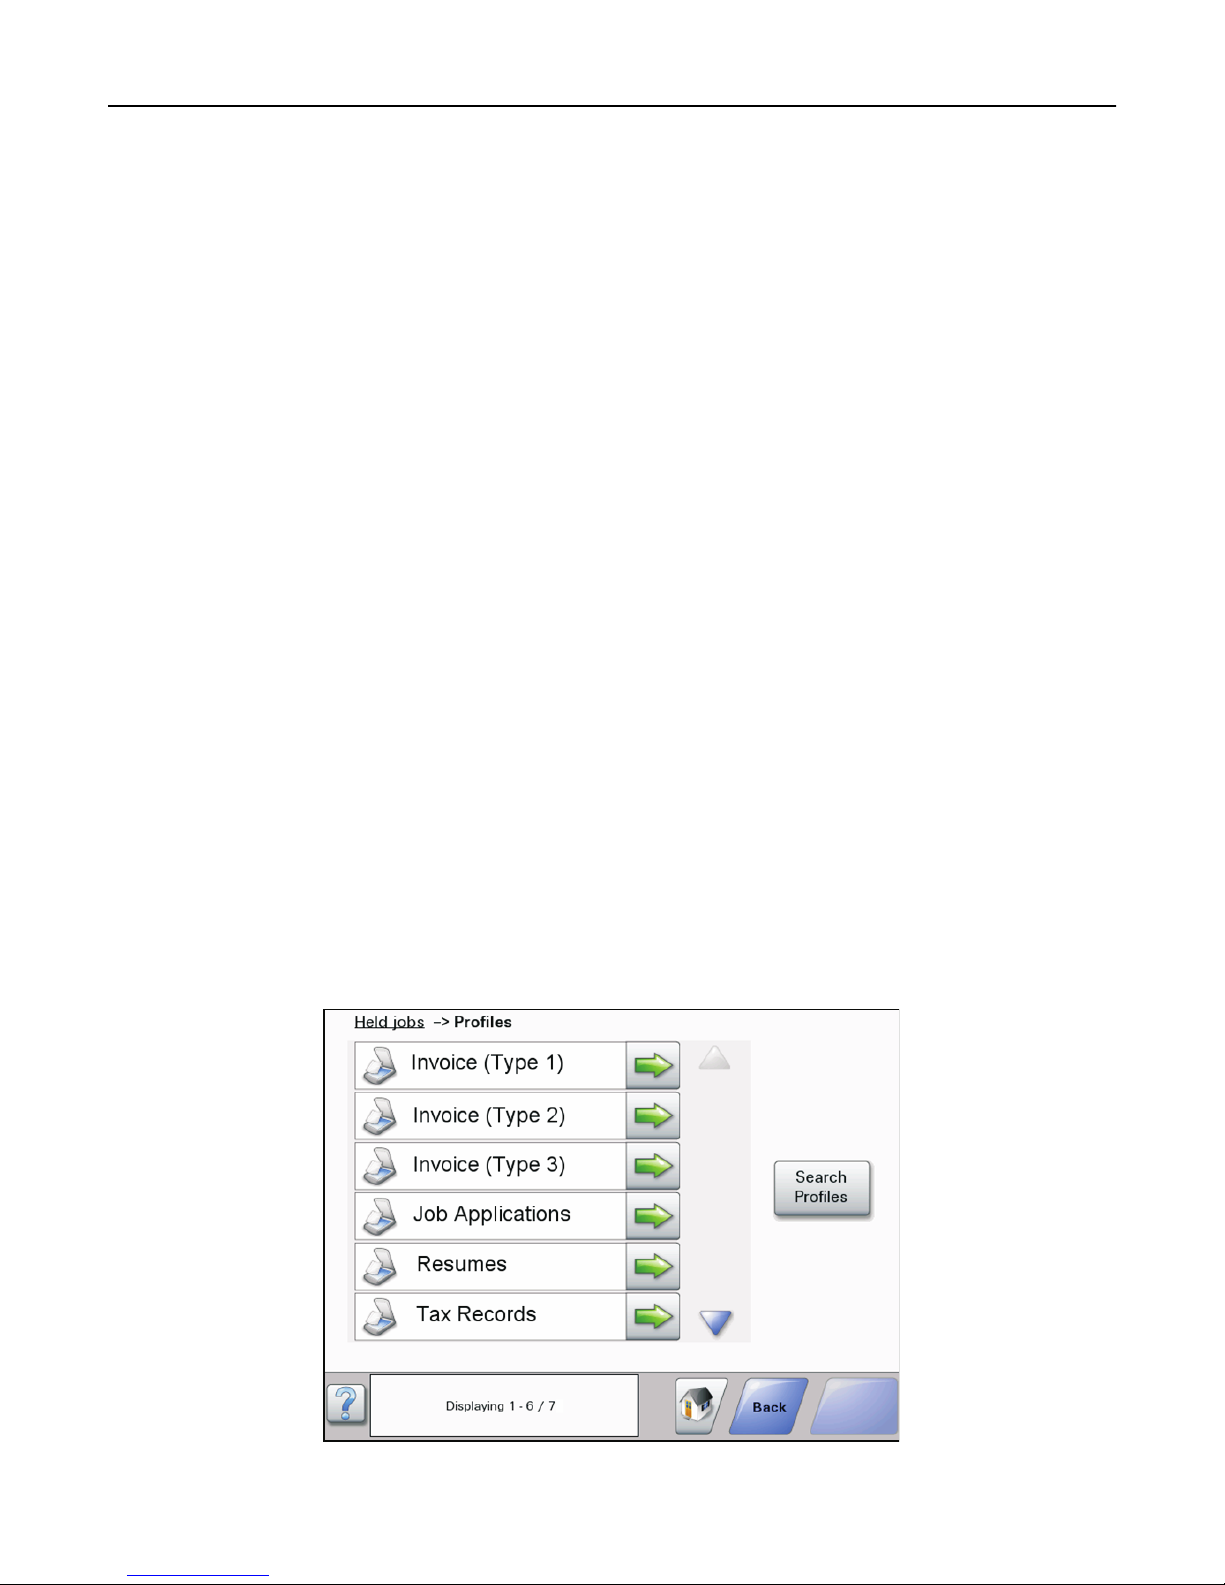
watcher. The user chooses from profiles, predefined job types that determine through scripts how the scanned
document will be processed and routed. On a printer, the most commonly used profiles are often configured as buttons
on the home screen.
Document processing
Document processing takes place on the Lexmark Intelligent Capture server after the document capture stage is
complete. The document is analyzed or modified according to scripts associated with the profile selected prior to
document capture.
Common tasks in document processing include reading bar codes, OCR, OMR, and image processing and manipulation.
Document routing
The main function of Lexma rk Intelligent Capture is delivering captured documents to other systems, using its processing
capabilities to transform paper documents into formats required by your business processes. A document can be routed
to multiple destinations. When a user submits a document, Lexmark Intelligent Capture can automatically perform any
combination of faxing, sending by e‑mail, printing, and archiving without further user intervention.
Lexmark Intelligent Capture can route documents to any of the following destinations:
• ECM systems, such as SharePoint
• E‑mail recipients
• Fax recipients
• Network shares
• FTP locations
• Printers
Confirmation
After document capture, processing, and routing, the user can be provided with feedback indicating success or failure.
A custom report may be printed, or a confirmation prompt can be displayed on the screen of e‑Task 2 or later printers.
Additionally, other Lexmark Intelligent Capture services can be used for confirmation purposes. For example, an e‑mail
notification can be sent to the user or other recipients each time a job is completed.
Understanding the Lexmark Intelligent Capture system
System components
• Clients—Clients can be either printers or workstations that use Select'N'Send (SnS) or the Lexmark Document Server
Port. The document capture and confirmation stages of a job occur at a client, and, in the case of printer clients,
prompts may be presented to the user to collect information during document processing and document routing.
• Load balancer—The load balancer receives jobs from clients and balances those jobs across servers, providing a
transition between document capture and document processing stages of a job.
Page 10
Lexmark Intelligent Capture overview 10
• Lexmark Intelligent Capture servers—The servers process incoming jobs, managing document processing and
document routing stages of a job.
• Database—The database maintains information about clients, solutions, settings, and jobs.
Reliability, scalability, and disaster recovery
The load balancer, database, and server components may be installed together on one computer or separately on
individual computers, depending on the demands placed on the system. However, a one‑computer setup is subject to
downtime if that computer fails, and the server load will be fairly limited. Ideally, a system should have at least two
server computers, connected to separate database and load balancer computers.
Lexmark Intelligent Capture is scalable to support a large number of clients, submitting jobs to as many servers as
required to handle the load. The load balancer selects a server for each received job to distribute the total load and
maintain system performance. Using multiple servers also increases system reliability. If one server fails, then the load
balancer will direct jobs to the other servers until the failed server is back online.
Lexmark Intelligent Capture uses a Tomcat Connector to manage load balancing in the system. The default balancing
method is session, which estimates the number of sessions open by counting requests to the system that do not have
a session cookie. The session count is decayed by dividing in half, once per minute by default. The server with the lowest
number of estimated sessions is selected to process the request.
To further increase reliability by keeping the system online in the event of a failing load balancer or database, the load
balancer and database can each be paired in a failover cluster using a Microsoft Cluster Server (MSCS).
Finally, you can back up the databases and solutions from the database and load balancer to a network share. If a
recovery becomes necessary, then a new load balancer and/or database can access the recovery data using a Restore
Install. Existing servers are directed to the new database and/or load balancer, or new servers are installed as necessary.
Workflow solutions
A workflow solution determines the specifics of each stage of a job in Lexmark Intelligent Capture to meet a business
need. A workflow solution usually provides a new profile, or type of job a user can initiate, on a printer or software
client to which it is deployed. Some solutions, however, may be scheduled to run at particular times.
Page 11

Lexmark Intelligent Capture overview 11
A workflow solution contains some or all of the following elements:
• Script—This defines the actions executed when a solution is initiated. Scripts can be static, or they may solicit user
input to make decisions about processing and routing documents. For example, a script that processes bank loans
may request additional user input such as a branch name, account number, or social security number.
• Policy—These are the settings for the solution and the printers to which it is deployed:
– Device settings—This is the configuration required on printers to support the jobs. This configuration typically
includes profiles but can include almost any device setting.
– Solution settings—These are solution settings that allow you to adjust jobs or printer configurations. Some
settings are global to the solution across all printers, while others vary from one group of printers to another.
• Embedded Solution Framework (eSF) application—This is an application installed on printer to provide
functionality needed by the solution, such as delayed sending of scanned documents.
• Components—These are JAR files that provide services not available in the base Lexmark Intelligent Capture
installation, such as interaction with a custom ECM system.
• Formsets—These are custom form files used for merging data with standard forms.
• Custom reports—These are reports created by a solution developer that present custom data.
• Solution Status Page—This is an easy‑to‑use Web page that can be included with solutions to simplify viewing
system status and performing basic operations related to a solution.
Client software
Client software is used to submit files from a Windows computer to the Lexmark Intelligent Capture system for
processing. A computer that uses client software is known as a software client. Lexmark Intelligent Capture can process
documents submitted through client software in the same way as documents scanned at a printer.
Note: For more information on the latest Lexmark Intelligent Capture port monitor support, see the Readme file.
There are two types of client software:
• Select'N'Send—This is a Windows application, including both a command line utility and a GUI version, that lets
users send files directly to Lexmark Intelligent Capture and select Lexmark Intelligent Capture profiles to use in
processing the sent files. Selected files are submitted to the system in their current formats.
Note: Select'N'Send does not support prompting from an Lexmark Intelligent Capture server system profile.
• Lexmark Document Server Printer Port—This is a port monitor that lets users submit documents to Lexmark
Intelligent Capture by printing from any Windows application to a print queue assigned to the port. Printed
documents are submitted to the system in the format determined by the print driver used with the print queue.
A Lexmark Intelligent Capture printer port can now be assigned to a Lexmark Intelligent Capture server system
profile that prompts for user input at the time of printing. The prompting is controlled by the profile or script running
on the Lexmark Intelligent Capture server system that the printer port is assigned to. For Lexmark Intelligent Capture
printer port prompting, the port monitor software must be installed on the computer. The Lexmark Intelligent
Capture printer port must be created and assigned to a profile that prompts to an existing print queue.
Notes:
– Lexmark Intelligent Capture printer port prompting is not supported on print servers. Do not configure a
Lexmark Intelligent Capture port on a print server to use a profile that prompts; otherwise, the spooler will
stop responding and possibly crash when print jobs start going into the print server. You can still use
Lexmark Intelligent Capture ports on print servers, but you can assign them only to profiles that do not
prompt.
Page 12
Lexmark Intelligent Capture overview 12
– Configure the nonprompting profiles in the SDK with a property in the SDK that specifies that the profile
does not prompt. This helps improve the performance of a Lexmark Intelligent Capture port assigned to a
nonprompting profile.
Lexmark Management Console
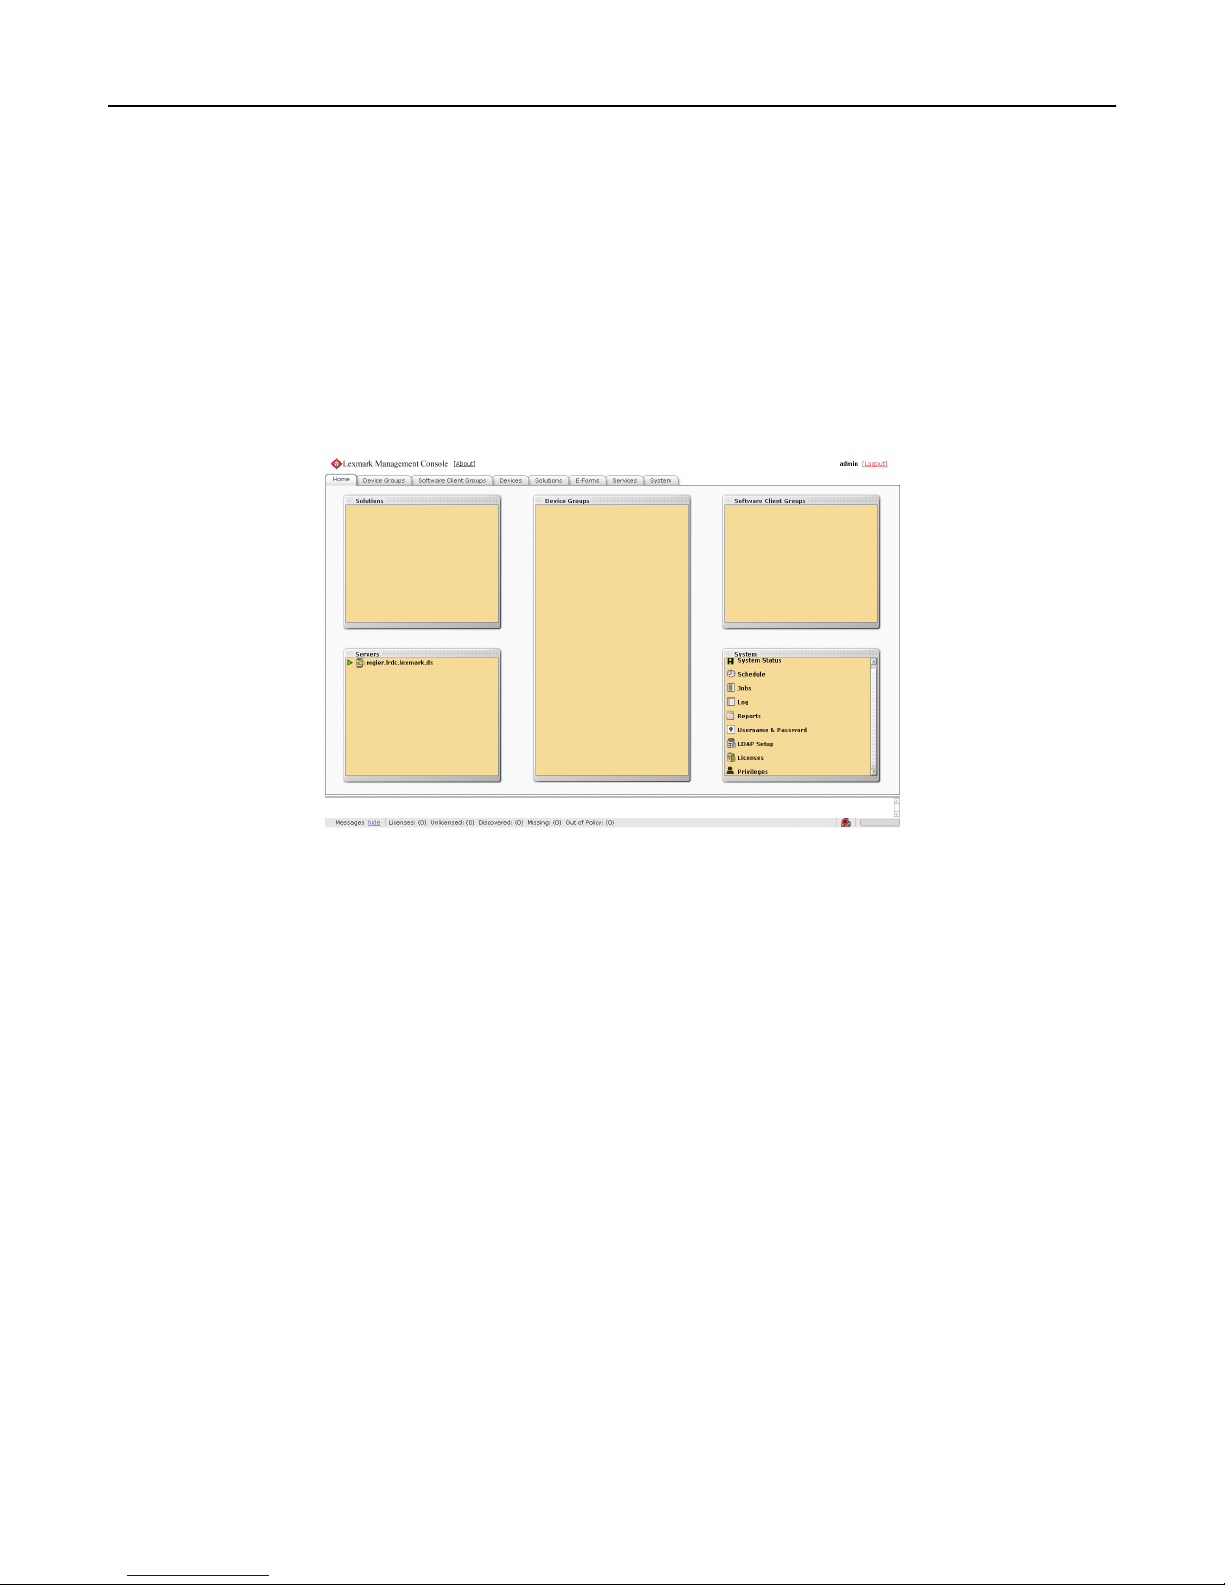
Lexmark Management Console (LMC) provides system administration for Lexmark Intelligent Capture. LMC is a Web
application hosted on the Lexmark Intelligent Capture servers and accessed through the computer where the load
balancer is installed. LMC is accessible from anywhere on the network using a Flash plug‑in with Internet Explorer or
Mozilla Firefox.
Security overview
• Administrative security—Lexmark Management Console is password‑protected so that only authorized
administrators are allowed access.
• User authentication—Printers may require users to log in to run profiles. Text and password prompts are available
for use in scripts. Kerberos authentication is available for use only with printers that support it.
Note: Secure Sockets Layer (SSL) is required to use Kerberos authentication with an Lexmark Intelligent Capture
system.
• Data encryption—Data encryption is available for communication between any two Lexmark Intelligent Capture
components, or with any Lexmark printer that supports encryption. Encryption for communication between
Lexmark Intelligent Capture components is accomplished using Internet Protocol Security (IPsec) through your
operating system. Encryption for communication with printers can be enabled for each device group in LMC.
Page 13

Lexmark Intelligent Capture overview 13
System setup overview
Each of the following steps represents a different stage of the system setup process, covered in the chapter indicated:
1 Activate the appropriate licenses, and then install the database, load balancer, and servers. For more information,
see “Installing Lexmark Intelligent Capture” on page 18.
2 Perform initial system configuration, including setting up device groups, discovering printers, and scheduling a
backup. For more information, see “Managing device groups and devices” on page 95 and “Backup and disaster
recovery” on page 86.
3 Deploy solutions to printers. For more information, see “Managing solutions” on page 91.
4 If you are using software clients, prepare software client groups and install client software where necessary. For
more information, see “Managing software clients” on page 110.
5 Test deployed solutions on printers and software clients. For more information, see “Testing and using Intelligent
Capture solutions” on page 119.
Supported printers
Notes:
• Only e‑Task 2, e‑Task 2+, e‑Task 3, and X642 printers support eSF applications used in hybrid solutions and
prompts that contain double‑byte characters.
• e‑Task 2, e‑Task 2+, e‑Task 3, and X642 multifunction printers and single‑function printers are distinguished as
separate classes for home screen customization and eSF application configuration because of different
capabilities in those areas. However, discoveries and solution profiles do not distinguish among these classes
and designate all printers listed in those classes as e‑Task 2 printers.
• During the first policy update after installation or a software patch, Lexmark Intelligent Capture installs an
Advanced Prompting Bundle (AP Bundle) eSF application on e‑Task 2, e‑Task 2+, and e‑Task 3 multifunction and
single‑function printers, and on X642 multifunction printers. This application is required for Lexmark Intelligent
Capture support and provides prompting capabilities, held jobs support, and security support for these printers
with Lexmark Intelligent Capture.
• On e-Task 2+ and e-Task 3 printers, the following access controls are supported: Remote Management, Create
Profiles, and Firmware Updates. Lexmark Intelligent Capture supports basic security that requires authentication
through a password or a PIN to change settings. If Security for these access controls is set to Disabled,
then these access controls cannot be managed by Lexmark Intelligent Capture. For more information on
changing settings for Access Controls, see the Embedded Web Server Administrator’s Guide.
Page 14

Lexmark Intelligent Capture overview 14
Multifunction printers
3,5
3,5
3,5
3,5,6
3,5,6
3,5,6
3,5,6
3,5,6
1
e‑Task printers X642 printers
• X620x
• X632x
• X634x
• X752x
• X820x
• X830x
• X832x
• X912x
1
1
1
1
1
1
1
1
X642x
2,3
e‑Task 3 printers e‑Task 2+ printers
• X548x
• 6500x
• X792x
• X925x
• X950x
• X952x
• X954x
• X746x
• X748x
Note: For more information about the latest
device and firmware level support with Lexmark
Intelligent Capture, see the Readme file.
3,4,5,6
3,4,5,6
3,4,5,6
3,4,5,6
3,4,5,6
3,4,5,6
3,4,5,6
3,4,5,6
3,4,5,6
• X463x
• X464x
• X466x
• X651x
• X652x
• X654x
• X656x
• X658x
• X734x
• X736x
• X738x
• X860x
• X862x
• X864x
1
These printers may be identified as corresponding single‑function (“C,” “T,” or “W”) models in Lexmark Management
2,3,4,5
2,3,4,5
2,3,4,5
3,4,5
3,4,5
3,4,5
3,4,5
3,4,5
3,4,5
3,4,5
3,4,5
2,3,4,5
2,3,4,5
2,3,4,5
e‑Task 2 printers
• X644x
• X646x
• X772x
• X782x
• X850x
• X852x
• X854x
• X940x
• X945x
Console. Scanning functionality is not affected.
2
These printers may require additional memory to support eSF applications.
3
These printers support Simplified Chinese prompting.
4
These printers support Traditional Chinese prompting.
5
These printers support Korean prompting.
6
These printers support Japanese prompting.
Single‑function printers
1
e‑Task 2 printers without a touch screen e‑Task 2+ printers with a touch screen
Supported
printers
1
Single‑function printers do not support all prompts supported by multifunction printers. Lists of supported prompts are
• T654x
• W850x
T656x
included here.
Page 15

Lexmark Intelligent Capture overview 15
e‑Task 2 printers without a touch screen e‑Task 2+ printers with a touch screen
Supported
prompts
• ArrayPrompt
• AuthenticationPrompt (requires a
supported card reader)
• BooleanPrompt
• IntegerPrompt
• ListPrompt
• MessagePrompt
• NumericPrompt
• PasswordPrompt
• StringPrompt
• ArrayPrompt
• AuthenticationPrompt (requires a
supported card reader)
• BooleanPrompt
• CustomVlmlPrompt
• ImageBooleanPrompt
• ImageListPrompt
• ImageMessagePrompt
• IntegerPrompt
• ListPrompt
• MessagePrompt
• NumericPrompt
• PasswordPrompt
• StringPrompt
• NullPrompt
1
Single‑function printers do not support all prompts supported by multifunction printers. Lists of supported prompts are
included here.
Page 16

Lexmark Intelligent Capture overview 16
Single‑function printers
e‑Task 3 printers with a touch screen e‑Task printers without a touch screen
Supported
printers
• C792
• C925
• C950
• C748x
Notes:
• These printers support Simplified Chinese, Traditional
Chinese, Korean, and Japanese prompting.
• For more information about the latest device and
firmware level support with Lexmark Intelligent
Capture, see the Readme file.
1
• C520x
• C522x
• C524x
• C530x
• C532x
• C534x
• C732x
• C734x
• C736x
• C780x
• C782x
• C920x
• C935x
• E450x
• E460x
• E462x
• T640x
• T642x
• T644x
• T650x
• T652x
• W840x
Supported
prompts
• ArrayPrompt
• AuthenticationPrompt (requires a supported card
reader)
• BooleanPrompt
• CustomVlmlPrompt
• ImageBooleanPrompt
• ImageListPrompt
• ImageMessagePrompt
• ArrayPrompt
• BooleanPrompt
• IntegerPrompt
• ListPrompt
• MessagePrompt
• PasswordPrompt
(supports only numeric PINs)
• NullPrompt
• IntegerPrompt
• ListPrompt
• MessagePrompt
• NumericPrompt
• PasswordPrompt
• StringPrompt
1
Single‑function printers do not support all prompts supported by multifunction printers. Lists of supported prompts are
included here.
Page 17

Lexmark Intelligent Capture overview 17
Supported ECM platforms
• IBM FileNet P8
Content Engine
• IBM FileNet IS 4.0 SP4
• IBM FileNet CS 5.4
• IBM FileNet CE 3.5.2
• Windows SharePoint Services 3.0
• Microsoft Office SharePoint Server 2007
• Microsoft SharePoint 2010
• Microsoft SharePoint Foundation 2010
• EMC Documentum 5.3
• Autonomy iManage WorkSite with WorkSite Server 8.2 or 8.5
• ImageNow 6.6
Notes:
• Integration with ECM systems may require specific licenses.
• For ECM platforms not capable of direct integration, Lexmark Intelligent Capture can save documents and a text
file containing metadata, to a directory where an ECM system is configured to poll for files.
Page 18

Installing Lexmark Intelligent Capture 18
Installing Lexmark Intelligent Capture
Minimum and recommended system requirements
Server, load balancer, and database components
Category Required Recommended for enterprise systems
Operating system Any of the following:
• Windows Server 2008 R2 Standard
or Enterprise Edition (x64)
• Windows Server 2008 Standard or
Enterprise Edition with SP2 (x86 and
x64)
• Windows Server 2003 R2 Standard
or Enterprise Edition with SP2 (x86
and x64)
• Windows Server 2003 Standard
Edition with SP2 (x86 and x64)
Note: An x86-based system refers to a
32-bit operating system and an x64based system refers to a 64-bit
operating system.
Processor 2GHz dual‑core Dual 2.5GHz quad‑core Intel Xeon or
RAM 2GB 4GB
Windows Server 2008 R2 (x64)
AMD Opteron
Page 19

Installing Lexmark Intelligent Capture 19
Category Required Recommended for enterprise systems
Hard disk drive 20GB free space for each system
component
Note: The listed space requirement
includes both space for the application
and free space for operation, but
requirements may vary depending on
system complexity and number of jobs.
Configuration 1‑N, X‑N, or X‑Y‑N:
• Database and load balancer
– Operating system and server
configured for LMC installed on
two 15000 RPM Serial‑Attached
SCSI drives configured as a
RAID 1 array with at least 80GB
free space
– Database and load balancer
installed on four 15000 RPM
Serial‑Attached SCSI drives
configured as a RAID 5 array,
with at least 300GB free space
• Servers
– Operating system and server
configured for jobs installed on
four 15000 RPM Serial‑Attached
SCSI drives configured as a
RAID 5 array with at least 80GB
free space
Note: For more information, see
“Assigning servers to only run LMC or
process jobs” on page 65.
Network speed 100Mbps network
Note: Network speed affects the time
required to perform a solution, and
speed requirements depend on each
solution. Solutions that require
intensive processing and more network
traffic may require Gigabit Ethernet to
run at a satisfactory speed.
Network name resolution Domain Name System (DNS) or
Windows Internet Name Service (WINS)
Notes:
• Local hosts files can be used
instead of external DNS.
• Contact Lexmark Professional
Services for support of other
network systems.
Gigabit Ethernet using dual‑port
network adapters
Page 20

Installing Lexmark Intelligent Capture 20
Category Required Recommended for enterprise systems
Static addressing
• The database must have a static IP
address if it is installed on a cluster.
• The load balancer must have a static
IP address if:
Static IP addresses are recommended
for all system components and any
e‑Task printers used with the system.
– It is installed on a cluster.
– Any e‑Task printers are used
with the system.
– Any printers used with the
system do not have a DNS server
configured.
Note: The database requires the most system resources and disk I/O and therefore should be installed on the fastest
hardware with the fastest disk I/O infrastructure available. Second in resource usage are the servers.
Computers where Lexmark Management Console is accessed
Category Requirements
Browser Internet Explorer 7.0 or later, or Mozilla Firefox 9.0 or later, with Adobe Flash Player 10 or later installed with
cookies enabled for the address where LMC is accessed
Video Capable of displaying 1024 x 768 or higher resolutions
Virtual machine where components are installed
Category Requirement
Virtual machine monitor VMware ESX 3.0.1 or later
Note: It is not recommended to install the database on a virtual machine.
Client software operating system compatibility
Select'N'Send and the Lexmark Document Server Printer Port can be used on the following operating systems:
• Windows Server 2008 R2 Standard or Enterprise Edition (x86 and x64)
• Windows Server 2008 Standard or Enterprise Edition with SP2 (x86 and x64)
• Windows Server 2003 R2 Standard or Enterprise Edition with SP2 (x86 and x64)
• Windows Server 2003 Standard or Enterprise Edition with SP2 (x86 and x64)
• Windows 7 (x86 and x64)
• Windows Vista with SP2 (x86 and x64)
• Windows XP Professional with SP2 (x86 and x64)
Notes:
• An x86-based system refers to a 32-bit operating system and an x64-based system refers to a 64-bit operating
system.
• Enterprise Editions and Enterprise x64 Editions of Windows Server support an active/passive or active/active
clustered print server with the Lexmark Document Server Printer Port.
• 32-bit Enterprise Editions of Windows Server support Citrix Presentation Server 4.0.
Page 21

Installing Lexmark Intelligent Capture 21
Avoiding conflicts with other software
• Install each system component on a computer with a new Windows installation and with no other software install ed.
• Avoid installing other software that includes these applications on the same computer where Lexmark Intelligent
Capture components are installed:
– Apache HTTP Server
– Apache Tomcat
– Firebird database server
• Microsoft Internet Information Services (IIS) may conflict with Apache HTTP Server and should not be installed.
Ports used by the Lexmark Intelligent Capture system
Communication using the following ports should be allowed on the network.
Notes:
• Ports depend on the implementation of each Lexmark Intelligent Capture system and may differ from the listing
shown here.
• Any ports used by forms printers are determined by the Lexmark Intelligent Capture administrator.
Component Port Protocol Function
Database 3050 TCP Database communications
8001 TCP Backup/restore agent
Load balancer 4113 TCP Web adapter (JMX)
9700 TCP Profile submission to e-Task printers, Web adapter (JMX)
9705 TCP Apache agent
9780 TCP Load balancer communications, including LMC
Server 4111 TCP JMX
5111 TCP RMI
8009 TCP AJP/Tomcat connector (load balancer worker)
9743 TCP Profile submission to printers using SSL
9780 TCP Profile submission to printers
9788 TCP Profile submission to printers
Page 22

Installing Lexmark Intelligent Capture 22
Component Port Protocol Function
Printer 79 TCP Finger
161 UDP SNMP, device discovery
5000 TCP Policy updates, ObjectStore plain text communication
5353 UDP Multicast DNS
6000 UDP Device discovery, ObjectStore communication using XML protocol
6100 UDP Device discovery, policy updates, Lexmark Secure Transport (LST) encrypted data
6110 TCP Device discovery, policy updates, LST authentication and negotiation
9100 TCP Printing, policy updates
9300 UDP Device discovery, NPA protocol UDP communications
9500 TCP NPA protocol TCP communications
Software clients 9780 TCP Profile submission
9788 TCP Profile submission
Activating Lexmark Intelligent Capture licenses
Notes:
• If your Lexmark reseller has provided you with license files, then save them in a folder accessible to the server,
skip the following procedure, and then continue with the server installation using the provided license files.
• If your Lexmark reseller manages your licenses, then you may not be provided with an entitlement ID. Contact
your reseller to obtain the proper licenses.
• When using a failover cluster for the load balancer, a complete set of licenses (including a server license, printer
licenses for all printers, a client license if applicable, and e‑forms virtual printer licenses if applicable) must be
activated for the host ID of each node in the cluster and made available on the shared drive.
• Before installing the load balancer, the appropriate licenses must be activated. Activation associates the server
license, each printer license, and, if applicable, a client license with the physical address of the load balancer in
the Lexmark Intelligent Capture system and generates license files that will only work with that system.
1 On the computer where you want to install the load balancer or workgroup system, click Activate and Download
License File(s) in the installation window.
2 Enter the entitlement ID provided with the server software package.
3 Copy the host ID displayed on the installation window.
Notes:
• The host ID is the physical address (MAC address) of the network adapter in the server, without hyphens or
other punctuation.
• If multiple network adapters are present, then a list of host IDs are shown. Any listed host ID is appropriate
as long as the associated network adapter remains in the server. However, using the host ID associated with
the network adapter connected to the same network as your Lexmark Intelligent Capture system may help
avoid future confusion. For more information, see “Finding the host ID” on page 68.
4 Click Launch Lexmark Licensing Portal.
Page 23
Installing Lexmark Intelligent Capture 23
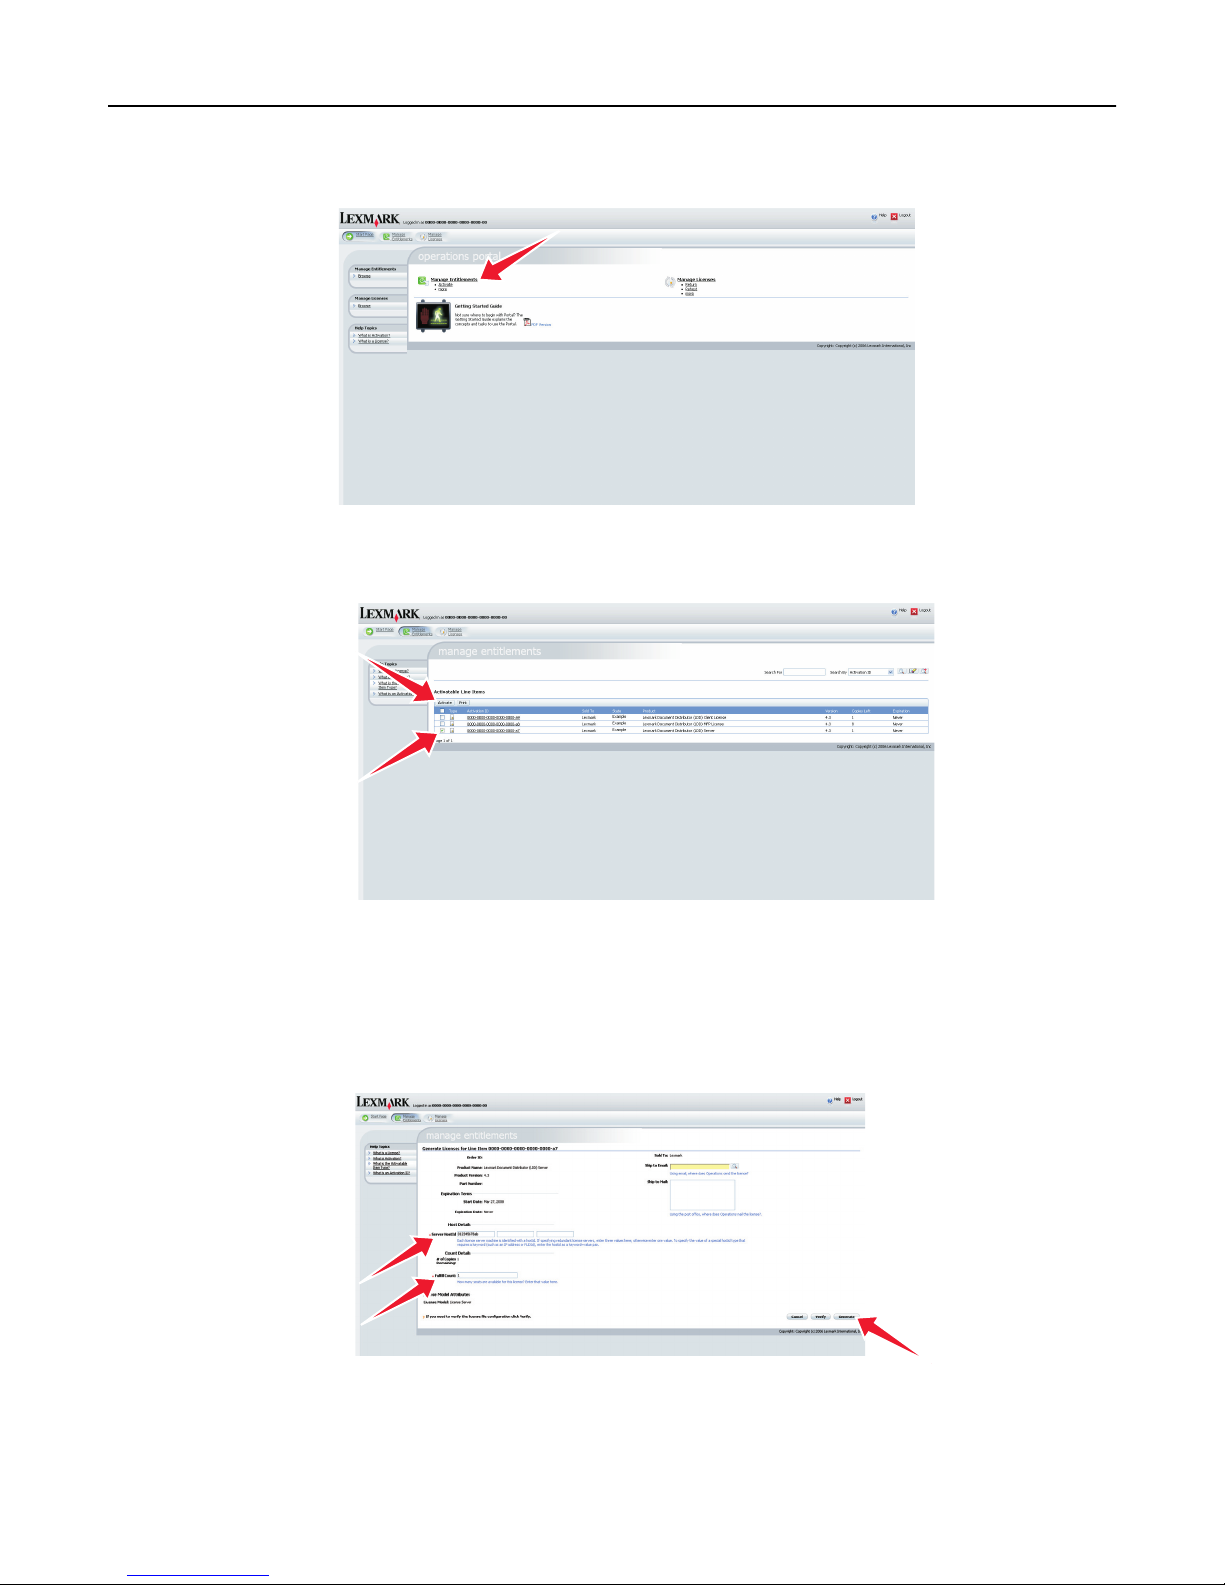
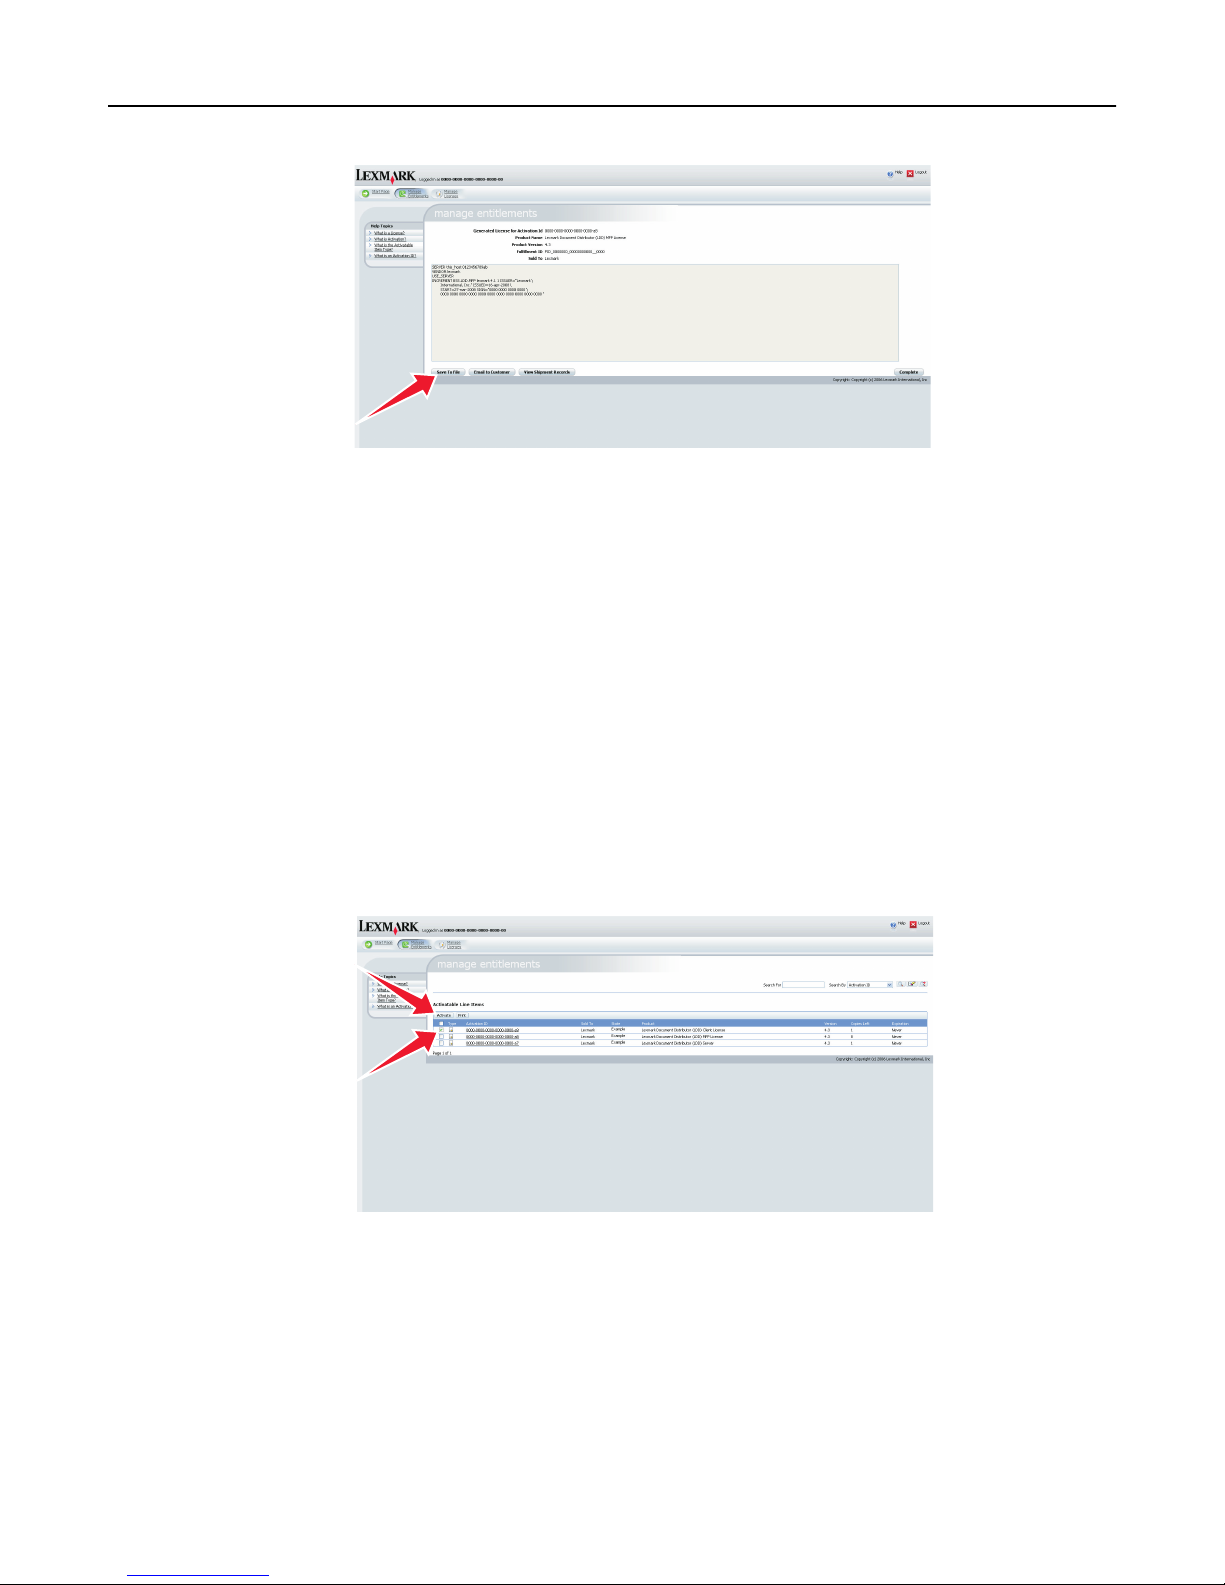
5 In your Web browser, click Manage Entitlements.
6 Activate and download the license for your Lexmark Intelligent Capture server system:
a Select the line for the product Lexmark Intelligent Capture Server, and then click Activate.
b In the first Host ID field, enter the host ID determined in step 3.
Note: The host ID is the physical address (MAC address) of the network adapter in the server, without
hyphens or other punctuation.
c In the Fulfill Count field, type 1.
d Click Generate.
Page 24
Installing Lexmark Intelligent Capture 24
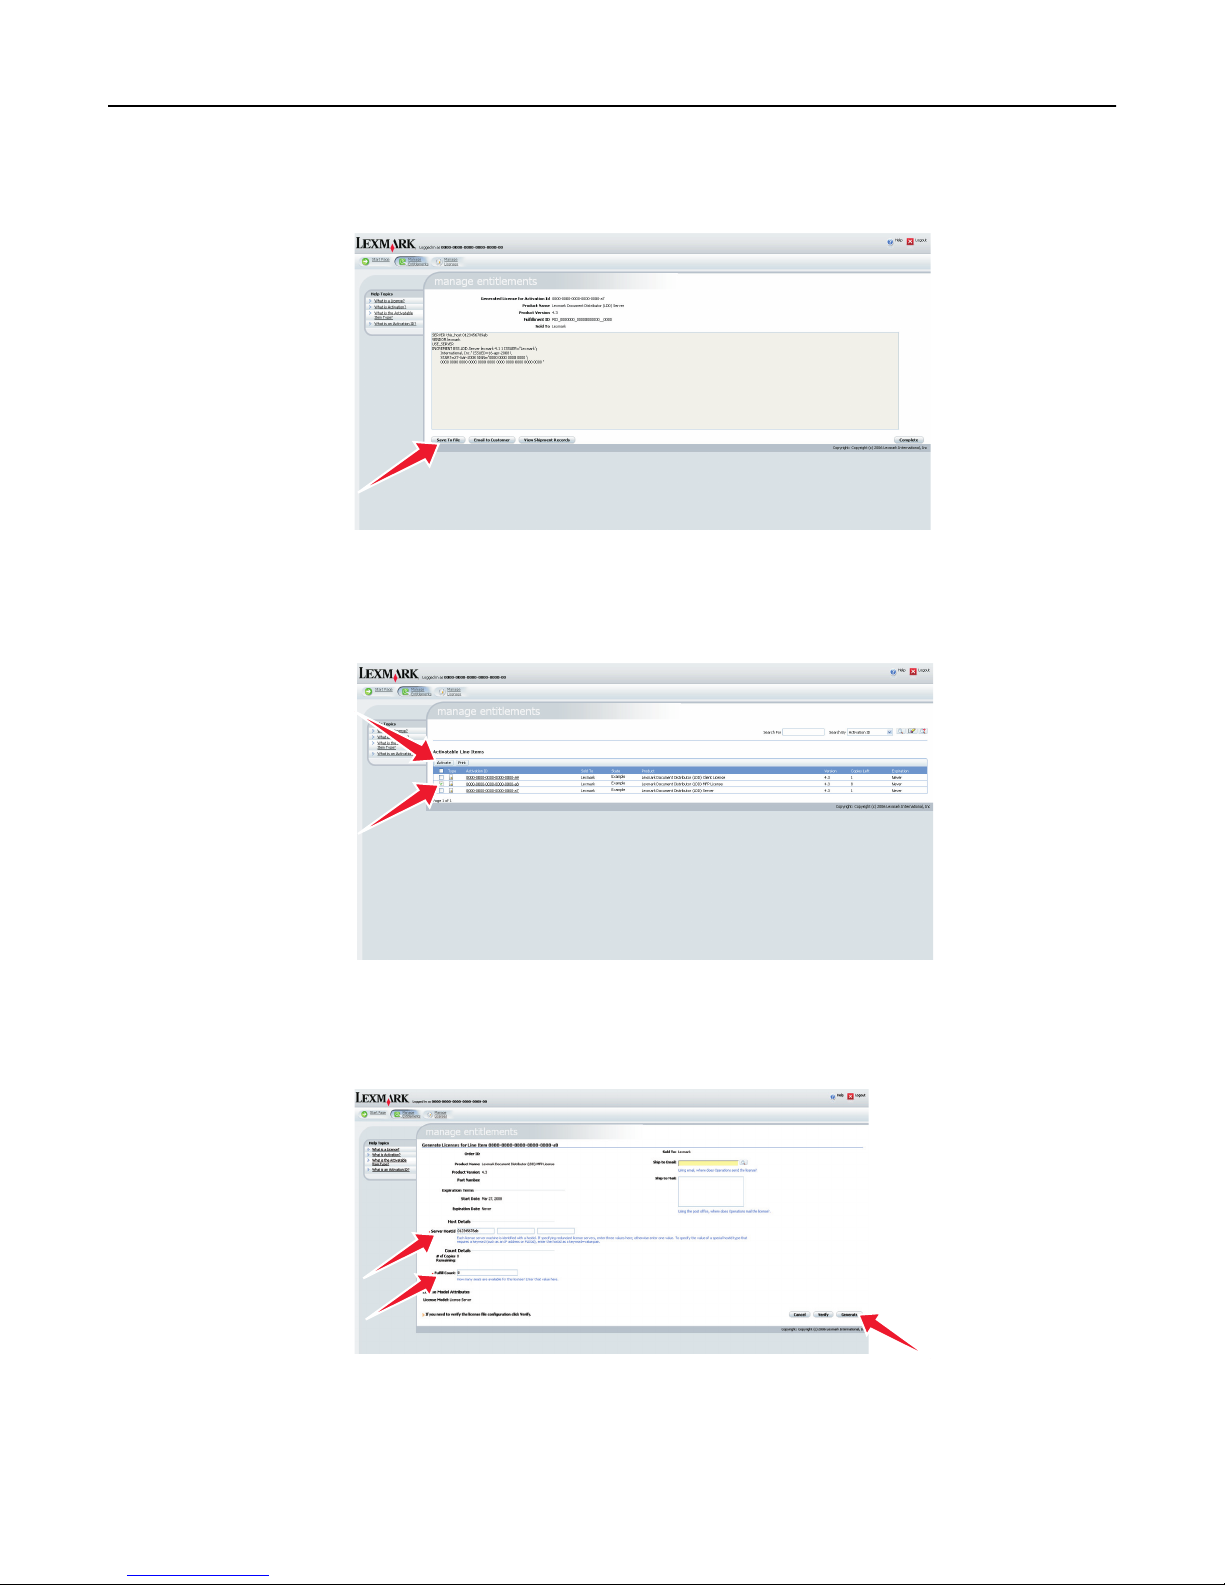
e Click Save To File, and then save the file using a descriptive file name, such as server.lic, to a folder
accessible to the load balancer.
f Click Complete.
7 Activate and download the license for using Lexmark Intelligent Capture with your printers:
a Select the line for the product Lexmark Intelligent Capture MFP License, and then click Activate.
b In the first Host ID field, type the host ID determined in step 3.
c In the Fulfill Count field, type the number of printers associated with the server you are licensing.
d Click Generate.
e Click Save To File, and then save the file using a descriptive file name, such as printer.lic, in the same
folder used in step 6.
Note: Use a file name different from any other saved license files so they are not overwritten.
Page 25
Installing Lexmark Intelligent Capture 25
f Click Complete.
8 If you are using e‑forms, then activate and download the license for e‑forms virtual printers:
a Select the line for the product Lexmark Intelligent Capture EFVP License, and then click Activate.
b In the first Host ID field, type the host ID determined in step 3.
c In the Fulfill Count field, type the number of e‑forms virtual printers associated with the server.
d Click Generate.
e Click Save To File, and then save the file using a descriptive file name, such as efvp.lic, in the same folder
used in step 6.
Note: Use a file name different from any other saved license files so they are not overwritten.
f Click Complete.
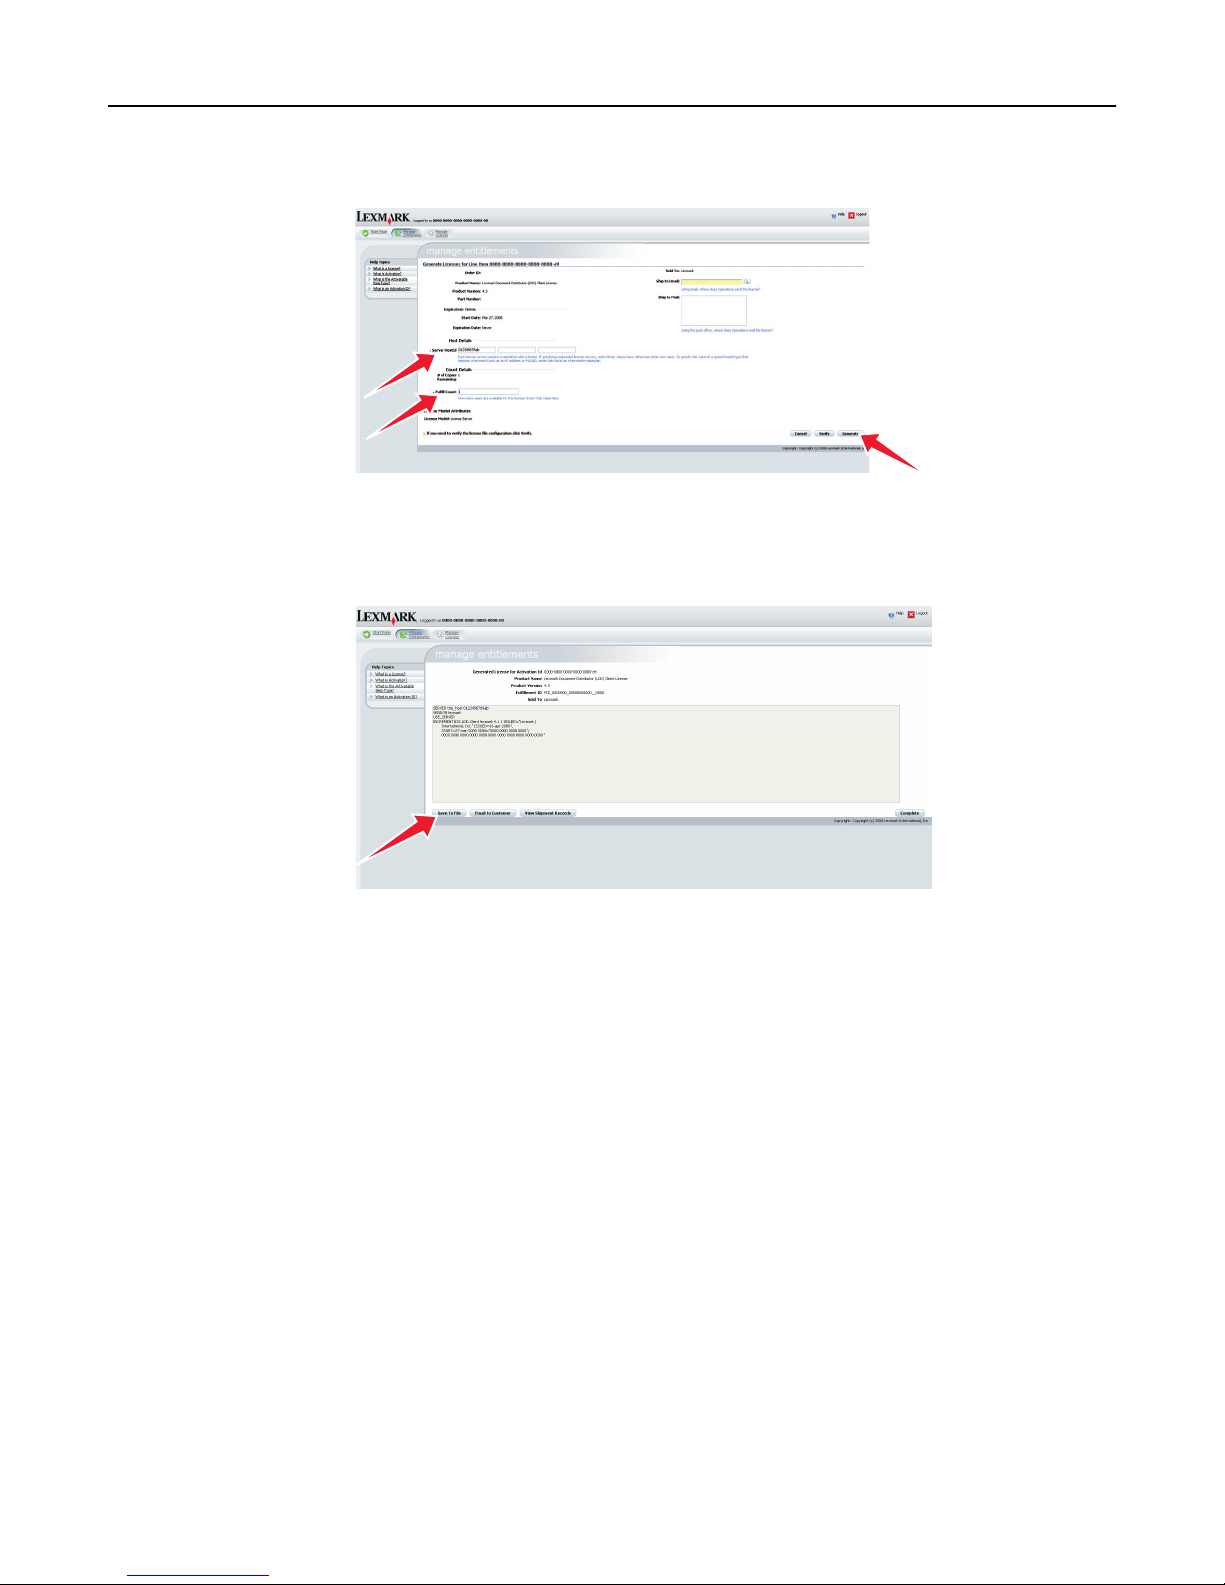
9 If you are using software clients with your Lexmark Intelligent Capture system, then activate and download the
license for software clients:
a Select the line for the product Lexmark Intelligent Capture Client License, and then click Activate.
b In the first Host ID field, type the host ID determined in step 3. If you are using a failover cluster for the load
balancer, then type the host IDs for standby nodes in the additional host ID fields.
c In the Fulfill Count field, type the number of software clients associated with the server.
Page 26
Installing Lexmark Intelligent Capture 26
d Click Generate.
e Click Save To File, and then save the file using a descriptive file name, such as client.lic, in the same folder
used in step 6 and step 7.
Note: Use a file name different from any other saved license files so they are not overwritten.
f Click Complete.
Understanding installation types
Two types of Lexmark Intelligent Capture systems can be installed:
• Workgroup system—This is a Lexmark Intelligent Capture installation with a packaged solution for smaller systems.
Installing a workgroup system quickly installs the database, load balancer, and one server on one computer, and a
solution is installed during the installation.
• Enterprise system—This is the standard Lexmark Intelligent Capture installation for larger systems and more
demanding applications. Installing an enterprise system lets you install the database, load balancer, and servers on
different computers to create a reliable and scalable system.
Page 27
Installing Lexmark Intelligent Capture 27
Installing a workgroup system
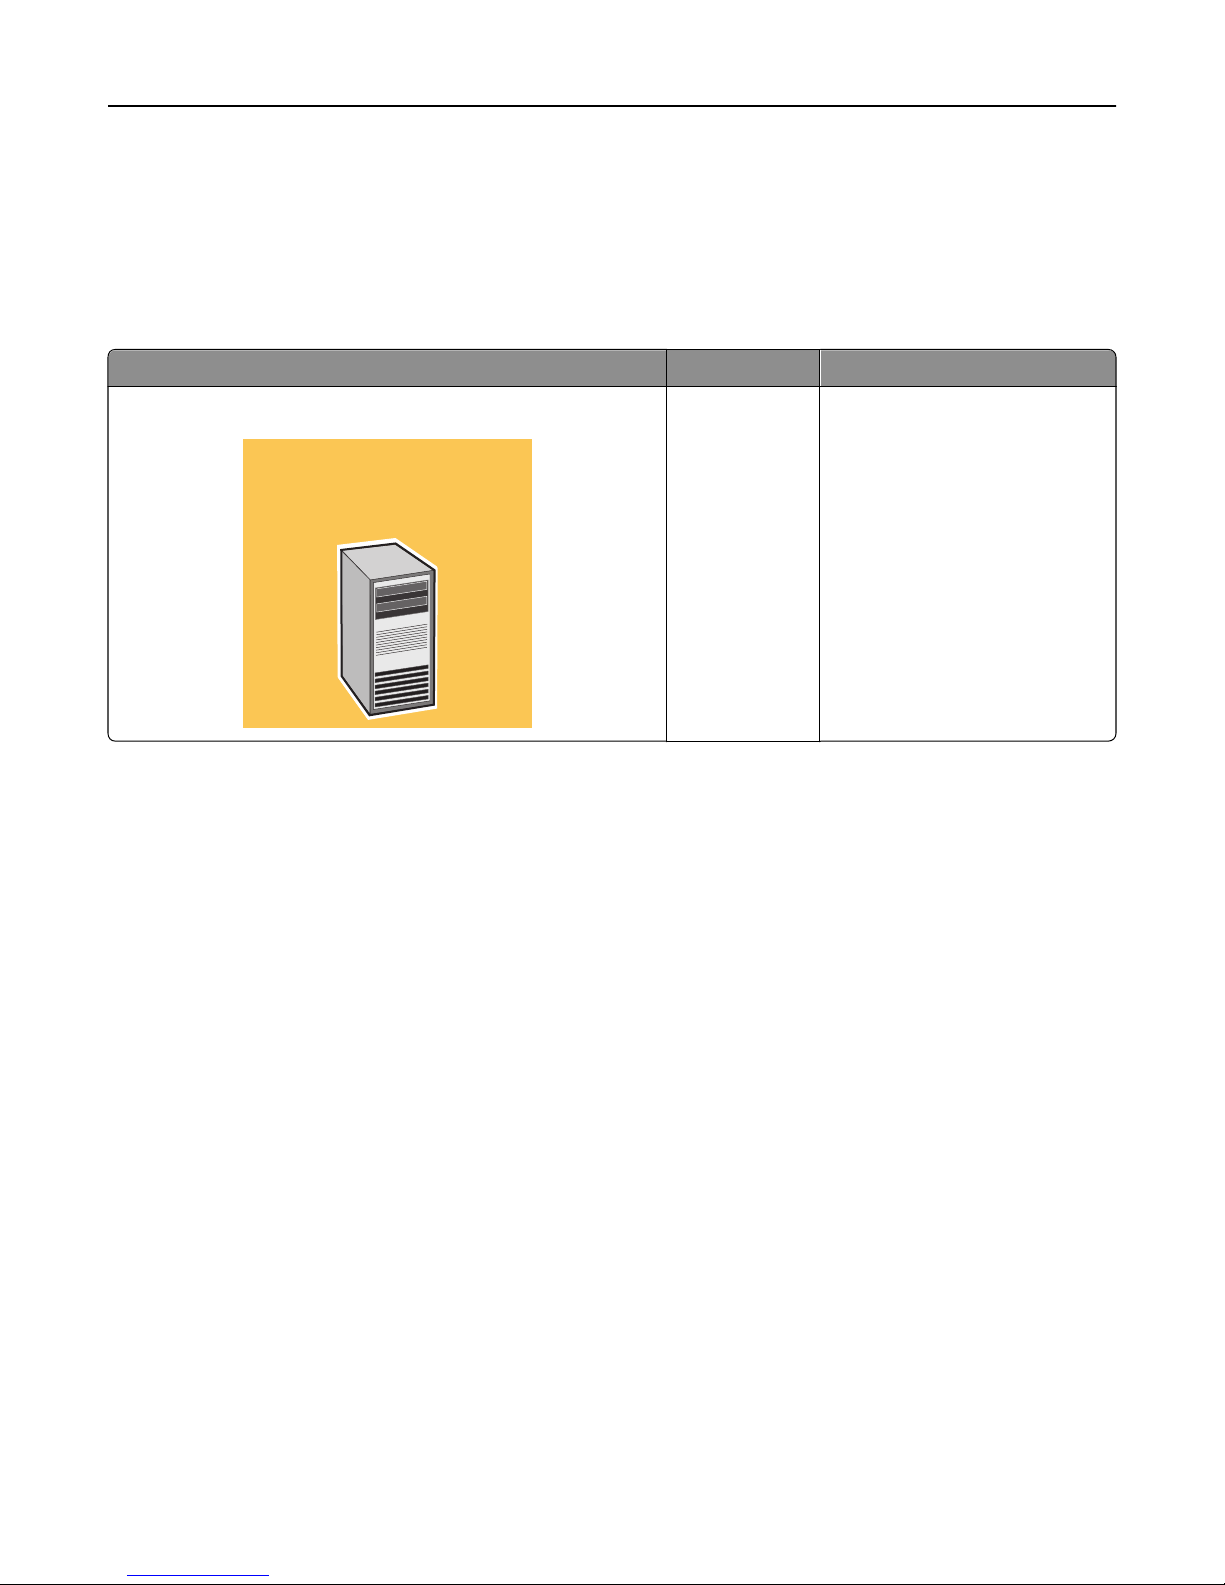
Configuration type for workgroup systems
Configuration type and its advantages and disadvantages
Description Advantage Disadvantage
Database (DB), load balancer (LB), and server on a single computer
Minimum
equipment
No failover for database or load
balancer, limited resources
DB
LB
Server
Installation overview for a workgroup system
1 Configure the computer where to install Lexmark Intelligent Capture on the network.
2 Activate and download licenses.
3 Install Lexmark Intelligent Capture using a workgroup installation.
4 Change the administrator password, and optionally, the administrator user name.
5 Temporarily set servers online to test function.
Note: Because software clients are managed differently than printers, client software is installed later in the system
setup process. For information about installing client software and managing software clients, see “Managing
software clients” on page 110.
Installing system components in a workgroup system
1 From the Lexmark Intelligent Capture installation package, run Setup.exe.
2 From the Lexmark Solutions installation window, click Install Workgroup System.
3 Click Agree to accept the license agreement.
4 Specify the folder where the server software should be installed, and then click Next.
5 If multiple network adapters are present, then select the network containing your printers by selecting the IP address
of the server on that network, and then click Next.
Page 28
Installing Lexmark Intelligent Capture 28
6 If you are installing a system to recover a backup, then do the following:
a Select Restore Install (RI).
b Type the path of the folder containing the .ri file from the backup, or click the folder icon and then locate the .ri
file.
7 Specify the folder where you stored the license files during the activation process.
Notes:
• If the license files are located on a network share that requires authentication, then you must supply
authentication before specifying the license location. To authenticate with the remote server, click Start >
Run, type the UNC path to the share (for example, \\myserver\myshare\), and then type the user
name and password when prompted.
• During installation, the license files are copied to the program folder. You can safely move the license files
from the temporary location where you saved them.
8 Specify the solution file that should be installed with the workgroup system.
9 Click Finish > Done.
Installing an enterprise system
Configuration types for enterprise systems
When installing an enterprise system, Lexmark Intelligent Capture can be installed using the following hardware
configurations:
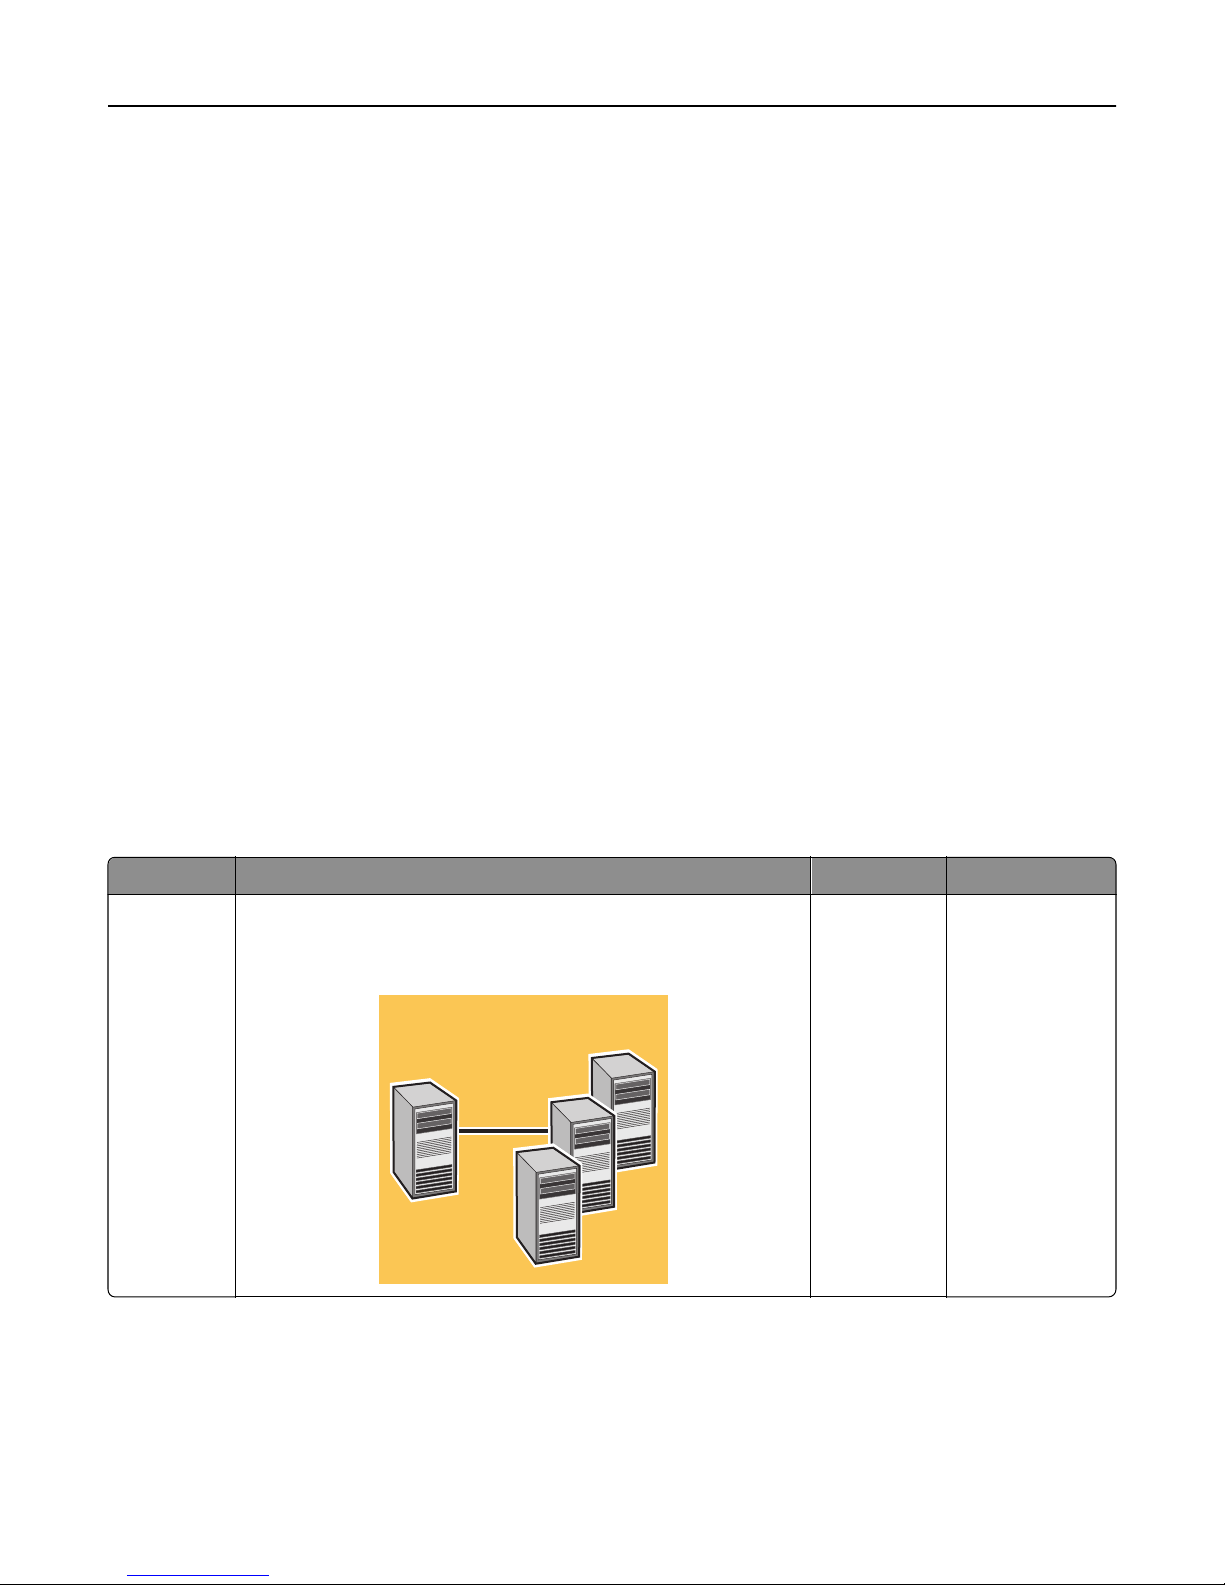
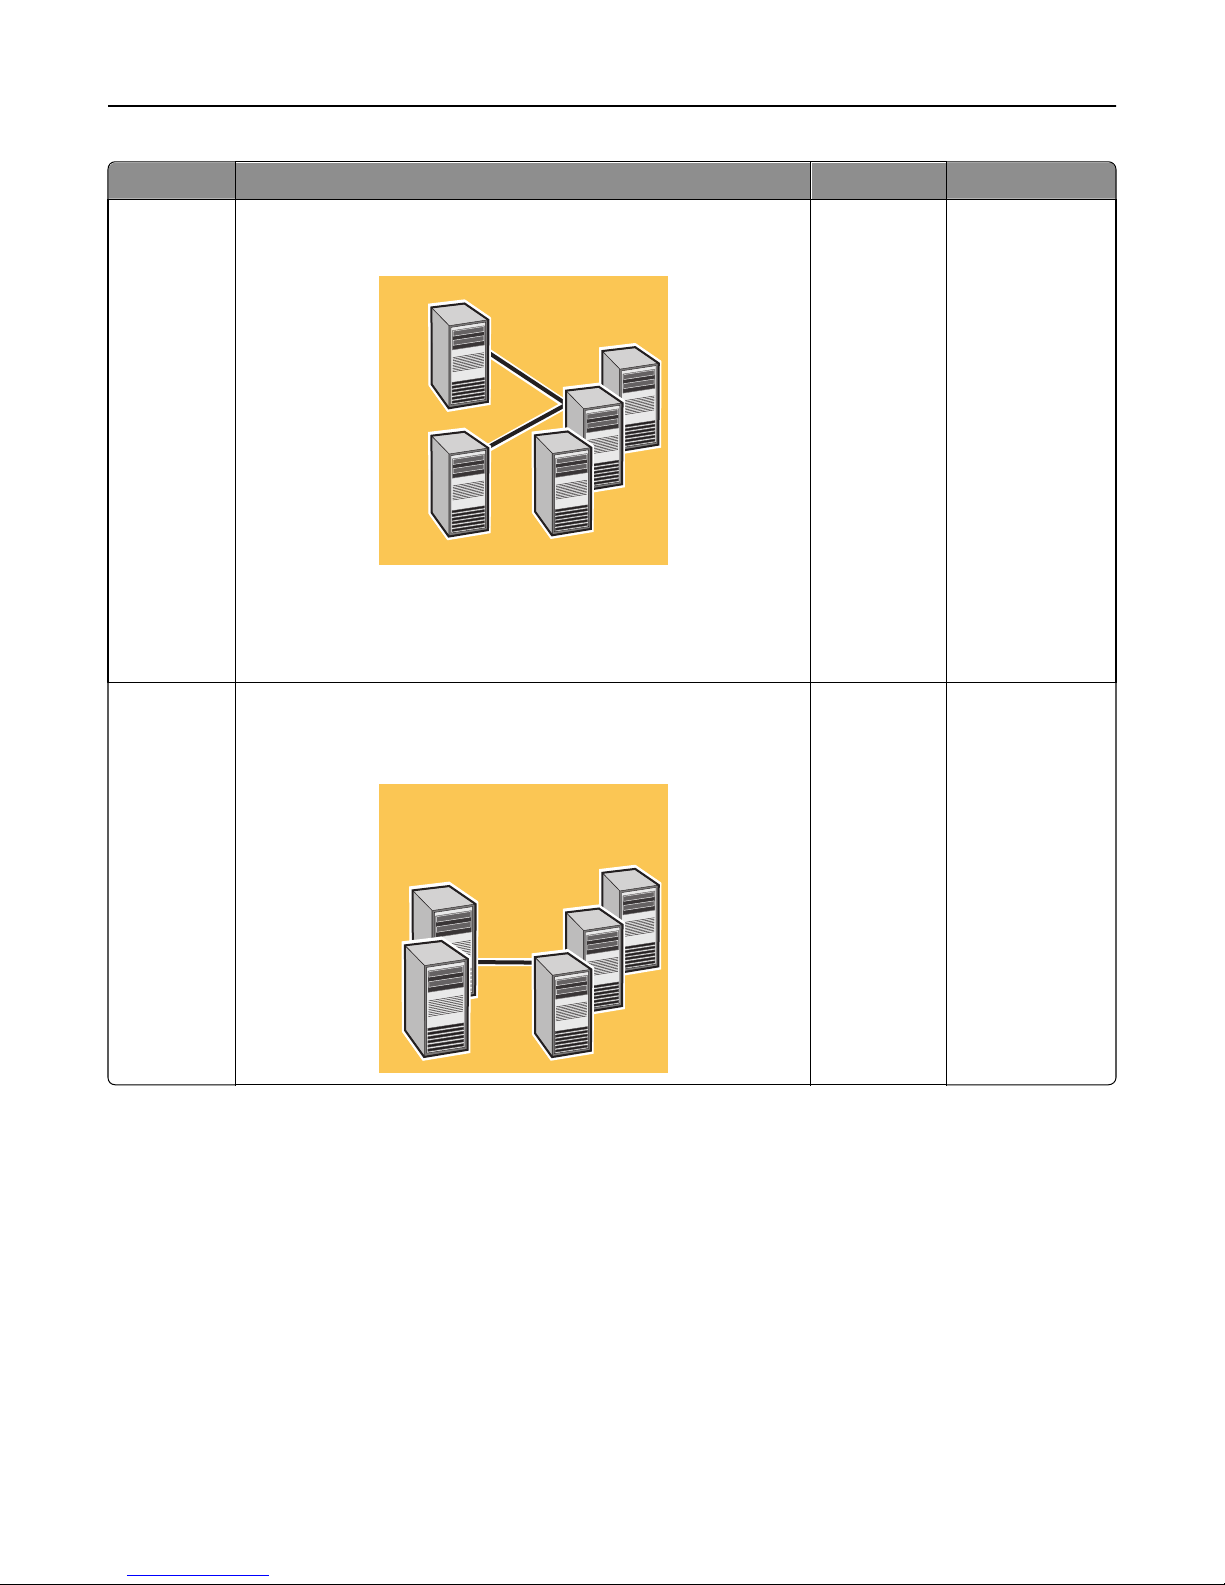
Configuration Description Advantages Disadvantages
1‑N Database (DB) and load balancer (LB) on one computer, server on one
or more additional computers (most common setup when failover is
not used)
DB
Server(s)
LB
Improved
performance
Increased
hardware needs,
no failover for
database or load
balancer
Page 29
Installing Lexmark Intelligent Capture 29
Configuration Description Advantages Disadvantages
1‑1‑N Database (DB) and load balancer (LB) on separate computers, server
on one or more additional computers
Server(s)
LB
DB
Note: An external Oracle database may be installed in place of the
standard database, resulting in an E-1-N configuration. The external
database (E) and load balancer (LB) are on separate computers, and
the server is on one or more additional computers.
X‑N Database (DB) and load balancer (LB) together on X computers in a
Microsoft Cluster Server for failover, server on one or more additional
computers (most common setup when using failover)
DB
LB
Server(s)
(cluster)
Further
improved
performance
High
availability,
improved
performance
Further increased
hardware needs,
no failover for
database or load
balancer
Increased
hardware needs,
cluster licensing
Page 30
Installing Lexmark Intelligent Capture 30
Configuration Description Advantages Disadvantages
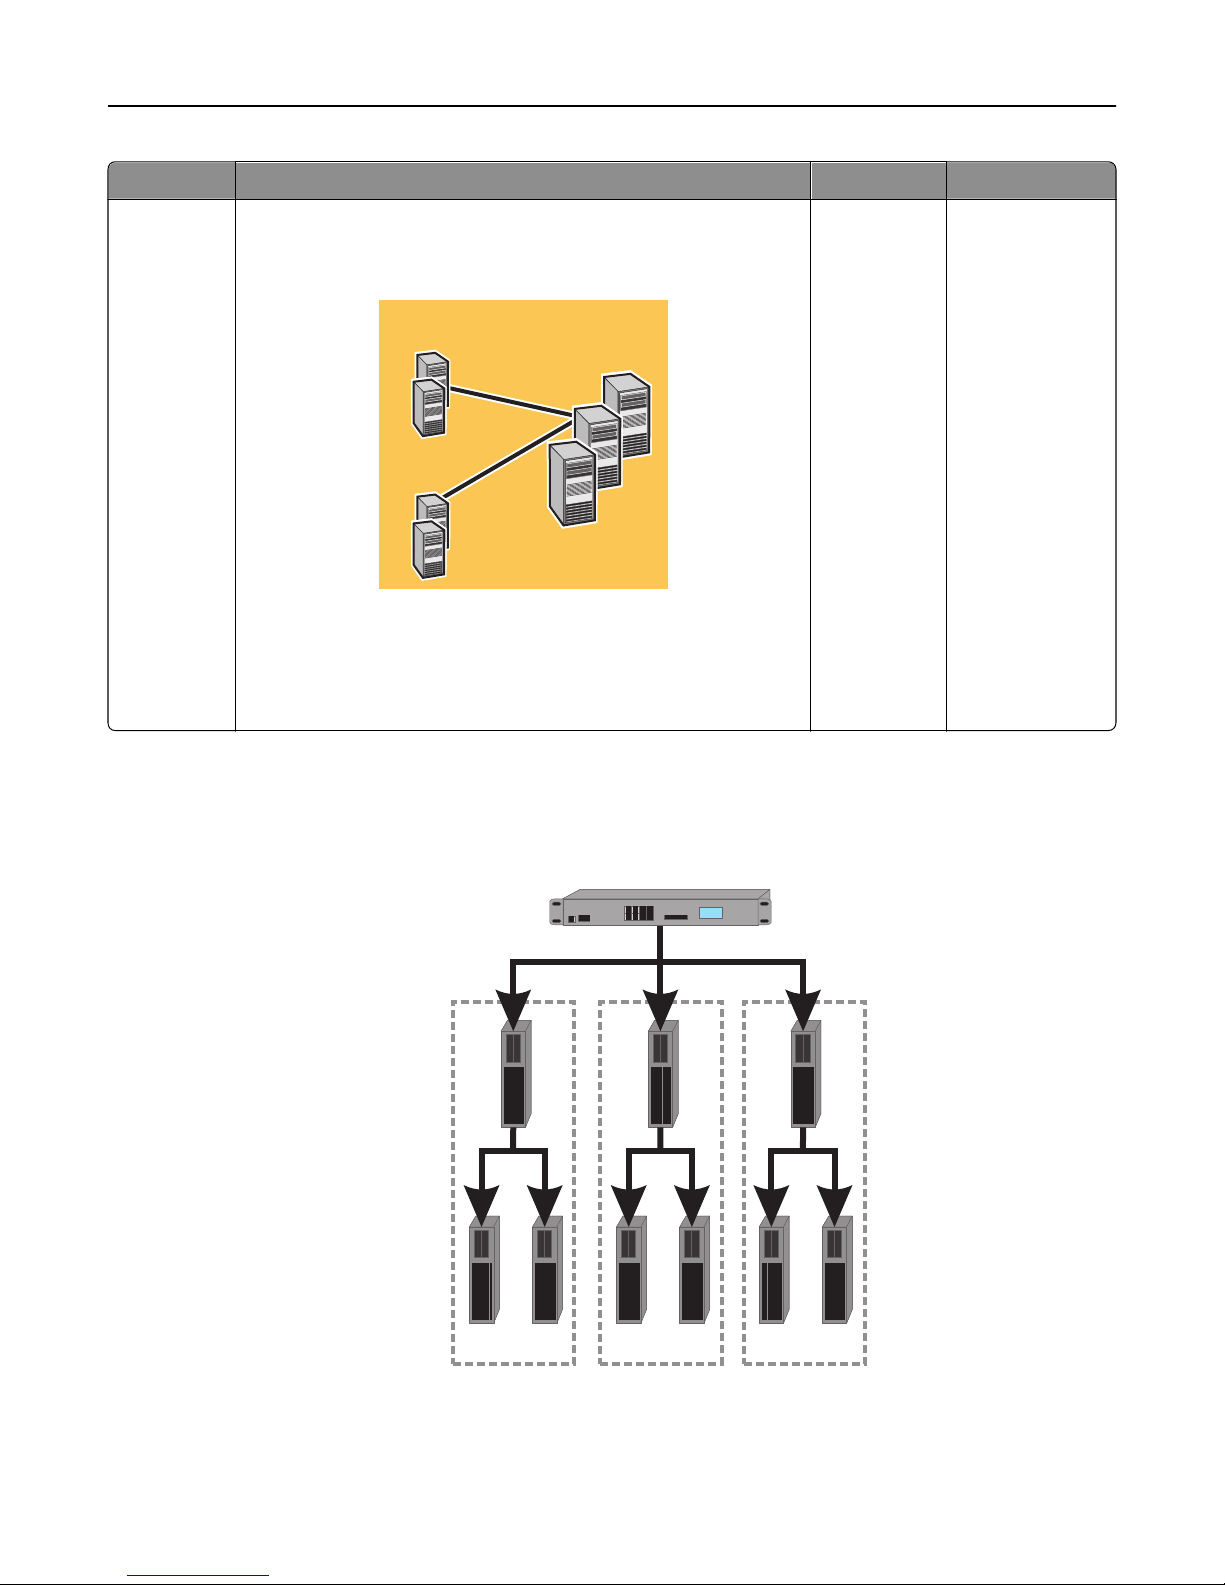
X‑Y‑N Database (DB) on X computers in a Microsoft Cluster Server for
failover, load balancer (LB) on Y other computers in a Microsoft Cluster
Server for failover, server on one or more additional computers
LB
(cluster)
DB
(cluster)
Note: An external Oracle database may be installed in place of the
standard database, resulting in an E-Y-N configuration. The external
database (E) on X computers and the load balancer (LB) on Y other
computers are in a Microsoft Cluster Server for failover. The server
is on one or more additional computers.
Server(s)
Using multiple systems for high availability
High
availability,
further
improved
performance
Further increased
hardware needs,
cluster licensing
When configuring multiple Lexmark Intelligent Capture systems, you can connect them to a hardware load balancer or
Global Site Selector (GSS) to provide high availability, without using clustering, as well as increased capacity.
Hardware load balancer
A1 A2 A3
Load
balancers/
databases
Servers
T1 T2 T3
Configuration 1-N
LDD system
T4 T5
Configuration 1-N
LDD system
Configuration 1-N
T6
LDD system
Each system group contains two identical Lexmark Intelligent Capture systems. Jobs are balanced between these
systems in each group by the hardware load balancer or GSS. If a failure occurs in one system in a group, then the other
system in the group receives all incoming jobs until the failed system can be restored.
Page 31

Installing Lexmark Intelligent Capture 31
With this type of setup, you need additional computers, as well as a hardware load balancer or GSS. You also need to
manually configure these systems to be identical.
Note: Printers that do not support eSF applications cannot be used with a Lexmark Intelligent Capture system that
uses a hardware load balancer or GSS.
When a hardware load balancer is used with multiple Lexmark Intelligent Capture systems, the hardware load balancer
must be configured as follows:
• The X-Forwarded-For HTTP header must be inserted into incoming packets.
The packets going into the Lexmark Intelligent Capture systems from the HW LB should not appear to be from the
hardware load balancer of the packet headers so that device or clients groups and their settings will work properly.
• Cookie-based session persistence must be disabled.
This is needed in case one of the Lexmark Intelligent Capture systems is down. If this is enabled, then LMC may not
work properly when one of the Lexmark Intelligent Capture systems is down.
• The load balancing algorithm should be set to Round Robin.
Based on tests made on hardware balancing algorithms, Lexmark Intelligent Capture systems work better with
round robin than the other algorithms.
System sizing guidelines
There are two main factors for determining the number of servers required to process jobs efficiently:
• Peak demand—This is usually the deciding factor when the average execution time for a solution is under 30
seconds.
• Concurrency—This is usually the deciding factor when the average execution time for a solution is over 30 seconds.
Additionally, the database, when installed on the recommended hardware and connected using Gigabit Ethernet, can
process 200,000 logged messages per hour, which is approximately 40,000 jobs per hour when using a typical solution
(five logged messages per job). If this limit is reached, then it may be necessary to use multiple systems.
Peak demand
Use the following formulas to determine the number of servers necessary to handle peak loads for a particular solution:
(System‑wide hourly job rate) = (system printer capacity) x (jobs per printer per day) / (length of business day)
(Peak demand) = 2 x (system‑wide hourly job rate)
(Minimum number of servers) = (peak demand) / (single‑server throughput for current solution)
Consider the following example:
• Each server in your system can process 3000 jobs per hour using the solution.
• There is capacity for 300 printers in your system.
• Each printer in your system averages 100 jobs per day.
Perform the following calculations:
1 Determine the system‑wide hourly job rate:
(300 printers) x (100 daily jobs/printer) / (8 hours/day) = 3750 jobs/hour
2 Determine the peak demand:
2 x (3750 jobs/hour) = 7500 jobs/hour
Page 32

Installing Lexmark Intelligent Capture 32
3 Determine the minimum number of servers:
(7500 jobs/hour) / (3000 jobs/hour) = 2.5
Rounding up, the system should include three servers to reliably handle the peak load for a solution with average
execution time below 30 seconds.
The single‑server throughput for a solution must be determined by the solution developer, though the following typical
throughputs on a server with the recommended hardware may help determine a rough estimate:
Solution processing load Functions used Average single‑server throughput
Typical
• Some image processing
6000–8000 jobs per hour
• Printing
Heavy
• Extensive image processing
2000–3000 jobs per hour
• Bar codes
• External processes
• Small to medium Document Producer (e-forms) jobs
Very heavy (OCR)
• OCR
100–200 jobs per hour
• Large Document Producer (e-forms) jobs
Note: Using less than the recommended RAM significantly reduces throughput. For example, a dual‑processor server
with only 2GB of RAM can process only 600–800 jobs/hour when using a “heavy” solution.
For more information, see the Lexmark Document Distributor SDK Guide.
Concurrency
Each server that meets recommended requirements can process 30 concurrent jobs from clients. The following formula
determines the number of servers necessary to meet concurrency requirements:
(minimum number of servers) = (number of printers expected to submit jobs near the same time) / 30
For example, assume that 1/3 of the 300 printers in the last example might be active at the same time:
100 / 30 = 3.33
Rounding up, the system should include four servers to allow for 100 active printers for a solution with average execution
time below 30 seconds.
Installation overview for an enterprise system
1 Select a system configuration, and then configure the appropriate hardware on the network.
2 Make sure the time on all computers used in the Lexmark Intelligent Capture system is synchronized using a Network
Time Protocol (NTP) server.
3 Install the system components.
Note: If you are installing Lexmark Intelligent Capture using the default database (Firebird), then the system
components can be installed in any order. However, if you are using Oracle database, then see “Using Oracle
database with Lexmark Intelligent Capture” on page 33 before installing Lexmark Intelligent Capture.
a Install the database.
b Activate and download licenses on the computer where the load balancer will be installed.
Page 33

Installing Lexmark Intelligent Capture 33
c Install the load balancer.
d If you are using one or more Microsoft Cluster Servers, then extend the database and load balancer to standby
nodes.
e Install servers.
Note: Multiple servers should not be installed at the same time. Let each server installation complete
before beginning another server installation.
4 Change the administrator password. You can also change the administrator user name.
5 Temporarily set servers online to test function.
Notes:
• The database requires the most system resources and disk I/O, and therefore should be installed on the fastest
hardware with the fastest disk I/O infrastructure available. Second in resource usage are the servers.
• Lexmark Intelligent Capture components can be installed on virtual servers using VMware ESX 3.0.1 or later.
However, the best performance can be achieved only by using separate physical servers.
Using Oracle database with Lexmark Intelligent Capture
If you are using Oracle as the back-end database, then make sure:
• The Oracle database 10g or later is completely installed before proceeding with the Lexmark Intelligent Capture
installation.
• Lexmark Intelligent Capture system components are not installed on the server running Oracle.
• The internal Lexmark Intelligent Capture database is not installed.
For Lexmark Intelligent Capture to work with Oracle, six databases should be created before the load balancer and
server are installed. To help the database administrator create these databases, Lexmark Intelligent Capture includes
the following in the installation package:
• Database templates—These are Database Configuration Assistant (DBCA) templates used to create databases. Your
database administrator can launch these templates through DBCA, and then configure parameter settings as
needed.
• Scripts—These are user configuration scripts for adding users. Users are added to access and manage Lexmark
Intelligent Capture databases.
• Pfiles—These files contain information about the database configuration parameters. The values of database
configuration parameters may vary, except the parameter value for nls_timestamp_format and
nls_timestamp_tz_format of the MONITOR database.
These parameters should have the following values:
nls_timestamp_format string YYYY-MM-DD HH24:MI:SS:FF3
nls_timestamp_tz_format string YYYY-MM-DD HH24:MI:SS:FF3
Note: Make sure to follow the correct time‑stamp format when configuring time‑stamp parameters.
Page 34

Installing Lexmark Intelligent Capture 34
Installing the database and load balancer without clustering (configurations 1,
1‑N, and 1‑1‑N)
Installing the database
Note: If you are installing an Oracle database, then do not install the default database.
Do the following on the computer that will run the database:
1 From the installation package, run Setup.exe.
2 From the Lexmark Solutions installation window, click Install Enterprise System > Install Database.
3 Click Agree to accept the license agreement.
4 If necessary, specify a location for the installation, and then click Next.
Note: The installation path cannot contain double‑byte characters.
5 Select the IP address of the computer that will run the database.
6 If you want to use only IP addresses for a system without reliable DNS, then select IP address only install, and then
click Next.
7 If you are installing a system to recover a backup, then do the following:
a Select Restore Install (RI).
b Type the path of the folder containing the .ri file from the backup, or click the folder icon, and then locate the .ri
file.
8 Click Finish.
9 Allow the installation to complete, and then click Done.
Installing the load balancer
Do the following on the computer that will run the load balancer:
1 If the Lexmark Solutions installation window is not open, then run Setup.exe from the installation package.
2 From the Lexmark Solutions installation window, click Install Enterprise System > Install Load Balancer.
3 Click Agree to accept the license agreement.
4 If necessary, specify a location for the installation, and then click Next.
Note: The installation path cannot contain double‑byte characters.
5 Select the IP address of the computer that will run the load balancer.
6 If you want to use only IP addresses for a system without reliable DNS, then select IP address only install, and then
click Next.
7 Type the fully qualified domain name or IP address of the computer where the database is installed.
Notes:
• If you are installing the load balancer on the same computer as the database, then you must still use the
fully qualified domain name or IP address of the computer on the network. Do not use localhost or the
loopback IP address (127.0.0.1) for the location of the database.
• When installing any configuration other than configuration 1, the location of the database can be set most
conveniently during installation. If the database is moved, or the IP address of the database changes for any
Page 35

Installing Lexmark Intelligent Capture 35
other reason, then you must uninstall, and then reinstall the load balancer. For more information about
changing the IP address of a Configuration 1 system, see “Changing the IP address on a configuration 1
system” on page 59.
8 Select the type of database, and then click Next.
Note: If you are using an Oracle database, then make sure the database is already installed before proceeding
with the installation.
9 Specify the folder that contains your license files, and then click Next.
Notes:
• If the license files are located on a network share that requires authentication, then you must supply
authentication before specifying the license location. To authenticate with the remote server, click Start >
Run, type the Uniform Naming Convention (UNC) path to the share (for example, \\myserver\myshare
\), and then type the user name and password when prompted.
• During installation, the license files are copied to the program folder. You can safely move the license files
from the temporary location where you saved them.
10 If you are installing a system to recover a backup, then do the following:
a Select Restore Install (RI).
b Type the path of the folder containing the .ri file from the backup, or click the folder icon and then locate the .ri
file.
11 Click Finish.
12 Allow the installation to complete, and then click Done.
Installing the database and load balancer with clustering (configurations X‑N, and
X‑Y‑N)
Notes:
• Before installing Lexmark Intelligent Capture, set up the failover clusters using Microsoft Windows Server
Clustering Services.
• Make sure to set up all firewall exceptions on all physical and logical nodes in the cluster before installing
Lexmark Intelligent Capture.
Setting up firewall exceptions on a Windows Server 2008 cluster node
1
Create a temporary directory.
2 From the install\Cluster_Config_Script of the Lexmark Intelligent Capture installation package, copy all the batch
files (2008-cluster-*.bat) to the temporary directory.
3 Open a command prompt window as an administrator.
a Click Start > All Programs > Accessories.
b Right-click Command prompt, and then click Run as administrator.
c If the User Account Control dialog appears, then confirm that you want to start the command prompt as an
administrator, and then click Continue.
Page 36

Installing Lexmark Intelligent Capture 36
4 From the command prompt window, change the current directory to the temporary directory you created.
5 Run the batch files (2008-cluster-*.bat) by typing the batch file name and then pressing Enter.
Note: If you are using an Oracle database for Lexmark Intelligent Capture, then do not run the Lexmark
Intelligent Capture DB firewall batch file (2008-cluster-firewall-config-DB.bat).
Installing the database
If you are installing the Lexmark Intelligent Capture database on a Microsoft server cluster, then install the Microsoft
C++ 2005 Redistributable package on all physical nodes or servers in the cluster. If these files are not installed, then
the Lexmark Intelligent Capture database cluster resource will not initiate failover to the cluster node where Lexmark
Intelligent Capture is not installed.
Depending on the operating system installed on the cluster node (x86 or x64), run the Microsoft C++ 2005
Redistributable package, found in the packages folder of the Lexmark Intelligent Capture installation package
(vcredist_x86*.exe or vcredist_x64*.exe).
Note: If you are using an Oracle database, then do not install the Lexmark Intelligent Capture database.
Do the following on the primary node of the failover cluster that will run the database:
1 From the Lexmark Intelligent Capture installation package, run Setup.exe.
2 From the Lexmark Solutions installation window, click Install Enterprise System > Install Database.
3 Click Agree to accept the license agreement.
4 Specify a location on a shared cluster disk for the installation, and then click Next.
Note: The installation path cannot contain double‑byte characters.
5 Select the IP address or host name of the logical host of the cluster.
6 If you want to use only IP addresses for a system without reliable DNS, then select IP address only install, and then
click Next.
7 If you are installing a system to recover a backup, then do the following:
a Select Restore Install (RI).
b Type the path of the folder containing the .ri file from the backup, or click the folder icon and then locate the .ri
file.
8 Click Finish.
9 Allow the installation to complete, and then click Done.
Installing the load balancer
Do the following on the primary node of the failover cluster that will run the load balancer:
1 If the Lexmark Solutions installation window is not open, then run Setup.exe from the Lexmark Intelligent Capture
installation package.
2 From the Lexmark Solutions installation window, click Install Enterprise System > Install Load Balancer.
3 Click Agree to accept the license agreement.
4 If necessary, specify a location on a shared cluster disk for the installation, and then click Next.
Note: The installation path cannot contain double‑byte characters.
5 Select the IP address or host name of the logical host of the cluster.
Page 37

Installing Lexmark Intelligent Capture 37
6 If you want to use only IP addresses for a system without reliable DNS, then select IP address only install, and then
click Next.
7 Type the fully qualified domain name or IP address of the logical host where the database is installed.
Notes:
• If you are installing the load balancer on the same computer as the database, then you must still use the
fully qualified domain name or IP address of the logical host on the network. Do not use localhost or the
loopback IP address (127.0.0.1) for the location of the database.
• For installation on a cluster, the location of the database can be set most conveniently during installation. If
the database is moved, then you must uninstall, and then reinstall the load balancer, or contact Lexmark
Professional Services to assist in modifying your current installation.
8 Select the type of database, and then click Next.
Note: If you are using an Oracle database, then make sure that the database is already installed before
proceeding with the installation.
9 Specify the folder that contains your Lexmark Intelligent Capture license files, and then click Next.
Notes:
• If the license files are located on a network share that requires authentication, then you must supply
authentication before specifying the license location. To authenticate with the remote server, click Start >
Run, type the UNC path to the share (for example, \\myserver\myshare\), and then type the user
name and password when prompted.
• For cluster installation, the folder must contain the license files for all of the cluster nodes with their
appropriate network card MAC addresses.
• During installation, the license files are copied to the program folder. You can safely move the license files
from the temporary location where you saved them.
10 If you are installing a system to recover a backup, then do the following:
a Select Restore Install (RI).
b Type the path of the folder containing the .ri file from the backup, or click the folder icon and then locate the .ri
file.
11 Click Finish.
12 Allow the installation to complete, and then click Done.
Extending the database and load balancer to standby nodes
Do the following on the primary node of each failover cluster:
1 Run the Lexmark Solutions Cluster Configuration script:
In Windows Server 2003
From the install\Cluster_Config_Script folder of the Lexmark Intelligent Capture installation package, run the
LexmarkSolutionsClusterConfigScript.vbs script.
In Windows Server 2008
a Create a temporary directory.
b From the install\Cluster_Config_Script of the Lexmark Intelligent Capture installation package, copy
LexmarkSolutionsClusterConfigScript.vbs to the temporary directory.
Page 38
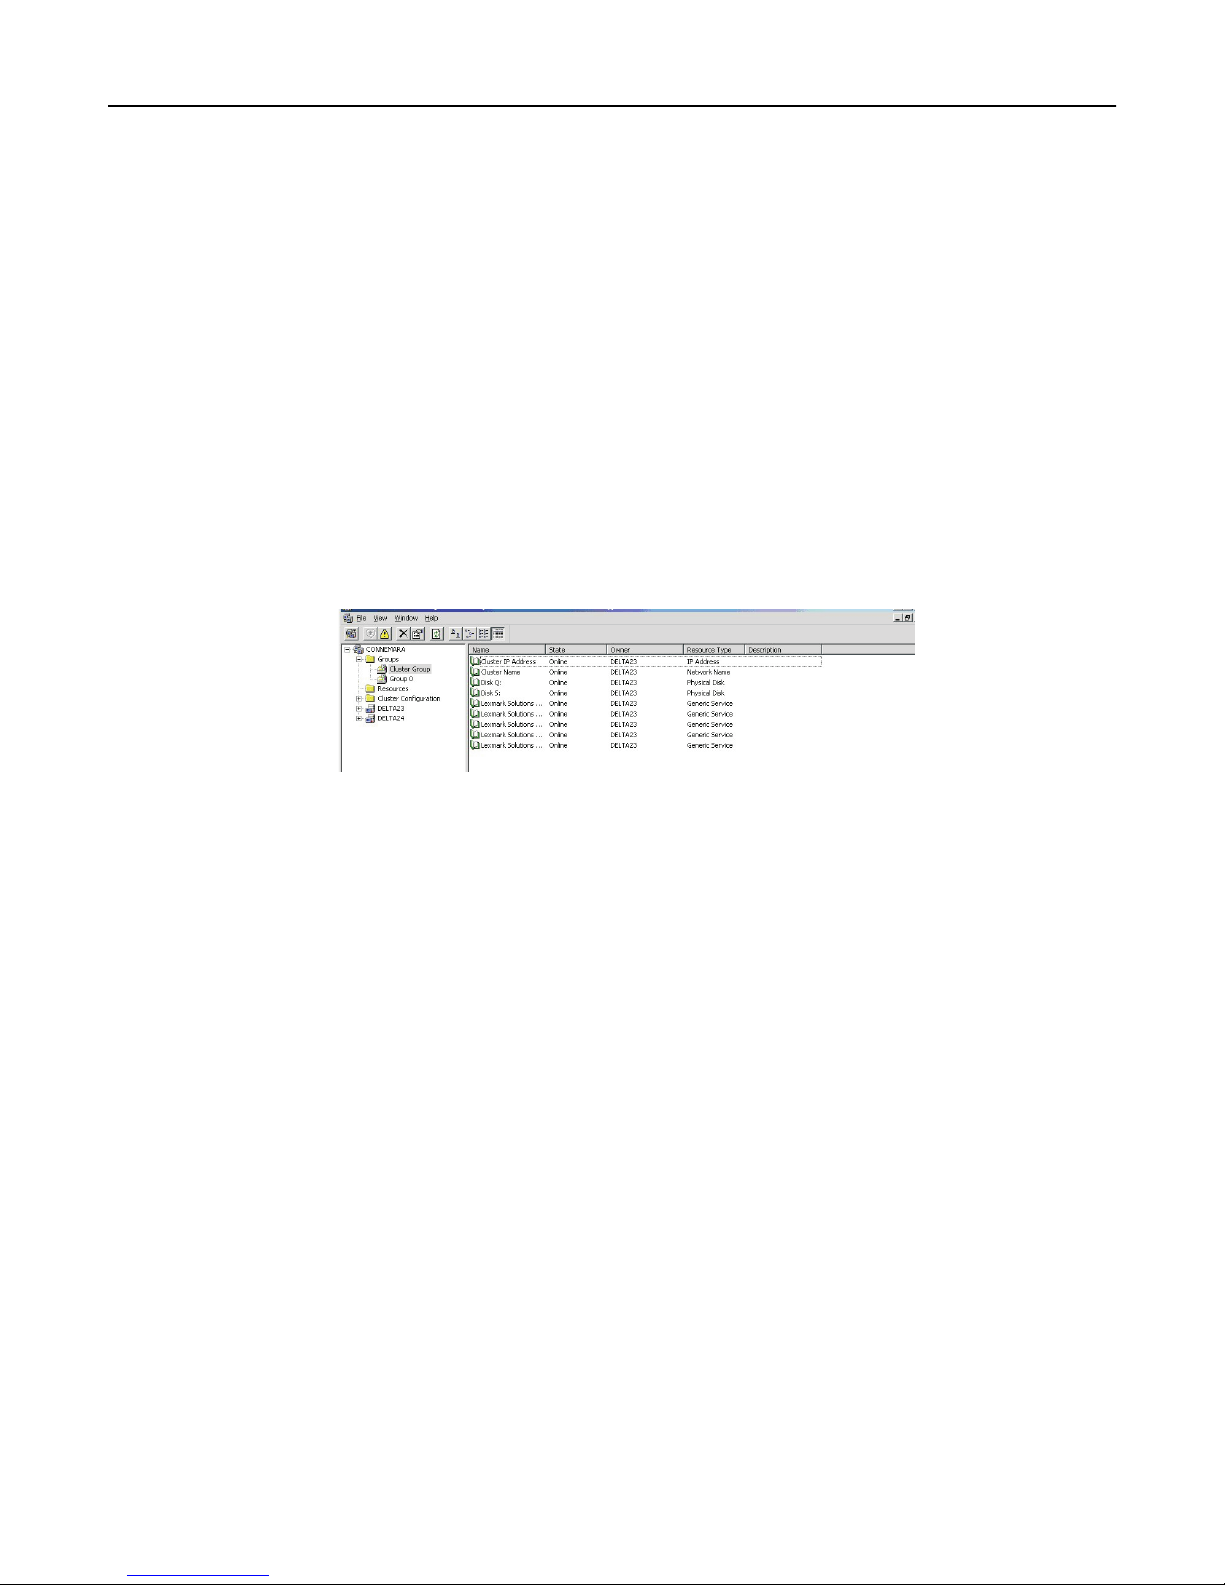
Installing Lexmark Intelligent Capture 38
c Open a command prompt window as an administrator.
1 Click Start > All Programs > Accessories.
2 Right-click Command prompt, and then click Run as administrator.
3 If the User Account Control dialog appears, then confirm that you want to start the command prompt as an
administrator, and then click Continue.
d From the command prompt window, change the current directory to the temporary directory you created.
e Run the VBScript file by typing cscript LexmarkSolutionsClusterConfigScript.vbs and then
pressing Enter.
2 Click Yes to begin the installation.
3 Enter a number to select a resource group as shown in the dialog, and then click OK.
4 Enter a number to select an IP address for the logical host as shown in the dialog, and then click OK.
5 Allow the installation to complete, and then click OK.
The configured cluster contains the necessary Lexmark services.
Installing servers
Note: Multiple servers should not be installed at the same time. Complete each server installation before beginning
another one.
Do the following on each computer that will run a server:
1 If the Lexmark Solutions installation window is not open, then run Setup.exe from the installation package.
2 From the Lexmark Solutions installation window, click Install Enterprise System > Install Server.
3 Click Agree to accept the license agreement.
4 If necessary, specify a location for the installation, and then click Next.
5 If the computer contains multiple network adapters, then select the IP address to bind to the installed server.
6 If you want to use only IP addresses for a system without reliable DNS, then select IP address only install, and then
click Next.
7 Type the fully qualified domain name or IP address of the computer or cluster logical host where the database is
installed.
Notes:
• If you are installing the server on the same computer as the database and/or the load balancer, then you
must still use the fully qualified domain name or IP address of the computer on the network. Do not use
localhost or the loopback IP address (127.0.0.1) for the location of the database or load balancer.
• If you are using DNS aliases for connection to a backup system during a recovery, then use the DNS aliases of
the database and load balancer.
Page 39

Installing Lexmark Intelligent Capture 39
8 Select the type of database, and then click Next.
Note: If you are using an Oracle database, then make sure that the database is already installed before
proceeding with the installation.
9 Select the Same as Database check box if the load balancer is installed on the same computer as the database, or
type the fully qualified domain name or IP address of the computer or cluster logical host where the load balancer
is installed.
Notes:
• If you want to type the fully qualified domain name or IP address of the computer or cluster logical host,
then clear the Same as Database check box.
• When installing any configuration other than configuration 1, the location of the database and load balancer
can be set most conveniently during installation. If the database or load balancer is moved, or the IP address
of the database or load balancer changes for any other reason, then you must uninstall and then reinstall
the load balancer. For more information about changing the IP address of a Configuration 1 system, see
“Changing the IP address on a configuration 1 system” on page 59.
10 If you want to set the Globe Site Selector (GSS) IP address, then do the following:
a Click Advanced.
b Type the GSS IP address, and then click OK.
Note: You can type a GSS IP address only if all the printers in the system are e ‑Task 2 or later. GSS is not
supported in e ‑Task and earlier printers.
11 Click Finish.
12 Allow the installation to complete, and then click Done.
After all servers are installed, log on to LMC, then change the administrator password, and then set the servers
online.
Antivirus policy requirements and recommendations
Required antivirus policies
• Do not include the following folders when performing real-time virus scanning:
– Load balancer server or database server (or only the database server if the load balancer is installed on another
server)
• \Lexmark\solutions\firebird\data
• \Lexmark\solutions\Apache2\logs
• \Lexmark\solutions\Apache2\htdocs\apachewebdav
– All Tomcat transaction servers (\Lexmark and all subfolders)
If this is not allowed, the following folders must be excluded:
• \Lexmark\Solutions\tomcat\temp
• \Lexmark\Solutions\tomcat\logs
• \Lexmark\Solutions\tomcat\webapps\webdav and all subfolders
• \Lexmark\Solutions\apps\wf-ldss and all subfolders
Page 40

Installing Lexmark Intelligent Capture 40
– Print servers where applicable
• Directory where print jobs are spooled (for example, C:\spool or C:\Windows\system32\spool\printers)
• Windows temporary directory (C:\Windows\temp)
– Network file shares and subdirectories where solutions installed write files
• Make sure full virus scans and virus definition updates on all Lexmark servers, including load balancers or databases,
application servers, and print servers are scheduled to run during off‑peak hours.
Recommended antivirus policy
If you are running the system on a virtualized server environment, then make sure full virus scans and virus definition
updates on all virtual machines on the same virtual machine hosts as the Lexmark virtual machine servers are scheduled
to run during off‑peak hours.
Installing Lexmark Intelligent Capture components silently
Lexmark Intelligent Capture components may be installed silently using the batch files located in the install
\Silent_Install_Script_Examples folder of the installation CD. Additionally, batch files are included for uninstallation and
cleanup. All batch files included on the installation CD contain usage instructions. The included batch files are examples
for basic setups and may be modified as necessary for your system.
Note: To run an installation script from a network share, you must map a drive letter to the network share. The UNC
path cannot be used when running an installation script.
1 Select the appropriate batch file from those included with the installation package:
Installation batch files
• Install_All_on_One_PC.bat—This installs the database, load balancer, and server components on the local
computer for configuration 1.
• Install_Client_Software.bat—This installs client software on the local computer.
• Install_Database.bat—This installs the database component on the local computer for configurations 1‑1‑N
and X‑Y‑N.
Install_DB_LB_on_One_PC.bat—This installs the database and load balancer components on the local
•
computer for configurations 1‑N and X‑N.
• Install_LoadBalancer.bat—This installs the load balancer component on the local computer for configurations
1‑1‑N and X‑Y‑N.
• Install_Server.bat—This installs the server component on the local computer for configurations 1‑N, 1‑1‑N, X‑N,
and X‑Y‑N.
Uninstallation and cleanup batch files
• clean.bat—This removes files left behind from a previous installation.
Note: Only use this file if there is no other Lexmark software that should remain installed.
• Uninstall_DB_LB_Server_on_One_PC.bat—This uninstalls the database and load balancer components from
the local computer.
• Uninstall_Server.bat—This uninstalls the server component from the local computer.
2 From the command prompt, run the batch file using the switch /? to view the instructions for using the selected
file.
Page 41

Installing Lexmark Intelligent Capture 41
3 Run the batch file again using the appropriate options as shown in the usage instructions.
4 Follow any other instructions in the command prompt window.
Using Kerberos authentication
If a user logs on at a printer using Kerberos, the credentials can be used by the Lexmark Intelligent Capture system to
manipulate files on the network and interact with ECM systems on behalf of the user.
Notes:
• SSL is required to use Kerberos authentication with an Lexmark Intelligent Capture system, and secure
communication between printers and servers must be enabled for any device group that uses a solution with
Kerberos authentication. For more information, see “Enabling secure communication between servers and
printers in a device group” on page 106.
• The date and time must be correct on the printer, Lexmark Intelligent Capture server, and KDC server when
using Kerberos authentication.
Configuring Kerberos authentication on printers
Notes:
• The following procedure applies to e‑Task 2+ printers. If these steps do not apply to your printer, then see the
documentation that came with your printer.
• The names and locations of some links differ depending on the firmware installed on your printer. Where
multiple link names or locations are specified below, click the specified link that appears for your printer.
1 Type the printer IP address or host name in the address field of your Web browser to access the printer Embedded
Web Server.
Note: If you do not know the IP address or host name of the printer, then you can:
• View the information on the printer control panel home screen, or in the TCP/IP section under the
Networks/Ports menu.
• Print a network setup page or menu settings page and locate the information in the TCP/IP section.
2 Click Settings > Security > Security Setup.
3 Configure the connection to the Kerberos Domain Controller:
a In the “Step 1: Configuring a Security Building Block” section, click Kerberos 5.
b Select a configuration method:
• To import a Kerberos configuration file, which allows more control over Kerberos tickets, use the Import
Kerberos File section:
1 Click Browse to find the krb5.conf file.
2 Click Submit.
Notes:
– Click Delete File to remove the Kerberos configuration file from the printer.
– Click View File to view the Kerberos configuration file for the printer.
Page 42

Installing Lexmark Intelligent Capture 42
The following example represents a minimal configuration file:
[libdefaults]
default_realm = MY.REALM
kdc_timesync = 1
forwardable = true
[realms]
MY.REALM = {
kdc = MY.KDC.ADDRESS
}
When a configuration file is used, tickets should be marked forwardable by default. Tickets must be
forwardable in order to forward them to the Lexmark Intelligent Capture system.
For more information about configuration files, see the Kerberos documentation.
• To use a simple Kerberos setup, use the Simple Kerberos Setup section:
1 In the KDC Address field, type the key distribution center (KDC) address.
2 In the KDC Port field, type the number of the port (1–88) used by the Kerberos server. The default is 88.
3 In the Realm field, type the realm used by the Kerberos server.
4 Click Submit.
c Click Test Setup to verify that the Kerberos configuration file for the selected device is functional.
d Click Return to Edit security Setup.
4 Add a security template:
a In the “Step 2: Set up a Security Template” section, click Security Template.
b Click Add a Security Template.
c Type a security template name.
d Select the Kerberos_Building_Block authentication setup.
e Click Save Template > Return to Security Setup.
5 Configure access controls for profiles:
a In the “Step 3: Apply your Security Template to one or more Access Controls.” section, click Access Controls.
b Apply the security template to either all profiles or a specific profile:
• To apply the security template to all profiles on the printer, including eSF applications, select the security
template you created beside Use Profiles.
• To apply the security template to an individual profile:
1 Determine the access control number of the profile:
Note: Keep the printer Embedded Web Server open while accessing LMC.
a From the Device Groups tab in LMC, select the device group that contains the printer and the solution.
b Select the Profiles task.
c In the main window, select the tab that corresponds to the device class of the printer.
d Find the number beside Access Control.
Note: If 0 appears beside Access Control, then no access control number has been
assigned to the profile. For more information, contact the developer of the solution.
2 From the Access Controls page in the printer Embedded Web Server, locate the setting between Solution
1 and Solution 10 that corresponds to the access control number assigned to the profile, and select the
security template you created.
c Click Submit.
Page 43

Installing Lexmark Intelligent Capture 43
Depending on the overall authentication setup on the printer, the user is required to provide authentication either
before accessing the home screen or when accessing an Lexmark Intelligent Capture profile from the printer.
Configuring Lexmark Intelligent Capture servers for Kerberos authentication
When using Kerberos authentication, you may need to configure Kerberos on each Lexmark Intelligent Capture server
in your system.
The Lexmark Intelligent Capture server requesting a ticket must have the KDC address and realm available in order to
request a Kerberos ticket. Often, the KDC address and realm can be determined from the ticket forwarded from the
printer. In this case, no configuration i s necessary. A warning is included in the log indicating that the server is attempting
to determine the KDC address and realm from a forwarded ticket.
To manually configure each Lexmark Intelligent Capture server for Kerberos authentication, do one of the following:
• Create a Kerberos configuration file for the server. This file may be a duplicate of the file uploaded to configure
Kerberos on the printer, but we recommend a minimal configuration specifying only the KDC address and realm.
The configuration file must be named krb5.ini, and it should be placed in the folder \Lexmark\Solutions\Security
where Lexmark Intelligent Capture is installed on each server. You may have to create the Security folder.
Note: If you need to read the Kerberos configuration file from another location, see the Apache Tomcat
documentation for more information.
• Set the KDC address and realm from the script.
Page 44
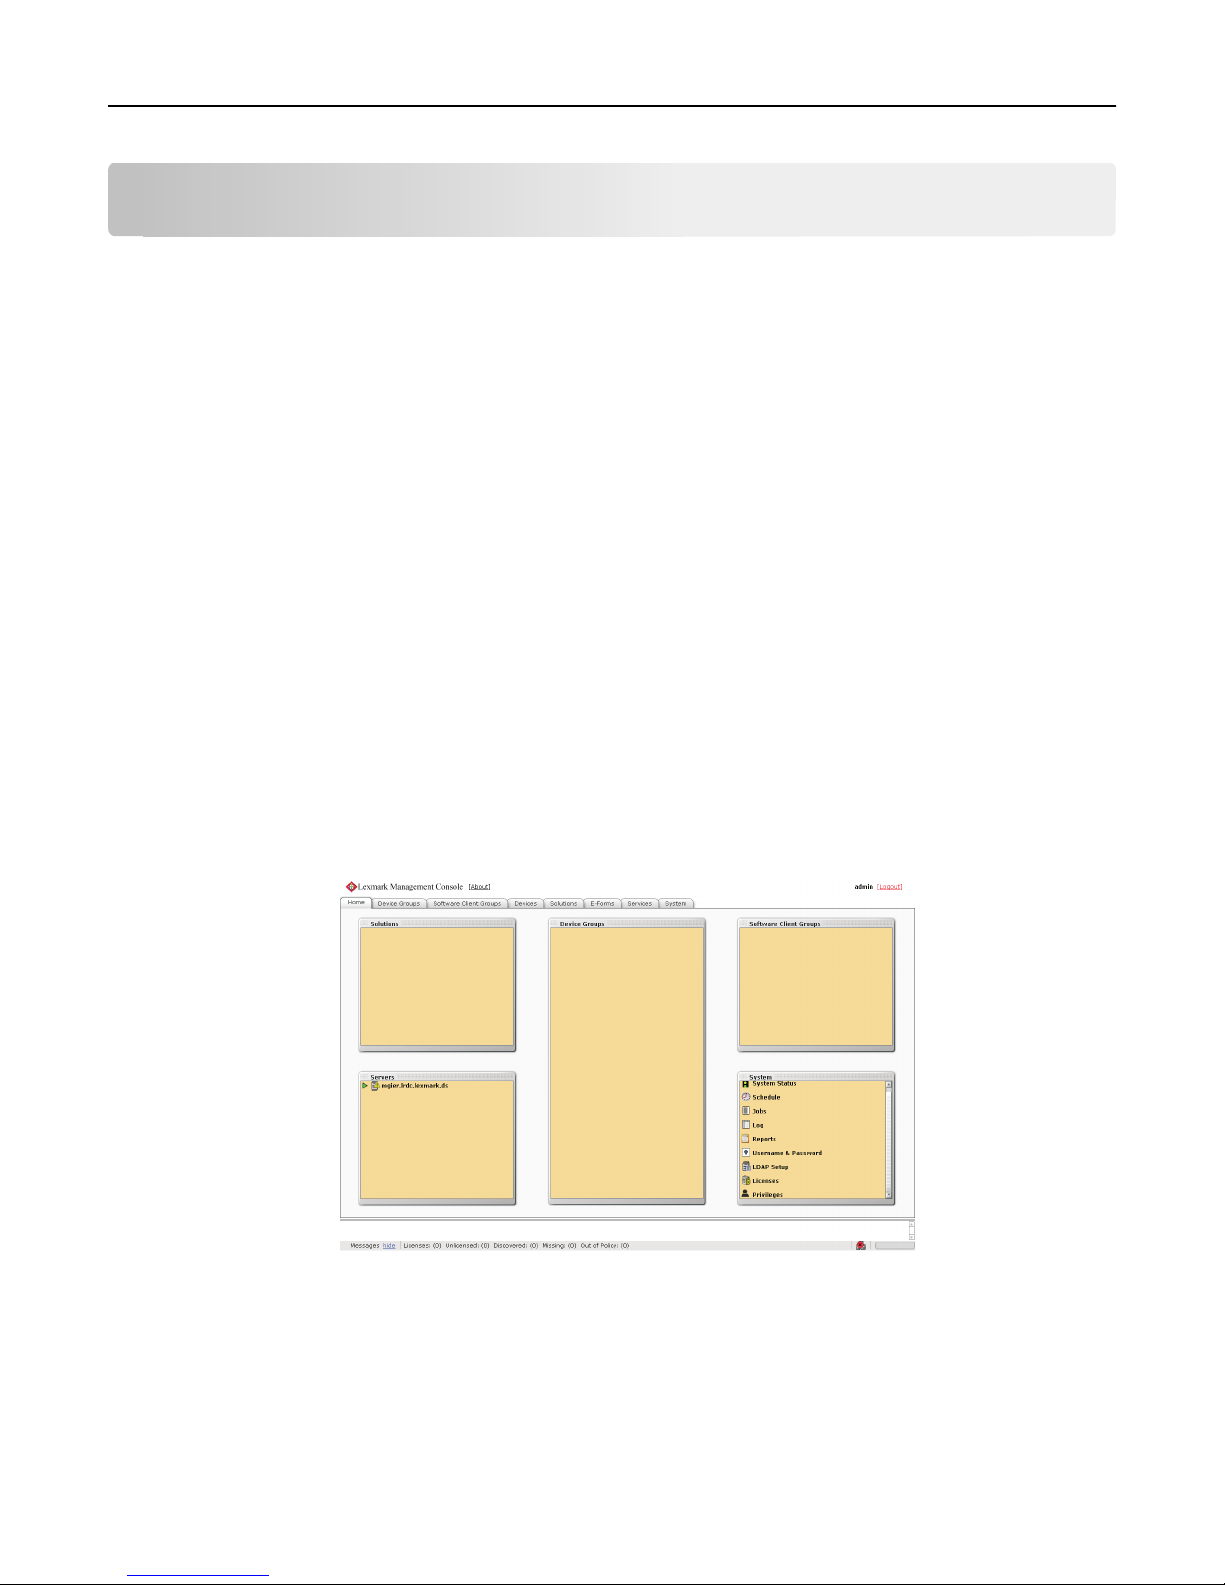
Monitoring and maintaining the system 44
Monitoring and maintaining the system
Using Lexmark Management Console
Accessing Lexmark Management Console
1 Launch LMC from your Web browser using the URL http://loadbalancer:9780/lmc, where
loadbalancer is the computer where the load balancer is installed.
The load balancer selects a server to host the LMC session, indicated by a green arrow beside a server in the Servers
list on the Home tab after logging in.
Notes:
• On a computer where a server is installed, you can use the desktop shortcut to access LMC.
• To access LMC on a particular server, use the URL http://server:9788/lmc, where server is the
computer where the chosen server is installed.
• It may take several minutes to start all services after the system boots. If LMC cannot be accessed
immediately after booting the system, wait a few minutes, and then try again.
• Cookies must be enabled on your Web browser in order to use LMC.
• Adobe Flash Player 10 or later is required. If your Web browser settings do not allow ActiveX controls to run,
then you must upgrade manually by visiting the Adobe Web site.
2 Enter the administrator user name and password, and then click Login.
Notes:
• The default user name and password are both admin.
• If LMC is configured to connect to an LDAP server, any valid user name and password may be used.
The Home tab is displayed after a successful login.
Page 45

Monitoring and maintaining the system 45
Changing the administrator user name
1 In LMC, click the System tab.
2 Select Username & Password from the System list.
3 Type the new user name.
4 Re‑type the new user name to confirm it.
5 Click Apply.
Changing the administrator password
1 Click the System tab.
2 Select Username & Password from the System list.
3 Type the current password.
4 Type the new password, and then re‑type it to confirm.
5 Click Apply.
Enabling LDAP server authentication for LMC
The administrator can set up a connection with an LDAP server to authenticate user names and passwords other than
those for the administrator account.
1 Select LDAP Setup from the System list.
2 Select the Enable LDAP Authentication check box.
3 If your LDAP server requires a secure connection, then select Use Secure Connection (SSL/TLS).
4 Type the LDAP server address and server port.
Note: Port 389 is typically used for non‑secure communication, and Port 636 is typically used for secure
communication.
5 In the User Search Filter field, type the attribute used in the directory to identify a user name, such as cn, sn,
uid, or sAMAccountName.
6 In the User Search Base field, type the relative distinguished name where a subtree search for a user should begin
in the directory, such as ou=Employees.
7 Do the following to filter the search to users in specific groups:
a In the Group Search Filter field, type the attribute used to identify a member of the group, such as member or
uniquemember.
b In the Group Search Base field, type the relative distinguished name where a subtree search should begin in the
directory for groups, such as ou=Groups.
c In the “Member of Group(s)” field, type a comma‑delimited list of group names to search. The user name must
be a member of at least one of the groups listed.
d In the Group Identifier field, type a name for the object class.
Note: The object class name can be used to search for the group base when assigning privileges to groups.
Page 46

Monitoring and maintaining the system 46
Example
•
User Search Filter: uid
• User Search Base: ou=Employees
• Group Search Filter: uniquemember
• Group Search Base: ou=Groups
• Group Identifier: groupOfNames
• Member of Group(s): Dept A,Dept C
If the user name testuser is used to log in to LMC, then the user can be authenticated if each of the
following is true:
– The distinguished name uid=testuser,ou=Employees,o=MyOrganization is found in the
directory.
– The distinguished name cn=Dept A,ou=Groups,o=MyOrganization or
cn=Dept C,ou=Groups,o=MyOrganization is found in the directory and contains the attribute
uniquemember: uid=testuser,ou=Employees,o=MyOrganization.
– The object class is groupOfNames .
– The correct password is supplied for the user.
8 Select an authentication method:
• If the LDAP server accepts anonymous connections, then select Anonymous.
• If the LDAP server requires authentication, then do the following:
a Select the Username option.
b In the Username field, type a distinguished name used to log on to the LDAP server, such as
uid=ldapuser,ou=Employees,o=MyOrganization.
c Type the password associated with the selected user name.
9 If you want to test the connection settings, then click Test Settings.
Note: If the LDAP server accepts anonymous connections but you want to authenticate with a user name and
password, then the test cannot determine whether the user name and password are correct. If the test reports
an anonymous connection when you have chosen to use a user name and password, then you should check the
user name and password.
10 In the Search Base field, type the distinguished name where the directory search should begin, such as
o=MyOrganization.
11 Click Save Settings.
Assigning privileges to groups
You can add access control to users accessing LMC. This feature allows you to restrict system access to authorized
groups. The Privileges settings depend on the role assigned to the user.
Notes:
• You need to add a group first before defining privileges. By default, the Default Group is already added to the
group list. This group has access to all tabs and tasks of LMC. The administrator can modify the privileges of the
default group.
Page 47
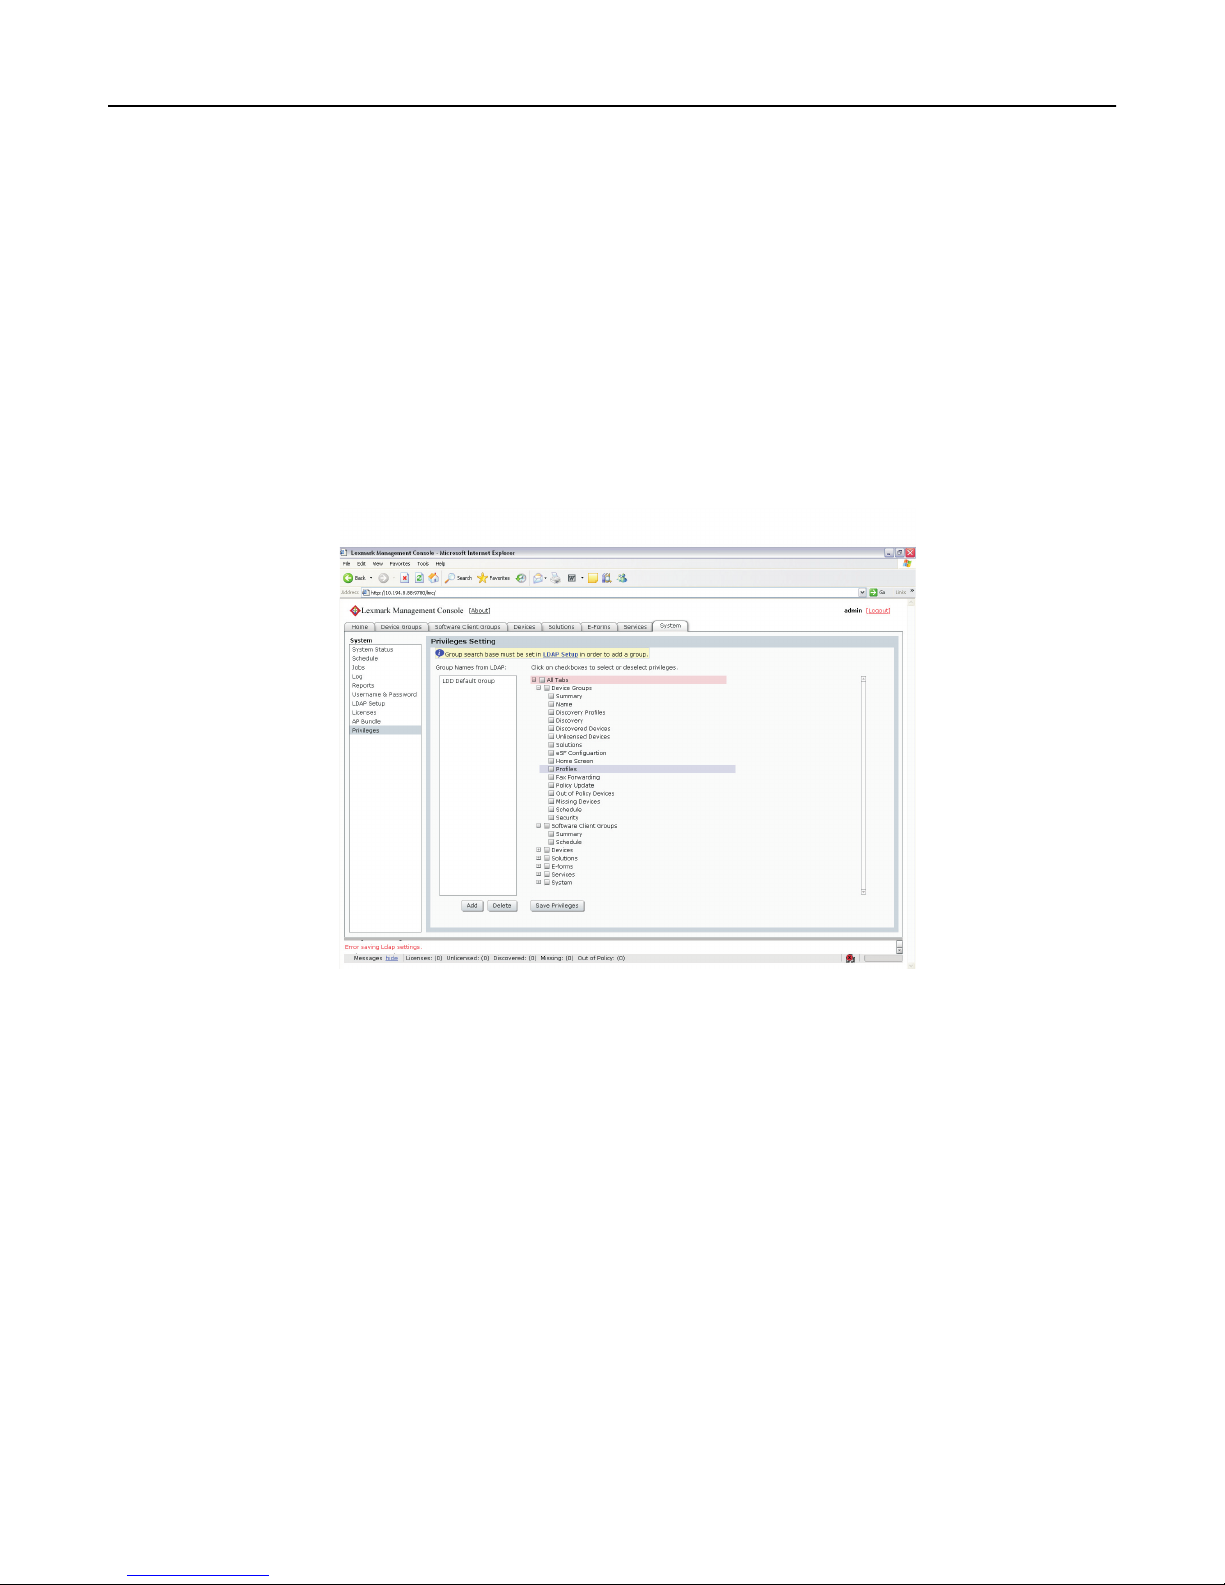
Monitoring and maintaining the system 47
• If a user belongs to multiple groups, then group privileges are combined. Privileges can be modified for LDAP
users only. The default administrator has access to all tabs and tasks, and these settings cannot be modified.
1 Select Privileges from the System list.
2 Select a group from the “Group Names from LDAP” list, or add a new group.
To add a group:
a
Click Add, then type the first few characters of the group name, and then click Search.
b Select a group name from the list, and then click Add.
3 Select the tabs and tasks the group is allowed to access and perform.
When assigning privileges, you can select specific tasks under each tab.
4 Click Save Privileges to save settings.
Page 48

Monitoring and maintaining the system 48
Device Groups tab tasks
Task Operation
Summary Displays the following information for a selected group:
• A list of solutions deployed for the device group
• The number of discovered printers
• The number of unlicensed printers. Unlicensed printers are those that do not have a license
available on the server.
• The number of missing printers. Missing printers are those that have been previously discovered
but did not respond on the network during the most recent discovery operation.
• The number of out‑of‑policy printers. Out‑of‑policy printers are those that have not been updated
with policy changes initiated on the server.
• Whether the device group is configured to use a secure communication channel when submitting
jobs. When Secure Server Communication is enabled, communication between the server and
printers associated with the selected group is encrypted.
Some of these values are linked to appropriate tasks for more information or to make changes.
When All Device G roups is selected in the Device Groups list, a table is displayed that lists the following
information for each device group:
• A list of solutions deployed
• The number of discovered printers
• The number of unlicensed printers
• The number of missing printers
• The number of out‑of‑policy printers
• Whether Secure Server Communication is enabled
Name* Allows you to change the unique name for the selected group
Discovery Profiles* Allows you to add, edit, import, and remove discovery profiles used to discover printers
Discovery Finds printers on the network that match the discovery profile for each selected group
Discovered Devices Displays a table listing the following information for all printers within selected device groups:
• Address
• Host name
• Model
• Serial number
• Contact name
• Contact location
• Property tag
• Last discovered date
• Policy last applied date
Unlicensed Devices Displays a table of unlicensed printers within the selected device groups. The table contains the same
fields as the Discovered Devices table.
Solutions* Allows you to select solutions to deploy to the printers within the selected group. When the solutions
are selected, you can edit local settings for the current device group, and the solutions are deployed
using the Policy Update task.
* These tasks are not available when All Device Groups is selected.
Page 49

Monitoring and maintaining the system 49
Task Operation
eSF Configuration* Allows you to edit the settings of eSF application associated with hybrid solutions deployed to the
device group
Home Screen* Allows you to customize the layout of the home screens for the printers included in the device group.
There is a tab for each supported class of printer.
Profiles* Displays the profile settings for the device group for each device class
Fax Forwarding Allows you to configure MFPs such that incoming faxes are forwarded to a fax number, e-mail address,
FTP site, or LDSS. Based on configuration, you can set the system to manage all incoming fax requests
for processing before the MFP prints and forwards received faxes.
Policy Update Deploys group device policies to printers included in selected device groups
Out of Policy Devices Displays a table that lists all out‑of‑policy printers in the specified device group. The table contains
the same fields as the Discovered Devices table. You can click Update Policy to apply any changes.
Missing Devices Displays a table of missing printers in the selected device group or groups. The table contains the
same fields as the Discovered Devices table.
Schedule Allows you to add, edit, and delete Discovery, Policy Update, and script tasks scheduled to run for
the selected device group or groups
Security* Enables or disables secure communication between the server and the printers in the device group
* These tasks are not available when All Device Groups is selected.
Software Client Groups tab tasks
Task Operation
Summary When an individual software client group is selected in the Software Client Groups list, it displays the group
name and solutions added to the group.
When All Software Client Groups is selected in the Software Client Groups list, it displays a table containing
the preceding information about all the software client groups in the system.
Name* Allows you to change the unique name for the selected group
Client Profiles* Allows you to add and remove software clients within the selected group
Solutions* Allows you to select solutions which solutions are available to software clients within the group
Profiles* Displays the profile settings for the software client group
Schedule Allows you to add, edit, and delete script tasks scheduled to run for the selected software client group or
groups
* These tasks are not available when All Software Client Groups is selected.
Devices tab tasks
The Devices tab is used for maintenance of printers that have already been discovered through the Device Groups tab.
Only discovered printers can be found using the search function on this tab.
Page 50

Monitoring and maintaining the system 50
Task Description
Summary When one device is selected, it displays the following device information:
• Address
• Host name
• List of device groups to which the device belongs
• List of solutions deployed on the device
• Model
• Serial number
• Contact name
• Contact location
• Property tag
• Last discovered date and time
• Unlicensed status
When multiple devices are selected, it displays a table with the same information for each device. The
total number is shown for Device Groups and Solutions and may be expanded to show the list for each.
Profiles Displays each profile and the associated settings for a selected device
Note: This task shows only one device at a time. When multiple devices are selected, the first device
selected is shown, and other devices may be selected by clicking Next, Previous, or individual page
numbers.
Policy Update Sends policy updates to selected devices
Missing Devices Identifies any missing devices in the current selection
Unlicensed
Devices
Home Screen Displays the layout of the home screen on a selected device and provides an interface to edit the home
Jobs Displays a sortable table of the jobs for selected devices
Log Displays a sortable table of logged messages for the selected device
Identifies any unlicensed devices in the current selection
screen of an individual device
Note: This task shows only one device at a time. When multiple devices are selected, the first device
selected is shown, and other devices may be selected by clicking Next, Previous, or individual page
numbers.
Solutions tab tasks
Task Description
Summary When an individual solution is selected in the Solutions list, it displays the solution name, version number,
install time, update time, lists of the device groups and software client groups to which the selected solution
is assigned, and lists of the formsets and reports included in the solution.
When All Solutions is selected in the Solutions list, a table is displayed containing the preceding information
about all the solutions deployed on the network.
*
Configuration
*
This task is not available when All Solutions is selected in the Solutions list.
Adjusts the global settings for the selected solution. The parameters are predetermined for each solution.
Page 51
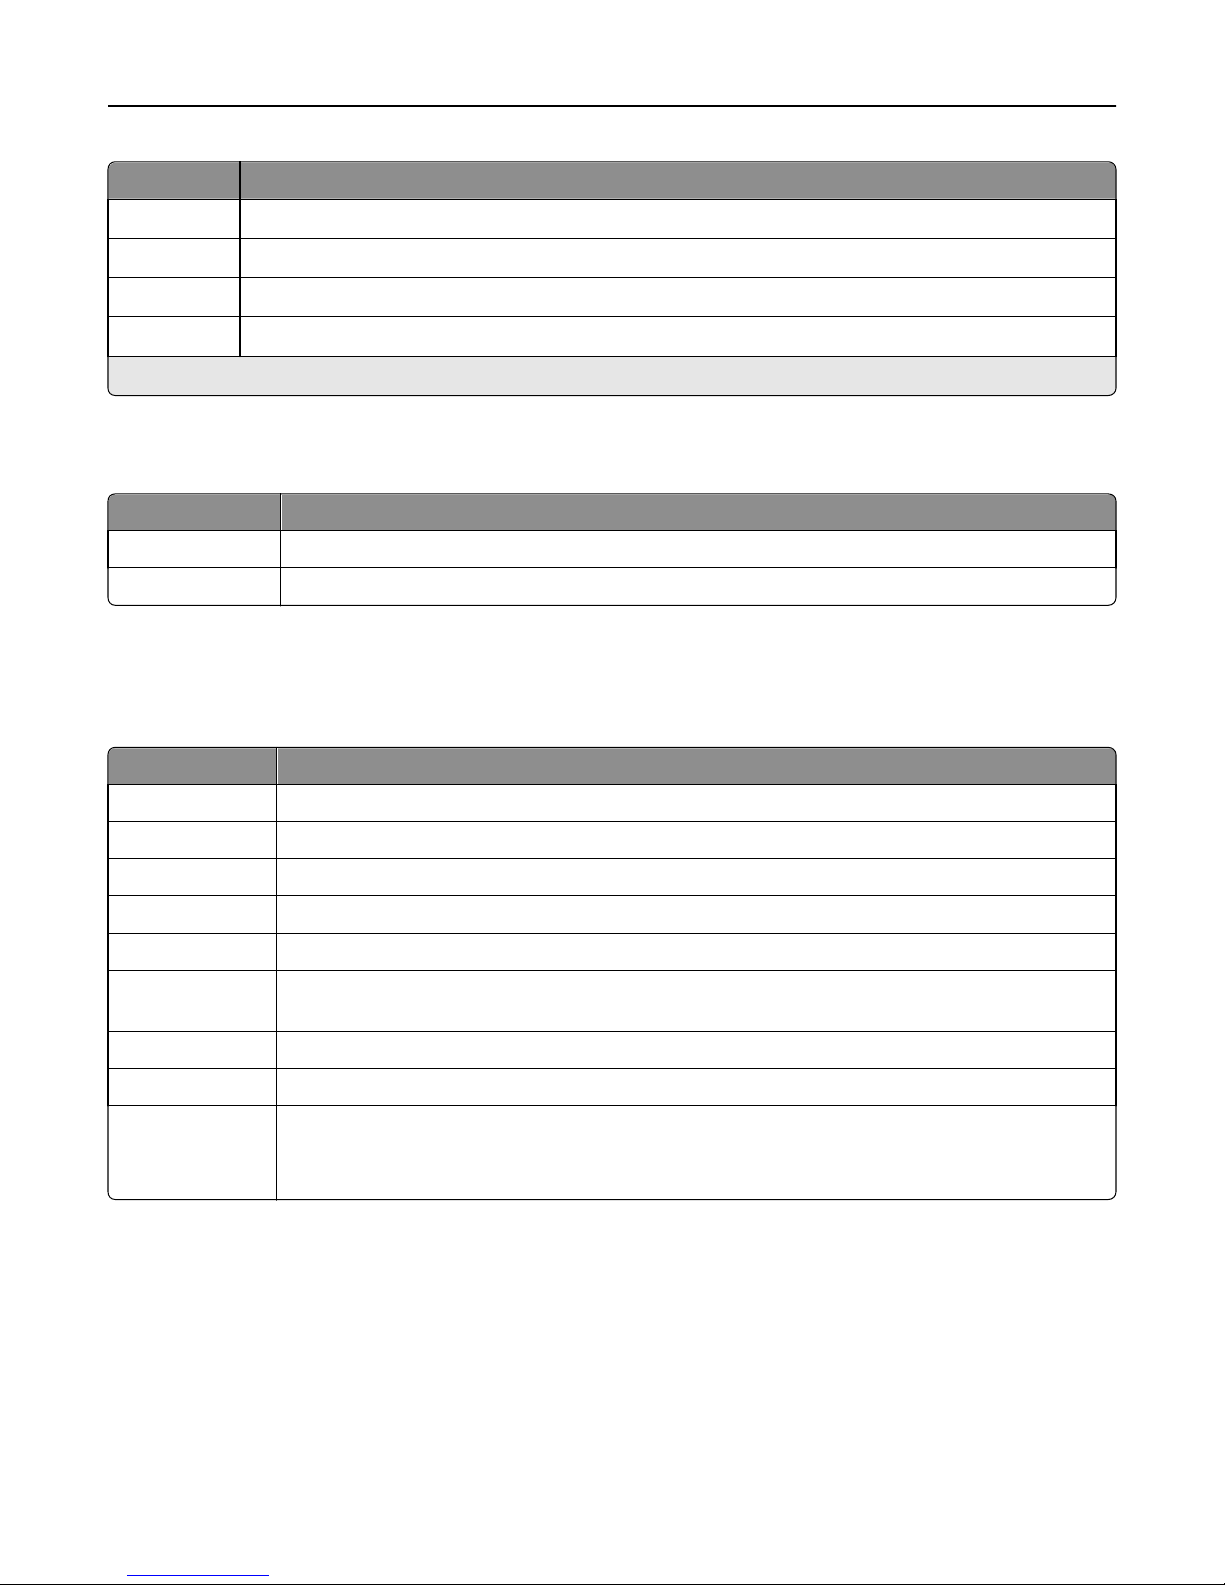
Monitoring and maintaining the system 51
Task Description
*
EForms
*
eSF
*
Jobs
*
Log
*
This task is not available when All Solutions is selected in the Solutions list.
Displays a list of the formsets associated with the selected solution
Displays a list of eSF applications associated with the selected solution
Displays a table of the jobs that utilize the selected solution
Displays a table of the events and messages generated by the selected solution
E‑Forms tab tasks
Task Description
Form printers Allows you to view and manage the virtual printers that process e‑forms
Formsets Allows you to view and manage formsets for all solutions
Services tab tasks
Services tab tasks and their descriptions
Task Description
Confirm This lets you set the font parameters for all services.
DeviceSecurity This lets you set the authentication type for security‑enabled devices.
E‑mail This lets you set the e-mail server parameters.
General This lets you configure the chunk size for device discovery and policy updates.
NPA This lets you set the default port and the timeout periods between retries during device discovery.
PolicyUpdate This lets you set the policy update parameters, such as the timeout for each device and whether to
overwrite function overrides on the device such as copy or fax.
Reports This lets you configure the e-mail parameters, such as th e default sender, receiver, and e‑mail message.
SNMP This lets you configure the SNMP parameters.
IDRLicenseMonitor This lets you configure e‑mails and thresholds for IDR licenses.
Note: This service uses e-mail server parameters defined in the e-mail service. For this service to
function, make sure the e‑mail service is properly configured.
Page 52

Monitoring and maintaining the system 52
System tab tasks
Task Description
System Status This shows a table that lists all servers in the system, and the corresponding server address, host name,
status, license, number of running tasks, CPU usage, memory usage, network load, and thread count for
each server.
The server where the current LMC session is running is indicated by a green arrow beside the server address
in the table.
Note: You can also set a server online or offline.
Schedule This shows all script, report, backup and restore, discovery, and policy update tasks scheduled to run on
the system and lets you add, edit, and delete scheduled tasks.
This task is equivalent to the Schedule task on the Device Groups tab when All Device Groups is selected.
Jobs This shows a sortable table of all pending and completed jobs from all printers within the system.
Log This shows a sortable table of event messages generated from all pending and completed jobs from all
printers within the system.
Reports This lets you manage and schedule built‑in and custom reports.
Username &
Password
LDAP Setup This lets you set up a connection with the LDAP server to enable other user accounts.
Licenses This shows a table that lists all licenses installed on the system, the license usage of the IDR engine, and
AP Bundle This lets you update the Advanced Prompting Bundle (AP Bundle) eSF application that e‑Task 2 printers
Privileges This lets you add access control to users.
This lets you set a new administrator user name and password for LMC.
the corresponding feature ID (where the license applies), expiration date, number of licenses, licenses in
use, and license type for each license.
You can also add new licenses to the system.
require for support.
Specifying updated files here updates the applications on printers during the next policy update.
You can assign privileges to users depending on the group to which they belong.
Finding basic information
Understanding the Home tab
The Home tab provides shortcuts to tasks on the System tab and individual items on other tabs, as well as indicating
the status of each server and device group in the system.
Home tab
section
Solutions Lists all solutions available in the system. Clicking a solution in the list links to that solution on the Solutions
Servers Lists all servers connected to the system. The icon of each server indicates the status of that server. Clicking
Description
tab.
a server in the list links to the System Status task on the System tab.
Page 53
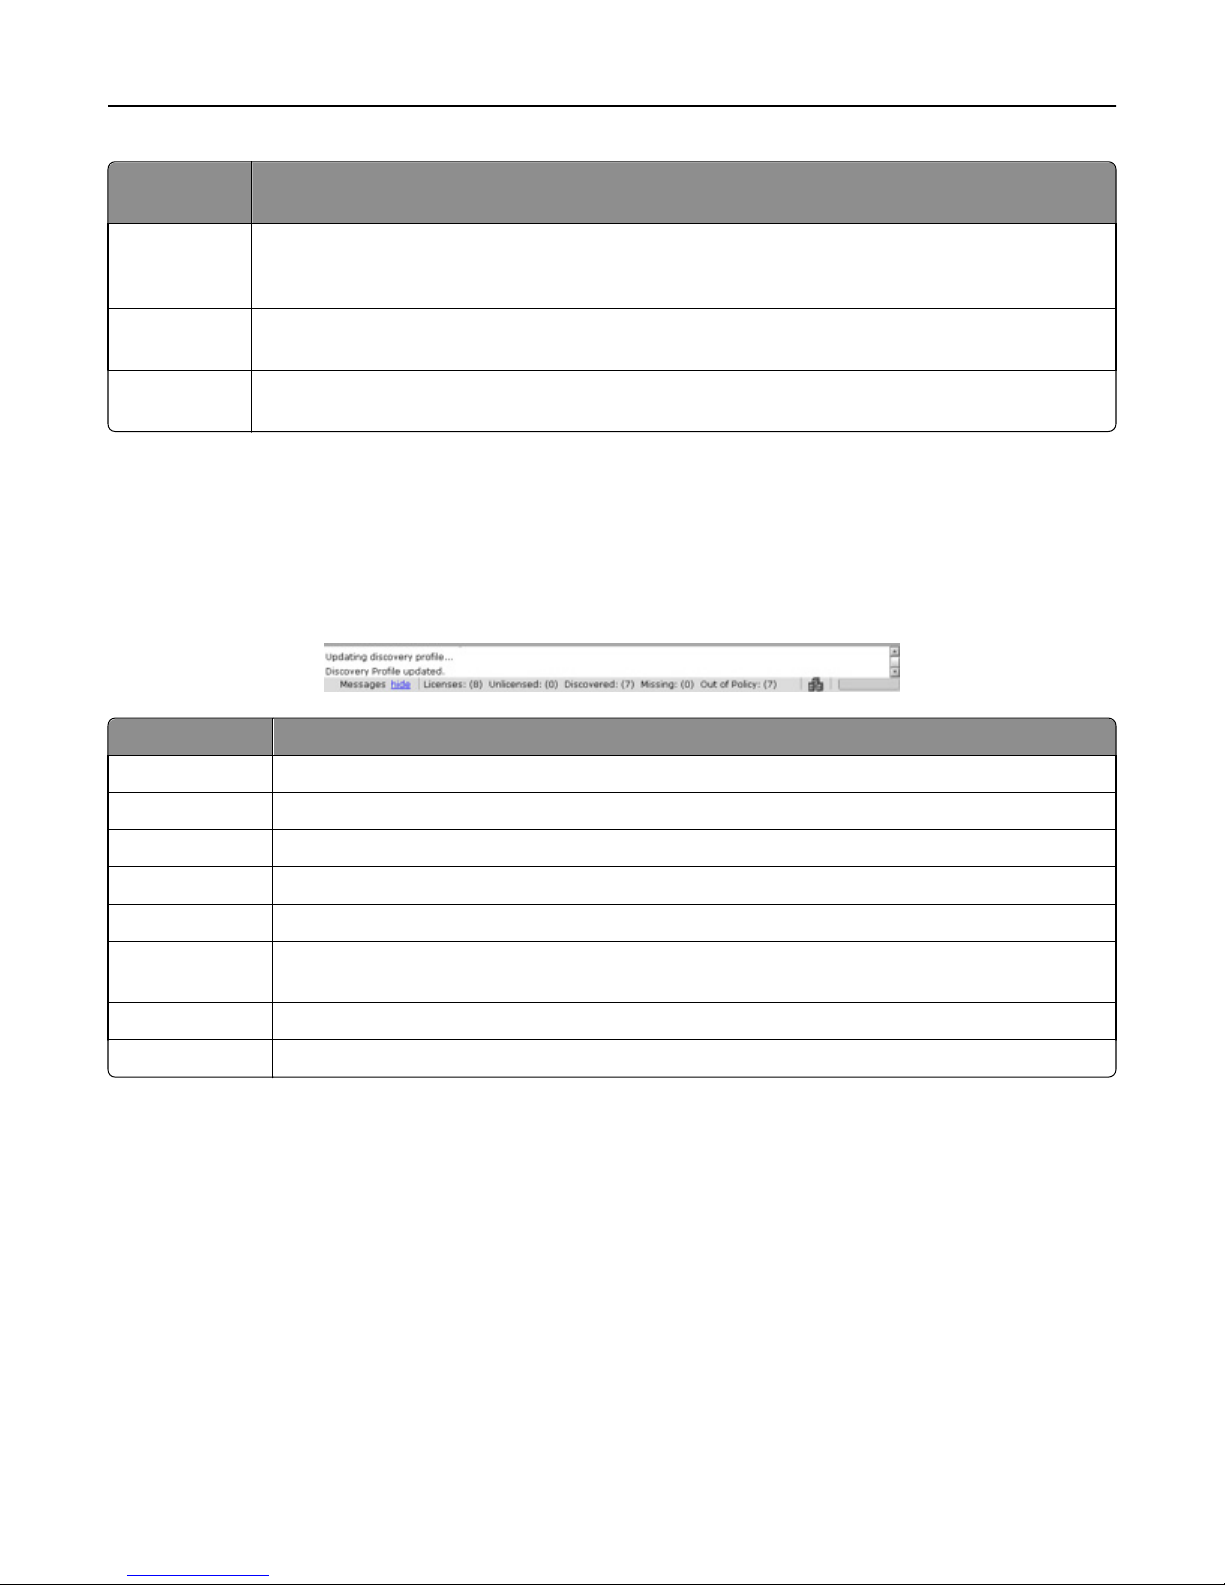
Monitoring and maintaining the system 53
Home tab
section
Device Groups Lists all device groups that have been created. A yellow exclamation mark icon appears on the icon of a
Software Client
Groups
System Provides shortcuts for all tasks on the System tab. Clicking a task in the list links to that task on the System
Description
device group that contains out‑of‑policy printers. Clicking a device group in the list links to that device
group on the Device Groups tab.
Lists all groups of software clients connected to the system. Clicking a software client group in the list links
to that group on the Software Client Groups tab.
tab.
Understanding the status bar
The status bar appears on all tabs and shows the number of licenses, discovered printers, unlicensed printers, missing
printers, and printers known to be out‑of‑policy, as well as the overall system status. The message bar above the status
bar also appears on all tabs. This area provides feedback when the system setup or device discovery changes and lists
any errors or warnings.
Status bar item Description
Messages Toggles the message bar by clicking show or hide
Licenses Displays the number of licenses available on the system
Discovered Displays the number of discovered printers currently stored in the database
Unlicensed Displays the number of discovered printers that do not have a license available in the system
Missing Displays the number of previously discovered printers that are no longer responding on the network
Out of Policy Displays the number of discovered printers known to have settings different from profiles required by
solutions deployed to those printers
System status icon Indicates the overall status of the system
Progress bar Shows the progress of the current operation
System status information on the status bar and Home tab
The overall system status is indicated by the icon showing three server boxes in the status bar. If any servers are offline
or not communicating, then a yellow exclamation mark icon appears on the system status icon to indicate the system
is operating at reduced capacity. If all servers are offline or not communicating, then a red X icon appears on the system
status icon.
More detailed system status information is available through the System Status task on the System tab. Click System
Status in the System section of the Home tab to access this information.
Page 54
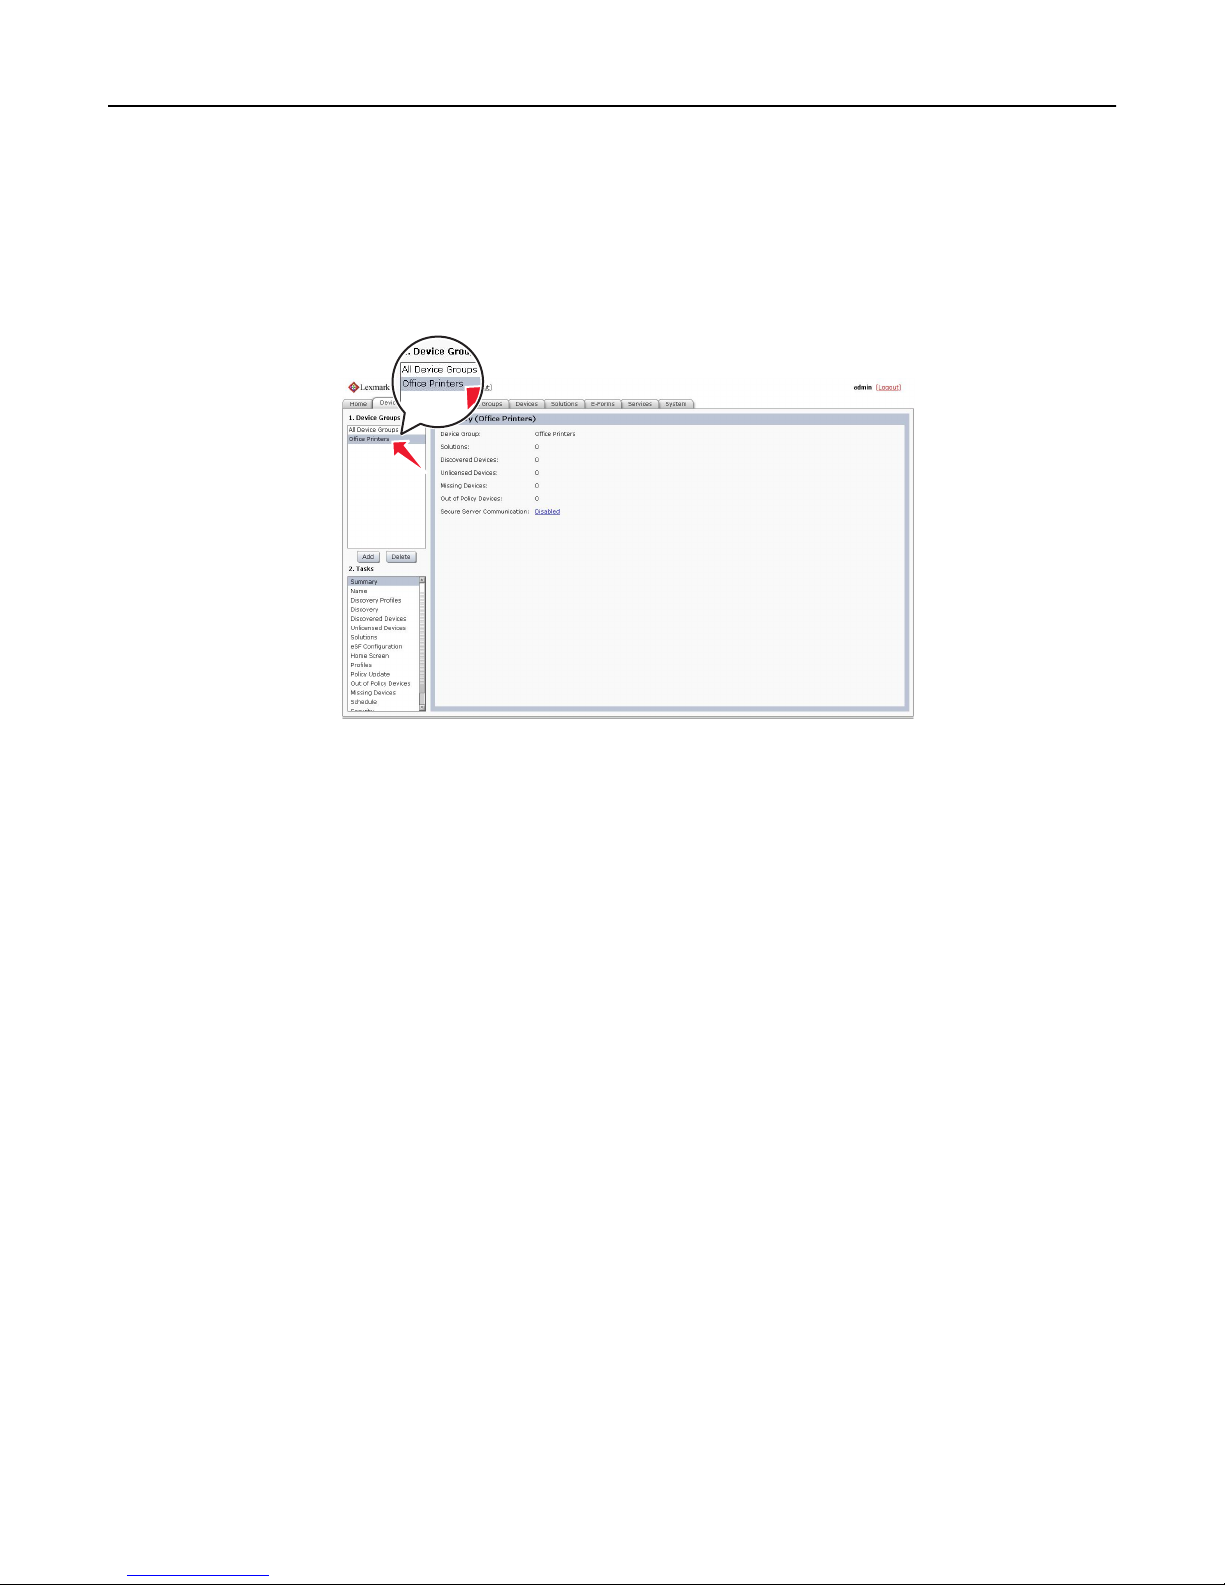
Monitoring and maintaining the system 54
Viewing information summaries for Lexmark Intelligent Capture elements
Summaries of essential information are available for device groups, software client groups, printers, and solutions.
1 Click the Device Groups, Software Client Groups, Devices, or Solutions tab.
2 Select an item from the list, or when on the Devices tab, perform a search.
3 Click Summary from the Tasks list.
A summary of basic information about the selected element appears. The summary includes links to find more
information or settings about the included information.
Viewing jobs or system logs
You can view all jobs initiated in the system, including both tasks performed in LMC and print jobs initiated using a
printer or software client. Additionally, a log is available showing any messages reported by jobs, such as printers
discovered during a discovery task. Data for both jobs and logs are saved for seven days.
1 Click the System tab.
2 Select Jobs from the System list to view jobs, or select Log to view logs.
Optionally, apply a filter to the jobs list or log:
• To apply a filter, make selections or entries in the applicable fields, and then click Refresh. If you want to access
less commonly used filter fields, then click Show More Filters.
• To remove a previously applied filter, click Reset Filter, and then click Refresh.
Note: You can also view jobs and logs for specific solutions or printers through the Jobs and Log tasks on the
Solutions and Devices tabs.
While viewing the jobs list, you can view all log entries that apply to a specific job by clicking the task ID of a job. The
log is automatically filtered for the selected task ID. Additionally, to quickly filter the list to view only jobs in progress,
click Running Tasks.
To stop a job, click Stop Task.
To refresh the jobs list or log, click Refresh. To set the jobs list to automatically refresh on a timed interval, select the
Auto Refresh option, and then select a time interval.
Page 55

Monitoring and maintaining the system 55
To change the number of entries that appear on each page of the jobs list or log, select a new value for Number of
Jobs/Page.
To export the jobs list or logs in comma
‑
separated values (CSV) format, click Export Report.
Customizing columns for jobs and system logs
1 Click the System tab.
2 Select Jobs or Log.
3 Click Customize Table.
All columns are shown by default.
4 From the Customize Jobs Table or Customize Log Table, adjust the columns as necessary:
• To remove a column from view, select it in the Current Columns list, and then click Remove.
• To add a column back to the Current Columns list, select it in the Available Columns list, and then click Add.
• To adjust the position of a column, select it in the Current Columns list, and then click Move Up or Move Down.
• To return all columns to view in the default order, click Reset.
5 Click OK to save your changes, or click Cancel to keep the current view.
Custom selections for columns are saved in a cookie in your browser so they are available each time you use LMC.
Viewing device group profile settings
1 Click the Device Groups tab.
2 Select a device group from the Device Groups list.
3 Select Profiles from the Tasks list.
4 In the main section, select the desired Device Class tab.
5 Select a profile name to display the settings.
Viewing software client group profiles
1 Click the Software Client Groups tab.
2 Select a software client group from the Software Client Groups list.
3 Select Profiles from the Tasks list.
Viewing forms associated with a solution
Solutions that include forms merge functionality are associated with forms that are installed along with the solution.
1 Click the Solutions tab.
2 Select a solution from the Solutions list.
3 Select EForms from the Tasks list.
Page 56

Monitoring and maintaining the system 56
Viewing version information
You can view version numbers for all system components, which may help you to troubleshoot problems and make
sure all components are up to date.
1 Click the System tab.
2 Select System Status from the System list.
3 In the Components column, click Version Info. You may have to scroll to the right to see the Components column.
To export component version information along with system status information, click Export Report in the System
Status window.
Managing the Lexmark Intelligent Capture system
To perform system tasks, such as creating reports on the overall performance of the system, setting servers offline,
changing the administrative user name and password, or viewing the overall job schedule, use the System tab in Lexmark
Management Console.
Viewing and changing server status
To view server status, click the System tab, and then select System Status from the System list.
A table is displayed with information about each server in the system. The Status column indicates whether the server
is online, offline, or has a communication problem. A yellow exclamation mark icon appears beside the status when
the server is offline, and a red X icon appears to indicate a communication problem.
Note: Multiple non‑communicating servers may impact system performance. If you do not expect a
non‑communicating server to quickly reestablish communication, you should remove it.
The server on which the current LMC session is running is indicated by a green arrow beside the Server Address.
You can perform the following tasks:
• To change the online status of a server, select the check box of a server from the table, and then click Set Online
or Set Offline.
• To export all system status information and component version information, click Export Report.
• To remove a server that is not communicating, select the check box beside it in the table, and then click Remove
Server(s). If the server later reestablishes communication, it automatically reappears in the server list.
Viewing and managing scheduled tasks
To access a list of all scheduled discovery, policy update, and script tasks for all device groups and software client groups,
select Schedule from the System list on the System tab.
From this list, you can perform the following actions:
• Add a new task—Click Add.
• Edit an existing task—Select the existing scheduled task you want to edit, and then click Edit.
Note: You cannot change the task type for an existing task.
• Delete an existing task—Select the existing scheduled task you want to delete, and then click Delete.
Page 57

Monitoring and maintaining the system 57
Do the following when adding or editing a task:
1 If you are adding a new task, then select a task to schedule.
2 Edit the description of the task, and then click Next.
3 Configure the task:
• If you are adding or editing a discovery or policy update task, then select the device groups for which the task
is performed, and then click Next.
• If you are adding or editing a script task, then do the following:
a Select whether to associate the scheduled script with a device group or software client group to access the
local solution settings of that group:
– To associate the script with a device group, click DeviceGroup, and then click Next.
– To associate the script with a software client group, click SftClientGroup, and then click Next.
– To schedule the script without associating it with a device group or software client group, click None,
and then click Next.
b Select the device group or software client group for which the task is performed, and then click Next.
Note: You can select only one device group or software client group for a script task.
c Select the solution that contains the script you want to run.
d Select the script to run, and then click Next.
• If you are adding or editing a discovery or policy update task, then select the device groups for which the task
is performed, and then click Next.
• If you are adding or editing a report task, then select and configure the report to run, and then click Next.
• If you are adding or editing a backup and restore task, then type the backup share path and the credentials
required to access the specified share, and then click Next.
• If you are adding or editing a directory watcher task, then do the following:
a Type the directory path and the credentials required to access the specified share.
Note: You cannot configure another directory watcher task to an existing task with the same directory
path and regular expression.
b Type the regular expression and the batch size.
A regular expression is a set of characters that specify a pattern. This helps you specify the type of files the
system will process each time the task is run. A batch size is the number of files the system will process each
time the task is run.
c Click Test Settings to check the directory settings.
d Select the solution that contains the script you want to run.
Note: Make sure that at least one solution is configured in the scheduled script task.
e Select the script to run, and then click Next.
4 Configure the date, time, and frequency information for the task.
5 Click Finish.
Page 58

Monitoring and maintaining the system 58
Configuring the confirmation page
When a job is completed, a confirmation is automatically delivered through a printout or e‑mail message unless it is
disabled within a particular solution. These settings determine the type of confirmation, how it appears, and, if it is an
e‑mail message, to whom it is sent.
1 Click the Services tab.
2 Select Confirm from the Services list.
3 Select Parameters from the Tasks list.
4 Select the lowest level of messages to include in confirmations:
• debug—This includes detailed messages used to diagnose problems, as well as other lower message levels than
this level.
• info—This includes messages that indicate successful job activities, as well as other lower message levels than
this level.
• warn—This includes messages that indicate potential problems, as well as other lower message levels than this
level.
• error—This includes messages that indicate unsuccessful job activities, as well as other lower message levels
than this level.
• fatal—This includes only messages that indicate complete failure of jobs.
5 Select a task from the “Task used to deliver confirmation page” list:
• confirm.printPS—This prints a confirmation page in PostScript format.
• confirm.printPDF—This prints a confirmation page in PDF format.
• confirm.emailAdmin—This sends a message to the administrator e‑mail address with a PDF confirmation page
attached.
• confirm.emailAdminTextOnly—This sends a message containing the confirmation information to the
administrator e‑mail address with no attachments.
Note: The e‑mail service must be correctly configured to use confirm.emailAdmin or confirm.emailAdminTextOnly.
6 If you are using e‑mail confirmations, then type the address where e‑mail confirmations are sent in the “Admin
email address” field.
7 Type a page title to appear on the confirmation page or message.
8 Edit the remaining parameters to determine the font settings for the title and page text.
9 Click Apply.
Adding servers to the system after initial installation
New servers may be added to an existing system to increase capacity, or servers may be replaced without reinstalling
other components. When a new server is installed on a system that already has s olutions, the solutions and all associated
settings are added to the new server. However, any third‑party services used with existing solutions must be installed
manually. If the new server is left without the same services as existing servers, any jobs that use the solution that is
missing services on the new server will fail.
1 Add the computer where the server will be installed on the network, and make sure the time is synchronized using
an NTP server.
2 Install the server. For more information, see “Installing servers” on page 38.
Page 59
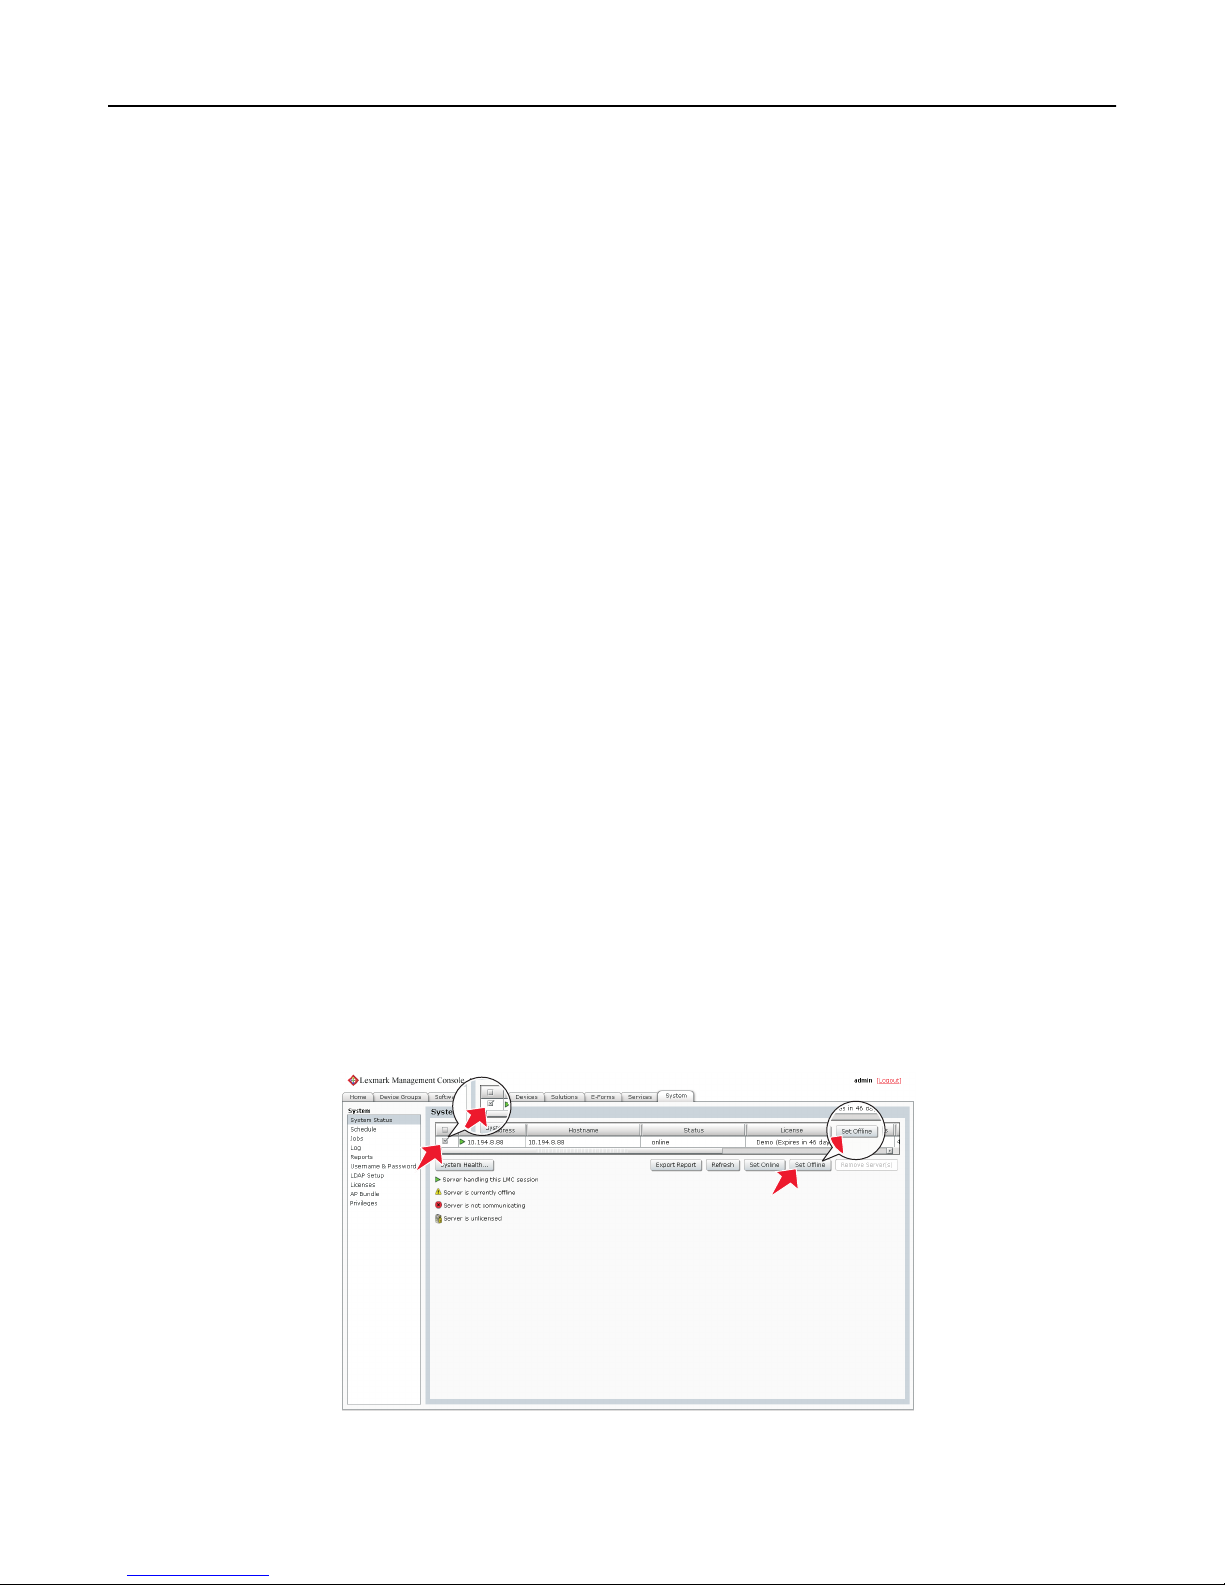
Monitoring and maintaining the system 59
3 Install any third‑party services required by existing solutions on the new server.
4 From the System tab in LMC, set the new server online. For more information, see “Viewing and changing server
status” on page 56.
Changing the IP address on a configuration 1 system
If an incorrect IP address or fully qualified domain name is used when installing a configuration 1 system, or the IP
address of the computer on which the components of a configuration 1 system are installed changes for any reason,
then the IP address of the components can be changed without reinstallation.
1 From the command line on the computer where all components are installed, navigate to the Lexmark\Solutions
\InstallHelper folder in the location where the components are installed. (The default is C:\Program Files\Lexmark
\Solutions\InstallHelper.)
2 Type update‑addr.bat ‑hostname to use the fully qualified domain name of the local computer, and then
press Enter
or
Type update‑addr.bat ‑ip to use the IP address of the local computer, and then press Enter.
3 The desktop shortcut must be changed to the new address manually:
a On the desktop of the computer where the components are installed, right click the Lexmark Management
Console (LMC) icon, and then click Properties.
b Click Find Target.
c In the folder that appears, right click the shortcut lmc, and then click Properties.
d Change the IP address or host name part of the URL to the new IP address or host name of the local computer.
The complete URL should be http://hostname:9780/lmc/, where hostname is the host name or IP
address of the computer where the components are installed.
Rebooting the Lexmark Intelligent Capture system
1 Click the System tab.
2 Set all servers offline. For more information, see “Viewing and changing server status” on page 56.
3 Shut down all server computers, load balancer computers, and database computers.
Page 60
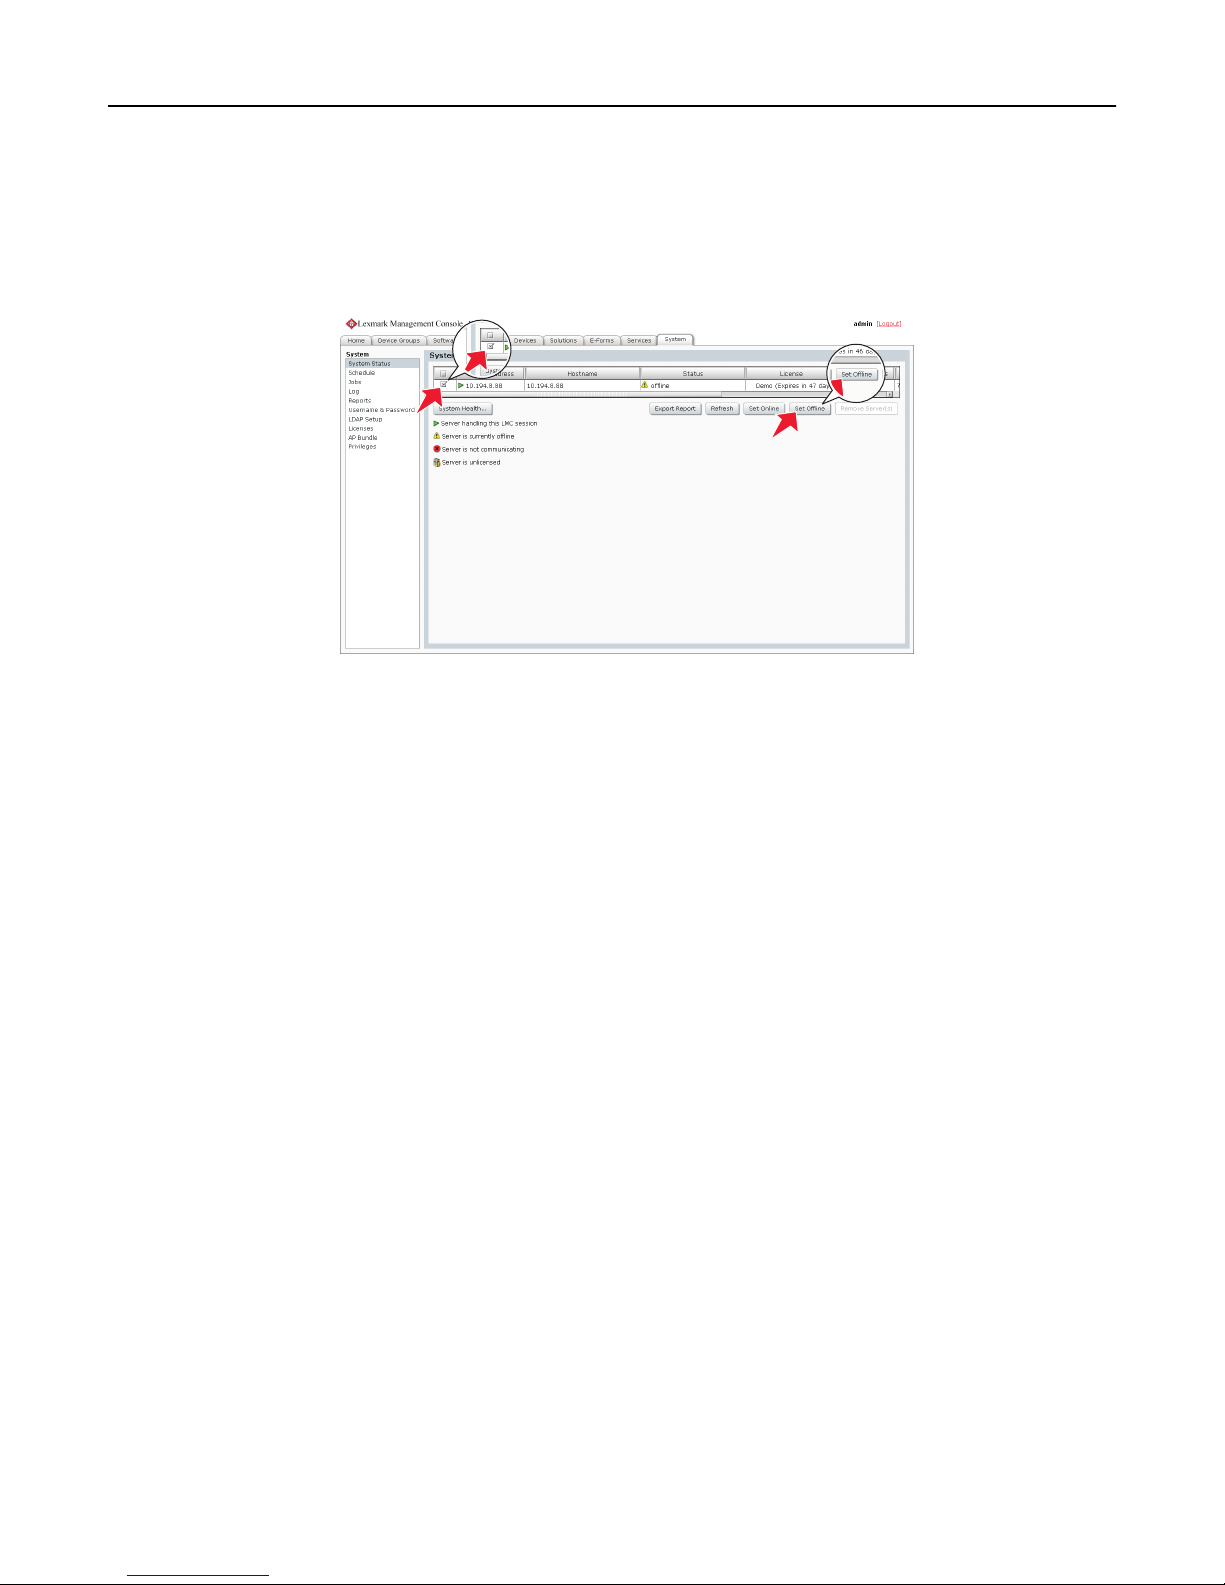
Monitoring and maintaining the system 60
4 Boot the database computers, load balancer computers, and server computers.
Note: You can boot the server components in any order.
5 From the System tab in LMC, set all servers online. For more information, see “Viewing and changing server status”
on page 56.
Note: It may take several minutes to start all services when the Lexmark Intelligent Capture system is first
booted. If LMC cannot be accessed immediately after booting the system, then wait a few minutes, and then try
again.
Restarting the Lexmark Solutions Application Server
If you install a workflow solution that includes a component, then you may need to restart the Lexmark Solutions
Application Server for the solution to fully function.
Before restarting the Lexmark Solutions Application Server, set the server offline on the System tab in LMC. Make sure
the server is offline before proceeding. Click Refresh, and then make sure offline is reported in the Status column
for the server.
You can restart the Lexmark Solutions Application Server from the Windows Services control panel.
Note: When you restart the Lexmark Solutions Application Server service, any solution‑related file in the \Lexmark
\Solutions\apps\wf-ldss\ or \Lexmark\Solutions\apps\wf-ldss\solutions folders, such as a property file for a solution,
is reverted to the version stored with the solution package as it was initially installed or upgraded, and any manual
changes are lost.
Page 61
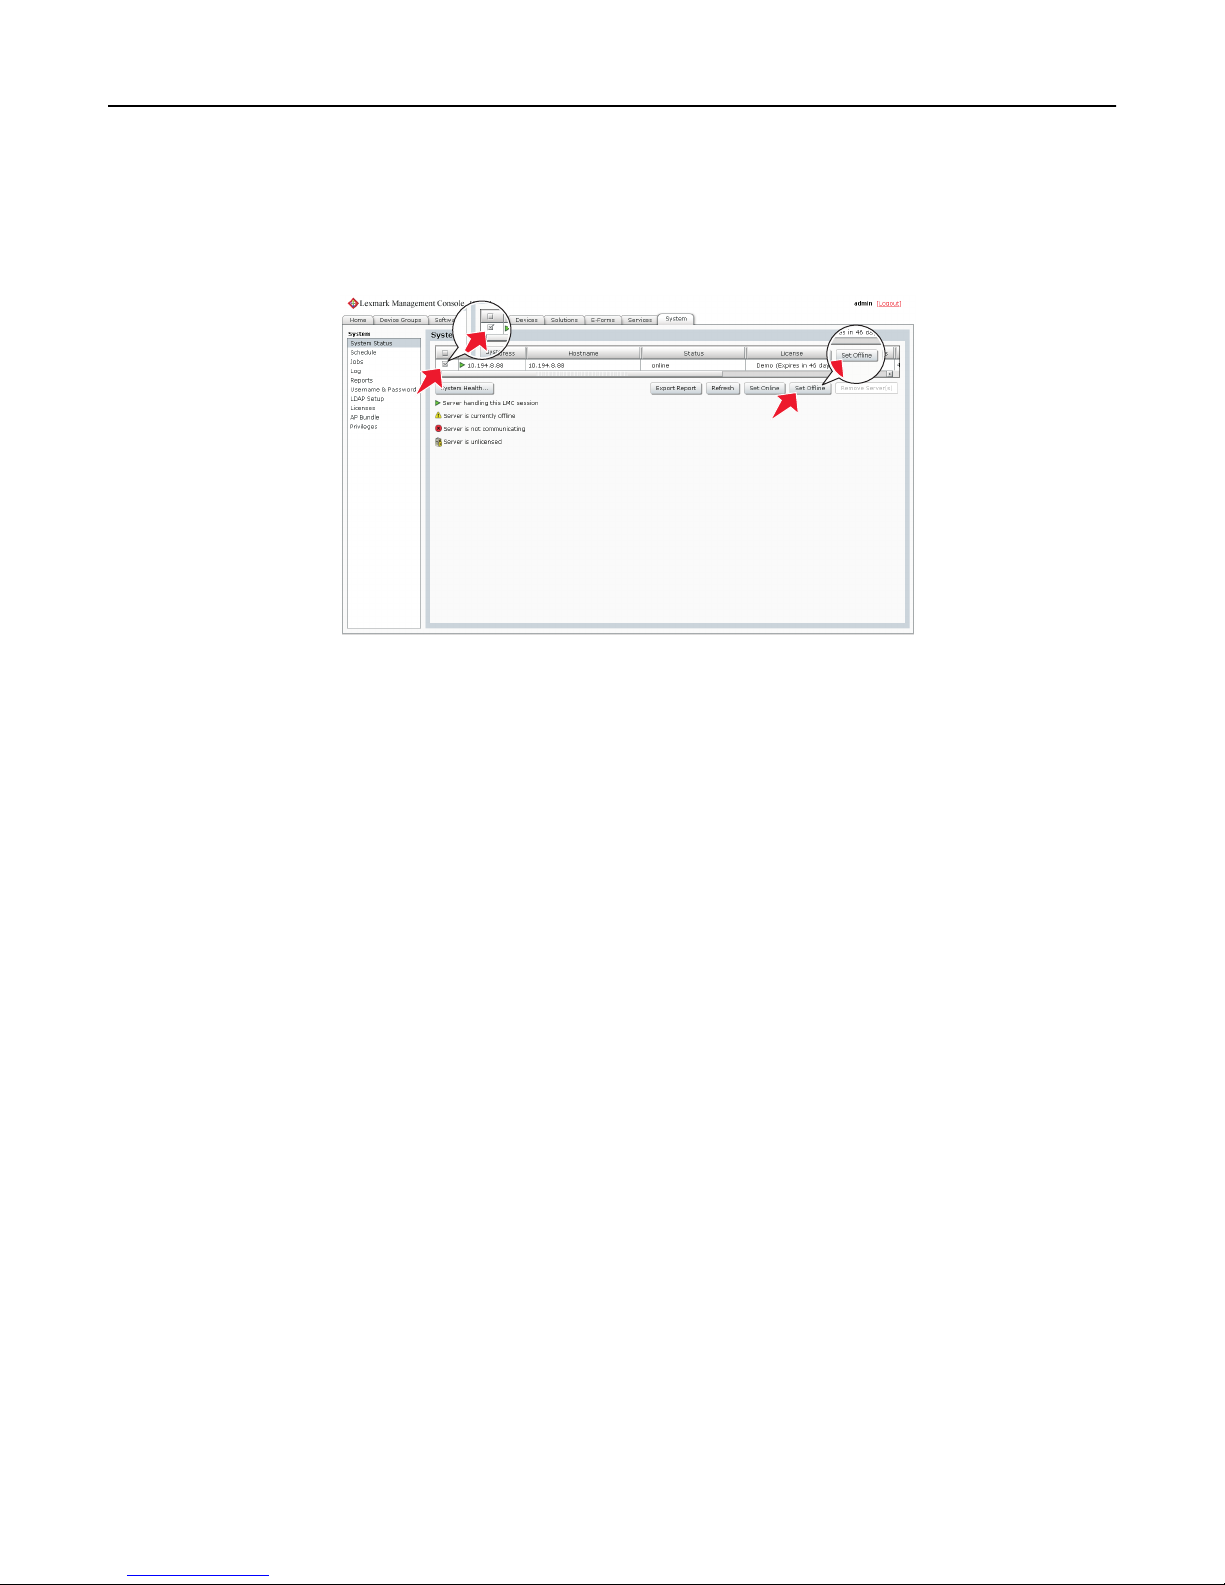
Monitoring and maintaining the system 61
Uninstalling Lexmark Intelligent Capture components
1 Click the System tab.
2 Set all servers offline. For more information, see “Viewing and changing server status” on page 56.
Notes:
• Make sure all servers are offline before proceeding. Click Refresh, and then make sure offline is reported
in the Status column for each server.
• Any jobs running or queued on a server must be completed before the server goes offline.
• If a server does not change from the status setting offline after all jobs have been completed, restart
the server computer, and then make sure the status of the server is offline.
3 If the database or load balancer is installed on a failover cluster, then do the following:
a On the primary node in each cluster, close all unnecessary applications, and make sure no applications are using
the shared drive where Lexmark Intelligent Capture components are installed.
b In the Cluster Administrator, move all cluster resources to the primary node where the system components are
originally installed.
c Stop the cluster service on standby nodes.
Wait for confirmation from the Cluster Administrator that the standby nodes are disabled before continuing
the upgrade.
4 From the computer where the component(s) are installed, do the following:
a Click Start.
b Click Programs or All Programs.
c Click Lexmark > Solutions Software Uninstall.
Note: If a database or load balancer is installed on a failover cluster, then use the node where the component is
originally installed.
5 Select the components to uninstall, and then click Finish.
6 Allow the process to complete, and then click Done.
Page 62

Monitoring and maintaining the system 62
Updating the Advanced Prompting Bundle
The Advanced Prompting Bundle (AP Bundle) is an eSF application that Lexmark Intelligent Capture installs on e‑Task 2,
e‑Task 2+, and e‑Task 3 multifunction and single‑function printers, and X642 multifunction printers. This application is
required for Lexmark Intelligent Capture support and provides prompting capabilities, held jobs support, and security
support for printers with Lexmark Intelligent Capture.
1 Click System tab > AP Bundle.
2 Beside AP Bundle Application File, click Browse, and then locate the file ap‑x.x.x.x.fls.
3 Beside AP Bundle Descriptor File, click Browse, and then locate the file ap‑x.x.x.x_desc.xml.
Notes:
• The descriptor file is required in order to update the AP Bundle.
• You can change the default settings of the AP Bundle application on e‑Task 2+ printers by editing the value
attributes of the property elements in the descriptor file. Adding or removing settings in the descriptor file
does not affect the application.
4 Click Upload.
During the next policy update, Lexmark Intelligent Capture updates the AP Bundle application on printers where it
has not been installed or when an older version is installed.
Note: If a printer already has a newer version of the AP Bundle application installed, then the version specified
for the update is not installed.
Managing the e‑mail watcher service
The e‑mail watcher service lets you capture and process digital documents from the Lexmark Intelligent Capture profile.
This service checks an e-mail account for any incoming e-mails, including attachments. You need to configure the email watcher configuration files to set the parameters.
The following folders are located within the EmailWatcher folder where the Lexmark Intelligent Capture load balancer
is installed:
• lib—This contains JAR files, including third‑party and Lexmark Intelligent Capture e‑mail watcher JAR files.
Note: Make sure not to make any changes in this folder.
• conf—This folder contains two files: config_EmailWatcher.properties and l4j_EmailWatcher.xml.
• logs—All logs related to the e‑mail watcher are saved in this folder.
Configuring e‑mail watcher
Notes:
• Only one e‑mail address at a time can be configured to be read by the e‑mail watcher service.
• Make sure there are no spaces between the parameter values.
1 From the conf folder, open config_EmailWatcher.properties in a text editor, and then modify the following:
• ldd.server—This is the IP address of the load balancer where the solution is deployed. This IP address can have
a port or domain name.
• ldd.profile —This is the name of the profile which will be invoked when an e‑mail is received.
Page 63

Monitoring and maintaining the system 63
• mail.type—This is the e‑mail protocol used to read the mailbox. Supported values are POP3 and IMAP.
Note: E‑mail servers which support POP3 or IMAP, and are within the same firewall can be configured in the
e‑mail watcher service.
• mail.server—This is the e‑mail server address.
• mail.user—This is the user ID used to log in to the mail server.
• mail.pw—This is the password used to log in to the mail server.
• mail.port—This is the port used to read the mail from the mail server. If no port is provided, then the default
and standard port is used based on the e‑mail protocol and SSL usage.
• mail.ssl—If the mail server requires SSL authentication, then set the value to 1. Otherwise, set it 0. The default
value is 0.
• mail.folder —This is the name of the mailbox folder from which all e‑mails received will be read. The default
folder name is INBOX.
• mail.allowIdle—If you want the mail server to support IMAP IDLE, then set this value to 1. Otherwise, leave it
blank.
2 From the conf folder, open l4j_EmailWatcher.xml in a text editor, and then do the following:
a Type the file location of the log folder. This is the log folder in the EmailWatcher folder.
b Type the log priority. The default and suggested value is fatal.
c Save your changes.
Note: If there are new changes made to the config_EmailWatcher.properties and l4j_EmailWatcher.xml, then
you need to restart the Lexmark E‑mail Watcher service from the Windows Services control panel.
3 Make sure to add the IP address of the load balancer in LMC. From the Software Client Groups tab in LMC, select
a software client group, then click Client Profiles, and then add the IP address.
Managing system performance
Accessing the System Health dashboard
1 Click the System tab.
2 Select System Status from the System list, and then click System Health.
Monitoring system health
The overall system health is shown in the top section of the page by the following indicators:
• Overloaded—The indicator changes color depending on the overload condition of the system:
– Green—No servers are overloaded, and all servers are operating at normal capacity.
– Yellow—One or more servers are overloaded, but at least one server is not. Overloaded servers operate at
diminished capacity until they are no longer overloaded.
– Red—All servers are overloaded and operating at diminished capacity.
• Tasks / hour—This displays the current hourly task rate, based on tasks done in the past minute.
• Threshold exceptions—This displays the hourly rate of tasks that exceed the threshold time set for each job on
each server, based on tasks done in the past minute.
Page 64

Monitoring and maintaining the system 64
To view the performance data for an individual server, select the address of the server from the list in the Server Health
section. The following data are shown for overall server performance:
• Task Count—This displays the number of jobs running on the server over time.
• Overload / hour—This displays the hourly rate of overload events. An overload event occurs when more tasks are
sent to the server than the currently configured design load and ends when the number of tasks is reduced to the
currently configured recover load.
Note: For more information about design load and recover load, see “Tuning the load balancer for unequal
servers” on page 65.
The following task‑specific data are shown for the task selected from the list:
• Task / hour—This displays the current hourly task rate for the selected task, based on tasks done in the past minute.
• Threshold exceptions / hour—This displays the hourly rate of task that exceed the threshold time set for the selected
task, based on tasks done in the past minute.
Note: To change the threshold time for the selected task on the selected server, type a new value beside “Set
threshold (seconds),” and then click Apply.
To zoom in any of the performance graphs in the Server Health section, click the graph. Click the graph again to return
to the view of all graphs.
Notes:
• Each time a graph reaches a significant number of data points, each two points are averaged, and then new data
is recorded as normal until the maximum number of data points is again reached.
• The slider controls at the bottom of the page are used to tune system performance. For information about these
controls, see “Tuning the load balancer for unequal servers” on page 65 and “Adjusting limits on concurrent
jobs” on page 64.
Adjusting limits on concurrent jobs
A server that meets recommended requirements is tested to process 30 concurrent jobs from clients. If a server is
faster than the recommended system, then you may be able to raise the limit on concurrent jobs for that server to
increase system capacity. If a server is slower than the recommended system, then you may need to lower the limit on
concurrent jobs to maintain system reliability.
Warning—Potential Damage: Setting high limits on concurrent jobs could cause failures with some solutions,
including out of memory errors, timeouts, very slow system response, and database failures. Make sure
databases are properly backed up before raising limits for concurrently running tasks.
The adjustment shown here sets the baseline design load for the server. Additionally, a recover load is set at 80% of
the design load. When the jobs running on the server exceed the design load, the server is considered to be overloaded,
and the load balancer reduces job submissions to the server until the recover load is reached.
Do the following for each server for which you want to change the limit on concurrent jobs:
1 From the System Health dashboard, select the address of the server from the list in the Server Health section.
2 Adjust the Concurrently Running Task Limit slider to the desired limit for the server.
Note: These settings are not saved during an upgrade. If you upgrade your system, then you must repeat these
steps.
Page 65

Monitoring and maintaining the system 65
Tuning the load balancer for unequal servers
When all servers in the system are approximately equal, server loads should be optimal without manually tuning the
load balancer. However, when servers are unequal, the least powerful machine determines the overall throughput
unless you compensate by manually assigning a load balancing factor to each server. Since more powerful machines
can run more concurrent jobs and complete each job in less time, routing more traffic to them increases the overall
job capacity of the system.
The load balancer component is composed of three different Tomcat load balancing workers that separately manage
Lexmark Management Console (L MC) sessions, job submission s from e‑Task 2 and e‑Task 3 printers, and job s ubmissions
from e‑Task printers. The adjustment shown here affects the e‑Task 2, e‑Task 3, and e‑Task load balancers, but not the
LMC load balancer. Each load balancer distributes jobs to servers in proportion to the load balancing factors assigned
to each server. For example, in a system with three servers with load balancing factors of 10,10, and 20, the first two
servers each receive 25% of jobs, and the third receives 50%.
The ideal job distribution depends on the hardware, network environment, and the solution being run. The optimal
proportions for load balancing factors can be found by running performance tests on each server. However, some
factors such as memory, number of processors, or CPU speed may suggest an initial value for the load balancing factor
to add more system capacity. Note, however, that performance improvements are not linear functions of numerical
improvements in hardware.
Perform the following steps on each server after initial values are determined for load balancing factors:
1 From the System Health dashboard, select the address of the server from the list in the Server Health section.
2 Adjust the Load Factor slider to the desired load balancing factor for the server.
Note: These settings are not saved during an upgrade. If you upgrade your system, then you must repeat these
steps.
Assigning servers to only run LMC or process jobs
When using more than one server in a system, you can assign some servers to only run LMC and other servers to only
process jobs. When all servers are separated in this manner, it is usually adequate to assign only one server to run LMC.
When using a configuration 1‑N, X‑N, or X‑Y‑N system with the recommended hardware, it is recommend to do the
following:
• Install the server component on the RAID 1 array where the operating system is installed on the load balancer
computer, and configure it to only run LMC.
• Configure servers installed on dedicated computers to only process jobs.
1 Launch JK Status Manager from your Web browser using the URL http://loadbalancer:9780/status/?
opt=454, where loadbalancer is the computer where your load balancer is installed.
Server information and the worker status for each of the three load balancing workers appear. Each server in the
system is listed as a worker in each Balancer Members list.
2 For each server that should only process jobs, stop the associated worker on the adminloadbalancer load balancing
worker, which balances requests to LMC:
a In the “Worker Status for adminloadbalancer” section, click E beside the server name.
b For Activation, select the Stopped option.
c Click Update Worker.
Page 66

Monitoring and maintaining the system 66
3 For each server that should only run LMC, stop the associated worker on the clientloadbalancer and
adaptorloadbalancer load balancing workers, that balance job requests:
a In the “Worker Status for clientloadbalancer” section, click E beside the server name.
b For Activation, select the Stopped option.
c Click Update Worker.
d Repeat these steps for the same server in the “Worker Status for adaptorbalancer” section.
Notes:
• Make sure at least one server is assigned to run LMC and at least one server is assigned to process jobs.
• Changing other load balancer and server properties is not recommended in most cases.
Configuring chunk size for device discovery and policy updates
When using three or more servers, reducing the chunk size may increase the speed of device discovery and policy
updates.
1 Click the Services tab.
2 Select General from the Services list.
3 Select Parameters from the Tasks list.
4 In the ChunkSize field, type a new value. When using three or more servers, a value as low as 2 may be appropriate.
5 Click Apply.
Configuring communications
Configuring connection to an SMTP server
1 Click the Services tab.
2 Select Email from the Services list.
3 Select Parameters from the Tasks list.
4 Type the password and user ID used to log on to your SMTP server.
5 Type the e‑mail server connection timeout in seconds. The default is 60.
6 Type the e‑mail server host name or IP address.
7 Enter the e‑mail server I/O timeout in seconds.
8 Click Apply.
Page 67

Monitoring and maintaining the system 67
Configuring NPA device communication
Though the default port is usually used for NPA device communication, the timeout periods between retries can be
changed to improve reliability during device discovery.
1 Click the Services tab.
2 Select NPA from the Services list.
3 Select Parameters from the Tasks list.
4 Type the port number used for NPA on your network in the Unsecure Port field. The default setting is 9300.
5 Type a timeout period in milliseconds for each retry in sequence, separating each by a space in the NPANT Timeout
field. The default settings are 1000 and 5000.
6 Click Apply.
Configuring SNMP for discovering printers
1 Click the Services tab.
2 Select SNMP from the Services list.
3 Select Parameters from the Tasks list.
4 In the Port field, type the port number used for SNMP on your network. The default is 161.
5 In the Write Community Name field, type the write community string for printers on your network.
6 In the Timeouts/Retries field, type a timeout period in milliseconds for each retry in sequence, separating each by
a space.
7 In the Read Community Name field, type the read community string for printers on your network.
8 Click Apply.
Configuring device security
To enable communication with Basic Security template–enabled devices, make sure the Basic Security template
matches the authentication type and the password or PIN configured in LMC. Only authentication through password
or PIN is supported.
1 Click the Services tab.
2 Select DeviceSecurity from the Services list.
3 Select Parameters from the Tasks list.
4 Select the type of authentication for the device, and then type the password or PIN.
5 Click Apply.
Page 68
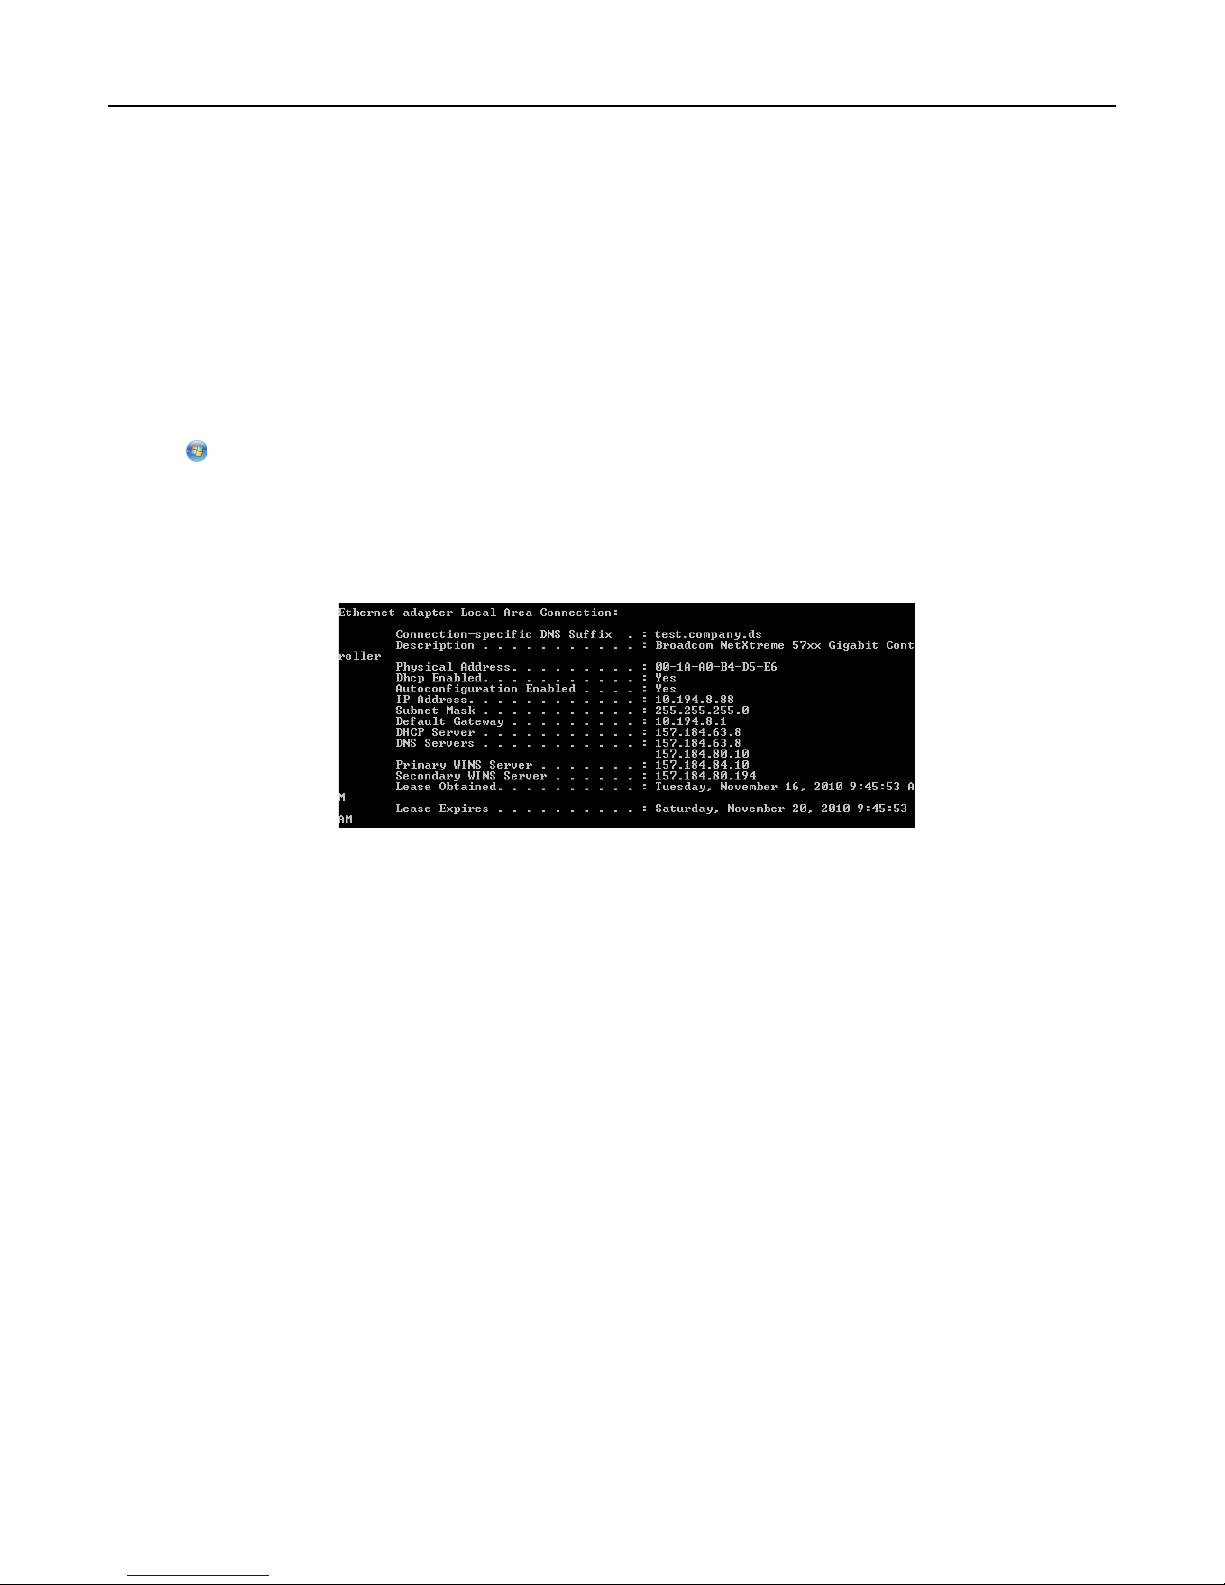
Monitoring and maintaining the system 68
Managing licenses
Finding the host ID
Each license file installed on the server is associated with a host ID on the server, which is the physical address (MAC
address) of a network adapter in the load balancer without hyphens or other punctuation. During installation, the host
ID is shown by clicking Activate and Download License File(s). If you do not have access to the installation files, or if
you have multiple host IDs and want to determine which is associated with the network adapter connected to the same
network as your printers, then do following:
1 Click , or click Start and then click Run.
2 In the Start Search or Run box, type cmd.
3 Press Enter, or click OK.
4 From the command prompt window, type ipconfig /all, and then press Enter.
5 If you want to use the host ID associated with the network adapter connected to the same network as your system,
then determine the correct network adapter using the description and IP address.
Note: The host ID of any listed network adapter is appropriate for creating license files as long as the associated
network adapter remains in the server. However, using the host ID associated with the network adapter
connected to the same network as your system may help avoid future confusion.
6 Write down the physical address shown with the selected network adapter, removing the hyphens, and store it in
a safe place for use as the host ID in the Lexmark Licensing Portal.
Viewing or downloading existing licenses
1 Open the Lexmark Licensing portal at http://software.lexmark.com.
2 Type the entitlement ID you received when you purchased your licenses, and then click Login.
3 Click Manage Licenses.
Each record represents a license file generated using the current entitlement ID.
4 Select the line for the license you want to view or download, and then click View Licenses.
5 To download the license file, click Save To File.
6 To return to the start page of the Lexmark Licensing Portal, click Complete.
Page 69
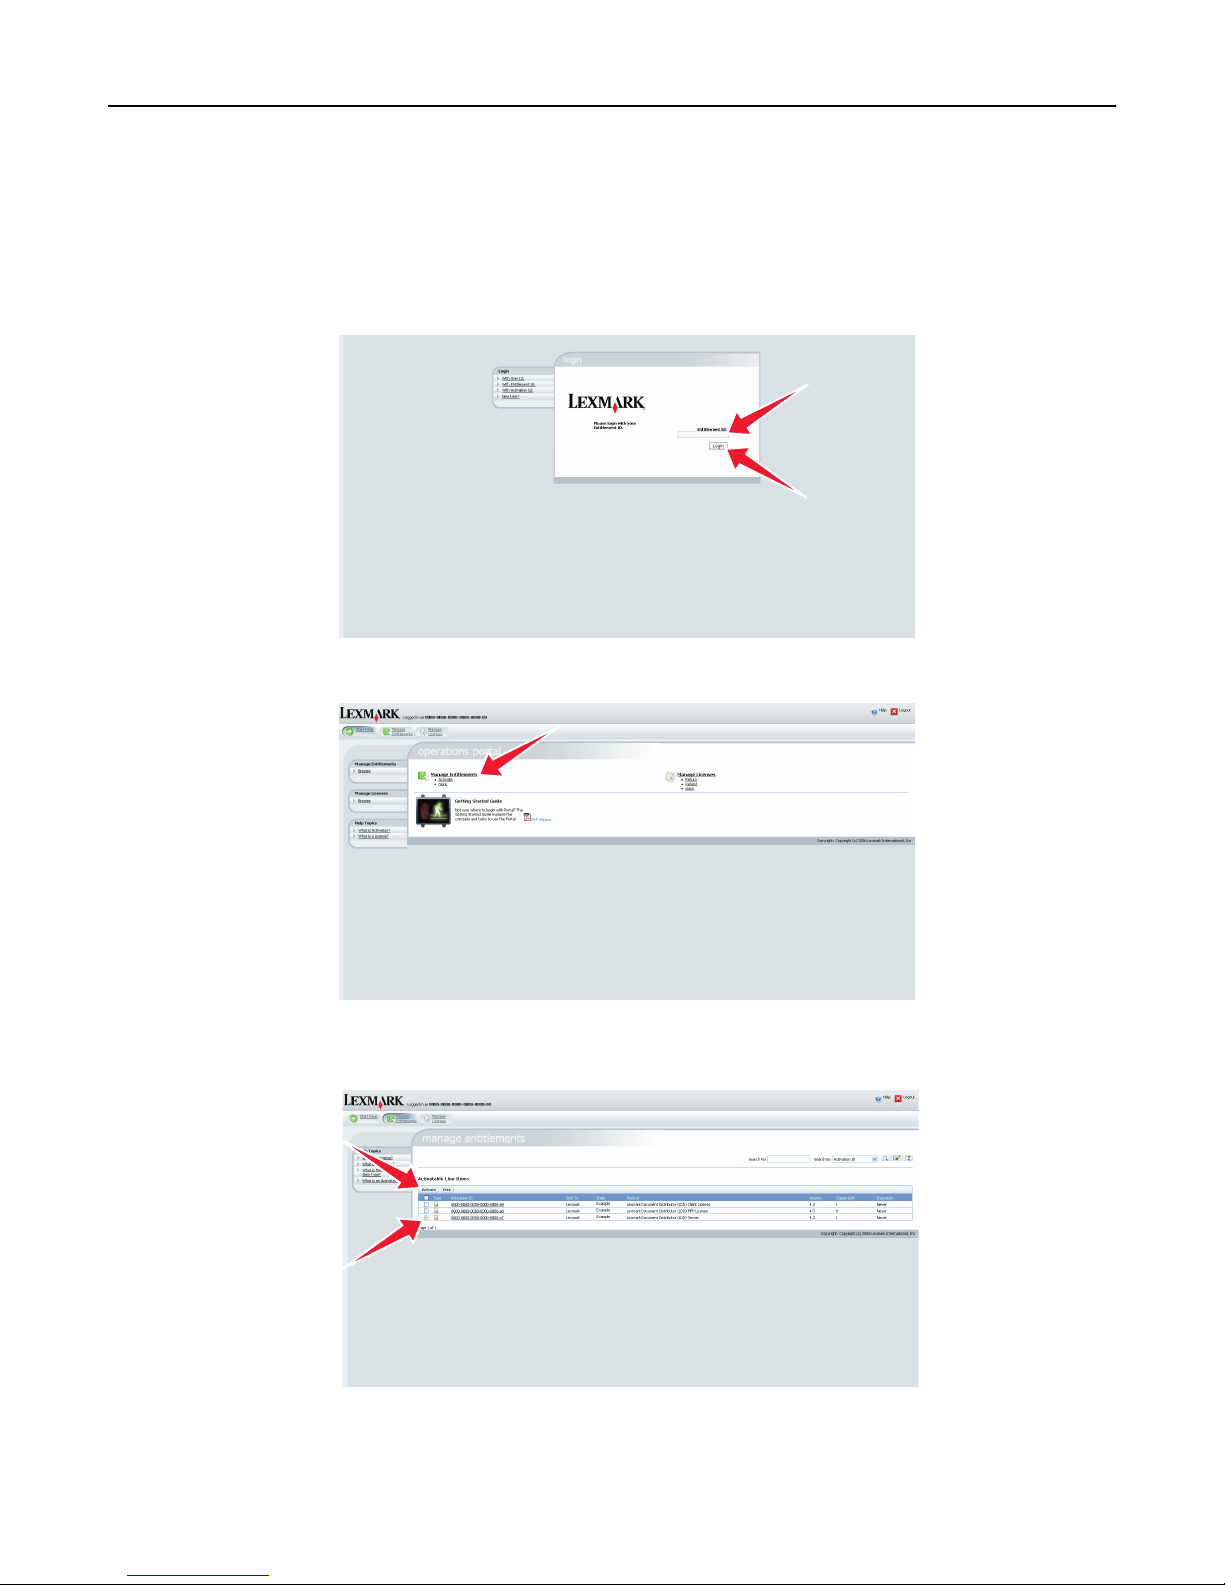
Monitoring and maintaining the system 69
Upgrading the license of an existing server
Note: Back up your current license files before updating with new files.
1 Open the Lexmark Licensing portal at http://software.lexmark.com.
2 Type the entitlement ID you received when you purchased your license, and then click Login.
3 Click Manage Entitlements.
4 Select the line for the product Lexmark Intelligent Capture Server License that indicates one or more licenses in the
Copies Left column, and then click Activate.
5 In the Host ID field, type the host ID of your server. For more information, see “Finding the host ID” on page 68.
Page 70
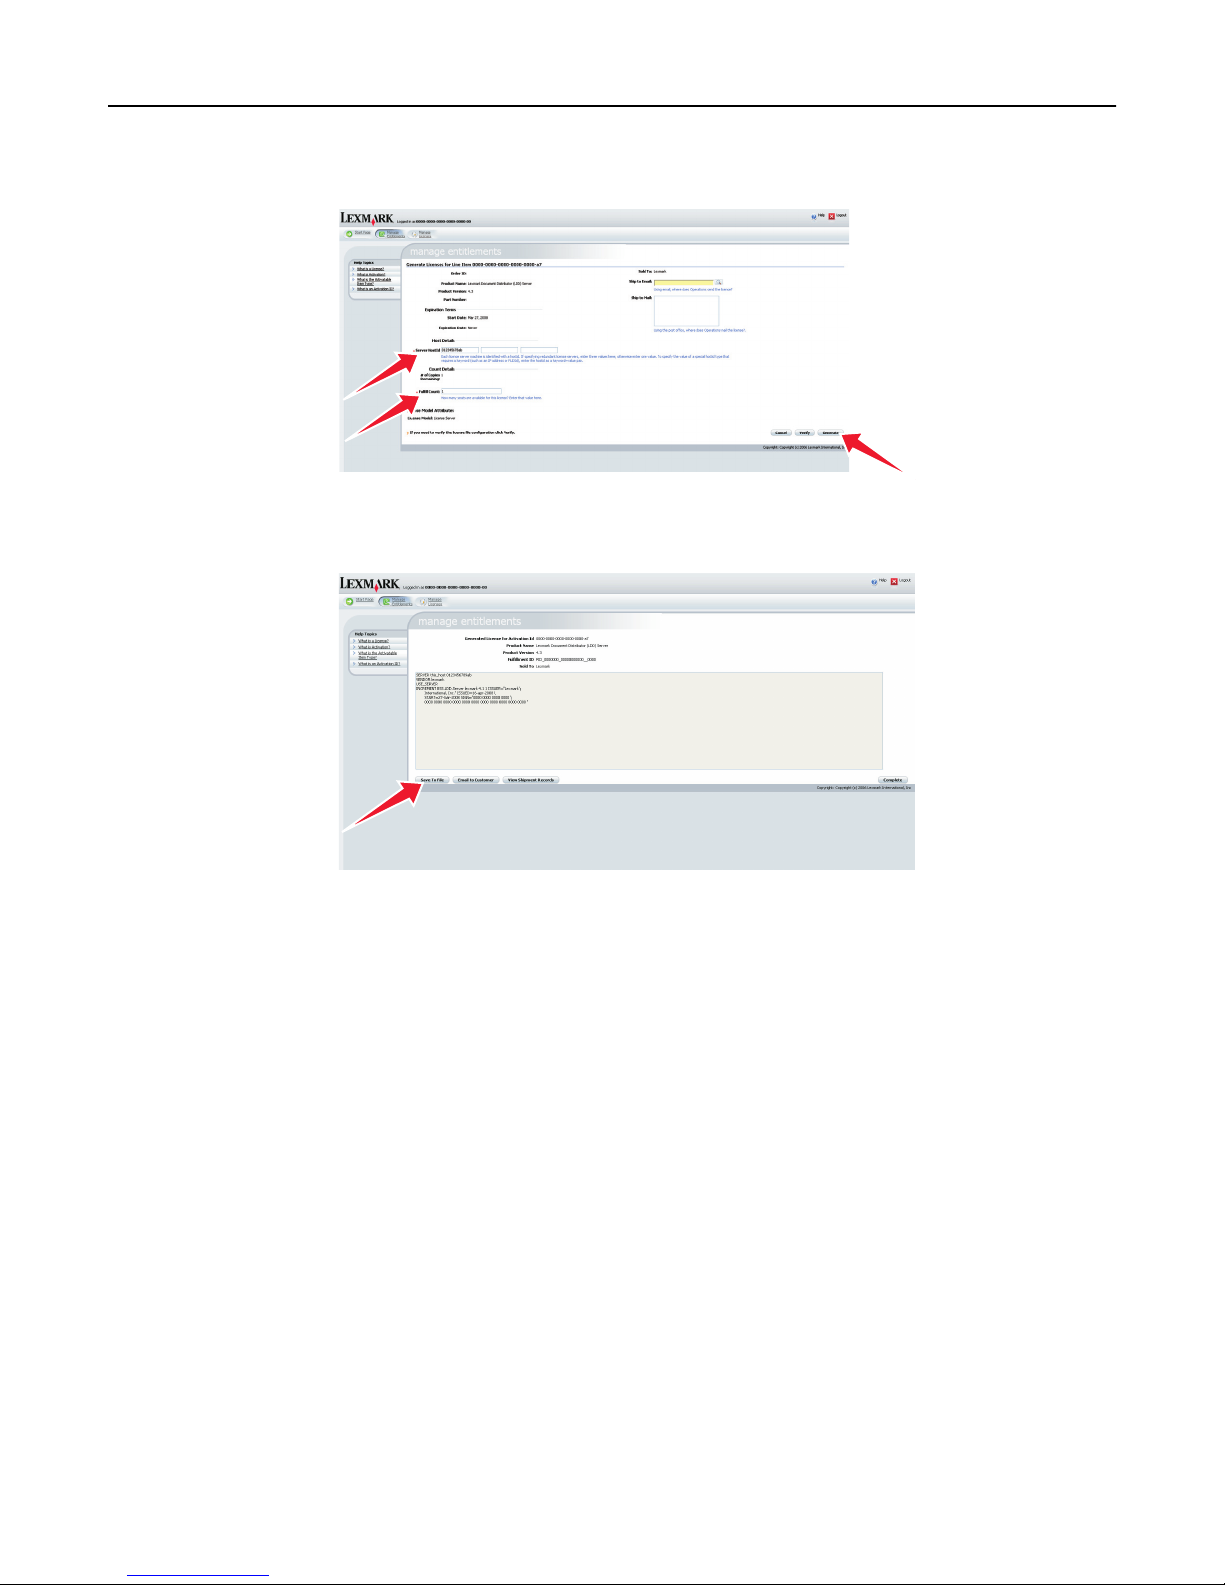
Monitoring and maintaining the system 70
6 In the Fulfill Count field, type 1, and then click Generate.
7 Click Save To File, and then save the file using a descriptive file name, such as server.lic, to a folder accessible
to the load balancer.
8 Click Complete.
Note: If you are using a failover cluster for the load balancer, then repeat steps through 1 through 7, using the
host ID of each standby node of the failover cluster. Use unique file names to avoid overwriting existing license
files.
9 From the System tab in LMC, select Licenses from the System list.
10 Click Add License.
11 In the window that appears, type a path to a license file, or click Browse to browse for a license file, and then click
Upload.
Note: Uploading license files copies them to the program folder. You can safely move or delete the license files
from the temporary location where you saved them.
Page 71
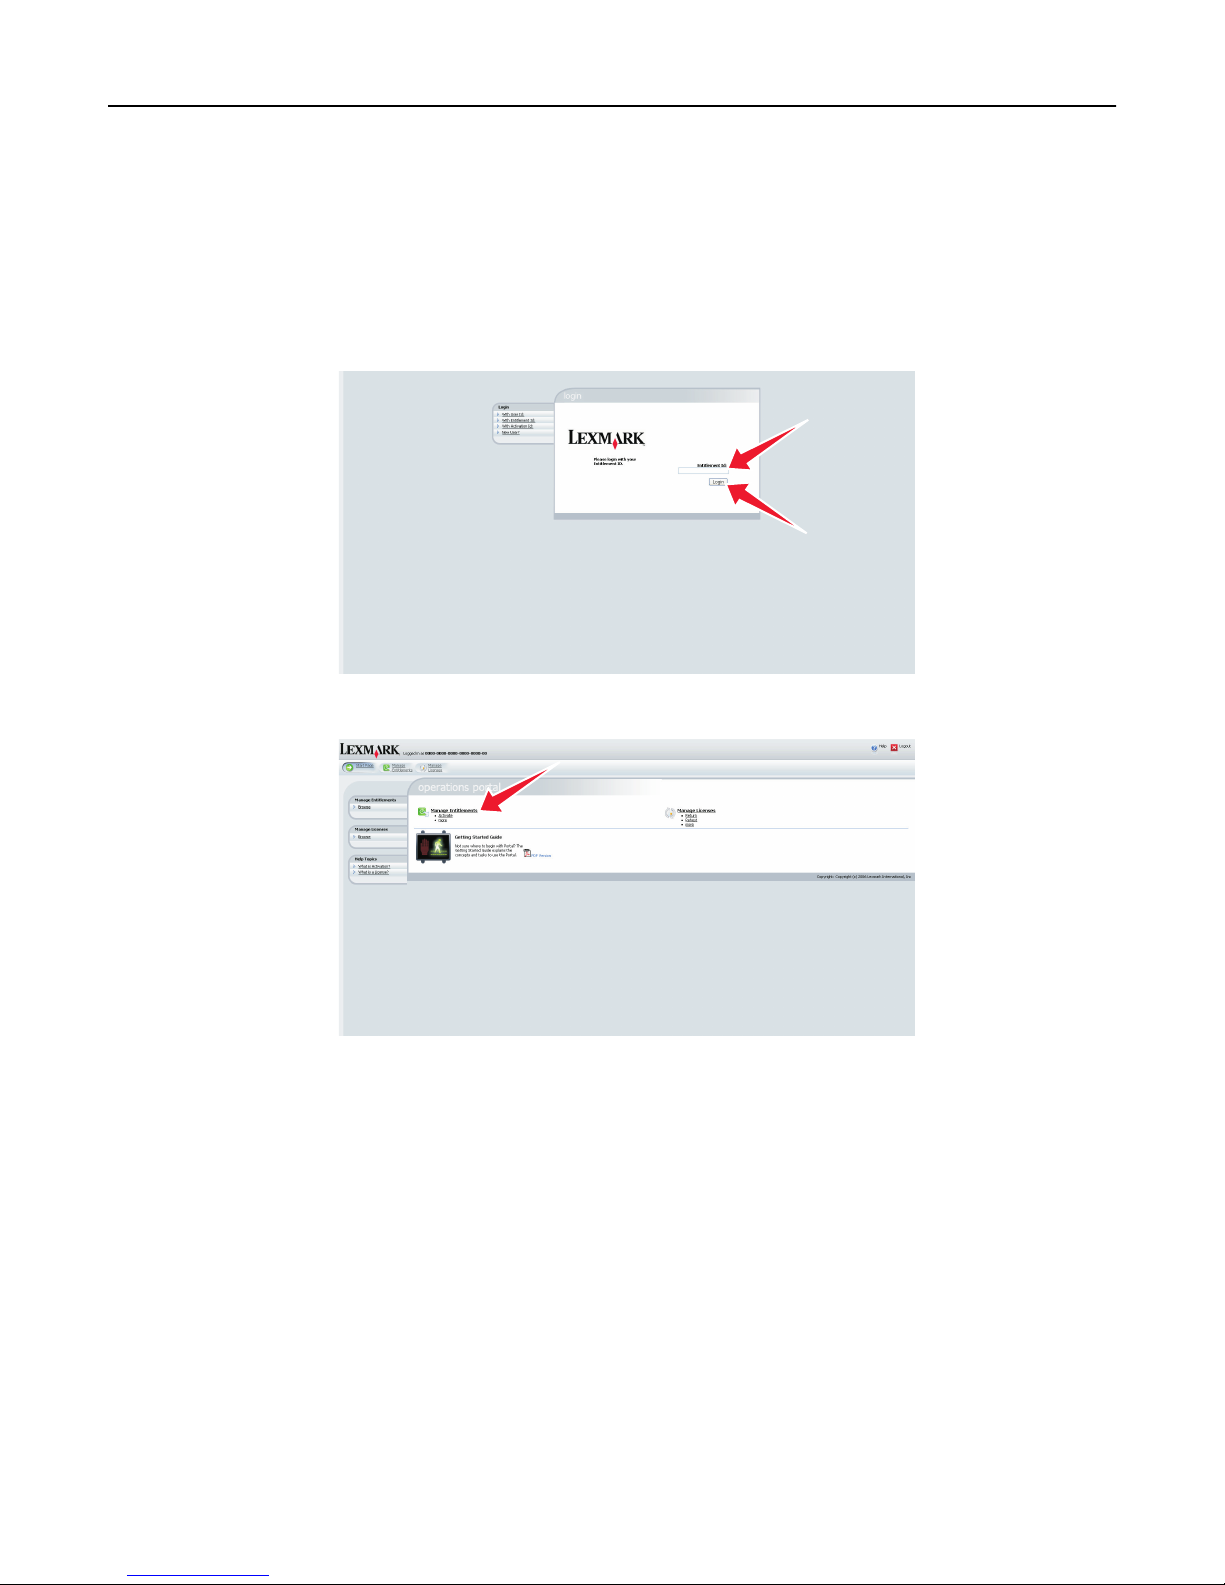
Monitoring and maintaining the system 71
Adding an MFP, e‑forms virtual printer, or software client license to an existing
server
Note: Back up your current license files before updating with new files.
1 Open the Lexmark Licensing portal at http://software.lexmark.com.
2 Type the entitlement ID you received when you purchased your licenses, and then click Login.
3 Click Manage Entitlements.
4 Select the license to activate:
• For an MFP license, select the line for the product Lexmark Intelligent Capture MFP License that indicates one
or more licenses in the Copies Left column, and then click Activate.
• For an e‑forms virtual printer license, select the line for the product Lexmark Intelligent Capture EFVP License
that indicates one or more licenses in the Copies Left column, and then click Activate.
• For a software client license, select the line for the product Lexmark Intelligent Capture Client License that
indicates one or more licenses in the Copies Left column, and then click Activate.
Page 72
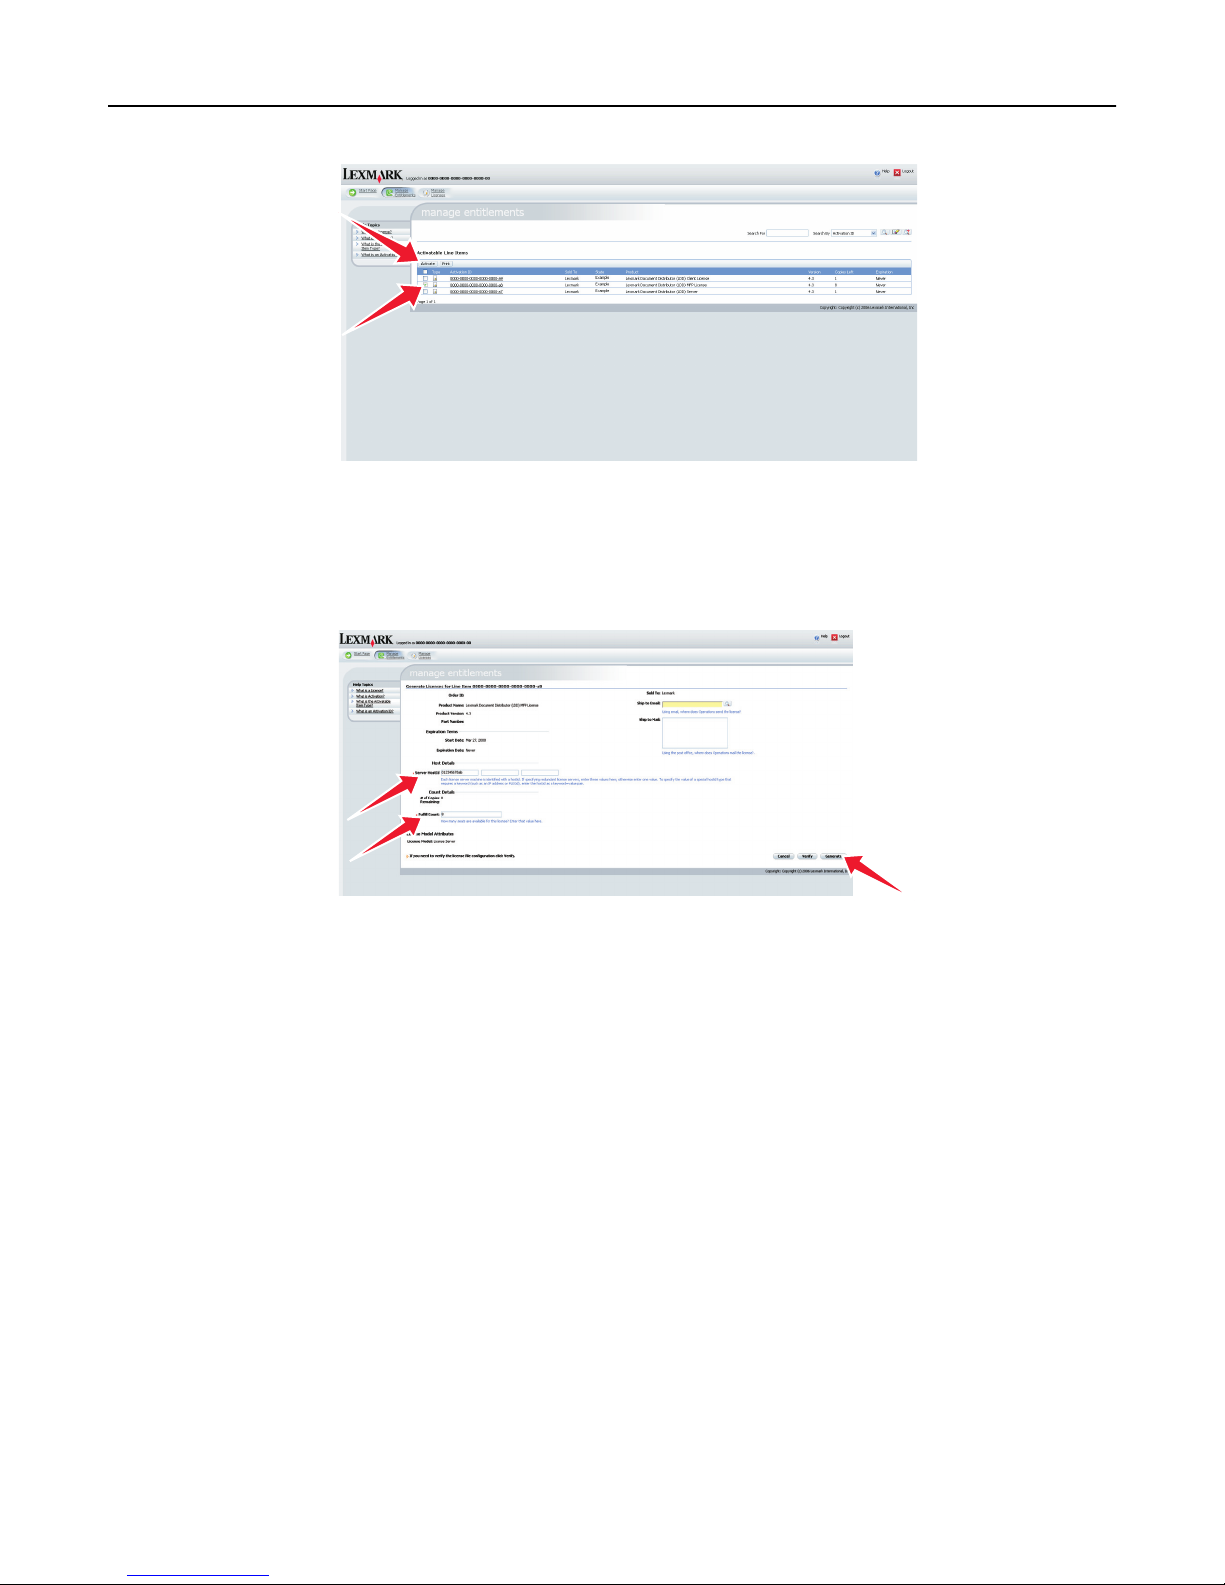
Monitoring and maintaining the system 72
5 Type the host ID of your server into the first Host ID field. For more information, see “Finding the host ID” on page 68.
6 Type the number of printers, virtual printers, or software clients associated with the current server in the Fulfill
Count field.
7 Click Generate.
8 Click Save To File, and then save the file using a descriptive file name, such as mfp.lic, efvp.lic, or
client.lic, to a folder accessible to the load balancer.
Note: The server automatically adds a time stamp to the file name of new licenses as they are installed, so
existing licenses are not overwritten if the file name used is the same as an already installed license file.
9 Click Complete.
Note: If you are using a failover cluster for the load balancer, then repeat steps 1 through 8, using the host ID of
each standby node of the failover cluster. Use unique file names to avoid overwriting existing license files.
10 From the System tab in LMC, select Licenses from the System list.
11 Click Add License.
12 In the window that appears, type a path to a license file, or click Browse to browse for a license file.
13 Click Upload.
Note: Uploading license files copies them to the program folder. You can safely move the license files from the
temporary location where you saved them.
Page 73

Monitoring and maintaining the system 73
Re‑hosting licenses
Activating purchased licenses associates the server license and each printer license with the host ID of the load balancer
and generates license files that will work only with that load balancer. If the load balancer is transferred to a new
computer, then printers are moved to a different server system, or the network adapter is changed in the load balancer,
the applicable licenses must be reallocated to the new host ID.
1 Open the Lexmark Licensing portal at http://software.lexmark.com.
2 Type the entitlement ID you received when you purchased your licenses, and then click Login.
3 Click Manage Licenses.
4 Select a license, and then click Rehost.
5 Replace the existing server host ID with the host ID of the new load balancer. For more information on determining
the host ID, see “Activating Lexmark Intelligent Capture licenses” on page 22.
6 In the Rehost Count field, type the number of licenses to re‑host :
• When moving a server license, always use 1.
• When moving all printer licenses to the new server system, use the number shown in the Fulfill Count field.
• To move only some of the existing printer licenses to the new server system (known as a partial re‑host), enter
a number less than the number show in the Fulfill Count field.
7 Click Rehost.
The new license is shown. If you are re‑hosting only some printer licenses, a second fulfillment ID is shown.
8 If you are re‑hosting all licenses, then click Save To File, and then save the new license file to a folder accessible to
the new Lexmark Intelligent Capture system.
If you are re‑hosting only some of the printer licenses, then you must replace the license file on the original server
system:
a Note the host ID for the license file associated with each fulfillment ID shown to determine the server system
with which each of the new license files is associated.
b Click Save To File while viewing the license for the original server system, and then save the new license file.
c Click Save To File while viewing the license for the new server system, and then save the new license file. Use
a different name or folder from the license file for the original server system so that you do not overwrite it.
9 Click Complete.
Note: When moving all licenses, this procedure must be completed once for the server license, and a second
time for all printer licenses.
10 Launch Lexmark Management Console for the new system in your Web browser, and then add a new license. For
more information, see “Adding an MFP, e‑forms virtual printer, or software client license to an existing server” on
page 71.
11 If you are re‑hosting only some of the printer licenses, then repeat step 10 for the original server.
Page 74
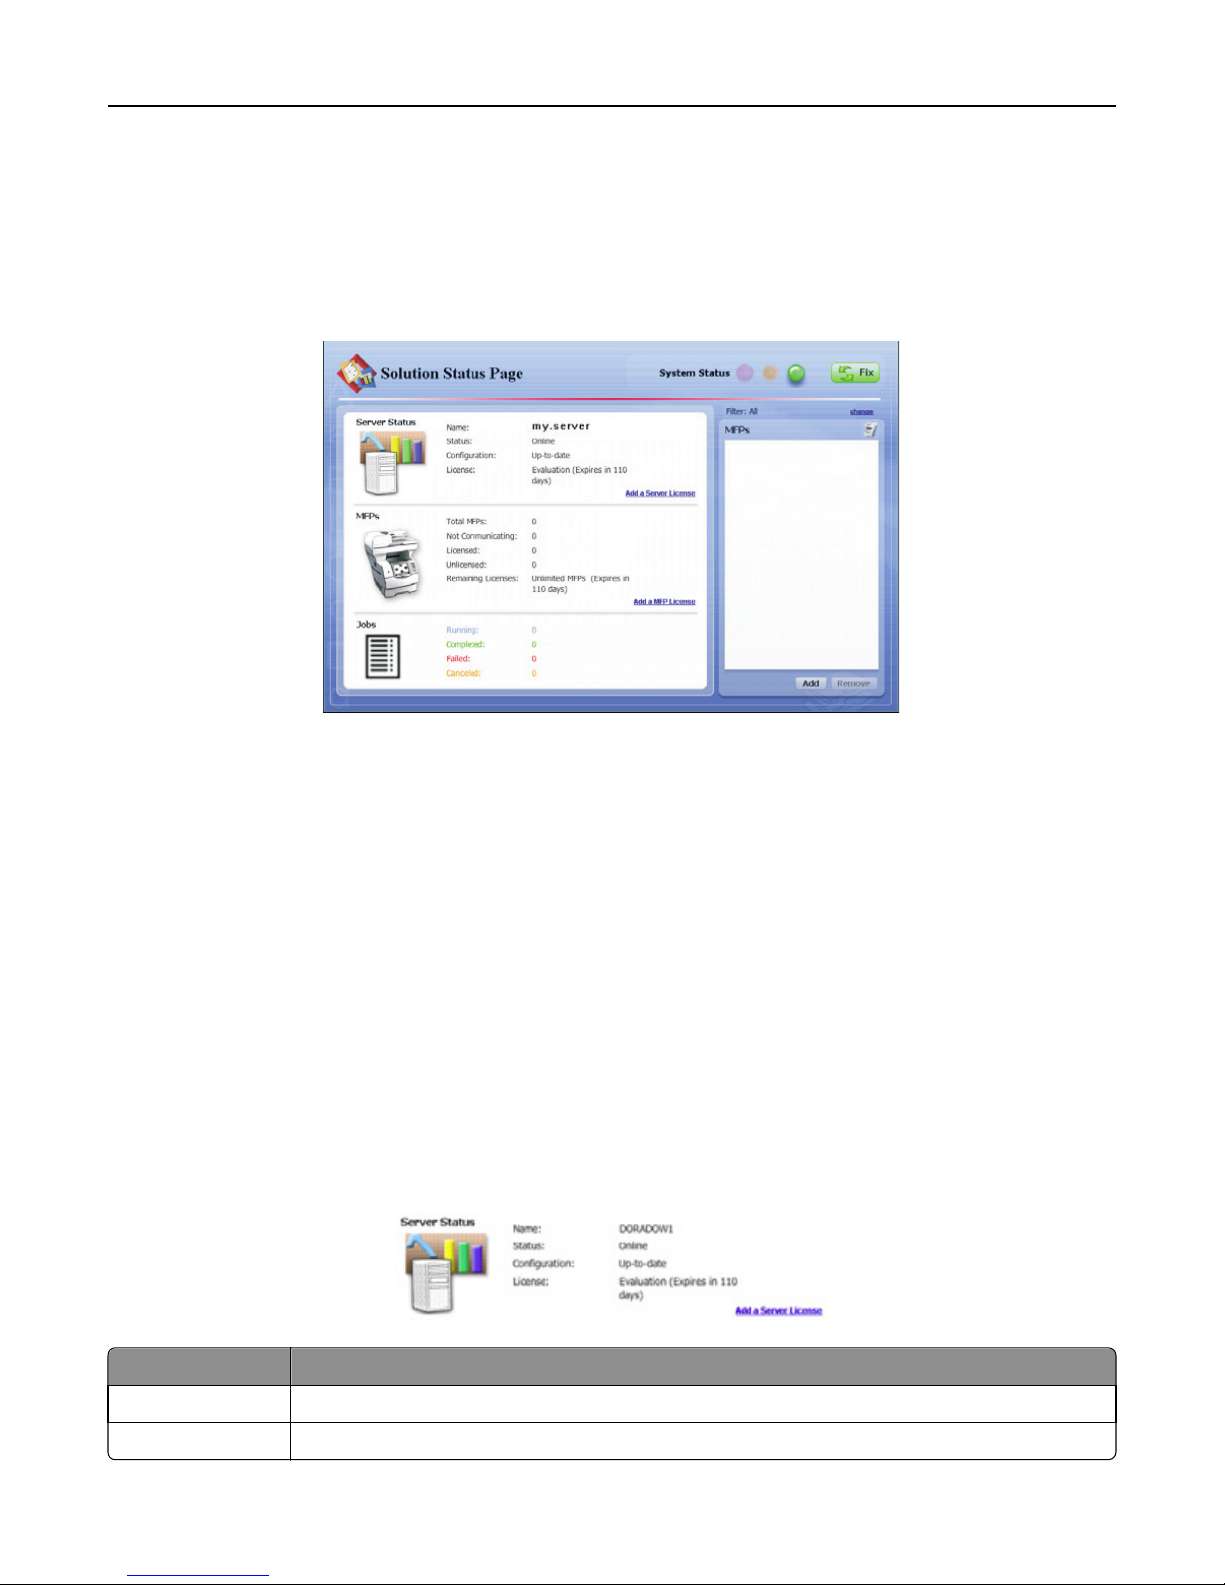
Monitoring and maintaining the system 74
Using the Solution Status Page
Some solutions include a Solution Status Page that provides simple and easy-to-use access to status information for
the server system where the solution is running and the printers in the device group associated with the Solution Status
Page. Additionally, new printers and licenses can be added, and a single Fix button can fix many common problems.
The Solution Status Page is particularly suited to less-experienced users.
Note: The Solution Status Page can only be enabled for solutions designed for device groups.
Accessing the Solution Status Page
Launch the Solution Status Page from your Web browser using the URL http://loadbalancer:
9780/lmc/statuspage/?solutionName=solutionname, where loadbalancer is the computer where
your load balancer is installed, and solutionname is the name of the associated solution.
Understanding status information
Note: The following section titles and fields may have been customized for your solution and may differ from the
text shown here.
Server Status
The Server Status section provides basic information about the server system and indicates any problems related to
the server system itself.
Field Description
Name The host name of the computer where the server system is running
Status Indicates whether the server system is online or offline
Page 75
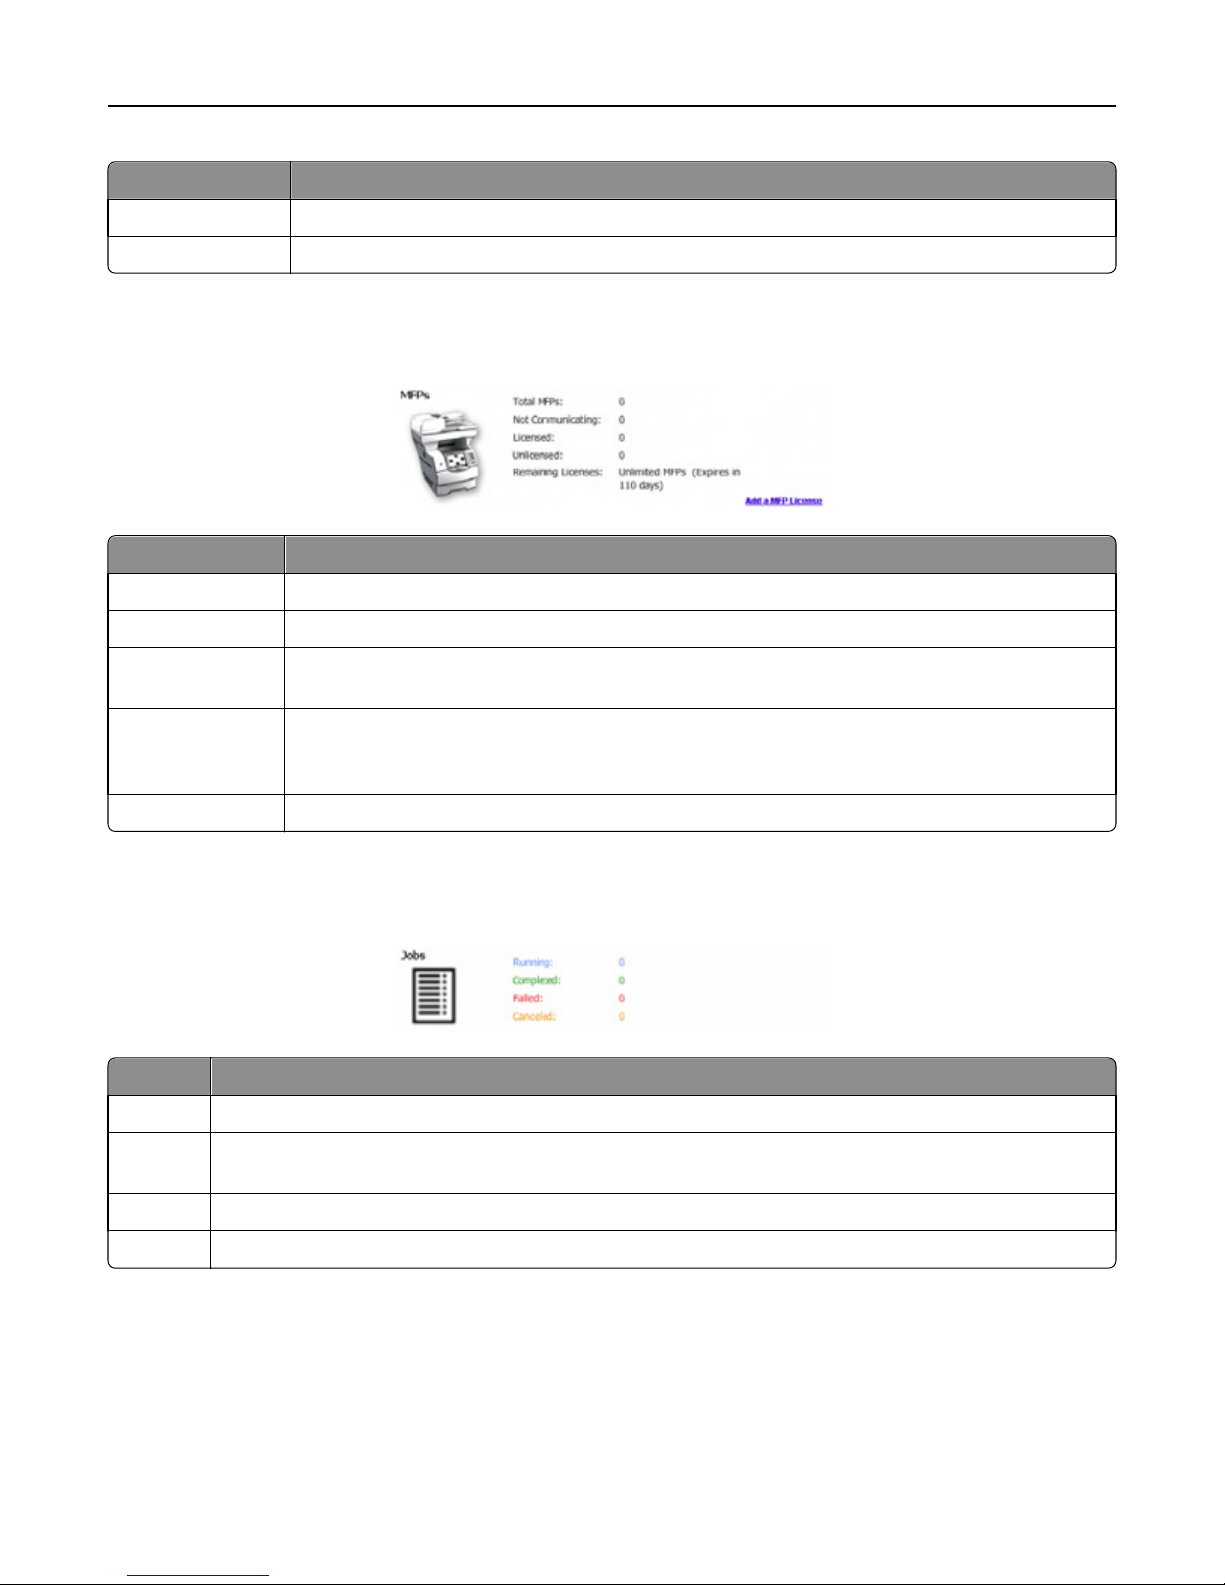
Monitoring and maintaining the system 75
Field Description
Configuration Indicates the current status of the server configuration
License Indicates the type of license, if any, that is provided for the server
MFPs (overview)
The MFPs section in the left pane shows the overall status of the printers connected to the server.
Field Description
Total Stations Indicates the number of printers connected to the server system
Not Communicating Indicates the number of printers that are not responding to the server system
Licensed Indicates the number of printers connected to the server that have licenses available on the server
system
Unlicensed Indicates the number of printers connected to the server that do not have licenses available on the
server system. Solutions will not function on printers added that exceed the number of licenses
available.
Remaining Licenses Indicates the number of licenses available for connecting more printers to the server system
Jobs
The Jobs section provides an overview of jobs run on the connected printers.
Field Description
Running Indicates how many jobs are currently being processed on all connected printers
Completed Indicates how many jobs have been successfully processed on all connected printers since the server was
installed
Failed Indicates how many jobs failed to successfully complete on all connected printers since the server was installed
Canceled Indicates how many jobs were canceled by the user on all connected printers since the server was installed
Page 76
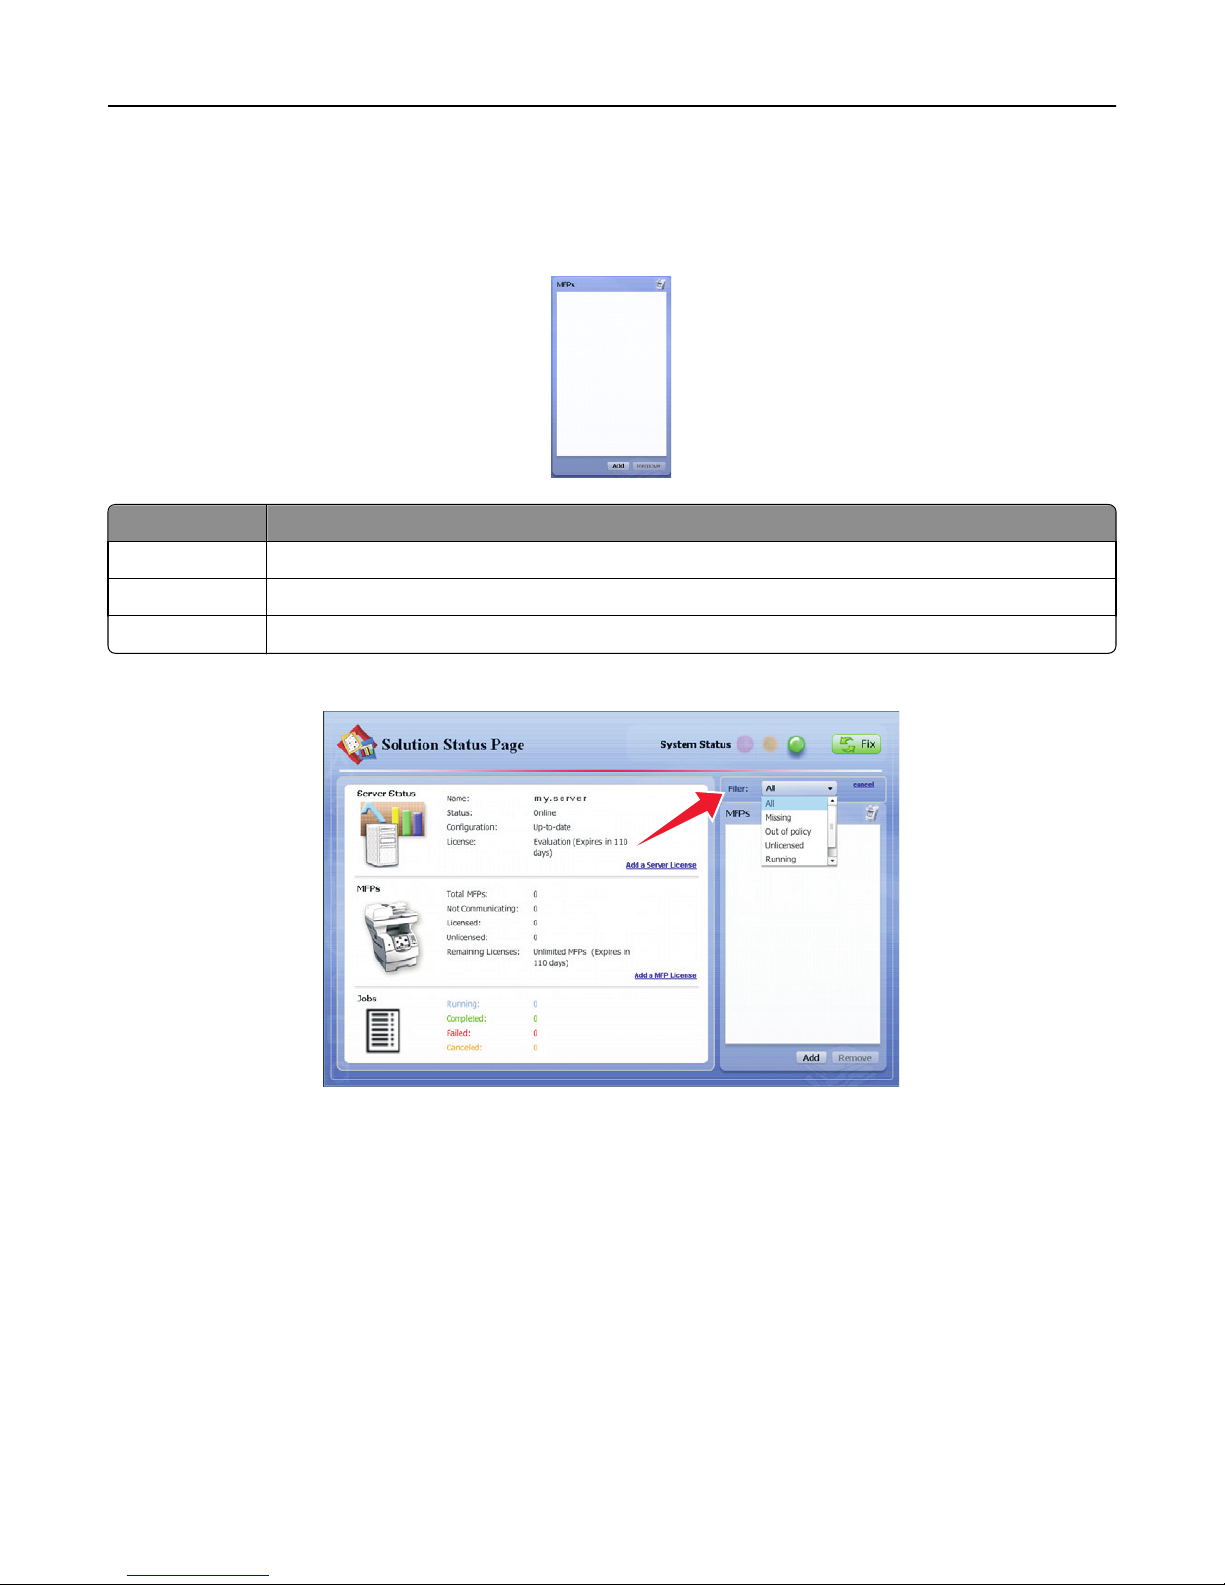
Monitoring and maintaining the system 76
MFPs (detail)
The MFPs section in the right pane lists each connected printer. Expand a printer in the list to show the following
information:
Field Description
Configuration Indicates the current status of the printer configuration
Licensed Indicates whether the printer has a license available on the server
State Indicates the current status of the printer and any errors reported by the printer
To filter the list of printers by status, select an option from the Filter list.
Page 77
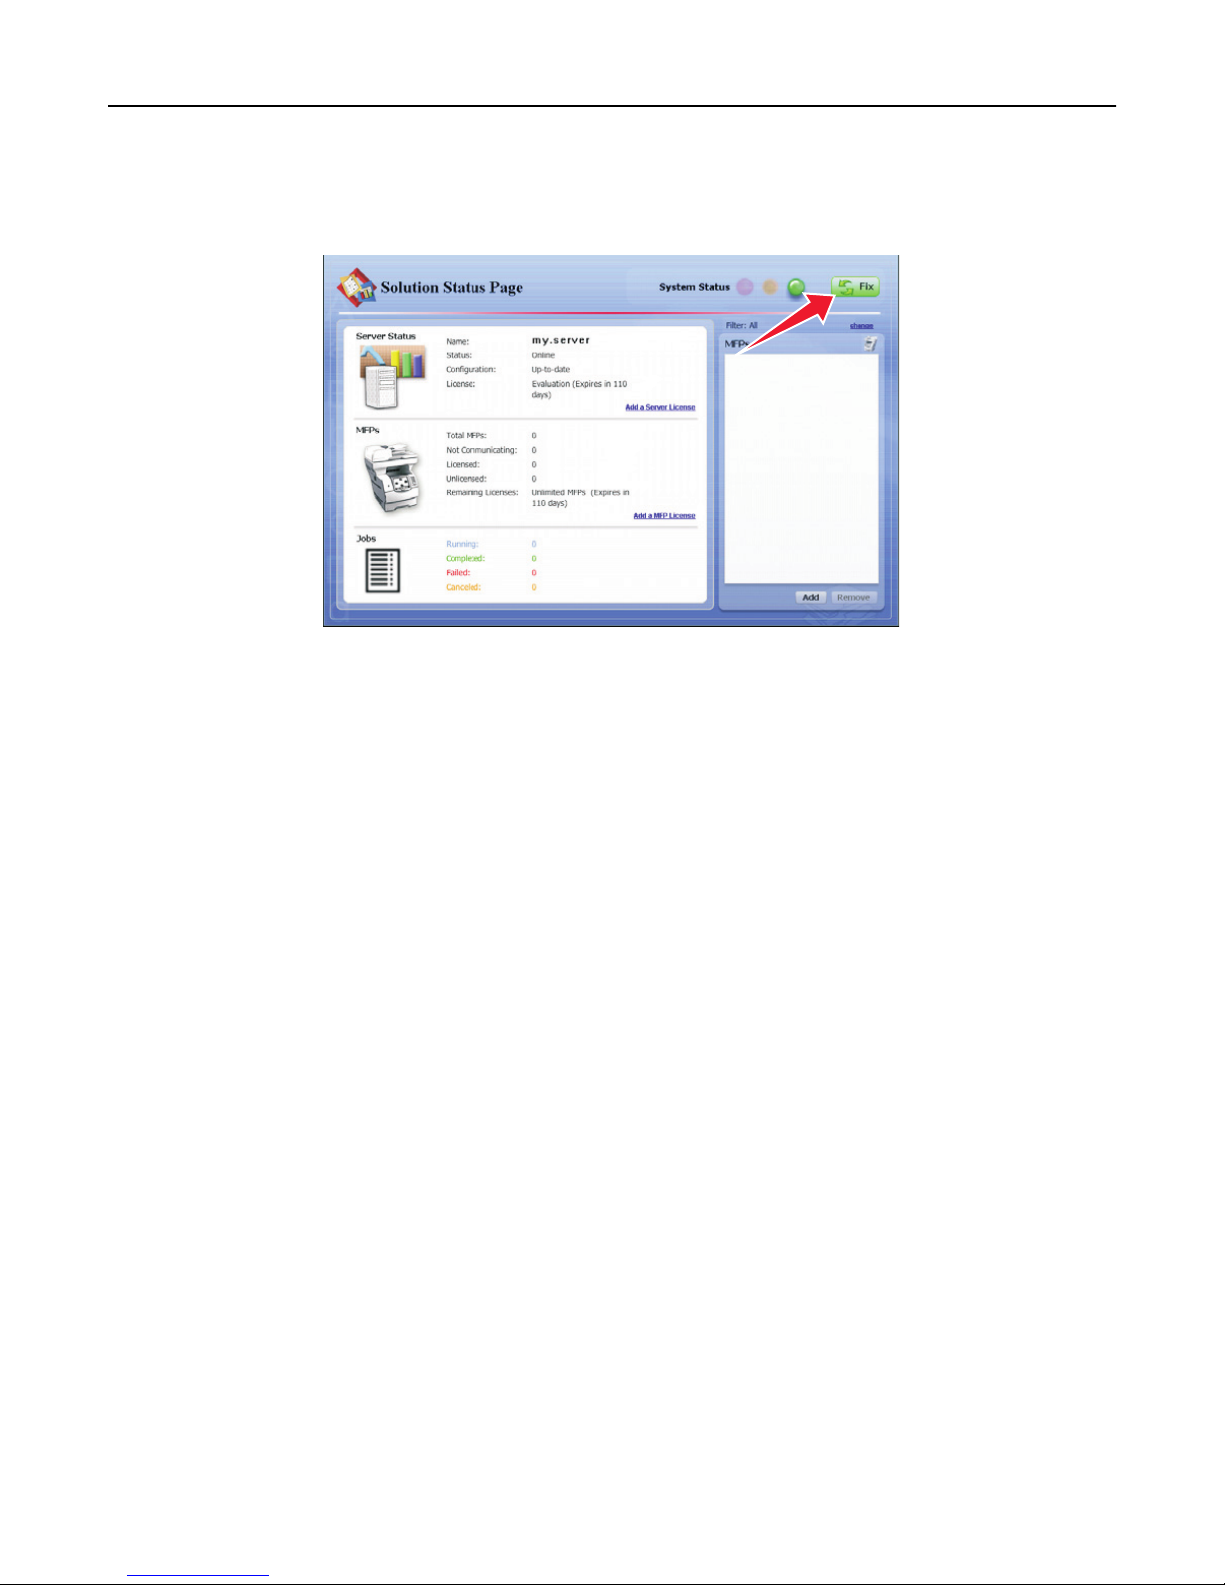
Monitoring and maintaining the system 77
Repairing common server problems
Click Fix to repair several common problems that occur in the system.
The Fix button does each of the following as necessary:
• Set all servers online.
• Run a discovery for the associated device group.
• Update policies on associated printers.
• Reload the license files on the server system.
Printers that are powered off when using the Fix button are placed in the Not Communicating category. To recover
communication with a printer in the Not Communicating category, turn on the printer, and then click Fix again.
Adding printers to a server
Adding a printer using the Solution Status Page adds the printer to the device group associated with the solution and
runs a discovery to initiate communication with the printer. Each printer added uses one of the available licenses on
the server.
1 Make sure the printers being added are turned on.
2 In the right pane of the Solution Status Page, click Add.
Note: The Add button is available only if the server has unused licenses.
Page 78
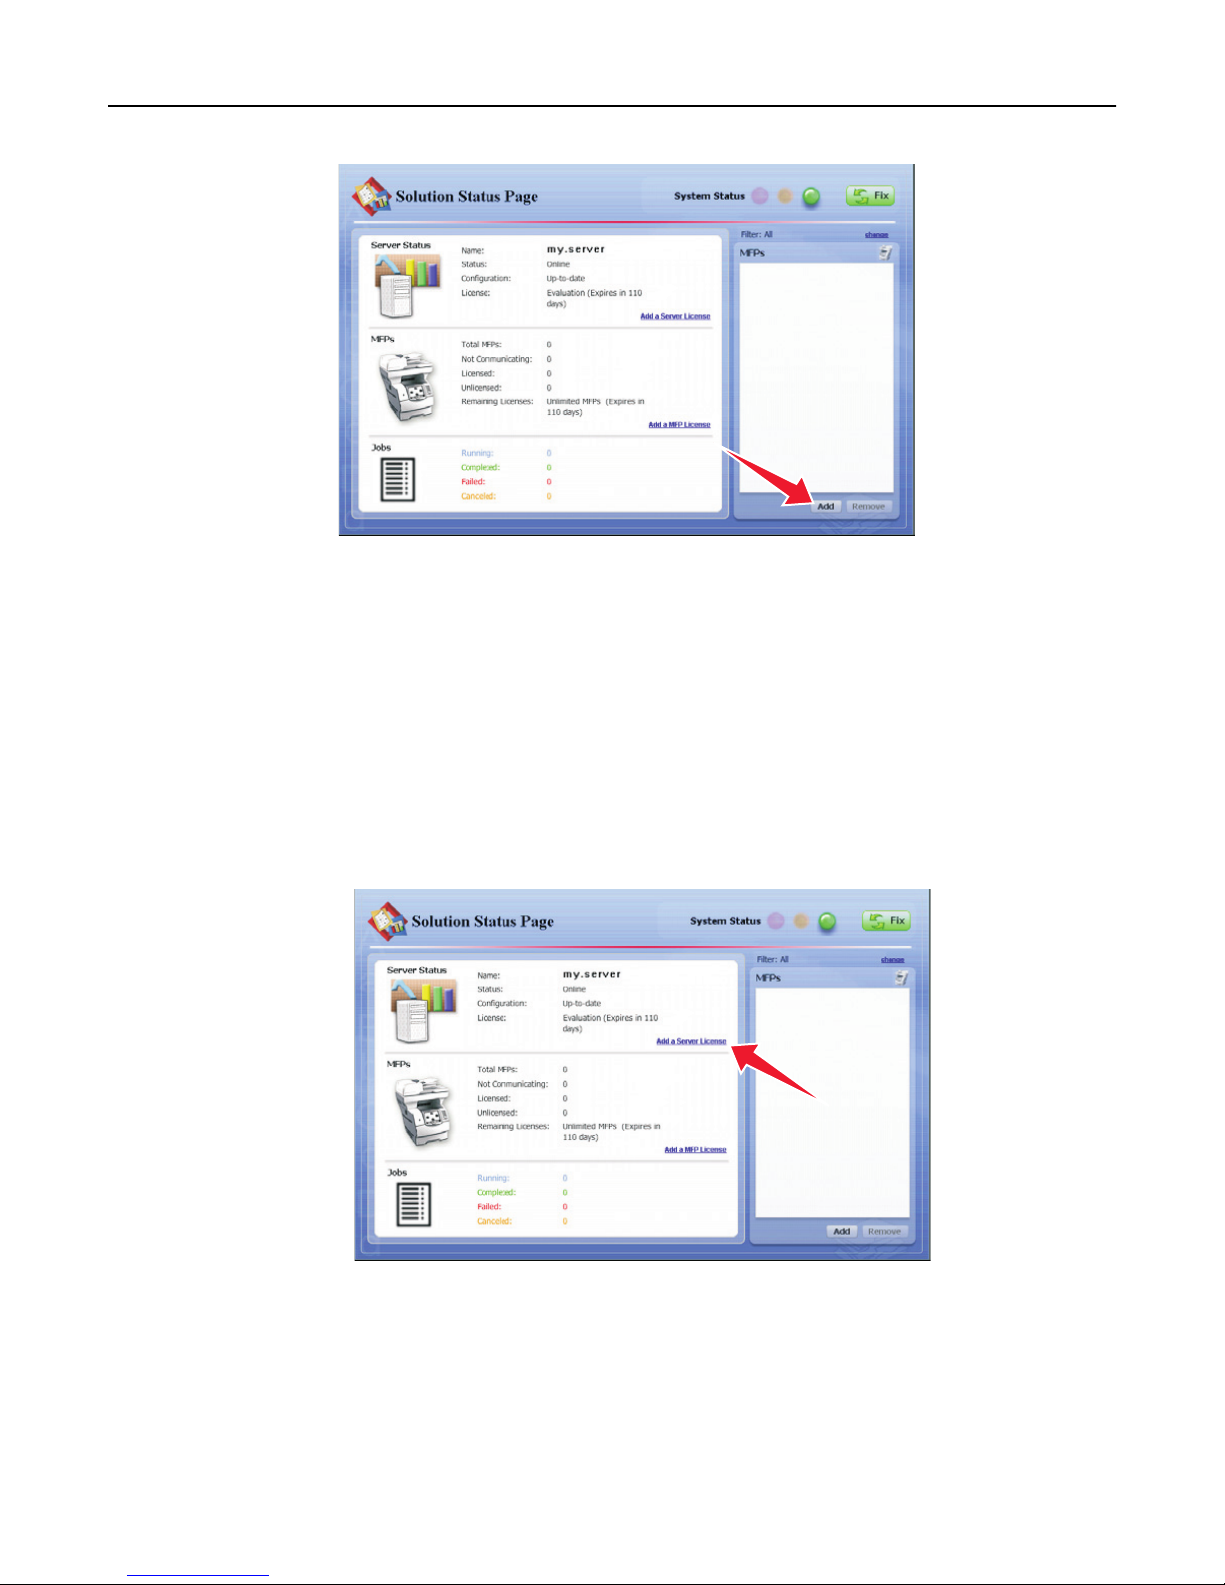
Monitoring and maintaining the system 78
3 Type the IP address or host name of the printer, and then click Add.
The printer is added to the MFPs list in the right pane, and the numbers in the MFPs section of the left pane are
adjusted accordingly.
4 Click Yes to add another printer, or click No to complete the process.
Adding licenses to a server
You can add both server licenses and MFP licenses from the Solution Status Page.
1 Select the type of license to add:
• To add a new server license, click Add a Server License.
Page 79
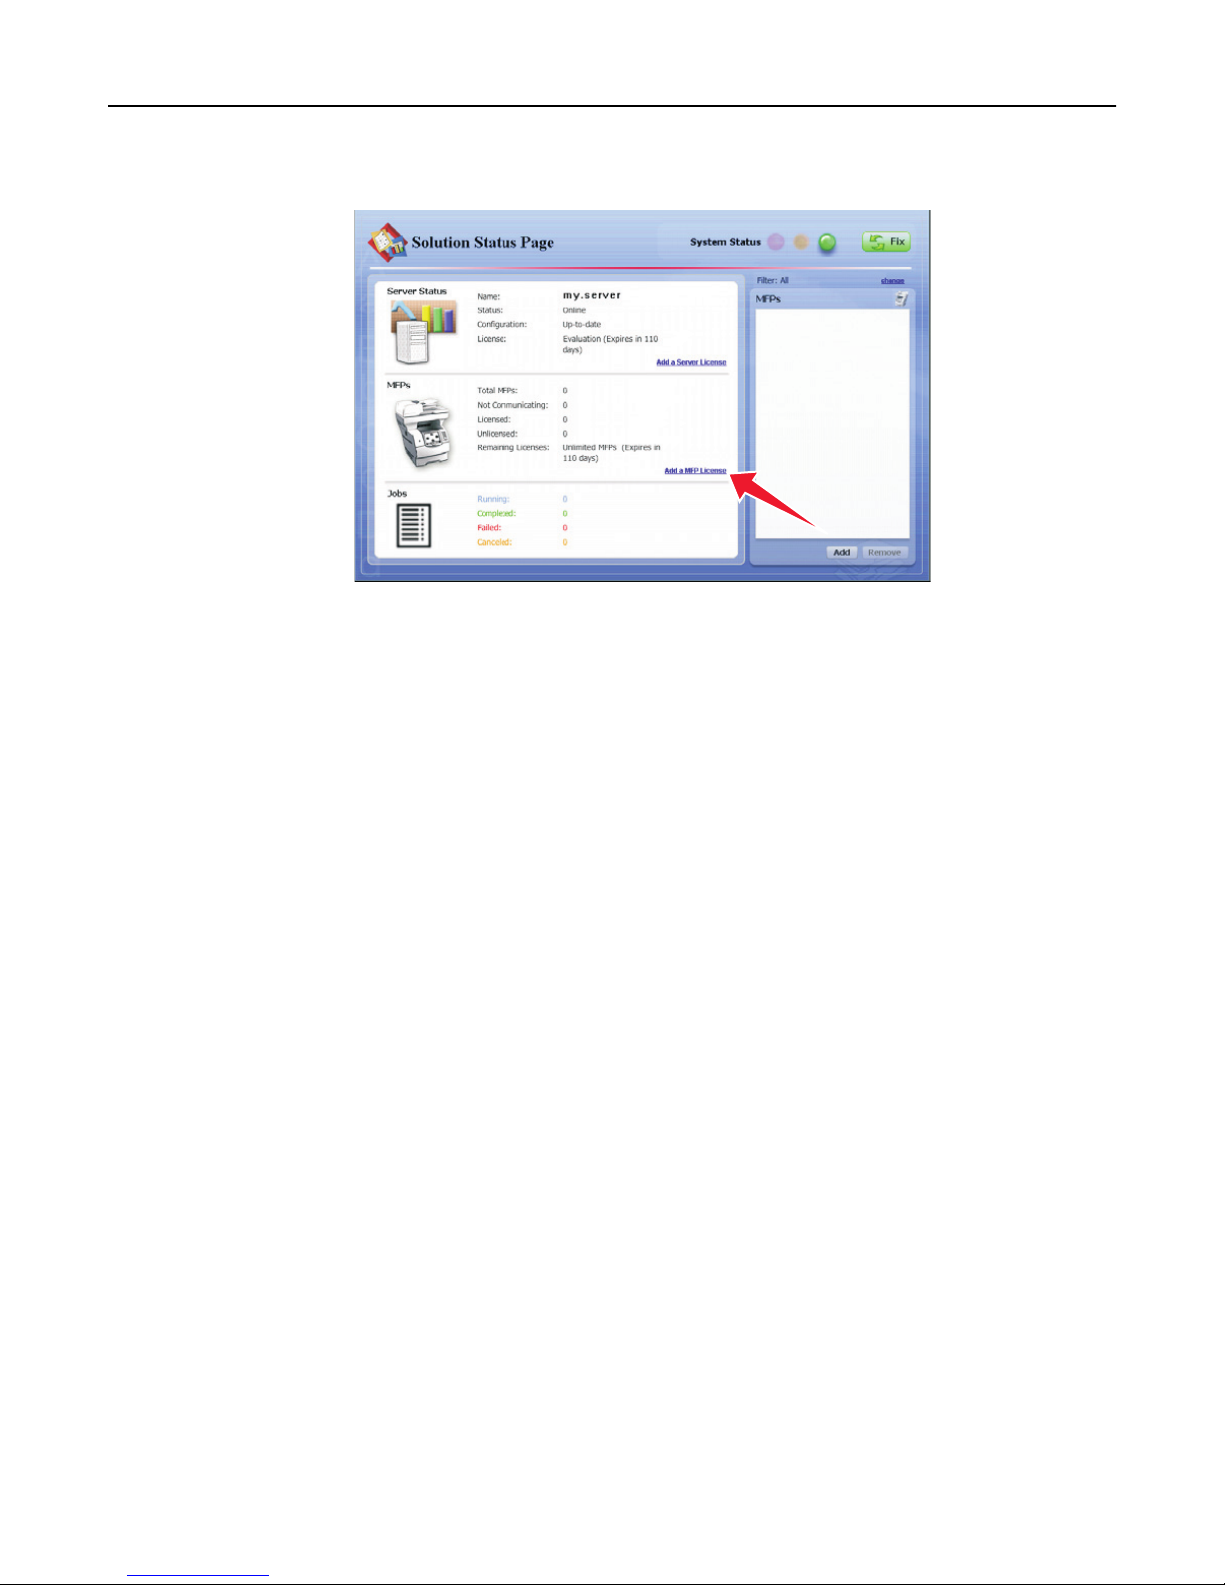
Monitoring and maintaining the system 79
• To add a new printer license, click Add a MFP license.
2 In the window that appears, type a path to a license file, or click Browse to browse to the license file.
3 Click Upload.
Removing printers
Removing a printer disables the solution on that printer and frees a license on the server.
1 In the right pane of the Solution Status Page, select a printer to remove.
2 Click Remove.
3 Click Yes to confirm.
The printer is removed from the associated device group, and its license is made available.
Managing reports
Running a report
Note: It is recommended to run reports during off‑peak usage times to avoid affecting system performance.
1 Click the System tab.
2 Select Reports from the System list.
3 Select a report from the Available Reports list.
4 Specify the reporting period.
5 Select an output format from the Output Format drop‑down menu.
Note: Each report has a default selection for the output format, which may be the format that the report was
specifically designed to use. For more information about a custom report, contact the designer of your custom
report.
6 Save the report to a file, or send it in an e‑mail message:
Page 80

Monitoring and maintaining the system 80
To save the report to a file:
a Select the Save To check box.
b Click beside the Save To field.
c Type a destination folder path using either a local drive letter or a UNC path for a network share.
d If the folder is located on a network share that requires authentication, then type the network share user name
and password.
e Click OK.
To send the report in an e‑mail message:
a Select the Email To check box .
b Click beside the Email To field.
c Edit the fields of the e‑mail message as necessary, and then click OK.
7 If additional query parameters are available for the selected report, then click Additional Parameters to specify
values for those parameters. If no additional parameters are available, then the button is disabled.
Note: Additional parameters can be defined only when including a report with a workflow solution during
development.
8 Click Run Report.
The report appears in a new window and may be saved to a file or sent in an e‑mail message.
Notes:
• Only summary reports are supported. Even if a custom report has a detail section defined, the section does
not appear. If a custom report does not have a summary section, then the finished report is blank.
• Pop‑ups must be allowed for LMC in your Web browser to view reports.
• Adobe Reader is required to view PDF reports.
Scheduling a report
Note: It is recommended to run reports during off‑peak usage times to avoid affecting system performance.
1 Click the System tab.
2 Select Schedule from the System list.
3 Click Add > Report.
Note: Some solutions may include a script that runs a report with a predetermined configuration which can be
scheduled like any other script. Additionally, reports that run through a script can be run separately for each
server in the system. For more information, contact the developer of your solution.
4 Type a description for the task, and then click Next.
5 Select and configure the scheduled report:
a Select a report from the Available Reports list.
b Select a reporting period.
Page 81

Monitoring and maintaining the system 81
c Select an output format from the Output Format drop‑down menu.
Note: Each report has a default selection for Output Format, which may be the format that the report was
specifically designed to use. For more information about a custom report, contact the designer of your
custom report.
d Save the report to a file or send it in an e‑mail message:
To save the report to a file:
1 Select the Save To check box.
2 Click beside the Save To field.
3 Type a destination folder path using either a local drive letter or a UNC path for a network share.
4 If the folder is located on a network share that requires authentication, then type the network share user
name and password.
5 Click OK.
To send the report in an e‑mail message:
1 Select the Save To check box..
2 Click beside the Email To field.
e If additional query parameters are available for the selected report, then click Additional Parameters to specify
values for those parameters. If no additional parameters are available, then the button is disabled.
6 Click Next.
7 Enter a start date and a start time.
8 Configure the frequency of the scheduled event, and then click Finish.
Using built‑in reports
Built‑in reports are available to display commonly used data. All built‑in reports are designed for PDF output, except
for those that specify CSV in the report title.
• Jobs Report ‑ CSV—This displays the jobs list in CSV format.
• Log Report ‑ CSV—This displays all log entries in CSV format.
• Log Report ‑ Failed Jobs—This displays log entries for failed jobs.
• Printer Report—This displays data related to printer usage, such as printer success rates, printer model usage,
printer usage per profile, and most active users per printer.
• Report by Time—This displays daily and hourly data, such as job totals, job success rates, printer usage, user usage,
server usage, and job durations.
• Server Report—This displays data related to server usage, such as job success rates, hourly job rates, job duration,
and server distribution. Both a summary for all servers and details for individual servers are available.
• Software Client Report—This displays data related to software client usage, such as software client success rates,
software client usage per profile, and most active users per software client.
• Solution Report—This displays data related to solution usage, such as solution success rates, most used solutions,
and how solutions are accessed.
• Task Summary Report—This displays data related to tasks, such as task attempts, task success rates, and task times.
Both a summary and details are available.
• Tops Report—This displays the most active of the following elements:
– Users
– Printers
Page 82

Monitoring and maintaining the system 82
– Printer models
– Profiles
– User for each profile
– Servers
– User for each printer
– Software client for each profile
– User for each software client
– Tasks
– Printer for each profile
– Scheduled scripts
• User Report—This displays data related to users, such as user job success rates, most active users, and job duration.
Adding a report
Note: Only summary reports are supported. Even if a custom report has a detail section defined, the section will not
be displayed. If a custom report does not have a summary section, then any reports generated from the custom
report will be blank.
1 Click the System tab.
2 Click Reports in the System list.
3 Upload the report files:
a Click Upload Report Files > Browse.
b Select a .jasper compiled report file, as well as any of the following:
• .jasper compiled report files used as subreports
• .jpg or .png graphics included in the report
• .jrxml report source files (optional)
c Click Open.
d Existing files are overwritten by default. If you do not want to overwrite existing files, then clear the Overwrite
if file already exists check box.
e Click Upload.
Selected files are copied to the folder \Lexmark\Solutions\apps\wf-ldss\WEB-INF\reports\ where the system is
installed on each server.
4 Below the Available Reports list, click Add.
5 Type a descriptive report name.
6 Select the Jasper report file name for the compiled report you uploaded.
7 Select the database the report was designed to access from the Datasource drop‑down menu. Commonly used
databases include:
• MONITOR—This is used by reports that access the jobs list and the log.
• SOLUTIONINFO—This is used by some solutions to store custom data.
For more information about a custom report, contact the designer of your custom report.
Page 83

Monitoring and maintaining the system 83
8 Select the default output format.
Note: Each report has a default selection for output format, which may be the format that the report was
specifically designed to use. For more information about a custom report, contact the designer of your custom
report.
9 Click Save.
Editing report settings
1 Click the System tab.
2 Click Reports in the System list.
3 Select a report from the Available Reports list, and then click Edit.
4 Edit the report settings as necessary:
• Type a descriptive report name.
• Select the Jasper report file name for a compiled report that has been uploaded to the system.
• Select the data source.
• Select the default output format.
Note: Each report has a default selection for output format, which may be the format the report was
specifically designed to use. For more information about a custom report, contact the designer of your
custom report.
5 Click Save.
Removing a report
To remove a report, select a report from the Available Reports list, and then click Remove.
Note: Removing a report automatically removes any associated scheduled report tasks. However, any scheduled
script tasks that use the report are not detected and must be removed manually.
After removing a report from the Available Reports list, you can optionally delete associated files from the folder
\Lexmark\Solutions\apps\wf-ldss\WEB-INF\reports\ where the system is installed on each server.
Configuring default report options
You can configure default report options, such as default e‑mail or file destination and default reporting period.
Select the Reports service from the Services tab.
Clicking Refresh Defaults while configuring a report returns settings to defaults.
Page 84

Monitoring and maintaining the system 84
Creating custom reports
Lexmark Intelligent Capture uses JasperReports for custom reports. You can create custom reports using the open
source application iReport 3.5.2, available from http://jasperforge.org/ireport. For more information about overall
report design, see the documentation for iReport.
Note: Only summary reports are supported. Even if a custom report has a detail section defined, the section will not
be displayed. If a custom report does not have a summary section, any reports generated from the custom report
will be blank.
Using special Lexmark Intelligent Capture parameters
You can add the following parameters to the report design in order to use the specified information in other parts of
the report:
• start_date—This retrieves the start date for report data, as specified in a script or by the administrator when
the report is run.
• end_date—This retrieves the end date for report data, as specified in a script or by the administrator when the
report is run.
• SUBREPORT_DIR—This retrieves the reports folder, located at \Lexmark\Solutions\apps\wf-ldss\WEB-INF
\reports\ where Lexmark Intelligent Capture is installed on each server, from the Lexmark Intelligent Capture
installation in order to locate subreport files.
Note: Additional parameters can only be added when a report is developed and uploaded with a solution using the
SDK..
Querying the database
Information for built‑in reports and many custom reports are retrieved from the MONITOR database, which contains
information about tasks. Custom reports may also retrieve information from the SOLUTIONINFO database, where some
solutions store custom data.
The credentials for all databases are as follows:
• User name—framework
• Password—rivet
Information that appear in the log are available from the TASK_LOG table in the MONITOR database. The following
fields are available:
• ID—This is a unique ID number assigned to each entry in the log.
• LOG_TIME—This is the time when an entry was added to the log.
• STATUS—This is the status reported by the solution that added the log entry.
• PERCENT_COMPLETE—This is the progress reported by the solution that added the log entry.
• TASK_MESSAGE—This is the log message reported by the solution.
• TASK_ID—This is the unique ID number assigned to a task. Each entry recorded from the same task has the same
TASK_ID.
Information from the Jobs list are available from the TASK_INFO table in the MONITOR database. The following fields
are available:
• TASK_ID—This is the unique ID number assigned to the task.
• HOST_NAME—This is the host name of the server where the job was run.
Page 85

Monitoring and maintaining the system 85
• TASK_NAME—This is the name of the task.
• SOLUTION_NAME—This is the name of the solution where the task was run.
• STATUS—This is the status reported when the job was completed or abandoned.
• START_TIME—This is the time when the job was received.
• END_TIME—This is the time when the job was completed or abandoned.
• PERCENT_COMPLETE—This is the progress reported by the job when it was completed or abandoned.
• USER_ID—This is the user who submitted the job, if applicable.
• PRINTER—This is the address of the printer or software client that submitted the job, if applicable.
• ADDRESS—This is the unique ID number of a printer.
• SCHEDULE_ID—This is the ID for the scheduled task that ran, if applicable.
• PARENT_ID—This is the task ID of the previous task that started the listed task, if applicable.
• THREAD_NAME—This is the name of the thread used by the task.
• CLIENT_NAME—This is the host name of the printer or software client that submitted the job, if applicable.
• PRINTER_MODEL—This is the printer model number reported by the printer that submitted the job, if applicable.
• JOB_TYPE—This is the device class for which a profile was run by the task, if applicable.
• HAS_SCANNER—This is the boolean value (0 or 1) for whether the printer that submitted that job has a scanner.
Using included subreports
Some subreports included may be useful in developing other custom reports. Since these files are included with the
installation, they do not have to be uploaded before adding a form that includes any of them.
When using a subreport in a custom report, you must pass the start_date, end_date, and SUBREPORT_DIR to
the subreport using the Parameters property of the subreport element.
File name Page
orientation
_portrait_title.jasper Portrait Displays a default header image, the title of the report, and the
_landscape_title.jasper Landscape
_portrait_footer.jasper Portrait Displays the date when the report was created, and the page
_landscape_footer.jasper Landscape
_portrait_no_data_message.jasper Portrait Displays a message indicating that no data was found within the
_landscape_no_data_message.jasper Landscape
_Printers_Least_Used Either Displays the printers least used to submit jobs
_Printer_Models_Most_Used Either Displays the printer models most used to submit jobs
Description
selected reporting period for use as a header in a report
number for use as a footer in the report
selected period for use as a No Data node in a report
Note: By default, iReport does not generate a report if there is no
data. To use a No Data node, change the setting for when there is
no data in the report from No Pages selection to No Data Section.
_Printers_Most_Used Either Displays the printers most used to submit jobs
_Server_Stats Either Displays a breakdown of job types run on a server
Note: This subreport uses the additional parameter SERVER,
which contains the host name of the server for which the
subreport should be run.
Page 86

Monitoring and maintaining the system 86
File name Page
orientation
_Servers_Most_Used Either Displays the servers that have processed the most jobs
_SoftwareClients_Most_Used Either Displays the software clients most used to submit jobs
_Solution_Profile_Most_Used Either Displays the solution profiles most used for submitted jobs
_Solution_Profile_Printers Either Displays the printers from where the most jobs are submitted for
_Solution_Profile_Scheduled_Scripts Either Displays the solution profiles most often run by scheduled tasks
_Solution_Profile_SoftwareClients Either Displays the software clients from where the most jobs are
_Solution_Profile_Users Either Displays the users who most often submit jobs for each profile
_Solutions_Most_Used Either Displays the solutions most used for submitted jobs
_Task_Most_Run Either Displays the most frequently run tasks
_Users_Most_Active Either Displays the users who have submitted the most jobs
_Users_Most_Cancellations Either Displays the users who have canceled the most jobs
_Users_Printers Either Displays the users who most often submit jobs for each printer
_Users_SoftwareClients Either Displays the users who most often submit jobs from each software
Description
each profile
submitted for each profiles
client
Backup and disaster recovery
Scheduling automatic backups
You can back up the databases and solutions in an Lexmark Intelligent Capture system to a network share. In the event
a recovery is necessary, a new system can access the recovery data using Restore Install. You can direct existing servers
from a partially failed system to the new load balancer and/or database, or you can install new servers.
When a scheduled backup occurs, the system validates backup database files on the share and sends an e‑mail message
that indicates success or failure to the address specified for the “Admin email address” setting of the Confirm service.
Any failures are also recorded in the system log.
Note: Backups should be scheduled during off‑peak times to avoid negatively affecting system performance.
1 Click the System tab.
2 Select Schedule from the System list.
3 Click Add > Backup Restore.
4 Type a description for the task, and then click Next.
Page 87

Monitoring and maintaining the system 87
5 Type the UNC path of the existing network share (for example, \\myserver\myshare\) where the system
should be backed up.
Note: When storing backup data from multiple Lexmark Intelligent Capture systems, make sure to assign a
different folder to each system. Assigning a backup folder for each Lexmark Intelligent Capture system prevents
an existing data from being overwritten by another system. This also helps you identify from which Lexmark
Intelligent Capture system the backup data belongs to.
6 If the network share requires authentication, then type the user name and password.
7 To back up the jobs list and the log, make sure the Keep Jobs Logs Database check box is selected.
8 To keep previous backup sets, make sure the Keep previous backups check box is selected. If this option is selected,
data from each backup is stored in a folder named with the date of the backup within the specified network share
folder. If it is cleared, backup data is stored directly in the specified network share folder, overwriting any previous
data.
Note: The database containing the jobs list and the log may be very large. If both Keep Jobs Logs Database and
Keep previous backups check boxes are selected, regularly make sure that you have enough space on the
network share where the files are backed up.
9 Click Next.
10 Enter a start date and a start time.
11 Configure the frequency of the scheduled event, and then click Finish.
Note: When keeping previous backups, you can delete dated backup folders containing entire previous backups as
necessary, but do not modify the internal folder structure of backup data.
Recovering backup data with a new installation
When a recovery is necessary and you are using a network share backup, a new load balancer or database and load
balancer together can access backup data using Restore Install.
Note: If only the load balancer has failed, then you can restore the load balancer by itself. However, if only the
database has failed, then you must restore the database, and then restore the load balancer as well.
1 Select the appropriate installation, proceeding to the final step of the installation wizard without clicking Finish:
• If a workgroup system has failed, then perform a workgroup installation.
• If the database and load balancer together or the database only has failed in an enterprise system, then install
the database.
• If only the load balancer has failed in an enterprise system, then install the load balancer.
2 Select Restore Install (RI).
3 Type the path of the folder containing the .ri file from the backup data.
or
Click the folder icon and then locate the .ri file from the backup data.
4 Click Finish to complete Restore Install.
5 If you are using an enterprise system and you just installed the database, then repeat steps 1 through 4 for the load
balancer.
Page 88

Monitoring and maintaining the system 88
6 If you are using an enterprise system, then add servers to the system and set them online.
• If you are installing new servers, then see “Installing new servers during recovery” on page 88.
• If you are using existing servers, then see “Connecting existing servers during recovery” on page 88.
7 If the new load balancer is identified by a new IP address or fully qualified domain name, then do the following:
a Recreate any printer ports on software clients. For more information, see “Recreating Lexmark Intelligent
Capture printer ports after an address change” on page 89.
b Change settings for any associated eSF applications that specify the load balancer address using the eSF
Configuration task on the Device Groups tab in LMC. For more information, see “Configuring an eSF application
associated with a solution” on page 93.
Installing new servers during recovery
1 On computers where you want to install servers, make sure the time is synchronized with existing system
components using an NTP server.
2 Perform server installations using the new database and/or load balancer. For more information, see “Installing
servers” on page 38.
3 Install any third‑party services required by installed solutions on each new server.
4 Perform policy updates as necessary:
• If the new database and load balancer are identified by the same IP address(es) and fully qualified domain
name(s) as the failed database and/or load balancer, then perform a policy update for any device groups that
contain e‑Task printers, making sure to clear the Only update those devices which are Out of Policy check box.
• If the backup database or load balancer is identified by a new IP address or fully qualified domain name, then
perform a policy update for all device groups, making sure to clear the Only update those devices which are
Out of Policy check box.
5 From the System tab in LMC, set the new servers online. For more information, see “Viewing and changing server
status” on page 56.
6 If new servers are identified by different addresses than the failed servers, then the failed servers remain in the
system and appear as non‑communicating on the System Status page. To avoid affecting system performance,
remove these servers from the System tab in LMC.
Connecting existing servers during recovery
Do the following after the database or load balancer is recovered:
• If the new database and load balancer are identified by the same IP address(es) and fully qualified domain name(s)
as the failed database and/or load balancer, then do the following:
1 Make sure the time is synchronized among all system components using an NTP server.
2 Restart the Lexmark Solutions Application Server service from the Windows Services control panel on each
server.
3 Perform a policy update for any device groups that contain e‑Task printers, making sure to clear the Only update
those devices which are Out of Policy check box.
4 From the System tab in LMC, set the servers online. For more information, see “Viewing and changing server
status” on page 56.
Page 89

Monitoring and maintaining the system 89
• If the new database or load balancer is identified by a new IP address or fully qualified domain name, then do the
following on each server:
1 Make sure the time is synchronized among all system components using an NTP server.
2 From the Services control panel, stop the Lexmark Solutions Application Server service.
3 In the file \Lexmark\Solutions\apps\wf‑ldss\WEB‑INF\classes\adaptor.properties where the server is installed,
change each of the properties adaptor.address and adaptor.canonicalhostname to the IP address
or fully qualified domain name of the new load balancer.
Note: If the setting is currently an IP address, then use the IP address of the load balancer. Likewise, if the
setting is currently a fully qualified domain name, then use the fully qualified domain name of the load
balancer.
4 Change the URL for the desktop shortcut to LMC on the server:
a In the folder \Lexmark\Solutions\apps\wf‑ldss\, right click the shortcut lmc, and then click Properties.
b Change the IP address or host name part of the URL to the new IP address or host name of the new load
balancer. The complete URL should be http://hostname:9780/lmc/, where hostname is the host
name or IP address of the new load balancer.
5 If you are using a new database, then locate the file
\Lexmark\Solutions\apps\wf‑ldss\WEB‑INF\classes\database.properties where the server is installed, and then
change the property database.hostname to the fully qualified domain name of the new database.
Note: If you are using an IP address for this setting because the network does not have a reliable DNS, then
you can use the IP address of the new database.
6 From the Services control panel, start the Lexmark Solutions Application Server service.
7 Perform a policy update for all device groups, making sure to clear the Only update those devices which are
Out of Policy check box.
8 From the System tab in LMC, set the servers online. For more information, see “Viewing and changing server
status” on page 56.
Recreating Lexmark Intelligent Capture printer ports after an address change
If the new load balancer is identified by a new IP address or fully qualified domain name after a recovery, then you
must recreate any Lexmark Intelligent Capture printer ports on software clients.
1 In the printers control panel in Windows, right‑click a Lexmark Intelligent Capture print queue, and then click
Properties.
Note: For more information about accessing the properties for the Lexmark Document Server port, see
“Configuring a Lexmark Document Server port in Windows 7, Windows Vista, Windows Server 2008, or Windows
Server 2008 R2” on page 117.
2 Click the Ports tab > Add Port > Lexmark Document Server Port ‑ Enterprise > New Port.
Note: The port name must be 75 characters or fewer.
3 Add the new Lexmark Document Server:
a Click Manage List.
b From the Server Setup dialog, click Add.
c Type the fully qualified domain name or IP address of the load balancer, and then click OK.
d Select the old load balancer from the list, then click Remove, and then click Yes to confirm removal.
e Click OK to exit the Server Setup dialog.
Page 90

Monitoring and maintaining the system 90
4 Make sure the new server is selected from the Document Server list, and then click Next.
5 Select a profile on the server to use with the new port, and then click Next.
Note: If the server is currently running a large number of jobs, then profiles on the server may not appear in the
list. Wait until the server is not as busy, and then try adding the port again.
6 Click Finish to add the new port.
7 If you are using pooled ports, then add additional ports using the same server and profile.
8 If the Printer Ports dialog is still open, then click Close.
9 Make sure only newly created ports are selected, and then click Apply.
10 Do the following for each port associated with the failed load balancer:
a Select the port from the list.
b Click Delete, and then click Yes to confirm deletion.
Note: If a port cannot be deleted, then it may still be associated with the print queue. Make sure only newly
created ports are selected, then click Apply, and then try again.
11 If necessary, select newly created ports again.
12 Click Close.
Manually backing up databases
You can back up the Lexmark Intelligent Capture databases using any normal Firebird backup procedure. For manual
backups, you can use GBAK.exe, located in the \Lexmark\Solutions\firebird\bin\ folder within the folder where the
Lexmark Intelligent Capture load balancer or database is installed.
The following databases, located in the \Lexmark\Solutions\firebird\data\ folder within the folder where the Lexmark
Intelligent Capture database is installed, should be included in the backup:
• EFORMS.FDB
• FRAMEWORK.FDB
• LICENSE.FDB
• MONITOR.FDB
• QUARTZ.FDB
• SOLUTIONINFO.FDB
The user name for each database is framework, and the password is rivet.
The following command is recommended for each file:
LDD_folder\firebird\bin\gbak.exe -v -t -user framework -password rivet
"DB_IP_address:LDD_folder\firebird\data\source_db" "backup_db"
Make the following replacements:
• LDD_folder—This is the folder where the Lexmark Intelligent Capture database is installed. This folder typically
starts with a prefix C:\Program Files\Lexmark\Solutions\.
• DB_IP_address—This is the IP address of the Lexmark Intelligent Capture database.
• source_db—This is the file name of the database file to back up.
• backup_db—This is the path and file name of the backup database file, which uses the extension .fbk.
Page 91

Managing solutions 91
Managing solutions
Understanding the solution deployment process
1 Set servers offline to prevent execution of profiles before configuration is complete. For more information, see
“Viewing and changing server status” on page 56.
2 Upload the solution to the system and adjust global settings for the solution.
3 Create a device group to contain printers where the solution will be deployed.
Note: Multifunction and single‑function printers are known as devices in LMC.
4 Create discovery profiles to add printers to the device group.
5 Discover printers in the device group according to the discovery profiles.
6 Add the solution to the device group and adjust local settings.
7 Configure home screens for the device group to use the deployed solution.
8 Update the device policies for the printers in the device group.
9 Set servers online. For more information, see “Viewing and changing server status” on page 56.
Each step is covered in more detail in the following sections.
Note: Some solutions may automatically complete any or all of steps 3 through 8 if the creator of the solution
included auto‑configure. For more information, see the documentation associated with a specific solution.
Understanding solution settings
Setting
type
Global Configuration task on the
Local Solutions task on the Device
Location in LMC Initial configuration Scope
Solutions tab
Groups or Software Client Groups
tab (Select a solution, and then
click Edit.)
After uploading the solution in
LMC
During deployment to a
device group or assignment to
a software client group
All printers in all device groups to which the
solution is applied, or all software clients in
all software client groups to which the
solution is applied
All printers in the selected device group, or
all software clients in the selected software
client group
Uploading solutions to the Lexmark Intelligent Capture system
1 Click the Solutions tab.
2 Select All Solutions from the Solutions list.
3 Click Install/Upgrade.
Page 92

Managing solutions 92
4 In the window that appears, type a path to a solution file, or click Browse to browse to the solution file.
5 Click Upload.
Notes:
• If you are upgrading an existing solution, then it is recommended that you set all servers offline so that jobs for
the solution are not accepted during the upgrade. Servers can be set online again after policy updates for the
associated device groups. For more information, see“Viewing and changing server status” on page 56.
• If you install a workflow solution that includes a component, then you may need to restart the Lexmark
Solutions Application Server from the Windows Services control panel for the solution to fully function.
• Solutions should be removed from home screens, device groups, and software client groups before removal. For
more information about removing solutions, see “Removing solutions” on page 93.
• You can upload a solution to the Lexmark Intelligent Capture system directly from Eclipse by adding the solution
to the Lexmark Intelligent Capture System List.
Configuring global solution settings
1 Click the Solutions tab.
2 Select a solution name from the Solutions list.
3 Select Configuration from the Tasks list.
4 Adjust the settings for the solution as needed. For more information, see the documentation that came with the
solution.
Note: When updating the shortcut number of a profile, make sure to match it with the shortcut number in the
Home Screen settings. For more information on configuring the home screen, see “Customizing the home
screen for a device group” on page 100.
5 Click Apply.
Editing local settings for a deployed or assigned solution
Local settings are configured during deployment or assignment of a solution.
1 Select a group:
a Click the Device Groups tab.
b Select a device group from the Device Groups list.
or
a Click the Software Client Groups tab.
b Select a software client group from the Software Client Groups list.
2 Select Solutions from the Tasks list.
3 Select a solution from the list in the main section, and then click Edit.
4 Configure the deployment settings of the solution for the current device group, and then click Finish.
Note: A policy update is required after changing solution settings that affect a device group. For more information
see “Updating policies for device groups” on page 105.
Page 93

Managing solutions 93
Configuring an eSF application associated with a solution
If a hybrid solution is installed, and an associated eSF applications includes a descriptor file, then you can edit the eSF
application settings for e‑Task 2+ and e‑Task 3 printers. Each device group contains separate settings for any eSF
applications, much like local solution settings.
Note: Lexmark Intelligent Capture can only manage eSF application settings for e‑Task 2+ and e‑Task 3 printers. You
must configure eSF application settings for e‑Task 2 and X642 printers using the Embedded Web Server on each
printer after the application is deployed.
1 Click the Device Groups tab.
2 Select a device group from the Device Groups list.
3 Select eSF Configuration from the Tasks list.
4 Select an eSF application from the list in the main section.
5 Select the Verify eSF application deployment and deploy these eSF settings check box.
6 Configure the settings of the eSF application for the current device group, and then click Save Settings.
Note: A Policy Update is required after changing eSF application settings for a device group. For more information
see “Updating policies for device groups” on page 105.
Managing solution‑related files
Some solutions may include properties files or other associated files.
Files associated with only a single solution are located in the \Lexmark\Solutions\apps\wfldss\solutions\SolutionName\WEB-INF folder where each server is installed. SolutionName is the name of the solution.
Files added by a solution to be shared with all solutions are located in the \Lexmark\Solutions\apps\wf-ldss\ folder
where each server is installed.
For more information, contact the developer of your solution.
Note: If you restart the Lexmark Solutions Application Server service, then any solution‑related file is reverted to the
version stored with the solution package as it was initially installed or upgraded, and any manual changes are lost.
Removing solutions
1 Remove home screen buttons for the solution on any printers where they appear:
a Click the Device Groups tab.
b Select a device group where a home screen button is assigned to the solution from the Device Groups list.
c Select Home Screen from the Tasks list.
d Do the following for each device class that includes a button assigned to the solution:
1 Select the button.
2 Select None or a different action from the Action list.
3 Click Apply.
e Repeat these steps for any other device groups that contain a home screen button assigned to the solution.
Page 94

Managing solutions 94
2 Delete the solution from any device groups or software client groups where it has been deployed:
a Click the Device Groups tab.
b Select a device group where the solution has been deployed from the Device Groups list.
c Select Solutions from the Tasks list.
d Select the solution from the list.
e Click Delete.
f Repeat these steps for any other device groups where the solution has been deployed.
3 Remove the solution from the system:
a Click the Solutions tab.
b Select All Solutions from the Solutions list.
c Select the solution from the Summary list.
d Click Remove.
If a solution has associated forms, then you are asked whether to remove the associated forms along with the
solution.
Notes:
• Forms may be shared among solutions, and removing forms that are used by any remaining solutions will
stop those solutions from working correctly.
• Removing a solution automatically removes any associated scheduled tasks.
Page 95
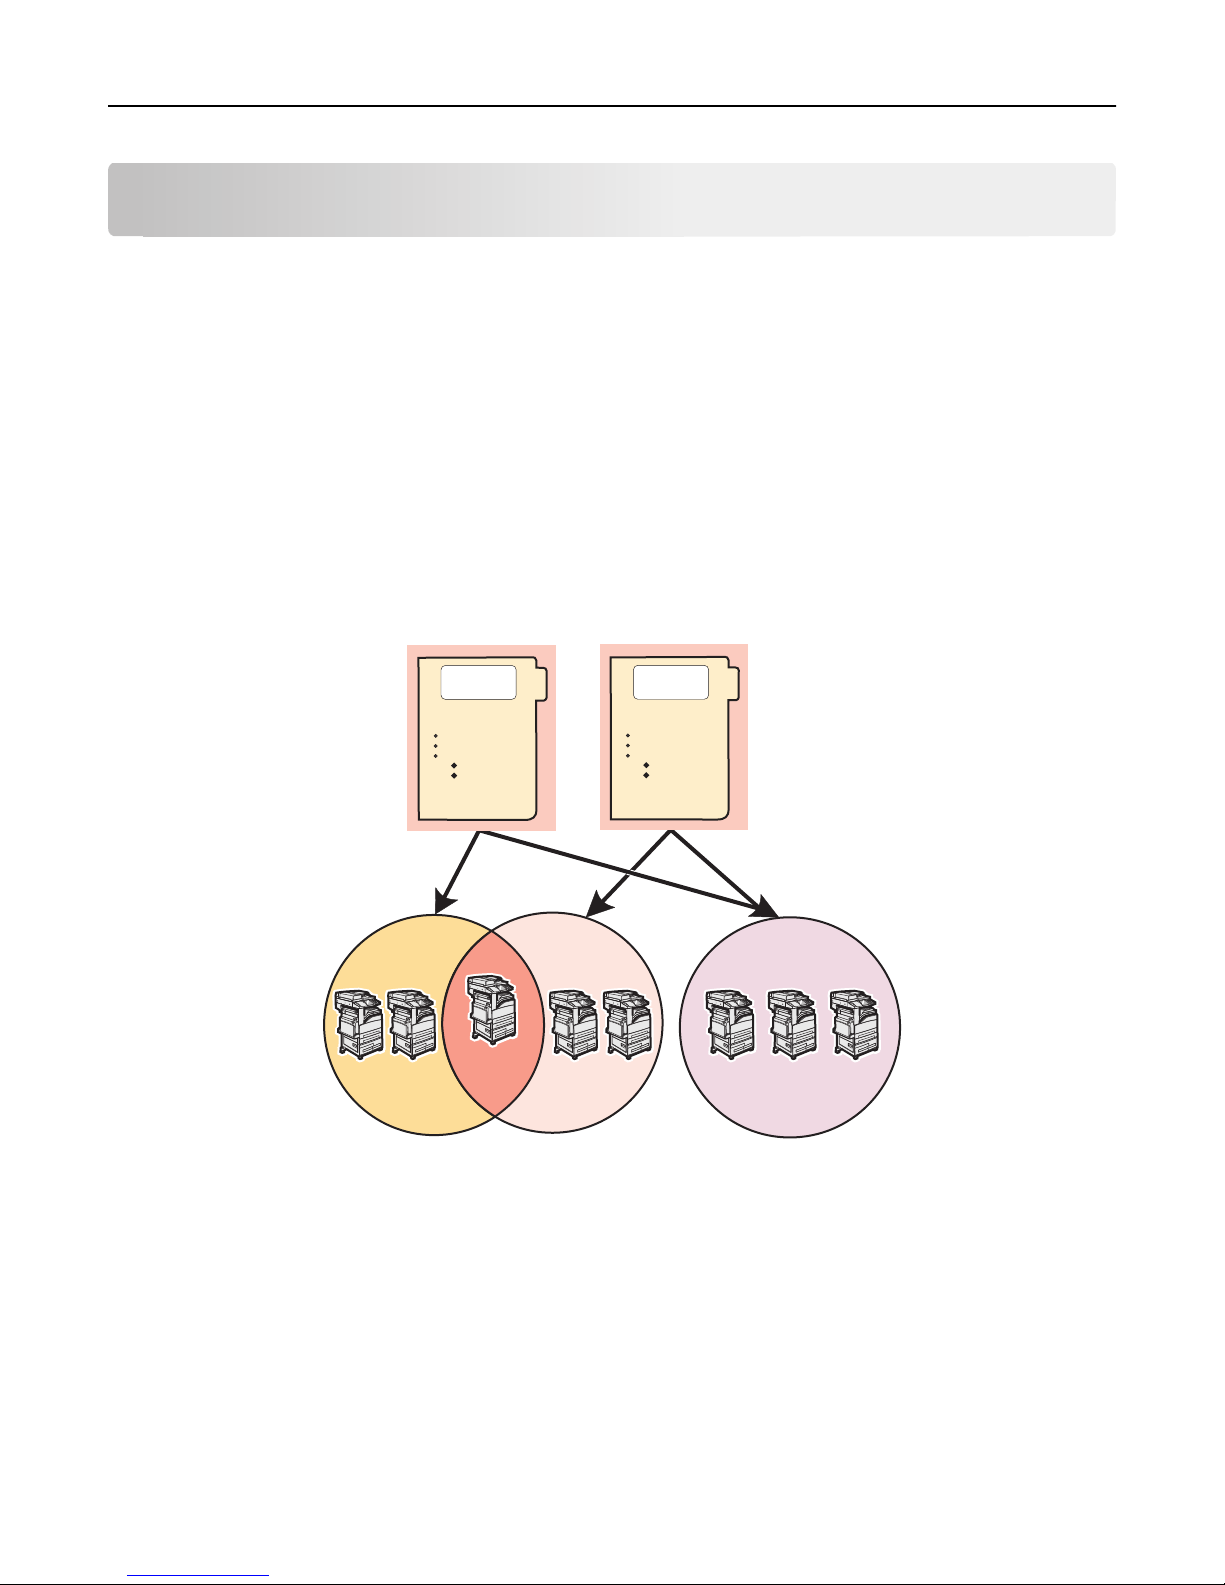
Managing device groups and devices 95
Managing device groups and devices
Creating and populating device groups
Understanding device groups
A device group is a collection of printers that share one or more solution deployments with the same local configuration.
At least one device group must be created to deploy solutions. Multiple device groups should be created if either more
than one solution is deployed to different sets of printers or one solution is deployed with different local configurations
for different printers.
Note: Printers are known as devices in LMC.
Printers can be members of more than one device group. Solutions from each device group to which a printer belongs
will be deployed to that printer.
Device Group 1 Device Group 3Device Group 2
Solution 1
Configuration A
Creating a device group
1 Click the Device Groups tab.
Solution 1
*.solution file
-Scripts
-Policy
Welcome Screen Layout
Device Settings
Solution Settings
Local
Global
-eSF
-3rd party jar files
-Status Page
Solution 1
Configuration A &
Solution 2
Configuration B
Solution 2
Configuration B
Solution 2
*.solution file
-Scripts
-Policy
Welcome Screen Layout
Device Settings
Solution Settings
Local
Global
-eSF
-3rd party jar files
-Status Page
Solution 1
Solution 2
Configuration C
&
Configuration D
2 Under the Device Groups list, click the Add button.
3 Type a unique name for the device group, and then click Add.
Page 96

Managing device groups and devices 96
Creating a device group from an existing device group
1 Click the Device Groups tab.
2 Under the Device Groups list, click Add.
3 Type a unique name for the new device group.
4 Select the existing group to copy, and then click Add.
The following settings are copied from the existing device group to the new device group:
• Solution associations
• Solution settings
• eSF application associations
• eSF application settings
• Home screen configurations
• Fax forwarding configurations
• Security settings
Configuring policy updates
1 Click the Services tab.
2 Select PolicyUpdate from the Services list.
3 If necessary, select Parameters from the Tasks list.
4 Type a timeout period in seconds for each device during a policy update.
The timeout setting for the PolicyUpdate service determines how long the system waits for a printer to respond
after it is initially connected during a policy update.
Note: If a large eSF application or several eSF applications are included with a hybrid solution, then you may
need to increase the default timeout for policy updates in order to allow enough time for policy updates that
include eSF application deployments to complete.
5 Select the Overwrite all function overrides on the device check box.
Note: If there are eSF applications installed on the device that can override the device function, then clear the
Overwrite all function overrides on the device check box. Otherwise, this setting should be selected at all times.
6 Click Apply.
Creating a new discovery profile
1 Click the Device Groups tab.
2 Select a device group from the Device Groups list.
3 Select Discovery Profiles from the Tasks list.
4 Type the IP address, address range, subnet, host name, or fully qualified domain name in the Address field.
Page 97

Managing device groups and devices 97
Address format Example
IP address
IP address range
Subnet
Host name
Fully qualified domain name
10.10.2.100
10.10.2.1‑10.10.2.127
10.10.2.*
printer‑host‑name
printer‑host‑name.domain‑name
5 Type information in the remaining fields for any optional filters.
6 Click Add in the main section to save the discovery profile.
Importing a list of printers to a device group
A list of printers can be imported from an XML, TXT, or CSV file exported from MarkVision or other systems.
1 Click the Device Groups tab
2 Select a device group from the Device Groups list.
3 Select Discovery Profiles from the Tasks list.
4 Click Import.
5 Type the path of the file, or click Browse, and then locate the file.
6 Click Upload.
The entries in the file are added to the list of discovery profiles. Perform a device discovery to search for the imported
printers.
In a TXT file, each line contains the host name or IP address for a single printer.
In a CSV file, each line contains the record for a single printer. Each line may contain a single IP address or fully qualified
domain name, or the following fields may be used:
IP address or fully qualified domain name, SNMP read name, SNMP write name,
device class, device model, serial number, contact name, contact location,
property tag
As with any CSV file, you must still include a comma for a blank field followed by populated fields.
An XML file is structured like the following example:
<?xml version="1.0" encoding="UTF‑8" ?>
<filters>
<filter>
<addressRange>10.10.2.200</addressRange>
<snmpRead>public</snmpRead>
<snmpWrite>public</snmpWrite>
<contactName>John Doe</contactName>
<contactLocation>Office 1A</contactLocation>
<serialNumber>0123456789</serialNumber>
<propertyTag>XYZ123</propertyTag>
<deviceClass>All</deviceClass>
</filter>
<filter>
<addressRange>10.10.2.150</addressRange>
Page 98

Managing device groups and devices 98
<snmpRead>public</snmpRead>
<snmpWrite>public</snmpWrite>
<contactName>Don Joseph</contactName>
<contactLocation>Office 2B</contactLocation>
<serialNumber>1234567890</serialNumber>
<propertyTag>ABC789</propertyTag>
<deviceClass>All</deviceClass>
</filter>
</filters>
Discovering printers
Before a solution can be deployed to a printer, the printer must be discovered as part of a device group. Printers may
be manually discovered or automatically discovered on a schedule. This section covers manual discovery, which is used
during initial setup of the system. For more information about scheduled discovery, see “Scheduling a discovery task”
on page 99.
1 Click the Device Groups tab.
2 If necessary, create a new discovery profile.
3 Select a device group from the Device Groups list, or select All Device Groups to discover printers in multiple device
groups.
4 Select Discovery from the Tasks list.
5 If you are discovering printers in a device group or groups where you have previously discovered printers, and you
want to skip any IP address where a printer has been discovered (including currently missing devices), then select
Discover new devices only. This results in a faster discovery when adding subsequent discovery profiles.
If you are discovering printers from multiple device groups, then select the device groups for the discovery task in
the main section. The list does not appear if a specific device group is selected in the Device Groups list.
6 If necessary, click Edit to edit the discovery configuration.
Note: For more information about adjusting timeout periods for device discovery, see “Configuring NPA device
communication” on page 67.
7 Click Discover.
After device discovery, the system reports the number of printers discovered. To see the discovered printers, select
the Discovered Devices task.
Notes:
• If you stop the discovery process, then it may take a few minutes for the discovery task to completely stop.
• After a printer has been discovered, removing the related device group or discovery profile does not remove
the printer from the system. For information about removing printers from the system, see “Removing
devices from the system” on page 108.
• After the discovery process, the number of missing devices appears, if applicable. Click Missing Devices
Count to launch the Missing Devices task. For more information, see “Discovering missing printers” on
page 99.
Page 99

Managing device groups and devices 99
Discovering missing printers
If a printer is offline during a discovery, then it will be identified as missing.
1 Click the Device Groups tab.
2 Select a device group from the Device Groups list, or select All Device Groups to discover missing printers in multiple
device groups.
3 Select Missing Devices from the Tasks list.
4 If you are discovering missing printers in multiple device groups, then select the device groups for the discovery
task in the main section. The list does not appear if a specific device group is selected in the Device Groups list.
5 If necessary, edit the discovery parameters.
6 Click Discover.
Viewing all printers with outdated policies
1 Click the Device Groups tab.
2 Select All Device Groups from the Device Groups list.
3 Select Out of Policy Devices from the Tasks list.
Scheduling a discovery task
1 Click the Device Groups tab.
2 Select a device group from the Device Groups list, or select All Device Groups to discover devices in multiple device
groups.
Note: Make sure discovery profiles exist for device groups to be included in the operation.
3 Select Schedule from the Tasks list.
4 Click Add > Discovery.
5 Type a description for the task, and then click Next.
6 If you are discovering devices from multiple device groups, then select the device groups for the discovery task,
and then click Next. The list does not appear if a specific device group is selected in the Device Groups list.
7 Enter a start date and a start time.
8 Configure the frequency of the scheduled event, and then click Finish.
Page 100

Managing device groups and devices 100
Deploying solutions to a device group
Deploying a solution to a device group creates profiles on the printers in the group that allow users to execute jobs
using the solution.
Note: It is recommended to set servers offline before deploying solutions to device groups to prevent execution of
associated profiles before you have completed configuration. For more information, see “Viewing and changing
server status” on page 56.
1 Click the Device Groups tab.
2 Select a device group from the Device Groups list.
3 Select Solutions from the Tasks list.
4 In the main section, click Add.
5 Select the solution from the list, and then click Next.
6 Configure the deployment settings of the solution for the current device group, and then click Finish.
Note: A policy update is required to complete the deployment of the solution. For more information see “Updating
policies for device groups” on page 105.
Customizing the home screen for a device group
To place buttons for deployed solutions on the home screens of printers in a device group (or in the menus of
single‑function printers without touch screens), you can configure custom home screens. A custom home screen is not
a requirement to deploy a solution. However, if the default home screen is used, then solutions must be accessed
through the Held Jobs menu on the printer.
Because different device classes have different capabilities, a separate custom home screen must be configured for
each device class.
Notes:
• On e‑Task 2+ and e‑Task 3 printers, actions included in a custom home screen must be enabled in the printer
settings to appear on the home screen. To adjust these settings, type the printer IP address in the address field
of your Web browser to access the printer Embedded Web Server, and then click Settings > General Settings >
Home screen customization.
• If a printer is assigned to more than one device group with a custom home screen configured, then the last
policy update determines which home screen is used. If multiple device group membership is necessary, then it
is not recommended to configure a home screen for more than one of the device groups to which the printer
belongs.
1 Click the Device Groups tab.
2 Select a device group from the Device Groups list.
3 Select Home Screen from the Tasks list.
4 Click the tab for the class of printers that you want to configure.
5 Select the Use this home screen as part of the device group's policy check box.
 Loading...