

Page 1

www.lexmark.com
Setup Guide
March 2001
ImageQuick SIMM
Page 2

Edition: March 2001
The following para graph does not apply to any country where such provisions are inconsistent
with local law: LEXMAR K INTERNATIONAL, INC., PRO V IDES THIS PUBLICATION “AS IS”
WITHOUT WARRANTY OF ANY KIND, E IT HER EX PR ES S OR IMPLIED, INCLU DIN G, BUT NO T
LIMITED TO, THE IMPLIED WARRANTIES OF MERCHANTABILITY OR FITNESS FOR A PARTICULAR PURPOSE. Some states do not allow disclaimer of expr ess or implie d warranties i n certain
transactions; therefore, this statement may not apply to you.
This publication could include technical inaccuracies or typographical errors. Changes are periodically made to the information herein; these changes will be incorporated in later editions. Improvements or changes in the products or the programs described may be made at any time.
Comments about this publicat io n may be ad dressed to Lexmark International, Inc., Department F95/
032-2, 740 West New Circle Road, Lexington, Kentucky 40550, U.S.A. In the United Kingdom and
Eire, send to Lexmark International Ltd., Marketing and Services Department, Westhorpe House,
Westhorpe, Marlow Bucks SL7 3RQ. Lexmark may use or distribute any of the information you supply in any way it believes appropriate without incurring any obligation to you. You can purchase
additional copies of publ icati ons r elat ed to thi s pr oduct by calling 1-800 -553- 9727. I n the Unit ed Ki ngdom and Eire, call 0628-481500. In other countries, contact your point of purchase.
References in this publication to products, programs, or services do not imply that the manufacturer
intends to m ake these available in all countries in which it operates. Any reference t o a product, program, or service is not intended to state or imply that only that product, program, or service may be
used. Any functionally equivalent product, program , or service that does not infringe any existing
intellectual property rig ht may be used instead. Evaluation and ve rification of operation in conjunction with other products, programs, or services, except those expressly designated by the manufacturer, are the user’s responsibility.
Lexmark, Lexmark with diamond design, MarkNet, MarkVision, and Optra are trademarks of Lexmark International, Inc., registered in the United States and/or other countries.
Drag'N'Print, ImageQuick, and OptraImage are trademarks of Lexmark International, Inc.
Other trademarks are the property of their respective owners.
© Copyright 2001 Lexmark International, Inc.
All rights reserved.
UNITED STATES GOVERNMENT RESTRICTED RIGHTS
This software and documentation are provided with RESTRICTED RIGHTS. Use, duplication or disclosure by the Gov ernment is s ubject t o res trictions as set fort h in subpara graph (c) (1)(ii) of the Rights
in Technical Data and Computer Softwar e clause at DFARS 252.227-7013 an d in ap plica ble FAR provisions: Lexmark International, Inc., Lexington, KY 40550.
Page 3

iii
Lexmark ImageQuick SIMM Setup Guide
Table of
contents
Before you begin . . . . . . . . . . . . . . . . . . . . . . . . . . . . . . . . . . . . . . . . . . . . . . . . . . 1
Printer requirements . . . . . . . . . . . . . . . . . . . . . . . . . . . . . . . . . . . . . . . . . . . . . . . . . . . . . . . . 1
Print server requirements . . . . . . . . . . . . . . . . . . . . . . . . . . . . . . . . . . . . . . . . . . . . . . . . . . . . 1
ImageQuick software requirements . . . . . . . . . . . . . . . . . . . . . . . . . . . . . . . . . . . . . . . . . . . . 2
Step 1: Print the menu settings . . . . . . . . . . . . . . . . . . . . . . . . . . . . . . . . . . . . . . 3
Step 2: Install the ImageQuick SIMM . . . . . . . . . . . . . . . . . . . . . . . . . . . . . . . . 5
Installing the SIMM in an Optra T printer . . . . . . . . . . . . . . . . . . . . . . . . . . . . . . . . . . . . . . . 5
Installing the SIMM in an Optra W810 printer . . . . . . . . . . . . . . . . . . . . . . . . . . . . . . . . . . . 9
Installing the SIMM in an Optra C710 printer . . . . . . . . . . . . . . . . . . . . . . . . . . . . . . . . . . . 13
Installing the SIMM in a Lexmark C720 printer . . . . . . . . . . . . . . . . . . . . . . . . . . . . . . . . . 17
Step 3: Install the Lexmark ImageQuick software . . . . . . . . . . . . . . . . . . . . . 22
Step 4: Adjust print server settings . . . . . . . . . . . . . . . . . . . . . . . . . . . . . . . . . 23
Troubleshooting. . . . . . . . . . . . . . . . . . . . . . . . . . . . . . . . . . . . . . . . . . . . . . . . . . 26
Page 4

1
Lexmark ImageQuick SIMM Setup Guide
Before you begin
Printer
requirements
The Lexmark™ ImageQuick™ SIMM is designed for
use with Lexmark Optra™ T, Optra C710, Optra
W810, and Lexmark C720 laser printers with a
minimum of 8MB memory. Additional memory or
a hard disk may be required for large or complex
jobs.
You need a number 2 Phillips screwdriver to install
the SIMM.
Print server
requirements
Your Optra T, Optra C710, Optra W810, or
Lexmark C720 printer must either be networkready, or be equipped with one of the following
Lexmark MarkNet™ N2000 Series print servers:
• MarkNet N2000t, N2001e, or N2002e
Requires firmware version 3.12.19 or later.
• MarkNet N2501e or N2401e with OptraImage™
Requires firmware version 5.12.19 or later.
Note: If multiple print servers
are installed in your printer,
SIMM functionality is only supported for one of them.
To determine your print server firmware version,
print a MarkNet network setup page. For more
information about upgrading firmware, launch the
Drivers, MarkVision™ and Utilities CD, click View
Documentation, and look for the MarkNet link.
The network print server must have TCP/IP
configured and enabled. Refer to your printer
setup manual or your print server manual for
TCP/IP configuration.
Page 5

2
Lexmark ImageQuick SIMM Setup Guide
ImageQuick
software
requirements
ImageQuick software is supported on computers
in the following environments:
• Windows 95/98, Windows NT 4.0, or
Windows 2000
• Sun Solaris 2.6, 7, or 8
Page 6

3
Lexmark ImageQuick SIMM Setup Guide
Step 1: Print the menu settings
Installing the ImageQuick SIMM may reset the
printer’s default menu settings. Print and save the
list of current menu settings. For more information
about using the printer operator panel and
changing menu settings, refer to your printer
documentation.
To print your current printer settings:
1 Plug in the printer power cord and turn on the
printer.
2 From the printer operator panel, press Menu>
until UTILITIES MENU appears.
3 Pr ess Select.
4 Pr ess Menu> until Print Menus appears.
UTILITIES MENU is on the first line, and Print
Menus is on the second line.
5 Pr ess Select.
If an error message appears, refer to your
printer documentation.
Page 7

4
Lexmark ImageQuick SIMM Setup Guide
6 Locate your printer in the following table and
turn to the appropriate page to begin
installation of the ImageQuick SIMM.
Type of printer See page
Optra T 5
Optra W810 9
Optra C710 13
Lexmark C720 17
Page 8
5
Lexmark ImageQuick SIMM Setup Guide
Step 2: Install the ImageQuick
SIMM
Installing the
SIMM in an
Optra T printer
Accessing the
system board
You must access the printer system board to install
the Lexmark ImageQuick SIMM.
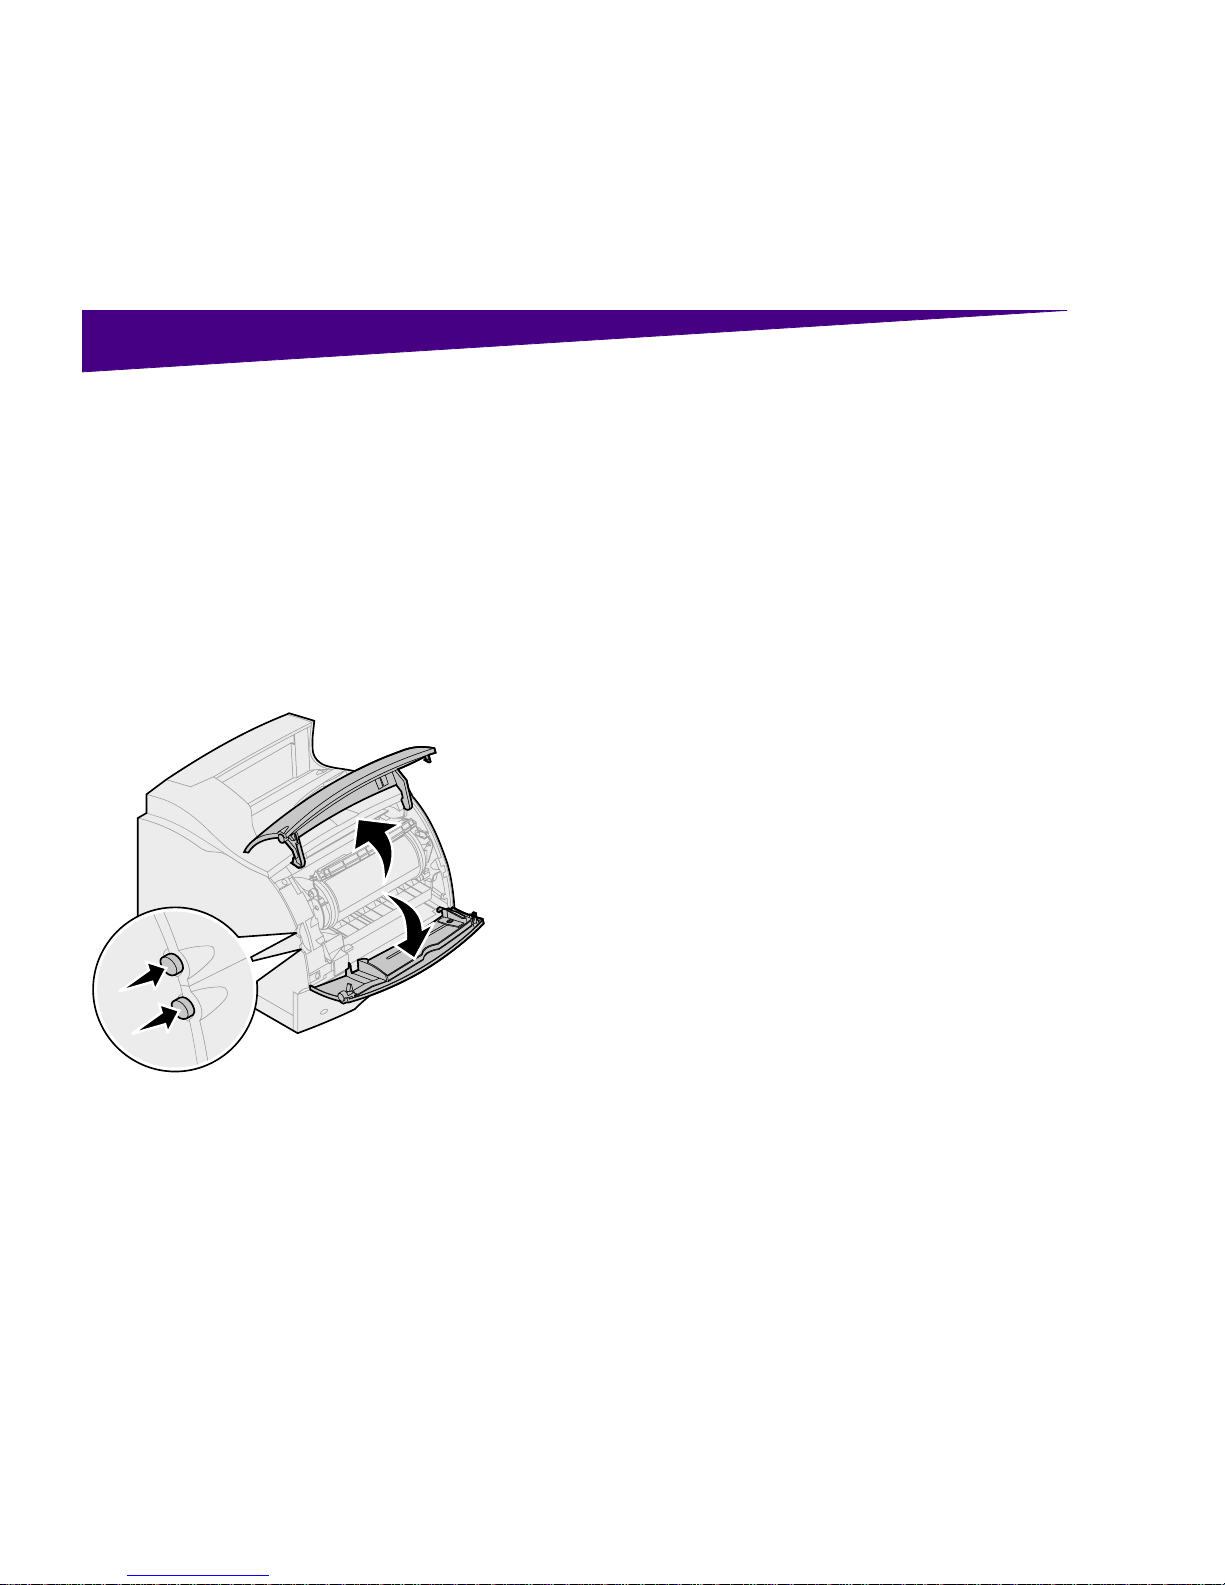
1 Unplug the printer power cord and disconnect
all cables from the back of the printer.
2 Press the release latches to open the upper and
lower front doors.
Page 9
6
Lexmark ImageQuick SIMM Setup Guide
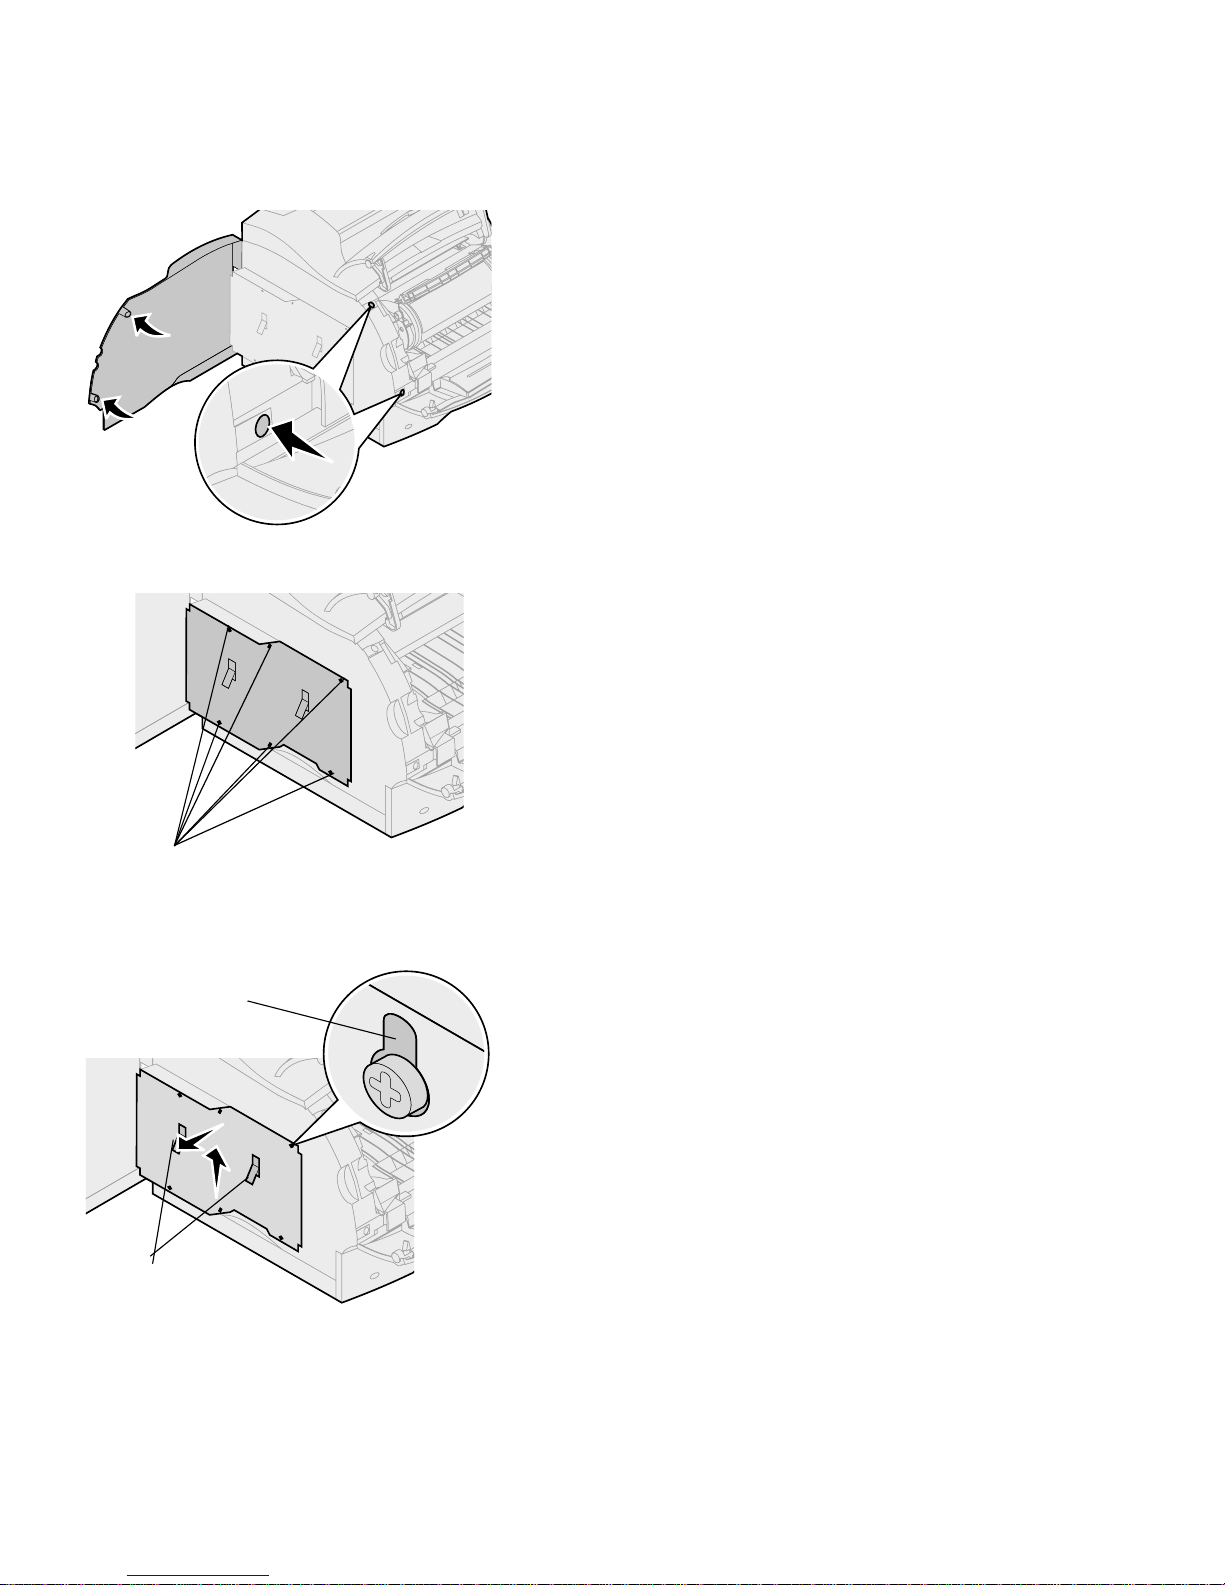
3 Pr ess on the side door latches and open the side
door.
4 Loosen, but do not remove, the six screws, as
shown.
5 Use the tabs to slide the shield up until the top
three screws fit into the three keyholes on the
shield.
6 Hold the shield by the tabs and lift it off.
Screws
Keyhole
Tabs
Page 10
7
Lexmark ImageQuick SIMM Setup Guide
Installing the SIMM
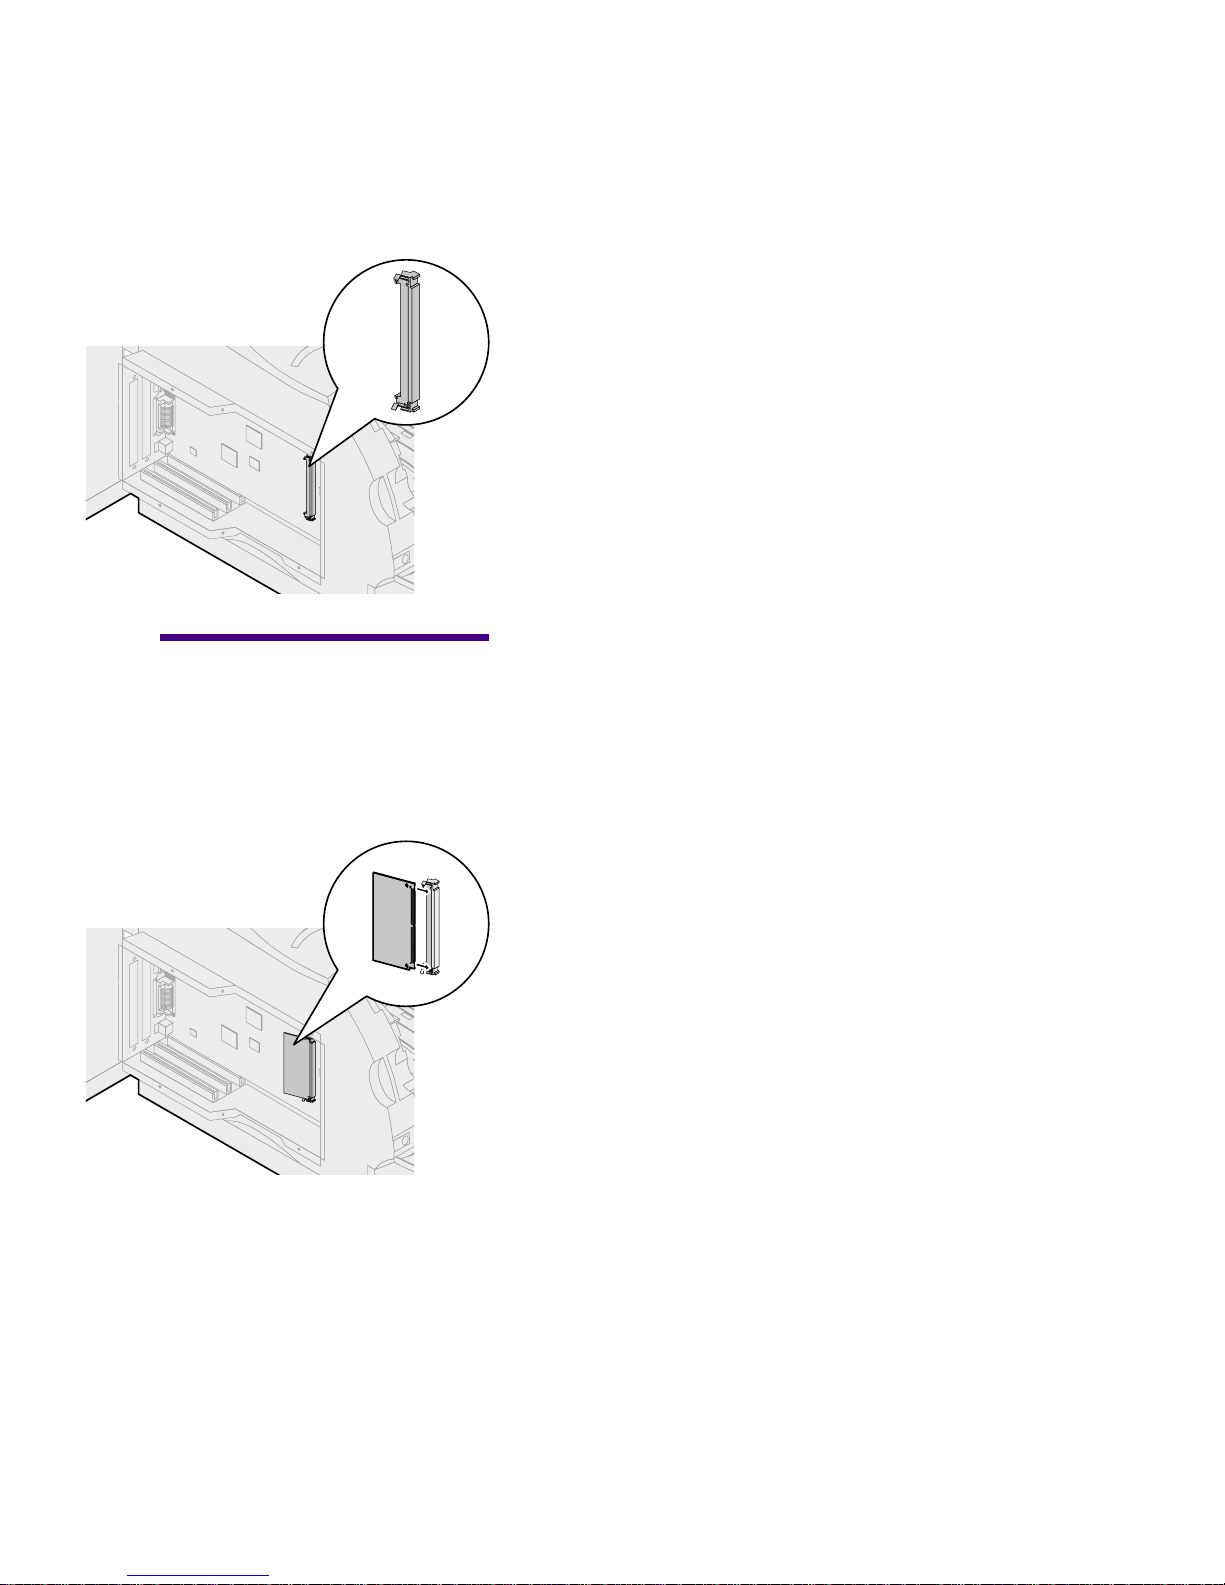
1 Locate the optional firmware SIMM connector
on the system board.
Warning: Elec troni c compo-
nents can be damaged by static
electricity. Touch something
metal or wear an antistatic wrist
strap before handling the SIMM.
2 Hold the Lexmark ImageQuick SIMM with the
connection points facing toward the system
board with the notch as indicated below:
• For all models except the Optra T610 and
T612 non-network models, hold the SIMM
with the notch toward the bottom of the
printer and insert the SIMM all the way into
the connector at a 45 degree angle, as shown.
• For the Optra T610 and T612 non-network
models, hold the SIMM with the notch
toward the top of the printer and insert the
SIMM at the opposite of the angle shown.
3 Pr ess the SIMM toward the system board until it
snaps into place.
Page 11
8
Lexmark ImageQuick SIMM Setup Guide
Reattaching the
shield
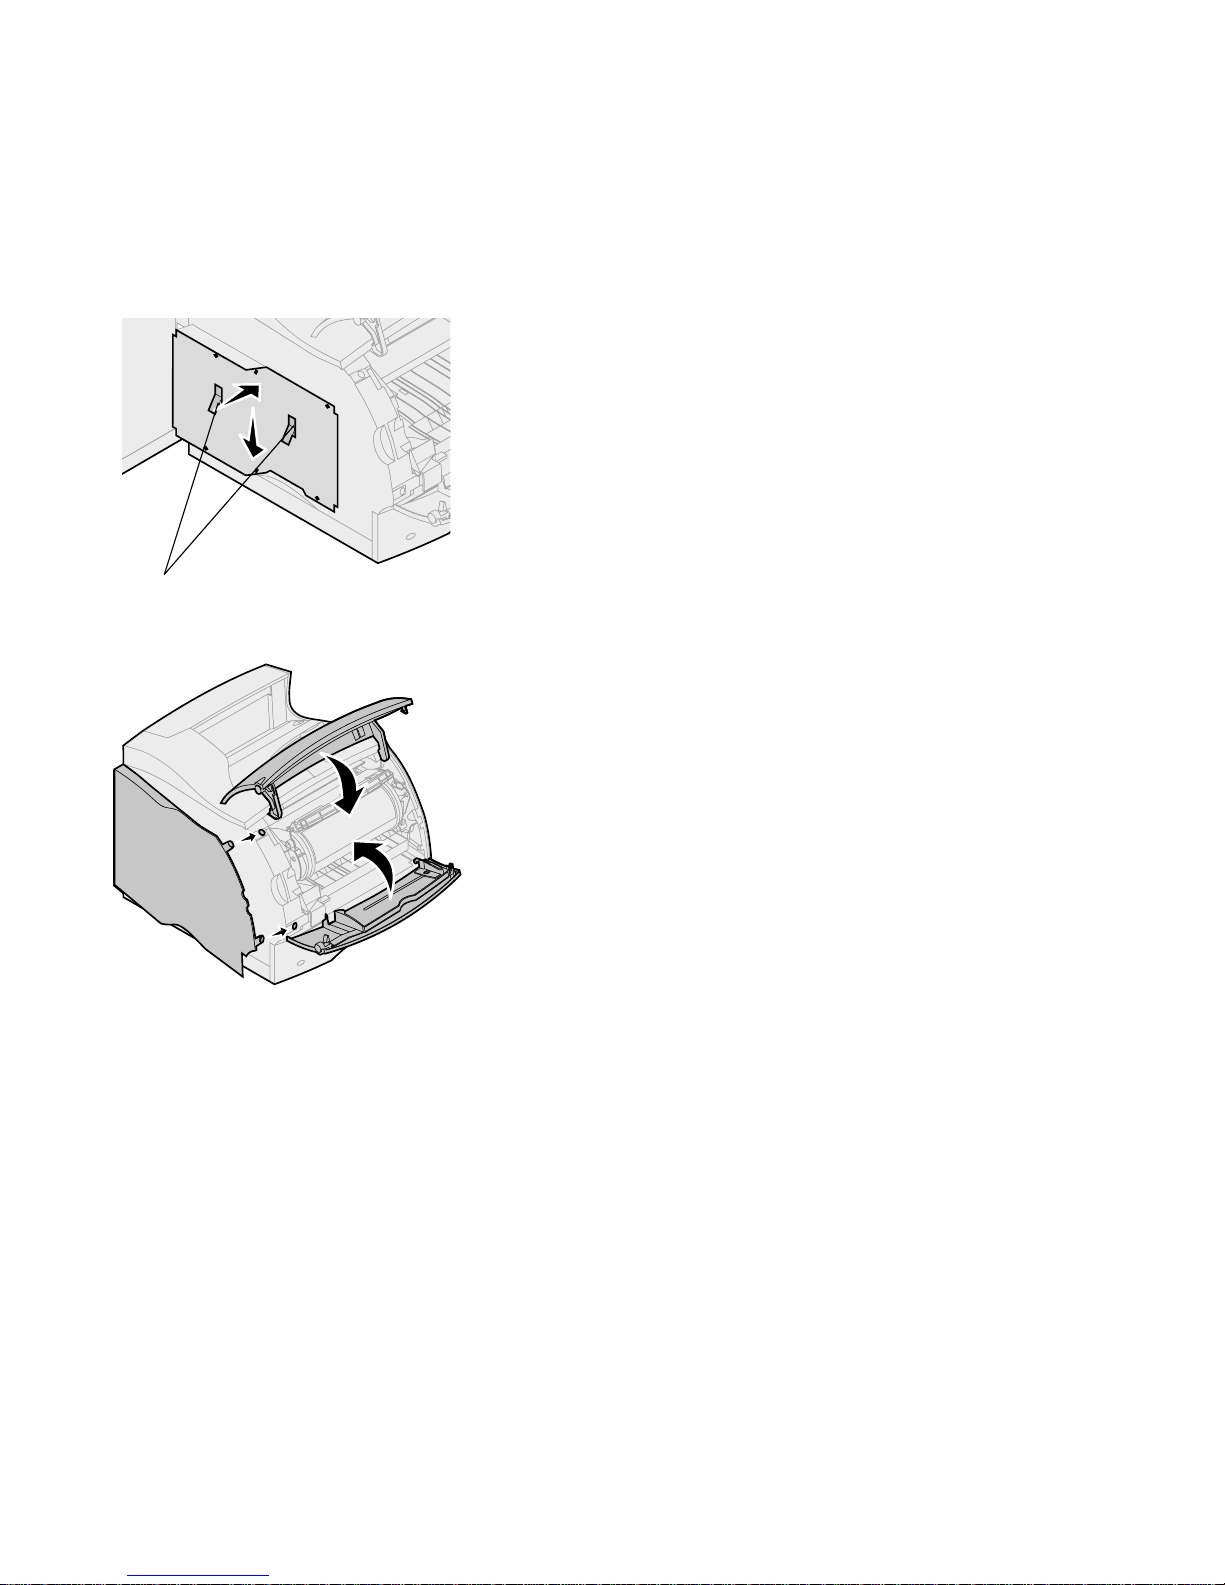
1 Holding the shield by the tabs, align the three
keyholes on the shield wi th the t op thr ee scr ew s
on the printer.
2 Slide the shield down.
3 Tighten all six screws.
4 Close the side door, and then the upper and
lower front doors.
5 Connect the printer cables and power cord, and
turn the printer on.
Verifying installation Print a menu settings page. (See page 3 for
instructions.) If the SIMM is installed correctly,
“ImageQuick SIMM” appears under the Printer
Information section.
After verifying the installation, you may want to
reset your printer settings. Refer to the menu
settings page you printed and saved before
installing the SIMM.
Tabs
Page 12
9
Lexmark ImageQuick SIMM Setup Guide
Installing the
SIMM in an
Optra W810
printer
Accessing the
system board
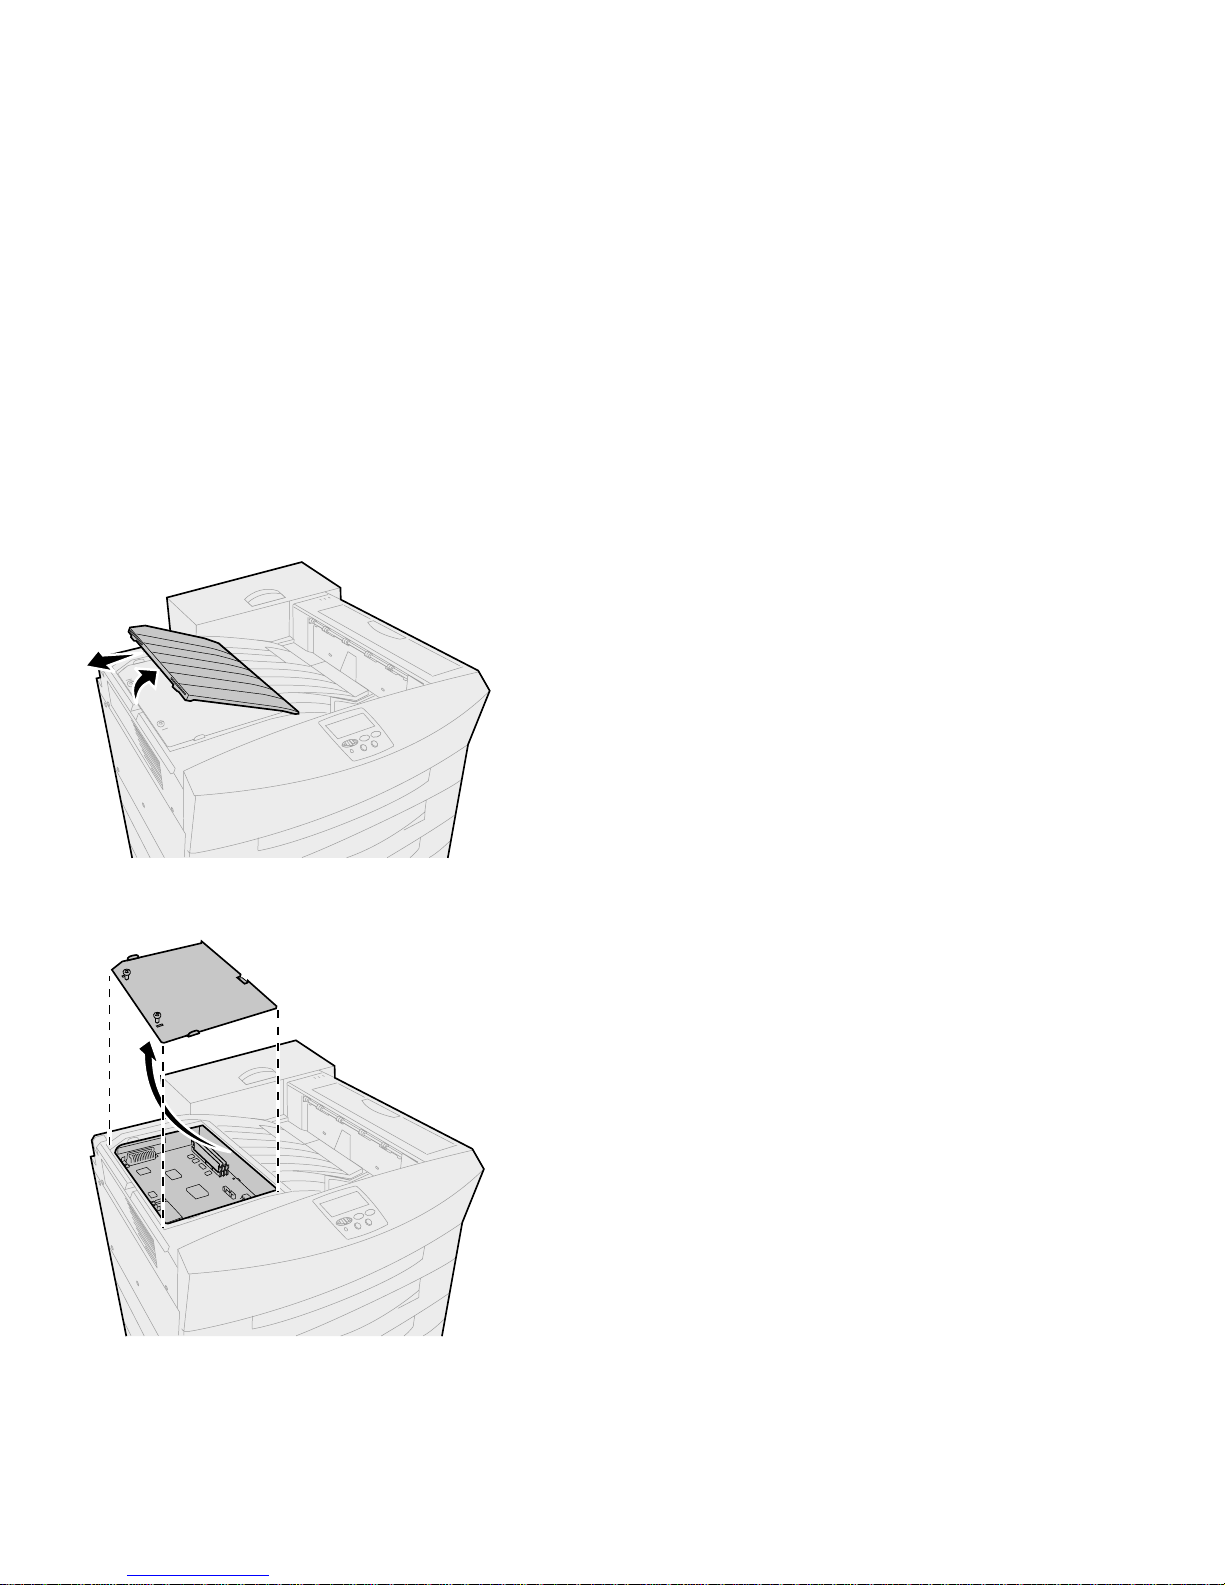
If your Optra W810 has an optional finisher or
mailbox attached, you must remove the option to
access the printer system board. Refer to your
printer documentation for the appropriate steps.
1 Unplug the printer power cord and disconnect
all cables from the back of the printer.
2 Lift off the system board access cover and lay it
aside.
3 Loosen the two screws on the shield. Do not
remove the screws.
4 Remove the shield and lay it aside.
Page 13
10
Lexmark ImageQuick SIMM Setup Guide
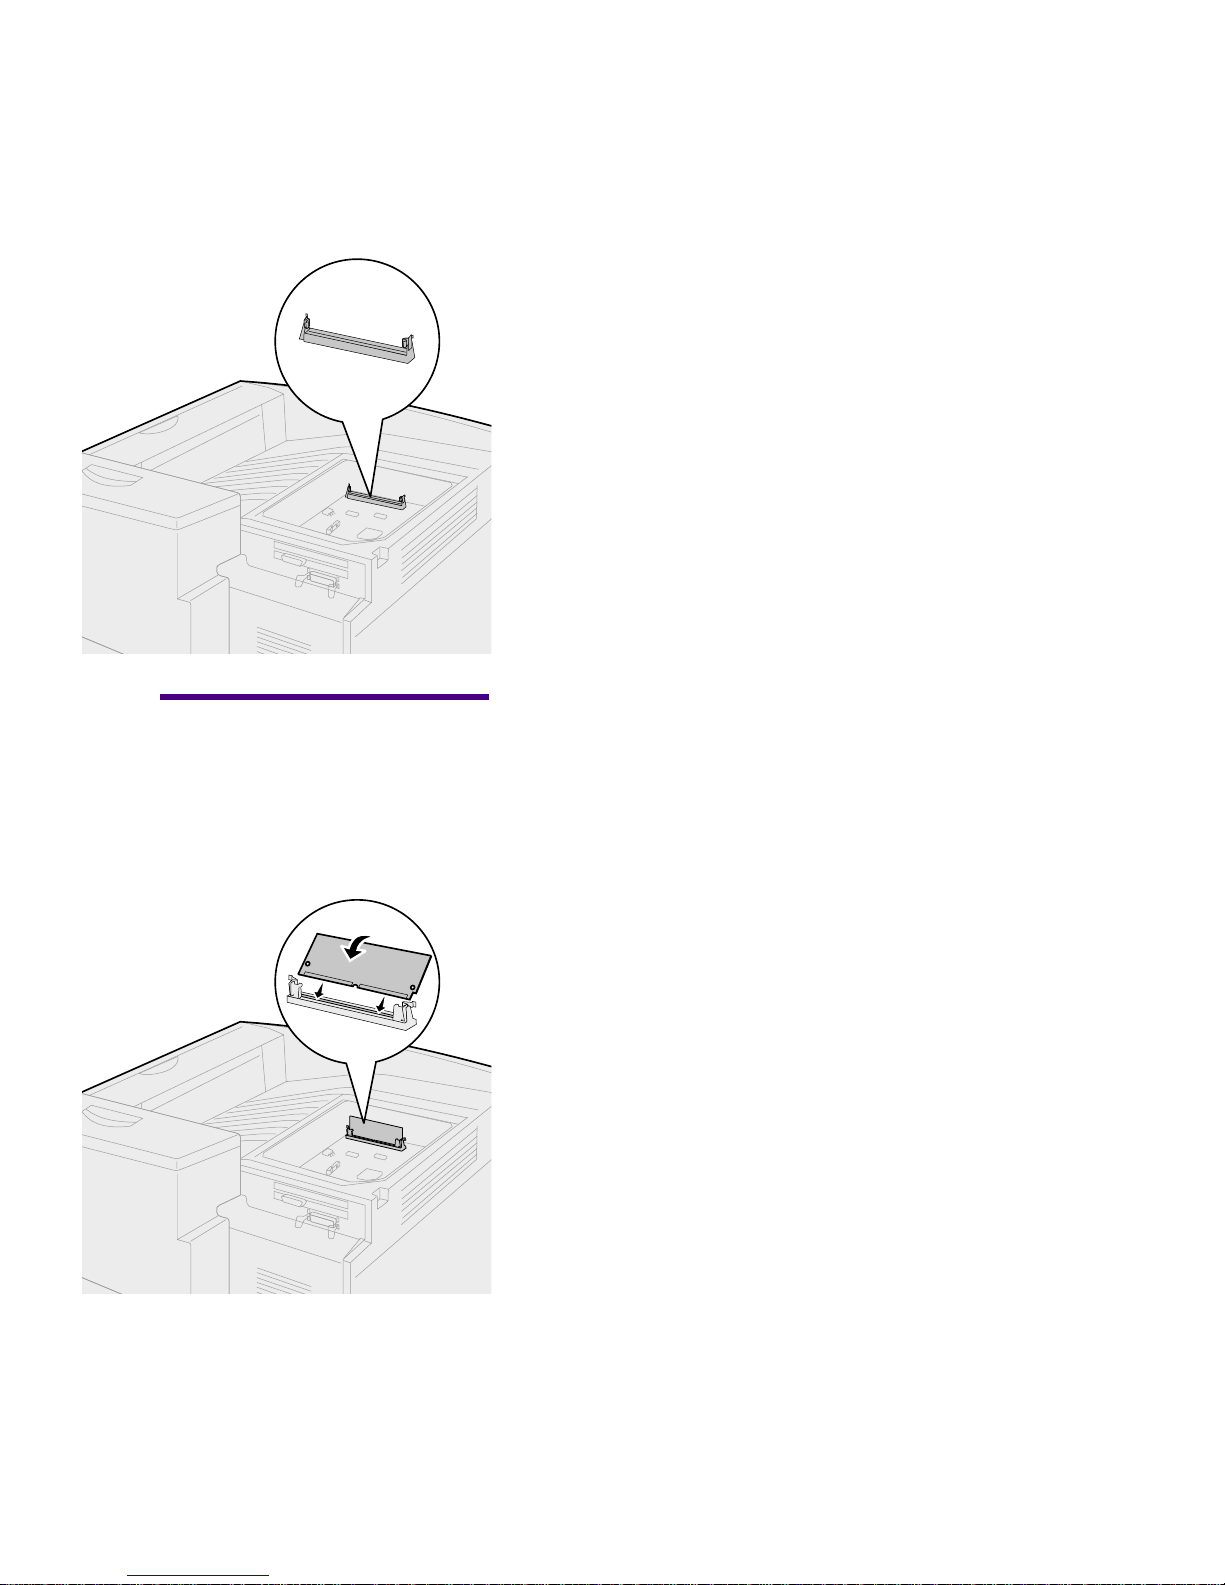
Installing the SIMM
1 Locate the optional firmware SIMM connector
on the system board.
Warning: Elec troni c compo-
nents can be damaged by static
electricity. Touch something
metal or wear an antistatic wrist
strap before handling the SIMM.
2 Hold the Lexmark ImageQuick SIMM with the
connection points facing toward the system
board and the notch toward the rear of the
printer . Insert it all the way into the connector at
a 45 degree angle (leaning toward the front of
the printer).
3 Pr ess the SIMM toward the system board until it
snaps into place.
Page 14
11
Lexmark ImageQuick SIMM Setup Guide
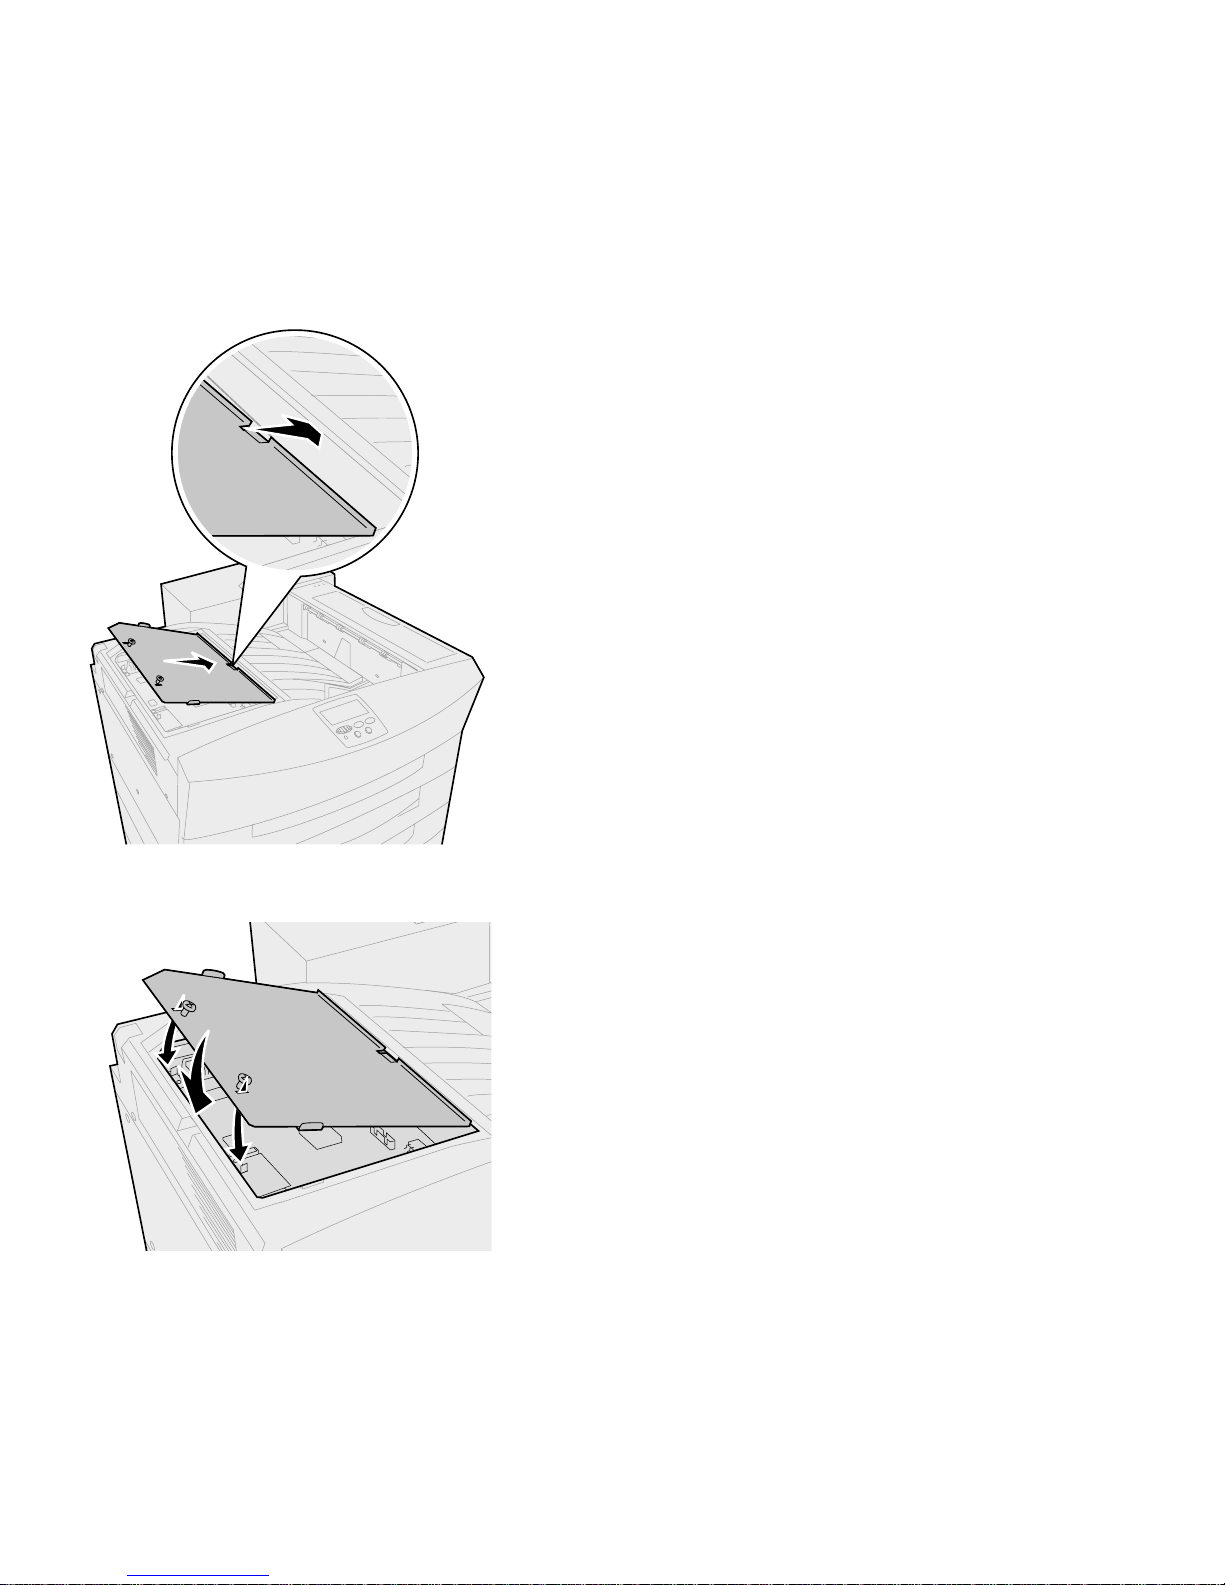
Reinstalling the
shield and access
cover
1 Reinstall the shield.
a Slide the tab on the shield under the lip of the
opening, as shown.
b Align the slots on the shield with the tabs.
c Lower the shield into place.
d Tighten the two screws.
Page 15

12
Lexmark ImageQuick SIMM Setup Guide
2 Reinstall the system board access cover.
a Insert the tabs on the system board access
cover into the slots, as shown.
b Lower the cover and gently push it down to
snap it into place.
Refer to your printer documentation to replace
your finisher or mailbox.
3 Connect the printer cables and power cord, and
turn the printer on.
Verifying installation Print a menu settings page. (See page 3 for
instructions.) If the SIMM is installed correctly,
“ImageQuick SIMM” appears under the Printer
Information section.
After verifying the installation, you may want to
reset your printer settings. Refer to the menu
settings page you printed and saved before
installing the SIMM.
Page 16
13
Lexmark ImageQuick SIMM Setup Guide
Installing the
SIMM in an
Optra C710
printer
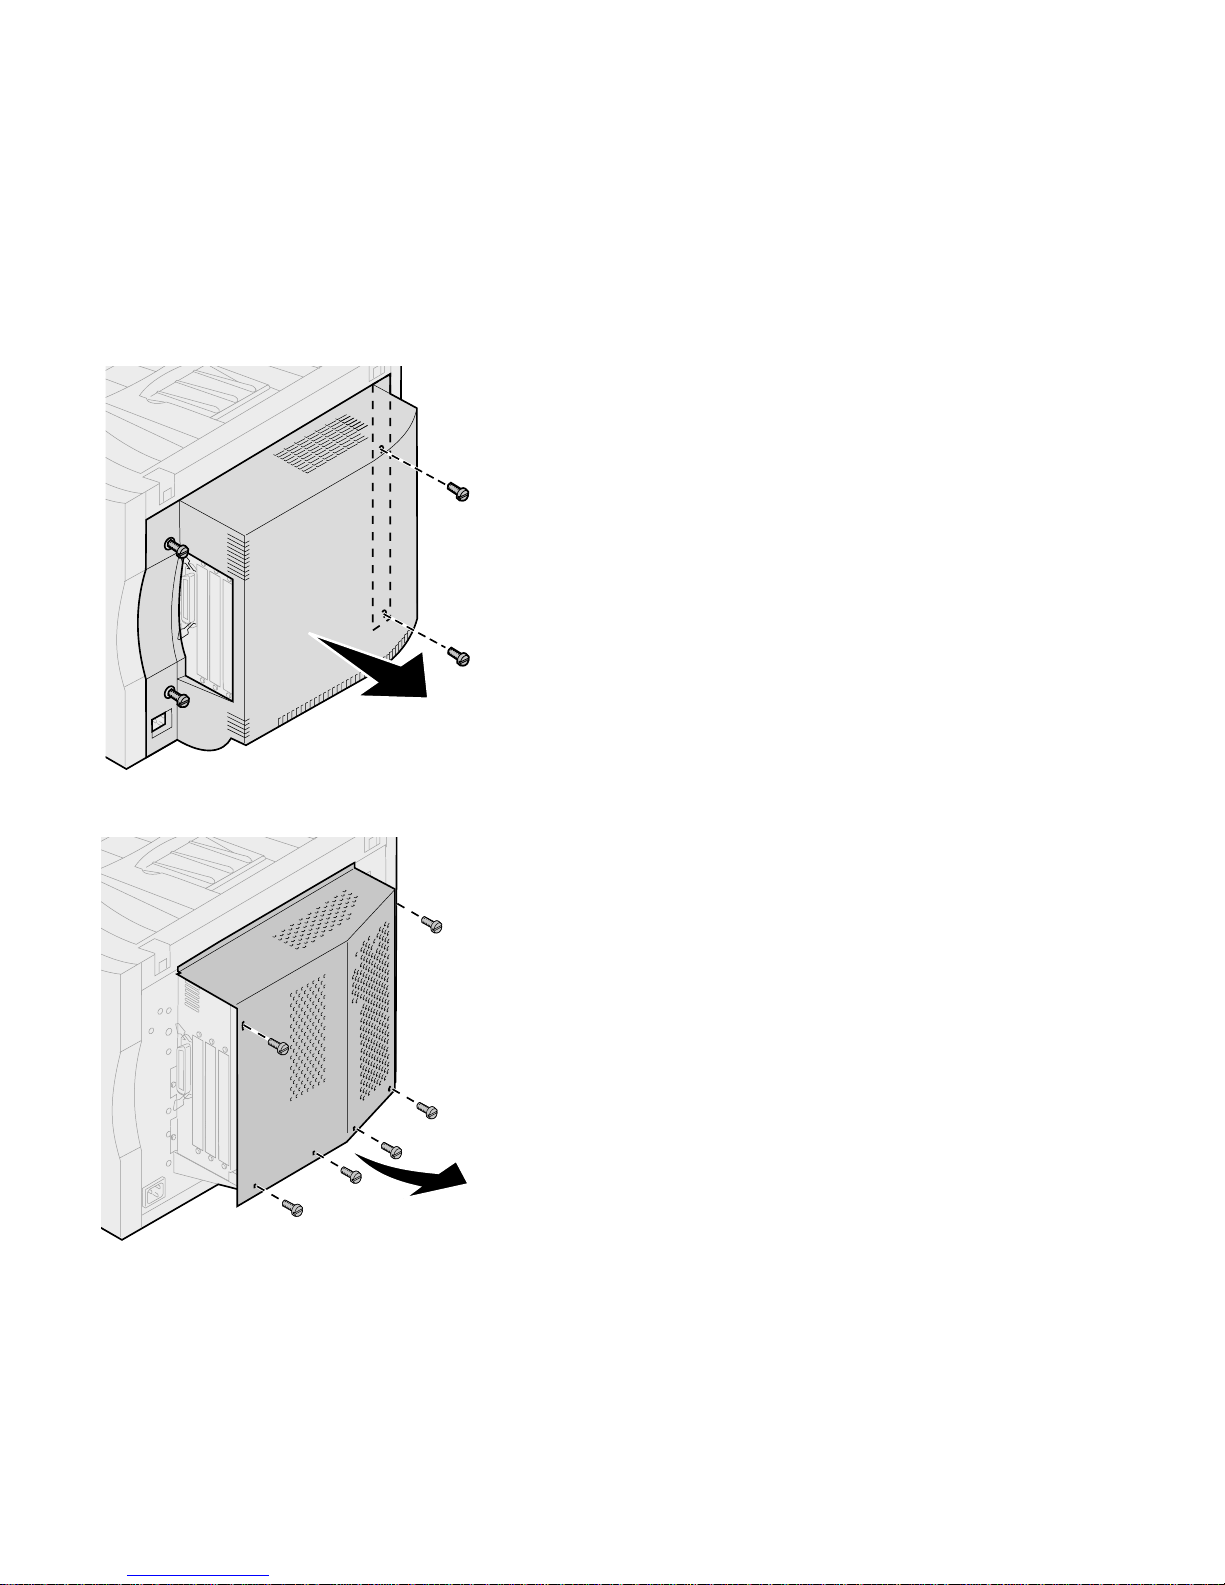
1 Turn the printer off and disconnect the power
cord and printer cables.
2 Loosen the four screws on the rear cover, as
shown.
The screws on the rear cover are captive and
remain on the cover.
3 Remove the rear cover and lay it aside.
4 Loosen the six screws on the shield, as shown.
The screws on the shield are captive and remain
on the shield.
5 Lift and remove the shield, and then lay it aside.
Page 17
14
Lexmark ImageQuick SIMM Setup Guide
Installing the SIMM
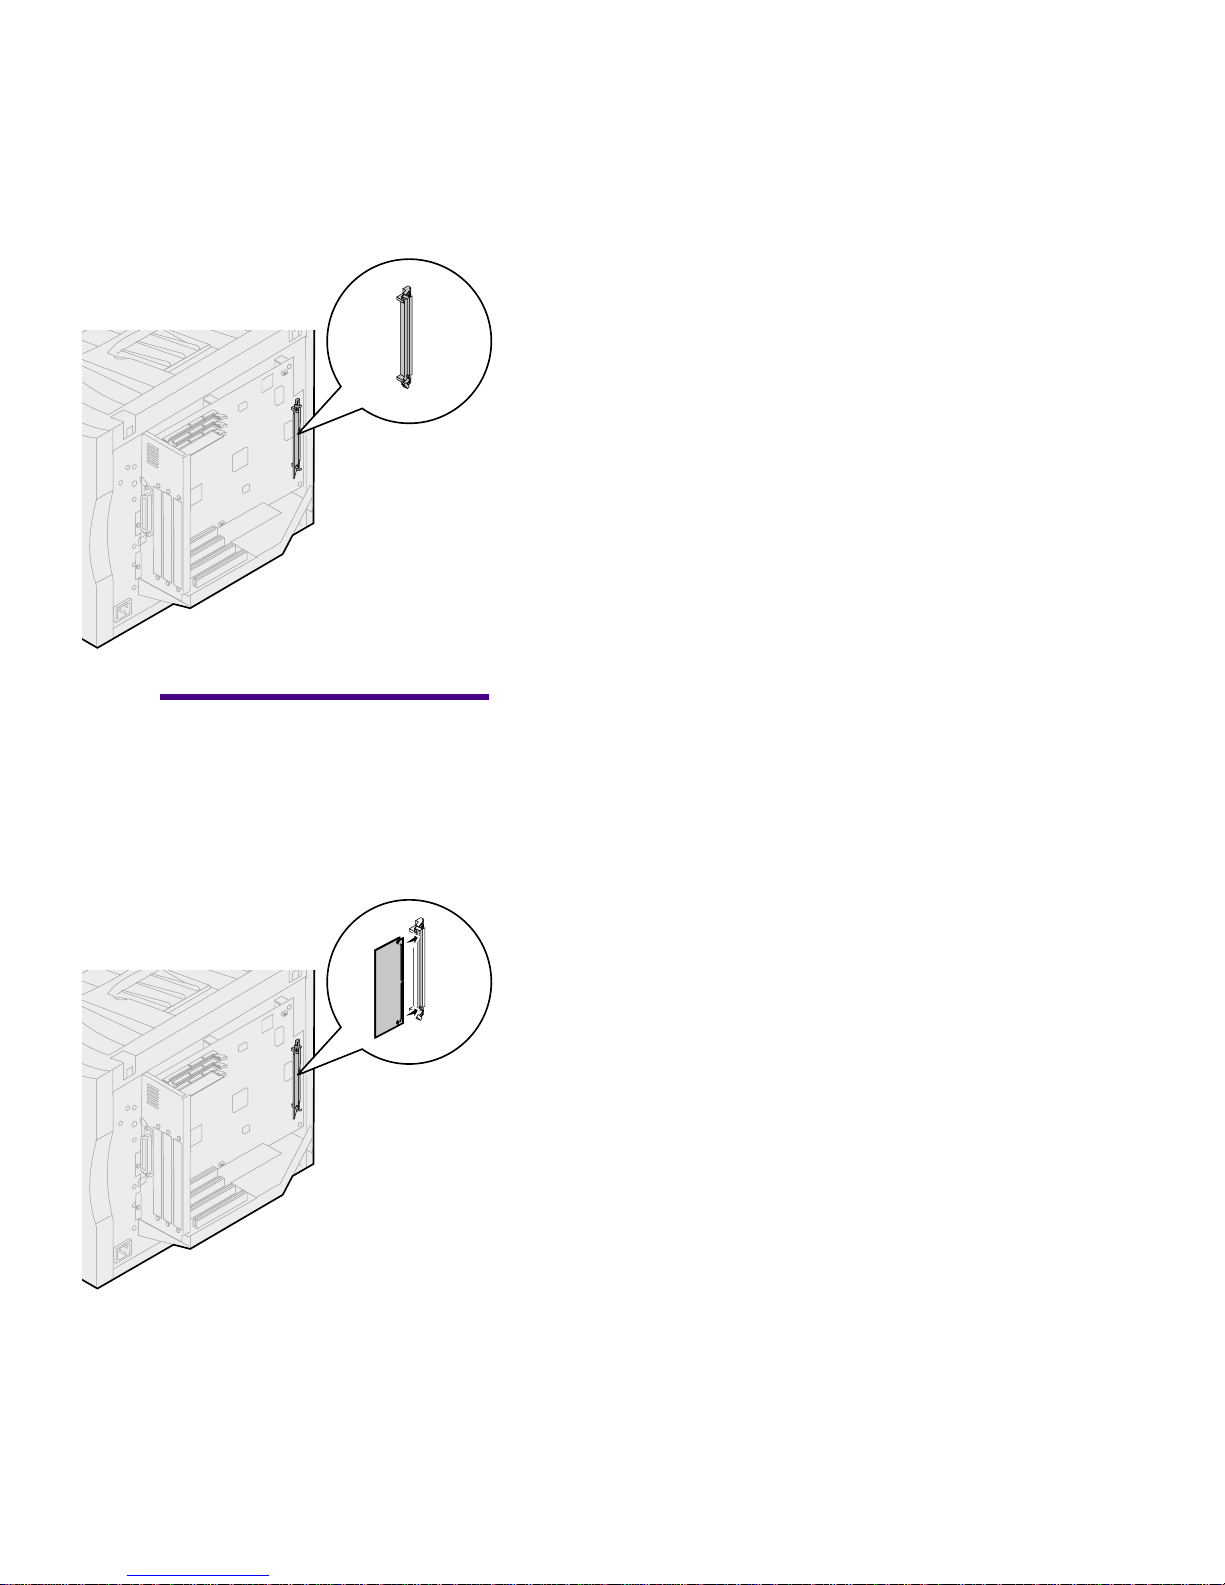
1 Locate the optional firmware SIMM connector
on the system board.
Warning: Elec troni c compo-
nents can be damaged by static
electricity. Touch something
metal or wear an antistatic wrist
strap before handling the SIMM.
2 Hold the Lexmark ImageQuick SIMM with the
connection points facing toward the system
board and the notch toward the bottom of the
printer . Insert it all the way into the connector at
a 45 degree angle (leaning toward the front of
the printer).
3 Pr ess the SIMM toward the system board until it
snaps into place.
Page 18
15
Lexmark ImageQuick SIMM Setup Guide
Reinstalling the
shield and rear cover
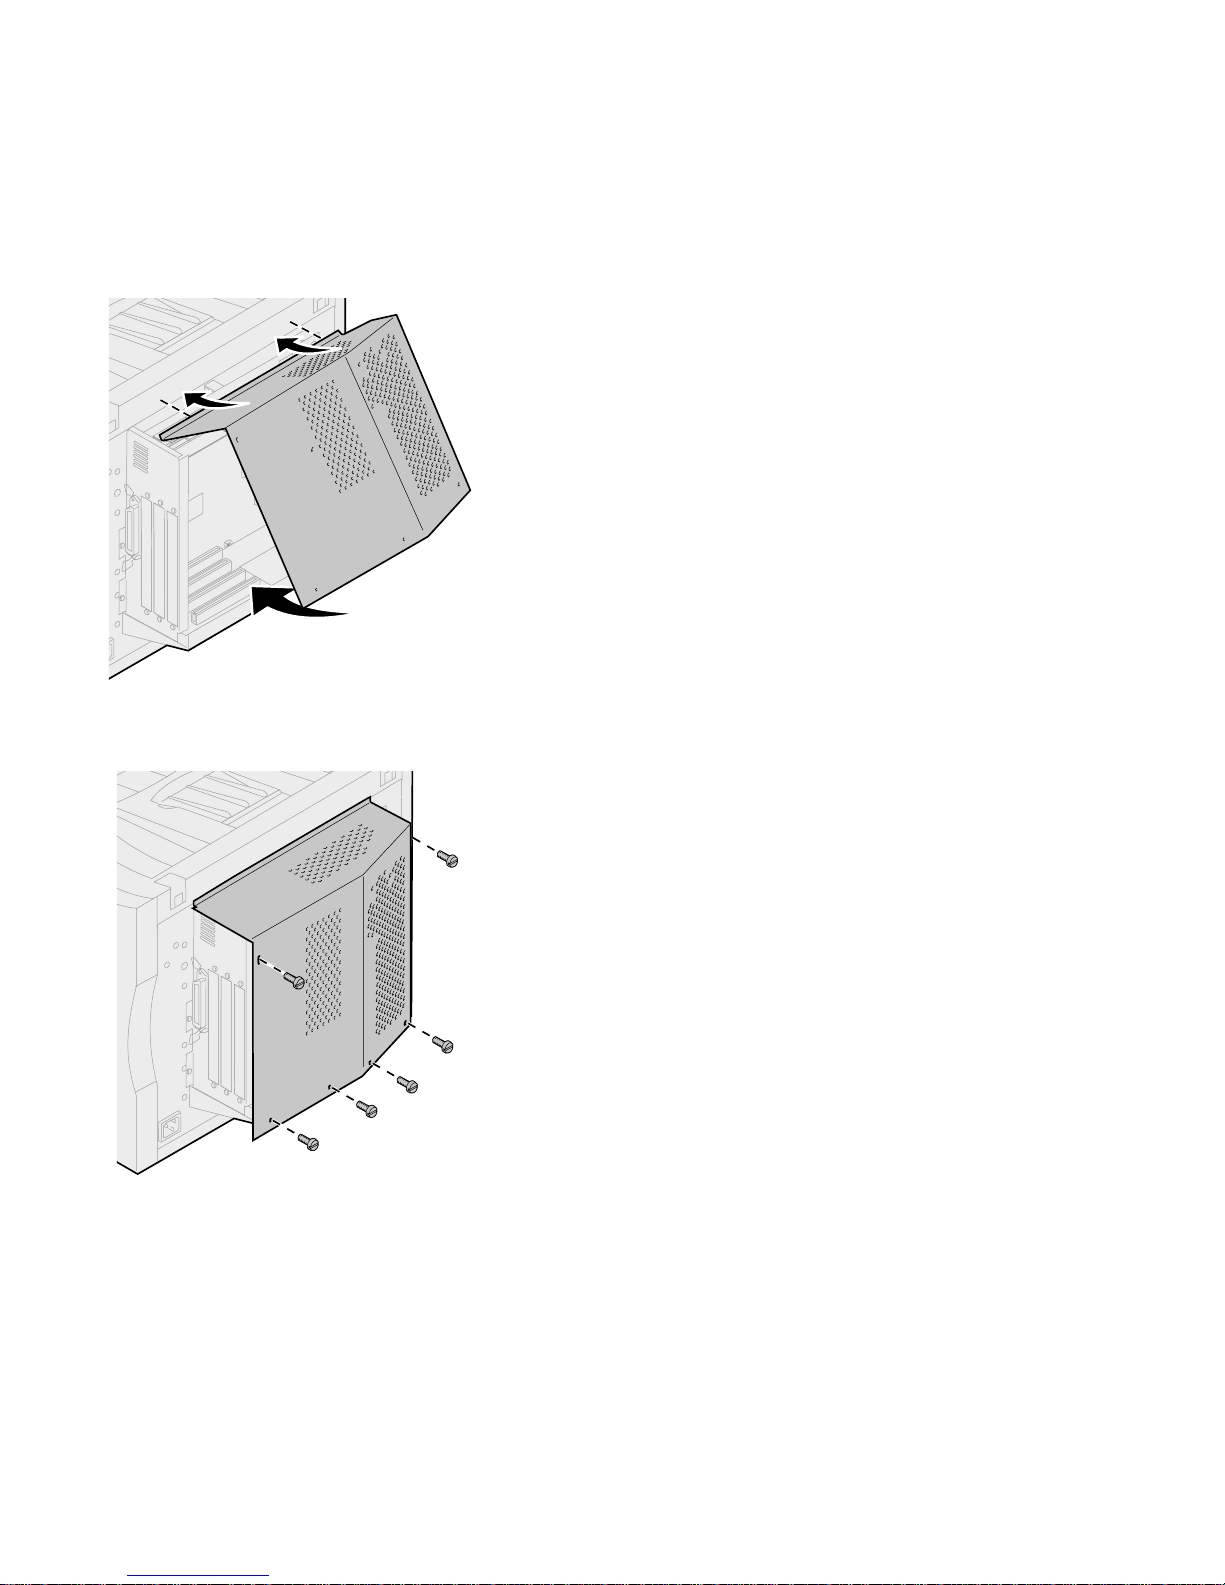
1 Insert the top of the shield, as shown.
2 Align the six screws in the shield with the holes
on the printer.
3 Tighten the six screws.
Page 19
16
Lexmark ImageQuick SIMM Setup Guide
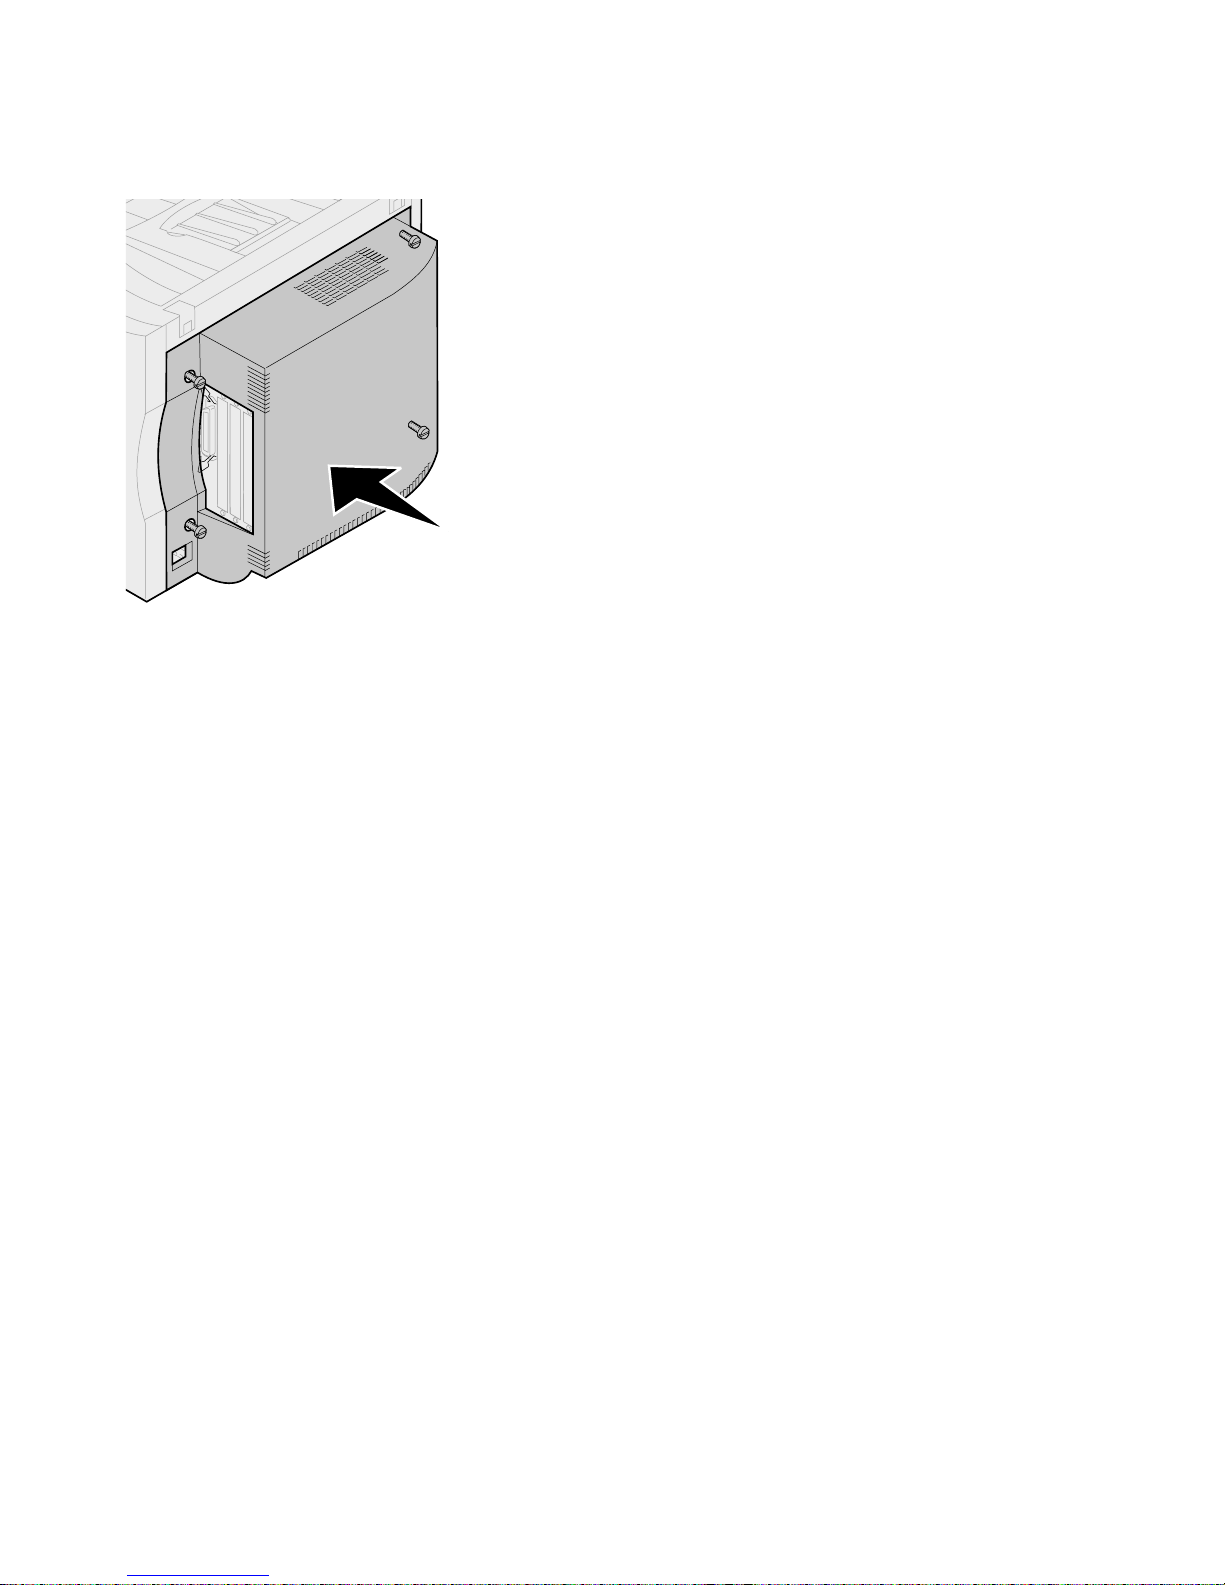
4 Place the rear cover on the printer and align the
screws.
5 Tighten the four screws.
6 Connect the printer cables and power cord, and
turn the printer on.
Verifying installation Print a menu settings page. (See page 3 for
instructions.) If the SIMM is installed correctly,
“ImageQuick SIMM” appears under the Printer
Information section.
After verifying the installation, you may want to
reset your printer settings. Refer to the menu
settings page you printed and saved before
installing the SIMM.
Page 20
17
Lexmark ImageQuick SIMM Setup Guide
Installing the
SIMM in a
Lexmark C720
printer
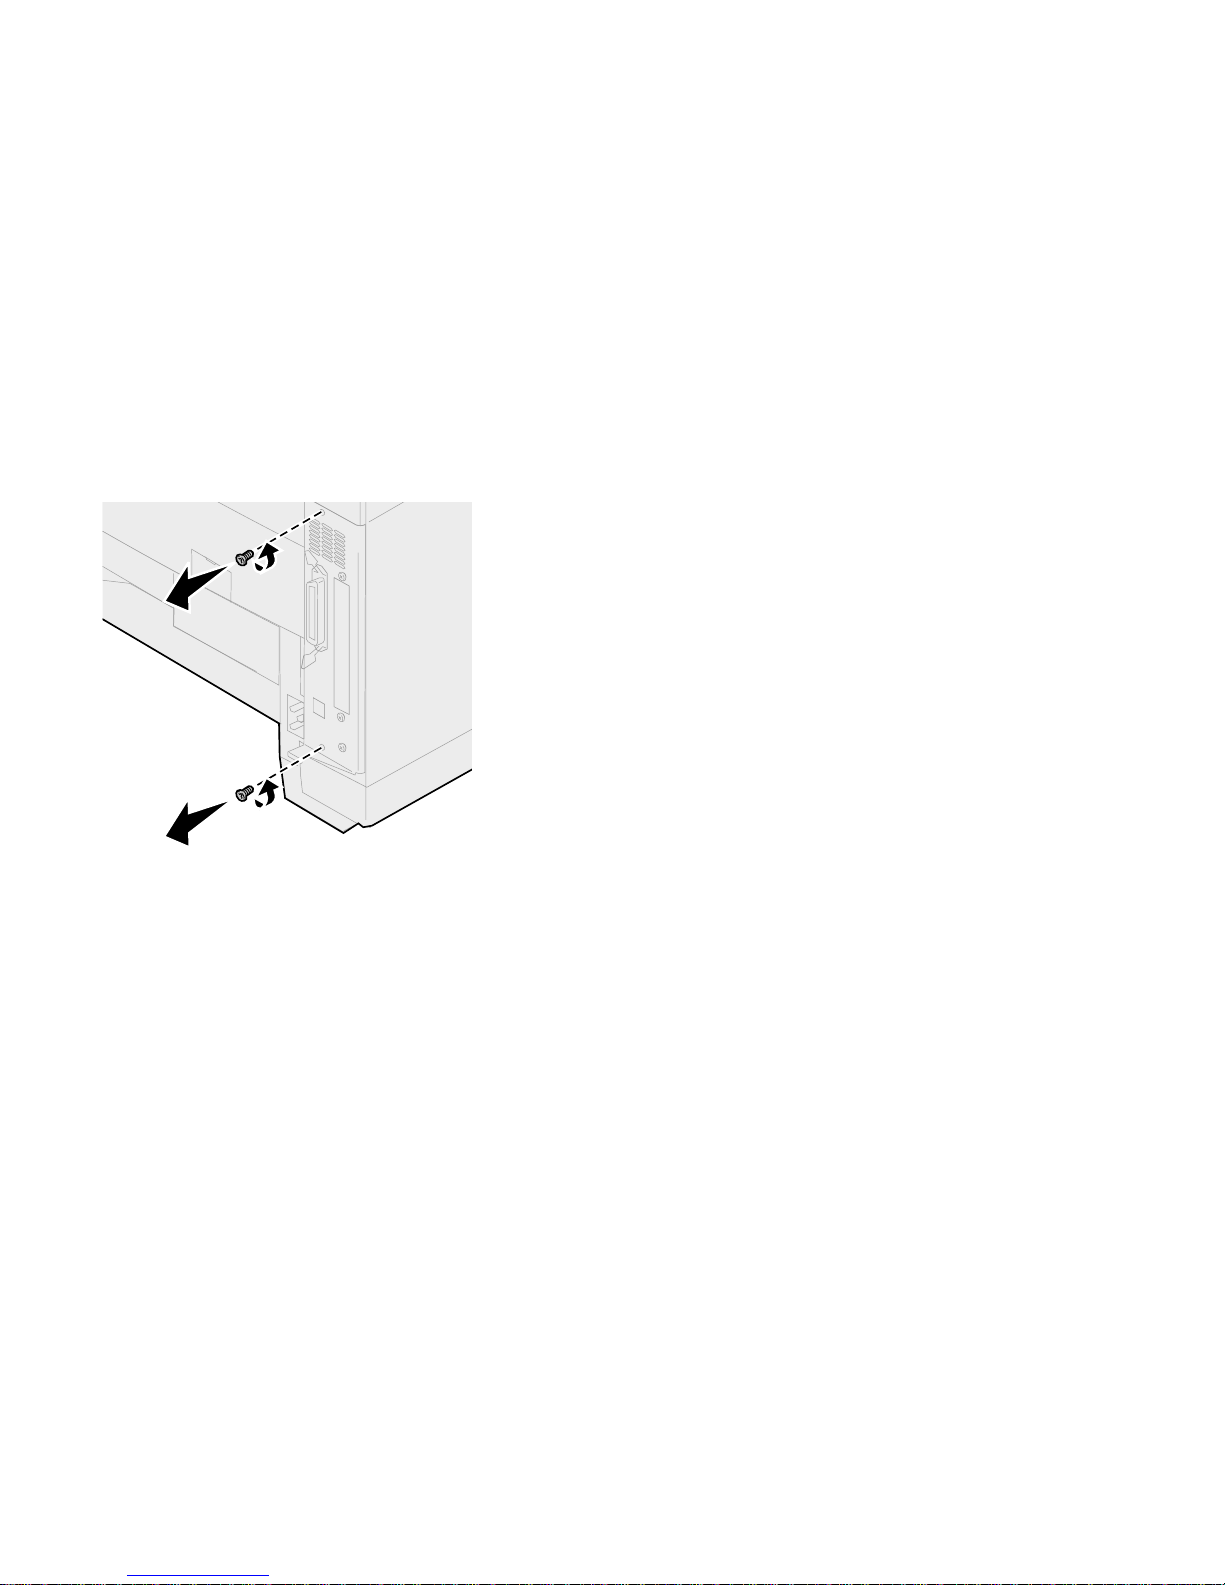
1 Turn the printer off and disconnect the power
cord and printer cables.
2 Remove the two screws on the system board
cover as shown.
Put the screws in a safe place so they are
available when you reinstall the system board.
Page 21
18
Lexmark ImageQuick SIMM Setup Guide
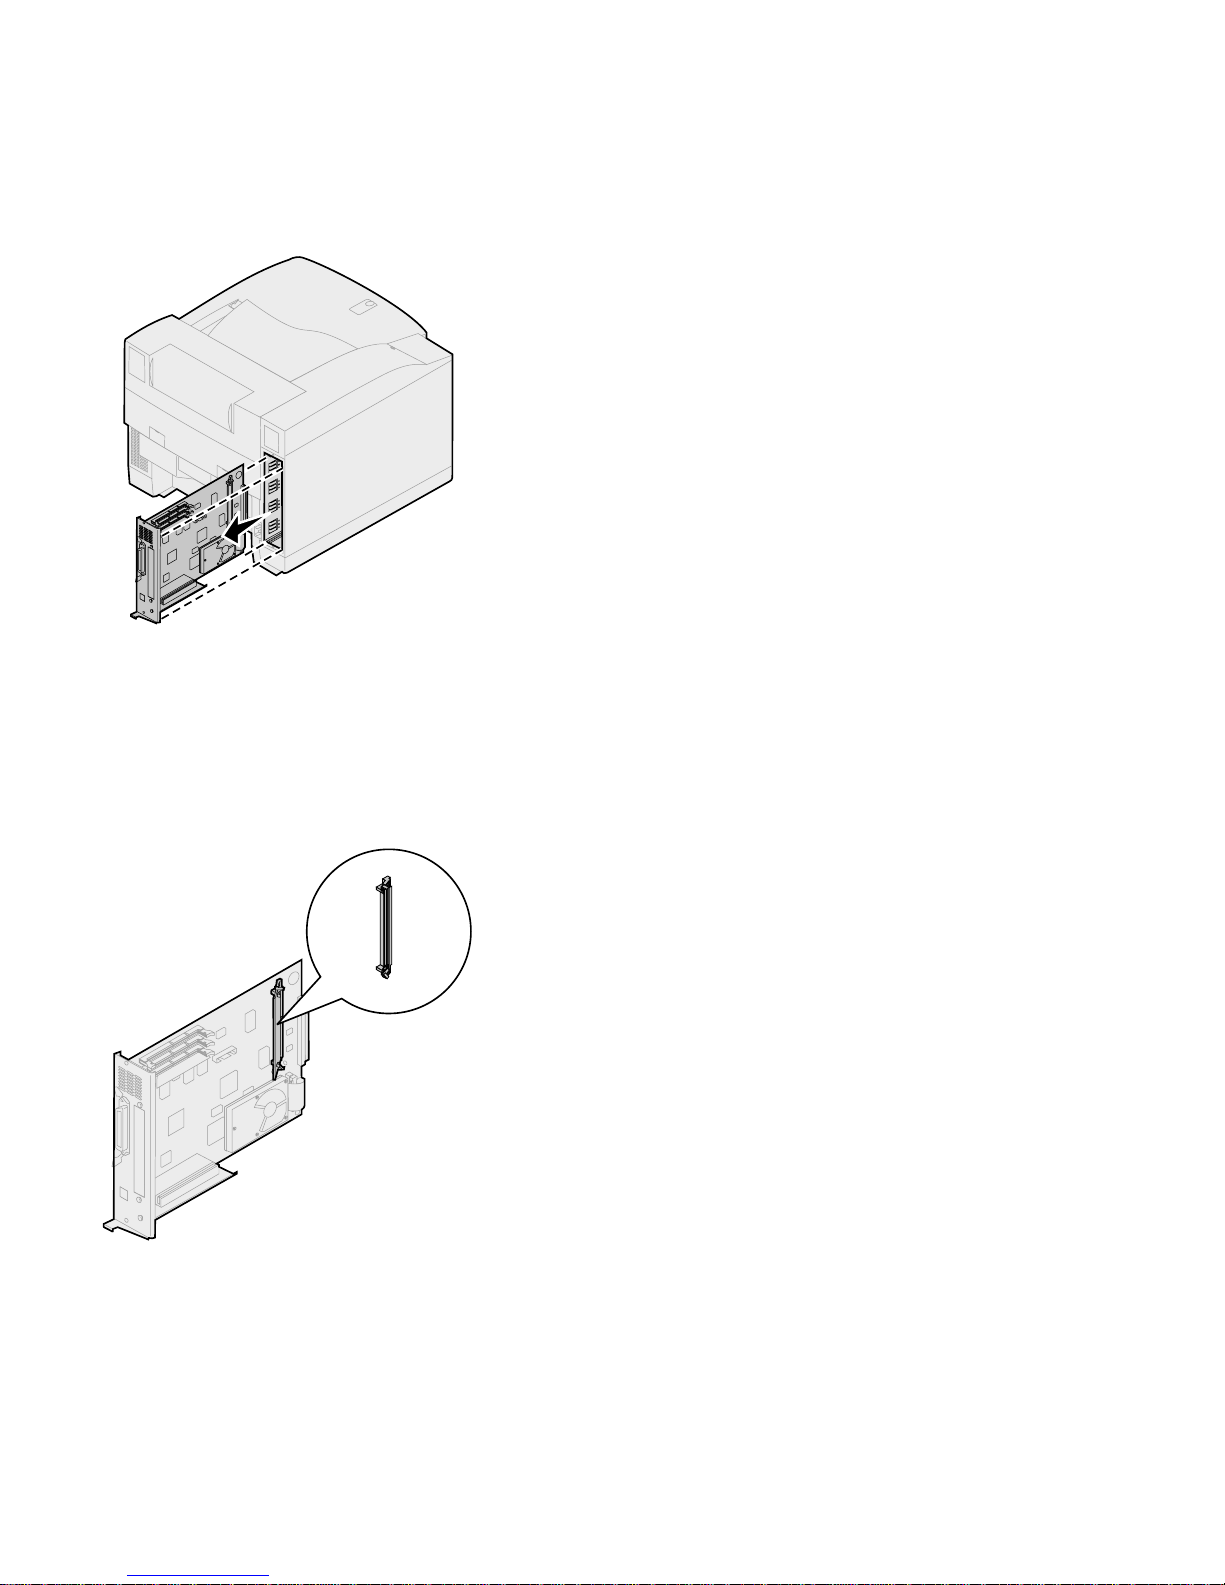
3 Pull the system board out of the printer.
Installing the SIMM
1 Locate the optional firmware SIMM connector
on the system board.
Page 22
19
Lexmark ImageQuick SIMM Setup Guide
Warning: Elec troni c compo-
nents can be damaged by static
electricity. Touch something
metal or wear an antistatic wrist
strap before handling the SIMM.
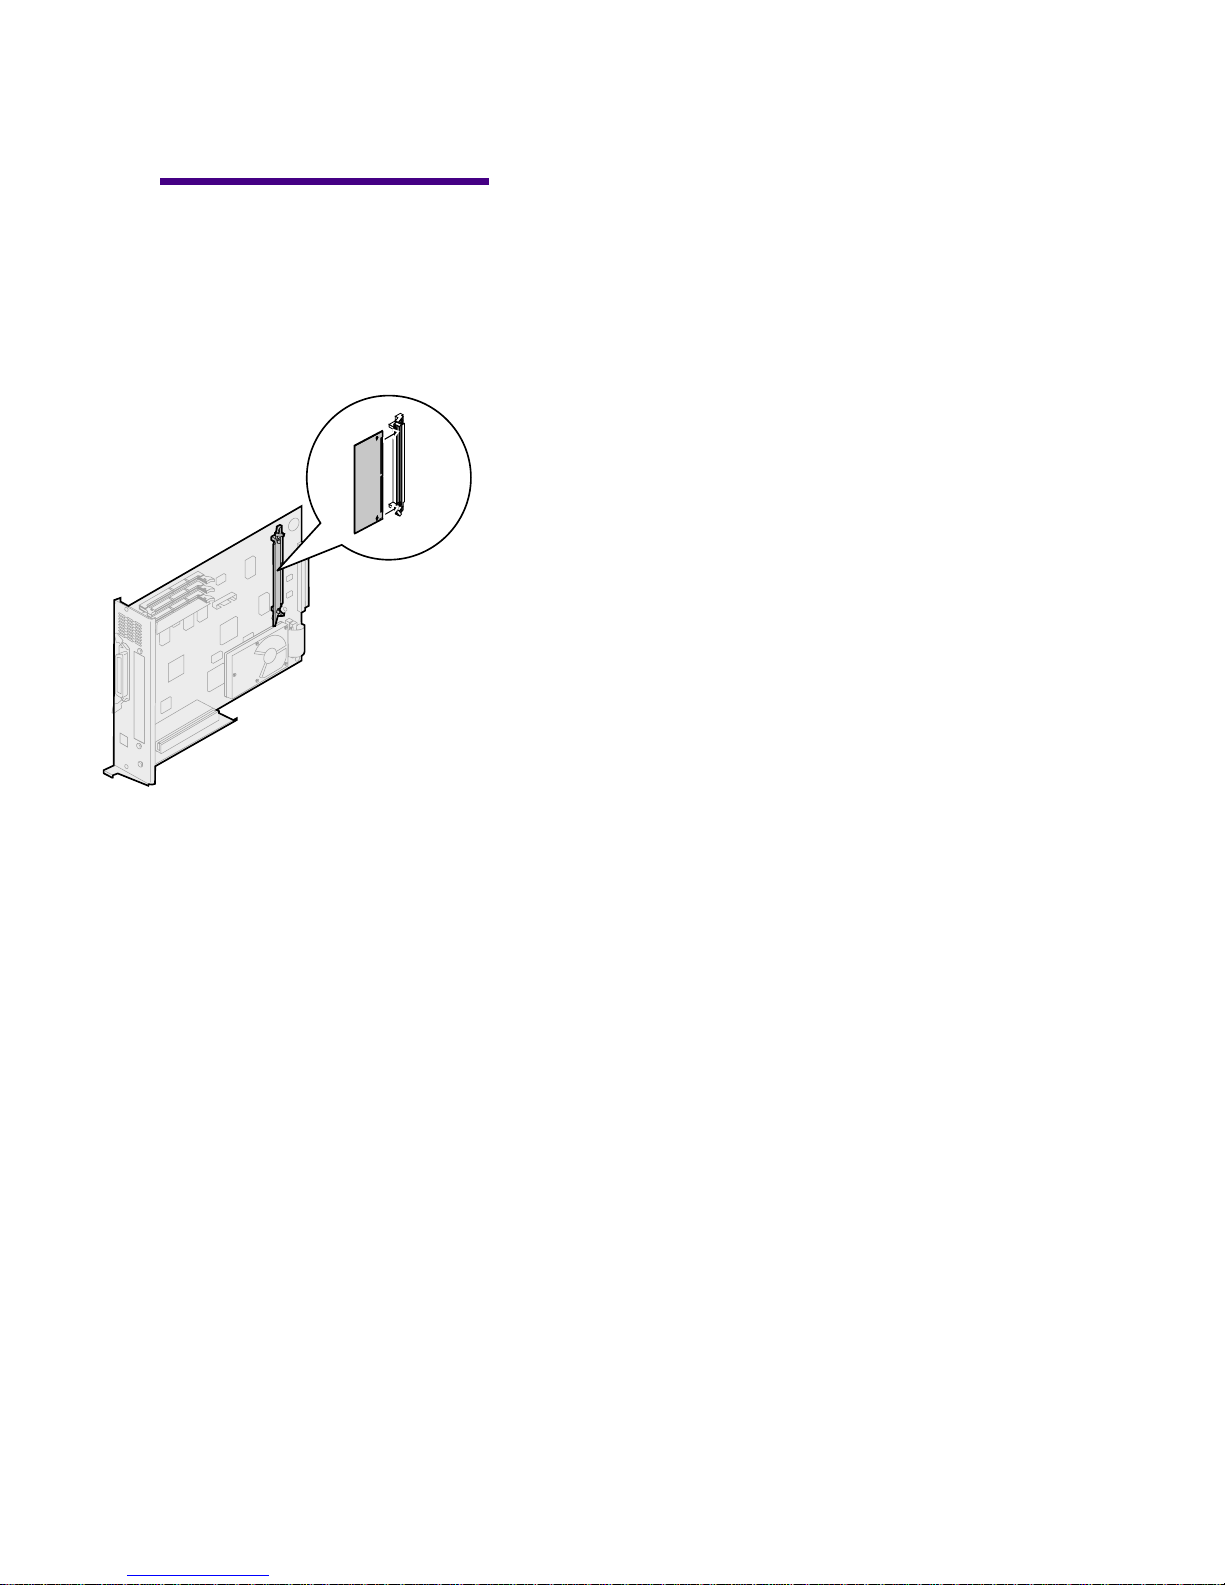
2 Hold the Lexmark ImageQuick SIMM with the
connection points facing toward the system
board and the notch toward the bottom of the
printer . Insert it all the way into the connector at
a 45 degree angle (leaning toward the front of
the printer).
3 Pr ess the SIMM toward the system board until it
snaps into place.
Page 23
20
Lexmark ImageQuick SIMM Setup Guide
Reinstalling the
system board
and cover
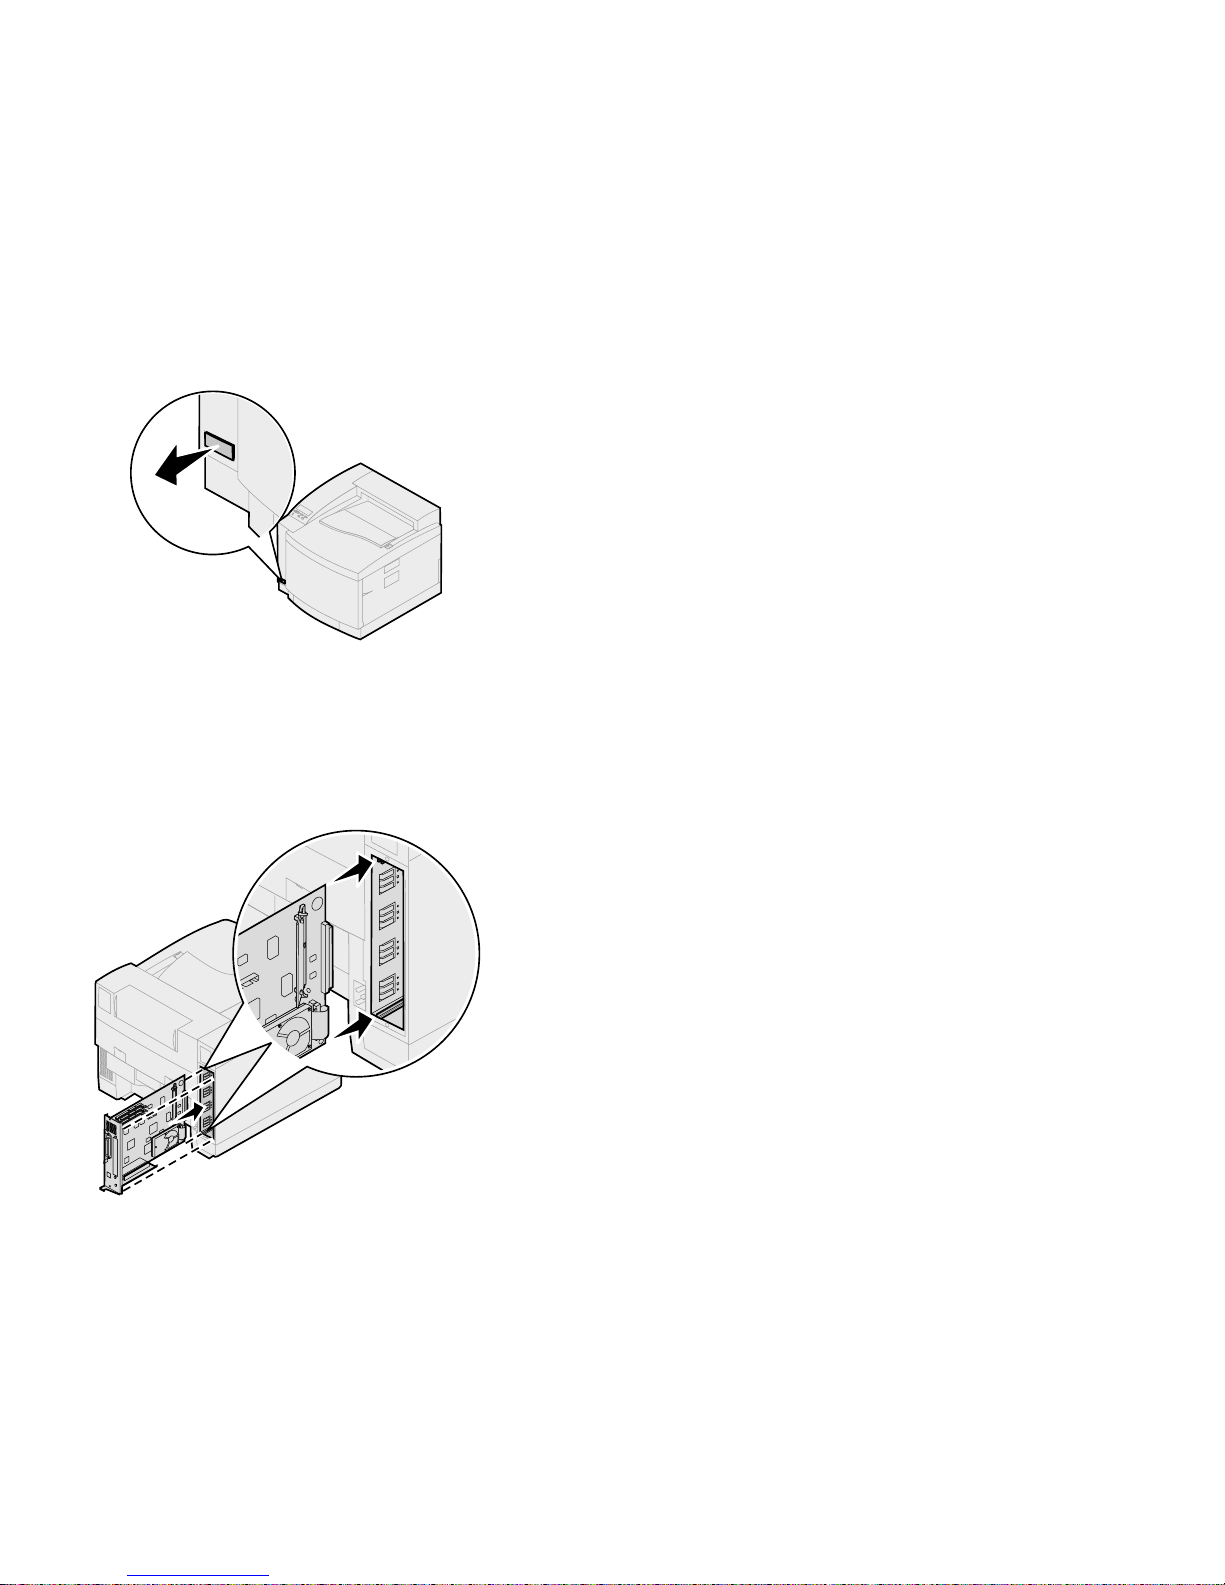
1 Turn the printer off.
2 Align the system board with the top and bottom
slots inside the printer, as shown.
3 Insert the system board into the printer.
Page 24
21
Lexmark ImageQuick SIMM Setup Guide
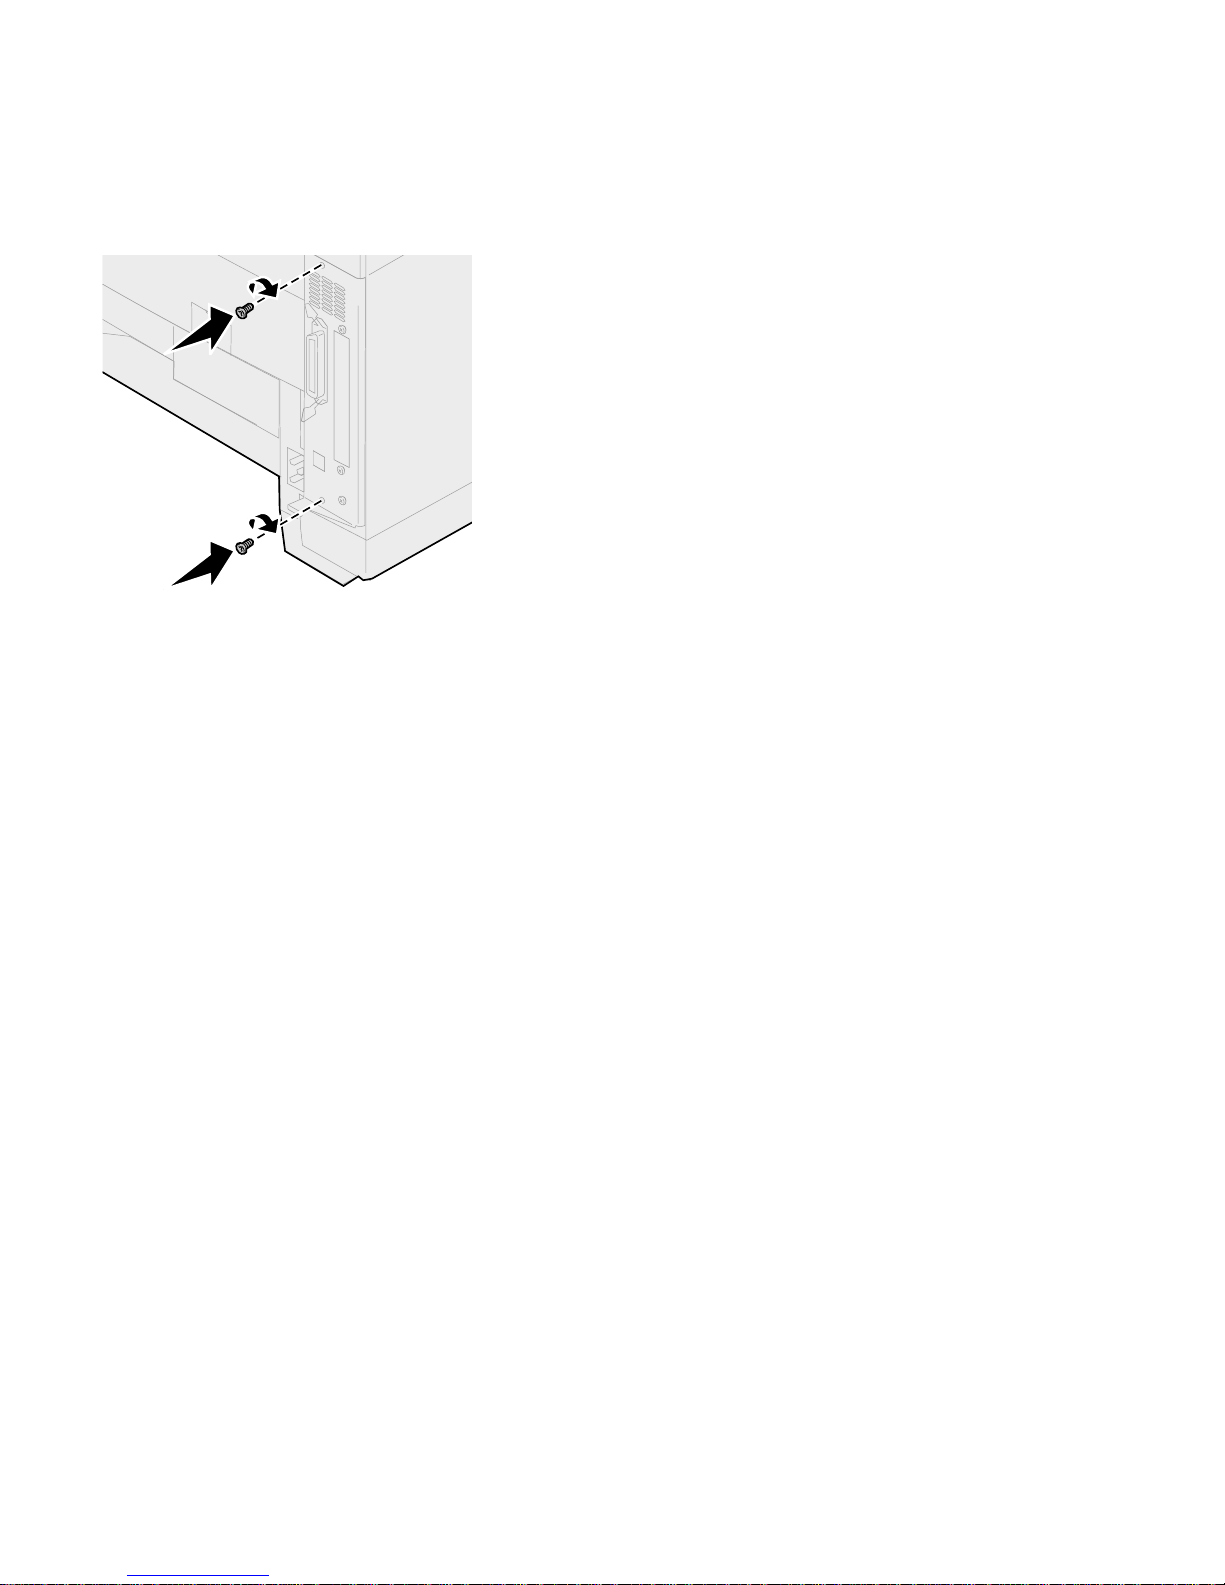
4 Align the two screws in the system board cover
with the holes on the printer frame.
5 Tighten the two screws.
6 Connect the printer cables and power cord, and
turn the printer on.
Verifying installation Print a menu settings page. (See page 3 for
instructions.) If the SIMM is installed correctly,
“ImageQuick SIMM” appears under the Printer
Information section.
After verifying the installation, you may want to
reset your printer settings. Refer to the menu
settings page you printed and saved before
installing the SIMM.
Page 25

22
Lexmark ImageQuick SIMM Setup Guide
Step 3: Install the Lexmark
ImageQuick software
The Lexmark ImageQuick software lets you
manage printer bookmarks and use the Lexmark
Drag'N'Print™ utility.
To install the ImageQuick software, refer to the
enclosed booklet with your ImageQuick CD and
follow the instructions.
Page 26

23
Lexmark ImageQuick SIMM Setup Guide
Step 4: Adjust print server
settings
1 Navigate your Web browser to the printer by
typing the IP address or full name of the printer
in the address line of your browser.
2 Pr ess Enter.
Note: See your network
administrator if you are
prompted for a password.
3 Click the Configuration tab in the left pane.
4 Under Print Server, in the right pane, click
TCP/IP.
5 Click Advanced Settings.
6 Scroll down to Pull Printing in the right pane.
7 Adjust the print server fields.
Print server fields • Local Domains. The Local Domains field is a
comma-, semicolon-, or space-delimited list of
domains or IP subnets used to specify which
addresses do not use the proxy server.
To specify an IP subnet, use asterisks to
represent the domain. For example, on a class B
network, enter 192.168.*.* to designate all hosts
within your domain as local.
To specify local domains, simply enter the
domain name. For example, to designate all
machines in the Lexmark domain as local, enter
Page 27

24
Lexmark ImageQuick SIMM Setup Guide
lexmark.com. You can also specify
*.lexmark.com.
If a Web server's IP address is specified (and if a
proxy server is not set), the printer connects
directly to that server. The printer does not need
a Domain Name Server (DNS).
If the proxy server is set, the host name or IP
address is first checked against the Local
Domains list. If it matches, the printer attempts
to look up host names by way of DNS if set, and
connects directly to IP addresses.
If the host name or IP address does not match
any of the entries in the Local Domains field, the
printer connects to the host through the
specified proxy server.
• DNS IP Address. The DNS translates the Web
server name in the URL into its corresponding
IP address. If no DNS is available and no proxy
is configured, then you can only use IP
addresses for pull printing.
• HTTP Proxy IP Address. This is the IP address
of the system serving as the network proxy for
HTTP requests.
• FTP Proxy IP Address. This is the IP address of
the system ser ving as th e netw ork pr oxy fo r FTP
requests.
• HTTP Proxy Port. This is the IP port number
that the print server uses when attempting to
communicate with the HTTP proxy. The default
port number is 80 and is typically not changed.
• FTP Proxy Port. This is the IP port number that
the print server uses when attempting to
Page 28

25
Lexmark ImageQuick SIMM Setup Guide
communicate with the FTP proxy. The default
port number is 21 and is typically not changed.
• Timeout for HTTP/FTP requests. This field
defines how long (in seconds) the server waits
for a reply to an HTTP or FTP request.
• Retries. The Retries field specifies the maximum
number of attempts that the printer makes to
pull a file. The printer retries on timeouts,
refused or unexpectedly broken connections,
and proxy errors.
Tip for print server
configuration
If the print server’s Pull Printing settings have not
been configured (that is, no DNS IP address has
been set and the HTTP and FTP proxy addresses
have not been set), the print server can still “pull”
Web pages from Web servers that reside on the
same IP subnet as the print server. The only
requirement is that the pull print URL be in
dotted-IP address format (for example,
http://192.168.12.99/printpage.html).
Page 29

26
Lexmark ImageQuick SIMM Setup Guide
Troubleshooting
My Lexmark
ImageQuick SIMM
doesn’t work.
• The Lexmark ImageQuick SIMM is only
compatible with specific Lexmark printers.
Verify that you installed the SIMM in the
appropriate printer. (See page 1 for a list of
compatible printers.)
• The SIMM may not be inserted into the
connector correctly. Remove the SIMM and
reinstall it. (See “Install the ImageQuick SIMM”
beginning on page 5 for help.)
I don’t know my
printer’s IP address.
Print the network setup page:
1 From the printer operator panel, press Menu>
until UTILITIES MENU appears.
2 Pr ess Select.
3 Pr ess Menu> until PRINT NETx SETUP
appears.
UTILITIES MENU is on the first line, and
PRINT NETx SETUP is on the second line.
4 Pr ess Select.
5 Look for the IP address under the TCP/IP
section on the page that prints.
If your IP address has not been set, refer to your
print server manual for the appropriate steps.
Page 30

www.lexmark.com
Lexmark and Lexmark with diamond design are trademarks of Lexmark International, Inc.,
registered in the United States and/or other countries.
© 2001 Lexmark International, Inc.
740 West New Circle Road
Lexington, Kentucky 40550
 Loading...