

Page 1

CS720, CS725, CS725R, CS727,
CS728 Printers
User's Guide
June 2019 www.lexmark.com
Machine type(s):
5028
Model(s):
135, 1A5, 630, 6A0
Page 2

Contents 2
Contents
Safety information........................................................................................ 5
Conventions.......................................................................................................................................................... 5
Product statements............................................................................................................................................. 5
Learning about the printer...........................................................................8
Finding information about the printer.............................................................................................................8
Selecting a location for the printer..................................................................................................................9
Printer configurations........................................................................................................................................10
Attaching cables.................................................................................................................................................. 11
Using the control panel.................................................................................................................................... 12
Understanding the status of the power button and indicator light.......................................................13
Using the home screen.....................................................................................................................................13
Menu map.............................................................................................................................................................15
Printing a menu settings page........................................................................................................................16
Setting up and using the home screen applications.............................. 17
Customizing the home screen........................................................................................................................ 17
Using Display Customization...........................................................................................................................17
Setting up Forms and Favorites......................................................................................................................17
Configuring Eco‑Settings................................................................................................................................. 18
Managing contacts.............................................................................................................................................18
Setting up and using the accessibility features..................................... 20
Enabling Magnification mode........................................................................................................................ 20
Activating Voice Guidance............................................................................................................................. 20
Adjusting the Voice Guidance speech rate................................................................................................20
Enabling spoken passwords or personal identification numbers........................................................20
Navigating the screen using gestures..........................................................................................................21
Using the keyboard on the display................................................................................................................21
Loading paper and specialty media.........................................................22
Setting the size and type of the specialty media......................................................................................22
Configuring Universal paper settings.......................................................................................................... 22
Loading trays......................................................................................................................................................22
Loading the multipurpose feeder..................................................................................................................24
Page 3

Contents 3
Linking trays........................................................................................................................................................25
Printing.........................................................................................................27
Printing from a computer.................................................................................................................................27
Printing forms......................................................................................................................................................27
Printing from a mobile device........................................................................................................................ 27
Printing from a flash drive............................................................................................................................... 28
Supported flash drives and file types.......................................................................................................... 29
Configuring confidential jobs.........................................................................................................................30
Printing held jobs...............................................................................................................................................30
Printing a font sample list.................................................................................................................................31
Canceling a print job..........................................................................................................................................31
Securing the printer................................................................................... 32
Erasing printer memory................................................................................................................................... 32
Erasing printer hard disk memory.................................................................................................................32
Configuring printer hard disk encryption....................................................................................................32
Restoring factory default settings................................................................................................................. 32
Statement of Volatility.......................................................................................................................................33
Maintaining the printer.............................................................................. 34
Adjusting the speaker volume.......................................................................................................................34
Networking..........................................................................................................................................................34
Setting up serial printing (Windows only)....................................................................................................35
Cleaning the printer..........................................................................................................................................36
Ordering supplies.............................................................................................................................................. 37
Replacing parts and supplies.........................................................................................................................40
Moving the printer..............................................................................................................................................61
Saving energy and paper................................................................................................................................62
Recycling............................................................................................................................................................. 62
Clearing jams.............................................................................................. 64
Avoiding jams.....................................................................................................................................................64
Identifying jam locations..................................................................................................................................65
Paper jam in trays..............................................................................................................................................66
Paper jam in the multipurpose feeder......................................................................................................... 67
Paper jam in the standard bin........................................................................................................................ 67
Page 4

Contents 4
Paper jam in door A.......................................................................................................................................... 68
Troubleshooting..........................................................................................72
Network connection problems...................................................................................................................... 72
Hardware options problems...........................................................................................................................74
Issues with supplies..........................................................................................................................................76
Paper feed problems........................................................................................................................................78
Printing problems..............................................................................................................................................82
Color quality problems...................................................................................................................................103
Contacting customer support.......................................................................................................................105
Upgrading and migrating........................................................................ 106
Hardware........................................................................................................................................................... 106
Software.............................................................................................................................................................120
Firmware............................................................................................................................................................ 120
Notices........................................................................................................122
Index........................................................................................................... 134
Page 5

Safety information 5
Safety information
Conventions
Note: A note identifies information that could help you.
Warning: A warning identifies something that could damage the product hardware or software.
CAUTION: A caution indicates a potentially hazardous situation that could injure you.
Dierent types of caution statements include:
CAUTION—POTENTIAL INJURY: Indicates a risk of injury.
CAUTION—SHOCK HAZARD: Indicates a risk of electrical shock.
CAUTION—HOT SURFACE: Indicates a risk of burn if touched.
CAUTION—TIPPING HAZARD: Indicates a crush hazard.
CAUTION—PINCH HAZARD: Indicates a risk of being caught between moving parts.
Product statements
CAUTION—POTENTIAL INJURY: To avoid the risk of fire or electrical shock, connect the power cord to
an appropriately rated and properly grounded electrical outlet that is near the product and easily
accessible.
CAUTION—POTENTIAL INJURY: To avoid the risk of fire or electrical shock, use only the power cord
provided with this product or the manufacturer's authorized replacement.
CAUTION—POTENTIAL INJURY: Do not use this product with extension cords, multioutlet power strips,
multioutlet extenders, or UPS devices. The power capacity of these types of accessories can be easily
overloaded by a laser printer and may result in a risk of fire, property damage, or poor printer
performance.
CAUTION—POTENTIAL INJURY: Only a Lexmark Inline Surge Protector that is properly connected
between the printer and the power cord provided with the printer may be used with this product. The
use of non-Lexmark surge protection devices may result in a risk of fire, property damage, or poor
printer performance.
CAUTION—SHOCK HAZARD: To avoid the risk of electrical shock, do not place or use this product near
water or wet locations.
CAUTION—SHOCK HAZARD: To avoid the risk of electrical shock, do not set up this product or make
any electrical or cabling connections, such as the power cord, fax feature, or telephone, during a
lightning storm.
CAUTION—POTENTIAL INJURY: Do not cut, twist, bind, crush, or place heavy objects on the power
cord. Do not subject the power cord to abrasion or stress. Do not pinch the power cord between objects
such as furniture and walls. If any of these things happen, a risk of fire or electrical shock results. Inspect
the power cord regularly for signs of such problems. Remove the power cord from the electrical outlet
before inspecting it.
Page 6

Safety information 6
CAUTION—SHOCK HAZARD: To avoid the risk of electrical shock, make sure that all external
connections (such as Ethernet and telephone system connections) are properly installed in their marked
plug-in ports.
CAUTION—SHOCK HAZARD: To avoid the risk of electrical shock, if you are accessing the controller
board or installing optional hardware or memory devices sometime after setting up the printer, then turn
the printer o, and unplug the power cord from the electrical outlet before continuing. If you have any
other devices attached to the printer, then turn them o as well, and unplug any cables going into the
printer.
CAUTION—SHOCK HAZARD: To avoid the risk of electrical shock when cleaning the exterior of the
printer, unplug the power cord from the electrical outlet and disconnect all cables from the printer before
proceeding.
CAUTION—POTENTIAL INJURY: If the printer weight is greater than 20 kg (44 lb), then it may require
two or more people to lift it safely.
CAUTION—POTENTIAL INJURY: When moving the printer, follow these guidelines to avoid personal
injury or printer damage:
• Make sure that all doors and trays are closed.
• Turn o the printer, and then unplug the power cord from the electrical outlet.
• Disconnect all cords and cables from the printer.
• If the printer has separate floor-standing optional trays or output options attached to it, then disconnect
them before moving the printer.
• If the printer has a caster base, then carefully roll it to the new location. Use caution when passing over
thresholds and breaks in
flooring.
• If the printer does not have a caster base but is configured with optional trays or output options, then remove
the output options and lift the printer o the trays. Do not try to lift the printer and any options at the same
time.
• Always use the handholds on the printer to lift it.
• Any cart used to move the printer must have a surface able to support the full footprint of the printer.
• Any cart used to move the hardware options must have a surface able to support the dimensions of the
options.
• Keep the printer in an upright position.
• Avoid severe jarring movements.
• Make sure that your fingers are not under the printer when you set it down.
• Make sure that there is adequate clearance around the printer.
CAUTION—TIPPING HAZARD: Installing one or more options on your printer or MFP may require a
caster base, furniture, or other feature to prevent instability causing possible injury. For more information
on supported configurations, see
CAUTION—TIPPING HAZARD: To reduce the risk of equipment instability, load each tray separately.
Keep all other trays closed until needed.
CAUTION—HOT SURFACE: The inside of the printer might be hot. To reduce the risk of injury from a hot
component, allow the surface to cool before touching it.
CAUTION—PINCH HAZARD: To avoid the risk of a pinch injury, use caution in areas marked with this
label. Pinch injuries may occur around moving parts, such as gears, doors, trays, and covers.
www.lexmark.com/multifunctionprinters.
Page 7

Safety information 7
CAUTION—POTENTIAL INJURY: This product uses a laser. Use of controls or adjustments or
performance of procedures other than those specified in the User’s Guide may result in hazardous
radiation exposure.
CAUTION—POTENTIAL INJURY: The lithium battery in this product is not intended to be replaced.
There is a danger of explosion if a lithium battery is incorrectly replaced. Do not recharge, disassemble,
or incinerate a lithium battery. Discard used lithium batteries according to the manufacturer's instructions
and local regulations.
This product is designed, tested, and approved to meet strict global safety standards with the use of specific
manufacturer's components. The safety features of some parts may not always be obvious. The manufacturer
is not responsible for the use of other replacement parts.
Refer service or repairs, other than those described in the user documentation, to a service representative.
This product uses a printing process that heats the print media, and the heat may cause the media to release
emissions. You must understand the section in your operating instructions that discusses the guidelines for
selecting print media to avoid the possibility of harmful emissions.
This product may produce small amounts of ozone during normal operation, and may be equipped with a filter
designed to limit ozone concentrations to levels well below the recommended exposure limits. To avoid high
ozone concentration levels during extensive usage, install this product in a well-ventilated area and replace
the ozone and exhaust filters if instructed to do so in the product maintenance instructions. If there are no
references to filters in the product maintenance instructions, then there are no filters requiring replacement for
this product.
SAVE THESE INSTRUCTIONS.
Page 8
Learning about the printer 8
Learning about the printer
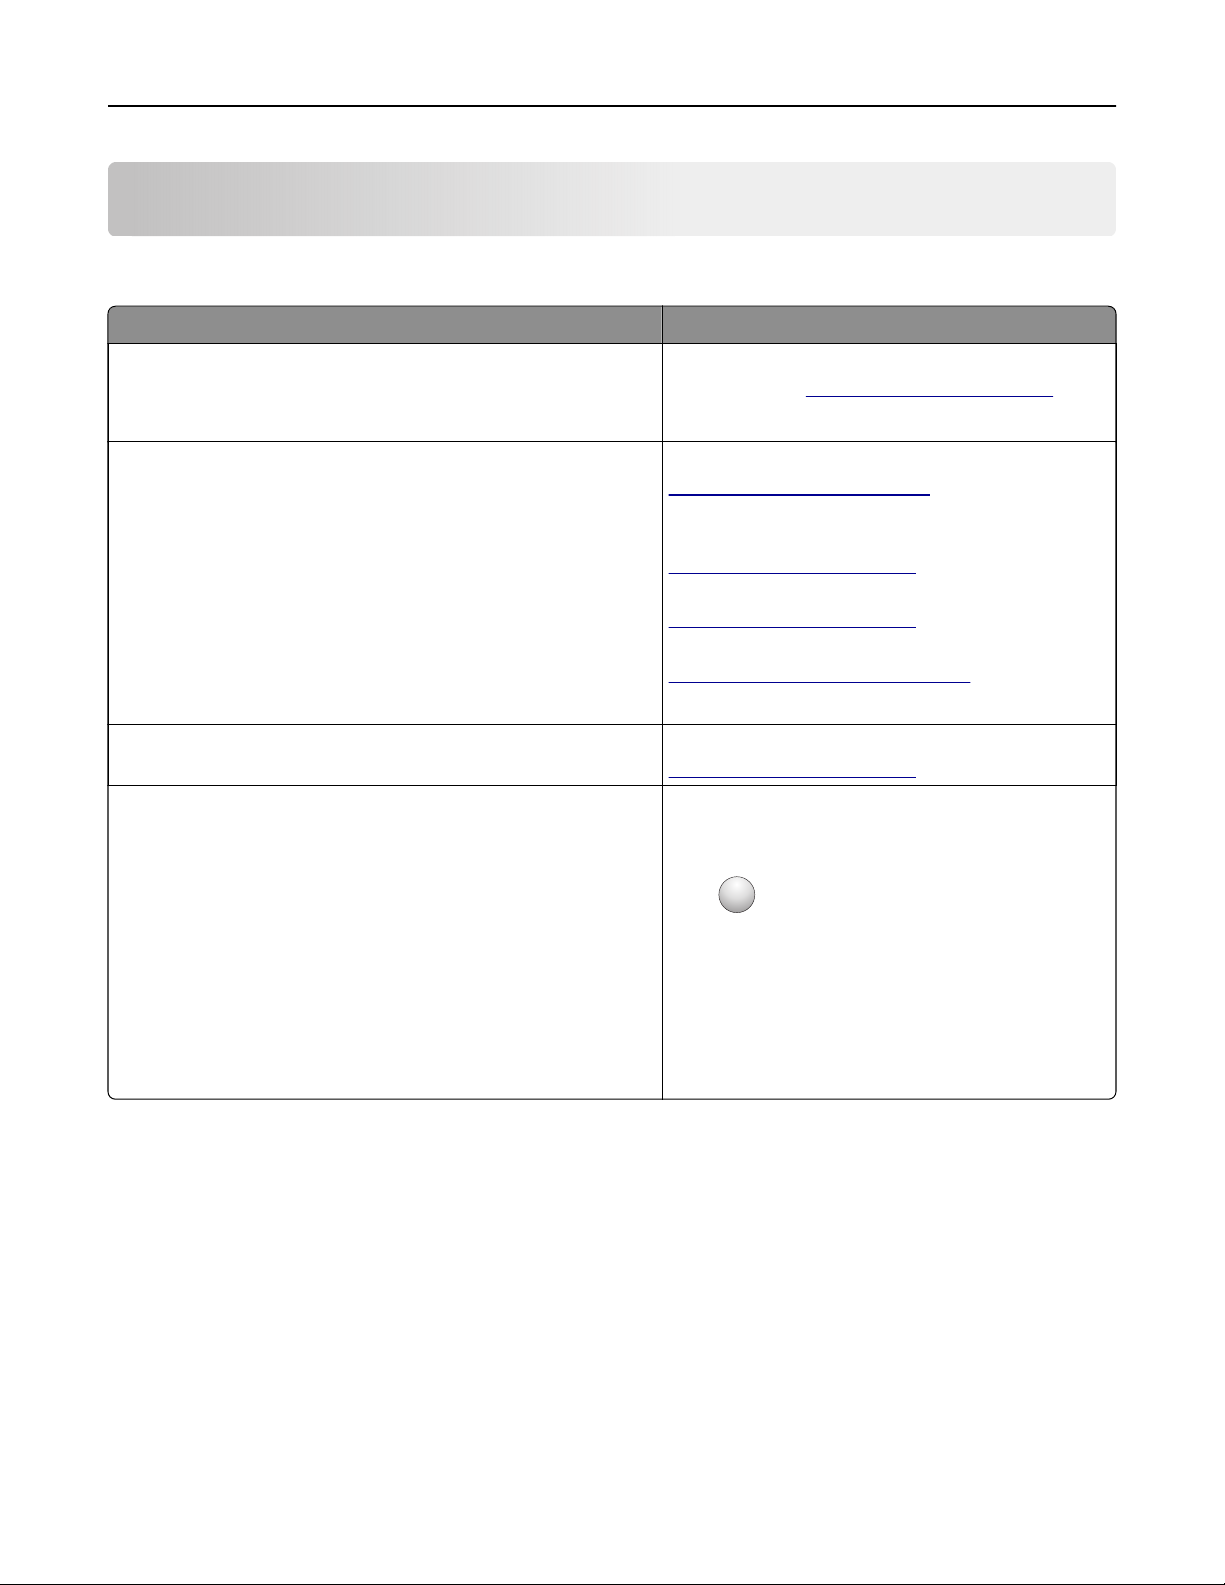
Finding information about the printer
What are you looking for? Find it here
Initial setup instructions:
• Connecting the printer
See the setup documentation that came with the
printer or go to
http://support.lexmark.com.
• Installing the printer software
More setup and instructions for using the printer:
• Selecting and storing paper and specialty media
• Loading paper
• Configuring printer settings
• Viewing and printing documents and photos
• Setting up and using the printer software
• Configuring the printer on a network
• Caring for and maintaining the printer
Information Center—Go to
http://infoserve.lexmark.com.
Help Menu Pages—Access the guides on the
printer
http://support.lexmark.com.
Touch Screen Guide—Go to
http://support.lexmark.com.
Product videos—Go to
http://infoserve.lexmark.com/idv/.
firmware
or go to
• Troubleshooting and solving problems
Information on setting up and configuring the accessibility
features of your printer
Help using the printer software Help for Microsoft® Windows® or Macintosh
Lexmark Accessibility Guide—Go to
http://support.lexmark.com.
operating systems—Open a printer software
program or application, and then click Help.
?
Click
Notes:
to view context‑sensitive information.
• Help is automatically installed with the printer
software.
• Depending on the operating system, the
printer software is located in the printer
program folder or on the desktop.
Page 9
Learning about the printer 9
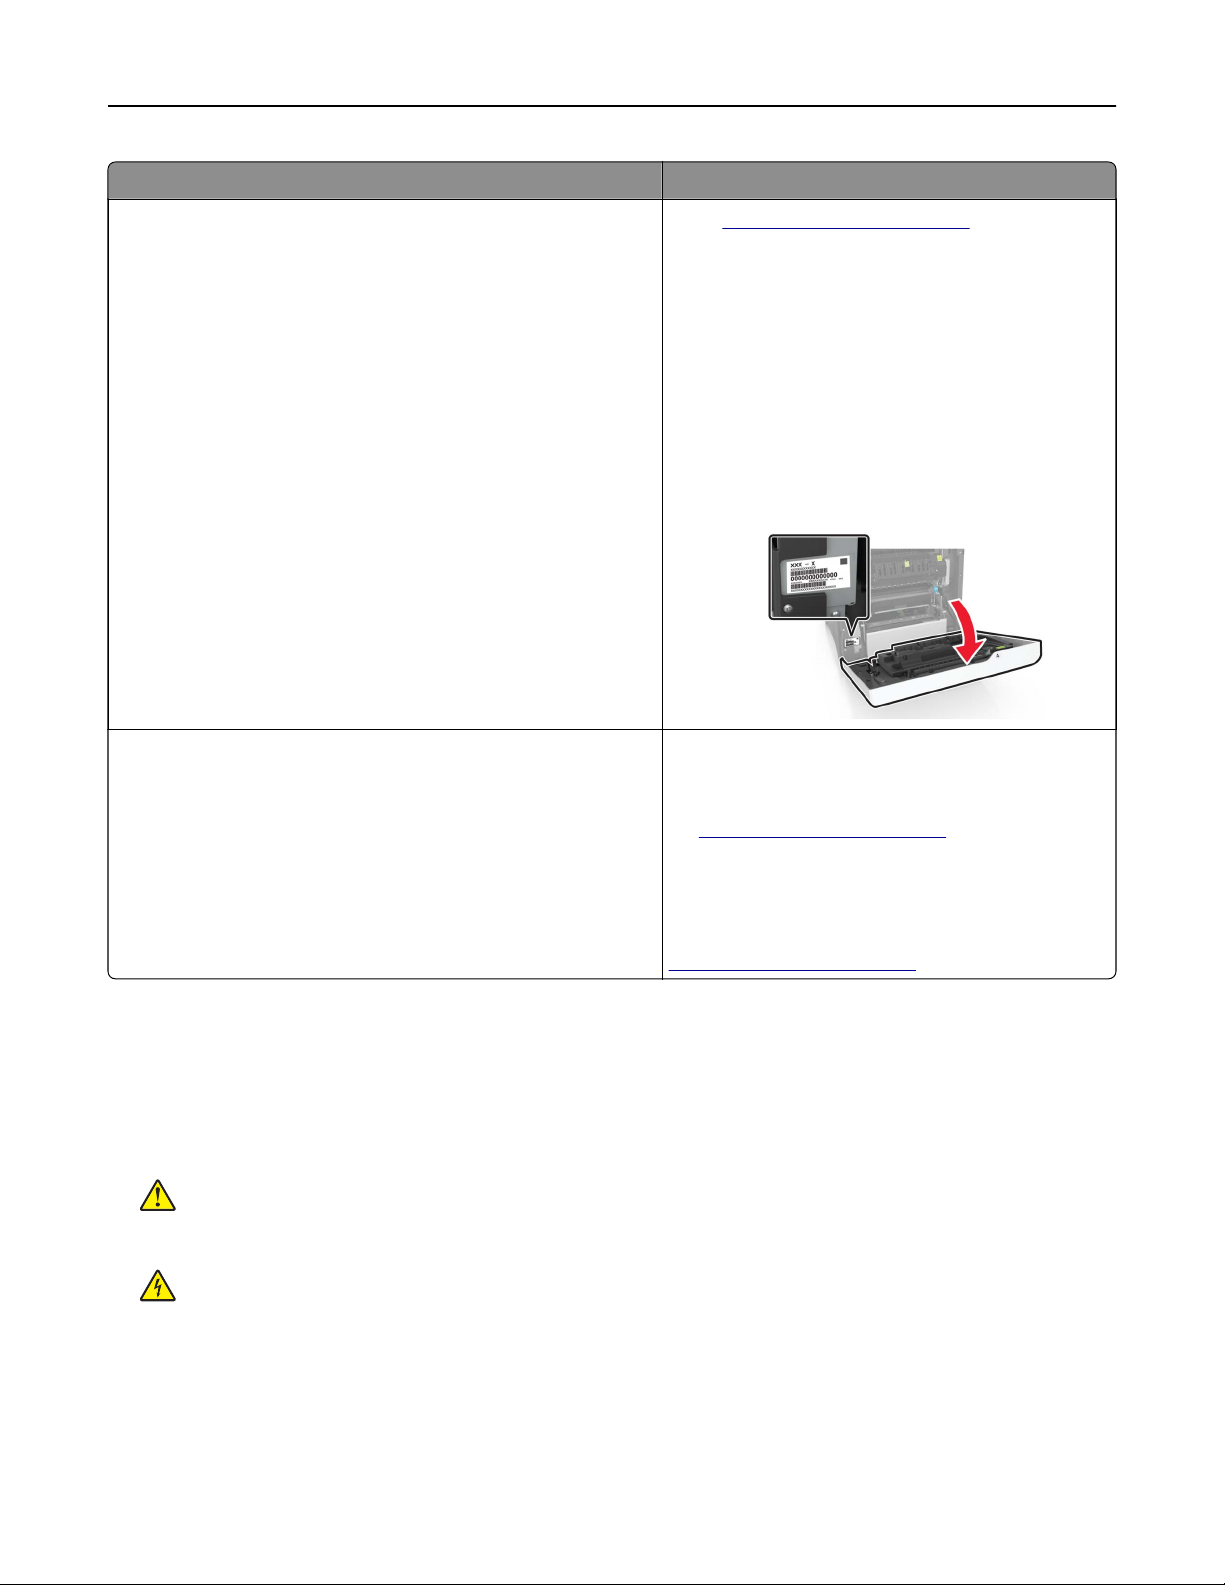
What are you looking for? Find it here
Go to
The latest supplemental information, updates, and customer
support:
• Documentation
• Driver downloads
• Live chat support
• E‑mail support
• Voice support
http://support.lexmark.com.
Note: Select your country or region, and then
select your product to view the appropriate
support site.
Support contact information for your country or
region can be found on the website or on the
printed warranty that came with the printer.
Have the following information ready when you
contact customer support:
• Place and date of purchase
• Machine type and serial number
• Safety information
• Regulatory information
• Warranty information
• Environmental information
Warranty information varies by country or region:
• In the U.S.—See the Statement of Limited
Warranty included with the printer, or go to
http://support.lexmark.com.
• In other countries and regions—See the
printed warranty that came with the printer.
Product Information Guide—See the
documentation that came with the printer or go to
http://support.lexmark.com.
Selecting a location for the printer
When selecting a location for the printer, leave enough room to open trays, covers, and doors and to install
hardware options.
• Set up the printer near an electrical outlet.
CAUTION—POTENTIAL INJURY: To avoid the risk of fire or electrical shock, connect the power cord
to an appropriately rated and properly grounded electrical outlet that is near the product and easily
accessible.
CAUTION—SHOCK HAZARD: To avoid the risk of electrical shock, do not place or use this product
near water or wet locations.
• Make sure that airflow in the room meets the latest revision of the ASHRAE 62 standard or the CEN Technical
Committee 156 standard.
• Provide a
sturdy, and stable surface.
flat,
Page 10
Learning about the printer 10
• Keep the printer:
– Clean, dry, and free of dust.
– Away from stray staples and paper clips.
– Away from the direct airflow of air conditioners, heaters, or ventilators.
– Free from direct sunlight and humidity extremes.
• Observe the recommended temperatures and avoid
Ambient temperature 10 to 32.2°C (50 to 90°F)
Storage temperature -40 to 43°C (-40 to 110°F)
fluctuations:
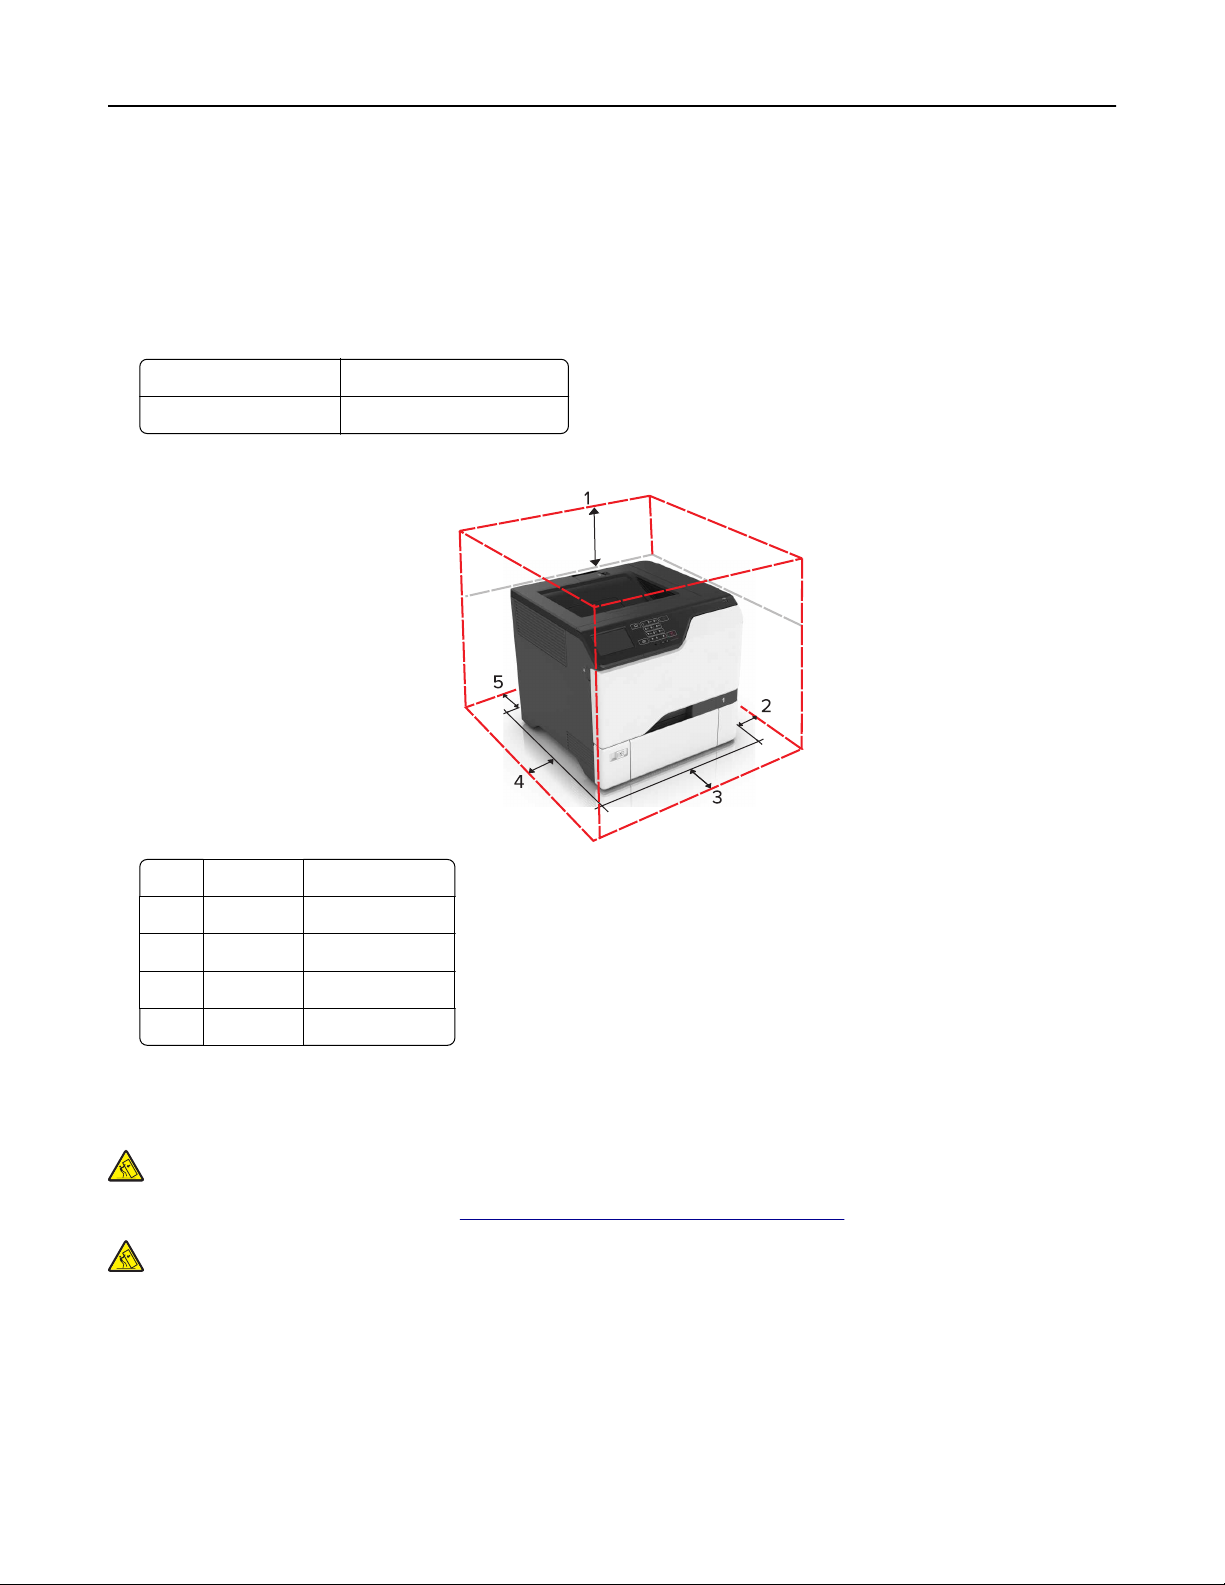
• Allow the following recommended amount of space around the printer for proper ventilation:
1 Top 178 m m ( 7 in . )
2 Right side 127 mm (5 in.)
3 Front 508 mm (20 in.)
4 Left side 127 mm (5 in.)
5 Rear 76 mm (3 in.)
Printer configurations
CAUTION—TIPPING HAZARD: Installing one or more options on your printer or MFP may require a
caster base, furniture, or other feature to prevent instability causing possible injury. For more information
on supported configurations, see
CAUTION—TIPPING HAZARD: To reduce the risk of equipment instability, load each tray separately.
Keep all other trays closed until needed.
You can configure your printer by adding three optional 550‑sheet trays.
www.lexmark.com/multifunctionprinters.
Page 11
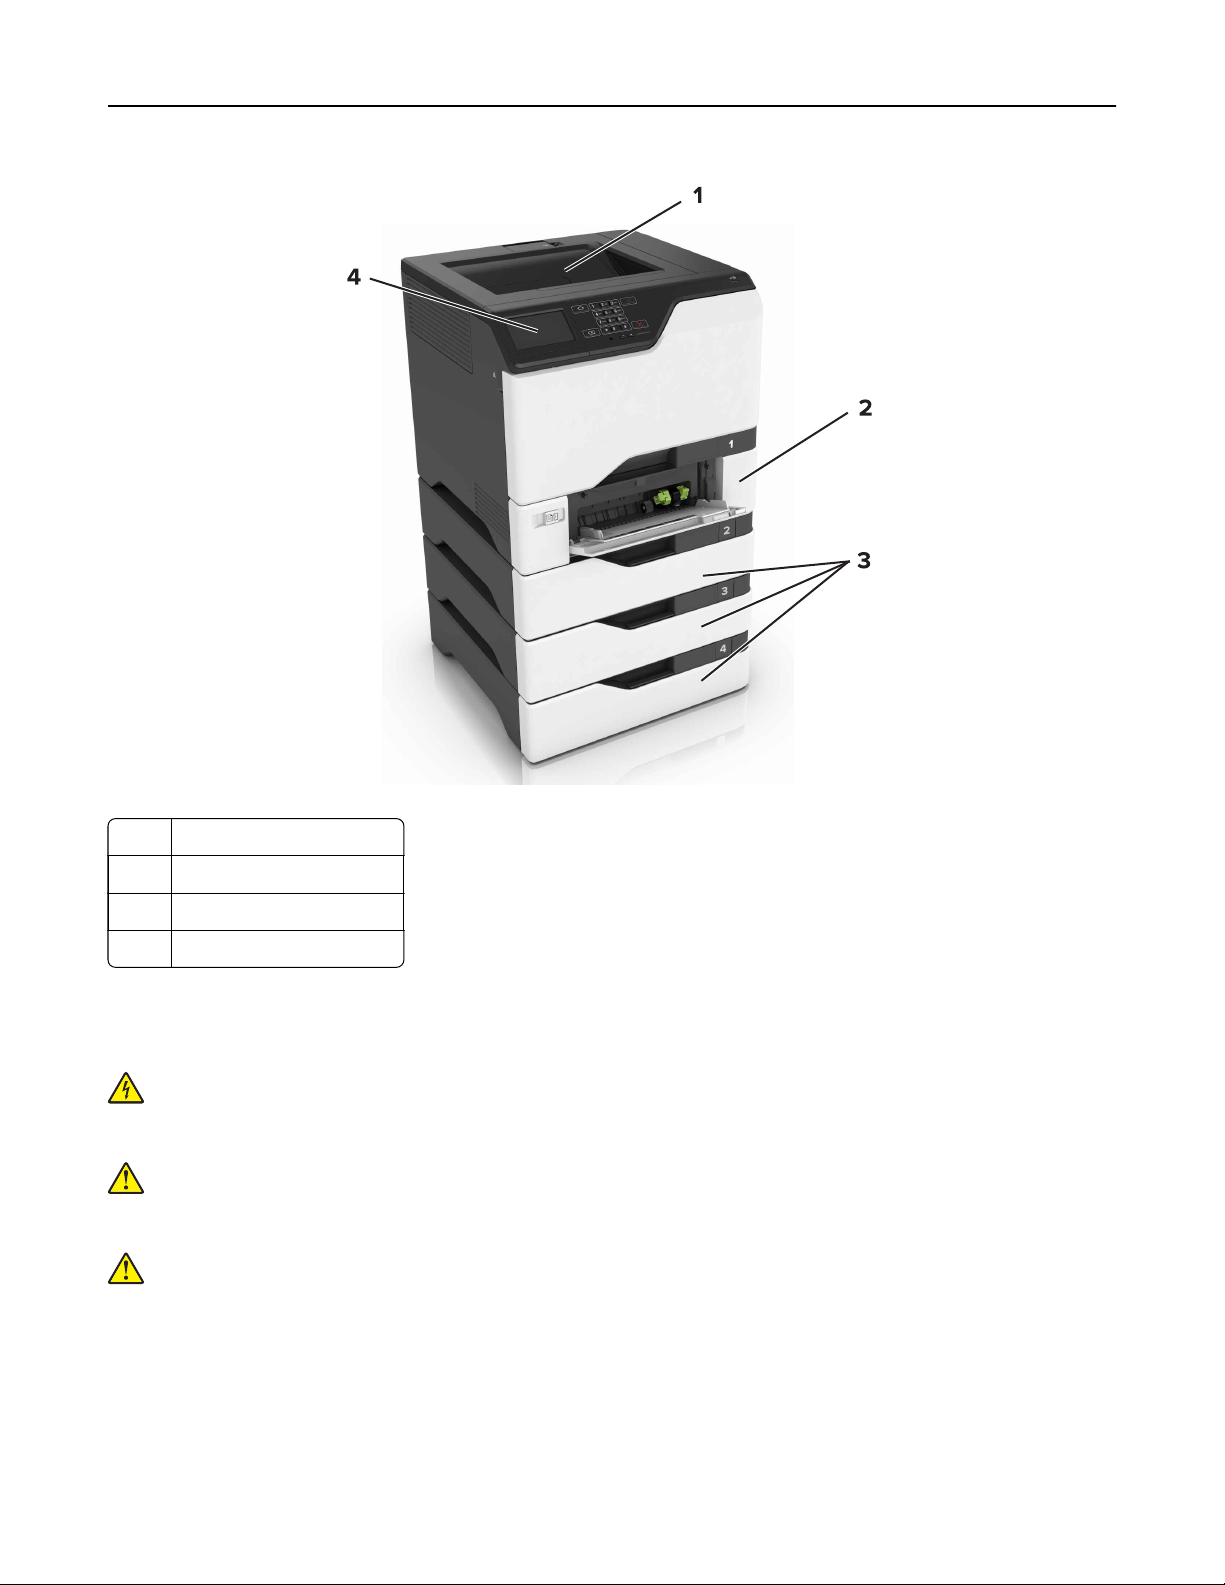
Learning about the printer 11
1 Standard bin
2 650-sheet duo tray
3 Optional 550‑sheet trays
4 Control panel
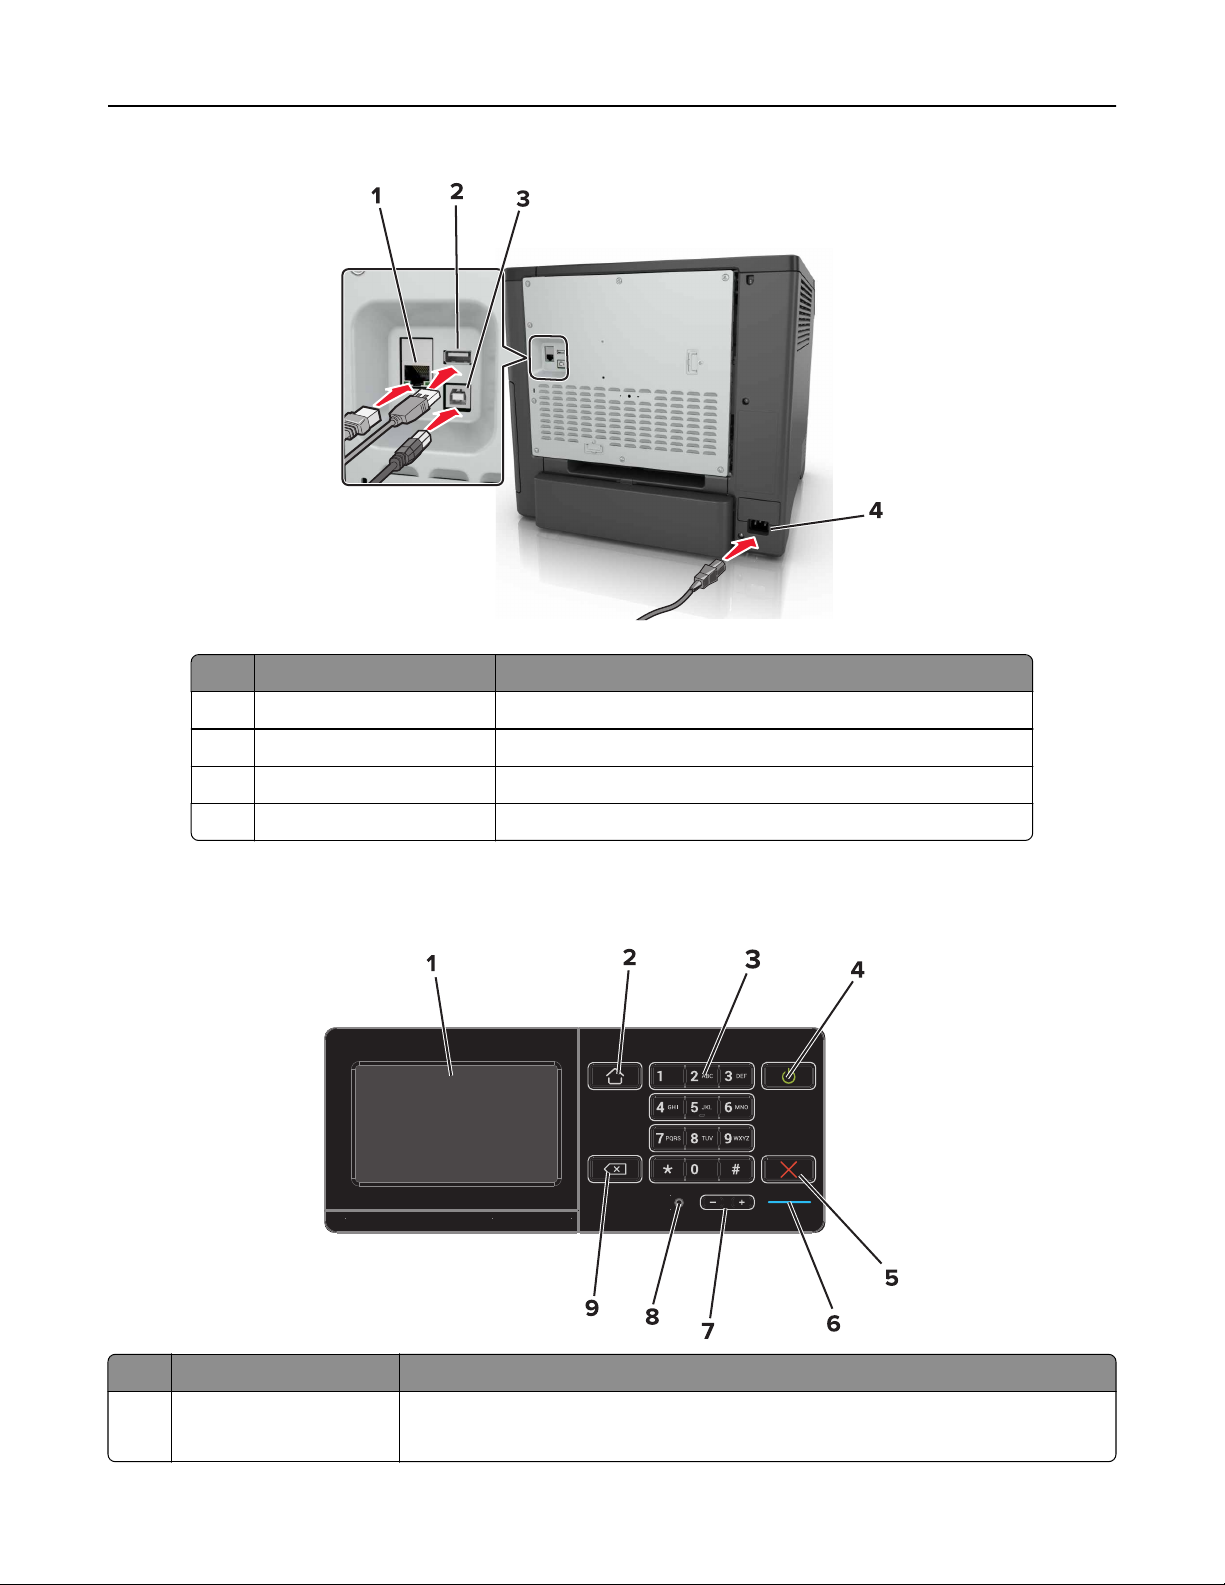
Attaching cables
CAUTION—SHOCK HAZARD: To avoid the risk of electrical shock, do not set up this product or make
any electrical or cabling connections, such as the power cord, fax feature, or telephone, during a
lightning storm.
CAUTION—POTENTIAL INJURY: To avoid the risk of fire or electrical shock, connect the power cord to
an appropriately rated and properly grounded electrical outlet that is near the product and easily
accessible.
CAUTION—POTENTIAL INJURY: To avoid the risk of
provided with this product or the manufacturer's authorized replacement.
Warning—Potential Damage: Do not touch the USB cable, any wireless network adapter, or the printer in the
area shown while actively printing. Loss of data or a malfunction can occur.
or electrical shock, use only the power cord
fire
Page 12
Learning about the printer 12
Use the To
1 Ethernet port Connect the printer to a network.
2 USB port Attach a keyboard or any compatible option.
3 USB printer port Connect the printer to a computer.
4 Printer power cord socket Connect the printer to a properly grounded electrical outlet.
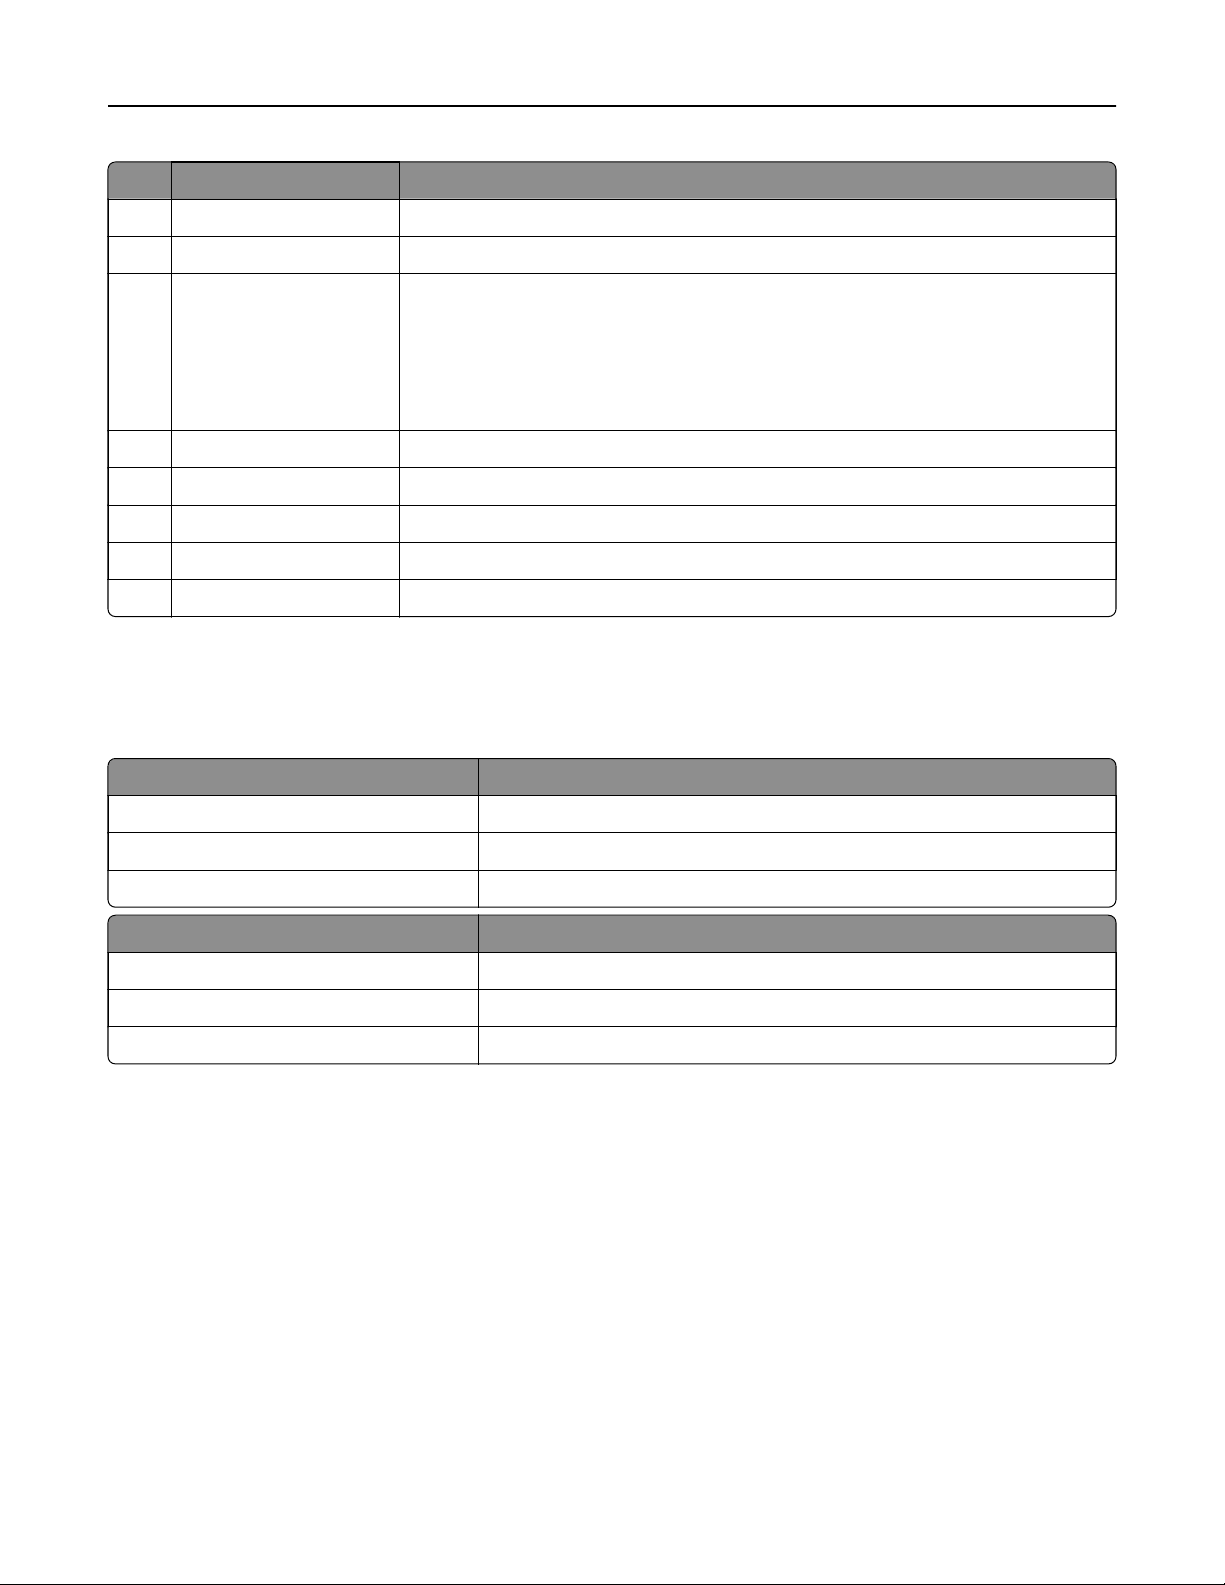
Using the control panel
Use the To
1 Display
• View the printer messages and supply status.
• Set up and operate the printer.
Page 13
Learning about the printer 13
Use the To
2 Home button Go to the home screen.
3 Keypad Enter numbers or symbols in an input field.
4 Power button
5 Stop or Cancel button Stop the current job.
6 Indicator light Check the status of the printer.
7 Volume buttons Adjust the volume of the headset or speaker.
8 Headset or speaker port Attach a headset or speaker.
9 Backspace button Move the cursor backward and delete a character in an input field.
• Turn on or turn o the printer.
Note: To tu r n o the printer, press and hold the power button for
seconds.
• Set the printer to Sleep or Hibernate mode.
• Wake the printer from Sleep or Hibernate mode.
Understanding the status of the power button and
indicator light
Indicator light Printer status
O The printer is o or in Hibernate mode.
Blue The printer is ready or processing data.
five
Red The printer requires user intervention.
Power button light Printer status
O The printer is o, ready, or processing data.
Solid amber The printer is in sleep mode.
Blinking amber The printer is in hibernate mode.
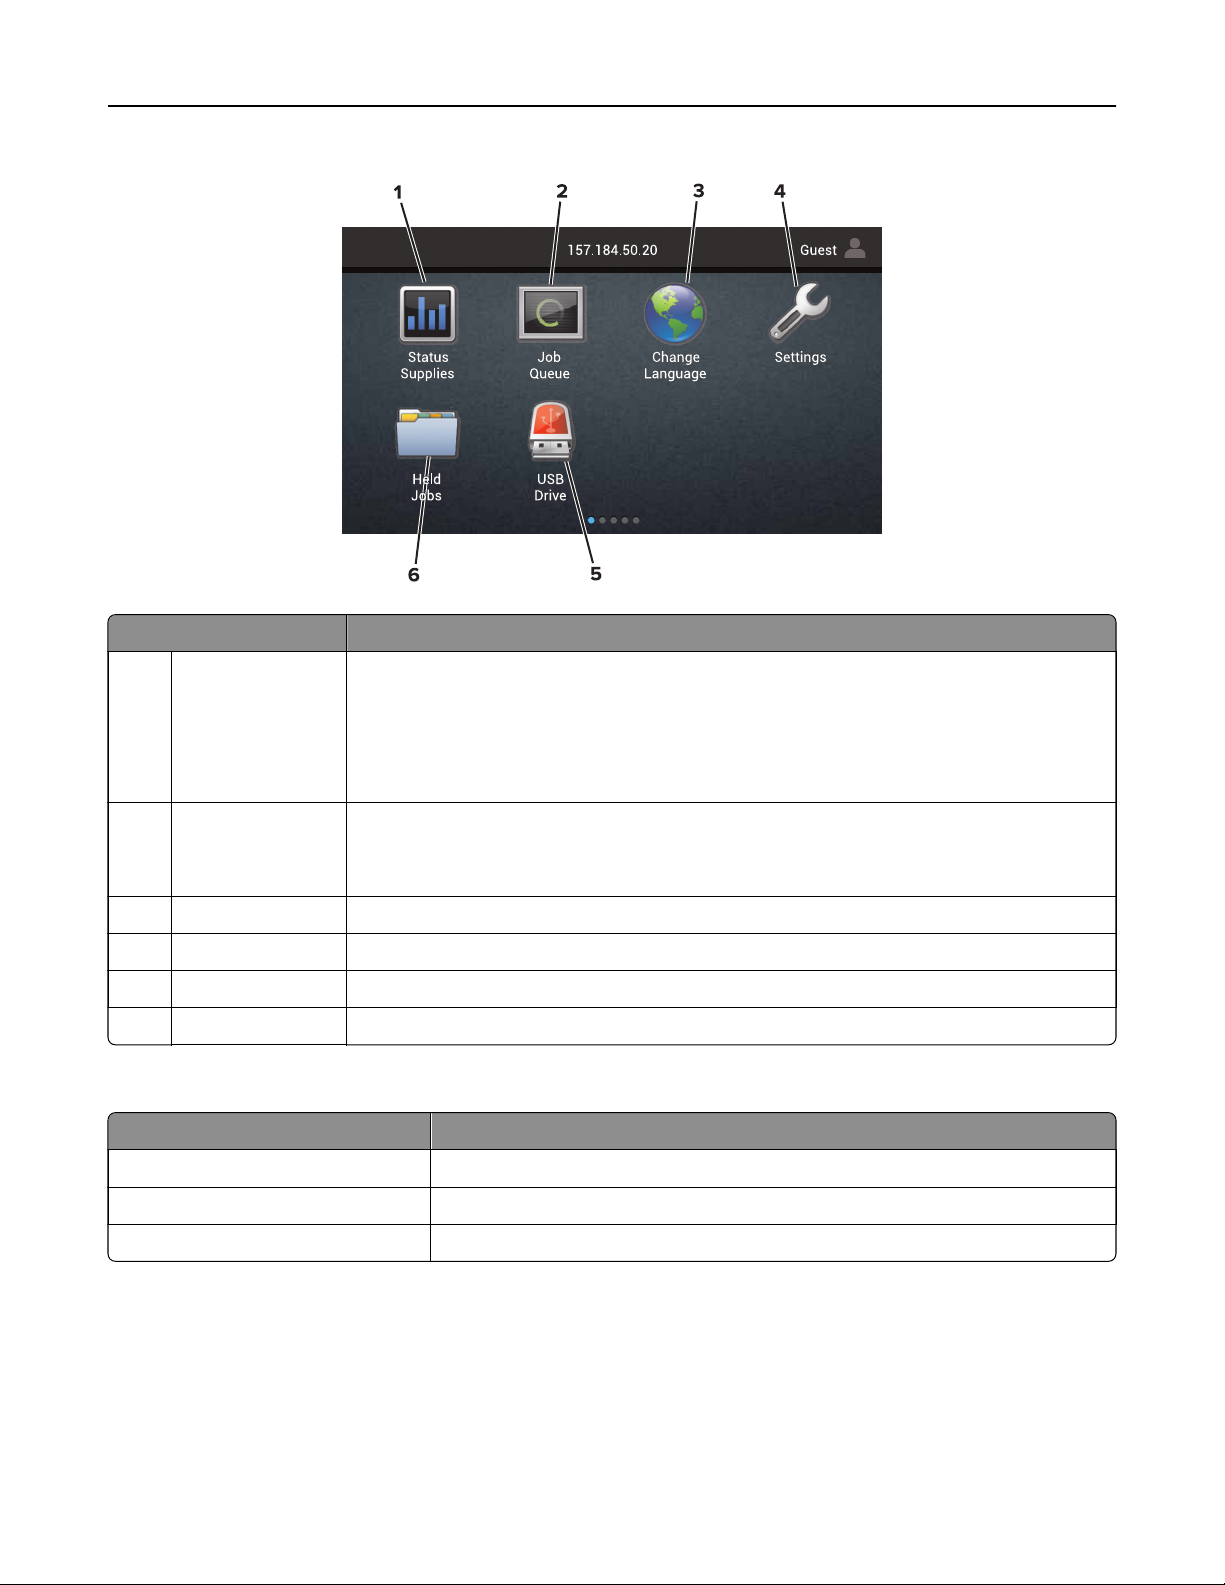
Using the home screen
When the printer is turned on, the display shows the home screen. Use the home screen buttons and icons to
initiate an action.
Note: Your home screen may vary depending on your home screen customization settings, administrative
setup, and active embedded solutions.
Page 14
Learning about the printer 14
To uc h To
1 Status/Supplies
• Show a printer warning or error message whenever the printer requires intervention
to continue processing.
• View more information on the printer warning or message, and on how to clear it.
Note: You can also access this setting by touching the top section of the home
screen.
2 Job Queue Show all the current print jobs.
Note: You can also access this setting by touching the top section of the home
screen.
3 Change Language Change the language on the printer display.
4 Settings Access the printer menus.
5 USB Drive View, select, or print photos and documents from a flash drive.
6 Held Jobs Show all the current held print jobs.
These settings may also appear on the home screen
To uc h To
Bookmarks Access bookmarks.
App Profiles Access application profiles.
Lock Device Prevent users from accessing any printer functions from the home screen.
Page 15

Learning about the printer 15
Menu map
Device
• Preferences
• Remote Operator Panel
• Notifications
• Power Management
• Information Sent to Lexmark
Print
• Layout
• Finishing
• Setup
• Quality
• Job Accounting
• XPS
Paper
• Tra y Configu r ation
• Media
Configuration
Network/Ports
• Accessibility
• Restore Factory Defaults
• Maintenance
• Visible Home Screen Icons
• About This Printer
• PDF
• PostScript
• PCL
• HTML
• Image
• PPDS
• Bin Configuration
• Network Overview
• Wireless
• AirPrint
• Ethernet
• TCP/IP
• IPv6
• SNMP
• IPSec
USB Drive
Flash Drive Print
Security
• Login Methods
• Schedule USB Devices
• Security Audit Log
• Login Restrictions
• Confidential Print Setup
• LPD Configuration
• HTTP/FTP Settings
• ThinPrint
• USB
• Parallel [x]
• Serial
• Google Cloud Print
• Wi-Fi Direct
• Disk Encryption
• Erase Temporary Data Files
• Solutions LDAP Settings
• Miscellaneous
Page 16

Learning about the printer 16
Option Card Menu
Note: This setting appears only when an optional card is installed.
Reports
• Menu Settings Page
• Device
• Print
• Shortcuts
• Network
Help
• Print All Guides
• Color Quality Guide
• Connection Guide
• Information Guide
• Media Guide
• Moving Guide
• Print Quality Guide
• Supplies Guide
Troubleshooting
• Basic Print Quality Samples • Advanced Print Quality Samples
Printing a menu settings page
From the home screen, touch Settings > Reports > Menu Settings Page.
Page 17

Setting up and using the home screen applications 17
Setting up and using the home screen
applications
Customizing the home screen
1 Open a web browser, and then type the printer IP address in the address field.
Notes:
• View the printer IP address on the printer home screen. The IP address appears as four sets of
numbers separated by periods, such as 123.123.123.123.
• If you are using a proxy server, then temporarily disable it to load the web page correctly.
2 Click Settings > Device > Visible Home Screen Icons.
3 Select the icons that you want to appear on the home screen.
4 Apply the changes.
Using Display Customization
Changing the wallpaper
1 From the home screen, touch Change Wallpaper.
2 Select an image to use.
3 Apply the changes.
Creating a slide show
Before you begin, make sure to configure the slide show settings. For more information, see the documentation
that came with the solution.
1 Insert a
2 From the home screen, touch Slideshow.
Note: Images appear in alphabetical order.
drive into the USB port.
flash
Setting up Forms and Favorites
1 Open a Web browser, and then type the printer IP address in the address field.
Notes:
• View the printer IP address on the printer home screen. The IP address appears as four sets of
numbers separated by periods, such as 123.123.123.123.
• If you are using a proxy server, then temporarily disable it to load the Web page correctly.
2 Click Apps > Forms and Favorites > Configure.
3 Click Add, and then customize the settings.
Page 18

Setting up and using the home screen applications 18
Notes:
• To make sure that the location settings of the bookmark are correct, type the IP address of the host
computer where the bookmark is located.
• Make sure that the printer has access rights to the folder where the bookmark is located.
4 Apply the changes.
Configuring Eco‑Settings
1 From the home screen, touch Eco‑Settings.
2 Configure the Eco‑Mode settings or schedule a power-saving mode.
3 Apply the changes.
Managing contacts
Adding contacts
1 Open a web browser, and then type the printer IP address in the address field.
Notes:
• View the printer IP address on the printer home screen. The IP address appears as four sets of
numbers separated by periods, such as 123.123.123.123.
• If you are using a proxy server, then temporarily disable it to load the web page correctly.
2 Click Address Book.
3 From the Contacts section, add a contact.
Note: You can assign the contact to one or more groups.
4 If necessary, specify a login method to allow application access.
5 Apply the changes.
Adding groups
1 Open a web browser, and then type the printer IP address in the address field.
Notes:
• View the printer IP address on the printer home screen. The IP address appears as four sets of
numbers separated by periods, such as 123.123.123.123.
• If you are using a proxy server, then temporarily disable it to load the web page correctly.
2 Click Address Book.
3 From the Contact Groups section, add a group name.
Note: You can assign one or more contacts to the group.
4 Apply the changes.
Page 19

Setting up and using the home screen applications 19
Editing contacts or groups
1 Open a web browser, and then type the printer IP address in the address
Notes:
• View the printer IP address on the printer home screen. The IP address appears as four sets of
numbers separated by periods, such as 123.123.123.123.
• If you are using a proxy server, then temporarily disable it to load the web page correctly.
2 Click Address Book.
3 Do either of the following:
• From the Contacts section, click a contact name, and then edit the information.
• From the Contact Groups section, click a group name, and then edit the information.
4 Apply the changes.
field.
Deleting contacts or groups
1 Open a web browser, and then type the printer IP address in the address field.
Notes:
• View the printer IP address on the printer home screen. The IP address appears as four sets of
numbers separated by periods, such as 123.123.123.123.
• If you are using a proxy server, then temporarily disable it to load the web page correctly.
2 Click Address Book.
3 Do either of the following:
• From the Contacts section, select a contact that you want to delete.
• From the Contact Groups section, select a group name that you want to delete.
Page 20

Setting up and using the accessibility features 20
Setting up and using the accessibility features
Enabling Magnification mode
1 From the control panel, press and hold the 5 key until you hear a voice message.
2 Select
3 Select OK.
For more information on navigating a magnified screen, see
page 21.
Magnification
.
“Navigating the screen using gestures” on
Activating Voice Guidance
From the control panel
1 Press and hold the 5 key until you hear a voice message.
2 Select OK.
From the keyboard
1 Press and hold the 5 key until you hear a voice message.
2 Press Tab to navigate the focus cursor to the OK button, and then press Enter.
Notes:
• Voice Guidance is also activated when you insert headphones into the headphone jack.
• To adjust the volume, use the volume buttons at the bottom part of the control panel.
Adjusting the Voice Guidance speech rate
1 From the home screen, select Settings > Device > Accessibility > Speech Rate.
2 Select the speech rate.
Enabling spoken passwords or personal identification
numbers
1 From the home screen, select Settings > Device > Accessibility > Speak Passwords/PINs.
2 Enable the setting.
Page 21

Setting up and using the accessibility features 21
Navigating the screen using gestures
Notes:
• The gestures are applicable only when Voice Guidance is activated.
• A physical keyboard is required for typing characters and adjusting certain settings.
Gesture Function
Double‑tap Select an option or item on the screen.
Triple‑tap Zoom in or zoom out text and images.
Swipe right or swipe down Move to the next item on the screen.
Swipe left or swipe up Move to the previous item on the screen.
Pan Access parts of the zoomed image that are beyond the limits of the screen.
Note: This gesture requires the use of two
image.
Swipe up then left Exit an application and return to the home screen.
fingers
to drag across a zoomed
Swipe down then left
Swipe up then down Repeat a spoken prompt.
• Cancel a job.
• Go back to the previous setting.
• Exit the screen that appears without changing any setting or value.
Using the keyboard on the display
Do one or more of the following:
• Drag a
• Lift the
• Press Backspace to delete characters.
• To hear the content in the input field, press Tab , and then press Shift + Tab.
over the key to announce the character.
finger
to enter or type the character in the
finger
field.
Page 22

Loading paper and specialty media 22
Loading paper and specialty media
Setting the size and type of the specialty media
The trays automatically detect the size of plain paper. For specialty media like labels, card stock, or envelopes,
do the following:
1 From the home screen, navigate to:
Settings > Paper > Tray Co nfig uration > Paper Size/Type > select a paper source
2 Set the size and type of the specialty media.
Configuring Universal paper settings
1 From the home screen, touch Settings > Paper > Media Configuration > Universal Setup.
2 Configure the settings.
Loading trays
CAUTION—TIPPING HAZARD: To reduce the risk of equipment instability, load each tray separately.
Keep all other trays closed until needed.
1 Remove the tray.
Note: To avoid jams, do not remove trays while the printer is busy.
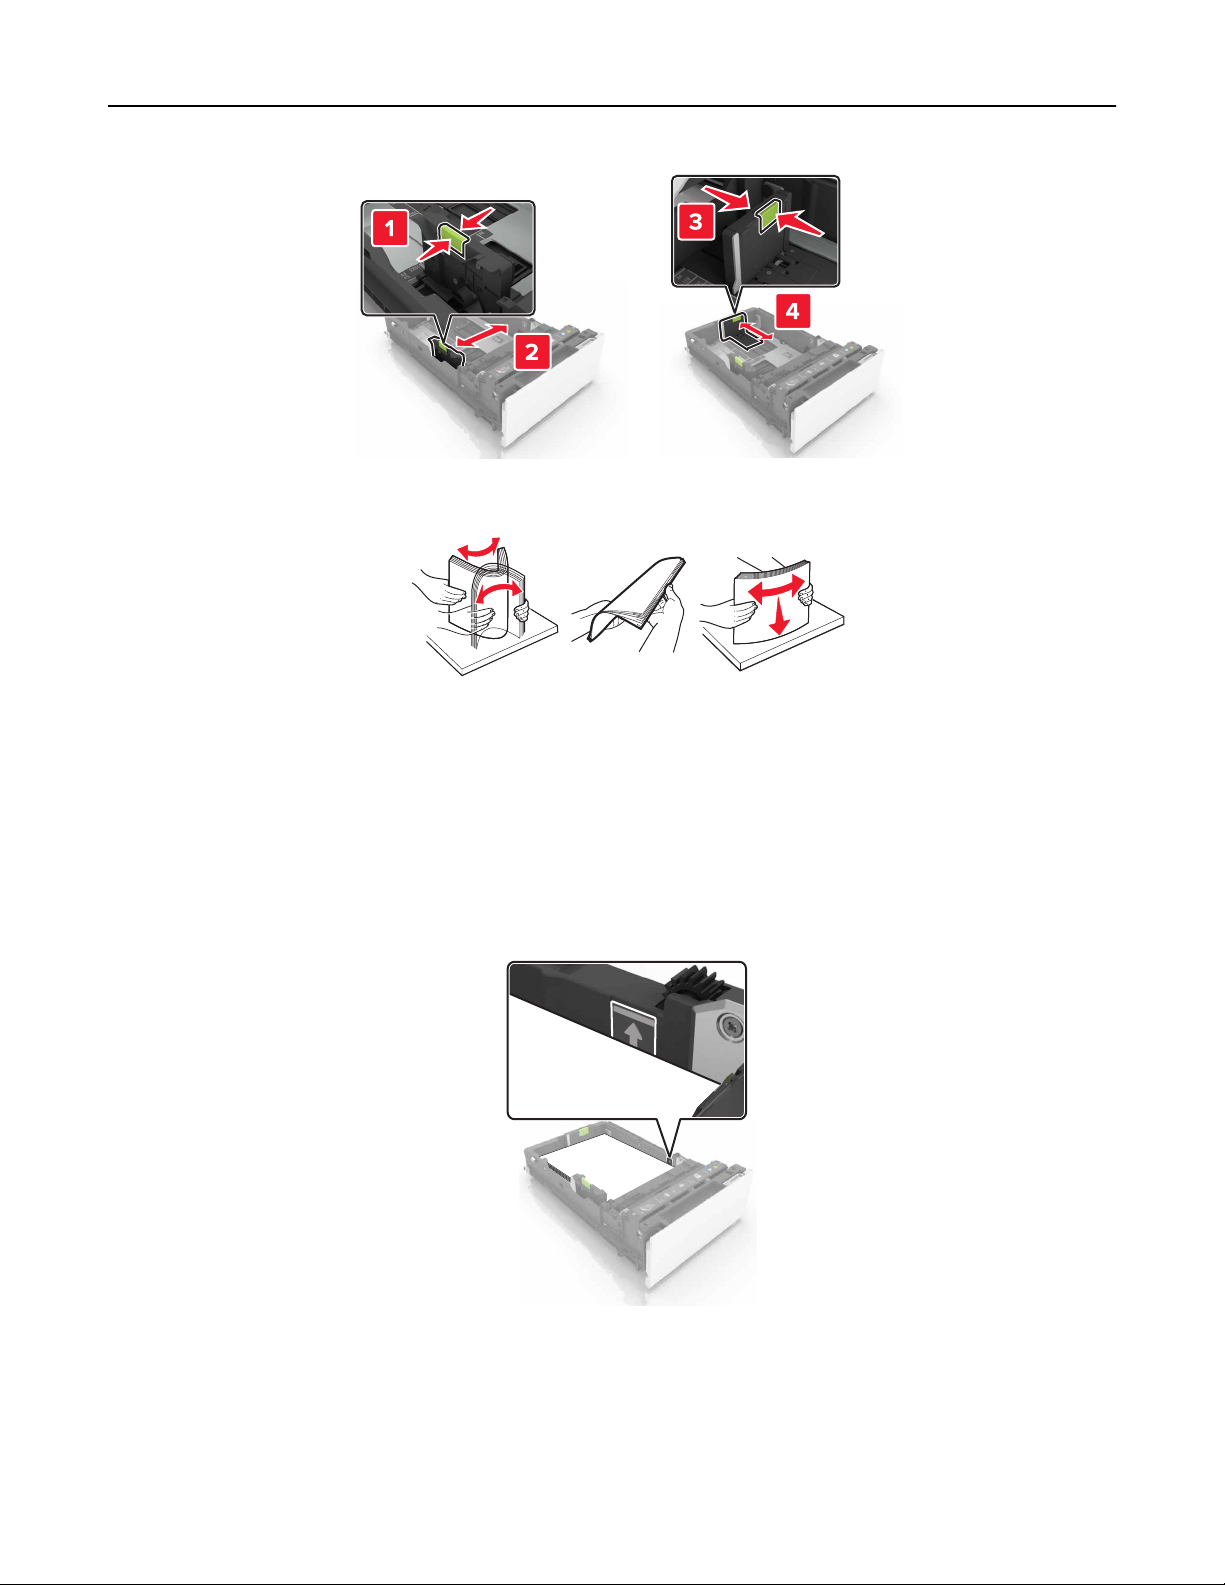
2 Adjust the guides to match the size of the paper you are loading.
Note: Use the indicators on the bottom of the tray to position the guides.
Page 23
Loading paper and specialty media 23
3 Flex, fan, and align the paper edges before loading.
4 Load the paper stack with the printable side faceup.
Notes:
• For one‑sided printing, load letterhead faceup with the header toward the front of the tray.
• For two‑sided printing, load letterhead facedown with the header toward the back of the tray.
• Do not slide paper into the tray.
• Make sure that the stack height is below the maximum paper fill indicator. Overfilling may cause
paper jams.
5 Insert the tray.
If necessary, set the paper size and type to match the paper loaded in the tray.
Page 24
Loading paper and specialty media 24
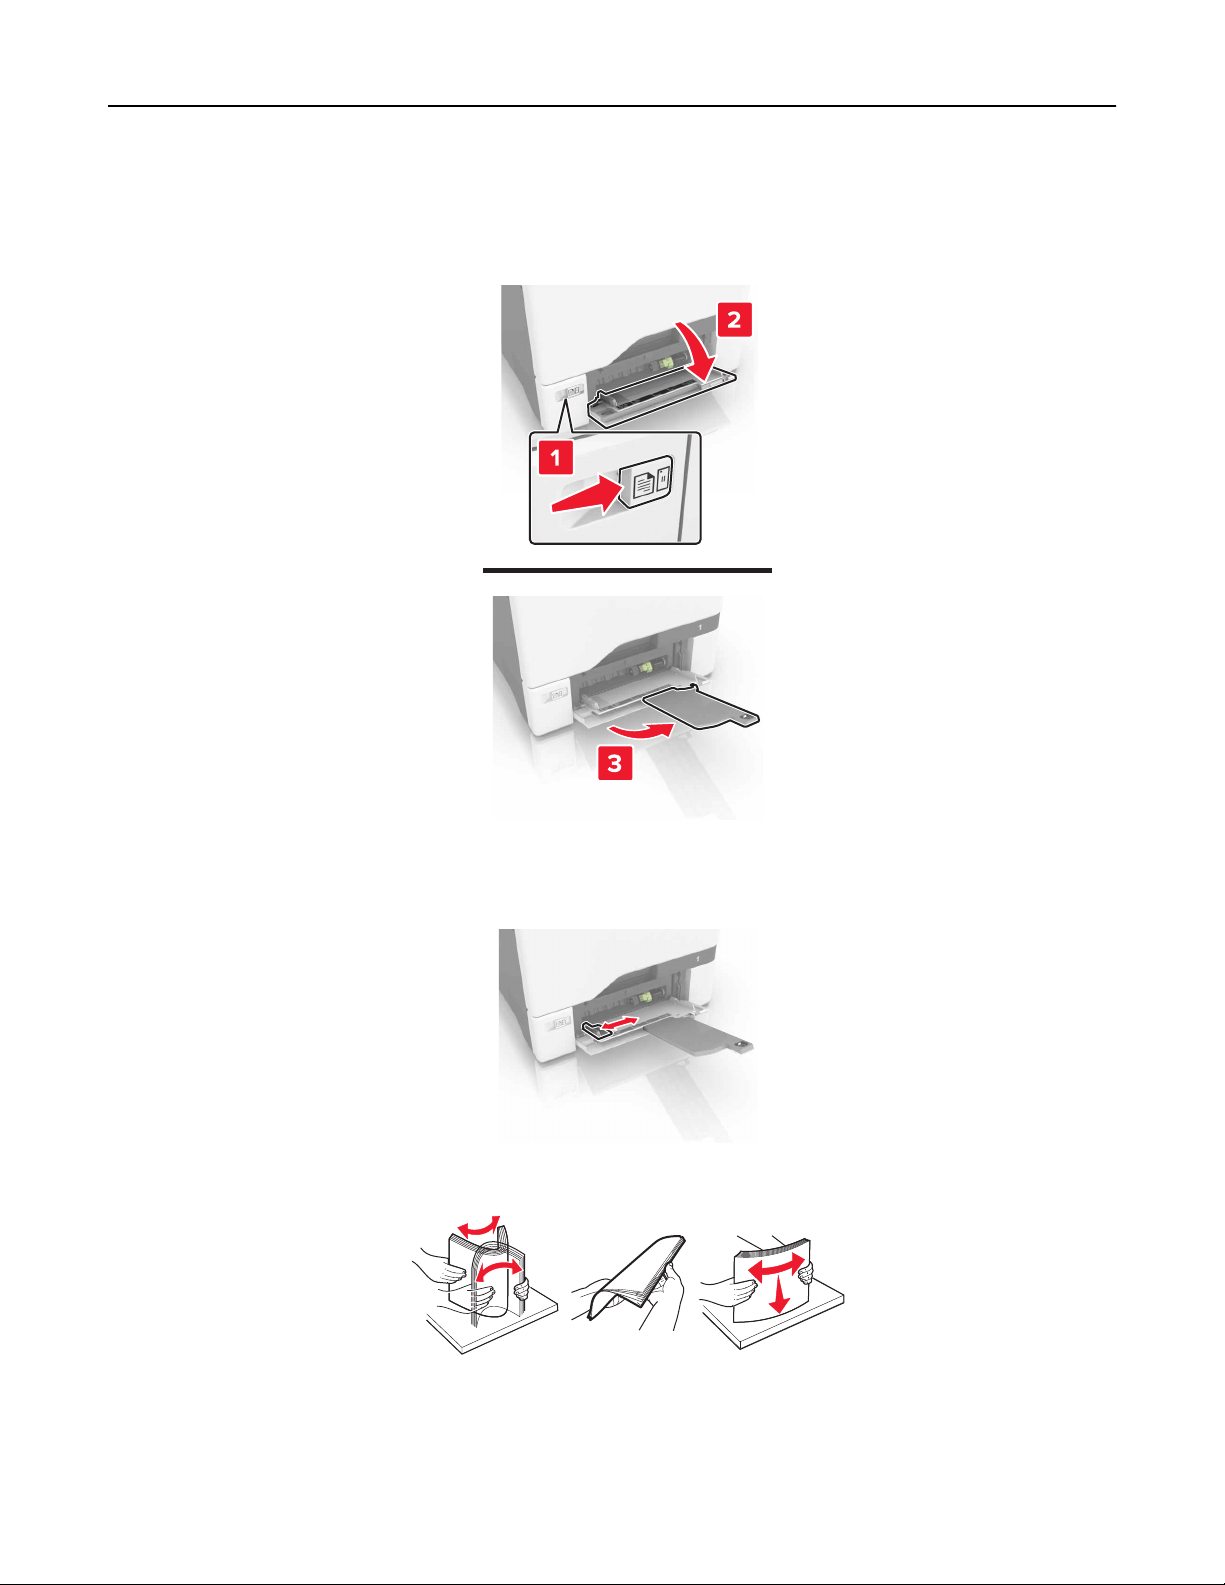
Loading the multipurpose feeder
1 Open the multipurpose feeder.
2 Adjust the guide to match the size of the paper you are loading.
3 Flex, fan, and align the paper edges before loading.
Page 25
Loading paper and specialty media 25
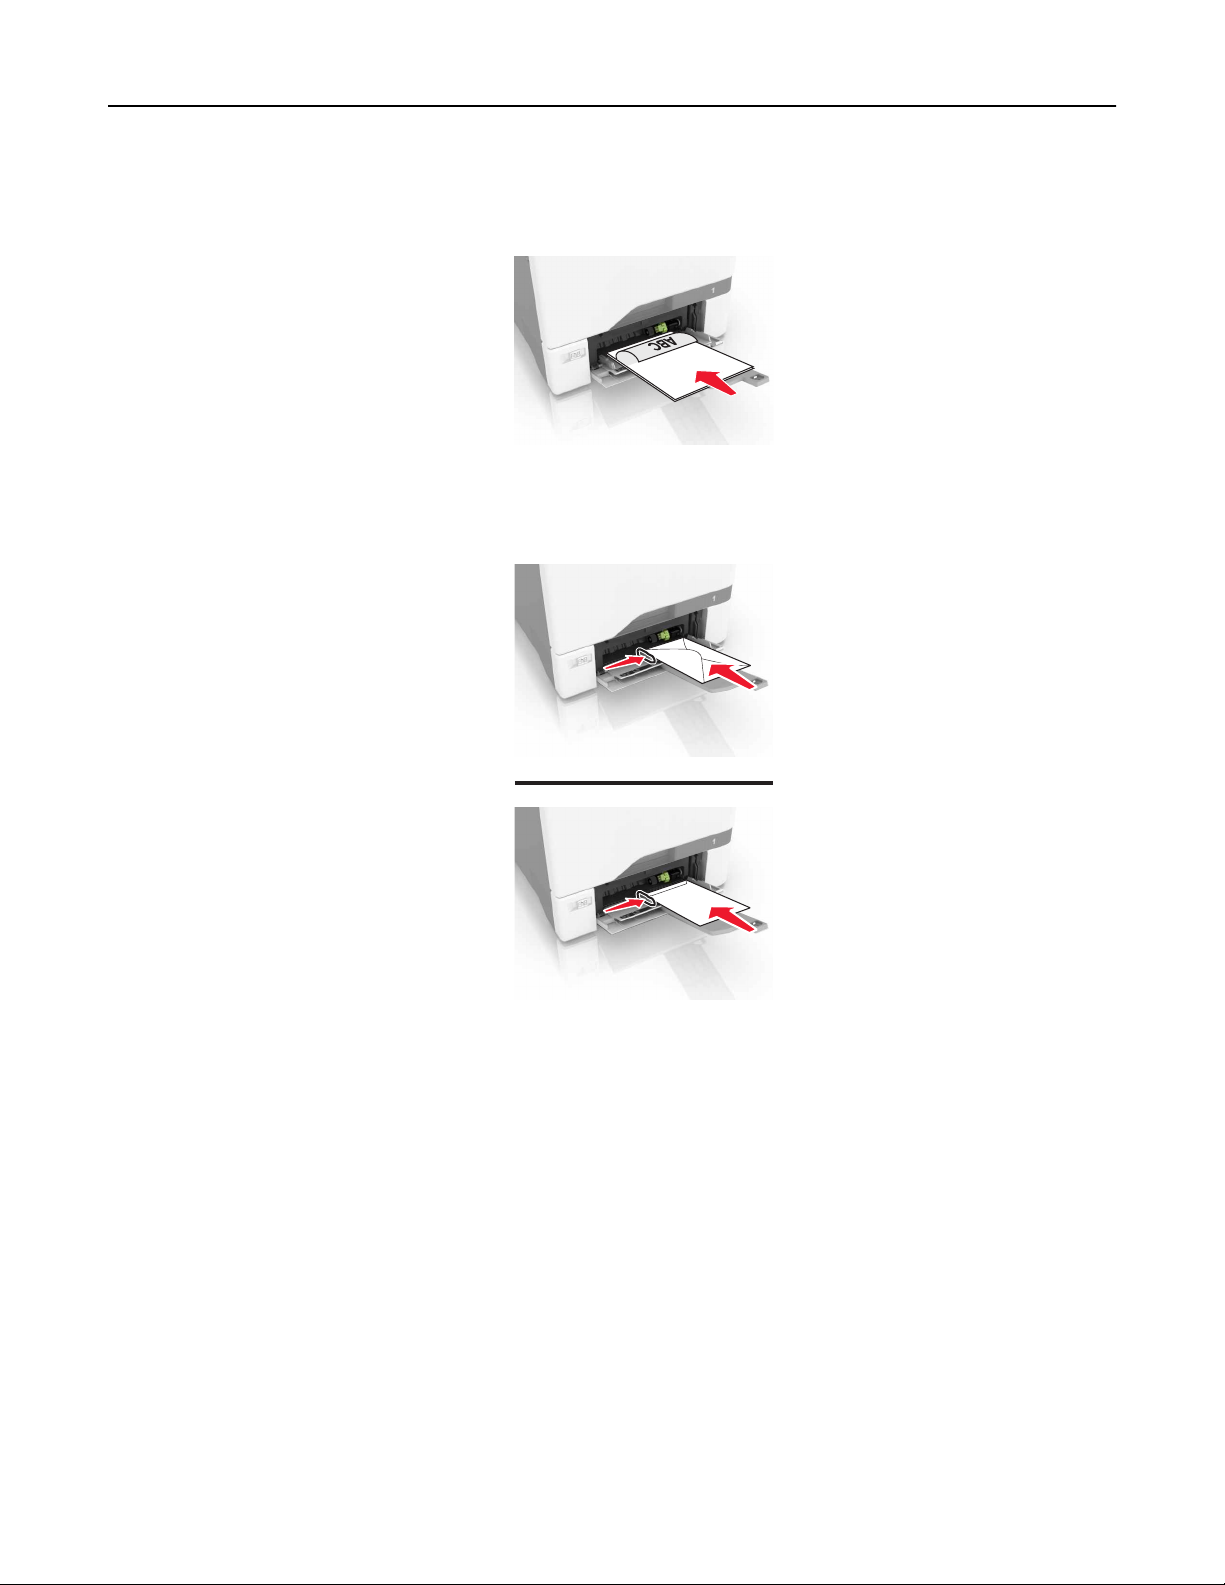
4 Load the paper.
• Load paper and card stock with the printable side facedown and the top edge entering the printer first.
• Load envelopes with the
envelopes with the
Warning—Potential Damage: Do not use envelopes with stamps, clasps, snaps, windows, coated
linings, or self‑stick adhesives.
flap
side up and against the right side of the paper guide. Load European
flap
entering the printer
first.
5 From the Paper Menu in the control panel, set the paper size and type to match the paper loaded in the
tray.
Linking trays
1 Open a Web browser, and then type the printer IP address in the address field.
Notes:
• View the printer IP address on the printer home screen. The IP address appears as four sets of
numbers separated by periods, such as 123.123.123.123.
• If you are using a proxy server, then temporarily disable it to load the Web page correctly.
2 Click Settings > Paper.
Page 26

Loading paper and specialty media 26
3 Match the paper size and type for the trays you are linking.
Note: To unlink trays, make sure that no trays have the same paper size or type.
4 Save the settings.
Note: You can also change the paper size and type settings from the printer control panel.
Warning—Potential Damage: The temperature of the fuser varies according to the specified paper type. To
avoid printing issues, match the paper type settings in the printer with the paper loaded in the tray.
Page 27

Printing 27
Printing
Printing from a computer
Note: For labels, card stock, and envelopes, set the paper size and type in the printer before printing the
document.
1 From the document that you are trying to print, open the Print dialog.
2 If necessary, adjust the settings.
3 Print the document.
Printing forms
1 From the home screen, navigate to:
Forms and Favorites > select form > Print
2 If necessary, configure the print settings.
3 Send the print job.
Printing from a mobile device
Printing from a mobile device using Lexmark Mobile Print
LexmarkTM Mobile Print allows you to send documents and images directly to a supported Lexmark printer.
1 Open the document, and then send or share the document to Lexmark Mobile Print.
Note: Some third‑party applications may not support the send or share feature. For more information, see
the documentation that came with the application.
2 Select a printer.
3 Print the document.
Printing from a mobile device using Google Cloud Print
Google Cloud PrintTM is a mobile printing service that allows enabled applications on mobile devices to print
to any Google Cloud Print‑ready printer.
1 From the home screen of your mobile device, launch an enabled application.
2 Tap Print, and then select a printer.
3 Print the document.
Page 28

Printing 28
Printing from a mobile device using Mopria Print Service
Mopria® Print Service is a mobile printing solution for mobile devices running on Android version 4.4 or later. It
allows you to print directly to any Mopria‑certified printer.
Note: Before printing, make sure that the Mopria Print Service is enabled.
1 From the home screen of your mobile device, launch a compatible application.
2 Tap Print, and then select a printer.
3 Print the document.
Printing from a mobile device using AirPrint
AirPrint is a mobile printing solution that allows you to print directly from Apple devices to an AirPrint‑certified
printer.
Notes:
• This application is supported only in some Apple devices.
• This application is supported only in some printer models.
1 From the home screen of your mobile device, launch a compatible application.
2 Select an item to print, and then tap the share icon.
3 Tap Print, and then select a printer.
4 Print the document.
Printing from a flash drive
1 Insert a flash drive into the USB port.
Notes:
• If you insert the flash drive when an error message appears, then the printer ignores the flash drive.
Page 29

Printing 29
• If you insert the flash drive while the printer is processing other print jobs, then Busy appears on the
display.
2 From the display, touch the document that you want to print.
If necessary, configure other print settings.
3 Send the print job.
To print another document, touch USB Drive.
Warning—Potential Damage: Do not touch the printer or the flash drive in the area shown while actively
printing, reading, or writing from the memory device. Loss of data or a malfunction can occur.
Supported flash drives and file types
Flash drives
• Lexar JumpDrive S70 (16GB and 32GB)
• SanDisk Cruzer (16GB and 32GB)
• PNY Attaché (16GB and 32GB)
Notes:
– The printer supports high‑speed USB flash drives with full‑speed standard.
– USB flash drives must support the File Allocation Table (FAT) system.
File types
Documents:
• .doc or .docx
• .xls or .xlsx
• .ppt or .pptx
• .pdf
• .xps
Page 30

Printing 30
Images:
• .dcx
• .gif
• .jpeg or .jpg
• .bmp
• .pcx
• .ti or .tif
• .png
Configuring confidential jobs
1 From the home screen, touch Settings > Security > Confidential Print Setup.
2 Configure the settings.
Use To
Max Invalid PIN Limit the number of times an invalid PIN can be entered.
Note: When the limit is reached, the print jobs for that user name are deleted.
Confidential Job
Expiration
Repeat Job
Expiration
Verify Job Expiration Set the amount of time before verify jobs are deleted from the printer memory.
Reserve Job
Expiration
Set the amount of time before confidential jobs are automatically deleted from the printer
memory.
Note:
Confidential
delete them manually.
Set the amount of time before repeat jobs are deleted from the printer memory.
Note: Repeat held jobs are stored so extra copies can be printed later.
Note: Verify jobs print one copy to check if it is satisfactory before printing the
remaining copies.
Set the amount of time before reserved jobs are deleted without being printed.
Note: Reserve held jobs are automatically deleted after printing.
held jobs are stored in the printer until you log in and release or
Printing held jobs
1 From the document you are trying to print, open the Print dialog.
2 Select the printer, and then do the following:
• For Windows users, click Properties or Preferences, and then click Print and Hold.
• For Macintosh users, select Print and Hold.
3 Select the print job type.
4 If necessary, assign a user name.
5 Send the print job.
6 From the printer home screen, touch Held Jobs.
7 Send the print job.
Page 31

Printing 31
Printing a font sample list
1 From the home screen, touch Settings > Reports > Print > Print Fonts.
2 To u ch PCL Fonts or PostScript Fonts.
Canceling a print job
From the printer control panel
1 From the home screen, touch Job Queue.
Note: You can also access this setting by touching the top section of the home screen.
2 Select the job to cancel.
From the computer
1 Depending on the operating system, do either of the following:
• Open the printers folder, and then select your printer.
• From the System Preferences in the Apple menu, navigate to your printer.
2 Select the job to cancel.
Page 32

Securing the printer 32
Securing the printer
Erasing printer memory
To erase volatile memory or buered data in your printer, turn o the printer.
To e r as e no n ‑volatile memory or individual settings, device and network settings, security settings, and
embedded solutions, do the following:
1 From the home screen, touch Settings > Device > Maintenance > Out of Service Erase.
2 Select the Sanitize all information on nonvolatile memory check box, and then touch ERASE.
3 Follow the instructions on the display.
Erasing printer hard disk memory
1 From the home screen, touch Settings > Device > Maintenance > Out of Service Erase.
2 Select the Sanitize all information on hard disk check box, and then touch ERASE.
3 Follow the instructions on the display.
Note: This process can take from several minutes to more than an hour, making the printer unavailable
for other tasks.
Configuring printer hard disk encryption
1 From the home screen, touch Settings > Security > Disk Encryption > Start Encryption.
Note: Enabling disk encryption erases the contents of the hard disk. If necessary, back up important data
from the printer before starting the encryption.
2 Follow the instructions on the display.
Notes:
• Do not turn o the printer during the encryption process. Loss of data can occur.
• Disk encryption can take from several minutes to more than an hour, making the printer unavailable
for other tasks.
• After encryption, the printer returns to the home screen.
Restoring factory default settings
From the home screen, touch Settings > Device > Restore Factory Defaults > Restore Settings > Restore all
settings > RESTORE > Start.
For more information, see
“Erasing printer memory” on page 32.
Page 33

Securing the printer 33
Statement of Volatility
Your printer contains various types of memory that can store device and network settings, and user data.
Type of memory Description
Volatile memory Your printer uses standard random access memory
(RAM) to temporarily buer user data during simple print
jobs.
Non-volatile memory Your printer may use two forms of non-volatile memory:
EEPROM and NAND (flash memory). Both types are used
to store the operating system, device settings, network
information and bookmark settings, and embedded
solutions.
Hard disk memory Some printers have a hard disk drive installed. The printer
hard disk is designed for printer-specific functionality.
This lets the printer retain buered user data from
complex print jobs, as well as form data, and font data.
Erase the content of any installed printer memory in the following circumstances:
• The printer is being decommissioned.
• The printer hard disk is being replaced.
• The printer is being moved to a dierent department or location.
• The printer is being serviced by someone from outside your organization.
• The printer is being removed from your premises for service.
• The printer is being sold to another organization.
Disposing of a printer hard disk
Note: Some printer models may not have a printer hard disk installed.
In high‑security environments, it may be necessary to take additional steps to make sure that confidential data
stored in the printer hard disk cannot be accessed when the printer—or its hard disk—is removed from your
premises.
• Degaussing—Flushes the hard disk with a magnetic field that erases stored data
• Crushing—Physically compresses the hard disk to break component parts and render them unreadable
• Milling—Physically shreds the hard disk into small metal bits
Note: Most data can be erased electronically, but the only way to guarantee that all data are completely
erased is to physically destroy each hard disk where data is stored.
Page 34

Maintaining the printer 34
Maintaining the printer
Warning—Potential Damage: Failure to maintain optimum printer performance, or to replace parts and
supplies, may cause damage to your printer.
Adjusting the speaker volume
Adjusting the default internal speaker volume
The speaker volume will reset to default value after the session is logged out, when the printer wakes from
Sleep or Hibernate mode, or after a power‑on reset.
1 From the control panel, navigate to:
Settings > Device > Preferences > Audio Feedback
2 Select the volume.
Note: If Quiet Mode is enabled, then audible alerts are turned
o.
Adjusting the default headphones volume
Headphones volume will reset to default value after the session is logged out, when the printer wakes from
Sleep or Hibernate mode, or after a power‑on reset.
1 From the control panel, select Settings > Device > Accessibility > Headphone Volume.
2 Select the volume.
Networking
Connecting the printer to a wireless network using Wi‑Fi Protected Setup
(WPS)
Before you begin, make sure that:
• The access point (wireless router) is WPS‑
documentation that came with your access point.
• A wireless network adapter is installed in your printer. For more information, see the instructions that came
with the adapter.
certified
or WPS‑compatible. For more information, see the
Using the Push Button method
1
From the control panel, navigate to:
Settings > Network/Ports > Wireless > Wi‑Fi Protected Setup > Start Push Button Method
2 Follow the instructions on the display.
Page 35

Maintaining the printer 35
Using the personal identification number (PIN) method
1
From the control panel, navigate to:
Settings > Network/Ports > Wireless > Wi‑Fi Protected Setup > Start PIN Method
2 Copy the eight‑digit WPS PIN.
3 Open a Web browser, and then type the IP address of your access point in the address field.
Notes:
• View the printer IP address on the printer home screen. The IP address appears as four sets of
numbers separated by periods, such as 123.123.123.123.
• If you are using a proxy server, then temporarily disable it to load the Web page correctly.
4 Access the WPS settings. For more information, see the documentation that came with your access
point.
5 Enter the eight‑digit PIN, and then save the changes.
Changing port settings after installing an internal solutions port
Notes:
• If the printer has a static IP address, then do not change the configuration.
• If the computers are configured to use the network name instead of an IP address, then do not change
the configuration.
• If you are adding a wireless internal solutions port (ISP) to a printer previously configured for an Ethernet
connection, then disconnect the printer from the Ethernet network.
For Windows users
1
Open the printers folder.
2 From the shortcut menu of the printer with the new ISP, open the printer properties.
3 Configure the port from the list.
4 Update the IP address.
5 Apply the changes.
For Macintosh users
1
From System Preferences in the Apple menu, navigate to the list of printers, and then select + > IP.
2 Type the IP address in the address field.
3 Apply the changes.
Setting up serial printing (Windows only)
1 Set the parameters in the printer.
a From the control panel, navigate to the menu for the port settings.
b Locate the menu for the serial port settings, and then adjust the settings, if necessary.
Page 36

Maintaining the printer 36
c Apply the changes.
2 From your computer, open the printers folder, and then select your printer.
3 Open the printer properties, and then select the COM port from the list.
4 Set the COM port parameters in Device Manager.
Notes:
• Serial printing reduces printing speed.
• Make sure that the serial cable is connected to the serial port on your printer.
Cleaning the printer
CAUTION—SHOCK HAZARD: To avoid the risk of electrical shock when cleaning the exterior of the
printer, unplug the power cord from the electrical outlet and disconnect all cables from the printer before
proceeding.
Notes:
• Perform this task after every few months.
• Damage to the printer caused by improper handling is not covered by the printer warranty.
1 Turn o the printer, and then unplug the power cord from the electrical outlet.
2 Remove paper from the standard bin and multipurpose feeder.
3 Remove any dust, lint, and pieces of paper around the printer using a soft brush or vacuum.
4 Wipe the outside of the printer with a damp, soft, lint‑free cloth.
Notes:
• Do not use household cleaners or detergents, as they may damage the finish of the printer.
• Make sure that all areas of the printer are dry after cleaning.
5 Connect the power cord to the electrical outlet, and then turn on the printer.
CAUTION—POTENTIAL INJURY: To avoid the risk of
to an appropriately rated and properly grounded electrical outlet that is near the product and easily
accessible.
or electrical shock, connect the power cord
fire
Page 37

Maintaining the printer 37
Ordering supplies
To order supplies in the U.S., contact Lexmark at 1-800-539-6275 for information about Lexmark authorized
supplies dealers in your area. In other countries or regions, go to
you purchased the printer.
Note: All life estimates for printer supplies assume printing on letter‑ or A4‑size plain paper.
Checking the status of parts and supplies
1 From the home screen, touch Status/Supplies.
2 Select the parts or supplies that you want to check.
Note: You can also access this setting by touching the top section of the home screen.
Using genuine Lexmark parts and supplies
Your Lexmark printer is designed to function best with genuine Lexmark parts and supplies. Use of third-party
supplies or parts may aect the performance, reliability, or life of the printer and its imaging components. It can
also aect warranty coverage. Damage caused by the use of third-party parts and supplies is not covered by
the warranty. All life indicators are designed to function with Lexmark parts and supplies, and may deliver
unpredictable results if third-party parts and supplies are used. Imaging component usage beyond the intended
life may damage your Lexmark printer or its associated components.
www.lexmark.com or contact the place where
Ordering toner cartridges
Notes:
• The estimated cartridge yield is based on the ISO/IEC 19798 standard.
• Extremely low print coverage for extended periods of time may negatively aect actual yield and may
cause cartridge parts to fail before exhaustion of toner.
Lexmark CS720, CS725, and CS725R Return Program cartridges
Item United States
and Canada
Return Program toner cartridges
Black 74C10K0 74C20K0 74C30K0 74C40K0 74C50K0 74C60K0
Cyan 74C10C0 74C20C0 74C30C0 74C40C0 74C50C0 74C60C0
Magenta 74C10M0 74C20M0 74C30M0 74C40M0 74C50M0 74C60M0
Yellow 74C10Y0 74C20Y0 74C30Y0 74C40Y0 74C50Y0 74C60Y0
1
These Return Program toner cartridges are supported in the Lexmark CS720, CS725, and CS725R printer models.
2
These High Yield Return Program toner cartridges are supported only in the Lexmark CS725 and CS725R printer
models.
European
Economic
Area (EEA+)
1
Rest of Asia
Pacific (RoAP)
Latin America
Distribution
(LAD)
Rest of
Europe,
Middle East,
and Africa
(RoEMEA)
Australia and
New Zealand
(ANZ)
Page 38

Maintaining the printer 38
Item United States
and Canada
European
Economic
Area (EEA+)
Rest of Asia
Pacific (RoAP)
Latin America
Distribution
(LAD)
Rest of
Europe,
Middle East,
Australia and
New Zealand
(ANZ)
and Africa
(RoEMEA)
High Yield Return Program toner cartridges
1
Black
2
Cyan
Magenta
Yellow
2
2
Standard Yield Return Program toner cartridges
74C1HK0 74C2HK0 74C3HK0 74C4HK0 74C5HK0 74C6HK0
74C1HC0 74C2HC0 74C3HC0 74C4HC0 74C5HC0 74C6HC0
74C1HM0 74C2HM0 74C3HM0 74C4HM0 74C5HM0 74C6HM0
74C1HY0 74C2HY0 74C3HY0 74C4HY0 74C5HY0 74C6HY0
1
Black 74C1SK0 74C2SK0 74C3SK0 74C4SK0 74C5SK0 74C6SK0
Cyan 74C1SC0 74C2SC0 74C3SC0 74C4SC0 74C5SC0 74C6SC0
Magenta 74C1SM0 74C2SM0 74C3SM0 74C4SM0 74C5SM0 74C6SM0
Yellow 74C1SY0 74C2SY0 74C3SY0 74C4SY0 74C5SY0 74C6SY0
1
These Return Program toner cartridges are supported in the Lexmark CS720, CS725, and CS725R printer models.
2
These High Yield Return Program toner cartridges are supported only in the Lexmark CS725 and CS725R printer
models.
Regular toner cartridges
Item Worldwide
Lexmark CS720 Regular toner cartridges
Cyan 74C0S20
Magenta 74C0S30
Yellow 74C0S40
Lexmark CS725 and CS725R High yield regular toner cartridges
Black* 74C0H10
Cyan 74C0H20
Magenta 74C0H30
Yellow 74C0H40
* This toner cartridge is also supported in the Lexmark CS720 printer model.
Page 39

Maintaining the printer 39
Lexmark CS727 and CS728 Return Program cartridges
Item United States
and Canada
Return Program toner cartridges
Black 75B10K0 75B20K0 75B30K0 75B40K0 75B50K0 75B60K0
Cyan 75B10C0 75B20C0 75B30C0 75B40C0 75B50C0 75B60C0
Magenta 75B10M0 75B20M0 75B30M0 75B40M0 75B50M0 75B60M0
Yellow 75B10Y0 75B20Y0 75B30Y0 75B40Y0 75B50Y0 75B60Y0
European
Economic
Area (EEA+)
Rest of Asia
Pacific (RoAP)
Latin America
Distribution
(LAD)
Rest of
Europe,
Middle East,
and Africa
(RoEMEA)
Australia and
New Zealand
(ANZ)
Lexmark CS727 and CS728 Regular cartridges
Item Worldwide
Regular toner cartridges
Black 75B0010
Cyan 75B0020
Magenta 75B0030
Yellow 75B0040
Ordering imaging unit or imaging kit
Item All countries and regions
Return Program imaging unit or imaging kit
Black imaging unit 74C0ZK0
Color (CMY) imaging kit 74C0ZV0
Regular imaging unit or imaging kit
Black imaging unit 74C0Z10
Color (CMY) imaging kit 74C0Z50
Ordering a waste toner bottle
Item Part number
Waste toner bottle 74C0W00
Page 40

Maintaining the printer 40
Ordering a fuser maintenance kit
Fuser maintenance kit type Part number
Fuser maintenance kit, type 00, 110–120 V 41X0554
Fuser maintenance kit, type 01, 220–240 V 41X0556
Fuser maintenance kit, type 02, 100 V 41X0552
Ordering a transfer module
Item Part number
Trans f er modu l e 40X99 2 9
Replacing parts and supplies
Replacing the imaging unit
1 Open door B.
Page 41

Maintaining the printer 41
2 Remove the waste toner bottle.
3 Remove the imaging kit.
Page 42

Maintaining the printer 42
4 Remove the black toner cartridge.
5 Remove the imaging unit.
Warning—Potential Damage: Do not expose the photoconductor unit to direct light for more than 10
minutes. Extended exposure to light may cause print quality problems.
Warning—Potential Damage: Do not touch the shiny photoconductor drum under the imaging kit. Doing
so may
the quality of future print jobs.
aect
6 Unpack the new imaging unit.
7 Insert the new imaging unit.
Page 43

Maintaining the printer 43
8 Insert the black toner cartridge.
9 Insert the imaging kit.
Page 44

Maintaining the printer 44
10 Insert the waste toner bottle.
11 Close door B.
Replacing the imaging kit
1 Open door B.
Page 45

Maintaining the printer 45
2 Remove the waste toner bottle.
3 Remove the imaging kit.
Page 46

Maintaining the printer 46
4 Remove the toner cartridges.
5 Unpack the new imaging kit, and then remove the packing material.
Note: The imaging kit includes the imaging kit and the cyan, magenta, and yellow developer units.
6 Remove the black imaging unit.
Warning—Potential Damage: Do not expose the photoconductor unit to direct light for more than 10
minutes. Extended exposure to light may cause print quality problems.
Warning—Potential Damage: Do not touch the shiny photoconductor drum under the imaging unit.
Doing so may
Note: The black imaging unit includes the black developer unit and photoconductor unit.
the quality of future print jobs.
aect
7 Insert the black imaging unit into the new imaging kit.
Page 47

Maintaining the printer 47
8 Insert the toner cartridges.
9 Insert the new imaging kit.
Page 48

Maintaining the printer 48
10 Insert the waste toner bottle.
11 Close door B.
Replacing a toner cartridge
1 Open door B.
Page 49

Maintaining the printer 49
2 Remove the toner cartridge.
3 Unpack the new toner cartridge.
4 Insert the new toner cartridge.
5 Close door B.
Page 50

Maintaining the printer 50
Replacing the waste toner bottle
1 Open door B.
2 Remove the waste toner bottle.
3 Unpack the new waste toner bottle.
Page 51

Maintaining the printer 51
4 Insert the new waste toner bottle.
5 Close door B.
Replacing the fuser
1 Turn o the printer, and then unplug the power cord from the electrical outlet.
2 Open doors A and D.
CAUTION—HOT SURFACE: The inside of the printer might be hot. To reduce the risk of injury from a
hot component, allow the surface to cool before touching it.
3 Remove the fuser.
4 Unpack the new fuser.
Page 52

Maintaining the printer 52
5 Insert the new fuser.
6 Close doors D and A.
7 Connect the power cord to the electrical outlet, and then turn on the printer.
CAUTION—POTENTIAL INJURY: To avoid the risk of fire or electrical shock, connect the power cord
to an appropriately rated and properly grounded electrical outlet that is near the product and easily
accessible.
8 Reset the fuser maintenance counter.
For more information, see
“Resetting the maintenance counter” on page 61.
Replacing the pick roller
Replacing the pick roller in the 550‑sheet tray
Turn o the printer, and then unplug the power cord from the electrical outlet.
1
2 Remove the tray.
Page 53

Maintaining the printer 53
3 Remove the pick roller.
4 Unpack the new pick roller.
Page 54

Maintaining the printer 54
5 Insert the new pick roller until it clicks into place.
6 Insert the tray.
7 Connect the power cord to the electrical outlet, and then turn on the printer.
CAUTION—POTENTIAL INJURY: To avoid the risk of fire or electrical shock, connect the power cord
to an appropriately rated and properly grounded electrical outlet that is near the product and easily
accessible.
Replacing the pick roller in the multipurpose feeder
Turn o the printer, and then unplug the power cord from the electrical outlet.
1
2 Open the multipurpose feeder.
Page 55

Maintaining the printer 55
3 Remove the pick roller.
4 Unpack the new pick roller.
5 Insert the new pick roller until it clicks into place.
6 Close the multipurpose feeder.
7 Connect the power cord to the electrical outlet, and then turn on the printer.
CAUTION—POTENTIAL INJURY: To avoid the risk of
to an appropriately rated and properly grounded electrical outlet that is near the product and easily
accessible.
or electrical shock, connect the power cord
fire
Replacing the separator pad
1 Pull out the tray.
Page 56

Maintaining the printer 56
2 Remove the separator pad.
3 Unpack the new separator pad.
4 Insert the new separator pad until it clicks into place.
5 Insert the tray.
Page 57

Maintaining the printer 57
Replacing the transfer module
1 Turn
2 Open door B.
the printer, and then unplug the power cord from the electrical outlet.
o
3 Remove the waste toner bottle.
Page 58

Maintaining the printer 58
4 Remove the imaging kit.
5 Open door A.
CAUTION—HOT SURFACE: The inside of the printer might be hot. To reduce the risk of injury from a
hot component, allow the surface to cool before touching it.
Page 59

Maintaining the printer 59
6 Remove the transfer module.
7 Unpack the new transfer module, and then remove the packing material.
8 Insert the new transfer module.
9 Close door A.
Page 60

Maintaining the printer 60
10 Insert the imaging kit.
11 Insert the waste toner bottle.
12 Close door B.
13 Connect the power cord to the electrical outlet, and then turn on the printer.
CAUTION—POTENTIAL INJURY: To avoid the risk of fire or electrical shock, connect the power cord
to an appropriately rated and properly grounded electrical outlet that is near the product and easily
accessible.
14 Reset the maintenance counter. For more information, see “Resetting the maintenance counter” on
page 61.
Page 61

Maintaining the printer 61
Resetting the maintenance counter
1 From the home screen, touch Settings > Device > Maintenance >
And Counters.
Configuration
Menu > Supply Usage
2 Select Fuser Reset or ITM Reset.
Moving the printer
Moving the printer to another location
CAUTION—POTENTIAL INJURY: If the printer weight is greater than 20 kg (44 lb), then it may require
two or more people to lift it safely.
CAUTION—POTENTIAL INJURY: To avoid the risk of fire or electrical shock, use only the power cord
provided with this product or the manufacturer's authorized replacement.
CAUTION—POTENTIAL INJURY: When moving the printer, follow these guidelines to avoid personal
injury or printer damage:
• Make sure that all doors and trays are closed.
• Turn
• Disconnect all cords and cables from the printer.
• If the printer has separate floor-standing optional trays or output options attached to it, then disconnect
them before moving the printer.
• If the printer has a caster base, then carefully roll it to the new location. Use caution when passing over
thresholds and breaks in flooring.
• If the printer does not have a caster base but is
the output options and lift the printer o the trays. Do not try to lift the printer and any options at the same
time.
• Always use the handholds on the printer to lift it.
• Any cart used to move the printer must have a surface able to support the full footprint of the printer.
• Any cart used to move the hardware options must have a surface able to support the dimensions of the
options.
• Keep the printer in an upright position.
• Avoid severe jarring movements.
• Make sure that your
• Make sure that there is adequate clearance around the printer.
the printer, and then unplug the power cord from the electrical outlet.
o
with optional trays or output options, then remove
fingers
configured
are not under the printer when you set it down.
Note: Damage to the printer caused by improper moving is not covered by the printer warranty.
Shipping the printer
For shipping instructions, go to http://support.lexmark.com or contact customer support.
Page 62

Maintaining the printer 62
Saving energy and paper
Setting up power saver modes
Eco‑Mode
1
From the home screen, touch Settings > Device > Power Management > Eco‑Mode.
2 Select a setting.
Sleep mode
1
From the home screen, touch Settings > Device > Power Management > Timeouts > Sleep Mode.
2 Enter the number of minutes the printer stays idle before it enters Sleep mode.
Hibernate mode
From the home screen, touch Settings > Device > Power Management > Timeouts > Hibernate Timeout.
1
2 Select the amount of time before the printer enters hibernate mode.
Notes:
• Make sure to wake the printer from hibernate mode before sending a print job.
• The Embedded Web Server is disabled when the printer is in hibernate mode.
Adjusting the brightness of the printer display
1 From the home screen, touch Settings > Device > Preferences > Screen Brightness.
2 Adjust the setting.
Conserving supplies
• Print on both sides of the paper.
Note: Two-sided printing is the default setting in the print driver.
• Print multiple pages on a single sheet of paper.
• Use the preview feature to see how the document looks like before printing it.
• Print one copy of the document to check its content and format for accuracy.
Recycling
Recycling Lexmark products
To return Lexmark products for recycling:
1 Go to www.lexmark.com/recycle.
2 Select the product you want to recycle.
Page 63

Maintaining the printer 63
Note: Printer supplies and hardware not listed in the Lexmark Collection and Recycling Program may be
recycled through your local recycling center.
Recycling Lexmark packaging
Lexmark continually strives to minimize packaging. Less packaging helps to ensure that Lexmark printers are
transported in the most ecient and environmentally sensitive manner and that there is less packaging to
dispose of. These eciencies result in fewer greenhouse emissions, energy savings, and natural resource
savings. Lexmark also
information, go to
packaging recycling programs is included with the information on product recycling.
Lexmark cartons are 100% recyclable where corrugated recycling facilities exist. Facilities may not exist in your
area.
The foam used in Lexmark packaging is recyclable where foam recycling facilities exist. Facilities may not exist
in your area.
When you return a cartridge to Lexmark, you can reuse the box that the cartridge came in. Lexmark recycles
the box.
www.lexmark.com/recycle, and then choose your country or region. Information on available
recycling of packaging components in some countries or regions. For more
oers
Returning Lexmark cartridges for reuse or recycling
The Lexmark Cartridge Collection Program allows you to return used cartridges for free to Lexmark for reuse
or recycling. One hundred percent of the empty cartridges returned to Lexmark are either reused or
demanufactured for recycling. The boxes used to return the cartridges are also recycled.
To return Lexmark cartridges for reuse or recycling, do the following:
1 Go to www.lexmark.com/recycle.
2 Select the product that you want to recycle.
Page 64

Clearing jams 64
Clearing jams
Avoiding jams
Load paper properly
• Make sure that the paper lies flat in the tray.
Correct loading of paper Incorrect loading of paper
• Do not load or remove a tray while the printer is printing.
• Do not load too much paper. Make sure that the stack height is below the maximum paper fill indicator.
• Do not slide paper into the tray. Load paper as shown in the illustration.
• Make sure that the paper guides are positioned correctly and are not pressing tightly against the paper or
envelopes.
• Push the tray firmly into the printer after loading paper.
Use recommended paper
• Use only recommended paper or specialty media.
• Do not load paper that is wrinkled, creased, damp, bent, or curled.
Page 65

Clearing jams 65
• Flex, fan, and align the paper edges before loading.
• Do not use paper that has been cut or trimmed by hand.
• Do not mix paper sizes, weights, or types in the same tray.
• Make sure that the paper size and type are set correctly on the computer or printer control panel.
• Store paper according to manufacturer recommendations.
Identifying jam locations
Notes:
• When Jam Assist is set to On, the printer flushes blank pages or pages with partial prints after a jammed
page has been cleared. Check your printed output for blank pages.
• When Jam Recovery is set to On or Auto, the printer reprints jammed pages.
Jam locations
1 Standard bin
2 Fuser
3 Trays
4 Duplex unit
5 Multipurpose feeder
Page 66

Clearing jams 66
Paper jam in trays
1 Pull out the tray.
Warning—Potential Damage: A sensor inside the optional tray is easily damaged by static electricity.
Touch a metal surface before removing the jammed paper in the tray.
2 Remove the jammed paper.
Note: Make sure that all paper fragments are removed.
3 Insert the tray.
Page 67

Clearing jams 67
Paper jam in the multipurpose feeder
1 Remove paper from the multipurpose feeder.
2 Pull out the tray.
3 Remove the jammed paper.
Note: Make sure that all paper fragments are removed.
4 Insert the tray.
Paper jam in the standard bin
1 Remove the jammed paper.
Note: Make sure that all paper fragments are removed.
2 Open doors A and D, and then remove any paper fragments.
CAUTION—HOT SURFACE: The inside of the printer might be hot. To reduce the risk of injury from a
hot component, allow the surface to cool before touching it.
Page 68

Clearing jams 68
3 Close doors D and A.
Paper jam in door A
Paper jam in the fuser
1 Open door A.
CAUTION—HOT SURFACE: The inside of the printer might be hot. To reduce the risk of injury from a
hot component, allow the surface to cool before touching it.
2 Remove the jammed paper.
Note: Make sure that all paper fragments are removed.
Page 69

Clearing jams 69
3 Open the fuser access door.
4 Remove the jammed paper.
Note: Make sure that all paper fragments are removed.
Page 70

Clearing jams 70
5 Close door A.
Paper jam in the duplex unit
1 Open door A.
CAUTION—HOT SURFACE: The inside of the printer might be hot. To reduce the risk of injury from a
hot component, allow the surface to cool before touching it.
Page 71

Clearing jams 71
2 Open the duplex cover.
3 Remove the jammed paper.
Note: Make sure that all paper fragments are removed.
4 Close the duplex cover and door A.
Page 72

Troubleshooting 72
Troubleshooting
Network connection problems
Cannot open Embedded Web Server
Action Yes No
Step 1
Check if you are using a supported browser:
• Internet Explorer® version 9 or later
• Safari version 8.0.3 or later
• Google Chrome
TM
• Mozilla Firefox
Is your browser supported?
Step 2
Make sure that the printer IP address is correct.
View the printer IP address:
• From the home screen
• From the TCP/IP section in the Network/Ports menu
• By printing a network setup page or menu settings page,
and then finding the TCP/IP section
Note: An IP address appears as four sets of numbers separated
by periods, such as 123.123.123.123.
Is the printer IP address correct?
Step 3
Check if the printer is on.
Go to step 2. Install a supported
browser.
Go to step 3. Type the correct
printer IP address in
the address
Go to step 4. Turn on the printer.
field.
Is the printer on?
Step 4
Check if the network connection is working.
Is the network connection working?
Step 5
Make sure that the cable connections to the printer and print server
are secure.
For more information, see the setup documentation that came with
the printer.
Are the cable connections secure?
Go to step 5. Contact your
administrator.
Go to step 6. Secure the cable
connections.
Page 73

Troubleshooting 73
Action Yes No
Step 6
Check if the web proxy servers are disabled.
Are the web proxy servers disabled?
Step 7
Access the Embedded Web Server.
Did the Embedded Web Server open?
Unable to read
Action Yes No
Step 1
Check if the flash drive is inserted into the front USB port.
Note: The flash drive does not work when it is inserted into the
rear USB port.
Is the
Step 2
Check if the flash drive is supported. For more information, see
“Supported flash drives and file types” on page 29
drive inserted into the front USB port?
flash
flash
drive
Go to step 7. Contact your
The problem is
solved.
Go to step 2. The problem is
Go to step 3. The problem is
administrator.
Contact
support.
solved.
solved.
customer
Does the error message still appear?
Step 3
Check if the front USB port is disabled. For more information, see
“Enabling the USB port” on page 73.
Does the error message still appear?
Contact
support.
customer
The problem is
solved.
Enabling the USB port
From the home screen, touch Settings > Network/Ports > USB > Enable USB Port.
Checking the printer connectivity
1 From the home screen, touch Settings > Reports > Network > Network Setup Page.
2 Check the first section of the network setup page, and confirm that the status is connected.
If the status is not connected, then the LAN drop may be inactive, or the network cable may be unplugged
or malfunctioning. Contact your administrator for assistance.
Page 74

Troubleshooting 74
Hardware options problems
Cannot detect internal option
Action Yes No
Step 1
Turn o the printer, wait for about 10 seconds, and then turn it back
on.
Does the internal option operate correctly?
Step 2
Print a menu settings page, and then check if the internal option
appears in the Installed Features list.
Is the internal option listed in the menu settings page?
Step 3
Check if the internal option is properly installed in the controller
board.
a Turn o the printer, and then unplug the power cord from the
electrical outlet.
b Make sure that the internal option is installed in the appropriate
connector in the controller board.
c Connect the power cord to the electrical outlet, and then turn
on the printer.
CAUTION—POTENTIAL INJURY: To avoid the risk of fire
or electrical shock, connect the power cord to an
appropriately rated and properly grounded electrical outlet
that is near the product and easily accessible.
The problem is
solved.
Go to step 4. Go to step 3.
The problem is
solved.
Go to step 2.
Go to step 4.
Does the internal option operate correctly?
Step 4
a Check if the internal option is available in the print driver.
Note: If necessary, manually add the internal option in the
print driver to make it available for print jobs. For more
information, see
on page 120.
“Adding available options in the print driver”
b Resend the print job.
Does the internal option operate correctly?
The problem is
solved.
Contact
support.
customer
Page 75

Troubleshooting 75
Internal solutions port does not operate correctly
Action Yes No
Step 1
Print a menu settings page, and then check if the internal solutions
port (ISP) appears in the Installed Features list.
Is the ISP listed in the Installed Features list?
Step 2
Remove, and then install the ISP. For more information, see
“Installing an internal solutions port” on page 108.
Note: Use a supported ISP.
Does the ISP operate correctly?
Step 3
Check the cable and the ISP connection.
a Use the correct cable, and then make sure that it is securely
connected to the ISP.
b Check if the ISP solution interface cable is securely connected
into the receptacle of the controller board.
Does the ISP operate correctly?
Go to step 3. Go to step 2.
The problem is
solved.
The problem is
solved.
Go to step 3.
Contact
support.
customer
Parallel or serial interface card does not operate correctly
Action Yes No
Step 1
Print a menu settings page, and then check if the parallel or serial
interface card appears in the Installed Features list.
Is the parallel or serial interface card listed in the Installed Features
list?
Step 2
Remove, and then install the parallel or serial interface card.
For more information, see
page 108.
Does the parallel or serial interface card operate correctly?
Step 3
Check the connection between the cable and the parallel or serial
interface card.
Does the parallel or serial interface card operate correctly?
“Installing an internal solutions port” on
Go to step 3. Go to step 2.
The problem is
solved.
The problem is
solved.
Go to step 3.
Contact
support.
customer
Page 76

Troubleshooting 76
Defective flash detected
Try one or more of the following:
• Replace the defective flash memory.
• From the printer control panel, select Continue to ignore the message and continue printing.
• Cancel the current print job.
Not enough free space in
Try one or more of the following:
• From the printer control panel, select Continue to clear the message and continue printing.
• Delete fonts, macros, and other data stored in the flash memory.
• Install flash memory with larger capacity.
Note: Downloaded fonts and macros that are not previously stored in the
Unformatted
Try one or more of the following:
• From the control panel, select Continue to stop the defragmentation and continue printing.
• Format the flash memory.
Note: If the error message remains, then the flash memory may be defective and needs to be
replaced.
flash
detected
flash
memory for resources
memory are deleted.
flash
Issues with supplies
Replace cartridge, printer region mismatch
To correct this problem, purchase a cartridge with the correct region that matches the printer region, or
purchase a worldwide cartridge.
• The first number in the message after 42 indicates the region of the printer.
• The second number in the message after 42 indicates the region of the cartridge.
Printer and toner cartridge regions
Region Numeric code
Worldwide or Undefined region 0
North America (United States, Canada) 1
European Economic Area, Western Europe, Nordic countries, Switzerland 2
Asia Pacific 3
Latin America 4
Rest of Europe, Middle East, Africa 5
Australia, New Zealand 6
Page 77

Troubleshooting 77
Region Numeric code
Invalid region 9
Note: To find the region settings of the printer and toner cartridge, print the print quality test pages.
From the control panel, navigate to: Settings > Troubleshooting > Print Quality Test Pages.
Non‑Lexmark supply
The printer has detected a non‑Lexmark supply or part installed in the printer.
Your Lexmark printer is designed to function best with genuine Lexmark supplies and parts. Use of thirdparty supplies or parts may aect the performance, reliability, or life of the printer and its imaging
components.
All life indicators are designed to function with Lexmark supplies and parts and may deliver unpredictable
results if third-party supplies or parts are used. Imaging component usage beyond the intended life may
damage your Lexmark printer or associated components.
Warning—Potential Damage: Use of third-party supplies or parts can aect warranty coverage.
Damage caused by the use of third-party supplies or parts may not be covered by the warranty.
To accept any and all of these risks and to proceed with the use of non-genuine supplies or parts in your
printer, from the control panel, press and hold X and # simultaneously for 15 seconds.
If you do not want to accept these risks, then remove the third-party supply or part from your printer and
install a genuine Lexmark supply or part. For more information, see
supplies” on page 37.
If the printer does not print after pressing and holding X and # simultaneously for 15 seconds, then reset
the supply usage counter.
“Using genuine Lexmark parts and
1 From the control panel, navigate to:
Settings > Device > Maintenance >
Configuration
Menu > Supply Usage And Counters
2 Select the part or supply that you want to reset, and then select Start.
3 Read the warning message, and then select Continue.
4 Press and hold X and # simultaneously for 15 seconds to clear the message.
Note: If you are unable to reset the supply usage counters, then return the item to the place of
purchase.
Page 78

Troubleshooting 78
Paper feed problems
Envelope seals when printing
Action Yes No
1 Use envelopes that have been stored in a dry environment.
Note: Printing on envelopes with high moisture content can seal the
flaps.
Contact
customer
support.
2 Resend the print job.
Does the envelope seal when printing?
Collated printing does not work
Action Yes No
Step 1
a From the home screen, touch Settings > Print > Layout >
Collate.
b Set Collate to On.
c Print the document.
Are the pages collated correctly?
Step 2
a From the document that you are trying to print, open the Print
dialog, and then select Collate.
b Print the document.
The problem is
solved.
The problem is
solved.
The problem is
solved.
Go to step 2.
Go to step 3.
Are the pages collated correctly?
Step 3
a Reduce the number of pages to print.
b Print the document.
Are the pages collated correctly?
The problem is
solved.
Contact
support.
customer
Page 79

Troubleshooting 79
Paper curl
Action Yes No
Step 1
Move the paper guides in the tray to the correct position for the
paper loaded.
Is the paper still curled?
Step 2
a Depending on your operating system, specify the paper type
and weight from the Printing Preferences or Print dialog.
Notes:
• Make sure that the settings match the paper loaded in
the tray.
• You can also change the settings on the printer control
panel.
b Resend the print job.
Is the paper still curled?
Step 3
a Remove paper from the tray, and then turn it over.
b Resend the print job.
Go to step 2. The problem is
solved.
Go to step 3. The problem is
solved.
Go to step 4. The problem is
solved.
Is the paper still curled?
Step 4
a Load paper from a fresh package.
Note: Paper absorbs moisture due to high humidity. Store
paper in its original wrapper until you are ready to use it.
Contact
support.
customer
b Resend the print job.
Is the paper still curled?
Tray linking does not work
Action Yes No
Step 1
a Check if the trays contain paper of the same size and type.
b Check if the paper guides are positioned correctly.
c Print the document.
Do the trays link correctly?
The problem is
solved.
The problem is
solved.
Go to step 2.
Page 80

Troubleshooting 80
Action Yes No
Step 2
a From the home screen, touch Settings > Paper > Tr ay
Configuration > Paper Size/Type.
b Set the paper size and type to match the paper loaded in the
linked trays.
c Print the document.
Do the trays link correctly?
Check tray connection
Try one or more of the following:
• Turn o the printer, wait for about 10 seconds, and then turn it back on.
If the error occurs a second time, then:
1 Turn o the printer.
2 Unplug the power cord from the electrical outlet.
3 Remove the indicated tray.
4 Insert the tray.
5 Connect the power cord to the electrical outlet.
The problem is
solved.
Contact
support.
customer
CAUTION—POTENTIAL INJURY: To avoid the risk of fire or electrical shock, connect the
power cord to an appropriately rated and properly grounded electrical outlet that is near
the product and easily accessible.
6 Turn on the printer.
If the error occurs again, then:
1 Turn o the printer.
2 Unplug the power cord from the electrical outlet.
3 Remove the indicated tray.
4 Contact customer support.
• From the control panel, select Continue to clear the message and resume printing.
Page 81

Troubleshooting 81
Paper frequently jams
Action Yes No
Step 1
a Pull out the tray.
b Check if the paper is loaded correctly.
Notes:
• Make sure that the paper guides are positioned correctly.
• Make sure that the stack height is below the maximum
paper
indicator.
fill
• Make sure to print on recommended paper size and type.
c Insert the tray.
d Print the document.
Do paper jams still occur frequently?
Step 2
a From the Paper menu on the control panel, check if the printer
is detecting the correct paper size.
b Resend the print job.
Do paper jams still occur frequently?
Step 3
a Load paper from a fresh package.
b Print the document.
Go to step 2. The problem is
solved.
Go to step 3. The problem is
solved.
Contact
support.
customer
The problem is
solved.
Do paper jams still occur frequently?
Jammed pages are not reprinted
Action Yes No
a From the home screen, touch Settings > Device > Notifications
> Jam Content Recovery.
b Select On or Auto.
c Apply the changes.
Are the jammed pages reprinted?
The problem is
solved.
Contact
support.
customer
Page 82

Troubleshooting 82
Printing problems
Confidential and other held documents do not print
Action Yes No
Step 1
a From the control panel, check if the documents appear in the
Held Jobs list.
Note: If the documents are not listed, then print the
documents using the Print and Hold options.
b Print the documents.
Are the documents printed?
Step 2
The print job may contain a formatting error or invalid data.
• Delete the print job, and then send it again.
• For PDF files, generate a new file, and then print the
documents.
Are the documents printed?
Step 3
If you are printing from the Internet, then the printer may be reading
the multiple job titles as duplicates.
For Windows users
a Open the Printing Preferences dialog.
b From the Print and Hold section, select Keep duplicate
documents.
c Enter a PIN.
d Resend the print job.
The problem is
solved.
The problem is
solved.
The problem is
solved.
Go to step 2.
Go to step 3.
Go to step 4.
For Macintosh users
a Save and name each job dierently.
b Send the job individually.
Are the documents printed?
Step 4
a Delete some held jobs to free up printer memory.
b Resend the print job.
Are the documents printed?
The problem is
solved.
Go to step 5.
Page 83

Troubleshooting 83
Action Yes No
Step 5
a Add printer memory.
The problem is
solved.
b Resend the print job.
Are the documents printed?
Slow printing
Action Yes No
Step 1
a Make sure that the printer is not in Eco‑Mode and Quiet Mode.
b Print the document.
Is the printer printing slow?
Step 2
a Depending on your operating system, specify the paper type
from the Printing Preferences or Print dialog.
Notes:
• Make sure that the setting matches the paper loaded in
the tray.
• You can also change the setting on the printer control
panel.
b Print the document.
Go to step 2. The problem is
Go to step 3. The problem is
Contact
support.
solved.
solved.
customer
Is the printer printing slow?
Step 3
a Reduce the number of pages to print.
b Print the document.
Is the printer printing slow?
Step 4
a Remove held jobs.
b Print the document.
Is the printer printing slow?
Step 5
a Connect the printer cable securely to the printer and the
computer, print server, option, or other network device.
b Print the document.
Is the printer printing slow?
Go to step 4. The problem is
solved.
Go to step 5. The problem is
solved.
Go to step 6. The problem is
solved.
Page 84

Troubleshooting 84
Action Yes No
Step 6
a From the Quality menu on the control panel, set the Print
Resolution to 4800CQ.
b Print the document.
Is the printer printing slow?
Step 7
a Make sure that the printer is not overheating.
Notes:
• Allow the printer to cool down after a long print job.
• Observe the recommended ambient temperature for the
printer. For more information, see
for the printer” on page 9.
“Selecting a location
b Print the document.
Is the printer printing slow?
Step 8
a Add more printer memory.
b Print the document.
Go to step 7. The problem is
solved.
Go to step 8. The problem is
solved.
Contact
support.
customer
The problem is
solved.
Is the printer printing slow?
Print jobs do not print
Action Yes No
Step 1
a From the document you are trying to print, open the Print
dialog, and then check if you have selected the correct printer.
b Resend the print job.
Is the document printed?
Step 2
a Check if the printer is on.
b Resolve any error messages that appear on the display.
c Resend the print job.
Is the document printed?
The problem is
solved.
The problem is
solved.
Go to step 2.
Go to step 3.
Page 85

Troubleshooting 85
Action Yes No
Step 3
a Check if the ports are working and if the cables are securely
connected to the computer and the printer.
For more information, see the setup documentation that came
with the printer.
b Resend the print job.
Is the document printed?
Step 4
a Turn o the printer, wait for about 10 seconds, and then turn it
back on.
b Resend the print job.
Is the document printed?
Step 5
a Remove, and then reinstall the printer software.
Note: The printer software is available at
http://support.lexmark.com.
b Resend the print job.
Is the document printed?
The problem is
solved.
The problem is
solved.
The problem is
solved.
Go to step 4.
Go to step 5.
Contact
support.
customer
Print quality is poor
Blank or white pages
Note: Before solving the problem, print the quality sample pages to determine the missing color. From the
home screen, touch Settings > Troub leshooti ng > Basic Print Quality Pages.
Page 86

Troubleshooting 86
Action Yes No
Step 1
a Remove, and then reinstall the imaging unit or imaging kit.
Warning—Potential Damage: Do not expose the imaging unit
or imaging kit to direct light for more than 10 minutes.
Extended exposure to light may cause print quality problems.
Warning—Potential Damage: To avoid damage, do not touch
the underside of the imaging unit or imaging kit.
b Print a document.
Is the printer still printing blank or white pages?
Step 2
a Replace the imaging unit or imaging kit.
Warning—Potential Damage: Do not expose the imaging unit
or imaging kit to direct light for more than 10 minutes.
Extended exposure to light may cause print quality problems.
Warning—Potential Damage: To avoid damage, do not touch
the underside of the imaging unit or imaging kit.
b Print a document.
Is the printer still printing blank or white pages?
Go to step 2. The problem is
solved.
Contact
support.
customer
The problem is
solved.
Dark print
Action Yes No
Step 1
a From the Quality menu on the control panel, select Color
Adjust.
b Resend the print job.
Is the print still too dark?
Go to step 2. The problem is
solved.
Page 87

Troubleshooting 87
Action Yes No
Step 2
a Depending on your operating system, reduce the toner
darkness from the Printing Preferences or Print dialog.
Note: You can also change the settings on the printer control
panel.
b Resend the print job.
Is the print still too dark?
Step 3
a Depending on your operating system, specify the paper type,
texture, and weight from the Printing Preferences or Print
dialog.
Notes:
• Make sure that the settings match the paper loaded in
the tray.
• You can also change the settings on the printer control
panel.
b Resend the print job.
Is the print still too dark?
Go to step 3. The problem is
solved.
Go to step 4. The problem is
solved.
Step 4
Make sure that the paper has no texture or rough finishes.
Are you printing on textured or rough paper?
Step 5
a Load paper from a fresh package.
Note: Paper absorbs moisture due to high humidity. Store
paper in its original wrapper until you are ready to use it.
b Resend the print job.
Is the print still too dark?
Step 6
a Remove, and then reinstall the waste toner bottle.
b From the Quality menu on the control panel, select Color
Adjust.
c Resend the print job.
Is the print still too dark?
Change the texture
settings to match the
paper you are
printing on.
Go to step 6. The problem is
Contact
support.
customer
Go to step 5.
solved.
The problem is
solved.
Page 88

Troubleshooting 88
Ghost images
Leading edge
ABCD
ABCD
ABCD
ABCD
Trailing edge
Action Yes No
Step 1
a Load the tray with the correct paper type and weight.
b Resend the print job.
Do ghost images still appear on prints?
Step 2
a Depending on your operating system, specify the paper type
and weight from the Printing Preferences or Print dialog.
Notes:
• Make sure that the settings match the paper loaded in
the tray.
• You can also change the settings on the printer control
panel.
b Resend the print job.
Do ghost images still appear on prints?
Step 3
a From the Quality menu on the control panel, select Color
Adjust.
b Resend the print job.
Go to step 2. The problem is
solved.
Go to step 3. The problem is
solved.
Contact customer
support.
The problem is
solved.
Do ghost images still appear on prints?
Gray background
Leading edge
ABCDE
ABCDE
ABCDE
Trailing edge
Page 89

Troubleshooting 89
Action Yes No
Step 1
a From the home screen, touch Settings > Print > Quality.
b Adjust the toner darkness.
c Print the document.
Does gray background still appear on prints?
Step 2
a From the home screen, touch Settings > Print > Quality >
Advanced Imaging > Color Adjust.
b Start the process.
c Print the document.
Does gray background still appear on prints?
Step 3
a Remove, and then reinstall the imaging unit or imaging kit.
Warning—Potential Damage: Do not expose the imaging unit
or imaging kit to direct light for more than 10 minutes.
Extended exposure to light may cause print quality problems.
Warning—Potential Damage: To avoid damage, do not touch
the underside of the imaging unit or imaging kit.
b Print the document.
Go to step 2. The problem is
solved.
Go to step 3. The problem is
solved.
Contact
support.
customer
The problem is
solved.
Does gray background still appear on prints?
Horizontal dark lines
ABCDE
ABCDE
ABCDE
Note: If horizontal dark lines keep appearing on your prints, then see the “Repeating defects” topic.
Action Yes No
Step 1
a Depending on your operating system, specify the tray or feeder
from the Printing Preferences or Print dialog.
b Resend the print job.
Do horizontal dark lines still appear on prints?
Go to step 2. The problem is
solved.
Page 90

Troubleshooting 90
Action Yes No
Step 2
a Depending on your operating system, specify the paper type
and weight from the Printing Preferences or from Print dialog.
Notes:
• Make sure that the settings match the paper loaded in
the tray.
• You can also change the settings on the printer control
panel.
b Resend the print job.
Do horizontal dark lines still appear on prints?
Step 3
a Load paper from a fresh package.
Note: Paper absorbs moisture due to high humidity. Store
paper in its original wrapper until you use it.
b Resend the print job.
Do horizontal dark lines still appear on prints?
Step 4
a Remove, and then reinstall the imaging unit or imaging kit.
Warning—Potential Damage: Do not expose the imaging unit
or imaging kit to direct light for more than 10 minutes.
Extended exposure to light may cause print quality problems.
Warning—Potential Damage: To avoid damage, do not touch
the underside of the imaging unit or imaging kit.
b Resend the print job.
Go to step 3. The problem is
solved.
Go to step 4. The problem is
solved.
Contact
support.
customer
The problem is
solved.
Do horizontal dark lines still appear on prints?
Horizontal white lines
Leading edge
Trailing edge
Note: If horizontal dark lines keep appearing on your prints, then see the “Repeating defects” topic.
Page 91

Troubleshooting 91
Action Yes No
Step 1
a Depending on your operating system, specify the paper type
and weight from the Printing Preferences or Print dialog.
Notes:
• Make sure that the settings match the paper loaded in
the tray.
• You can also change the settings on the printer control
panel.
b Resend the print job.
Do horizontal white lines still appear on prints?
Step 2
a Load the specified tray or feeder with the recommended paper
type.
b Resend the print job.
Do horizontal white lines still appear on prints?
Step 3
a Remove, and then reinstall the imaging unit or imaging kit.
Warning—Potential Damage: Do not expose the imaging unit
or imaging kit to direct light for more than 10 minutes.
Extended exposure to light can cause print quality problems.
Warning—Potential Damage: To avoid damage, do not touch
the underside of the imaging unit or imaging kit.
b Resend the print job.
Go to step 2. The problem is
solved.
Go to step 3. The problem is
solved.
Contact
support.
customer
The problem is
solved.
Do horizontal white lines still appear on prints?
Incorrect margins
ABCD
ABCD
ABCD
Page 92

Troubleshooting 92
Action Yes No
Step 1
a Squeeze and slide the paper guides to the correct position for
the size of the paper you are loading.
b Resend the print job.
Are the margins correct?
Step 2
a From the Paper menu on the control panel, check if the printer
is detecting the correct paper size.
b Resend the print job.
Are the margins correct?
Step 3
a Depending on your operating system, specify the paper size
from the Printing Preferences or Print dialog.
Notes:
• Make sure that the settings match the paper loaded in
the tray.
• You can also change the settings on the printer control
panel.
b Resend the print job.
The problem is
solved.
The problem is
solved.
The problem is
solved.
Go to step 2.
Go to step 3.
Contact
support.
customer
Are the margins correct?
Jagged or uneven characters
Page 93

Troubleshooting 93
Action Yes No
a Check if the printer supports the fonts that are installed on your
computer.
1 From the control panel, touch:
Settings > Reports > Print > Print Fonts
2 Select PCL Fonts or PS Fonts.
b If the font is not supported, then install a supported font. For
more information, contact your administrator.
c Resend the print job.
Do prints still contain jagged or uneven characters?
Light print
Contact
support.
customer
The problem is
solved.
Action Yes No
Step 1
a From the Quality menu on the control panel, select Color
Adjust.
Go to step 2. The problem is
solved.
b Resend the print job.
Is the print still too light?
Step 2
a Depending on your operating system, increase the toner
darkness from the Printing Preferences or Print dialog.
Note: You can also change the settings on the printer control
panel.
Go to step 3. The problem is
solved.
b Resend the print job.
Is the print still too light?
Page 94

Troubleshooting 94
Action Yes No
Step 3
a Depending on your operating system, specify the paper type,
texture, and weight from the Printing Preferences or Print
dialog.
Notes:
• Make sure that the settings match the paper loaded in
the tray.
• You can also change the settings on the printer control
panel.
b Resend the print job.
Is the print still too light?
Step 4
Make sure that the paper has no texture or rough finishes.
Are you printing on textured or rough paper?
Step 5
a Load paper from a fresh package.
Note: Paper absorbs moisture due to high humidity. Store
paper in its original wrapper until you are ready to use it.
b Resend the print job.
Go to step 4. The problem is
solved.
Change the texture
settings to match the
paper you are
printing on.
Go to step 6. The problem is
Go to step 5.
solved.
Is the print still too light?
Step 6
a Remove, and then reinstall the waste toner bottle.
b From the Quality menu on the control panel, select Color
Adjust.
Is the print still too light?
Step 7
Remove, and then reinstall the imaging kit.
Is the print still too light?
Mottled print and dots
ABC
DEF
Go to step 7. The problem is
solved.
Contact
support.
customer
The problem is
solved.
Page 95

) )
Troubleshooting 95
Action Yes No
Step 1
Check the printer for leaked toner contamination.
Is the printer free of leaked toner?
Step 2
a From the home screen, touch Settings > Device > Preferences.
b Check if the paper type and size settings match the paper type
and size set in the tray.
Do the settings match?
Step 3
a Change the paper size and type in the Paper menu or adjust
the size settings in the tray.
b Print the document.
Is the print still mottled?
Step 4
a Replace the textured or rough paper loaded in the tray with
plain paper.
b Print the document.
Go to step 2. Contact
support.
Go to step 4. Go to step 3.
Go to step 4. The problem is
solved.
Go to step 5. The problem is
solved.
customer
Is the print still mottled?
Step 5
a Replace the imaging unit or imaging kit.
Warning—Potential Damage: Do not expose the imaging unit
or imaging kit to direct light for more than 10 minutes.
Extended exposure to light can cause print quality problems.
Warning—Potential Damage: To avoid damage, do not touch
the underside of the imaging unit or imaging kit.
b Print the document.
Is the print still mottled?
Print crooked or skewed
ABCDE
ABCDE
ABCDE
Contact
support.
customer
The problem is
solved.
Page 96

)
)
)
Troubleshooting 96
Action Yes No
Step 1
a Remove the tray.
b Remove the paper, and then load paper from a fresh package.
Note: Paper absorbs moisture due to high humidity. Store
paper in its original wrapper until you are ready to use it.
c Squeeze and slide the paper guides to the correct position for
the size of the paper you are loading.
d Insert the tray.
e Resend the print job.
Is the print still crooked or skewed?
Step 2
a Check if you are printing on a supported paper.
b Resend the print job.
Is the print still crooked or skewed?
Repeating defects
Go to step 2. The problem is
solved.
Contact
support.
customer
The problem is
solved.
Note: Before solving the problem, print the Maintenance Defect Ruler from the Troubleshooting section of
the Settings menu.
Action Yes No
Step 1
Go to step 2. Go to step 3.
a Print the quality sample pages.
From the home screen, touch Settings > Troubleshooting >
Basic Print Quality Samples.
b Determine how many colors have defects.
Is only one color aected?
Page 97

Troubleshooting 97
Action Yes No
Step 2
a Using the Maintenance Defect Ruler, measure the distance
between the repeating defects on the aected color page.
b Replace the supply item that matches the measurement on the
aected
Imaging kit or imaging unit
color page.
• 94.20 mm (3.70 in.)
• 29.80 mm (1.17 in.)
• 25.10 mm (0.99 in.)
Developer unit
• 43.90 mm (1.73 in.)
• 45.50 mm (1.79 in.)
c Print the quality sample pages.
Do the defects still appear?
Step 3
a Using the Maintenance Defect Ruler, measure the distance
between the defects on the aected color page.
b Replace the supply item that matches the measurement on the
aected
Transfer mo dul e
color page.
• 37.70 mm (1.48 in.)
• 78.50 mm (3.09 in.)
• 55 mm (2.17 in.)
Take note of the
distance, and then
contact
support or your
service
representative.
Take note of the
distance, and then
contact
support or your
service
representative.
customer
customer
The problem is
solved.
The problem is
solved.
Fuser
• 95 mm (3.74 in.)
• 110 mm (4.33 in.)
• 34.60 mm (1.36 in.)
c Print the quality sample pages.
Do the defects still appear?
Solid color or black images
Page 98

Troubleshooting 98
Action Yes No
a Remove, and then reinstall the imaging unit or imaging kit.
Warning—Potential Damage: Do not expose the imaging unit
or imaging kit to direct light for more than 10 minutes.
Extended exposure to light may cause print quality problems.
Warning—Potential Damage: To avoid damage, do not touch
the underside of the imaging unit or imaging kit.
Contact
support.
customer
b Resend the print job.
Is the printer still printing solid color or black images?
Text or images cut o
Leading edge
ABCDE
ABCDE
ABCDE
Trailing edge
Action Yes No
Step 1
a Move the paper guides in the tray to the correct position for the
paper loaded.
b Resend the print job.
Go to step 2. The problem is
The problem is
solved.
solved.
Is the page or image still clipped?
Step 2
a Depending on your operating system, specify the paper size
from the Printing Preferences or Print dialog.
Notes:
• Make sure that the settings match the paper loaded in
the tray.
• You can also change the settings on the printer control
panel.
b Resend the print job.
Is the page or image still clipped?
Go to step 3. The problem is
solved.
Page 99

Troubleshooting 99
Action Yes No
Step 3
a Remove, and then reinstall the imaging unit or imaging kit.
Warning—Potential Damage: Do not expose the imaging unit
or imaging kit to direct light for more than 10 minutes.
Extended exposure to light may cause print quality problems.
Warning—Potential Damage: To avoid damage, do not touch
the underside of the imaging unit or imaging kit.
Contact
support.
customer
b Resend the print job.
Is the page or image still clipped?
Toner easily rubs o
Leading edge
ABC
DEF
Trailing edge
Action Yes No
The problem is
solved.
1 Depending on your operating system, specify the
paper type, texture, and weight from the Printing
Preferences or Print dialog.
Notes:
• Make sure that the settings match the paper
loaded in the tray.
• You can also change the settings on the printer
control panel.
2 Resend the print job.
Does the toner still rub o?
Uneven print density
Contact
support.
customer
The problem is solved.
Page 100

Troubleshooting 100
Action Yes No
Replace the imaging unit or imaging kit, and then resend the print
job.
Warning—Potential Damage: Do not expose the imaging unit or
imaging kit to direct light for more than 10 minutes. Extended
exposure to light can cause print quality problems.
Warning—Potential Damage: To avoid damage, do not touch the
underside of the imaging unit or imaging kit.
Is the print density uneven?
Contact
support.
customer
Vertical dark lines or streaks
Leading edge
ABCDE
ABCDE
ABCDE
Trailing edge
Action Yes No
a Remove, and then reinstall the imaging unit or imaging kit.
Warning—Potential Damage: Do not expose the imaging unit
or imaging kit to direct light for more than 10 minutes.
Extended exposure to light can cause print quality problems.
Warning—Potential Damage: To avoid damage, do not touch
the underside of the imaging unit or imaging kit.
b Resend the print job.
Contact
support.
customer
The problem is
solved.
The problem is
solved.
Do vertical dark lines or streaks still appear on prints?
Vertical white lines
Leading edge
Trailing edge
 Loading...