

Page 1
Information guide
Page 1 of 42
Information guide
Help menu
The Help menu consists of a series of Help pages that are stored in the printer as PDFs. They contain information about using
the printer and performing printing tasks.
English, French, German, and Spanish translations are stored in the printer. Other translations are available on the Software
and Documentation CD.
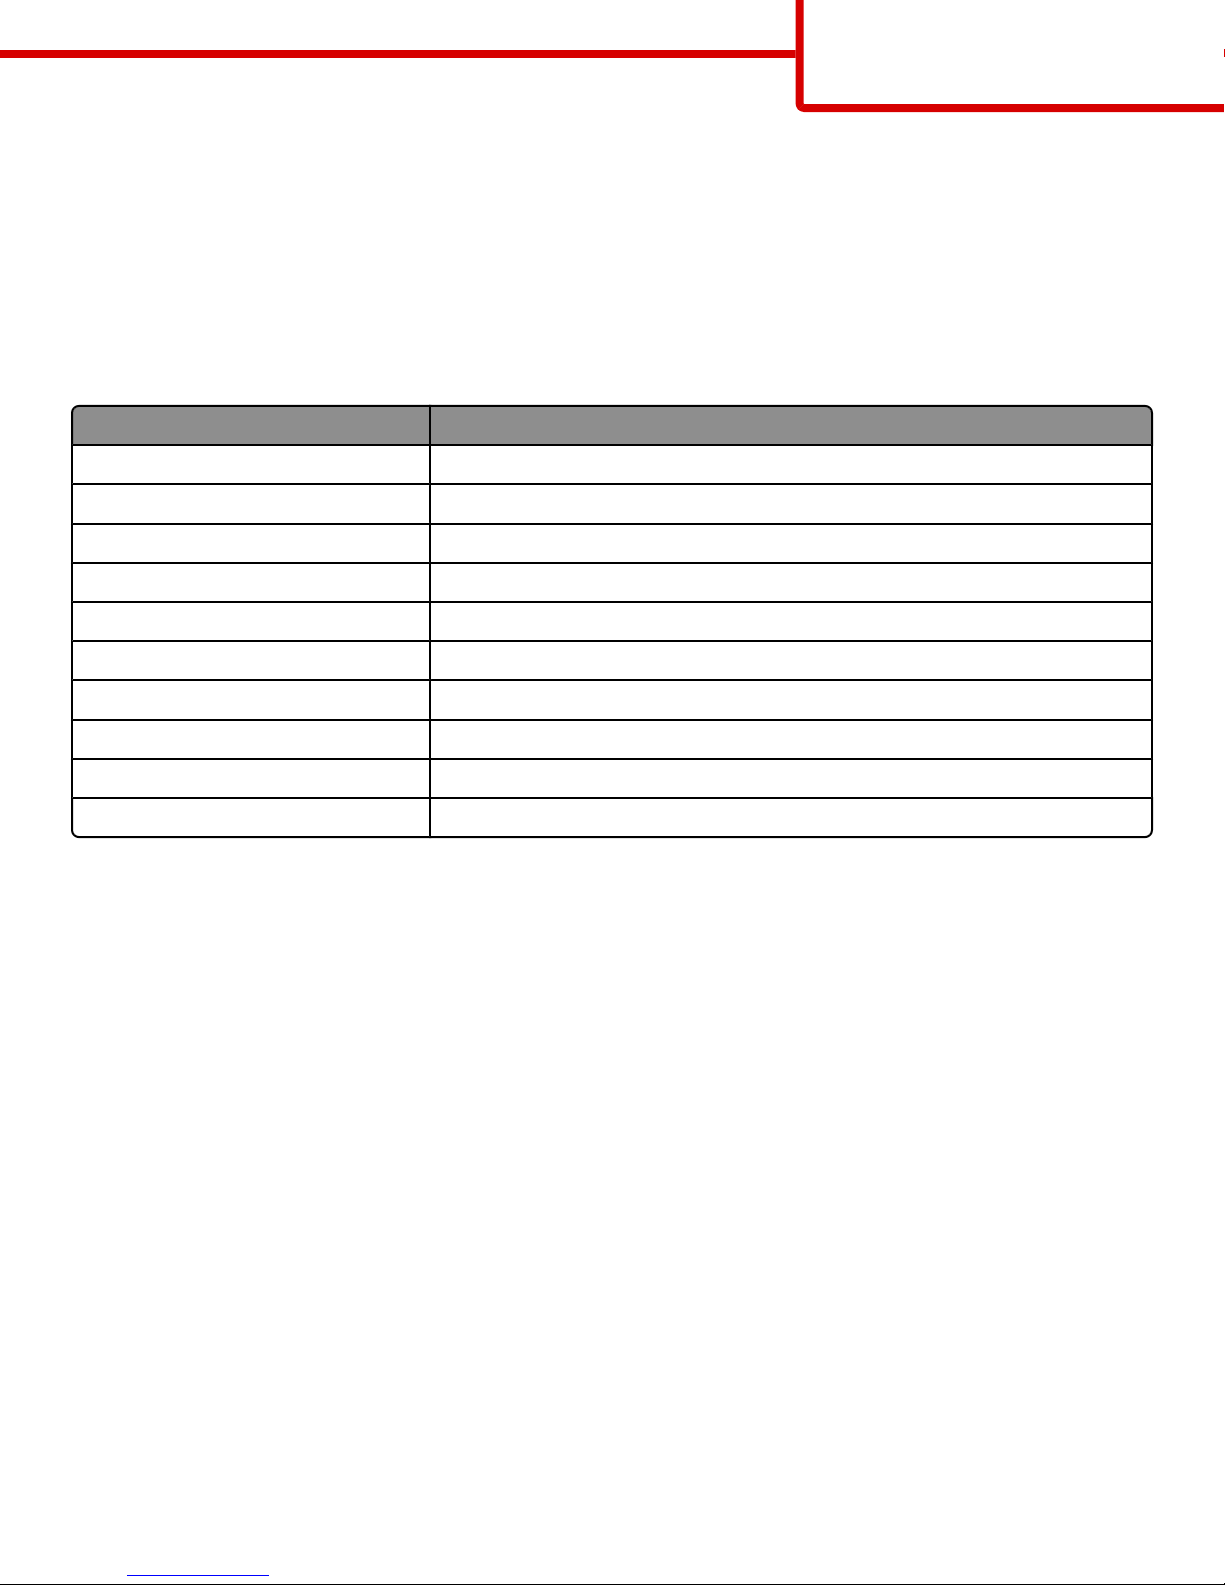
Menu item Description
Print All Prints all the guides
Print Quality Provides information about solving print quality issues
Printing Guide Provides information about loading paper and other speciality media
Media Guide Provides a list of the paper sizes supported in trays, drawers, and feeders
Print Defects Provides information about resolving print defects
Menu Map Provides a list of the printer control panel menus and settings
Information Guide Provides help in locating additional information
Connection Guide Provides information about connecting the printer locally (USB) or to a network
Moving Guide Provides instructions for safely moving the printer
Supplies Guide Provides part numbers for ordering supplies
Setup
The Setup sheet packaged with the printer provides information about setting up the printer.
Software and Documentation
The Software and Documentation CD packaged with the printer includes a User's Guide. The User's Guide provides information
about loading paper, printing, ordering supplies, troubleshooting, clearing jams, and maintaining the printer.
sheet
CD
Additional language support
The User's Guide, Setup sheet, and Help pages are also available in other languages on the Software and Documentation CD.
Page 2

Connection guide
Page 2 of 42
Connection guide
Windows instructions for a locally attached printer
Before installing printer software for Windows
A locally attached printer is a printer connected to a computer using a USB cable or parallel cable. When setting up this type
of printer with a USB cable, install the printer software before connecting the USB cable. For more information, see the setup
documentation.
The Software and Documentation CD can be used to install the necessary printer software on most Windows operating systems.
Note: If the operating system is not supported by the Software and Documentation CD, the Add Printer Wizard must be used.
Updates for the printer software may be available on the Lexmark Web site at www.lexmark.com.
Installing software using the CD
Using the Software and Documentation CD, you can install printer software for the following operating systems:
• Windows Server 2008
• Windows Vista
• Windows Server 2003
• Windows XP
• Windows 2000
1 Insert the Software and Documentation CD. Wait for the Welcome screen to appear.
If the Welcome screen does not appear after a minute, do one of the following:
In Windows Vista:
a
Click .
b In the Start Search box, type D:\setup.exe, where D is the letter of your CD or DVD drive.
In Windows XP and earlier:
a Click Start.
b Click Run.
c Type D:\setup.exe, where D is the letter of your CD or DVD drive.
2 Press Enter.
3 Select Install Printer and Software.
4 Select Suggested, and then click Next.
5 Select Local Attach, and then click Next.
The printer software is copied to your computer.
6 Connect the USB or parallel cable, and then turn on the printer.
The Plug and Play screen appears, and a printer object is created in the Printers folder.
Page 3
Connection guide
Page 3 of 42
Installing software using the Add Printer Wizard
You can install printer software for the following operating systems:
• Windows 98 First Edition (USB not supported)
• Windows 95 (USB not supported)
1 Insert the Software and Documentation CD.
If the CD automatically starts, click Exit.
2 Click Start Settings Printers, and then click Add Printer to start the Add Printer Wizard.
3 When prompted, select to install a local printer, and then click Have Disk.
4 Specify the location of the printer software. The path should be similar to D:\Drivers\Print\Win_9xMe\, where
D is the letter of your CD or DVD drive.
5 Click OK.
Windows instructions for network attached printers
What is network printing?
In Windows environments, network printers can be configured for direct printing or shared printing. Both network printing
methods require the installation of printer software and the creation of a network port.
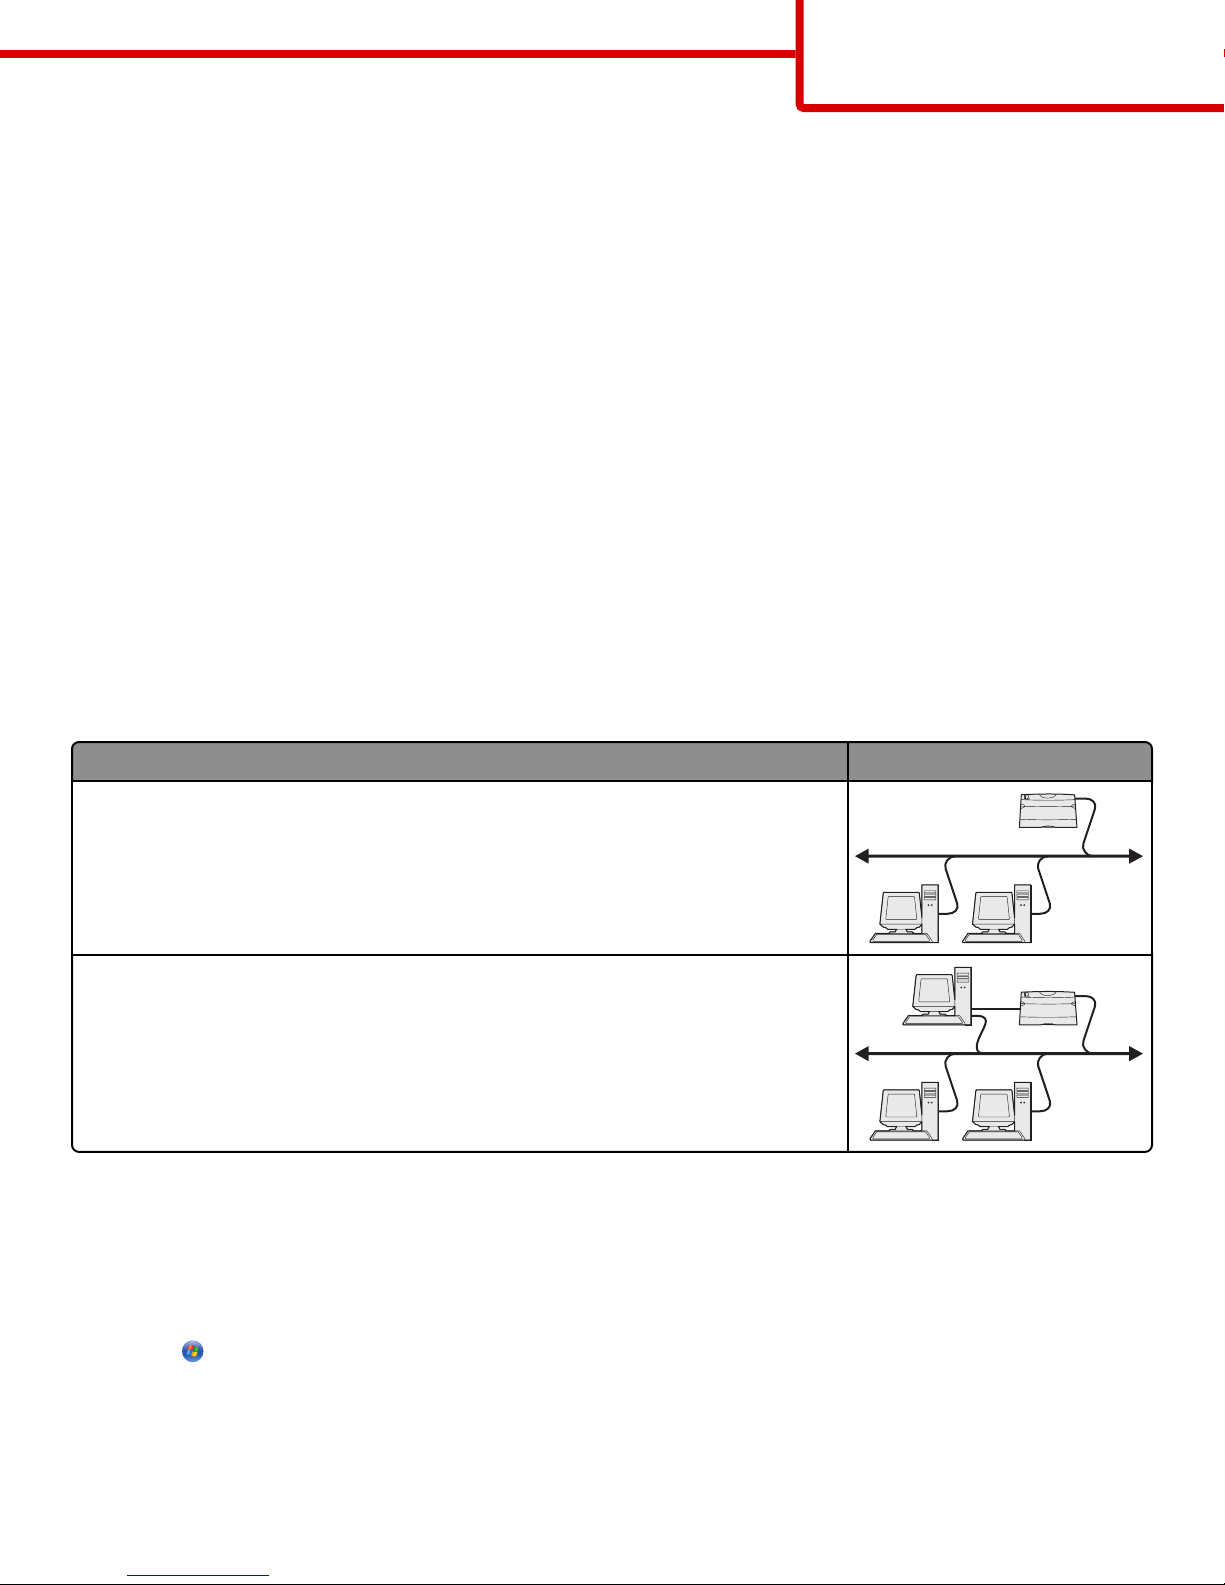
Printing method Example
IP printing
• Printer is connected directly to the network using a network cable, such as an Ethernet
cable.
• Printer software is typically installed on each network computer.
Shared printing
• Printer is connected to one of the computers on the network using a local cable, such
as a USB or parallel cable.
• Printer software is installed on the computer attached to the printer.
• During software installation, the printer is set up to be “shared” so that other network
computers can print to it.
Installing software for direct IP printing
1 Insert the Software and Documentation CD. Wait for the Welcome screen to appear.
If the Welcome screen does not appear after a minute, do one of the following:
In Windows Vista:
a
Click .
b In the Start Search box, type D:\setup.exe, where D is the letter of your CD or DVD drive.
Page 4

Connection guide
Page 4 of 42
In Windows XP and earlier:
a Click Start.
b Click Run.
c Type D:\setup.exe, where D is the letter of your CD or DVD drive.
2 Press Enter.
3 Select Install Printer and Software.
4 Select Suggested, and then click Next.
Note: Select Custom instead of Suggested to select the components you want to install.
5 Select Network Attach, and then click Next.
6 Select the printer model you are installing.
The printer is automatically discovered on the network, and an IP address is automatically assigned.
7 From the list of discovered printers, select the one you want to print to.
Note: If the printer does not appear in the list, click Add Port, and then follow the instructions on the screen.
8 Click Finish to complete the installation.
9 Click Done to exit the installer.
Installing optional printer software
If you want to use any of the other programs available on the Software and Documentation CD, install them by following the
Custom install path:
1 Insert the Software and Documentation CD. Wait for the Welcome screen to appear.
If the Welcome screen does not appear after a minute, do one of the following:
In Windows Vista:
a
Click .
b In the Start Search box, type D:\setup.exe, where D is the letter of your CD or DVD drive.
In Windows XP and earlier:
a Click Start.
b Click Run.
c Type D:\setup.exe, where D is the letter of your CD or DVD drive.
2 Press Enter.
3 Select Install Printer and Software.
4 Select Custom, and then click Next.
5 Select Select Components, and then click Next.
6 Specify whether to install software on the Local computer or on a Remote computer on your network, and then click
Next.
7 Click the + boxes under Select Components to view the list of available software.
Page 5

Connection guide
Page 5 of 42
8 Select the check box next to each program you want to install, and then click Finish.
The software is copied to the computer.
9 Connect the USB or parallel cable, and then turn the printer on.
The Plug and Play screen appears, and a printer object is created in the Printers folder.
Macintosh instructions for a locally attached printer
Before installing printer software for Macintosh
A locally attached printer is a printer connected to a computer using a USB cable. When setting up this type of printer, install
the printer software before connecting the USB cable. For more information, see the setup documentation.
The Software and Documentation CD can be used to install the necessary printer software.
Note: A PPD for the printer is also available in a downloadable software package on the Lexmark Web site at
www.lexmark.com.
Creating a print queue
For local printing, you need to create a print queue:
1 Install a PostScript Printer Description (PPD) file on the computer. A PPD file provides detailed information to the Macintosh
computer about the capabilities of the printer.
a Insert the Software and Documentation CD.
b Double-click the installer package for the printer.
c From the Welcome screen, click Continue, and then click Continue again after viewing the Readme file.
d Click Continue after viewing the license agreement, and then click Agree to accept the terms of the agreement.
e Select a Destination, and then click Continue.
f From the Easy Install screen, click Install.
g Enter the user password, and then click Okay. All the necessary software is installed on the computer.
h Click Close when installation is complete.
2 Do one of the following:
• In Mac OS X version 10.5:
a From the Apple menu, choose System Preferences.
b Click Print & Fax.
• In Max OS X version 10.4 and earlier:
a From the Go menu, choose Applications.
b Double-click Utilities, and then double-click Print Center or Printer Setup Utility.
3 Verify that the print queue was created:
• If the USB-attached printer appears in the Printer list, then the print queue was successfully created.
• If the USB-attached printer does not appear in the Printer list, then make sure the USB cable is properly connected and
the printer is turned on, and then check the Printer list again.
Page 6

Connection guide
Page 6 of 42
Mac instructions for network-attached printers
Installing software for network printing
To print to a network printer, each Macintosh user must install a custom PostScript Printer Description (PPD) file and create a
print queue in Print & Fax, Print Center, or Printer Setup Utility.
1 Install a PPD file on the computer:
a Insert the Software and Documentation CD.
b Double-click the installer package for the printer.
c From the Welcome screen, click Continue, and then click Continue again after viewing the Readme file.
d Click Continue after viewing the license agreement, and then click Agree to accept the terms of the agreement.
e Select a Destination, and then click Continue.
f From the Easy Install screen, click Install.
g Enter the user password, and then click OK.
All the necessary software is installed on the computer.
h Click Close when installation is complete.
2 Create a print queue:
• For IP printing:
In Mac OS X version 10.5
From the Apple menu, choose System Preferences.
a
b Click Print & Fax.
c Click +.
d Select the printer from the list.
e Click Add.
In Mac OS X version 10.4 and earlier
From the Go menu, choose Applications.
a
b Double-click Utilities.
c Double-click Printer Setup Utility or Print Center.
d From the Printer List, click Add.
e Select the printer from the list.
f Click Add.
• For AppleTalk printing:
In Mac OS X version 10.5
From the Apple menu, choose System Preferences.
a
b Click Print & Fax.
c Click +.
d Click AppleTalk.
e Select the printer from the list.
f Click Add.
In Mac OS X version 10.4 and earlier
From the Go menu, choose Applications.
a
b Double-click Utilities.
Page 7

c Double-click Print Center or Printer Setup Utility.
d From the Printer List, click Add.
e Choose the Default Browser tab.
f Click More Printers.
g From the first pop-up menu, choose AppleTalk.
h From the second pop-up menu, select Local AppleTalk zone.
i Select the printer from the list.
j Click Add.
Installing other software for Macintosh
The following Macintosh utilities can be found on the Software and Documentation CD:
• Printer File Loader
• Printer Status
• Auto Updater
• Printer Settings
Connection guide
Page 7 of 42
The Software and Utilities documentation is copied to the Macintosh hard disk during the printer installation process.
Page 8
Media guide
Page 8 of 42
Media guide
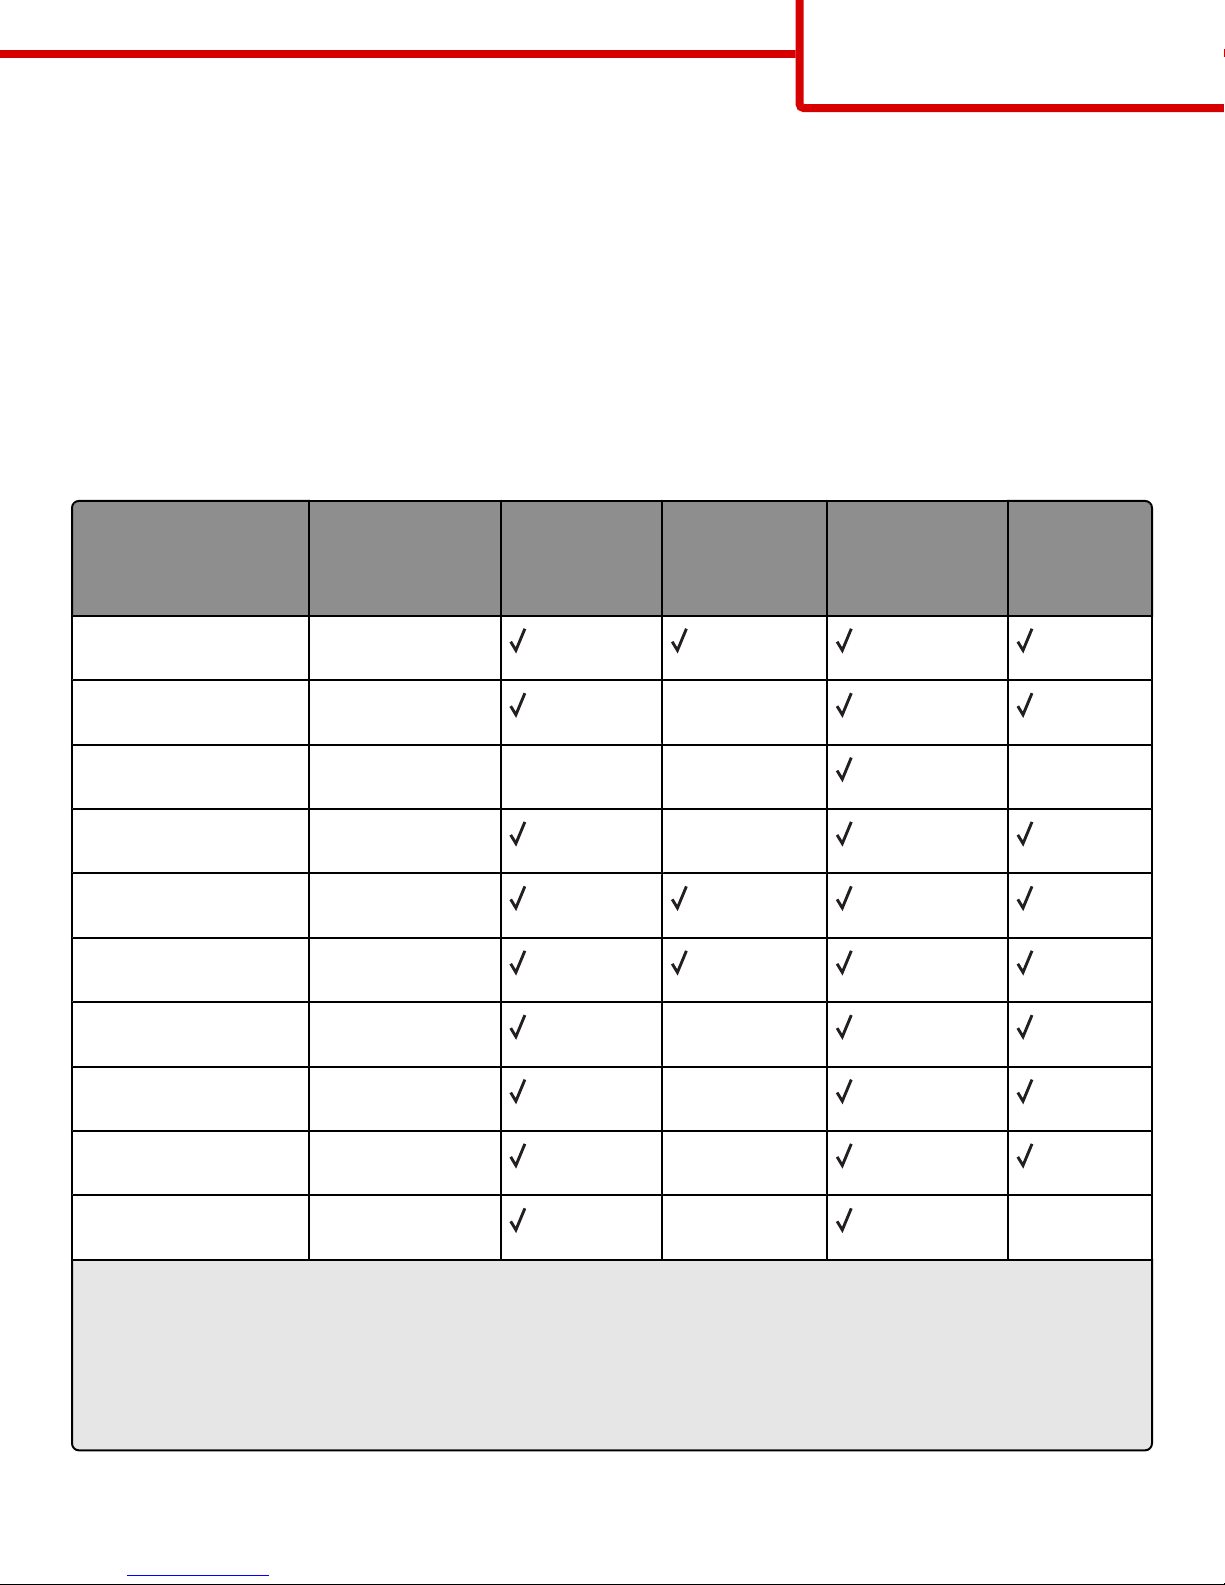
The printer supports the following paper and other specialty media sizes. Select custom sizes up to the maximum specified
for the Universal setting.
Supported paper sizes, types, and weights
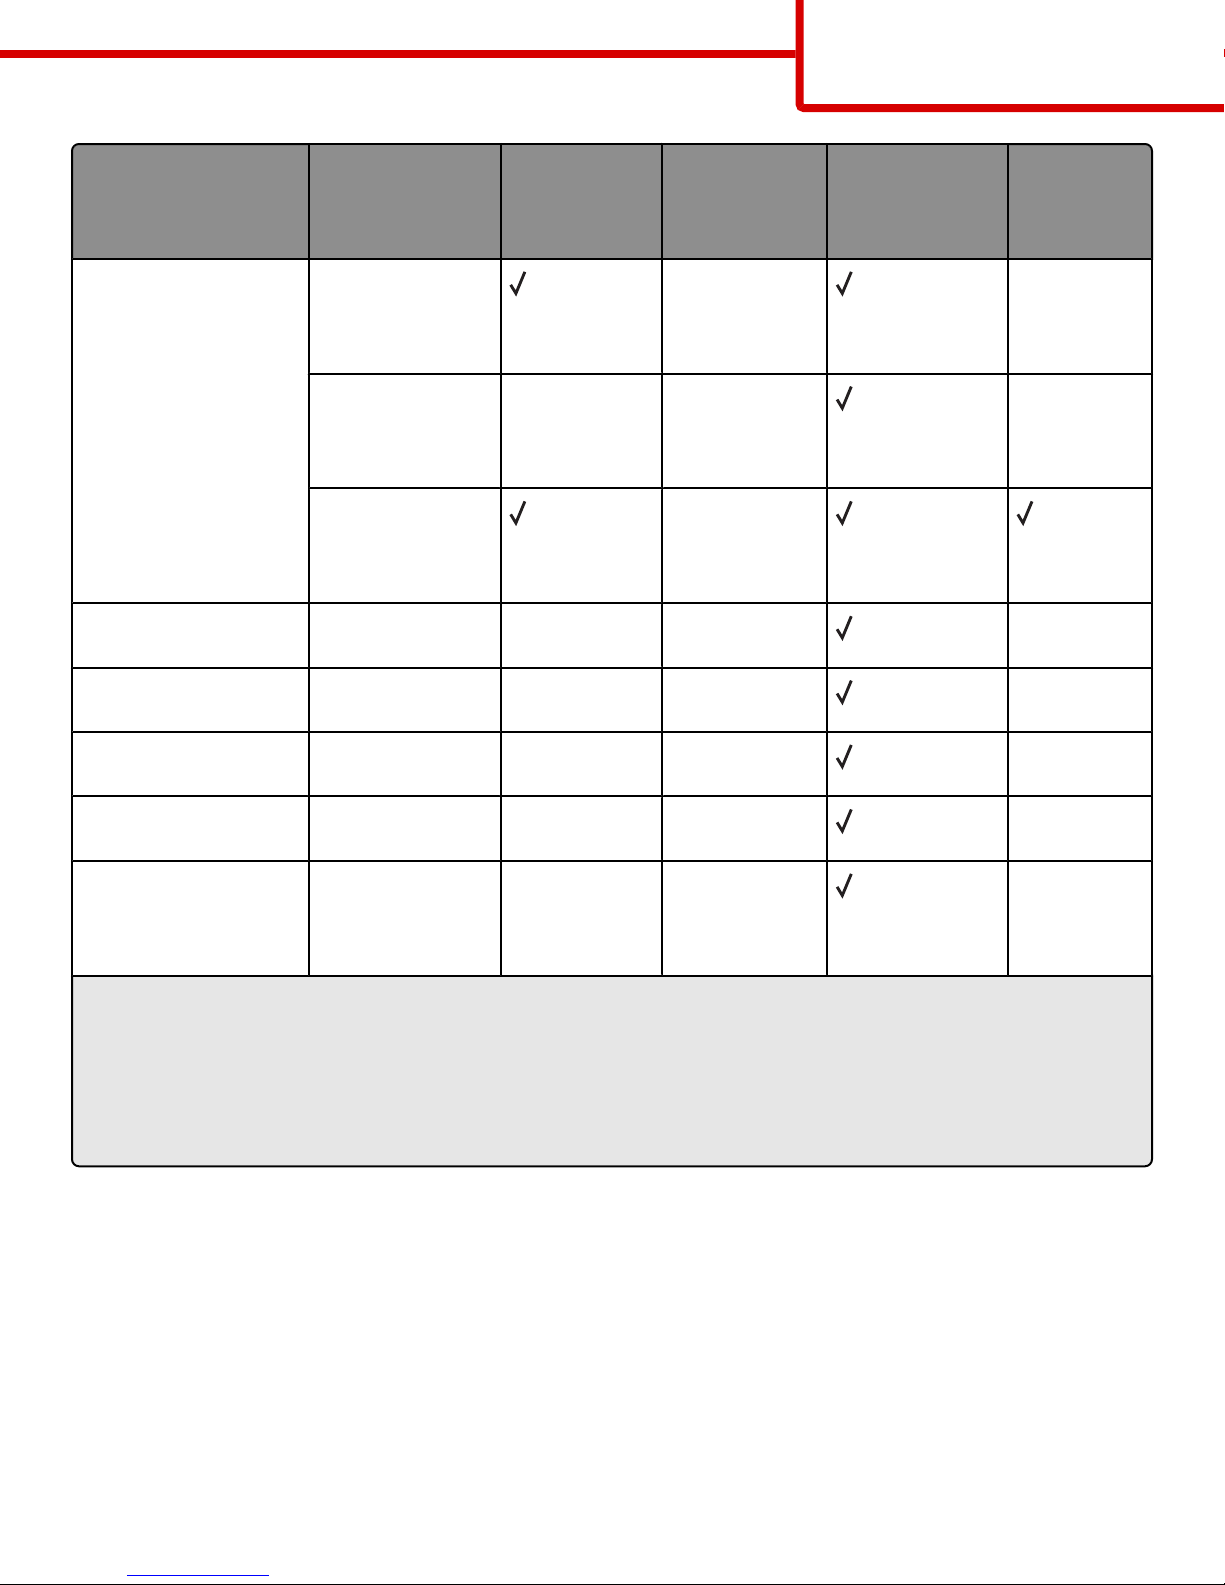
The following tables provide information on standard and optional paper sources, the types of paper they support, and
capacities.
Note: For an unlisted paper size, select the closest larger listed size.
Paper sizes supported by the printer
Paper size Dimensions 250- or
550-sheet trays
Optional
2000-sheet tray
Multipurpose
feeder
Duplex unit
(standard or
optional)
A4
210 x 297 mm
(8.3 x 11.7 in.)
A5
148 x 210 mm
X
(5.8 x 8.3 in.)
A6
1,2
105 x 148 mm
X X X
(4.1 x 5.8 in.)
JIS B5
182 x 257 mm
X
(7.2 x 10.1 in.)
Letter
216 x 279 mm
(8.5 x 11 in.)
Legal
216 x 356 mm
(8.5 x 14 in.)
Executive
184 x 267 mm
X
(7.3 x 10.5 in.)
Oficio
1
216 x 340 mm
X
(8.5 x 13.4 in.)
Folio
1
216 x 330 mm
X
(8.5 x 13 in.)
Statement
1
140 x 216 mm
X X
(5.5 x 8.5 in.)
1
This size appears in the Paper Size menu only when the paper source does not support size sensing or when size sensing
is turned off.
2
Only the standard output bin supports this size.
3
This size setting formats the page for 216 x 356 mm (8.5 x 14 in.) unless the size is specified by the software application.
4
To support duplexing, the Universal width must be between 148 mm (5.8 in) and 216 mm (8.5 in); Universal length must
be between 182 mm (7.2 in) and 356 mm (14 in).
Page 9
Media guide
Page 9 of 42
Paper size Dimensions 250- or
550-sheet trays
(standard or
optional)
Universal
2,3
138 x 210 mm
(5.5 x 8.3 in.) up to
216 x 356 mm
(8.5 x 14 in.)
70 x 127 mm
X X X
(2.8 x 5 in.) up to
216 x 356 mm
(8.5 x 14 in.)
148 x 182 mm
(5.8 x 7.7 in.) up to
216 x 356 mm
(8.5 x 14 in.)
7 3/4 Envelope
(Monarch)
9 Envelope
98 x 191 mm
(3.9 x 7.5 in.)
98 x 225 mm
X X X
X X X
(3.9 x 8.9 in.)
Optional
2000-sheet tray
Multipurpose
feeder
X X
X
Duplex unit
10 Envelope
105 x 241 mm
X X X
(4.1 x 9.5 in.)
DL Envelope
110 x 220 mm
X X X
(4.3 x 8.7 in.)
Other Envelope
98 x 162 mm
X X X
(3.9 x 6.4 in.) to
176 x 250 mm
(6.9 x 9.8 in.)
1
This size appears in the Paper Size menu only when the paper source does not support size sensing or when size sensing
is turned off.
2
Only the standard output bin supports this size.
3
This size setting formats the page for 216 x 356 mm (8.5 x 14 in.) unless the size is specified by the software application.
4
To support duplexing, the Universal width must be between 148 mm (5.8 in) and 216 mm (8.5 in); Universal length must
be between 182 mm (7.2 in) and 356 mm (14 in).
Note: An optional 250-sheet Universally Adjustable Tray is available for sizes smaller than A5, such as index cards.
Page 10
Media guide
Page 10 of 42
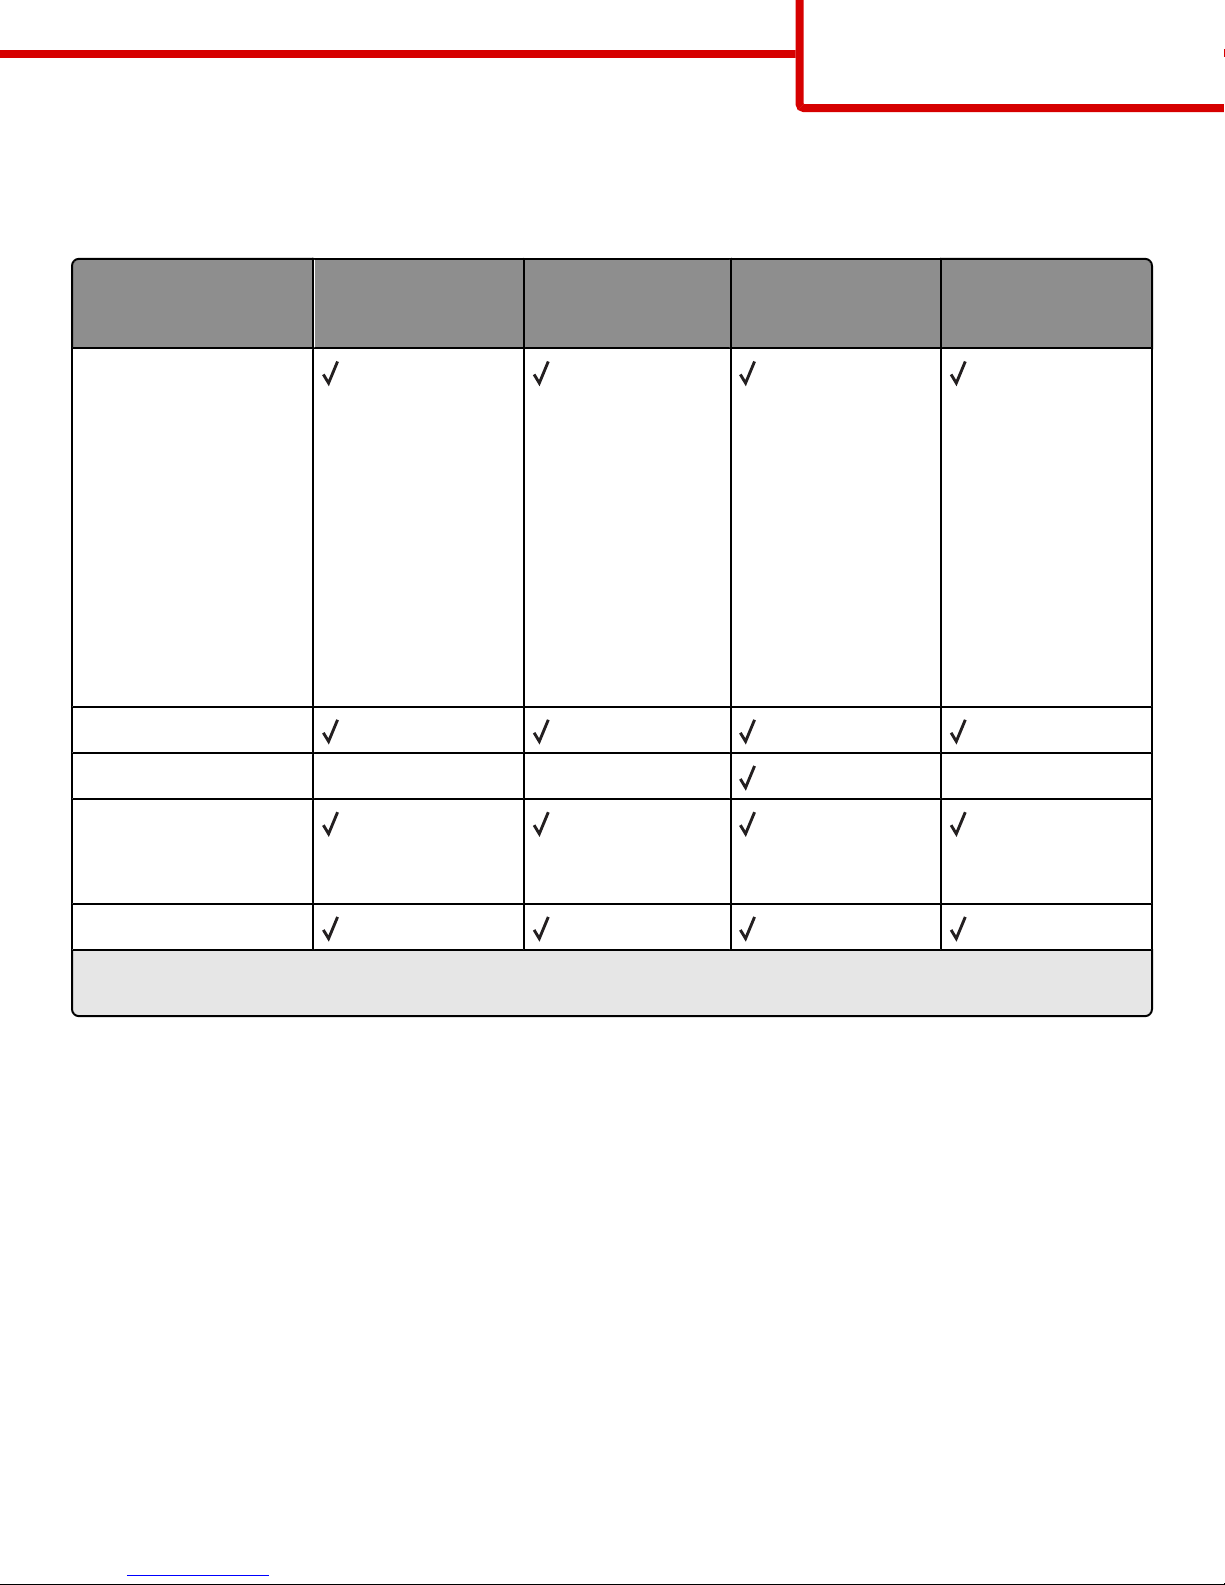
Paper types and weights supported by the printer
The printer engine supports 60–176 g/m2 (16–47 lb) paper weights. The duplex unit supports 63–170 g/m2 (17–45 lb) paper
weights.
Paper type 250- or 550-sheet
trays (standard or
optional)
Paper
Optional 2000-sheet
tray
Multipurpose feeder Duplex unit
• Plain
• Bond
• Colored
• Custom
• Letterhead
• Light
• Heavy
• Preprinted
• Rough/Cotton
• Recycled
Card stock
Envelopes X X X
Labels
1
• Paper
• Vinyl
Transparencies
1
Printing labels requires a special label fuser cleaner which prevents duplexing. The label fuser cleaner is included with the
special cartridge required for label applications.
Paper types and weights supported by the finisher
Use this table to determine the possible output destinations of print jobs which use supported paper types and weights. The
paper capacity of each output bin is listed in parentheses. Paper capacity estimations are calculated based on 75 g/m
paper.
2
(20 lb)
Page 11
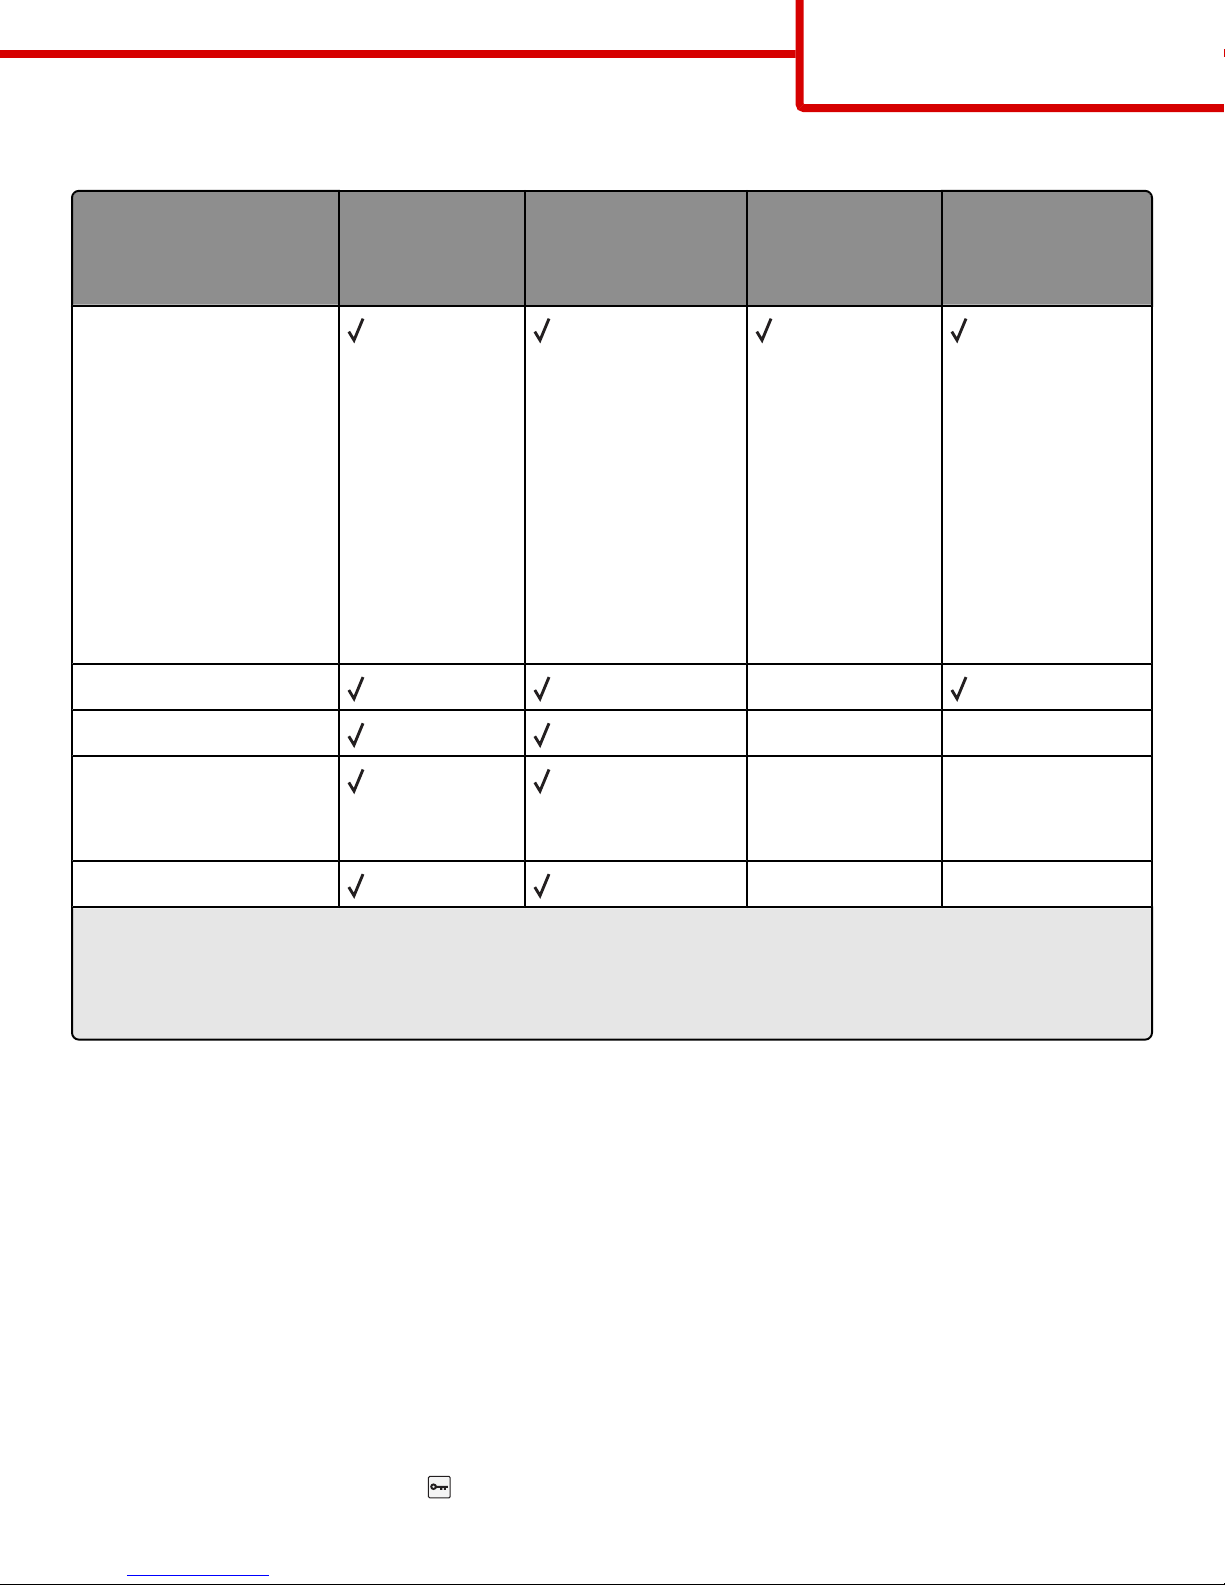
The Finisher supports 60–176 g/m2 (16–47 lb) paper weights.
Media guide
Page 11 of 42
Paper type Finisher standard
bin (250 or 550
sheets)
Paper
Output Expander (550
sheets) or High
Capacity Output
Stacker (1850 sheets)
5-Bin Mailbox
(500 sheets)
1
• Plain
• Bond
• Colored
• Custom
• Letterhead
• Light
• Heavy
• Preprinted
• Rough/Cotton
• Recycled
Card stock X
Envelopes X X
Labels
3
X X
• Paper
• Vinyl
StapleSmart
Finisher
(500 sheets
TM
2
)
Transparencies X X
1
Supports 60-90 g/m2 (16-24 lb) paper weights.
2
Maximum of 50 sheets per stapled packet.
3
Printing labels requires a special label fuser cleaner which prevents duplexing. The label fuser cleaner is included with the
special cartridge required for label applications.
Configuring Universal paper settings
The Universal Paper Size is a user-defined setting that lets you print on paper sizes that are not preset in the printer menus.
Set the Paper Size for the specified tray to Universal when the size you want is not available from the Paper Size menu. Then,
specify all of the following Universal size settings for your paper:
• Units of measure (millimeters or inches)
• Portrait Width
• Portrait Height
• Feed Direction
Note: The smallest supported Universal size is 70 x 127 mm (2.8 x 5 in.); the largest is 216 x 356 mm (8.5 x 14 in.).
Specify a unit of measurement
1 Make sure the printer is on and Ready appears.
2 From the printer control panel, press .
Page 12

Media guide
Page 12 of 42
3 Press the arrow buttons until Paper Menu appears, and then press .
4 Press the arrow buttons until Universal Setup appears, and then press .
5 Press the arrow buttons until Units of Measure appears, and then press .
6 Press the arrow buttons until appears next to the correct unit of measure, and then press .
Submitting Selection appears, followed by the Universal Setup menu.
Specify the paper height and width
Defining a specific height and width measurement for the Universal paper size (in the portrait orientation) allows the printer
to support the size, including support for standard features such as duplex printing and printing multiple pages on one sheet.
1 From the Universal Setup menu, press the arrow buttons until Portrait Width appears, and then press .
2 Press the arrow buttons to change the paper width setting, and then press .
Submitting Selection appears, followed by the Universal Setup menu.
3 Press the arrow buttons until Portrait Height appears, and then press .
4 Press the arrow buttons to change the paper height setting, and then press .
Submitting Selection appears, followed by the Universal Setup menu.
Storing paper
Use these paper storage guidelines to help avoid jams and uneven print quality:
• For best results, store paper where the temperature is 21°C (70°F) and the relative humidity is 40%. Most label manufacturers
recommend printing in a temperature range of 18 to 24°C (65 to 75°F) with relative humidity between 40 and 60%.
• Store paper in cartons when possible, on a pallet or shelf, rather than on the floor.
• Store individual packages on a flat surface.
• Do not store anything on top of individual paper packages.
Avoiding jams
The following hints can help you avoid jams:
Paper recommendations
• Use only recommended paper or specialty media. For more information, see “Paper types and weights supported by the
printer” on page 10.
• Do not load too much paper. Make sure the stack height does not exceed the indicated maximum height.
• Do not load wrinkled, creased, damp, bent, or curled paper.
• Flex, fan, and straighten paper before loading it.
• Do not use paper that has been cut or trimmed by hand.
• Do not mix paper sizes, weights, or types in the same stack.
• Store the paper in an appropriate environment.
• Make sure all sizes and types are set correctly in the printer control panel menu.
Page 13

Media guide
Page 13 of 42
Envelope recommendations
• Do not feed envelopes that:
– Have excessive curl or twist
– Have windows, holes, perforations, cutouts, or embossing
– Have metal clasps, string ties, or folding bars
– Have an interlocking design
– Have postage stamps attached
– Have any exposed adhesive when the flap is in the sealed or closed position
– Have bent corners
– Have rough, cockle, or laid finishes
– Are stuck together or damaged in any way
Paper tray recommendations
• Do not remove trays while the printer is printing.
• Do not load trays, the multipurpose feeder, or the envelope feeder while the printer is printing. Load them prior to printing,
or wait for a prompt to load them.
• Push all trays in firmly after loading paper.
• Make sure the guides in the paper trays, multipurpose feeder, or envelope feeder are properly positioned and are not
pressing too tightly against the paper or envelopes.
Page 14

Menu map
Page 14 of 42
Menu map
Menus list
A number of menus are available to make it easy for you to change printer settings:
Paper Menu Reports Network/Ports
Default Source
Paper Size/Type
Configure MP
Envelope Enhance
Substitute Size
Paper Texture
Paper Weight
Paper Loading
Custom Types
Universal Setup
Bin Setup
1
This menu item appears only if a wireless card is installed.
2
Depending on the printer setup, this menu item appears as Standard Network or Network <x>.
Menu Settings Page
Device Statistics
Network Setup Page
Network <x> Setup Page
Wireless Setup Page
1
Profiles List
NetWare Setup Page
Print Fonts
Print Directory
Print Demo
Asset Report
Active NIC
Standard Network
Standard USB
Parallel <x>
Serial <x>
SMTP Setup
Security Settings Help
Miscellaneous
Confidential Print
Disk Wiping
Security Audit Log
Set Date/Time
General Settings
Setup Menu
Finishing Menu
Quality Menu
Utilities Menu
XPS Menu
PDF Menu
PostScript Menu
PCL Emul Menu
HTML Menu
Print All
Print Quality
Printing Guide
Media Guide
Print Defects
Menu Map
Information Guide
Connection Guide
Moving Guide
Supplies Guide
Image Menu
Flash Drive Menu
2
Page 15
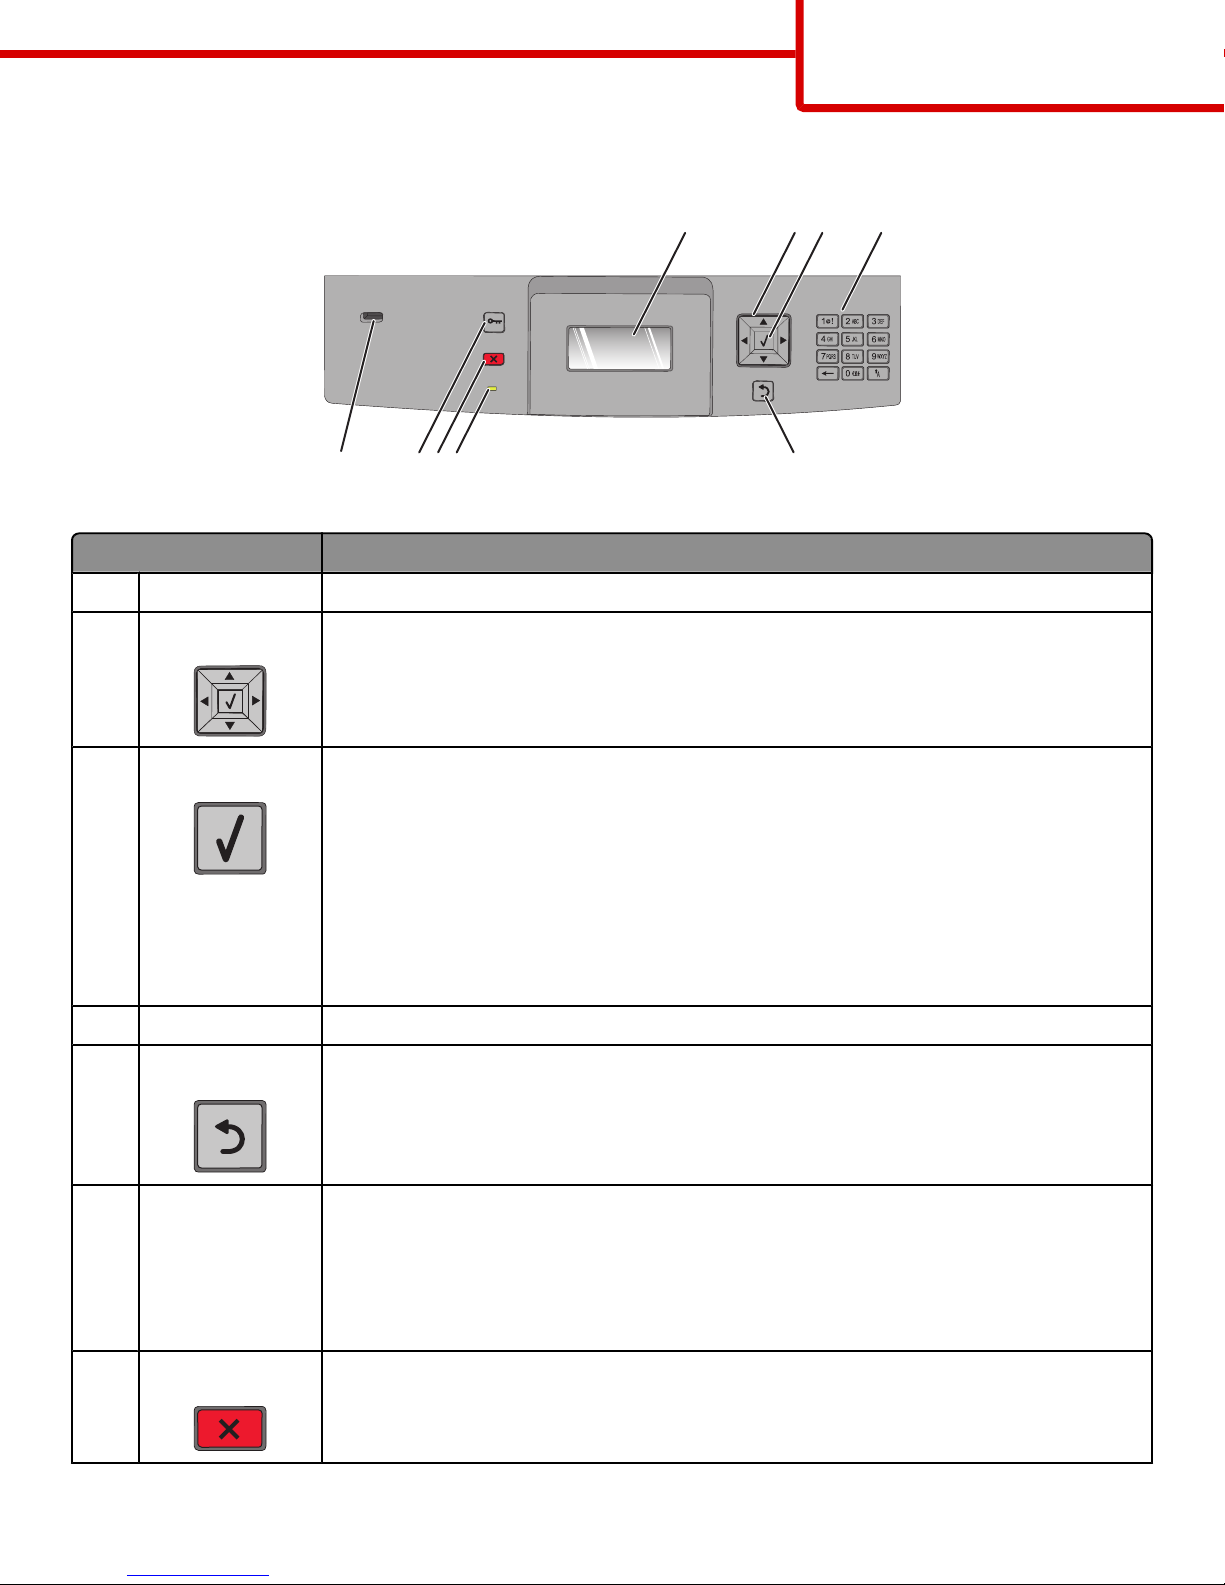
Understanding the printer control panel
Menu map
Page 15 of 42
89
Item Description
Display Shows messages and pictures that communicate the status of the printer
1
Navigation buttons Press the up or down arrow buttons to scroll through menus or menu items, or to increase or
2
decrease a value when entering numbers.
Press the left or right arrow buttons to scroll through menu settings (also called values or
options), or to scroll through text that rolls to another screen.
Select
3
• Opens a menu item and displays the available values or settings. The current setting is
indicated by an asterisk (*).
• Saves a displayed menu item as the new user default setting.
123
7
56
4
Notes:
• When a new setting is saved as the user default setting, it remains in effect until a new
setting is saved or until factory defaults are restored.
• Settings chosen from a software program can also change or override the user default
settings selected from the printer control panel.
Keypad Enter numbers or symbols on the display.
4
Back Returns the display to the previous screen
5
Indicator light Indicates the printer status:
6
• Off—The power is off.
• Blinking green—The printer is warming up, processing data, or printing.
• Solid green—The printer is on, but idle.
• Solid red—Operator intervention is needed.
Stop Stops all printer activity
7
A list of options is offered once Stopped appears on the display.
Page 16
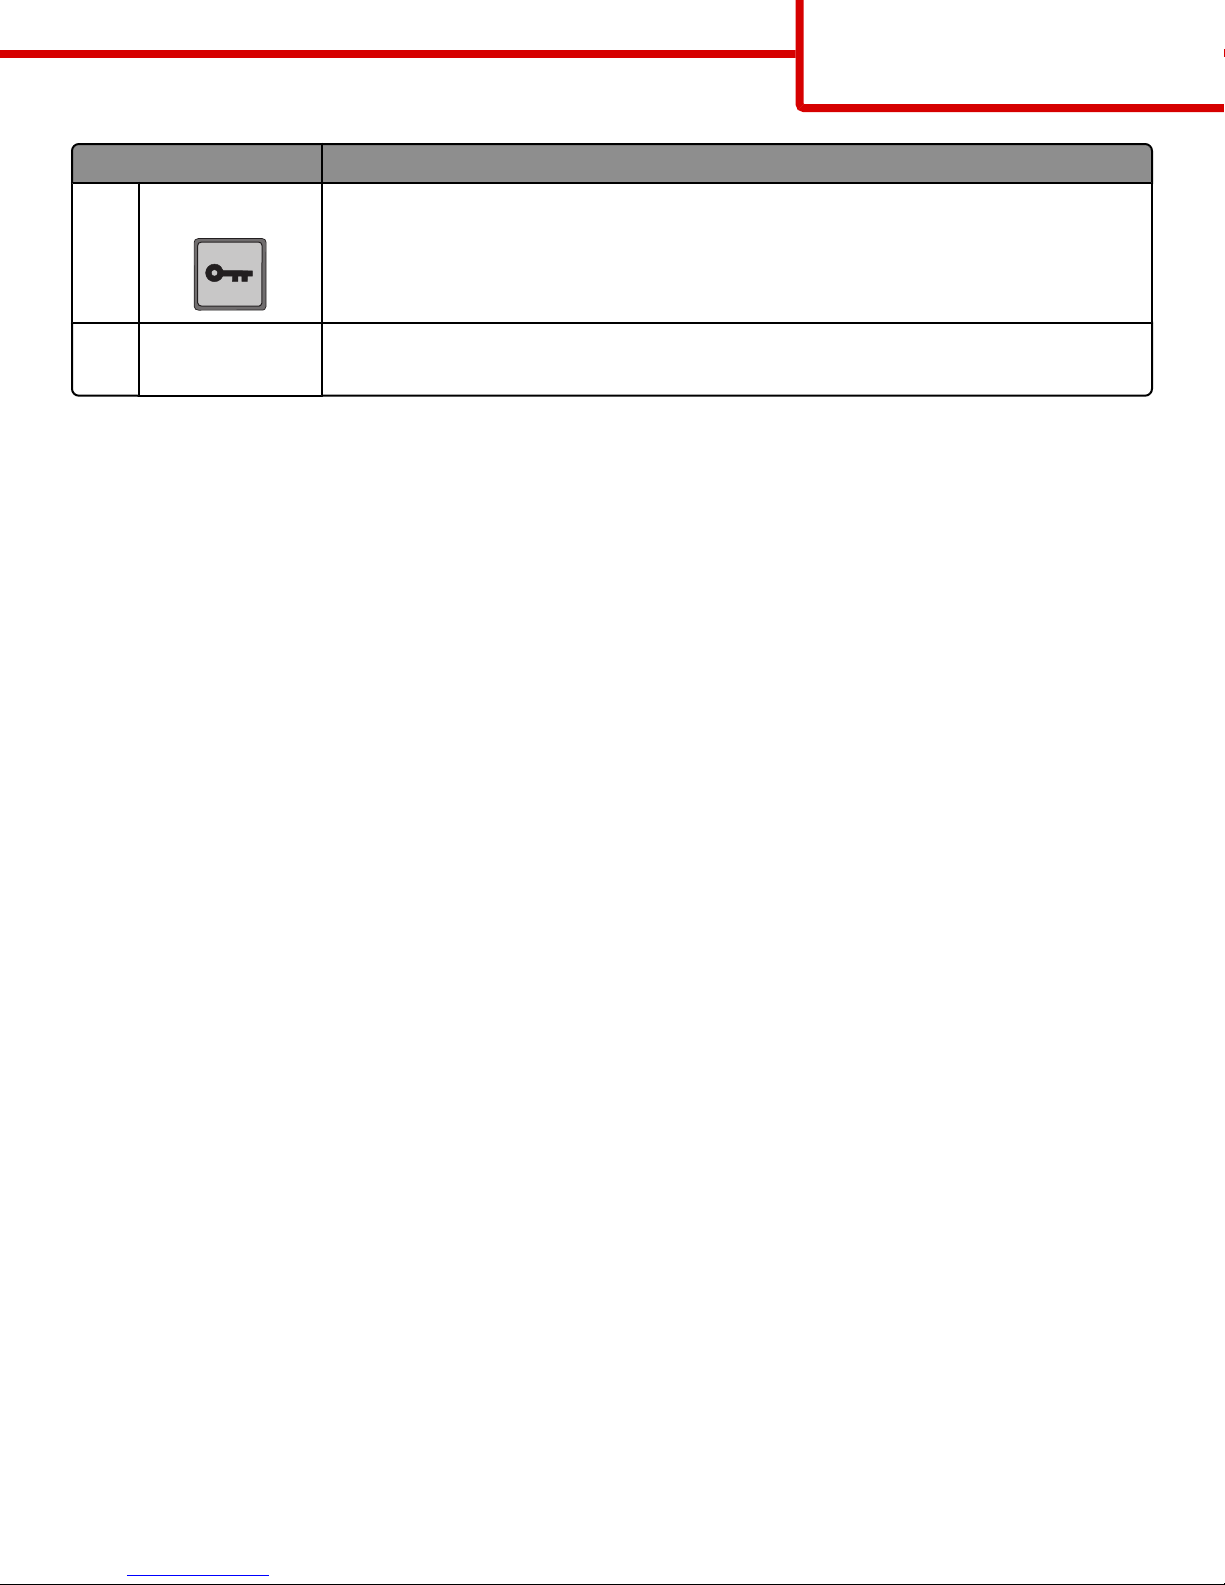
Item Description
Menu Opens the menu index
8
Note: The menus are available only when the printer is in the Ready state.
USB port Insert a flash drive into the front of the printer to print saved files.
9
Note: Only the front USB port supports flash drives.
Menu map
Page 16 of 42
Page 17
Moving the printer
Page 17 of 42
Moving the printer
Before moving the printer
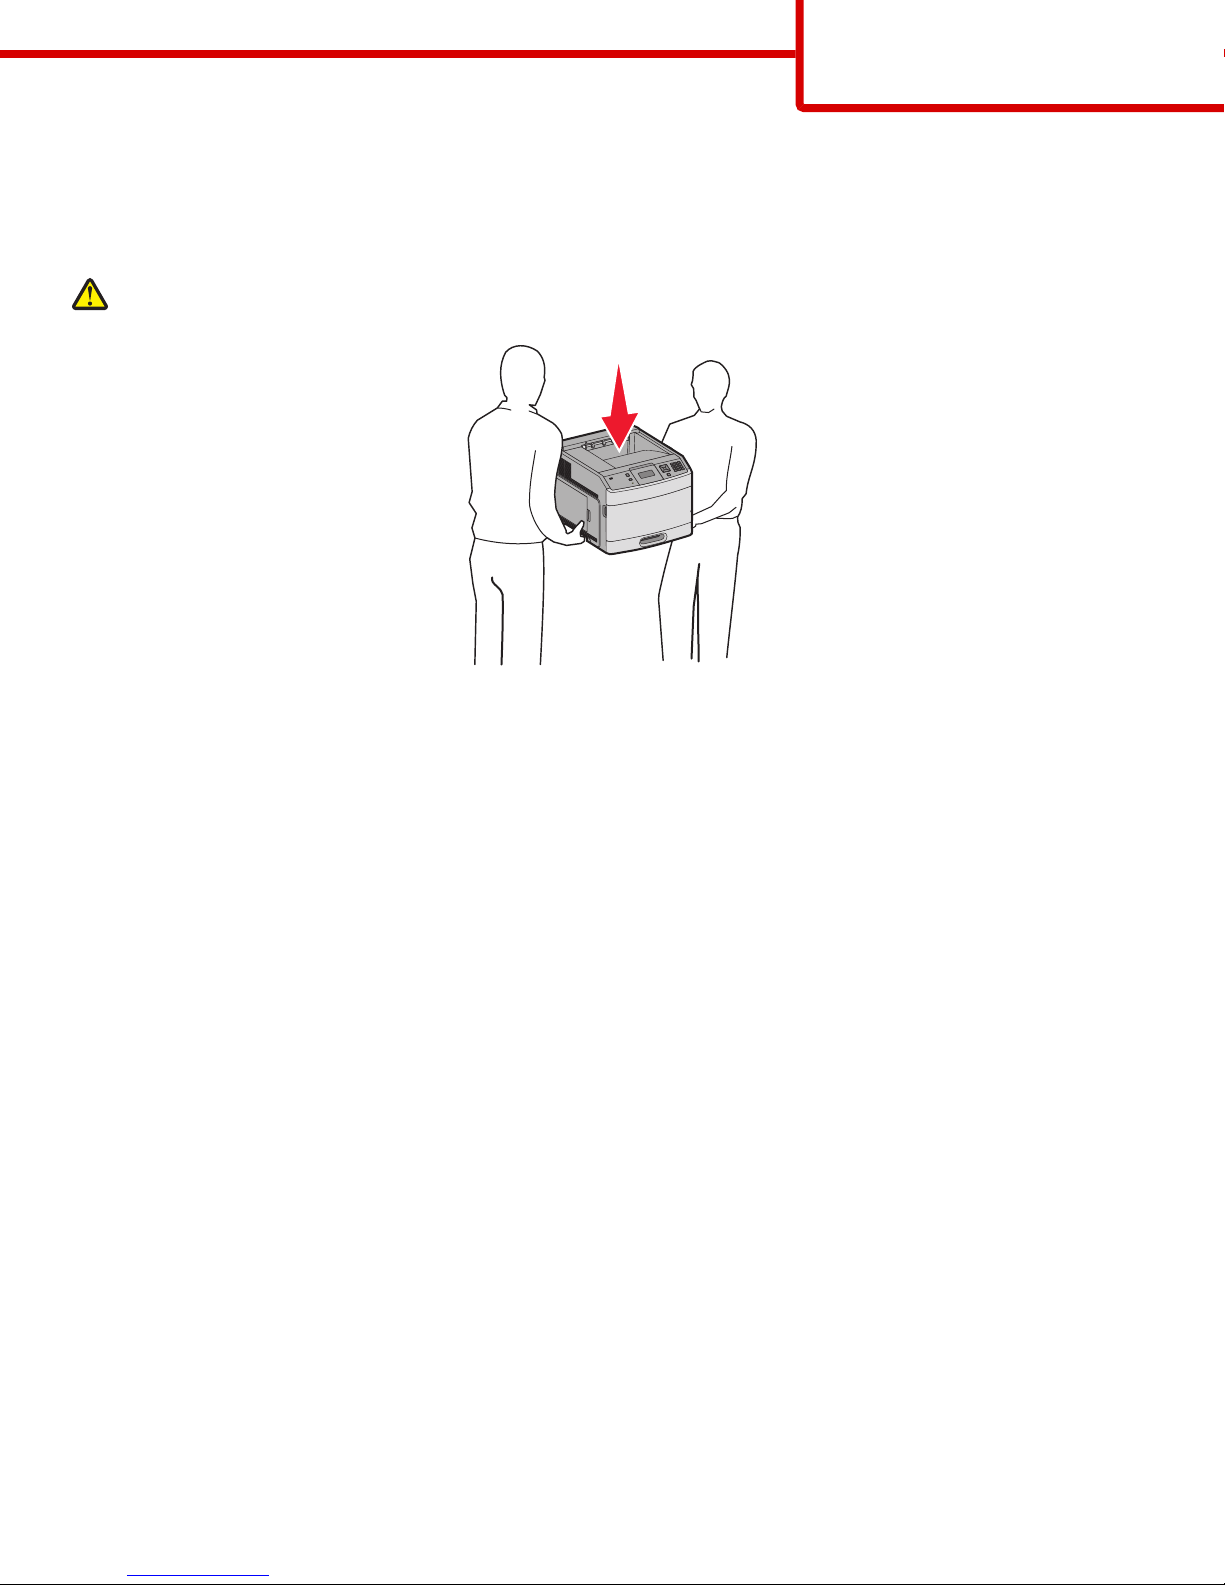
CAUTION—POTENTIAL INJURY: The printer weight is greater than 18 kg (40 lb) and requires two or more trained
personnel to lift it safely.
Follow these guidelines to avoid personal injury or printer damage:
• Turn the printer off using the power switch, and then unplug the power cord from the wall outlet.
• Disconnect all cords and cables from the printer before moving it.
• Remove all printer options before moving the printer.
• Use the handholds on the sides of the printer to lift it, and make sure your fingers are not under the printer when you set
it down.
Warning—Potential Damage: Damage to the printer caused by improper moving is not covered by the printer warranty.
Moving the printer to another location
The printer and options can be safely moved to another location by following these precautions:
• Any cart used to move the printer must have a surface able to support the full footprint of the printer. Any cart used to
move the options must have a surface able to support the dimensions of the options.
• Keep the printer in an upright position.
• Avoid severe jarring movements.
Setting the printer up in a new location
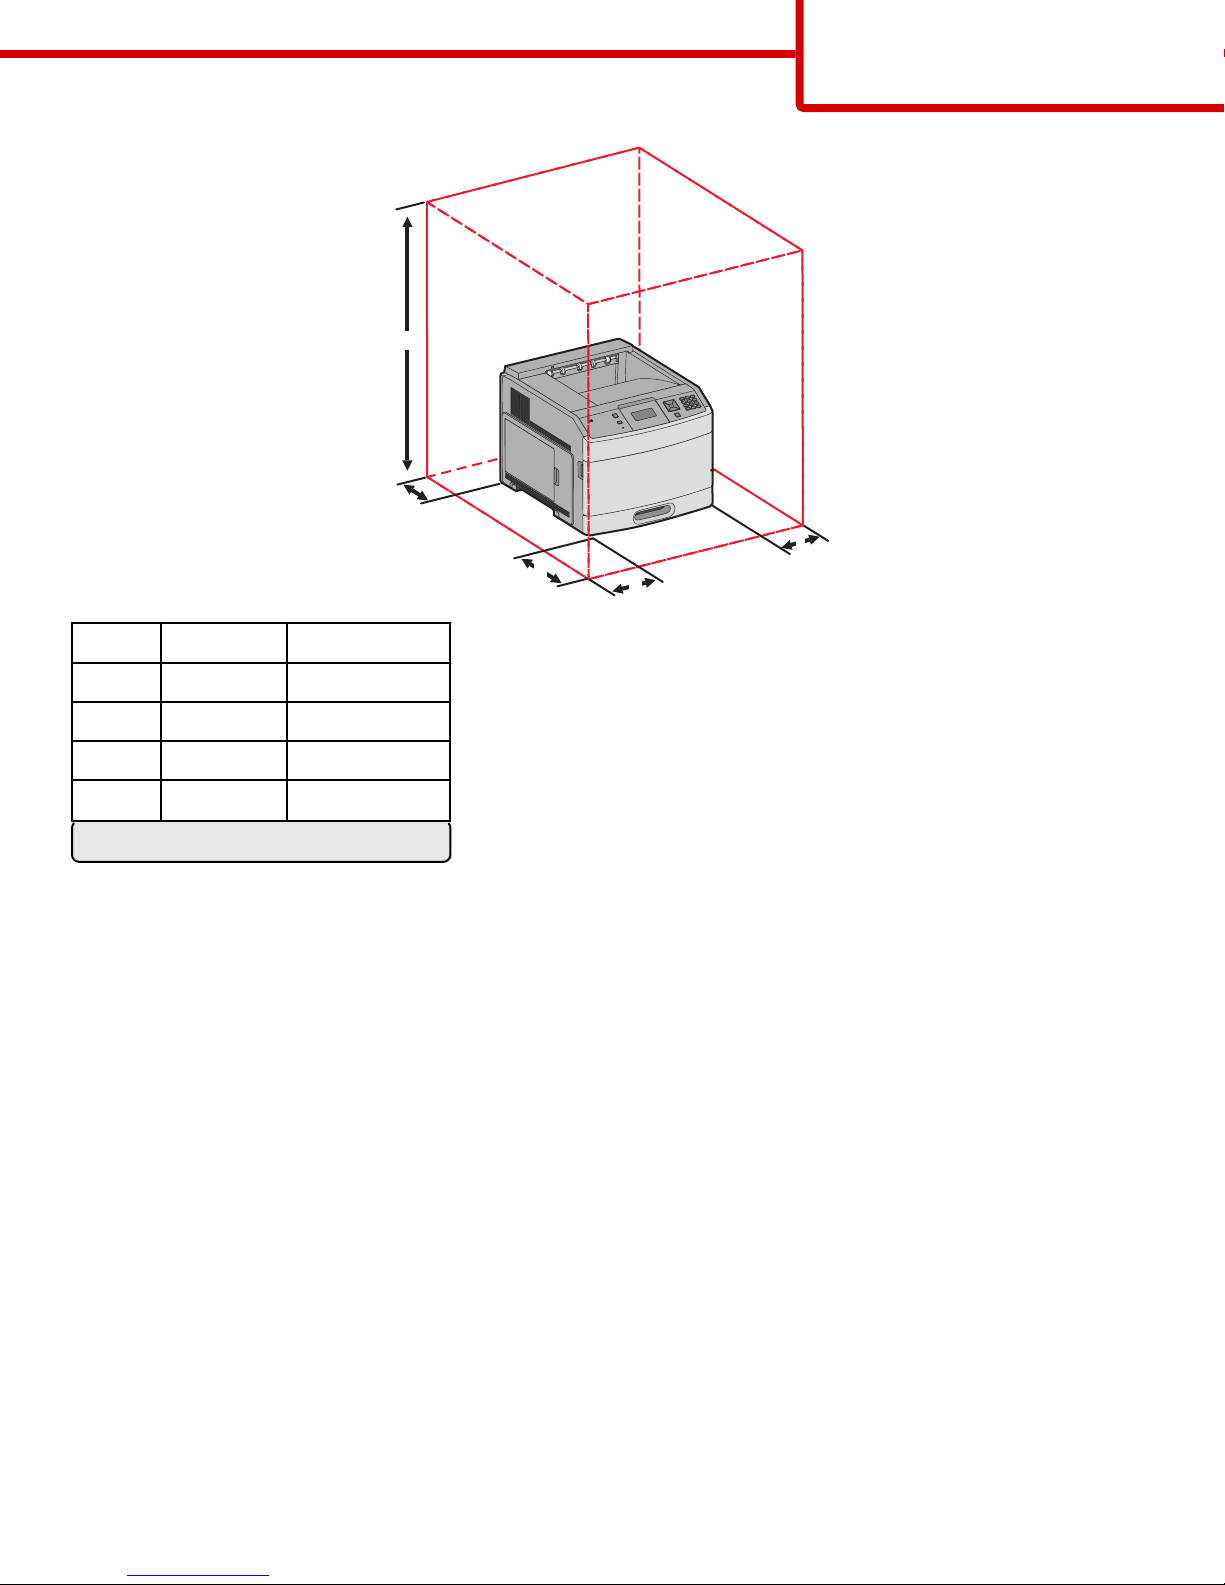
Allow the following recommended amount of space around the printer:
Page 18
Moving the printer
Page 18 of 42
5
4
1
3
2
Right Side 31 cm (12 in.)
1
Left Side 31 cm (12 in.)
2
Front 51 cm (20 in.)
3
Rear 31 cm (12 in.)
4
Top
1
5
1
Allows for addition of all output options.
137 cm (54 in.)
Shipping the printer
When shipping the printer, use the original packaging or call the place of purchase for a relocation kit.
Page 19
Quality guide
Page 19 of 42
Quality guide
The Quality guide helps users understand how operations available on the printer can be used to adjust and customize output.
Quality menu
Menu item Description
Print Resolution
300 dpi
600 dpi
1200 dpi
1200 IQ
2400 IQ
Pixel Boost
Off
Fonts
Horizontally
Vertically
Both Directions
Toner Darkness
1–10
Specifies the printed output resolution
Note: 600 dpi is the factory default setting. The printer driver default is 1200 IQ.
Enhances the printed quality of small fonts and graphics
Notes:
• Off is the factory default setting.
• Fonts applies this setting only to text.
• Horizontally darkens horizontal lines of text and images.
• Vertically darkens vertical lines of text and images.
• Both Directions darkens horizontal and vertical lines on text and images.
Lightens or darkens the printed output
Notes:
• 8 is the factory default setting.
• Selecting a smaller number can help conserve toner.
Enhance Fine Lines
On
Off
Gray Correction
Auto
Off
Brightness
-6–6
Enables a print mode preferable for files such as architectural drawings, maps, electrical
circuit diagrams, and flow charts
Notes:
• Off is the factory default setting.
• To set Enhance Fine Lines using the Embedded Web Server, type the network printer
IP address in a browser window.
Adjusts the contrast enhancement applied to images.
Note: Auto is the factory default setting.
Adjusts or darkens printed output and conserves toner
Notes:
• +0 is the factory default setting.
• A negative value will darken text, images, and graphics. A positive value will lighten
them.
Page 20

Menu item Description
Quality guide
Page 20 of 42
Contrast
0–5
Adjusts the degree of difference between levels of gray in printed output
Notes:
• 0 is the factory default setting.
• Higher settings show more difference between levels of gray.
Page 21
Print quality guide
Page 21 of 42
Print quality guide
Isolating print quality problems
To help isolate print quality problems, print the print quality test pages:
1 Turn the printer off.
2 From the printer control panel, press and hold and the right arrow button while turning the printer on.
3 Release both buttons when Performing Self Test appears.
The printer performs its power-on sequence, and then Config Menu appears.
4 Press the down arrow button until Prt Quality Pgs appears, and then press .
The pages are formatted, Printing Quality Test Pages appears, and then the pages print. The message remains
on the printer control panel display until all the pages print.
5 After the print quality test pages print, press the down arrow button until Exit Config Menu appears, and then
press
.
The information in the following topics may help you solve print quality problems. If these suggestions still do not correct the
problem, then call for service. You may have a printer part that requires adjustment or replacement.
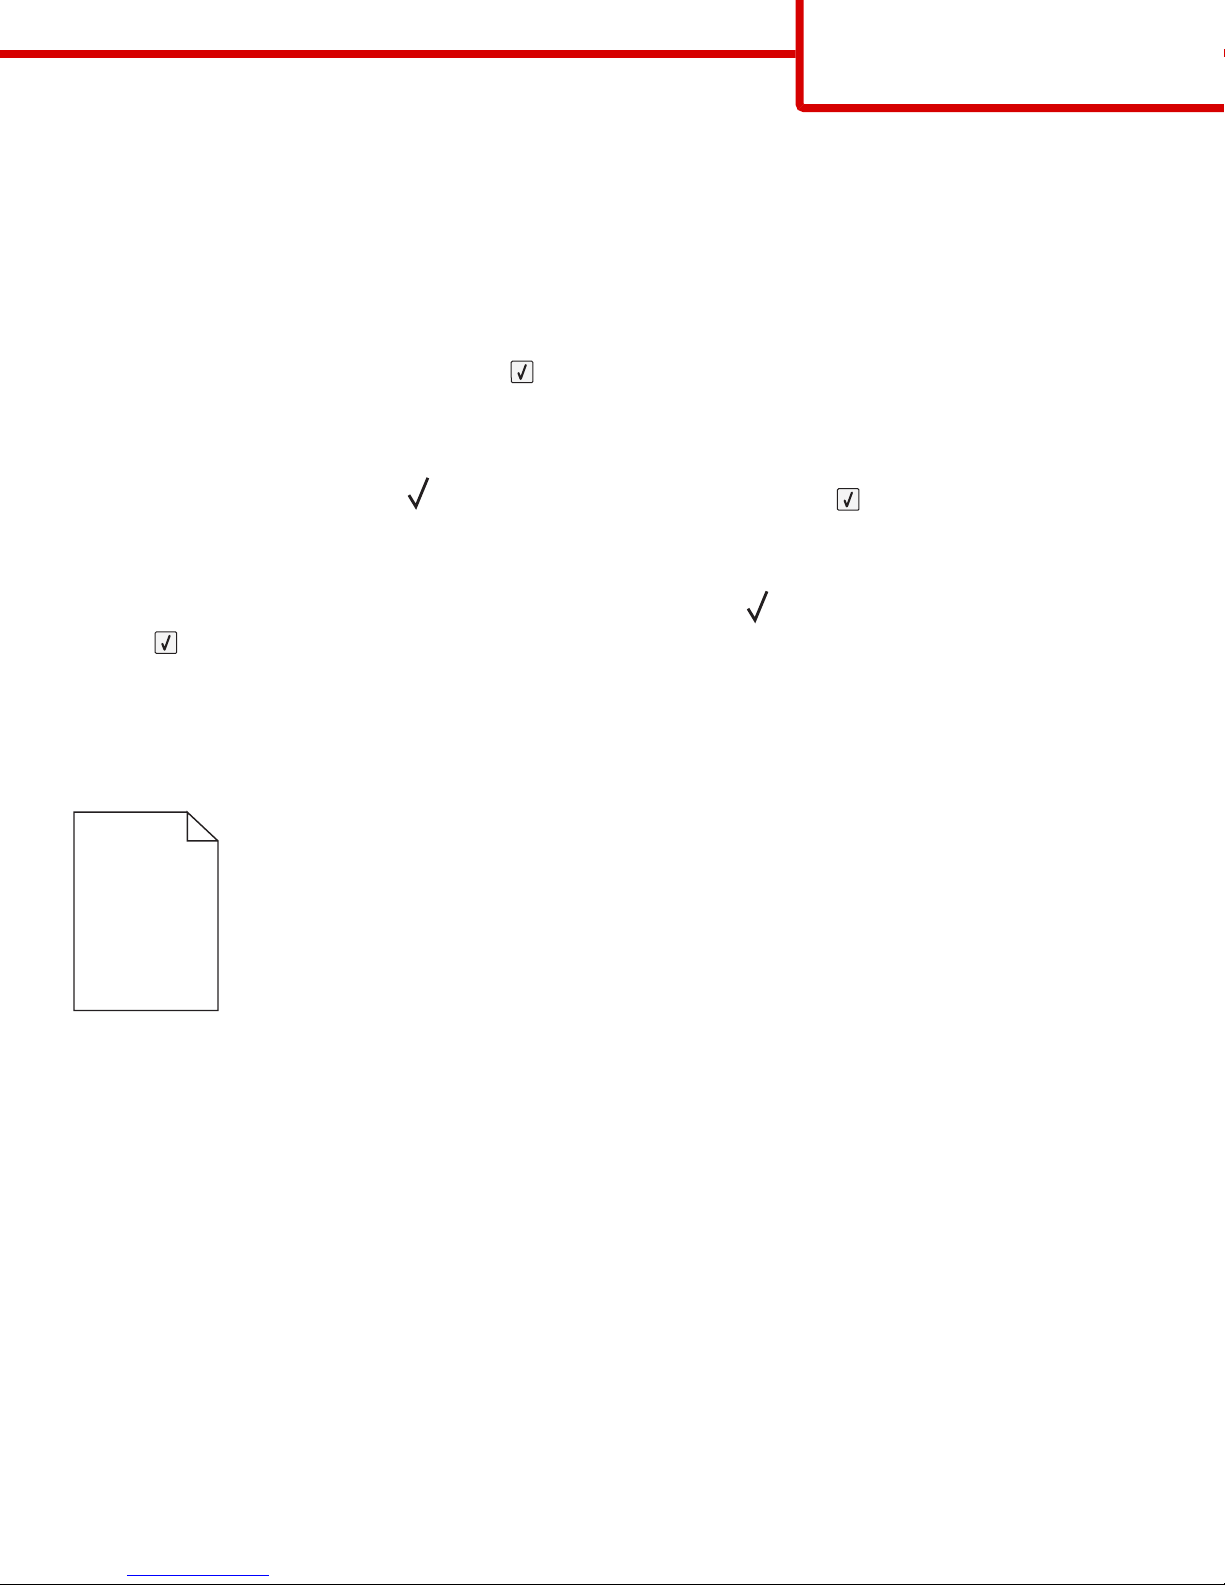
Blank pages
These are possible solutions. Try one or more of the following:
PACKING MATERIAL MAY BE ON THE PRINT CARTRIDGE
Remove the print cartridge and make sure the packing material is properly removed. Reinstall the print cartridge.
THE TONER MAY BE LOW
When 88 Cartridge low appears, order a new print cartridge.
If the problem continues, the printer may need to be serviced. For more information, contact Customer Support.
Page 22
Print quality guide
Page 22 of 42
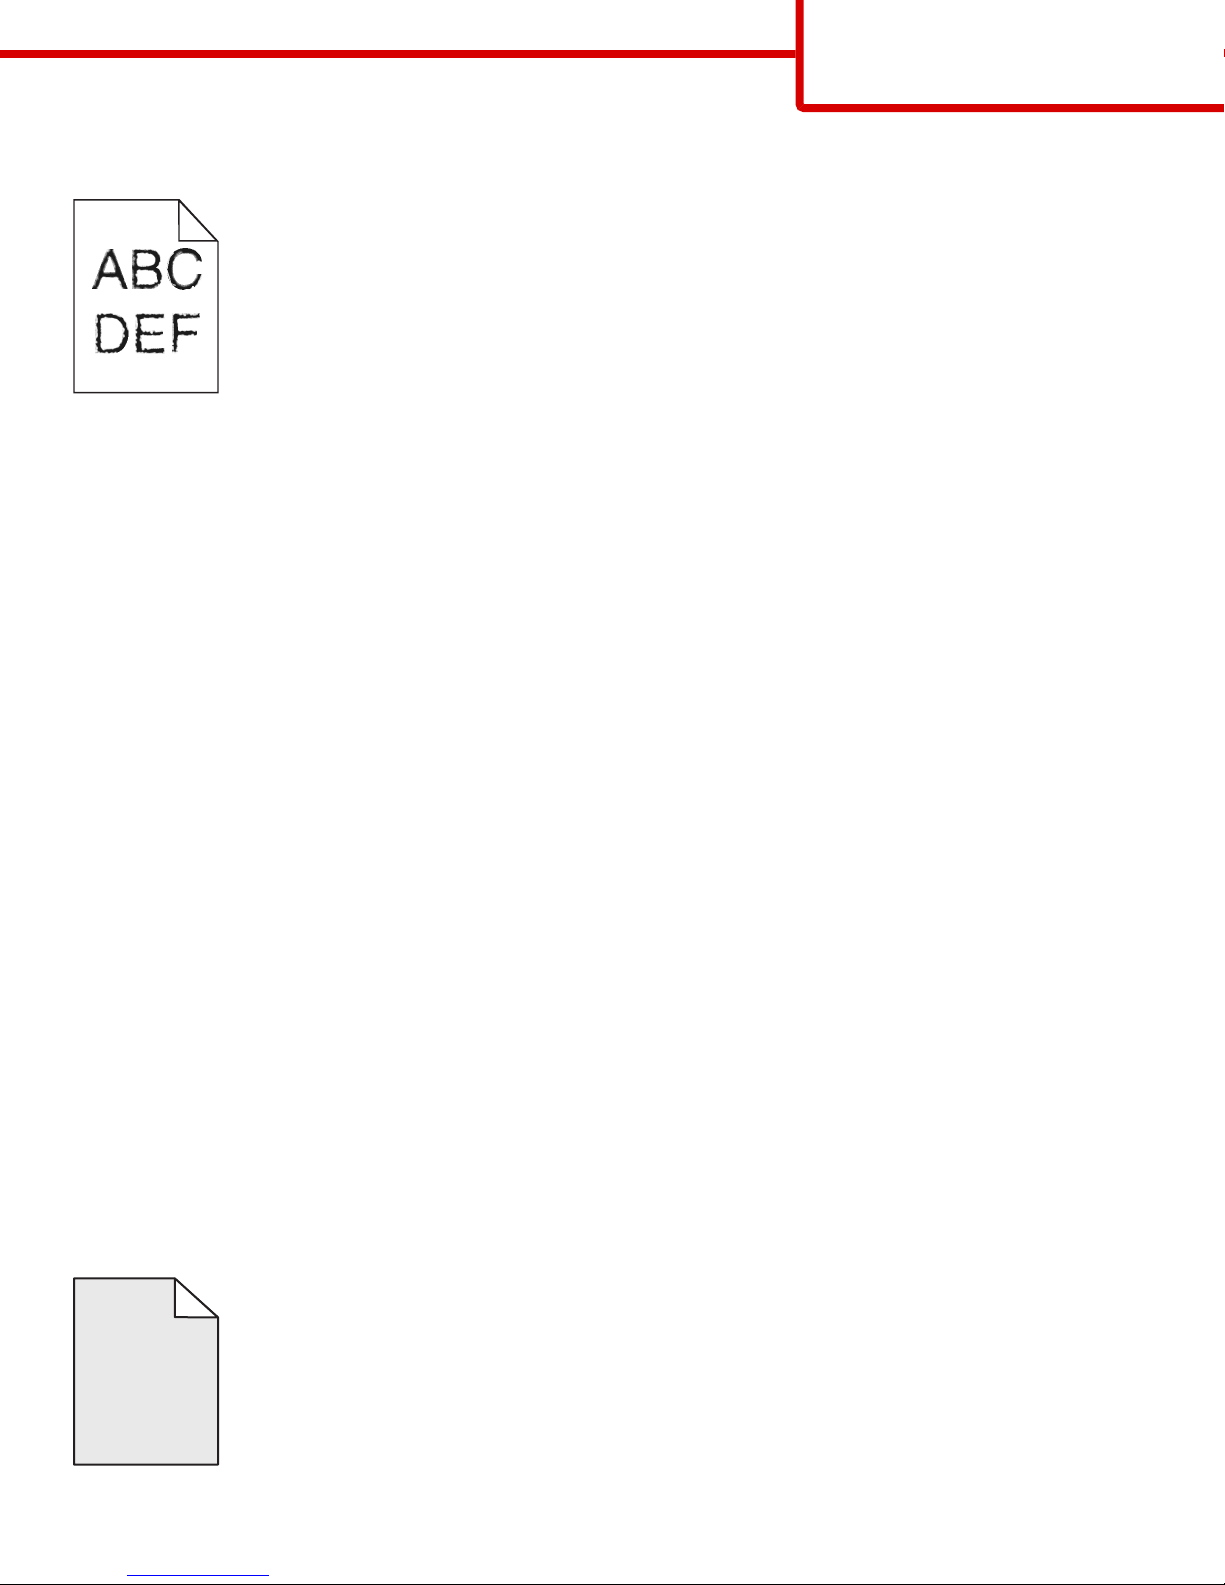
Characters have jagged or uneven edges
These are possible solutions. Try one or more of the following:
CHECK THE PRINT QUALITY SETTINGS
• Change the Print Resolution setting in the Quality menu to 600 dpi, 1200 Image Q, 1200 dpi, or 2400 Image Q.
• Enable Enhance Fine Lines in the Quality menu.
MAKE SURE DOWNLOADED FONTS ARE SUPPORTED
If you are using downloaded fonts, then verify that the fonts are supported by the printer, the host computer, and the software
program.
Clipped images
These are possible solutions. Try one or more of the following:
CHECK THE GUIDES
Move the width and length guides in the tray to the correct positions for the paper size loaded.
CHECK THE PAPER SIZE SETTING
Make sure the paper size setting matches the paper loaded in the tray:
1 From the printer control panel, check the Paper Size setting from the Paper menu.
2 Before sending the job to print, specify the correct size setting:
• For Windows users, specify the size from Print Properties.
• For Macintosh users, specify the size from the Page Setup dialog.
Gray background
ABCDE
ABCDE
ABCDE
Page 23
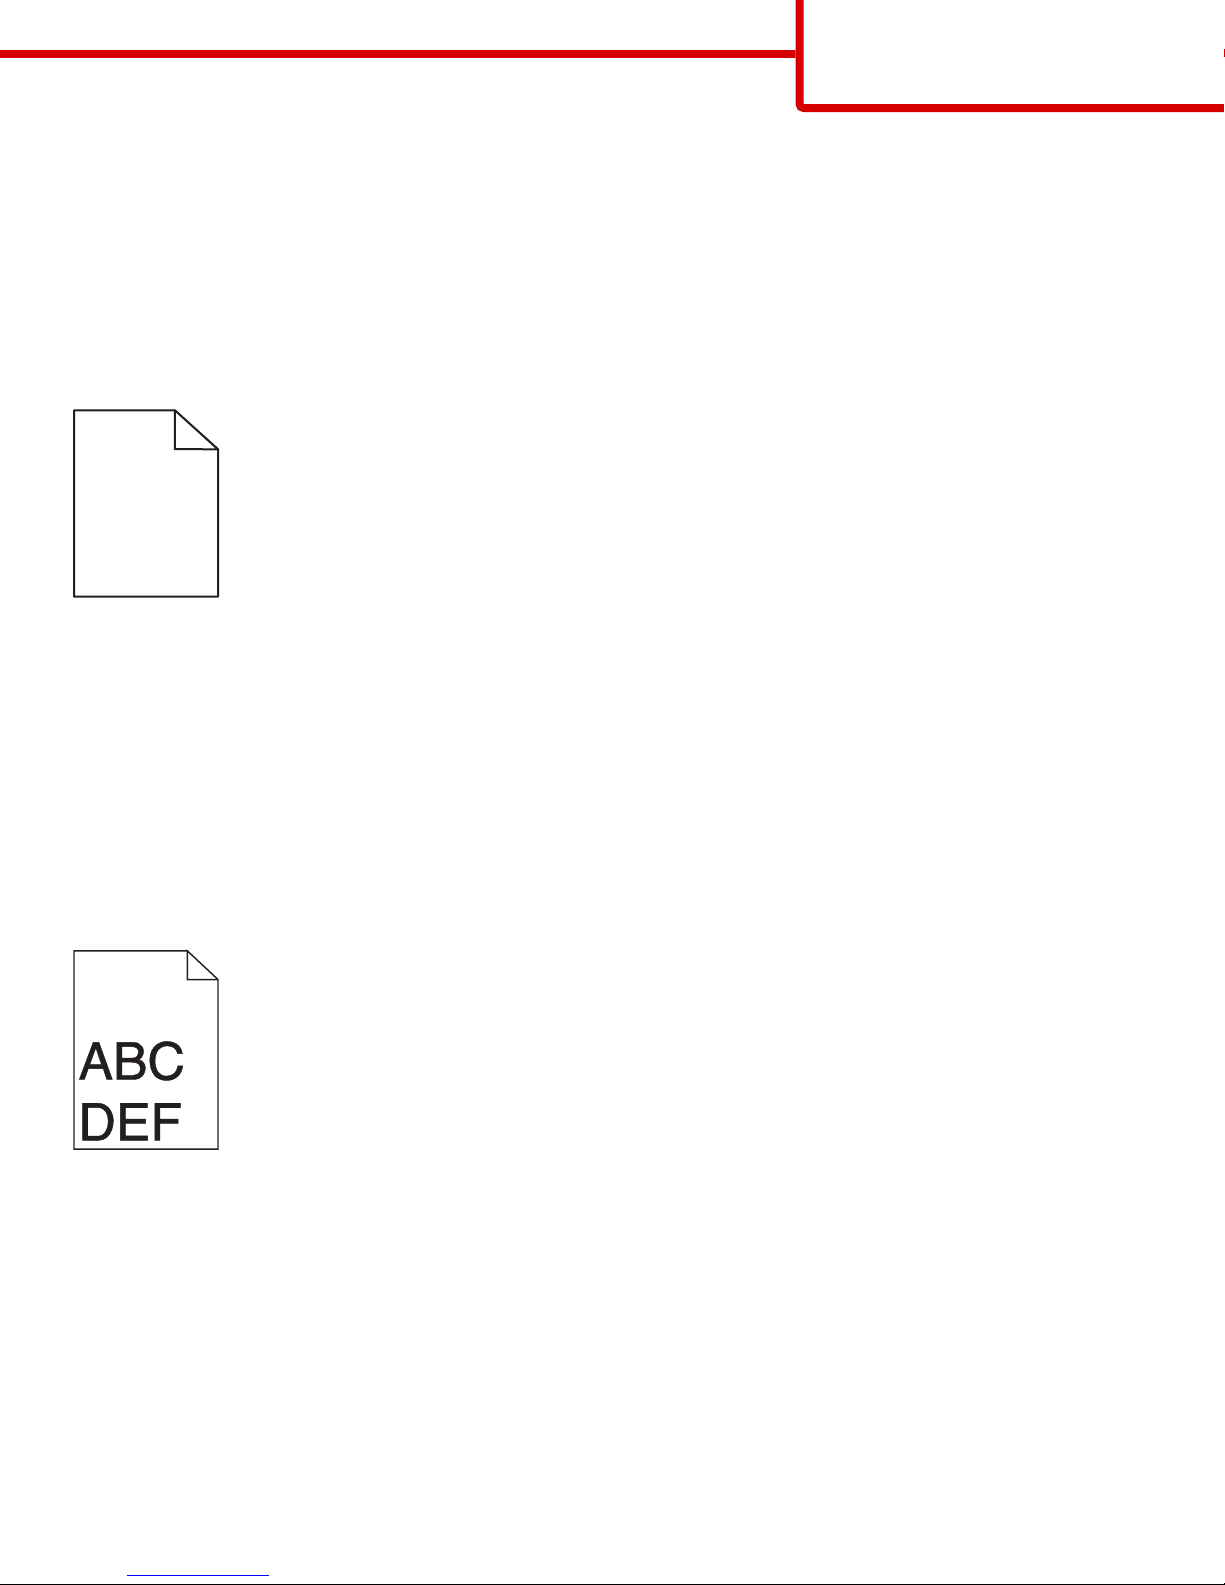
CHECK THE TONER DARKNESS SETTING
Select a lighter Toner Darkness setting:
• From the printer control panel, change the setting from the Quality menu.
• For Windows users, change the setting from Print Properties.
• For Macintosh users, change the setting from the Print dialog.
Ghost images
ABCDE
ABCDE
ABCDE
ABCDE
ABCDE
ABCDE
Print quality guide
Page 23 of 42
CHECK THE PAPER TYPE SETTING
Make sure the paper type setting matches the paper loaded in the tray:
1 From the printer control panel, check the Paper Type setting from the Paper menu.
2 Before sending the job to print, specify the correct type setting:
• For Windows users, specify the type from Print Properties.
• For Macintosh users, specify the type from the Print dialog.
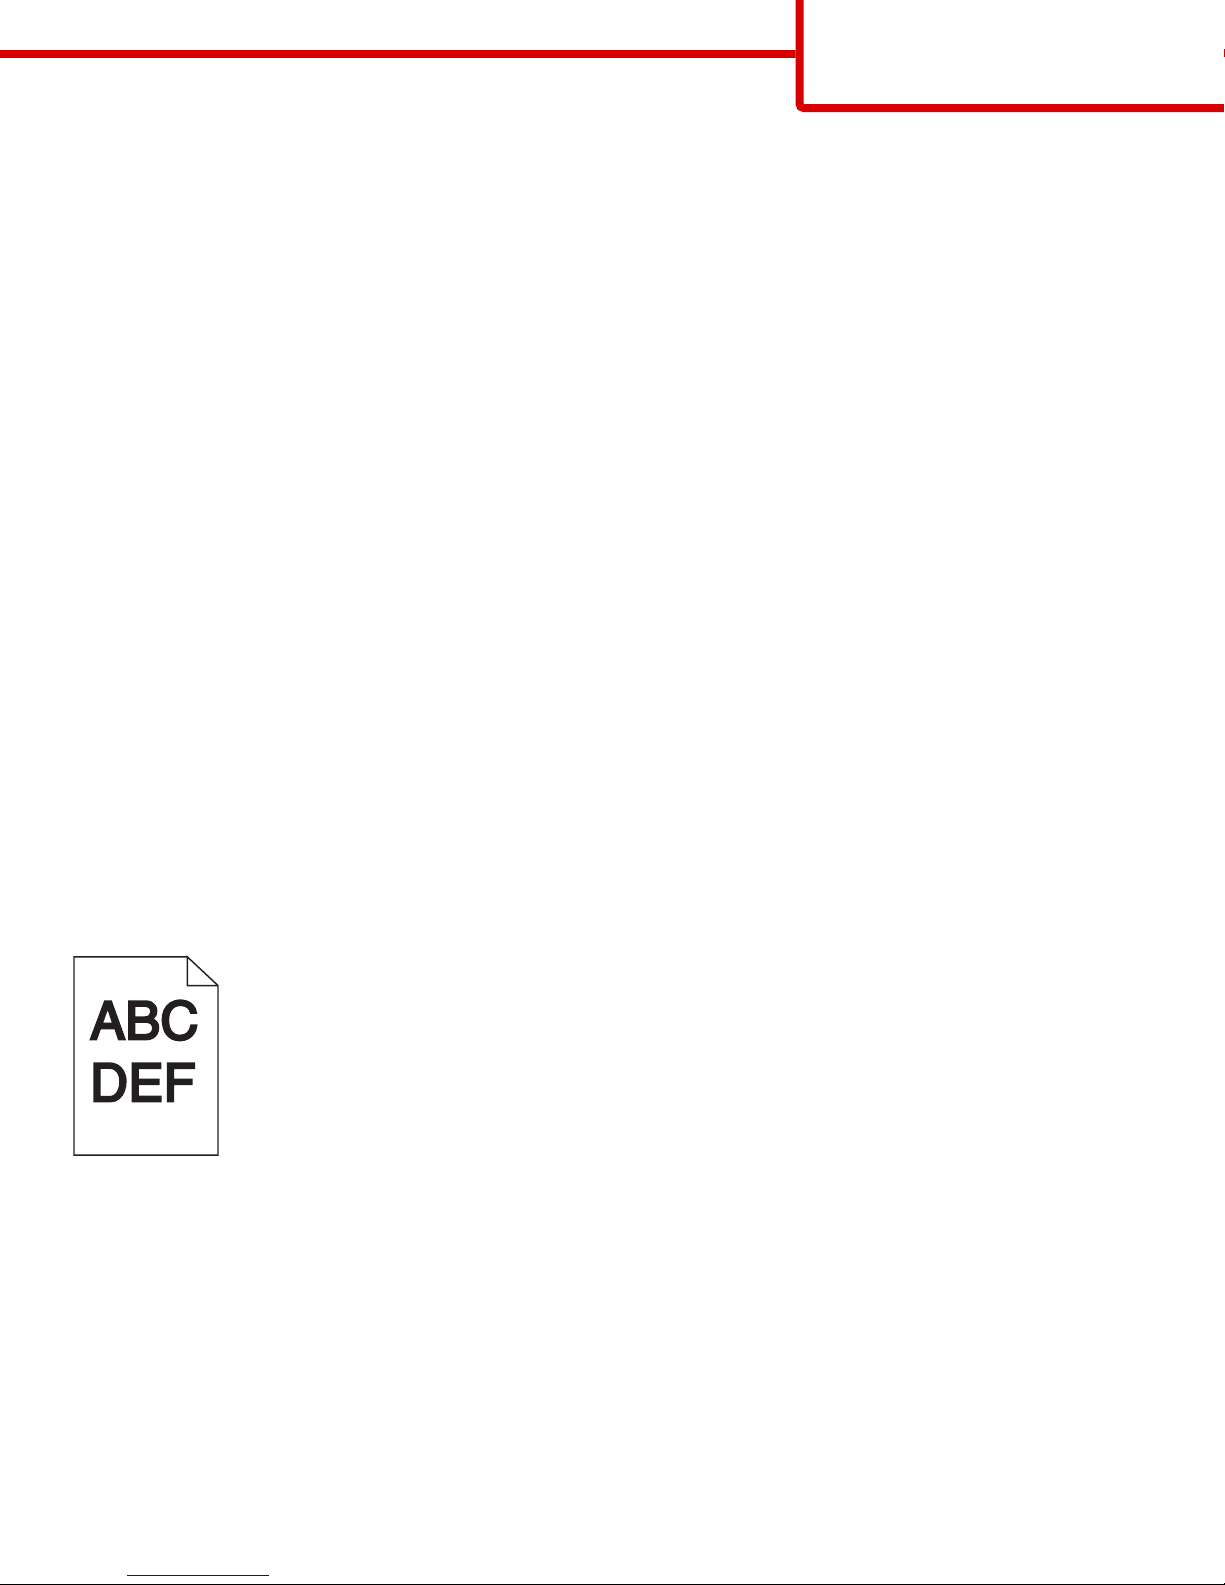
Incorrect margins
These are possible solutions. Try one or more of the following:
CHECK THE PAPER GUIDES
Move the guides in the tray to the correct positions for the paper size loaded.
Page 24
CHECK THE PAPER SIZE SETTING
Make sure the paper size setting matches the paper loaded in the tray:
1 From the printer control panel, check the Paper Size setting from the Paper menu.
2 Before sending the job to print, specify the correct size setting:
• For Windows users, specify the size from Print Properties.
• For Macintosh users, specify the size from the Page Setup dialog.
Paper curl
These are possible solutions. Try one or more of the following:
CHECK THE PAPER TYPE SETTING
Make sure the paper type setting matches the paper loaded in the tray:
1 From the printer control panel, check the Paper Type setting from the Paper menu.
Print quality guide
Page 24 of 42
2 Before sending the job to print, specify the correct type setting:
• For Windows users, specify the type from Print Properties.
• For Macintosh users, specify the type from the Print dialog.
THE PAPER HAS ABSORBED MOISTURE DUE TO HIGH HUMIDITY
• Load paper from a fresh package.
• Store paper in its original wrapper until you use it.
Print is too dark
These are possible solutions. Try one or more of the following:
CHECK THE DARKNESS, BRIGHTNESS, AND CONTRAST SETTINGS
The Toner Darkness setting is too dark, the Brightness setting is too dark, or the Contrast setting is too high.
• From the printer control panel, change these settings from the Quality menu.
• For Windows users, change these settings from Print Properties.
• For Macintosh users, change these settings from the Print dialog and pop-up menus.
Page 25

THE PAPER HAS ABSORBED MOISTURE DUE TO HIGH HUMIDITY
• Load paper from a fresh package.
• Store paper in its original wrapper until you use it.
CHECK THE PAPER
Avoid textured paper with rough finishes.
CHECK THE PAPER TYPE SETTING
Make sure the paper type setting matches the paper loaded in the tray:
1 From the printer control panel, check the Paper Type setting from the Paper menu.
2 Before sending the job to print, specify the correct type setting:
• For Windows users, specify the type from Print Properties.
• For Macintosh users, specify the type from the Print dialog.
Print quality guide
Page 25 of 42
THE PRINT CARTRIDGE MAY BE DEFECTIVE
Replace the print cartridge.
Print is too light
These are possible solutions. Try one or more of the following:
CHECK THE DARKNESS, BRIGHTNESS, AND CONTRAST SETTINGS
The Toner Darkness setting is too light, the Brightness setting is too light, or the Contrast setting is too low.
• From the printer control panel, change these settings from the Quality menu.
• For Windows users, change these settings from Print Properties.
• For Macintosh users, change these settings from the Print dialog and pop-up menus.
THE PAPER HAS ABSORBED MOISTURE DUE TO HIGH HUMIDITY
• Load paper from a fresh package.
• Store paper in its original wrapper until you use it.
Page 26

CHECK THE PAPER
Avoid textured paper with rough finishes.
CHECK THE PAPER TYPE SETTING
Make sure the paper type setting matches the paper loaded in the tray:
1 From the printer control panel, check the Paper Type setting from the Paper menu.
2 Before sending the job to print, specify the correct type setting:
• For Windows users, specify the type from Print Properties.
• For Macintosh users, specify the type from the Print dialog.
THE TONER IS LOW
When 88 Cartridge Low appears, order a new print cartridge.
Print quality guide
Page 26 of 42
THE PRINT CARTRIDGE MAY BE DEFECTIVE
Replace the print cartridge.
Skewed print
CHECK THE PAPER GUIDES
Move the guides in the tray to the correct positions for the paper size loaded.
CHECK THE PAPER
Make sure you are using paper that meets the printer specifications.
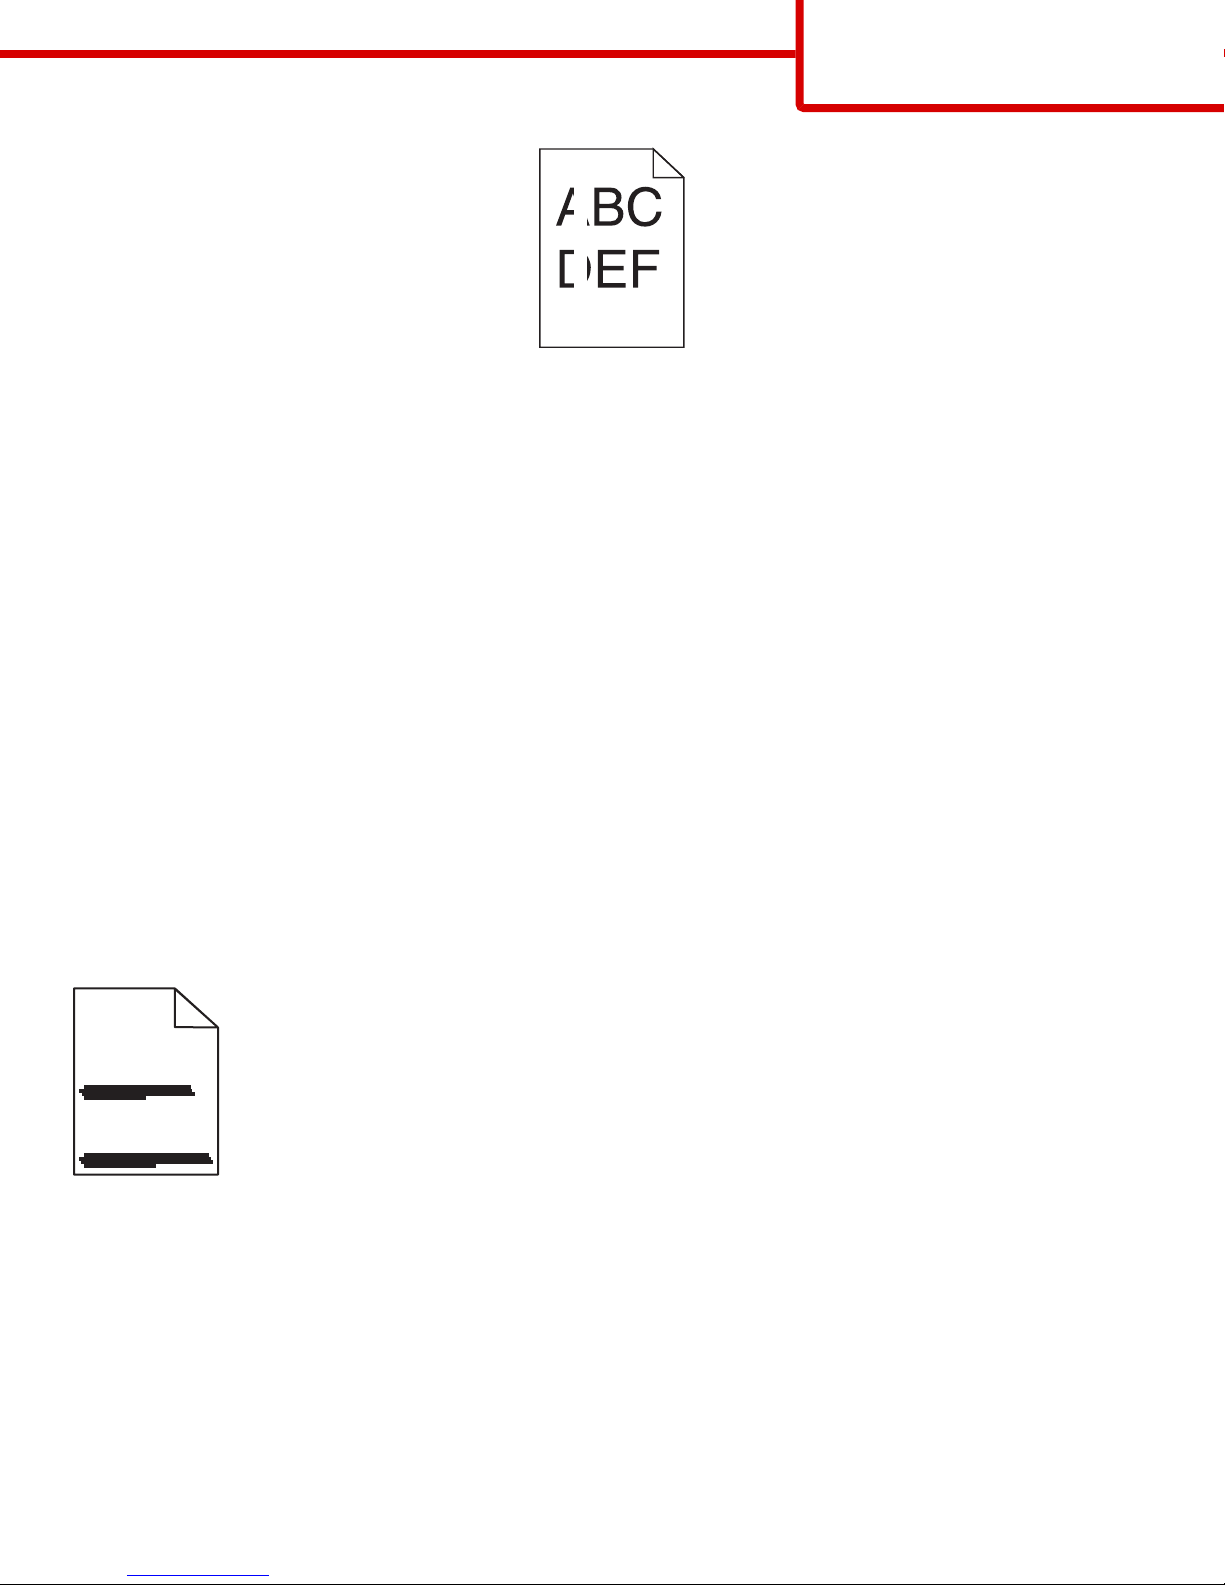
Solid black or white streaks
Page 27
Print quality guide
Page 27 of 42
These are possible solutions. Try one or more of the following:
MAKE SURE THE FILL PATTERN IS CORRECT
If the fill pattern is incorrect, choose a different fill pattern from your software program or application.
CHECK THE PAPER TYPE
• Try a different type of paper.
• Use only transparencies recommended by the printer manufacturer.
• Make sure the Paper Type and Paper Texture settings match the paper loaded in the tray or feeder.
MAKE SURE THE TONER IS DISTRIBUTED EVENLY IN THE PRINT CARTRIDGE
Remove the print cartridge and shake it from side to side to redistribute the toner, and then reinstall it.
THE PRINT CARTRIDGE MAY BE DEFECTIVE OR LOW ON TONER
Replace the used print cartridge with a new one.
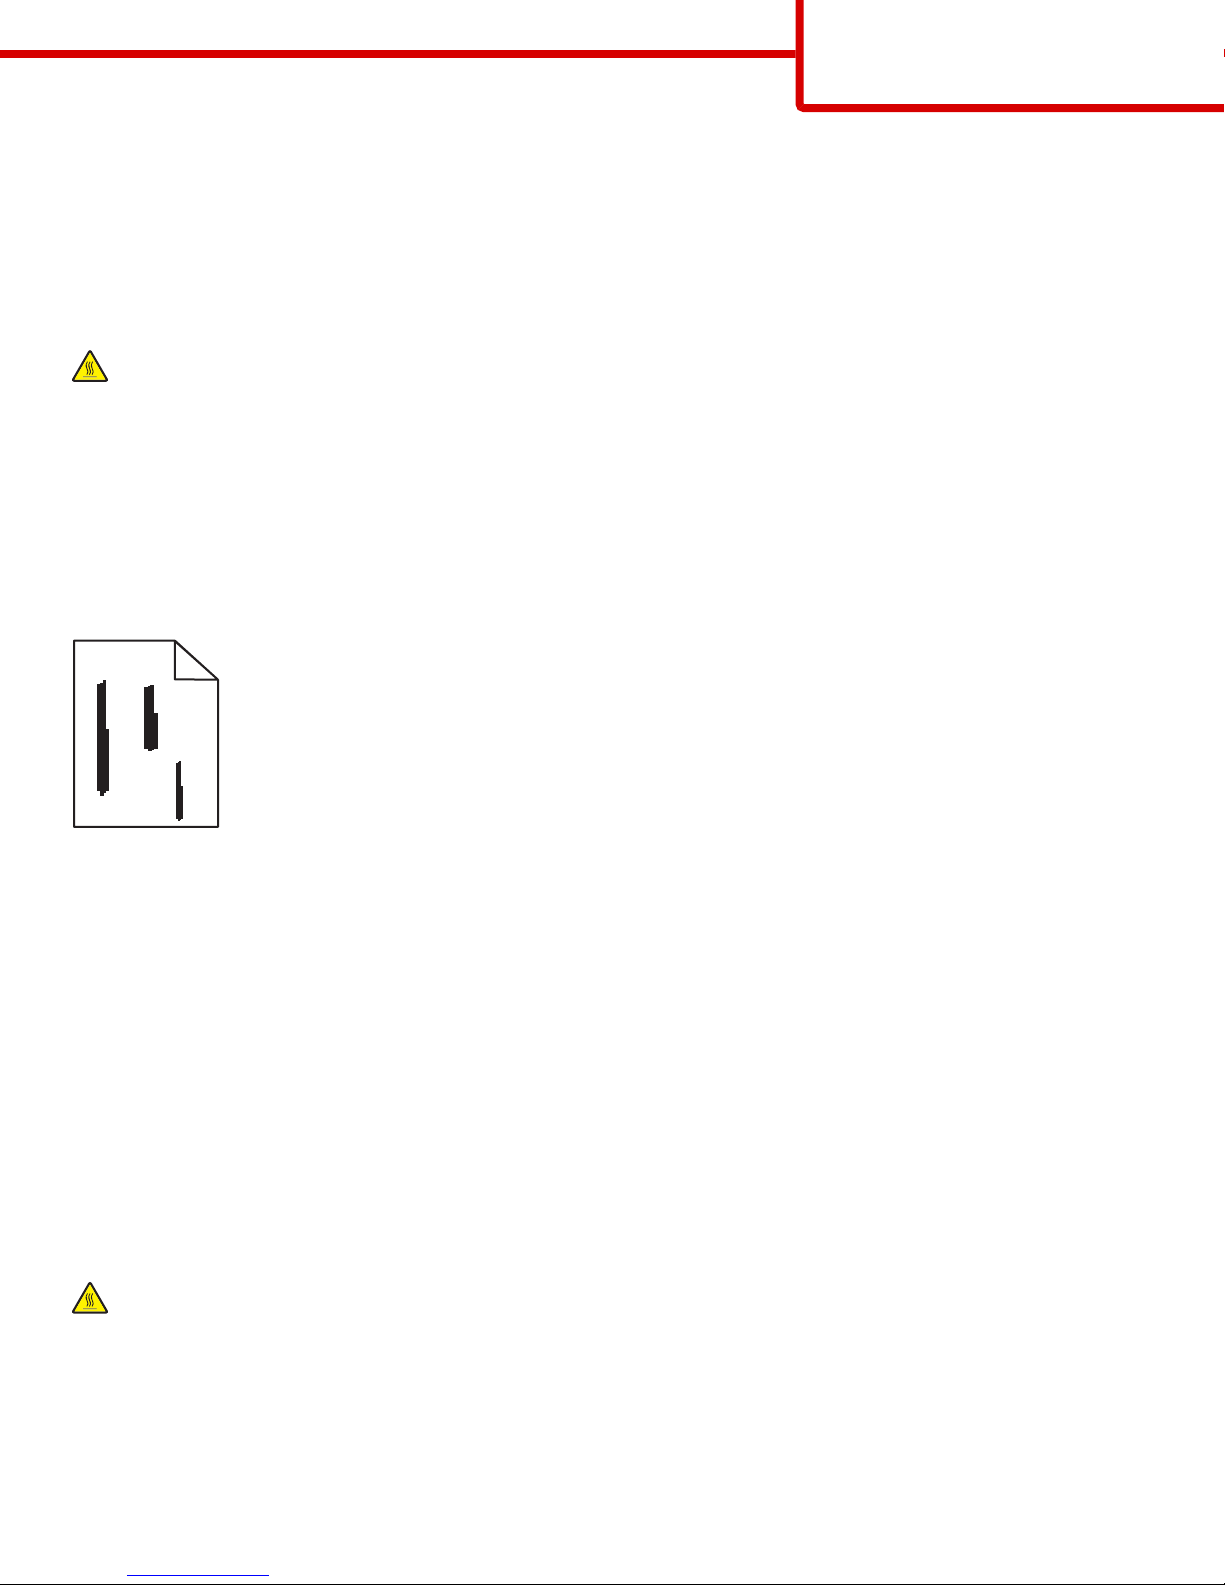
Streaked horizontal lines
ABCDE
ABCDE
ABCDE
These are the possible solutions. Try one or more of the following:
THE TONER IS SMEARED
Select another tray or feeder to feed the paper for the job:
• From the printer control panel, select the Default Source from the Paper Menu.
• For Windows users, select the paper source from Print Properties.
• For Macintosh users, select the paper source from the Print dialog and pop-up menus.
Page 28
Print quality guide
Page 28 of 42
THE PRINT CARTRIDGE MAY BE DEFECTIVE
Replace the print cartridge.
THE PAPER PATH MAY NOT BE CLEAR
Check the paper path around the print cartridge.
CAUTION—HOT SURFACE: The inside of the printer might be hot. To reduce the risk of injury from a hot component,
allow the surface to cool before touching.
Clear any paper you see.
THERE IS TONER IN THE PAPER PATH
Contact Customer Support.
Streaked vertical lines
ABCDE
ABCDE
ABCDE
THE TONER IS SMEARED
Select another tray or feeder to feed paper for the job:
• From the printer control panel, select the Default Source from the Paper Menu.
• For Windows users, select the paper source from Print Properties.
• For Macintosh users, select the paper source from the Print dialog and pop-up menus.
THE PRINT CARTRIDGE IS DEFECTIVE
Replace the print cartridge.
THE PAPER PATH MAY NOT BE CLEAR
Check the paper path around the print cartridge.
CAUTION—HOT SURFACE: The inside of the printer might be hot. To reduce the risk of injury from a hot component,
allow the surface to cool before touching.
Clear any paper you see.
THERE IS TONER IN THE PAPER PATH
Contact Customer Support.
Page 29
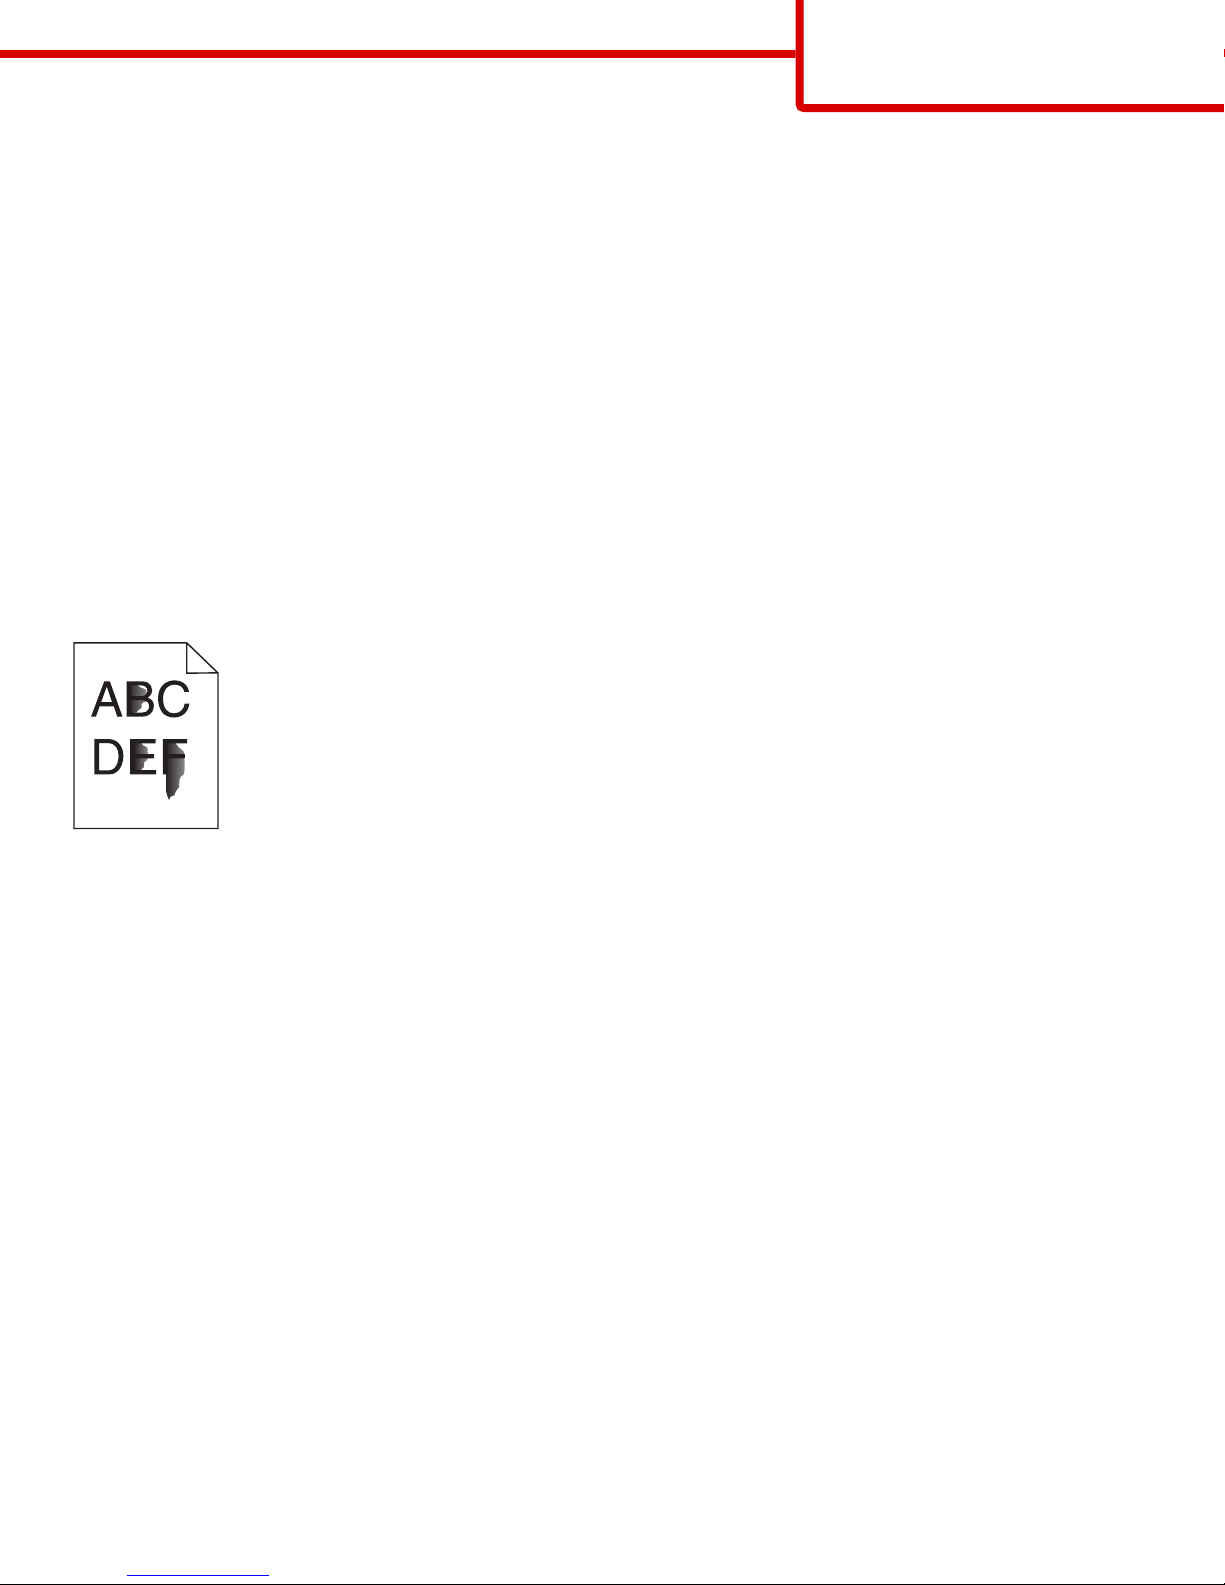
Toner fog or background shading appears on the page
These are possible solutions. Try one or more of the following:
THE PRINT CARTRIDGE MAY BE DEFECTIVE
Replace the print cartridge.
THE CHARGE ROLLS MAY BE DEFECTIVE
Replace the charge rolls.
THERE IS TONER IN THE PAPER PATH
Contact Customer Support.
Toner rubs off
Print quality guide
Page 29 of 42
These are possible solutions. Try one or more of the following:
CHECK THE PAPER TYPE SETTING
Make sure the paper type setting matches the paper loaded in the tray:
1 From the printer control panel, check the Paper Type setting from the Paper menu.
2 Before sending the job to print, specify the correct type setting:
• For Windows users, specify the type from Print Properties.
• For Macintosh users, specify the type from the Print dialog.
CHECK THE PAPER TEXTURE SETTING
From the printer control panel Paper menu, make sure the Paper Texture setting matches the paper loaded in the tray.
Page 30
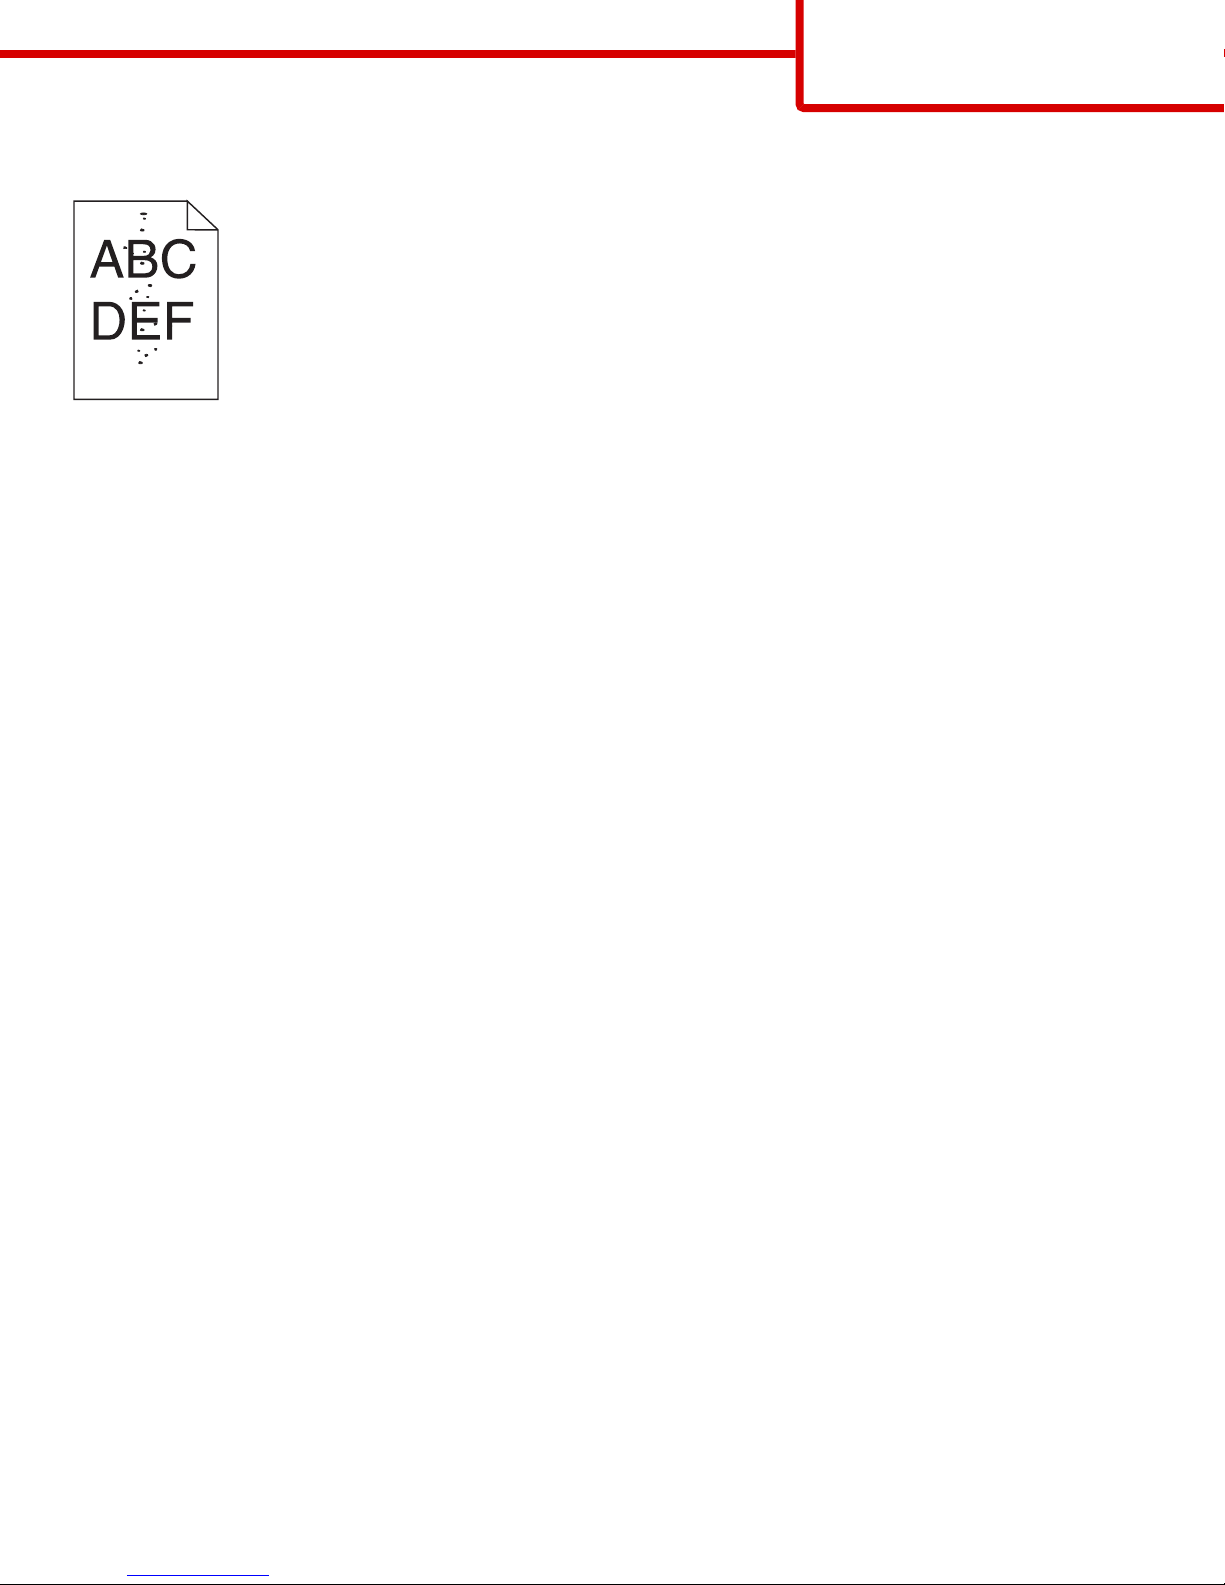
Toner specks
These are possible solutions. Try one or more of the following:
THE PRINT CARTRIDGE MAY BE DEFECTIVE
Replace the print cartridge.
THERE IS TONER IN THE PAPER PATH
Print quality guide
Page 30 of 42
Contact Customer Support.
Transparency print quality is poor
CHECK THE TRANSPARENCIES
Use only transparencies recommended by the printer manufacturer.
CHECK THE PAPER TYPE SETTING
Make sure the paper type setting matches the paper loaded in the tray:
1 From the printer control panel, check the Paper Type setting from the Paper menu.
2 Before sending the job to print, specify the correct type setting:
• For Windows users, specify the type from Print Properties.
• For Macintosh users, specify the type from the Print dialog.
Page 31
Printing guide
Page 31 of 42
Printing guide
This section explains how to load the 250-, 500-, and 2000-sheet trays. It also includes information about setting the Paper
Size and Paper Type.
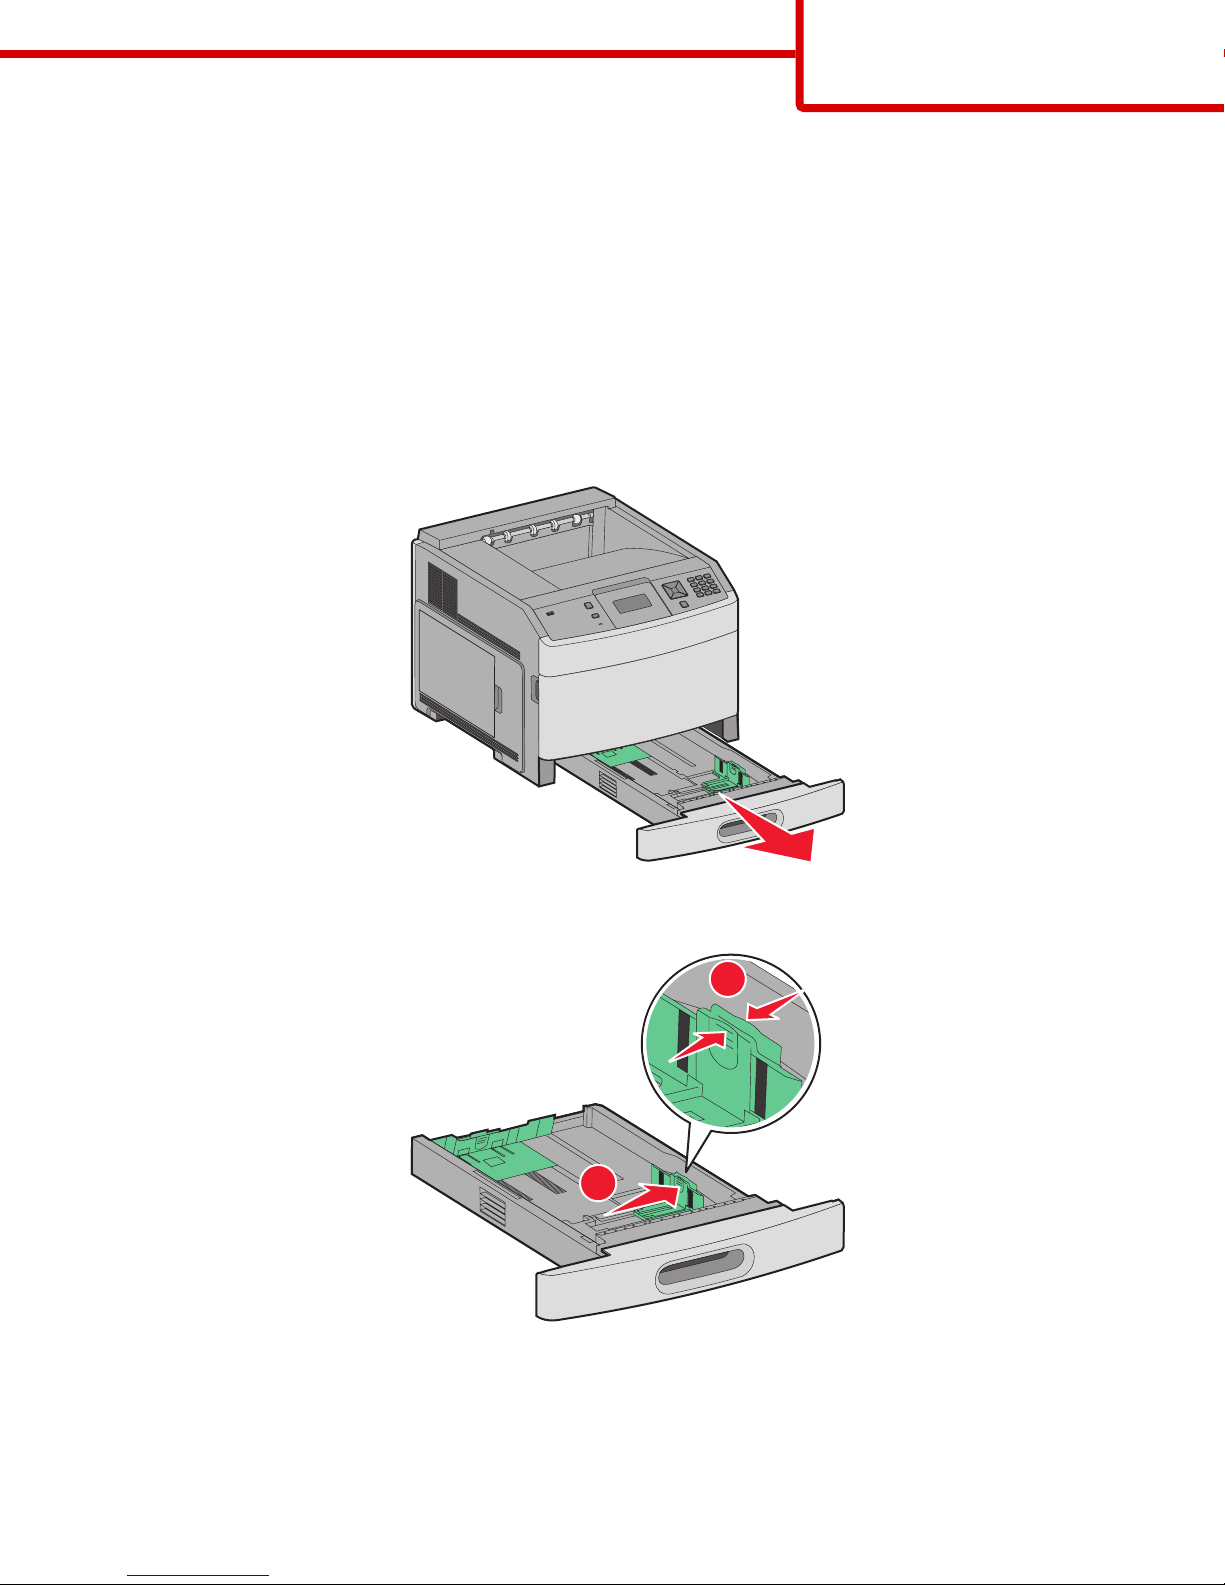
Loading the standard or optional 250-sheet or 550-sheet tray
Although the 250-sheet tray and the 550-sheet tray are different in appearance, they require the same process for loading
paper. Use these instructions to load paper in either tray:
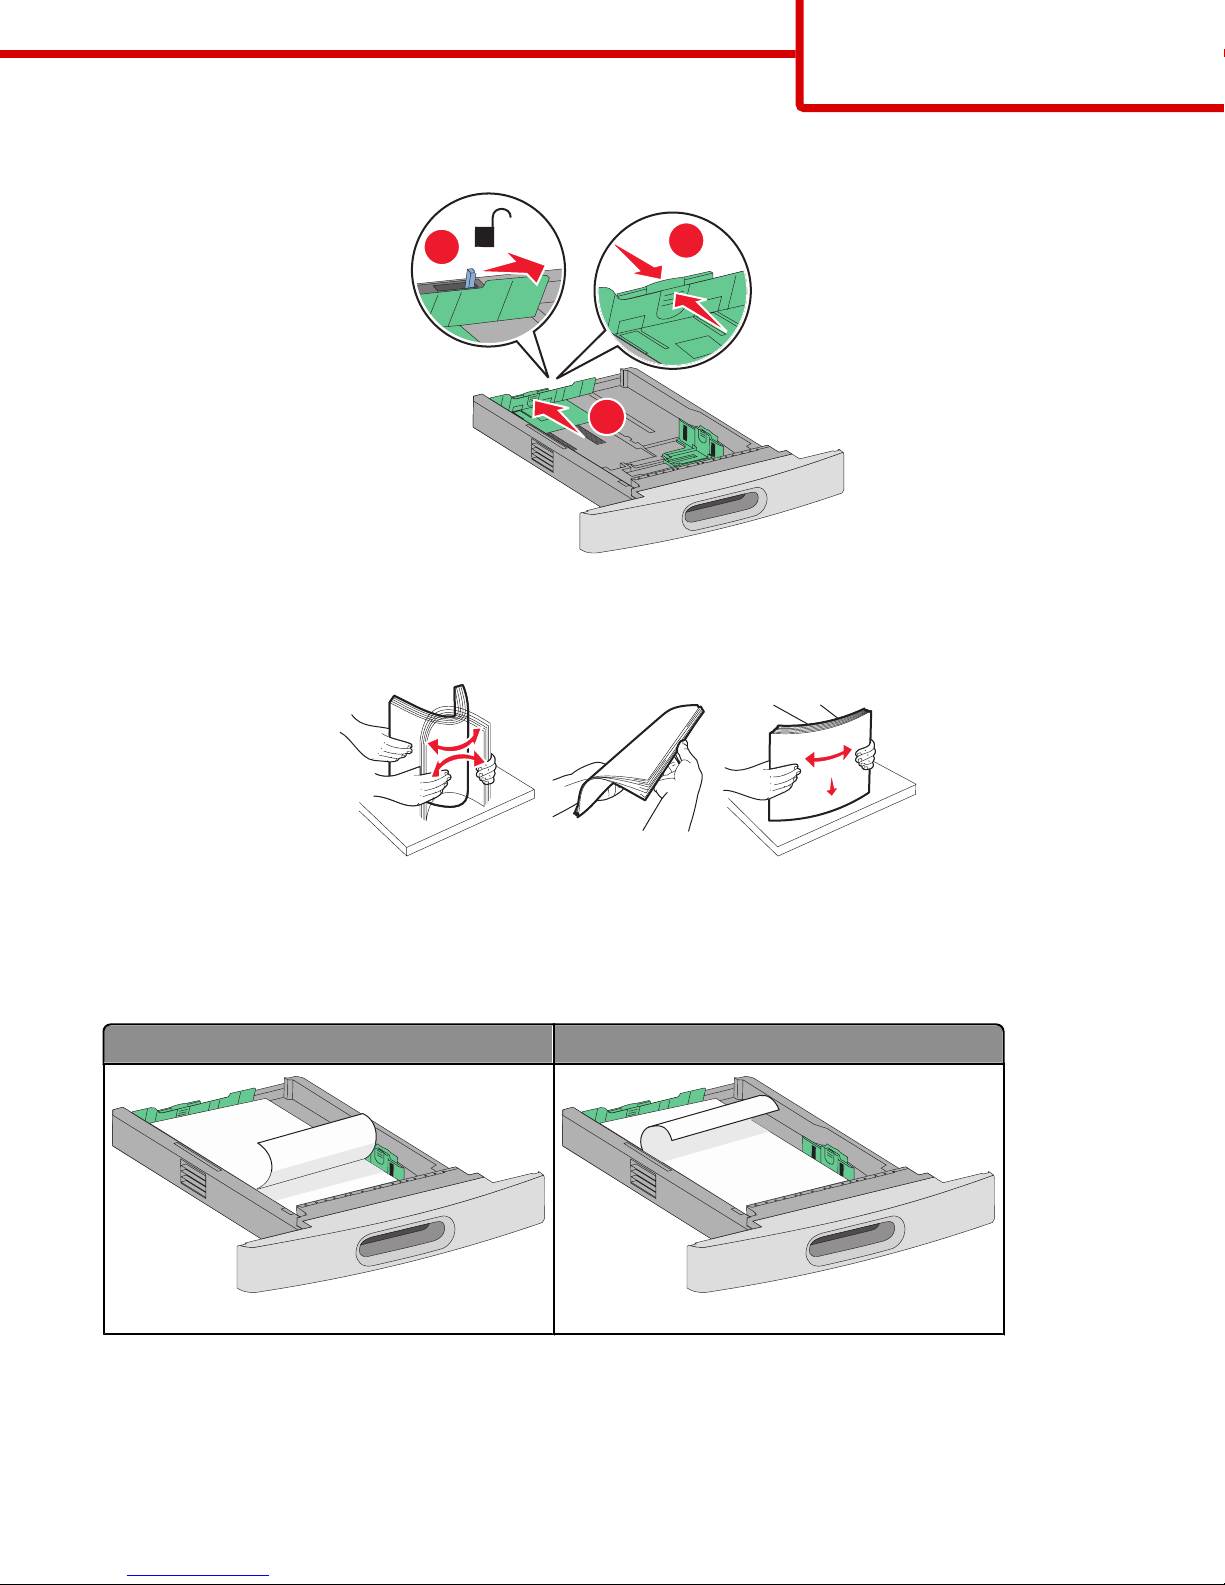
1 Pull the tray out.
Note: Do not remove trays while a job prints or while Busy appears on the display. Doing so may cause a jam.
2 Squeeze the width guide tab inward as shown, and move the width guide to the correct position for the paper size being
loaded.
1
2
Page 32
Printing guide
Page 32 of 42
3 Squeeze the length guide tab inward as shown, and slide the guide to the correct position for the paper size being loaded.
1
2
3
Note: Use the size indicators on the bottom of the tray to help position the guides.
4 Flex the sheets back and forth to loosen them, and then fan them. Do not fold or crease the paper. Straighten the edges
on a level surface.
5 Load the paper stack:
• Print side facedown for single-sided printing
• Print side faceup for duplex printing
Note: Paper must be loaded differently in the trays if an optional StapleSmart Finisher is installed.
Without an optional StapleSmart Finisher With an optional StapleSmart Finisher
LETTERHEAD
LETTERHEAD
Single-sided printing
Single-sided printing
Page 33
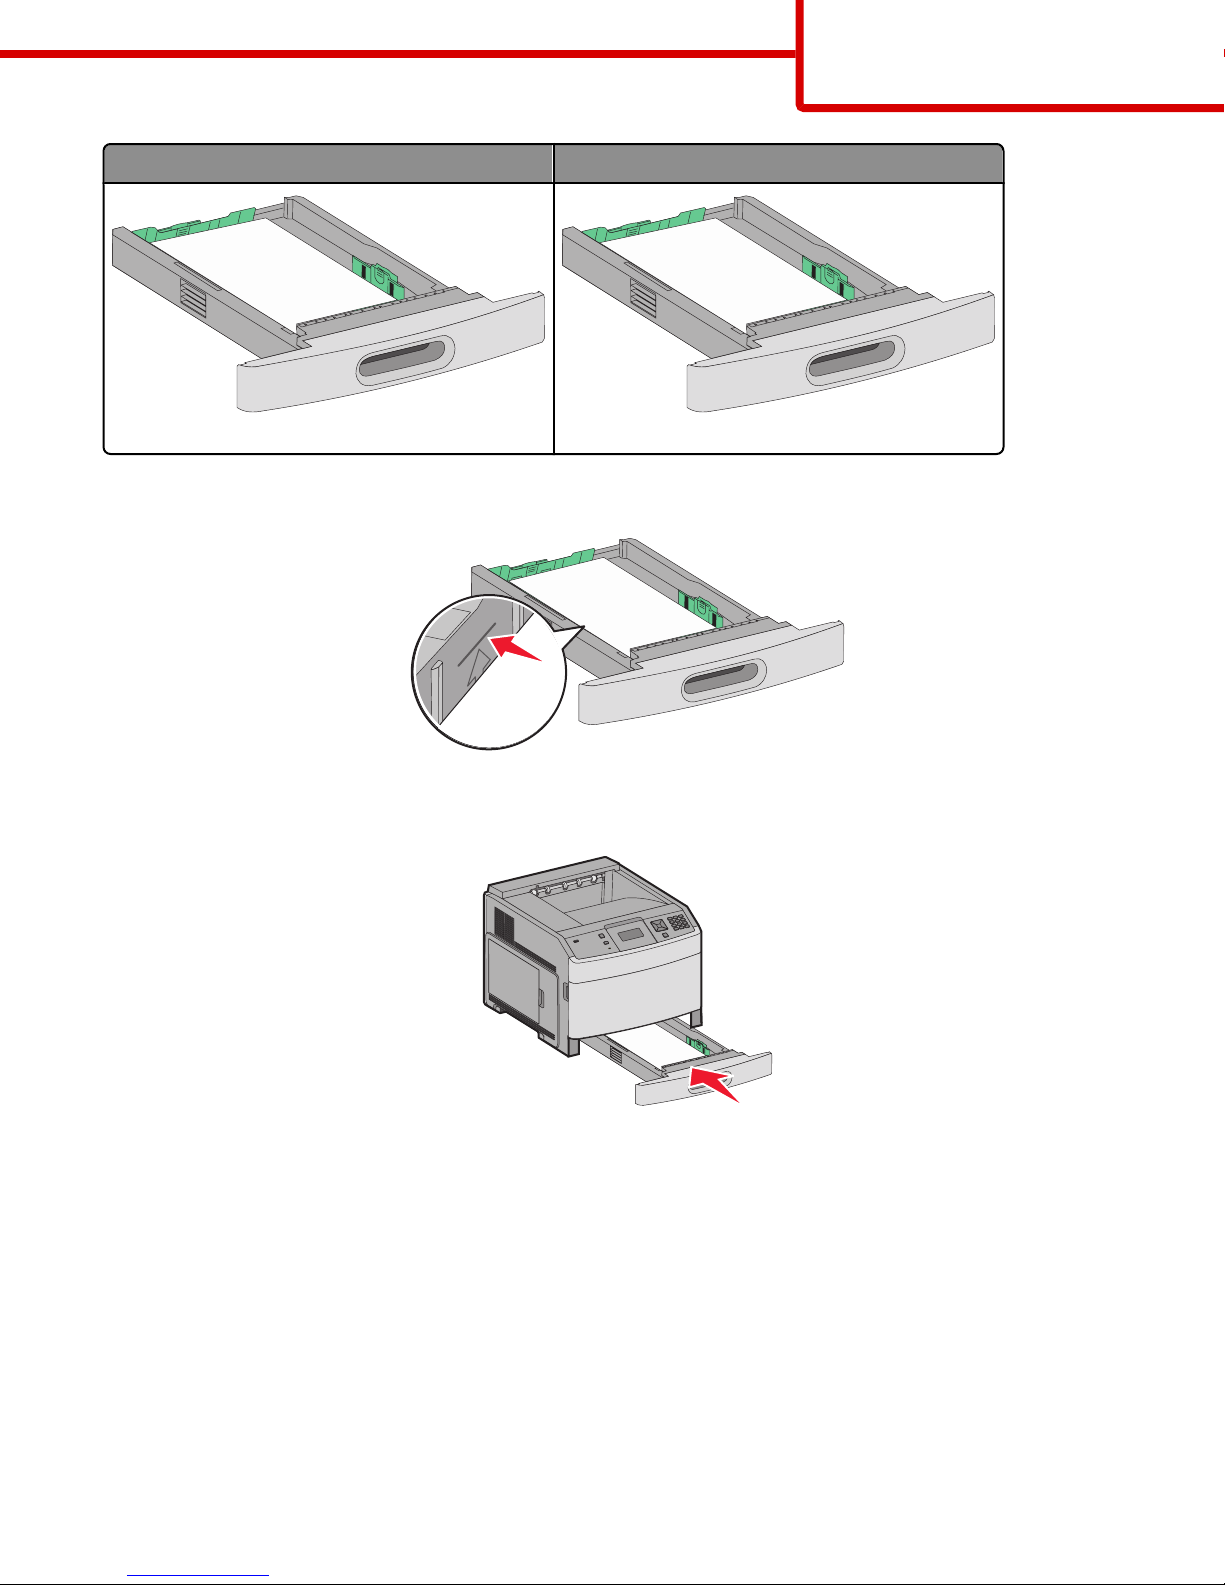
Without an optional StapleSmart Finisher With an optional StapleSmart Finisher
LETTERHEAD
LETTERHEAD
Printing guide
Page 33 of 42
Duplex (two-sided) printing
Duplex (two-sided) printing
Note: Notice the maximum fill line on the side of the tray which indicates the maximum height for loading paper. Do not
overload the tray.
6 If necessary, adjust the paper guides to lightly touch the sides of the stack.
7 Insert the tray.
8 If a different type of paper was loaded than the type previously loaded in the tray, then change the Paper Type setting for
the tray from the printer control panel.
Page 34
LETTERHEAD
Printing guide
Page 34 of 42
Loading the 2000-sheet tray
1 Pull the tray out.
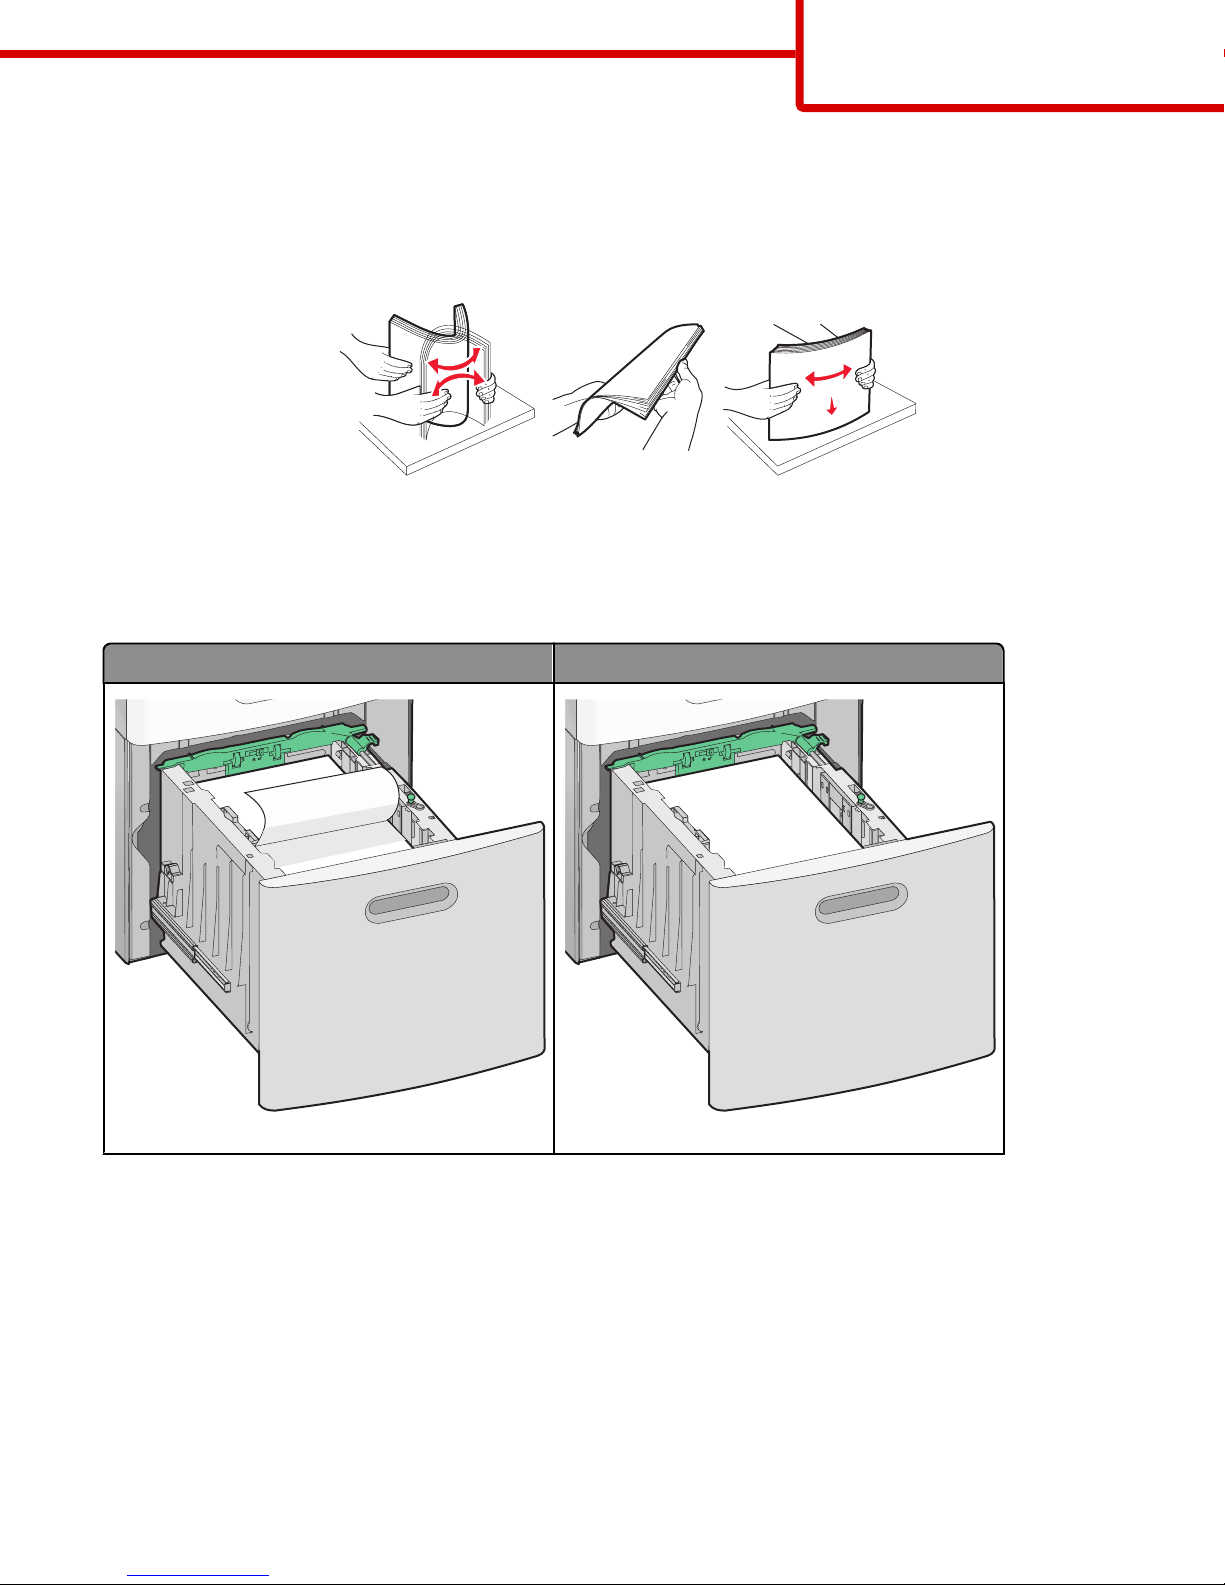
2 Flex the sheets back and forth to loosen them, and then fan them. Do not fold or crease the paper. Straighten the edges
on a level surface.
3 Load the paper stack:
• Print side facedown for single-sided printing
• Print side faceup for duplex printing
Note: Paper must be loaded differently in the trays if an optional StapleSmart Finisher is installed.
Without an optional StapleSmart Finisher With an optional StapleSmart Finisher
LETTERHEAD
Single-sided printing
Single-sided printing
Page 35
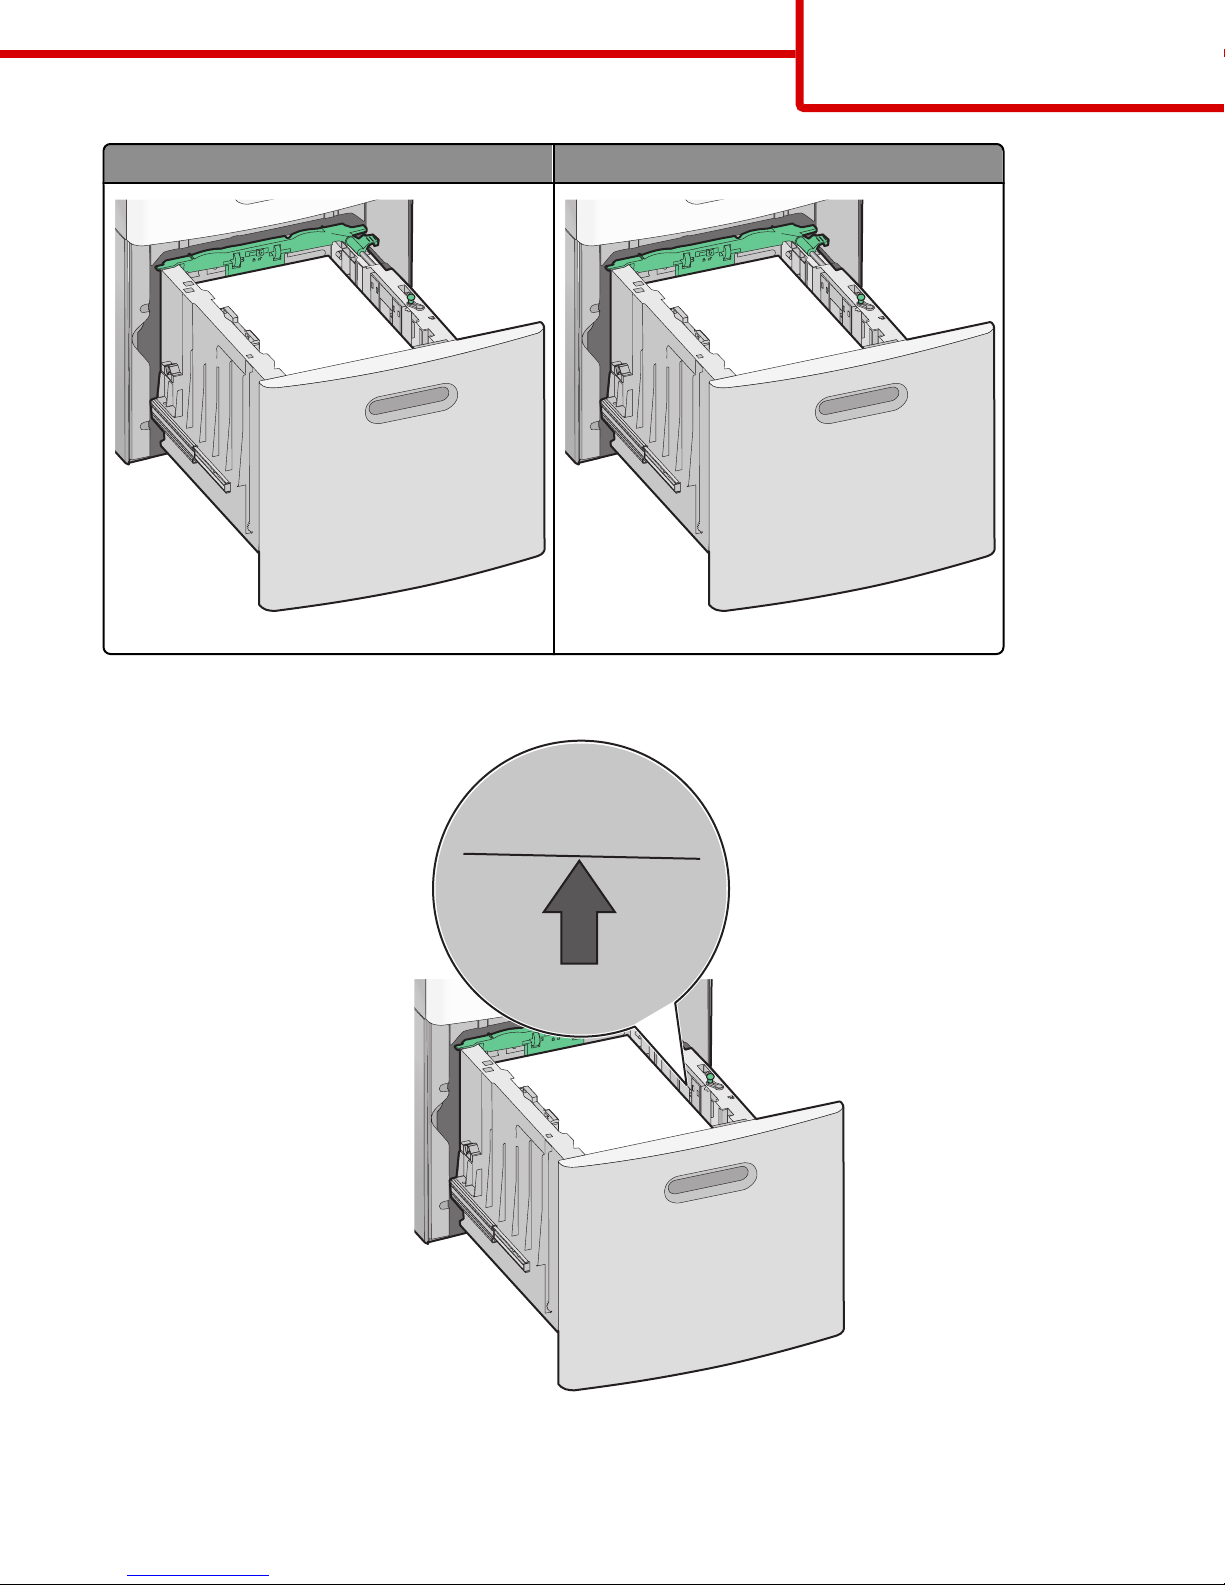
Without an optional StapleSmart Finisher With an optional StapleSmart Finisher
LETTERHEAD
LETTERHEAD
Printing guide
Page 35 of 42
Duplex (two-sided) printing
Duplex (two-sided) printing
Note: Notice the maximum fill line on the side of the tray which indicates the maximum height for loading paper. Do not
overload the tray.
4 Insert the tray.
Page 36
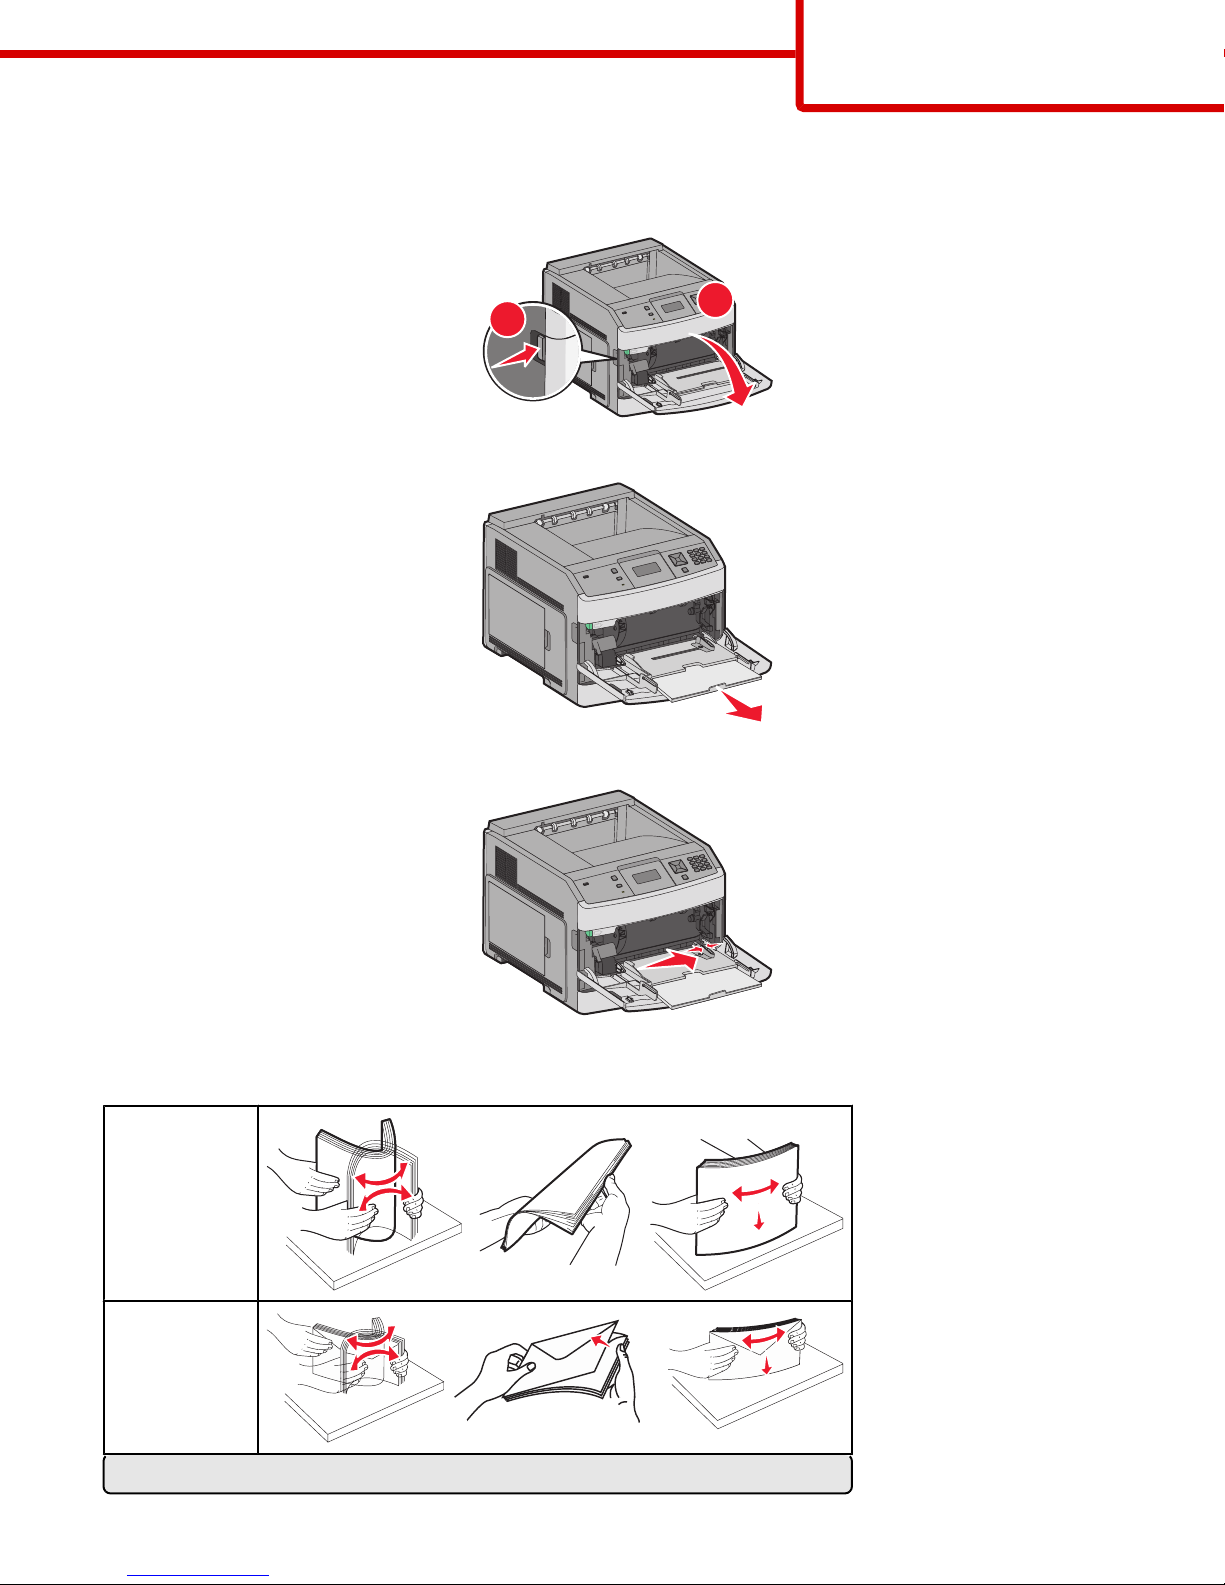
Loading the multipurpose feeder
1 Press the release latch, and then pull down the multipurpose feeder door.
Printing guide
Page 36 of 42
2 Pull out the extension until it is fully extended.
3 Slide the width guide to the far right.
1
2
4 Flex the sheets of paper or specialty media back and forth to loosen them, and then fan them. Do not fold or crease them.
Straighten the edges on a level surface.
Paper
Envelopes
* Avoid touching the print side of transparencies. Be careful not to scratch them.
Page 37
Printing guide
Page 37 of 42
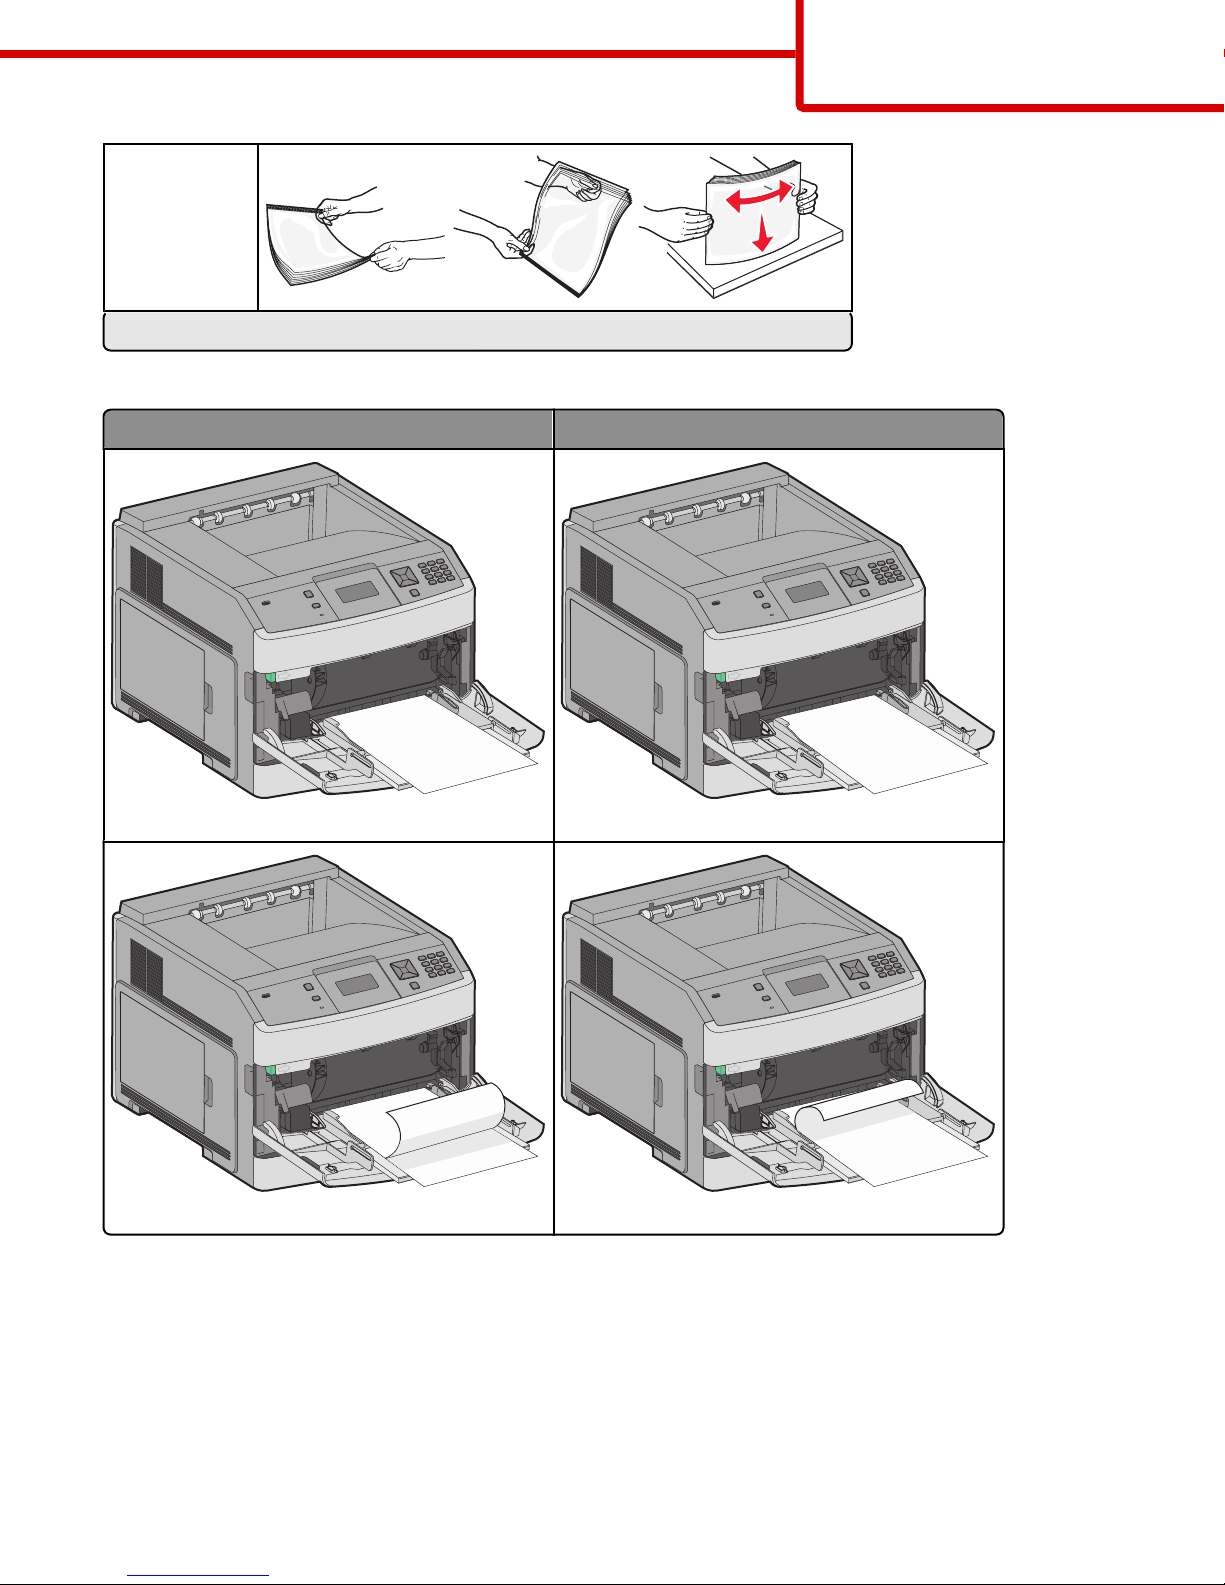
Transparencies*
* Avoid touching the print side of transparencies. Be careful not to scratch them.
5 Load the paper or specialty media. Slide the stack gently into the multipurpose feeder until it comes to a stop.
Without an optional StapleSmart Finisher With an optional StapleSmart Finisher
LETTERHEAD
Single-sided printing
LETTERHEAD
Duplex (two-sided) printing
Notes:
• Do not exceed the maximum stack height by forcing paper under the stack height limiter.
• Do not load or close the printer while a job is printing.
• Load only one size and type of media at a time.
• Load envelopes with the flap side up.
Single-sided printing
Duplex (two-sided) printing
LETTERHEAD
LETTERHEAD
Warning—Potential Damage: Never use envelopes with stamps, clasps, snaps, windows, coated linings, or self-stick
adhesives. These envelopes may severely damage the printer.
Page 38
Printing guide
Page 38 of 42
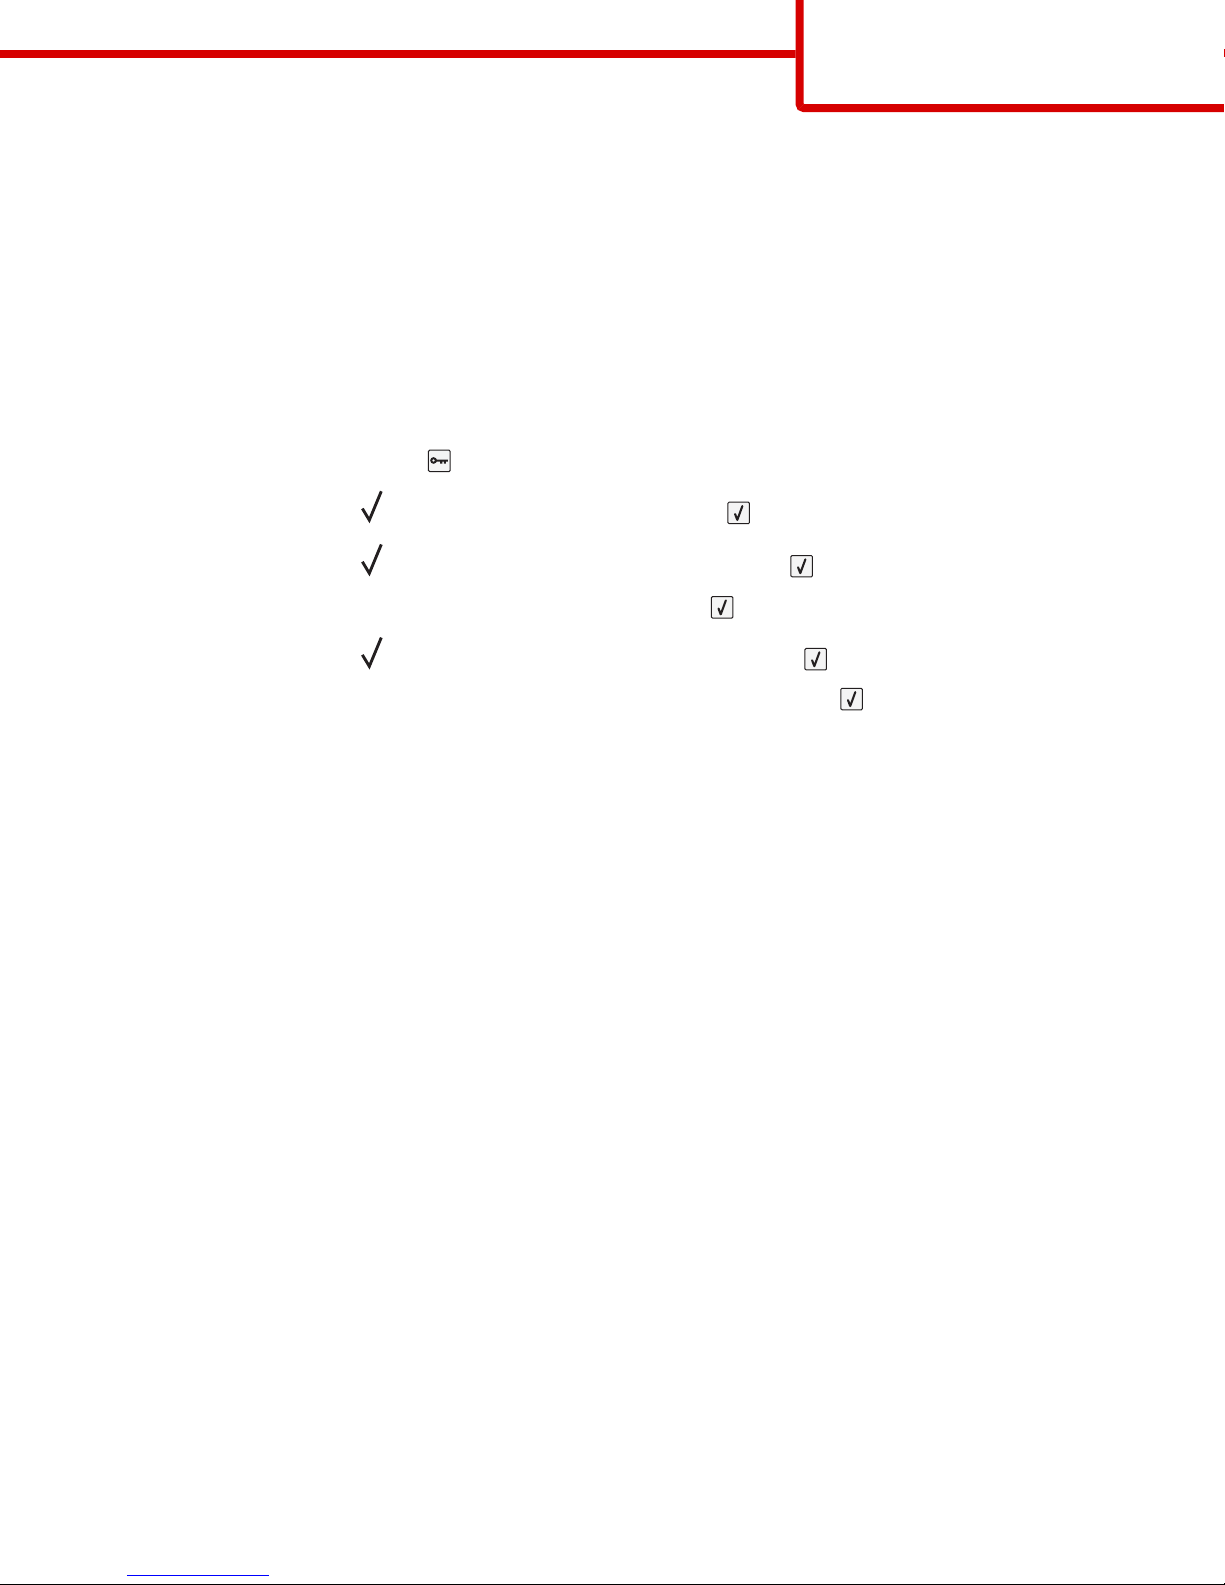
6 Adjust the width guide to lightly touch the edge of the paper stack. Make sure the paper fits loosely in the multipurpose
feeder, lies flat, and is not bent or wrinkled.
7 From the printer control panel, set the Paper Size and Paper Type.
Setting the Paper Size and Paper Type
The Paper Size setting is determined by the position of the paper guides in the tray for all trays except the multipurpose feeder.
The Paper Size setting for the multipurpose feeder must be set manually. The factory default Paper Type setting is Plain Paper.
The Paper Type setting must be set manually for all trays that do not contain plain paper.
1 Make sure the printer is on and Ready appears.
2 From the printer control panel, press .
3 Press the arrow buttons until Paper Menu appears, and then press .
4 Press the arrow buttons until Paper Size/Type appears, and then press .
5 Press the arrow buttons until the correct tray appears, and then press .
6 Press the arrow buttons until appears next to the correct size, and then press .
7 Press the arrow buttons until the correct Paper Type setting appears, and then press .
Ready appears.
Page 39

Print defects
Page 39 of 42
Print defects
Repeating defects measurements
Match a set of repeating defects on a print job to the marks on one of the vertical lines. The line that best matches the defects
on the print job indicates which particular part is causing the defect.
Replace the charge rolls Replace the transfer roller Change the toner cartridge Replace the fuser
28.3 mm
(1.11 in.)
51.7 mm
(2.04 in.)
47.8 mm
(1.88 in.)
or 96.8 mm
(3.81 in.)
88.0 mm
(3.46 in.)
or 95.2 mm
(3.75 in.)
Page 40
Supplies guide
Page 40 of 42
Supplies guide
When a cartridge low message appears, you should order a new print cartridge.
You may be able to print a limited number of pages when the message first appears, but it is best to have the new cartridge
available when the current one runs out.
Note: Shake your new print cartridge gently before installing it into the printer to maximize its yield.
The following table lists the part numbers for ordering supply items.
Ordering print cartridges
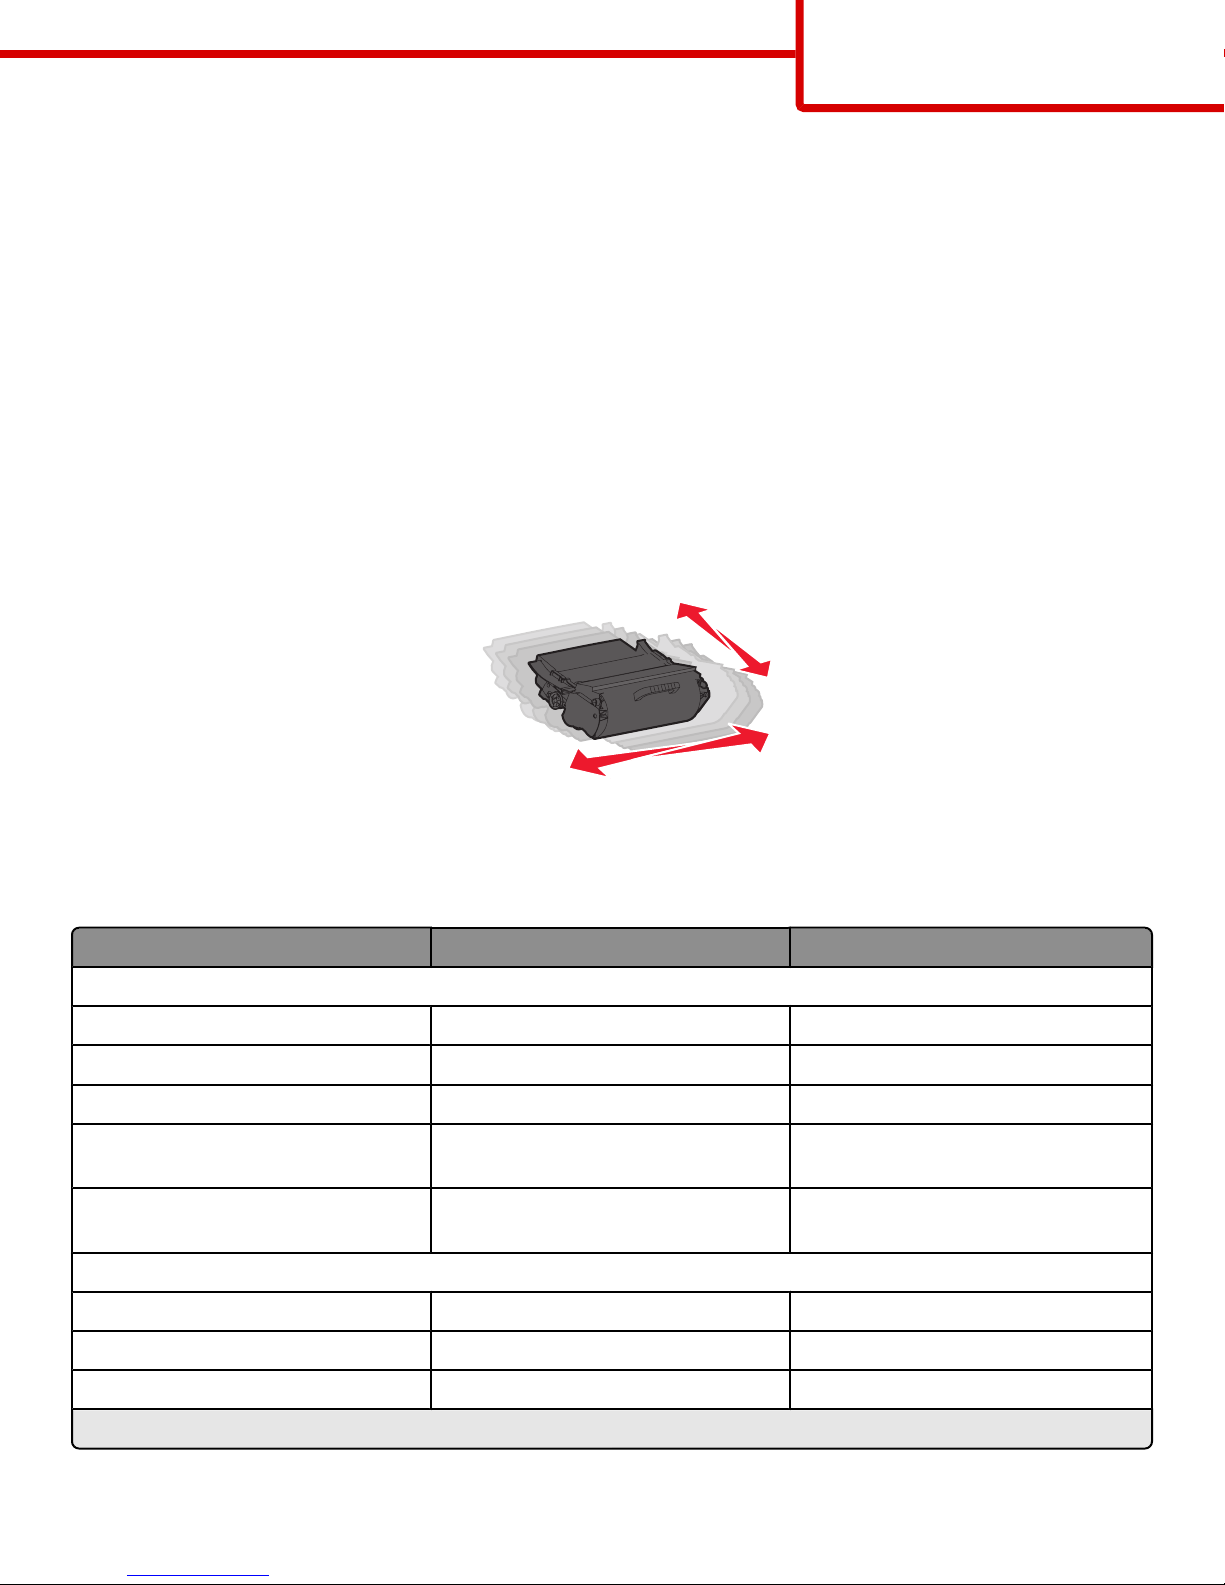
When 88 Cartridge low appears or when the print becomes faded, you may be able to extend the life of the print
cartridge:
1 Remove the print cartridge.
2 Firmly shake the cartridge side-to-side and front-to-back several times to redistribute toner.
3 Reinsert the cartridge and continue printing.
Note: Repeat this procedure multiple times until the print remains faded, and then replace the cartridge.
Recommended print cartridges
Part name Lexmark Return Program Cartridge Regular cartridge
For the US and Canada
Print Cartridge T650A11A T650A21A
High Yield Print Cartridge T650H11A T650H21A
Extra High Yield Print Cartridge* T652X11A T652X21A
High Yield Print Cartridge for Label
Applications
Extra High Yield Print Cartridge for Label
Applications*
For Europe, the Middle East, and Africa
Print Cartridge T650A11E T650A21E
High Yield Print Cartridge T650H11E T650H21E
Extra High Yield Print Cartridge* T652X11E T652X21E
T650H04A Not applicable
T652X04A Not applicable
* Available for the T652 and T654 models.
Page 41
Supplies guide
Page 41 of 42
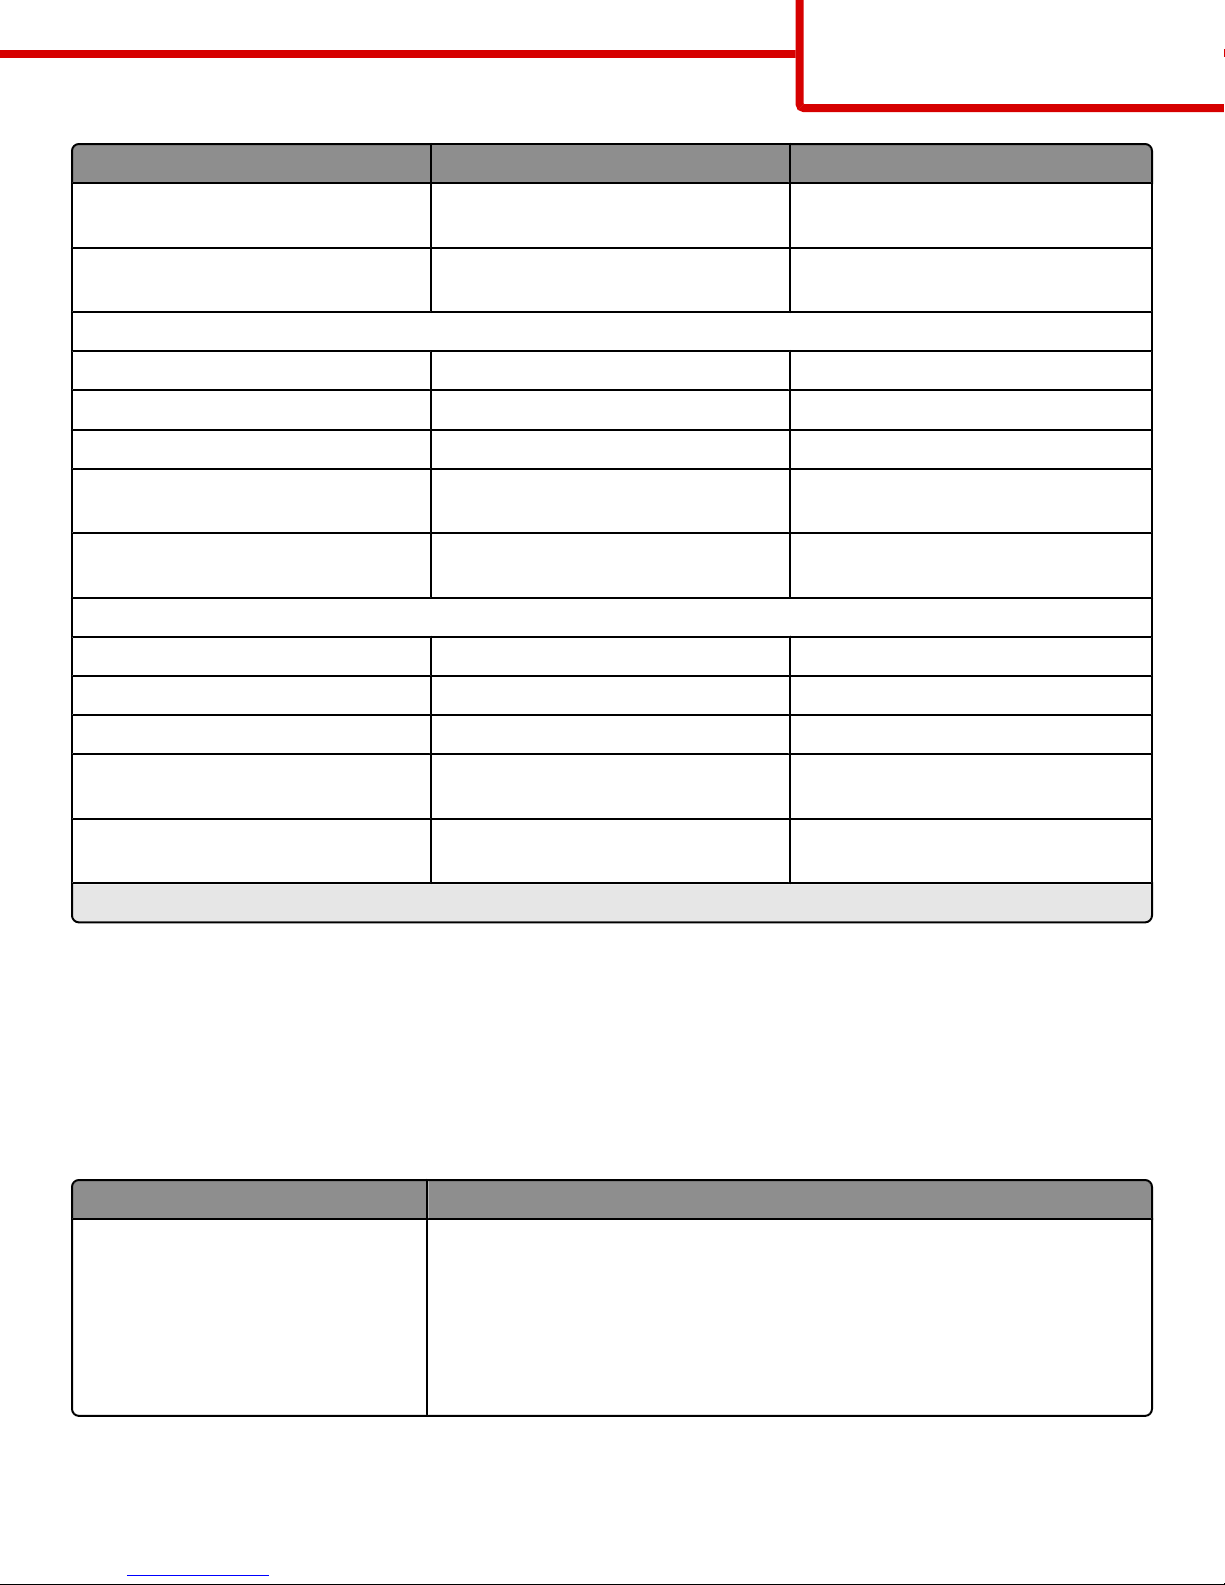
Part name Lexmark Return Program Cartridge Regular cartridge
High Yield Print Cartridge for Label
Applications
Extra High Yield Print Cartridge for Label
Applications*
For the Asia Pacific Region
Print Cartridge T650A11P T650A21P
High Yield Print Cartridge T650H11P T650H21P
Extra High Yield Print Cartridge* T652X11P T652X21P
High Yield Print Cartridge for Label
Applications
Extra High Yield Print Cartridge for Label
Applications*
For Latin America
Print Cartridge T650A11L T650A21L
High Yield Print Cartridge T650H11L T650H21L
Extra High Yield Print Cartridge* T652X11L T652X21L
High Yield Print Cartridge for Label
Applications
T650H04E Not applicable
T652X04E Not applicable
T650H04P Not applicable
T652X04P Not applicable
T650H04L Not applicable
Extra High Yield Print Cartridge for Label
Applications*
* Available for the T652 and T654 models.
T652X04L Not applicable
Ordering a maintenance kit
When 80 Routine maintenance needed appears, order a maintenance kit. The maintenance kit contains all the items
necessary to replace the pick rollers, the charge roll, the transfer roller, and the fuser.
Note: Using certain types of paper may require more frequent replacement of the maintenance kit. The charge roll, transfer
roller, and pick rollers can also be individually ordered and replaced as necessary.
See the following table for the maintenance kit part number for your specific printer.
Part name Part number
Maintenance kit 40X4723 (100 V non-contact fuser)
40X4724 (110 V non-contact fuser)
40X4765 (220 V non-contact fuser)
40X4766 (100 V contact fuser)
40X4767 (110 V contact fuser)
40X4768 (220 V contact fuser)
Page 42

Ordering staple cartridges
When Staples Low or Staples Empty appears, order the specified staple cartridge.
For more information, see the illustrations inside the stapler door.
Part name Part number
Staple Cartridges–3 pack 25A0013
Supplies guide
Page 42 of 42
 Loading...