

Page 1

6300 Series All-In-One
User's Guide
May 2005 www.lexmark.com
Lexmark and Lexmark with diamond design are trademarks of Lexmark International, Inc.,
registered in the United States and/or other countries.
© 2005 Lexmark International, Inc.
All rights reserved.
740 West New Circle Road
Lexington, Kentucky 40550
Page 2

Edition: June 2005
The following paragraph does not apply to any country where such provisions are inconsistent with
local law: LEXMARK INTERNATIONAL, INC., PROVIDES THIS PUBLICATION "AS IS" WITHOUT
WARRANTY OF ANY KIND, EITHER EXPRESS OR IMPLIED, INCLUDING, BUT NOT LIMITED TO, THE
IMPLIED WARRANTIES OF MERCHANTABILITY OR FITNESS FOR A PARTICULAR PURPOSE. Some
states do not allow disclaimer of express or implied warranties in certain transactions; therefore, this statement
may not apply to you.
This publication could include technical inaccuracies or typographical errors. Changes are periodically made
to the information herein; these changes will be incorporated in later editions. Improvements or changes in
the products or the programs described may be made at any time.
Comments about this publication may be addressed to Lexmark International, Inc., Department F95/032-2,
740 West New Circle Road, Lexington, Kentucky 40550, U.S.A. In the United Kingdom and Eire, send to
Lexmark International Ltd., Marketing and Services Department, Westhorpe House, Westhorpe, Marlow
Bucks SL7 3RQ. Lexmark may use or distribute any of the information you supply in any way it believes
appropriate without incurring any obligation to you. You can purchase additional copies of publications related
to this product by calling 1-800-553-9727. In the United Kingdom and Eire, call +44 (0)8704 440 044. In other
countries, contact your point of purchase.
References in this publication to products, programs, or services do not imply that the manufacturer intends
to make these available in all countries in which it operates. Any reference to a product, program, or service
is not intended to state or imply that only that product, program, or service may be used. Any functionally
equivalent product, program, or service that does not infringe any existing intellectual property right may be
used instead. Evaluation and verification of operation in conjunction with other products, programs, or
services, except those expressly designated by the manufacturer, are the user’s responsibility.
© 2005 Lexmark International, Inc.
All rights reserved.
UNITED STATES GOVERNMENT RIGHTS
This software and any accompanying documentation provided under this agreement are commercial
computer software and documentation developed exclusively at private expense.
Safety information
•
Use only the power supply and power cord provided with this product or the manufacturer's authorized
replacement power supply and power cord.
•
Connect the power supply cord to a properly grounded electrical outlet that is near the product and easily
accessible.
•
Refer service or repairs, other than those described in the user documentation, to a professional service
person.
CAUTION: Do not set up this product or make any electrical or cabling connections, such as the power cord
or telephone, during a lightning storm.
Page 3

Contents
Setting up the printer.......................................................................7
Checking the box contents...............................................................................7
Finding information about the printer................................................................8
Learning about the printer............................................................13
Understanding the parts of the printer............................................................13
Using the control panel...................................................................................15
Navigating the control panel menus...............................................................17
Using the Copy menu.....................................................................................17
Using the Scan menu.....................................................................................18
Using the Photo Card menu...........................................................................19
Learning about the printer software............................................22
Using the printer software...............................................................................22
Opening the Imaging Studio...........................................................................22
Using the Imaging Studio buttons...................................................................23
Using the All-In-One Center............................................................................24
Using the Scanning & Copying tab.................................................................24
Using the Saved Images tab...........................................................................26
Using the Maintain/Troubleshoot link..............................................................26
Using the Solution Center...............................................................................27
Using Print Properties.....................................................................................29
Using the Photo Editor....................................................................................31
Using Fast Pics...............................................................................................31
Loading paper and original documents.......................................32
Loading paper.................................................................................................32
Loading various paper types...........................................................................33
Loading original documents on the scanner glass..........................................36
Contents
3
Page 4

Printing...........................................................................................38
Printing a document........................................................................................38
Printing envelopes..........................................................................................38
Printing cards..................................................................................................38
Printing transparencies...................................................................................39
Getting ready to print photos using media devices...................40
Inserting a memory card.................................................................................40
Inserting a flash drive......................................................................................43
Browsing and selecting photos from a memory card or flash drive................45
Transferring digital photos from a memory card or flash drive.......................45
Using a PictBridge-enabled digital camera to control printing photos............46
Printing photos using the control panel......................................48
Printing photos from the control panel............................................................48
Printing selected photos.................................................................................48
Printing all photos from the control panel.......................................................49
Printing a DPOF selection..............................................................................50
Printing an index page....................................................................................50
Previewing changes to photos before printing................................................51
Viewing a photo slide show on the control panel............................................51
Choosing a photo paper size using the control panel.....................................52
Changing the photo size.................................................................................52
Adjusting brightness.......................................................................................52
Cropping photos from the control panel..........................................................53
Printing photos using the computer............................................54
Printing photos................................................................................................54
Printing borderless photos..............................................................................54
Browsing and selecting photos stored on the computer.................................55
Creating and printing a scrapbook or album page..........................................55
Adding text captions to a photo page.............................................................56
Contents
4
Page 5

Copying...........................................................................................57
Making a copy using the control panel...........................................................57
Changing the blank paper size.......................................................................57
Setting the copy quality...................................................................................57
Changing the brightness of a copy.................................................................57
Making borderless copies using the control panel..........................................58
Enlarging or reducing an image using the control panel.................................58
Repeating an image on one page from the control panel...............................59
Making a copy using the software .................................................................59
Scanning.........................................................................................60
Scanning a text-only document......................................................................60
Scanning a text and graphics document.........................................................60
Saving a scanned image................................................................................60
Scanning documents or images for e-mailing using the control panel...........61
Scanning documents or images for e-mailing using the computer.................61
Scanning to a computer over a network.........................................................62
Scanning documents to edit text.....................................................................62
Scanning clear images from magazines or newspapers................................63
Faxing.............................................................................................65
Faxing a document using the software...........................................................65
Receiving a fax using the software.................................................................66
Networking.....................................................................................67
Installing network printers...............................................................................67
Tips for installing a network printer.................................................................69
Maintaining the printer..................................................................71
Removing a used print cartridge.....................................................................71
Installing print cartridges.................................................................................72
Aligning print cartridges..................................................................................74
Cleaning the print cartridge nozzles...............................................................75
Wiping the print cartridge nozzles and contacts.............................................75
Preserving the print cartridges........................................................................76
Contents
5
Page 6

Using the cartridge storage area....................................................................77
Refilling the print cartridges............................................................................78
Ordering Lexmark Supplies..........................................................80
Ordering supplies............................................................................................80
Troubleshooting.............................................................................81
Setup troubleshooting.....................................................................................81
Print troubleshooting.......................................................................................85
Copy troubleshooting......................................................................................88
Scan troubleshooting......................................................................................89
Fax troubleshooting........................................................................................90
Network troubleshooting.................................................................................93
Jams and misfeeds troubleshooting...............................................................94
Memory card troubleshooting.........................................................................97
Error messages..............................................................................................99
Removing and reinstalling the software........................................................104
Notices..........................................................................................105
Index..............................................................................................111
Contents
6
Page 7
Setting up the printer
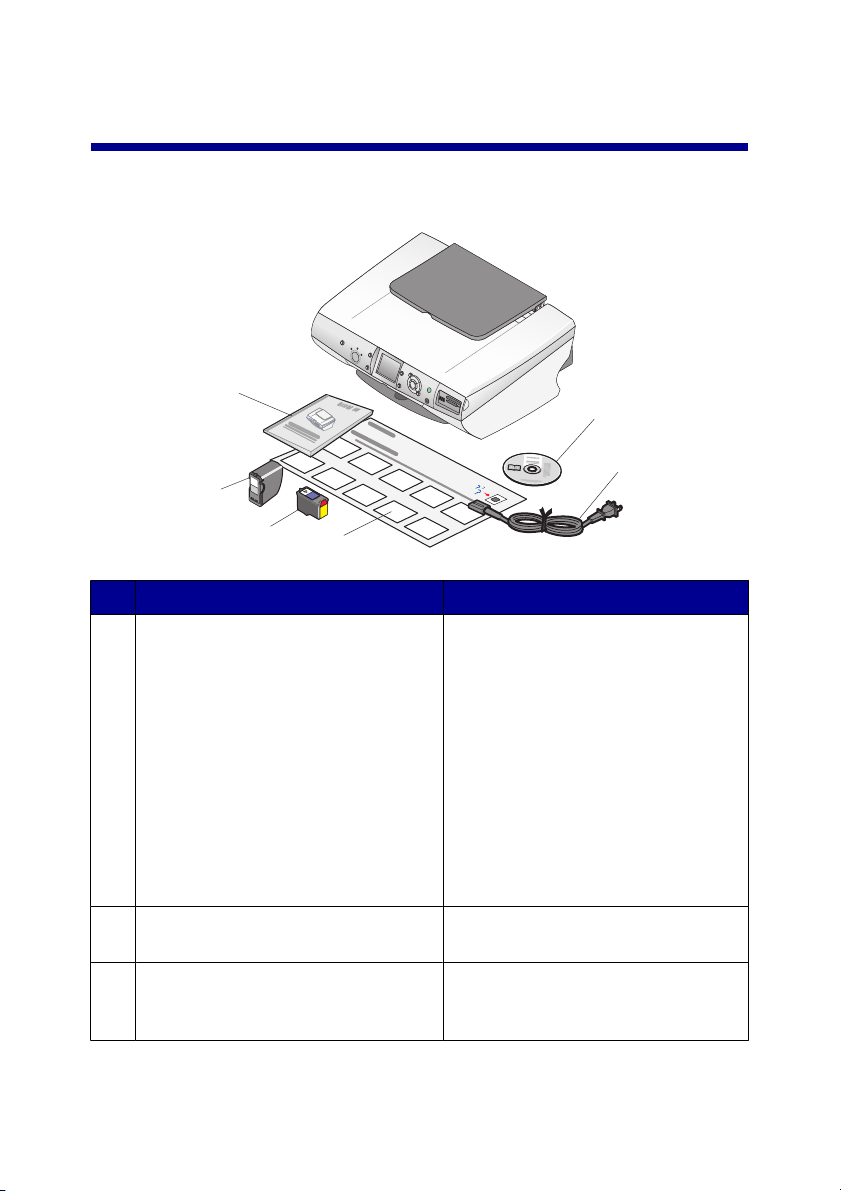
Checking the box contents
6
5
1
2
4
Name Description
Installation software CD
1
Power supply cord Attaches to the power supply port
2
Setup sheet Instructions on setting up printer
3
3
•
Windows
–
Installation software for the
printer
–
Help
–
User's Guide in electronic
format
•
Mac
–
Installation software for the
printer
–
Help and combined
User's Guide in HTML form at
located at the back of the printer.
hardware and software, and
information on setup troubleshooting.
Setting up the printer
7
Page 8
Name Description
Color print cartridge Cartridges to be installed in the
4
Photo print cartridge
5
User’s Guide or Setup Solutions Printed booklet that serves as a guide
6
printer.
Note: Cartridge combinations vary
depending upon the product
purchased.
(for Windows users).
Finding information about the printer
Setup sheet
Description Where to find
The Setup sheet gives you instructions for
setting up hardware and software.
You can find this document in the
printer box or on the Lexmark Web site.
User's Guide
Description Where to find
The User's Guide gives you instructions for
using the printer and other information such
as:
•
Maintenance
•
Troubleshooting
•
Safety
Note: All information in this User's Guide
applies to the Windows operating system.
You can find this document in the
printer box or on the Lexmark Web
site.
When you install the printer
software, the User's Guide may
also be installed.
CD
Description Where to find
The CD contains drivers, software, and
publication files. The CD will install the
Help system on your computer if your
printer connects to a computer.
You can find this CD in the printer box.
See the Setup sheet for installation
instructions.
Setting up the printer
8
Page 9
Help
Description Where to find
Help gives you instructions for using the
software if your printer connects to a
computer.
While in any Lexmark software
program, click Help, Tips Help, or
Help Help Topics.
Lexmark Solution Center
Description Where to find
The Lexmark Solution Center software
is included on your CD if your printer
connects to a computer. It will install
with the other software.
To access the Lexmark Solution Center:
1
Click Start Programs or All
Programs Lexmark 6300 Series.
2
Select Lexmark Solution Center.
Readme file
Description Where to find
This file contains late-breaking
information about the printer and
software that does not appear in other
documentation, as well as information
specific to your operating system.
To access the Readme file:
1
Click Start Programs or All
Programs Lexmark 6300
Series.
2
Select Readme.
Web site
Description Where to find
Our Web site contains a variety of
information.
Note: All paths for the Web site are
subject to change.
Setting up the printer
Visit our Web site at www.lexmark.com.
1
Go to the Web site.
2
Select a language from the dropdown list in the upper-right corner of
the page.
3
Select the link for the information you
need.
9
Page 10

Description Where to find
Drivers, updates, and patches
This area gives you updated driver
files.
Product specifications
The product specifications give you
information such as how many pages
you can put in the paper support, and
which ink cartridges to use with your
printer.
KnowledgeBase
The KnowledgeBase is a searchable
database that gives you information
such as troubleshooting your printer
and printing ideas.
Visit our Web site at www.lexmark.com.
1
Select drivers & downloads Find
Drivers & Downloads .
2
Select your printer family.
3
Select your printer model.
4
Select your operating system or
click Show files for ALL supported
Operating Systems.
5
Select the file you want to download,
and follow the directions.
Visit our Web site at www.lexmark.com.
1
Select Products & Supplies
Printers & Multifunction Products.
2
Select your printer family.
3
Select your printer model.
4
Click the Tech Specs tab.
Visit our Web site at www.lexmark.com.
1
Select customer support
Technical Support.
2
Select your printer family and model.
3
Type a term to search, or click one of
the tabs.
Customer care
This area gives you access to technical
support, publications, warranty status,
drivers and downloads, and rebates
and promotions; tells you how to find a
retail location near you, contact a sales
representative, register your printer,
and check order status; and gives
information about parts, service
providers, and safety.
Setting up the printer
Visit our Web site at www.lexmark.com.
1
Select customer support.
2
Select the corresponding tab on the
left of the Web page.
10
Page 11

Description Where to find
Ordering supplies
You can order supplies such as
cartridges and paper from our Web site.
Limited Warranty information
Lexmark International, Inc. furnishes a
limited warranty that this printer will be
free of defects in material and
workmanship for a period of 12 months
after the original date of purchase.
Visit our Web site at www.lexmark.com.
1
Select Products and Supplies
Supplies.
2
Select the corresponding tab on the
left of the Web page.
To view the limitations and conditions of
this limited warranty, please refer to the
Statement of Limited Warranty included
with this unit or set forth at
www.lexmark.com.
1
Select customer support
Warranty Information.
2
From the Statement of Limited
Warranty section, click Inkjet &
All-In-One Printers.
3
Scroll through the Web page to view
the warranty.
Customer support
Description Where to find
Telephone support
Call us at (800) 332-4120.
Monday–Friday (8:00 AM–11:00 PM EST)
Saturday (Noon–6:00 PM EST)
Note: Phone number and support times
may change without notice.
E-mail support
For e-mail support, visit our Web site:
www.lexmark.com.
1
Select customer support Technical
Support.
2
Select your printer family, and then
select your printer model.
3
From the Support Tools section, click eMail a Support Representative.
4
Complete the form, and then click
Submit Request.
Setting up the printer
11
Page 12

Description Where to find
Record the following information (located on the store receipt and the back of the
printer), and have it ready when you contact us so that we may serve you faster:
Machine Type number:
Serial number:
Date purchased:
Store where purchased:
Setting up the printer
12
Page 13
Learning about the printer
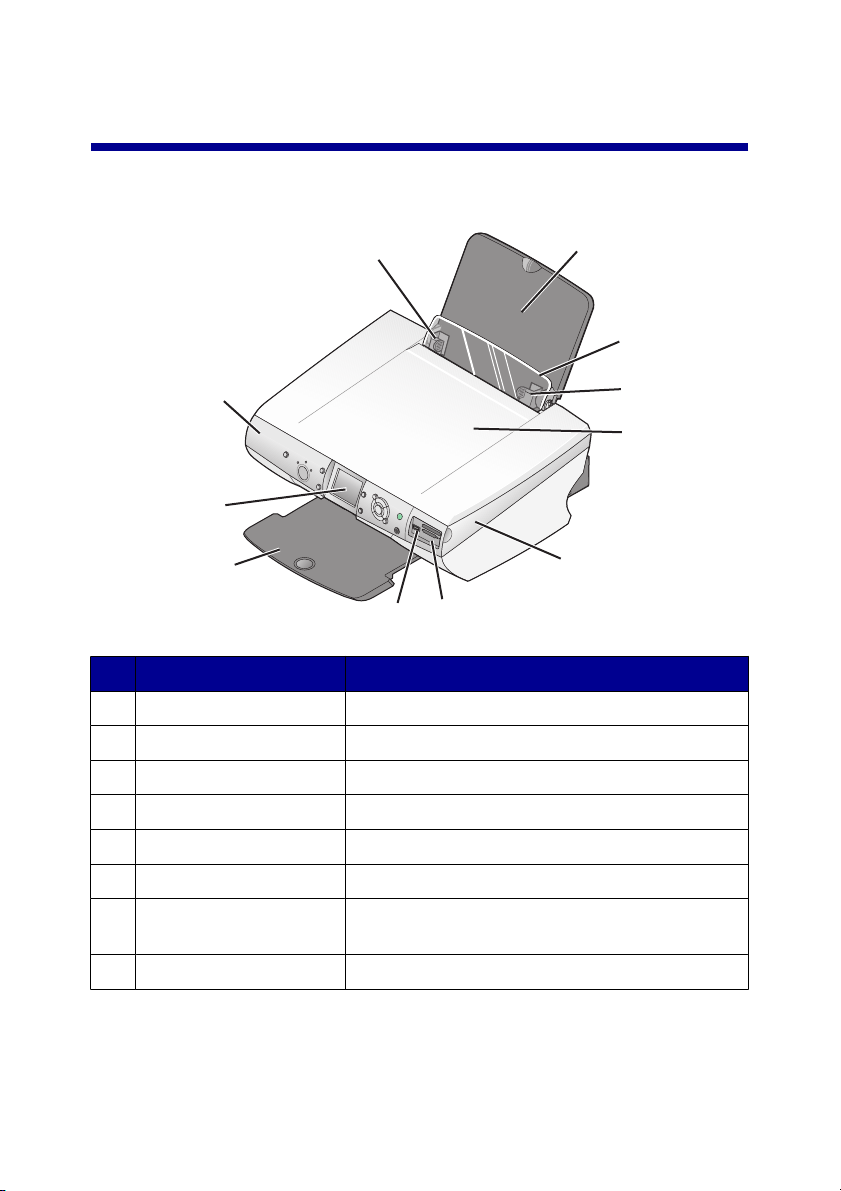
Understanding the parts of the printer
1
2
3
10
9
8
6
7
Use the To
Paper guide Align paper when feeding.
1
Paper support Load paper.
2
Paper feed guard Prevent items from falling into the paper slot.
3
Top cover Access the scanner glass.
4
5
1
4
Scanner unit Access the print cartridges.
5
Memory card slots Insert memory cards.
6
PictBridge port Connect a PictBridge-enabled digital camera or a
7
flash drive to the printer.
Paper exit tray Stack paper as it exits.
8
Learning about the printer
13
Page 14
Use the To
Display View photos on the camera memory card, preview
9
a scanned image, or check the status of the
printer.
The display tilts for easy viewing.
Control panel Operate the printer.
10
1
2
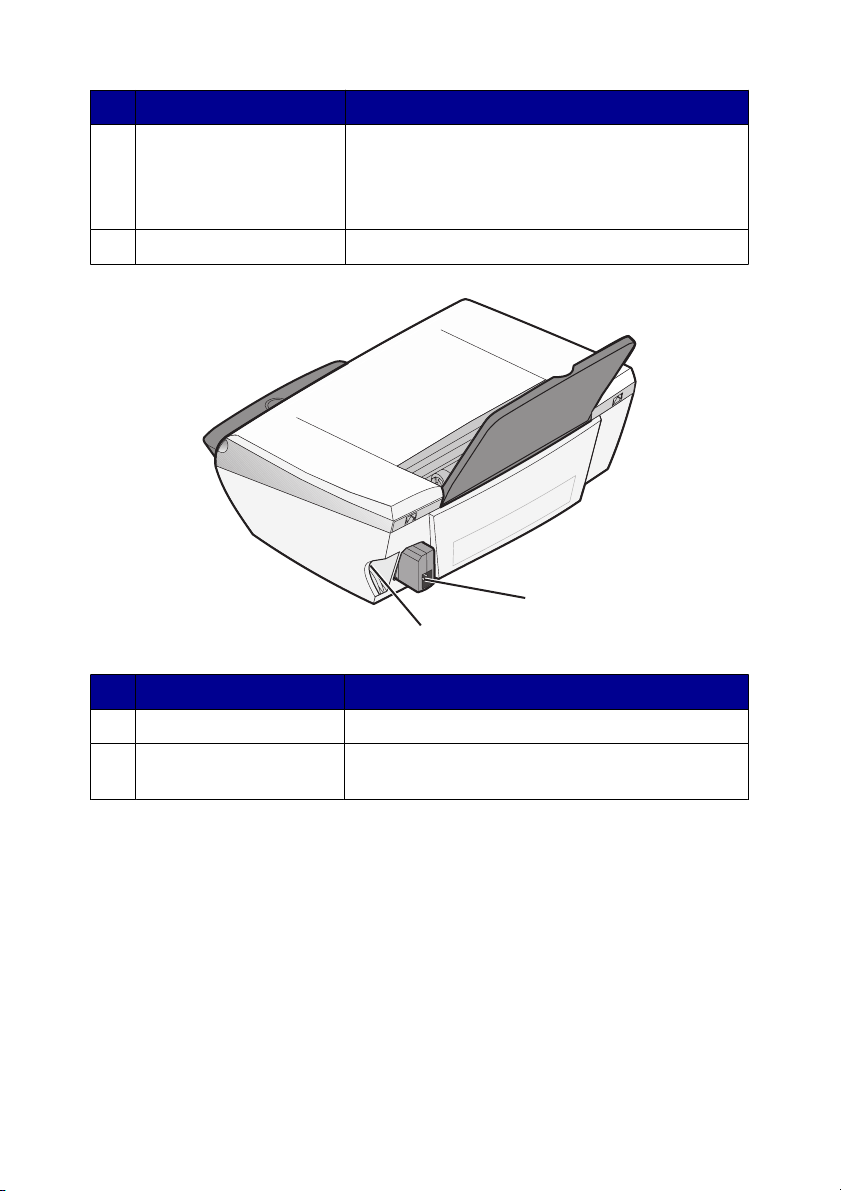
Use the To
Power supply port Connect the printer to a power source.
1
USB port Connect the printer to a computer using a USB
2
cable.
Learning about the printer
14
Page 15
Using the control panel
1
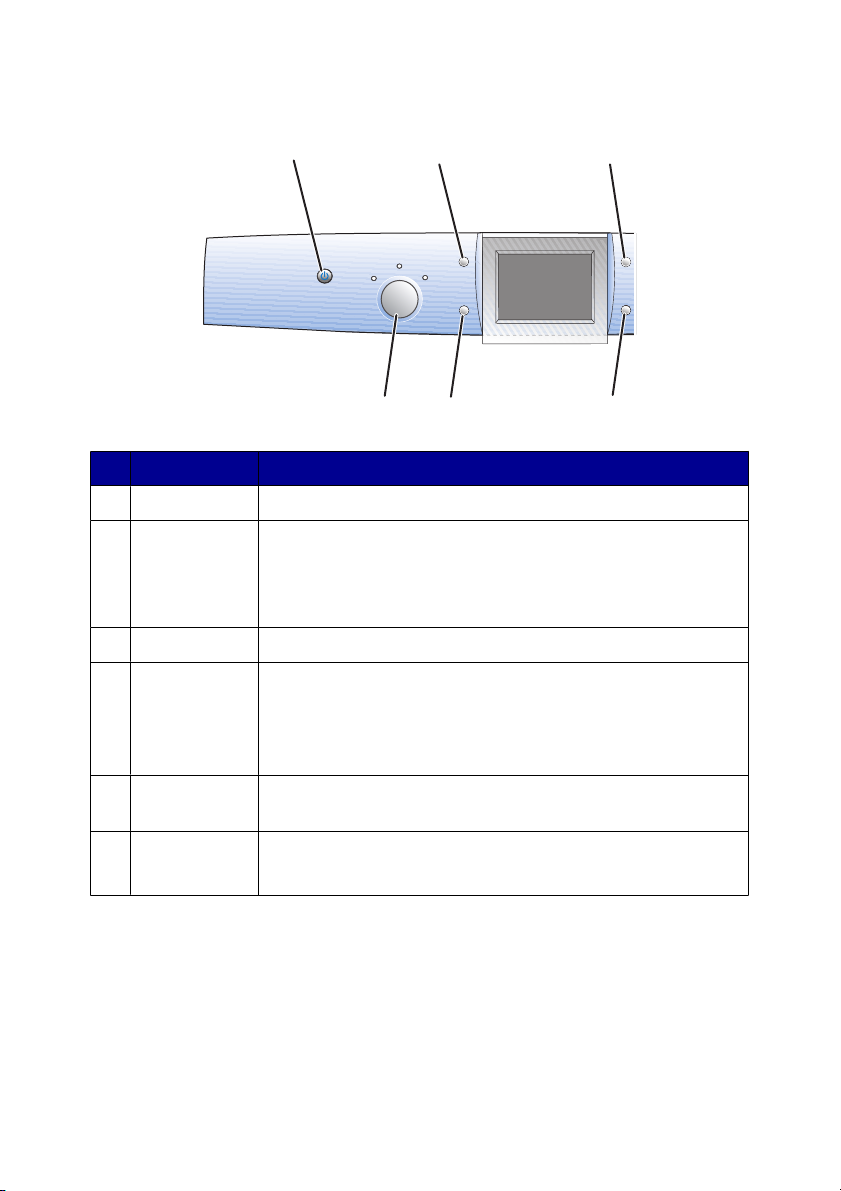
Press To
Power Turn the printer on and off.
1
Rotate
2
Page Preview Preview an image before it is printed, scanned, or copied.
3
Resize
4
•
Rotate the image on the control panel display 90
degrees.
•
Rotate the selected image area when cropping in Photo
Card mode.
•
Enlarge or reduce an image while in Copy mode.
•
Set the image size of photos while in Photo Card mode.
•
Zoom in or zoom out on a photo while cropping in Photo
Card mode.
23
6
5
4
Number of
5
Copies
Mode
6
Specify the number of copies to print while in Copy or Photo
Card mode.
Select Copy, Scan, or Photo Card mode.
Note: The mode is selected when the light is on.
Learning about the printer
15
Page 16
1
2
3
4
5
4
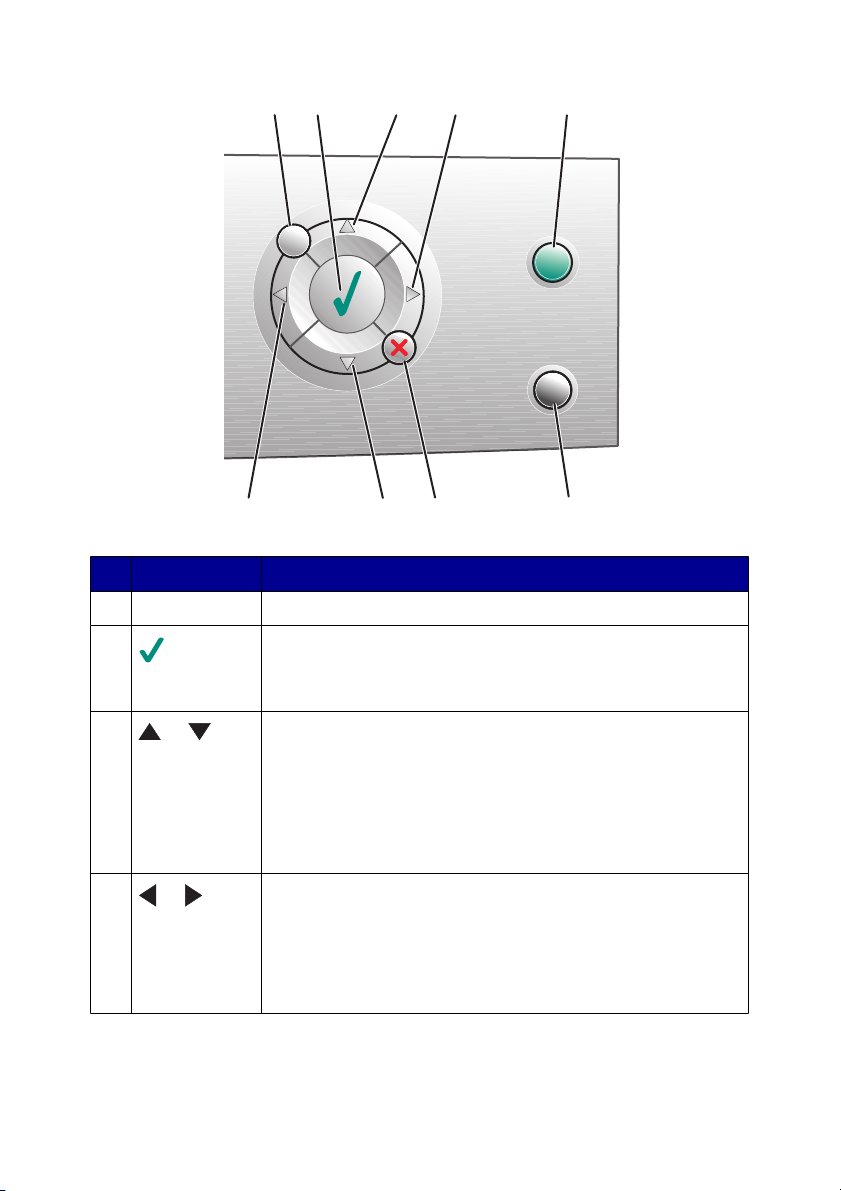
Press To
Menu Display the menu for the selected mode.
1
2
3
or
4
or
•
Choose a menu option.
•
Select or clear a photo from the list to be printed while in
Photo Card mode.
•
Scroll through menu options.
•
Change the selected area when cropping an image.
•
Skip forward or backward through the memory card or
flash drive to view every tenth picture on the control panel
display while in Photo Card mode.
•
Change the blank paper size while in Copy mode.
•
Change settings on a submenu item.
•
Display the previous or next picture on a memory card
or flash drive.
•
Change the selected area when cropping an image.
•
Increase or decrease the number of copies.
3
7
6
Learning about the printer
16
Page 17
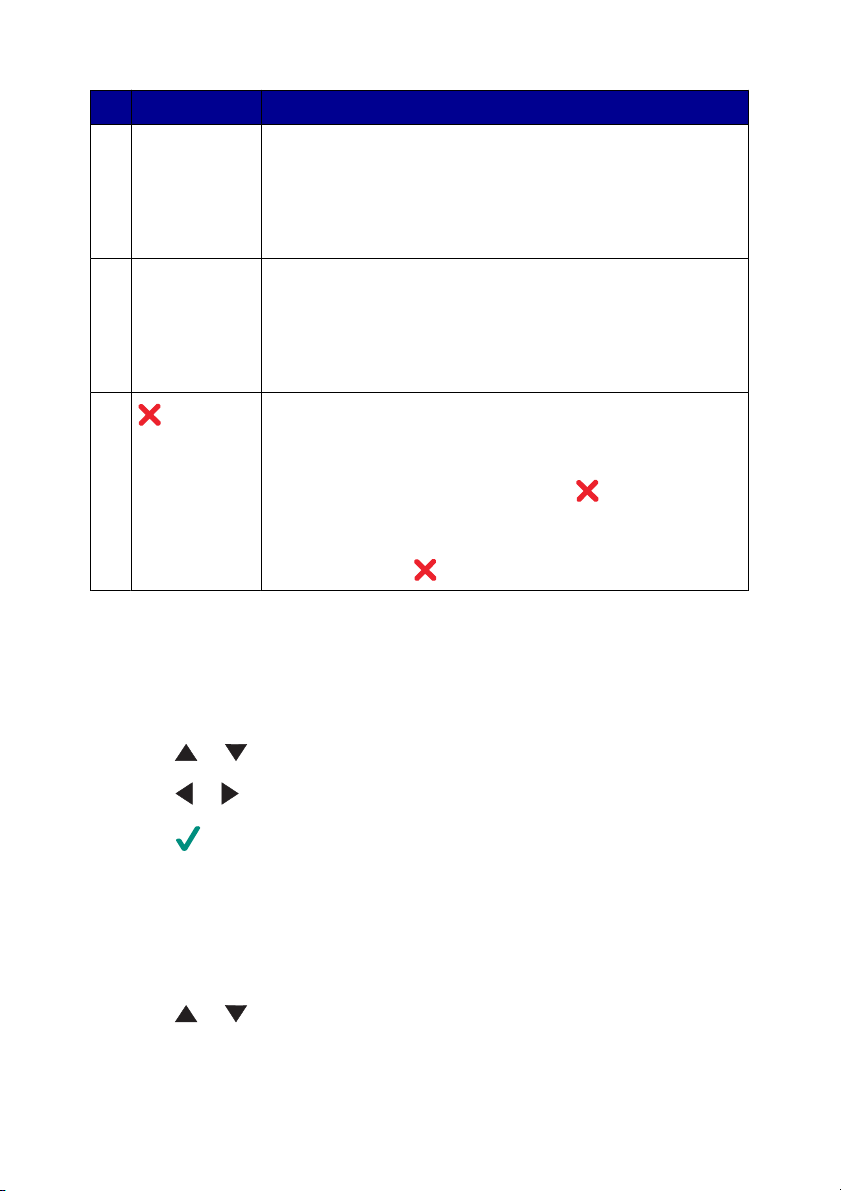
Press To
Color Start a color copy, scan, or photo job.
5
Note: Make sure the mode you want is selected.
In order for a photo print job to start, a memory card or flash
drive must be inserted, or a PictBridge-enabled digital
camera must be connected to the printer.
Black Start a black-and-white copy, scan, or photo job.
6
Note: Make sure the mode you want is selected.
In order for a photo print job to start, a memory card or flash
drive must be inserted, or a PictBridge-enabled digital
camera must be connected to the printer.
7
•
Cancel a copy, scan, or print job.
•
Clear the selected preview photo from the list while in
Photo Card mode.
•
Cancel all photo selections. Press twice, and then
follow the instructions on the control panel display.
•
Return to the default copy settings. From the Copy Mode
screen, press
twice.
Navigating the control panel menus
1
Press Mode to select the Copy, Scan, or Photo Card mode.
2
Press Menu to open the menu for the selected mode.
3
Press or to scroll through the menus.
4
Press or to scroll through the options list of the highlighted menus.
5
Press to choose an option.
Using the Copy menu
1
From the control panel, press Mode repeatedly until Copy is selected.
2
Press Menu.
3
Press or to scroll through the menu.
Learning about the printer
17
Page 18
4
Press or to scroll through the options list of the highlighted menu item.
5
Press when the menu item you want appears.
Menu item Action
Copy Quality Select a print quality.
Brightness Lighten or darken the copied image.
Blank Paper Size Specify the size of paper loaded in the paper
support.
Repeat Image Specify the number of images to place on one page.
Size of Original Specify the size of the original document loaded on
the scanner glass.
Maintenance
Defaults
•
Check ink levels.
•
Change cartridges.
•
Align cartridges.
•
Clean cartridges.
•
Print a test page.
•
Obtain cartridge diagnostic information.
•
Restore default settings.
•
Specify the type of paper loaded in the paper
support.
•
Select a language for the control panel display
text.
•
Specify when settings are cleared.
•
Specify when the printer enters Power Save
mode.
Using the Scan menu
1
From the control panel, press Mode repeatedly until Scan is selected.
2
Press Menu.
3
Press or to scroll through the menu.
Learning about the printer
18
Page 19
4
Press or to scroll through the options list of the highlighted menu item.
5
Press when the menu item you want appears.
From this menu You can
Maintenance
Defaults
•
Check ink levels.
•
Change cartridges.
•
Align cartridges.
•
Clean cartridges.
•
Print a test page.
•
Obtain cartridge diagnostic information.
•
Restore default settings.
•
Select a language for the control panel display text.
•
Specify when to enter Power Save mode.
Using the Photo Card menu
1
From the control panel, press Mode repeatedly until Photo Card is selected.
2
Press Menu.
3
Press or to scroll through the menu.
4
Press or to scroll through the options list of the highlighted menu item.
5
Press when the menu item you want appears.
From this submenu You can
Blank Paper Size Specify the size of paper loaded in the paper support.
Print Quality Select a print quality.
Brightness Lighten or darken the scanned image.
Crop Crop an image.
Learning about the printer
19
Page 20
From this submenu You can
Auto Image Enhance Improve the quality of printed photos.
Notes:
•
The enhanced image will not appear on the
display.
•
If Auto Image Enhance is selected, the Colorize
Effect options will be turned off.
Red Eye Reduction Reduce the red eye effect in photos.
Notes:
•
The red eye reduction will not appear on the
display.
•
If Red Eye Reduction is selected, the colorizing
options described below will be turned off.
Colorize Effect Apply color effects to the image before printing. You
can choose from:
•
Sepia Tone Print
•
Antique Brown
•
Antique Gray
Note: If a colorizing option is selected, the Red Eye
Reduction and Auto Image Enhance options will be
turned off.
Print All Photos Print all of the photos saved on a memory card or flash
drive.
View Slide Show View a slide show of the photos on a memory card or
flash drive.
Print Index Page Print an index of the photos on a memory card or flash
drive.
View Photos or Print Browse through images on a memory card or flash
drive, and select which photos to print.
Print DPOF Selection Print photos directly from a memory card.
Note: This menu selection appears only if a valid
DPOF file is present on the memory card.
Save to Computer Save photos to the computer.
Learning about the printer
20
Page 21

From this submenu You can
Maintenance
Defaults
•
Check ink levels.
•
Change cartridges.
•
Align cartridges.
•
Clean cartridges.
•
Print a test page.
•
Obtain cartridge diagnostic information.
•
Restore default settings.
•
Specify the type of paper loaded in the paper
support.
•
Specify the size of photo to be printed.
•
Choose whether to preview the photo before
printing.
•
Select a language for the control panel display text.
•
Specify when the printer enters Power Save mode.
Learning about the printer
21
Page 22

Learning about the printer software
Using the printer software
Use this software To
The Imaging Studio Open the component necessary for you to complete a task.
The All-In-One Center Scan, copy, or print images.
The Solution Center Find troubleshooting, maintenance, and cartridge ordering
information.
Print Properties Select the best print settings for the document you are
printing.
The Photo Editor Edit photos and graphics.
Fast Pics Transfer digital photos.
Opening the Imaging Studio
The Imaging Studio buttons link to software and information that help you with the
following tasks:
•
Printing, browsing, or sharing photos
•
Using photos from a memory card, flash drive, or PictBridge-enabled digital
camera
•
Printing an album page
•
Scanning and editing text using OCR
•
Scanning, copying, or faxing
•
Finding our Web site
•
Finding tips on using the software
•
Finding maintenance and troubleshooting information
To open the Imaging Studio, use one of these methods:
Method 1 Method 2
From the desktop, double-click the
Imaging Studio icon.
Learning about the printer software
1
Click Start Programs or All
Programs Lexmark 6300 Series.
2
Select Imaging Studio.
22
Page 23
Using the Imaging Studio buttons
Click To Details
Print photos Print common photo sizes from
saved images on the computer.
Share photos E-mail images or photos which
are stored on the computer.
Use memory card
photos
Browse photos View photos saved on the
Print an album page Print an album or scrapbook
Scan & edit text (OCR) Use Optical Character
Scan Scan a photo or document.
Save or print photos from an
inserted memory card.
computer.
page with various photo sizes.
Recognition (OCR) to scan a
document to a word processor so
you can edit the text.
Learning about the printer software
23
Page 24
Click To Details
Copy
Fax Fax a document or an image
Access the Web Visit our Web site.
Learn more about what you can do with this software.
Find maintenance and troubleshooting information and
tools to keep the printer working properly.
•
Copy photos or documents.
•
Enlarge, reduce, or change
other features before
printing.
saved on the computer.
Using the All-In-One Center
Use the All-In-One Center software to scan, copy, and fax documents.
To open the All-In-One Center, use one of these methods:
Method 1 Method 2
From the desktop, double-click the
Imaging Studio icon, and then click
the Scan or Copy button.
1
Click Start Programs or All
Programs Lexmark 6300 Series.
2
Select All-In-One Center.
Using the Scanning & Copying tab
From this section You can
Scan
Learning about the printer software
•
Select a program to send a scanned image to.
•
Select what type of image is being scanned.
•
Select the scan quality.
Note: Click See More Scan Settings to view all
settings.
24
Page 25

From this section You can
Copy
Creative Tasks
•
Select the quantity and color of copies.
•
Select a quality setting for copies.
•
Select a blank paper size.
•
Select the size of the original document.
•
Lighten or darken copies.
•
Enlarge or reduce copies.
Note: Click See More Copy Settings to view all
settings.
•
Print
–
Repeat an image several times on one
page.
–
Enlarge or reduce an image.
–
Print an image as a multiple-page poster.
•
Share
–
E-mail an image or document.
–
Fax using your computer modem.
•
Save
–
Save an image on the computer.
–
Save multiple photos.
•
Edit
–
Edit text found in a scanned document
(OCR).
–
Modify an image with a photo editor.
Preview
Note: For more information about the Scanning & Copying tab, click Help in the top
center of the screen.
Learning about the printer software
•
Select a region of the previewed image to
scan or copy.
•
View an image of what will be printed or
copied.
25
Page 26

Using the Saved Images tab
Use the Saved Images tab to perform tasks with images that are saved on the
computer.
From this section You can
Preview
Open With Select where to send the saved images.
Photo Prints
Creative Tasks
Note: For more information about the Saved Images tab, click Help in the top center
of the screen.
•
Show or create folders.
•
Preview and select images.
•
Rename, delete, or edit selected images.
Click Next to print selected photos in Fast Pics.
•
Print an album page with various photo sizes.
•
Perform creative tasks available from the All-In-One
Main Page Creative Tasks section.
–
Print
•
Repeat an image several times on one page.
•
Enlarge or reduce an image.
•
Print an image as a multiple-page poster.
–
Share
•
E-mail an image.
•
Fax using your computer modem.
–
Edit
•
Edit text found in a scanned document
(OCR).
•
Modify an image with a photo editor.
Using the Maintain/Troubleshoot link
The Maintain/Troubleshoot link provides you with direct links to the Solution Center.
1
Click Maintain/Troubleshoot.
2
Select from these topics:
•
Maintain or fix quality problems
•
Troubleshoot problems
Learning about the printer software
26
Page 27
•
Device status and ink levels
•
More printing ideas and how to's
•
Contact information
•
Advanced (Skin, voice, and communication options)
•
View the software version and copyright information
Using the Solution Center
The Solution Center provides help, as well as information about the printer status
and ink levels.
To open the Solution Center, use one of these methods:
Method 1 Method 2 Method 3 Method 4
From the desktop,
double-click the
Imaging Studio
icon, and then click
the Maintain/
Troubleshoot
button.
The Solution Center consists of six tabs:
From this tab You can
Printer Status (Main dialog)
1
Click Start
Programs or All
Programs
Lexmark 6300
Series.
2
Select Solution
Center.
•
•
•
View the status of the printer. For example,
while printing, the status of the printer is Busy
Printing.
View the type of paper detected in the printer.
View the ink levels of the print cartridges.
From the All-In-One
Center, click the
Maintain/
Troubleshoot link
located in the top
center, and then
click one of the
available topics.
Right-click the
system tray
icon, and then
select
Solution
Center.
Learning about the printer software
27
Page 28
From this tab You can
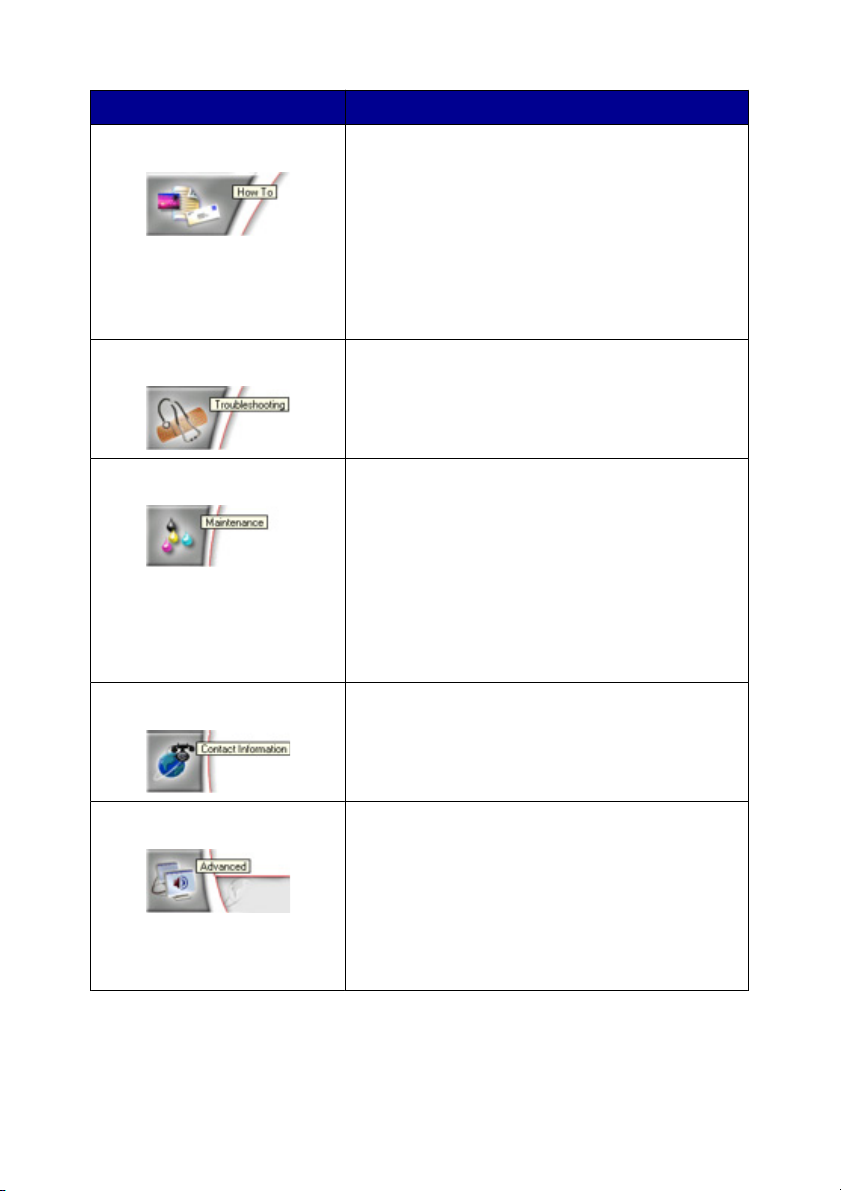
How To Learn how to:
•
Scan, copy, and print.
•
Find and change settings.
•
Use basic features.
•
Print projects such as banners, photos,
envelopes, cards, iron-on transfers, and
transparencies.
•
Find the printable User's Guide.
Troubleshooting
Maintenance
Contact Information Learn how to contact us by telephone, e-mail, or
Advanced
•
Learn tips about the current status.
•
Solve printer problems.
•
Install a print cartridge.
Note: Wait until scanning is complete before
installing new print cartridges.
•
View shopping options for new cartridges.
•
Print a test page.
•
Clean to fix horizontal streaks.
•
Align to fix blurry edges.
•
Troubleshoot other ink problems.
on the World Wide Web.
•
Change the appearance of the Printing Status
window.
•
Turn printing voice notification on or off.
•
Change network printing settings.
•
Share information with us regarding how you
use the printer.
•
Obtain software version information.
Note: For more information, click Help in the lower right corner of the screen.
Learning about the printer software
28
Page 29
Using Print Properties
Print Properties is the software that controls the printing function when the printer is
connected to a computer. You can change the settings in Print Properties based on
the type of project you want to create. You can open Print Properties from almost
any program:
1
With a document open, click File Print.
2
From the Print dialog, click Properties, Preferences, Options, or Setup.
Save Settings menu
From the “Save Settings” menu, you can name and save the current Print Properties
settings for future use. You can save up to five custom settings.
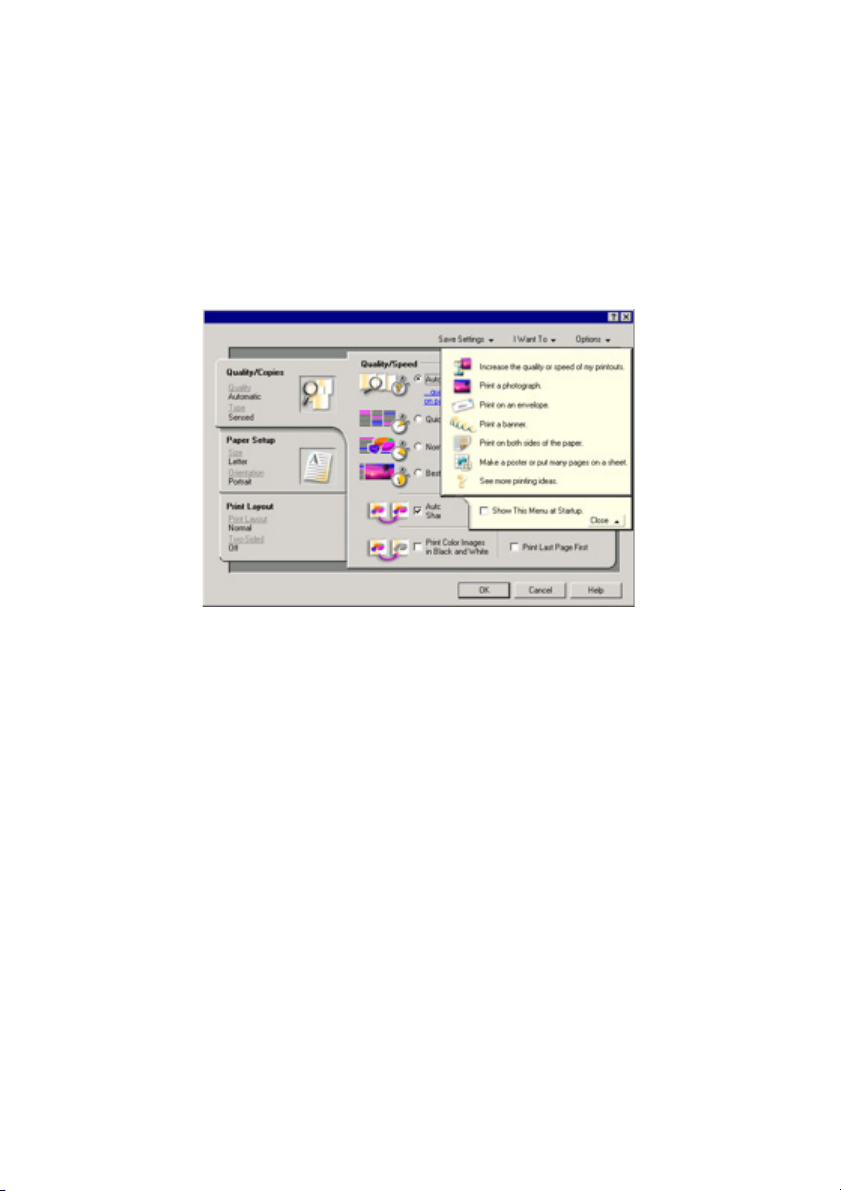
I Want To menu
The “I Want To” menu contains a variety of task wizards (printing a photo, an
envelope, a banner, a poster, or printing on both sides of the paper) to help you select
the correct print settings for a project.
Options menu
Use the “Options” menu to make changes to the Quality Options, Layout Options,
and Printing Status Options settings. For more information on these settings, open
the tab dialog from the menu, and then click the Help button on the dialog.
The “Options” menu also provides direct links to different parts of the Solution Center
as well as software version information.
Learning about the printer software
29
Page 30

Print Properties tabs
All of the print settings are on the three main tabs of the Print Properties software:
Quality/Copies, Paper Setup, and Print Layout.
Tab Options
Quality/Copies
Paper Setup
Print Layout
Note: For more information about these settings, right-click a setting on the screen,
and then select What's This?
•
Select a Quality/Speed setting.
•
Select a Paper Type.
•
Customize how the printer prints several copies of
a single print job: collated or normal.
•
Choose Automatic Image Sharpening.
•
Choose to print color images in black and white.
•
Choose to have the last page printed first.
•
Specify the size of paper loaded.
•
Select the orientation of the document on the
printed page: portrait or landscape.
•
Select the layout you want to print.
•
Choose to print on both sides of the paper, and
select a duplexing preference.
Learning about the printer software
30
Page 31

Using the Photo Editor
Use the Photo Editor software to edit graphics or photos.
1
Click Start Programs or All Programs Lexmark 6300 Series.
2
Click Photo Editor.
3
Click File Open to select the image you want to edit.
4
Edit the image with the available tools.
Notes:
•
You can edit only one image at a time.
•
Move the mouse pointer over the tool for a description.
5
Click File Save as.
6
Enter a file name and file type, and then click Save.
Using Fast Pics
Use Fast Pics to save or print photos from a digital camera memory card or flash
drive.
Use one of these methods to open Fast Pics:
•
Insert a digital camera memory card or flash drive. For more information, see
“Inserting a memory card” on page 40 or “Inserting a flash drive” on
page 43.
•
From the Imaging Studio, click Use Memory Card Photos.
With Fast Pics, you can:
•
Print photos using a computer. For more information, see “Printing photos using
the computer” on page 54.
•
Save photos from a memory card or flash drive to the computer. For more
information, see “Transferring digital photos from a memory card or flash drive”
on page 45.
Learning about the printer software
31
Page 32

Loading paper and original documents
Loading paper
1
Make sure:
•
You use paper designed for inkjet printers.
•
The paper is not used or damaged.
•
You read the instructions that came with the specialty paper.
•
You do not force paper into the printer.
2
Before loading paper the first time, hold down the paper feed guard and slide
the paper guides out toward the edges of the paper tray.
3
Load the paper vertically in the center of the paper support.
4
Hold down the paper feed guard and slide the paper guides to the edges of the
paper.
2
2
2
1
Note: To avoid paper jams, make sure the paper does not buckle when you
adjust the paper guides.
Loading paper and original documents
32
Page 33

Loading various paper types
Load up to Make sure
100 sheets of plain paper The paper is designed for use with inkjet printers.
100 sheets of coated paper
25 sheets of photo paper
25 sheets of glossy paper
10 iron-on transfers
25 greeting cards
25 index cards
25 photo cards
25 postcards
•
The glossy or coated side of the paper faces
you.
•
The paper guides rest against the edges of the
paper.
Note: Photos require more drying time. Remove
each photo as it exits, and allow it to dry to avoid ink
smudging.
•
You follow the loading instructions on the ironon transfer packaging.
•
The print side of the transfers faces you.
•
The paper guides rest against the edges of the
transfers.
Note: For best results, load transfers one at a time.
•
The total thickness of the card stack does not
exceed 0.394 inches or 10 mm.
•
The print side of the cards faces you.
•
The cards are loaded in the center of the paper
support.
•
The paper guides rest against the edges of the
cards.
Loading paper and original documents
33
Page 34

Load up to Make sure
10 envelopes
25 sheets of labels
•
The envelopes are loaded in the center of the
paper support.
•
The stamp location is in the upper left corner.
•
The envelopes are designed for use with inkjet
printers.
•
The paper guides rest against the edges of the
envelopes.
Warning: Do not use envelopes that have metal
clasps, string ties, or metal folding bars.
Notes:
–
Do not load envelopes with holes, perforations,
cutouts, or deep embossing.
–
Do not use envelopes that have exposed flap
adhesive.
•
The print side of the labels faces you.
•
The top of the labels feeds into the printer first.
•
The adhesive on the labels does not extend to
within 1 mm of the edge of the label.
•
The paper guides rest against the edges of the
paper.
•
Use full label sheets. Partial sheets (with areas
exposed by missing labels) may cause labels to
peel off during printing, resulting in a paper jam.
Loading paper and original documents
34
Page 35

Load up to Make sure
50 transparencies
100 sheets of custom size
paper
•
The rough side of the transparencies faces you.
•
If the transparencies have paper backing
sheets, you separate the paper from the
transparencies before loading.
•
If the transparencies have a removable strip,
each strip faces down toward the paper tray.
•
The transparencies are loaded in the center of
the paper support.
•
The paper guides rest against the edges of the
transparencies.
Note: Transparencies require more drying time.
Remove each transparency as it exits, and allow it
to dry to avoid ink smudging.
•
The print side of the paper faces you.
•
The paper size fits within these dimensions:
Width:
–
76–216 mm
–
3.0–8.5 inches
Length:
–
127–432 mm
–
5.0–17.0 inches
•
The paper is loaded in the center of the paper
support.
•
The paper guides rest against the edges of the
paper.
Loading paper and original documents
35
Page 36

Load up to Make sure
20 sheets of banner paper
•
You remove all the paper from the paper tray
before loading the banner paper.
•
You tear off only the number of pages needed
to print the banner.
•
You place the required stack of banner paper on
the top cover.
•
The leading edge of the banner paper feeds into
the printer first.
•
The paper guides rest against the edges of the
paper.
•
You have selected the correct paper size for the
banner in Print Properties. For more
information, see “Using Print Properties” on
page 29.
Loading original documents on the scanner glass
You can copy, scan and print photos, text documents, magazine articles,
newspapers, and other publications. You can also scan a document for faxing.
1
Make sure the printer is on.
2
Open the top cover.
Loading paper and original documents
36
Page 37

3
Place the original document face down on the scanner glass in the lower right
corner.
4
Close the top cover to avoid dark edges on the scanned image.
Loading paper and original documents
37
Page 38

Printing
Printing a document
1
Load paper.
2
With a document open, click File Print.
3
Click Properties, Options, Setup, or Preferences.
4
Adjust the settings.
5
Click OK.
6
Click OK or Print.
Printing envelopes
1
Load envelopes.
2
From the software application, click File Print.
3
Click Properties, Preferences, Options, or Setup.
4
From the “I Want To” menu, select Print on an envelope.
5
From the Envelope Size list, select the envelope size loaded.
6
Select Portrait or Landscape orientation.
Notes:
•
Most envelopes use landscape orientation.
•
Make sure the same orientation is also selected in the software application.
7
Click OK.
8
Click OK.
9
Click OK or Print.
Printing cards
1
Load greeting cards, index cards, or postcards.
2
From the software application, click File Print.
Printing
38
Page 39

3
Click Properties, Preferences, Options, or Setup.
4
Select a Quality/Speed setting.
Select Photo for photos and greeting cards and Normal for other types of cards.
5
Select the Paper Setup tab.
6
Select Paper.
7
From the Paper Size list, select a card size.
8
Click OK.
9
Click OK or Print.
Notes:
•
To avoid paper jams, do not force the cards into the printer.
•
To prevent smudging, remove each card as it exits, and let it dry before stacking.
Printing transparencies
1
Load transparencies.
2
With a document open, click File Print.
3
Click Properties, Preferences, Options, or Setup.
4
From the Paper Setup tab, select the size of the transparencies loaded.
5
Click OK.
6
Click OK or Print.
Note: To prevent smudging, remove each transparency as it exits, and let it dry
before stacking. Transparencies may require up to 15 minutes to dry.
Printing
39
Page 40

Getting ready to print photos using media devices
Inserting a memory card
1
Open the memory card reader door.
2
Insert a memory card.
•
Insert the card with brand name label facing up.
•
If there is an arrow on the card, make sure it points toward the printer.
Getting ready to print photos using media devices
40
Page 41

Slot Memory card
Top slot
Bottom slot
•
xD Picture Card
•
Secure Digital
•
Mini Secure Digital (with adapter)
Note: Make sure to connect the
memory card to the adapter that
came with it before inserting it in
the slot.
•
MultiMedia
•
Memory Stick
•
Memory Stick PRO
•
Memory Stick Duo (with adapter)
or Memory Stick PRO Duo (with
adapter)
Note: Make sure to connect the
memory card to the adapter that
came with it before inserting it in
the slot.
•
SmartMedia
Note: Make sure the gold contact
area faces up, and insert the card
all the way in quickly.
•
CompactFlash Type I and Type II
•
Microdrive
Getting ready to print photos using media devices
41
Page 42

3
Wait for the light on the printer to come on. The light blinks to indicate the memory
card is being read or is transmitting data.
Warning: Do not remove cables, media devices, or touch the printer while the
light is blinking in the area shown .
If the printer does not read the memory card, remove and reinsert it.
Note: The printer reads only one media device at a time.
Getting ready to print photos using media devices
42
Page 43

Inserting a flash drive
1
Insert the flash drive into the PictBridge port on the front of the printer.
Notes:
•
An adapter may be necessary if your drive does not fit directly into the port.
•
The printer reads only one media device at a time.
Getting ready to print photos using media devices
43
Page 44

2
Wait for the light on the printer to come on. The light blinks to indicate the flash
drive is being read or is transmitting data.
Warning: Do not remove cables or media devices, or touch the printer while the
light is blinking in the area shown.
Getting ready to print photos using media devices
44
Page 45

Browsing and selecting photos from a memory card or flash drive
1
Load paper. For best results, use photo or glossy paper, with the glossy or coated
side facing you.
2
Insert a memory card or flash drive. For more information, see “Inserting a
memory card” on page 40 or “Inserting a flash drive” on page 43.
3
Press .
4
Press or to browse through the photos.
Press
5
Press to select the currently displayed photo.
Press
or to skip forward or backward to view every tenth photo.
to deselect the currently displayed photo.
Transferring digital photos from a memory card or flash drive
Transferring photos using the control panel
1
Insert a memory card or flash drive. For more information, see “Inserting a
memory card” on page 40 or “Inserting a flash drive” on page 43.
2
From the "I Want To" menu, press or to scroll to Save Photos to
Computer.
3
Press .
4
Select the photos you want to save.
5
Click Next.
6
Follow the instructions on the computer screen to specify where you want to
save the images.
7
Click Save Now.
Getting ready to print photos using media devices
45
Page 46

Transferring photos using the computer
1
Insert a memory card or flash drive. For more information, see “Inserting a
memory card” on page 40 or “Inserting a flash drive” on page 43.
2
From the Fast Pics dialog, click Save Them On The PC.
3
Select the photos you want to save.
4
Click Next.
5
Follow the instructions on the computer screen to specify where you want to
save the images.
6
Click Save Now.
Using a PictBridge-enabled digital camera to control printing photos
Connect a PictBridge-enabled digital camera to the printer, and use the buttons on
the camera to select and print photos.
1
Insert one end of the USB cable into the camera.
Note: Use only the USB cable that came with the digital camera.
2
Insert the other end of the cable into the PictBridge port on the front of the printer.
Notes:
•
Make sure the PictBridge-enabled digital camera is set to the correct USB
mode. For more information, see the camera documentation.
•
The printer reads only one media device at a time.
Getting ready to print photos using media devices
46
Page 47

3
Follow the instructions in the camera documentation to select and print photos.
Warning: Do not remove cables or media devices, or touch the printer while the
light is blinking in the area shown.
Getting ready to print photos using media devices
47
Page 48

Printing photos using the control panel
Printing photos from the control panel
1
Load paper. Use photo or glossy paper for best results.
2
Insert a memory card or flash drive. For more information, see “Inserting a
memory card” on page 40 or “Inserting a flash drive” on page 43.
3
Press .
4
Press or to browse through the photos.
Note: Press
5
Press to select the currently displayed photo.
Note: To deselect the currently selected photo, press
6
To rotate the photo for easier viewing, press Rotate until the orientation you want
appears.
7
To make multiple copies:
a
Press Number of Copies.
b
Press or to scroll to the number of prints you want.
c
Press .
8
Press Color or Black.
If Preview before Print is off, the photos print immediately.
If Preview before Print is on, press Color or Black to print the photos.
or to browse through photos in increments of 10.
.
Printing selected photos
1
Load photo paper.
2
Insert a memory card or flash drive. For more information, see “Inserting a
memory card” on page 40 or “Inserting a flash drive” on page 43.
The “I Want to” menu appears with View Photos or Print highlighted.
3
Press .
Printing photos using the control panel
48
Page 49

4
Press or to browse through the photos.
•
Press to select the currently displayed photo.
•
Press to deselect the currently displayed photo.
•
Press twice, and then , to deselect all selected photos.
5
Press Color or Black.
If Preview before Print is off, the photos print immediately.
If Preview before Print is on, press Color or Black to print the photos.
Printing all photos from the control panel
1
Load paper.
2
Insert a memory card or flash drive.
3
Press until Print All Photos is highlighted.
4
Press .
5
If Preview before Print is on, press Color or Black to print the photos.
Printing photos using the control panel
49
Page 50

Printing a DPOF selection
Digital Print Order Format (DPOF) is a feature available on some digital cameras. If
your camera supports DPOF, you can specify which photos to print, and how many
of each, while the memory card is still in the camera. The printer recognizes these
settings when you insert the memory card into the printer.
Note: Make sure the size of the paper loaded is not smaller than the size you
specified in the DPOF selection.
1
Load paper. For best results, use photo or glossy paper, with the glossy or coated
side facing you.
2
Insert a memory card. For more information, see “Inserting a memory card” on
page 40.
3
Press or to scroll to Print DPOF Selection.
4
Press .
If Preview before Print is off, the photos print immediately.
If Preview before Print is on, a preview of the print job appears. Press Color or
Black to print the photos.
Printing an index page
1
Load paper.
2
Insert a memory card or flash drive. For more information, see “Inserting a
memory card” on page 40 or “Inserting a flash drive” on page 43.
3
Press Menu.
4
Press or to scroll to Print Index Page.
5
Press .
Note: Changes made by Auto Image Enhance, Red Eye Reduction, and Colorize
Effect selections will not appear on index pages.
Printing photos using the control panel
50
Page 51

Previewing changes to photos before printing
After making changes to photos, you can preview how they will print from the display
on the control panel.
1
Insert a memory card or flash drive. For more information, see “Inserting a
memory card” on page 40 or “Inserting a flash drive” on page 43.
2
Press .
3
Select a photo you want to preview. For more information, see “Browsing and
selecting photos from a memory card or flash drive” on page 45.
4
Press Page Preview to see an image of the photo on the paper size you
selected.
To turn on the Auto Preview Before Print option:
1
Press Mode repeatedly until Photo Card is selected.
2
Press Menu.
3
Press or to scroll to Preview before Print.
4
Press or until On appears.
Note: To turn off Auto Preview Before Print, press
5
Press .
or until Off appears.
Viewing a photo slide show on the control panel
You can view a slide show of the photos saved on a memory card or flash drive.
1
Insert a memory card or flash drive. For more information, see “Inserting a
memory card” on page 40 or “Inserting a flash drive” on page 43.
2
Press or repeatedly until View Slide Show is highlighted.
3
Press .
Note: Press
when you are finished viewing the slide show.
Printing photos using the control panel
51
Page 52

Choosing a photo paper size using the control panel
The size you select from the "Blank Paper Size" menu is the size of the photo paper
that you will load. For example, if you are printing two 2.5 x 3.5 inch photos and you
selected letter as the blank paper size, the printer will print two photos of that size
on one sheet of letter-size paper.
1
Press Mode repeatedly until Photo Card is selected.
2
Press Menu.
3
From the "Blank Paper Size" menu, press or to scroll through the available
sizes.
4
Press .
Changing the photo size
1
Insert a memory card or flash drive. For more information, see “Inserting a
memory card” on page 40 or “Inserting a flash drive” on page 43.
2
Browse and select the photo you want to resize. For more information, see
“Browsing and selecting photos from a memory card or flash drive” on page 45.
3
When the photo you want to resize appears, press Resize repeatedly until you
find the size you want to use.
4
Press .
Adjusting brightness
1
Insert a memory card or flash drive. For more information, see “Inserting a
memory card” on page 40 or “Inserting a flash drive” on page 43.
2
Press .
3
Press or repeatedly until the photo you want to adjust appears.
4
Press Menu.
5
Press or repeatedly until Brightness appears.
6
Press .
Printing photos using the control panel
52
Page 53

7
Press or to make the photo lighter or darker.
8
Press .
Cropping photos from the control panel
1
Insert a memory card or flash drive. For more information, see “Inserting a
memory card” on page 40 or “Inserting a flash drive” on page 43.
2
Press .
3
Press or to scroll to the photo you want to crop.
4
When the image appears on the display, press .
5
If needed, press Rotate to change the orientation of the image.
6
Press Menu.
7
Press or to scroll to Crop.
8
Press .
9
Press Resize to change the size of the crop area.
Note: The crop area is marked by a green line.
10
Adjust the crop area.
•
Press or to move the crop area vertically.
•
Press or to move the crop area horizontally.
•
Press Rotate to change the orientation of the crop area.
11
Press to save the settings.
Note: You cannot crop an image twice to magnify an extremely small portion.
Printing photos using the control panel
53
Page 54

Printing photos using the computer
Printing photos
1
Load photo or glossy paper.
2
From the software application, click File Print.
3
Click Properties, Preferences, Options, or Setup.
4
From the “I Want To” menu, select Print a photograph.
5
Select a print quality setting.
6
From the Paper Size list, select the paper size loaded into the printer.
7
Click OK.
8
Click OK.
9
Click OK or Print.
Notes:
•
To change the orientation of a photo, go to the Paper Setup tab.
•
To prevent smudging, remove each photo as it exits, and let it dry before
stacking.
Printing borderless photos
1
Load photo paper.
2
From the desktop, double-click the Imaging Studio icon.
3
Click Print Album Page.
4
Click Change the category of layouts listed above.
5
Select Only Borderless.
6
Click OK.
7
Select a paper size for the photos.
8
Select a page layout from the “Create a page from saved photos” section.
Printing photos using the computer
54
Page 55

9
Drag your photos onto the page.
10
Click Print Now.
Browsing and selecting photos stored on the computer
1
Click Start Programs or All Programs Lexmark 6300 Series.
2
Select Imaging Studio.
3
Click Browse Photos.
4
Click Show Folders.
5
Select the folder where the photos are stored.
6
Close the folder directory.
7
Select the photos you want to print by clicking each photo.
Creating and printing a scrapbook or album page
1
Load paper.
2
From the desktop, double-click the Imaging Studio icon.
3
Click Print Album Page.
4
Click Show Folders.
5
In the directory in the right panel, select the folder where your photos are stored.
6
Close the directory in the right panel.
7
From the “Paper Size” drop-down menu, select a paper size.
8
From the “Page Layout” drop-down menu, select a page layout.
For more options:
a
Click Change the category of layouts listed above.
b
Select a layout for the photos.
c
Click OK.
d
From the “Page Layout” drop-down menu, select a page layout.
Printing photos using the computer
55
Page 56

9
Drag the photos onto the page.
Note: Right-click the photo on the page for editing options.
10
Click Print Now.
Note: To prevent smudging, remove each page as it exits, and let it dry before
stacking.
Adding text captions to a photo page
1
Load paper.
2
From the desktop, double-click the Imaging Studio icon.
3
Click Print Album Page.
4
Click Change the category of layouts listed above.
5
Select Only Scrapbook Pages.
6
Click OK.
7
Select a paper size for the photos.
8
Select a page layout containing a black box.
9
Drag the photos onto the page.
10
Click inside the white box. A dialog appears.
11
Enter the text you want.
12
Click OK.
13
Click Print Now to print the photo page.
Printing photos using the computer
56
Page 57

Copying
Making a copy using the control panel
1
Load paper.
2
Load an original document face down on the scanner glass.
3
Press Mode repeatedly until Copy is selected.
4
Press Black or Color.
Changing the blank paper size
1
Press Mode repeatedly until Copy is selected.
2
Press or to scroll to the blank paper size that matches the size of the
paper you are loading.
3
Press .
Setting the copy quality
1
Press Mode repeatedly until Copy is selected.
2
Press Menu.
3
Press or until the appropriate copy quality for the document appears.
4
Press .
Changing the brightness of a copy
1
Load an original document face down on the scanner glass.
2
Press Mode repeatedly until Copy is selected.
3
Press Menu.
4
Press or until Brightness is selected.
5
Press .
Copying
57
Page 58

6
Press or to lighten or darken the copy.
7
Press .
Making borderless copies using the control panel
1
Load paper.
2
Load an original document face down on the scanner glass.
3
Press Mode repeatedly until Copy is selected.
4
Press Menu.
5
Press or until Photo appears.
6
Press .
7
Press Color or Black.
Enlarging or reducing an image using the control panel
1
Load paper.
2
Load an original document face down on the scanner glass.
3
Press Mode repeatedly until Copy is selected.
4
Press Resize.
5
Press or to scroll through the available options until the one you want
appears.
6
Press .
7
Press Color or Black.
Copying
58
Page 59

Repeating an image on one page from the control panel
You can print the same image multiple times on one sheet of paper. This option is
helpful in creating labels, decals, flyers, handouts, and so on.
1
Load paper.
2
Load an original document face down on the scanner glass.
3
Press Mode repeatedly until Copy is selected.
4
Press Menu.
5
Press or until Repeat Image appears.
6
Press .
7
Press or until the number of images you want to print on one page appears.
8
Press .
9
Press Color or Black.
Making a copy using the software
1
Load paper.
2
Load an original document face down on the scanner glass.
3
From the desktop, double-click the Imaging Studio icon.
4
Click Copy.
5
Customize the settings as needed.
6
Click Display Advanced Copy Settings.
7
Customize any other settings as needed.
8
Click OK.
9
Click Copy Now.
Copying
59
Page 60

Scanning
Scanning a text-only document
1
Make sure the printer is connected to a computer, and both the printer and the
computer are on.
2
Load an original document face down on the scanner glass.
3
From the desktop, double-click the Imaging Studio icon.
4
Click Scan.
5
From the “What is being scanned?” menu, select Black & White Document.
6
Adjust the settings as needed.
7
Click Scan Now.
Scanning a text and graphics document
1
Make sure the printer is connected to a computer, and both the printer and the
computer are on.
2
Load an original document face down on the scanner glass.
3
From the desktop, double-click the Imaging Studio icon.
4
Click Scan.
5
From the ”What is being scanned?” menu, select Mixed Graphics and Text.
6
Adjust the settings as needed.
7
Click Scan Now.
Saving a scanned image
1
Make sure the printer is connected to a computer, and both the printer and the
computer are on.
2
Load an original document face down on the scanner glass.
3
From the desktop, double-click the Imaging Studio icon.
4
Click Scan.
Scanning
60
Page 61

5
From the “Send scanned images to” menu, select the application where you want
to save the scanned image.
6
Adjust the settings as needed.
7
Click Scan Now.
8
From the software application, click File Save As.
9
Enter the file name, format, and location where you want the scanned image
saved.
10
Click Save.
Scanning documents or images for e-mailing using
the control panel
1
Make sure the printer is connected to a computer, and both the printer and the
computer are on.
2
Load an original document face down on the scanner glass.
3
Press Mode repeatedly until Scan is selected.
4
Press or to scroll through the list of applications to which you can scan.
5
Select Email from the application list.
6
Press Color or Black.
7
Follow the instructions on the computer screen.
Scanning documents or images for e-mailing using
the computer
1
Make sure the printer is connected to a computer, and both the printer and the
computer are on.
2
Load an original document on the scanner glass.
3
From the desktop, double-click the Imaging Studio icon.
4
Click Share Photos.
5
From the E-mail dialog, click Scan and e-mail a photo.
6
Follow the instructions on the screen to prepare the document or image for emailing.
Scanning
61
Page 62

7
Click Next.
8
Write a note to accompany the attached document or image, and then send it.
Scanning to a computer over a network
1
Make sure:
•
The printer is connected to a computer and both are on.
•
The printer is configured to scan over a network.
2
Load an original document face down on the scanner glass.
3
Press Mode repeatedly until Scan is selected.
4
Press Menu.
5
Press or repeatedly until PC appears.
6
Press .
7
Press or repeatedly until the computer to which you want to scan appears.
8
Press .
9
Enter a four-digit PIN.
10
Press .
11
Press Color or Black.
Scanning documents to edit text
Use the Optical Character Recognition (OCR) software feature to turn scanned
images into text you can edit with a word-processing application.
Note: Make sure that ABBYY Fine Reader is installed.
1
Load an original document face down on the scanner glass.
2
From the desktop, double-click the Imaging Studio icon.
3
Click Scan & Edit Text (OCR).
The All-In-One Center appears with the Scanning & Copying tab expanded.
Scanning
62
Page 63

4
To scan only a portion of the document:
a
Click Preview Now.
An image of the scanned document appears in the preview section.
b
Click and drag the dotted line box to select a specific area of the preview
image to scan.
Otherwise, continue with step 5.
5
Select a word-processing program to edit the text.
6
Click Send Now.
The document will appear in your text-editing program.
7
Make your editing changes.
8
To save the document, click File Save As.
9
Enter the file name, format, and location where you want the edited document
saved.
10
Click Save.
Scanning clear images from magazines or newspapers
Descreening helps to remove wavy patterns from images scanned from magazines
or newspapers.
1
Make sure the printer is connected to a computer, and both the printer and the
computer are on.
2
Load an original document face down on the scanner glass.
3
From the desktop, double-click the Imaging Studio icon.
4
Click Scan.
5
Click Display Advanced Scan Settings.
6
Select the Image Patterns tab.
7
Select the Remove image patterns from magazine/newspaper (descreen)
check box.
8
From the “What is being scanned?” menu, select Magazine or Newspaper.
Scanning
63
Page 64

9
Click OK.
10
Click Scan Now.
Scanning
64
Page 65

Faxing
Faxing a document using the software
1
Make sure:
•
The printer is connected to a computer that is equipped with a fax modem.
•
The computer is connected to a working phone line.
•
Both the printer and the computer are turned on.
2
Load an original document face down on the scanner glass.
3
From the desktop, double-click the Imaging Studio icon.
4
Click Fax.
5
Click Scan and send a fax.
6
Click Preview Now.
7
Click and drag the dotted line box to select a specific area of the preview image
to fax.
8
Adjust the settings as needed.
9
Click Next.
10
Follow the instructions on the computer screen to complete the task.
Faxing
65
Page 66

Receiving a fax using the software
1
Make sure:
•
The printer is connected to a computer that is equipped with a fax modem.
•
The computer is connected to a working phone line.
•
Both the printer and the computer are turned on.
2
From the desktop, double-click the Imaging Studio icon.
3
Click Fax.
4
Click Receive a fax or view settings/history.
Note: You can receive faxes only when the fax software is open.
5
Double-click the fax in the status window to view it.
6
Click the printer icon to print the fax.
If you want to print faxes as they arrive, select Print Incoming Faxes.
Faxing
66
Page 67

Networking
Installing network printers
Installing a network printer allows users at different workstations to print to a common
printer. Methods of setting up a network printer include:
•
sharing a printer that is locally attached to a network computer
•
a direct Ethernet connection through a print server
Shared printing
Installing software and sharing the printer on the network (on the host
computer)
1
Connect the printer to a network computer using a USB cable.
If the Found New Hardware dialog appears, click Cancel.
2
Insert the printer software CD.
3
Click Install.
4
Click Continue.
5
Select Yes to share your printer.
6
Assign a shared printer name.
7
When prompted, select Test Page to make sure that the computer can print to
the printer.
8
Follow the directions on the computer screen until installation is complete.
Networking
67
Page 68

Installing the shared printer on other network computers (on the
client computers)
Using the peer-to-peer method Using the point-and-print method
a
Go to a network computer that
you want to enable to print to the
shared printer.
b
Insert the printer CD.
c
Click Install.
d
From the “Connect Your Printer”
dialog, select the network option.
e
From the “Networking Setup”
dialog, select Peer-to-Peer.
f
Enter the shared names of both
the printer and the network
computer you assigned in step 6
on page 67.
g
When prompted, select Test
Page to make sure the computer
can print to the shared printer.
h
Follow the instructions on the
computer screen until installation
is complete.
i
Repeat this procedure for each
network computer you want to
access the shared printer.
a
Go to a network computer that you
want to enable to print to the
shared printer.
b
Browse the Network
Neighborhood until you find the
name of the shared printer
assigned in step 6 on page 67.
c
Right-click the printer icon, and
select Open or Connect.
d
This will copy a subset of the
printer software from the host
computer. A printer object will be
created in the Printers folder of the
client.
e
When prompted, select Test
Page to make sure the computer
can print to the shared printer.
Direct IP printing
1
Connect the printer to an external print server using a USB cable.
2
Connect the print sever to the network using an Ethernet cable.
Note: You may be connecting your printer directly into a wall connection or
through a router. For more information, see the print server documentation.
3
Insert the printer software CD.
4
Click Install.
5
From the “Connect Your Printer” dialog, select the network option.
Networking
68
Page 69

6
From the “Networking Setup” dialog, select Direct Network Attached.
7
Select the printer/print server combination from the Network Printers list.
Note: If more than one is listed, match the MAC address of the print server to
the one in the list. For more information, see “Finding your MAC address” on
page 69.
Tips for installing a network printer
The following topics will help you install, configure, and troubleshoot the network
printer.
Assigning an IP address
An IP address is assigned during printer software installation, but only for Direct IP
printing. The print object, created at the end of the installation, sends all print jobs
across the network to the printer attached to the print server using this address.
Many networks have the ability to automatically assign an IP address. In smaller
networks, it is often called Auto-IP. There are 2 common types of Auto-IP networks.
UPnP network environments provide automatic private IP addresses in the
169.254.x.x range. ICS network environments provide automatic private IP
addresses in the 192.168.x.x range. Larger networks may use DHCP to assign
addresses. These are usually unique to the company.
During the Direct IP printing installation of printer software, the IP address is only
visible in the printer list as it is being assigned. The print object that is created in the
Printers folder of the operating system will reference the MAC address of the print
server in the port name.
If the IP address is not automatically assigned during printer software installation,
you can try manually entering an address after selecting your printer/print server
from the available list.
Finding your MAC address
You may need the media access control (MAC) address of the print server to
complete network printer configuration. The MAC address is a series of letters and
numbers listed on the bottom of the external print server.
Networking
69
Page 70

Configuring a network printer manually
1
From the “Configure Network Printers” dialog, highlight the printer you want to
configure, and then click Configure.
2
Select DHCP or Configure IP Address Manually.
3
Enter the desired IP address, subnet mask, and gateway for the printer.
4
Click OK.
Finding a printer/print server located on remote subnets
The printer software CD can automatically find the printers that are located on the
same network as the computer. If the printer and print server are located on another
network (called a subnet), you must manually enter an IP address during printer
software installation.
Network troubleshooting tips
1
Make sure the printer is set up correctly. For more information, see the printer
setup documentation.
2
Make sure all cable connections are secure. For more information, see the
printer or print server setup documentation.
3
Make sure the correct lights are showing on the print server. For more
information, see the print server documentation.
4
If the printer software CD cannot find the printer/print server, wait a few minutes,
and then try running the CD again. Network traffic speeds vary.
5
Make sure the computer you are using to install the printer is connected to the
network.
6
See the print server documentation for additional troubleshooting.
Networking
70
Page 71

Maintaining the printer
Removing a used print cartridge
1
Make sure the printer is on.
2
Lift the scanner unit.
The print cartridge carrier moves and stops at the loading position, unless the
printer is busy.
3
Press down on the lever to raise the cartridge lid.
4
Remove the used print cartridge.
To recycle the used cartridge, see “Recycling Lexmark products” on
page 79.
If the cartridge you removed is not empty and you want to use it later, see
“Preserving the print cartridges” on page 76.
Note: If you are removing both cartridges, repeat steps 3 and 4 for the second
cartridge.
Maintaining the printer
71
Page 72

Installing print cartridges
1
If you are installing new print cartridges, remove the sticker and tape from the
back and bottom of the cartridges.
1
2
Warning: Do not touch the gold contact area on the back or the metal nozzles
on the bottom of the cartridges.
2
Press down on the cartridge levers to raise the cartridge lids.
3
Insert the black cartridge or the photo cartridge in the left carrier. Insert the color
cartridge in the right carrier.
1
2
Maintaining the printer
72
Page 73

4
Close the lids.
5
Close the scanner unit, making sure to keep your hands out from underneath
the scanner unit.
Note: The control panel display will prompt you to print an alignment page. For more
information, see “Aligning print cartridges” on page 74.
Note: The scanner unit must be closed to start a new scan, print, copy, or fax job.
Using genuine Lexmark print cartridges
When you install a print cartridge, one of the following messages appears:
•
Non-Lexmark cartridge in LEFT slot. See user guide for
details.
•
Non-Lexmark cartridge in RIGHT slot. See user guide for
details.
•
Lexmark recommends genuine ink. See user guide for details.
•
Thank you for using genuine Lexmark supplies.
Maintaining the printer
73
Page 74

If you believe you purchased a genuine Lexmark print cartridge, but a non-Lexmark
print cartridge message appears:
•
Contact us at our Web site: www.lexmark.com, or
•
Call the Customer Support Center for your country or region.
Lexmark’s warranty does not cover damage caused by non-Lexmark print cartridges.
Aligning print cartridges
Align the print cartridges after installing them to improve print quality.
Aligning print cartridges using the computer
1
Load paper.
2
From the desktop, double-click the Imaging Studio icon.
3
Click the Maintain/Troubleshoot button.
4
Click Maintenance.
5
Click Align to fix blurry edges.
6
Click Print.
An alignment page prints.
Note: Discard the alignment page after it prints.
Aligning print cartridges using the control panel
1
Load paper.
2
Press Menu.
3
Press or until Align Cartridges is highlighted.
4
Press .
An alignment page prints.
Note: Discard the alignment page after it prints.
Maintaining the printer
74
Page 75

Cleaning the print cartridge nozzles
Cleaning the print cartridge nozzles using the control panel
1
Load plain paper.
2
Press Menu.
3
Press or until Clean Cartridges is highlighted.
4
Press .
5
Press or until Clean appears.
6
Press .
A page prints, forcing ink through the print cartridge nozzles to clean them.
7
Print the document again to verify that the print quality has improved.
8
If print quality has not improved, try cleaning the nozzles up to two more times.
Cleaning the print cartridge nozzles using the computer
1
Load plain paper.
2
From the desktop, double-click the Imaging Studio icon.
3
Click the Maintain/Troubleshoot button.
4
Click Maintenance.
5
Click Clean to fix horizontal streaks.
6
Click Print.
A page prints, forcing ink through the print cartridge nozzles to clean them.
7
Print the document again to verify that the print quality has improved.
8
If print quality has not improved, try cleaning the nozzles up to two more times.
Wiping the print cartridge nozzles and contacts
1
Remove the print cartridges.
2
Dampen a clean, lint-free cloth with water.
Maintaining the printer
75
Page 76

3
Gently hold the cloth against the nozzles for about three seconds, and then wipe
in the direction shown.
4
Using another clean section of the cloth, gently hold the cloth against the
contacts for about three seconds, and then wipe in the direction shown.
5
With another clean section of the cloth, repeat step 3 and step 4.
6
Let the nozzles and contacts dry completely.
7
Reinsert the print cartridges.
8
Print the document again.
9
If the print quality does not improve, clean the print nozzles. For more
information, see “Cleaning the print cartridge nozzles” on page 75.
10
Repeat step 9 up to two more times.
11
If print quality is still not satisfactory, replace the print cartridges.
Preserving the print cartridges
•
Keep a new cartridge in its packaging until you are ready to install it.
•
Do not remove a cartridge from the printer except to replace, clean, or store it in
an airtight container. The cartridges do not print correctly if left exposed for an
extended period of time.
Maintaining the printer
76
Page 77

•
Keep the photo cartridge in its own storage unit when not in use.
Using the cartridge storage area
1
Place the print cartridge in the print cartridge storage unit.
2
Lift the scanner unit.
Maintaining the printer
77
Page 78

3
Place the storage unit in the cartridge storage area.
4
Close the scanner unit.
Refilling the print cartridges
The warranty does not cover repair of failures or damage caused by a refilled
cartridge. Lexmark does not recommend use of refilled cartridges. Refilling
cartridges can affect print quality and may cause damage to the printer. For best
results, use Lexmark supplies.
Maintaining the printer
78
Page 79

Recycling Lexmark products
To return Lexmark products to Lexmark for recycling:
1
Visit our Web site at www.lexmark.com.
2
Follow the instructions on the computer screen.
Maintaining the printer
79
Page 80

Ordering Lexmark Supplies
Ordering supplies
To order supplies or to locate a dealer near you, visit our Web site at
www.lexmark.com.
Print cartridges
Item Part number
Black cartridge 32 or 34
Color cartridge 33 or 35
Photo cartridge 31
Note: For best results, use only Lexmark print cartridges.
Lexmark photo paper types and sizes
Photo paper (glossy) 4 x 6
•
•
Photo paper (glossy) 8 1/2 x 11
•
Photo paper (glossy) A4
•
Premium photo paper (high gloss) 4 x 6
•
Premium photo paper (high gloss) 8 1/2 x 11
•
Premium photo paper (high gloss) A4
•
Premium photo paper (high gloss) L
Note: For best results, use Lexmark Premium Photo Paper when printing photos or
other high-quality images.
USB cables
12A2405
Ordering Lexmark Supplies
80
Page 81

Troubleshooting
•
“Setup troubleshooting” on page 81
•
“Print troubleshooting” on page 85
•
“Copy troubleshooting” on page 88
•
“Scan troubleshooting” on page 89
•
“Fax troubleshooting” on page 90
•
“Network troubleshooting” on page 93
•
“Jams and misfeeds troubleshooting” on page 94
•
“Memory card troubleshooting” on page 97
•
“Error messages” on page 99
•
“Removing and reinstalling the software” on page 104
Setup troubleshooting
•
“Incorrect language appears on the display” on page 81
•
“Power button is not lit” on page 82
•
“Software does not install” on page 82
•
“Page does not print” on page 83
•
“Cannot print from digital camera using PictBridge” on page 85
Incorrect language appears on the display
1
From the control panel, press Mode repeatedly until Copy is selected.
2
Press Menu.
3
Press until the last item is reached.
4
Press twice.
5
Press or repeatedly until the language you want appears on the display.
6
Press .
Troubleshooting
81
Page 82

Power button is not lit
1
Disconnect the power supply cord from the wall outlet and then from the printer.
2
Plug the cord all the way into the power supply port on the printer.
2
1
3
Plug the cord into an electrical outlet that other electrical devices have been
using.
4
If the Power button light is not on, press Power.
Software does not install
The following operating systems are supported:
•
Windows 98/Me
•
Windows 2000
•
Windows XP
•
Mac OS X version 10.2.3 or later
If the software does not launch automatically when you insert the CD:
1
Close all open software applications.
2
Disable any anti-virus programs.
3
Double-click the My Computer icon.
In Windows XP, click Start to access the My Computer icon.
4
Double-click the CD–ROM drive icon.
5
If necessary, double-click setup.exe.
6
Follow the instructions on the computer screen to install the software.
Troubleshooting
82
Page 83

1
Remove the printer software CD.
2
Turn off the computer.
3
Restart the computer.
4
When the desktop appears, cancel all "Found New Hardware" windows.
5
Reinsert the printer software CD.
6
Follow the instructions on the computer screen.
1
Check the USB cable for any obvious damage.
2
Firmly plug the rectangular end of the USB cable into the USB port of the
computer.
The USB port is marked with the
3
Firmly plug the square end of the USB cable into the back of the printer.
If the printer is connected to the computer through another device:
1
Disconnect the USB cable from any other device, such as a USB hub or switch
box.
2
Directly connect the cable to the printer and the computer.
USB symbol.
Page does not print
If an error message is displayed, see “Error messages” on page 99.
If the Power button light is not on, see “Power button is not lit” on page 82.
Make sure the black or photo cartridge is in the left carrier, and the color cartridge is
in the right carrier.
Remove and then load paper.
Check the ink levels, and install a new print cartridge if necessary.
Troubleshooting
83
Page 84

1
Remove the print cartridges.
2
Make sure the sticker and tape have been removed.
1
2
3
Reinsert the print cartridges.
If the printer is connected to the computer through another device:
1
Disconnect the USB cable from any other device, such as a USB hub or switch
box.
2
Directly connect the cable to the printer and the computer.
Make sure the printer is set as the default printer and is not on hold or paused.
1
Click:
•
For Windows XP Pro: Start Settings Printers and Faxes.
•
For Windows XP Home: Start Control Panel Printers and Faxes.
•
For Windows 2000: Start Settings Printers.
•
For Windows 98/Me: Start Settings Printers.
2
Double-click the name of your printer.
1
2
3
Click Printer.
•
Make sure no check mark appears next to Pause Printing.
•
Make sure a check mark does appear next to Set As Default.
1
Press Power to turn the printer off.
2
Disconnect the power supply cord from the wall outlet.
3
Gently remove the power supply from the printer.
4
Reconnect the power supply to the printer.
Troubleshooting
84
Page 85

5
Plug the power supply cord into the wall outlet.
6
Press Power to turn the printer on.
If none of the previous actions fixes the problem, uninstall the printer software, and
reinstall it. For more information, see “Removing and reinstalling the software” on
page 104.
Cannot print from digital camera using PictBridge
Enable PictBridge printing on the camera by selecting the correct USB mode. For
more information, see the digital camera documentation.
1
Disconnect the camera.
2
Connect a PictBridge-enabled digital camera to the PictBridge port. See the
digital camera documentation to determine whether it is PictBridge-enabled.
Use only the USB cable that came with the camera.
Remove the memory card from the printer.
Print troubleshooting
•
“Improving print quality” on page 85
•
“Poor text and graphic quality” on page 86
•
“Poor quality at the edges of the page” on page 87
•
“Partial document or photo prints” on page 88
•
“Printer does not print or respond” on page 88
•
“Print speed is slow” on page 88
Improving print quality
If you are not satisfied with the print quality of a document, make sure you:
•
Use the appropriate paper for the document. Use Lexmark Premium Photo
Paper if you are printing photos or other high quality images.
•
Use a paper that is a heavier weight, bright white, or coated.
•
Select a higher print quality.
Troubleshooting
85
Page 86

If the document still does not have the print quality you want, follow these steps:
1
Align the print cartridges. For more information, see “Aligning print cartridges”
on page 74.
If print quality has not improved, continue to step 2.
2
Clean the print nozzles. For more information, see “Cleaning the print cartridge
nozzles using the control panel” on page 75.
If print quality has not improved, continue to step 3.
3
Remove and reinsert the print cartridges. For more information, see “Removing
a used print cartridge” on page 71 and “Installing print cartridges” on page 72.
If print quality has not improved, continue to step 4.
4
Wipe the print nozzles and contacts. For more information, see “Wiping the print
cartridge nozzles and contacts” on page 75.
If print quality is still not satisfactory, replace the print cartridges. For more
information, see “Ordering supplies” on page 80.
Poor text and graphic quality
Examples of poor text and graphic quality include:
•
Blank pages
•
Dark print
•
Faded print
•
Incorrect colors
•
Light and dark bands in print
•
Skewed lines
•
Smudges
•
Streaks
•
White lines in print
Check the ink levels, and install a new print cartridge if necessary.
See “Improving print quality” on page 85.
To avoid ink smudging when you are working with the following media, remove each
sheet as it exits, and allow it to dry:
•
Document with graphics or images
•
Photo paper
•
Coated or glossy paper
Troubleshooting
86
Page 87

•
Transparency
•
Iron-on transfer
Note: Transparencies may take up to 15 minutes to dry.
Use a different brand of paper. Each paper brand accepts ink differently and prints
with color variations. Use Lexmark Premium Photo Paper if you are printing photos
or other high quality images.
Use only new, unwrinkled paper.
Uninstall the printer software, and then reinstall it. For more information, see
“Removing and reinstalling the software” on page 104.
Poor quality at the edges of the page
Unless you are using the borderless feature, use these minimum print margin
settings:
•
Left and right margins:
–
6.35 mm (0.25 in.) for letter size paper
–
3.37 mm (0.133 in.) for all paper sizes except letter
•
Top margin: 1.7 mm (0.067 in.)
•
Bottom margin: 16.51 mm (0.65 in.)
Select the Borderless print feature.
1
From the software application, click File Print.
2
Click Properties, Options, Setup, or Preferences.
3
Click Print Layout.
4
Click Borderless.
Check that the paper size being used matches the printer setting.
1
From the software application, click File Print.
2
Click Properties, Options, Setup, or Preferences.
3
Click Paper Setup.
4
Check the paper size.
Troubleshooting
87
Page 88

Printer does not print or respond
See “Page does not print” on page 83.
Print speed is slow
Close all applications not in use.
Try minimizing the number and size of graphics and images in the document.
Consider purchasing more RAM.
1
From the software application, click File Print.
2
Click Properties, Options, Setup, or Preferences.
3
Click Quality/Copies.
4
From the Quality/Speed area, select a lower print quality.
Partial document or photo prints
Make sure the document or photo is loaded correctly on the scanner glass.
Make sure the paper size being used matches the size you selected.
Copy troubleshooting
•
“Scanner unit does not close” on page 88
•
“Poor copy quality” on page 89
•
“Partial document or photo copies” on page 89
Scanner unit does not close
1
Lift the scanner unit.
2
Remove any obstruction keeping the scanner unit open.
3
Close the scanner unit.
Troubleshooting
88
Page 89

Poor copy quality
Examples include:
•
Blank pages
•
Checkerboard pattern
•
Distorted graphics or pictures
•
Missing characters
•
Faded print
•
Dark print
•
Skewed lines
•
Smudges
•
Streaks
•
Unexpected characters
•
White lines in print
If an error message is displayed, see “Error messages” on page 99.
Check the ink levels and install a new print cartridge if necessary.
If the scanner glass is dirty, gently wipe it with a clean, lint-free cloth dampened with
water.
See “Improving print quality” on page 85.
If you are copying or scanning from a newspaper, magazine, or glossy paper, see
“Scanning clear images from magazines or newspapers” on page 63.
If the quality of the original is not satisfactory, try using a clearer version of the
document or image.
Place the document face down on the scanner glass.
Partial document or photo copies
Make sure the document or photo is loaded correctly on the scanner glass.
Make sure the paper size being used matches the size you selected.
Scan troubleshooting
•
“Scanning takes too long or freezes the computer” on page 90
•
“Partial document or photo scans” on page 90
Troubleshooting
89
Page 90

•
“Scanner cannot scan to application” on page 90
Scanning takes too long or freezes the computer
Close all programs not being used.
To change the scanning resolution to a lower value:
1
Click Start Programs or All Programs Lexmark 6300 Series.
2
Select All-In-One Center.
3
From the Scan area, click See More Scan Settings.
4
Click Display Advanced Scan Settings.
5
From the “Scan Resolution” menu, select a lower number.
Partial document or photo scans
Make sure the document or photo is loaded correctly on the scanner glass.
Make sure the paper size being used matches the size you selected.
Scanner cannot scan to application
1
From the Selected Application Does Not Support Multi Pages dialog, click
Cancel.
2
From the All-In-One Center Scanning and Copying tab, choose a different
application from the “Send scanned images to” menu.
3
Scan the document.
Fax troubleshooting
•
“Cannot send or receive a fax” on page 91
•
“Can send but not receive faxes” on page 91
•
“Can receive but not send faxes” on page 91
•
“Printer receives a blank fax” on page 92
•
“Received fax has poor print quality” on page 92
•
“Error message: Fax error” on page 92
Troubleshooting
90
Page 91

•
Make sure:
–
The printer is connected to a computer that is equipped with a fax modem.
–
The computer is connected to a working phone line.
–
Both the printer and the computer are turned on.
•
For additional help when you are using a fax application, see the documentation
that came with the fax application.
Cannot send or receive a fax
If an error message appears, follow the instructions on the error message dialog.
If the Power light is not on, see “Power button is not lit” on page 82.
Place a test call to the telephone number to which you want to send a fax to make
sure that it is working correctly.
If the telephone line is being used by another device, wait until the other device is
finished before sending a fax.
Check for and clear any paper jams.
Make sure both the black and color print cartridges are installed. The printer works
only if both print cartridges are installed.
To produce a color fax, both the sending and receiving fax machines must be set for
color. The fax color settings are located on the Deferred Send page of the Send Fax
wizard.
Call Waiting can disrupt fax transmissions. Disable this feature before sending or
receiving a fax. Call your telephone company to obtain the keypad sequence for
temporarily disabling Call Waiting.
Can send but not receive faxes
Load paper to print any faxes that have been stored in the printer.
Check the ink cartridge levels, and install a new cartridge if necessary.
Can receive but not send faxes
Load the original document face down in the lower right corner of the scanner glass.
Troubleshooting
91
Page 92

Printer receives a blank fax
Ask the sender to verify the original document was loaded correctly.
Check the ink levels, and install a new cartridge if necessary.
1
Remove the print cartridges.
2
Make sure the sticker and tape have been removed.
3
Reinsert the print cartridges.
1
2
1
2
Received fax has poor print quality
Ask that the sender:
•
Check that the quality of the original document is satisfactory.
•
Resend the fax. There may have been a problem with the quality of the telephone
line connection.
•
Increase the fax scan resolution.
Check the ink levels, and install a new cartridge if necessary.
Error message: Fax error
The fax machines have stopped communicating.
Resend the fax. There may have been a problem with the quality of the telephone
line connection.
Troubleshooting
92
Page 93

Network troubleshooting
•
“The printer to be configured does not appear in the list of printers found on your
network” on page 93
•
“You cannot print to the network printer” on page 94
•
“Network name does not appear” on page 94
The printer to be configured does not appear in the list of printers found on your network
SSID is not being broadcast. Make sure security keys are correct.
Make sure the printer is connected to a power source and is turned on. For more
information, see “Power button is not lit” on page 82.
If you are using a print server:
1
Check the Ethernet cable for any obvious damage.
2
Firmly plug one end of the Ethernet cable into the printer or the print server.
3
Firmly plug the other end of the Ethernet cable into the network hub or wall
connection.
If you are also using a USB cable:
1
Check the USB cable for any obvious damage.
2
Firmly plug the rectangular end of the USB cable into the USB port of the
computer.
The USB port is marked with the USB symbol
3
Firmly plug the square end of the USB cable into the back of the printer.
See the print server documentation for setup instructions if:
•
The lights of the print server are not on.
•
The USB cable is not connected to the print server.
•
The print server is not connected to the power source.
If none of the previous actions fixes the problem, uninstall the printer software, and
reinstall it. For more information, see “Removing and reinstalling the software” on
page 104.
Troubleshooting
.
93
Page 94

You cannot print to the network printer
See the print server documentation for setup instructions if:
•
The lights of the print server are not on.
•
The USB cable is not connected to the print server.
•
The print server is not connected to the power source.
1
Check the Ethernet cable for any obvious damage.
2
Firmly plug one end of the Ethernet cable into the printer.
3
Firmly plug the other end of the Ethernet cable into the network hub or wall
connection.
If you are also using a USB cable:
1
Check the USB cable for any obvious damage.
2
Firmly plug the rectangular end of the USB cable into the USB port of the
computer.
The USB port is marked with the USB symbol
3
Firmly plug the square end of the USB cable into the back of the printer.
Contact your system support person to make sure the printer is connected to a
working network connection.
Make sure the printer is connected to a power source and is turned on. For more
information, see “Power button is not lit” on page 82.
.
Network name does not appear
SSID is not being broadcast. Make sure security keys are correct.
Jams and misfeeds troubleshooting
•
“Paper jam in the printer” on page 95
•
“Paper jam in the paper support” on page 95
•
“Paper or specialty media misfeeds” on page 95
•
“Printer does not feed paper, envelopes, or specialty media” on page 96
•
“Banner paper jams” on page 96
Troubleshooting
94
Page 95

Paper jam in the printer
To automatically eject the paper:
1
Press and hold .
2
Remove the paper from the paper exit tray.
To manually remove the paper:
1
Press Power to turn off the printer.
2
Firmly grasp the paper, and gently pull it out.
3
Press Power to turn the printer back on.
Paper jam in the paper support
1
Press Power to turn off the printer.
2
Firmly grasp the paper, and gently pull it out.
3
Press Power to turn the printer back on.
Paper or specialty media misfeeds
If paper or specialty media misfeeds or skews, or multiple sheets feed or stick
together, try the following solutions.
Load a smaller amount of paper into the printer.
See “Loading various paper types” on page 33 for information about:
•
Maximum loading amounts per paper type
•
Specific loading instructions for supported paper and specialty media
Load paper with the print side facing you.
Remove each page as it exits, and let it dry completely before stacking.
Use only new, unwrinkled paper.
Troubleshooting
95
Page 96

Adjust the paper guides:
•
When using media less than 8.5 inches wide
•
Against the edges of the paper or media, making sure it does not buckle
2
2
2
1
Printer does not feed paper, envelopes, or specialty media
If there is a paper jam, see the appropriate paper jam section.
Verify that the specialty media is loaded correctly.
Try loading one page, envelope, or sheet of specialty media at a time.
Make sure the printer is set as the default printer and is not on hold or paused.
1
Click:
•
For Windows XP Pro: Start Settings Printers and Faxes.
•
For Windows XP Home: Start Control Panel Printers and Faxes.
•
For Windows 2000: Start Settings Printers.
•
For Windows 98/Me: Start Settings Printers.
2
Double-click the name of your printer.
3
Click Printer.
•
Make sure no check mark appears next to Pause Printing.
•
Make sure a check mark does appear next to Set As Default.
Banner paper jams
1
Press Power to turn off the printer.
2
Remove the jammed banner paper from the printer.
Troubleshooting
96
Page 97

To keep a banner print job from jamming:
•
Use only the number of sheets needed for the banner.
•
Select the following settings to enable the printer to feed paper continuously
without jamming:
1
With a document open, click File Print.
2
Click Properties, Options, Setup, or Preferences.
3
Select the Paper Size tab.
4
From the Paper size area, select Banner.
5
Select Letter Banner or A4 Banner as the paper size.
6
From the Print Layout tab, select Banner.
Memory card troubleshooting
•
“Memory card cannot be inserted” on page 97
•
“Nothing happens when a memory card is inserted” on page 97
•
“Error messages on display” on page 98
Memory card cannot be inserted
Make sure that the type of memory card you are using can be used in the printer.
See “Inserting a memory card” on page 40 to determine which slot accommodates
your memory card and to see instructions on how to insert it.
Nothing happens when a memory card is inserted
Remove and reinsert the memory card quickly.
Warning: Do not remove cables, photo storage devices, or touch the printer in the
area shown while the light is blinking.
Troubleshooting
97
Page 98

See “Inserting a memory card” on page 40 to determine which slot accommodates
your memory card and to see instructions on how to insert it.
Make sure that the type of memory card you are using can be used in the printer.
See “Inserting a memory card” on page 40.
Check that there is no obvious damage to the memory card.
Insert only one memory card at a time.
Disconnect the PictBridge-enabled digital camera or flash drive from the printer.
Check the cable connections.
1
Check the USB cable for any obvious damage.
2
Firmly plug the rectangular end of the USB cable into the USB port of the
computer.
The USB port is marked with the USB symbol
3
Firmly plug the square end of the USB cable into the back of the printer.
.
Error messages on display
If an error message is displayed, see “Error messages” on page 99.
Troubleshooting
98
Page 99

Error messages
Low Ink
1
Check the ink levels, and install a new cartridge if necessary. The Low Ink
warning occurs when the cartridge is 25% full, 15% full, and 10% full.
To order supplies, see “Ordering supplies” on page 80.
2
Press to continue.
Paper Jam
See “Jams and misfeeds troubleshooting” on page 94.
Cartridge Error
This includes the following cartridge errors:
•
1105
•
1203
•
1204
•
1205
•
1206
Procedure 1
1
Remove the print cartridges.
2
Disconnect the power supply cord from the electrical outlet.
3
Reconnect the power supply cord to the electrical outlet.
4
If the power button is not lit, press Power.
5
Reinsert the print cartridges.
6
If the error:
•
Does not reappear, the problem has been corrected.
•
Reappears, one of the cartridges is not working properly. Continue with
Procedure 2.
Troubleshooting
99
Page 100

Procedure 2
Follow this procedure to determine which cartridge is not working properly.
1
Remove the print cartridges.
2
Disconnect the power supply cord from the electrical outlet.
3
Reconnect the power supply cord to the electrical outlet.
4
If the power button is not lit, press Power.
5
Reinsert the black (or photo) print cartridge.
6
If the error:
•
Reappears, replace the black (or photo) print cartridge with a new one.
•
Does not reappear, reinsert the color print cartridge.
7
If the error reappears, replace the color print cartridge with a new one.
Carrier Jam
1
Raise the scanner unit.
2
Remove any objects blocking the path of the cartridge carrier.
3
Make sure the cartridge lids are closed.
4
Close the scanner unit.
5
Press .
Error: 2200
1
Disconnect the power supply cord from the electrical outlet.
2
Reconnect the power supply cord to the electrical outlet.
Troubleshooting
100
 Loading...