

Lexmark X6100, X6150, X6170, 6170 - X Color Inkjet, X6190 Pro User Manual
...
www.lexmark.com
User’s Guide for Windows
X6100 Series
• “Learning about your All-In-One” on page 9
Information about the printer parts and software.
• “Networking” on page 75
How to use your All-In-One in a networ k environment.
• “Maintaining your All-In-One” on page 76
Caring for your print cartridges and ordering supplies.
• “Troubleshooting” on page 87
Information about se tup prob l ems, error messag es , print qual ity prob l ems ,
paper jams, and much more.

Edition: October 2003
The following paragraph does not apply to any country where such provisions are inconsistent
with local law: LEXMARK INTERNATIONAL, INC., PROVIDES THIS PUBLICATION “AS IS” WITHOUT
WARRANTY OF ANY KIND, EITHER EXPRES S OR IMPLIED, INCLUDING, BUT NOT LIMITED TO,
THE IMPLIED WARRANTIES OF MERCHANTABILITY OR FITNESS FOR A PAR TICULA R PURPOSE.
Some states do not allow disclaimer of express or implied warranties in cer t ain transactions; therefore,
this statement may not apply to you.
This publication could include technical inaccuracies or typographical errors. Changes are periodically
made to the information herein; these changes will be incorporated in later editions. Improvements or
changes in the products or the programs described may be made at any time.
Comments about this publication may be addressed to Lexmark International, Inc., Department F95/
032-2, 740 West New Circle Road, Lexington, Kentucky 40550, U.S.A. In the United Kingdom and Eire,
send to Lexmark International Ltd., Marketing and Services Department, Westhorpe House, Westhorpe,
Marlow Bucks SL7 3RQ. Lexmark may use or distribute any of the information you supply in any way it
believes appropriate without incurring any obligation to you. You can purchase additional copies of
publications related to this product by calling 1-800-553-9727. In the United Kingdom and Eire, call +44
(0)8704 440 044. In other countries, contact your point of purchase.
References in this publication to products, programs, or services do not imply that the manufacturer
intends to make these av ailable in all countries in which it operates. Any reference to a product, program,
or service is not intended to state or imply that only that product, program, or service may be used. Any
functionally equivalent product, program, or service that does not infringe any existing intellectual
property right may be used instead. Evaluation and verification of operation in conjunction with other
products, programs, or services, except thos e expressly designated by the manufacturer, are the user’s
responsibility.
Lexmark and Lexmark with diamond design are trademarks of Lexmark International, Inc.
© 2003 Lexmark International, Inc.
All rights reserved.
UNITED STATES GOVERNMENT RIGHTS
This software and any accompanying documentation provided under this agreement are commercial
computer software and documentation developed exclusively at private ex pense.
Safe ty information
• Use only the power supply provided with this product or the manufacturer's authorized replacement
power supply.
• Connect the power supply cord to an electrical outlet that is near the produc t and easily accessible.
• Refer service or repairs, other than those described in the user documentation, to a professional
service person.
CAUTION: Do not use the fax feature during a lightning storm. Do not set up this product or make any
electrical or cabling connections, such as the power supply cord or telephone, during a lightning storm.
Mercury statement
This product contains mercury in the lamp (<5mg Hg). Disposal of mercury may be regulated due to
environmental considerations. For disposal or recycling information, contact your local authorities or the
Electronic Industries Alliance: www.eiae.org.

i
Contents
Contents ..............................................................................i
Finding more information .................................... ..... .... ....1
Setting up your All-In-One ................................................3
Set up the All-In-One ....................................................................3
Learning about your All-In-One ........................................9
Understand the All-In-O ne parts .... ................................ ....... ...... .. 9
Use the control panel ..................................................................13
Use the All-In-One software ........................................................16
Loading paper and originals ...........................................24
Load plain paper into the paper support .....................................24
Load an original document into the ADF .....................................28
Load an original document on the scanner glass .......................30
Copying .............................................................................31
Copy using the control panel and the scanner glass ..................31
Copy using the control panel and the ADF .................................33
Copy using the All-In-One software and scanner glass .............. 34
Copy using the All-In-One software and ADF .............................36
Scanning ...........................................................................40
Scan using the control panel and the scanner glass ..................40

ii
Scan using the All-In-One software and the scanner glass ........42
Scan using the control panel and the ADF .................................44
Scan using the All-In-One software and the ADF .......................45
Scan multiple images ..................................................................46
E-mail a scanned image or document ........................................46
Save an image on your computer ...............................................47
Edit text found in a scanned document using Optical Character
Recognition .................................................................................47
Enlarge or reduce documents .....................................................47
Printing .............................................................................50
Print a document .........................................................................50
Print collated copies ....................................................................50
Print more than one page on a sheet of paper ...........................51
Print an image as a multi-page poster ........................................51
Print last page first ......................................................................51
Print repeating images ................................................................52
Print two images on one page ....................................................52
Print a banner ............................................................................. 53
Faxing ...............................................................................55
Receive a fax ..............................................................................55
Send a fax .................. ....... ...... ....... ................................ ....... ...... 57
Send a fax from your PC .............................................................61
Customize a fax job ....................................................................62
Networking .......................................................................75
Maintaining your All-In-One ............................................76
Replace the print cartridges .............................. ....... ...................76

iii
Align the print cartridges .............................................................81
Improve print quality .................................................................... 82
Preserve the print cartridges .......................................................85
Clean the scanner glass .............................................................85
Order supplies .............................................................................86
Troubleshooting ...............................................................87
Setup troubleshooting .................................................................87
General troubleshooting .............................................................. 87
More troubleshooting options ....................................................103
Fax troubleshooting ..................................................................104

iv

1
Finding more information
Your All-In-One comes with many helpful resources.
Resource Description
Box contents These items are in the box with your All-In-One:
• Power supply
• Line cord
• Setup sheet
• Installation software CD
• User’s Guide
• Black print cartridge
• Color print cartridge
Setup sheet The setup sheet provides instructions on how to set up your
All-In-One hardware and softwa re and information on setup
troubleshooting.
User’s Guide The User’s Guide provides information on:
• Basic usage of your All-In-One
• Printing, scanning, copying, and faxing
• Printing digital photos
• Creating projects
• Maintaining your All-In-One
• Setup and general troubleshooting
Help The Help provides information on using the All-In-One
software.
To access the help:
Click the Lexm ark X610 0 Ser ies All-I n-One Ce nter ic on on
your desktop, and then click Help.

2
Readme file After you install your software, you can access the Readme
file from the Lexmark 6100 Series All-In-One folder. The
Readme file con tains late -breaking inf ormation that does not
appear in the User’s Guide or the Help.
To access the Readme file:
Click Start Programs Lexmark X6100 Series Readme.
Lexmark Web
site
The Web site has information on:
• Upgrades–Software upgrade information
• Customer C are–Contact information, order status,
warranty, and repair information
• Downloads–Drivers
• Reference–Printer documentation and product
specifications
You can get more information from the Lexmark Web site at:
http://support.lexmark.com/.
Resource Description

3
Setting up your All-In-One
Set up the All-In-One
Multiple methods of setup are possible with the All-In-One you have
purchased. The Setup sheet that came with your All-In-One provides basic
setup instructions. However, you can also connect your All-In-One with
equipment, such as a telephone, an answering machine, or a computer
modem.
Note: The X6100 Series All-In-One is an analog device that
works best when directly connected to the wall jack.
Other devices (such as a telephone or answering
machine) can be successfully attached to pass through
the All-In-One, as described in the setup steps. If you
want a digital connection such as ISDN, DSL, or ADSL,
a third party device is required.
Equipment Benefits See this section:
• All-In-One
• phone cord
Make copies and send
and receiv e fa xes without
the use of a computer.
“Connecting directly to a
telephone wall jack” on
page 5
• All-In-One
• telephone
• two phone cords
• Use the fax line as a
normal telephone line.
• Set up your All-In-One
wherever your
telephone is.
• Make copies and send
and receive faxes
without the use of a
computer.
“Connecting to a
telephone” on page 5
4
Note: The phone cord must be connected into the correct
position.
• All-In-One
• telephone
• answering machine
• three phone cords
Receive both incoming
voice messages and
faxes.
“Connecting to an
answ ering ma chine” on
page 7
• All-In-One
• telephone
• computer modem
• three phone cords
Increas e the number of
phone connection
outlets.
“Connecting to a
computer modem” on
page 8
Equipment Benefits See this section:
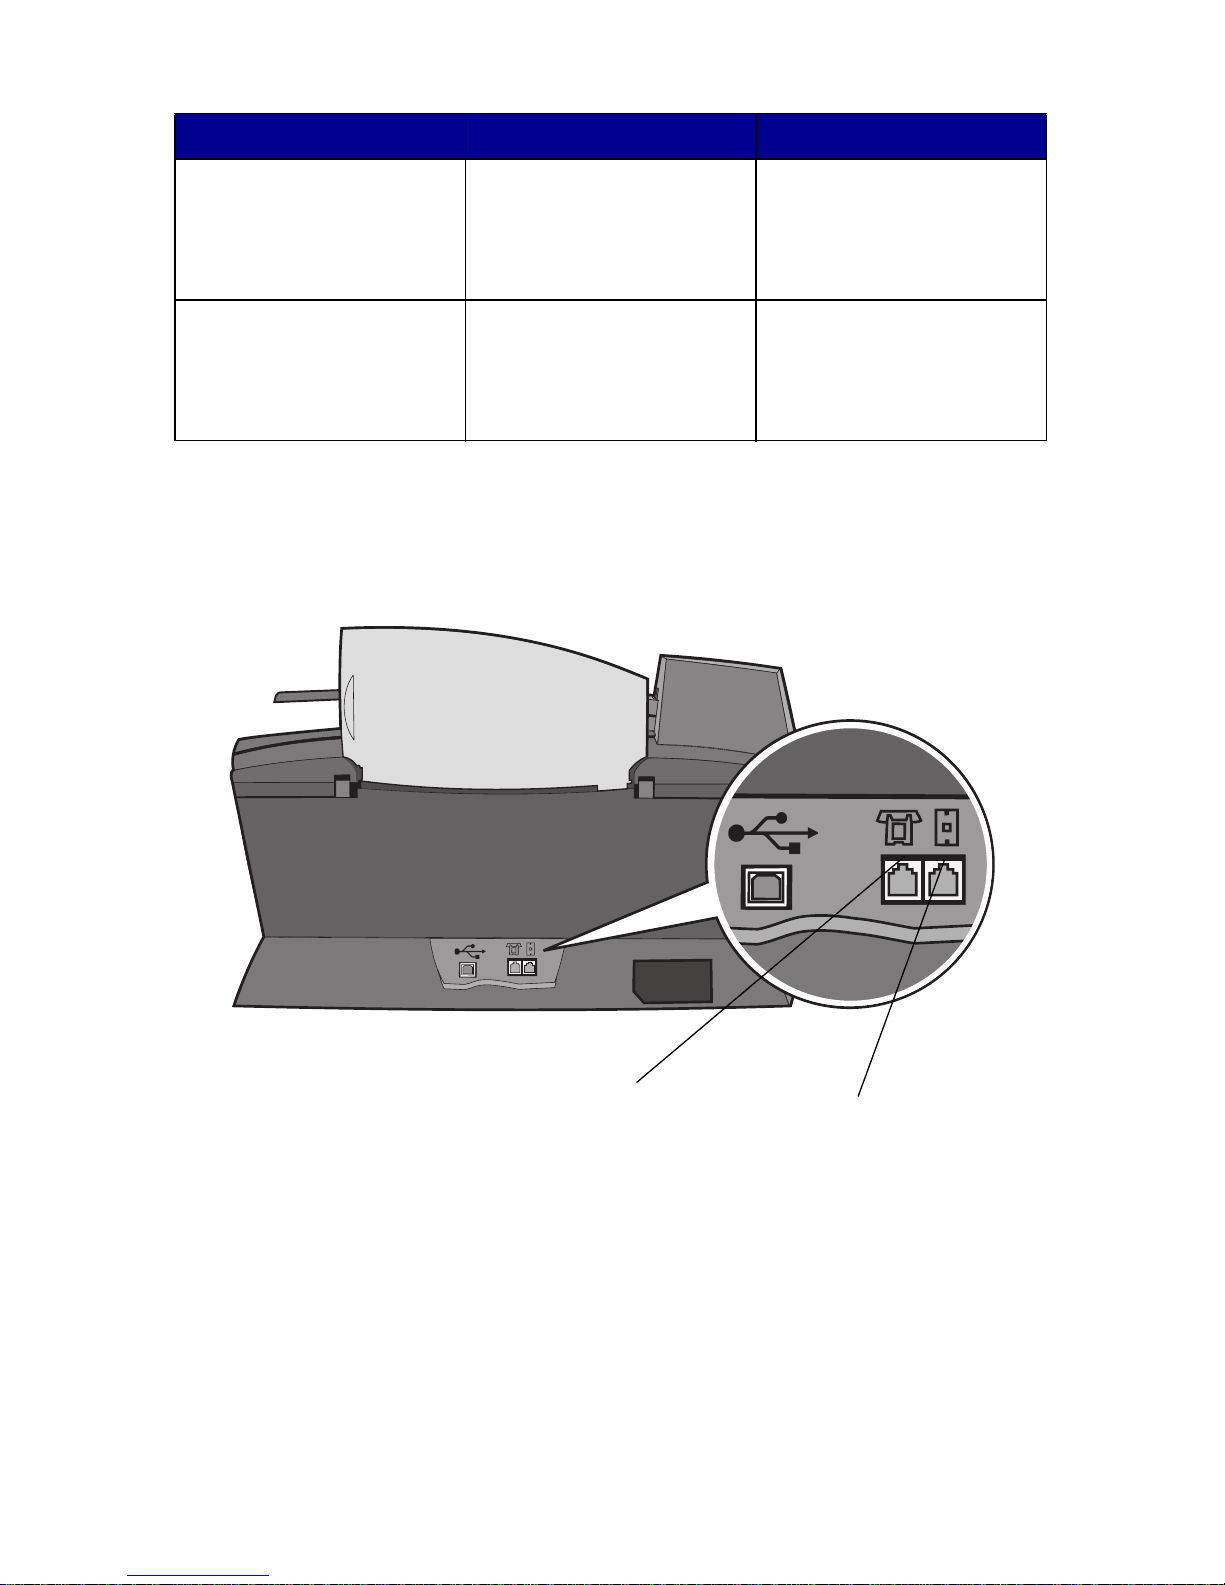
Wall jack port
Telephone/
answering machine
port
5
Connecting directly to a telephone wall jack
Connect a phone cord from the wall jack port on the All-In-One to the
telephone wall jack.
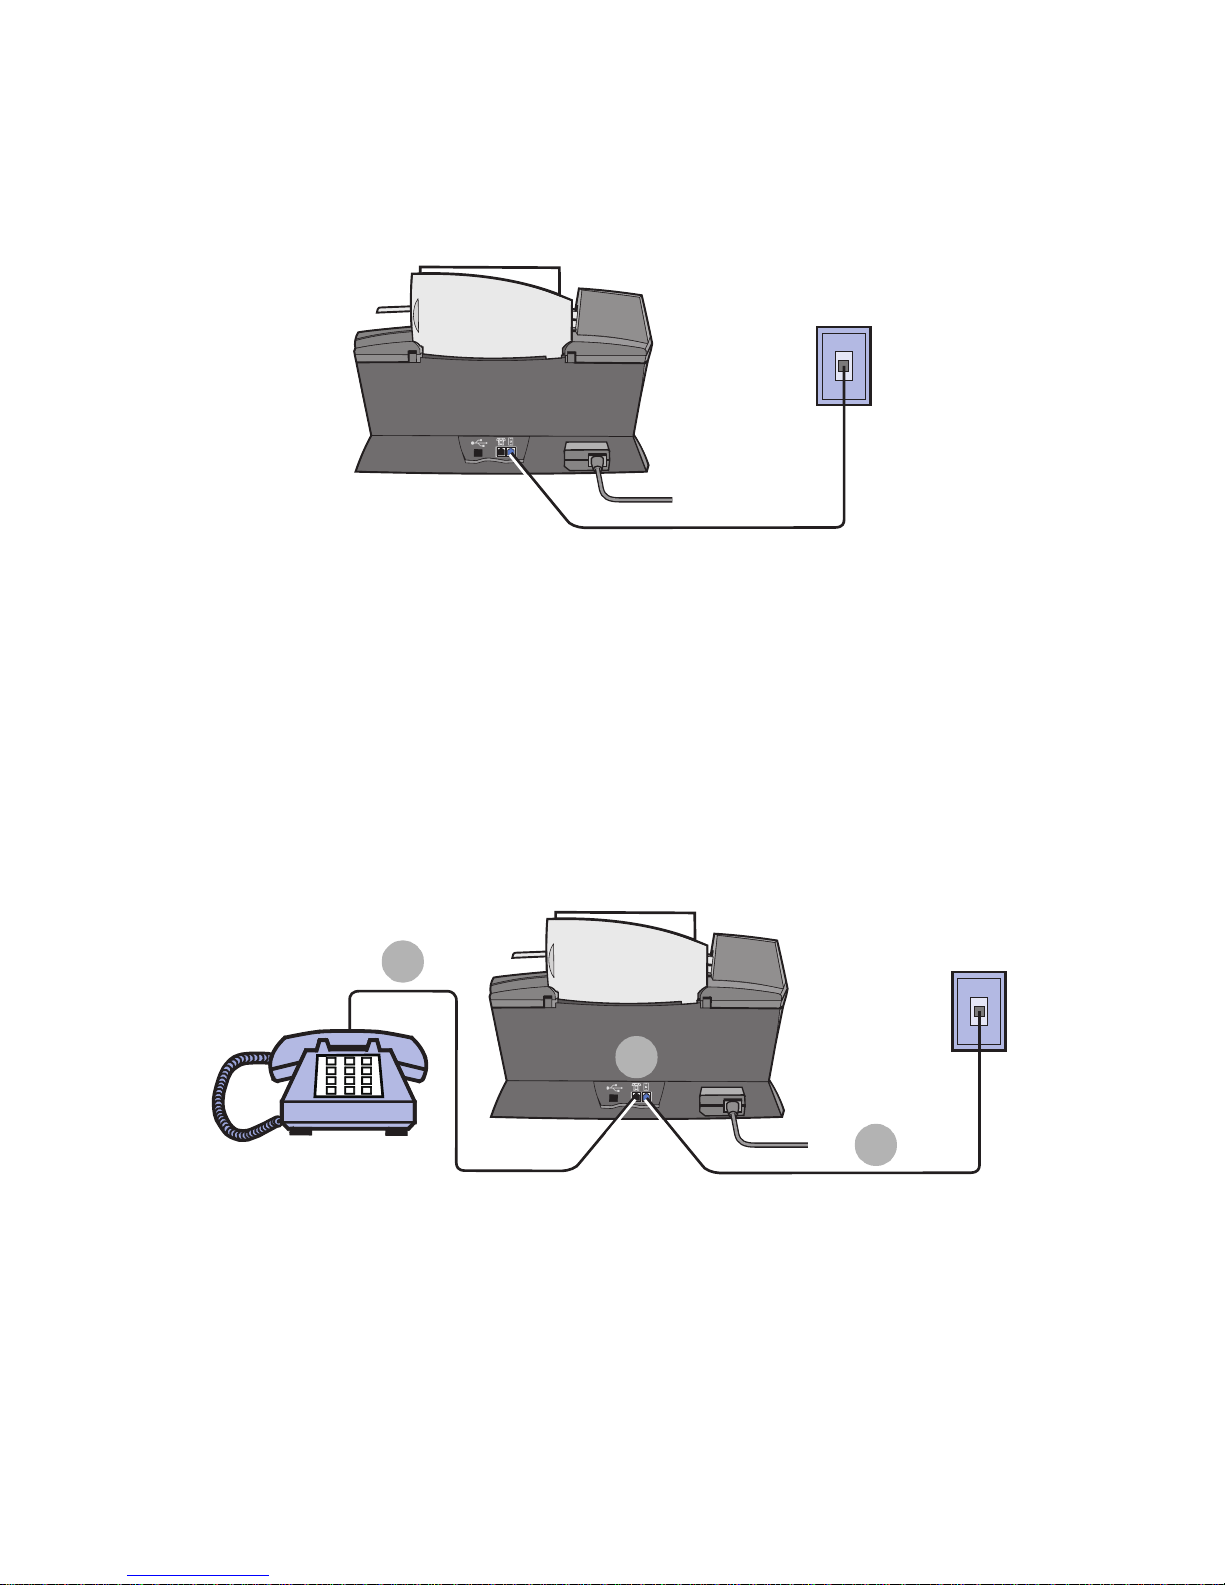
Connecting to a telephone
If your All-In-One does not have a handset, you can connect a telephone to
your All-In-One to use the fax line as a normal telephone line.
1 Remove the protective plug from the telephone/answering machine
port on the back of the All-In-One.
2 Connect a phone cord from the telephone to the telephone/
answering machine port on the All-In-One.
3
2
1

6
3 Connect a phone cord from the wall jack port on the All-In-One to
the telephone wall jack.
Note: Special setup option shown on page 56 for manual
receive modes.
7
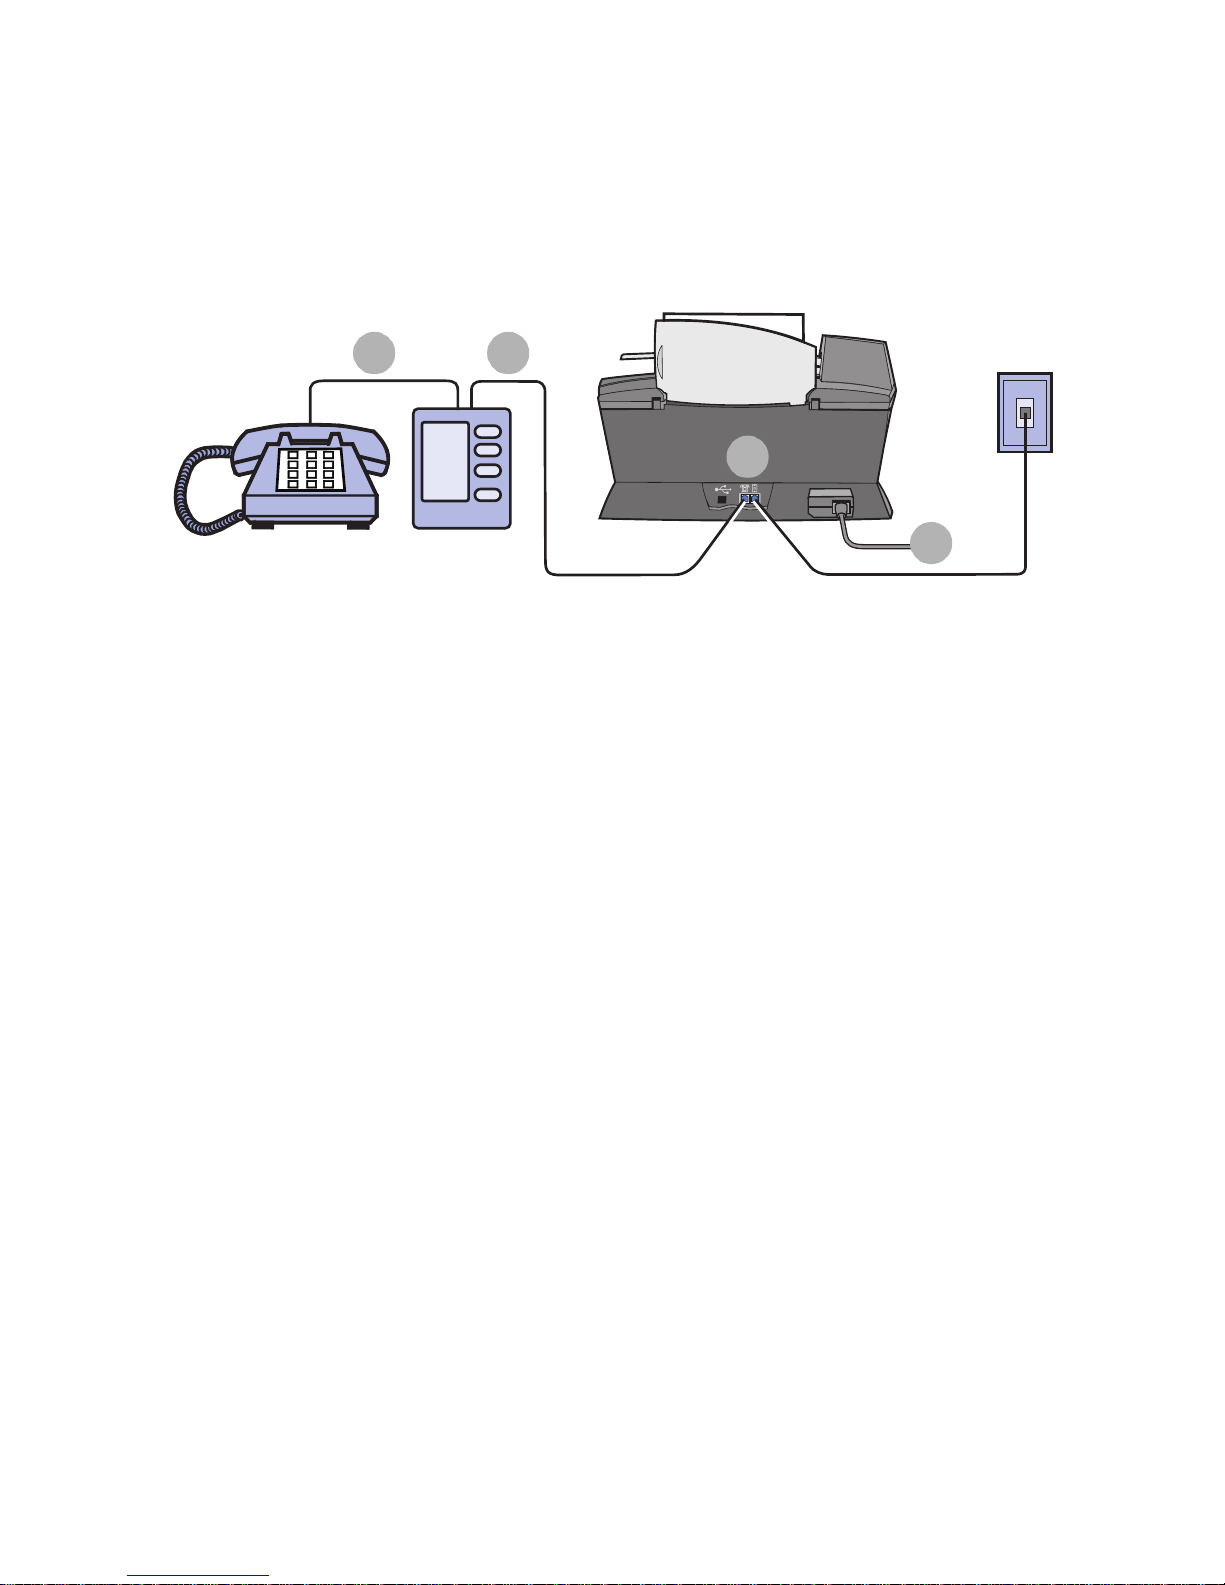
Connecting to an answering machine
1 Connect a phone cord from the telephone to the answering
machine.
2 Remove the protective plug from the telephone/answering machine
port on the back of the All-In-One.
3 Connect a phone cord from the answering machine to the
telephone/answering machine port on the All-In-One.
4 Connect a phone cord from the wall jack port on the All-In-One to
the telephone wall jack.
Note: Special setup option shown on page 57 for using
answering machines with an X6170.
3
4
1
2
8
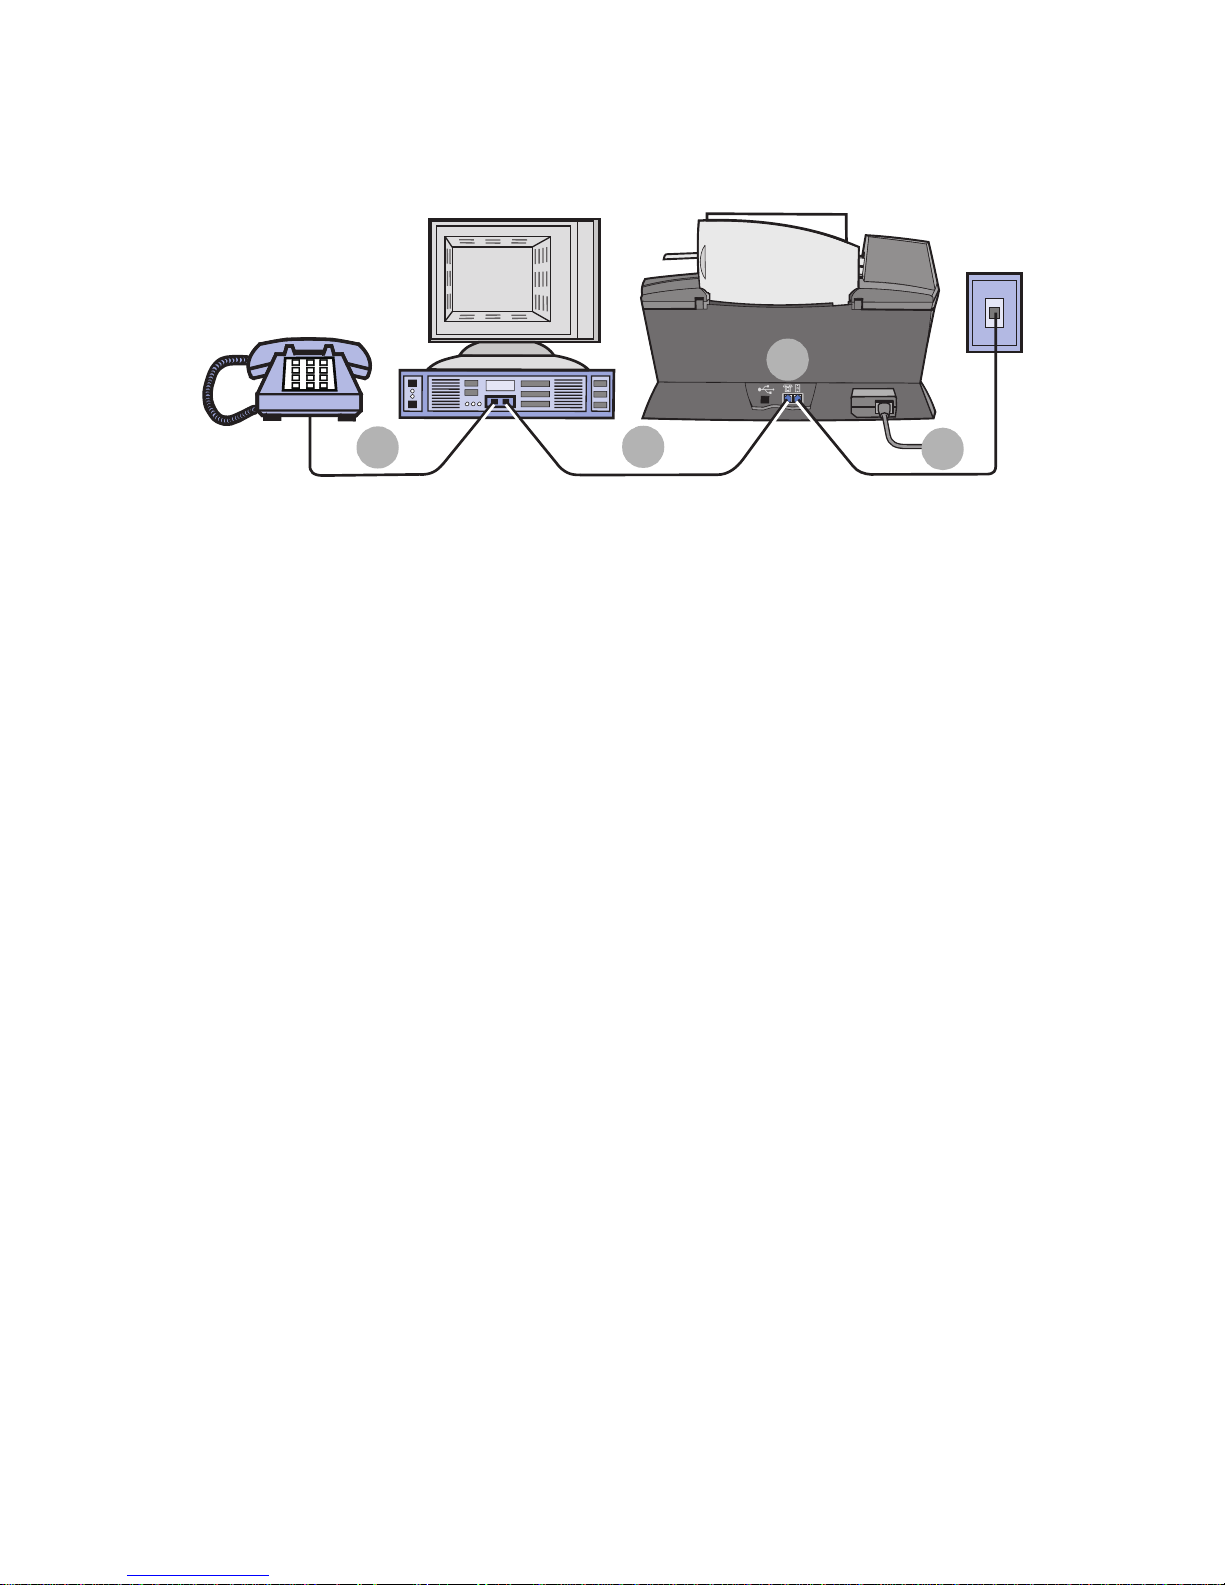
Connecting to a computer modem
1 Connect a phone cord from the telephone to the computer modem.
2 Remove the protective plug from the telephone/answering machine
port on the back of the All-In-One.
3 Connect a phone cord from the computer modem to the telephone/
answering machine port on the All-In-One.
4 Connect a phone cord from the wall jack port on the All-In-One to
the telephone wall jack.
Note: Special setup option shown on page 56 for manual
receive modes.
2
3
1
4

9
Learning about your All-In-One
To set up your All-In-One, follow the instructions on the Lexmark X6100
Series Setup sheet to install the hardware and software. For setup
troubleshooting, see page 87.
Understand the All-In-One parts
The Lexmark™ X6100 Series All-In-One is a color scanner, color printer,
color copier, and color fax machine. This guide shows you how to use the
All-In-One features.
Note: You do not have to attach your All-In-One to your
computer to make copies or send faxes.
The Lexmark X6100 Series is available in two models. One model has an
Automatic Document Feeder (ADF), and the other does not. The table on
page 12 describes each part.
10
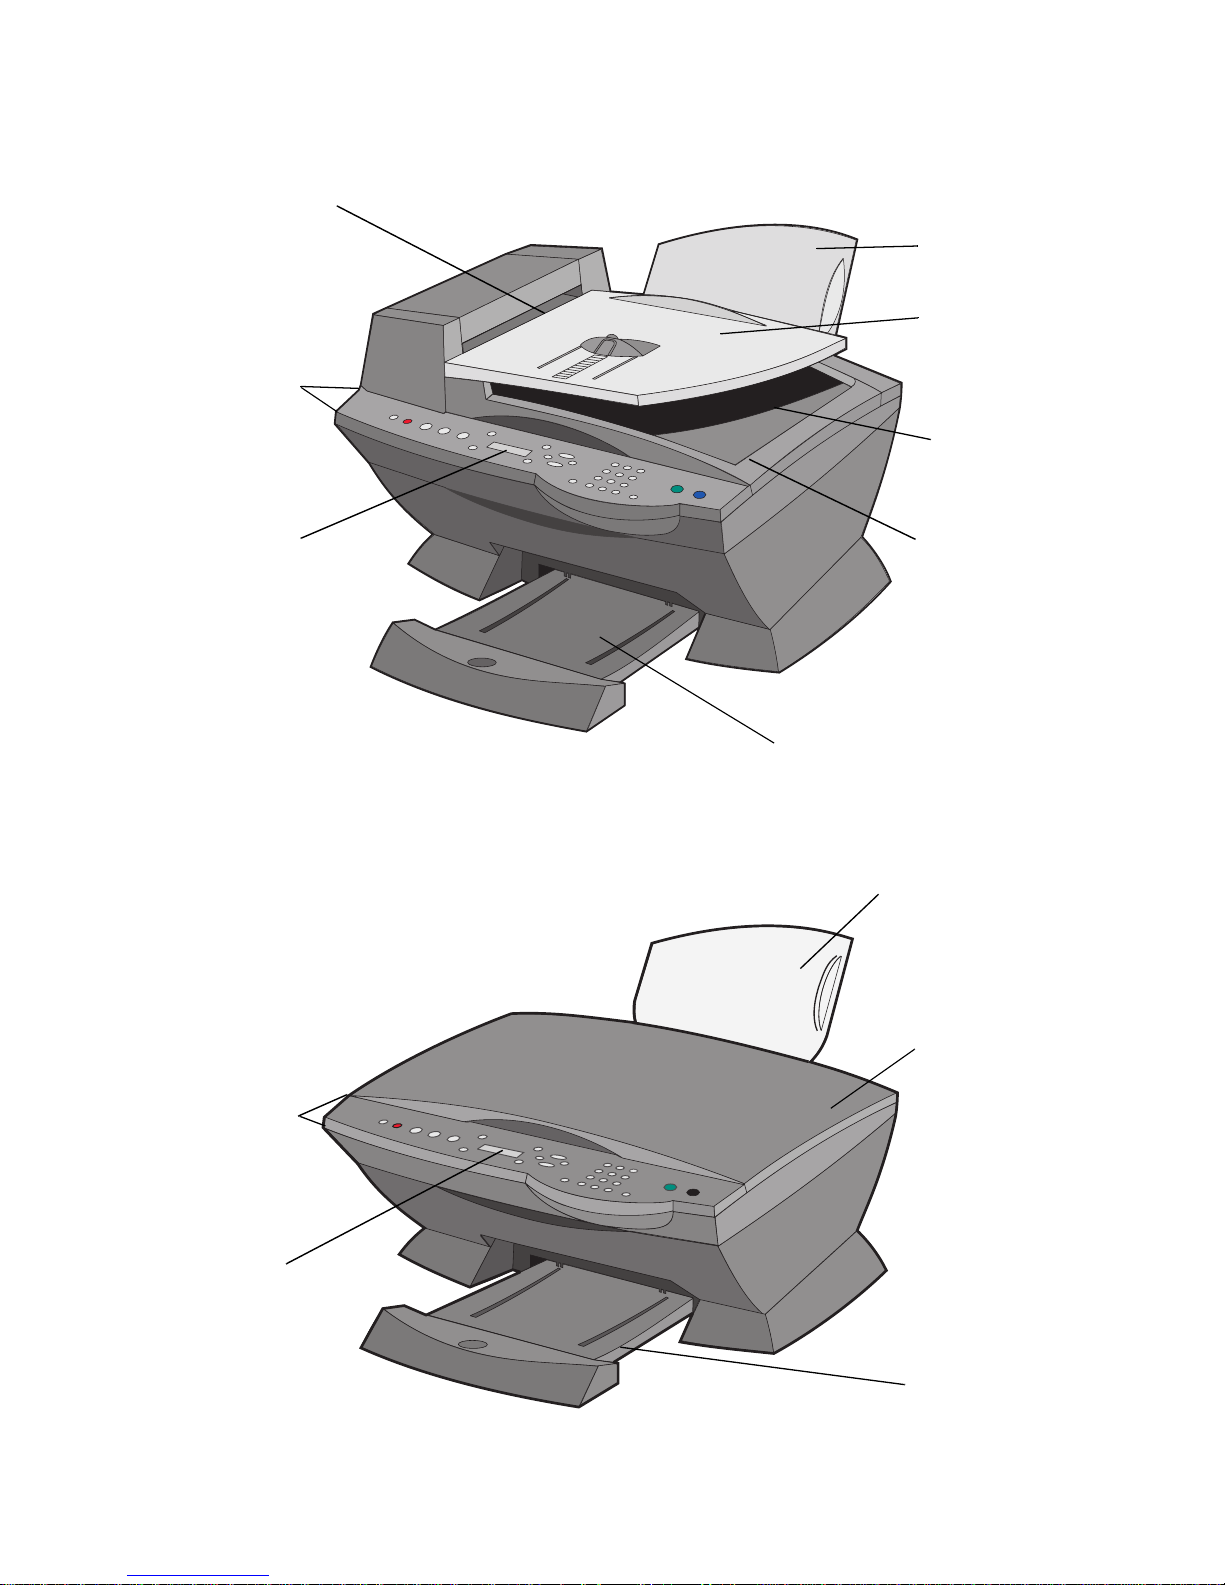
A Lexmark X6100 Series with an ADF:
A Lexmark X6100 Series without an ADF:
Control
panel
Paper
support
Automatic
Document
Feeder (ADF)
Display
Top cover
Paper exit tray
ADF input
tray
ADF exi t
tray
Paper
support
Top cover
Control
panel
Display
Paper e xit
tray
11
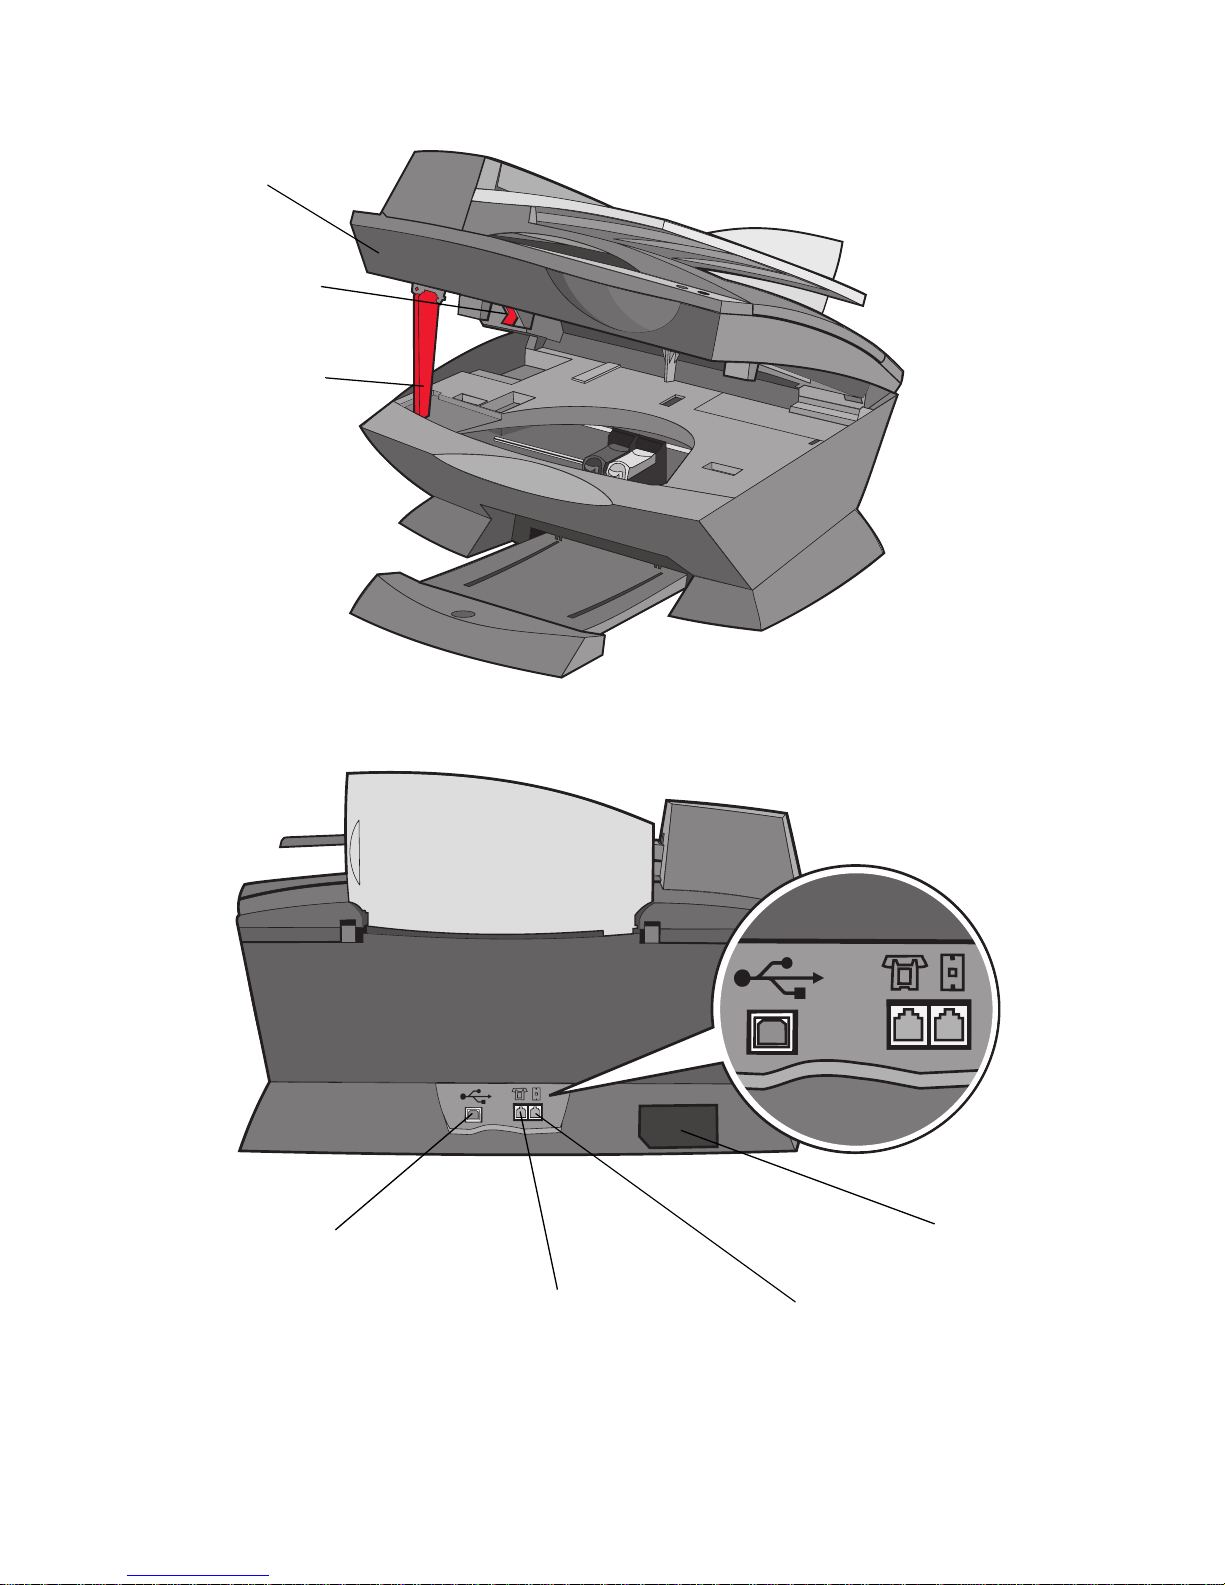
Scanner
support
Scanner unit
Scanner lock
Power supply
connector
USB cable port
Telephone/answering
machine port
Wall jack port

12
Use the: When you want to:
Automatic Document
Feeder (ADF)
Copy or fax multiple pages.
ADF exit tray Pick up your original document after it has gone
through the ADF.
ADF input tray Load original documents in the All-In-One.
Display Check the status of the All-In-One or view settings.
Control panel Operate your All-In-One (attached to a computer or
unattached). For more information, see page 13.
Paper exit tray Stack paper as it exits the All-In-One.
Paper support Load paper in the All-In-One.
Power supply connector Supply power to the All-In-One.
Scanner lock Lock or unlock the scanner.
Note: Lock the scanner if you are moving your
All-In-One. Unlock the scanner before use.
Scanner support Keep the scanner unit open.
Scanner unit • Install or change print cartridges.
• Lock or unlock the scanner.
Note: Lift the scanner unit to do these things.
Telephone/answering
machine port
Connect an ans wering ma chine or tele phone to y our
All-In-One.
Top cover • Place an item on the scanner glass.
• Remove an item from the scanner glass.
Note: Lift or remove the top cover to do these
things.
USB cable port Connect your All-In-One to a computer.
Wall jack port Connect the telephone line.
13
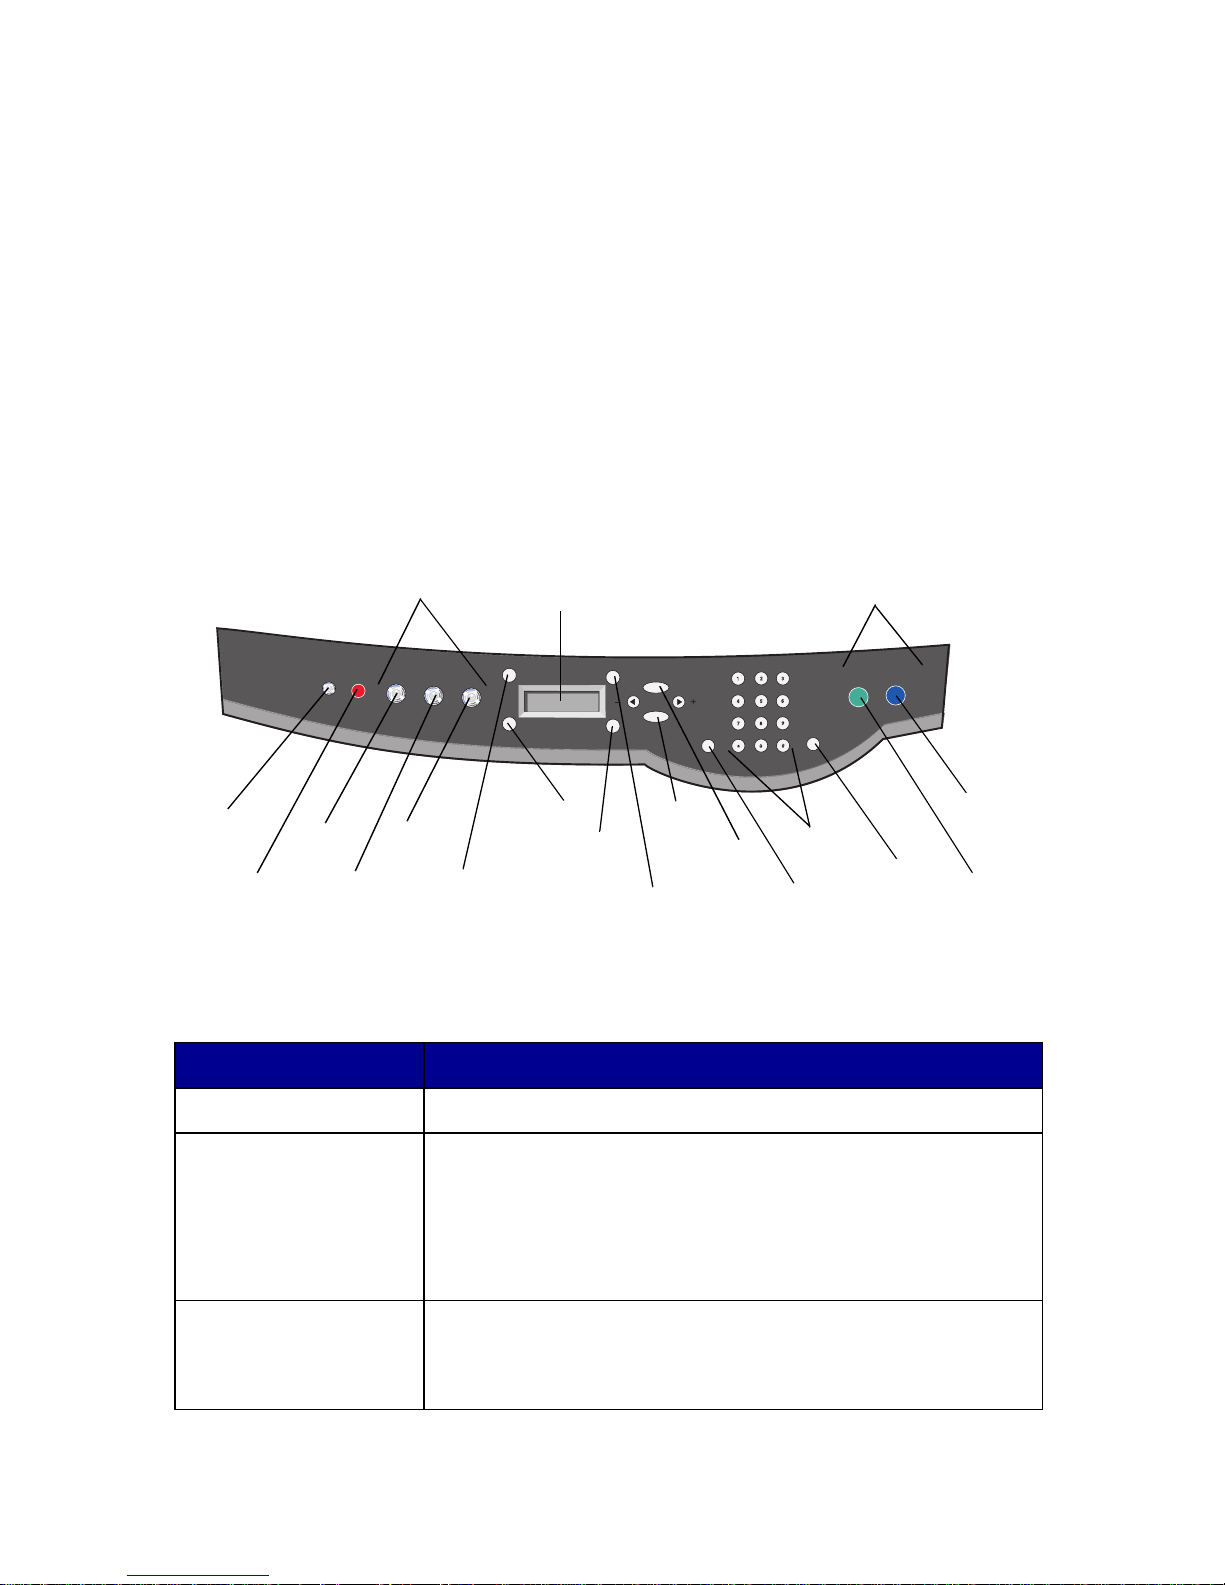
Use the control panel
The control panel buttons help you scan, copy, fax, and customize
documents. When Power is lit, the All-In-One is on. You can select a mode
from the Mode area, select or change settings using several of the buttons,
and initiate a scan, copy, or fax from the Start buttons on the far right.
The display features:
• All-In-One status
• Messages
• Menus
The table beginning on page 13 describes each button function.
Press: To:
Power • Turn your All-In-One on or off.
Stop/Clear • Cancel a scan, print, or copy job in progress.
• Clear a fax number or end a fax transmission and
return the display to the fax default.
• Exit a menu.
• Clear current settings and return to default settings.
Copy Enter cop y mode.
Note: This button is lit when the All-In-One is in copy
mode.
Power
Stop/
Clear
Copy
Scan
Fax
Quality
Reduce/
Enlarge
Lighter/
Darker
Black
Color
Redial/
Pause
Keypad
Speed Dial
Options
Select
Start buttonsMode area
Number
of
Copies
Display
14
Scan Enter scan mode (possible when the All-In-One is
attached to a computer).
Note: This button is lit when the All-In-One is in scan
mode.
Fax Enter fax mode. The All-In-One can receive a fax while in
any mode.
Note: This button is lit when the All-In-One is in fax
mode.
Quality • Select from the following copy qualities: Quick,
Normal, Better, or Best.
• Select a fax resolution : Standar d, Fine, Superfine, or
Ultrafine.
• Select a scan resolution when the All-In-One is
attached to a computer.
Number of Copies Specify a number (1-99) of copies.
Lighter/Darker Lighten or darken a copy or fax.
Reduce/Enlarge Customize the size of your original document by a
percentage, Fit to Page, or to poster size.
Left arrow • Decrease a number on the display.
• Scroll through a list on the display.
Select Choose the option that appea rs on the dis pl ay.
Options Scroll through the list of menu headings (see page 15).
Right arrow • Increase a number.
• Scroll through a list on the display.
Speed Dial Use the speed dial feature while the All-In-One is in fax
mode.
Note: If you press Spee d Dial when y our All-In-O ne is in
copy or scan mode, the All-In-One will automatically
switch to fax mode.
Press: To:

15
Enter text on the control panel
If you want to create a speed dial list using the control panel, you need to
enter text using the keypad buttons.
To enter text:
1 Find the number button that corresponds to the letter you want to
enter and press it repeatedly until the correct letter appears.
2 Press the right arrow button to move to the next character space.
Note: To enter a space between words, press the right arrow
button twice.
A keypad number
or symbol
• In fax mode:
Enter fax numbers.
Get through an automated answering system.
Select letters when creating a Speed Dial list.
Type numbers to enter or edit the date and time
shown on the All-In-One display.
• In copy mode:
Select the number of copies you want to make.
Redial/Pause • Redial the last number entered when the machine is
in fax mode.
• Insert a three-second pause in the number to be
dialed.
Enter a pause only when you have already begun
entering the number.
Note: If you press Redial/Pause when your All-In-One is
in copy or scan mode, the All-In-One automatically
switches to fax mode.
Color Start a color copy, fax, or scan job.
Note: In the Mode area, make sure the mode you want
is lit.
Black Start a black an d white copy, fax, or scan job.
Note: In the Mode area, make sure the mode you want
is lit.
Press: To:

16
3 Repeat the above steps until you are finished entering text.
4 Press Select.
Use the All-In-One software
The All-In-One software includes the:
• Fax Setup Utility (page 16)
• Lexmark All-In-One Center (page 19)
• Print Properties (page 19)
• Lexmark Photo Editor (page 21)
• Lexmark X6100 Series Solution Center (page 22)
• Optical Character Recognition (page 23)
Using the Fax Setup Utility
Use this utility to adjust the fax send and receive settings. When you save
the settings, they apply to every fax you send or receive. You can also use
this utility to create and edit your speed dial list.
• Click Start Programs Lexmark X6100 Series Fax Setup
Utility.
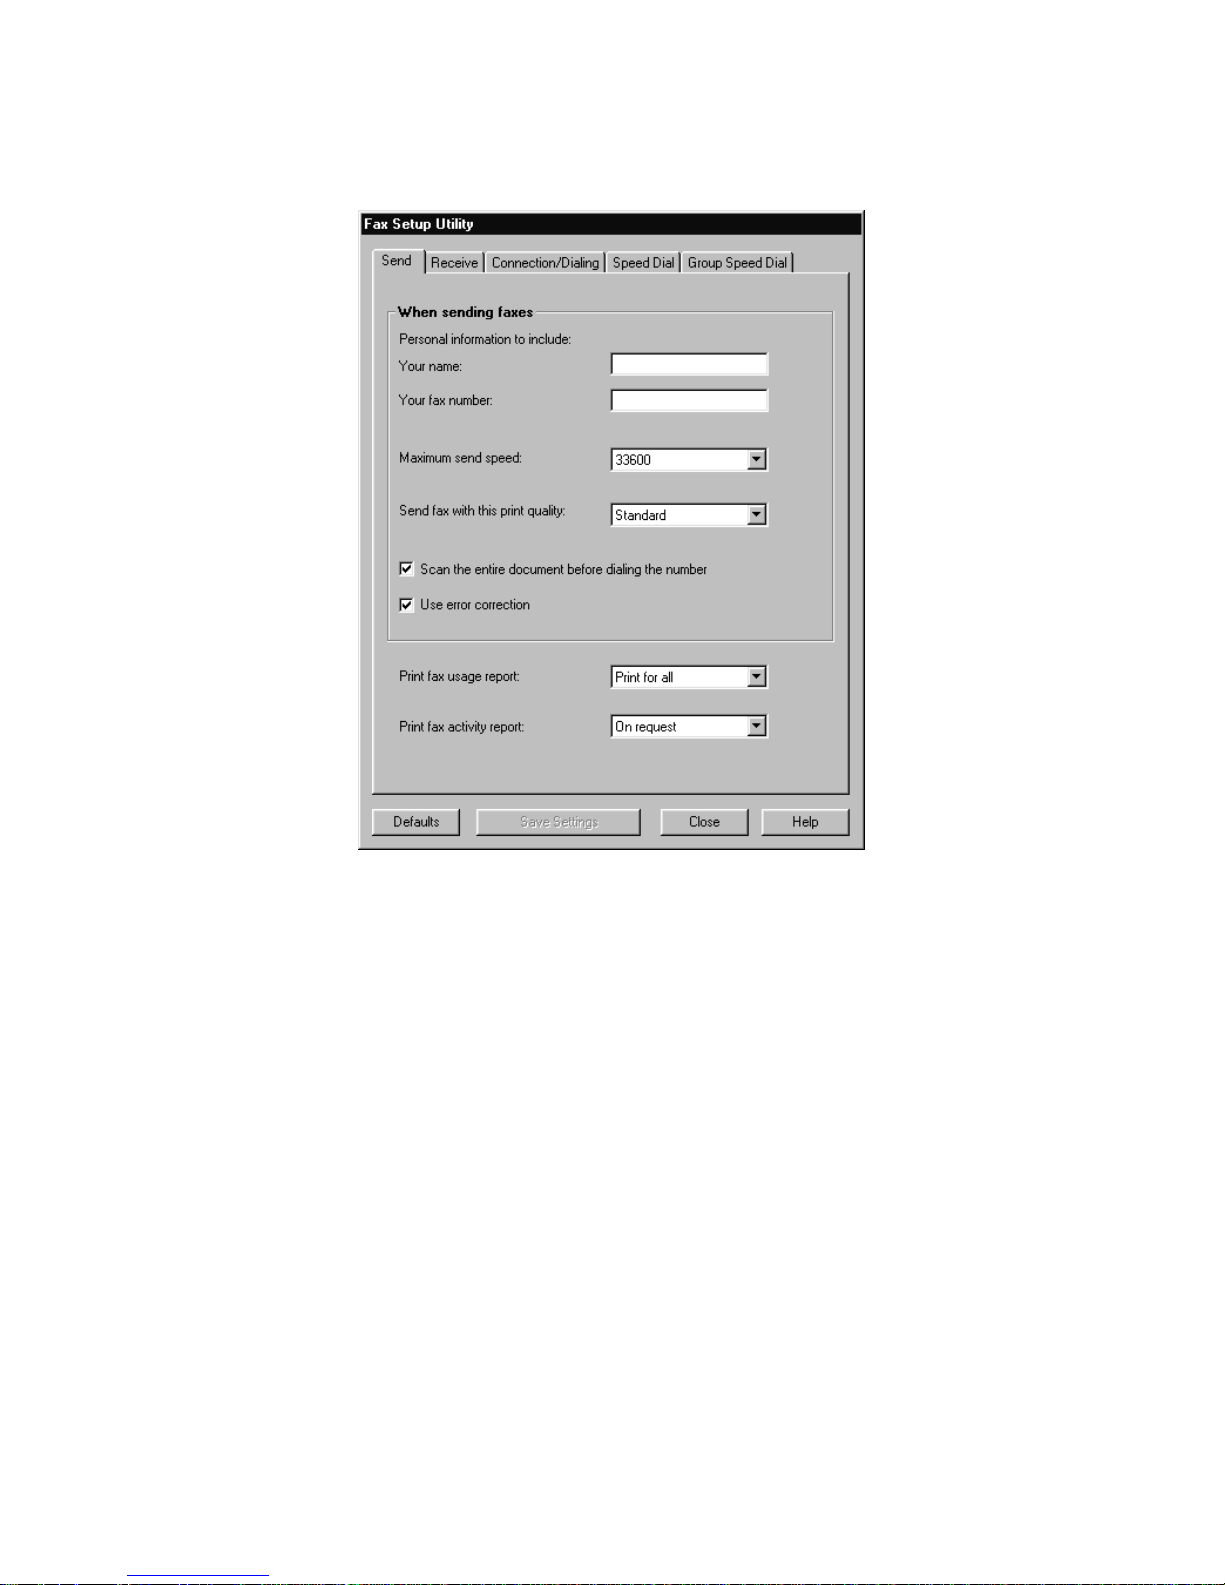
17
• From the Lexmark All-In-One Center, click the Maintain/
Troubleshoot tab and then click Display the Fax Setup Utility.

18
The following table contains the Fax Setup Utility tabs.
On this tab: You can:
Send • Enter your nam e and fax number.
• Select a maximum send speed and a print quality for
outgoing faxes.
• Choose whether to scan the entire document before
dialing the number.
• Choose whether to use error correction.
• Select when to print a fax usage report.
• Select when to print a fax activity report.
Receive • Choose whether you want a header (the sender’s fax
number and name) to appear on each page you
receive.
• Choose whether you wa nt to pri nt a footer (date, time,
and page number) on each page.
• Automatically reduce an incoming fax to fit to the
paper size loaded or print it on two sheets of paper.
• Select whether you want to forward a fax or print it,
and then forward it.
Connection/Dialing • Select the number of times you want the machine to
redial and the time between those attempts if the fax
cannot be sent on the first try.
• Select the phone line format you want to use (Pulse,
Touch-tone, Behind a PBX).
• Enter a dialing prefix.
• Choose how (manually, if fax tones are detected, or
after a certain amount of rings) you want to answer
incoming c alls.
• Choose a distinctive ring.
Speed Dial Add to, create, or edit the speed dial list.
Group Speed Dial Create a group number and name and add phone
numbers to the group.

19
Using the Lexmark All-In-One Center
To access the Lexmark All-In-One Center, the software driver for your
Lexmark X6100 Series:
• Double-click the Lexmark X6100 Series All-In-One Center
desktop icon.
• Click Start Programs Lexmark X6100 Series Lexmark
All-In-One Center.
You can use the Lexmark All-In-One Center to:
• Scan, copy, print, and do other tasks.
• View images you have scanned or saved.
• Select copy and scan settings.
• Access troubleshooting and maintenance information.
• Access the Fax Setup Utility (see page 16).
Using Print Properties
You can change your All-In-One settings in Print Properties. To open Print
Properties:
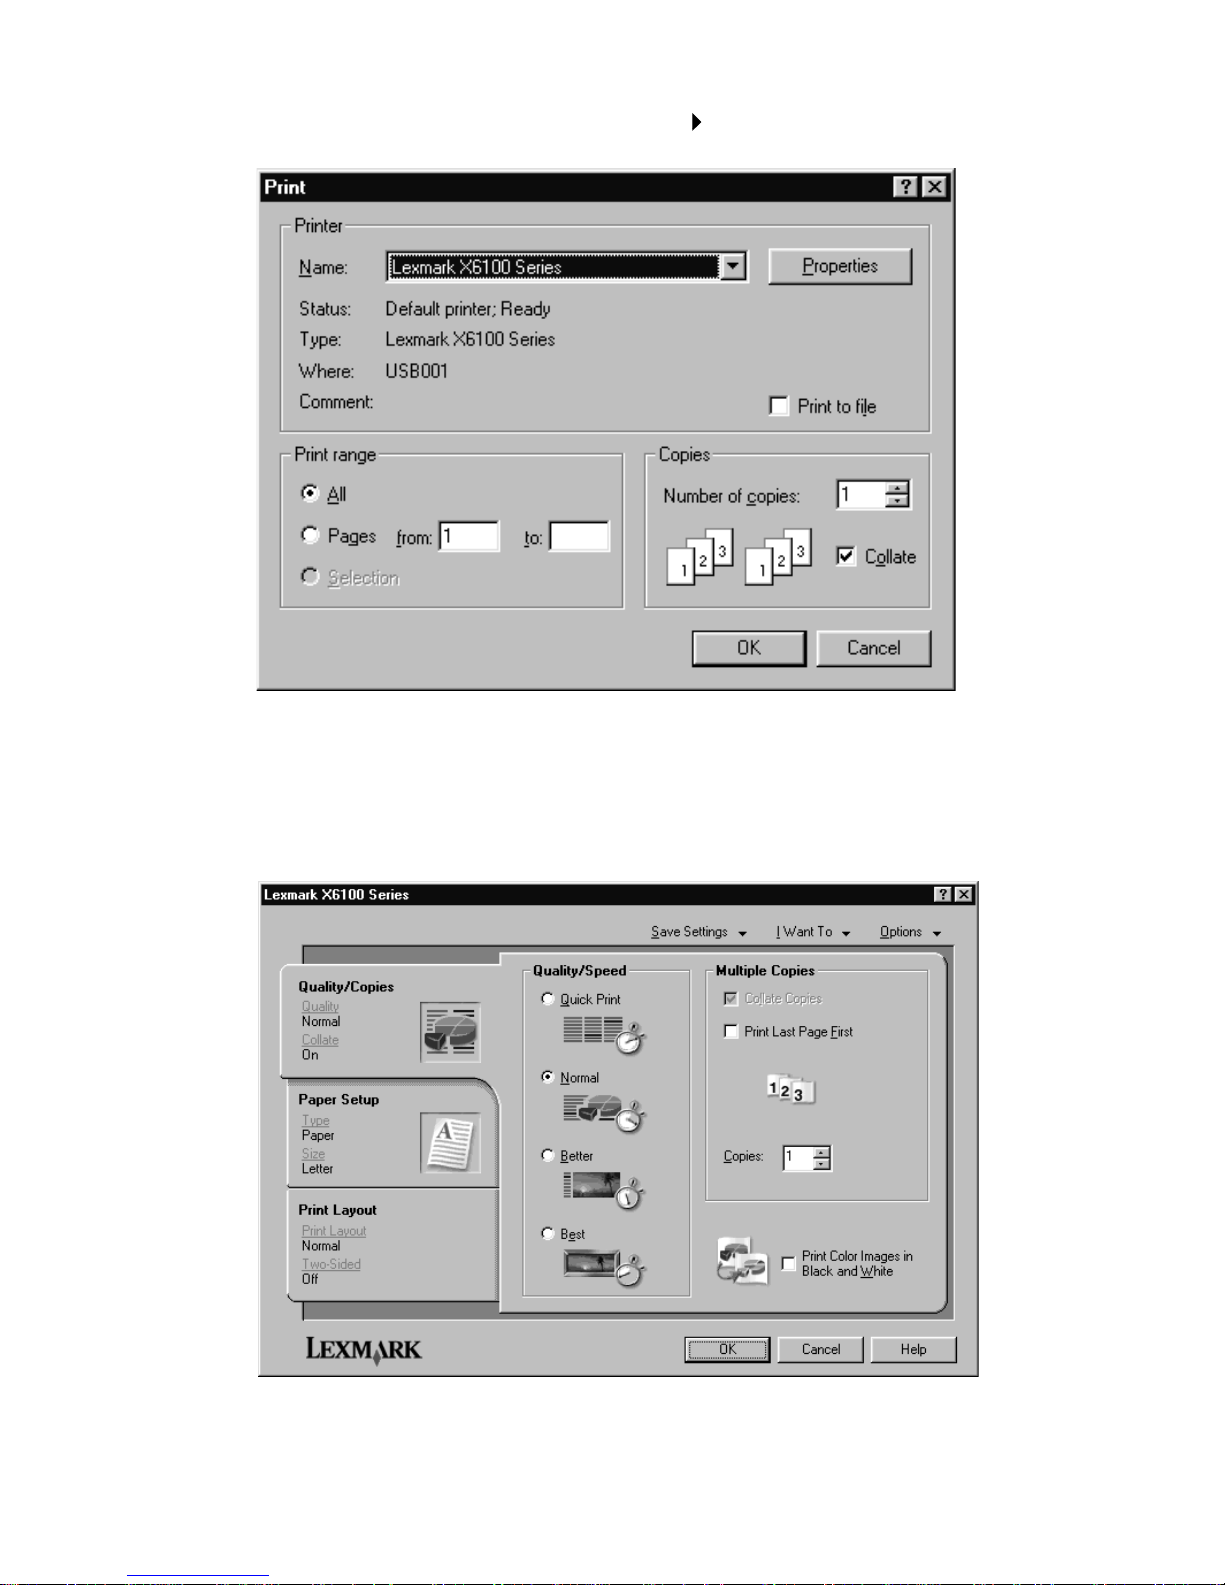
20
1 With your document open, click File Print.
2 In the Print dialog box, click Properties, Preferences, Options, or
Setup (depending on your program or operating system).
The Print Properties screen appears.

21
The I Want To menu helps you select the All-In-One settings
needed to print a variety of things such as photos, banners, and
envelopes.
Use the tabs (Quality/Copies, Paper Setup, and Print Layout) along
the left side of the Print Properties dialog box to select your
All-In-One print settings.
Using the Lexmark X6100 Series Photo Editor
The Photo Editor lets you adjust photo attributes (brightness, contrast, red
eye reduction, and orientation) of scanned images. You can also crop an
image or erase part of it.
To access the Lexmark X6100 Series Photo Editor, click Start
Programs Lexmark X6100 Series Lexmark Photo Editor.

22
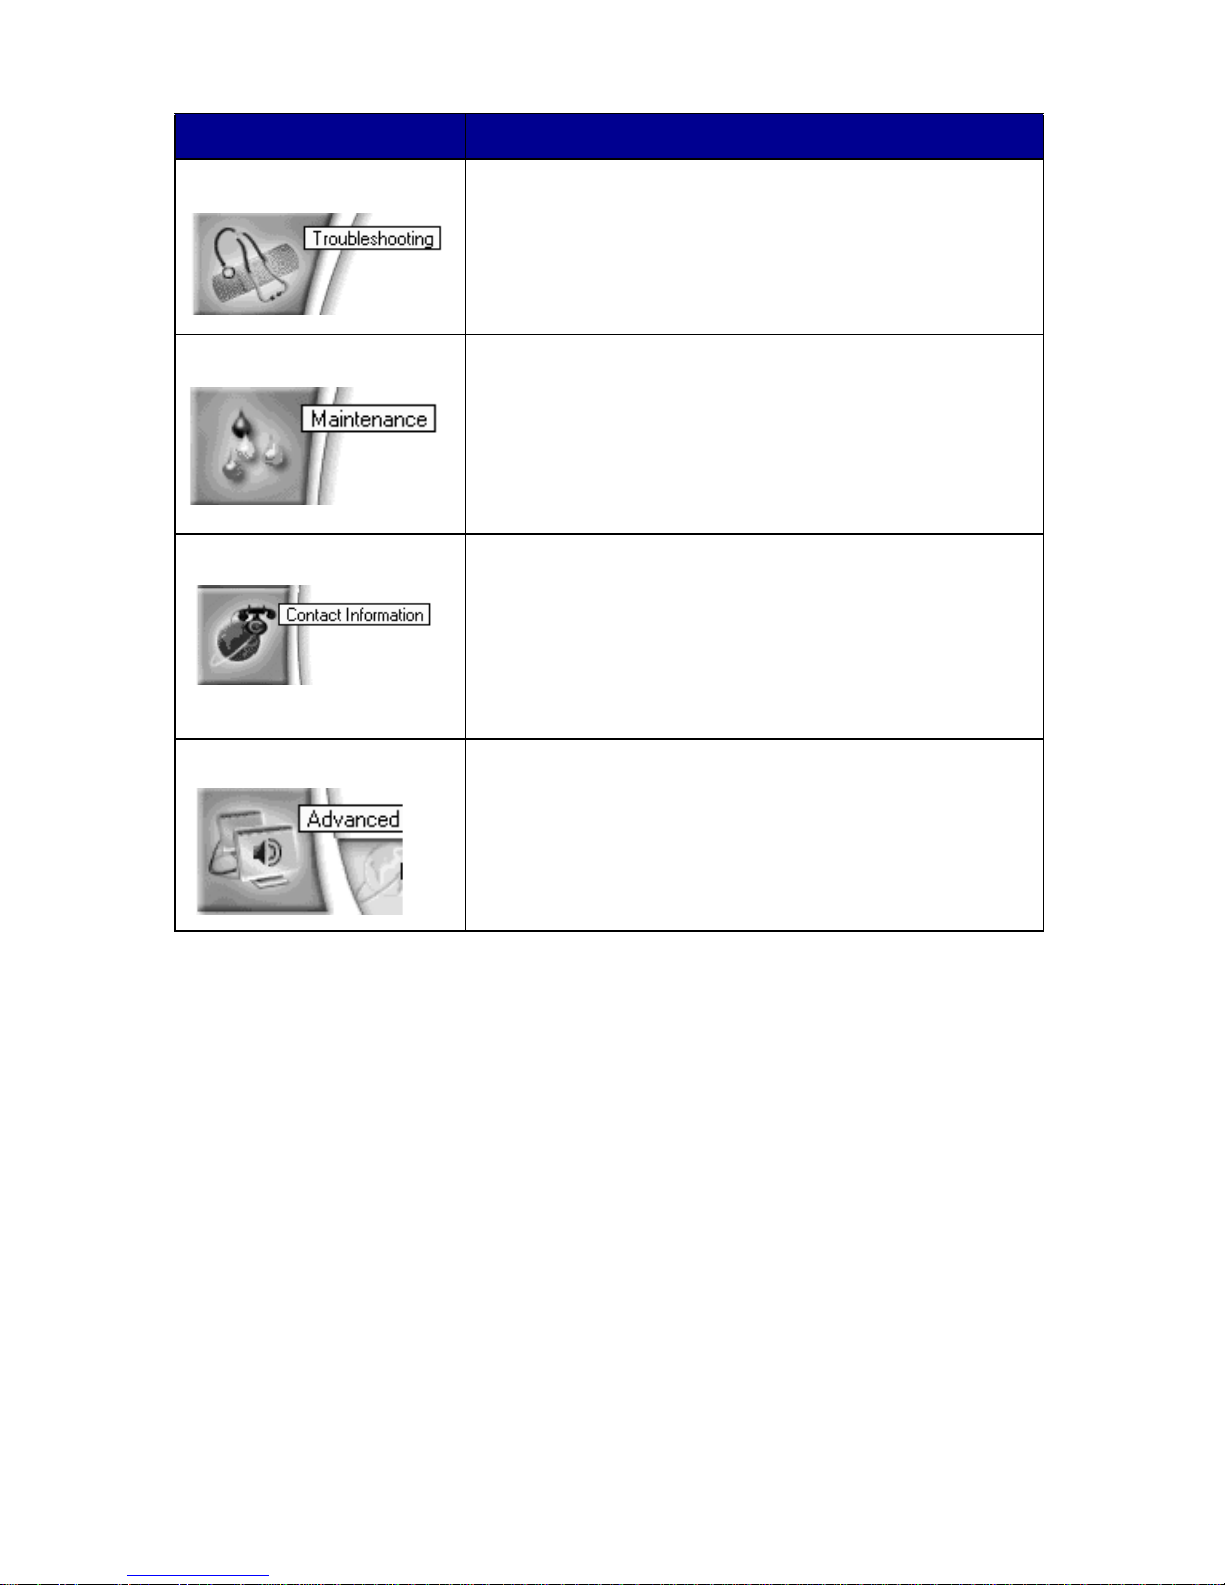
Using the Lexmark Solution Center
The Lexmark Solution Center (LSC) provides All-In-One help and
information about printer status, paper type detected, and ink levels. There
are two ways to open the LSC:
• Click Start Programs Lexmark X6100 Series Lexmark
Solution Center.
• From the All-In-One Center, click the Maintain/Troubleshoot tab
and click on a topic.
The following table describes the LSC tabs:
From this area or tab: You can:
Printer Status • Check printer stat us
• Check ink levels
How To • Learn about basic features.
• Print, scan, copy, and fax instructions.
• Look at project information.
23
Using Optical Character Recognition
You can use Optical Character Recognition (OCR) to edit document text.
1 From your desktop, double-click the Lexmark X6100 Series
All-In-One Center icon.
The All-In-One Main Page appears.
2 From the Productivity Tools list, select Edit text found in a
scanned document (OCR).
3 Follow the steps on your screen, and then click Send Now.
Troubleshooting • Check the current All-In-One status.
• View recommended Help topics.
• View common troubleshooting topics.
• Search for more specific troubleshooting topics.
Maintenance • Install a new print cartridge.
• Order new cartridges.
• Print a test page.
• Clean your print cartridges to fix horizontal
streaks.
• Align the cartridges.
Contact Infor mation • Order ink cartridges or supplies.
• Get an All-In-One software update.
• See special offers.
• Register your All-In-One.
• View Lexmark ph one numbers.
• Visit the Lexmark Customer Support Web site.
Advanced • Change voice or appearance options.
• See software version information.
• Change the network printing settings.
From this area or tab: You can:
24
Loading paper and originals
The basic functions of your All-In-One are the copy, scan, print, and fax
functions. First, learn how to load paper into your All-In-One with the
following instructions. Then, read on to learn how to copy, scan, print, and
fax.
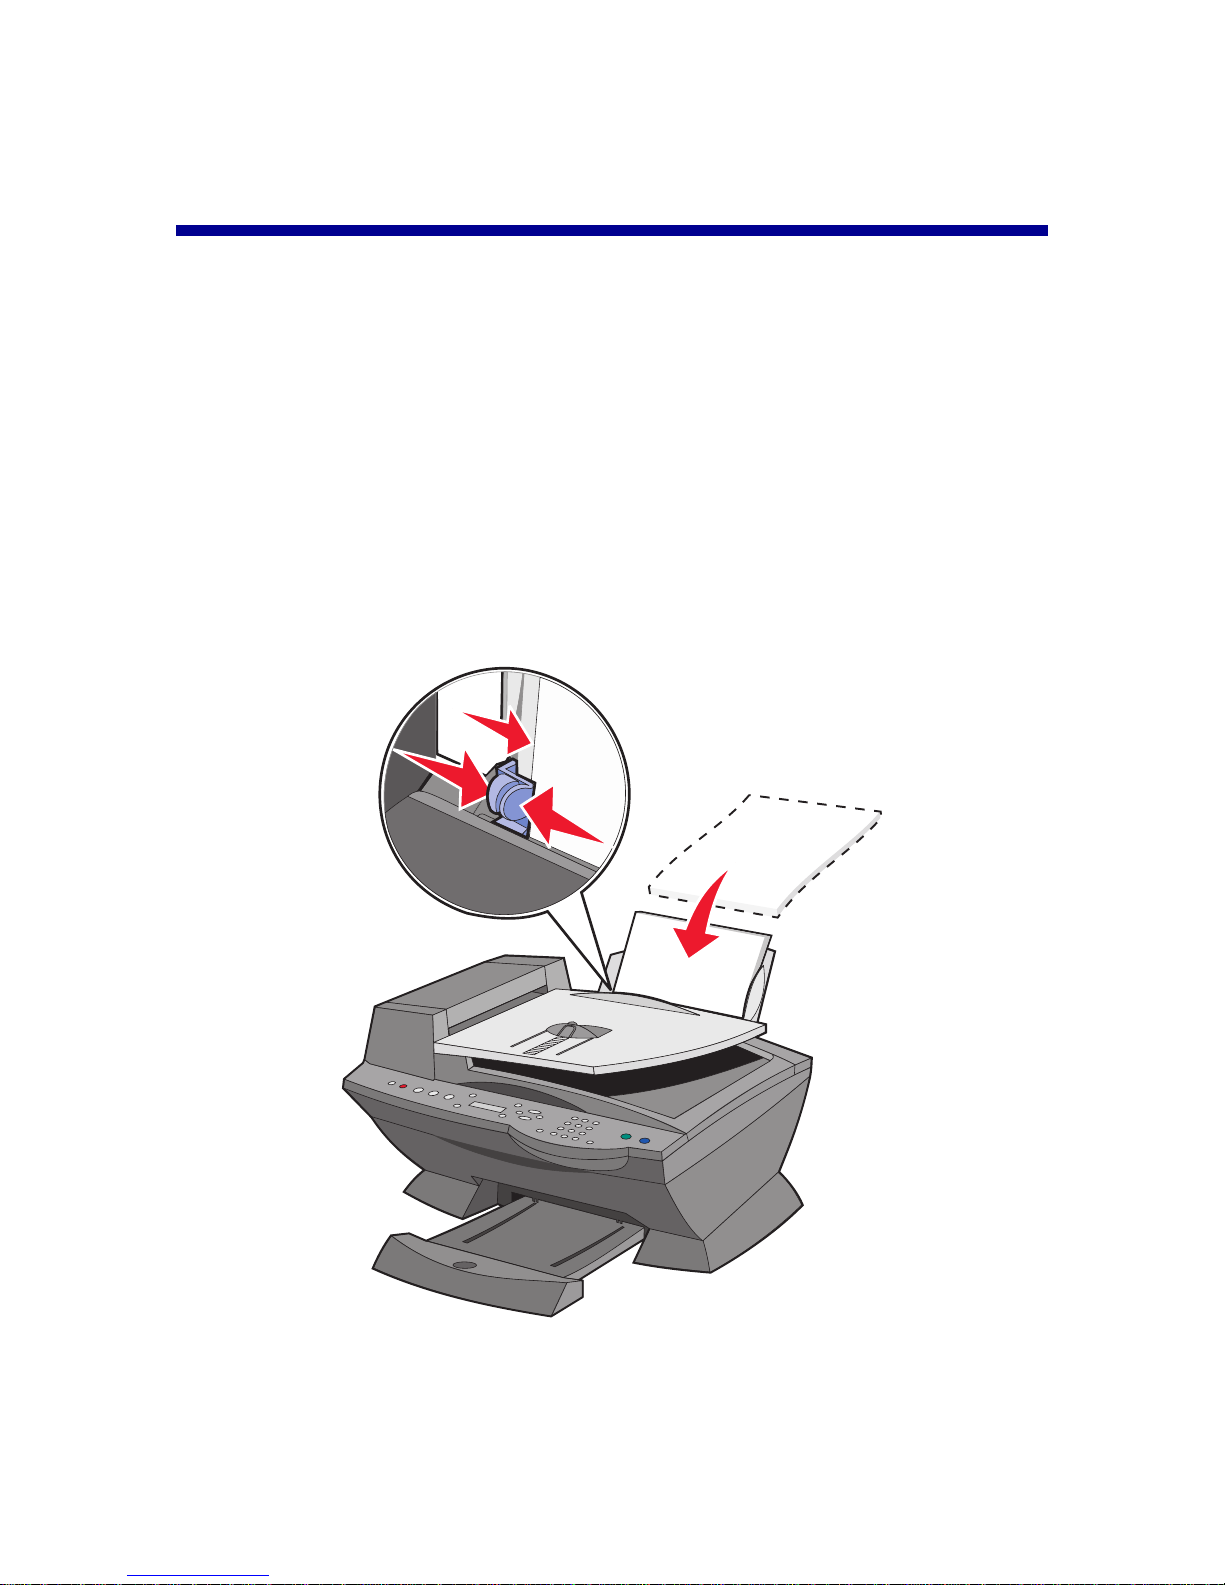
Load plain paper into the paper support
1 Place the paper against the right side of the paper support.
Note: Do not force the paper into the All-In-One.
2 Squeeze and slide the paper guide to the left edge of the paper.
 Loading...