

Page 1

Optra N Maintenance Kit
Page 2

Page 3

Contents
Introduction ......................................................................................................................1
Replacing the fuser ...........................................................................................................3
Replacing the transfer roll..............................................................................................11
Replacing the paper feed rollers in the printer...........................................................17
Replacing the paper feed rollers in the optional input drawer................................23
Verifying installation ......................................................................................................27
Contents
iii
Page 4

iv
Contents
Page 5
Introduction
Installing the fuser, transfer roll, and paper feed rollers included in this kit will help you
avoid print quality problems and paper feed problems resulting from worn parts. Each
time your printer displays the
nance kit.
Install all of the parts included in the maintenance kit, even if you cannot detect signs of
wear on the parts currently in your printer.
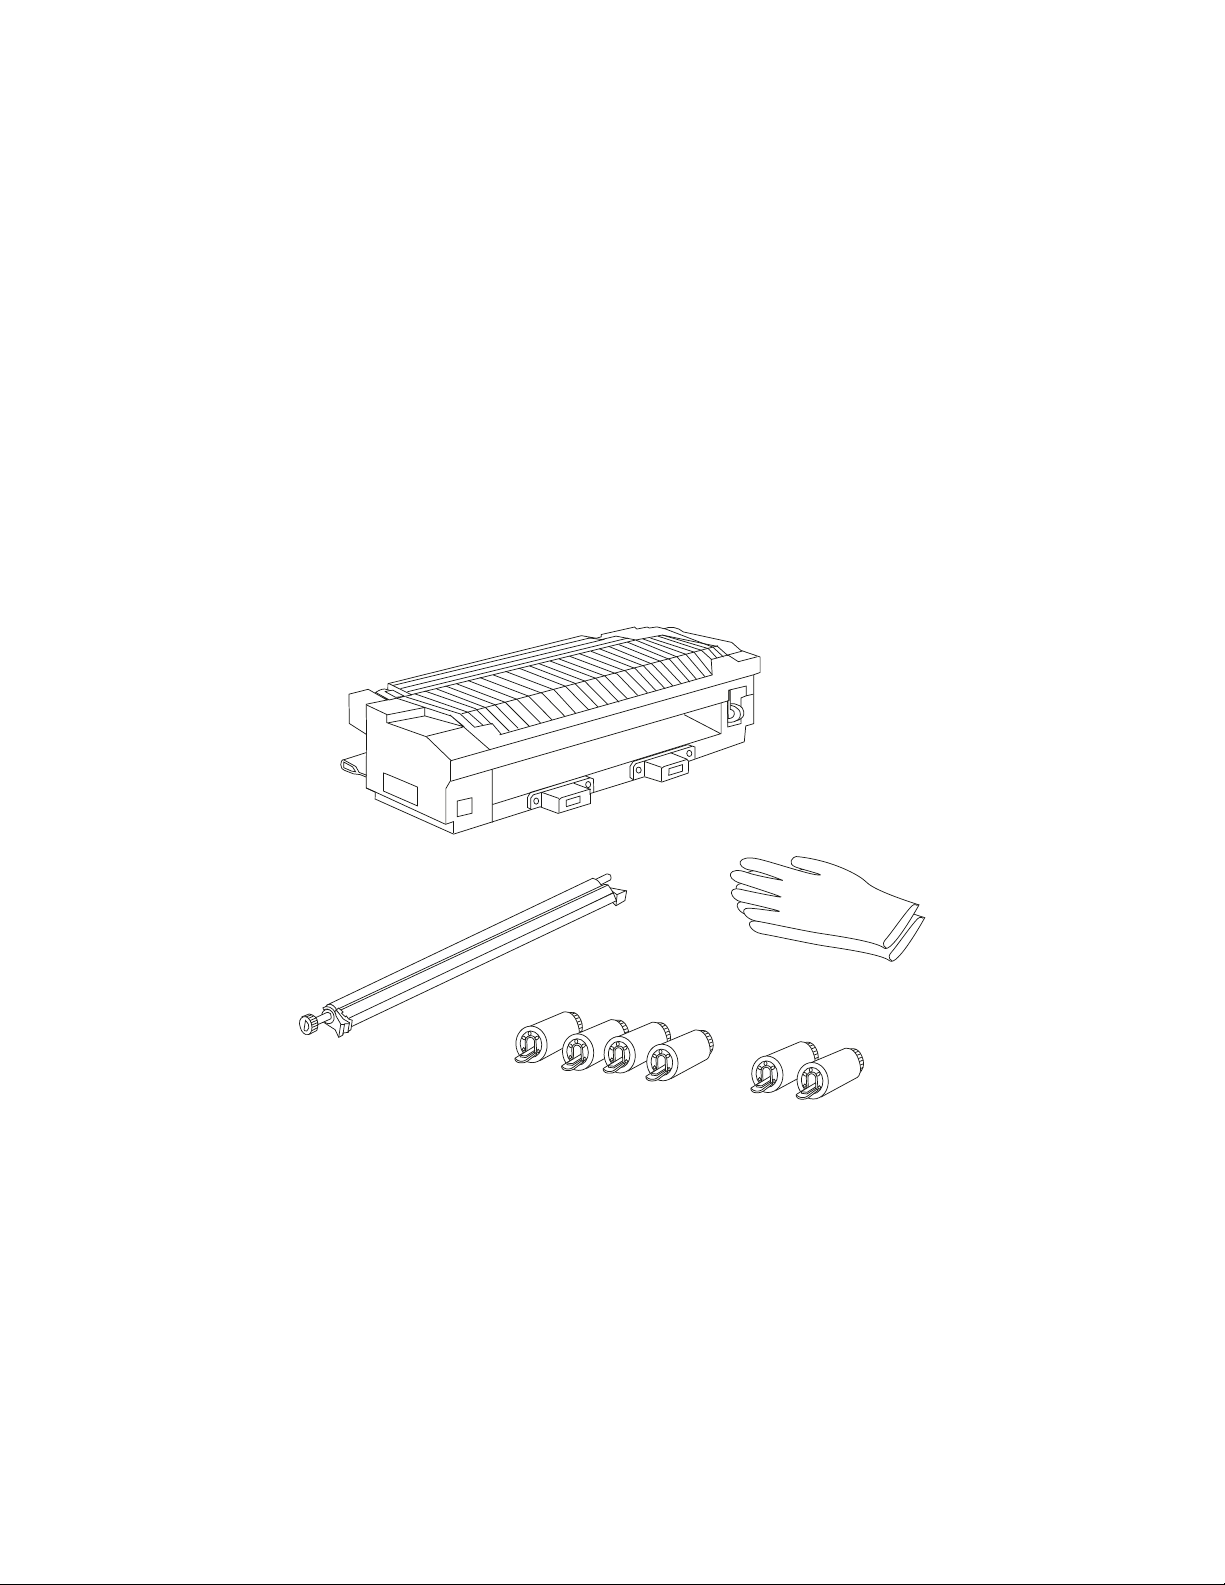
The Optra N maintenance kit includes:
80 Scheduled Maintenance
message, order a new mainte-
Fuser
Rubber gloves (1 pair)
Transfer roll
Paper feed rollers
(4 for the printer) (2 for the optional
input drawer)
Introduction
1
Page 6
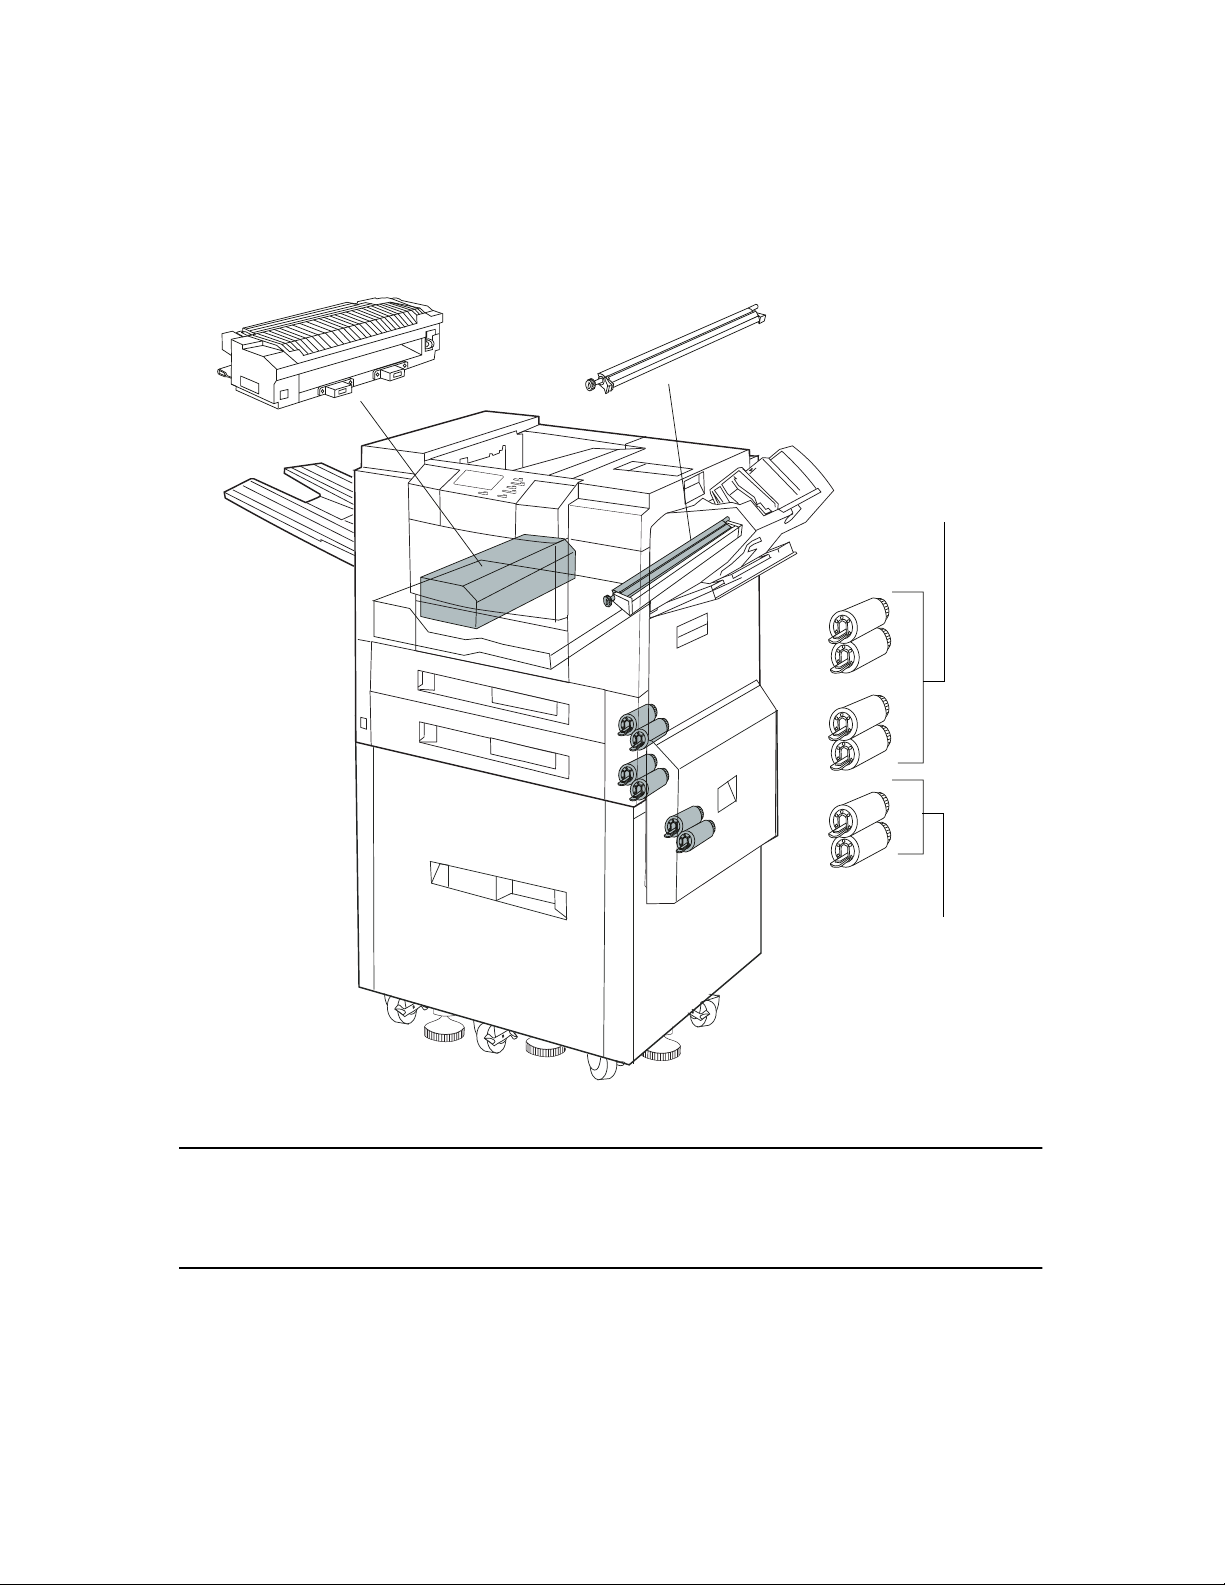
The following illustration shows the location of the parts you need to replace.
Fuser
Transfer roll
Paper feed rollers
for tray 1 and tray 2
Paper feed rollers for
optional input drawer
NOTE: Before installing the items included in the maintenance kit, turn the printer
power off and unplug the power cords (including those attached to the
optional input drawer and optional finisher). Then wait 20 minutes for the
printer to cool.
2
Introduction
Page 7
Replacing the fuser
Removing the old fuser
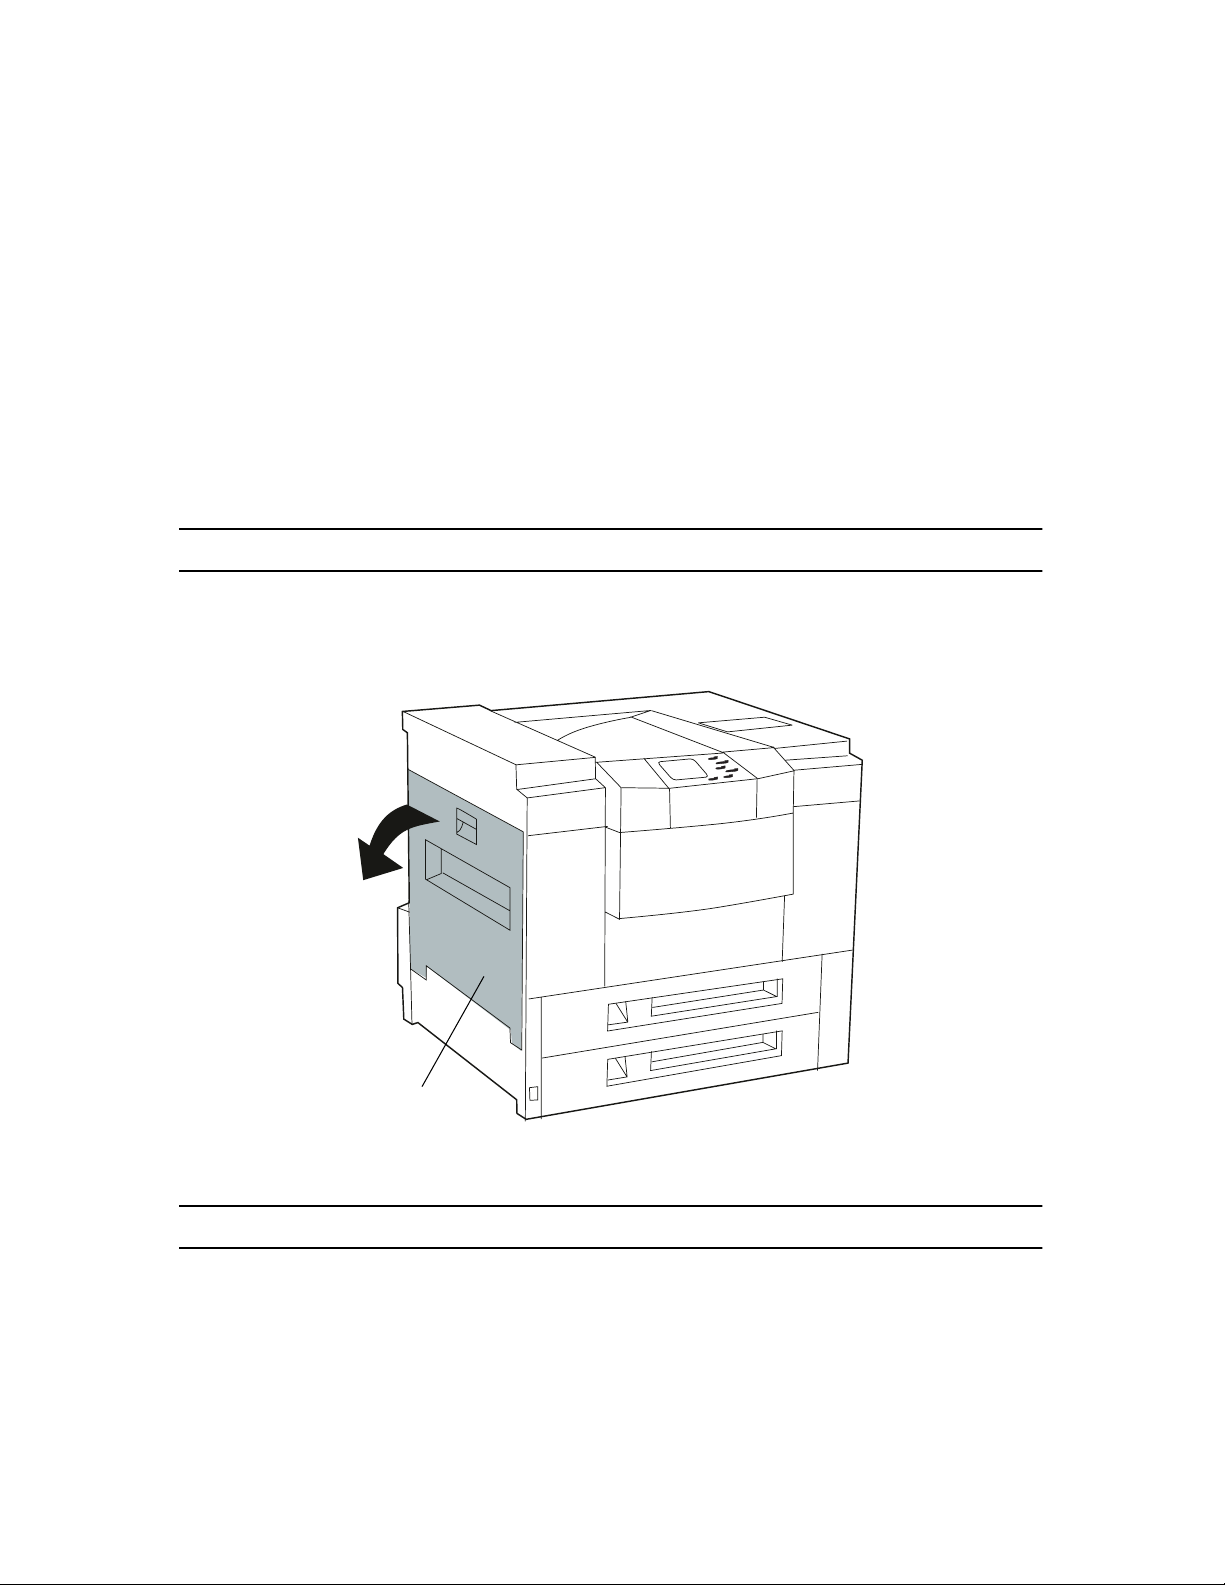
Make sure the printer power is off and the power cords are unplugged.
1
NOTE: Wait 20 minutes for the printer to cool before removing the fuser.
Open the left access door.
2
Left access door
NOTE: Surfaces inside the left access door may be hot.
Replacing the fuser
3
Page 8
3 If the optional duplexer is installed, remove it.
a
Press the green tab to unlock the duplexer.
Duplexer
Tab
b
Use both hands to pull the duplexer straight out of the printer.
4
Replacing the fuser
Page 9
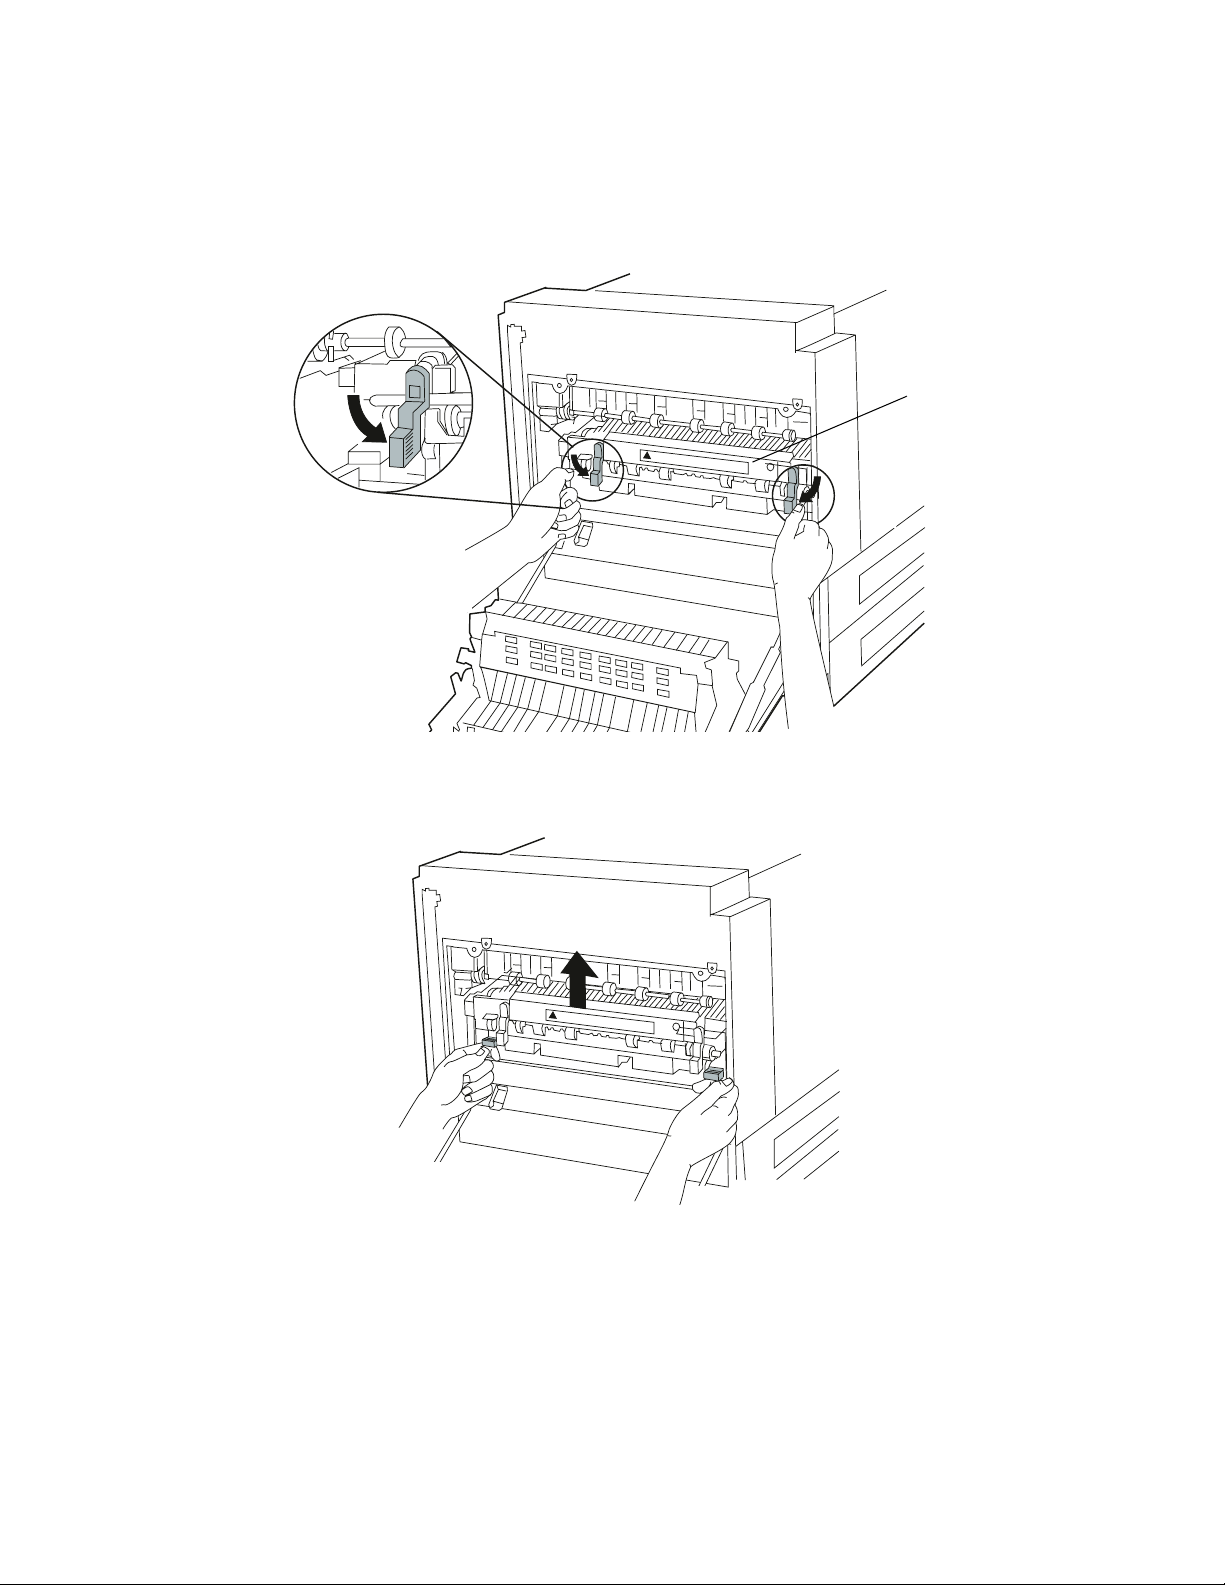
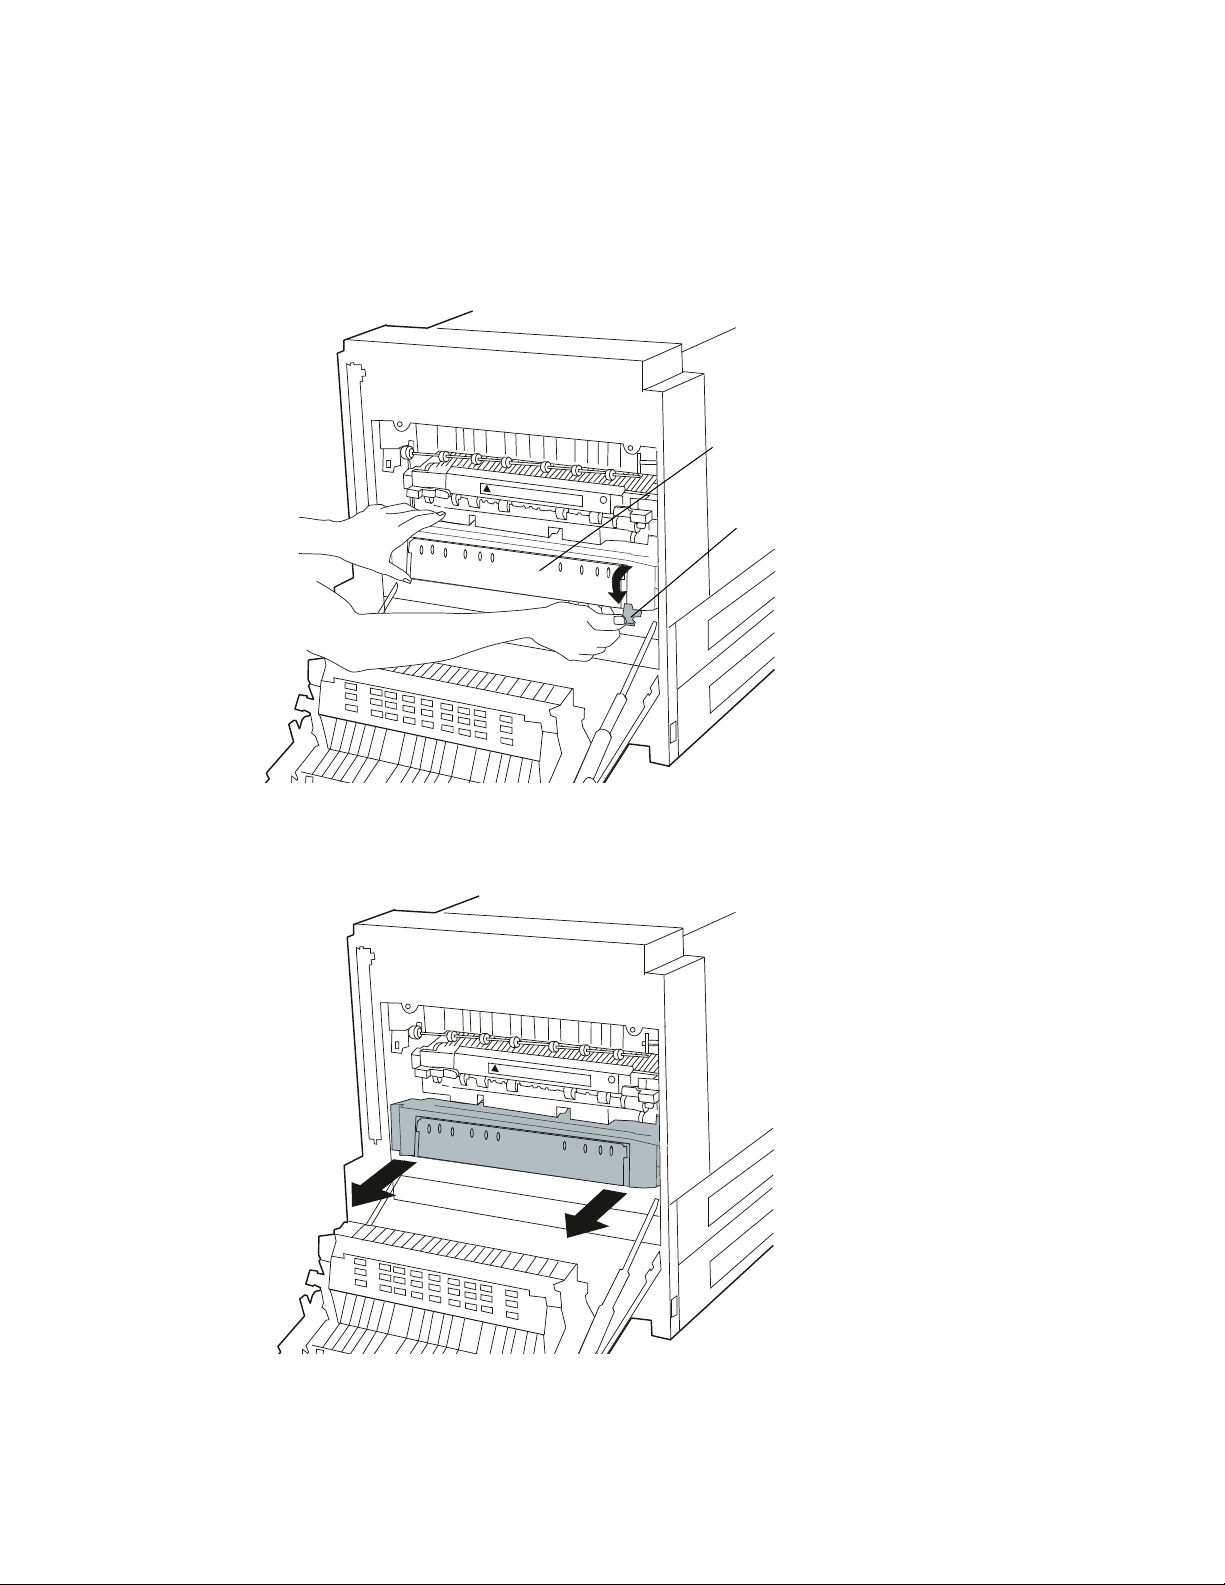
4 Push down firmly on the blue levers at each end of the fuser to unlock the fuser.
Fuser
5 Place a finger under the black tab on each end of the fuser. Lift the fuser slightly so
that it clears the lip at the front of the supporting frame.
Replacing the fuser
5
Page 10

6 Pull the fuser out of the printer with both hands.
Installing the new fuser
1
Unpack the new fuser. Remove the two orange spacers, as shown.
6
Replacing the fuser
Page 11
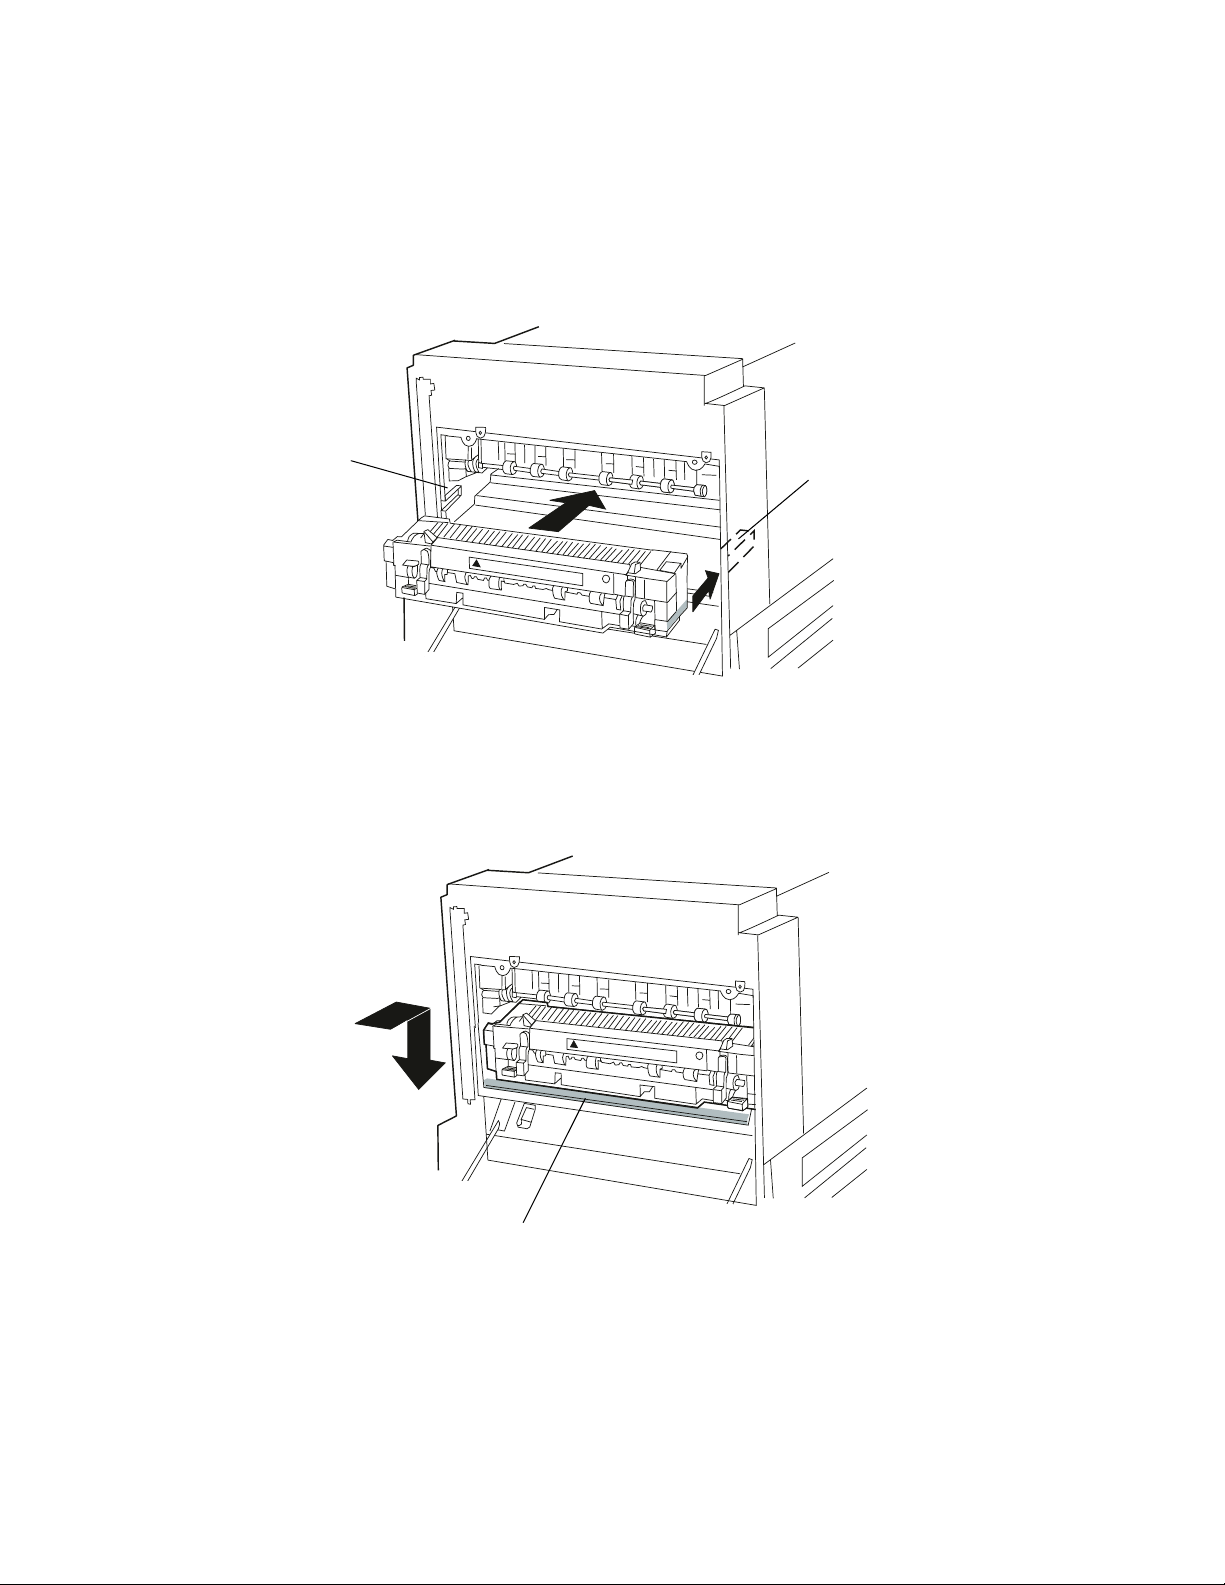
2 Insert the new fuser in the printer.
a
Rest the fuser on the black rails on either side of the printer opening.
Rail
b
Slide the fuser all the way into the printer. Make sure the fuser clears the lip at
the front of the supporting frame and drops securely into position.
Rail
Lip
Replacing the fuser
7
Page 12

3 Push the blue levers up to lock the fuser into place.
4 If you removed the optional duplexer, reinsert it into the printer.
a
Hold the duplexer with both hands and slide it into the opening, as shown.
8
Replacing the fuser
Page 13

b
Push on each end of the duplexer until it locks into place.
Close the left access door.
5
Replacing the fuser
9
Page 14

10
Replacing the fuser
Page 15

Replacing the transfer roll
Removing the old transfer roll assembly
Make sure the printer power is off and the power cords are unplugged.
1
Open the printer top cover.
2
Remove the print cartridge and set it aside.
3
Replacing the transfer roll
11
Page 16

4 Locate the black transfer roll inside the printer.
Closely observe how the transfer roll is installed.
5 Carefully lift the blue gear to release the transfer roll from the clip.
Transfer roll
Blue gear
Clip
6 Slide the transfer roll and paper guide assembly to the left to remove it.
NOTE: Avoid sharp edges in the circled areas.
Transfer roll
7 Discard the assembly.
12
Replacing the transfer roll
Paper guide
Page 17

Installing the new transfer roll assembly
1 Put on the rubber gloves included with the maintenance kit.
The gloves protect the new transfer roll from fingerprints or scratches. Damaging the
transfer roll may result in print quality problems.
2
Pull the tab to remove the protective sheet from the new transfer roll.
3
Discard the protective sheet.
Replacing the transfer roll
13
Page 18

NOTE: Improperly inserting the transfer roll assembly may damage the printer.
Study the illustrations carefully before installing the assembly.
4 Hold the transfer roll assembly by the paper guide, as shown.
5
Carefully insert the shaft on the right end of the transfer roll into the hole above
the opening for the spring.
NOTE: Do not press down on the parts near the spring.
Paper guide
14
Shaft
Replacing the transfer roll
Hole
Spring
Page 19
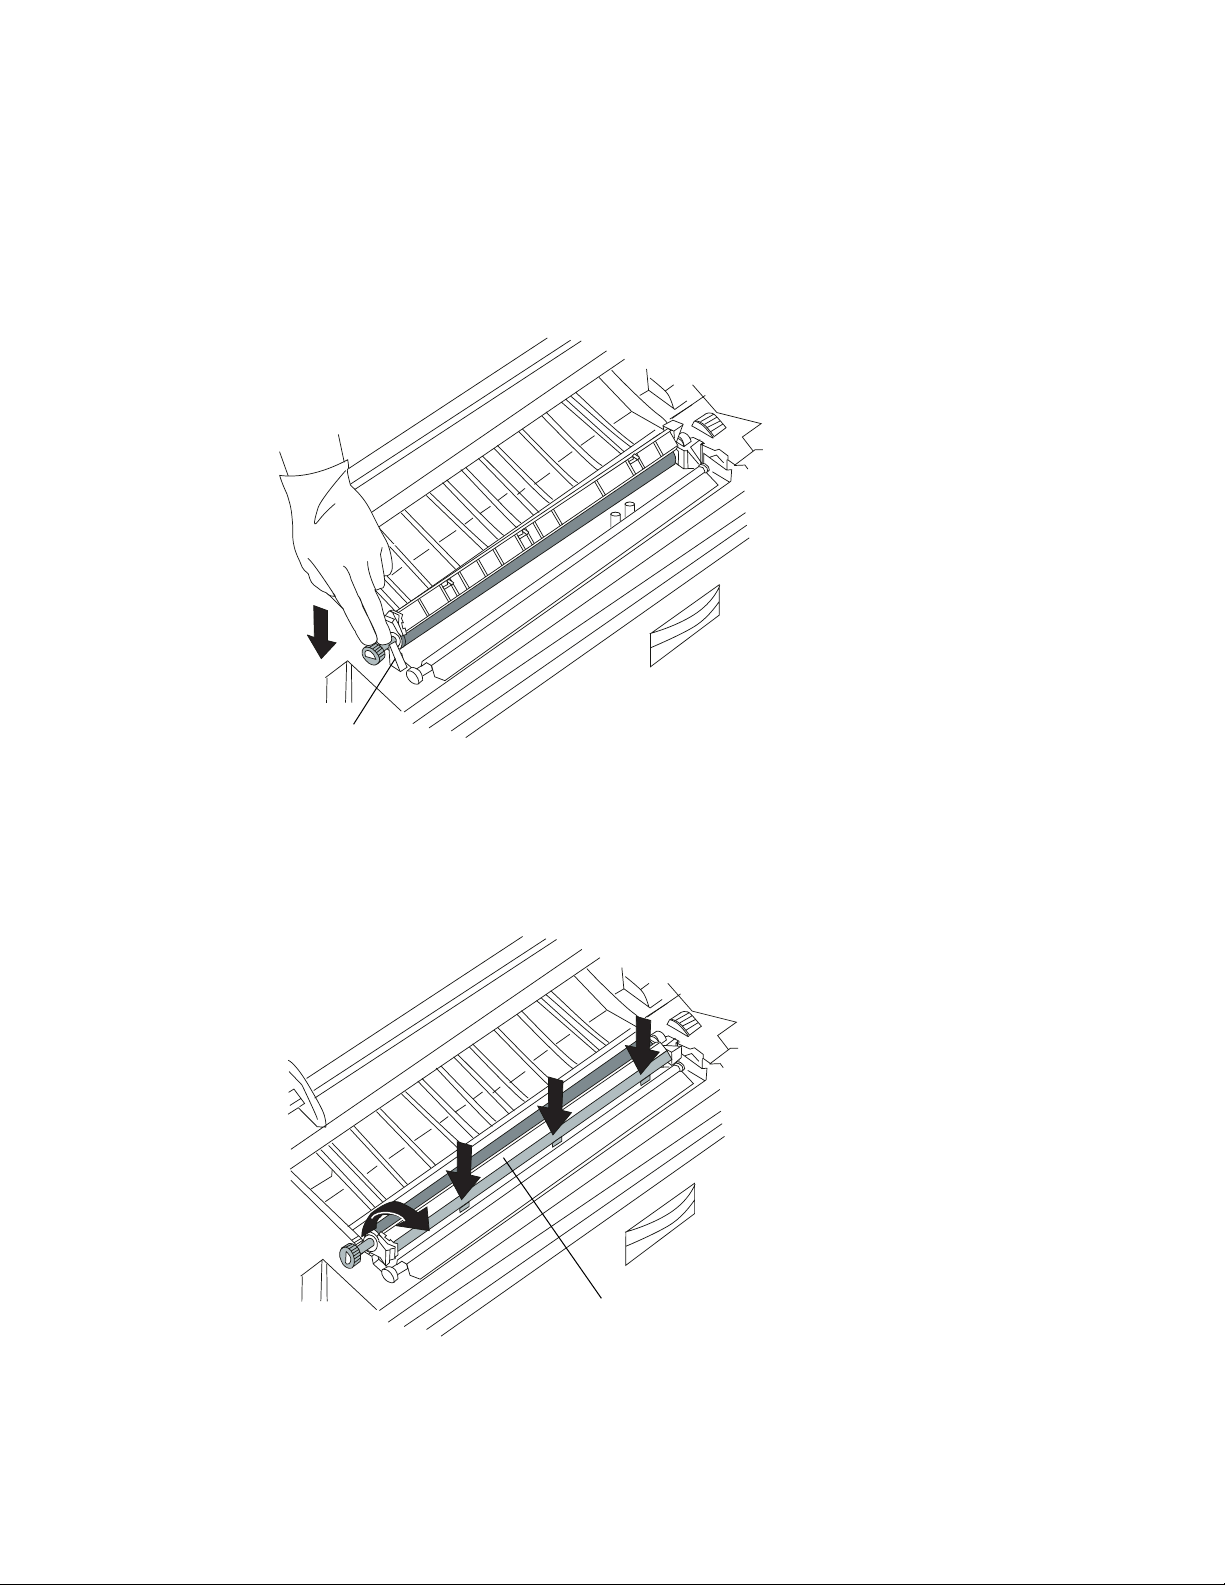
6 Align the transfer roll with the clip on the left side of the printer.
7
Press the left end of the transfer roll firmly into the clip.
Clip
8
Rotate the black plastic and metal paper guide forward.
9 Use both hands to firmly press the paper guide into position.
Make sure all three tabs snap securely into place.
Paper guide
Replacing the transfer roll
15
Page 20

10 Reinstall the print cartridge.
a
Locate the grooves on either side of the printer.
b
Slide the cartridge into the grooves until it is firmly seated.
Groove
11 Close the printer top cover.
16
Replacing the transfer roll
Page 21

Replacing the
paper feed rollers
in the printer
Removing the old rollers
Replace all four rollers, even if they do not appear worn.
Make sure the printer power is off and the power cords are unplugged.
1
Remove tray 1 and tray 2 from the printer.
2
a
Pull the paper tray completely open.
b
Firmly grasp the tray on both sides.
c
Lift the tray slightly and pull it out of the printer.
Tray 1
Tray 2
Replacing the paper feed rollers in the printer
17
Page 22

3 Locate the blue paper feed rollers in the two tray openings.
The paper feed rollers are in the same position in each of the two tray openings. Follow the instructions beginning on page 19 to replace all four rollers.
18
Replacing the paper feed rollers in the printer
Page 23

4 Pinch the release tab on the end of each roller and slide the roller off the shaft.
5 Discard all four old rollers.
Replacing the paper feed rollers in the printer
19
Page 24
Installing the new rollers
1 Locate the plastic bag containing the four paper feed rollers that came in the main-
tenance kit.
If you do not have the optional 2000-sheet input drawer installed on your printer, you
do not need the two paper feed rollers shipped in a separate bag.
2 Slide a new roller on each shaft until it clicks into place.
To verify that the roller is secured on the shaft, pull lightly on the tab.
20
Replacing the paper feed rollers in the printer
Page 25

3 Once you have replaced all four paper feed rollers, reinsert tray 1 and tray 2.
a
Align the yellow label at the back of the paper tray with the yellow label at the
front of the opening for the paper tray.
b
Slide the tray all the way into the printer.
Replacing the paper feed rollers in the printer
21
Page 26

22
Replacing the paper feed rollers in the printer
Page 27
Replacing the
paper feed rollers in the
optional input drawer
Removing the old rollers
Replace both rollers, even if they do not appear worn.
Make sure the printer power is off and the power cords are unplugged.
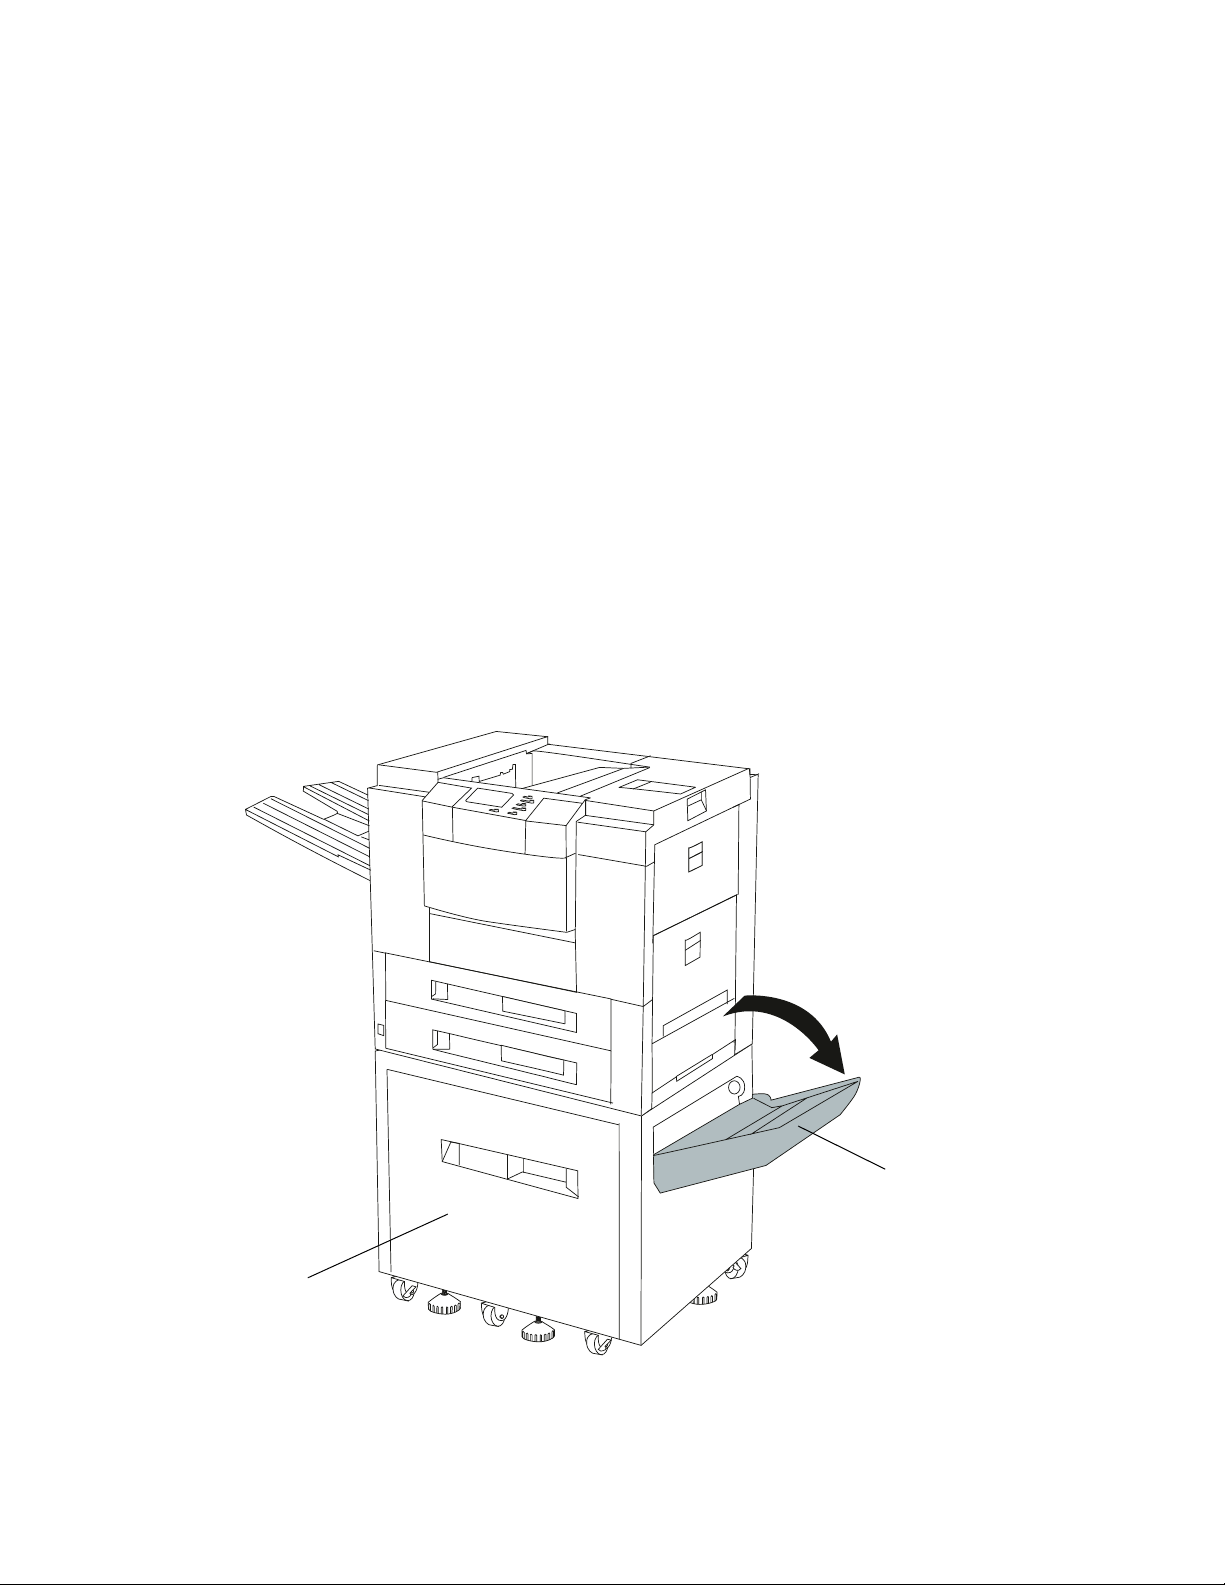
1
Lower the paper router.
2
Input drawer
Paper router
Replacing the paper feed rollers in the optional input drawer
23
Page 28

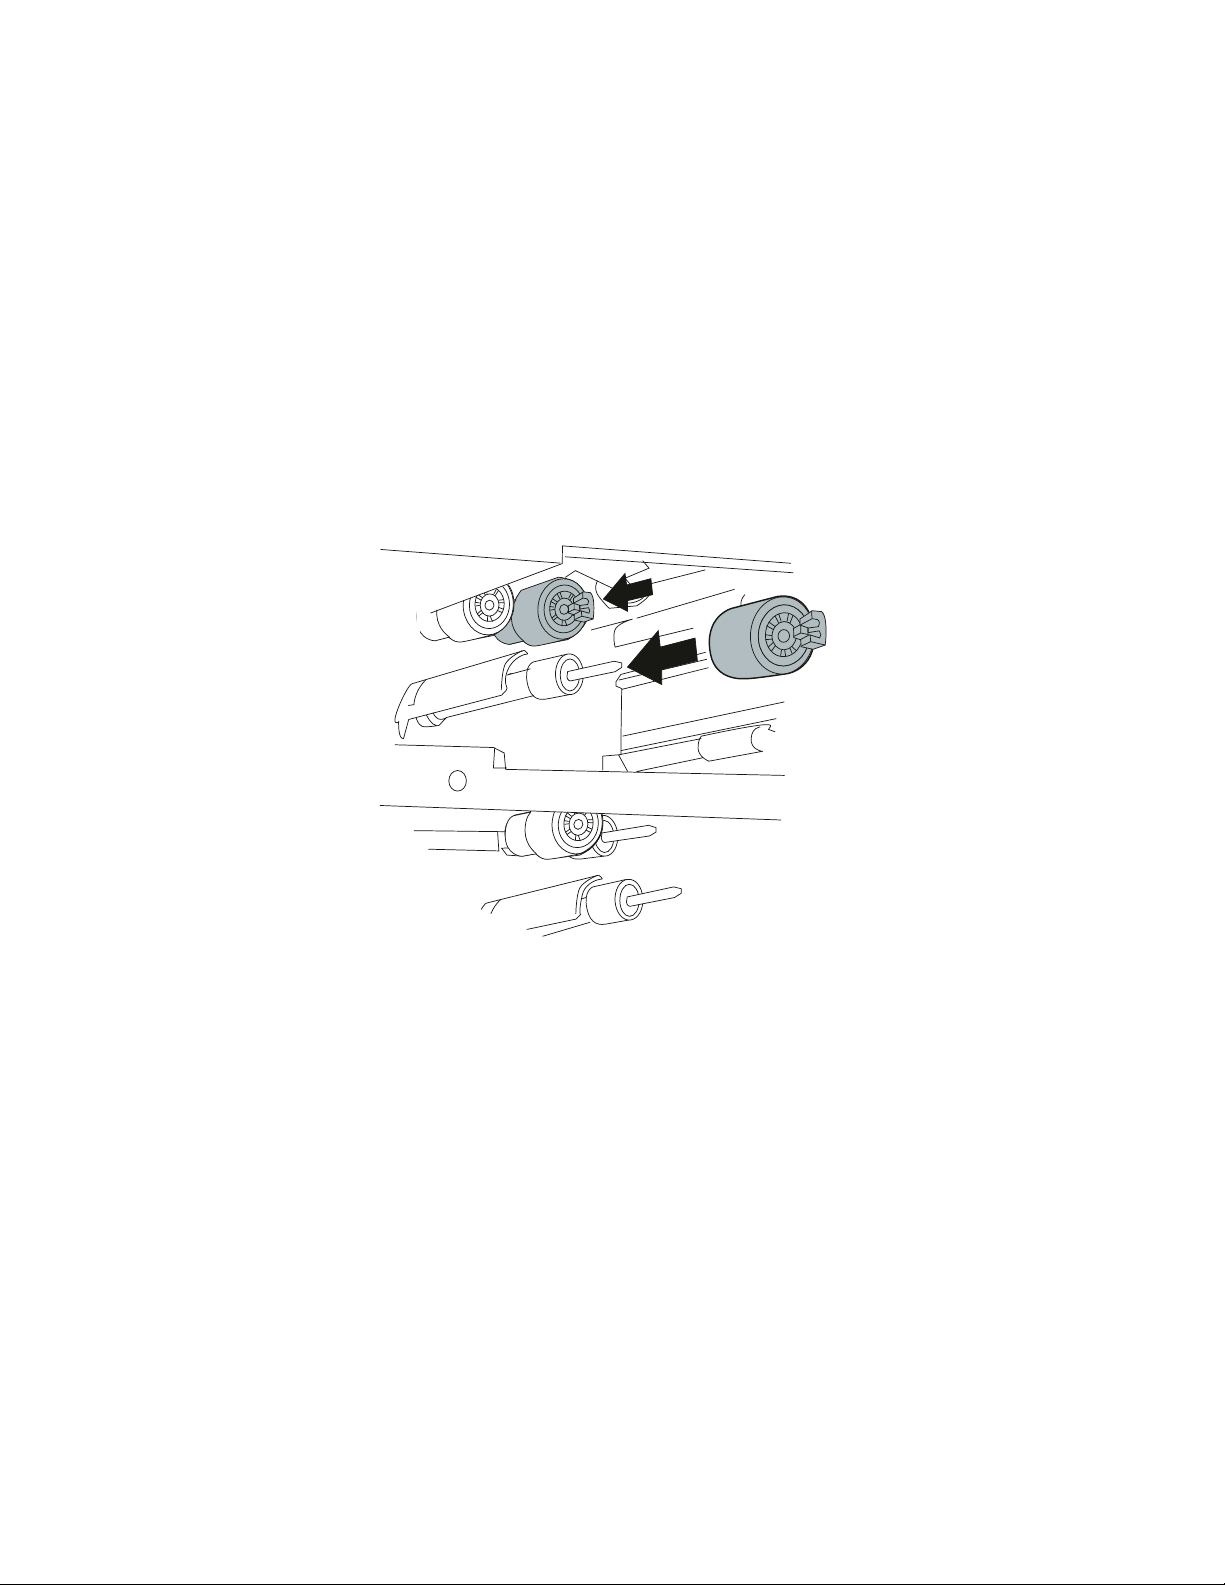
3 Locate the blue paper feed rollers.
Paper feed rollers
4 Remove the upper roller.
a
Use your right hand to press down lightly on the lower roller.
b
While pressing the lower roller, use your left hand to pinch the release tab of
the upper roller.
c
Slide the upper roller off the shaft.
24
Replacing the paper feed rollers in the optional input drawer
Page 29

5 Pinch the release tab on the end of the lower roller and slide the roller off the shaft.
6
Discard the two old rollers.
Installing the new rollers
1 Locate the plastic bag containing the two paper feed rollers that came in the main-
tenance kit.
2
Slide a new roller on the lower shaft until it clicks into place.
To verify that the roller is secured on the shaft, pull lightly on the tab.
Replacing the paper feed rollers in the optional input drawer
25
Page 30

3 Install the upper roller.
a
Use your right hand to press down lightly on the lower roller.
b
While pressing the lower roller, slide the upper roller on the upper shaft until it
clicks into place.
To verify that the roller is secured on the shaft, pull lightly on the tab.
4 Close the paper router.
26
Replacing the paper feed rollers in the optional input drawer
Page 31

Verifying installation
NOTE: To clear the
and to reset the internal counter that determines when it is necessary to
order another maintenance kit, you must follow the instructions in step 2
below after installing the fuser, transfer roll, and paper feed rollers.
Plug in the power cord(s).
1
Hold down the Return button and the bottom button to the right of the operator
2
panel, and turn the printer power on.
The messages
minute or two before the printer is ready.
80 Scheduled Maintenance
The
turn the printer off, and then turn it back on while holding down the two buttons as
described above.
Performing Self Test
Maintenance
message from the printer operator panel display,
Ready Return
Busy
and
message should not appear on the display. If it does,
appear on the display. It may take a
Print a test page to make sure the paper feeds properly through the printer.
3
a
From the printer operator panel, select
b
c
d
Select
Select
Select
MORE
.
TESTS MENU
Print Test Page
.
.
MENUS
.
Verifying installation
27
Page 32

e
Select
Single
.
Printing Test Page
appears on the display while the page prints.
If you experience a paper jam, you probably have a part that is not properly installed.
First, refer to the printer User’s Reference for instructions on how to clear the jam.
Then, check all of the maintenance kit parts to be sure they are properly installed. The
location of the jam may indicate which of the replacement parts is preventing proper
paper feeding.
NOTE: Before you check the installation of any replacement parts, make sure the
printer power is off and all power cords are unplugged.
Make sure the fuser is completely installed behind the lip of the supporting frame
•
and is locked into position.
Make sure the transfer roll is inserted in the clip and all three tabs of the paper guide
•
are snapped securely in position.
Make sure each paper feed roller is secured on its shaft.
•
28
Verifying installation
Page 33

Page 34

Printed in U.S.A.
8/96
P/N 11A9972
E.C. 539966
© Copyright Lexmark International, Inc. 1996. All rights reserved.
 Loading...