

Lexmark 5770 Photo Jetprinter, Photo Jetprinter 5770 User Manual
Lexmark Photo
Jetprinter 5770
User Guide

First Edition (July 1998)
The following paragraph does not apply to any country wher e such pro visions are inconsistent with
local law: LEXMARK INTERNATIONAL, INC. PROVIDES THIS PUBLICATION “AS IS”
WITHOUT WARRANTY OF ANY KIND, EITHER EXPRESS OR IMPLIED, INCLUDING, BUT
NOT LIMITED TO, THE IMPLIED WARRANTIES OF MERCHANTABILITY OR FITNESS FOR A
PARTICULAR PURPOSE. Some states do not allow disclaimer of express or implied warranties in
certain transactions, therefore, this statement may not apply to you.
This publication could include technical inaccuracies or typographical errors. Changes are periodically
made to the information herein; these changes will be incorporated in later editions. Improvements or
changes in the products or the programs described may be made at any time.
A form for reader’s comments is provided at the back of this publication. If the form has been removed,
comments may be addressed to Lexmark International, Inc., Department F95/035-3, 740 New Circle
Road N.W., Lexington, Kentucky 40550, U.S.A. In the United Kingdom and Eire, send to Lexmark
International Ltd., Marketing and Services Department, Westhorpe House, Westhorpe, Marlow Bucks
SL7 3RQ. Lexmark may use or distribute any of the information you supply in any way it believes
appropriate without incurring any obligation to you. You can purchase additional copies of publications
related to this product by calling 1-800-553-9727. In the United Kingdom and Eire, call 0628-481500. In
other countries, contact your point of purchase.
Lexmark, and Lexmark with diamond design are trademarks of Lexmark International, Inc., re gistered in
the United States and/or other countries.
Color Jetprinter is a trademark of Lexmark International, Inc.
Photo Jetprinter is a trademark of Lexmark International, Inc.
Windows is a registered trademark of Microsoft in the U.S. and other countries.
®
PCL
is a registered trademark of the Hewlett-Packard Company. PCL 3 is Hewlett-Packard Company's
designation of a set of printer commands (language) and functions included in its printer products. This
printer is intended by Lexmark International, Inc. to be compatible with the PCL 3 language. This means
that the printer recognizes PCL 3 commands used in various application programs, and that the printer
emulates the functions corresponding to the commands.
Other trademarks are the property of their respective owners.
© Copyright Lexmark International, Inc. 1998.
All rights reserved.
UNITED STATES GOVERNMENT RESTRICTED RIGHTS
This software and documentation are provided with RESTRICTED RIGHTS. Use, duplication or
disclosure by the Government is subject to restrictions as set forth in subparagraph (c)(1)(ii) of the Rights
in Technical Data and Computer Software clause at DFARS 252.227-7013 and in applicable FAR
provisions: Lexmark International, Inc., Lexington, KY 40550.

Contents
Chapter 1 -
Printer features and specifications . . . . . . . . . . . . . . . . . . . . 2
System requirements . . . . . . . . . . . . . . . . . . . . . . . . . . . . . . 4
Using the printer's light and button . . . . . . . . . . . . . . . . . . . 5
Chapter 2 -
Opening the Control Program . . . . . . . . . . . . . . . . . . . . . . . 8
Opening the Printer Driver . . . . . . . . . . . . . . . . . . . . . . . . . . 8
Chapter 3 -
Recommended paper types . . . . . . . . . . . . . . . . . . . . . . . . . . 9
Loading the automatic feeder . . . . . . . . . . . . . . . . . . . . . . . 14
Loading the manual feeder . . . . . . . . . . . . . . . . . . . . . . . . . 18
Introducing your printer . . . . . . . . 1
Contents
Using the printer software . . . . . . 7
Loading paper and other media . . 9
Chapter 4 -
Preserving print cartridges . . . . . . . . . . . . . . . . . . . . . . . . . 21
Installing or replacing print cartridges . . . . . . . . . . . . . . . . 22
Disposing of used cartridges . . . . . . . . . . . . . . . . . . . . . . . 26
Aligning the print cartridges . . . . . . . . . . . . . . . . . . . . . . . 27
Caring for your print cartridges . 21
Contents
iii

Cleaning the print nozzles . . . . . . . . . . . . . . . . . . . . . . . . . 29
Wiping the print nozzles and contacts . . . . . . . . . . . . . . . . 30
Cleaning print cartridge carrier contacts . . . . . . . . . . . . . . 32
Chapter 5 -
Changing print settings for DOS applications . . . . . . . . . . 35
Printing from DOS applications . . . . . . . . . . . . . . . . . . . . . 36
Chapter 6 -
Bidirectional communications problems . . . . . . . . . . . . . . 44
Printhead failure . . . . . . . . . . . . . . . . . . . . . . . . . . . . . . . . . 47
Deleting photo files . . . . . . . . . . . . . . . . . . . . . . . . . . . . . . 49
Error messages on your computer . . . . . . . . . . . . . . . . . . . 50
Error messages on the printer operator panel . . . . . . . . . . . 51
General printing problems . . . . . . . . . . . . . . . . . . . . . . . . . 52
Paper feed problems . . . . . . . . . . . . . . . . . . . . . . . . . . . . . . 57
Poor print quality . . . . . . . . . . . . . . . . . . . . . . . . . . . . . . . . 59
Printing from DOS . . . . . . . . . . . . 35
Troubleshooting . . . . . . . . . . . . . . 43
Contents
Printer software problems . . . . . . . . . . . . . . . . . . . . . . . . . 63
Removing the exit tray . . . . . . . . . . . . . . . . . . . . . . . . . . . . 64
Chapter 7 -
Print cartridges . . . . . . . . . . . . . . . . . . . . . . . . . . . . . . . . . . 65
Parallel cable . . . . . . . . . . . . . . . . . . . . . . . . . . . . . . . . . . . 65
Photo paper . . . . . . . . . . . . . . . . . . . . . . . . . . . . . . . . . . . . . 66
Coated paper . . . . . . . . . . . . . . . . . . . . . . . . . . . . . . . . . . . . 66
Glossy film . . . . . . . . . . . . . . . . . . . . . . . . . . . . . . . . . . . . . 67
Transparencies . . . . . . . . . . . . . . . . . . . . . . . . . . . . . . . . . . 67
Greeting cards with envelopes . . . . . . . . . . . . . . . . . . . . . . 68
Labels . . . . . . . . . . . . . . . . . . . . . . . . . . . . . . . . . . . . . . . . . 68
Ordering Supplies . . . . . . . . . . . . 65
iv
Contents

Iron-on transfers for T-shirts . . . . . . . . . . . . . . . . . . . . . . . 69
Appendix A Appendix B -
Notices. . . . . . . . . . . . . . . . . . . . .71
Statement of Limited Warranty .79
Contents
Contents
v

Contents
vi
Contents

Introducing
your printer
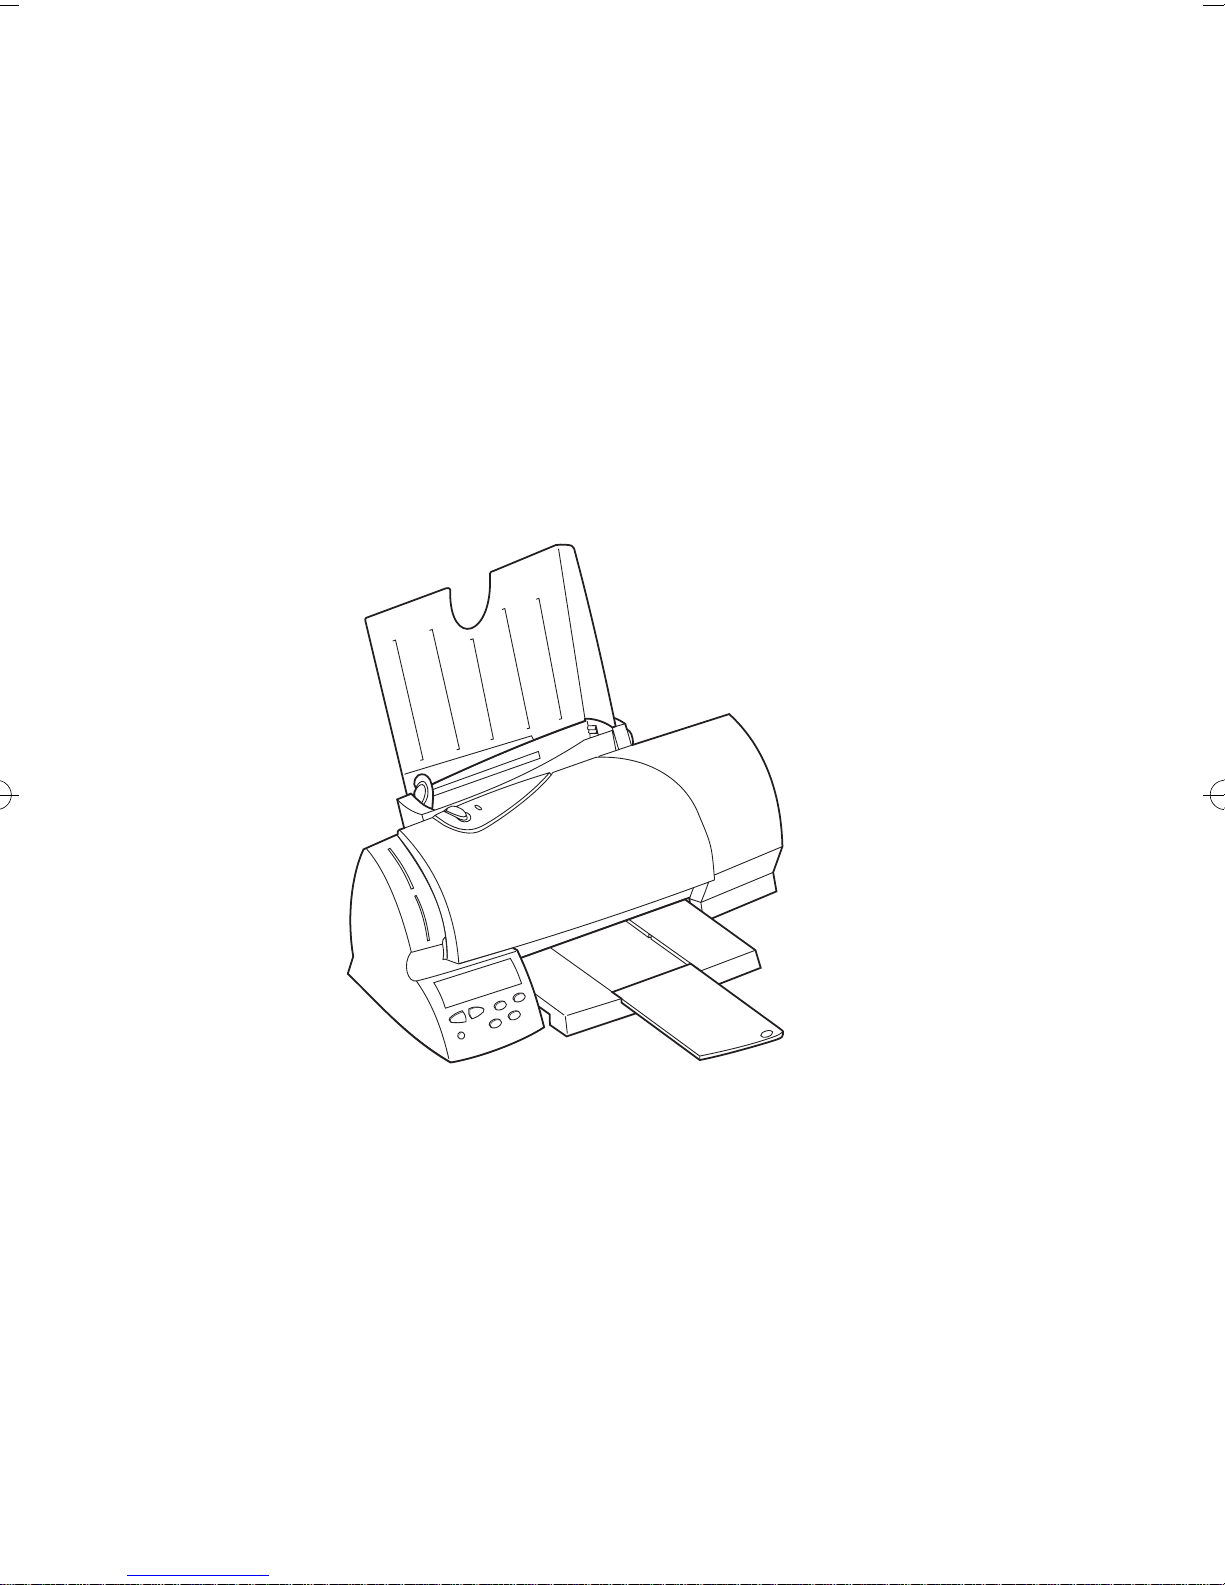
Your printer is a general purpose color inkjet printer that
provides high quality text and photos. You can use your
printer all by itself to print photos, or connect to your
computer when you want to print on single sheet paper,
envelopes, labels, index cards, coated paper, glossy film,
photo paper, transparencies, greeting cards, and iron-on
transfers.
Chapter One
Introducing your printer
This User’s Guide describes how to use your printer with
a computer. For information about using your printer all
by itself, refer to the Getting Started booklet that tells
you how to use your printer without a computer.
Introducing your printer
1
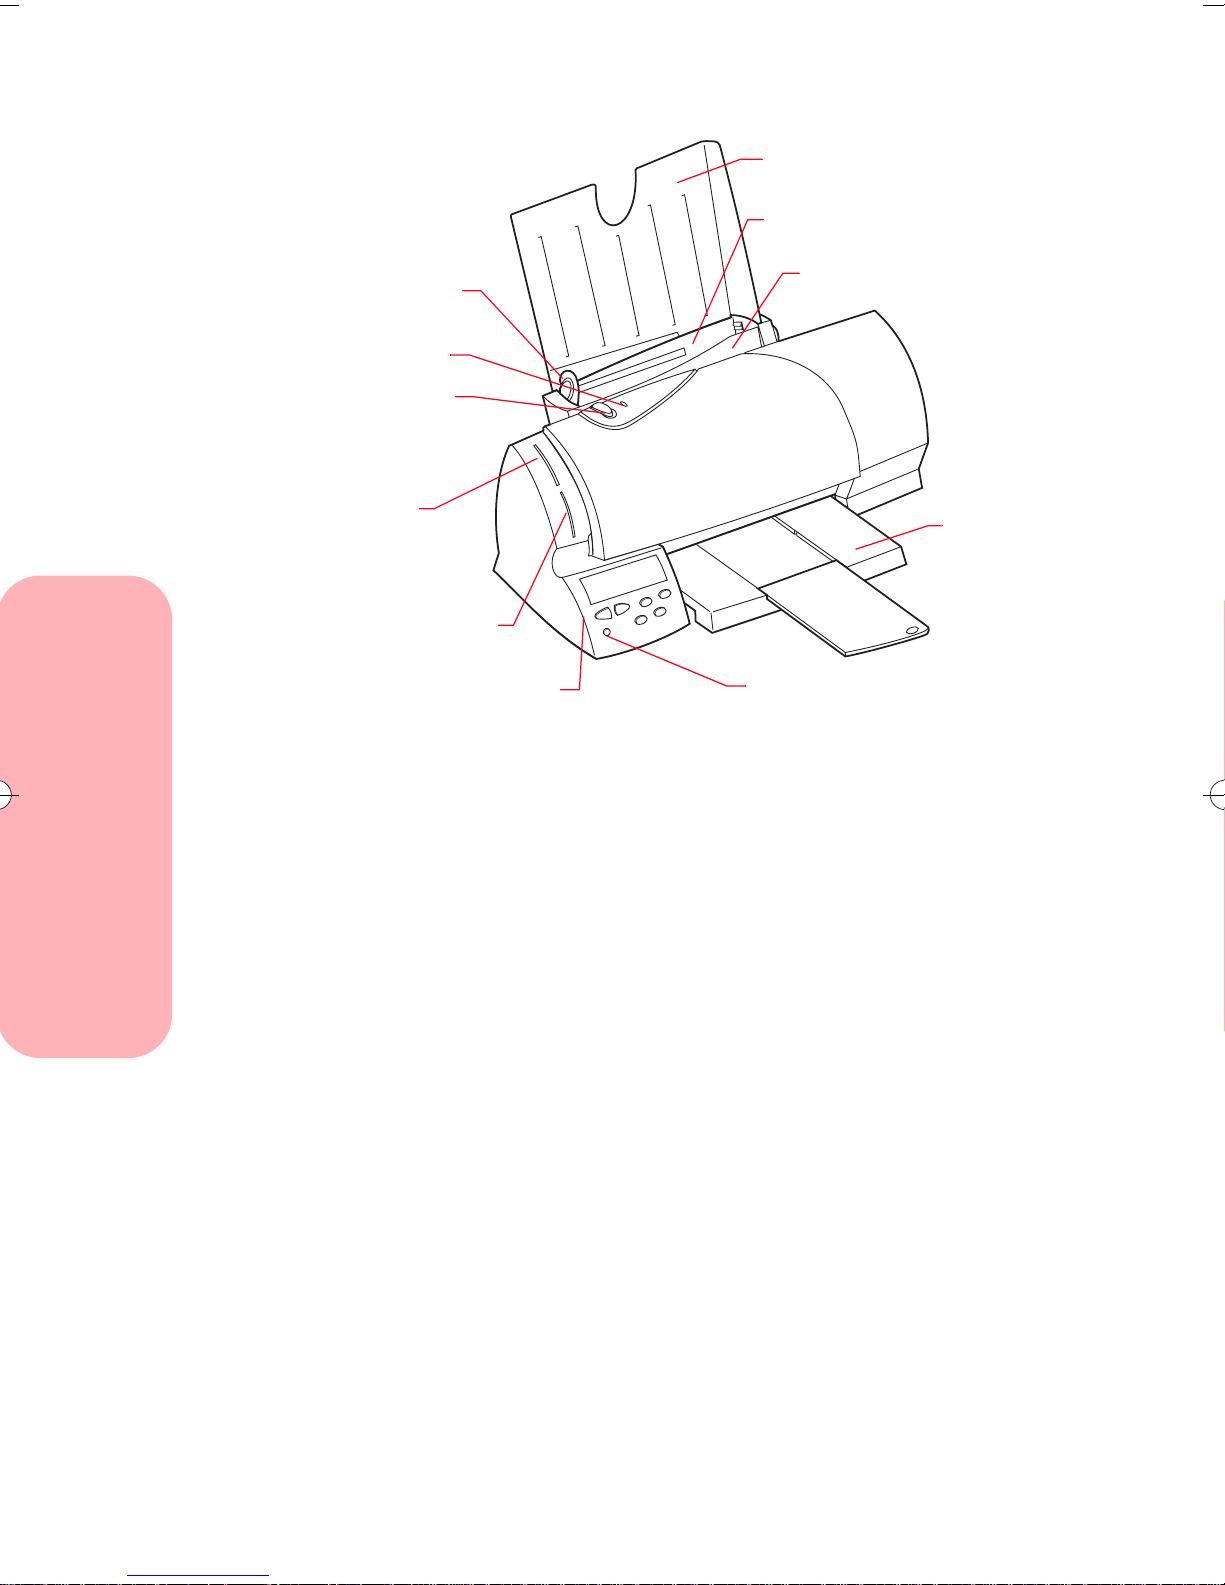
This illustration shows the parts of the printer.
Paper support
Automatic feeder
Left paper
guide
Paper status light
Paper feed button
Top camera
card slot
Bottom camera
card slot
Operator Panel
Busy light
Printer features and
Manual feeder
Paper
exit tray
specifications
Introducing your printer
Your printer features:
• Multiple print quality options that include High
Quality, Quality, and Normal.
• Direct digital input function which allows you to
download directly from the camera cards into the
printer.
• Camera card support for most digital cameras.
• Index printing of thumbnail images.
• Zip drive compatibility for storage support.
2
Introducing your printer

• Superior editing and formatting options.
You can edit your photos to produce panoramic or
cropped prints. You can also print your photos in
multiple photos per page formats.
• On-screen or verbal feedback of printer status.
• Low cost, near laser-quality print.
• Quiet operation.
• Portrait and landscape orientation.
• Low-ink messages when the print cartridge is low
on ink and connected to a computer.
• Superior paper handling in the industry for this
class of printer.
Your printer also supports index cards, labels,
envelopes, transparencies, plain paper, coated
paper, and hagaki.
• Support for these new paper types: iron-on
transfers, greeting cards, and glossy film or photo
paper.
Introducing your printer
• Automatic envelope feeding.
Introducing your printer
3

Printer dimensions
Height: 5.0 in. (152 mm)
Width: 17.0 in. (432 mm)
Depth: 8.0 in. (203 mm)
Weight: 9.0 lbs. (4.1 kg)
Temperature and humidity
Print quality can vary depending on air temperature and
relative humidity.
• Operating temperature range: 10° to 40°C
(50° to 104°F)
• Optimum print temperature range: 16° to 32°C
(60° to 90°F)
• Operating humidity range: 8% to 80% RH
(non-condensing)
System requirements
Introducing your printer
• Optimum humidity range: 20% to 60% RH
If you are using your printer with a computer, make sure
you:
• Are running Windows 95 or Windows 98.
• Have a 486 PC system or higher.
• Have at least 8 MB RAM.
• Have at least 20 MB free disk space.
4
Introducing your printer
Using the printer's light and
button
Your printer has two sets of lights and buttons:
• One set is located at the bottom left-hand corner of
the printer, on the operator panel. For more
information on the operator panel light and
buttons, refer to the Getting Started booklet that
tells you how to set up and use your printer
without a computer.
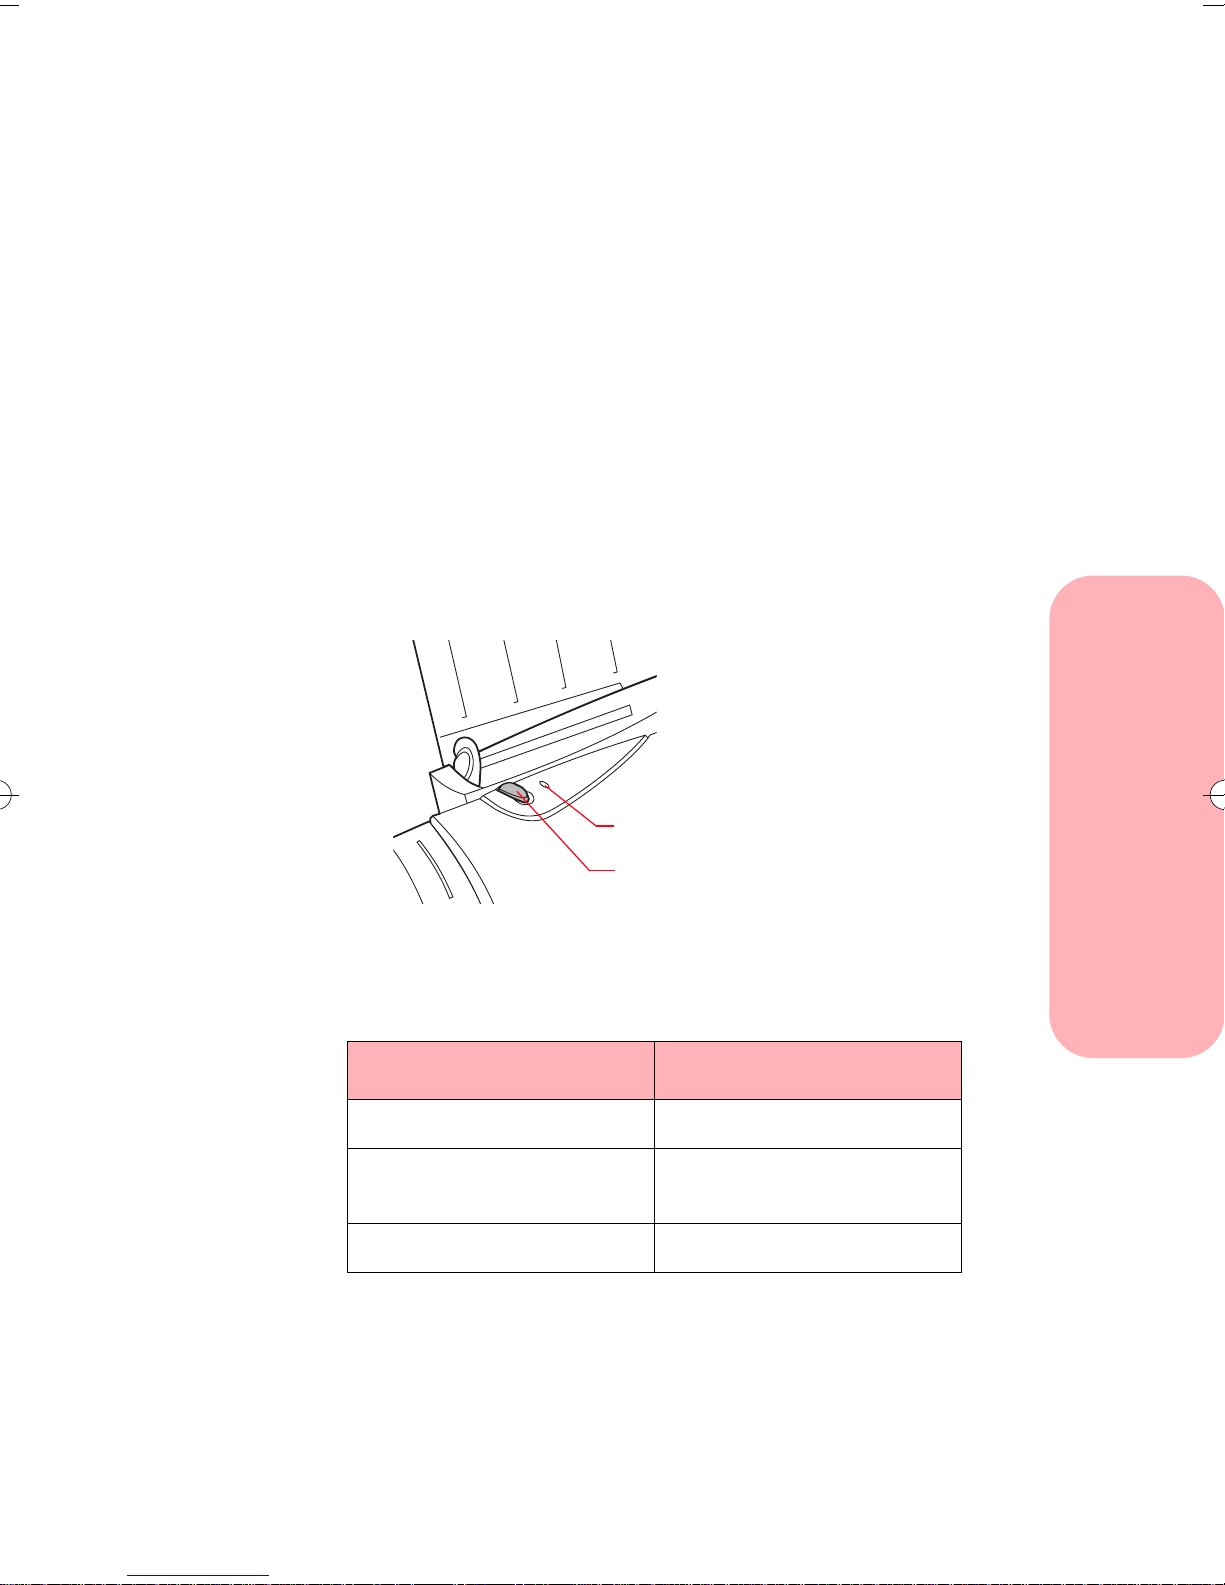
• The other set is located at the top of your printer
and includes the Paper Status light and the Paper
Feed button.
Introducing your printer
Paper Status light
If the light is: Then the printer is:
Off Ready to print
On solid Printing or feeding media
Blinking Out of paper or has an error
Paper Status light
Paper Feed button
through the printer
Introducing your printer
5

Paper Feed button
Use the Paper Feed button to feed paper into the printer
when you run out of paper during a print job and the
Paper Status light blinks.
If you run out of paper during a print job:
1 Load paper.
Press the Paper Feed button.
2
Introducing your printer
Note:
You do not need to press the Paper Feed button in
order to get the printer to load the paper under
normal conditions.
6
Introducing your printer
Using the
printer software
Chapter Two
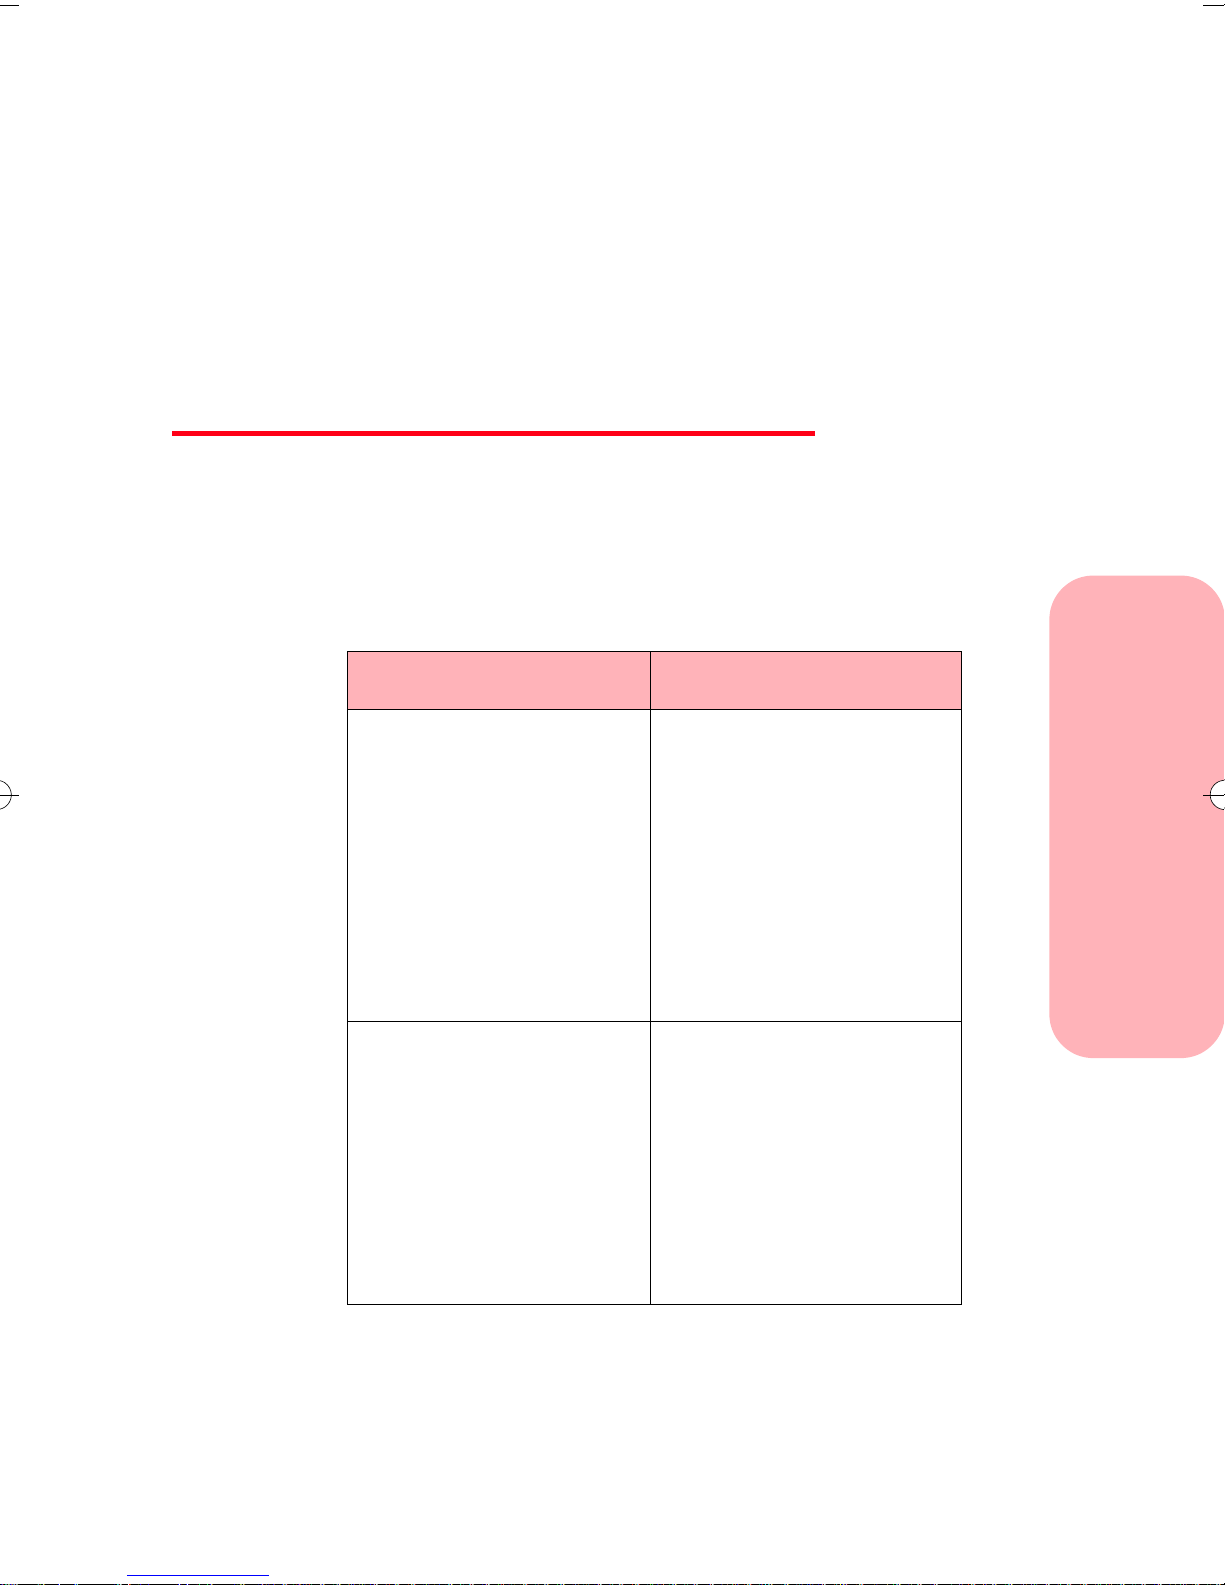
When you installed the software for your printer, several
small applications were installed on your computer. The
following table describes these applications:
Use this software: When you want to:
Control Program • install or replace print
cartridges
• align print cartridges
• monitor print jobs and
print cartridge ink levels
• print a test page
• change DOS settings
• control when and how
the Control Program
appears
Using the printer software
Printer Driver • change printer
properties
• choose the paper source
• choose page orientation
• choose different sizes
and types of media
• adjust the quality of
print jobs
• reset printer defaults
Using the printer software
7

Opening the Control Program
From the Start menu, click Programs.
1
Click the Lexmark 5700 Series program group.
2
3 Click Lexmark 5700 Ctrl Prog on LPTx.
Opening the Printer Driver
You can open the printer driver from almost any
application. To open the printer driver:
Open the application's File menu.
1
Choose Print (or Printer) Setup.
2
3 In the Printer Setup dialog box, click the
Properties, Options, or Setup b utton (depending on
the application).
Using the printer software
8
Using the printer software

Loading paper
and other media
Chapter Three
Your printer prints on photo paper, coated paper,
envelopes, index cards, labels, transparencies, paper,
iron-on transfers, glossy film, and greeting cards. This
section includes general guidelines for purchasing and
loading print materials.
Recommended paper types
Loading paper and other media
This section describes photo paper, coated paper,
transparency, paper, envelope, index card, label, greeting
card, and iron-on transfer types and sizes you can use
with your printer.
Note:
• Use the Photo print cartridge shipped with your
printer to print on photo paper and glossy film.
• Use a Black print cartridge to print on all other
paper types. (To purchase a Black print cartridge
from Lexmark, use part number 12A1970.)
Loading paper and other media
9
Photo paper types and sizes
For best photo print results using Color and Photo print
cartridges, use photo paper designed for an inkjet printer,
such as the following:
Type Size Part number
Photo paper
*
Letter (20-pack)
A4 (20-pack)
4x6 cards (20-pack)
1372481
1372208
12A0074
* You can purchase other excellent photo papers in both
snapshot sizes (4x6, A6, Hagaki) and letter sizes. Since
the quality of photo paper varies widely, you should test
the print quality before buying large quantities of paper.
Do not use photo paper designed for copiers, laser
printers, or pen plotters.
For best results:
• Handle only on the edges. Do not touch the side
being printed on.
• Store unused paper in the original packaging.
• Do not store in excessively hot or humid areas.
• Feed photo paper one sheet at a time.
• Be careful not to touch the printed surface until the
ink is dry.
Loading paper and other media
• If you are printing several sheets, remove each
sheet as it exits the printer and allow it to dry
before stacking.
• Cover the printed area with plain paper when
storing.
10
Loading paper and other media

Coated paper types and sizes
Coated paper gives excellent photo printing results at
lower costs compared to the heavier photo papers. Use a
coated paper designed for inkjet printers, such as
Lexmark's High Resolution Premium Inkjet paper. To
order this paper from Lexmark, use Lexmark part number
1402780 (letter size) or 1402781 (A4 size).
Plain paper
You can get good print quality on many types of plain
paper. Since the quality of plain paper varies widely, you
should test the print quality before buying large
quantities of paper.
You can use letter, legal, A4, A5, A6, B5, executive, and
index card size paper with your printer.
Use paper that meets the following specifications:
Loading paper and other media
• Automatic feeder:
Length
Width
Weight
Thickness
127 to 432 mm 5.0 to 17.0 in.
76 to 216 mm 3.0 to 8.5 in.
60 to 90 g/sqm 16 to 24 lb.
0.071 to 0.18 mm 0.0028 to 0.007 in.
• Manual feeder:
Length
Width
Weight
Thickness
127 to 432 mm 5.0 to 17.0 in.
76 to 228 mm 3.0 to 9.0 in.
60 to 120 g/sqm 16 to 32 lb.
0.071 to 0.18 mm 0.0028 to 0.007 in.
Loading paper and other media
11
Envelope types and sizes
The printer supports the following envelope sizes and
card types:
Envelope Sizes Card Types
• 6 3/4
• 7 3/4
• #9
• #10
• DL
• C5
• C6
• B5
• Baronial
Do not use envelopes that have:
• Windows, holes, perforations, cutouts, or deep
embossing
• A metal clasp, a string tie, or metal folding bars
• Peel-off sealing strips
• Contents enclosed
Transparency types and sizes
The printer supports letter and A4-size transparencies.
Use transparencies designed for an inkjet printer, such as
the following:
• Postcard
• Index card
Type Size Part number
Transparency Letter (20-pack)
Loading paper and other media
Do not use transparencies designed for copiers, laser
printers, or pen plotters.
For best results:
• Handle only on the edges. Do not touch the side
being printed on.
• Store unused paper in the original packaging.
• Do not store in excessively hot or humid areas.
• Feed transparencies one sheet at a time.
12
Loading paper and other media
A4 (20-pack)
1402797
1402798

• Be careful not to touch the printed surface until the
ink is dry.
• If you are printing several sheets, remove each
sheet as it exits the printer and allow it to dry
before stacking.
• Cover the printed area with plain paper when
storing.
Label types and sizes
The printer supports letter and A4 size label sheets. You
can use the automatic feeder or manual feeder to print
labels.
Label size Number of
labels per
sheet
1 x 2 5/8 in. 30 Letter 70X7250
2 x 4 in. 10 Letter 70X7251
63.5 x 38.1 mm 21 A4 70X7252
99.1 x 67.7 mm 8 A4 70X7253
Sheet
size
Part
number
For best results, labels used in the printer should meet the
following requirements:
• Do not use label sheets with a slick backing
material.
• Be sure the adhesive does not come in contact with
any part of the printer.
• Use full label sheets. Partially used sheets (with
areas exposed by missing labels) can cause labels
to peel off during printing and can damage the
printer.
Loading paper and other media
Loading paper and other media
13
Greeting card types and sizes
Use Lexmark Inkjet Greeting Cards, part number
1372482 (letter) or 70X7254 (A4). Each greeting card
comes with an envelope.
Iron-on transfer types and sizes
To create colorful, custom-designed T-shirts, use
Lexmark Iron-On Transfers, part number 1372480
(letter) or 1402519 (A4).
Loading the automatic feeder
Automatic f eeder
Depending on the thickness of the media, the printer can
hold approximately:
Loading paper and other media
• 100 sheets of paper
• 25 transparencies, glossy film, or photo paper
• 10 envelopes, thick paper, or card stock
Paper, transparencies, glossy film, and
labels
To load paper, transparencies, glossy film, photo paper,
or labels in the automatic feeder:
14
Loading paper and other media
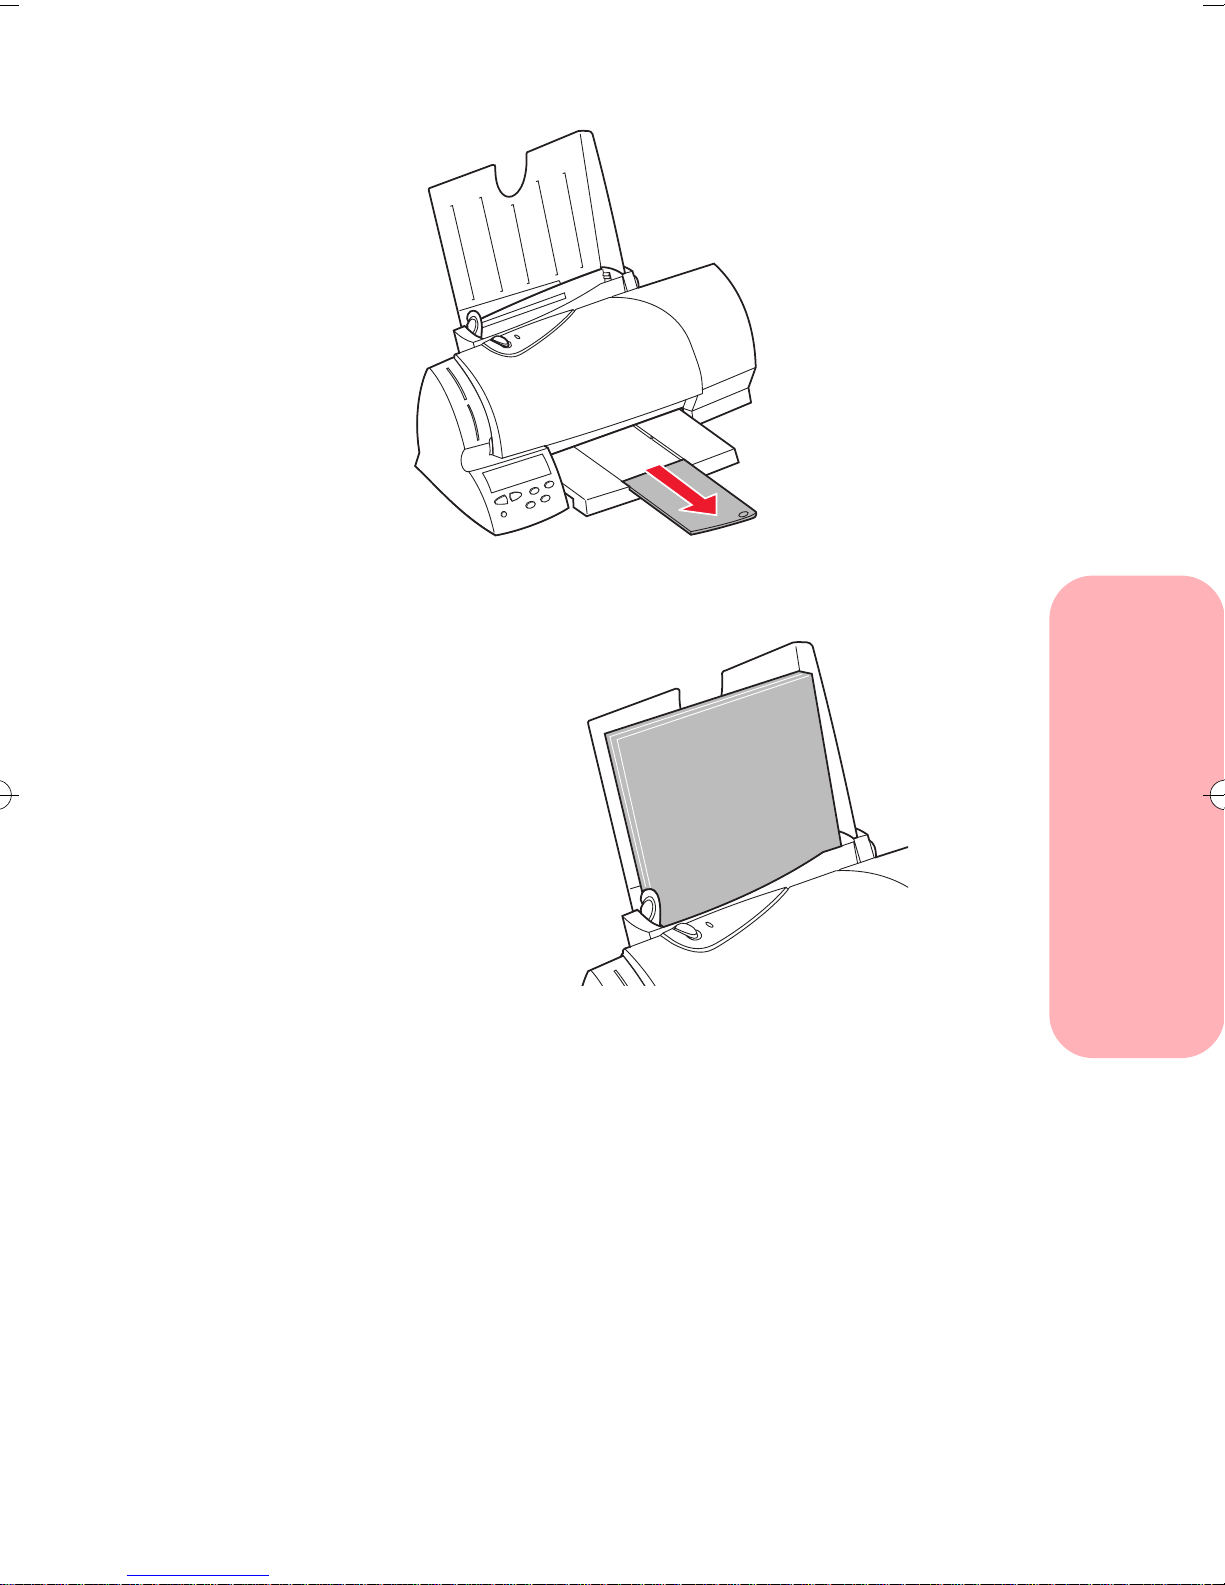
Extend the paper exit tray.
1
2 Place the paper or other media against the right
side of the automatic feeder.
Loading paper and other media
• If the media has a preferred print side, insert
with the print side facing you.
• Insert letterhead with the top of the page
pointing down.
• Insert transparencies with a removable
stripe so the stripe is away from you and
pointing down.
Note:
You do not need to push paper into the
printer or press the Paper Feed button for
the printer to load paper!
Loading paper and other media
15
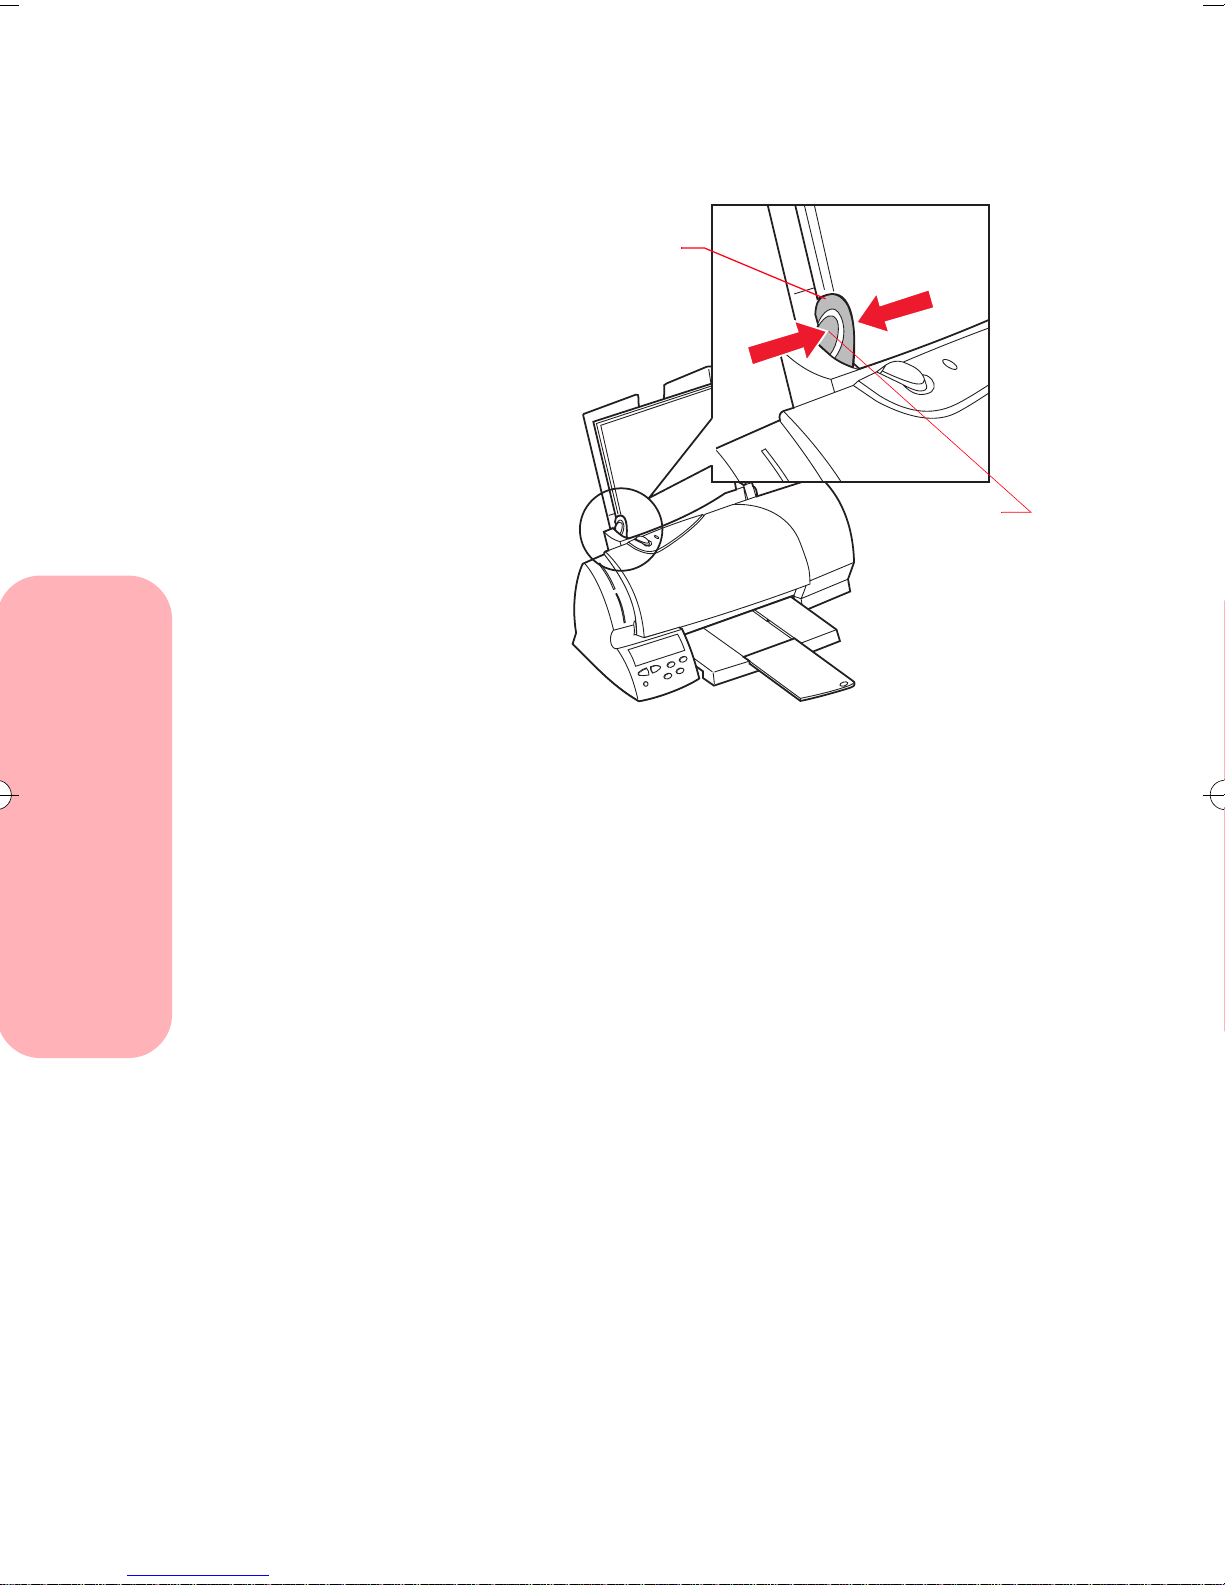
Squeeze the release tab and the left paper guide
3
together, and slide the left paper guide to the edge
of the paper.
Paper Guide
ReleaseTab
You are now ready to print.
Loading envelopes or other print media
To load envelopes, thick paper, or other card stock in the
automatic feeder:
1 Remove any paper from the automatic feeder.
Loading paper and other media
2 Place the envelopes or other card stock against the
right edge of the automatic feeder.
• Always place the preferred print side facing
you.
• Insert env elopes so that the stamp location is
in the lower right-hand corner.
16
Loading paper and other media

• Insert index cards or postcards vertically so
the shortest side feeds into th printer first.
Squeeze the release tab and the paper guide
3
together, and slide the paper guide to the right until
it rests against the envelopes or card stock.
Loading paper and other media
Paper guide
Release
tab
4 Before you send a job to print, choose the
appropriate paper size and paper type in the
Lexmark printer software.
Loading paper and other media
17
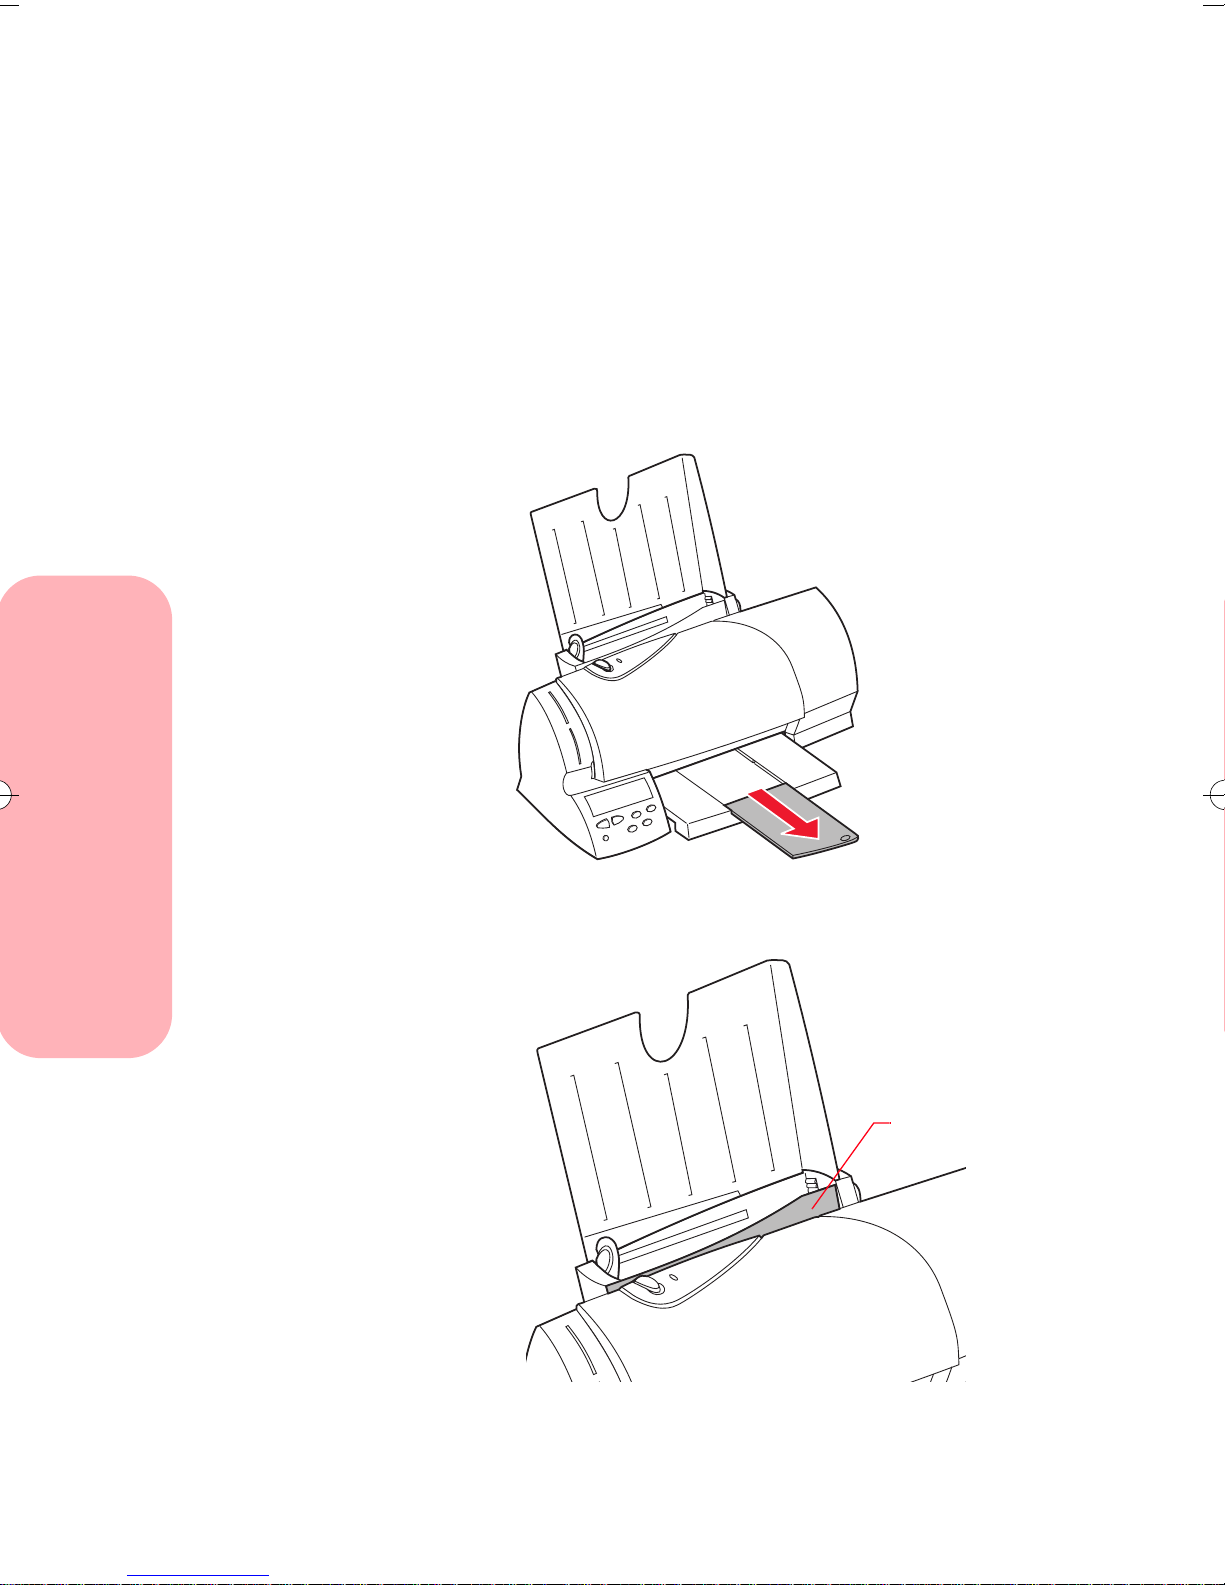
Loading the manual feeder
You can print from the manual feeder without removing
paper or envelopes from the automatic feeder. The
manual feeder allows you to print one sheet of print
media at a time.
Loading paper or other print media
1 Extend the paper exit tray.
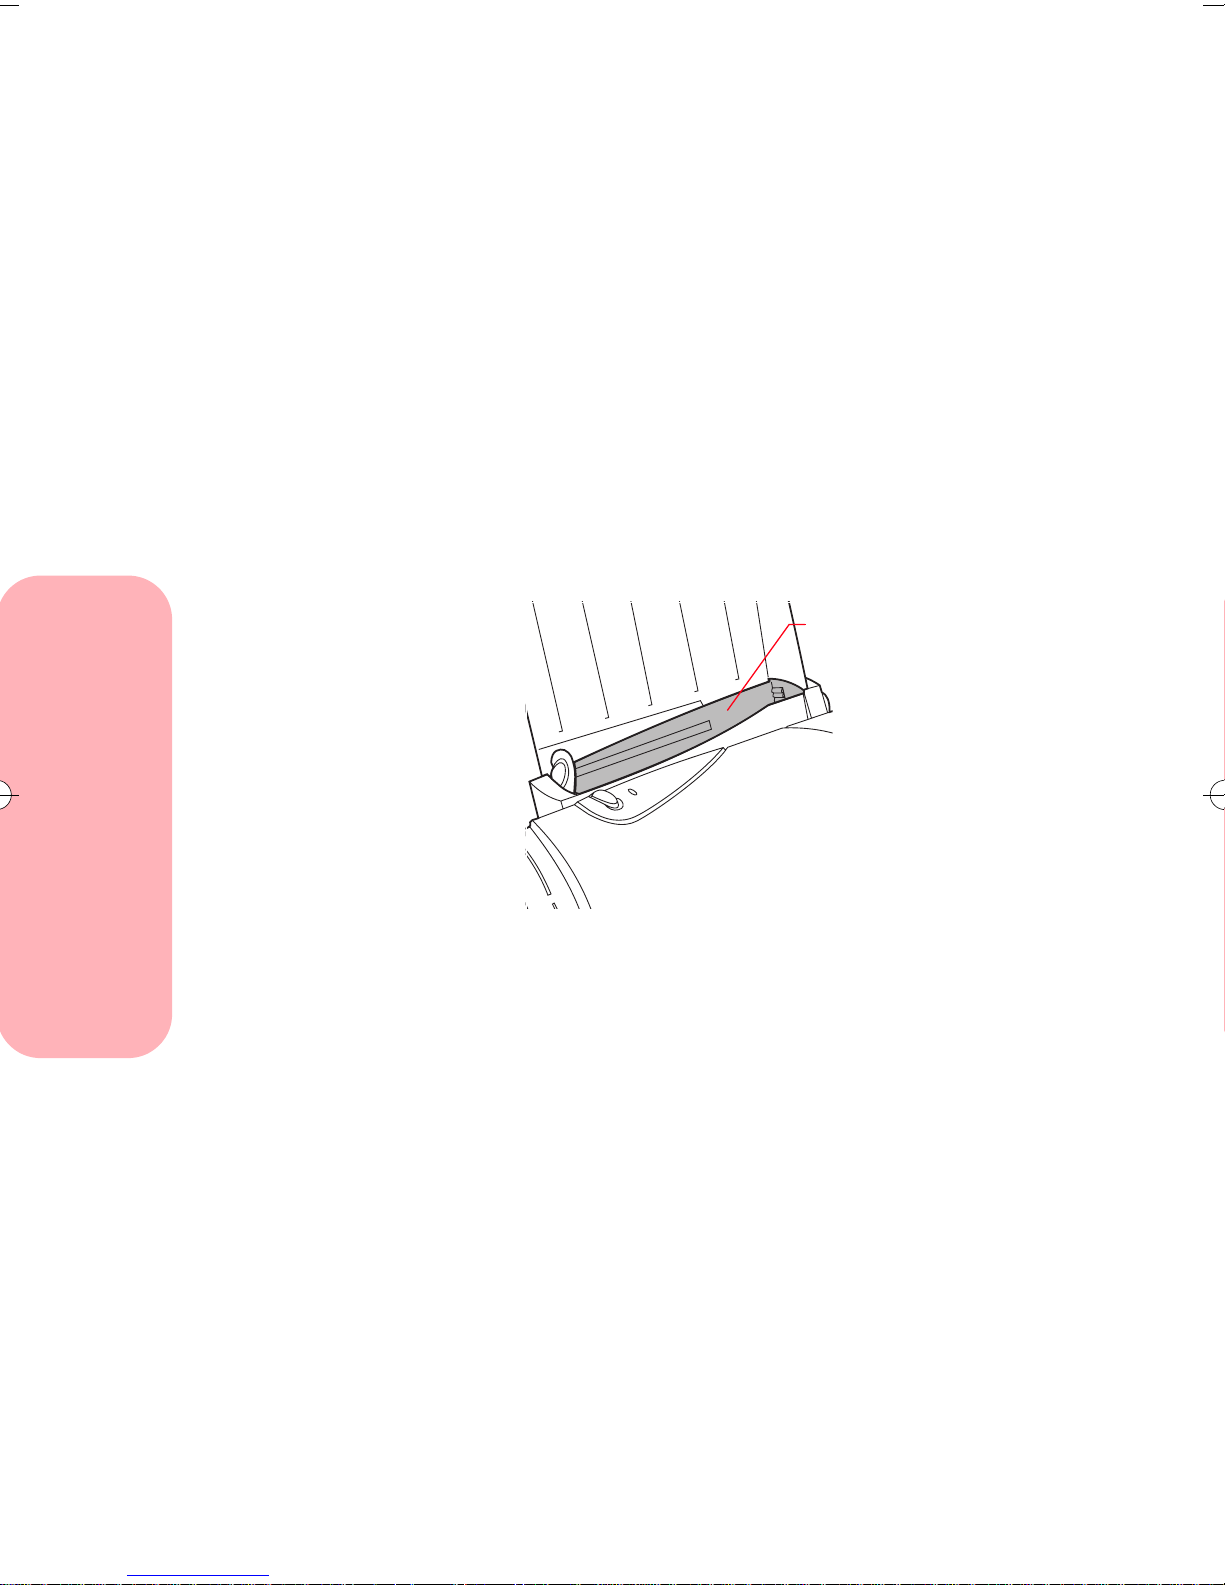
Locate the manual feeder.
2
Loading paper and other media
18
Loading paper and other media
Manual feeder
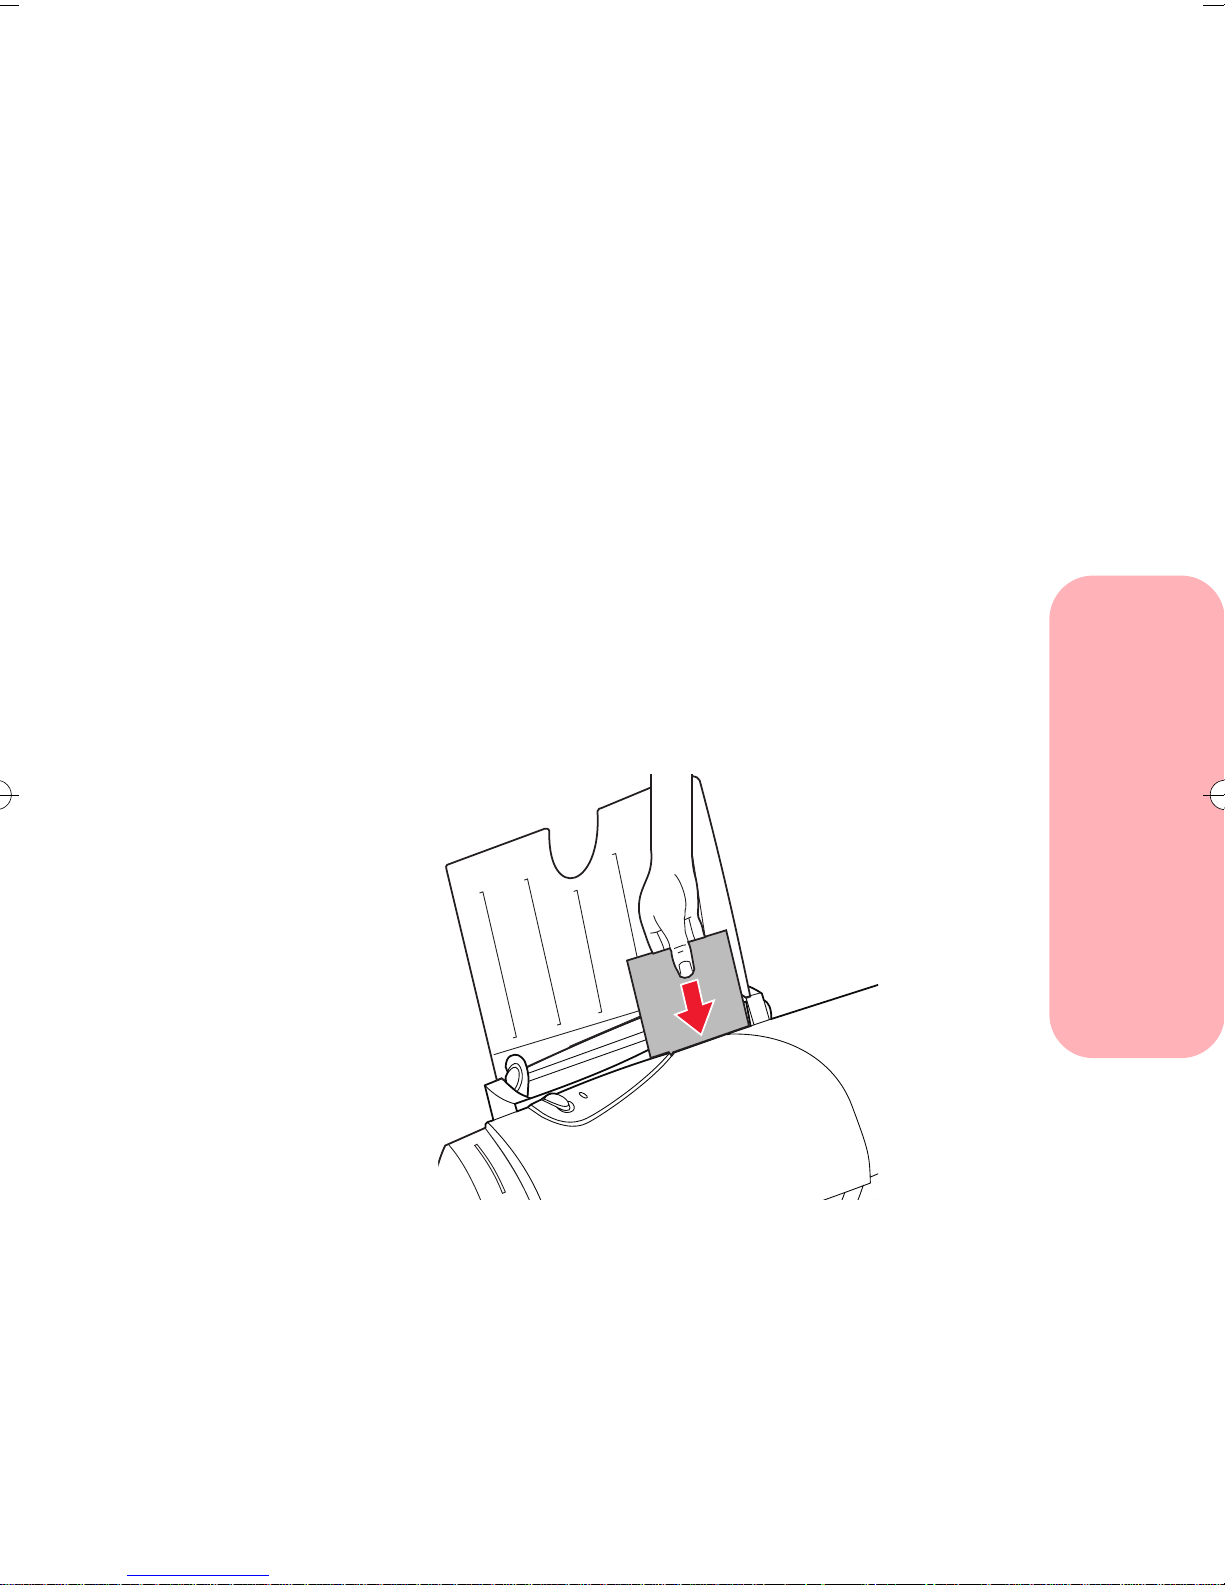
Place one piece of paper or specialty media against
3
the right edge of the manual feeder.
• Always place the preferred print side facing
you.
• Insert paper or other media against the right
edge of the manual feeder.
• Insert an envelope so that the return address
is in the upper right-hand corner.
• Insert an index card or postcard vertically so
the shortest side is fed into the printer first.
• Insert transparencies with a removable
stripe so the stripe is away from you and
pointing down.
• Remove each transparency or glossy film
from the paper exit area before the next one
is printed to avoid smearing
Push the media downward until the printer
4
automatically loads it.
Loading paper and other media
5 Before you send a job to print, choose the
appropriate paper size and paper type in the
Lexmark printer software.
Loading paper and other media
19

Loading paper and other media
20
Loading paper and other media

Caring for your
print cartridges
Chapter Four
This chapter describes print cartridge maintenance
procedures to help you get the best performance from
your print cartridge and your printer.
Preserving print cartridges
To ensure the longest life from your print cartridge and
optimum performance from your printer:
Caring for your print cartridges
• Keep a print cartridge in its packaging until you
are ready to install it.
• Do not remove a print cartridge from the printer
except to replace, clean, or store it in a print
cartridge storage unit. The print cartridge will not
print correctly if removed from the printer and left
exposed for an extended period of time.
• If a print cartridge runs out of ink, leave the empty
cartridge in the printer until you are ready to
replace it. Printing with one of the print cartridge
carriers empty may cause printer problems.
• Do not refill print cartridges. Refilling empty print
cartridges invalidates your warranty. Incompatible
inks can cause damage to the printhead or to the
printer . For best results, use Lexmark supplies with
the printer.
Caring for your print cartridges
21

Installing or replacing print
cartridges
The following procedures are for installing or replacing a
print cartridge when your printer is connected to a
computer. If you are using your printer without a
computer, you can install or replace print cartridges
through the operator panel. For help, see the Getting
Started booklet that tells you how to use your printer
without a computer.
Perform the entire print cartridge replacement procedure
without interruption.
If you are interrupted and leave the print cartridge carrier
in the load position for more than three minutes, the
carrier returns to the far right position. The Cartridges
Tab remains displayed on your screen.
• If you have not inserted the new cartridge, click
Cancel and begin the installation process again.
• If you have inserted the new cartridge, click New
Cartridge Installed.
Removing a print cartridge
If you need to remove a print cartridge before you install
a different one, follow these steps:
Caring for your print cartridges
Open the printer front cover.
1
2 From the printer’s Control Program, click the
Cartridges Tab.
For help opening the Control Program, see
“Opening the Control Program” on page 8.
Click Install Color Cartridge, Install Black
3
Cartridge, or Install Photo Cartridge.
22
Caring for your print cartridges
The print cartridge carrier moves to the load
position and the Change Cartridge dialog box
appears on your computer screen.
If you are installing a Photo or Black cartridge, a
Change Cartridge screen appears. Choose the type
of cartridge you are installing.
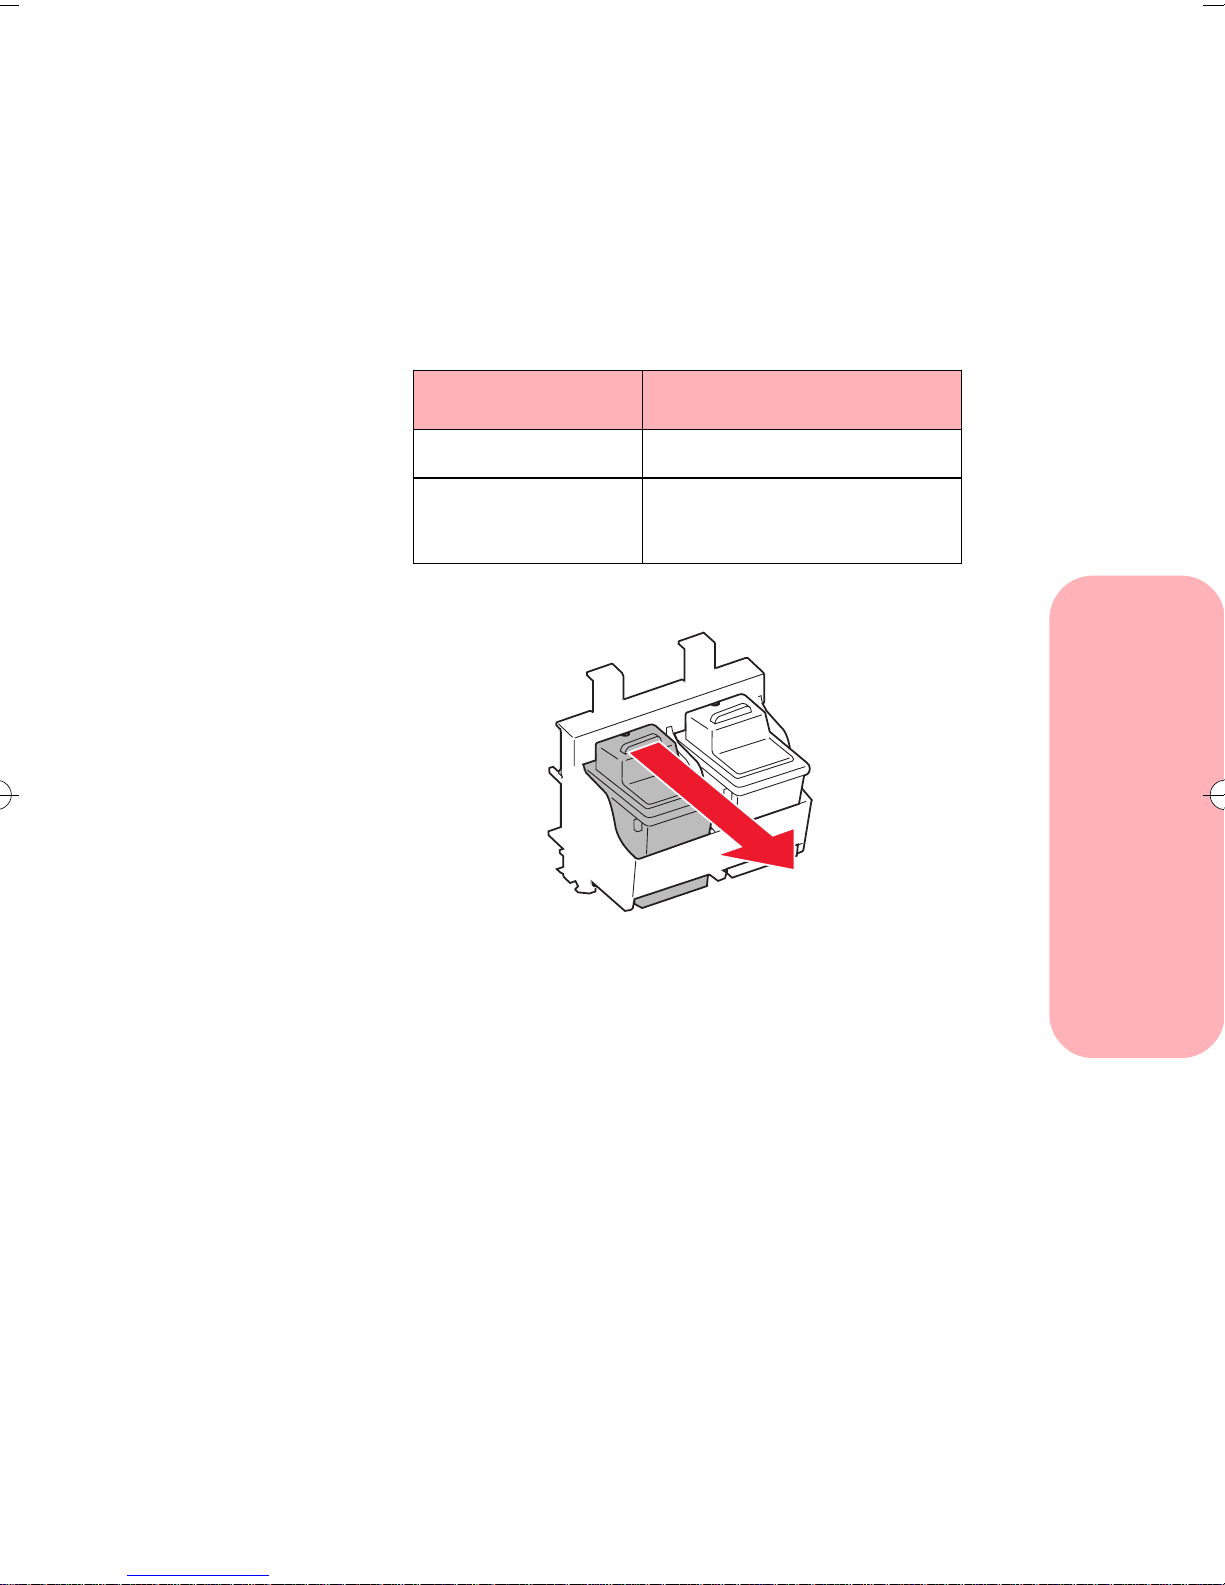
At the printer, pull the handle of the print cartridge
4
you are replacing toward you until you hear a snap.
The following table lists the correct position for
each cartridge type.
Cartridge type Cartridge carrier slot
Color left
Photo or
Black (optional)
right
Caring for your print cartridges
Caring for your print cartridges
23
 Loading...