

Lexmark 16C0365 - 5500 MFP, 5500 Setup Manual

www.lexmark.com
Printer and Scanner
Setup Guide
5500 MFP Option
August 2003

English
Setup Guide

Edition: August 2003
The following paragraph does not apply to any country where such
provisions are inconsistent with local law: LEXMARK
INTERNATIONAL, INC., PROVIDES THIS PUBLICATION “AS IS”
WITHOUT WARRANTY OF ANY KIND, EITHER EXPRESS OR IMPLIED,
INCLUDING, BUT NOT LIMITED TO, THE IMPLIED WARRANTIES OF
MERCHANTABILITY OR FITNESS FOR A PARTICULAR PURPOSE.
Some states do not allow disclaimer of express or implied warranties in
certain transactions; therefore, this statement may not apply to you.
This publication could include technical inaccuracies or typographical
errors. Changes are periodically made to the information herein; these
changes will be incorporated in later editions. Improvements or changes
in the products or the programs described may be made at any time.
Comments about this publication may be addressed to Lexmark
International, Inc., Department F95/032-2, 740 West New Circle Road,
Lexington, Kentucky 40550, U.S.A. In the United Kingdom and Eire, send
to Lexmark International Ltd., Marketing and Services Department,
Westhorpe House, Westhorpe, Marlow Bucks SL7 3RQ. Lexmark may
use or distribute any of the information you supply in any way it believes
appropriate without incurring any obligation to you. You can purchase
additional copies of publications related to this product by calling 1-800553-9727. In the United Kingdom and Eire, call +44 (0)8704 440 044. In
other countries, contact your point of purchase.
References in this publication to products, programs, or services do not
imply that the manufacturer intends to make these available in all countries
in which it operates. Any reference to a product, program, or service is not
intended to state or imply that only that product, program, or service may
be used. Any functionally equivalent product, program, or service that
does not infringe any existing intellectual property right may be used
instead. Evaluation and verification of operation in conjunction with other
products, programs, or services, except those expressly designated by the
manufacturer, are the user’s responsibility.
Lexmark, Lexmark with diamond design, MarkNet, and MarkVision are
trademarks of Lexmark International, Inc., registered in the United States
and/or other countries. ImageQuick is a trademark of Lexmark
International, Inc.
Other trademarks are the property of their respective owners.
© 2003 Lexmark International, Inc.
All rights reserved.
UNITED STATES GOVERNMENT RIGHTS
This software and any accompanying documentation provided under this
agreement are commercial computer software and documentation
developed exclusively at private expense.
Safety information
• Use only the power supply provided with this product or the
manufacturer's authorized replacement power supply.
CAUTION: Do not use the fax feature during a lightning storm. Do not set
up this product or make any electrical or cabling connections, such as the
power cord or telephone, during a lightning storm.
• Connect the power cord to a properly grounded electrical outlet
that is near the product and easily accessible.
• Refer service or repairs, other than those described in the
operating instructions, to a professional service person.
• This product is designed, tested, and approved to meet strict
global safety standards with the use of specific Lexmark
components. The safety features of some parts may not always
be obvious. Lexmark is not responsible for the use of other
replacement parts.
This product contains mercury in the lamp (<5mg Hg). Disposal of
mercury may be regulated due to environmental considerations. For
disposal or recycling information, please contact your local authorities or
the Electronic Industries Alliance: www.eiae.org.
Attention!
This symbol identifies static-sensitive parts. Do not
touch in the areas near these symbols without first
touching the metal frame of the printer.
Conventions
It may help you to recognize the caution and warning conventions used in
this document.
CAUTION: A caution identifies something that
could cause you harm.
Warning: A warning identifies something that
could damage your product hardware or
software.

iii
Contents
Contents
Step 1: Get started . . . . . . . . . . . . . . . . . . . . . . . . . . . . . . . . .1
Step 2: Assemble paper handling options . . . . . . . . . . . . . 4
Step 3: Install printer memory and network options . . . . 10
Step 4: Set up the printer . . . . . . . . . . . . . . . . . . . . . . . . . . 17
Step 5: Install the scanner . . . . . . . . . . . . . . . . . . . . . . . . . 31
Step 6: Attach the cables and power cord . . . . . . . . . . . . 35
Step 7: Power up and change configuration settings . . . 40
Step 8: Verify MFP setup . . . . . . . . . . . . . . . . . . . . . . . . . . . 46
Step 9: Distribute MFP user instructions . . . . . . . . . . . . . 48
Solve setup problems . . . . . . . . . . . . . . . . . . . . . . . . . . . . . 50
Maintain your scanner . . . . . . . . . . . . . . . . . . . . . . . . . . . . . 52
Notices . . . . . . . . . . . . . . . . . . . . . . . . . . . . . . . . . . . . . . . . . .57
1
Step 1: Get started
Using this book
This guide is intended to help you set up
your printer and scanner (MFP option). If
you do not have an option listed here, you
can skip that portion of the setup guide
and continue to the next task.
If you need more information to assemble
an option or your printer, refer to the
documentation that came with the option
or your printer and then return to this
guide and continue setup.
If you encounter a problem while setting
up the printer, see “Solve setup
problems” on page 50, or visit our Web
site at www.lexmark.com.
Turning off the printer If you are installing a scanner after initial
printer setup, turn the printer off and
unplug the power cord from both the wall
outlet and the printer. If you have any
other devices connected to the printer,
turn them off as well and unplug their
power cords.
2
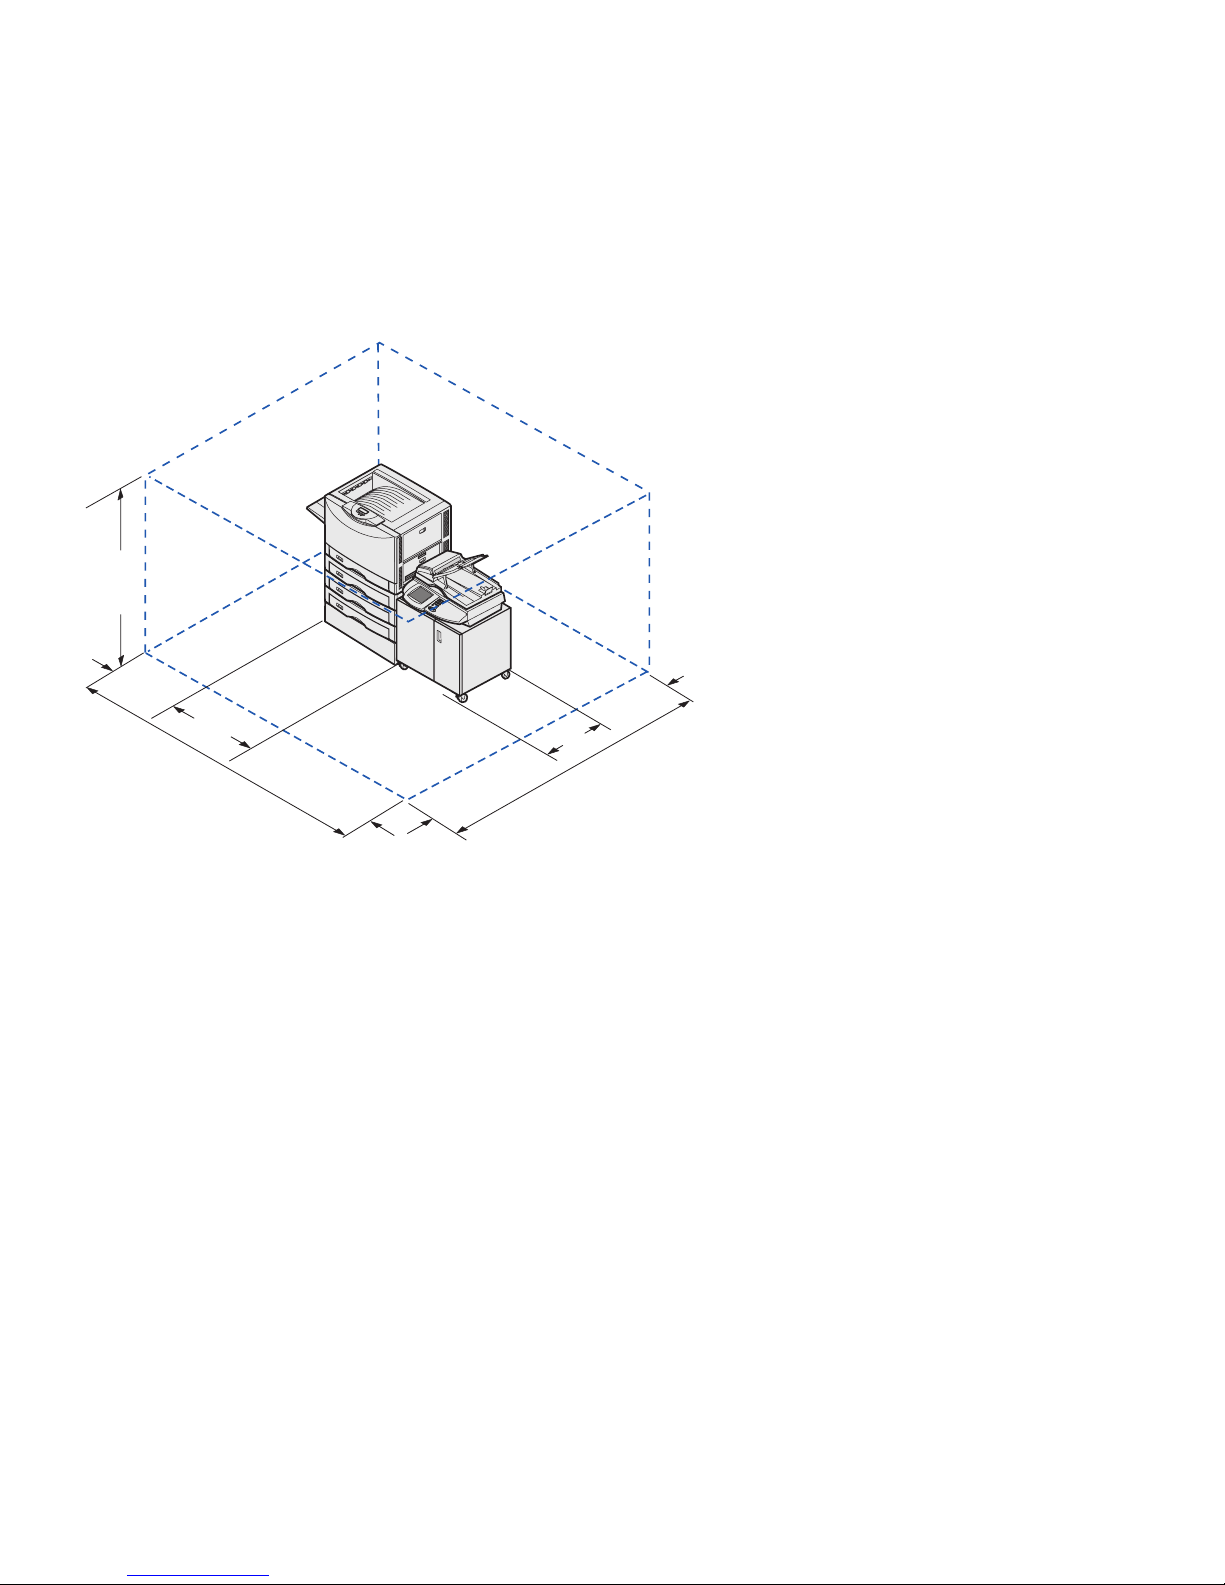
Selecting a location for your printer
and MFP
When selecting a location for your printer
and MFP option, you must leave enough
room to open the printer trays, covers,
doors, and MFP option. It is also
important to:
• Allow space around the printer for
proper ventilation
• Provide a firm, level, and stable
surface
• Keep the equipment away from the
direct airflow of air conditioners,
heaters, or ventilators
• Keep the equipment free of
sunlight, humidity extremes, or
temperature fluctuations
• Keep the equipment clean, dry,
and free of dust
For more information on space
requirements, refer to the printer Setup
Guide.
CAUTION: The printer weighs 69.9 kg (154 Ib) and
requires at least four people to lift it safely.
Note: Leave the printer in the box until you are ready to
install it.
126.7 mm
(5 in.)
660 mm
(26 in.)
1419.2 mm
(56 in.)
1784.1 mm
(70.4 in.)
1110 mm
(43.8 in.)
329.5 mm
(13 in.)
1140.4 mm
(45 in.)
3
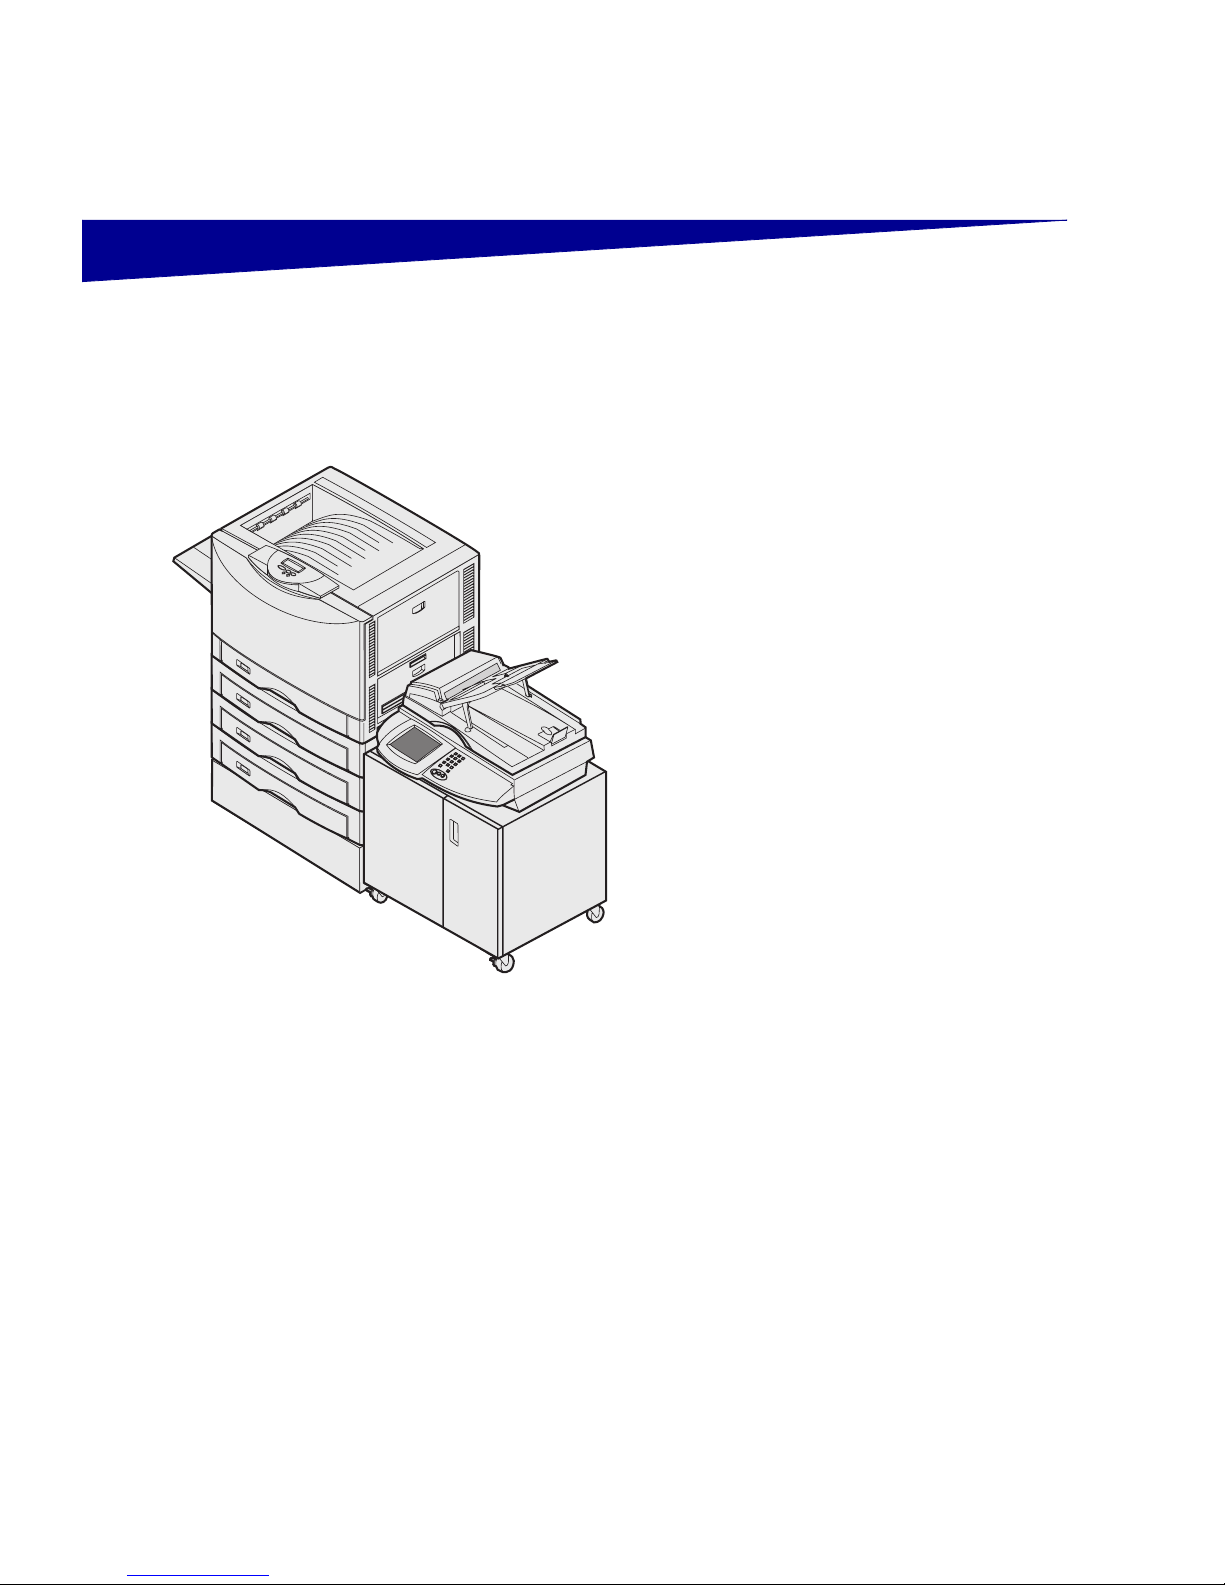
Customizing your MFP option You can customize your MFP with
various input and memory options.
The MFP cabinet provides stability when
configuring the printer plus an MFP
option. You can install up to three 550sheet drawers with the printer. A duplex
unit can also be installed.
Note: Leave all components and hardware in the boxes
until you are ready to install them.
Check the boxes you received to make
sure you have all the necessary
components for the configuration you
ordered.
You may want to arrange the boxes in the
order the components are assembled.
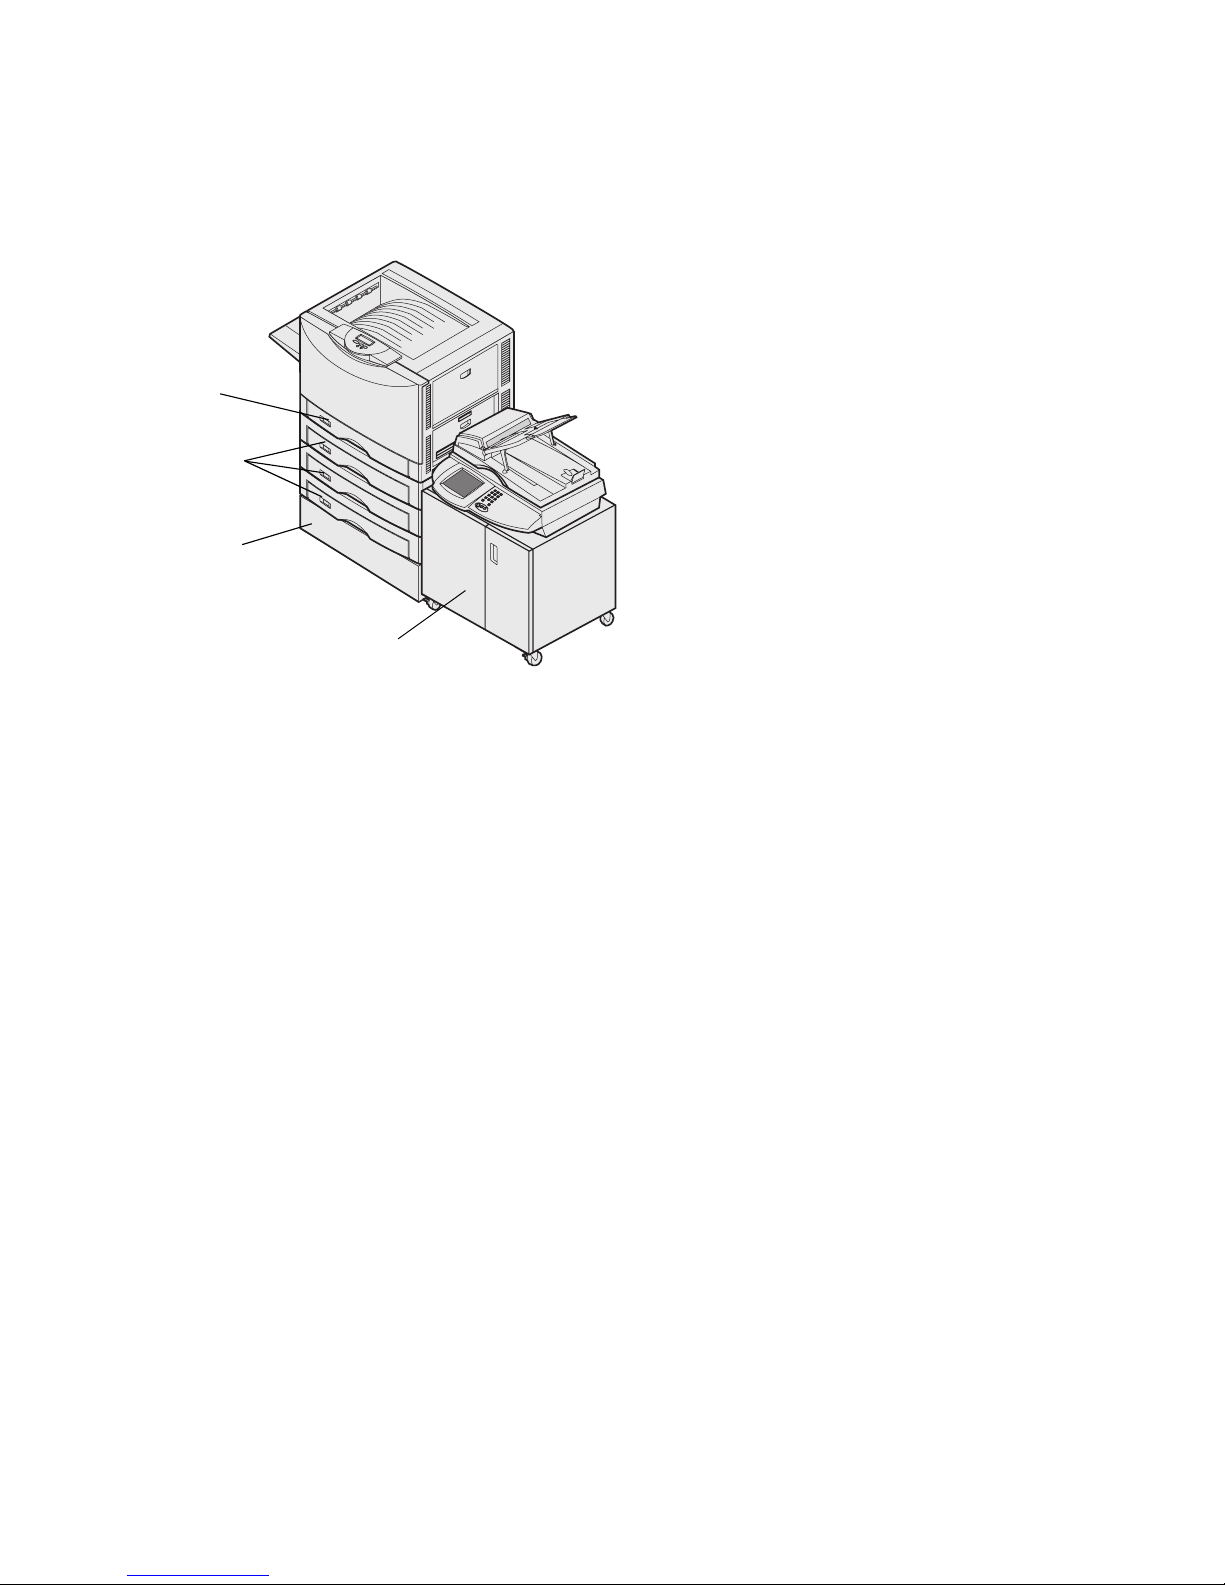
You can use the illustrated configuration
to help lay out your boxes.
If you have previously set up your printer,
go to “Prepare for scanner installation” on
page 28.
Optional
550-sheet drawer
Optional
scanner cabinet
Standard tray
Optional
printer base

4
Step 2: Assemble paper
handling options
Installing the printer base or cabinet You can purchase an optional printer
cabinet or printer base.
To install the printer cabinet or printer
base:
1 Remove the cabinet or base from
the box.
2 Remove all packing material.
3 Align and screw the positioning
posts into the screw holes in the
top of the cabinet or printer base.
4 Hand tighten the posts.
5 Place the cabinet or base in the
location you have chosen for your
printer.
5
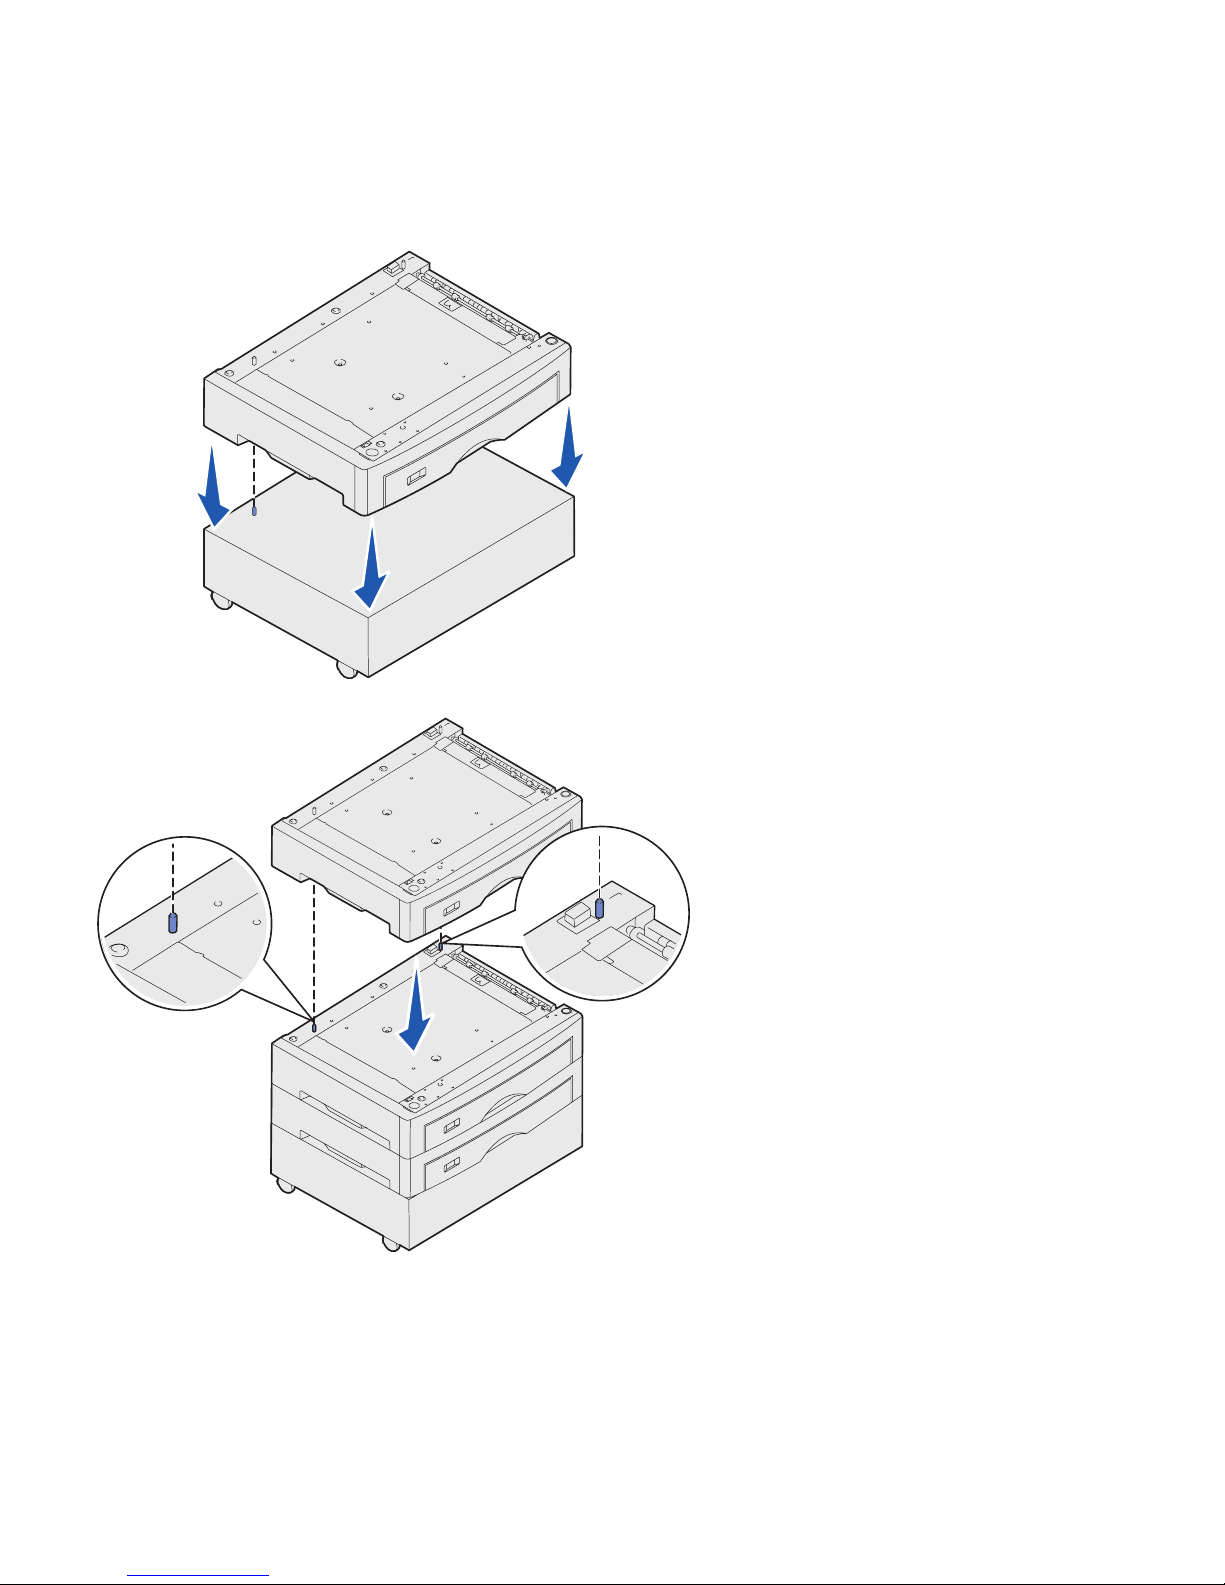
Installing a 550-sheet drawer Your printer supports up to three optional
550-sheet drawers.
1 Unpack the 550-sheet drawer and
remove any packing material.
2 Place the 550-sheet drawer in the
location you have chosen, on the
optional printer cabinet, or on the
optional printer base.
Carefully align the positioning
posts on the cabinet or base to the
holes in the 550-sheet drawer.
3 If you have additional 550-sheet
drawers:
a Align the positioning posts on
the lower drawer with the holes
in the 550-sheet drawer.
b Lower the 550-sheet drawer
into place.
c Repeat steps a and b for each
additional drawer.
6
Positioning the printer 1 Open the printer box and then
remove all items from the box
except the printer.
CAUTION: The printer weighs 69.9 kg (154 Ib) and
requires at least four people to lift it safely. Anytime you
move or lift the printer, make sure you have enough
people to help you. Use the handholds on the sides of the
printer when lifting.
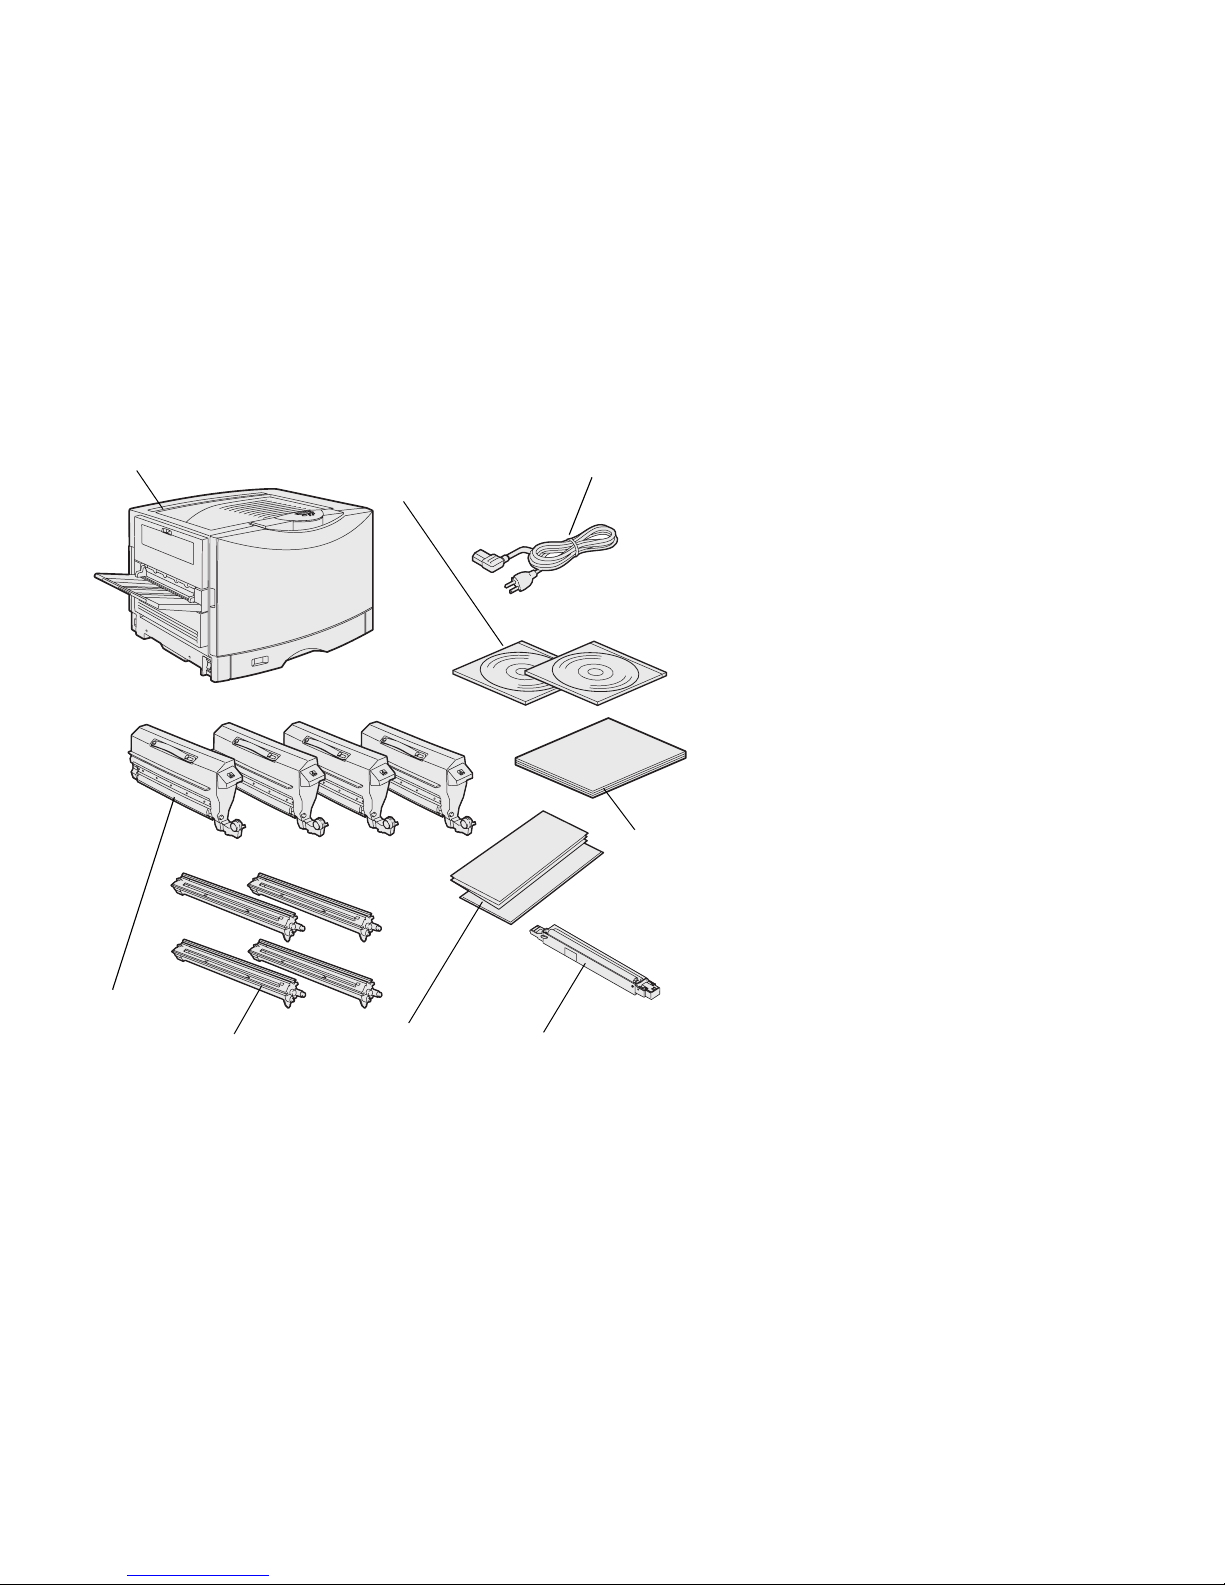
2 Make sure you have the following
items:
• Power cord
• Toner cartridges (4)
• Photodevelopers (4)
• Oil coating roll
• Setup Guide
• Publications CD
• Quick Reference and sleeve
• Drivers CD
3 Place all items except the printer
aside for later use.
Power cord
Printer
Toner
cartridges
Photodevelopers
Oil coating roll
Publication
and Drivers
CDs
Quick
Reference
Setup
Guide

7
4 Have three people help you lift the
printer out of the box and place the
printer on the printer cabinet or
printer stand.
If you are installing the printer on a
550-sheet drawer, align the
positioning posts on the option
with the holes in the printer. Make
sure the printer is seated securely
on the option.
5 Remove any tape or packing
material from the outside of the
printer.
8
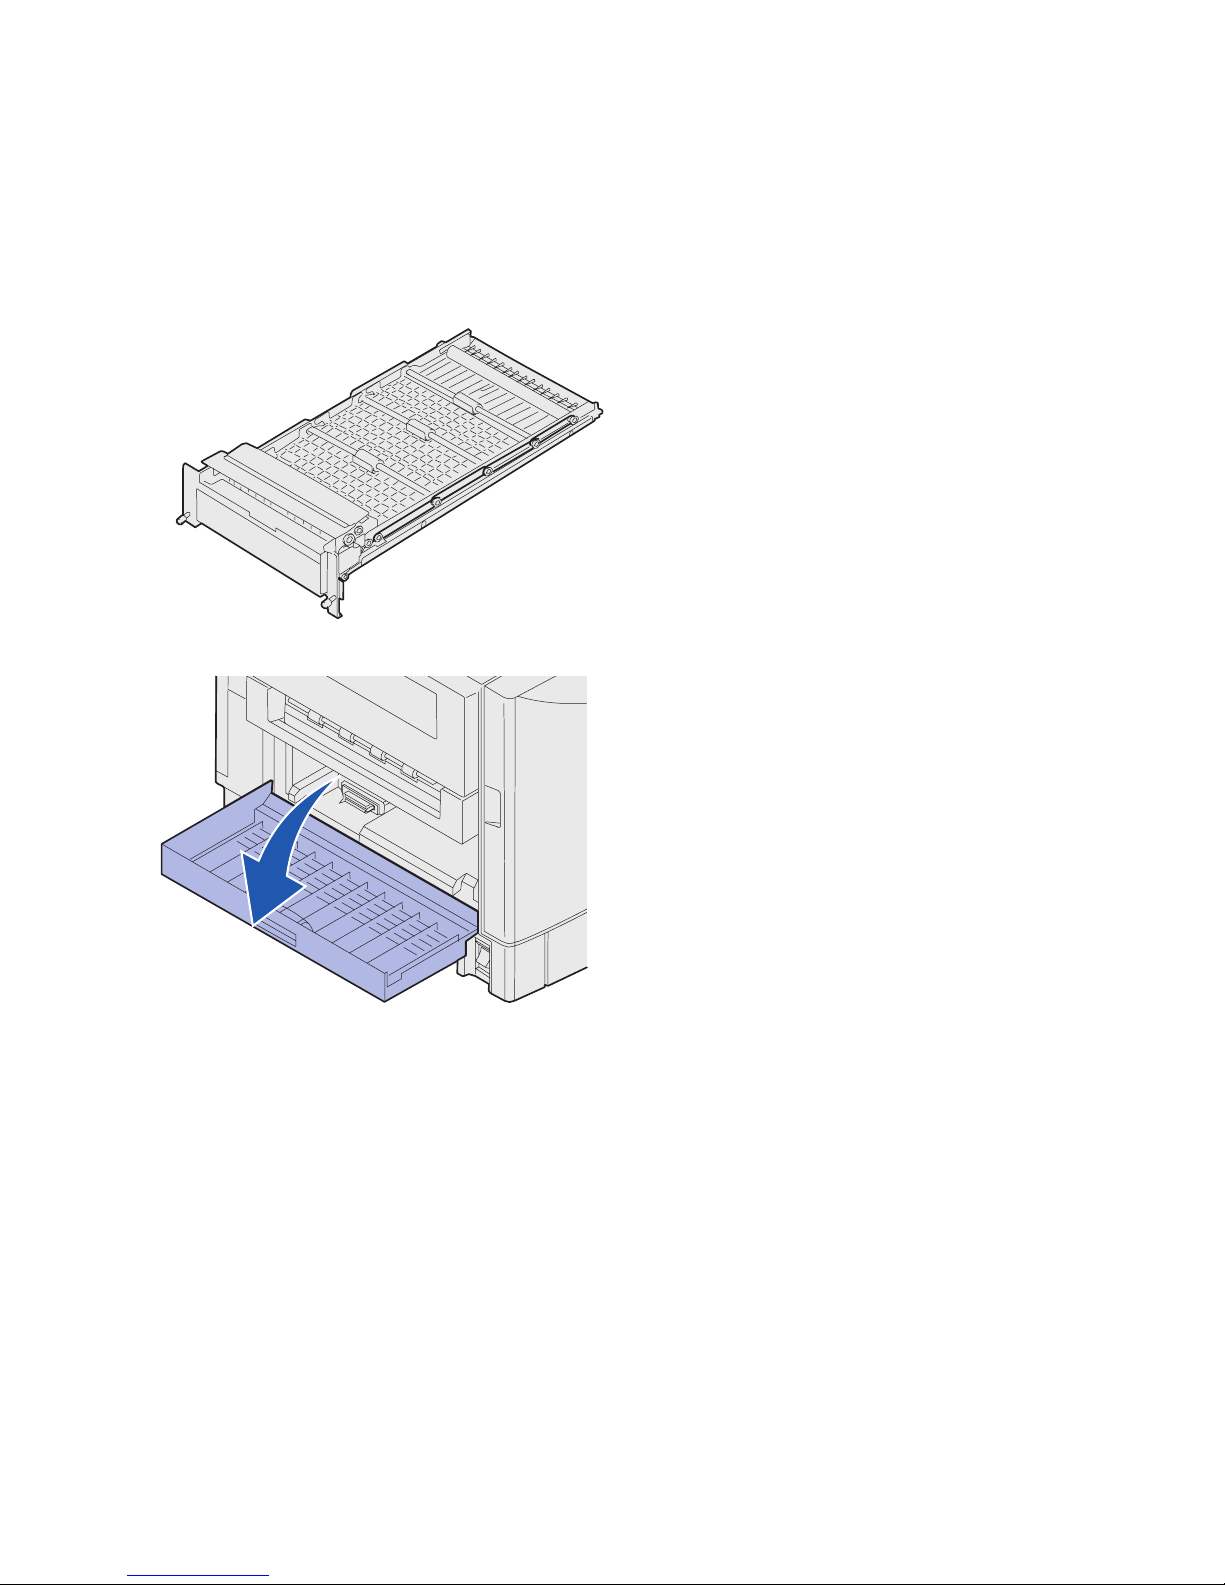
Installing an optional duplex unit Your printer supports an optional duplex
unit that provides two-sided printing.
Note: Refer to the publications CD for information about
the types and sizes of paper the duplex unit supports.
1 Remove the duplex unit from its
packing material.
2 Remove any shipping tape and
additional packing material from
the duplex unit.
3 Open the duplex unit access door
on the left side of the printer.
9
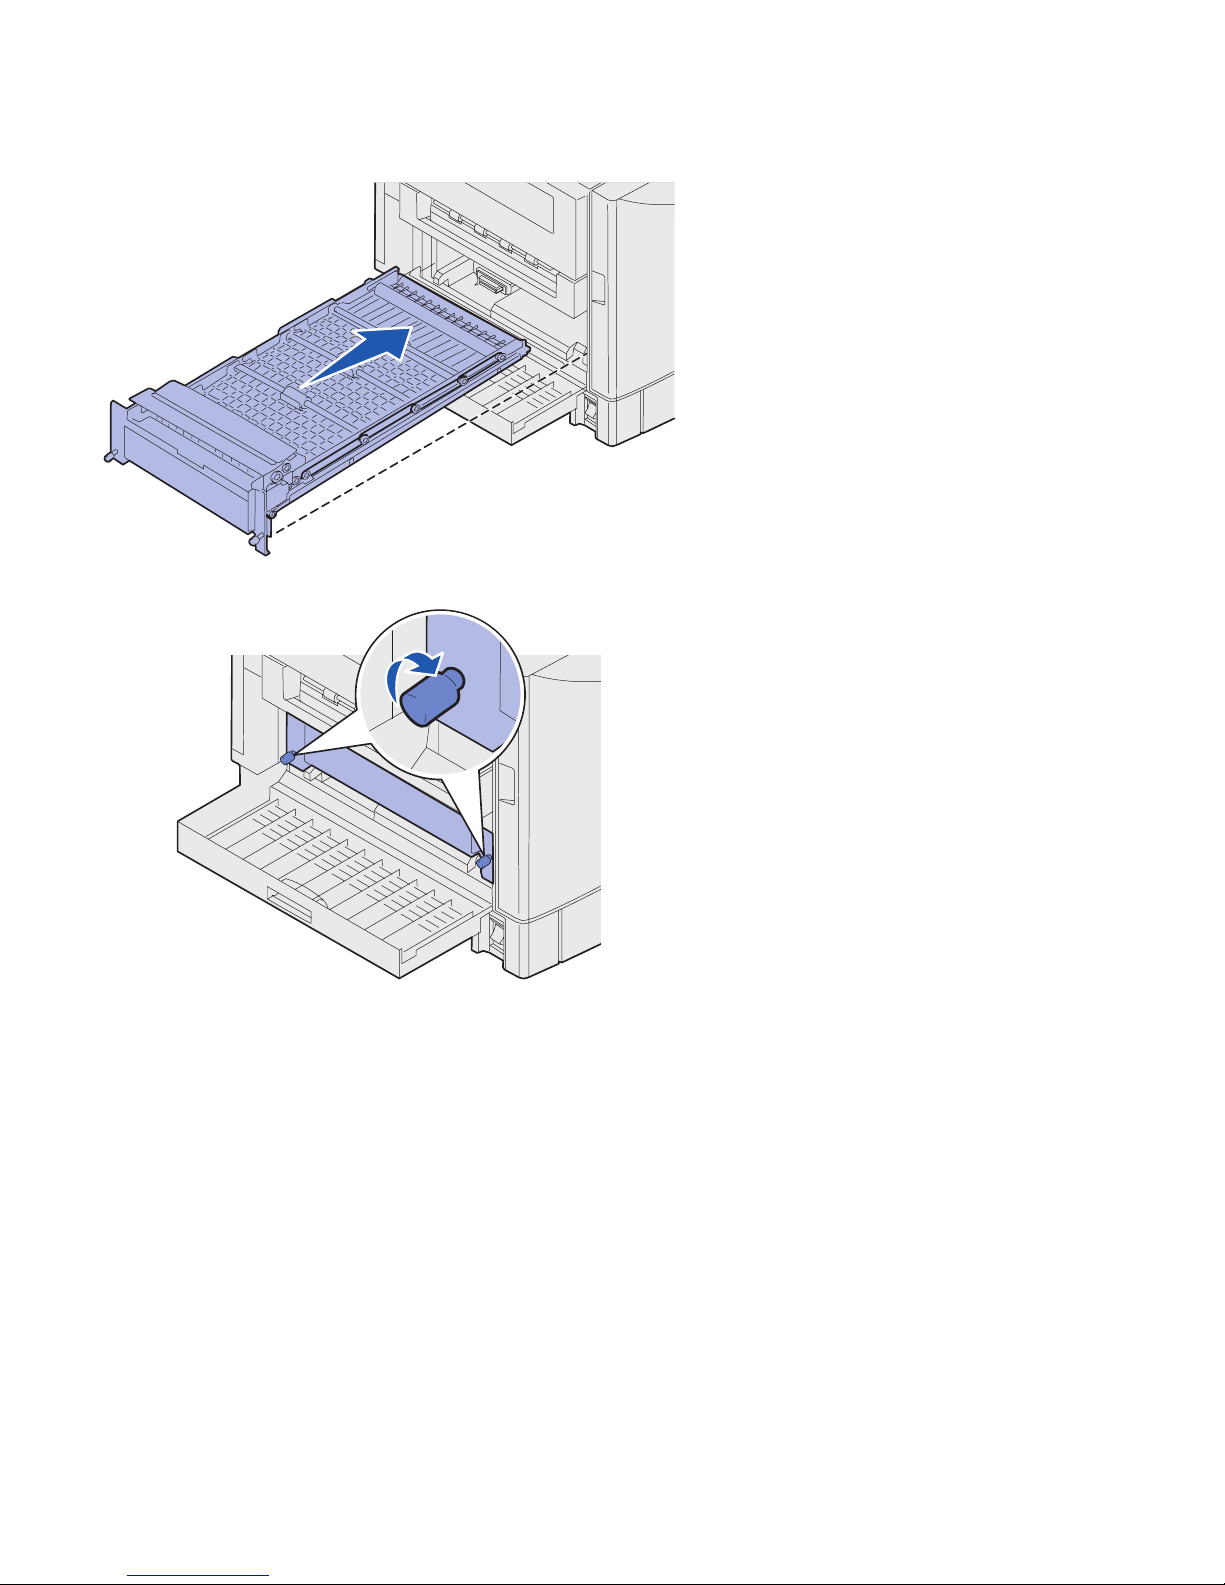
4 Align the duplex unit with the slots
in the printer.
5 Slide in the duplex unit.
6 Align the thumbscrews on the
duplex unit with the holes in the
printer.
7 Tighten the thumbscrews.
8 Close the duplex unit door.
The optional high capacity feeder Your printer supports an optional high
capacity feeder. To install the high
capacity feeder, refer to “Installing an
optional high capacity feeder” in the
printer Setup Guide.
When you complete high capacity feeder
installation return to Step 3: “Install
printer memory and network options” on
page 10 in this guide.
10
Step 3: Install printer memory
and network options
You can customize your printer memory
capacity and connectivity by adding
optional cards or a hard disk.
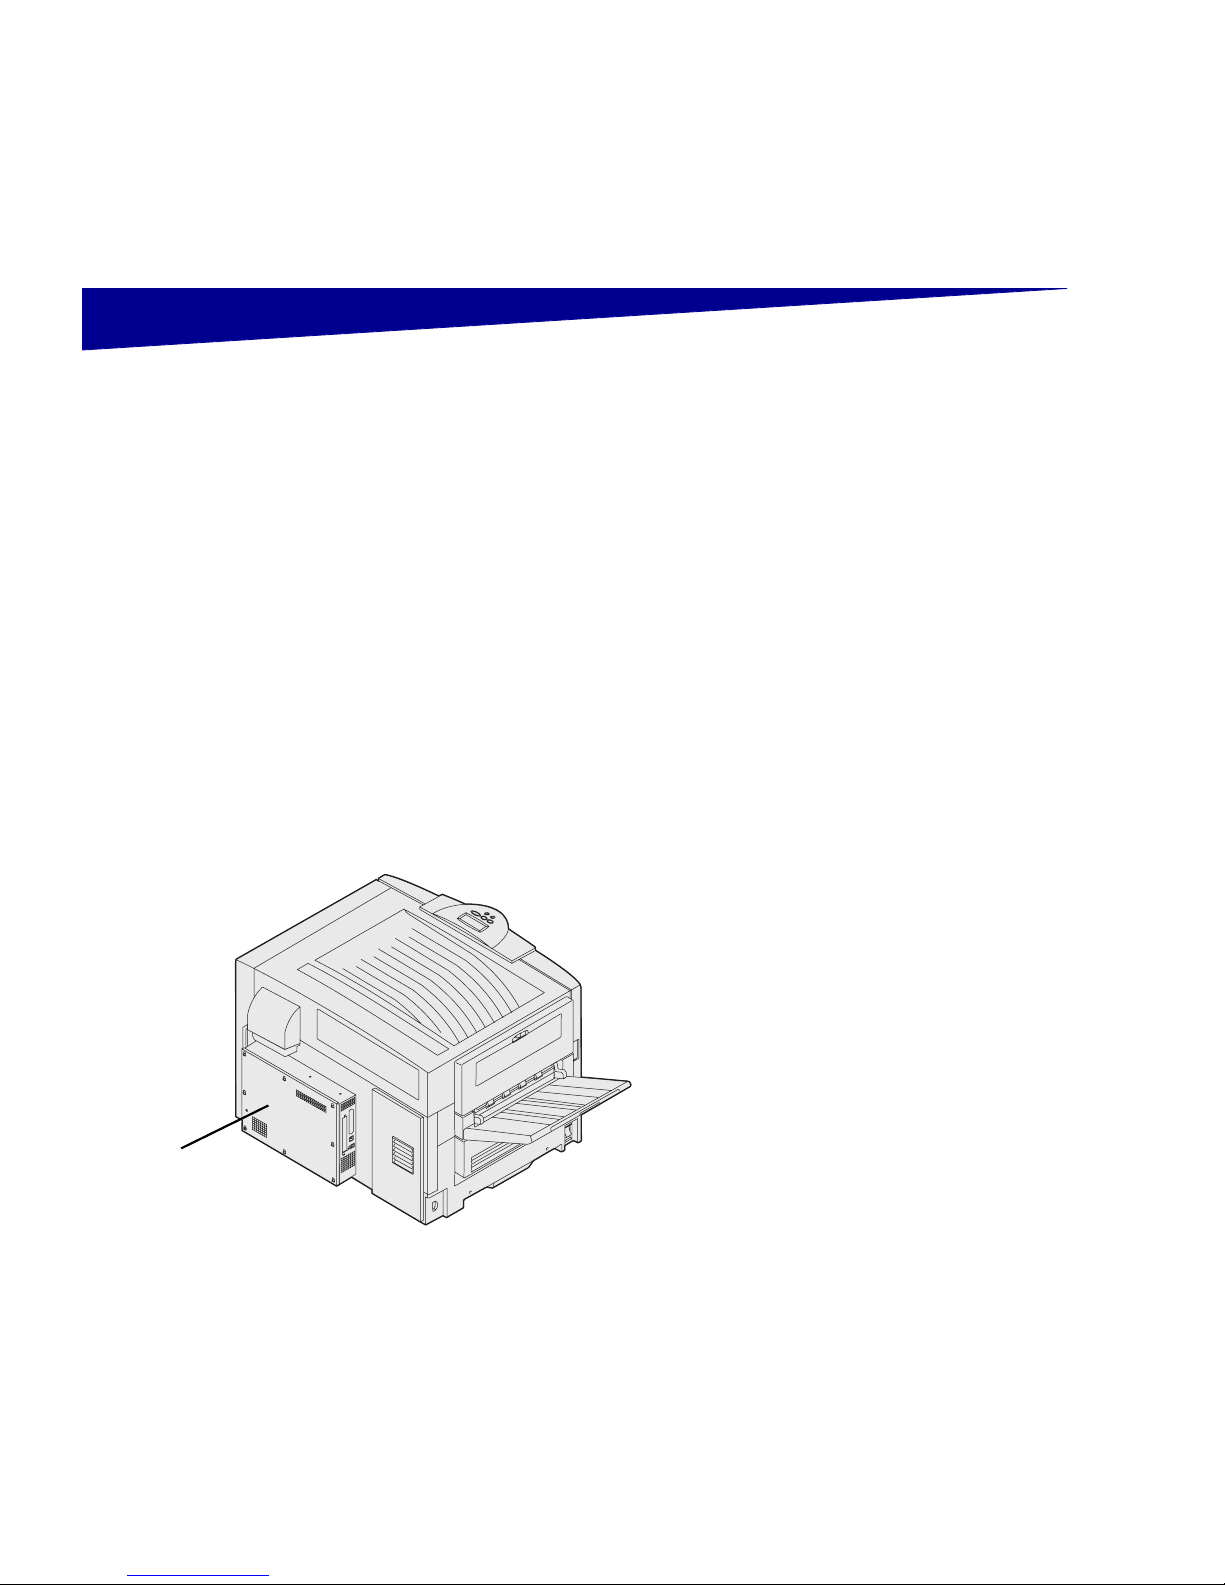
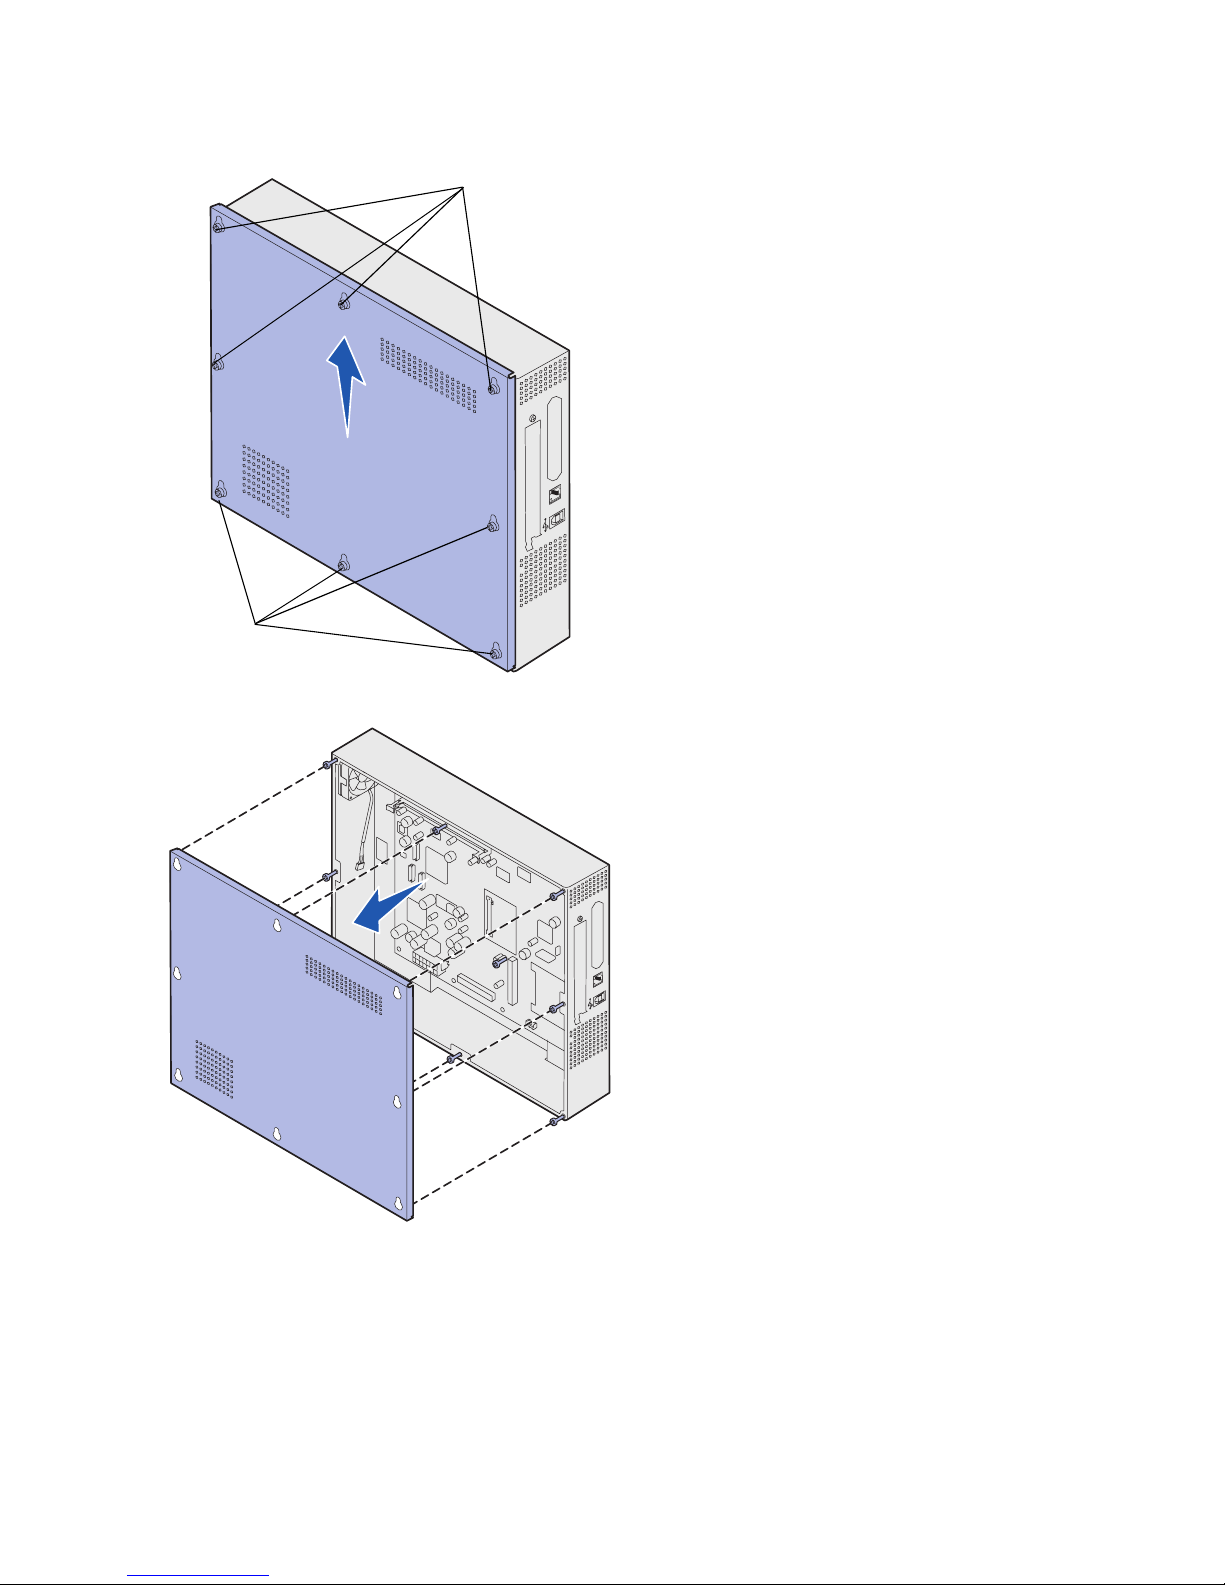
Removing the system board cover You must remove the system board cover
to install memory cards, a firmware card,
a hard disk, or an option card.
CAUTION: If you are installing memory or option cards
after initial printer setup, turn the printer off and unplug the
power cord. If you have any other devices connected to
the printer, turn them off as well and unplug any cables
going to the printer.
You need a number 2 Phillips screwdriver
to remove the system board cover.
Cover
11
1 Loosen the eight screws on the
system board cover. Do not
remove the screws completely.
2 Slide the cover up and away from
the printer.
Screws
Screws
12
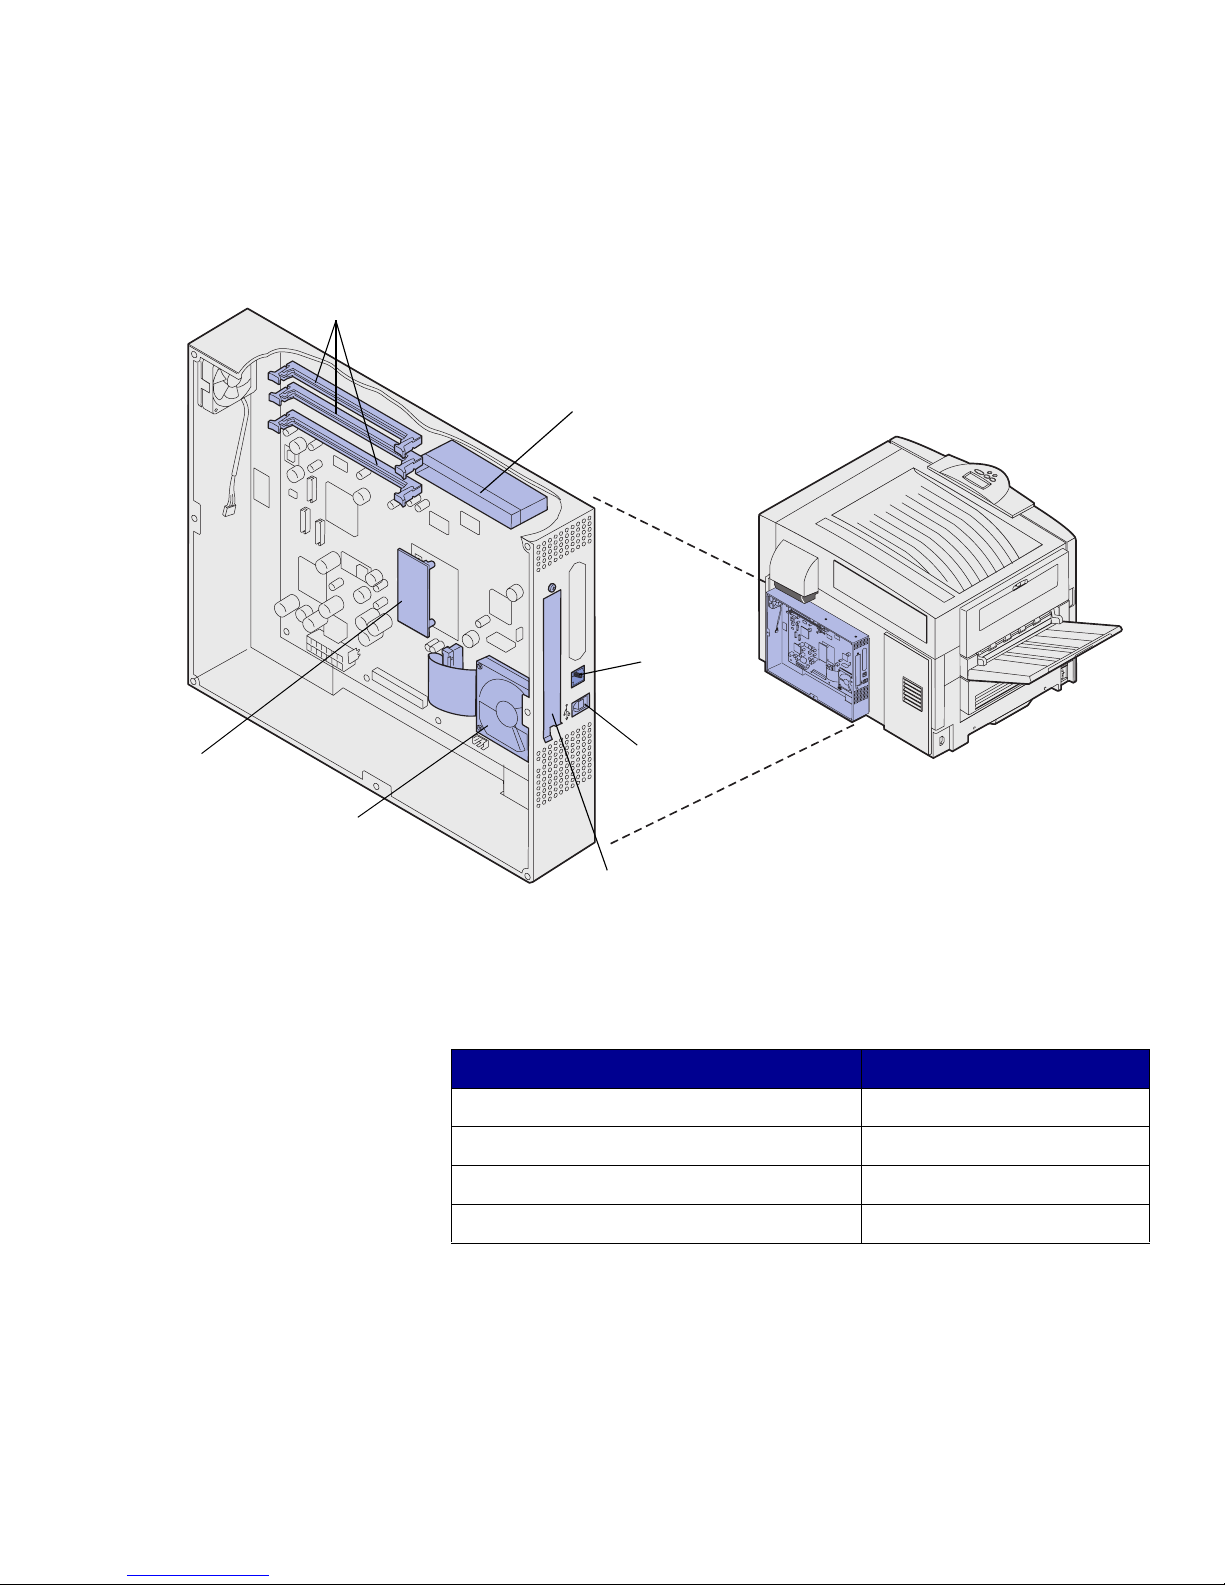
3 Use the illustration to locate the
connector for the card you want to
install.
4 Use the following table to locate
the instructions you need.
Memory and flash memory
card connectors
Optional hard disk
Optional
ImageQuick™
firmware card
Option card connector
Ethernet
connector
USB
connector
Option card cover
To install a... Go to page...
Memory card 13
Firmware card 13
Hard disk 14
Option card 14
13
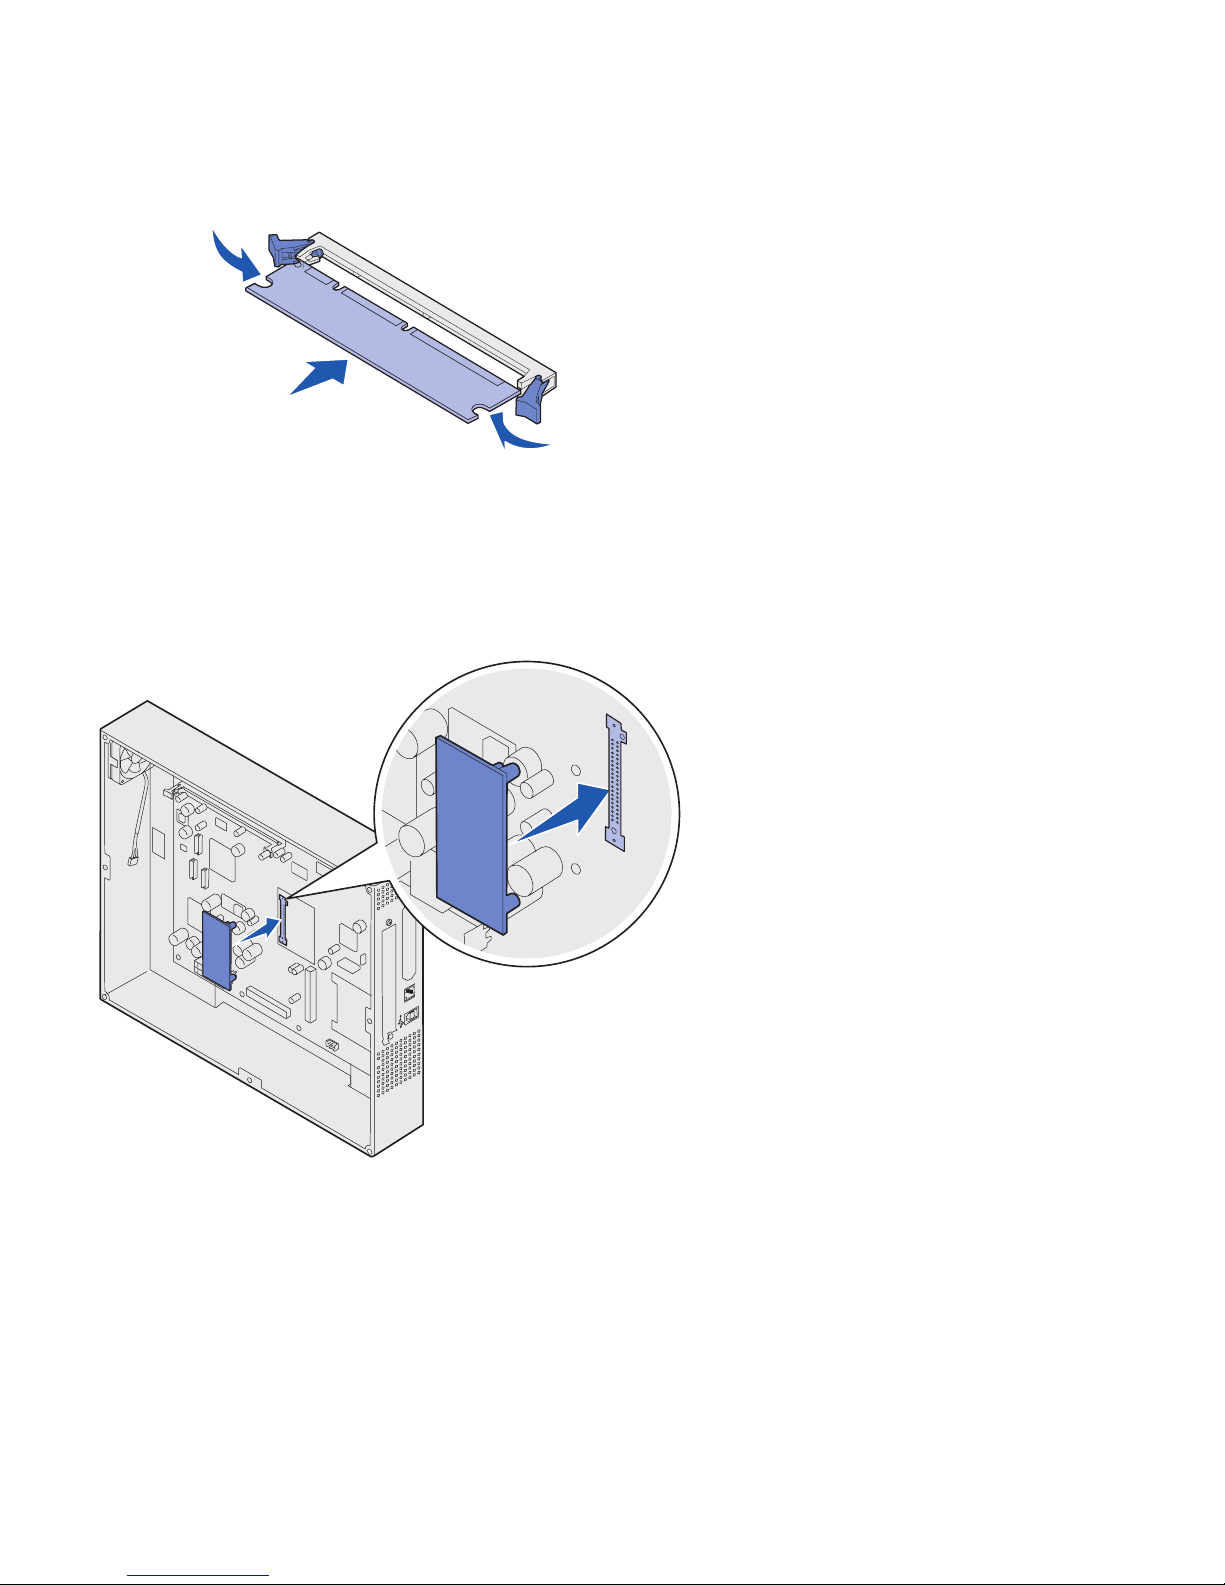
Installing memory 1 Unpack the memory option.
2 Open both latches on the
connector.
3 Push the memory card firmly into
the connector until it snaps into
place.
Installing a firmware card 1 Locate the holes on the system
board near the option card
connectors.
2 Unpack the firmware card.
3 Holding the firmware card by its
sides, align the two pins on the
card with the holes on the system
board.
4 Push in until the firmware card is
firmly in place.
14
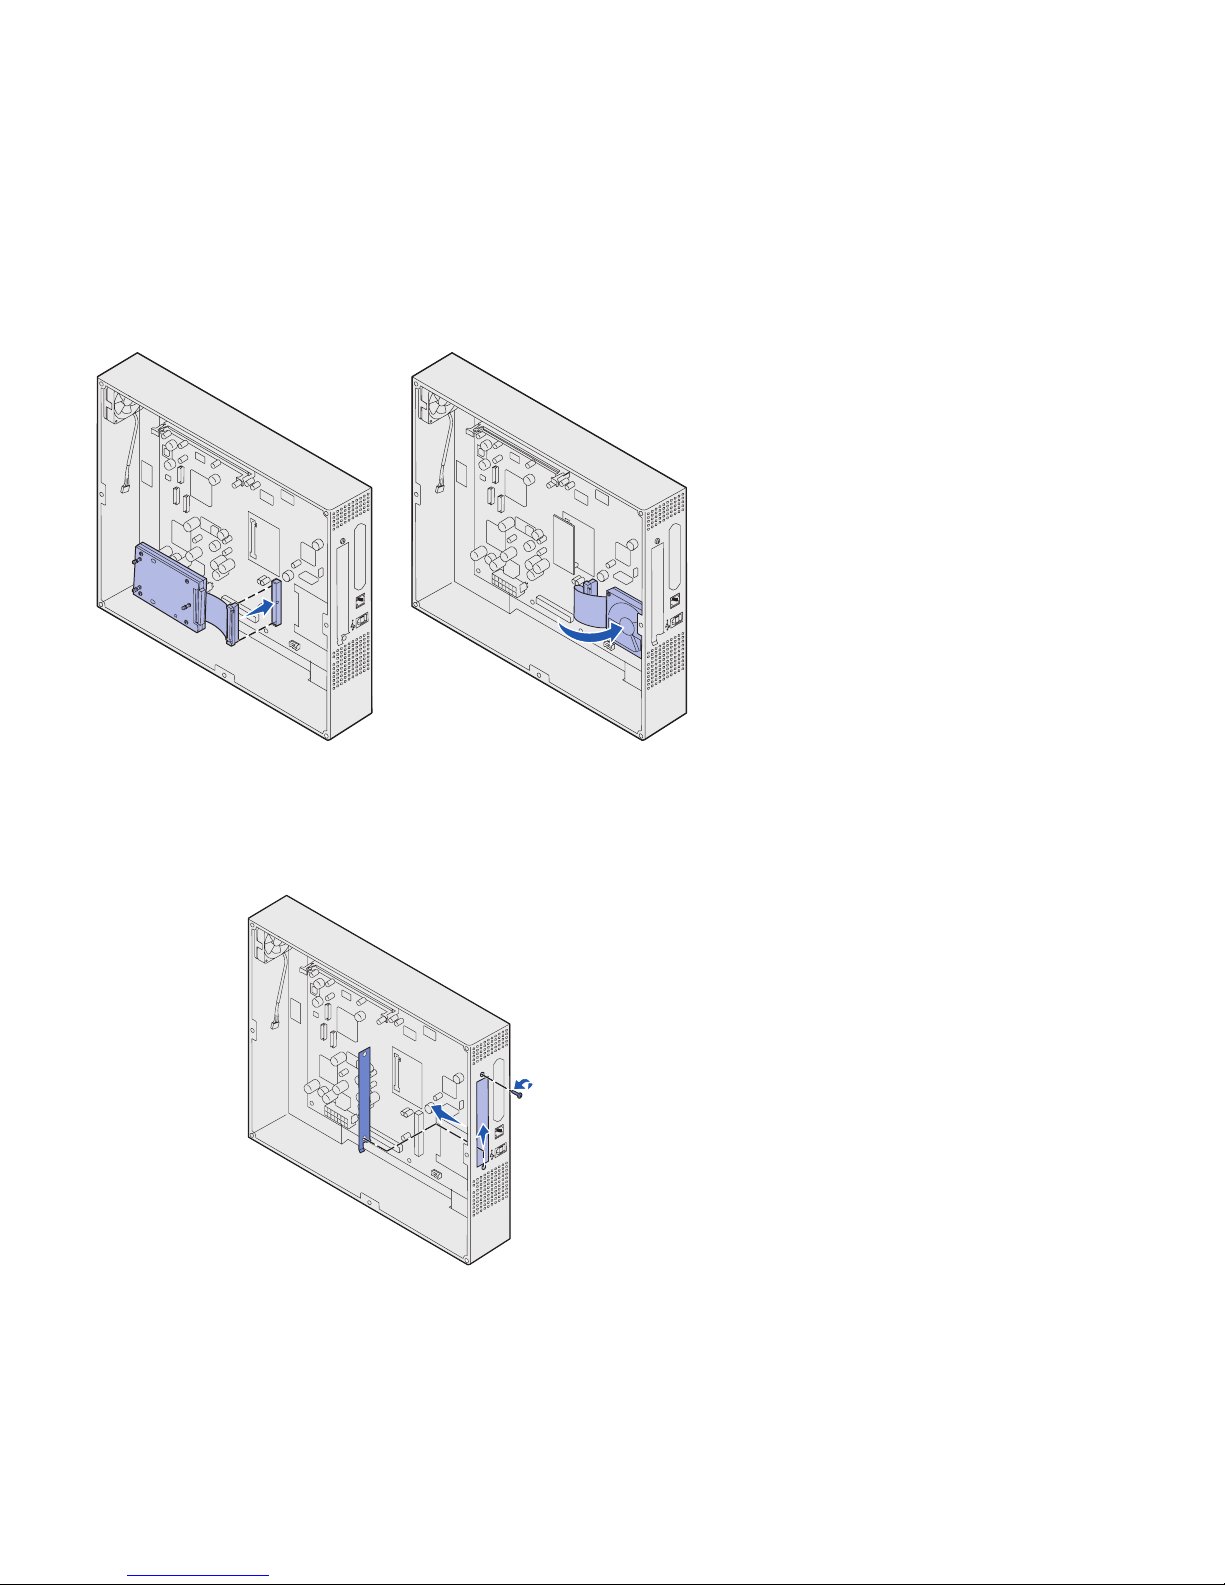
Installing a hard disk Follow the instructions in this section to
install an optional hard disk.
Warning: Hard disks are easily damaged by static
electricity. Touch something metal such as the printer
frame before you touch the hard disk.
If an option card has been installed, you
need to remove the option card before
installing the hard disk.
1 Align and press the ribbon cable
connector into the connector on
the system board.
2 Flip the hard disk over, and then
press the three posts on the
mounting plate into the holes on
the system board. The hard disk
snaps into place.
Installing an option card
1 Remove the screw from the metal
plate that covers the connector
slot, and then lift the plate off.
2 Unpack the card.
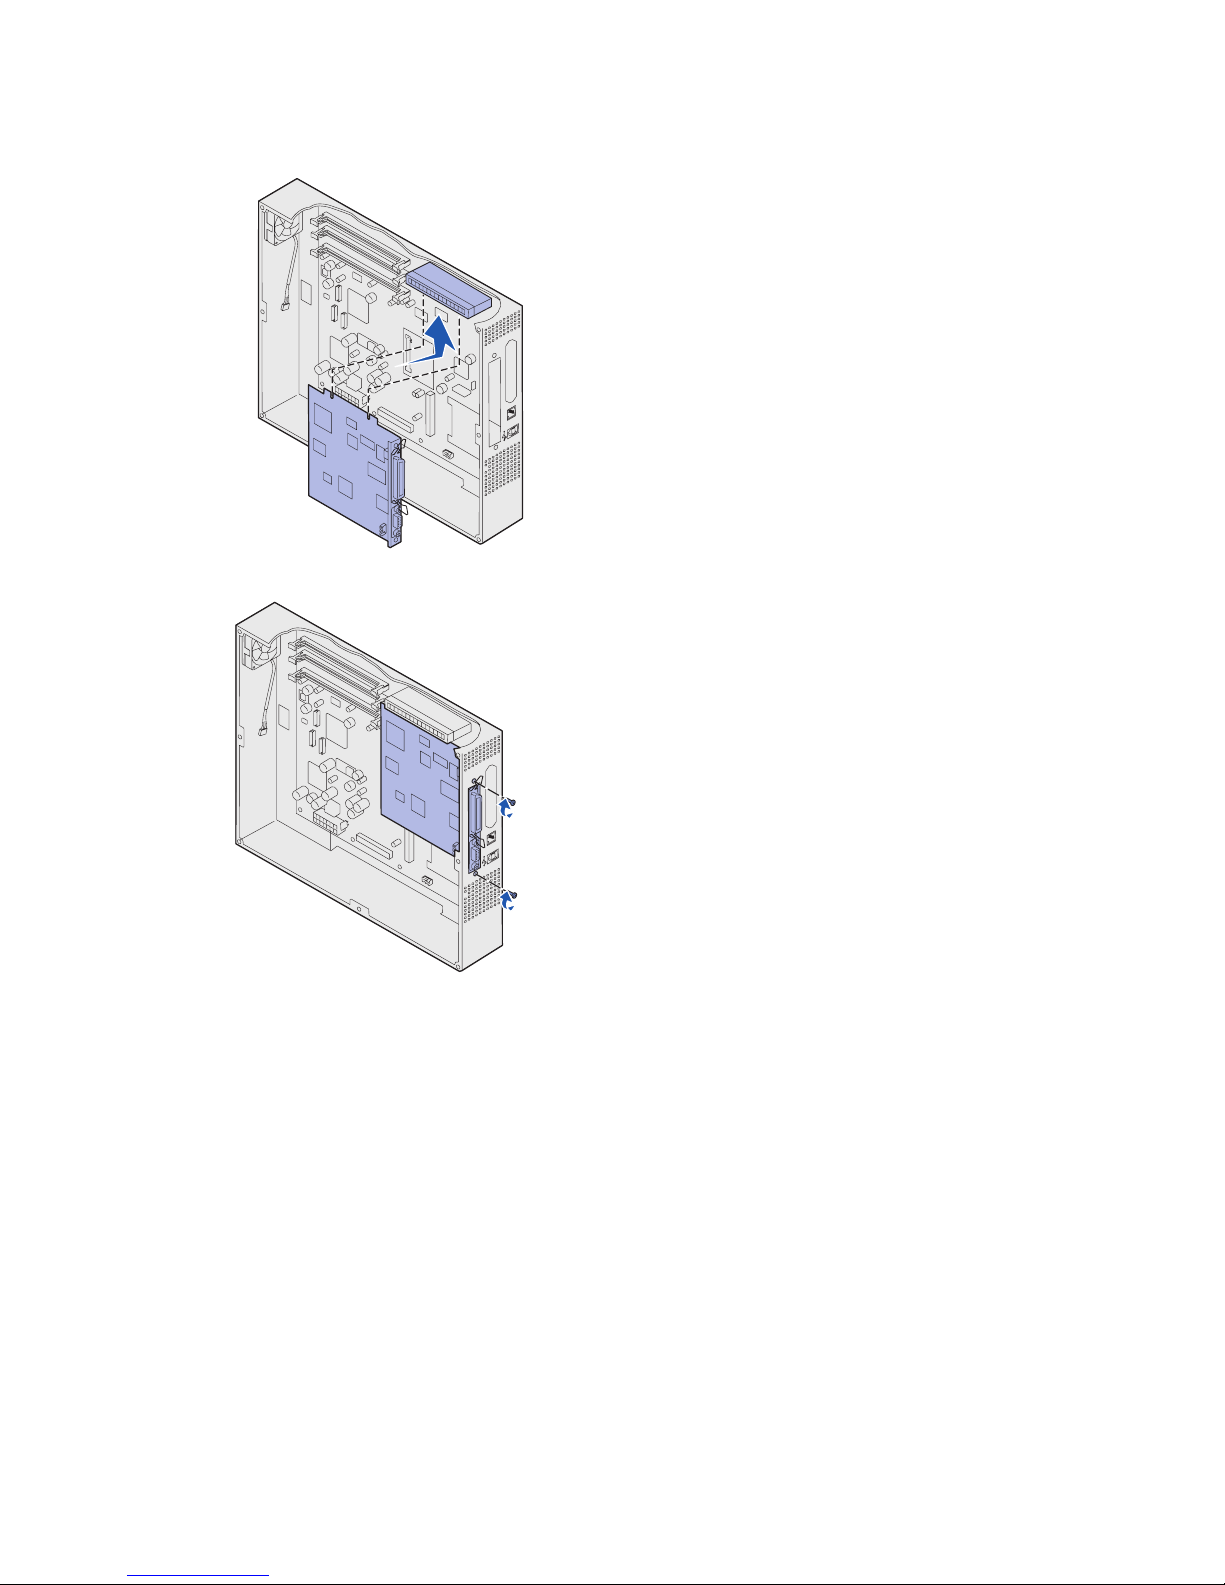
15
3 Locate the card connector on the
system board.
4 Align the connector on the option
card with the connector on the
system board.
The cable connectors on the side
of the option card must fit through
the connector slot.
5 Push the option card firmly into the
option card connector.
6 Secure the card to the system
board with the screws.
16
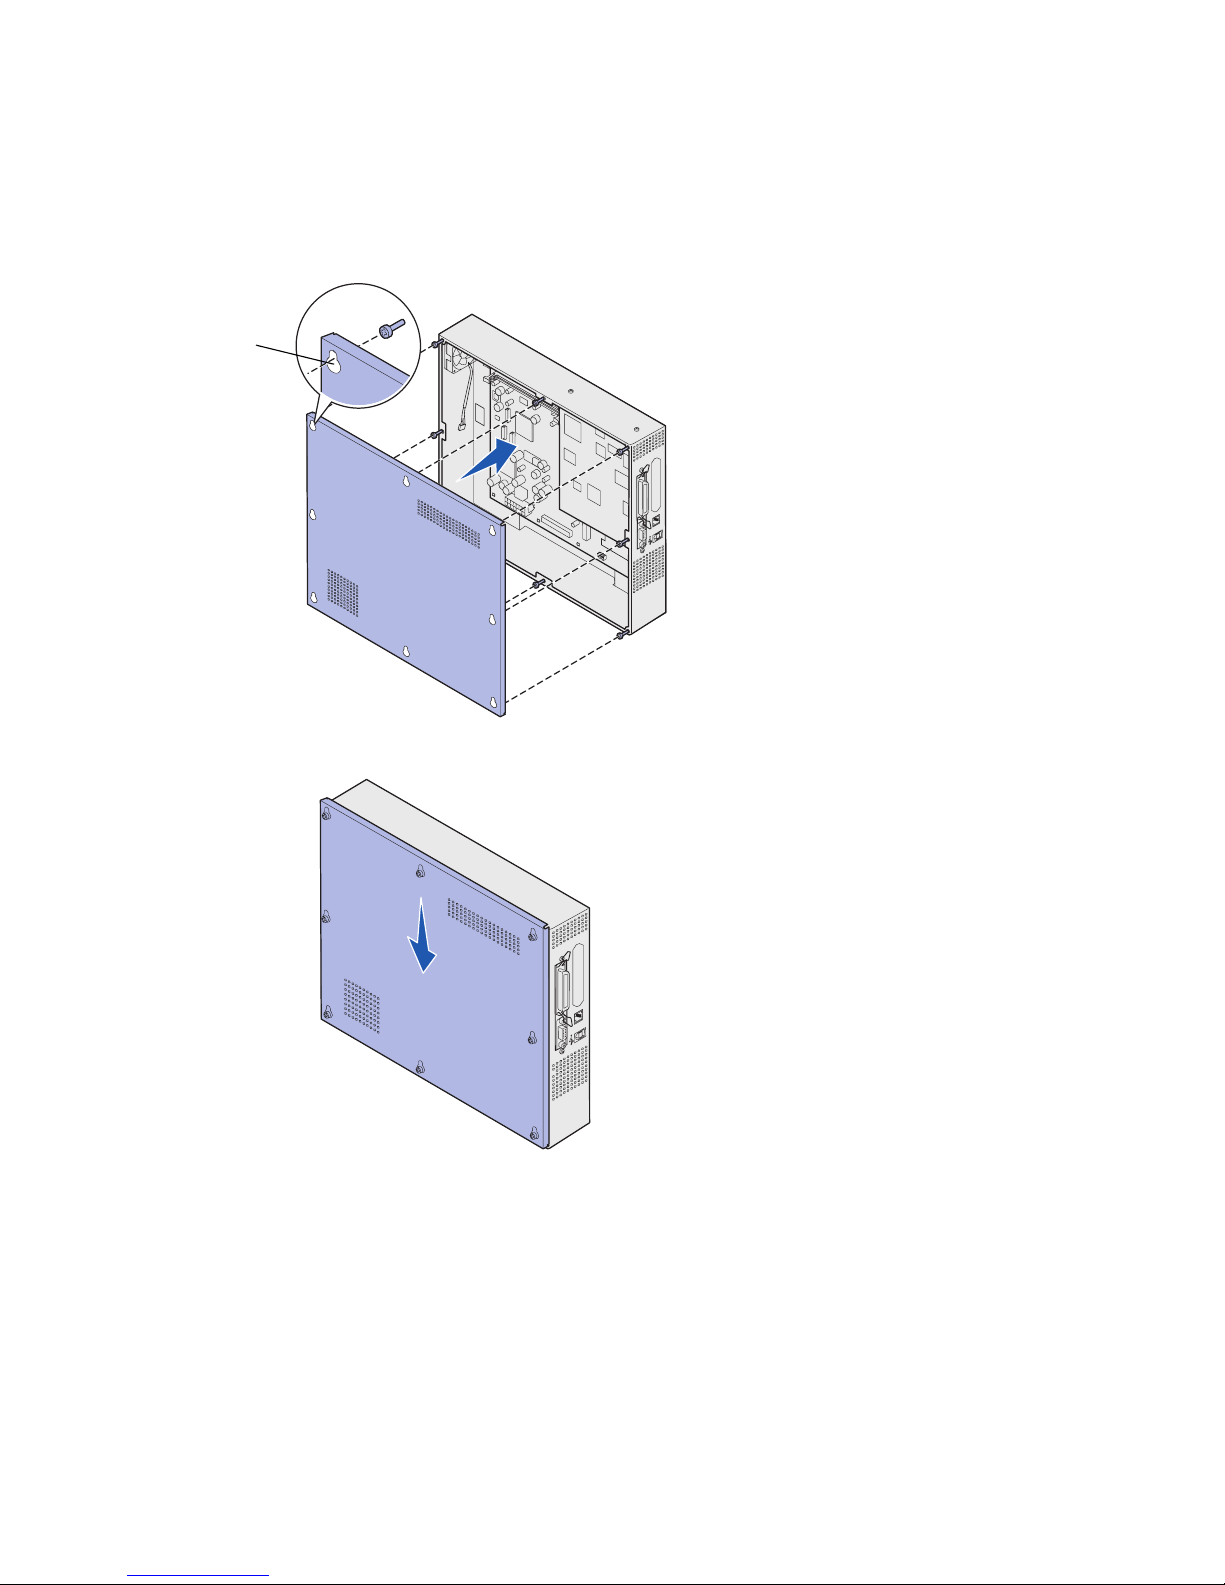
Reinstalling the system board cover After you have finished installing cards on
the printer system board, you must
reinstall the system board cover.
1 Align the holes on the cover with
the screws on the printer as
shown.
2 Place the cover against the printer
and slide it down.
3 Tighten the eight screws.
Screw slot
 Loading...