

Lexmark 5200 Series, X5250, X5270, 5250 - X All-In-One Color Inkjet, 5270 - X Color Inkjet Quick Start Manual
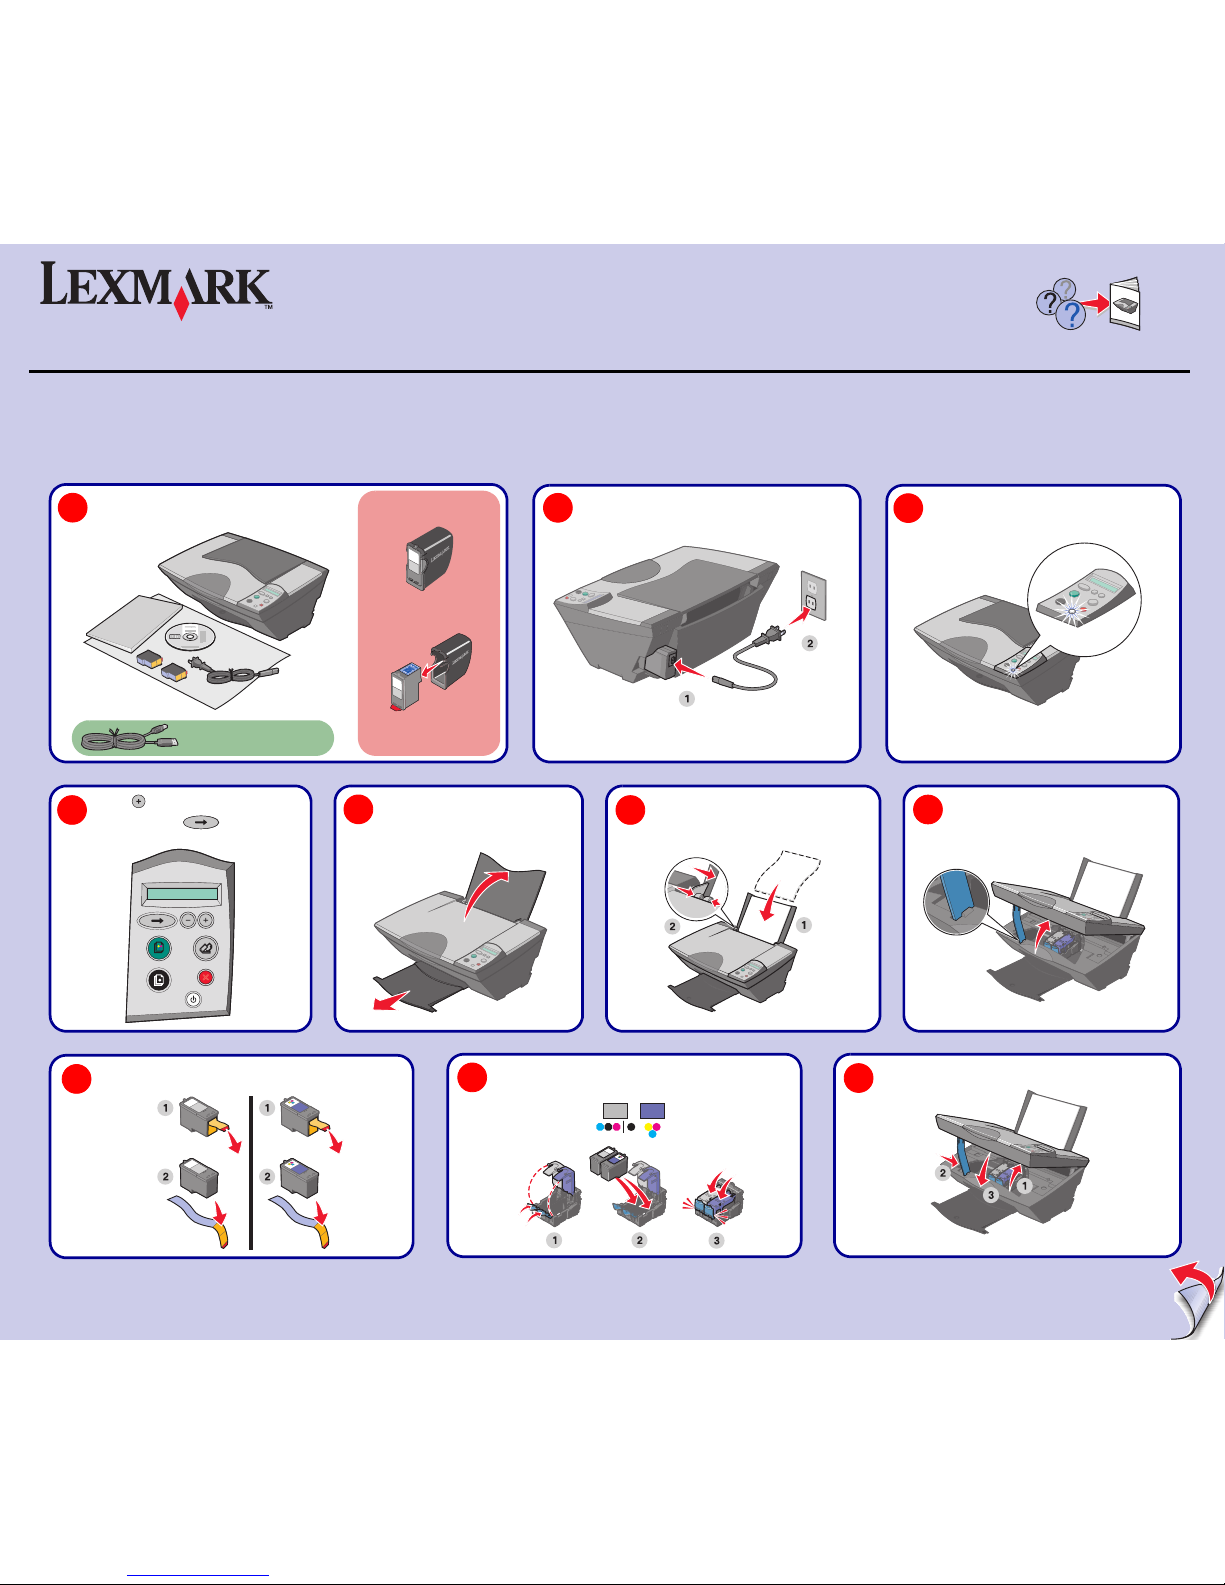
Unpack your All-In-One.
Note: Contents may vary based on geography.
1
Note: You may need to purchase a
USB cable separately.
www.lexmark.com
5200 Series All-In-One
Connect the power cord.
2
Lift the paper support and extend
the paper exit tray.
5
Load paper and adjust the paper guide.
6
21D0070
Make sure the Pow er light is on.
3
Lift the scanner unit.
7
Remove the sticker and tape from the print cartridges.
8
Open the cartridge lids, insert the cartridges, and
snap the lids closed.
9
Close the scanner unit.
10
Safety information
• Use only the power supply provided with this product or the manufacturer's authorized
replacement power supply.
• Connect the power supply cord to an electrical outlet that is near the product and easily
accessible.
• Refer service or repairs, other than those described in the user documen tation, to a pr ofessional
service person.
CAUTION:Do not set up this product or make any electrical or cabling connections, such as the
power supply cord or telephone, during a lightning storm.
Your All-In-One may include a
photo cartridge instead of a
black print cartridge.
Before you continue, remove the
photo cartridge from the print
cartridge storage unit.
Reminder: Save the print
cartridge storage unit to protect
unused cartridges.
Press to scroll to your language
and then press .
4
Steps 11 - 15
P/N 21D0070 E.C. 21D005
© 2004 Lexmark International, Inc. All rights reserved.
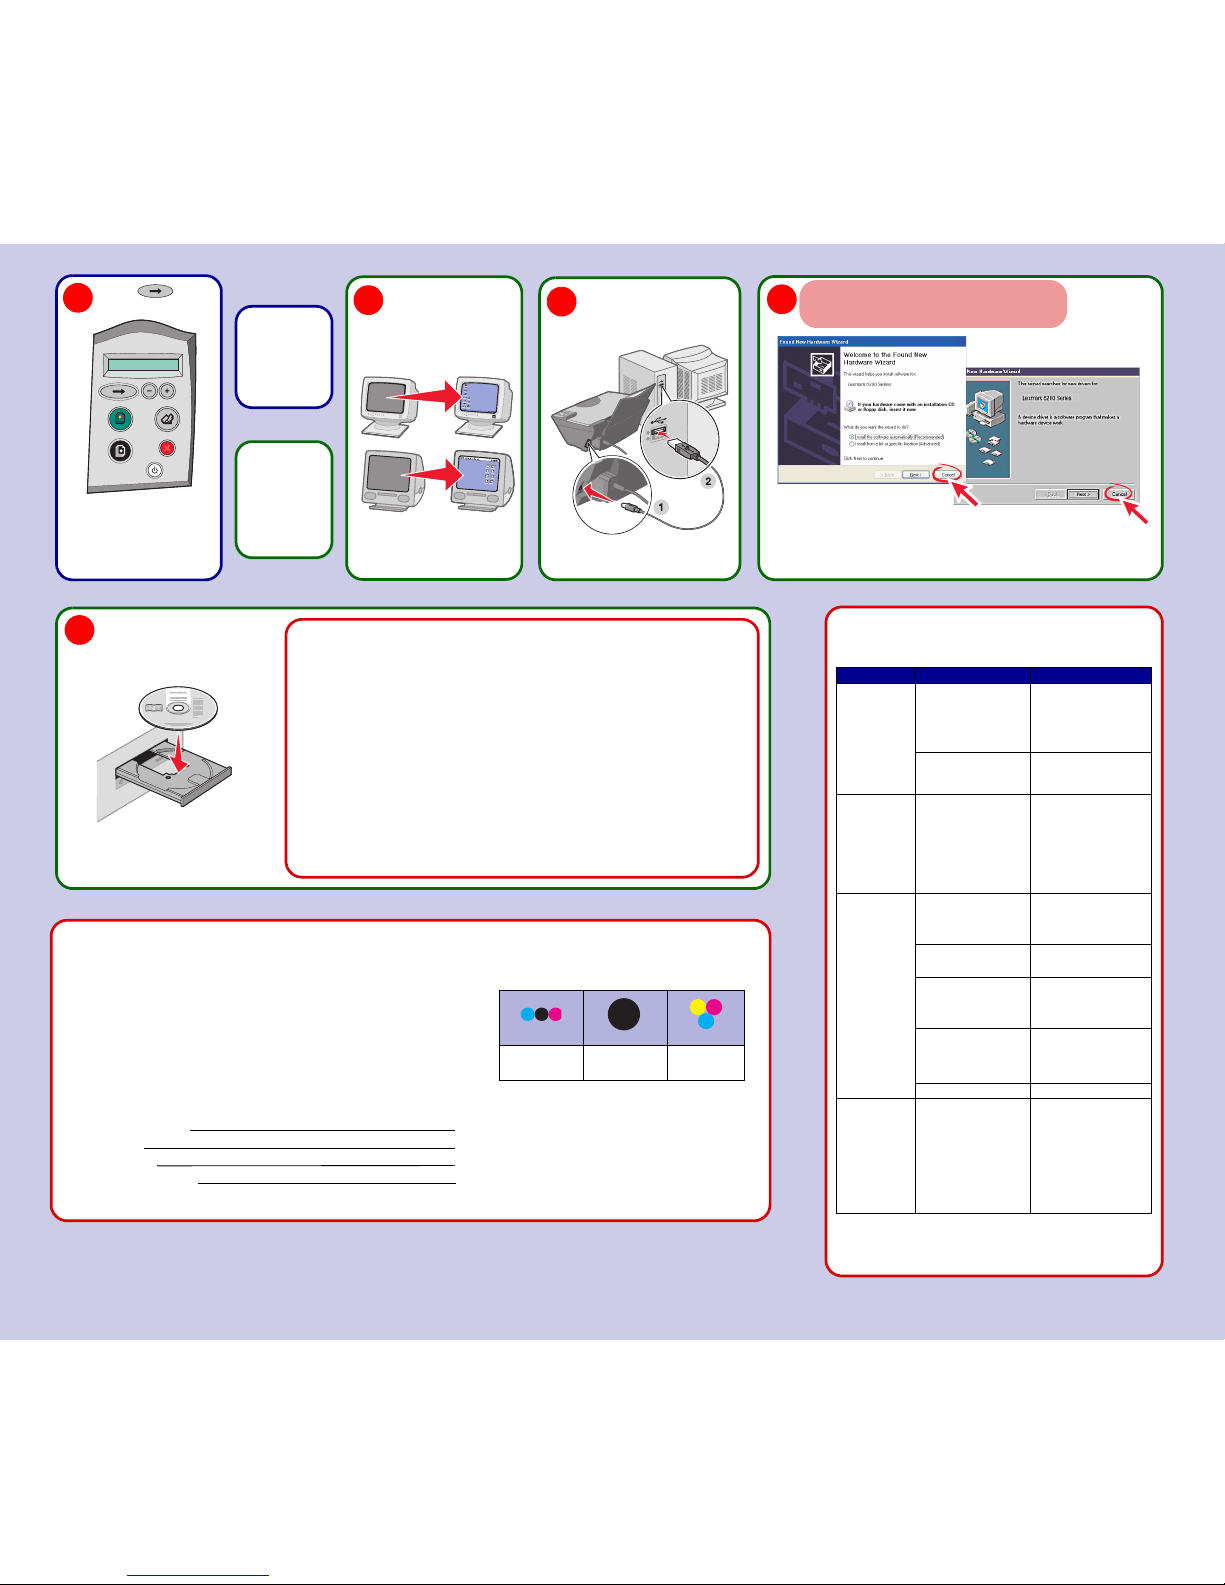
Connect the USB cable.
13
Make sure your
computer is on.
12
Insert the CD. Follow the
instructions on your computer
screen.
15
Have a question?
• Refer to your User’s Guide.
• Visit our Web site: http://support.lexmark.com/.
• Call us at 1-800-332-4120.
Monday-Friday (9:00 AM - 9:00 PM EST)
Saturday (Noon-6:00 PM EST)
Note: Phone number and support times may change without notice.
Record the following information (located on your store receipt and the
back of your printer) and have it read y when you cont act us so that we ma y
serve you faster:
Machine Type number
Serial number
Date purchased
Store where purchased
Press to print
an alignment page.
You may discard the
alignment page after it
prints.
11
If you are using
your All-In-One
with a
computer,
continue to
step 12.
If you are using
your All-In-One
without a
computer, you
are finished.
Setup Troubleshooting
Symptom: Diagnosis: Solution:
The Power light is
not lit
Is the power cord pushed all
the way into the All-In-One?
Disconnect the power cord from
the wall outlet, and then from
the All-In-One. Reconnect the
power cord by pushing it all the
way into the connector on the
All-In-One, and then into the
wall outlet.
Is the All-In-One connected to
a working electrical outlet?
Connect the All-In-One to an
electrical outlet that other
electrical devices have been
using.
Software will not
install
Is your operating system
compatible with the All-InOne?
The All-In-One supports these
operating systems:
• Windows 98
• Windows Me
• Windows 2000
• Windows XP
• Mac OS X version 10.1.5
• Mac OS X version 10.2.3 and
later
Alignment page or
test page will not
print
Is the All-In-One on? Press the Power button. If the
Power light does not come on,
see the “The Power light is not
lit” symptom at the beginning of
this table.
Do you see an error
message?
See “Error messages
troubleshooting” in your User’s
Guide.
Is your All-In-One connected
to your computer through
another device, such as a
USB hub or switch box?
Disconnect the USB cable from
any other devices and directly
connect it between the All-InOne and your computer. For
help, see step 13.
Did you remove the sticker
and tape from the bottom of
each print cartridge?
Are the print cartridges
installed properly?
Remove the print cartridges,
check for the sticker and tape
and then reinsert them. For
help, see step8 and step 9.
Is the paper loaded correctly? See step 6.
The control panel
displays text in the
wrong language
Did you select a language? 1 Press the Power button to
turn on the All-In-One.
2 Press and hold both the
Power and Cancel buttons
for 10 seconds. Language
text appears on the display.
3 Press the + button repeatedly
until the language you want
appears on the display.
4 Press the Arrow button to
select that language.
Need more ink?
The following cartridges work with your printer.
• 31 • 32
• 34
• 33
• 35
If you inserted the CD and the install screen did not appear (Windows):
1 Click Cancel on any New Hardware screens.
2 Eject and reinsert the All-In-One software CD.
If the All-In-One software install screen does not appear:
a From your desktop, double-click My Computer (In Windows XP, click
Start
à My Computer).
b Double-click the CD-ROM drive icon. If n ece ssary, double-click setup.exe.
c When the All-In-One software installation screen appears, click Install.
d Follow the instructions on the screen.
If you inserted the CD and the install screen did not appear (Mac):
1 From your desktop, double-click the Lexmark 5200 Series Installer icon.
2 Double-click Install and follow the instructions on the screen.
Note: New Hardware screens appear only f or Windows users . F or
Macintosh, continue to step 15.
14
Windows 98/Me
Windows 2000/XP
Important!
Click Cancel on all New Hardware screens.
 Loading...