

Page 1
Quick Reference
Printing
Printing from a computer
Note: For labels, card stock, and envelopes, set the paper size
and type in the printer before printing the document.
1
From the document that you are trying to print, open the Print
dialog.
2
If necessary, adjust the settings.
3
Print the document.
Printing from a mobile device
Printing from a mobile device using Google Cloud Print
Google Cloud PrintTM is a printing service that allows you to print
to any Google Cloud Print
Before you begin, make sure that:
•
The printer is registered to the Google Cloud Print server.
•
The Cloud Print plugin is downloaded from the Google Play
store and is enabled in the mobile device.
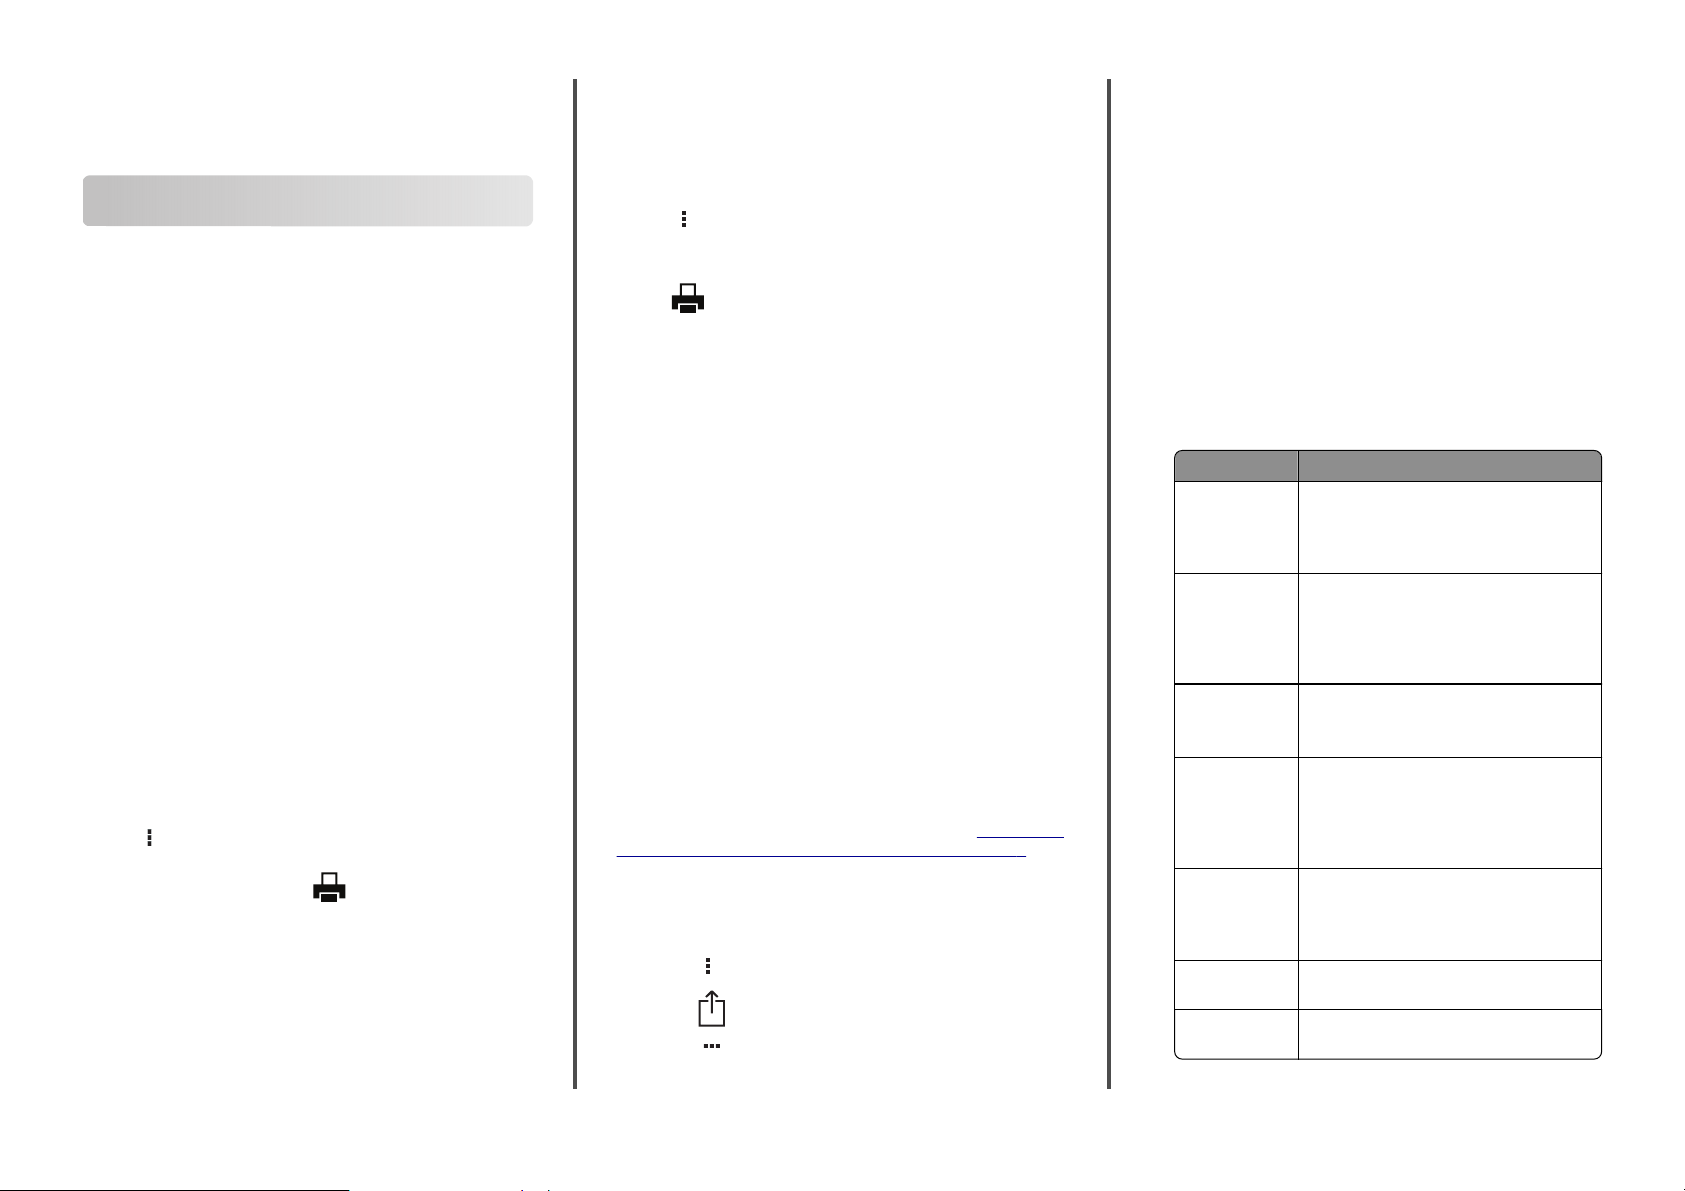
1
From your AndroidTM mobile device, open a document or
select a document from your file manager.
2
Ta p > Print.
3
Select a printer, and then tap .
Printing from a mobile device using Mopria Print Service
Mopria® Print Service is a mobile printing solution for mobile
devices running on Android version 4.4 or later. It allows you to
print directly to any Mopria
‑
ready printer.
‑
certified printer.
Note: Make sure that you download the Mopria Print Service
application from the Google Play store and enable it in the
mobile device.
1
From your Android mobile device, launch a compatible
application or select a document from your file manager.
2
Ta p > Print.
3
Select a printer, and then adjust the settings, if necessary.
4
Ta p .
Printing from a mobile device using AirPrint
AirPrint is a mobile printing solution that allows you to print directly
from Apple devices to an AirPrint
Notes:
•
This application is supported only in some Apple devices.
•
This application is supported only in some printer models.
1
From the home screen of your mobile device, launch a
compatible application.
2
Select an item to print, and then tap the share icon.
3
Ta p Print, and then select a printer.
4
Print the document.
‑
certified printer.
Printing from a mobile device using Wi‑Fi
TM
Direct®
Wi‑Fi Direct® is a printing service that lets you print to any Wi‑Fi
Direct
‑
ready printer.
Note: Make sure that the mobile device is connected to the
printer wireless network. For more information, see
a mobile device to the printer wireless network” on page 5.
1
From your mobile device, launch a compatible application or
select a document from your
2
Depending on your mobile device, do one of the following:
•
Ta p > Print.
•
Ta p > Print.
•
Ta p > Print.
manager.
file
“Connecting
3
Select a printer, and then adjust the settings, if necessary.
4
Print the document.
Configuring confidential
1
Open a web browser, and then type the printer IP address in
the address field.
Notes:
•
View the printer IP address on the home screen. The IP
address appears as four sets of numbers separated by
periods, such as 123.123.123.123.
•
If you are using a proxy server, then temporarily disable
it to load the web page correctly.
2
Click Settings > Security > Confidential Print Setup.
3
Configure the settings.
Use To
Max Invalid PIN Set the number of times an invalid PIN can
Confidential Job
Expiration
Repeat Job
Expiration
Verif y Job
Expiration
Reserve Job
Expiration
Require All Jobs
to be Held
Keep duplicate
documents
be entered.
Note: When the limit is reached, the print
jobs for that user name are deleted.
Set the expiration time for confidential print
jobs.
Note: Confidential held jobs are stored in
the printer until they are released or
deleted manually.
Set the expiration time for a repeat print job.
Note: Repeat held jobs are stored in the
printer memory for reprinting.
Set the expiration time that the printer prints
a copy before printing the remaining copies.
Note: Verify jobs print one copy to check if
it is satisfactory before printing the
remaining copies.
Set the expiration time that the printer stores
print jobs.
Note: Reserve held jobs are automatically
deleted after printing.
Set the printer to hold all print jobs.
Set the printer to print all documents with the
same file name.
jobs
1
Page 2
Maintaining the printer
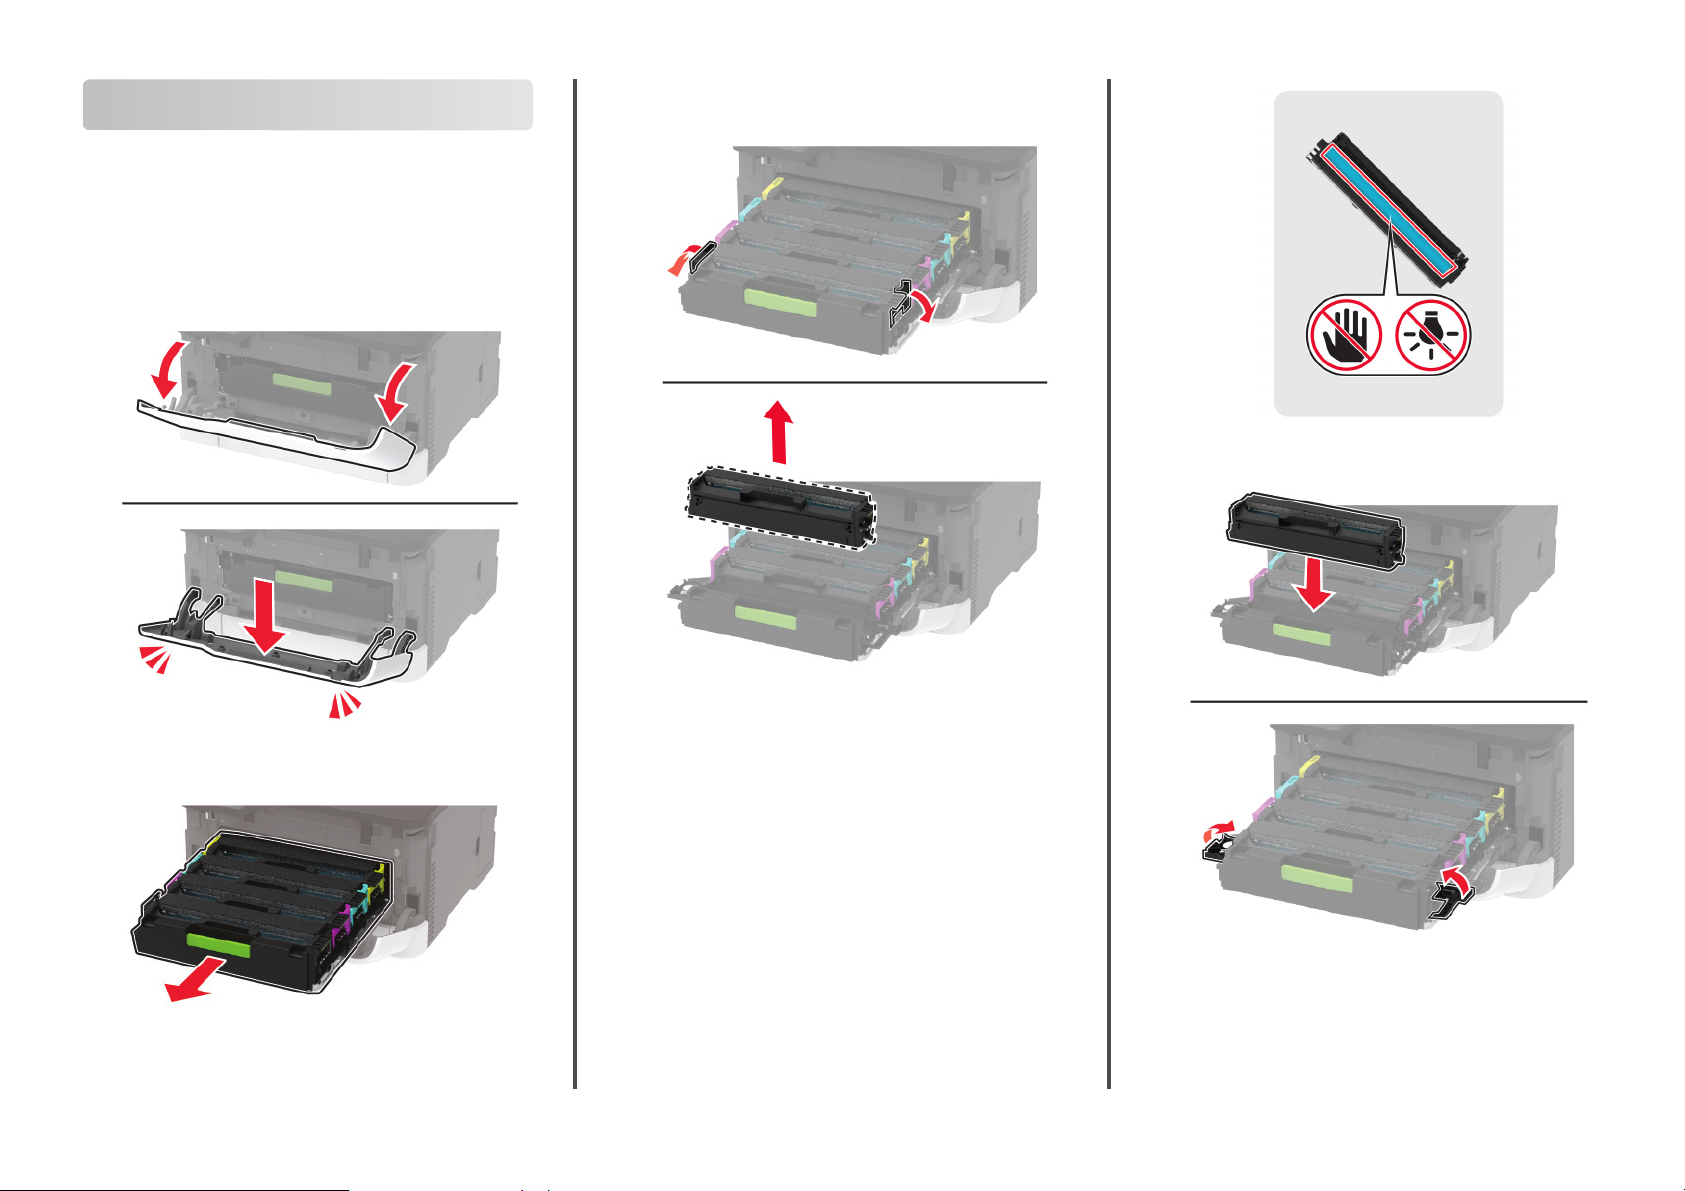
Replacing a print cartridge
Note: If the tray is extended, then remove it before replacing a
cartridge.
1
Open the front door, and then firmly push it down.
3
Remove the used print cartridge.
5
Insert the new print cartridge.
2
Pull out the print cartridge tray.
4
Unpack the new print cartridge.
Warning—Potential Damage: Do not expose the underside
of the print cartridge to direct light. Extended exposure to
light may cause print quality problems.
Warning—Potential Damage: Do not touch the underside of
the print cartridge. Doing so may aect the quality of future
print jobs.
2
6
Insert the print cartridge tray, and then close the door.
Page 3
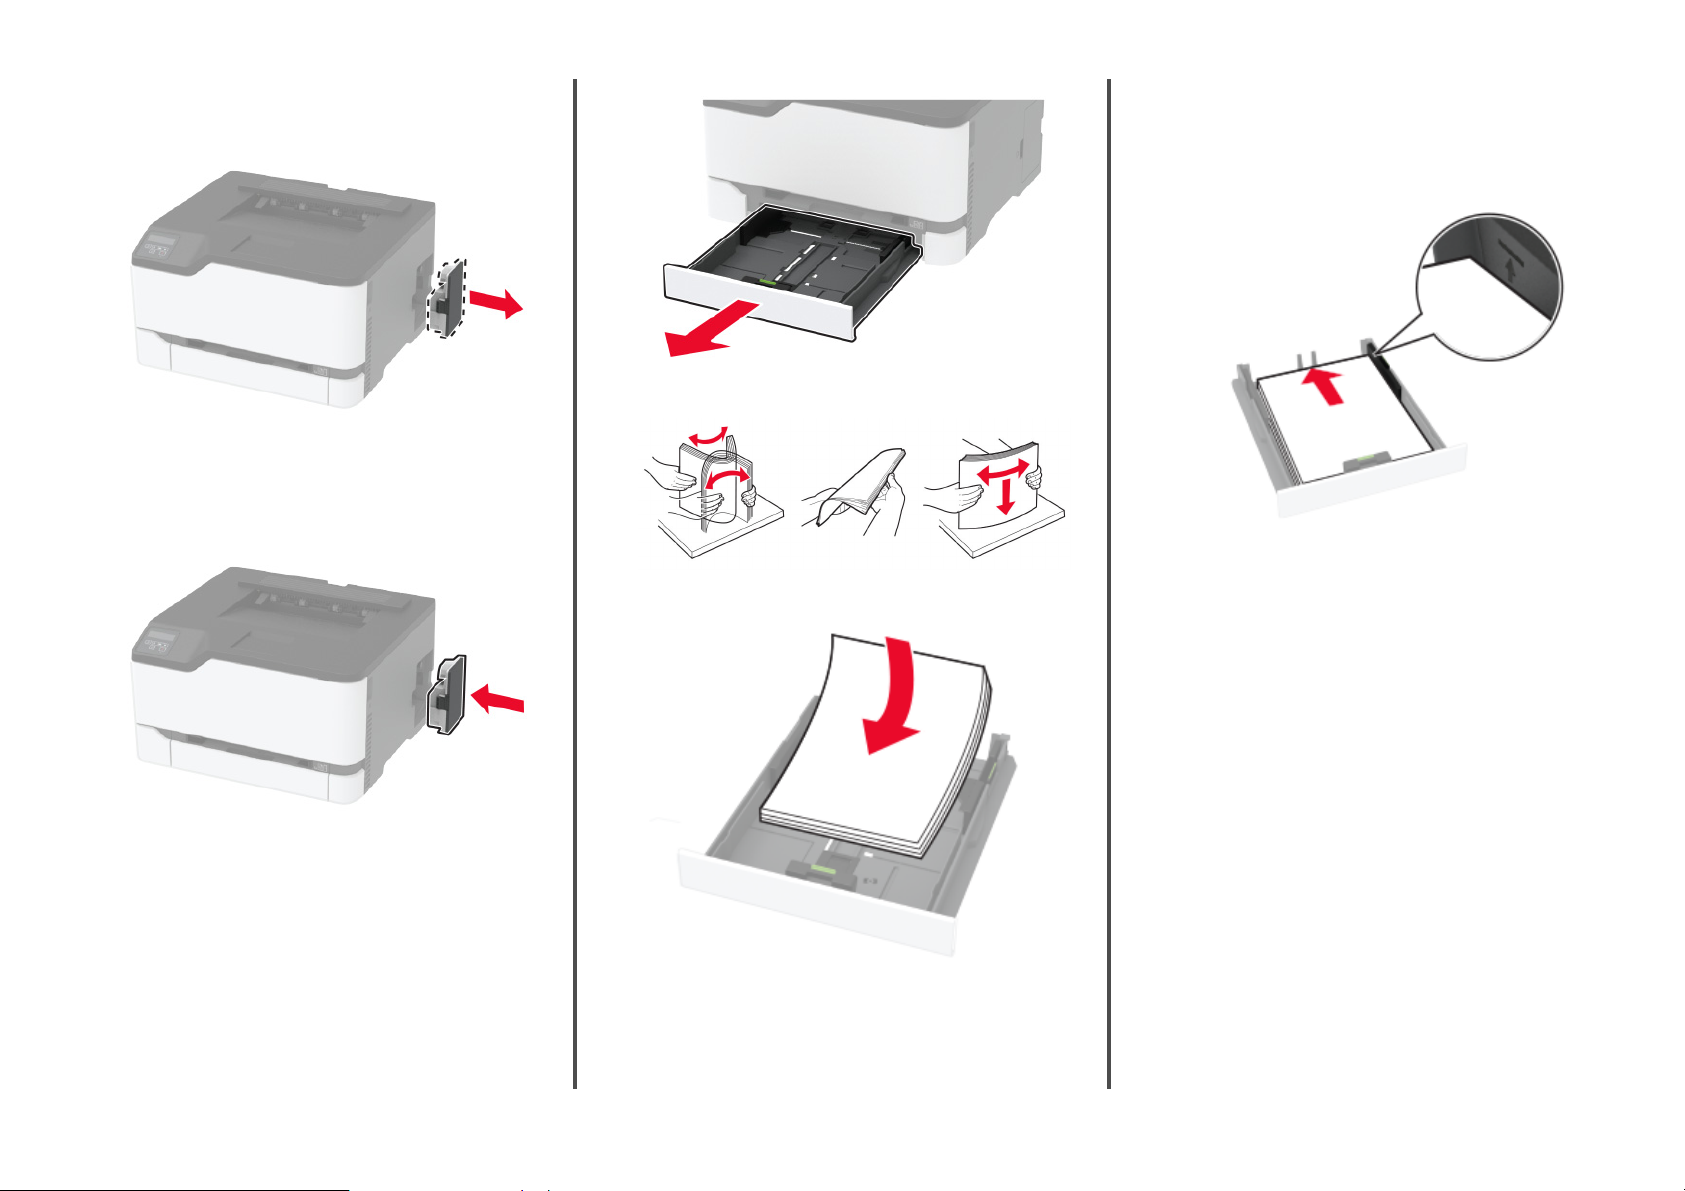
Replacing the waste toner bottle
1
Remove the used waste toner bottle.
Note: To avoid spilling the toner, place the bottle in an
upright position.
2
Unpack the new waste toner bottle.
3
Insert the new waste toner bottle.
2
Flex, fan, and align the paper edges before loading.
3
Load the paper stack with the printable side faceup.
•
Load letterhead facedown with the header toward the
front of the tray for two
•
Do not slide paper into the tray.
•
To avoid paper jams, make sure that the stack height is
below the maximum paper
‑
sided printing.
indicator.
fill
Loading the tray
1
Remove the tray.
Note: To avoid paper jams, do not remove the tray while the
printer is busy.
Notes:
•
Load letterhead faceup with the header toward the back
of the tray for one
‑
sided printing.
3
Page 4

4
Adjust the guides to match the size of the paper that you are
loading.
Loading the manual feeder
1
Adjust the guide to match the size of the paper that you are
loading.
2
Load a sheet of paper with the printable side faceup.
•
Load letterhead with the printable side faceup and the top
edge entering the printer first for one
‑
sided printing.
•
Load letterhead with the printable side facedown and the
top edge entering the printer last for two
•
Load envelope with the flap side down and against the right
side of the paper guide.
‑
sided printing.
5
Insert the tray.
If necessary, set the paper size and paper type from the control
panel to match the paper loaded.
3
Feed the paper until its leading edge gets pulled in.
Warning—Potential Damage: To avoid paper jams, do not
force paper into the manual feeder.
Setting the paper size and type
1
From the control panel, navigate to:
Settings >
> Paper Size/Type > > select a paper source
2
Set the paper size and type.
4
> Paper > > Tra y Con figur atio n >
Page 5

Connecting a mobile device to the printer wireless network
1
Enable Wi‑Fi Direct in the printer. From the home screen,
navigate to:
Paper jam in the tray
1
Remove the tray and the manual feeder.
Settings >
> Enable Wi‑Fi Direct >
Notes:
•
The Wi‑Fi Direct SSID and password are generated
automatically. To view the Wi
password, go to the Wi
•
You can also change the SSID and password, if
necessary.
2
Connect your mobile device to the printer wireless network.
> Network/Ports > > Wireless >
‑
Fi Direct SSID and
‑
Fi Direct menu.
Clearing jams
Identifying jam locations
Notes:
•
When Jam Assist is set to On, the printer
pages or pages with partial prints after a jammed page has
been cleared. Check your printed output for blank pages.
•
When Jam Recovery is set to On or Auto, the printer reprints
jammed pages.
flushes
blank
Jam locations
1 Standard bin
2 Manual feeder
3 Tr ay
4 Rear door
2
Remove the jammed paper.
Note: Make sure that all paper fragments are removed.
5
Page 6

3
Insert the manual feeder and the tray.
4
Open the rear door.
CAUTION—HOT SURFACE: The inside of the printer
might be hot. To reduce the risk of injury from a hot
component, allow the surface to cool before touching
it.
5
Remove the jammed paper.
Note: Make sure that all paper fragments are removed.
Paper jam in the manual feeder
1
Remove the tray and the manual feeder.
3
Insert the manual feeder and the tray.
Paper jam in the rear door
1
Open the rear door.
CAUTION—HOT SURFACE: The inside of the printer
might be hot. To reduce the risk of injury from a hot
component, allow the surface to cool before touching
it.
2
Remove the jammed paper from any of the following areas:
Note: Make sure that all paper fragments are removed.
6
Close the door.
2
Remove the jammed paper.
Note: Make sure that all paper fragments are removed.
6
Page 7

•
Fuser area
•
Below the fuser area
•
Duplex unit
3
Close the door.
7
 Loading...