


Forms Printer 2500 Series
User's Guide
July 2007 www.lexmark.com
Lexmark and Lexmark with diamond design are trademarks of Lexmark International, Inc., registered in the United States and/or other countries.
All other trademarks are the property of their respective owners.
© 2007 Lexmark International, Inc.
All rights reserved.
740 West New Circle Road
Lexington, Kentucky 40550

Contents
Safety information.............................................................................7
Learning about the printer...............................................................8
Printer overview.....................................................................................................................................................................8
Applying control panel overlays......................................................................................................................................9
Understanding the printer features and functions.................................................................................................10
Printing a demonstration page......................................................................................................................................12
Printing a network setup page.......................................................................................................................................14
Printing from Windows or DOS......................................................................................................................................14
Using IBM emulation mode.............................................................................................................................................15
Using Epson emulation mode........................................................................................................................................15
Using Okidata MICROLINE emulation mode.............................................................................................................16
Using the control panel...................................................................17
Understanding the control panel buttons.................................................................................................................17
Understanding the control panel lights......................................................................................................................19
Setting the printer online or offline..............................................................................................................................20
Advancing paper.................................................................................................................................................................20
Using the Load/Unload function...................................................................................................................................20
Locking and unlocking the control panel...................................................................................................................20
Selecting a Tractor mode..................................................................................................................................................21
Selecting and locking a font............................................................................................................................................21
Disabling Font Lock............................................................................................................................................................21
Selecting and locking a pitch..........................................................................................................................................22
Disabling Pitch Lock...........................................................................................................................................................22
Loading paper...................................................................................23
Setting the forms thickness lever..................................................................................................................................23
Paper paths............................................................................................................................................................................25
Using the Tear Off function..............................................................................................................................................25
Loading continuous paper...............................................................................................................................................26
Loading continuous forms using the push tractor............................................................................................................. 26
Front loading continuous forms using the pull tractor .................................................................................................... 29
Bottom loading continuous forms using the pull tractor ................................................................................................ 32
Loading cut forms...............................................................................................................................................................37
Contents
2

Loading a cut form or envelope manually ............................................................................................................................ 37
Aligning the left margin ............................................................................................................................................................... 39
Setting Top-of-Form...........................................................................................................................................................40
Setting Top-Of-Form for continuous forms in push mode.............................................................................................. 40
Setting Top-Of-Form for continuous forms in pull mode ................................................................................................ 41
Setting Top-Of-Form for a cut form or an envelope .......................................................................................................... 41
Setting Top-Of-Form in a macro ............................................................................................................................................... 42
Paper and specialty media guide..................................................43
Paper types and sizes supported by the printer......................................................................................................43
Changing tractor positions............................................................44
Push tractor position..........................................................................................................................................................44
Pull tractor position............................................................................................................................................................44
Converting the push tractor to pull tractor position..............................................................................................45
Converting the pull tractor to push tractor position..............................................................................................46
Understanding Setup mode and menu options........................48
Using Setup mode...............................................................................................................................................................48
Changing menu settings (an example).......................................................................................................................49
Setup Mode - Main menu.................................................................................................................................................50
Main menu options........................................................................................................................................................................ 50
Forms Macro options..................................................................................................................................................................... 51
Data options ..................................................................................................................................................................................... 52
Control options................................................................................................................................................................................ 54
Emulation options .......................................................................................................................................................................... 55
Interface options ............................................................................................................................................................................. 56
Maintaining the printer...................................................................57
Ordering supplies................................................................................................................................................................57
Removing the ribbon cartridge......................................................................................................................................57
Cleaning the printer............................................................................................................................................................57
Recycling Lexmark products...........................................................................................................................................58
Administrative support...................................................................59
Restoring the factory default settings..........................................................................................................................59
Supporting IPSec.................................................................................................................................................................60
Supporting SNMPv3...........................................................................................................................................................60
Using 802.1x authentication...........................................................................................................................................61
Contents
3

Troubleshooting...............................................................................62
Checking an unresponsive printer................................................................................................................................62
Testing the printer...............................................................................................................................................................62
Checking the printer status..............................................................................................................................................63
Adjusting character (bidirectional) alignment..........................................................................................................65
Solving printing problems...............................................................................................................................................66
Printer test works, but the printer does not print when attached to the computer .............................................. 66
Printer is noisy.................................................................................................................................................................................. 67
Printer sounds like it is printing, but does not print .......................................................................................................... 67
Printer alarm sounds...................................................................................................................................................................... 67
Printer goes to the Tear Off position before the print job finishes............................................................................... 67
Buttons do not work, except for Start/Stop, FormFeed, Tear Off and Load/Unload.............................................. 68
Printer power switch is on, but the power light is off........................................................................................................ 68
Left margin moves to the right during printing .................................................................................................................. 68
Incorrect line length; lines do not start at the left margin ............................................................................................... 68
Printer speed slows ........................................................................................................................................................................ 68
Incorrect characters print, left margin changes, or printing stops ............................................................................... 69
Printing continues beyond the edges of the continuous forms ................................................................................... 69
Selected font or pitch is not printing or is changing ......................................................................................................... 69
Solving paper feed problems..........................................................................................................................................69
Paper is jammed in the printer .................................................................................................................................................. 69
Paper is jammed in the Auto Sheet Feeder........................................................................................................................... 70
Paper fed in the Auto Sheet Feeder jams at the printer entrance ................................................................................ 70
Paper jam in the Tractor 2 Feeder............................................................................................................................................. 70
Printer does not feed paper ........................................................................................................................................................ 70
Printer does not feed from the optional Tractor 2 Feeder............................................................................................... 71
Printer does not feed from the Auto Sheet Feeder ............................................................................................................ 71
The optional Tractor 2 Feeder positions paper at incorrect Top-Of-Form position ............................................... 71
The Auto Sheet Feeder feeds paper at an incorrect rate.................................................................................................. 71
The Auto Sheet Feeder places paper at the wrong Top-Of-Form position ............................................................... 72
Paper fed from the Auto Sheet Feeder is skewed............................................................................................................... 72
The Auto Sheet Feeder feeds multiple sheets ..................................................................................................................... 72
Solving print quality problems.......................................................................................................................................73
Print is too light ............................................................................................................................................................................... 73
Dots are missing or print quality is poor ................................................................................................................................ 73
Characters are wrong or missing .............................................................................................................................................. 74
Forms are smudged or print is too dark ................................................................................................................................. 74
Incorrect number of lines on a page........................................................................................................................................ 74
Graphics do not print .................................................................................................................................................................... 74
Incorrect line spacing or overprinting occurs ...................................................................................................................... 75
Contacting Customer Support..................................................................................................75
Contents
4

Notices................................................................................................76
Edition notice........................................................................................................................................................................76
Power consumption...........................................................................................................................................................79
Index...................................................................................................83
Contents
5

6

Safety information
Connect the power supply cord to a properly grounded electrical outlet that is near the product and easily accessible.
CAUTION—POTENTIAL INJURY: Do not twist, bind, crush, or place heavy objects on the power cord. Do not
subject the power cord to abrasion or stress. Do not pinch the power cord between objects such as furniture
and walls. If the power cord is misused, a risk of fire or electrical shock results. Inspect the power cord regularly
for signs of misuse. Remove the power cord from the electrical outlet before inspecting it.
Refer service or repairs, other than those described in the user documentation, to a professional service person.
This product is designed, tested, and approved to meet strict global safety standards with the use of specific Lexmark
components. The safety features of some parts may not always be obvious. Lexmark is not responsible for the use of
other replacement parts.
CAUTION—SHOCK HAZARD: Do not set up this product or make any electrical or cabling connections, such
as the power supply cord or telephone, during a lightning storm.
CAUTION—POTENTIAL INJURY: The printhead may be hot. If so, allow it to cool before touching.
CAUTION—SHOCK HAZARD: Make sure that all external connections (such as Ethernet and telephone system
connections) are properly installed in their marked plug-in ports.
Safety information
7
Learning about the printer
Printer overview
The LexmarkTM Forms Printer 2500 Series printers are available in 9- and 24-wire narrow- and wide-carriage models.
Depending on the model you have chosen, your printer may look slightly different from the printer illustrated.
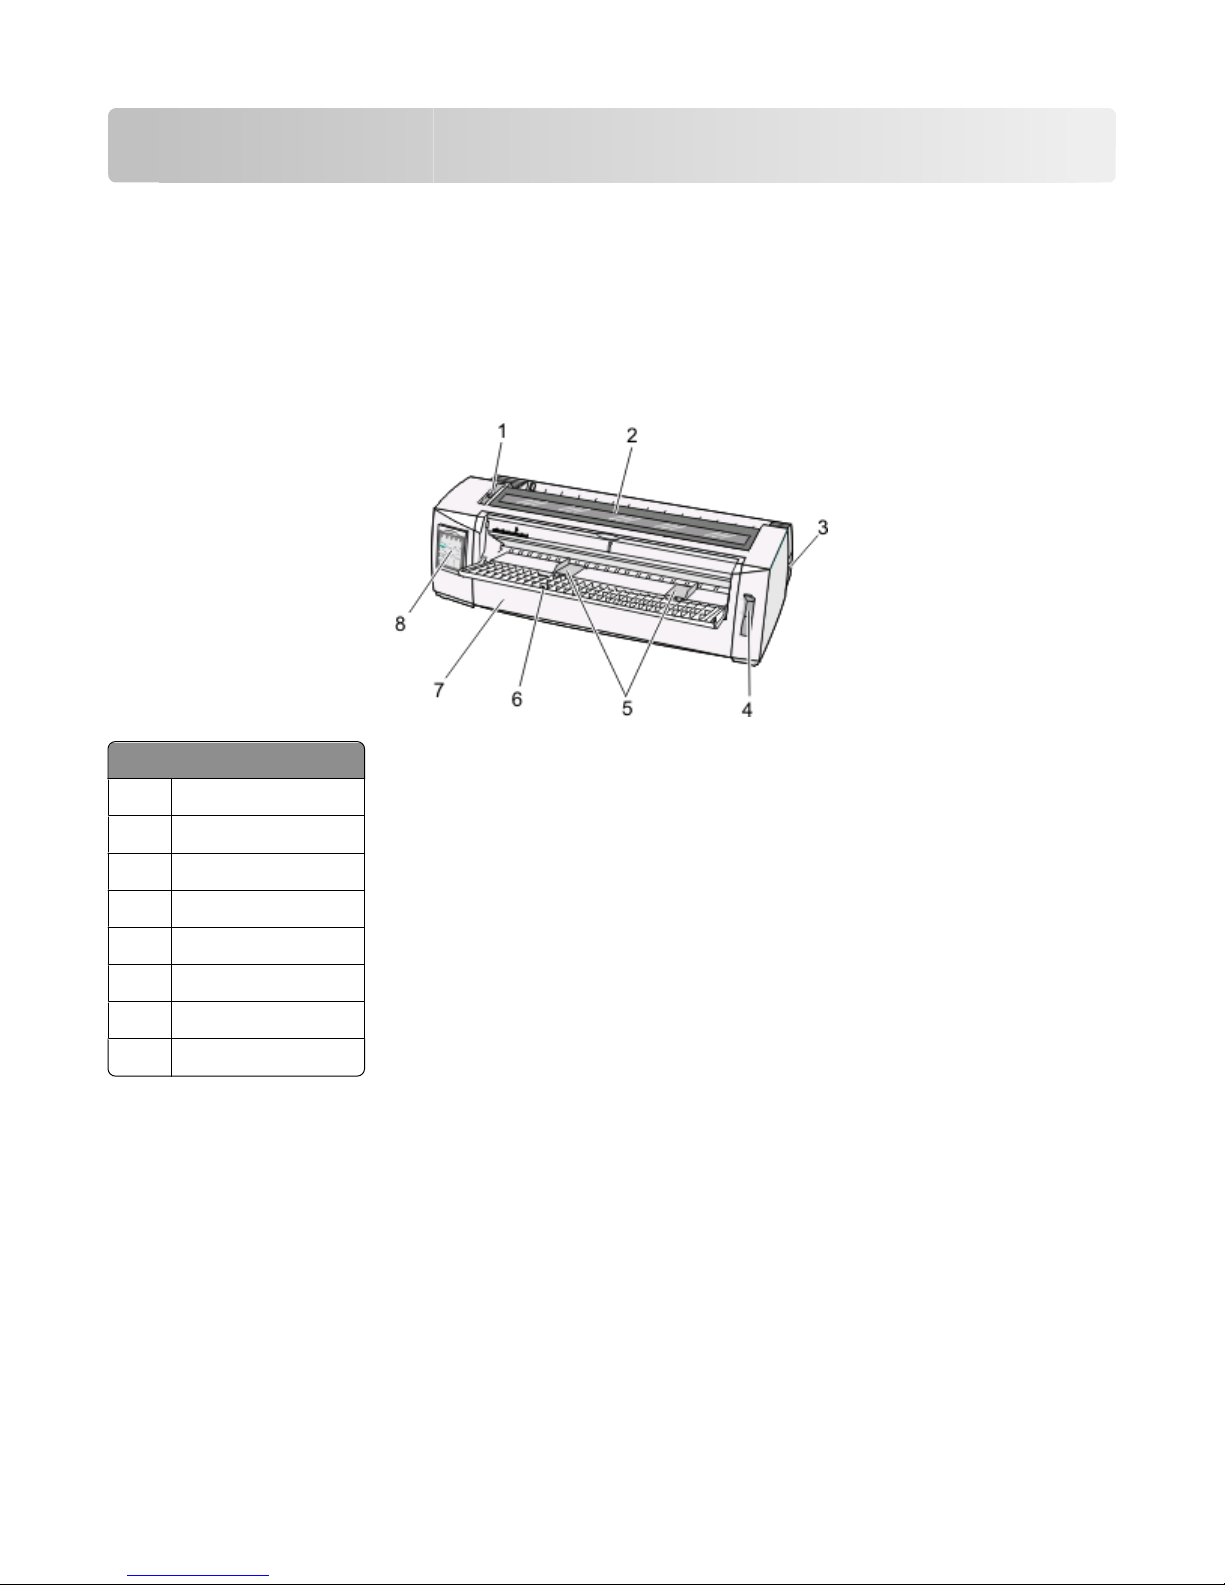
Printer front view
Part name
Forms thickness lever
1
2 Ribbon access cover
Power switch
3
Paper select lever
4
Paper guides
5
Manual feeder
6
7 Front cover
Control panel
8
Learning about the printer
8
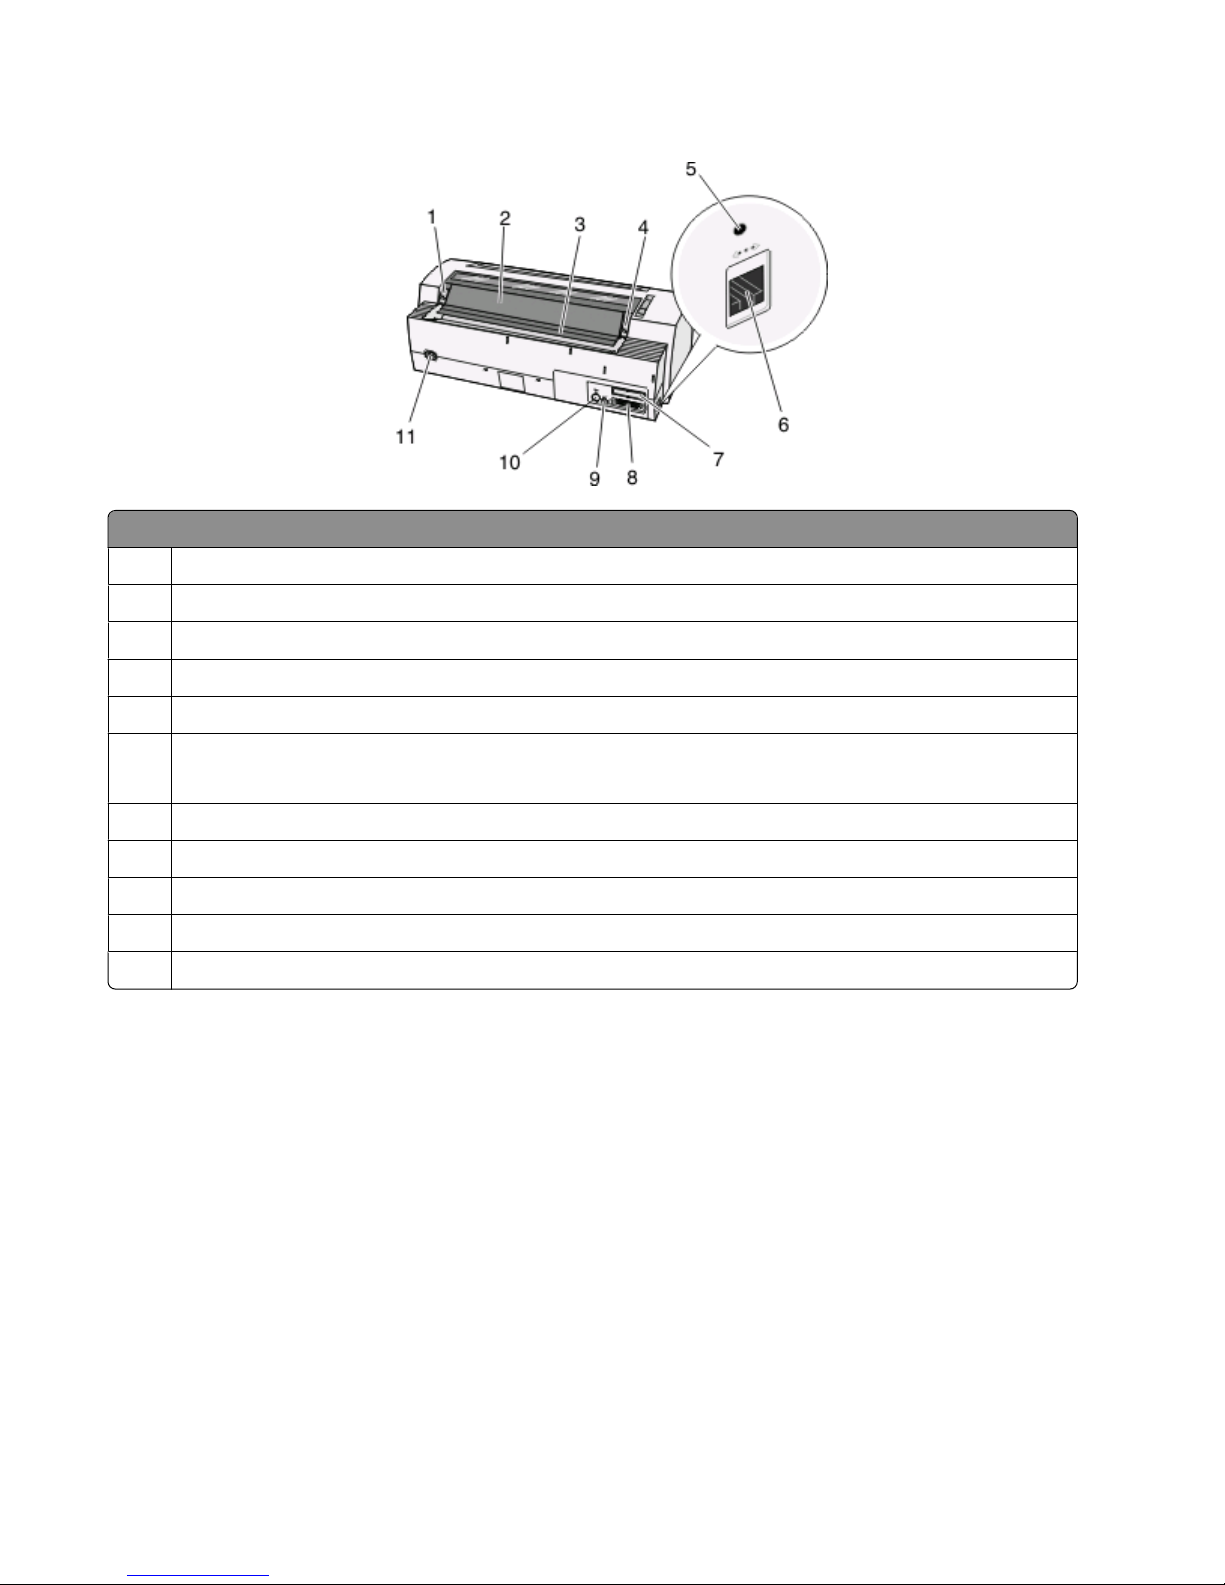
Printer back view
Part name
1 Ribbon access cover latch
Acoustic flap
2
Tear off bar
3
Ribbon access cover latch
4
Recessed network button
5
6 Network connector
Warning—Potential Damage: Do not touch the Network connector except when the printer is turned off.
Optional serial interface knockout
7
8 Parallel connector
USB connector
9
Optional Tractor 2 connector knockout
10
Power cord connector
11
Applying control panel overlays
The Lexmark Forms Printer 2500 Series printers have control panel overlays available in different languages.
Note: There is an overlay label for layer 1 of the control panel and a different overlay label for layer 2 of the control
panel.
To apply an overlay in the language of your choice:
1 Peel the backing off of the layer 1 label, and then place the overlay directly over layer 1 of the control panel.
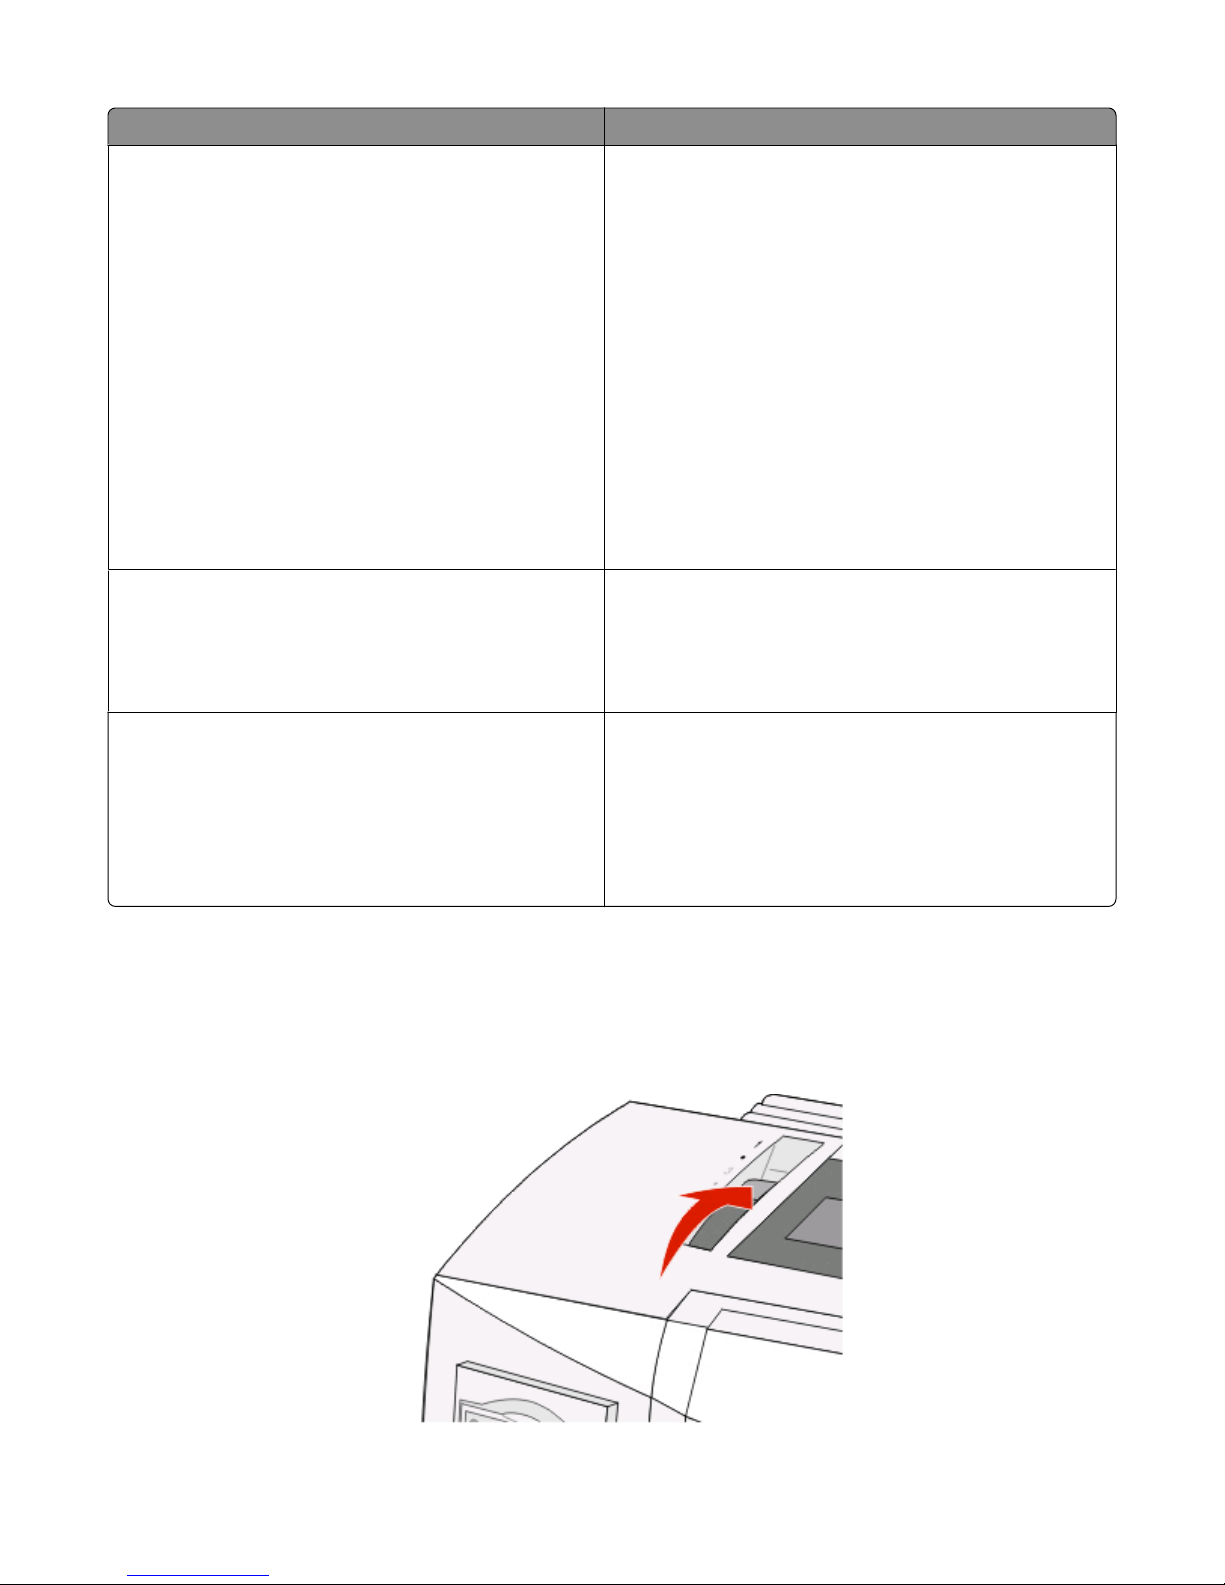
2 Open the control panel cover to access layer 2.
3 Peel the backing off of the layer 2 label, and then place the overlay directly over layer 2 of the control panel.
4 Close the control panel cover.
Learning about the printer
9

Understanding the printer features and functions
Printer features by model
Feature/function 2580/2581 2590/2591
Multi-speed printing
FastDft (Fast Draft)
• 10 characters per inch (cpi)
• 440 characters per second (cps)
• 520 cps
• 410 cps
• 520 cps
• 12 cpi
Draft 309 cps 274 cps
Courier
Gothic
Character spacing
Note: Fast Draft supports only 10, 12,
and 15 pitch.
Resident fonts
77 cps (Near-Letter-Quality mode) 91 cps (Letter-Quality mode)
Prints in 10, 12, 15, 17, and 20 cpi, as well
as proportional spacing
• Fast Draft
• Draft
• Gothic
• Courier
Prints in 10, 12, 15, 17, 20, and 24 cpi,
as well as proportional spacing
• Fast Draft
• Draft
• Gothic
• Courier
• Prestige
• Presentor
• Orator
• Script
Print styles
Note: This feature is available through
printer commands.
Highlighting capability:
• Double-high
• Double-strike
• Double-wide
• Emphasized
• Italics
• Overscore
• Subscript
• Superscript
• Underline
Highlighting capability:
• Double-high
• Double-strike
• Double-wide
• Emphasized
• Italics
• Overscore
• Subscript
• Superscript
• Underline
• Shading
• Outline
Graphics printing
Note: This feature supports existing
graphics programs.
Multiple-part forms
Resolution of up to 144 x 240 dots per
square inch (dpi)
Prints original plus five copies (six-part
forms)
Learning about the printer
10
Resolution of up to 360 x 360 dpi
Prints original plus three copies
(four-part forms)

Feature/function All models
Control panel Button control for Load/Unload, Tear Off, Font, Setup, Pitch,
Macro, and paper movement functions. Control panel lights
indicate current status.
Font lock
• Locks the font selection you make from the control panel
so it is not changed by your program.
• Font lock is deactivated when you turn the printer off
unless it is set in the printer default settings.
Pitch lock
• Locks pitch selections you make from the control panel
so they are not changed by your program
• Pitch lock is deactivated when you turn the printer off
unless it is set in the printer default settings.
Load/Unload Loads and unloads continuous form paper (tractor fed)
Macro function The printer has the capability of storing four unique
document formats to enhance flexibility when using
different styles of pre-printed forms.
Manual front loading for cut sheets Enables printing on cut sheets or envelopes
Tear Off bar
• Assists in removing printed continuous forms at the
perforation
• Assists in tearing non-perforated forms
• Reduces the amount of paper used, thus reducing costs
Adjustable tractor Lets you handle continuous form paper without purchasing
additional options. It can be repositioned to function as:
• Push tractor
• Pull tractor
Control panel disable Limits control panel functions to the Start/Stop, FormFeed,
Tear Off, and Load/Unload buttons only, thus limiting the
potential that untrained operators may accidentally change
forms settings
Ribbon cartridge Contains the inked fabric ribbon
Printer tests
• Power-on Self Test
• Printer test page—Determines whether your machine
has print problems
• Demonstration Print
Box and line drawings Prints tables, charts, and other graphics as shown on your
computer screen
Greek and math symbols Prints a variety of symbols used in mathematical equations,
including subscript and superscript
Code pages Selects the characters and symbols corresponding to various
country languages
Learning about the printer
11
Feature/function All models
Bar code function These bar codes are resident in the printer:
• 3 of 9
• Codabar (NW-7)
• Code 39
• Code 128
• Interleaved 2 of 5
• UPC-A
• UPC-E
• EAN 8
• EAN 13
• PostNet
Note: For more information on the Bar code function, see the
Technical Reference available on the Lexmark Web site at
www.lexmark.com.
Software compatibility
• Compatible with all programs that support IBM
emulation or Epson emulation
• Compatible with Okidata MICROLINE emulation (with the
M320 turbo), which is standard on the 9-wire printer and
2580/2581 printer models.
Interface connection
Warning—Potential Damage: Do not touch the Network
connector except when the printer is turned off.
Allows the printer to work with all computers with
compatible interface connections
Both parallel and USB interfaces are standard. The internal
serial interface (RS-232) is optional for the 2580/2581 and
2590/2591 models.
The Network option is standard on the 2580n/2581n and
2590n/2591n models.
Printing a demonstration page
The following steps explain how to load a single sheet of paper so you can print a demonstration page.
1 Set the forms thickness lever to position 1.
Learning about the printer
12
2 Turn the printer on.
The Power light comes on solid, the Paper Out light is blinking, and the current default font light is on solid.
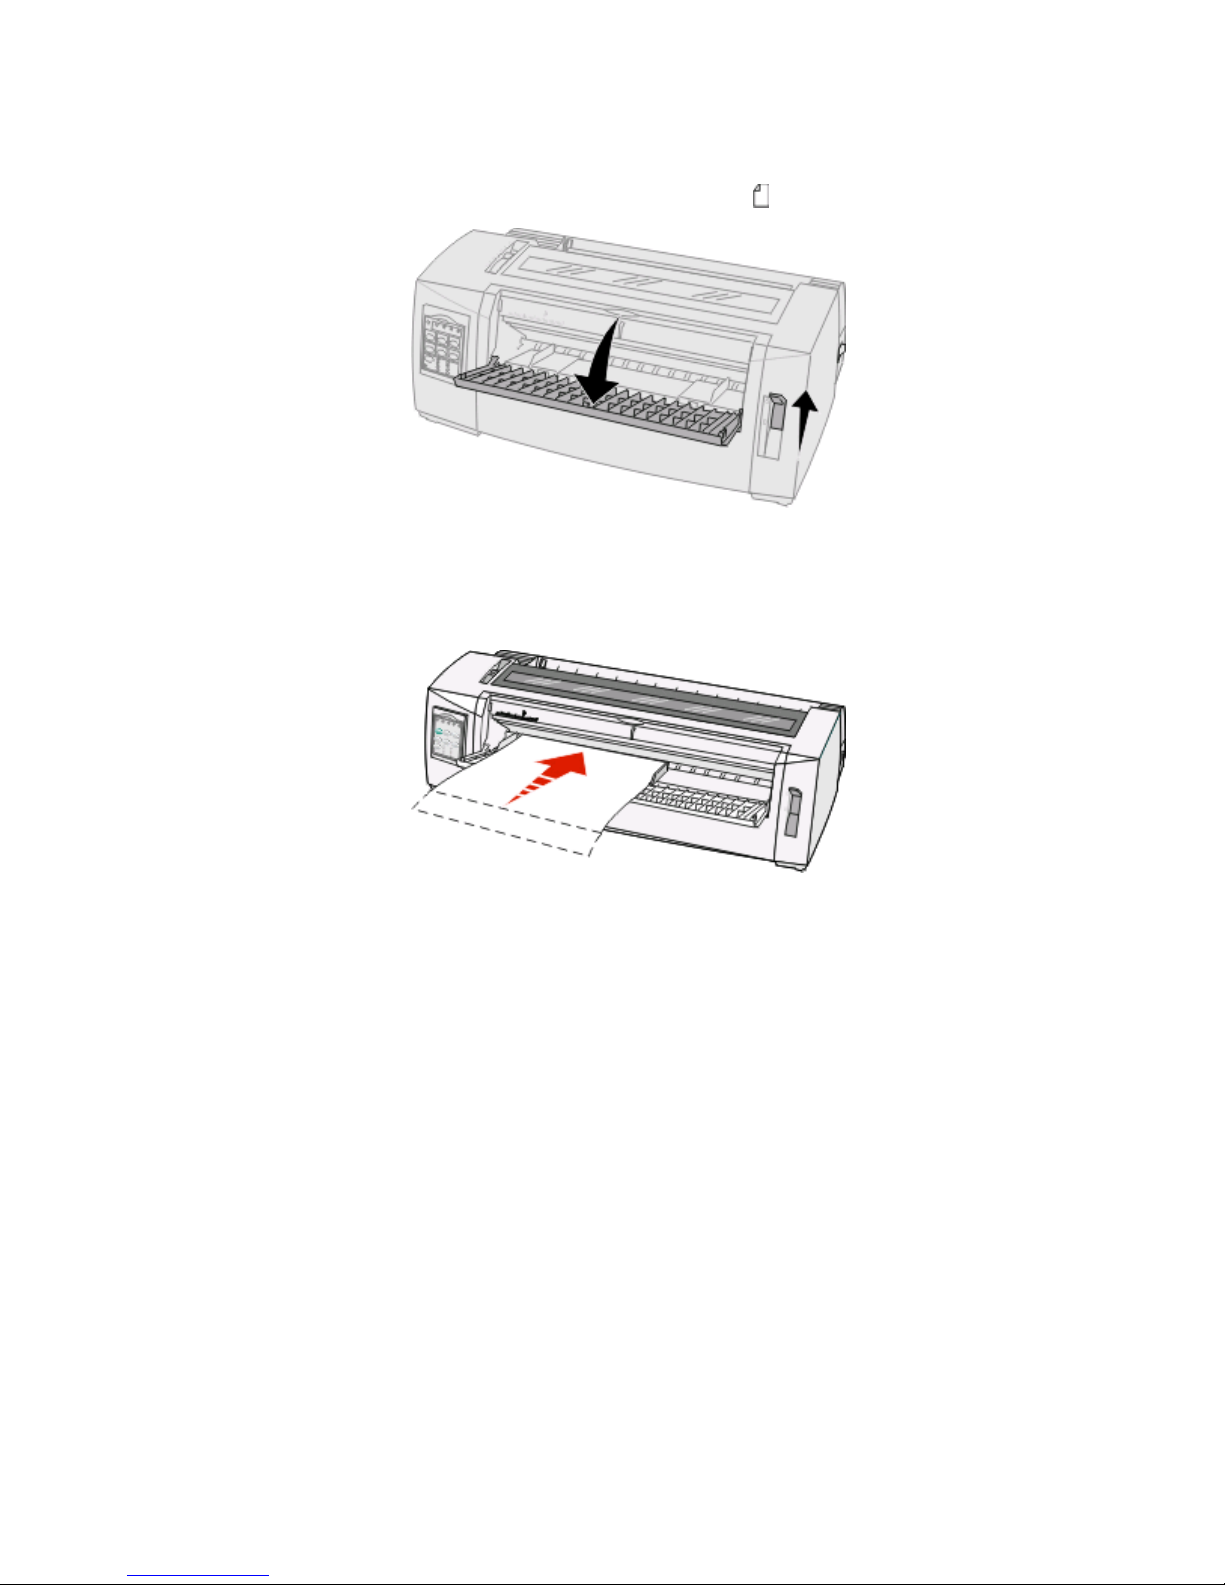
3 Open the manual feeder, and then move the paper select lever to the position.
4 Move the left paper guide to the right until it stops.
5 Insert a single sheet of paper into the front of the printer.
6 Adjust the right paper guide to fit the paper width.
7 Continue to push the paper into the printer until the Paper Out light stops blinking.
• If Auto Cut Sheet Load is set to On, the paper feeds automatically to the Top-Of-Form.
• If Auto Cut Sheet Load is set to Off, press FormFeed.
8 Turn the printer off.
9 While pressing Font on the control panel, turn the printer on.
Hold down the Font button until all the control panel lights blink.
10 Release the Font button.
The Power and Ready lights stay on, and the demonstration page prints.
Learning about the printer
13

Printing a network setup page
If the printer is attached to a network, print a network setup page to verify the network connection and find the
printer address.
Note: This function is disabled if a USB cable is connected.
1 Make sure the printer is on and paper is loaded.
2 With a paper clip or the tip of a pen, press the recessed button located just above the Network connection.
The network setup page prints.
Warning—Potential Damage: Do not touch the Network connector except when the printer is turned off.
3 Check the first section on the network setup page, and confirm that the status is Connected.
If the status is Not Connected, the LAN drop may not be active, or the network cable may be malfunctioning.
Consult a system support person for a solution, and then print another network setup page.
4 Check the network setup page to find the IP Address and the Fully Qualified Domain Name.
The Fully Qualified Domain Name is useful in situations where the Address changes. For instance, the Address
changes if the printer is moved; however, the Fully Qualified Domain Name does not change.
Note: The network setup page also provides important network configuration information.
Printing from Windows or DOS
Windows
When printing from a Windows application, use the Windows Forms Printer 2500 Series driver available from the
Lexmark Web site at www.lexmark.com.
DOS
Follow the instructions that came with your DOS application to see what printer drivers are supported for your level
of DOS. Most applications let you specify the type of printer you are using so the application can take full advantage
of the printer features.
Learning about the printer
14

Using IBM emulation mode
If the printer is using IBM mode (the factory default setting), select a printer from your program in the following
preferred order.
For Lexmark Forms Printer 2580/2581 users:
1 Forms Printer 2580/2581
2 Forms Printer 2480/2481 plus
3 Forms Printer 2380/2381 plus
4 2380 plus/2381 plus
5 2380/2381 IBM Personal Printer Series
6 4201/4202 IBM Proprinter
TM
III
7 4201/4202 IBM Proprinter II
8 IBM ExecJet
TM
Printer Model 4072
For Lexmark Forms Printer 2590/2591 users:
1 Forms Printer 2590/2591
TM
II
2 Forms Printer 2490/2491
3 Forms Printer 2390 plus/2391 plus
4 2390 plus/2391 plus
5 2390/2391 IBM Personal Printer Series II
6 4212 IBM Proprinter 24P
7 2390 IBM PS/1 Printer
8 4207/4208 Proprinter X24/XL24
9 IBM ExecJet Printer Model 4072
10 2205 IBM PS/1 Printer
If your software does not allow you to select one of the printers in this list, you may need to customize your printer
for Epson emulation mode.
Note: The printer driver you select in your program must match the emulation model you select for your printer.
Printer drivers other than the 2500 series support most, but not all, of the printer capabilities.
Using Epson emulation mode
If the printer is using Epson mode, select a printer from your application in the following preferred order.
Note: The printer driver you select in your application must match the emulation mode you select for your printer.
Printer drivers other than the 2500 series support most, but not all, of the printer capabilities.
Learning about the printer
15

For Forms Printer 2580/2581 users:
1 Epson FX850
2 Epson FX 1050
For Forms Printer 2590/2591 users:
1 Epson LQ850
2 LQ 1050
Using Okidata MICROLINE emulation mode
If the printer has the Okidata MICROLINE emulation option installed, select a printer from your application in the
following preferred order.
1 Oki 320/321 Turbo
2 Oki 320/321
Learning about the printer
16
Using the control panel
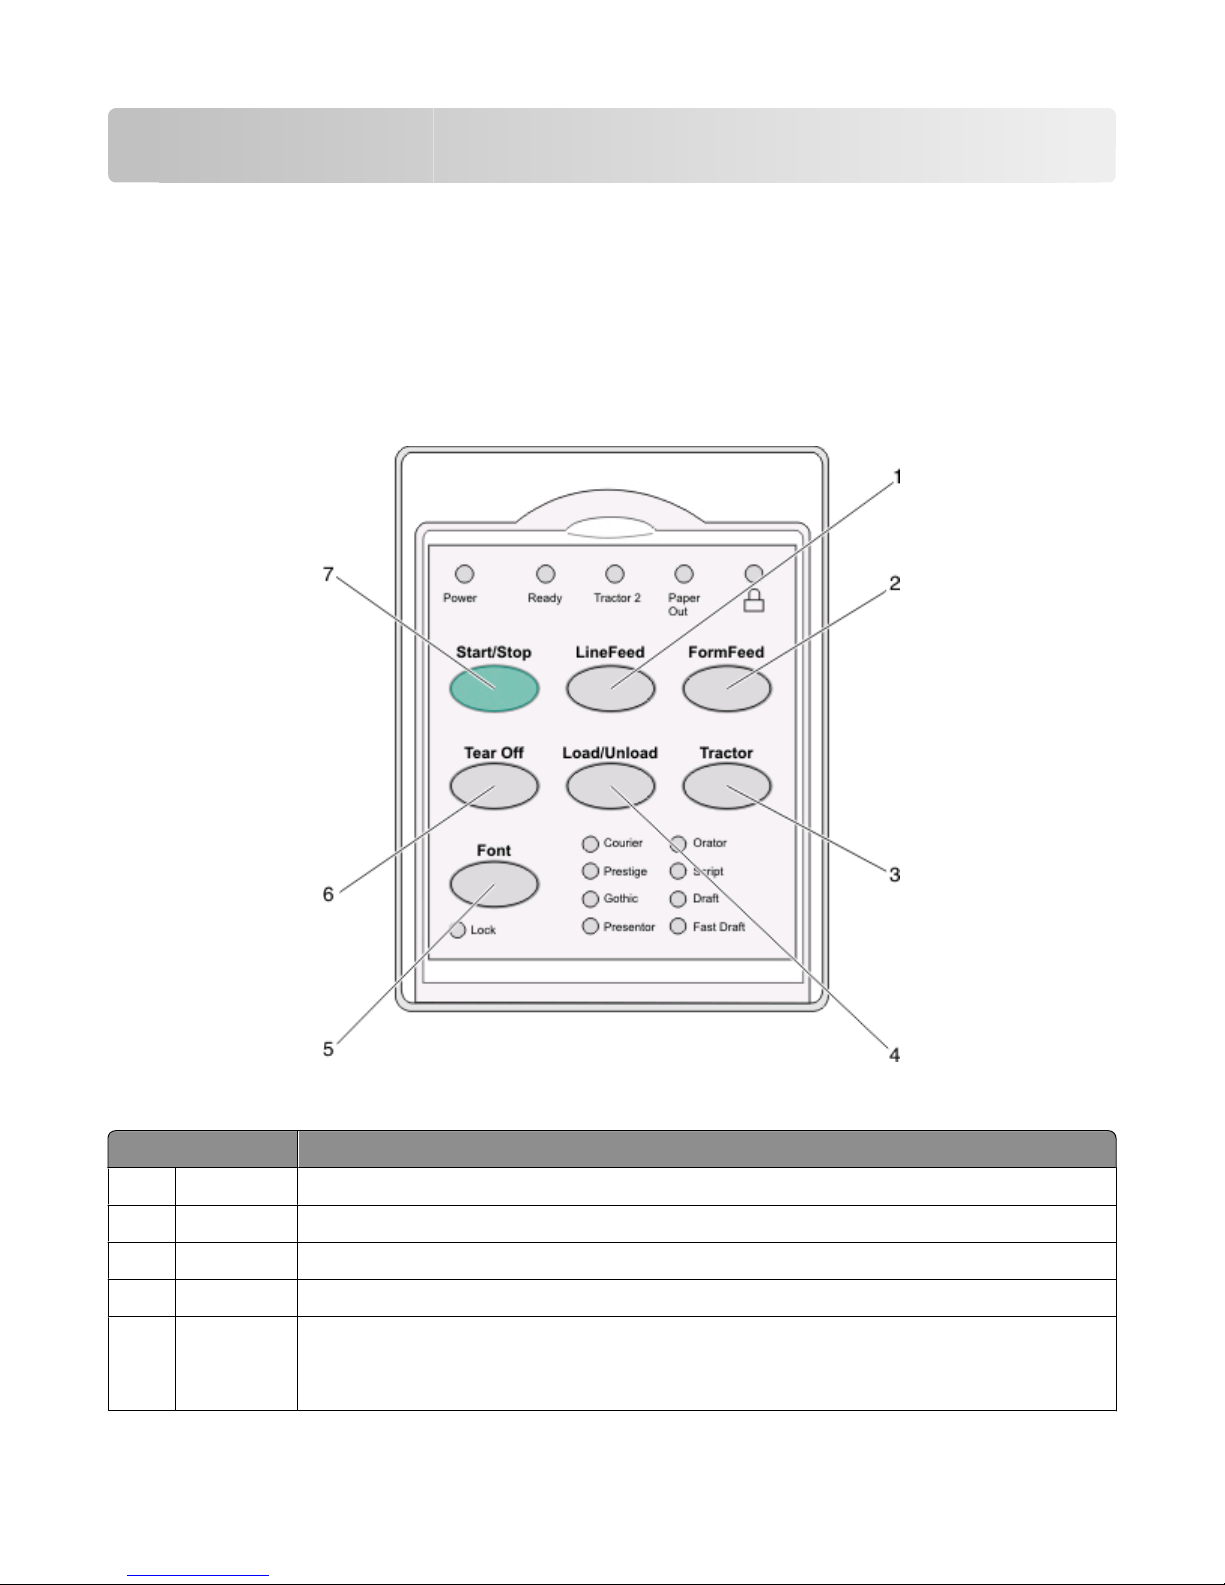
Understanding the control panel buttons
The control panel has two layers of functionality:
• Layer 1, with the control panel cover closed, contains basic functions like FormFeed, Tear Off, and taking the
printer online/offline.
• Layer 2, with the control panel cover open, contains more advanced functionality. Use layer 2 to select a macro
and change printer menu settings.
Layer 1 control panel buttons
Button Function
LineFeed Advances the paper one line
1
FormFeed Advances the paper to the next Top-Of-Form
2
3 Tractor Alternates between Tractor 1 and Tractor 2 if the optional Tractor 2 is installed
Load/Unload Loads paper to the current Top-Of-Form or unloads paper to a parked position
4
5 Font Selects one of the resident font styles
Note: Repeatedly pressing the Font button cycles through the printer font selections. If you
continue pressing Font through a second pass, the font selections will be locked.
Using the control panel
17

Button Function
Tear Off Alternates the paper between Tear Off and Top-Of-Form
6
7 Start/Stop Communicates the on/off status of the printer
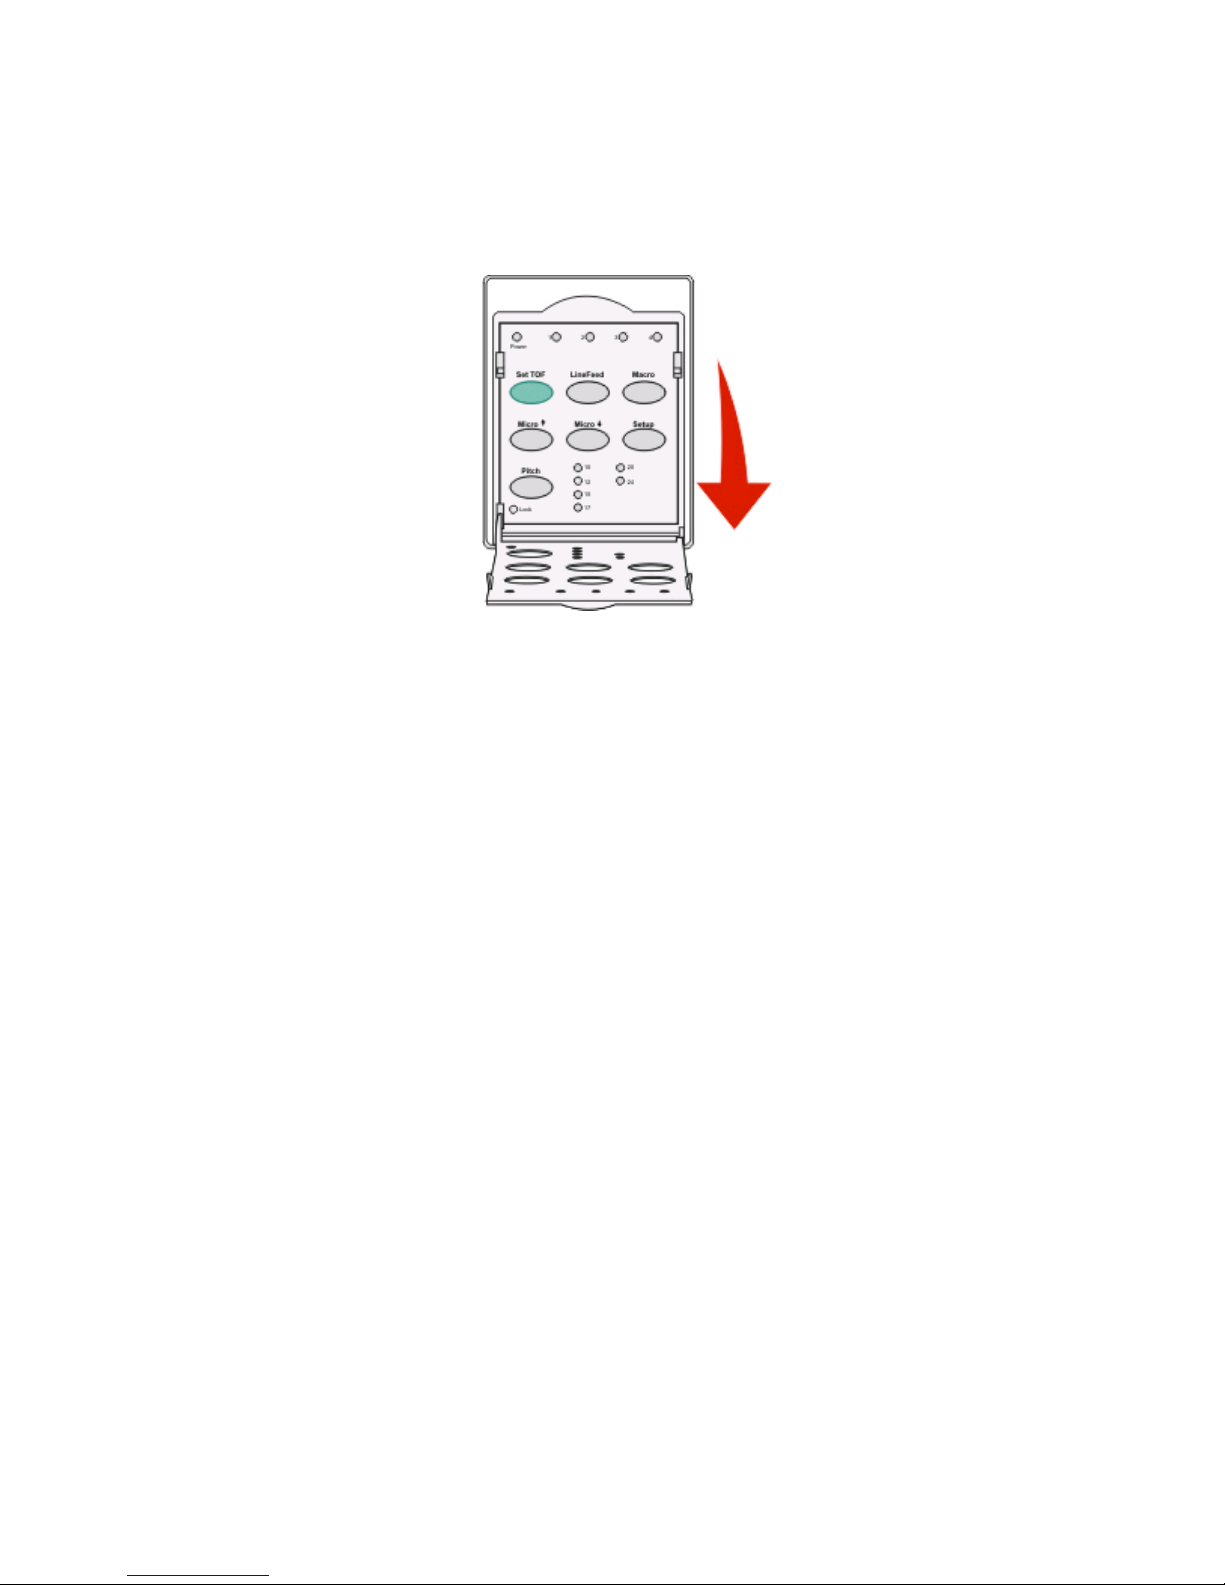
Layer 2 control panel buttons
Button Function
LineFeed
1
Macro To support different styles of pre-printed forms, selects between four document formats
2
Setup Press to enter Setup mode. Lets you change the default values and modes of printer operation.
3
4
Micro
5 Pitch Sets the character pitch to: 10 cpi, 12 cpi, 15 cpi, 17 cpi, 20 cpi, or proportional spacing
Advances the paper one line. Press and hold LineFeed to advance the paper 5 micro movements, and
then go into continuous feed.
Feeds the paper downward in small incremental movements. Press and hold to select continuous feed.
Notes:
• On 2590/2591 models, you can also select 24 cpi.
• Fast Draft supports only 10, 12, and 15 pitch.
6
Micro
Feeds the paper upward in small incremental movements. Press and hold to select continuous feed.
Using the control panel
18
Button Function
Set TOF Sets the Top-Of-Form, which is the position of the first print line on the page
7
Understanding the control panel lights
The following tables describe the light patterns on the control panel.
Layer 1 control panel lights
Light Light status What it means
Power On The printer is online.
Ready On The printer is online and ready to print.
Blinking The printer is receiving data.
Off The printer is offline.
Tractor 2 On Tractor 2 is activated.
Note: The optional Tractor 2 Feeder must be installed.
Paper Out Off Paper is loaded in the printer.
Blinking The printer is out of paper.
On A printer error has occurred.
On The control panel is locked, restricting the use of the following buttons: Start/Stop, FormFeed,
Tear Off, and Load/Unload.
Font On One of the printer resident fonts is selected.
Off A downloaded font is selected.
Font Lock On Font Lock is active. Printer resident fonts are locked.
Layer 2 control panel lights
Light Light status What it means
Macro On The specified macro function is active.
Off No macro is being used, or Macros are disabled in the Setup menu.
Pitch On One of the printer resident pitches is selected.
Pitch Lock On Pitch Lock is active. Printer resident fonts are locked.
Using the control panel
19

Setting the printer online or offline
The printer must be online to accept data.
• To set the printer online, press Start/Stop.
The Ready light comes on. If paper is not loaded, the Paper Out light blinks. When online, the printer is ready to
receive print jobs.
• To set the printer offline, press Start/Stop.
The Ready light turns off. The printer finishes printing the current line and then stops. To resume printing, press
Start/Stop until the Ready light comes on.
Advancing paper
Use these control panel buttons to advance the paper when the printer is not printing:
Note: When you are printing continuous forms, the first time you press LineFeed, it moves the paper from the Tear
Off position to the current print line before advancing the paper.
• Press LineFeed to advance the paper to the next line.
• Press FormFeed to advance the paper to the Top-Of-Form on the next page or to eject the cut form.
To change the Tear Off position on the current page:
• Press LineFeed to move the paper incrementally.
• Press Tear Off to move the paper to the Top-Of-Form.
Using the Load/Unload function
Use the Load/Unload button to unload continuous forms from the printer to allow printing on either a cut form or
an envelope.
The Load/Unload function works only when the tractor unit is in the push position.
You can also use the Load/Unload button to load continuous forms into the printer when the paper path is clear, or
to change one type of pre-printed form to another.
Locking and unlocking the control panel
To restrict the use of printer functions to the Start/Stop, FormFeed, Tear Off, and Load/Unload buttons, lock the
control panel. When the panel is locked, the
To lock the control panel:
1 Turn the printer off.
2 Press and hold Load/Unload and Tractor while turning the printer on.
To unlock the control panel:
1 Turn the printer off.
2 Press and hold Load/Unload and Tractor while turning the printer on.
light comes on.
Using the control panel
20

Selecting a Tractor mode
Note: Because this function unloads continuous forms from the currently selected tractor, tear off excess paper prior
to initiating.
When the optional Tractor 2 Feeder is installed, you can press Tractor to unload the current continuous forms and
switch to the continuous forms loaded in the other tractor source.
The Tractor 2 light comes on when the optional Tractor 2 Feeder is selected.
Selecting and locking a font
The printer data stream may contain control codes which select a particular font. To override the codes, you can
select and lock a particular font of your choice.
1 To select a font, press Font repeatedly until you see the font light on next to the selection you want.
2 Continue pressing Font until the Font Lock light comes on, and the font you want is selected.
The font is locked until the printer is turned off.
Disabling Font Lock
1 To disable Font Lock, press Font repeatedly until the Font Lock light turns off and the font you want is selected.
2 If the printer is offline, press Start/Stop.
The printer is ready to print when the Ready light comes on.
Using the control panel
21
Selecting and locking a pitch
The printer data stream may contain control codes which select a particular pitch. To override the codes, you can
select and lock a particular pitch of your choice.
1 To select a pitch, open the control panel to layer 2.
2 Press Pitch repeatedly until the pitch light comes on next to the pitch you want.
3 Continue pressing Pitch until the Pitch Lock light comes on and the pitch you want is selected.
The pitch is locked until the printer is turned off.
Disabling Pitch Lock
1 To disable Pitch Lock, press Pitch repeatedly until the Pitch Lock light turns off and the pitch you want is selected.
2 Close the control panel.
3 If the printer is offline, press Start/Stop.
When the Ready light comes on, the printer is ready to print.
Using the control panel
22
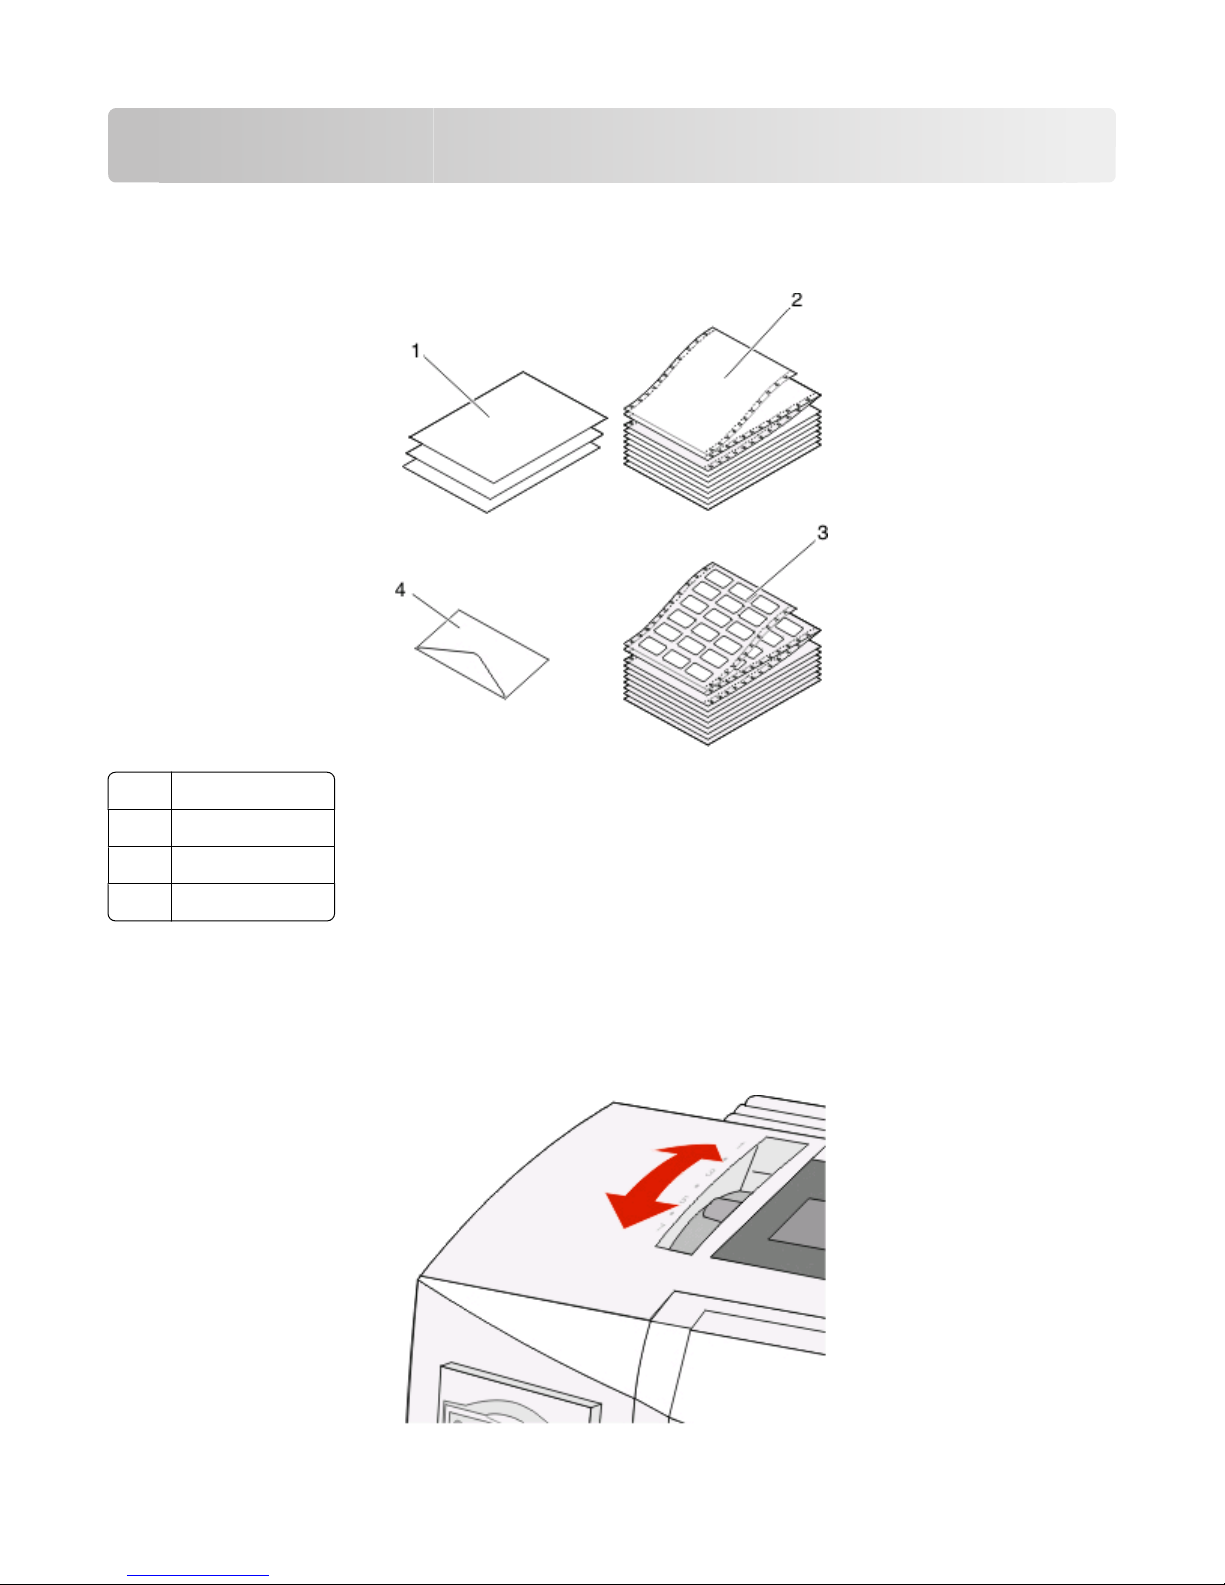
Loading paper
T hi s s ec ti o n e xp la in s h o w t o l oa d c on t in uo us fo r ms , c ut sh ee t fo rm s, la be ls an d e nv elop es . I t a ls o inc lu de s i nf or ma ti on
about paper orientation, setting the forms thickness lever, and using the push and pull tractors for different paper
paths.
Cut sheet forms
1
Continuous forms
2
Envelopes
3
4 Labels
Setting the forms thickness lever
Use the forms thickness lever to make adjustments for printing on various forms depending on the paper thickness.
When setting this lever, see one of the following tables depending on your printer model:
Loading paper
23
Forms thickness for 2580/2581
Paper type Paper thickness Paper weight Forms thickness lever
setting
Single forms (cut or
continuous)
Multiple-part forms 2-part
Thin
Normal
Thick
56 g/m2 (15 lb)
2
65 g/m
(16 lb)
68 g/m2 (18 lb)
2
75 g/m
(20 lb)
90 g/m2 (24 lb)
3-part
4-part
5-part
6-part
1
1 or 2
2
2 or 3
3 or 4
4 or 5
5 or 6
5, 6, or 7
Envelopes 4, 5, or 6
Notes:
• Print quality depends on the multiple-paper quality and the operating environment. Low-temperature printing may
cause poor print quality, depending on the paper used.
• Printing speed becomes slower when the forms thickness lever setting is 4 or higher.
Forms thickness for 2590/2591
Paper type Paper thickness Paper weight Forms thickness lever
setting
Single forms (cut or continuous) Thin
56 g/m2 (15 lb)
65 g/m
Normal
68 g/m2 (18 lb)
75 g/m
Thick
90 g/m2 (24 lb)
Multiple-part forms 2-part
3-part
4-part
5-part
6-part
2
(16 lb)
2
(20 lb)
1
1 or 2
2
2 or 3
3 or 4
4 or 5
5 or 6
5, 6, or 7
Envelopes 4, 5, or 6
Note:
Print quality depends on the m ultiple- paper qu ality a nd the operating environment. Low-temperature printing may cause
poor print quality, depending on the paper used.
Loading paper
24
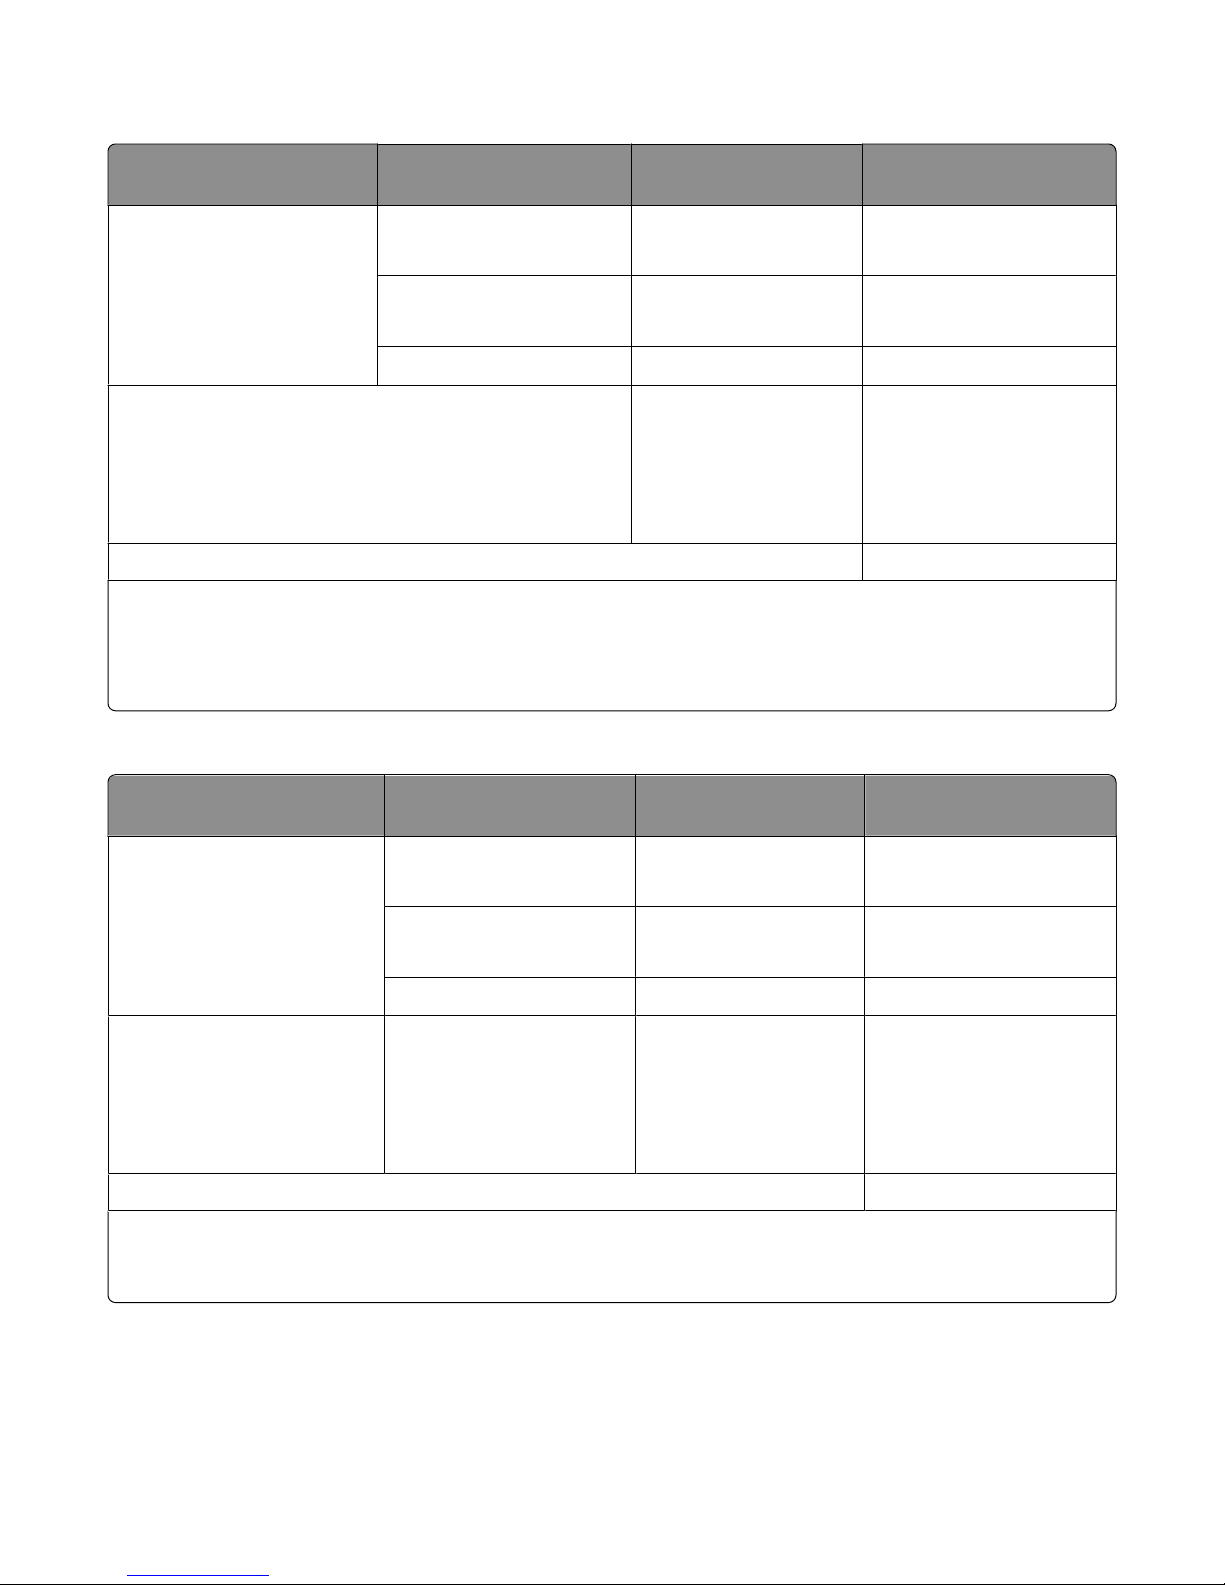
Paper paths
Paper paths for the push tractor
In these examples, the tractor pushes the paper from the front or the rear of the printer.
Front loading paper Rear loading paper
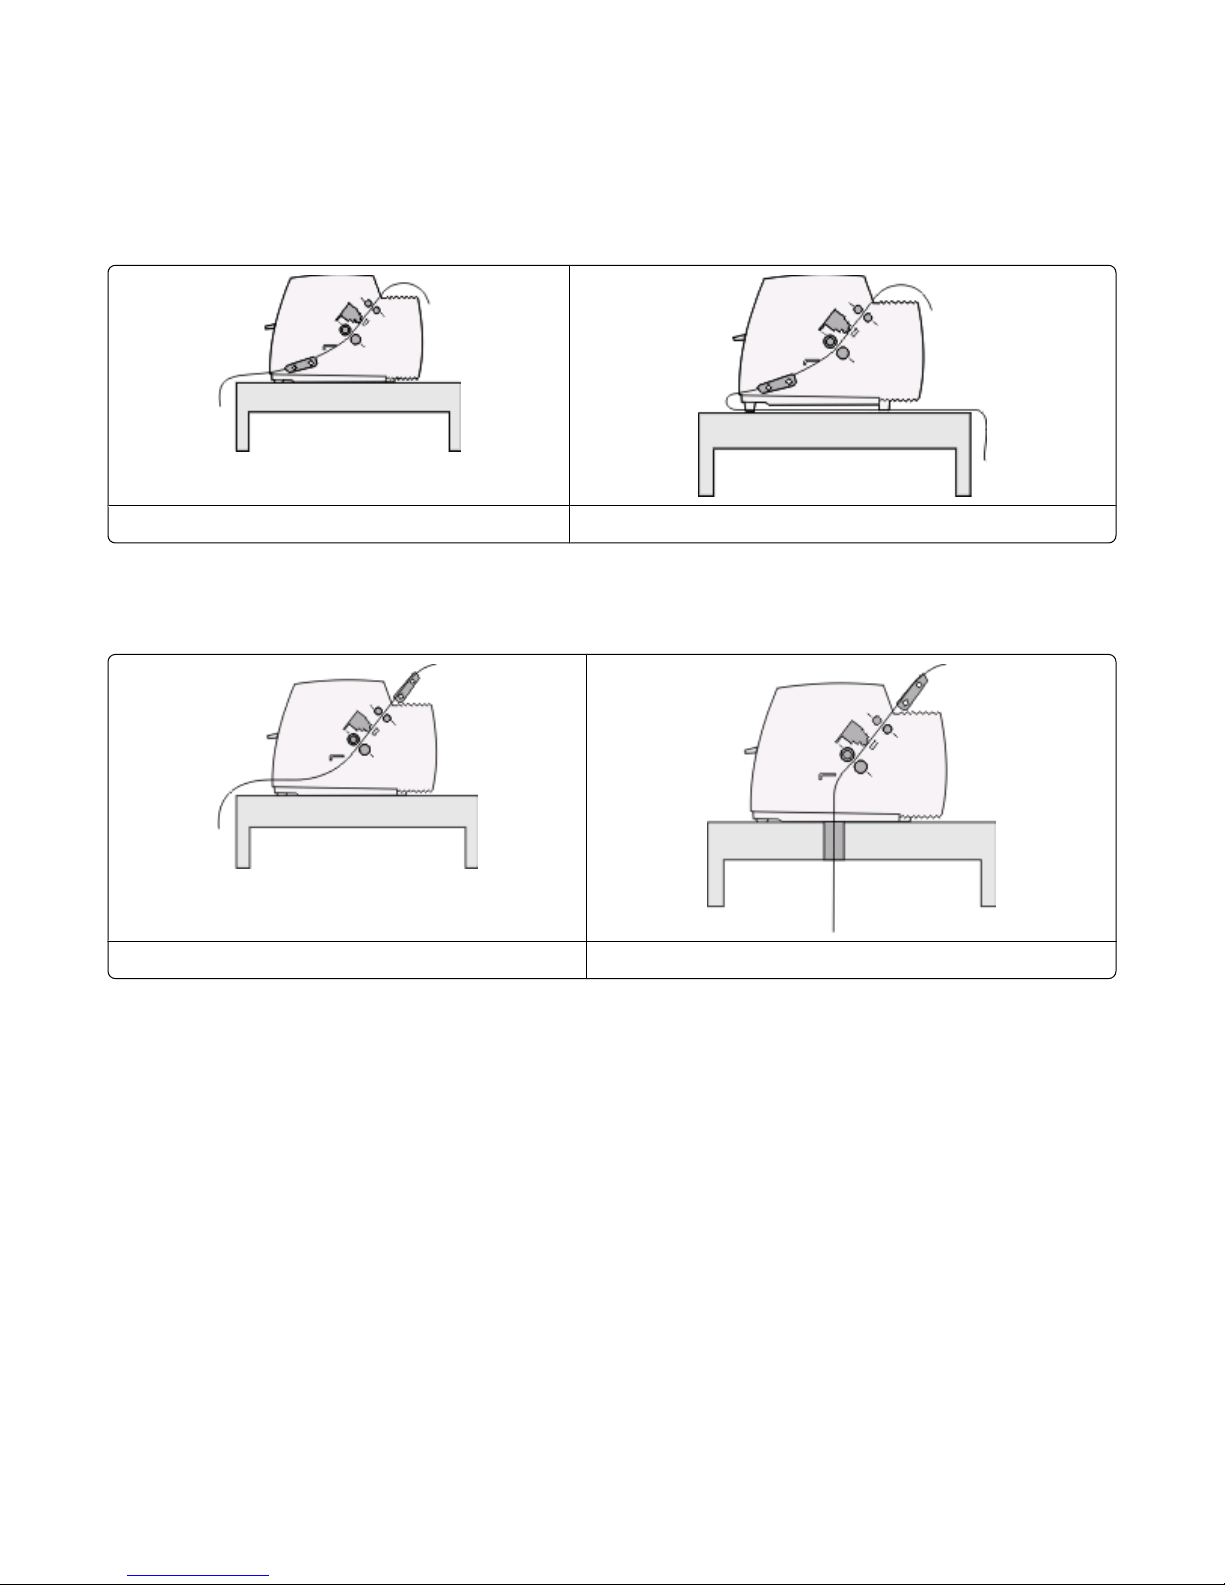
Paper paths for the pull tractor
In these examples, the tractor pulls the paper from the front or the bottom of the printer.
Front loading paper Bottom loading paper
Using the Tear Off function
Pressing the Tear Off button advances the perforation of a continuous form to the tear off position. You can set the
Tear Off function to automatic or manual by adjusting the Auto Tear Off Setting in Setup mode:
• On—Sets the Tear Off function to move a continuous form automatically to the Tear Off position
• Off—Lets you move a continuous form manually to the Tear Off position
Note: On is the factory default setting.
Note: The Tear Off function works only when the tractor unit is in the push position, and the correct page length is
set in the Setup menu or from your program. For more information, see “Using Setup mode” on page 48.
Loading paper
25

Setting the Tear Off position
When Auto Tear Off is set to On, it moves the top perforation of a continuous form to the Tear Off position when all
of the following are true:
• The printer has finished printing.
• The paper has advanced to the Top-Of-Form on the next page.
• No data, printer control codes, or escape codes have been sent to the printer after advancing to the Top-Of-Form.
• The print buffer has not received data for one second.
If you have already set your Top-Of-Form and now want to change the Tear Off position, follow these steps:
1 Press Start/Stop to take the printer offline.
2 Press and hold Tear Off until the printer beeps.
The
light blinks.
3 Open the control panel cover to access layer 2.
4 Press Micro or Micro to move the paper to the desired Tear Off position.
5 Close the control panel cover.
The printer beeps twice. The paper rolls backward, then goes to the new Tear Off position.
6 Press Start/Stop.
The paper remains at the current Tear Off position until you send another job to the printer. The paper moves
from the Tear Off position to the Top-Of-Form and begins printing.
Loading continuous paper
Loading continuous forms using the push tractor
You can load continuous paper utilizing four different paper paths, depending on whether you have the push tractor
installed or the pull tractor installed. The factory default setting for your printer is the push tractor position.
Note: If you have installed the optional Auto Sheet Feeder or Tractor 2, see the documentation that came with your
option for paper loading instructions.
1 Turn the printer on.
Loading paper
26
 Loading...