

Page 1
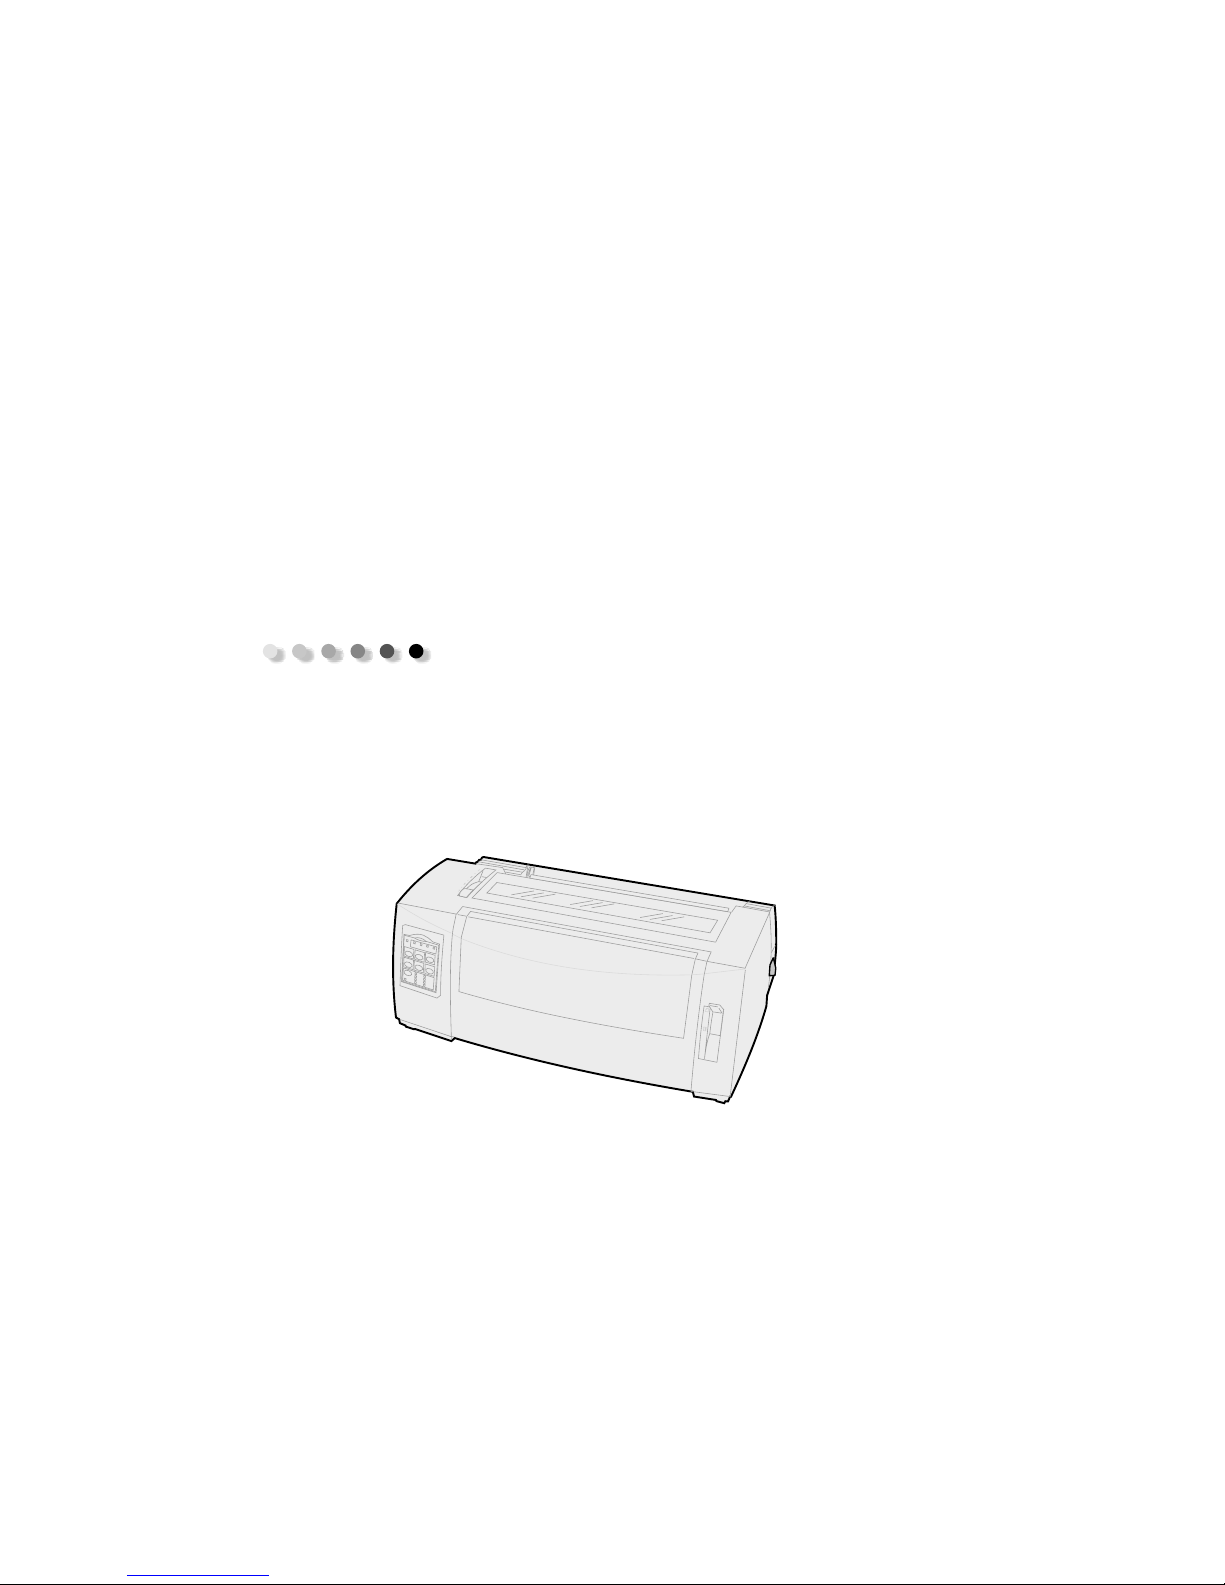
User’s Guide
Page 2

Edition: June 2000
The following paragraph does not apply to any country where such provisions are
inconsistent with local law: LEXMARK INTERNATIONAL, INC., PROVIDES THIS PUBLICATION
“AS IS” WITHOUT WARRANTY OF ANY KIND, EITHER EXPRESS OR IMPLIED, INCLUDING, BUT NOT
LIMITED TO, THE IMPLIED WARRANTIES OF MERCHANTABILITY OR FITNESS FOR A PARTICULAR
PURPOSE. Some states do not allow disclaimer of express or implied warranties in certain
transactions; therefore, this statement may not apply to you.
This publication could include technical inaccuracies or typographical errors. Changes are
periodically made to the information herein; these changes will be incorporated in later editions.
Improvements or changes in the products or the programs described may be made at any time.
Comments about this publication may be addressed to Lexmark International, Inc., Department
F95/032-2, 740 West New Circle Road, Lexington, Kentucky 40550, U.S.A. In the United Kingdom
and Eire, send to Lexmark International Ltd., Marketing and Services Department, Westhorpe
House, Westhorpe, Marlow Bucks SL7 3RQ. Lexmark may use or distribute any of the information
you supply in any way it believes appropriate without incurring any obligation to you. You can
purchase additional copies of publications related to this product by calling 1-800-553-9727. In
the United Kingdom and Eire, call 0628-481500. In other countries, contact your point of
purchase.
References in this publication to products, programs, or services do not imply that the
manufacturer intends to make these available in all countries in which it operates. Any reference
to a product, program, or service is not intended to state or imply that only that product,
program, or service may be used. Any functionally equivalent product, program, or service that
does not infringe any existing intellectual property right may be used instead. Evaluation and
verification of operation in conjunction with other products, programs, or services, except those
expressly designated by the manufacturer, are the user’s responsibility.
Lexmark, Lexmark with diamond design, ExecJet, and Proprinter are trademarks of Lexmark
International, Inc., registered in the United States and other countries.
Personal Printer Series is a trademark of Lexmark International, Inc.
Other trademarks are the property of their respective owners.
© Copyright 1993, 2000 Lexmark International, Inc.
All rights reserved.
UNITED STATES GOVERNMENT RESTRICTED RIGHTS
This software and documentation are provided with RESTRICTED RIGHTS. Use, duplication or
disclosure by the Government is subject to restrictions as set forth in subparagraph (c)(1)(ii) of
the Rights in Technical Data and Computer Software clause at DFARS 252.227-7013 and in
applicable FAR provisions: Lexmark International, Inc., Lexington, KY 40550.
Page 3

Contents
Chapter 1: About your printer ....................................................... 1
Features and functions ................................................................................... 2
Printer description .......................................................................................... 7
Printing the demonstration sample ............................................................ 10
Connecting the printer to your computer .................................................. 14
Setting up your Windows and DOS application software ........................ 17
Chapter 2: Using the operator panel ........................................... 21
Contents
Operator panel layers .................................................................................. 22
Setting the printer online or offline ........................................................... 28
Advancing the paper .................................................................................... 29
Using Tear Off .............................................................................................. 29
Using the Load/Unload feature ................................................................... 30
Locking/unlocking the operator panel ....................................................... 30
Selecting Tractor mode ................................................................................ 30
Selecting or locking a font .......................................................................... 31
Selecting or locking a pitch ......................................................................... 32
Chapter 3: Changing tractor positions ........................................ 33
Push tractor position .................................................................................... 34
Pull tractor position ...................................................................................... 35
Converting the push tractor to pull tractor position ................................. 36
Converting the pull tractor to the push tractor position ........................... 40
Chapter 4: Loading paper ............................................................ 43
Setting the forms thickness lever ................................................................ 44
Loading continuous forms ........................................................................... 46
iii
Page 4

Loading a cut form or envelope ................................................................. 72
Aligning the left margin ............................................................................. 77
Setting Top-Of-Form ................................................................................... 81
Contents
Using the Tear Off bar ................................................................................ 87
Chapter 5: Using Setup mode ...................................................... 89
Using Setup mode to change printer settings ........................................... 89
Setup menu options .................................................................................... 95
Forms Macro menu options ........................................................................ 96
Data menu options .................................................................................... 100
Control menu options ............................................................................... 102
Emulation menu options .......................................................................... 103
Interface menu options ............................................................................. 105
Chapter 6: Supplies .................................................................... 107
Ordering supplies ...................................................................................... 107
Parallel cable .............................................................................................. 108
USB cable .................................................................................................... 108
Serial adapter and cable ........................................................................... 108
Printer ribbon ............................................................................................ 108
Paper specifications ................................................................................... 109
Chapter 7: Troubleshooting and maintenance ........................ 111
Checklist for typical problems ................................................................... 112
Testing the printer ..................................................................................... 116
Checking the printer status ....................................................................... 118
Setting printer to default settings ............................................................ 121
Adjusting bidirectional alignment ........................................................... 123
Clearing paper jams ................................................................................... 126
Problem conditions .................................................................................... 128
Maintenance .............................................................................................. 142
Appendix: Notices ................................................................................. 145
Index ...................................................................................................... 161
iv
Page 5
1
About your printer
The Lexmark™ Forms Printer 2400 Series are available
in 9- and 24-wire narrow-carriage (2480 and 2490) and
9- and 24-wire wide-carriage (2481 and 2491) models.
Depending on the printer model you have chosen, your
printer may look different than those illustrated in this
manual.
Printer models
Carriage width Narrow Wide
Cut forms
Continuous forms
297 mm (11.7 in.)
254 mm (10.0 in.)
419 mm (16.5 in.)
406 mm (16.0 in.)
About your printer
1
Page 6

Features and functions
Printer features by model
Feature/function 2480/2481 2490/2491
Multi-speed printing
FastDft (Fast Draft)
• 10 characters per
inch (cpi)
• 12 cpi
Draft 309 cps 274 cps
Courier and Gothic 77 cps
Prestige,
Presentor, Orator, and
Script
Character spacing
About your printer
Note:
supports only 10, 12,
and 15 pitch.
Resident fonts
Fast Draft
Fast Draft, Draft,
• 438 characters per
second (cps)
510 cps
(Near-Letter-Quality
mode)
Not available on these
models.
Prints in 10, 12, 15, 17,
and 20 characters per
inch (cpi), as well as
proportional spacing.
Gothic, and Courier
• 409 cps
• 465 cps
91 cps
(Letter-Quality mode)
91 cps
(letter-quality mode)
Prints in 10, 12, 15, 17,
20, and 24 (cpi), as
well as proportional
spacing.
Courier, Prestige,
Gothic, Presentor,
Orator, Script, Draft,
and Fast Draft
2
Page 7
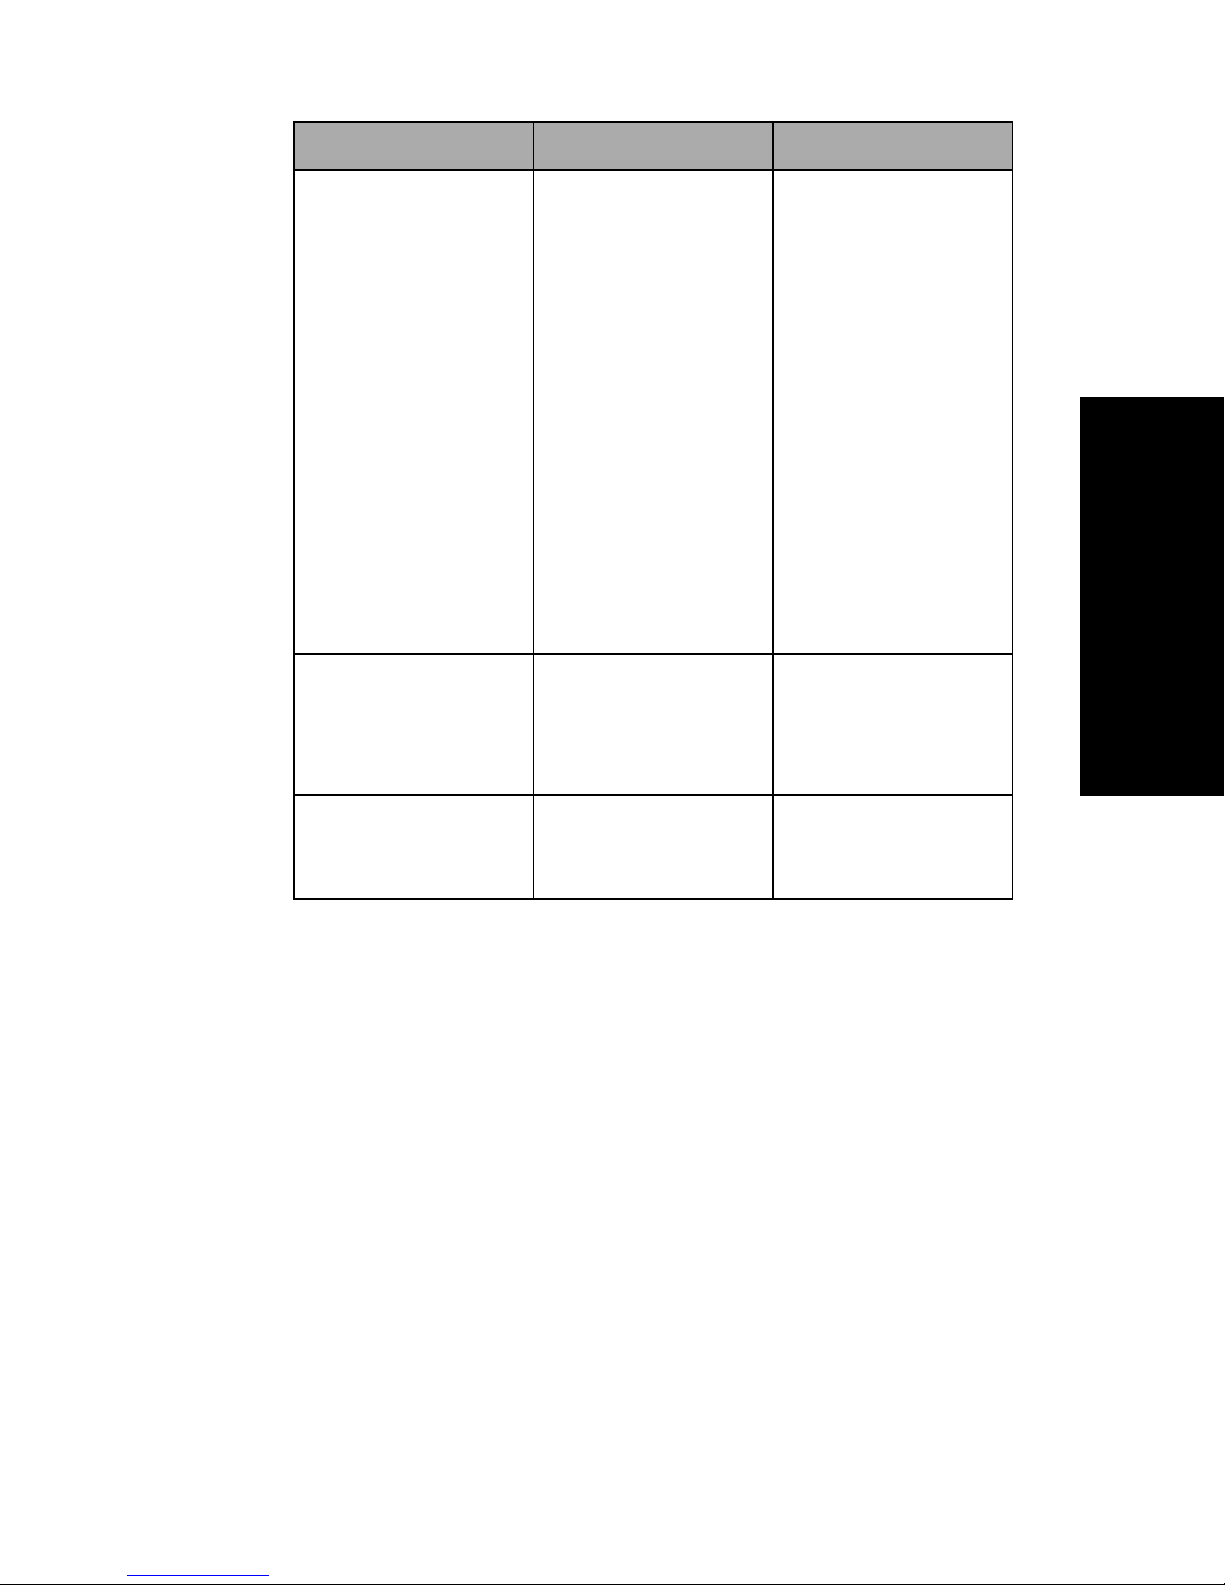
Printer features by model (continued)
Feature/function 2480/2481 2490/2491
Print styles
Available through
printer commands.
Graphics printing
Supports existing
graphics software
applications.
Highlighting
capability:
• Double-high
• Double-strike
• Double-wide
• Emphasized
•Italics
• Overscore
• Subscript
• Superscript
• Underline
Resolution of up to
144 x 240 dots per
square inch (dpi).
Highlighting
capability:
• Double-high
• Double-strike
• Double-wide
•Emphasized
•Italics
• Overscore
• Subscript
• Superscript
•Underline
• Shading
• Outline
Resolution of up to
360 x 360 (dpi).
About your printer
Multiple-part forms
Prints original plus
five copies (six-part
forms).
Prints original plus
three copies (fourpart forms).
3
Page 8

Features and functions
Features/functions All models
Operator panel
Font lock and Pitch lock
Load/Unload
About your printer
Macro function
Button control for
Font, Setup
Off
,
Pitch
panel lights indicate current status.
• Locks font and pitch selections you
make from the operator panel so
they are not changed by your
application software.
• Font or Pitch lock is deactivated
when you turn the printer
unless you set them as the menu
default.
For more information, see “Selecting
or locking a font” on page 31.
Loads and unloads continuous form
paper.
This printer has the capability of
storing 4 unique document formats
which include character option
settings (font, pitch, and so on) and
paper handling options (page length,
margins and so on).
, and
Macro
Load/Unload, Tea r
, paper movement,
functions. Operator
Off
Front loading for cut
sheets
Tear Off
4
For information on setting up macros
see “Forms Macro menu options” on
page 96.
Enables printing on cut sheets or
envelopes.
• Assists you in removing printed
continuous forms at the
perforation.
• Reduces the amount of paper used,
reducing costs.
Page 9
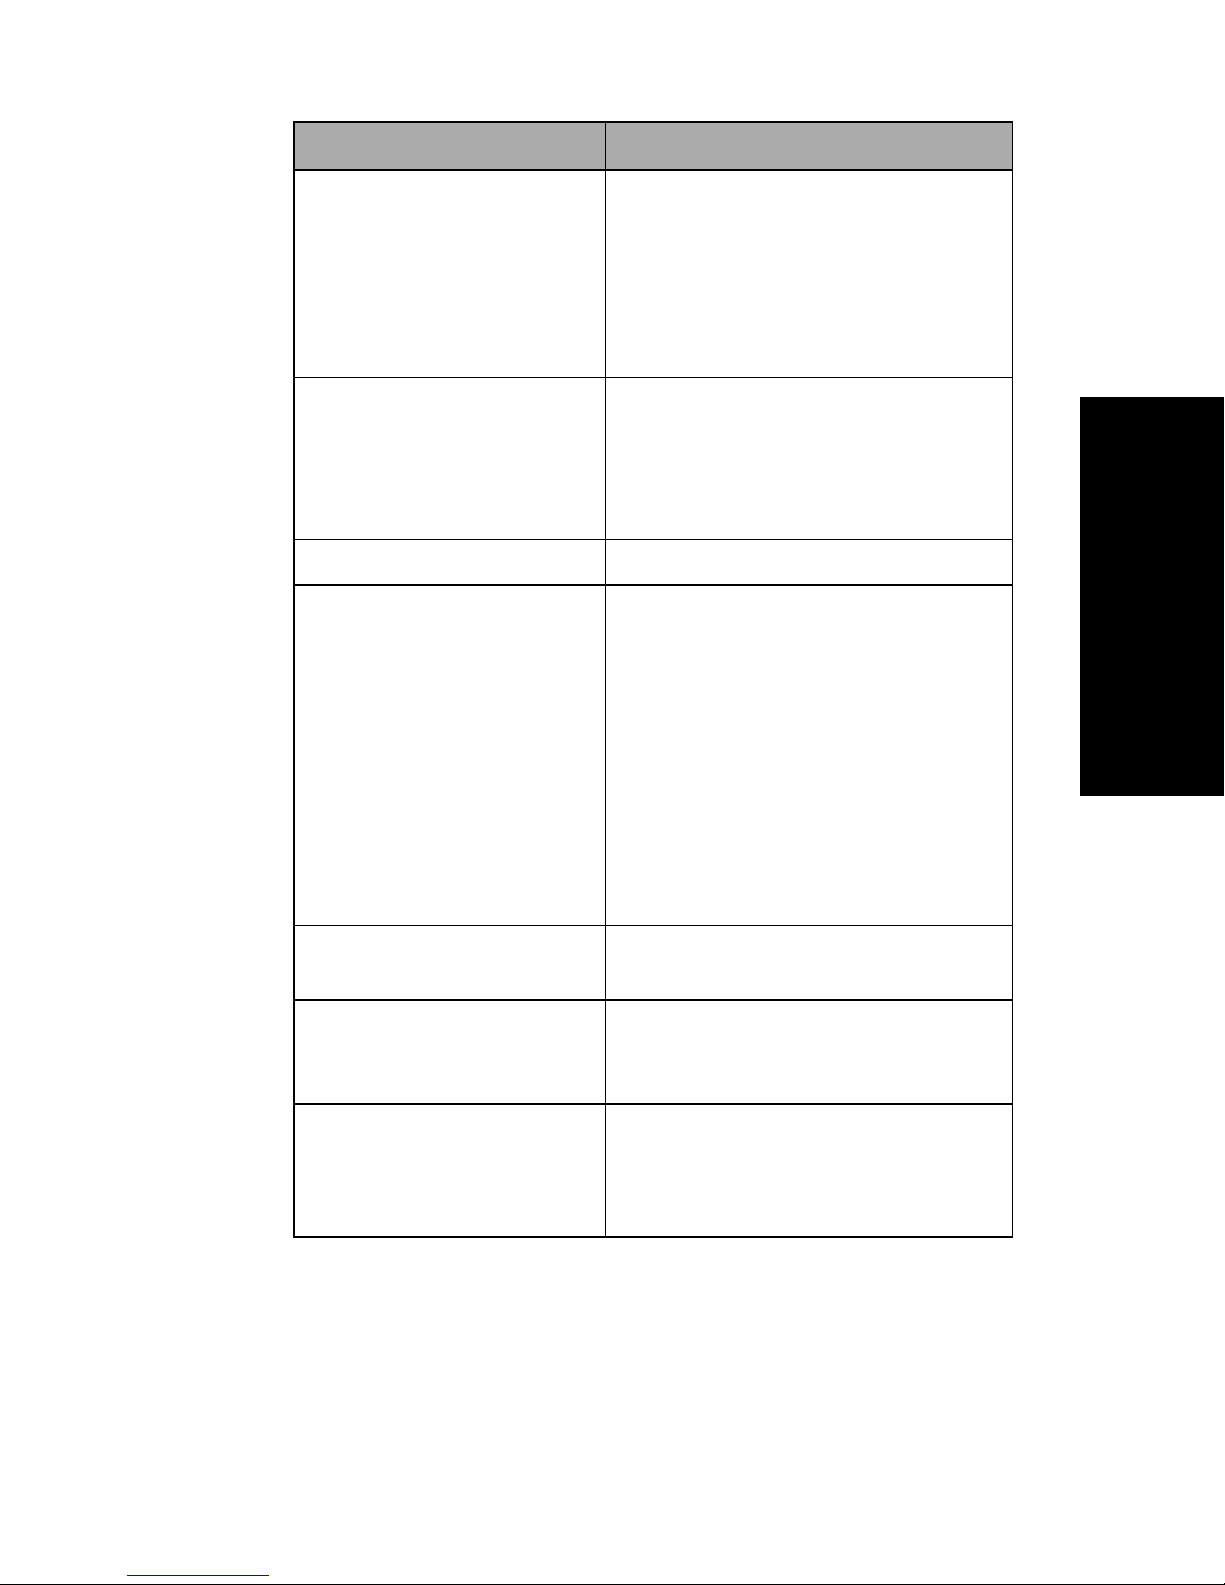
Features and functions (continued)
Features/functions All models
Adjustable tractor
Operator panel disable
Ribbon cartridge
Printer tests
Built-in adjustable tractor lets you
handle continuous form paper without
purchasing any options. It can be
repositioned to function as:
• Push tractor
• Pull tractor
Limits the operator panel functions to
Start/Stop, FormFeed, Tear Off,
the
Load/Unload
and
restricting the use of all printer
functions to designated persons only.
Contains the printer ribbon.
• Power-On Self Test
• Test Print
Test Print determines whether your
machine has print problems. To
perform a Test Print, see “Testing
the printer” on page 116.
buttons only,
About your printer
Box and line drawings
Greek and math symbols
Code Pages 437, 437G,
813, 850, 851, 853T, 857,
858, 860, 861, 863, 865,
869, 920, 1004, and 1053.
• Demonstration Print
For more information, see “Printing
the demonstration sample” on
page 10.
Prints tables, charts and other graphics
as shown on your monitor.
Prints a variety of symbols used in
mathematical equations, including
subscript and superscript.
These code pages contain the
characters and symbols corresponding
to various country languages.
5
Page 10

Features and functions (continued)
Features/functions All models
Bar code function
Software compatibility
About your printer
These bar codes are resident in the
printer:
• 3 of 9
• Code 128
• Interleaved 2 of 5
•UPC-A
• EAN 8
• EAN 13
• PostNet
For more information on the Bar code
function, refer to the Technical
Reference (www.lexmark.com).
• Compatible with all computer
software programs that support
IBM emulation or Epson emulation.
• Compatible with Okidata
MICROLINE emulation (option must
be installed).
Interface connection
Available for 2480/2481 printers
only.
Lets the printer work with all
computers with a compatible
interface.
Both parallel and USB interfaces are
standard. The internal serial interface
(RS-232) is optional.
For more information, see
“Connecting the printer to your
computer” on page 14.
6
Page 11
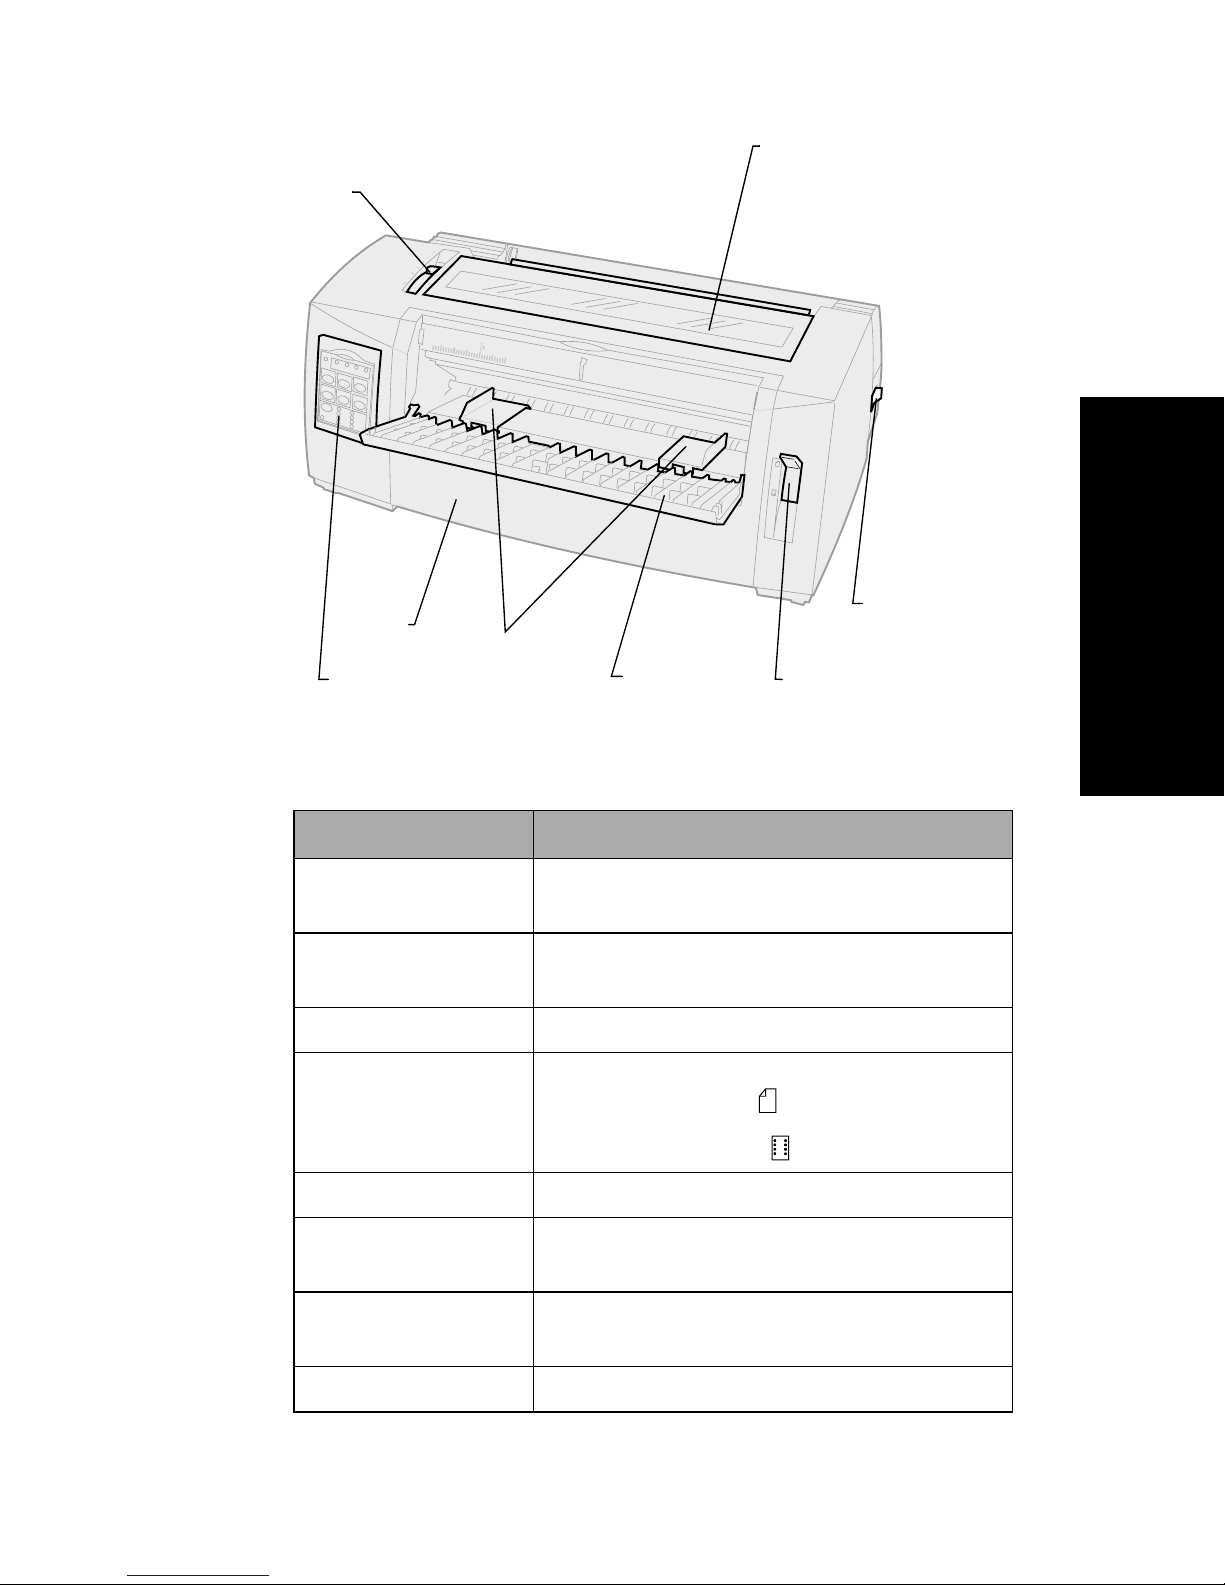
Printer description
Forms
thickness
lever
Ribbon
access cover
About your printer
Front
cover
Operator
panel
Paper
guides
Manual
feed door
Paper
select lever
Power
switch
Printer parts and function
Part name Function
Forms thickness lever Adjusts the printhead for the thickness of
forms being printed.
Ribbon access cover Covers the ribbon cartridge and internal
printer components.
Power switch Turns the printer
Paper select lever Selects the paper type:
• Cut (form) sheet
• Continuous forms
On
and
Off
.
Front cover Covers the continuous forms push tractors.
Manual feed door Pull down to load individual cut forms and
Operator panel Indicates printer status and makes control of
Paper guides Align the margins of a cut sheet.
envelopes.
printer functions simple and convenient.
7
Page 12
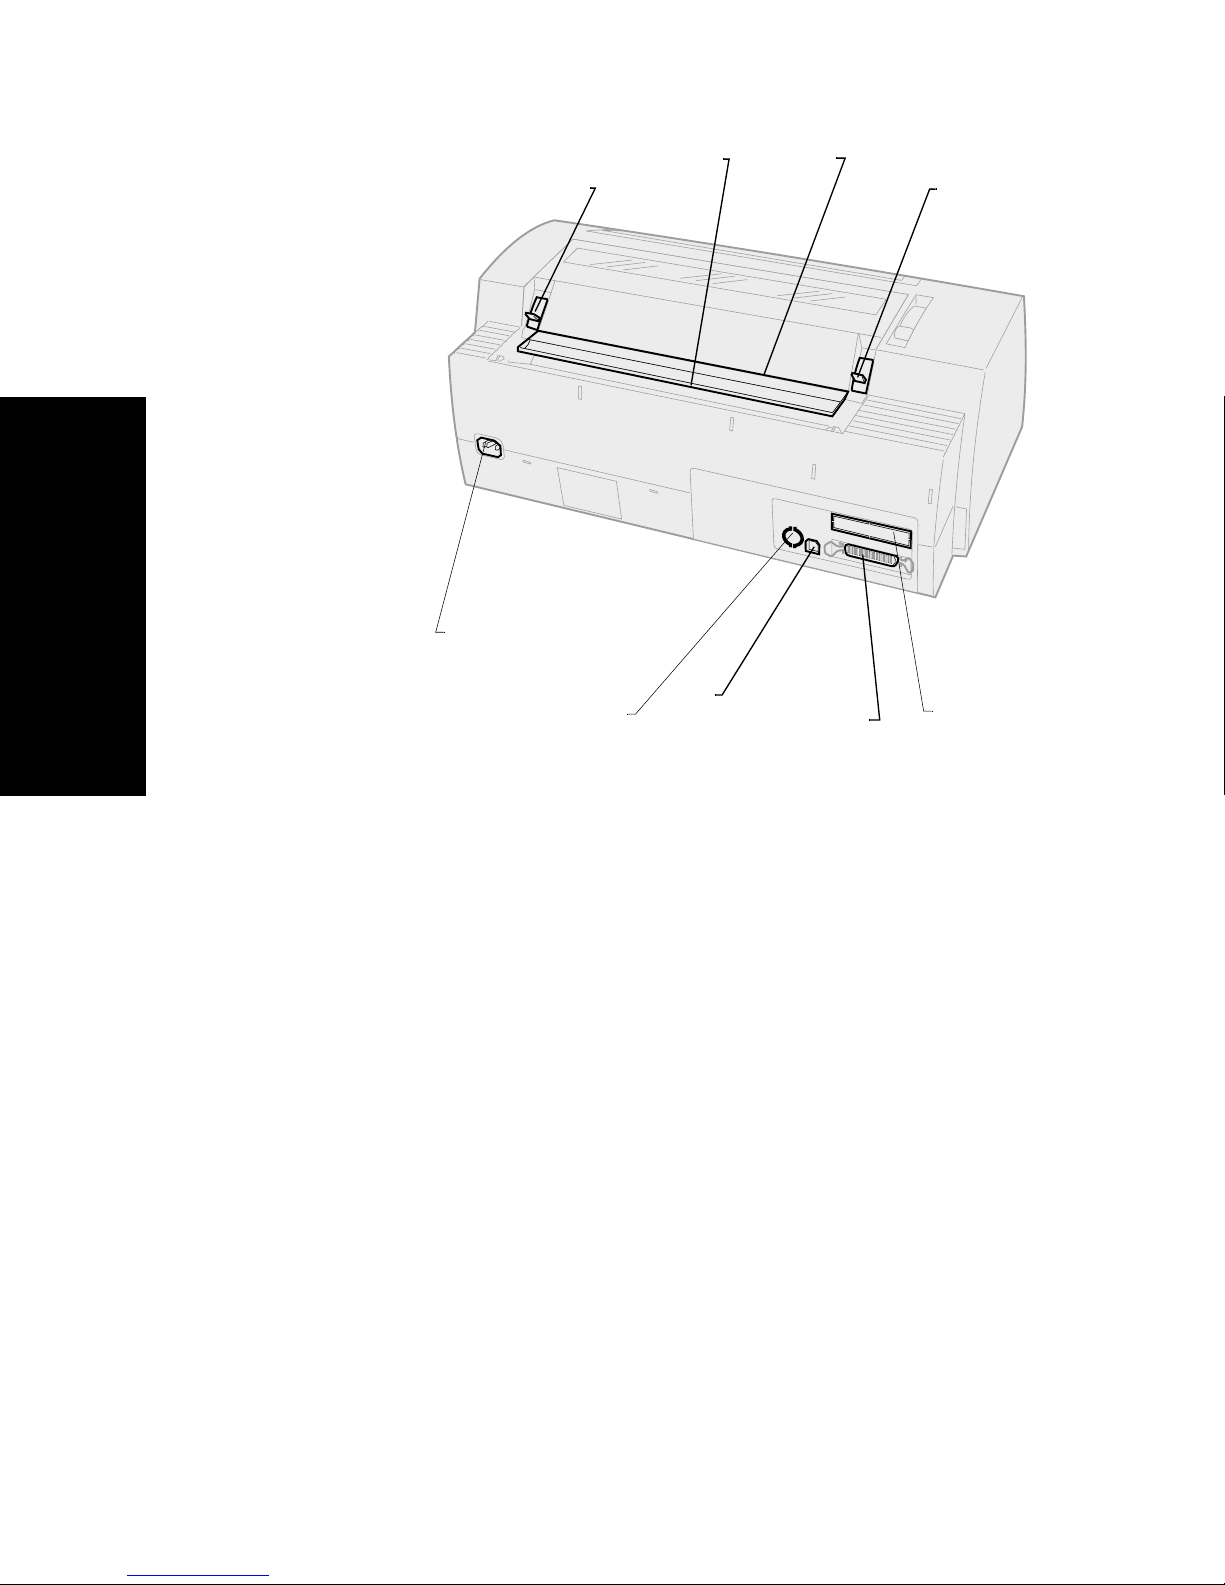
Latch
Power cord
connector
Acoustic
flap
Tear Off
bar
Latch
About your printer
Tractor 2
connector
USB
connector
Parallel
connector
Optional serial
interface
knockout
8
Page 13
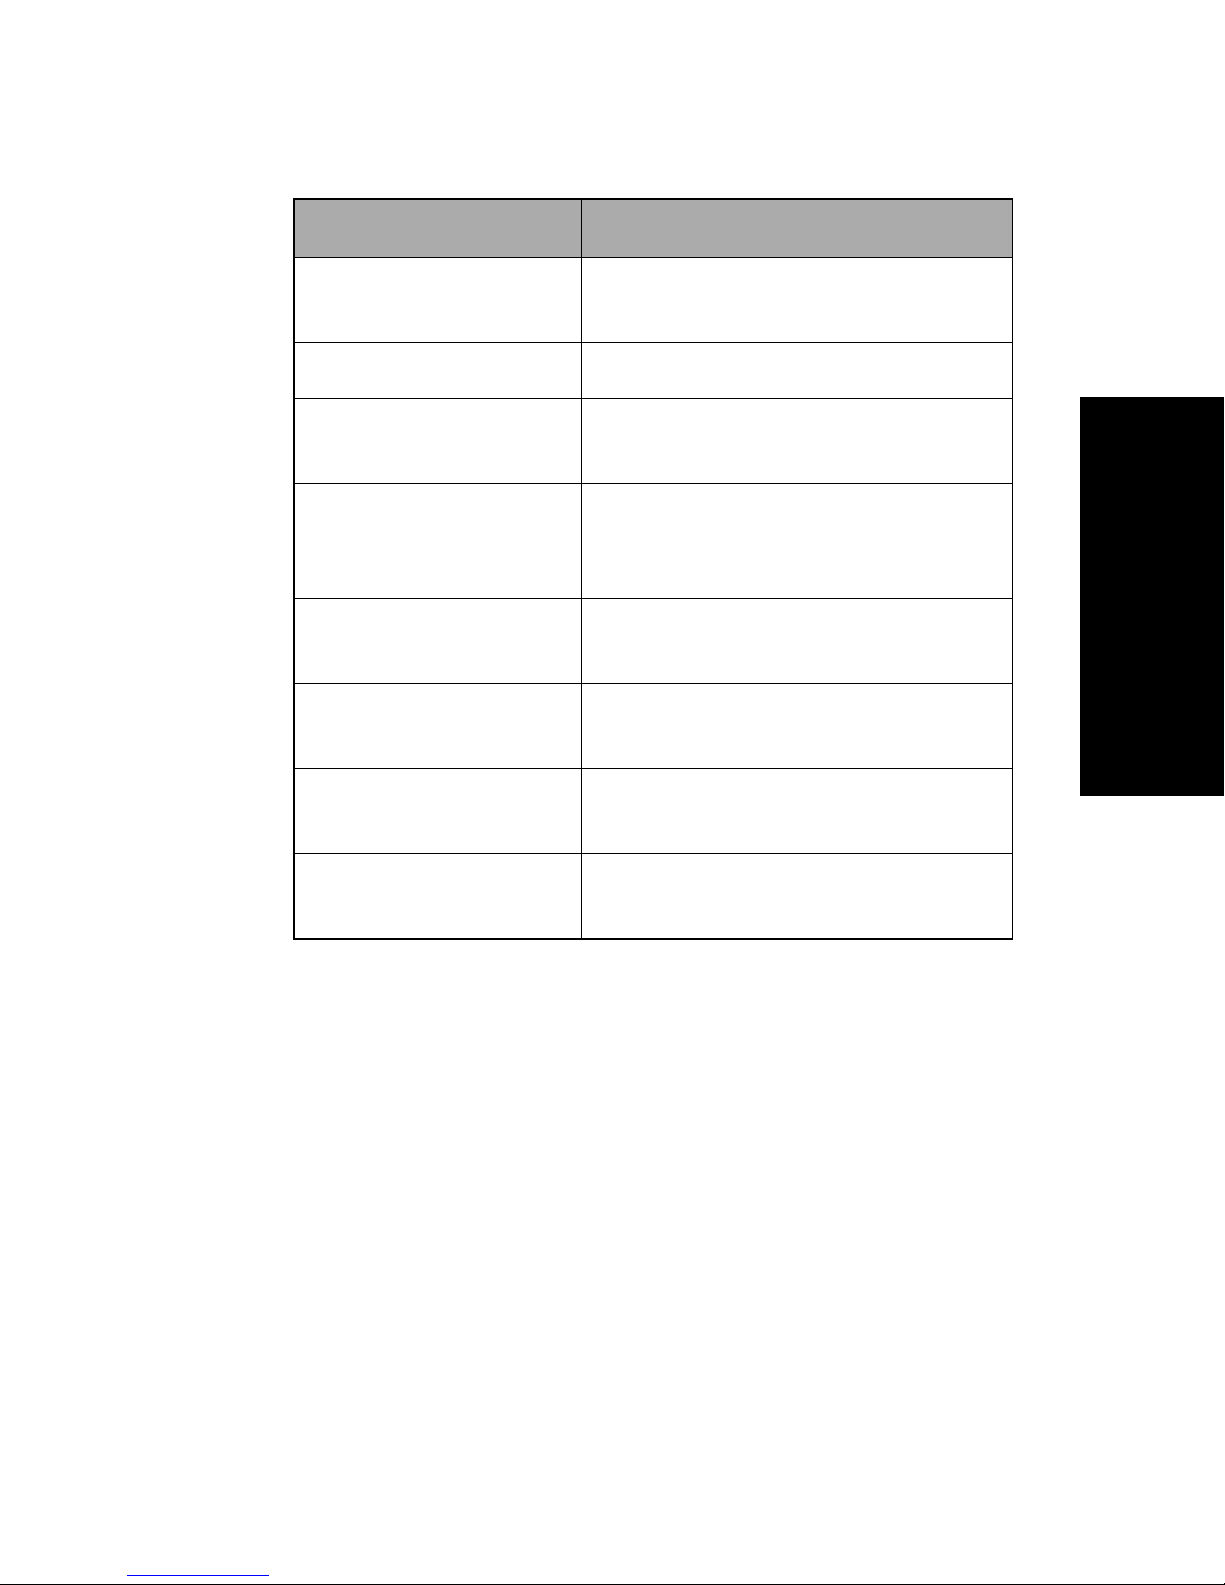
Printer parts and function
Part name Function
Latches Fastens the ribbon access cover to the
printer.
Acoustic flap Helps reduce noise during printing.
Tear Off bar Provides an edge for a continuous
form when
Serial interface
knockout
Parallel connector Where the parallel cable connects to
USB connector Where the USB cable connects to the
Tractor 2 connector Supplies power to the optional
Power cord connector Connects power from the power cord
Removing the serial interface
knockout allows you to connect the
optional serial interface cable.
the printer.
printer.
Tractor 2 Feeder.
to the printer.
Tear Off
is used.
About your printer
9
Page 14
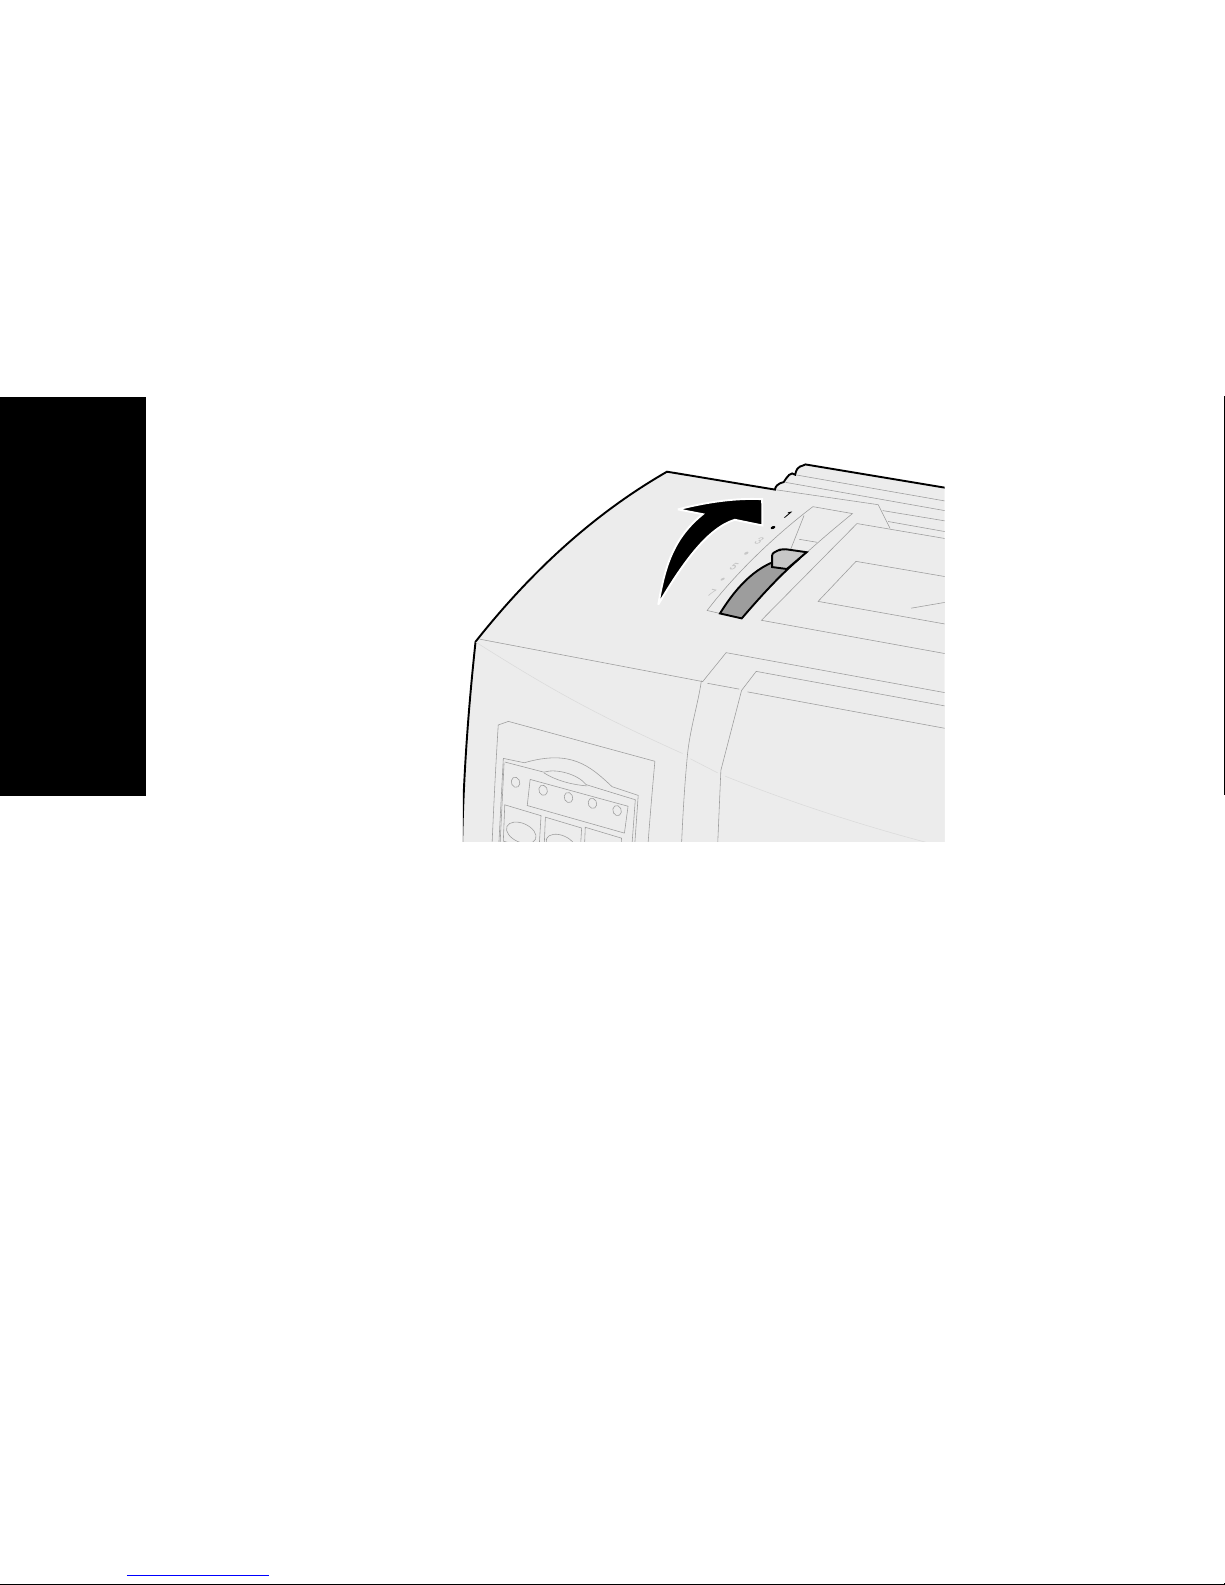
Printing the demonstration sample
The following steps explain how to load a single sheet
of paper so you can print the demonstration sample. If
you want to load continuous forms, see “Loading
continuous forms” on pag e46.
1
Set the forms thickness lever to position 1.
About your printer
2
Turn the printer
The Power light comes
light is blinking, and the current default font
light is
For more information on printer status, see
“Checking the printer status” on pag e118.
On
solid.
On
.
On
solid, the Paper Out
10
Page 15
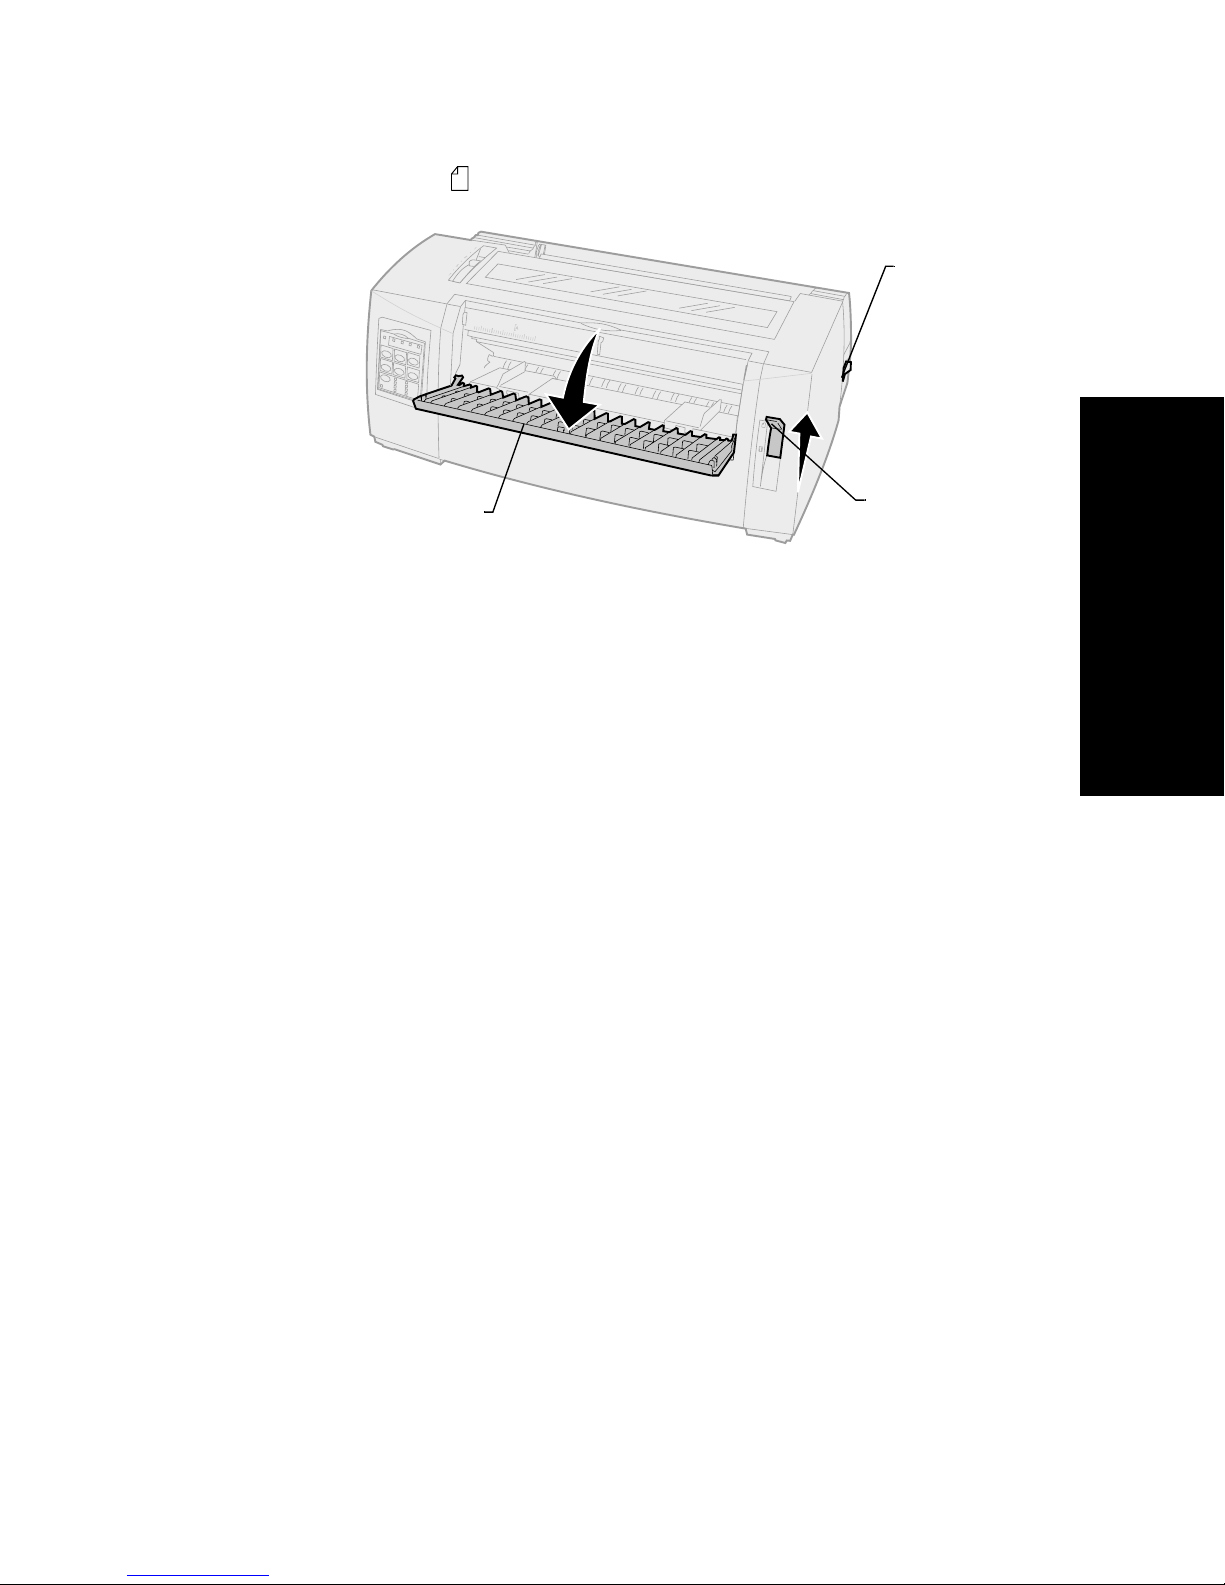
3
Open the manual feed door.
4
Move the paper select lever up to the cut
forms position.
Power
switch
About your printer
Manual
feed door
5
Move the left paper guide to the right until it
Paper select
lever
stops.
6
Insert a single sheet of paper into the front of
the printer and adjust the right paper guide so
the paper is aligned against both the left and
right paper guides.
11
Page 16
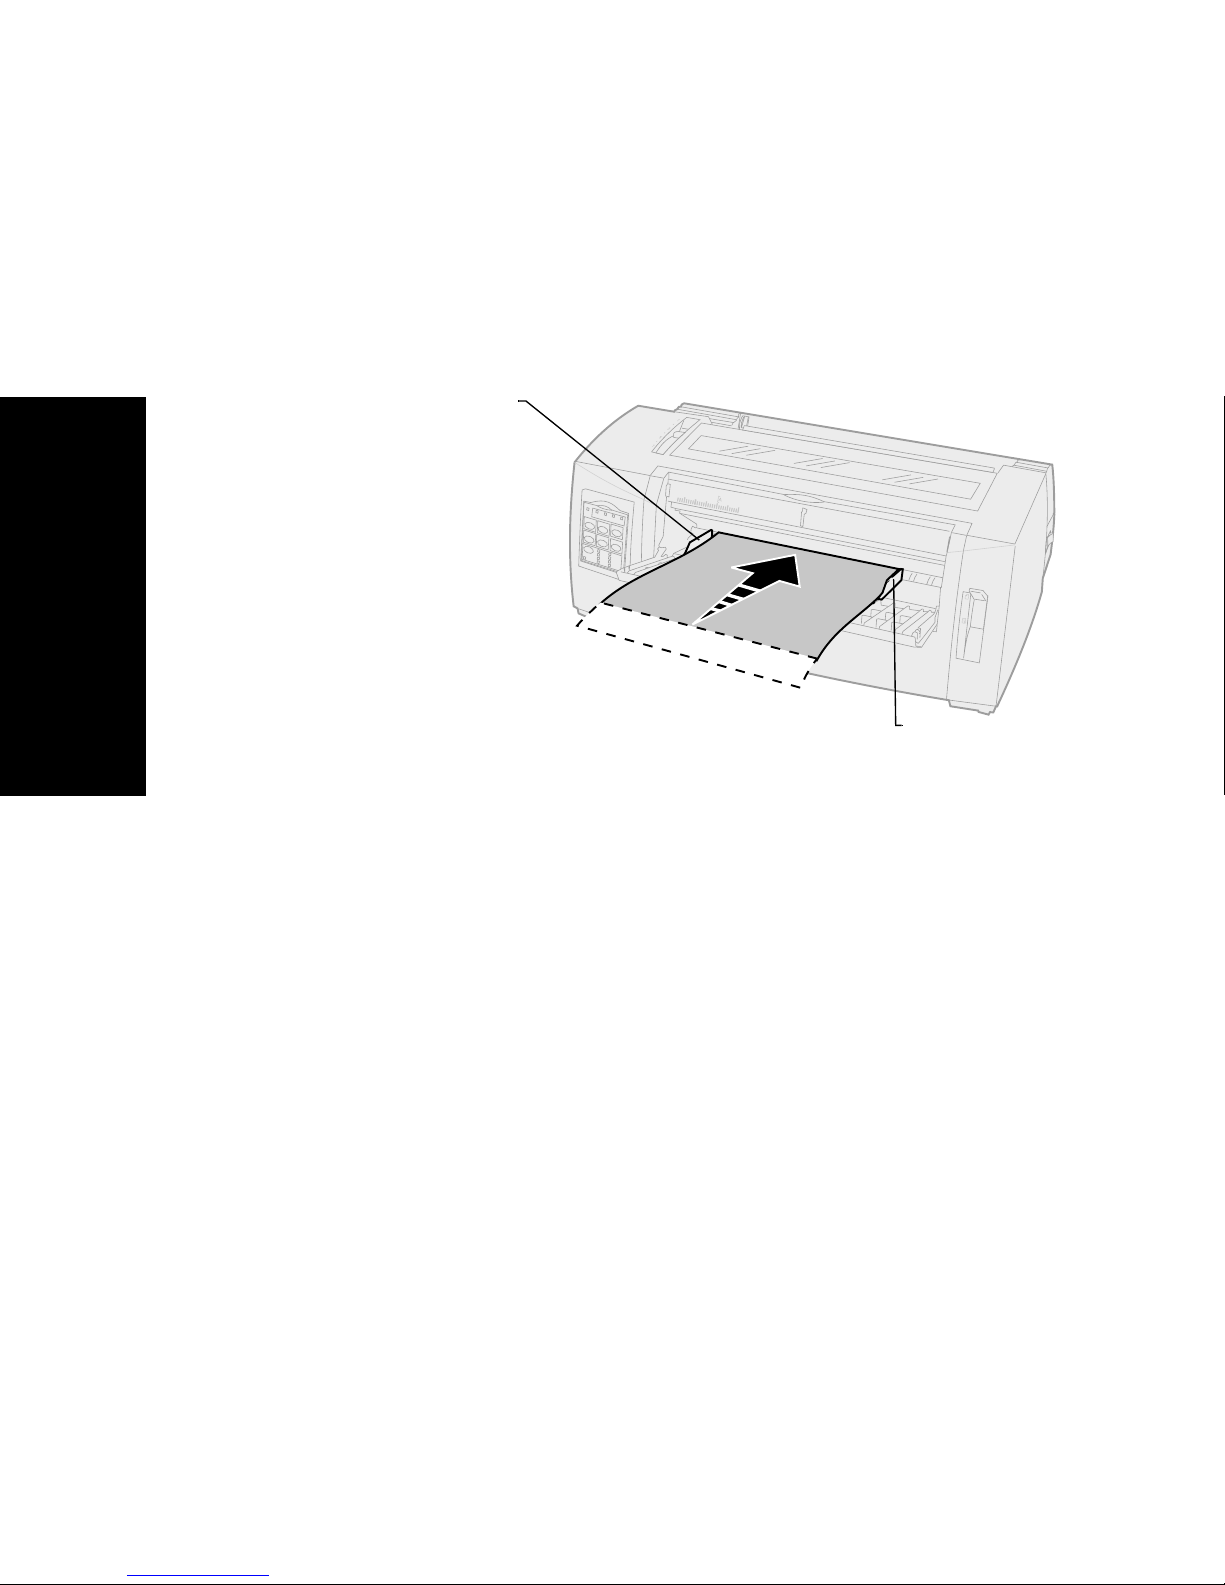
7
Insert paper into the printer until the Paper Out
light stops blinking.
•
•
Left paper
guide
About your printer
If Auto Cut Sheet Load is set to
On
, the
paper feeds automatically to the Top-OfForm.
If Auto Cut Sheet Load is set to
FormFeed
.
Off
, press
Right paper
guide
12
Page 17
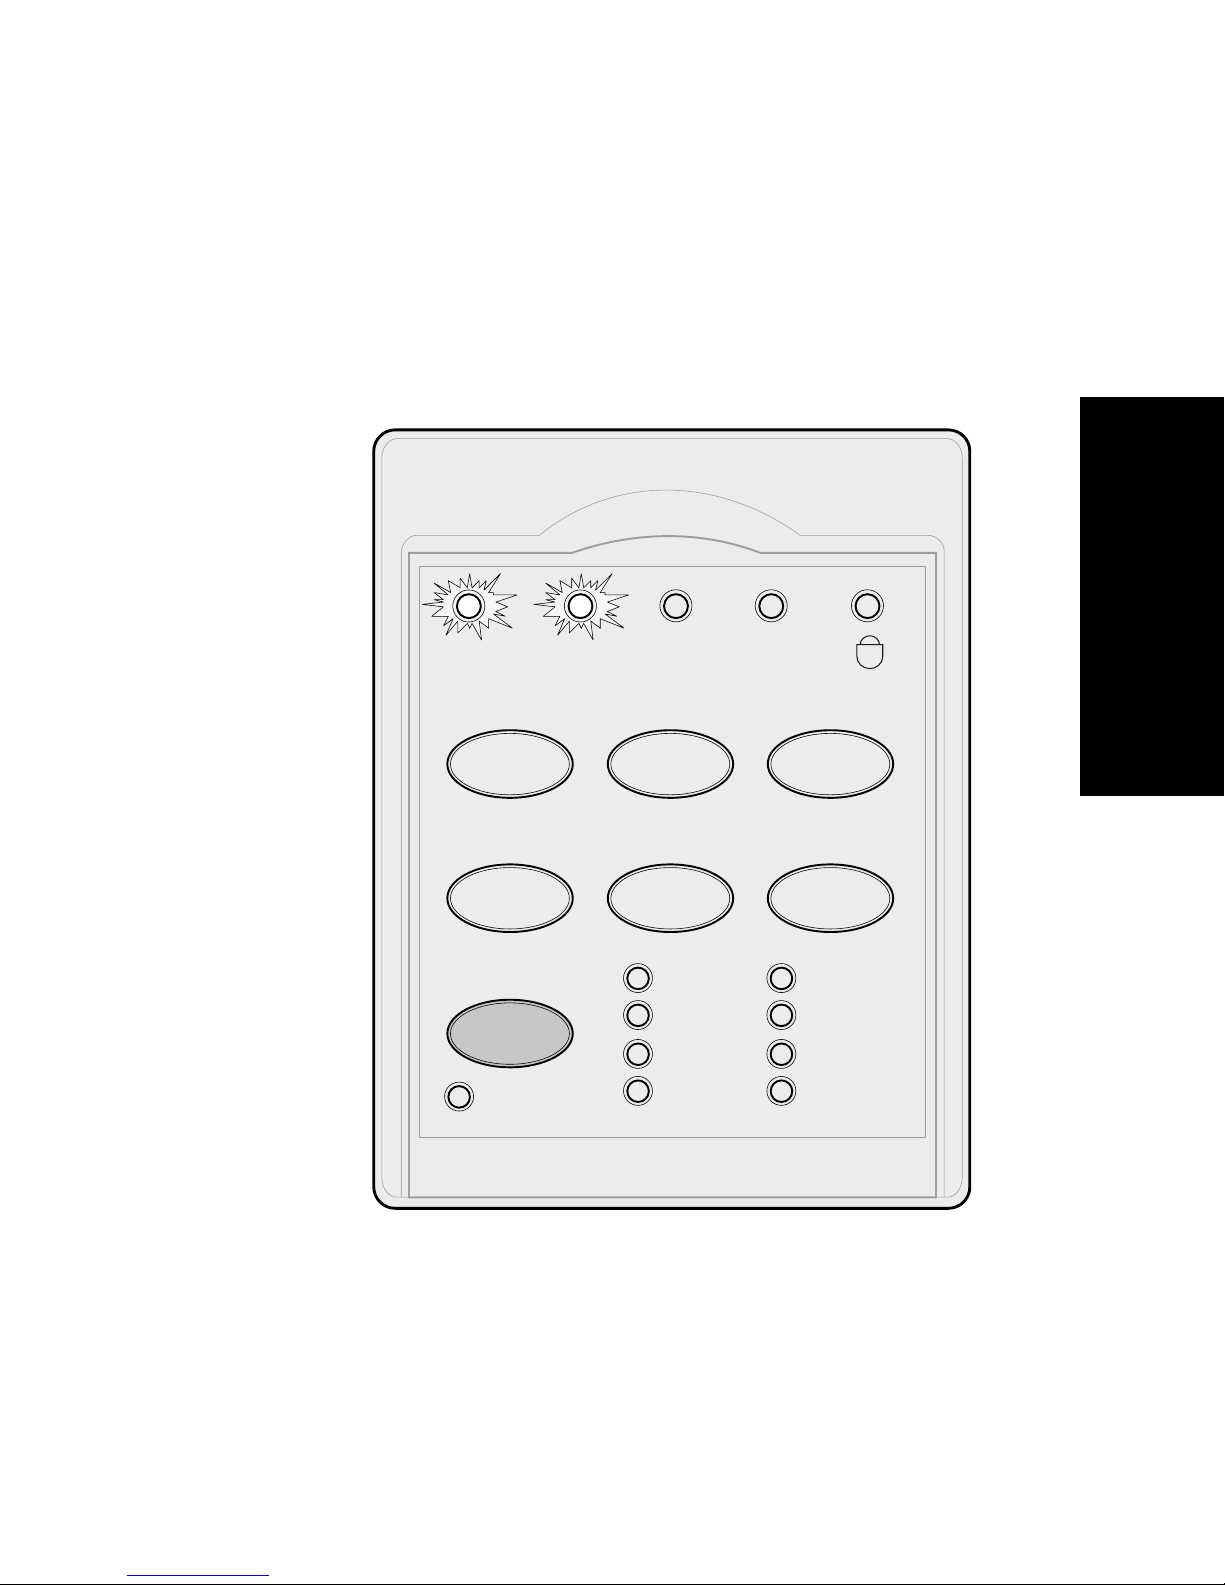
8
Turn the printer
Off
.
9
10
On
Font
.
on the operator panel turn
Font
until all the operator
While pressing
the printer
Continue pressing
panel lights blink.
Release the
Font
button.
The Power and Ready lights stay
demonstration page prints.
Power Ready Tractor2 Paper
out
Start/Stop LineFeed FormFeed
On
and the
About your printer
Tear Off Load/Unlo ad Tractor
Font
Lock
Courier
Prestige
Presentor
Orator
Script
DraftGothic
FastDft
13
Page 18
Connecting the printer to your computer
These cables are not supplied with your printer. For
ordering information, see “Supplies” on pag e107.
•
If you are using a parallel cable, see
“Connecting the parallel cable” on pag e14.
•
If you are using a USB cable, see
“Connecting the USB cable” on pag e16.
•
If you are using the optional serial interface,
see “Connecting the serial cable” on
page 17.
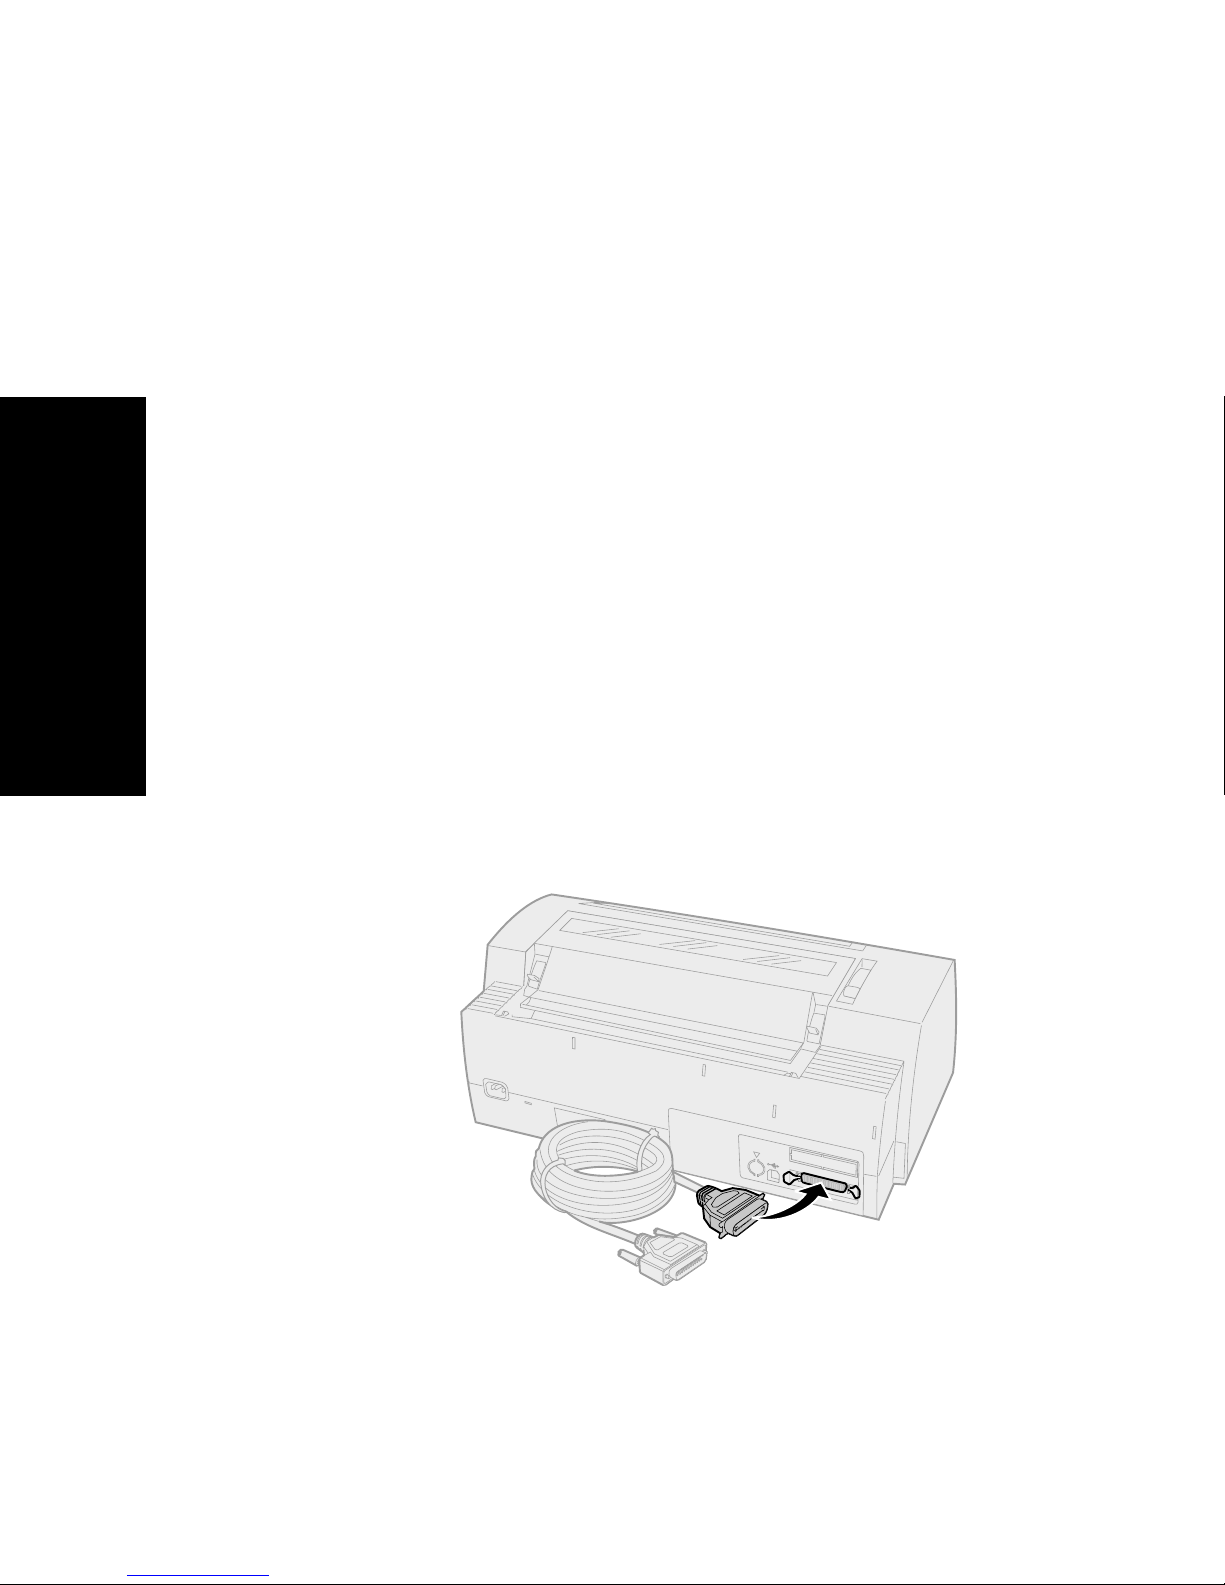
Connecting the parallel cable
1
Turn the printer and computer
2
Connect the parallel cable at the back of the
printer.
This cable is not supplied with your printer. Use
About your printer
an IEEE-1284 compatible parallel cable such as
Lexmark part number 1329605 (10 ft cable) or
1427498 (20 ft cable).
Off
.
Note:
You do not need to attach a grounding
wire to the computer.
14
Page 19
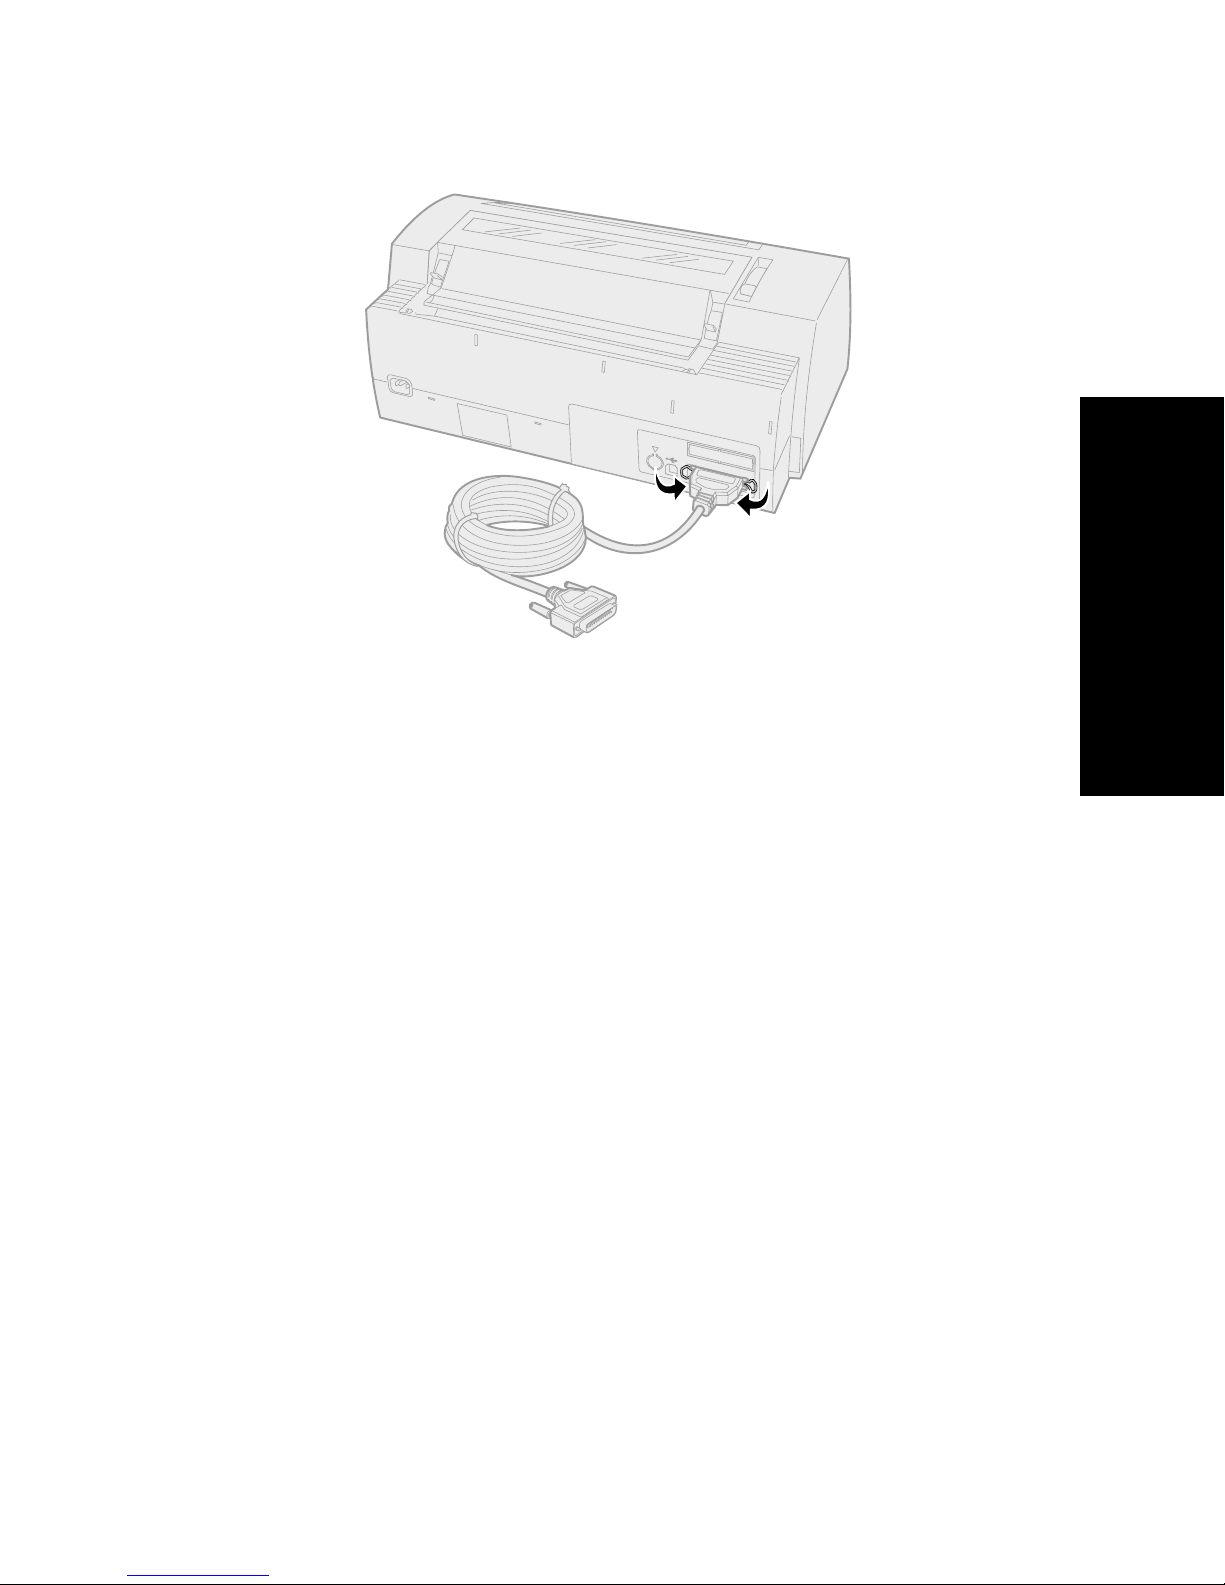
3
Fasten the clip wires to the parallel cable, as
shown.
About your printer
4
Connect the other end of the parallel cable to
your computer.
5
Turn the printer and computer
6
Continue with “Setting up your Windows and
On
.
DOS application software” on pag e17.
15
Page 20
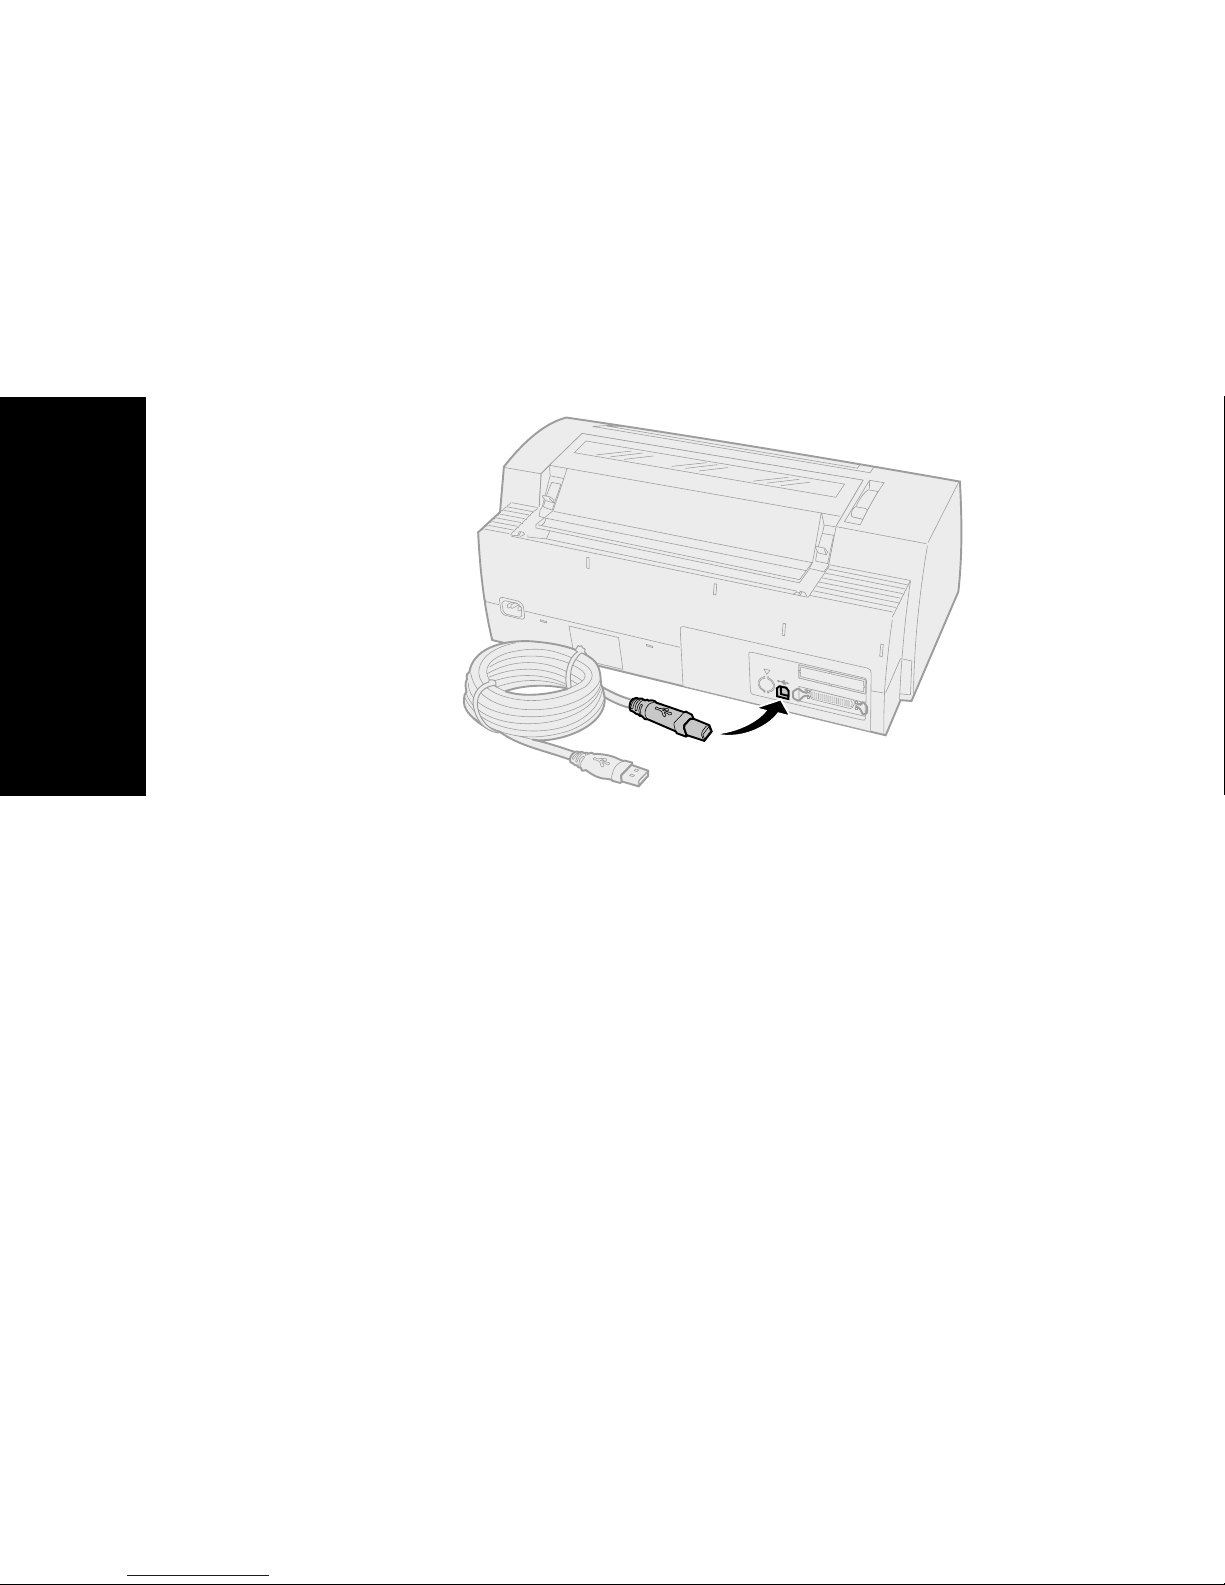
Connecting the USB cable
1
Turn the printer and computer
2
Connect the USB cable at the back of the
printer.
This cable is not supplied with your printer.
Order the Lexmark USB cable using part
number 12A2405.
Off
.
About your printer
3
Connect the other end of the USB cable to your
computer.
4
Turn the printer and computer
5
Continue with “Setting up your Windows and
DOS application software” on pag e17.
On
.
16
Page 21

Connecting the serial cable
For installation and connection instructions, see the
optional serial interface manual.
About your printer
Setting up your Windows and DOS application
software
Windows-based applications
If you are using a Windows program, use the Windows
Forms Printer 2400 Series driver available from the
Lexmark Web site at www.lexmark.com.
Note:
Instructions for installing drivers are in the
readme.1st file included in the download
package.
17
Page 22

DOS applications
Follow the instructions that came with your DOS
application software to see what printer drivers are
available with that specific program. Most programs let
you specify the type of printer you are using so the
program can take full advantage of the printer’s
features.
Using IBM emulation mode
If your printer is using IBM mode (the factory default),
select a printer from your application software, in the
following preferred order.
For Lexmark Forms Printer 2480/2481 users:
1
Forms Printer 2480/2481
2
Forms Printer 2380/2381 plus
3
2380 plus/2381 plus
About your printer
4
2380/2381 IBM Personal Printer Series™ II
5
4201/4202 IBM Proprinter™ III
6
4201/4202 IBM Proprinter II
7
IBM ExecJet™ Printer Model 4072
For Lexmark Forms Printer 2490/2491 users:
1
Forms Printer 2490/2491
2
Forms Printer 2390 plus/2391 plus
3
2390 plus/2391 plus
4
2390/2391 IBM Personal Printer Series II
5
4212 IBM Proprinter 24P
6
2390 IBM PS/1 Printer
7
4207/4208 Proprinter X24/XL24
8
IBM ExecJet Printer Model 4072
9
2205 IBM PS/1 Printer
If your software does not let you select one of the
printers in this list, you may need to customize your
printer for Epson emulation mode.
18
Page 23

The printer driver you select in your software
application must match the emulation mode you select
for your printer. Printer drivers other than the 2400
series support most, but not all, of the printer’s
capabilities. See “Emulation menu options” on
page 103 for more information.
Using Epson emulation mode
If your Forms printer is set to Epson emulation, select a
printer from your application software in the following
preferred order:
For Forms Printer 2480/2481 users:
1
Epson FX850
2
Epson FX1050
For Forms Printer 2490/2491 users:
1
Epson LQ850
2
LQ1050
About your printer
See “Emulation menu options” on page 103 for more
information.
Using Okidata MICROLINE emulation mode
If your Forms Printer 2480/2481 has the Okidata
MICROLINE emulation option installed, select a printer
from your application software in the following
preferred order:
1
Oki 320/321 Turbo
2
Oki 320/321
19
Page 24

About your printer
20
Page 25

2
Using the operator panel
Use the operator panel to perform basic tasks like
feeding forms, taking the printer offline, and setting
defaults in Setup mode.
Operator panel
21
Page 26
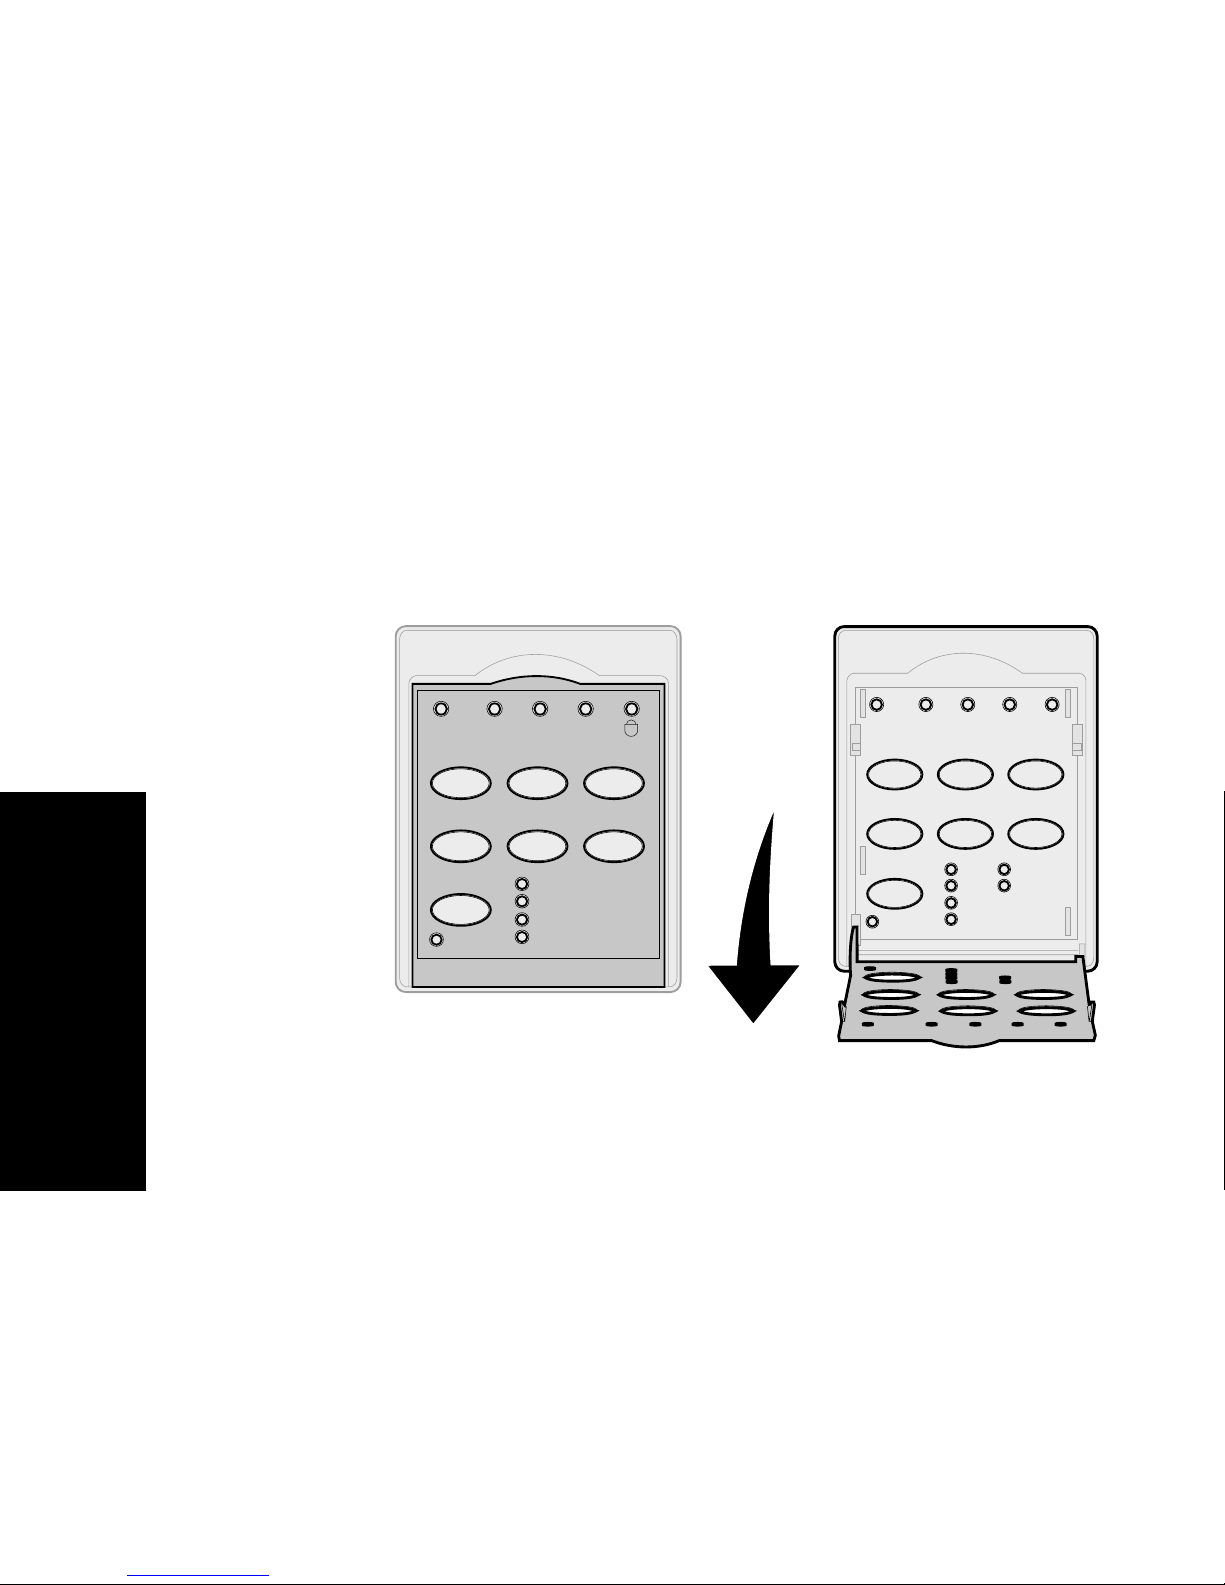
Operator panel layers
2
The operator panel has two layers of functionality.
•
Layer 1, with the operator panel cover
closed, contains basic functions like
LineFeed, FormFeed, Tear Off, and taking
the printer online/offline.
•
Layer 2, with the operator panel cover
down, as shown, contains more advanced
functionality. Use layer 2 to select a macro
and change printer menu settings such as
Top-Of-Form.
480/2481 operator panel
Operator panel
Power Ready Tractor2 Paper
Start/Stop LineFeed FormFeed
Tear Off Load/Unload Tractor
Font
Lock
out
FastDraft
Draft
Gothic
Courier
layer 1
Power
Set TOF LineFeed Macro
Set TOF
↑
Micro
Pitch
Lock
Macro
Micro ↓Setup
10
20
12
PS
15
17
23
1
layer 2
4
22
Page 27
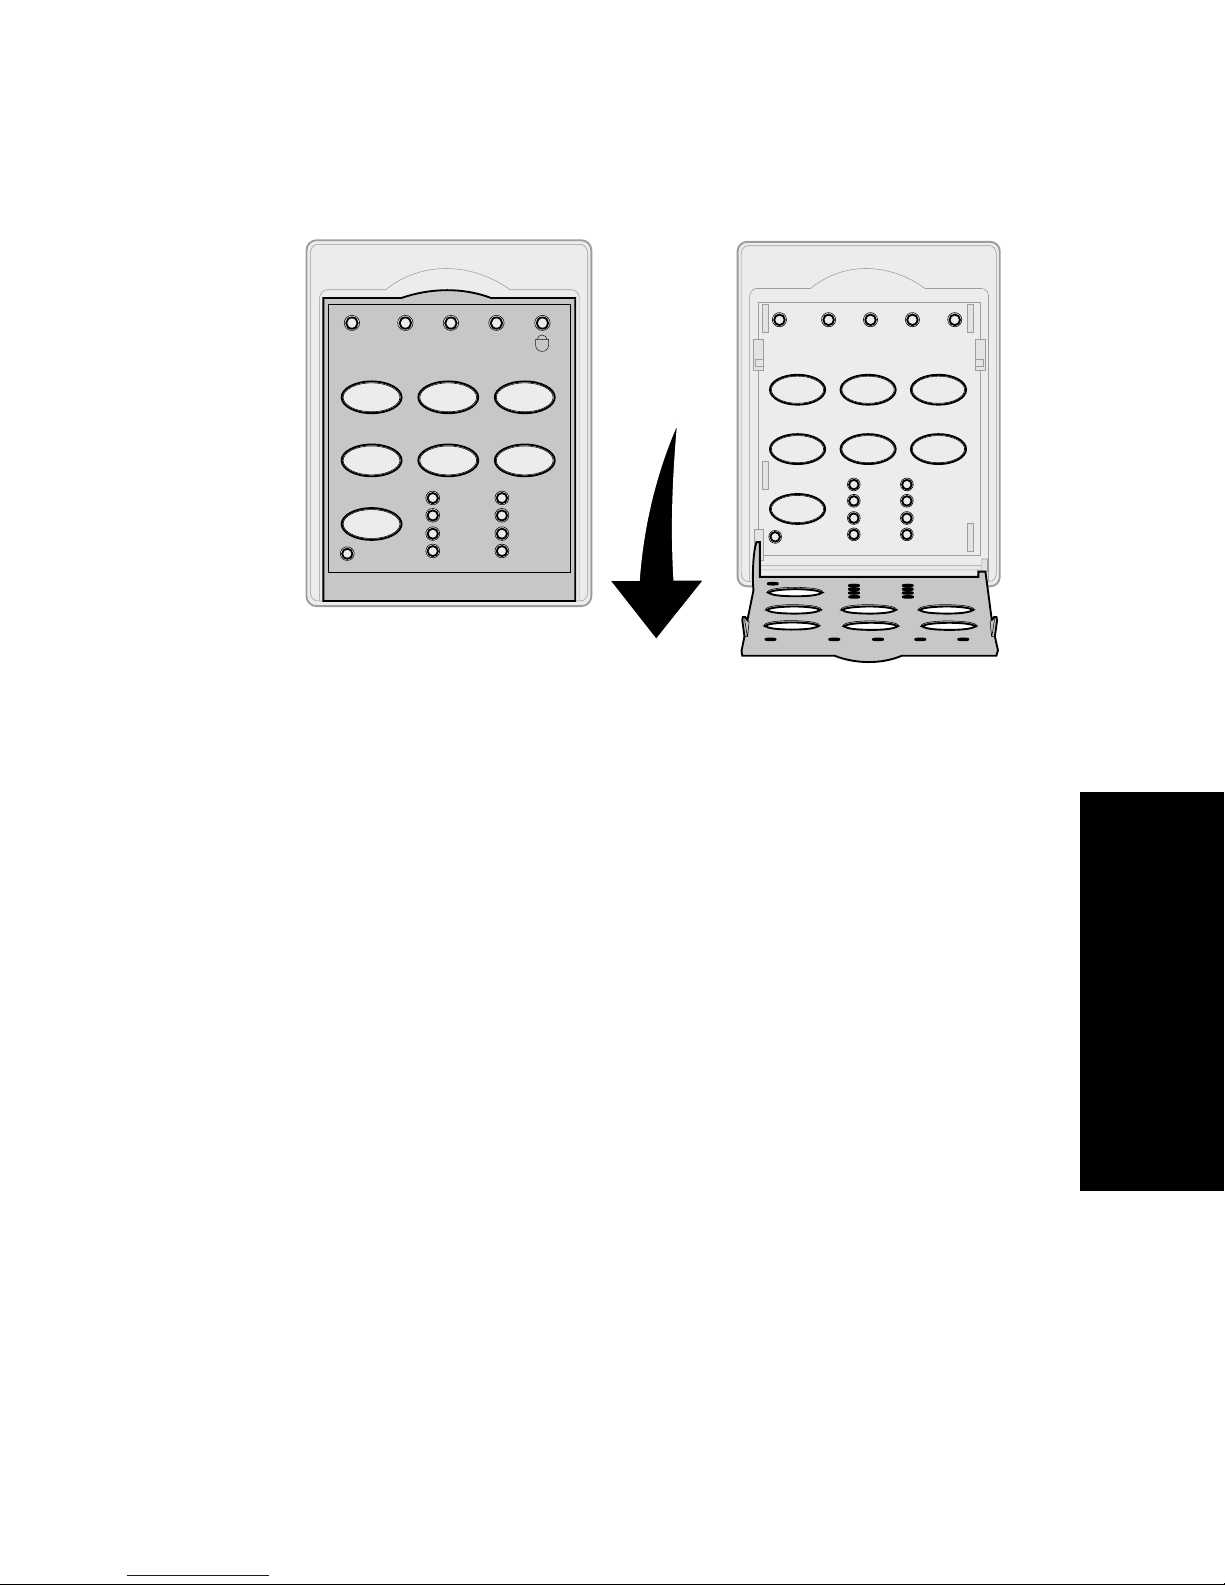
2490/2491 operator panel
Power Ready Tractor2 Paper
Start/Stop LineFeed FormFeed
Tear Off Load/Unload Tractor
Font
Lock
Courier
Prestige
Gothic
Presentor
out
Orator
Script
Draft
FastDft
layer 1
12
Power
Set TOF LineFeed Macro
Set TOF
↑
Micro
Pitch
Lock
Micro
10
12
15
17
34
Macro
↓
20
24
PS
Setup
layer 2
Operator panel
23
Page 28
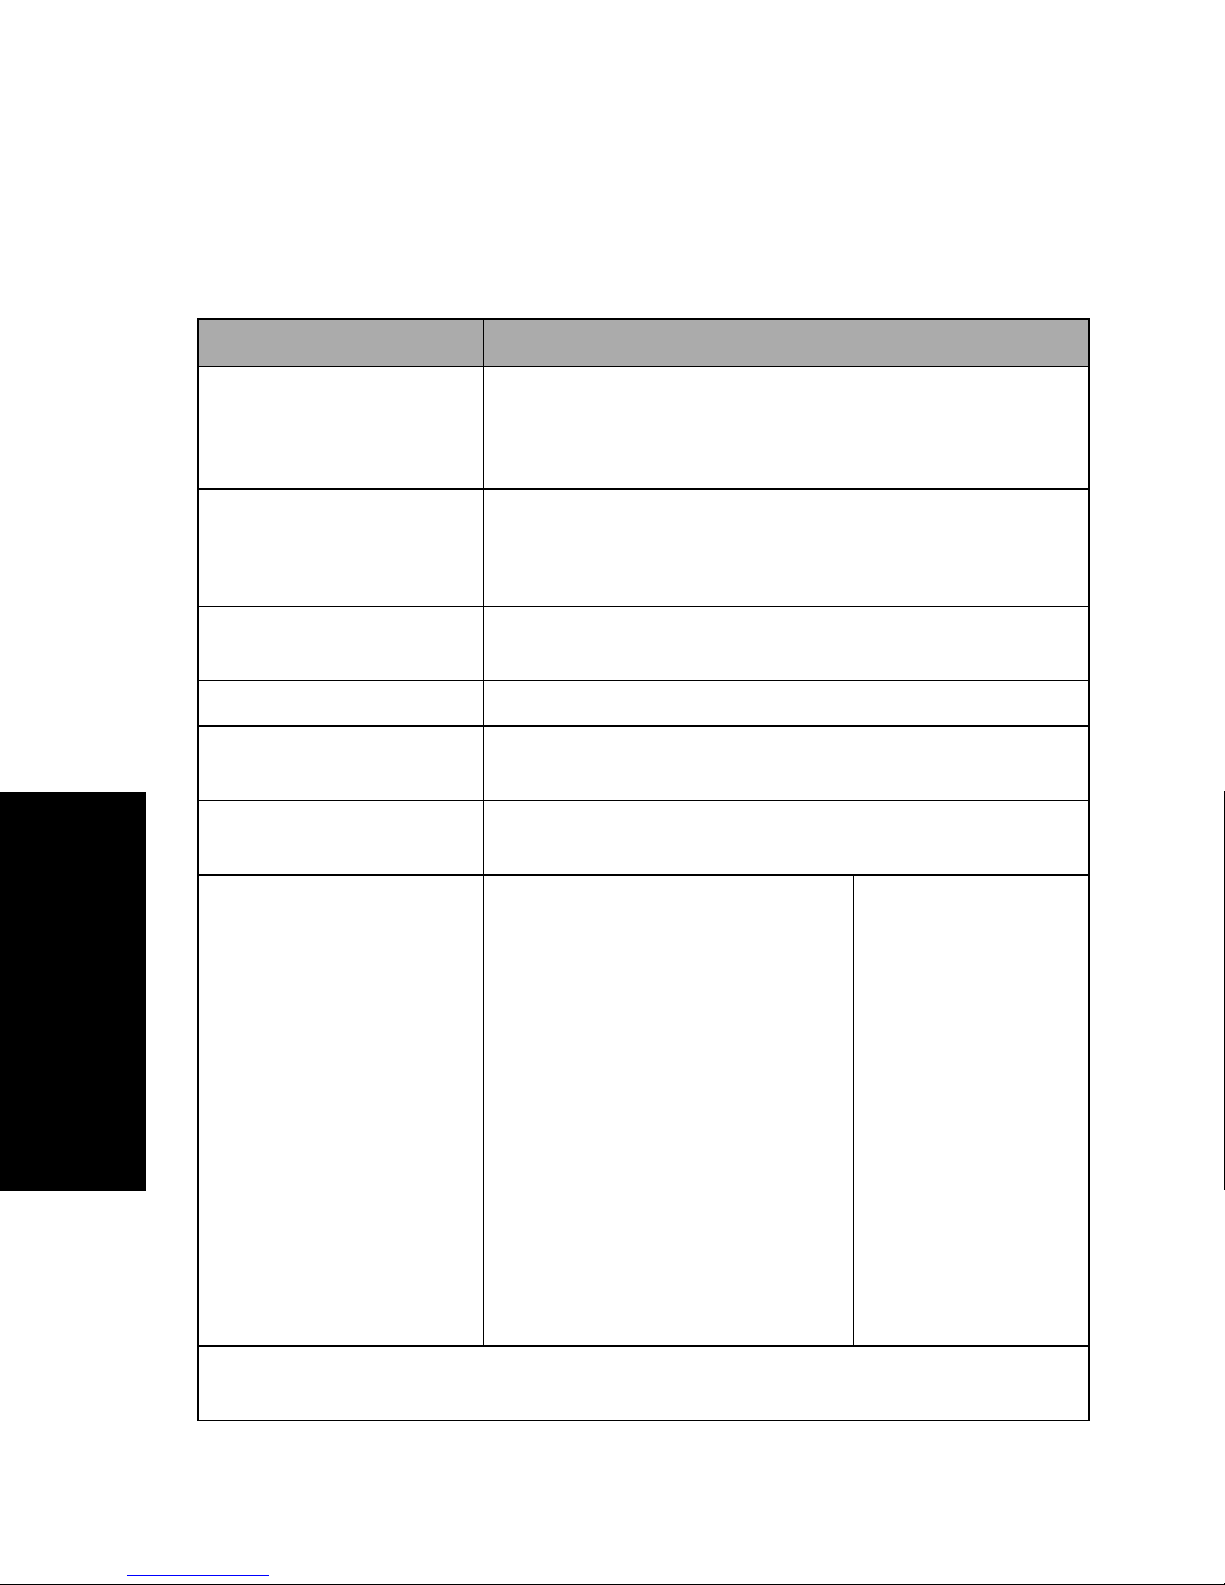
Understanding the operator panel
buttons
Use the operator panel buttons to perform printer tasks
and change printer settings.
Layer 1 operator panel buttons
Press this button: When you want to …
Start/Stop
LineFeed
FormFeed
Tear Off
Load/Unload
Tractor
Font
Notes:
• Repeatedly pressing the
Font
button rotates
through the printer
font selections. If you
Operator panel
continue pressing
through a second pass,
the font selections are
locked.
Font
Alternate the printer between online (Ready light is On)
Off
and offline (Ready light is
Note:
Advance the paper one line.
If you press and hold
micro movements and then goes into continuous mode.
Advance the paper to the next
Top-Of-Form.
Alternate paper between Tear Off and Top-Of-Form.
Load paper to the current Top-Of-Form or unload paper to
parked position.
Alternate between Tractor 1 and Tractor 2, if the optional
Tractor 2 is installed.
Select one of the resident font
styles:
2480/2481
• FastDft
• Draft
•Gothic
•Courier
2490/2491
•Courier
Printer must be online to receive data.
LineFeed
).
, the paper advances 5
• Orator
• This setting will be lost
when the printer is
Off
powered
On
.
Note:
online (Ready light is
Some functions may not work when data is being processed and the printer is
and back
On
• Prestige
•Gothic
• Presentor
).
•Script
• Draft
• FastDft
24
Page 29

Layer 2 operator panel buttons
Press this button: When you want to…
Set TOF
LineFeed
Macro
Micro
↑
Set Top-Of-Form.
Top-Of-Form is the position of the first
print line on the page.
Advance the paper one line.
If you press and hold
paper advances 5 micro movements
and then goes into continuous feed.
Select between four document
formats.
For more information, see “Forms
Macro menu options” on page 96.
Feed the paper upward in:
• 1/72-inch increments (2480/2481
models)
• 1/90-inch increments (2490/2491
models)
If you press and hold the
button, the paper advances in micro
movements and then goes into
continuous feed.
LineFeed
Micro
, the
↑
Operator panel
Micro
Use
Top-Of-Form.
↑ to adjust the
25
Page 30

Layer 2 operator panel buttons (continued)
Press this button: When you want to…
Micro
Setup
Pitch
Notes:
• Repeatedly pressing
↓
Pitch
the
rotates through the
printer pitch
selections. If you
continue pressing
Pitch
second pass the pitch
selections are locked.
button
through a
Feed the paper downward in:
• 1/72-inch increments (2480/2481
models)
• 1/90-inch increments (2490/2491
models)
If you press and hold the
button, the paper advances in micro
movements and then goes into
continuous feed.
Micro
Use
Top-Of-Form.
Enter Setup mode to change the
default values and modes for printer
operation.
Set the character pitch to: 10, 12, 15,
17, 20 cpi, or Proportional Spacing.
Notes:
• On 2490/2491 models you can also
select 24 cpi.
• Fast Draft supports only 10, 12, and
15 pitch.
↓
to adjust the
Micro
↓
• This setting will be
Operator panel
Note:
cessed and the printer is online (Ready light is
lost when the printer
Off
is powered
On
back
.
Some functions may not work when data is being pro-
and
26
On
).
Page 31
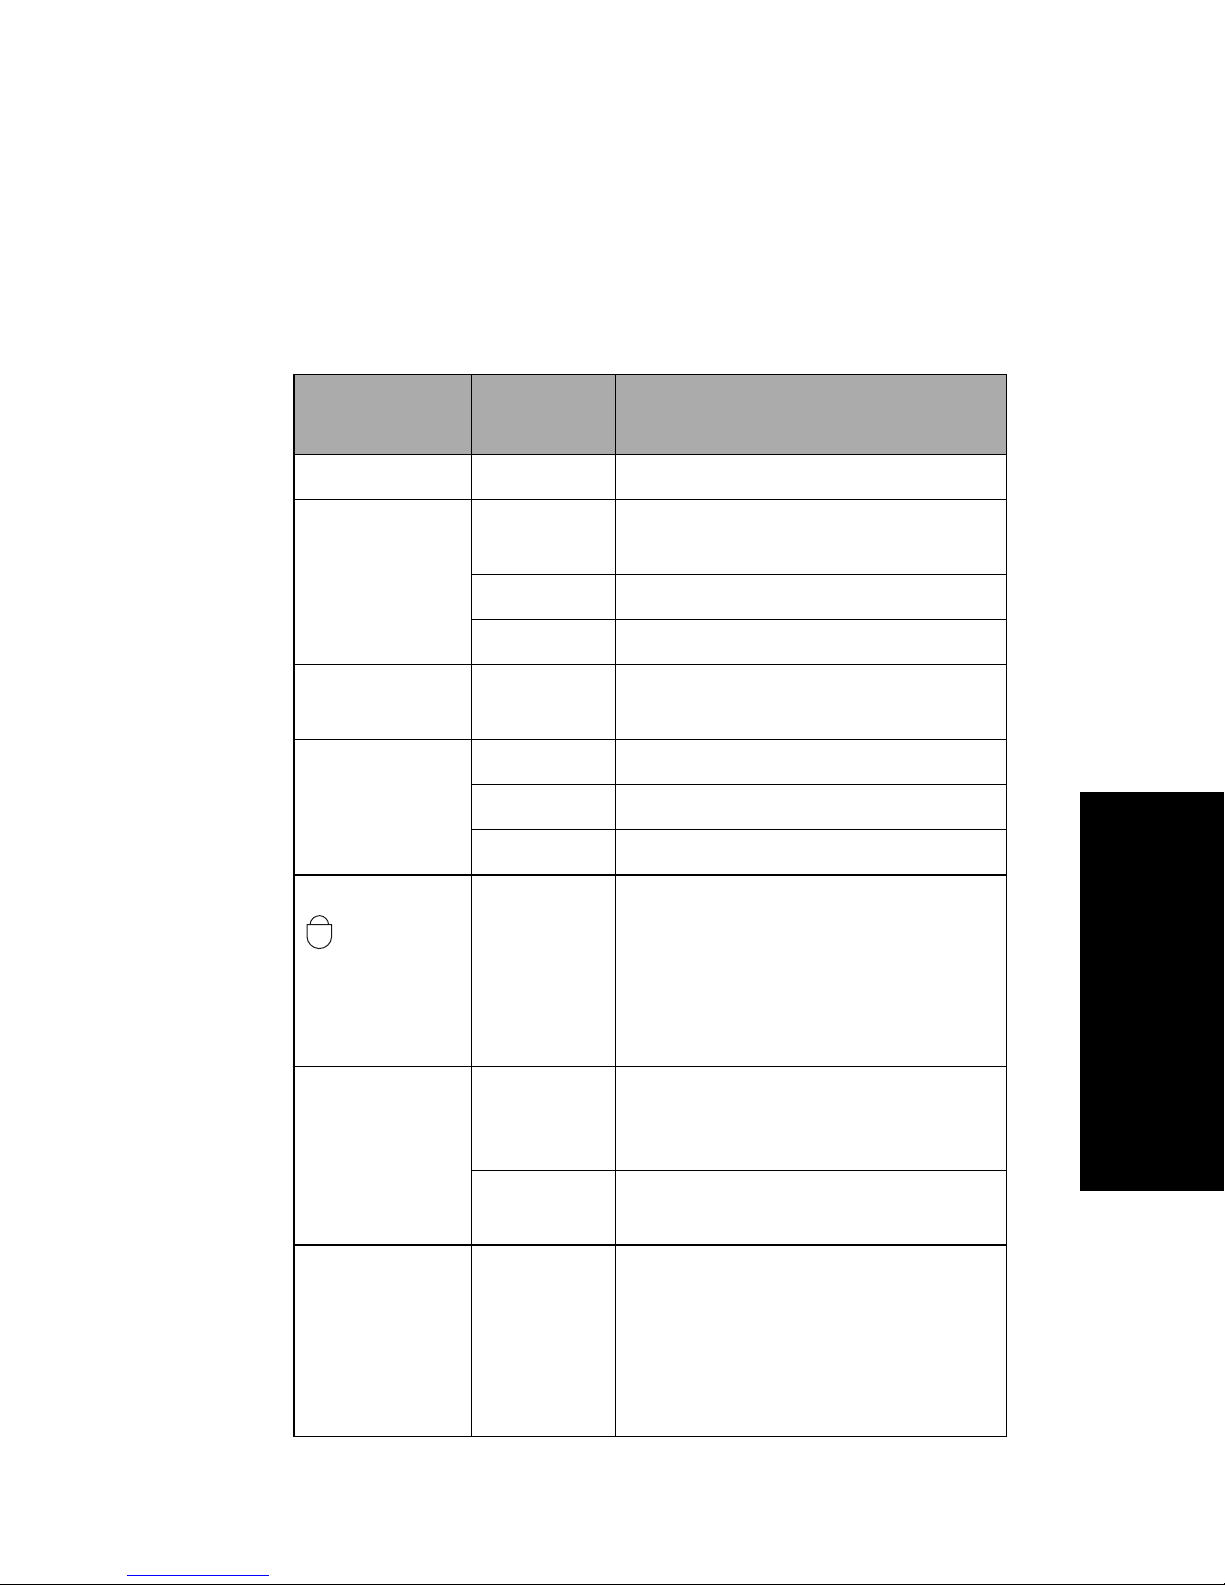
Understanding the operator panel
lights
The following table describes the light patterns on the
operator panel.
Layer 1 operator panel lights
Light
Light
status
What it means
Power On
Ready On
Blinking The printer is receiving data.
Off
Tractor 2 On
Paper Out Off
Blinking The printer is out of paper.
On
Padlock On
The printer is On.
The printer is online and ready to
print.
The printer is offline.
Tractor 2 is activated. (The optional
Tractor 2 Feeder must be installed.)
Paper is loaded in the printer.
A printer error occurred.
The operator panel is disabled,
restricting the use of panel buttons
Start/Stop, FormFeed, Tear Off
to
Load/Unload
and
information, see “Locking/unlocking
the operator panel” on pag e30.
only. For more
Operator panel
Font On
Font Lock On
Off
You (or your software application)
selected one of the printer's resident
fonts.
If all font lights are Off, then a
downloaded font is selected.
Font Lock is active and prevents your
software application from changing
the font you selected on the
operator panel. For more
information, see “Selecting or
locking a font” on page 31.
27
Page 32

Layer 2 operator panel lights
Light
Light
status
What it means
Macro On
Off
Pitch On
Pitch Lock On
The specified macro function is
activated. For more information, see
“Forms Macro menu options” on
page 96.
No macro is being used, or Macros
have been disabled in the Setup
menu.
You (or your software application)
selected one of the printer's
standard pitches.
Pitch Lock is active and prevents
your software application from
changing the pitch you selected on
the operator panel. For more
information, see “Selecting or
locking a pitch” on page 32.
Setting the printer online or offline
Operator panel
The printer must be online to accept data.
To set the printer:
•
Online, press
comes
On
Start/Stop
.
; the Ready light
If paper is not loaded, the Paper Out light
blinks. When online, the printer is ready to
receive print jobs.
•
Offline, press
goes
Off
.
Start/Stop
; the Ready light
The printer finishes printing the current line
and then stops printing. To resume printing,
press
Start/Stop
until the Ready light is
On
.
28
Page 33

Advancing the paper
You can use the operator panel to advance the paper
when the printer is not printing.
If you are at the Tear Off bar:
Using Tear Off
Tea r O f f
position.
Note:
•
Press
next line.
•
Press
the Top-Of-Form on the next page or to
eject the cut form.
•
Press
incrementally.
•
Press
Top-Of-Form.
works only when the tractor unit is in the push
LineFeed
FormFeed
LineFeed
Tear Off
For the Tear Off function to work
properly, you must set the correct page
to advance the paper to the
to advance the paper to
to move the paper
to move the paper to the
Operator panel
length in the Setup menu or your
application software.
The Tear Off function advances the perforation of a
continuous form to the tear bar position. You can set
Tea r O f f
the Tear Off position (Auto Tear Off set to
Second
to the Tear Off position (Auto Tear Off set to
more information, see “Setting the Tear Off position”
on page 87.
to move a continuous form automatically to
On
or to
), or you can move a continuous form manually
Off
One
). For
29
Page 34

Using the Load/Unload feature
Load/Unload
push position. For information, see “Changing tractor
positions” on page 33.
Use the
forms from the printer while you print on either a cut
form or envelope. You can also use the feature to load
continuous forms into the printer when the paper path
is clear. For information, see “Loading continuous
forms” on pag e46.
Load/Unload
works only when the tractor unit is in the
feature to unload continuous
Locking/unlocking the operator panel
To restrict the use of printer functions to just the
Start/Stop, FormFeed, Tear Off
buttons, you can lock the operator panel. When the
panel is locked, the padlock light comes
1
Turn the printer
Off
.
, and
Load/Unload
On
.
Selecting Tractor mode
Operator panel
2
Press and hold
turning the printer
To unlock the operator panel, repeat steps 1 and 2.
If you installed the optional Tractor 2 Feeder, you can
press
feeder and the Tractor 2 Feeder. The Tractor 2 light
comes
Tra c tor
On
when the Tractor 2 Feeder is selected.
Note:
to switch between the normal tractor
Before you switch tractor feeders, tear off
excess paper.
Load/Unload
On
.
and
Tra c tor
while
30
Page 35
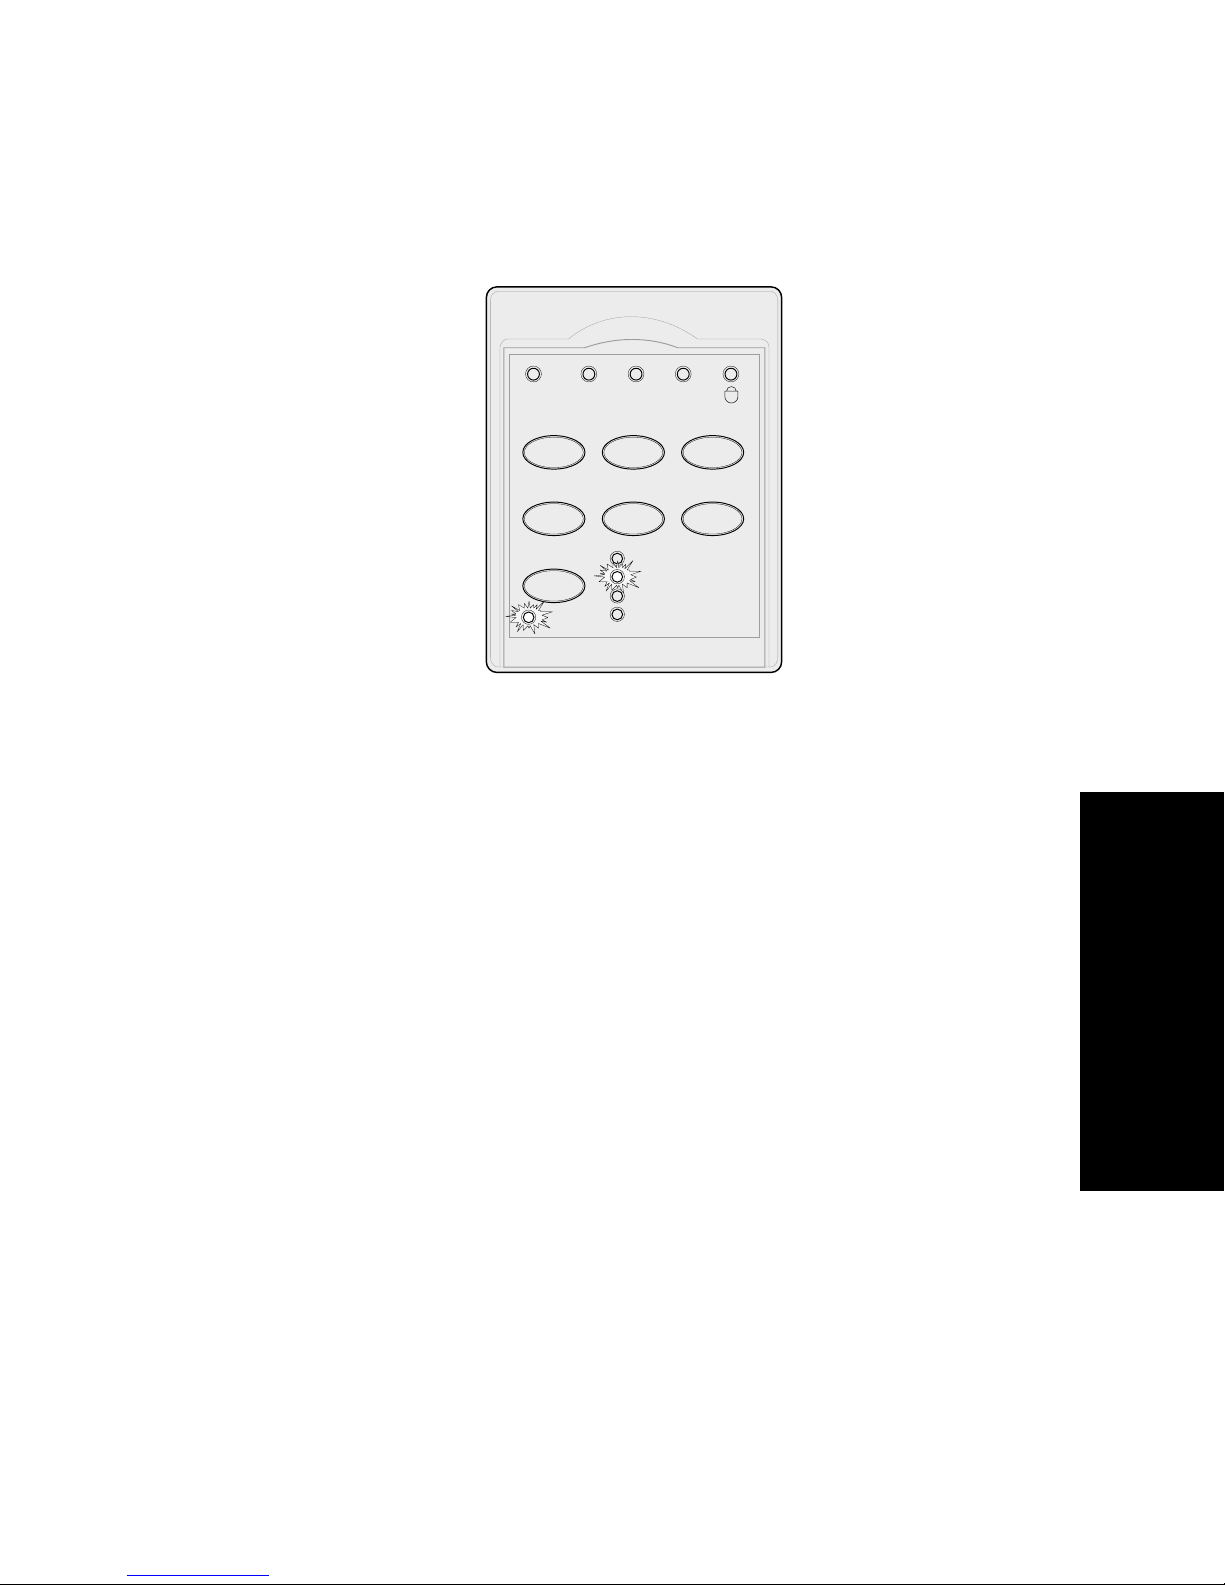
Selecting or locking a font
1
To select a font, repeatedly press
see the font light
On
next to the selection you
Font
want.
Layer 1
Power Ready Tractor2 Paper
Start/Stop LineFeed FormFeed
Tear Off Load/Unload Tractor
Font
Lock
2
To lock any font so your software application
out
FastDraft
Draft
Gothic
Courier
until you
cannot select a different one, continue pressing
Font
until the Font Lock light comes
On
the font you want is selected.
The font is locked until the printer is turned
Off
.
3
To disable Font Lock, repeatedly press
until the Font Lock light turns
Off
Font
and the font
you want is selected.
If the printer is offline, press
the ready light comes
On
Start/Stop.
, you are ready to
print.
4
To set a
Font
or to set Font Lock as a default
setting in the Setup menu, see “Using Setup
mode to change printer settings” on page 89.
, and
Operator panel
When
31
Page 36
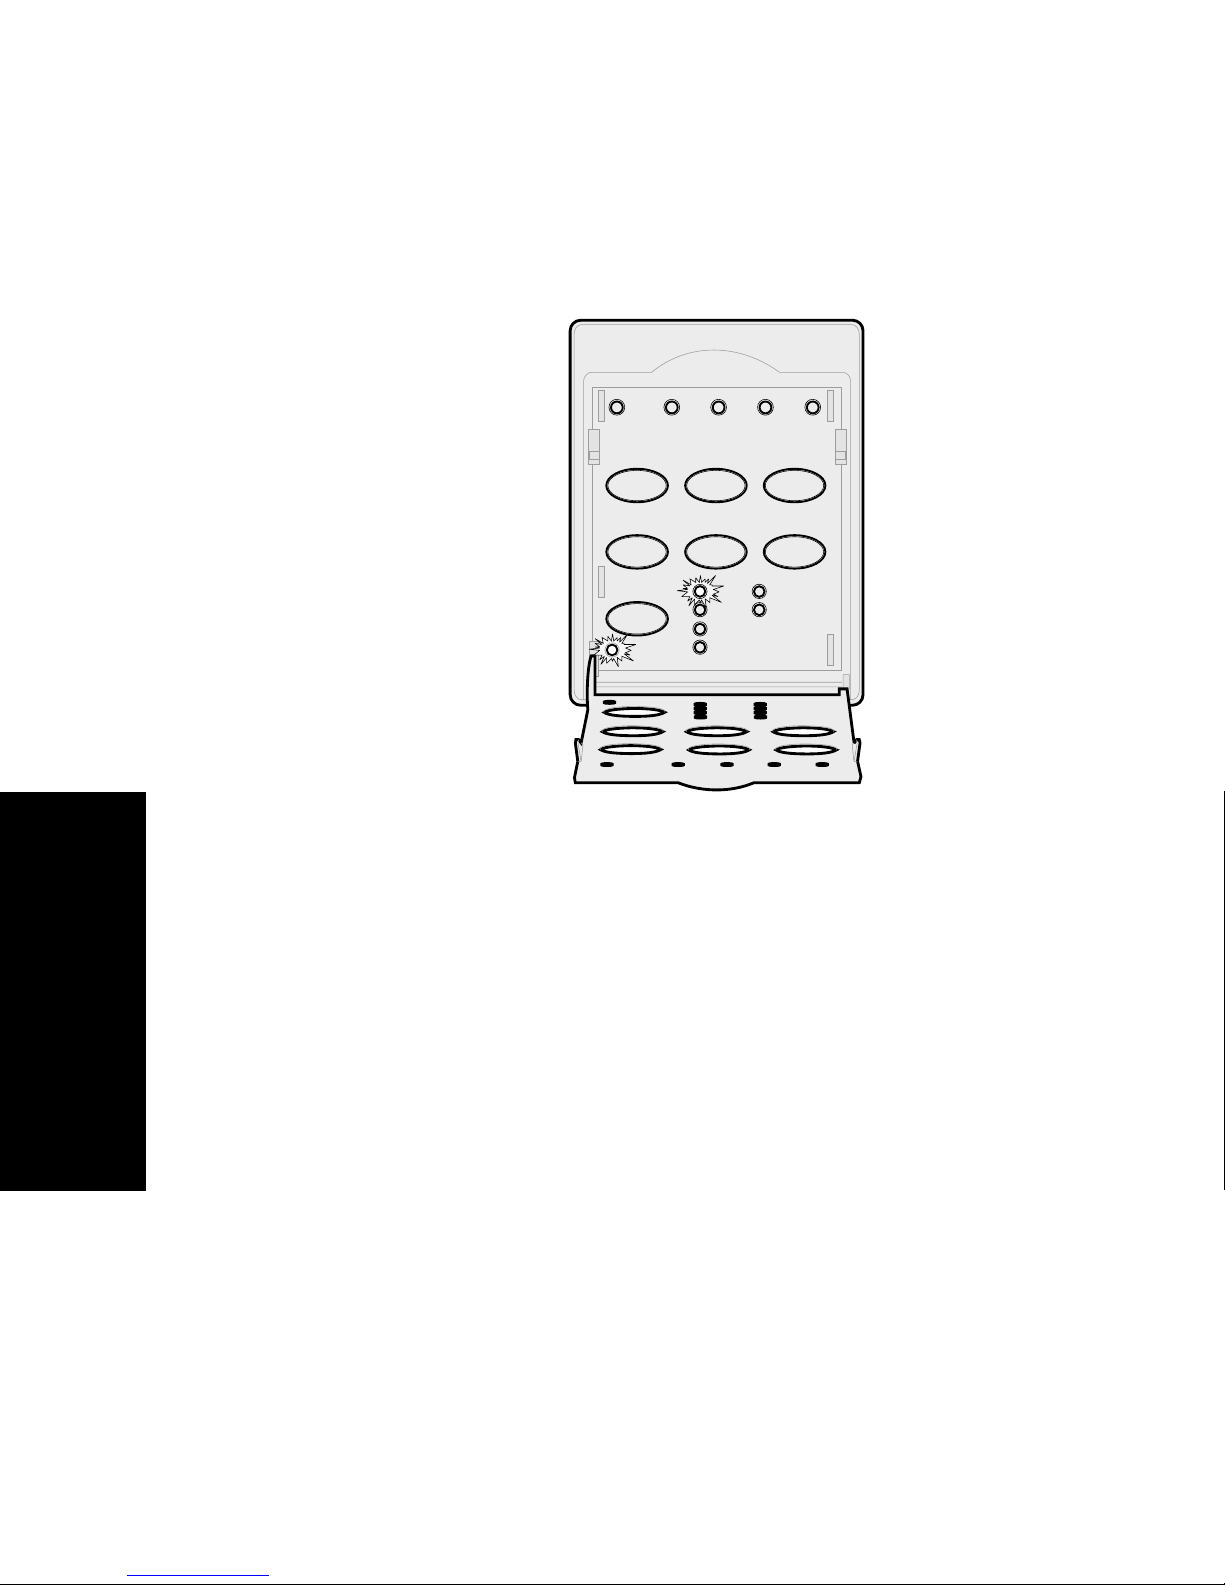
Selecting or locking a pitch
1
To select a pitch, open the operator panel to
layer 2.
2
Repeatedly press
light
On
next to the selection you want.
Layer 2
Pitch
1
Power
Set TOF LineFeed Macro
Micro
Pitch
Lock
234
Micro
↑
10
12
15
17
until you see the pitch
Macro
Setup
↓
20
PS
Operator panel
3
To lock a pitch so your software application
cannot select a different one, continue pressing
Pitch
until the Pitch Lock light comes
On
the pitch you want is selected.
The pitch is locked until the printer is turned
Off
.
4
To disable Pitch Lock, repeatedly press
until the Pitch Lock light turns
Off
and the pitch
Pitch
you want is selected.
5
Close the operator panel.
If the printer is offline, press
Ready light comes
On
and you are ready to
Start/Stop
print.
6
To set a
Pitch
or Pitch Lock as a default setting
in the Setup menu, see “Using Setup mode to
change printer settings” on pag e89.
and
. The
32
Page 37
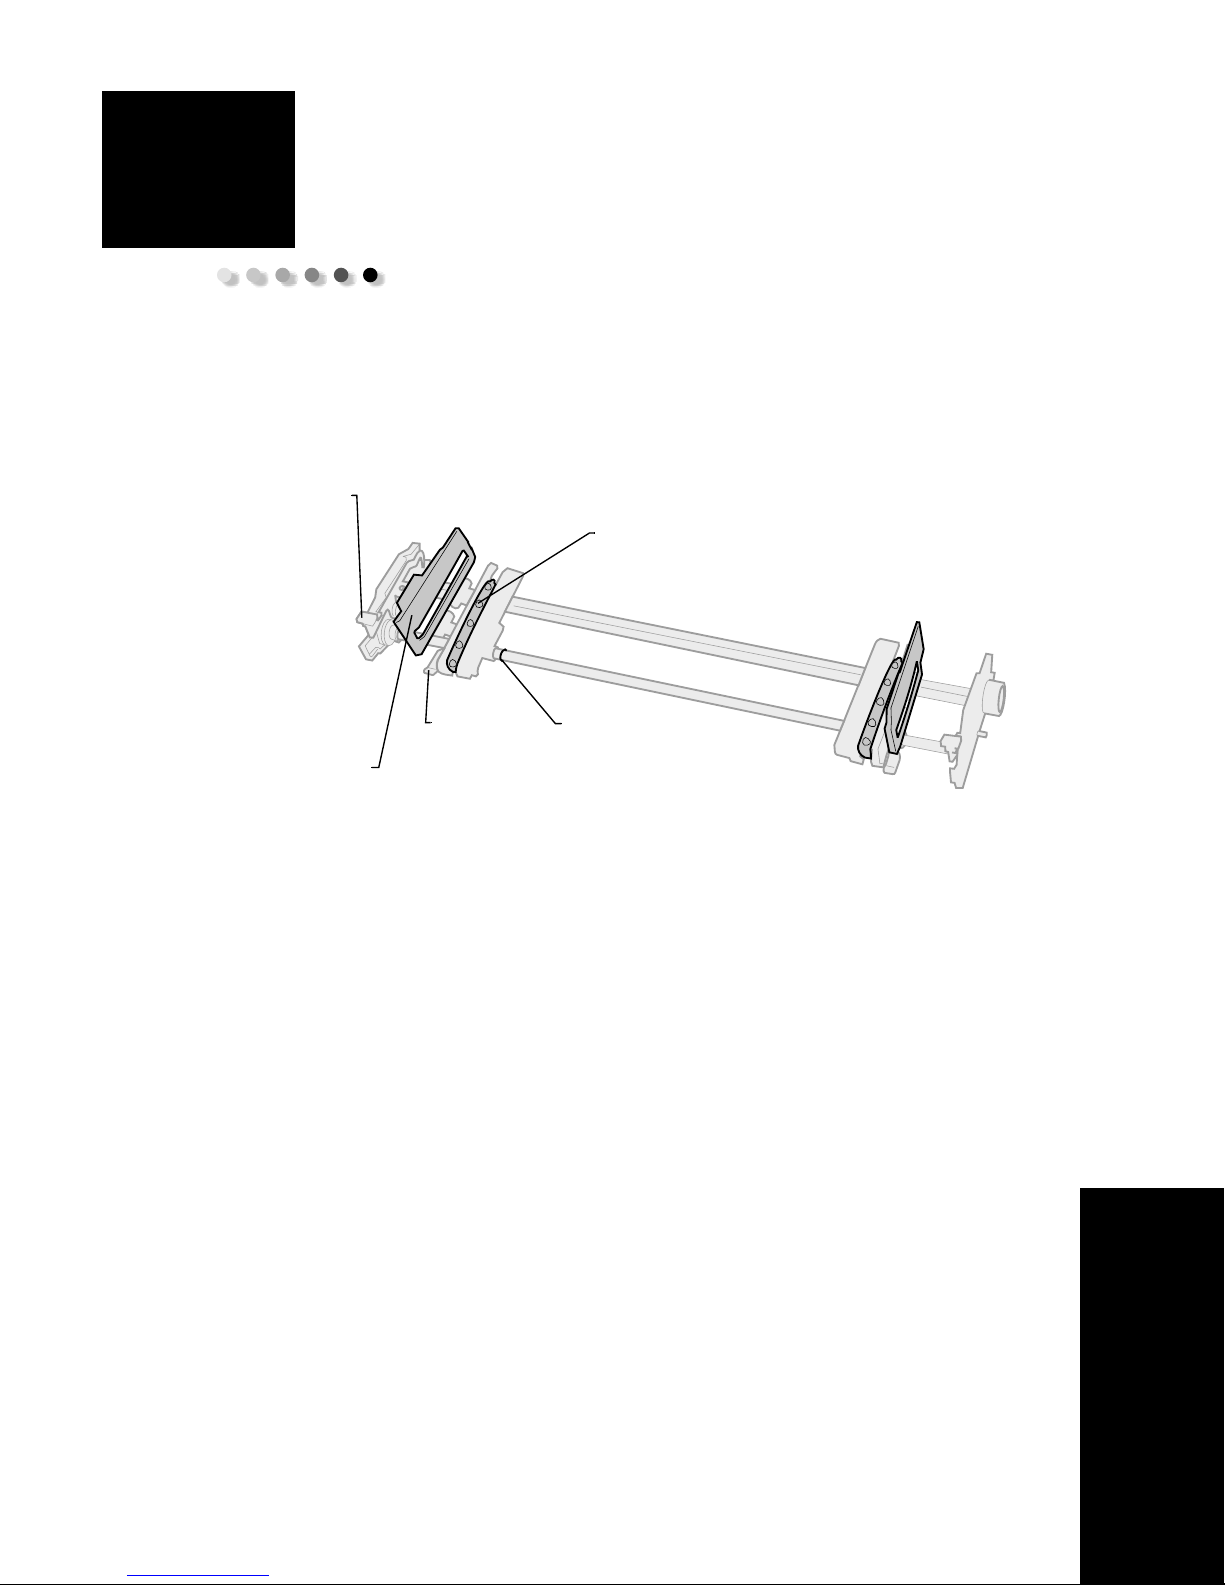
3
Changing tractor positions
This section describes how to change the tractor unit
position.This a tractor unit.
Left
latching
lever
Pin
Left
tractor
door
Left
locking
lever
Rubber
tractor
stop
You can install the tractor unit in the push tractor
position or the pull tractor position. To view an
illustration of the tractor positions and paper paths
available, see “Paper paths for the push tractor” on
page 47.
Tractor positions
33
Page 38
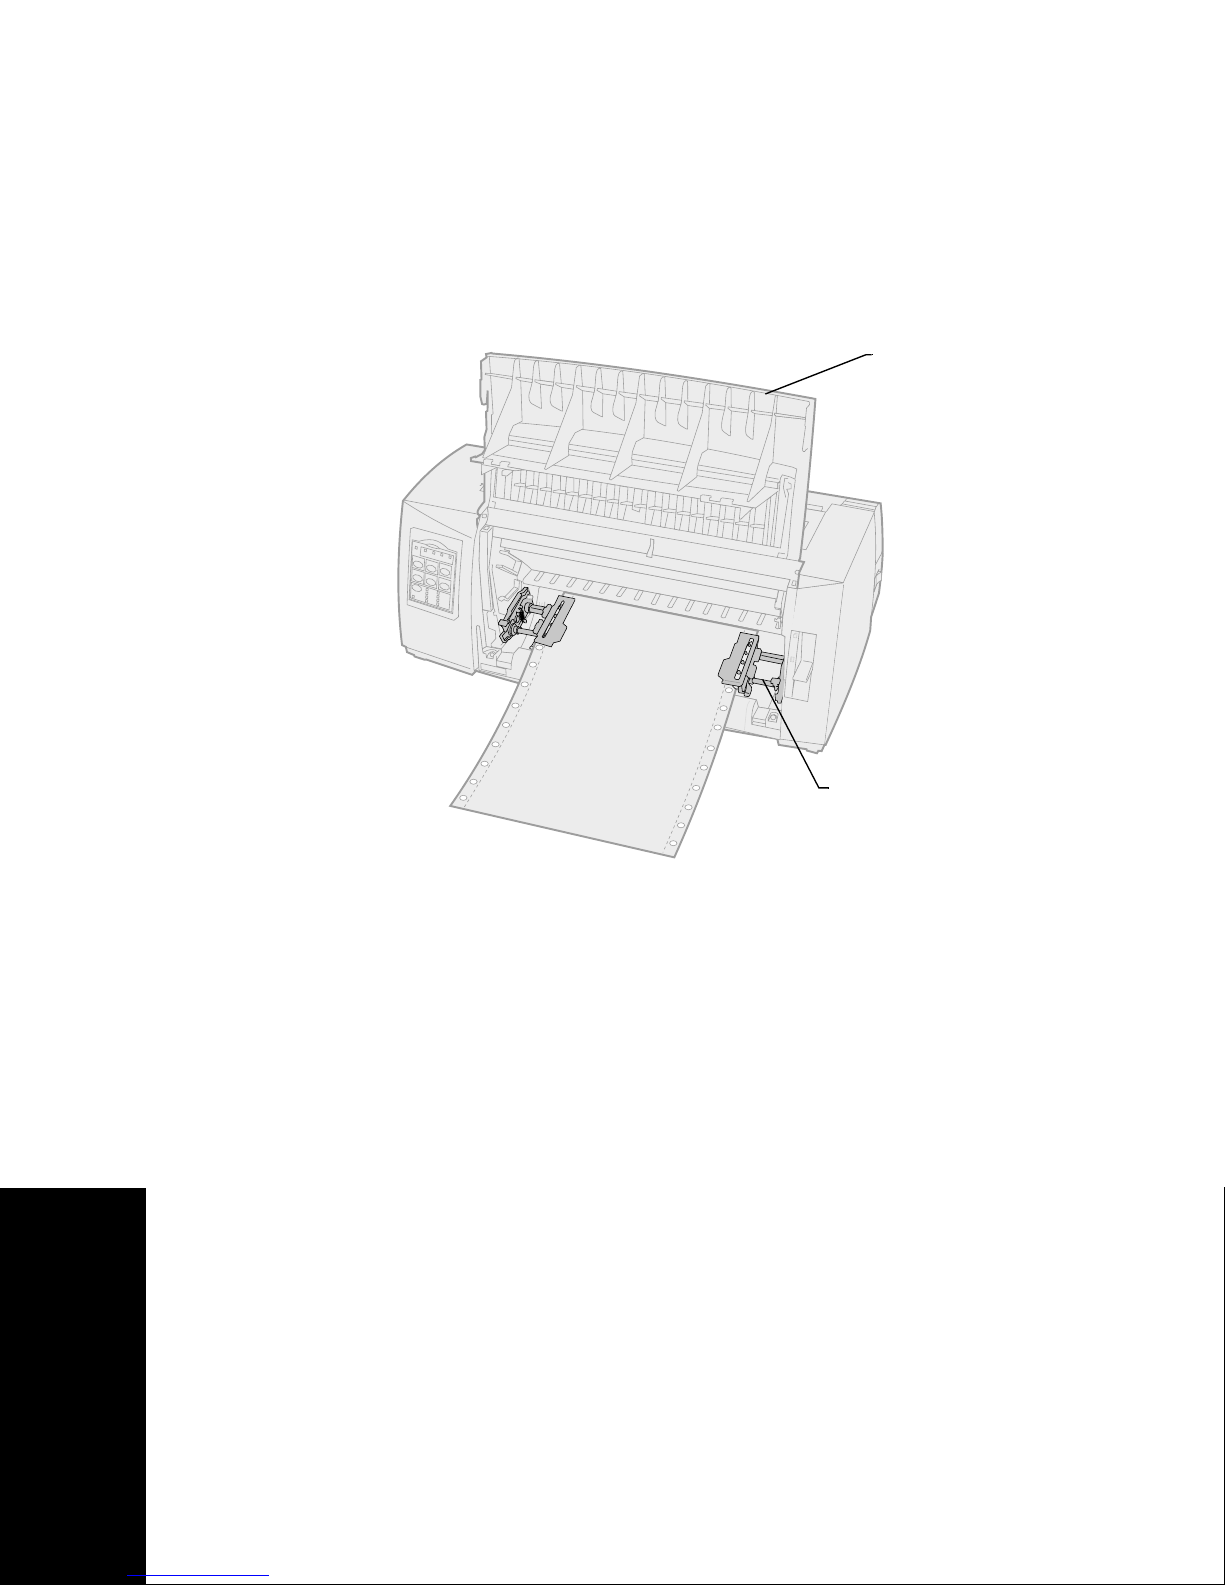
Push tractor position
The printer is shipped with the tractor unit installed at
the front of the printer, which is the push tractor
position.
This position lets you use the Tear Off feature of the
printer.
Front cover
Push tractor
position
Tractor positions
34
Page 39
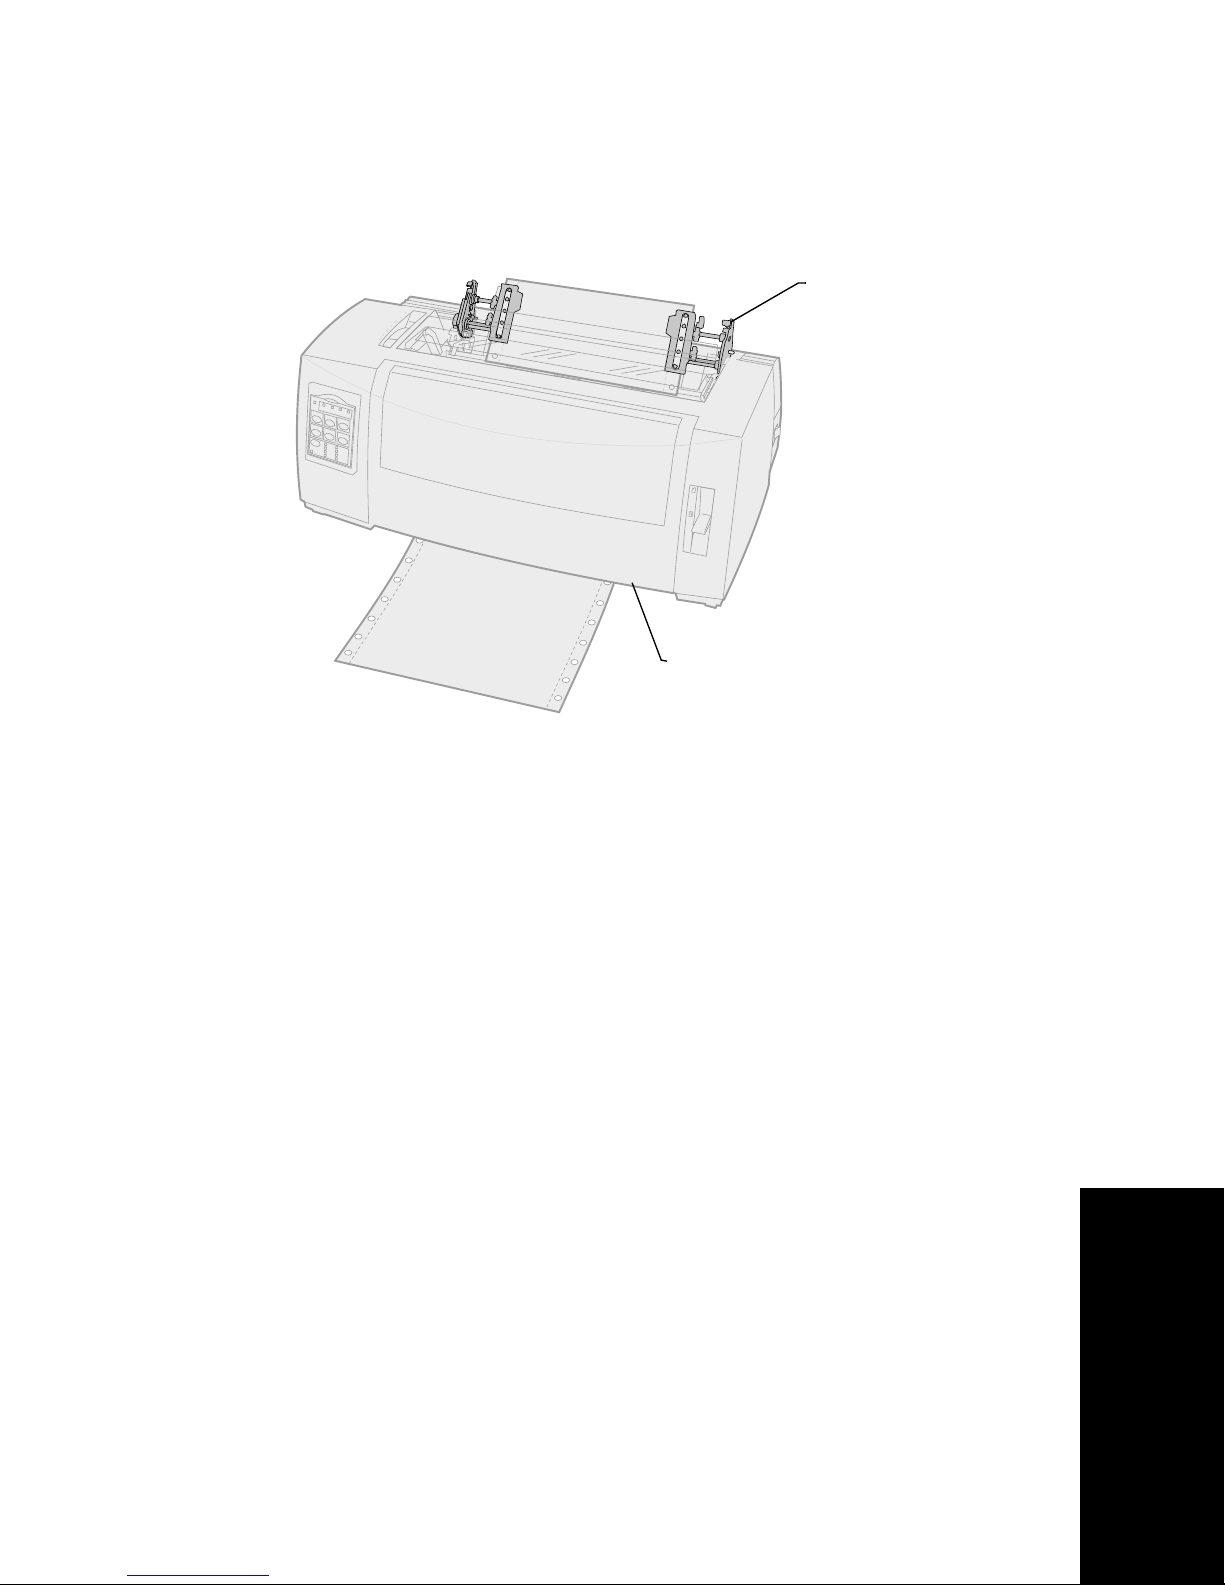
Pull tractor position
When the tractor unit is installed at the top of the
printer, it functions as a pull tractor and supports front
and bottom paper loading.
Pull tractor
position
Front cover
Tractor positions
35
Page 40
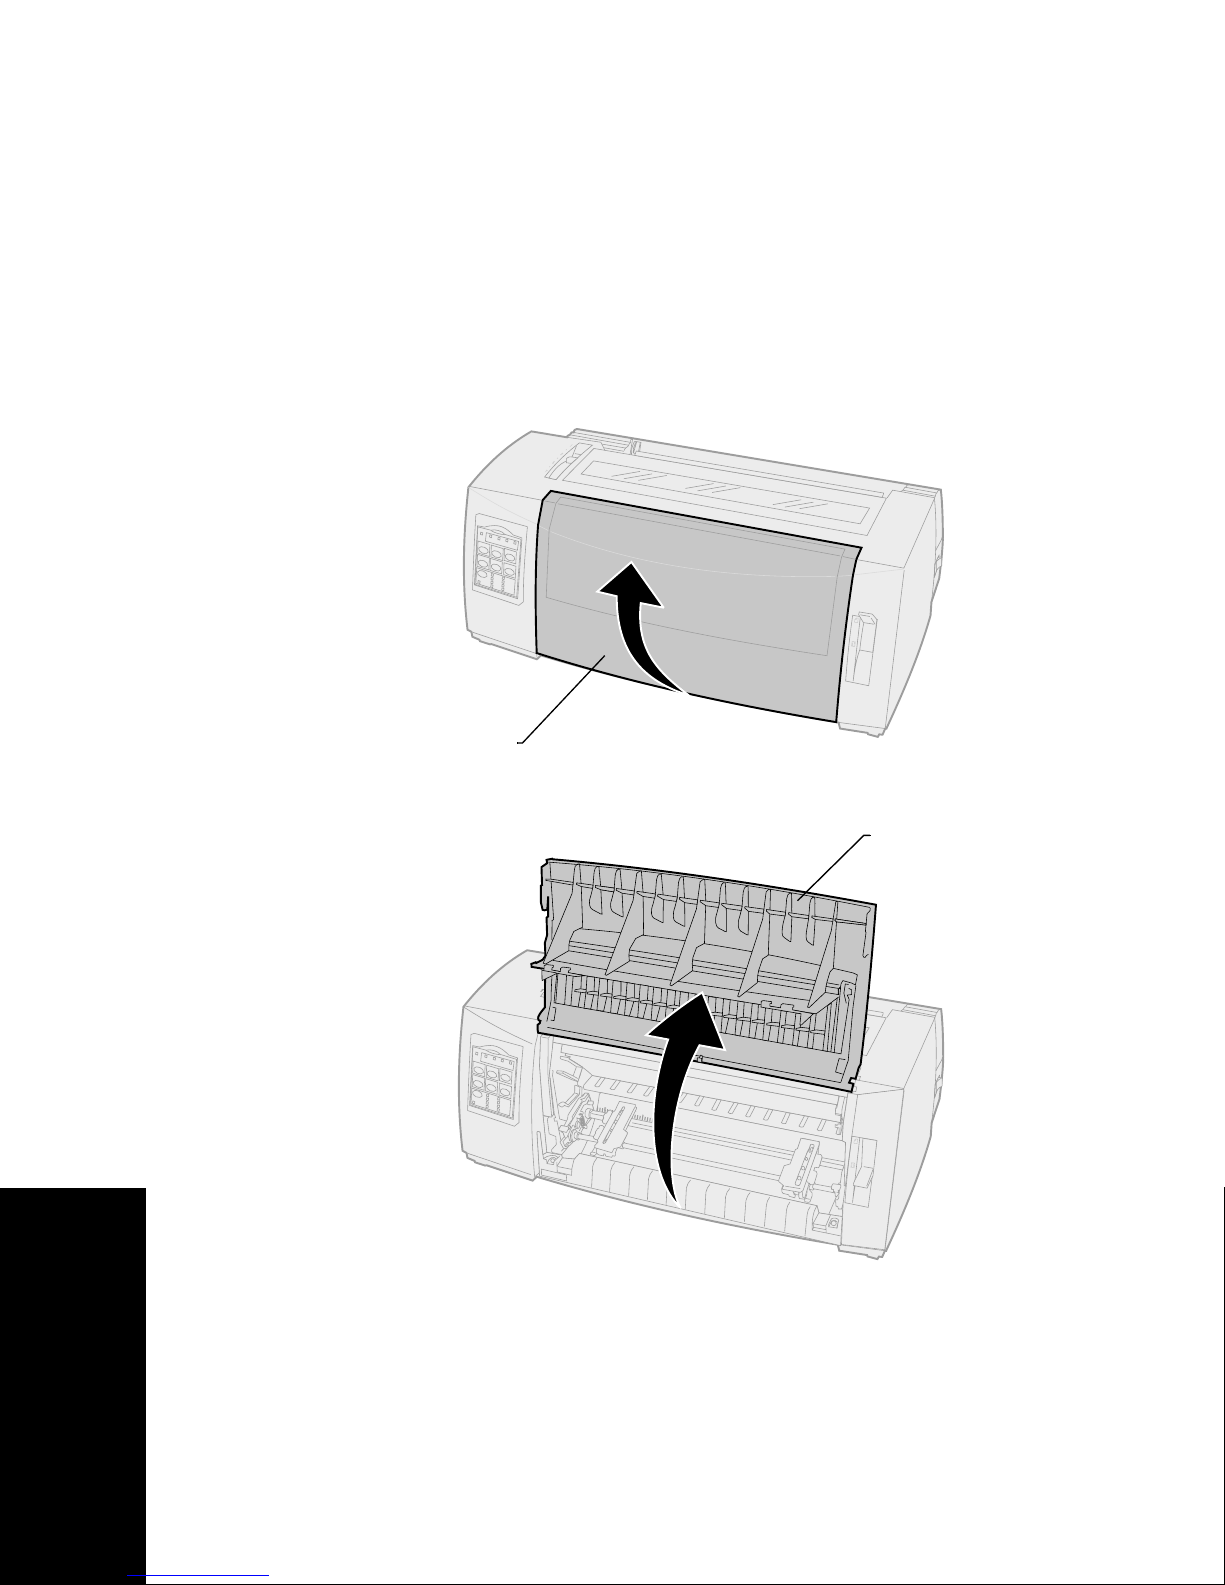
Converting the push tractor to pull tractor
position
Removing the push tractor
1
Make sure paper is not loaded in the printer.
2
Pull out the front cover to release it and pivot
the cover up out of the way.
Front
cover
Front cover
Tractor positions
36
Page 41
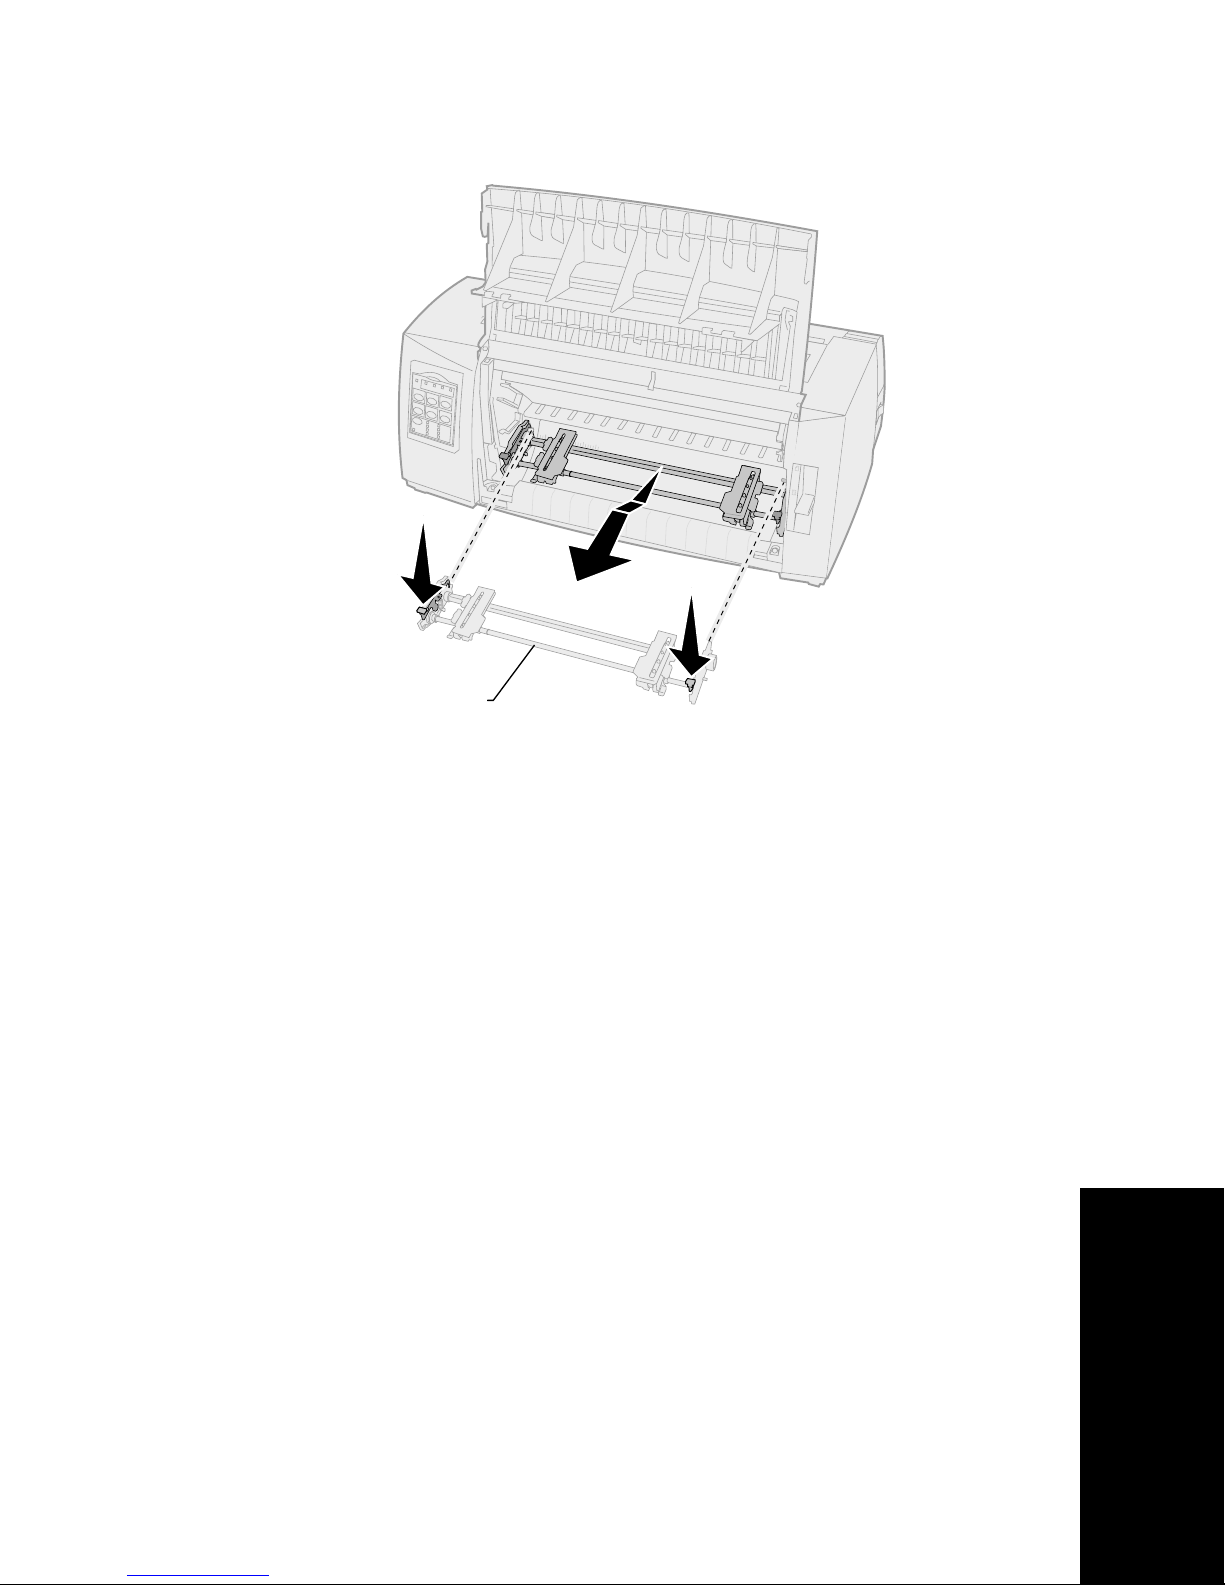
3
Hold down the latching levers while you pull
and lift the tractor unit out of the printer.
Tractor unit
Tractor positions
37
Page 42
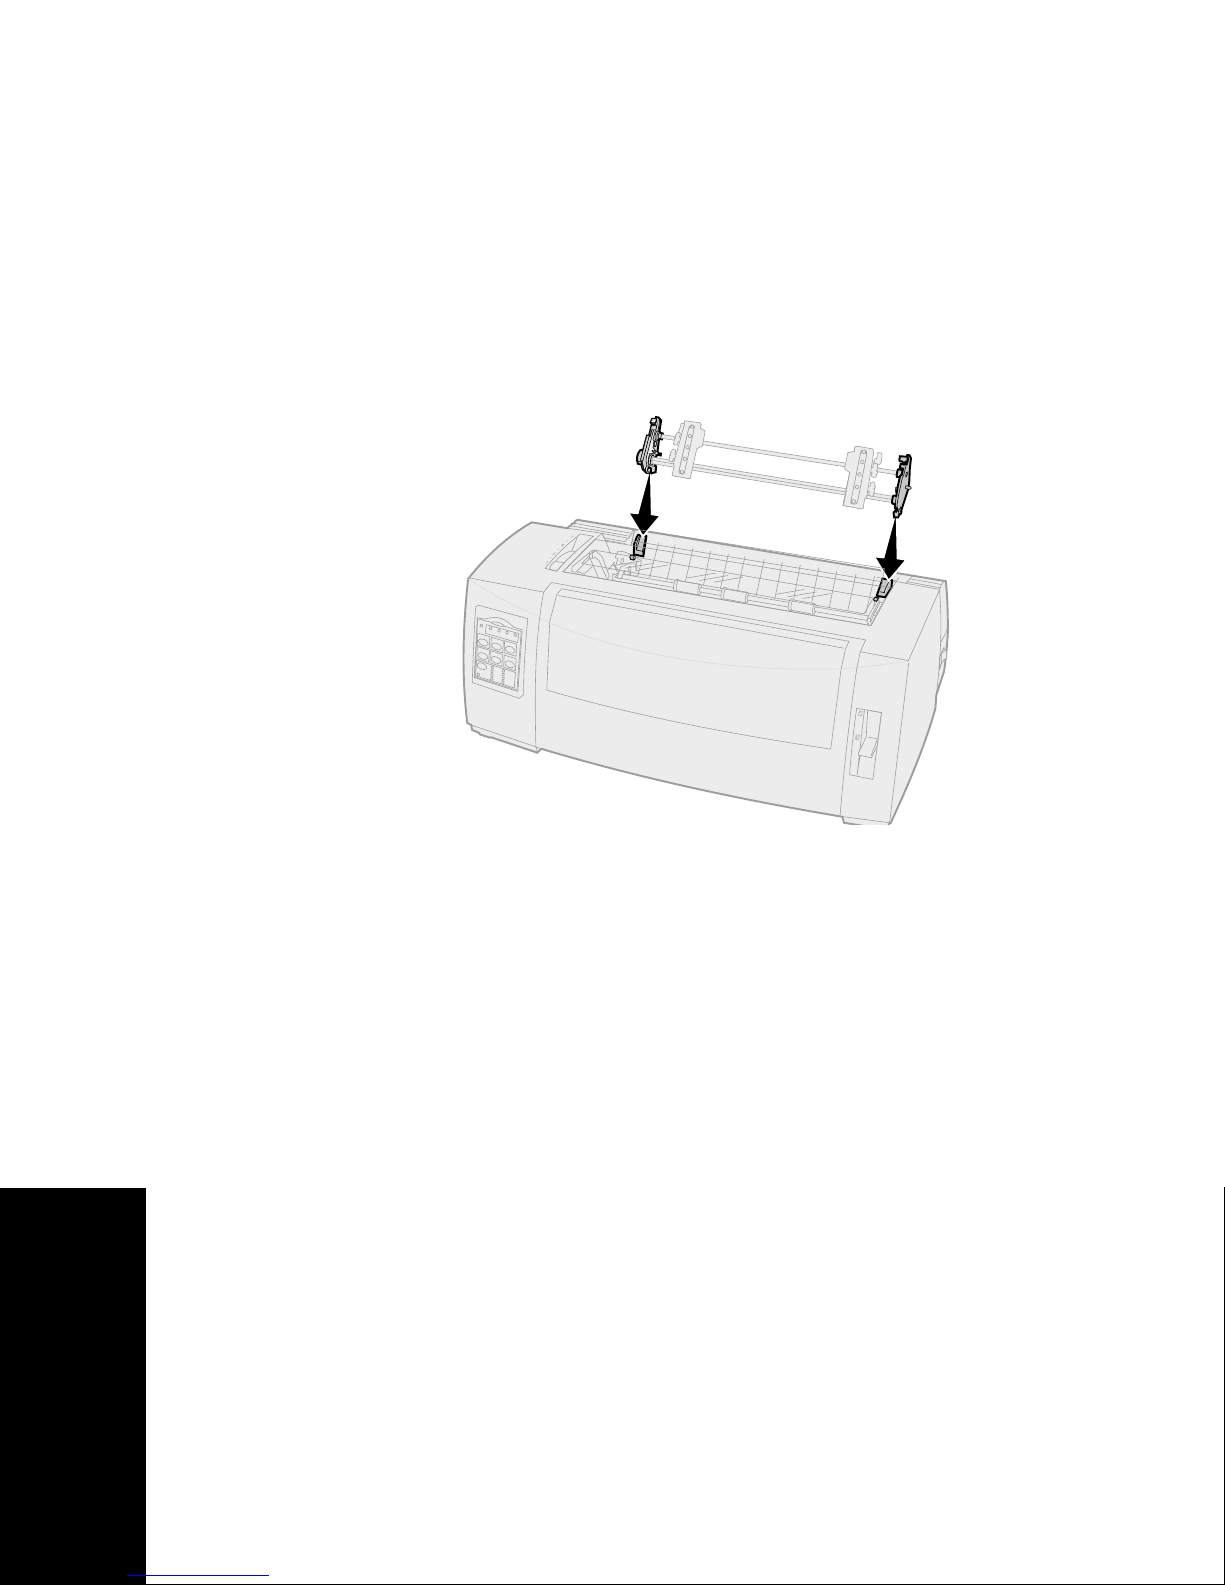
Installing the pull tractor
1
Remove the ribbon access cover.
2
Turn the tractor unit around so that the
latching levers are upright, facing you.
3
Place the tractor against the back slant of your
printer along the tractor guides.
Tractor positions
38
Page 43
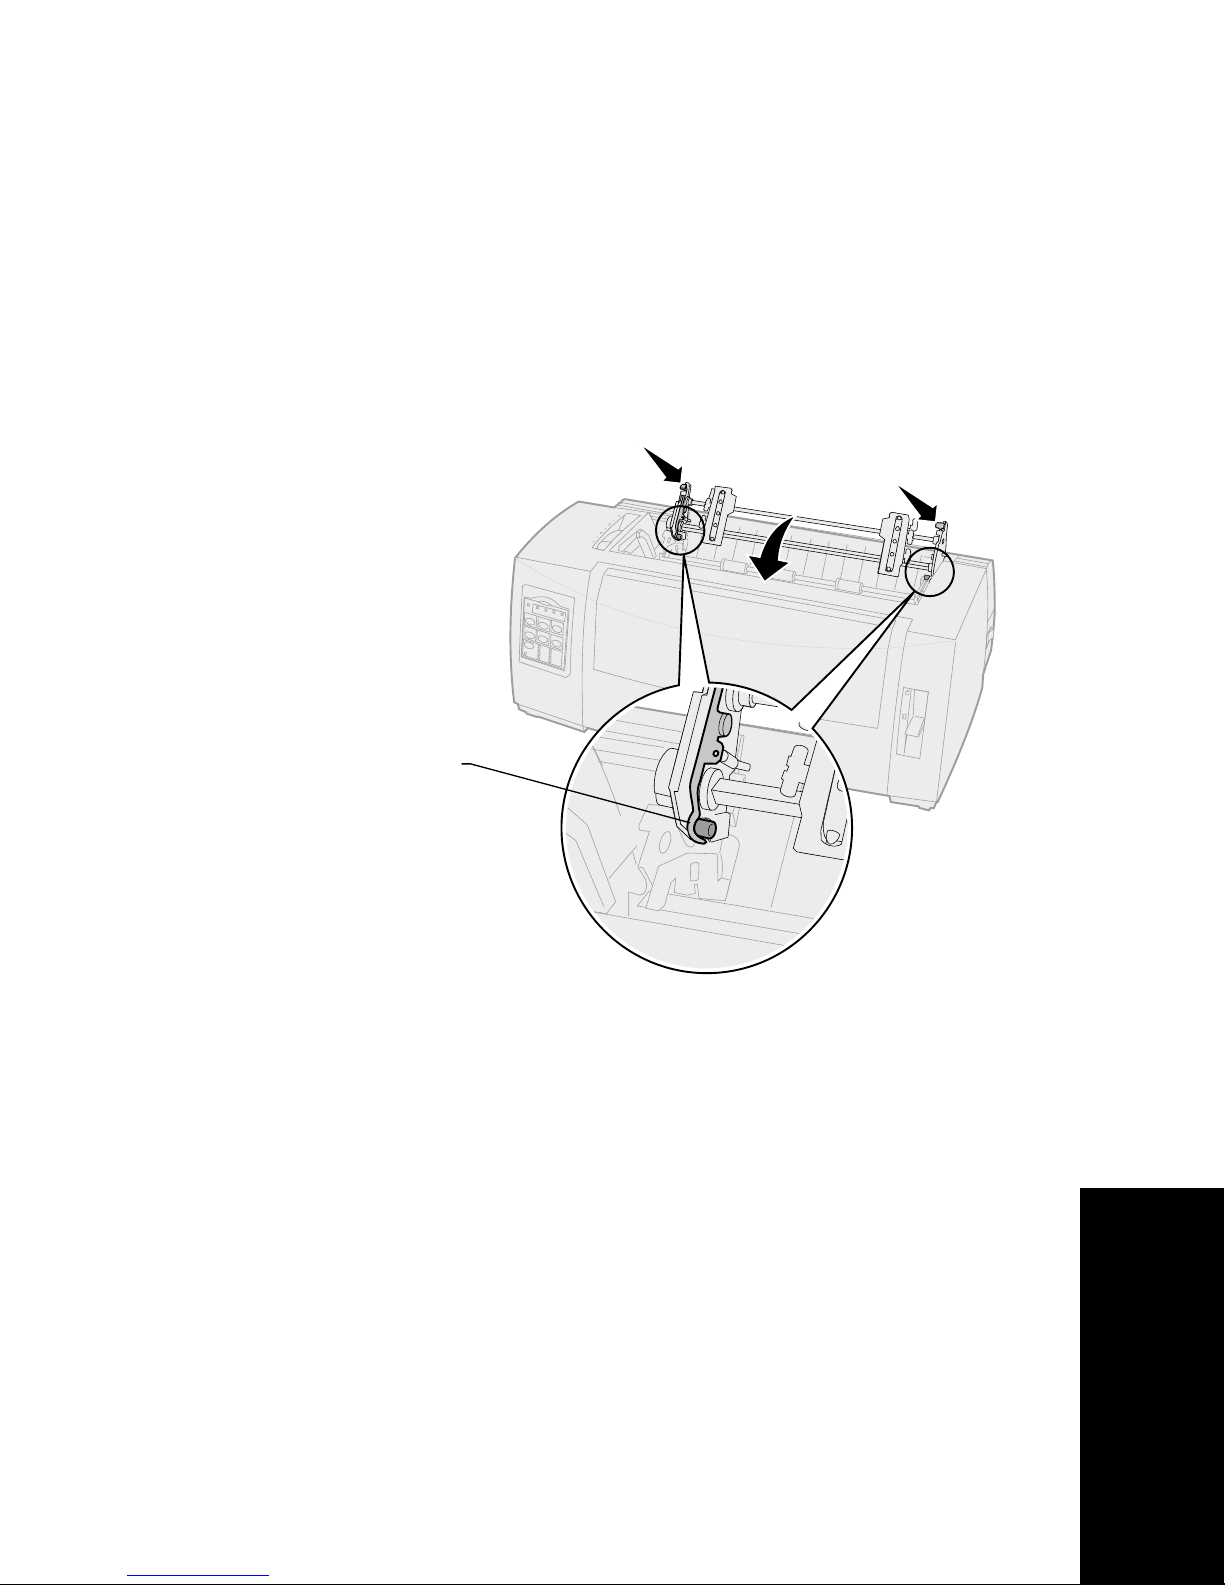
4
To slide the tractor feeder into the printer:
a
Hold down the latching levers and gently
push the tractor feeder into the printer until
it stops.
b
While still holding down the latching levers,
tilt the tractor feeder toward the front of
the printer until the hooks at the end of the
latching levers fit around the posts on the
printer frame.
Latching
lever
hook
c
Release the latching levers. The tractor unit
fits into place at a 45° angle.
Tractor positions
39
Page 44
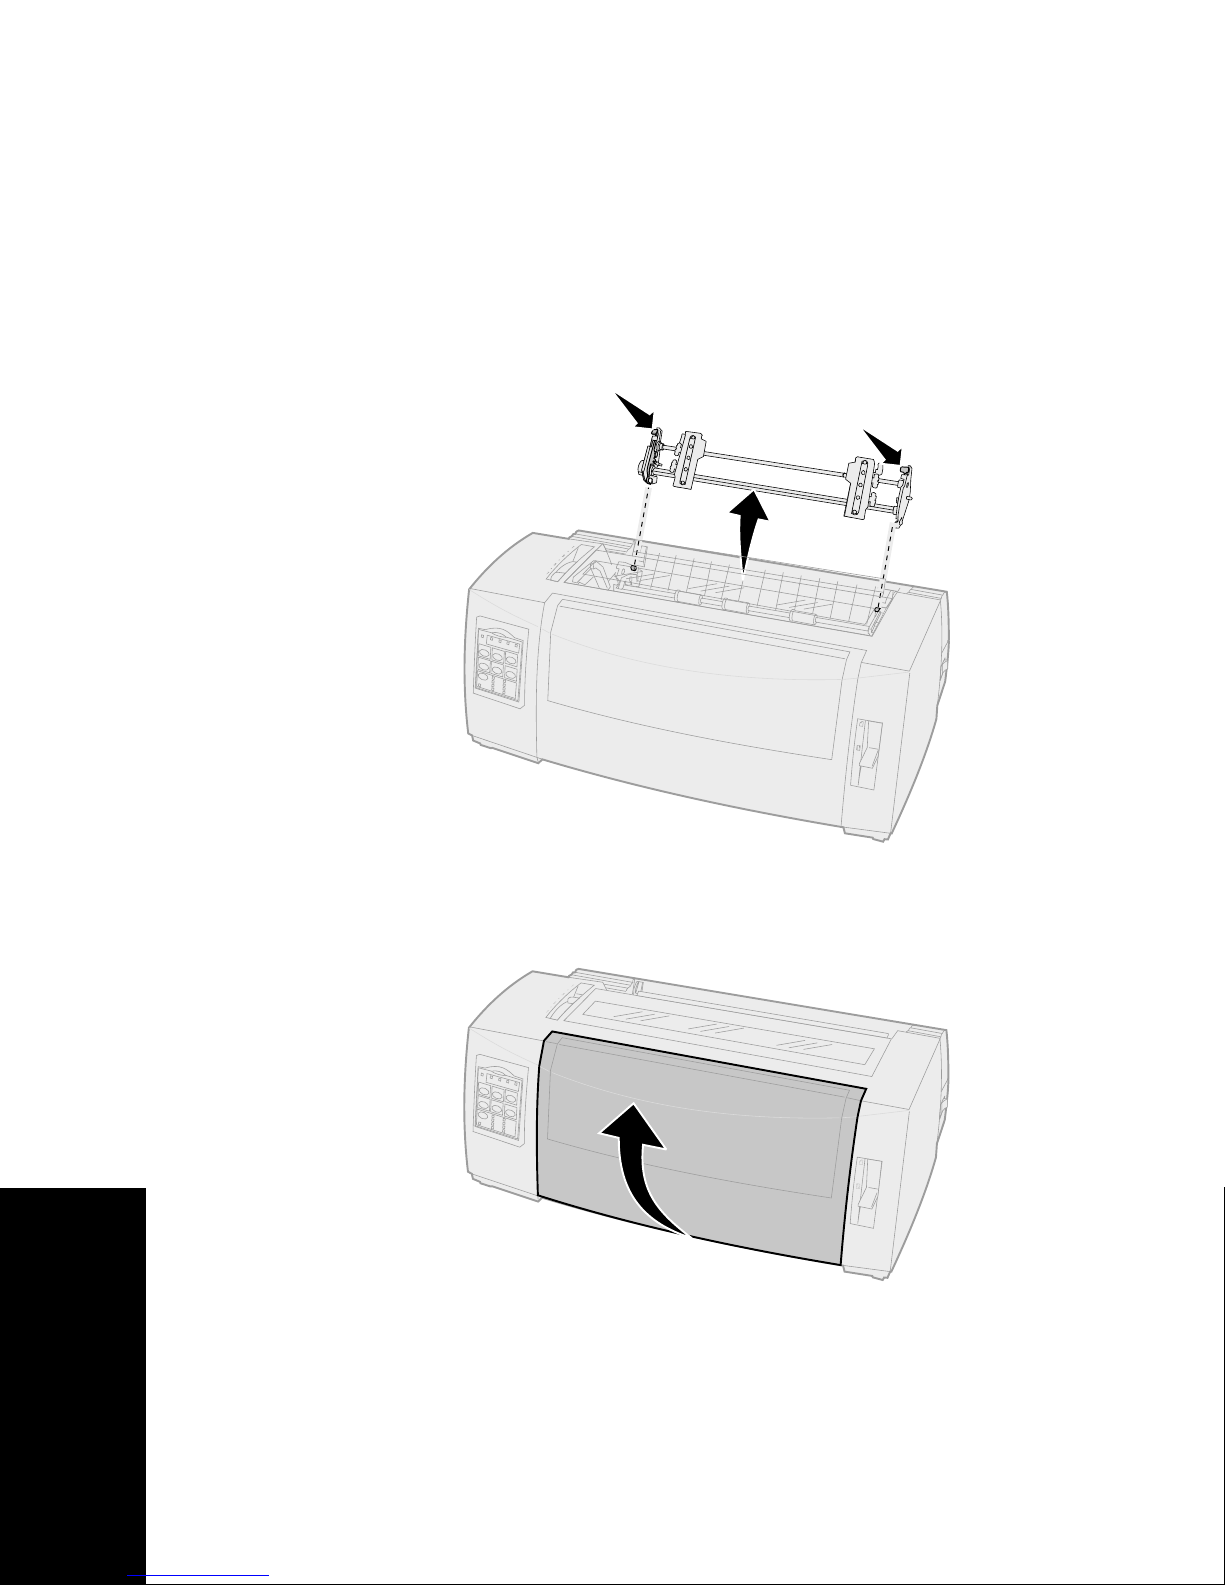
Converting the pull tractor to the push tractor
position
1
Make sure the printer is
2
Make sure paper is not loaded in the printer.
3
Holding down the latching levers, lift the
tractor unit out of the printer.
Off
.
4
Pull out the front cover to release it and pivot
the cover up out of the way.
Tractor positions
40
Page 45
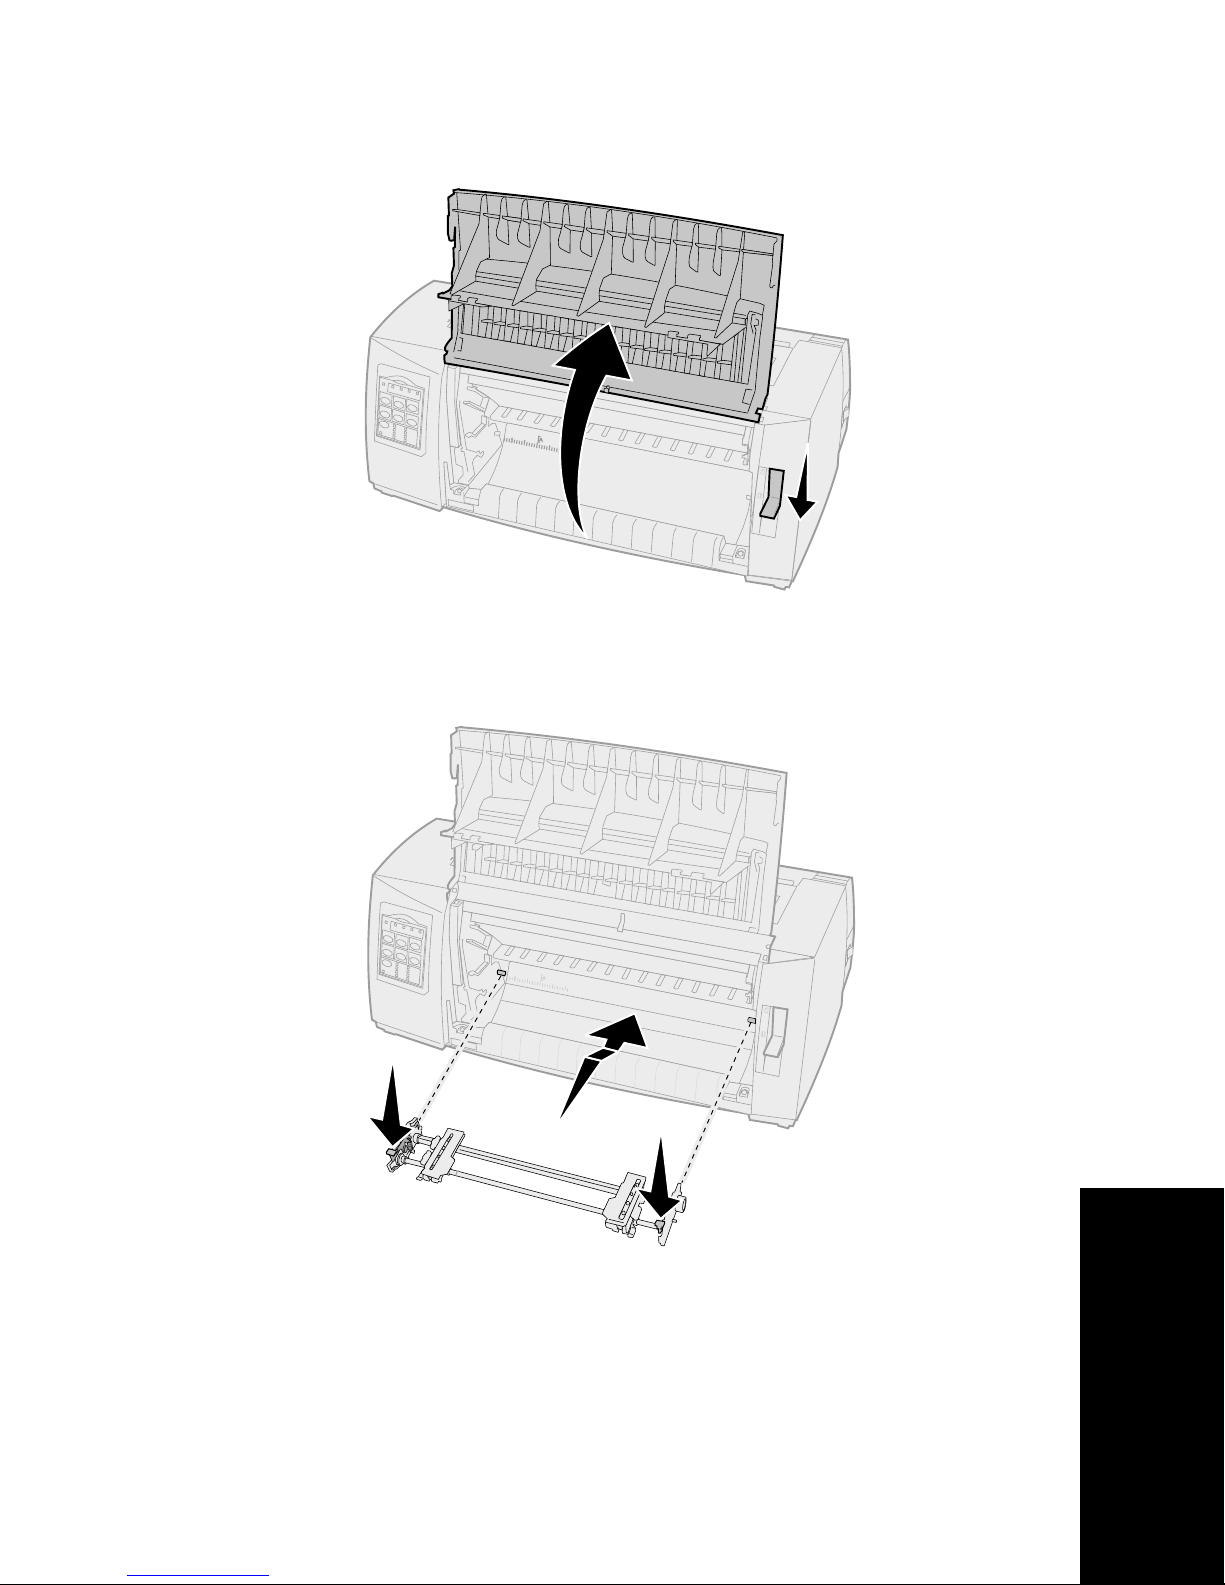
5
Make sure the paper select lever is set for
continuous forms.
6
Holding down the latching levers, fit the left
and right locks onto the posts in the printer.
7
Release the latching levers.
8
Close the front cover.
Tractor positions
41
Page 46

Tractor positions
42
Page 47
Loading paper
4
Loading paper
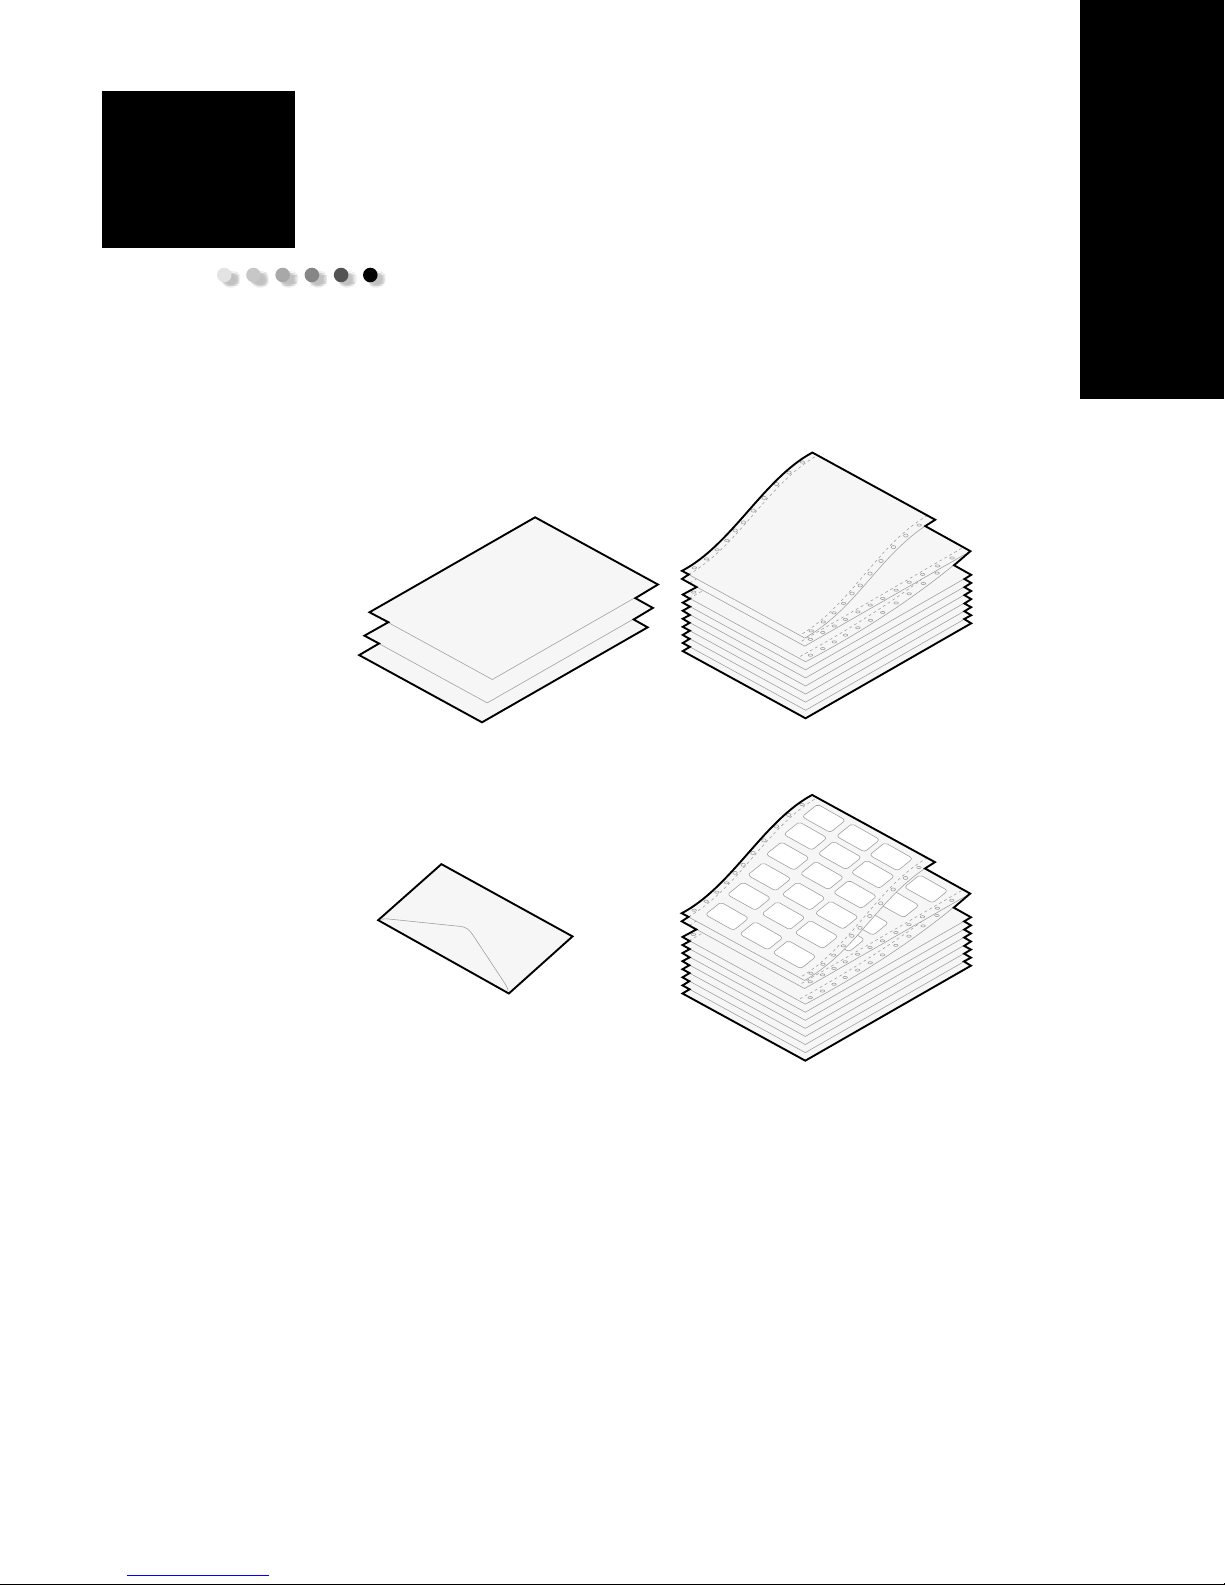
This section describes how to load a cut form,
continuous forms, labels, and an envelope.
Continuous formsCut (form) sheet
Envelope Labels
43
Page 48
Setting the forms thickness lever
Loading paper
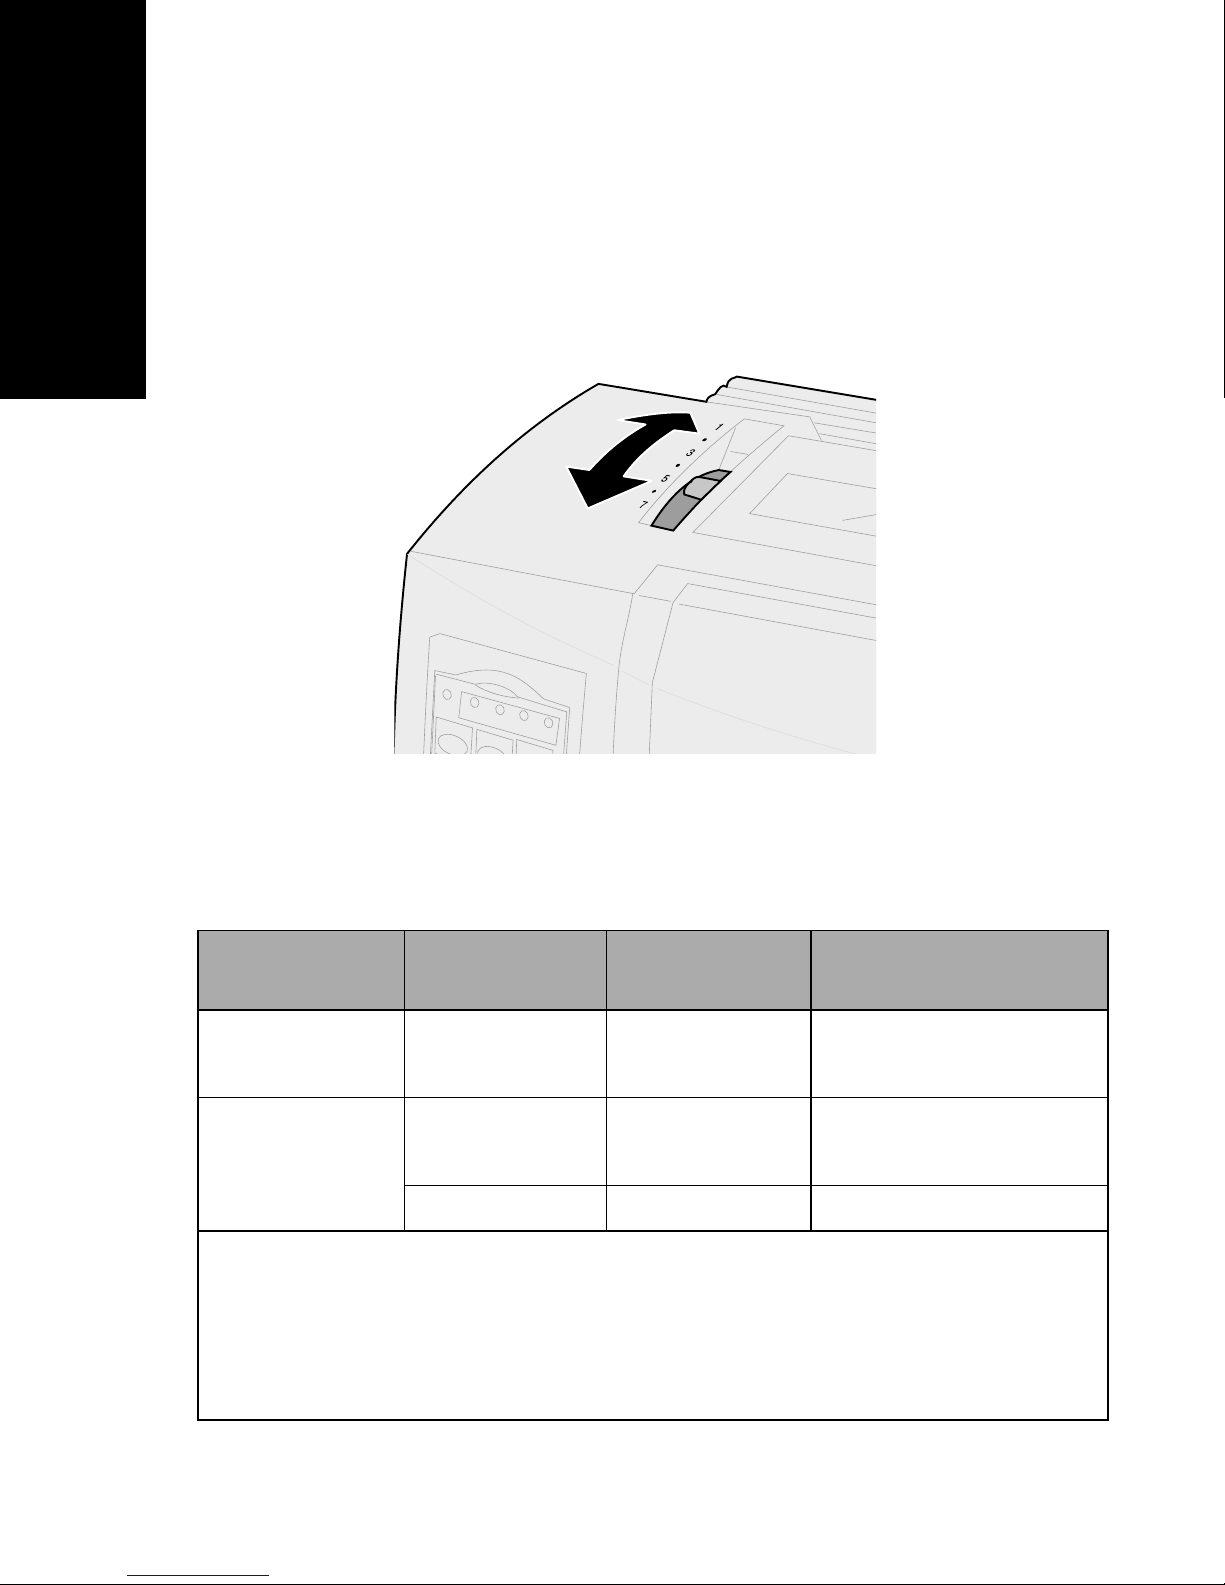
Use the forms thickness lever to adjust printing on
various forms, depending on the paper thickness. See
the following table when setting this lever.
Forms thickness for 2480/2481
Paper
Paper type
Single forms (cut
or continuous)
Single forms (cut
or continuous)
Notes:
• Print quality depends on the multiple-paper quality and the operating environment.
Printing at low temperature may cause poor print quality, depending on the paper
used.
• When the setting is 4 or higher, printing speed becomes slower.
thickness
Thin 56 g/m² (15 lb)
Normal 68 g/m² (18 lb)
Thick 90 g/m² (24 lb) 2
Paper weight
65 g/m² (16 lb)
75 g/m² (20 lb)
Forms thickness lever
setting
1
1 or 2
44
Page 49
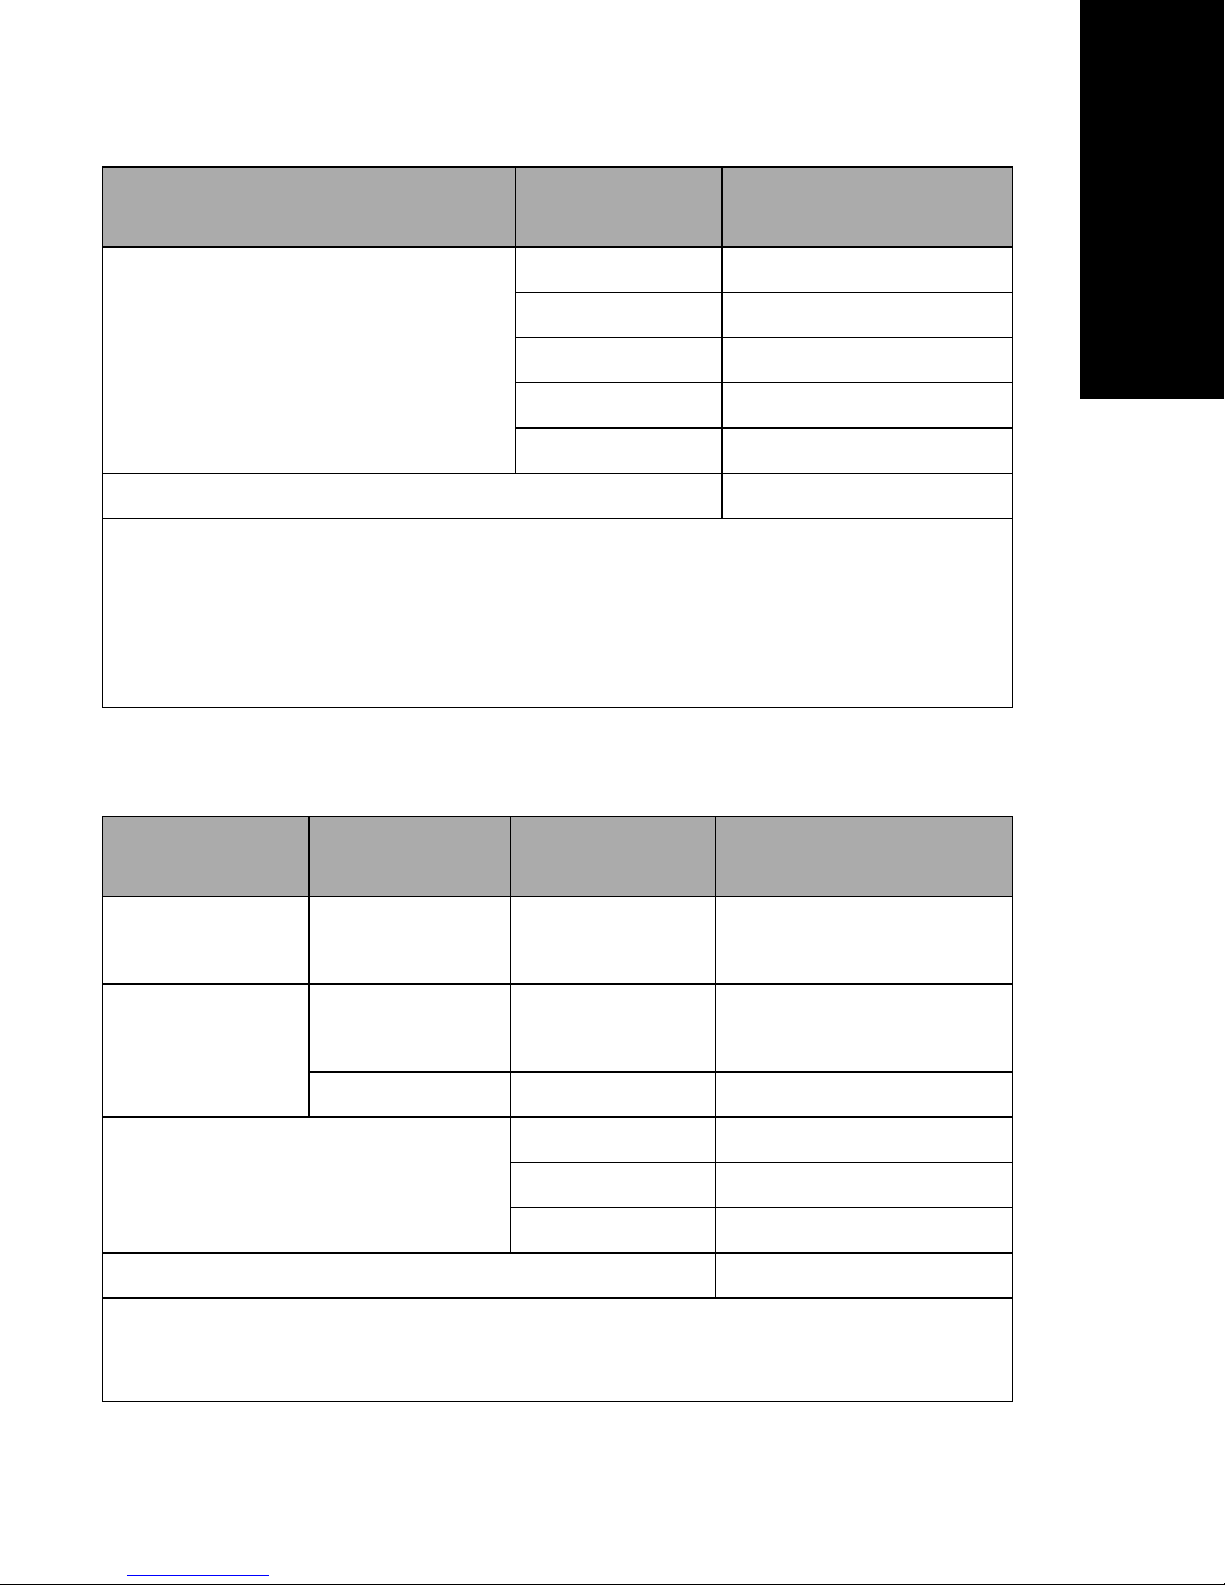
Forms thickness for 2480/2481 (continued)
Forms thickness lever
Paper type Paper weight
Multiple-part forms 2-part form 2 or 3
3-part form 3 or 4
4-part form 4 or 5
5-part form 5 or 6
6-part form 5, 6, or 7
Envelopes 4, 5, or 6
Notes:
• Print quality depends on the multiple-paper quality and the operating environment.
Printing at low temperature may cause poor print quality, depending on the paper
used.
settings
Loading paper
• When the setting is 4 or higher, printing speed becomes slower.
Forms thickness for 2490/2491
Paper
Paper type
Single forms (cut
or continuous)
Single forms (cut
or continuous)
Multiple-part forms 2-part form 2 or 3
thickness
Thin 56 g/m² (15 lb)
Normal 68 g/m² (18 lb)
Thick 90 g/m² (24 lb) 2
Paper weight
65 g/m² (16 lb)
75 g/m² (20 lb)
3-part form 3 or 4
4-part form 4, 5, 6, or 7
Forms thickness lever
setting
1
1 or 2
Envelopes 4, 5, or 6
Note:
ment. Printing at low temperature may cause poor print quality, depending on the paper
used.
Print quality depends on the multiple-paper quality and the operating environ-
45
Page 50

Loading continuous forms
You can load continuous paper utilizing four different
paper paths, depending on whether you have the push
tractor installed or the pull tractor installed.
Loading paper
Note:
If you have installed the optional Auto
Sheet Feeder or Tractor 2 Feeder, refer to
the documentation shipped with your
option for paper loading instructions.
46
Page 51
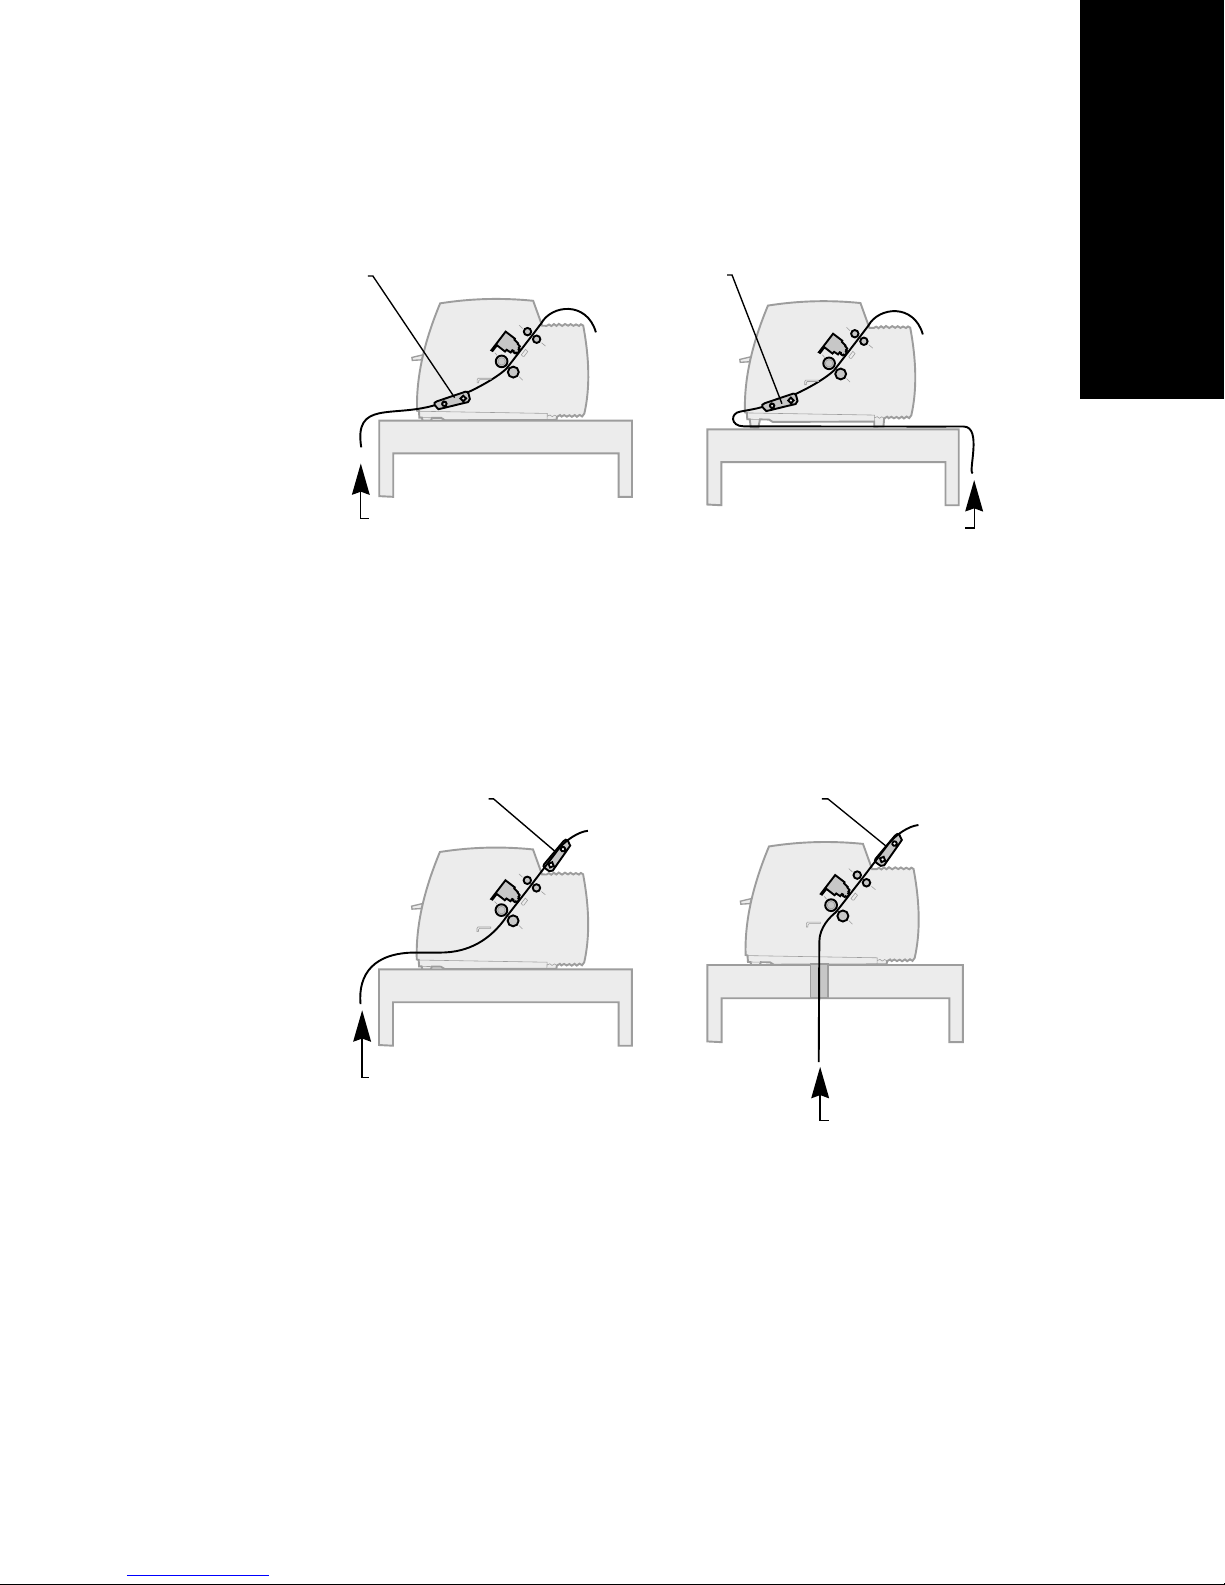
Paper paths for the push tractor
In these examples, the tractor pushes the paper from
the front or the rear of the printer.
Push tractor
Trac tor Trac tor
Loading paper
Front loading paper
Rear loading paper
Paper paths for the pull tractor
In these examples, the tractor pulls the paper from the
front or bottom of the printer.
Pull tractor
Tractor Tractor
Front loading paper
Bottom loading
paper
47
Page 52
Loading continuous forms using the
push tractor
The factory setting for your printer is the push tractor
position. If the tractor unit is not in this position, see
“Converting the pull tractor to the push tractor
Loading paper
position” on pag e40.
1
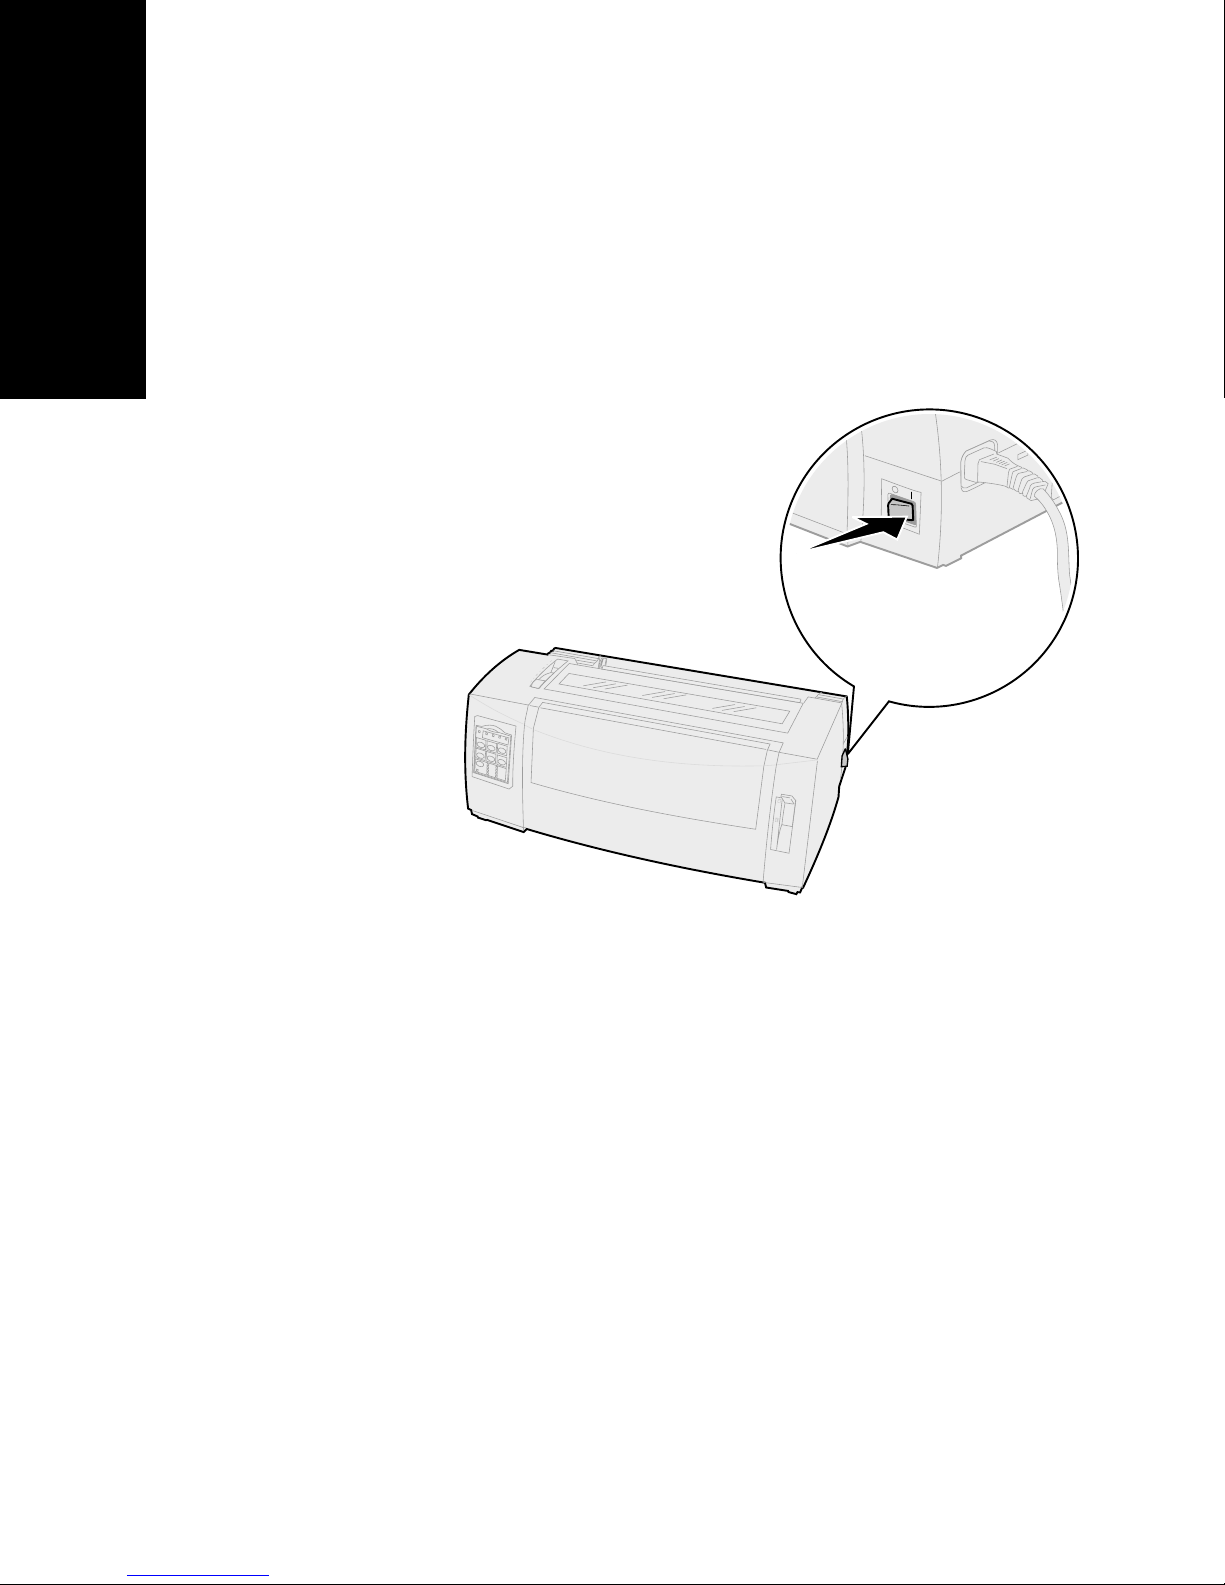
Turn the printer
On
.
2
Make sure the paper path is clear.
If a cut form or envelope is loaded in the
printer, press
FormFeed
48
to remove it.
Page 53
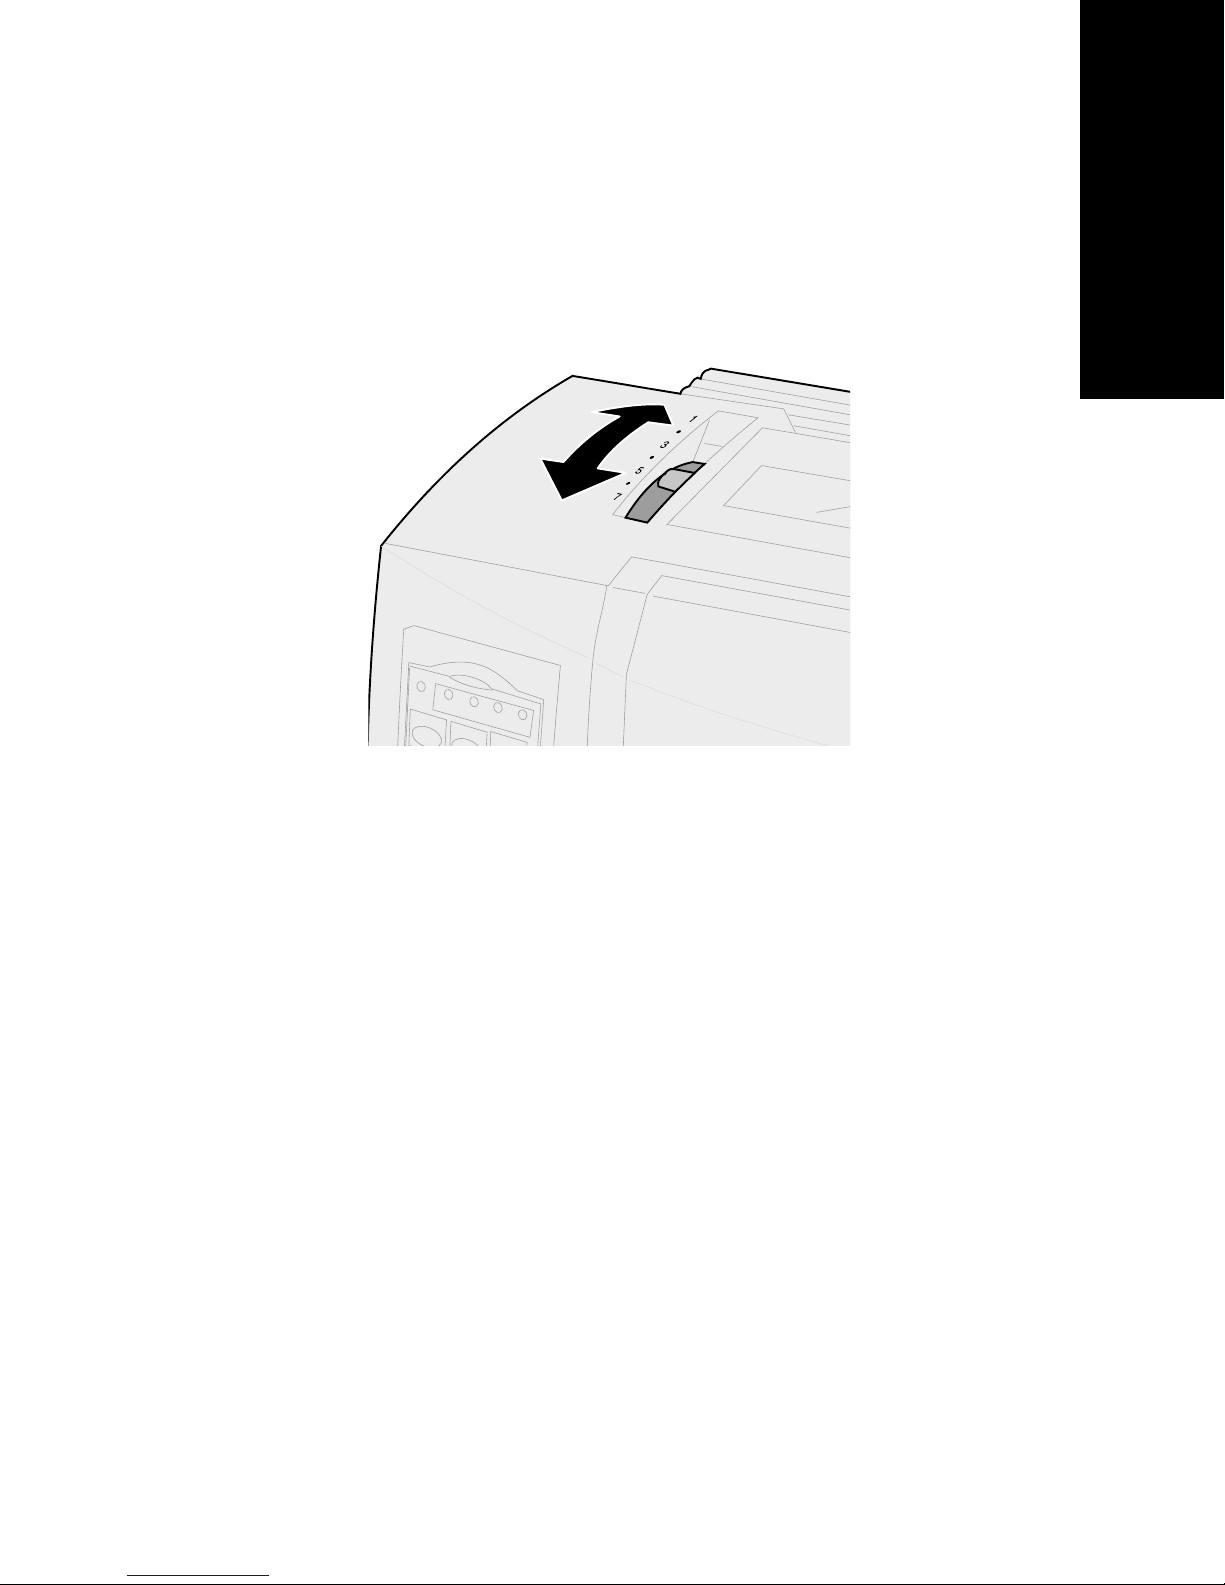
3
Set the forms thickness lever to a suitable
setting.
See “Setting the forms thickness lever” on
page 44.
Loading paper
49
Page 54
Loading paper
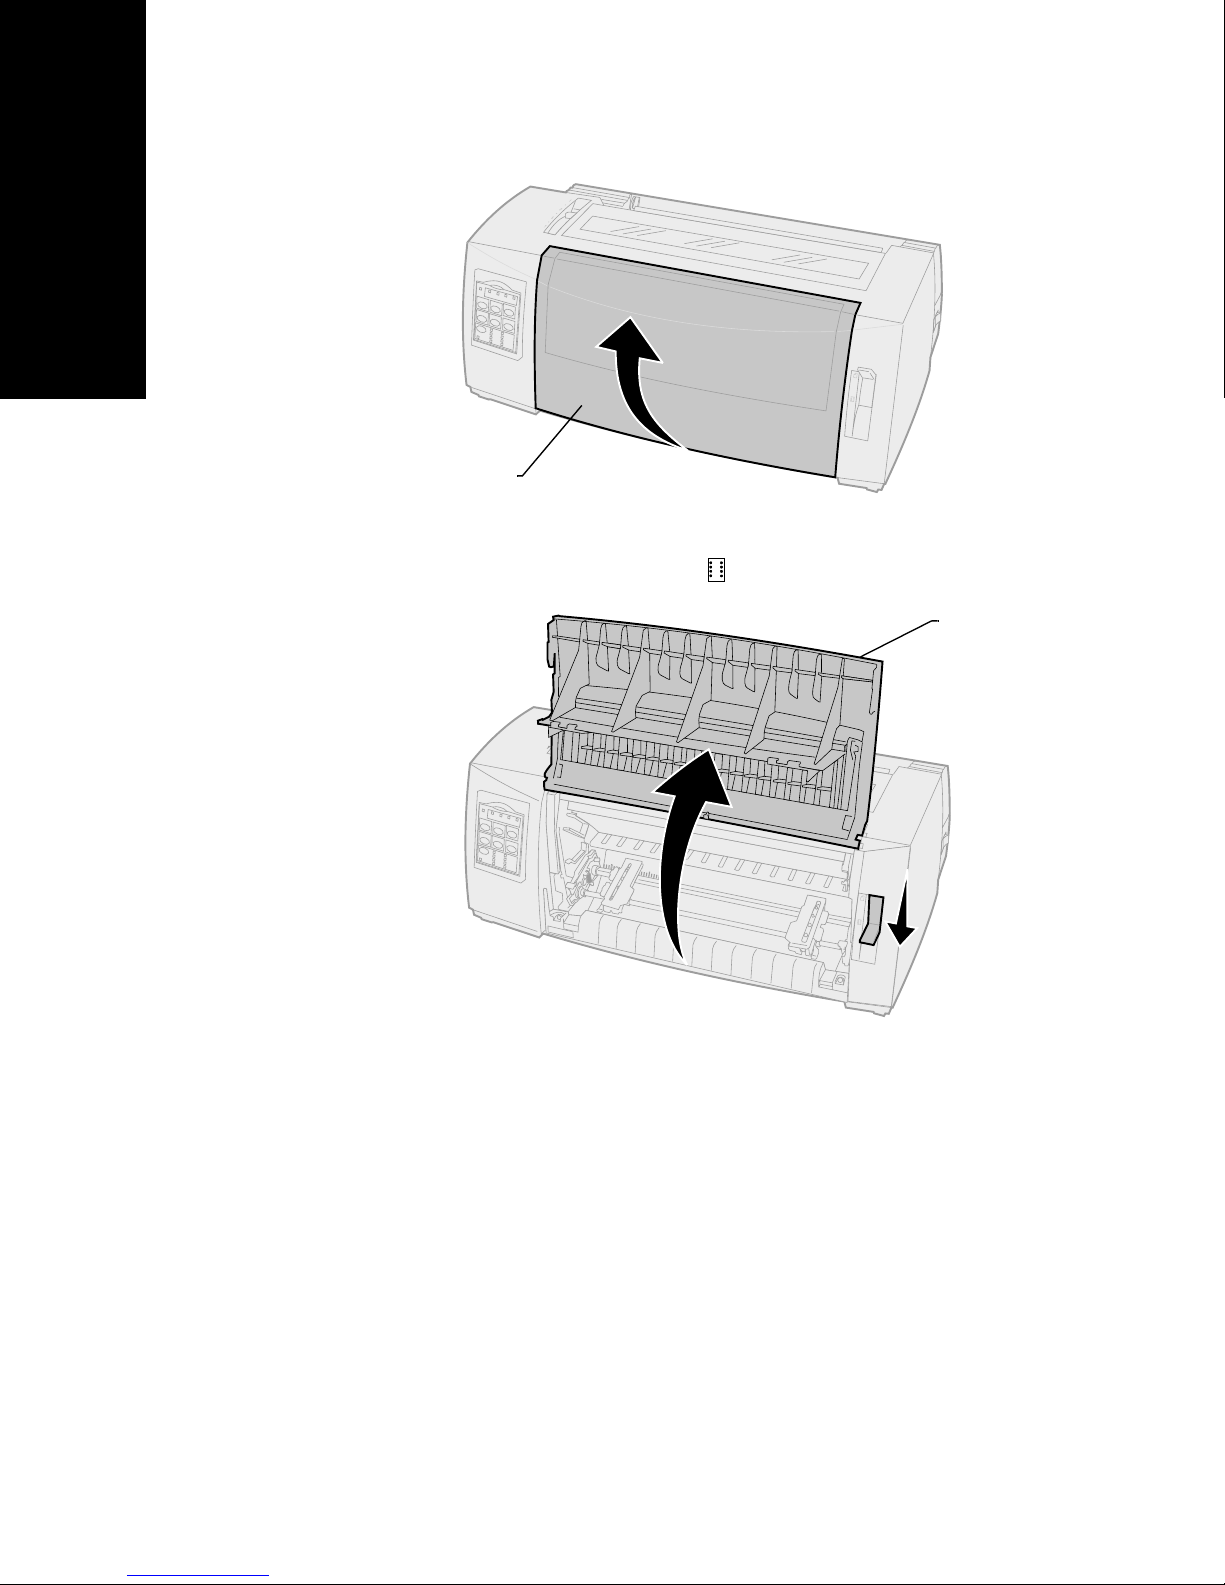
4
Pull out the front cover to release it and pivot
the cover up out of the way.
Front
cover
5
Move the paper select lever down to the
continuous forms position.
Front
cover
50
Page 55
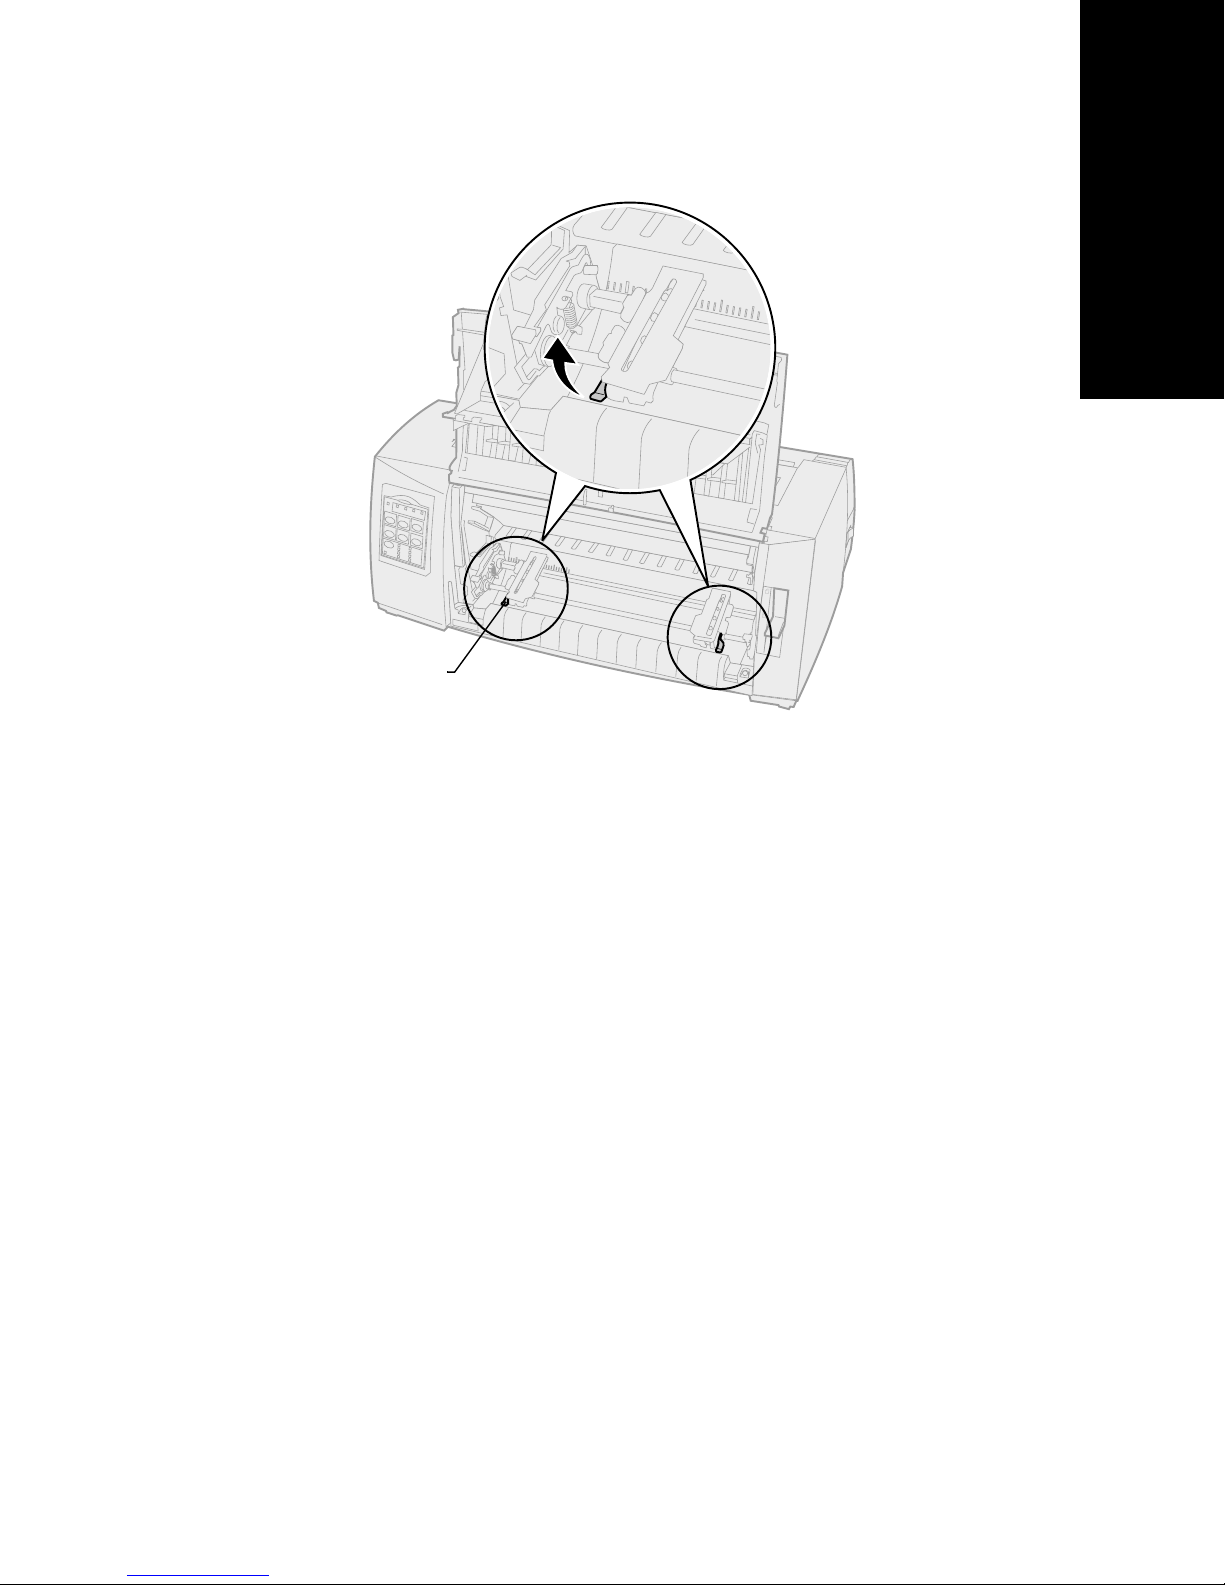
6
Pull up the left and right tractor locking levers
to unlock the tractors.
Loading paper
Locking
lever
51
Page 56
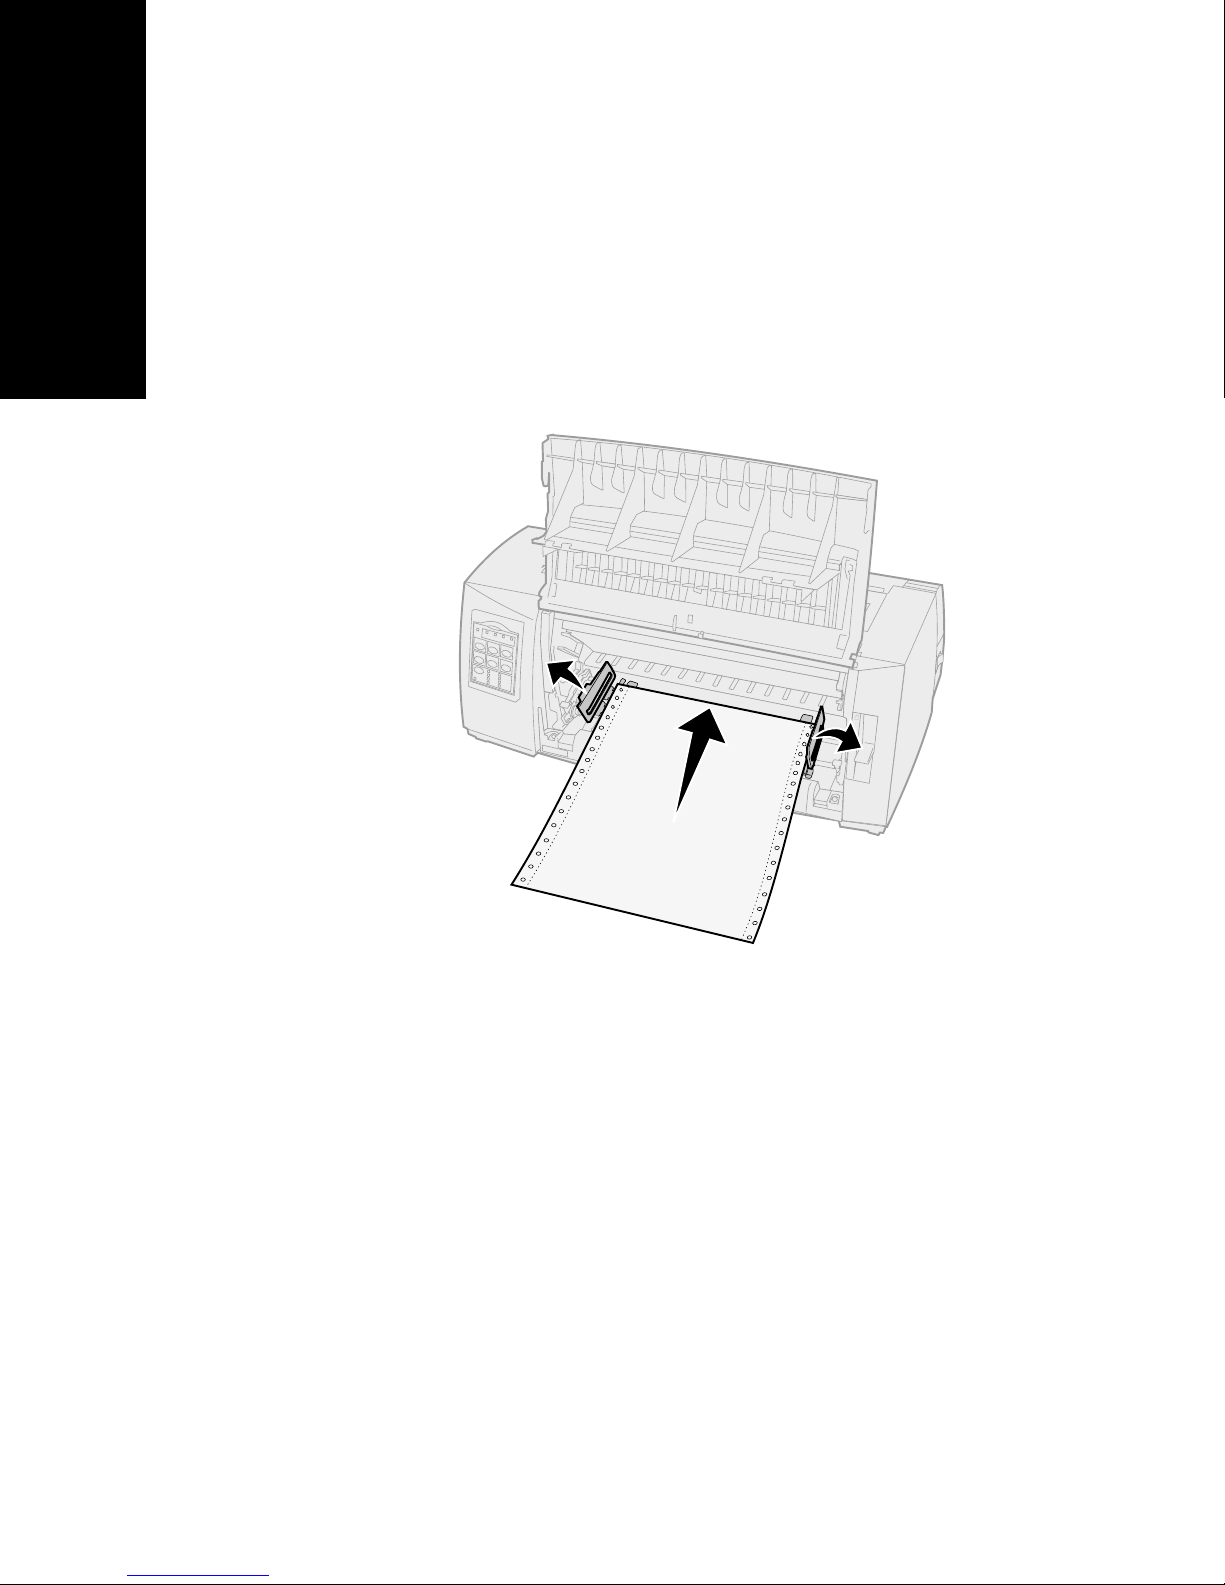
Loading paper
7
Open the left and right tractor doors.
8
Place the paper pinfeed holes over the second
or third pins of the tractor unit.
If necessary, move the left or right tractor to
adjust the tractors to the paper width.
Keeping the left tractor positioned to the left
of the rubber tractor stop keeps your paper
within the paper sensor area.
9
Close the left and right tractor doors.
52
Page 57
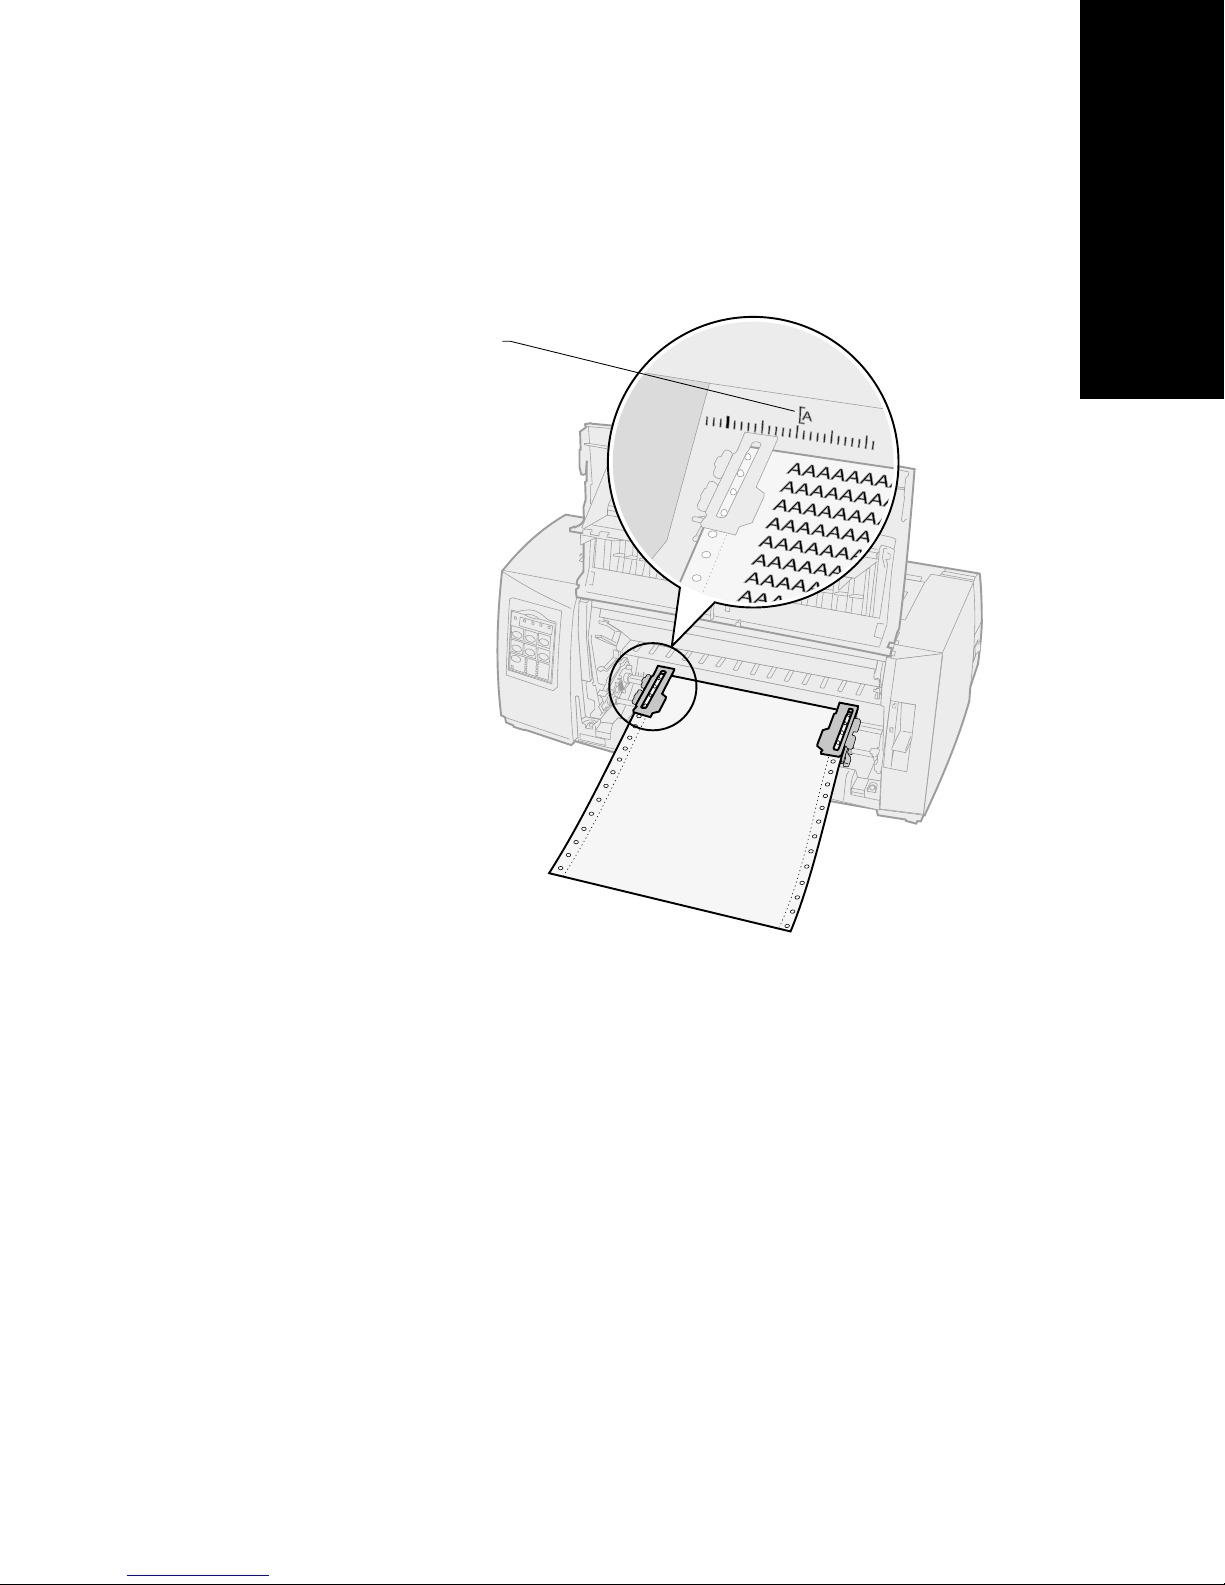
Loading paper
10
Set the left margin.
Move the tractor to align the left margin on
your paper with the [A symbol printed on the
rear plate. For help, see “Aligning the left
margin” on pag e77.
Margin guide printing starts at
the [A symbol.
The distance from the [A symbol
to the left edge of the paper
determines the width of the left
margin.
53
Page 58
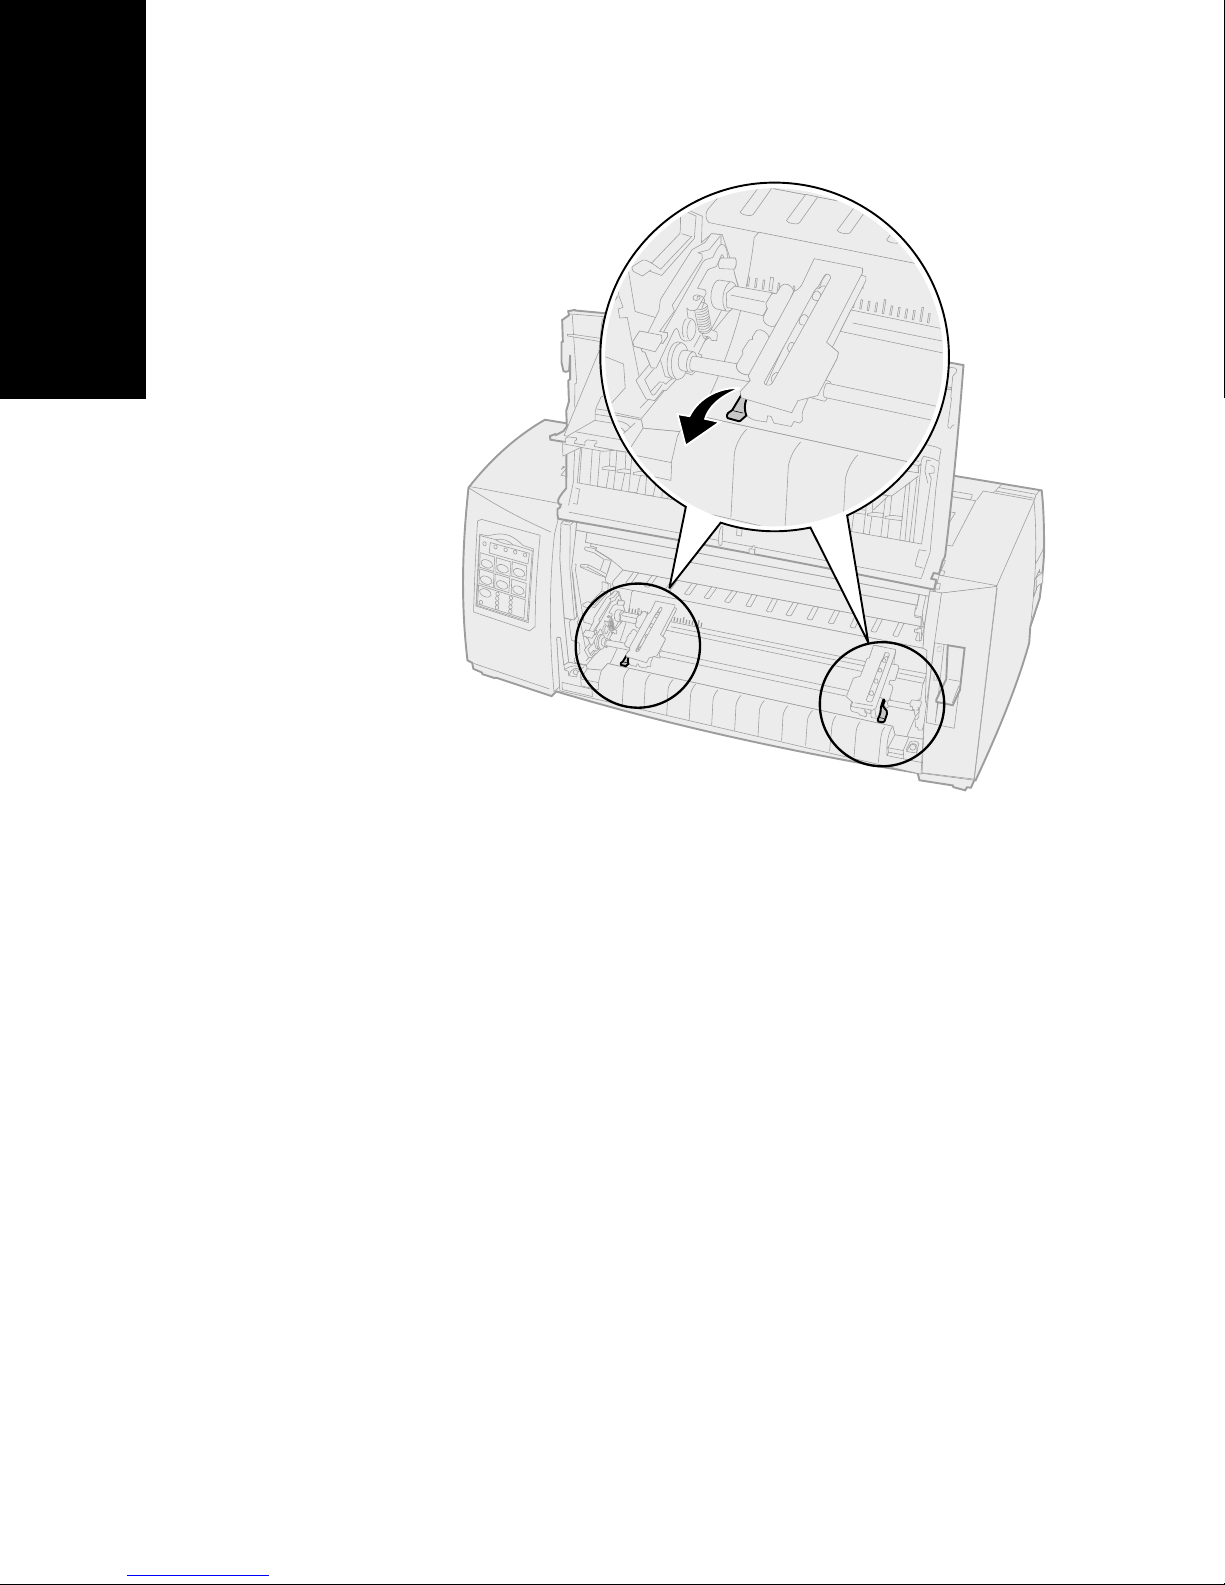
Loading paper
11
Push down the left tractor locking lever to lock
the tractor in place.
12
Remove slack from the paper and lock the right
locking lever.
54
Page 59
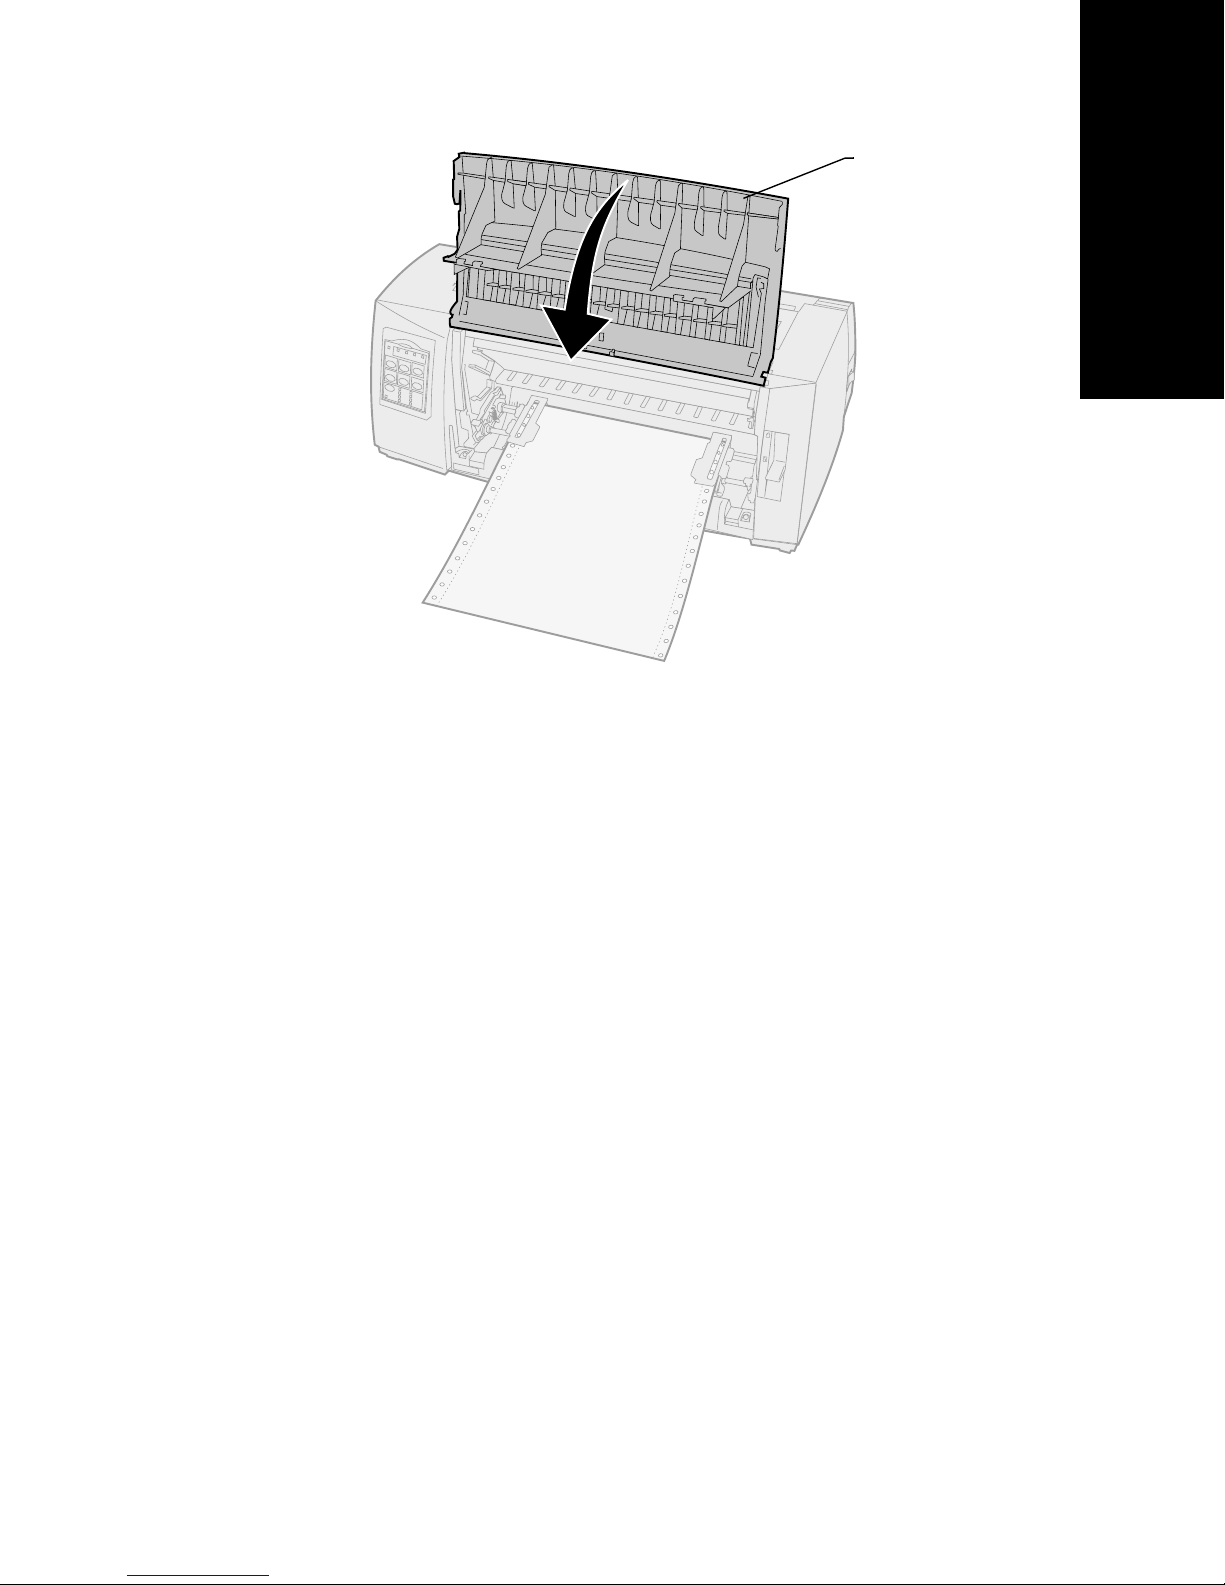
Loading paper
13
Close the front cover.
Front
cover
14
15
Press
Load/Unload
.
The paper loads to the current Top-of-Form.
Press
If Auto Tear Off is set to
Start/Stop
to put the printer online.
On
One Second
or
,
the printer moves the paper to the Tear Off bar.
Note:
When you use the push tractor to print
continuous forms, line spacing within the
first 1½ inches of the first form may not
be uniform.
55
Page 60
Front loading continuous forms
using the pull tractor
Make sure the tractor is in the pull position. If the
tractor unit is not in this position, see “Converting the
push tractor to pull tractor position” on pag e36.
Loading paper
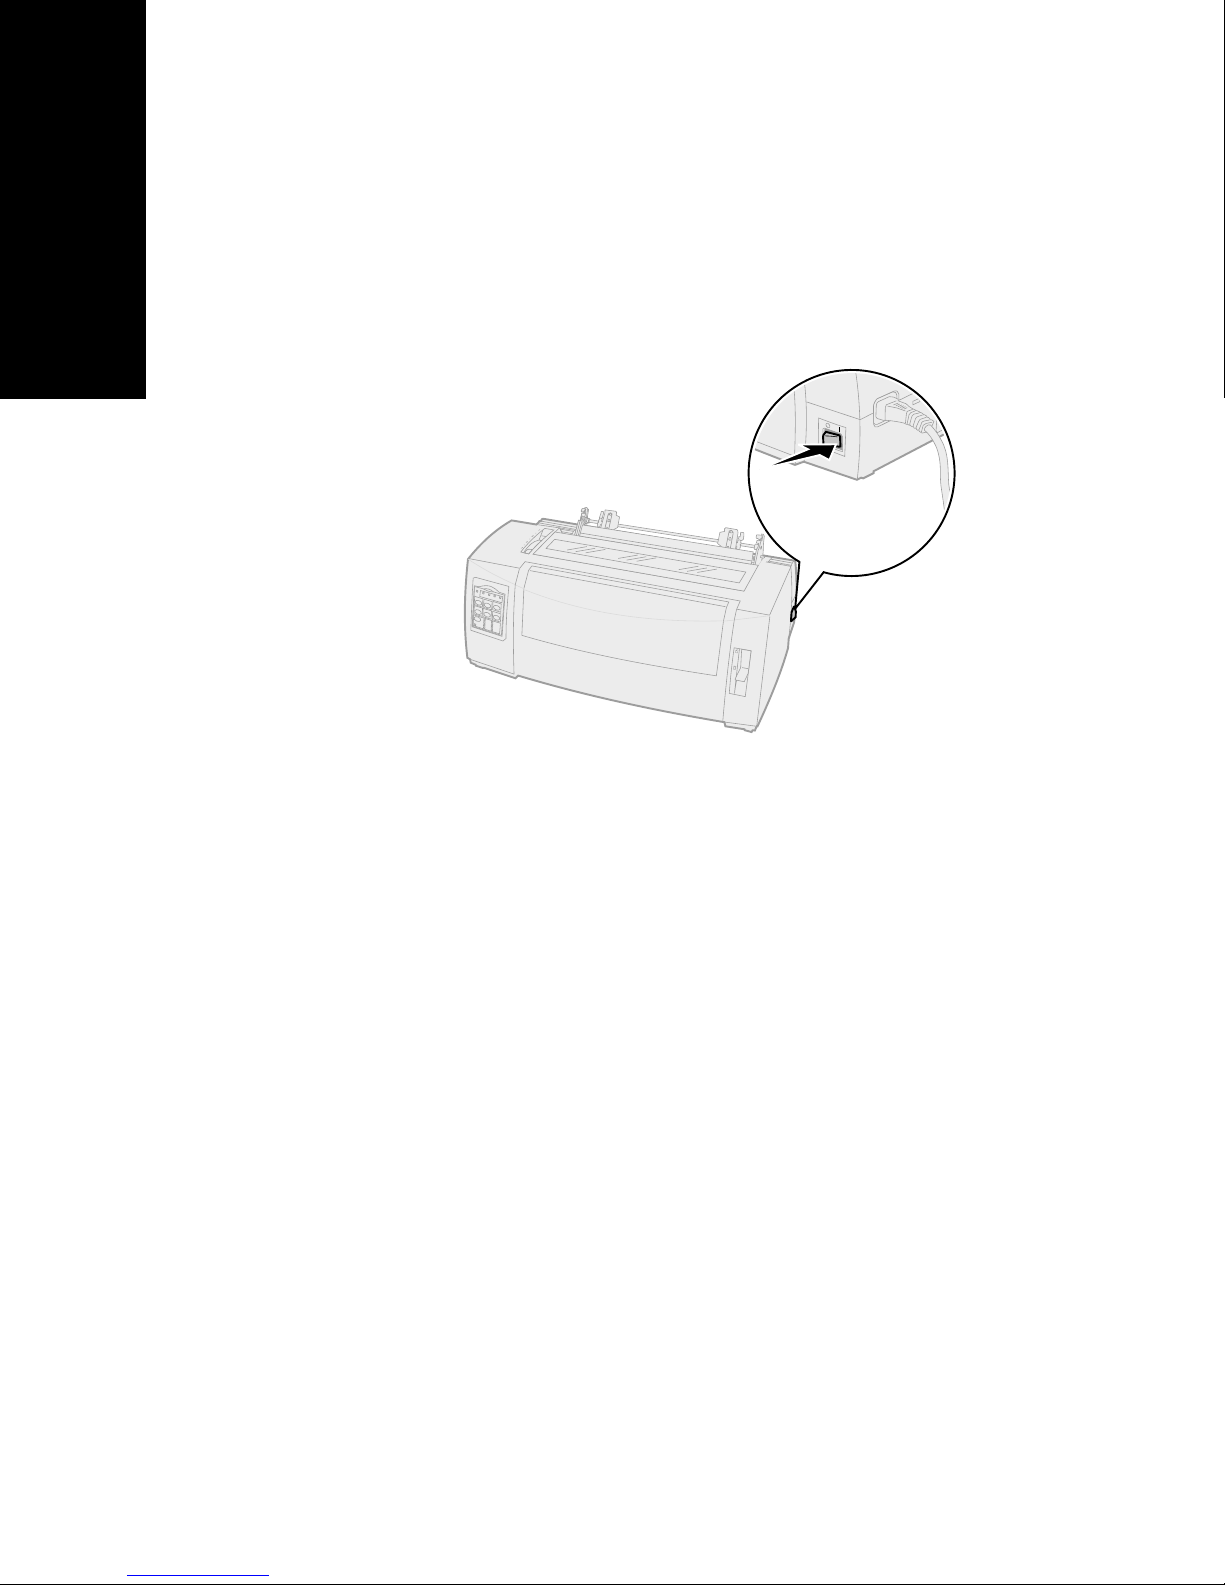
1
Turn the printer
2
Make sure the paper path is clear.
If a cut form or envelope is loaded in the
printer, remove it by pressing
On
.
FormFeed
.
56
Page 61
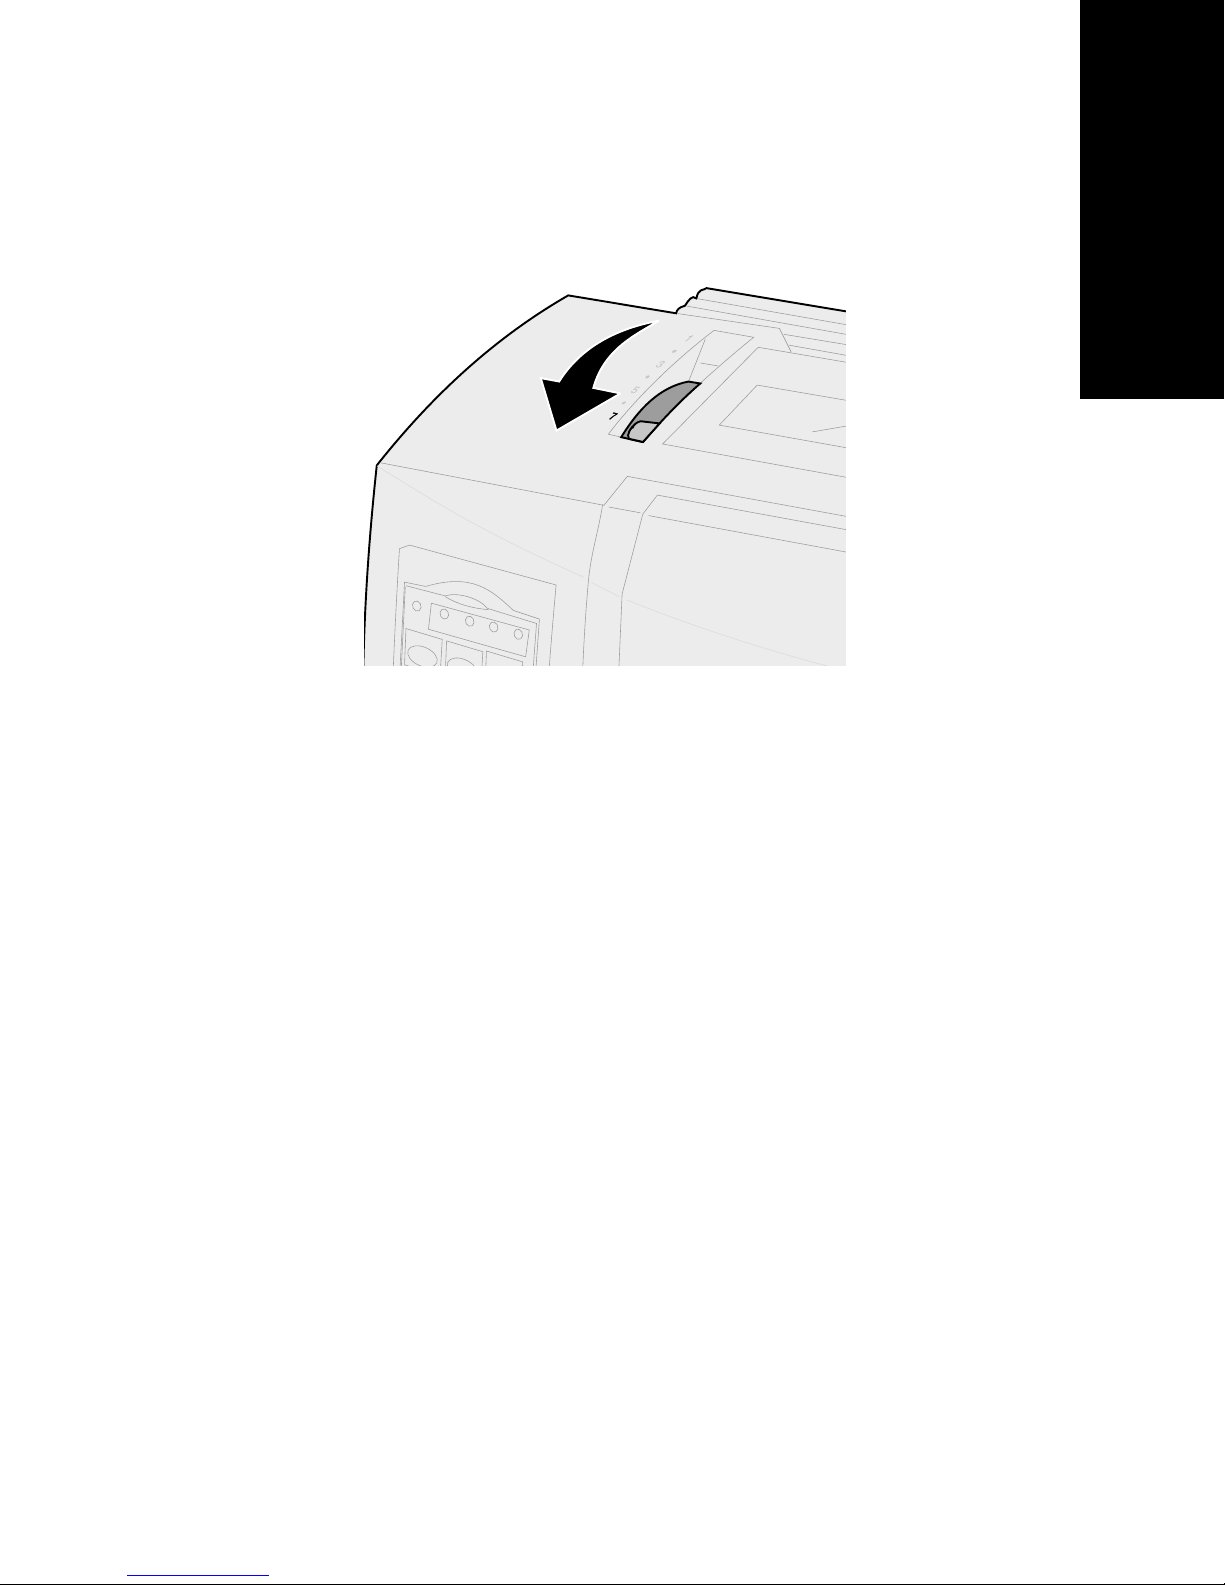
3
Set the forms thickness lever to position 7 while
loading the paper.
Loading paper
57
Page 62
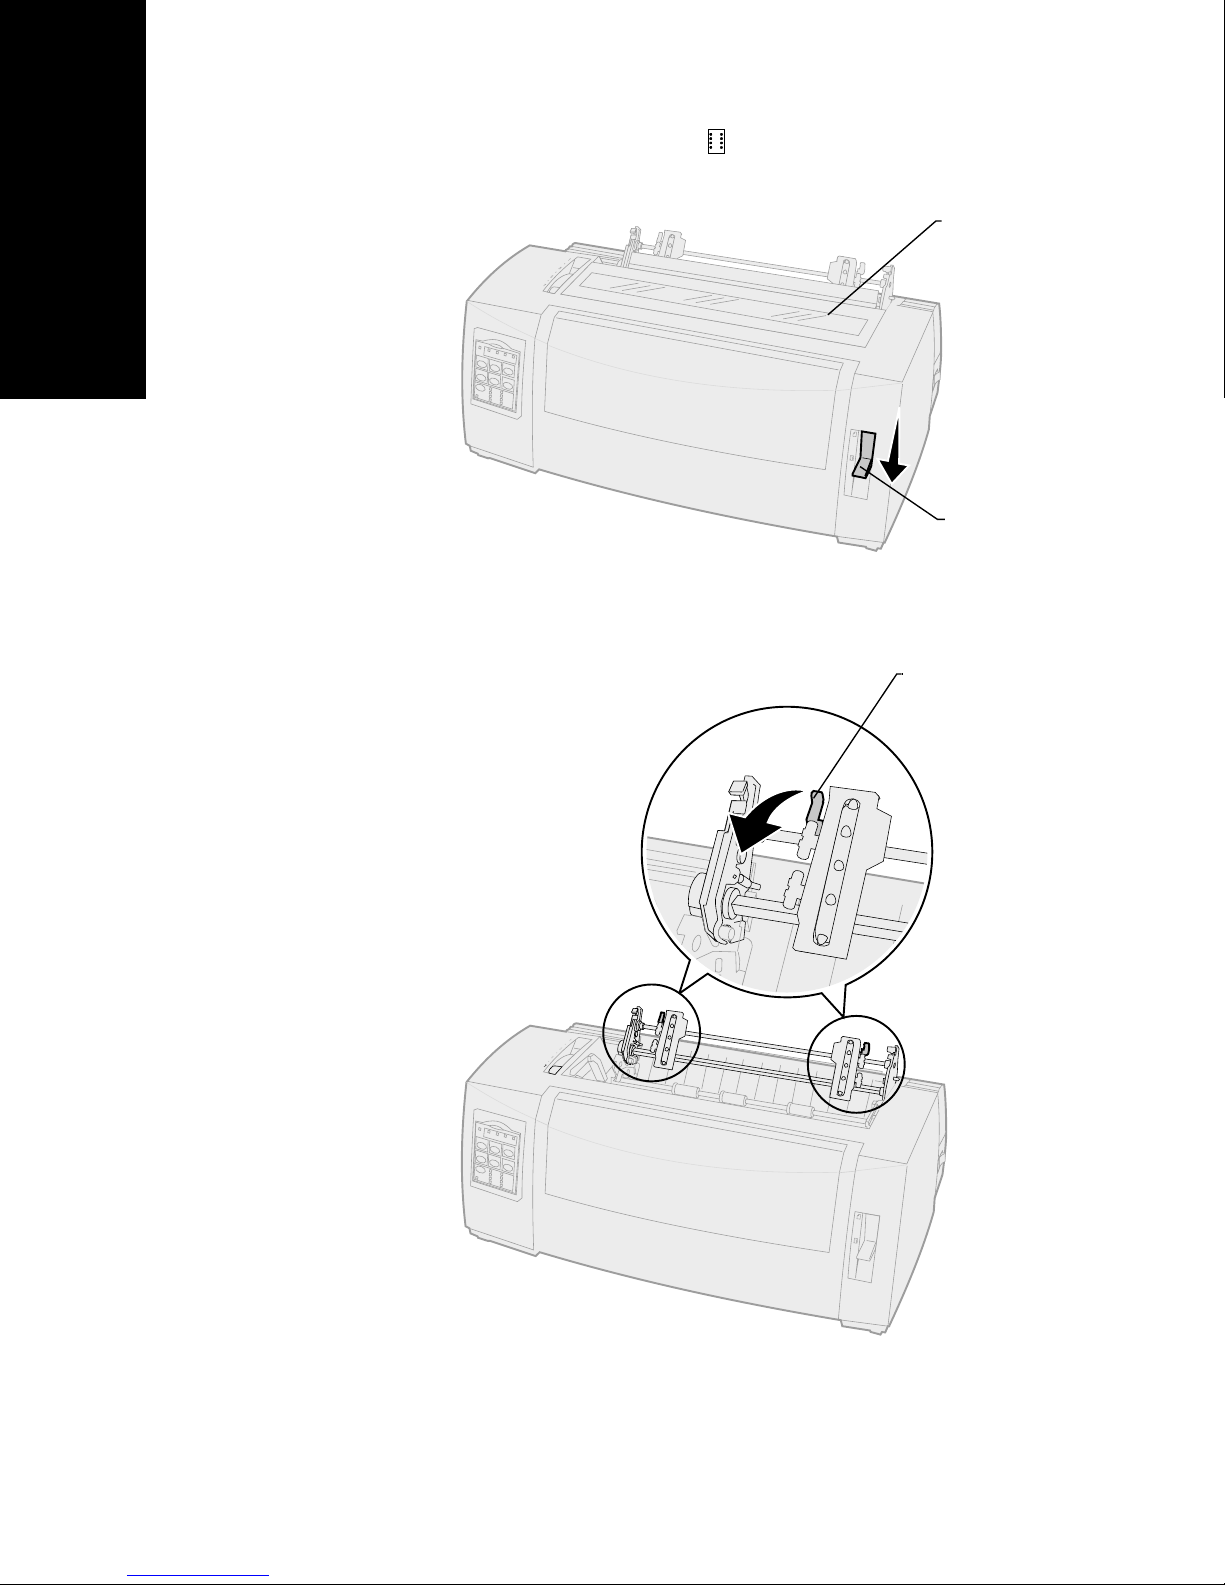
Loading paper
4
Move the paper select lever down to the
continuous forms position.
5
Remove the ribbon access cover.
Ribbon access
cover
Paper select
lever
6
Pull up the left and right tractor locking levers
to unlock the tractors.
Locking
lever
58
Page 63
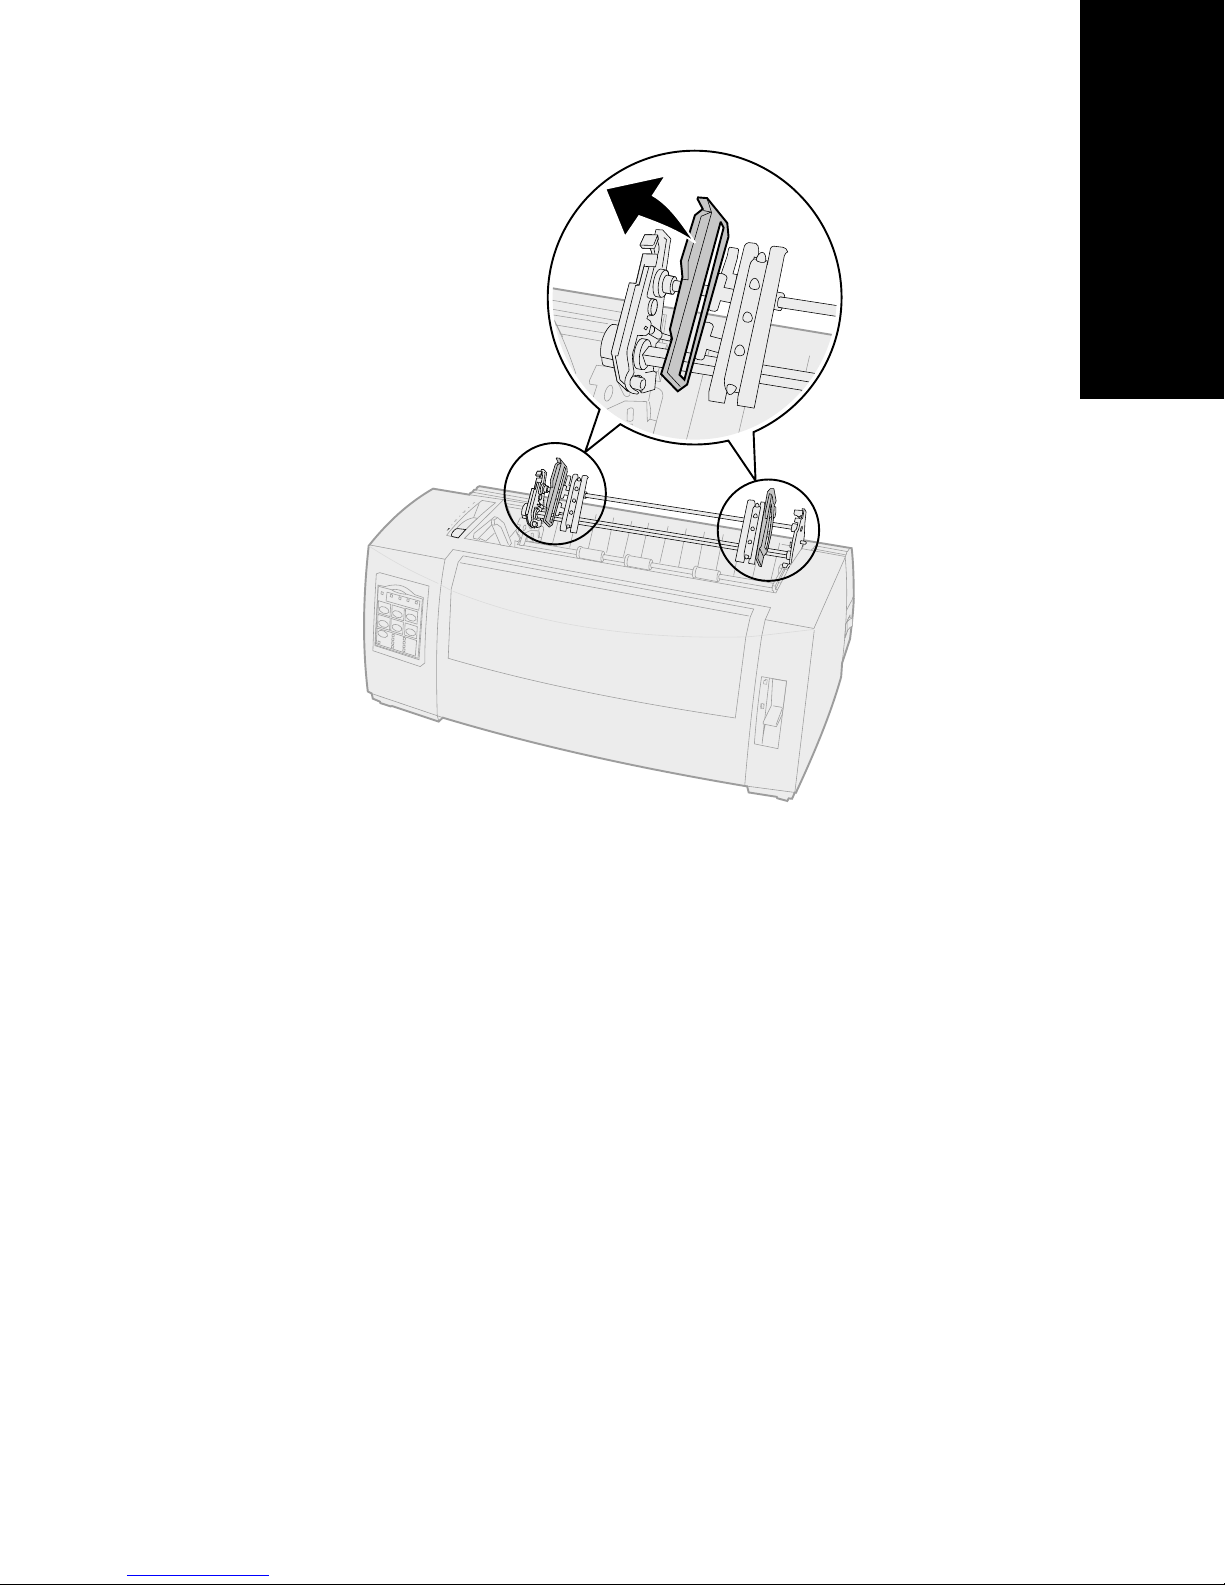
7
Open the left and right tractor doors.
Loading paper
59
Page 64
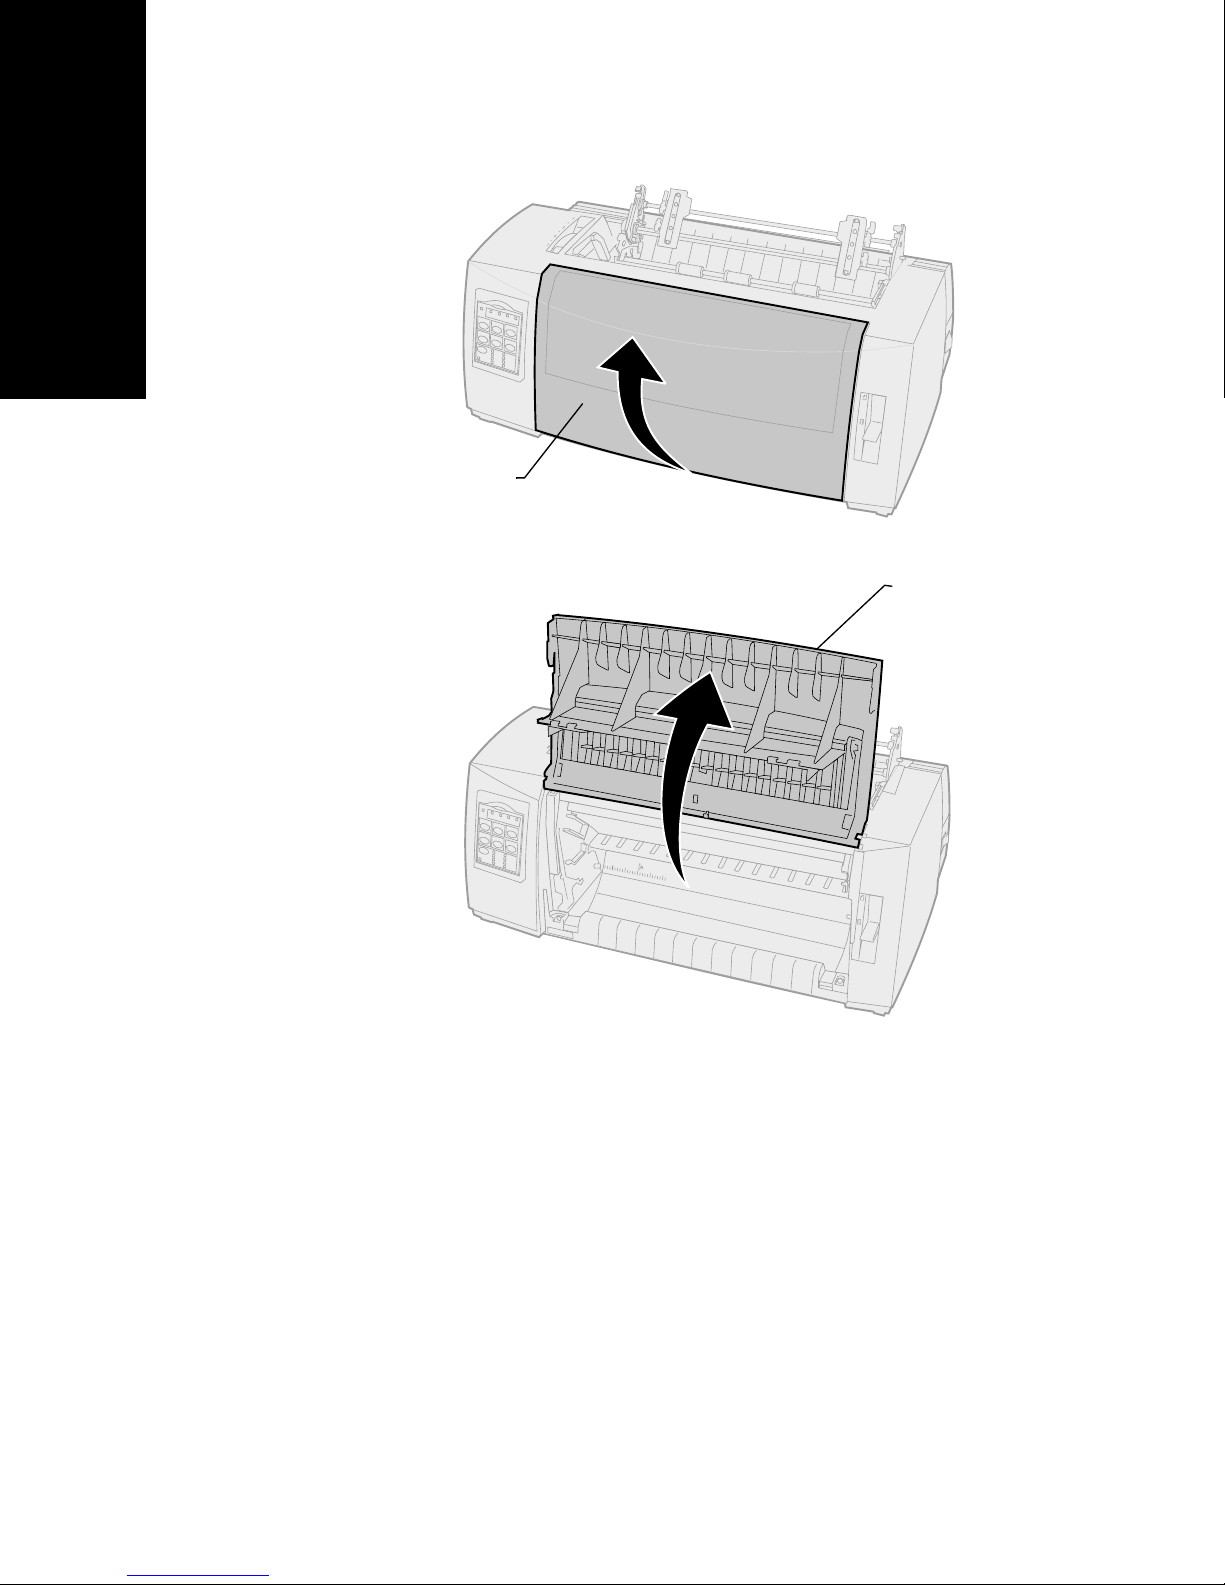
Loading paper
8
Pull out the front cover to release it and pivot
the cover up out of the way.
Front
cover
Front cover
60
Page 65
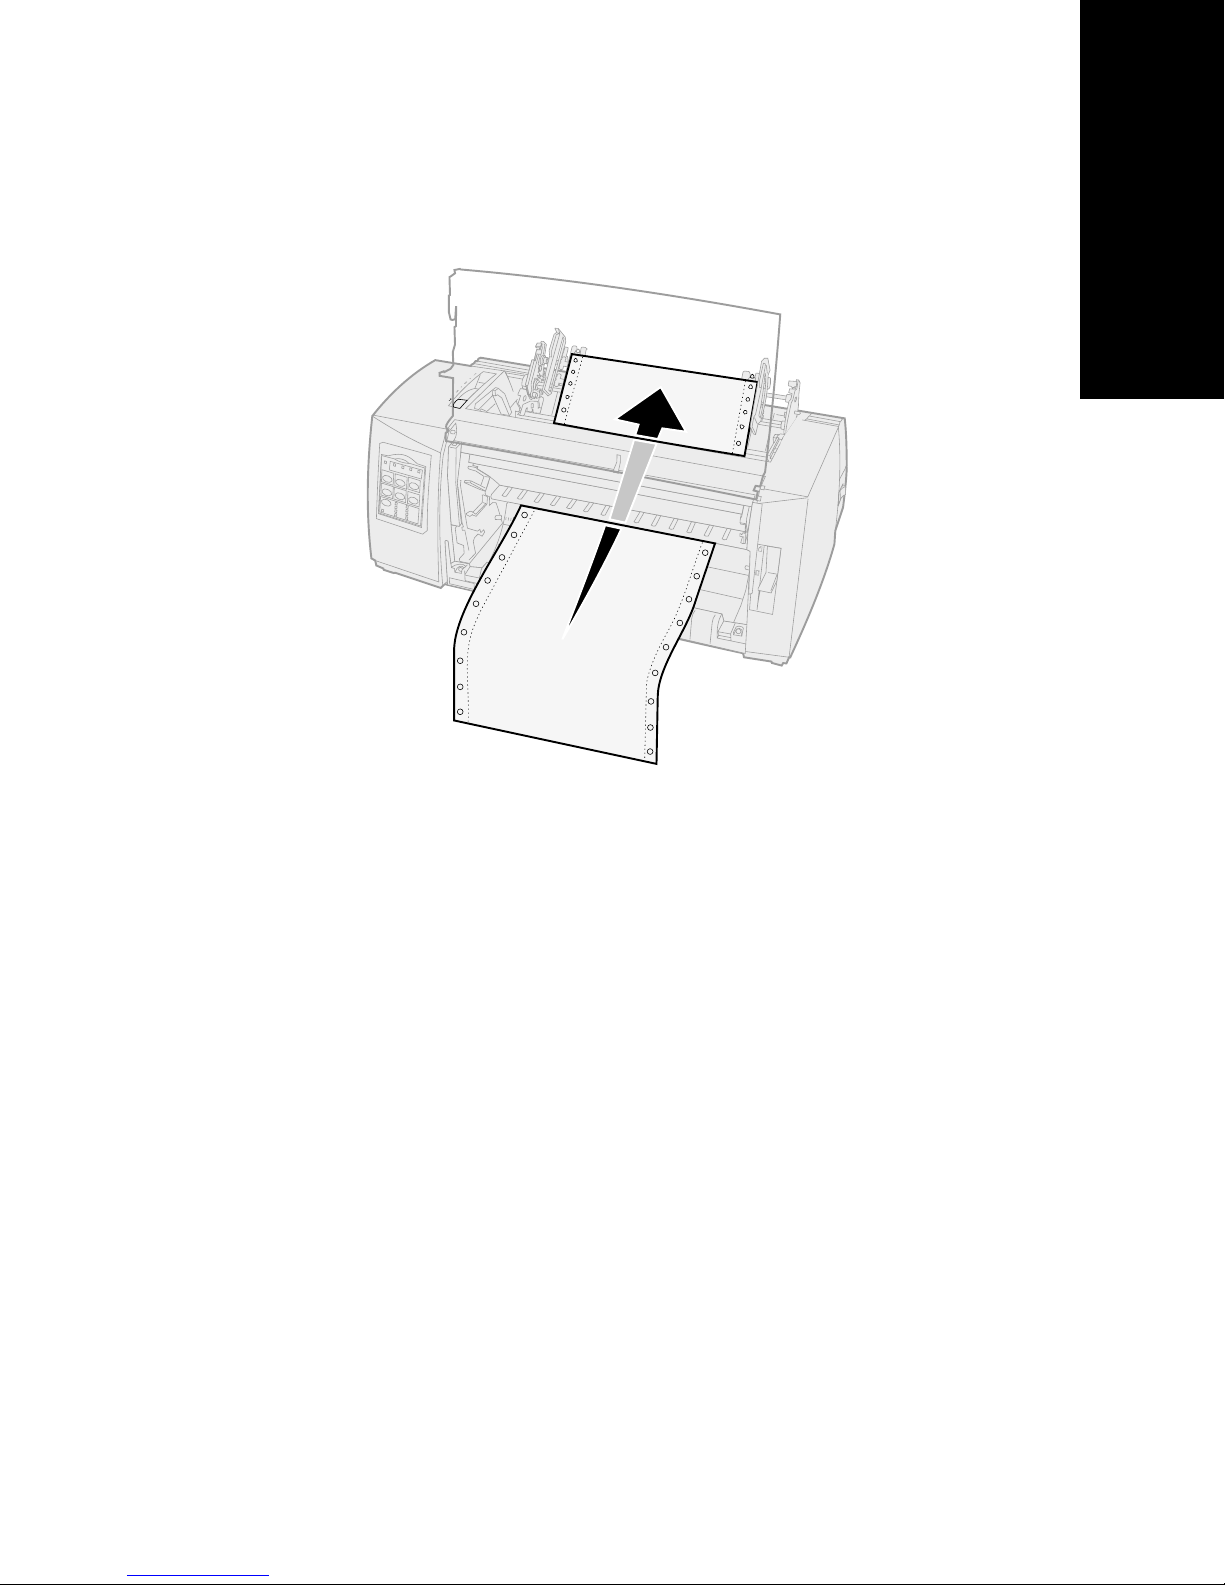
9
Insert paper into the front of the printer
between the metal and plastic plates.
Push or pull the paper through the paper path
until it passes the printhead.
Loading paper
61
Page 66
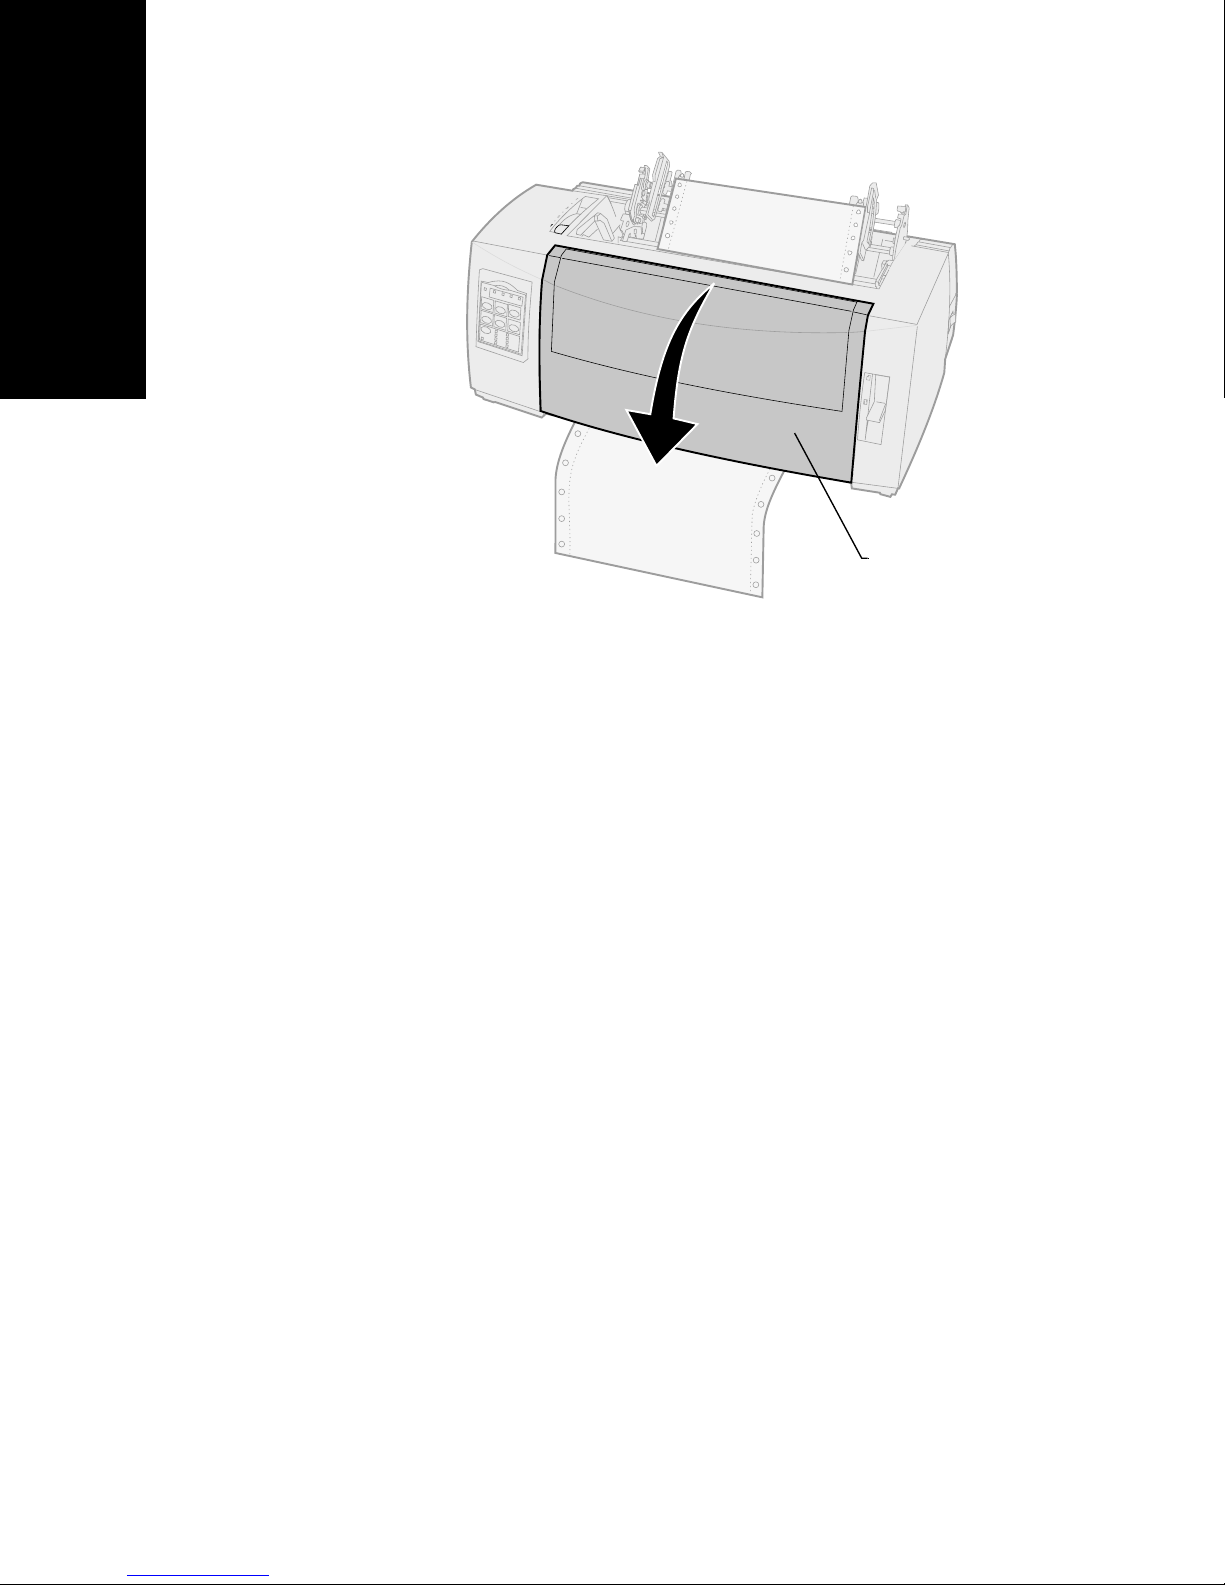
Loading paper
10
Close the front cover.
Front
cover
11
Fit the paper pinfeed holes over the tractor
pins.
If necessary, move the left or right tractor to
adjust the tractor to the paper width.
Note:
If you have trouble moving the right
tractor to the paper width, roll the rubber
tractor stop out of its’ seated position.
Move the tractor to the paper width, load
the paper, and lock the right tractor. To
view the rubber tractor stop location, see
“Changing tractor positions” on pag e33.
62
Page 67
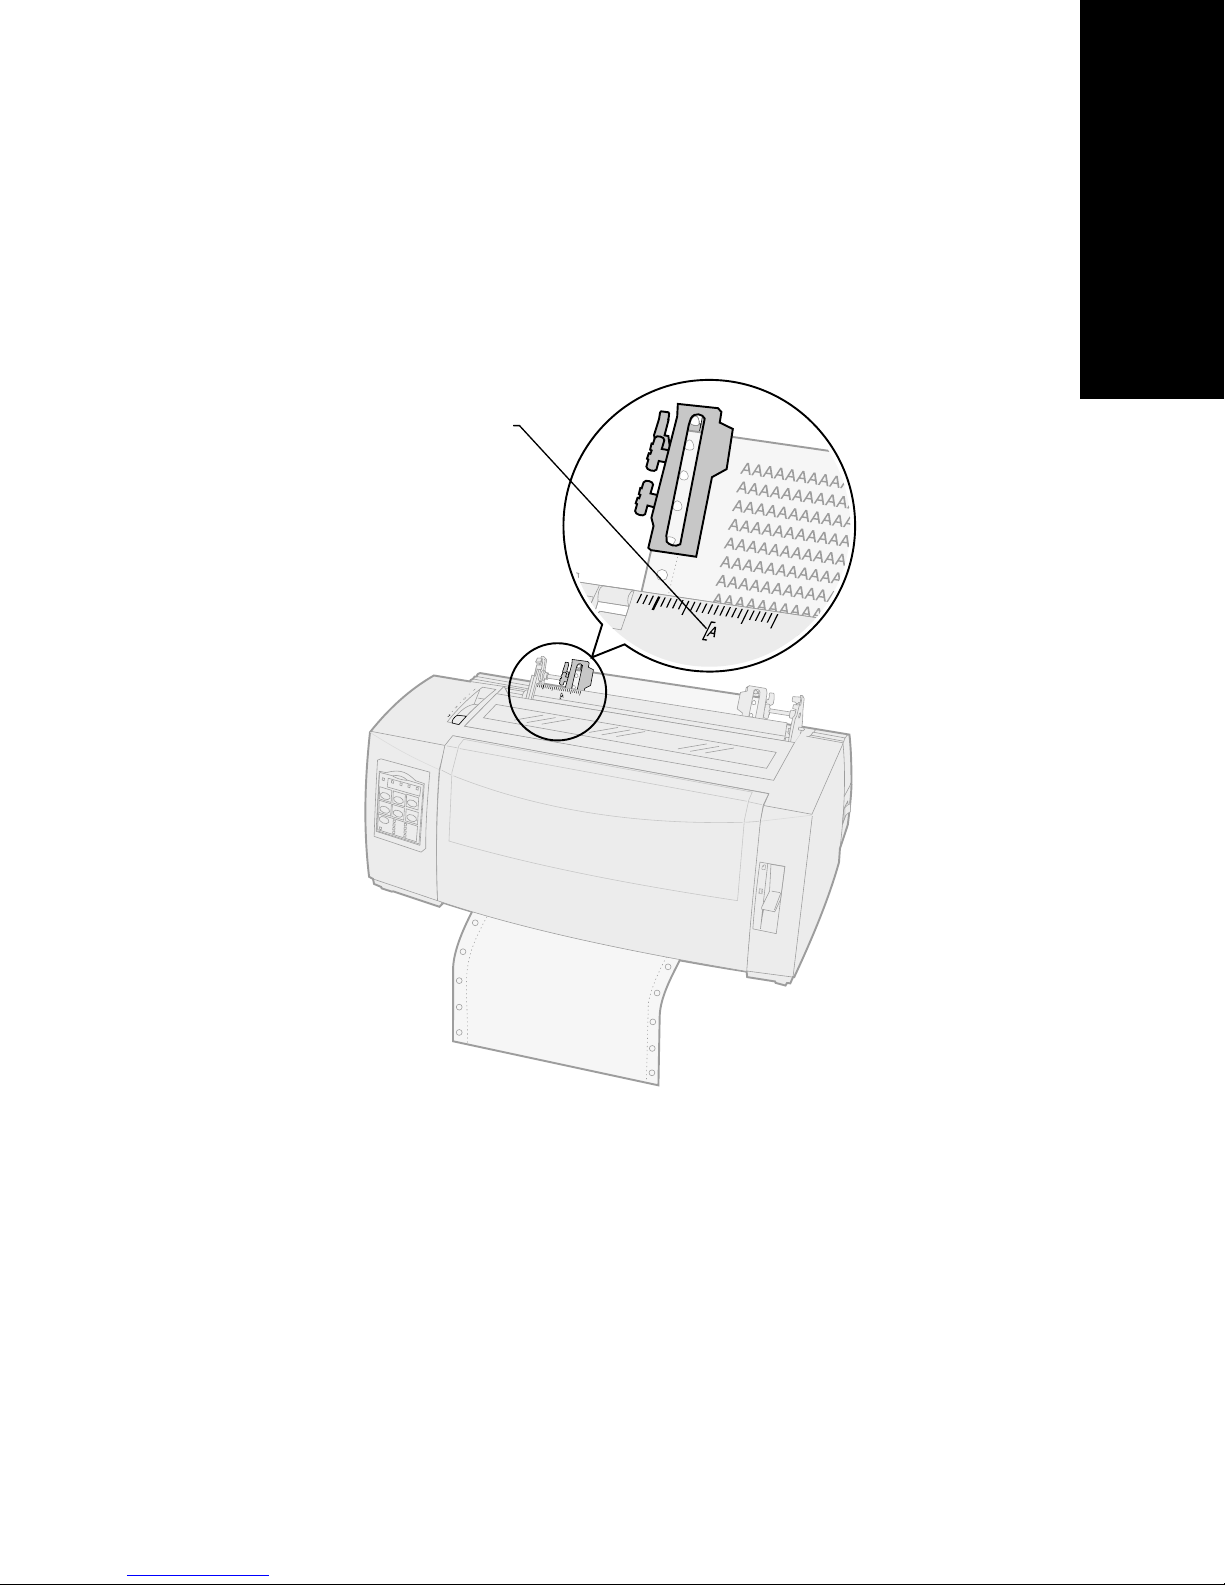
Loading paper
12
13
14
Close the left and right tractor doors.
Replace ribbon access cover.
Set the left margin.
Move the tractor to align the left margin on
your paper with the symbol [A printed on the
ribbon access cover. For help, see “Aligning the
left margin” on pag e77.
Margin guide printing starts at
the [A symbol.
The distance from the [A
symbol to the left edge of
the paper determines the
width of the left margin.
63
Page 68
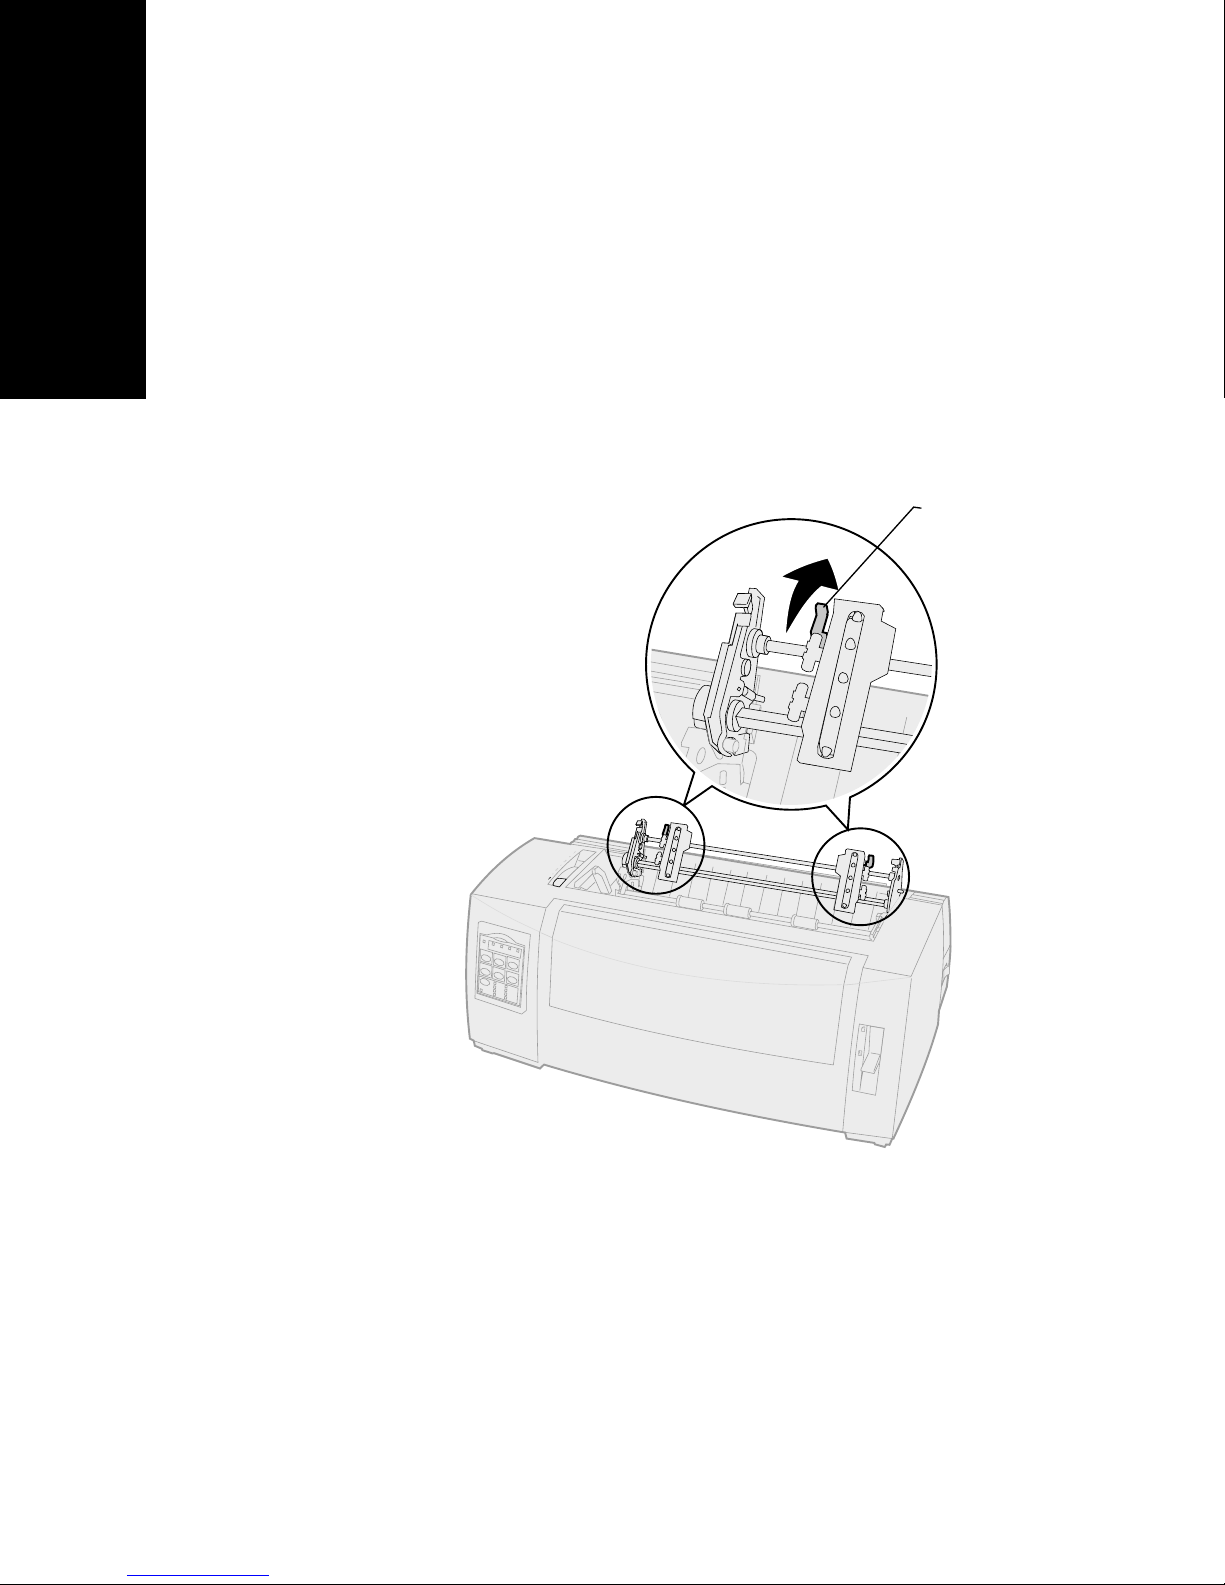
15
Push down the left tractor locking lever to lock
the tractor in place.
Loading paper
16
Remove slack from the paper and lock the right
lever.
Note:
If you have trouble moving the right
tractor to the paper width, roll the rubber
tractor stop out of its’ seated position.
Move the tractor to the paper width, load
the paper, and lock the right tractor. To
view the rubber tractor stop location, see
“Changing tractor positions” on pag e33.
Locking lever
17
Move the forms thickness lever back to a
suitable setting for the type of paper you are
using.
For help, see “Setting the forms thickness lever”
on pag e44.
64
Page 69

Loading paper
18
19
Open the operator panel cover to access layer 2.
Press
Micro
↑,
Micro
↓,
LineFeed
or
to move
the paper to the Top-Of-Form you want to use.
Note:
• Use the second form to set Top-Of-Form
alignment.
• To do this, align the horizontal lines (located on
the platen) with the Top-Of-Form you want. To
see an illustration, go to ” on pag e83.
20
Press
Set TOF
to set Top-Of-Form.
Top-Of-Form is not saved if the printer is turned
Off
or runs out of paper when using the pull
tractor.
21
Make sure the printer is online (Ready light is
On
solid).
If not, press
On
solid.
Start/Stop
until the Ready light is
65
Page 70
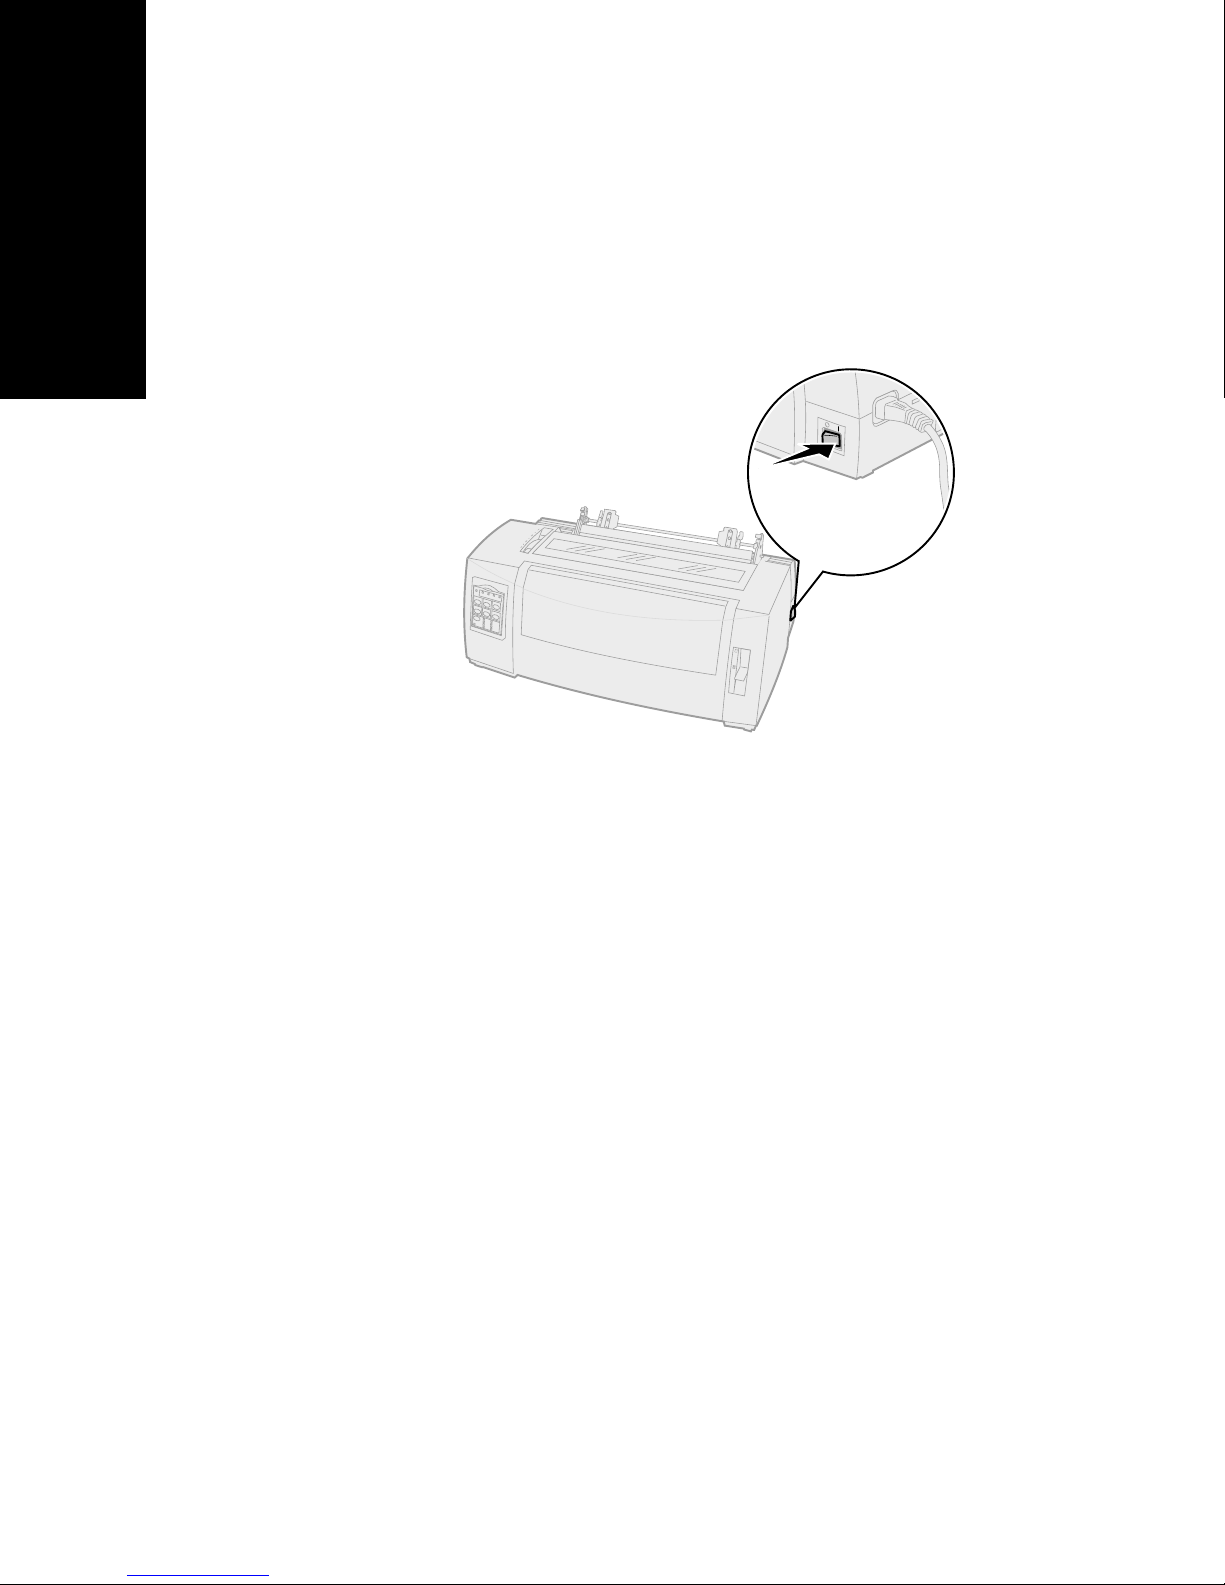
Bottom loading continuous forms
using the pull tractor
Make sure the tractor is in the pull position. If the
tractor is not in this position, see “Converting the push
tractor to pull tractor position” on pag e36.
Loading paper
1
Turn the printer
2
Make sure the paper path is clear.
If a cut form or envelope is loaded in the
printer, press
On
.
FormFeed
to remove it.
66
Page 71
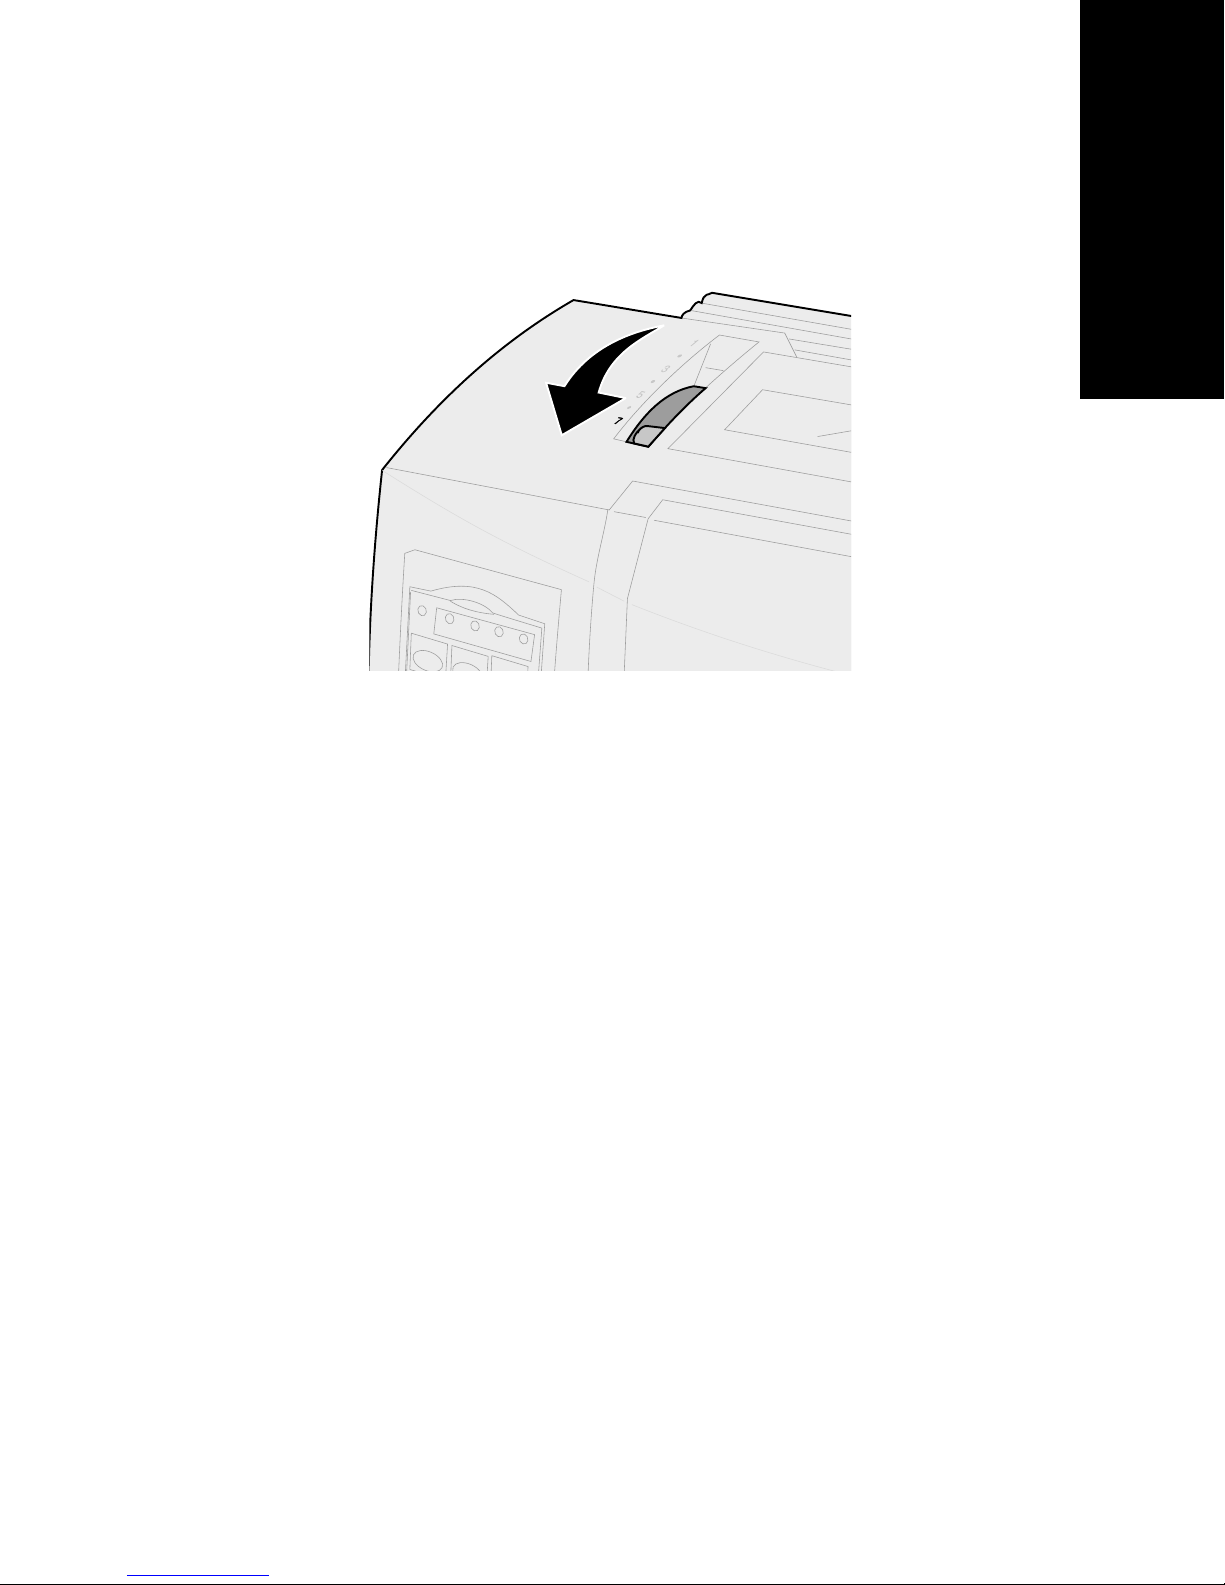
3
Set the forms thickness lever to position 7 while
loading the paper.
Loading paper
67
Page 72
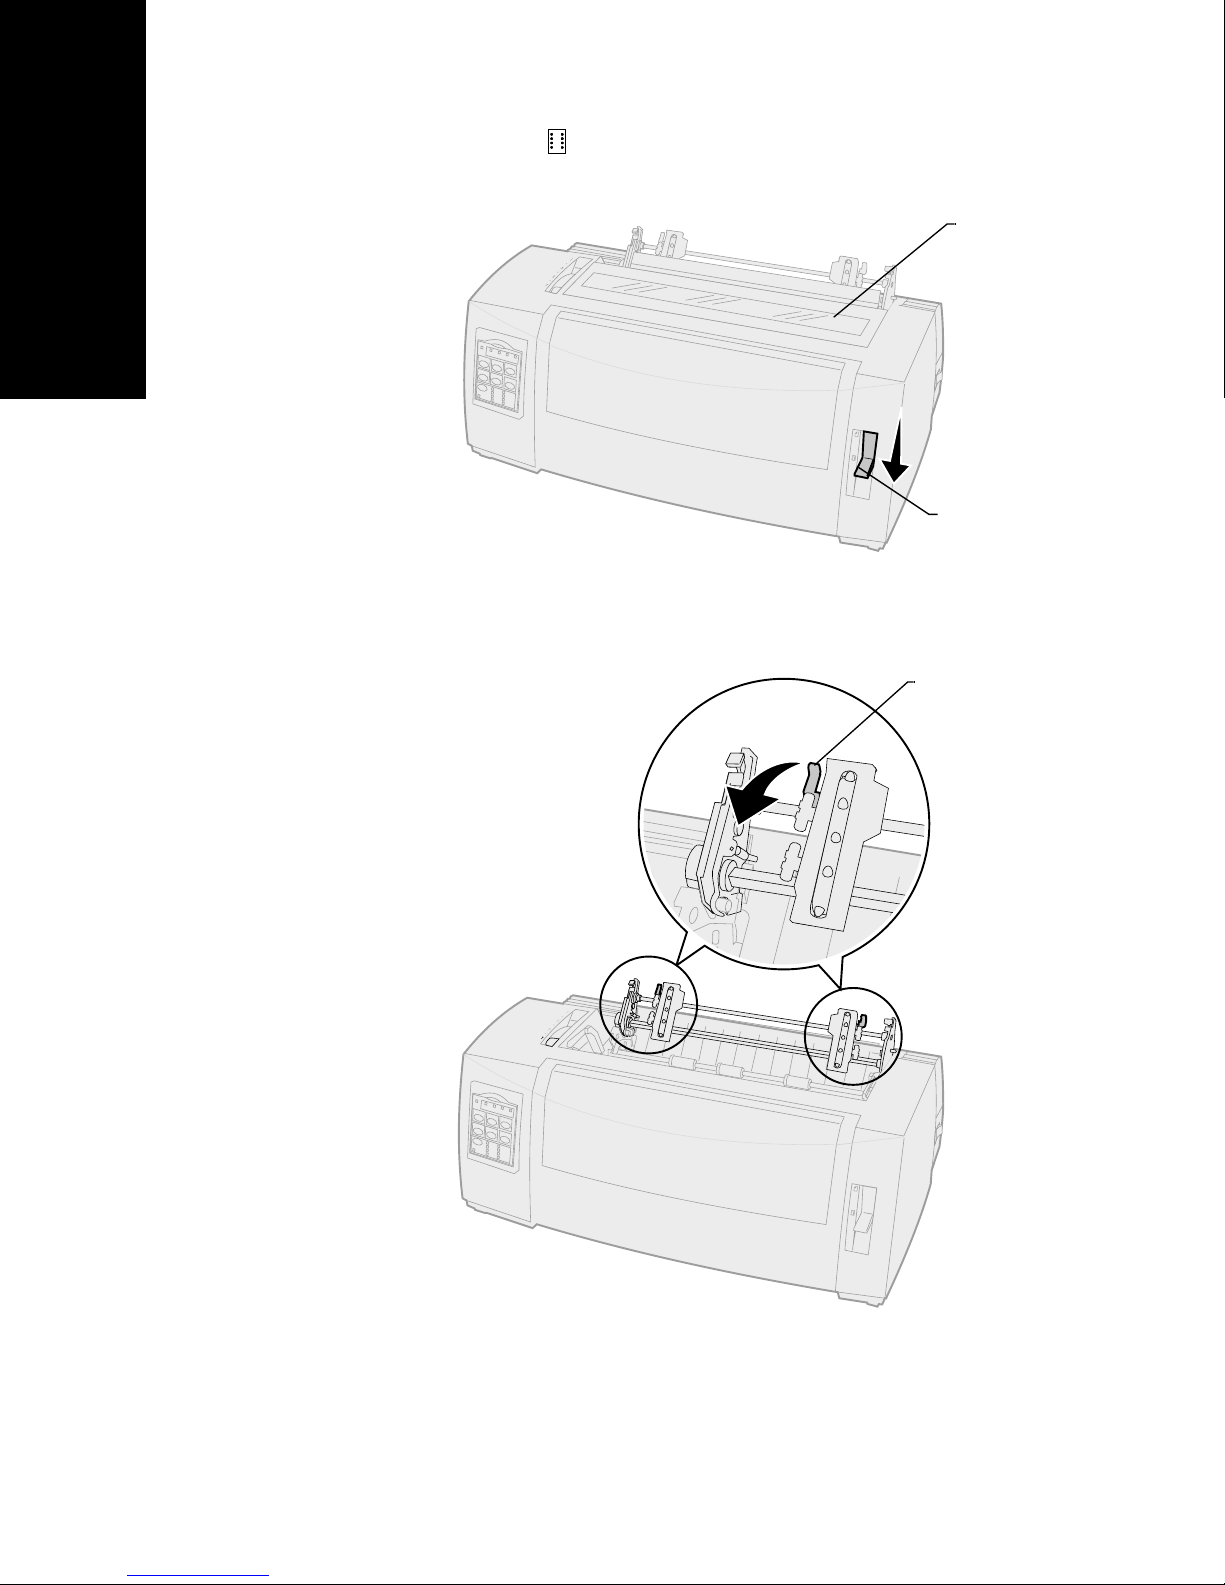
Loading paper
4
Move the paper select lever to the continuous
forms position.
5
Remove the ribbon access cover.
Ribbon access
cover
Paper select
lever
6
Pull up the left and right tractor locking levers
to unlock the tractors.
Locking lever
68
Page 73
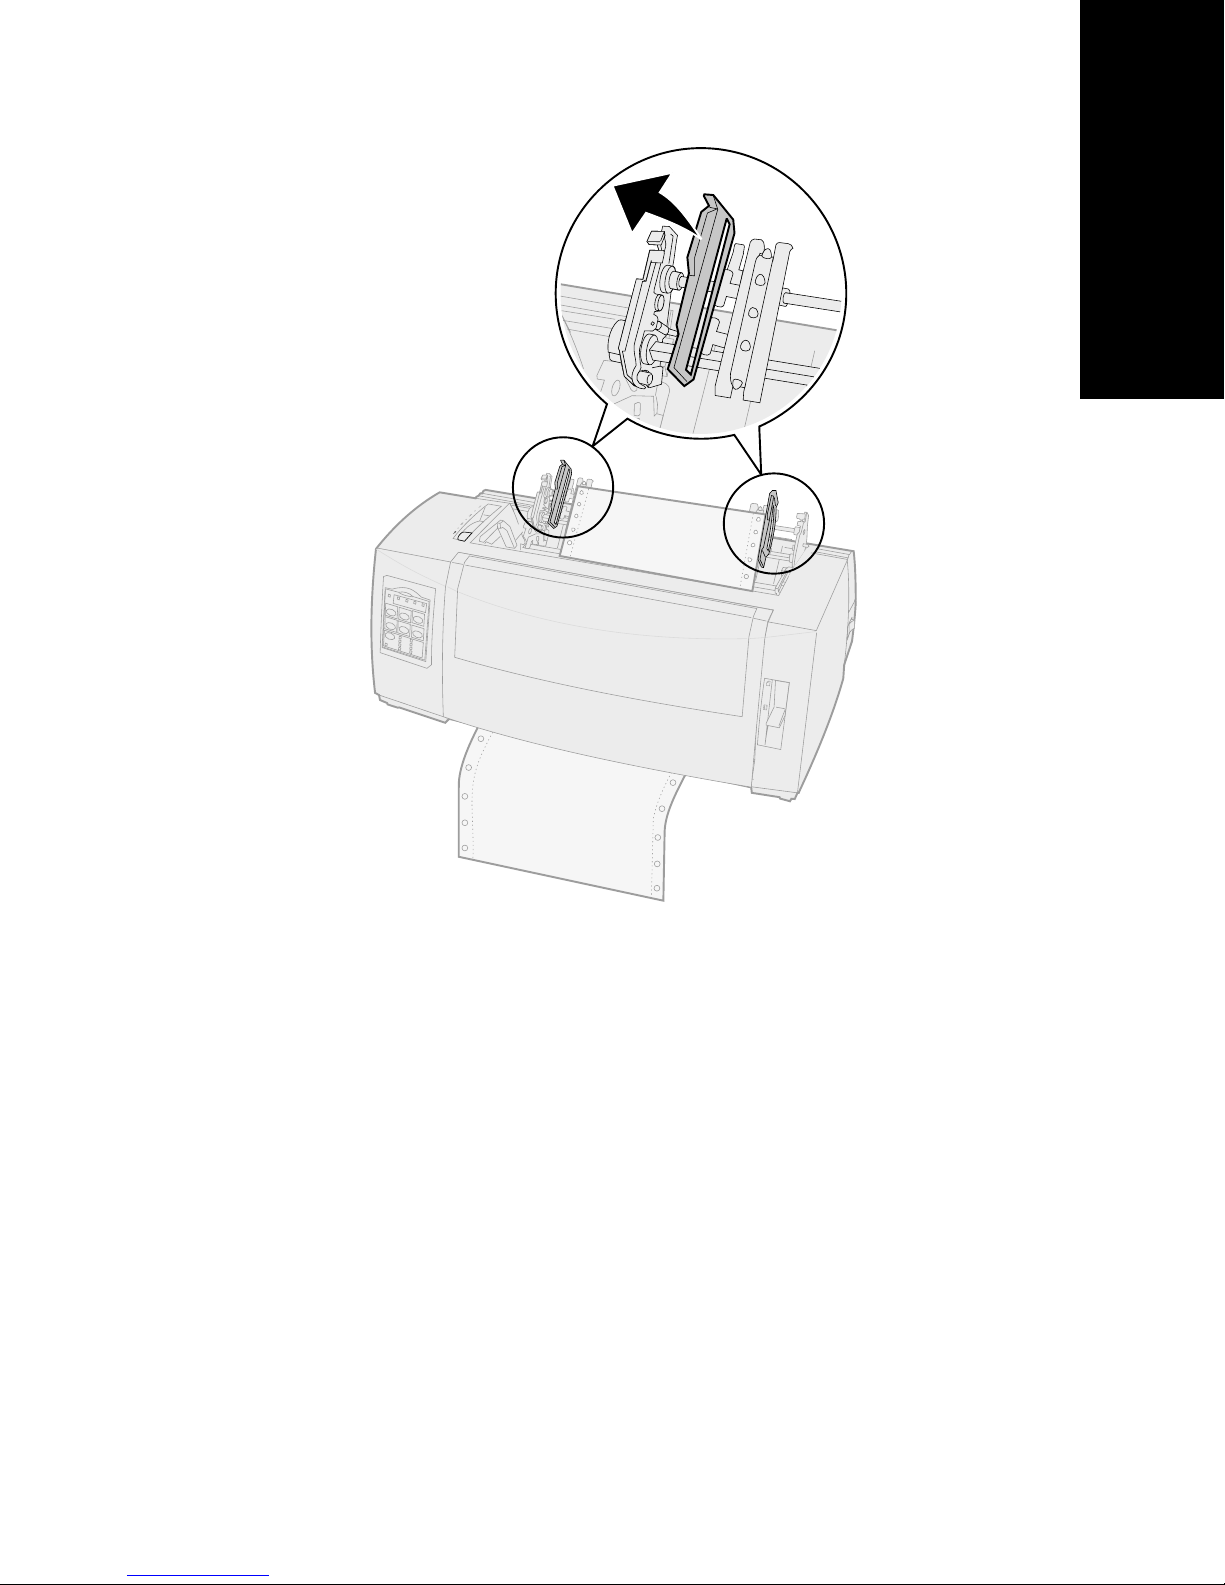
7
Open the left and right tractor doors.
Loading paper
8
Insert the paper through the bottom slot of the
printer.
Push or pull the paper through the paper path
until it passes the printhead.
9
Fit the paper pinfeed holes over the tractor
pins.
If necessary, move the left or right tractor to
adjust the tractor to the paper width.
Note:
If you have trouble moving the right
tractor to the paper width, roll the rubber
tractor stop out of its’ seated position.
Move the tractor to the paper width, load
69
Page 74
the paper, and lock the right tractor. To
view the rubber tractor stop location, see
“Changing tractor positions” on pag e33.
Loading paper
10
11
12
Close the left and right tractor doors.
Replace the ribbon access cover.
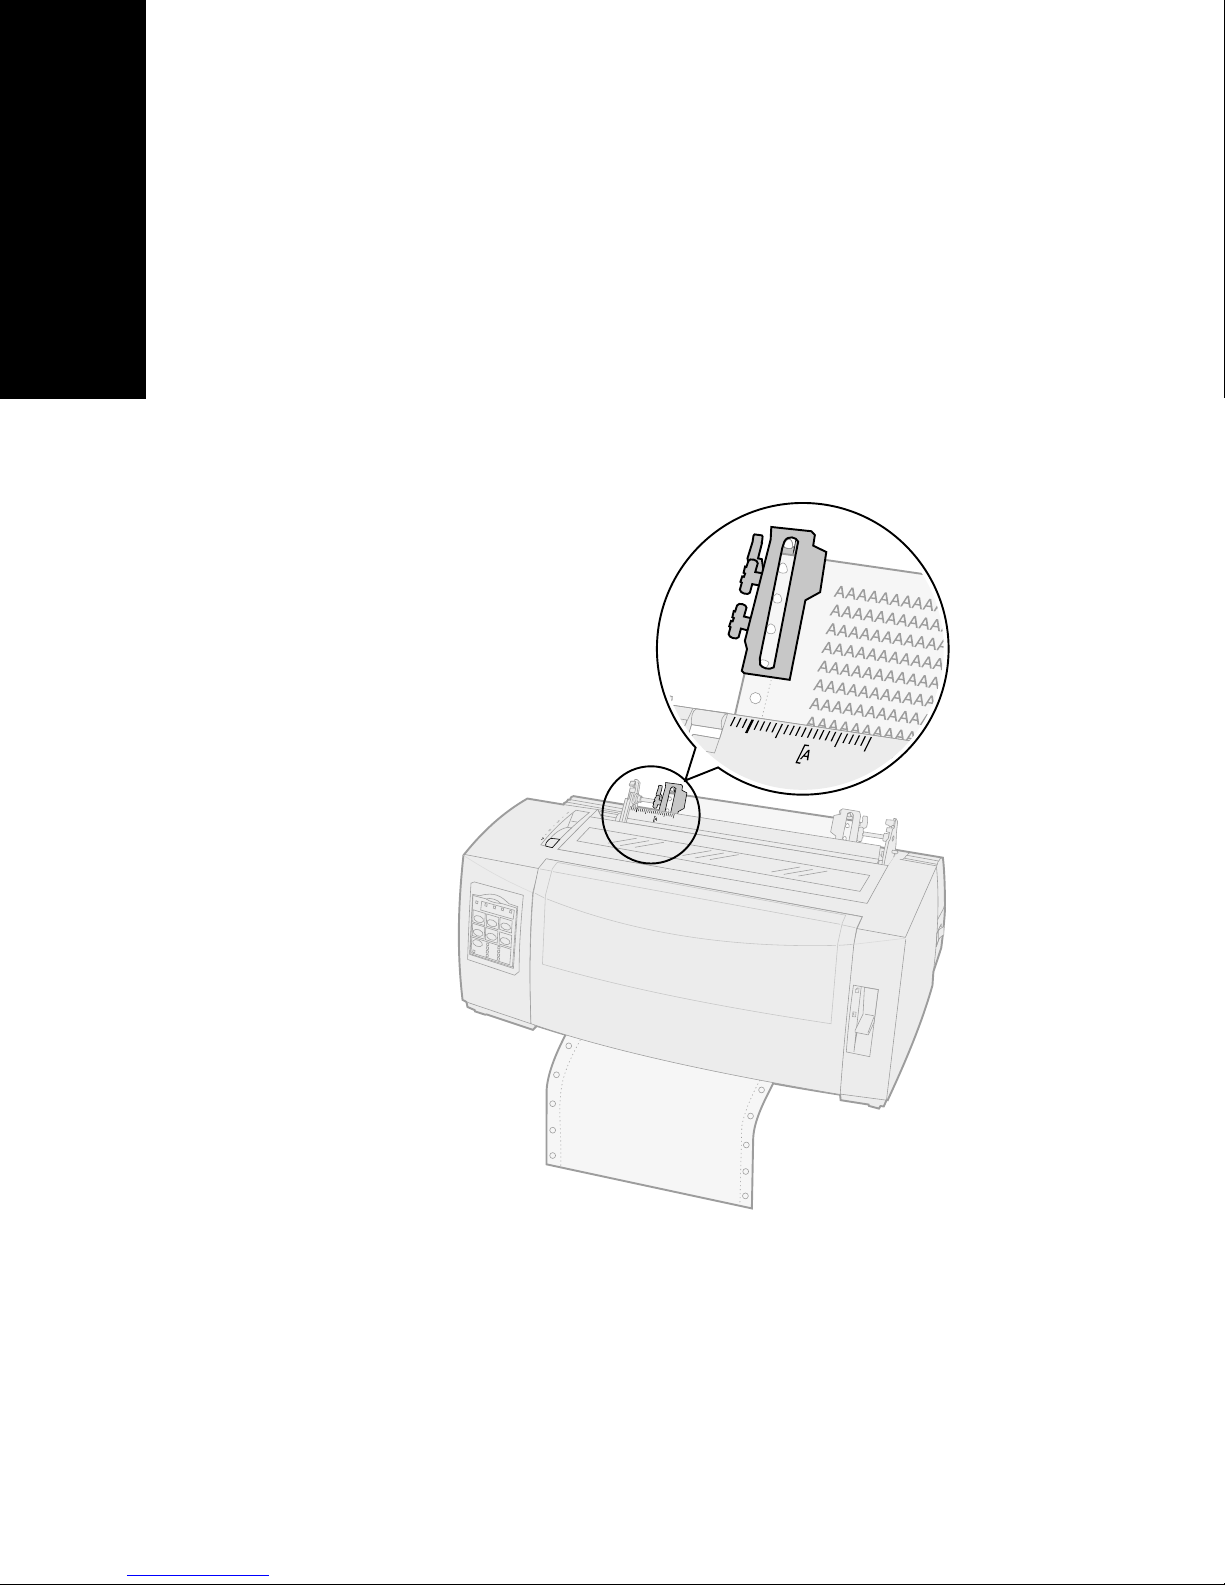
Set the left margin.
Move the tractor to align the left margin on
your paper with the symbol [A printed on the
ribbon access cover. For help, see “Aligning the
left margin” on page 77.
Margin guide printing starts at
the [A symbol.
The distance from the [A
symbol to the left edge of the
paper determines the width of
the left margin.
70
Page 75
Loading paper
13
14
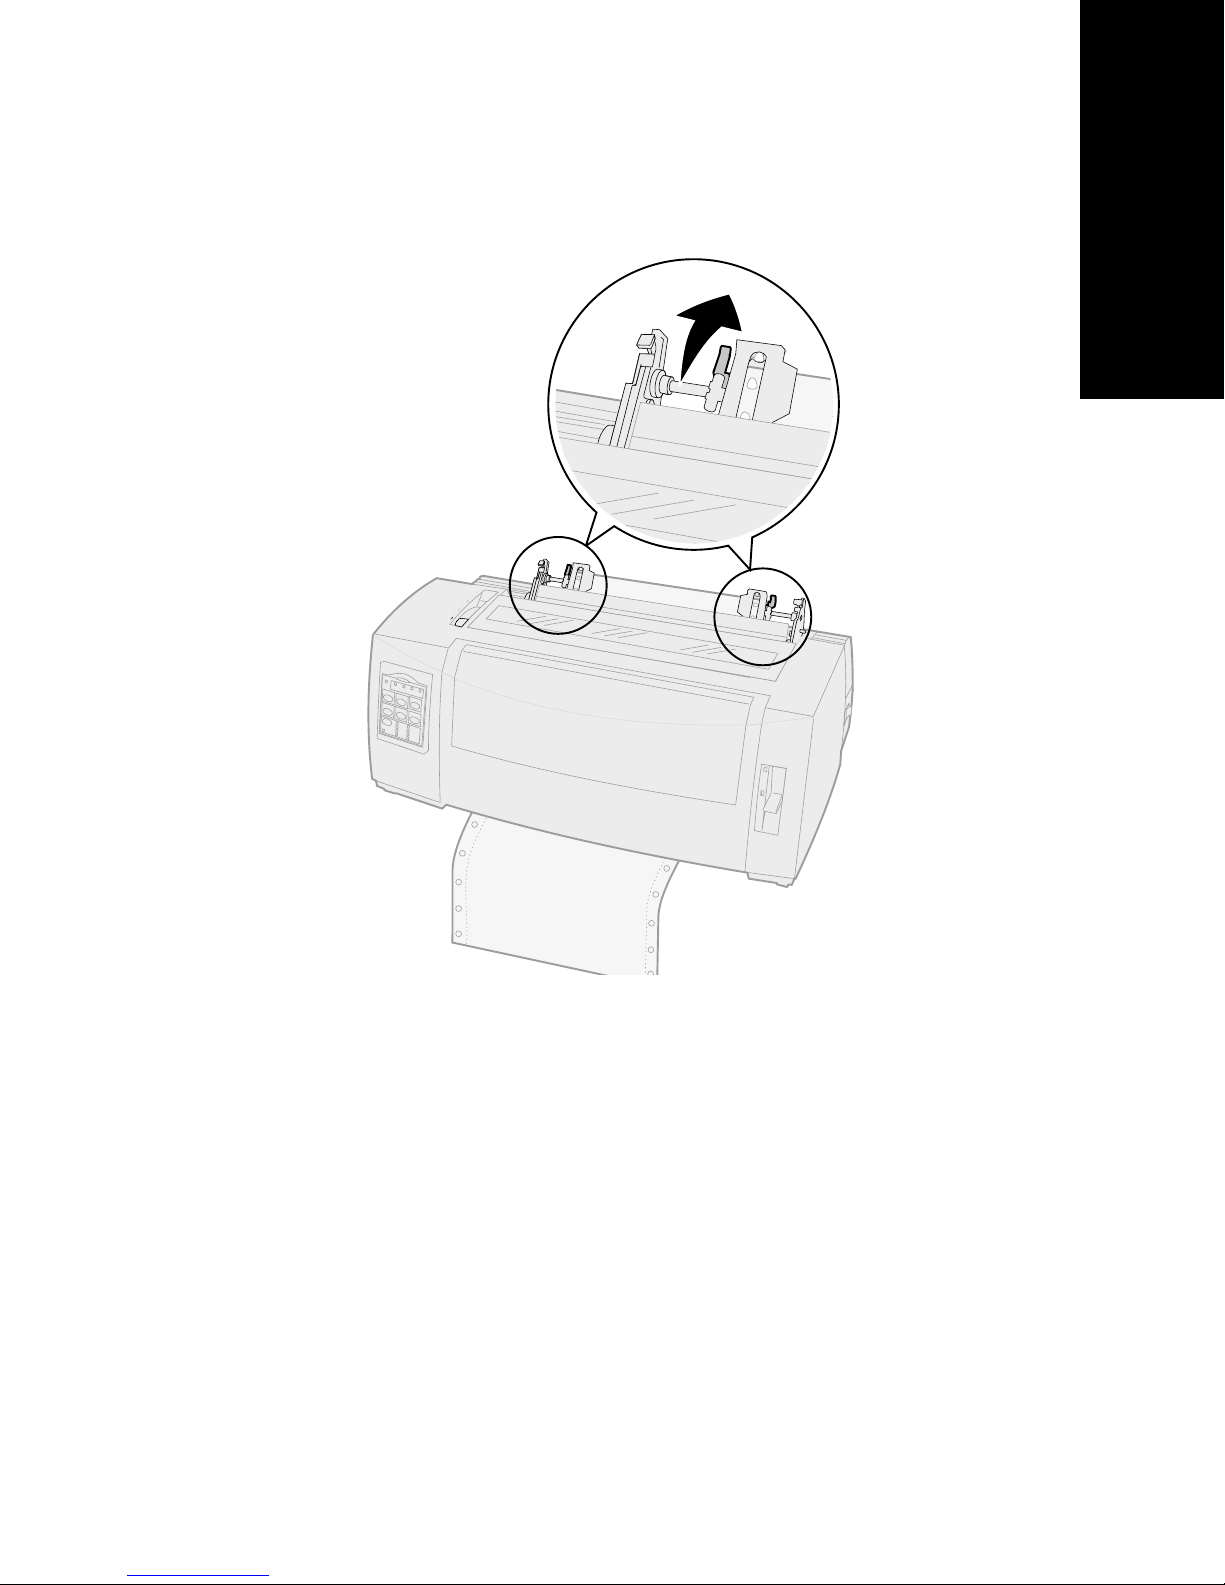
Push down the left tractor locking lever to lock
the tractor in place.
Remove slack from the paper and lock the right
lever.
15
Move the forms thickness lever back to a
suitable setting for the type of paper you are
using.
For help, see “Setting the forms thickness lever”
on pag e44.
71
Page 76

16
Open the operator panel cover to access layer 2.
Loading paper
Loading a cut form or envelope
17
18
19
Cut forms can be a single sheet, an envelope, or a
multiple-part form. They are placed one at a time into
the manual feeder.
Press
the paper to the Top-Of-Form.
Press
Top-Of-Form is not saved if the printer is turned
Off
tractor.
Make sure the printer is online (Ready light is
On
If not, press
On
LineFeed, Micro
Set TOF
or runs out of paper when using the pull
solid).
solid.
to set Top-Of-Form.
Start/Stop
↑, or
until the Ready light is
Micro
↓ to move
Note:
If you have installed the optional Auto
Sheet Feeder or Tractor 2 Feeder, refer to
the documentation shipped with your
option for paper loading instructions.
72
Page 77
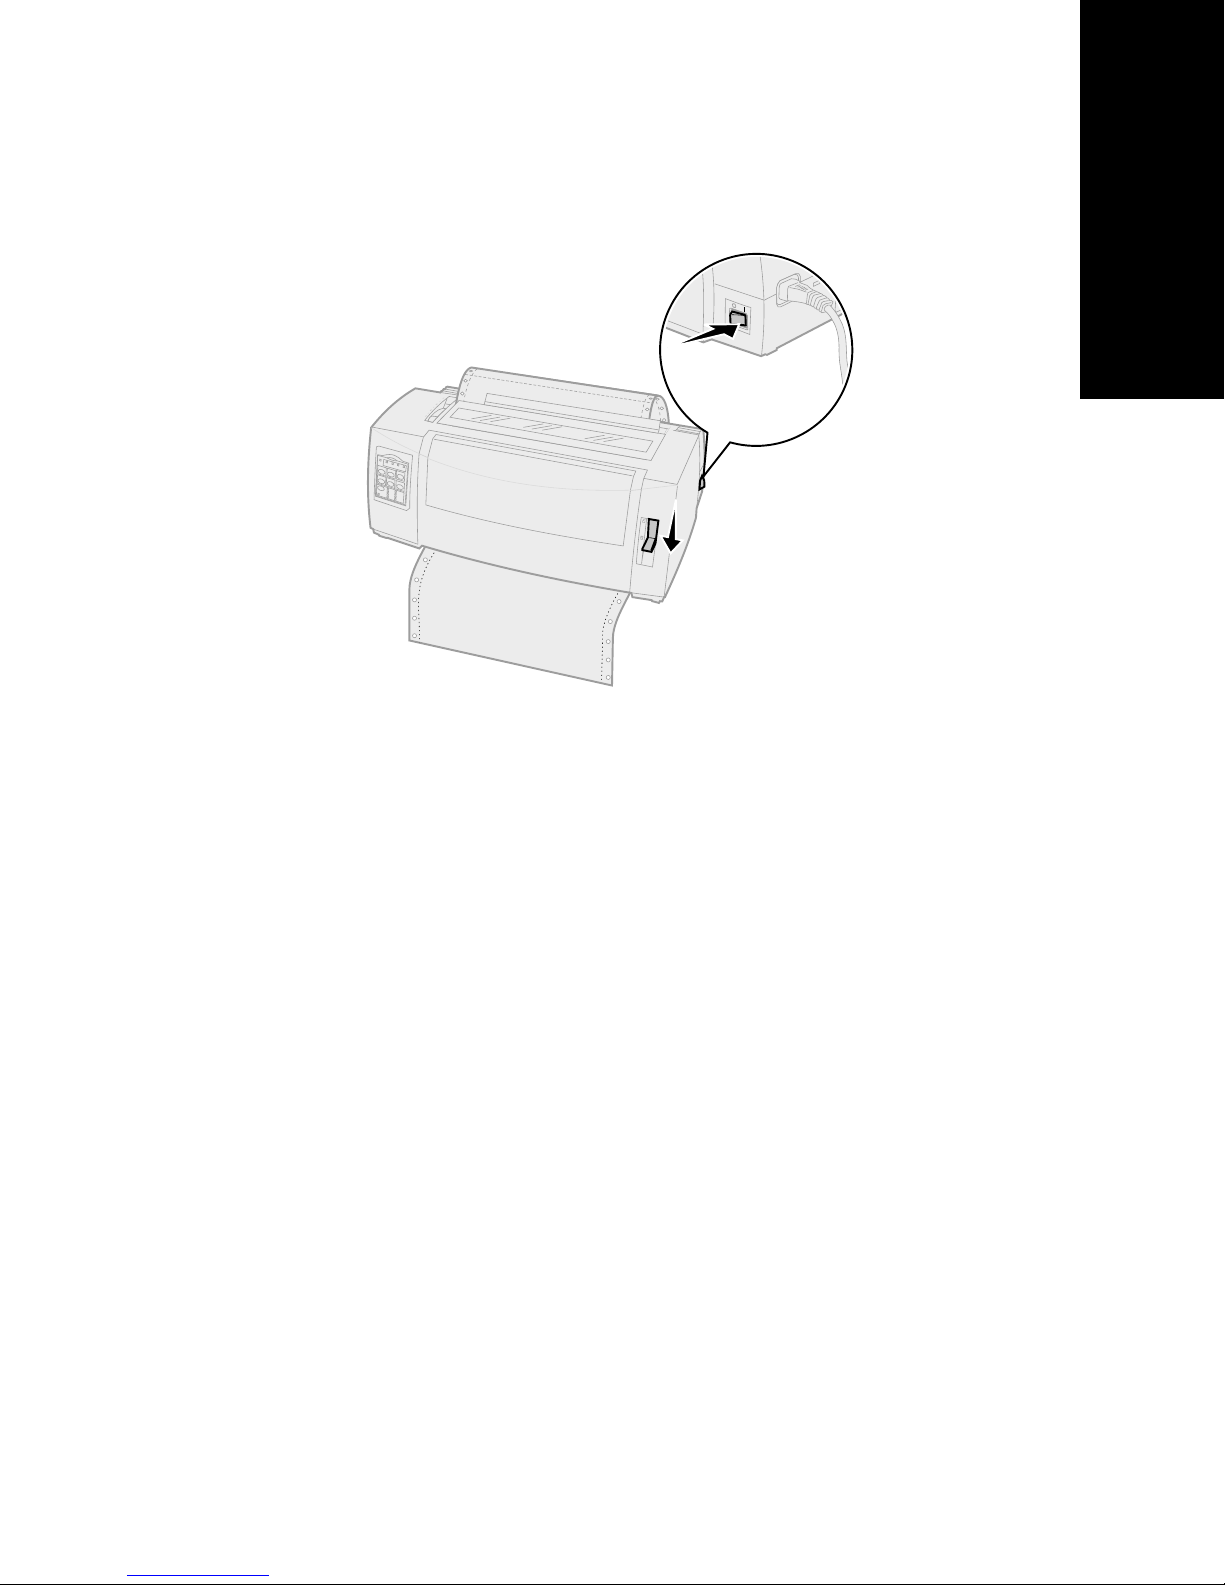
Loading a cut form or envelope
manually
Loading paper
1
Turn the printer
2
Make sure the paper path is clear.
3
If continuous forms are currently loaded, tear
On
.
off the leading edge of the continuous form
and then press
continuous forms.
The Paper Out light is blinking.
4
Set the forms thickness lever to a suitable
setting for the type of paper you are using.
See “Setting the forms thickness lever” on
page 44 for more information.
Load/Unload
to park the
73
Page 78
Loading paper
5
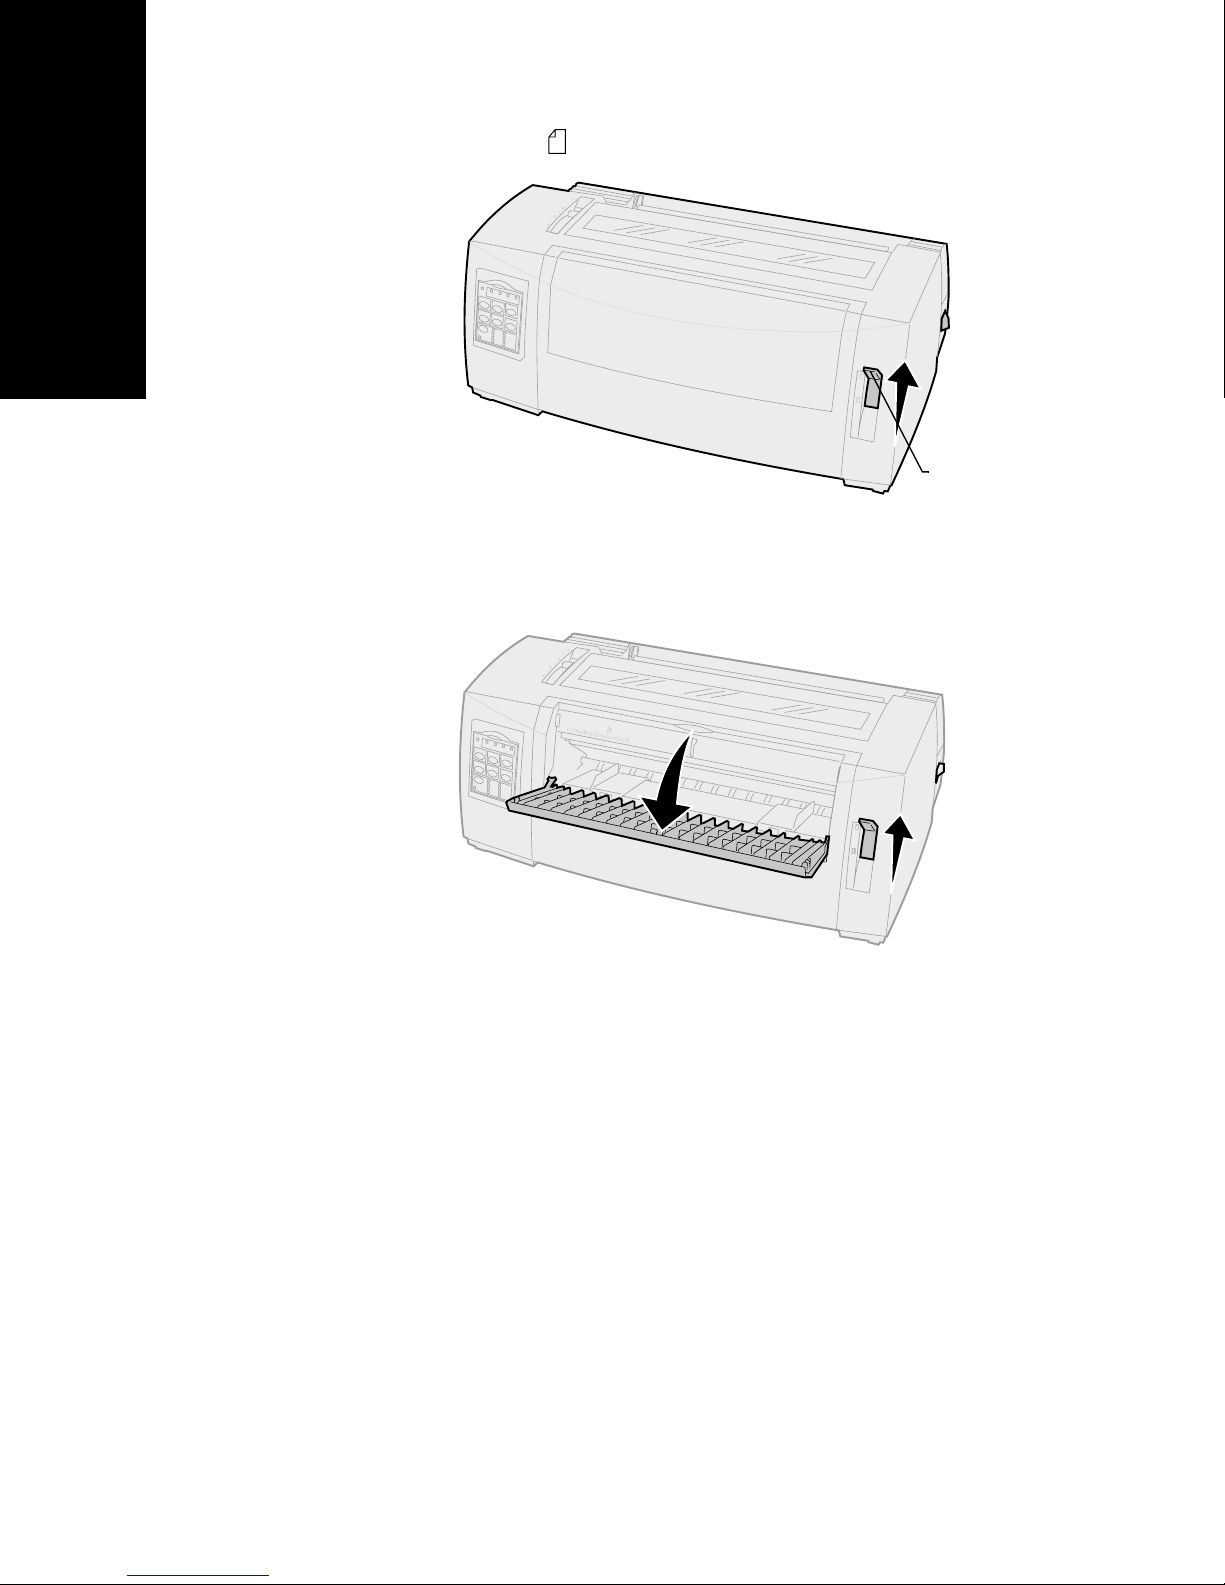
Move the paper select lever up to the cut
forms position.
6
Open the manual feed door.
Paper select
lever
74
Page 79
7
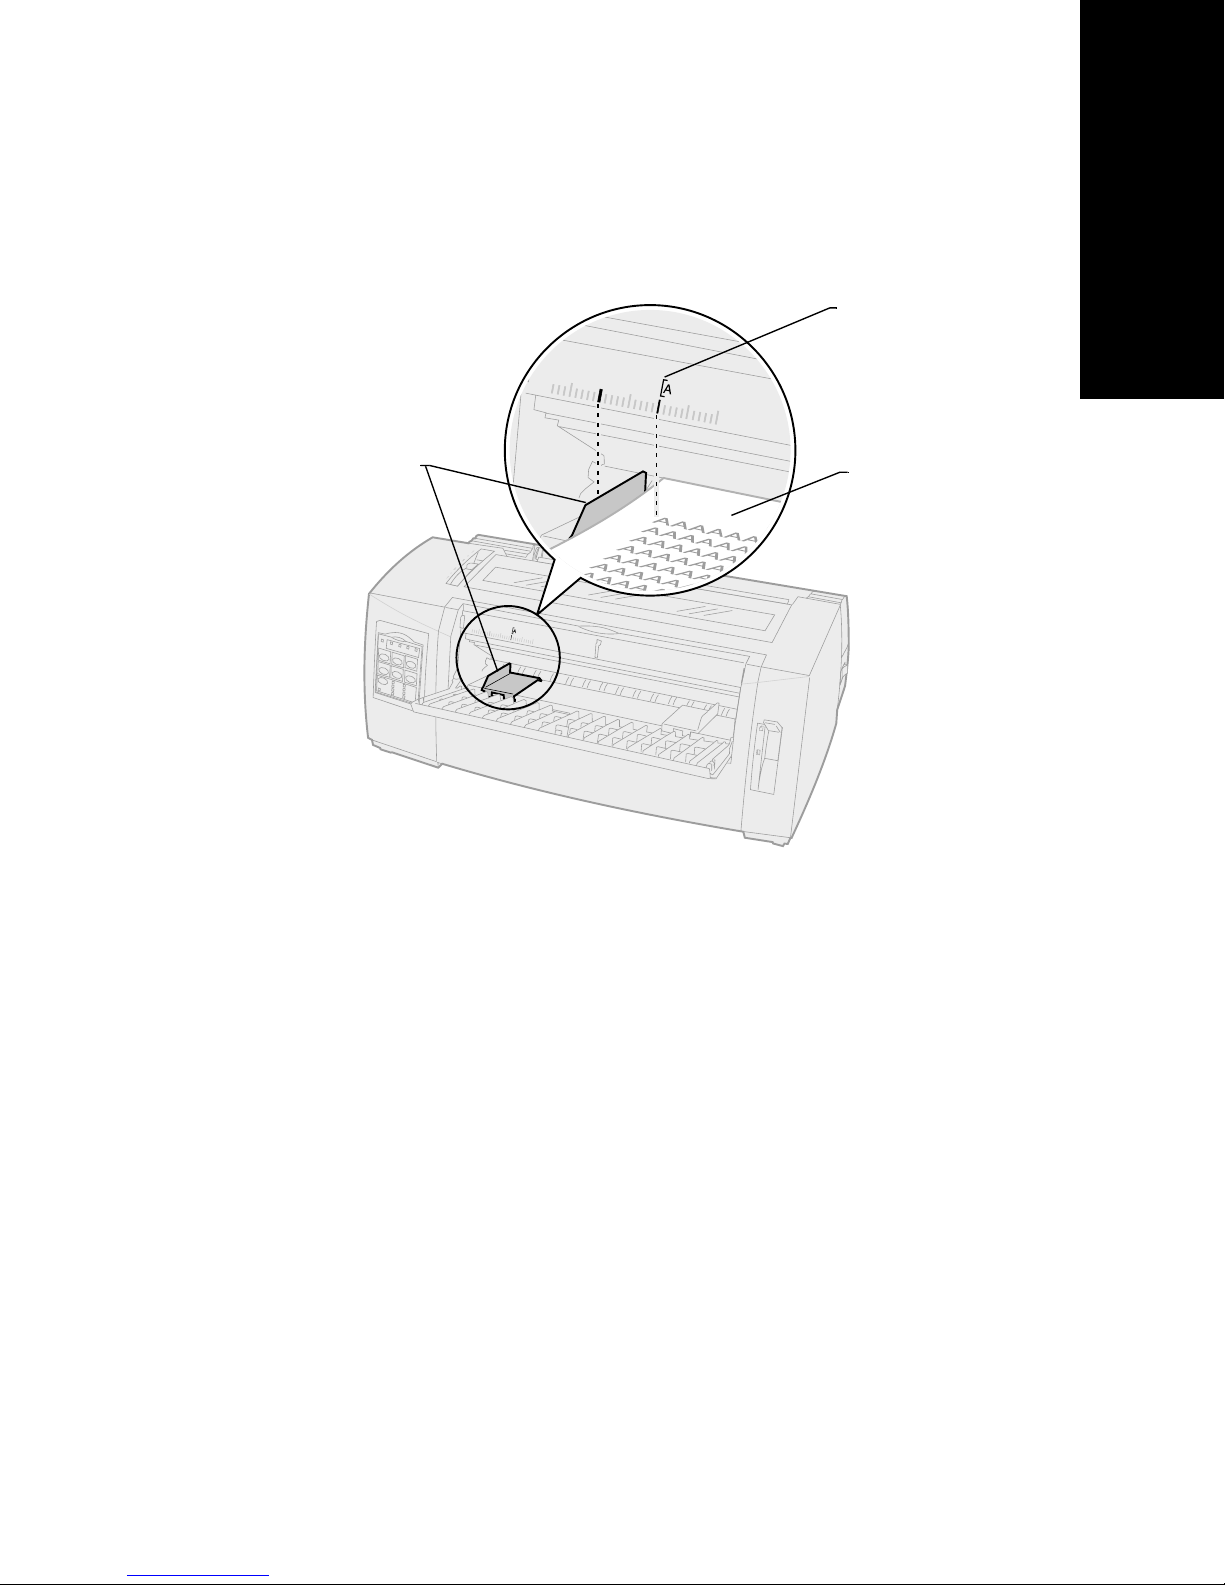
Set the left margin.
Move the left paper guide so that the print
start position you want aligns with the [A
symbol printed on the margin guide. For help,
see “Aligning the left margin” on pag e77.
Margin guide printing begins
at the [A
symbol.
Left paper
guide
Paper
Loading paper
The distance from the left paper
guide to the [A symbol determines
the width of the left margin.
75
Page 80
Loading paper
8
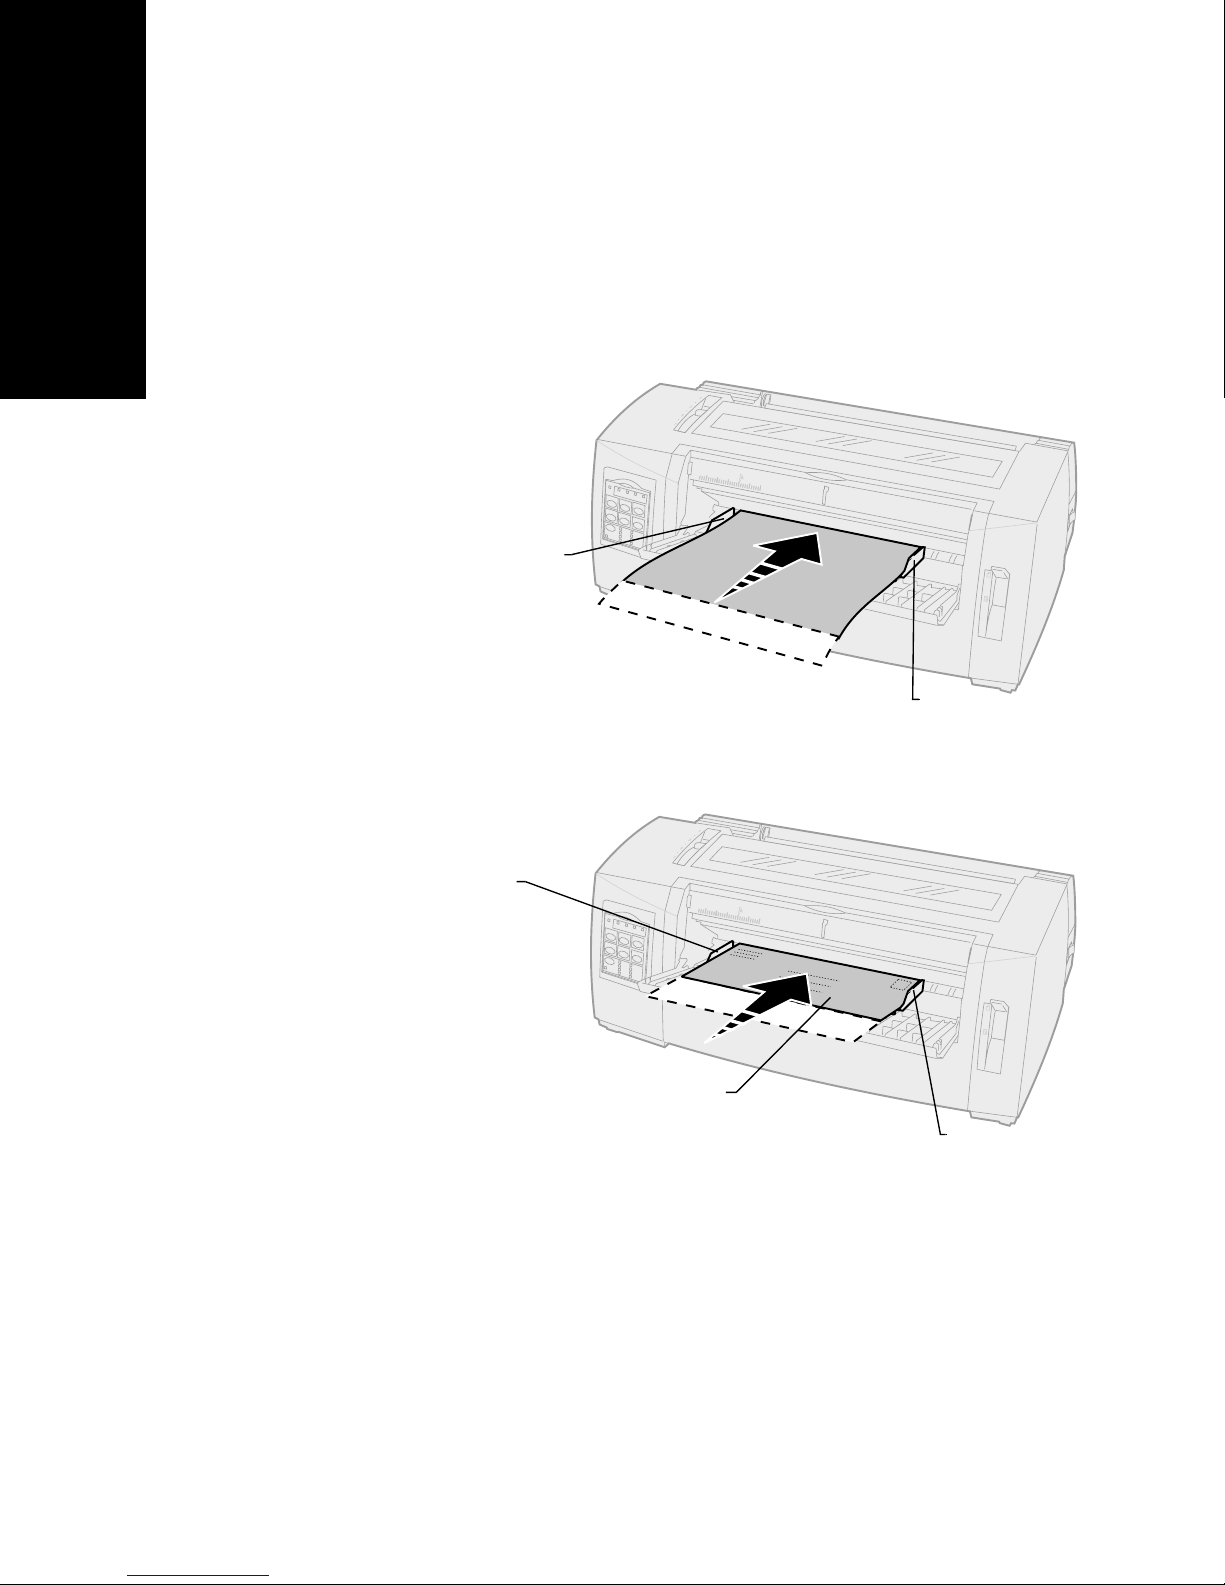
Place a cut form or envelope against the left
paper guide.
If you are loading a preprinted form or
envelope, put the top edge in first, printed side
up.
9
Move the right paper guide so the guide aligns
with the right edge of the paper.
Left paper
guide
Left paper
guide
Right paper
guide
Envelope
Right paper
guide
76
Page 81

Loading paper
10
11
Insert paper into the printer until the Paper Out
light stops blinking.
•
If Auto Cut Sheet Load is set to
paper feeds automatically to the Top-OfForm.
•
If Auto Cut Sheet Load is set to
FormFeed
Make sure the printer is online (Ready light is
On
solid).
If it is not, press
light is
On
.
Start/Stop
solid.
Aligning the left margin
You can manually change the first print position at the
left margin. The first print position is indicated by the
On
, the
Off
, press
until the Ready
[A
symbol. You can also set the left margin from your
software application.
Note:
Setting the left margin in your software
application, adds it to the left margin
setting on the printer. For example, if you
set the left margin at 1 inch on the
printer, and also have the left margin set
at 1 inch in your software application, the
printer begins printing 2 inches from the
left edge of the page.
77
Page 82
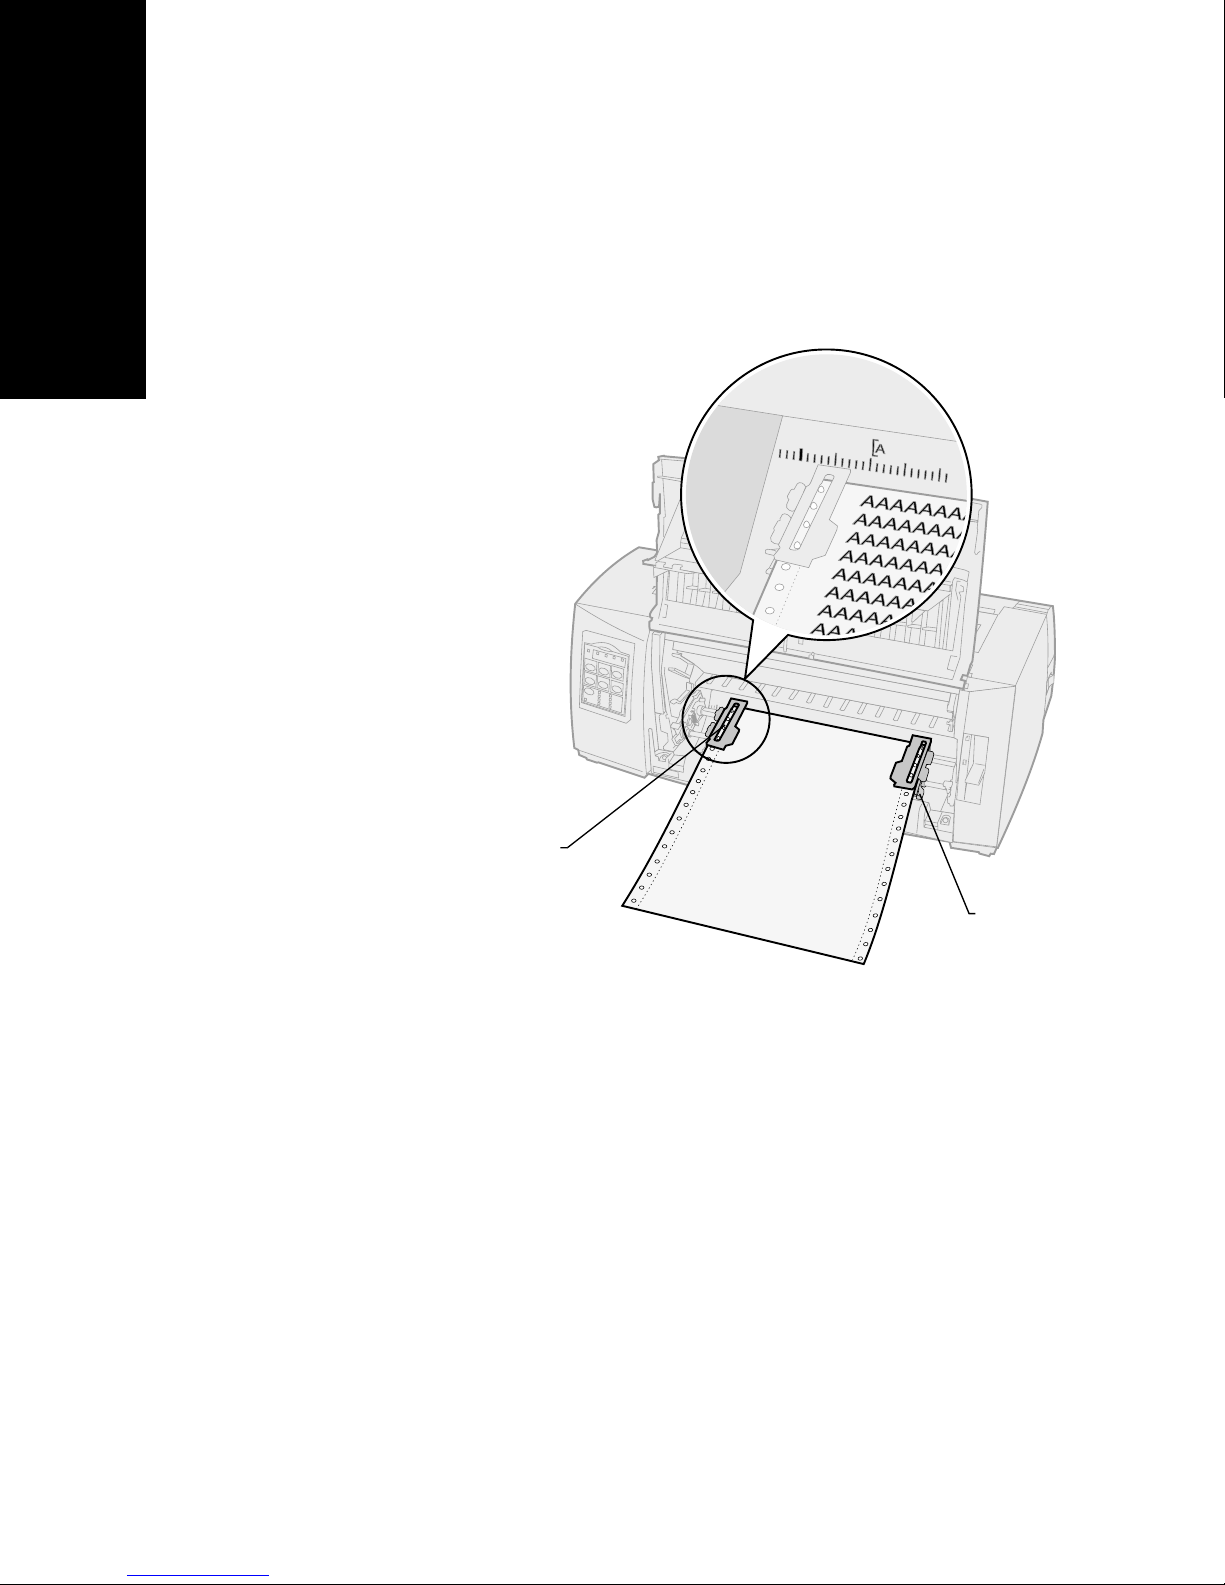
Aligning the left margin for
continuous forms
To set the left margin for continuous forms, first locate
the [A symbol on the printer. The location of this
symbol depends on the position of the tractor unit.
Loading paper
Push tractor position
Push tractor
position
Locking
lever
78
Page 83
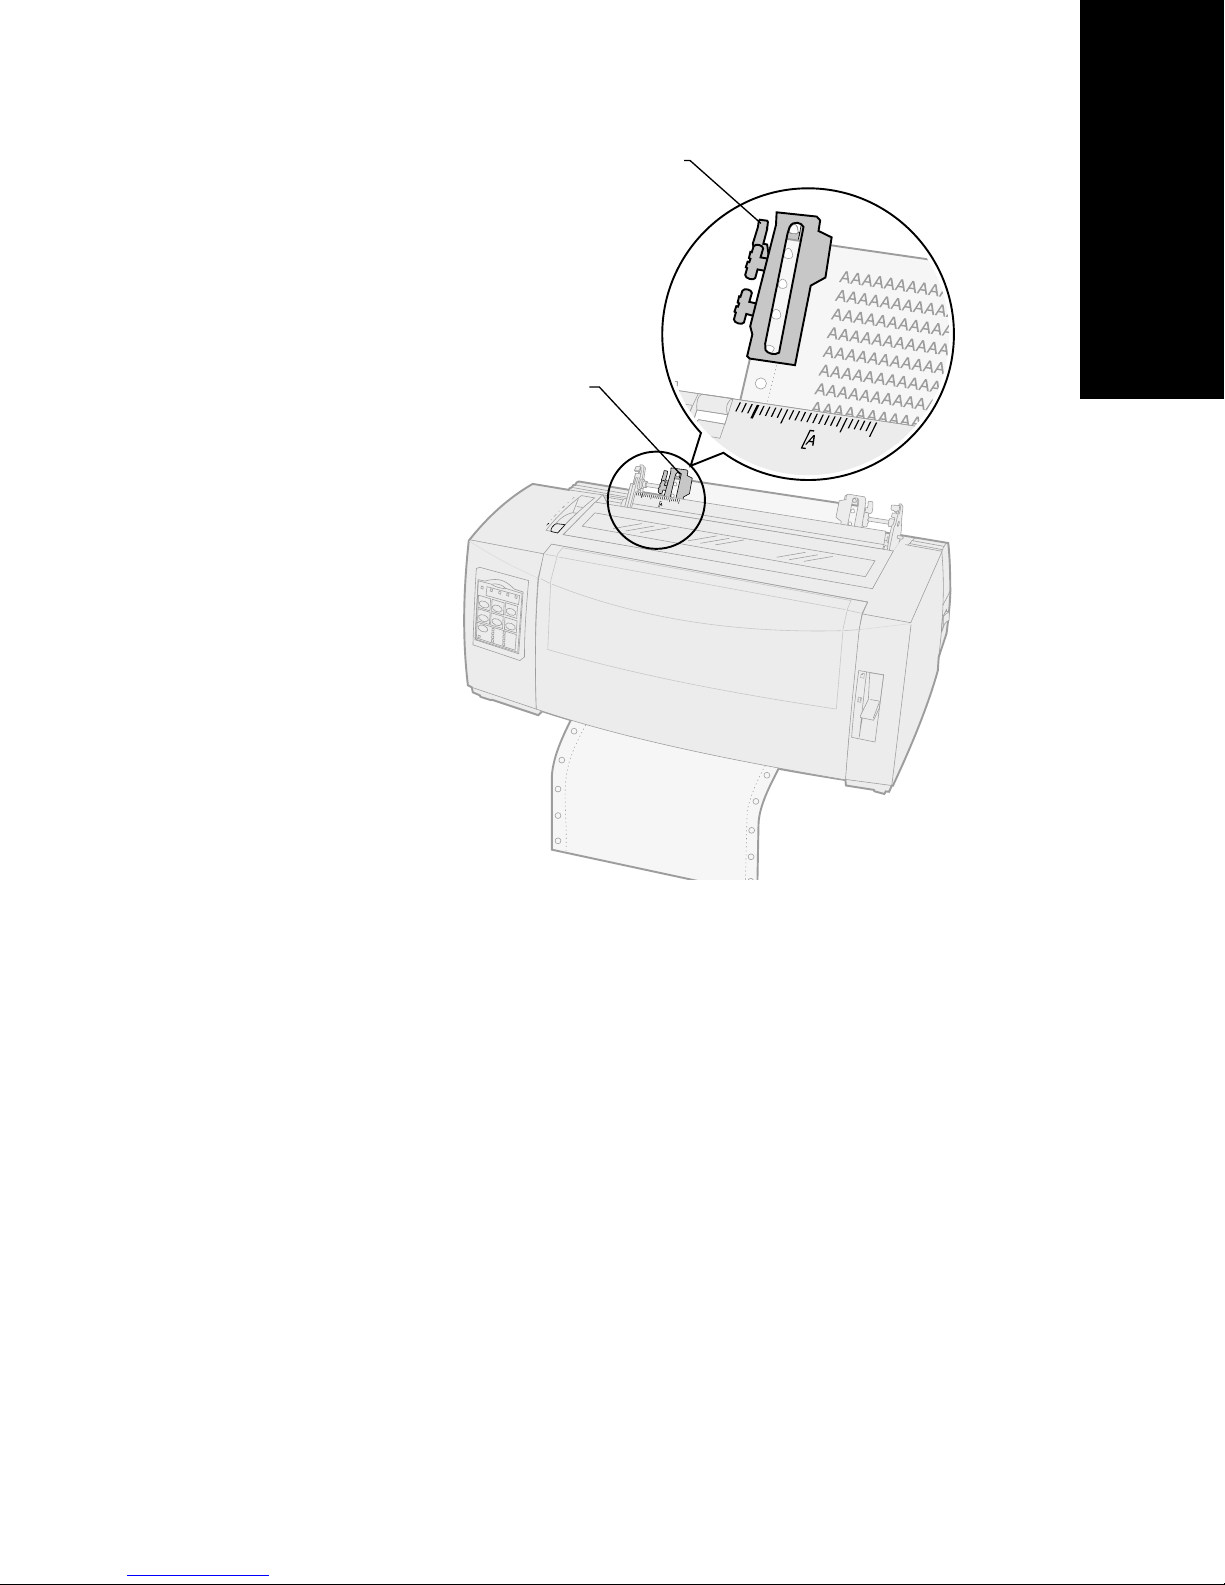
Loading paper
Pull tractor position
Pull tractor
position
Locking
lever
1
Pull up the left and right tractor locking levers
to unlock the tractors.
2
Move the left tractor to the left or right of the
[A
symbol.
3
Push down the left tractor locking lever to lock
it in place.
4
Remove slack from the paper and lock the right
lever.
Note:
If you have trouble moving the right
tractor to the paper width, roll the rubber
tractor stop out of its’ seated position.
Move the tractor to the paper width, load
the paper, and lock the right tractor. To
view the rubber tractor stop location, see
“Changing tractor positions” on pag e33.
79
Page 84
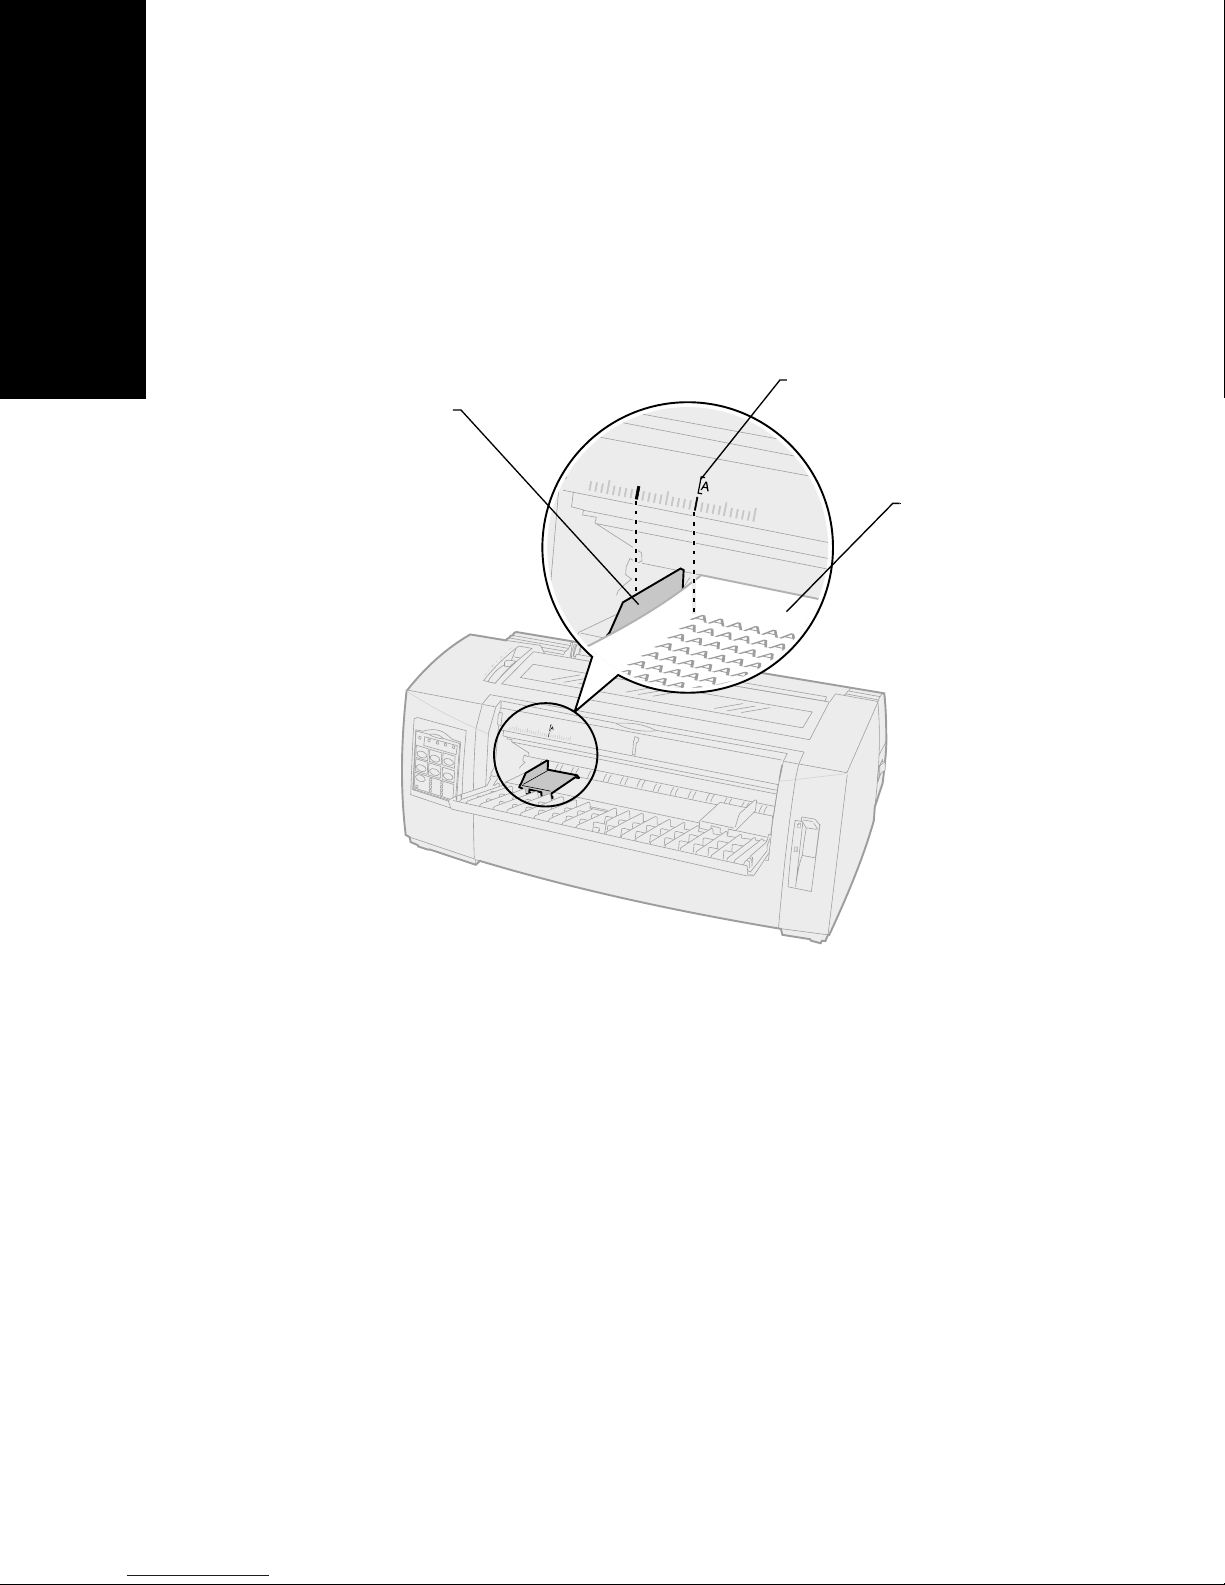
Aligning the left margin for a
manually loaded cut form or
envelope
To set the left margin for a cut form or envelope, move
the left paper guide to the left of the [A symbol,
Loading paper
located above the left paper guide.
Left paper
guide
Print start
position
Paper
You may then need to adjust the right paper guide to
fit flush against the right edge of the page.
80
Page 85

Setting Top-Of-Form
Top-Of-Form sets the first line of print. Use the operator
panel to save your Top-of-Form settings for continuous
forms, a cut form, and for each macro enabled.
Setting Top-Of-Form for continuous
form paper in push mode
Top-Of-Form can range from minus 1 inch to plus
14 inches from the top of continuous form paper.
Loading paper
Note:
To set and save Top-Of-Form:
1
Clear the paper path.
The Paper Out light blinks if no paper is loaded.
If the Paper Out light is
forms and press
If an individual form is loaded, press
to clear paper path.
2
Make sure the paper select lever is in the
continuous forms position.
3
Load continuous form paper on the push
tractor feed pins (or Tractor 2 feed pins if you
are using the optional Tractor 2 Feeder).
Use this method to also set Top-Of-Form
for continuous forms loaded in the
optional Tractor 2 Feeder.
Load/Unload
Off
, tear off excess
.
FormFeed
For help loading paper, see “Loading
continuous forms using the push tractor” on
page 48.
4
Remove the ribbon access cover.
5
Press
The paper moves to the current Top-Of-Form.
The Paper Out light goes
Load/Unload
81
.
Off
.
Page 86
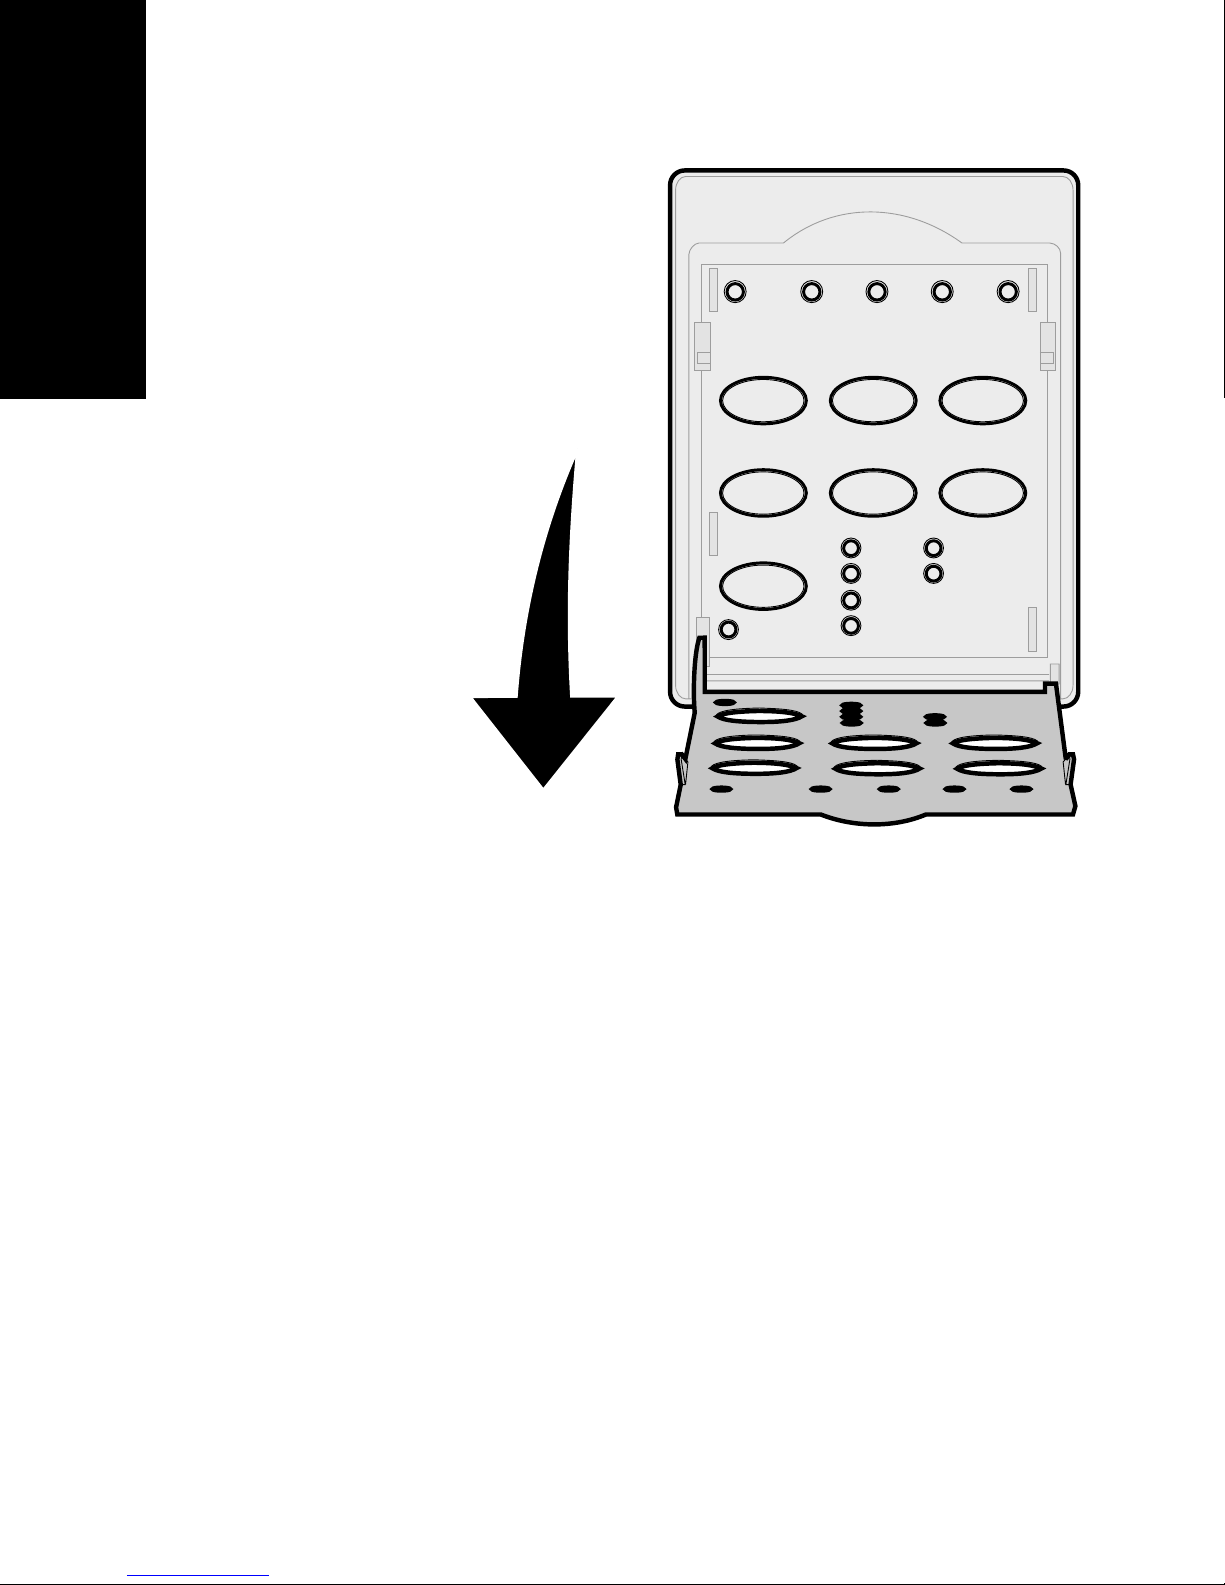
6
Open the operator panel cover to access layer 2.
Loading paper
↑
Micro
23
Macro
↓
Setup
10
12
15
17
20
PS
4
1
Power
Set TOF LineFeed Macro
Micro
Pitch
Lock
7
Press any paper movement button (
Micro
↑,
Micro
↓) to align with the horizontal
LineFeed
lines (located on the platen) with the Top-OfForm you want.
See the illustration, on ” on pag e83.
Note:
If you press and hold a paper movement
button, the paper advances in micro
movements and then goes into
continuous feed.
,
82
Page 87
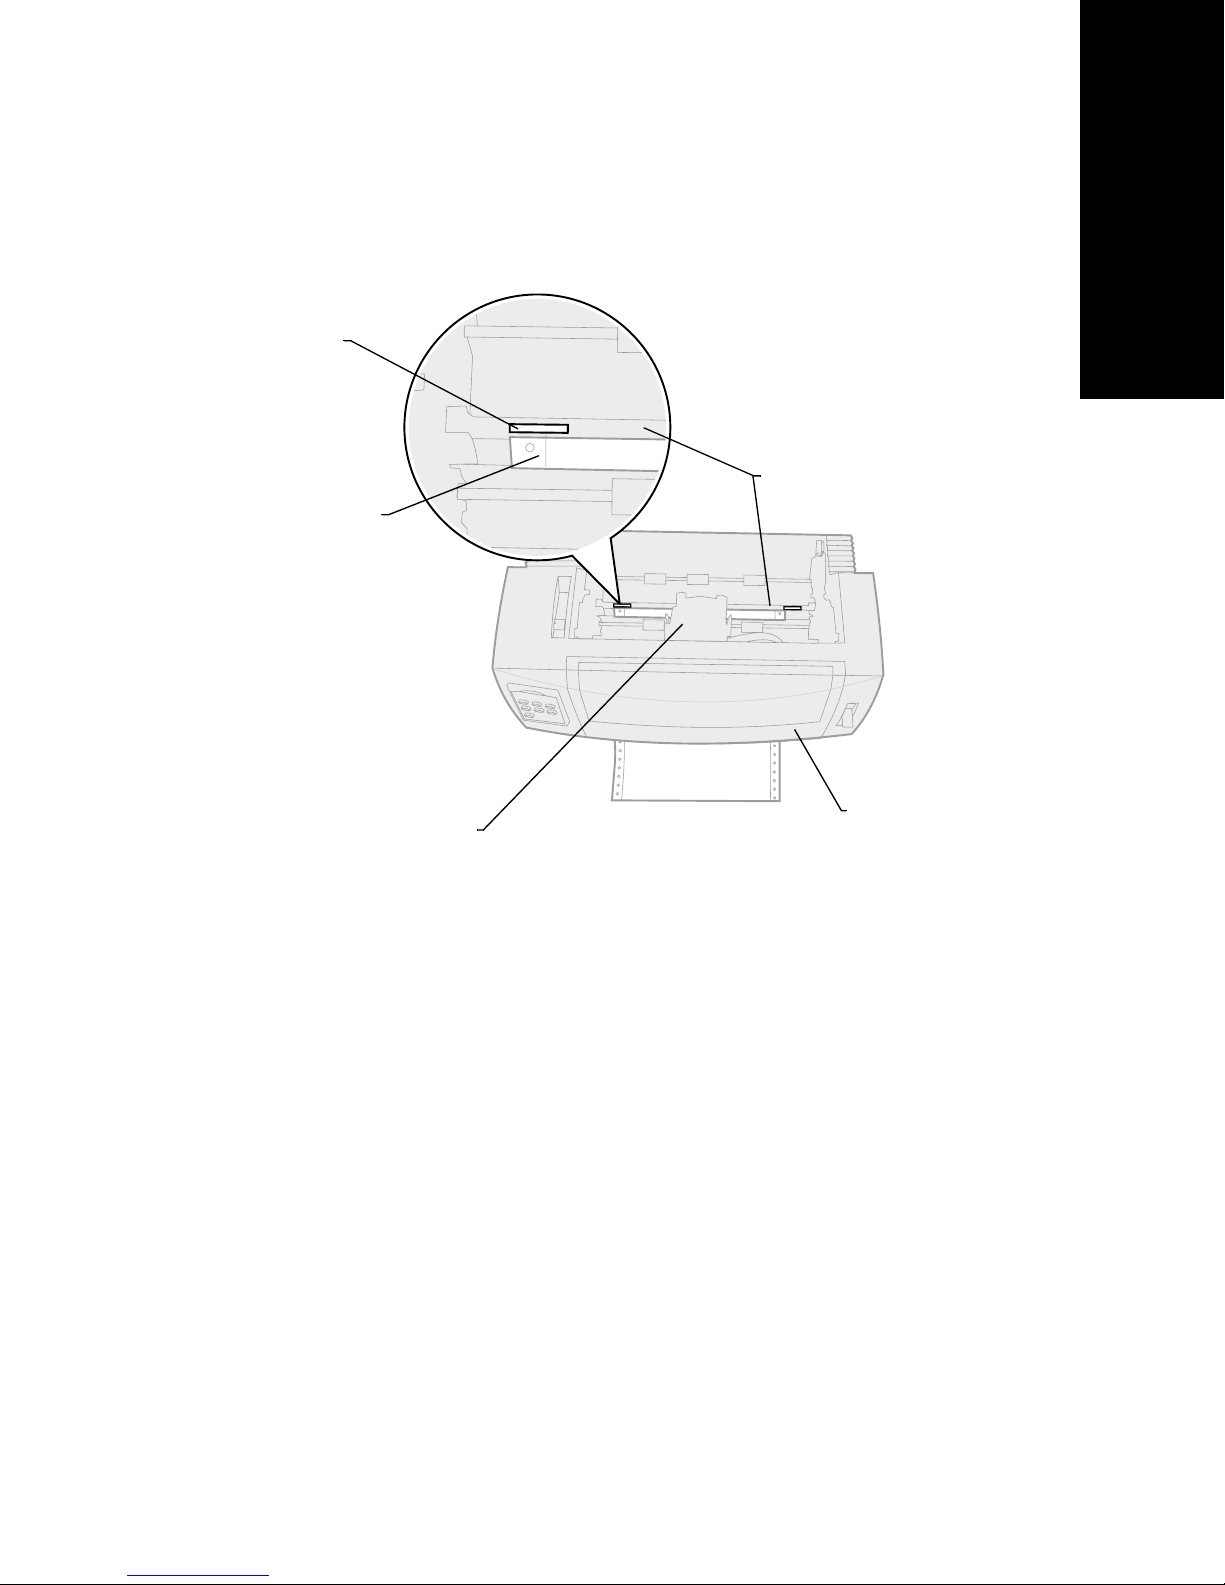
This illustration shows the position of the two
horizontal lines on either side of the metal platen bar.
Use these lines as your reference point when lining up
your Top-Of-Form. The bottom of a printed character
will be even with the horizontal lines.
Loading paper
Horizontal
line
Paper
Ribbon
cartridge
Align paper with
horizontal lines on
metal platen bar
Metal
platen
Front
cover
8
9
10
11
Press
Set TOF
to set and save your Top-Of-
Form.
Close the operator panel cover.
To verify the new Top-Of-Form, press
Load/Unload to
and press
Load/Unload
unload the continuous forms
again to reload the
forms.
The continuous forms load to the current
Top-Of-Form setting.
Press
Note:
Start/Stop
to set the printer online.
If Auto Tear Off is set to
Second
the paper advances to the Tear
On
or
One
Off position. A print job or pressing
Off
returns the paper to the current
Top-Of-Form.
Tea r
83
Page 88

Setting Top-Of-Form for continuous
form paper in pull mode
Loading paper
1
Turn the printer
The Paper Out light blinks if no paper is loaded.
2
Move the paper select lever down to the
continuous forms position.
3
Load continuous form paper on the pull tractor
feed pins.
For help loading paper, see “Front loading
continuous forms using the pull tractor” on
page 56.
4
Open the operator panel cover to access layer 2.
5
Press any paper movement button (
Micro
Top Of Form position.
Note:
↑, or
Micro
Use the second sheet of the continuous
forms to set Top-Of-Form.
On
.
LineFeed
↓) to move the paper to the
,
6
Press
7
Close the operator panel cover.
Note:
8
Press
Set TOF
Top-Of-Form is not saved if the printer is
turned
printer is in pull tractor mode.
Start/Stop
to set and save Top-Of-Form.
Off
or runs out of paper when the
to set the printer online.
84
Page 89

Setting Top-Of-Form for a cut form
or envelope
Top-Of-Form can range from minus 1 to plus 22 inches
from the top of cut sheet paper. To set and save
Top-Of-Form:
1
Clear the paper path.
The Paper Out light blinks if no paper is loaded.
Loading paper
If the Paper Out light is
forms and press
If a single form is loaded, press
clear paper path.
2
Move the paper select lever up to the cut
forms position.
3
Load a cut sheet of paper or envelope through
the manual feed door.
For help loading paper, see “Loading a cut form
or envelope manually” on pag e73.
•
If Auto Cut Sheet is set to
moves the paper or envelope to the current
Top-Of-Form
•
If Auto Cut Sheet is set to
FormFeed
Load/Unload
when the
Off
, tear off excess
.
FormFeed
On
, the printer
Off
, press
Paper Out
light goes
to
Off
4
Open the operator panel cover to access layer 2.
5
Press any paper movement button (
Micro
lines (located on the platen) with the Top-OfForm you want.
See the illustration, on ” on pag e83.
Note:
.
LineFeed
Micro
↑,
If you press and hold a paper movement
button, the paper advances in micro
movements and then goes into
continuous feed.
↓) to align with the horizontal
85
,
Page 90

6
Press
Top-Of-Form.
7
Close the operator panel cover.
Set TOF
to set and save your
Loading paper
8
Press
Start/Stop
to put the printer online.
Setting Top-Of-Form in a macro
Each macro has a separate Top-Of-Form setting. To set
Top-Of-Form in a macro, you must first select that
macro:
1
Open the operator panel cover to access layer 2.
2
Press
use to set a Top-Of-Form.
Now set the Top-Of-Form. The procedure for setting
Top-Of-Form depends on the paper and print mode you
are using. For help, see one of the following:
•
•
Macro
“Setting Top-Of-Form for continuous form
paper in push mode” on pag e81.
“Setting Top-Of-Form for continuous form
to select the macro you want to
paper in pull mode” on page 84.
•
“Setting Top-Of-Form for a cut form or
envelope” on pag e85.
86
Page 91

Using the Tear Off bar
Setting the Tear Off position
Loading paper
When Auto Tear Off is
moves the top perforation of a continuous form to the
Tear Off position when all of the following are true:
•
The printer has finished printing.
•
The paper has advanced to the Top-Of-Form
on the next page.
•
No data, printer control codes, or escape
codes have been sent to the printer after
advancing to the Top-Of-Form.
•
The print buffer has not received data for
one second.
If you have already set your Top-Of-Form and now want
to change the Tear Off bar position, follow these steps:
1
Press
2
Press and hold
Start/Stop
On
or set to
to take the printer offline.
Tea r O f f
One Second
until the printer beeps.
, it
3
Open the operator panel cover to access layer 2.
4
Press
the correct position on the Tear Off bar.
5
Close the operator panel cover.
The printer beeps twice.
The paper rolls backward, then goes to the new
Tear Off position.
6
The Ready light is
7
Press
The paper remains at the current Tear Off position until
you send another job to the printer. The paper moves
from the Tear Off position to the Top-Of-Form and
begins printing.
Micro
Start/Stop
↑ or
Micro
On
.
.
↓ to move the paper to
87
Page 92

Loading paper
88
Page 93

5
Using Setup mode
Your printer is preset at the factory for font, pitch, form
length, and other settings (also called
This section describes how to change these default
settings, how to set up macros, and how to set form
length.
default settings
).
Using Setup mode to change printer settings
This menu-driven mode lets you customize your printer
to fit your business needs. Once you enter Setup mode,
follow the printed menu page to select the area you
want to change.
Note:
Make sure continuous forms are loaded in
your printer while you are using Setup
mode. For help see
forms” on pag e46.
“Loading continuous
Using Setup mode
89
Page 94
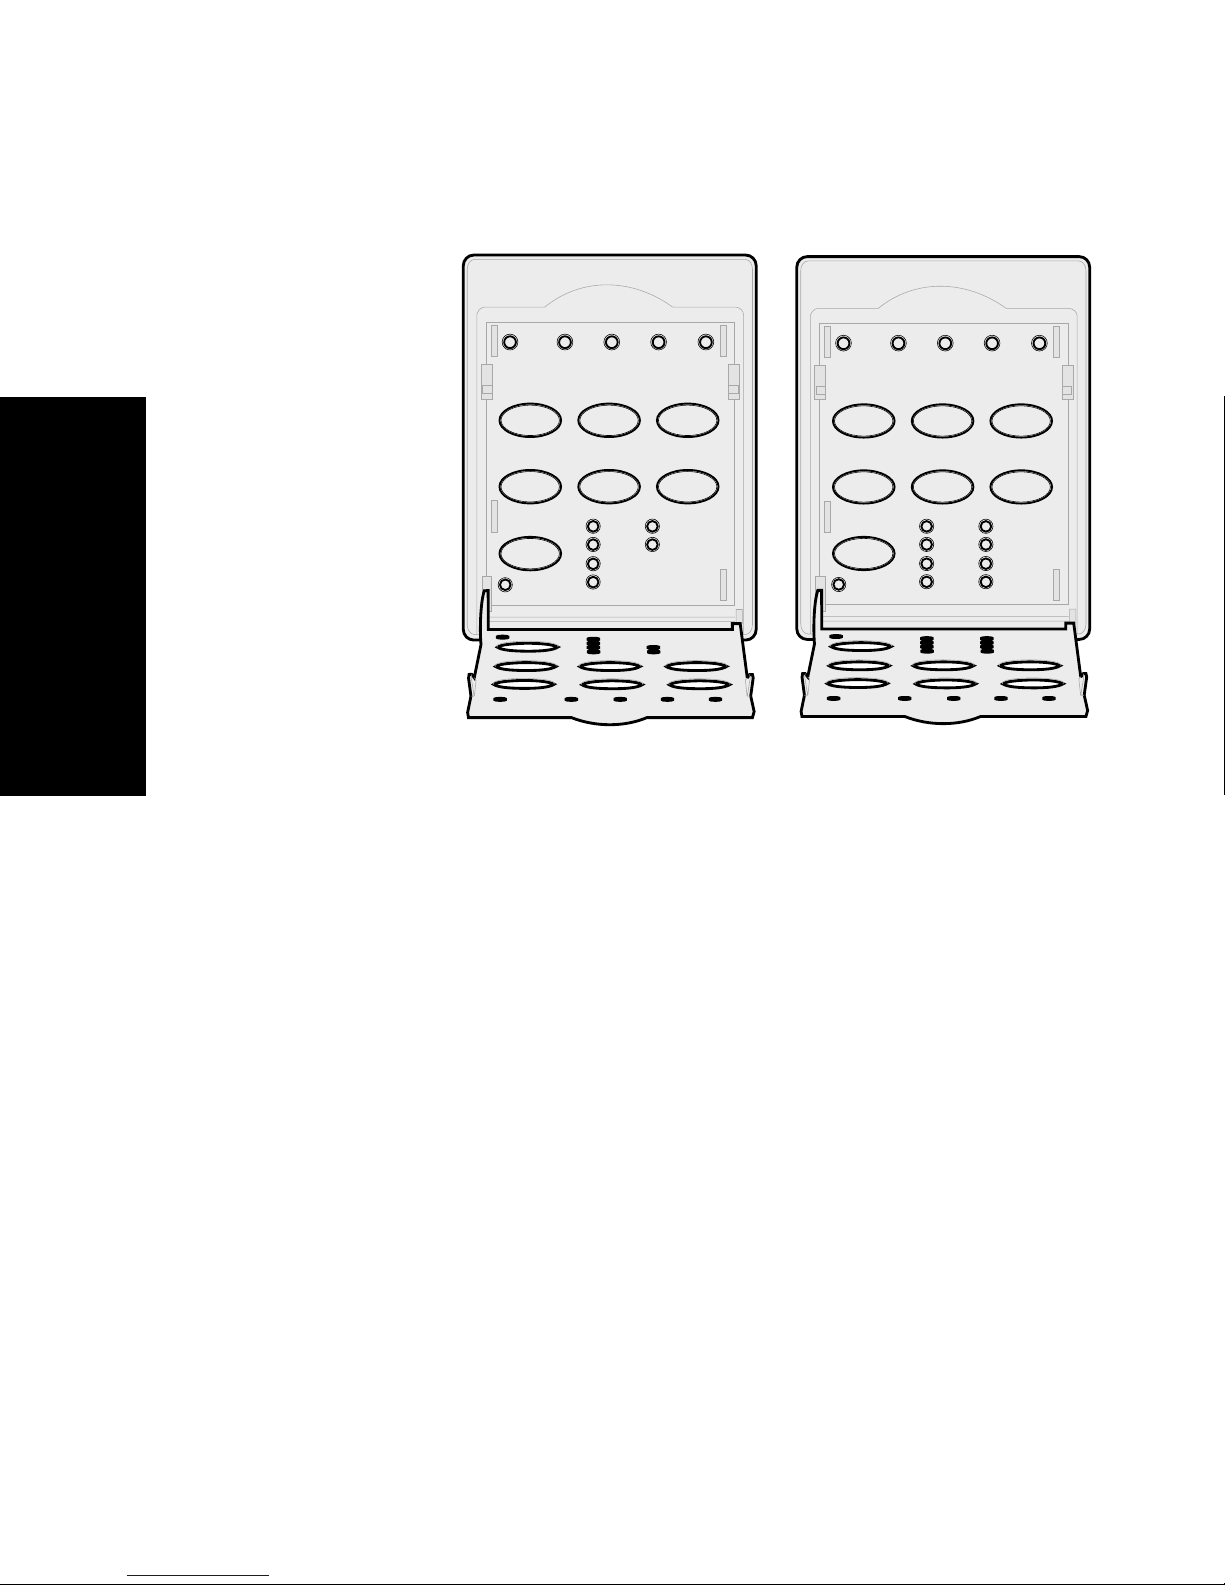
Entering Setup mode
1
Open the operator panel cover to access layer 2.
2480/2481 2490/2491
Using Setup mode
2
12 3
Power
Set TOF LineFeed Macro
↑
Micro
Pitch
Lock
Pressing
Micro
Setup
Macro
↓
10
12
15
17
4
Setup
20
PS
puts the printer in Setup mode
and prints the Main Menu.
1234
Power
Set TOF LineFeed Macro
↑
Micro
Pitch
Lock
Micro
10
12
15
17
Macro
↓
Setup
20
24
PS
90
Page 95

3
Press
LineFeed
to print a list of all the available
options you can change.
Printer Setup mode - Main Menu
--------------------------------------------------
To Select
--------------
Press
--------
Exit and Save Setup
Print All
Forms Macro Options
Data Options
Control Options
Emulation Options
Interface Options
4
Select any option from the Main Menu by
Set TOF
LineFeed
Macro
Micro ↑
Micro ↓
Setup
Pitch
pressing the corresponding button.
A new menu prints each time you press a
button, displaying new selections.
5
After you make all your selections the printer
prints a page with your changes reflected.
Using Setup mode
The following example illustrates how to change the
Menu Language setting.
91
Page 96

Example: Changing the menu
language setting
1
2
Using Setup mode
3
With the printer in Setup mode, press
Micro
to print the Control Options menu.
Press
Control Options
------------------------
Return to Main Menu
Uni-Dir Printing
Auto Ready Cut Sheet
Paper Out Alarm
Bi-Di Alignment
Demo Print
(More)
Pitch
to print more control options.
Current
------------
Off
On
Enabled
Enabled
Press
--------
Set TOF
LineFeed
Macro
Micro ↑
Micro ↓
Setup
Pitch
To change the Setup menu language, press
↓
Macro
Control Options
------------------------
Return to Main Menu
Return to previous page
Menu Language
TOF Read
Quiet
4
Press the button that corresponds to the
language you want, or press
.
Current
------------
English
Enabled
Setup
more Menu Language options.
Press
--------
Set TOF
LineFeed
Macro
Micro ↑
Micro ↓
to print
92
Page 97

5
For this example, press
Menu Language
-------------------------
Macro
to select French.
To Select
--------------
No Change
English
French
German
Italian
(More)
Return to Main Menu
Press
--------
Set TOF
LineFeed
Macro
Micro ↑
Micro ↓
Setup
Pitch
Printer menus now print in French.
Manu contrôle
------------------------
Retour menu principal
En cours
------------
Using Setup mode
Appuyez sur
-----------------
Déb page
Revenir à la page
précédente
Menu langue
Lecture haut de page
Silence
6
Press
Pitch
Set TOF
Francais
Activé
Désactivé
to return to the Main Menu or press
(No Change) to go back one menu and
Ligne
MACRO
Micro ↑
Micro ↓
change another setting.
7
If you return to the Main Menu, press
to exit Setup mode and save the new setting.
Set TOF
93
Page 98

Exiting Setup mode
1
Press
Main Menu or press
containing a
2
Press
New settings are saved only when the printer
exits Setup mode.
Note:
Set TOF
Set TOF
If the printer runs out of paper while
using Setup mode, load more paper into
the Tractor pins and press
continue.
until the printer returns to the
Pitch
Return to Main Menu
again to exit Setup mode.
from any menu
selection.
Setup
to
Using Setup mode
94
Page 99

Setup menu options
Use Setup mode to configure your printer according to
your business needs.
Note:
To print a list of all default settings, select
Print All
from the Main Menu.
This table describes the different options and controls
you can select for your printer.
Menu options
Menus What it controls …
Forms Macro options Lets you customize macros to
print a variety of forms.
See “Forms Macro menu options”
on page 96.
Data options Defines how information that is
sent to the printer is processed.
See “Data menu options” on
page 100.
Control options Defines how the printer performs
many of its basic tasks.
Using Setup mode
See “Control menu options” on
page 102.
Emulation options Determines how the printer
interacts with your software
application.
See “Emulation menu options”
on page 103.
Interface options Defines how information is
transferred from your computer
to the printer.
See “Emulation menu options”
on page 103.
The following tables outline and explain the many
functions and settings you can use with your printer.
95
Page 100

Forms Macro menu options
Macro options
Use these menu
options
Set Default Macro Select the macro you want to be the default when the
Character options Default font
When you want to customize…
printer is powered
use a macro as the default.
Select the font you want from the available fonts listed.
Font Lock
Enabling this setting lets you set Font Lock as the default
even after the printer is turned
Default Pitch
Select from the following pitches: 10, 12, 15, 17, 20, (24 for
2490/2491), and PS pitch.
On
or select disable if you do not want to
Off
and back On.
Using Setup mode
Not all pitches are available in all fonts.
Pitch Lock
Enabling this setting lets you set Pitch Lock as the default
even after the printer is turned
Code Page
You may select one of the following code pages: 437, 850,
858, 860, 861, 863, 865, 437G, 813, 851, 853T, 857, 869, 920,
1004, and 1053. Refer to the Technical Reference for more
information.
Character Set
You may select Character Set 1 or Character Set 2.
• Character Set 1 is the factory default for the U.S.
• Character Set 2 is the factory default for EMEA.
Off
and back On.
96
 Loading...