

Lexmark X75, 14J0000 - X 75 Color Inkjet, 14J0445 - PrintTrio X75 Inkjet Multifunction, X74-X75 All-In-One User Manual

User’s Guide
X74-X75 All-In-One

User’s Guide
Safety information
Use only the Lexmark
power supply provided with
this product.
Connect the power cord to
an electrical outlet that is
near the product and easily
accessible.
Refer service or repairs,
other than those described
in the manual, to a
professional service
person.

iii
Contents
Learning about your All-In-One ........................................1
Setting up your All-In-One .............................................................1
Understanding the parts of your All-In-One ..................................1
Using the Operator Panel .............................................................2
Understanding your software ...........................................3
Using Print Properties ...................................................................3
Using the Lexmark All-In-One Center ...........................................6
Using the Lexmark Solution Center .............................................. 9
Using your All-In-One ......................................................11
Printing ................. ............................................. ..........................11
Scanning .....................................................................................14
Copying ...................... ....................................... ..........................15
Faxing ......................................................................................... 17
Troubleshooting ...............................................................18
Troubleshooting checklist ...........................................................18
Setup troubleshooting ................................................................. 19
Printing troubleshooting .............................................................. 21
Scanning, copying, and faxing troubleshooting .......................... 23
Uninstalling and reinsta ll ing the softwar e .... ...... ....... ...... ....... ...... 25
Appendix ...........................................................................26
Electronic emission notices ......................................................... 26

iv
Index ..................................................................................28
Thank you for purchasing a Lexmark X74-X75 All-In-One!
Congratulations on your new purchase. The Lexmark X74-X75 All-In-One
combines the functionality of an inkjet printer, a scanner, a copier, and a
fax machine all into a single, multifunction device making it one of the most
exciting products on the market today.
This User’s Guide takes you, step by step, from setting up your All-In-One
to creating a variety of fun projects. Also included are sections describing
the All-In-One software and troubleshooting information. Let’s get started!
1
Learning about your All-In-One
Setting up your All-In-One
If you have not already done so, follow the steps on the setup sheet that
came with your All-In-One to complete the hardware and software
installation. If problems occur during the setup process, see Setup
Troubleshooting on page 19.
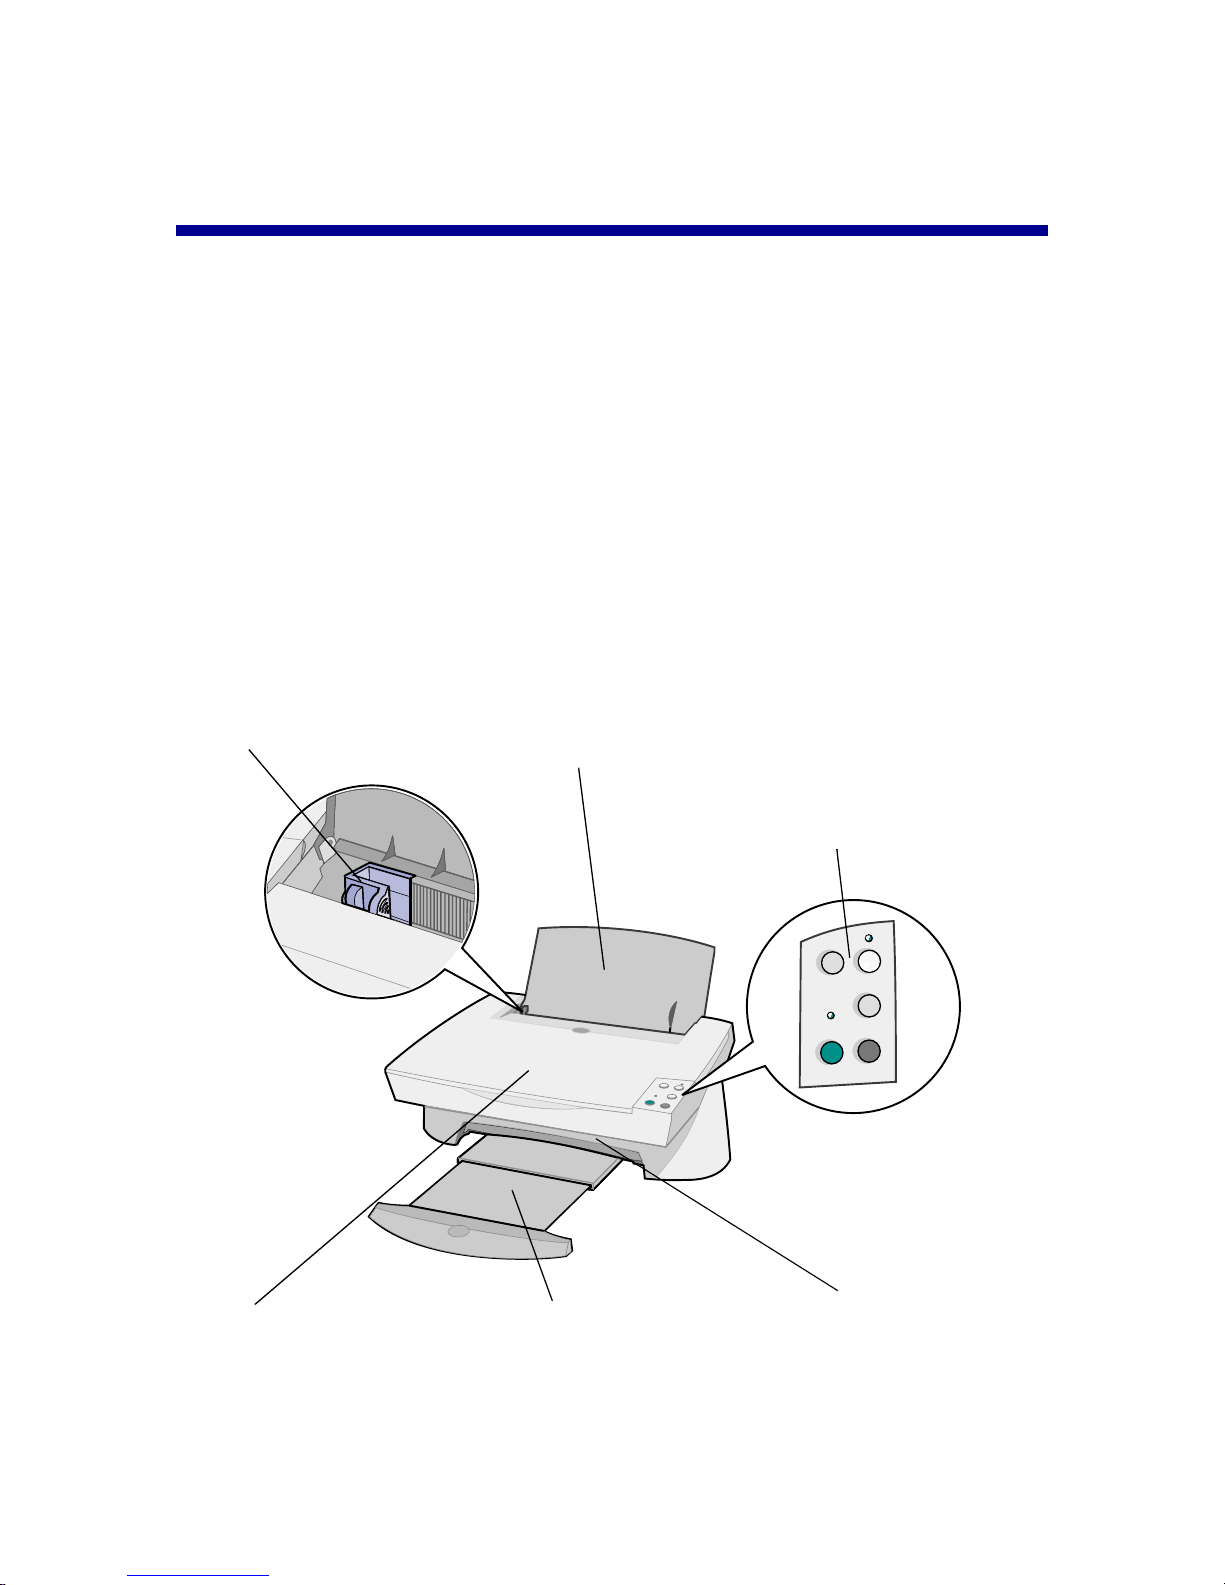
Understanding the parts of your All-In-One
Scanner unit
Lift to access the print
cartridges.
Top cover
Lift to place an item on
the scanner glass.
Paper exi t t ray
Extend to hold paper as
it exits the All-In-One.
Paper guide
Slide next to paper to
ensure proper feeding.
Paper support
Extend to load paper
into the All-In-One.
Operat or panel
Use the buttons to operate the
All-In-One (see page 2 for details
about each of the buttons).
2
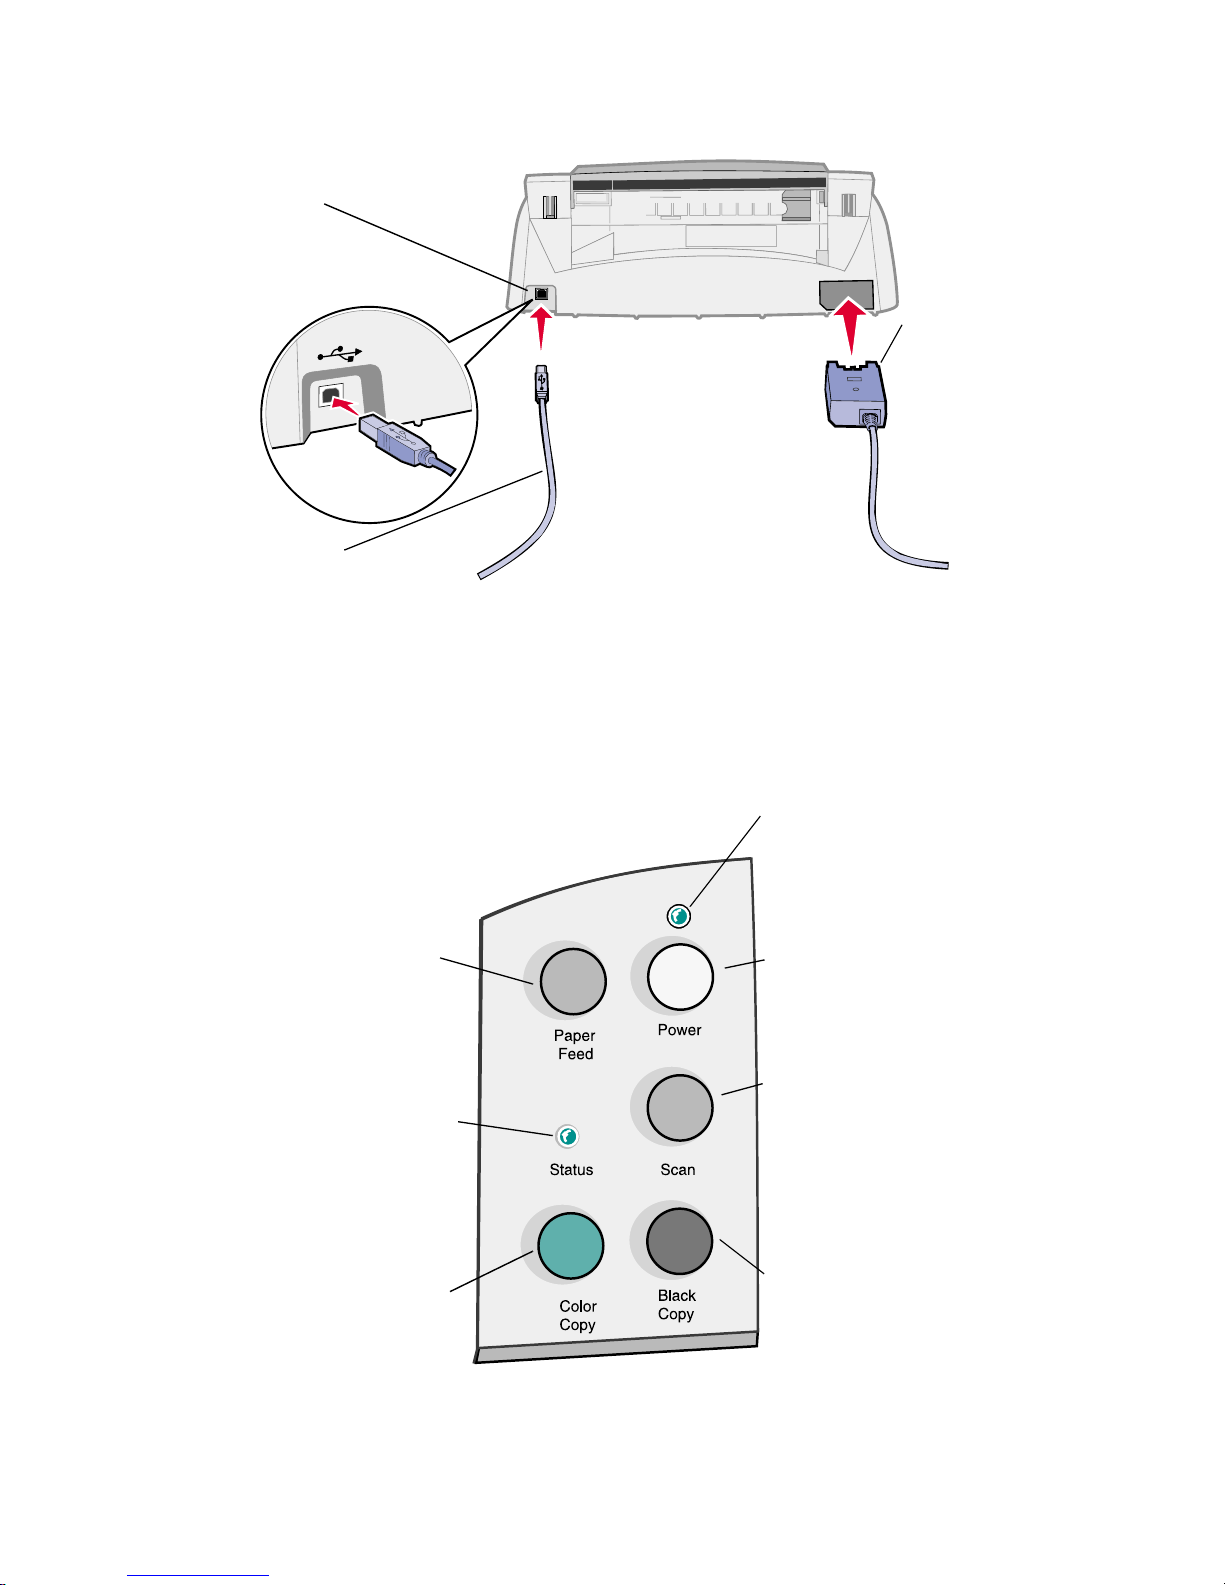
Using the Operator P anel
Your All-In-One is equipped with an operator panel that lets you scan and
copy with the press of a button.
USB cable connector
Power s upply
Silver, metal
contacts are on
the top of the
power supply.
USB cable
Power light
Indicates whether or not the
All-In-One is powered on.
Power button
Turns your All-In-One on
and off.
Scan button
Automatically starts the
scanning process and
opens the All-In-One
Center (see page 6).
Black Copy butt on
Press to make a black and
white copy (your computer
must be on for this to wo r k).
Paper Feed button
Feeds paper through the
All-In-One. Press when the
Status light is flashing.
Status light
When flashing, indicates the
All-In-One is out of paper or
experiencing another type of
problem.
Color Copy button
Press to make a color copy
(your computer must be on
for this to work).

3
Understanding your software
Your All-In-One software consists of three main components:
• Print Properties (printing)
• The Lexmark X74-X75 All-In-One Center (scanning, copying, and
faxing)
• The Lexmark X74-X75 Solution Center (troubleshooting,
maintenance, and cartridge ordering information)
While each component has a distinct function, they all work together to
optimize the performance of your All-In-One.
Using Print Properties
Print Properties is the software that controls your All-In-One printing
function. You can change the settings in Print Properties based on the type
of project you are creating. You can open Print Properties from almost any
program:
1 Open your program’s File menu.
2 Click Print.
3 In the Print dialog box, click the Properties, Preferences, Options,
or Setup button (depending on the program). The Print Properties
screen is displayed.
Note: Some applications may open Print Properties differently .
4
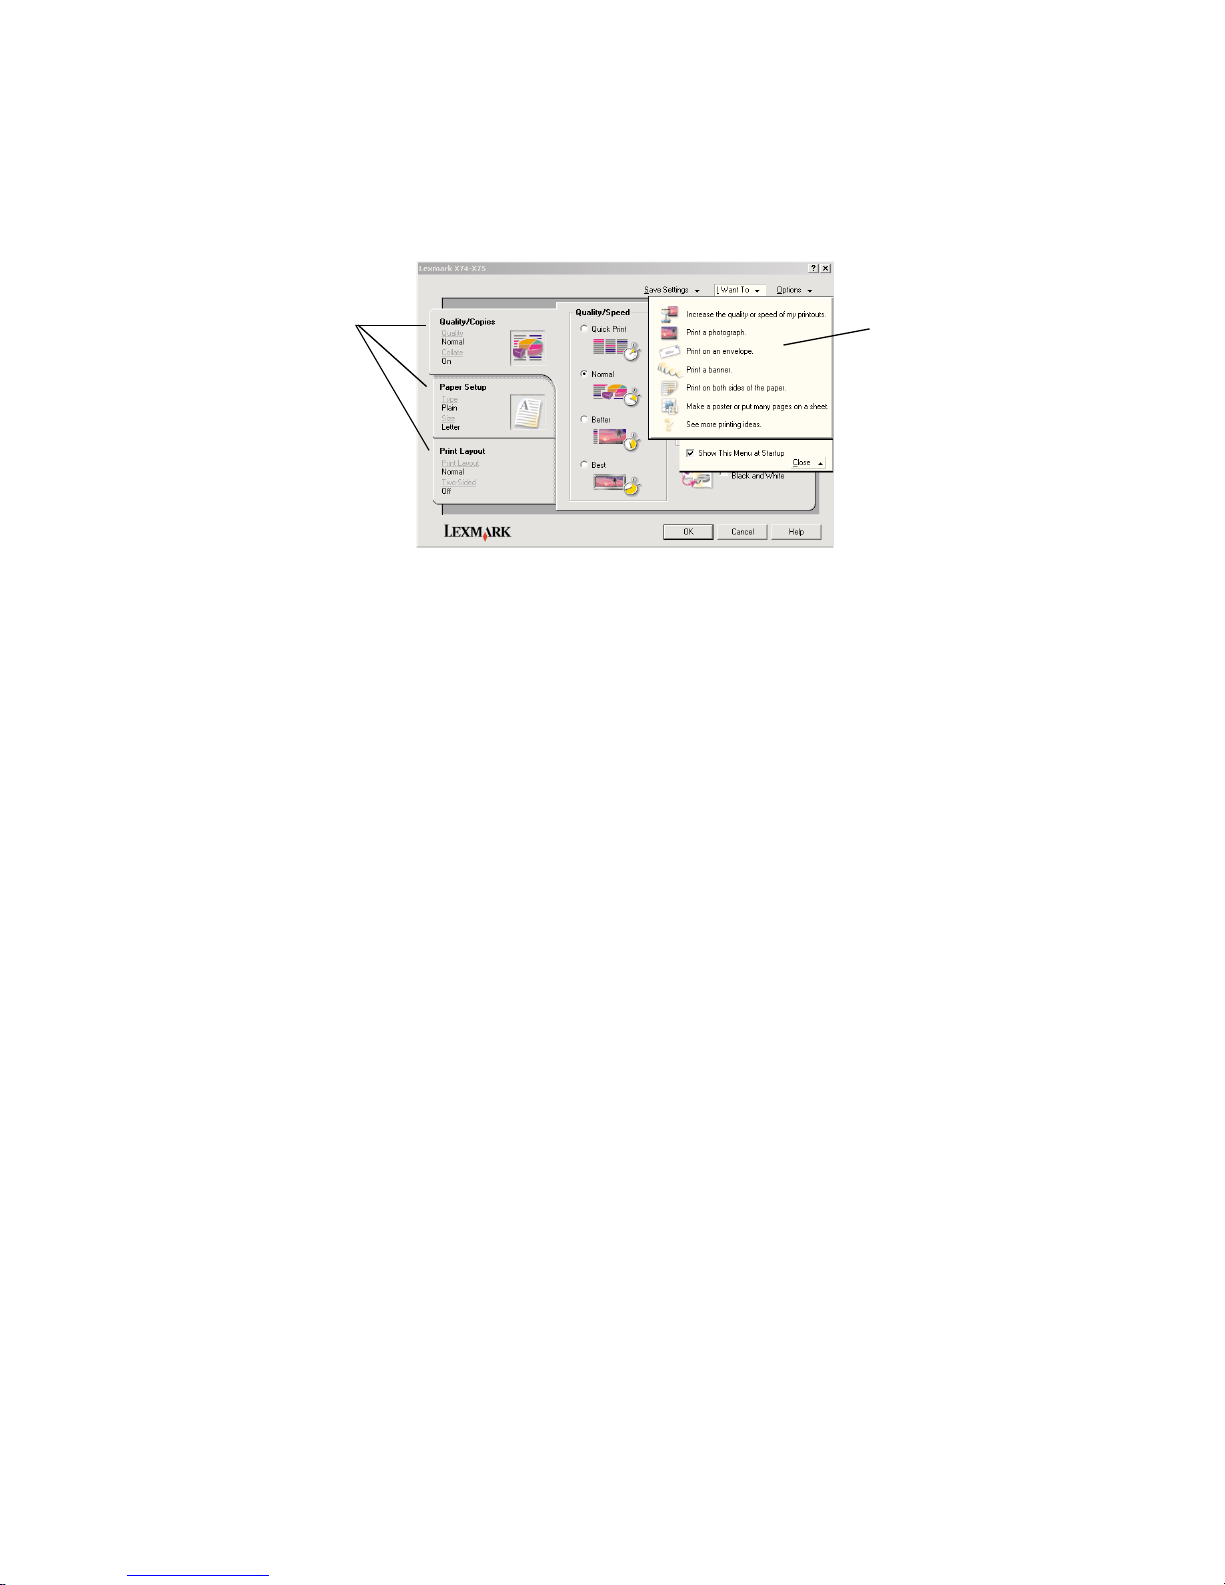
Once you open Print Properties, the Quality/Copies tab displays along with
the I want to... menu.
The I want to... menu
The I want to... menu automatically appears when you open Print
Properties. It contains a variety of task wizards to help you select the
correct printer settings for your printing project. Close the menu for a full
view of the Print Properties dialog box.
Print Pr ope rt ie s
Quality Copies tab and I want to... menu
I want to.. . m e nu
This easy-to-use
projects menu
helps you print
photos, banners,
envelopes,
posters, and
much more.
Print Pr operties
tabs
Use the Quality/
Copies, Paper
Setup, and Print
Layout tabs to
select your
printer settings.

5
Print Properties tabs
All of your printer settings are on the three main tabs of the Print Properties
software: the Quality/Copies tab, Paper Setup tab, and Print Layout tab.
Note: For additional information about these settings,
right-click a setting on the screen, and then select
What’s This?
Save Settings menu
From the Save Settings menu, you can name and save your current Print
Properties settings for future use. You can save up to five custom settings
configurations.
Options menu
The Options menu lets you make changes to the Quality Options, Style
Options, and Printing Status Options settings. For more information on
these settings, open the Quality Options, Style Options, or Printing Status
Options dialog box from the menu, and then click the Help button on the
From this tab: You can change these settings:
Quality/Copies Quality/Speed - Select a Quality/Speed setting based on
your needs. A better quality gives you a higher resolution,
but prints slower.
Multiple Copies - Customize how your All-In-One prints
multiple copies of a single print job.
Print Color Images in Black and White - Select this to
print color images on the screen in black and white.
Paper Setup Paper Typ e - Select the type of paper you are using.
Paper Size - Select the size of the paper you are using.
Orientation - Selec t ho w y ou w a nt the docum ent orient ed
on the printed page.
Print Layout Layou t - Selec t the type of la yout y ou want y our documen t
to have.
Duplexing - Select this when you want to print on both
sides of the paper.
6
dialog box. The Options menu also provides you with direct links to
different parts of the Lexmark Solution Center (see page 9) as well as
software version information.
Using the Lexmark All-In-One Center
The Lexmark All-In-One Center is the software that lets you scan, copy,
and fax documents. You can open the All-In-One Center from a variety of
locations:
• F rom t he Sta rt menu - clic k Start Programs Lexmark X74-X75
Lexmark All-In-One Center.
• From the Desktop icon - double-click the Lexmark X74-X75
All-In-One Center icon.
• From the operator panel - press Scan. For more information about
using the operator panel, see page 2.
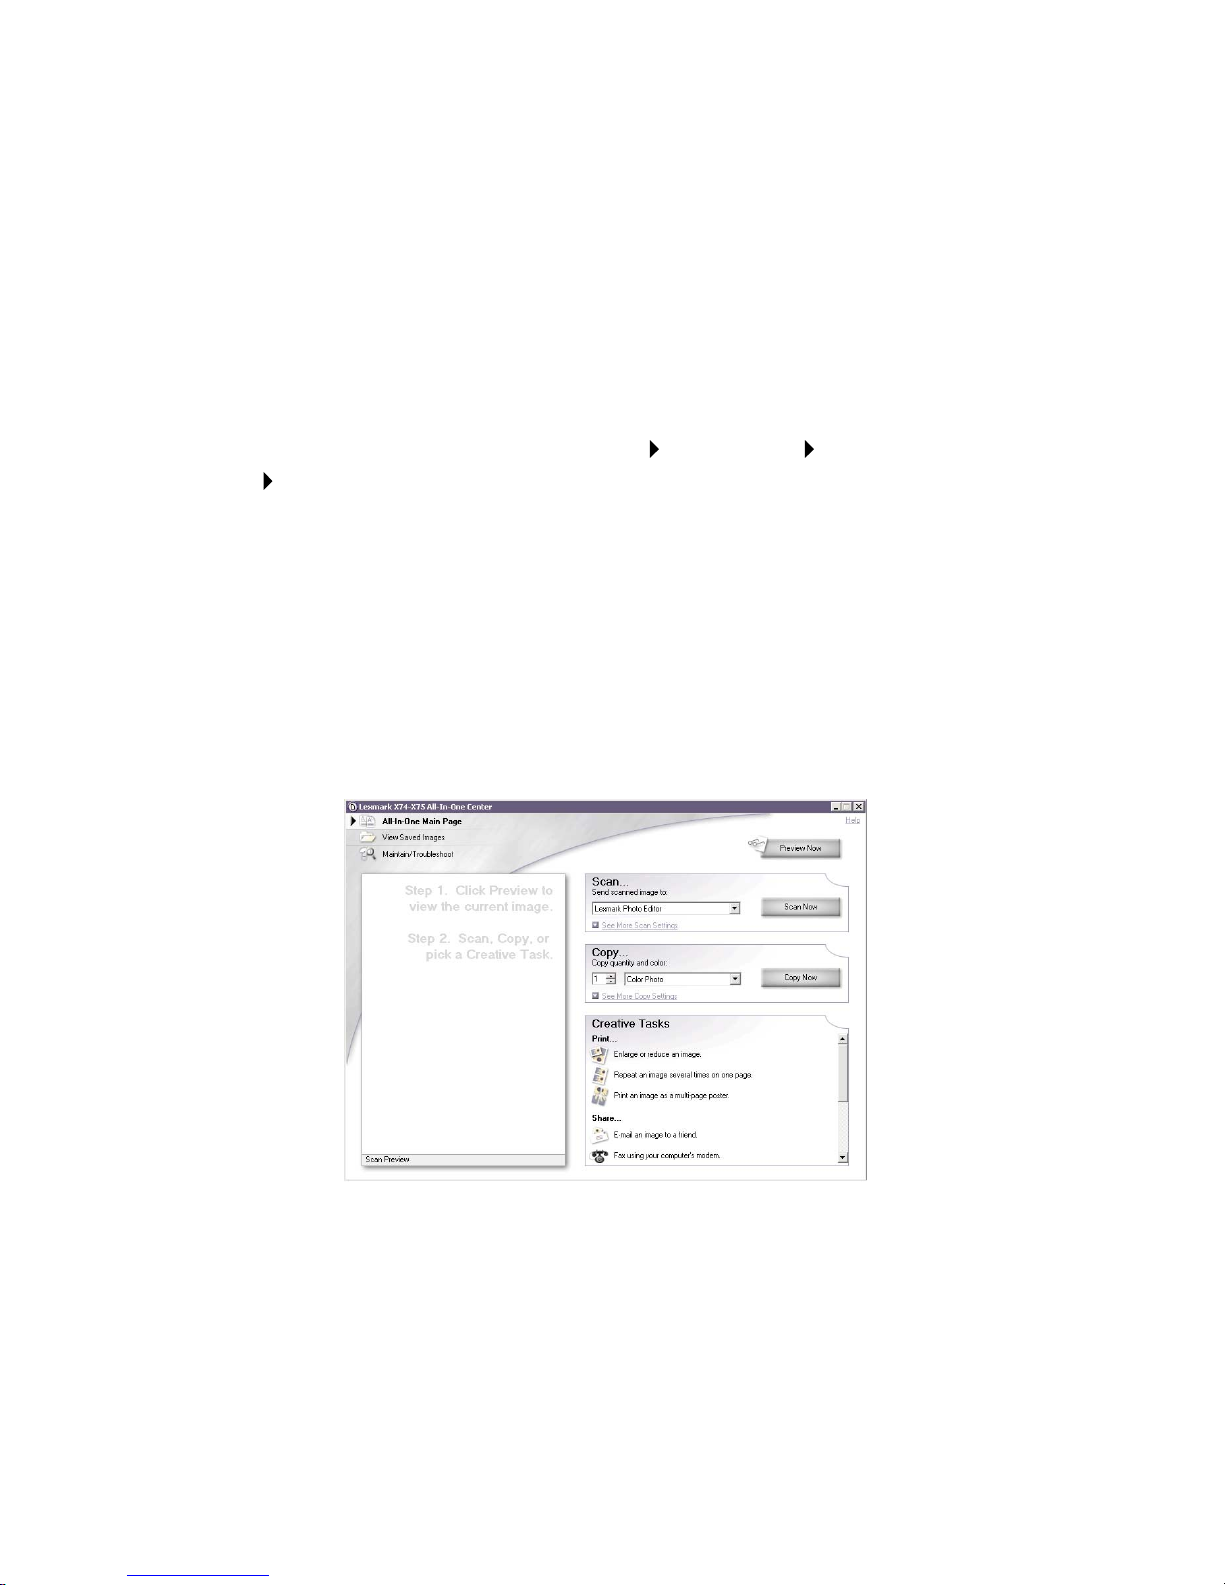
Once you open the All-In-One Center, the All-In-One Main Page is
displayed.
All-In-One Center
All-In-One Main Page

7
The All-In-One Main Page
The All-In-One Main Page consists of four main sections: Scan, Copy,
Creative Tasks, and Preview area.
Note: For more information about this page, click the Help
button located in the top, right corner of the screen.
From this section: You can do the following:
Scan... • Choose a prog ra m to sen d your scanned image to.
• Choose what type of image is bei ng sc ann ed .
• Choose how the scan will be used.
Note: Click See More Scan Settings to view all
settings.
Copy... • Choose the quantity and color of your copies.
• Select a quality se tting for your copies.
• Adjust the size of the scanned area.
• Lighten or darken your copies.
• Enlarge or reduce your copies.
Note: Click See More Copy Settings to view all
settings.
Creative Tasks... Choose from a variety of exciting, creative ideas.
• Enlarge or reduce an image.
• Print an image as a poster.
• E-mail an image to a friend.
• Modify an image with a photo edito r.
• Edit text found in a scanned document using
Optical Character Recognition (OC R).
• And much more!
Preview area Scan preview - Use your mouse to select a region of
the preview image to be scanned.
Print/Copy preview - View an image of what will be
printed or co pied.
 Loading...