

Page 1

Optra Color 1200
User’s Guide
Page 2

First Edition (March 1998)
The following paragraph does not apply to any country where such provisions are inconsistent with local law: LEXMARK INTERNATIONAL, INC.
PROVIDES THIS PUBLICATION “AS IS” WITHOUT WARRANTY OF ANY KIND, EITHER EXPRESS OR IMPLIED, INCLUDING, BUT NOT
LIMITED TO, THE IMPLIED WARRANTIES OF MERCHANTABILITY OR FITNESS FOR A PARTICULAR PURPOSE. Some states do not allow
disclaimer of express or implied warranties in certain transactions, therefore, this statement may not apply to you.
This publication could include technical inaccuracies or typographical errors. Changes are periodically made to the information herein; these changes
will be incorporated in later editions. Improvements or changes in the products or the programs described may be made at any time.
A form for reader’s comments is provided at the back of this publication. If the form has been removed, comments may be addressed to Lexmark
International, Inc., Department F95/035-3, 740 New Circle Road N.W., Lexington, Kentucky 40550, U.S.A. In the United Kingdom and Eire, send to
Lexmark International Ltd., Marketing and Services Department, Westhorpe House, Westhorpe, Marlow Bucks SL7 3RQ. Lexmark may use or distribute
any of the information you supply in any way it believes appropriate without incurring any obligation to you. You can purchase additional copies of
publications related to this product by calling 1-800-553-9727. In the United Kingdom and Eire, call 0628-481500. In other countries, contact your point of
purchase.
© Copyright Lexmark International, Inc. 1998.
All rights reserved.
UNITED STATES GOVERNMENT RESTRICTED RIGHTS
This software and documentation are provided with RESTRICTED RIGHTS. Use, duplication or disclosure by the Government is subject to restrictions
as set forth in subparagraph (c)(1)(ii) of the Rights in Technical Data and Computer Software clause at DFARS 252.227-7013 and in applicable FAR
provisions: Lexmark International, Inc., Lexington, KY 40550.
Page 3

Table of
contents
Preface . . . . . . . . . . . . . . . . . . . . . . . . . . . . . . . . . . . . . ix
About the manuals . . . . . . . . . . . . . . . . . . . . . . . . . . . . . . . . . . . . . . . . . . . . . . ix
Conventions . . . . . . . . . . . . . . . . . . . . . . . . . . . . . . . . . . . . . . . . . . . . . . . . . ix
Other sources of information . . . . . . . . . . . . . . . . . . . . . . . . . . . . . . . . . . . . . . x
Online documents . . . . . . . . . . . . . . . . . . . . . . . . . . . . . . . . . . . . . . . . . . . . . x
Technical Reference . . . . . . . . . . . . . . . . . . . . . . . . . . . . . . . . . . . . . . . . . . xi
Lexmark web site . . . . . . . . . . . . . . . . . . . . . . . . . . . . . . . . . . . . . . . . . . . . xi
Automated fax system . . . . . . . . . . . . . . . . . . . . . . . . . . . . . . . . . . . . . . . . xi
Trademarks . . . . . . . . . . . . . . . . . . . . . . . . . . . . . . . . xiii
1 Introducing your printer . . . . . . . . . . . . . . . . . . . . 1
Print speed . . . . . . . . . . . . . . . . . . . . . . . . . . . . . . . . . . . . . . . . . . . . . . . . . . . . . . 2
Memory . . . . . . . . . . . . . . . . . . . . . . . . . . . . . . . . . . . . . . . . . . . . . . . . . . . . . . . . 2
Print quality . . . . . . . . . . . . . . . . . . . . . . . . . . . . . . . . . . . . . . . . . . . . . . . . . . . . . 2
MarkVision . . . . . . . . . . . . . . . . . . . . . . . . . . . . . . . . . . . . . . . . . . . . . . . . . . . . . 3
Paper handling . . . . . . . . . . . . . . . . . . . . . . . . . . . . . . . . . . . . . . . . . . . . . . . . . . 3
2 Changing printer settings . . . . . . . . . . . . . . . . . . . 5
Using the operator panel . . . . . . . . . . . . . . . . . . . . . . . . . . . . . . . . . . . . . . . . . . 6
MarkVision’s remote operator panel . . . . . . . . . . . . . . . . . . . . . . . . . . . . . 7
Table of contents
iii
Page 4

Menus . . . . . . . . . . . . . . . . . . . . . . . . . . . . . . . . . . . . . . . . . . . . . . . . . . . . . . . . . . 8
Printing current menu settings . . . . . . . . . . . . . . . . . . . . . . . . . . . . . . . . . . 8
Changing menu settings . . . . . . . . . . . . . . . . . . . . . . . . . . . . . . . . . . . . . . . 9
Locking the menus . . . . . . . . . . . . . . . . . . . . . . . . . . . . . . . . . . . . . . . . . . . 10
Menu overview . . . . . . . . . . . . . . . . . . . . . . . . . . . . . . . . . . . . . . . . . . . . . . 12
Supplies Menu . . . . . . . . . . . . . . . . . . . . . . . . . . . . . . . . . . . . . . . . . . . . . . . 13
Maintenance Menu . . . . . . . . . . . . . . . . . . . . . . . . . . . . . . . . . . . . . . . . . . . 14
Color Menu . . . . . . . . . . . . . . . . . . . . . . . . . . . . . . . . . . . . . . . . . . . . . . . . . 15
Paper Menu . . . . . . . . . . . . . . . . . . . . . . . . . . . . . . . . . . . . . . . . . . . . . . . . . 16
Finishing Menu . . . . . . . . . . . . . . . . . . . . . . . . . . . . . . . . . . . . . . . . . . . . . . 22
Tests Menu . . . . . . . . . . . . . . . . . . . . . . . . . . . . . . . . . . . . . . . . . . . . . . . . . . 26
Job Menu . . . . . . . . . . . . . . . . . . . . . . . . . . . . . . . . . . . . . . . . . . . . . . . . . . . 28
Setup Menu . . . . . . . . . . . . . . . . . . . . . . . . . . . . . . . . . . . . . . . . . . . . . . . . . 29
PCL Emul Menu . . . . . . . . . . . . . . . . . . . . . . . . . . . . . . . . . . . . . . . . . . . . . 35
PostScript Menu . . . . . . . . . . . . . . . . . . . . . . . . . . . . . . . . . . . . . . . . . . . . . 39
Parallel Menu . . . . . . . . . . . . . . . . . . . . . . . . . . . . . . . . . . . . . . . . . . . . . . . . 40
Serial Menu . . . . . . . . . . . . . . . . . . . . . . . . . . . . . . . . . . . . . . . . . . . . . . . . . 43
Network Menu . . . . . . . . . . . . . . . . . . . . . . . . . . . . . . . . . . . . . . . . . . . . . . 47
Infrared Menu . . . . . . . . . . . . . . . . . . . . . . . . . . . . . . . . . . . . . . . . . . . . . . . 49
LocalTalk Menu . . . . . . . . . . . . . . . . . . . . . . . . . . . . . . . . . . . . . . . . . . . . . . 52
Fax Menu . . . . . . . . . . . . . . . . . . . . . . . . . . . . . . . . . . . . . . . . . . . . . . . . . . . 55
iv
Using color . . . . . . . . . . . . . . . . . . . . . . . . . . . . . . . 57
3
Communicating in color . . . . . . . . . . . . . . . . . . . . . . . . . . . . . . . . . . . . . . . . . 57
Guidelines . . . . . . . . . . . . . . . . . . . . . . . . . . . . . . . . . . . . . . . . . . . . . . . . . . 58
Defining color . . . . . . . . . . . . . . . . . . . . . . . . . . . . . . . . . . . . . . . . . . . . . . . . . . 58
Additive colors . . . . . . . . . . . . . . . . . . . . . . . . . . . . . . . . . . . . . . . . . . . . . . 59
Subtractive colors . . . . . . . . . . . . . . . . . . . . . . . . . . . . . . . . . . . . . . . . . . . . 59
Color tools . . . . . . . . . . . . . . . . . . . . . . . . . . . . . . . . . . . . . . . . . . . . . . . . . . . . . 60
In your printer . . . . . . . . . . . . . . . . . . . . . . . . . . . . . . . . . . . . . . . . . . . . . . . 60
In your software . . . . . . . . . . . . . . . . . . . . . . . . . . . . . . . . . . . . . . . . . . . . . 60
Adjusting color . . . . . . . . . . . . . . . . . . . . . . . . . . . . . . . . . . . . . . . . . . . . . . . . . 61
Printing color and mono jobs . . . . . . . . . . . . . . . . . . . . . . . . . . . . . . . . . . . . . 63
Table of contents
Page 5

4 Managing memory . . . . . . . . . . . . . . . . . . . . . . . . 65
Printer memory . . . . . . . . . . . . . . . . . . . . . . . . . . . . . . . . . . . . . . . . . . . . . . . . . 65
EDO memory . . . . . . . . . . . . . . . . . . . . . . . . . . . . . . . . . . . . . . . . . . . . . . . . 65
Adding memory . . . . . . . . . . . . . . . . . . . . . . . . . . . . . . . . . . . . . . . . . . . . . 66
Solving memory problems . . . . . . . . . . . . . . . . . . . . . . . . . . . . . . . . . . . . 66
Allocating memory . . . . . . . . . . . . . . . . . . . . . . . . . . . . . . . . . . . . . . . . . . . 67
Flash memory . . . . . . . . . . . . . . . . . . . . . . . . . . . . . . . . . . . . . . . . . . . . . . . . . . 68
Hard disk . . . . . . . . . . . . . . . . . . . . . . . . . . . . . . . . . . . . . . . . . . . . . . . . . . . . . . 68
Job buffering . . . . . . . . . . . . . . . . . . . . . . . . . . . . . . . . . . . . . . . . . . . . . . . . 68
Collating jobs . . . . . . . . . . . . . . . . . . . . . . . . . . . . . . . . . . . . . . . . . . . . . . . . 68
Storing job statistics . . . . . . . . . . . . . . . . . . . . . . . . . . . . . . . . . . . . . . . . . . 69
Managing resources downloaded to flash or disk . . . . . . . . . . . . . . . . . . . . 69
5 Paper handling . . . . . . . . . . . . . . . . . . . . . . . . . . . 71
Paper sources and output bins . . . . . . . . . . . . . . . . . . . . . . . . . . . . . . . . . . . . 71
Paper sizes . . . . . . . . . . . . . . . . . . . . . . . . . . . . . . . . . . . . . . . . . . . . . . . . . . . . . 72
Media guidelines . . . . . . . . . . . . . . . . . . . . . . . . . . . . . . . . . . . . . . . . . . . . . . . . 74
Paper . . . . . . . . . . . . . . . . . . . . . . . . . . . . . . . . . . . . . . . . . . . . . . . . . . . . . . . 74
Letterhead . . . . . . . . . . . . . . . . . . . . . . . . . . . . . . . . . . . . . . . . . . . . . . . . . . 75
Transparencies . . . . . . . . . . . . . . . . . . . . . . . . . . . . . . . . . . . . . . . . . . . . . . . 76
Envelopes . . . . . . . . . . . . . . . . . . . . . . . . . . . . . . . . . . . . . . . . . . . . . . . . . . . 78
Labels . . . . . . . . . . . . . . . . . . . . . . . . . . . . . . . . . . . . . . . . . . . . . . . . . . . . . . 79
Card stock . . . . . . . . . . . . . . . . . . . . . . . . . . . . . . . . . . . . . . . . . . . . . . . . . . 79
Storing media . . . . . . . . . . . . . . . . . . . . . . . . . . . . . . . . . . . . . . . . . . . . . . . . . . . 80
Avoiding paper jams . . . . . . . . . . . . . . . . . . . . . . . . . . . . . . . . . . . . . . . . . . . . 80
Loading paper in the trays . . . . . . . . . . . . . . . . . . . . . . . . . . . . . . . . . . . . . . . . 81
Tray linking . . . . . . . . . . . . . . . . . . . . . . . . . . . . . . . . . . . . . . . . . . . . . . . . . . . . 82
Using the multipurpose feeder . . . . . . . . . . . . . . . . . . . . . . . . . . . . . . . . . . . . 83
Printing from the multipurpose feeder . . . . . . . . . . . . . . . . . . . . . . . . . . 83
Feeding media manually . . . . . . . . . . . . . . . . . . . . . . . . . . . . . . . . . . . . . . 85
Table of contents
v
Page 6

6 Replacing supplies . . . . . . . . . . . . . . . . . . . . . . . . 89
Ordering supplies . . . . . . . . . . . . . . . . . . . . . . . . . . . . . . . . . . . . . . . . . . . . . . . 89
Storing supplies . . . . . . . . . . . . . . . . . . . . . . . . . . . . . . . . . . . . . . . . . . . . . . . . . 91
When do I replace them? . . . . . . . . . . . . . . . . . . . . . . . . . . . . . . . . . . . . . . . . . 92
Toner cartridges . . . . . . . . . . . . . . . . . . . . . . . . . . . . . . . . . . . . . . . . . . . . . 93
Photoconductors . . . . . . . . . . . . . . . . . . . . . . . . . . . . . . . . . . . . . . . . . . . . . 94
Fuser coating roll . . . . . . . . . . . . . . . . . . . . . . . . . . . . . . . . . . . . . . . . . . . . . 95
Recycling used supplies . . . . . . . . . . . . . . . . . . . . . . . . . . . . . . . . . . . . . . . . . . 96
Conserving supplies . . . . . . . . . . . . . . . . . . . . . . . . . . . . . . . . . . . . . . . . . . . . . 96
Toner Saver setting . . . . . . . . . . . . . . . . . . . . . . . . . . . . . . . . . . . . . . . . . . . 96
Black & White printing . . . . . . . . . . . . . . . . . . . . . . . . . . . . . . . . . . . . . . . . 97
Printer Usage setting . . . . . . . . . . . . . . . . . . . . . . . . . . . . . . . . . . . . . . . . . 97
Replacing service items . . . . . . . . . . . . . . . . . . . . . . . . . . . . . . . . . . . . . . . . . . 98
7 Solving printer problems . . . . . . . . . . . . . . . . . . . 99
Understanding printer messages . . . . . . . . . . . . . . . . . . . . . . . . . . . . . . . . . 100
Identifying other problems . . . . . . . . . . . . . . . . . . . . . . . . . . . . . . . . . . . . . . 109
Clearing paper jams . . . . . . . . . . . . . . . . . . . . . . . . . . . . . . . . . . . . . . . . . . . . 118
Cleaning the LEDs . . . . . . . . . . . . . . . . . . . . . . . . . . . . . . . . . . . . . . . . . . . . . 126
Cleaning the fuser coating roll . . . . . . . . . . . . . . . . . . . . . . . . . . . . . . . . . . . 127
Calling for service . . . . . . . . . . . . . . . . . . . . . . . . . . . . . . . . . . . . . . . . . . . . . . 129
vi
Appendix A: MarkVision . . . . . . . . . . . . . . . . . . . . . 131
Operating systems supported . . . . . . . . . . . . . . . . . . . . . . . . . . . . . . . . . . . . 131
Introducing MarkVision . . . . . . . . . . . . . . . . . . . . . . . . . . . . . . . . . . . . . . . . 131
Features . . . . . . . . . . . . . . . . . . . . . . . . . . . . . . . . . . . . . . . . . . . . . . . . . . . 133
MarkVision online Help . . . . . . . . . . . . . . . . . . . . . . . . . . . . . . . . . . . . . . 139
Installing MarkVision on a network . . . . . . . . . . . . . . . . . . . . . . . . . . . . . . 140
Getting updated utilities and drivers . . . . . . . . . . . . . . . . . . . . . . . . . . . . . . 141
Online services . . . . . . . . . . . . . . . . . . . . . . . . . . . . . . . . . . . . . . . . . . . . . 141
Automated fax system . . . . . . . . . . . . . . . . . . . . . . . . . . . . . . . . . . . . . . . 141
Appendix B: Printer specifications . . . . . . . . . . . . . 143
Table of contents
Page 7

Appendix C: Fonts . . . . . . . . . . . . . . . . . . . . . . . . . . 147
Printing font samples . . . . . . . . . . . . . . . . . . . . . . . . . . . . . . . . . . . . . . . . . . . 147
Resident fonts . . . . . . . . . . . . . . . . . . . . . . . . . . . . . . . . . . . . . . . . . . . . . . . . . 148
Scalable fonts . . . . . . . . . . . . . . . . . . . . . . . . . . . . . . . . . . . . . . . . . . . . . . . 148
Bitmapped fonts . . . . . . . . . . . . . . . . . . . . . . . . . . . . . . . . . . . . . . . . . . . . 149
Symbol sets . . . . . . . . . . . . . . . . . . . . . . . . . . . . . . . . . . . . . . . . . . . . . . . . . . . 150
Symbol sets for PCL emulation . . . . . . . . . . . . . . . . . . . . . . . . . . . . . . . . 150
Downloadable fonts . . . . . . . . . . . . . . . . . . . . . . . . . . . . . . . . . . . . . . . . . . . . 152
Appendix D: Safety information . . . . . . . . . . . . . . . 153
Appendix E: Notices . . . . . . . . . . . . . . . . . . . . . . . . . 163
Appendix F: Warranty . . . . . . . . . . . . . . . . . . . . . . . 167
Glossary . . . . . . . . . . . . . . . . . . . . . . . . . . . . . . . . . . . 169
Index . . . . . . . . . . . . . . . . . . . . . . . . . . . . . . . . . . . . . . 183
Table of contents
vii
Page 8

viii
Table of contents
Page 9

Preface
About the manuals
Conventions
This User’s Guide provides detailed information about
color functions, media specifications, printer supplies,
memory requirements, changing printer settings, using
the printer operator panel, and solving printer problems.
The book is intended primarily for system administrators
who are making decisions about the appropriate printer
configuration and printer default settings, and who may
be responsible for troubleshooting printer problems and
ordering printer supplies.
The Quick Reference offers an overview of the printer menu
structure and some tips for clearing paper jams and loading paper. You may want to keep the Quick Reference near
the printer so all printer users have convenient access to it.
Refer to the Setup Guide for detailed instructions on setting
up the printer hardware, installing options, loading paper
in the standard or optional trays, loading media in the
multipurpose feeder, and launching the CD to install
printer drivers and utilities.
It may help you to recognize the conventions we have
used in this book:
• Operator panel buttons are printed in a boldface
type:
Press
Go
after changing a menu setting.
Preface
ix
Page 10

• Messages that appear on the operator panel display
are also printed in a boldface type:
Black Toner Empty
If
panel display, you must install a new black toner
cartridge before you can resume printing.
• Notes, warnings, and cautions appear in the left column for easy reference.
appears on the operator
Note:
iary information you may find
useful.
Warning!
something that might damage
your printer hardware or software.
Caution!
something that might cause you
harm.
A note provides auxil-
A warning identifies
A caution identifies
Other sources
of information
Online documents
In addition to the User’s Guide, Setup Guide, and Quick Reference, Lexmark offers other sources of information about
your printer or about Lexmark products and services.
The CD that was shipped with your printer contains several online documents. Refer to the booklet that came with
the CD for launching instructions. Once you have
launched the CD, click the View Online Documentation
icon to display a list of the available documents. All online
documents are provided in English only.
The CD includes:
• Introduction to MarkVision, which describes how to
use some of the most popular MarkVision features.
• Network Adapter User’s Guide, which provides gen-
eral information about setting up an optional network adapter after installing it in your printer.
x
Preface
Page 11

• Card Stock & Label Guide, which provides detailed
information about selecting media appropriate for
your printer.
• A listing of PCL emulation printer commands.
Technical Reference
Lexmark web site
Automated
fax system
If you find you need more information about printer languages and commands, interface specifications, or memory management, a printed Technical Reference is available
from Lexmark. To request a Technical Reference, simply fill
out the order form included with the printer registration
card and drop it in the mail.
Access our site on the World Wide Web for up-to-date
information about Lexmark and Lexmark products:
http: //www.lexmark.com
If you’re in the U.S. or Canada, you can use the Lexmark
automated fax system to request information about Lexmark products, available printer drivers, or other related
topics.
To request a catalog of the information available, simply
dial (606) 232-2380 from a touchtone phone and follow the
voice prompts. Have your fax number ready.
LEXFAX
is available 24 hours a day, 7 days a week.
Preface
xi
Page 12

xii
Preface
Page 13

Trademarks
FontVision, Lexmark, MarkNet, MarkVision, and Optra
are trademarks of Lexmark International, Inc., registered
in the United States and/or other countries. LexExpress,
LexOnSite, and Operation ReSource are service marks of
Lexmark International, Inc.
AppleTalk, LocalTalk, and Macintosh are trademarks of
Apple Computer, Inc., registered in the U.S. and other
countries. TrueType is a trademark of Apple Computer,
Inc.
PANTONE Colors generated by the Optra Color 1200 are
four-color process simulations and may not match PANTONE-identified solid color standards. Use current PANTONE Color Reference manuals for accurate color.
PANTONE Color simulations are only obtainable on this
product when driven by qualified Pantone-licensed software packages. Contact Pantone, Inc. for a current list of
qualified licensees.
PA N TO N E
property of Pantone, Inc. © Pantone, Inc., 1988
®
PCL
Company. PCL 5 and PCL 6 are Hewlett-Packard Company’s designations of a set of printer commands (language) and functions included in its printer products. This
printer is intended by Lexmark International, Inc. to be
compatible with the PCL 5 and PCL 6 languages. This
means the printer recognizes PCL 5 and PCL 6 commands
used in various application programs, and that the printer
emulates the functions corresponding to the commands.
®
and other Pantone, Inc. trademarks are the
is a registered trademark of the Hewlett-Packard
Trademarks
xiii
Page 14

PostScript® is a registered trademark of Adobe Systems
Incorporated. PostScript is Adobe Systems’ designation of
a set of printer commands (language) and functions
included in its printer products. This printer is intended
by Lexmark International, Inc. to be compatible with the
PostScript language. This means the printer recognizes
PostScript commands used in various application programs, and that the printer emulates the functions corresponding to the commands.
Details relating to compatibility are included in the Te c h n i -
cal Reference.
Sun is a trademark or registered trademark of Sun Microsystems, Inc., in the United States or other countries.
The following terms are trademarks or registered trademarks of these companies:
Albertus The Monotype Corporation plc
Antique Olive Monsieur Marcel OLIVE
Arial The Monotype Corporation plc
CG Omega A product of Bayer Corporation
CG Times Based on Times New Roman under license
Helvetica Linotype-Hell AG and/or its subsidiaries
Intellifont Bayer Corporation
ITC Bookman International Typeface Corporation
ITC Zapf Chancery International Typeface Corporation
Marigold AlphaOmega Typography, Inc.
Palatino Linotype-Hell AG and/or its subsidiaries
Times New Roman The Monotype Corporation plc
Univers Linotype-Hell AG and/or its subsidiaries
Wingdings Microsoft Corporation
from The Monotype Corporation plc, is a
product of Bayer Corporation
xiv
Other trademarks are the property of their respective
owners.
Trademarks
Page 15
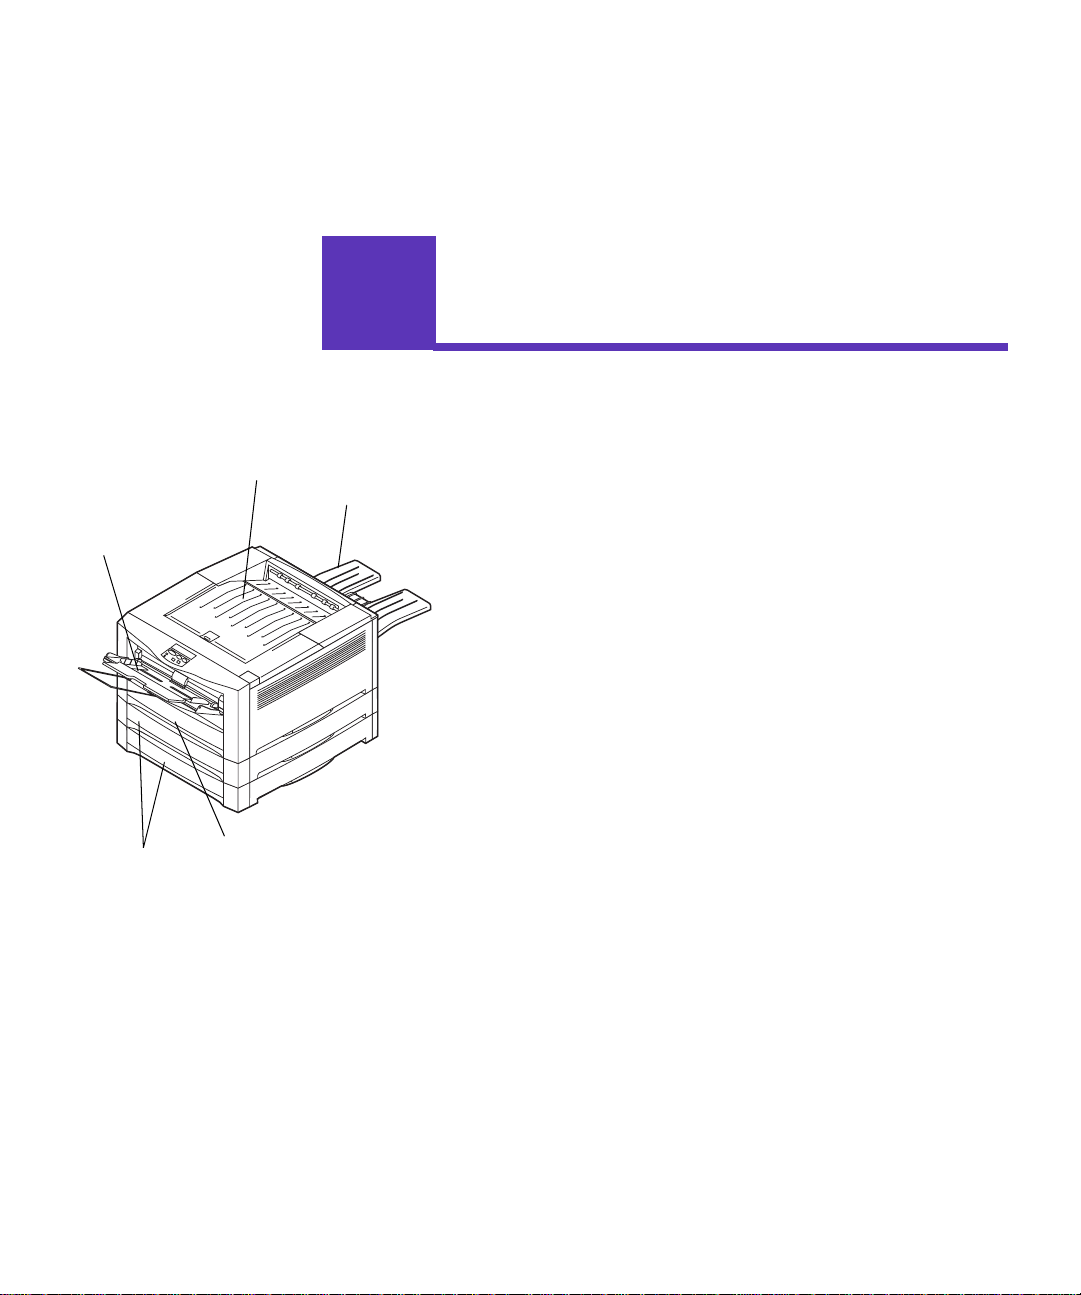
Top output bin
Multipurpose
feeder
50-sheet optional drawers
1
Rear output bin
250-sheet standard tray
Introducing
your printer
The Optra Color 1200 is a network color printer that uses
electrophotographic technology to deliver high quality
images, presentation graphics, line art, and text. Its fast
output—up to 12 pages per minute (ppm) for both fourcolor and monochrome print jobs—makes it the ideal
solution for businesses where performance is critical.
The printer’s flexible design allows it to support a variety
of printing needs. For example, if you print a mixture of
color and mono (black only) jobs, you can choose to maximize print speed or maximize supplies yield. If you need
the printer to match the color process used in a particular
application, you can select RGB or CMYK color corrections. Or you can adjust the printed colors to more closely
represent the colors on your computer display.
A variety of connectivity options make the Optra
Color 1200 an excellent choice for all types of system environments. You can attach up to two internal adapters to
support network configurations requiring Ethernet,
Token-Ring, LocalTalk, serial, infrared, or additional parallel ports. You can even attach a class 1 fax modem to the
optional serial port and receive faxes directly to your
printer.
The printer also offers flexible paper handling. It supports
a wide variety of paper sizes, from A5 to A3 and 11x17 in.,
and has a standard multipurpose feeder that makes it easy
to print on envelopes, transparencies, labels, card stock,
and non-standard size paper. You can also add up to two
optional drawers, which can increase the printer’s total
paper capacity to 850 sheets.
Introducing your printer
1
Page 16

Print speed
Your Optra Color 1200 printer can print four-color and
mono jobs at up to 12 ppm. With all printers, print speed
varies depending on specific characteristics of the job,
such as the size of the formatted page, the number of
fonts, the number and complexity of images and graphics,
and so on. Printing a mix of color and mono jobs may also
slow printing, depending on the printer settings you have
chosen.
Memory
Print quality
Your printer ships with 32MB of standard printer memory
for fast, efficient processing of color jobs. (Some models
may ship with more memory.) If you typically print large,
complex jobs, you can install pairs of optional memory
cards to increase the total memory to a maximum of
128MB.
Your printer also comes with 4MB of standard flash memory for storing downloaded resources, such as fonts and
macros. In addition, you can install an optional hard disk
for storing downloaded resources and job statistics, and
for spooling or collating print jobs. Resources stored in
flash memory or on disk are retained in memory even
after the printer is turned off and back on.
With standard 600 dpi resolution, your printer provides
high quality printouts of all your jobs. In addition, the
1200 Image Quality setting lets you optimize the quality of
printed images.
If you sometimes print simple drafts, you can set Toner
Saver On to preserve toner, while minimally affecting
print quality. If Toner Saver is Off, the printer smooths
printed characters for enhanced text printing.
2
Chapter 1: Introducing your printer
Page 17

MarkVision
The MarkVision printer utility, included on the CD that
was shipped with your printer, provides numerous
printer management and color management tools that you
can access directly from your computer. MarkVision can
display a graphic of your printer indicating the options
installed and the location of any printer problems. If your
printer is attached to a network and located some distance
from your workstation, you can view printer status and
change printer settings without leaving your desk. You
can also use MarkVision to gather statistics about the jobs
you print, or download resources to flash memory or disk.
Paper handling
The printer comes equipped with a 250-sheet paper tray
and a multipurpose feeder. (Some models may ship with a
second 250-sheet tray.) The multipurpose feeder lets you
load a stack of envelopes, transparencies, labels, or card
stock for multiple-page jobs. To increase paper feeding
capacity, you can attach up to two optional drawers, each
with a 250-sheet tray.
MarkVision
3
Page 18

4
Chapter 1: Introducing your printer
Page 19

2
Changing
printer settings
Read this chapter for details about the printer settings you
can change to control printer function. To make it easy for
you to find the information you need, the chapter is organized according to the structure of the printer operator
panel menus. However, you can also change many of
these settings from your application, from a Lexmark
printer driver, or from the MarkVision printer utility.
Note:
selected from a software application or driver override default
settings selected from the operator panel.
Printer settings
If there is a printer feature you cannot control from the
application or printer driver, use the printer operator
panel or the remote operator panel available from MarkVision. Keep in mind, however, that changing a printer setting from the operator panel or from MarkVision makes
that setting the user default for all subsequent jobs sent to
the printer. In most cases, settings you change from the
application or driver apply only to the job you are preparing to send to the printer.
Changing printer settings
5
Page 20
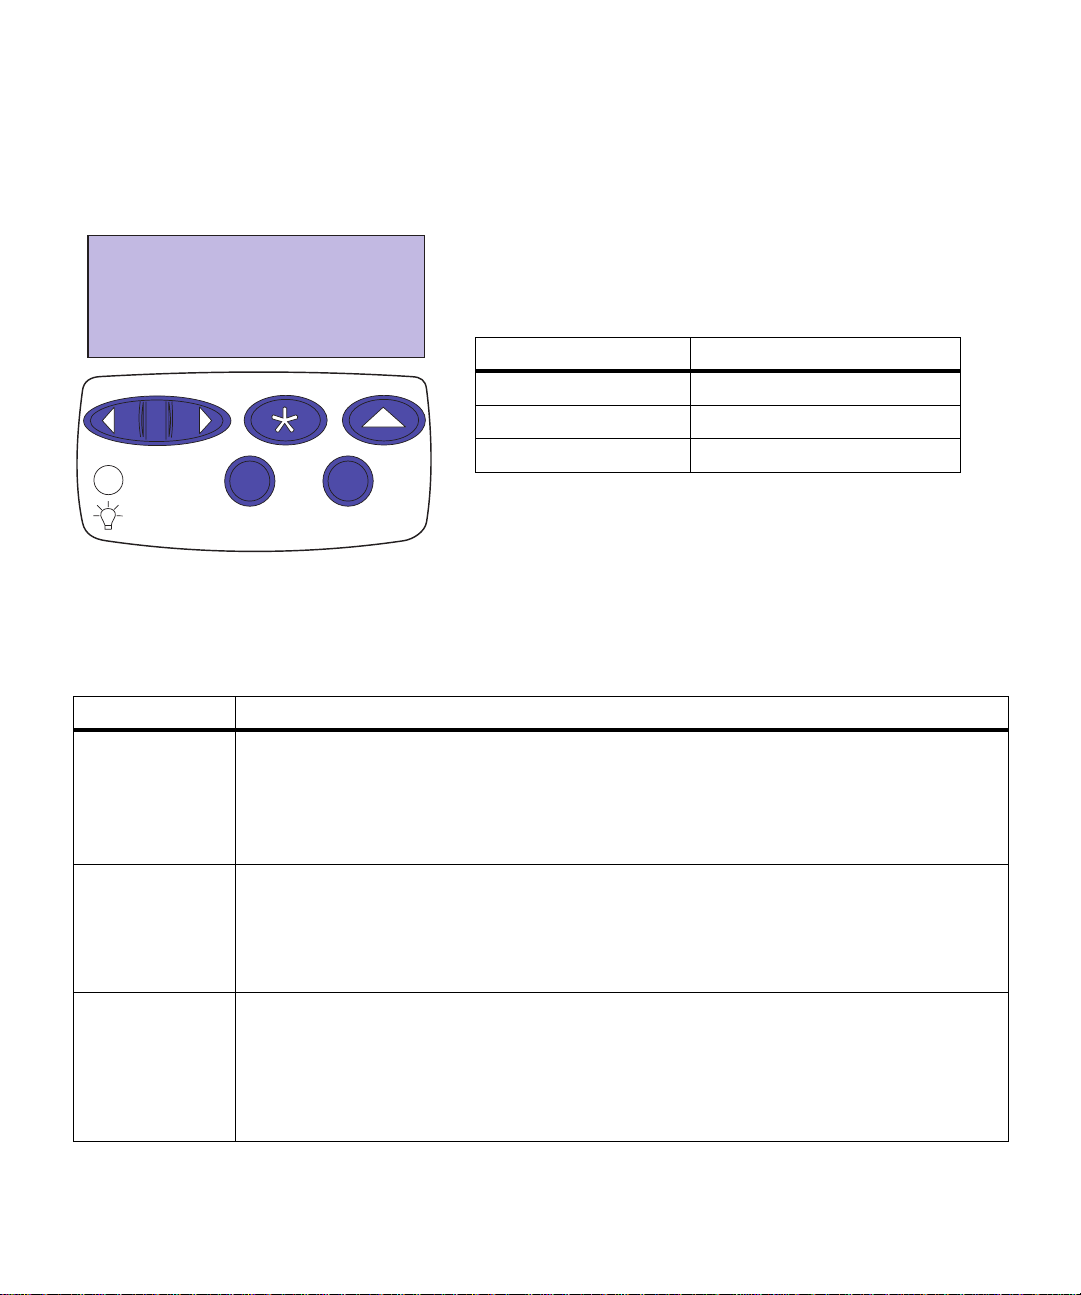
Using the
operator panel
Menu
Operator panel buttons
Select Return
Go Stop
The operator panel on the top of your printer has a 2-line
by 16-character liquid crystal display (LCD), five buttons,
and one indicator light.
The light indicates whether the printer power is on and
whether the printer is idle or busy processing a job.
Indicator light
State Indicates
Off Printer power is off.
On Printer is on, but idle.
Flashing Printer is busy processing a job.
Use the five operator panel buttons to open a menu, scroll
through a list of values, select printer settings, and clear
error messages. Detailed instructions for changing a
printer setting begin on page 9.
Button Function
Go
Menu >
<Menu
Select
6
and
Chapter 2: Changing printer settings
Press the Go button to:
• Exit printer menus and return the printer to the ready state
• Clear certain messages from the display
If you’ve changed printer settings from the operator panel menus, press Go before you send a
job to print.
Press the
• Enter the menus from the
• Scroll to the next (
• Increase or decrease a numerical value for a menu item setting
• Display the Job Menu or the Supplies Menu while the printer is busy
Press the
• Select the menu shown on the second line of the display and view the available menu items
• Select the menu item shown on the second line of the display and view the available values
and the current user default setting for that menu item
• Save the value displayed on the second line of the display as the new user default setting
• Clear certain messages from the display
Menu>
Select
<Menu
or
Menu>
button to:
button to:
state
ready
) or the previous (
<Menu
) menu, menu item, or value
Page 21

Operator panel buttons (continued)
Button Function
Return
Stop
Press the
a new menu item or value.
Press the
stop all activity. The message
activity.
For example, if you need to load paper in a tray while a job is printing, press
the printer motors to idle before removing the tra y from the printer. Reinsert the loaded tray, and
then press
Return
button to back up to the previous level of the menu structure without selecting
Stop
button when the printer displays the
Go
.
Not Ready
Busy
is then displayed until y ou press Go to continue printer
or
Waiting
message to temporarily
Stop
and wait for
MarkVision’s remote
operator panel
The MarkVision utility has a remote operator panel that
displays an exact replica of the printer operator panel on
your computer screen. You can use the remote operator
panel to check printer status and change printer settings
just as you would the printer operator panel. If the printer
is located some distance from your computer, it may be
more convenient to use the remote operator panel on your
computer.
In addition to the remote operator panel, some versions of
MarkVision also provide a way to view many of the menu
items for one menu on a single screen. If you need to make
several changes to settings in the Paper Menu, for example, you may find it easier to make those changes when
you can see all of the menu items and their available values at one time. That eliminates the time required to scroll
through the various menu items and values when using
the remote operator panel and its two-line display.
For additional information about MarkVision, see
page 131.
Using the operator panel
7
Page 22

Menus
A number of menus are available to make it easy for you
to change printer settings. The diagram on page 12 shows
the menus and all of the menu items available in each
menu. The items in each menu and the values you can
select are described in more detail in the tables beginning
on page 13.
Some of the menu items or values are displayed only if a
specific option is installed on the printer. Other menu
items may only be effective for a particular printer language. You can select these values at any time, but they
only affect printer function when you use the specified
printer language.
An asterisk (*) next to a value in the tables indicates the
factory default setting. Factory defaults may differ for different countries. When you select a new setting from the
operator panel, the asterisk moves next to the selected setting to identify it as the current user default. These settings remain active until new ones are selected or the
factory defaults are restored.
See “Changing menu settings” on page 9 for instructions
on how to select a new setting.
Printing current
menu settings
Note:
menu settings page, make sure
the selected paper source holds
A4, letter, or legal size paper
and the Paper Type setting for
the source is Plain Paper.
8
Chapter 2: Changing printer settings
Before printing the
You can print a list of the current user default settings at
any time.
1 From the operator panel, press
enter the menus.
2 Continue to press and release
you see
3 Press the
TESTS MENU
Print Menus
4 Press
The message
printer returns to the ready state after the list of user
default settings prints.
TESTS MENU
Select
is then displayed on the first line, and
is on the second line.
Select
again to print the page.
Printing Menu Settings
.
button.
Menu>
Menu>
is displayed. The
or
or
<Menu
<Menu
to
until
Page 23

If an error message appears on the display, see
“Understanding printer messages” on page 100.
Changing
menu settings
Note:
tings you choose from your software application or printer
driver override the user default
settings you set from the operator panel menus.
Remember that set-
Follow the steps below to change a user default setting
from the menus:
1 From the operator panel, press
2 Continue to press and release
the menu you want appears on the second line of
the display.
The menus and their menu items are listed on
page 12.
3 Press
4 Press
5 Press
Select
to display the list of menu items for
the selected menu.
Menu>
need appears on the second line.
Select
the menu item.
An asterisk (*) appears beside the current user
default setting for that menu item.
Some menu items have submenus. For example, if
you select the Paper Menu, and then select the
Paper Type menu item, you must select another
menu (such as Tray 1 Type) before the available values are displayed.
<Menu
or
to display a list of available values for
until the menu item you
Menu>
Menu>
or
or
<Menu
<Menu
until
.
A value can be:
– An On or Off setting
– A phrase or word that describes a setting
– A numerical value that you can increase or
decrease
6 Press
values.
Menu>
or
<Menu
to scroll through the list of
Menus
9
Page 24

7
When the value you want appears on the second
line of the display, press
the new user default setting.
An asterisk appears beside the value to indicate that
it is now the user default setting. The display shows
the new setting for one second and then clears and
shows the word
list of menu items.
Saved.
Select
to make the value
It then displays the previous
Locking the menus
8 Press
9
User default settings remain in effect until you save new
settings or restore the factory defaults.
To lock the menus so that changes cannot be made to the
user default settings:
Return
if you need to go back to previous
menus or menu items and select other user
defaults.
Press Go if you have finished changing menu settings.
1 Turn the printer off.
2 Press and hold the
the printer on.
Go
3 Release the buttons when
displayed.
Locking Menus
printer self test is complete, the
displayed.
appears on the display. When the
Stop
and
buttons and turn
Performing Self Test
Ready
is
message is
10
Chapter 2: Changing printer settings
If you press
message is displayed.
To unlock the menus, repeat steps 1–3 above.
Menu>
or
<Menu
Menus Disabled
, the
Page 25

If you want to disable the button sequence so users cannot
easily lock or unlock the menus from the printer operator
panel, change the password variable of the PJL JOB command. Select any non-zero value for the password variable to prevent the button sequence from unlocking (or
locking) the menus. Refer to the printer Technical Reference
for more information about PJL commands.
Menus
11
Page 26
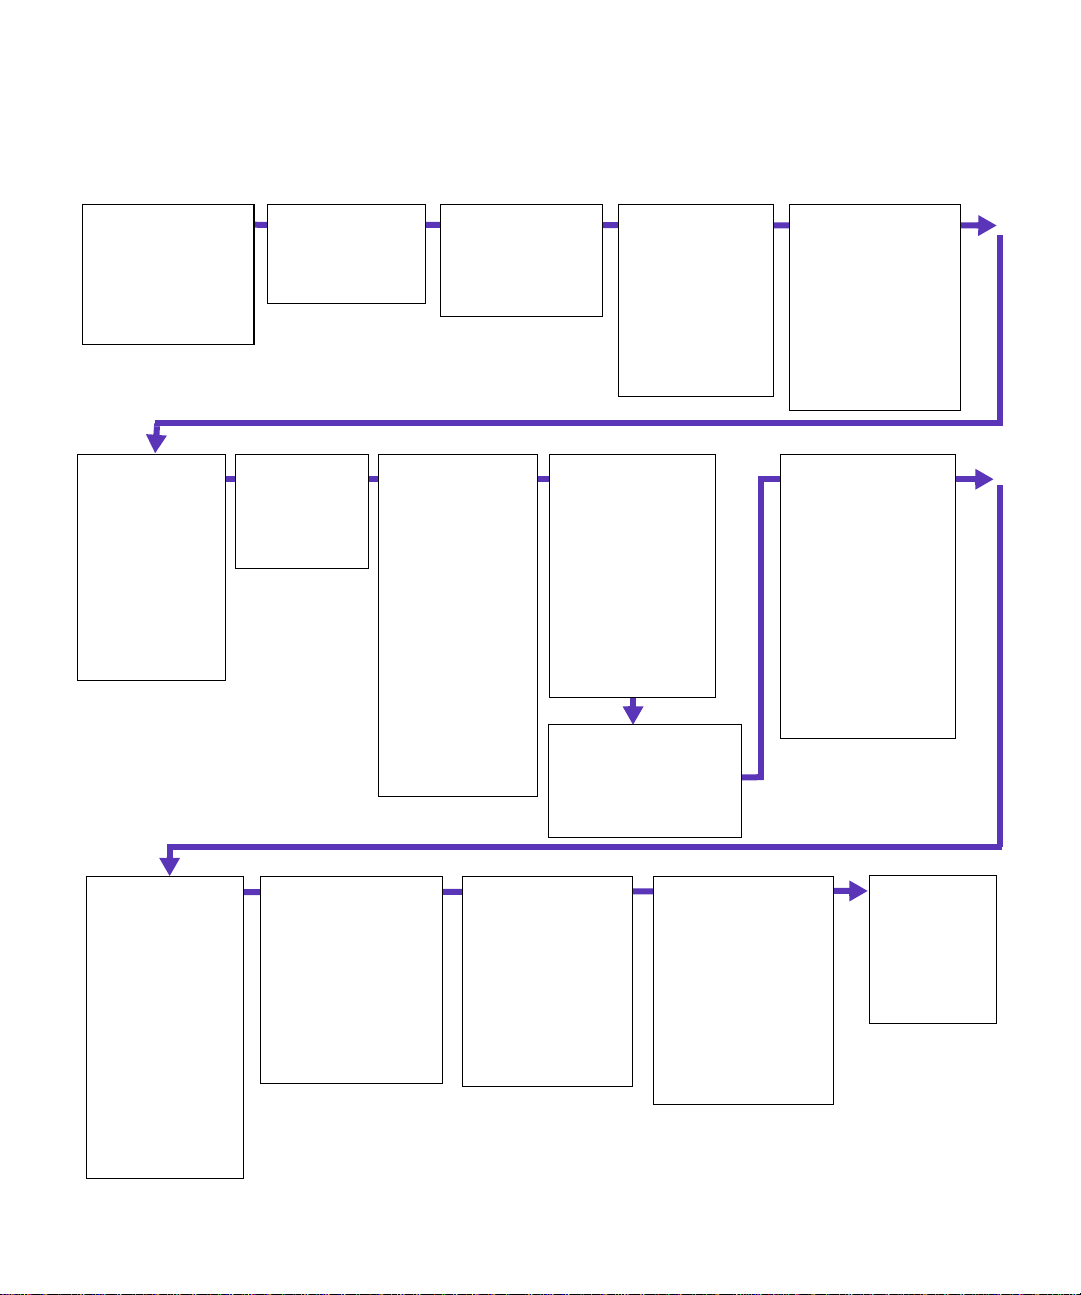
Menu overview
Menus or menu items in
are displayed only when the required
italics
option is installed. Capitalized menu items (for example, PAPER
SIZE) have submenus . Ref er to the tab les on the f ollo wing pages f o r
a listing of the values for each menu item.
SUPPLIES MENU
(page 13)
<color> Toner
<color> PC Drum
Tray 1 Status
Tray 2 Status
Tray 3 Status
TESTS MENU
(page 26)
Print Menus
Print Fonts
Print Directory
Print Demo
Color Samples
Factory Defaults
Format Flash
Format Disk
Job Acct Stat
Hex Trace
MAINTENANCE
MENU
(page 14)
Maint Status
JOB MENU
(page 28)
Cancel Job
Reset Printer
Print Buffer
COLOR MENU
(page 15)
Color Correction
Print Quality
Toner Saver
SETUP MENU
(page 29)
Printer Language
Power Saver
Resource Save
Download Target
Print Timeout
Wait Timeout
Auto Continue
Jam Recovery
Page Protect
Print Area
Display Language
Alarm Control
Printer Usage
Timing Adj
Job Buffer Size
Job Accounting
Job Acct Limit
PAPER MENU
(page 16)
Paper Source
PAPER SIZE
PAPER TYPE
CUSTOM TYPES
Output Bin
Substitute Size
Configure MP
Size Detection
PCL EMUL MENU
(page 35)
Font Source
Font Name
Point Size
Pitch
Symbol Set
Orientation
Lines per Page
A4 Width
TRAY RENUMBER
Auto CR after LF
Auto LF after CR
POSTSCRIPT MENU
(page 39)
Print PS Error
Font Priority
Image Smoothing
FINISHING MENU
(page 22)
Copies
Blank Pages
Collation
Separator Sheets
Separator Source
Multipage Print
Multipage Order
Multipage View
Multipage Border
PARALLEL MENU
(page 40)
STD PARALLEL
PARALLEL OPT 1
PARALLEL OPT 2
PCL SmartSwitch
PS SmartSwitch
NPA Mode
Parallel Buffer
Job Buffering
Advanced Status
Protocol
Honor Init
Parallel Mode 1
Parallel Mode 2
SERIAL MENU
(page 43)
SERIAL OPTION 1
SERIAL OPTION 2
PCL SmartSwitch
PS SmartSwitch
NPA Mode
Serial Buffer
Job Buffering
RS-232/RS-422
RS-422 Polarity
Serial Protocol
Robust XON
Baud
Data Bits
Parity
Honor DSR
12
Chapter 2: Changing printer settings
NETWORK MENU
(page 47)
NETWORK OPTION 1
NETWORK OPTION 2
PCL SmartSwitch
PS SmartSwitch
NPA Mode
Network Buffer
Job Buffering
NETWORK x SETUP
INFRARED MENU
(page 49)
Infrared Port
PCL SmartSwitch
PS SmartSwitch
NPA Mode
Infrared Buffer
Job Buffering
Window Size
Transmit Delay
Max Baud Rate
LOCALTALK MENU
(page 52)
LocalTalk Port
PCL SmartSwitch
PS SmartSwitch
NPA Mode
LocalTalk Buffer
Job Buffering
NPA Hosts
LocalTalk Name
LocalTalk Addr
LocalTalk Zone
FAX MENU
(page 55)
Fax Port
Fax Baud
Fax Data Bits
Fax Parity
Fax Buffer
Page 27
Supplies Menu
Supplies Menu
Menu item Values
Toner Low
color
When a toner cartridge has only enough toner left to print approximately 250 pages, the
printer identifies the cartridge in the Supplies Menu (for example, Magenta Toner). When the
toner cartridge is completely empty, the printer ceases operation. See page 93 or page 108
for more information.
PC Drum Life Warning
color
Tray
Status Missing
x
Exhausted
Like the toner cartridge, each of the color photoconductors requires periodic replacement.
When a photoconductor (or PC Drum) is nearing the end of its life or needs replacing, the
printer displays an item such as Magenta PC Drum in the Supplies Menu.
You must replace all three color photoconductors (magenta, cyan, and yellow) at the same
time. When you replace the black photoconductor, you must also replace the fuser
coating roll.
See page 94 or page 108 for more information.
Low
Empty
The Supplies Menu provides information about printer
supplies that require attention. It is only available when a
supply is low or needs replacement.
You can view the Supplies Menu when the printer is idle
or when the printer is busy processing or printing a job.
Press
Menu>
or
<Menu
to open the Supplies Menu. The
information in the menu changes as the supplies’ status
changes, even after you have opened the menu.
Your printer can detect if a tray is missing, low on paper (less than 50 sheets), or empty. The
Supplies Menu lists any of the installed trays (tray 1, tray 2, or tray 3) that meets any of these
three conditions.
Menus
13
Page 28

Maintenance Menu
Maintenance Menu
Menu item Values
Maint Status Life Warning
The printer requires replacement of routine maintenance items, such as the fuser and
transport belt, to maintain top performance and avoid print quality and paper feed problems.
This menu appears when the printer maintenance counter determines 100,000 pages have
printed.
These maintenance items are in a kit available from Le xmark. You must have a trained service
technician install the maintenance kit. Failure to replace these items will not interrupt printer
operation, but can result in unsatisfactory performance of the printer.
See page 98 for more information about ordering a maintenance kit.
The Maintenance Menu provides information about
printer parts that need replacement by a service technician. The menu is only available when this condition
exists.
14
Chapter 2: Changing printer settings
Page 29
Color Menu
Color Menu
Menu item Values
Color Correction Vivid*
RGB
CMYK
Black & White
Display
The Color Correction setting lets you adjust the printed color to better match the colors of
other output devices or standard color systems. For example, if you want your printed colors
to simulate the colors on your computer screen, choose Display. If you are using a software
application that has its own color correction, choose CMYK. The Vivid setting (the default)
produces bright and well saturated colors for transparencies and general business graphics.
For more information, see page 61.
Print Quality Graphics*
Images
1200 Image Q
The default setting, Graphics, provides high quality output for text and business graphics,
such as line art and electronically generated charts.
If you need to print jobs composed largely of image data (scanned photos or video frames, for
example), you ma y w ant to select Images . The Images setting enhances the quality of printed
images on the page, while maintaining high quality text and gr aphics.
For the best overall print quality when printing jobs containing images, text, and graphics,
select 1200 Image Quality. This setting may require more memory than the other two settings
to process a particular job, and may slow print speed. However, the 1200 Image Quality
setting delivers the highest quality output, with crisp text and graphics and exceptionally high
quality images.
See page 62 for more information about the Print Quality settings.
Toner Saver Off*
On
Use the Color Menu to make print quality adjustments
and customize color printing.
*Factory default
To get the most from your toner supply, set Toner Saver On. Toner Saver reduces the amount
of toner used on the printed page and may help lower the cost of printing.
When Toner Saver is Off, the printer smooths printed characters to improv e the appearance of
text.
Menus
15
Page 30
Paper Menu
Paper Menu
Menu item Values
Paper Source Tray 1*
Tray 2
Tray 3
MP Feeder
Manual Paper
Manual Env
The Paper Source setting identifies the def ault paper source. Only installed paper sources are
displayed.
The MP Feeder (multipurpose feeder) value is displayed only if the Configure MP menu item
is set to Cassette. If Paper Source is set to MP Feeder and Configure MP is then changed to
Manual or First, the Paper Source setting automatically changes to Tray 1.
If you are using the same size and type of media in two or more paper sources (and the P aper
Type settings are correct), the trays are automatically linked. When one tray is empty, paper
feeds from the other tray.
Paper Size Tray 1 Size
Tray 2 Size
Tray 3 Size
(Select the Tray
Use the Paper Menu to define all settings relating to the
media you load in your printer.
Size setting by adjusting the rear paper guide in the tray.)
x
*Factory default
16
Chapter 2: Changing printer settings
MP Feeder Size
A4* (Country specific)
A5
JIS B4
JIS B5
Letter* (Country specific)
Legal
A3
11x17
Universal
7 3/4 Envelope
9 Envelope
10 Envelope* (Country specific)
DL Envelope* (Country specific)
C5 Envelope
B5 Envelope
Other Envelope
Page 31

Paper Menu (continued)
Menu item Values
Paper Size
(continued)
*Factory default
Manual Pap Size
A4* (Country specific)
A5
JIS B4
JIS B5
Letter* (Country specific)
Legal
A3
11x17
Universal
Manual Env Size
7 3/4 Envelope
9 Envelope
10 Envelope* (Country specific)
DL Envelope* (Country specific)
C5 Envelope
B5 Envelope
Other Envelope
The Paper Size setting identifies the default formatting size for each paper source. See
page 73 for a list of the dimensions for each paper and envelope size.
Trays 1, 2, and 3 hav e size sensing. The printer automatically determines the size of the paper
installed in the tray and displays
cannot change the default paper size f or these tr a ys from the oper ator panel. To set the paper
size, adjust the rear paper guide to the appropriate position in the tray. See page 72 for a
listing of the paper sizes the trays support.
The printer can only recognize A3 and B4 size paper
decide which of the pairs of paper sizes you want y our tr ays to support. (You can still load the
paper sizes you don’t select in the multipurpose feeder.) Select the appropriate setting from
the Size Detection menu item. See page 21 for more information.
For paper and envelope sources without size sensing (manual feed and the multipurpose
feeder), it is important to select the correct paper size from the menu. The MP Feeder Size
menu item is displayed only if the Configure MP menu item is set to Cassette.
Select Universal from the Paper Size menu when you load media in the multipurpose feeder
that doesn’t match any of the standard sizes. The printer formats the page for 11.7 x 17 in.
(297 x 432 mm). You can then set the margins for the actual page size from your software
application.
that size as the default in the Paper Size menu. You
only
11x17 and legal size paper . You must
or
Menus
17
Page 32

Paper Menu (continued)
Menu item Values
Paper Type Tray 1 Type
Plain Paper*
Bond
Letterhead
Preprinted
Colored Paper
Transparency
Custom Type 1
Custom Type 2
Custom Type 3
Custom Type 4
Tray 2 Type
Plain Paper
Bond
Letterhead
Preprinted
Colored Paper
Custom Type 1
Custom Type 2*
Custom Type 3
Custom Type 4
Tray 3 Type
Plain Paper
Bond
Letterhead
Preprinted
Colored Paper
Custom Type 1
Custom Type 2
Custom Type 3*
Custom Type 4
*Factory default
18
Chapter 2: Changing printer settings
Page 33

Paper Menu (continued)
Menu item Values
Paper Type
(continued)
*Factory default
MP Feeder Type
Plain Paper
Bond
Letterhead
Preprinted
Colored Paper
Transparency
Labels
Card Stock
Envelope
Custom Type 1
Custom Type 2
Custom Type 3
Custom Type 4*
Manual Pap Type
Plain Paper*
Bond
Letterhead
Preprinted
Colored Paper
Transparency
Labels
Card Stock
Custom Type 1
Custom Type 2
Custom Type 3
Custom Type 4
Manual Env Type
Envelope*
Custom Type 1
Custom Type 2
Custom Type 3
Custom Type 4
Menus
19
Page 34

Paper Menu (continued)
Menu item Values
Paper Type
(continued)
Custom Types Custom Type
The Paper Type setting lets you specify the type of media installed in each source. The printer
uses the Paper Type setting to optimize print quality for the media you specified.
For example, if you set Tray 1 Type to Transparency, the printer heats the fuser to a higher
temperature and slows printing to produce the best transparency possible. If y ou then change
Tray 1 Type to Plain Paper, there is a slight delay while the printer cools to the appropriate
temperature for printing paper.
You can also select paper sources from your software application simply by specifying a paper
type and size. Or, use the MarkVision utility to define names for up to four Custom Types
identifying special print materials. For example, if you are using names for three different
letterheads for different individuals in your workplace, you can define a custom type for each
individual’s letterhead. If you’re not sure which source contains the letterhead you need, you
can specify the Custom Type from the software application or driver, and the printer will feed
paper from the proper source.
The correct Paper Type setting, along with the Paper Size setting, is also critical for the
automatic tray linking function. If you have the same paper loaded in two paper sources and
want to enable tray linking, set the Paper Type for each source to the same value. When one
tray is empty, the printer then automatically feeds paper from the other tray.
A simple way to disable tray linking is to set Tray 1 Type to Custom Type 1, Tray 2 Type to
Custom Type 2, and Tray 3 Type to Custom Type 3 (if those three custom types are not
predefined for other special media).
The MP Feeder Type menu item is displayed only if the Configure MP menu item is set to
Cassette.
Paper*
Card Stock
Transparency
Labels
(where x represents a custom type from 1 to 4)
x
The Custom Type x setting specifies the print material for each of the Custom Types (1–4)
defined in the Paper Type menu item. If a user-defined name is available, the name is
displayed instead of Custom Type
Output Bin Top Output*
*Factory default
20
Chapter 2: Changing printer settings
Rear Output
Select Top Output to collate jobs face down. Select Rear Output to create a straight paper
path from the multipurpose feeder to the rear output bin. This may be useful when printing on
heavier media, such as transparencies, envelopes, labels, or card stock. Printed pages stack
face up and uncollated in the rear output bin.
If you select Rear Output, make sure you’ve attached the rear output bin. Refer to the
for installation instructions.
Guide
.
x
Setup
Page 35

Paper Menu (continued)
Menu item Values
Substitute Size Off*
Letter / A4
11x17 / A3
All Listed
Select Letter / A4 if you want the printer to automatically print A4 jobs on letter size paper and
letter jobs on A4 size paper, if the requested size is not currently installed in the printer.
Likewise, select 11x17 / A3 if y ou w ant the printer to automatically print 11x17 jobs on A3 size
paper and A3 jobs on 11x17 size paper, if the requested size is not available.
Select All Listed if you want to substitute paper sizes in both cases.
If the printer substitutes a paper size other than the one requested for the job , the printer may
have to clip the image to fit on the new page size. Some data may be lost.
If you do not want the printer to substitute paper sizes automatically, select Off. The printer
then prompts you to load the requested paper size, if it is not installed.
Configure MP Cassette*
Manual
First
When the multipurpose feeder (MP) is configured as a Cassette, the printer treats it like any
other tray. If a print job requests a size paper that is only loaded in the multipurpose feeder,
the printer picks paper from the multipurpose feeder to print the job.
Set Configure MP to Manual to use the multipurpose feeder strictly for manual feed of single
sheets or envelopes.
If you set Configure MP to
empty, regardless of the paper source or paper size requested for the job. When the multipurpose feeder is empty, the printer then feeds paper from the source containing the
requested size.
Size Detection A3 & B4* (Country specific)
11x17 & Legal* (Country specific)
First, the printer feeds paper from the multipurpose feeder until it is
*Factory default
The printer determines the size paper loaded in the trays by the position of the rear paper
guide. However, the printer can only recognize A3 and B4 size paper
paper. You must decide which of the pairs of paper sizes you want your trays to support. (You
can still load the paper sizes you don’t select in the multipurpose feeder.) For example, if you
select A3 & B4 and send a job formatted for legal size paper, the printer displays a message
asking you to load legal size paper in the multipurpose feeder.
Note:
Changing the Size Detection setting automatically resets the printer.
11x17 and legal size
or
Menus
21
Page 36

Finishing Menu
Finishing Menu
Menu item Values
Copies 1*…999
The Copies setting determines the number of copies printed for each page. The printer does
not automatically collate the copies printed. For example, if you send a three-page job to print
and set Copies to 2, the printer prints page 1, page 1, page 2, page 2, page 3, page 3.
Note:
Selecting the number of copies from the operator panel changes the printer default and
affects all subsequent jobs.
Blank Pages Do Not Print*
Collation Off*
*Factory default
Print
Set Blank Pages to Print to include application-generated blank pages with your print job.
On
Set Collation On to collate multiple copies of a job. For example, if you send a three-page job
to print and set Copies to 2, the printer prints page 1, page 2, page 3, page 1, page 2, page 3.
When Collation is Off, the printer prints each page of a job the number of times specified by
the Copies setting. For example , if you send a three-page job to print and set Copies to 2, the
printer prints page 1, page 1, page 2, page 2, page 3, page 3.
Many applications collate multiple copies of a print job by repeatedly sending the job to the
printer, until the correct number of copies has printed. If Copies is set to 2, for example, the
printer actually processes the same job twice. However, if you set Collation On from the
printer operator panel or from MarkVision, the printer processes the file only once, saves the
file in printer memory (or in the optional hard disk, if installed), and then prints the specified
number of copies. This saves processing time for the printer and the application, and may
reduce overall printing time.
For Collation to work effectively, your software application must recognize this printer feature
and not send the job to the printer multiple times. Your application must also let you specify
the number of copies needed
You can select Collation from the printer operator panel or from the printer driver. For best
results, select
cation, select
If the job is complex or exceeds the printer’s storage capacity , y ou ma y receiv e an
Collation Area
pages in memory. If you reset the printer, the printer discards the job.
Use the Finishing Menu to specify the final output of your
jobs, including the number of copies, whether you want to
insert separator pages between jobs, and how many page
images you want to print on each sheet of paper.
Collated
Uncollated
message. Press
in the printer driver and set the number of copies to one. In your appli-
(if the option is available) and the number of copies you want.
recognize the printer default setting for Copies.
or
Go
to clear the message. The printer collates the remaining
Insufficient
22
Chapter 2: Changing printer settings
Page 37

Finishing Menu (continued)
Menu item Values
Separator Sheets None*
Separator Source Tray 1*
Multipage Print Off*
Between Copies
Between Jobs
Between Pages
You can have the printer insert blank separator sheets between jobs, between m ultiple copies
of a job, or between each page of a job . Separ ator sheets are pulled from the source identified
in the Separator Source menu item.
Select Between Copies for multiple copy jobs. If Collation is Off, a blank page is inserted
between sets of each printed page. If Collation is On, a blank page is inserted between each
copy of the job.
If you select Between Jobs, a blank page is inserted after each print job. This may be helpful
when several people are using the printer in a network environment.
When you select Between Pages, a blank page is inserted between each page of a job. This
may be useful if you are printing transparencies and want to reduce static build-up when
stacking transparencies in the output bin.
Tray 2
Tray 3
MP Feeder
If you’ re using separator sheets , the Separator Source menu item lets y ou specify the tra y that
holds the separator sheets.
Only installed paper sources are displayed as values. You can only select MP Feeder as the
separator source if the Configure MP menu item is set to Cassette. If Separator Source is set
to MP Feeder and Configure MP is set to Manual or First, the Separator Source setting
automatically changes to Tray 1.
2-Up
3-Up
4-Up
6-Up
9-Up
12-Up
16-Up
*Factory default
Choose a Multipage Print value to print images of the specified number of pages on one sheet
of paper. The printer automatically reduces the image of each page so the specified number
of images fits on one sheet.
For example, select 4-Up to print reduced images of pages 1–4 of your document on the first
sheet of paper, pages 5–8 on the second sheet, and so on.
Menus
23
Page 38

Finishing Menu (continued)
Menu item Values
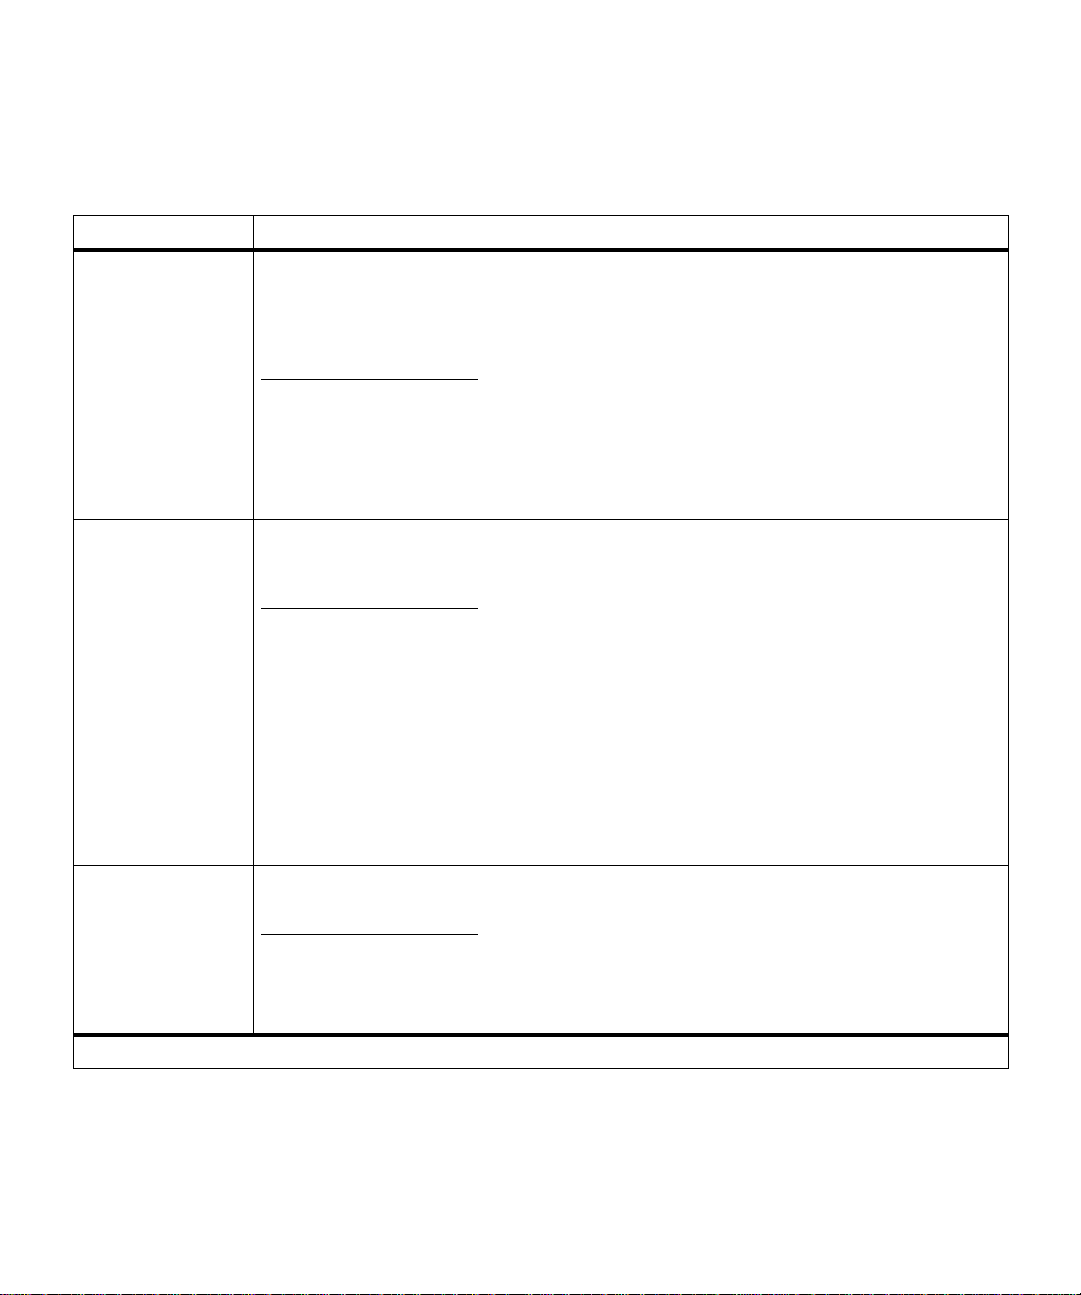
Multipage Order Horizontal*
Vertical
Rev Horizontal
Rev Vertical
Use the Multipage Order setting to determine the sequence of the page images on each
sheet of a multipage print job. The actual order of the pages depends on whether the
individual page images use portrait or landscape orientation.
For example, choose Horizontal to position portrait images in rows from left to right, from the
top of the page to the bottom. Choose Vertical to position the images in columns from top to
bottom, left to right.
4-up print job (portrait orientation)
Horizontal Vertical
*Factory default
Page 1 Page 2
Page 3 Page 4
Page 1 Page 3
Page 2 Page 4
24
Chapter 2: Changing printer settings
Page 39

Finishing Menu (continued)
Menu item Values
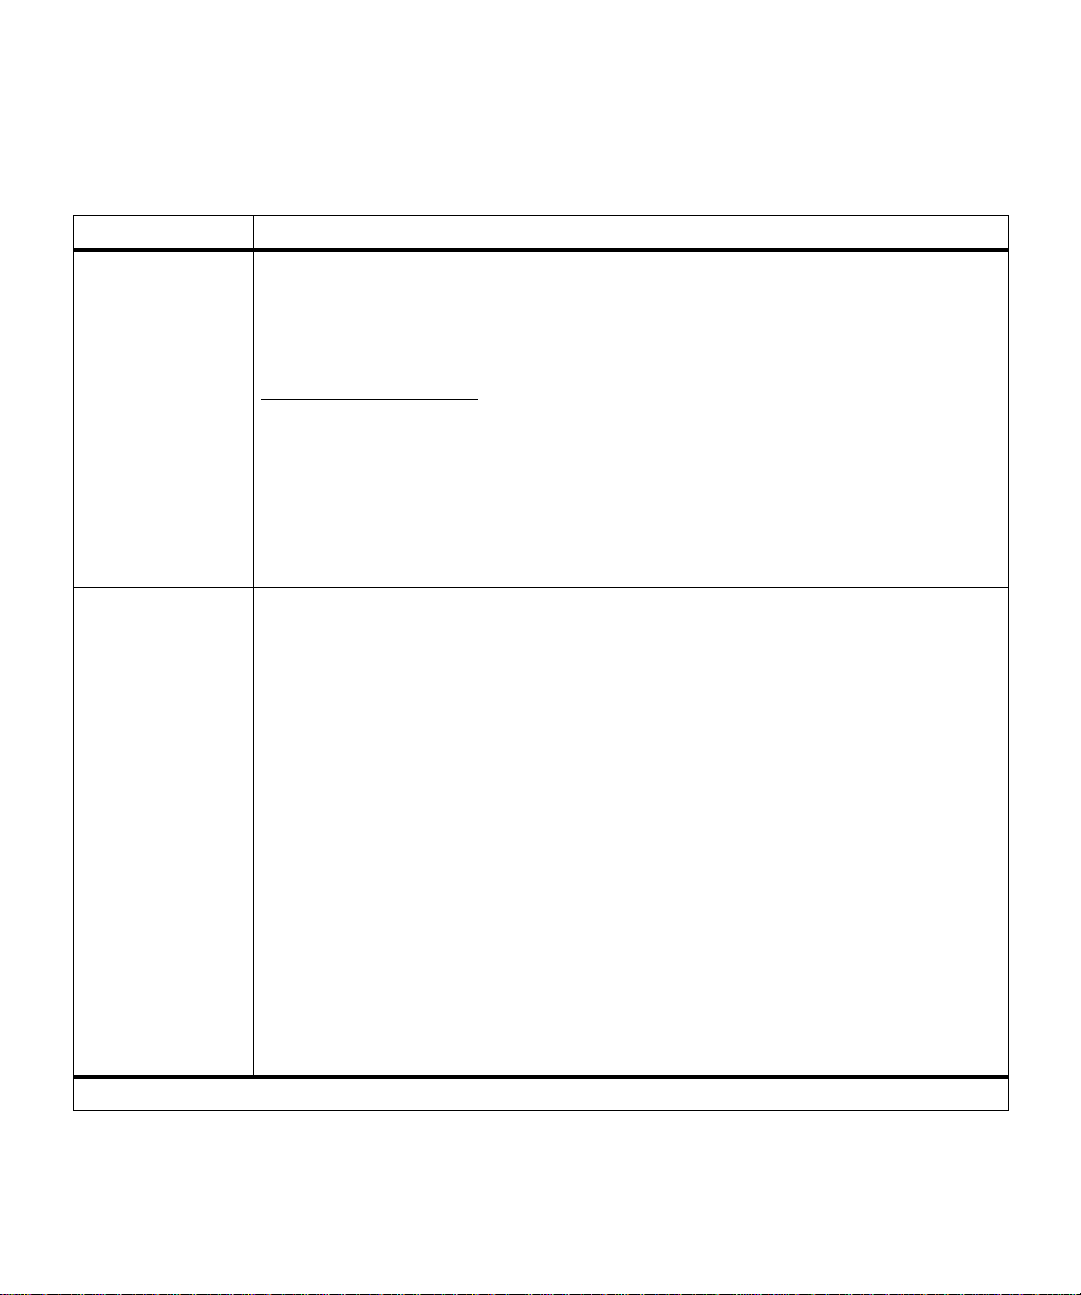
Multipage View Auto*
Long Edge
Short Edge
When using multipage printing, the printer by default automatically chooses whether to
position the top of each page image along the long edge of the sheet or along the short edge,
depending on how it can best fit the selected number of images on the sheet. For example,
when printing portrait pages 2-up with Horizontal order selected, the printer positions the top
edge of the images along the long edge of the page. When printing the same job 4-up, the
printer positions the top edge of the images along the short edge of the page.
Auto setting (horizontal order)
2-up 4-up
Page 1 Page 2
Page 2
Page 3 Page 4
Page 1
If you prefer to have the page images always oriented along the long edge or along the short
edge of the sheet, select Long Edge or Short Edge as the user default.
Multipage Border None*
Solid
Select Solid to print a border around each page image when using multipage printing.
*Factory default
Menus
25
Page 40

Tests Menu
Use the Tests Menu to print a variety of listings relating to
available printer resources, printer settings, and print jobs.
Additional menu items let you set up printer hardware
and troubleshoot printer problems.
Tests Menu
Menu item Values
Print Menus Press
Print Fonts PCL Fonts
Print Directory Press
Print Demo List of demo files stored in flash memory or on optional hard disk
Color Samples Select this menu item to print a multipage color sample. The sample may take a few minutes
Factory Defaults Restore
Select
options, the amount of installed printer memory, the printer software code levels, the total
count of printed pages, and the printer serial number. You can only print the menu settings
page on A4, letter, and legal size paper.
PS 2 Fonts
Select PCL Fonts or PS 2 Fonts to print a sample of all the fonts currently available in the
specified printer language.
Technical Reference
Select the Print Demo menu item to view a list of the demo files stored in your printer. Press
Menu>
pages you may have stored in your printer.
Refer to the
to print. To cancel the print job, press
select Cancel Job.
Use the sample to choose colors for your applications. The printout also details the RGB and
CMY percentages for easy reference.
Do Not Restore
to print a page detailing the user default setting for each menu item, the installed
Select
to print a list of all the resources stored in flash memory or on disk. Refer to the
<Menu
or
Technical Reference
for details.
to scroll through the list of Lexmark demo pages, as well as any other demo
for more information about creating demo pages.
Menu>
or
<Menu
to display the Job Menu, and then
26
When you choose to restore the factory default settings:
• All downloaded resources (fonts, macros, symbol sets) in printer memory (RAM) are
deleted. (Resources residing in flash memory or on hard disk are unaffected.)
• All menu settings are returned to the factory default values
– Display Language
– Job Buffer Size
– All settings in the Parallel Menu, Serial Menu, Fax Menu, Network Menu, Infr ared Menu,
and LocalTalk Menu.
Note:
An asterisk (*) appears next to the factory default value for each of the menu items
listed in this chapter.
Chapter 2: Changing printer settings
except
:
Page 41

Tests Menu (continued)
Menu item Values
Format Flash Yes
No
Formatting flash memory deletes all resources (fonts, macros) stored in flash memory and
prepares flash memory to receive new resources. You may want to select Print Directory
before you format the flash memory to determine what resources, if any, are stored in flash.
The Format Flash menu item is not displayed if the flash memory is Read/Write or Write
protected.
Warning:
lost.
Format Disk Yes
No
Formatting the hard disk option deletes all resources stored on the hard disk and prepares the
disk to receive new resources. You may want to select Print Directory before you format the
disk to determine what resources, if any, are stored on the disk.
The Format Disk menu item is not display ed if the installed option is def ective or is Read/Write
or Write protected. Format Disk is also not displayed if Job Buffer Size is set to 100%.
Warning:
lost.
Job Acct Stat Print
Clear
Go
,
If you select Format Flash and then press
any data stored in flash memory is
Do not turn the printer off while the flash is formatting.
If you select Format Disk and then press Go, any data stored on the hard disk is
Do not turn the printer off while the hard disk is formatting.
If you have an optional disk installed in your printer and you are using the printer’s Job
Accounting function, you can choose to print a list of statistics for a defined number of the
most recent print jobs. (The number of jobs is determined by the value of the Job Acct Limit
menu item in the Setup Menu.) The statistics include whether the job printed with or without
errors, the time required to print the job, the size (in b ytes) of the job , the requested paper siz e
and paper type, the total number of printed pages, and the number of copies requested.
Select Clear to delete all accumulated job statistics from the optional disk.
Note:
job statistics from the disk if the disk is write protected or read/write protected.
Hex Trace Press
Hex Trace helps isolate the source of a print job problem. With Hex Trace selected, all data
sent to the printer is printed in hexadecimal and character representation. Control codes are
not executed.
To exit Hex Trace, turn the printer off, or reset the printer. To reset the printer, press
<Menu
second line. Press
You cannot print a list of statistics if the disk is read/write protected. You cannot clear
Select
to enter Hex Trace mode.
Menu>
. The Job Menu is displayed. Press
Select
.
Menu>
or
<Menu
until Reset Printer is on the
Menus
or
27
Page 42

Job Menu
The Job Menu is available when the printer is idle, when
the printer is busy processing or printing a job, when a
printer message is displayed, or when the printer is in Hex
Trace mode. Press
Job Menu
Menu item Values
Cancel Job If the printer is processing a job, press
Reset Printer Press
Print Buffer Press
Select
press
The printer resets to the user default setting for each menu item. All downloaded resources
(fonts, macros, symbol sets) in printer memory (RAM) are deleted. All data on the currently
selected host interface is deleted from the interface link buffer.
Note:
This menu item is only available when you enter the Job Menu while the
displayed. The W aiting state occurs if an incomplete job is sent to the printer or if an ASCII job
is being printed. Examples include sending a print screen command from your host computer
or copying a DOS file.
to cancel the job.
Select
to reset the printer.
Before selecting Reset Printer, exit the software application you are using.
Select
to print any data stored in the print buffer.
Menu>
Menu>
<Menu
or
<Menu
or
to open the Job Menu, and then
to open the Job Menu.
Waiting
message is
28
Chapter 2: Changing printer settings
Page 43

Setup Menu
Setup Menu
Menu item Values
Printer Language PCL Emulation
PS 2 Emulation*
The printer language defines how the computer communicates with the printer. Your computer
uses printer languages, such as PCL emulation and PostScript Level 2 emulation, to send
print data to the printer. Setting a printer language as the default does not prevent the
software application from sending print jobs that use the other printer language.
Power Saver Disabled
1…120 (20*)
The Pow er Saver menu item lets you reduce power usage when the printer is idle. The Power
Saver setting determines the length of time (in minutes) the printer waits after a job is printed
before it goes to a reduced power state.
If you have selected a Power Saver value, the message
message on the operator panel display when the printer is in a ready state (after the time
specified by the Power Saver setting has elapsed). This is the printer default. Both messages
indicate the printer is ready to receive jobs.
If your printer is in constant use, select a high setting, such as 120. Under most circumstances, this keeps the printer ready to print with minimum warm-up time. However, it also
uses more energy.
Setting Power Saver to 1 puts the printer in Power Saver mode one minute after it finishes
printing each job. This uses much less energy, but requires more warm-up time f or the printer.
If your printer shares an electrical circuit with room lighting and you notice lights flickering, you
may want to set Power Saver to 1.
If you want a balance between energy consumption and a shorter warm-up period, select a
Power Saver value between 1 and 120 minutes.
Resource Save Off*
On
Use the Setup Menu to configure a variety of printer features.
Power Saver
replaces the
Ready
*Factory default
The Resource Save setting determines what the printer does with resources downloaded to
RAM if the printer receives a job that requires more memory than is available.
If Resource Save is On, the printer retains all permanent downloaded resources for all printer
languages during language changes and printer resets. If the printer runs out of memory, the
message
If Resource Save is Off, the printer retains permanent downloaded resources only until
memory is needed. Then it deletes those resources stored for the inactive printer language.
See page 66 for information about adding memory to your printer.
Memory Full
appears on the display.
Menus
29
Page 44

Setup Menu (continued)
Menu item Values
Download Target RAM*
Flash
Disk
The Download Target menu item specifies where you want to store downloaded resources.
Storing downloaded resources in flash memory or an optional hard disk is permanent storage
rather than the temporary storage that RAM provides. You can add resources to flash memory
or disk until the device is full. Use your software application or the MarkVision printer utility to
download resources to the printer.
The Download Target menu item is only displayed if the flash memory or hard disk is not
defective or Read/Write or Write protected. Disk is not an av ailab l e v alue for Download Target
if Job Buffer Size is set to 100%.
Print Timeout Disabled
1…255 (90*)
The Print Timeout setting determines the time (from 1 to 255 seconds) the printer waits before
printing the last page of a print job that does not end with a command to print the page. The
print timeout counter does not start until the printer displays the
When a print timeout occurs, the printer stores the page in the print buffer.
When Print Timeout is disabled, the printer does not print the last page of a print job until one
of the following occurs:
• The printer receives enough information to fill the page.
• The printer receives a Form Feed command.
• You select Print Buffer from the Job Menu. See page 28 for more information.
Wait Timeout Disabled
15…65535 (40*)
Waiting
message.
*Factory default
30
Chapter 2: Changing printer settings
The Wait Timeout setting determines the amount of time in seconds the printer waits to
receive additional bytes of PostScript data from the computer. When this timeout expires, the
print job is canceled. Select Disabled to turn Wait Timeout off.
The Wait Timeout menu item is only available when using PostScript Level 2 emulation. The
setting has no effect on PCL emulation print jobs.
Page 45

Setup Menu (continued)
Menu item Values
Auto Continue Disabled*
5…255
Set Auto Continue to a value between 5 seconds and 255 seconds to have the printer
automatically continue operating after it detects one of the following errors:
35 Res Save Off Deficient Memory
37 Insufficient Collation Area
38 Memory Full
39 Complex Page
52 Flash Full
53 Unformatted Flash
54 Parallel Error
54 Parallel Option
54 Serial Option
54 Std Par ENA Connection Lost
54 Par
56 Std Parallel Port Disabled
56 Parallel Port
56 Serial
61 Defective Disk
62 Disk Full
63 Unformatted Disk
80 Scheduled Maintenance
Print Jobs on Disk?
If one of these errors occurs and Auto Continue is disabled, the printer stops and waits for
operator intervention. When Auto Continue is set to a numerical value, the printer waits for
operator intervention for the specified length of time and then automatically resumes
processing.
The Auto Continue value has one other purpose. If the operator panel has displayed menu
information for the specified period of time without a button being pressed, the printer
automatically exits the menus and returns to the ready state.
Jam Recovery On
Off
Auto*
Error
x
Error
x
ENA Connection Lost
x
Disabled
x
Port Disabled
x
*Factory default
When Jam Recovery is set Off, the printer does not reprint a page that has jammed.
When Jam Recovery is set On, the printer keeps the image for a printed page until the printer
signals that the page has successfully exited the printer. The printer reprints all jammed
pages.
If Jam Recovery is set to Auto, the printer keeps the image and reprints the page unless the
memory required to hold the page is needed for other printer tasks.
Menus
31
Page 46

Setup Menu (continued)
Menu item Values
Page Protect Off*
Print Area Normal*
On
Set Page Protect On to ensure that an entire page is processed before it is printed. This may
be helpful if you are having trouble printing a page properly because of complex page errors.
If you still cannot print the page after setting Page Protect On, your printer may not have
enough memory to process the page. You may have to reduce the size and number of fonts
on the page, change the Print Quality setting, or increase the installed printer memory.
For most print jobs, you do not need to set Page Protect On. When Page Protect is On,
printing may slow.
Whole Page
Select Whole Page to modify the PCL formatting area and the printer physical print area.
Refer to the
Display Language English*
Français
Deutsch
Italiano
Español
Dansk
Norsk
Nederlands
Svenska
Português
Suomi
Japanese
The Display Language setting determines the language of the text that appears on the
operator panel display.
Alarm Control Off
Single*
Continuous
If you want the printer alarm to sound any time the printer requires intervention, select Single
or Continuous. If you select Single, the printer sounds three quick beeps to let you know
operator intervention is required. If you select Continuous, the printer repeats the three beeps
every ten seconds.
If you do not want the alarm to sound, select Off.
*Factory default
Technical Reference
for more information about printable areas.
32
Chapter 2: Changing printer settings
Page 47

Setup Menu (continued)
Menu item Values
Printer Usage Max Speed*
Timing Adj Gear Only*
Job Buffer Size Disabled*
Max Yield
The Printer Usage setting determines how your printer reacts when it receives mono pages
(pages with only black print). The setting you choose affects the overall print speed and how
frequently you must replace printer supplies.
Select Maximum Speed to ensure the fastest throughput for all jobs. When Maximum Speed
is selected, the printer makes no mechanical changes when it detects a mono page. It
handles all pages as if they require color printing.
Select Maximum Yield to reduce wear of the color toner cartridges and photoconductors and
thereby extend the life of the supplies. If the printer detects a mono page, it physically
removes the color print units from the paper path to reduce wear. When the printer detects a
color page, it must then perform the internal adjustments necessary to synchronize the color
print units with the black print unit (see “Timing Adj”). This may slow overall printing time,
depending on the mix of mono and color pages.
See page 63 for illustrations of the paper path the printer uses for each of the settings. See
page 96 for more information about conserving printer supplies.
Gear and Drum
The Timing Adjustment menu item determines how the printer calibrates itself when you first
turn it on and when switching between mono and color pages. This menu item is only
available when the Printer Usage menu item is set to Max Yield.
If you select Gear and Drum, the printer synchronizes the black and color toner cartridge drive
gears, as well as the black and color photoconductors (drums). This setting guarantees the
best print quality, but slows printing.
Select Gear Only to minimize the time the printer requires for this calibration. You may notice
slightly inconsistent color registration when using this setting.
10…100%
*Factory default
If you hav e an optional disk installed in y our printer, you can allocate a portion of the availab le
disk space for spooling jobs. You can choose any 1% increment between 10 and 100%. You
must select a Job Buffering Size before you can set the Job Buffering menu item On for a
particular port.
Warning:
stored on the disk are deleted.
The Job Buffer Size menu item is only displayed if the installed disk option is formatted and is
not defective or Read/Write or Write protected.
If you change the job buff er size , the printer formats the hard disk, and all resources
Menus
33
Page 48

Setup Menu (continued)
Menu item Values
Job Accounting Off*
On
If you have an optional disk installed in your printer, set Job Accounting On to use the disk to
store statistical information about your printer’s most recent jobs. The statistics include
whether the job printed with or without errors, the time required to print the job, the size (in
bytes) of the job, the requested paper size and paper type, the color settings used, the total
number of printed pages, and the number of copies requested.
To print a listing of all the accumulated statistics, select Print from the Job Acct Stat menu item
in the Tests Menu.
The Job Accounting menu item is not displayed if the installed disk option is defective or
Read/Write or Write protected, or if the Job Buffer Size menu item is set to 100%.
Job Acct Limit Disabled
10…1000*
If you have an optional disk installed in your printer, you can use the disk to store statistical
information about a specified number of jobs. The value you select from the Job Acct Limit
menu item determines the number of jobs for which statistics are stored. Once you reach the
job limit, statistics for the oldest job are deleted as new statistics are stored, maintaining
statistics for the specified number of jobs.
If you select Disabled, the only limit to the number of jobs for which statistics are stored is the
memory available on the disk.
Warning:
disk is discarded.
The Job Acct Limit menu item is not displayed if the installed disk option is defective or Read/
Write or Write protected, or if the Job Buffer Size menu item is set to 100%.
*Factory default
When you change the Job Acct Limit value, all statistical information stored on the
34
Chapter 2: Changing printer settings
Page 49

PCL Emul Menu
Use the PCL Emul Menu to change printer settings that
only affect jobs printed using the PCL emulation printer
language.For information about the PCL emulation commands supported by your printer, refer to the printer Te c h -
nical Reference.
PCL Emul Menu
Menu item Values
Font Source Resident*
Font Name Font position and font name for all fonts in the selected font source
Point Size 1…1008 (in increments of 0.25)
Download
Flash
Disk
All
The Font Source setting determines which fonts appear in the Font Name menu. If a font
source is not installed or does not contain any fonts, it is not listed as a value.
(R0 Courier 10*)
Always select the font source before you select a font name. After you select a font source,
choose the specific font from the Font Name menu item. The printer displays the font source
abbreviation, font ID, and font name f or each font. The font source abbreviation is R for
resident, F for flash, K for disk, and D for download.
To print a font sample list showing all the fonts available for PCL emulation, select Print Fonts
and then PCL Fonts from the Tests Menu.
(12*)
If you chose a scalable typographic font, you can select the point size for the font. Point size
refers to the height of the characters in the font. One point equals approximately 1/72 of an
inch. You can select point sizes from 1 to 1008 in increments of 0.25 points.
Pitch 0.08…100 (in increments of 0.01)
(10*)
If you chose a scalable monospaced font, you can select the font pitch. Pitch refers to the
number of fixed-space characters in a horizontal inch of type. You can select a pitch from 0.08
to 100 characters per inch (cpi) in increments of 0.01 cpi. For non-scalable monospaced f onts ,
the pitch is displayed, but it cannot be changed.
*Factory default
Menus
35
Page 50

PCL Emul Menu (continued)
Menu item Values
Symbol Set List of symbol set IDs and symbol set names
10U PC-8* (Country specific)
12U PC-850* (Country specific)
A symbol set is a set of alphabetic and numeric characters, punctuation, and special symbols
used when printing with a selected font. Symbol sets support the different requirements for
languages or specific applications, such as math symbols for scientific text. The printer
displays only the symbol sets supported for the selected font name.
Orientation Portrait*
Landscape
The Orientation setting determines how the printing is oriented on the page.
In Portrait
orientation, the printing runs parallel to the short edge of the paper.
This is
PORTRAIT
orientation.
This is
PORTRAIT
orientation.
This is
In Landscape
Lines per Page 1…255
60* (U.S.)
64* (EMEA)
The Lines per Page setting determines the number of lines that print on each page. The
setting can range from 1 to 255 lines per page. The printer sets the amount of space between
each line (vertical line spacing) based on the Lines per Page, Paper Size, and Orientation
settings. Select the correct Paper Size and Orientation before setting Lines per Page.
*Factory default
36
Chapter 2: Changing printer settings
orientation, the printing runs parallel to the long edge of the paper.
This is
LANDSCAPE
orientation. This is
LANDSCAPE
orientation.
Page 51

PCL Emul Menu (continued)
Menu item Values
A4 Width 198 mm*
Tray Renumber Assign MP Feeder
203 mm
The A4 Width menu item lets you select the width of the logical page for A4 paper. When you
select 198 mm, the width of the logical page is compatible with Hewlett-Packard LaserJet
printers. When you select 203 mm, the width of the logical page is wide enough to print eighty
10-pitch characters.
Assign Tray 1
Assign Tray 2
Assign Tray 3
Assign Man Paper
Assign Man Env
Off*
0…199
VIEW FACTORY DEF
MPF Default = 8
T1 Default = 1
T2 Default = 4
T3 Default = 5
MPap Default = 2
MEnv Default = 3
*Factory default
Restore Defaults
Yes
No
The Tray Renumber menu item provides software compatibility with other Lexmark Optra
printers, as well as with other manufacturers’ printers. This may be helpful if you have print
jobs or applications previously set up for other printers.
For example, if you want to use a LaserJet 5 printer driver with an Optra Color 1200 with two
optional drawers installed, use the Tray Renumber menu item to set the following values:
Assign MP Feeder = 4
Assign Tray 1= Off
Assign Tray 2 = 5
Assign Man Pap = Off
Assign Man Env = Off
You can then successfully choose the correct paper source with the LaserJet 5 printer driver.
Refer to the
Technical Reference
for more information about assigning source numbers.
Menus
37
Page 52

PCL Emul Menu (continued)
Menu item Values
Auto CR after LF Off*
Auto LF after CR Off*
*Factory default
On
The Auto CR after LF setting determines whether the printer automatically performs a
carriage return after a line feed control command.
On
The Auto LF after CR setting determines whether the printer automatically performs a line
feed after a carriage return control command.
38
Chapter 2: Changing printer settings
Page 53

PostScript Menu
PostScript Menu
Menu item Values
Print PS Error Off*
On
Set Print PS Error On to print PostScript Level 2 emulation errors. If an error occurs, the job
stops processing, the error message prints, and the printer flushes the job.
If Print PS Error is set Off
message.
Font Priority Resident*
Flash/Disk
Use the Font Priority menu item to establish the font search order. Select Resident to search
the printer’s internal memory (ROM) for the requested font before searching flash memory or
an optional hard disk. Select Flash/Disk to search the hard disk, if installed, and then search
flash memory, before searching for the requested fonts in printer memory.
Image Smoothing Off*
On
Use the PostScript Menu to change settings that only affect
jobs printed using the PostScript Level 2 emulation printer
language. For information about the PostScript commands
supported by your printer, refer to the printer Technical
Reference.
and an error occurs, the job flushes without printing the error
*Factory default
When you are printing low resolution images, such as images you download from the World
Wide Web at 72 dpi, set Image Smoothing On. Image Smoothing enhances the contrast and
sharpness of bitmapped images and smooths color transitions. The setting may have no
effect on images downloaded at 300 dpi or higher resolution.
Menus
39
Page 54

Parallel Menu
Parallel Menu
Menu item Values
PCL SmartSwitch Off
On*
Setting PCL SmartSwitch On lets the printer examine the data on the parallel interface
connection and select PCL emulation if the data indicates that is the printer language.
If both PCL SmartSwitch and PS SmartSwitch are set Off, the printer uses the language
specified in the Printer Language menu as the default. If only one SmartSwitch setting is set
Off, the printer uses the language that has its SmartSwitch setting set On as the default.
PS SmartSwitch Off
On*
Use the Parallel Menu to change settings affecting jobs
sent to the printer via a parallel interface port.
When you select Parallel Menu from the operator panel,
Std Parallel appears on the second line of the display.
Select
Press
if you want to change the settings listed in the
following table for the standard parallel port.
If you have an optional parallel port adapter installed,
select Parallel Menu, and then press
Menu>
or
<Menu
to
scroll to Parallel Opt 1 or Parallel Opt 2. When the correct
option is displayed, press
Select
to view the menu items
listed in the following table.
*Factory default
40
Chapter 2: Changing printer settings
Setting PS SmartSwitch On lets the printer examine the data on the parallel interface
connection and select PostScript Level 2 emulation if the data indicates that is the printer
language.
If both PCL SmartSwitch and PS SmartSwitch are set Off, the printer uses the language
specified in the Printer Language menu as the default. If only one SmartSwitch setting is set
Off, the printer uses the language that has its SmartSwitch setting set On as the default.
Page 55

Parallel Menu (continued)
Menu item Values
NPA Mode On
Off
Auto*
NPA is a mode of bidirectional communication that follows the conv entions defined in
Printing Alliance Protocol, A Printer/Host Control Specification
NPA mode requires special processing of the print data. If NPA Mode is set On, the data
received must be in NPA format. If not, it is rejected as bad data. If NPA Mode is set Off, the
printer does not perform any NPA processing. If NPA Mode is set to Auto, the printer examines
the data to determine the format and then processes it in either format.
The NPA Mode setting in the Parallel Menu applies only to the parallel interface connection.
Note:
Changing the NPA Mode setting automatically resets the printer.
Parallel Buffer Disabled
Job Buffering Off*
Auto*
3K to maximum size allowed
You can configure the size of the parallel input buff er to meet the requirements of y our system.
If the limited size of the input buff er is preventing you from continuing work in your application
each time you send a job to the printer, you may want to increase the buffer size.
The maximum size depends on the amount of memory in your printer, the size of the other link
buffers, and whether the Resource Save setting is On or Off. To maximize the range for the
Parallel Buff er siz e, y ou can disab le or reduce the size of the serial, f ax, network, infrared, and
LocalTalk buffers. Choose the Auto setting to let the printer automatically calculate a buffer
size proportional to the total amount of available printer memory. In most cases, Auto is the
recommended setting.
See page 67 for a listing of the default buffer sizes for all the interface ports.
Note:
Changing the Parallel Buffer setting automatically resets the printer.
On
Developed by the NPA
Network
.
*Factory default
If you hav e an optional disk installed in y our printer, you can choose to have jobs that are sent
to the parallel port spool to the disk. Spooling jobs to disk may decrease the time required for
the printer to accept data from an application, and therefore free the application faster for
other work. Since disk memory provides permanent storage, job buffering to disk also
prevents the loss of print job data if the printer loses power.
The Job Buffering menu item is not displayed if the formatted hard disk is defective, is Read/
Write or Write protected, or if Job Buffer Size is set to Disabled in the Setup Menu.
See page 68 for more information about job buffering.
Note:
Changing the Job Buffering setting automatically resets the printer.
Menus
41
Page 56

Parallel Menu (continued)
Menu item Values
Advanced Status Off
On*
If Advanced Status is set On, bidirectional communication is enabled through the parallel
interface.
Protocol Standard
Fastb ytes*
You can select Standard or Fastbytes protocol for the parallel interface. Fastbytes is
compatible with most existing parallel interface implementations. Use Standard only if you
experience parallel interface problems. Refer to the
about the parallel interface.
Honor Init Off*
On
The Honor Init setting determines whether the printer honors hardware initialization requests
from the computer. The computer requests initialization by activating the INIT signal on the
parallel interface. Man y personal computers activate the INIT signal each time the computer is
turned on and off.
Parallel Mode 1 Off
On*
Technical Reference
for more information
Parallel Mode 2 Off
*Factory default
42
Chapter 2: Changing printer settings
This setting enables or disables the pull up resistors on the parallel port signals. It is useful for
personal computers that have open collector outputs on the parallel port signals. Set Parallel
Mode 1 On to disable the resistors or Off to enable the resistors.
Refer to the
On*
This setting determines if the parallel port data is sampled on the leading or trailing edge of
strobe. If Parallel Mode 2 is set On, the parallel port data is sampled on the leading edge of
strobe. The parallel port data is sampled on the trailing edge of strobe if Parallel Mode 2
Off.
Refer to the
Technical Reference
Technical Reference
for more information about this setting.
for more information about this setting.
is set
Page 57

Serial Menu
Menu item Values
PCL SmartSwitch Off
On*
Setting PCL SmartSwitch On lets the printer examine the data on the serial interface
connection and select PCL emulation if the data indicates that is the printer language.
If both PCL SmartSwitch and PS SmartSwitch are set Off, the printer uses the language
specified in the Printer Language menu as the default. If only one SmartSwitch setting is set
Off, the printer uses the language that has its SmartSwitch setting set On as the default.
PS SmartSwitch Off
On*
Serial Menu
Use the Serial Menu to change settings affecting jobs sent
to the printer via the serial interface port. This menu is
only available if an optional tri-port adapter is installed in
your printer.
When you select Serial Menu from the operator panel,
Serial Option 1 or Serial Option 2 appears on the second
line of the display, depending on whether a tri-port
adapter is installed in connector 1, connector 2, or both.
When the correct option is displayed, press
Select
to view
the menu items listed in the following table.
Setting PS SmartSwitch On lets the printer examine the data on the serial interface
connection and select PostScript Level 2 emulation if the data indicates that is the printer
language.
If both PCL Smartswitch and PS Smartswitch are set Off, the printer uses the language
specified in the Printer Language menu as the default. If only one SmartSwitch setting is set
Off, the printer uses the language that has its SmartSwitch setting set On as the default.
NPA Mode On
Off
Auto*
NPA is a mode of bidirectional communication that follows the conv entions defined in
Printing Alliance Protocol, A Printer/Host Control Specification
NPA mode requires special processing of the print data. If NPA Mode is set On, the data
received must be in NPA format. If not, it is rejected as bad data. If NPA Mode is set Off, the
printer does not perform any NPA processing. If NPA Mode is set to Auto, the printer examines
the data to determine the format and then processes it in either format.
The NPA Mode setting in the Serial Menu applies only to the serial interface connection.
Note:
*Factory default
Developed by the NPA
Changing the NPA Mode setting automatically resets the printer.
Menus
Network
.
43
Page 58

Serial Menu (continued)
Menu item Values
Serial Buffer Disabled
Auto*
3K to maximum size allowed
You can configure the size of the serial input buffer to meet the requirements of your system.
If the limited size of the input buff er is preventing you from continuing work in your application
each time you send a job to the printer, you may want to increase the buffer size.
The maximum size depends on the amount of memory in your printer, the size of the other link
buffers, and whether the Resource Save setting is On or Off. To maximize the range for the
Serial Buffer size, you can disable or reduce the size of the parallel, network, infrared,
LocalTalk, fax, or other serial buffer. Choose the Auto setting to let the printer automatically
calculate a buffer size proportional to the total amount of available printer memory. In most
cases, Auto is the recommended setting.
See page 67 for a listing of the default buffer sizes for all the interface ports.
Note:
Job Buffering Off*
On
If you hav e an optional disk installed in y our printer, you can choose to have jobs that are sent
to the serial port spool to the disk. Spooling jobs to disk may decrease the time required for
the printer to accept data from an application, and therefore free the application faster for
other work. Since disk memory provides permanent storage, job buffering to disk also
prevents the loss of print job data if the printer loses power.
The Job Buffering menu item is not displayed if the formatted hard disk is defective, is Read/
Write or Write protected, or if Job Buffer Size is set to Disabled in the Setup Menu.
See page 68 for more information about job buffering.
Note:
RS-232/RS-422 RS-232*
RS-422
Changing the Serial Buffer setting automatically resets the printer.
Changing the Job Buffering setting automatically resets the printer.
Choose the serial communication configuration for your printer. If RS-422 is selected, Serial
Protocol is automatically set to XON/XOFF.
RS-422 Polarity Normal*
*Factory default
44
Chapter 2: Changing printer settings
Reverse
If you select RS-422 for the serial communication configuration, you can then select Normal
Reverse polarity.
or
Page 59

Serial Menu (continued)
Menu item Values
Serial Protocol DTR* (hardware handshaking)
Robust XON Off*
Baud 1200
DTR/DSR (hardware handshaking)
XON/XOFF (software handshaking)
XON/XOFF/DTR (combined handshaking)
XON/XOFF/DTR/DSR (combined handshaking)
The printer supports hardware handshaking, software handshaking, and combined hardware
and software handshaking, as indicated in the list of values for this menu item.
Refer to the
On
This printer setting only applies to the serial port if Serial Protocol is set to XON/XOFF. When
Robust XON is set On, the printer sends a continuous stream of XONs to the host computer
to indicate that the serial port is ready to receive more data.
2400
4800
9600*
19200
38400
57600
115200
Technical Reference
for more information about serial interface.
Data Bits 7
*Factory default
If you use a serial interface, you must select the rate at which data is being sent to or from
your computer. Refer to the
values.
8*
If you use serial interface, select the number of data bits that are sent in each transmission
frame. Refer to the
Technical Reference
Technical Reference
for more information about data bits.
for information about the range of baud
Menus
45
Page 60

Serial Menu (continued)
Menu item Values
Parity Even
Odd
None*
Ignore
This setting lets you select the parity for serial input and output data frames. Refer to the
Technical Reference
Honor DSR Off*
On
The Honor DSR setting determines whether the printer uses its data set ready (DSR) signal.
DSR is one of the handshaking signals for most serial interface cables. The serial interface
uses DSR to distinguish data sent by the computer from data created by electrical noise in the
serial cable. This electrical noise can cause stray characters to print. Set Honor DSR On to
prevent stray characters from printing.
*Factory default
for more information about parity.
46
Chapter 2: Changing printer settings
Page 61

Network Menu
Network Menu
Menu item Values
PCL SmartSwitch Off
On*
Setting PCL SmartSwitch On lets the printer examine the data on the network interface
connection and select PCL emulation if the data indicates that is the printer language.
If both PCL SmartSwitch and PS SmartSwitch are set Off, the printer uses the language
specified in the Printer Language menu as the default. If only one SmartSwitch setting is set
Off, the printer uses the language that has its SmartSwitch set On as the default.
PS SmartSwitch Off
On*
Use the Network Menu to change settings affecting jobs
sent to the printer via the network port. This menu is only
available if an optional network adapter is installed in
your printer.
When you select Network Menu from the operator panel,
Network Option 1 or Network Option 2
appears on the
second line of the display, depending on whether a network adapter is installed in connector 1, connector 2, or
both connectors. When the correct option is displayed on
the second line, press
Select
to view the menu items listed
in the following table.
Setting PS SmartSwitch On lets the printer examine the data on the network interface
connection and select PostScript Level 2 emulation if the data indicates that is the printer
language.
If both PCL SmartSwitch and PS SmartSwitch are set Off, the printer uses the language
specified in the Printer Language menu as the default. If only one SmartSwitch setting is set
Off, the printer uses the language that has its SmartSwitch setting set On as the default.
NPA Mode Off
Auto*
NPA is a mode of bidirectional communication that follows the conv entions defined in
Printing Alliance Protocol, A Printer/Host Control Specification
NPA mode requires special processing of the print data. If NPA Mode is set On, the data
received must be in NPA format. If not, it is rejected as bad data. If NPA Mode is set Off, the
printer does not perform any NPA processing. If NPA Mode is set to Auto, the printer examines
the data to determine the format and then processes it in either format.
The NPA Mode setting in the Network Menu applies only to the network interface connection.
Note:
*Factory default
Developed by the NPA
Changing the NPA Mode setting automatically resets the printer.
Menus
Network
.
47
Page 62

Network Menu (continued)
Menu item Values
Network Buffer Auto*
Job Buffering Off*
Network
*Factory default
Setup Values for this menu item are supplied by the specific network adapter. Open the menu to see
x
3K to maximum size allowed
You can configure the size of the network input buffer to meet the requirements of your
system. If the limited size of the input buffer is preventing you from continuing work in your
application each time you send a job to the printer, you may want to increase the buffer size.
The maximum size depends on the amount of memory in your printer, the size of the other link
buffers, and whether the Resource Save setting is On or Off. To maximize the range for the
Network Buffer size, you can disable or reduce the size of the parallel, serial, fax, infrared,
LocalTalk, or other network buffer. Choose the Auto setting to let the printer automatically
calculate a buffer size proportional to the total amount of available printer memory. In most
cases, Auto is the recommended setting.
See page 67 for a listing of the default buffer sizes for all the interface ports.
Note:
Changing the Network Buffer setting automatically resets the printer.
On
If you hav e an optional disk installed in y our printer, you can choose to have jobs that are sent
to the network port spool to the disk. Spooling jobs to disk may decrease the time required for
the printer to accept data from an application, and therefore free the application faster for
other work. Since disk memory provides permanent storage, job buffering to disk also
prevents the loss of print job data if the printer loses power.
The Job Buffering menu item is not displayed if the formatted hard disk is defective, is Read/
Write or Write protected, or if Job Buffer Size is set to Disabled in the Setup Menu.
See page 68 for more information about job buffering.
Note:
Changing the Job Buffering setting automatically resets the printer.
the available values.
For more information, refer to the documentation that came with your network adapter.
48
Chapter 2: Changing printer settings
Page 63

Infrared Menu
Infrared Menu
Menu item Values
Infrared Port Disabled*
IR Option 1
IR Option 2
Select IR Option 1 or IR Option 2 to activate the infrared port on the optional tri-port adapter.
If you have a tri-port adapter installed in both connector 1 and connector 2, you can only
activate one infrared port. If you select Disabled, all of the other menu items in the Infrared
Menu are hidden.
PCL SmartSwitch Off
On*
Setting PCL SmartSwitch On lets the printer examine the data on the infrared interface
connection and select PCL emulation if the data indicates that is the printer language.
If both PCL SmartSwitch and PS SmartSwitch are set Off, the printer uses the language
specified in the Printer Language menu as the default. If only one SmartSwitch setting is set
Off, the printer uses the language that has its SmartSwitch setting set On as the default.
PS SmartSwitch Off
On*
Use the Infrared Menu to change settings affecting jobs
sent to the printer via the infrared interface port. This
menu is only available if an optional tri-port adapter is
installed in your printer.
If the Infrared Port menu item is set to Disabled, all of the
other menu items in the Infrared Menu are hidden.
*Factory default
Setting PS SmartSwitch On lets the printer examine the data on the network infrared
connection and select PostScript Level 2 emulation if the data indicates that is the printer
language.
If both PCL SmartSwitch and PS SmartSwitch are set Off, the printer uses the language
specified in the Printer Language menu as the default. If only one SmartSwitch setting is set
Off, the printer uses the language that has its SmartSwitch setting set On as the default.
Menus
49
Page 64

Infrared Menu (continued)
Menu item Values
NPA Mode Off
Auto*
NPA is a mode of bidirectional communication that follows the conv entions defined in
Printing Alliance Protocol, A Printer/Host Control Specification
NPA mode requires special processing of the print data. If NPA Mode is set On, the data
received must be in NPA format. If not, it is rejected as bad data. If NPA Mode is set Off, the
printer does not perform any NPA processing. If NPA Mode is set to Auto, the printer examines
the data to determine the format and then processes it in either format.
The NPA Mode setting in the Infrared Menu applies only to the infrared interface connection.
Note:
Changing the NPA Mode setting automatically resets the printer.
Infrared Buffer Disabled
Job Buffering Off*
Auto*
5K to maximum size allowed
You can configure the size of the infrared input buffer to meet the requirements of your
system. If the limited size of the input buffer is preventing you from continuing work in your
application each time you send a job to the printer, you may want to increase the buffer size.
The maximum size depends on the amount of memory in your printer, the size of the other link
buffers, and whether the Resource Save setting is On or Off. To maximize the range for the
Infrared Buffer size , you can disab le or reduce the siz e of the parallel, netwo rk, serial, fax, and
LocalTalk buffers. Choose the Auto setting to let the printer automatically calculate a buffer
size proportional to the total amount of available printer memory. In most cases, Auto is the
recommended setting.
See page 67 for a listing of the default buffer sizes for all the interface ports.
Note:
Changing the Infrared Buffer setting automatically resets the printer.
On
Developed by the NPA
Network
.
*Factory default
50
Chapter 2: Changing printer settings
If you hav e an optional disk installed in y our printer, you can choose to have jobs that are sent
to the infrared port spool to the disk. Spooling jobs to disk may decrease the time required for
the printer to accept data from an application, and therefore free the application faster for
other work. Since disk memory provides permanent storage, job buffering to disk also
prevents the loss of print job data if the printer loses power.
The Job Buffering menu item is not displayed if the formatted hard disk is defective, is Read/
Write or Write protected, or if Job Buffer Size is set to Disabled in the Setup Menu.
See page 68 for more information about job buffering.
Note:
Changing the Job Buffering setting automatically resets the printer.
Page 65

Infrared Menu (continued)
Menu item Values
Window Size Auto*
Transmit Delay Auto*
Max Baud Rate 2400
1
The Window Size setting specifies the maximum number of infrared frames the printer can
receive before it must send an acknowledgment to the host computer. If Auto is selected, the
printer automatically sets the window size during power-on to maximize link performance.
In most cases, Auto is the recommended setting. If yo u hav e trouble printing using the infrared
port, changing the Window Size setting to 1 may resolve the problem.
None
1…15
The Transmit Delay setting defines the amount of time the printer must wait before transmitting meaningful infrared data to the host computer, as well as the amount of time the
printer requests the host computer to wait before it transmits infrared data. If Auto is selected,
the printer automatically sets the Transmit Delay value during power-on to maximize link
performance.
In most cases, Auto is the recommended setting. If yo u hav e trouble printing using the infrared
port, selecting a high Transmit Delay setting, such as 15, may resolve the problem.
9600
19200
38400
57600
115200
576000
1152000*
4000000
*Factory default
The maximum baud rate possible f or both the printer and the infrared adapter is automatically
set during power-on. However, if your printer is situated in a bright or highly reflective
environment, you may experience intermittent communication problems. If you do, select a
lower baud rate for the infrared connection.
Menus
51
Page 66

LocalTalk Menu
LocalTalk Menu
Menu item Values
LocalTalk Port Disabled*
LTalk Option 1
LTalk Option 2
Select LTalk Option 1 or LTalk Option 2 to activate the LocalTalk port on the optional tri-port
adapter. If you have a tri-port adapter installed in both connector 1 and connector 2, you can
only activate one LocalTalk port. If you select Disabled, all of the other menu items in the
LocalTalk Menu are hidden.
PCL SmartSwitch Off
On*
Setting PCL SmartSwitch On lets the printer examine the data on the LocalTalk interface
connection and select PCL emulation if the data indicates that is the printer language.
If both PCL SmartSwitch and PS SmartSwitch are set Off, the printer uses the language
specified in the Printer Language menu as the default. If only one SmartSwitch setting is set
Off, the printer uses the language that has its SmartSwitch setting set On as the default.
PS SmartSwitch Off
On*
Use the LocalTalk Menu to change settings affecting jobs
sent to the printer via the LocalTalk port. This menu is
only available if an optional tri-port adapter is installed in
your printer.
If the LocalTalk Port menu item is set to Disabled, all of
the other menu items in the LocalTalk Menu are hidden.
*Factory default
52
Chapter 2: Changing printer settings
Setting PS SmartSwitch On lets the printer examine the data on the specified LocalTalk
interface connection and select PostScript Level 2 emulation if the data indicates that is the
printer language.
If both PCL SmartSwitch and PS SmartSwitch are set Off, the printer uses the language
specified in the Printer Language menu as the default. If only one SmartSwitch setting is set
Off, the printer uses the language that has its SmartSwitch setting set On as the default.
Page 67

LocalTalk Menu (continued)
Menu item Values
NPA Mode Off
Auto*
NPA is a mode of bidirectional communication that follows the conv entions defined in
Printing Alliance Protocol, A Printer/Host Control Specification
NPA mode requires special processing of the print data. If NPA Mode is set On, the data
received must be in NPA format. If not, it is rejected as bad data. If NPA Mode is set Off, the
printer does not perform any NPA processing. If NPA Mode is set to Auto, the printer examines
the data to determine the format and then processes it in either format.
The NPA Mode setting in the LocalTalk Menu applies only to the LocalTalk interface
connection.
Note:
Changing the NPA Mode setting automatically resets the printer.
LocalTalk Buffer Disabled
Job Buffering Off*
Auto*
6K to maximum size allowed
You can configure the size of the LocalTalk input buffer to meet the requirements of your
system. If the limited size of the input buffer is preventing you from continuing work in your
application each time you send a job to the printer, you may want to increase the buffer size.
The maximum size depends on the amount of memory in your printer, the size of the other link
buffers, and whether the Resource Save setting is On or Off. To maximize the range for the
LocalTalk Buffer size, you can disable or reduce the size of the parallel, serial, fax, network,
and infrared buffers. Choose the Auto setting to let the printer automatically calculate a buffer
size proportional to the total amount of available printer memory. In most cases, Auto is the
recommended setting.
See page 67 for a listing of the default buffer sizes for all the interface ports.
Note:
Changing the LocalTalk Buffer setting automatically resets the printer.
On
Developed by the NPA
Network
.
*Factory default
If you hav e an optional disk installed in y our printer, you can choose to have jobs that are sent
to the LocalTalk port spool to the disk. Spooling jobs to disk may decrease the time required
for the printer to accept data from an application, and therefore free the application faster for
other work. Since disk memory provides permanent storage, job buffering to disk also
prevents the loss of print job data if the printer loses power.
The Job Buffering menu item is not displayed if the formatted hard disk is defective, is Read/
Write or Write protected, or if Job Buffer Size is set to Disabled in the Setup Menu.
See page 68 for more information about job buffering.
Note:
Changing the Job Buffering setting automatically resets the printer.
Menus
53
Page 68

LocalTalk Menu (continued)
Menu item Values
NPA Hosts 1…10 (2*)
Use this setting to specify the maximum number of NPA hosts that can register for NPA printer
alerts. When the number of hosts registered for NPA alerts exceeds the quantity specified by
the NPA Hosts menu item, any additional hosts attempting to register for alerts are ignored.
Note:
Changing the NPA Hosts setting automatically resets the printer.
LocalTalk Name Lexmark (Default Name)
This setting identifies the printer model name stored in printer memory. It cannot be modified
from the printer operator panel.
LocalTalk Addr 0.0.0 (LocalTalk Node Number)
The LocalTalk Address identifies the LocalTalk Node number assigned to the printer. It cannot
be modified from the printer operator panel.
LocalTalk Zone *
*Factory default
(Zone name provided by LocalTalk network)
This setting identifies the LocalTalk Zone. The setting * indicates that no particular zone is
specified, and therefore all zones are valid. This setting cannot be modified from the printer
operator panel.
54
Chapter 2: Changing printer settings
Page 69

Fax Menu
Menu item Values
Fax Port Disabled*
Ser Option 1
Ser Option 2
Select Ser Option 1 or Ser Option 2 to activate the fax function for the specified serial port. If
you have a tri-port adapter installed in both connector 1 and connector 2, you can only
activate one fax port. If you select Disabled, all of the other menu items in the Fax Menu are
hidden.
Fax Baud 1200
2400
4800
9600
19200*
38400
57600
115200
Fax Menu
Use the Fax Menu to configure a serial port to receive
faxes from a class 1 fax modem connected to the port. This
menu is only available if an optional tri-port adapter is
installed in your printer.
If the Fax Port menu item is set to Disabled, all of the other
menu items in the Fax Menu are hidden.
Fax Data Bits 7
*Factory default
Select the baud appropriate for the fax modem you attached to the serial port.
8*
Select the number of data bits that the fax modem sends in each transmission frame.
Menus
55
Page 70

Fax Menu (continued)
Menu item Values
Fax Parity Even
Odd
None*
Ignore
This setting lets you select the parity for the input and output data frames. Refer to the
Technical Reference
Fax Buffer Disabled
*Factory default
Auto*
3K to maximum size allowed
You can configure the size of the fax input buffer to meet the requirements of your system. If
the limited size of the input buffer is preventing you from continuing work in your application
each time you receive a fax, you may want to increase the buffer size.
The maximum size depends on the amount of memory in your printer, the size of the other link
buffers, and whether the Resource Save setting is On or Off. To maximize the range for the
Fax Buffer size, you can disable or reduce the size of the parallel, serial, network, infrared, or
LocalTalk buffer . Choose the Auto setting to let the printer automatically calculate a buffer size
proportional to the total amount of available printer memory. In most cases, Auto is the recommended setting.
See page 67 for a listing of the default buffer sizes for all the interface ports.
Note:
Changing the Fax Buffer setting automatically resets the printer.
for more information about parity.
56
Chapter 2: Changing printer settings
Page 71

3
Using color
Your printer provides you with outstanding color printing
technology for many business office uses, such as business
charts, photographic images, or spot colors.
Color can give life to your printed material, adding excitement, realism, importance, clarity, or whatever feeling you
want to convey. You can enhance your use of color by
understanding how color printing works and how to use
it most effectively.
This chapter provides information about selecting, using,
and adjusting color for desktop printing.
Communicating
in color
Today’s fast-paced, competitive business and professional
climate demands an accurate, concise way to communicate and exchange information. One of the most effective
visual communication tools is color. By using color to convey information, you reduce the amount of verbal explanation needed to get your message across. Applications
for communicating in color are endless. They include:
• Business internal and external documents
• Charts and graphs
• Promotional literature
• Presentation graphics
• Overhead transparencies
• Product manuals
• Sales brochures
• Scientific image printing
• Architectural drawings
Communicating in color
57
Page 72

Guidelines
Follow these guidelines when using color:
• Less is better when using color. Overusing color can
minimize its impact.
• Be consistent with your color use to make your message meaningful and easy to understand. For example, use the same color in a document to highlight
similar concepts.
• Use the brightest color to draw attention to the most
important point.
• When adding color to a business document, use the
color for meaning and clarification, not decoration.
• Avoid colors that may offend or confuse your audience.
• In a pie chart, fill each slice with a solid color. Draw
attention to the most important slice with the
brightest color.
• When using color on transparencies, use vivid, saturated colors. Use high contrast colors to attract
attention to major points.
• Select colors that look good together and reinforce
your message.
58
Defining color
Chapter 3: Using color
• Avoid red and green combinations. These colors are
hard for people with red/green color blindness to
distinguish.
For more information about color, refer to the numerous
books available in the marketplace and to the documentation that is included with your software application.
Because perception of color is subjective, no two people
see color in exactly the same way. In the desktop printing
environment, how we perceive color also depends on
whether we are looking at color on a computer screen or
printed on paper.
Knowing how color is produced gives you a clearer
understanding of color and how it works with your color
printer. For example, light coming from a computer screen
Page 73

is additive color, and light reflected from ink or toner on a
page is subtractive color.
Additive colors
Subtractive colors
The colors displayed on computer screens are combinations of red, green, and blue (RGB). Additive color is produced when selected hues in the color spectrum of white
light are combined (or added) to change how colors are
emphasized. Combinations of red, green, and blue are
additive colors.
• Because red, green, and blue are the foundation for
building all other additive colors, they are called
primary additive colors.
• White is a combination of each of the primary colors. You can see an example of this in a beam of
pure white light striking a prism, separating into a
rainbow of color.
Printers use the colors cyan, magenta, and yellow (CMY).
Subtractive color is produced when white light strikes a
pigment that absorbs (or subtracts) most of the hues and
reflects only one (or a few) back to the eye. In addition to
human-made subtractive pigments (such as ink or toner
on paper, or dye in fabric), most natural pigments are subtractive.
• Combinations of cyan, magenta, and yellow are
subtractive colors.
• Because cyan, magenta, and yellow are the foundation for building all other subtractive colors, they
are called primary subtractive colors.
• Black is produced by overlaying a mixture of each
of the subtractive primary colors. Black produced
this way is not a pure black; it is called process
black, or composite black. (Your printer can print
with pure black by using the black toner.)
Defining color
59
Page 74

Color tools
Since no two people see color in exactly the same way, you
need to match your colors to standard colors. There are
several tools to help balance your own perception of color
with measurable color standards.
In your printer
In your software
You can print color samples from your printer by selecting
Color Samples from the Tests Menu. The sample prints
using the printer’s Print Quality and Color Correction settings. (See “Adjusting color” on page 61 for more information.) The RGB and CMY percentages also print on the
chart for easy reference. Use this multipage color sample
to select colors when using applications that let you set
RGB or CMY palette colors.
Most software applications have a color chart in the software that lets you select and adjust colors from within the
software. However, since your computer screen uses an
additive RGB color process and printers use a subtractive
CMY process, what you see on the screen is often not what
you see when you print. Color management systems seek
to minimize this problem. Still, even with color correction,
there are many colors you can see on your screen, particularly bright blues and greens, which cannot be reproduced
on any four-color printer.
Most software applications let you make some color selections and adjustments from within the software. Be aware
that changes made in an application override changes
made from the printer operator panel. The “Color Correction” table on page 61 may help you determine the best
method to reproduce the colors in your software applications.
60
If you are using color correction from your software or
operating system, make sure the printer’s Color Correction menu item is set to CMYK.
Chapter 3: Using color
Page 75

Adjusting color
You can make color adjustments from your Lexmark
printer driver, from the MarkVision printer utility, and
from the printer operator panel. Lexmark posts updates
about color support on its web site (www.lexmark.com).
See page 141 for more information about online services.
From the operator panel, select Color Menu. The following menu items are available to customize your color
printing:
• Color Correction
• Print Quality
• Ton er Sav er
The values for each menu item are defined in the following tables. Each table indicates:
•What you can adjust
•Why you would make the adjustment
•When you would want to make the adjustment
The settings you choose may depend on the types of jobs
you print. For example, jobs full of images—visual data
typically scanned from original sources external to the PC,
such as photographs or video frames—may require settings different from those you would choose for business
graphics, such as charts and graphs electronically generated from a software application.
Color Correction
What Why When
Vivid (default) To print brighter colors. Vivid adjusts CMYK
components, resulting in more saturated
colors.
To adjust the cyan to magenta range of
colors to be more blue.
RGB To print with no color correction from RGB
applications.
CMYK To print with no color correction from CMYK
applications.
• You need sharp overhead
• Printed colors appear faded or washed
Your printed blues are too purple.
You are using an application that does its
own color correction in RGB color.
You are using a software application that
does its own color correction.
transparencies, especially when creating
transparencies that contain graphics.
out.
Adjusting color
61
Page 76

Color Correction (continued)
What Why When
Black & White To print color images in a monochrome
gray scale.
Display To print colors that approximate the colors
on a standard computer screen.
• You want to print a draft of a color
• You’re printing a color document for
• You want to preserve your color toner
• You want your printed colors to look
• Your application does not do its own
Print Quality
What Why When
Graphics Optimal for most business printing,
providing the fastest speed, low est memory
usage, and optimal print quality for
documents containing text and graphics.
Images To print enhanced images without signifi-
cantly affecting the memory requirements
or print speed for a particular job.
1200 Image Quality Optimizes the print quality of images on the
page. This setting provides outstanding text
and graphics quality, while enhancing fine
detail in all image data.
• You want high quality output for text and
• You want to print complex jobs fast.
• You need to collate large jobs.
You’re printing documents that contain
image data and:
You’re printing documents that contain
image data and:
document in shades of black and white.
photocopying.
and thereby reduce printing expenses.
similar to your computer screen.
color correction and defines colors as
RGB (red, green, blue), HLS (hue,
lightness, saturation), or HSB (hue,
saturation, brightness).
business graphics.
– You need the best combination of
speed, memory usage, and image
quality.
– You don’t have sufficient memory
installed to print the job using the
1200 Image Quality setting.
– You want the printer to choose which
images are enhanced.
– You want the best print quality
possible for a job that incorporates
image data.
– You want sharp edges on small
graphic objects.
– Quality output is more important than
printing speed.
– You have sufficient memory installed
in your printer to print your jobs with
1200 Image Quality selected.
62
Chapter 3: Using color
Page 77

Toner Saver
What Why When
Off Enhances the quality of printed text by
smoothing the edges of individual
characters.
On Reduces toner consumption without
markedly affecting the quality of the printed
output.
• You need the best possib le quality for
• You value quality over economy.
• You want to conserve your supply of
• You’re printing drafts or review copies
• Your jobs consist largely of text and
text and business graphics.
toner and reduce printing costs.
that don’t require fully saturated colors.
graphics, which are aff ected the least by
setting Toner Saver On.
Printing color and
mono jobs
Maximum Speed
(paper path for color and mono pages)
Black Yellow Cyan Magenta
Transport belt
You can choose whether your printer handles all pages as
if they contain color, or adjusts mechanically when it recognizes a mono page—one which requires black toner
only. The adjustment for mono jobs significantly slows
overall printing time, but also extends the life of printer
supplies. If you’re interested in conserving printer supplies and reducing the overall cost of printing, you may
want to change the Printer Usage setting in the Setup
Menu to Maximum Yield.
When shipped from the factory, your printer is designed
to deliver the fastest possible printing of all jobs: color and
mono. When the Printer Usage menu item is set to the
default, Maximum Speed, the printer does not make any
mechanical adjustments when it detects mono pages.
Although it lays only black toner on the page, it does not
remove the color print units from the paper path. This
results in fast throughput, but at the cost of some wear on
the color photoconductors and the developer rolls within
the color toner cartridges.
Printing color and mono jobs
63
Page 78

Maximum Yield
(paper path for mono pages)
Black Yellow Cyan Magenta
Transport belt
If you set Printer Usage to Maximum Yield, the printer
drops the transport belt when it detects a mono page and
thereby removes the color print units from the paper path.
This extends the life of the color photoconductors and
color toner cartridges. However, when the printer detects
a color page, it must then lift the transport belt back into
the color position, and calibrate the four photoconductors
and the toner cartridge drive gears to ensure consistent
color registration. This adds time to your printing.
If you choose Maximum Yield, the Timing Adjustment
menu item (also in the Setup Menu) lets you specify which
calibrations you want the printer to perform when it
adjusts from a mono job to a color job. The printer also
performs these same calibrations each time you turn the
printer on and each time you open and close the top cover.
The Timing Adjustment setting you choose may affect the
overall printing time, as well as print quality. See page 33
for more information.
For more suggestions on ways to conserve printer supplies, see page 96.
64
Chapter 3: Using color
Page 79

4
Managing
memory
Printer memory
EDO memory
Note:
designed for other Lexmark
laser printers do not work with
your printer.
Memory options
The Optra Color 1200 printer ships with at least 32MB of
standard memory. To determine the amount of memory
currently installed in your printer, select Print Menus from
the Tests Menu. The total installed memory appears on the
printout. For more information about printing the menu
settings page, see page 8.
Your printer requires Extended Data Out (EDO) memory.
EDO memory is a memory chip technology that improves
memory performance 10 to 15% over other types of memory. Your printer has been designed to use EDO memory
and take advantage of the performance increase it offers.
The memory cards shipped in your printer, as well as the
Lexmark printer memory options available for your
printer model, use the EDO memory technology. Unpredictable results may occur if you attempt to operate your
printer with memory other than EDO memory installed.
When purchasing memory for your printer, make sure the
EDO memory card meets the following criteria:
• 50ns
• 72 pin
• No parity
Printer memory
65
Page 80

Adding memory
You may choose to install optional memory to increase the
printer memory to a maximum of 128MB. You must install
memory cards in pairs, each with the same amount of
memory. For example, to install 32MB of memory you
must install two 16MB cards. You can install up to 128MB
of memory by installing four 32MB memory cards in your
printer.
Note:
designed for other Lexmark
laser printers do not work with
your printer.
Memory options
Solving memory
problems
Lexmark offers two memory options for the Optra
Color 1200 printer: a 32MB option (two 16MB memory
cards) and a 64MB option (two 32MB memory cards). For
installation instructions, refer to the Setup Guide.
Additional memory allows the printer to print complex
jobs on large paper, collate large jobs, and operate more
efficiently. You can also download fonts and macros to
printer memory. However, you should consider this type
of memory temporary storage: anything stored in printer
memory is lost when the printer power is turned off.
If your printer encounters a memory shortage when trying to print a job, it may post a
38 Memory Full
ing on the task it’s trying to complete. Refer to “Understanding printer messages” on page 100 for more
information about these and other messages.
If these messages appear frequently, you probably want to
install additional printer memory. If they only occur rarely,
try reducing the:
• Size of the formatted page
39 Complex Page
, or
37 Insufficient Collation Area
error message, depend-
,
66
• Number of pages in the job
• Number of fonts or graphics on each page
• Size of scalable fonts used in the document
• Number of fonts or macros downloaded to printer
memory
Chapter 4: Managing memory
Page 81

You may also want to set the Print Quality menu item to
Graphics or Images, since the 1200 Image Quality setting
requires more memory. If Complex Page errors persist, try
setting Page Protect On from the Setup Menu. If you experience frequent Memory Full errors, you may want to set
Resource Save Off.
Allocating memory
A portion of printer memory is reserved for input buffers
that hold print jobs sent from your software application.
Your printer has an input buffer for each interface (parallel, serial, network, LocalTalk, or infrared). You can change
the amount of memory allocated to each buffer, depending on your system requirements. For more information
about using printer menus to allocate memory for each
interface, see the description of the various interface
menus in Chapter 2.
The size of the input buffers varies with the amount of
memory installed in the printer. The following table lists
the default size of the input buffers for each interface. If
your printer is not using a particular interface, the allocated memory is reserved for job processing.
For more detailed information about these input buffers
and memory allocation, refer to the Technical Reference.
Default input buffer size
Installed
memory Each parallel port Each serial port Each network port LocalTalk port Infrared port
32MB 192K
64MB
96MB
128MB
1
1MB allocated to standard parallel port if no optional adapter is installed.
1
2MB 300K 2MB 2MB 300K
150K 1MB 1MB 150K
Printer memory
67
Page 82

Flash memory
Your printer comes with 4MB of standard flash memory. If
you frequently download fonts, macros, forms, or symbol
sets to your printer, you may want to use flash memory
storage, rather than RAM. Resources stored in flash memory are not lost when the printer power is turned off or the
printer is reset.
Hard disk
Job buffering
If you have a large number of permanent resources you’d
like to download to your printer, you may want to install a
hard disk option. The hard disk works much like flash
memory, but has a larger storage capacity for downloaded
resources. You can also use the hard disk for job buffering,
collating large jobs, and gathering job statistics.
For instructions on installing a hard disk, refer to the
printer Setup Guide.
You can partition a portion of the hard disk for job buffering. In some cases, spooling jobs to a disk may decrease
the time required for the printer to accept the print job
data from the application. The job also remains stored in
the disk until the entire job prints. Since disk memory acts
as permanent storage, that means your jobs remain secure
in the event of a power failure.
You can enable or disable job buffering for each of the
available printer ports (parallel, serial, fax, network,
LocalTalk, and infrared) from the printer operator panel
menus or from MarkVision. Use the Job Buffer Size menu
item in the Setup Menu to set the percentage of the disk
you want to use for job buffering.
68
Collating jobs
Chapter 4: Managing memory
If you are collating a large job and the printer memory is
not sufficient, the printer automatically uses storage area
available on an installed hard disk to finish collating the
job. See page 22 for more information about collation.
Page 83

Storing job statistics
You can also use an installed hard disk to gather statistics
about a specified number of the most recent print jobs.
The statistics include whether the job printed with or
without errors, the time required to print the job, the size
(in bytes) of the job, the requested paper size and paper
type, the color settings used, the total number of printed
pages, and the number of copies requested.
See page 34 for more information about setting up your
printer to gather job statistics and printing the accumulated data. Or, if you’re using the MarkVision utility, refer
to the MarkVision online Help or the MarkVision documentation on the printer CD.
Managing
resources
downloaded to
flash or disk
Use the Mark Vision utility to manage the resources you
store on flash memory or hard disk. MarkVision offers
tools for setting the download target, formatting the storage devices, downloading resources, deleting files, moving files from one storage device to the other on the same
printer or from one printer to another, printing a directory
listing the resources stored on a device, and setting both
read/write and write passwords to protect all the
resources stored on flash memory or disk or to protect
individual files.
For more information about the specific resource management tools that MarkVision offers, see “Introducing
MarkVision” on page 131 or refer to the MarkVision online
Help. For more information about setting passwords, refer
to the printer Technical Reference.
Managing resources downloaded to flash or disk
69
Page 84

70
Chapter 4: Managing memory
Page 85

5
Paper handling
Paper sources
and output bins
Top output bin
Multipurpose
feeder
50-sheet optional drawers
Rear output bin
250-sheet standard tray
Your printer comes equipped with two standard paper
sources: a 250-sheet paper tray and the 100-sheet multipurpose feeder. (Some models may ship with a second
250-sheet tray.) You can load paper and transparencies in
the standard tray. Load paper, transparencies, labels, card
stock, or envelopes in the multipurpose feeder.
For additional paper capacity, you can attach up to two
250-sheet optional drawers to your printer. When linked,
you can then effectively create a single 850-sheet source.
See page 82 for more information about tray linking. Refer
to the Setup Guide for information about installing
optional drawers.
The table on page 72 details the types and quantities of
media you can load in each of the printer’s paper sources.
For more information about selecting specific media, see
“Media guidelines” on page 74.
Your printer also has two output bins: the top output bin
that collates up to 250 sheets of paper (face down), and the
rear output bin that stacks up to 100 sheets of paper, 50
transparencies, or 30 labels face up. The rear output bin
lets you feed transparencies, labels, card stock, and envelopes straight out the back of the printer, reducing curling
and potential paper jams. Select the bin you want to use
from the Output Bin menu.
The top output bin has a sensor that detects when the bin
is full. When the printer displays the message
Paper / Top Output
continue printing.
, you must empty the bin before you can
Paper sources and output bins
Remove
71
Page 86

Paper source specifications
Source Media Sizes Weight Capacity
Standard tray
(Tray 1)
Optional drawers
(Tray 2 or 3)
Multipurpose
feeder
1
For 20 lb paper, unless otherwise noted.
2
Use the Size Detection menu item in the Paper Men u to configure y our tra ys to support either B4 and A3 size paper
legal and 11x17 size paper. See page 21 for more information.
or
Paper
Transparencies
Paper only A4, A5, JIS B5, JIS B4, A3,
Paper
Transparencies
Labels
Envelopes
Card stock
A4, A5, JIS B5, JIS B4, A3,
letter, legal, 11x17
letter, legal, 11x17
Supports all standard sizes
listed in the ”Paper size specifications” and ”Envelope size
specifications” tables
on page 73.
Supports any odd-size paper
within the following
dimensions:
Minimum: 90 x 148 mm
(3.5 x 5.8 in.)
Maximum: 297 x 432 mm
(11.7 x 17 in.)
Select Universal from the MP
Feeder Size menu when
feeding odd-size paper.
2
2
60–90 g/m
(16–24 lb)
60–90 g/m
(16–24 lb)
60–135 g/m
(16–36 lb)
Card stock:
163 g/m
(90 lb)
2
250 sheets
50 transparencies
2
250 sheets Face down
2
100 sheets
30 transparencies
30 label sheets
15 envelopes
2
1
Print side
Face d own
Face u p
72
Paper sizes
Chapter 5: Paper handling
Your printer supports a wide variety of paper sizes. Some
paper sizes feed from the trays short edge first, and others
feed long edge first. This affects the print speed, as well as
the proper positioning of letterhead or other preprinted
paper in the trays. See the ”Paper size specifications” table
on page 73 for details. Refer to the Setup Guide for illustra-
tions of proper paper orientation in the trays.
The printer determines the size paper loaded in the trays
by the position of the rear paper guide. Since the printer
can only recognize A3 and B4 size paper or 11x17 and legal
size paper, you must decide which paper sizes you want
your trays to support. Then choose the appropriate setting
from the Size Detection menu item. You can still load the
paper sizes you don’t select in the multipurpose feeder.
Page 87

The following tables list the paper and envelope sizes
your printer supports.
Paper size specifications
Size Dimensions Feed orientation Print speed (ppm)
A5 148 x 210 mm Long edge 16
JIS B5 182 x 257 mm Long edge 13.5
A4 210 x 297 mm Long edge 12
JIS B4 257 x 364 mm Short edge 7.5
A3 297 x 420 mm Short edge 6.5
Letter 8.5 x 11 in. Long edge 12
Legal 8.5 x 14 in. Short edge 7.5
11 x 17 11 x 17 in. Short edge 6.5
Universal
1
Select this value when you’re feeding a non-standard size sheet from the multipurpose feeder. The
printer formats the page for 11.7 x 17 in. (297 x 432 mm). Set the margins for the actual page size from
your software application.
1
297 x 432 mm
(11.7 x 17 in.)
Short edge 6.5
Envelope size specifications
Size Dimensions Feed orientation Print speed (ppm)
DL Envelope 220 x 110 mm Short edge 7.5
C5 Envelope 229 x 162 mm Short edge 7.5
B5 Envelope 250 x 176 mm Short edge 7.5
7 3/4 Envelope 7.5 x 3.875 in. Short edge 12
9 Envelope 8.875 x 3.875 in. Short edge 7.5
10 Envelope 9.5 x 4.125 in. Short edge 7.5
Other Envelope
1
Select this value when you’re using a non-standard size envelope. The printer formats the
envelope for the maximum size (8.5 x 14 in.). Set the margins for the actual envelope size
from your software application.
1
8.5 x 14 in. Short edge 7.5
Paper sizes
73
Page 88

Media guidelines
Select appropriate media (paper, transparencies, labels,
card stock, and envelopes) for your printer to avoid printing problems. For detailed information about media characteristics, refer to the Card Stock & Label Guide available
on the CD that was shipped with your printer. Brief guidelines for choosing paper and other media follow.
Paper
For the best output when printing photographic quality
images, use a high quality laser printer paper. We recommend the following papers for optimum results:
• Hammermill Laser Print 90 g/m
• Xerox Image Series LX Paper
When printing text and typical business graphics, you
may find 75 g/m
printers or photocopiers produces acceptable print quality.
Always try a sample of any paper you are considering
using with the printer before buying large quantities.
Before loading paper, note the recommended print side
identified on the paper package. Load paper with the recommended print side face down in the paper trays and face
up in the multipurpose feeder. Refer to the Setup Guide for
complete paper loading instructions.
The following papers are not recommended for use with
your printer:
• Paper with a rough or heavily textured surface
• Coated papers, such as erasable bond
• Preprinted papers manufactured with chemicals
that may contaminate the printer
2
(20 lb) paper designed for use with laser
2
(24 lb)
74
Chapter 5: Paper handling
• Multiple-part forms
• Synthetic papers
• Thermal papers
• Recycled paper having a weight less than 20 lb
(75 g/m
2
)
Page 89

Letterhead
Refer to the illustrations at left to orient A4 or letter size
preprinted paper in the multipurpose feeder or the paper
trays.
Preprinted papers such as letterhead must be able to withstand temperatures up to 195°C (383°F) without melting
or releasing hazardous emissions. Use inks that are not
affected by the resin in toner or the silicone in the fuser.
Inks that are oxidation-set or oil-based should meet these
requirements. Latex inks might not.
Media guidelines
75
Page 90

Transparencies
Notch
For best results, use only the following Lexmark transparencies with the Optra Color 1200 printer:
Recommended transparencies
Part number Size
12A0541 A4
12A0540 Letter
These transparencies are designed to provide optimal
print quality when used with your printer. Using other
transparencies designed for laser printers may yield
unpredictable results
To order transparencies in the U.S., call 1-800-438-2468. In
other countries, refer to the table on page 90 for a listing of
appropriate phone numbers.
Changing the Paper Type
Always set the Paper Type to Transparency when printing
transparencies. The printer then adjusts the fuser temperature and engine speed to ensure the best possible print
quality. When you print transparencies, you will experience a slight delay before printing starts as the printer
warms the fuser to the higher temperature. Transparencies
then print at approximately 3 ppm.
76
When you load transparencies in the multipurpose feeder,
the printer recognizes the type of media you have loaded
and automatically makes these adjustments. However,
waiting for the printer to sense the presence of transparencies may further delay the job. We recommend always
selecting the correct Paper Type before sending a job to
print.
Chapter 5: Paper handling
Page 91

Notch
Multipurpose feeder
Loading transparencies
Before loading transparencies, fan the stack to prevent
sheets from sticking together. To prevent print quality
problems, avoid getting fingerprints on the transparencies.
Load transparencies only in the multipurpose feeder or
tray 1. Your printer does not feed transparencies from
tray 2 or tray 3.
Load transparencies with the corner notch oriented as
shown. This properly positions the specially coated print
side. For more information, refer to the detailed loading
instructions packaged with the transparencies.
Cardboard
Note:
paper path and minimize curling,
load transparencies in the multipurpose feeder and stack them
in the rear output bin.
To create a straight
Tray 1
Notch
When loading transparencies in tray 1, use the piece of
cardboard with the rectangular cutout that comes with the
transparencies. Place the cardboard in the bottom of the
tray before loading transparencies. The cardboard ensures
proper feeding of the last transparency in the stack.
Only use the cardboard when loading transparencies in
tray 1. Do not use the cardboard in the multipurpose
feeder.
Media guidelines
77
Page 92

Envelopes
You can load up to 15 envelopes in the multipurpose
feeder. Load envelopes with the flap side down and the
short edge nearest the return address area positioned to
enter the printer first, as shown. Do not load stamped
envelopes. Refer to the Setup Guide for additional loading
instructions.
To ensure the best print quality, make sure you set the
Paper Type to Envelope and select the correct envelope
size before sending the job to print.
When printing on envelopes:
• Try a sample of any envelopes you are considering
using with the printer before buying large quantities.
• Use envelopes made from 90 to 105 g/m
28 lb) bond paper. For best performance and fewer
paper jams, do not use envelopes that:
– Have excessive curl
– Are stuck together
– Are damaged in any way
– Contain windows, holes, perforations, cutouts,
or embossing
– Use metal clasps or string ties
– Have postage stamps attached
– Have any exposed adhesive when the flap is in
the sealed or closed position
• Use envelopes that can withstand temperatures of
195°C (383°F) without sealing, excessive curling,
wrinkling, or releasing hazardous emissions.
• Adjust the left and right paper guides to fit the
width of the envelopes.
• To minimize curl, use the rear output bin so the
envelopes feed straight out the back of the printer.
2
(24 to
78
Chapter 5: Paper handling
Page 93

Acceptable labels
Unacceptable labels
Labels
If you occasionally need to print labels, use paper labels
designed for laser printers. Use only label sheets that have
no gaps between the labels, as shown at left. Try a sample
of any labels you are considering using with the printer
before purchasing a large quantity.
Labels must be able to withstand temperatures of 195°C
(383°F) and pressure of 25 psi. For detailed information on
label printing, characteristics, and design, refer to the Card
Stock & Label Guide on the printer CD.
Only feed labels from the multipurpose feeder. Do not
load labels in the trays. Refer to the Setup Guide for loading
instructions.
When printing on labels:
• Use only paper labels. Do not use vinyl labels.
• Do not print a large number of labels continuously.
• Do not use labels that have adhesive exposed on the
sheets.
• Do not use labels that have coating or sizing applied
to make the labels liquid-resistant.
• To minimize curl, use the rear output bin so the
labels feed straight out the back of the printer.
Card stock
• From the operator panel or from MarkVision, set the
Paper Type to Labels.
You can load a small quantity of heavier paper in the multipurpose feeder. To minimize curl, use the rear output bin
so the paper feeds straight out the back of the printer.
The properties of the card stock you choose—such as the
orientation of the paper fibers, moisture content, thickness, and texture—can affect print quality. For more information on the types of card stock your printer supports,
refer to the Card Stock & Label Guide on the printer CD.
Always set the Paper Type to Card Stock when printing on
heavier paper. The printer then adjusts the fuser temperature and engine speed to ensure the best print quality.
Media guidelines
79
Page 94

Storing media
Properly storing media helps ensure trouble-free printing.
Follow the guidelines below:
• For best results, store media in an environment
where the temperature is approximately 21°C (70°F)
and the relative humidity is 40%.
• Store cartons of paper on a pallet or shelf, rather
than directly on the floor.
• If you store individual packages of paper out of the
original carton, make sure they rest on a flat surface
so the edges do not buckle or curl.
• Do not place anything on top of the paper packages.
A voiding
paper jams
If you follow the tips outlined in “Media guidelines” on
page 74, you’re well on your way to trouble-free printing.
If you do experience a paper jam, see page 118 for instructions on clearing the jam.
Here are a few reminders of ways to avoid paper jams:
• Make sure the paper guides in the trays are properly positioned for the size paper you have loaded.
• Load only standard-size paper in the trays.
• If you need to load paper in a tray while a job is
printing, press the
printer motors to idle before you remove the tray
from the printer. After you reinstall the loaded tray,
Go
press
• Use only recommended media. See page 74 for
more information.
• Do not load wrinkled, creased, or damp paper.
• Flex and straighten the paper before you load it.
• Do not overload the paper trays. Make sure the
paper stack does not exceed the maximum height
indicated by the paper guides.
to continue printing.
Stop
button and wait for the
80
• The multipurpose feeder does not have size sensing. Select the correct source and paper size from
Chapter 5: Paper handling
Page 95

the operator panel, MarkVision, or the printer
driver before sending the job to print.
• If you are printing a job using manual feed, send the
job to the printer and then wait for the
message to appear on the display before you place
media in the multipurpose feeder.
• Print transparencies only after warming the printer
by printing a job on paper (such as the menu settings page you can print from the Tests Menu).
Load Manual
Loading paper
in the trays
The procedure for loading paper in all the trays (the standard 250-sheet tray and the optional 250-sheet trays) is the
same. Refer to the Setup Guide for detailed instructions.
The printer lets you know when you need to load paper in
the trays. If a tray has less than 50 sheets of paper, the
Supplies
Menu>
scroll through the list of supplies that need attention. The
menu indicates whether a tray is missing, low on paper, or
empty.
When you change the paper in the tray, make sure the
paper guides are in the correct positions. The position of
the rear paper guide informs the printer of the size paper
loaded in the tray. Feeding paper when the rear paper
guide is not in the correct position may result in misfeeds
or paper jams.
If you load a different type of media, change the Paper
Type setting in the Paper Menu. Selecting the correct
paper type guarantees optimal print quality for that
media. See “Media guidelines” on page 74 for information
about the changes the printer makes for specific media.
For more information about changing the Paper Type setting, see page 18 or refer to the Setup Guide.
status message appears on the display. Press
<Menu
or
to open the Supplies Menu, and then
The paper size and the paper type also must be set correctly for tray linking to work as expected. See page 82 for
more information about tray linking.
Loading paper in the trays
81
Page 96

Tray linking
If you want to increase your printer’s paper capacity, you
can add up to two optional 250-sheet drawers to your
printer. If you load the same paper size and type in more
than one tray, the printer automatically links the trays:
when one tray is empty, paper feeds from the other tray.
By linking the trays, you can effectively create a single
paper source that holds up to 850 sheets (depending on
the options you have installed).
To initiate tray linking:
1 Load paper of the same size and type in all the
trays you want to link.
2 Make sure the rear paper guide is set to the proper
position for the paper size you’ve loaded.
The position of the rear paper guide informs the
printer of the paper size loaded in the tray.
If you want to link the multipurpose feeder to a tray,
select the appropriate MP Feeder Size setting from
the Paper Size menu.
3
Select the same Paper Type setting for all the
sources.
82
See page 18 or refer to the Setup Guide for more
information about changing the Paper Type setting.
With tray linking in effect, the printer feeds paper from
one tray until it is empty, and then feeds paper from the
next tray.
To disable tray linking, change the Paper Type setting for
one or more of the trays to a Custom Type setting. See
page 18 for more information.
Chapter 5: Paper handling
Page 97

Using the
multipurpose
feeder
The multipurpose feeder holds 100 sheets of paper,
30 transparencies, 30 sheets of labels, or 15 envelopes.
Refer to the Setup Guide for instructions for loading media
in the multipurpose feeder.
If you want to use the multipurpose feeder like you use
the other trays, make sure the Configure MP menu item in
the Paper Menu is set to Cassette.
You can also use the multipurpose feeder to manually
feed a single sheet or envelope. See page 85 for more information about manual feed.
Printing from the
multipurpose feeder
Since the multipurpose feeder does not have auto size
sensing, you must select the correct paper size and type
from the printer operator panel or from MarkVision before
you send a job to print.
1 Select MP Feeder as the paper source.
From the printer operator panel or from MarkVision:
a
b
c
d
e
Menu>
Press
Paper Menu
play.
Select
Press
Paper Source
The
ond line of the display.
Select
Press
Press and release
on the second line of the display.
Select
Press
the paper source.
<Menu
or
appears on the second line of the dis-
to open the Paper Menu.
to select Paper Source.
to set the multipurpose feeder as
to enter the menus.
menu item appears on the sec-
Menu>
until
MP Feeder
appears
Using the multipurpose feeder
83
Page 98

f
Press Go to return the printer to the ready state.
2 Select the paper size.
Since the multipurpose feeder does not automatically sense the size of the media you loaded, you
must select the correct paper size.
If you set the size from your software application or
driver, press
appears on the display. Follow the instructions
below to set the size from the operator panel or
from MarkVision:
Go
when the message
Load MP Tray
a
b
c
d
e
f
g
h
i
Menu>
Press
Paper Menu
play.
Select
Press
Menu>
Press
second line of the display.
Select
Press
Press and release
appears on the second line of the display.
Select
Press
sizes.
Menu>
Press
of sizes.
When the size you need appears on the second
line of the display, press
Press Go to return the printer to the ready state.
<Menu
or
appears on the second line of the dis-
to open the Paper menu.
until
to select Paper Size.
to open a list of paper and envelope
or
to enter the menus.
PAPER SIZE
Menu>
<Menu
to scroll through the list
appears on the
MP Feeder Size
until
Select
.
3 Make sure the Paper Type setting is appropriate
for the media you’re loading in the feeder.
84
See page 18 or refer to the Setup Guide for more
information about the Paper Type setting.
4 When the printer is in the ready state, send the job
to print.
Chapter 5: Paper handling
Page 99

Feeding media
manually
You can also use the multipurpose feeder to feed single
sheets of paper, transparencies, card stock, labels, or individual envelopes.
To print a page manually:
1
Select
source from the operator panel or from MarkVi-
sion:
a
b
c
d
e
f
Manual Paper
Menu>
Press
Paper Menu
play.
Press
Paper Source
The
ond line of the display.
Press
Press and release
Manual Env
display.
Press
Press Go to return the printer to the ready state.
or
appears on the second line of the dis-
Select
to open the Paper Menu.
Select
to select Paper Source.
appears on the second line of the
Select
to set the paper source.
Manual Envelope
or
<Menu
to enter the menus.
menu item appears on the sec-
Menu>
until
as the paper
Manual Paper
2 Select the paper size.
Since the multipurpose feeder does not automatically sense the size of the media you load, you must
select the correct paper size for each job.
or
You can set the paper size from your software application or driver, or follow the instructions below to
set the paper size from the operator panel or from
MarkVision:
a
b
Menu>
Press
Paper Menu
play.
Select
Press
<Menu
or
appears on the second line of the dis-
to open the Paper Menu.
Using the multipurpose feeder
to enter the menus.
85
Page 100

c
Menu>
Press
ond line of the display
until
Paper Size
.
appears on the sec-
d
e
f
g
h
i
Select
Press
Press and release
Manual Env Size
the display.
Press
sizes.
Press
of paper or envelope sizes.
When the size you need appears on the second
line of the display, press
Press Go to return the printer to the ready state.
to select Paper Size.
Menu>
appears on the second line of
Select
to open a list of paper or envelope
Menu>
or
<Menu
to scroll through the list
Manual Pap Size
until
Select
.
or
3 Make sure the Paper Type setting is appropriate
for the media you’re loading in the tray.
See page 18 for more information about the Paper
Typ e se tt ing .
4 If you’re loading an envelope, a transparency, or a
sheet of labels or card stock, select the rear output
bin.
86
This allows media to feed through the printer along
a straight path, thereby reducing curl and stacking
problems.
5 When the printer is in the ready state, send the job
to print.
Chapter 5: Paper handling
 Loading...