

Lexmark T520, T522n, 09H0052 - T522 25PPM LASERPR, 09H0300 - T522N Laser Printer, 9H0100 - T 520 B/W Laser Printer User Reference Manual
Lexmark T522
User’s Reference
May 2001
www.lexmark.com


Table of contents
Chapter 1: Printer overview ..............................................................7
Chapter 2: Using the operator panel ...............................................8
Understanding the operator panel .. ....... ...... ...... ....... ............................................ 8
Using the operator panel buttons ......................................................................... 9
Using the operator panel to change printer settings .......................................... 10
Printing the menu settings page ......................................................................... 11
Chapter 3: Using the Print and Hold function ..............................12
Printing and deleting held jobs ........................................................................... 12
Accessing held jobs from the operator panel ..................................................... 13
Recognizing when format errors occur .............................................................. 13
Repeat Print ....................................................................................................... 14
Reserve Print ..................................................................................................... 14
Verify Print .......................................................................................................... 14
Confidential jobs ................................................................................................. 14
Chapter 4: Canceling a print job ....................................................16
Chapter 5: Printing folio and statement size paper .....................17
Chapter 6: Choosing print material ...............................................18
Paper characteristics .......................................................................................... 18
Weight ......................... ....... ...... ....... ...... ...... ....... .......................................... 18
Curl .............................................................................................................. 19
Smoothness ................ ................................ ................................. ................ 19
Moisture content .......................................................................................... 19
Grain direction ...... ...... ............................................. ....... ...... ....... ...... ....... ... 19
Fiber content ................................................................................................ 19
Recommended paper ......................................................................................... 19
Unacceptable paper ........................................................................................... 20
Choosing preprinted forms and letterhead ......................................................... 20
i

Choosing prepunched paper .............................................................................. 20
Choosing paper .................................................................................................. 21
Choosing envelopes ........................................................................................... 22
Choosing labels .................................................................................................. 22
Choosing card stock ........................................................................................... 23
Choosing transparencies ................................................................................... 24
Chapter 7: Print material specifications ........................................25
Chapter 8: Loading print material ..................................................29
Chapter 9: Loading a paper tray ....................................................30
Loading letterhead ....................................................................................... 31
Chapter 10: Loading the multipurpose feeder ..............................32
Capacity ............................................................................................................. 32
Paper dimensions .............................................................................................. 32
Trouble-free printing ................. ............................................. ...... ....... ...... ....... ... 32
Loading paper and transparencies .............................................................. 36
Loading envelopes ....................................................................................... 36
Loading letterhead ....................................................................................... 37
Closing the multipurpose feeder ........................................... ............................. 39
Chapter 11: Loading the envelope feeder .....................................40
Chapter 12: Loading the 2000-sheet drawer .................................44
Chapter 13: Storing paper ..............................................................45
Chapter 14: Tray linking .................................................................46
Chapter 15: Tips for avoiding paper jams .....................................47
Chapter 16: Replacing the print cartridge .....................................48
Chapter 17: Replacing the charge roll ...........................................49
Chapter 18: Replacing the transfer roll .........................................50
Chapter 19: Replacing the fuser assembly ...................................51
ii

Chapter 20: Resetting the maintenance counter ..........................52
Chapter 21: Ordering supplies .......................................................53
Maintenance kit ............................................................................................ 53
Print cartridges ............................................................................................. 53
Label fuser cleaner ...................................................................................... 53
Charge roll ................................................................................................... 53
Transfer roll .................................................................................................. 54
Fuser assembly ........................................................................................... 54
Chapter 22: Storing supplies .........................................................55
Chapter 23: Checking an unresponsive printer ...........................56
Chapter 24: Clearing paper jams ..................................................57
Identifying paper jam areas ......................................................................... 57
Accessing paper jam areas ......................................................... ...... ....... ... 59
200 and 201 Pap er Jam
Remove Cartridge ........... ........... ........... ......... ...59
202 Paper Jam
Open Rear Door ....... ......... ........ ...... ........ ........ .60
Before reaching the output bin ..................................................................... 61
While exiting to the output bin ...................................................................... 62
230 Paper Jam
Check Duplex ................................................................................................... 63
24x Paper Jam
Check Tray x ................................................................................................... 66
On the incline surface of a tray or between two trays .................................. 66
Between three trays ..................................................................................... 67
Between a tray, the duplex unit, and the integrated tray ............................. 68
In the 2000-sheet drawer ............................................................................. 70
250 Paper Jam
Check MP Feeder ............... ........ ...... ........ ........ .71
260 Paper Jam
Check Env Feede r .............. ........ ...... ........ ........ .71
At entry into the envelope feeder ................................................................. 71
Between the envelope feeder and the printer .............................................. 72
Chapter 25: Solving display problems ..........................................74
Chapter 26: Solving printing problems .........................................75
Chapter 27: Solving print quality problems ..................................77
iii

Chapter 28: Solving option problems ...........................................80
Chapter 29: Solving network printing problems ..........................82
Chapter 30: Resolving other problems and questions ................83
Chapter 31: Understanding printer messages ............................84
Chapter 32: Using printer menus .................................................116
Chapter 33: Finishing Menu .........................................................119
Chapter 34: Infrared Menu ............................................................125
Chapter 35: Job Menu ...................................................................130
Chapter 36: LocalTalk Menu .........................................................133
Chapter 37: Network Menu ...........................................................137
Chapter 38: Paper Menu ...............................................................141
Chapter 39: PCL Emul Menu ........................................................149
Chapter 40: Parallel Menu ............................................................154
Chapter 41: PostScript Menu .......................................................159
Chapter 42: Quality Menu .............................................................160
Chapter 43: Serial Menu ...............................................................162
Chapter 44: Setup Menu ...............................................................168
Chapter 45: Utilities Menu ............................................................174
Chapter 46: USB Menu ..................................................................178
Chapter 47: Disabling operator panel menus .............................181
iv

Chapter 48: Removing options ....................................................182
Chapter 49: Removing the envelope feeder ...............................183
Chapter 50: Removing a paper tray or duplex unit ....................185
Chapter 51: Removing printer or flash memory .........................187
Chapter 52: Removing an option card ........................................188
Chapter 53: Understanding fonts ................................................189
Typefaces and fonts ......................................................................................... 189
Weight and style ........................................................................................ 189
Pitch and point size .................................................................................... 189
Bitmapped and scalable fonts .......................................................................... 191
Resident fonts .......................... ...... ....... ...... ...... ....... ...... ....... ........................... 192
Symbol sets .......... ....... ...... ....... ...... ....... ...... ...... ....... ........................................ 197
Symbol sets for PCL 6 emulation .............................................................. 197
Downloadable fonts .......................................................................................... 198
Printing a font sample list ................................................................................. 198
Chapter 54: Printer specifications ...............................................199
Dimensions ...................................................................................................... 199
Duty cycle ......................................................................................................... 199
Notices ............................................................................................200
Edition notice ........ ....... ...... ....... ...... ....... ...... ...... ....... ........................................ 201
Trademarks ...................................................................................................... 201
Licensing notice ............................................................................................... 202
Safety information ............................................................................................ 203
Cautions and warnings ...... ....... ...... ....... ...... ............................................. ....... . 203
Electronic emission notices ...... ...... ....... ...... ...... ....... ...... ....... ...... ..................... 203
With a network cable attached ................................................................... 203
Without a network cable attached .............................................................. 204
The United Kingdom Telecommunications Act 1984 ................................. 205
Energy Star ..................................................................................................... 205
Laser notices .................................................................................................... 206
Laser advisory label ................................................................................... 206
Laser notice ............................................................................................... 206
Index ................................................................................................ 207
v

vi
1
Printer overview
The following illustrations show a standard network model configuration and a fully configured printer.
If you have attached paper handling options to your printer, it may look more like the fully configured
model. For information on other possible configurations, refer to the Setup Guide.
Standard network
model configuration
Tray 1
(integrated tray)
Standard output bin
Operator panel
Multipurpose feeder
Tray 1
(integrated tray)
Fully configured
Optional envelope
feeder
Optional duplex
unit
Tray 2
Tray 3
Tray 4
Tray 5
(2000-sheet dra we r )
7
2
Using the operator panel
This section contains information about understanding the operator panel, changing printer settings,
and understanding operator panel menus.
You can change most printer settings from your software application or printer driver. Settings you
change from the application or printer driver apply only to the job you are preparing to send to the
printer.
Changes made to printer settings from a software application override changes made from the printer
operator panel.
If you cannot change a setting from your application, use the printer operator panel or the remote
operator panel available from MarkVision™. Changing a printer setting from the printer operator panel
or from MarkVision makes that setting the user default.
Understanding the operator panel
The printer operator panel has a 2-line by 16-character liquid crystal display (LCD), five buttons, and
one indicator light.
LCD
1
Light
Menu
2
Go
Select
5
3
Return
Stop
4
6
Indicator light
The indicator light gives information about the status of your printer. If the light is:
• Off, the printer is off
• On, the printer is on, but idle
• Blinking, the printer is on and is busy
8

Using the operator panel buttons
Use the five operator panel buttons to open a menu, scroll through a list of values, change printer
settings, and respond to printer messages.
The numbers 1 through 6 appear beside the operator panel buttons; these numbers are used to enter
personal identification numbers (PIN) for Print and Hold jobs. For more information, see Using the
Print and Hold function.
The following information describes the functions of each button.
Note: Buttons act upon the information displayed on the second line of the operator
panel.
Go
Menu
Select
Press the
• Return to the Ready state if the printer is in an offline situation (the Ready
• Exit printer menus and return to the Ready state.
• Clear operator panel error messages.
If you’ve changed printer settings from the operator panel menus, press Go
before sending a job to print. The printer must display Ready for jobs to print.
Each end of the button has a function. Press
• When Ready is displayed, to take the printer offline (out of the Ready state)
• When Busy is displa
• yed, to take the printer to the Job Menu.
• When the printer is offline, press
For menu items with numeric values, such as Copies, press and hold Menu to
scroll through the values. Release the button when the number you want is
displayed.
Press Select to:
• Select the menu displayed on the second line of the display. Depending on
• Save the displayed menu item as the default setting. The printer shows the
• Clear certain messages from the operator panel.
Go button to:
message does not appear on the display).
Menu:
and scroll through the menus.
Menu> to scroll through the menus.
– Press
the type of menu, this action:
– Opens the menu and shows the first item in the menu.
– Opens the menu item and shows the default setting.
Saved message and returns to the menu item.
<Menu to go to the previous item in the menus.
Return Press Return to return to the previous menu level or menu item.
Press
Stop at the Ready, Busy , or W aiting message to temporarily stop all
Stop
activity and tak e the printer offlin e. T he ope rator panel status mes sage cha nges
to Not Ready.
Go to return the printer to the Ready, Busy, or Waiting state.
Press
9

Using the operator panel to change printer settings
From the operator panel, you can select menu items and associated values to print your jobs
successfully. You can also use the operator panel to alter the setup and operating environment of the
printer. See Using printer menus for an explanation of all the menu items.
You can modify printer settings by:
• Selecting a setting from a list of values
• Changing an On/Off setting
• Changing a numerical setting
To select a new value as a setting:
1 From a Ready status message, press Menu. The menu names appear.
2 Continue to press and release Menu until you see the menu you need.
3 Press Select to select the menu or menu item displayed on the second line of the display.
– If the selection is a menu, the menu is opened and the first printer setting in the menu
appears.
– If the selection is a menu item, the default setting for the menu item appears.
(The current user default setting has an asterisk [*] beside it.)
Each menu item has a list of values for the menu item. A value can be:
– A phrase or word to describe a setting
– A numerical value that can be changed
– An On or Off setting
4 Press Menu to move to the value you need.
5 Press Select to select the value on the second line of the display. An asterisk appears beside
the value to indicate that it is now the user default setting. The new setting appears for one
second, clears, displays the word Saved, and then shows the previous list of menu items.
6 Press Return to go back to previous menus. Make additional menu selections to set new
default settings. Press
User default settings remain in effect until you save new settings or restore the factory defaults.
Settings you choose from your software application can also change or override the user default
settings you select from the operator panel.
Go if this is the last printer setting to change.
10

Printing the menu settings page
Complete the following steps to print a list of the current user default settings and installed printer
options:
1 Make sure the printer power is on and the Ready message appears.
2 Press Menu until you see Utilities Menu and then press Select.
3 Press Menu until you see Print Menus and then press Select.
The message Printing Menu Settings appears and remains until the page prints. The
printer returns to Ready when the page or pages finish printing.
If a message displays, see Understanding printer messages for more information.
The diagram in Using printer menus shows the menu items in each menu.
An asterisk (*) next to a value indicates the factory default setting. Factory defaults may differ for
different countries.
Factory defaults are the function settings in effect the first time you turn your printer on. These remain
in effect until you change them. Factory defaults are restored if you select the Restore value for the
Factory Defaults menu item in the Utilities Menu. See Utilities Menu for more information.
When you select a new setting from the operator panel, the asterisk moves next to the selected setting
to identify it as the current user default.
User defaults are the settings you select for different printer functions and store in printer memory.
Once stored, these settings remain active until new ones are stored or the factory defaults are
restored.
Note: Settings you choose from your software application may override the settings you
select from the operator panel.
Menus Disabled
If your printer is configured as a network printer available to a number of users, Menus Disabled ma y
appear when you press
operator panel to inadvertently change a printer default that has been set by the person managing the
printer. You can still use Print and Hold features, clear messages, and select items from the Job Menu
when printing a job, but you cannot change other printer settings. You can, however, use your printer
driver to override printer defaults and select settings for individual print jobs.
Menu from the Ready state. Disabling the menus prevents users from using the
11

3
Using the Print and Hold function
When sending a job to the printer, y ou can specify in the driver that you want the printer to hold the job
in memory. When you are ready to print the job, you must go to the printer and use the operator panel
menus to identify which held job you want to print.
Note: Print and Hold functions require a minimum of 16MB available printer memory . W e
recommend a minimum of 32MB available printer memory and a hard disk.
To learn more about this function, click a topic:
• Printing and deleting held
jobs
• Recognizing when format
• Accessing held jobs from
the operator panel
• Repeat Print
errors occur
• Confidential jobs
• Ve rify Print
• Reserve Print
Printing and deleting held jobs
Once held jobs are stored in printer memory, you can use the printer operator panel to specify what
you want to do with one or more of the jobs. You can select either Confidential Job or Held Jobs
(Repeat Print, Reserve Print, and Verify Print jobs) from the Job Menu. If you select Confidential Job,
you must enter the personal identification number (PIN) you specified in the driver when you sent the
job. See Confidential jobs for more information.
From either the Confidential Job or the Held Jobs menu items, you have five choices:
• Print All Jobs
• Print A Job
• Delete All Jobs
• Delete A Job
• Print Copies
12

Accessing held jobs from the operator panel
1 To access held jobs from the operator panel:
– If the printer is Busy, press Menu and the Job Menu appears.
– If the printer is Ready, continue to step 2.
2 Press Menu until you see Held Jobs or Confidential Job on the operator panel display,
depending on the type of job you want to access.
3 Press Select.
User Name appears on the first line of the operator panel. The second line displays the names
of users currently associated with Print and Hold jobs.
4 Press Menu until you see your user name.
Note: If you are looking for a Confidential Job, you are prompted to enter your PIN. See
Confidential jobs for more information.
5 Press Select.
6 Press Menu until the action you want to take is on the second line of the operator panel (Print
A Job, Delete A Job, and so on).
7 Press Select.
– If you are looking for a particular job, press Menu to scroll through the list of available jobs,
and press Select when the correct job is displayed. An asterisk (*) appears next to the job
name indicating you have chosen to print or delete that job.
– If you are prompted to enter the number of copies you want to print, use the Menu button
to increase or decrease the number on the display, and then press Select.
8 Press Go to print or delete specific jobs you have marked.
The printer briefly shows messages indicating what Print and Hold functions it is performing.
Recognizing when format errors occur
If the symbol appears on the display, it indicates that the printer had trouble formatting one or more
of the held jobs. These formatting problems are most commonly the result of insufficient printer
memory or invalid data that might cause the printer to flush the job.
When a symbol appears next to a held job, you can:
• Print the job. Be aware, however, that only part of the job may print.
• Delete the job. You may want to free up additional printer memory by scrolling through the list
of held jobs and deleting others you have sent to the printer.
If formatting errors are a recurring problem with held jobs, your printer may require more memory.
13

Repeat Print
If you send a Repeat Print job, the printer prints all requested copies of the job and stores the job in
memory so you can print additional copies later. You can print additional copies as long as the job
remains stored in memory.
Note: Repeat Print jobs are automatically deleted from printer memory when the printer
requires extra memory to process additional held jobs.
Reserve Print
If you send a Reserve Print job, the printer does not print the job immediately, but stores the job in
memory so you can print the job later. The job is held in memory until you delete it from the Held Jobs
menu. Reserve Print jobs may be deleted if the printer requires extra memory to process additional
held jobs.
See Printing and deleting held jobs for information.
Verify Print
If you send a Verify Print job, the printer prints one copy and holds the remaining copies you requested
from the driver in printer memory. Use Verify Print to examine the first copy to see if it is satisfactory
before printing the remaining copies.
See Printing and deleting held jobs if you need help printing the additional copies stored in memory.
Note: Once all copies are printed, the Verify Print job is deleted from printer memory.
Confidential jobs
When you send a job to the printer, you can enter a personal identification number (PIN) from the
driver. The PIN must be four digits using the numbers 1–6. The job is then held in printer me mo ry unti l
you enter the same four-digit PIN from the printer operator panel and choose to print or delete the job.
This ensures that the job does not print until you are there to retrieve it, and no one else using the
printer can print the job.
When you select Confidential Job from the Job Menu and then select your user name, the following
prompt is displayed:
Enter PIN:
=____
14

Use the buttons on the operator panel to enter the four-digit PIN associated with your confidential job.
The numbers next to the button names identify which button to press for each digit (1–6). As you enter
the PIN, asterisks are displayed on the operator panel to ensure confidentiality.
Enter PIN
=****
1
If you enter an invalid PIN, the message No Jobs Found. Retry? appears. Press
PIN, or press
Stop to exit the Confidential Job menu.
Menu
2
Go
Select
5
3
Stop
Return
6
4
Go to reenter the
When you enter a valid PIN, you have access to all print jobs matching the user name and PIN you
entered. The print jobs matching the PIN you entered appear on the display when you enter the Print A
Job, Delete A Job, and Print Copies menu items. You can then choose to print or delete jobs matching
the PIN you entered. (See Printing and deleting held jobs for more information.) After printing the
job, the printer deletes the confidential job from memory.
15

4
Canceling a print job
To cancel a print job:
1 Press Menu. Job Menu appears on the first line of the display and Cancel Job appears on the
second line.
Note: Job Menu is the only available menu item when the printer is in the Busy state.
2 Press Select.
Canceling Job briefly appears in the display. The printer finishes printing any page already
being printed, and then stops. The printer returns to the Ready state.
16

Printing folio and statement size
5
paper
Folio and statement sizes are not available in the Paper Size menu until Size Sensing is turned off. To
turn off Size Sensing:
1 Press and hold the Select and Return buttons while you turn the printer on.
2 Release the buttons when Performing Self Test appears.
The printer performs its power-on sequence, and then Config Menu appears on the first line of
the display.
3 Press Menu until you see Size Sensing, and then press Select.
Tray 1 Sensing appears on the second line of the display.
4 Press Menu to select the input option that will hold the folio or statement size paper, and then
Select.
press
The first line of the display shows the selected input option and the second line shows the
current setting.
5 Press Menu to change the setting to Off, and then press Select.
SAVED appears briefly on the display, and then is replaced by Config Menu on the first line and
Size Sensing on the second line.
6 Press Menu until you see Exit Config Menu, and then press Select.
7 Activating Menu Changes appears briefly , followed by Performing Self Test. The printer
returns to the Ready state.
8 Once Size Sensing is turned off, go into the Paper Size menu for that tray and change the size
to folio or statement.
17

6
Choosing print material
The print quality and feed reliability of your printer and options can vary with the type and size of print
material you use. This section provides guidelines for each type of print material. For information on
card stock and labels, refer to the Card Stock & Label Guide located on Lexmark’s Web site at
www.lexmark.com.
Always print samples on the print material you are considering before buying large quantities.
Click a topic for more information:
• Paper characteristics
• Recommende d paper
• Unacceptable paper
• Choosing preprinted forms
• Choosing paper
• Choosing envelopes
• Choosing labels
• Choosing card stock
and letterhead
• Choosing transparencies
• Choosing prepunched paper
Paper characteristics
The following paper characteristics affect print quality and reliability. We recommend that you keep
these guidelines in mind when evaluating new paper stock.
For detailed information, refer to the Card Stock & Label Guide located on the Lexmark Web site at
www.lexmark.com.
Weight
The printer can automatically feed paper weights from 60 to 176 g/m2 (16 to 47 lb bond) grain long.
Paper lighter than 60 g/m
best performance, use 75 g/m
mm (7.2 x 10.1 in.), we recommend that the basis weight be greater than or equal to 90 g/m
bond).
2
(16 lb) might not be stiff enough to feed properly, causing paper jams. For
2
(20 lb bond) grain long paper. To use paper narrower than 182 x 257
2
(24 lb
18

Curl
Curl is the tendency of paper to curve at its edges. Excessive curl can cause paper feeding problems.
Curl usually occurs after the paper passes through the printer, where it is exposed to high
temperatures. Storing paper unwrapped in humid conditions, even in the paper tray, can contribute to
paper curling.
Smoothness
The degree of smoothness of paper directly affects print quality. If the paper is too rough, the toner
does not fuse to the paper properly, resulting in poor print quality. If the paper is too smooth, it can
cause paper feeding problems. Smoothness needs to be between 100 and 300 Sheffield points;
however, smoothness between 100 and 250 Sheffield points produces the best print quality.
Moisture content
The amount of moisture in the paper affects both print quality and the ability of the printer to feed the
paper properly. Leave the paper in its original wrapper until you are ready to use it. This limits the
exposure of the paper to moisture changes that can degrade its performance.
Grain direction
Grain refers to the alignment of the paper fibers in a sheet of paper. Grain is either grain long, running
the length of the paper, or grain short, running the width of the paper.
2
For 60 to 176 g/m
than 176 g/m
36 lb bond) paper, grain long fibers are recommended. For the multipurpose feeder, papers heavier
than 135 g/m
(16 to 47 lb bond) paper, grain long fibers are recommended. For papers heavier
2
(47 lb bond), grain short is preferred. For the multipurpose feeder, 60 to 135 g/m2 (16 to
2
(36 lb bond), grain short is preferred.
Fiber content
Most high-quality xerographic paper is made from 100% chemically pulped wood. This content
provides the paper with a high degree of stability resulting in fewer paper feeding problems and better
print quality. P aper containing fibers such as cotton possess characteristics that can result in degraded
paper handling.
Recommended paper
To ensure the best print quality and feed reliability, use 75 g/m2 (20 lb) xerographic paper. Business
papers designed for general business use may also provide acceptable print quality.
Always print several samples before buying large quantities of any type of paper. When choosing any
papers, consider the weight, fiber content, and color of the paper.
The laser printing process heats paper to high temperatures of 225°C (437°F) for MICR (Magnetic Ink
Character Recognition) applications, and 205°C (401°F) for non-MICR applications. Use only papers
that are able to withstand these temperatures without discoloring, bleeding, or releasing hazardous
emissions. Check with the manufacturer or vendor to determine whether the paper you’ve chosen is
acceptable for laser printers.
19

Unacceptable paper
The following papers are not recommended for use with the printer:
• Chemically treated papers used to make copies without carbon paper, also known as
carbonless papers, carbonless copy paper (CCP), or no carbon required (NCR) paper.
• Coated papers (erasable bond)
• Multiple-part forms or documents
• Preprinted papers that require a registration (the precise print location on the page) greater
than ±0.09 in., such as optical character recognition (OCR) forms
In some cases, you can adjust registration with your software application to successfully print
on these forms.
• Preprinted papers with chemicals that may contaminate the printer
• Preprinted papers that can be affected by the temperature in the printer fuser
• Rough-edged or curled papers
• Synthetic papers
• Thermal papers
• Less than 60 g/m
2
(16 lb) recycled paper
• Recycled papers containing more than 25% post-consumer waste that do not meet DIN 19
309
Choosing preprinted forms and letterhead
Use the following guidelines when selecting preprinted forms and letterhead paper for the printer:
• Use grain long papers for best results.
• Use only forms and letterhead printed using an offset lithographic or engraved printing
process.
• Choose papers that absorb ink, but do not bleed.
• Avoid papers with rough or heavily textured surfaces.
Use papers printed with heat-resistant inks designed for use in xerographic copiers. The ink must
withstand temperatures of 205°C (401°F) for non-MICR applications, and 225°C (437°F) for MICR
applications, without melting or releasing hazardous emissions. Use inks that are not affected by the
resin in the toner. Inks that are oxidation-set or oil-based should meet these requirements. Latex inks
might not meet these requirements. If you are in doubt, contact your paper supplier.
Choosing prepunched paper
Prepunched paper brands can differ in the number and placement of holes and in manufacturing
techniques.
20
Use the following guidelines when selecting and using prepunched paper:
• Test paper from several manufacturers before ordering and using large quantities of pre-
punched paper.
• Paper should be punched at the paper manufacturer and not drilled into paper already
packaged in a ream. Drilled paper can cause paper jams when multiple sheets feed through
the printer.
• Prepunched paper can include more paper dust than standard paper. Your printer may require
more frequent cleaning and feed reliability may not be as good as that of standard paper.
• Weight guidelines for prepunched paper are the same as for non punched paper.
Choosing paper
Proper paper loading helps prevent paper jams and ensures trouble-free printing.
To help avoid paper jams or poor print quality:
• Always use new, undamaged paper.
• Before loading paper, you need to know the recommended print side of the paper you’re
using. This information is usually indicated on the paper package.
• Do not use paper that you have cut or trimmed yourself.
• Do not mix paper sizes, weights, or types in the same paper source; mixing results in paper
jams.
• Do not use coated papers.
• Do not forget to change the Paper Size setting when you use a source that does not support
auto size sensing.
• Do not remove paper trays while a job is printing or Busy is displayed.
• Make sure the Paper Type, Paper Texture, and Paper Weight settings are correct. (See Paper
Menu for detailed information about these settings.)
• Make sure the paper is properly loaded in the paper source.
• Flex paper back and forth. Do not fold or crease the paper. Straighten the edges on a level
surface.
21

Choosing envelopes
When printing on envelopes:
• To achieve the best possible print quality, use only high-quality envelopes that are designed
for use in laser printers.
• Use only new, undamaged envelopes.
• Load only one size of envelope at a time in the envelope feeder.
• Make sure the glue is not exposed.
• A combination of high humidity (over 60%) and the high printing temperatures may seal the
envelopes.
• Be sure to select Env Feeder or MP Feeder as the paper source in the Paper Menu and set
the correct envelope size.
The laser printing process heats envelopes to a temperature of 205°C (401°F). Use only envelopes
that are able to withstand these temperatures without sealing, excessive curling, wrinkling, or releasing
hazardous emissions. If you have any doubts about the envelopes you are considering using, check
with the envelope supplier.
2
For best performance, use envelopes made from 75 g/m
2
(28 lb bond) weight for the multipurpose feeder or 105 g/m2 (28 lb bond) weight for the envelope
m
feeder as long as the cotton content is 25% or less. Envelopes with 100% cotton content must not
exceed 90 g/m
2
(24 lb bond) weight.
(20 lb bond) paper. You can use up to 105 g/
To minimize jams, do not use envelopes that:
• Have excessive curl or twist
• Are stuck together or damaged in any way
• Contain windows, holes, perforations, cutouts, or embossing
• Use metal clasps, string ties, or metal folding bars
• Have an interlocking design
• Have postage stamps attached
• Have any exposed adhesive when the flap is in the sealed or closed position
• Have nicked edges or bent corners
• Have rough, cockle, or laid finishes
Choosing labels
The printer can print on many labels designed for use with laser printers. These labels are supplied in
letter size and A4 size sheets.
When printing on labels:
• Be sure to select Labels in the Paper Type menu item in the Paper Menu. (See Paper Type
for detailed information about these settings.)
• Do not load labels together with paper or transparencies in the same paper tray; mixing print
materials can cause feeding problems.
22

• Do not load partial sheets with areas exposed by missing labels; this can cause labels to peel
off during printing, jam, and contaminate your printer and your print cartridge with adhesive. It
can also void your printer and cartridge warranties.
• Avoid using labels that may release hazardous emissions when heated.
Note: Labels are one of the most difficult print materials for laser printers. Your printer
requires a special fuser cleaner for label applications in order to optimize feed
reliability. See Ordering supplies for information on obtaining a label fuser
cleaner.
After continuously printing approximately 10,000 page sides of labels (or each time you replace the
print cartridge), complete the following steps to maintain printer feeding reliability:
1 Print five sheets of paper.
2 Wait approximately five seconds.
3 Print five more sheets of paper.
For detailed information on label printing, characteristics, and design, refer to the Card Stock & Label
Guide, available on the Lexmark Web site at www.lexmark.com.
Choosing card stock
Card stock is single-ply and has many properties. The orientation of paper fibers, moisture content,
thickness, and texture can all affect printing on card stock. See Print material specifications for
information on the preferred weight for the grain direction of print materials.
When printing on card stock:
• Be sure to select Card Stock in the Paper Type menu item in the Paper Menu. (See Paper
Type for detailed information about these settings.)
• Be aware that preprinting, perforation, and creasing can significantly affect the print quality
and cause paper handling or jamming problems.
• Avoid using card stock that may release hazardous emissions when heated.
After printing approximately 10,000 page sides of card stock (or each time you replace the print
cartridge), complete the following steps to maintain printer feeding reliability:
1 Print five sheets of paper.
2 Wait approximately five seconds.
3 Print five more sheets of paper.
For more information, refer to the Card Stock & Label Guide, available on the Lexmark Web site at
www.lexmark.com.
23

Choosing transparencies
The printer can print directly on transparencies designed for use in laser printers. Print quality and
durability depend on the transparency used. Always print samples on the transparencies you are
considering before buying large quantities.
The Paper Type setting should be set to Transparency to help prevent jams. (See Paper Type for
detailed information about this setting.) Check with the manufacturer or vendor to determine whether
your transparencies are compatible with laser printers that heat transparencies to 212°C (414°F). Use
only transparencies that are able to withstand these temperatures without melting, discoloring,
offsetting, or releasing hazardous emissions. For detailed information, refer to the Card Stock & Label
Guide, which is available on the Lexmark Web site at www.lexmark.com.
Transparencies can be fed automatically from the multipurpose feeder and all standard and optional
trays, except the 2000-sheet drawer, for all printer models. See Print material specifica tions for
information about transparency compatibility with output options.
Be careful when you handle transparencies. Fingerprints on the surface of the transparency cause
poor print quality.
24
7
Print material specifications
The following tables provide information on standard and optional paper sources for your printer
model, including the paper sizes you can select from the Paper Size menu and supported weights.
Note: If you use a paper size not listed, select the next larger size.
For information on card stock and labels, refer to the Card Stock & Label Guide available on Lexmark’s
Web s ite at www.lexmark.com.
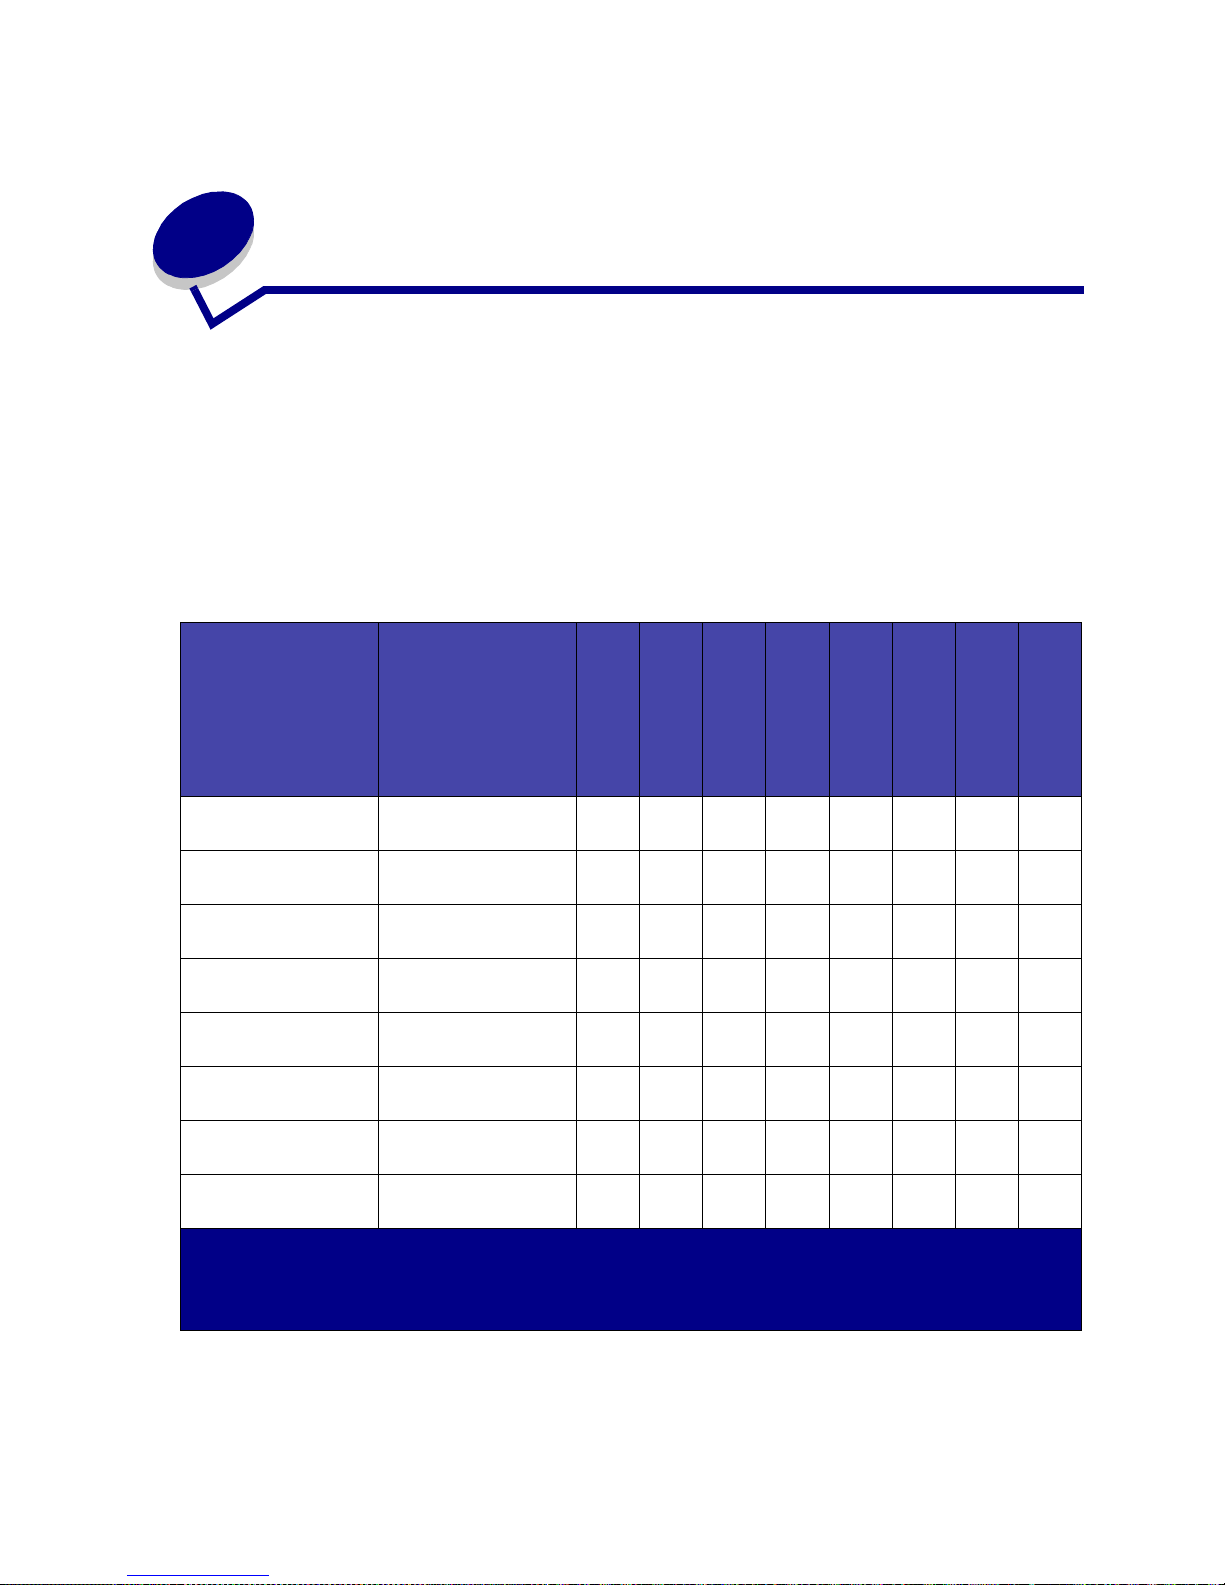
Paper size Dimensions
A4 210 x 297 mm
A5 148 x 210 mm
JIS B5 182 x 257 mm
Letter 215.9 x 279.3 mm
Legal 215.9 x 355.6 mm
Executive 184.2 x 266.7 mm
2
Folio
Statement
1
This default setting is 215.9 x 355.6 mm (8.5 x 14 in.). You can set the actual page size from your application
software or through the Universal Setup menu item.
2
This size does not appear in the P ap er Siz e men u until Tray Size Sensing is turned off . See Printing f olio and
statement size paper for more information.
2
(8.27 x 11.7 in.)
(5.83 x 8.27 in.)
(7.17 x 10.1 in.)
(8.5 x 11 in.)
(8.5 x 14 in.)
(7.25 x 10.5 in.)
216 x 330 mm
(8.5 x 13 in.)
139.7 x 215.9 mm
(5.5 x 8.5 in.)
250-sheet drawer
✓✓✓✓✓
✓✓✓✓✓
✓✓✓✓✓
✓✓✓✓✓
✓✓✓✓✓
✓✓✓✓✓
✓✓✓ ✓
✓✓✓
250 UAT
Optional
500-sheet drawer
Optional 500 UAT
Multipurpose tray
Optional
2000-sheet drawer
Optional
envelope feeder
Optional
duplex unit
25
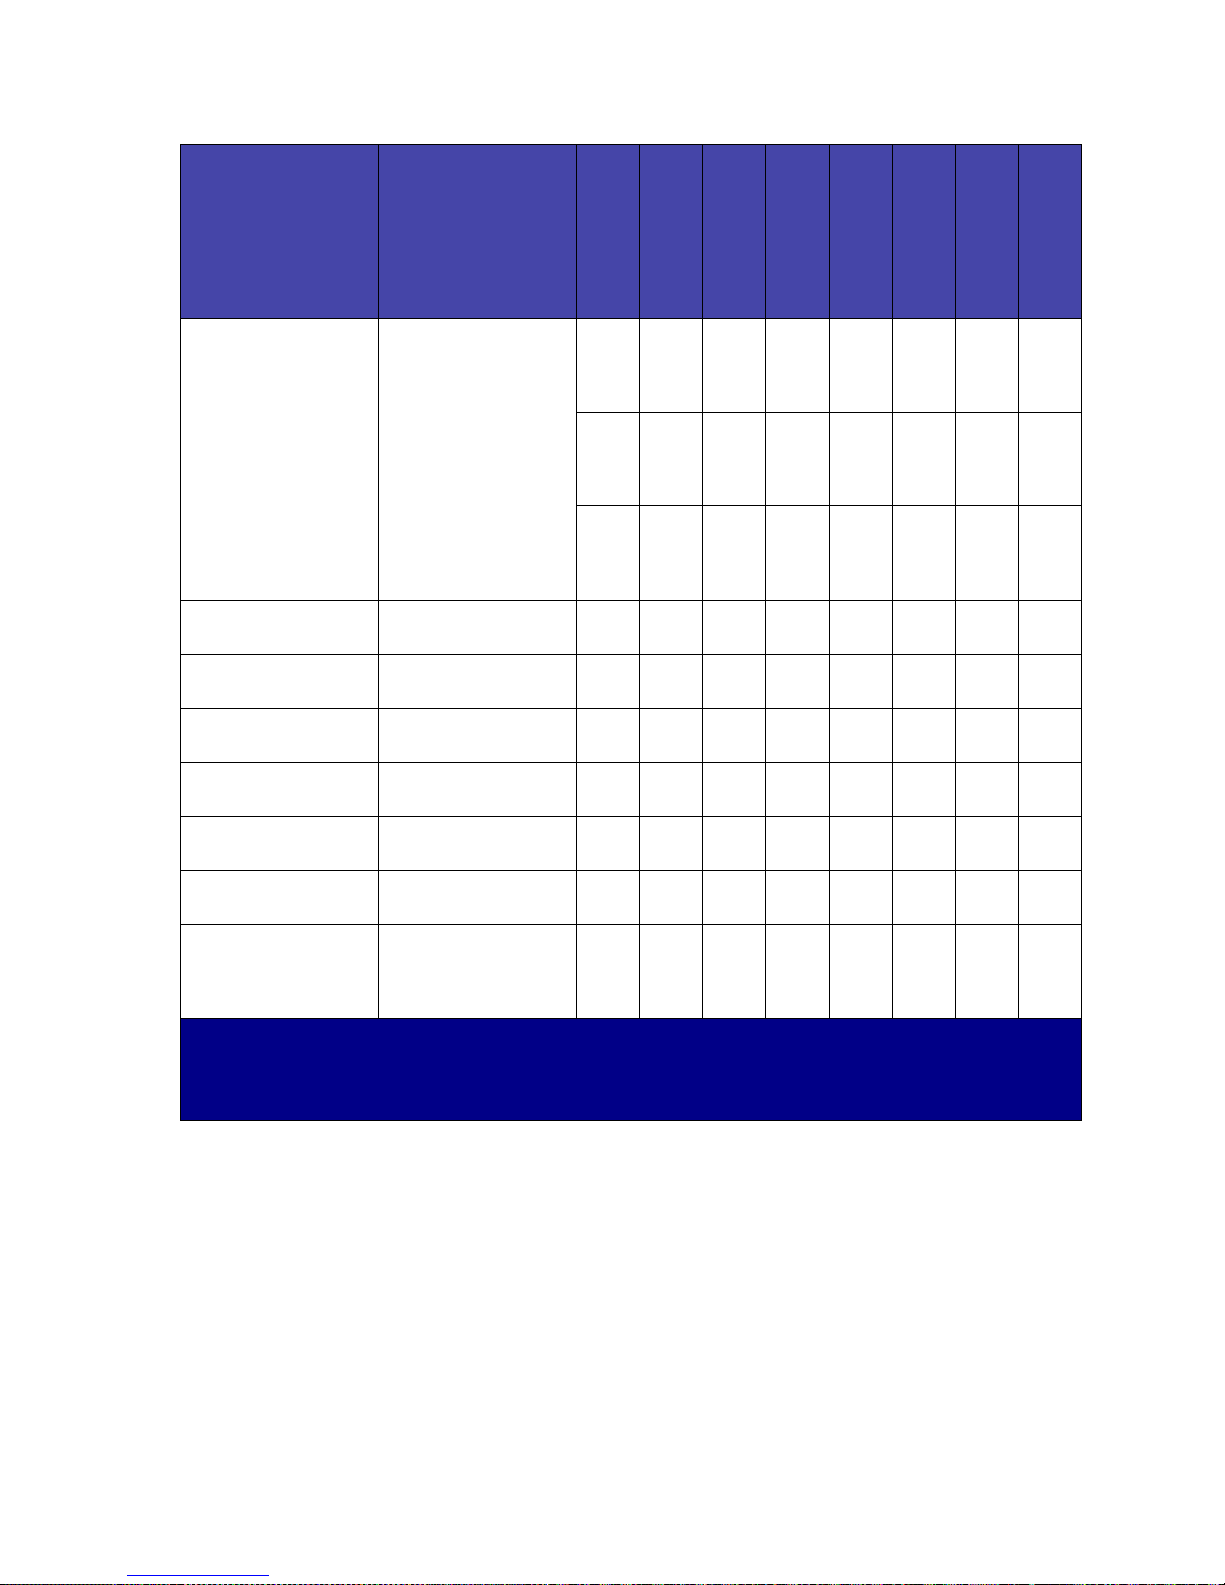
Paper size Dimensions
Universal
1
139.7 x 210 mm to
215.9 x 355.6 mm
(5.5 x 8.27 in. to 8.5 x
14 in.)
69.85 x 127 mm to 229
x 355.6 mm
(2.75 x 5 in. to 9.01 x
14 in.)
148 x 182 mm to 215.9
x 355.6 mm
(5.83 x 7.17 in. to 8.5 x
14 in.)
250-sheet drawer
250 UAT
Optional
500-sheet drawer
Optional 500 UAT
Multipurpose tray
Optional
2000-sheet drawer
Optional
envelope feeder
Optional
duplex unit
✓✓✓✓✓
✓✓✓
✓✓✓✓✓ ✓
7 ¾ Envelope 98.4 x 190.5 mm
✓✓
(3.875 x 7.5 in.)
9 Envelope 98.4 x 225.4 mm
✓✓
(3.875 x 8.9 in.)
10 Envelope 104.8 x 241.3 mm
✓✓
(4.12 x 9.5 in.)
DL Envelope 110 x 220 mm
✓✓
(4.33 x 8.66 in.)
C5 Envelope 162 x 229 mm
✓✓
(6.38 x 9.01 in.)
B5 Envelope 176 x 250 mm
✓✓
(6.93 x 9.84 in.)
Other Envelope
1
98.4 x 162 mm to 176
x 250 mm
(3.87 x 6.38 in. to 6.93
✓✓
x 9.84 in.)
1
This default setting is 215.9 x 355.6 mm (8.5 x 14 in.). You can set the actual page size from your application
software or through the Universal Setup menu item.
2
This size does not appear in the P ap er Siz e men u until Tray Size Sensing is turned off . See Printing f olio and
statement size paper for more information.
26

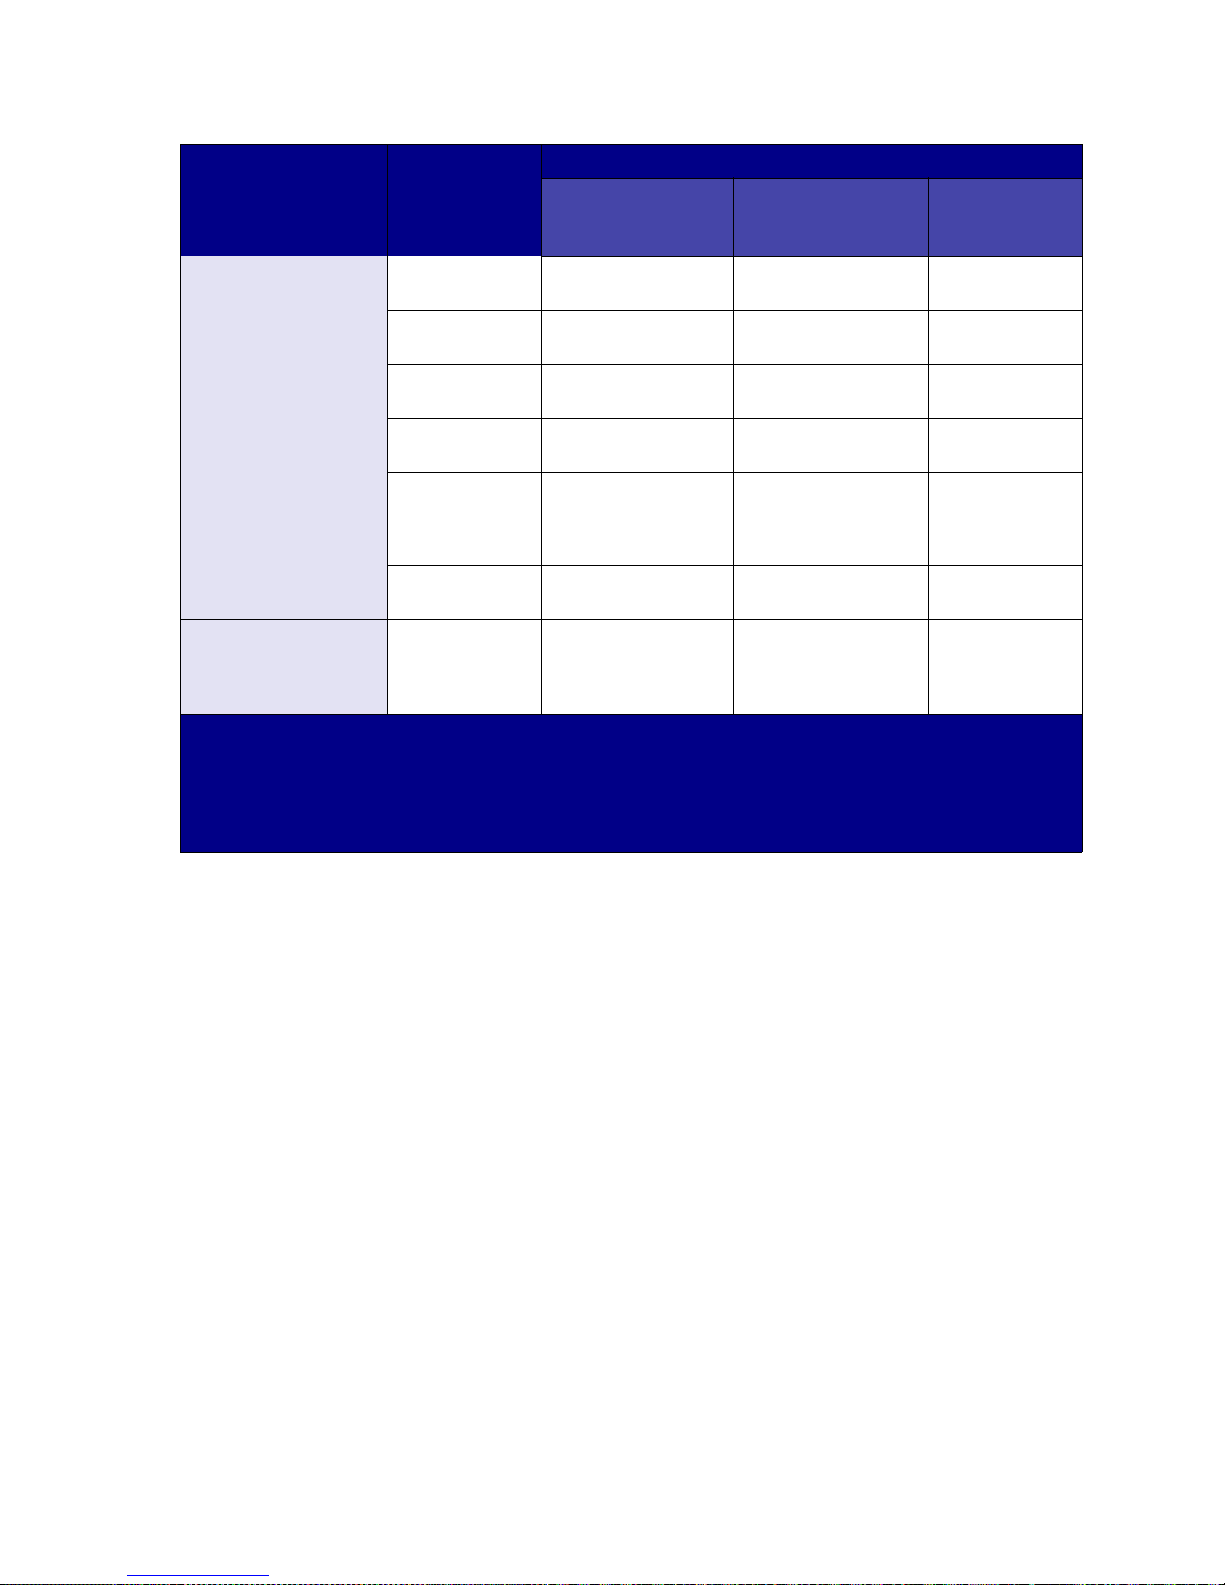
Print material
250-sheet drawer
Optional
500-sheet drawer
Multipurpose tray
Optional
2000-sheet drawer
Optional
envelope feeder
Optional
duplex unit
Paper ✓✓ ✓✓ ✓ ✓
Card stock ✓✓ ✓ ✓ ✓
Transparencies ✓✓ ✓ ✓
Vinyl labels
Paper labels
Polyester labels
Dual-web labels
*
Printing label applications on the LexmarkT522 requires a special label fuser cleaner which prevents
*
*
*
*
✓✓ ✓ ✓
✓✓ ✓ ✓
✓✓ ✓ ✓
✓✓ ✓ ✓
duplexing. The label fuser cleaner is included with a special label cartridge for label applications. See
Ordering supplies for more information on obtaining a label fuser cleaner.
Print material weight
Integrated tray and
optional
Print material Type
Paper Xerographic or
business paper
500-sheet drawer
60 to 176 g/m2 grain
long
(16 to 47 lb bond)
Card stock—
maximum (grain
1
long)
Card stock—
maximum (grain
1
short)
Index Bristol 163 g/m
Tag
Cover
163 g/m2 (100 lb) 120 g/m2 (74 lb) N/A
176 g/m2 (65 lb) 135 g/m2 (50 lb) N/A
Index Bristol 199 g/m
Tag 203 g/m
Cover
216 g/m2 (80 lb) 176 g/m2 (65 lb) N/A
2
(90 lb) 120 g/m2 (67 lb) N/A
2
(110 lb) 163 g/m2 (90 lb) N/A
2
(125 lb) 163 g/m2 (100 lb) N/A
Transparencies Laser printer 138 to 146 g/m
(37 to 39 lb bond)
1
Grain short is preferred for papers over 176 g/m2.
2
Printing label applications on the LexmarkT522 requires a special label fuser cleaner which prevents
Multipurpose feeder
and optional
250-sheet drawer
60 to 135 g/m2
grain long
(16 to 36 lb bond)
2
138 to 146 g/m
(37 to 39 lb bond)
2
Envelope
feeder
N/A
N/A
duplexing.
3
28 lb bond envelopes are limited to 25% cotton content.
4
Includes envelopes fed from the multipurpose tray only.
Standard output bin
27
Print material weight
Integrated tray and
optional
Print material Type
Labels—upper limit
2
Paper 180 g/m
500-sheet drawer
2
(48 lb bond)
Dual-web paper 180 g/m
2
(48 lb bond)
Polyester 220 g/m
2
(59 lb bond)
Vinyl 300 g/m
2
(92 lb liner)
Integrated forms Pressure-
Envelopes
100% cotton content
maximum weight–24 lb
1
Grain short is preferred for papers over 176 g/m2.
2
Printing label applications on the LexmarkT522 requires a special label fuser cleaner which prevents
duplexing.
3
28 lb bond envelopes are limited to 25% cotton content.
4
Includes envelopes fed from the multipurpose tray only.
sensitive area
(must enter the
printer first)
Paper base
(grain long)
Sulfite, woodfree or up to
100% cotton
bonds
140 to 175 g/m
75 to 135 g/m
(20 to 36 lb bond)
N/A 60 to 105 g/m
2
Multipurpose feeder
and optional
250-sheet drawer
163 g/m
(43 lb bond)
163 g/m
(43 lb bond)
220 g/m
(59 lb bond)
260 g/m
(78 lb liner)
2
140 to 175 g/m
75 to 135 g/m
(20 to 36 lb bond)
(16 to 28 lb
3, 4
bond)
Envelope
feeder
2
2
2
2
2
2
2
N/A
N/A
N/A
N/A
N/A
N/A
75 to 90 g/m
(20 to 24 lb
bond)
2
28

8
Loading print material
This section provides information about loading the various input options. Proper paper loading helps
prevent paper jams and ensure trouble-free printing.
Before loading paper, you need to know the recommended print side of the paper you’re using. This
information is usually indicated on the paper package.
Click below for information on loading a particular option:
• Loading a paper tray
• Loading the multipurpose feeder
• Loading the envelope feeder
• Loading the 2000-sheet drawer
29

9
Loading a paper tray
Complete these instructions to load print materials into any of the standard or optional trays.
1 Remove the paper tray.
2 Pull the width guide tab and slide the width guide to the far right side of the tray.
3 Squeeze the length guide lever and slide the length guide to the correct position for the size
paper you are loading.
Pull here
Length guide
lever
Length
guide
Width
guide
Pap er size
indicators
4 Place the paper into the paper tray with the recommended print side face down for single-
sided printing and face up for double-sided printing. Do not fill paper above the stack height
mark.
5 Pull the width guide tab and slide the width guide to the left until it lightly rests against the edge
of the paper stack.
Paper capac ity
mark
30

6
Reinstall the tray.
Loading letterhead
For simplex (single-sided) printing on letterhead, place the printed side face down a s shown.
For duplex printing on letterhead, place the printed side face up as shown.
Note: The Paper Loading menu item lets you print simplex (single-sided) jobs on
letterhead (or other preprinted media) that has been loaded specifically for duplex
printing. See Paper Loading for more information.
31

10
Loading the multipurpose f eeder
The multipurpose feeder can hold several sizes and types of paper, such as transparencies,
postcards, note cards, and envelopes. It is useful for single page printing on letterhead, colored paper,
or other special paper.
Keep in mind the following capacities, paper dimensions, and operating tips when loading the
multipurpose feeder.
Capacity
The maximum stack height is 10 mm (0.4 in.). The multipurpose feeder can hold approximately:
• 100 sheets of 75 g/m
• 10 envelopes
• 75 transparencies
2
(20 lb) paper
Paper dimensions
The multipurpose feeder accepts paper within the following dimensions:
• Width—69.85 mm (2.75 in.) to 229 mm (9.01 in.)
• Length—127 mm (5 in.) to 355.6 mm (14 in.)
Trouble-free printing
• Load only one size of paper or envelopes at a time in the multipurpose feeder.
• To achieve the best possible print quality, use only high-quality print media that is designed for
use in laser printers. For more guidelines on paper, see Choosing print material.
• To prevent paper jams, do not add or remove paper when there is still paper in the
multipurpose feeder. This applies to other types of print materials, too.
• Never add print materials to the multipurpose feeder while the printer is printing from the
multipurpose feeder. Doing so may cause a paper jam.
• Print material should be loaded with the recommended print side up and the top of the print
material going into the multipurpose feeder first.
32

• Do not place objects on the multipurpose feeder. Also, avoid pressing down or applying
excessive force on it.
• Do not remove any paper tray while a job is printing from the multipurpose feeder or Busy is
displayed on the operator panel. Doing so may cause a paper jam.
Note: The multipurpose feeder may be used with the optional envelope feeder installed.
The icons on the multipurpose feeder show you how to load the multipurpose feeder with paper, how
to turn an envelope for printing, and how to load letterhead paper for simplex and duplex printing. See
Loading letterhead for detailed instructions on loading documents loaded on letterhead.
Simplex
letterhead
Duplex
letterhead
Envelope
Note: The Paper Loading menu item in the Paper Menu lets you print simplex (single-
sided) jobs on letterhead (or other preprinted media) that has been loaded
specifically for duplex printing. For more information, see Paper Loading.
To load the multipurpose feeder:
1 Push the lower release latch. The multipurpose feeder door drops open.
33

2
Pull out the metal bar in the recessed area on the multipurpose feeder far enough to
accommodate the paper you will be using.
3 Slide the paper width guide to the far right.
4 Prepare the print material for loading.
– Flex paper or fan envelopes back and forth. Do not fold or crease the paper. Straighten
the edges on a level surface.
34

– Hold transparencies by the edges and avoid touching the print side. Fan the stack of
transparencies to prevent jams. Be careful not to scratch or leave fingerprints on the
transparencies.
5 Use the stack height limiter as a guide for stack height when loading print materials.
Stack height limiter
6 Load one type of print material in the multipurpose feeder. Do not mix types. Click a topic for
loading instructions:
– Loading paper and transparencies
– Loading envelopes
– Loading letterhead
35

Loading paper and transparencies
a Load paper with the left edge of the stack against the stack height limiter and with the
recommended print side face up.
b Continue with step 7.
Loading envelopes
a Load envelopes flap side down with the stamp area and flap on the left side. The end of
the envelope with the stamp area enters the multipurpose feeder first.
WARNING: Never use envelopes with stamps, clasps, snaps, windows, coated linings, or self-
stick adhesives. These envelopes may severely damage the printer.
b Continue with step 7.
Note: If envelopes jam while printing, try reducing the number of envelopes in the
multipurpose feeder.
36

Loading letterhead
Load letterhead according to the options installed on the printer. Click the topic that describes your
printer configuration.
• Without a duplex unit
• With a duplex unit
Without a duplex unit
a
Load letterhead paper for single-sided printing with the logo face up. The end of the sheet
with the logo should enter the printer first.
b Continue with step 7.
With a duplex unit
a
Load letterhead paper for duplex printing with the logo face down. The end of the sheet
with the logo should enter the printer last.
37

b Continue with step 7.
Note: The Paper Loading menu item in the Paper Menu lets you print simplex (single-
sided) jobs on letterhead (or other preprinted media) that has been loaded
specifically for duplex printing. For more information, see Paper Loading.
7 Gently slide the print material into the multipurpose feeder as far as it will go. Forcing the print
material may cause it to buckle.
8 Slide the paper width guide to the left until it lightly touches the stack of print material. Do not
bend the print material.
9 Select the paper source, size, and type from your software application and select paper size
and type from the printer operator panel.
a Make sure the Paper Size and Paper Type for the multipurpose feeder (MP Feeder Size
and MP Feeder Type) are set to the correct value for the print material you are loading.
(See Paper Size and Paper Type for detailed information about these settings.)
b Press Go to return to Ready.
Note: Software settings may override operator panel settings.
38

Closing the multipurpose feeder
1 Remove print material from the multipurpose feeder.
2 Push the metal bar straight back to collapse the multipurpose feeder to its short-length
position.
3 Close the multipurpose feeder door.
39

11
Loading the en velope f eeder
1 Gently adjust the envelope support for the size you are loading:
– Fully closed (pushed in toward the printer) for short envelopes
– Extended to the middle position for medium-length envelopes
– Fully open (extended to its full length) for long envelopes
WARNING: Do not place objects on the envelope feeder. Av oid pressing down on it or applying
excessive force.
2 Lift the envelope weight back toward the printer. It stays in place.
40

3
Slide the envelope edge guide to the far right.
4 Flex a stack of envelopes back and forth and then straighten the edges on a level surface.
Press down the corners to flatten them.
Fan the envelopes. This prevents the edges of the envelopes from sticking together and helps
them feed properly.
Note: When you load envelopes, do not exceed the maximum stack height of 64.7 mm
(2.55 in.). The envelope feeder holds a maximum of 85 envelopes (75 g/m
bond).
2
, 20 lb
41

5
Load the stack of envelopes flap side down with the stamp area and the flap on the left. The
end of the envelopes with the stamp area enters the envelope feeder first. Let the envelopes
at the bottom of the stack slide into the envelope feeder slightly more than the ones at the top
of the stack.
WARNING: Never use envelopes with stamps, clasps, snaps, windows, coated linings, or self-
stick adhesives. These envelopes may severely damage the printer. See
Choosing envelopes for more information.
Note: Do not load more envelopes by forcing them under the envelope feeder weight.
This causes jams.
6 Slide the envelope edge guide to the left until it lightly touches the stack. Make sure the
envelopes do not buckle.
42

7
Lower the envelope weight to the stack.
8 Select the paper source, size, and type from your software application.
9 Select the paper size and type from printer operator panel:
a Make sure the Paper Size for the envelope feeder (Env Feeder Size) is set to the correct
envelope size you are loading. (See Paper Size for detailed information about this
setting.)
b Press Go to return to Ready.
Note: Software settings may override operator panel settings.
If envelopes jam, see Clearing paper jams.
43

12
Loading the 2000-sheet drawer
For information on loading the 2000-sheet drawer, refer to the 2000-Sheet Drawer User’s Guide on
the Lexmark T522 Publications CD that came with your printer.
44

13
Storing paper
Properly storing paper helps ensure trouble-free printing. Use the following guidelines:
• For best results, store paper in an environment where the temperature is approximately 21
• Store cartons of paper on a pallet or shelf, rather than directly on the floor.
• If you store individual packages of paper out of the original carton, make sure they rest on a
• Do not place anything on top of the paper packages.
o
F) and the relative humidity is 40%.
(70
flat surface so the edges do not buckle or curl.
o
C
45

14
Tray linking
Tray linking enables the automatic linking feature for trays when you use the same size and type of
print material in multiple paper sources (trays).
For example, let’s say you have loaded two optional trays with the same size print material and both
are set to the same paper type. When one tray becomes empty, the printer automatically selects print
material from the other tray since the printer sees the trays as linked.
If you use different print material in the trays, each source with a different print material must have the
Paper Type set to a unique value to disable the automatic linking feature. If all the trays do not have
the same paper type when they are linked, you could mistakenly print a job on the wrong paper type.
46

15
Tips for a v oiding paper jams
By carefully selecting print materials and loading them properly, you can avoid most paper jams. If
jams do occur, follow the steps outlined in Clearing paper jams. If jams occur frequently, make sure
you follow these tips to avoid jams:
• See Loading print material to load paper properly. Make sure the adjustable guides are
positioned correctly.
• Do not overload the paper trays. Make sure the paper is under the paper capacity mark on the
inside of the paper tray.
• Do not remove paper trays while print jobs are in process.
• Flex, fan, and straighten the paper before loading it.
• Fan stacks of labels or transparencies before loading them into trays or the multipurpose
feeder. If jams do occur using the multipurpose feeder, try feeding one sheet at a time.
• Do not load wrinkled, creased, damp, or curled paper.
• Do not mix paper types or paper sizes in one tray.
• Do not add paper to existing paper in tray. Allow tray to go empty before adding more paper.
• Use only recommended print materials. See Recommended paper.
• Make sure the recommended print side is face down for simplex printing when loading all
trays.
• Keep print materials stored in an acceptable environment. See Moisture content.
47

16
Replacing the print cartridge
Order a new print cartridge when the Toner Low message first appears so you will have it when the
current one no longer prints satisfactorily. See Ordering supplies for information on ordering print
cartridges.
Note: We do not recommend that you use print cartridges from a third party. Print quality
and printer reliability cannot be guaranteed if you do. F or best results, use Lexmark
supplies.
To utilize the remaining toner, remove the cartridge by gripping the handles with both hands. With the
cartridge arrows pointing downward, shake the print cartridge back and forth. Reinstall the cartridge
and then press
Complete the following steps to replace the print cartridge. Refer to the documentation that comes with
the print cartridge for detailed installation information.
1 Turn the printer off and unplug the printer power cord.
2 Open the front doors and remove the used print cartridge.
Go.
WARNING: Never touch the photoconductor drum on the underside of the print cartridge. Use
the handhold on the cartridge to avoid touching this area.
3 Clean the printer.
4 Install the new print cartridge and close the front door.
5 Replace the fuser cleaner if you are printing special label applications.
6 Plug the printer power cord into a properly grounded electrical outlet and turn the printer on.
7 Follow the instructions on the new print cartridge box to return the used print cartridge to
Lexmark for recycling.
When you return a used print cartridge, you contribute to a worldwide recycling effort at no
cost to you.
Note: The print cartridge warranty is voided by unauthorized refilling.
48

17
Replacing the charge r oll
Order a new charge roll kit when toner fog or background shading appears. See Ordering supplies
for information on ordering a charge roll.
Complete the following steps to replace the charge roll. Refer to the documentation that comes with
the charge roll for detailed installation information.
1 Turn the printer off and unplug the printer power cord.
2 Open the front doors and remove the print cartridge.
3 Remove the old charge roll.
4 Install the new charge roll.
5 Reinstall the print cartridge and close the front doors.
6 Plug the printer power cord into a properly grounded electrical outlet.
7 Reset the maintenance counter.
49

18
Replacing the transfer r oll
Order a new transfer roll when light print, toner fog, or background shading appears. See Ordering
supplies for information on ordering a transfer roll.
Complete the following steps to replace the transfer roll. Refer to the documentation that comes with
the transfer roll for detailed installation information.
1 Turn the printer off and unplug the printer power cord.
2 Open the front doors and remove the print cartridge.
3 Remove the old transfer roll.
4 Install the new transfer roll.
5 Reinstall the print cartridge and close the front doors.
6 Plug the printer power cord into a properly grounded electrical outlet.
7 Reset the maintenance counter.
50

19
Replacing the fuser assembl y
Order a new fuser assembly when toner fog or background shading appears. See Ordering supplies
for information on ordering a fuser assembly.
CAUTION: The fuser assembly should only be replaced by a Lexmark service technician.
Note: For best results, use Lexmark supplies with the printer. If you are in the U.S. or
Canada, call 1-800-438-2468 for information about Lexmark Authorized Supplies
Dealers in your area. In other countries, contact the place where you bought your
printer.
51

20
Resetting the maintenance counter
After replacing all the items in the main tenance kit , reset the maintenance counter:
1 Press and hold the Select and Return buttons while you turn the printer on.
2 Release the buttons when Performing Self Test appears on the display.
The printer performs its power-on sequence, and then Config Menu appears on the first line of
the display.
3 Press Menu until you see Reset Maint Cnt and then press Select.
Reset appears on the second line of the display.
4 Press Select.
Resetting Maint C nt Value appears briefly on the display, and then is replaced by Config
Menu on the top line and Reset Maint Cnt on the second line.
5 Press Menu until you see Exit Config Menu, and then press Select.
Activating Menu Changes appears briefly, followed by Perform ing S elf Test. The
printer returns to the Ready state.
52

20
Ordering supplies
For best results, use Lexmark supplies with the printer. If you are in the U.S. or Canada, call 1-800438-2468 for information about Lexmark Authorized Supplies Dealers in your area, or visit the
Lexmark Web site at www.lexmark.com. In other countries, contact the place where you bought your
printer.
Maintenance kit
80 Scheduled Ma intenance appears on the display after 250,000 pages have printed to let you
know it is time to replace printer maintenance items.
Print cartridges
Order a new print cartridge when Toner Low first appears on the display so you will have it when the
current one no longer prints satisfactorily.
Five print cartridges are specifically designed for your printer:
Print cartridge
part number
12A6830 7,500 pages
12A6835 20,000 pages
12A6839 (label cartridge; shipped with a
label fuser cleaner2)
1
Sold at a special price with the understanding that you return your empty cartridges
only to Lexmark. For regular priced cartridges without these terms, order part number
12A6730 (7,500 pages) or 12A6735 (20,000 pages).
2
Label fuser cleaners are not recommended for duplex printing.
1
Average yield
20,000 pages
Print coverage
(approximate)
5%
Label fuser cleaner
A special label fuser cleaner should be used for label applications to optimize feeding reliability. They
are included in the print cartridge box when you order part number 12A6839. You also may order this
item separately using part number 99A0725.
Label fuser cleaners are not recommended for duplex printing.
Charge roll
Order part number 99A1017.
53

Transfer r oll
Order part number 99A1015.
Fuser assembly
Order a fuser assembly when 80 Scheduled Mainte nance first appears on the display. See the
following table for the fuser assembly part number for your specific printer.
Fuser assembly
Printer power supply
115 V 11K0555
220 V 11K0556
part number
54

21
Storing supplies
Store supplies in their original packaging until you are ready to install them.
Do not store supplies in:
• Temperatures greater than 43°C (110°F)
• An environment with extreme changes in humidity or
temperature
• Direct sunlight
• Dusty places
• A car for a long period of time
• An environment where corrosive gases are present
• An environment with salty air
55

22
Checking an unresponsive printer
When you have a problem, first make sure that:
• The printer power cord is plugged into the printer and a properly grounded electrical outlet.
• The printer power switch is on.
• The electrical outlet is not turned off by any switch or breaker.
• Other electrical equipment plugged into the outlet is working.
• You try turning the printer off, then wait for about 10 seconds, and turn the printer on. This
often fixes the problem.
• Your printer driver settings are correct.
Note: If an error message appears, see Understanding printer messages.
56

23
Clearing paper jams
By carefully selecting print materials and loading them properly, you can avoid most paper jams. (See
the suggestions in Tips for avoiding paper jams.) If paper jams do occur, follow the steps in this
section.
To resolve the paper jam messages, you must clear all paper from the paper path. Press
printing. The printer prints a new copy of the page that jammed if Jam Recovery is set to On or Auto;
however, the Auto setting does not guarantee the page will print.
Identifying paper jam areas
See the diagram on page 58 for the path the paper travels through the printer and options, and areas
where jams may occur. The path varies depending on the paper source.
Go to resume
57

Note: If a jam occurs in the
multipurpose feeder, you
receive a 250 Paper J am
message. The 260 Paper
Jam
is shown here for a jam in
the optional envelope feeder.
Both types of jams occu r in the
same way.
201 Paper Jam
200 Paper Jam
202 Paper Jam
260 Paper Jam
250 Paper Jam
230 Paper Jam
24x Paper Jam
24x Paper Jam ma y occur in
Note:
any of the paper trays, including the
2000-sheet drawer. x indicates the
tray where the jam is located. Jams
can occur between two or thre e tra ys,
on the incline surface of a tray, or
between a tray, the duplex unit, and
the printer integrated tray.
230 Paper Jam
58

Accessing paper jam areas
You open doors and covers and remove paper trays to access paper jam areas. If your printer has a
multipurpose feeder, it is visible when the lower front door is opened. The illustration shows the
location of paper sources and possible paper jam areas.
Printer rear door
Optional duple x rear
door
Lower front door
(down when envelope
feeder is installe d)
Integrated tray
Note: All illustrations in this section show the printer in its standard configuration unless
it is necessary to show input or output options.
Upper front door
Envelope feeder
Envelope feeder
Optional duple x front
access cover
Paper trays
200 and 201 Paper Jam
Remove Cartridge
A 200 Paper Jam message indicates the paper is jammed in the area under the print cartridge. This
requires removing the print cartridge from the printer. A 201 Paper Jam message indicates the jam is
farther inside the printer.
1 Push the release latch and open the printer upper and lower front doors.
CAUTION: The rear portion of the inside of the printer is hot.
59

2
While grasping the print cartridge by the hand grip, pull the print cartridge up toward the upper
front door, and then pull it straight out toward you. Lay it aside on a sheet of paper.
3 Pull the paper up and toward you and to the right.
Note: If the paper does not move when you pull, stop pulling. You may need to access
the paper from the rear door. See Between the envelope feeder and the printer
for more information.
4 Reinstall the print cartridge.
5 Close the upper and lower front doors.
202 Paper Jam
Open Rear Door
Jams that cause a 202 Paper Jam message require opening the printer rear door.
Note: To resolve the message, you must clear all paper from the paper path.
For instructions on clearing the jam, click the area where the jam occurred:
• Before reaching the output bin
• While exiting to the output bin
60

Before reaching the output bin
1
Open the rear door.
2 Remove the paper based on what part is visible.
– If the middle section of paper is visible, grasp it on both sides and gently pull it straight out.
– If paper is still in the fuser area, open the upper front door and remove the paper.
– If the end of the paper is visible, pull the paper straight out.
If the paper does not move immediately when you pull, stop pulling. Remove the print
cartridge, and then pull the paper out. See Replacing the print cartridge for more
information.
3 Close the rear door.
61

While exiting to the output bin
Pull the paper straight out.
If the paper does not move immediately when you pull, stop pulling. Open the upper front door and pull
the paper out.
62

230 Paper Jam
Check Duplex
Jams that cause a 230 Paper Jam message require opening the duplex front access cover.
Note: To resolve the message, you must clear all paper from the paper path.
1 Open the duplex rear door.
2 Look under the duplex rear door for the edge of the paper to determine how the paper is
jammed:
– If a short piece is visible inside the duplex unit next to the inner wall, grasp it and pull it out.
If you cannot grasp it, see step 6.
– If only a short piece of paper is visible toward the rear of the printer, do not pull it out; it
may be easier to access from inside the printer. See 200 and 201 Paper Jam Remove
Cartridge for instructions.
– If most of the paper is visible, continue with the following.
3 Pull the paper up and out toward you:
63

4
Pull down and out if the paper is in this position.
5 Close the duplex rear door. Make sure it snaps into place.
6 Locate the recessed areas on each side of the duplex front access cover.
7 Slowly pull the duplex front access cover straight out.
64

8
If the edge of the paper is visible, pull the paper straight up and out.
If the paper is not visible, continue with step 9. Otherwise, close the duplex front access cover.
9 Slide out the integrated tray.
10 Remove any sheets of paper lying in the duplex front access cover.
Interior view of duplex unit
11 Slide the duplex front access cover back into the duplex unit. Make sure it snaps into place.
12 Slide the integrated tray back into the printer.
65

24x Paper Jam
Check Tray x
Jams in four areas result in a 24x Paper Jam message, where x represents the tray number where
the jam has occurred.
Note: To resolve the message, you must clear all paper from the paper path.
For instructions on clearing the jam, click the area where the jam occurred:
• On the incline surface of a tray or between two trays
• Between three trays
(This may happen if you are using legal-size paper in the trays or if you have an optional 250sheet drawer installed with other optional drawers.)
• Between a tray, the duplex unit, and the integrated tray
• Between the envelope feeder and the printer
• In the 2000-sheet drawer
On the incline surface of a tray or between two trays
1 Pull the paper tray halfway out of the support unit.
2 Remove the paper based on how it is jammed:
– If the paper is lying on the incline or wall surface at the front of the tray, pull the paper
straight out.
– If the paper is in the pass-through area between two trays, pull the paper straight up and
out.
66

– If you do not see either end of the print material, see Between three trays to remove the
jam.
3 Slide the paper tray back into the support unit.
Between three trays
This type of jam may occur if you are using legal-size paper in the trays or if you have a 250-sheet
drawer installed with other optional drawers.
1 Pull the paper tray out of the support unit. If only a short piece of the paper is visible, do not
pull down to remove the paper.
2 Gently slide the paper tray back into the support unit.
3 Pull the paper tray out of the support unit that is above the tray you just closed.
4 Pull the paper either up or down. If it does not pull easily one way, try the other way.
5 Slide the paper tray back into the support unit.
Note: With this type of jam, there may be another jam under the print cartridge. Remove
the print cartridge and any jammed paper, and then reinstall the print cartridge.
See Replacing the print cartridge for more information.
67

Between a tray, the duplex unit, and the integrated tray
1
Pull the paper tray out of the support unit. If only a short piece of the paper is visible, do not
pull down to remove the paper.
2 Slowly pull the duplex front access cover straight out from the duplex unit.
68

3
Pull the integrated tray out of the printer.
If you see the edge of the paper in the integrated tray:
a Pull the paper down and out.
b Slide the tray all the way into the printer.
c Slide the duplex front access cover back into the duplex unit. Make sure it snaps into
place.
If you do not see the edge of the paper in the integrated tray:
a Push the tray back into the printer.
b Open the printer upper and lower front doors.
c Remove the print cartridge. See Replacing the print cartridge for more information. You
should see the leading edge of the paper now.
d Pull the paper out.
69

e Reinstall the print cartridge.
Align the slides on the print cartridge with the slots on the print cartridge cradle. Use the
colored arrows inside the printer for placement. Guide the print cartridge down as it snaps
into place.
f Close the printer upper and lower front doors.
g Slide the paper tray all the way into the printer.
In the 2000-sheet drawer
1 Open the loading door.
2 Press the elevator down button.
3 Remove the paper jam. Clear all paper from the paper path of the drawer and printer.
Elevator down
button
4 Make sure the stack of paper is neat and aligned; otherwise, another paper jam may occur.
5 Close the door.
6 Allow a few seconds for the elevator to reach the top.
7 Press Go to resume printing.
70

250 Paper Jam
Check MP Feeder
Slowly pull the jammed print material straight out of the multipurpose feeder.
Note: To resolve the message, you must clear all paper from the paper path.
260 Paper Jam
Check Env Feede r
Envelope jams may occur in two areas.
Note: To resolve the message, you must clear all paper from the paper path.
For instructions on clearing the jam, click the area where the jam occurred:
• At entry into the envelope feeder
• Between the envelope feeder and the printer
At entry into the envelope feeder
Since the envelope feeder feeds envelopes from the bottom of the stack, the envelope on the bottom
is jammed.
1 Lift the envelope weight.
2 Flip the envelope weight back toward the printer.
3 Remove the stack of envelopes from the envelope feeder.
71

4
Slowly pull the jammed envelope straight out toward you.
5 Replace the stack of envelopes in the envelope feeder.
6 Adjust the envelope edge guide.
7 Lower the envelope weight to the stack.
Note: If envelope jams continue to occur, repeat these steps and feed a single envelope
between steps 4 and 5. This may correct the problem.
Between the envelope feeder and the printer
1 Lift the envelope weight.
2 Flip the envelope weight back toward the printer.
3 Remove the stack of envelopes from the envelope feeder.
4 Push the envelope support to the closed position.
5 Open the printer upper front door.
72

6
Pull the envelope feeder up slightly and straight out of the printer. Set it aside.
7 Pull the envelope straight out of the printer.
Note: You may have to remove the print cartridge to get the envelope out. See
Replacing the print cartridge for instructions.
8 Reinstall the envelope feeder. Make sure it snaps into place.
9 Close the printer upper front door.
10 Replace the stack of envelopes in the envelope feeder.
11 Adjust the envelope edge guide.
12 Lower the envelope weight to the stack.
73

24
Solving display pr ob lems
If the suggested corrective action does not fix the problem, call your service representative.
Problem Action
Operator panel displays only
diamonds or is blank.
Menu settings changed from
the operator panel have no
effect.
• Turn the printer off, wait about 10 seconds, and turn the printer on.
• Performing Self Test appears on the display. When the test is
completed, Ready is displayed.
If the messages do not appear, turn the printer off and call the Lexmark
Customer Support Center.
Settings in the software application, the printer driver, or the printer utilities are
overriding the settings made from the operator panel.
• Change the menu settings from the printer driver, the printer utilities, or the
software application instead of the operator panel.
• Disable the settings in the printer driver, the printer utilities, or the software
application so you can change settings from the operator panel.
74

25
Solving printing prob lems
If the suggested corrective action does not fix the problem, call your service representative.
Problem Action
Job did not print or incorrect
characters printed.
Job did not print or incorrect
characters printed (continued).
Make sure Ready appears on the operator panel before you send a job to
print. Press Go to return to Ready.
Make sure there is print material loaded in the printer. Press Go to return to
Ready .
Verify that the printer is using the correct printer language.
Verify that you are using the correct printer driver.
Make sure the parallel, serial, ethernet, USB cable is firmly plugged in at the
back of the printer. Make sure you are using the correct cable. Use IEEE
1284-compliant par all el cable. We recommend Lexmark part number
1329605 (10 ft) or 1427498 (20 ft). If you us e R S-232 Serial, verify that a null
modem cable is used.
If the printer is connected through a switch box, try a direct connection.
V erify that the co rrect paper si ze is selected throu gh the oper ator panel, i n the
printer driver, or in the software application.
Make sure PCL SmartSwitch and PS SmartSwitch are set to On.
If you are using a print spooler, verify that the spooler is not stalled.
If you print across a network or on a Macintosh computer, see Network
printing problems.
Check the printer interface from the Setup Menu.
Determine which host interface you are using. Print a menu settings page to
verify that the current interface settings are correct. See Printing the menu
settings page.
If you are using a serial interface:
• Mak e sure Honor DSR is set to Off.
• Check the protocol, baud, parity , and data bit settings. The settings
on the printer and on the host computer should match.
Printer is connected to the USB
port, but will not print.
Print material misfeeds or
multiple feeds occur.
Make sure you are using Windows 98, Windows 2000, Windows Me, or
another USB-capable operating system supported by Lexmark.
Make sure the print material you are using meets the specifications for your
printer. See Print material specifications for more details.
Flex print material before loading it in any of the paper sources.
Make sure the print material is loaded correctly.
75

Problem Action
Print material misfeeds or
multiple feeds occur
(continued).
Envelope misfeeds or
multiple feeds occur.
Page breaks in unexpected
places.
Make sure the paper width and length guides on the paper sources are
adjusted correctly.
Do not overfill the paper sources.
Do not force print material into the multipurpose feeder when you load it;
otherwise, it may skew or buckle.
Remove any curled print material from paper sources.
Load the recommended print side correctly for the type of print material you
are using. See Loading print material for more information.
Load less print material in the paper sources.
Turn the print material over or around and try printing again to see if feeding
improves.
Do not mix print material types.
Do not mix reams of print material.
Remove the top and bottom sheets of a ream before loading the print
material.
Load a paper source only when it is empty.
Remove the stack of envelopes from the envelope feeder. Load one
envelope, feed it through the printer, and then reload the stack of envelopes
in the envelope feeder.
Check the Print Timeout setting in the Setup Menu. Increase the setting.
Job prints from the wrong paper
source or on the wrong print
material.
Paper does not stack neatly in
the output bin.
Printer does not duplex pages. • Make s ure Dup lex is selected in both the F ini shing Menu and in the printer
Check the Paper Type setting in the Paper Menu from the printer operator
panel and in the printer driver.
• Make sure the paper bail is installed.
• Tur n the paper stack over in the tray or multipurpose feeder.
driver.
• Make sure you have enough printer memory installed.
76

26
Solving print quality prob lems
If the suggested corrective action does not fix the problem, call your service representative.
Problem Action
Print is too light. • The toner may be low. To utilize the remai nin g to ner, remov e the cartridge by
Toner smears or print comes
off the page.
Toner appears on the back of
the printed page.
gripping the handles with both hands. With the cartridge arrows pointing
downward, shake the print cartridge back and forth. Reinstall the cartridge
and then press Go.
• Change the Toner Darkness setting in the Quality Menu.
• If you are printing on an uneven print surface, change the Paper Weight and
Paper Texture settings in the Paper Menu. See Paper Type.
• Verify that the correct print material is being used.
• If you are printing on an uneven print surface, change the Paper Weight and
Paper Texture settings in the Paper Menu. See Paper Type.
• Verify that the print material is within the printer specifications. See Print
material specifications for more details.
• If the problem continues, call the Lexmark Customer Support Center.
Toner is on the transfer roll. To help prevent this, do not load print material that
is smaller than the page size of the job to be printed.
Open and close the printer upper front door to run the printer setup cycle and
clean the transfer roll.
77

Problem Action
Toner fog or background
shading appears on th e page .
Entire page is white. • Make sure the packaging material is removed from the print cartridge.
Streaks appear on the page. • The toner may be low. To util ize the remaining toner, remove the cartridge by
• Check the print cartridge to make sure it is installed correctly.
• Change the print cartridge. See Replacing the print cartridge for more
details.
• If the probl em co ntinues, change the charge rol l. See Replacing the charge
roll for more details.
• Check the print cartridge to be sure it is installed correctly.
• The toner may be low. To utilize the remai nin g to ner, remov e the cartridge by
gripping the handles with both hands. With the cartridge arrows pointing
downward, shake the print cartridge back and forth. Reinstall the cartridge
and then press Go.
gripping the handles with both hands, and then shake the print cartridge
gently back and forth. Reinstall the same print cartridge.
• If you are using pre printed for m s, make sure the ink can withstand
temperatures of 212
°C (414°F).
Printing is too dark. Change the Toner Darkness setting in the Quality Menu.
Note: Macintosh computer users should make sure the lines per inch (lpi)
setting is not set too high in the software application.
78

Problem Action
Characters have jagged or
unev en edg es.
Image quality is poor. Resolution wa s auto matic ally reduce d. Re duce t he com ple x ity o f the print j ob or
Part or all of the page is
printed in black.
• Change the Print Resolution setting in the Quality Menu to 600 dpi or 1200
dpi.
• Turn PQET in the Quality Menu to On.
• If you are using downloaded fonts, verify that the fonts are supported by the
printer, the host computer, and the software application.
add additional printer memory. See Res Reduced.
• Check the print cartridge to see if it is installed correctly.
• If the charge roll has been replaced, verify that it is installed correctly.
The job prints, b ut the t op and
side margins are incorrect.
• Make sure the Paper Size setting in the Paper Menu is correct.
• Make sure the margins are set correctly in your software application.
79

27
Solving option problems
If an option does not operate correctly after it is installed or if it quits working:
• Make sure paper options are marked with a colored triangle, indicating they are compatible
with y our printer.
• Turn the printer off, wait for about 10 seconds, and turn the printer on. If this does not fix the
problem, unplug the printer, and check the connection between the option and printer.
• Print the menu settings page and check to see if the option is listed in the Installed Options list.
If the option is not listed, reinstall it.
• Make sure the option is selected in the software application you are using.
For Macintosh computer users: Make sure the printer is set up in Chooser.
Printer options are listed below with suggested corrective actions for related problems. If the
suggested corrective action does not fix the problem, call your service representative.
Options Action
Drawers • Make sure the connection between drawers (250-sheet drawer, optional 500-
Duplex unit • Make sure the connect ion betw ee n the dup le x u nit and th e printer is secure . I f the
Envelope feeder • Make s ure th e c onn ec tion bet w e en th e envelope f eed er an d th e prin ter i s secu re.
Flash memory Make sure flash memory is securely connected to the printer system board.
Hard disk with adapter Make sure the hard disk is securely connected to the hard disk adapter card. Also
sheet drawer, or optional 2000-sheet drawer), or the connection between a
drawer and a duplex unit or the printer, is secure.
• Make sure the print material is loaded correctly. See Loading print material for
more details.
duplex unit is listed on the menu settings page, but print material jams when it
enters or exits the duplex unit, the printer and duplex unit may not be properly
aligned.
• Make sure the duplex front a ccess cover is securely installed.
• Make sure the Paper Size setting is correct in both the Paper Menu and in the
software application.
• Make sure the e nv elope s are lo aded corre ctly. See Loading the envelope feeder
for more details.
make sure the hard disk adapter card is securely connected to the printer system
board.
80

Options Action
Infrared adapter If infrared communication stops or does not occur, make sure:
• The distance between the two infrared ports is 1 m
(39 in.) or less. If communication does not occur between ports, move the ports
closer together.
• Both ports are stable.
• The computer and the printer are on a level surface.
• The angle of communication between the two infrared ports is within 15 degrees
of either side of an imaginary line drawn between the two infrared ports.
• No bright light, such as direct sunshine, is interfering with communication. No
objects are placed between the two infrared ports.
Internal print server • Make sure the internal print server (also called an internal network adapter or
INA) is securely connected to the printer system board.
• Make sure you are using t he correct cable, that it is securely connected, and that
the network software is correctly set up.
Refer to the drivers CD for more details.
Printer memory Check to make sure printer memory is securely connected to the printer system
board.
Tri-Port Adapter • Make sure the Tri-Port Adapter is securely connected to the printer system board.
• For Macintosh computer users, make sure the host computer is set to LocalTalk.
• If you are using a phone wire connection, use a terminator plug.
USB/Parallel interface • Make sure the USB/parallel interface card is securely connected to the printer
system board.
• Make sure you are using the correct cable and that it is securely connected.
81

28
Solving network printing pr oblems
If a job did not print or incorrect characters printed, verify that the Lexmark internal print server or
external print server is set up properly and the network cable is connected.
Note: Refer to the drivers CD for more details.
For Novell users:
• Make sure the netware.drv file is dated October 24, 1994, or later.
• Make sure the NT (no tabs) flag is included in the capture statement.
For Macintosh users:
• The printer may need an optional internal print server to allow Macintosh connection.
• Verify that the printer is set up correctly in Chooser.
82

Resolving other prob lems and
29
questions
Problem Action
I need to get updated printer
drivers or utilities.
I need to attache a serial
cable to the printer.
I can’t find the printer escape
codes.
• Refer to the drivers CD that came with your printer which contains printer
drivers and utilities.
• Visit the Le xm ark W e b site, www.lexmark.com, for the most current printer
drivers or utilities.
If you have installed an optional interface card in your printer, refer to the
Setup Guide.
Refer to the Technical Reference available on the drivers CD or at the Lexmark
Web site, www.lexmark.com.
83

30
Understanding printer messages
The printer operator panel displays messages describing the current state of the printer and indicates
possible printer problems you must resolve. This topic provides a list of all printer messages, explains
what they mean, and tells you how to clear the messages.
Enter PIN:
=___
1
Click a letter or number at the bottom of the page to locate information about a message beginning
with that character.
Menu
2
Select 3Return
5
Go
Stop
4
6
84

A
Insert Tray <x>
Printing Menu Settings
Activating Menu Changes
B
Busy
C
Canceling Job
Check <device> Connection
Clearing Job
Accounting Stat
Close Door or
Insert Cartridge
D
Defragmenting
Delete All Jobs Go/Stop?
Deleting Jobs
Disabling Menus
Disk Corrupted. Reformat?
Disk Recovery
E
Enabling Menus
Enter PIN: =___
F
Flushing Buffer
Formatting Disk
Formatting Flash
G
H
Held Jobs may be lost.
I
Infrared <x>
Install <device>
or Cancel Job
Invalid Network <x> C ode
Invalid Standard
Network Code
J
K
L
Load Manual
Load Tray <x>
LocalTalk <x>
M
Menus Disabled
N
Network Card Busy
Network <x>
Network <x><y>
No Jobs Found. Retry?
Not Ready
O
P
Parallel <x>
Performing Self Test
Power Saver
Print Jobs on Disk. Go/
Stop?
Printing Directory List
Printing Font List
Printing Job Accounting Stat
Prog Engine Code
Prog System Code
Program Flash
Programming Disk
Q
Queuing and Deleting Jobs
Queuing Jobs
R
Ready
Ready Hex
Reattach <device>
Res Reduced
Resetting the P rinter
Resetting Maint Cnt Value
Restoring Factory Defaults
S
Serial <x>
T
Toner Low
Tray <x> Empty
Tray <x> Low
Tray <x> Missing
U
USB <x>
V
W
Waiting
85

X
54 Parallel Error
Y
Z
0
1
2
2<xx> Paper Jam
3
31 Defective Print Cartridge
32 Unsupported
Print Cartridge
34 Short Paper
35 Res Save Off
Deficient Memory
37 Insufficient
Collation Area
37 Insufficient
Defrag Memory
54 Parallel Option <x> Error
54 Std Network
Software Error
54 Std Par ENA
Connection Lost
56 Parallel
Port <x> Disabled
56 Std Parallel
Port Disabled
56 Serial Port <x> Disabled
58 Too Many Disks Installed
58 Too Many Flash Options
58 Too Many Trays Attached
59 Incompatible <device>
6
61 Defective Disk
62 Disk Full
63 Unformatted Disk
37 Insufficient Memory
38 Memory Full
39 Complex Page
4
5
51 Defective Flash
52 Flash Full
53 Unformatted Flash
54 Serial Option <x> Error
54 Network <x>
Software Error
54 Par <x> ENA
Connection Lost
7
70–79 <message>
8
80 Scheduled Maintenance
81 Engine Code
CRC Failure
88 Toner Low
9
900–999 Service
<message>
86

Activating Menu
Changes
What this message means:
The printer is activating changes made to the printer settings.
What you can do:
Wait for the message to clear.
Busy
What this message means:
The printer is busy receiving, processing, or printing data.
What you can do:
•
Wait for the message to clear.
• Press Menu to open the Job Menu and cancel the current job.
See also:
Cancel Job
Canceling Job
What this message means:
The printer is processing a request to cancel the current print job.
What you can do:
Wait for the message to clear.
87

Check <device>
Connection
What this message means:
The specified device is either not fully connected to the printer or is experiencing a hardware
failure.
What you can do:
•
Reestablish communication by removing the specified device and reattaching it to the printer.
• Press Go to clear the message and continue printing.
• If a hardware failure occurs, turn the printer off and back on. If the error recurs, turn the printer
off, remove the specified device, and call for service.
Clearing Job
Accounting Stat
What this message means:
The printer is deleting all job statistics stored on the hard disk.
What you can do:
Wait for the message to clear.
Close Door or
Insert Cartridge
What this message means:
The upper front door is open or the toner cartridge is not installed.
What you can do:
•
Close the upper front door.
• Install the toner cartridge.
88

Defragmenting
What this message means:
The printer is defragmenting the flash memory to reclaim storage space occupied by deleted
resources.
What you can do:
Wait for the message to clear. No button actions are possible while this message is displayed.
WARNING: Do not turn the printer off while this message is displayed.
Delete All Jobs
Go/Stop?
What this message means:
The printer is requesting confirmation to delete all held jobs.
What you can do:
•
Press Go to continue. The printer deletes all held jobs.
• Press Stop to cancel the operation.
Deleting Jobs
What this message means:
The printer is deleting one or more held jobs.
What you can do:
Wait for the message to clear.
89

Disabling Menus
What this message means:
The printer is responding to a request to disable the menus.
What you can do:
Wait for the message to clear.
Note: While the menus are disabled, you cannot change the printer settings from the
operator panel.
See also:
Disabling operator panel menus
Disk Corrupted.
Reformat?
What this message means:
The printer has attempted a disk recovery process and cannot repair the disk. The disk cannot
be used unless it is reformatted.
What you can do:
•
Press Go. All disk data will be lost when the disk is reformatted.
• Press Stop to clear the message without reformatting the disk. Disk Recovery may be
displayed again and the printer will attempt to recover the disk.
See also:
Disk Recovery
90

Disk Recovery
What this message means:
The printer is attempting to recover the hard disk after finding errors on it. The disk recovery
takes place in five phases. The second line on the display shows the percent complete of the
current phase.
Note: Errors can occur if the printer is powered off while writing to the disk.
What you can do:
•
Wait for the message to clear. No button actions are possible while this message is displayed.
• To avoid this error in the future, do not turn off the printer unless Ready is displayed.
Enabling Menus
What this message means:
The printer is responding to a request to make the menus available to all users.
What you can do:
Wait for the message to clear, and then press Menu to view the menus from the operator
panel.
See also:
Disabling operator panel menus
Enter PIN:
=___
What this message means:
The printer is waiting for you to enter your four-digit personal identification number (PIN).
What you can do:
Use the operator panel buttons to enter the PIN you identified in the driver when you sent the
confidential job to the printer.
See also:
Confidential jobs
91

Flushing Buffer
What this message means:
The printer is flushing corrupted print data and discarding the current print job.
What you can do:
Wait for the message to clear.
Formatting Disk
What this message means:
The printer is formatting the hard disk. Since formatting the disk may take longer in some
cases, the second line shows the percent complete.
What you can do:
Wait for the message to clear.
WARNING: Do not turn the printer off while this message is displayed.
Formatting Flash
What this message means:
The printer is formatting the flash memory.
What you can do:
Wait for the message to clear.
WARNING: Do not turn the printer off while this message is displayed.
92

Held Jobs may be
lost.
What this message means:
The printer memory is too full to continue processing print jobs.
What you can do:
•
Press Go to clear the message and continue printing. The printer frees memory by deleting the
oldest held job and continues deleting held jobs until there is enough printer memory to
process the job.
• To avoid this error in the future:
– Delete fonts, macros, and other data stored in printer memory.
– Install more printer memory.
Note: The messages 37 Insufficient Mem ory and Held Jobs may be lost
alternate on the display.
Infrared <x>
What this message means:
An infrared interface is the active communication link.
Insert Tray <x>
What this message means:
The specified tray is either missing or not fully inserted.
What you can do:
Insert the speci fi ed tray completely.
93

Install <device>
or Cancel Job
What this message means:
The printer is requesting that a specified device be installed so it can print a job.
What you can do:
•
Turn the printer off, install the specified device, and restart the printer.
• Press Menu to open the Job Menu and cancel the current job.
See also:
Setup Guide
Invalid
Network <x> Code
What this message means:
The code in an internal print server is not valid. The printer cannot receive and process jobs
until valid code is programmed into the internal print server.
What you can do:
Download valid code to the printer internal print server. No button actions are possible while
this message is displayed.
Note: You can download network code while this message is displayed.
See also:
Technical Reference
Invalid Standard
Network Code
94

Load Manual
What this message means:
A request for a manual feed job has been sent to the printer. The printer is ready for insertion
of a single sheet into the manual feed slot.
What you can do:
•
Load a sheet of the paper specified on the second line of the display in the multipurpose
feeder.
• Press Select or Go to ignore the manual feed request and print on paper already installed in
one of the input sources. If the printer finds a tray that has paper of the correct type and size, it
feeds paper from that tray. If the printer cannot find a tray with the correct paper type and size,
it prints on whatever paper is installed in the default input source.
• Press Menu to open the Job Menu and cancel the current job.
See also:
Loading the multipurpose feeder
Load Tray <x>
What this message means:
The printer is trying to feed paper from a source it detects is empty.
What you can do:
•
Load paper of the size and type requested on the second line of the display in the specified
tray. The printer automatically clears the message and continues printing the job.
• Press Menu to open the Job Menu and cancel the current job.
LocalTalk <x>
What this message means:
A LocalTalk interface is the active communication link.
95

Menus Disabled
What this message means:
The printer menus are disabled. You cannot change the printer settings from the operator
panel.
What you can do:
You can still open the Job Menu to cancel a job that is printing or to select a confidential job or
a held job that you want to print. If you need access to the printer menus, contact your network
administrator.
Network Card
Busy
What this message means:
An internal print server (also called an internal network adapter or INA) is being reset.
What you can do:
Wait for the message to clear.
Network <x>
What this message means:
A network interface is the active communication link.
Network <x><y>
What this message means:
A network interface is the active communication link, where <x> represents the active
communication link and <y> represents the channel.
96

No Jobs Found.
Retry?
What this message means:
The four-digit personal identification number (PIN) you entered is not associated with any
confidential print job.
What you can do:
•
Press Go to enter another PIN.
• Press Stop to clear the PIN entry prompt.
Not Ready
What this message means:
The printer is not ready to receive or process data. Someone pressed Stop to take the printer
offline.
What you can do:
Press Go to make the printer ready to receive jobs.
Parallel <x>
What this message means:
A parallel interface is the active communication link.
Performing
Self Test
What this message means:
The printer is running the series of start-up tests it performs after it is turned on.
What you can do:
Wait for the message to clear.
97

Power Saver
What this message means:
The printer is ready to receive and process data. It is reducing its electricity consumption while
idle. If the printer remains inactive for the period of time specified in the Power Saver menu
item, the Power Saver message replaces the Ready message.
What you can do:
•
Send a job to print.
• Press Go to quickly warm the printer to normal operating temperature and display the Ready
message.
Print Jobs on
Disk. Go/Stop?
What this message means:
Jobs that were spooled to the hard disk before the printer was last turned off have not yet
printed.
What you can do:
•
Press Go to print the jobs.
• Press Return or Stop to delete the jobs from the hard disk without printing them.
Printing
Directory List
What this message means:
The printer is processing or printing a directory of all files stored in flash memory or on a hard
disk.
What you can do:
Wait for the message to clear.
98
 Loading...