

Page 1

English
Summary
Page
Introduction . . . . . . . . . . . . . . . 2
Keys . . . . . . . . . . . . . . . . . . . . 3
Overview . . . . . . . . . . . . . . . . 3
Screen and Icons . . . . . . . . 3
Desktop . . . . . . . . . . . . . . . 4
Shortcut Bar . . . . . . . . . . . . 4
Organiser . . . . . . . . . . . . . . . . 5
Phonebook . . . . . . . . . . . . . 5
Memo . . . . . . . . . . . . . . . . . 6
Expense . . . . . . . . . . . . . . . 6
Date . . . . . . . . . . . . . . . . . . . . 6
Calendar . . . . . . . . . . . . . . . 6
Anniversary . . . . . . . . . . . . 6
Schedule . . . . . . . . . . . . . . 6
To Do . . . . . . . . . . . . . . . . . 7
Communication . . . . . . . . . . . . 7
Email . . . . . . . . . . . . . . . . . 7
Library . . . . . . . . . . . . . . . . . . . 7
Translation . . . . . . . . . . . . . 7
Library . . . . . . . . . . . . . . . . 8
Calculator and conversions . . . 8
Calculator . . . . . . . . . . . . . . 8
Metric Conversion . . . . . . . . 8
Currency conversion . . . . . . 9
Copyright © 2002 Lexibook 1
Page
Euro Currency . . . . . . . . . . . 9
Time . . . . . . . . . . . . . . . . . . . . 9
Clock . . . . . . . . . . . . . . . . . 9
World Time . . . . . . . . . . . . . 10
Alarm . . . . . . . . . . . . . . . . . 10
Count Down . . . . . . . . . . . . 10
Games . . . . . . . . . . . . . . . . . . 10
777 Games . . . . . . . . . . . . . 10
Lottery Game . . . . . . . . . . . 10
Set Up . . . . . . . . . . . . . . . . . . . 11
Synchronisation . . . . . . . . . . 11
User Information . . . . . . . . . 11
Language . . . . . . . . . . . . . . 11
Password . . . . . . . . . . . . . . 11
LCD Contrast . . . . . . . . . . . 12
Beep Tone . . . . . . . . . . . . . 12
Check Memory . . . . . . . . . . 12
Auto Shut off . . . . . . . . . . . . 12
Memory Management . . . . . 12
Reset . . . . . . . . . . . . . . . . . . . 12
Care and Safety . . . . . . . . . . . 12
Batteries . . . . . . . . . . . . . . . . . 13
General specification . . . . . . . . 13
Warranty . . . . . . . . . . . . . . . . . 14
Instruction manual
TM282 - TM284
TM282 English 1/10/02 7:49 Page 1
Page 2

Introduction
Congratulations on the purchase of your Lexibook TouchMan®280 Series PDA. This ultra
modern PDA/organizer has many useful features to ease and simplify your daily
organisation.
This document is a brief guide, which illustrates TouchMan’s main features and functions.
It will also help and guide you with the usage of the product.
For detailed instructions on the usage of the product, please refer to the instruction
manual on the SyncMan
®
CD-ROM or on https://my.lexibook.com web site where a copy
of the detailed guide is available for you to download.
These are the main features included in your TouchMan
®
:
● 4 Contact Directories – Business, Personal, Other and All (All can only be use
to view data).
● Schedule – Input with alarm to remind you of appointments, meetings and
other events.
● Calendar – 1 month calendar from 1900 to 2060 and weekly number
indication.
● Anniversary – Input of anniversary data, date and time.
● To D o – Input of action description, action date, select priority, set “Pending”
and “Done”.
● Memo - Input and storage of memos.
● Secret function – Hide records by setting a password in: Schedule, Memo, To
do, Expense and Calendar.
● Home Time & World Time –.With 96 city time zones, 12/24 hour and DST
support
● Alarm – 3 alarms can be set daily, weekly or for a specified day.
● Count Down Function
● Financial Expense Manager – 5 field input (Date, Amount, Payment, Category
and Description).
● SyncMan
®
- to synchronise, backup and work with data on your PC and the
Internet.
● E-Mail - to read, compose and send emails (via SyncMan
®
).
● Library - to download Mini Text from the Internet and read files (via SyncMan
®
).
● Translator - to find translations in 6 different languages (English, German,
Italiano, Spanish, Portuguese, French) from a 5500 words per language
database.
● Calculator – 12 Digit general calculator.
● Conversion – Metric conversion (with 20 unit conversion) – Euro currency
conversion (12 fixed Euro currency conversions) and 5 programmable currency
conversion.
● Download Function - to download text files (.txt) and other applications into the
TouchMan
®
(via SyncMan®), and view them.
● Settings – to changes system settings.
● Password - to protect your data.
English
Copyright © 2002 Lexibook 2
TM282 English 1/10/02 7:49 Page 2
Page 3
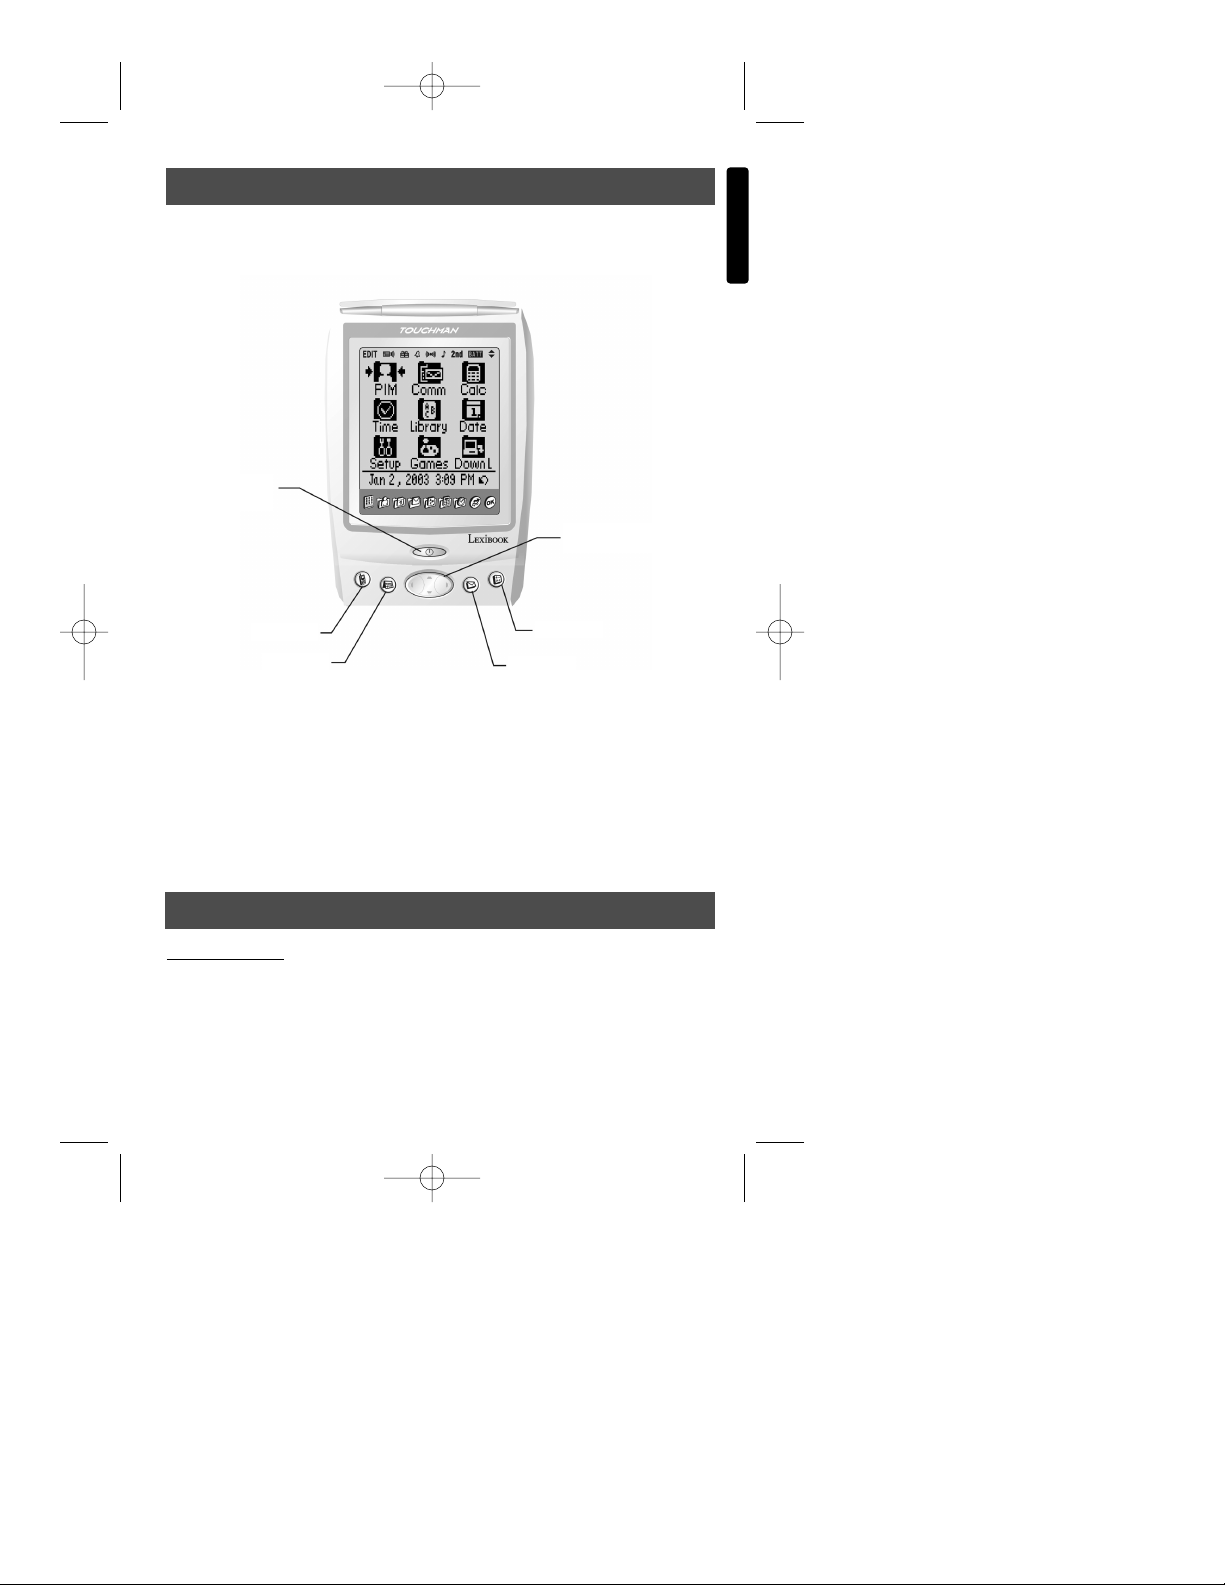
The On/Off key is located in the middle at the bottom of the unit, above the hot
keys – as shown below.
There are also five keys below the LCD screen: four ‘hot keys’ and a larger Up / Down
key in the middle. Hot keys start applications and they are fixed. Their default settings
are as follows (from left to right):
● Hotkey 1 – Phonebook
● Hotkey 2 – Calendar
● Hotkey 3 – E-mail
● Hotkey 4 – Calculator
Screen and Icons
The TouchMan®TM280 series has a touch-sensitive screen. Use the stylus provided to
touch the screen to select icons and enter data. The screen is divided into two main
areas, the Shortcut bar (see illustration above) and the Desktop:
English
Copyright © 2002 Lexibook 3
Keys
Overview
HOTKEY 1
HOTKEY 2
HOTKEY 3
HOTKEY 4
ON/OFF
KEY
DIRECTIONAL
KEY
TM282 English 1/10/02 7:49 Page 3
Page 4
English
Copyright © 2002 Lexibook 4
Desktop
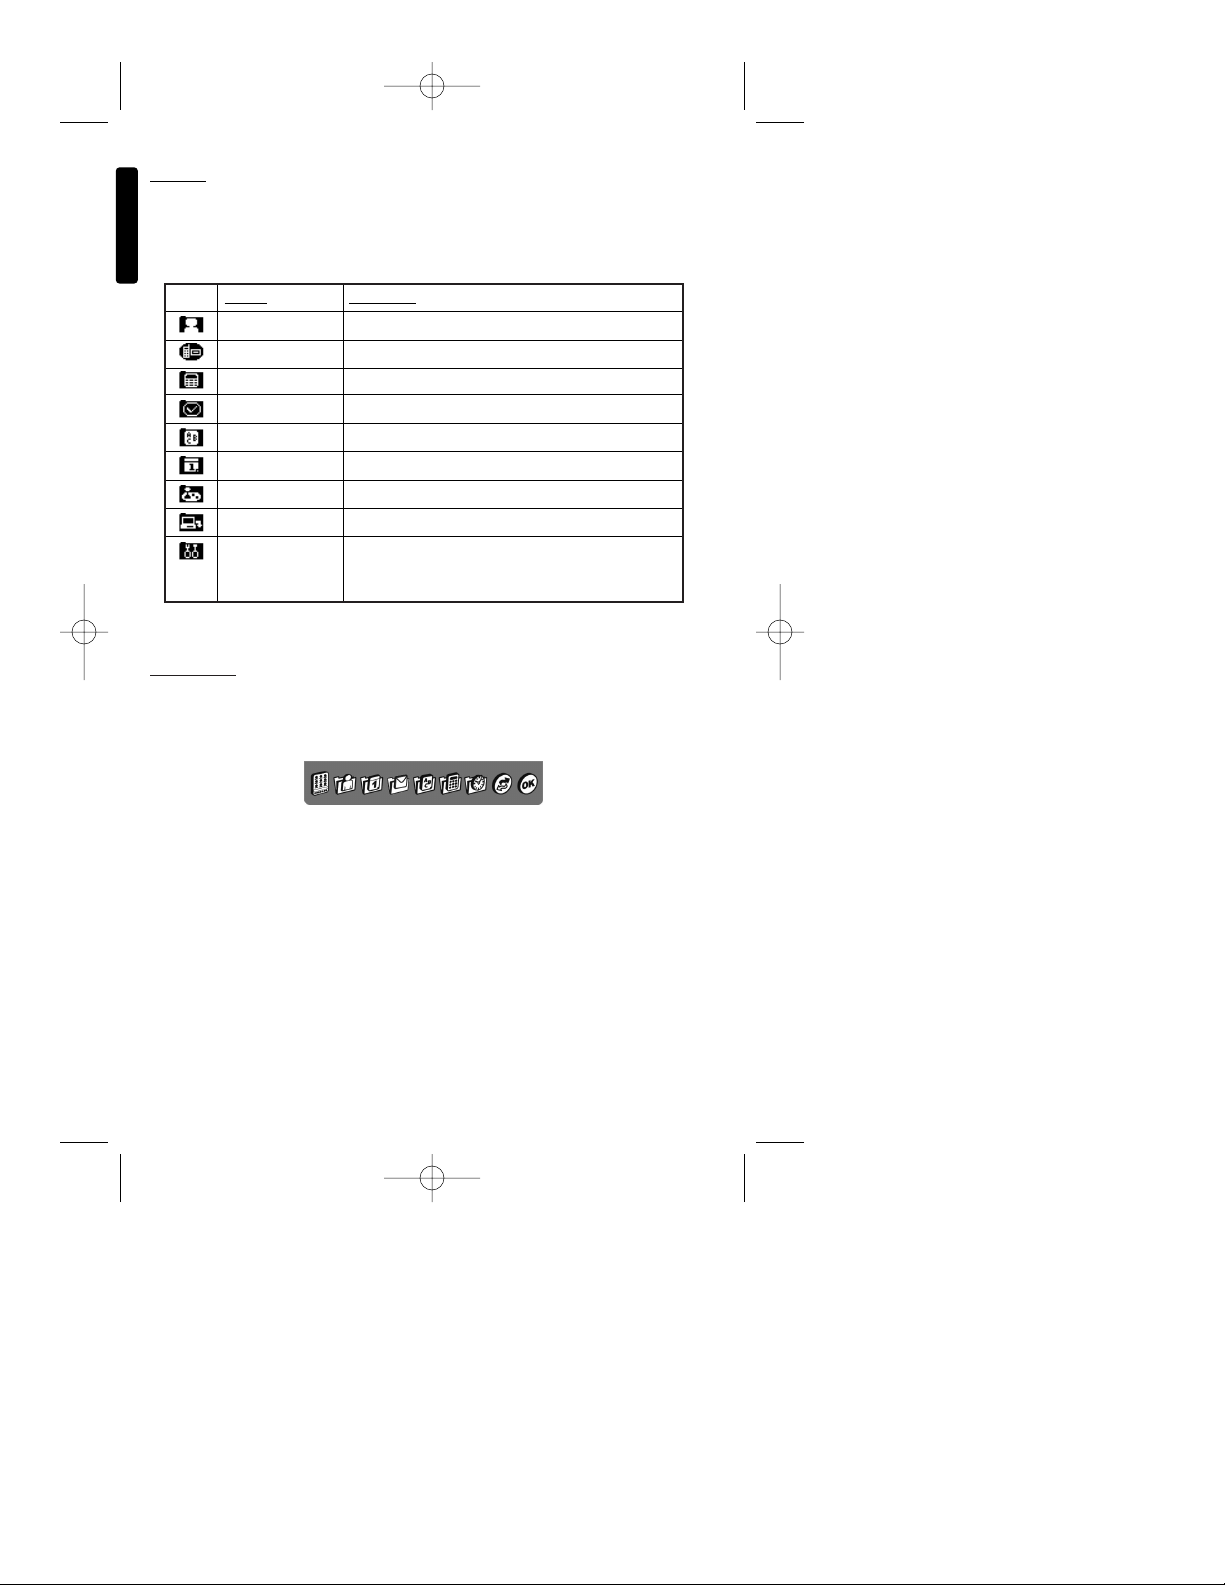
The desktop comprises of nine folders. Each folder has a tab at the top of the screen and
contains a group of functions. Tap on the tab with the stylus to gain access to the
functions in the folder.
Folder Functions
PIM Contact, Memo and Expenses
Communication E-mail
Calculator Calculator, Metric, Currency and Euro conversion
Time Clock, World, Alarm and Count Down
Library Translator and mini text
Date Calendar, Anniversary, Schedule and To do
Game 777 and Lottery
Download For downloading files and applications
Setup Synchronization, User Information, Interface
Language, Password, LCD Contrast, Beep tone and
memory manager.
Tap the icon of the desired function to open it.
Shortcut Bar
There are 9 shortcut direct access icons. Tap them to directly activate their functions and
toggle between each function in turn. Tap each icon in turn to access each function:
TM282 English 1/10/02 7:49 Page 4
Page 5
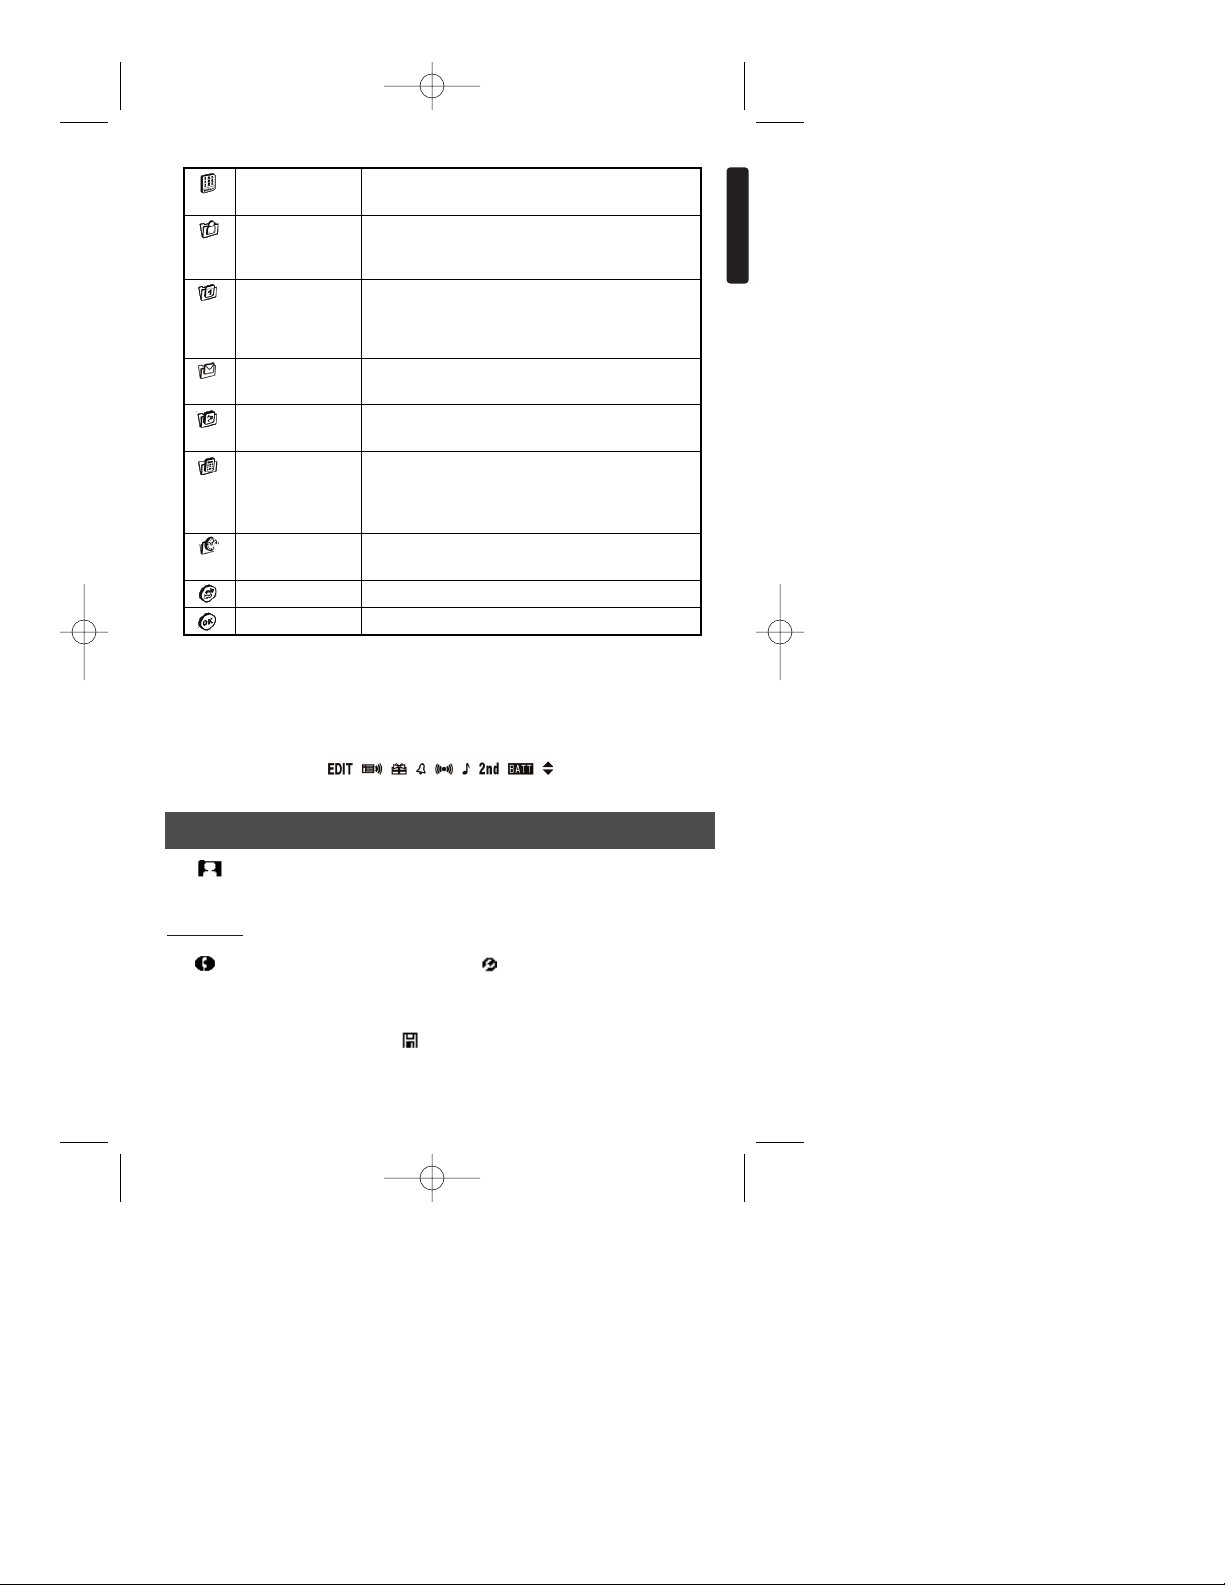
Tap to quit any function and return to the desktop.
The indicators on the status bar along the Top of the screen show the Schedule alarm,
Anniversary, Alarm sound, Alarm sign, Key tone, 2nd function, battery level and up and
down key.
Tap to enter the Organiser mode. To exit this mode and return to the Desktop,
Tap .
Phonebook
Tap to enter the Phonebook mode. Then Tap to show the menu. This includes
“New”, “Edit”, “Search”, “Delete Records” and “Email” functions. All records are listed in
alphabetical order by first name (If there are no records, “New record” is shown). To create a new record, Tap “New Record” and enter the desired data in the appropriate fields
using the stylus or the [] key. Tap to save the record.
English
Copyright © 2002 Lexibook 5
Organiser
Main Displays the main opening screen showing the 9
application icons.
Contacts Access to your address book
Memo Access the memo function and
Expenses Access the expenses function
Calendar Access the calendar and view appointments
Schedule Check your agenda and meetings
To D o Access the To Do function
Anniversary Check anniversaries
Email For the creation, saving, editing and sending of
emails (via. SyncMan software)
Translator Access to the 5 language translator
Mini Text Access Mini Text application to download text files
Calculator Access to the calculator
Euro Convertor Access the euro convertor
Metric Convertor Access the metric convertor function
Currency Convertor
Access the none Euro currency convertor
Clock “Home Time & World Time” Menu and alarm and
countdown functions
Synchronisation Starts synchronisation function
OK Enter a Menu / application or Save your records
TM282 English 1/10/02 7:49 Page 5
Page 6

Memo
Tap to open Memo mode. All Memos are listed alphabetically by subject. Then
Tap to show the menu (If there are no records, “New record” is shown). To create a
new memo, Tap “New Memo”. Enter the subject of the Memo in Title field and enter
contents of Memo in the Memo field. Tap to save record.
Expense
A. Add Expense Record
Tap to open Expense mode. Then tap [] to show the category menu of this mode
and tap “Expense 1” to enter expense 1 list. Then tap to enter the menu (If there are
no records, “New record” is shown). To create a new expense record, tap “New Record”.
Touch any date on the calendar to select a day and then highlight the next category with
the stylus and tap [] key and select a category. Tap to save record.
B. Expense Report
Tap [] to show the menu and select “Report Period”. Then tap the line with the Stylus
to enter “Expense Report” mode. Input the desired date and then, tap to execute it.
The date format keeps with the home time mode all the time.
Tap to enter the date mode. To exit this mode and return to the Desktop, tap .
Calendar
Tap to view the Calendar. The current date is highlighted. Dots on the right side of
the days indicate different type of events. The top dot on the right of the day indicates
“Schedule” event, the middle dot indicates “To Do” event and the bottom dot indicates
“Anniversary” event.
Tap to enter the menu and choose “New Record” or “View Record”. Another window
appears and you can choose to create or to view the following modes: “Schedule”, “To
Do” or “Anniversary”. To go back to the previous menu Tap [➛].
Anniversary
Tap to open Anniversary mode. Then tap to enter the menu (if there are no
records, “New record” is shown). Input the desired date and then tap the “Description
field with the stylus to input description data. Tap to save the record.
Schedule
Tap to open Schedule mode. Then tap to enter the menu (if there are no records,
“New record” is shown). To create a new record, tap “New Record”. Tap any date on the
calendar to select a day and then highlight the next category using the stylus and
tap [] key to select the next fields. Tap to save record.
English
Copyright © 2002 Lexibook 6
Date
TM282 English 1/10/02 7:49 Page 6
Page 7

English
Communication
To Do
Tap to open To Do mode. All To Do’s are listed alphabetically by date. Then
tap to enter the menu. If there are no records, “New record” is shown. To create a new
record, tap “New Record”. Touch any date on the calendar to select a day and then
highlight the next category using the stylus and tap [] to select the next fields.
Tap to save the record.
Tap the to enter the mode. To exit this mode and return to the Desktop, tap .
Email
Emails can be sent to recipients via a host PC and by using SyncMan™ synchronisation.
Note: You must have a valid email address to use this function. You will have to
register with an ISP or have set up an email address with Internet provider such as
Hotmail, MSN, Yahoo or similar.
Outgoing emails will go via the host PC directly to the secure https://my
.lexibook.com
website and seamlessly from there to the recipient. Replies will come back to the email
address that you entered as your receiving address, via your ISP or provider.
You need first to register your E-mail address in the field “User Information” in “System
Setting” mode. Then, go back to mode and Tap to open Email mode. Tap to
enter the menu. If there are no records, “New record” is shown. To create a new record,
tap “New Record”.
Input the email address and tap [] or touch the next line directly to enter the next field:
“CC” , “BCC”, tap [] to skip the next field: “Subj” and “Body”. Tap to save the record.
Tap the [➛] to go back and select “Outbox” by taping [List ()] to view all your E-mails
in this box.
Tap the Library icon to enter this mode. To exit this mode and return to the Desktop,
tap .
T
ranslation
A/ Setting the language that should be translated
Tap to open Translation mode. Tap “English” to open the menu of available
languages. Select the desired input language by tapping [] to select a home language.
B/ Setting the desired languages
Tap on the top left corner of the screen to open the menu. Then tap the screen in
front of the corresponding language to make that language active or inactive.
Copyright © 2002 Lexibook 7
Library
TM282 English 1/10/02 7:49 Page 7
Page 8

Calculator and conversions
After selecting languages, tap anywhere on the screen outside the prompt dialogue to
return to the original screen and the setting will be effective.
Note: the translator database is on the SyncMan CDROM (supplied with this unit).
Before starting the translator for the 1st time, you need to install the database onto
the TM280 series via SyncMan (see the section on how to download applications
in the synchronisation section).
Library
Note: To use this function you need to have downloaded at least one text file from the
secure site https://my.lexibook.com, via SyncMan™ software or create a text file from
your favourite word processor package – NOTE – remember to save the file you are
working on or export it as a text file NOT the normal format of the program you are using.
Tap to open mini text mode. Tap on the item or book you wish to view. Then
tap [] [] to view the article page by page and tap to view the article line by line.
Tap and select “search record”. Input the subject or any word of the text. Then tap
to search record.
Tap to enter the calculator functions. To exit this mode and return to the desktop,
tap .
Calculator
Tap to open Calculator mode. The calculator includes basic functions, percentage
calculation and memory features.
Note:
Tap “AC” to clear the result.
Tap “M+” to place value into the memory.
Tap “M-” to subtract the numbers from memory.
Tap “MR” to show the value stored in the memory and to perform further calculations.
Tap “MC” to clear the value stored in the memory.
Metric Conversion
Tap to open Metric Conversion mode. This function provides two-way conversion
between common units of measurement. There are six metric conversions, which
include: length, surface, weight, cubic, capacity and temperature.
Select the desire measure by tapping directly on it’s line or touch [❿] [➛] [] [] to select
the desire choice.
Tap to enter “Unit”. Choose the “Length” conversion and enter. Tap [❿] or [➛] to change
the conversion direction. Input the amount “100” and tap = to get the result.
English
Copyright © 2002 Lexibook 8
TM282 English 1/10/02 7:49 Page 8
Page 9

Tap to return to the metric conversation menu.
Use [] [] keys to search through the conversion rates.
Use [❿] [➛] key to change the conversion direction.
Tap [CE] key to clear the input amount.
Currency conversion
There are 5 available tables for currency conversion and conversions can be up to 12
digits. You can also amend or create currency names (3 characters MAX.).
Tap to select Currency conversion mode. Tap [] [] to select the desire currency
conversion. Tap to enter edit mode.
For example:
The cursor will flash on the line of “UNIT 1?”.
Input USD. Then tap [] to change to “UNIT 2?” Or tap directly on the next line.
Input NTD. Then tap [] to change to “Rate =”.
Input the rate 32.659. Tap to store the setting.
Euro Currency
There are 12 EURO currency conversion available with fixed rate. Conversions can
be up to12 digits long. You can input the EURO conversion value up to 5 digits after the
decimal point, but you can also achieve a conversion result after only entering 2 decimal
places.
Tap to select Euro Currency conversion mode. Tap [] [] arrow to select the
desire currency conversion. Then tap [=] to get your result. If you want to change the
convert direction, tap [➛] arrow.
Tap to return to the previous menu.
Tap to enter the Time mode. To exit this mode and return to the Desktop, tap .
Clock
Set Home Country, city and time. You can also select [12/24] key to toggle between
12-hour and 24-hour format. You can also tap on the [DST] key to toggle between DST
time or non-DST time.
Tap the to enter the Clock mode. Tap “Edit” on the bottom right corner to enter
setting mode. Then, tap “Number key” to input the desire time or tap the [❿] [➛] arrow
to move the cursor to country directly. Touch the [] [] arrow to view each country.
Tap to store the setting.
Tap to return to the previous menu.
English
Copyright © 2002 Lexibook 9
Time
TM282 English 1/10/02 7:49 Page 9
Page 10

World Time
Tap to enter the World Time mode. Tap “Edit” on the bottom right corner to enter
setting mode. Then, tap “Number key” to input the desire time or tap the [❿] [➛] arrow
to move the cursor to country directly. Touch the [] [] arrow to view each country.
Tap to store the setting.
Tap to return to the previous menu.
Alarm
There are 3 alarms. Each alarm can be set daily, weekly, weekend or for a specified day.
Tap to enter the Alarm mode. Tap [A1 ] to access the different alarms and select
one “Alarm”. Then tap key icon to edit the alarm mode (the current time displayed is
the home time and the cursor flashes on the first number). Tap Number key: Ex. 06 30
or you can also tap the [] [] arrow. Then tap the line “Daily Alarm” to set alarm
category, then “Weekly Alarm” and select “Sun Alarm” by tapping it. Tap “Note” field to
enter a note, if required. Tap to store the Alarm.
Count Down
The maximum number of Count Down days is 99. Maximum hours is 23, 59 minutes and
seconds are 59. If numbers exceed this range, “Error!” will appear.
Tap to enter the Count Down mode. Tap the “Number key” or the [] [] arrow to set
the time. Tap the note field and input the note using the keyboard. Tap to store the
Alarm.
Tap to enter the game mode. To exit this mode and return to the Desktop, Tap .
777 Games
Tap to enter this game.
The default bet is 1 and the default total amount of money is 00920. Choose a bet by
tapping [] [] and select bet number form 1~9. Touch “Spin” on the bottom right to start
the game. The most you can get is 9999.
When the total money is “99999”, a “Congratulate! You Have Got 99999!” message will
be displayed and if the total money is “0”, the screen will display “You Lost! You Lost!”
Touch the screen to return to the initial display.
Lottery Game
Tap to enter the mode.
You can set the quantity of numbers that can be displayed.
The range is from 1 to 9, and also you can set the maximum number that can be
displayed. The range is from 1 to 99.
English
Copyright © 2002 Lexibook 10
Games
TM282 English 1/10/02 7:49 Page 10
Page 11

English
Copyright © 2002 Lexibook 11
Tap “Sets” to enter setting mode. Then, input your desire number using [] []. Tap
“Max” to set the maximum number that can be displayed and input your desire number.
Tap [Start] to start the game. The numbers will be sent out from the left and form its shape
by degrees. Seconds later, a set lottery number will be displayed at random.
Tap to enter the mode. To exit this mode and return to the Desktop, Tap .
Synchronisation
Tap “Synchronisation” and click “Yes” to start synchronisation or “No” to cancel
connection.
If the connection fails, the TM280 will give you a message to notify you. If the connection
succeeds, the device begins to transfer the information and a message appears on the
screen showing: “Synchronising”.
To download new applications or files, click on Download in the SyncMan software on the
PC. Then click on Refresh to check which applications are available on the iServer or
click on Import to browse for a file on your hard drive or floppy disk. The files appear on
the list and will be downloaded to the TM280 series during the next synchronisation.
After the synchronisation has completed successfully, both your Touchman
®
and the
computer will give you a confirmation message.
User Information
Tap “User Information” to enter the mode.
Before using the E-mail function, you must enter your personal data information in User
Information mode.
Tap to edit User Information mode. Then enter the details of your personal
information into each field. Then tap to store your personal data.
Language
Tap “Language” to enter this mode. Then select the home language you desire by
tapping on it.
Password
Tap “Password” to enter this mode. Then enter your alphanumeric password
(8 characters max). Tap to store your personal data.
Set up
TM282 English 1/10/02 7:49 Page 11
Page 12

LCD Contrast
Tap “LCD Contrast” to enter this mode. Then tap [] or [] to lighten or darken the
screen. Tap to go back to the “Set Up” menu.
Beep T
one
Tap “Beep Tone” to enter this mode. Select [ON] or [OFF] by tapping on the relevant word
then the screen will return the original display.
Check Memory
Tap “Check Memory” to enter this mode. Then tap “Yes” to execute the operation.
If you don’t execute this operation after, the caution screen will prompt “Please perform
memory management!” in any mode.
Auto Shut off
Tap “Auto Shut off” to enter this function.
You can choose between 1,3,5,7,9,11 minutes before the unit will turn itself off.
Memory Management
Tap “Memory Management” to enter this function. Tap [OK] to execute memory
management or tap [NO] to exit.
If there is a lot of data in your unit using the memory management function might take
some while during the process. Do not press any keys or turn the unit off until the unit
confirms it has finished.
The reset button is positioned on the back of the unit, inside the hole underneath the
product label. It is marked RESET.
Insert a thin, blunt instrument, such as a paper clip, and press the reset button gently.
After resetting the unit you will need to perform a screen recalibration. The unit will then
take you to the Organizer folder.
Keep the unit away from direct sunlight, high or low temperatures, humidity and dust.
Do not drop the unit.
Do not use detergent, liquid cleaners or solvents to clean the unit. Wipe the unit with a
clean, soft, dry cloth.
English
Copyright © 2002 Lexibook 12
Reset
Care and safety
TM282 English 1/10/02 7:49 Page 12
Page 13

Do not twist or bend the unit.
We highly recommend to you to keep a hard copy of your significant data. By principle,
any system with electronic memory can lose its data in certain circumstances.
We therefore cannot accept any responsibility for the loss of any data, which it was
caused by misuse, an unauthorised repair, a malfunction, the change of batteries, the
use of batteries after their useful expiry date or any other circumstance. We cannot
accept any direct or indirect responsibility for financial losses or complaints from third
parties, which could result from the use of this product and its functions.
NOTE: If the unit receives an electro static shock it may cease to function. Should this
happen remove the batteries and reinsert them. The unit should then be able to function
again.
The TouchMan TM280 series uses 2x AAA batteries. If the display becomes too dim to
read properly, use the display contrast control to increase the contrast. If the display is
still too dim, this is an indication that the battery life is low and they should be replaced
as soon as possible.
To replace the batteries, open the battery compartment on the bottom of the unit,
take out the old batteries and dispose of them carefully. Note the polarity of the battery
compartment and replace the old batteries with NEW high quality batteries. Replace the
battery compartment lid and turn the unit on.
DO NOT dispose of old batteries by throwing them into a fire. They may explode and
cause serious injury. ALWAYS dispose of batteries carefully.
DO NOT leave the battery in the unit for extended periods of non-use as it may leak and
cause irrevocable damage to your unit. This will invalidate your warranty.
If in doubt consult your local stockist or ring the help line for further information.
Batteries 2 x AAA
Dimensions 105 x 72 x 13 mm
Weight 94g (with batteries)
Warranty 2 years
Memory TM 282: 2Mb, TM 284: 4Mb
Made in China
English
Copyright © 2002 Lexibook 13
Batteries
General specification
TM282 English 1/10/02 7:49 Page 13
Page 14

English
Specifications are subject to change without notice.
Warning: If the unit receives an electrostatic shock and ceases to function, it can
be reset by tapping on/off key or by removing the batteries and then
reinserting them.
This product is covered by our standard 2-year manufacturer warranty. In the case of any
fault, please return the unit to the address below for replacement or repair, or to your
original place of purchase. A copy of your sales receipt must be provided or other proof
of purchase. This warranty does not cover damage or faults occurring through misuse,
damage or abuse. This does not affect your statutory rights.
Return/Warranty addresses:
*Damage to LCD display not included.
Web: http://www
.lexibook.com, http://www.lexibook.co.uk and https://my.lexibook.com
Email: infouk@lexibook.com
TM282/TM284IM0392
Warranty
Copyright © 2002 Lexibook 14
UK Address
Lexibook UK Limited
PO Box 66
Bordon
Hants
GU35 0ZN
England
Tel: 0808 100 3015 (Freephone)
Fax: +44 1420 477929
Email: infouk@lexibook.com
France Address
Lexibook SA
2 avenue de Scandinavie.
91953 COURTABOEUF Cedex
FRANCE.
Tel: 33 (0)1 73 23 23 23
Fax: 33 (0)1 73 23 23 04
TM282 English 1/10/02 7:49 Page 14
 Loading...