


C M Y CM MY CY CMY K
DGBFNLEPIDKSNFIN
Bedienungsanleitung
User's Guide
Mode d'Emploi
Handleiding
Instrucciones
Instruções
Istruzioni
Betjeningsvejledning
Bruksanvising
Bruksanvising
Käyttöohjeista
DE-1
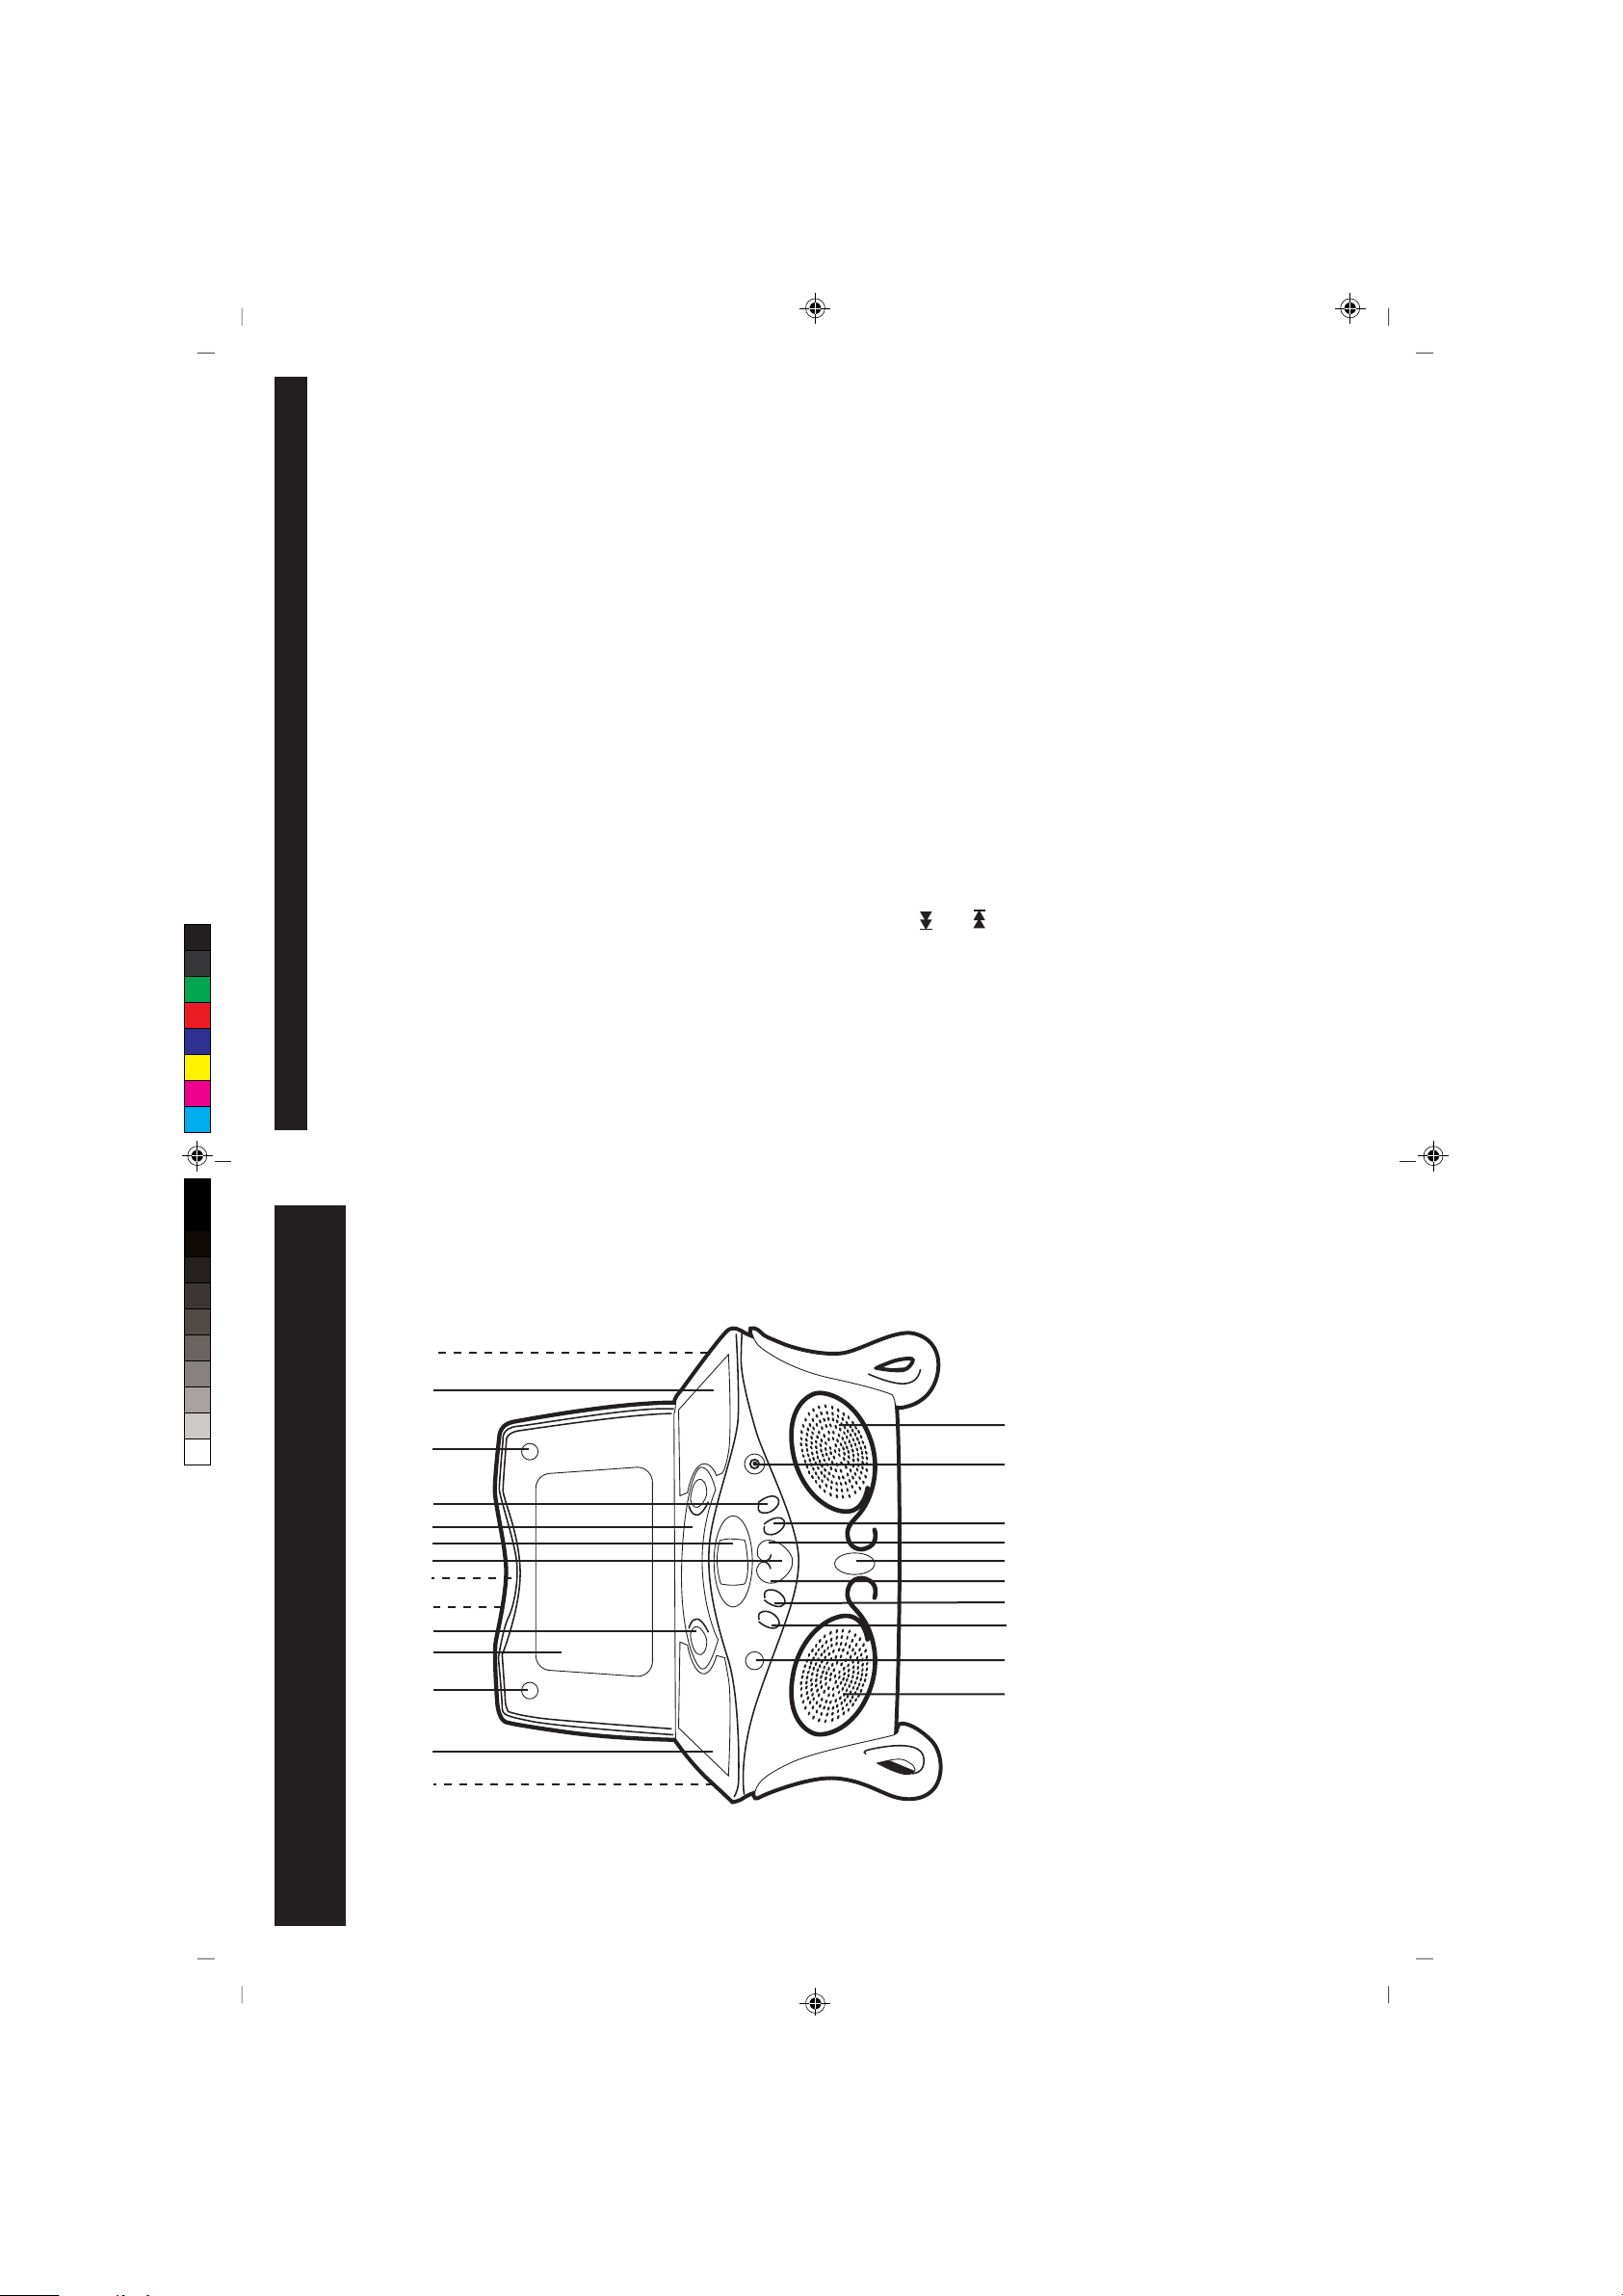
BEDIENELEMENTE
1. Linke Schublade (Geräteseite)
2. Linkes Fach
3. Taste zum Öffnen des CD-Aufbewahrungsfachs
4. Spiegel
5. Drucktaste zum Öffnen/Schliessen des CD-Fachs
6. Netzkabel (Rückseite)
7. CD Aufbewahrungsfach (hinter der Spiegelklappe)
8. PLAY/PAUSE: Starten/Anhalten der Wiedergabe
9. Display
10. CD-Fach
11. VOLUME+: Lautstärke erhöhen
12. Taste zum Öffnen des CD-Aufbewahrungsfachs
13. Rechtes Fach
14. Rechte Schublade (Geräteseite)
15. Linker Lautsprecher
16. POWER-Taste/POWER-Anzeige
17. REPEAT/INTRO: Wiederholfunktion
C M Y CM MY CY CMY K
18. STOP: Wiedergabe anhalten
): Titelsprung vor/schneller Suchlauf vorwärts
): Titelsprung zurück/schneller Suchlauf rückwärts
19. SKIP/SEARCH (
20. Taste zum Öffnen des Truhendeckels
21. SKIP/SEARCH (
22. VOLUME-: Lautstärke verringern
23. PHONE (Kopfhörer): Anschlussbuchse für Kopfhörerstecker 3.5 mm
24. Rechter Lautsprecher
9
1 2 3 4 5 6 7 8 10 11 12 13 14
ÜBERSICHT/OVERVIEW/VUE D'ENSEMBLE
18 1920 2122 23 24
17
15 16
DE-2
DE-3
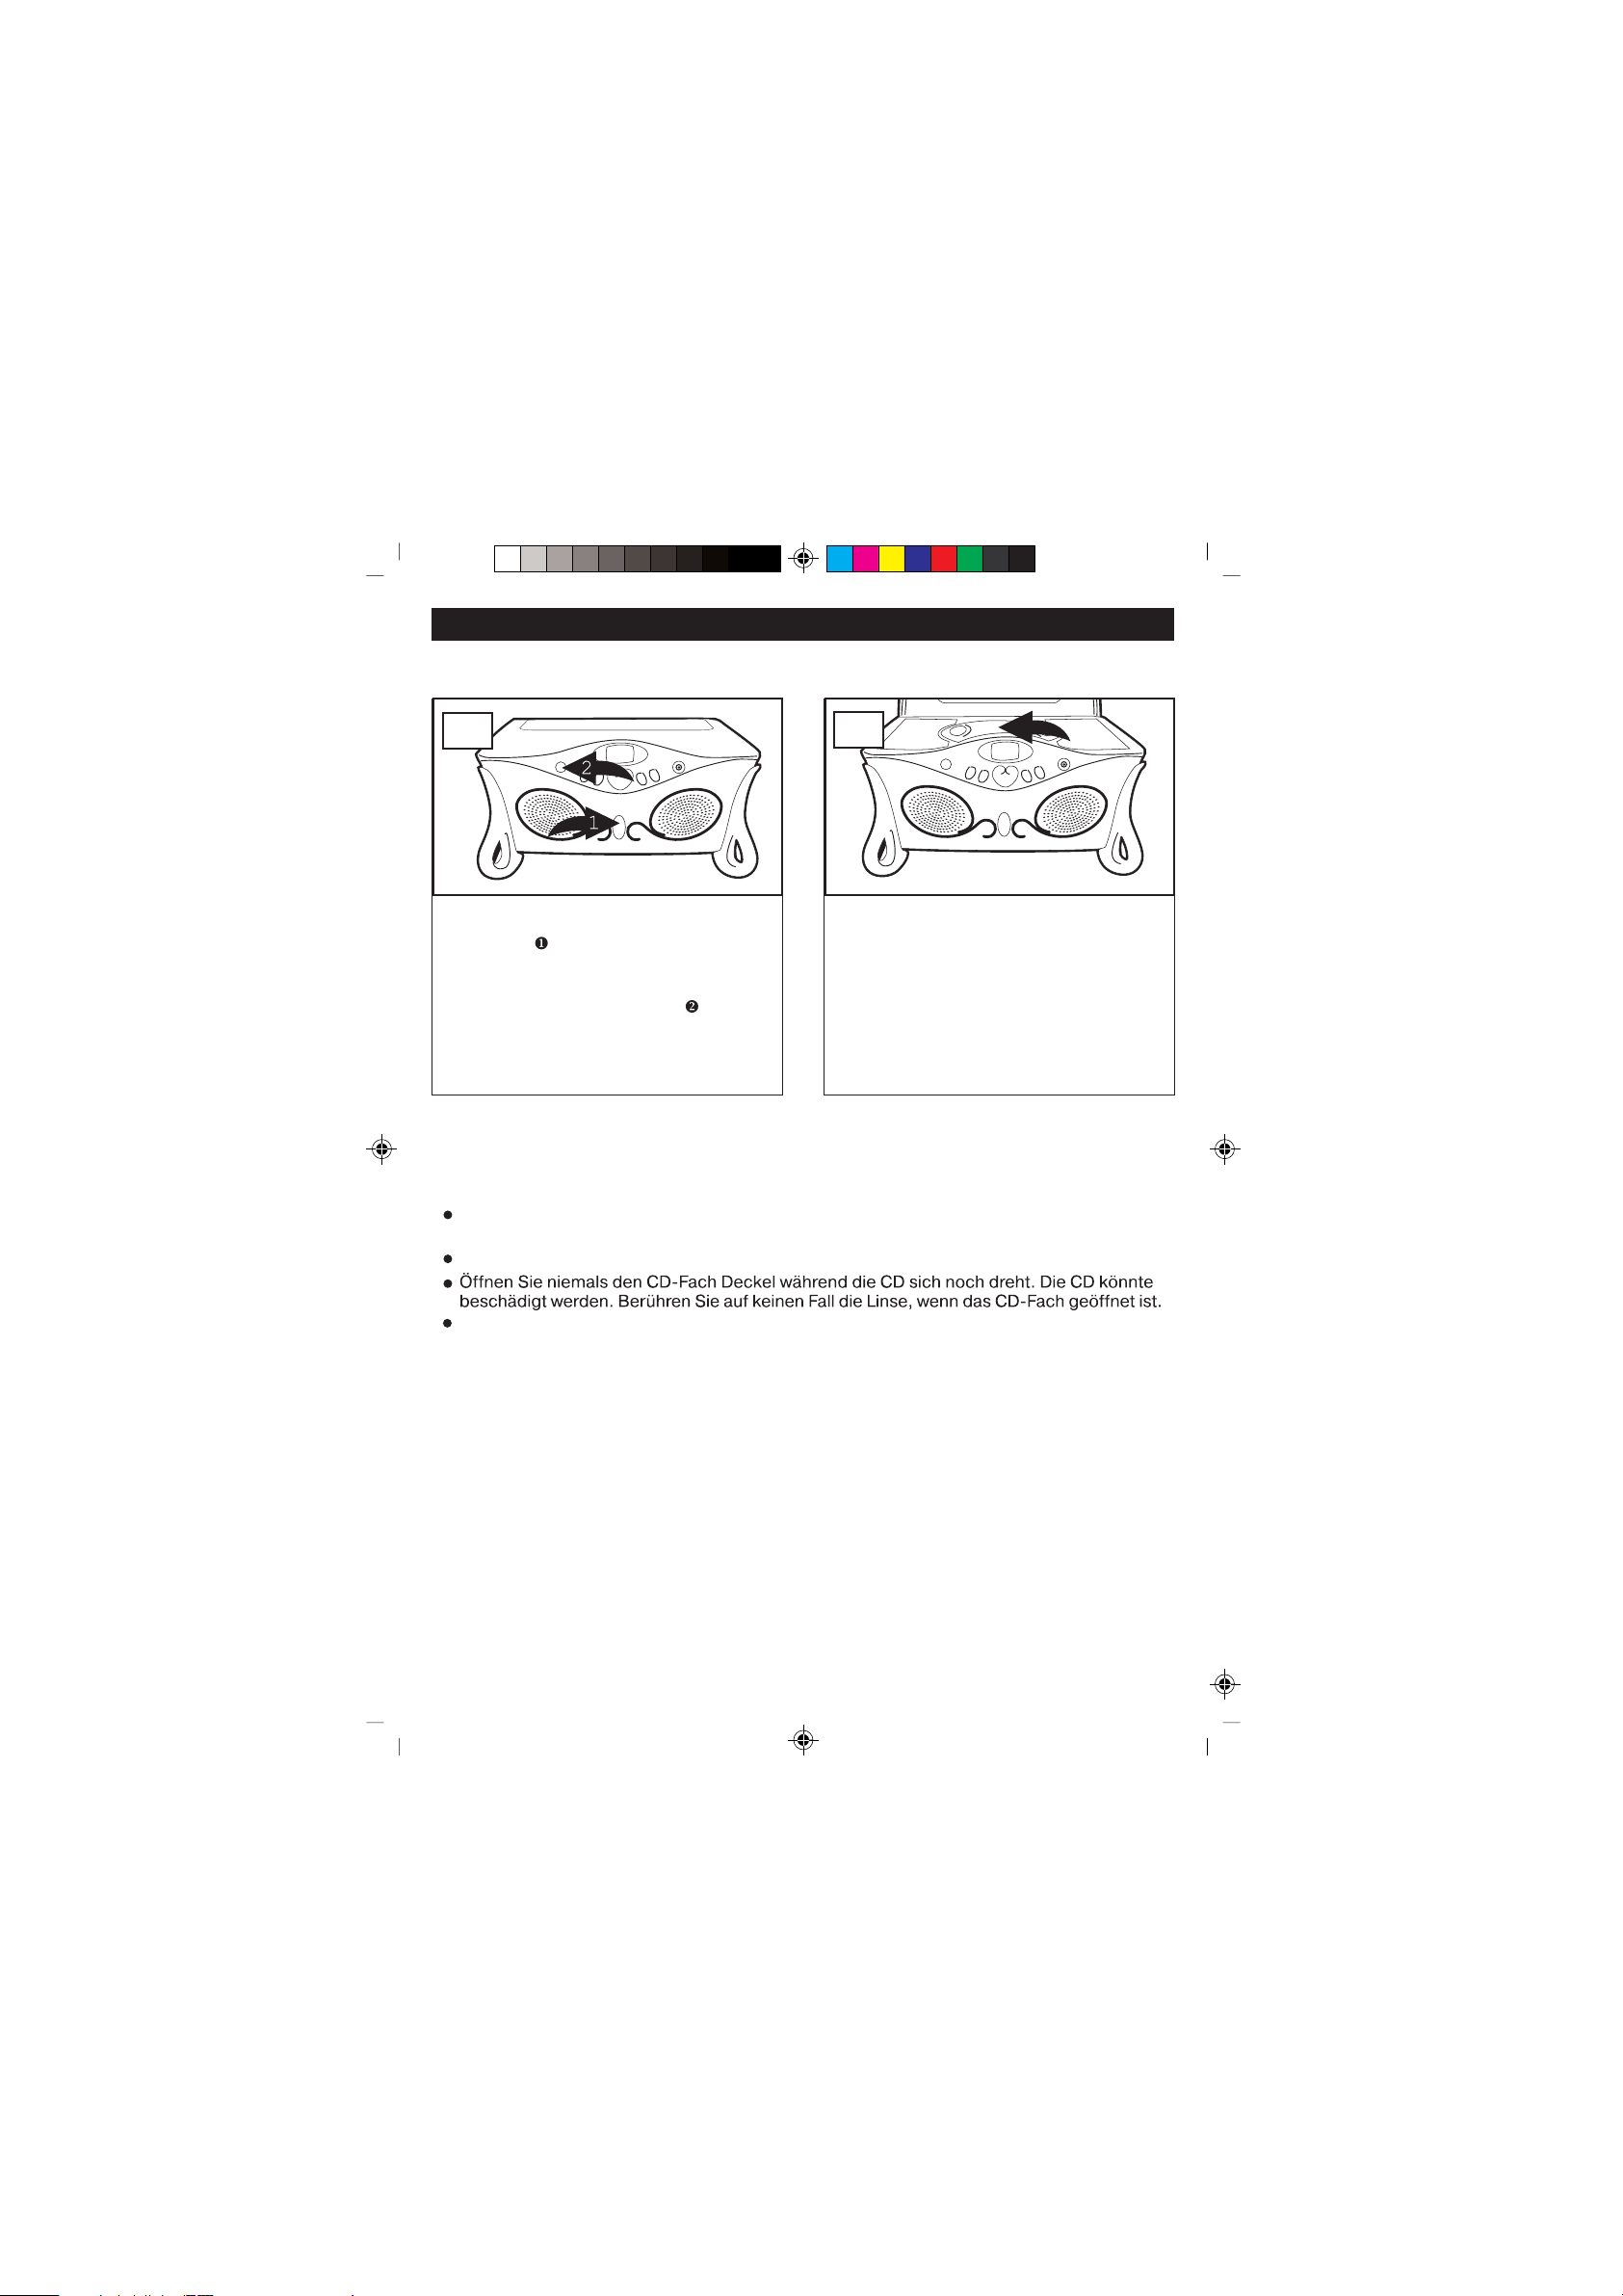
EINE CD EINLEGEN
1
C M Y CM MY CY CMY K
BETRIEB
2
1
Drehen Sie vorsichtig die Auslösetaste für
den Deckel nach rechts, woraufhin sich
der obere Deckel leicht öffnen lässt. Heben
Sie den Deckel an, und das CD-Fach wird
sichtbar. Drücken Sie POWER (die
Netztaste), um das Gerät einzuschalten,
und die POWER-Lampe (Betriebsanzeige)
leuchtet auf.
HINWEISE:
Sollte eine CD nicht richtig im CD-Fach eingelegt, verschmutzt, beschädigt oder aus anderen
Gründen nicht lesbar sein, so erscheint im Display die Anzeige "ERROR" oder "NO DISC".
Während des Abspielens einer CD wird im Display die jeweilige Titelnummer angezeigt.
Nachdem das Gerät an das Stromnetz angeschlossen wurde und 30 Sekunden lang kein
Tastendruck erfolgte bzw. das Gerät im Stoppmodus gelassen wurde, wird der OFF-Modus
(kein Display) aktiviert. In diesem Fall müssen Sie POWER (die Netztaste) zweimal drücken,
um den CD-Player wieder einzuschalten.
FÄCHER UND SCHUBLADEN
Schubladen: Auf jeder Seite des Geräts befindet sich eine Schublade. Ziehen Sie die
Schublade hinaus, um kleinere Dinge darin aufzubewahren.
Fächer: Beim Öffnen des oberen Deckels finden Sie zwei Fächer jeweils seitlich vom
CD-Player vor; wenn Sie die Fächerdeckel abheben, können Sie dort Gegenstände verstauen.
CD Aufbewahrungsfach: Drücken Sie bei geöffnetem Truhendeckel eine der beiden Tasten
zum Öffnen des CD-Aufbewahrungsfachs, um die Deckelinnenseite aufzuklappen.
Hier können Sie bis zu 10 CDs aufbewahren.
Öffnen Sie das CD-Fach, indem Sie auf die
Drucktaste zum Öffnen/Schließen des CDFachs drücken. Legen Sie eine CD mit der
Aufschrift nach oben zeigend in die
Vertiefung ein und schließen Sie den CDFach Deckel.
HINWEIS: In diesem CD-Player können Sie
herkömmliche CDs und Single-CDs (8 cm)
abspielen.
DE-4

C M Y CM MY CY CMY K
BETRIEB (FORTS.)
EINE CD ABSPIELEN (STANDARD, CD UND CD-RW)
1
2
2
Legen Sie eine CD ein, wie vorher
beschrieben. Drücken Sie die Taste
PLAY/PAUSE, um die Wiedergabe zu
starten.
Im Display werden kurz die gesamte Anzahl
der Titel und die gesamte Spieldauer der
CD angezeigt, danach startet die
Wiedergabe.
3 4
Stellen Sie mit den VOLUME+/- Tasten
die gewünschte Lautstärke ein.
Drücken Sie die Taste SKIP/SEARCH
oder SKIP/SEARCH , um die Titel
vorwärts oder rückwärts durchzuschalten.
Um einen kurzen Suchlauf durch den
aktuellen Titel in Vorwärts- oder
Rückwärtsrichtung zu aktivieren, halten Sie
SKIP/SEARCH oder (die
Titelsprung-/Suchtaste vorwärts rückwärts)
gedrückt.
Drücken Sie die Taste PLAY/PAUSE, um die
Wiedergabe zu unterbrechen.
Im Display blinkt die Zeitanzeige und das
PAUSE Symbol wird angezeigt.
Um die Wiedergabe fortzusetzen, drücken
Sie erneut die Taste PLAY/PAUSE.
Wenn die CD mit der Wiedergabe fertig ist,
stoppt sie automatisch, oder Sie können
vorher STOP (die Stopptaste) drücken;
die Gesamtzahl der Titel und die gesamte
Spielzeit angezeigt.
Drücken Sie die Taste POWER
Gerät auszuschalten. Die POWER Anzeige
erlischt.
, um das
DE-5

EINEN TITEL WIEDERHOLEN
1
C M Y CM MY CY CMY K
BETRIEB (FORTS.)
2
2
Um einen Titel direkt anzuwählen, drücken
Sie während der Wiedergabe die Taste
SKIP/SEARCH
. Drücken Sie die REPEAT/INTRO Taste
. Im Dis-play erscheint die Repeat1
Anzeige
GESAMTE DISK WIEDERHOLEN
oder SKIP/SEARCH
.
Das Gerät spielt nun solange denselben
Titel ab, bis Sie die Taste STOP
Stellen Sie die Lautstärke über die Tasten
VOLUME+/-
wie gewünscht ein.
drücken.
1 2
Drücken Sie während der Wiedergabe
zweimal die Taste REPEAT/INTRO.
Im Display erscheint die Repeat ALL
Anzeige
WENN SIE DIE WIEDERGABEWIEDERHOLUNG AUFHEBEN WOLLEN, drücken Sie
REPEAT/INTRO (die Wiederholungs-/Introtaste) mehrmals, bis die Wiederholanzeige erlischt;
das Gerät fährt fort
INTRO ALLER TITEL WIEDERGEBEN
.
Das Gerät wiederholt nun solange die
gesamte CD bis Sie die Taste STOP
drücken.
Stellen Sie die Lautstärke über die Tasten
VOLUME+/-
wie gewünscht ein.
1
Drücken Sie während der Wiedergabe
dreimal die Taste REPEAT/INTRO. Im
Display erscheint die Repeat INTRO
Anzeige. Das Gerät spielt nun die ersten 10
Sekunden jedes Titels auf der CD an.
2
Nachdem alle Titel 10 Sekunden angespielt
wurden, stoppt die Wiedergabe automatisch.
Stellen Sie die Lautstärke über die Tasten
VOLUME+/-
DE-6
wie gewünscht ein.

C M Y CM
MY CY
CMY K
T48064-23
V-240V
DE-7

C M Y CM MY CY CMY K
LOCATION OF CONTROLS
1. Left Drawer (Side of Unit)
2. Left Compartment
3. Left Press-To-Open Button
4. Mirror
5. CD Door Open/Close Area
6. AC Cord (Rear of Unit)
7. CD Storage Compartment (Behind Mirror Door)
8. PLAY/PAUSE Button
9. Display
10. CD Compartment
11. VOLUME + Button
12. Right Press-To-Open Button
13. Right Compartment
14. Right Drawer (Side of Unit)
15. Left Speaker
16. POWER Button
17. REPEAT/INTRO Button
18. STOP Button
19. SKIP/SEARCH (
20. Top Door Open Knob
21. SKIP/SEARCH (
22. VOLUME Button
23. PHONE (Headphone) Jack
24. Right Speaker
) Button
) Button
GB-1

Important Safety information
Mains supply
This equipment is designed to operate from a 230 Volt, 50Hz AC mains supply. Other power sources may damage it.
Check that the rating label on the back cover of the equipment says 230V AC ( ~ ) before you plug it in for the first
time.
Mains plug
We have fitted this equipment with a standard mains plug.
If the mains lead gets damaged it must be replaced by a qualified service agent with an approved lead of the same
type.
If you cut off the mains plug, for example to fit a different type, please destroy the old plug as it would be
dangerous if inserted into a live power outlet. Carefully follow the wiring instructions supplied with the new plug.
If a fuse is fitted to the plug, remove the fuse before throwing the plug away.
Carefully follow the wiring instructions supplied with a new mains plug.
Never use a fused mains plug without the fuse cover.
Mains plug wiring for the UK
In a re-wirable plug the wires in the mains lead of this equipment must be connected as follows.
The wire-coloured brown must be connected to the terminal that is marked with the letter L.
The wire-coloured blue must be connected to the terminal that is marked with the letter N.
Do not connect anything to the earth terminal which is
marked E, or
You must make sure the mains lead is firmly secured under the cord clamp.
Mains fuse
UK standard (BS1363) plugs must have a 3 amp (BS1362 type) fuse fitted. Replace the plug or have the power lead
assembly replaced if the fuse cover is lost.
If the power transformer or it’s leads become damaged, it must be replaced by a qualified service agent with the same
type and rating.
Symbols
This equipment is double insulated and an
earth connection is not required.
This mark is applied to show the equipment
conforms to European safety and electromagnetic compatibility standards.
Dangerous voltage constituting a risk of
electric shock is present inside this equipment.
There are important operating and
maintenance instructions in the literature
accompanying this equipment.
Safe use and care of your audio equipment
We have designed and made this product to meet European safety standards, but as with any electrical equipment you
must take care to get the longest working life from it and stay safe. Here are a few tips to help you do this.
Read these instructions carefully before you try to use the
Protect the mains lead. You must ensure the mains lead cannot be walked on, crushed, chafed, cut, and so on.
equipment.
GB-2

Avoid harsh conditions such as wet or damp places, high humidity, strong vibration, extremely high or low
temperatures, strong sunlight and places that are very dusty.
Never push objects into holes and ventilation slots.
To save power, switch off mains power or pull out the mains power plug when you are not using the equipment
Don't continue to use this equipment if you have spilt liquids in it, if it is damaged in any way or if it does not work
normally. Immediately unplug the equipment and seek expert advice.
Pull the mains plug out of the wall socket during thunderstorms.
WARNING:
Connect headphones with the volume set low and increase it if required. Prolonged listening through some
headphones at high volume settings can result in hearing damage.
This product is designed for domestic use only. Any other use may invalidate the guarantee and
might be dangerous.
Ventilation
Place the equipment on a hard flat surface away from direct sunlight and heat sources, allow at least a 10cm gap all
around. Don't obstruct ventilation slots, including those underneath, with soft furnishings. Overheating will shorten
the life of the equipment and increase the risk of fire.
Cleaning
Disconnect the mains supply and use only a lightly dampened soft cloth. Do not use chemical solvents or strong
detergents as these may damage the cosmetic finish.
Disposal
Waste electrical and electronic products must not be disposed of with household waste. Please
refer to the retailer from whom you purchased this item for disposal instructions.
Packaging materials can be recycled using your local collection facilities.
Important Safety warnings
To prevent electric shock, do not remove any cover.
If anything goes wrong, don't try and fix it yourself, get a qualified service agent to look at it.
Do not expose this equipment to dripping or splashing or place any objects filled with liquids, such as vases,
on the equipment.
Never put a naked flame source on or near the equipment.
Class 1 laser product
This product contains a low power laser device. Invisible laser radiation when open and interlocks defeated.
Avoid exposure to beam.
GB-3

INSERTING A CD
1
C M Y CM MY CY CMY K
OPERATION
2
1
door release
NOTES:
If a disc is inserted incorrectly, dirty, damaged or not present at all, and the PLAY/PAUSE
button is pressed, Error or No Disc will appear in the display.
As each track is played, the track number is shown in the display.
To prevent damage to the disc, never open the CD door while the disc is rotating. Wait for
the disc to stop before opening the CD door. Never touch the lens when the CD compartment
door is open.
After connecting the appliance to the supply and no buttons are pressed or if left in STOP
mode for more than 30 seconds, the appliance will enter OFF mode (no display), you need
to press the power button twice to turn the CD player back on.
Open the CD Compartment by pressing
the CD Door Open/Close area. Place a
disc on the spindle, label side up, and
close the CD compartment door.
NOTE: You can use standard and
single-size (3) CDs with this unit.
the lid of
located in the inside top left and right of the door.
GB-4
there are
, one on

OPERATION (CONTINUED)
TO PLAY A CD (STANDARD, CD-R AND CD-RW)
1
C M Y CM MY CY CMY K
2
2
Insert a CD as described before.
Press the PLAY/PAUSE button to start
playback; the total number of tracks
and playing time will appear briefly,
then playback will begin.
3 4
Press the PLAY/PAUSE button to pause
playback; the time display will blink and
the Pause indicator will appear in the
display. Press again to resume playback.
has finished
stop automatically or you can
briefly t
current track
GB-5

OPERATION (CONTINUED)
TO REPEATEDLY PLAY BACK ONE TRACK
1
2
2
With a CD inserted and playing, select
a track using the SKIP/SEARCH
or button. Press the REPEAT/INTRO
button
TO REPEATEDLY PLAY BACK ALL TRACKS
once; the Repeat 1 indicator
will appear in the display.
The unit will then play the same track
over and over until the STOP button
is pressed. Adjust the VOLUME buttons
as desired.
1 2
With a CD inserted and playing, press
the REPEAT/INTRO button twice; the
Repeat ALL indicator
the display.
TO CANCEL OR STOP REPEAT PLAYBACK
TO STOP REPEAT PLAYBACK, press the STOP button once.
TO PLAY EVERY TRACK ON THE DISC FOR A SHORT TIME
ALL will appear in
The unit will then play all the tracks on
the CD over and over until the STOP
button
VOLUME buttons
is pressed. Adjust the
as desired.
repeatedly until
1
During playback, press the REPEAT/INTRO
button three times. The Repeat INTRO
indicator appears in the display. The unit
now plays the first 10 seconds of every
track on the CD.
2
automatically.
STOP button
the INTRO play ends.
Set the Volume as desired with the
VOLUME+/-
GB-6
, to stop the playback before
buttons.
10 seconds, the

You can listen to the music through standard headphones (3.5mm Jack), by plugging them into
the headphones jack on the front of the jewellery box.
Caution : Connect headphones with the volume set low and increase it if required.
Prolonged listening through some headphones at high volume settings can result in
hearing damage.
T48064-23
Primary:
Secondary: 9V
230V-240V ~ 50Hz 12W
GB-7

Troubleshooting
If you have any of the problems listed below please use this troubleshooting guide to try and solve them.
A little time spent in this way may save you the inconvenience of returning your equipment.
Problems Items to check
Power
System does not turn on, or
does not respond to
controls.
Strange noises, does not
work properly
CD
Disc won't play
Sound skips or pickup
sticks
If something doesn't seem to work
If there is something about your appliance which you do not understand and you live in the UK you
can phone our help line during normal office hours on: 0113 2793520
Calls are charged at standard rates.
We apologise for any inconvenience caused by minor inconsistencies in these instructions, which may occur as a result of product
improvement and development.
Make sure AC mains plug is secure in the outlet, and outlet has power.
Remove batteries, pull the mains plug out for 5 minutes then re-connect
and try again. Try on batteries and mains. If this does not work, leave the
unit unplugged before seeking advice.
Batteries low. Replace all of them at once with the recommended type.
Make sure FUNCTION button is set to CD.
Make sure disc label is facing up.
Make sure disc is clean and not damaged. Try another disc.
Pause mode is activated; press the play-pause button again.
Make sure disc is clean and not badly scratched.
Vibration can cause the disc to skip.
GB-8

C M Y CM MY CY CMY K
COMMANDES
1. Tiroir gauche (sur le côté)
2. Compartiment gauche
3. Touche d'ouverture du casier de rangement des CD
4. Miroir
5. Touche d'ouverture et de fermeture du compartiment à CD
6. Câble d'alimentation secteur (au dos)
7. Casier de rangement des CD (derrière le miroir rabattant)
8. PLAY/PAUSE : pour lancer/interrompre la lecture
9. Affichage
10. Compartiment à CD
11. VOLUME+ : pour augmenter le volume
12. Touche d'ouverture du casier de rangement des CD
13. Compartiment droit
14. Tiroir droit (sur le côté)
15. Enceinte gauche
16. Touche POWER/Voyant POWER
17. REPEAT/INTRO : fonction de répétition
18. STOP : arrêt de la lecture
19. SKIP/SEARCH (
20. Bouton d'ouverture du couvercle du coffre
21. SKIP/SEARCH (
22. VOLUME- : pour baisser le volume
23. PHONE (casque): prise pour fiche casque 3,5 mm
24. Enceinte droite
): retour au titre précédent/retour rapide
): passage au titre suivant/avance rapide
F-1

F-2

CLASS 1 LASER PRODUCT
KLASSE 1 LASER PRODUKT
LUOKAN 1 LASER LAITE
KLASS 1 LASER APPARAT
F-3

C M Y CM MY CY CMY K
UTILISATION
2
1
1
Tournez doucement le bouton d'ouverture
de la porte vers la droite. La porte s'ouvre
légèrement. Levez-la complètement pour
pouvoir accéder au compartiment de CD.
Appuyez sur le bouton POWER
(Marche/arrêt) pour allumer l'appareil.
Le témoin lumineux de ce bouton s'allume.
REMARQUES :
Si le CD n'a pas été inséré correctement dans le compartiment, s'il est sale, abîmé ou illisible
pour une quelconque autre raison, la mention « ERROR » ou « NO DISC » apparaît dans
l'affichage.
Durant la lecture d'un CD, le numéro du titre en cours apparaît dans l'affichage.
N'ouvrez jamais le couvercle du compartiment à CD tant que le CD tourne. Cela risquerait
d'abîmer le disque. Ne touchez en aucun cas la lentille lorsque le compartiment à CD est
ouvert.
Si vous allumez votre appareil mais n'appuyez sur aucun bouton, ou le laissez en mode
STOP pendant plus de 30 secondes, l'appareil se place automatiquement en mode OFF
(ARRÊT) (aucun affichage).Pour remettre l'appareil en marche, appuyez deux fois sur le
bouton de marche/arrêt.
Casier de rangement des CD : lorsque le coffre est ouvert, appuyez sur l'une des deux
touches d'ouverture du casier de rangement des CD pour ouvrir le couvercle.
Ce casier peut accueillir 10 CD.
Compartiments : Lorsque vous ouvrez la porte supérieure, vous accédez à deux
compartiments, un de chaque côté du lecteur de CD. Levez simplement le couvercle de
chaque compartiment pour placer un disque.
CASIERS ET TIROIRS
Tiroirs : vous trouverez de chaque côté de l'appareil un tiroir permettant de ranger de petits
objets. Pour ouvrir les tiroirs, tirez dessus.
Ouvrez le compartiment à CD en appuyant
sur la touche d'ouverture et de fermeture
du compartiment à CD. Insérez un CD dans
l'appareil en plaçant l'inscription vers le haut
et refermez le compartiment à CD.
REMARQUE : ce lecteur de CD permet de
jouer les CD classiques et les disques CD
single (8 cm).
F-4
 Loading...