

Page 1
o
b
o
i
k
x
e
l
.
w
w
w
I
n
s
t
r
u
c
o
i
t
n
m
a
n
u
a
l
.
c
o
m
1
MFC105GBZ
Page 2

2
Page 3
CONTENTS
Introduction
Safety instructions
Important safety instructions
Start-up guide
Getting to know your laptop
Unpacking the device
Installation
Charging and using the built-in lithium battery
Turning your MFC105GBZ on and off
Using the Touch Pad
Desktop icons
PDFReader
Printer setting
USB connection
Internet connection
Wi-Fi connection
Internet Security
Email application
SD card reader
Resetting the system
Troubleshooting
Specications
Maintenance
Warranty
FCC Notice
EC Declaration of conformity
3
4
4
5
7
9
9
10
11
12
12
18
18
18
19
20
21
22
22
23
23
24
25
25
26
27
ENGLISH
INTRODUCTION
Thank you for purchasing this Lexibook Laptop Master MFC105GBZ. The Lexibook Laptop
Master is more than an educative tool, specially designed for children age 6 and up. It is also a
complete laptop with many applications: Word Processor to type reports or essays, integrated
mailbox software to send and receive e-mails, Internet Explorer for browsing the net for school
projects... Everything students need to learn, progress and acquire a useful knowledge of the
digital world!
It is strongly recommended that you read the following instructions to nd all the necessary
information regarding the functions of the Lexibook Laptop Master. Please take note of all the
enclosed instructions and safety precautions.
3
Page 4
ENGLISH
SAFETY INSTRUCTIONS
CAUTION
RISK OF ELECTRIC SHOCK
DO NOT OPEN
CAUTION: TO REDUCE THE RISK OF ELECTRIC SHOCK. DO NOT REMOVE COVER
(OR BACK). NO USER SERVICEABLE PARTS INSIDE. REFER SERVICING TO QUALIFIED
SERVICE PERSONNEL.
The graphic symbols on the back cover of the set mean the following:
The lightning ash with arrowhead symbol within an equilateral triangle is intended to
alert the user to the presence of uninsulated “dangerous voltage” within the product’s
enclosure that may be of sufcient magnitude to constitute a risk of electric shock
to persons.
The exclamation point within an equilateral triangle is intended to alert the user to
the presence of important operating and maintenance (servicing) instructions in the
literature accompanying the appliance.
WARNING:
• To reduce the risk of re or electric shock, do not expose this appliance to rain or
moisture.
• The apparatus shall not be exposed to dripping or splashing and no objects lled with
liquids, such as vases, shall be placed on the apparatus.
• The mains plug is used as the disconnect device, the disconnect device shall remain
readily operable.
• In order to disconnect the apparatus from the mains completely, the mains plug should
be disconnected from the mains socket outlet completely.
• The socket-outlet shall be installed near the equipment and shall be easily accessible.
IMPORTANT SAFETY INSTRUCTIONS
WARNING: THIS PRODUCT IS NOT A TOY, ADULT SUPERVISION IS RECOMMENDED.
1. Read these instructions.
2. Keep these instructions.
3. Heed all warnings.
4. Follow all instructions.
5. Do not use the product on your lap for more than 30 minutes, with at least a 5 minutes
break.
6. Do not use this unit near water.
7. Clean only with a dry cloth.
4
Page 5
8. Do not block any ventilation openings. Install in accordance with manufacturer’s
instructions.
9. To avoid overheating, do not leave the product in a non-ventilated space (e.g.: a schoolbag)
when it is turned on.
10. Do not install near any heat sources such as radiators, heat registers, stoves or other
apparatus (including ampliers) that produce heat.
11. Do not defeat the safety purpose of the polarized or grounding-type plug. A polarized plug
has two blades with one wider than the other. A grounding-type plug has two blades and a third
grounding prong. The wide blade or the third prong is provided for your safety. If the provided
plug does not t into your outlet, consult an electrician for replacement of the obsolete outlet.
12. Protect the power cord from being walked on or pinched particularly at plugs, convenience
receptacles, and the point where they exit from the unit.
13. Only use attachments/ accessories specied by the manufacturer.
14. Unplug this unit during lightning storms or when unused for long periods of time.
15. Refer all servicing to qualied service personnel. Servicing is required when the unit has
been damaged in any way, such as the following: the power-supply cord or plug has been
damaged; liquid has been spilled or objects have fallen into the unit; and/or the unit has been
exposed to rain or moisture, does not operate normally, has changed its performance or has
been dropped.
16. Do not overload wall outlet. Use only power source as indicated.
17. Use replacement parts as specied by the manufacturer.
18. Upon completion of any service or repairs to this product, ask the service technician to
perform safety checks.
START-UP GUIDE
ENGLISH
1
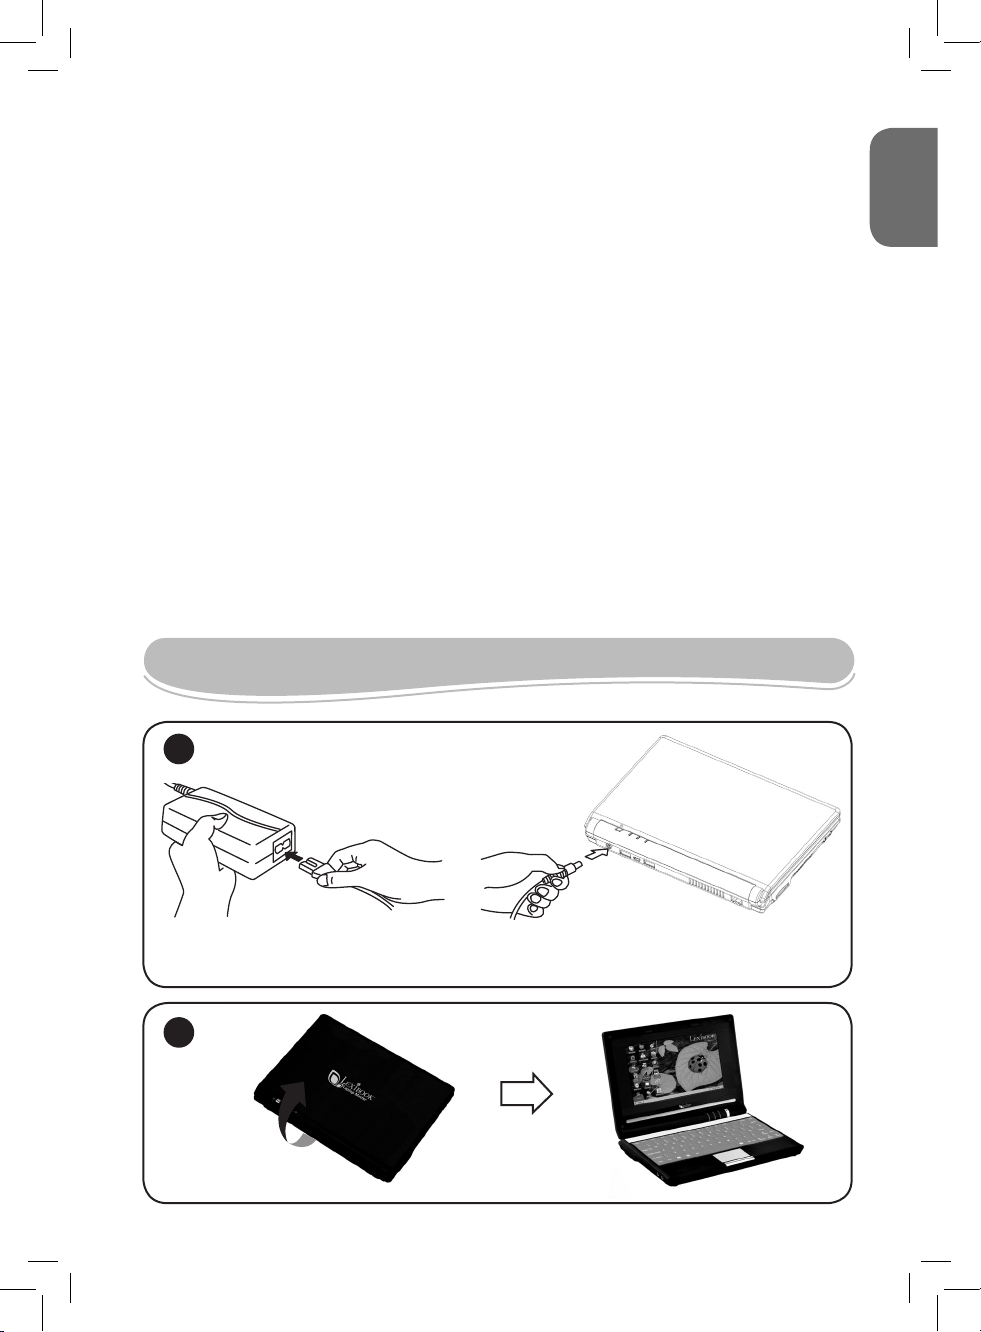
1. Connect the power cord to the AC adaptor.
2. Connect the AC adaptor’s DC output plug to the DC IN port on the back side of the computer.
3. Plug the power cord into a wall outlet. The battery charge indicator on the front of the computer should glow.
2
Lift up the LCD screen to open it.
5
Page 6
ENGLISH
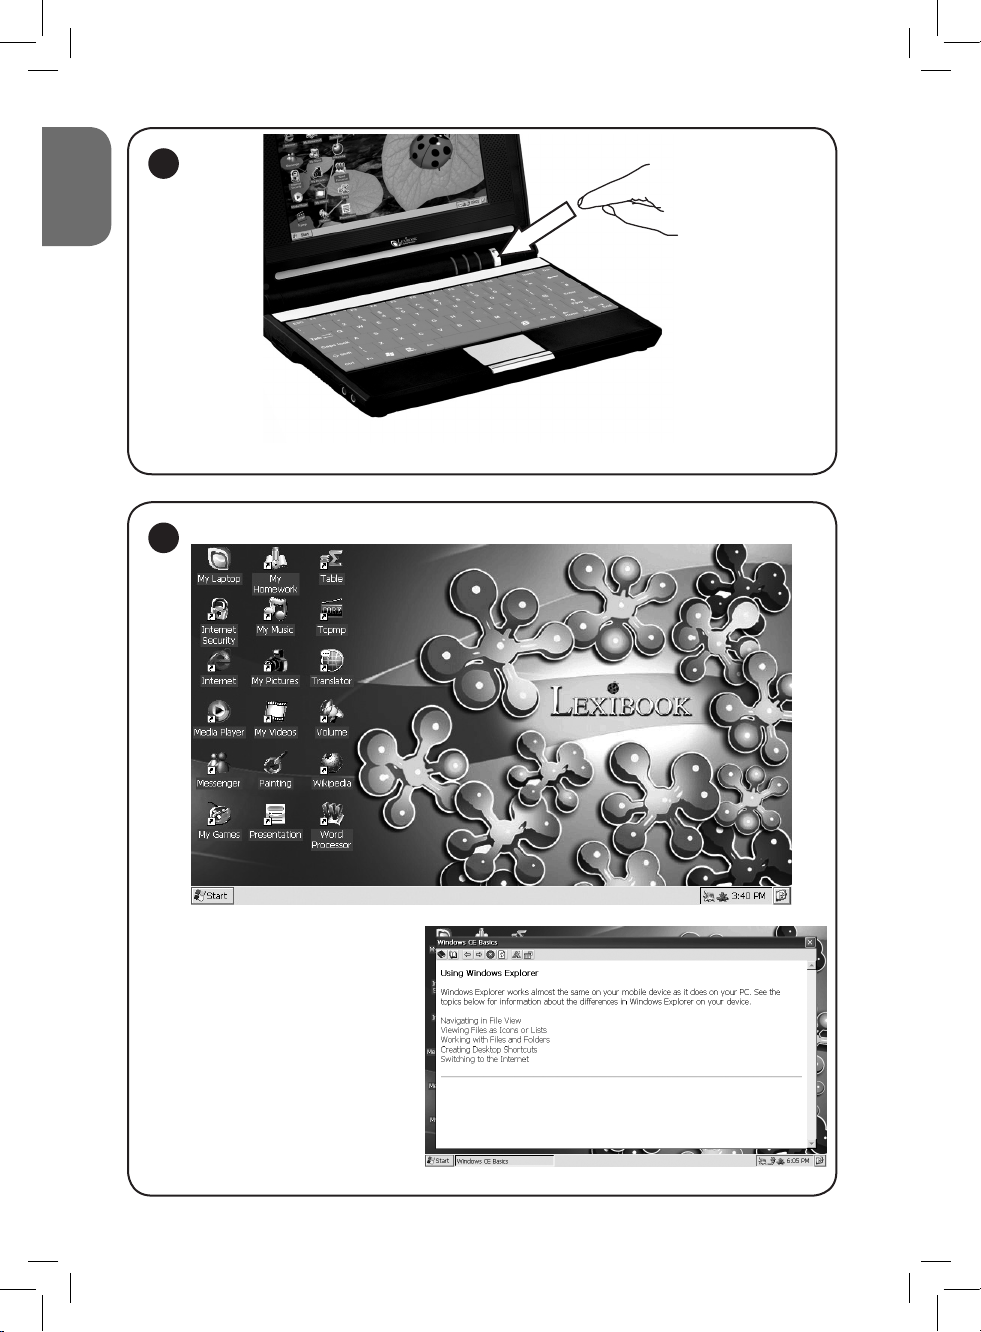
3
Press the power button to turn on your laptop.
4
Windows® CE starts automatically and after
a few seconds, the desktop is displayed on
screen.
For detailed information about how to use the
basic functions of Microsoft® Windows® CE,
use the integrated help function:
1. Click on “Start”, then “Help” and click on
“Windows CE Basics”.
2. Browse through the topics available to learn
how to use Windows® CE.
Note: You can also press the F1 key while the
desktop is displayed or when using Windows
Explorer to open the “Help” dialog box.
6
Page 7
5
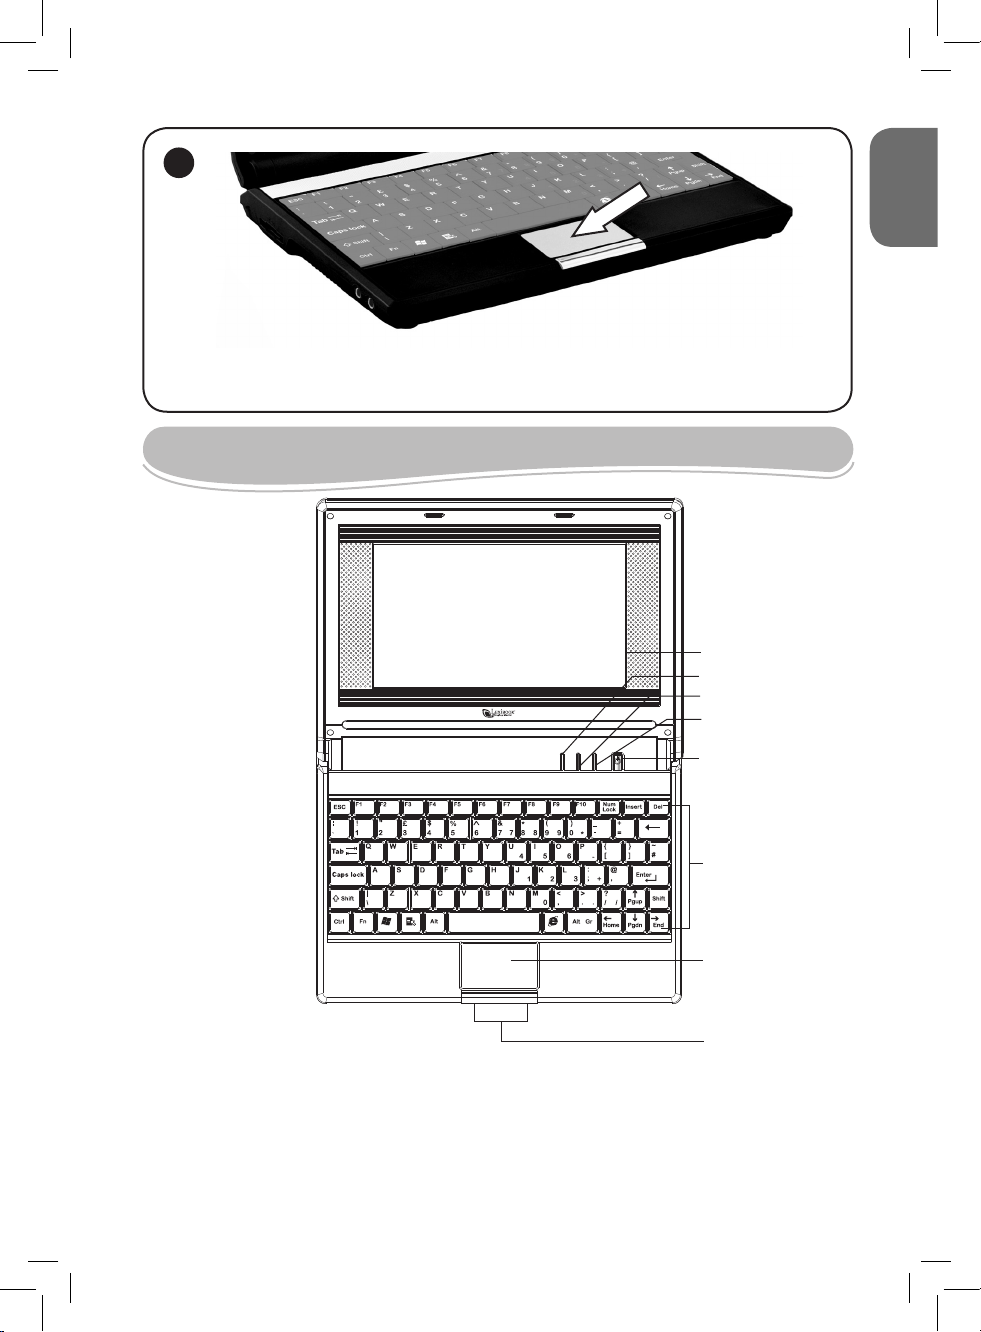
Use the Touch Pad or a mouse (not included) to double-click on the desired icons and launch the applications
(for detailed information about the Touch Pad, refer to the “Using the Touch Pad” section, p.12).
GETTING TO KNOW YOUR LAPTOP
1
2
3
4
ENGLISH
5
6
7
1. LCD screen
2. Battery charge indicator (red): lights up steadily when the AC adapter is plugged.
3. Operating system indicator (orange): indicates that the system is working.
4. Caps Lock indicator (green): indicates when the caps lock function is turned on or off.
5. Power ON/ Power OFF button: press to turn the laptop on. Press and hold for about 5 seconds to turn off the unit
manually.
6. Keyboard
7. Touch Pad: the Touch Pad is a built-in pointing device with functions similar to a mouse.
8. Touch Pad button: works like the two right and left buttons of an ordinary mouse.
8
7
Page 8
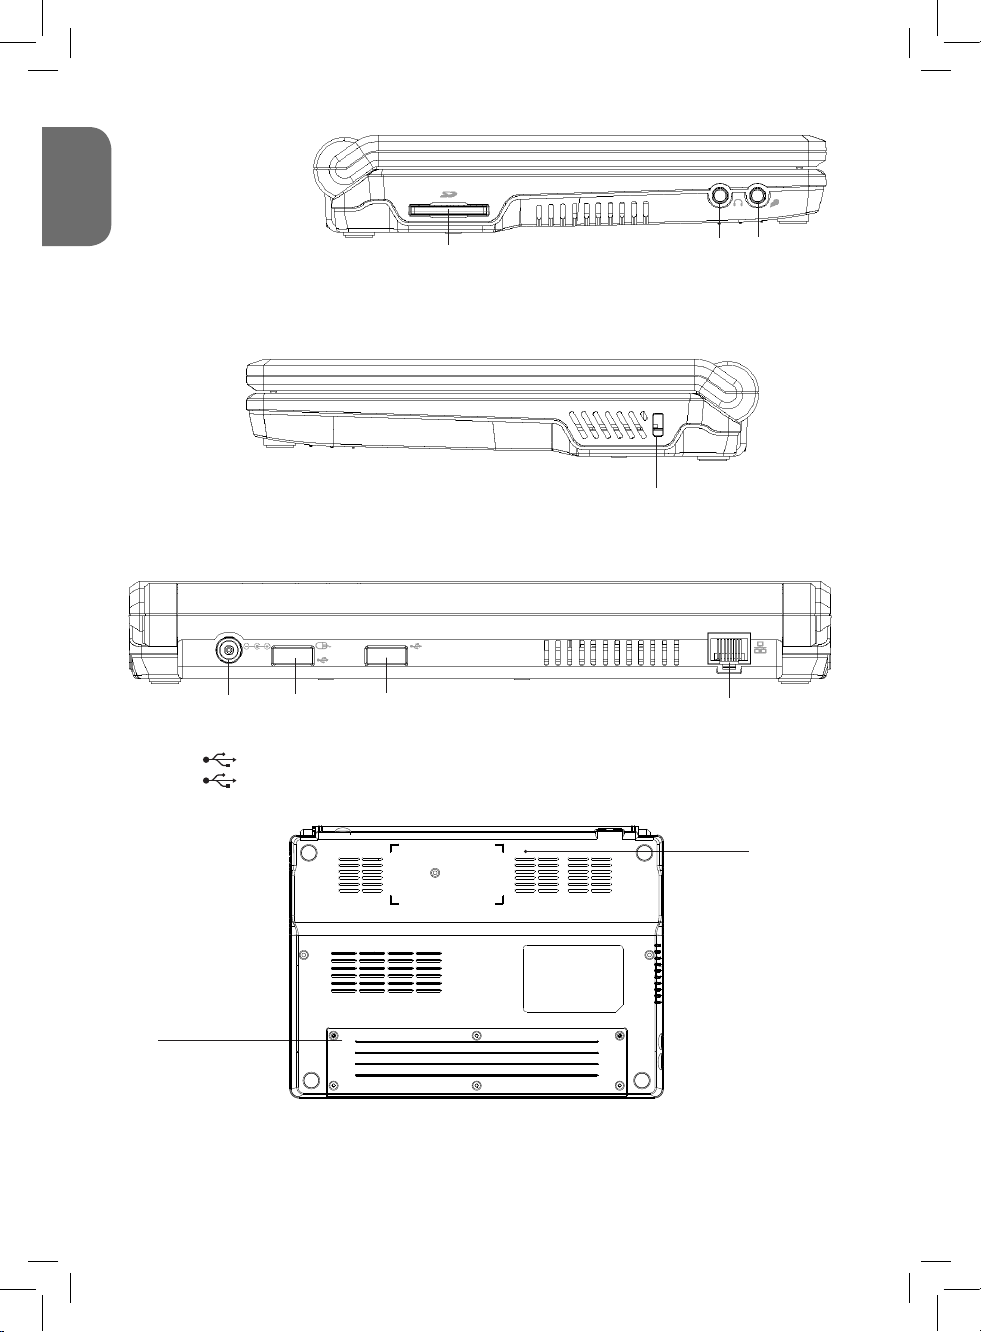
Left side
ENGLISH
1. SD card reader: supports SD card up to 16GB.
2. Headphone Jack: the headphone jack (3.5 mm diameter) is where you connect the headphones or external
speakers.
3. Microphone jack: the microphone jack (3.5 mm diameter) is where you connect a microphone.
1
Right side
3
2
1. Kensington lock: this slot allows you to connect an optional security cable (not included) and anchor the computer to a
desk or other large object to deter theft.
1
Back side
1
1. DC IN 9.8V : the AC adaptor connects to this socket. Use only the AC adaptor supplied with the laptop. Using the wrong
adaptor can damage the product.
2. USB port : use this port to connect a USB mouse, a USB key or a printer (not included).
3. USB port : use this port to connect a USB mouse, a USB key or a printer (not included).
4. LAN jack : this jack allows you to connect to a Ethernet cable.
2
3
4
Underside
2
1
1. Lithium battery compartment: the integrated lithium battery powers the computer when the AC adaptor is not
connected (for more details about how to use properly the battery, refer to the “Charging and using the built-in lithium
battery” section, p.10).
2. Reset button: if the unit malfunctions press this button to reset the system (refer to the “Resetting the system” section
p.23).
8
Page 9
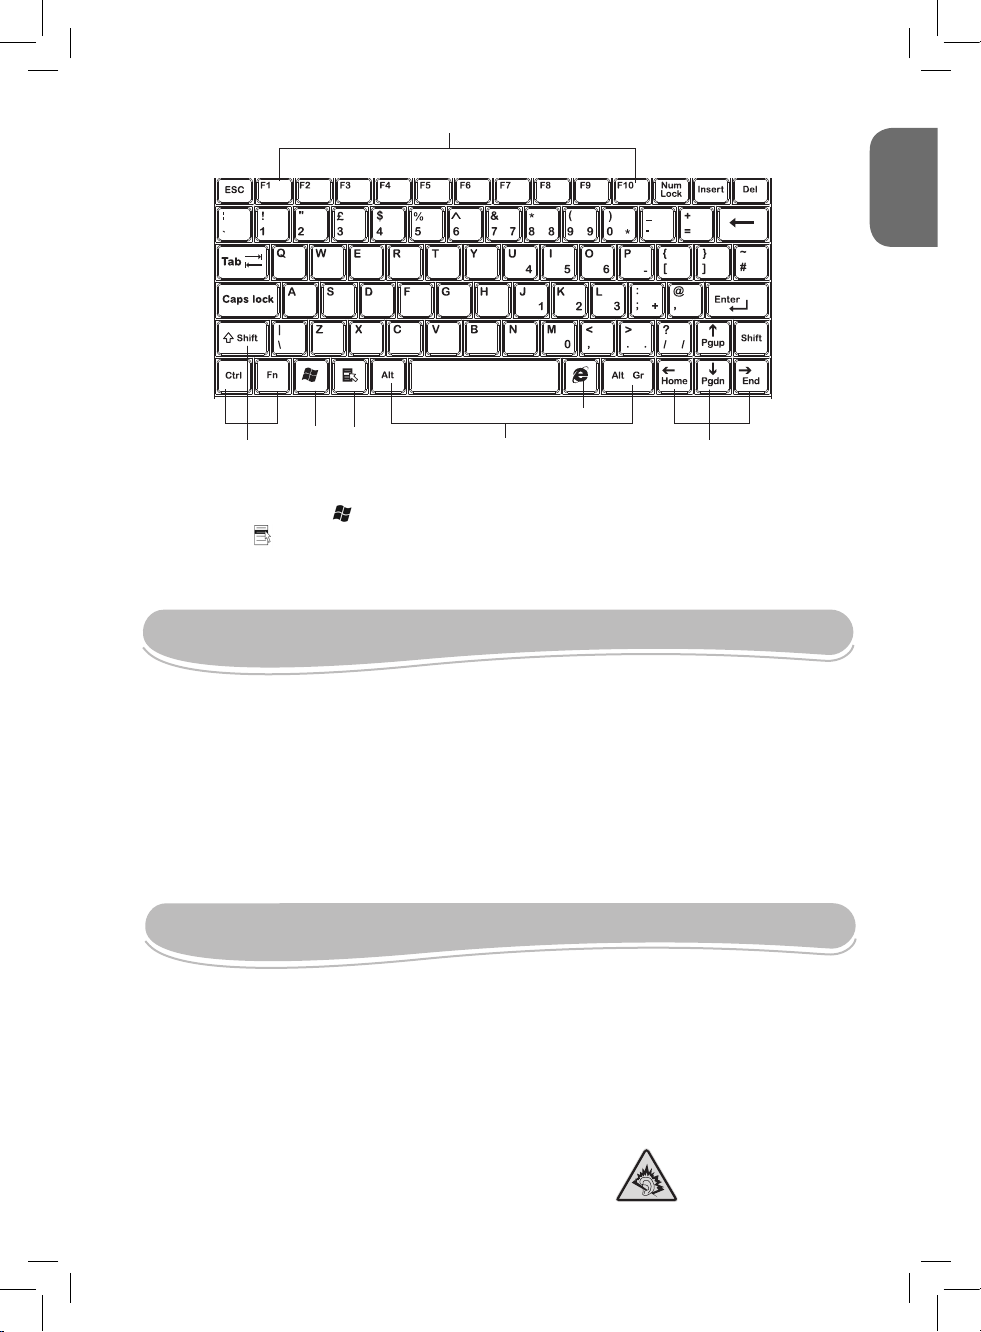
Keyboard
3
2
1. Function keys
2. Control keys
3. Windows “Start” menu key : press this key to open the Windows “Start” menu.
4. “Context” key : this key has the same function as the right mouse button.
5. Alt keys
6. Internet Explorer access key: press this key to launch the Internet Explorer program.
7. Direction keys
4
1
6
5
UNPACKING THE DEVICE
When unpacking, ensure that the following elements are included:
1 x Lexibook Laptop Master MFC105GBZ
1 x Lexibook Laptop Wi-Fi dongle MFA30
1 x power cord
1 x AC/DC adapter
1 x instruction manual
ENGLISH
7
WARNING: All packaging materials, such as tape, plastic sheets, wire ties and tags are not part
of this laptop and should be discarded.
INSTALLATION
Mouse connection
You can use one of the USB port on the back of the laptop to plug in a mouse (reference MFA10,
sold separately).
Headphones connection
On the left side of the unit is a headphones socket, suitable for any normal earphones tted with
a 3.5mm jack plug. When the headphones are in use, the speakers are turned off.
CAUTION: too high volume, especially when using
headphones, can damage your hearing.
For this reason, please turn the volume down before
connecting the headphones.
9
Prolonged use at full power can
damage the ear of the user.
Page 10

ENGLISH
Power connection
Use the AC/DC adapter (AC 100V- 240V~ 50/60Hz) provided with the unit to connect the
computer to a main socket.
Note:
• Only use the unit in combination with the adapter supplied. Do not use a different adapter to
power the computer.
• Whenever possible, keep the AC adapter plugged into the laptop and an electrical outlet to
recharge the battery.
• Never turn off or reset your Lexibook Laptop Master while the hard disk is in use, doing so
can result in loss or destruction of your data. Always wait at least 5 seconds after turning off the
laptop before turning it back on. Turning the power on and off in rapid succession can damage
the unit’s electrical circuitry.
Please switch off the MFC105GBZ before connecting the computer to a main socket.
Before using this product for the rst time, please remove the static label from the
LCD screen.
CHARGING AND USING THE BUILT-IN LITHIUM BATTERY
The Lexibook Laptop Master is equipped with a built-in rechargeable lithium battery that
provides power when you don’t have access to an AC outlet. The battery life is approximately
3 hours.
IMPORTANT: The battery must be charged for at least 4 hours before using it for the rst
time.
Charging the battery and charging time
To charge the battery, plug the AC adapter into the laptop and an electrical outlet.
For a totally discharged battery, it will take approximately 4 hours to charge to 100% capacity
while the Lexibook Laptop Master is powered off. It will take about 5 hours to charge the battery
to 100% capacity while the unit is powered on. The battery charge indicator lights up steadily
during the charge.
Note:
• The battery life may vary based on usage patterns of the computer.
• Do not expose the battery to temperatures below 0°C (32°F) or above 60° C (140°F). This may
adversely affect the battery pack.
Checking the remaining power
1. To access the Power Properties menu, click the “Start” button, then select “Settings” and click
10
Page 11

“Control Panel”.
2. Double-click the “Power” option to
open the power conguration
dialogue box and check the remaining
power.
Note:
• the unit will automatically shut down
a few minutes after a battery warning
message has been displayed.
• when the Lexibook Laptop Master is
connected to an AC outlet, you can
also double-click the battery icon in
the task bar on the lower right corner
of the screen to open the power
conguration dialogue box.
The lithium battery is intended to use only with this laptop. Do not disassemble the battery. Do not dispose of the
battery in re or water. To avoid risk of re, burns, or damage to your battery, do not allow a metal object to touch the
battery contacts. Handle a damaged or leaking battery with extreme care. If you come in contact with the electrolyte,
wash the exposed area with soap and water. If it contacts the eye, ush the eye with water for 15 minutes and seek
medical attention. Do not charge the lithium battery pack if the ambient temperature exceeds 45°C (113°F). To obtain
a replacement battery, contact your local dealer. Do not expose the battery to high storage temperatures (above
60°C, 140°F). When discarding a battery pack, contact your local waste disposal provider regarding local restrictions
on the disposal or recycling of batteries. Use only supplied AC Adapter for charging.
WARNING: Danger of explosion if battery is incorrectly replaced. Replace only with same
or equivalent type recommended by the manufacturer. Discard used batteries
according to the manufacturer’s instructions or local laws.
ENGLISH
WARNING: Mal-function or loss of memory may be caused by strong frequency
interference or electrostatic discharge. Should any abnormal function occurs, reset the
unit or unplug the AC/DC adapter from the mains socket and re-plug it again.
TURNING YOUR MFC105GBZ ON AND OFF
Turning on the unit
Press the power button to turn on
your laptop. Windows® CE will start
automatically.
Turning off the unit
1. To turn the Lexibook Laptop
Master off, save your work and close
all open applications, click on “Start”,
then “Shut down” and select “Shut
down”.
2. Or press and hold the power
button for 4-6 seconds.
11
Page 12

ENGLISH
USING THE TOUCH PAD
The Touch Pad is a rectangular electronic panel located just below your keyboard. To use the
Touch Pad, simply touch and move your nger tip across it in the direction you want the cursor
to go. The button located below the Touch Pad can be used like the left and right buttons on a
mouse.
NOTE: You can also tap the Touch Pad to perform functions similar to those of the left button.
• Click: Tap the Touch Pad once.
• Double click: Tap twice.
• Drag and drop: Tap to select the material you want to move. Leave your nger on the Touch
Pad after the second tap and move the material.
Touch Pad care
The Touch Pad is a pressure sensitive device. Please take note of the following precautions.
• Make sure the Touch Pad does not come into contact with dirt, liquids or grease.
• Do not touch the Touch Pad if your ngers are dirty.
• Do not rest heavy objects on the Touch Pad or the Touch Pad buttons.
• You can use the Touch Pad with Microsoft Windows® as well as non-Windows®
applications.
• The Touchpad might become unresponsive, in this case restart or reset the unit.
DESKTOP ICONS
Windows® Explorer
To display topics about how to use the Windows® Explorer application and navigate in the
folders and les of the Lexibook Laptop Master:
1. Press F1 or click “Start”, then “Help” and select “Windows CE Basics”.
2. Browse through the topics available and select “Using Windows Explorer”.
My laptop
Double-click this icon to access the hard drive of the Lexibook Laptop Master and the connected
devices.
• The “ C ” hard drive contains all the programs and applications.
• The “Network”, “Temp” and “Windows” folders contain programs, les and
applications ensuring that your system operates correctly. You do not need to modify them.
• The “USB Disk” drive icon appears when you insert a USB key into one of the USB ports
at the back of the laptop. Double-click the icon to display the les stored on the USB key (refer
to the “USB Connection” section p.18).
12
Page 13

• The “SDCard” drive icon appears when you insert a SD card into the corresponding slot
of the laptop. Double-click the icon to display the les stored on the SD card (refer to the “SD
Card Reader” section p. 22).
Note: For detailed information about the navigation with Windows Explorer, press the F1 button
while the application is running to display an onscreen help menu.
Internet Explorer
Double-click this icon to launch the Internet Explorer application.
This famous web browser allows you to surf the Internet. You can also use the Internet Explorer
access key to launch this application directly .
Note:
• For detailed information about the navigation with Internet Explorer, press the F1 button while
the application is running to display an onscreen help menu.
• Due to system restrictions, some websites with a lot of content and streaming video such as
“You Tube” or “Daily Motion” might not operate properly or might not open at all.
WARNING:
• Some online email services might not work properly with this application.
• This version of Internet Explorer is not compatible with websites using Adobe Flash Player 7
or higher.
Internet Security
Double-click this icon to launch the Windows CE Remote Management Tool and setup the
parental control.
Parents can use the available options to set time and URL restrictions. The Lexibook Laptop
Master is provided with a default list of around 100 “forbidden” words, blocking access to web
pages with contents unsuitable for children.
Note: For detailed information about the internet security features, refer to the “Internet
Security” section, p.21.
ENGLISH
Media Player
Double-click this icon to launch the Windows® Media 9 Series software.
This application allows you to view video les in WMV format and listen to audio les in MP3
format.
Note: For additional information about media player, refer to the “My Music” section, p.14.
Messenger
Double-click this icon to launch the Messenger application.
The instant messaging client to communicate online with your friends.
13
Page 14

ENGLISH
My Games
Double-click this icon to play the Windows and Flash games preloaded in the system.
There are 50 games available divided in several categories: puzzle games, memory games,
logic games, strategy games and 2 Windows games.
Follow the instructions on-screen at the beginning of the games to learn how to play.
My Homework
Double-click this icon to open the “My
Homework” folder. This folder contains
hundreds of educational memos and
activities covering several school topics,
tricks for memorising the 9 times table,
dictations in audio format, scientic
experiments to perform at home and
important historical dates. You can save
the presentations, tables and essays
les created with the “Presentation”,
“Table” and “Word processor”
applications in this folder.
Note: For detailed information about the “Presentation”, “Table” and “Word processor”
applications, refer to the corresponding sections, p.16.
WARNING: As deleted les cannot be restored, make sure to avoid accidental deletion of the
memos.
My Music
Double-click this icon to open the “My
Music” folder. You can save audio les
in this folder.
To listen to audio les stored in the
“My Music” folder
1. Double-click the “My Music” icon. The
contents of the folder will be displayed.
2. Double-click the desired audio le to
play it with the media player.
To create a playlist
1. Double-click the “Media Player” icon on the desktop to launch the media player
application.
2. Click the “File” option, then select “Playlists” from the drop-down menu.
3. Click the “Local Content” option, then select “Organize Playlists” from the drop-down menu.
4. On the next screen, click “New” and enter a name for the playlist. Press “Enter” to conrm.
5. Click “OK”. A window with a list of audio les will be displayed on screen.
6. Select the les you want to add to the playlist by ticking them, then click “OK”.
14
Page 15

7. The new playlist will be displayed on the next screen. Click the “+” icon in the lower part of the
window to add other les or click the “PLAY” icon.
8. The media player will automatically play the selected les one by one.
My Pictures
Double-click this icon to open the “My
Pictures” folder. You can save picture
les in this folder.
To view picture les stored in the
“My Pictures” folder
1. Double-click the “My Pictures” icon.
The contents of the folder will be
displayed.
2. Double-click the desired picture le to
view it with the “Image Viewer”
application.
My Videos
Double-click this icon to open the “My Videos” folder. You can save video les in this folder.
To play video les stored in the “My Videos” folder
1. Double-click the “My Videos” icon. The contents of the “My Videos” folder will be
displayed.
2. Double-click the desired video le to view it with the “Tcpmp” video player.
ENGLISH
Painting activity
Double-click this icon to launch the “Painting” activity.
Use the painting tools and the colour palettes on the left side of the screen to colour the
black and white drawing. You can also add graphic elements and choose the background
picture you wish to use from a selection of 10 pictures.
Tcpmp
“Tcpmp” is a video player that allows you to play your videos in different screen format (4:3, 16:9,
full screen…).
To play a video le with “Tcpmp”:
1. Follow steps 1 and 2 of the “My Videos” section or double-click the “Tcpmp” icon, or click
“Start”, then select “Programs” and click “Tcpmp” to launch the application.
2. To open a video le, click “File”, then the “Open le” option from the drop-down menu. Browse
your folders and les and double-click the desired video le to launch the playback.
3. Click the command buttons on the top of the window to suspend/resume the playback, fast
forward or stop the video. You can also turn on the full screen mode and mute or adjust the
volume.
15
Page 16

ENGLISH
Word Processor
Double-click this icon to launch the
“TextMaker” application. This reliable
and friendly word processor is perfect
for writing clear, direct, and interesting
essays. When launching the
“TextMaker” application, a registration
dialog box is displayed on-screen. You
can choose to register the program or
skip the registration process. After you
have started the program for the third
time, you will be able to tick the “Do not
show this dialog box again” option.
Note: For detailed information about the features of the “TextMaker” program, visit the
SoftMaker web site at http://www.softmaker.com/english/.
Presentation
Double-click this icon to launch the
“SoftMaker Presentations” application.
“SoftMaker Presentations” is a
powerful presentation graphics
program. When launching the
“SoftMaker Presentations” application, a
registration dialog box is displayed
on-screen. You can choose to register
the program or skip the registration
process. After you have started the
program for the third time, you will be able to tick the “Do not show this dialog box again”
option.
Note: For updates or detailed information about the features of the “SoftMaker Presentations”
program, visit the SoftMaker web site at http://www.softmaker.com/english/.
Table
Double-click this icon to launch the
“PlanMaker” application.
“PlanMaker” is a spreadsheet program that
allows you to create easily elaborate
worksheets. When launching the
“PlanMaker” application, a registration
dialog box is displayed on-screen. You can
choose to register the program or skip the
registration process. After you have started
the program for the third time, you will be
able to tick the “Do not show this dialog box
again” option.
16
Page 17

Note: For detailed information about the features of the “PlanMaker” program, visit the
SoftMaker website at www.softmaker.com/english/ofcpm_en.htm
WARNING: To use one of your documents with a Microsoft Ofce program, you must save
it in a compatible format (.doc, .xls, .ppt). Click “File”, “Save as” then select the desired
format from the “Save as type” drop-down menu.
Volume
Double-click this icon to open the “Volume & Sounds
Properties” dialog box.
Use the available options to adjust the volume and
the sounds.
Wikipedia
Double-click this icon to go directly to the Wikipedia homepage.
Wikipedia is the biggest multilingual free-content encyclopaedia on the Internet. A useful tool for
school projects.
Translator
Double-click this icon to launch the “Translator” application.
The Lexibook Laptop Master integrated translator software has been designed to help you
translate words in English, French, German, Spanish, Italian and Portuguese.
ENGLISH
To perform a translation
1. Double-click the “Translator”
icon.
2. Select the source language
(the language you wish to
translate from) and the target
language (the language you wish
to translate to) from the
drop-down menus.
3. Enter a word. Its translation in
the selected target language will
be displayed automatically.
17
Page 18

Note: If a program stops responding, you can use the “Task Manager” system utility to end
ENGLISH
the application or switch to another program. Press Ctrl+Alt+Del to launch “Task Manager”,
then select the application you want to exit and click “End Task”. To switch to another
program, click the program that you want to switch to, and then click “Switch To”.
PDF READER
“PDF Reader” (or “JETCET PDF”) is a very simple but complete application that allows you to
open and read your PDF les.
To open a PDF le with “PDF Reader”
1. Double-click the desired PDF le to read it with the “PDF Reader” software.
2. Or, click “Start”, then select “Programs” and click “PDF Reader” to launch the application.
Browse through your folders then double-click the desired PDF le to open it.
PRINTER SETTINGS
To setup your printer and use it with the Lexibook Laptop
Master:
1. Use a USB cable (not included) to connect the laptop to
your printer. Click “Start”, select “Settings” then click “Control
Panel”.
2. Double-click the “Printers” icon. In the “Printers” window,
double-click the “Add Local Printer” icon to launch the “Add
Printer Wizard” assistant.
3. Follow the instructions displayed on screen. When the set
up is completed, click “Finish”. Your printer is ready for use.
USB CONNECTION
Using a USB key:
1. Plug the USB key into one of the USB ports located on the back of the laptop.
2. Double-click the “My Laptop” icon, then double-click the “USB Disk” icon that has
appeared.
3. The les stored on the USB key will be displayed on screen.
Note:
• You can plug a USB key, a USB mouse or a printer in the USB ports located on the back of the
unit (see p.8). Some USB devices may not be compatible.
18
Page 19

• The MFC105GBZ is compatible with USB 1.1 and USB 2.0 USB ash drives. However, with
USB 2.0 USB ash drives, the data transfer speed will be the same as for USB 1.1 USB ash
drives.
To remove the USB key safely:
1. Click “Start”, then select “Settings”
and click “Control Panel”.
2. Double-click the “Storage Manager”
icon, then select the USB drive in the
“Store Info” drop-down menu.
3. Click on dismount. The “USB Disk”
icon disappears and the USB key can
be removed safely.
ENGLISH
INTERNET CONNECTION
Use the Ethernet port on the back side of the unit to plug an Ethernet cable (not included) and
connect the laptop to internet.
19
Page 20

To set up your connection, use the integrated
ENGLISH
“Help” menu:
1. Click “Start”, then select “Help”.
2. Click “Network” to display a list of help topics and
follow the indications on screen to congure your
internet connection.
Note: it is also recommended to refer to the
information from your Internet service provider and the
instructions supplied with the network device in use.
WIFI CONNECTION
With the Lexibook WiFi USB key MFA30 (included), the MFC105GBZ can wirelessly
access the internet:
1. Plug the WiFi USB key MFA30 (included) into one of the USB ports at the back of the laptop.
2. The wireless information menu will be displayed automatically.
Note: The wireless information dialog box is
displayed automatically for the rst installation and
when you are not connected to the internet. Once
you have selected a wireless connection, the
laptop will connect automatically to the network
and if the connection is successful, this dialog box
will not be displayed.
3. Click the desired network in the list of all
available WiFi networks then click the “Connect”
button.
4. On the “Wireless Network Properties” screen,
use the different options to set the network
properties (network name, WEP key settings….).
When you have nished, click “OK”.
Note: To access directly the “Wireless Network
Properties” menu, you can also double-click the
desired network in the list of the wireless information
menu.
20
Page 21

5. Click “Connect” again to connect to the network. You can now start surng the internet
wirelessly.
Note:
• To surf the internet wirelessly, you must use the Lexibook WiFi USB key. Only use this key to
connect to the wireless networks.
• Double-click the internet connection icon in the task bar at any time to open the wireless
information menu.
• When switching on or restarting your laptop, if you have difculties connecting to a wireless
network, unplug then replug the WiFi key.
• When the WiFi key is used for long periods, it can become very warm. This condition does not
indicate a malfunction. Please handle carefully.
• Using the WiFi connection consumes more power than using the Ethernet connection.
Recharge the battery regularly.
INTERNET SECURITY
To access the internet security management menu
1. Double-click the “Internet Security” icon on the desktop.
2. The “Windows CE Remote Management Tool” will start and prompt you to log in.
3. Under “User Name” type “admin”, enter the default password “abcd” then click OK.
To change the password
It is strongly recommended to change the password.
1. After logging in as “admin”, click “Security” and then “Change Password”.
2. Type your old password, then your new password and retype your new password.
3. The “Management Tool” will restart and you will be prompted to login with your new
password.
ENGLISH
To set restrictions
Set time restrictions
1. Click “Parental Controls Restrictions” on the left side.
2. Select “Child” as the group for which you want to set the time restrictions.
3. Under “Schedule” select “Only allow access during the specied days and times”.
4. Choose the days and times you want to allow internet access for the selected group.
5. Scroll down and click “Apply”.
Block list and URL ltering settings
1. The “Block access” option is the default setting. The MFC105GBZ is provided with a preset
list of around 100 forbidden words. The user will not be able to access web pages which URL
addresses contain the words that are on the list.
2. You can modify the existing list by editing or deleting entries if you choose.
3. You can create your own personal block list, making certain sites and URL addresses
forbidden. The user will not be able to access the web pages whose URL addresses contain the
words on the block list. Click “Block access” then click “Apply” and type the exact address, or
part of the address into the “Type URL” eld. Click “Add”.
4. If “No ltering” is selected, all web pages can be accessed and the block list will not function.
5. If “Permit access” is selected you can set up a list with allowed web addresses. The user will
21
Page 22

only be able to access web pages that are on the list. Click “Permit access”, then click “Apply”
ENGLISH
and type the exact address into the “Type URL” ied. Click “Add”.
The next time a new Internet Explorer session is started, the internet access will be restricted
according to the chosen settings.
To disable the preset block list and/or the parental control
1. Select “No ltering” to disable the block list only.
2. Or click « Parental controls » on the left side of the “Windows CE Remote Management Tool”.
Deselect the “Enable parental controls” option: the preset block list and the parental control
feature are disabled.
Important note: all the options on the left part of the “Windows CE Remote Management Tool”
window have already been set up in factory. You do not need to modify them.
EMAIL APPLICATION
The Lexibook Laptop Master includes an
email application software that allows you to
send and receive emails easily.
To congure the “Mail” application:
1. Click “Start”, then select “Programs” and
click “Mail” to launch the application.
2. The “Mail Setup Wizard” assistant will start
automatically. If the assistant does not start,
click “Tools”, then select “New Account” in the
drop-down menu.
3. Follow the instructions on screen to set up
a mail service.
WARNING: Some online email services
might not work properly with this
application.
SD CARD READER
You can insert a SD card up to 16GB (not
included) in the integrated SD card reader
on the left side of the unit.
To access a SD card contents:
1. Insert a SD card in the card reader
of the Lexibook Laptop Master.
22
Page 23

2. Double-click the “My Laptop” icon, then
double-click the “SDCard” icon to display
the les stored on the SD card.
3. Push the card in and release it to pop the
card out slightly. Grasp the card and remove it
carefully from the card reader.
RESETTING THE SYSTEM
To reset the system, or “reboot,” press the “Reset” button located under the unit. You can use
this button when you encounter hardware or software problems, which lock up the Lexibook
Laptop Master.
WARNING: Mal-function or loss of memory may be caused by strong frequency interference or
electrostatic discharge. Should any abnormal function occurs, reset the unit or unplug the AC/
DC adapter from the mains socket and re-plug it again.
ENGLISH
TROUBLESHOOTING
When you encounter a problem, you should rst try to:
• Remove all the external devices and check if the problem persists.
• Make sure the power cord is properly plugged into the wall outlet and to the computer.
• Make sure the power indicator of the computer is on.
• Check to see if your keyboard is operational by pressing and holding any key.
• Check for any incorrect or loose cable connections.
• If external devices do not function correctly when connected to the system, it is usually the
device’s own problem. Consult the device’s manufacturer rst.
The computer does not power on
• Make sure the power adapter plug is rmly inserted into the socket.
• First charge the battery, connect the adapter to the laptop and then turn on your computer.
• Make sure the power indicator is lit up when you use the integrated battery or AC adapter.
• If these methods do not work, contact the nearest service center.
The computer crashes, runs slow or programs do not operate correctly
• Close other running software to decrease system overhead.
• If the above methods fail, press the Reset button located under the computer and restart
again.
23
Page 24

Short service time of battery
ENGLISH
• Make sure the battery is fully charged.
• Make sure the battery is not used for an excessive long time after being fully charged.
• Recharge the battery before using it again.
• Due to the battery’s chemical properties, it’s normal that after frequent use, the battery’s
service time shortens.
• Any further questions, please contact the nearest service center.
After the Lexibook welcome screen, the laptop switch itself off/ LCD blank screen
• Make sure the battery has enough power for the computer to start and operate normally.
• Plug the AC adapter to a main socket to charge the battery.
Build-in speaker doesn’t work
• Check the volume settings in the volume control panel.
• Earphones may be inserted into the computer.
Disconnection of SD Card
• Check the connection between the equipment and the computer.
• Check if the computer interface conguration can satisfy the requirements of the devices, or if
they are compatible.
Is it possible to install a new program?
You can install new programs on your laptop if they are compatible with Windows CE 5.0 (those
programs are rare). But for security reasons Windows CE 5.0 will generally not allow new
applications. This will protect your laptop and prevent the unit from being infested by viruses.
SPECIFICATIONS
CPU 533MHz
Memory 128MB
Storage 2GB (expandable up to 16GB)
Display 7” TFT LCD, 800 x 480 TFT LCD
Connector 2 USB 1.1 ports, SD card reader (SDHC compatible), Ethernet port,
Microphone input, Headphone jack, AC power jack, TouchPad
Windows CE 10/100 Mbit Ethernet broadband connection
communication Compatibility with the Lexibook WiFi USB key (included)
Audio Hi-denition Audio CODEC, built-in mono speaker
Battery 1 lithium battery (included) / 1500mAh, 7.4V
Autonomy 3hrs (average)
Dimension 225 x 165 x 30 mm
Weight 0.8kg
Adaptor specications: Input: 100V-240V~ 50/60Hz 0,8A
Output: 9,8V 2,5A
24
Page 25

MAINTENANCE
To prevent re or shock hazard, disconnect your unit from the AC power source when cleaning.
The nish on your unit may be cleaned with a dust cloth and cared for as other furniture. Use
a soft, clean cloth moistened with plain, lukewarm water to clean the exterior of the unit. Use
caution when cleaning and wiping the plastic parts. Mild soap and a damp cloth may be used
on the front panel.
LCD Care
LCD screens are delicate devices that need careful handling. To avoid damage to the display
panel, please pay attention to the following precautions:
• Do not slam the display when closing it.
• Do not place any object on top of the display when it is closed or open.
• Make sure the system is turned off before you close the display panel.
• When you are not using the computer, keep the LCD screen closed to protect it from dust.
• If you need to clean your LCD screen, use a soft tissue to gently wipe the LCD surface.
• Do not put your ngers or sharp objects directly on the surface and never spray cleaner directly
onto the display.
• Do not press on, or store any objects on the cover when it is closed. Doing so may cause the
LCD to break.
WARRANTY
NOTE: Please keep this instruction manual, it contains important information.
This product is covered by our 1-year warranty. For any claim under the warranty or after sale
service, please contact your distributor and present a valid proof of purchase. Our warranty
covers any manufacturing material and workmanship defect, with the exception of any
deterioration arising from the non-observance of the instruction manual or from any careless
action implemented on this item (such as dismantling, exposition to heat and humidity, etc.). It is
recommended to keep the packaging for any further reference.
In a bid to keep improving our services, we could implement modication on the colours and the
details of the product shown on the packaging.
ENGLISH
Reference: MFC105GBZ
©2009 LEXIBOOK®
Designed and developed in Europe – Made in China, Zhongshan
Lexibook S.A
2 avenue de Scandinavie
91953 Courtaboeuf Cedex
France
Service consommateurs à votre écoute :
0892 23 27 26 (0,34 € TTC/min)
Service consommateurs : 0892 23 27 26 (0.34€ TTC/min)
Environmental Protection
Unwanted electrical appliances can be recycled and should not be discarded along with regular household waste! Please
actively support the conservation of resources and help protect the environment by returning this appliance to a collection
centre (if available).
25
This product is
not a toy.
Page 26

ENGLISH
FCC Notice
This device complies with Part 15 of the FCC Rules. Operation is subject to the following two
conditions:
(1) this device may not cause harmful interference, and
(2) this device must accept any interference received, including interference that may cause
undesired operation.
Warning: Changes or modications to this unit not expressly approved by the party responsible
for compliance could void the user’s authority to operate the equipment.
NOTE: This equipment has been tested and found to comply with the limits for a Class B digital
device, pursuant to Part 15 of the FCC Rules. These limits are designed to provide reasonable
protection against harmful interference in a residential installation. This equipment generates,
uses and can radiate radio frequency energy and, if not installed and used in accordance with
the instructions, may cause harmful interference to radio communications.
However, there is no guarantee that interference will not occur in a particular installation. If this
equipment does cause harmful interference to radio or television reception, which can be
determined by turning the equipment off and on, the user is encouraged to try to correct the
interference by one or more of the following measures:
- Reorient or relocate the receiving antenna.
- Increase the separation between the equipment and receiver.
- Connect the equipment into an outlet on a circuit different from that to which the receiver is
connected.
- Consult the dealer or an experienced radio/TV technician for help.
26
MFC105GBZ_01 IM0359
Page 27

EC DECLARATION OF CONFORMITY
Lexibook® S.A.
2, avenue de Scandinavie
91953 Courtaboeuf Cédex – France
Declare under our sole responsibility that the following product:
Kind of product: Personal computer
Type designation: MFC105GBZ
Complies with both the EMC Directive (2004/108/EC) and the Low Voltage Directive (2006/95/
EC) and, for the Lexibook WiFi USB key only, the R&TTE Directive (1999/5/EC) issued by the
Commission of the European Community.
Yiu Wai Man
Product Development Manager
27
 Loading...