

Page 1
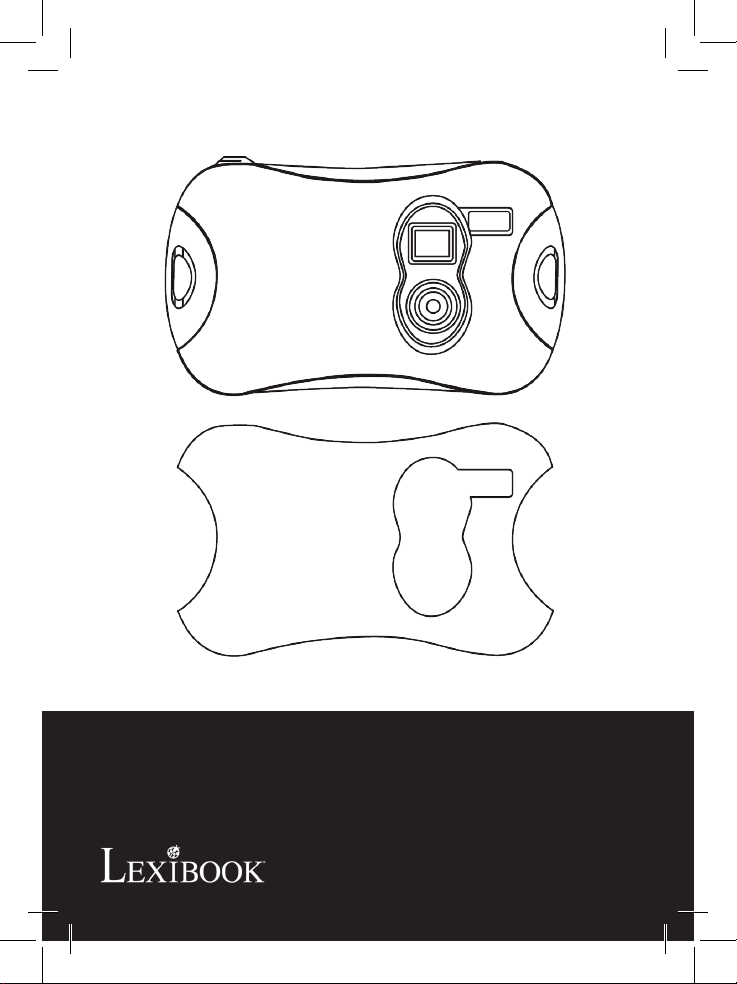
Appareil photo numérique avec flash
Digital camera with flash
MODE D’EMPLOI - INSTRUCTION MANUAL
DJ025series
Page 2
14
A
1
2
3
4
5
6
B
7
8
MENU
9
10
13
11
12
Page 3
C
D
1
3
2
Page 4

FRANÇAIS
5
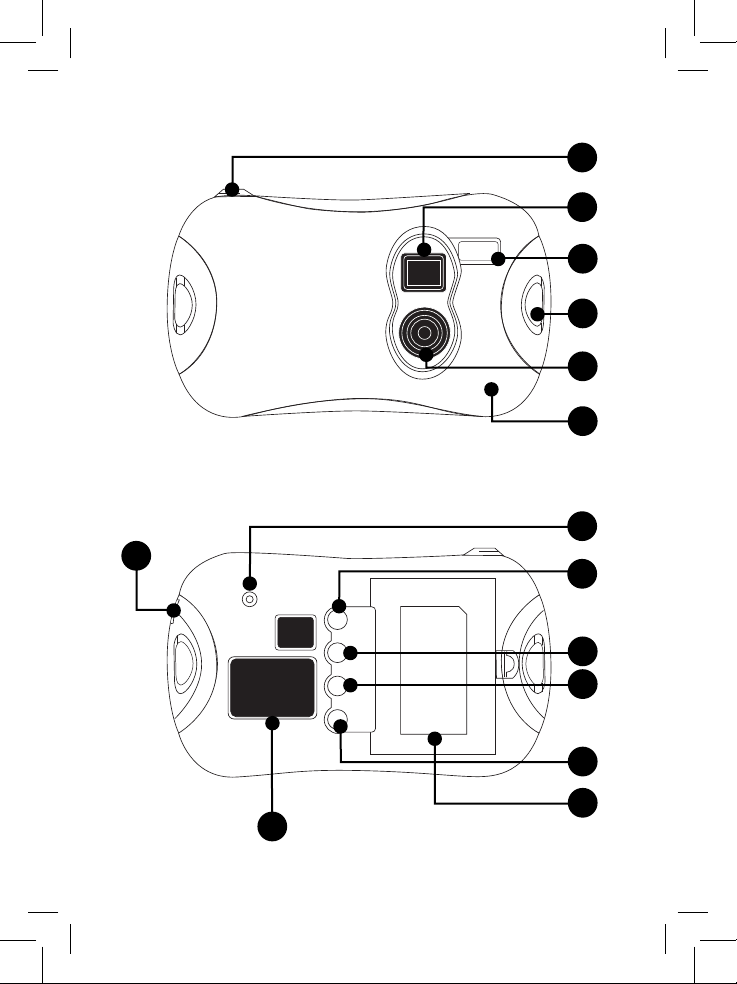
PRÉSENTATION DE VOTRE APPAREIL PHOTO
Veuillez vous référer aux images A & B.
1. Déclencheur/bouton de conrmation
2. Viseur optique
3. Flash
4. Attache de courroie
5. Objectif
6. Façade interchangeable
7. LED
8. Bouton de mise en marche/Menu
9. Bouton mode lecture/mode
appareil photo
10. Bouton èche du haut
11. Bouton èche du bas
12. Compartiment des piles
13. Écran LCD
14. Connecteur USB
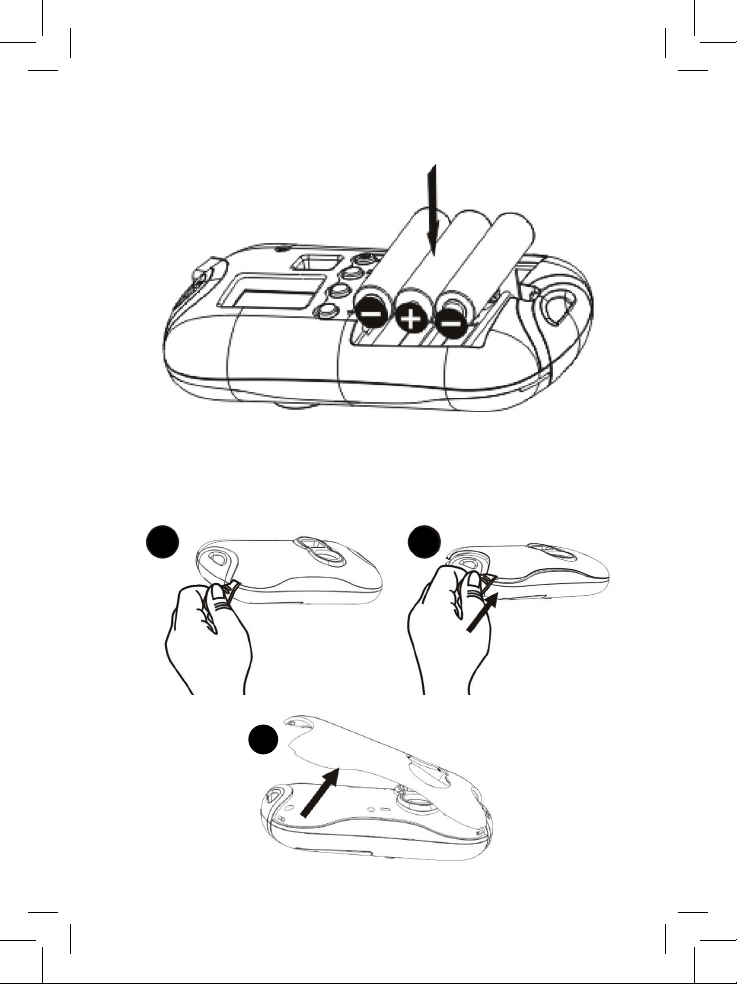
INSTALLATION DES PILES
Veuillez vous référer à l’image C.
1. Assurez-vous que l’appareil photo soit éteint.
2. Ouvrez le compartiment des piles situé à l’arrière de l’appareil.
3. Respectez la polarité des piles (symboles +/-) à l’intérieur du compartiment.
4. Insérez 3 piles neuves de type AAA 1,5 V (non fournies). Refermez le
couvercle.
ATTENTION : D’importantes interférences électromagnétiques ou des
décharges électrostatiques peuvent provoquer un dysfonctionnement ou une
perte de données. Si l’appareil ne fonctionne pas correctement, enlevez puis
remettez les piles.
Remarque importante : Tous les chiers s’effacent lorsque les piles sont
remplacées. Assurez-vous de transférer les chiers sur votre PC avant cette
manipulation.
INSTALLER LES LOGICIELS ET LE PILOTE DE
L’APPAREIL PHOTO
Suivez ces instructions pour installer les logiciels « PhoTags Express »
et « WebCam Express » ainsi que le pilote de l’appareil photo sur votre
ordinateur.
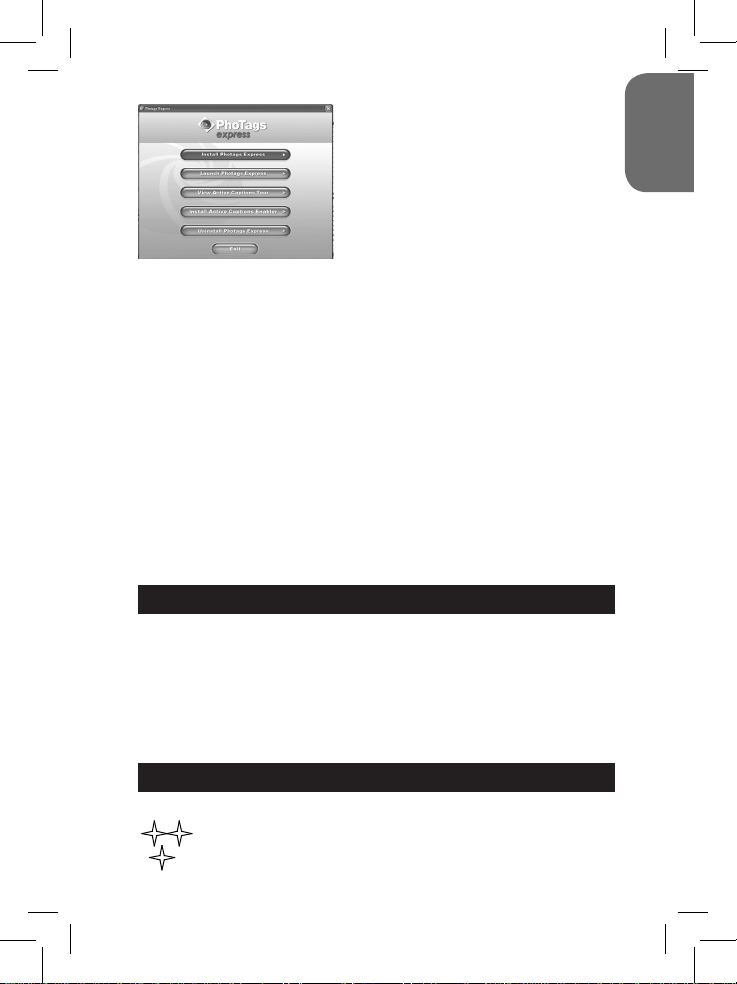
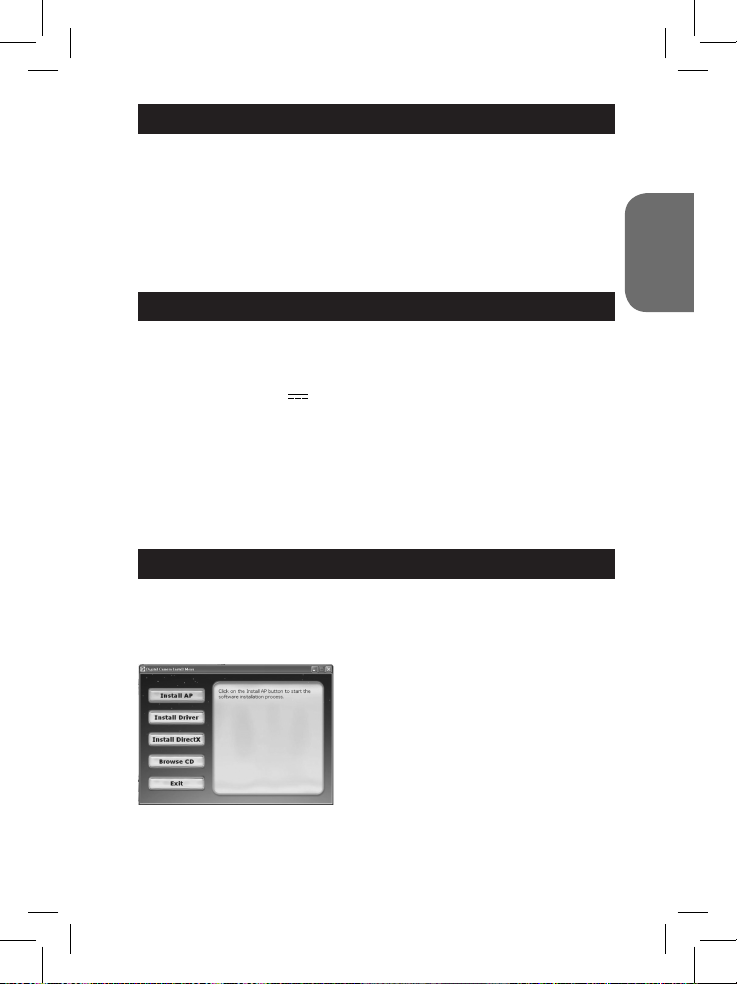
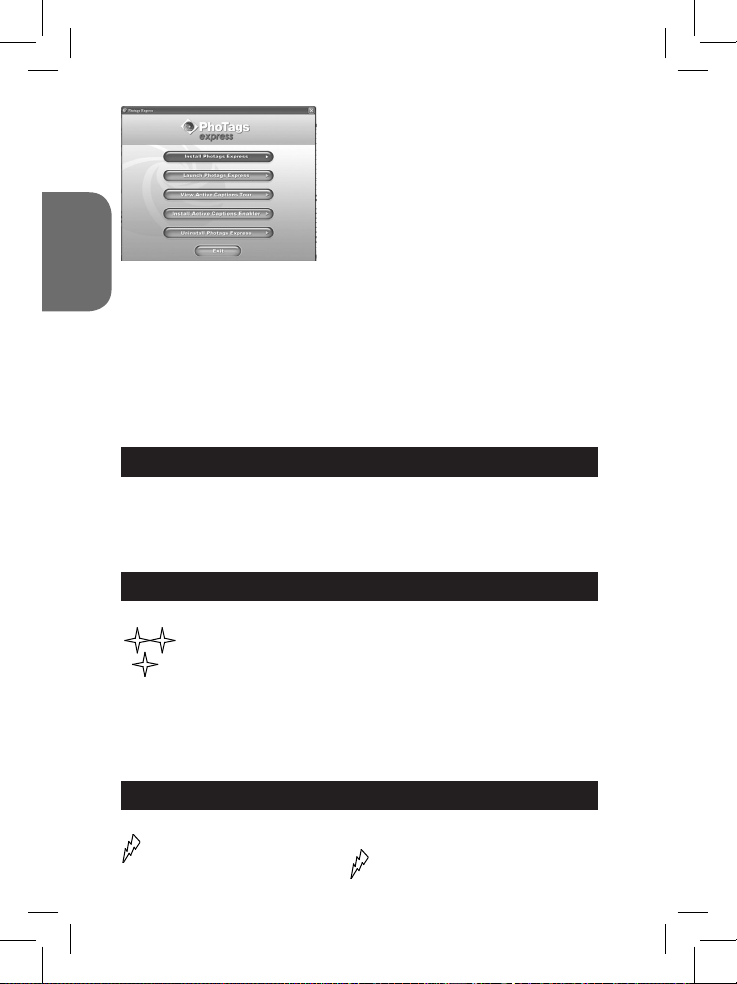
1. Insérez le CD des logiciels (inclus) dans le lecteur de CD-ROM. Le CD
s’initialisera automatiquement et le menu d’installation suivant apparaîtra:
Cliquez sur « Install AP » puis
sélectionnez la langue d’installation.
4
Page 5
Cliquez ensuite sur « Installer PhoTags
Express » et suivez les instructions à
l’écran pour installer « PhoTags Express »
et « WebCam Express ». Les logiciels
« PhoTags Express » et « WebCam
Express » offrent de nombreuses
applications pour éditer et imprimer vos
photos. Une fois l’installation des logiciels
terminée, un écran de conrmation
programme » et cliquez sur le bouton « Terminer » pour fermer la fenêtre et
revenir au menu d’installation. Vous pouvez maintenant installer le pilote de
l’appareil photo.
2. Pour installer le pilote, cliquez sur « Install Driver », puis suivez les
instructions.
3. Vous devrez redémarrer votre ordinateur après l’installation du pilote. Le
pilote « Dual Mode Camera » vous permet d’utiliser votre appareil photo
comme webcam.
Note :
• Si le CD ne démarre pas automatiquement, allez dans la barre des tâches,
cliquez sur « Démarrer », « Exécuter », écrivez « D:\autorun.exe » dans la
boîte de dialogue d’exécution (où « D:\ » est votre lecteur CD-ROM) et
appuyez sur Entrée.
• Vous devez installer le pilote pour pouvoir transférer les photos/vidéos et
pour utiliser l’appareil photo comme webcam.
• Ne branchez pas l’appareil photo à votre ordinateur pendant l’installation
des logiciels.
• Lorsque vous lancez le programme « PhoTags Express » pour la première
fois, un formulaire d’enregistrement en ligne apparaît à l’écran. Vous pouvez
choisir d’enregistrer le programme, de reporter l’enregistrement ou de ne
plus afcher cet écran.
s’afche. Décochez l’option « Démarrer le
MISE EN MARCHE ET ARRÊT DE L’APPAREIL PHOTO
Appuyez sur le bouton de mise en marche (8) durant environ 3 secondes
pour mettre l’appareil photo en marche. L’appareil émet un « bip » pour
conrmer qu’il est prêt à être utilisé.
Maintenez le bouton de mise en marche (8) enfoncé pendant 3 secondes
pour mettre l’appareil photo hors tension.
Remarque :
L’appareil photo s’éteindra automatiquement après 60 secondes d’inactivité.
FRANÇAIS
SÉLECTION DE LA RÉSOLUTION DES PHOTOS
Il y a 2 modes de résolution :
Haute résolution : l’appareil photo peut stocker environ 48 photos
Basse résolution : l’appareil photo peut stocker environ 186
photos.
5
Page 6
FRANÇAIS
7
1. Appuyez trois fois sur le bouton Menu (8) pour que le type de résolution
sélectionné s’afche.
2. Dans les 3 secondes qui suivent, appuyez une fois sur le déclencheur (1)
pour changer la résolution.
3. Répétez les étapes 1 et 2 pour changer à nouveau la résolution.
UTILISATION DU FLASH
Mettez l’appareil sous tension.
A Flash automatique
1. Appuyez sur le bouton Menu (8) jusqu’à ce que l’icône A apparaisse dans
le coin inférieur gauche de l’écran. Appuyez sur le déclencheur (1) dans les
3 secondes qui suivent pour conrmer votre choix et activer le ash
automatique.
Flash activé
2. Appuyez sur le bouton Menu (8) jusqu’à ce que l’icône apparaisse dans
le coin inférieur gauche de l’écran. Appuyez sur le déclencheur (1) dans
les 3 secondes qui suivent pour conrmer votre choix et activer le ash.
Flash désactivé
3. Appuyez sur le bouton Menu (8) jusqu’à ce que l’icône apparaisse
dans le coin inférieur gauche de l’écran. Appuyez sur le déclencheur (1)
dans les 3 secondes qui suivent pour conrmer votre choix et désactiver
le ash.
PRISE DE PHOTOS
Mettez l’appareil sous tension et appuyez sur le déclencheur (1) pour
prendre une photo. Vous entendrez un “bip” sonore après chaque prise de
photo. Le nombre de photos encore disponible en mémoire s’afche sur
l’écran LCD.
Remarque : Si la mémoire de l’appareil photo est pleine et que vous
essayez de prendre une photo, l’écran LCD afchera « 00 » et l’appareil
photo émettra deux « bip » sonores.
MODE LECTURE
1. Mettez l’appareil sous tension. Appuyez sur le bouton lecture (9) pour
entrer en mode lecture.
2. Un diaporama des photos enregistrées sur l’appareil photo se lance
automatiquement quand vous entrez en mode lecture. Appuyez sur la
èche du haut (10) ou sur la èche du bas (11) pour sortir du diaporama.
Remarque : le diaporama ne peut se lancer que s’il y a 2 photos ou plus
enregistrées dans la mémoire de l’appareil.
6
Page 7
3. Appuyez sur la èche du haut (10) ou sur la èche du bas (11) pour
visionner vos photos.
SUPPRESSION DE FICHIERS
1. Mettez l’appareil sous tension.
2. En mode appareil photo :
Supprimer la dernière photo prise
Appuyez deux fois sur le bouton Menu (8), l’icône apparaîtra sur l’écran
LCD. Appuyez sur le déclencheur (1) dans les 3 secondes qui suivent pour
supprimer la dernière photo prise.
Supprimer toutes les photos
Appuyez une fois sur le bouton Menu (8), l’icône apparaîtra sur l’écran
LCD. Appuyez sur le déclencheur (1), le nombre de photos encore
disponible en mémoire clignote. Appuyez une nouvelle fois sur le
déclencheur (1) dans les 3 secondes qui suivent pour supprimer toutes les
photos.
3. En mode lecture :
Supprimer la dernière photo prise
Appuyez sur la èche du haut (10) ou sur la èche du bas (11) pour sortir
du diaporama. Appuyez sur le déclencheur (1), l’appareil émet un « bip »
continu. Appuyez une nouvelle fois sur le déclencheur (1) pour supprimer la
dernière photo prise.
TÉLÉCHARGEMENT DE VOS PHOTOS
1. Connectez l’appareil photo à votre ordinateur avec le câble USB fourni.
Vous entendrez un petit bip sonore et l’écran LCD s’allumera lorsque
l’appareil photo sera connecté au PC.
2. Sur le bureau, double-cliquez sur l’icône « Pho Tags Express » pour ouvrir
le logiciel « Pho Tags Express ».
3. Dans le menu principal, cliquez sur le bouton « Réception photos ».
4. Sélectionnez ensuite “ Dual Mode Camera ” dans la liste des
périphériques connectés à l’ordinateur et suivez les instructions à l’écran
pour télécharger vos photos.
FRANÇAIS
MODE PC CAM
Connecté à votre PC, votre appareil photo peut être utilisé comme webcam.
Mode webcam
1. Connectez l’appareil photo à votre ordinateur avec le câble USB.
2. Dans « Poste de travail », double-cliquez sur un nouveau pilote appelé
“ Dual Mode Camera ”. Vous serez alors en mode webcam.
7
Page 8
FRANÇAIS
Messagerie instantanée (chat)
En mode webcam, vous pouvez aussi utiliser votre appareil photo avec votre
programme de messagerie instantanée (Yahoo Messenger, MSN Messenger, Skype…).
Ex : Utilisation avec Yahoo Messenger
1. Connectez l’appareil photo à votre ordinateur avec le câble USB.
2. Lancez Yahoo Messenger.
3. Cliquez sur l’onglet « Outils » et dans le menu déroulant, choisissez
« Lancer ma caméra ».
4. Une fenêtre avec votre image apparaît à l’écran. Vos correspondants
peuvent voir votre image.
COQUES INTERCHANGEABLES
Veuillez vous référer à l’image D.
Votre appareil photo offre 2 coques interchangeables. Pour enlever et insérer
une coque, utilisez un outil pointu pour détacher chaque coin de l’appareil photo.
Enclenchez la nouvelle coque.
ENTRETIEN
Protéger le produit de l’humidité. S’il est mouillé, l’essuyer immédiatement.
Ne pas le laisser en plein soleil, ne pas l’exposer à une source de chaleur.
Ne pas le laisser tomber. Ne pas tenter de le démonter. Pour le nettoyer, utiliser un
chiffon légèrement imbibé d’eau à l’exclusion de tout produit détergent.
GARANTIE
Ce produit est couvert par notre garantie de deux ans. Pour toute mise en œuvre
de la garantie ou de service après-vente, vous devez vous adresser à votre
revendeur muni de votre preuve d’achat. Notre garantie couvre les vices de
matériel ou de montage imputables au constructeur à l’exclusion de toute
détérioration provenant du non-respect de la notice d’utilisation ou de toute
intervention intempestive sur l’article (telle que démontage, exposition à la
chaleur ou à l’humidité…). Note : Veuillez garder ce mode d’emploi, il contient
d’importantes informations. Le contenu de ce mode d’emploi peut changer sans
préavis. Aucune partie de ce mode d’emploi ne doit être reproduite sans le
consentement écrit du fabricant.
Référence : DJ025series
LEXIBOOK S.A,
2, avenue de Scandinavie,
91953 Courtaboeuf Cedex France
Assistance technique : 0892 23 27 26 (0,34 € TTC/Min),
www.lexibook.com
©2009 LEXIBOOK®
Ce produit n’est pas un jouet.
Informations sur la protection de l’environnement
Tout appareil électrique usé est une matière recyclable et ne devrait pas faire partie des ordures ménagères! Nous vous
demandons de bien vouloir nous soutenir en contribuant activement au ménagement des ressources et à la protection de
l’environnement en déposant cet appareil dans sites de collecte (si existants).
Conçu en Europe – Fabriqué en Chine
8
Page 9
GETTING TO KNOW YOUR CAMERA
Please refer to images A & B.
1. Shutter/Set button
2. Optical viewnder
3. Flash
4. Strap hole
5. Camera lens
6. Face plate
7. LED
8. Power/Menu button
9. Playback mode/Camera
mode button
10. Up button
11. Down button
12. Battery compartment
13. LCD display
14. USB connector port
INSERTING NEW BATTERIES
Please refer to image C.
1. Make sure the camera is off.
2. Open the battery compartment located at the back of the unit.
3. Note the polarity of the batteries (+/- signs) inside the battery compartment.
4. Insert 3 new AAA 1,5 V batteries (not included). Replace and close the
battery cover.
Warning: Mal-function or loss of memory may be caused by strong
frequency interference or electrostatic discharge. Should any abnormal function occur, remove the batteries and insert them again.
Important note: All les will be lost when replacing the batteries. Make sure
you transfer the les to your PC before changing the batteries.
INSTALLING THE SOFTWARE AND THE CAMERA DRIVER
Follow these instructions to install the “PhoTags Express” and “Webcam
Express” software and the camera driver on your computer system.
1. Insert the CD Software (included) in your CD-ROM drive. The CD will auto
run, and the installation menu will appear.
ENGLISH
Click “Install AP” on the “Digital Camera
Install Menu” window and select a
language from the drop down
list.
Click “Install PhoTags Express” and follow the instructions to install “PhoTags
Express” and “WebCam Express”. “PhoTags Express” and “WebCam
Express” software offer many applications for photo editing and printing.
When the installation is completed, a conrmation window will be displayed.
Untick the “Start the application” option and click the “Finish” button to close
9
Page 10
11
the window and go back to the installation
menu. Now you can install the camera
driver.
2. Click “Install Driver”, and then follow the
instructions to install the camera driver.
3. You will need to reboot your computer
ENGLISH
• If the CD does not auto run, click “Start”, “Run”, then type in “D:\autorun.
exe” in the Run dialog text box (where D:\ is your CD-ROM drive) and press
Enter.
• You must install the driver before downloading pictures/videos from the
camera or using it as a webcam.
• Make sure the camera is not connected to your computer before installing
the driver and the software.
• When launching the “PhoTags Express” software for the rst time, a
registration dialog box is displayed on-screen. You can choose to register the
program, skip the registration process or to stop displaying this dialog
box again.
after the driver installation. The “Dual
Mode Camera” driver allows you to use
your digital camera as a webcam.
Note:
TURNING THE CAMERA ON AND OFF
Press the Power button (8) for about 3 seconds to turn the camera on. The
camera will sound a beep to conrm that it is ready for use. Press and hold
Power button (8) for about 3 seconds again to turn it off.
Note: The camera will auto power off after 60 seconds of inactivity.
SELECTING THE PHOTO RESOLUTION
There are 2 resolution modes:
High resolution: the camera can store about 48 pictures in this mode.
Low resolution: the camera can store about 186 pictures in this
mode.
1. Press the Menu button (8) three times to see what kind of resolution setting is
selected on your camera.
2. Press the Shutter button (1) once within 3 seconds to change the resolution.
3. Repeat steps 1 and 2 to modify the resolution again.
FLASH FUNCTION
Switch on the camera.
A Auto Flash
1. Press the Menu button (8) until the A icon appears on the lower left
10
Page 11
corner of the LCD screen. Press the Shutter button (1) within 3 seconds to
conrm and activate the auto ash.
Flash on
2. Press the Menu button (8) until the icon appears on the lower left
corner of the LCD screen. Press the Shutter button (1) within 3 seconds to
conrm and switch on the ash.
Flash off
3. Press the Menu button (8) until the icon appears on the lower left
corner of the LCD screen. Press the Shutter button (1) within 3 seconds to
conrm and switch off the ash.
TAKING PHOTOS
Switch on the unit. In Camera mode, press the Shutter button (1) to take
a photo. The camera will beep once to conrm that a picture is taken. The
number of pictures you can still take in memory is shown on the LCD screen.
Note: When the camera’s memory is full, if you try to take a photo the LCD
screen will display “00” and the camera will beep two times.
PLAYBACK MODE
1. Switch on the camera. Press the playback button (9) to enter playback mode.
2. The camera will automatically show the photos currently stored in memory
in a slide show format. Press the up button (10) or the down button (11) to
exit the slide show.
Note: the camera will launch the slide show only if there are 2 photos, or
more, stored in your camera’s memory.
3. Press the up button (10) or the down button (11) to browse manually
through your photos.
DELETING FILES
1. Switch on the camera.
2. In Camera mode:
Delete the last picture taken
Press the Menu button (8) two times; the icon will appear on the LCD
display. Press the Shutter button (1) within 3 seconds to delete the last
picture taken.
Deleting all les
Press the Menu button (8) one time; the icon will appear on the LCD
display. Press the Shutter button (1), the number of pictures you can still
take in memory will ash on the LCD. Press the Shutter button (1) again
within 3 seconds to delete all the pictures stored in the camera.
11
ENGLISH
Page 12

13
3. In playback mode:
Delete the last picture taken
Press the up button (10) or the down button (11) to exit the slide show.
Press the Shutter button (1); you will hear a continuous « beep » sound.
Press the Shutter button (1) again to delete the last picture taken.
ENGLISH
1. Connect the camera to your computer via the USB cable provided. You
will hear a small beep sound and the LCD screen will turn on when the
camera is connected to your PC.
2. Double-click on the PhoTags Express icon that appears on your desktop
to launch the PhoTags Express program.
3. Click on the “Get Photos” button on the Main Menu.
4. Select the “ Dual Mode Camera ” driver from the list of devices and follow
the instructions to download your photos.
DOWNLOADING YOUR PHOTOS
PC CAM MODE
Connected to your PC, your camera can be used as a webcam.
Webcam mode
1. Connect the camera to your computer via the USB cable.
2. In “My Computer”, double click on a new drive called “Dual Mode
Camera”. You will be in webcam mode.
Instant messaging (chat)
You can use your camera as a webcam with your instant messaging client
(Yahoo Messenger, MSN Messenger, Skype…).
Ex: Using Yahoo Messenger
1. Connect the camera to your computer via the USB cable.
2. Start Yahoo messenger.
3. Select the « Tools » listing on the top of the toolbar. Go to the drop down
menu and select the listing for « Start my Webcam ».
4. You will see a window appearing with your image. Now people who have
your Yahoo login name will be able to see you.
INTERCHANGEABLE COVERS
Please refer to image D.
Your digital camera comes with 2 interchangeable covers. To remove and
insert a cover, use a sharp instrument to unsnap the cover on each corner of
the camera. Snap in a new cover.
12
Page 13
MAINTENANCE
Only use a soft, slightly damp cloth to clean the unit. Do not use detergent.
Do not expose the unit to direct sunlight or any other heat source. Do not
immerse the unit in water. Do not dismantle or drop the unit. Do not try to
twist or bend the unit.
WARRANTY
NOTE: Please keep this instruction manual, it contains important information. This
product is covered by our two-year warranty. To make use of the warranty or the
after-sales service, please contact your retailer and supply proof of purchase. Our
warranty covers material or installation-related defects attributable to the
manufacturer, with the exception of wear caused by failure to respect the
instructions for use or any unauthorised work on the equipment (such as
dismantling, exposure to heat or damp, etc).
Reference: DJ025series
LEXIBOOK UK ltd,
Unit 10 Peterseld Industrial Estate,
Bedford Road, Peterseld, Hampshire,
GU32 3QA, United Kingdom,
Helpline: 0808 100 3015,
http://www.lexibook.com
©2009 LEXIBOOK®
ENGLISH
This product is not a toy.
Environmental Protection
Unwanted electrical appliances can be recycled and should not be discarded along with regular household waste! Please
actively support the conservation of resources and help protect the environment by returning this appliance to a collection
centre (if available).
Designed in Europe – Made in China
13
Page 14

15
CONOCE TU CÁMARA
Consulta las guras A y B.
1. Botón de Disparo/Ajuste
2. Visor
3. Flash
4. Oricio para la correa
5. Lente de la cámara
6. Carátula
7. Indicador LED
8. Botón Encendido/Menú
9. Botón Modo Reproducción/
Modo Cámara
10. Botón Subir
11. Botón Bajar
12. Compartimento de las pilas
13. Pantalla LCD
14. Conector para puerto USB
PARA COLOCAR LAS PILAS
Véase la gura C.
ESPAÑOL
1. Asegúrate de que la cámara esté apagada.
2. Abre el compartimento de las pilas situado en la parte trasera de la unidad.
3. Ten en cuenta la polaridad de las pilas (símbolos +/-) indicada en el
compartimento.
4. Coloca 3 pilas AAA 1,5 V nuevas (no incluidas). Vuelve a colocar la
tapa de las pilas.
¡ADVERTENCIA! Las descargas electrostáticas o interferencias de
frecuencia fuertes podrán causar el funcionamiento anormal del aparato o
la pérdida de los datos almacenados en la memoria. En caso de observarse
algún funcionamiento anormal, retire y vuelva a instalar Las pilas.
Nota importante: al sustituir las pilas se borrarán todos los archivos
almacenados. Asegúrate de transferirlos a tu PC antes de cambiar las pilas.
INSTALACIÓN DEL SOFTWARE Y DEL CONTROLADOR DE LA CÁMARA
Siga las instrucciones que se proporcionan a continuación para instalar en
su ordenador los programas de software “PhoTags Express” y “Webcam
Express”, así como el controlador para la cámara.
1. Inserte el CD de software (incluido) en
la unidad de CD-ROM de su ordenador.
El CD se iniciará de forma automática y la
pantalla mostrará el menú de instalación.
14
Page 15

Haga clic en la opción “Install AP” en la
ventana del “Menú de instalación de la
cámara digital” y seleccione un idioma de
los que se incluyen en la lista desplegable.
Haga clic en la opción “Install PhoTags Express” y siga las instrucciones que
se muestren en la pantalla para proceder a la instalación de los programas
“PhoTags Express” y“WebCam Express”. El software “PhoTags Express” y
“WebCam Express” cuentan con numerosas aplicaciones para la edición e
impresión de fotografías. Una vez completada la instalación, se mostrará un
cuadro de conrmación. Elimine la marca de la casilla titulada “Start the application” (Iniciar el programa) y haga clic en el botón “Finish” (Finalizar) para
cerrar el cuadro y volver al menú de instalación. Tras esto, habrá instalado
con éxito el controlador de la cámara.
2. Haga clic en la opción “Install Driver” (instalar controlador) y siga las
instrucciones que se muestren en la pantalla para proceder a la instalación
del controlador de la cámara.
3. Será necesario que reinicie su ordenador una vez instalado el controlador. El controlador de la cámara “Dual Mode Camera” le permite utilizar su
cámara de fotos digital a modo de cámara Web.
Nota:
• En caso de que el CD no se inicie de forma automática, haga clic en “Inicio”, seleccione la opción “Ejecutar” y escriba “D:\autorun.exe” en el cuadro
de diálogo que aparezca (donde D:\ corresponde a la letra asignada
a su unidad de CD-ROM). A continuación, pulse la tecla “Enter” (introducir).
• Será necesario que instale el controlador antes de proceder a la descarga
de imágenes o videos almacenados en la cámara, así como antes de utilizar
el aparato a modo de cámara Web.
• Asegúrese de que la cámara no está conectada a su ordenador antes de
instalar el controlador y el software.
• Cuando ejecute por primera vez el programa “PhoTags Express”, la pantalla
mostrará un cuadro de diálogo a través del cual podrá registrar el programa.
Podrá decidir registrar el programa, o bien saltarse el proceso de
registro o hacer que no vuelva a mostrarse dicho cuadro de diálogo.
ESPAÑOL
ENCENDER Y APAGAR LA CÁMARA
Pulsa el botón de encendido (8) durante unos 3 segundos para encender la
cámara. La cámara emitirá un pitido para conrmar que está preparada para
el uso. Mantén pulsado de nuevo el botón de encendido (8) durante unos 3
segundos para apagar la cámara.
Nota: La cámara se desconecta automáticamente transcurridos 60
segundos de inactividad.
15
Page 16

17
SELECCIÓN DE LA RESOLUCIÓN DE LAS FOTOGRAFÍAS
Hay 2 modos de resolución:
Alta resolución: en este modo la cámara puede almacenar unas 48
fotografías.
Baja resolución: en este modo la cámara puede almacenar unas 186
fotografías.
1. Pulsa tres veces el botón Menú para cambiar el ajuste de la resolución de la
cámara.
2. Pulsa una vez el botón de disparo (1), antes de que transcurran 3 segundos,
para seleccionar la resolución y conrmar tu elección.
3. Repite los pasos 1 y 2 para modicar la resolución.
ESPAÑOL
FUNCIÓN DE FLASH
Enciende la cámara.
A Flash automático (Auto Flash)
1. Pulsa el botón Menú (8) hasta que se muestre el icono A en la esquina
inferior izquierda de la pantalla LCD. Pulsa una vez el botón de disparo (1),
antes de que transcurran 3 segundos, para conrmar y activar el modo de
ash automático.
Flash activado
2. Pulsa el botón Menú (8) hasta que se muestre el icono en la esquina
inferior izquierda de la pantalla LCD. Pulsa una vez el botón de disparo (1),
antes de que transcurran 3 segundos, para conrmar y poner la cámara
en el modo de ash activado.
Flash desactivado
3. Pulsa el botón Menú (8) hasta que se muestre el icono en la esquina
inferior izquierda de la pantalla LCD. Pulsa una vez el botón de disparo (1),
antes de que transcurran 3 segundos, para conrmar y poner la cámara
en el modo de ash desactivado.
16
Page 17

PARA TOMAR FOTOGRAFÍAS
Enciende la unidad. En modo de Cámara, pulsa el botón de disparo (1)
para tomar una fotografía. La cámara emitirá un pitido para conrmar que
ha tomado una fotografía. El número de fotografías que caben todavía en la
memoria se te mostrará en la pantalla LCD.
Nota: Si intentas sacar una foto cuando la memoria de la cámara está llena,
la pantalla LCD mostrará “00” y la cámara emitirá dos pitidos.
MODO DE REPRODUCCIÓN
1. Enciende la cámara. Pulsa el botón playback (9) para acceder al modo de
reproducción.
2. La cámara mostrará automáticamente las fotografías actualmente
almacenadas en la memoria en un formato de presentación de diapositivas.
Pulsa el botón Subir (10) o el botón Bajar (11) para salir del modo de
presentación de diapositivas.
Nota: la cámara comenzará la presentación de diapositivas solo si hay 2 ó
más fotografías almacenadas en la memoria de la cámara.
3. Pulsa el botón Subir (10) o el botón Bajar (11) para desplazarte manualmente
por las fotografías almacenadas.
BORRADO DE ARCHIVOS
1. Enciende la cámara.
2. En modo de Cámara:
Para borrar la última fotografía tomada
Pulsa dos veces el botón Menú (8); el icono aparecerá en la pantalla
LCD. Pulsa el botón de disparo (1), antes de que transcurran 3 segundos,
para borrar la última fotografía tomada.
Para borrar todos los archivos
Pulsa el botón Menú (8) una vez; el icono aparecerá en la pantalla LCD.
Pulsa el botón de disparo (1); se mostrará en la pantalla LCD parpadeando
el número de fotografías que puedes sacar aún.
Pulsa el botón de disparo (1) de nuevo, antes de que transcurran
3 segundos, para borrar todas las fotografías almacenadas en la cámara.
3. En modo reproducción:
Para borrar la última fotografía tomada
Pulsa el botón Subir (10) o el botón Bajar (11) para salir del modo de
presentación de diapositivas.
Pulsa el botón de disparo (1); oirás un pitido continuo.
Pulsa el botón de disparo (1) de nuevo para borrar la última fotografía tomada.
ESPAÑOL
17
Page 18

19
PARA PASAR TUS FOTOGRAFÍAS AL ORDENADOR
1. Conecta la cámara a tu ordenador utilizando el cable USB que se
suministra. Oirás un pequeño pitido y la pantalla LCD se encenderá
cuando la cámara se conecte con tu PC.
2. Pulsa dos veces sobre el icono de PhoTags Express que se muestra en el
escritorio del PC para hacer que se ejecute el programa
PhoTags Express.
3. Pulsa en el botón “Get Photos” del menú principal.
4. Selecciona el controlador “ Dual Mode Camera ” de la lista de dispositivos
y sigue las instrucciones para transferir tus fotografías al ordenador.
ESPAÑOL
Tu cámara puede utilizarse como webcam cuando la conectas al PC.
Modo Webcam
1. Conecta la cámara a tu ordenador utilizando el cable USB.
2. En “Mi PC”, pulsa dos veces con el ratón en una nueva unidad que
aparecerá, llamada “ Dual Mode Camera ”. Ya estás en modo webcam.
Mensaje instantáneo (chat)
Puedes utilizar la cámara como una webcam con tu programa de
mensajería instantánea (Yahoo Messenger, MSN Messenger, Skype…).
P.e: Para utilizar Yahoo Messenger
1. Conecta la cámara a tu ordenador utilizando el cable USB.
2. Arranca Yahoo Messenger.
3. Selecciona el listado « Herramientas » en la parte superior de la barra de
herramientas. En el menú desplegable selecciona el listado para « Invitar
a mi webcam ».
4. Verás una ventana con tu imagen. Ahora la gente que se conecte contigo
podrá verte.
MODO PC CAM
CARÁTULAS INTERCAMBIABLES
Véase la gura D.
Tu cámara digital se suministra con 2 carátulas intercambiables. Para
retirar una carátula utiliza un instrumento alado para desencajarla de cada
esquina de la cámara. Encaja la nueva carátula.
MANTENIMIENTO
Para limpiar la unidad, utiliza solo un paño suave, ligeramente húmedo.
No utilices detergente. No expongas la unidad a la luz directa del sol ni a
ninguna otra fuente de calor. No sumerjas la unidad en agua. No desmontes
la unidad ni la dejes caer. No intentes doblar o retorcer la unidad.
18
Page 19

GARANTÍA
NOTA: Conserva este manual de instrucciones, ya que contiene información
importante. Este producto tiene una garantía de dos años. Para utilizar la garantía
o el servicio postventa, contacta con tu vendedor presentándole el comprobante
de compra. Nuestra garantía cubre defectos relativos al material o al montaje
atribuibles al fabricante; con excepción del desgaste causado por no seguir las
instrucciones de uso o cualquier manipulación no autorizada del equipo (como
desensamblado, exposición al calor o a la humedad, etc.).
Referencia: DJ025series
Lexibook Ibérica S.L,
C/ de las Hileras 4, 4° dpcho 14,
28013 Madrid, España.
Servicio consumidores: 902.102.191, http://www.lexibook.com
©2009 LEXIBOOK®
ESPAÑOL
Este producto no es un juguete.
Protección medioambiental
¡Los aparatos eléctricos para desecho pueden ser reciclados y no deben ser desechados junto con la basura doméstica
habitual! Apoye activamente el aprovechamiento racional de los recursos y ayude a proteger el medio ambiente enviando
este producto a un centro de recolección para reciclaje (en caso de estar disponible).
Diseñado en Europa – Fabricado en China
19
Page 20

21
CONHECER A SUA CÂMARA
Por favor, consulte as imagens A e B.
1. Obturador / botão de conguração
2. Visor óptico
3. Flash
4. Orifício da alça
5. Lente da câmara
6. Placa dianteira
7. LED
8. Botão “Power/Menu”
9. Botão do modo de
reprodução / modo de
câmara
10. Botão para cima
11. Botão para baixo
12. Compartimento das pilhas
13. Ecrã LCD
14. Porta de ligação USB
COLOCAR PILHAS NOVAS
Por favor, consulte a imagem C.
1. Certique-se de que a câmara está desligada.
2. Abra o compartimento das pilhas, que se encontra na parte traseira da unidade.
3. Tenha em conta a polaridade das pilhas (sinais +/-) dentro do comparti
mento das pilhas.
4. Coloque 3 pilhas AAA 1,5 V novas (não incluídas). Volte a colocar e
feche a tampa do compartimento das pilhas.
PORTUGUÊS
Aviso: O mau funcionamento ou perda de memória pode ser causado por
fortes interferências ou descarga electrostática. Caso ocorra alguma função
anormal, retire as pilhas e volte a colocá-las.
Nota importante: Todos os cheiros serão perdidos quando substituir as
pilhas. Certique-se de que transfere os cheiros para o seu PC antes de
mudar de pilhas.
INSTALAR O SOFTWARE E O CONTROLADOR DA CÂMARA
Siga estas instruções para instalar o software “PhoTags Express” e o
“Webcam Express” e o controlador da câmara no sistema do seu
computador.
1. Insira o CD do Software (incluído) na sua
unidade do CD-ROM. O CD é executado
automaticamente e aparece o menu de
instalação.
Clique em “Install AP” na janela do “Menu de Instalação da Câmara Digital”
e seleccione uma língua a partir do menu de arrastamento.
Clique em “Install PhoTags Express” e siga as instruções para instalar o
“PhoTags Express” e o “WebCam Express”. O software do “PhoTags Ex-
20
Page 21

press” e “WebCam Express” oferece muitas
aplicações para a edição e impressão de
fotos. Quando a instalação estiver
terminada, aparece uma janela de
conrmação. Retire o sinal da opção “Start
the application” (iniciar a aplicação) e clique
no botão
“Finish” (terminar) para fechar a janela e
voltar ao menu de instalação. Agora, pode
instalar o controlador da câmara.
2. Clique em “Install Driver” (instalar o controlador) e siga as instruções para
instalar o controlador da câmara.
3. Precisa de reiniciar o seu computador após a instalação do controlador.
O controlador da “Dual Mode Camera” permite-lhe usar a sua câmara digital
como webcam.
Nota:
• Se o CD não for executado automaticamente, clique em “Iniciar”,
“Executar”, escreva “D:\autorun.exe” na caixa de diálogo em “Executar” (em
que D:\ é a sua unidade de CD-ROM) e prima Enter.
• Tem de instalar o controlador antes de descarregar imagens/vídeos da
câmara ou de a usar como webcam.
• Certique-se de que a câmara não está ligada ao seu computador antes
de instalar o controlador e o software.
• Quando iniciar o software “PhoTags Express” pela primeira vez, aparece
no ecrã uma caixa de diálogo para proceder ao registo. Pode registar o
programa, saltar o processo de registo ou parar de apresentar esta caixa de
diálogo.
LIGAR E DESLIGAR A CÂMARA
Prima o botão Power (8) durante cerca de 3 segundos para ligar a câmara.
A câmara toca um “beep” para conrmar que está pronta a ser usada.
Prima e mantenha premido o botão Power (8) durante cerca de 3 segundos
novamente para a desligar.
Nota: A câmara desliga-se automaticamente após 60 segundos sem ser
utilizada.
ESCOLHER A RESOLUÇÃO DA FOTO
Existem 2 modos de resolução:
Alta resolução: A câmara pode guardar cerca de 48 imagens neste modo.
Baixa resolução: A câmara pode guardar cerca de 186 imagens
neste modo.
1. Prima o botão Menu (8) três vezes para mudar a conguração da
resolução na sua câmara.
21
PORTUGUÊS
Page 22

23
2. Prima o obturador (1) uma vez no espaço de 3 segundos para escolher a
resolução e conrmar a sua escolha.
3. Repita os passos 1 e 2 para modicar a resolução.
FUNÇÃO DO FLASH
Ligue a câmara.
A Flash Automático
1. Prima o botão Menu (8) até que o ícone A apareça no canto inferior
esquerdo do ecrã LCD. Prima o obturador (1) no espaço de 3 segundos
para conrmar e activar o ash automático.
Flash ligado
2. Prima o botão Menu (8) até que o ícone apareça no canto inferior
esquerdo do ecrã LCD. Prima o obturador (1) no espaço de 3 segundos
para conrmar e ligar o ash.
Flash desligado
3. Prima o botão Menu (8) até que o ícone apareça no canto inferior
esquerdo do ecrã LCD. Prima o obturador (1) no espaço de 3 segundos
PORTUGUÊS
para conrmar e desligar o ash.
TIRAR FOTOS
Ligue a unidade. No modo da câmara, prima o obturador (1) para tirar uma
foto. A câmara faz um “beep” para conrmar que tirou uma fotograa. O
número de imagens que ainda pode guardar na memória é apresentado no
ecrã LCD.
Nota: Quando a memória da câmara estiver cheia, se tentar tirar uma
fotograa, o ecrã LCD apresenta “00” e a câmara faz dois “beeps”.
MODO DE REPRODUÇÃO
1. Ligue a câmara. Prima o botão de reprodução (9) para entrar no modo de
reprodução.
2. A câmara apresenta automaticamente as fotos guardadas actualmente na
memória, num formato de apresentação de diapositivos. Prima o botão para
cima (10) ou o botão para baixo (11) para sair da apresentação de diapositivos.
Nota: A câmara inicia a apresentação de diapositivos apenas se existirem 2
fotos ou mais, guardadas na memória da sua câmara.
3. Prima o botão para cima (10) ou o botão para baixo (11) para correr
manualmente as suas fotos.
APAGAR FICHEIROS
1. Ligue a câmara.
22
Page 23

2. No modo da câmara:
Apagar a última fotograa tirada
Prima o botão Menu (8) duas vezes. O ícone aparece no ecrã LCD.
Prima o obturador (1) no espaço de 3 segundos para apagar a última
fotograa tirada.
Apagar todos os cheiros
Prima o botão Menu (8) uma vez. O ícone aparece no ecrã LCD. Prima
o obturador (1), o número de imagens que ainda pode guardar na memória
pisca no ecrã LCD.
Prima novamente o obturador (1) no espaço de 3 segundos para apagar
todas as imagens guardadas na câmara.
3. No modo de reprodução:
Apagar a última fotograa tirada
Prima o botão para cima (10) ou o botão para baixo (11) para sair da
apresentação de diapositivos.
Prima o obturador (1). Irá ouvir um “beep” contínuo.
Prima novamente o obturador (1) para apagar a última fotograa tirada.
DESCARREGAR AS SUAS FOTOS
1. Ligue a câmara ao seu computador através do cabo USB fornecido. Irá
ouvir um pequeno “beep” e o ecrã LCD liga quando a câmara estiver
ligada ao seu PC.
2. Clique duas vezes no ícone “PhoTags Express” que aparece no seu
ambiente de trabalho para iniciar o programa “PhoTags Express”.
3. Clique no botão “Get Photos” no menu principal.
4. Escolha a unidade de disco “ Dual Mode Camera ” a partir da lista de
dispositivos e siga as instruções para descarregar as suas fotos.
MODO PC CAM
Ligada ao seu PC, a sua câmara pode ser usada como webcam.
Modo webcam
1. Ligue a câmara ao seu computador através do cabo USB.
2. Em “Meu Computador”, clique duas vezes numa nova unidade de disco
chamada “ Dual Mode Camera ”. Entrará no modo webcam.
Mensagens Instantâneas (conversação)
Pode usar a sua câmara como webcam com o seu programa de mensagens
instantâneas (Yahoo Messenger, MSN Messenger, Skype…).
Por ex: Usando o Yahoo Messenger
PORTUGUÊS
23
Page 24

1. Ligue a câmara ao seu computador através do cabo USB.
2. Inicie o Yahoo messenger.
3. Escolha “Ferramentas” listado na parte superior da barra de ferramentas.
Vá para o menu de opções e escolha “Iniciar a minha Webcam”.
4. Aparecerá uma janela na sua imagem. Agora, as pessoas que estão
ligadas a si através do Yahoo poderão vê-lo.
COBERTURAS PERMUTÁVEIS
Por favor, consulte a imagem D.
A sua câmara digital vem com 2 coberturas permutáveis. Para retirar e
inserir uma cobertura, use um instrumento aado para retirar a cobertura em
cada canto da câmara. Coloque e xe uma nova cobertura.
MANUTENÇÃO
Use apenas um pano suave ligeiramente embebido em água para limpar
a unidade. Não use detergente. Não exponha a unidade à luz directa do
sol ou a qualquer outra fonte de calor. Não coloque a unidade dentro de
água. Não desmonte nem deixe cair a unidade. Não tente torcer ou dobrar
a unidade.
PORTUGUÊS
GARANTIA
NOTA: Por favor, guarde este manual de instruções, pois contém informações
importantes. Este produto é abrangido pela nossa garantia de dois anos. Para
utilizar a garantia ou o serviço pós-venda, por favor contacte o seu revendedor e
apresente-lhe uma prova de compra. A nossa garantia cobre defeitos de material
ou de fabrico atribuídos ao fabricante, com a excepção de desgaste causado
pela falha no respeito pelas instruções de utilização, ou qualquer trabalho sem
autorização no aparelho (como desmontar, expor ao calor ou humidade, etc.).
Referência: DJ025series
Lexibook Electrónica Lda,
Quinta dos loios,
Praceta José Domingos dos Santos, 6B-8A,
2835-343 Lavradio-Barreiro, Portugal.
Apoio técnico: 21 206 13 48, http://www.lexibook.com
©2009 LEXIBOOK®
Este produto não é um brinquedo.
Protecção Ambiental
Os aparelhos eléctricos indesejados podem ser reciclados e não devem ser eliminados juntamente com o lixo doméstico
comum! Por favor, suporte activamente a conservação de recursos e ajude a proteger o ambiente, devolvendo esta
unidade a um centro de recolha (se disponível).
Desenhado na Europa – Fabricado na China
24
Page 25

PER IMPARARE A CONOSCERE LA TUA MACCHINA FOTO
Fare riferimento alle gure A & B.
1. Pulsante Otturatore/Imposta
2. Mirino ottico
3. Flash
4. Lenti macchina fotograca
5. Foro laccio da polso
6. Frontalino
7. LED
8. Pulsante Accensione/Menu
9. Pulsante modalità Playback
/Macchina fotograca
10. Pulsante Su
11. Pulsante Giù
12. Vano batterie
13. Display LCD
14. Porta USB
GRAFICA
INSERIRE NUOVE BATTERIE
Fare riferimento alla gura C.
1. Assicurarsi che la macchina fotograca sia spenta.
2. Aprire il vano batterie posizionato sulla parte posteriore dell’unità.
3. Notare la polarità delle batterie (segni +/-) all’interno del vano batterie.
4. Inserire 3 batterie nuove tipo AAA 1,5 V (non in dotazione).
Riposizionare e chiudere il coperchio.
Avvertenza: Forti interferenze in frequenza o scariche elettrostiche possono
causare malfunzionamenti o perdita di memoria. Se si dovessero vericare
malfunzionamenti, togliere le batterie e inserirle nuovamente.
Nota importante: tutti i le saranno persi al momento della sostituzione
delle batterie. Controllare di aver trasferito i le al PC prima di cambiare le
batterie.
INSTALLARE IL SOFTWARE E I DRIVER DELLA MACCHINA FOTOGRAFICA
Seguire queste istruzioni per installare i software “PhoTags Express” e “Webcam
Express” e il driver della macchina fotograca su computer.
1. Inserire il CD contenente il Software
(in dotazione) nel drive CD-ROM. Il CD
è autoinstallante e compare il menu di
installazione.
Cliccare su “Install AP” (Installa AP) sul
menu “Digital Camera Install Menu” (Menu
installazione macchina
fotograca digitale) e selezionare una
lingua dall’elenco a tendina.
Cliccare su “Install PhoTags Express” e seguire le istruzioni per installare
“PhoTags Express” e “WebCam Express”. I software “PhoTags Express” e
“WebCam Express” offrono molte applicazioni per la modica e la stampa delle
foto. Quando l’installazione è completa, compare una nestra di conferma.
Togliere il segno di spunta dall’opzione “Start the application” (avvia l’applicazione)
e cliccare sul pulsante “Finish” (termina) per chiudere la nestra e tornare al menu
installazione. Ora potete installare il driver della macchina fotograca.
25
ITALIANO
Page 26

27
2. Cliccare su “Install Driver” (installa driver)
poi seguire le istruzioni per installare il driver
della macchina fotograca.
3. Occorre riavviare il computer dopo
l’installazione del driver. Il driver “Dual Mode
Camera” vi consente di usare la macchina
fotograca digitale come webcam.
Note:
• Se il CD non si avvia automaticamente,
cliccare su “Start”, “Esegui”, quindi scrivere
“D:\autorun.exe” nella nestra di dialogo Esegui (dove D:\ rappresenta il drive CDROM) e premere Invio.
• Dovete installare il driver prima di scaricare foto /video dalla macchina fotograca
o prima di usarla come webcam.
• Vericare che la macchina fotograca non sia collegata al computer prima di
installare il driver e il software.
• Quando si lancia il software “PhoTags Express” per la prima volta, compare sullo
schermo una nestra per la registrazione del programma, saltare la procedura di
registrazione e o bloccate la visualizzazione di questa nestra.
ACCENDERE E SPEGNERE LA MACCHINA FOTOGRAFICA
Premere il pulsante di accensione (8) per circa 3 secondi per accendere
la macchina fotograca. La macchina fotograca emetterà un beep per
confermare che è pronta per l’uso.
Tenere premuto il pulsante di accensione (8) per circa 3 secondi per
spegnerla.
Nota: La macchina fotograca si spegne automaticamente dopo 60 secondi
di inattività.
ITALIANO
SELEZIONARE LA RISOLUZIONE DELLE FOTO
Ci sono 2 modalità di risoluzione:
Risoluzione alta: la macchina fotograca può memorizzare circa
48 foto in questa modalità.
Risoluzione bassa: la macchina fotograca può memorizzare circa
186 foto in questa modalità.
1. Premere il pulsante Menu (8) tre volte per cambiare le impostazioni di
risoluzione sulla macchina fotograca.
2. Premere il pulsante Otturatore (1) una volta entro 3 secondi per selezionare la
risoluzione e confermare la scelta.
3. Ripetere i passaggi 1 e 2 per modicare la risoluzione.
FUNZIONE FLASH
Accendere la macchina fotograca.
26
Page 27

A Flash Automatico
1. Premere il pulsante Menu (8) no a che compare l’icona A icon nell’angolo
inferiore sinistro dello schermo LCD. Premere il pulsante Otturatore (1) entro
3 secondi per confermare e attivare il ash automatico.
Flash acceso
2. Premere il pulsante Menu (8) no a che compare l’icona nell’angolo inferiore
sinistro dello schermo LCD. Premere il pulsante Otturatore (1) entro 3 secondi
per confermare e attivare il ash.
Flash spento
3. Premere il pulsante Menu (8) no a che compare l’icona nell’angolo
inferiore sinistro dello schermo LCD. Premere il pulsante Otturatore (1) entro
3 secondi per confermare e spegnere il ash.
SCATTARE FOTOGRAFIE
Accendere la macchina. In modalità Macchina Fotograca, premere il
pulsante Otturatore (1) per scattare una foto. La macchina fotograca
emetterà un beep per confermare che la foto è stata scattate. Il numero di
foto che si possono ancora memorizzare compare sullo schermo LCD.
Nota: Quando la memoria della macchina fotograca è piena, se si cerca
di scattare una foto, sullo schermo LCD compare “00” e la macchina
fotograca emette due beep.
MODALITÀ PLAYBACK
1. Accendere la macchina. Premere il pulsante playback (9) per accedere alla
modalità playback.
2. La macchina fotograca mostrerà automaticamente le foto memorizzate in
formato slide show. Premere il pulsante Su (10) o Giù (11) per uscire dallo
slide show.
Nota: La macchina fotograca lancia lo slide show solo se ci sono almeno 2 foto
memorizzate nella macchina fotograca.
3. Premere il pulsante Su (10) o Giù (11) per scorrere manualmente le foto.
ITALIANO
BORRADO DE ARCHIVOS
1. Accendere la macchina.
2. In modalità Macchina Fotograca:
Cancellare l’ultima foto scattata
Premere il pulsante Menu (8) due volte; compare l’icona sul display LCD.
Premere il pulsante Otturatore (1) entro 3 secondi per cancellare l’ultima foto
scattata.
27
Page 28

29
Cancellare tutti i le
Premere il pulsante Menu (8) una volta; compare l’icona sul display LCD.
Premere il pulsante Otturatore (1), sul display LCD lampeggia il numero di foto
che si possono ancora memorizzare.
Premere di nuovo il pulsante Otturatore (1) entro 3 secondi per cancellare
tutte le foto memorizzate nella macchina fotograca.
3. In modalità playback:
Cancellare l’ultima foto scattata
Premere il pulsante Su (10) o Giù (11) per uscire dallo slide show.
Premere il pulsante Otturatore (1); si sente un « beep » continuo.
Premere di nuovo il pulsante Otturatore (1) per cancellare l’ultima foto
scattata.
SCARICARE LE FOTO
1. Conecta la cámara a tu ordenador utilizando el cable USB que se
suministra. Oirás un pequeño pitido y la pantalla LCD se encenderá
cuando la cámara se conecte con tu PC.
2. Pulsa dos veces sobre el icono de PhoTags Express que se muestra
en el escritorio del PC para hacer que se ejecute el programa PhoTags
Express.
3. Pulsa en el botón “Get Photos” del menú principal.
4. Selecciona el controlador “ Dual Mode Camera ” de la lista de dispositivos
y sigue las instrucciones para transferir tus fotografías al ordenador.
MODALITÀ WEB CAM
Collegata al PC, la macchina fotograca può essere utilizzata anche come
ITALIANO
webcam.
Modalità Webcam
1. Collegare la macchina fotograca al computer con il cavo USB.
2. In “My Computer”, fare doppio click su un nuovo drive chiamato “ Dual Mode
Camera ”. Si entra in modalità webcam.
Messaggi immediati (chat)
Potete utilizzare la macchina fotograca come webcam con un client per
messaggi immediati (Yahoo Messenger, MSN Messenger, Skype…).
Ad es.: con Yahoo Messenger
1. Collegare la macchina fotograca al computer con il cavo USB.
2. Avviare Yahoo messenger.
3. Selezionare l’elenco degli « Strumenti » sulla barra in alto. Andare al menu a
tendina e selezionare una voce per « Avvia Webcam ».
4. Si vedrà compare una nestra con la propria immagine. Ora le persone che
conoscono il vostro contatto in Yahoo vi potranno anche vedere.
28
Page 29

FRONTALINI INTERCAMBIABILI
Fare riferimento alla gura D.
La macchina fotograca digitale viene fornita con 2 frontalini intercambiabili.
Per togliere e inserire un frontalino, utilizzare uno strumento appuntito per
sganciare il frontalino su ciascun angolo della macchina. Agganciare un
nuovo frontalino.
MANUTENZIONE
Utilizzare solo un panno morbido leggermente umido per pulire l’unità. Non
utilizzare detergenti. Non esporre l’unità a luce diretta del sole o ad altre fonti
di calore. Non immergere l’unità in acqua. Non smontarla né farla cadere.
Non tentare di piegare o deformare l’unità.
GARANZIA
NOTA: Conservare il manuale di istruzioni, contiene informazioni importanti.
Questo prodotto è coperto dalla nostra garanzia di due anni. Per usufruire della
garanzia e del servizio post-vendita, contattare il rivenditore e fornire lo scontrino
relativo all’acquisto. La garanzia copre difetti legati ai componenti e al montaggio,
tranne l’usura causata dalla mancata osservanza delle istruzioni d’uso o eventuali
interventi non autorizzati sull’apparecchiatura (quali smontaggio, esposizione a
calore o umidità, ecc.).
Riferimento: DJ025series
Lexibook Italia S.r.l,
Via Eustachi, 45,
20129 Milano, Italia.
Servizio consumatori : 022040 4959 (Prezzo di una chiamata locale).
http://www.lexibook.com
©2009 LEXIBOOK®
ITALIANO
Questo prodotto non è un giocattolo.
Protezione Ambientale
Gli elettrodomestici da smaltire possono essere riciclati e non devono essere gettati con i normali riuti domestici! Sostenete attivamente la conservazione delle risorse e contribuite alla protezione dell’ambiente portando questa apparecchiatura
presso un centro di raccolta (se disponibile).
Progettato in Europa – Fabbricato in Cina
29
Page 30

31
LERNE DEINE KAMERA KENNEN
Bitte siehe hierzu die Abbildungen A & B.
1. Auslöser / Taste zum Einstellen
2. Optischer Bildsucher
3. Blitz
4. Öse für das Halteband
5. Kameralinse
6. Frontabdeckung
7. LED
8. Ein-/ Aus-Taste/Menü-Taste
9. Wiedergabemodus-/
Kameramodus-Taste
10. Aufwärts-Taste
11. Abwärts-Taste
12. Batteriefach
13. LCD-Anzeige
14. USB-Anschlussbuchse
NEUE BATTERIEN EINLEGEN
Bitte siehe hierzu Abbildung C.
1. Stelle sicher, dass die Kamera ausgeschaltet ist.
2. Öffne das Batteriefach auf der Rückseite des Geräts.
3. Beachte die Polarität der Batterien (+/- Zeichen) im Batteriefach.
4. Lege 3 neue AAA 1,5 V Batterien ein (nicht mitgeliefert). Setze die
Batteriefachabdeckung wieder ein und schließe das Batteriefach.
Warnung: Starke Frequenzstörungen oder elektrostatische Entladungen
können Fehlfunktionen oder Speicherverlust verursachen. Sollte die Kamera
nicht ordnungsgemäß funktionieren, entfernen Sie die Batterien und legen
Sie die Batterien wieder ein.
Wichtiger Hinweis: Wenn du die Batterien auswechselst, verlierst du alle
Dateien. Stelle sicher, dass du alle Dateien auf deinen PC überträgst, bevor
du die Batterien auswechselst.
SOFTWARE UND KAMERATREIBER INSTALLIEREN
Folgen Sie diesen Anleitungen, um die „PhoTags Express“ und „Webcam
Express“ Software und den Kameratreiber auf Ihrem Computersystem zu
installieren.
DEUTSCH
1. Legen Sie die Software-CD (mitgeliefert)
in Ihr CD-ROM-Laufwerk. Die CD startet
automatisch und das Installationsmenü
erscheint.
Klicken Sie auf „Install AP [AP installieren]“ in dem Fenster „Digital Camera
Install Menu [Digitalkamera
Installationsmenü]“ und wählen Sie eine Sprache aus der Aufklappliste.
30
Page 31

Klicken Sie auf „PhoTags Express
installieren“ und folgen Sie den
Anleitungen, um „PhoTags Express“
und „WebCam Express“ zu installieren.
Die „PhoTags Express“ und „WebCam
Express“ Softwares bieten zahlreiche
Anwendungen zum Bearbeiten und
Drucken von Fotos. Wenn die Installation abgeschlossen ist, erscheint ein
Bestätigungsfenster. Entfernen Sie das
Häkchen von der Option „Anwendung starten“ und klicken Sie auf die Schaltäche „ Fertigstellen“, um das Fenster zu schließen und zum Installationsmenü zurückzukehren. Sie können jetzt den Kameratreiber installieren.
2. Klicken Sie auf „Treiber installieren“ und folgen Sie anschließend den
Anleitungen, um den Kameratreiber zu installieren.
3. Sie müssen Ihren Computer nach der Treiberinstallation neu starten. Der
„Dual Mode Camera“ Treiber ermöglicht Ihnen, Ihre Digitalkamera auch als
Webcam zu nutzen.
Hinweis:
• Falls die CD nicht automatisch startet, klicken Sie „Start“, „Ausführen“.
Tippen Sie „D:\autorun.exe“ in das Ausführen-Dialogfenster (wobei D:\ für Ihr
CD-ROM-Laufwerk steht) und drücken Sie Eingabe.
• Sie müssen den Treiber installieren, bevor Sie Bilder/Videos von der Kamera herunterladen oder die Kamera als Webcam verwenden.
• Stellen Sie sicher, dass die Kamera nicht mit Ihrem Computer verbunden
wird, bevor Sie den Treiber und die Software installieren.
• Wenn Sie die „PhoTags Express“ Software das erste Mal starten, erscheint
auf dem Bildschirm ein Anmeldungsdialogfeld. Sie können sich aussuchen,
ob Sie das Programm anmelden, den Anmeldungsprozess überspringen
oder die erneute Anzeige des Dialogfeldes in Zukunft vermeiden möchten.
KAMERA EIN - UND AUSSCHALTEN
Drücke die Ein-/Aus-Taste (8) für etwa 3 Sekunden, um die Kamera einzuschalten. Wenn du einen Piepton hörst, ist die Kamera zur Benutzung bereit.
Halte die Ein-/Aus-Taste (8) erneut für etwa 3 Sekunden heruntergedrückt,
um die Kamera auszuschalten.
Hinweis: Die Kamera stellt sich automatisch aus, wenn sie für 60 Sekunden
inaktiv ist.
FOTOAUFLÖSUNG AUSWÄHLEN
Es gibt zwei Auösungsmodi:
Hohe Auösung: Die Kamera kann in diesem Modus ungefähr
48 Bilder speichern.
Niedrige Auösung: Die Kamera kann in diesem Modus ungefähr
186 Bilder speichern.
31
DEUTSCH
Page 32

33
1. Drücke dreimal die Menü-Taste (8), um die Auösungseinstellung deiner
Kamera zu ändern.
2. Drücke einmal innerhalb von 3 Sekunden den Auslöser (1), um die
Auösung auszuwählen und deine Auswahl zu bestätigen.
3. Wiederhole Schritt 1 und 2, um die Auösung zu verändern.
BLITZFUNKTION
Schalte die Kamera ein.
A Automatischer Blitz
1. Drücke die Menü-Taste (8), bis das A Symbol in der unteren linken Ecke
der LCD-Anzeige erscheint. Drücke den Auslöser (1) innerhalb von
3 Sekunden, um zu bestätigen und den automatischen Blitz zu aktivieren.
Blitz ein
2. Drücke die Menü-Taste (8), bis das Symbol in der unteren linken Ecke
der LCD-Anzeige erscheint. Drücke den Auslöser (1) innerhalb von
3 Sekunden, um zu bestätigen und den Blitz einzuschalten.
Blitz aus
3. Drücke die Menü-Taste (8), bis das Symbol in der unteren linken
Ecke der LCD-Anzeige erscheint. Drücke den Auslöser (1) innerhalb von
3 Sekunden, um zu bestätigen und den Blitz auszuschalten.
FOTOGRAFIEREN
Schalte das Gerät ein. Drücke den Auslöser (1) im Kameramodus, um ein
Foto zu machen. Die Kamera piept einmal zur Bestätigung, dass ein Bild
gemacht wurde. Die Anzahl der Bilder, die du noch im Speicher machen
kannst, wird auf der LCD-Anzeige gezeigt.
Hinweis: Wenn du versuchst ein Foto zu machen und der Speicher der
Kamera ist voll, zeigt die LCD-Anzeige “00” an und die Kamera piept
zweimal.
WIEDERGABEMODUS
DEUTSCH
1. Schalte die Kamera ein. Drücke die Wiedergabe-Taste (9), um in den
Wiedergabemodus zu gelangen.
2. Die Kamera zeigt automatisch die gegenwärtig gespeicherten Fotos im
Diashow-Format. Drücke die Aufwärts-Taste (10) oder die Abwärts-Taste (11),
um die Diawshow zu beenden.
Hinweis: Die Kamera startet die Diashow nur, wenn mindestens 2 Fotos im
Speicher deiner Kamera sind.
3. Drücke die Aufwärts-Taste (10) oder Abwärts-Taste (11), um manuell durch
deine Fotos zu browsen.
DATEIEN LÖSCHEN
1. Schalte die Kamera ein.
32
Page 33

2. Im Kameramodus:
Lösche das zuletzt aufgenommene Foto
Drücke die Menü-Taste (8) zweimal; das Symbol erscheint auf der
LCD-Anzeige. Drücke den Auslöser (1) innerhalb von 3 Sekunden, um das
zuletzt aufgenommene Bild zu löschen.
Alle Dateien löschen
Drücke die Menü-Taste (8) einmal; das Symbol erscheint auf der
LCD-Anzeige. Drücke den Auslöser (1); die Anzahl der Bilder, die du noch im
Speicher machen kannst, blinkt auf der LCD-Anzeige.
Drücke den Auslöser (1) erneut innerhalb von 3 Sekunden, um alle in der
Kamera gespeicherten Bilder zu löschen.
3. Im Wiedergabemodus:
Lösche das zuletzt aufgenommene Foto
Drücke die Aufwärts-Taste (10) oder Abwärts-Taste (11), um die Diashow zu
beenden.
Drücke den Auslöser (1); du hörst einen andauernden « Piep » Ton.
Drücke den Auslöser (1) noch einmal, um das zuletzt aufgenommene Bild zu
löschen.
LADE DEINE FOTOS HERUNTER
1. Verbinde die Kamera mit deinem Computer mit Hilfe des mitgelieferten
USB-Kabels. Du hörst einen kurzen Piepton und die LCD-Anzeige
schaltet sich ein, sobald die Kamera mit deinem PC verbunden ist.
2. Doppelklicke auf das PhoTags Express Symbol, das auf der
Arbeitsoberäche deines PCs erscheint, um das PhoTags Express
Programm zu starten.
3. Klicke auf die “Get Photos“ Schaltäche im Hauptmenü.
4. Wähle den “ Dual Mode Camera ” Treiber von der Liste der Vorrichtungen
und folge den Anleitungen, um deine Fotos herunterzuladen.
WEBCAM-MODUS
An deinen Computer angeschlossen kann deine Kamera als Webcam
benutzt werden.
Webcam-Modus
1. Schließe die Kamera mit Hilfe des USB-Kabels an deinen Computer an.
2. Doppelklicke unter “Arbeitsplatz” auf einen neuen Treiber mit dem
Namen “ Dual Mode Camera ”. Du bist nun im Webcam-Modus.
Instant Messaging (chatten)
Du kannst deine Kamera als Webcam mit deinem Instant Messaging
Programm benutzen (Yahoo Messenger, MSN Messenger, Skype…).
Bsp.: Yahoo Messenger benutzen
1. Schließe die Kamera mit Hilfe des USB-Kabels an deinen Computer an.
33
DEUTSCH
Page 34

2. Starte Yahoo Messenger.
3. Wähle die « Werkzeuge » Auistung oben in der Symbolleiste. Wähle im
Rollmenü die Auistung « Meine Webcam starten».
4. Du siehst ein Fenster mit deinem Bild erscheinen. Leute, die deinen
Yahoo-Anmeldenamen haben, können dich nun sehen.
AUSTAUSCHBARE FRONTABDECKUNG
Bitte siehe hierzu Abbildung D.
Deine Digitalkamera wird mit zwei austauschbaren Frontabdeckungen
geliefert. Um eine Abdeckung zu entfernen und eine andere einzusetzen,
verwende einen spitzen Gegenstand, um die Abdeckung an jeder Ecke der
Kamera zu lösen. Setze eine neue Abdeckung ein.
PFLEGE
Reinige das Gerät nur mit einem weichen, leicht feuchten Tuch. Verwende
kein Reinigungsmittel. Setze das Gerät nicht direktem Sonnenlicht oder
anderen Hitzequellen aus. Tauche das Gerät nicht ins Wasser. Nimm das
Gerät nicht auseinander oder lasse es fallen. Versuche nicht, das Gerät zu
verbiegen.
GARANTIE
HINWEIS: Bitte bewahren Sie diese Bedienungsanleitung auf; sie enthält wichtige
Informationen. Dieses Produkt ist mit zwei Jahren Garantie versehen. Um die
Garantie oder den Kundendienst zu nutzen, wenden Sie sich bitte an Ihren
Händler und legen Sie den Kaufbeleg vor. Unsere Garantie deckt Material- oder
Herstellungsmängel, die dem Erzeuger zu zuschreiben sind, ab. Davon
ausgenommen ist Verschleiß, der aus der Nichtbeachtung der Bedienungsanleitung
oder jedweder unberechtigter Arbeit am Gerät resultiert (z.B. Auseinanderbauen,
das Gerät Hitze oder Feuchtigkeit aussetzen, usw.).
Referenz: DJ025series
Lexibook Deutschland - Service-Hotline
Tel. 01805 010931(0,14 Euro/Minute)
DEUTSCH
E-Mail: savcomfr@lexibook.com
http://www.lexibook.com
©2009 LEXIBOOK®
Dieses Produkt ist kein Spielzeug.
Umweltschutz
Unerwünschte elektrische Geräte können recycelt werden und sollten nicht mit dem normalen Hausmüll entsorgt werden!
Bitte unterstützen Sie aktiv die Erhaltung natürlicher Ressourcen und helfen Sie, unsere Umwelt zu schützen, indem Sie
dieses Gerät bei einer Sammelstelle entsorgen (sofern vorhanden).
Entwickelt in Europa – hergestellt in China.
34
Page 35

UW CAMERA LEREN KENNEN
Zie afbeeldingen A & B.
1. Sluiter/Insteltoets
2. Optische zoeker
3. Flits
4.Sluitklep
5. Cameralens
6. Venster
7. LED
8. Power/Menuknop
9. Playbackmodus/Knop
Cameramodus
10. Omhoogknop
11. Omlaagknop
12. Batterijcompartiment
13. LCD-scherm
14.USB-poort
NIEUWE BATTERIJEN INSTEKEN
Zie afbeelding C.
1. Zorg ervoor dat het fototoestel uitgeschakeld is.
2. Open het batterijcompartiment dat zich bevindt op de achterkant van het
toestel.
3. Let op de polariteit van de batterijen (+/- tekens) in het batterijcompartiment.
4. Steek 3 nieuwe AAA 1,5 V batterijen in (niet inbegrepen). Vervang en
sluit het batterijdeksel.
Waarschuwing: Er kan een storing of geheugenverlies veroorzaakt worden
door een sterke frequentiestoring of elektrostatische ontlading. Mocht er een
abnormale functie optreden, haal de batterijen dan uit en plaats ze opnieuw.
Belangrijke opmerking: alle bestanden gaan verloren als u de batterijen
vervangt. Zorg er dus voor dat u uw bestanden overzet op uw pc alvorens de
batterije te vervangen.
DE SOFTWARE EN CAMERA DRIVER INSTALLEREN
Volg deze instructies en installeer de “PhoTags Express” en “Webcam
Express” software en de camera driver op uw computersysteem.
1. Steek de CD Software (inbegrepen) in
uw CD-ROM drive. De CD zal automatisch
uitgevoerd worden en het installatiemenu zal
verschijnen.
Klik op “Install AP” (AP installeren) in het
“Digital Camera Install Menu”
(Installatiemenu Digitale Camera) venster en
kies een taal uit de uitklaplijst.
Klik op “Install PhoTags Express” (PhoTags Express installeren) en volg de
instructies om “PhoTags Express”
en “WebCam Express” te installeren. “PhoTags Express” en “WebCam
Express” software bieden vele toepassingen voor fotobewerking en afdrukken.
Als de installatie voltooid is, zal er een bevestigingsscherm weergegeven
worden. Vink het hokje van “Start the application” (Start de toepassing) optie
35
NEDERLANDS
Page 36

37
uit en klik op de “Finish” (Voltooien) knop om
het venster te sluiten en terug te gaan naar
het installatiemenu. Nu kunt u de camera
driver installeren.
2. Klik op “Install Driver” (Driver installeren),
en volg vervolgens de instructies om de
camera driver te installeren.
3. U zult uw computer opnieuw moeten
opstarten na de installatie van de driver.
Door de “Dual Mode Camera” driver kunt u
uw digitale camera gebruiken als een webcam.
Opmerking:
• Als de CD niet automatisch uitgevoerd wordt, klik dan op “Start”, “Run”
(Uitvoeren), en vervolgens tikt u “D:\autorun.exe” in, in het Run (Uitvoeren)
dialoogvenster (waar D:\ uw CD-ROM drive is) en druk op Enter.
• U moet de driver installeren alvorens foto’s/video’s te downloaden of het
toestel als een webcam te gebruiken.
• Zorg ervoor dat de camera niet aangesloten is op uw computer alvorens de
driver en de software te installeren.
• Als u de “PhoTags Express” software de eerste keer opstart, zal er een registratievenster op het scherm verschijnen. U kunt kiezen om het programma
te registeren, het registratieproces over te slaan of om het dialoo gvenster niet
meer weer te geven.
DE CAMERA IN- EN UITSCHAKELEN
Druk ongeveer 3 seconden op de Powerknop (8) om de camera in te
schakelen. De camera laat een biep horen om te bevestigen dat hij klaar is
voor gebruik.
Druk en houd de Powerknop (8) ongeveer 3 seconden ingedrukt om hem uit
te schakelen.
Opmerking: De camera wordt automatisch uitgeschakeld na 60 seconden
van inactiviteit.
DE FOTORESOLUTIE SELECTEREN
Er zijn 2 resolutiemodi:
Hoge resolutie: de camera kan ongeveer 48 foto’s opslaan in deze
modus.
Lage resolutie: de camera kan ongeveer 186 foto’s opslaan in deze
NEDERLANDS
modus.
1. Druk driemaal op de Menuknop (8) om de resolutie-instelling op uw
camera te veranderen.
2. Druk eenmaal binnen de drie seconden op de Sluiterknop (1) om de
resolutie te selecteren en uw keuze te bevestigen.
3. Herhaal stappen 1 en 2 om de resolutie te wijzigen.
36
Page 37

FLITSFUNCTIE
De camera aanschakelen.
A Autoits
1. Druk op de Menuknop (8) tot het A icoon onderaan in de linkerhoek van
het LCD-scherm verschijnt. Druk binnen de drie seconden op de
Sluiterknop (1) om de autoits te bevestigen en te activeren.
Flits aan
2. Druk op de Menuknop (8) totdat het icoon onderaan in de linkerhoek
van het LCD-scherm verschijnt. Druk binnen de drie seconden op de
Sluiterknop (1) om de its te bevestigen en aan te schakelen.
Flits uit
3. Druk op de Menuknop (8) totdat het icoon onderaan in de linkerhoek
van het LCD-scherm verschijnt. Druk binnen de 3 seconden op de
Sluiterknop (1) om te bevestigen en de its uit te schakelen.
FOTO’S NEMEN
Schakel het toestel aan. Druk op de Sluiterknop (1) in Cameramodus om
een foto te nemen. De camera zal eenmaal biepen om te bevestigen dat
er een foto genomen is. Het aantal foto’s die nog kunnen bewaard worden,
wordt weergegeven op het LCD-scherm.
Opmerking: Als het camerageheugen vol is en u een foto probeert te
nemen, zal het LCD-scherm “00” weergeven en zal de camera tweemaal
biepen.
PLAYBACK MODUS
1. Schakel de camera aan. Druk op de playbackknop (9) om de playbackmodus
te starten.
2. De camera zal automatisch de huidig opgeslagen foto’s weergeven in
diavoorstellingformaat. Druk op de Omhoogknop (10) of Omlaagknop (11) om
de diavoorstelling te verlaten.
Opmerking: de camera zal enkel de diavoorstelling starten als er 2 of meer
foto’s opgeslagen zijn in uw camerageheugen.
3. Druk op de omhoogknop (10) of de omlaagknop(11) om manueel te bladeren
door uw foto’s.
37
NEDERLANDS
Page 38

39
BESTANDEN VERWIJDEREN
1. Schakel de camera aan.
2. In Cameramodus:
Verwijder de laatst genomen foto
Druk tweemaal op de Menuknop (8); het icoon zal op het LCD-scherm
verschijnen. Druk binnen de 3 seconden op de Sluiterknop (1) om de laatst
genomen foto te verwijderen.
Alle bestanden verwijderen
Druk eenmaal op de Menuknop (8); het icoon zal op het LCD-scherm
verschijnen. Druk op de Sluiterknop (1), het aantal foto’s die nog in het
geheugen kan opgenomen worden, zal op het LCD-scherm oplichten.
Druk opnieuw binnen 3 seconden op de Sluiterknop (1) om alle opgeslagen
foto’s in de camera te verwijderen.
3. In playbackmodus:
Verwijder de laast genomen foto
Druk op de omhoogknop (10) of de omlaagknop (11) om de diavoorstelling te
verlaten.
Druk op de Sluiterknop (1); u zult een ononderbroken “biepgeluid’ horen.
Druk nogmaals op de Sluiterknop (1) om de laatst genomen foto te verwijderen.
UW FOTO’S DOWNLOADEN
1. Sluit de camera aan op uw computer via de meegeleverde USB-kabel.
U zult een licht biepgeluid horen en het LCD-scherm zal oplichten van
zodra de camera aangesloten is op uw pc.
2. Dubbelklik op het PhoTags Express icoon dat op uw computer verschijnt
om het PhoTags Express programma te starten.
3. Klik op ‘Get Photos’ in het Hoofdmenu.
4. Selecteer de “ Dual Mode Camera ” driver uit de lijst van toestellen en
volg de instructies om uw foto’s te downloaden.
PC CAM MODUS
Uw camera kan gebruikt worden als een webcam als hij aangesloten is op
uw pc.
Webcam modus
1. Sluit de camera aan op uw computer via de USB-kabel.
2. Dubbelklik in “Mijn Computer” op een nieuwe drive, “ Dual Mode Camera ”
NEDERLANDS
genoemd. U komt in de webcammodus terecht.
38
Page 39

Instant messaging (chat)
U kunt uw camera als een webcam gebruiken met uw instant messaging
client (Yahoo Messenger, MSN Messenger, Skype…).
Bijv. Bij gebruik van Yahoo Messenger
1. Sluit de camera aan op uw computer via de USB-kabel.
2. Start Yahoo messenger.
3. Selecteer de lijst met « Tools » bovenaan de toolbar. Ga naar het
uitklapmenu en selecteer de listing voor « Start mijn webcam ».
4. U zult een venster zien verschijnen met uzelf erin. Nu zullen mensen die
uw Yahoo loginnaam hebben, u kunnen zien.
VERWISSELBARE COVERS
Zie afbeelding D.
Er zitten 2 verwisselbare covers bij uw digitale camera. Om een cover te
verwijderen en in te steken, gebruikt u best iets scherps om de cover los te
maken aan elke hoek van de camera. Klik er een nieuwe cover in vast.
ONDERHOUD
Gebruik enkel een zachte, lichtjes vochtige doek om het toestel te reinigen.
Gebruik geen afwasmiddel. Stel het toestel niet bloot aan rechtstreeks
zonlicht of een andere warmtebron. Dompel het toestel niet onder in water.
Haal het toestel niet uit elkaar of laat het niet vallen. Probeer niet om het
toestel te verwringen of buigen.
GARANTIE
Opmerking: Gelieve deze handleiding te bewaren, het bevat belangrijke
informatie. Dit product is gedekt door onze garantie van 2 jaar. Om gebruik te
maken van de garantie of de dienst-na-verkoop, gelieve dan uw
detailhandelaar te contacteren en bewijs van aankoop voor te leggen. Onze
garantie dekt materiaal- of installatiegerelateerde defecten toe te schrijven aan de
fabrikant, met de uitzondering van slijtage te wijten aan het niet respecteren van
gebruiksinstructies of enig ander onbevoegd werk aan de uitrusting (zoals het uit
elkaar halen, blootstelling aan hitte of vochtigheid, enz.).
Referentie: DJ025series
http://www.lexibook.com
©2009 LEXIBOOK®
Dit product is geen speelgoed.
Milieubescherming
Ongewenste elektrische toestellen kunnen gerecycleerd worden en mogen niet weggegooid worden samen met het gewoon huishoudelijk afval! Gelieve de bescherming van hulpbronnen actief te steunen en het milieu te helpen beschermen
door dit apparaat terug te bezorgen aan een verzamelcentrum (indien beschikbaar).
DJ025seriesIM0169Ontworpen in Europa – Gemaakt in China
39
NEDERLANDS
Page 40

Page 41

City/V ille :
Averag e/Moy en
FRANC E
LEXIB OOK S.A,
Mon a vis compt e
91953 Courtabo euf Cedex
2, av enue de S candinavi e,
YOUR OPINION MATTERS / VOTRE AVIS COMPTE
produi ts en core meill eurs! Merc i de bien voulo ir re mplir ce c oupon en f rança is ou en an glais et d e nou s le retou rner à l’a dress e sui vante :
Help u s mak e pro ducts bett er th an ev er! P lease fill out the f ollow ing f orm i n Engl ish o r in Frenc h, an d ret urn i t to / Aid ez-no us à rendr e nos
Name a nd re feren ce of produ ct pu rchas ed / N om et réfé rence du pr oduit ache té :
First name/ Préno m : Last n ame/N om de famil le :
Addres s/Adr esse :
Zip co de/Co de Po stal : Country/Pays :
Store / Ens eigne :
Birth Date of th e user / Da te de nais sance de l’ utili sateur de c e pro duit : ____ /____ _/___ __
Date o f pur chase / Dat e de l’ach at : ____/_ ____/ _____
Phone /Télép hone : Email :
What i s you r ove rall impre ssion of t he pr oduct ? / V ous t rouve z le produi t glo balem ent :
Very satisfactory/Très satisfaisant Satisf actor y/Sat isfai sant
Please feel free to leave your comments here / Vous pouvez à présent utiliser l’espace suivant pour nous donner vos remarques :
Disapp ointi ng/Dé cevan t Very d isapp ointi ng/Tr ès dé cevan t
Conformément aux articles 34 et suivants de la loi « Informatique et Libertés » du 6 janvier 1978, vous disposez d'un droit d'accès, de modification,
de rectification et de suppression des données qui vous concernent. Vous pouvez l'exercer sur simple demande à notre adresse. Si vous ne souhaitez
pas que ces données soient utilisées à des fins de prospection commerciale, veuillez cocher ici :
Find a ll ou r new produ cts / Retr ouvez toute notr e act ualit é: htt p://w ww.le xibook .com
Page 42

FRANCE
91953 Courtaboeuf Cedex
2, avenue de Scandinavie,
Mon avis compte,
LEXIBOOK S.A,
Affranchir
ici
 Loading...