

Page 1
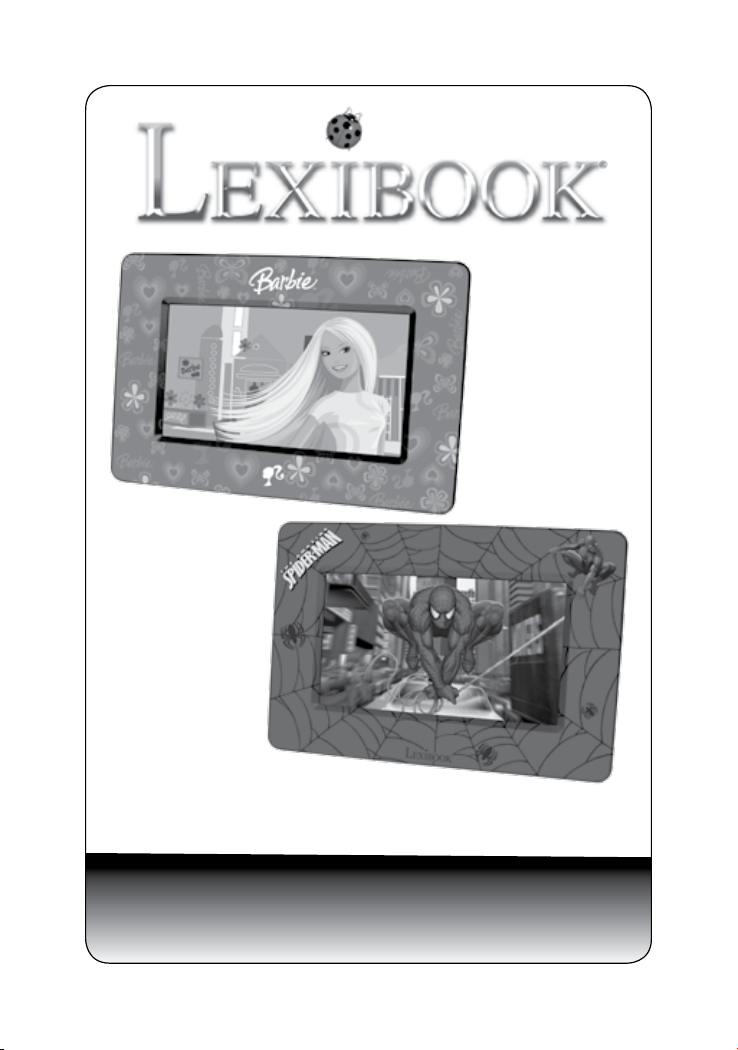
CADRE PHOTO NUMERIQUE
DIGITAL PHOTO FRAME
MODE D’EMPLOI – INSTRUCTION MANUAL
DF700 Series
Page 2
FR
FR
FR
GB
----------
----------
FRANÇAIS
ENGLISH
ES
PT
IT
DE
NL
----------
----------
----------
----------
----------
ESPAÑOL
PORTUGUÊS
ITALIANO
DEUTSCH
NEDERLANDS
2
Copyright © Lexibook 2008
Page 3
MESURES DE SÉCURITÉ
MISE EN GARDE
RISQUE D’´ELECTROCUTION
NE PAS OUVRIR
MISE EN GARDE : AFIN DE RÉDUIRE LES RISQUES D’ÉLECTROCUTION,
NE PAS ENLEVER LE COUVERCLE (NI L’ARRIÈRE). NE CONTIENT
AUCUNE PIÈCE POUVANT ÊTRE RÉPARÉE NI REMPLACÉE PAR
L’UTILISATEUR. CONFIER TOUTE RÉPARATION À UN TECHNICIEN
QUALIFIÉ.
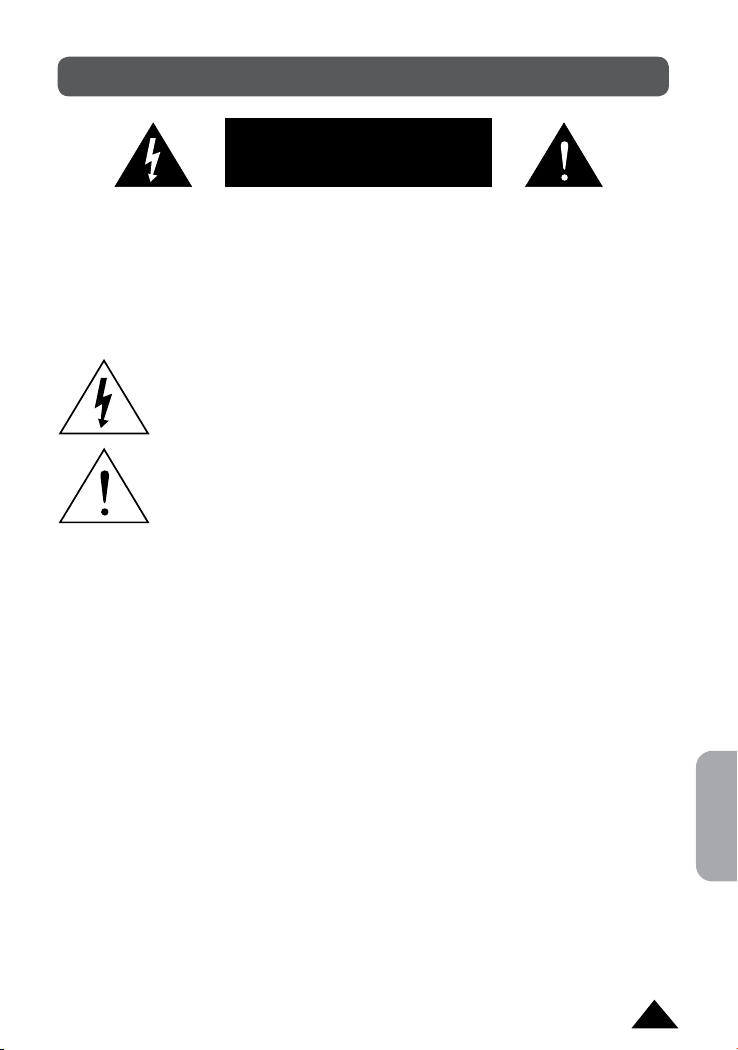
Les symboles au dos du produit signient :
TENSION DANGEREUSE :
Les symboles de l’éclair et de la pointe de èche dans un
triangle permettent d’alerter l’utilisateur de la présence de
‘tension dangereuse’ non isolée à l’intérieur de l’appareil, ce qui
constitue un risque d’électrocution.
ATTENTION :
Le point d’exclamation à l’intérieur du triangle permet d’alerter
l’utilisateur de la présence d’instructions d’opération et
d’entretien importantes accompagnant le produit.
AVERTISSEMENT:
• An de réduire tout risque d’incendie ou de choc électrique, n’exposez pas
cet appareil à la pluie ou à l’humidité.
• N’exposez pas le produit à des gouttes d’eau ou à des éclaboussures et ne
placez aucun objet rempli de liquide, tel un vase, sur l’appareil.
• La prise d’alimentation est utilisée comme système de déconnexion et doit
toujours être facilement accessible.
• An de déconnecter complètement l’appareil de l’électricité, la prise
d’alimentation doit être déconnectée de la prise électrique.
Français
Copyright © Lexibook 2008
3
Page 4

Français
INSTRUCTIONS RELATIVES À LA SÉCURITÉ
1. Lisez ces instructions.
2. Conservez ces instructions.
3. Suivez toutes les instructions.
4. Prenez en compte les avertissements.
5. N’utilisez pas cet appareil près de l’eau.
6. Nettoyez-le seulement avec un chiffon doux.
7. Ne bloquez aucune ouverture de ventilation. Procédez à l’installation selon
les instructions.
8. N’installez pas cet appareil près de sources de chaleur telles que plinthes
électriques, cuisinières, ou autres (même les amplicateurs).
9. Ne tentez pas d’outrepasser la mesure de sécurité de la che polarisée ou de
la prise de terre. Une che polarisée deux broches, dont l’une est plus large
que l’autre. Une che avec une prise de terre possède deux broches plates
et une troisième broche ronde pour la prise de terre. La broche plus large et
la troisième broche constituent des mesures de sécurité importantes visant à
vous protéger. Si vous ne parvenez pas à insérer complètement la prise dans
la prise électrique murale, contactez votre électricien pour remplacer la prise
murale obsolète.
10. Le câble d’alimentation doit être mis en place de sorte qu’on ne marche pas
dessus ou qu’il soit écrasé particulièrement à l’endroit de la prise, à l’endroit
où il est branché et à l’endroit d’où il sort de l’appareil.
11. Utilisez uniquement les pièces détachées/accessoires spéciés par le
fabricant.
12. Débranchez cet appareil durant les orages ou lorsqu’il n’est pas utilisé durant
une longue période.
13. Référez-vous à un personnel qualié pour toute réparation. Une réparation
sera nécessaire si l’appareil était endommagé d’une manière ou d’une autre,
si le câble d’alimentation ou la prise était endommagé(e), si un liquide s’est
déversé ou si des objets sont tombés dans l’appareil, si l’appareil a été
exposé à la pluie ou à l’humidité, ou s’il a subi une chute.
14. Ne surchargez pas la prise électrique. Utilisez uniquement la source
d’alimentation comme indiqué.
15. Utilisez les pièces de rechange spéciées par le fabricant.
16. Vous ne pouvez installer le produit au mur que si cela est recommandé par le
fabricant. Suivez les méthodes indiquées dans le guide d’utilisation.
17. Après toute révision ou réparation effectuée sur ce produit, demandez au
technicien de procéder à une vérication de sécurité.
4
Copyright © Lexibook 2008
Page 5
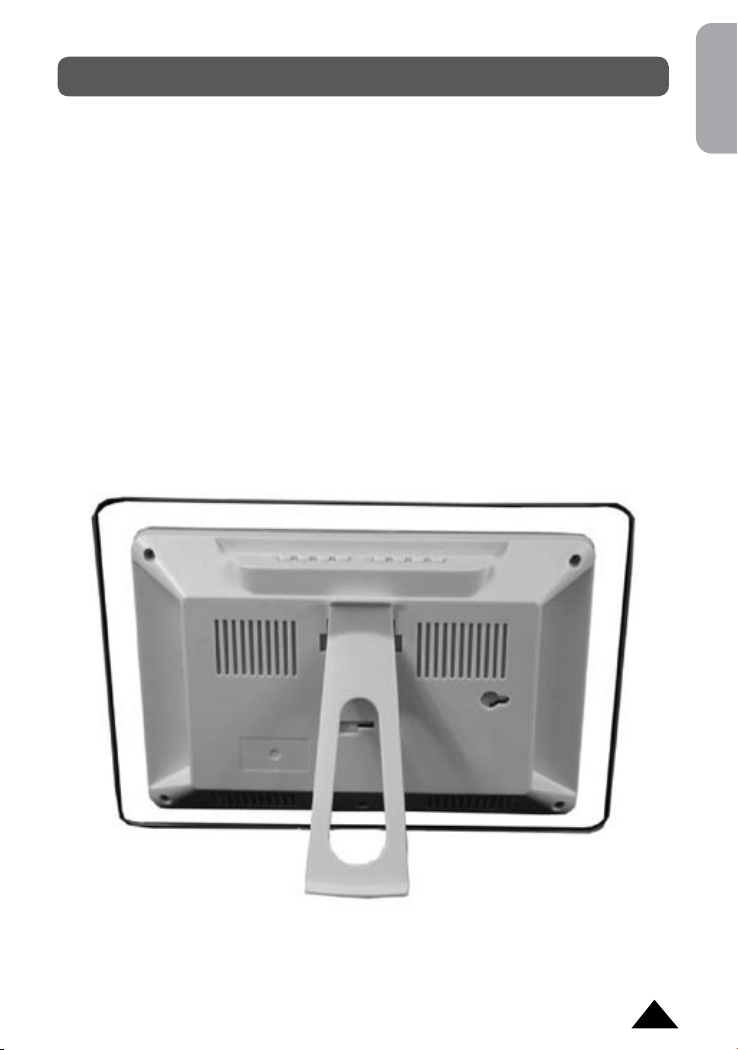
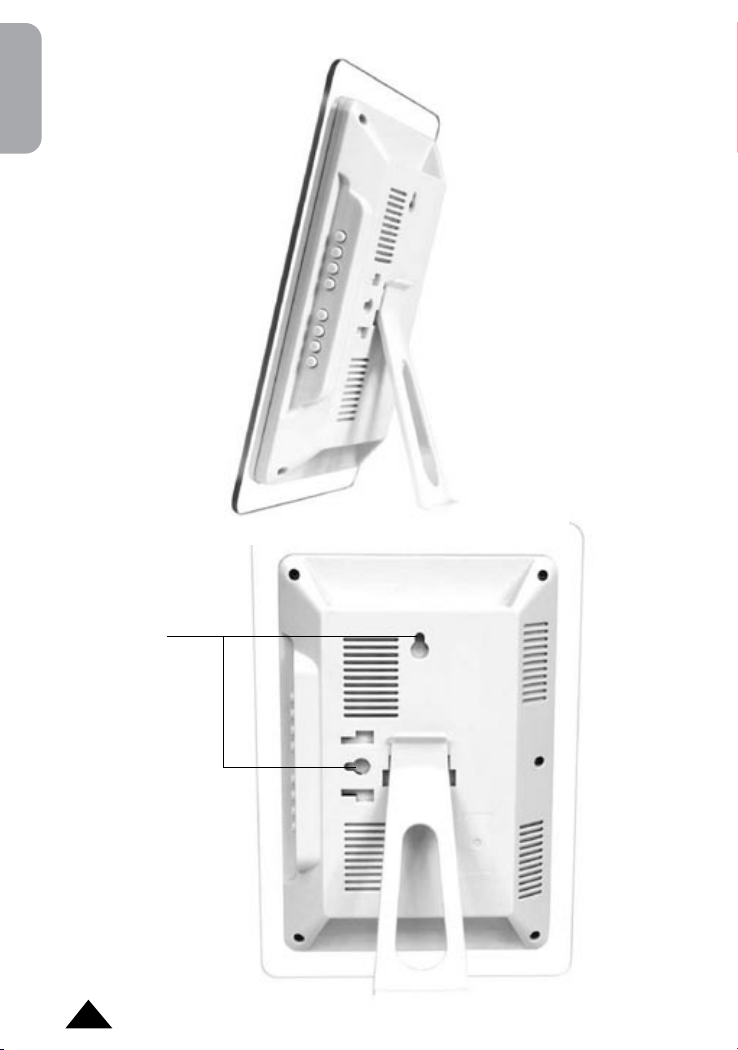
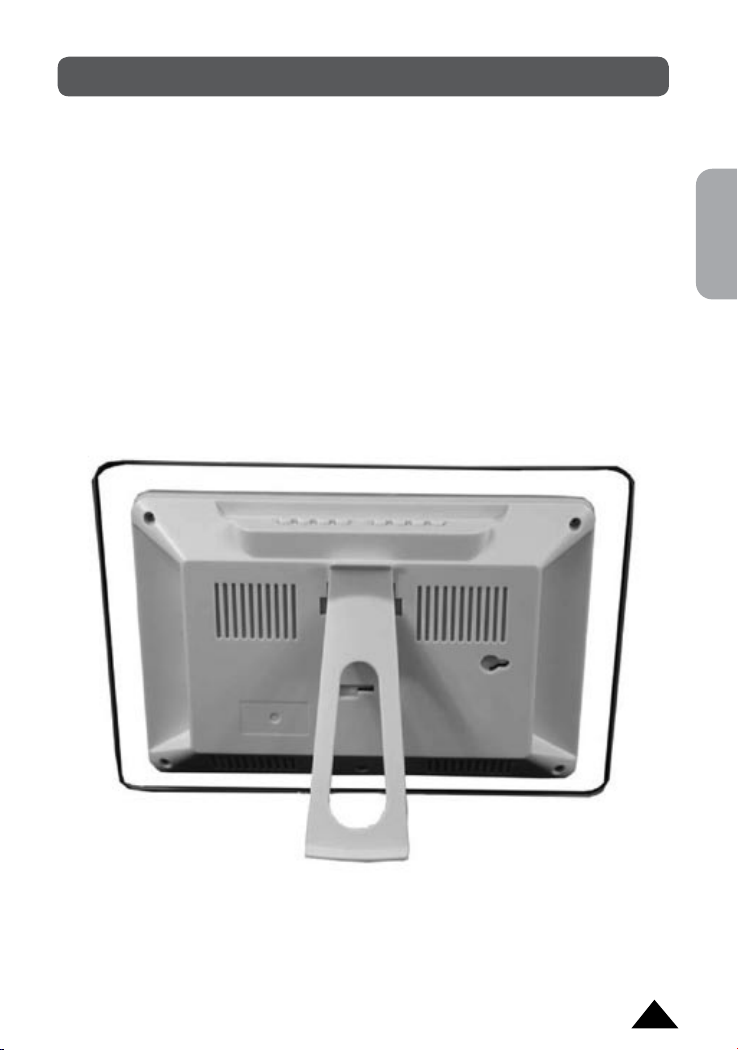
INSTALLATION
Déballage de l’appareil
Lors du déballage, assurez-vous que les pièces suivantes soient incluses :
1 cadre photo numérique
1 adaptateur secteur
1 support
1 mode d’emploi
AVERTISSEMENT: Tous les matériaux d’emballage, comme le scotch, les
feuilles en plastique, les celles et les étiquettes ne font pas partie du cadre
numérique et doivent être jetés.
Installation du support
Insérez le support dans l’un des deux emplacements prévus à cet effet à
l’arrière du cadre. Votre cadre photo numérique peut-être installé de trois
façons différentes:
En position « panorama » :
Français
Copyright © Lexibook 2008
5
Page 6
Français
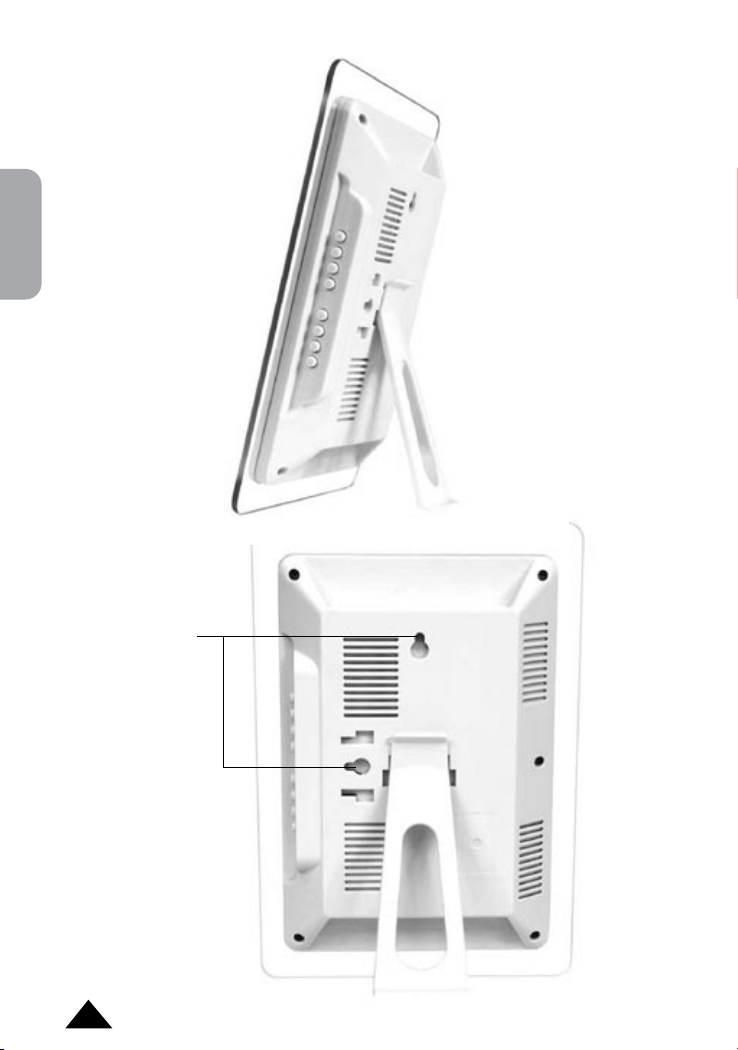
En position « portrait » :
Sur un mur :
Fixations
murales
6
Copyright © Lexibook 2008
Page 7
Installation de la carte SD/MMC
Pour visualiser vos photos, vous devez d’abord insérer une carte SD/MMC
dans le port correspondant situé sur le côté droit du cadre photo numérique.
Faîtes attention à bien insérer la carte dans le bon sens (indiqué sur la
plupart des cartes).
Connexion à l’alimentation
Branchez le cadre photo numérique à une prise de courant adaptée
(AC100V-240V/DC12V) en connectant l’adaptateur secteur fourni à l’entrée
secteur située sur le côté droit à l’arrière de l’appareil.
Note :
• Veuillez retirer la pellicule antistatique de l’écran LCD avant toute
utilisation.
• Eteignez le cadre photo numérique avant toute connexion.
• Si le produit présente un mauvais fonctionnement ou subit des décharges
électrostatiques, éteindre puis rallumer le produit.
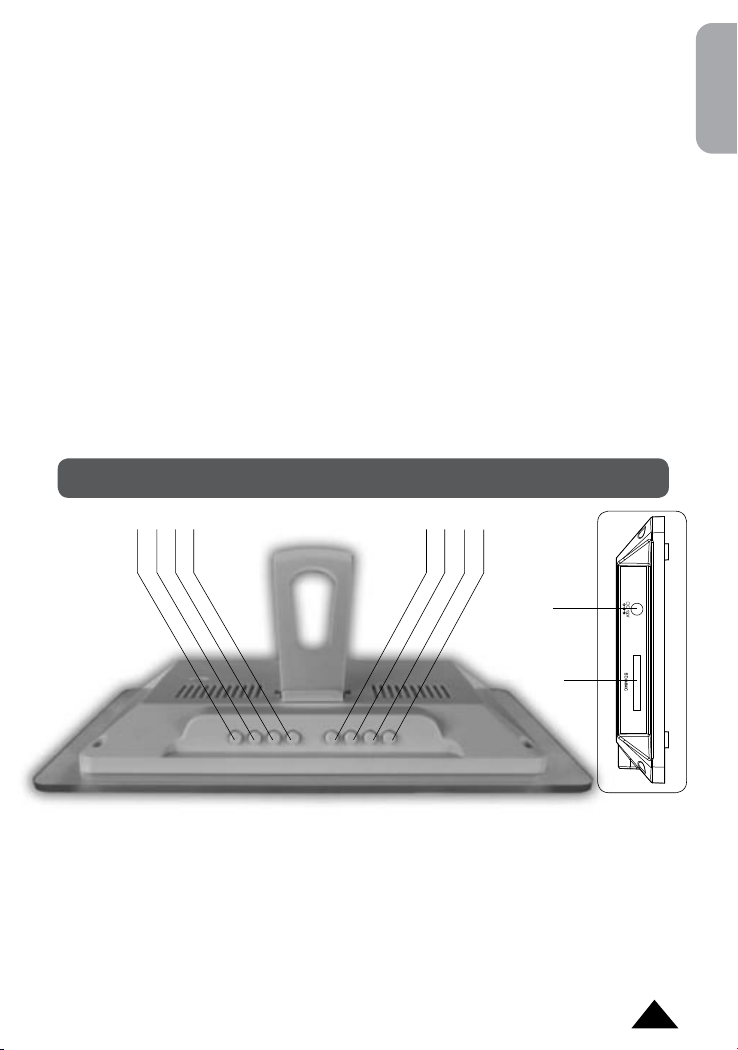
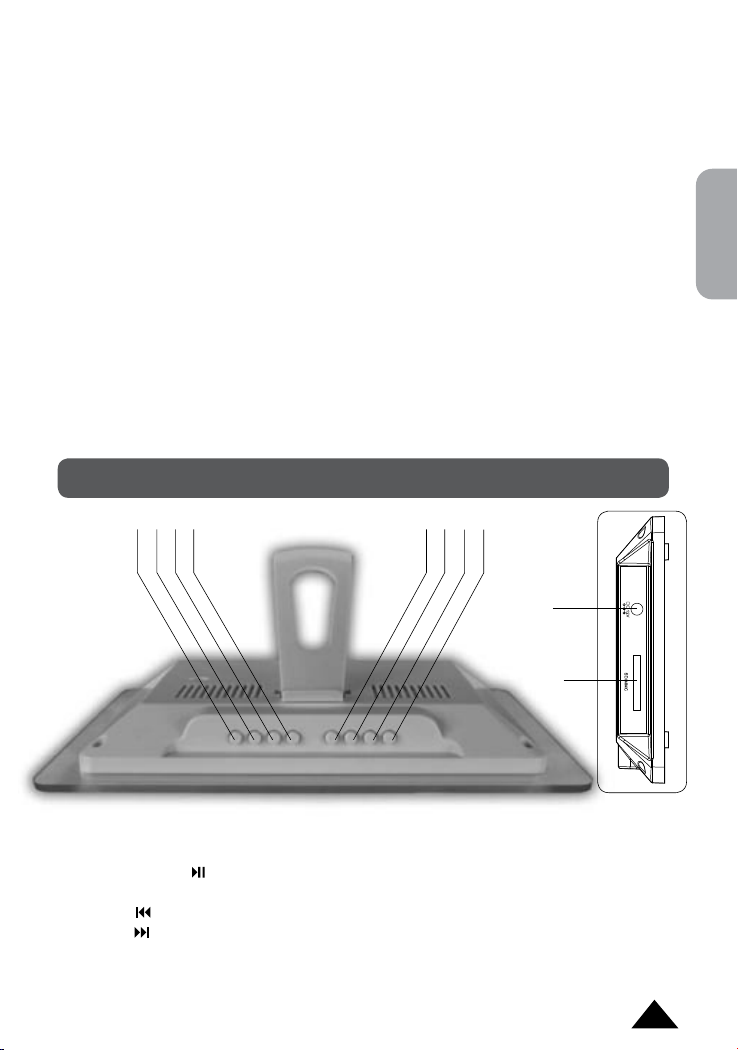
DESCRIPTION DES TOUCHES
1 2 3 4 5 6 7 8
9
Français
1. Bouton Lecture/Pause (PLAY/PAUSE)
2. Bouton MENU
3. Bouton Précédent (SKIPB)
4. Bouton Suivant (SKIPF)
5. Bouton Délai (INTERVAL)
Copyright © Lexibook 2008
10
6. Bouton MODE
7. Bouton ANGLE
8. Bouton Marche/Arrêt (POWER)
9. Entrée secteur (DC 12V)
10. Port carte SD/MMC
7
Page 8
Français
UTILISATION DU CADRE PHOTO NUMÉRIQUE
Cette section vous explique comment utiliser votre cadre photo numérique.
Veuillez suivre les instructions suivantes pour utiliser au mieux toutes ses
fonctions.
Bien démarrer
1. Retirer la pellicule antistatique de l’écran LCD.
2. Insérez une carte SD/MMC sur laquelle vous avez enregistré vos photos,
dans le port correspondant sur le côté droit du cadre.
Lire vos photos
1. Appuyez sur le bouton « Marche/Arrêt » pour mettre en marche ou
éteindre le cadre.
2. Un diaporama des photos enregistrées sur la carte SD/MMC se lance
automatiquement.
3. Appuyez une fois sur le bouton « Lecture/Pause »
lecture des photos. Appuyez à nouveau sur le bouton pour relancer le
diaporama.
4. Pour afcher la photo précédente, appuyez et maintenez le bouton
« Précédent » pendant au moins 2 secondes, puis relâchez-le.
5. Pour afcher la photo suivante, appuyez et maintenez le bouton
« Suivant » pendant au moins 2 secondes, puis relâchez-le.
pour suspendre la
Attention : pour un fonctionnement optimal du cadre photo, il est
recommandé d’utiliser des images de 500KB maximum. Des photos de taille
plus importante peuvent ralentir considérablement les temps de chargement.
Réglage de l’image
1. Appuyez sur le bouton « MENU » pour accéder au menu de réglage de
l’image.
2. Pour sélectionner les options «Luminosité », « Contraste », « Couleur »
ou « Langue », appuyez et maintenez le bouton « MENU » pendant au
moins 2 secondes, puis relâcher le (répétez l’opération pour sélectionner
les différentes options).
3. Utilisez les boutons « Précédent »
ou diminuer les réglages et sélectionner la langue désirée.
4. Pour sauvegarder vos réglages et quitter le menu, appuyez une nouvelle
fois sur la touche « MENU ».
8
et « Suivant » pour augmenter
Copyright © Lexibook 2008
Page 9
Réglage du temps d’afchage des photos
Appuyez plusieurs fois sur la touche « Délai » (INTERVAL) pour changer le
temps d’afchage des photos pendant le diaporama : 5s/15s/30s/45s/1m/
15m/30m/45m/1h.
Réglage du mode d’afchage des photos
Pendant le diaporama, appuyez plusieurs fois sur la touche « MODE » pour
régler le type d’afchage des photos : « Pan Scan » (afchage plein écran
haute résolution), « Ajuster hauteur » (afchage adapté à la hauteur de
l’écran), « Ajuster largeur » (afchage adapté à la largeur de l’écran),
« Remplir » (afchage plein écran), « AUTO FILL » (afchage en 4 :3),
« Original » (afchage de la photo avec sa taille par défaut).
Réglage de l’angle d’afchage des photos
Pendant le diaporama, appuyez plusieurs fois sur la touche « Angle » pour
choisir un angle d’afchage pour vos photos : 90°, 180° ,270 ° ou « Pas de
rotation ».
SPÉCIFICATIONS TECHNIQUES
Français
Dimensions écran
Résolution
Luminosité
Contraste
Angles de vue
Temps de réponse
Format de présentation
Durée d’intervalle du diaporama
Format
Dimensions photo
Alimentation
Consommation
Plages de température
Dimensions
Poids
Copyright © Lexibook 2008
6” (15.24 cm)
520 x 288
350 cd/m2
300
60/60/50/40(CR≥10)
30ms
16 :9
5s/15s/30s/45s/1m/15m/30m/45m/1h
JPEG
5.0 Mpixels
AC100V-240V/DC12V
6W
Exploitation -20°C à 65°C
Entreposage -30°C à 75°C
231(L) x 160(W) x 36(H) mm
0.4Kg
9
Page 10
Français
ENTRETIEN
Assurez-vous d’éteindre l’appareil et de débrancher le câble d’alimentation
avant de le nettoyer. Essuyez cet appareil avec un chiffon sec et souple. Si
les surfaces sont extrêmement sales, nettoyez les avec un chiffon qui a été
trempé dans une solution eau et savon puis essoré fermement. Essuyez une
nouvelle fois avec un chiffon sec. N’utilisez jamais d’alcool, d’essence, de
dissolvant, liquides nettoyants ou autres produits chimiques. Et n’utilisez pas
d’air comprimé pour enlever la poussière.
GARANTIE
Ce produit est couvert par notre garantie de deux ans. Pour toute mise en
œuvre de la garantie ou de service après-vente, vous devez vous adresser
à votre revendeur muni de votre preuve d’achat. Notre garantie couvre les
vices de matériel ou de montage imputables au constructeur à l’exclusion de
toute détérioration provenant du non-respect de la notice d’utilisation ou de
toute intervention intempestive sur l’article (telle que démontage, exposition
à la chaleur ou à l’humidité…).
Note : Veuillez garder ce mode d’emploi, il contient d’importantes
informations. Le contenu de ce mode d’emploi peut changer sans préavis.
Aucune partie de ce mode d’emploi ne doit être reproduite sans le
consentement écrit du fabricant.
Référence: DF700 Series
©2008 Marvel Characters, Inc.
©2008 Barbie, Inc. All rights Reserved.
©2008 LEXIBOOK®
Conçu et développé en Europe – Fabriqué en Chine
Lexibook S.A,
2, avenue de Scandinavie,
91953 Courtaboeuf Cedex, France.
Service consommateurs : 0892 23 27 26 (0.34€ TTC/min)
http://www.lexibook.com
Informations sur la protection de l’environnement
Tout appareil électrique usé est une matière recyclable et ne devrait pas faire
partie des ordures ménagères ! Nous vous demandons de bien vouloir nous
soutenir en contribuant activement au ménagement des ressources et à la
protection de l’environnement en déposant cet appareil dans sites de collecte (si
existants).
10
Copyright © Lexibook 2008
Page 11
SAFETY INSTRUCTIONS
CAUTION
RISK OF ELECTRIC SHOCK
DO NOT OPOEN
CAUTION: TO REDUCE THE RISK OF ELECTRIC SHOCK. DO NOT
REMOVE COVER (OR BACK). NO USER SERVICEABLE PARTS INSIDE.
REFER SERVICING TO QUALIFIED SERVICE PERSONNEL.
The graphic symbols on the back cover of the set mean the following:
The lightning ash with arrowhead symbol within an equilateral
triangle is intended to alert the user to the presence of
uninsulated “dangerous voltage” within the product’s enclosure
that may be of sufcient magnitude to constitute a risk of
electric shock to persons.
The exclamation point within an equilateral triangle is intended
to alert the user to the presence of important operating
and maintenance (servicing) instructions in the literature
accompanying the appliance.
WARNING:
• To reduce the risk of re or electric shock, do not expose this appliance to
rain or moisture.
• The apparatus shall not be exposed to dripping or splashing and that no
objects lled with liquids, such as vases, shall be placed on the apparatus.
• The mains plug is used as the disconnect device, the disconnect device
shall remain readily operable.
• In order to disconnect the apparatus from the mains completely, the mains
plug should be disconnected from the mains socket outlet completely.
English
Copyright © Lexibook 2008
11
Page 12

IMPORTANT SAFETY INSTRUCTIONS
1. Read these instructions.
2. Keep these instructions.
3. Heed all warnings.
English
4. Follow all instructions.
5. Do not use this unit near water.
6. Clean only with a dry cloth.
7. Do not block any ventilation openings. Install in accordance with
manufacturer’s instructions.
8. Do not install near any heat sources such as radiators, heat registers,
stoves or other apparatus (including ampliers) that produce heat.
9. Do not defeat the safety purpose of the polarized or grounding-type
plug. A polarized plug has two blades with one wider than the other. A
grounding-type plug has two blades and a third grounding prong. The
wide blade or the third prong is provided for your safety. If the provided
plug does not t into your outlet, consult an electrician for replacement of
the obsolete outlet.
10. Protect the power cord from being walked on or pinched particularly at
plugs, convenience receptacles, and the point where they exit from the
unit.
11. Only use attachments/ accessories specied by the manufacturer.
12. Unplug this unit during lightning storms or when unused for long periods
of time.
13. Refer all servicing to qualied service personnel. Servicing is required
when the unit has been damaged in any way, such as the following: the
power-supply cord or plug has been damaged; liquid has been spilled or
objects have fallen into the unit; and/or the unit has been exposed to rain
or moisture, does not operate normally, has changed its performance or
has been dropped.
14. Do not overload wall outlet. Use only power source as indicated.
15. Use replacement parts as specied by the manufacturer.
16. The product may be mounted to a wall only if recommended by the
manufacturer.
17. Upon completion of any service or repairs to this product, ask the service
technician to perform safety checks.
12
Copyright © Lexibook 2008
Page 13
INSTALLATION
Unpacking the device
When unpacking, ensure that the following elements are included:
1 x digital photo frame
1 x AC/DC adapter
1 x frame support bracket
1 x instruction manual
WARNING: All packaging materials, such as tape, plastic sheets, wire ties
and tags are not part of this photo frame and should be discarded.
Support bracket installation
Fix the bracket into one of the two slots on the back of the photo frame.
There are three different kinds of view positions:
Landscape:
English
Copyright © Lexibook 2008
13
Page 14
Portrait:
English
Wall mounted:
Wall mounting
slots
14
Copyright © Lexibook 2008
Page 15
SD/MMC card installation
To display your pictures, insert your SD/MMC card into the SD/MMC card
slot located on the right side of the photo frame. Make sure to insert the card
in the correct direction.
Power connection
Use the AC/DC adapter (AC100V-240V/DC12V) to connect the photo frame
to a main socket (the DC input is located on the right side, at the back of the
frame).
Note:
• Before using this product for the rst time, please remove the static label
from the LCD screen.
• Please switch off the unit before you make any connections.
• If the unit malfunctions or receives an electrostatic shock, turn the unit off
and on again. If this proves to be ineffective, unplug the AC/DC adapter
from the mains socket then plug it again.
PRODUCT FEATURES
1 2 3 4 5 6 7 8
9
10
English
1. PLAY/PAUSE button
2. MENU button
3. SKIPB button
4. SKIPF button
5. INTERVAL button
Copyright © Lexibook 2008
6. MODE button
7. ANGLE button
8. POWER button
9. DC IN (12V)
10. SD/MMC card slot
15
Page 16
USING THE DIGITAL PHOTO FRAME
This section explains how to use the digital photo frame. Read the following
instructions to discover all its functions.
Getting started
English
1. Before using this product for the rst time, remove the static label from
the LCD screen.
2. Save pictures on a SD/MMC card and insert it into the SD/MMC card slot
on the right side of the frame.
To Display your pictures
1. Press the “POWER” button to switch on or switch off the photo frame.
2. The photo frame will automatically launch a slideshow of the pictures
stored on the SD/MMC card.
3. Press the “PLAY/PAUSE” button once to pause the slideshow. Press
the button again to resume playback.
4. To display the previous picture, press and hold the SKIPB button for at
least 2 seconds, then release it.
5. To display the next picture, press and hold the SKIPF button for at least
2 seconds, then release it.
Warning: to ensure optimal performance of the digital photo frame, it is
recommended to use pictures with a maximum size of 500KB. Larger picture
size will slow down the loading times.
Picture settings
1. Press the “MENU” button to enter the picture settings menu.
2. To select “Brightness”, “Contrast”, “Colour” or “Language”, press and
hold the “MENU” button for at least 2 seconds, then release it (repeat the
procedure to select the desired setting).
3. Use the
select the desired language.
4. To save your settings and exit the menu, press the “MENU” button.
Slideshow delay interval settings
Press repeatedly the “INTERVAL” button to set the slideshow delay interval:
5s/15s/30s/45s/1m/15m/30m/45m/1h.
16
and buttons to increase or decrease the settings and to
Copyright © Lexibook 2008
Page 17
Display settings
During the slideshow, press repeatedly the “MODE” button to change the
display mode of your pictures : “Pan Scan” (high resolution, full screen
display), “Height t” (picture is resized to t the height of the screen), “Width
t” (picture is resized to t the width of the screen), “Fill” (picture is resized
for a full screen display), “AUTO FILL” (4 :3 display), “Original” (picture is
displayed at its original size).
Angle settings
During the slideshow, press repeatedly the “ANGLE” button to set the display
angle: 90°, 180°, 270 ° or “No rotation”.
TECHNICAL SPECIFICATIONS
English
Display
Resolution
Luminosity
Contrast
View Angles
Response Time
Screen size mode
Slideshow delay interval
File format Type
Photo size
Power supply
Power consumption
Temperature
Dimensions
Weight
6” (15.24 cm)
520 x 288
350 cd/m2
300
60/60/50/40(CR≥10)
30ms
16 :9
5s/15s/30s/45s/1m/15m/30m/45m/1h
JPEG
5.0 Mpixels
AC100V-240V/DC12V
6W
Operating -20°C to 65°C
Storage -30°C to 75°C
231(L) x 160(W) x 36(H) mm
0.4Kg
Copyright © Lexibook 2008
17
Page 18
MAINTENANCE
To prevent re or shock hazard, disconnect your unit from the AC power
source when cleaning. The nish on your unit may be cleaned with a dust
cloth and cared for as other furniture. Use a soft, clean cloth moistened with
plain, lukewarm water to clean the exterior of the unit. Use caution when
English
cleaning and wiping the plastic parts. Mild soap and a damp cloth may be
used on the front panel.
WARRANTY
NOTE: Please keep this instruction manual, it contains important
information.
This product is covered by our 2-year warranty. For any claim under the
warranty or after sale service, please contact your distributor and present
a valid proof of purchase. Our warranty covers any manufacturing material
and workmanship defect, with the exception of any deterioration arising
from the non-observance of the instruction manual or from any careless
action implemented on this item (such as dismantling, exposition to heat
and humidity, etc.). It is recommended to keep the packaging for any further
reference. In a bid to keep improving our services, we could implement
modication on the colours and the details of the product shown on the
packaging.
Reference: DF700 Series
©2008 Marvel Characters, Inc.
©2008 Barbie, Inc. All rights Reserved.
©2008 LEXIBOOK®
Designed en developed in Europe – Made in China
Lexibook UK Ltd,
Unit 10 Peterseld Industrial Estate,
Bedford Road, Peterseld,
Hampshire, GU32 3QA, United Kingdom.
Helpline: 0808 1003015
http://www.lexibook.com
Environmental Protection
Unwanted electrical appliances can be recycled and should not be discarded
along with regular household waste! Please actively support the conservation
of resources and help protect the environment by returning this appliance to a
collection centre (if available).
18
Copyright © Lexibook 2008
Page 19

INSTRUCCIONES DE SEGURIDAD
PRECAUCIÓN
RIESGO DE DESCARGA ELÉCTRICA
NO ABRIR
PRECAUCIÓN: PARA REDUCIR EL RIESGO DE DESCARGA ELÉCTRICA,
NO RETIRE LA CUBIERTA (O PIEZA TRASERA). NO HAY COMPONENTES
EN EL INTERIOR SUSCEPTIBLES DE SER AJUSTADOS POR EL
USUARIO. PARA REPARACIONES ACUDA A PERSONAL TÉCNICO
CUALIFICADO.
Los símbolos grácos en la cubierta trasera del equipo tienen el
siguiente signicado:
El símbolo del rayo dentro de un triángulo equilátero, advierte
al usuario de la presencia de “tensiones peligrosas”, sin
aislamiento, en el interior del equipo, que pueden ser de
magnitud suciente como para constituir un riesgo de descarga
eléctrica para las personas.
El signo de exclamación dentro de un triángulo equilátero
advierte al usuario de la existencia de instrucciones
importantes de mantenimiento (reparación) y funcionamiento
en la literatura que acompaña al equipo.
ADVERTENCIA:
• Para reducir riesgos de descarga eléctrica o de incendio, no exponga este
equipo a la lluvia o a la humedad.
• No exponga el equipo a goteras o salpicaduras, y no coloque sobre él
objetos con líquidos, como por ejemplo jarrones.
• El conector de red se utiliza como dispositivo de desconexión; debe
mantenerse accesible de manera que sea fácil desconectarlo en cualquier
momento.
• Para desconectar completamente el aparato de la red eléctrica, debe
desenchufarse de la pared el enchufe de red.
Español
Copyright © Lexibook 2008
19
Page 20

INSTRUCCIONES IMPORTANTES DE SEGURIDAD
1. Lea estas instrucciones.
2. Guarde estas instrucciones.
3. Respete todas las advertencias.
4. Siga todas las instrucciones.
5. No utilice este equipo cerca de agua.
6. Límpielo únicamente con un paño seco.
7. No bloquee ninguna abertura de ventilación. Instálelo siguiendo las
Español
instrucciones del fabricante.
8. El producto debe colocarse apartado de fuentes de calor, como radiadores,
calentadores, estufas u otros productos (incluyendo amplicadores) que
generen calor.
9. No anule la función de seguridad del enchufe polarizado o de tipo con toma
de tierra. Un enchufe polarizado tiene dos conectores planos, uno más ancho
que el otro. Un enchufe con toma de tierra tiene dos conectores más una
tercera borna para tierra. El conector plano más ancho o la tercera borna se
proporcionan para su seguridad. Si el enchufe suministrado no encaja en su
enchufe de red, consulte con un electricista para que sustituya el enchufe de
tipo obsoleto.
10. Proteja el cable de alimentación para evitar que se pise o se pille,
particularmente en las zonas de los enchufes, enchufes auxiliares y en el
lugar por el que sale el cable del equipo.
11. Utilice únicamente los complementos o accesorios especicados por el
fabricante.
12. Desenchufe este equipo durante las tormentas eléctricas o cuando no se
vaya a utilizar durante un periodo largo de tiempo.
13. Confíe todas las reparaciones a personal de reparación cualicado. Es
necesaria la reparación de la unidad cuando haya sufrido cualquier daño,
como los siguientes: el cable de alimentación se ha dañado; ha caído agua o
algún objeto al interior del equipo; la unidad ha estado expuesta a la lluvia o
a la humedad, no funciona normalmente, su funcionamiento ha cambiado o
la unidad se ha caído.
14. No sobrecargue el enchufe de red de la pared. Utilice solo una alimentación
eléctrica con las características indicadas.
15. Utilice las piezas de recambio especicadas por el fabricante.
16. El producto puede montarse en una pared solo cuando así lo recomiende el
fabricante.
17. Después de que se realice cualquier inspección o reparación a este producto,
solicite al servicio técnico que realice las comprobaciones de seguridad.
20
Copyright © Lexibook 2008
Page 21

INSTALACIÓN
Desembalaje del producto
Al desembalar el equipo, asegúrese de que estén incluidos los siguientes
elementos:
1 x Marco digital de fotografías
1 x Adaptador CA/CC
1 x Brazo para soporte del marco
1 x Manual de instrucciones
ADVERTENCIA: Deberán retirarse y desecharse todos los materiales que
no forman parte de este marco de fotografías, como por ejemplo cintas,
láminas de plástico, alambres de sujeción, etc.
Instalación del brazo de soporte
Sujete el brazo en una de las dos ranuras situadas en la parte trasera del
marco de fotografías. Hay tres modos diferentes de colocación:
Apaisado:
Español
Copyright © Lexibook 2008
21
Page 22

Vertical:
Español
Montado en pared:
Aberturas para
montaje en pared
22
Copyright © Lexibook 2008
Page 23

Instalación de una tarjeta SD/MMC
Para visualizar sus imágenes en el marco, introduzca su tarjeta SD/MMC en
la ranura para la tarjeta, situada en el lado derecho del marco de fotografías.
Asegúrese de insertar la tarjeta en la dirección correcta.
Conexión de alimentación eléctrica
Utilice el adaptador de red CA/CC (100 Vca - 240 Vca / 12 Vcc) para
conectar el marco digital de fotografías a la toma de red (la entrada de CC
está situada en la parte posterior, a la derecha, del marco).
Nota:
• Antes de utilizar este producto por primera vez, retire la etiqueta
transparente de la pantalla LCD.
• Apague la unidad antes de realizar cualquier tipo de conexión.
• En caso de que la unidad funcionase mal o recibiese una descarga
electrostática, apague la unidad y vuelva a encenderla. Si esto no diese
resultado, desenchufe el adaptador CA/CC de la toma de red y vuelva a
enchufarla.
CARACTERÍSTICAS DEL PRODUCTO
1 2 3 4 5 6 7 8
9
Español
1. Botón REPRODUCIR/PAUSA
2. Botón MENÚ
3. Botón RETROCESO
4. Botón AVANCE
5. Botón INTERVALO
Copyright © Lexibook 2008
10
6. Botón MODO
7. Botón ÁNGULO
8. Botón ENCENDIDO
9. ENTRADA CC (12 V)
10. Ranura para tarjeta SD/MMC
23
Page 24

USO DEL MARCO DIGITAL DE FOTOGRAFÍAS
Esta sección explica cómo utilizar el marco digital de fotografías. Lea las
siguientes instrucciones para descubrir todas sus funciones.
Preparación de la unidad
1. Antes de utilizar este producto por primera vez, retire la etiqueta
transparente de la pantalla LCD.
2. Almacene sus fotografías en una tarjeta SD/MMC e introduzca la tarjeta
en la ranura situada en el lado derecho del marco de fotografías.
Para ver sus fotografías
Español
1. Para encender o apagar el marco utilice el botón “ENCENDIDO”.
2. El marco de fotografías mostrará automáticamente en secuencia las
fotografías almacenadas en la tarjeta SD/MMC.
3. Pulse el botón “REPRODUCIR/PAUSA”
en la presentación. Pulse de nuevo el botón para continuar con la
presentación.
4. Para ver la fotografía anterior, mantenga pulsado el botón RETROCESO
durante al menos 2 segundos y luego suéltelo.
5. Para ver la fotografía siguiente, mantenga pulsado el botón AVANCE
durante al menos 2 segundos y luego suéltelo.
Advertencia: para asegurar un funcionamiento óptimo del marco digital de
fotografías, se recomienda utilizar fotografías con un tamaño máximo de
500 KB. Fotografías de más tamaño aumentarán los tiempos de carga.
una vez para hacer una pausa
Ajustes de la imagen
1. Para acceder al menú de ajustes de la imagen, pulse el botón “MENÚ”.
2. Para seleccionar “Brightness” (Brillo), “Contrast” (Contraste), “Colour”
(Color) o “Language” (Idioma), mantenga pulsado el botón MENÚ
durante al menos 2 segundos y luego suéltelo (repita el procedimiento
hasta seleccionar el ajuste deseado).
3. Utilice los botones
seleccionado y también, en el ajuste del idioma, para seleccionar el
idioma.
4. Para guardar los ajustes realizado y salir del menú, pulse el botón
“MENÚ”.
Ajuste del intervalo para la presentación de fotografías en secuencia
Pulse repetidamente el botón “INTERVALO” para ajustar el intervalo
deseado, de la siguiente manera: 5s/15s/30s/45s/1m/15m/30m/45m/1h.
24
y para aumentar o disminuir el ajuste
Copyright © Lexibook 2008
Page 25

Ajustes de la pantalla
Durante la presentación en secuencia de las imágenes, pulse repetidamente
el botón “MODO” para cambiar el modo de visualización de las imágenes:
“Pan Scan” (“Pantalla completa”: alta resolución, visualización a pantalla
completa), “Height t” (“Ajustar en altura”: la imagen se redimensiona
para ajustarse a la altura de la pantalla), “Width t” (“Ajustar en anchura”:
la imagen se redimensiona para ajustarse a la anchura de la pantalla),
“Fill” (“Escalar”: la imagen se redimensiona para adaptarse a la pantalla
completa), “AUTO FILL” (“Escala automática”: proporciones 4:3), “Original”
(“Original”: la imagen se visualiza en su tamaño original).
Ajustes de la orientación
Durante la presentación en secuencia de las imágenes, pulse repetidamente
el botón “ÁNGULO” para cambiar la orientación de las imágenes: 90°, 180°,
270 ° o “No rotation” (“Sin rotación”).
ESPECIFICACIONES TÉCNICAS
Pantalla
6” (15.24 cm)
Español
Resolución
Luminosidad
Contraste
Ángulos de visión
Tiempo de respuesta
Proporciones de pantalla
Intervalos para la presentación
de fotografías en secuencia
Formato de archivos
Tamaño de fotografía
Alimentación
Consumo
Temperatura
Dimensiones
Peso
Copyright © Lexibook 2008
520 x 288
350 cd/m2
300
60/60/50/40(CR≥10)
30 ms
16 :9
5s/15s/30s/45s/1m/15m/30m/45m/1h
JPEG
5,0 Mpíxeles
100 Vca - 240 Vca / 12 Vcc
6 W
De funcionamiento: -20°C a 65°C
De almacenamiento: -30°C a 75°C
231 (lado) x 160 (ancho) x 36
(profundidad) mm
0,4 Kg
25
Page 26

MANTENIMIENTO
Para evitar fuego o peligro de descarga eléctrica, desconecte la unidad
de la red eléctrica de CA antes de proceder a su limpieza. El acabado de
la unidad puede limpiarse con un paño de polvo y requiere los mismos
cuidados que cualquier otro aparato. Utilice un paño blando, limpio,
humedecido con agua natural tibia para limpiar el exterior de la unidad.
Tenga cuidado cuando limpie y frote las partes de plástico. Para el marco
frontal puede utilizar un paño húmedo y jabón neutro.
GARANTÍA
Español
NOTA: Conserve este manual de instrucciones ya que contiene información
importante.
Este producto tiene una garantía de 2 años. Para cualquier reclamación
sobre la garantía o servicio posventa, contacte con su distribuidor y presente
una prueba válida de compra. Nuestra garantía cubre cualquier defecto de
fabricación por material o por mano de obra, con excepción de cualquier
deterioro que resulte de la inobservancia de las instrucciones de este
manual, o de alguna acción imprudente realizada sobre la unidad (como
desmontarla, exposición al calor o a la humedad, etc.). Se recomienda
conservar el embalaje para consultas en el futuro. En nuestro compromiso
por mejorar nuestros servicios, podrían haberse realizado modicaciones en
los colores y detalles del producto mostrado en el embalaje.
Referencia: DF700 Series
©2008 Marvel Characters, Inc.
©2008 Barbie, Inc. All rights Reserved.
©2008 LEXIBOOK®
Diseñado y desarrollado en Europa – Fabricado en China
Lexibook Ibérica S.L,
C/ de las Hileras 4, 4° dpcho 14,
28013 Madrid, España.
Servicio consumidores: 91 548 89 32
http://www.lexibook.com
Advertencia para la protección del medio ambiente
¡Los aparatos eléctricos desechados son reciclables y no deben ser eliminados
en la basura doméstica! Por ello pedimos que nos ayude a contribuir
activamente en el ahorro de recursos y en la protección del medio ambiente
entregando este aparato en los centros de colección (si existen).
26
Copyright © Lexibook 2008
Page 27

INSTRUÇÕES DE SEGURANÇA
CUIDADO
RISCO DE CHOQUE ELÉCTRICO
NÃO ABRIR
CUIDADO: PARA REDUZIR O RISCO DE CHOQUE ELÉCTRICO, NÃO
RETIRE A COBERTURA (OU PARTE TRASEIRA). NÃO EXISTEM PEÇAS
QUE POSSAM SER REPARADAS PELO UTILIZADOR NO INTERIOR.
CONSULTE PESSOAL QUALIFICADO PARA PROCEDER À REPARAÇÃO.
Os símbolos existentes na parte traseira da unidade signicam o
seguinte:
O trovão com uma seta no nal dentro de um triângulo
equilátero serve para alertar o utilizador da presença de
“voltagem perigosa” sem isolamento dentro da estrutura do
produto, que pode ser de magnitude suciente para constituir
risco de choque eléctrico para as pessoas.
O ponto de exclamação dentro de um triângulo equilátero
serve para alertar o utilizador da presença de instruções
importantes de funcionamento e manutenção (reparação) na
literatura que acompanha a unidade.
AVISO:
• Para reduzir o risco de fogo ou de choque eléctrico, não exponha esta
unidade à chuva ou humidade.
• O aparelho não deve ser exposto a pingos ou borrifos e não coloque
objectos cheios de líquidos, como vasos, em cima do aparelho.
• A cha da alimentação é usada para desligar o aparelho. O aparelho
desligado deve permanecer pronto a ser utilizado.
• De modo a desligar o aparelho da tomada por completo, retire a cha da
tomada.
Português
Copyright © Lexibook 2008
27
Page 28

INSTRUÇÕES IMPORTANTES DE SEGURANÇA
1. Leia estas instruções.
2. Guarde estas instruções.
3. Preste atenção a todos os avisos.
4. Siga todas as instruções.
5. Não use esta unidade perto da água.
6. Limpe apenas com um pano seco.
7. Não bloqueie quaisquer entradas de ventilação. Instale de acordo com as
instruções do fabricante.
8. Não instale perto de fontes de calor, como radiadores, registadores de calor,
fornos ou outros aparelhos (incluindo amplicadores) que produzam calor.
9. Não danique a segurança da cha polarizada ou de ligação à terra. Uma
cha polarizada tem dois dentes, um mais largo do que o outro. Uma cha
com ligação à terra tem dois dentes e um terceiro dente de ligação à terra. O
dente mais largo, ou o terceiro dente foram criados para sua segurança. Se a
Português
cha fornecida não couber na sua tomada, consulte um electricista, para que
este substitua a tomada obsoleta.
10. Proteja o o da alimentação de ser pisado ou dobrado, especialmente nas
chas, receptáculos de conveniência e no ponto onde sai da unidade.
11. Use apenas acessórios especicados pelo fabricante.
12. Desligue esta unidade durante trovoadas ou quando não a usar durante
longos períodos de tempo.
13. Consulte pessoal qualicado para proceder à reparação. A reparação tem de
ser feita quando a unidade for danicada de algum modo, como o seguinte:
Danos no o ou na cha da alimentação, líquido derramado ou objectos que
tenham caído em cima da unidade e/ou se a unidade tiver sido exposta à
chuva ou humidade, se não funcionar normalmente, se o seu desempenho
for alterado, ou se deixar cair a unidade.
14. Não sobrecarregue a tomada. Use apenas a alimentação conforme indicado.
15. Use peças sobresselentes, conforme especicado pelo fabricante.
16. O produto pode ser montado numa parede, apenas se recomendado pelo
fabricante.
17. Quando terminar quaisquer reparações ou anações neste produto, peça
ao técnico que efectuou a reparação para proceder às vericações de
segurança.
28
Copyright © Lexibook 2008
Page 29

INSTALAÇÃO
Retirar o aparelho da caixa
Quando retirar o aparelho da caixa, certique-se de que os seguintes
elementos se encontram incluídos:
1 moldura digital
1 adaptador AC/DC
1 xador de suporte da moldura
1 manual de instruções
AVISO: Todos os materiais de empacotamento, como ta, películas de
plástico, arames e etiquetas não fazem parte desta moldura e deverão ser
deitados fora.
Instalação do xador de suporte da moldura
Fixe o suporte numa das duas ranhuras na parte traseira da moldura.
Existem três tipos diferentes de posições de visualização:
Paisagem:
Português
Copyright © Lexibook 2008
29
Page 30

Retrato:
Português
Montado na parede:
Ranhuras de
montagem na
parede
30
Copyright © Lexibook 2008
Page 31

Instalação do cartão SD/MMC
Para ver as suas imagens, insira o seu cartão SD/MMC na ranhura do
cartão SD/MMC do lado direito da moldura. Certique-se de que insere o
cartão na direcção correcta.
Ligação à alimentação
Use o adaptador AC/DC (AC100V-240V/DC12V) para ligar a moldura a
uma tomada (a entrada DC encontra-se do lado direito, na parte traseira da
moldura).
Nota:
• Antes de usar este produto pela primeira vez, por favor retire a película
estática do ecrã LCD.
• Por favor, desligue a unidade antes de fazer quaisquer ligações.
• Se a unidade funcionar mal ou receber um choque electrostático, desligue
a unidade e volte a ligar. Se isto não funcionar, desligue o adaptador AC/
DC da tomada e volte a ligá-lo.
CARACTERÍSTICAS DO PRODUTO
1 2 3 4 5 6 7 8
9
Português
1. Botão PLAY/PAUSE
2. Botão MENU
3. Botão SKIPB
4. Botão SKIPF
5. Botão INTERVAL
Copyright © Lexibook 2008
10
Botão MODE
7. Botão ANGLE
8. Botão POWER
9. DC IN (12V)
10. Ranhura para cartão SD/MMC
31
Page 32

USAR A MOLDURA DIGITAL
Esta secção explica como usar a moldura digital. Leia as instruções
apresentadas a seguir para descobrir todas as suas funções.
Iniciar
1. Antes de usar este produto pela primeira vez, retire a película estática do
ecrã LCD.
2. Guarde as imagens num cartão SD/MMC e insira-o na ranhura para
cartões SD/MMC do lado direito da moldura.
Para ver as suas imagens
1. Prima o botão “POWER” para ligar ou desligar a moldura.
2. A moldura inicia automaticamente uma apresentação de diapositivos das
imagens guardadas no cartão SD/MMC.
3. Prima o botão “PLAY/PAUSE”
de diapositivos. Prima de novo o botão para continuar a reprodução.
4. Para ver a imagem anterior, prima e mantenha premido o botão SKIPB
Português
durante, pelo menos, 2 segundos e, depois, deixe de o premir.
5. Para ver a imagem seguinte, prima e mantenha premido o botão
SKIPF durante, pelo menos, 2 segundos e, depois, deixe de o premir.
Aviso: Para assegurar um desempenho óptimo da moldura digital,
recomendamos que use imagens com um tamanho máximo de 500KB.
Um tamanho maior da imagem aumenta o tempo de carregamento das
imagens.
para fazer uma pausa na apresentação
Congurações de imagem
1. Prima o botão “MENU” para entrar no menu de congurações de
imagem.
2. Para escolher a “Luminosidade”, “Contraste”, “Cor” ou “Língua”, prima
e mantenha premido o botão “MENU” durante, pelo menos, 2 segundos
e, depois, deixe de o premir (repita este procedimento para escolher a
conguração desejada).
3. Use os botões
escolher a língua desejada.
4. Para guardar as suas congurações e sair do menu, prima o botão
“MENU”.
Congurações do intervalo na apresentação de diapositivos
Prima repetidamente o botão “INTERVAL” para congurar o intervalo na
apresentação de diapositivos: 5s/15s/30s/45s/1m/15m/30m/45m/1h.
32
e para aumentar ou diminuir as congurações e para
Copyright © Lexibook 2008
Page 33

Congurações na apresentação
Durante a apresentação de diapositivos, prima repetidamente o botão
“MODE” para alterar o modo de apresentação das suas imagens: “Pan
Scan” (apresentação em alta resolução e no ecrã por completo), “Height
t” (tamanho de imagem alterado para caber na altura do ecrã), “Width
t” (tamanho de imagem alterado para caber na largura do ecrã), “Fill”
(tamanho de imagem alterado para caber no ecrã por completo), “AUTO
FILL” (formato 4:3), “Original” (a imagem é apresentada no seu tamanho
original).
Congurações do ângulo
Durante a apresentação de diapositivos, prima repetidamente o botão
“ANGLE” para congurar o ângulo de apresentação: 90°, 180°, 270 ° ou
“Sem rotação”.
CARACTERÍSTICAS TÉCNICAS
Ecrã
Resolução
Luminosidade
Contraste
Ângulos de visão
Tempo de resposta
Modo do tamanho do ecrã
Intervalo na apresentação de
diapositivos
Tipo de formato do cheiro
Tamanho da foto
Alimentação
Consumo de energia
Temperatura
Dimensões
Peso
6” (15.24 cm)
520 x 288
350 cd/m2
300
60/60/50/40(CR≥10)
30ms
16:9
5s/15s/30s/45s/1m/15m/30m/45m/1h
JPEG
5.0 Mpixels
AC100V-240V/DC12V
6W
Funcionamento -20 °C a 65 °C
Armazenamento -30 °C a 75 °C
231(C) x 160(L) x 36(A) mm
0,4 Kg
Português
Copyright © Lexibook 2008
33
Page 34

MANUTENÇÃO
Para prevenir fogo ou choques eléctricos, desligue a sua unidade da
alimentação AC quando proceder à limpeza. O acabamento da sua
unidade pode ser limpo com um pano do pó e pode ser cuidado tal como
qualquer outra peça de mobiliário. Use um pano suave e limpo, ligeiramente
embebido em água morna para limpar o exterior da unidade. Tenha cuidado
quando limpar e secar as partes de plástico. Pode usar detergente neutro e
um pano ligeiramente embebido em água para limpar o painel dianteiro.
GARANTIA
NOTA: Guarde este manual de instruções, pois contém informações
importantes.
Este produto é abrangido pela nossa garantia de 2 anos. Para quaisquer
reclamações utilizando a garantia ou o nosso serviço pós-venda, por
favor, contacte o seu distribuidor e apresente uma prova de compra
válida. A nossa garantia cobre quaisquer defeitos de material e de fabrico,
com a excepção de qualquer deterioração devido à não observância do
Português
manual de instruções ou de qualquer acção descuidada implementada
neste item (como desmontagem, exposição ao calor e humidade,
etc.). Recomendamos que guarde a caixa para futuras referências.
Numa tentativa constante de melhorar os nossos serviços, poderemos
implementar modicações nas cores e pormenores do produto apresentado
na caixa.
Referência: DF700 Series
©2008 Marvel Characters, Inc.
©2008 Barbie, Inc. All rights Reserved.
©2008 LEXIBOOK®
Desenhado e desenvolvido na Europa - Fabricado na China
Lexibook Electrónica Lda,
Quinta dos loios,
Praceta José Domingos dos Santos, 6B-8A,
2835-343 Lavradio-Barreiro, Portugal.
Apoio técnico: 21 206 13 48
http://www.lexibook.com
Indicações para a protecção do meio ambiente
Aparelhos eléctricos antigos são materiais que não pertencem ao lixo doméstico!
Por isso pedimos para que nos apoie, contribuindo activamente na poupança de
recursos e na protecção do ambiente ao entregar este aparelho nos pontos de
recolha, caso existam.
34
Copyright © Lexibook 2008
Page 35

ISTRUZIONI DI SICUREZZA
ATTENZIONE
PERICOLO DI SCCOSSA ELETTRICA
NON APPIRE
ATTENZIONE: PER RIDURRE IL RISCHIO DI SCOSSA ELETTRICA:
NON RIMUOVERE IL COPERCHIO (O LA PARTE POSTERIORE).
ALL’INTERNO NON SONO PRESENTI PARTI SOSTITUIBILI DALL’UTENTE.
PER EVENTUALI MANUTENZIONI, RIVOLGERSI A PERSONALE DI
ASSISTENZA QUALIFICATO.
I simboli graci presenti sul retro dell’apparecchio indicano quanto
segue:
Il simbolo del fulmine con testa a freccia contenuto in un
triangolo equilatero avvisa l’utente della presenza di “voltaggi
pericolosi” non isolati all’interno del corpo del prodotto che
potrebbero risultare di intensità tale da costituire un rischio di
scossa elettrica per le persone.
Il punto esclamativo all’interno di un triangolo equilatero
avvisa l’utente della presenza di importanti istruzioni per l’uso
e la manutenzione (riparazioni) nella documentazione che
accompagna il dispositivo.
AVVERTENZA:
• Per ridurre il rischio di incendio o di scossa elettrica, non esporre
l’apparecchio alla pioggia o all’umidità.
• Evitare di esporre l’apparecchio a gocce e spruzzi ed evitare di appoggiare
su di esso oggetti pieni di liquido, ad es. vasi.
• La presa di rete serve a scollegare il dispositivo; il dispositivo scollegato
deve rimanere pronto all’uso.
• Per scollegare completamente l’apparecchio dall’alimentazione di rete, la
spina deve essere completamente staccata dalla presa a muro.
Italiano
Copyright © Lexibook 2008
35
Page 36

IMPORTANTI ISTRUZIONI DI SICUREZZA
1. Leggere le presenti istruzioni.
2. Conservare le presenti istruzioni.
3. Prestare attenzione a tutte le avvertenze.
4. Seguire tutte le istruzioni.
5. Non utilizzare l’apparecchio vicino all’acqua.
6. Pulire il prodotto unicamente con un panno asciutto.
7. Non bloccare le aperture di ventilazione. Installare nel rispetto delle istruzioni
del produttore.
8. Non installare nei pressi di sorgenti di calore quali radiatori, diffusori di aria
calda, fornelli o altri dispositivi (inclusi amplicatori) che producono calore.
9. Non aggirare la protezione garantita dalla spina polarizzata o di messa a
terra. Una spina polarizzata presenta due lame di cui una più larga dell’altra.
Una spina di massa presenta due lame e un terzo dente destinato alla messa
a terra. La lama ampia e il terzo dente sono forniti per la vostra sicurezza. Se
la spina in dotazione non è adatta alla vostra presa a muro, rivolgersi ad un
elettricista per la sostituzione della presa obsoleta.
10. Proteggere il cavo di alimentazione per evitare che venga pestato o pinzato,
soprattutto a livello di spine, prese e nel punto in cui escono dall’apparecchio.
11. Servirsi unicamente degli accessori specicati dal produttore.
12. Scollegare l’apparecchio durante i temporali o quando non viene utilizzato a
lungo.
Italiano
13. Afdare qualsiasi riparazione a personale tecnico qualicato. La
manutenzione è necessaria quando l’apparecchio è stato danneggiato in
qualsiasi modo, ad esempio se: il cavo di alimentazione o la spina sono stati
danneggiati; sono stati versati liquidi sull’apparecchio o oggetti vi sono caduti
all’interno e/o l’apparecchio è stato esposto alla pioggia o all’umidità, non
funziona normalmente, presenta prestazioni diverse o è caduto.
14. Non sovraccaricare la presa a muro. Servirsi dell’alimentazione elettrica come
indicato.
15. Servirsi delle parti di ricambio indicate dal produttore.
16. Il prodotto può essere installato a parete unicamente se consigliato dal
produttore.
17. Al termine di qualsiasi riparazione o manutenzione del prodotto, chiedere al
tecnico dell’assistenza di eseguire le veriche di sicurezza.
36
Copyright © Lexibook 2008
Page 37

INSTALLAZIONE
Disimballare il dispositivo
Al momento di togliere l’apparecchio dalla confezione, assicurarsi che
questa contenga i seguenti elementi:
1 cornice digitale
1 adattatore CA/CC
1 staffa supporto per la cornice
1 manuale di istruzioni
AVVERTENZA: tutti i materiali da imballaggio quali nastro adesivo, fogli di
plastica, cavi e linguette non fanno parte della cornice e vanno gettati.
Installazione della staffa di supporto
Fissare la staffa in una delle due fessure sul retro della cornice. Vi sono tre
diverse posizioni possibili:
Panorama:
Copyright © Lexibook 2008
Italiano
37
Page 38

Ritratto:
Installazione a parete:
Italiano
Slot per
installazione
a parete
38
Copyright © Lexibook 2008
Page 39

Installazione scheda SD/MMC
Per visualizzare le vostre fotograe, inserite la scheda SD/MMC
nell’apposito slot situato sul lato destro della cornice. Assicurarsi di inserire
la scheda nella direzione corretta.
Collegamento di alimentazione
Servirsi dell’adattatore CA/CC (AC100V-240V/DC12V) per collegare la
cornice ad una presa di rete elettrica (l’ingresso CC è situato sul lato destro,
sul retro della cornice).
Nota:
• Prima di utilizzare il prodotto per la prima volta, rimuovere l’etichetta statica
dallo schermo LCD.
• Spegnere l’apparecchio prima di effettuare qualsiasi collegamento.
• In caso di malfunzionamento dell’apparecchio o se questo dovesse
ricevere uno shock elettrostatico, spegnere l’apparecchio stesso e
accenderlo nuovamente. Qualora ciò risultasse inefcace, scollegare
l’adattatore CA/CC dalla presa di alimentazione di rete e collegarlo
nuovamente.
CARATTERISTICHE DEL PRODOTTO
1 2 3 4 5 6 7 8
9
1. Tasto PLAY/PAUSE
2. Tasto MENU
3. Tasto SKIPB
4. Tasto SKIPF
5. Tasto INTERVAL
Copyright © Lexibook 2008
10
6. Tasto MODE
7. Tasto ANGLE (angolazione)
8. Tasto POWER (accensione)
9. INGRESSO CC (12V)
10. Slot per scheda SD/MMC
Italiano
39
Page 40

USO DELLA CORNICE DIGITALE
Questa sezione spiega come utilizzare la cornice digitale. Leggi
attentamente le seguenti istruzioni per scoprirne tutte le funzioni.
Primi passi
1. Prima di utilizzare il prodotto per la prima volta, rimuovere l’etichetta
statica dallo schermo LCD.
2. Salvare le fotograe su una scheda SD/MCC e inserirla nell’apposito slot
posto sul lato destro della cornice.
Per visualizzare le immagini a display
1. Premere il tasto “POWER” per accendere o spegnere la cornice.
2. La cornice lancerà automaticamente una presentazione delle fotograe
salvate sulla scheda SD/MMC.
3. Premere il tasto “PLAY/PAUSE”
presentazione. Premere nuovamente il tasto per riavviare la
riproduzione.
4. Per visualizzare l’immagine precedente, premere il tasto SKIPB e
tenerlo premuto per almeno 2 secondi, quindi rilasciare la pressione.
5. Per visualizzare l’immagine successiva, premere il tasto SKIPF e
tenerlo premuto per almeno 2 secondi, quindi rilasciare la pressione.
Avvertenza: per garantire le prestazioni ottimali della cornice digitale, si
Italiano
raccomanda di utilizzare immagini con una dimensione massima di 500KB.
Dimensioni maggiori dell’immagine rallenteranno i tempi di caricamento.
una volta per interrompere la
Congurazione immagini
1. Premere il tasto “MENU” per entrare nel menu di congurazione immagini.
2. Per selezionare “Luminosità”, “Contrasto”, “Colore” o “Lingua”, premere il
tasto “MENU” e tenerlo premuto per almeno 2 secondi, quindi rilasciare
la pressione (ripetere la procedura per selezionare l’impostazione
desiderata).
3. Servirsi dei tasti e per aumentare o diminuire il valore delle
impostazioni e per selezionare la lingua desiderata.
4. Per salvare le impostazioni e uscire dal menu, premere il tasto “MENU”.
40
Copyright © Lexibook 2008
Page 41

Impostazione dell’intervallo della presentazione
Premere ripetutamente il tasto “INTERVAL” per impostare l’intervallo della
presentazione: 5s/15s/30s/45s/1m/15m/30m/45m/1h.
Congurazione del display
Durante la presentazione, premere più volte il tasto “MODE” per modicare
la modalità di visualizzazione delle immagini: “Pan Scan” (elevata
risoluzione, visualizzazione a schermo intero), “Height t” (l’immagine
viene ridimensionata per adattarsi all’altezza dello schermo), “Width t”
(l’immagine viene ridimensionata per adattarsi alla larghezza dello schermo),
“Fill” (l’immagine viene ridimensionata per una visualizzazione a schermo
intero), “AUTO FILL” (visualizzazione 4 :3), “Original” (l’immagine viene
visualizzata nella sua dimensione originale).
Impostazione dell’angolazione
Durante la presentazione, premere ripetutamente il tasto “ANGLE” per
impostare l’angolazione del display: 90°, 180°, 270 ° o “No rotation”
(nessuna rotazione).
SPECIFICHE TECNICHE
Display (Visualizzazione)
Risoluzione
Luminosità
Contrasto
Angolazioni visuale
Tempo di risposta
Modalità dimensioni dello schermo
Intervallo presentazione
Formato dei le
Dimensione della foto
Alimentazione
Consumo
Temperatura
Dimensioni
Peso
Copyright © Lexibook 2008
6” (15.24 cm)
520 x 288
350 cd/m2
300
60/60/50/40(CR≥10)
30ms
16 :9
5s/15s/30s/45s/1m/15m/30m/45m/1h
JPEG
5.0 Mpixel
CA 100V-240V/CC 12V
6W
Uso da -20°C a 65°C
Conservazione da -30°C a 75°C
231(L) x 160(L) x 36(H) mm
0,4 Kg
Italiano
41
Page 42

MANUTENZIONE
Per evitare il pericolo di incendi o di scossa elettrica, scollegare
l’apparecchio dall’alimentazione CA al momento di pulirlo. La nitura
dell’apparecchio può essere pulita con un panno per spolverare così come
gli altri mobili. Servirsi di un panno morbido e pulito inumidito con acqua
tiepida per pulire l’esterno dell’apparecchio. Prestare attenzione al momento
di pulire e stronare le parti in plastica. A livello del pannello anteriore è
possibile utilizzare un sapone delicato e un panno bagnato.
GARANZIA
NOTA: conservare il manuale di istruzioni in quanto contiene informazioni
importanti.
Questo prodotto è coperto dalla nostra garanzia di 2 anni. Per qualsiasi
richiesta in garanzia o per richiedere l’assistenza del servizio post vendita,
contattare il rivenditore presentando la prova d’acquisto. La garanzia
copre qualsiasi difetto di materiale o di fabbrica, ad eccezione di eventuali
deterioramenti dovuti al mancato rispetto delle istruzioni contenute nel
manuale o ad azioni sconsiderate cui è stato sottoposto il prodotto (quali
smontaggio, esposizione a calore e umidità, ecc.). Si raccomanda di
conservare la confezione per eventuali riferimenti futuri. Nel nostro impegno
volto a migliorare i nostri servizi, potremmo apportare modiche ai colori e ai
dettagli del prodotto illustrato sulla confezione.
Riferimento: DF700 Series
©2008 Marvel Characters, Inc.
Italiano
©2008 Barbie, Inc. All rights Reserved.
©2008 LEXIBOOK®
Progettato e sviluppato in Europa – Fabbricato in Cina
Lexibook Italia S.r.l,
Via Eustachi, 45,
20129 Milano, Italia.
Servizio consumatori : 022040 4959 (Prezzo di una chiamata locale)
http://www.lexibook.com
Avvertenze per la tutela dell’ambiente
Gli apparecchi elettrici vecchi sono materiali pregiati, non rientrano nei normali
riuti domestici! Preghiamo quindi i gentili clienti di contribuire alla salvaguardia
dell’ambiente e delle risorse e di consegnare il presente apparecchio ai centri di
raccolta competenti, qualora siano presenti sul territorio.
42
Copyright © Lexibook 2008
Page 43
SICHERHEITSVORKEHRUNGEN
ACHTUNG GEFAHR VON
ELEKTROSCHOCK
NICHT ÖFFNEN
ACHTUNG: UM DIE GEFAHR EINES STROMSCHLAGES ZU VERMEIDEN,
NICHT DIE ABDECKUNG (ODER RÜCKSEITE) ENTFERNEN. DAS
GERÄTEINNERE ENTHÄLT KEINE TEILE, DIE VOM NUTZER
REPARIERT WERDEN KÖNNEN. FÜR WARTUNGSARBEITEN BITTE AN
QUALIFIZIERTES FACHPERSONAL WENDEN.
Die Symbole auf der Gehäuserückseite haben die folgende Bedeutung:
Der Blitz mit Pfeilspitze in einem gleichseitigen Dreieck warnt
den Benutzer, dass nicht isolierte „gefährliche elektrische
Spannung” im Inneren des Produktes vorhanden ist, die stark
genug ist, einen Stromschlag herbeizuführen.
Das Ausrufezeichen in einem gleichseitigen Dreieck weist
den Benutzer auf wichtige Bedien- und Wartungsanleitungen
(Instandhaltung) in der Begleitliteratur des Gerätes hin.
WARNUNG:
• Um die Gefahr eines Feuers oder Stromschlags zu vermeiden, sollte
dieses Gerät weder Regen noch Feuchtigkeit ausgesetzt werden.
• Dieses Gerät darf weder Tropfen noch Spritzern ausgesetzt werden und es
sollten keine mit Wasser gefüllten Objekte, wie z.B. Vasen, auf das Gerät
gestellt werden.
• Das Gerät wird mit dem Netzstecker vollständig vom Netzstrom getrennt.
Der Netzstecker muss deshalb leicht zugänglich sein.
• Um das Gerät ganz vom Netzstrom zu trennen, muss der Netzstecker
vollständig aus der Netzsteckdose gezogen werden.
Copyright © Lexibook 2008
Deutsch
43
Page 44

WICHTIGE SICHERHEITSVORKEHRUNGEN
1. Lesen Sie diese Anleitungen.
2. Bewahren Sie diese Anleitungen auf.
3. Beachten Sie alle Warnungen.
4. Befolgen Sie alle Anleitungen.
5. Benutzen Sie dieses Produkt nicht in der Nähe von Wasser.
6. Reinigen Sie das Gerät nur mit einem trockenen Tuch.
7. Verdecken Sie keine Belüftungsöffnungen. Stellen Sie das Gerät gemäß den
Anleitungen des Herstellers auf.
8. Stellen Sie das Gerät nicht in der Nähe von Hitzequellen, wie z.B. Heizungen,
Wärmespeichern, Öfen oder anderen Apparaten (einschließlich Verstärkern),
die Hitze erzeugen, auf.
9. Zerstören Sie nicht den Sicherheitszweck des polarisierten Netzsteckers
oder Schukosteckers. Ein polarisierter Stecker hat zwei Stifte, wobei einer
größer als der andere ist. Ein Schukostecker hat zwei Stifte und einen
dritten Erdungsstift. Der größere Stift oder der dritte Erdungsstift dient Ihrer
Sicherheit. Sollte der mitgelieferte Stecker nicht in Ihre Steckdose passen,
wenden Sie sich bitte an einen Elektriker, um die technisch überholte
Steckdose zu erneuern.
10. Legen Sie das Netzstromkabel so, dass niemand darauftritt und achten Sie
darauf, dass es besonders am Netzstecker, an der Netzsteckdose und den
Austrittspunkten aus dem Gerät nicht abgeknickt wird.
11. Benutzen Sie nur vom Hersteller empfohlene Anbauteile und Zubehör.
12. Ziehen Sie den Netzstecker des Gerätes während eines Gewitters oder
wenn Sie es für längere Zeit nicht benutzen.
13. Überlassen Sie alle Wartungsarbeiten qualiziertem Fachpersonal.
Wartungsarbeiten sind erforderlich, wenn das Gerät in irgendeiner Weise
beschädigt wurde, wie z.B. in folgenden Situationen: Das Netzstromkabel
oder der Netzstecker sind beschädigt; Flüssigkeit oder Gegenstände sind in
Deutsch
das Gerät gekommen, und/oder das Gerät wurde Regen oder Feuchtigkeit
ausgesetzt; das Gerät funktioniert nicht ordnungsgemäß, zeigt einen
Leistungsabfall oder wurde fallen gelassen.
14. Überladen Sie die Wandsteckdose nicht. Benutzen Sie die Stromquelle nur
wie angezeigt.
15. Benutzen Sie Ersatzteile nur wie vom Hersteller vorgegeben.
16. Das Produkt darf nur an der Wand angebracht werden, sofern dies vom
Hersteller empfohlen wird.
17. Bitten Sie nach Beendigung einer jeden Wartungsarbeit oder Reparatur den
Kundendiensttechniker, Sicherheitsüberprüfungen durchzuführen.
44
Copyright © Lexibook 2008
Page 45

AUFSTELLEN
Auspacken des Gerätes
Stellen Sie beim Asupacken sicher, dass folgende Teile im Lieferumfang
enthalten sind:
1 x Digital Fotorahmen
1 x AC/DC Adapter
1 x Standhalterung
1 x Bedienungsanleitung
WARNUNG: Alle Verpackungsmaterialien, wie das Klebeband, Plastikfolien,
Drahtbänder und Etiketten, gehören nicht zu diesem Fotorahmen und sollten
weggeworfen werden.
Befestigung der Standhalterung
Befestigen Sie die Halterung in einem der zwei Schlitze auf der Rückseite
des Fotorahmens. Es gibt drei verschiedene Stellpositionen:
Landschaft:
Copyright © Lexibook 2008
Deutsch
45
Page 46

Porträt:
Wandmontage:
WandmontageÖffnungen
Deutsch
46
Copyright © Lexibook 2008
Page 47

Installation der SD/MMC-Karte
Schieben Sie Ihre SC/MMC-Karte in den Steckplatz auf der rechten Seite
des Fotorahmens, um Ihre Bilder anzeigen zu lassen. Achten Sie darauf,
dass Sie die Karte richtig herum einschieben.
Stromverbindung
Verbinden Sie den Fotorahmen mit Hilfe des AC/DC Adapters
(Wechselstrom 100V-240V/Gleichstrom 12V) mit einer Netzsteckdose
(der Gleichstrom-Eingang bendet sich auf der rechten Seite der
Rahmenrückseite).
Hinweis:
• Entfernen Sie bitte die Statik-Folie von dem LC-Display, bevor Sie das
Produkt zum ersten Mal benutzen.
• Bitte schalten Sie das Gerät aus, bevor Sie etwaige Verbindungen
herstellen.
• Wenn das Gerät nicht ordnungsgemäß funktioniert oder einen
elektrostatischen Schock erhält, schalten Sie es aus und dann wieder ein.
Sollte dies nicht das gewünschte Ergebnis erzielen, ziehen Sie bitte den
AC/DC Adapter aus der Netzsteckdose und stecken Sie ihn wieder ein.
PRODUKTMERKMALE
1 2 3 4 5 6 7 8
1. WIEDERGABE/PAUSE Taste
2. MENÜ-Taste
3. ZURÜCK TASTE
4. WEITER TASTE
5. INTERVALL-Taste
Copyright © Lexibook 2008
9
10
Deutsch
6. MODUS-Taste
7. WINKEL-Taste
8. EIN-/AUS-Taste
9. DC-Eingang (12V)
10. SD/MMC -Steckplatz
47
Page 48

BENUTZUNG DES DIGITAL FOTORAHMENS
In diesem Abschnitt wird erklärt, wie Sie den Digital Fotorahmen benutzen.
Bitte lesen Sie die folgenden Anleitungen, um alles über seine Funktionen zu
erfahren.
Inbetriebnahme
1. Entfernen Sie bitte die Statik-Folie von dem LC-Display, bevor Sie das
Produkt zum ersten Mal benutzen.
2. Speichern Sie Bilder auf einer SD/MMC-Karte und schieben Sie diese in
den SD/MMC-Steckplatz auf der rechten Seite des Bilderrahmens.
Bilder anzeigen
1. Drücken Sie die “EIN-/AUS-” Taste, um den Fotorahmen ein- oder
auszuschalten.
2. Der Fotorahmen beginnt automatisch eine Diashow der auf der SD/
MMC-Karte gespeicherten Bilder zu zeigen.
3. Drücken Sie die „WIEDERGABE/PAUSE”
Diashow zu unterbrechen. Drücken Sie die Taste noch einmal, um die
Diashow weiter laufen zu lassen.
4. Um das vorherige Bild anzuzeigen, halten Sie die ZURÜCK
mindestens 2 Sekunden heruntergedrückt und lassen Sie sie dann los.
5. Um das nächste Bild anzuzeigen, halten Sie die WEITER
mindestens 2 Sekunden heruntergedrückt und lassen Sie sie dann los.
Warnung: Es wird empfohlen, Bilder mit einer Maximalgröße von 500
KB zu benutzen, um eine optimale Leistung des Digital Fotorahmens zu
gewährleisten. Größere Bilder verlangsamen die Ladezeiten.
Taste einmal, um die
Taste für
Taste für
Bildeinstellungen
1. Drücken Sie die “MENÜ” Taste, um in das Bildeinstellungen-Menü zu
Deutsch
gelangen.
2. Um “Brightness” (Helligkeit), “Contrast” (Kontrast), “Colours” (Farbe)
oder “Language” (Sprache) auszuwählen, halten Sie die “MENÜ” Taste
für mindestens 2 Sekunden heruntergedrückt und lassen Sie sie dann
los (wiederholen Sie den Vorgang, um die gewünschte Einstellung
auszuwählen).
3. Mit den
vermindern und die gewünschte Sprache auswählen.
4. Um Ihre Einstellungen zu speichern und das Menü zu verlassen, drücken
Sie die “MENÜ” Taste.
48
und Tasten können Sie die Einstellungen verstärken oder
Copyright © Lexibook 2008
Page 49

Anzeigeintervall-Einstellungen für die Diashow
Drücken Sie mehrmals die “INTERVALL” Taste, um das Anzeigeintervall für
die Diashow einzustellen: 5Sek/15Sek/30Sek/45Sek/1Min/15Min/30Min/
45Min/1Std.
Anzeige-Einstellungen
Drücken Sie während der Diashow mehrmals die “MODUS” Taste, um
den Anzeige-Modus der Bilder zu ändern: “Pan Scan” (hohe Auösung,
Vollbildanzeige), “Height t” (Bildgröße wird an die Höhe des Displays
angepasst), “Width t” (Bildgröße wird an die Breite des Displays
angepasst), “Fill” (Bildgröße wird für eine Vollbildanzeige angepasst), “Auto
Fill” (4 :3 Anzeige), “Original” (Bild wird in seiner Originalgröße angezeigt).
Betrachtungswinkel-Einstellungen
Drücken Sie während der Diashow mehrmals die „WINKEL” Taste, um den
Betrachtungswinkel einzustellen: 90°, 180°, 270 ° oder „Keine Drehung”.
TECHNISCHE DATEN
Display
Auösung
Helligkeit
Kontrast
Betrachtungswinkel
Reaktionszeit
Displaygröße-Modus
Diashow-Anzeigeintervalle
Dateiformat
Auösung
Stromversorgung
Stromverbrauch
Temperatur
Abmessungen
Gewicht
Copyright © Lexibook 2008
6” (15.24 cm)
520 x 288
350 cd/m2
300
60/60/50/40(CR≥10)
30ms
16 :9
5Sek/15Sek/30Sek/45Sek/1Min/
15Min/30Min/45Min/1Std
JPEG
5,0 Mpixel
Wechselstrom 100V-240V/
Gleichstrom 12V
6W
Betrieb -20°C bis 65°C
Lagerung -30°C bis 75°C
231(L) x 160(W) x 36(H) mm
0,4Kg
Deutsch
49
Page 50

PFLEGE
Um der Gefahr eines Stromschlags oder Feuers vorzubeugen, trennen
Sie das Gerät von der Wechselstrom-Stromquelle, wenn Sie es reinigen.
Das Oberächen-Finish Ihres Gerätes kann mit einem Staubtuch gereinigt
werden und wie andere Möbelstücke gepegt werden. Reinigen Sie das
Äußere des Gerätes mit einem weichen, sauberen Tuch, das mit klarem,
lauwarmem Wasser angefeuchtet ist. Seien Sie beim Reinigen und
Abwischen der Plastikteile vorsichtig. Eine milde Seife und ein feuchtes Tuch
können zum Reinigen der Vorderseite benutzt werden.
GARANTIE
HINWEIS: Bitte bewahren Sie diese Bedienungsanleitung auf, da sie
wichtige Informationen enthält. Dieses Produkt ist mit unserer 2-JahresGarantie versehen.
Bei Beanstandungen, die unter diese Garantie fallen oder sollten Sie den
Kundendienst benötigen, wenden Sie sich bitte an Ihren Händler und legen
Sie einen gültigen Kaufbeleg vor. Unsere Garantie deckt alle Material- und
Verarbeitungsmängel ab, mit Ausnahme jeglicher Verschleißerscheinungen,
die aus der Nichtbeachtung der Bedienungsanleitung resultieren oder durch
jedwede fahrlässige Handlung an diesem Produkt verursacht wurden (wie
demontieren, Hitze oder Feuchtigkeit aussetzen, usw.). Es wird empfohlen,
die Verpackung für etwaige zukünftige Bezugnahmen aufzubewahren.
Da wir uns stets bemühen, unseren Service weiter zu verbessern, könnte es
sein, dass wir an den Produktfarben und Produktausführungen, wie sie auf
der Verpackung abgebildet sind, Veränderungen vornehmen.
Referenz: DF700 Series
©2008 Marvel Characters, Inc.
©2008 Barbie, Inc. All rights Reserved.
©2008 LEXIBOOK®
Entworfen und entwickelt in Europa – hergestellt in China
Deutsch
Lexibook Deutschland - Service-Hotline/Kundendienst
Tel. 01805 010931(0,14 Euro/Minute)
E-Mail: savcomfr@lexibook.com
http://www.lexibook.com
Hinweise zum Umweltschutz
Alt-Elektrogeräte sind Wertstoffe, sie gehören daher nicht in den Hausmüll!
Wir möchten Sie daher bitten, uns mit Ihrem aktiven Beitrag bei der
Ressourcenschonung und beim Umweltschutz zu unterstützen und dieses Gerät
bei den (falls vorhanden) eingerichteten Rücknahmestellen abzugeben.
50
Copyright © Lexibook 2008
Page 51

VEILIGHEIDSINSTRUCTIES
LET OP GEVAAR
VOOR ELECTRISCH SCHOK
NIET OPENEN
VOORZICHTIG: OM HET RISICO OP EEN ELEKTRISCHE SCHOK TE
VERMINDEREN, DIENT U DE COVER (OF ACHTERKANT) NIET TE
VERWIJDEREN. ER ZIJN GEEN ONDERDELEN DIE BRUIKBAAR ZIJN
VOOR DE GEBRUIKER. LAAT HET ONDERHOUD OVER AAN BEVOEGD
PERSONEEL.
De grasche symbolen op de achtercover van de set betekenen het
volgende:
De bliksemits met een pijlpunt symbool in een gelijkzijdige
driehoek is bedoeld om de gebruiker te waarschuwen
betreffende de aanwezigheid van ongeïsoleerde “gevaarlijke
voltage” in de behuizing van het product die van voldoende
grootte kan zijn om een risico op elektrische schok voor
personen in te houden.
Het uitroepteken in een gelijkzijdige driehoek is bedoeld om
de gebruiker te waarschuwen voor de aanwezigheid van
belangrijke werk- en onderhoudsinstructies in de literatuur die
bij dit toestel geleverd wordt.
WAARSCHUWING:
• Stel dit toestel niet bloot aan regen of vochtigheid om het risico op brand of
een elektrische schok te verminderen.
• Het apparaat zal niet blootgesteld worden aan gedruppel of bespatting
en er zullen geen voorwerpen gevuld met vloeistof, zoals vazen, op het
apparaat geplaatst worden.
• De netsnoer wordt gebruikt als het loskoppelingtoestel, het
loskoppelingtoestel zal voortdurend operationeel blijven.
• Om het apparaat volledig van de netsnoer los te koppelen, zou de netsnoer
volledig moeten losgekoppeld worden van de contactdoos.
Copyright © Lexibook 2008
51
Nederlands
Page 52

BELANGRIJKE VEILIGHEIDSINSTRUCTIES
1. Lees deze instructies.
2. Bewaar deze instructies.
3. Besteed aandacht aan alle waarschuwingen.
4. Volg alle instructies.
5. Gebruik dit apparaat niet nabij water.
6. Maak enkel schoon met een droge doek.
7. Blokkeer geen ventilatieopeningen. Installeer in overeenstemming met de
instructies van de fabrikant.
8. Plaats het toestel niet dichtbij warmtebronnen, zoals radiatoren, warme lucht
roosters, kachels of andere apparaten (inclusief versterkers) die warmte
produceren.
9. Vernietig het veiligheidsdoel van de gepolariseerde of aardingssnoer
niet. Een gepolariseerde snoer heeft uiteindes, waarvan één wijder is
dan de ander. Een aardingssnoer heeft twee uiteindes en een derde
aardingvertakking. Het wijdere uiteinde of de derde vertakking is voor uw
veiligheid. Als de meegeleverde snoer niet op uw contactdoos past, gelieve
dan een elektricien te raadplegen voor het vervangen van de verouderde
contactdoos.
10. Bescherm de stroomkabel tegen mensen die er overlopen of tegen het in
knijpen, in het bijzonder van stekkers, comfortstopcontacten, en het punt
waar ze vertrekken uit het apparaat.
11. Gebruik enkel de toebehoren/accessoires die duidelijk aangegeven werden
door de fabrikant.
12. Koppel het apparaat los tijdens bliksem of indien niet gebruikt gedurende een
langere periode.
13. Laat al het onderhoud over aan bevoegd onderhoudspersoneel. Onderhoud
is vereist als het apparaat op een bepaalde manier beschadigd is, zoals het
volgende: de elektrische voeding of stekker is beschadigd; er werd vloeistof
gemorst of er zijn voorwerpen gevallen op het toestel; en/of het toestel werd
blootgesteld aan regen of vochtigheid, werkt niet normaal, de prestatie ervan
is gewijzigd of verminderd.
14. Overbelast het stopcontact niet. Gebruik enkel de aangegeven
stroomtoevoer.
15. Gebruik enkel de vervangstukken die opgegeven werden door de fabrikant.
Nederlands
16. Het product mag enkel aan een muur bevestigd worden als dit aanbevolen is
door de fabrikant.
17. Bij het voltooien van enig onderhoud of herstellingen, doet u er goed aan de
onderhoudstechnicus te vragen enkele veiligheidscontroles uit te voeren.
52
Copyright © Lexibook 2008
Page 53

INSTALLATIE
Het toestel uitpakken
Let er bij het uitpakken op dat de volgende onderdelen inbegrepen zijn:
1 x digitaal fotokader
1 x AC/DC adapter
1 x statief voor kader
1 x handleiding
WAARSCHUWING: Alle verpakkingsmateriaal, zoals kleefband, plastic
folie, draadjes en etiketten is geen onderdeel van dit fotokader en moet
weggegooid worden.
Plaatsing van het statiefje
Bevestig het statiefje in één van de twee gleuven aan de achterzijde van het
fotokader. Er zijn drie verschillende posities:
Landschap:
Copyright © Lexibook 2008
53
Nederlands
Page 54

Portret:
Bevestigd aan de muur:
Gleuven voor
bevestiging
aan de muur
Nederlands
54
Copyright © Lexibook 2008
Page 55

SD/MMC kaartinstallatie
Om uw foto’s weer te geven, plaatst u uw SD/MMC kaart in de kaartgleuf
aan de rechterzijde van het fotokader. Zorg ervoor dat u de kaart in de juiste
richting geplaatst hebt.
Stroomverbinding
Gebruik de AC/DC adapter (AC100V-240V/DC12V) om het fotokader
te verbinden met een contactdoos (de DC invoer bevindt zich aan de
rechterzijde, aan de achterkant van het kader).
Opmerking:
• Alvorens dit product voor de eerste keer te gebruiken, gelieve het statische
label van het LCD scherm te verwijderen.
• Gelieve het toestel uit te schakelen alvorens aan te koppelen.
• Als het toestel een defect of een elektrostatische schok vertoont, dient u
het toestel in- en uit te schakelen. Indien dit geen effect blijkt te hebben,
koppelt u de AC/DC los van de hoofdadapter en koppelt u hem opnieuw
aan.
PRODUCTKENMERKEN
1 2 3 4 5 6 7 8
9
1. AFSPELEN/PAUZE knop
2. MENU knop
3. Vorige
4. Volgende
5. INTERVAL knop
Copyright © Lexibook 2008
knop
knop
10
6. MODUS knop
7. HOEK knop
8. POWER button
9. DC IN (12V)
10. SD/MMC kaartgleuf
55
Nederlands
Page 56

HET DIGITAAL FOTOKADER GEBRUIKEN
Cette seIn deze sectie wordt er uitgelegd hoe het digitaal fotokader te
gebruiken. Gelieve de volgende instructies te lezen om alle functies te
ontdekken.
Aan de slag
1. Alvorens dit product voor de eerste keer te gebruiken, dient u het
statische label van het LCD scherm te verwijderen.
2. Bewaar foto’s op een SD/MMC kaart en plaats hem in de SD/MMC
kaartgleuf aan de rechterkant van het kader.
Om uw foto’s weer te geven
1. Druk op de “POWER” knop om het fotokader in- en uit te schakelen.
2. Het fotokader zal automatisch de diavoorstelling starten van de foto’s die
opgeslagen staan op de SD/MMC kaart.
3. Druk eenmaal op de “AFSPELEN/PAUZE”
op pauze te zetten. Druk nogmaals op de knop om de weergave te
hervatten.
4. Om de vorige foto weer te geven, drukt u en houdt u de VORIGE
minstens 2 seconden ingedrukt, dan laat u hem los.
5. Om de volgende foto weer te geven, drukt u en houdt u de
VOLGENDE knop minstens 2 seconden ingedrukt, dan laat u hem los.
Waarschuwing: om een optimale prestatie van het digitaal fotokader te
verzekeren, is het aanbevolen foto’s te gebruiken met een maximum grootte
van 500 kb. Een grotere foto zal de laadtijden vertragen.
knop om de diavoorstelling
knop
Foto-instellingen
1. Druk op de “MENU” knop om het menu voor de foto-instellingen te
openen.
2. Om “Helderheid”, “Contrast”, “Kleur” of “Taal” te selecteren, drukt u op en
houdt u de “MENU” knop minstens 2 seconden ingedrukt en dan laat u
hem los (herhaal de procedure om de gewenste instelling te selecteren).
3. Gebruik de
en om de gewenste taal te selecteren.
4. Om uw instellingen te bewaren en het menu te verlaten, drukt u op de
“MENU” knop.
en knoppen om de instellingen te verhogen of verlagen
Nederlands
Instellingen voor diavoorstelling met tussenpozen
Druk herhaaldelijk op de “INTERVAL” knop om de gewenste tijd tussen
de dia’s te selecteren: 5 sec/15 sec/30 sec/45 sec/1 min/15 min/30 min/45
min/1u.
56
Copyright © Lexibook 2008
Page 57

Weergave-instellingen
Druk herhaaldelijk op de “MODUS” knop tijdens de diavoorstelling om de
weergavemodus van uw foto’s te wijzigen: “Pan Scan” (hoge resolutie,
volledige schermweergave), “Inpassen hoogte” (foto wordt van formaat
veranderd om in de hoogte van het scherm te passen), “Inpassen breedte”
(foto wordt van formaat veranderd om in de breedte van het scherm te
passen), “Uitvullen” (foto wordt van formaat veranderd om in een volledig
scherm te passen), “AUTO AANVULLEN” (4 :3 weergave), “Origineel” (foto
wordt weergegeven in zijn normale grootte).
Hoekinstellingen
Druk herhaaldelijk op de “HOEK” knop tijdens de diavoorstelling om de
hoekweergave in te stellen: 90°, 180°, 270 ° of “Geen rotatie”.
TECHNISCHE DETAILS
Weergave
Resolutie
Helderheid
Contrast
Weergave hoeken
Reactietijd
Modus schermgrootte
Tijd tussen dia’s
Bestandstype
Fotogrootte
Stroomtoevoer
Verbruik
Temperatuur
Afmetingen
Gewicht
6” (15.24 cm)
520 x 288
350 cd/m2
300
60/60/50/40(CR≥10)
30 ms
16 :9
5 sec/15 sec/30 sec /45 sec/1 min/15
min /30 min/45 min/1u
JPEG
5.0 Megapixels
AC100V-240V/DC12V
6W
In werking -20°C tot 65°C
Opslag -30°C tot 75°C
231(L) x 160(B) x 36(H) mm
0,4 kg
Copyright © Lexibook 2008
57
Nederlands
Page 58

ONDERHOUD
Om brand of schokgevaar te vermijden, dient u uw toestel los te koppelen
van de AC stroomtoevoer bij het schoonmaken. De afwerking op uw toestel
kan schoongemaakt worden met een stofdoek en onderhouden worden als
andere meubels. Gebruik een zachte, propere doek, die lichtjes bevochtigd
is met puur, lauw water om de buitenkant van het apparaat schoon te
maken. Wees voorzichtig bij het schoonmaken en wrijven van de plastic
onderdelen. Zachte zeep en een vochtige doek kunnen gebruikt worden
voor het voorpaneel.
GARANTIE
OPMERKING: Gelieve deze handleiding te bewaren, het bevat belangrijke
informatie.
Dit product is gedekt door onze garantie van 2 jaar. Gelieve voor een klacht
die onder de garantie valt of een dienst-na-verkoop kwestie uw verdeler te
contacteren en een geldig aankoopbewijs voor te leggen. Onze garantie
dekt productiefouten en uitvoeringsdefecten, met de uitzondering van enige
beschadiging door het niet naleven van de handleiding of het onvoorzichtig
behandelen van dit artikel (zoals het uit elkaar halen, blootstelling aan
hitte en vochtigheid, enz.). Het is aanbevolen de verpakking te bewaren
voor het geval u ze later nog nodig hebt. In een poging tot het voortdurend
verbeteren van onze diensten, is het mogelijk dat we een wijziging in de
kleuren en details van het product zoals weergegeven op de verpakking
doorvoeren.
Referentie: DF700 Series
©2008 Marvel Characters, Inc.
©2008 Barbie, Inc. All rights Reserved.
©2008 LEXIBOOK®
Ontworpen en ontwikkeld in Europa – Gemaakt in China
http://www.lexibook.com
Richtlijnen voor milieubescherming
Gebruikte elektronische apparaten horen niet thuis in het huisafval ! Wij vragen
u daarom een bijdrage aan de bescherming van ons milieu te leveren en dit
apparaat op de voorziene verzamelplaatsen af te geven.
Nederlands
58
IM Code: DF700SERIESIM0118
Copyright © Lexibook 2008
Page 59

YOUR OPINION MATTERS / VOTRE AVIS COMPTE
Help us make produ cts bette r th an ever! Plea se fill o ut the follow ing form in E nglish or in French, a nd return it to / Aidez-nous à rendre nos
produits encore meilleurs! Merci de bien vouloir remplir ce coupon en français ou en anglais et de nous le retourner à l’adresse suivante :
Name and refer ence of produc t purchas ed / Nom et référence du produit acheté :
Date of purcha se / Date de l’achat : ____/_____/_____
Store / Enseigne :
Birth Date of the u ser / Date de naissance de l’utilisateur de ce produit : ____/_____/_____
What is your overa ll impres sion of the p rodu ct? / Vous trouvez le produit globalement :
Very satisfactory/Très satisfaisant
Satis factory/Satisfaisant
Please feel free to leave your comments here / Vous pouvez à présent utiliser l’espace suivant pour nous donner vos remarques :
Find all our n ew pr oducts / Retrouvez toute notre actualité: http://www.lexibook.com
First name/Prénom :
Last name/Nom de famille :
Addre ss/Adresse :
Zip c ode/Code Postal :
Country/Pays :
Phone /Téléphone :
Email :
Avera ge/Moyen
Disap pointing/Décevant Very disappointing /Très décevant
LEXIBOOK S.A,
Mon avis compte
2, avenue de Scandinavie,
91953 Courtaboeuf Cedex
FRANCE
City/Ville :
Conformément aux articles 34 et suivants de la loi « Informatique et Libertés » du 6 janvier 1978, vous disposez d'un droit d'accès, de modification,
de rectification et de suppression des données qui vous concernent. Vous pouvez l'exercer sur simple demande à notre adresse. Si vous ne souhaitez
pas que ces données soient utilisées à des fins de prospection commerciale, veuillez cocher ici :
Page 60

LEXIBOOK S.A,
Mon avis compte,
2, avenue de Scandinavie,
91953 Courtaboeuf Cedex
FRANCE
Affranchir
ici
 Loading...