

Page 1

Model: LV110WP-3X
Water Filter Pitcher with Extra Filters
Questions or Concerns?
Please contact us Mon–Fri, 9:00 am–5:00 pm PST/PDT
at [email protected] or at (888) 726-8520.
READ AND SAVE THESE
INSTRUCTIONS
1
Page 2

Page 3

THANK YOU FOR PURCHASING THE
LV110WP3X WATER FILTER PITCHER
WITH EXTRA FILTERS BY LEVOIT.
If you have any questions or concerns,
please reach out to us at [email protected].
We hope you enjoy your new pitcher!
SHARE THE LEVOIT LOVE
Find @LevoitLifestyle on social media
for wellness + style inspiration. We
make every space mindful and chic.
@LevoitLifestyle
#LevoitLove • #LevoitLifestyle
3
Page 4

TABLE OF CONTENTS
Package Contents
Safety Information
Getting to Know Your Pitcher
Getting Started
• Restrictor Cap Settings
• Rubber Gasket
Using Your Pitcher
Filter Details
Filter Change Indicator
Care & Maintenance
Warranty Information
Customer Support
PACKAGE CONTENTS
1 x Water Filter Pitcher
4 x Filter Cartridges
1 x User Manual
4
4
5
6
7
7
8
8
9
10
11
12
13
Page 5

SAFETY INFORMATION
Follow all safety guidelines. Read all instructions before using.
• Do not use until all water has
been filtered, to avoid pouring out
unfiltered water.
• Only filter tap water. This pitcher
is not designed to filter water from
other sources (such as river water).
• The filter cartridge may become
clogged and may not work
correctly if filtering liquids other
than tap water.
• Do not filter hot water (over 95°F /
35°C). This may damage the filter
and may release contaminants.
• Use filtered water within 1–2 days.
Bacteria may grow in the water if
left longer.
• Keep the pitcher closed, and store
in the refrigerator when not using.
• Do not expose the pitcher to direct
sunlight.
5
Page 6
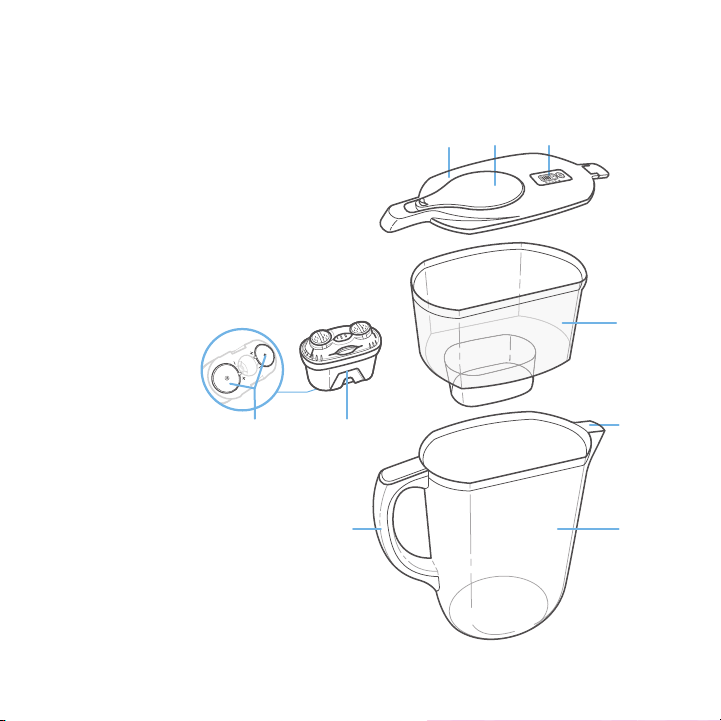
GETTING TO KNOW YOUR PITCHER
Your water pitcher filters out
chlorine and impurities in your
water to improve taste and smell,
reduce water hardness, and
protect your health. The pitcher
can hold up to 2.5 liters / 10 US
cups. All pitcher materials are
food-grade plastic.
BOTTOM
A
C
B
D
A. Lid
B. Water Inlet
C. Filter Change Indicator
D. Filter Chamber
E. Water Outlet
F. Pitcher
G. Handle
H. Filter Cartridge
I. Filter Restrictor Caps
6
I
H
G
E
F
Page 7
GETTING STARTED
1. Remove all packaging from the
water pitcher and filter cartridge.
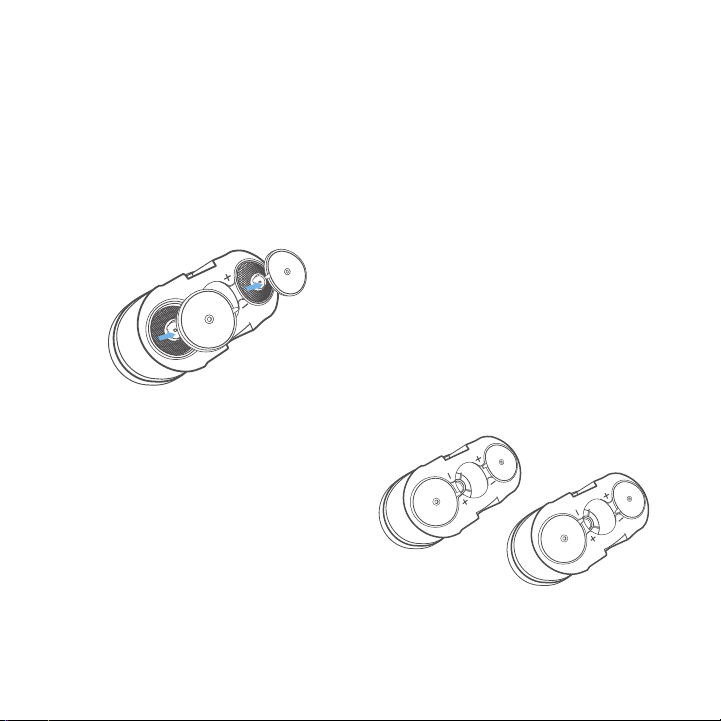
2. Remove the restrictor caps from
the bottom of the filter. [Figure 1.1]
Figure 1.1
3. Soak the filter cartridge in clean
tap water (submerged completely)
for 15 minutes.
NOTE:
There may be carbon dust in
the water while rinsing or soaking the
filter. This is normal.
4. Rinse the filter cartridge thoroughly
for 10 seconds under running
water.
5. Replace the restrictor caps on the
bottom of the filter.
Restrictor Cap Settings
• Place the restrictor cap in the
“+” position if you want water to
filter faster, or in the “-” position
if you want water to filter more
thoroughly. [Figure 1.2]
+ position
- position
Figure 1.2
7
Page 8
GETTING STARTED CONT.
• You can remove the caps
completely if you want water to
filter as fast as possible.
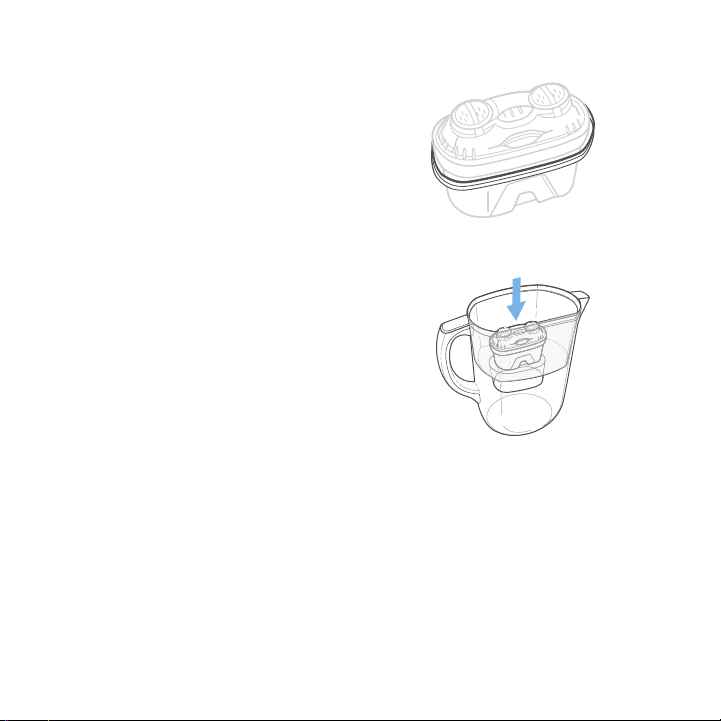
Rubber Gasket
• Make sure the rubber gasket is
correctly in place on the filter
cartridge. If the rubber gasket
has come loose, press into place,
making sure the ridge is facing up.
[Figure 1.3]
6. Place the filter cartridge into the
filter chamber. Press the cartridge
into place as firmly as possible to
prevent leaks. [Figure 1.4]
7. Fill the pitcher with cold tap water.
Discard the filtered water. Refill and
discard the water two more times.
8. Reset the filter indicator (see Filter
Change Indicator, page 10). Your
filter is ready to use.
Figure 1.3
Figure 1.4
USING YOUR PITCHER
1. Fill the filter chamber with cold tap
water.
2. Allow all water to filter into the
pitcher before pouring.
8
Page 9
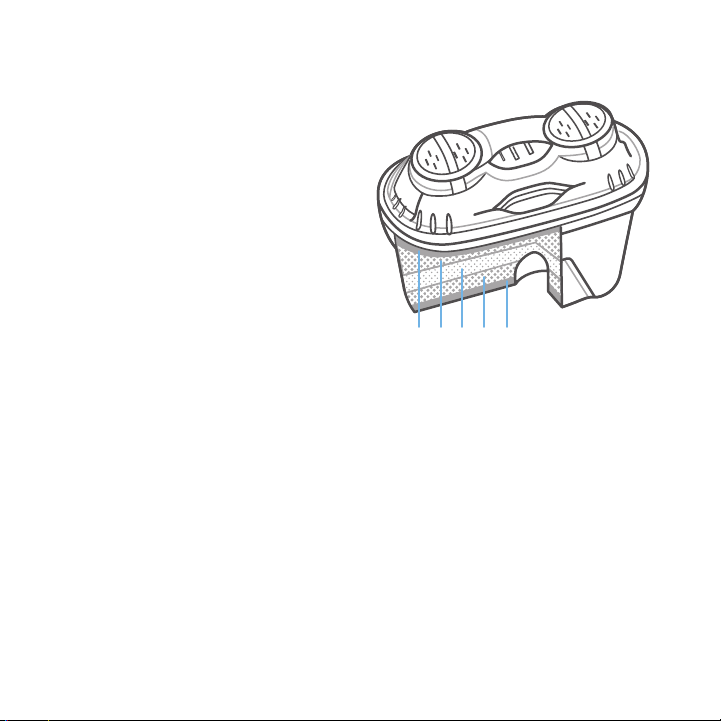
FILTER DETAILS
A. Upper Micro Net
• Removes particles suspended
in the water, such as sand, rust,
sludge, and organic matter.
B. Activated Carbon
• Uses high-quality activated
carbon for excellent filtration.
• Removes chlorine taste and
odor eectively.
• Removes pesticides (including
Endrin) and residual pollutants.
• Improves taste of water.
C. Ion-Exchange Resin
• Removes heavy metals (such as
lead, cadmium, mercury, copper,
and aluminum).
• Removes minerals from water to
soften it, leaving a percentage
of beneficial minerals
behind (such as calcium and
magnesium).
1 2 3 2 4
D. Lower Micro Net
• Final filtration removes any
remaining unwanted particles in
the water.
9
Page 10
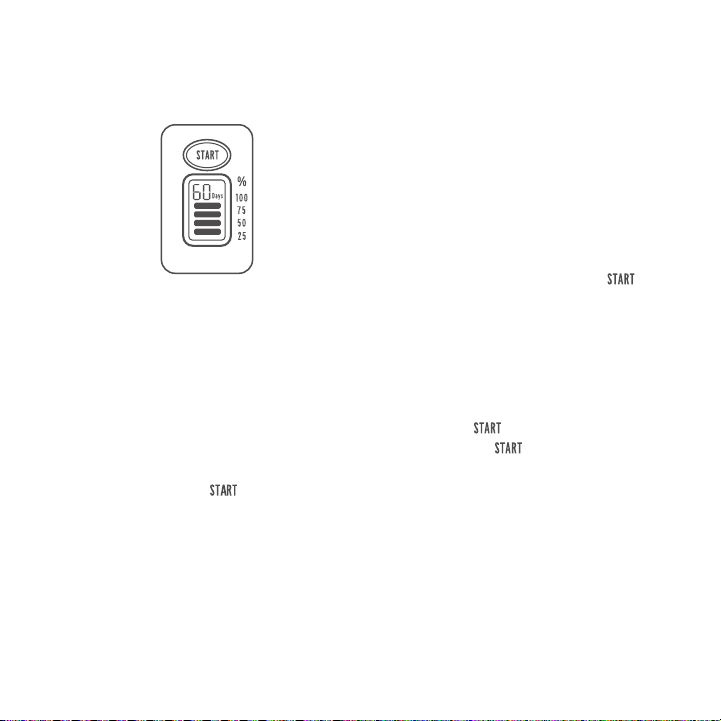
FILTER CHANGE INDICATOR
• The lid has a timer and indicator
to remind you to change the filter.
Changing the filter is important to
keep your water purified.
• The filter cartridge should be
replaced after 60 days, or after
filtering 150 L / 40 US gal of water.
1. Press and hold
or until the display turns on.
2. Use the indicator as a reminder to
replace the filters. The number at
the top shows the days remaining
until you need to change the filter,
for 3 seconds
and the 4 bars show the remaining
percentage of filter life (100%, 75%,
50%, and 25%).
3. Replace the filter when the number
of days reads “0”. All display bars
will reappear and blink.
4. To reset the filter timer, press
firmly for 8 seconds. The indicator
will stop blinking, and will reset.
Remember to reset the indicator
after replacing the filter.
5. To pause the filter timer and hide
the filter indicator display, press
and hold
for 3 seconds.
Release the button. The
display will go blank and the timer
will be paused.
NOTE: Pause the filter timer when you
won’t be using your water pitcher for
a long period of time. Remember to
resume the filter timer when you start
using your water pitcher again.
10
Page 11

FILTER CHANGE
INDICATOR CONT.
6. To resume the filter timer and show
the display, press and hold
again for 3 seconds.
NOTE:
• The filter cartridge cannot be
cleaned, only replaced.
• Only use Levoit LV110WP-RF
replacement filter cartridges for
this pitcher.
• To buy replacement filters, visit
Levoit’s online store. Go to
levoit.com for more information.
CARE & MAINTENANCE
• Clean the pitcher regularly.
• Wash all parts except the timer
and filter with mild detergent and
a soft cloth. Do not use abrasive
cleaners. Do not expose the filter
to detergent.
• If necessary, wipe the timer with
a wet cloth. Do not immerse the
timer in water or place under
running water.
• Rinse thoroughly.
• When storing the pitcher for a
long period of time, remove the
filter from the pitcher and store
separately.
NOTE: If water takes an unusually long
time to filter, the filter cartridge may
have air trapped in it. Take the filter out
and shake it, then place the filter back
into the pitcher.
11
Page 12

WARRANTY INFORMATION
12
Product Name Water Filter Pitcher
Default Warranty Period 1 year
For your own reference, we strongly
recommend that you record your order ID
and date of purchase.
TERMS & POLICY
Arovast Corporation warrants all products
to be of the highest quality in material,
craftsmanship, and service, eective from
the date of purchase to the end of the
warranty period.
Arovast Corporation will replace any product
found to be defective due to manufacturer
flaws based on eligibility. Refunds are
available within the first 30 days of purchase.
Refunds are only available to the original
purchaser of the product. This warranty
extends only to personal use and does not
extend to any product that has been used
for commercial, rental, or any other use in
which the product is not intended for. There
are no warranties other than the warranties
expressly set forth with each product.
with Extra Filters
Model LV110WP-3X
This warranty is non-transferrable. Arovast
Corporation is not responsible in any way
for any damages, losses, or inconveniences
caused by equipment failure or by user
negligence, abuse, or use noncompliant
with the user manual or any additional safety
or use warnings included in the product
packaging and manual.
This warranty does not apply to the
following:
• Damage due to abuse, accident,
alteration, misuse, tampering, or
vandalism.
• Improper or inadequate maintenance.
• Damage in return transit.
• Unsupervised use by children under 18
years of age.
Arovast Corporation and its subsidiaries
assume no liability for damage caused
by the use of the product other than for
its intended use or as instructed in the
user manual. Some states do not allow
this exclusion or limitation of incidental
or consequential losses so the foregoing
disclaimer may not apply to you. This
warranty gives you specific legal rights and
you may also have other rights which may
vary from state to state.
Page 13

ALL EXPRESSED AND IMPLIED
WARRANTIES, INCLUDING THE
WARRANTY OF MERCHANTABILITY, ARE
LIMITED TO THE PERIOD OF THE LIMITED
WARRANTY.
Additional 1-Year Warranty
You can extend your 1-year warranty by an
additional year. Log onto
www.levoit.com/warranty to register your
new product for the extended warranty.
Please fill out all required fields and include
your order ID, place of purchase, and
purchase date, if applicable.
Defective Products & Returns
If you discover your product is defective
within the specified warranty period, please
contact Customer Support via
[email protected] with a copy of your
invoice and order ID. DO NOT dispose of
your product before contacting us. Once
Customer Support has approved your
request, please return the product with a
copy of the invoice or order ID.
CUSTOMER SUPPORT
If you encounter any issues or have
any questions regarding your new
product, feel free to contact our helpful
Customer Support Team.
Arovast Corporation
1202 N. Miller St., Suite A
Anaheim, CA 92806
Email: [email protected]
Toll-Free: (888) 726-8520
Support Hours
Mon–Fri, 9:00 am–5:00 pm PST/PDT
*Please have your order invoice and order
ID ready before contacting Customer
Support.
13
Page 14

Page 15

Connect with us @LevoitLifestyle
15
Page 16

levoit.com
JJ0719CY-M1_0719LV110WP-3X
 Loading...