

Page 1
USER MANUAL
Ultrasonic Top-Fill Cool Mist
2-in-1 Humidifier & Diuser
Model: Dual 100
Questions or Concerns?
Please contact us Mon–Fri, 9:00 am–5:00 pm PST/PDT
at [email protected] or at (888) 726-8520.
Page 2

Thank you for purchasing the
DUAL 100 ULTRASONIC
TOPFILL COOL MIST
2IN1 HUMIDIFIER &
DIFFUSER BY LEVOIT.
If you have any questions or concerns, please
reach out to us at [email protected].
We hope you enjoy your new 2-in-1
Humidifier & Diuser!
Share the Levoit Love
Find @LevoitLifestyle on social media for
wellness + style inspiration. We make every
space mindful and chic.
@LevoitLifestyle
#LevoitLove • #LevoitLifestyle
2
Page 3

Table of Contents
Package Contents
Package Contents
Specifications
Safety Information
Getting to Know Your
2-in-1 Humidifier & Diuser
Getting Started
Using Your 2-in-1 Humidifier & Diuser
Keeping Things Clean
Troubleshooting
Warranty Information
Customer Support
10
12
13
3
3
4
5
6
7
8
1 x 2-in-1 Humidifier & Diuser
1 x User Manual
Specifications
Power Supply AC 100–240V, 50/60Hz
Rated Power 24W
Water Tank
Capacity
Run Time 8–20 hours
Noise Level ≤ 28dB
Eective
Range
Dimensions 7 x 7 x 10.6 in /
0.48 gal / 1.8 L
Note: The humidifier will
be able to run for a longer
or shorter time depending
on the environmental
temperature and humidity.
107–260 ft² / 10–24 m²
17.6 x 17.6 x 27.1 cm
3
Page 4

SAFETY INFORMATION
To reduce the risk of fire, electric shock, or other injury, follow all instructions and
safety guidelines.
General Safety
• Only use the humidifier as described in
this manual.
• Place the humidifier and cord so that it
will not be knocked over. Do not place
near large pieces of furniture or in hightrac areas.
• When not in use, turn the humidifier
o and disconnect from power by
removing the plug from the outlet.
• Do not use the humidifier in
wet environments.
• Keep the humidifier out of reach
from children.
• To avoid risk of electric shock, always
unplug the humidifier from the power
outlet before cleaning it or detaching
the water tank from the base.
• Always make sure the humidifier
is placed on a flat, level surface
before operation.
• Do not place the humidifier near
sources of heat, such as stovetops,
ovens, or radiators.
• Do not place the humidifier directly on
floors, carpets, or rugs. Only place on
water-resistant surfaces.
• Do not place foreign objects into the
humidifier’s base or water tank.
• Do not use attachments that are
not recommended by Levoit for
the humidifier.
• Do not cover the mist outlet while the
humidifier is on. Doing so may damage
the humidifier.
• Do not allow water or other liquids
inside the air vent.
• Remove the water tank from the base
before moving the humidifier.
• Do not immerse the humidifier base,
power cord, or plug in water.
• Always allow the humidifier to
completely cool before cleaning.
• Do not use detergents to clean
the humidifier. Only use distilled
white vinegar.
• If the humidifier is damaged or is not
functioning properly, stop using it and
contact Customer Support immediately
(see page 13).
• Not for commercial use. Household
use only.
Plug and Cord
• Do not handle the power cord or plug
with wet hands. Keep the plug and
power cord away from liquids.
• Ensure that the plug fits properly into a
polarized socket.
• The humidifier has a polarized plug (one
prong is wider than the other), which
fits into a polarized outlet only one way.
This is a safety feature to reduce the
risk of electric shock. If the plug does
not fit, reverse the plug. If it still does not
fit, do not use the plug in that outlet. Do
not bypass this safety feature.
READ AND SAVE
THESE INSTRUCTIONS
4
Page 5
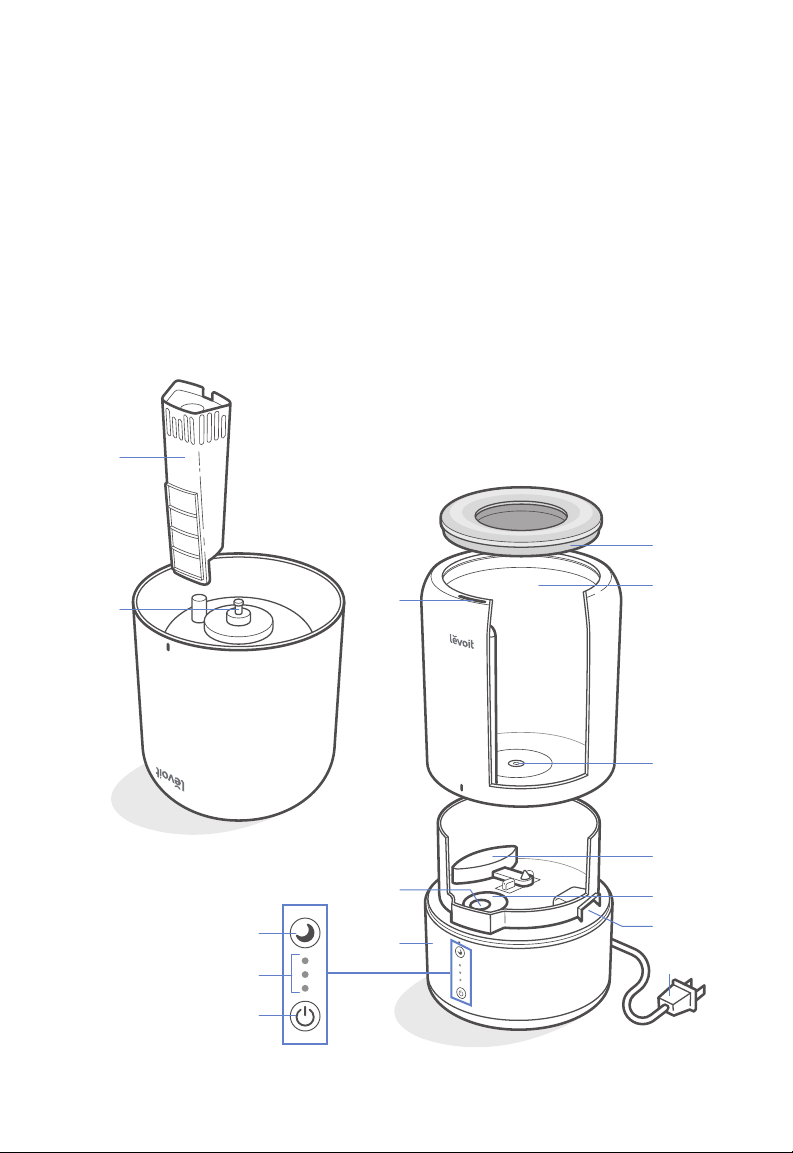
GETTING TO KNOW YOUR
2IN1 HUMIDIFIER & DIFFUSER
A. Mist Tube
B. Water Outlet
C. Sleep Mode Button
D. Mist Level Indicators
E. Control Button
F. Mist Outlet
G. Transducer
H. Base
A
B
I. Top Cover
J. Water Tank
K. Sealing Ring
L. Float
M. Insulation Ring
N. Air Outlet
O. Power Cord
F
I
J
Water tank upside down
C
D
E
K
L
G
M
N
H
O
5
Page 6
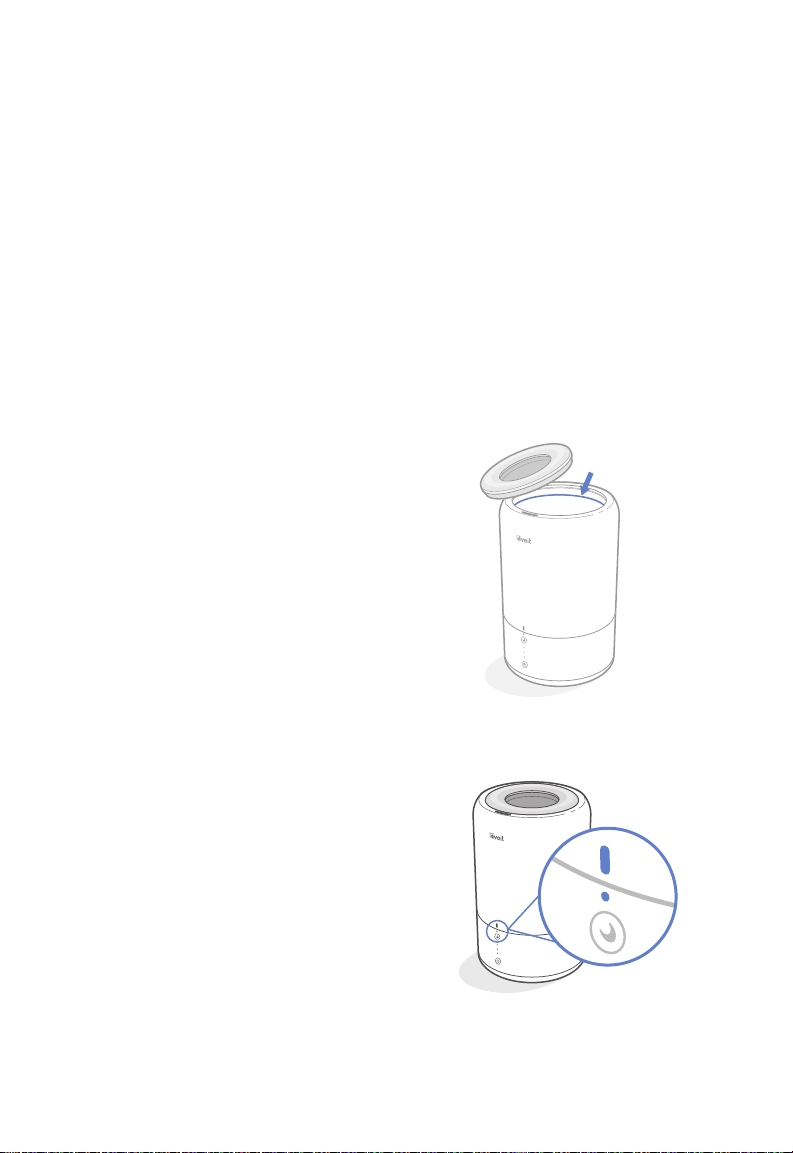
GETTING STARTED
1. Place the humidifier on a level, elevated,
and water-resistant surface, such as a
table or nightstand.
Note: Keep mist away from walls, furniture,
and appliances to prevent them from
getting wet.
2. Take the water tank o of the base and
remove all tape.
3. Remove the top cover from the
water tank. Fill the tank with at least
2 cups / 475 mL of cold or room
temperature filtered water.
Note:
• Only use filtered water in the
humidifier.
• Do not use hot water.
• Do not fill above the “MAX” line.
[Figure 1.1] Overfilling can cause
spilling and risk of electric shock.
• Do not add water through the mist
tube. This will damage the humidifier.
• When pouring water, never let water
get inside the air outlet (see Getting
to Know Your 2-in-1 Humidifier &
Diuser, page 5).
• If water gets inside the air outlet,
unplug the humidifier and pour out all
water. Let the humidifier rest in a wellventilated area for 24 hours. Do not
use again until completely dry.
4. Optionally, add 4–6 drops of essential
oil into the water tank.
Note: Only add essential oils into the
water tank. Do not add essential oils into
the base.
5. Make sure the tank is properly placed
on the base by aligning the indicator
marks [Figure 1.2]. Place the top cover
back onto the water tank.
6. Plug in. The humidifier will enter
standby mode.
MAX Line
Figure 1.1
Figure 1.2
6
Page 7
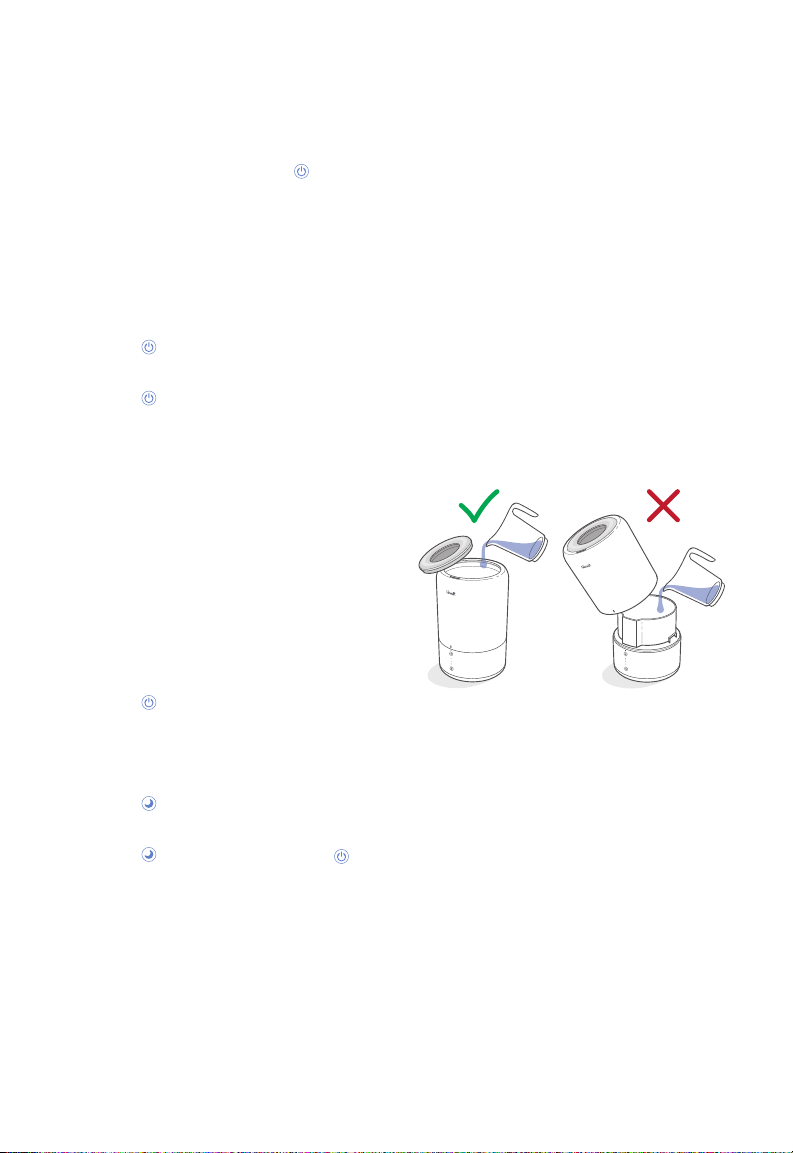
USING YOUR 2IN1 HUMIDIFIER & DIFFUSER
Note:
• If there is no water in the tank, the
humidifier will not turn on and will
blink. Fill the water tank (see Getting
Started, page 6).
• Keep the humidifier stable while using, or
water may spill.
Mist Level
1. Press once. The humidifier will start
on the low mist level.
2. Press several times to cycle through
mist levels (low, medium, high) and to
turn the humidifier o.
Intelligent Sleep Mode
Intelligent Sleep Mode turns o all display
lights and uses a humidity sensor to
automatically adjust the mist level to
maintain a 60% relative humidity (RH) while
you sleep.
1. Press to turn on the humidifier.
Note: The humidifier must be on to start
Sleep Mode.
Note:
• Excessive humidity can cause health
issues and mold growth. If the relative
humidity in your room is over 60%,
use the low mist setting or turn o
the humidifier.
• Do not pour water directly into the
base. This can cause the humidifier to
produce little to no mist. [Figure 2.1]
• Moving or shaking the humidifier can
cause too much water to flow into the
base. If the base has too much water,
pour some out.
Figure 2.1
2. Press to start Sleep Mode. After 5
seconds, all display lights will turn o.
3. Press a second time (or press )
to cancel Sleep Mode. The humidifier
will go back to the previously set mist
level.
7
Page 8

KEEPING THINGS CLEAN
Note:
• Change the water every day to avoid
bacteria growth.
• Regularly use a tissue or cloth to clean the
mist outlet.
• Do not use detergents to clean the
humidifier.
• Never submerge the base in water.
• Deep clean before storing.
• If not using the humidifier regularly, do not
leave water inside. Dry and store instead.
Basic Cleaning
You should clean your humidifier every
3 days.
1. Unplug the humidifier.
2. Remove and wash the top cover.
3. Remove the water tank. Pour out any
remaining water from the tank and base.
Note: Do not let water inside the air outlet
or near the indicators.
4. Rinse the tank and base with cool,
clean water.
5. To remove any scale buildup inside the
water tank or base, soak with distilled
white vinegar and wipe with a cloth and
cotton swab.
6. Rinse all parts and pour out
remaining water.
7. Dry all parts with a cloth. Make sure
all parts are completely dry before
reassembling or storing.
8
Page 9
KEEPING THINGS CLEAN (CONT.)
Deep Cleaning
Deep clean the humidifier every 2 weeks
and before and after storing it for long
periods of time. You should also deep clean
if there is any mold or scale buildup inside
the water tank or base.
1. Unplug the humidifier.
2. Remove and wash the top cover.
3. Remove the water tank and pour out
any remaining water.
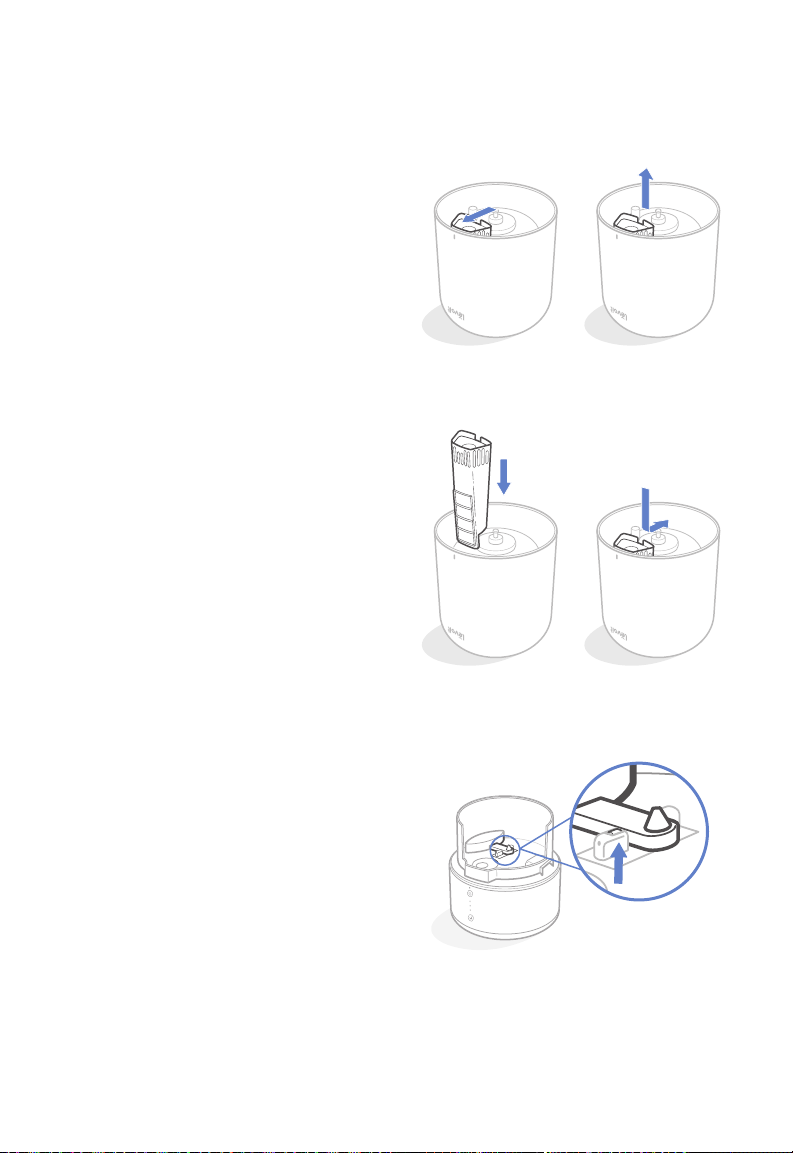
4. Flip the tank over and remove the
mist tube from the tank. Pull the mist
tube away from the center to detach it
[Figure 3.1], then lift it out. [Figure 3.2]
5. Pour out any remaining water in
the base.
Note: Do not let water inside the air outlet
or near the indicators.
6. If you used essential oils in the
humidifier, fill the water tank and the
base with distilled white vinegar and
allow to soak.
Figure 3.1
Figure 3.2
Snaps into place
Figure 3.4Figure 3.3
Note: Make sure to clean the silicone
sealing ring.
7. Rinse all parts and dry with a cloth.
Make sure all parts are completely dry
before reassembling or storing.
a. Put the mist tube into place inside
the water tank. First, align the top
of the mist tube with the mist outlet.
[Figure 3.3] Then, press it down
and towards the center of the water
tank until the tab snaps into place.
[Figure 3.4]
b. Make sure the float is securely in
place. [Figure 3.5] If the float is
not in place, water may spill out of
the base.
Figure 3.5
9
Page 10

TROUBLESHOOTING
Problem Possible Solution
No mist comes out, or the
buttons do not work.
Only a small amount of mist
comes out of the mist outlet.
Humidifier runs out of water
too quickly.
Humidifier produces an
unusual smell.
Unplug the humidifier and plug it back in. Press to turn
the humidifier on.
Add at least 2 cups / 475 mL of filtered water to the
water tank.
Press to use a higher mist setting.
There may be mineral buildup inside the base. Clean the
transducer with a cleaning brush and white vinegar (see
Keeping Things Clean, page 8).
Water may be dirty or has been sitting in the tank for a
long period of time. Clean the humidifier (see Keeping
Things Clean, page 8) and refill with clean water.
Make sure the air outlet is not blocked (see Getting to
Know Your 2-in-1 Humidifier & Diuser, page 5).
The humidifier uses up water based on the environmental
temperature and humidity. If your environment is cold and/
or dry, the humidifier will run out of water faster.
If the humidifier is new, remove the top cover, and place
the water tank in a cool, dry place for 12 hours.
Water may be dirty or has been sitting in the tank for a
long period of time. Clean the humidifier (see Keeping
Things Clean, page 8) and refill with clean water.
If essential oils were diused, deep clean with white
vinegar (see Keeping Things Clean, page 8), and allow
the humidifier to dry.
White dust appears around
the humidifier.
10
This is caused by using water with high mineral content.
Use filtered water to fill the humidifier.
Clean the humidifier (see Keeping Things Clean, page 8).
Page 11

TROUBLESHOOTING (CONT.)
Problem Possible Solution
Water leaks from
the humidifier.
If your problem is not listed, please contact Customer Support (see page 13).
Make sure the tank is properly placed on the base by
aligning the indicator marks (see page 6).
Make sure the sealing ring inside the water tank is securely
in place. If necessary, clean the sealing ring and make sure it
can open and close normally.
Make sure the float is correctly installed and securely in
place (see page 9).
11
Page 12

WARRANTY INFORMATION
Product Ultrasonic Top-Fill Cool Mist
Default Warranty
For your own reference, we strongly recommend
that you record your order ID and date
Order ID
Date of Purchase
2-in-1 Humidifier & Diuser
Model Dual 100
1 year
Period
of purchase.
Terms & Policy
Arovast Corporation warrants all products to be of
the highest quality in material, craftsmanship, and
service, eective from the date of purchase to the
end of the warranty period.
Arovast Corporation will replace any product
found to be defective due to manufacturer flaws
based on eligibility. Refunds are available within
the first 30 days of purchase. Refunds are only
available to the original purchaser of the product.
This warranty extends only to personal use and
does not extend to any product that has been
used for commercial, rental, or any other use in
which the product is not intended for. There are
no warranties other than the warranties expressly
set forth with each product.
This warranty is non-transferrable. Arovast
Corporation is not responsible in any way for any
damages, losses, or inconveniences caused by
equipment failure by user negligence, abuse, or
use noncompliant with the user manual or any
additional safety, use, or warnings included in the
product packaging and manual.
This warranty does not apply to the following:
• Damage due to abuse, accident, alteration,
misuse, tampering, or vandalism.
• Improper or inadequate maintenance.
• Damage in return transit.
• Unsupervised use by children under 18 years
of age.
Arovast Corporation and its subsidiaries assume no
liability for damage caused by the use of the product
other than for its intended use or as instructed in the
user manual. Some states do not allow this exclusion
or limitation of incidental or consequential losses so
the foregoing disclaimer may not apply to you. This
warranty gives you specific legal rights and you may
also have other rights which may vary from state
to state.
ALL EXPRESSED AND IMPLIED
WARRANTIES, INCLUDING THE WARRANTY
OF MERCHANTABILITY, ARE LIMITED TO THE
PERIOD OF THE LIMITED WARRANTY.
Additional 1-Year Warranty
You can extend your 1-year warranty by an additional
year. Log onto www.levoit.com/warranty to register
your new product for the extended warranty.
Please fill out all required fields and include your
order ID, place of purchase, and purchase date,
if applicable.
Defective Products & Returns
If your product proves defective within the specified
warranty period, please contact Customer Support
via [email protected] with your order ID. Do not
dispose of your product before contacting us. Once
Customer Support has approved your request,
please return the unit with a copy of the invoice or
your order ID.
12
Page 13

CUSTOMER SUPPORT
If you encounter any issues or have any
questions regarding your new product,
feel free to contact our helpful Customer
Support Team. Your satisfaction is our goal!
Customer Support
Arovast Corporation
1202 N. Miller St., Suite A
Anaheim, CA 92806
Email: [email protected]
Toll-Free: (888) 726-8520
Support Hours
Mon–Fri, 9:00 am–5:00 pm PST/PDT
*Please have your order invoice and order ID
ready before contacting Customer Support.
13
Page 14

Notes
Page 15

Connect with us @LevoitLifestyle
15
Page 16

levoit.com
JJ0419MC-M1_0419DUAL100
 Loading...