

Page 1
Model No.: LV-PUR131S
Smart True HEPA Air Purifier
Questions or Concerns?
Please contact us Mon–Fri, 9:00 am–5:00 pm PST/PDT
at [email protected] or at (888) 726-8520.
READ AND SAVE THESE INSTRUCTIONS
1
Page 2

THANK YOU FOR PURCHASING
THE LVPUR131S SMART TRUE
HEPA AIR PURIFIER BY LEVOIT.
If you have any questions or concerns, please reach out to us at
[email protected]. We hope you enjoy your new air purifier!
SHARE THE LEVOIT LOVE
Find @LevoitLifestyle on social media for wellness + style
inspiration. We make every space mindful and chic.
@LevoitLifestyle
#LevoitLove • #LevoitLifestyle
Page 3

TABLE OF CONTENTS
PACKAGE CONTENTS
Package Contents
Specifications
Safety Information
Getting to Know Your Air Purifier
LED Display
Controls
Getting Started
Using Your Purifier
· General Operation
· VeSync App Setup
· Configuration
· Using the App
· Air Quality Indicator
· Timers
· Schedules
· Filter Settings
· Device Settings
· Share Devices
· Firmware Updates
· Deleting Your Air Purifier
· Resetting Your Air Purifier
Keeping Things Clean
· Cleaning the Air Purifier
· Check Filter Indicator
· Cleaning the Air Filters
· When Should I Replace the Air Filters?
· Replacing the Air Filters
· Resetting the Check Filter Indicator
· Cleaning the Dust Sensor Lens
Troubleshooting
VeSync App Troubleshooting
Warranty Information
Customer Support
3
3
4
5
6
7
8
9
9
10
11
17
18
18
19
20
21
21
23
23
24
25
25
25
25
26
27
28
28
29
31
33
33
1 x Smart True HEPA Air Purifier
1 x Activated Carbon Filter (Pre-Installed)
1 x Preliminary/True HEPA Combination Filter (Pre-Installed)
1 x User Manual
SPECIFICATIONS
Power Supply AC 120V, 60Hz
Rated Power 40W
Eective Range ≤ 322 ft² (30 m²)
Operating
Conditions
Noise Level ≤ 52dB
Clean Air Delivery
Rate (CADR)
Standby Power < 0.8W
14°F–104°F
(-10°C–40°C)
135 CFM (230 m³/h)
3
Page 4

SAFETY INFORMATION
To reduce the risk of fire, electric shock, or other injury, follow all instructions and safety guidelines.
General Safety Plug and Cord
• Only use your air purifier as described in this manual.
• Do not use your air purifier outdoors.
• Keep your air purifier away from water, and wet or damp
areas. Never place in water or other liquids.
• Keep the inside of the air purifier dry. To prevent
moisture buildup, avoid placing in rooms with major
temperature changes or underneath air conditioners.
• Keep your air purifier away from heat sources.
• Do not use where combustible gases or vapors are
present.
• Supervise children when they are near the air purifier.
• Do not place anything into any opening on the air
purifier, unless directed by the manual.
• Do not sit or place heavy objects on the air purifier.
• Always unplug your air purifier before servicing (such
as changing air filters).
• Do not use your air purifier if it is damaged or not
working correctly, or if the cord or plug is damaged.
Do not try to repair it yourself. Contact Customer
Support (see page 33).
• Keep the air purifier near the outlet it is plugged into.
• Never place the cord near any heat source.
• Do not cover the cord with a rug, carpet, or other
covering. Do not place the cord under furniture or
appliances.
• Keep the cord out of areas where people often walk.
Place the cord where it will not be tripped over.
• Your air purifier has a polarized plug (one prong is wider
than the other), which fits into a polarized outlet only
one way. This is a safety feature to reduce the risk of
electric shock. If the plug does not fit, reverse the plug.
If it still does not fit, do not use the plug in that outlet.
Do not bypass this safety feature.
READ AND
SAVE THESE
• WARNING: Do not use this air purifier with solid-state
speed controls (such as a dimmer switch).
• Not for commercial use. Household use only.
4
INSTRUCTIONS
Page 5
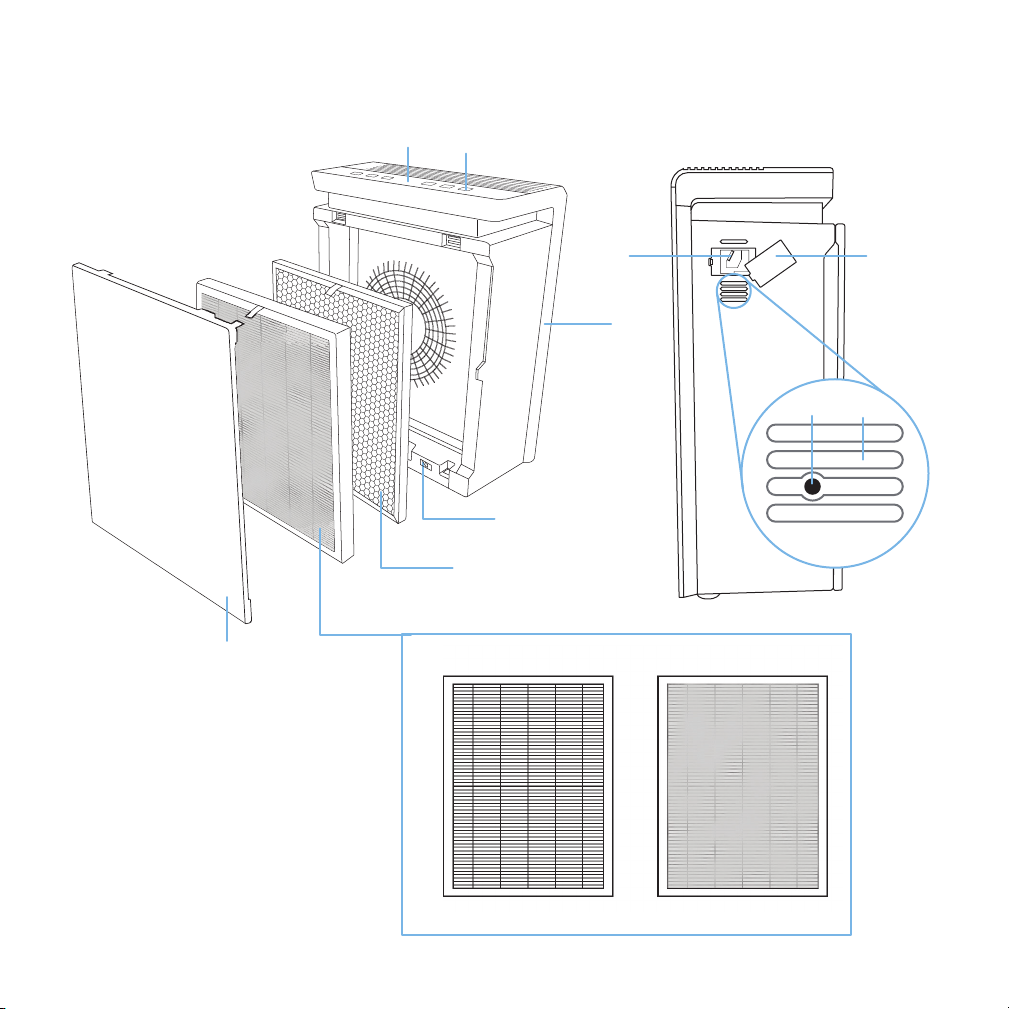
GETTING TO KNOW YOUR AIR PURIFIER
L
A. LED Display
B. Touch-Control Panel
C. Dust Sensor Lens
D. Dust Sensor Cover
E. Filter Indicator Reset Button
F. Button Vent
G. Housing
H. Safety Switch
I. Activated Carbon Filter
J. True HEPA Filter
K. Fine Preliminary Filter
L. Back Cover
A
B
C D
G
FE
H
I
J K
Back Front
5
Page 6
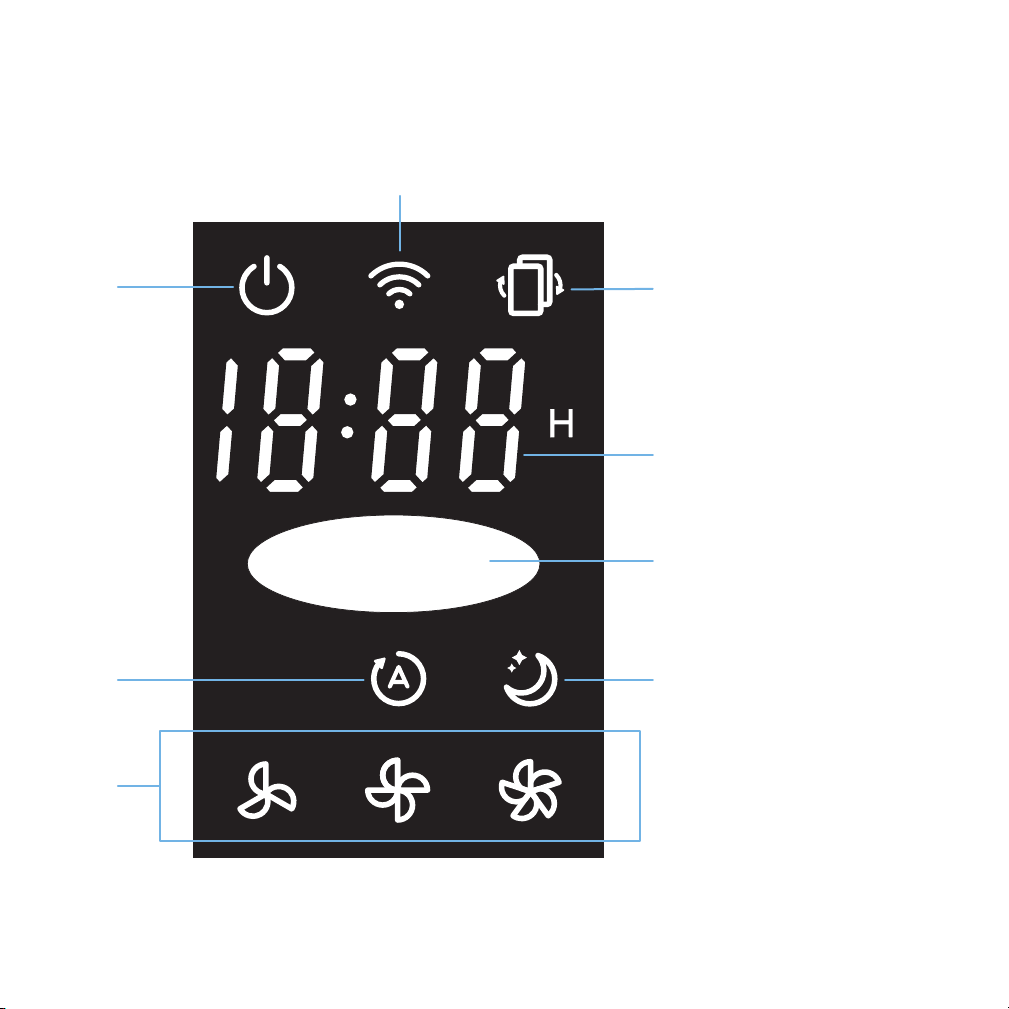
LED DISPLAY
B
A
F
H
C
D
E
G
A. On/O Indicator
B. WiFi Indicator
C. Check Filter Indicator
D. Timer Display
E. Air Quality Indicator
F. Auto Mode Indicator
G. Sleep Mode Indicator
H. Fan Speed Indicator
6
Page 7
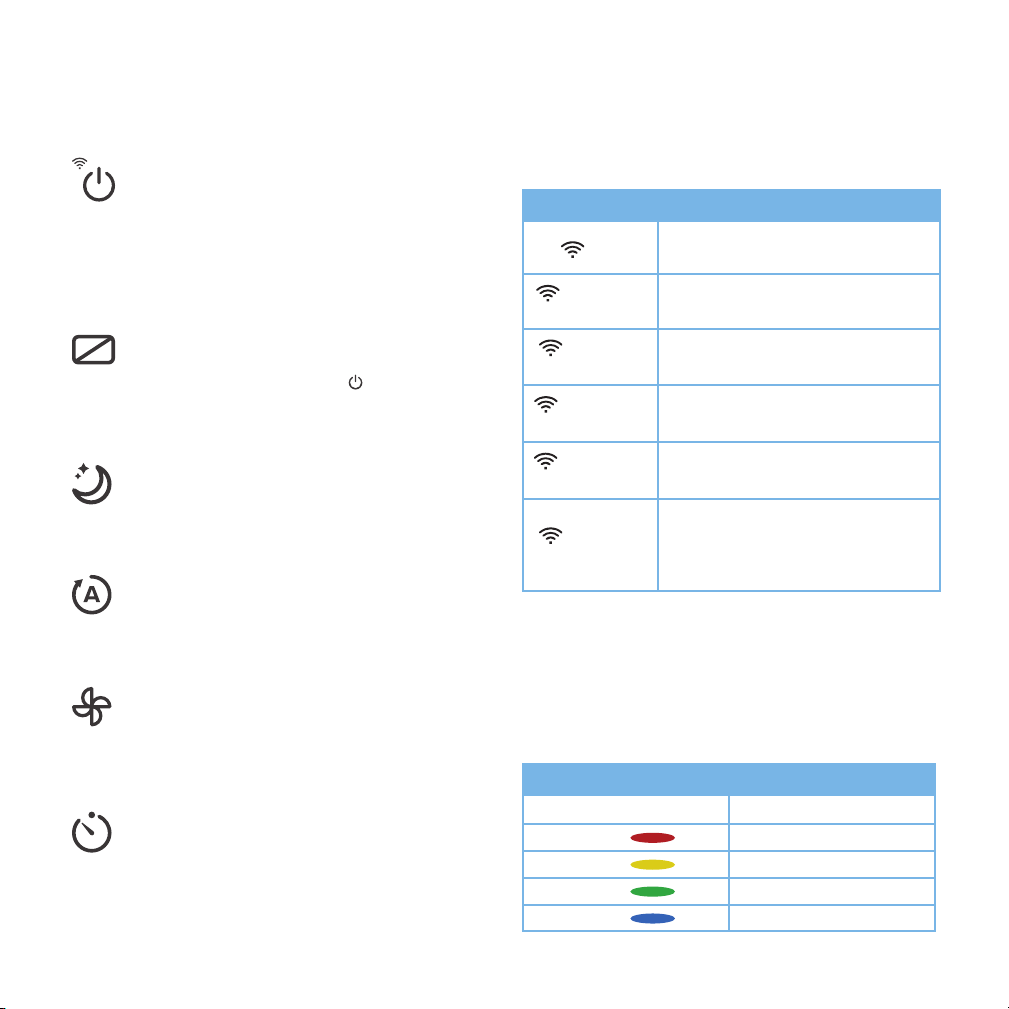
CONTROLS
On/O Button
• Turns the air purifier on or o.
• Press and hold for 5 seconds to enter
Configuration Mode.
• Press and hold for 15 seconds to reset to
original settings.
Display Button
• Turns the display o.
• Press any button (except ) to turn the
display back on.
Sleep Mode Button
• Turns Sleep Mode on or o
(see page 9).
Auto Button
• Turns Auto Mode on or o
(see page 9).
Fan Speed Button
• Cycles through fan speeds: low,
medium, and high.
• The fan speed cannot be changed
during Auto or Sleep Modes.
Timer Button
• Creates or cancels a timer
(see page 9).
WiFi Indicator
WiFi Indicator Status
is o
is on and not
blinking
blinks 1 time
per second
blinks 4 times
per second
blinks 2 times
per 5 seconds
blinks 1 time
per 5 seconds
Air purifier is not configured with the
VeSync app. To configure, see page 11.
Configuration with the VeSync app is
complete.
Air purifier is in Configuration Mode (see
page 11).
Air purifier has been hard reset
(see page 24).
Air purifier cannot connect with router.
Air purifier has connected with router
successfully, but the router is not
connected to the VeSync server.
Air Quality Indicator
• Displays air quality using the dust sensor inside the air
purifier.
• It may take up to 1 minute to detect air quality.
Air Quality Indicator Chart
Color Air Quality
Red Bad
Yellow Moderate
Green Good
Blue Very Good
7
Page 8
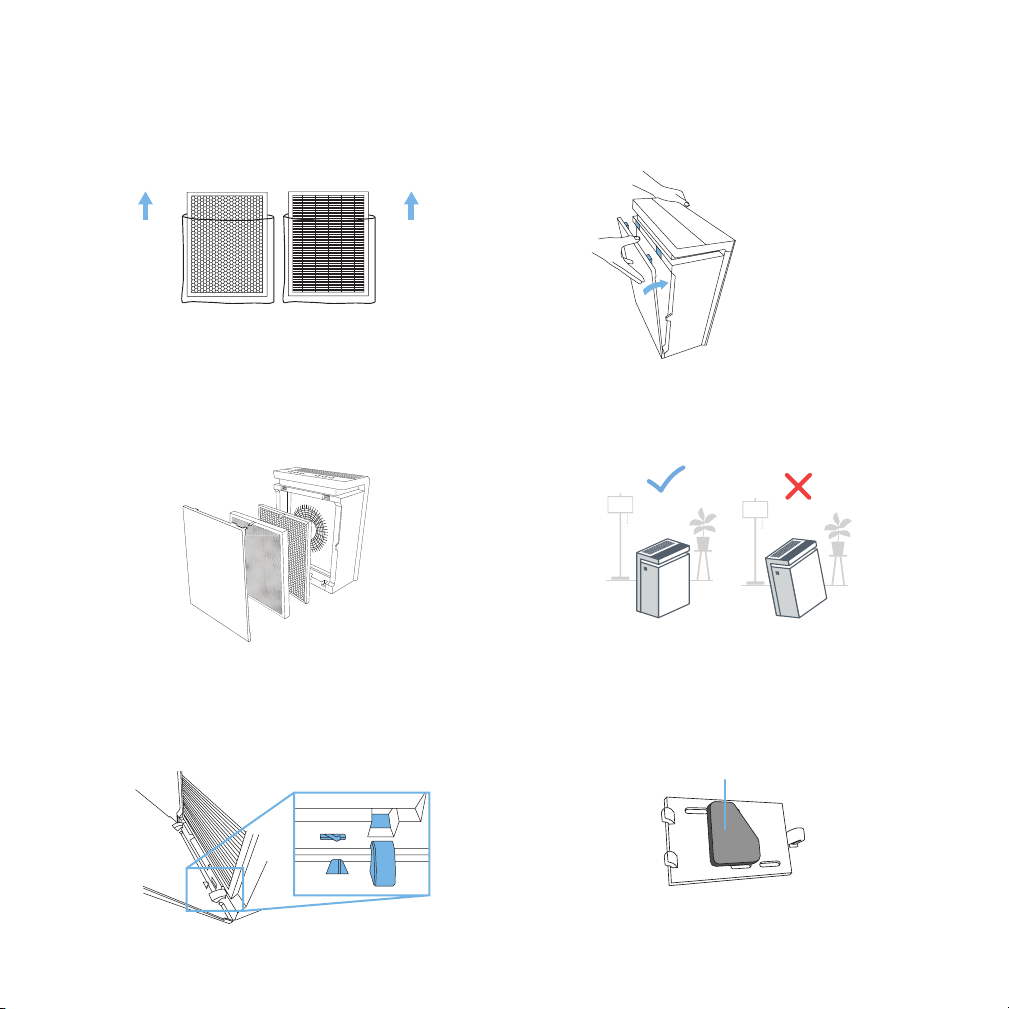
GETTING STARTED
1. Open the back cover of the air purifier and remove both
filters from their plastic packaging. [Figure 1.1]
Carbon
Filter
Figure 1.1
2. Place the black activated carbon filter back into the air
purifier. Then, place the white HEPA filter back into the
air purifier. Make sure the pull tabs on both filters are
facing out. [Figure 1.2]
1st
2nd
3rd
Figure 1.2
3. Replace the back cover by lining up the cover’s feet
with the matching slots on the bottom of the housing.
Make sure that the triangular piece at the bottom of the
cover is touching the safety switch. [Figure 1.3]
HEPA
Filter
4. Push the cover closed. [Figure 1.4]
Figure 1.4
5. Place the air purifier on a hard, flat surface. [Figure 1.5]
Leave 15 inches (38 cm) of clearance on all sides of the
purifier.
Figure 1.5
NOTE:
Do not remove the foam piece attached to the dust sensor cover
unless instructed by Customer Support. [Figure 1.6]
foam piece
Figure 1.3
8
Figure 1.6
Page 9
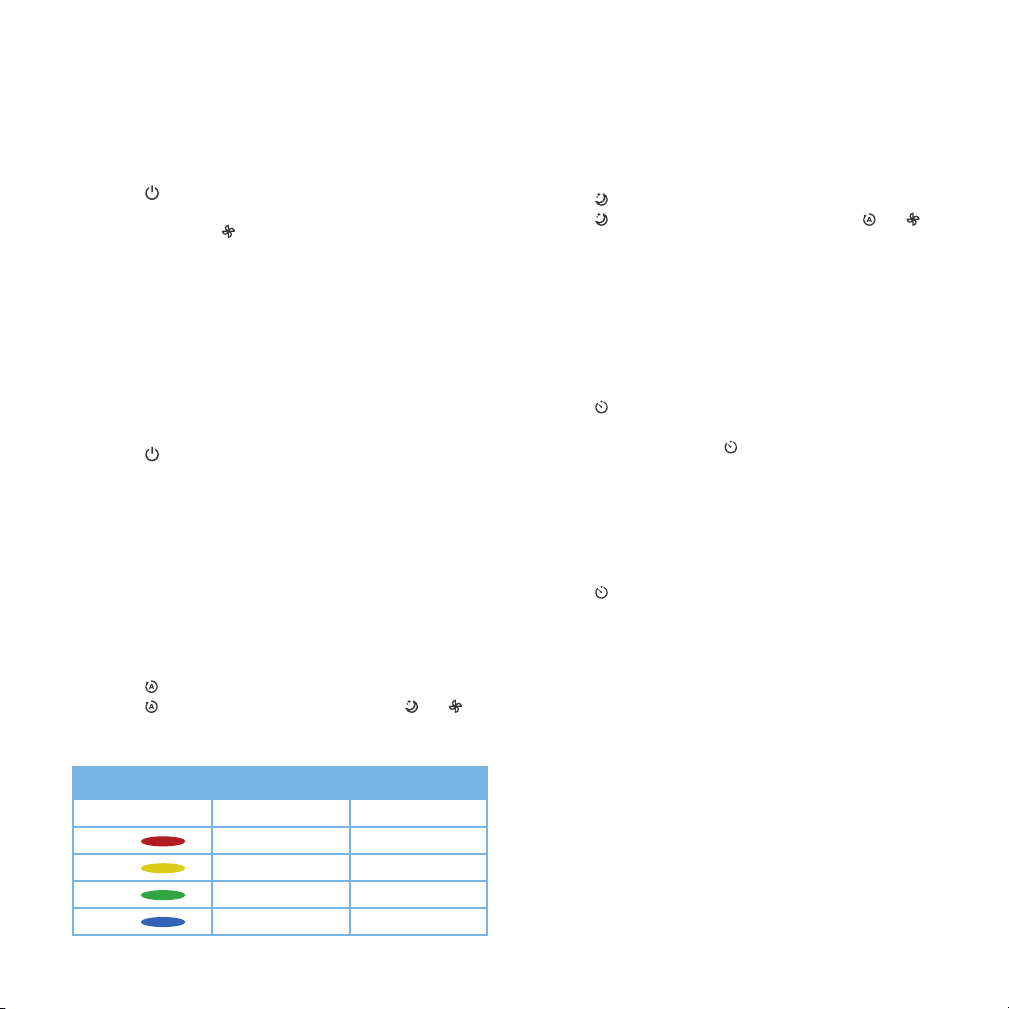
USING YOUR PURIFIER
Sleep Mode
General Operation
1. Press to turn on the air purifier. The air purifier fan
will start automatically at low speed.
2. Optionally, press to increase fan speed. You can
also select Auto or Sleep Mode, or create a timer.
NOTE:
• For best results, run the air purifier at maximum
speed for 15–20 minutes before using a lower
speed or Auto Mode.
• To eectively clean air, keep windows closed while
the air purifier is operating.
3. Press to turn o the air purifier.
Auto Mode
Auto Mode uses the sensor inside the air purifier to adjust
the fan speed automatically based on air quality. For
example, if the air quality is bad, the fan will automatically be
set to high speed. See chart below.
1. Press to turn on Auto Mode.
2. Press again to exit Auto Mode. Pressing or
will also exit Auto Mode.
Auto Mode Chart
Color Air Quality Fan Speed
Red Bad High
Yellow Moderate Medium
Green Good Low
Blue Very Good Sleep Mode
Sleep Mode uses the lowest possible fan speed to maintain
a quiet environment.
1. Press to turn on Sleep Mode.
2. Press again to exit Sleep Mode. Pressing or
will also exit Sleep Mode.
Timer
You can set a timer between 1 and 12 hours.
1. Press repeatedly to choose a time in increments of
1 hour.
2. When you stop pressing , the display will flash 3
times and the timer will start.
3. The air purifier will automatically power o once the
timer is finished.
To cancel a timer:
1. Press repeatedly until the display reads “ -:-- ”.
2. Wait until “ -:-- ” flashes 3 times, and the timer will
cancel.
Memory Function
When the air purifier is plugged in, it will remember its
programmed settings when turned o, and will resume
these settings when turned back on.
Automatic Shuto
As a safety feature, the air purifier will automatically turn o
if the back cover is removed.
9
Page 10
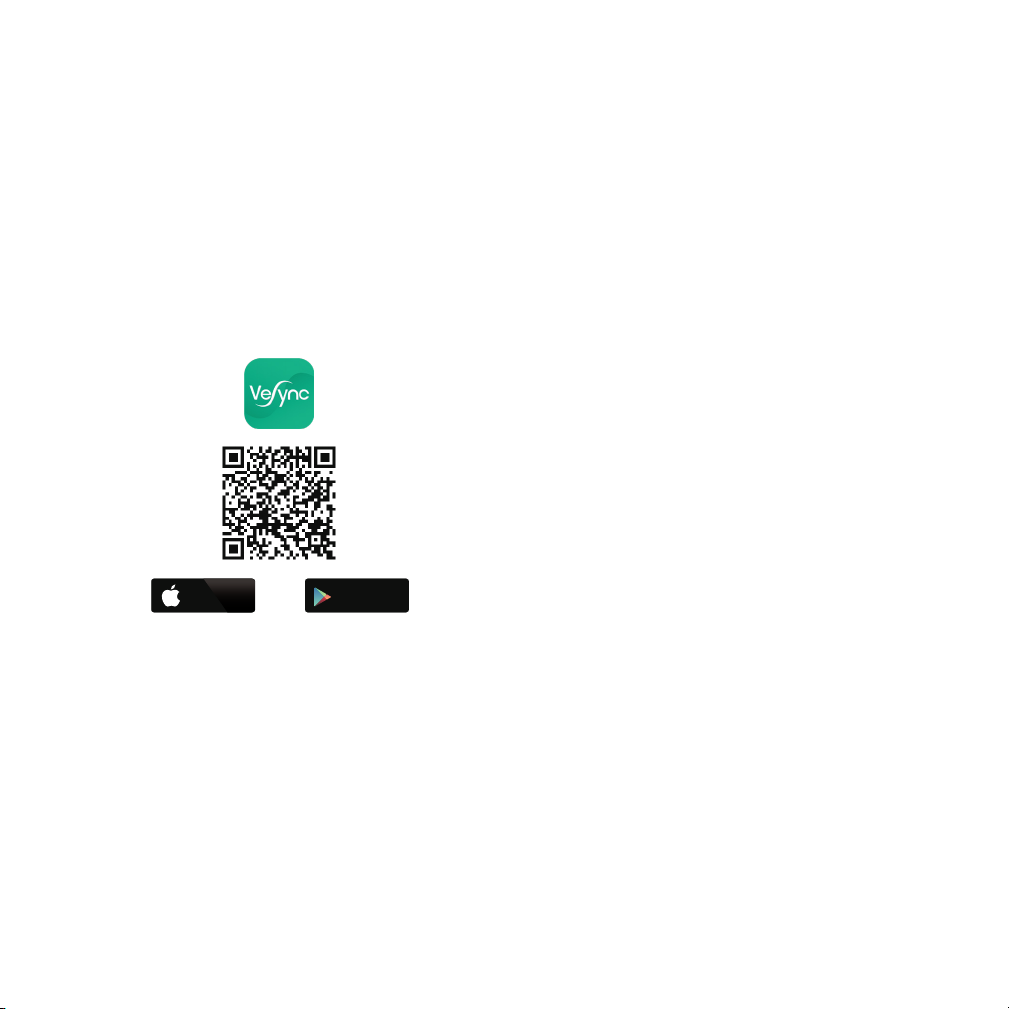
VeSync App Setup
NOTE: Due to continuing updates and improvements, the VeSync
app may appear slightly dierent.
1. To download the VeSync app, scan the QR code, or
search “VeSync” in the Apple App Store® or Google
Play™ Store. [Figure 2.1]
NOTE: For Android™ users, choose “Allow” (when prompted) to
use VeSync.
10
Available on the
App Store
GET IT ON
Google Play
Figure 2.1
2. Open the VeSync app. Tap Sign Up to create a new
account.
3. After you’ve signed up, enter your email and password,
then tap Log In.
NOTE: You must create your own VeSync account to use thirdparty services and products, such as the Amazon® Echo™ and
Google Home™. These will not work with the guest account.
With a VeSync account, you can also allow your family and
friends to use your air purifier.
Page 11
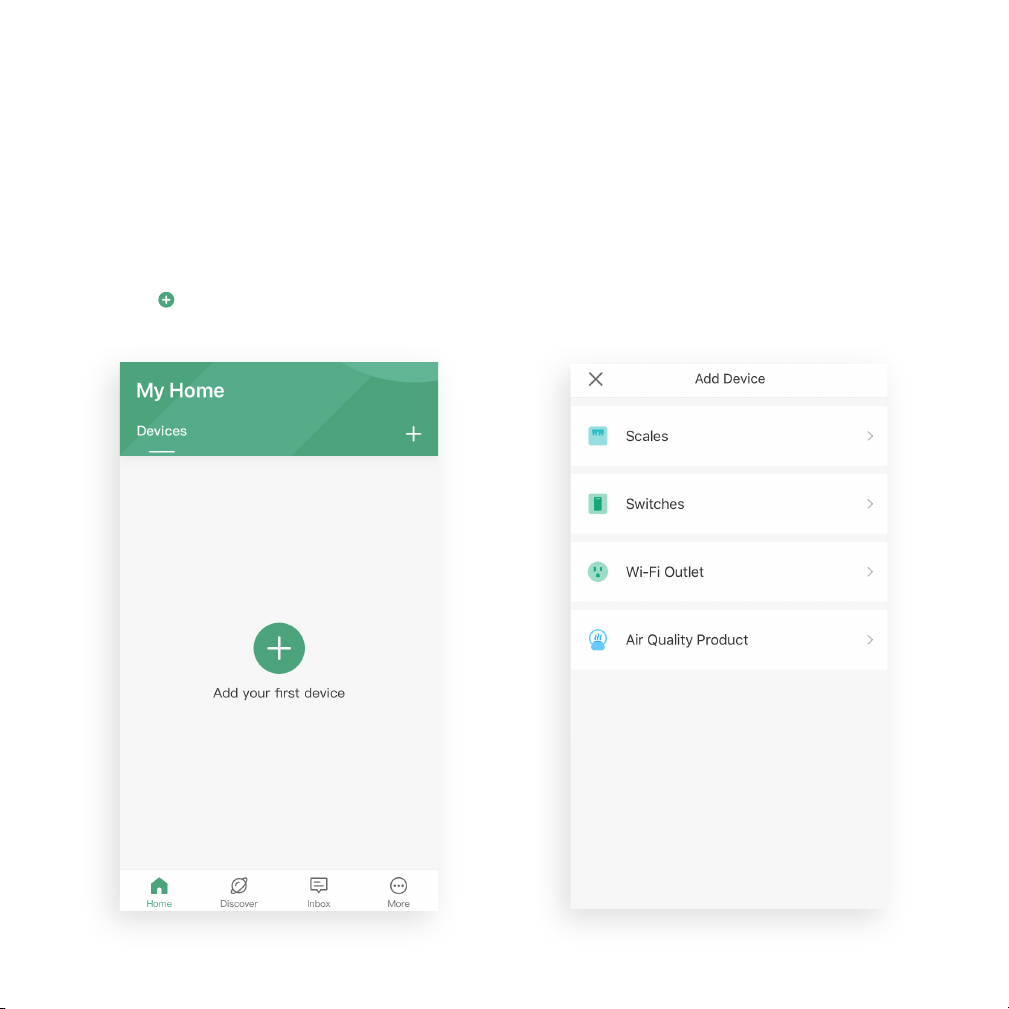
Configuration
Set up your air purifier with the VeSync app.
1. Connect your phone to a secure 2.4GHz WiFi network.
NOTE: The air purifier can only be set up on a secure 2.4GHz
network.
2. Tap the button to add your air purifier.
3. Tap Air Quality Product.
11
Page 12
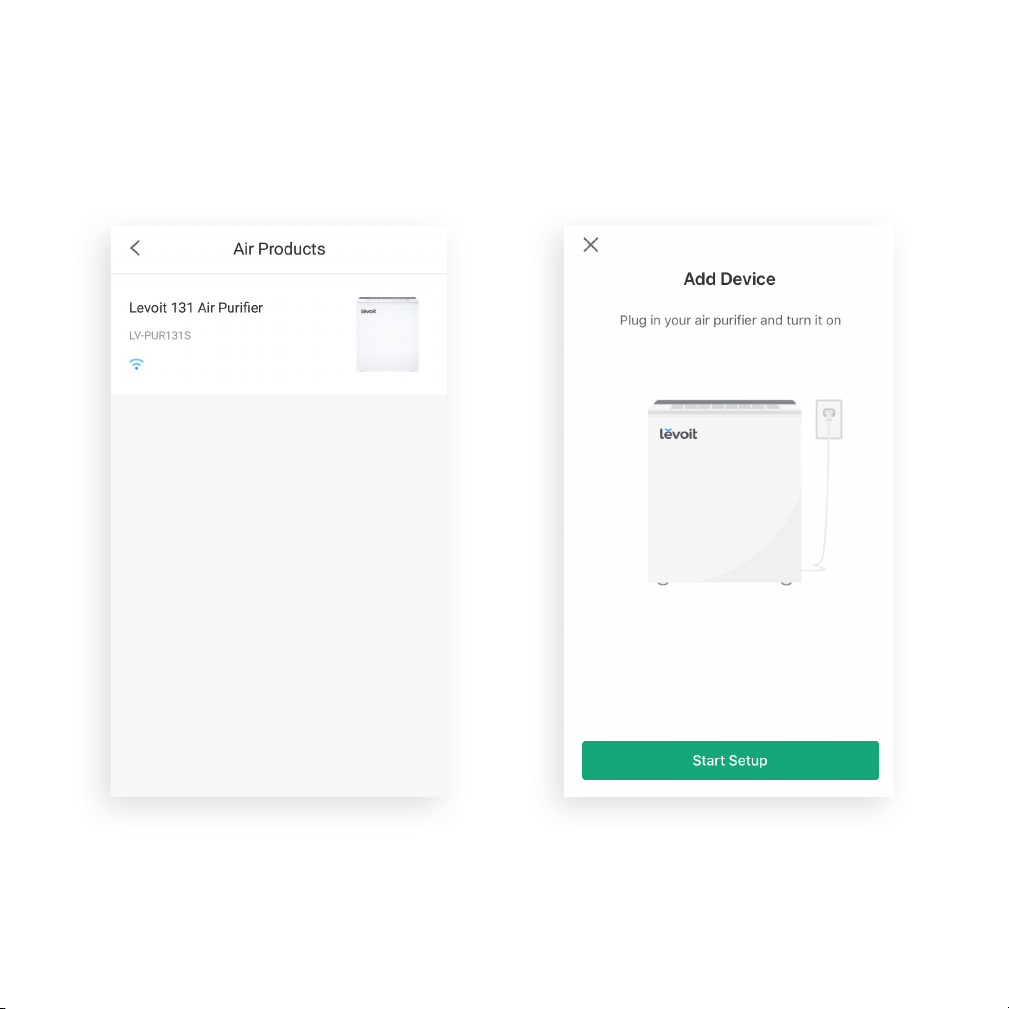
5. Tap Start Setup.4. Select the Levoit 131 Air Purifier (LV-PUR131S).
12
Page 13
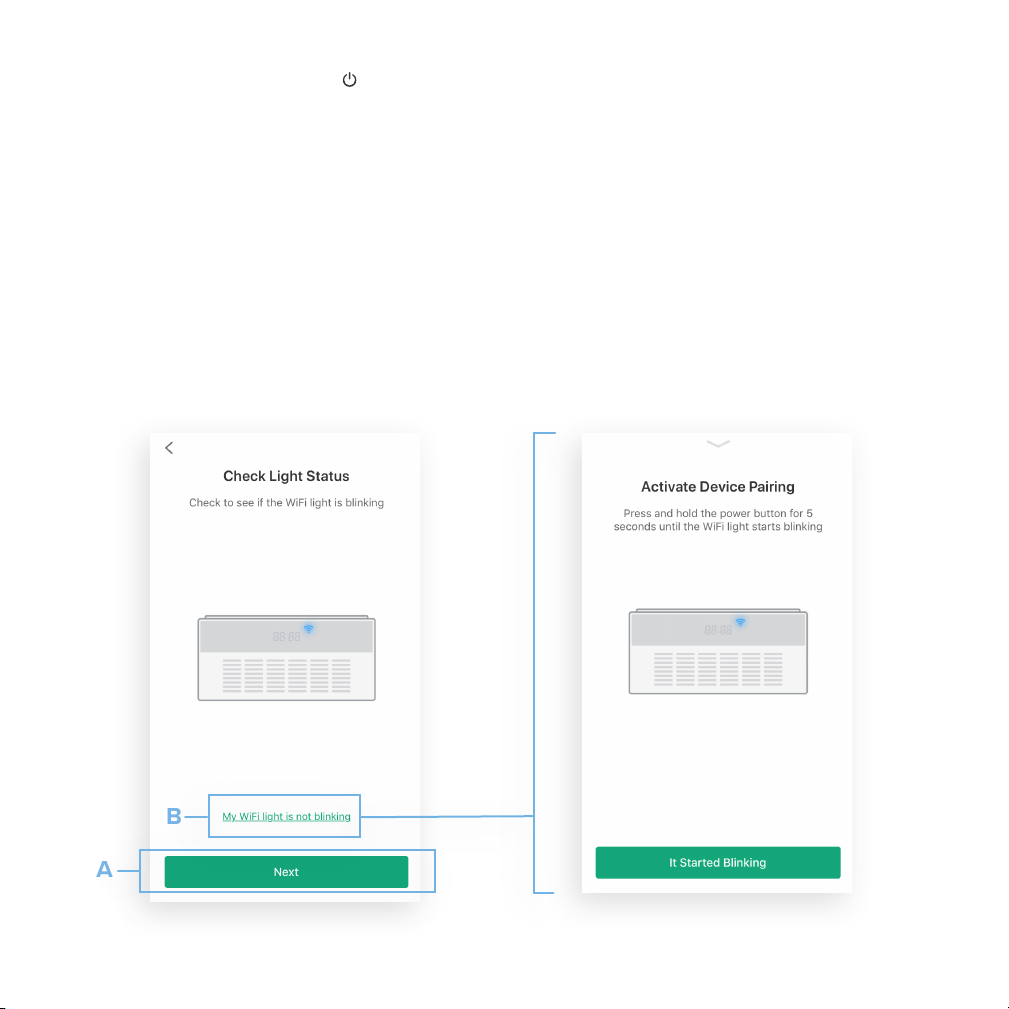
6. Turn on the air purifier by pressing once.
The LED indicator light should blink blue (1 blink per second),
indicating that your air purifier is in Configuration Mode.
A. If the LED indicator light is blinking, tap Next.
B. If the LED indicator light is not blinking, tap
My LED light is not blinking. Press and hold the
power button for 5 seconds, until the LED indicator
light blinks blue (1 blink per second). Then tap It
Started Blinking.
NOTE: Configuration Mode will turn o after 10 minutes.
A
B
13
Page 14
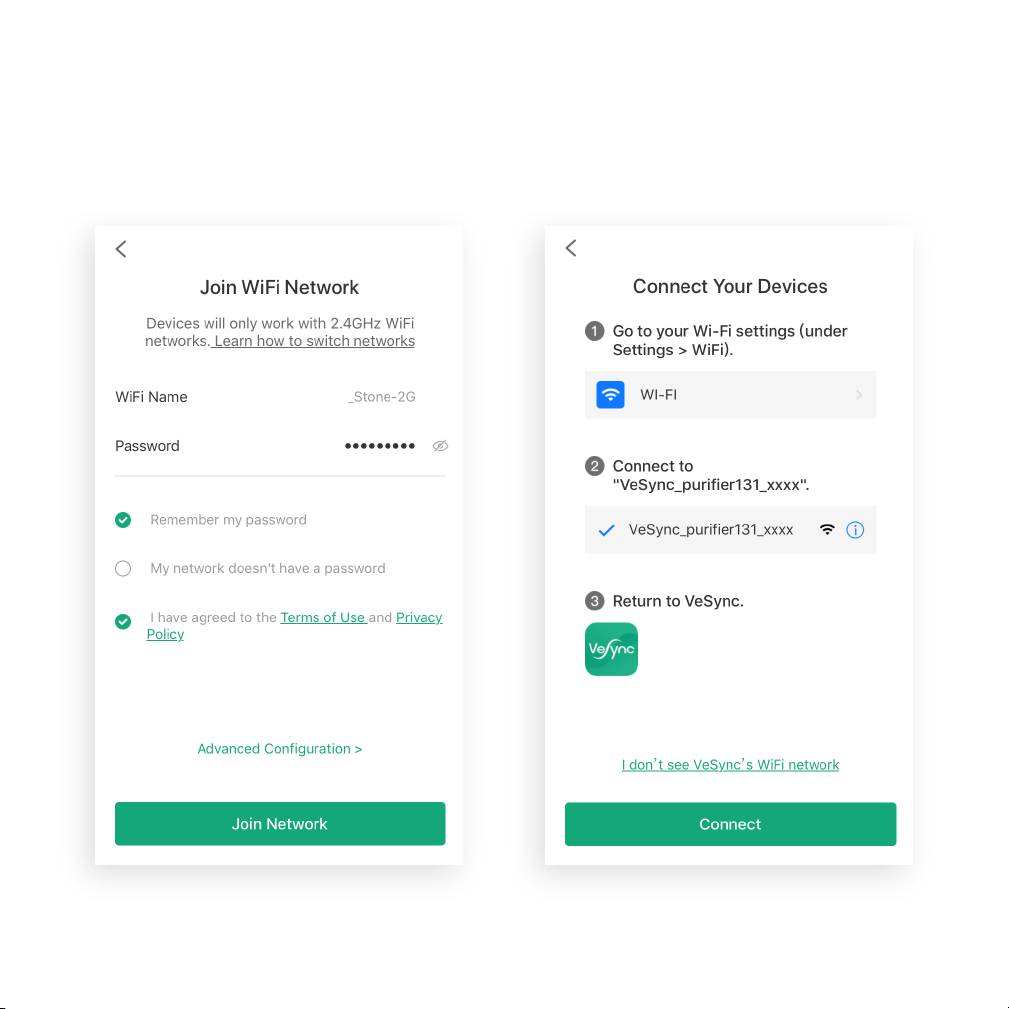
7. Enter the information for your home WiFi network, then
tap Join Network.
8. Follow the in-app instructions to choose the WiFi
network that starts with “VeSync_”.
14
Page 15
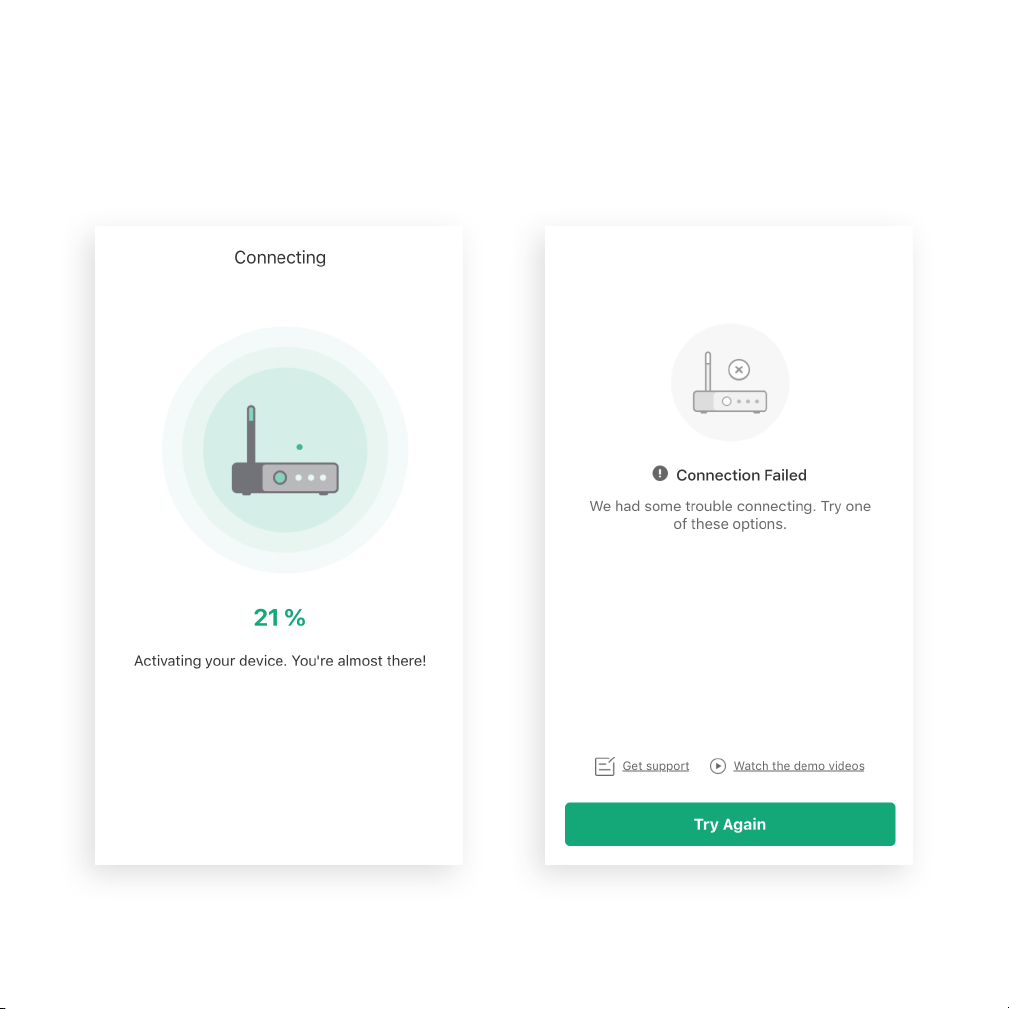
9. Wait for the app to connect. This may take up to 90
seconds.
10. If you can’t connect, tap Get Support, Watch the demo
videos, or Try Again.
15
Page 16
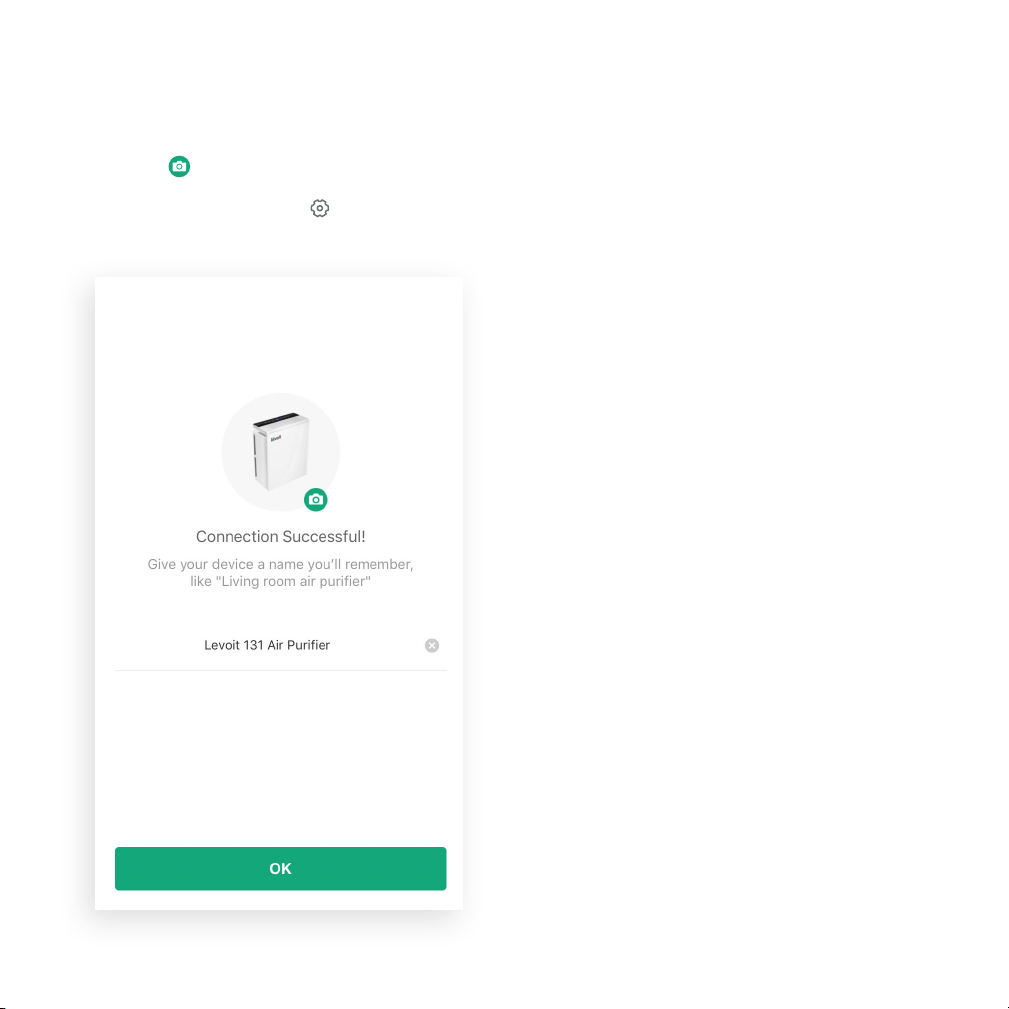
11. You’ve completed setup! Give your air purifier a unique
name, or simply use the default name.
NOTE:
• Tap to change the air purifier icon.
• You can change the name and icon at any time
in “Device Settings”. Tap , then tap Device
Settings.
16
Page 17
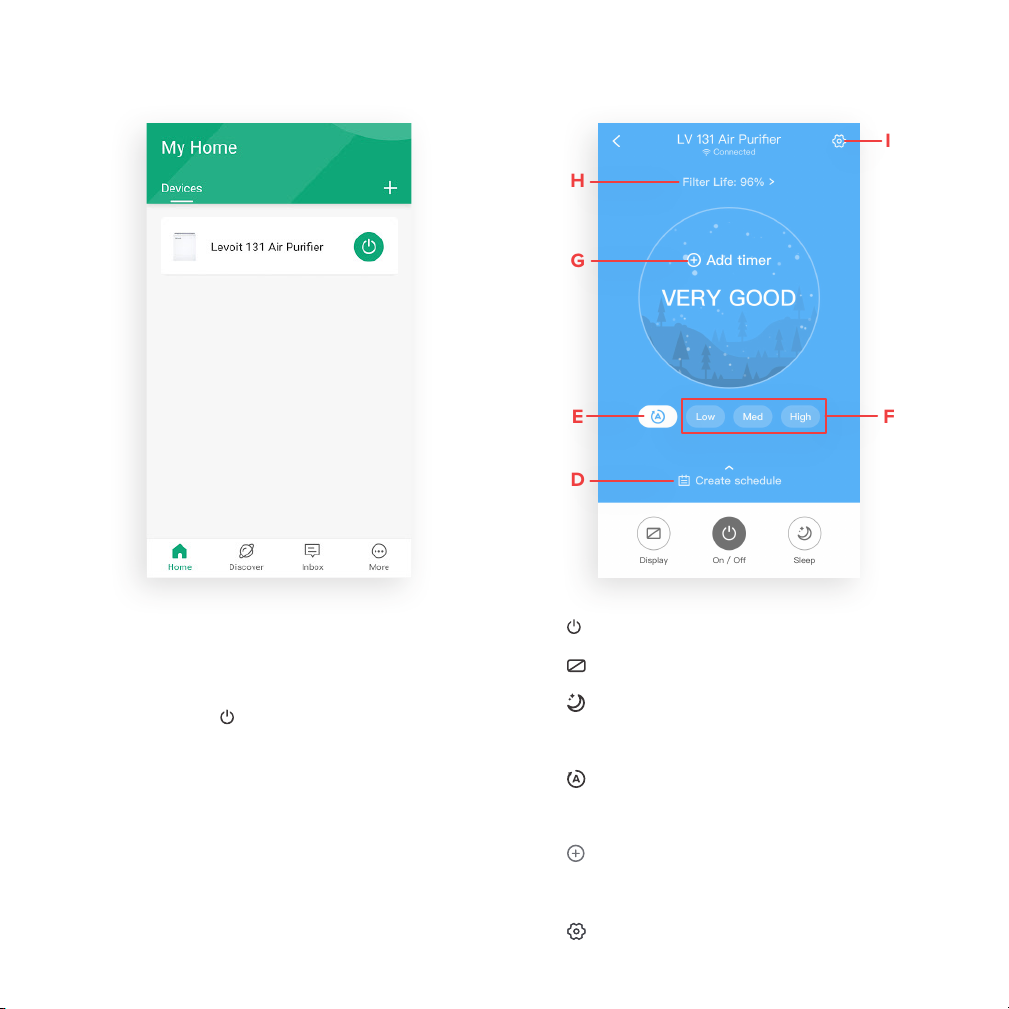
Using the App
I
H
G
E F
D
• From the “My Home” screen, tap on the air purifier
name to view device options and details.
• You can also tap to turn the air purifier on and o.
B
A. Tap to turn the air purifier on or o.
B. Tap to turn the air purifier’s display on or o.
C. Tap to turn Sleep Mode on or o (see page 9).
D. Tap Create schedule to create or cancel a schedule (see page 19).
E. Tap to turn Auto Mode on or o (see page 9).
F. Tap Low, Med, or High to select the fan speed.
G. Tap Add timer to set or cancel a timer (see page 18).
H. Tap Filter Life to see filter options and details (see page 20).
I. Tap to see Device Settings (see page 21).
A C
17
Page 18
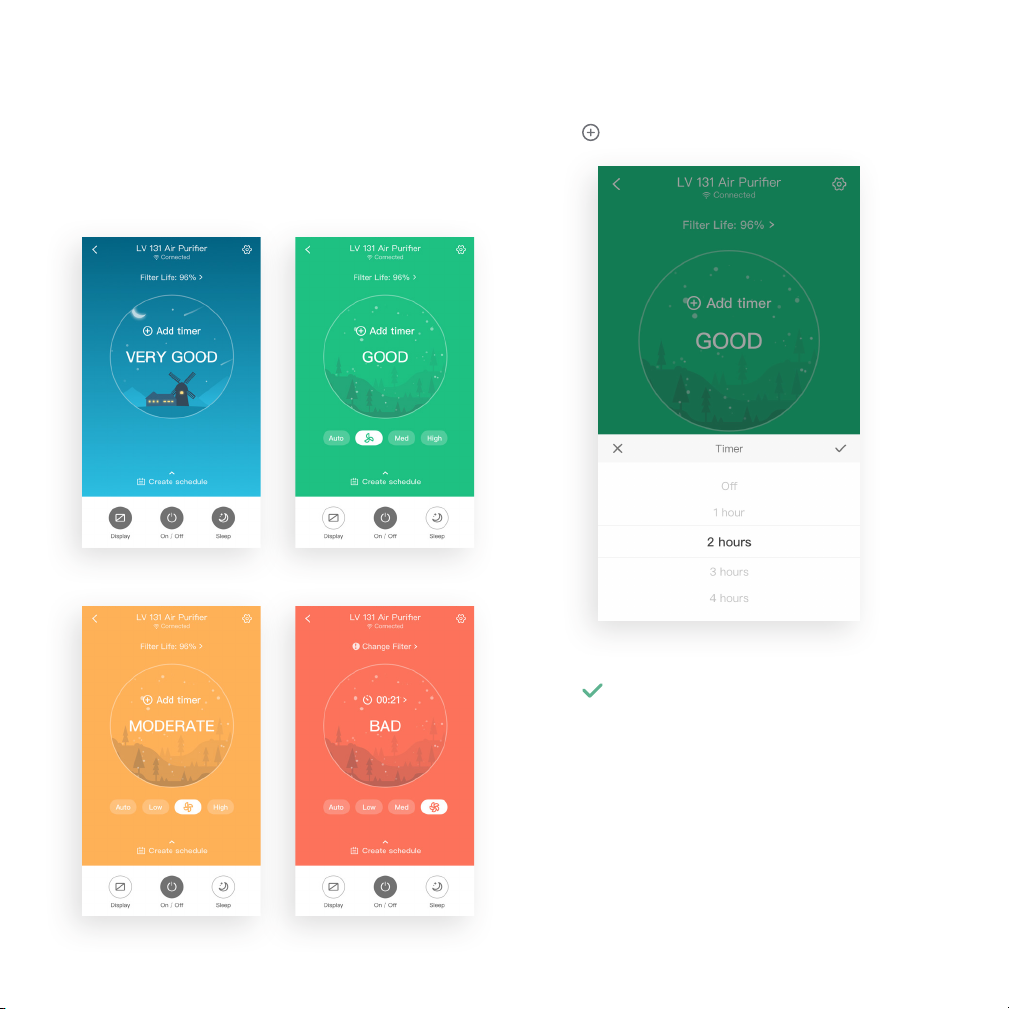
Air Quality Indicator Timers
The color of the main screen will change according to
the air quality, and when in Sleep Mode.
1. Tap Add timer.
2. Select a number of hours for the timer to run.
Tap to save.
3. To cancel a timer, scroll to the top and select O.
18
Page 19
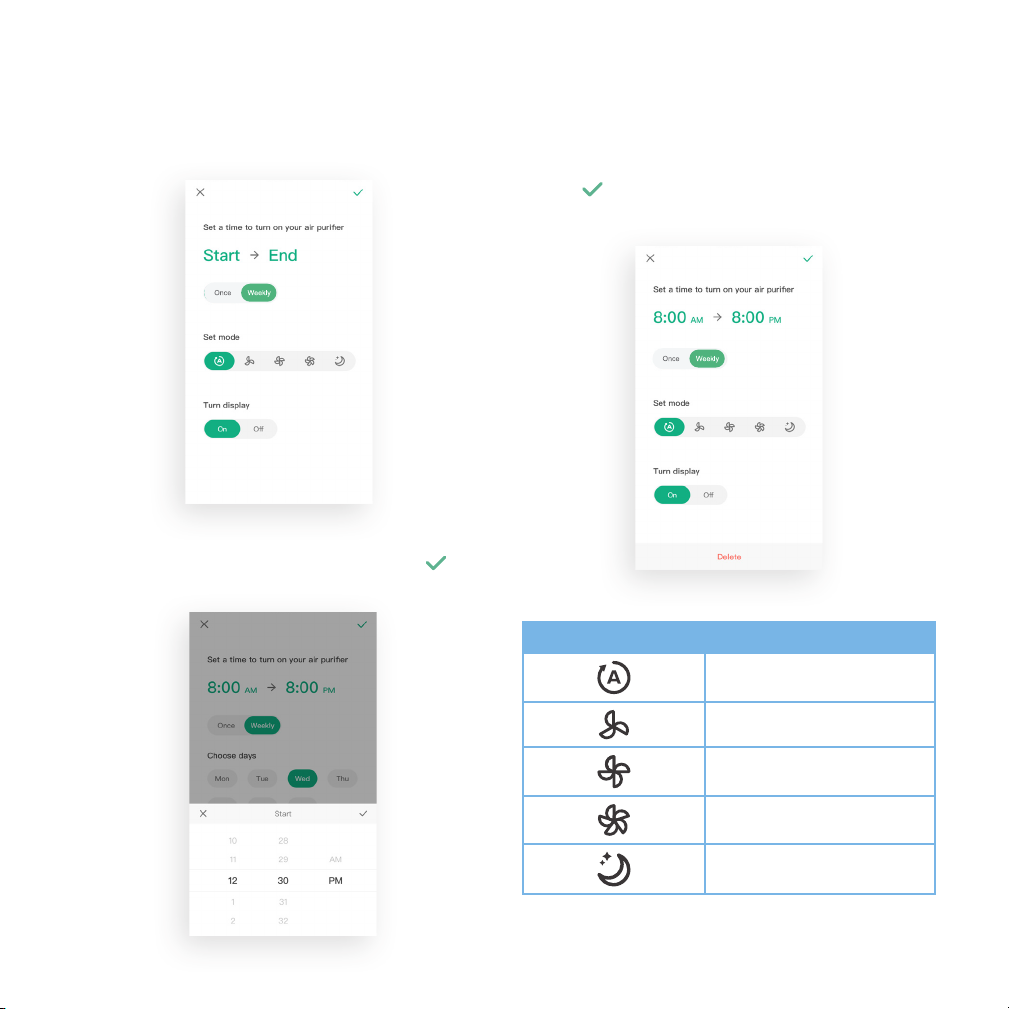
Schedules
1. Tap Create schedule. Then, tap Start to set a start time,
and tap End to set an end time.
2. Set a time for the schedule to start or end. Tap
when you are done.
3. Optionally, choose if you want the schedule to repeat,
the mode (see chart), and whether to have the display
on or o.
4. Tap to save and close.
Mode Chart
Auto Mode (see page 9)
Low Fan Speed
Medium Fan Speed
High Fan Speed
Sleep Mode (see page 9)
19
Page 20
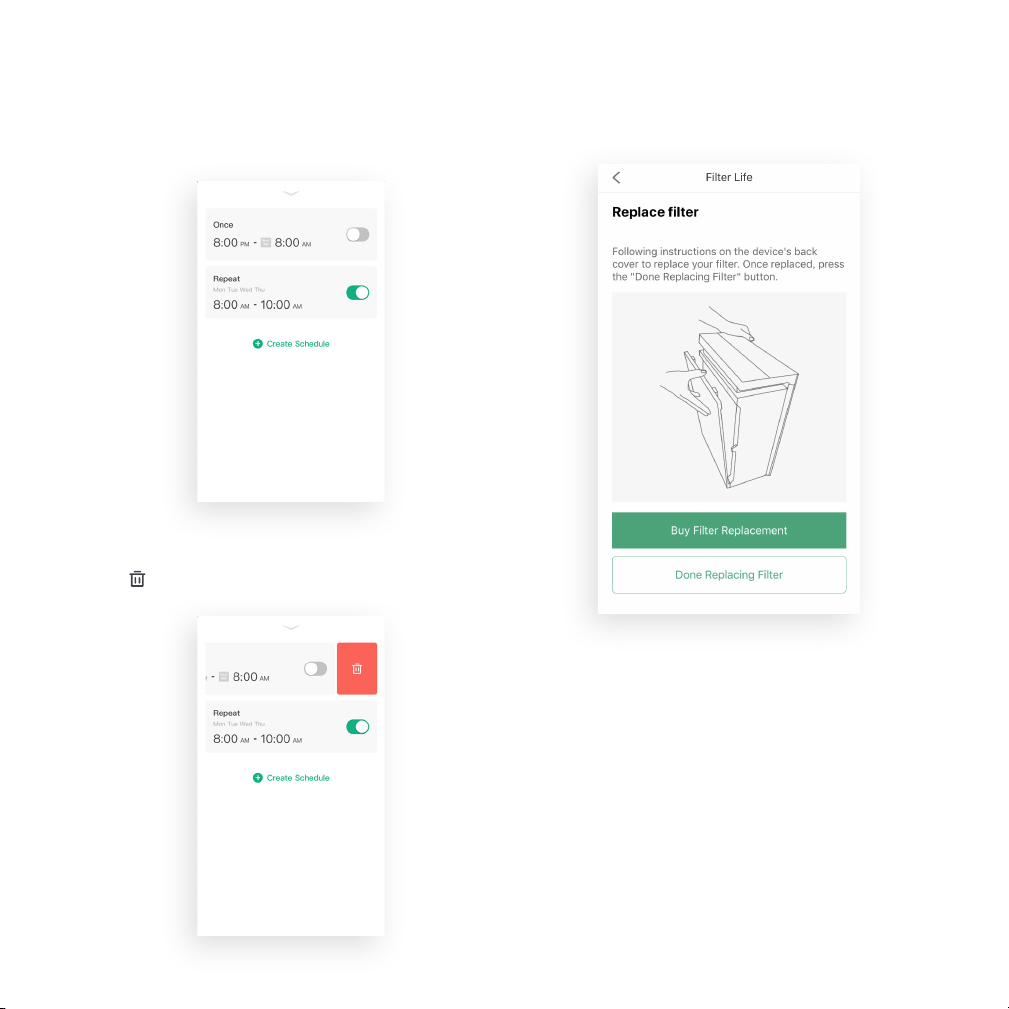
5. Tap on any schedule to edit it.
6. To delete a schedule, swipe left on the schedule and
tap , or tap on a schedule and then tap Delete at the
bottom of the screen.
Filter Settings
20
• If you are ready to buy a filter, tap Buy Filter Replacement
to see buying options.
• Tap Done Replacing Filter after you’ve replaced your
filter (see page 27).
Page 21
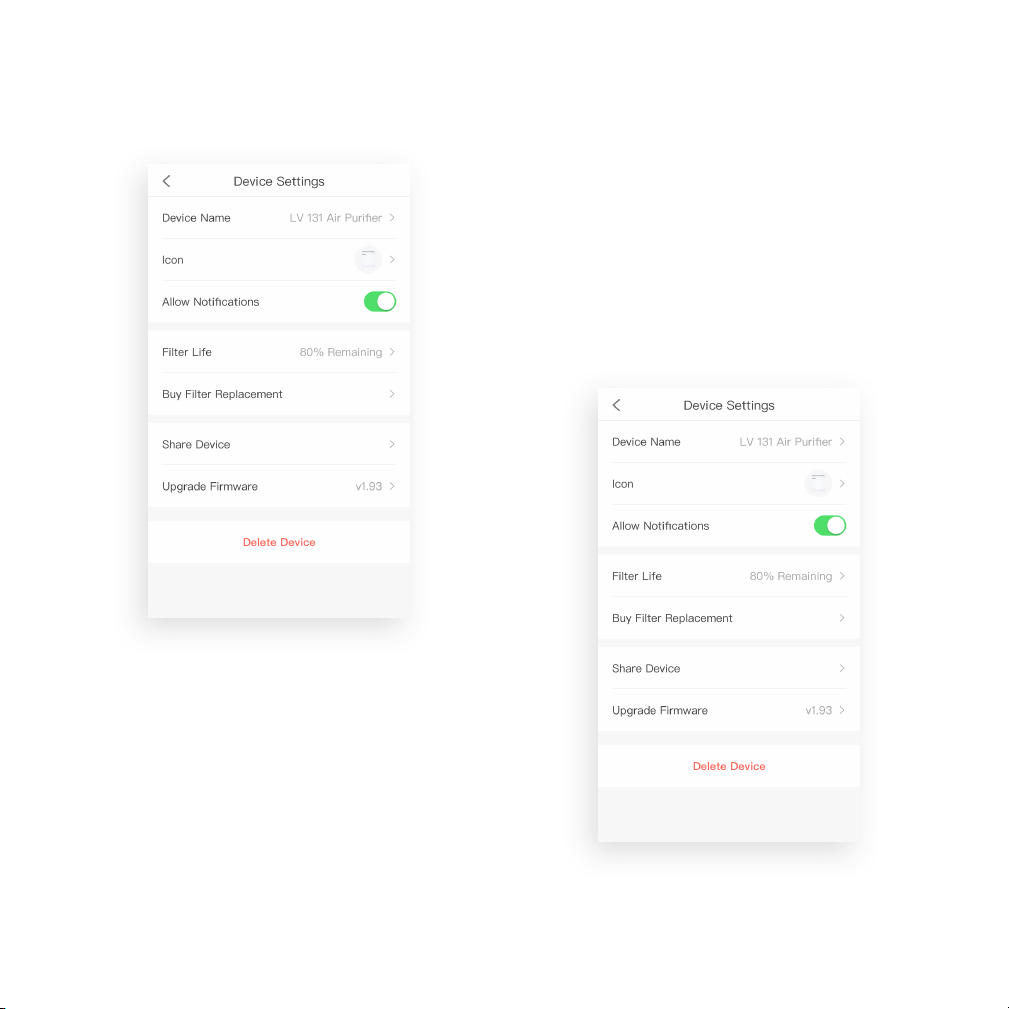
Device Settings Share Devices
You can allow someone else to control your air purifier
(such as family, friends, roommates, or anyone you choose).
NOTE:
• People who you share your air purifier with cannot edit or delete
any of your device settings.
1. Tap Share Device.
• To change any setting, tap on any of the text, icons, or
> symbols on the right side of the screen. For example,
tap the air purifier name to change the name.
21
Page 22
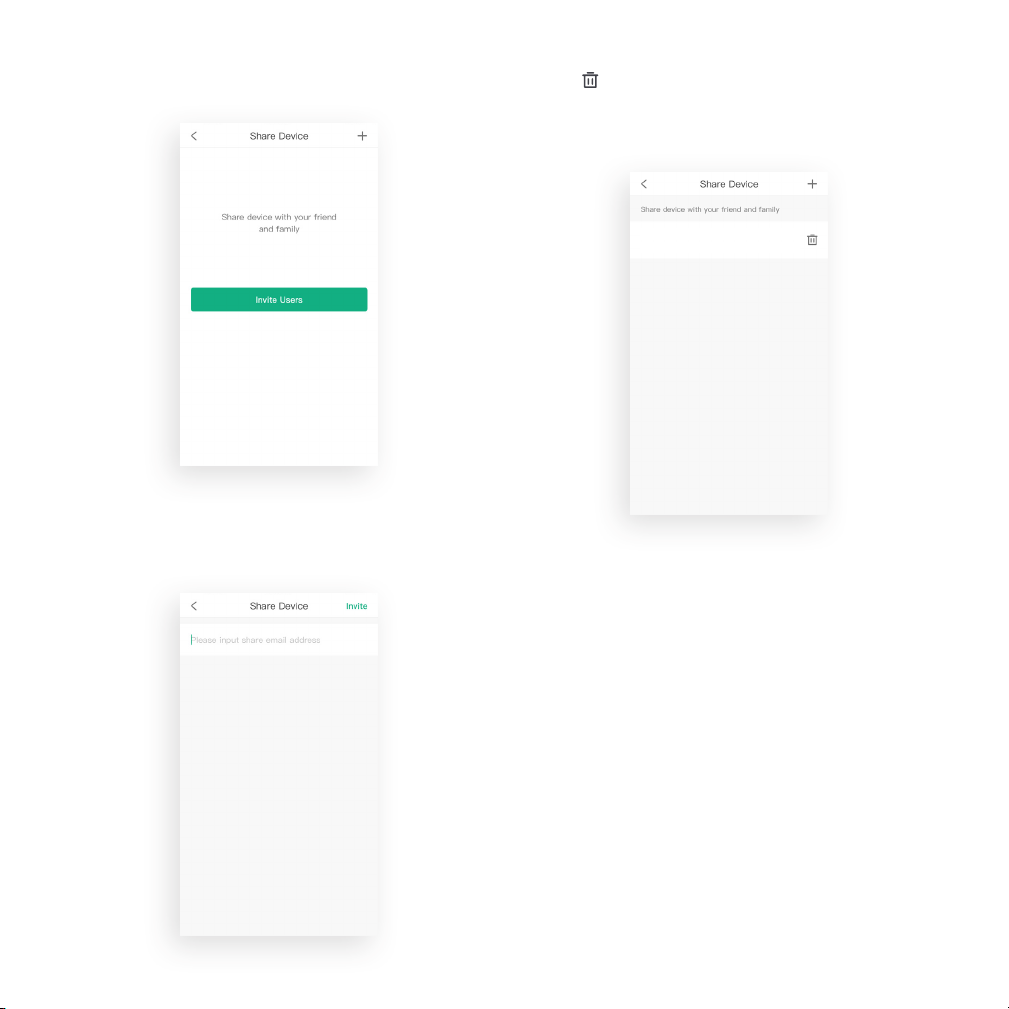
2. Tap Invite Users, or tap the + icon in the upper right
corner.
3. Type in the email of the user you want to share your air
purifier with. The user must also have a VeSync account.
Tap Invite in the upper right corner.
4. Tap to remove people who you have shared your
air purifier with. These people will no longer be able to
control your purifier.
Levoit123
22
Page 23
Firmware Updates Deleting Your Air Purifier
You can delete your air purifier from the VeSync app from
“Device Settings” (see page 21). Tap Delete Device.
This option is located at the bottom of the screen.
You can also delete your air purifier from the “My Home”
screen in the VeSync app.
iOS™: Swipe left on the air purifier’s name to delete.
Android™: Press and hold for 2 seconds on the air
purifier’s name to delete.
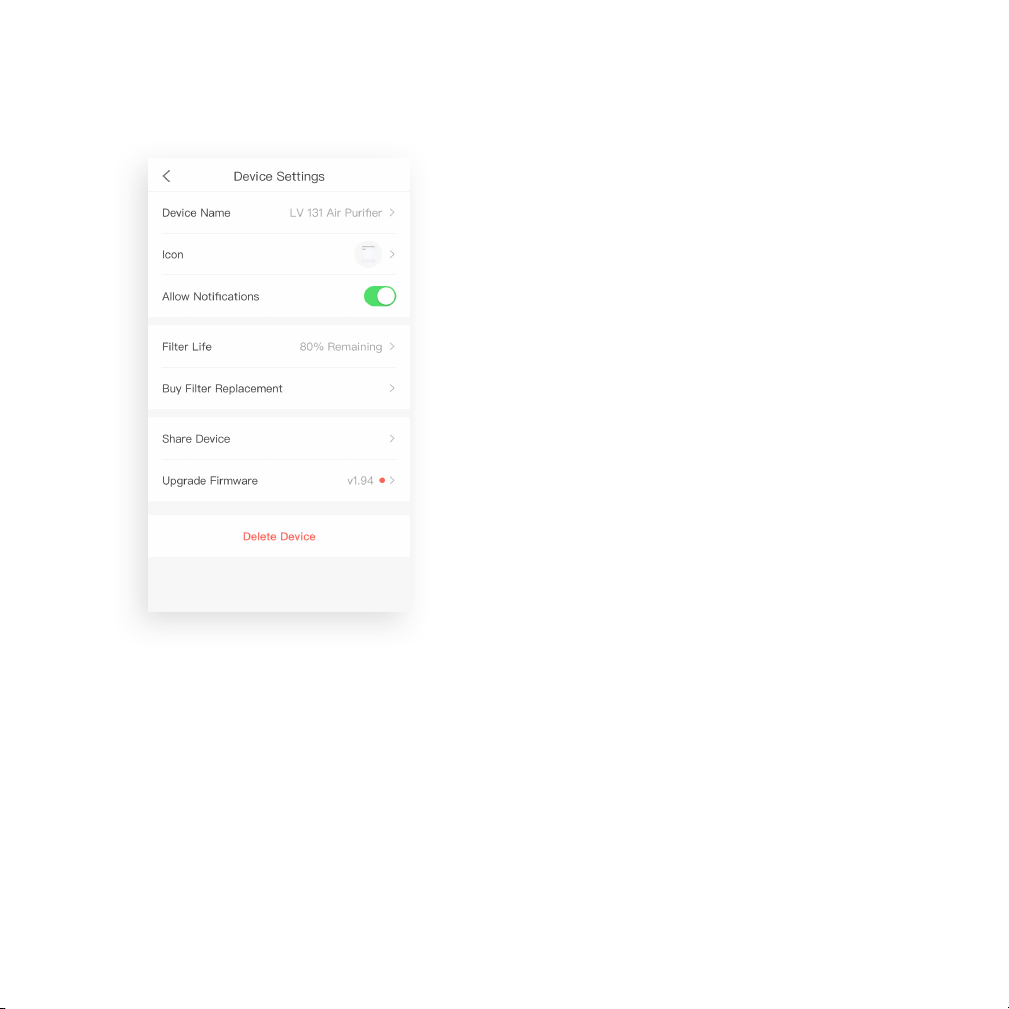
• To keep your air purifier up to date with the latest
improvements and fixes, you should always update the
firmware when updates are available.
• The red dot (shown) lets you know that there is a new
firmware version available.
23
Page 24
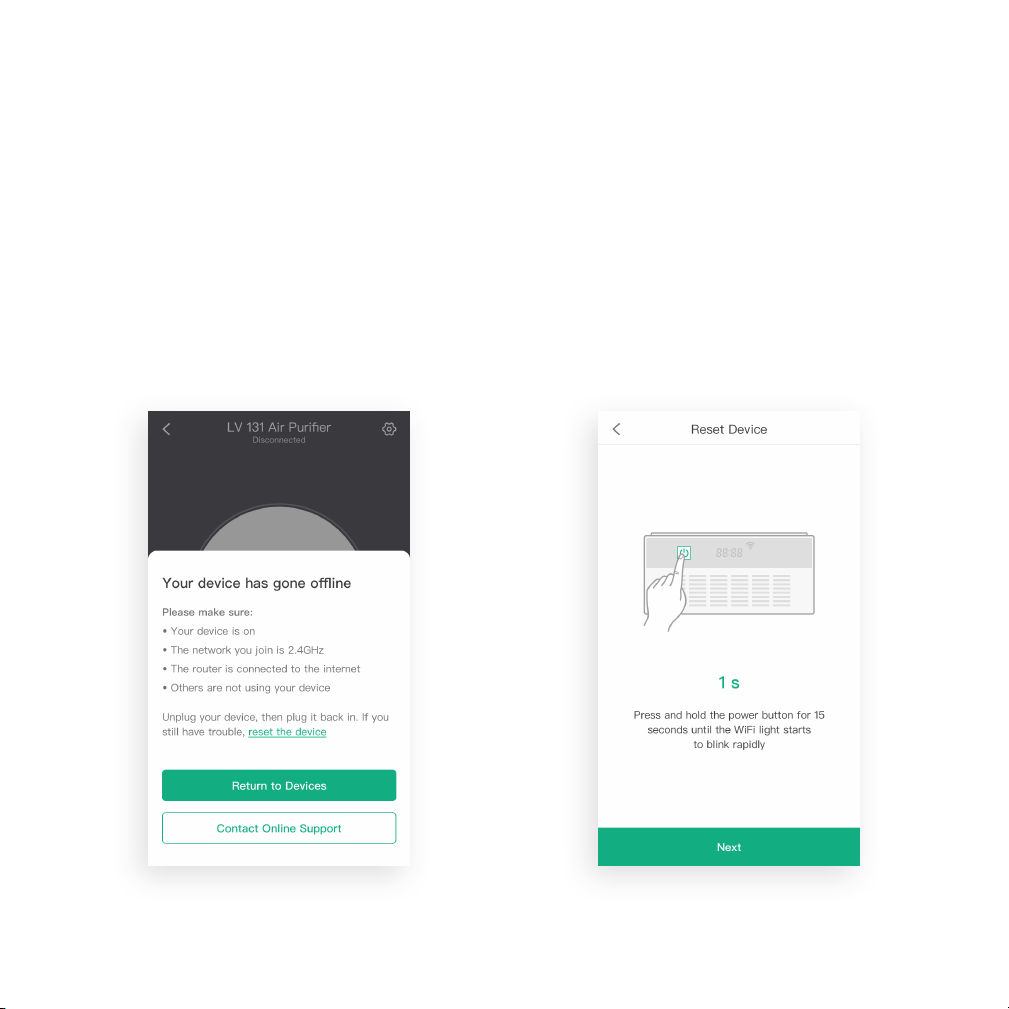
Resetting Your Air Purifier
Resetting your air purifier can help you troubleshoot any
issues you may have, including if your air purifier has gone
oine.
NOTE:
• Hard resetting the purifier will erase all of your custom settings
and restore the default settings.
1. Delete your air purifier from the VeSync app.
2. Press and hold the power button for 15 seconds or
longer.
• After 5 seconds, the WiFi indicator light will blink
slowly (1 time per second). The air purifier will beep
once.
• After 15 seconds, the WiFi indicator light will blink
quickly (4 times per second). The air purifier will
beep again. This will reset the air purifier to factory
default settings.
24
Page 25
KEEPING THINGS CLEAN
Cleaning the Air Purifier
Wipe the outside of the air purifier with a dry cloth. Do not
clean with water or any other liquid, to avoid risk of electric
shock.
Check Filter Indicator
The Check Filter Indicator will light up as a reminder to
check the air filters. The indicator will turn on automatically.
You may not need to change your filters yet, but you need
to check them when the indicator light turns on.
Reset the Check Filter Indicator by pressing the black reset
button inside the vent on the side of the air purifier (see
page 28).
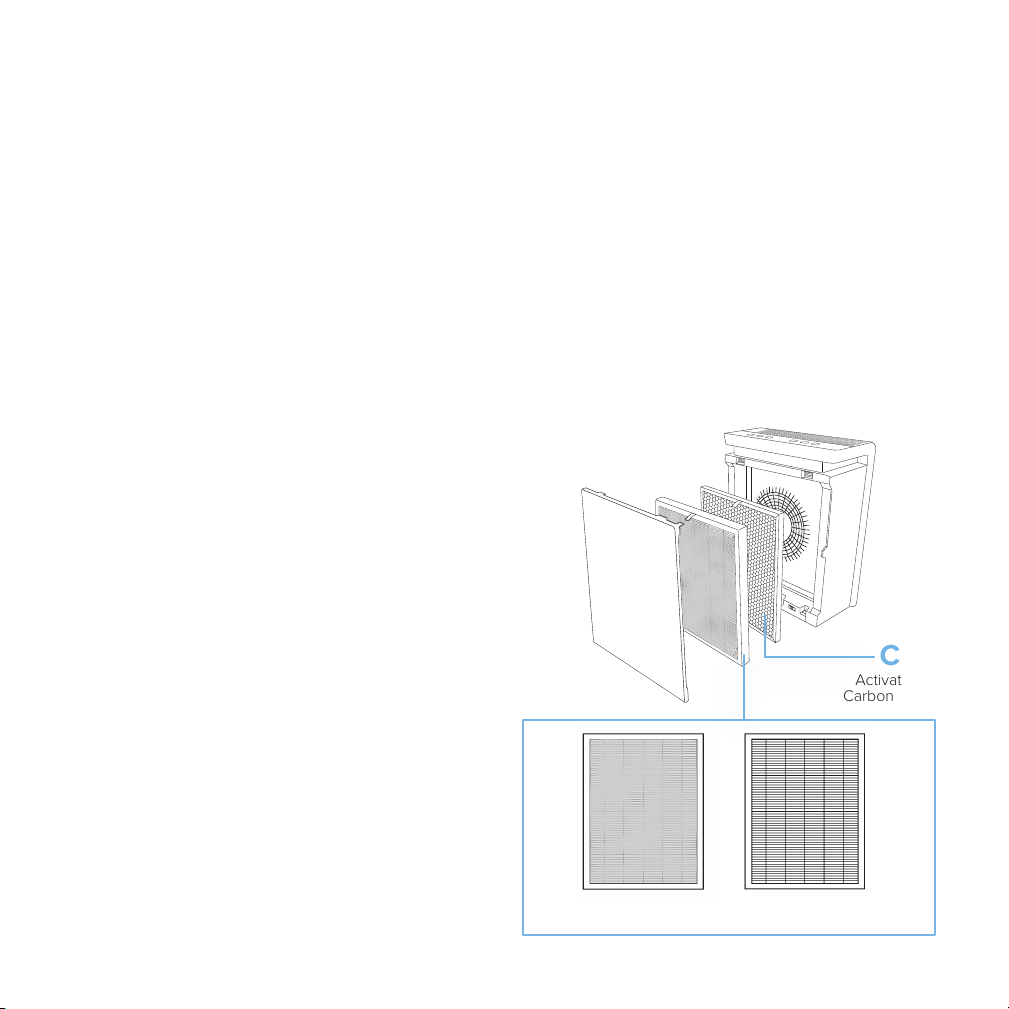
Cleaning the Air Filters
A. The Fine Preliminary Filter should be cleaned once a month to
increase eciency and extend the life of your filter. Clean the
Fine Preliminary Filter using a brush or small vacuum hose to
remove hair, dust, and large particles.
B. Do not clean the True HEPA Filter. Fine dust or bacteria may
be released back into the air if cleaning is attempted. Only
clean the Fine Preliminary Filter.
C. The Activated Carbon Filter does not require cleaning.
C
Activated
Carbon Filter
Front
Fine Preliminary Filter True HEPA Filter
Back
BA
25
Page 26
When Should I Replace the Air Filters?
The air filters should be replaced every 5–7 months. You
may need to replace your filters sooner or later depending
on how often you use your air purifier. Using your air purifier
in an environment with relatively high pollution may mean
you will need to change the filters more often (even if the
Check Filter Indicator is o).
Watch out for the signs of expired filters:
• Increased noise when the air purifier is on
• Decreased airflow
• Unusual odors
• Visibly clogged filters
NOTE: To avoid shortening the life of your
air purifier, only use genuine Levoit filters.
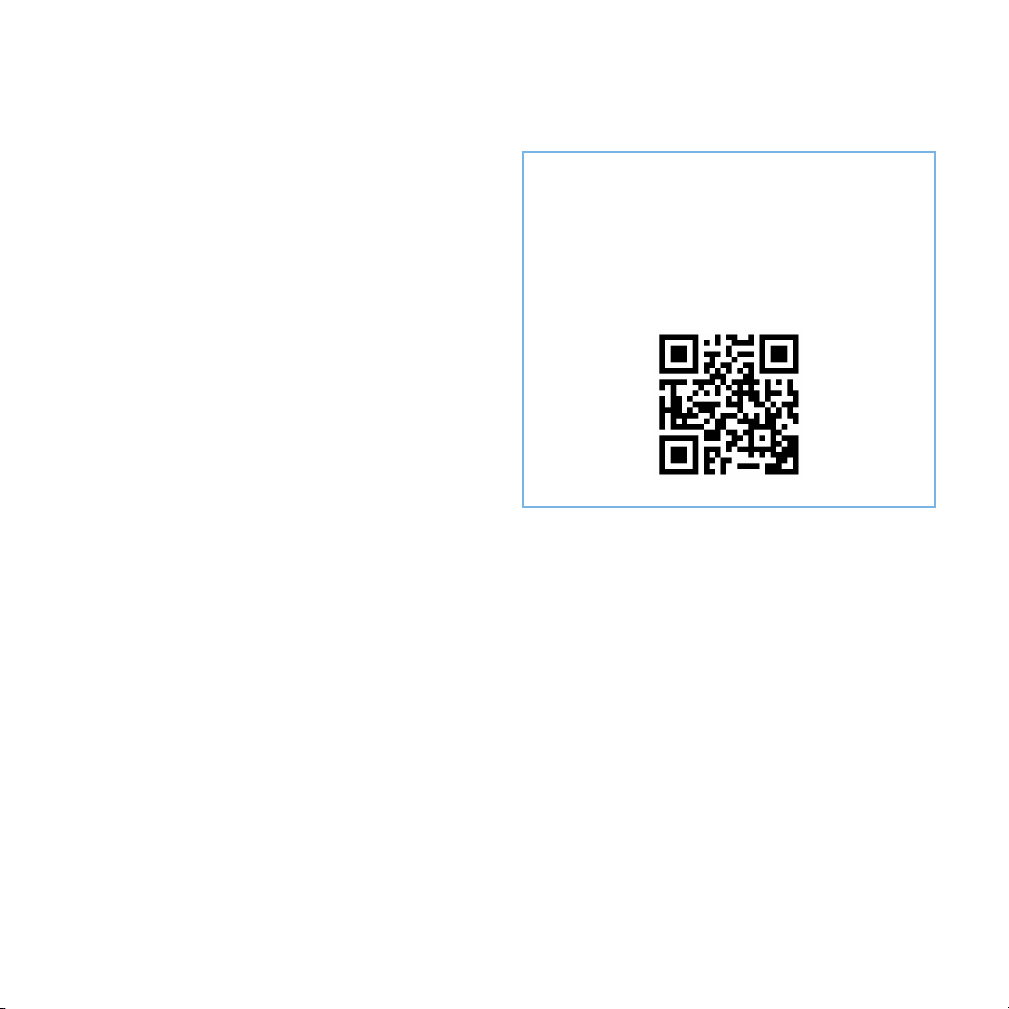
To purchase more filters for your air purifier,
scan the QR code or go to levoit.com for
more information.
26
Page 27
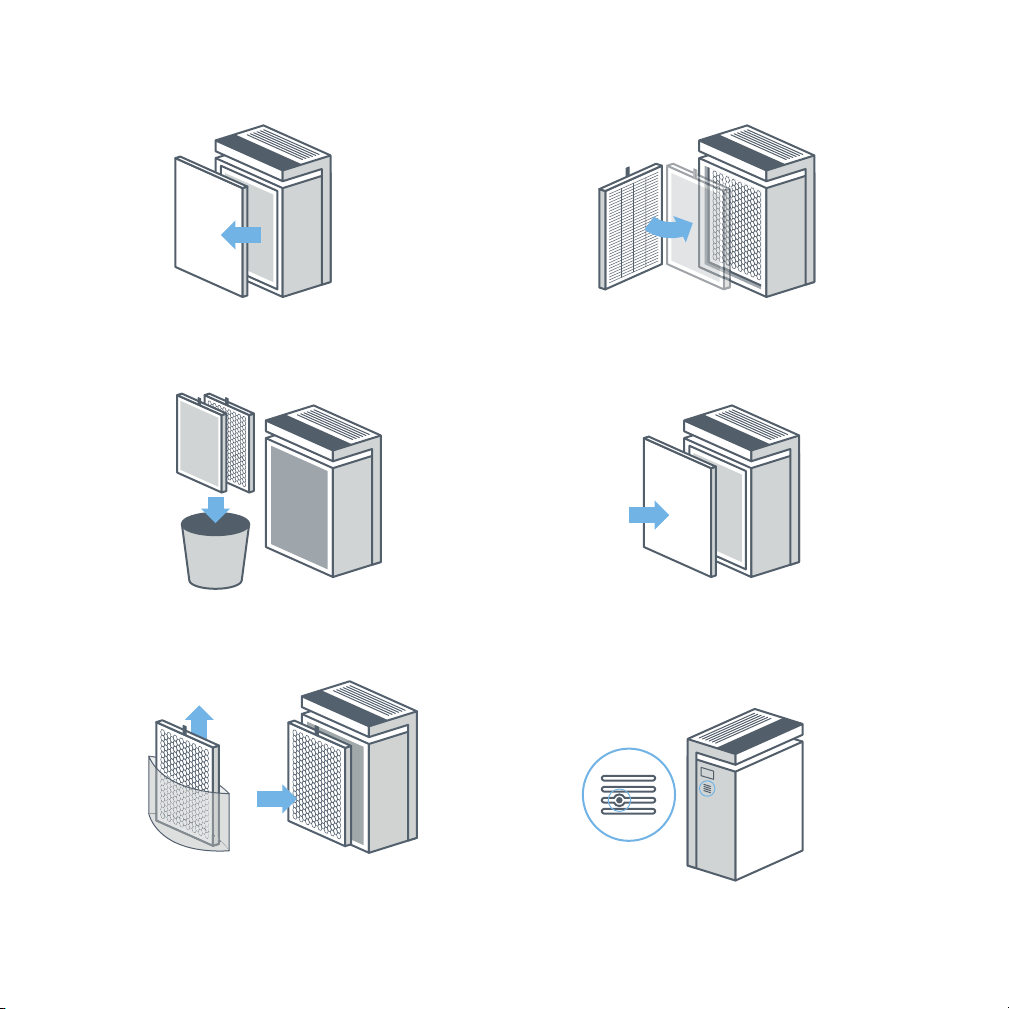
Replacing the Air Filters
1. Unplug the air purifier and remove the back cover.
2. Remove the old air filters and properly dispose of them.
3. Unwrap the new air filters. Place the Activated Carbon
Filter inside the housing first. Make sure the pull tabs
are facing out.
4. Install the True HEPA Combination Filter into the
housing. Make sure the pull tabs are facing out.
5. Replace the back cover. The air purifier will not power
on unless the back cover is replaced correctly.
6. Press the Filter Indicator Reset Button inside the vent
(see page 28).
27
Page 28
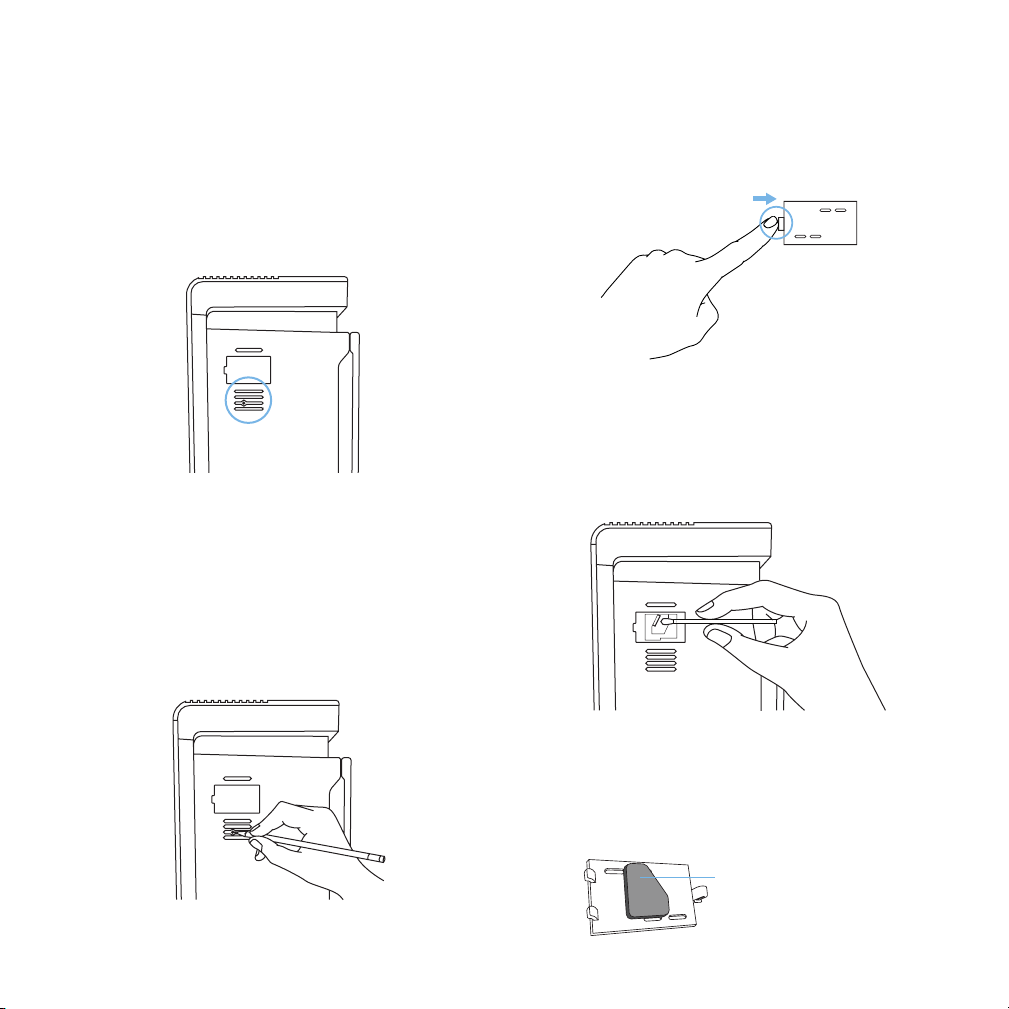
Resetting the Check Filter Indicator
Cleaning the Dust Sensor Lens
Reset the Check Filter Indicator after changing the air filters.
1. Plug in the air purifier and turn it on.
2. Locate the button vent on the side of the air purifier.
[Figure 3.1]
Figure 3.1
3. Use a pen, pencil, or small object to press the black
Filter Indicator Reset Button inside the vent. Press and
hold for 10 seconds. [Figure 3.2]
4. The Check Filter Indicator will turn o, indicating that the
reset is complete.
1. Turn o and unplug the air purifier.
2. Open the dust sensor cover. [Figure 4.1]
Figure 4.1
3. Use a cotton swab, dipped in water, to clean the dust
sensor lens. [Figure 4.2]
4. Wipe the lens dry with a dry cotton swab.
28
Figure 3.2
Figure 4.2
NOTE: Do not remove the foam piece attached to the dust sensor
cover unless instructed by Customer Support. [Figure 4.3]
foam piece
Figure 4.3
Page 29

TROUBLESHOOTING
Problem Possible Solution
Plug in the air purifier.
Check to see if the power cord is damaged. If so, stop using the air purifier and
contact Customer Support (see page 33).
Air purifier will not turn on or
respond to button controls.
The air quality indicator
always stays red, and the air
purifier is running on high
speed.
The air quality indicator
always stays blue, even
though air quality is poor.
Air purifier makes an unusual
noise while the fan is on.
Properly place the back cover on the air purifier, so that the safety switch is
activated (see page 8).
Plug the air purifier into a dierent outlet.
Air purifier is malfunctioning. Contact Customer Support (see page 33).
Clean the dust sensor lens (see page 28).
Make sure the air filters are removed from their packaging and properly in place
(see page 8).
Replace the air filters (see page 27).
The air purifier may be damaged, or a foreign object may be inside. Stop using the
air purifier and contact Customer Support (see page 33). Do not open the air
purifier.
29
Page 30

TROUBLESHOOTING (cont.)
Problem Possible Solution
Make sure the filters are removed from their packaging.
Airflow is significantly
reduced.
Poor air purification quality.
Check Filter Indicator is still
illuminated after replacing
the air filter.
Press to increase the fan speed.
Make sure there is clearance of at least 15 in (38 cm) on all sides of the air purifier.
Replace the air filters (see page 27).
Make sure no objects are blocking the top or sides of the air purifier (the inlet or
outlet).
Make sure the air filters are removed from their packaging and properly in place
(see page 27).
Close doors and windows while running the air purifier.
Make sure the room is smaller than 300 ft² (8 m²). The air purifier may not be
eective in larger rooms.
Clean the dust sensor lens (see page 28).
Replace the air filters (see page 27).
Reset the Check Filter Indicator (see page 28).
30
Air purifier randomly turns
o.
If your problem is not listed, please contact Customer Support (see page 33).
Air purifier is malfunctioning. Stop using the air purifier and contact Customer
Support (see page 33).
Page 31

VESYNC APP TROUBLESHOOTING
Why can’t I connect my air purifier to my WiFi
network?
• During the setup process, you must be on a
secure 2.4GHz WiFi network.
• Make sure the WiFi password you entered is
correct.
I already have another smart appliance
connected to the VeSync app, but my smart air
purifier won’t connect.
• Close and relaunch the VeSync app.
• Reset the air purifier by pressing and holding
the power button for 15 seconds. The WiFi
indicator will rapidly blink 10 times and turn
o.
How do I change my WiFi network to a 2.4GHz WiFi
network?
• Most dual-band routers support both 2.4G and 5G
networks. Select the WiFi name that does not end in
“_5G”.
• If your phone is attempting to connect to the 5G
network, try “forgetting” or temporarily disabling the 5G
network.
• If you are unsure, or if the 2.4G and 5G networks do
not have separate names, please contact your internet
service provider.
My air purifier is oine.
1. Make sure your router is connected to the internet,
and your phone’s network connection is working
properly.
2. Delete the oine air purifier from the VeSync app.
Swipe left (iOS) or tap and hold (Android), and tap
Delete.
3. Reset the air purifier by pressing and holding the
power button for more than 15 seconds. The WiFi
indicator will rapidly blink 10 times and turn o.
4. Reconfigure your air purifier with the VeSync app.
NOTE: Power outages, internet outages, or changing WiFi
routers may cause your air purifier to go oine.
If your problem is not listed, please contact Customer Support (see page 33).
31
Page 32

FCC Statement
This device complies with Part 15 of the FCC Rules. Operation is subject to the following two conditions:
1. This device may not cause harmful interference.
2. This device must accept any interference received, including interference that may cause undesired operation.
Any changes or modifications not expressly approved by the party responsible for compliance could void the user’s authority
to operate this equipment.
This equipment has been tested and found to comply with the limits for a Class B digital device, pursuant to Part 15 of the FCC
Rules. These limits are designed to provide reasonable protection against harmful interference in a residential installation.
This equipment generates, uses, and can radiate radio frequency energy and, if not installed and used in accordance with the
instructions, may cause harmful interference to radio communications. However, there is no guarantee that interference will
not occur in a particular installation. If this equipment does cause harmful interference to radio or television reception, which
can be determined by turning the equipment o and on, the user is encouraged to try to correct the interference by one of
the following measures:
• Reorient or relocate the receiving antenna.
• Connect the equipment into an outlet on a circuit dierent from that to which the receiver is connected.
• Increase the separation between the equipment and receiver.
• Consult the dealer or an experienced radio/TV technician for help.
FCC Radiation Exposure Statement
This equipment complies with FCC radiation exposure limits set forth for an uncontrolled environment. End users must follow
the specific operating instructions for satisfying RF exposure compliance. To maintain compliance with FCC RF exposure
compliance requirements, please follow operation instructions as documented in this manual. This transmitter must not be
co-located or operating in conjunction with any other antenna or transmitter. This equipment should be installed and operated
with a minimum distance of 20cm between the radiator and your body. The availability of some specific channels and/or
operational frequency bands are country dependent and are firmware programmed at the factory to match the intended
destination. The firmware setting is not accessible by the end user.
32
Page 33

WARRANTY INFORMATION
Product Name Smart True HEPA Air Purifier
Model Number LV-PUR131S
Default Warranty Period 1 year
For your own reference, we strongly recommend that you record
your order number and date of purchase.
Date of Purchase
Order Number
TERMS & POLICY
Levoit warrants all products to be of the highest quality in material,
craftsmanship, and service, eective from the date of purchase to
the end of the warranty period.
Levoit will replace any product found to be defective due to
manufacturer flaws based on eligibility. Refunds are available within
the first 30 days of purchase. Refunds are only available to the
original purchaser of the product. This warranty extends only to
personal use and does not extend to any product that has been
used for commercial, rental, or any other use in which the product is
not intended for. There are no warranties other than the warranties
expressly set forth with each product.
This warranty is non-transferrable. Levoit is not responsible in
any way for any damages, losses, or inconveniences caused by
equipment failure by user negligence, abuse, or use noncompliant
with the user manual or any additional safety, use, or warnings
included in the product packaging and manual.
This warranty does not apply to the following:
• Damage due to abuse, accident, alteration, misuse, tampering, or
vandalism.
• Improper or inadequate maintenance.
• Damage in return transit.
• Unsupervised use by children under 18 years of age.
Levoit and its subsidiaries assume no liability for damage caused
by the use of the product other than for its intended use or as
instructed in the user manual. Some states do not allow this
exclusion or limitation of incidental or consequential losses so the
foregoing disclaimer may not apply to you. This warranty gives you
specific legal rights and you may also have other rights which may
vary from state to state.
ALL EXPRESSED AND IMPLIED WARRANTIES, INCLUDING THE
WARRANTY OF MERCHANTABILITY, ARE LIMITED TO THE
PERIOD OF THE LIMITED WARRANTY.
Additional 1-Year Warranty
You can extend your 1-year warranty by an additional year. Log
onto www.levoit.com/warranty and enter your order number (for
example, from Amazon or Houzz) to register your new product for
the extended warranty.
If you are unable to provide the order number for your product,
please type a short note in the order number field along with the
date you received your product.
Defective Products & Returns
If your product proves defective within the specified warranty period,
please contact Customer Support via [email protected] with your
order number. DO NOT dispose of your product before contacting
us. Once Customer Support has approved your request, please
return the unit with a copy of the invoice or your order number.
CUSTOMER SUPPORT
If you encounter any issues or have any questions
regarding your new product, feel free to contact our helpful
Customer Support Team. Your satisfaction is our goal!
Arovast Corporation
1202 N. Miller St., Suite A
Anaheim, CA 92806
Email: [email protected]
Toll-Free: (888) 726-8520
Support Hours
Mon–Fri, 9:00 am–5:00 pm PST/PDT
*Please have your order invoice and order number ready before
contacting Customer Support.
33
Page 34

Connect with us @LevoitLifestyle
Page 35

Levoit.com
v01.03
35
 Loading...