

Page 1

Model: LV-H132
Compact HEPA Air Purifier
Questions or Concerns?
Please contact us Monday - Friday 9:00 am - 5:00 pm PST
at [email protected] or at (888) 726-8520.
Page 2

THANK YOU FOR PURCHASING
THE LVH132 COMPACT HEPA
AIR PURIFIER BY LEVOIT.
Should you have any questions or concerns regarding your
new product, please contact us at [email protected].
We hope you enjoy your new product!
GET STYLE INSPIRATION
Find @LevoitLifestyle on social media for wellness + style
inspiration. We make every space mindful and chic.
@LevoitLifestyle
#LevoitLove • #LevoitLifestyle
Page 3

TABLE OF CONTENTS
PACKAGE CONTENTS
Package Contents
Specifications
Safety Information
Getting to Know Your Air Purifier
Getting Started
Operation
· General Operation
· Button Controls
Keeping Things Clean
· General Maintenance
· Checking the Air Filters
· When Should I Replace the
Air Filters?
· Replacing the Air Filters
· Resetting the Air Purifier
Troubleshooting
Warranty Information
Customer Support
3
3
4
6
7
10
10
11
12
12
12
12
13
15
16
18
18
1 x LV-H132 Compact HEPA Air Purifier
1 x Activated Carbon & HEPA Filter (Pre-installed)
1 x Pre-filter (Pre-installed)
1 x User Manual
SPECIFICATIONS
Power Supply AC 120V / 60Hz
Rated Power 28W
Eective Range 129 ft² (12 m²)
Operating Conditions Temperature: 14°F~104°F
(-10°C~40°C)
Noise Level ≤ 50dB
Standby Power < 0.8W
3
Page 4

SAFETY INFORMATION
IMPORTANT: Please read and comply with all of the instructions and warnings provided in this manual before using the
product. Failure to comply with the instructions and warnings provided herein may result in inaccurate results and/or damage
to the product itself.
General Safety Use & Care
Only use this air purifier as described in this manual.
• Ensure the plug fits properly into a polarized power
oulet.
• When not being used, turn the air purifier o and
disconnect it from its power source by removing the
plug from the electrical outlet.
• DO NOT operate the unit if cord or plug is damaged.
Doing so may result in injury or damage to the unit.
• DO NOT handle the unit with wet hands. Thoroughly dry
your hands before handling any part of the air purifier.
• DO NOT immerse air purifier in water or liquids. Doing
so may result in damage to the appliance, electric
shock, or fire.
• DO NOT use the air purifier in wet or humid
environments.
• DO NOT use the air purifier outdoors. This appliance is
designed for indoor use only.
• DO NOT use the purifier in a room with major indoor
temperature changes as this may cause condensation
to build up inside the appliance.
• DO NOT use the air purifier in an enclosed space
where flammable, combustible or explosive gases are
present.
• DO NOT use in an area where toxic vapors, flammable
dust or oxygen tanks are present.
• It is important to keep all objects away from the air
intake grill.
• DO NOT insert fingers or objects into the air outlet.
• Child supervision is required while the air purifier is on.
Do not allow children to play on or near the air purifier.
• CAUTION: This appliance does not remove carbon
monoxide (CO) or radon (Rn). It cannot be used as a
safety device to prevent or clean up accidents with
combustion processes and hazardous chemicals.
• Always make sure to place the air purifier on a flat, level
surface before operation.
• Always allow 15 inches (38 cm) of clearance on all sides
of the purifier.
• WARNING: To reduce the risk of fire or electric shock,
do not use the appliance with any solid-state speed
control device.
• Place the air purifier so that the power cord easily
reaches a standard electrical outlet for a polarized plug.
• DO NOT run the power cord under carpeting. Do not
cover cord with throw rugs, runners or similar coverings.
DO NOT ROUTE CORD UNDER FURNITURE OR
APPLIANCES. Place the power cord away from high-
trac areas.
• DO NOT use an extension cord with this unit.
• Never place the unit on soft surfaces such as a bed or
sofa.
• This air purifier should not be used as a substitute for
kitchen or bathroom ventilation or vacuum cleaning.
• DO NOT sit on or place anything on top of the purifier
• DO NOT place the purifier directly below an air
conditioner to prevent any moisture from getting into
the purifier.
• DO NOT place the air purifier near sources of heat,
such as stove tops, ovens, radiators or computers.
• DO NOT place open flames, including candles, directly
in front of the air purifier.
• DO NOT use this appliance with indoor smoke-type
insect repellents or in places with oily residues, burning
incense, or chemical fumes.
• This appliance should only be used in rooms with
temperatures between 14°F and 104°F.
• Always unplug the appliance from the power supply
before servicing.
4
Page 5

• This unit should be inspected frequently. Dirt that has
collected should be removed regularly to prevent
excessive accumulation that may result in flashover or
fire.
• DO NOT clean the appliance with water or any other
liquid to avoid electric shock and/or electrical fires.
• Only use Levoit LV-H132-RF replacement filters for
this unit. Do not attempt to use other filters with this
appliance.
• If you experience any problems while operating the air
purifier, refer to the Troubleshooting section on page
16. If you are still having problems with your air purifier,
contact Customer Support on page 18.
• If the unit is damaged or is not functioning properly,
immediately discontinue use and contact Customer
Support (page 18).
• DO NOT attempt to repair this device in any way or use
any replacement components or parts to modify the
air purifier. Doing so will void your warranty. Contact
Customer Support immediately if your appliance is no
longer working.
SAVE THESE INSTRUCTIONS
5
Page 6
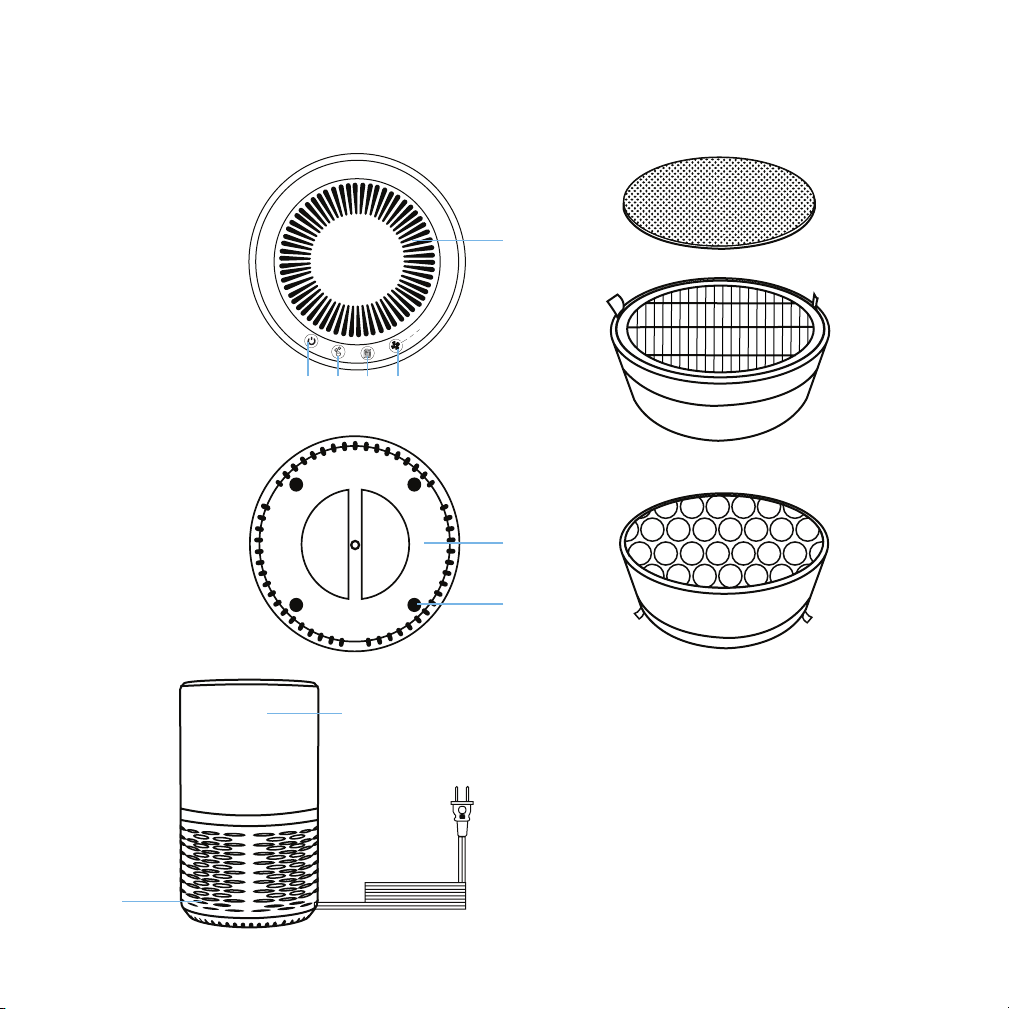
GETTING TO KNOW YOUR AIR PURIFIER
9
Side
3
To p
Bottom
4 5 6 7
1
2
3
2
1
10
Top view of filter
12
11
13
Bottom view of filter
8
1. Housing
2. Air Outlet
3. Air Inlet
4. Power Button
5. Night Light Button
6. Filter Reset Button
8. Power Cord
9. Pre-Filter
10. HEPA Filter
11. Activated Carbon Filter
12. Filter Cover
13. Anti-Skid Pads
7. Fan Speed Button
6
Page 7
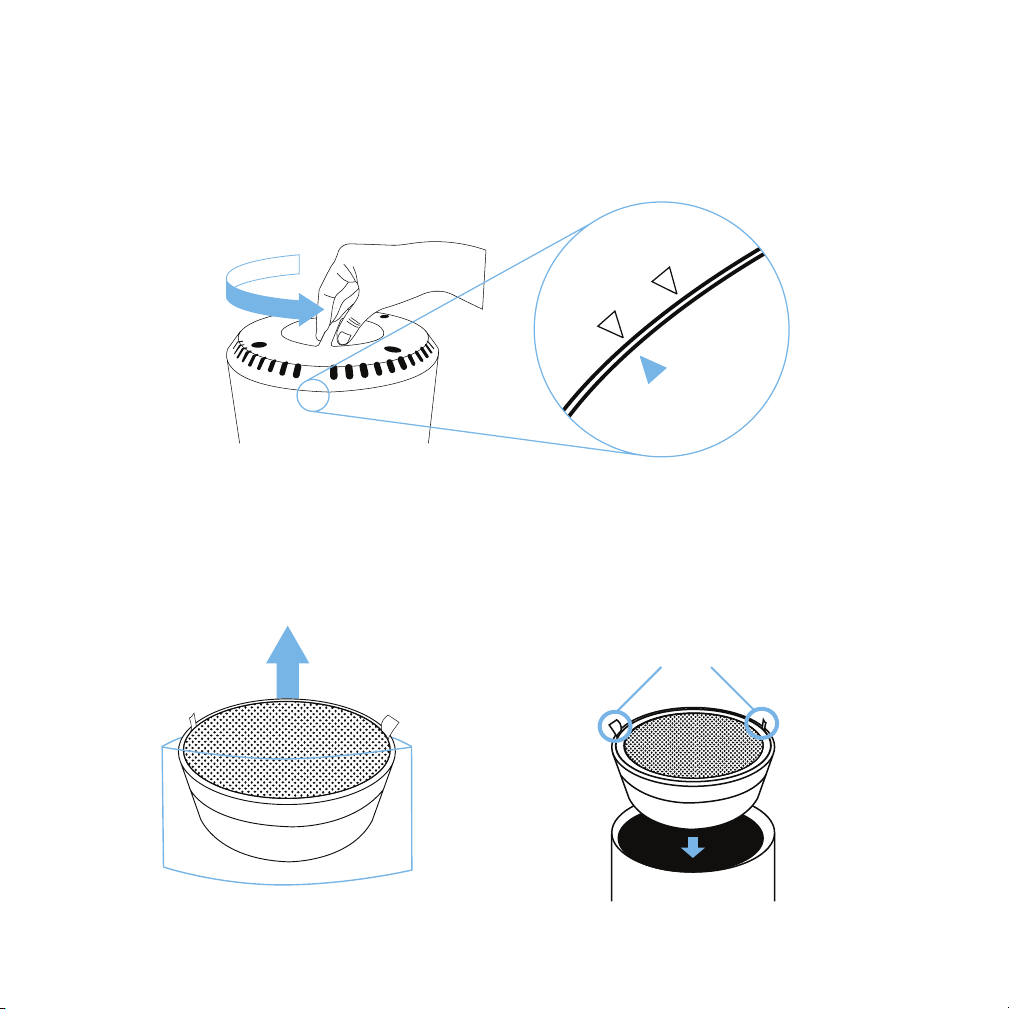
GETTING STARTED
OPEN
LOCK
1. Flip over the purifier to reveal the filter cover.
2. Twist the filter cover counterclockwise to the “OPEN” position and remove the cover. [Figure 1.1]
Figure 1.1
3. Remove the filters from their plastic packaging, then reinstall the filters. The white HEPA filter along with the pull tabs
should be facing outward. Place the pre-filter on top of the HEPA filter. [Figures 1.2 & 1.3]
Tabs should face
outward.
Figure 1.2 Figure 1.3
7
Page 8
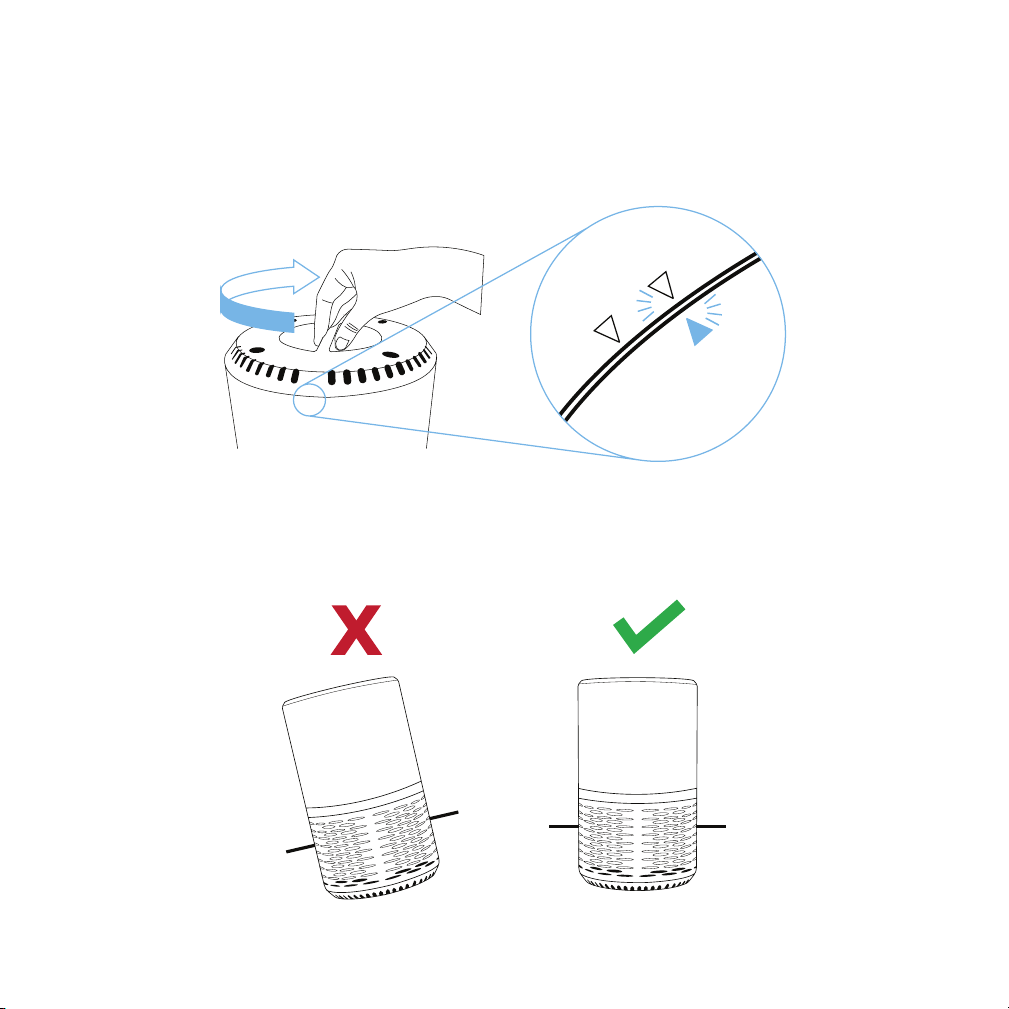
GETTING STARTED cont.)
OPEN
LOCK
4. Replace the filter cover on the air purifier, making sure the arrows on the housing and filter cover align. Twist the filter
cover clockwise to the “LOCK” position to secure the filters. The filter cover should snap shut. [Figure 1.4]
Cover should
snap shut
Figure 1.4
5. Place the air purifier on a flat, stable surface with the night light facing up. [Figure 1.5]
8
Figure 1.5
Page 9
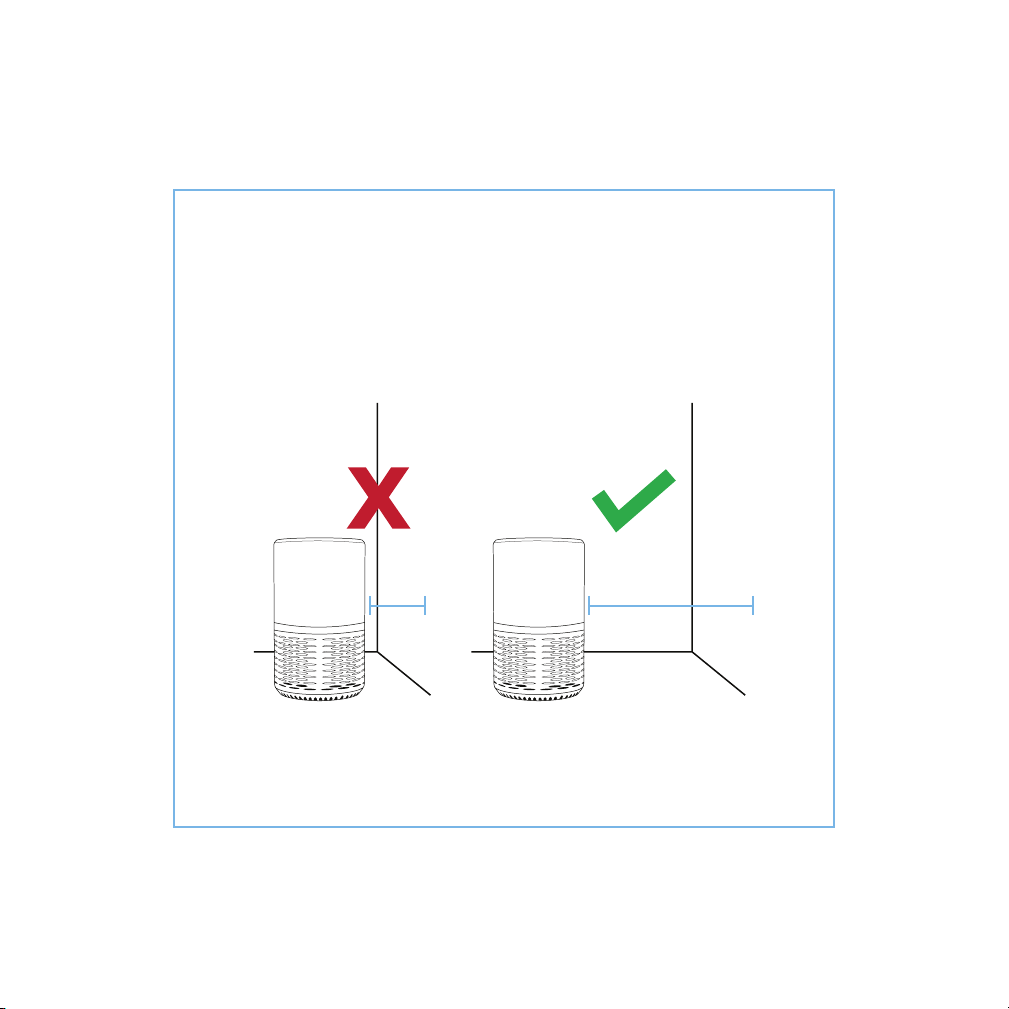
NOTE:
• Always allow 15 inches of clearance on all sides of the purifier. [Figure 1.6]
• Ensure the air filter is properly positioned in the purifier before use.
15 inches
Figure 1.6
9
Page 10

OPERATION
General Operation
1. Plug the air purifier into a powered electrical outlet. The
unit will chime to indicate that it is connected to a power
source.
2. Tap ‘ ’ to turn on the air purifier. It will start producing
fresh air on fan speed level 2.
3. (Optional): Tap ‘ ’ to change the fan speed of the air
purifier.
4. (Optional): Tap ‘ ’ to adjust the brightness or turn o
the built-in night light.
5. Tap ‘ ’ to turn o the air purifier once you are finished
using the air purifier.
NOTE: It may seem that the airflow is restricted at certain portions of
the air purifier when it is operating. This is normal.
10
Page 11
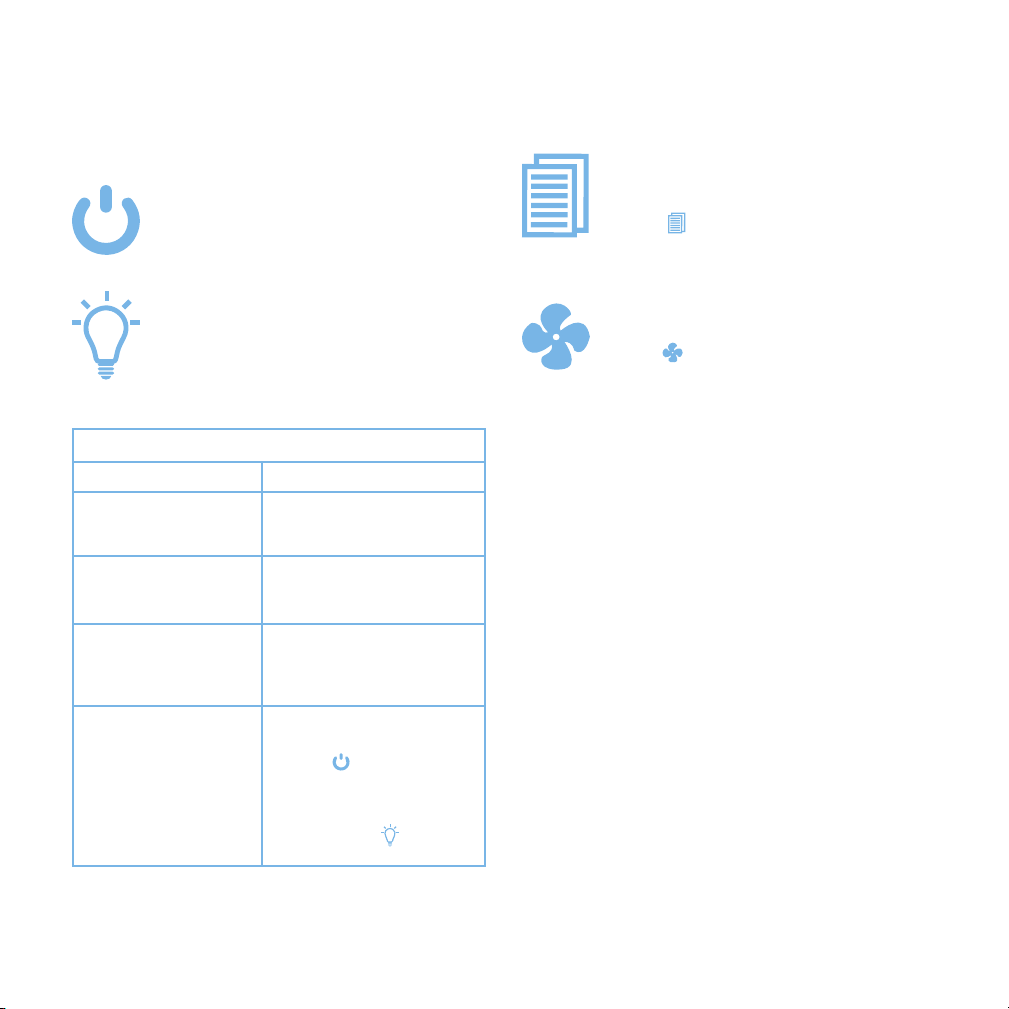
Button Controls
Power Button
Tap once to turn on or turn o the air purifier.
Filter Reset Button
This button will light up when the air filters
need to be checked or replaced. Tap and
hold ‘ ’ for 3 seconds after checking or
changing the air filters (See Checking the
Air Filters on page 12).
Night Light Button
Activates the night light for the air purifier.
Chart A
Night Light Operation
Action Function
Tap once. Turns on night light
Tap a second time. Dims the night light.
Tap a third time. Turns o the night light.
Turns o all of the lights on
the air purifier. Tap any button
Tap and hold.
except ‘
NOTE: Only the button lights will
turn back on. The night light will
remain o until ‘
’ to turn the lights
back on.
’ is tapped
once more.
Fan Speed Button
Tap ‘
’ to cycle through the 3 fan speeds
of the air purifier.
NOTE:
• To eectively clean the air, make sure to keep
the windows closed while the air purifier is
operating. Open the windows regularly to
maintain proper air circulation throughout your
home.
• For best results, it is recommended to run the
air purifier at maximum speed for 15–20 minutes
before using a lower speed setting or setting
the purifier to auto mode.
Memory Function
The air purifier will remember its programmed settings
when turned o. This includes fan speed and night light
brightness level. The purifier will resume its settings when it
is turned back on.
11
Page 12

KEEPING THINGS CLEAN
General Maintenance When Should I Replace the Air Filters?
• Wipe down the housing with a soft, clean cloth.
• DO NOT immerse the purifier in water or liquid
detergents.
• If necessary, wipe the housing with a clean damp cloth,
then immediately dry the housing with a separate clean
cloth.
Checking the Air Filters
The ‘
’ will light up to remind you to check the air filters.
Please note, this is simply a reminder to check the air filters.
The button will light up on sooner or later depending on
how often you use your air purifier. It does not necessarily
mean it is time to change the filters.
If ‘ ’ has illuminated, please remember to reset the air
purifier after checking the filters by tapping and holding
‘ ’ for 3 seconds (See Resetting the Air Purifier see
page 15).
It is recommended to change the air filters every 6–8
months. However, you may need to change your filters
sooner or later depending on how often you use your air
purifier. It is important to watch out for the following signs of
expired filters:
• Increased operating noise
• Decreased airflow
• Clogged filters
• Increased presence of odors
NOTE:
• The environment in which the air purifier being used
may also extend or shorten the lifetime of the the
air filters. Using your air purifier in an environment of
relatively high pollution may mean you will need to
change the air filters more often.
• If the air pollution in your environment is very high, there
is a possibility that the filters may not be completely
eective and may need to be replaced before ‘
lights up.
• Remember to reset the air purifier after changing the
air filters.
’
12
Page 13
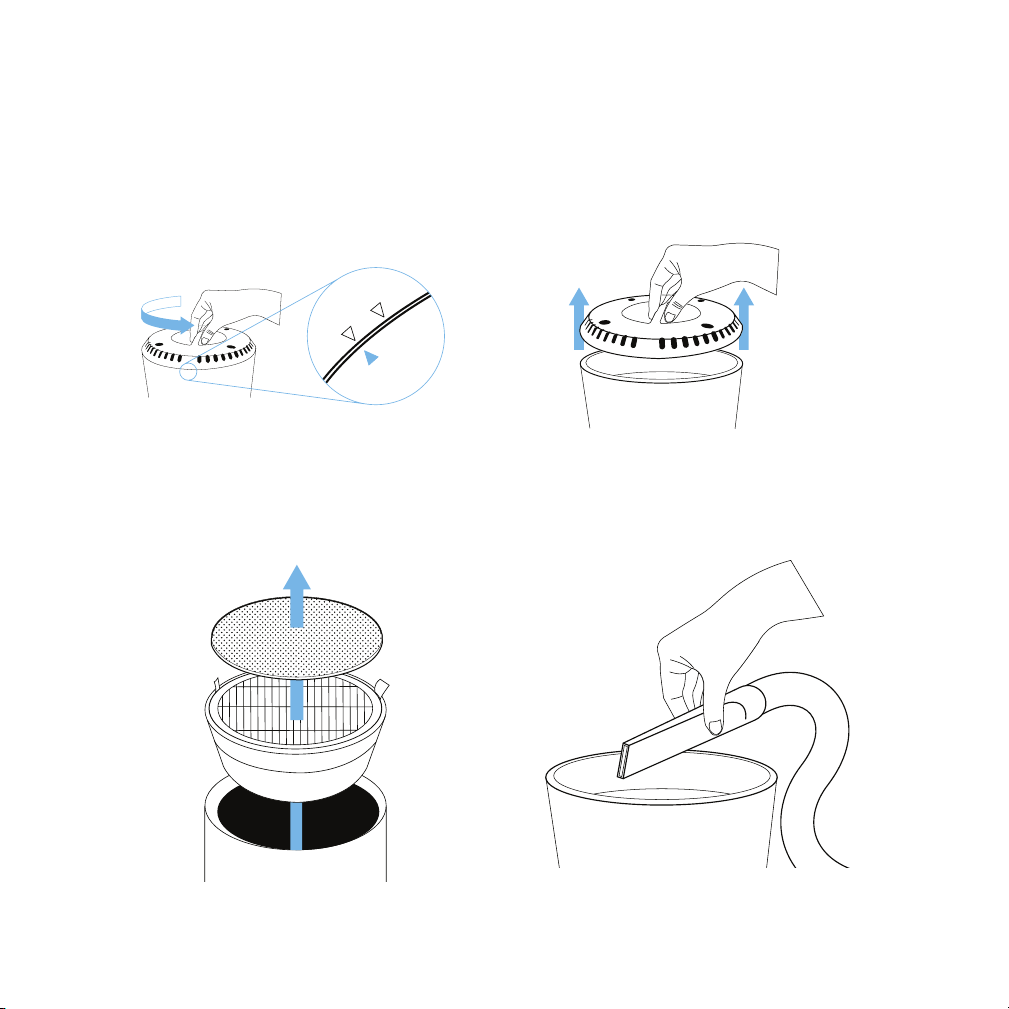
Replacing the Air Filters
OPEN
LO
C
K
1. Turn o and unplug the air purifier.
2. Flip over the purifier and remove the filter cover. [Figure 2.1 & 2.2]
Figure 2.2Figure 2.1
3. Remove the old filters. [Figure 2.3]
4. (Optional) Clean any remaining dust or hair inside the purifier using a vacuum hose [Figure 2.4]. DO NOT use water or
liquids to clean the purifier.
Figure 2.3 Figure 2.4
13
Page 14
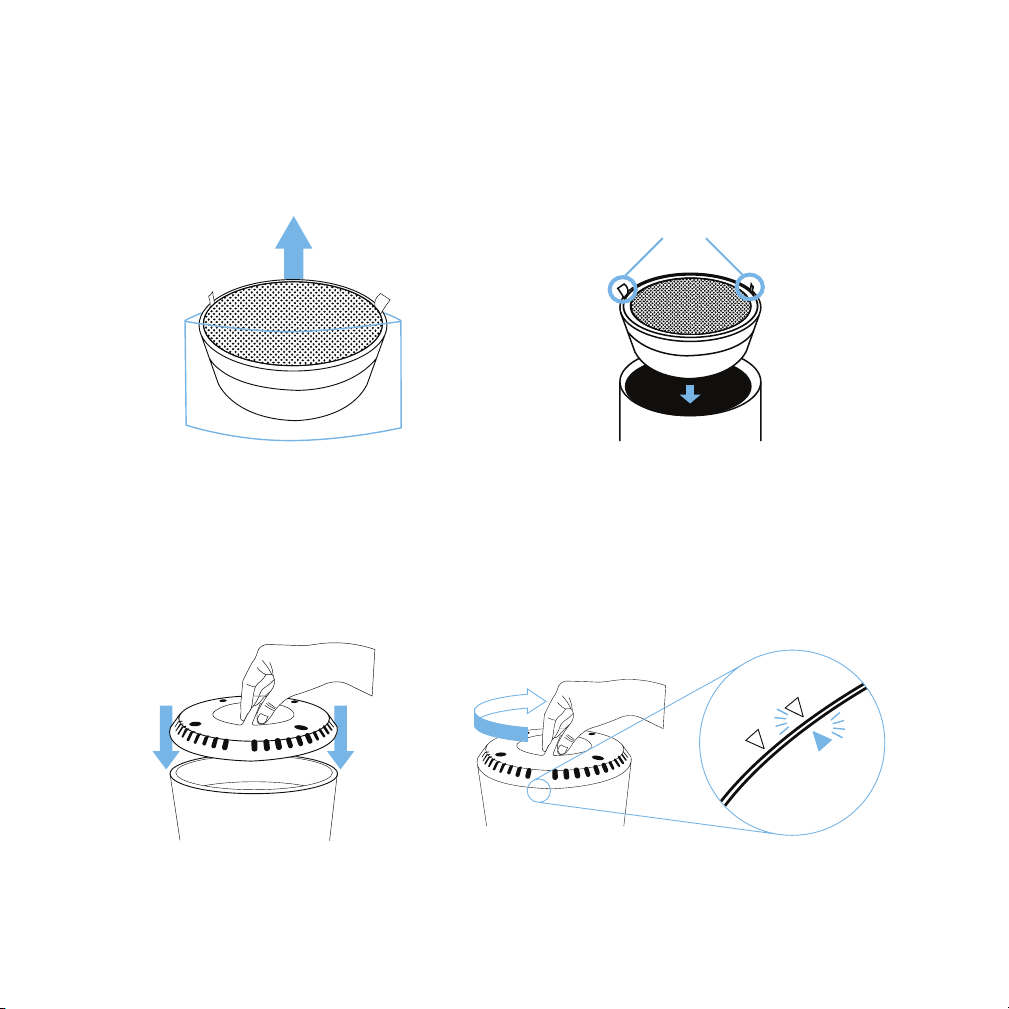
Replacing the Air Filters (cont.)
OPEN
LOCK
5. Remove the new filters from their packaging and place them into the purifier with the pull tabs facing out. The white HEPA
filter should also be facing out with the gray pre-filter on top of it. [Figures 2.5 & 2.6]
Tabs should face the
opening.
14
Figure 2.5
Figure 2.6
6. Replace the filter cover onto the housing, making sure the arrows on the housing and filter cover align. Turn the filter
cover clockwise to the lock position. [Figures 2.7 & 2.8]
7. Follow the instructions in the Resetting the Air Purifier on page 15 to complete the filter replacement process.
Cover should
snap shut
Figure 2.8Figure 2.7
Page 15
NOTE:
• DO NOT wash and reuse air filters. The air filters cannot be be cleaned manually.
• Only use Levoit LV-H132-RF True HEPA Filters when changing the filter for this device.
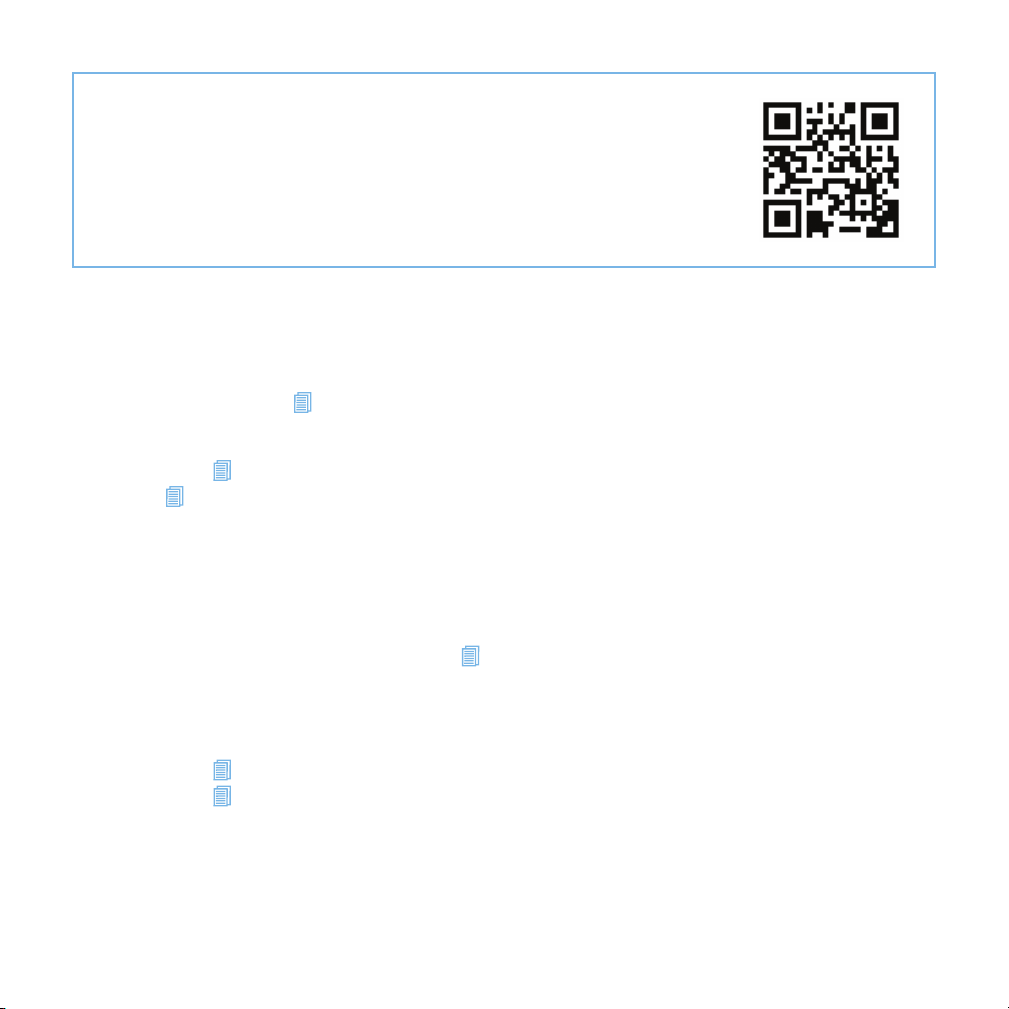
• Scan the QR Code to the right to purchase new air filters.
Resetting the Air Purifier
The air purifier must be reset if ‘ ’ lights up, and after checking or replacing the air filters.
1. Plug in the air purifier and turn it on.
2. Press and hold ‘ ’ for 3 seconds.
3. Release ‘ ’ and the light will turn o, indicating that the reset is complete.
Performing a Hard Reset
When using the air purifier in an environment of heavy pollution, the lifespan of the air filters may be
significantly reduced. You can change the filters even if ‘ ’ does not light up. Follow the steps below to
perform a hard reset.
1. Replace the air filters as mentioned in the Replacing the Air Filters section on page 13.
2. Plug in the air purifier and turn it on.
3. Press and hold ‘ ’ for 3 seconds, and it will light up.
4. Press and hold ‘ ’ again for 3 seconds, and it will turn o. The reset is now complete.
15
Page 16

TROUBLESHOOTING
Problem Cause Solution
Air purifier does not
power on.
Air purifier does not
respond to button
controls.
Air purifier makes an
unusual noise while
operating.
Significantly reduced
airflow.
Unit is not plugged into an electrical outlet. Connect the plug to a powered electrical outlet.
Outlet is not working properly. Try plugging the air purifier into a dierent outlet.
Power button has not been pressed after
plugging in the air purifier.
Power cord is damaged. Immediately discontinue use and contact
Air purifier is defective or malfunctioning.
Air purifier is not plugged into an outlet. Connect the plug to a powered electrical outlet.
Air purifier is defective or malfunctioning. Immediately discontinue use and contact
Air filters are dirty. Replace the air filters as instructed in the
Filter does not fit properly. Properly place filter(s) as noted in the Getting
Foreign object inside the unit. Immediately discontinue use and contact
Filter packaging has not been removed. Remove filter from packaging before use.
Fan speed is low.
Air filters need to be replaced. Replace the air filters as instructed in the
Not enough clearance on all sides of the
purifier.
Press ‘
Customer Support (page 18).
Customer Support (page 18).
Replacing the Air Filters section on page 13.
Started and Replacing the Air Filters sections
(pages 8 and 13).
Customer Support (page 18). DO NOT attempt to
open the air purifier.
Press ‘
Replacing the Air Filters section on page 13.
Ensure there is at least 15 inches (38 cm) of
clearance on all sides of the purifier.
’ once to turn on the air purifier.
’ to adjust fan speed.
16
Page 17

Problem Cause Solution
Poor air purification
quality.
Filter reset button is
still illuminated after
replacing the air filters.
Air purifier turns on,
then suddenly turns o.
Air purifier beeps
repeatedly after
being powered on or
plugged in.
Air filters need to be replaced. Replace the air filters as instructed in the
Replacing the Air Filters section on page 13.
Room is too large for the air purifier’s
applicable area.
Air inlet or outlet is blocked. Remove objects blocking air inlet or outlet.
Filters not properly placed in housing. Properly place filters as noted in the Getting
The air purifier has been reset incorrectly. See the Resetting the Air Purifier section on
Air purifier is defective or malfunctioning. Immediately discontinue use and contact
Ensure the room is smaller than 129 ft² (12 m²).
Started and Replacing the Air Filters sections
(pages 8 & 13).
how to properly reset the unit (page 15).
Customer Support (page 18). DO NOT attempt to
open the air purifier for self-servicing.
17
Page 18

WARRANTY INFORMATION
Product Name Compact HEPA Air Purifier
Model Number LV-H132
Default Warranty Period 1 Year(s)
For your own reference, we strongly recommend that you record
your order number and date of purchase.
Date of Purchase
Order Number
TERMS & POLICY
Levoit warrants all products to be of the highest quality in material,
craftsmanship, and service, eective starting from the date of
purchase.
Levoit will replace any product found to be defective due to
manufacturer flaws based on eligibility. Refunds are available within
the first 30 days of purchase. Refunds are only available to the
original purchaser of the product. This warranty extends only to
personal use and does not extend to any product that has been
used for commercial, rental, or any other use in which the product is
not intended for. There are no warranties other than the warranties
expressly set forth with each product.
This warranty is non-transferrable. Levoit is not responsible in
any way for any damages, losses or inconveniences caused
by equipment failure or by user negligence, abuse, or use
noncompliant with the user manual or any additional safety, use, or
warnings included in the product packaging and manual.
This warranty does not apply to the following:
• Damage due to abuse, accident, alteration, misuse, tampering or
vandalism.
• Improper or inadequate maintenance.
• Damage in return transit.
• Unsupervised use by children under 18 years of age.
Levoit and its subsidiaries assume no liability for damage caused
by the use of the product other than for its intended use or as
instructed in the user manual. Some states do not allow this
exclusion or limitation of incidental or consequential losses so the
foregoing disclaimer may not apply to you. This warranty gives you
specific legal rights and you may also have other rights which may
vary from state to state.
ALL EXPRESSED AND IMPLIED WARRANTIES, INCLUDING THE
WARRANTY OF MERCHANTABILITY, ARE LIMITED TO THE
PERIOD OF THE LIMITED WARRANTY.
Additional 1-Year Warranty
You can extend your one-year warranty by an additional year. Log
onto www.levoit.com/warranty and enter your order number (i.e.
Amazon or Houzz) within the first 14 days of purchase to register
your new product for the extended warranty.
If you are unable to provide the order number for your product,
please type a short note in the order number field along with the
date you received your product.
Defective Products & Returns
Should your product prove defective within the specified warranty
period, please contact Customer Support via [email protected]
with your invoice and order number. Once our Customer Support
team has approved your request, please return the unit with a copy
of your invoice and order number.
CUSTOMER SUPPORT
Should you encounter any issues or have any questions
regarding your new product, feel free to contact our helpful
Customer Support Team. Your satisfaction is our goal!
Customer Support
Levoit Corporation
1202 N. Miller St., Suite A
Anaheim, CA 92806
Email: [email protected]
Toll-Free: (888) 726-8520
Support Hours
Monday - Friday: 9:00 am - 5:00 pm PST
*Please have your order invoice or order number ready before
contacting Customer Support.
18
Page 19

Connect with us @LevoitLifestyle
19
Page 20

Levoit.com
 Loading...