

Page 1

LEVO C3
LEVO AG
Internet: http://www.levo.ch
Instruction manual
Please read the Instruction Manual carefully before attempting to use
your wheelchair
Alterations in constructional and technical manner or to the electronic
require the written authorisation of LEVO AG, otherwise no warranty or
product liability will be accepted.
In case of difficulty contact:
Manufacturer: Agent:
Version 1.8
Anglikerstrasse 20
CH-5610 Wohlen
Tel:+41 (0)56 618 44 11
Fax:+41 (0)56 618 44 10
1
Page 2

Dear Customer,
We would like to thank you for putting your trust in LEVO stand-up wheelchairs.
The LEVO stand-up wheelchair is a unique aid for use by those facing difficulties
walking and standing up. As well as performing all the functions of an active
wheelchair, the LEVO enables you to stand up on your own.
Please read these operating instructions carefully before using your
LEVO. They contain important information necessary for successful
operation of the wheelchair.
Whether you use your LEVO as a stand-up aid at work in everyday life, or to help
with standing exercises, it guarantees you optimum independence, mobility and
health.
As a LEVO customer, you have a valuable contribution to make to the on-going
further development of our products. We put great store by your suggestions,
which ensure that LEVO still offers the most comprehensive service available and
provides for the widest possible range of needs.
Yours faithfully,
LEVO AG
2
Page 3

Content
Declaration of Conformity ......................................................................... 6
Warranty ................................................................................................ 8
1. Intoduction ........................................................................................ 9
2. Safety instructions ........................................................................... 10
2.1. General safety instructions ............................................................. 10
2.2. Operation ..................................................................................... 11
2.3. Driving ......................................................................................... 11
2.4. Stand-up function ......................................................................... 11
2.5. Safety belt system ........................................................................ 12
2.6. Transportation .............................................................................. 12
2.7. Servicing and maintenance ............................................................. 13
3. Preparing the wheelchair for use and operation .............................. 14
3.1. Dispatch and transport................................................................... 14
Initial operation / Main fuse handling in case of replacement,
transportation and storage.................................................................... 14
3.2. Delivery ....................................................................................... 15
3.3. Storage ........................................................................................ 15
3.4. First adjustments .......................................................................... 15
4. Control unit ...................................................................................... 16
4.1. VR2-control .................................................................................. 16
4.1.1. On-/ Off-button .......................................................................... 16
4.1.2. Battery gauge ............................................................................ 16
4.1.3. Joystick ..................................................................................... 17
4.1.4. Speed ....................................................................................... 17
4.1.5. Change of the seat position ......................................................... 18
4.1.6. Light kit .................................................................................... 19
4.1.7. Horn ......................................................................................... 19
4.1.8. Locking/ unlocking the wheelchair ................................................ 19
4.2. R-net control (option) ............................................................. 20
4.2.1. On-/ Off-button .................................................................... 20
4.2.2. Battery gauge ............................................................................ 20
4.2.3. Joystick ................................................................................ 21
4.2.4. Speed ................................................................................... 21
4.2.5. Change of the seat position ......................................................... 22
4.2.6. Light Kit ................................................................................ 22
4.2.7. Horn ..................................................................................... 23
4.2.8. Locking/ unlocking the wheelchair ................................................ 23
3
Page 4

5. Electromagnetic interference (EMI) ................................................. 24
6. Driving the wheelchair ..................................................................... 26
6.1. Driving in general .......................................................................... 26
6.2. Obstacles ..................................................................................... 26
6.3. Permissible inclinations .................................................................. 27
6.4. Unlock the drive brakes ................................................................. 27
6.5. Charging the batteries ................................................................... 27
7. Safety harness ................................................................................. 28
7.1. Knee support ................................................................................ 28
7.1.1. Knee support „Pro“................................................................ 28
7.1.2. Knee support „Integral“ ......................................................... 28
7.2. Chest strap................................................................................... 28
8. Transfer ........................................................................................... 30
8.1. Getting into the wheelchair ..................................................... 30
8.2. Getting out of the wheelchair .................................................. 30
8.3. Sideways transfer .................................................................... 30
9. Individual settings ........................................................................... 31
9.1. Adjustment of the seat depth.......................................................... 31
9.2. Change of the seat width ............................................................... 32
9.3. Change the distance between the armrests ...................................... 32
9.4. Adjustment of the backrest angle .................................................... 32
9.5. Change of the distance footrest - seat cushion and angle adjustment of
the footrest ........................................................................................... 33
9.6. Adjustment of the armrest height/angle ........................................... 33
9.7. Adjustment of the armrest length .................................................... 34
9.8. Change the position of the control unit ............................................. 34
9.9. Adjustment of the knee support ...................................................... 34
9.9.1. Knee support „Pro“................................................................ 34
9.9.2. Knee support „Integral“ ......................................................... 35
9.10. Adjustment of the backrest height ................................................ 35
10. Options ............................................................................................ 36
10.1. Tilt in space ............................................................................... 36
10.2. Swing away holder for the Control unit .......................................... 36
10.3. Joystick protection guard ............................................................. 36
10.4. Swing away table tray ................................................................. 37
10.5. Skirt guard ................................................................................ 37
10.6. Upper leg support ....................................................................... 37
10.7. Chest role .................................................................................. 38
10.8. Foot guide ................................................................................. 38
4
Page 5

10.9. Lamps for outdoor use with indicators ........................................... 38
10.10. Jostick-top .............................................................................. 39
10.11. Rear view mirror ...................................................................... 39
11. Transportation of your wheelchair ................................................... 40
11.1. Transportation in a vehicle without the person in the wheelchair ...... 40
11.2. Transportation in a vehicle with the person in the wheelchair ........... 42
12. Cleaning ........................................................................................... 42
13. Maintenance .................................................................................... 43
13.1. Service...................................................................................... 43
13.2. Safety checks ............................................................................ 43
13.2.1. Daily checks ............................................................................ 43
13.2.2. Weekly checks ........................................................................ 44
13.3. Spare parts................................................................................ 44
14. Disposal ........................................................................................... 45
15. Trouble shooting .............................................................................. 46
16. Controller self help guide VR2 ......................................................... 47
17. Controller self help guide R-net ....................................................... 48
18. Technical information ...................................................................... 49
19. Version-Management ....................................................................... 50
5
Page 6

Declaration of Conformity
As manufacturer of the LEVO Stand-up wheelchair, the company
LEVO AG
Anglikerstrasse 20
CH-5610 Wohlen, Switzerland
Tel.: +41 (0)56-618 4411
Fax: +41 (0)56-618 4410
Internet: http://www.levo.ch
Declares in all responsibility that the product hereby mentioned (see following list) corresponds
with the valid direction of the EC instructions for medical products determined 14th June, 1993
(93/42/EWG).
This Declaration of Conformity of the LEVO C3 includes all its accessories and options available from
LEVO.
ISO 7176-1:1999 Wheelchairs - Part 1: Determination of static stability
ISO 7176-2:2001 Wheelchairs - Part 2: Determination of dynamic stability of electric
wheelchairs
ISO 7176-3:2003 Wheelchairs - Part 3: Determination of efficiency of brakes
ISO 7176-4:1997 Wheelchairs - Part 4: Energy consumption of electric wheelchairs and
scooters for determination of theoretical distance range
ISO 7176-5:1986 Wheelchairs - Part 5: Determination of overall dimensions, mass and
turning space
ISO 7176-6:2001 Wheelchairs - Part 6: Determination of maximum speed, acceleration and
deceleration of electric wheelchairs
ISO 7176-8:1998 Wheelchairs - Part 8: Requirements and test methods for static, impact and
fatigue strengths
ISO 7176-9:2001 Wheelchairs - Part 9: Climatic tests for electric wheelchairs
ISO 7176-10:1988 Wheelchairs - Part 10: Determination of obstacle climbing ability of electric
wheelchairs
ISO 7176-11:1992 Wheelchairs - Part 11: Test dummies
ISO 7176-13:1989 Wheelchairs - Part 13: Determination of coefficient of friction of test
surfaces
ISO 7176-14:1997 Wheelchairs - Part 14: Power and control systems for electric wheelchairs -
Requirements and test methods
ISO 7176-15:1996 Wheelchairs - Part 15: Requirements for information disclosure,
documentation and labelling
ISO 7176-16:1997 Wheelchairs - Part 16: Resistance to ignition of upholstered parts -
Requirements and test methods
ISO 8191-1:1987 Furniture - Assessment of the ignitability of upholstered furniture - Part 1:
Ignition source: smouldering cigarette
ISO 8191-2:1988 Furniture - Assessment of ignitability of upholstered furniture - Part 2 :
Ignition source : match-flame equivalent
ISO 10993-5:1999 Biological evaluation of medical devices - Part 5: Tests for In Vitro
6
Page 7

ISO 14971:2007 Medical devices - Application of risk management to medical devices
EN 12184:2004 Electrically powered wheelchairs, scooters an their chargers
EN 12182:1999 Technical aids for disabled persons. General requirements and test methods
ISO 7176-21:2003 Wheelchairs - Part21: Requirements and test methods for electromagnetic
compatibility
EN 61000-3-2:2006 Limits – Limits for harmonic current emissions
EN 61000-3-3:1995+A1:2001 +A2:2005
Electromagnetic compatibility (EMC). Limits. Limitation of voltage changes,
voltage fluctuations and flicker in public low-voltage supply systems, for
equipment with rated current less or equal 16 A per phase and not subject
to conditional connection
CISPR 11:2003+A1:2004
Industrial, scientific and medical (ISM) radio-frequency equipment Electromagnetic disturbance characteristics - Limits and methods of
measurement
EN 61000-4-11:2004 Electromagnetic compatibility (EMC). Testing and measurement techniques.
Voltage dips, short interruptions and voltage variations immunity tests
EN 61000-4-5:2006 Surge Immunity testing
EN 61000-4-4:2004 Electrical fast transient/burst immunity test
EN 61000-4-2:1995+A1:1998+A1:2001
Electrostatic discharge immunity test
EN 61000-4-6:1996+A1:2001
Immunity to conducted disturbances, induced by radio-frequency fields
EN 61000-4-3:2006 Radiated, radio-frequency, electromagnetic field immunity test
ISO WC/Volume1:1998 Section 7:
Method of Measurement of Seating and Wheel Dimensions
ISO WC/Volume1:1998 Section 20:
Determination of the performance of stand-up wheelchairs
ISO WC/Volume1:1998 Section 22:
Set up procedures
ISO WC/Volume1:1998 Section 93:
Maximum overall dimensions
Type of power stand-up wheelchair:
LEVO C3 S-XL
52Ah and 73Ah battery capacity
Incl. Its options and accessories
Wohlen, January 1, 2010
Thomas Nietlisbach Thomas Räber
7
Page 8

Warranty
Your LEVO product is guaranteed from the date of purchase for:
Two years covering all material and manufacturing defects of mechanical
parts.
One year covering all electronic components including the motors.
Batteries are excluded from the warranty.
LEVO AG will not repair or replace free of charge any part or parts found to be
defective due to abuse, misuse or lack of maintenance.
The customer has no claim on warranty, if there has been any design
modifications (mechanic or electronic) been made on the wheelchair without the
approval from LEVO AG.
Warranty claims should be directed to:
In Switzerland LEVO AG
Other Countries To your local agent
Addresses and telephone numbers are given on the front page.
8
Page 9

1. Intoduction
Thank you to choose the LEVO C3.
The LEVO C3 has been designed as a powered stand-up wheelchair for indoor
and outdoor use. As such it belongs to the wheelchair category B.
The LEVO C3 makes it possible to stand-up and to drive in a standing as well as
in a sitting position. This function provides great independence to the user.
This wheelchair is made for everyone whose muscles do not support them to
propel a wheelchair manually. The LEVO C3 is a unique aid for those facing
difficulties in standing and walking.
The LEVO C3 has been designed for older children and adults who will benefit
from motorised mobility and the ability to stand up at will.
The standard model of the LEVO C3 allows comfortable sitting and standing on
every stage between the sitting and the complete standing position. Driving is
possible in all stages.
The front wheels are permanent powered with the same speed as the middle
wheels, which offers a great maneuverability around ramps, obstacles and
uneven ground (4WD). In sitting configuration, the chair is driven by the middle
wheels and the front wheels are lifted up from the floor which causes a very
small turning circle. In standing configuration, the chair is driven by the front
wheels and the middle wheels are lifted up from the floor. This allows also a
great mobility in standing position. In sitting or standing position, the driven
wheels are directly in the centerline of the body.
The seat depth, the armrests and the knee support are stage less adjustable, this
gives an ideal possibility to adjust the chair to the customers’ needs.
The maximum load weight is 140 kilograms or 310 pounds; this includes all
personal belongings carried along too.
Read the safety instructions first, to acquaint yourself with the risks and
dangers that can occur by the use of the wheelchair.
The LEVO C3 is certificated with the -sign. This product corresponds to the
regulations notified as 93/42 EWG.
If we use the male form in the following, the female form is included in this.
All information, images, pictures and specifications were made on the base of the
product information we had at the point in time when we printed the manual.
The images and pictures are type examples they don’t claim to be exact
reproductions of the various parts of the wheelchair.
We reserve ourselves the right to changes of product without previous
announcement.
9
Page 10

2. Safety instructions
Before using the LEVO C3, have your LEVO dealer explain the instructions to
so. Don't hesitate to ask for any explanation.
LEVO AG is not responsible for damages to persons or property, who
resulted from the fact that the user or another person ignored the
recommendations, warnings and instructions specified in this manual.
For your own security we recommend to read and obey all the
instructions carefully in this manual.
On the LEVO C3 you find the following symbols attached:
Warning, risk of pinching! Make sure no parts of the body, clothing
2.1. General safety instructions
you. It also helps if you have a friend to listen as well. Study the instruction
manual yourself or if you cannot understand it, get a friend to help you doing
or other items get jammed
Warning, read user’s manual!
Anchorage point for the tie down straps.
Label for the shutdown of the brake release
10
Page 11

2.2. Operation
Avoid driving through puddles with the LEVO C3. The wheelchair and
some electrical parts getting too wet.)
The LEVO C3 is designed for outdoor and indoor use.
-Using the LEVO C3 outdoors, switch on the lights at dawn and dusk and in the
dark of course.
The wheelchair is not designated to take along passengers, independently
from the age of the driver.
Look further ahead while driving, so that you have sufficient time to react to
Pay attention to pedestrians, children, dogs etc. close to and especially in
front of you, since they can stop suddenly or change the direction.
Never switch off the joystick module during driving. Otherwise the wheelchair
will stop abrupt, so that you run the risk, to be thrown forward from the
wheelchair. Just release the joystick to stop the wheelchair from moving.
Consider the road permission regulations; these are different from country to
country. It is usually prescribed by law, which kind of streets can be used for
department.
Avoid steep edges, hillside situations or stairs if you push the chair manually
obstacle we recommend, using a ramp or an elevator.
Be aware of, that your wheelchair can produce electromagnetic emissions and
disturb other devices
The necessary force to push the LEVO C3 manually is higher than you are
used to with other powered wheelchairs. Depending on the floor surface and
the constitution of the person which is pushing the wheelchair, it can be
helpful to have a second person around, to help pushing the wheelchair if
necessary.
If unintended movement or brake release occurs, turn the wheelchair OFF as
2.3. Driving
-Whenever you are driving, use the knee support and the chest belt.
-LEVO does not recommend driving the LEVO C3 on uneven, soft or steeply
sloping ground.
especially electrical components are very sensitive to too much water, some
splashes of water don't harm. (There is a danger of false function regarding
obstacles and avoid accidents in your way.
your purposes. Inquire in this regards at your road traffic licensing
(brake release lever in lower position), because there is a risk to lose the
control over the wheelchair because of its weight and measurements. There is
even the risk that the user can fall out of the wheelchair. To overcome an
2.4. Stand-up function
11
Page 12

Standing up stresses your body in ways you may not be used to. Therefore we
recommend, consulting your doctor or physical therapist before using the
standing function of the LEVO C3.
It is not recommended to drive long distances in the standing position in
outdoor areas. This function is meant for moving around standing indoors, as
in the kitchen or in the office for examples.
The LEVO C3 is only allowed to bring you into the stand-up position when the
free wheel device is "ON", this guarantees the motor brakes function correctly.
Do not stand-up while the chair is in “free wheel” configuration!
You should only bring the LEVO C3 into standing position, if the chair is on
even, solid ground. If this condition is not ensured, the danger of tilting exists.
It’s absolutely essential to mount the knee support and the chest belt correct
before you use the stand-up function or you are driving (see chapter 5.).
You should under no circumstances attempt to stand up without
following all safety precautions.
Do not lift the wheelchair at mobile parts. This can lead to damages to
property or person and/or damages at the wheelchair.
The chest belt is exclusively intended to hold the torso of the user while
driving and the stand-up function. It is not used to be a protection device at
collisions and/or accidents.
We recommend to stand-up only when in company in case of sudden
spasticity, convulsions and similar problems.
2.5. Safety belt system
2.6. Transportation
12
Page 13

2.7. Servicing and maintenance
The LEVO C3 is a complicated piece of machinery. Do not attempt to maintain
it yourself. For all maintenance work, please contact an authorized dealer. It is
once every year.
You should only use original LEVO spare parts at possible repairs or
modifications. If you use other parts, the function and the security of the
wheelchair can be influenced. This also means that the wheelchair is no longer
covered under warranty.
Programming should only be conducted by healthcare professionals within
depth knowledge of PG Drives electronic control systems. Incorrect
programming could result in an unsafe set-up of a wheelchair for the user.
LEVO accepts no liability for losses of any kind if the drive or stability
characteristics of the wheelchair are altered without prior notification and
discussion with LEVO.
All inappropriate changes of the wheelchair and its different systems can lead
you’re unsecure about any issue, please ask your dealer first.
requested that your authorized dealer is in charge to services the wheelchair
to an increased accident risk.
All changes and interventions have to be made by an authorized dealer, if
13
Page 14

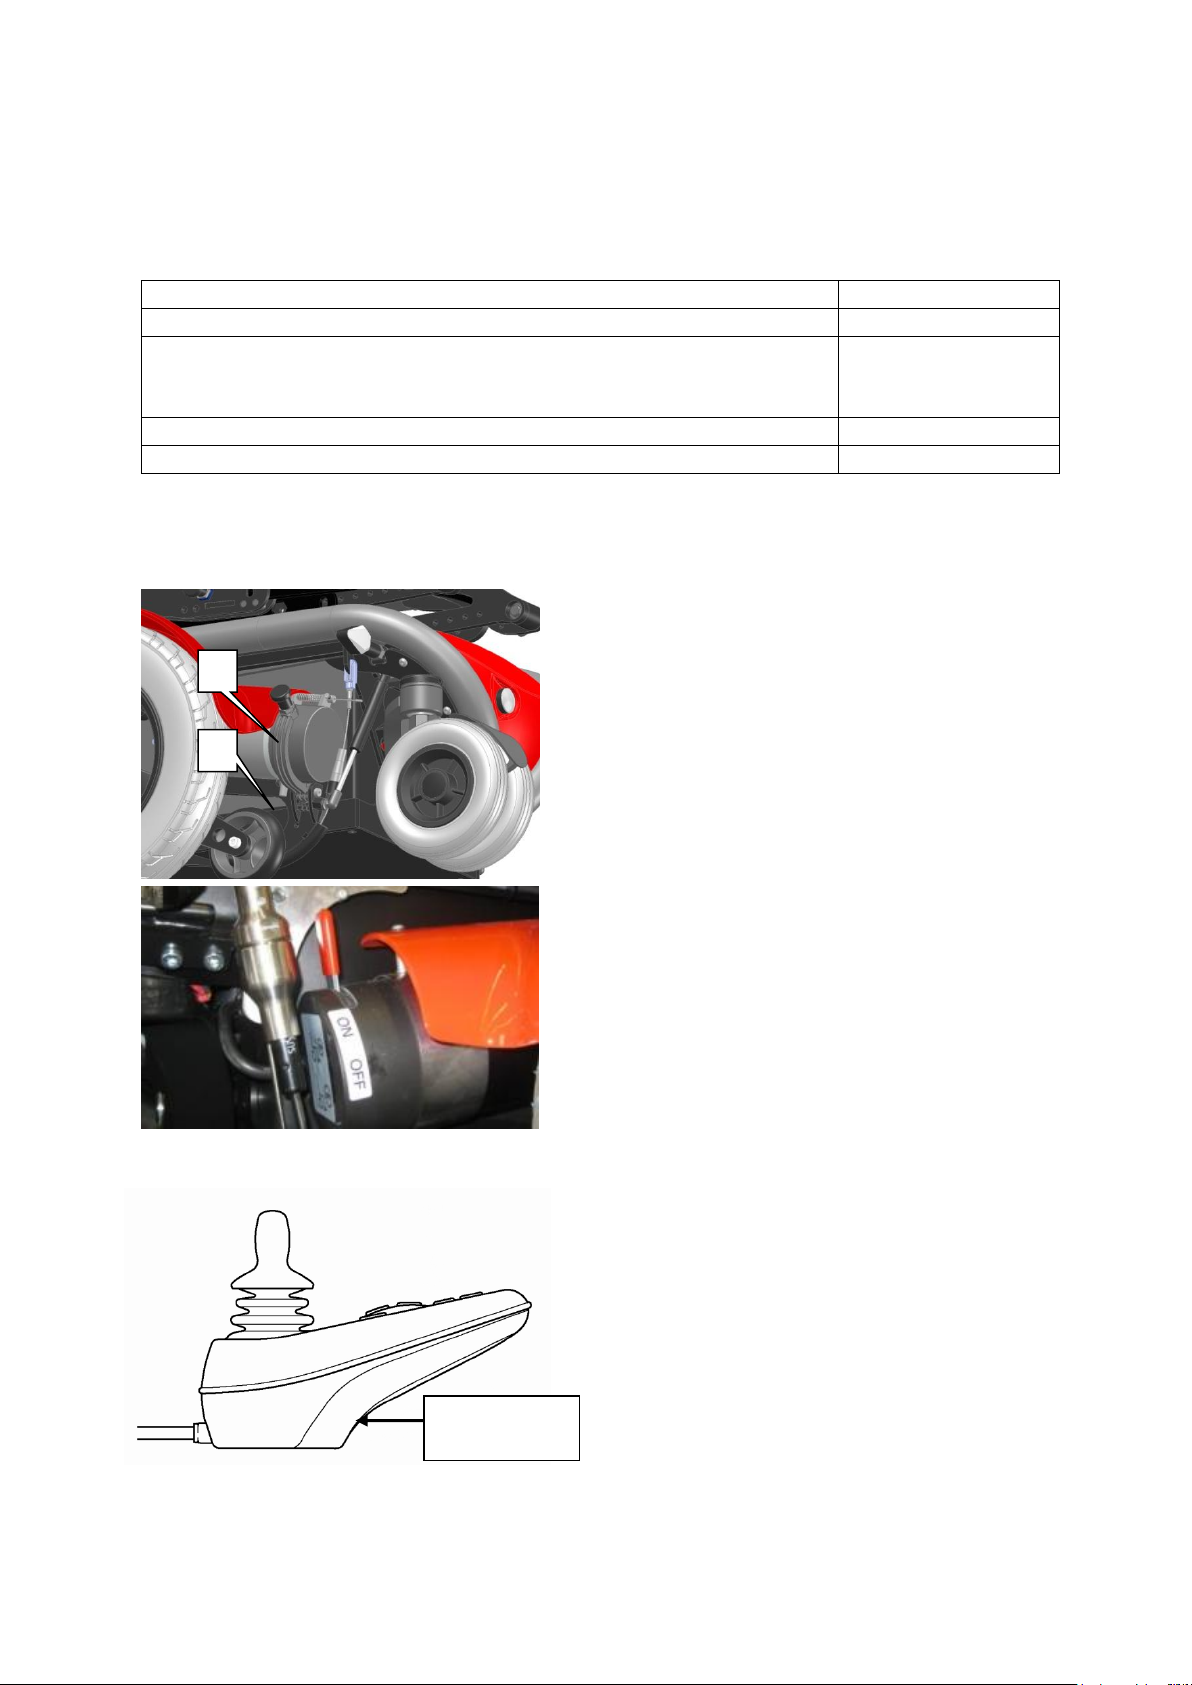
3. Preparing the wheelchair for use and operation
Main fuse
3.1. Dispatch and transport
For delivering LEVO wheelchairs they are packed in a cardboard box. The back is
detached and carefully packed. Particularly delicate parts have extra protection
to avoid any damage that could be caused by transportation. All wheelchairs are
transported by lorry or air freight. To ensure no damage during transport the
main fuse is taken / switched off.
Initial operation / Main fuse handling in case of
replacement, transportation and storage
Installation of the
main fuse
Fuse version since April 2011
Before shipping, the 70A main
fuse is taken off. Before using
the chair the main fuse has to
be inserted. You shall do this
also when travelling by air
with this wheelchair.
The main fuse housing is under the chair cover in the rear.
To get access, carefully open the cover as shown above.
Open the fuse cover, insert the fuse which is delivered in a separate plastic bag and snap the
fuse cover back. Now the chair can be brought into standing position to get access to the
fuse cabling. Store the fuse cabling properly above the batteries and the main fuse housing
below the control system under the chairs cover.
Activating of the
main fuse
Cut out version until March 2011
To activate the main fuse, push the button of the
cut out in
14
Page 15

3.2. Delivery
Component
Quantity
1.
Wheelchair base
1
2.
Seat unit
1
3.
Backrest unit
1
4.
Knee support
1
5.
Chest strap
1
6.
Joystick unit
1
7.
Joystick Module
1
8.
Set of batteries
1
9.
Battery charger
1
10.
Tool set
1
11.
Options and accessories
Corresponding to
order form
Because of the complex nature of this wheelchair it will be delivered and
demonstrated to you by your local agent.
The wheelchair comprises the following components:
3.3. Storage
The ideal condition to store the LEVO C3 is a temperature between – 40° and +
60° Celsius (between -30° and +140° Fahrenheit). The humidity should not be
above 90%. Please take care to guarantee these mentioned conditions to provide
a long life time for the LEVO C3.
That the batteries don’t discharge too fast, we recommend to taken respectively
switch off the main fuse (see 3.1.). We also recommend charging the batteries at
least every 2 months if the chair is not used.
3.4. First adjustments
Because the LEVO C3 was ordered with your personal measurements, it should
fit your personal constitution when the chair is delivered to you. If there should
be any variations, please take a look at chapter 8. there you can see how the
different elements can be adjusted.
Your local agent is responsible to do the final tuning of the adjustment. Therefore
take your time at delivery of the chair to assure the chair fits correctly.
15
Page 16
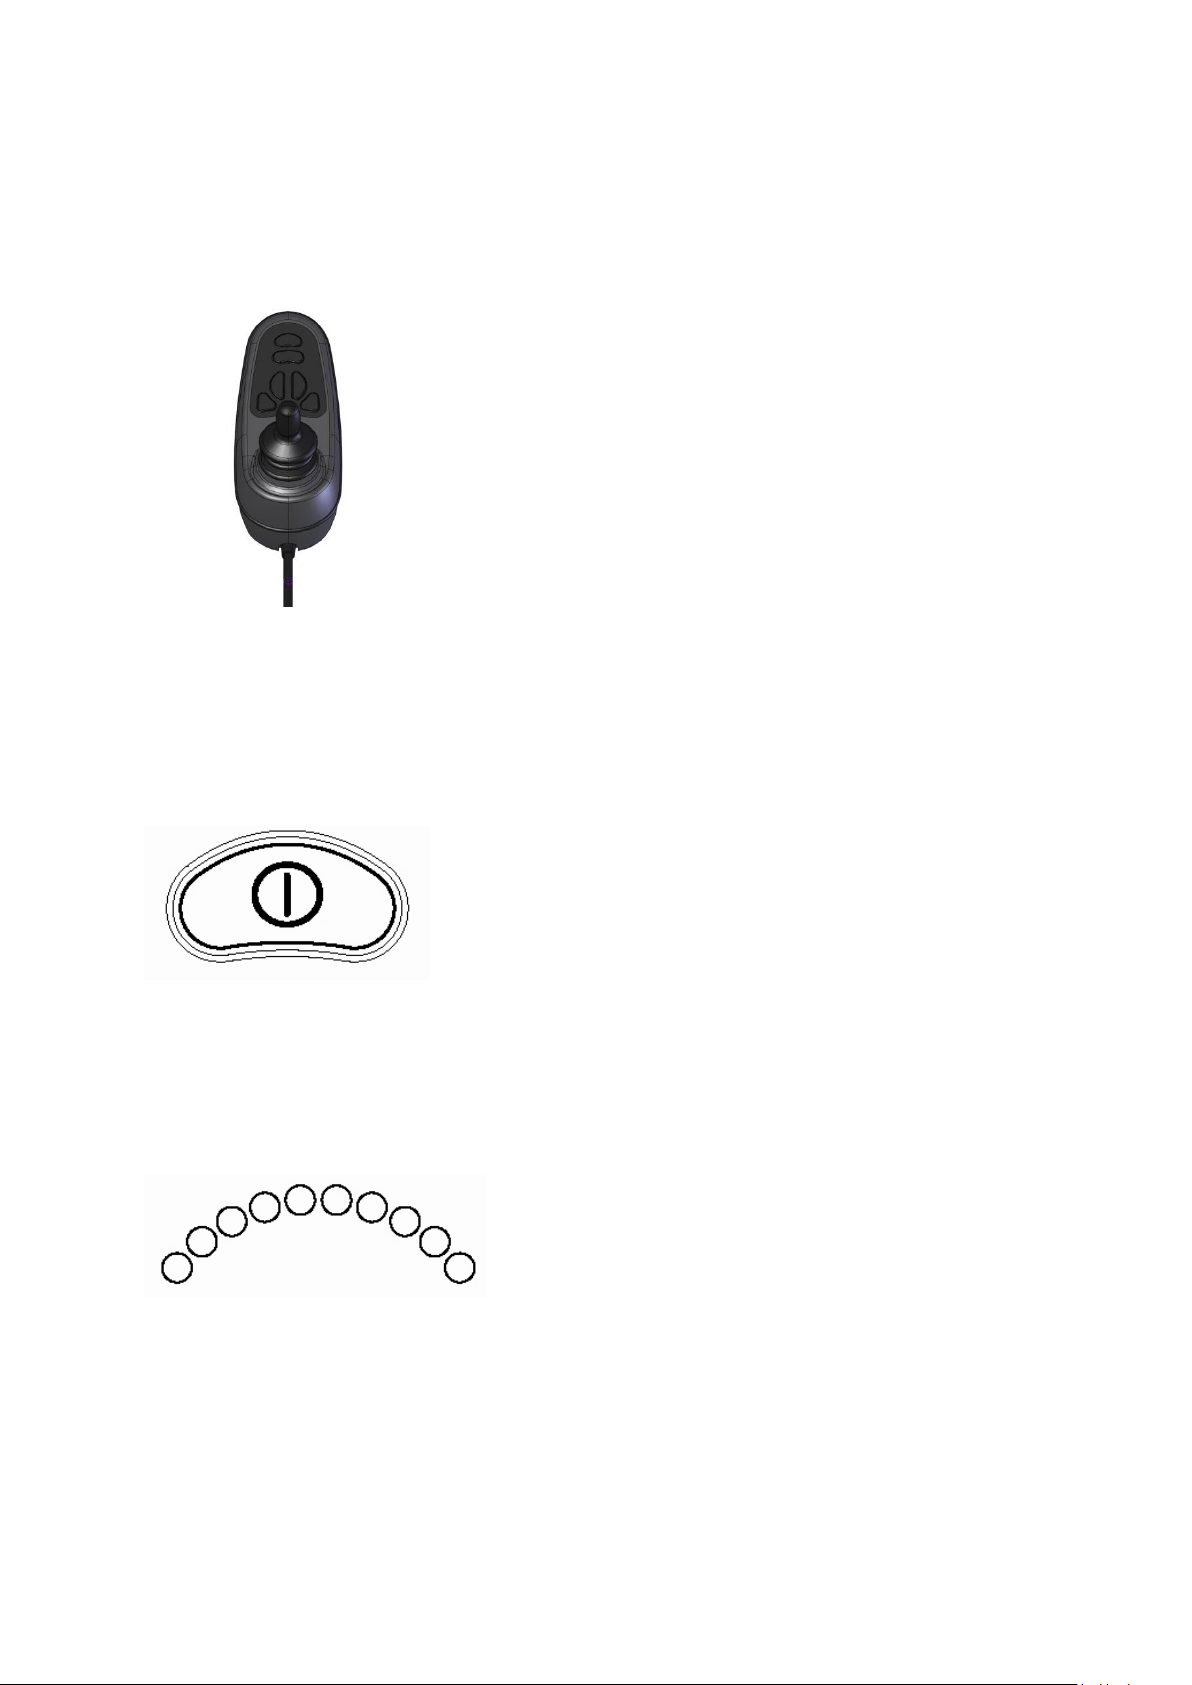
4. Control unit
On the control unit you can find a
joystick, buttons and symbols, where
we take a closer look at in the
With the On-/ Off-button the chair
can be turned on or switched off.
Don’t use this button to stop the
wheelchair, unless there is an
The battery gauge shows you that
the wheelchair is switched on and it
shows you how much power there is
left in the batteries. The gauge is also
used as an electronic fault detection
4.1. VR2-control
following.
4.1.1. On-/ Off-button
4.1.2. Battery gauge
emergency.
(see chapter 16.)
16
Page 17
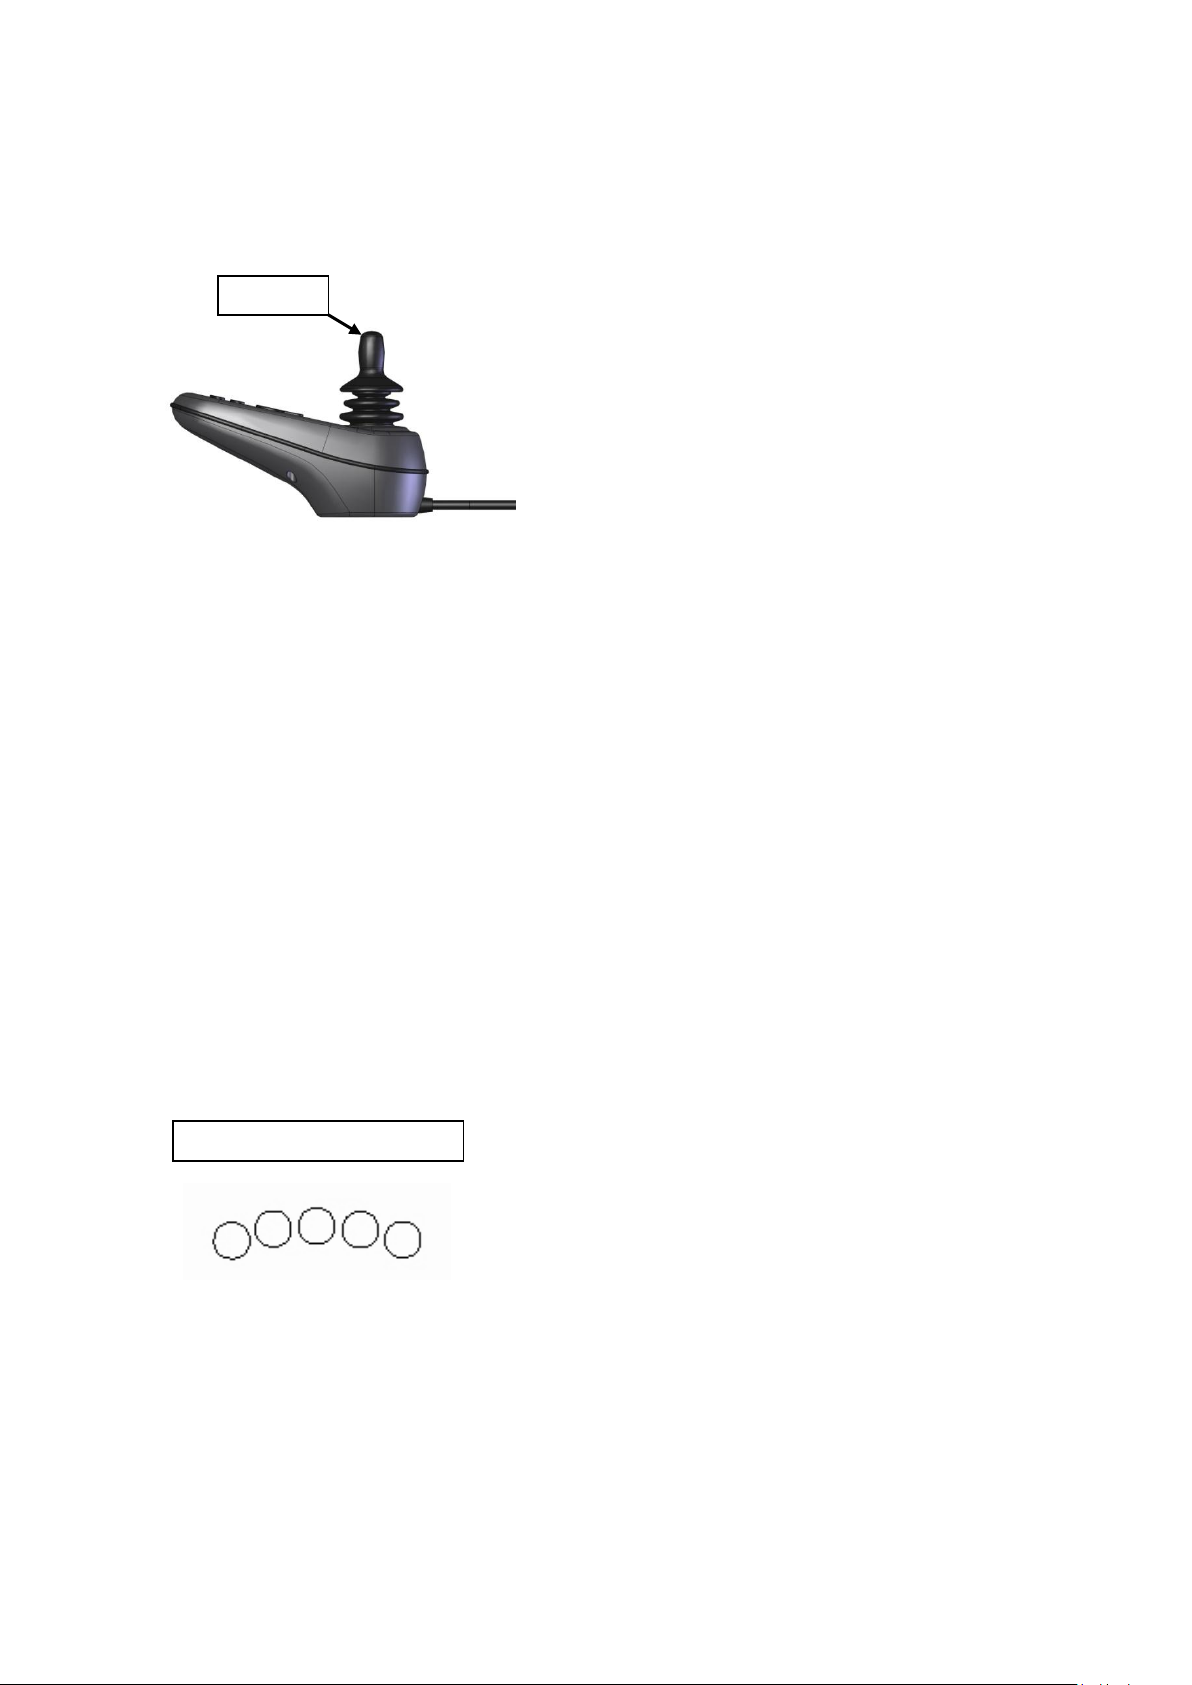
4.1.3. Joystick
Joystick
The joystick controls the direction
To drive forwards push the joystick
forwards. The further you push it
from the centre the faster the
wheelchair will move. Let go of the
joystick and the wheelchair will stop
For backwards driving push the
joystick backwards. Pushing the
joystick to the right side means a
right hand curve as a reaction.
Pushing the joystick to the left then
the chair will drive to the left hand
The joystick can be used to choose
and to move the actuators as well
Speed gauge
This is a gauge that shows the
maximum speed setting for the
wheelchair. This gauge also indicates
if the speed of the wheelchair is
being limited or if the control system
If one LED is illuminated, you drive
with the slowest speed, 5 illuminated
LED’s mean that you drive with the
If the LED’s are flashing, it means
the speed is reduced. That happens
If the LED’s are ripple up and down,
and speed of the wheelchair.
and the brakes come on.
side.
(see chapter 4.1.5.).
4.1.4. Speed
is locked.
highest programmed speed.
when you go into standing position.
it means the chair is locked.
17
Page 18
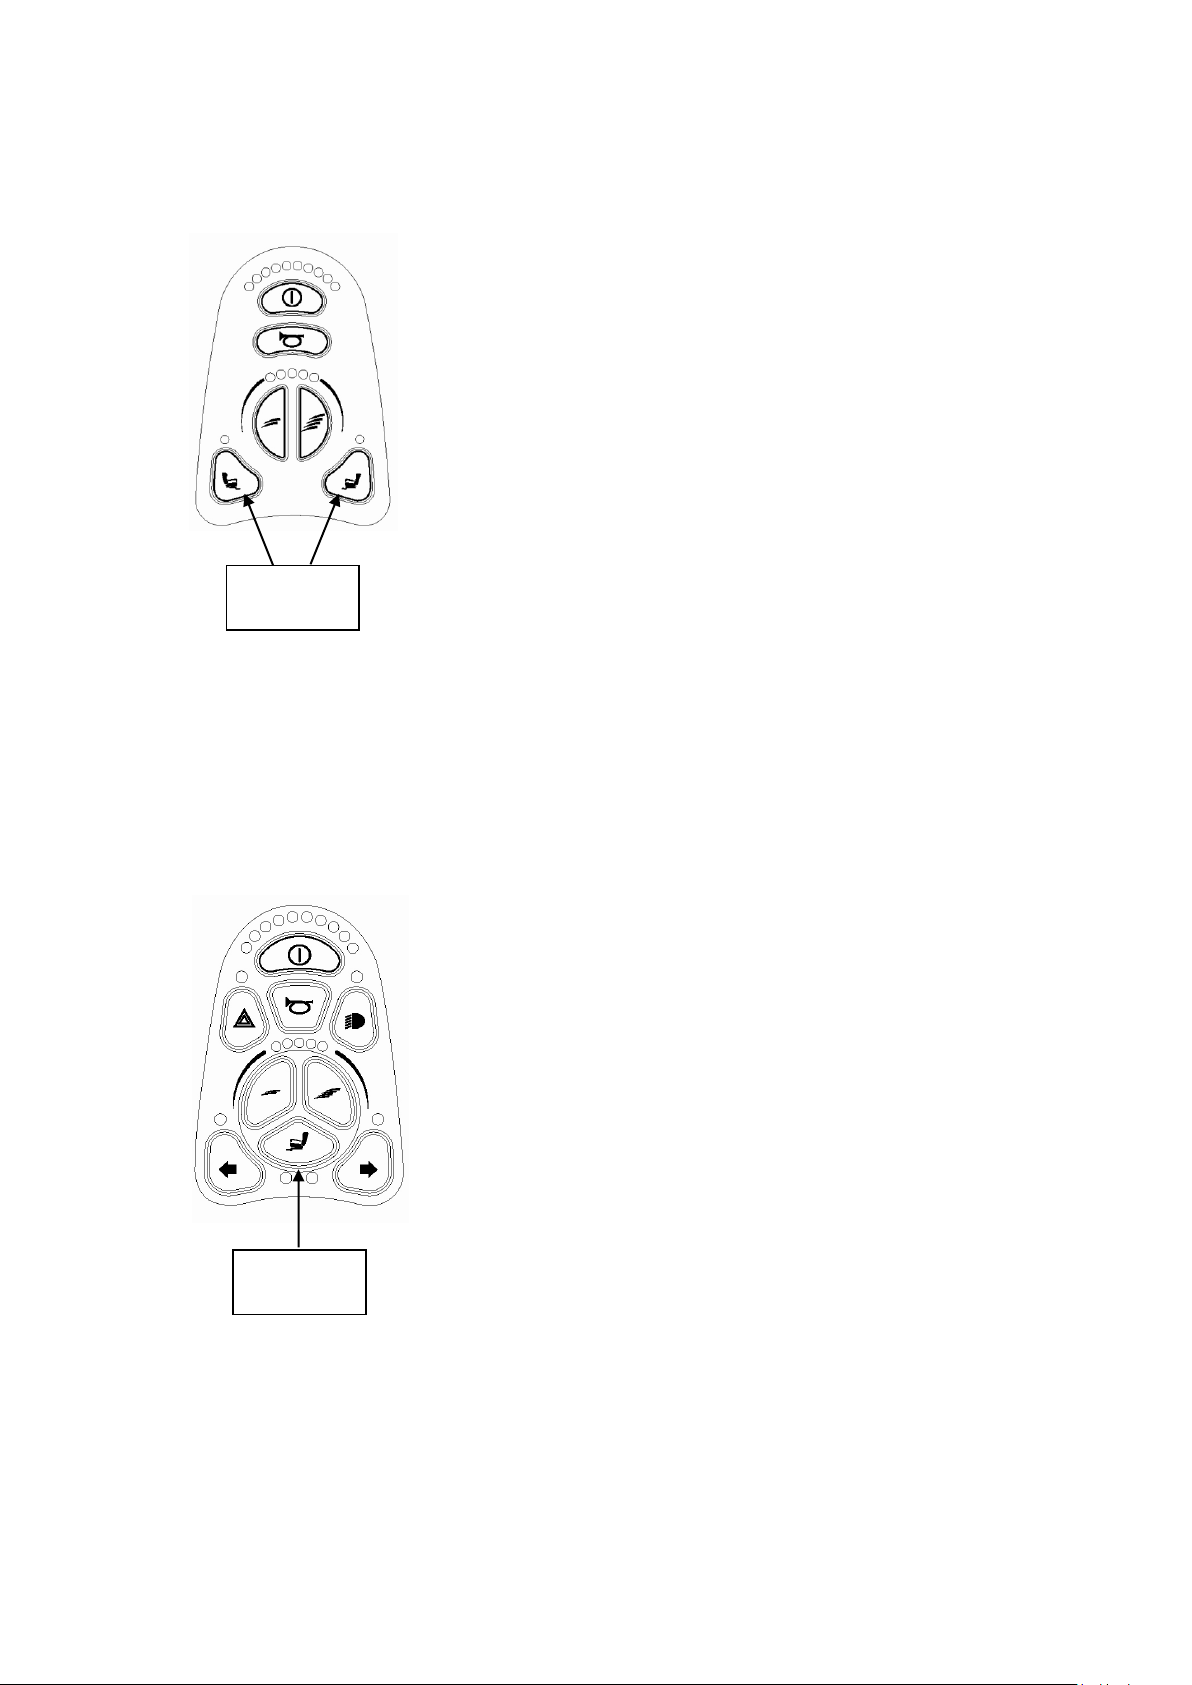
Standard chair without light:
By pressing the left actuator-button,
you can activate the stand-up
function. If you move the joystick
forward, the chair is rising upwards, if
you move the joystick backwards, the
If your chair is equipped with the
option “Tilt in space”, it can be
activated by pressing the right
actuator-button. If you move the
joystick backwards, the complete
seat is tilting backwards, if you press
the joystick forward, the seat is
moving back to the horizontal
Chair with light:
button, deflect the joystick to the left,
If you have the option “Tilt in space”
on your chair, to choose this
actuator, press the actuator-button
and move the joystick to the right,
until the right LED is illuminated. If
you move the joystick backwards, the
complete seat is tilting backwards, if
you press the joystick forward, the
seat is moving back to the horizontal
4.1.5. Change of the seat position
Actuator-
button
Actuator-
button
chair is moving downwards.
position.
If your chair is equipped with light,
you just have one button to choose
the actuators. To activate the standup function, press the actuator-
until the left LED under the actuator-
button is illuminated. Now you can
move the joystick forward to bring
the chair into the stand-up position,
to go down into the seating position,
you just need to move the joystick
backwards.
position.
18
Page 19

If you choosed the option light for
your chair, the keypad looks like it’s
button, you switch on the two front
and the two rear lights on your chair
To notify that you like to turn to the
left, press the left indicator-button, to
announce that you like to turn to the
right, press the right indicator-button.
If you have a breakdown or you
would like to call attention to you,
you can activate all indicators at the
Indicator-
buttons
The horn will sound while this button
Warning-
button
Lightbutton
lights-
4.1.6. Light kit
shown on the left.
To activate the light, press the light-
with this.
same time with the warning-lightsbutton.
4.1.7. Horn
is depressed.
4.1.8. Locking/ unlocking the wheelchair
The VR2 control system can be locked to prevent unauthorized use. The locking
method is via a sequence of key presses and joystick movements, as detailed
below:
To lock the wheelchair:
While the control system is switched on, depress and hold the on/off
button.
After 1 second the control will beep. Now release the on/off button.
Deflect the joystick forwards until the control system beeps.
Deflect the joystick in reverse until the control system beeps.
Release the joystick, there will be a long beep.
The wheelchair is now locked.
To unlock the wheelchair:
Use the on/off button to switch the control system on. The speed indicator
will be rippling up and down.
Deflect the joystick forwards until the control system beeps.
Deflect the joystick in reverse until the control system beeps.
Release the joystick, there will be a long beep.
The wheelchair is now unlocked.
19
Page 20

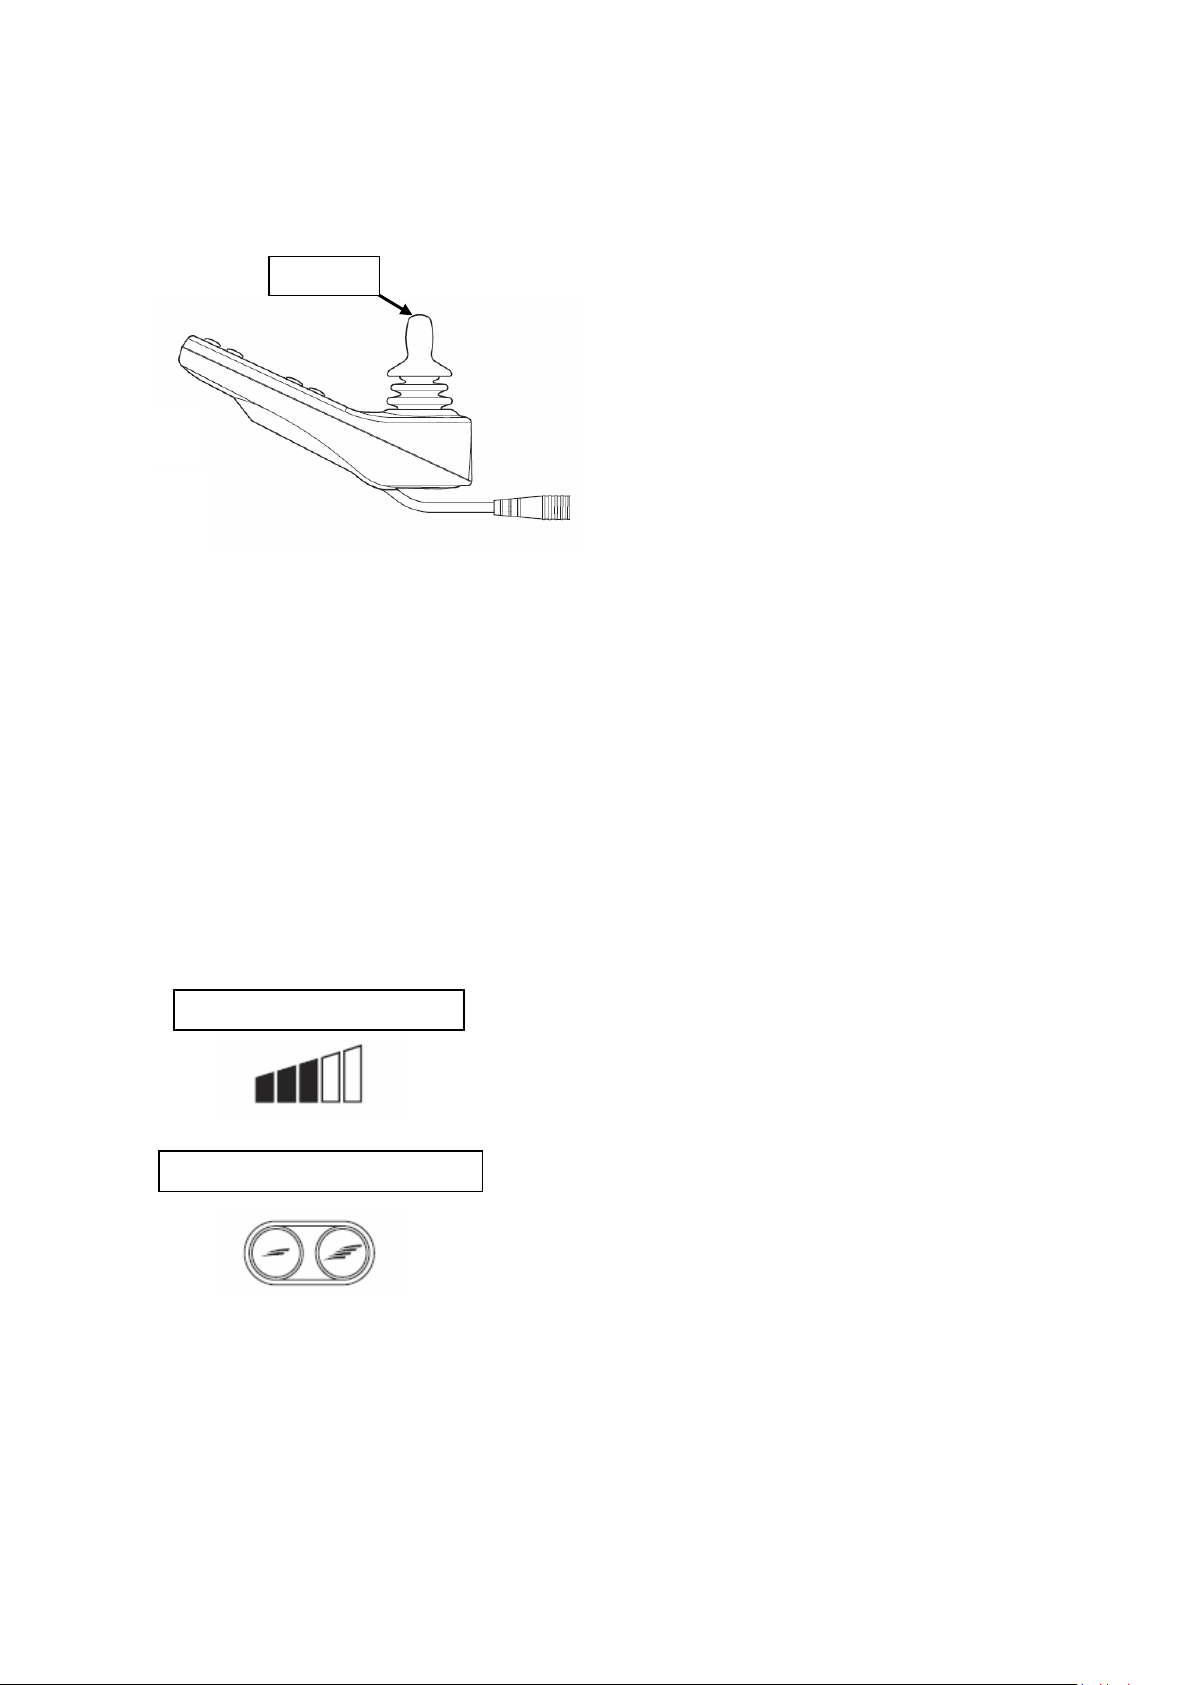
4.2. R-net control (option)
On the control unit you can find a
joystick, buttons and a LCD-display,
where we take a closer look at in the
With the On-/ Off-button the chair
can be turned on or switched off.
Don’t use this button to stop the
wheelchair, unless there is an
emergency.
This gauge is only visible on the
display, if the control is turned on. It
shows you how much power there is
left in the batteries. If the gauge
starts to flash, it means the chair is
still working correct, but the batteries
4.2.1. On-/ Off-button
following.
4.2.2. Battery gauge
should be charged very soon.
20
Page 21
4.2.3. Joystick
Joystick
The joystick controls the direction
To drive forwards push the joystick
forwards. The further you push it
from the centre the faster the
wheelchair will move. Let go of the
joystick and the wheelchair will stop
For backwards driving push the
joystick backwards. Pushing the
joystick to the right side means a
right hand curve as a reaction.
Pushing the joystick to the left then
the chair will drive to the left hand
The joystick can be used to choose
and to move the actuators as well
Speed gauge
Speed buttons
and speed of the wheelchair.
and the brakes come on.
side.
(see chapter 4.2.5.).
4.2.4. Speed
21
Page 22

By pressing the MODE-button, you
get into the standing function menu
(picture A should appear on the
display). If you now press the
joystick forward, the seat is raising, if
you press the joystick backwards, the
If your chair is equipped with the
option “Tilt in space”, you can choose
this function in the standing menu
too, by pressing the joystick to the
left or right (picture B should appear
on the display). If you pull the
joystick backwards, the complete
seat is tilting backwards, if you press
the joystick forward, the seat is
moving back into the horizontal
The standing or the tilt motion can be
4.2.5. Change of the seat position
If you choose the option light for your
chair, the keypad looks like it’s shown
button, you switch on the two front
and the two rear lights o n your chair
To notify that you like to turn to the
left, press the left indicator-button, to
announce that you like to turn to the
right, press the right indicator-button.
If you have a breakdown or you
would like to call attention to you,
you can activate all indicators at the
Indicator-
buttons
or
Without light
With light
Picture A, menu standing function
Picture B, joystick pressed
space
Warning-
button
Light-
button
to the left or right -> Tilt in
seat is lowering.
position.
stopped and fixed at any time.
4.2.6. Light Kit
lights-
on the left.
To activate the light, press the light-
with this.
same time with the warning-lightsbutton.
22
Page 23

4.2.7. Horn
The horn will sound while this button
is depressed.
4.2.8. Locking/ unlocking the wheelchair
The R-net control system can be locked to prevent unauthorized use. The locking
method is via a sequence of key presses and joystick movements, as detailed
below:
To lock the wheelchair:
While the control system is switched on, depress and hold the on/off
button.
After 1 second the control will beep. Now release the on/off button.
Deflect the joystick forwards until the control system beeps.
Deflect the joystick in reverse until the control system beeps.
Release the joystick, there will be a long beep.
The wheelchair is now locked.
To unlock the wheelchair:
Use the on/off button to switch the control system on (a lock is showed on
the display).
Deflect the joystick forwards until the control system beeps.
Deflect the joystick in reverse until the control system beeps.
Release the joystick, there will be a long beep.
The wheelchair is now unlocked.
23
Page 24

5. Electromagnetic interference (EMI)
Important: You must be aware of the effect of electromagnetic
interference (EMI) regarding your LEVO C3. Please study the following
facts carefully.
Electromagnetical interference of transmitter and radio wavelength
Powered wheelchairs might be influenced by strong electromagnetic interference.
This interference is caused by radio and tv stations, amateur radio sets (walkietalkie), two-way radios and mobile phones. Interference (especially of radio
stations) might have an influence on the brakes of a powered wheelchair so that
they get released and so the chair runs away. It could also happen that the
wheelchair starts driving in a not desired direction or the stand-up function could
operate non-requested. There could occur constant damages to the steering
system of the powered wheelchair.
The intensity of power is measured in volt per meter (vpm). All powered
wheelchairs are able to resist to a certain amount of electromagnetic
interference. This is called "level of disruptive strength". The security depends on
the level of disruptive strength; the higher the level the better the protection.
Thanks to modern technology the capability of disruptive strength is up to 20
vpm.
The LEVO C3 standard version (no further measures) is supplied with a
disruptive strength level of 20 vpm.
The LEVO C3 is constructed to resist to a regular level of interference as it occurs
in a household. Beside that there exist a certain number of sources of relatively
strong magnetic fields to which you should stay in a safe distance. Some of these
magnetic fields are obvious and easy to avoid. Some other are not easy to be
realized and it is hard to stay off at times. Please take knowledge of the following
list of sources of interference and avoid getting close to these disruptive factors.
The EMI-risk is reduced to the minimum when you follow these instructions.
The sources of radiated EMI are put in three categories:
Portable sender and receiver on which an aerial is directly mounted.
Examples: CB-radio, walkie-talkie, sender and receiver of alarming systems,
fire alarm, police radio equipment, mobile phone and various private
communication systems.
Please notice: Some mobile phones and similar objects transmit signals as
soon as they are switched on even if they are not in use at the moment!
There have not been any known incidents caused by mobile phones to date.
Mobile sender and receiver of intermediate range, as they are installed in
police cars, fire engines, ambulances and cubs. The aerial is normally fixed on
the outside of the vehicle.
Sender and receiver of a huge range, as radio and TV stations and amateur
radio sets.
Be aware that wireless phones, lap tops, AM/FM-radios, TVs, CD players,
recorders as well as gadgets like razors, hair dryers and so on are only small
24
Page 25

sources of electromagnetically interference. These objects don't cause any
problems regarding the functionality of the LEVO C3.
Electromagnetical interference in regard to a powered wheelchair
Considering that electromagnetical power reaches high intensity in just a short
time as soon as you get close to the source, it is advised to take especially care
carrying a sender and receiver with you. It might occur that an item as
mentioned gets very close to the controller of the wheelchair and like that
electromagnetic energy gets unintended too close too. In this situation the
electromagnetic energy might influence negatively the function of brakes as well
as the motion characteristics of the wheelchair.
Warning: Your wheelchair can produce electromagnetic emissions as
well and disturb other devices.
If unintended movement or brake release occurs, turn the wheelchair
OFF as soon as it is safe.
25
Page 26

6. Driving the wheelchair
6.1. Driving in general
Before starting to drive your wheelchair take time to read all the instructions
regarding the LEVO C3 and to get to know the controls. When first learning to
drive your wheelchair, practice in an area you know well. We suggest a large flat
smooth area such as your living room or the driveway to your home. Do not
attempt to drive the wheelchair in confined areas or where there is traffic until
you are sure you can control the wheelchair safely.
Please note, that the knee support and the chest belt is correctly mounted like
7.1. and 9.9. respectively 7.2..
When driving outdoors always have the seat plate in a horizontal position or
tilted backwards (in case seat angle tilt is an optional function).
Switch on the joystick module and practice driving the wheelchair slowly
forwards, backwards and turning side to side. When you have more confidence
increase the speed and practice until you have mastered driving the wheelchair.
It is possible to drive the wheelchair in the standing position. Speeds are cut to
half the speed as soon as the seat leaves the lowest seat position. When indoors
practice standing up in the wheelchair and slowly driving it across the room.
The wheelchair allows driving absolutely safely in a sitting position on slopes with
a maximum gradient up to 10 degree. When driving up or down steeper slopes
than this or over uneven ground, braking and steering response will be limited
due to reduced traction. On a slope don’t lean out of the wheelchair down the
slope. Driving in a standing is no problem on an even and none angled ground.
A limit switch with some important security features programmed is a standard
of the LEVO C3. In correlation of the current position of the chair and the
inclination of the ground the speed is automatically reduced. In extreme
situations the system prohibits to continuing driving for the safety of the user. It
is be possible to go on as soon as the seat plate is lowered. Please read the
detailed information below.
6.2. Obstacles
Avoid driving your LEVO C3 over obstacles that are higher than 80 mm. The risk
to tilt over raises during you drive over high curbs as well as the risk to damage
your wheelchair.
If you like to pass an obstacle you never drove over before, LEVO recommends
doing this with an assistant, to get used to the reactions of the wheelchair.
Because of the special drive mechanism, obstacles can be overcome in an angle
of 45°.
Drive carefully if you pass an obstacle.
26
Page 27
6.3. Permissible inclinations
Sitting position facing downhill
13 degree
Standing position facing downhill
10 degree
Sitting position facing uphill
(front wheels not touching the ground at the max., but still
100% of stability)
18 degree
Sitting position crossways direction
16 degree
Sitting position 45° to the horizontal direction
9 degree
Charging
socket
Only use the charger LEVO
To charge the batteries, switch off the
control unit and plug the charger into
the socket beneath the front of the
If the joystick is witched on, the
If the batteries are completely
discharged, it takes at least 10 hours
to fully charge them.
To disengage the motor brakes, to
push the chair manually, switch off
the control, pull the quick release
knob (A) and press the lever (B)
down respectively the lever from ON
Attention: The brakes are out of
To bring the wheelchair in the
standard driving mode, press the
lever (B) upwards respectively from
OFF to ON and take care that the
(new break release from June 2011)
A
B
The test (TUV, Germany) of the stability of the LEVO C3 while not in motion
proved the following results:
6.4. Unlock the drive brakes
to OFF
.
order in this position.
quick release knob (A) snaps in.
6.5. Charging the batteries
delivered with the chair.
joystick.
batteries won’t charge.
We recommend to load batteries every night up to the next morning.
27
Page 28

7. Safety harness
You can insert the knee support with
To use the knee support, make sure
A
The safety harness consists of two parts: a chest strap and a knee support.
Caution: Before attempting to stand in your wheelchair, fit and adjust
the chest strap and the knee support.
7.1. Knee support
The knee support helps your knee not to bow in the standing position; you are
standing with your legs totally stretched. Beside that the knee support keeps you
in the perfect position during the stand-up motion.
7.1.1. Knee support „Pro“
just one hand.
To remove the knee support, pull it a
bit to the back and then upwards.
If the adjustments don’t fulfill your
requirements, please see chapter
8.7.1. to adjust the knee support.
Adjustable knee pads are available.
7.1.2. Knee support „Integral“
7.2. Chest strap
that it’s adjusted correctly.
Pull the quick release knob (A) and
bring the knee support in position,
release the quick release knob and
make sure that it’s locked in place.
If the adjustments don’t fulfill your
requirements, please see chapter
8.7.2. to adjust the knee support.
Adjustable knee pads are available.
There is also a park position which
provides to stay the knee support
Integral in place by any transfer.
28
Page 29

2
The chest strap a has to be round the
Guide the chest strap around the
backrest posts to the front and secure
your torso by closing the buckle
(picture 2). Adjust the length of the
strap so that it is not too tight but fits
The length can be adjusted in two
There is a closure at the buckle for
small adjustments of the length
If you need to adjust the length of
the chest strap more, you have to do
Take off the chest strap and change
the length at the two metal-buckles
3
4
1
backrest tubes. The height of the
chest strap may be changed.
comfortably across your chest.
different ways.
(picture 3).
it at the back of the chest strap.
(picture 4).
29
Page 30

8. Transfer
8.1. Getting into the wheelchair
Make sure the wheelchair joystick module is switched off.
Check if the motor disengaging lever is in the ON position for no movements
of the powered wheels.
Lift up the footplates.
Transfer yourself onto the seat using the armrests for support or have
yourself transferred onto the seat.
Lock the footrests down and rest your feet on them.
Fit the knee support and chest strap.
8.2. Getting out of the wheelchair
Make sure the wheelchair joystick module is switched off.
Check if the motor disengaging lever is in the ON position for no movements
of the powered wheels.
Remove the chest strap and knee support.
Lift up the foot plates.
Transfer yourself in your usual way out of the wheelchair or have yourself
transferred out of the wheelchair.
8.3. Sideways transfer
Drive as close as possible to a chair, bed or any other objects you want to
transfer to.
Make sure the joystick module is switched off.
Check if the motor disengaging lever is in the ON position for no movements
of the powered wheels.
Flip up the footrest of the wheelchair and put your feet on the ground.
Lift up the armrest on the side you are transferring to.
Transfer yourself in your usual way out of the wheelchair or have yourself
transferred out of the wheelchair.
30
Page 31
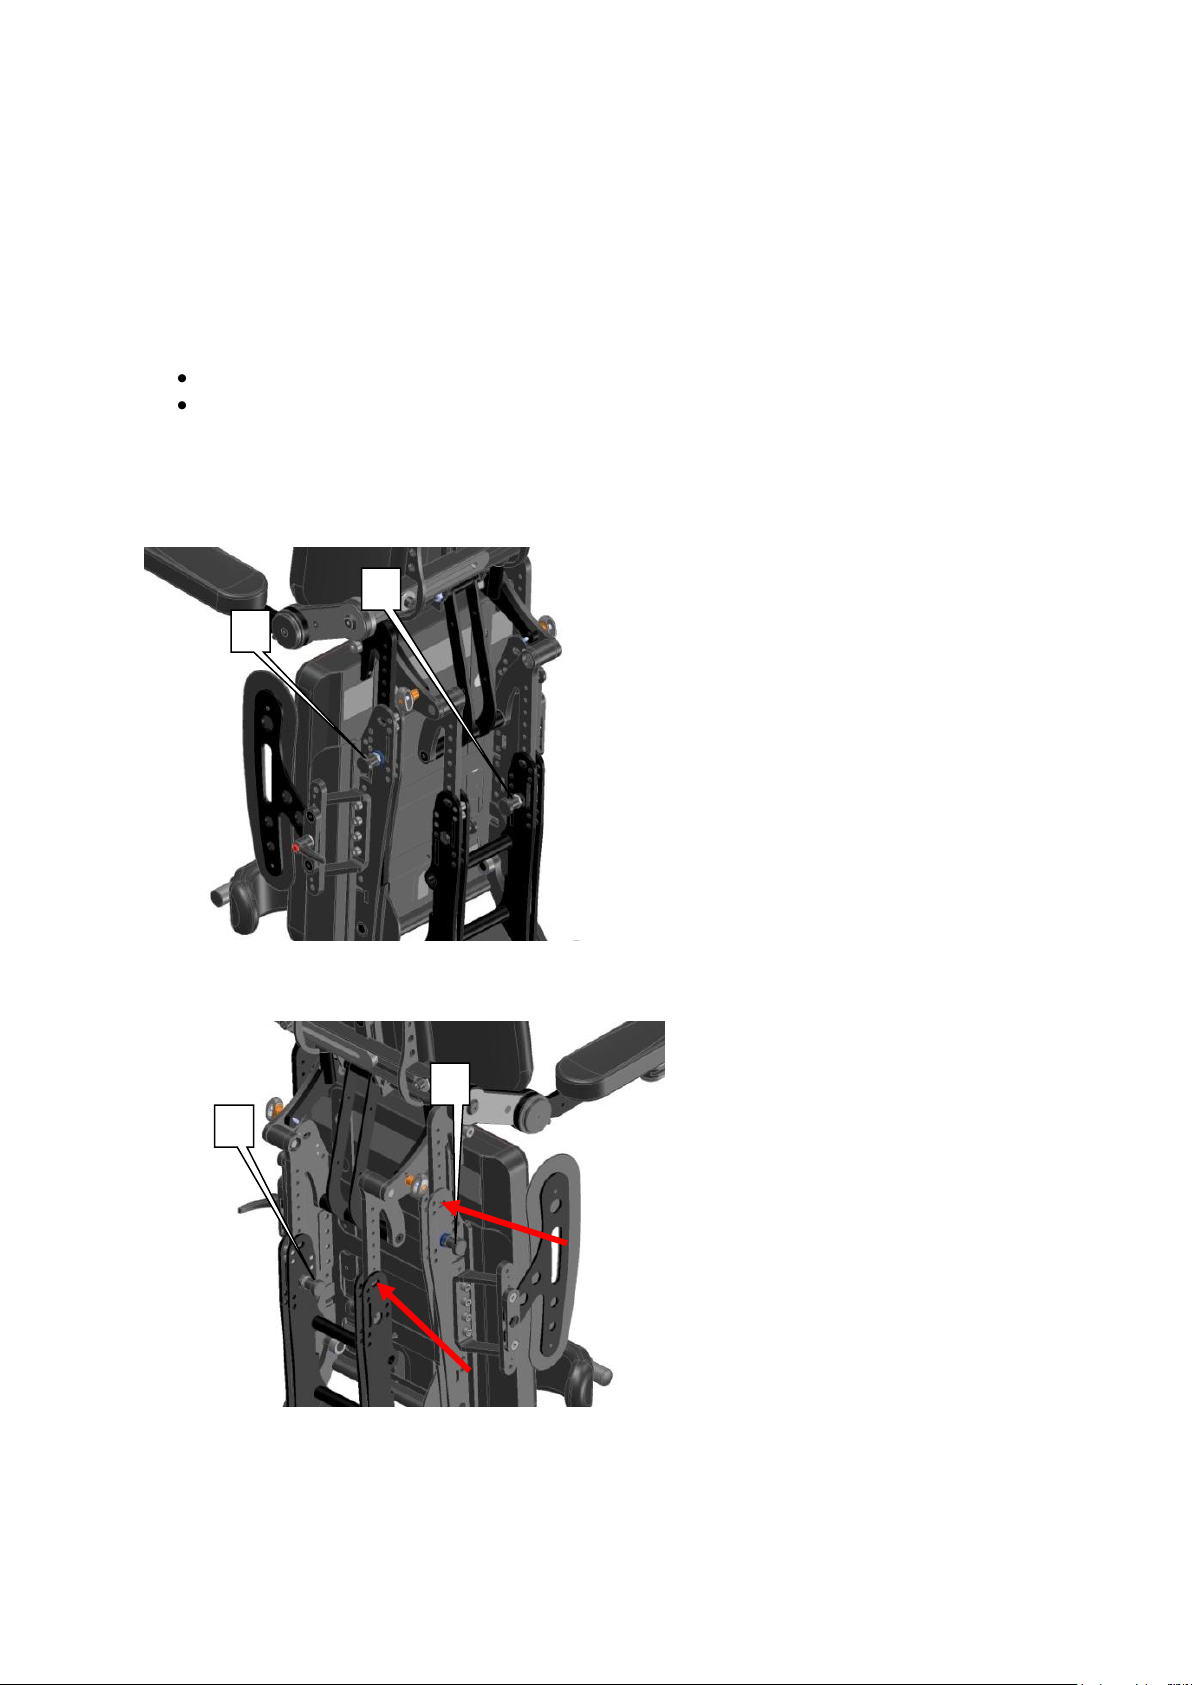
9. Individual settings
The seat depth will be adjusted
bolt) (C) and (D). Now you can
same number/length like the
C
D B A
The LEVO C3 is individual adjustable to every person. Partly it is necessary to
have tools for the adjustments; on some elements it is possible to adjust them
simply without any tools.
Required tools:
Allen key: from 3mm to 8 mm
Spanner: 13 mm
9.1. Adjustment of the seat depth
with (optional w/o) tools.
Adjust the lower levers first.
Release the screw (pull the
set the levers to the necessary
length.
Tighten the screw (release the
bolt) and lock the lever in the
new position.
Now you can adjust the upper
levers. Release the screw (pull
the bolt) (A) and (B). Now you
can adjust the lever to the
lower levers.
Tighten the screw (release the
bolt) and lock the lever in the
new position.
Please watch the red arrow on
the picture.
Warning: Please watch the
right position of the lower
and the upper lever.
Per example, if you choose
the seat depth of 48cm,
48cm have to be shown at
the small window (red
arrow at the picture left).
31
Page 32
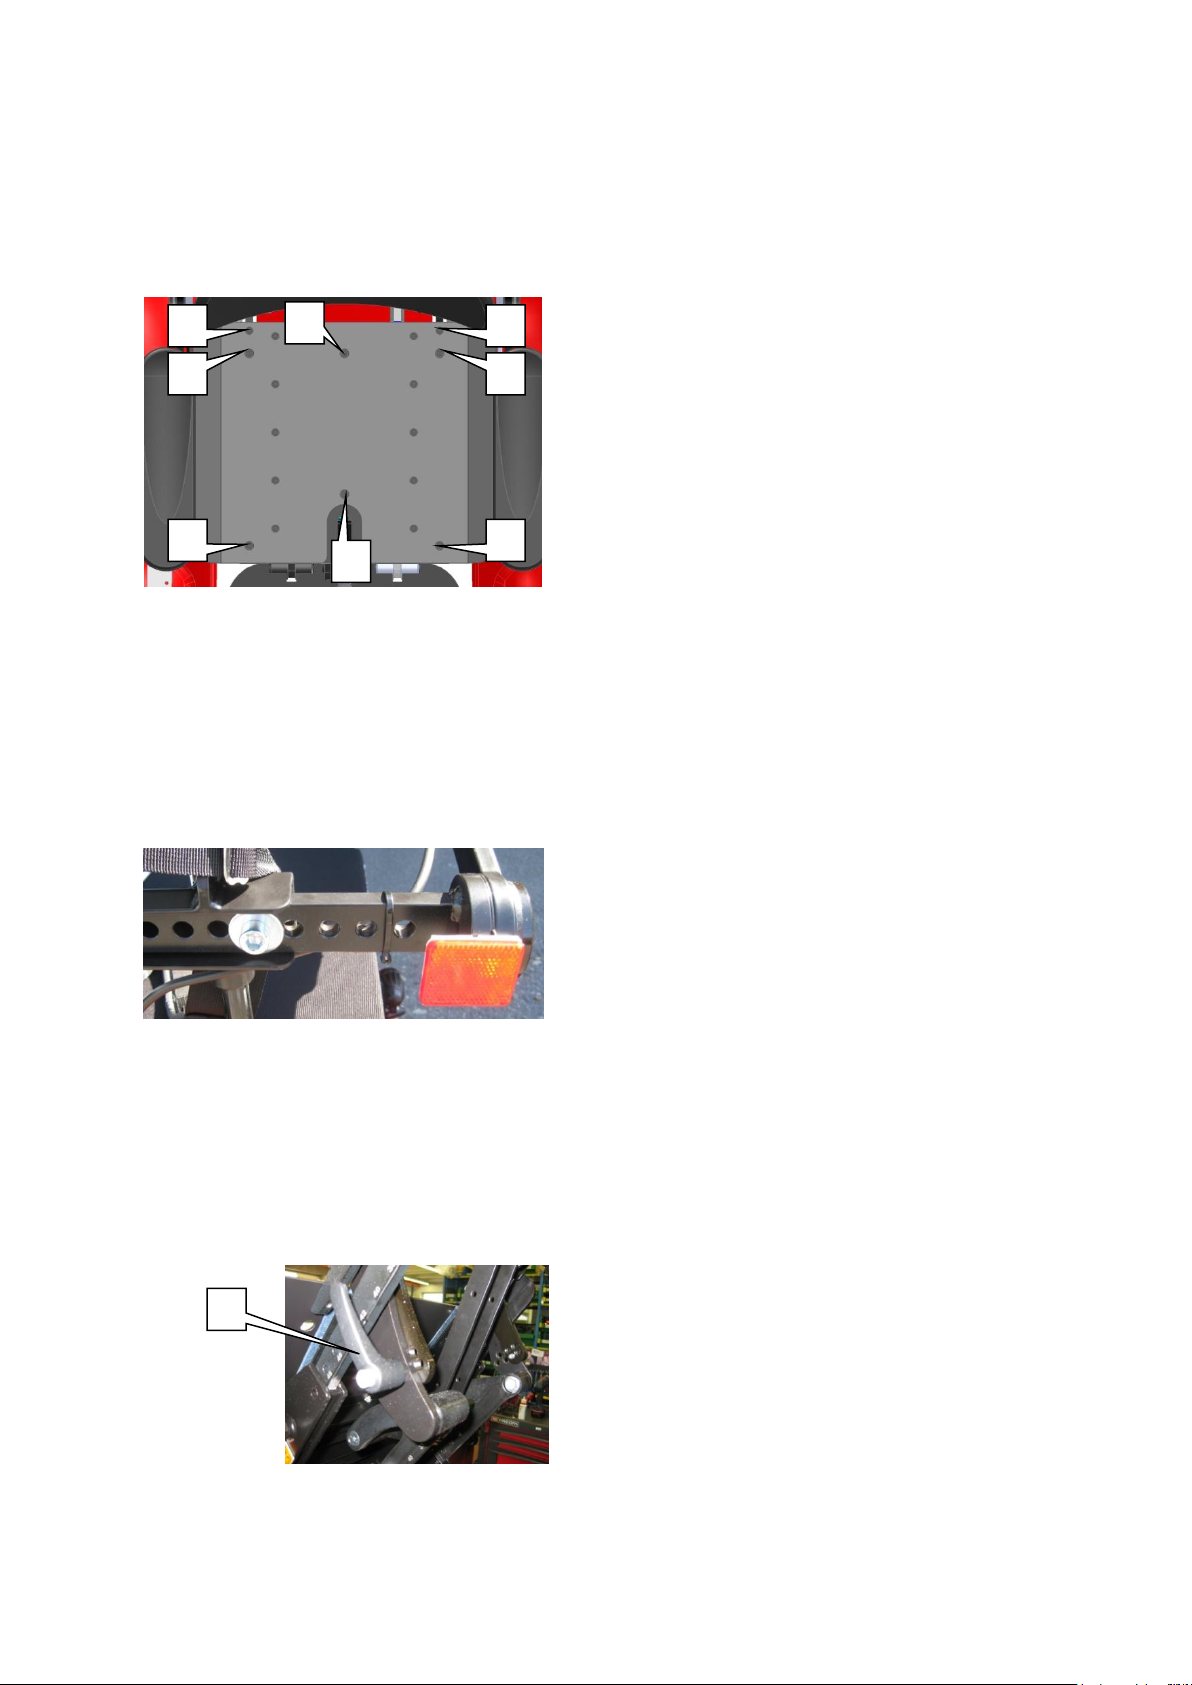
9.2. Change of the seat width
Take off the seat cushion first.
Telescope the seat plate to the first
Untighten the 8 screws (A) at the
seat plate, to be able to take off the
Put the new wider/smaller seat plate
on the chair and tighten the 8 screws
The adjust the distance between the
armrests to the seat plate, follow the
To adjust the knee support to the
changed seat width, follow the
If the chair is equipped with the skirt
guard, you have to change the
bracket, to match it with the seat
Untighten the two screws. Now you
can adjust the armrests in the width.
If you have adjusted them to the
A
A
A
A
A
A
A
A
You can adjust the backrest in
Unscrew the lever-screw (A) on both
sides. Now you can tilt the backrest
back and forward to the desired
angle. Put the lever-screw (A) into
the hole where the backrest post and
the plate correspond.
A
position (see chapter 9.1.)
whole seat plate.
to fix the new seat plate.
instructions in chapter 9.3.
instructions in chapter 9.7.
width.
9.3. Change the distance between the armrests
9.4. Adjustment of the backrest angle
desired width, tighten the screws.
different angles.
32
Page 33

9.5. Change of the distance footrest - seat cushion and
To adjust the height respectively the
To lower the armrest unscrew screw
A. To increase the heigt tigten the
To lower the angle unscrew srew B.
To increase the angle tighten screw
B.
The footrest will be adjusted with
The angle of the footrest plate is
adjustable by turning on the screw
If you turn the screw clockwise, the
plate is rising, if you turn the screw
counter clockwise, the plate is
That the screw isn’t becoming
unscrewed, we recommend mounting
A
C
A
B
A A
A
A A A B
angle adjustment of the footrest
(optional w/o) tools.
To change the height of the footrest,
release the screw (A). Now you can
set the footrest to the necessary
height.
Tighten the screw back in place.
On both sides there are 4 holes (B)
you can use to adjust the height.
(C).
lowering.
the screw with thread locker.
9.6. Adjustment of the armrest height/angle
angle, please refer as follos:
Height adjustment
srew A.
Angle adjustment
33
Page 34

9.7. Adjustment of the armrest length
Adjusting the distance between
Untighten the two screws (D), adjust
the knee pads to the necessary width
Adjusting the height of the knee
Untighten the two screws (E), now
you can adjust the height of the knee
support. If it is adjusted to the
correct position, put the screws (E)
You can adjust the control unit to the
Untighten the screws (B) and screw
(C), now you can bring the control
unit into the necessary position. If
you have reached the correct
Adjustment of the angle:
Untighten the 4 screws (F), now you
can adjust the angle of the knee
support. If the correct position is
B
B
C
D D E
F
You can adjust the position of the
(A) until the pad is fixed.
A
A
armrest pad. Just unscrew the two
screws (A) a bit and then you’re able
to shift the pad forward and
backwards. After you reached the
necessary position, tighten the screws
9.8. Change the position of the control unit
inner or outer side.
position, tighten the screws.
9.9. Adjustment of the knee support
9.9.1. Knee support „Pro“
the knee pads:
and tighten the screws (D).
support:
back into place and tighten them.
Adjustable knee pads are available.
reached, tighten the screws.
34
Page 35

Adjusting the depth of the knee
Check in which hole, the quick
release bolt has to lock, turn the set
screw (H) counterclockwise
downwards, that the quick release
Check the hole that was used before,
turn this set screw clockwise that the
9.9.2. Knee support „Integral“
Adjusting the distance between
Untighten the 4 screws (G), adjust
the knee support to the necessary
Height adjustable knee pads are
G G H
You can adjust the height of the
the back must not touch the seat plate
in standing position.
I
I
the knee pads:
width and tighten the screws (G).
available.
support:
bolt can lock into the hole.
hole is blocked.
9.10. Adjustment of the backrest height
backrest by untighten the two screws
(I) a bit. Then you’re able to shift the
backrest up and down. If the backrest
is in the desired position, tighten the
screws (I).
Please check the adjustment in
standing position. The back must have
space to the seat cussion respectively
35
Page 36

10. Options
With the option „Tilt in space” it’s
possible to tilt the seat to an angle of
approx. 30° to the back, this leads to
position. The “Tilt in space” is a good
prevention against decubitus by the
In chapter 4.6. you can see how the
The swing away joystick holder is
used to drive closer to a table for
example. The transfer can also be
easier, if the control unit is
With the aid of the magnet that’s
mounted at the armrest, you can
adjust the force, that’s needed to
You can avoid collisions between the
joystick and other objects with the
It protects the users hand on the
The LEVO C3 can be equipped with several options. The most options can also be
mounted after the chair is delivered.
10.1. Tilt in space
10.2. Swing away holder for the Control unit
a more comfortable seat-/ rest-
way.
“Tilt in space” can be adjusted.
retractable.
deviate the control unit.
10.3. Joystick protection guard
joystick protection guard.
joystick as well.
36
Page 37

10.4. Swing away table tray
The swing away table tray is
retractable to the side, if you don’t
The skirt guard should prevent that
the clothing is hanging beside the
seat and is getting into the drive
The skirt guard is easily displaceable
for lateral transfers. Just untighten
the stop lever (A), now you can easily
lift the skirt guard upwards to remove
Leads the thigh and stabilizes the leg
axle in seating and standing position.
Can be adapted individually in place,
To change the position, open the
zipper at the outside of the pad and
untighten the screws lightly, now you
can adjust the pad to the necessary
position, tighten the screws
A
10.5. Skirt guard
need it.
wheels or the standing mechanism.
it.
10.6. Upper leg support
distance, angle and height.
afterwards.
37
Page 38

10.7. Chest role
The chest role gives a feeling of more
safety and stability, especially while
Important: It does not replaces
It is individually adjustable in the
The foot guides give a better
opportunity to place and stabilize the
They are individually adjustable, you
just have to drill two holes into the
footplate at the necessary place, to
mount the foot guides with the
Some countries assume a fully
functional light kit, to drive on public
LEVO AG recommends to equip the
chair with light, if you use your LEVO
If you wish to equip your chair
afterwards with the light kit, your
LEVO-Dealer /-distributor can mount
10.8. Foot guide
standing.
the chest strap.
height.
feet.
provided screws.
10.9. Lamps for outdoor use with indicators
roads with the chair.
C3 predominant outdoors.
it additionally.
38
Page 39
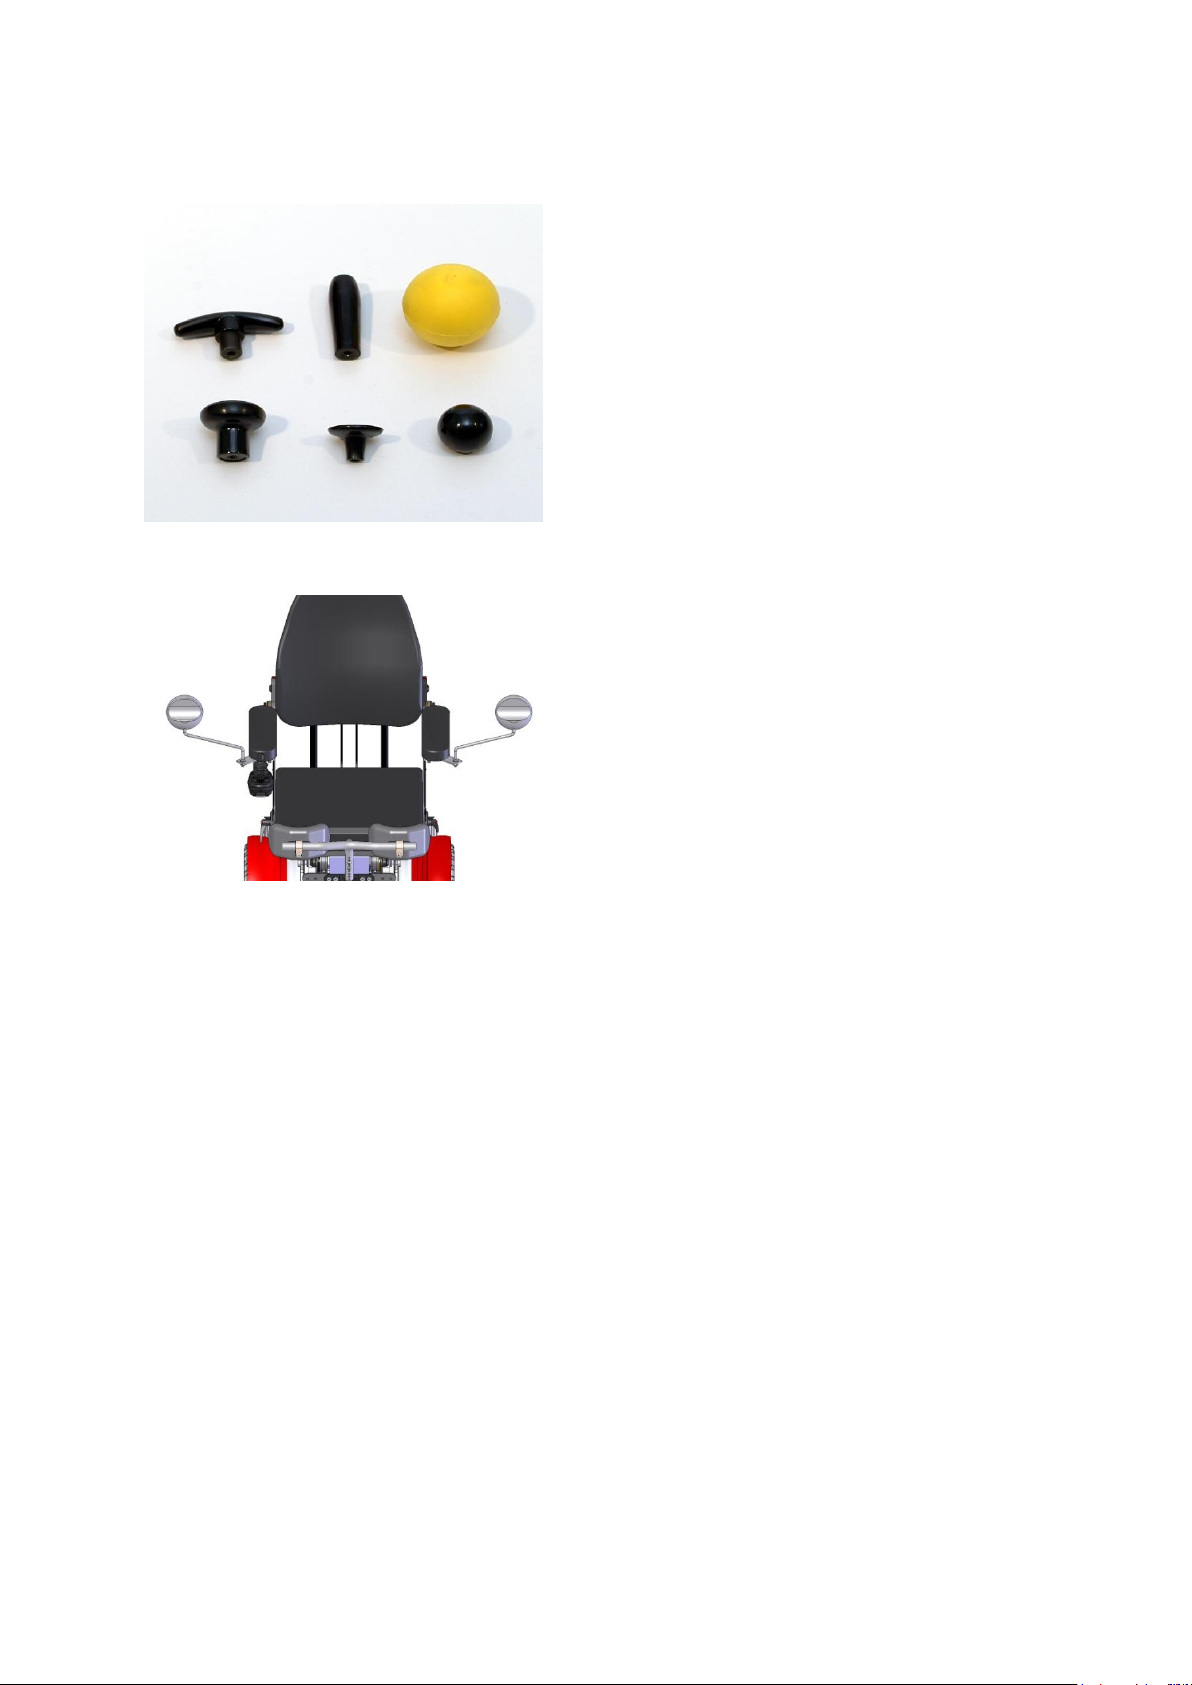
10.10. Jostick-top
If you are not satisfied with the
standard joystick knob, there are
To change it, just pull the knob
upwards to remove it and push the
To have a better overview in the
public traffic, you can have rear view
10.11. Rear view mirror
several different shapes available.
new knob over the joystick post.
mirrors on your LEVO C3 as well.
39
Page 40

11. Transportation of your wheelchair
To have a bit smaller dimensions of the chair, when you like to transport it, there
are two things you can do:
Flip up the footrest
Fold down the backrest (take off the quick pin and fold it)
11.1. Transportation in a vehicle without the person in
the wheelchair
When transporting the wheelchair in a motor vehicle, make sure that the
wheelchair is so secured as to prevent it sliding about or tipping over. Just use
the licensed fastening systems and secure the wheelchair at the marked
anchorage points (hook sticker).
40
Page 41
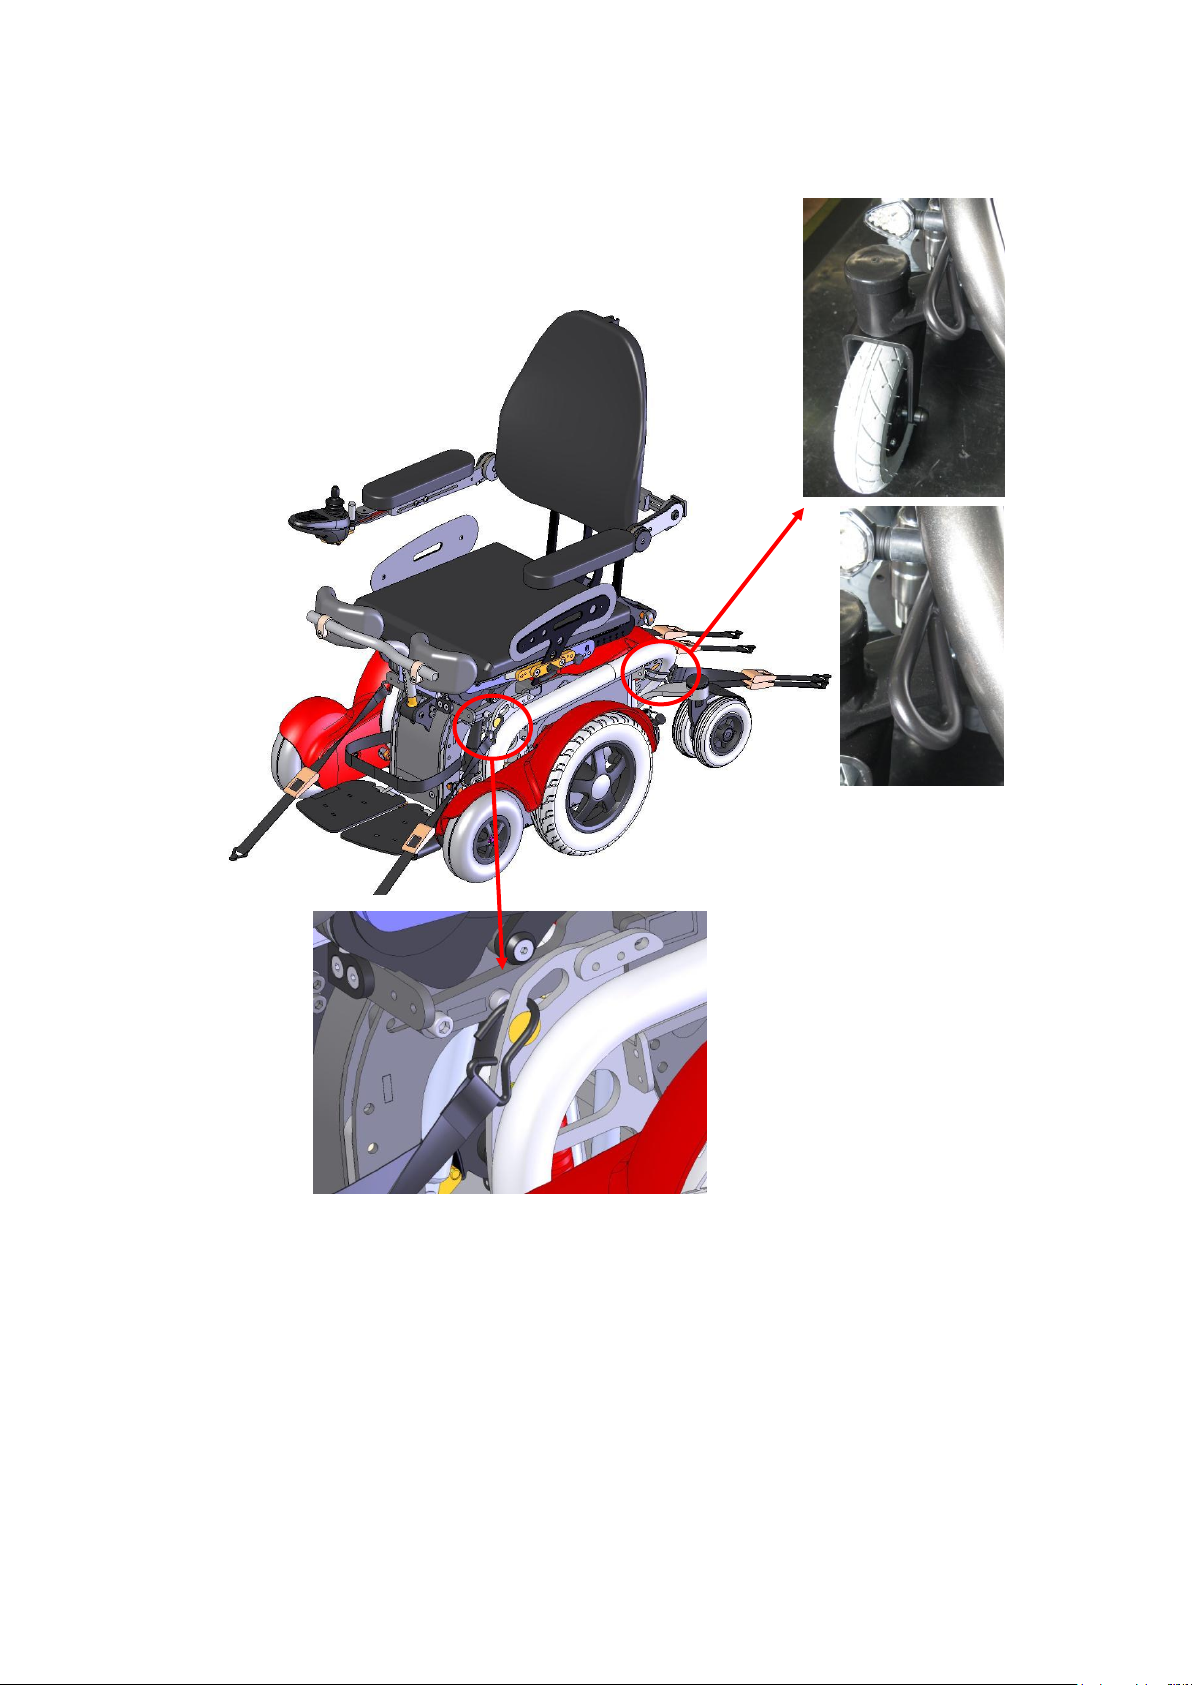
Here’s an example how the chair should be strapped down in a motor vehicle:
41
Page 42

11.2. Transportation in a vehicle with the person in the
wheelchair
The LEVO C3 passed the crash test after the norms ISO 7176/19 and
ANSI/RESNA WC/Vol. 1-Section 19.
The LEVO C3 has been positively crash tested for car transportation after the
norms mentioned above. Please read the information/instructions below:
Certified test centre: Millbrook Proving Ground Ltd, Bedford MK45 2JQ,
UK
Millbrook Report No.: MBK 07/0995
Millbrook Test No.: S10169
Restraints Wheelchair: Q’Straint 4 Punkte Gurten mit Karabiner
(http://www.qstraint.com/english/products/products.a
spx)
Restraints Occupant: Q’Straint Vehicle Anch 3-Pt
Requirements ISO 7176/19: Pass
And ANSI/RESNA Section 19: Pass
Preparations of the LEVO C3 before using it for car transportation:
1. The chair has to be tight down by using the Q’Straint 4 pt with karabiners or
any restraint system that has been tested and passed the ISO 10542/2
standards.
2. The occupant has to be safely secured by using the Q’Straint Vehicle Anch 3-Pt
or any restraint system that has been tested and passed the ISO 10542/2
standards.
12. Cleaning
Whenever the wheelchair gets dirty it should be cleaned using a damp cloth
and then dried thoroughly.
For more stubborn stains wipe with a damp cloth using a mild solution of
warm water and a mild cleansing agent.
Never use furniture polish, spirit or solvents to clean the frame.
In case of dirt on the seat cushion cover or the back rest cover, you can
remove both of it and wash it softly. Do not wash it warmer than 40 degree
Celsius or according the cleaning instructions on the label inside the
cushion cover.
Caution: Never use high pressure water cleaner.
42
Page 43

13. Maintenance
13.1. Service
The LEVO C3 is designed to be maintenance free and apart from the items below
does not require attention from the user.
Please note that to maintain safe and efficient operation the wheelchair
should be serviced at least once per year by your LEVO agent or
authorized dealer. This annual service has to be filled into the service
card from the agent/dealer.
The user or their family can easily carry out the following tasks.
Keep the wheelchair clean.
Never store the wheelchair when damp.
Keep the batteries charged to the maximum.
Check if all fittings, harness, etc. are working properly (see section 6. - 8.).
Check operation of motor disengaging lever weekly.
Check operation of all controls daily.
If any faults are found, report them immediately to your agent. He will advise
you whether to continue using the wheelchair or not, and what action you
should take to repair the wheelchair.
13.2. Safety checks
The electronic circuits in your control system have been designed to be
extremely safe and reliable. The on-board microcomputer carries out safety
checks at up to 100 times per second. To supplement this safety monitoring you
should carry out the following periodic checks.
If the control system fails any of these checks, do not use the wheelchair and
contact your service agent.
13.2.1. Daily checks
Joystick: With the control system switched off, check that the joystick is not
bent or damaged and that it returns to the center when you push and
release it. If there is a problem do not continue with the safety checks
and contact your service agent.
43
Page 44

13.2.2. Weekly checks
Solenoid (parking) brake:
This test should be carried out on a level floor with at least one meter clear space
around the wheelchair.
Switch on the control system.
Check that the battery gauge remains on, or flashes slowly, after one
second.
Push the joystick slowly forwards until you hear the parking brakes
operate.
The chair may start to move.
Immediately release the joystick. You must be able to hear each parking
brake operate within a few seconds.
Repeat the test a further three times, pushing the joystick slowly
backwards, left and right.
Connectors: Make sure that all connectors are securely mated.
Cables: Check and ensure that the condition of all cables and
connectors are OK and without damage.
Joystick gaiter: Check the thin rubber gaiter or boot, around the base of the
joystick shaft, for damaged or splitting. Check visually only,
do not handle the gaiter.
Mounting: Make sure that all the components of the control system are
securely mounted. Do not over tighten any securing screws.
13.3. Spare parts
LEVO AG delivers single parts or modules as spare parts. Your distributor can
provide all spare parts listed for your LEVO C3. You have also the opportunity to
order a spare part list from LEVO AG directly.
44
Page 45

14. Disposal
Wheelchair:
Return the wheelchair after the product lifetime to the sales point. The dealer will
dispose of it according to local regulations. Regarding the possibilities for
individual adjustments your LEVO C3 might be of use to another stand-up
wheelchair user.
Batteries:
Return old batteries to the sales point of the wheelchair or of the new batteries.
The dealer will dispose of them according to local regulations. Remove the
batteries especially careful, if they could have a damaged casing, because there
is the risk of a chemical burn.
45
Page 46

15. Trouble shooting
ITEM
PROBLEM
Solution
Joystick
Module
Battery level indicator
does not light
Switch on ON/OFF switch
Insert fuse / switch on safety cut out
Unplug charging plug
Replace battery
If above does not work consult LEVO
agent
Battery level indicator
flashes slowly
Charge Battery
Battery level indicator
blinks every 2.5 Seconds
Joystick module in sleep mode. To
restart switch off then on again
Battery level indicator
flashes rapidly
See chapter 16
Driving
Will not drive in a straight
line
Consult LEVO agent
Motors turn and battery
level indicator lights up
but chair does not drive
Push motor disengaging lever upwards
Charge batteries
Battery
charger
2412SRF
LED 1 does not light
Plug in main plug
Check fuse at the charger
Check household fuse
LED 1 lights red, but LED
2 does not light
Check fuse at the charger
Consult LEVO agent
LED 1 lights, LED 2
flashes green
Check charging plug is inserted
Check safety switch is on
Consult LEVO agent
LED 1 lights, LED 2
flashes fast green
Charger has a damage
Check with your dealer to replace the
charger
Red Polarity lamp LED 2
lights
Unplug charger immediately
Consult LEVO agent
If you have problems with your wheelchair check this list before calling your local
agent.
46
Page 47

16. Controller self help guide VR2
Lights
flashing
10
green
High battery voltage
An excessive voltage has been applied to the control
system. This is usually caused by a poor battery
connection. Check battery and power module
connections. If the fault remains contact your local
agent.
9
green
Solenoid brake fault
The parking brakes have a bad connection. Make sure
all connectors are plugged in properly. If the fault
remains contact your local agent
8
green
Possible power
module fault
A Power Module fault is indicated. Make sure all the
power module connections are pushed in properly.
7
yellow
Possible joystick
module fault
A joystick fault is indicated. Make sure the joystick is in
the rest position before switching on.
6
yellow
Charger connected
The battery charger is plugged into the wheelchair.
Unplug the charger from the joystick module.
5
yellow
Right motor wiring
fault
The right-hand motor has a short circuit to a battery
connection. Contact your local agent.
4
yellow
Right motor
disconnected
The right-hand motor has a bad connection. Make sure
the motor connector is plugged in properly.
3
red
Left motor wiring fault
The left-hand motor has a short circuit to a battery
connection. Contact your local agent.
2
red
Left motor
disconnected
The left-hand motor has a bad connection. Make sure
the motor connector is plugged in properly.
1
red
Low battery voltage
The battery needs charging or there is a bad connection
in the battery. Check connections to the battery, power
module and joystick module.
red
green
yellow
The battery indicator provides information in case a fault occurs to the
wheelchair’s electronical system. An appropriate number of lights flash rapidly on
the display for a particular fault. Please see below.
Please contact your local specialist in case you followed the advices but the
problem still exists. Please provide your specialist with the serial number of your
LEVO C3 which is noted on the warranty card. This number might be important
in case of questions to the manufacture company LEVO AG.
47
Page 48
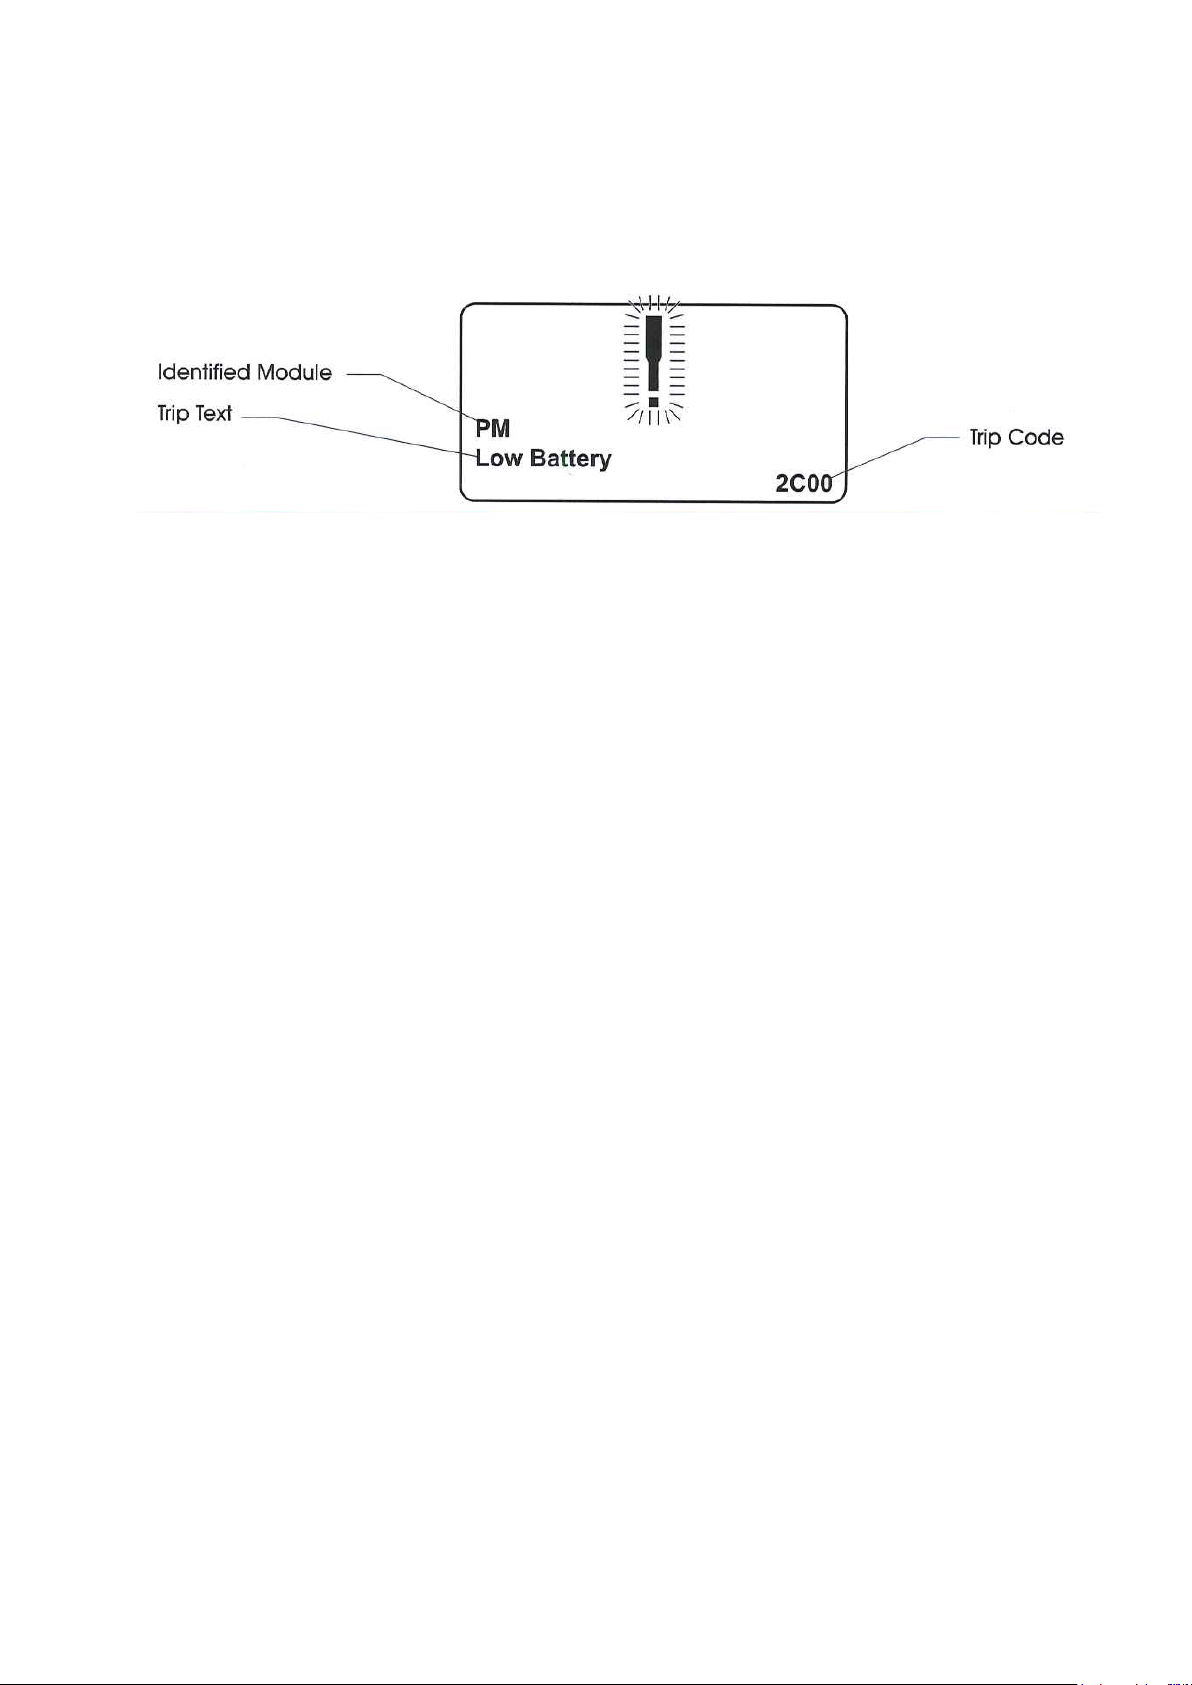
17. Controller self help guide R-net
The joystick module has its own error-management-system. If an error occurs, a
message is indicated on the display, for example this could look like that:
If you can’t solve the problem, just with the showed message, you can enter the
trip code on the PG Drives homepage
(http://www.pgdt.com/diagmob/diagnostic.asp), there you’ll get some more
information about the error and how you can solve it. If you can’t solve the
problem, please get in touch with your LEVO-dealer.
48
Page 49

18. Technical information
Description
Battery 48 Ah
Battery 73 Ah
Voltage
12 V
12 V
Capacity
48 Ah
73 Ah
Dimensions in cm (L x W x H)
23x14x20.5
26x17x20.5
Quantity built in chair
2
2
Model
LEVO C3
Wheelchair category
B
Seat width
32 – 52 cm
Overall width
63 cm
Overall length
(without footplate)
105 cm
Overall length (with
footplate)
105 cm
Overall height, incl.
backrest
100 cm
Backrest
V-Trak 40cm (or any other optional heights)
Seat height
(incl. Seat cushion)
48 cm
Seat depth
38 – 66 cm
Type of tire
breakdown safe, without air
Size of tire
front 2.80/2.50-4“
middle 3.00-8"
back 7x1 3/4"
Footrest
heigth and angle adjustable
Max. weight
185 kg
Max. total load
140 kg
Speed
0-10 km/h
Turning circle
110 cm
Max. gradient (sitting
position)
10°
Max. gradient
(standing position)
3°
Curb climbing ability
(sitting position)
8 cm
Curb climbing ability
(standing position)
2 cm
Range (55 Ah/ 73 Ah
batteries)
25 km/ 35 km
Battery charger
Brand: MK LS24/8 E DUAL voltage 24V DC, current 8A
Joystick module
PG Drives VR2 90A or R-net 120A
Programming of
driving characteristics
Standard
for trained
Classic
for newcomer
Fun
for experts
Colour
Standard:
RAL-colours
yellow / red /
blue / black
Optional:
Metallic
red / green / blue /
silver
Optional:
184 other colours of
the RAL-offer
Optional:
3 reflex colours
orange/ lemon /
silver
49
Page 50

19. Version-Management
VersionNo.
Date
Description
Author
1.0
10.07.08
First released version
T. Meier
1.1
19.11.08
Additions for aid numbers
T. Meier
1.2
09.12.08
Additions for Handicap Institute
T. Meier
1.3
05.02.09
Miscellaneous changes in chapters
T. Meier
1.4
24.02.09
Additions for the R-net control system
T. Meier
1.5
01.01.10
Miscellaneous changes in chapters
T. Räber
1.6
23.07.10
Additional in safety instructions
H. Bögli
1.7
01.04.11
New main fuse version
H. Bögli
1.8
12.04.12
Improvements
H. Bögli
50
 Loading...