

Page 1
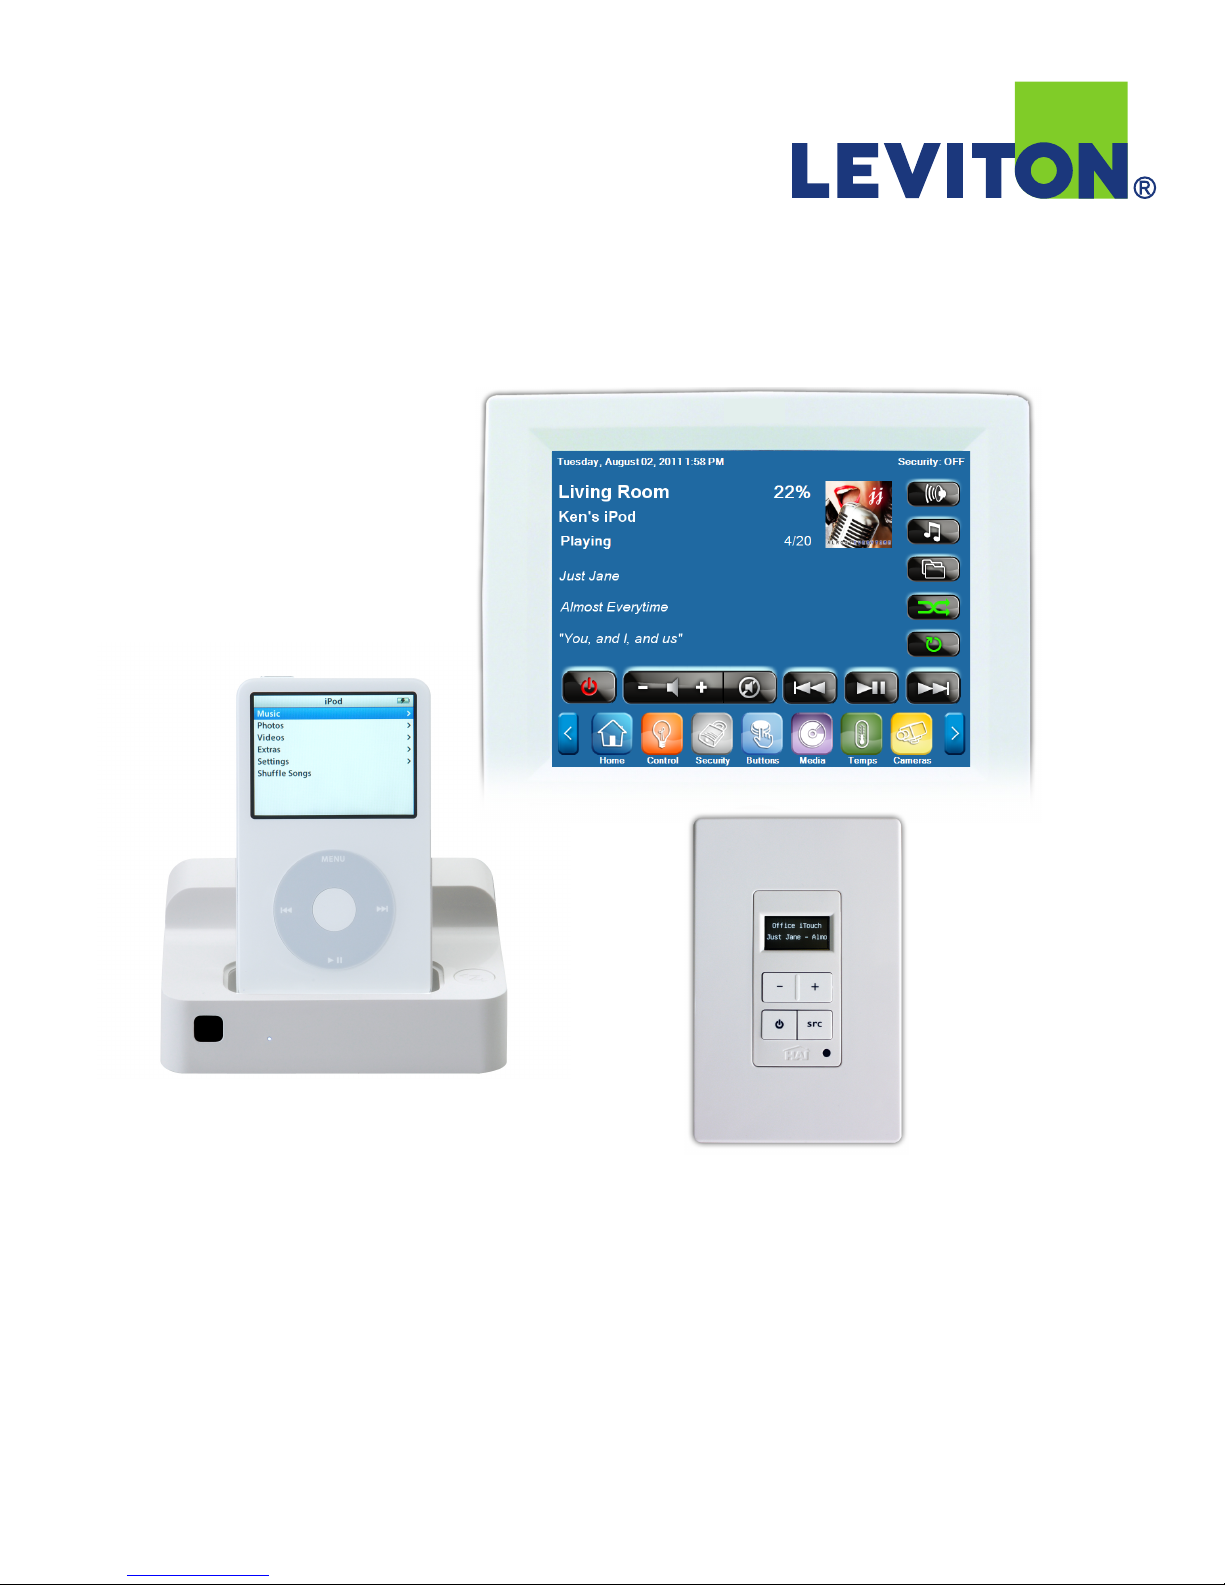
LEVITON Dock
Operation Manual
Page 2

Copyright and Trademark Information
This document and all its contents herein are subject to and protected by international copyright and other intellectual property
rights and are the property of Leviton Manufacturing Co., Inc, its subsidiaries, affiliates and/or licensors. © 2013 Leviton
Manufacturing Co., Inc. All rights reserved.
Use herein of third party trademarks, service marks, trade names, brand names and/or product names are for informational
purposes only, are/may be the trademarks of their respective owners; such use is not meant to imply affiliation, sponsorship,
or endorsement.
No part of this document may be reproduced, transmitted or transcribed without the express written permission of Leviton
Manufacturing Co., Inc.
Page 3

i
Regulatory Compliance Statements
FCC Notice
This equipment has been tested and found to comply with the limits for a Class B digital device, pursuant to
Part 15 of the FCC Rules. These limits are designed to provide reasonable protection against harmful
interference in a residential installation. This equipment generates, uses, and can radiate radio frequency
energy and, if not installed and used in accordance with the instructions, it may cause harmful interference to
radio communications. However, there is no guarantee that interference will not occur in a particular
installation. If this equipment does cause harmful interference to radio or television reception, which can be
determined by turning the equipment off and on, the user is encouraged to try to correct the interference by
one or more of the following measures:
- Reorient or relocate the receiving antenna.
- Increase the separation between the equipment and receiver.
- Connect the equipment into an outlet on a circuit different from that to which the receiver is connected.
- Consult the dealer or an experienced radio/TV technician for assistance.
This device complies with Part 15 of the FCC Rules. Operation is subject to the following two conditions:
(1) This device may not cause harmful interference, and (2) this device must accept any interference received,
including interference that may cause undesired operation.
EN55022 Class-B
EN55024
Safety instructions regarding the radio waves
Do not use this product near medical devices, such as a heart pacemaker. The radio waves
generated by this product may interfere with the operation of these devices.
Do not use this product near microwave ovens. The radio wave used by microwave ovens may
cause interference with this product.
Page 4

ii
Safety Precautions
Users are strongly advised to adhere to the directions and recommendations offered in this manual. Failure to do
so may result in problems during operation.
Use the following safety guidelines to help protect yourself and the
• Do not attempt to service the LEVITON Dock yourself.
• Always follow installation instructions closely.
• Make sure the correct voltage is being supplied before turning the power on.
• Use only the AC adapter and power cord that are approved for use with this unit.
• Do not install in a very humid environment.
• Do not install in an area exposed to sunlight or heat.
• Do not use in areas containing flammable materials like propane gas and gasoline or in areas that generate
dust. Doing so may cause an explosion or fire.
• Do not dismantle, repair, or modify the product. Doing so may cause damage or an electric shock. Refer all
servicing to qualified personnel.
• Do not use water, thinner, or organic solvent for cleaning the product exterior. Doing so may
cause damage or an electric shock. Use a dry cloth instead and turn off the power before
cleaning.
Disclaimer
• While every effort has been made to ensure that the information contained in this guide is accurate and
complete, no liability can be accepted for any errors or omissions.
• LEVITON reserves the right to change the specifications of the hardware and software described herein at any
time without prior notice.
• No part of this guide may be reproduced, transmitted, transcribed, stored in a retrieval system, or translated
into any language in any form, by any means, without prior written permission of LEVITON.
• LEVITON makes no warranties for damages resulting from corrupted or lost data due to mistaken operation or
malfunction of the LEVITON Dock, the software, personal computers, peripheral devices, or
unapproved/unsupported devices.
Page 5

iii
Table of Contents
Regulatory Compliance Statements .............................. i!
Safety Precautions ..................................................... ii!
Discl a i m e r ............................................................................................................................. ii!
Introducing the LEVITON Dock ............................ 1!
Features .......................................................................................................... 1 !
Package Contents ............................................................................................. 2!
Suppor t e d Operati n g Systems ................................................................................................. 2 !
Suppor t e d iPod M o d e l s .......................................................................................................... 2!
LEVITON Dock Overview
.................................................................................... 3!
Connections to the LEVITON Dock ..................................................................... 5!
Connec t i n g the N e t w o rk ......................................................................................................... 5!
To ro u t e r, hub, o r networ k s w itch ............................................................................................ 5 !
Connec t i n g the P o w e r ............................................................................................................ 5 !
Connec t i n g the A u d i o Output .................................................................................................. 6 !
Getting Started
...................................................... 7!
Configuring the LEVITON Dock .......................................................................... 7!
LEVITO N D o c k Setup U t ility ................................................................................................... 8!
LEVITON Dock Operation ................................................................................ 14!
Operat i o n Modes ................................................................................................................. 15!
Playing Music ................................................................................................. 15!
Inserting and Removing an iPod ....................................................................... 16!
Accessing the Web Server ............................................................................... 16!
Statu s ................................................................................................................................. 17!
Config u r a tion ...................................................................................................................... 18!
Syste m I n formati o n .............................................................................................................. 18!
Reset to Factory Default .................................................................................. 19!
Interfacing with the LEVITON Dock .................. 20!
Enabling the LEVITON Dock ............................................................................ 20!
Creati n g a New P r o j e ct wit h t he LEVIT O N D o ck ..................................................................... 20!
Addin g T o uchscree n s to the P r o ject ...................................................................................... 22!
Adding the LEVITON Dock to an Existing Design ............................................... 24!
Import i n g the L E V I T O N Dock P a g e s ...................................................................................... 24!
Discovering Touchscreens ............................................................................... 25!
Adding an LEVITON Controller to the Design .................................................... 26!
Adding the LEVITON Dock to the Design .......................................................... 26!
Disco v e r the LEV I T O N Dock ................................................................................................. 27!
Assig n i n g the A u d i o Output .................................................................................................. 28!
Assig n i n g a Touc h s c r een Pag e f o r Media
................................................................................ 29!
Updating the Touchscreens ............................................................................. 30!
Page 6

iv
Accessing Your Music ..................................................................................... 32!
Browse t h e Media L i b rary ..................................................................................................... 33!
Selec t i n g a new M u s ic Sourc e
................................................................................................ 34!
Selec t i n g a New A u d i o Zone
.................................................................................................. 35!
Specifications ...................................................... 36!
Page 7
Chapter 1
Introducing the LEVITON Dock
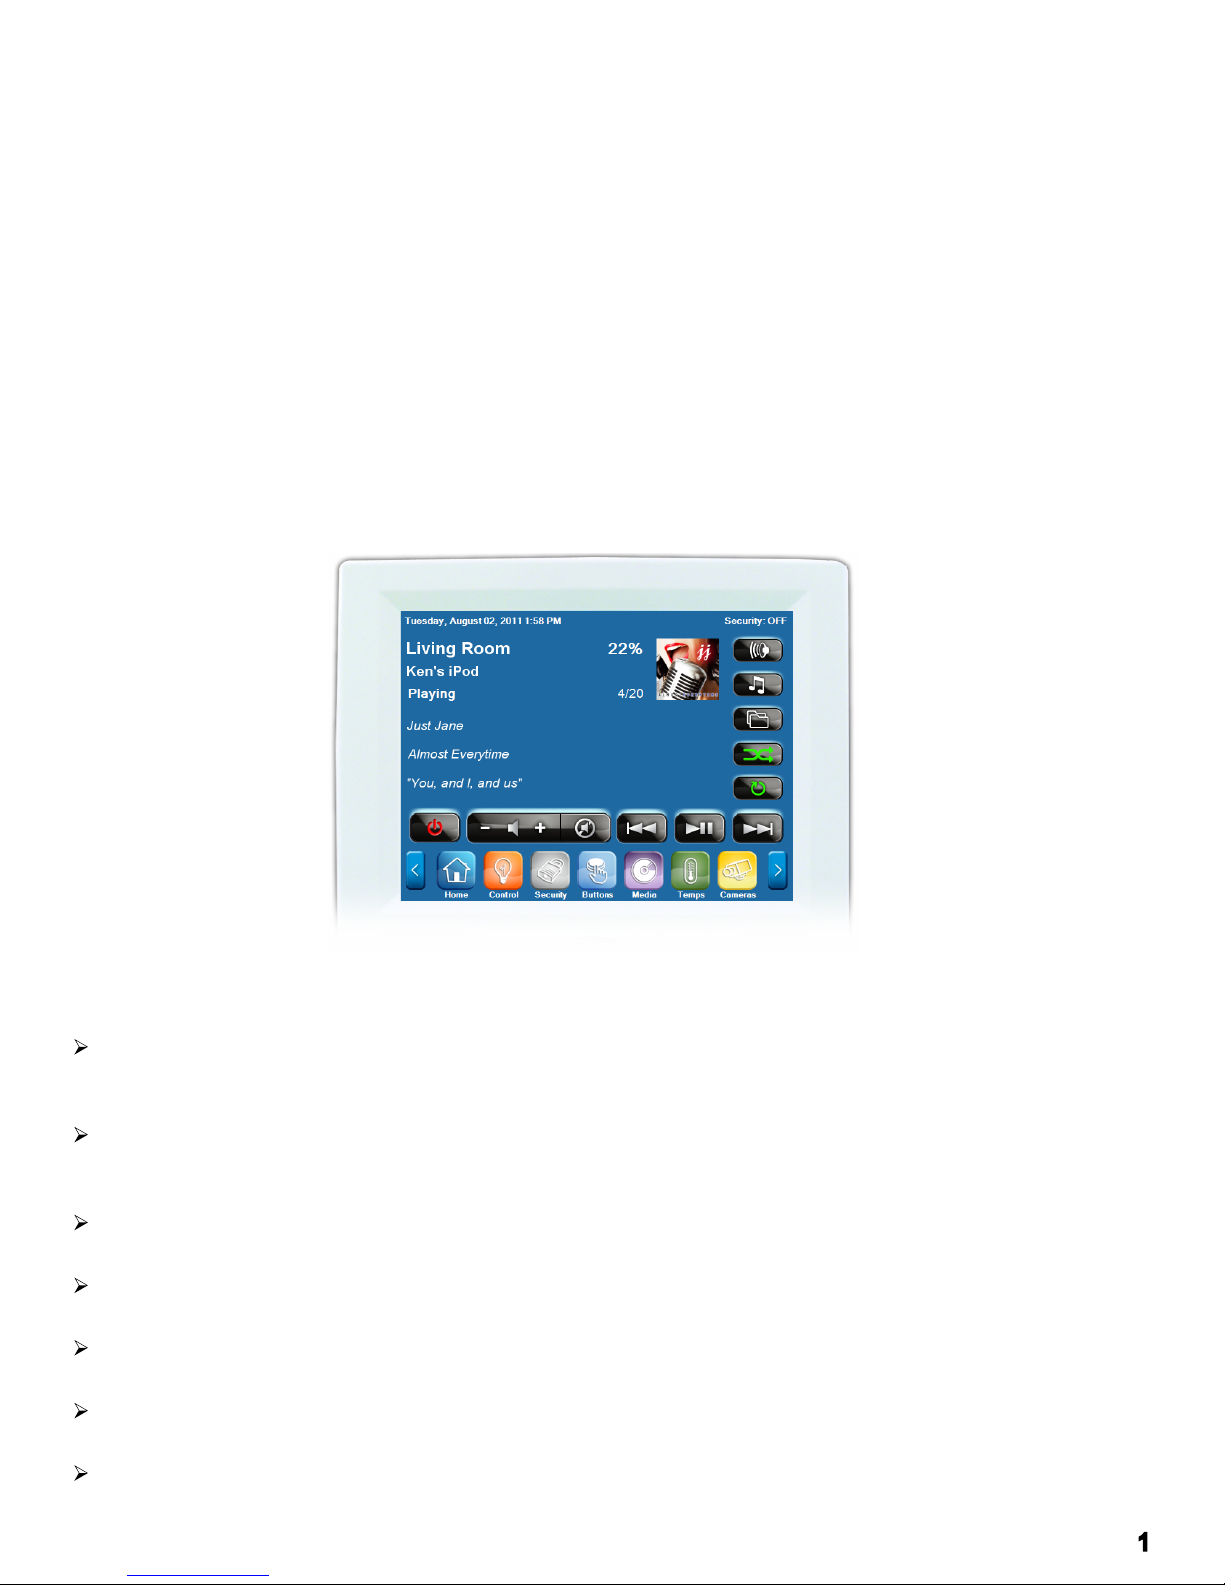
The LEVITON Dock is a product that allows you to access music and other content on an iPod, iPod
Touch, or iPhone using IP enabled devices, such as LEVITON OmniTouch 5.7e and 10pe
Touchscreens, and Hi-Fi2 audio distribution systems. The LEVITON Dock connects over a wired or
wireless LAN network. When used with a supported audio distribution system, an iPod that is connected
to a LEVITON Dock becomes an audio source that can be played in any audio zone in the house.
Using a LEVITON OmniTouch 5.7e, 10p, or 10pe Touchscreen, you can browse and make music
selections by Playlists, Artists, Albums, Songs, Podcasts, Genres, Composers, and Audiobooks. Album
art and other music metadata are displayed with each selection.
Features
Works with OmniTouch 5.7e and 10pe Touchscreens when combined with a LEVITON controller and
supported audio distribution system (e.g. LEVITON Hi-Fi or Hi-Fi2, NuVo, Russound, Xantech,
Speakercraft, or Proficient).
Works standalone with Hi-Fi2 audio distribution systems. VSC keypads will display iPod metadata (artist,
album, and track) and allows for control commands (play, pause, next track, and previous track) at the VSC
keypad.
LEVITON Dock sends iPod metadata and album artwork to IP enabled devices, such as LEVITON
OmniTouch 5.7e and 10pe.
IP enabled devices can send control commands (play, pause, stop, next track, previous track, rewind, fast
forward, next chapter, previous chapter, etc.) to an iPod that is docked in the LEVITON Dock.
LEVITON Dock allows IP enabled devices to navigate and browse the music library on the iPod by Playlists,
Artists, Albums, Songs, Podcasts, Genres, Composers, and Audiobooks.
Connects to an existing wired 10/100 LAN network or wireless 802.11 b/g (on supported LEVITON Dock
models) network.
Up to 8 LEVITON Docks can be connected and controlled on a network.
1
Page 8

2
Charges the battery in the docked iPod.
Package Contents
After opening the box, ensure the following items are present:
o LEVITON Dock
o Power Supply
o Audio Cable
o LEVITON Dock CD (Setup Utility and Manual)
o Getting Started Guide
Supported Operating Systems
o Windows 7, Windows Vista, Windows XP, Windows 2000
o Mac OS X 10.2.7 to 10.4.x (PPC version)
o Mac OS X 10.4.3 or later (Intel version)
Supported iPod Models
o iPod classic
o iPod Nano (3G, 4G, 5G, 6G)
o iPod touch (1st, 2G, 3G, 4G)
o iPhone (1st, 3G, 3GS, 4G)
Page 9
3
LEVITON Dock Overview
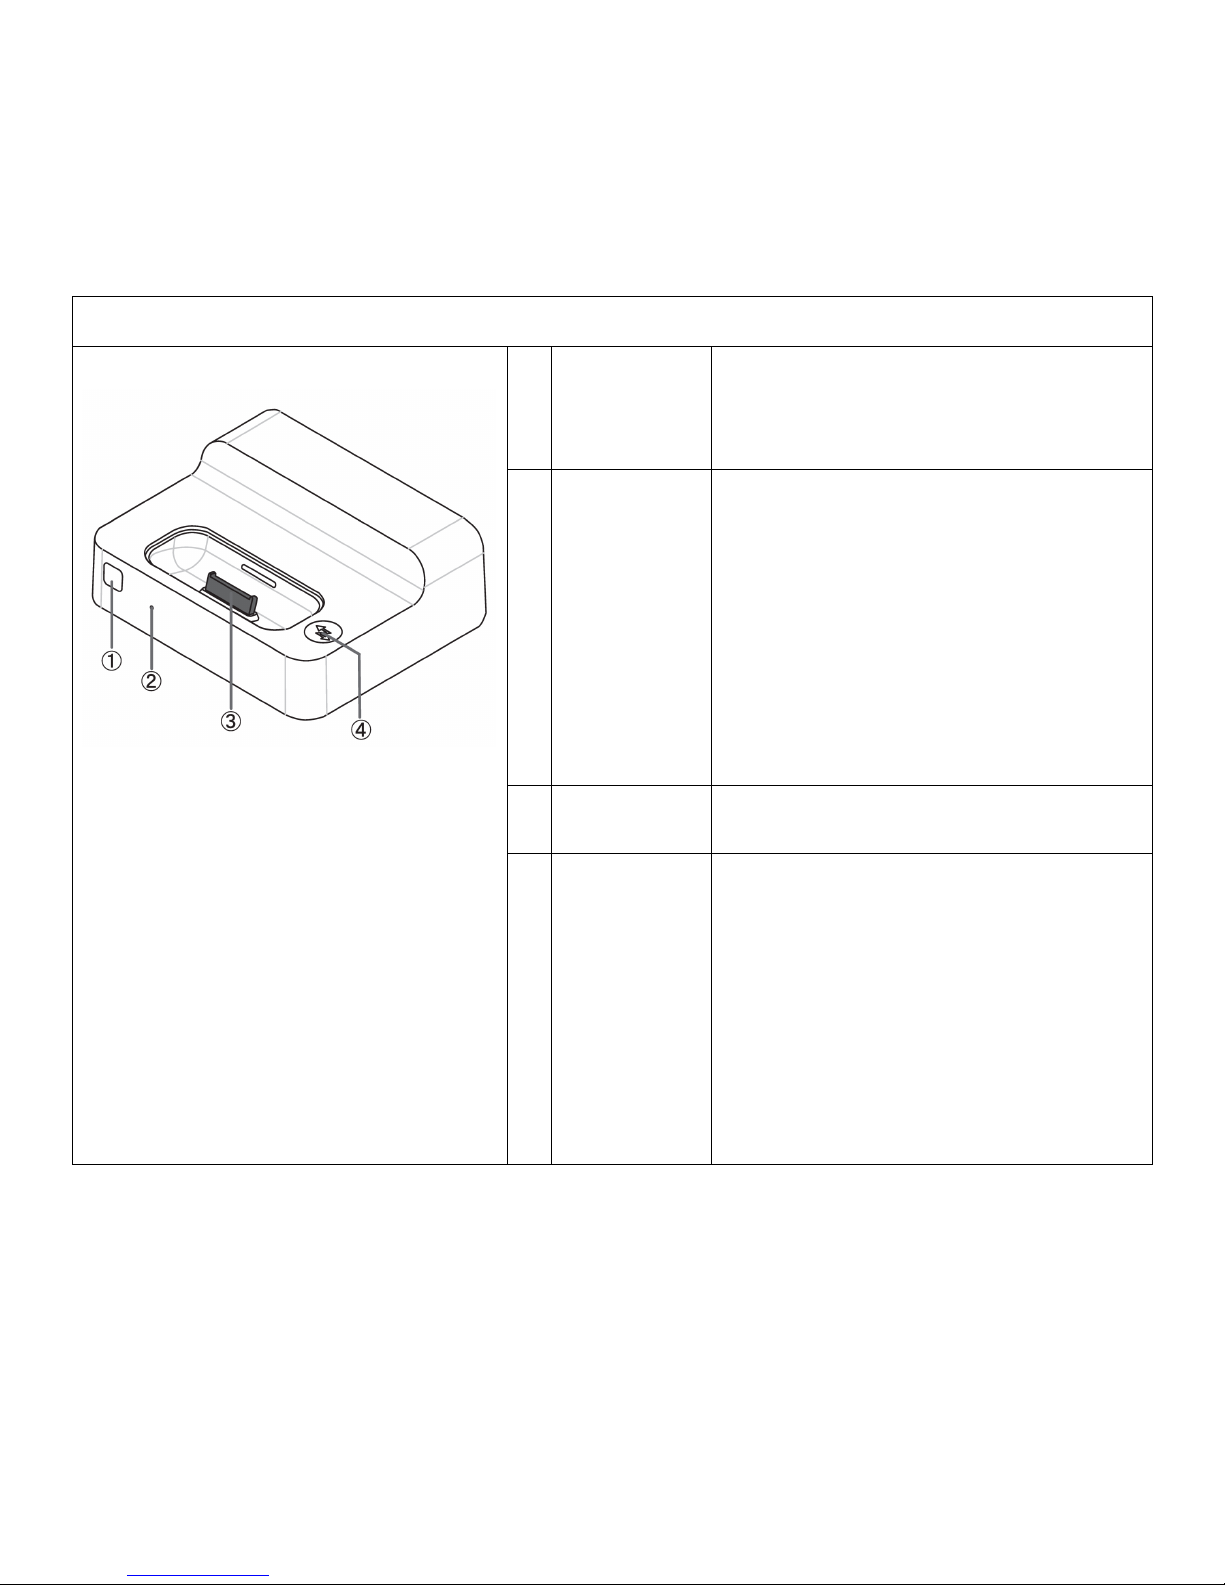
This section describes the main components of the LEVITON Dock.
Front View
1
Infrared (IR)
Receiver
Control playback of a connected iPod
from a distance using the Apple
Remote when the LEVITON Dock is in
Local Mode.
2
Operation
Mode LED
The Operation Mode LED is illuminated
when the LEVITON Dock is in Network
Mode (running and can be controlled
via IP enabled devices).
The Operation Mode LED is off when
the LEVITON Dock is in Standby
Mode. In Standby Mode the USB
controller, Ethernet PHY, and the
wireless radio (if applicable) is
disabled.
3
iPod
Connector
Connects the iPod to the LEVITON
Dock.
4
Operation
Mode Button
When is Standby Mode, press this
button to start the unit in Network
Mode.
When in Network Mode, press and
hold for 2 seconds to put the unit into
Standby Mode.
The Operation Mode Button is also
used to reset the LEVITON Dock to
factory default settings.
Page 10
4
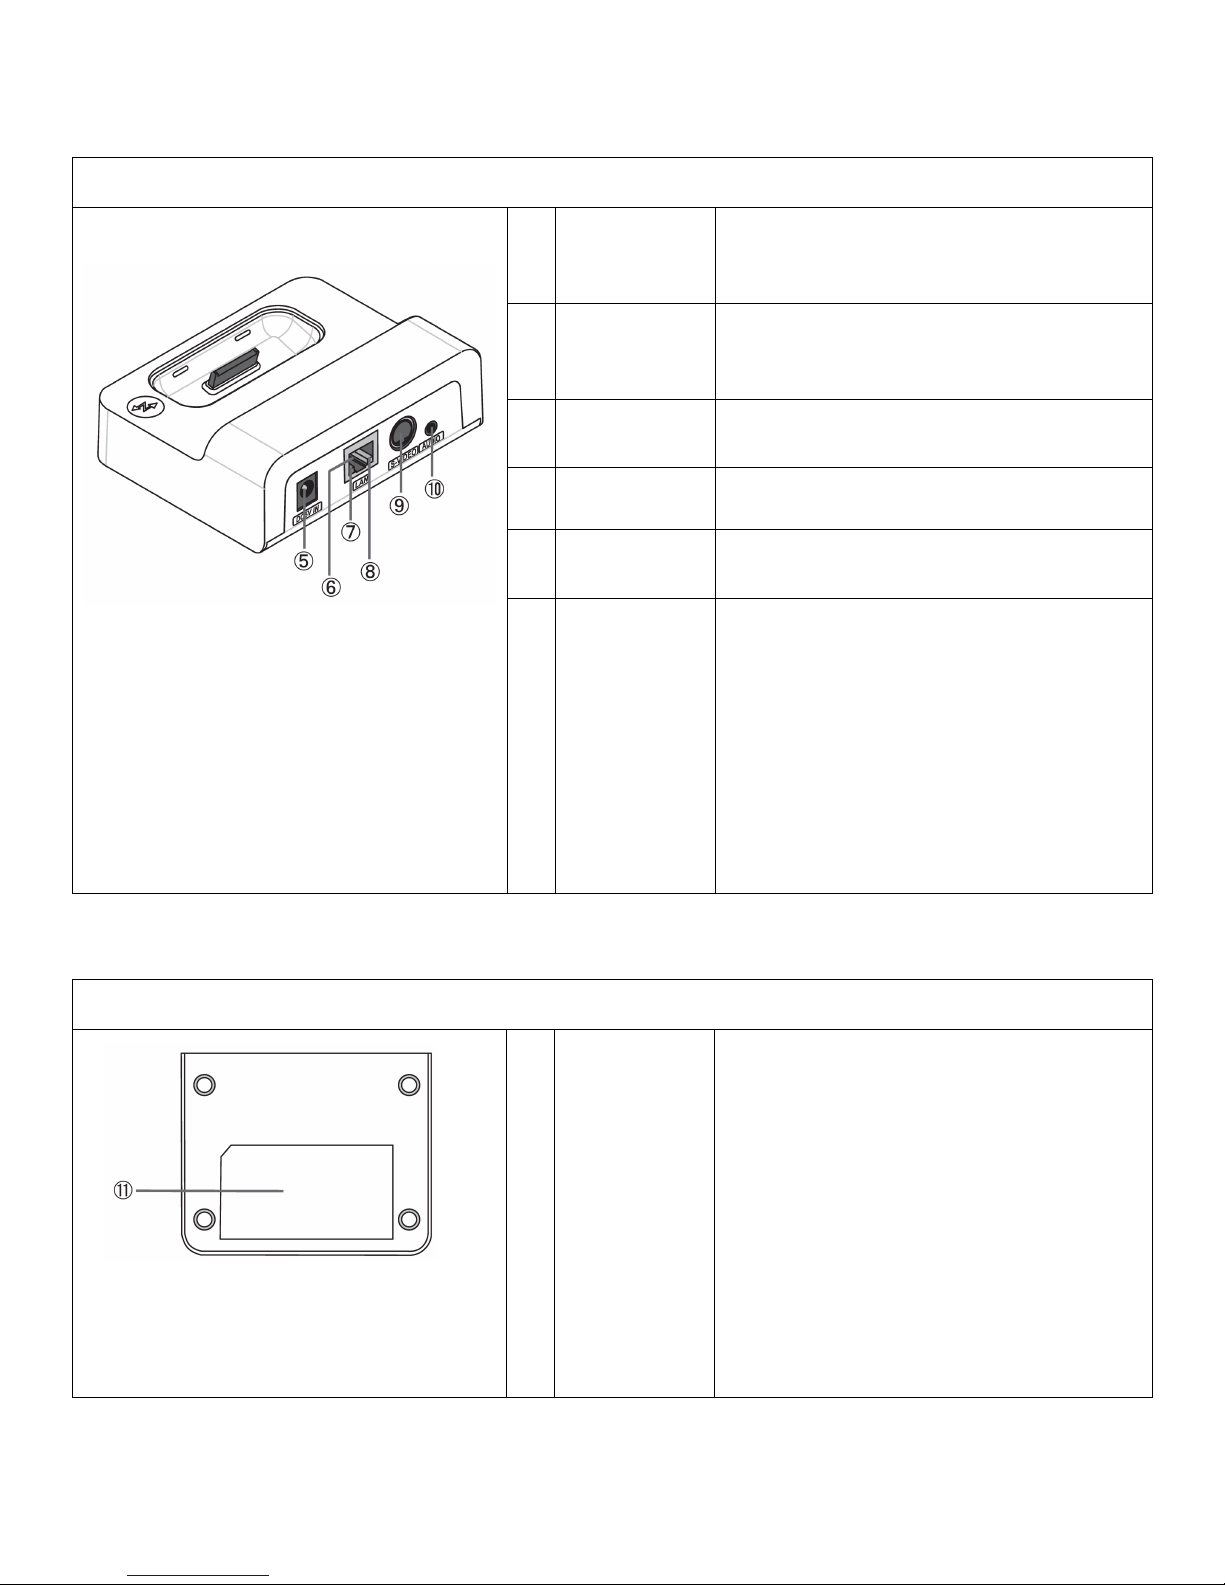
Re ar Vi ew
5
Power Jack
Connect the supplied AC power supply
to this jack to provide power to the
LEVITON Dock.
6
Network
Port
Use a standard network cable to
connect the Network Port to the local
network.
7
Green LED
Shows the network communication
status.
8
Orange LED
Shows the network communication
status.
9
S-Video
Output
This output is currently not active.
10
Audio
Output
Connect supplied 3.5mm male stereo
patch cable between the Audio Output
on the LEVITON Dock and an audio
input on Hi-Fi2 or other audio
distribution system.
3.5mm male to 2 RCA male stereo
patch cable can be used to connect
LEVITON Dock to audio equipment
which requires RCA audio inputs.
Bo tto m View
11
Ethernet
Address
The Ethernet (MAC) Address of the
LEVITON Dock is found on the label
on the bottom of the unit.
The last 6 digits of the Ethernet
Address is the LEVITON Dock serial
number.
For example: If the Ethernet Address
is 00:07:A6:00:11:22 (noted as
0007A6001122) then the product's
serial number is “001122”.
Page 11
5
Connections to the LEVITON Dock
To operate the LEVITON Dock, the following must be connected: Network (LAN), Power, and Audio
Output.
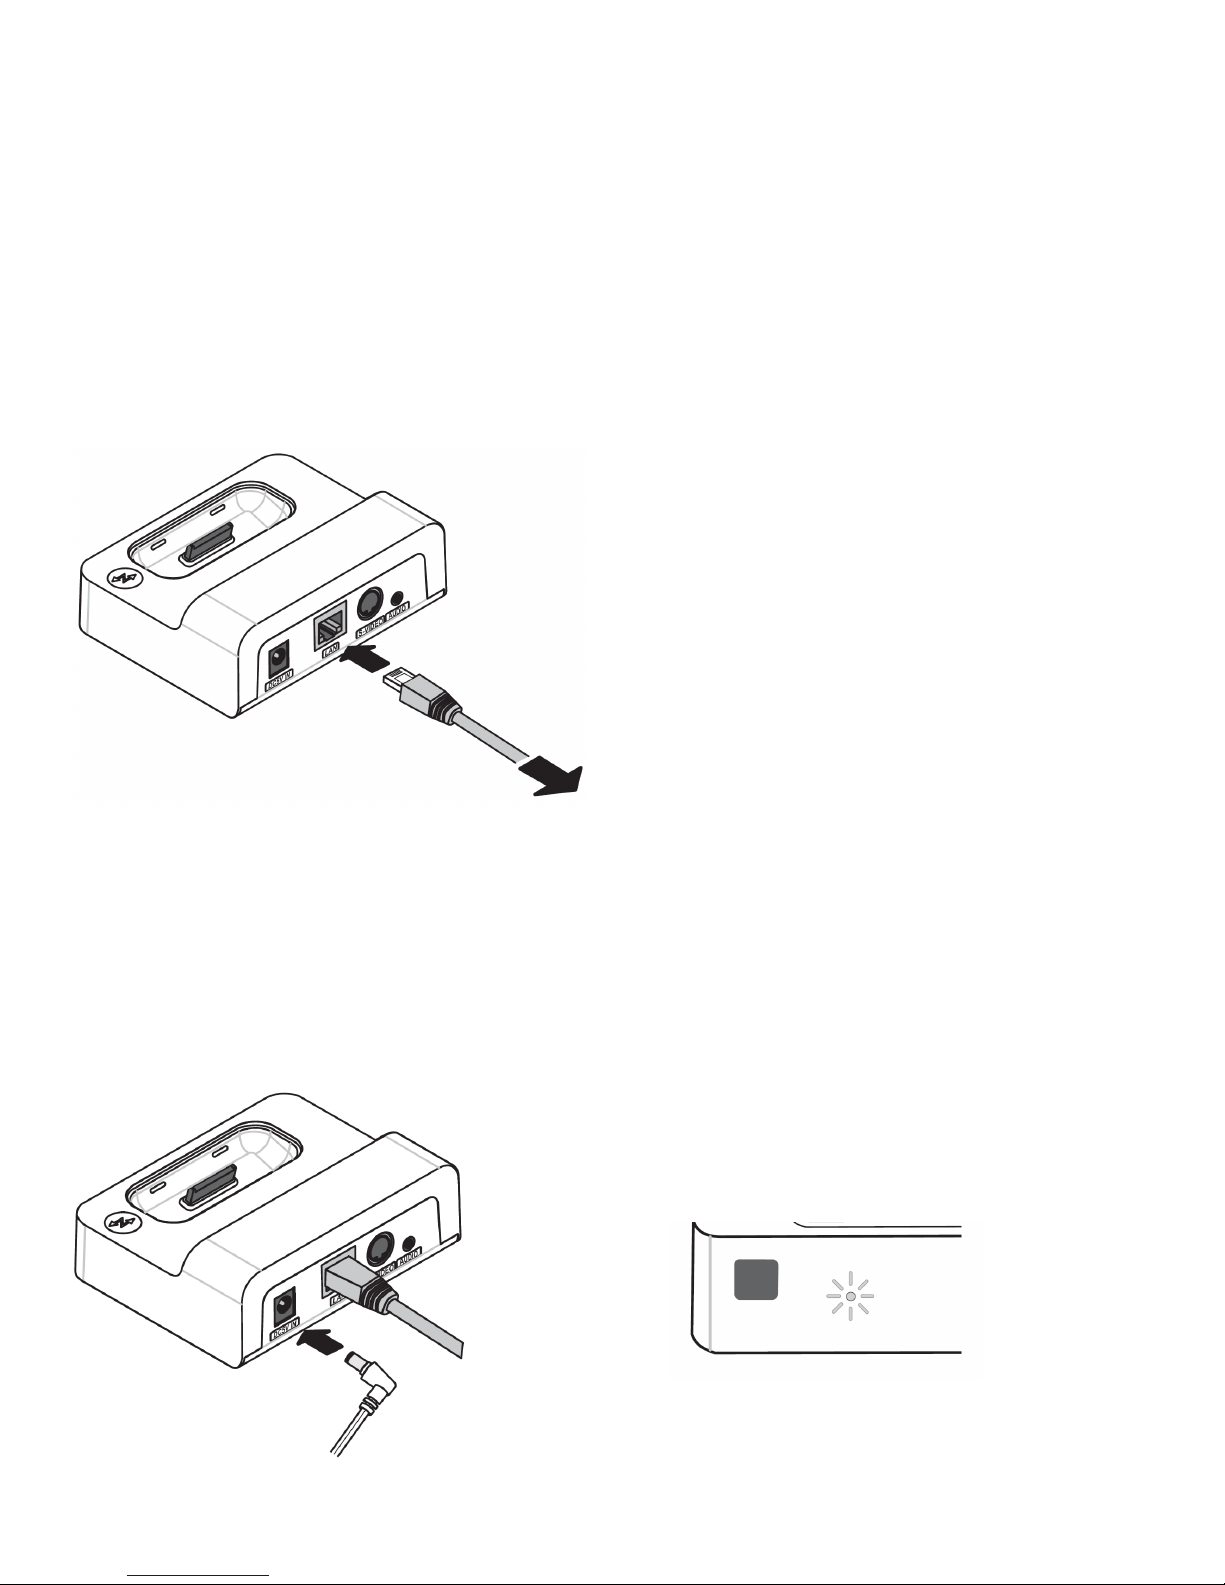
Connecting the Network
Connect a network cable to the Network Port on the LEVITON Dock and connect the other end of the
network cable to a router, hub, or network switch on the local network.
To router, hub, or network switch
Connecting the Power
Connect the supplied AC power supply to the Power Jack on the LEVITON Dock. Plug the power
cord into an outlet.
Make sure that the Operation Mode LED is
illuminated.
Page 12
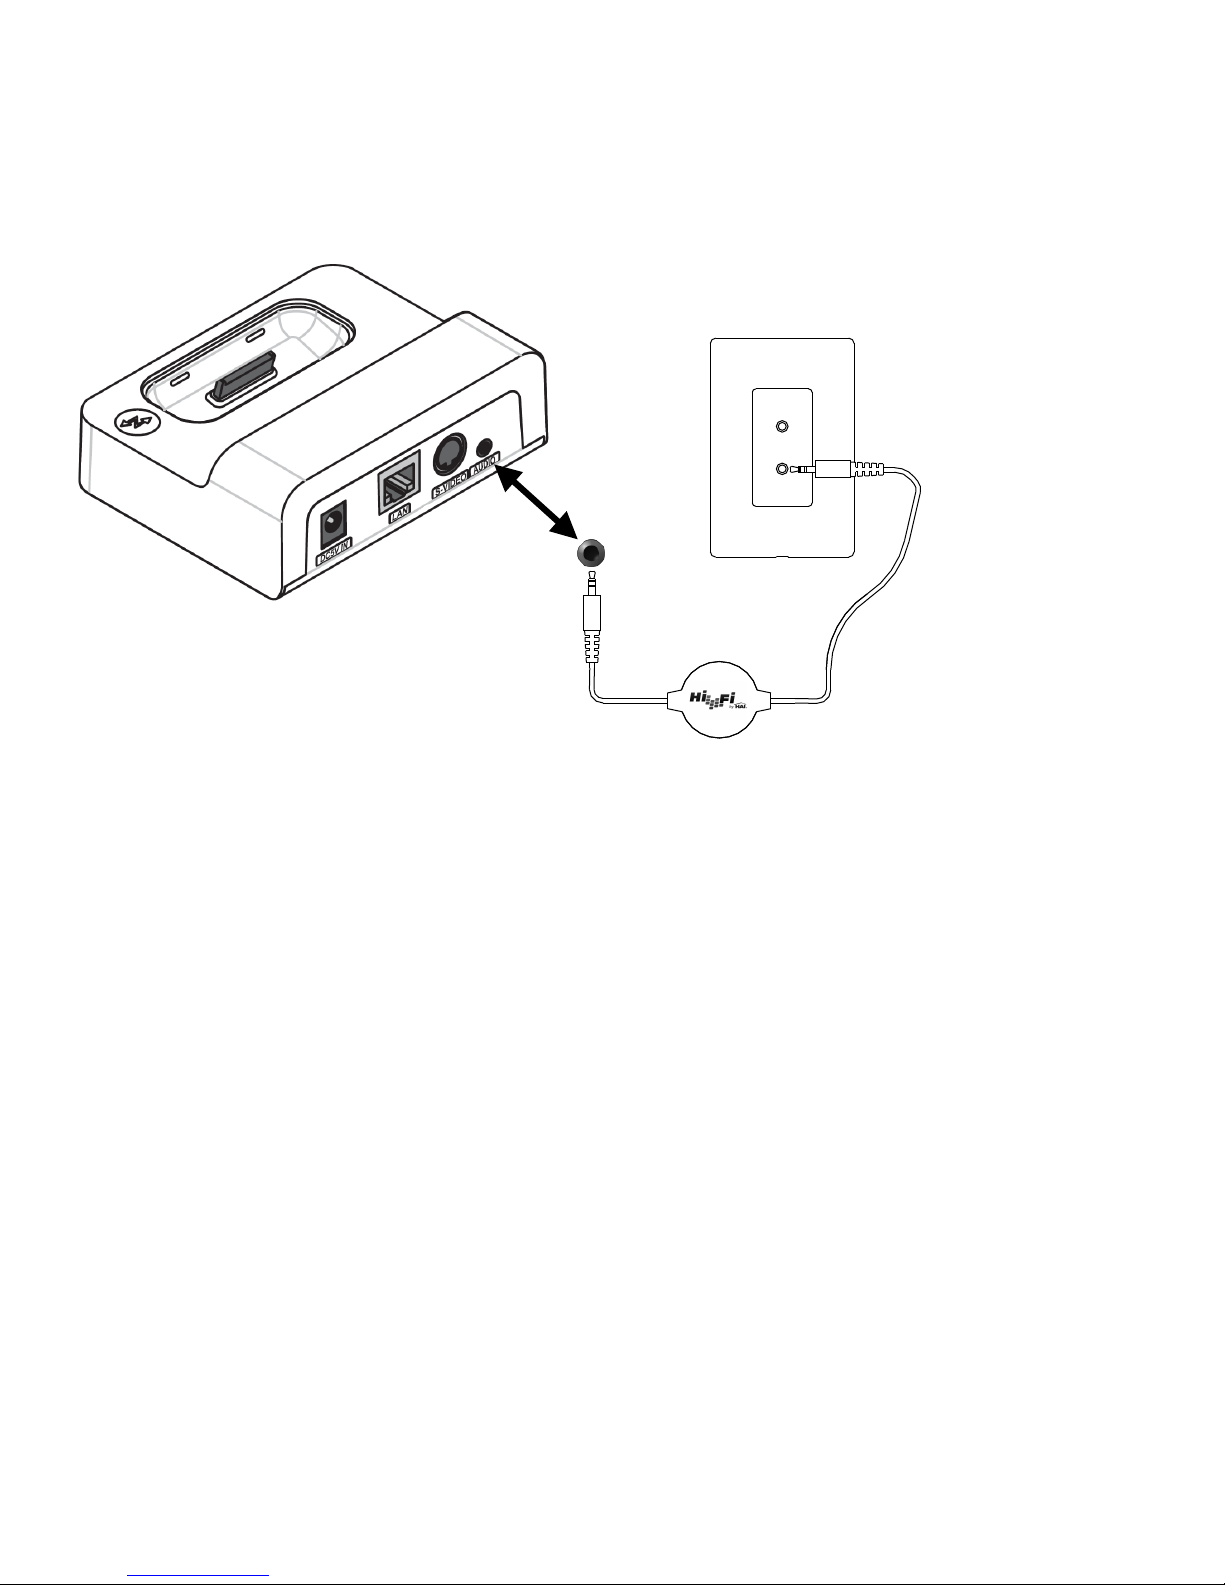
Connecting the Audio Output
AUDIO
Connect the LEVITON Dock to an audio system using the Audio Output jack on the LEVITON Dock
using a 3.5mm male stereo patch cable (supplied).
IR OUT
AUDIO IN
Hi-Fi RIM
Remote Input Module
RIM
6
Page 13
Chapter 2
Getting Started
The LEVITON Dock is configured over the network using the supplied LEVITON Dock Setup Utility. The
LEVITON Dock Setup utility runs on a PC on the same local network as the LEVITON Dock.
Configuring the LEVITON Dock
To configure the LEVITON Dock using the LEVITON Dock Setup Utility:
1. Ensure that the LEVITON Dock is connected to the local network.
2. Ensure that the AC power supply is connected to the LEVITON Dock.
Ensure that the LEVITON Dock is in Network Mode (the Operation Mode LED is illuminated).
3.
4.
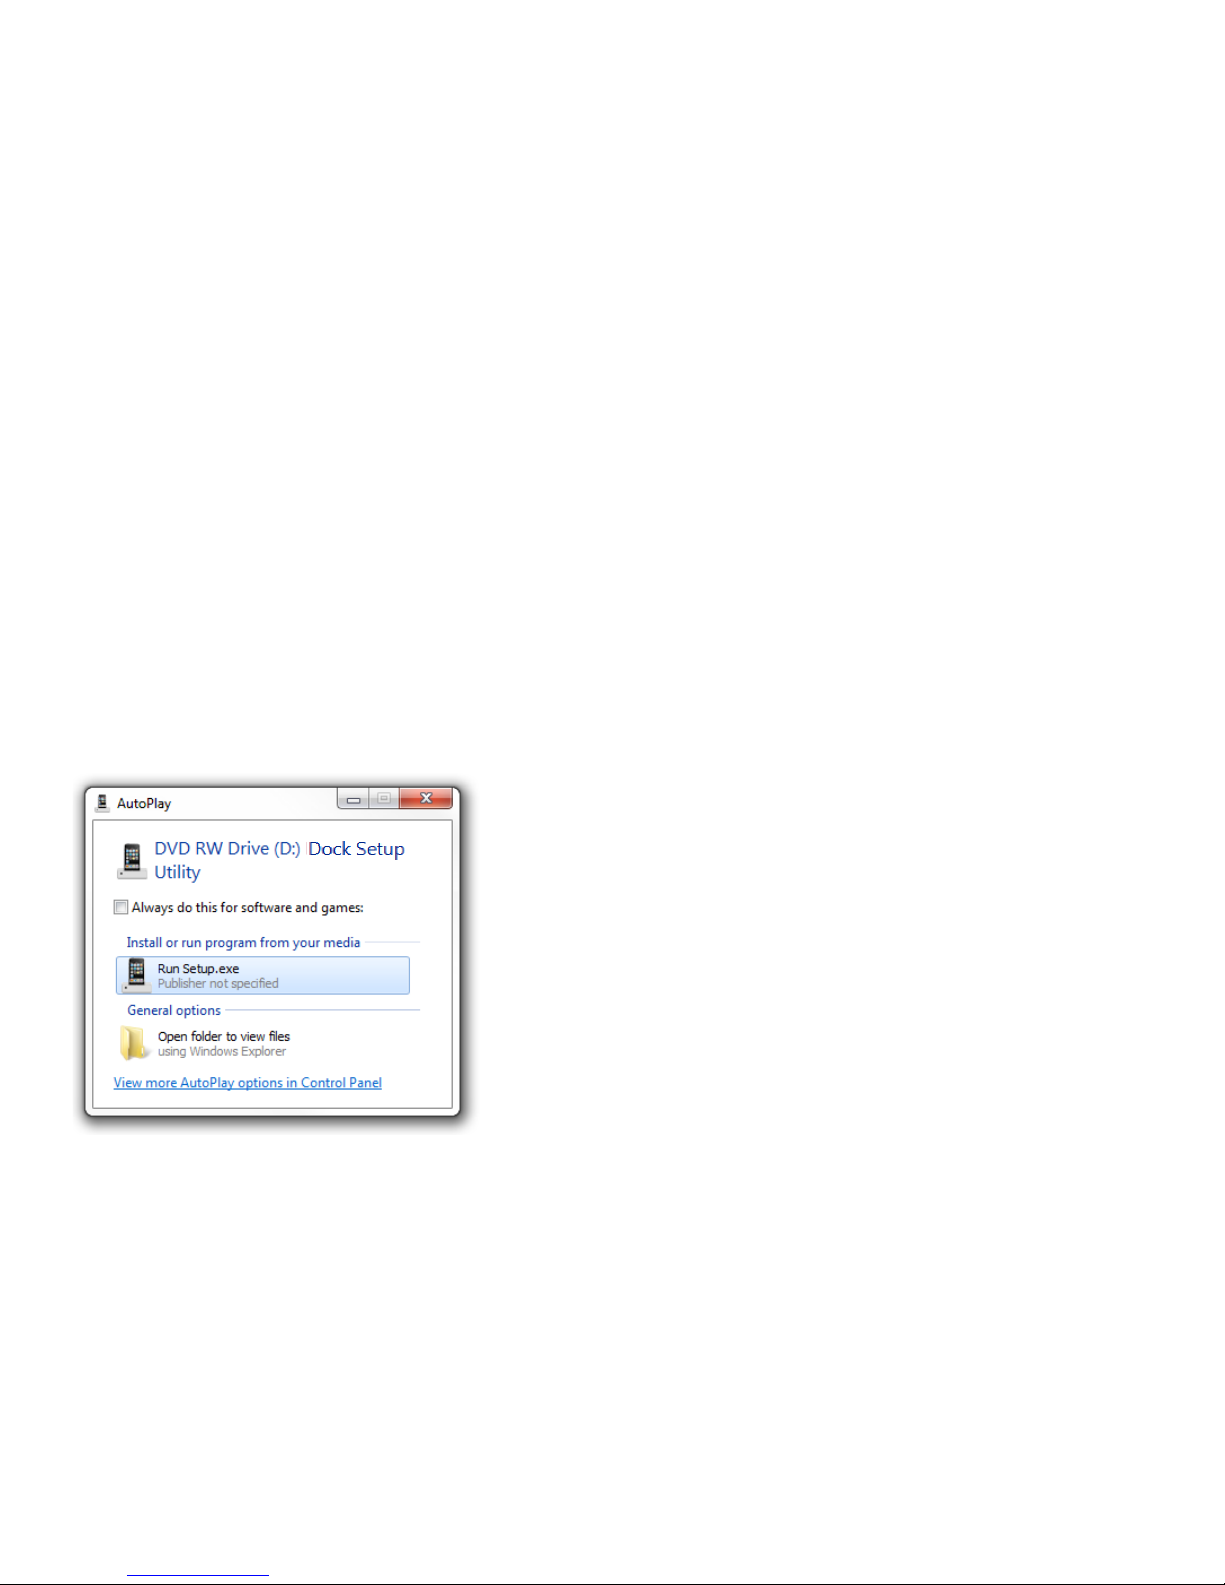
Insert the LEVITON Dock S e t u p Utility CD (LEVITON Part Number 96A02-1) into your PC
and run the utility Setup.exe.
7
Page 14
8
LEVITON Dock Setup Utility
Follow the instructions on the screen to configure the LEVITON Dock using the LEVITON Dock Setup
Utility.
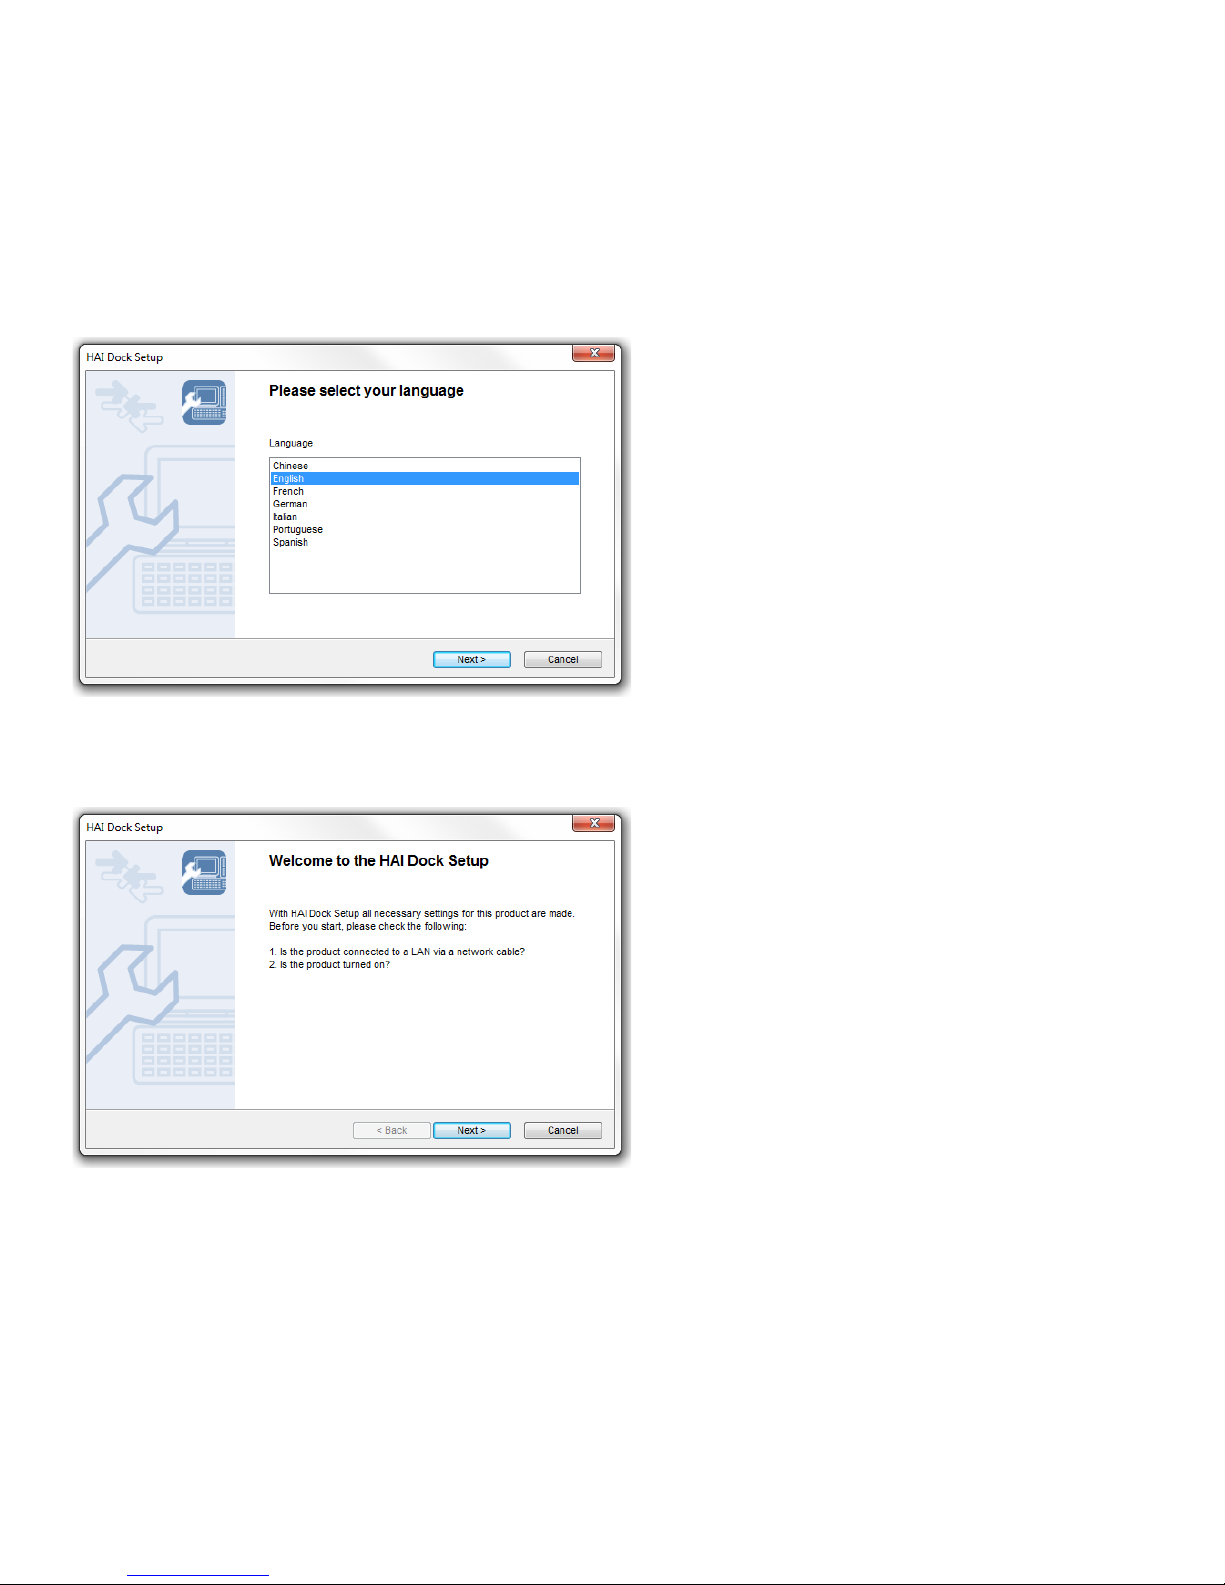
1. When the LE V I T O N Do c k Setup Utility is st a r t e d , you are fir st pr o m p t e d to select
your language:
Select your language and then click Next.
2. Verify that t h e L E V I T O N D o c k is connected to the network with a n e t w o r k cable and
is turned on:
Verify that the LEVITON Dock is connected
to the network and is turned on and then click
Next.
3. Read the Software License Agreement:
Page 15
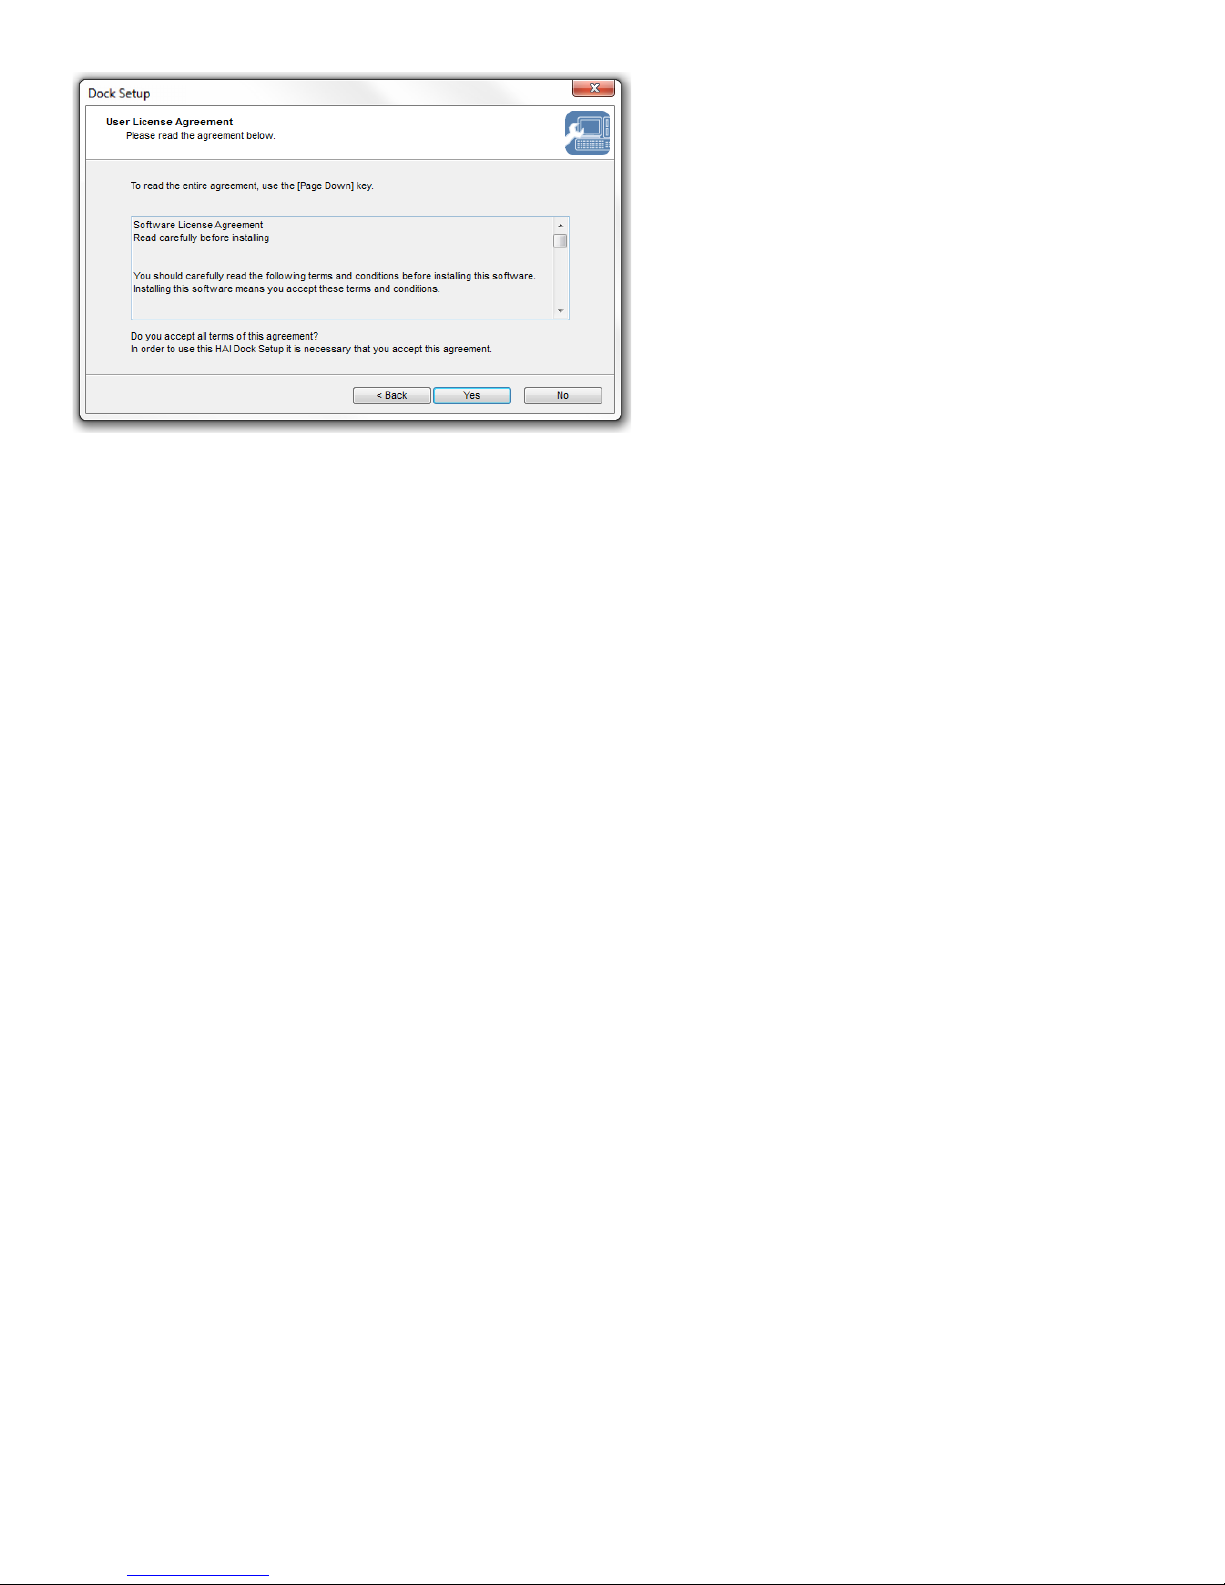
Read the Software License Agreement and
then click Yes to accept the terms and
proceed.
9
Page 16
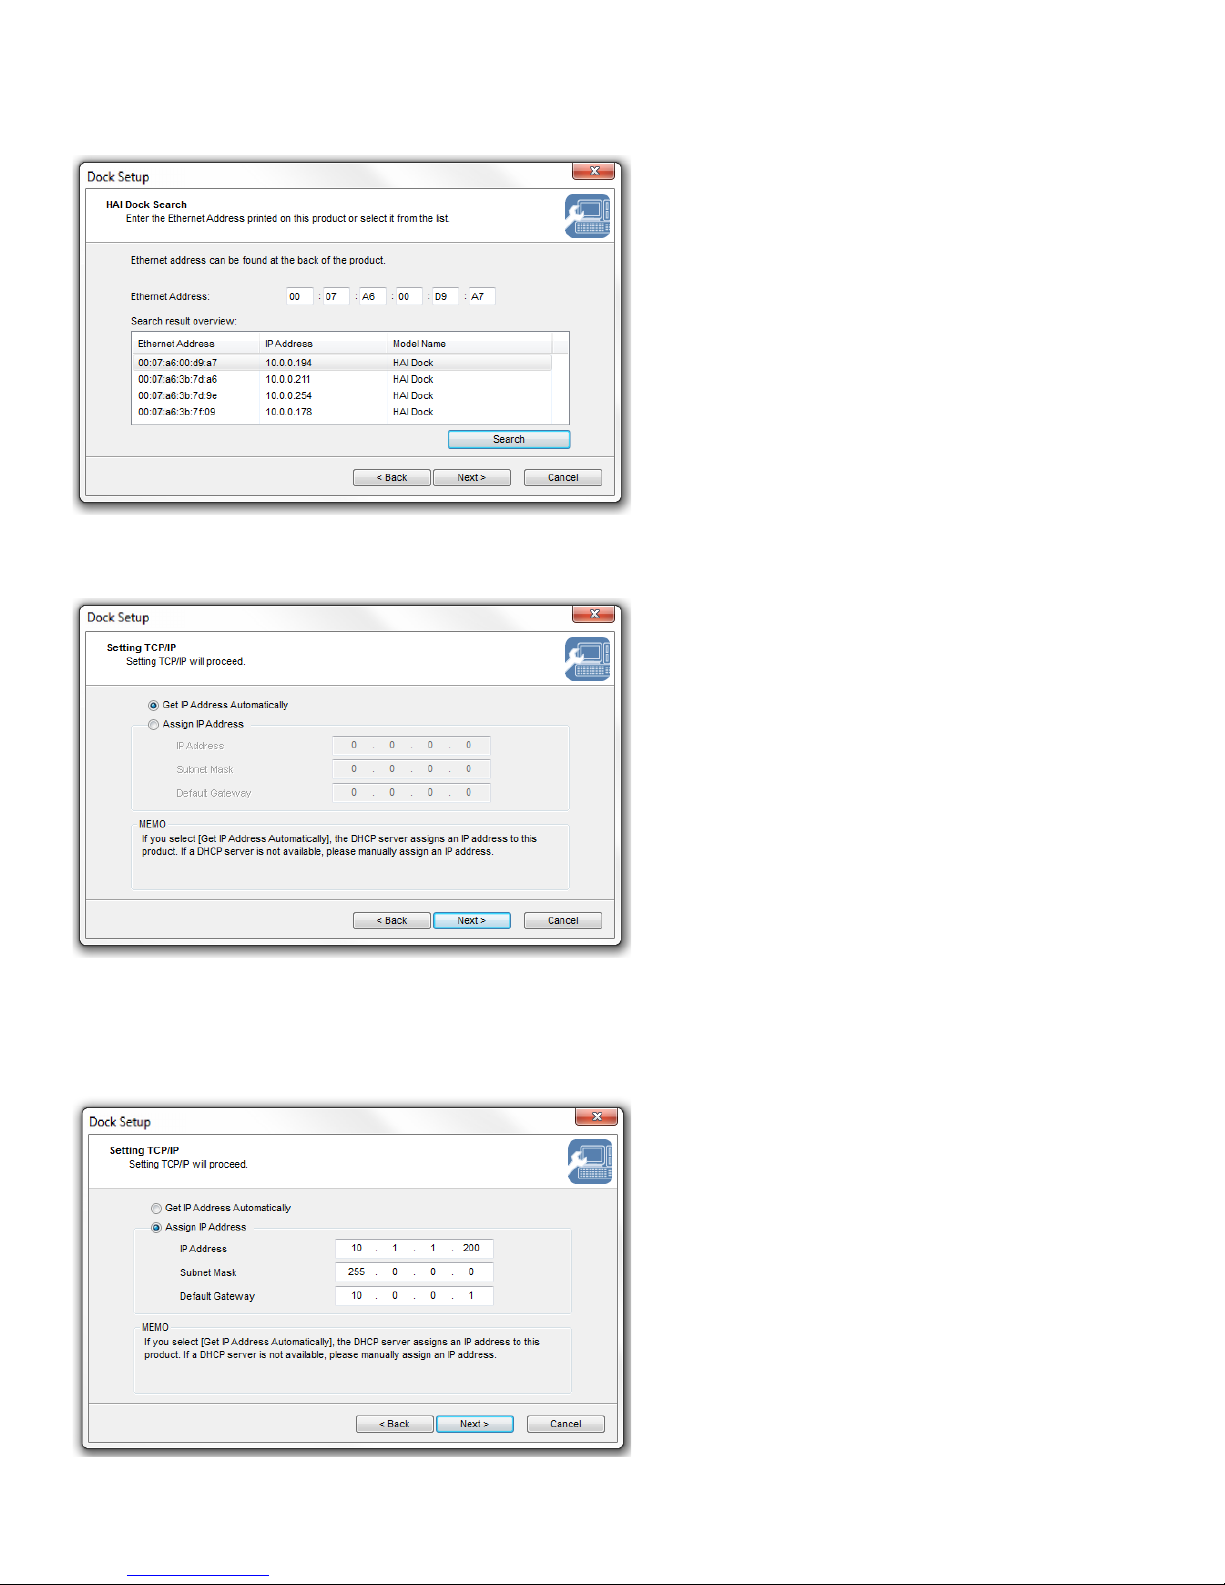
4. The LEVITON Dock Setup Utility will discover all of the LEVITON Docks connected
on the local network:
Select the LEVITON Dock to be configured
and then click Next.
5. Configure the TCP/IP network settings for the LEVITON Dock:
By default, the LEVITON Dock will G e t an
IP A d d r e s s Automatically. The DHCP
client in the LEVITON Dock will accept an IP
Address and other network parameters from
a DHCP server on the network.
To have the LEVITON Dock use the DHCP
settings, with the Get an IP A d d r e s s
Automatically radio button selected, click
Next.
If DHCP is disabled on the router and there is no other DHCP server on the network, you can
manually assign a static IP address. The IP address of the LEVITON Dock must be compatible with
your existing network. To manually assign a static IP address to the LEVITON Dock:
10
a) Select the Assign IP Ad d r e s s radio
button.
b) Enter the desired IP address for the
LEVITON Dock in the IP A d d r e s s edit
box.
c) Enter the subnet mask of the network in
the Subnet Mask edit box.
d) Enter the default gateway of the network
in the Default Gateway edit box.
e) When complete, click Next.
Page 17
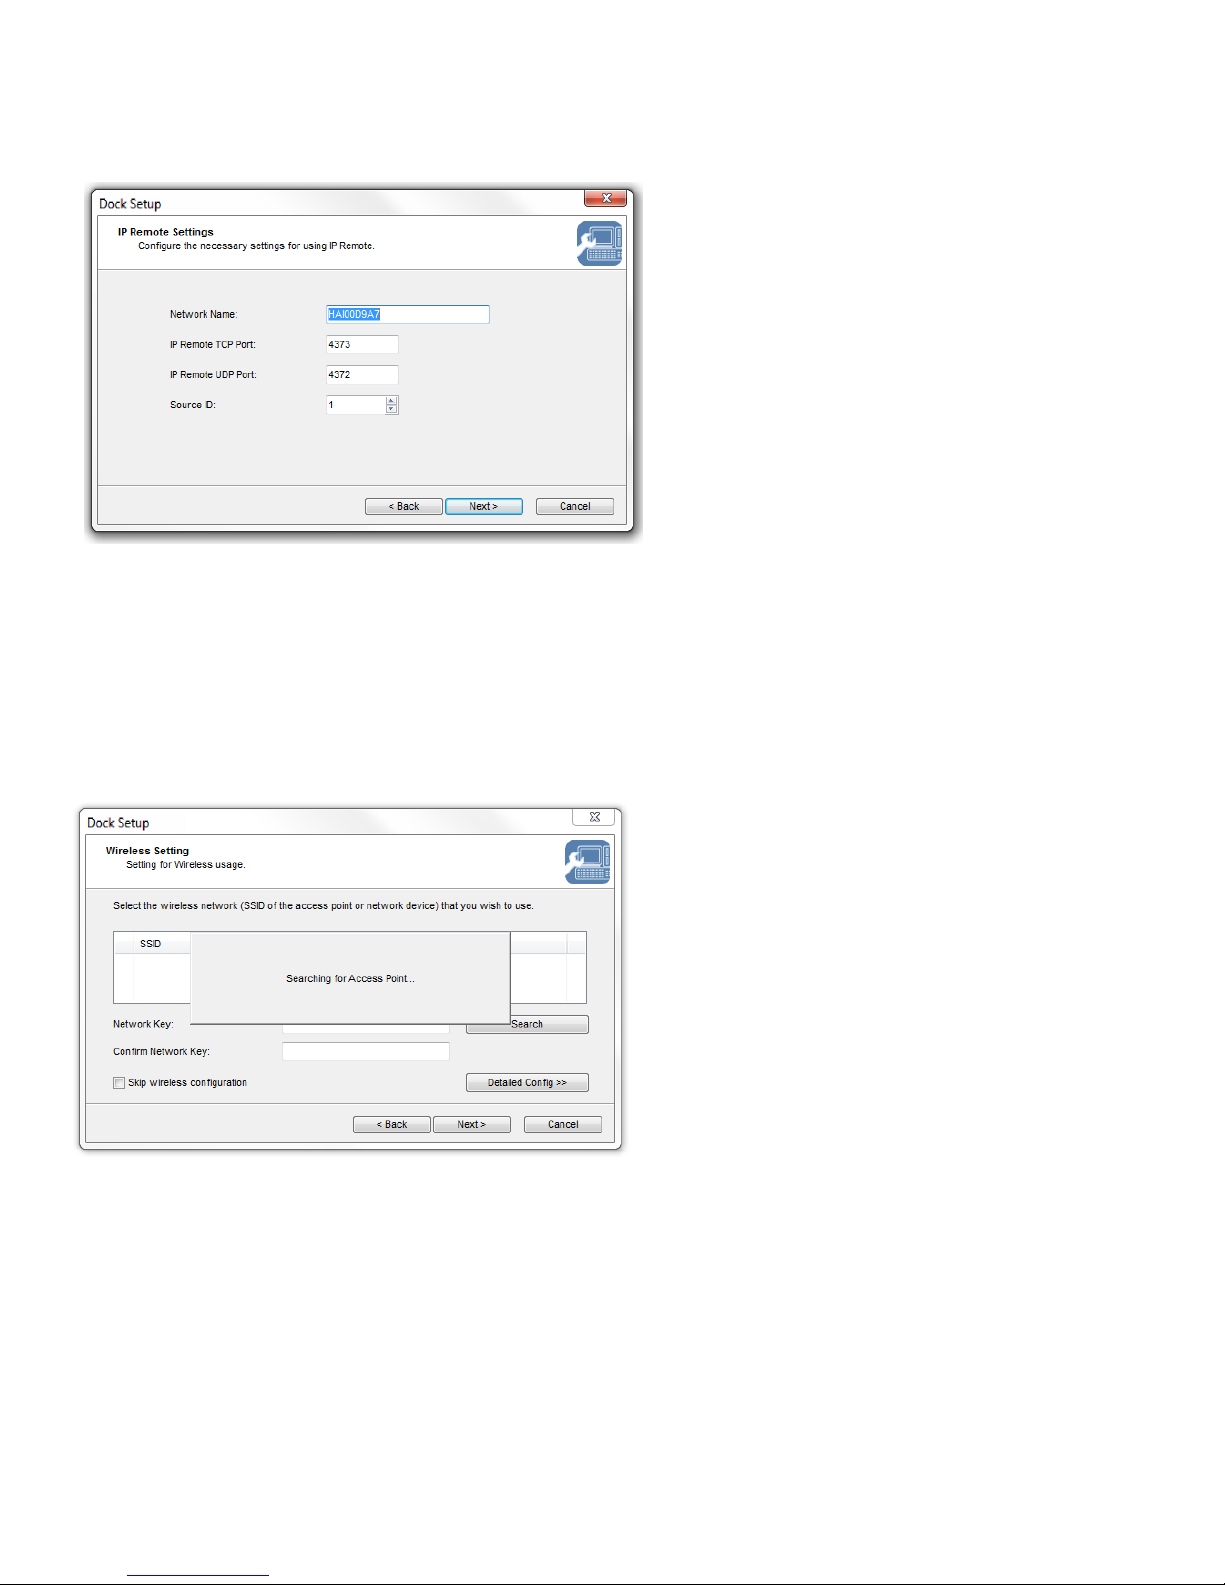
6. Configure the IP Remote Settings for the LEVITON Dock:
Network Name: Give a unique name to the
LEVITON Dock. For example: Kitchen Dock
(15 characters maximum).
IP R e m o t e TCP P o r t : This is the port that
a TCP device (e.g. OmniTouch 5.7e and
10pe touchscreen) uses to connect to the
LEVITON Dock.
IP Remote U D P Port: This is the port that
Hi-Fi2 uses to connect to the LEVITON Dock
Source I D : This setting identifies which
source input the LEVITON Dock is connected
to on the audio system.
When complete, click Next.
If this is a wireless version of the LEVITON Dock, the following setup screens will be
displayed.
Otherwise, confirm configuration parameters and complete Setup (see Step 9).
7. The LEVITON Dock will search for wireless networks:
8. Once wireless networks have been discovered, they are displayed in a list:
11
Page 18
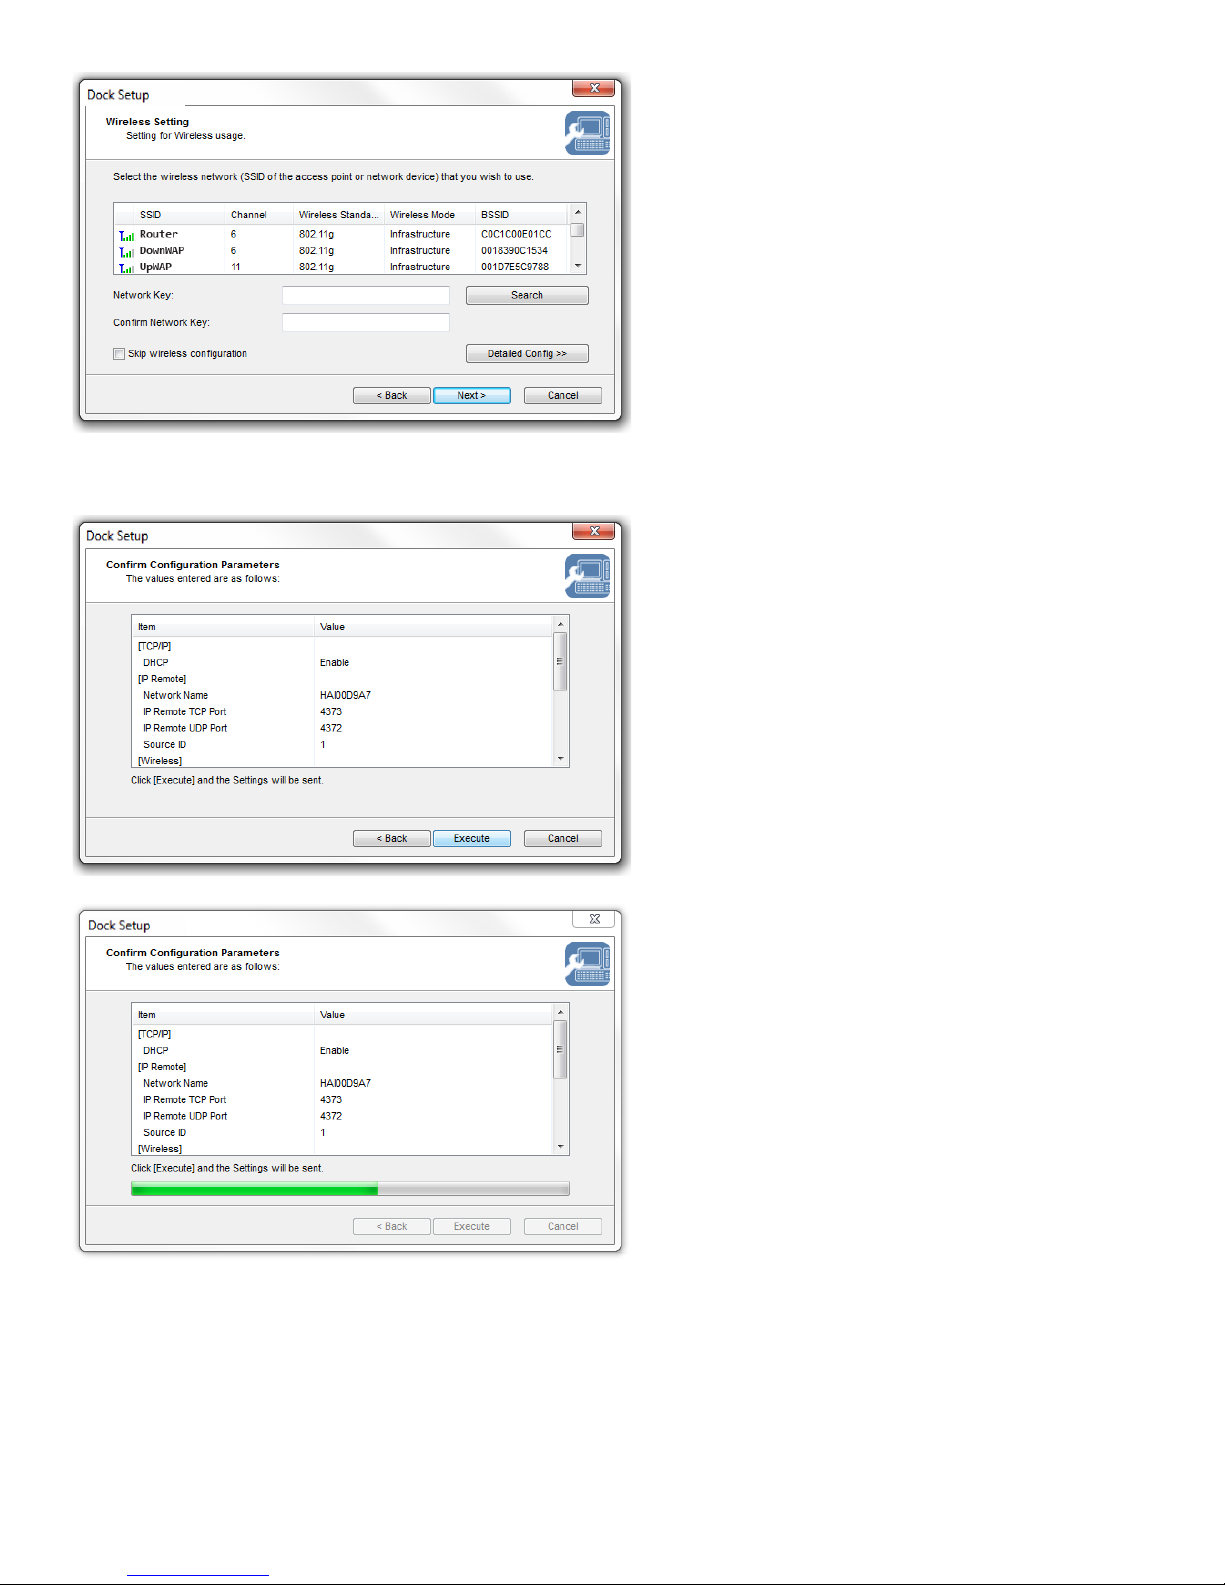
Select the wireless network that you want to
connect to, enter the Network Key, reenter
then click Next complete Setup.
the Network Key under C o n f i r m N e t w o r k
Key, and then click Next.
If the wireless network that you wish to use is
not shown in the list, click Detail e d Config
and manually configure each setting.
If you are going to use the LEVITON Dock
with a network cable instead of wirelessly,
check Skip w i r e l e s s c o n f i g u r a t i o n and
9. Confirm configuration parameters and save the settings in the LEVITON Dock:
View and confirm the configuration
parameters and then click Execute.
If any changes need to be made, click B a c k
and make the necessary modifications.
The new configuration is being stored in the
LEVITON Dock. Please wait.
12
Page 19

LEVITON Dock Setup is completed. Click
Finish.
10. Reboot the LEVITON Dock:
The LEVITON Dock must be rebooted for the new settings to take effect. If wireless has been
configured, first unplug the network cable before rebooting the LEVITON Dock.
To reboot the LEVITON Dock, disconnect the power cable momentarily, and then reconnect the
power cable.
13
Page 20

14
LEVITON Dock Operation
The LEVITON Dock has 3 LED indicators which can be used to determine its operation mode and network
status. The Operation Mode LED indicator is located on the front of the unit and indicates the operation mode
status:
Status
LED
Description
Network Mode
On
LEVITON Dock is running. Connected iPod can play music and can
be controlled via IP enabled devices on the network (IP Remote). In
this mode:
1) The LEVITON Dock charges the battery in the docked iPod.
2) The iPod cannot be controlled locally while docked.
3) Some iPod models may display “Accessory Connected” while
docked.
Standby Mode
Off
Connected iPod can play music and can be controlled locally.
1) The LEVITON Dock does not charge the battery in the docked
iPod.
2) In this mode the USB controller, Ethernet PHY, and the wireless
radio (if applicable) is disabled.
3) This mode complies with the European Power Regulations.
The Network LED indicators (green and orange) on the back of the unit indicate the network connection status:
Status
LED
Description
Wired LAN
Green: Blink
Orange: Off
Waiting for network connection.
Green: ON
Orange: Blinks during data
transmission
Communicating with a wired LAN. Orange LED
blinks during data transmission.
Wireless LAN
Green and Orange blink at the same
time
Waiting for network connection.
Green: ON
Orange: Blink
Connecting with router or wireless access point
(WAP) and communicating in infrastructure mode.
Green and Orange blinks alternatively
Communicating in Ad hoc mode.
Page 21
15
Operation Modes
To set the LEVITON Dock to Network Mode, if the unit is currently in Standby Mode (i.e. Operation Mode LED
is off), press the Operation Mode Button momentarily. The Operation Mode LED will illuminate.
To set the LEVITON Dock to Standby Mode, if the unit is currently in Network Mode (i.e. Operation Mode LED
is on), press and hold the Operation Mode Button for 2 seconds. The Operation Mode LED will turn off.
Playing Music
To play music, ensure that an audio system is connected to the Audio Output jack on the LEVITON
Dock.
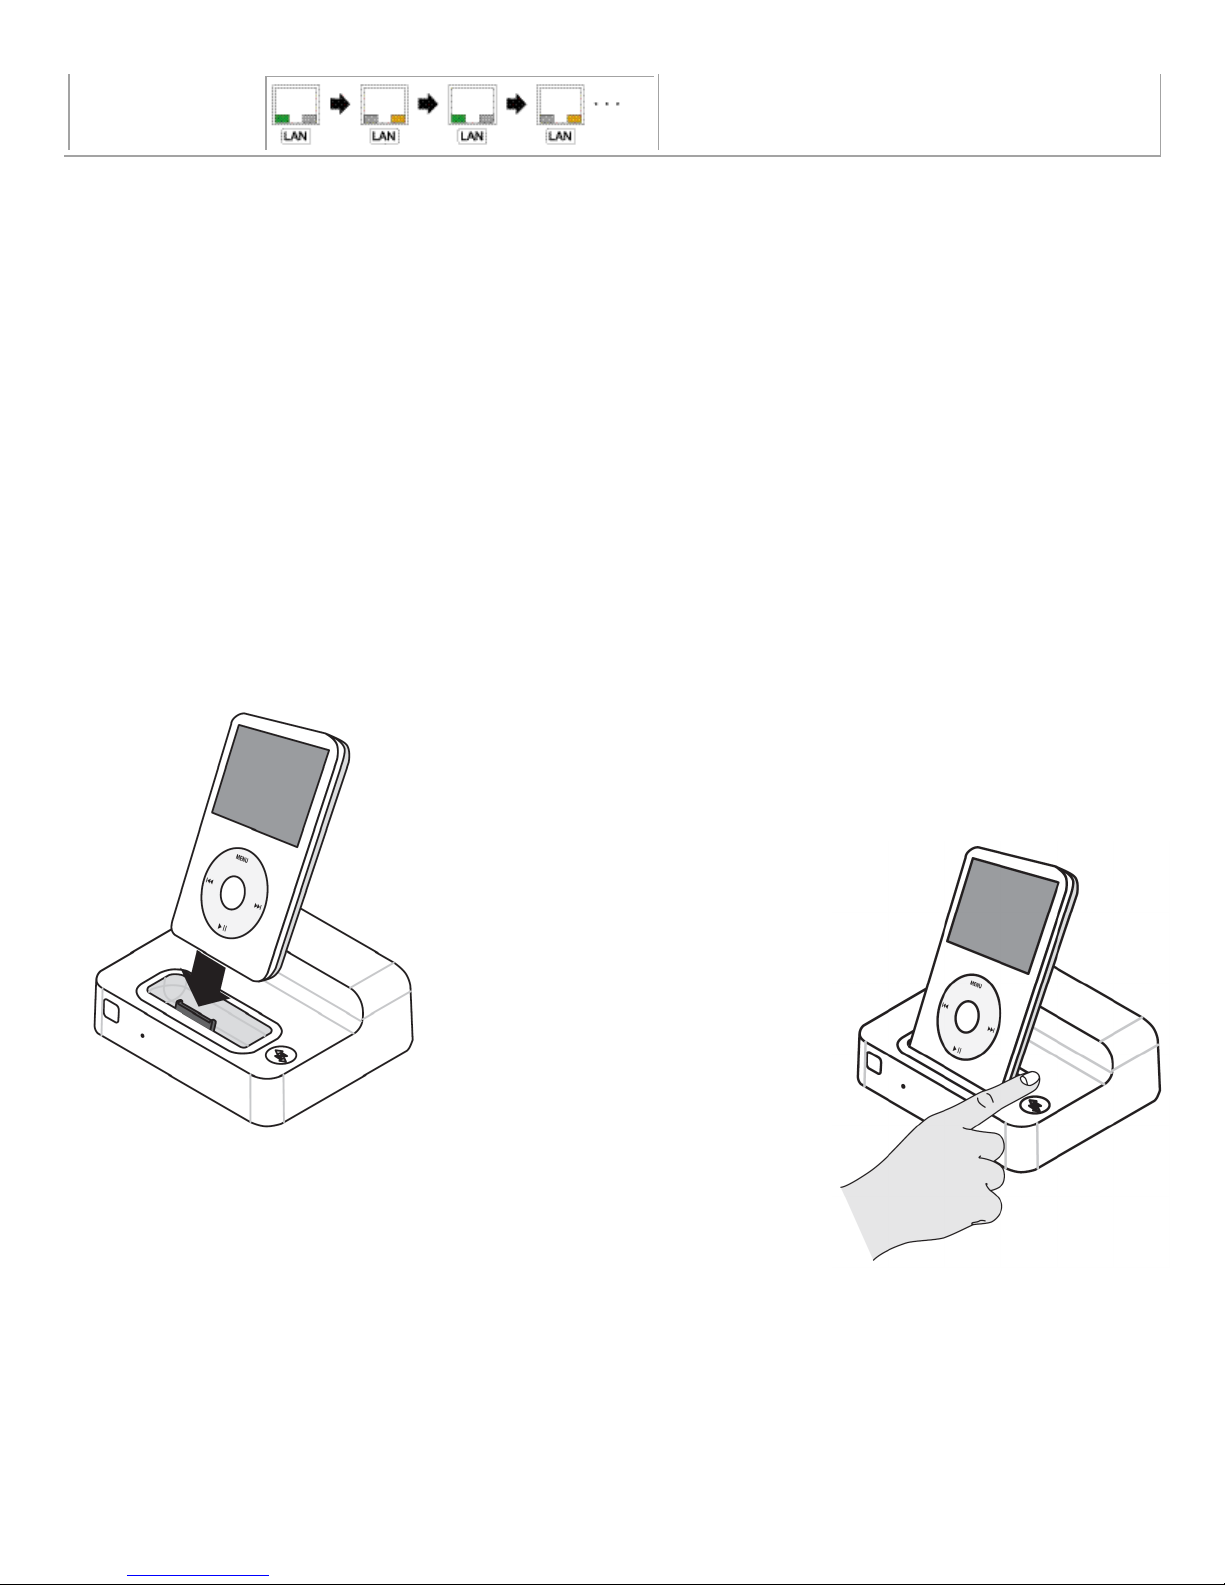
To play music while in Standby Mode:
1. Insert the iPod into the LEVITON Dock.
2. Press the Operation Mode Button for 2 seconds so that the
Operation Mode LED goes off.
3. Start a Playlist, Song, Podcast, or Audiobook on the iPod.
4. The selected music will play over the connected audio system.
To play music while in Network Mode:
1. Start a Playlist, Song, Podcast, or Audiobook on the iPod.
2. Verify that the LEVITON Dock is in Network Mode (i.e. the Operation Mode LED is illuminated). If it
is not, press the Operation Mode Button so that the Operation Mode LED illuminates.
3. Insert the iPod into the LEVITON Dock.
Page 22

16
4. From a connected IP device or Hi-Fi2 audio system, select Play.
5. The selected music will play over the connected audio system.
Inserting and Removing an iPod
An iPod can be inserted (docked) or removed (undocked) from the LEVITON Dock at any time and in
any operation mode.
Whenever an iPod that is currently playing a Playlist, Song, Podcast, or Audiobook is docked in a
LEVITON Dock that is currently in Network Mode, the iPod is automatically paused. After docking the
iPod, simply go to a connected IP device or Hi-Fi2 audio system and select Play to resume playback.
At any time, an iPod can be removed from one LEVITON Dock and inserted into a different LEVITON
Dock on the network (e.g. an iPod is moved from the Kitchen LEVITON Dock to the Bedroom
LEVITON Dock). Likewise, each LEVITON Dock will accept any supported iPod at any time. For
example, after Dad removes his iPhone from the Kitchen LEVITON Dock, Mom can then dock her
iPod in the Kitchen. When controlling the LEVITON Dock using IP devices, the name of the iPod is
displayed as the audio source, so that there’s no guessing to whose iPod is currently docked.
Accessing the Web Server
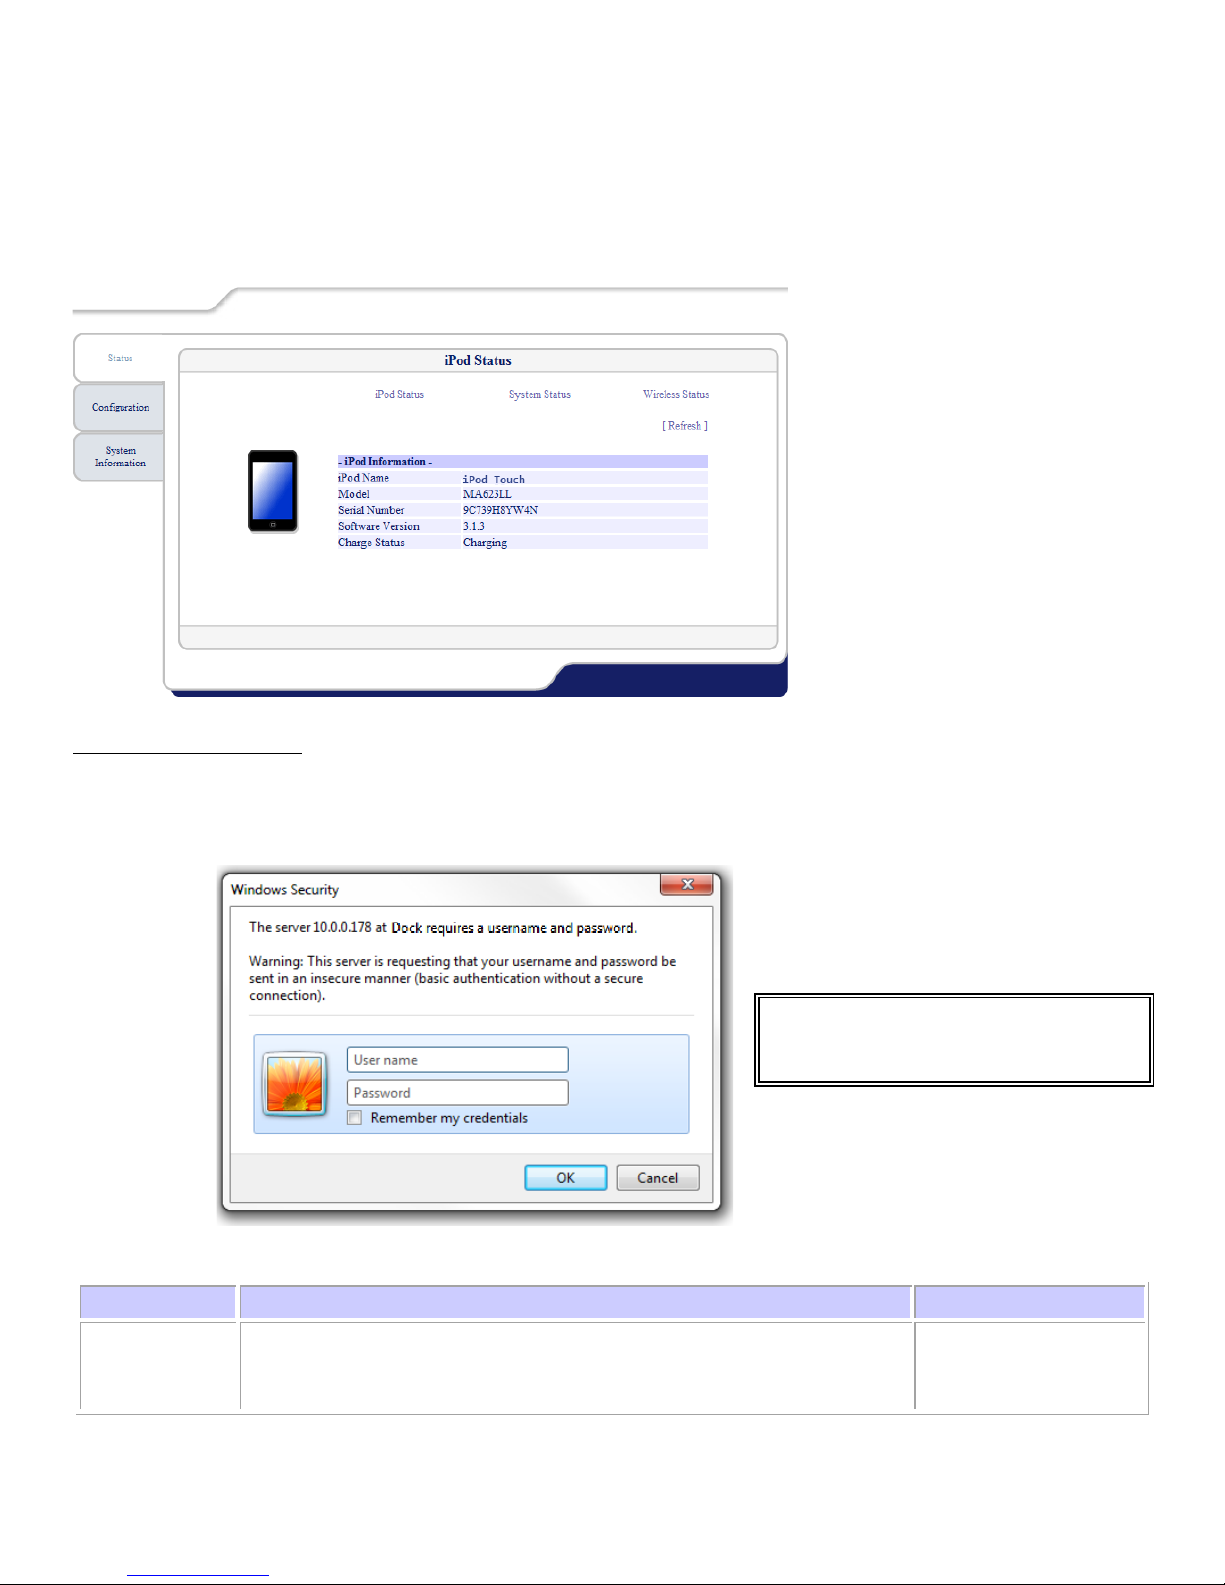
The LEVITON Dock has a built-in web server that can be used for configuring, modifying, and
monitoring the status of the LEVITON Dock and docked iPod.
Status
Displays iPod Status (information about the connected iPod), System Status
(network settings), and Wireless Status (wireless settings and signal strength) can
be viewed.
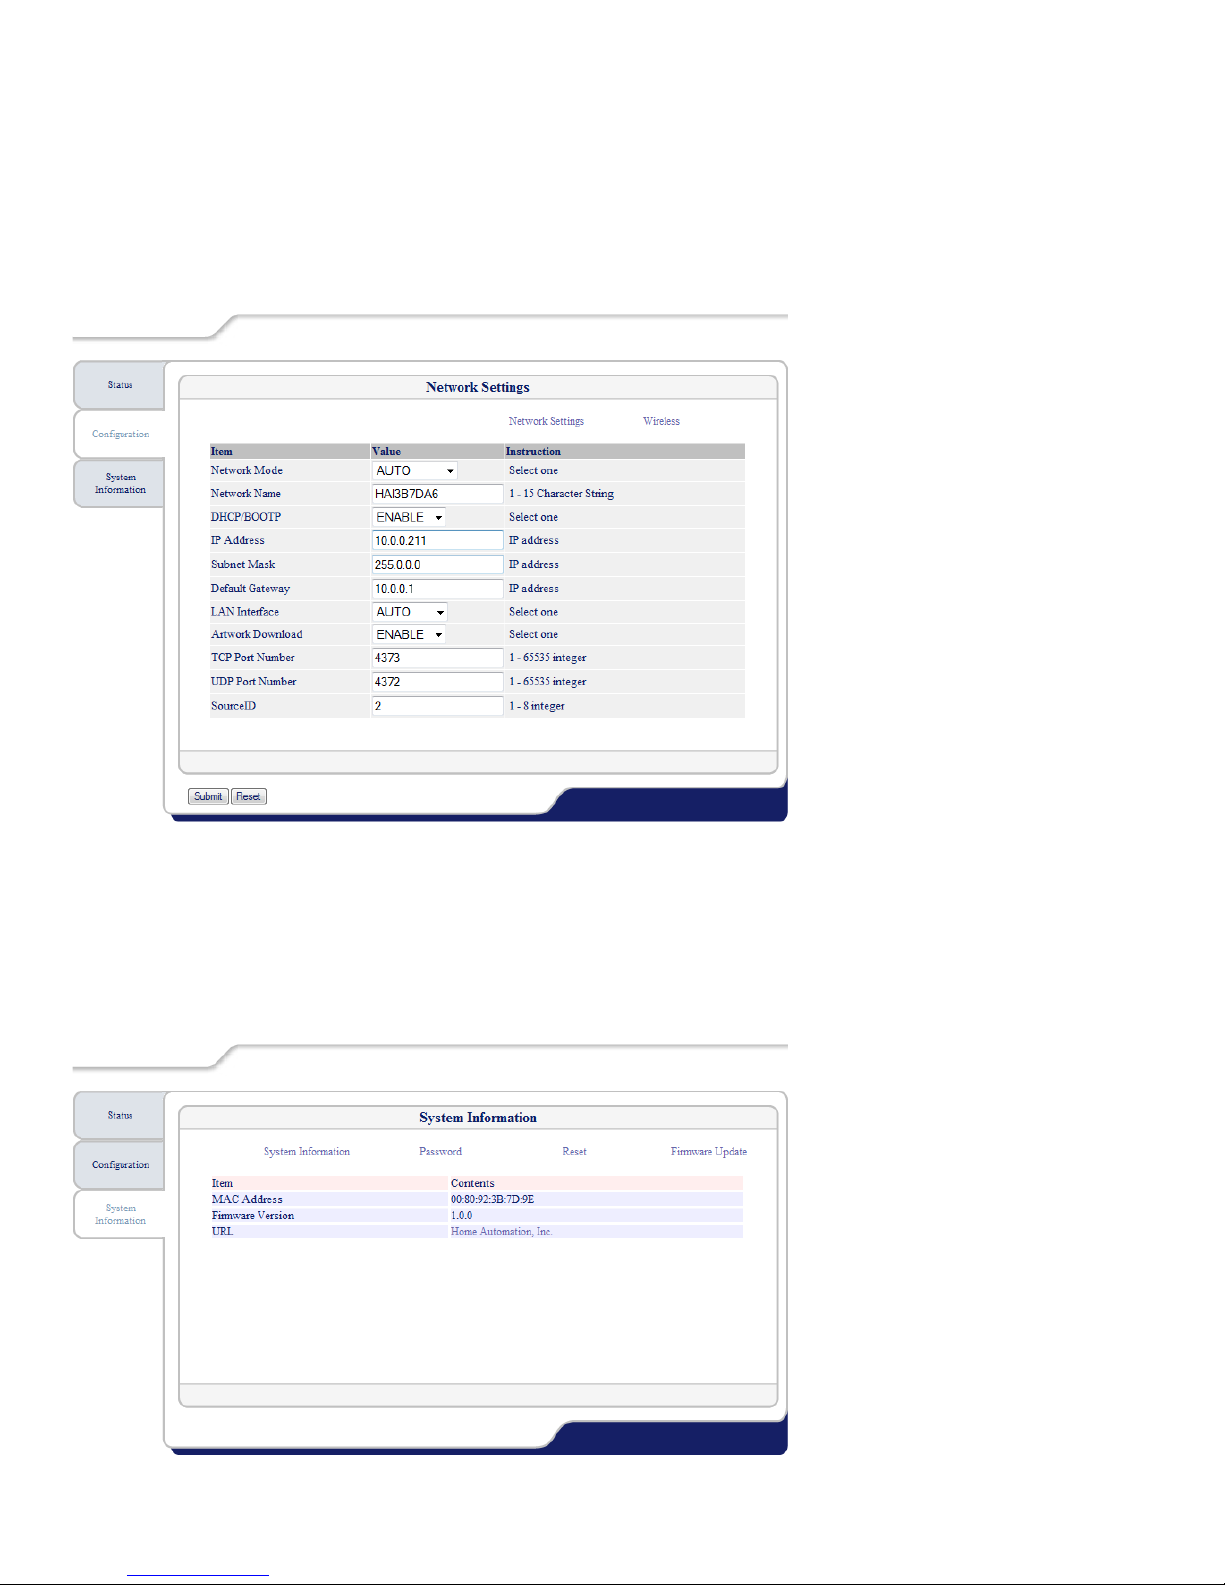
Configuration
Configure the wired and wireless (if applicable) network settings of the LEVITON
Dock.
System
Information
Displays information about the LEVITON Dock. Also used to change the web
server password, reset (factory default), remotely restart, and update the firmware
in the LEVITON Dock.
To access the web server, open a web browser and enter the IP address of the LEVITON Dock in the
Address Bar.
Page 23
Status
Item
Description
Factory default
Configure the password within 7 characters. This is used as
web interface.
The default username is: root
Select between iPod Status, System Status, and Wireless status. Click [Refresh] to update the
status on the page.
Protected Information
The Configuration Menu and some of the System Information settings are protected with a user name
and password. When the screen below is displayed, type a user name (root) and click OK.
Password
the authentication password for configuration changes via the
By default there is no password
Blank
17
Page 24
Configuration
Select between Network Settings and Wireless Settings. Click the item you wish to configure.
Select or enter a value for the appropriate item, then click Submit.
System Information
Select between System Information, Password, Reset, or Firmware Upgrade and follow the
instructions on the screen.
18
Page 25

19
Reset to Factory Default
To reset the LEVITON Dock back to its factory default configuration:
1) Disconnect the AC power cable.
2) Press and hold the Operation Mode Button on the front of the LEVITON Dock and reconnect the
AC power cable. Keep holding the Operation Mode Button to start the factory default
configuration.
3) The factory default configuration is complete when the orange Network LED is turned on.
4) Release the Operation Mode LED Button.
Page 26

20
Chapter 3
Interfacing with the LEVITON
Dock
A custom touchscreen design must be used to operate the LEVITON Dock from an OmniTouch 5.7e,
10p, or 10pe Touchscreen. LEVITON Automation Studio must be used to enable and configure the
LEVITON Dock, assign the audio output to source input on the audio distribution system, assign the
touchscreen page, and update each of the respective touchscreens with the new design.
Enabling the LEVITON Dock
Using LEVITON Automation Studio, you must add a LEVITON controller, the LEVITON Dock, and an
audio distribution system to your touchscreen design.
LEVITON Dock functionality was added to Automation Studio in Version 1.0.2.167. If you have a
touchscreen design that was created in Automation Studio prior to Version 1.0.2.167, you must import
the LEVITON Dock pages as described under A d d i n g t h e LEVITON Dock to an E x i s t i n g
Design in this document. If you are adding the LEVITON Dock functionality to an existing project,
skip Creating a N e w Pr o j e c t with t h e LEVITON D o c k and Adding Touchscreens to t h e
Project.
Creating a New Project with the LEVITON Dock
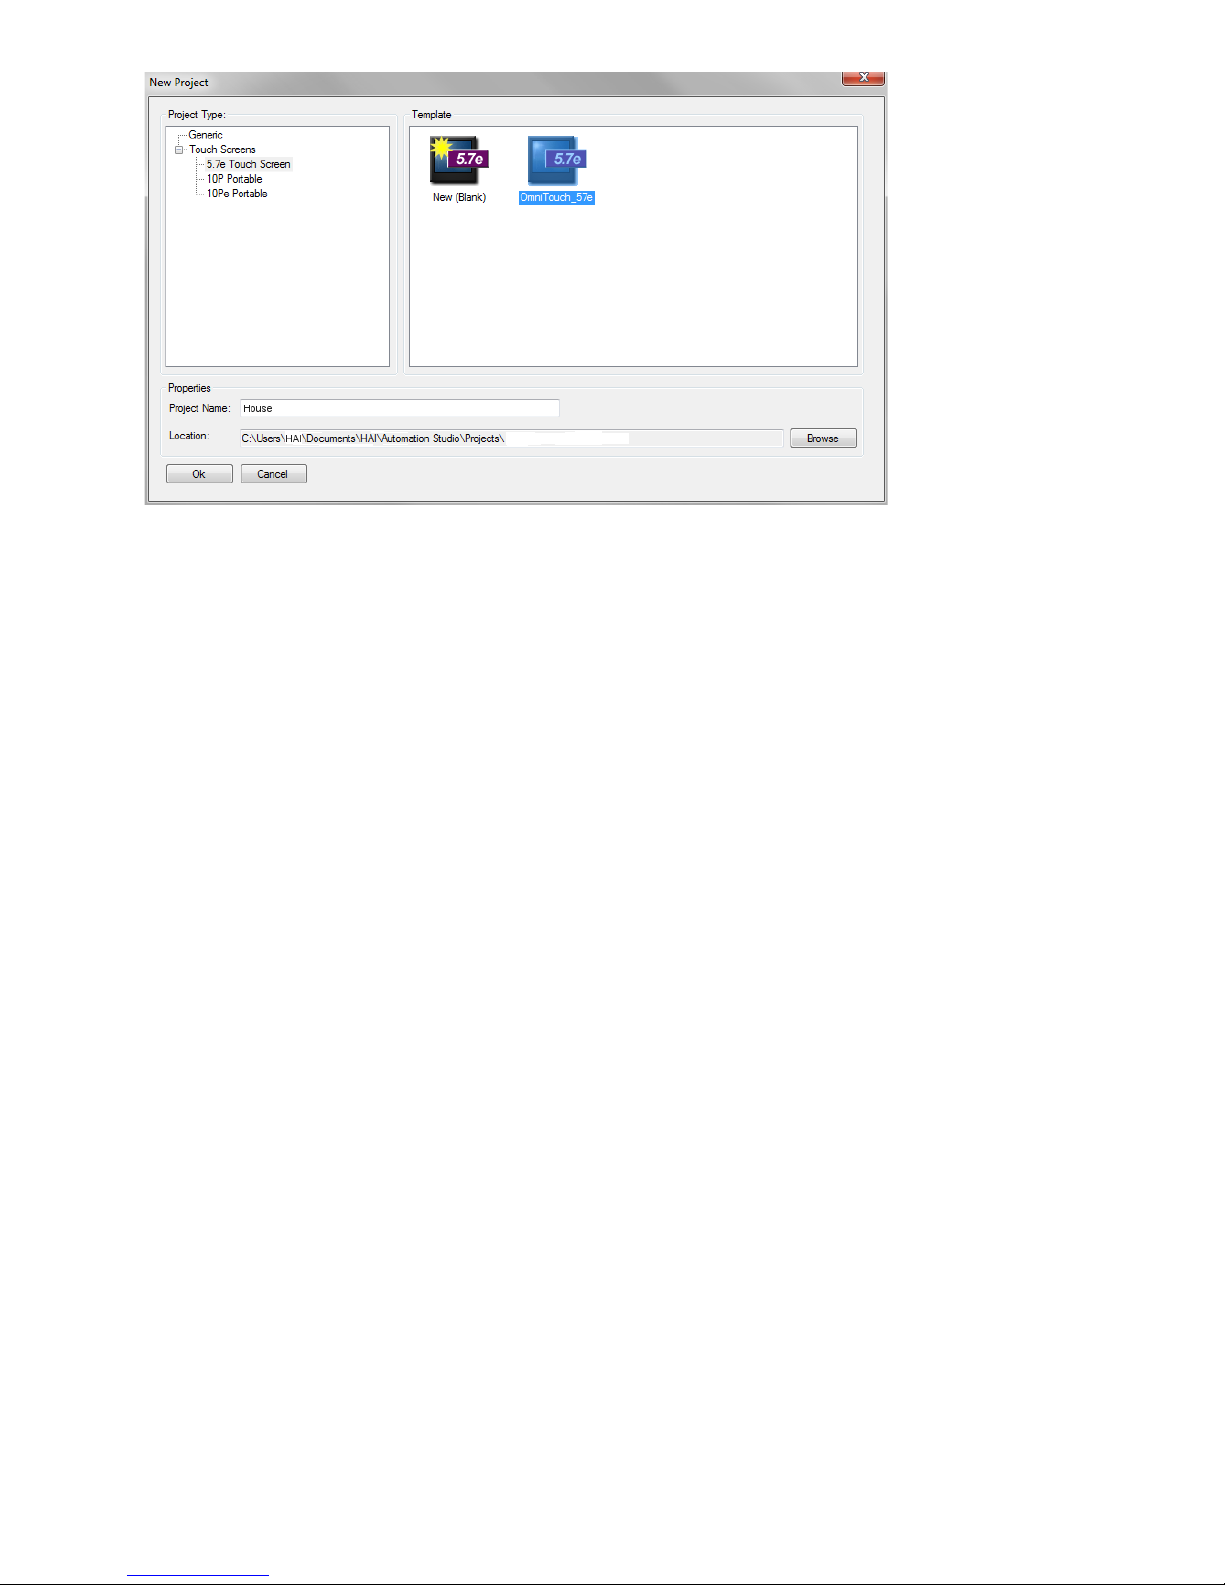
To create a new Automation Studio Project with touchscreens that will use the LEVITON Dock:
1. Start LEVITON Automation Studio and create a new project.
2. Select 5. 7e Touch Sc reen as the Project Type and select OmniTouch_57e as the
Template.
3. Give a name to the project next to Project Name under Properties.
Page 27
21
Page 28
22
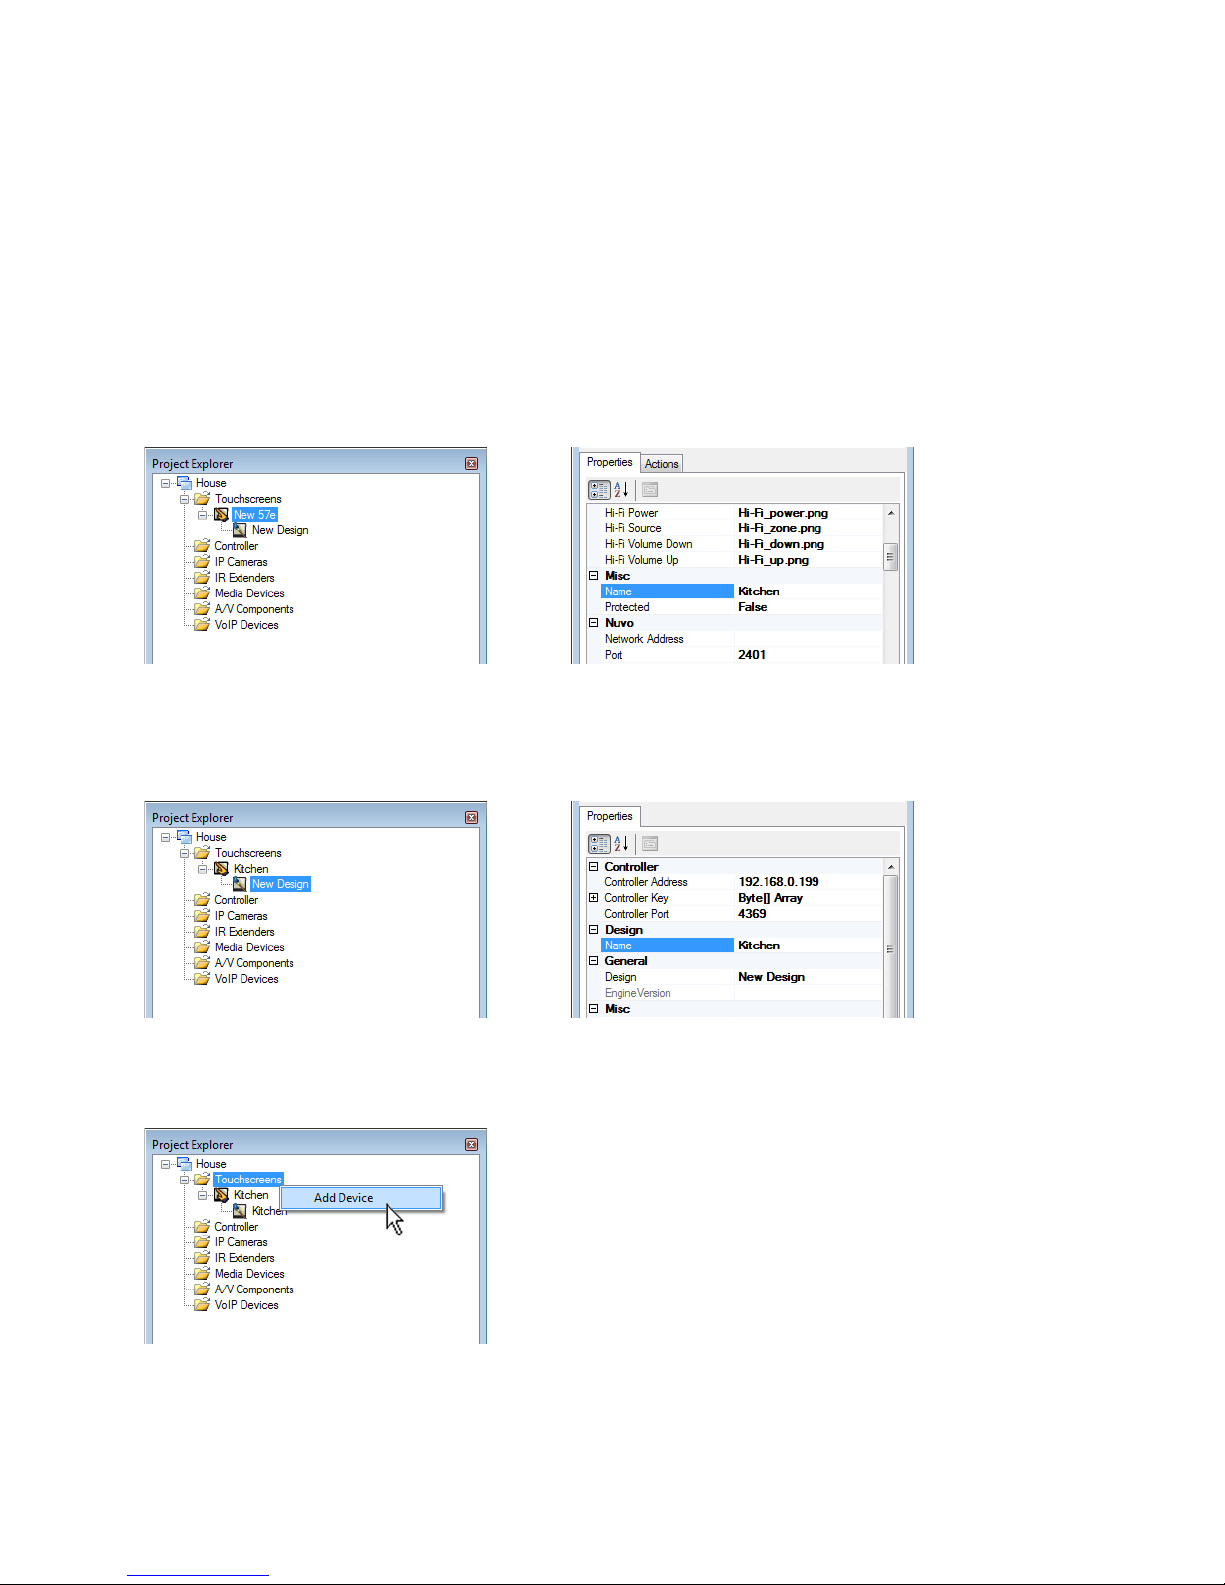
Adding Touchscreens to the Project
When the project was created (using the steps above), one touchscreen was automatically added to
the project along with a touchscreen design. The touchscreen and design was given a default name.
It is generally a good idea to rename the touchscreen and the project that better describes where the
touchscreen is installed. For example, it the touchscreen is installed in the kitchen, the touchscreen
and the design should be named Kitchen.
1. In Project Explorer, click on the touchscreen that was added.
2. Select the Properties tab. Give a name to the touchscreen next to Name under Misc.
3. In Project Explorer, click on the design under the touchscreen that was just named.
4. Select the Properties tab. Give a name to the design next to Name under Design.
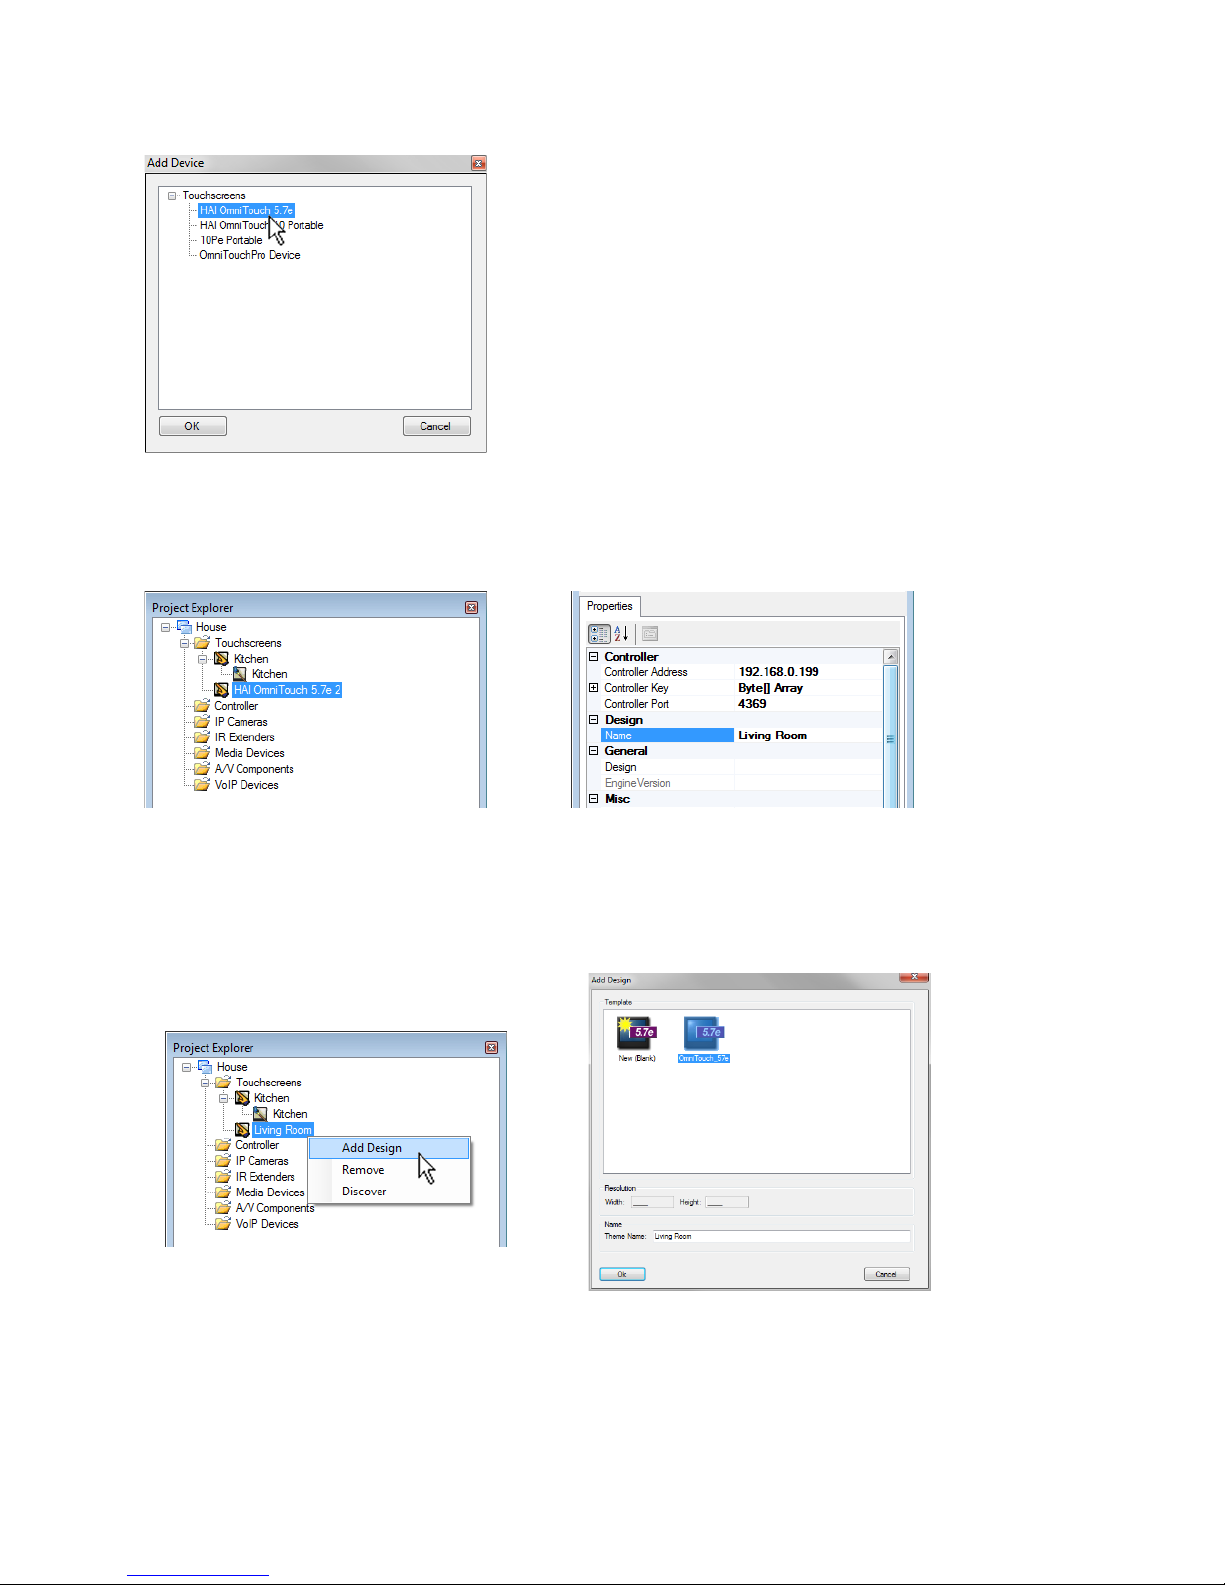
5. If desired, add another touchscreen to the project by right-clicking on Touchscreens under
Project Explorer and select Add Device.
Page 29
23
6. From the Add Device dialog, select LEVITON O m n i T o u c h 5.7 e , LEVITON OmniTouch
10 Portable, or 10Pe Portable under Touchscreens.
7. In Project Explorer, click on the touchscreen that was added.
8. Select the Properties tab. Give a name to the touchscreen next to Name under Design.
9. In Project Explorer, right-click on the touchscreen that was added and select Add Design.
10. From the Add Des ign dialog, select OmniTouch_57e as the Template and give a name the
design next to Theme Name under Name.
11. Repeat for each touchscreen installed.
12. When complete, skip to the section entitled Discovering the Touchscreens in this document.
Page 30
24
Adding the LEVITON Dock to an Existing
Design
If you have an existing Automation Studio project with a custom design, you can add the LEVITON
Dock functionality by importing the LEVITON Dock pages as described below.
Importing the LEVITON Dock Pages
To use the LEVITON Dock functionality in an Automation Studio design that was created in a version
of Automation Studio prior to Version 1.0.2.167, you must import the LEVITON Dock pages using the
Add Modules feature in Automation Studio.
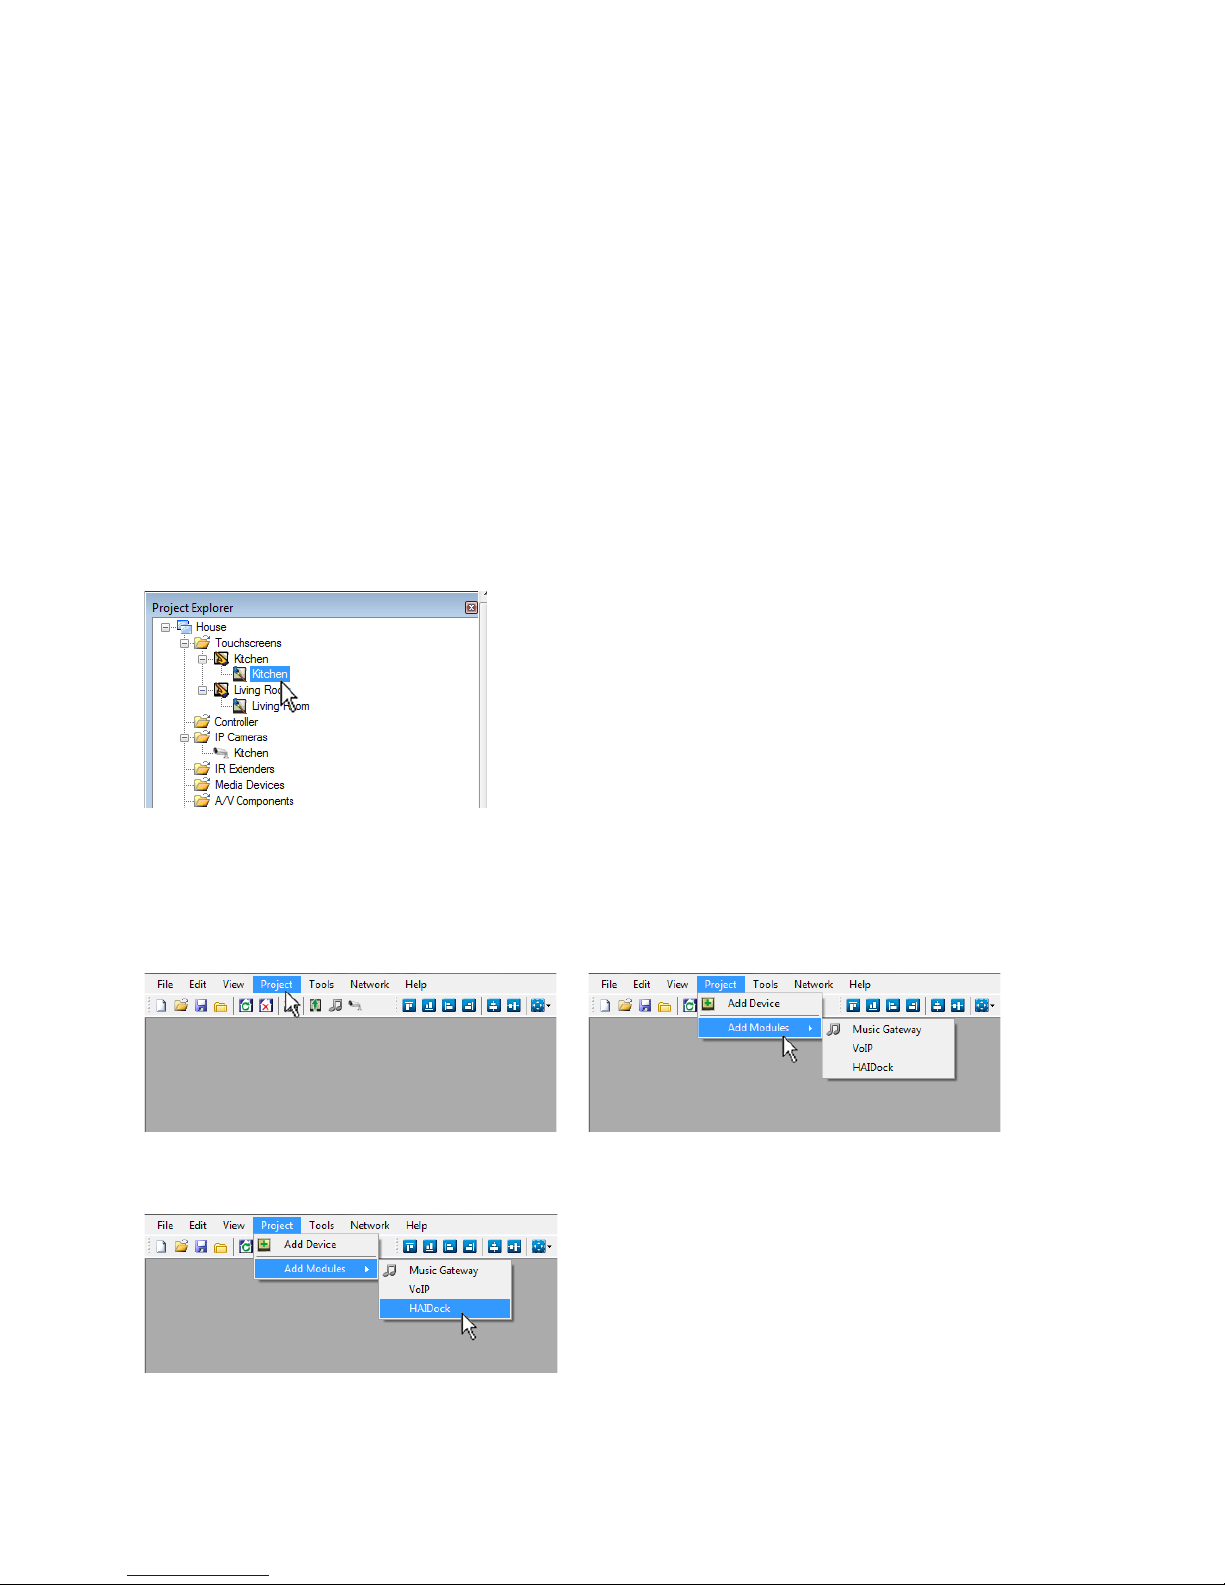
1. In Project Explorer, open the canvas a touchscreen design by double-clicking on the
touchscreen design.
2. From the Menu Bar in Automation Studio, select P r o j e c t .
3. From the P r o j e c t menu, select A d d M o d u l e s .
4. From the A d d M o d u l e s menu, select L E V I T O N D o c k .
Page 31
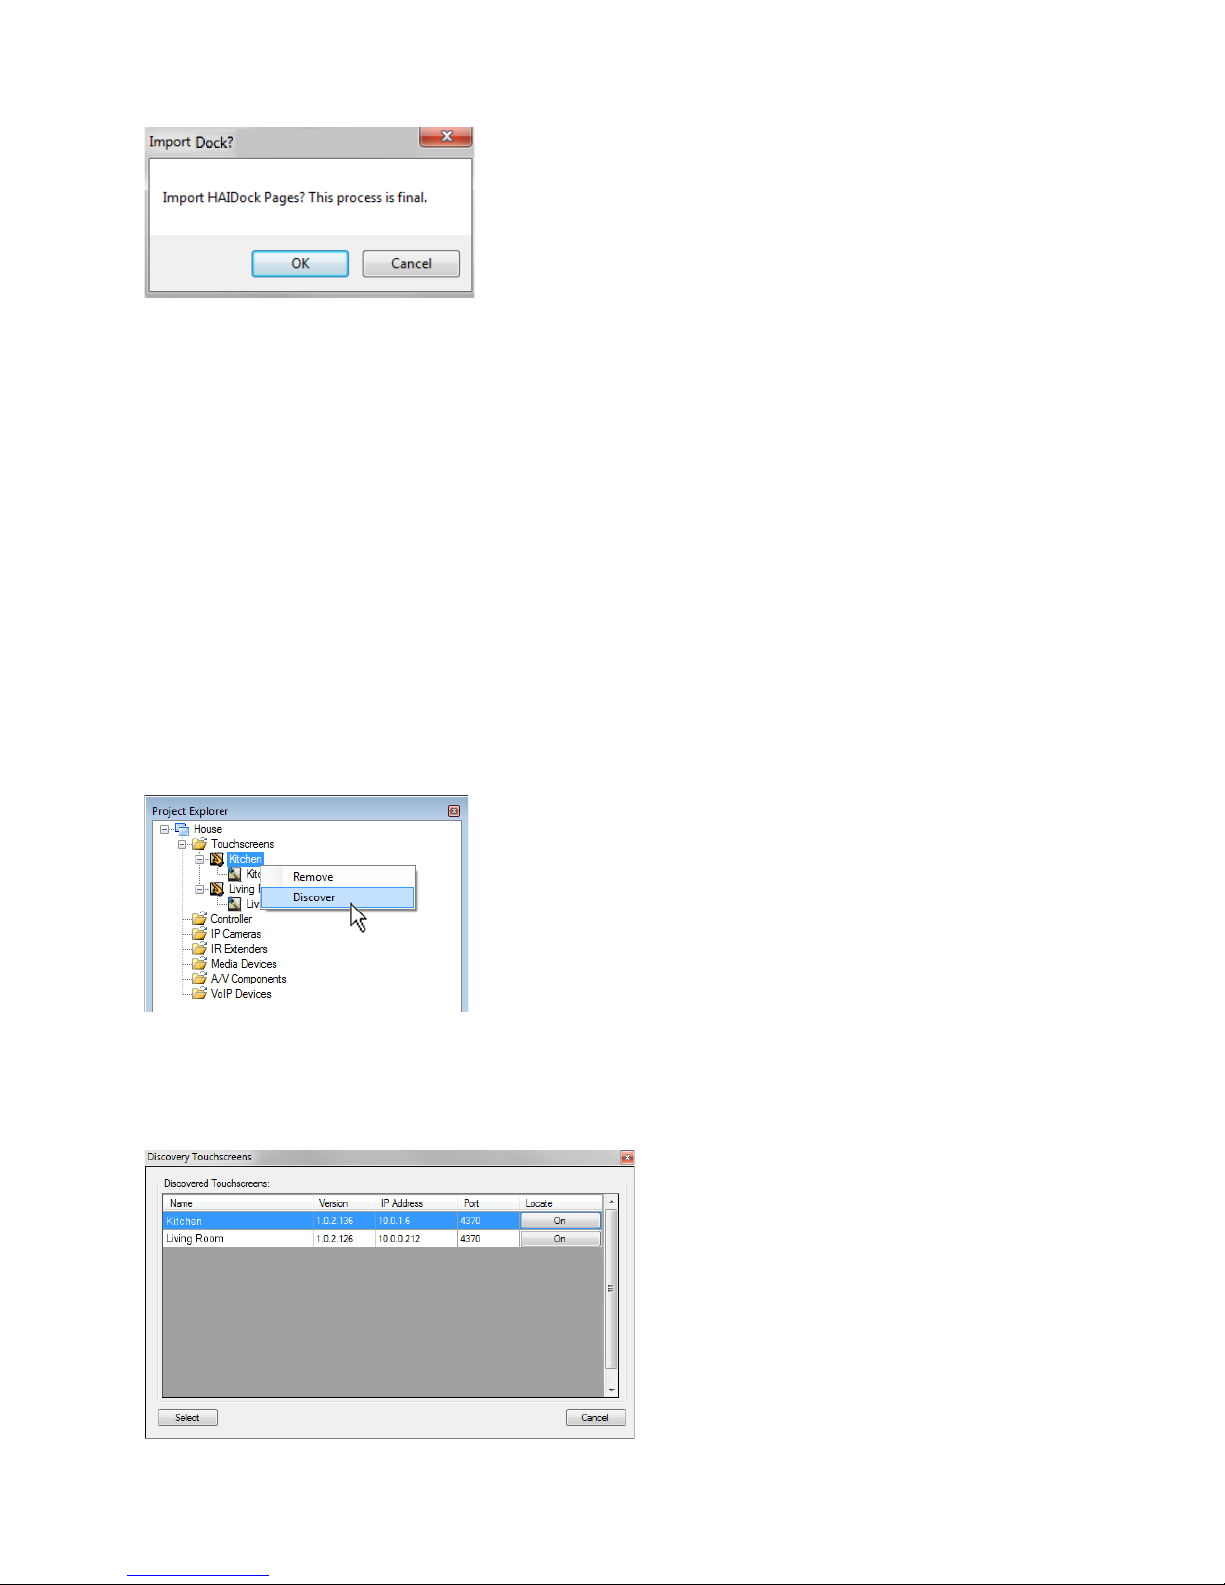
5. A dialog is displayed to confirm the import of the LEVITON Dock pages.
Once confirmed, the import cannot be undone. Before confirming, make sure that the
LEVITON Dock pages do not already exist. If they do, duplicate pages will be added.
6. Click O K to add the pages.
7. Repeat this process for each touchscreen design under Proje ct Expl orer.
Discovering Touchscreens
You must use Automation Studio to discover each touchscreen in the project.
To discover a touchscreen:
1. In Projec t Explo rer, right-click on a touchscreen and select Discove r.
2. In the Discove ry Touc hscreen s dialog, select the respective touchscreen from the list and then
click Select.
3. Repeat this process for each touchscreen installed under Proj ect Explorer.
25
Page 32
26
Adding a LEVITON Controller to the
Design
When using a LEVITON Dock, a LEVITON controller with a configured audio distribution system must
be added to the project. To add a LEVITON controller to the project:
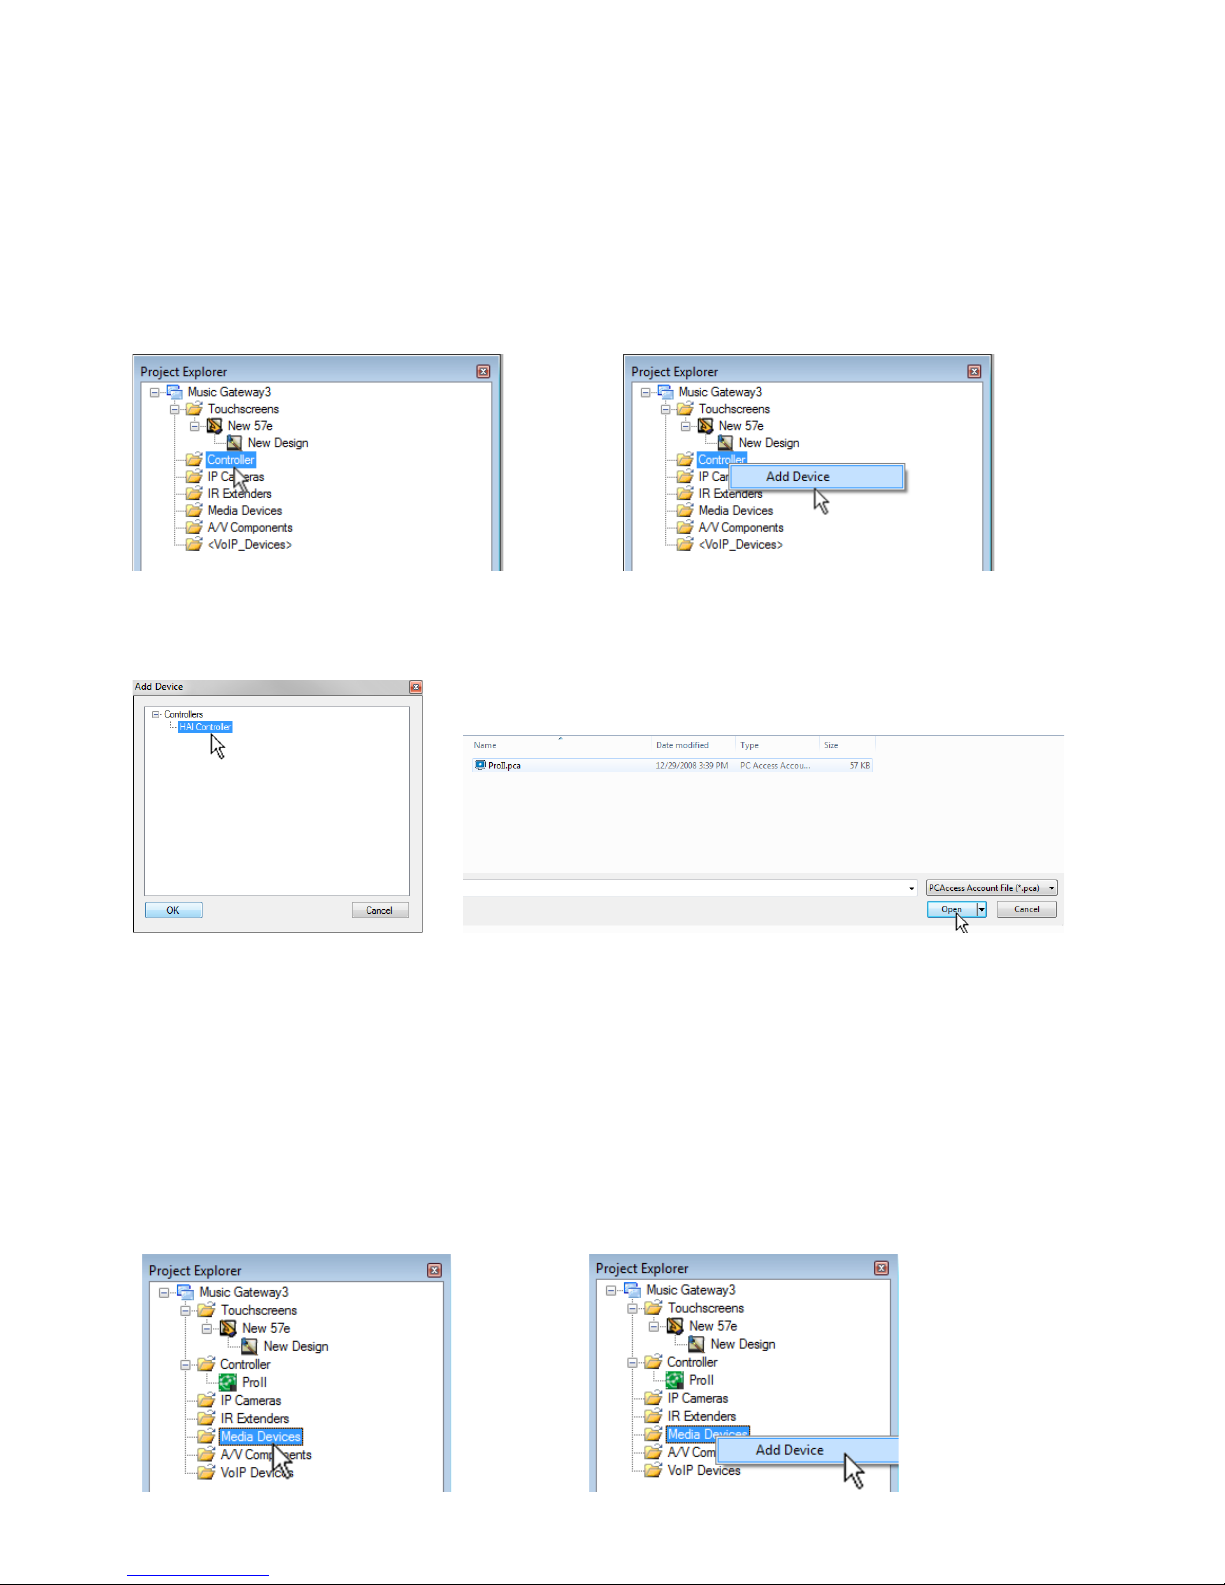
1. In Project Explorer, right-click on Controller and select Add Device from the menu.
2. From the Add Device dialog, select LEVITON Controller from the Controllers list. Then
select the PC Access account file that will be used with the touchscreen.
Adding the LEVITON Dock to the Design
When a LEVITON Dock is added to the project, Automation Studio will guide you through the steps to
configure it. Add the LEVITON Dock to the project as follows:
1. In Project Explorer, right-click on Media Devices and select Add Device from the menu.
Page 33
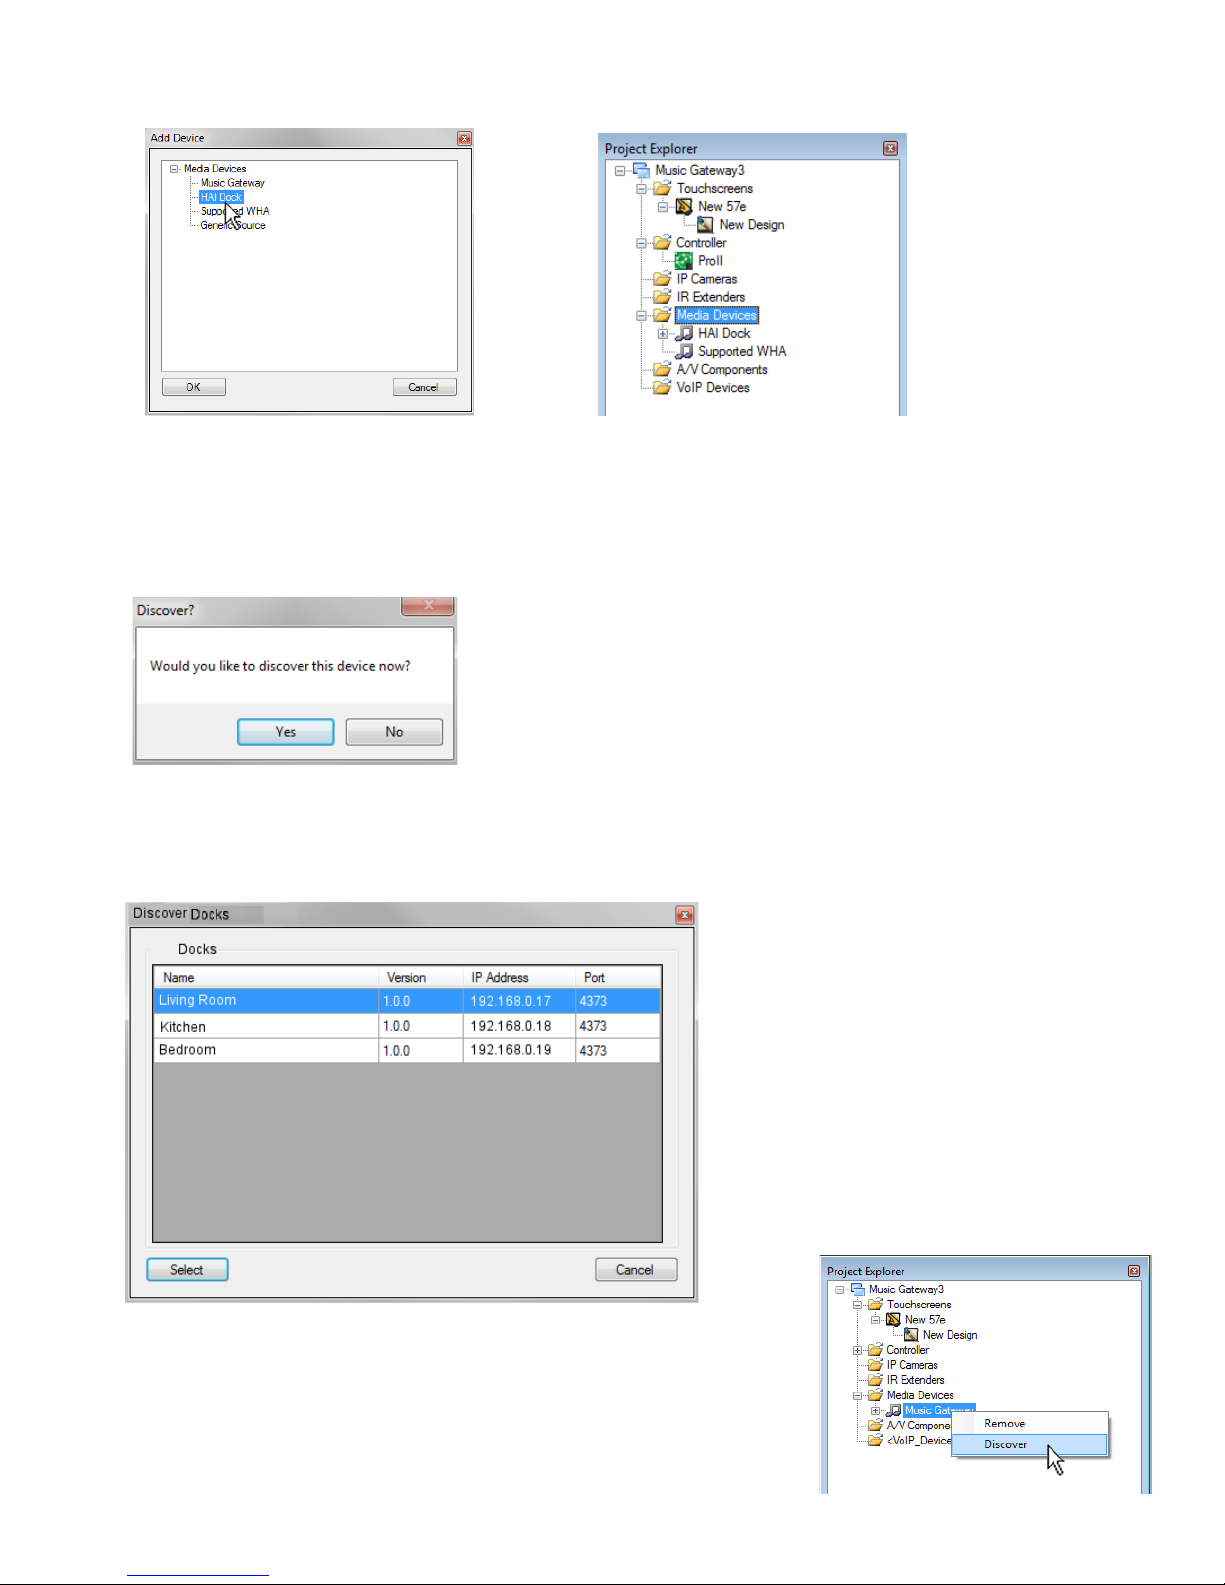
2. From the Add De vice dialog, select LEVITO N Dock from the Media Devic es list.
Discover the LEVITON Dock
After the LEVITON Dock has been added, you will be prompted to discover it as follows:
In the Discover LEVITON Docks dialog, select the discovered LEVITON Dock, and then press
the Select button to save the network settings with the design.
Note: A LEVITON Dock can be rediscovered at any time by rightclicking on LEVITO N Dock and select Discover from the menu in
Project Explorer.
27
Page 34
28
Assigning the Audio Output
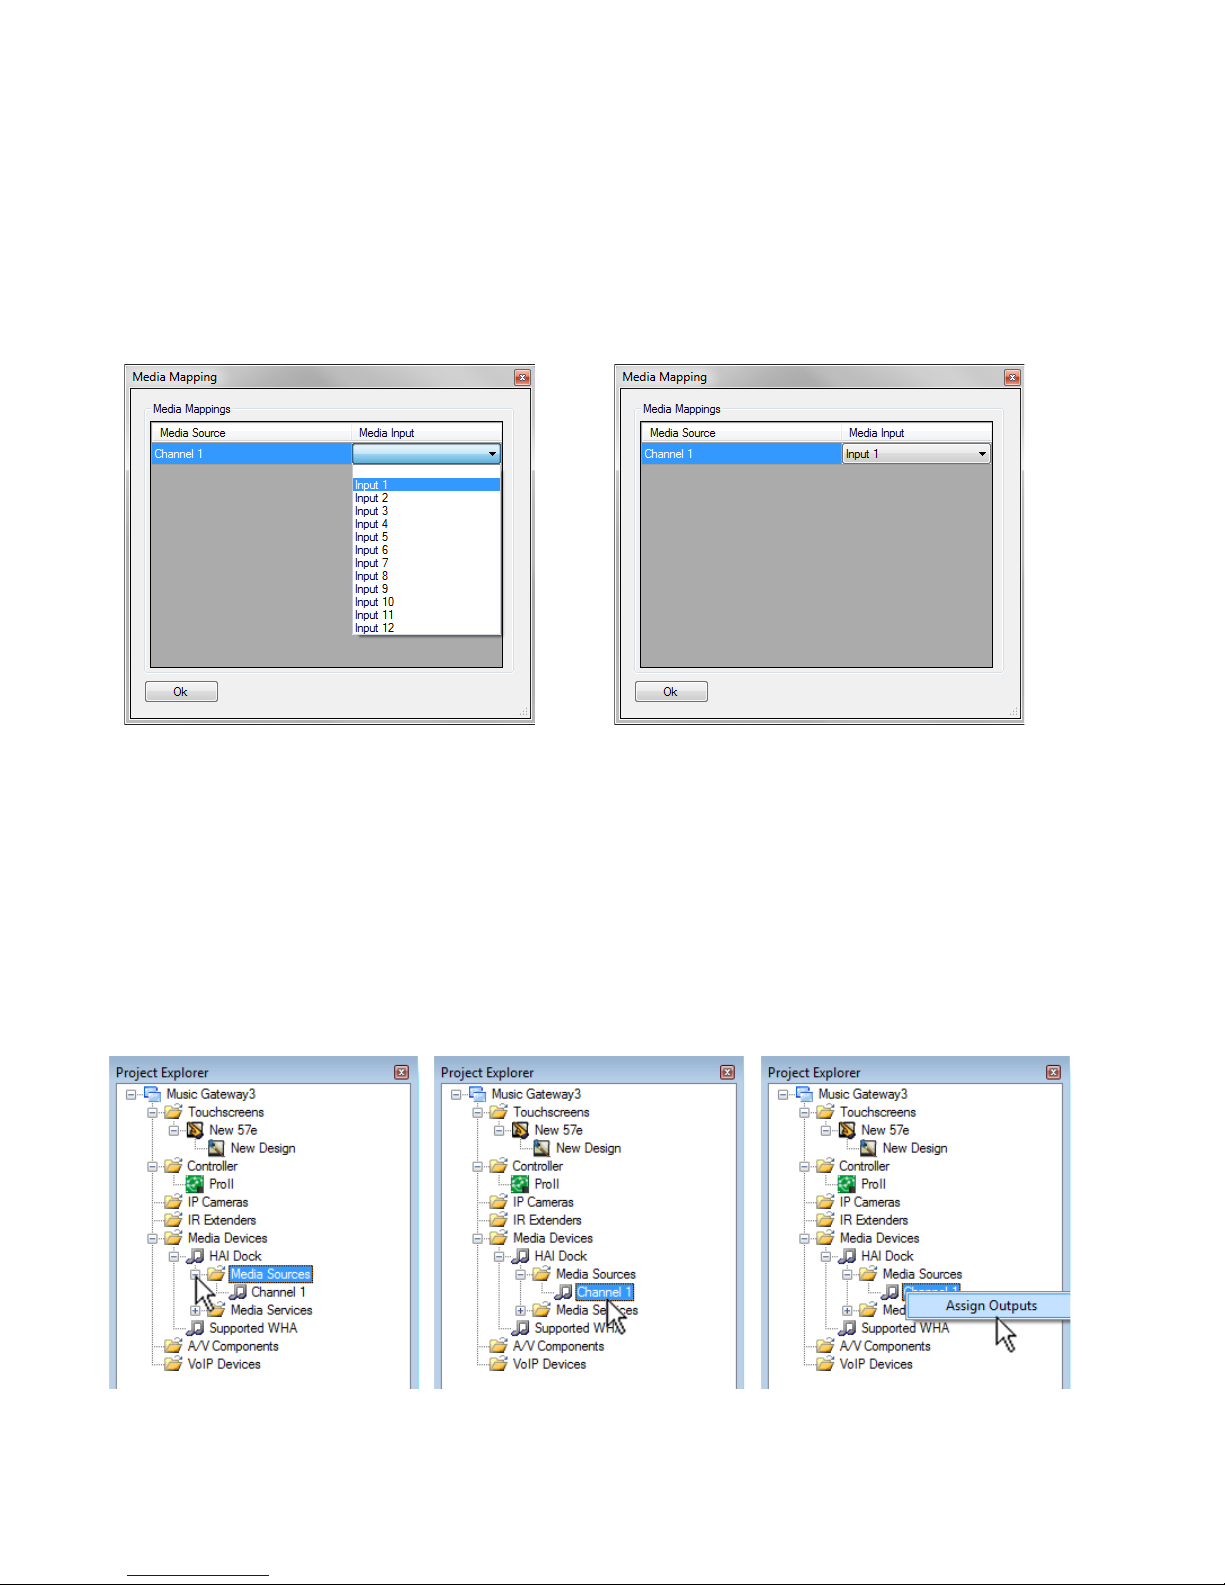
The Audio Output of the LEVITON Dock must be assigned to a source input on the audio distribution
system. After discovering the LEVITON Dock, the Media Mapping dialog is displayed:
1. From the Media Ma pping dialog, select the Media Input (source input on the audio distribution
system) where the audio will be routed for the Me dia Sourc e (Audio Output) of the LEVITON
Dock.
2. When complete, click the OK button.
Note: At any time the Media Source can be remapped to the Media Input as follows:
a) In Project Explorer, expand the LEVITON Dock device to display the Media Sources folder.
b) Expand the Media Sources folder to display Channel 1 (audio output).
c) Right-click on one of Channel 1 and select Assign Outputs.
Alternatively, you can click the music note icon in the menu bar to display the dialog.
Page 35
29
Assigning a Touchscreen P ag e for Med ia
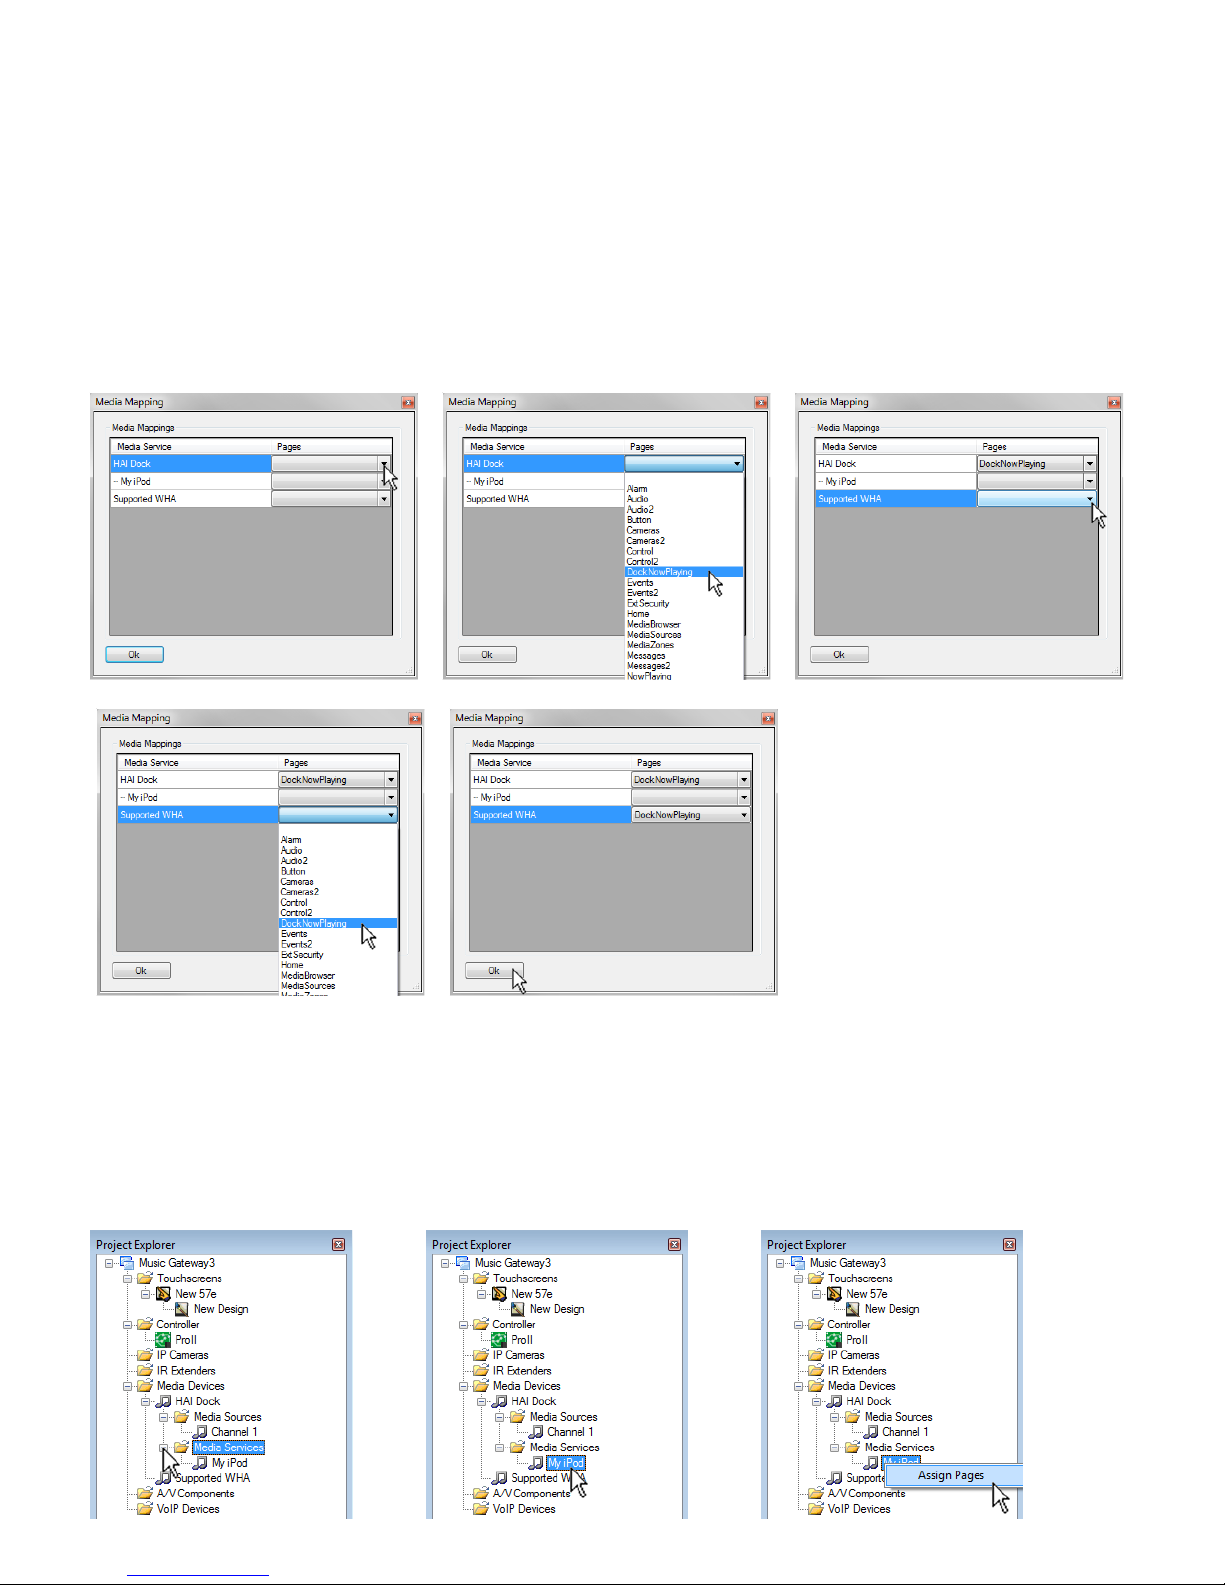
Finally, a page that the touchscreen will jump to when the Media button is pressed must be assigned.
A special Dock Now Play ing page has been created for the LEVITON Dock. After assigning the
Audio Output, the Channel Mapping dialog is displayed:
1. Click on the drop-down under Pages next to LEVITON Dock and select Dock Now Playing.
2. Click on the drop-down under Pages next to Supported WHA and select Dock Now Playing.
Note: At any time the Pages can be remapped as follows:
a) In Project Explorer, expand the LEVITON Dock device to display the Media Services folder.
b) Expand the Media Services folder to display the available Services.
c) Right-click on My iPod and select Assign Pages.
3. When complete, click the
OK button.
Page 36
30
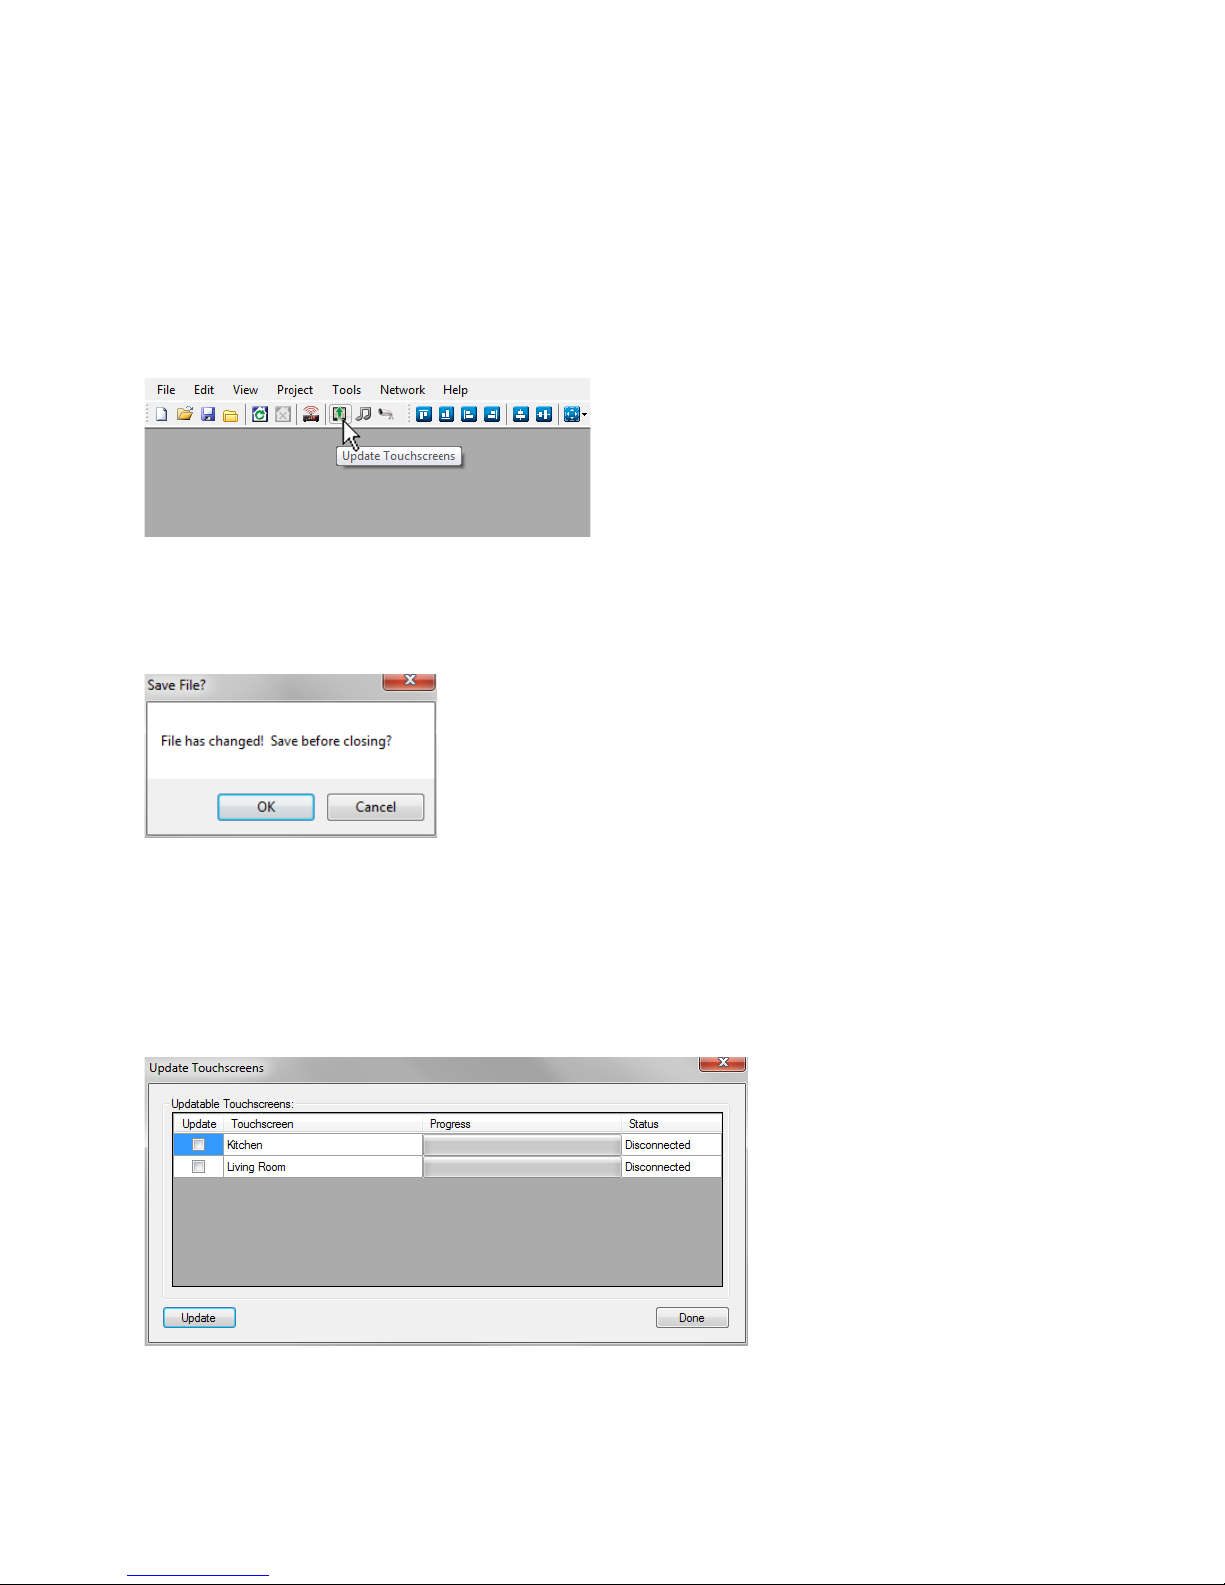
Updating the Touchscreens
The final step in enabling the LEVITON Dock is to update each touchscreen using Automation Studio.
To update the touchscreens:
1. Click the U p d a t e icon on the toolbar.
2. If the project has not been saved, you will be prompted to save.
3. To save the project and continue with the update, click OK.
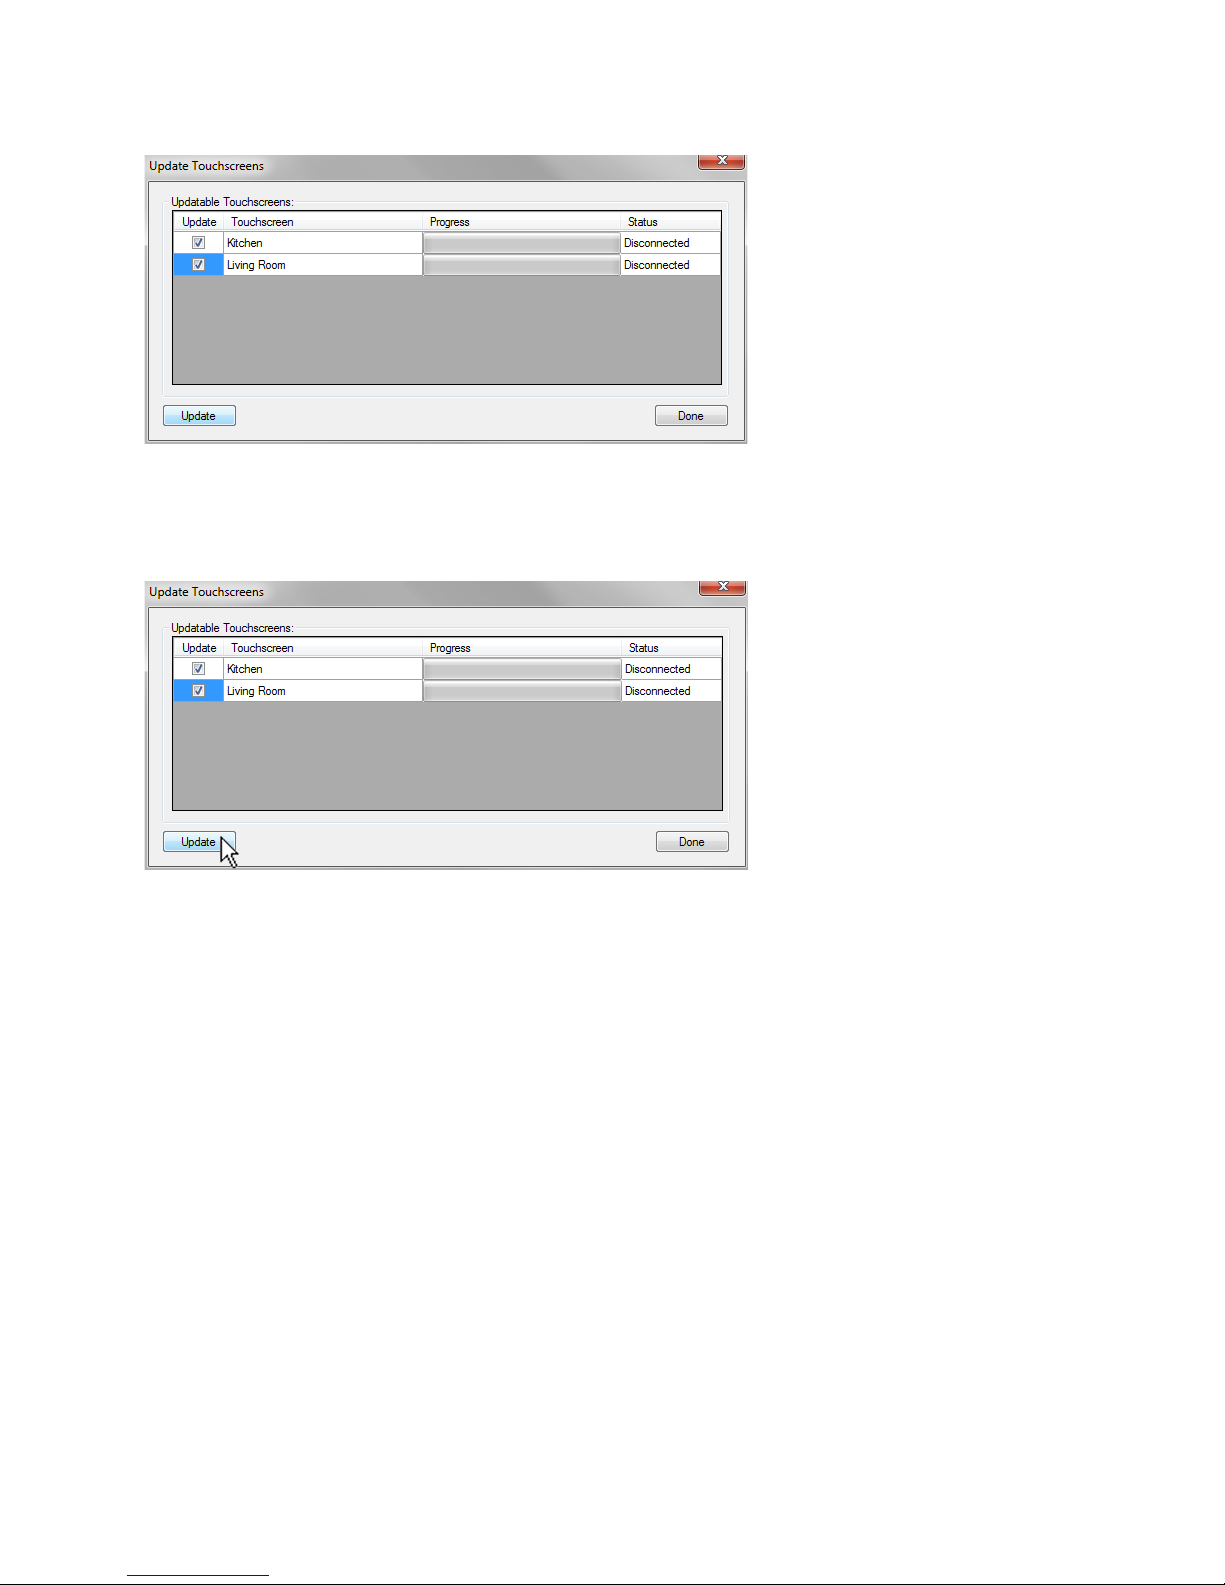
4. All discovered touchscreens are displayed in the U p da te T o u c h s c r e e n s dialog.
Page 37
31
5. Put a check in the boxes under U p d a t e to select which touchscreens will be updated.
6. Click the Update button to update the selected touchscreens.
7. After the update is complete, the touchscreens will have LEVITON Dock functionality.
Page 38
Accessing Your Music
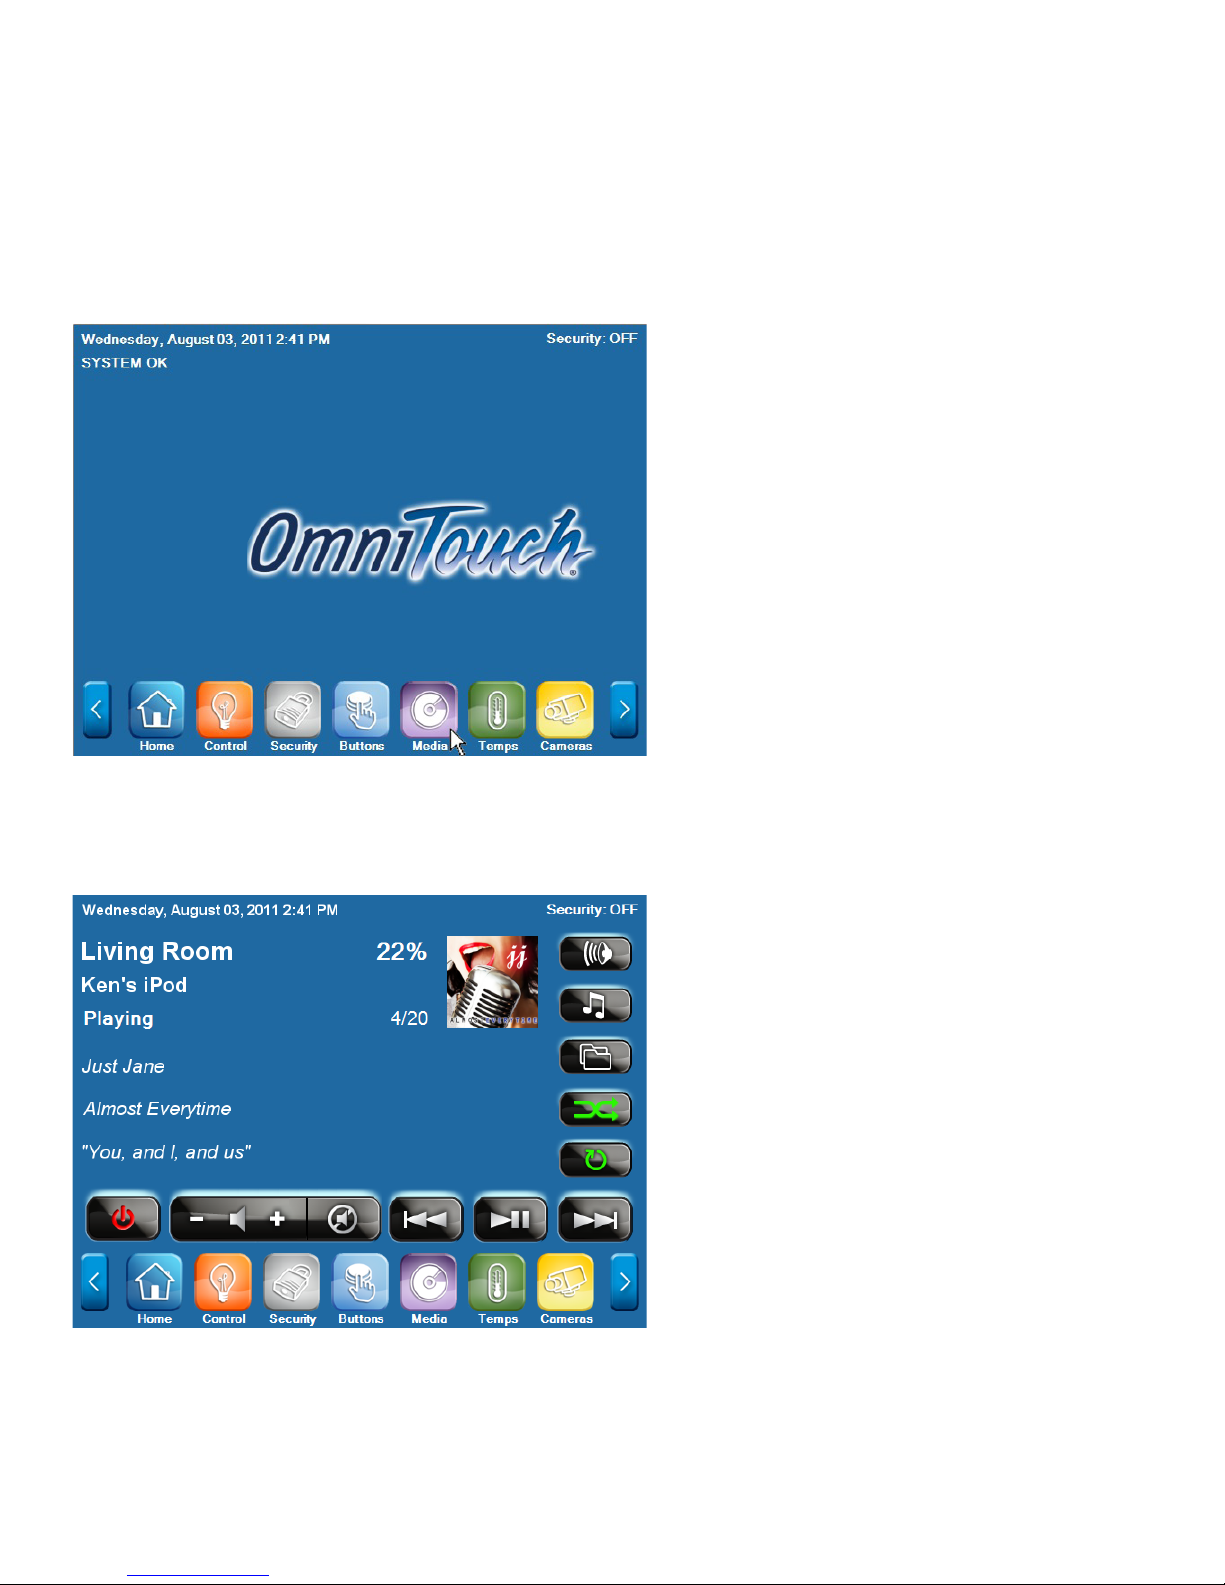
Using a LEVITON OmniTouch 5.7e, 10p, or 10pe Touchscreen, you can browse and make music
selections by Playlists, Artists, Albums, Songs, Podcasts, Genres, Composers, and Audiobooks.
From the Menu Bar on an OmniTouch 5.7e, 10p, or 10pe Touchscreen, select the Me dia icon.
When the media button is selected, the LEVITON Dock media page is displayed:
32
Page 39
33
Browse the Media Library
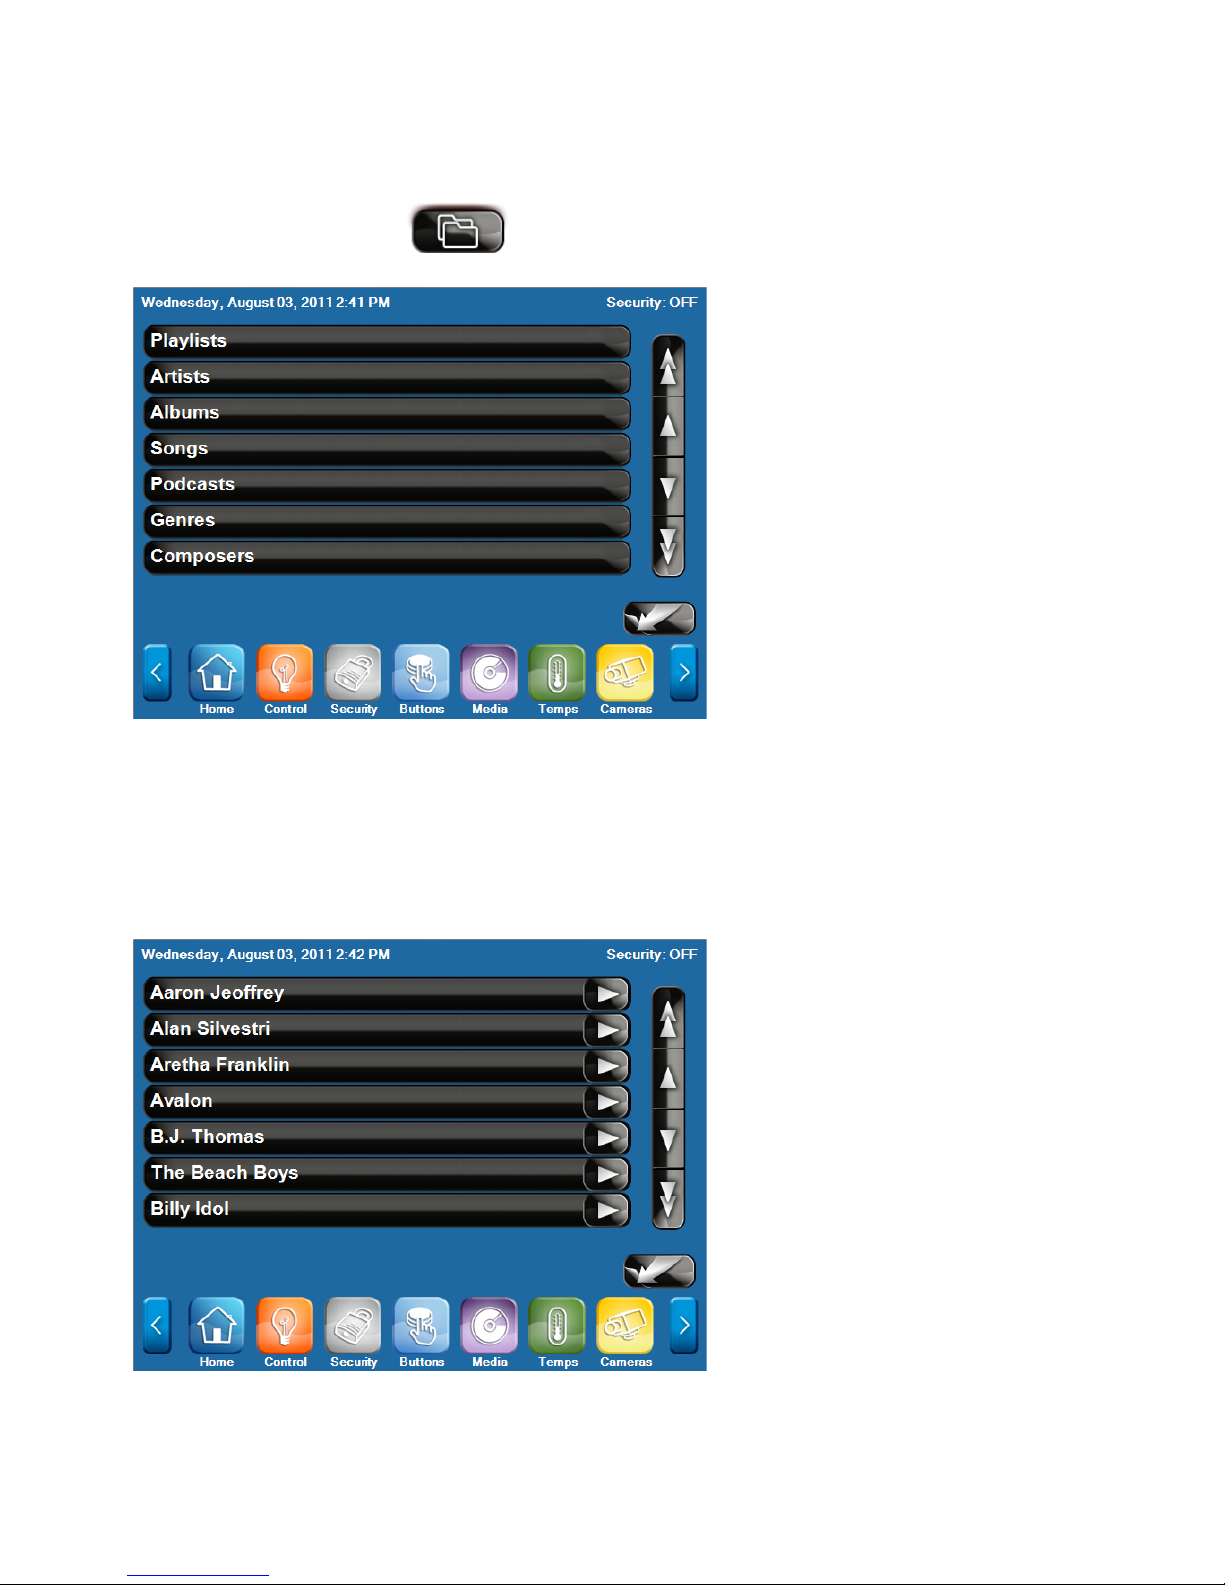
To play music in an audio zone, select the music from the device. To browse the device for music:
1. Press the Browse button to display the available media:
2. You are able to browse your media by Playlists, Artists, Albums, Songs, Podcasts, Genres,
Composers, and Audiobooks.
3. Select the desired method to browse the media. For example, if Artists was selected, a list of
artists will be displayed:
4. Select the item in the list to drill-down to the music in the selected category.
Page 40
34
5. Select the P lay button to the right of the selected item to immediately play the song
and/or entire contents of the selection.
6. At any time, you can press the Back button to return to the previous menu.
Selecting a new Music Sourc e
To select a new music source for your audio zone:
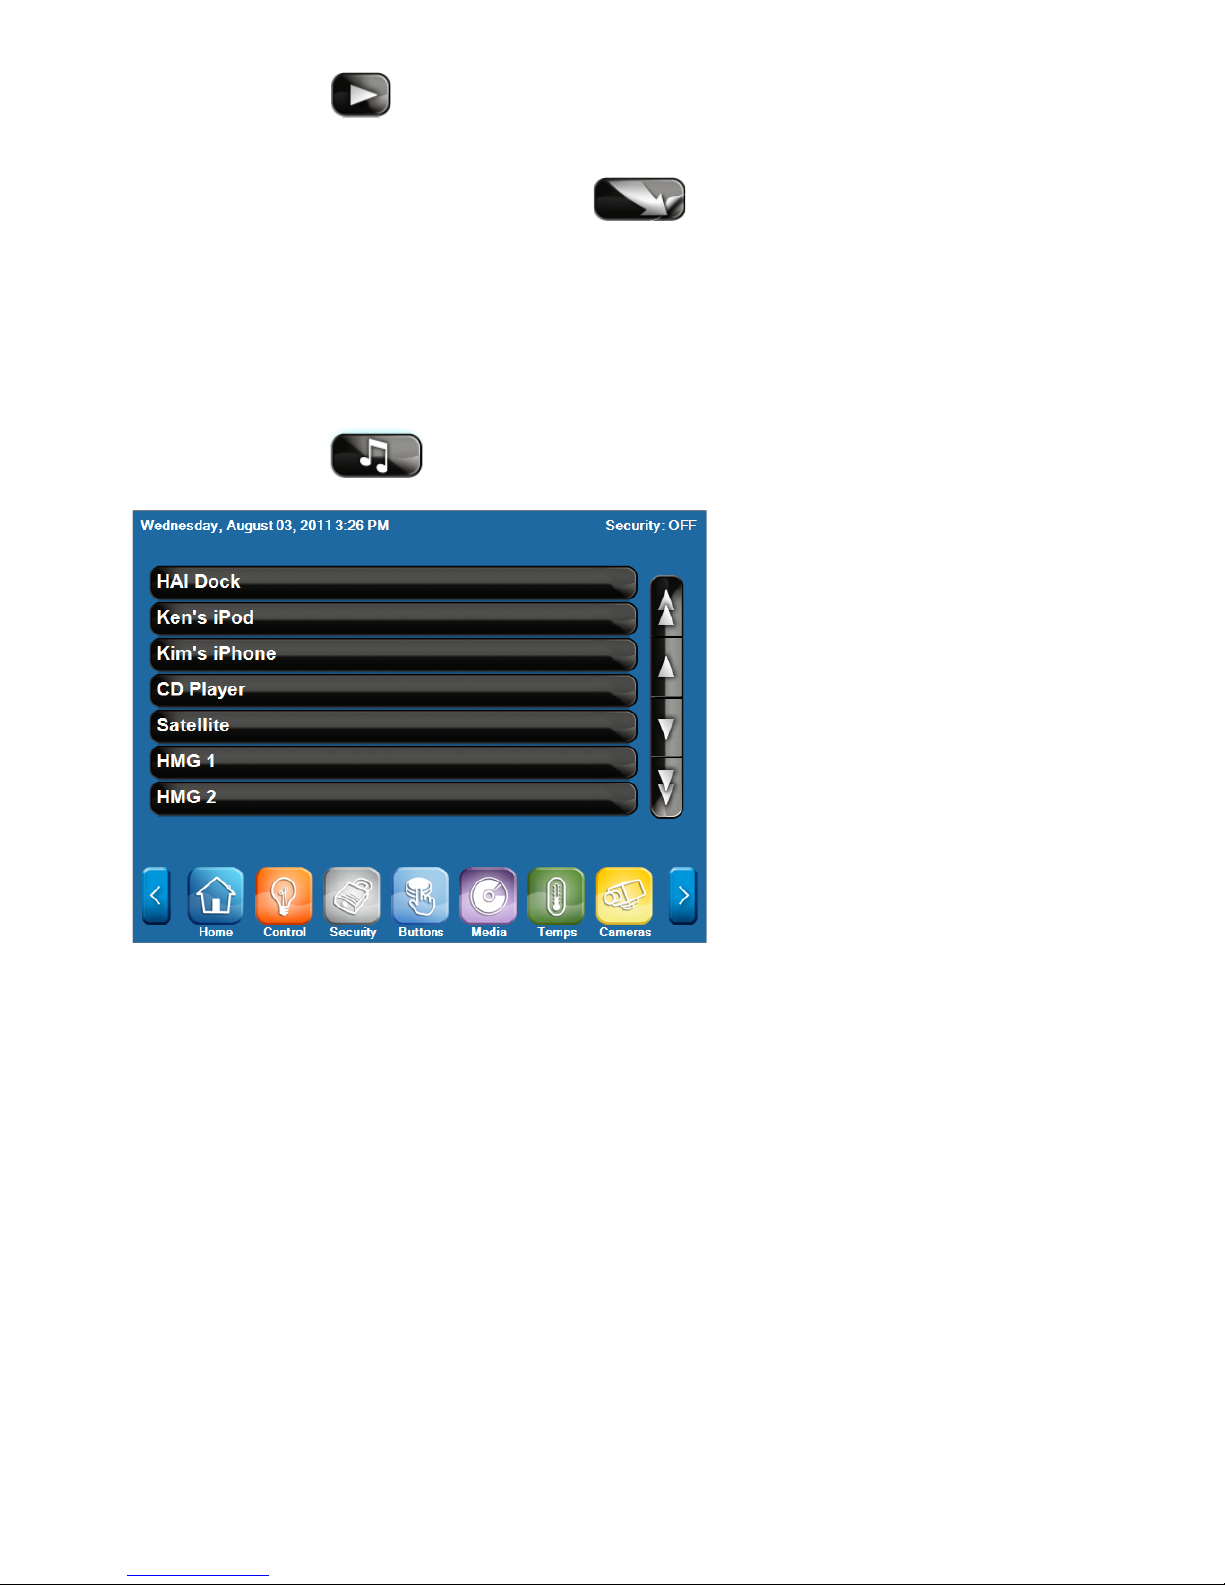
1.
Press the Source button to display the available music sources:
2.
Select the audio output for the iPod that you want to listen to, or select from one of the other
available sources.
Notes:
1. When controlling the LEVITON Dock using an OmniTouch Touchscreen, the name of the iPod is
displayed as the audio source, so that there’s no guessing to whose iPod is currently docked.
2. When an iPod is not currently docked in a LEVITON Dock, the name LEVITON Dock will be
displayed as the audio source in the list instead of the name on an iPod.
Page 41
35
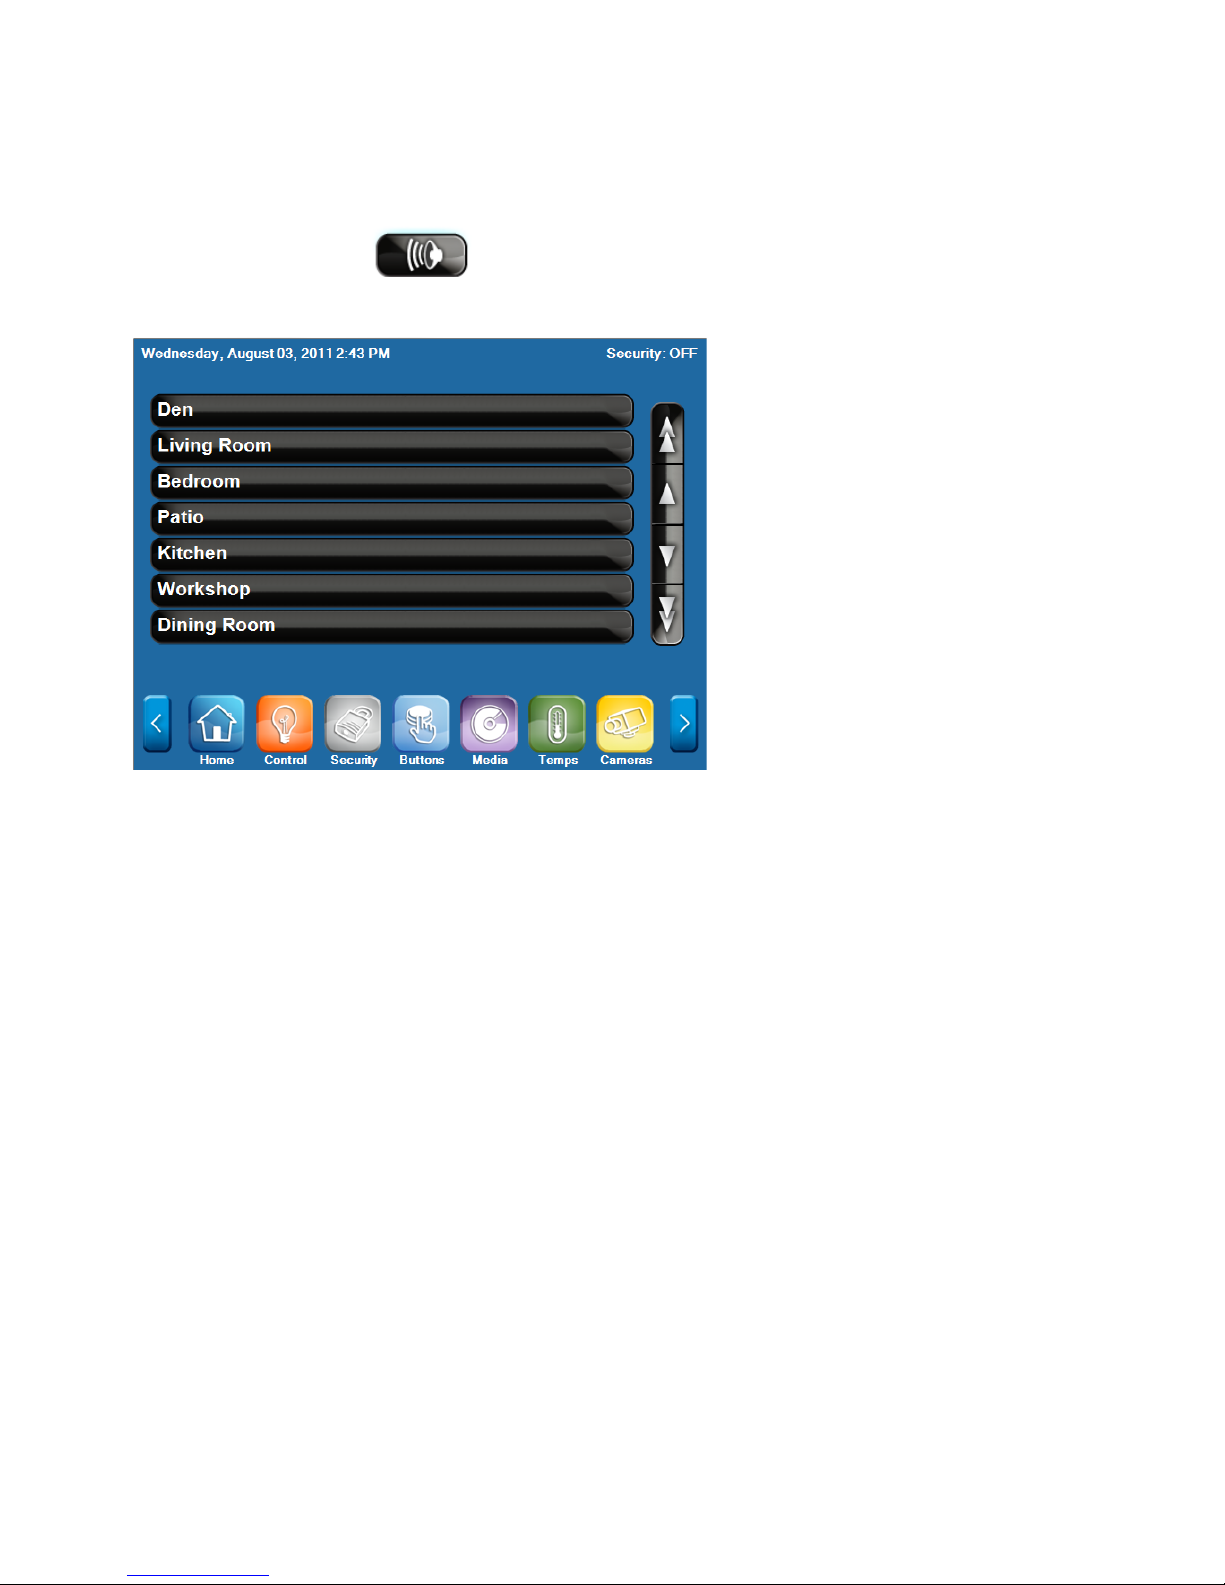
Selecting a New Audio Zone
To select a new audio zone to control with the touchscreen:
1.
Press the Zone button to display the available audio zones:
2.
Select the audio zone that you want to control with the touchscreen.
Page 42

36
Chapter 4
Specifications
Operating environment
Temperature
: +0°C to +40°C , +32°F to +104°F
Humidity
: 5% to 95%RH (Non-condensing)
Storage environment
Temperature
: -20°C to +50°C , -4°F to +122°F
Humidity
: 5% to 95%RH (Non-condensing)
EMI
VCCI Class B / FCC Class B / EN55022 / EN55024
CPU
32bit RISC CPU
Memory
RAM
: 8MByte
FlashROM
: 2MByte
Wired network interface
10BASE-T/100BASE-TX
1 port (a
utomatic detection)
Wireless network interface
IEEE802.11b
Frequency
2.4GHz
Transmission
system
DS-SS
Transmission
speed
1M/2M/5.5M/11M
(Automatic detection)
Channel
US : 1-11ch
EU : 1-13ch
IEEE802.11g
Frequency
2.4GHz
Transmission
system
OFDM
Transmission
speed
6M/9M/12M/18M/24M/36M/48M/54M
(Automatic detection)
Channel
US : 1-11ch
EU : 1-13ch
Page 43

FOR CANADA ONLY
For warranty information and/or product returns, residents of Canada should contact Leviton in writing at Leviton Manufacturing of Canada Ltd to the attention of the Quality
Assurance Department, 165 Hymus Blvd, Pointe-Claire (Quebec), Canada H9R 1E9 or by telephone at 1 800 405-5320.
Leviton warrants to the original consumer purchaser and not for the benefit of anyone else that products manufactured by Leviton under the Leviton brand name (“Product”) will be free
LEVITON LIMITED WARRANTY
from defects in material and workmanship for the time periods indicated below, whichever is shorter: • OmniPro II and Lumina Pro: three (3) years from installation or 42 months from
manufacture date. • OmniLT, Omni IIe, and Lumina: two (2) years from installation or 30 months from manufacture date. • Thermostats, Accessories: two (2) years from installation or
30 months from manufacture date. • Batteries: Rechargeable batteries in products are warranted for ninety (90) days from date of purchase. Note: Primary (non-rechargeable) batteries
shipped in products are not warranted. Products with Windows
at no charge, provided that the product has been used as originally intended. Installation of non-Leviton software or modification of the operating system voids this warranty. Leviton’s
®
Operating Systems: During the warranty period, Leviton will restore corrupted operating systems to factory default
obligation under this Limited Warranty is limited to the repair or replacement, at Leviton’s option, of Product that fails due to defect in material or workmanship. Leviton reserves the
right to replace product under this Limited Warranty with new or remanufactured product. Leviton will not be responsible for labor costs of removal or reinstallation of Product.
The repaired or replaced product is then warranted under the terms of this Limited Warranty for the remainder of the Limited Warranty time period or ninety (90) days, whichever
is longer. This Limited Warranty does not cover PC-based software products. Leviton is not responsible for conditions or applications beyond Leviton’s control.
not responsible for issues related to improper installation, including failure to follow written Installation and operation instructions, normal wear and tear, catastrophe,
fault or negligence of the user or other problems external to the Product. To view complete warranty and instructions for returning product, please visit us at www.leviton.com.
Copyright and Trademark Information
This document and all its contents herein are subject to and protected by international copyright and other intellectual property rights and are the property of Leviton Manufacturing
Co., Inc, its subsidiaries, affiliates and/or licensors. © 2013 Leviton Manufacturing Co., Inc. All rights reserved.
Use herein of third party trademarks, service marks, trade names, brand names and/or product names are for informational purposes only, are/may be the trademarks of their
respective owners; such use is not meant to imply affiliation, sponsorship, or endorsement.
No part of this document may be reproduced, transmitted or transcribed without the express written permission of Leviton Manufacturing Co., Inc.
For Technical Assistance Call: 1-800-824-3005 (U.S.A. Only) www.leviton.com
PK-93494-10-B0-5AAR2133
Leviton is
 Loading...