

Page 1
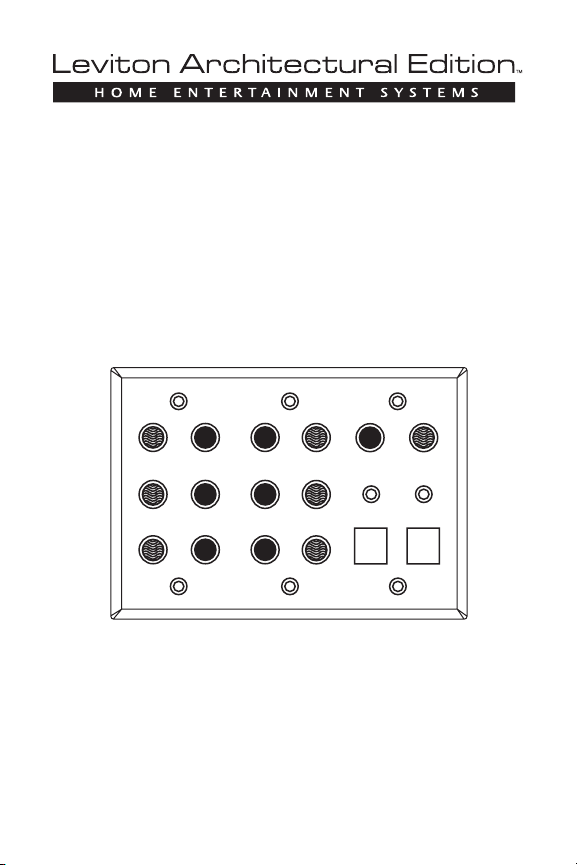
Home Theater Interface Plate
Left Front Right Front
Surround Left
Surround Right
Surround Back Left
6.1/7.1 Surround Connections
Center
Subwoofer
Surround Back Right
7.1 Surround Connections
5.1 Surround Connections
Cat. No.
AEHTK
INSTALLATION INSTRUCTION
DI-000-AEHTK-00A
Page 2

This page to be printed as Blank
Page 3

OVERVIEW
The Leviton Home Theater Wallplate provides a convenient
method of terminating in-wall speaker wires to installed speakers
and cables from amplifier speaker outputs. The wallplate also
provides for the connection of up to two subwoofers and has two
QuickPorts that can be used for any of the full line of QuickPort
jacks.
INSTALLATION
TO PREWIRE:
1. Install a three-gang low-voltage ring at amplifier location and
a single-gang low-voltage ring at each speaker location (if
speaker bracket requires it).
2. Run a minimum of 16/2 Class 3 speaker wire from Home
Theater Wallplate location to each satellite speaker.
Minimum Gauge Lengths are as follows:
WIRE LENGTH RECOMMENDED SIZE
Up to 50 feet (15 m) 18-gauge
50-150 feet (15-45 m) 16-gauge
Over 150 feet (45 m) 14-gauge
NOTE: The smaller the wire gauge number is, the thicker the
wire is.
3. Run a RG6 quad shielded coax cable from the Home Theater
Wallplate location to each subwoofer location.
TO TRIM-OUT:
1. Connect each speaker cable to the screw terminal connector
on the back of the Home Theater Wallplate that corresponds
to the speaker’s location in the room.
2. Terminate the end of the coax cable at the Home Theater
Wallplate with a Leviton RCA compression connector (p/n
40985-CR*) and plug it into one of the RCA connectors in the
wallplate.
3. At subwoofer location, use a single port QuickPort wallplate
(p/n 40701-BW) and a compression RCA QuickPort Jack
(p/n 40782-REW) to complete connection for subwoofer.
Page 4

4. Connect amplifier speaker outputs to corresponding spring
post connectors on the Home Theater Wallplate by stripping
approximately one inch of insulation from the speaker wire.
Push in on the spring post until the holes in the post line up
and insert bare portion of wire through the hole and release
spring post. Spring pressure will maintain contact on the
speaker wire.
NOTE: It is not necessary to use all of the connections on the
wallplate. If the system is a 5.1 surround style system, then
only those connections on the wallplate for left front, center,
right front, surround left and surround right, are used.
NOTE: For a 6.1 surround system, the connection labeled
“Surround Back Left” is added for the rear center speaker. To
connect a 7.1 surround system, use all of the spring post
connectors.
5. If the source amplifier has an LFE (Low Frequency Effects)
connection, use an RCA cable to connect it to the RCA jack in
the Home Theater Wallplate the subwoofer is connected to.
Otherwise, use the subwoofer output (refer to the owners
manual for the amplifier being used) for this connection.
6. Use an RCA patch cord to connect the subwoofer to the wall
plate at the subwoofer location.
Page 5
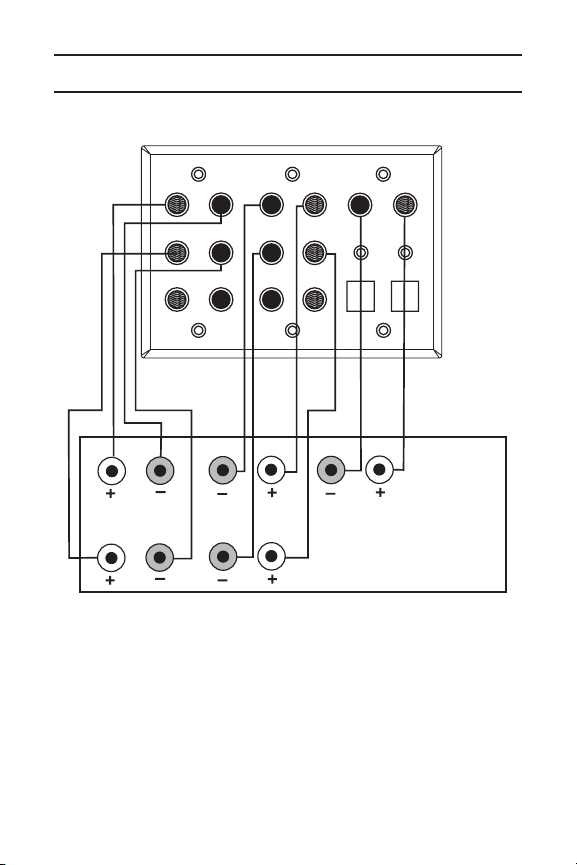
WIRING DIAGRAM EXAMPLE
Left Front Right Front
Surround Left
Surround Right
Surround Back Left
6.1/7.1 Surround Connections
Center
Subwoofer
Surround Back Right
7.1 Surround Connections
5.1 Surround Connections
Left Front
Center
Right Front
Surround Left
Surround Right
5.1 Surround Amplifier
Front View
Page 6
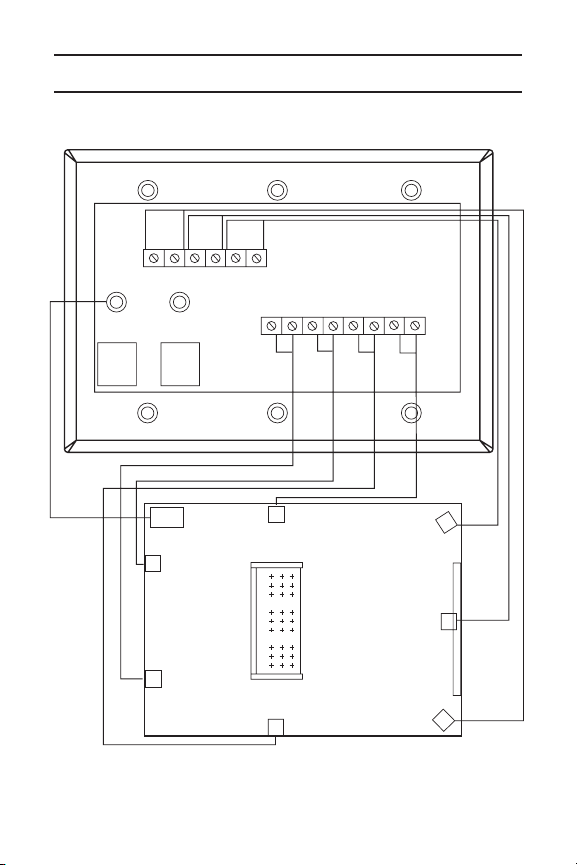
WIRING DIAGRAM EXAMPLE
Left Front
Right Fr
ont
Center
Surr
ound
Left
Surr
ound
Right
Surround
Back
Left
Surround
Back
Right
Left Front
Right Fron
t
Surr
ound
Left
Surr
ound
Righ
t
Surr
ound
Bac
k
Left
Center
Surround
Back
Right
Rear View
Page 7

This page to be printed as Blank
Page 8

Leviton warrants to the original consumer purchaser and not for the benefit of anyone
else that this product at the time of its sale by Leviton is free of defects in materials
and workmanship under normal and proper use for five years from the purchase date.
Leviton’s only obligation is to correct such defects by repair or replacement, at its
option, if within such five year period the product is returned prepaid, with proof of
purchase date, and a description of the problem to Leviton Manufacturing Co., Inc.,
Att: Quality Assurance Department, 59-25 Little Neck Parkway, Little Neck, New
York 11362-2591. This warranty excludes and there is disclaimed liability for labor for
removal of this product or reinstallation. This warranty is void if this product is installed
improperly or in an improper environment, overloaded, misused, opened, abused,
or altered in any manner, or is not used under normal operating conditions or not in
accordance with any labels or instructions. There are no other or implied warranties
of any kind, including merchantability and fitness for a particular purpose, but
if any implied warranty is required by the applicable jurisdiction, the duration of any
such implied warranty, including merchantability and fitness for a particular purpose,
is limited to five years. Leviton is not liable for incidental, indirect, special, or
consequential damages, including without limitation, damage to, or loss of use
of, any equipment, lost sales or profits or delay or failure to perform this warranty
obligation. The remedies provided herein are the exclusive remedies under this
warranty, whether based on contract, tort or otherwise.
LIMITED 5 YEAR WARRANTY AND EXCLUSIONS
For additional information, contact Leviton’s Techline at
1-800-824-3005 or visit Leviton’s website at www.leviton.com
DI-000-AEHTK-00A
Page 9
This page is NOT to be printed in the booklet
DOCUMENTATION
LEVITON INSTRUCTION SHEET/MANUAL
SPECIFICATIONS
KKC 04/05/06
Helvetica
DI-000-AEHTK-00A
Black
N/A
Final fold size:
50 lb. offset
Overall size:
8.0" x 6.0" printer spread-8 pages
4.0" x 6.0" folded size (saddle)s
Paper size:
4.0"
6.0"
FINAL SIZE
Cat. No.
OVERALL SIZE
8.0"
6.0"
 Loading...