

Levenhuk DTX RC1, DTX RC2, DTX RC4, DTX RC3 User Manual [ru]

Levenhuk DTX RC Remote Controlled
Microscopes
User Manual
EN
Ръководство за потребителя
BG
Návod k použití
CZ
Bedienungsanleitung
DE
Guía del usuario
ES
Használati útmutató
HU
Guida all’utilizzo
IT
Instrukcja obsługi
PL
Manual do usuário
PT
Инструкция по эксплуатации
RU
Наслади се отблизо
Radost zaostřit
Zoom ran und hab Fun!
Amplíe y disfrute
Kellemes nagyítást!
Ingrandisci il divertimento
Radość przybliżania
Dê um zoom na sua emoção
Приближает с удовольствием
1
1
8
3
8
5
2
4
3
5
6
2
4
6
7
10
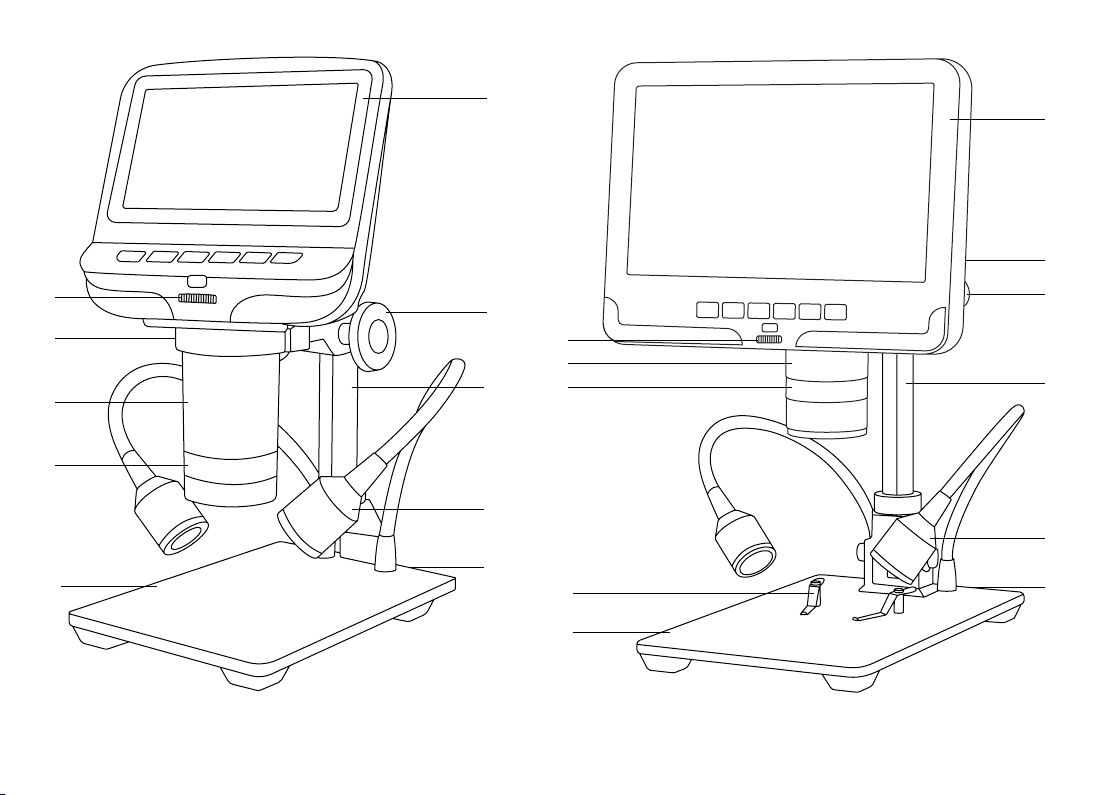
1a. Levenhuk DTX RC1 1b. Levenhuk DTX RC2
2
9
11
10
7
9
1
3
8
2
5
4
6
2
1
8
4
5
6
9
7
10
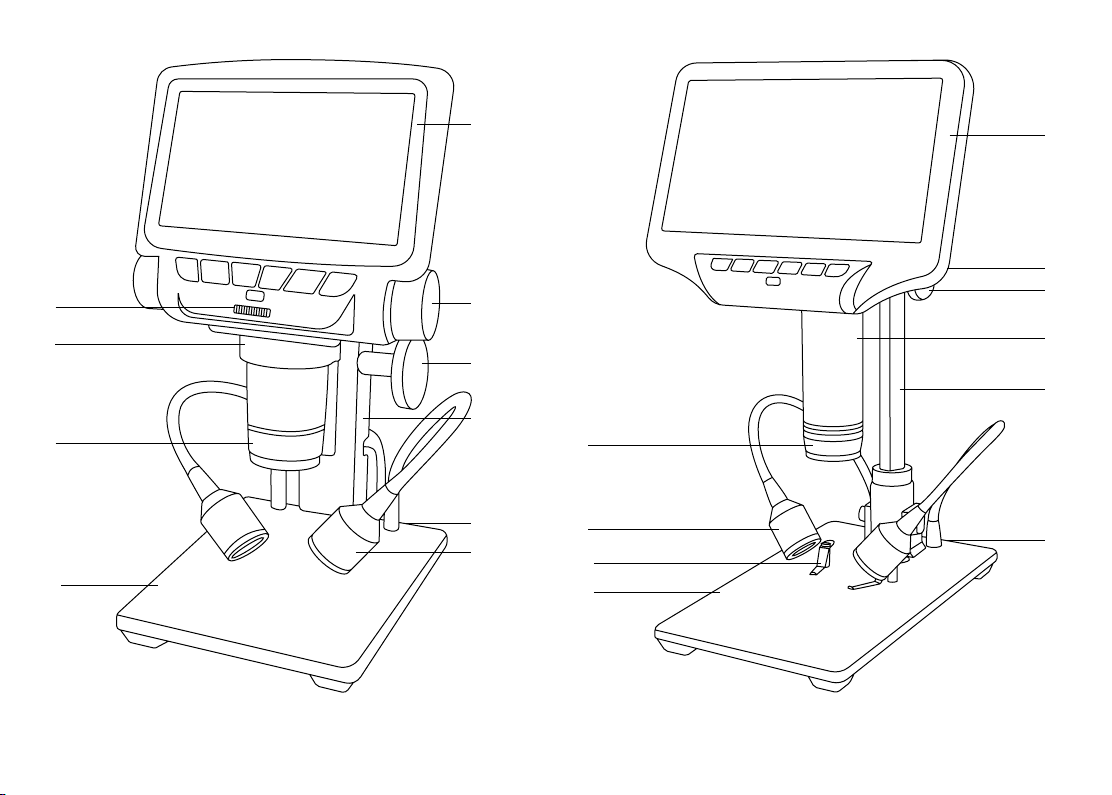
1c. Levenhuk DTX RC3 1d. Levenhuk DTX RC4
7
11
10
9
3

EN BG CZ
1. LCD screen
2. Objective
3. Brightness adjustment knob (except RC4)
4. Coarse focusing knob
5. Optical zoom ring
6. Pole
7. Spotlights
8. LCD screen locking screw (not shown)
9. Power connector (not shown)
10. Stage
11. Specimen holders (RC2, RC4 only)
1. LCD-Bildschirm
2. Objektiv
3. Helligkeitsregler (außer RC4)
4. Grobtrieb
5. Optischer-Zoom-Ring
6. Stange
7. Punktbeleuchtung
8. LCD-Bildschirmfixierschraube (nicht
abgebildet)
9. Stromanschluss (nicht abgebildet)
10. Objekttisch
11. Probenhalter (nur RC2, RC4)
1. Течнокристален екран
2. Обектив
3. Бутон за регулиране на яркостта (с
изключение на RC4)
4. Бутон за грубо фокусиране
5. Пръстен за промяна на оптичното
увеличение
6. Прът на стойката
7. Прожектори
8. Заключващ винт на течнокристален екран
(не е показан)
9. Съединител за захранването (не е показан)
10. Предметна маса
11. Държачи за образец (само за RC2, RC4)
1. Pantalla LCD
2. Objetivo
3. Mando de ajuste del brillo (excepto RC4)
4. Mando de enfoque aproximado
5. Anillo de zoom óptico
6. Varilla
7. Focos
8. Tornillo de bloqueo de la pantalla LCD (no se
muestra)
9. Compartimento de la batería (no se muestra)
10. Platina
11. Porta muestras (solo RC2, RC4)
1. LCD obrazovka
2. Objektiv
3. Knoflík pro nastavení jasu (kromě RC4)
4. Makrošroub pro hrubé zaostření
5. Kroužek optického zoomu
6. Sloupek
7. Bodové reflektory
8. Pojistný šroub LCD obrazovka (není
zobrazeno)
9. Konektor napájení (nezobrazeno)
10. Pracovní stolek
11. Držáky preparátů (pouze RC2, RC4)
HUESDE
1. LCD-kijelző
2. Objektív
3. Fényerősség állítógomb (kivéve: RC4)
4. Durva-fókuszállító gomb
5. Optikaizoom-állító gyűrű
6. Rúd
7. Spotlámpák
8. LCD képernyőrögzítő-csavar (nem látható)
9. Hálózati csatlakozó (nincs feltüntetve)
10. Tárgyasztal
11. Mintatartók (csak RC2, RC4)
4

IT PL PT
1. Schermo LCD
2. Obiettivo
3. Manopola di regolazione della luminosità
(tranne RC4)
4. Manopola di messa a fuoco grossolana
5. Anello dello zoom ottico
6. Colonna
7. Faretti
8. Vite di fissaggio dello schermo LCD (non
visibile)
9. Presa di alimentazione (non visibile)
10. Tavolino
11. Portacampione (solo RC2, RC4)
1. Ekran LCD
2. Obiektyw
3. Pokrętło regulacji jasności (oprócz RC4)
4. Pokrętło zgrubnej regulacji ostrości
5. Pierścień powiększenia optycznego
6. Statyw
7. Oświetlenie punktowe
8. Śruba blokująca ekranu LCD (niepokazany)
9. Komora baterii (nie pokazano)
10. Stolik
11. Zaczepy do preparatów (tylko RC2, RC4)
RU
1. ЖК-экран
2. Объектив
3. Регулятор яркости подсветки
(кроме RC4)
4. Ручка грубой фокусировки
5. Кольцо оптического увеличения
6. Штатив
7. Осветители
8. Фиксатор ЖК-экрана (не
показан)
9. Гнездо сетевого адаптера (не
показано)
10. Предметный столик
11. Держатели препарата (только
RC2, RC4)
1. Ecrã LCD
2. Objetiva
3. Botão de ajuste do brilho (exceto RC4)
4. Botão de focagem grosseira
5. Anel de zoom ótico
6. Polo
7. Destaques
8. Parafuso de bloqueio do ecrã LCD (não
apresentado)
9. Conector de alimentação (não apresentado)
10. Platina
11. Suportes de espécimes (apenas RC2, RC4)
5
9 10 11 12
EN
13
1 2 3 54 6
7
8
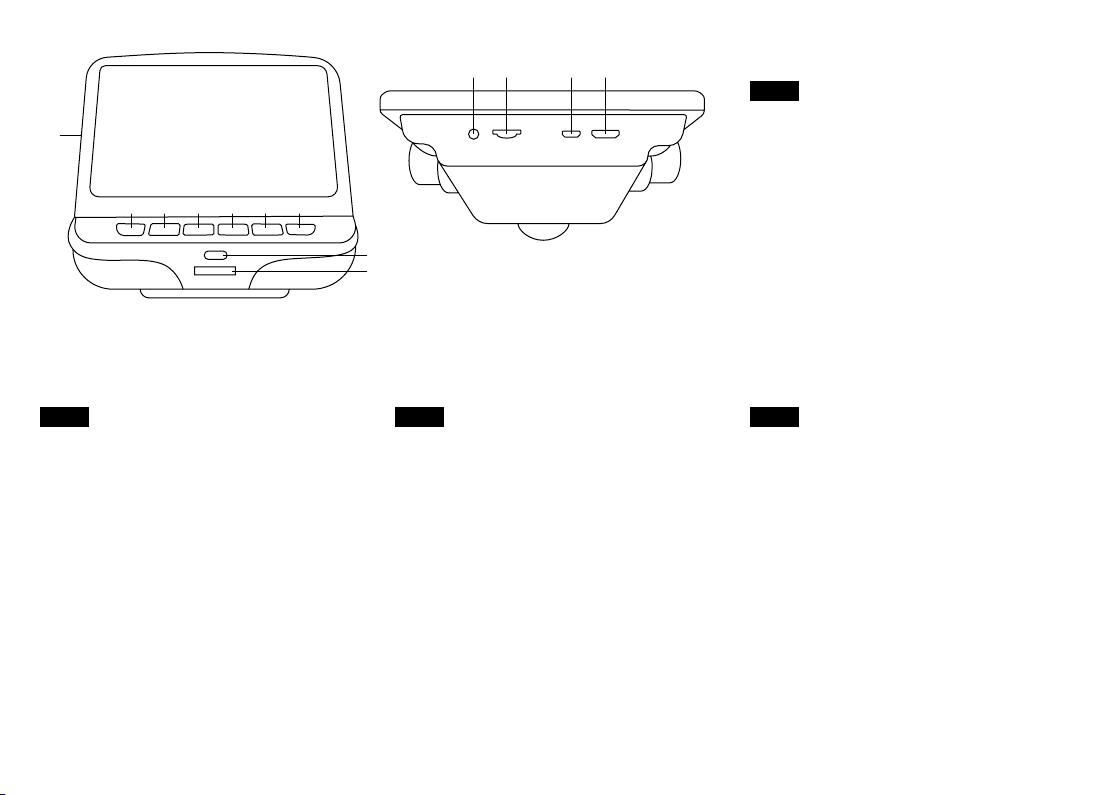
2.
1. Power on/off
2. Menu
3. Up
4. Down
5. OK
6. Capture
7. Infrared sensor
8. Brightness adjustment wheel (except RC4)
9. AVout (RС3 only)
10. SDslot
11. MiniUSB: output to PC
12. HDMI out (RC3, RC4 only)
13. Reset (not shown)
BG CZ
1. Вкл./изкл. на захранването
2. Меню
3. Нагоре
4. Надолу
5. OK
6. Заснемане
7. Инфрачервен сензор
8. Колело за регулиране на яркостта (с
изключение на RC4)
9. Изход за AV (само за RС3)
10. Слот за SD карта
11. Мини USB: изход към компютър
12. Изход HDMI (само за RC3, RC4)
13. Нулиране (не е показан)
6
1. Vypínač napájení (zap/vyp)
2. Nabídka
3. Nahoru
4. Dolů
5. OK
6. Pořídit snímek
7. Infračervený snímač
8. Regulátor nastavení jasu (kromě RC4)
9. Výstup AV (pouze RС3)
10. Slot pro SD kartu
11. MiniUSB: výstup do PC
12. HDMI výstup (pouze RC3, RC4)
13. Resetovat (není zobrazeno)
DE
1. Ein-/Ausschalter
2. Menü
3. Aufwärts
4. Abwärts
5. OK
6. Aufnahme
7. Infrarotsensor
8. Helligkeitsregler (außer RC4)
9. AV-Ausgang (nur RС3)
10. SD-Kartensteckplatz
11. MiniUSB: PC-Anschluss
12. HDMI-Ausgang (nur RC3, RC4)
13. Rücksetzen (nicht abgebildet)

HUES
1. Encendido/apagado
2. Menú
3. Arriba
4. Abajo
5. OK
6. Captura
7. Sensor infrarrojo
8. Rueda de ajuste de brillo (excepto RC4)
9. Salida AV (solo RС3)
10. Ranura SD
11. MiniUSB: salida a PC
12. Salida HDMI (solo RC3, RC4)
13. Restablecer (no se muestra)
1. Ki-/bekapcsoló gomb
2. Menü
3. Fel
4. Le
5. OK
6. Felvétel
7. Infravörös érzékelő
8. Fényerő szabályzókerék (kivéve: RC4)
9. AV kimenet (csak RС3)
10. SD-hely
11. MiniUSB: kimenet számítógéphez
12. HDMI kimenet (csak RC3, RC4)
13. Visszaállítás (nincs feltüntetve)
PL PT RU
1. Wł./wył. zasilania
2. Menu
3. W górę
4. W dół
5. OK
6. Rejestrowanie
7. Czujnik podczerwieni
8. Pokrętło regulacji jasności (oprócz RC4)
9. Wyjście AV (tylko RС3)
10. Gniazdo karty SD
11. Mini USB: wyjście do komputera
12. Gniazdo wyjściowe HDMI (tylko RC3, RC4)
13. Resetuj (nie pokazany)
1. Ligar/desligar
2. Menu
3. Para cima
4. Para baixo
5. OK
6. Capturar
7. Sensor infravermelho
8. Roda de ajuste do brilho (exceto RC4)
9. Saída AV (apenas RС3)
10. Ranhura SD
11. MiniUSB: saída para PC
12. Saída de HDMI (apenas RC3, RC4)
13. Repor (não apresentado)
IT
1. Interruttore on/off
2. Menù
3. Su
4. Giù
5. OK
6. Cattura
7. Sensore a infrarossi
8. Rotella regolazione luminosità (tranne RC4)
9. Uscita AV (solo RС3)
10. Slot SD
11. MiniUSB: uscita PC
12. Uscita HDMI (solo RC3, RC4)
13. Reset (non visibile)
1. Кнопка вкл./выкл. питания
2. Кнопка «Меню»
3. Кнопка «Вверх»
4. Кнопка «Вниз»
5. Кнопка «ОК»
6. Кнопка «Съемка»
7. Инфракрасный датчик
8. Кольцо регулировки яркости (кроме RC4)
9. Разъем AV (только RС3)
10. Разъем карты SD
11. Разъем miniUSB
12. HDMI-разъем (кроме RC3, RC4)
13. Кнопка «Перезагрузка» (не показана)
7
EN BG
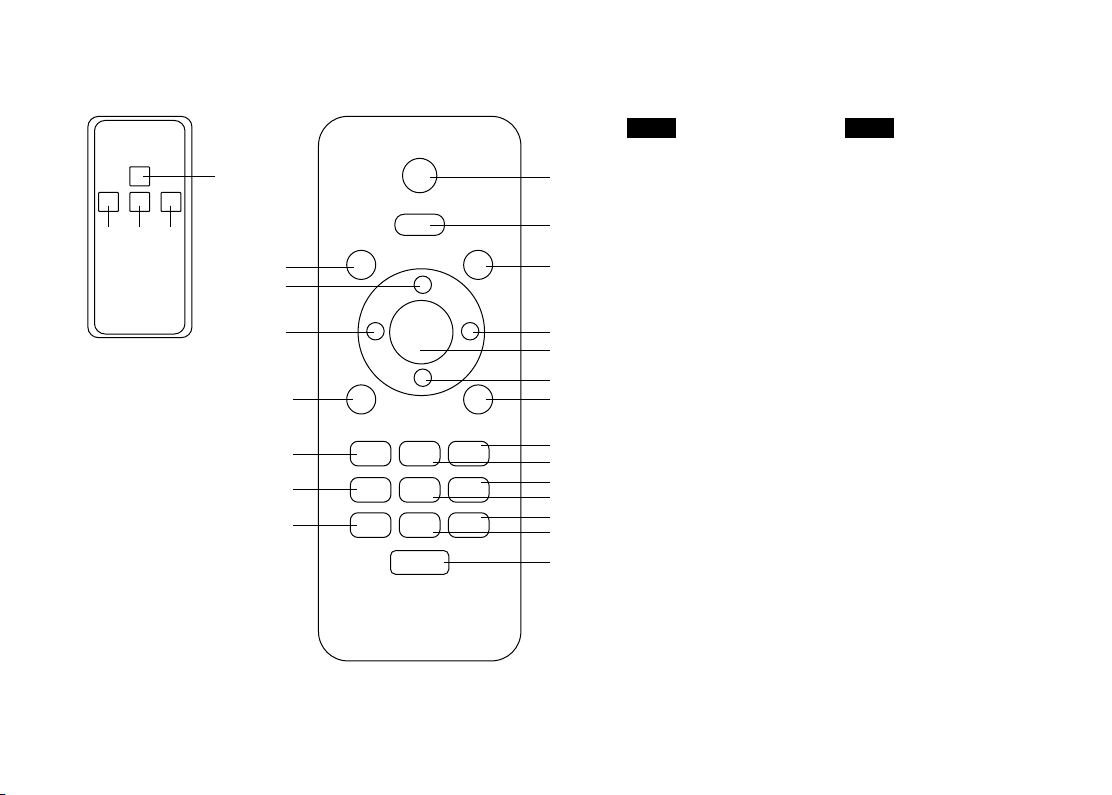
1. Capture
5
891
3
5
6
10
12
13
14
3b. Levenhuk DTX RC2, RC3, RC43a. Levenhuk DTX RC1
1
2
4
7
8
9
11
18
15
19
16
20
17
21
2. Menu
3. Frozen
4. Mode
5. Zoom up
6. Brightness down
7. Brightness up
8. OK
9. Zoom down
10. 50/60Hz
11. Cross line
12. Sharpness down
13. Contrast down
14. Inverse
15. Sharpness up
16. Contrast up
17. Black&white
18. Lock/unlock file
19. NTL/PAL
20. Default set
21. Image rotate
1. Заснемане
2. Меню
3. Застиване
4. Режим
5. Увеличаване
6. Намаляване на яркостта
7. Увеличаване на яркостта
8. OK
9. Намаляване на
увеличението
10. 50/60 Hz
11. Напречна линия
12. Намаляване на
отчетливостта
13. Намаляване на контраста
14. Обръщане
15. Увеличаване на
отчетливостта
16. Увеличаване на контраста
17. Чернобяло
18. Заключване/отключване
на файл
19. NTL/PAL
20. Настройка по подразбиране
21. Завъртане на изображение
8

CZ
1. Pořídit snímek
2. Nabídka
3. Nehybné
4. Režim
5. Zvětšit zoom
6. Snížit jas
7. Zvýšit jas
8. OK
9. Zmenšit zoom
10. 50/60 Hz
11. Překročit čáru
12. Snížit ostrost
13. Snížit kontrast
14. Negativ
15. Zvýšit ostrost
16. Zvýšit kontrast
17. Černobílá
18. Zamknout/odemknout
soubor
19. NTL/PAL
20. Výchozí sada
21. Otočit snímek
DE ITHUES
1. Aufnahme
2. Menü
3. Eingefroren
4. Modus
5. Zoom +
6. Helligkeit –
7. Helligkeit +
8. OK
9. Zoom –
10. 50/60 Hz
11. Kreuzlinie
12. Schärfe –
13. Kontrast –
14. Invers
15. Schärfe +
16. Kontrast +
17. Schwarzweiß
18. Datei sperren/entsperren
19. NTL/PAL
20. Standardset
21. Bilddrehung
1. Captura
2. Menú
3. Inmovilizado
4. Modo
5. Aumentar ampliación
6. Reducir brillo
7. Aumentar brillo
8. OK
9. Reducir ampliación
10. 50/60Hz
11. Retícula en cruz
12. Reducir nitidez
13. Reducir contraste
14. Inverso
15. Aumentar nitidez
16. Aumentar contraste
17. Blanco y negro
18. Bloquear/desbloquear
archivo
19. NTL/PAL
20. Kit predeterminado
21. Rotación de imagen
1. Felvétel
2. Menü
3. Kimerevített
4. Üzemmód
5. Közelítés
6. Fényerő csökkentése
7. Fényerő növelése
8. OK
9. Távolítás
10. 50/60 Hz
11. Keresztvonal
12. Élesség csökkentése
13. Kontraszt csökkentése
14. Inverz
15. Élesség növelése
16. Kontraszt növelése
17. Fekete-fehér
18. Fájl zárolása/feloldása
19. NTL/PAL
20. Alapértelmezett beállítás
21. Kép elforgatása
1. Cattura
2. Menù
3. Bloccato
4. Modalità
5. Aumenta zoom
6. Diminuisci luminosità
7. Aumenta luminosità
8. OK
9. Diminuisci zoom
10. 50/60 Hz
11. Mirino
12. Diminuisci nitidezza
13. Diminuisci contrasto
14. Inverso
15. Aumenta nitidezza
16. Aumenta contrasto
17. Bianco e nero
18. Blocca/sblocca file
19. NTL/PAL
20. Imposta predefinito
21. Ruota immagine
9

PL
1. Rejestrowanie
2. Menu
3. Tryb wstrzymania
4. Tryb
5. Powiększenie
6. Zmniejszenie jasności
7. Zwiększenie jasności
8. OK
9. Oddalenie
10. 50/60 Hz
11. Linia z podziałką
12. Zmniejszenie ostrości
13. Zmniejszenie kontrastu
14. Odwrócenie
15. Zwiększenie ostrości
16. Zwiększenie kontrastu
17. Czarno-biały
18. Zablokowanie/odblokowanie pliku
19. NTL/PAL
20. Ustawienia domyślne
21. Obrócenie obrazu
PT RU
1. Capturar
2. Menu
3. Bloqueado
4. Modo
5. Aumentar zoom
6. Diminuir luminosidade
7. Aumentar luminosidade
8. OK
9. Diminuir zoom
10. 50/60 Hz
11. Linha transversal
12. Diminuir nitidez
13. Diminuir contraste
14. Inverso
15. Aumentar nitidez
16. Aumentar contraste
17. Preto e branco
18. Bloquear/desbloquear ficheiro
19. NTL/PAL
20. Predefinição
21. Rotação de imagem
1. Кнопка «Съемка»
2. Кнопка «Меню»
3. Кнопка «Стоп-кадр»
4. Кнопка «Режим»
5. Кнопка «Увеличение»
6. Кнопка уменьшения яркости
7. Кнопка увеличения яркости
8. Кнопка «OK»
9. Кнопка «Уменьшение»
10. Кнопка переключения частоты между 50 и 60 Гц
11. Кнопка отображения сетки
12. Кнопка уменьшения резкости
13. Кнопка уменьшения контраста
14. Кнопка фотоэффекта «Негатив»
15. Кнопка увеличения резкости
16. Кнопка увеличения контраста
17. Кнопка фотоэффекта «Черное/белое»
18. Кнопка блокировки/разблокировки файла
19. Кнопка переключения форматов NTL/PAL
20. Кнопка «Заводские настройки»
21. Кнопка «Поворот изображения»
10
3M 300LSE
3M 300LSE
3M 300LSE
Q
.C.
P
ASSED
1 2
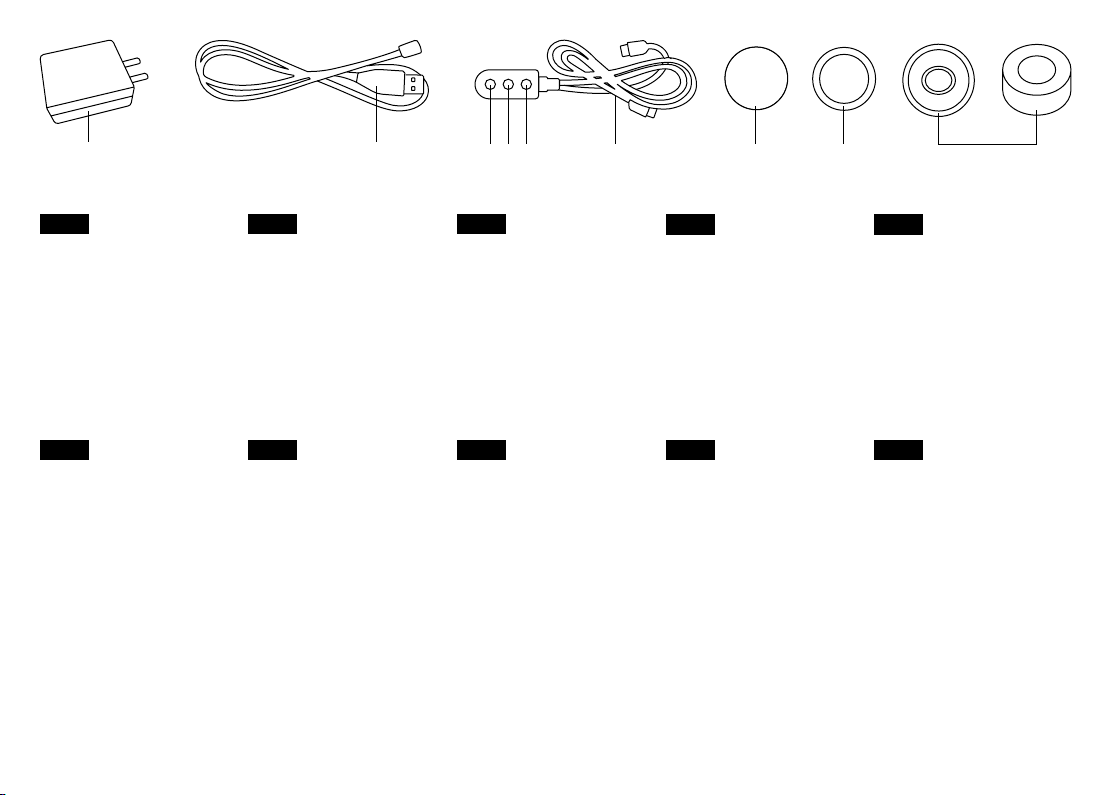
EN BG
1. DC adapter
2. USB cable
3. Switch cable
4. On/Off
5. Brightness up
6. Brightness down
7. 3M sticker (RC1, RC2
only)
8. UV filter
9. Lens covers (RC1, RC2
only)
HU
1. Hálózati adapter
2. USB-kábel
3. Kapcsolókábel
4. Főkapcsoló
5. Fényerő növelése
6. Fényerő csökkentése
7. 3M matrica (csak RC1,
RC2)
8. UV-szűrő
9. Lencsesapkák (csak RC1,
RC2)
1. DC адаптер
2. USB кабел
3. Кабел за включване
4. Вкл./Изкл.
5. Увеличаване на яркостта
6. Намаляване на яркостта
7. 3M стикер (само за RC1,
RC2)
8. UV филтър
9. Капаци на обектива
(само за RC1, RC2)
IT
1. Adattatore DC
2. Cavo USB
3. Cavo interruttore
4. On/Off
5. Aumenta luminosità
6. Diminuisci luminosità
7. Adesivo 3M (solo RC1,
RC2)
8. Filtro UV
9. Coperture delle lenti
(solo RC1, RC2)
3
4.
CZ
1. Stejnosměrný adaptér
2. Kabel USB
3. Vyměnit kabel
4. Zap/Vyp
5. Zvýšit jas
6. Snížit jas
7. Nálepka 3M (pouze RC1,
RC2)
8. UV filtr
9. Ochranné kryty zorníku
(pouze RC1, RC2)
PL
1. Zasilacz
2. Przewód USB
3. Przewód przełączający
4. Wł./Wył.
5. Zwiększenie jasności
6. Zmniejszenie jasności
7. Naklejka 3M (tylko RC1,
RC2)
8. Filtr ultrafioletowy
9. Osłona soczewki (tylko
RC1, RC2)
7 8 94 5 6
DE
1. Netzteil
2. USB-Kabel
3. Kabelschalter
4. Ein/Aus
5. Helligkeit +
6. Helligkeit –
7. 3M-Klebestreifen (nur
RC1, RC2)
8. UV-Filter
9. Objektivabdeckung (nur
RC1, RC2)
PT RU
1. Adaptador de CC
2. Cabo USB
3. Cabo do interruptor
4. Ligado/Desligado
5. Aumentar luminosidade
6. Diminuir luminosidade
7. Autocolante 3M (apenas
RC1, RC2)
8. Filtro UV
9. Tampas da lente (apenas
RC1, RC2)
ES
1. Adaptador de CC
2. Cable USB
3. Cable de conmutación
4. Encendido/Apagado
5. Aumentar brillo
6. Reducir brillo
7. Cinta adhesiva 3M (solo
RC1, RC2)
8. Filtro UV
9. Cubiertas de lentes (solo
RC1, RC2)
1. Адаптер постоянного тока
2. USB-кабель
3. Пульт управления
яркостью подсветки с
кабелем подключения и
питания
4. Кнопка вкл./выкл.
подсветки
5. Кнопка увеличения
яркости подсветки
6. Кнопка уменьшения
яркости подсветки
7. Стикер 3M (только RC1,
RC2)
8. UV-фильтр
9. Крышки объектива
(только RC1, RC2)
11
Levenhuk DTX RC
Remote Controlled
Caution: Please refer to the specications table for the correct mains
voltage and never attempt to plug a 110V device into 220V outlet and vice
versa without using a converter. Remember that mains voltage in the U.S.
and Canada is 110V and 220–240V in most European countries.
Microscopes
EN
Please refer to g. 1 (device), 2 (LCD screen), 3 (control panel), and 4 (accessories). Find your
microscope model and view all of the details of the device.
Getting started
• Unpack the microscope carefully and place it on a at surface.
• Use the supplied hardware to secure the pole and specimen holders to the base
using the supplied hardware.
• Install the LCD screen on the pole and tighten the locking screw.
• Plug the power cable into the corresponding connectors on the base and on the
LCD screen, and then the backlight and screen will turn on automatically.
• Press and hold the “Power on/o” button for 2 seconds on the screen to turn the
screen on and o.
A microSD card (purchased separately) is required to save captured images and recorded
videos. Turn the microscope o and insert the microSD card into the corresponding slot
on the microscope body until it locks in place with a click. Do not apply excessive force
when inserting the microSD card. Try rotating the card, if it does not lock in place with
ease.
If the LCD screen freezes, look for the “Reset” button on the back of the LCD screen. Use
a narrow object, such as a straightened paperclip, to press the button. This will reset all
of the settings to the factory defaults and restart the LCD screen. Saved photos or videos
will not be deleted.
UV lter
Use a 3M sticker to stick the UV lter and lens cover together. The threaded side of the
lter must be glued to the lens cover.
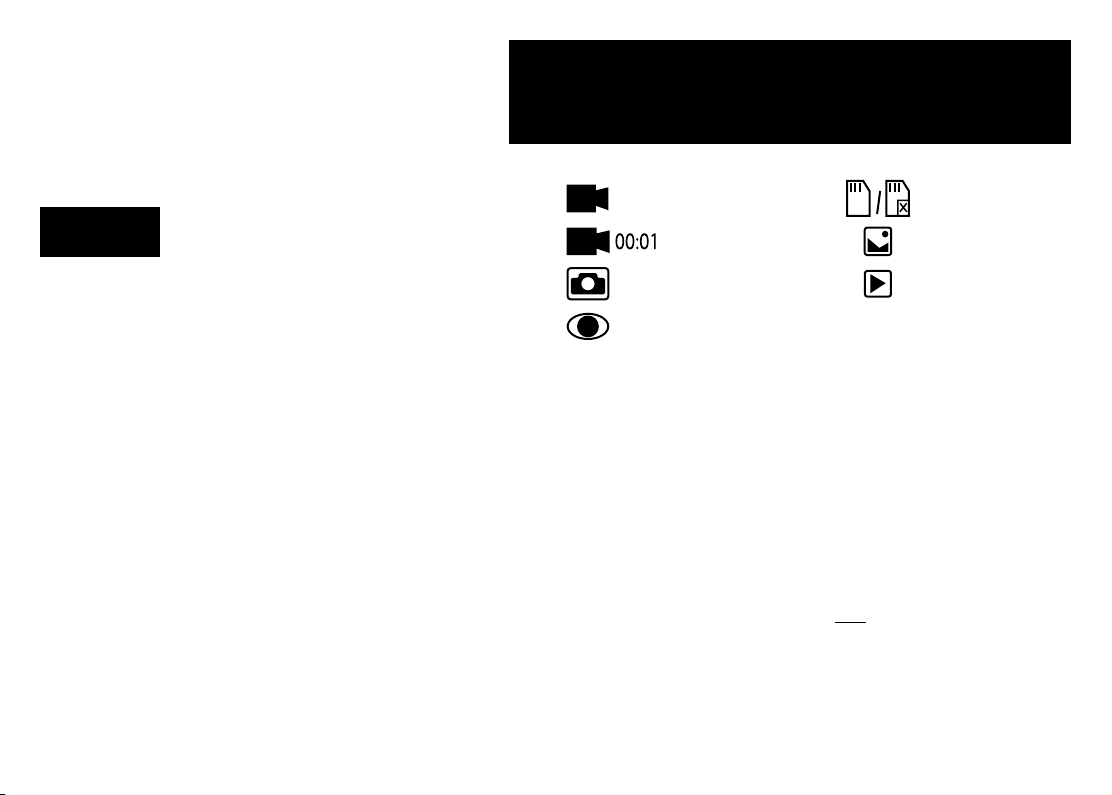
Application menu
Video mode
Video recording
Photo mode
Capture an image
Digital magnication
During observations, press the “Up” button to enlarge the image and the “Down” button
to reduce the image.
Capturing an image
1. Turn the microscope on and place a specimen on the stage.
2. Set the objective to the desired height using the coarse focusing knob.
3. Adjust the illumination brightness, so that the specimen is evenly lit.
4. Adjust the magnication and sharpness of the image by rotating the coarse focus
knob and optical zoom ring.
5. To take a photo, press the “Capture” button.
6. In “Freeze” mode, briey press the “OK” button to take a picture (except RC1).
Recording a video
1. Press the “Video” button to switch to video mode. The icon in the upper le corner
of the screen will change in conrmation.
2. Press the “OK” button to start recording. Note: do not hold down the “OK” button;
instead, briey press and release it.
3. Press the “OK” button again to stop recording.
4. Press the “Capture” button to take a picture while the microscope is recording a
video. If you take a photo this way, the image resolution may not be as high as the
video resolution – the image quality will be lower.
TF
MicroSD status icon
Still image mode
Review mode
12

View photos and videos
1. Insert the microSD card into the SD slot.
2. Press the “Video” button twice to turn on the viewing mode.
3. Press the “Right” and “Le” buttons to view the pictures and videos. Press the
“Capture” button to start playing the video.
Use with a computer and TV
View on a computer (RC1, RC3 only)
AMCAP, ViewPlayCap, WebCam Monitor, and Microscope Measure programs can be
download from the ocial Levenhuk website.
Levenhuk DTX RC1
Windows 7/8/10, Mac OS:
1. Install the AMCAP (Windows 7/8), ViewPlayCap (Windows 10) and WebCam
Monitor (Mac OS) soware on the computer. The PC camera icon will appear on
your desktop aer the installation of the soware is complete.
2. Use the “Power on/o” button to turn o the LCD screen.
3. Use the USB cable for connecting the LCD screen to the computer.
4. Click the PC camera icon on your computer’s desktop to start viewing.
Levenhuk DTX RC3
Windows XP SP3/7/8/10:
1. Install the Microscope Measure soware on the computer. The Microscope
Measure icon will appear on your desktop aer the installation of the soware is
complete.
2. Use the “Power on/o” button to turn o the LCD screen.
3. Use the USB cable for connecting the LCD screen to the computer.
4. Click the Microscope Measure icon on your computer’s desktop to start viewing.
Connecting to a TV/monitor with an AV connector (RC3 only)
1. Connect the microscope to the mains.
2. Use an AV cable (not included) for connecting the LCD screen to the TV/monitor. The
image on the LCD screen turns o and the display on the connected screen starts.
3. Now, you can start viewing on the screen. If a microSD card is inserted into
the microscope, you can take and save photos. Video recording function is not
available in this display mode.
Connecting to a TV/monitor with an HDMI connector (RC3, RC4 only)
1. Connect the microscope to the mains.
2. Use an HDMI cable (included) for connecting the LCD screen to the TV/monitor. The
image on the LCD screen turns o and the display on the connected screen starts.
3. Now, you can start viewing on the screen. If a microSD card is inserted into
the microscope, you can take and save photos. Video recording function is not
available in this display mode.
Setup
Press the “Menu” button to go to the settings menu of the LCD screen Use the control
buttons to select the required parameters. Press the “Menu” button again to save the
selected parameters. Do not turn o the power of the microscope while saving the
settings.
13

Specications
Product ID 76821 76822 76823 76824
Model Levenhuk DTX RC1 Levenhuk DTX RC2 Levenhuk DTX RC3 Levenhuk DTX RC4
Digital magnication 3–220x 3–200x 5–260x 5–270x
Optical magnication 3–55x 3–50x 5–15x 5–40x
Optics material optical glass
Body metal
Stage 100x160mm 120x200mm, with specimen holders 120x170mm 120x200mm, with specimen holders
Focus coarse, 23mm coarse, 150mm coarse, 100mm coarse, 77mm
Illumination upper LED (2 illuminators on exible arms and illumination inside
UV lter +
Rotatable color LCD screen 4.3" 7" 5" 7"
Megapixels (sensor/image) 1/12 2/12 3/12 4/24
Max. resolution (image/video) 4032x3024px/1920x1080px 4032x3024px/1920x1080px 5600x4200px/3840×2160px
Image/video format *.jpg/*.avi *.jpg/*.avi, *.mov *.jpg/*.mp4
Sensor 1/4 1/2.9
Pixel size 3.0μm 2.8μm
Sensitivity highly sensitive sensor 3800mV/Lux·s 2000mV/Lux·s 1900mV/Lux·s
Spectral range 410–1100nm
Manual settings white balance, exposure control
Output (connectors) microSD, miniUSB microSD, miniUSB microSD, miniUSB, HDMI, AV microSD, miniUSB, HDMI
Operating system Windows 7/8/10, Mac OS – Windows XP SP3/7/8/10 –
Power supply (microscope) 110–220V; 5V, 2A via USB cable
Power supply (IR remote) 1pc CR2025 batteries (included) 2pcs ААА batteries (not included)
Operating temperature range –20…+70 °C (–4...+158 °F)
the objective)
Levenhuk reserves the right to modify or discontinue any product without prior notice.
upper LED (2 illuminators on exible arms)
1/3
2.2μm 2.0μm
14

Care and maintenance
• Never, under any circumstances, look directly at the Sun, another bright
source of light or at a laser through this device, as this may cause
PERMANENT RETINAL DAMAGE and may lead to BLINDNESS.
• Take necessary precautions when using the device with children or others who
have not read or who do not fully understand these instructions.
• Aer unpacking your microscope and before using it for the rst time check for
integrity and durability of every component and connection.
• Do not try to disassemble the device on your own for any reason. For repairs and
cleaning of any kind, please contact your local specialized service center.
• Protect the device from sudden impact and excessive mechanical force. Do not
apply excessive pressure when adjusting focus. Do not overtighten the locking
screws.
• Do not touch the optical surfaces with your ngers. To clean the device exterior,
use only special cleaning wipes and special optics cleaning tools from Levenhuk.
Do not use any corrosive or acetone-based uids to clean the optics.
• Abrasive particles, such as sand, should not be wiped o lenses, but instead blown
o or brushed away with a so brush.
• Do not use the device for lengthy periods of time, or leave it unattended in direct
sunlight. Keep the device away from water and high humidity.
• Be careful during your observations, always replace the dust cover aer you are
nished with observations to protect the device from dust and stains.
• If you are not using your microscope for extended periods of time, store the
objective lenses and eyepieces separately from the microscope.
• Store the device in a dry, cool place away from hazardous acids and other
chemicals, away from heaters, open re and other sources of high temperatures.
• When using the microscope, try not to use it near ammable materials or
substances (benzene, paper, cardboard, plastic, etc.), as the base may heat up
during use, and might become a re hazard.
• Always unplug the microscope from a power source before opening the base
or changing the illumination lamp. Regardless of the lamp type (halogen or
incandescent), give it some time to cool down before trying to change it, and
always change it to a lamp of the same type.
• Always use the power supply with the proper voltage, i.e. indicated in the
specications of your new microscope. Plugging the instrument into a dierent
power outlet may damage the electric circuitry of the microscope, burn out the
lamp, or even cause a short circuit.
• Seek medical advice immediately if a small part or a battery is swallowed.
Battery safety instructions
• Always purchase the correct size and grade of battery most suitable for the
intended use.
• Always replace the whole set of batteries at one time; taking care not to mix old
and new ones, or batteries of dierent types.
• Clean the battery contacts and also those of the device prior to battery installation.
• Make sure the batteries are installed correctly with regard to polarity (+ and –).
• Remove batteries from equipment that is not to be used for an extended period of
time.
• Remove used batteries promptly.
• Never attempt to recharge primary batteries as this may cause leakage, re, or
explosion.
• Never short-circuit batteries as this may lead to high temperatures, leakage, or
explosion.
• Never heat batteries in order to revive them.
• Do not disassemble batteries.
• Remember to switch o devices aer use.
• Keep batteries out of the reach of children, to avoid risk of ingestion, suocation,
or poisoning.
• Utilize used batteries as prescribed by your country laws.
Levenhuk International Lifetime Warranty
All Levenhuk telescopes, microscopes, binoculars and other optical products, except for
accessories, carry a lifetime warranty against defects in materials and workmanship.
Lifetime warranty is a guarantee on the lifetime of the product on the market. All
Levenhuk accessories are warranted to be free of defects in materials and workmanship
for six months from date of retail purchase. Levenhuk will repair or replace such
product or part thereof which, upon inspection by Levenhuk, is found to be defective
in materials or workmanship. As a condition to the obligation of Levenhuk to repair or
replace such product, the product must be returned to Levenhuk together with proof of
purchase satisfactory to Levenhuk. This warranty does not cover consumable parts, such
as bulbs (electrical, LED, halogen, energy-saving and other types of lamps), batteries
(rechargeable and non-rechargeable), electrical consumables etc. For further details,
please visit our web site: www.levenhuk.com/warranty
If warranty problems arise, or if you need assistance in using your product, contact the
local Levenhuk branch.
15
Микроскопи
с дистанционно
Внимание: моля, вижте в таблицата с техническите спецификации
правилното мрежово напрежение и никога не се опитвайте да включите
устройство за 110 V в захранващо гнездо за 220 V изход и обратно, без да
използвате преобразувател. Не забравяйте, че мрежовото напрежение в
САЩ и Канада е 110 V и 220–240 V в повечето европейски страни.
управление
Levenhuk DTX RC
BG
Вижте фиг. 1 (устройство), 2 (течнокристален екран), 3 (контролен панел), и 4
(принадлежности). Намерете Вашия модел микроскоп и прегледайте всички данни
на устройството.
Подготовка
• Внимателно разопаковайте микроскопа и го поставете на равна повърхност.
• Използвайте предоставените елементи, за да закрепите колоната и
държачите за образци към основата.
• Поставете течнокристален екран към колоната и стегнете заключващия винт.
• Включете захранващия кабел в съответните конектори на основата и на
течнокристален екран и фоновото осветление и екранът ще се включат
автоматично.
• Натиснете и задръжте бутона “Power on/o” (Вкл./изкл. на захранването) на
екрана за 2 секунди, за да включите или изключите екрана.
За да запишете заснетите изображения и видео, е необходима microSD карта
(закупува се отделно). Изключете микроскопа и вкарайте microSD картата в
съответния слот върху корпуса на микроскопа, докато щракне на мястото си. Не
прилагайте прекомерна сила при вкарването на microSD картата. Опитайте да
завъртите картата, ако не щраква лесно на мястото си.
Ако LCD екранът замръзне, потърсете бутона “Reset” (Нулиране) на гърба на LCD
екрана. Използвайте тънък предмет, например изправен кламер, за да натиснете
бутона. Това ще нулира всички настройки до фабричните настройки и ще рестартира
LCD екрана. Запазените снимки или видеоклипове няма да бъдат изтрити.
16
UV филтър
Използвайте 3M стикер, за да залепите един към друг UV филтъра и капака на обектива.
Страната с резба на филтъра трябва да бъде залепена към капака на обектива.
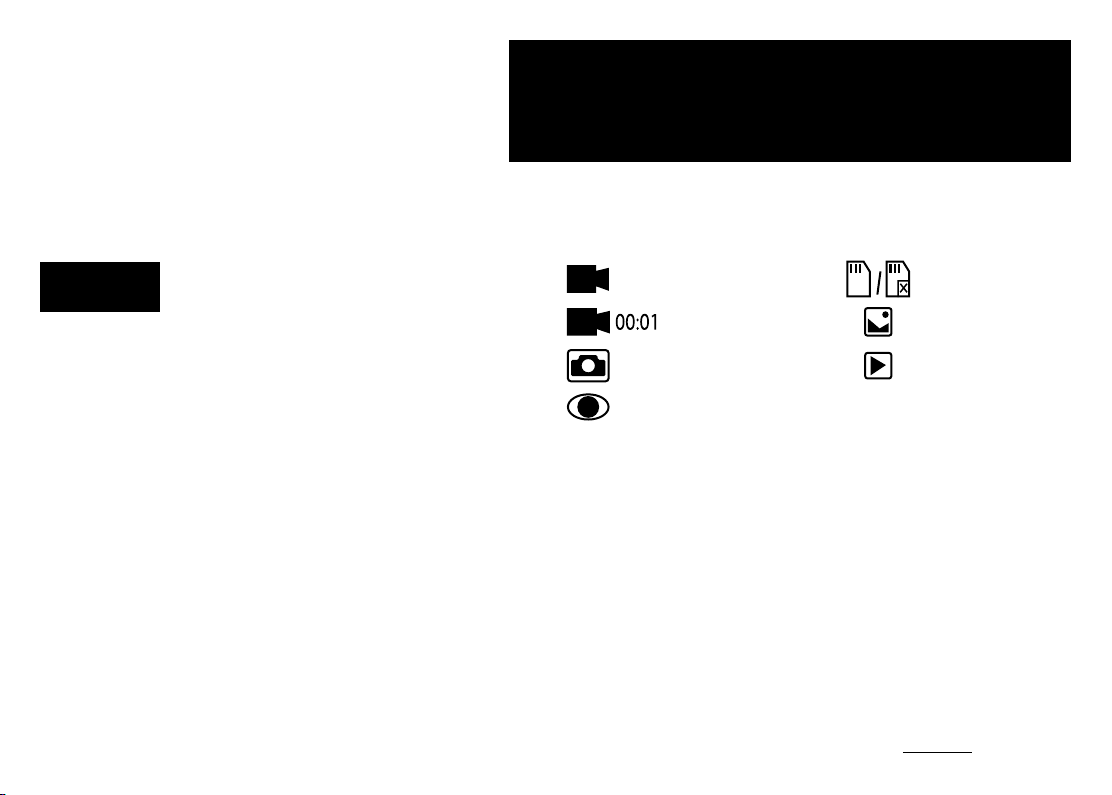
Значки основного интерфейса
Режим за
видеоклипове
Видеозапис
Режим за снимки
Заснемане на
изображение
Цифрово увеличение
По време на наблюденията натиснете бутона “Up” (Нагоре), за да увеличите
изображението, и бутона “Down” (Надолу), за да намалите изображението.
Заснемане на изображение
1. Включете микроскопа и поставете образец на предметната маса.
2. Поставете обектива на желаната височина, като използвате бутона за грубо
фокусиране.
3. Регулирайте яркостта на осветлението, така че образецът да е равномерно
осветен.
4. Регулирайте увеличението и остротата на изображението, като завъртите
бутона за грубо фокусиране и пръстена за оптично увеличение.
5. За да направите снимка, натиснете бутона “Capture” (Заснемане).
6. В режим “Freeze” (Застиване) натиснете за кратко бутона “OK”, за да направите
снимка (с изключение на RC1).
Записване на видео
1. Натиснете бутона за “Video” (Видео), за да превключите на режим на видео.
Иконата в горния ляв ъгъл на екрана ще се промени за потвърждение.
2. Натиснете бутона за “OK”, за да започнете записа. Забележка: не задържайте
TF
Иконка за състоянието
на microSD
Режим на неподвижно
изображение
Режим на преглед
 Loading...