

Page 1

Levenhuk DTX 90
Digital microscope
User Guide
Never, under any circumstances, look directly at the Sun, another bright
source of light or at a laser through this device, as this may cause
PERMANENT RETINAL DAMAGE and may lead to BLINDNESS.
Introduction
The kit includes
1. Microscope
2. Mount
3. Levenhuk DTX installation CD
4. User Guide
5. Calibration scale
Microscope parts
1. Coarse focus knob
2. Focus lock knob
3. Fine focus knob
4. Mount arm locking knob
5. Locking screw
6. Mount locking ring
7. Shutter button (works in MS Windows only)
8. Brightness adjustment wheel
9. USB cable
10. Stage
Page 2

Microscope assembly
Take the microscope and all accessories out of the package. Place the stage
on a stable surface. Attach the mount locking ring (6) to the metal tube of the
mount. Insert the metal tube into the opening on the stage and lock it in place
with the ring (6).
Insert the microscope into the clamp on the mount arm and tighten the
locking screw (5). Tighten the locking knob (4) to lock the mount arm in
place.
Focusing
Place a specimen on the stage and use the coarse focus knob (1) to focus
your view. Use the fine focus knob (3) for maximum precision and
sharpness.
Page 3

Upon focusing your view, tighten the focus lock knob (2) to lock the results.
Software installation
Insert the installation CD into your CD drive. The Main Menu window will
be displayed. Click the Install MicroCapture Pro to install the application
and follow the instructions on screen.
The installation CD contains a copy of this User Guide, which you can read
by clicking the corresponding entry in the Main Menu.
Using the microscope
Connect the microscope to your PC with a USB cable and run the
MicroCapture Pro application.
A pop-up message will warn you if the microscope is not connected to the
PC.
Application interface
Toolbar icons
Capture an image
Start and stop video recording
Sequence capture (you can set the time to begin capturing
images or videos, interval between them, video duration and
the number of images or videos to be captured)
Full screen mode. To exit full screen mode, press Escape on
your keyboard or double-click anywhere on the screen
Menu
File
Page 4
Photos Directory: set a directory for captured images.
Videos Directory: set a directory for recorded videos.
Options
Resolution: set image resolution.
Date/Time: hide or display date and time of capture during preview.
Language: change the language of the user interface.
X (Grid): hide or display a grid on images.
Full screen mode: go full screen.
Capture
Photo: capture an image.
Video: record a video.
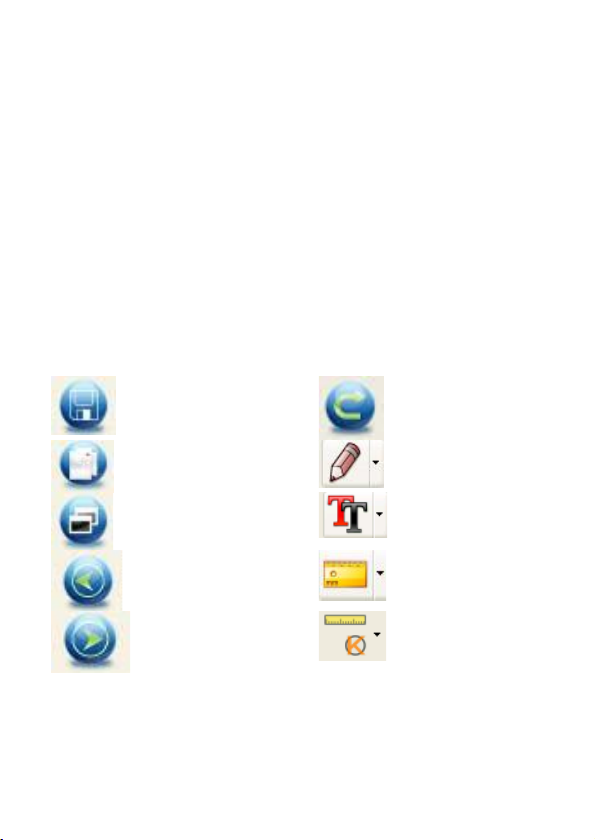
Preview window toolbar
Save as
Copy to clipboard
Copy file
Repeat the last
action
Draw
Text
Previous image
Next image
Measurement
Calibration
Page 5

Undo the last action
Using the application
Capturing an image
Click the corresponding icon on the toolbar or select Photo from the
Capture menu.
Recording a video
Click the corresponding icon on the toolbar or select Video from the
Capture menu.
Sequence capture
Click the corresponding icon on the toolbar. A dialog window will appear
where you can set a number of parameters for sequence capture.
Click the Photo radio button to set the time to begin capturing images,
interval between them and the total number of images.
Click the Video radio button to set the time to begin recording videos,
their duration, interval between them and the total number of clips.
Calibration and measurements
It is recommended to calibrate the system before proceeding with
measurements.
Calibrating
Before calibrating the microscope, turn the grid display on. To do so, select
on from Options > X (Grid). By default, the grid is visible.
Place the calibration scale on the stage and focus your view. Make sure that
the vertical axis of the grid is parallel to scale divisions and capture an
image.
Page 6

Double-click the image thumbnail to open it in a separate window.
Click the corresponding icon on the toolbar to begin calibration. Using your
mouse, choose two points on the image (you have to know the actual
distance between these two points). Once you choose the second point, a
dialog window will open, where you have to enter the known distance in the
Actual dimension field.
The application will automatically calculate the magnification of the image.
Click OK to close the dialog window. The calculated magnification will be
displayed in the Magnification field.
Page 7

Note: chosen points should form a horizontal line.
You can check calibration results by measuring the same distance with the
Any Angle Line tool. Click the measurements icon, choose the Any Angle
Line tool and draw a similar line on the image. If the measured distance is
equal to the actual distance, calibration has been successful.
Measurements
This section explains all the measurement tools.
Any Angle Line
Press and hold the left mouse button to start drawing a line. Release the left
mouse button to complete the line.
Continuous Line
Use this tool to draw a curve on the image and measure its length.
Radius Circle
Draw a straight line on the image. The application will automatically
calculate the radius, as well as circumference and area of the corresponding
circle.
Diameter Circle
Page 8

Draw a straight line on the image. The application will automatically
calculate the diameter, as well as circumference and area of the
corresponding circle.
Three Points Angle
Place three points on the image with your mouse. The application will
automatically calculate the angle value.
Recalibration
The calibration process has to be repeated if the magnification or focus has
been changed during observations.
Click the corresponding icon on the toolbar again and select Reset picture
magnification from Reset magnification. Repeat the calibration process, as
described above.
Change the magnification and capture a few images. Double-click one of the
thumbnails to open the resulting image in a preview window. Click the
calibration icon on the toolbar and select Set picture magnification from
Set magnification. Enter the current magnification in the dialog window
that appears and click OK.
If you want to use the same magnification when capturing images in the
future, click the calibration icon on the toolbar and select Set capture
magnification from Set magnification.
Draw and text
MicroCapture Pro allows you to add drawings and textboxes to your images.
Open an image in a preview window and click the Pencil icon on the toolbar.
Select one of the tools from the drop-down menu and draw something on the
image.
By clicking the TT icon on the toolbar, you can edit font type and color to
be used in textboxes.
Working with the application for Mac OS users
Page 9

Installing software
Browse to the mac folder on the installation CD and copy MicroCapture
Pro file to the desktop.
Operating the microscope
Use a USB cable to connect the microscope to your computer.
Run the MicroCapture Pro application by double-clicking its icon.
Observing specimens
A magnified image of the observed specimen may be seen in the main
window of the application.
Image resolution
From the Options menu, select Preview Size to set the image resolution.
Keep in mind that the preview window cannot be resized (standard
resolution is 640x480). The image resolution is shown in the bottom left
corner of the preview window.
Date and time
From the Options menu, select Date/Time to display or hide the date and
time of capture during preview.
Capturing an image
Click the corresponding icon on the toolbar or select Photo from the
Capture menu to capture an image.
An image thumbnail will appear on the right side of the main window.
Recording a video
Click the corresponding icon on the toolbar or select Video from the
Capture menu to start recording a video.
Note: during recording, the camcorder icon on the toolbar will turn red.
Click the icon again to stop recording.
Page 10

A video thumbnail will appear on the right side of the main window.
Editing images and videos
Image and video thumbnails are displayed on the right side of the main
window of the application.
Double-click an image thumbnail to open it in a separate preview window.
Editing images with MicroCapture Pro application is similar to working with
other applications in Mac OS.
Double-click a video thumbnail to play the video clip.
Exiting the application
From the main menu, select Quit MicroCapture to exit the application.
Care and maintenance
Never, under any circumstances, look directly at the Sun,
another bright source of light or at a laser through this
device, as this may cause PERMANENT RETINAL
DAMAGE and may lead to BLINDNESS.
White LEDs are very bright; do not look at them as this may
cause permanent damage to your vision.
Page 11

Take necessary precautions when using the device with children
or others who have not read or who do not fully understand these
instructions.
After unpacking your microscope and before using it for the first
time check for integrity and durability of every component and
connection.
Do not try to disassemble the device on your own for any reason.
For repairs and cleaning of any kind, please contact your local
specialized service center.
Protect the device from sudden impact and excessive mechanical
force. Do not apply excessive pressure when adjusting focus. Do
not overtighten the locking screws.
Do not touch the optical surfaces with your fingers. To clean the
device exterior, use only special cleaning wipes and special
optics cleaning tools from Levenhuk.
Abrasive particles, such as sand, should not be wiped off lenses,
but instead blown off or brushed away with a soft brush.
Do not use the device for lengthy periods of time, or leave it
unattended in direct sunlight. Keep the device away from water
and high humidity.
Be careful during your observations, always replace the dust
cover after you are finished with observations to protect the
device from dust and stains.
If you are not using your microscope for extended periods of
time, store the objective lenses and eyepieces separately from the
microscope.
Store the device in a dry, cool place away from hazardous acids
and other chemicals, away from heaters, open fire and other
sources of high temperatures.
To avoid data loss or equipment damage, always close the
application first, and then disconnect the microscope from your
PC. Wait until the illumination goes off completely, and
disconnect the microscope.
Seek medical advice immediately if a small part or a battery
is swallowed.
Page 12

Battery safety instructions
Always purchase the correct size and grade of battery most
suitable for the intended use.
Always replace the whole set of batteries at one time; taking care
not to mix old and new ones, or batteries of different types.
Clean the battery contacts and also those of the device prior to
battery installation.
Make sure the batteries are installed correctly with regard to
polarity (+ and -).
Remove batteries from equipment that is not to be used for an
extended period of time.
Remove used batteries promptly.
Never attempt to recharge primary batteries as this may cause
leakage, fire, or explosion.
Never short-circuit batteries as this may lead to high
temperatures, leakage, or explosion.
Never heat batteries in order to revive them.
Remember to switch off devices after use.
Keep batteries out of the reach of children, to avoid risk of
ingestion, suffocation, or poisoning.
Specifications
Image sensor 5 Mpx
Magnification 10x–300x
Available image resolutions 2592x1944, 2048x1536, 1600x1200,
Available video resolutions 1280x960
Photo/video format *.jpeg/*.avi
Focusing Manual, 0–150 mm focusing range
Illumination 8-LED system with variable brightness
Power source USB 2.0 cable
Software language English, German, Spanish, Russian,
Microscope dimensions 110 mm x 33 mm
1280x960
Italian, French, Portuguese, Dutch,
Polish, Japanese, Korean, Chinese
Page 13

(length x diameter)
Mount dimensions
(H x W x D)
Levenhuk reserves the right to modify or discontinue any product without prior notice.
12 mm x 118 mm x 165 mm
System requirements
Operating system: Windows XP/Vista/7/8, Mac 10.6~10.8.
CPU: at least P4 1.8 GHz
RAM: 512 MB
GPU: 64 MB
Interface: USB 2.0
A CD drive is required to install the MicroCapture Pro application.
Levenhuk Limited Warranty
All Levenhuk telescopes, microscopes, binoculars and other optical
products, except for accessories, carry a lifetime warranty against defects
in materials and workmanship. Lifetime warranty is a guarantee on the
lifetime of the product on the market. All Levenhuk accessories are
warranted to be free of defects in materials and workmanship for six months
from date of retail purchase. Levenhuk will repair or replace such product or
part thereof which, upon inspection by Levenhuk, is found to be defective in
materials or workmanship. As a condition to the obligation of Levenhuk to
repair or replace such product, the product must be returned to Levenhuk
together with proof of purchase satisfactory to Levenhuk.
This warranty does not cover consumable parts, such as bulbs (electrical,
LED, halogen, energy-saving and other types of lamps), batteries
(rechargeable and non-rechargeable), electrical consumables etc.
A Return Authorization (RA) Number must be obtained in advance of return. Contact
the
Levenhuk branch to receive the RA number to be displayed on the outside of
local
your shipping container. All returns must be accompanied by a written statement setting
forth the name, address and telephone number of the owner, including a description of
any claimed defects. Parts or products for which replacement is made will become the
property of Levenhuk.
Page 14

The customer will be responsible for all costs of transportation and insurance to and
from Levenhuk or its authorized dealers and will be required to prepay such costs.
Levenhuk will use reasonable efforts to repair or replace any product covered by this
warranty within thirty days of receipt. If a repair or replacement will require more than
thirty days, Levenhuk will notify the customer accordingly. Levenhuk reserves the right
to replace any product that has been discontinued from its product line with a new
product of comparable value and function.
This warranty does not apply to any defects or damages resulting from alteration,
modification, neglect, misuse, usage of improper power sources, damage in
transportation, abuse, or any cause other than normal use, or to malfunction or
deterioration due to normal wear. This warranty does not cover product that is lost,
stolen, dropped, shattered, or any other type of damage or modifications to the original
product caused by the customer.
Levenhuk disclaims all warranties, express or implied, whether of merchantability or
fitness for a particular use, except as expressly set forth herein. The sole obligation of
Levenhuk under this limited warranty will be to repair or replace the covered product,
in accordance with the terms set forth herein. Levenhuk disclaims liability for any loss
of profits, loss of information, or for any general, special, direct, indirect or
consequential damages which may result from breach of any warranty, or arising out of
the use or inability to use any Levenhuk product. Any warranties which are implied and
which cannot be disclaimed will be limited in duration to a term of six months for
accessories from the date of retail purchase.
Some states/provinces do not allow the exclusion or limitation of incidental or
consequential damages, so the above limitations and exclusions may not apply to you.
This warranty gives you specific legal rights, and you may have other rights which vary
from state to state or province to province.
Levenhuk reserves the right to modify or discontinue any product without prior notice.
NOTE: This warranty is valid to USA and Canadian customers who have purchased
this product from an authorized Levenhuk dealer in the USA or Canada. Warranty
outside the USA or Canada is valid only to customers who purchased from an
authorized Levenhuk dealer in the specific country or international distributor. Please
contact them for any warranty service.
If warranty problems arise, or if you need assistance in using your product, contact the
local Levenhuk branch:
Levenhuk Worldwide:
USA: www.levenhuk.com
Page 15

Canada: www.levenhuk.ca
Czech Republic: www.levenhuk.cz
Germany: de.levenhuk.com
Netherlands: nl.levenhuk.com
Poland: pl.levenhuk.com
Russia: www.levenhuk.ru
Ukraine: www.levenhuk.ua
EU: www.levenhuk.eu
Purchase date _______________ Signature___________________ Stamp
 Loading...