

Page 1

230x
Levenhuk DTX 30
Levenhuk DTX 50
Digital Microscope
MEGA
2
PIXELS
USB 2.0
400x
MEGA
1.3
PIXELS
User Guide
EN CZ PL RU
Page 2

Page 3

Levenhuk DTX 30
Levenhuk DTX 50
EN
Digital microscope
Never, under any circumstances, look directly at the Sun, another bright source of light
or at a laser through this device, as this may cause PERMANENT RETINAL DAMAGE
and may lead to BLINDNESS.
The kit includes
Microscope
Levenhuk DTX
Software
DTX 30
Photo/video capturing
DTX 50
and micromeasuring software
for Levenhuk Digital Microscopes
DTX 90
+ user manuals
DTX 500 Mobi
DTX 500 LCD
Windows/Mac
www.levenhuk.com
Levenhuk DTX
installation CD
Levenhuk DTX 30
Levenhuk DTX 50
230x
MEGA
2
PIXELS
USB 2.0
400x
MEGA
1.3
PIXELS
Цифровой микроскоп
Инструкция по эксплуатации
User Guide Calibration scale
1
Page 4

Software installation
Make sure the microscope is connected to your PC before proceeding with the setup.
Insert the installation CD into your CD drive. The Main Menu window will be displayed.
Click the install Microscope Driver to install the required drivers and follow the instructions on screen.
After the drivers are installed, click the MicroCapture software to install the software.
Keep in mind that a system restart will be required during installation.
The installation CD contains a copy of this User Guide, which you can read by clicking the corresponding
entry in the Main Menu.
Using the microscope
Remove the protective cap from the objective lens. Use the focus wheel
to focus your view. The shutter button allows you to images with default
settings (using MicroCapture software to create images is described
in the corresponding section of this User Guide). If you wish to adjust
brightness of the LED illumination, you can use the illumination
brightness adjustment ring at the top of the microscope body.
1. LED light brightness control wheel
2. Shutter button
3. Focus wheel
4. Calibration scale
2
Page 5

PortableCapture software
Software installationInsert the installation CD into your CD drive. The Main Menu window will
be displayed. Select PortableCapture software to install the PortableCapture application.
Keep in mind that a system restart will be required during installation.The installation CD contains
a copy of this User Guide, which you can read by clicking the corresponding entry in the Main Menu.
Connect the microscope to your PC with a USB cable and run the PortableCapture application.
A pop-up message will warn you if the microscope is not connected to the PC.
Image resolution
From the Options menu, select Preview Size to set the required
image resolution.
Rotating the image
From the Options menu, select Rotate and choose to rotate created
images 90° clockwise or counterclockwise.
Date and time
From the Options menu, select Date/Time to display or hide
the date and time of capture during preview.
3
Page 6

Language
From the Options menu, select Language to change the language
of the user interface.
Full screen mode
There are three ways to enter full screen mode:
1. Double-click an image in the main window;
2. Click the Full screen mode icon on the toolbar;
3. From the Options menu, select Fullscreen mode.
To exit full screen mode, click the corresponding icon on the toolbar.
Skins
From the Options menu, select Skin to change the user interface appearance.
Settings
From the Options menu, select Preferences to set various preferences for MicroCapture application,
including brightness, contrast and saturation of images, white balance, etc.
4
Page 7

Images and videos
Capturing an image
Click the corresponding icon on the toolbar, or select Photo the Capture to capture an image,
or press F11 on your keyboard. A thumbnail of the captured image will appear on the right side
of the main window.
Recording a video
Click the corresponding icon on the toolbar or select Video the Capture to start recording a video.
The camcorder icon on the toolbar will change once you start recording. To stop recording
you can either click the corresponding icon on the toolbar again or select Stop capturing the Capture.
Note: videos are recorded in 640x480.
5
Page 8

Working with images6 Calibration and measurements
Preview
Left-click the thumbnail of the image you wish to edit and it will open
in the main window of the application. The image resolution
will be displayed in the bottom left corner of the screen. Double-clicking
a thumbnail will open the image in a separate window.
Saving images
To save an image, right-click the thumbnail of the desired image
and select Save from the drop-down menu.Images may be saved
in .jpeg and .bmp formats. When saving images in .jpeg format,
clicking Advanced allows you to view and edit additional options.
Deleting images
To delete an image, right-click the thumbnail of the desired image
and select Delete from the drop-down menu.When viewing images
in a separate window, you can click the corresponding icon on the toolbar
to delete the image.
Copying images
To copy an image, right-click the thumbnail of the desired image
and select Copy from the drop-down menu.
Page 9
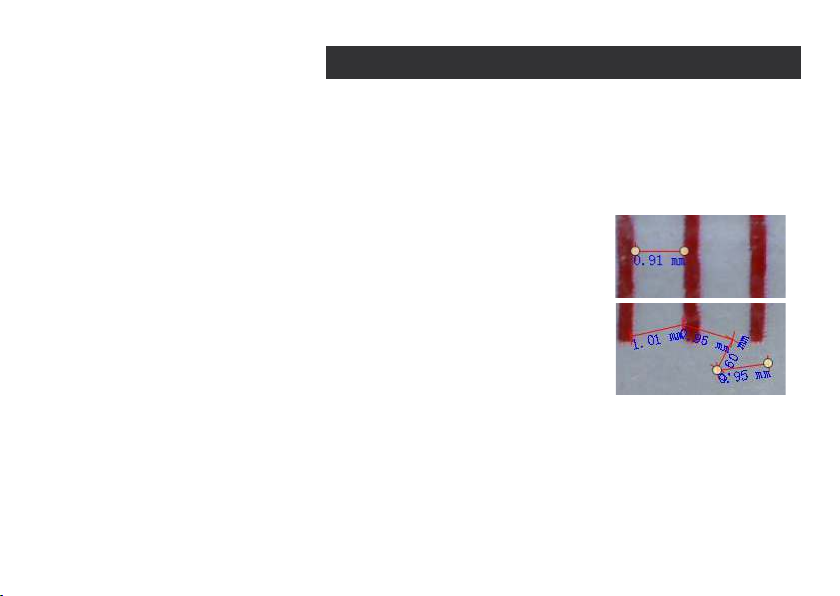
Place a ruler on the stage, focus your view and aimage. Take note of the current magnification
by looking at the calibration scale on the microscope body. Double-click the image thumbnail
to open it in a separate window. Enter the magnification value into the corresponding field
in the upper right corner of the preview window. Upon calibrating the microscope, you will be able
to measure various parameters of observed specimens. All the buttons on the toolbar of the preview
window are described below.
Line
Press and hold the left mouse button to start drawing a line.
Release the left mouse button to complete the line.
Free-form line
Press and hold the left mouse button and draw a line.
Release the left mouse button to complete the segment.
You can continue adding more segments to the free-form line.
7
Page 10

Radius
Draw a straight line on the image. The application will automatically
calculate the radius, as well as circumference and area
of the corresponding circle.
Diameter
Draw a straight line on the image. The application will automatically
calculate the diameter, as well as circumference and area
of the corresponding circle.
Angle
Press and hold the left mouse button to draw a line on the image.
Release the left mouse button and draw another line. The application
will automatically calculate value of the resulting angle.
Measurement units
From the drop-down menu on the toolbar you can select measurement
units for calculations (pixels, inches, kilometers, meters, centimeters,
millimeters, microns).
8
Page 11

Other instruments on the preview window toolbar are described below.
Press this button to create a text box on the image
Press this button to edit font parameters
These buttons allow you to draw something on the image
Press this button to choose the line color
Press this button to choose the line thickness
Press this button to choose the line style
Press this button to undo the last action
Note:
1. Magnification range of Levenhuk DTX 50 is 20x–400x and 20x–230x for Levenhuk DTX 30.
Do not use magnification values that exceed this range.
2. The application calculates values based on the magnification you have entered.
The results may not be precise.
3. Measurement functions are only available to MS Windows users.
9
Page 12

Working with the application for Mac OS users
Browse to the mac folder on the installation CD and copy PortableCapture Pro file to the desktop.
Use a USB cable to connect the microscope to your computer. Run the PortableCapture Pro application
by double-clicking its icon.
A magnified image of the observed specimen may be seen in the main window of the application.
From the Options menu, select Preview Size to set the image resolution. Keep in mind that
the preview window cannot be resized (standard resolution is 640x480). The image resolution
is shown in the bottom left corner of the preview window.
Click the corresponding icon on the toolbar or select Photo from the Capture menu to capture
an image. An image thumbnail will appear on the right side of the main window.
Click the corresponding icon on the toolbar or select Video from the Capture menu to start recording
a video. Image and video thumbnails are displayed on the right side of the main window
of the application.
Note: during recording, the camcorder icon on the toolbar will turn red. Click the icon again
to stop recording.A video thumbnail will appear on the right side of the main window.
Double-click an image thumbnail to open it in a separate preview window. Editing images
with PortableCapture Pro application is similar to working with other applications in Mac OS.
10
Page 13

Care and maintenance
Never, under any circumstances, look directly at the Sun, another bright source of light or at a laser through this device,
as this may cause PERMANENT RETINAL DAMAGE and may lead to BLINDNESS. White LEDs are very bright; do not look
at them as this may cause permanent damage to your vision. Take necessary precautions when using the device with
children or others who have not read or who do not fully understand these instructions. After unpacking your microscope
and before using it for the first time check for integrity and durability of every component and connection. Do not try
to disassemble the device on your own for any reason. For repairs and cleaning of any kind, please contact your local
specialized service center. Protect the device from sudden impact and excessive mechanical force. Do not apply
excessive pressure when adjusting focus. Do not overtighten the locking screws. Do not touch the optical surfaces
with your fingers. To clean the device exterior, use only special cleaning wipes and special optics cleaning tools
from Levenhuk.Abrasive particles, such as sand, should not be wiped off lenses, but instead blown off or brushed away
with a soft brush. Do not use the device for lengthy periods of time, or leave it unattended in direct sunlight. Keep
the device away from water and high humidity. Be careful during your observations, always replace the dust cover
after you are finished with observations to protect the device from dust and stains. If you are not using your microscope
for extended periods of time, store the objective lenses and eyepieces separately from the microscope. Store the device
in a dry, cool place away from hazardous acids and other chemicals, away from heaters, open fire and other sources
of high temperatures. To avoid data loss or equipment damage, always close the application first, and then disconnect
the microscope from your PC. Wait until the illumination goes off completely, and disconnect the microscope.
Seek medical advice immediately if a small part or a battery is swallowed.
Battery safety instructions
Always purchase the correct size and grade of battery most suitable for the intended use. Always replace the whole set
of batteries at one time; taking care not to mix old and new ones, or batteries of different types. Clean the battery
contacts and also those of the device prior to battery installation. Make sure the batteries are installed correctly
with regard to polarity (+ and -). Remove batteries from equipment that is not to be used for an extended period
of time. Remove used batteries promptly. Never attempt to recharge primary batteries as this may cause leakage, fire,
or explosion.Never short-circuit batteries as this may lead to high temperatures, leakage, or explosion.Never heat
batteries in order to revive them. Remember to switch off devices after use. Keep batteries out of the reach of children,
to avoid risk of ingestion, suffocation, or poisoning.
11
Page 14

Specifications
Image sensor
Magnification
Available image resolutions (DTX 50)
Available image resolutions (DTX 30)
Available video resolutions (DTX 50)
Available video resolutions (DTX 30)
Photo/video format
Focusing
Illumination
Power source
Frame rate
Software languages
Dimensions (length x diameter)
Levenhuk reserves the right to modify or discontinue any product without prior notice.
1.3 Mpx, interpolated to 2 Mpx (DTX 50)
2 Mpx, interpolated to 5 Mpx (DTX 30)
20x–400x (DTX 50), 20х–230х (DTX 30)
1600x1200, 1280x1024, 1280x960, 1024x768, 800x600, 640x480,
352x288, 320x240, 160x120
2560x2048 (5M), 2000x1600, 1600x1280 (2M), 1280x1024, 1024x960,
1024x768, 800x600, 640x480, 352x288, 320x240, 160x120
1600x1200, 1280x1024, 1280x960, 1024x768, 800x600, 640x480,
352x288, 320x240, 160x120
2560x2048 (5M), 2000x1600, 1600x1280 (2M), 1280x1024, 1024x960,
1024x768, 800x600, 640x480, 352x288, 320x240, 160x120
*.jpeg or *.bmp/*.avi
Manual, 0–150 mm focusing range
8-LED system with variable brightness
USB 2.0 cable
30 fps
English, German, Spanish, Korean, French, Russian
125 mm х 33 mm
System requirements
Operating system: Windows XP SP2/Vista/7/8, Mac 10.6~10.8,
CPU: at least P4 1.8 GHz, RAM: 5 12 MB, interface: USB 2.0
12
Page 15

Levenhuk Limited Warranty
All Levenhuk telescopes, microscopes, binoculars and other optical products, except for accessories, carry a lifetime warranty against
defects in materials and workmanship. Lifetime warranty is a guarantee on the lifetime of the product on the market. All Levenhuk
accessories are warranted to be free of defects in materials and workmanship for six months from date of retail purchase. Levenhuk
will repair or replace such product or part thereof which, upon inspection by Levenhuk, is found to be defective in materials
or workmanship. As a condition to the obligation of Levenhuk to repair or replace such product, the product must be returned to Levenhuk
together with proof of purchase satisfactory to Levenhuk.
This warranty does not cover consumable parts, such as bulbs (electrical, LED, halogen, energy-saving and other types of lamps), batteries
(rechargeable and non-rechargeable), electrical consumables etc.
A Return Authorization (RA) Number must be obtained in advance of return. Contact the local Levenhuk branch to receive the RA number
to be displayed on the outside of your shipping container. All returns must be accompanied by a written statement setting forth the name,
address and telephone number of the owner, including a description of any claimed defects. Parts or products for which replacement
is made will become the property of Levenhuk.
The customer will be responsible for all costs of transportation and insurance to and from Levenhuk or its authorized dealers and will be
required to prepay such costs.
Levenhuk will use reasonable efforts to repair or replace any product covered by this warranty within thirty days of receipt. If a repair
or replacement will require more than thirty days, Levenhuk will notify the customer accordingly. Levenhuk reserves the right to replace
any product that has been discontinued from its product line with a new product of comparable value and function.
This warranty does not apply to any defects or damages resulting from alteration, modification, neglect, misuse, usage of improper power
sources, damage in transportation, abuse, or any cause other than normal use, or to malfunction or deterioration due to normal wear.
This warranty does not cover product that is lost, stolen, dropped, shattered, or any other type of damage or modifications to the original
product caused by the customer.Levenhuk disclaims all warranties, express or implied, whether of merchantability or fitness for
a particular use, except as expressly set forth herein. The sole obligation of Levenhuk under this limited warranty will be to repair
or replace the covered product, in accordance with the terms set forth herein.
13
Page 16

Levenhuk disclaims liability for any loss of profits, loss of information, or for any general, special, direct, indirect or consequential
damages which may result from breach of any warranty, or arising out of the use or inability to use any Levenhuk product. Any warranties
which are implied and which cannot be disclaimed will be limited in duration to a term of six months for accessories from the date
of retail purchase.
Some states/provinces do not allow the exclusion or limitation of incidental or consequential damages, so the above limitations
and exclusions may not apply to you. This warranty gives you specific legal rights, and you may have other rights which vary from state
to state or province to province.
Levenhuk reserves the right to modify or discontinue any product without prior notice.
NOTE: This warranty is valid to USA and Canadian customers who have purchased this product from an authorized Levenhuk dealer
in the USA or Canada. Warranty outside the USA or Canada is valid only to customers who purchased from an authorized Levenhuk dealer
in the specific country or international distributor. Please contact them for any warranty service.
If warranty problems arise, or if you need assistance in using your product, contact the local Levenhuk branch:
Levenhuk Worldwide:
USA: www.levenhuk.com
Canada: www.levenhuk.ca
Czech Republic: www.levenhuk.cz
Purchase date _______________ Signature___________________ Stamp
Germany: de.levenhuk.com
Netherlands: nl.levenhuk.com
Poland: pl.levenhuk.com
Russia: www.levenhuk.ru
Ukraine: www.levenhuk.ua
EU: www.levenhuk.eu
14
Page 17

Levenhuk DTX 30
Levenhuk DTX 50
CZ
Digitální mikroskop
Nikdy, za žádných okolností se tímto přístrojem nedívejte přímo do slunce,
jiného světelného zdroje nebo laseru, neboť hrozí nebezpečí TRVALÉHO POŠKOZENÍ SÍTNICE
a případně i OSLEPNUTÍ.
Obsah soupravy
Mikroskop
Levenhuk DTX
Software
DTX 30
Photo/video capturing
DTX 50
and micromeasuring software
for Levenhuk Digital Microscopes
DTX 90
+ user manuals
DTX 500 Mobi
DTX 500 LCD
Windows/Mac
www.levenhuk.com
Instalační CD
Levenhuk DTX
Levenhuk DTX 30
Levenhuk DTX 50
230x
MEGA
2
PIXELS
USB 2.0
400x
MEGA
1.3
PIXELS
Цифровой микроскоп
Инструкция по эксплуатации
Návod k použití Kalibrační stupnice
15
Page 18

Instalace software
Před instalací mikroskopu se ujistěte, že je připojen k počítači. Do CD jednotky svého počítače vložte
instalační CD. Zobrazí se okno hlavní nabídky. Kliknutím na položku Install Microscope Driver (Instalovat
ovladač mikroskopu) zahajte instalaci potřebných ovladačů a postupujte podle pokynů na obrazovce.
Po dokončení instalace ovladačů kliknutím na položku MicroCapture software spusťte instalaci software.
Upozorňujeme, že během instalace bude vyžadováno restartování počítače. Instalační CD obsahuje kopii
této uživatelské příručky, kterou můžete otevřít kliknutím na odpovídající položku v hlavní nabídce.
Montáž mikroskopu
Sejměte ochrannou krytku z čočky objektivu. Pomocí zaostřovacího
šroubu zaostřete obraz. Tlačítko závěrky vám umožňuje pořizovat
snímky při výchozím nastavení (použití software MicroCapture
k vytváření fotografií je popsáno v příslušné části tohoto návodu).
Pokud si přejete upravit jas LED osvětlení, použijte k tomu regulátor
nastavení jasu v horní části těla mikroskopu.
1. Regulátor LED osvětlení
2. Tlačítko pořízení snímku
3. Zaostřovací šroub
4. Kalibrační stupnice
16
Page 19

Práce s aplikací PortableCapture
Do CD jednotky svého počítače vložte instalační CD. Zobrazí se okno hlavní nabídky. Instalaci aplikace
PortableCapture Pro zahájíte zvolením možnosti PortableCapture software. Upozorňujeme, že během
instalace bude vyžadováno restartování počítače. Instalační CD obsahuje kopii této uživatelské
příručky, kterou můžete otevřít kliknutím na odpovídající položku v hlavní nabídce.
První kroky
Pomocí USB kabelu připojte mikroskop k počítači a spusťte aplikaci
PortableCapture. Není-li k počítači připojen mikroskop, otevře se okno
se upozorněním.
Rozlišení obrazu
V nabídce Options (Možnosti) zvolte možnost Preview Size (Velikost náhledu)
a nastavte rozlišení obrazu.
Otáčení snímku
V nabídce Options (Možnosti) vyberte možnost Rotate (Otočit) a snímek
pootočte o 90° po směru nebo proti směru hodinových ručiček.
Datum a čas
V nabídce Options (Možnosti) zvolte možnost Date/Time (Datum/čas),
pomocí níž lze během náhledu zobrazit nebo skrýt datum a čas pořízení
snímku.
17
Page 20

Jazyk
V nabídce Options (Možnosti) vyberte možnost Language (Jazyk) a změňte
jazyk uživatelského rozhraní.
Režim celé obrazovky
Do režimu celé obrazovky lze přejít třemi způsoby:
1. Dvakrát klikněte na obrázek v hlavním okně;
2. Klikněte na ikonu Full screen mode (Režim celé obrazovky)
na panelu nástrojů;
3. V nabídce Options (Možnosti) vyberte možnost Fullscreen mode
(Režim celé obrazovky).
Chcete-li režim celé obrazovky ukončit, klikněte na odpovídající ikonu
na panelu nástrojů.
Vzhledy
V nabídce Options (Možnosti) zvolte možnost Skin (Vzhled) a změňte vzhled uživatelského rozhraní.
Nastavení
V nabídce Options (Možnosti) zvolte možnost Preferences (Předvolby) a nastavte různé předvolby
aplikace MicroCapture, například jas, kontrast a sytost snímků, vyvážení bílé apod.
18
Page 21

Snímky a videozáznamy
Snímání obrazu
Klikněte na příslušnou ikonu v panelu nástrojů nebo v nabídce Capture (Snímání) zvolte možnost
Photo, nebo stiskněte klávesu F11 na své klávesnici. Na pravé straně hlavního okna se zobrazí náhled
pořízeného snímku.
Pořizování videozáznamů
Klikněte na příslušnou ikonu v panelu nástrojů nebo v nabídce Capture (Snímání) zvolte možnost
Video. Po zahájení nahrávání se změní ikona kamery na panelu nástrojů. Nahrávání zastavíte dalším
kliknutím na příslušnou ikonu na panelu nástrojů nebo v nabídce Capture (Snímat) zvolte možnost
Stop Capturing (Zastavit snímání).
Poznámka: doporučené rozlišení pro video je 640x460.
19
Page 22

Práce se snímky
Náhled
Levým tlačítkem myši klikněte na náhled snímku, který chcete upravit.
Snímek se otevře v hlavním okně aplikace. V levém dolním rohu
obrazovky se zobrazí rozlišení snímku. Dvojitým kliknutím na náhled
obrázku jej otevřete v samostatném okně.
Ukládání snímků
Snímek uložíte tak, že pravým tlačítkem myši kliknete na náhled
požadovaného obrázku a z rozbalovací nabídky vyberete položku
Save (Uložit). Obrázky lze ukládat ve formátech .jpg a .bmp.
Při ukládání snímku ve formátu .jpg můžete po kliknutí na položku
Advanced (Pokročilé) zobrazit a upravit další možnosti.
Odstraňování snímků
Snímek odstraníte tak, že pravým tlačítkem myši kliknete na náhled
požadovaného obrázku a z rozbalovací nabídky vyberete položku
Delete (Odstranit). Při zobrazení snímků v samostatném okně můžete
kliknout na příslušnou ikonu na panelu nástrojů a snímek odstranit.
20
Page 23

Kalibrace a měření
Umístěte na pracovní stolek pravítko, zaostřete obraz a pořiďte snímek. Podívejte se na kalibrační
stupnici na těle mikroskopu a zaznamenejte si aktuální zvětšení. Dvojitým kliknutím na náhled
obrázku jej otevřete v samostatném okně. Do příslušného pole v pravém horním rohu okna s náhledy
zadejte hodnotu zvětšení. Po kalibraci mikroskopu budete schopni měřit různé parametry
pozorovaných preparátů. Všechna tlačítka na panelu nástrojů okna náhledů jsou popsána níže.
Line (Čára)
Chcete-li začít kreslit čáru, stiskněte a přidržte levé tlačítko myši.
Čáru ukončíte uvolněním levého tlačítka myši.
Free-form line (Volná forma čáry)
Chcete-li začít kreslit čáru, stiskněte a přidržte levé tlačítko myši.
Segment ukončíte uvolněním levého tlačítka myši. K čáře volné formy
můžete přidávat další segmenty.
21
Page 24

Radius (Poloměr)
Na snímku nakreslete přímku. Aplikace automaticky vypočte poloměr,
obvod a plochu odpovídajícího kruhu.
Diameter (Průměr)
Na snímku nakreslete přímku. Aplikace automaticky vypočte průměr,
obvod a plochu odpovídajícího kruhu.
Angle (Úhel)
Chcete-li začít kreslit čáru na obrázku, stiskněte a přidržte levé tlačítko
myši. Uvolněte levé tlačítko myši a nakreslete další čáru. Aplikace
automaticky vypočte hodnotu výsledného úhlu.
Jednotky měření
V rozbalovací nabídce na liště nástrojů si můžete zvolit jednotky měření
pro výpočty (obrazové body, palce, kilometry, metry, centimetry,
milimetry, mikrony).
22
Page 25

Další nástroje na panelu nástrojů okna náhledu jsou popsány níže.
Tímto tlačítkem vytvoříte na snímku textové pole
Pomocí tohoto tlačítka lze upravovat parametry písma
Tato tlačítka vám umožňují do snímku něco zakreslit
Tímto tlačítkem můžete zvolit barvu čáry.
Tímto tlačítkem můžete zvolit tloušťku čáry.
Tímto tlačítkem můžete zvolit styl čáry.
Tímto tlačítkem zrušíte poslední provedenou akci.
Poznámka:
1. Rozsah zvětšení mikroskopu Levenhuk DTX 50 je 20x–400x, Levenhuk DTX 30 – 20x–230x.
Nepoužívejte hodnoty zvětšení nad tímto intervalem.
2. Aplikace vypočte hodnoty na základě zadaného zvětšení. Výsledky nemusí být přesné.
3. Funkce měření jsou k dispozici pouze uživatelům MS Windows.
23
Page 26

Práce s aplikací v prostředí Mac OS
Pomocí kabelu USB mikroskop připojte k počítači.
Dvojím kliknutím na ikonu PortableCapture Pro spusťte aplikaci.
Zvětšený obraz pozorovaného preparátu lze pozorovat v hlavním okně aplikace.
V nabídce Options (Možnosti) zvolte možnost Preview Size (Velikost náhledu) a nastavte rozlišení
obrazu. Mějte na paměti, že velikost okna náhledu nelze měnit (standardní rozlišení
je 640x480).Hodnota rozlišení obrazu se zobrazuje v levém dolním rohu okna náhledu.
V nabídce Options (Možnosti) zvolte možnost Date/Time (Datum/čas), pomocí níž lze během náhledu
zobrazit nebo skrýt datum a čas pořízení snímku.
Klikněte na příslušnou ikonu v panelu nástrojů nebo v nabídce Capture (Snímání) zvolte možnost Photo.
Na pravé straně hlavního okna se zobrazí náhled snímku.
Klikněte na příslušnou ikonu v panelu nástrojů nebo v nabídce Capture (Snímání) zvolte možnost Video.
Poznámka: během nahrávání se barva ikona kamery v panelu nástrojů změní na červenou.
Dalším kliknutím na tuto ikonu nahrávání ukončíte.
Dvojitým kliknutím na náhled obrázku jej otevřete v samostatném okně náhledu. Úpravy obrázků
pomocí aplikace PortableCapture Pro se provádějí obdobně jako při práci s jiným aplikacemi
v systému Mac OS.
24
Page 27

Péče a údržba
Nikdy, za žádných okolností se tímto přístrojem nedívejte přímo do slunce, jiného světelného zdroje nebo laseru, neboť
hrozí nebezpečí TRVALÉHO POŠKOZENÍ SÍTNICE a případně i OSLEPNUTÍ. Bílé LED žárovky jsou velmi jasné; nedívejte se
přímo do nich, hrozí nebezpečí trvalého poškození zraku. Při použití tohoto přístroje dětmi nebo osobami, které tento
návod nečetly nebo s jeho obsahem nebyly plně srozuměny, uplatněte nezbytná preventivní opatření. Nepokoušejte se
přístroj sami rozebírat. S opravami veškerého druhu se obracejte na své místní specializované servisní středisko. Po
vybalení mikroskopu a před jeho prvním použitím zkontrolujte neporušenost jednotlivých komponent a spojů. Nedotýkejte
se svými prsty povrchů optiky. K vyčištění čoček můžete použít měkký ubrousek nebo čisticí utěrku navlhčené v éteru,
případně v čistém alkoholu. Doporučujeme používat speciální čisticí prostředky na optiku značky Levenhuk. K čištění optiky
nepoužívejte žádné žíraviny ani kapaliny na acetonové bázi. Abrazivní částice, například písek, by se neměly z čoček otírat,
ale sfouknout nebo smést měkkým kartáčkem.Při zaostřování nevyvíjejte nadměrný tlak. Neutahujte šrouby konstrukce
příliš silně. Přístroj chraňte před prudkými nárazy a nadměrným mechanickým namáháním. Přístroj ukládejte na suchém,
chladném místě, mimo dosah možných zdrojů prachu, nebezpečných kyselin nebo jiných chemikálií, topných těles,
otevřeného ohně a jiných zdrojů vysokých teplot. Přístroj příliš dlouho nepoužívejte ani neponechávejte bez dozoru
na přímém slunci. Chraňte přístroj před stykem s vodou. Při pozorování dbejte na opatrnost; po skončení pozorování vždy
nasaďte ochranný kryt, abyste mikroskop ochránili před prachem a jiným znečištěním. Pokud svůj mikroskop nebudete
delší dobu používat, uložte čočky objektivu a okuláru odděleně od samotného mikroskopu. Chcete-li předejít ztrátě
at nebo poškození zařízení, vždy nejprve zavřete aplikaci a teprve poté odpojte mikroskop od svého počítače. Počkejte,
až osvětlení zcela zhasne, a pak odpojte mikroskop. Při náhodném požití malé součásti nebo baterie ihned vyhledejte
lékařskou pomoc.
Bezpečnostní pokyny týkající se baterií
Vždy nakupujte baterie správné velikosti a typu, které jsou nejvhodnější pro zamýšlený účel. Při výměně vždy nahrazujte
celou sadu baterií a dbejte na to, abyste nemíchali staré a nové baterie, případně baterie různých typů. Před instalací
baterií vyčistěte kontakty na baterii i na přístroji. Ujistěte se, zda jsou baterie instalovány ve správné polaritě (+ resp. -).
V případě, že zařízení nebudete delší dobu používat, vyjměte z něj baterie. Použité baterie včas vyměňujte. Baterie
e nikdy nepokoušejte dobíjet, mohlo by dojít k úniku obsahu baterie, požáru nebo k explozi. Baterie nikdy nezkratujte,
mohlo by to vést ke zvýšení teploty, úniku obsahu baterie nebo k explozi. Baterie se nikdy nepokoušejte oživit zahříváním.
Po použití nezapomeňte přístroj vypnout. Baterie uchovávejte mimo dosah dětí, abyste předešli riziku spolknutí, vdechnutí
nebo otravy.
25
Page 28

Technické údaje
Obrazový snímač
Zvětšení
Dostupná rozlišení obrazu (DTX 50)
Dostupná rozlišení obrazu (DTX 30)
Dostupná rozlišení video (DTX 50)
Dostupná rozlišení video (DTX 30)
Photo/video format
Zaostření
Osvětlení
Napájení
Snímková rychlost
Jazyk software
Rozměry (délka x průměr)
Společnost Levenhuk si vyhrazuje právo provádět bez předchozího upozornění úpravy jakéhokoliv výrobku, případně zastavit jeho výrobu.
1,3 Mpx (interpolací 2 Mpx) DTX 50
2 Mpx (interpolací 5 Mpx) DTX 30
20x–400x (DTX 50), 20х–230х (DTX 30)
1600x1200, 1280x1024, 1280x960, 1024x768, 800x600, 640x480,
352x288, 320x240, 160x120
2560x2048 (5M), 2000x1600, 1600x1280 (2M), 1280x1024, 1024x960,
1024x768, 800x600, 640x480, 352x288, 320x240, 160x120
1600x1200, 1280x1024, 1280x960, 1024x768, 800x600, 640x480,
352x288, 320x240, 160x120
2560x2048 (5M), 2000x1600, 1600x1280 (2M), 1280x1024, 1024x960,
1024x768, 800x600, 640x480, 352x288, 320x240, 160x120
*.jpeg, *.bmp/*.avi
Ruční, rozsah ostření 0–150 mm
Systém s 8 LED žárovkami, s regulací jasu
USB 2.0 kabel
30 fps
Angličtina, němčina, španělština, korejština, francouzština, ruština
125 mm х 33 mm
Systémové požadavky
Operační systém: W indows XP SP2/Vista/7/8, Mac 10.6~10.8
CPU: minimálně P4 1.8 GHz, RAM: 5 12 MB, rozhraní: USB 2.0.
26
Page 29

Mezinárodní záruka
Na veškeré teleskopy, mikroskopy, triedry a další optické výrobky značky Levenhuk, s výjimkou příslušenství, se poskytuje
doživotní záruka pokrývající vady materiálu a provedení. Doživotní záruka je záruka platná po celou dobu životnosti
produktu na trhu. Na veškeré příslušenství značky Levenhuk se poskytuje záruka toho, že je dodáváno bez jakýchkoli vad
materiálu a provedení, a to po dobu dvou let od data zakoupení v maloobchodní prodejně. Společnost Levenhuk provede
opravu či výměnu výrobku nebo jeho části, u nichž se po provedení kontroly společností Levenhuk prokáže výskyt vad
materiálu nebo provedení. Nezbytnou podmínkou toho, aby společnost Levenhuk splnila svůj závazek provést opravu nebo
výměnu takového výrobku, je předání výrobku společně s dokladem o nákupu vystaveným ve formě uspokojivé pro Levenhuk.
Tato záruka se nevztahuje na spotřební materiál, jako jsou žárovky (klasické, LED, halogenové, úsporné a jiné typy žárovek),
baterie (akumulátory i jednorázové baterie), elektromontážní spotřební materiál apod.
Ke všem vráceným výrobkům musí být přiloženo písemné prohlášení, na němž bude uvedeno jméno, adresa a telefonní číslo
majitele výrobku, včetně popisu veškerých reklamovaných závad. Součásti nebo výrobky, za něž bude poskytnuta výměna,
se stávají majetkem společnosti Levenhuk.
Zákazník je povinen předem uhradit veškeré náklady na dopravu a pojištění do společnosti Levenhuk, případně k jejím
autorizovaným dealerům, a zpět.
Společnost Levenhuk vyvine přiměřené úsilí k tomu, aby výrobek, na nějž se vztahuje tato záruka, opravila nebo vyměnila
do 30 dnů od jeho obdržení. V případě, že bude oprava nebo výměna trvat déle než 30 dní, bude o tom společnost Levenhuk
zákazníka informovat. Společnost Levenhuk si vyhrazuje právo jakýkoli výrobek, jehož výroba byla zastavena, nahradit
novým výrobkem srovnatelné hodnoty a funkce.
Tato záruka se nevztahuje na závady nebo poškození vyplývající z pozměňování, úprav, nedbalosti, nesprávného použití,
použití nevhodných zdrojů napájení, poškození při dopravě, nedodržení pokynů, případně z jakékoliv jiné příčiny mimo
rozsah běžného užívání, nebo z důvodu poruchy či zhoršení funkčnosti v důsledku běžného opotřebení. Tato záruka se
nevztahuje na výrobek, na němž vznikla škoda v důsledku ztráty, odcizení, pádu, nárazu nebo jiného typu poškození
či změny původního výrobku způsobeného zákazníkem.
27
Page 30

Společnost Levenhuk odmítá jakékoliv jiné záruky, výslovně uvedené i mlčky předpokládané, týkající se obchodovatelnosti
nebo vhodnosti pro konkrétní účel, kromě těch, jež jsou výslovně uvedeny v této omezené záruce. Jediným závazkem
společnosti Levenhuk v rámci této omezené záruky bude provedení opravy nebo výměny výrobku, na který se tato záruka
vztahuje, a to v souladu s podmínkami v ní uvedenými. Společnost Levenhuk nepřebírá odpovědnost za žádné ušlé zisky,
ztrátu informací, ani za žádné všeobecné, speciální, přímé, nepřímé či následné škody, jež mohou vyplynout z porušení
jakékoliv záruky, případně nastat v důsledku užívání nebo nemožnosti použití jakéhokoliv výrobku značky Levenhuk.
Veškeré mlčky předpokládané záruky, jež nelze vyloučit, budou časově omezeny na období dvou let v případě příslušenství,
a to vždy od data zakoupení v maloobchodní prodejně.
Společnost Levenhuk si vyhrazuje právo provádět bez předchozího upozornění úpravy jakéhokoliv výrobku,
případně zastavit jeho výrobu.
Záruka mimo území USA nebo Kanady platí pouze pro zákazníky, kteří provedli nákup u autorizovaného dealera společnosti
Levenhuk v příslušné zemi nebo od mezinárodního distributora. S veškerými záručními opravami se obracejte na tyto subjekty.
V případě problémů s uplatněním záruky, nebo pokud budete potřebovat pomoc při používání svého výrobku,
obraťte se na místní pobočku společnosti Levenhuk:
Levenhuk ve světě:
USA: www.levenhuk.com
Kanada: www.levenhuk.ca
Česká republika: www.levenhuk.cz
Datum nákupu _______________ Podpis __________________ Razítko
Německo: de.levenhuk.com
Nizozemsko: nl.levenhuk.com
Polsko: pl.levenhuk.com
Rusko: www.levenhuk.ru
Ukrajina: www.levenhuk.ua
EU: www.levenhuk.eu
28
Page 31

Levenhuk DTX 30
Levenhuk DTX 50
PL
Mikroskop cyfrowy
Pod żadnym pozorem nie wolno kierować urządzenia bezpośrednio na słońce,
światło laserowe lub inne źródło jasnego światła bez stosowania specjalnego filtra,
ponieważ może to spowodować TRWAŁE USZKODZENIE SIATKÓWKI lub doprowadzić do ŚLEPOTY.
W skład zestawu wchodzi
Levenhuk DTX
Software
DTX 30
Photo/video capturing
DTX 50
and micromeasuring software
for Levenhuk Digital Microscopes
DTX 90
+ user manuals
DTX 500 Mobi
DTX 500 LCD
Windows/Mac
www.levenhuk.com
Mikroskop Płyta instalacyjna
Levenhuk DTX
Levenhuk DTX 30
Levenhuk DTX 50
230x
MEGA
2
PIXELS
USB 2.0
400x
MEGA
1.3
PIXELS
Цифровой микроскоп
Инструкция по эксплуатации
Instrukcja obsługi Skala kalibracyjna
29
Page 32

Instalacja oprogramowania
Przed przystąpieniem do konfiguracji upewnij się, że mikroskop jest podłączony do komputera.
Umieść płytę instalacyjną w napędzie CD. Wyświetlone zostanie okno menu głównego. Kliknij install
Microscope Driver (Zainstaluj sterownik mikroskopu), aby zainstalować wymagane sterowniki, i postępuj
według instrukcji wyświetlanych na ekranie. Po zainstalowaniu sterowników kliknij MicroCapture
software (Oprogramowanie MicroCapture), aby zainstalować aplikację. Pamiętaj, że podczas instalacji
wymagane będzie zrestartowanie systemu. Płyta instalacyjna zawiera kopię niniejszej instrukcji,
z której treścią można zapoznać się, klikając odpowiadającą pozycję w menu głównym.
Pierwsze kroki
Zdejmij osłonę ochronną z soczewki obiektywowej. Użyj pokrętła
regulacji ostrości, aby ustawić ostrość obrazu. Przycisk migawki
umożliwia robienie zdjęć o określonych ustawieniach (korzystanie
z oprogramowania MicroCapture do robienia zdjęć opisano w
odpowiednim rozdziale niniejszej instrukcji obsługi). Aby ustawić
jasność podświetlenia LED, użyj pierścienia do regulacji jasności
znajdującego się w górnej części korpusu mikroskopu.
1. Pierścień do regulacji jasności podświetlenia
2. Przycisk migawki
3. Pokrętło regulacji ostrości
4. Skala kalibracyjna
30
Page 33

Praca z aplikacją PortableCapture
Umieść płytę instalacyjną w napędzie CD. Wyświetlone zostanie okno menu głównego.
Wybierz PortableCapture software (Oprogramowanie PortableCapture), aby zainstalować aplikację
PortableCapture. Pamiętaj, że podczas instalacji wymagane będzie zrestartowanie systemu.
Płyta instalacyjna zawiera kopię niniejszej instrukcji, z której treścią można zapoznać się, klikając
odpowiadającą pozycję w menu głównym.
Pierwsze kroki
Podłącz mikroskop do komputera za pomocą kabla USB i uruchom aplikację
PortableCapture. Jeżeli mikroskop nie będzie podłączony do komputera,
wyświetlony zostanie komunikat ostrzegawczy.
Rozdzielczość obrazu
W menu Options (Opcje) wybierz Preview Size (Rozmiar podglądu),
aby ustawić rozdzielczość obrazu.
Obracanie zdjęcia
Z poziomu menu Options (Opcje) wybierz Rotate (Obróć), aby obrócić
utworzone zdjęcie o 90° w prawo lub w lewo.
Data i godzina
W menu Options (Opcje) wybierz Date/Time (Data/Godzina), aby wyświetlić
lub ukryć datę i godzinę przechwytywania podczas podglądu.
31
Page 34

Język
Z poziomu menu Options (Opcje) wybierz Language (Język),
aby wybrać język interfejsu użytkownika.
Tryb pełnoekranowy
Tryb pełnoekranowy można włączyć na trzy sposoby:
1. Kliknij dwukrotnie obraz w głównym oknie.
2. Kliknij ikonę trybu pełnoekranowego na pasku narzędzi.
3. Z poziomu menu Options (Opcje) wybierz Fullscreen mode
(Tryb pełnoekranowy). Aby wyjść z trybu pełnoekranowego,
kliknij odpowiednią ikonę na pasku narzędzi.
Skórki
Z poziomu menu Options (Oopcje) wybierz Skin (Sskórka), aby zmienić wygląd interfejsu użytkownika.
Ustawienia
Z poziomu menu Options (opcje) wybierz Preferences (Preferencje), aby wybrać różne ustawienia
aplikacji MicroCapture, w tym jasność, kontrast i nasycenie obrazu, balans bieli itd.
32
Page 35

Obrazy i pliki wideo
Przechwytywanie obrazu
Kliknij odpowiednią ikonę na pasku zadań lub wybierz Photo (Zdjęcie) z menu Capture
(Przechwytywanie), lub naciśnij F11 na klawiaturze. Po prawej stronie głównego okna pojawi się
miniatura zrobionego zdjęcia.
Nagrywanie filmu
Kliknij odpowiednią ikonę na pasku zadań lub wybierz Video (Film) z menu Capture
(Przechwytywanie). Po rozpoczęciu nagrywania ikona kamery na pasku narzędzi zmieni wygląd.
Aby zatrzymać nagrywanie, kliknij ponownie odpowiednią ikonę na pasku narzędzi lub wybierz
opcję Stop capturing (Zatrzymaj nagrywanie) z menu Capture (Nagrywanie).
Uwaga: zalecana rozdzielczość obrazu wideo to 640x480.
33
Page 36

Obróbka zdjęć
Podgląd
Kliknij lewym przyciskiem myszy zdjęcie, które chcesz edytować,
aby otworzyć je w głównym oknie aplikacji. Rozdzielczość obrazu zostanie
wyświetlona w lewym dolnym rogu ekranu. Kliknij dwukrotnie miniaturę,
aby otworzyć zdjęcie w nowym oknie.
Zapisywanie zdjęć
Aby zapisać zdjęcie, kliknij prawym przyciskiem myszy miniaturę
wybranego zdjęcia i wybierz opcję Save (Zapisz) z rozwijanego menu.
Można zapisać zdjęcia w formacie .jpeg lub .bmp. W przypadku
zapisywania zdjęć w formacie .jpeg, kliknij Advanced (Zaawansowane),
aby wyświetlić i wybrać dodatkowe opcje.
Usuwanie zdjęć
Aby usunąć zdjęcie, kliknij prawym przyciskiem myszy miniaturę
wybranego zdjęcia i wybierz opcję Delete (Usuń) z rozwijanego menu.
Podczas wyświetlania zdjęć w osobnym oknie kliknij odpowiednią ikonę
na pasku narzędzi, aby usunąć zdjęcie.
34
Page 37

Kalibracja i pomiary
Umieść podziałkę na stoliku, ustaw ostrość obrazu i zrób zdjęcie. Zapisz wielkość powiększenia
odczytanego ze skali kalibracyjnej na korpusie mikroskopu. Dwukrotnie kliknij miniaturę obrazu,
aby otwórz ją w osobnym oknie. Wprowadź wartość powiększenia w odpowiednim polu w prawym
górnym rogu ekranu podglądu. Po kalibracji mikroskopu możesz mierzyć różne parametry
obserwowanych próbek. Poniżej opisano wszystkie przyciski znajdujące się na pasku narzędzi
w oknie podglądu.
Line (Linia)
Nacisnij i przytrzymaj lewy przycisk myszy, aby rozpocząć rysowanie linii.
Zwolnij lewy przycisk myszy, aby zakończyć rysowanie linii.
Free-form line (Linia dowolna)
Naciśnij i przytrzymaj lewy przycisk myszy, aby narysować linię.
Zwolnij lewy przycisk myszy, aby zakończyć rysowanie odcinka linii.
Możesz dodać więcej odcinków do linii.
35
Page 38

Radius (Promień)
Po narysowaniu prostej linii na ekranie aplikacja automatycznie wyznacza
promień okręgu oraz obwód i pole odpowiadającego koła.
Diameter (Średnica)
Po narysowaniu prostej linii na ekranie aplikacja automatycznie wyznacza
średnicę okręgu oraz obwód i pole odpowiadającego koła.
Angle (Kąt)
Naciśnij i przytrzymaj lewy przycisk myszy, aby narysować linię
na zdjęciu. Naciśnij i przytrzymaj lewy przycisk myszy, aby narysować
kolejną linię. Aplikacja automatycznie obliczy wartość kąta pomiędzy
tymi liniami.
Jednostki miar
Z rozwijanego menu na pasku narzędzi można wybrać jednostki miar
stosowane do obliczeń (piksele, cale, kilometry, metry, centymetry,
milimetry, mikrometry).
36
Page 39

Poniżej opisano pozostałe narzędzia znajdujące się na pasku zadań w oknie podglądu.
Naciśnij ten przycisk, aby dodać pole tekstowe na zdjęciu
Naciśnij ten przycisk, aby edytować ustawienia czcionki
Te przyciski umożliwiają narysowanie różnych kształtów na zdjęciu
Naciśnij ten przycisk, aby wybrać kolor linii
Naciśnij ten przycisk, aby wybrać grubość linii
Naciśnij ten przycisk, aby wybrać styl linii
Naciśnij ten przycisk, aby cofnąć ostatnią operację
Uwaga:
1. Zakres powiększenia mikroskopu Levenhuk DTX 50 to 20x–400x, Levenhuk DTX 50 – 20x–230x.
Nie należy używać powiększenia o wartości wykraczającej poza ten zakres.
2. Aplikacja oblicza wartości na podstawie wprowadzonej wartości powiększenia.
Wyniki mogą nie być precyzyjne.
3. Funkcje pomiarów są dostępne wyłącznie dla użytkowników systemu MS Windows.
37
Page 40

Praca z aplikacją przez użytkowników systemu Mac OS
Odszukaj folder mac na płycie instalacyjnej I skopiuj plik PortableCapture Pro na pulpit.
Podłącz mikroskop do komputera za pomocą kabla USB. Uruchom aplikację PortableCapture Pro,
klikając dwukrotnie jej ikonę.
W menu Options (Opcje) wybierz Preview Size (Rozmiar podglądu), aby ustawić rozdzielczość obrazu.
Pamiętaj, że nie można zmienić rozmiaru okna podglądu (standardowa rozdzielczość
to 640x480). Rozdzielczość obrazu podawana jest w lewym dolnym rogu okna podglądu.
Aby przechwycić obraz, kliknij odpowiednią ikonę na pasku zadań lub wybierz Photo (Zdjęcie)
z menu Capture (Przechwytywanie).
Po prawej stronie głównego okna wyświetlona zostanie miniatura obrazu.
Aby rozpocząć nagrywanie filmu, kliknij odpowiednią ikonę na pasku zadań lub wybierz Video (Film)
z menu Capture (Przechwytywanie).
Uwaga: podczas nagrywania kolor ikony kamery na pasku narzędzi zmieni się na czerwony.
Kliknij ikonę ponownie, aby zatrzymać nagrywanie.
Edycja obrazów w aplikacji PortableCapture Pro przebiega w sposób podobny do obsługi innych
aplikacji w systemie Mac OS.
38
Page 41

Konserwacja i pielęgnacja
Pod żadnym pozorem nie wolno kierować urządzenia bezpośrednio na słońce, światło laserowe lub inne źródło jasnego światła
bez stosowania specjalnego filtra, ponieważ może to spowodować TRWAŁE USZKODZENIE SIATKÓWKI lub doprowadzić do ŚLEPOTY.
Białe diody LED świecą niezwykle jasnym światłem, z tego powodu nie należy patrzeć na nie bezpośrednio, ponieważ może
to doprowadzić do trwałego uszkodzenia wzroku. Zachowaj szczególną ostrożność, gdy urządzenia używają dzieci lub osoby,
które nie w pełni zapoznały się z instrukcjami. Nie podejmuj prób samodzielnego demontażu urządzenia, nawet w celu
wyczyszczenia lustra. W celu wszelkich napraw i czyszczenia skontaktuj się z punktem serwisowym. Po rozpakowaniu mikroskopu
i przed jego pierwszym użyciem należy sprawdzić stan i prawidłowość podłączenia każdego elementu. Nie dotykać powierzchni
optycznych palcami. Soczewki czyścić za pomocą ściereczki czyszczącej lub ściereczki nasączonej alkoholem. Polecamy
stosowanie specjalnych środków do czyszczenia układu optycznego firmy Levenhuk. Nie czyścić układu optycznego za pomocą
środków żrących lub zawierających aceton. Cząsteczki ścierające, takie jak ziarna piasku, powinny być zdmuchiwane
z powierzchni soczewek lub usuwane za pomocą miękkiej szczotki. Nie używać nadmiernej siły podczas ustawiania ostrości.
Nie należy dokręcać zbyt mocno śrub blokujących. Chronić przyrząd przed upadkami z wysokości i działaniem nadmiernej siły
mechanicznej. Przyrząd powinien być przechowywany w suchym, chłodnym miejscu, z dala od kurzu, niebezpiecznych kwasów
oraz innych substancji chemicznych, grzejników, otwartego ognia i innych źródeł wysokiej temperatury. Nie wystawiać przyrządu
na długotrwałe działanie promieni słonecznych. Trzymać z dala od wody. Nie przechowywać w warunkach wysokiej wilgoci, nie
zanurzać. Podczas obserwacji należy zachować ostrożność. Po zakończeniu obserwacji założyć osłonę przeciwpyłową w celu
zabezpieczenia mikroskopu przed kurzem I zanieczyszczeniami. W przypadku korzystania z mikroskopu przez dłuższy czas
soczewki obiektywowe i okulary oraz mikroskop należy przechowywać osobno. Aby uniknąć utraty danych lub uszkodzenia
urządzenia, należy najpierw zamknąć aplikację, a dopiero później odłączyć mikroskop od komputera. Zaczekać, aż podświetlenie
całkowicie się wyłączy, i odłączyć mikroskop. W przypadku połknięcia małej części lub baterii należy natychmiast zwrócić się
o pomoc medyczną.
Instrukcje dotyczące bezpiecznego obchodzenia się z bateriami
Należy używać baterii odpowiedniego typu i w odpowiednim rozmiarze. Należy wymieniać wszystkie baterie jednocześnie;
nie należy łączyć starych i nowych baterii ani baterii różnych typów. Przed włożeniem baterii należy wyczyścić styki baterii
I urządzenia. Podczas wkładania baterii należy zwracać uwagę na ich bieguny (znaki + I -). Jeśli sprzęt nie będzie używany przez
dłuższy czas, należy wyjąć baterie. Zużyte baterie należy natychmiast wyjąć. Nie ładować baterii jednorazowych, ponieważ
wiąże się to z ryzykiem wycieku, pożaru lub wybuchu. Nie doprowadzać do zwarcia baterii, ponieważ wiąże się to z ryzykiem
powstania wysokich temperatur, wycieku lub wybuchu. Nie ogrzewać baterii w celu przedłużenia czasu ich działania. Należy
pamiętać o wyłączeniu urządzenia po zakończeniu użytkowania. Baterie przechowywać w miejscu niedostępnym dla dzieci,
aby uniknąć ryzyka połknięcia, uduszenia lub zatrucia.
39
Page 42

Dane techniczne
Matryca
Powiększenie
Dostępne rozdzielczości obrazu (DTX 50)
Dostępne rozdzielczości obrazu (DTX 30)
Dostępne rozdzielczości filmu (DTX 50)
Dostępne rozdzielczości filmu (DTX 30)
Zdjęcie/Film
Regulacja ostrości
Podświetlenie
Źródło zasilania
Frame rate
Język systemu operacyjnego
Wymiary (długość x średnica)
Levenhuk zastrzega sobie prawo do modyfikowania lub zakończenia produkcji dowolnego produktu bez wcześniejszego powiadomienia.
1,3 Mpx (2 Mpx interpolowane) DTX 50
2 Mpx (5 Mpx interpolowane) DTX 30
20x–400x (DTX 50), 20х–230х (DTX 30)
1600x1200, 1280x1024, 1280x960, 1024x768, 800x600,
640x480, 352x288, 320x240, 160x120
2560x2048 (5M), 2000x1600, 1600x1280, 1280x1024, 1024x960,
1024x768, 800x600, 640x480, 352x288, 320x240, 160x120
1600x1200, 1280x1024, 1280x960, 1024x768, 800x600, 640x480,
352x288, 320x240, 160x120
2560x2048 (5M), 2000x1600, 1600x1280, 1280x1024, 1024x960,
1024x768, 800x600, 640x480, 352x288, 320x240, 160x120
*.jpeg, *.bmp/*.avi
Ręczna, zakres ostrości 0–150 mm
System 8diod LED zregulacją jasności
Kabel USB 2.0
30 kl./s
Angielski, niemiecki, koreański, hiszpański, francuski, rosyjski
125 mm х 33 mm
Wymagania systemowe
System operacyjny: Windows XP SP2/Vista/7/8, Mac 10.6~10.8
Procesor: co najmniej P4 1,8 GHz, pamięć RAM: 512 MB, interfejs: USB 2.0
40
Page 43

Gwarancja międzynarodowa
Wszystkie teleskopy, mikroskopy, lornetki i inne przyrządy optyczne Levenhuk, za wyjątkiem akcesoriów, posiadają
dożywotnią gwarancję obejmującą wady materiałowe I wykonawcze. Dożywotnia gwarancja to gwarancja na cały okres
użytkowania produktu. Wszystkie akcesoria Levenhuk są wolne od wad materiałowych i wykonawczych i pozostaną takie przez
dwa lata od daty zakupu detalicznego. Firma Levenhuk naprawi lub wymieni produkty lub ich części, w przypadku których
kontrola prowadzona przez Levenhuk wykaże obecność wad materiałowych lub wykonawczych. Warunkiem wywiązania się przez
firmę Levenhuk z obowiązku naprawy lub wymiany produktu jest dostarczenie danego produktu firmie razem z dowodem zakupu
uznawanym przez Levenhuk.
Niniejsza gwarancja nie obejmuje części eksploatacyjnych, takich jak żarówki (elektryczne, LED, halogenowe, energooszczędne
I inne), baterie (akumulatory i zwykłe), akcesoria elektryczne itd.
Przed dokonaniem zwrotu produktu należy uzyskać numer zwrotu (RA – Return Authorization). W celu uzyskania numeru zwrotu
(RA), który należy umieścić na zewnętrznej części opakowania używanego podczas wysyłki, należy skontaktować się z lokalnym
przedstawicielem firmy Levenhuk. Do wszystkich zwrotów należy dołączyć pisemne oświadczenie zawierające imię i nazwisko,
adres i numer telefonu właściciela produktu oraz opis wad, z tytułu których dokonywany jest zwrot. Części lub produkty,
które zostaną wymienione, stają się własnością firmy Levenhuk.
Klient ponosi wszelkie koszty transportu do i z siedziby firmy Levenhuk lub jej autoryzowanego sprzedawcy oraz związane
z tym koszty ubezpieczenia. Klient ma obowiązek pokryć te koszty z wyprzedzeniem.
Levenhuk dołoży wszelkich starań, aby procedura naprawy lub wymiany produktu podlegającego niniejszej gwarancji została
zakończona w ciągu trzydziestu dni od daty otrzymania produktu. Jeśli naprawa lub wymiana potrwa więcej niż trzydzieści dni,
firma Levenhuk powiadomi o tym klienta. Levenhuk zastrzega sobie prawo do zastąpienia produktu wycofanego
z produkcji nowym produktem o zbliżonej wartości I funkcji.
Niniejsza gwarancja nie obejmuje wad i uszkodzeń wynikających z wprowadzenia zmian, modyfikacji, zaniedbania,
nieprawidłowego korzystania, użycia nieodpowiednich źródeł zasilania, uszkodzeń powstałych w wyniku transportu, nadużycia
lub innych przyczyn związanych z użytkowaniem produktu niezgodnie z zaleceniami bądź z nieprawidłowego działania lub
spadku jakości wynikającego ze zużycia produktu. Niniejsza gwarancja nie obejmuje produktu, który został utracony, skradziony,
upuszczony, zniszczony lub w inny sposób uszkodzony ani modyfikacji oryginalnego produktu wykonanych przez klienta.
41
Page 44

Levenhuk nie udziela gwarancji, wyraźnej ani dorozumianej, w zakresie przydatności handlowej lub przydatności
do określonego celu, za wyjątkiem wszelkich gwarancji określonych w niniejszym dokumencie. Jedynym obowiązkiem firmy
Levenhuk w związku z niniejszą ograniczoną gwarancją jest naprawa lub wymiana objętego nią produktu zgodnie z zasadami
określonymi w niniejszym dokumencie. Levenhuk nie ponosi odpowiedzialności za jakiekolwiek straty zysków, straty
informacji lub inne szkody ogólne lub specjalne, pośrednie, bezpośrednie lub wynikowe powstałe wskutek naruszenia
warunków jakiejkolwiek umowy gwarancyjnej bądź z użycia lub niemożliwości użycia jakiegokolwiek produktu Levenhuk.
Wszelkie dorozumiane gwarancje, w przypadku których firma Levenhuk nie może zrzec się odpowiedzialności, obowiązują
przez okres dwóch lat w przypadku akcesoriów, licząc od daty zakupu detalicznego.
Levenhuk zastrzega sobie prawo do modyfikowania lub zakończenia produkcji dowolnego produktu bez wcześniejszego
powiadomienia.
Poza granicami USA i Kanady gwarancja obowiązuje tylko w stosunku do klientów, którzy zakupili produkt od autoryzowanego
sprzedawcy Levenhuk w danym kraju lub od dystrybutora międzynarodowego. W kwestiach związanych z obsługą gwarancyjną
należy kontaktować się z powyższymi podmiotami.
W przypadku wątpliwości związanych z gwarancją lub korzystaniem z produktu, proszę skontaktować się z lokalnym
przedstawicielem Levenhuk:
Przedstawiciele Levenhuk na całym świecie:
USA: www.levenhuk.com
Kanada: www.levenhuk.ca
Czechy: www.levenhuk.cz
Data zakupu ________________ Podpis _________________ Pieczęć
Niemcy: de.levenhuk.com
Niderlandy: nl.levenhuk.com
Polska: pl.levenhuk.com
Rosja: www.levenhuk.ru
Ukraina: www.levenhuk.ua
UE: www.levenhuk.eu
42
Page 45

Levenhuk DTX 30
Levenhuk DTX 50
RU
Цифровой микроскоп
Никогда не смотрите в прибор на Солнце, на источник яркого света
и лазерного излучения — ЭТО ОПАСНО ДЛЯ ЗРЕНИЯ И МОЖЕТ ПРИВЕСТИ К СЛЕПОТЕ!
Комплект поставки
Микроскоп
Levenhuk DTX
Software
DTX 30
Photo/video capturing
DTX 50
and micromeasuring software
for Levenhuk Digital Microscopes
DTX 90
+ user manuals
DTX 500 Mobi
DTX 500 LCD
Windows/Mac
www.levenhuk.com
Установочный диск
Levenhuk DTX
Levenhuk DTX 30
Levenhuk DTX 50
230x
MEGA
2
PIXELS
USB 2.0
400x
MEGA
1.3
PIXELS
Цифровой микроскоп
Инструкция по эксплуатации
Инструкция
по эксплуатации
Шкала калибровки
43
Page 46

Установка приложения
Перед установкой приложения подключите микроскоп к компьютеру. Вставьте установочный диск
Levenhuk DTX в дисковод. В появившемся диалоговом окне выберите пункт install Microscope Driver,
чтобы установить необходимые драйверы. Откроется мастер установки, который поможет вам
установить драйверы. После завершения установки драйверов выберите пункт MicroCapture
software, чтобы установить приложение. Обратите внимание, что во время установки потребуется
перезагрузка системы. Вы также можете прочесть инструкцию по эксплуатации,
выбрав в диалоговом окне соответствующий пункт.
Подготовка к работе
Снимите защитную крышку с объектива. Воспользуйтесь
колесом фокусировки, чтобы отрегулировать резкость
изображения. Спусковая кнопка затвора позволяет делать
снимки с настройками по умолчанию. Яркость системы
освещения регулируется при помощи соответствующего
колеса на корпусе микроскопа.
1. Колесо регулировки яркости освещения
2. Спусковая кнопка затвора
3. Колесо фокусировки
4. Шкала калибровки
44
Page 47

PortableCapture
Перед установкой приложения подключите микроскоп к компьютеру. Вставьте установочный диск
Levenhuk DTX в дисковод. В появившемся диалоговом окне выберите пункт install Microscope
Driver, чтобы установить необходимые драйверы. Откроется мастер установки, который поможет
вам установить драйверы. После завершения установки драйверов выберите пункт
PortableCapture, чтобы установить приложение. Обратите внимание, что во время установки
потребуется перезагрузка системы. Вы также можете прочесть инструкцию по эксплуатации,
выбрав в диалоговом окне соответствующий пункт.
Разрешение снимков
В разделе Preview Size меню Options можно установить
нужное разрешение снимков.
Поворот изображения
В разделе Rotate меню Options можно установить поворот
создаваемых изображений на 90° по часовой стрелке
или против часовой стрелки.
Дата и время
В разделе Date/Time меню Options можно выбрать,
будут ли на снимке отображаться дата и время.
45
Page 48

Внешний вид
В разделе Skin меню Options можно изменить внешний вид приложения.
Язык
В разделе Language меню Options можно установить язык интерфейса.
Полноэкранный режим
Существует три способа перехода в полноэкранный режим:
1. Двойной щелчок мыши на изображении в главном окне приложения;
2. Нажатие соответствующей кнопки на панели инструментов;
3. Выбор пункта Fullscreen mode в меню Options.
Для выхода из полноэкранного режима нажмите соответствующую кнопку
на панели инструментов.
Настройки
При выборе пункта Preferences в меню Options появится диалоговое окно,
в котором вы можете изменить множество параметров приложения
PortableCapture, в том числе яркость, контраст и насыщенность
изображений, баланс белого и пр.
46
Page 49

Съемка
Как сделать снимок
Нажмите соответствующую кнопку на панели управления
ИЛИ
Выберите пункт Photo в меню Capture
ИЛИ
Нажмите клавишу F11.
Эскиз сделанного снимка появится в списке в правой части главного окна приложения.
Как записать видеоролик
Нажмите соответствующую кнопку на панели управления
ИЛИ
Выберите пункт Video в меню Capture.
Во время записи видеоролика значок с изображением видеокамеры на панели управления
изменится. Чтобы остановить запись, можно повторно нажать кнопку на панели управления
или выбрать пункт Stop capturing в меню Capture.
Примечание: оптимальным разрешением записи видеороликов является 640x480.
47
Page 50

Редактирование изображений
Предварительный просмотр
Нажмите левой кнопкой мыши эскиз нужного изображения,
чтобы открыть это изображение в главном окне приложения.
Разрешение изображения будет указано в левом нижнем углу окна.
Двойной щелчок левой кнопкой мыши по эскизу откроет изображение
в отдельном окне.
Сохранение снимков
Чтобы сохранить снимок, нажмите правой кнопкой мыши эскиз
нужного изображения и выберите пункт Save в появившемся меню.
Изображения могут быть сохранены в формате .jpeg или .bmp.
Можно настроить параметры сохранения в формате .jpeg, нажав
кнопку Advanced.
Удаление снимков
Чтобы удалить снимок, нажмите правой кнопкой мыши эскиз нужного
изображения и выберите пункт Delete в появившемся меню.
При просмотре снимков в отдельном окне можно удалить снимок,
нажав соответствующую кнопку.
Копирование снимков
Нажмите правой кнопкой мыши эскиз нужного изображения
и выберите пункт Copy в появившемся меню.
48
Page 51

Калибровка и измерение
Поместите линейку на предметный столик. Настройте резкость изображения и сделайте
снимок. Посмотрите на шкалу калибровки, расположенную на корпусе микроскопа, и запомните
значение увеличения, на которое указывает риска на корпусе. Откройте полученное
изображение в отдельном окне, дважды щелкнув эскиз левой кнопкой мыши. Введите значение
увеличения в правом верхнему углу появившегося окна предварительного просмотра. После
проведения калибровки вы сможете легко измерять параметры определенных деталей
препарата. Ниже описаны существующие инструменты, которые расположены в верхней части
окна предварительного просмотра:
Прямая
Нажмите левую кнопку мыши в начальной точке и проведите линию.
Отпустите левую кнопку мыши в конечной точке.
Ломаная
Нажмите левую кнопку мыши в начальной точке и проведите линию.
Отпустите левую кнопку мыши в конечной точке. Вы можете продолжить
рисовать свободную линию от конечной точки последнего отрезка.
49
Page 52

Радиус
Проведите прямую линию, соответствующую радиусу круга.
Программа рассчитает радиус, а также длину и площадь окружности.
Диаметр
Проведите прямую линию, соответствующую диаметру круга.
Программа рассчитает диаметр, а также длину и площадь окружности.
Угол
Нажмите левую кнопку мыши в начальной точке и проведите линию.
Отпустите левую кнопку мыши в конечной точке. Проведите еще одну
линию от конечной точки последнего отрезка. Программа рассчитает
величину обозначенного угла.
Единица измерений
В выпадающем меню на панели инструментов можно выбрать
единицу измерений (пиксели, дюймы, километры, метры, сантиметры,
миллиметры, микроны).
50
Page 53

Ниже приведено описание остальных кнопок на панели инструментов в окне предварительного
просмотра:
Нажав эту кнопку, можно создать надпись на сделанном снимке
Нажав эту кнопку, можно выбрать отредактировать параметры шрифта
Нажав одну из этих кнопок, можно нарисовать что-либо на сделанном снимке
Нажав эту кнопку, можно выбрать цвет линий
Нажав эту кнопку, можно выбрать толщину линий
Нажав эту кнопку, можно выбрать тип линий
Нажав эту кнопку, можно отменить последнее совершенное действие
Примечания:
1. Допустимый предел увеличений — от 20х до 400х для Levenhuk DTX 50
(до 230х для Levenhuk DTX 30). Не вводите значения, лежащие вне этого предела.
2. Величины, рассчитанные программой, являются приблизительными
и основываются на указанном вами увеличении;
3. Функция измерения доступна только для ОС Windows.
51
Page 54

Работа с приложением на Mac OS
Откройте папку mac на установочном диске Levenhuk DTX и скопируйте файл PortableCapture Pro
на рабочий стол. Подключите микроскоп к компьютеру через USB-кабель. Откройте приложение
PortableCapture Pro, дважды щелкнув значок PortableCapture Pro.
В разделе Preview Size меню Options можно установить разрешение создаваемых снимков.
Обратите внимание, что размер окна предварительного просмотра изменить нельзя (стандартное
разрешение — 640х480), а установленное разрешение снимка отображается в левом нижнем углу
Чтобы сделать снимок или записать видеоролик, нажмите соответствующую кнопку на панели
управления или выберите пункт Photo или Video в меню Capture. Эскиз сделанного снимка или
видеоролика появится в списке в правой части главного окна приложения.
Дважды щелкните эскиз изображения, чтобы открыть его в окне предварительного просмотра,
или щелкните мышью эскиз видеоролика, чтобы проиграть видеоролик.
Процесс работы с изображениями не отличается от других процессов работы на Mac OS.
52
Page 55

Уход и хранение
Никогда не смотрите в прибор на Солнце, на источник яркого света и лазерного излучения — ЭТО ОПАСНО ДЛЯ ЗРЕНИЯ И МОЖЕТ
ПРИВЕСТИ К СЛЕПОТЕ! Белые светодиоды системы освещения микроскопа очень яркие; не смотрите на них, чтобы не повредить
зрение. Будьте внимательны, если пользуетесь прибором вместе с детьми или людьми, не ознакомленными с инструкцией.
Не разбирайте прибор. Сервисные и ремонтные работы могут проводиться только в специализированном сервисном центре.
После вскрытия упаковки и установки микроскопа проверьте каждый компонент. Не касайтесь пальцами поверхностей линз.
Для очистки линз пользуйтесь мягкой чистой салфеткой, на которую можно капнуть немного спирта или эфира, но лучше всего
использовать оригинальные средства для чистки оптики компании Levenhuk. Запрещается использовать для чистки средства
с абразивными или коррозионными свойствами и жидкости на основе ацетона! Абразивные частицы (например, песок) следует
не стирать, а сдувать или смахивать мягкой кисточкой. Не прикладывайте чрезмерных усилий при настройке фокуса. Не
прилагайте излишних усилий к стопорным и фиксирующим винтам. Оберегайте прибор от резких ударов и чрезмерных
механических воздействий. Микроскоп можно использовать при температуре от -5 °С до +50 °С. Помните, что резкие перепады
температуры могут привести к запотеванию линз и образованию конденсата. Храните прибор в сухом прохладном месте,
недоступном для пыли, влияния кислот или других активных химических веществ, вдали от отопителей (бытовых, втомобильных)
и от открытого огня и других источников высоких температур. Не подвергайте прибор длительному воздействию прямых
солнечных лучей. Не используйте прибор в условиях повышенной влажности и не погружайте его в воду. Работайте
с микроскопом аккуратно, надевайте на него пылезащитный чехол после работы, чтобы защитить его от пыли и масляных пятен.
Во избежание потери данных и повреждения оборудования отключайте микроскоп от компьютера только после закрытия
приложения. Дождитесь выключения системы освещения и отключите микроскоп. Если деталь прибора или элемент питания
были проглочены, срочно обратитесь за медицинской помощью.
Использование элементов питания
Всегда используйте элементы питания подходящего размера и соответствующего типа. При необходимости замены элементов
питания меняйте сразу весь комплект, не смешивайте старые и новые элементы питания и не используйте элементы питания
разных типов одновременно. Перед установкой элементов питания очистите контакты элементов и контакты в корпусе прибора.
Устанавливайте элементы питания в соответствии с указанной полярностью (+ и -). Если прибор не используется длительное
время, следует вынуть из него элементы питания. Оперативно вынимайте из прибора использованные элементы питания.
Не пытайтесь перезаряжать гальванические элементы питания - они могут протечь, воспламениться или взорваться. Никогда
не закорачивайте полюса элементов питания – это может привести к их перегреву, протечке или взрыву. Не пытайтесь нагревать
элементы питания, чтобы восстановить их работоспособность. Выключайте прибор после использования. Храните элементы
питания в недоступном для детей месте, чтобы избежать риска их проглатывания, удушья или отравления.
53
Page 56

Технические характеристики
Разрешение матрицы
Увеличение
Доступные разрешения (DTX 50)
Доступные разрешения (DTX 30)
Разрешение записи видео (DTX 50)
Разрешение записи видео (DTX 30)
Фото/видео
Фокусировка
Источник освещения
Питание
Частота
Язык ПО
Габариты микроскопа (Д х ⌀)
Компания Levenhuk оставляет за собой право вносить любые изменения или прекращать производство изделия без предварительного уведомления.
1,3 Мпикс, интерполяция до 2 Мпикс (DTX 50)
2 Мпикс, интерполяция до 5 Мпикс (DTX 30)
20x–400x (DTX 50), 20х–230х (DTX 30)
1600x1200, 1280x1024, 1280x960, 1024x768, 800x600, 640x480,
352x288, 320x240, 160x120
2560 x2048 (5M), 2000x1600, 1600x1280 (2M), 1280x1024, 1024x960,
1024x768, 800x600, 640x480, 352x288, 320x240, 160x120
1600x1200, 1280x1024, 1280x960, 1024x768, 800x600, 640x480,
352x288, 320x240, 160x120
2560x2048 (5M), 2000x1600, 1600x1280 (2M), 1280x1024, 1024x960,
1024x768, 800x600, 640x480, 352x288, 320x240, 160x120
*.jpeg или .bmp/*.avi
Ручная, в пределах от 0 мм до 150 мм
8 светодиодов с регулируемой яркостью системы
5В постоянного тока через кабель USB 2.0
30 кадров в секунду
Английский, немецкий, испанский, корейский,
французский, русский
125 мм х 33 мм
Требования к системе
Операционная система Windows XP/Vista/7/8, Mac 10.6~10.8
ЦПУ от P4 1,8 ГГц, ОЗУ от 512 МБ, видеокарта от 64 МБ, разъем USB 2.0, CD-ROM
54
Page 57

Международная гарантия
• Продавец гарантирует соответствие качества приобретенного вами изделия компании Levenhuk
требованиям технической документации при соблюдении потребителем условий и правил
транспортировки, хранения и эксплуатации изделия.
• Компания Levenhuk гарантирует отсутствие дефектов в материалах конструкции.
• В течение гарантийного периода покупатель может вернуть неисправное изделие продавцу
либо в Сервисный центр компании Levenhuk. Компания Levenhuk по своему усмотрению
отремонтирует или бесплатно заменит неисправное изделие.
• Претензии по качеству изделия не принимаются при отсутствии правильно оформленного
гарантийного талона или при наличии исправлений в нем, а также при непредъявлении данного
неисправного изделия. Гарантия не распространяется на случаи, когда, по мнению компании,
изделие употреблялось не по назначению, а также когда:
• изделие имеет механические повреждения, царапины, сколы, трещины и повреждения оптики;
• изделие вышло из строя в результате ударов, сжатия, растяжения корпуса, падения;
• дефекты или неисправности возникли при или вследствие неправильной эксплуатации,
хранения или транспортировки изделия;
• изделие было утеряно, украдено, сломано, разбито или иным образом повреждено
потребителем;
• изделие разбиралось, ремонтировалось, подвергалось модификации лицом, не имеющим
на то соответствующих полномочий.
• Гарантия не распространяется на комплектующие с ограниченным сроком использования,
в том числе лампы (накаливания, светодиодные, галогенные, энергосберегающие и прочие типы
ламп), электрокомплектующие, расходные материалы, элементы питания и прочее.
• Компания Levenhuk оставляет за собой право вносить любые изменения
или прекращать производство изделия без предварительного уведомления.
55
Page 58

Срок гарантии: на аксессуары — 6 (шесть) месяцев со дня покупки, на остальные изделия —
пожизненная гарантия (действует в течение всего срока эксплуатации прибора).
Храните гарантийный талон вместе с чеком.
По вопросам гарантийного обслуживания вы можете обратиться в ближайшее представительство
компании Levenhuk.
Представительства компании Levenhuk:
США: www.levenhuk.com
Канада: www.levenhuk.ca
Чехия: www.levenhuk.cz
Дата продажи _____________ Подпись ______________ Печать
56
Германия: de.levenhuk.com
Нидерланды: nl.levenhuk.com
Польша: pl.levenhuk.com
Россия: www.levenhuk.ru
Украина: www.levenhuk.ua
Европа: www.levenhuk.eu
Page 59

Page 60

The original Levenhuk cleaning accessories
Levenhuk Cleaning Pen LP10
• Removes dust with a brush
• The soft tip is treated with a special cleaning fluid that removes greasy stains
• Does not damage optical coatings of the lenses
• Leaves no smudges or stains
www.levenhuk.com
Levenhuk, Inc. 1935 Brandon Court, Suite A-1, Chicago, IL 60139 USA
Levenhuk® is a registered trademark of Levenhuk, Inc.
© 2006-2015 Levenhuk, Inc. All rights reserved.
20141111
 Loading...