


Levenhuk Rainbow DM LCD Digital Microscopes
User Manual
EN
Ръководство за потребителя
BG
Návod k použití
CZ
Bedienungsanleitung
DE
Guía del usuario
ES
Használati útmutató
HU
Guida all’utilizzo
IT
Instrukcja obsługi
PL
Manual do usuário
PT
Инструкция по эксплуатации
RU
Наслади се отблизо
Radost zaostřit
Zoom ran und hab Fun!
Amplíe y disfrute
Kellemes nagyítást!
Ingrandisci il divertimento
Radość przybliżania
Dê um zoom na sua emoção
Приближает с удовольствием
USA • Azerbaijan • Bulgaria • Canada • Czech Republic • Estonia • Finland • Germany • Hungary • Iceland • India • Italy • Latvia • Lithuania
Malaysia • Netherlands • Poland • Romania • Russia • Slovakia • Spain • Turkey • Ukraine • United Kingdom
1
1
4
8
3
5
2
11
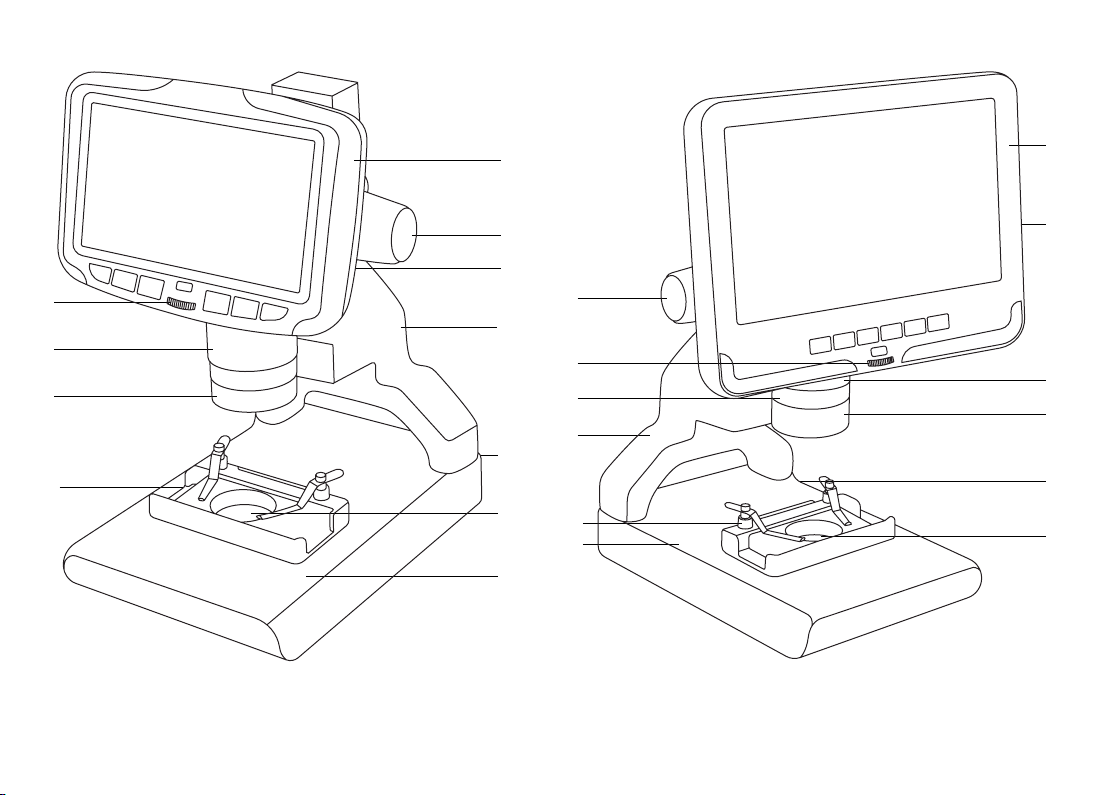
1a. Levenhuk Rainbow DM500 LCD 1b. Levenhuk Rainbow DM700 LCD
2
4
6
3
2
6
9
12
11
10
10
8
5
7
9
12

EN BG CZ
1. LCD screen
2. Objective
3. Brightness adjustment knob
4. Coarse focusing knob
5. Optical zoom ring
6. Pole
7. Upper illumination (DM700 only)
8. LCD screen locking screw (not shown)
9. Power connector (not shown)
10. Stage
11. Movable block with specimen holders
12. Lower illumination
1. LCD-Bildschirm
2. Objektiv
3. Helligkeitsregler
4. Grobtrieb
5. Optischer-Zoom-Ring
6. Stange
7. Dioptrienring (Nur DM700)
8. LCD-Bildschirmxierschraube (nicht abgebildet)
9. Stromanschluss (nicht abgebildet)
10. Objekttisch
11. Beweglicher Block mit Probenhalter
12. Transmissionslicht-Beleuchtung
1. Течнокристален екран
2. Обектив
3. Бутон за регулиране на яркостта
4. Бутон за грубо фокусиране
5. Пръстен за промяна на оптичното увеличение
6. Прът на стойката
7. Пръстен за регулиране на диоптъра (само за
DM700)
8. Заключващ винт на течнокристален екран (не
е показан)
9. Съединител за захранването (не е показан)
10. Предметна маса
11. Подвижен блок с държачи за образец
12. Долно осветление
1. Pantalla LCD
2. Objetivo
3. Mando de ajuste del brillo
4. Mando de enfoque aproximado
5. Anillo de zoom óptico
6. Varilla
7. Anillo de ajuste de las dioptrías (solo DM700)
8. Tornillo de bloqueo de la pantalla LCD (no se
muestra)
9. Compartimento de la batería (no se muestra)
10. Platina
11. Bloque movible con portamuestras
12. Iluminación de luz transmitida
1. LCD obrazovka
2. Objektiv
3. Knoík pro nastavení jasu
4. Makrošroub pro hrubé zaostření
5. Kroužek optického zoomu
6. Sloupek
7. Kroužek dioptrické korekce (pouze DM700)
8. Pojistný šroub LCD obrazovka (není zobrazeno)
9. Konektor napájení (nezobrazeno)
10. Pracovní stolek
11. Pohyblivý blok s držáky preparátů
12. Osvětlení procházejícím světlem
HUESDE
1. LCD-kijelző
2. Objektív
3. Fényerősség állítógomb
4. Durva-fókuszállító gomb
5. Optikaizoom-állító gyűrű
6. Rúd
7. Dioptria-állító gyűrű (cask DM700)
8. LCD képernyőrögzítő-csavar (nem látható)
9. Hálózati csatlakozó (nincs feltüntetve)
10. Tárgyasztal
11. Mozgatható blokk mintatartókkal
12. Alsó világítás
3

IT
1. Schermo LCD
2. Obiettivo
3. Manopola di regolazione della luminosità
4. Manopola di messa a fuoco grossolana
5. Anello dello zoom ottico
6. Colonna
7. Ghiera di regolazione diottrica (solo DM700)
8. Vite di ssaggio dello schermo LCD (non visibile)
9. Presa di alimentazione (non visibile)
10. Tavolino
11. Blocco mobile con portacampioni
12. Illuminazione inferiore
RU
1. ЖК-экран
2. Объектив
3. Регулятор яркости подсветки
4. Ручка грубой фокусировки
5. Кольцо оптического увеличения
6. Штатив
7. Верхняя подсветка (только DM700)
8. Фиксатор ЖК-экрана (не показан)
9. Гнездо сетевого адаптера (не
показано)
10. Предметный столик
11. Подвижный блок с держателями
препарата
12. Нижняя подсветка
PL PT
1. Ekran LCD
2. Obiektyw
3. Pokrętło regulacji jasności
4. Pokrętło zgrubnej regulacji ostrości
5. Pierścień powiększenia optycznego
6. Statyw
7. Pierścień regulacji dioptrii (tylko DM700)
8. Śruba blokująca ekranu LCD (nie pokazano)
9. Komora baterii (nie pokazano)
10. Stolik
11. Ruchomy blok z zaczepy do preparatów
12. Źródło światła przechodzącego
1. Ecrã LCD
2. Objetiva
3. Botão de ajuste do brilho
4. Botão de focagem grosseira
5. Anel de zoom ótico
6. Polo
7. Anel de ajuste de dioptria (apenas para DM700)
8. Parafuso de bloqueio do ecrã LCD (não
apresentado)
9. Conector de alimentação (não apresentado)
10. Platina
11. Bloco móvel com suportes de espécimes
12. Iluminação inferior
4

9 10
EN
11
1 2 3 54 6
7
8
2.
1. Power on/o
2. Menu
3. Up
4. Down
5. OK
6. Capture
7. Infrared sensor
8. Brightness adjustment wheel
9. SDslot
10. MiniUSB: output to PC
11. Reset (not shown)
BG CZ
1. Вкл./изкл. на захранването
2. Меню
3. Нагоре
4. Надолу
5. OK
6. Заснемане
7. Инфрачервен сензор
8. Колело за регулиране на яркостта
9. Слот за SD карта
10. Мини USB: изход към компютър
11. Нулиране (не е показан)
1. Vypínač napájení (zap/vyp)
2. Nabídka
3. Nahoru
4. Dolů
5. OK
6. Pořídit snímek
7. Infračervený snímač
8. Regulátor nastavení jasu
9. Slot pro SD kartu
10. MiniUSB: výstup do PC
11. Resetovat (není zobrazeno)
DE
1. Ein-/Ausschalter
2. Menü
3. Aufwärts
4. Abwärts
5. OK
6. Aufnahme
7. Infrarotsensor
8. Helligkeitsregler
9. SD-Kartensteckplatz
10. MiniUSB: PC-Anschluss
11. Rücksetzen (nicht abgebildet)
5

HUES
1. Encendido/apagado
2. Menú
3. Arriba
4. Abajo
5. OK
6. Captura
7. Sensor infrarrojo
8. Rueda de ajuste de brillo
9. Ranura SD
10. MiniUSB: salida a PC
11. Restablecer (no se muestra)
1. Ki-/bekapcsoló gomb
2. Menü
3. Fel
4. Le
5. OK
6. Felvétel
7. Infravörös érzékelő
8. Fényerő szabályzókerék
9. SD-hely
10. MiniUSB: kimenet számítógéphez
11. Visszaállítás (nincs feltüntetve)
PL PT RU
1. Wł./wył. zasilania
2. Menu
3. W górę
4. W dół
5. OK
6. Rejestrowanie
7. Czujnik podczerwieni
8. Pokrętło regulacji jasności
9. Gniazdo karty SD
10. MiniUSB: wyjście do komputera
11. Resetuj (nie pokazany)
1. Ligar/desLigar/desligar
2. Menu
3. Para cima
4. Para baixo
5. OK
6. Capturar
7. Sensor infravermelho
8. Roda de ajuste do brilho
9. Ranhura SD
10. MiniUSB: saída para PC
11. Repor (não apresentado)
IT
1. Interruttore on/o
2. Menù
3. Su
4. Giù
5. OK
6. Cattura
7. Sensore a infrarossi
8. Rotella regolazione luminosità
9. Slot SD
10. MiniUSB: uscita PC
11. Reset (non visibile)
1. Кнопка вкл./выкл. питания
2. Кнопка «Меню»
3. Кнопка «Вверх»
4. Кнопка «Вниз»
5. Кнопка «ОК»
6. Кнопка «Съемка»
7. Инфракрасный датчик
8. Кольцо регулировки яркости
9. Разъем карты SD
10. Разъем miniUSB
11. Кнопка «Перезагрузка» (не показана)
6
EN BG
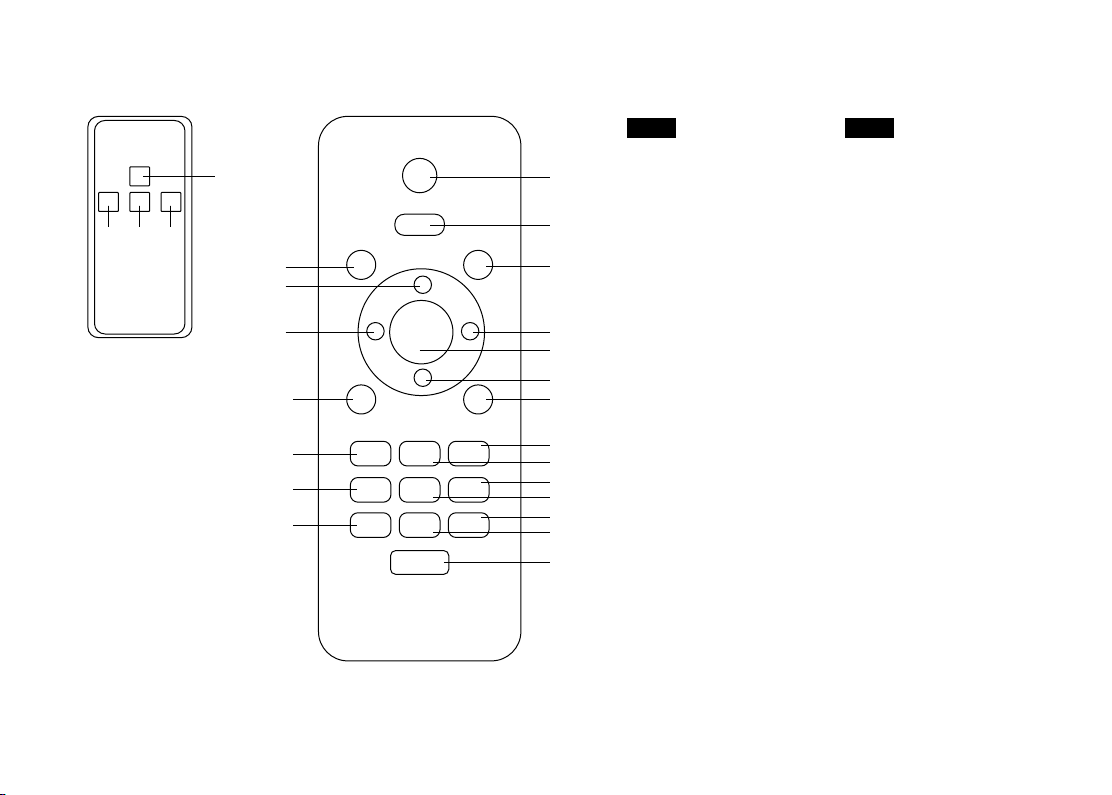
1. Capture
5
891
3
5
6
10
12
13
14
3b. Levenhuk Rainbow DM500 LCD 3a. Levenhuk Rainbow DM700 LCD
1
2
4
7
8
9
11
18
15
19
16
20
17
21
2. Menu
3. Frozen
4. Mode
5. Zoom up
6. Brightness down
7. Brightness up
8. OK
9. Zoom down
10. 50/60Hz
11. Cross line
12. Sharpness down
13. Contrast down
14. Inverse
15. Sharpness up
16. Contrast up
17. Black&white
18. Lock/unlock le
19. NTL/PAL
20. Default set
21. Image rotate
1. Заснемане
2. Меню
3. Застиване
4. Режим
5. Увеличаване
6. Намаляване на яркостта
7. Увеличаване на яркостта
8. OK
9. Намаляване на увеличението
10. 50/60 Hz
11. Напречна линия
12. Намаляване на отчетливостта
13. Намаляване на контраста
14. Обръщане
15. Увеличаване на
отчетливостта
16. Увеличаване на контраста
17. Чернобяло
18. Заключване/отключване на
файл
19. NTL/PAL
20. Настройка по подразбиране
21. Завъртане на изображение
7

CZ
1. Pořídit snímek
2. Nabídka
3. Nehybné
4. Režim
5. Zvětšit zoom
6. Snížit jas
7. Zvýšit jas
8. OK
9. Zmenšit zoom
10. 50/60 Hz
11. Překročit čáru
12. Snížit ostrost
13. Snížit kontrast
14. Negativ
15. Zvýšit ostrost
16. Zvýšit kontrast
17. Černobílá
18. Zamknout/odemknout
soubor
19. NTL/PAL
20. Výchozí sada
21. Otočit snímek
DE ITHUES
1. Aufnahme
2. Menü
3. Eingefroren
4. Modus
5. Zoom +
6. Helligkeit –
7. Helligkeit +
8. OK
9. Zoom –
10. 50/60 Hz
11. Kreuzlinie
12. Schärfe –
13. Kontrast –
14. Invers
15. Schärfe +
16. Kontrast +
17. Schwarzweiß
18. Datei sperren/entsperren
19. NTL/PAL
20. Standardset
21. Bilddrehung
1. Captura
2. Menú
3. Inmovilizado
4. Modo
5. Aumentar ampliación
6. Reducir brillo
7. Aumentar brillo
8. OK
9. Reducir ampliación
10. 50/60Hz
11. Retícula en cruz
12. Reducir nitidez
13. Reducir contraste
14. Inverso
15. Aumentar nitidez
16. Aumentar contraste
17. Blanco y negro
18. Bloquear / desbloquear
archivo
19. NTL/PAL
20. Kit predeterminado
21. Rotación de imagen
1. Felvétel
2. Menü
3. Kimerevített
4. Üzemmód
5. Közelítés
6. Fényerő csökkentése
7. Fényerő növelése
8. OK
9. Távolítás
10. 50/60 Hz
11. Keresztvonal
12. Élesség csökkentése
13. Kontraszt csökkentése
14. Inverz
15. Élesség növelése
16. Kontraszt növelése
17. Fekete-fehér
18. Fájl zárolása/feloldása
19. NTL/PAL
20. Alapértelmezett beállítás
21. Kép elforgatása
1. Cattura
2. Menù
3. Bloccato
4. Modalità
5. Aumenta zoom
6. Diminuisci luminosità
7. Aumenta luminosità
8. OK
9. Diminuisci zoom
10. 50/60 Hz
11. Mirino
12. Diminuisci nitidezza
13. Diminuisci contrasto
14. Inverso
15. Aumenta nitidezza
16. Aumenta contrasto
17. Bianco e nero
18. Blocca/sblocca le
19. NTL/PAL
20. Imposta predenito
21. Ruota immagine
8

PL
1. Rejestrowanie
2. Menu
3. Tryb wstrzymania
4. Tryb
5. Powiększenie
6. Zmniejszenie jasności
7. Zwiększenie jasności
8. OK
9. Oddalenie
10. 50/60 Hz
11. Linia z podziałką
12. Zmniejszenie ostrości
13. Zmniejszenie kontrastu
14. Odwrócenie
15. Zwiększenie ostrości
16. Zwiększenie kontrastu
17. Czarno-biały
18. Zablokowanie/odblokowanie pliku
19. NTL/PAL
20. Ustawienia domyślne
21. Obrócenie obrazu
PT RU
1. Capturar
2. Menu
3. Bloqueado
4. Modo
5. Aumentar zoom
6. Diminuir luminosidade
7. Aumentar luminosidade
8. OK
9. Diminuir zoom
10. 50/60 Hz
11. Linha transversal
12. Diminuir nitidez
13. Diminuir contraste
14. Inverso
15. Aumentar nitidez
16. Aumentar contraste
17. Preto e branco
18. Bloquear/desbloquear cheiro
19. NTL/PAL
20. Predenição
21. Rotação de imagem
1. Кнопка «Съемка»
2. Кнопка «Меню»
3. Кнопка «Стоп-кадр»
4. Кнопка «Режим»
5. Кнопка «Увеличение»
6. Кнопка уменьшения яркости
7. Кнопка увеличения яркости
8. Кнопка «OK»
9. Кнопка «Уменьшение»
10. Кнопка переключения частоты между 50 и 60 Гц
11. Кнопка отображения сетки
12. Кнопка уменьшения резкости
13. Кнопка уменьшения контраста
14. Кнопка фотоэффекта «Негатив»
15. Кнопка увеличения резкости
16. Кнопка увеличения контраста
17. Кнопка фотоэффекта «Черное/белое»
18. Кнопка блокировки/разблокировки файла
19. Кнопка переключения форматов NTL/PAL
20. Кнопка «Заводские настройки»
21. Кнопка «Поворот изображения»
9
Q
.C.
P
ASSED
1
EN BG
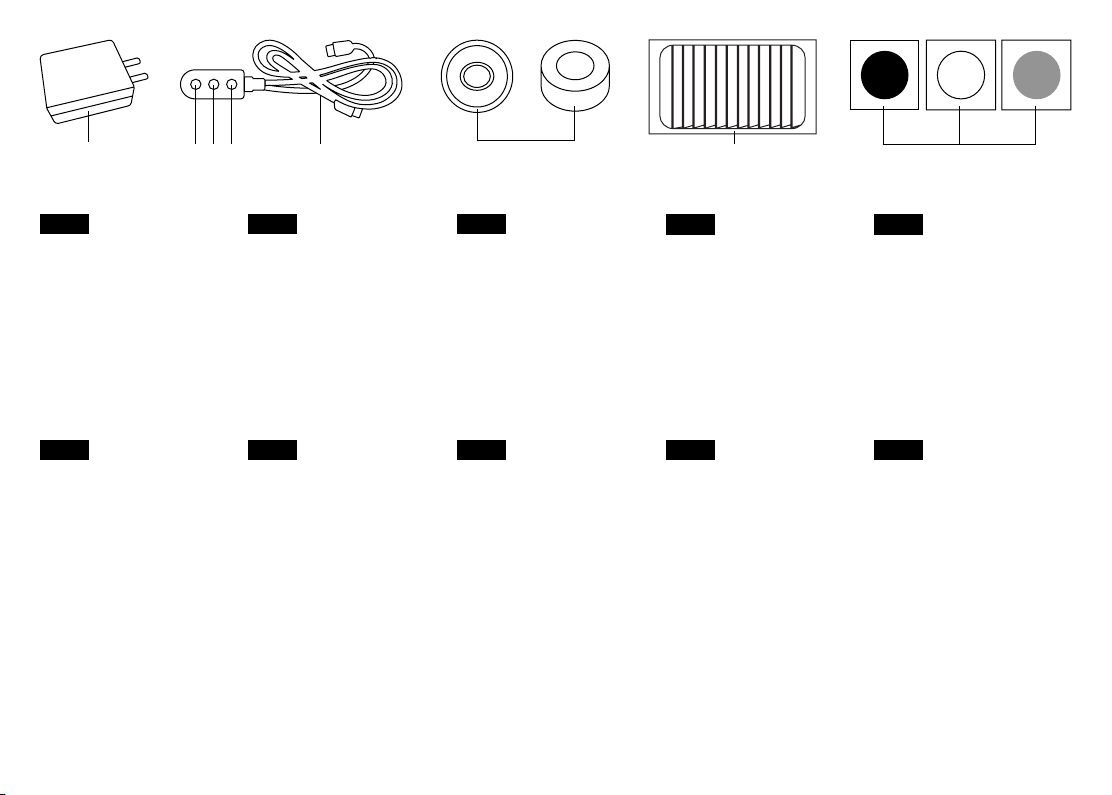
1. DC adapter
2. Switch cable
3. ON/OFF
4. Brightness up
5. Brightness down
6. Lens covers
7. 12 prepared slides
8. Black, white and uniform
light plates
HU
1. Hálózati adapter
2. Kapcsolókábel
3. Főkapcsoló
4. Fényerő növelése
5. Fényerő csökkentése
6. Lencsesapkák
7. 12 előkészített csúszik
8. Fekete, fehér és egyenletes
fénylemezek
23 4 5
1. DC адаптер
2. Кабел за включване
3. Вкл./Изкл.
4. Увеличаване на яркостта
5. Намаляване на яркостта
6. Капаци на обектива
7. 12 подготвени слайда
8. Черни, бели и еднакви
светлинни плочи
IT
1. Adattatore DC
2. Cavo interruttore
3. On/O
4. Aumenta luminosità
5. Diminuisci luminosità
6. Coperture delle lenti
7. 12 vetrini preparati
8. Piastre luminose nere,
bianche e uniformi
6
4.
CZ
1. Stejnosměrný adaptér
2. Vyměnit kabel
3. Zap/Vyp
4. Zvýšit jas
5. Snížit jas
6. Ochranné kryty zorníku
7. 12 připravených diapozitivy
8. Černé, bílé a rovnoměrné
světelné desky
PL
1. Zasilacz
2. Przewód przełączający
3. Wł./Wył.
4. Zwiększenie jasności
5. Zmniejszenie jasności
6. Osłona soczewki
7. 12 przygotowanych szkiełek
8. Czarne, białe i jednolite
światła talerze
7 8
DE
1. Netzteil
2. Kabelschalter
3. Ein/Aus
4. Helligkeit +
5. Helligkeit –
6. Objektivabdeckung
7. 12 vorbereitete MikroskopObjektträger
8. Schwarze, weiße und
einheitliche Lichtplatten
PT RU
1. Adaptador de CC
2. Cabo do interruptor
3. Ligado/Desligado
4. Aumentar luminosidade
5. Diminuir luminosidade
6. Tampas da lente
7. 12 slides preparados
8. Placas de luz pretas,
brancas e uniformes
ES
1. Adaptador de CC
2. Cable de conmutación
3. Encendido/Apagado
4. Aumentar brillo
5. Reducir brillo
6. Cubiertas de lentes
7. 12 diapositivas preparadas
8. Placas de luz negras,
blancas y uniformes
1. Адаптер постоянного тока
2. Пульт управления яркостью
подсветки с кабелем
подключения и питания
3. Кнопка вкл./выкл.
подсветки
4. Кнопка увеличения яркости
подсветки
5. Кнопка уменьшения яркости
подсветки
6. Крышки объектива
7. 12 готовых
микропрепаратов
8. Черное, белое и прозрачное
предметные стекла
10
Levenhuk Rainbow DM LCD
Digital Microscopes
Caution: Please refer to the specications table for the correct mains
voltage and never attempt to plug a 110V device into 220V outlet and vice
versa without using a converter. Remember that mains voltage in the U.S.
and Canada is 110V and 220–240V in most European countries.
EN
Please refer to g. 1 (device), 2 (LCD screen), 3 (control panel), and 4 (accessories). Find
your microscope model and view all of the details of the device.
Getting started
• Unpack the microscope carefully and place it on a at surface.
• Plug the power cable into the corresponding connectors on the base and on the
LCD screen, and then the backlight and screen will turn on automatically.
• Press and hold the “Power on/o” button for 2 seconds on the screen to turn the
screen on and o.
• Place the micropreparation on the movable block and x it with the specimen
holders. Place the movable block under the objective. The kit includes a set of
ready-made micropreparations for study. Remove the lens cover labeled “Q.C.
passed” from the bottom of the second lens cover.
• Adjust the brightness of the backlight and adjust the clarity of the image with the
coarse focusing knob.
A microSD card (purchased separately) is required to save captured images and recorded
videos. Turn the microscope o and insert the microSD card into the corresponding slot
on the microscope body until it locks in place with a click. Do not apply excessive force
when inserting the microSD card. Try rotating the card, if it does not lock in place with ease.
If the LCD screen freezes, look for the “Reset” button on the back of the LCD screen. Use
a narrow object, such as a straightened paperclip, to press the button. This will reset all
of the settings to the factory defaults and restart the LCD screen. Saved photos or videos
will not be deleted.
Stage inset glass
• Frosted glass stage inset may be used for observations of transparent specimens
or thin slices of objects. Place it on the stage and secure it in place with the locking
screw. Lower illumination source should be used during observations with this
glass stage inset.
• Additional black and white glass slides are supplied with the microscope. If the
specimen is white or bright, then for better image contrast, use a black glass slide
with only the top illumination on. Otherwise, use a white glass slide.
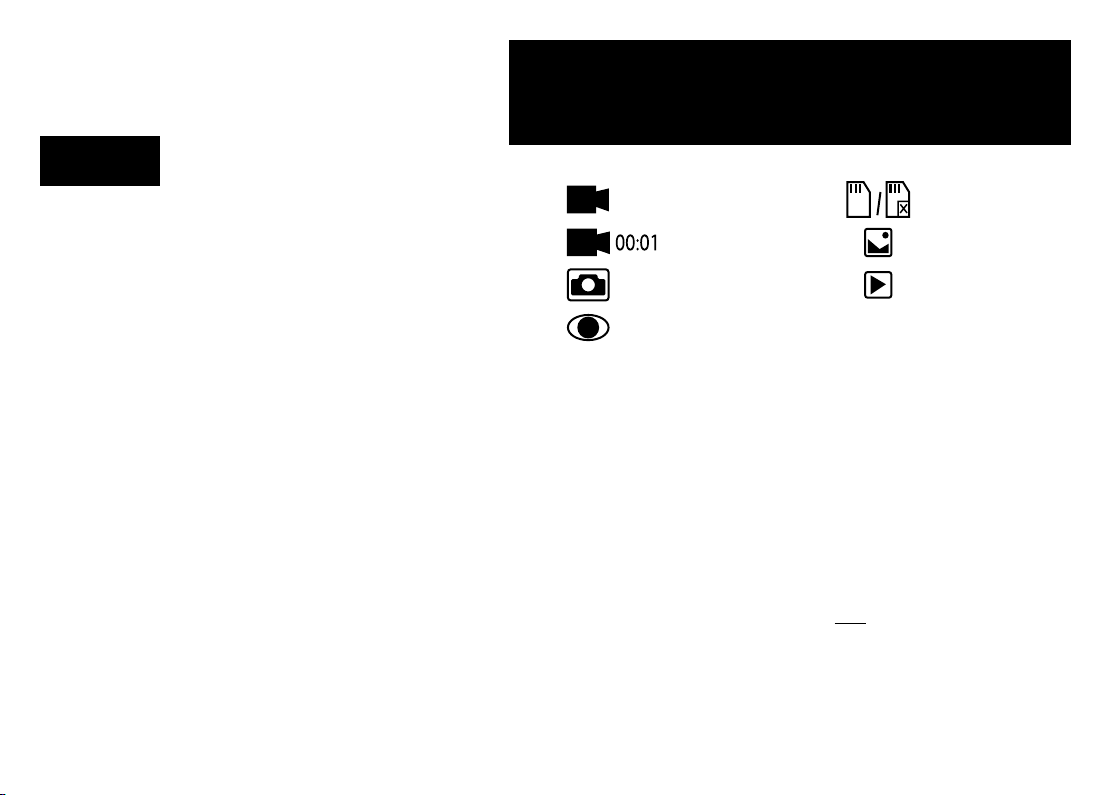
Application menu
Video mode
Video recording
Photo mode
Capture an image
Digital magnication
During observations, press the “Up” button to enlarge the image and the “Down” button
to reduce the image.
Capturing an image
1. Turn the microscope on and place a specimen on the stage.
2. Set the objective to the desired height using the coarse focusing knob.
3. Adjust the illumination brightness, so that the specimen is evenly lit.
4. Adjust the magnication and sharpness of the image by rotating the coarse focus
knob and optical zoom ring.
5. To take a photo, press the “Capture” button.
6. In “Freeze” mode, briey press the “OK” button to take a picture (DM500 only).
Recording a video
1. Press the “Video” button to switch to video mode. The icon in the upper le corner
of the screen will change in conrmation.
2. Press the “OK” button to start recording. Note: do not hold down the “OK” button;
instead, briey press and release it.
3. Press the “OK” button again to stop recording.
4. Press the “Capture” button to take a picture while the microscope is recording a
video. If you take a photo this way, the image resolution may not be as high as the
video resolution – the image quality will be lower.
TF
MicroSD status icon
Still image mode
Review mode
11

View photos and videos
1. Insert the microSD card into the SD slot.
2. Press the “Video” button twice to turn on the viewing mode.
3. Press the “Right” and “Le” buttons to view the pictures and videos. Press the “OK”
button to start playing the video.
4. Use the “Menu” button to provide additional options when viewing a still image or
video. Press and hold the “Menu” button until the options appear.
Setup
Press the “Menu” button to go to the settings menu of the LCD screen Use the control
buttons to select the required parameters. Press the “Menu” button again to save the
selected parameters. Do not turn o the power of the microscope while saving the
settings. Reboot the microscope aer applying the settings.
Date and time
Select Date/Time from the main menu by the “Down“ button and set the current date
and time. You can use the “Le” and “Right” buttons on the remote control to select the
required data. (DM500 only).
Specications
Product ID 76826 76825
Model
Digital magnication 7–200x 10–200х
Optical magnication 7–50х 10–50х
Optics material optical glass
Body plastic
Stage 120х180mm
Movable block 83х43mm, with specimen holders
Focus coarse, 50mm coarse, 90mm
Illumination upper and lower, LED
Rotatable color LCD screen 5" 7"
Megapixels (sensor/image)
Max. resolution (image/video) 4032x3024px/1920x1080px
Image/video format *.jpg/ *.avi
Sensor 1/2,9
Pixel size 2,8μm
Sensitivity 3800mV/Lux·s
Spectral range 410–1100nm
Manual settings white balance, exposure control
Output (connectors) microSD, miniUSB
Power supply (microscope)
Power supply (IR remote) 2pcs AAA batteries (not included)
Operating temperature range –20…+70 °C (–4...+158 °F)
Levenhuk Rainbow DM500
LCD
110–220V; 5V, 1A via USB
cable
Levenhuk reserves the right to modify or discontinue any product without prior notice.
Levenhuk Rainbow DM700
LCD
2/12
110–220V; 5V, 1A via USB cable;
built-in 2200 mAh battery
(working time: 4 hours,
charging time: 20 hours)
12

Care and maintenance
• Never, under any circumstances, look directly at the Sun, another bright source
of light or at a laser through this device, as this may cause PERMANENT
RETINAL DAMAGE and may lead to BLINDNESS.
• Take necessary precautions when using the device with children or others who have not
read or who do not fully understand these instructions.
• Aer unpacking your microscope and before using it for the rst time check for integrity
and durability of every component and connection.
• Do not try to disassemble the device on your own for any reason. For repairs and
cleaning of any kind, please contact your local specialized service center.
• Protect the device from sudden impact and excessive mechanical force. Do not apply
excessive pressure when adjusting focus. Do not overtighten the locking screws.
• Do not touch the optical surfaces with your ngers. To clean the device exterior, use
only special cleaning wipes and special optics cleaning tools from Levenhuk. Do not use
any corrosive or acetone-based uids to clean the optics.
• Abrasive particles, such as sand, should not be wiped o lenses, but instead blown o
or brushed away with a so brush.
• Do not use the device for lengthy periods of time, or leave it unattended in direct
sunlight. Keep the device away from water and high humidity.
• Be careful during your observations, always replace the dust cover aer you are nished
with observations to protect the device from dust and stains.
• If you are not using your microscope for extended periods of time, store the objective
lenses and eyepieces separately from the microscope.
• Store the device in a dry, cool place away from hazardous acids and other chemicals,
away from heaters, open re and other sources of high temperatures.
• When using the microscope, try not to use it near ammable materials or substances
(benzene, paper, cardboard, plastic, etc.), as the base may heat up during use, and might
become a re hazard.
• Always unplug the microscope from a power source before opening the base or
changing the illumination lamp. Regardless of the lamp type (halogen or incandescent),
give it some time to cool down before trying to change it, and always change it to a lamp
of the same type.
• Always use the power supply with the proper voltage, i.e. indicated in the specications
of your new microscope. Plugging the instrument into a dierent power outlet may
damage the electric circuitry of the microscope, burn out the lamp, or even cause a
short circuit.
• Seek medical advice immediately if a small part or a battery is swallowed.
Battery safety instructions
• Always purchase the correct size and grade of battery most suitable for the intended
use.
• Always replace the whole set of batteries at one time; taking care not to mix old and
new ones, or batteries of dierent types.
• Clean the battery contacts and also those of the device prior to battery installation.
• Make sure the batteries are installed correctly with regard to polarity (+ and –).
• Remove batteries from equipment that is not to be used for an extended period of time.
• Remove used batteries promptly.
• Never attempt to recharge primary batteries as this may cause leakage, re, or
explosion.
• Never short-circuit batteries as this may lead to high temperatures, leakage, or
explosion.
• Never heat batteries in order to revive them.
• Do not disassemble batteries.
• Remember to switch o devices aer use.
• Keep batteries out of the reach of children, to avoid risk of ingestion, suocation, or
poisoning.
• Utilize used batteries as prescribed by your country laws.
Levenhuk International Lifetime Warranty
All Levenhuk telescopes, microscopes, binoculars and other optical products, except for
accessories, carry a lifetime warranty against defects in materials and workmanship. Lifetime
warranty is a guarantee on the lifetime of the product on the market. All Levenhuk accessories
are warranted to be free of defects in materials and workmanship for six months from date
of retail purchase. Levenhuk will repair or replace such product or part thereof which, upon
inspection by Levenhuk, is found to be defective in materials or workmanship. As a condition
to the obligation of Levenhuk to repair or replace such product, the product must be returned
to Levenhuk together with proof of purchase satisfactory to Levenhuk. This warranty does
not cover consumable parts, such as bulbs (electrical, LED, halogen, energy-saving and other
types of lamps), batteries (rechargeable and non-rechargeable), electrical consumables etc.
For further details, please visit our web site: www.levenhuk.com/warranty
If warranty problems arise, or if you need assistance in using your product, contact the local
Levenhuk branch.
13

Цифрови микроскопи
Levenhuk Rainbow DM LCD
BG
Вижте фиг. 1 (устройство), 2 (течнокристален екран), 3 (контролен панел), и 4
(принадлежности). Намерете Вашия модел микроскоп и прегледайте всички данни на
устройството
Подготовка
• Внимателно разопаковайте микроскопа и го поставете на равна повърхност.
• Включете захранващия кабел в съответните конектори на основата и на
течнокристален екран и фоновото осветление и екранът ще се включат
автоматично.
• Натиснете и задръжте бутона „Power on/o” (Вкл./изкл. на захранването) на
екрана за 2 секунди, за да включите или изключите екрана.
• Поставете микроскопския препарат върху подвижния блок и го фиксирайте с
държачите за образци. Поставете подвижния блок под обектива. Комплектът
включва набор от готови микроскопски препарати за изследване. Извадете
капака на обектива с надпис „Q.C. passed“ (преминат качествен контрол) от
долната част на втория капак на обектива.
• Регулирайте яркостта на фоновото осветление и регулирайте яснотата на
изображението с бутона за грубо фокусиране.
За да запишете заснетите изображения и видео, е необходима microSD карта
(закупува се отделно). Изключете микроскопа и вкарайте microSD картата в
съответния слот върху корпуса на микроскопа, докато щракне на мястото си. Не
прилагайте прекомерна сила при вкарването на microSD картата. Опитайте да
завъртите картата, ако не щраква лесно на мястото си.
Ако LCD екранът замръзне, потърсете бутона „Reset“ (Нулиране) на гърба на LCD
екрана. Използвайте тънък предмет, например изправен кламер, за да натиснете
бутона. Това ще нулира всички настройки до фабричните настройки и ще рестартира
LCD екрана. Запазените снимки или видеоклипове няма да бъдат изтрити.
Стъклена вложка на предметната маса
• За наблюдения на прозрачни образци или на тънки срезове на обекти може
да се използва вложка от матирано стъкло. Поставете я върху предметната
14
Внимание: моля, вижте в таблицата с техническите спецификации
правилното мрежово напрежение и никога не се опитвайте да включите
устройство за 110 V в захранващо гнездо за 220 V изход и обратно, без да
използвате преобразувател. Не забравяйте, че мрежовото напрежение в
САЩ и Канада е 110 V и 220–240 V в повечето европейски страни.
маса и я закрепете на място чрез заключващия винт. При наблюденията с тази
стъклена вложка на предметната маса трябва да се използва източник на
долно осветление.
• С микроскопа се доставят допълнителни предметни стъкла от черно и бяло
стъкло. Ако образецът е бял или ярък, тогава за по-добър контраст на
изображението използвайте черно предметно стъкло с включено само горно
осветление. В противен случай използвайте бяло предметно стъкло.
Меню на приложението
Режим за
видеоклипове
Видеозапис
Режим за снимки
Заснемане на
изображение
Цифрово увеличение
По време на наблюденията натиснете бутона „Up“ (Нагоре), за да увеличите
изображението, и бутона „Down“ (Надолу), за да намалите изображението.
Заснемане на изображение
1. Включете микроскопа и поставете образец на предметната маса.
2. Поставете обектива на желаната височина, като използвате бутона за грубо
фокусиране.
3. Регулирайте яркостта на осветлението, така че образецът да е равномерно
осветен.
4. Регулирайте увеличението и остротата на изображението, като завъртите
бутона за грубо фокусиране и пръстена за оптично увеличение.
5. За да направите снимка, натиснете бутона „Capture“ (Заснемане).
6. В режим „Freeze“ (Застиване) натиснете за кратко бутона „OK“, за да
направите снимка (с изключение на DM500).
TF
Иконка за състоянието
на microSD
Режим на неподвижно
изображение
Режим на преглед

Записване на видео
1. Натиснете бутона за „Video“ (Видео), за да превключите на режим на видео.
Иконата в горния ляв ъгъл на екрана ще се промени за потвърждение.
2. Натиснете бутона за „OK“, за да започнете записа. Забележка: не задържайте
бутона „OK“ натиснат; натиснете го за кратко и го отпуснете.
3. Натиснете бутона „OK“» отново, за да спрете записването.
4. Натиснете бутона „Capture“ (Заснемане), за да направите снимка, докато
микроскопът записва видео. Ако направите снимка по този начин,
резолюцията на изображението може да не е толкова висока, колкото
резолюцията на видеото – качеството на изображението ще бъде по-ниско.
Преглед на снимки и видеоматериали
1. Поставете microSD картата в SD слота.
2. Натиснете бутона „Video“ (Видеозапис) два пъти, за да включите режима за
преглед.
3. Натискайте бутоните „Right“ (Наляво) и „Le“ (Надясно), за да прегледате
снимките и видеоматериалите. За да стартирате възпроизвеждане на
видеоматериала, натиснете бутона „ОК“.
4. Използвайте бутона „Menu“ (Меню), за да използвате допълнителни опции
при преглед на неподвижно изображение или видео. Натиснете и задръжте
бутона „Menu“ (Меню), докато се появят опциите.
Настройка
Натиснете бутона „Menu“ (Меню), за да отидете в менюто за настройки на
течнокристалния екран. Използвайте бутоните за управление, за да изберете
необходимите параметри. Натиснете отново бутона „Menu“ (Меню), за да
запаметите избраните параметри. Не изключвайте захранването на микроскопа,
докато запаметявате настройките. Рестартирайте микроскопа след прилагане на
настройките.
Дата и час
Изберете от главното меню „Date/Time“ (Дата/Час) чрез бутона „Down“ (Надолу)
и настройте текущите дата и час. Можете да използвате бутоните „Le“ (Ляво) и
„Right“ (Дясно) на дистанционното управление, за да изберете необходимите данни
(само за DM500).
Спецификации
ИД на продукт 76826 76825
Модел
Цифрово увеличение 7–200x 10–200x
Оптично увеличение 7–50x 10–50x
Материал на оптиката оптично стъкло
Корпус пластмаса
Предметна маса 120х180 mm
Подвижен блок 83х43 mm, с държачи за образец
Система за фокусиране грубо, 50 mm грубо, 90 mm
Осветление горно и долно, светодиодно
Въртящ се цветен течнокристален
кран
Мегапиксела (сензор/изображение) 2/12
Максимална разделителна
способност (изображение/видео)
Формат на изображението/
видеото
Сензор 1/2,9
Размер на пикселите 2,8 μm
Чувствителност 3800 mV/Lux·s
Спектрален обхват 410–1100 nm
Ръчни настройки баланс на бялото, контрол на експозицията
Изход (конектори) microSD, miniUSB
Захранване (микроскоп)
Levenhuk Rainbow
DM500 LCD
5" 7"
4032x3024/1920x1080 px
110–220 V; 5 V, 1 A
чрез USB кабел
Levenhuk Rainbow
DM700 LCD
*.jpg/ *.avi
110–220 V; 5 V, 1 A чрез
USB кабел;
вградена батерия 2200 mAh
(време на работа: 4 часа,
време на зареждане: 20 часа)
15

Захранване (IR дистанционно) 2 бр. батерии AAA (не е включен)
Диапазон на работната температура –20…+70 °C
Levenhuk си запазва правото да променя или да преустанови предлагането на
продукта без предварително уведомление.
Грижи и поддръжка
• Никога и при никакви обстоятелства не гледайте директно към
слънцето, друг ярък източник на светлина или лазер през това
устройство, тъй като това може да предизвика ПЕРМАНЕНТНО
УВРЕЖДАНЕ НА РЕТИНАТА и може да доведе до СЛЕПОТА.
• Предприемете необходимите превантивни мерки при използване на това
устройство от деца или други, които не са прочели или които не са разбрали
напълно тези инструкции.
• След като разопаковате Вашия микроскоп и преди да го използвате за първи
път, проверете дали всички компоненти и връзки са здрави и с ненарушена
цялост.
• Не се опитвайте да разглобявате устройството самостоятелно. За всякакви
ремонти се обръщайте към местния специализиран сервизен център.
• Предпазвайте устройството от внезапни удари и прекомерна механична сила.
Не прилагайте прекомерен натиск при настройване на фокусирането. Не
пренатягайте заключващите винтове.
• Не пипайте повърхностите на оптиката с пръсти. За почистване на отвън,
използвайте само специални кърпички и течности за почистване на оптика
от Levenhuk. Не използвайте корозивни течности или такива на основата на
ацетон за почистване на оптиката.
• Абразивните частици, като напр. пясък, не трябва да бъдат забърсвани от
лещите, а трябва да бъдат издухвани или изчетквани с мека четка.
• Не използвайте устройството за продължителни периоди от време и не го
оставяйте без надзор на директна слънчева светлина. Пазете устройството
далече от вода и висока влажност.
• Бъдете внимателни по време на наблюдения, винаги поставяйте покривалото
против прах обратно на мястото му, след като сте приключили с наблюдението,
за да предпазите устройството от прах и поява на петна.
• Ако не използвате Вашия микроскоп за продължителни периоди от време,
съхранявайте лещите на обектива и окулярите отделно от микроскопа.
• Съхранявайте устройството на сухо и хладно място, далеч от опасни киселини
и други химикали, далеч от отоплителни уреди, открит огън и други източници
на високи температури.
• Когато използвате микроскопа, опитайте да не го използвате в близост до
запалими материали или вещества (бензен, хартия, картон, пластмаса и т.н.),
16
тъй като основата може да се нагрее по време на употреба и може да възникне
опасност от пожар.
• Винаги изключвайте микроскопа от източника на захранване, преди да
отворите основата или да смените осветителната лампа. Независимо от вида на
лампата (халогенна или с нажежаема жичка) я оставете да се охлади за кратко,
преди да опитате да я смените, и винаги я сменяйте с лампа от същия тип.
• Винаги използвайте захранване с подходящо напрежение, т.е. посоченото
в спецификациите на Вашия нов микроскоп. Включването на инструмента в
електрически контакт с различно напрежение ще повреди електрическата
верига на микроскопа, ще изгори лампата или може дори да причини късо
съединение.
• Потърсете веднага медицинска помощ, ако погълнете малка част или
батерия.
Инструкции за безопасност на батериите
• Винаги купувайте батерии с правилния размер и характеристики, които са
най-подходящи за предвидената употреба.
• Винаги сменяйте всички батерии едновременно, като внимавате да не смесите
стари и нови или батерии от различен тип.
• Почистете контактите на батериите, както и тези на устройството, преди да
поставите батериите.
• Уверете се, че батериите са поставени правилно по отношение на полярността
(+ и –).
• Извадете батериите от оборудването, ако то няма да бъде използвано
продължителен период от време.
• Извадете използваните батерии незабавно.
• Никога не свързвайте батерии накъсо, тъй като това може да доведе до
високи температури, теч или експлозия.
• Никога не загрявайте батерии, опитвайки се да ги използвате допълнително
време.
• Не разглобявайте батериите.
• Не забравяйте да изключите устройствата след употреба.
• Дръжте батериите далеч от достъпа на деца, за да избегнете риск от
поглъщане, задушаване или отравяне.
• Изхвърляйте използваните батерии, както е предписано от законите във
Вашата страна.
Международна доживотна гаранция от Levenhuk
Всички телескопи, микроскопи, бинокли и други оптични продукти от Levenhuk, с
изключение на аксесоарите, имат доживотна гаранция за дефекти в материалите
и изработката. Доживотната гаранция представлява гаранция, валидна за целия
живот на продукта на пазара. За всички аксесоари Levenhuk се предоставя гаранция

за липса на дефекти на материалите и изработката за период от две години от датата
на покупка на дребно. Levenhuk ще ремонтира или замени всеки продукт или част
от продукт, за които след проверка от страна на Levenhuk се установи наличие на
дефект на материалите или изработката. Задължително условие за задължението на
Levenhuk да ремонтира или замени такъв продукт е той да бъде върнат на Levenhuk
заедно с документ за покупка, който е задоволителен за Levenhuk.
Тази гаранция не покрива консумативи, като крушки (електрически, LED,
халогенни, енергоспестяващи или други типове лампи), батерии (акумулаторни и
неакумулаторни), електрически консумативи и т.н.
За повече информация посетете нашата уебстраница: www.levenhuk.bg/garantsiya
Ако възникнат проблеми с гаранцията или ако се нуждаете от помощ за използването на
Вашия продукт, свържете се с местния представител на Levenhuk.
17

Digitální mikroskopy
Levenhuk Rainbow DM LCD
CZ
Viz obr. 1 (zařízení), 2 (LCD obrazovka), 3 (ovládací panel) a 4 (příslušenství). Vyhledejte
model svého mikroskopu a zobrazte všechny podrobnosti zařízení.
Rozbalení a zapnutí
• Mikroskop opatrně vybalte a položte na rovný povrch.
• Napájecí kabel připojte k odpovídajícím konektorům v základně a na LCD
obrazovce a poté se automaticky zapne obrazovka a podsvícení.
• Obrazovku lze zapnout a vypnout stisknutím a podržením tlačítka „Power on/o”
(Vypínač napájení) na obrazovce po dobu 2 sekund.
• Mikropreparát umístěte na posuvný blok a upevněte pomocí držáků vzorků.
Posuvný blok umístěte pod objektiv. Sada obsahuje několik předem připravených
mikropreparátů ke zkoumání. Odstraňte ochranný kryt zorníku s označením „Q.C.
passed“ z dolní části druhého krytu zorníku.
• Upravte jas podsvícení a ostrost obrazu pomocí makrošroubu pro hrubé zaostření.
Karta microSD (nutno koupit samostatně) slouží k ukládání pořízených statických snímků
a videozáznamů. Mikroskop vypněte a kartu microSD vložte do odpovídajícího slotu na
těle mikroskopu, dokud vám zvuk cvaknutí neoznámí, že je vložena správně. Při vkládání
microSD karty nepoužívejte příliš velkou sílu. Nejde-li na své místo vložit snadno, zkuste
ji otočit.
Pokud LCD obrazovka zamrzne, použijte tlačítko „Reset“ (Resetovat) na zadní straně
LCD obrazovky. Tlačítko lze stisknout úzkým předmětem, jako je například kancelářská
sponka. Obnovíte tím veškerá tovární nastavení a restartujete LCD obrazovku. Uložené
snímky nebo videa nebudou odstraněny.
Skleněná vložka pracovního stolku
• Pracovní stolek s matným sklem lze použít k pozorování transparentních
preparátů nebo tenkých řezů objektů. Položte jej na pracovní stolek a upevněte na
místě pojistným šroubem. Při pozorování na tomto skleněném pracovním stolku
by se mělo používat spodní osvětlení.
18
Upozornění: Správné síťové napětí naleznete v tabulce technických
parametrů. Bez použití měniče se nikdy nepokoušejte připojit zařízení
dimenzované na napětí 220 V do zásuvky poskytující napětí 110 V a opačně.
Mějte na paměti, že síťové napětí ve většině evropských zemí je 220–240 V,
zatímco v USA a v Kanadě je to 110 V.
• S mikroskopem se dodávají další černá a bílá sklíčka. Pokud je vzorek bílý nebo
světlý, pro lepší kontrast použijte černé sklíčko s osvětlením shora. V ostatních
případech použijte bílé sklíčko.
Nabídka aplikace
Režim videa
Záznam videa
Režim fotograe
Snímat statický obraz
Digitální zvětšení
Během pozorování můžete obraz zvětšit stisknutím tlačítka „Up“ (Nahoru) a zmenšit
stisknutím tlačítka „Down“ (Dolů).
Snímání obrazu
1. Zapněte mikroskop a položte vzorek na stolek.
2. Nastavte objektiv do požadované výšky pomocí makrošroubu pro hrubé zaostření.
3. Nastavte jas osvětlení tak, aby byl preparát rovnoměrně osvětlený.
4. Upravte zvětšení a ostrost obrazu pomocí makrošroubu pro hrubé zaostření a
kroužku optického zoomu.
5. Chcete-li pořídit snímek, stiskněte tlačítko „Capture“ (Pořídit snímek).
6. V režimu „Freeze“ (Znehybnění) lze uložit snímek krátkým stisknutím tlačítka „OK“
(kromě DM500).
Pořizování videozáznamů
1. Stisknutím klávesy „Video“ přejdete do režimu videozáznamu. Přechod do jiného
režimu je potvrzen změnou ikony v levém horním rohu.
2. Stisknutím tlačítka OK zahájíte záznam. Poznámka: tlačítko „OK“ nedržte
stisknuté; pouze jej krátce stiskněte a uvolněte.
3. Dalším stisknutím tlačítka „OK“ záznam zastavíte.
TF
Ikona stavu karty microSD
Režim snímku
Režim přehrávání/
zobrazení

4. Stisknutím tlačítka „Capture“ (Pořídit snímek) zachytíte snímek, když mikroskop
zaznamenává video. Snímek pořízený tímto způsobem nemusí mít tak vysoké
rozlišení jako je rozlišení videa – kvalita snímku bude nižší.
Prohlížení fotograí a videí
1. Vložte kartu microSD do slotu pro kartu SD.
2. Dvakrát stiskněte tlačítko „Video“. Přepnete tak do režimu prohlížení.
3. Obrázky a videa si můžete prohlížet pomocí tlačítek „Right“ (Doprava) nebo „Le“
(Doleva). Přehrávání videa zahájíte stisknutím tlačítka „OK“.
4. Pomocí tlačítka „Menu“ (Nabídka) můžete využít další možnosti při zobrazení
snímku nebo videa. Stiskněte a podržte tlačítko „Menu“ (Nabídka), dokud se
neobjeví možnosti.
Nastavení
Stisknutím tlačítka „Menu“ (Nabídka) přejdete do nabídky nastavení LCD obrazovky.
Pomocí ovládacích tlačítek vyberte požadované parametry. Znovu stiskněte tlačítko
„Menu“ (Nabídka) aby se vybrané parametry uložily. Při ukládání nastavení mikroskop
nevypínejte. Po provedení nastavení mikroskop restartujte.
Datum a čas
Vyberte možnost „Date/Time“ (Datum/čas) z hlavní nabídky pomocí tlačítka „Down“
(Dolů) a nastavte aktuální datum a čas. Pomocí tlačítek „Le“ (Vlevo) a „Right“ (Vpravo)
na dálkovém ovládání můžete vybrat požadovaná média. (pouze DM500).
Technické údaje
ID produktu 76826 76825
Model
Digitální zvětšení 7–200x 10–200x
Optické zvětšení 7–50x 10–50x
Materiál optiky optické sklo
Tělo plastik
Pracovní stolek 120х180 mm
Pohyblivý blok 83х43 mm, včetně držáků preparátů
Systém ostření hrubé, 50 mm hrubé, 90 mm
Osvětlení horní a dolní, LED
Otočná barevná LCD obrazovka 5" 7"
Rozlišení v megapixelech
(snímač/obraz)
Max. rozlišení (obraz/video) 4032x3024/1920x1080 px
Formát snímku/videa *.jpg/ *.avi
Snímač 1/2,9
Rozměr pixelu 2,8 μm
Citlivost 3800 mV/Lux·s
Spektrální rozsah 410–1100 nm
Ruční nastavení vyvážení bílé, nastavení expozice
Výstup (konektory) microSD, miniUSB
Napájení (mikroskop)
Napájení (IR dálkové ovládání) 2 ks AAA baterie (není součástí dodávky)
Rozsah provozní teploty –20…+70 °C
Levenhuk Rainbow DM500
LCD
110–220 V; 5 V, 1 A
přes USB kabel
Společnost Levenhuk si vyhrazuje právo provádět bez předchozího upozornění úpravy
jakéhokoliv výrobku, případně zastavit jeho výrobu.
Levenhuk Rainbow DM700
LCD
2/12
110–220 V; 5 V, 1 A přes USB kabel;
zabudovaná baterie 2200 mAh
(provozní doba: 4 hodiny, doba
nabíjení: 20 hodin)
19

Péče a údržba
• Nikdy, za žádných okolností se tímto přístrojem nedívejte přímo do slunce,
jiného světelného zdroje nebo laseru, neboť hrozí nebezpečí TRVALÉHO
POŠKOZENÍ SÍTNICE a případně i OSLEPNUTÍ.
• Při použití tohoto přístroje dětmi nebo osobami, které tento návod nečetly nebo s
jeho obsahem nebyly plně srozuměny, uplatněte nezbytná preventivní opatření.
• Po vybalení mikroskopu a před jeho prvním použitím zkontrolujte neporušenost
jednotlivých komponent a spojů.
• Nepokoušejte se přístroj sami rozebírat. S opravami veškerého druhu se obracejte
na své místní specializované servisní středisko.
• Přístroj chraňte před prudkými nárazy a nadměrným mechanickým namáháním.
Při zaostřování nevyvíjejte nadměrný tlak. Neutahujte šrouby konstrukce příliš
silně.
• Nedotýkejte se svými prsty povrchů optických prvků. K vyčištění vnějších částí
přístroje používejte výhradně speciální čisticí ubrousky a speciální nástroje k
čištění optiky dodávané společností Levenhuk. K čištění optiky nepoužívejte žádné
žíraviny ani kapaliny na acetonové bázi.
• Abrazivní částice, například písek, by se neměly z čoček otírat, ale sfouknout nebo
smést měkkým kartáčkem.
• Přístroj příliš dlouho nepoužívejte ani neponechávejte bez dozoru na přímém
slunci. Chraňte přístroj před stykem s vodou.
• Při pozorování dbejte na opatrnost; po skončení pozorování vždy nasaďte ochranný
kryt, abyste mikroskop ochránili před prachem a jiným znečištěním.
• Pokud svůj mikroskop nebudete delší dobu používat, uložte čočky objektivu a
okuláru odděleně od samotného mikroskopu.
• Přístroj ukládejte na suchém, chladném místě, mimo dosah nebezpečných kyselin
nebo jiných chemikálií, topných těles, otevřeného ohně a jiných zdrojů vysokých
teplot.
• Mikroskop nepoužívejte v blízkosti hořlavých materiálů nebo látek (benzín, papír,
lepenka, plast apod.), neboť stativ se může při práci zahřívat a vyvolávat riziko
požáru.
• Před otevřením stativu nebo výměnou žárovky osvětlení vždy mikroskop odpojte
od zdroje napájení. Bez ohledu na typ žárovky (halogenová nebo obyčejná) ji
nechejte před výměnou nějakou dobu vychladnout a vždy ji vyměňujte za žárovku
stejného typu.
• Vždy používejte napájení o správném napětí tak, jak je uvedeno v technických
údajích vašeho nového mikroskopu. Připojení přístroje do odlišné zásuvky může
vést k poškození elektronických obvodů mikroskopu, spálení žárovky nebo
dokonce vyvolat zkrat.
• Při náhodném požití malé součásti nebo baterie ihned vyhledejte lékařskou
pomoc.
20
Bezpečnostní pokyny týkající se baterií
• Vždy nakupujte baterie správné velikosti a typu, které jsou nejvhodnější pro
zamýšlený účel.
• Při výměně vždy nahrazujte celou sadu baterií a dbejte na to, abyste nemíchali
staré a nové baterie, případně baterie různých typů.
• Před instalací baterií vyčistěte kontakty na baterii i na přístroji.
• Ujistěte se, zda jsou baterie instalovány ve správné polaritě (+ resp. −).
• V případě, že zařízení nebudete delší dobu používat, vyjměte z něj baterie.
• Použité baterie včas vyměňujte.
• Baterie nikdy nezkratujte, mohlo by to vést ke zvýšení teploty, úniku obsahu
baterie nebo k explozi.
• Baterie se nikdy nepokoušejte oživit zahříváním.
• Po použití nezapomeňte přístroj vypnout.
• Baterie uchovávejte mimo dosah dětí, abyste předešli riziku spolknutí, vdechnutí
nebo otravy.
• S použitými bateriemi nakládejte v souladu s vašimi vnitrostátními předpisy.
Mezinárodní doživotní záruka Levenhuk
Na veškeré teleskopy, mikroskopy, triedry a další optické výrobky značky Levenhuk,
s výjimkou příslušenství, se poskytuje doživotní záruka pokrývající vady materiálu a
provedení. Doživotní záruka je záruka platná po celou dobu životnosti produktu na trhu.
Na veškeré příslušenství značky Levenhuk se poskytuje záruka toho, že je dodáváno
bez jakýchkoli vad materiálu a provedení, a to po dobu dvou let od data zakoupení v
maloobchodní prodejně. Tato záruka vám v případě splnění všech záručních podmínek
dává nárok na bezplatnou opravu nebo výměnu výrobku značky Levenhuk v libovolné
zemi, v níž se nachází pobočka společnosti Levenhuk. Další informace – navštivte naše
webové stránky: www.levenhuk.cz/zaruka
V případě problémů s uplatněním záruky, nebo pokud budete potřebovat pomoc při
používání svého výrobku, obraťte se na místní pobočku společnosti Levenhuk.

Levenhuk-Rainbow-DM-
VORSICHT: Die korrekte Netzspannung entnehmen Sie der Tabelle mit
den technischen Daten. Schließen Sie ein 220-V-Gerät niemals ohne
LCD-Digitalmikroskope
Spannungswandler an eine 110-V-Steckdose an und umgekehrt. In den
meisten europäischen Ländern beträgt die Netzspannung 220–240 V; in den
USA und Kanada beträgt sie 110 V.
DE
Schauen Sie sich die Abbildungen 1 (Gerät), 2 (LCD-Bildschirm), 3 (Bedienfeld) und
4 (Zubehör) an. Finden Sie das richtige Mikroskopmodell für Sie, schauen Sie sich
sämtliche Details an.
Vorbereitung
• Packen Sie das Mikroskop sorgfältig aus, stellen Sie das Instrument auf eine
ache Unterlage.
• Schließen Sie das Stromversorgungskabel an die dafür vorgesehenen Anschlüsse
an Basis und LCD-Bildschirm an. Hintergrundbeleuchtung und Bildschirm schalten
sich automatisch ein.
• Legen Sie das Präparat auf den verstellbaren Block, xieren Sie es mit den
Probenhaltern. Legen Sie den verstellbaren Block unter das Objektiv. Im Set
sind einsatzfertige Mikropräparate zum Studieren enthalten. Nehmen Sie die
mit „Q.C. passed“ beschriete Objektivabdeckung vom Boden der zweiten
Objektivabdeckung ab.
• Halten Sie die „Power on/o” (Ein-/Ausschalter)-Taste am Bildschirm zum Ein-
und Ausschalten des Bildschirms 2 Sekunden lang gedrückt.
• Stellen Sie die Helligkeit der Hintergrundbeleuchtung ein, justieren Sie die
Bildschärfe mit dem Grobtrieb.
Zum Speichern von Bild- und Videoaufnahmen ist eine microSD-Karte (separat
erhältlich) erforderlich. Schalten Sie das Mikroskop aus und schieben Sie die microSDKarte in den microSDSchlitz am Mikroskopsockel ein, bis sie mit einem Klicken einrastet.
Wenden Sie beim Einführen der microSD-Karte keine übermäßige Kra an. Falls sich die
Karte nicht leicht einrasten lässt, führen Sie sie anders herum ein.
Falls der LCD-Bildschirm ein eingefrorenes Bild zeigt, schauen Sie sich die „Reset“
(Rücksetztaste) an der Rückseite des LCD-Bildschirms an. Betätigen Sie die
Rücksetztaste mit einem sehr schmalen Gegenstand, zum Beispiel einer aufgebogenen
Büroklammer. Dadurch werden die Einstellungen auf die Werksvorgaben rückgesetzt,
der LCD-Bildschirm startet neu. Gespeicherte Fotos und Videos werden dabei nicht
gelöscht.
Objekttischeinlage aus Glas
• Die Objekttischeinlage aus Mattglas kann für Beobachtungen transparenter
Proben oder dünner Schnitte eingesetzt werden. Platzieren Sie die Einlage auf dem
Objekttisch und xieren Sie sie mit der Verriegelungsschraube. Verwenden Sie für
Beobachtungen mit der Glaseinlage die untere Beleuchtungsquelle.
• Mit dem Mikroskop werden zusätzliche schwarze und weiße Objektträger geliefert.
Bei weißen oder sehr hellen Proben benutzen Sie das besseren Kontrastes wegen
einen schwarzen Objektträger, schalten lediglich die Beleuchtung von oben ein.
Andernfalls benutzen Sie einen weißen Objektträger.
Applikationsmenü
Videomodus
Videoaufzeichnung
Fotomodus
Nimmt ein Bild auf
Digitale Vergrößerung
Mit der Aufwärtstaste vergrößern Sie die Bilddarstellung, mit der Abwärtstaste
verkleinern Sie die Darstellung.
Aufnehmen eines Bilds
1. Schalten Sie das Mikroskop ein, legen Sie dann die Probe auf den Objekttisch.
2. Stellen Sie das Objektivmit dem Grobtrieb auf die gewünschte Höhe ein.
3. Regeln Sie die Helligkeit der Beleuchtung so, dass die Probe gleichmäßig
ausgeleuchtet ist.
4. Stellen Sie Vergrößerung und Bildschärfe mit dem Grobtrieb und dem Zoomring ein.
5. Zum Aufnehmen eines Fotos drücken Sie die „Capture” (Aufnahme)-Taste.
6. Im Standbildmodus drücken Sie zur Bildaufnahme kurz auf die „OK”-Taste (außer
DM500).
TF
MicroSD-Status
Standbildmodus
Anzeigemodus
21

Aufzeichnen eines Videos
1. Drücken Sie die Video-Taste, um in den Videomodus zu wechseln. Das Symbol
oben links im Bildschirm zeigt den Videomodus an.
2. Zum Starten der Aufzeichnung drücken Sie die „OK”-Taste. Hinweis: Halten Sie die
„OK”-Taste nicht gedrückt, drücken Sie nur kurz.
3. Zum Stoppen der Videoaufnahme drücken Sie die „OK”-Taste noch einmal.
4. Durch kurzes Drücken der „Capture” (Aufnahme)-Taste können Sie ein Standbild
aufnehmen, während gerade ein Video aufgezeichnet wird. Auf diese Weise
aufgenommene Fotos sind gewöhnlich nicht so scharf wie eigens Fotomodus
aufgenommene Bilder.
Fotos und Videos anzeigen
1. Legen Sie die microSD-Karte in den SD-Kartensteckplatz ein (wenn die Karte nicht
eh schon eingelegt ist).
2. Drücken Sie zum Umschalten in den Anzeigemodus die Video-Taste zweimal.
3. Wählen Sie die Bilder und Videos mit den Links- und Rechts-Tasten aus. Starten
Sie die Videowiedergabe mit der „OK”-Taste.
4. Mit der Menütaste können Sie beim Betrachten von Fotos oder Videos zusätzliche
Optionen einblenden. Halten Sie die Menütaste gedrückt, bis die Optionen
erscheinen.
Einrichtung
Mit der „Menu” (Menü) gelangen Sie zum Einstellungsmenü des LCD-Bildschirms.
Wählen Sie die gewünschten Parameter mit den Steuerungstasten. Zum Speichern der
ausgewählten Parameter drücken Sie die „Menu” (Menü) noch einmal. Trennen Sie das
Mikroskop nicht von der Stromversorgung, während gerade gespeichert wird. Starten
Sie das Mikroskop neu, nachdem Sie die Einstellungen übernommen haben.
Datum und Uhrzeit
Wählen Sie mit der „Down” (Abwärtstaste) Datum/Zeit aus dem Hauptmenü, stellen
Sie dann das aktuelle Datum und die Uhrzeit ein. Mit den Links-/Rechtstasten an der
Fernbedienung treen Sie die gewünschte Auswahl (nur DM500).
22
Technische Daten
Artikelnummer 76826 76825
Modell
Digitale Vergrößerung 7–200x 10–200x
Optische Vergrößerung 7–50x 10–50x
Optisches Material Optikglas
Gehäuse Kunststo
Objekttisch 120х180 mm
Beweglicher Block 83х43 mm, mit Probenhaltern
Fokussierung Grobtrieb, 50 mm Grobtrieb, 90 mm
Beleuchtung von oben und unten, LED
Drehbarer LCD-Farbbildschirm 5" 7"
Megapixel (Sensor/Bild)
Maximale Auösung (Bild/Video) 4032x3024/1920x1080 px
Bild-/Videoformat *.jpg/ *.avi
Sensor 1/2,9
Pixelgröße 2,8 μm
Empndlichkeit 3800 mV/Lux·s
Spektralbereich 410–1100 nm
Manuelle Einstellungen Weißabgleich, Belichtungssteuerung
Anschlüsse (Anschlüsse) microSD, miniUSB
Stromversorgung (Mikroskop)
Stromversorgung
(Infrarotfernbedienung)
Umgebungstemperatur –20…+70 °C
Levenhuk Rainbow DM500
LCD
110–220 V; 5 V, 1 A
per USB-Kabel
2 AAA-Batterien (separat erhältlich)
Levenhuk behält sich das Recht vor, Produkte ohne vorherige Ankündigung zu modizieren
oder einzustellen.
Levenhuk Rainbow DM700
2/12
110–220 V; 5 V, 1 A per USB-Kabel;
LCD
integrierter 2200-mAh-Akku
(Betriebszeit: 4 Stunden.
Ladezeit: 20 Stunden)

Pege und Wartung
• Richten Sie das Instrument unter keinen Umständen direkt auf die Sonne,
andere helle Lichtquellen oder Laserquellen. Es besteht die Gefahr
DAUERHAFTER NETZZHAUTSCHÄDEN und ERBLINDUNGSGEFAHR.
• Treen Sie geeignete Vorsichtsmaßnahmen, wenn Kinder oder Menschen das
Instrument benutzen, die diese Anleitung nicht gelesen bzw. verstanden haben.
• Prüfen Sie nach dem Auspacken Ihres Mikroskops und vor der ersten Verwendung
die einzelnen Komponenten und Verbindungen auf ihre Beständigkeit.
• Versuchen Sie nicht, das Instrument eigenmächtig auseinanderzunehmen.
Wenden Sie sich für Reparaturen an ein spezialisiertes Servicecenter vor Ort.
• Schützen Sie das Instrument vor plötzlichen Stößen und anderen mechanischen
Belastungen. Üben Sie beim Fokussieren keinen übermäßigen Druck aus. Wenden
Sie keine übermäßige Kra auf die Feststellschrauben und Fixierungsschrauben an.
• Berühren Sie die optischen Oberächen nicht mit den Fingern. Verwenden
Sie zur äußerlichen Reinigung des Instruments ausschließlich die speziellen
Reinigungstücher und das spezielle Optik-Reinigungszubehör von Levenhuk.
Reinigen Sie die Optik nicht mit korrodierenden Flüssigkeiten oder Flüssigkeiten
auf Acetonbasis.
• Schleifkörper wie Sandkörner dürfen nicht abgewischt werden. Sie können sie
wegblasen oder einen weichen Pinsel verwenden.
• Das Instrument ist nicht für Dauerbetrieb ausgelegt. Lassen Sie das Instrument
nicht in direktem Sonnenlicht zurück. Halten Sie das Instrument von Wasser und
hoher Feuchtigkeit fern.
• Lassen Sie Sorgfalt bei der Beobachtung walten und setzen Sie nach Abschluss
der Beobachtung die Staubabdeckung wieder auf, um das Gerät vor Staub und
Verschmutzungen zu schützen.
• Bewahren Sie bei längeren Phasen der Nichtbenutzung die Objektivlinsen und
Okulare getrennt vom Mikroskop auf.
• Lagern Sie das Instrument an einem trockenen, kühlen Ort, der frei von Staub,
gefährlichen Säuren und anderen Chemikalien ist, und in ausreichendem Abstand
zu Heizgeräten, oenem Feuer und anderen Hochtemperaturquellen.
• Setzen Sie das Mikroskop nach Möglichkeit nicht in der Nähe brennbarer
Materialien oder Substanzen (Benzen, Papier, Karton, Plastik usw.) ein, da sich der
Sockel bei der Verwendung erhitzen kann und dies bei Anwesenheit brennbarer
Stoe ein Brandrisiko darstellt.
• Trennen Sie das Mikroskop immer vom Strom, bevor Sie den Sockel önen oder
die Beleuchtungslampe austauschen. Lassen Sie sowohl Glühlampen als auch
Halogenlampen vor dem Auswechseln zunächst abkühlen, und ersetzen Sie sie
stets durch Lampen desselben Typs.
• Verwenden Sie stets eine Stromquelle mit der Spannung, die in den technischen
Angaben zu Ihrem Mikroskop speziziert ist. Wird das Instrument an eine
Steckdose mit abweichender Spannung angeschlossen, ist mit Beschädigung der
elektrischen Schaltkreise des Mikroskops, Durchbrennen der Lampe oder sogar
Kurzschlüssen zu rechnen.
• Bei Verschlucken eines Kleinteils oder einer Batterie umgehend ärztliche
Hilfe suchen!
Sicherheitshinweise zum Umgang mit Batterien
• Immer die richtige, für den beabsichtigten Einsatz am besten geeignete
Batteriegröße und -art erwerben.
• Stets alle Batterien gleichzeitig ersetzen. Alte und neue Batterien oder Batterien
verschiedenen Typs nicht mischen.
• Batteriekontakte und Kontakte am Instrument vor Installation der Batterien reinigen.
• Beim Einlegen der Batterien auf korrekte Polung (+ und –) achten.
• Batterien entnehmen, wenn das Instrument für einen längeren Zeitraum nicht
benutzt werden soll.
• Verbrauchte Batterien umgehend entnehmen.
• Batterien nicht kurzschließen, um Hitzeentwicklung, Auslaufen oder Explosionen
zu vermeiden.
• Batterien dürfen nicht zum Wiederbeleben erwärmt werden.
• Instrumente nach Verwendung ausschalten.
• Batterien für Kinder unzugänglich aufbewahren, um Verschlucken, Ersticken und
Vergiungen zu vermeiden.
Lebenslange internationale Garantie
Levenhuk garantiert für alle Teleskope, Mikroskope, Ferngläser und anderen optischen
Erzeugnisse mit Ausnahme von Zubehör lebenslänglich die Freiheit von Material- und
Herstellungsfehlern. Die lebenslange Garantie ist eine Garantie, die für die gesamte
Lebensdauer des Produkts am Markt gilt. Für Levenhuk-Zubehör gewährleistet
Levenhuk die Freiheit von Material- und Herstellungsfehlern innerhalb von zwei Jahren
ab Kaufdatum. Produkte oder Teile davon, bei denen im Rahmen einer Prüfung durch
Levenhuk ein Material- oder Herstellungsfehler festgestellt wird, werden von Levenhuk
repariert oder ausgetauscht. Voraussetzung für die Verpichtung von Levenhuk zu
Reparatur oder Austausch eines Produkts ist, dass dieses zusammen mit einem für
Levenhuk ausreichenden Kaufbeleg an Levenhuk zurückgesendet wird.
Diese Garantie erstreckt sich nicht auf Verbrauchsmaterialien wie Leuchtmittel
(Glühbirnen, LEDs, Halogen- und Energiesparlampen u. a.), Batterien (wiederauadbare
Akkus und nicht wiederauadbare Batterien), elektrisches Verbrauchsmaterial usw.
Weitere Einzelheiten entnehmen Sie bitte unserer Website: www.levenhuk.de/garantie
Bei Problemen mit der Garantie, oder wenn Sie Unterstützung bei der Verwendung Ihres
Produkts benötigen, wenden Sie sich an die lokale Levenhuk-Niederlassung.
23

Microscopios digitales
de la serie Levenhuk
Rainbow DM LCD
ES
Consulte la gura 1 (dispositivo), 2 (pantalla LCD), 3 (panel de control) y 4 (accesorios).
Encuentre su modelo de microscopio y vea todos los detalles del dispositivo.
Desembalado y puesta en funcionamiento
• Desempaquete el microscopio con cuidado y colóquelo sobre una supercie plana.
• Enchufe el cable de alimentación en los conectores correspondientes de la base
y de la pantalla LCD, y entonces la retroiluminación y la pantalla se encenderán
automáticamente.
• Pulse y mantenga pulsado el botón “Power on/o” (Encendido/apagado) durante
2 segundos en la pantalla para encender y apagar la pantalla.
• Coloque la muestra en la platina móvil y fíjela con las pinzas para portaobjetos.
Coloque la platina móvil debajo del objetivo. El kit incluye un conjunto de muestras
preparadas para su estudio. Retire la tapa de la lente que lleva la indicación “Q.C.
passed” de la parte inferior de la segunda tapa de la lente.
• Ajuste el brillo de la retroiluminación y la claridad de la imagen con el mando de
enfoque aproximado.
Es necesaria una tarjera microSD (se compra por separado) para guardar las imágenes
capturadas y los vídeos grabados. Apague el microscopio e inserte la tarjeta microSD en
la ranura correspondiente en el cuerpo del microscopio hasta que se je con un clic. No
haga demasiada fuerza cuando inserte la tarjeta microSD. Intente rotar la tarjeta si no se
ja fácilmente.
Si la imagen de la pantalla LCD queda inmovilizada, utilice el botón “Reset“ (Restablecer)
situado en la parte posterior de la pantalla LCD. Utilice un objeto estrecho, tal como
un sujetapapeles enderezado, para pulsar el botón. Esto restablecerá todas las
conguraciones a los valores predeterminados de fábrica y reiniciará la pantalla LCD. Las
fotos o videos guardados no se borrarán.
24
Advertencia: Consulte en la tabla de especicaciones cuál es la tensión de
alimentación adecuada para este instrumento y no intente nunca conectar
un aparato de 220 V en un enchufe de 110 V o viceversa sin utilizar un
convertidor. Recuerde que la tensión de red en la mayor parte de los países
europeos es 220–240 V mientras que en los EUA y Canadá es 110 V.
Inserto de cristal esmerilado
• El inserto de cristal esmerilado puede utilizarse para observar muestras
transparentes o láminas nas de objetos. Colóquelo sobre la platina y fíjelo con
el tornillo de bloqueo. En observaciones realizadas con este inserto es necesario
utilizar la fuente de iluminación inferior.
• Con el microscopio se suministran platinas adicionales de vidrio de color blanco
y negro. Si la muestra es blanca o brillante, para obtener un mejor contraste
de imagen, utilice la platina de vidrio negro con tan solo la iluminación superior
encendida. En otro caso, utilice la platina de vidrio blanco.
Menú de la aplicación
Modo de vídeo
Grabación de vídeo
Modo de foto
Capturar una imagen
Aumento digital
Durante las observaciones, presione el botón “Up” (Arriba) para agrandar la imagen y el
botón “Down” (Abajo) para reducir la imagen.
Capturar una imagen
1. Encienda el microscopio y coloque una muestra en la platina.
2. Coloque el objetivo a la altura deseada utilizando el mando de enfoque
aproximado.
3. Ajuste el brillo de la iluminación de manera que el espécimen esté iluminado de
forma regular.
4. Ajuste la ampliación y nitidez de la imagen girando el mando de enfoque
aproximado y el anillo de zoom óptico.
5. Para tomar una foto, pulse el botón “Capture” (Captura).
TF
Icono de estado
de microSD
Modo de imagen estática
Modo de revisión

6. En el modo “Freeze” (Inmovilizado), pulse brevemente el botón «OK» para tomar
una foto (excepto en el modelo DM500).
Grabar un vídeo
1. Pulse la tecla “Video” (Vídeo) para pasar al modo de vídeo. El icono en la esquina
superior izquierda de la pantalla cambiará para conrmar.
2. Presione el botón “OK” para comenzar a grabar. Nota: no mantenga pulsado el
botón “OK”; en lugar de ello, púlselo brevemente y suéltelo.
3. Pulse de nuevo el botón “OK” para detener la grabación.
4. Pulse el botón “Capture” (Capturar) para tomar una foto mientras el microscopio
está grabando un vídeo. Si toma una foto de esta manera, es posible que la
resolución de la imagen no sea tan alta como la resolución del vídeo; la calidad de
la imagen será menor.
Ver fotos y vídeos
1. Inserte la tarjeta microSD en la ranura SD.
2. Pulse el botón “Video” (Vídeo) dos veces para activar el modo de visualización.
3. Pulse los botones “Right” (Derecha) e “Le” (Izquierda) para ver las imágenes y
vídeos. Pulse el botón “OK” para comenzar a reproducir el vídeo.
4. Utilice el botón “Menu” (Menú) para disponer de opciones adicionales al visualizar
una imagen estática o un vídeo. Pulse y mantenga pulsado el botón “Menu” (Menú)
hasta que aparezcan las opciones.
Conguración
Pulse el botón “Menu” (Menú) para ir al menú de conguración de la pantalla LCD. Use
los botones de control para seleccionar los parámetros requeridos. Pulse el botón
“Menu” (Menú) nuevamente para guardar los parámetros seleccionados. No apague el
microscopio mientras guarda la conguración. Reinicie el microscopio después de aplicar
la conguración.
Fecha y hora
Seleccione Fecha/Hora en el menú principal pulsando el botón “Down” (Flecha) abajo y
establezca la fecha y hora actuales. Puede utilizar los botones “Le” (Izquierda) y “Right”
(Derecha) del mando a distancia para seleccionar los datos necesarios (solo DM500).
Especicaciones
ID de producto 76826 76825
Modelo
Ampliación digital 7–200x 10–200x
Ampliación óptica 7–50x 10–50x
Material de la óptica vidrio óptico
Cuerpo plástico
Platina 120х180 mm
Bloque movible 83х43 mm, con portamuestras
Sistema de enfoque aproximado, 50 mm aproximado, 90 mm
Iluminación superior e inferior, LED
Pantalla LCD a color giratoria 5" 7"
Megapíxeles (sensor/imagen)
Resolución máx. (imagen/vídeo) 4032x3024/1920x1080 px
Formato de imagen/vídeo *.jpg/ *.avi
Sensor 1/2,9
Tamaño de píxel 2,8 μm
Sensibilidad 3800 mV/Lux·s
Rango espectral 410–1100 nm
Conguración manual balance de blancos, control de exposición
Salida (conectores) microSD, miniUSB
Fuente de alimentación
(microscopio)
Fuente de alimentación (mando a
distancia por infrarrojos)
Levenhuk Rainbow
DM500 LCD
110–220 V; 5 V, 1 A
mediante cable USB
2 pilas AAA (no incluido)
Levenhuk Rainbow
DM700 LCD
2/12
110–220 V; 5 V, 1 A
mediante cable USB; batería
incorporada de 2200 mAh
(tiempo de funcionamiento:
4 horas, tiempo de carga:
20 horas)
25

Rango de temperaturas de
funcionamiento
Levenhuk se reserva el derecho a modicar o descatalogar cualquier producto sin previo
aviso.
–20…+70 °C
Cuidado y mantenimiento
• Nunca, bajo ninguna circunstancia, mire directamente al sol, a otra fuente
de luz intensa o a un láser a través de este instrumento, ya que esto podría
causar DAÑO PERMANENTE EN LA RETINA y CEGUERA.
• Tome las precauciones necesarias si utiliza este instrumento acompañado de
niños o de otras personas que no hayan leído o que no comprendan totalmente
estas instrucciones.
• Tras desembalar el microscopio y antes de utilizarlo por primera vez, compruebe
el estado y la durabilidad de cada componente y cada conexión.
• No intente desmontar el instrumento usted mismo bajo ningún concepto, ni
siquiera para limpiar el espejo. Si necesita repararlo o limpiarlo, contacte con el
servicio técnico especializado que corresponda a su zona.
• Proteja el instrumento de impactos súbitos y de fuerza mecánica excesiva. No
aplique una presión excesiva al ajustar el foco. No apriete demasiado los tornillos
de bloqueo.
• No toque las supercies ópticas con los dedos. Para limpiar el exterior del instrumento,
utilice únicamente los paños y herramientas de limpieza especiales de Levenhuk. No
limpie las supercies ópticas con uidos corrosivos ni a base de acetonas.
• No limpie las partículas abrasivas, como por ejemplo arena, con un paño.
Únicamente sóplelas o bien pase un cepillo blando.
• No utilice este dispositivo durante períodos largos de tiempo ni lo deje sin atender
bajo la luz directa del sol. Protéjalo del agua y la alta humedad.
• Tenga cuidado durante las observaciones y cuando termine recuerde volver a
colocar la cubierta para proteger el dispositivo del polvo y las manchas.
• Si no va a utilizar el microscopio durante periodos largos de tiempo, guarde las
lentes del objetivo y los oculares por separado del microscopio.
• Guarde el instrumento en un lugar seco y fresco, alejado de ácidos peligrosos y otros
productos químicos, radiadores, de fuego y de otras fuentes de altas temperaturas.
• Cuando uses el microscopio intenta no hacerlo cerca de materiales o sustancias
inamables (benceno, papel, cartón, plástico, etc.) ya que la base puede calentarse
con el uso y suponer un riesgo de incendio.
• Desconecta siempre el microscopio de la fuente de alimentación antes de abrir la
base o cambiar la bombilla. Independientemente del tipo de lámpara (halógena o
incandescente), dale tiempo de enfriarse antes de cambiarla y sustitúyela siempre
por otra del mismo tipo.
• Utiliza siempre una fuente de alimentación con el voltaje apropiado, el indicado
26
en las especicaciones de tu nuevo microscopio. Si conectas el instrumento a un
enchufe distinto podrías dañar el circuito eléctrico, fundir la lámpara o incluso
provocar un cortocircuito.
• En el caso de que alguien se trague una pieza pequeña o una pila, busque
ayuda médica inmediatamente.
Instrucciones de seguridad para las pilas
• Compre siempre las pilas del tamaño y grado indicado para el uso previsto.
• Reemplace siempre todas las pilas al mismo tiempo. No mezcle pilas viejas y
nuevas, ni pilas de diferentes tipos.
• Limpie los contactos de las pilas y del instrumento antes de instalarlas.
• Asegúrese de instalar las pilas correctamente según su polaridad (+ y –).
• Quite las pilas si no va a utilizar el instrumento durante un periodo largo de
tiempo.
• Retire lo antes posible las pilas agotadas.
• No cortocircuite nunca las pilas ya que podría aumentar su temperatura y podría
provocar fugas o una explosión.
• Nunca caliente las pilas para intentar reavivarlas.
• No intente desmontar las pilas.
• Recuerde apagar el instrumento después de usarlo.
• Mantenga las pilas fuera del alcance de los niños para eliminar el riesgo de
ingestión, asxia o envenenamiento.
• Deseche las pilas usadas tal como lo indiquen las leyes de su país.
Garantía internacional de por vida Levenhuk
Todos los telescopios, microscopios, prismáticos y otros productos ópticos de Levenhuk,
excepto los accesorios, cuentan con una garantía de por vida contra defectos de
material y de mano de obra. La garantía de por vida es una garantía a lo largo de la vida
del producto en el mercado. Todos los accesorios Levenhuk están garantizados contra
defectos de material y de mano de obra durante dos años a partir de la fecha de compra
en el minorista. Levenhuk reparará o reemplazará cualquier producto o pieza que,
una vez inspeccionada por Levenhuk, se determine que tiene defectos de materiales
o de mano de obra. Para que Levenhuk pueda reparar o reemplazar estos productos,
deben devolverse a Levenhuk junto con una prueba de compra que Levenhuk considere
satisfactoria.
Esta garantía no cubre productos consumibles como bombillas (eléctricas, LED,
halógenas, de bajo consumo y otros tipos de lámparas), pilas (recargables y no
recargables), consumibles eléctricos, etc.
Para más detalles visite nuestra página web: www.levenhuk.es/garantia
En caso de problemas con la garantía o si necesita ayuda en el uso de su producto,
contacte con su ocina de Levenhuk más cercana.

Levenhuk Rainbow
Vigyázat: Kérjük, a megfelelő feszültséggel kapcsolatban nézze meg a
műszaki leírást, és soha ne próbálja meg a 110 V-os eszközt 220 V-os
DM LCD sorozatú
digitális mikroszkópok
aljzathoz csatlakoztatni (és fordítva) átalakító használata nélkül. Ne feledje,
hogy az Egyesült Államokban és Kanadában a hálózati feszültség 110 V,
míg a legtöbb európai országban 220–240 V.
HU
Kérjük, tekintse meg az 1. (készülék), a 2. (LCD-kijelző), a 3. (vezérlőpanel) és a 4.
(tartozékok) ábrát. Keressen rá a mikroszkóp típusára, és tekintse meg a készülékre
vonatkozó összes részletet.
Az első lépések
• Óvatosan csomagolja ki a mikroszkópot és helyezze egyenes felületre.
• Csatlakoztassa a tápkábelt az alapzaton és az LCD képernyőn található megfelelő
csatlakozókhoz, ezután a háttérvilágítás és a képernyő automatikusan bekapcsol.
• A képernyő be- és kikapcsolásához tartsa nyomva 2 másodpercig a képernyőn
lévő „Power on/o” (Ki-/bekapcsoló) gombot.
• Helyezze a mikropreparátumot a mozgatható tömbre, és rögzítse a
mintatartókkal. Helyezze a mozgatható tömböt az objektív alá. A készletben
tanulmányozási célból azonnal használható mikropreparátum-készlet
található. Távolítsa el a második lencsesapka aljáról a „Q.C. passed” (sikeres
minőségellenőrzést igazoló címke) feliratú lencsesapkát.
• Állítsa be a háttérvilágítás fényerejét, majd a durvafókusz-állító gombbal állítsa be
a kép tisztaságát.
A felvett képek és rögzített felvételek elmentéséhez mikro-SD-kártyára (külön
kapható) van szükség. Kapcsolja ki a mikroszkópot, majd helyezze be a mikro-SD-
kártyát a mikroszkóp vázának megfelelő foglalatába úgy, hogy az a helyére pattanjon.
Behelyezéskor ne nyomja meg túlzott erővel a mikro-SD-kártyát. Ha a kártya nem
illeszkedik könnyedén a helyére, akkor fordítsa meg a kártyát.
Ha az LCD képernyő lefagy, keresse meg az LCD képernyőn hátulján lévő „Reset”
(Visszaállítás) gombot. A gombot egy keskeny tárggyal – például egy kiegyenesített
gemkapoccsal – nyomja meg. Ekkor minden beállítás visszaáll a gyári alapértelmezett
beállításra, az LCD képernyő pedig újraindul. A mentett fényképek és videók nem
törlődnek.
Tárgyasztal betét üveg
• A matt üveg tárgyasztal betét átlátszó minták vagy vékony objektumszeletek
meggyelésére használható. Helyezze a tárgyasztalra, és rögzítse a helyére a
rögzítőcsavarral. Ezzel az üveg tárgyasztal betéttel alsó megvilágítási forrást kell
használni a meggyelések során.
• Con el microscopio se suministran platinas adicionales de vidrio de color blanco
y negro. Si la muestra es blanca o brillante, para obtener un mejor contraste
de imagen, utilice la platina de vidrio negro con tan solo la iluminación superior
encendida. En otro caso, utilice la platina de vidrio blanco.
Alkalmazás menü
Videó üzemmód
Videofelvétel
Fénykép üzemmód
Képrögzítés
Digitális nagyítás
Meggyelés közben a kép nagyítható a „Up” (Fel) gomb megnyomásával és kicsinyíthető
a „Down” (Le) gomb megnyomásával.
Kép rögzítése
1. Kapcsolja be a mikroszkópot, és helyezze a mintát a tárgyasztalra.
2. Állítsa az objektívet a kívánt magasságra a durvafókusz-állító gombbal.
3. Állítsa be a világítás fényerejét úgy, hogy a minta kellően megvilágított legyen.
4. A durvafókusz-állító gomb és az optikaizoom-állító gyűrű elforgatásával állítsa be
a nagyítási fokot és a kép élességét.
5. Fénykép készítéséhez nyomja meg a „Capture” (Felvétel) gombot.
6. „Freeze” (Kimerevítési) üzemmódban a fényképezéshez röviden nyomja meg az
„OK” gombot (kivéve: DM500).
TF
MicroSD állapotikon
Állókép üzemmód
Megtekintés üzemmód
27

Videó rögzítése
1. Nyomja meg a „Video” (Videó) gombot a videó üzemmódra váltáshoz. A művelet
megerősítéseként a képernyő bal felső sarkában található ikon megváltozik.
2. A felvétel megkezdéséhez nyomja meg a felvétel „OK” gombot. Megjegyzés: ne
tartsa nyomva az „OK” gombot, csak röviden nyomja meg, azután engedje el.
3. A rögzítés leállításához nyomja meg ismét az „OK” gombot.
4. Ha szeretne fényképet készíteni, miközben a mikroszkóp éppen videót rögzít,
nyomja meg a „Capture” (Felvétel) gombot. Ha ilyen módon készít fényképet, a kép
felbontása elképzelhető, hogy nem lesz olyan magas, mint a videó felbontása – a kép
minősége rosszabb lesz.
Képek és videók megtekintése
1. Helyezze be a microSD kártyát az SD-helyre.
2. A „Video” (Videó) gomb kétszeri megnyomásával lépjen be a megtekintő módba.
3. A „Right” (Jobb) és „Le” (Bal) gombok megnyomásával megtekintheti a képeket
és videókat. A videofelvétel lejátszásához nyomja meg a „OK” gombot.
4. Utilice el botón „Menu” (Menú) para disponer de opciones adicionales al visualizar
una imagen estática o un vídeo. Pulse y mantenga pulsado el botón „Menu” (Menú)
hasta que aparezcan las opciones.
Beállítások
„Menu” (Menü) gomb megnyomásával menjen az LCD-kijelzőn a beállítások menübe. Az
irányító gombokkal válassza ki a megfelelő paramétereket „Menu” (Menü) gomb újbóli
megnyomásával mentse el a kijelölt paramétereket. A beállítások mentése közben ne
kapcsolja ki a mikroszkópot.
Dátum és idő
Válassza ki a „Date/Time” (Dátum/Idő) opciót a főmenüből a „Down” (Le) gombbal, majd
állítsa be az aktuális dátumot és időt. A távvezérlőn lévő „Le” (Bal) és „Right” (Jobb)
gombokkal kiválaszthatók a kívánt adatok (csak DM500).
28
Műszaki adatok
Termékazonosító 76826 76825
Modell
Digitális nagyítás 7–200x 10–200х
Optikai nagyítás 7–50х 10–50х
Optika anyaga optikai üveg
Váz műanyag
Tárgyasztal 120х180 mm
Mozgatható blokk 83х43 mm, minta tartókkal
Élességállítási (más néven:
fókuszálási) rendszer
Megvilágítás felső és alsó, LED
Elforgatható, színes LCD képernyő 5" 7"
Megapixel (érzékelő/kép)
Max. felbontás (kép/videó) 4032x3024/1920x1080 px
Kép/videó formátuma *.jpg/ *.avi
Érzékelő 1/2,9
Képpont méret 2,8 μm
Érzékenység 3800 mV/Lux·s
Színképtartomány 410–1100 nm
Manuális beállítások fehéregyensúly, felvétel vezérlés
Kimenet (csatlakozók) microSD, miniUSB
Tápellátás (mikroszkóp)
Tápellátás (infravörös, távoli) 2 db AAA elem (nem része a csomagnak)
Üzemi hőmérséklet-tartomány –20…+70 °C
Levenhuk Rainbow DM500
LCD
durva, 50 mm durva, 90 mm
110–220 V; 5 V, 1 A USB
kábellel
A Levenhuk vállalat fenntartja a jogot, hogy bármely termékét előzetes értesítés nélkül
módosítsa vagy kivonja a forgalomból.
Levenhuk Rainbow DM700
2/12
110–220 V; 5 V, 1 A USB kábellel;
akkumulátor (üzemidő: 4 óra,
LCD
beépített 2200 mAh
töltési idő: 20 óra)

Ápolás és karbantartás
• Ennek az eszköznek a használatával soha, semmilyen körülmények között
ne nézzen közvetlenül a Napba, vagy egyéb, nagyon erős fényforrásba vagy
lézersugárba, mert ez MARADANDÓ KÁROSODÁST OKOZ A RETINÁJÁBAN
ÉS MEG IS VAKULHAT.
• Legyen kellően óvatos, ha gyermekekkel vagy olyan személyekkel együtt használja
az eszközt, akik nem olvasták vagy nem teljesen értették meg az előbbiekben
felsorolt utasításokat.
• A mikroszkóp kicsomagolása után, de még annak legelső használata előtt
ellenőrizze az alkatrészek és csatlakozások sérülésmentes állapotát és
tartósságát.
• Bármi legyen is az ok, semmiképpen ne kísérelje meg szétszerelni az eszközt.
Ha javításra vagy tisztításra szorul az eszköz, akkor keresse fel az erre a célra
specializálódott helyi szolgáltatóközpontot.
• Óvja az eszközt a hirtelen behatásoktól és a hosszabb ideig tartó mechanikai
erőktől. Ne használjon túlzott erőt a fókusz beállításánál. Ne húzza túl a
szorítócsavarokat.
• Az optikai elemek felületéhez soha ne érjen az ujjaival. Az eszköz külső
megtisztításához használja a Levenhuk által erre a célra gyártott tisztítókendőt
és optikai tisztító eszközöket. Az optikai elemek tisztításához ne használjon maró
hatású vagy aceton-alapú folyadékokat.
• A koptató hatású részecskéket, például a homokot ne törléssel, hanem fújással
vagy puha ecsettel távolítsa el a lencsékről.
• Ne használja az eszközt hosszú időtartamon keresztül a tűző napon, vagy ne
hagyja ott felügyelet nélkül. Tartsa az eszközt víztől és magas páratartalomtól
védett helyen.
• Legyen körültekintő a meggyelések során, mindig helyezze vissza a porvédőt a
meggyelés befejeztével, így megóvhatja eszközét a portól és a szennyeződésektől.
• Ha a mikroszkóp hosszabb ideig használaton kívül van, akkor a mikroszkóptól
elkülönítetten tárolja az objektívlencséket és a szemlencséket.
• Száraz, hűvös helyen tárolja az eszközt, veszélyes savaktól és egyéb kémiai
anyagoktól elkülönítetten, hősugárzóktól, nyílt lángtól és egyéb, magas
hőmérsékletet leadni képes forrásoktól távol.
• Lehetőség szerint ne használja a mikroszkópot gyúlékony anyagok közelében
(benzol, papír, kartonlap, műanyag, stb.), mivel a meggyelés során a mikroszkóp
talpazata felmelegedhet és így tűzveszélyessé válhat.
• A talpazat kinyitása vagy a megvilágítást biztosító izzó kicserélése előtt minden
esetben áramtalanítsa a mikroszkópot. Csere előtt az izzó típusától függetlenül
(halogén vagy hagyományos) minden esetben várja meg, amíg az izzó lehűl, és
mindig ugyanolyan típusú izzót használjon.
• A tápellátást mindig a megfelelő hálózati feszültségi szint mellett használja, azaz
kövesse az újonnan vásárolt mikroszkópjának műszaki leírását. Az eszköznek a
leírástól eltérő típusú aljzathoz történő csatlakoztatása tönkreteheti a mikroszkóp
áramkörét, kiéghet az izzó vagy akár rövidzárlatot is okozhat ezzel.
• Azonnal forduljon orvoshoz, amennyiben bárki lenyelt egy kis alkatrészt
vagy elemet.
Az elemekkel kapcsolatos biztonsági intézkedések
• Mindig a felhasználásnak legmegfelelőbb méretű és fokozatú elemet vásárolja meg.
• Elemcsere során mindig az összes elemet egyszerre cserélje ki; ne keverje a régi
elemeket a frissekkel, valamint a különböző típusú elemeket se keverje egymással
össze.
• Az elemek behelyezése előtt tisztítsa meg az elemek és az eszköz egymással érintkező
részeit.
• Győződjön meg róla, hogy az elemek a pólusokat tekintve is helyesen kerülnek az
eszközbe (+ és –).
• Amennyiben az eszközt hosszabb ideig nem használja, akkor távolítsa el az elemeket.
• A lemerült elemeket azonnal távolítsa el.
• Soha ne zárja rövidre az elemeket, mivel így azok erősen felmelegedhetnek, szivárogni
kezdhetnek vagy felrobbanhatnak.
• Az elemek élettartamának megnöveléséhez soha ne kísérelje meg felmelegíteni azokat.
• Használat után ne felejtse el kikapcsolni az eszközt.
• Az elemeket tartsa gyermekektől távol, megelőzve ezzel a lenyelés, fulladás és
mérgezés veszélyét.
A Levenhuk nemzetközi, élettartamra szóló szavatossága
A Levenhuk vállalat a kiegészítők kivételével az összes Levenhuk gyártmányú teleszkóphoz,
mikroszkóphoz, kétszemes távcsőhöz és egyéb optikai termékhez élettartamra szóló
szavatosságot nyújt az anyaghibák és/vagy a gyártási hibák vonatkozásában. Az élettartamra
szóló szavatosság a termék piaci forgalmazási időszakának a végéig érvényes. A Levenhukkiegészítőkhöz a Levenhuk-vállalat a kiskereskedelmi vásárlás napjától számított két évig
érvényes szavatosságot nyújt az anyaghibák és/vagy a gyártási hibák vonatkozásában. A
Levenhuk vállalat vállalja, hogy a Levenhuk vállalat általi megvizsgálás során anyaghibásnak
és/vagy gyártási hibásnak talált terméket vagy termékalkatrészt megjavítja vagy kicseréli.
A Levenhuk vállalat csak abban az esetben köteles megjavítani vagy kicserélni az ilyen
terméket vagy termékalkatrészt, ha azt a Levenhuk vállalat számára elfogadható vásárlási
bizonylattal együtt visszaküldik a Levenhuk vállalat felé. Ez a szavatosság nem vonatkozik
a fogyóeszközökre, például az izzólámpákra (függetlenül attól, hogy azok hagyományos
elektromos izzók, LED-es izzók, halogén izzók, energiatakarékos izzók vagy más típusú
izzók-e), az elemekre (beleértve a nem tölthető elemeket és a tölthető akkumulátorokat is), az
elektromos fogyóeszközökre stb.
További részletekért látogasson el weboldalunkra: www.levenhuk.hu/garan cia
Amennyiben garanciális probléma lépne fel vagy további segítségre van szüksége a
termék használatát illetően, akkor vegye fel a kapcsolatot a helyi Levenhuk üzlettel.
29

Microscopi digitali Levenhuk
Rainbow DM LCD
IT
Fare riferimento alle g. 1 (strumento), 2 (schermo LCD), 3 (pannello di controllo) e
4 (accessori). Basta trovare il proprio modello di microscopio per visualizzare tutti i
dettagli dello strumento.
Fasi iniziali
• Estrarre il microscopio dalla confezione e posizionarlo con attenzione su una
supercie piana.
• Inserire il cavo di alimentazione nei relativi connettori sulla base e sullo schermo
LCD: la retroilluminazione e lo schermo si accenderanno in automatico.
• Tenere premuto il pulsante “Power on/o” (Interruttore on/o) per 2 secondi, in
modo da accendere o spegnere lo schermo.
• Posizionare il micropreparato sul tavolino mobile e ssarlo con il porta campione.
Posizionare il tavolino mobile sotto l’obiettivo. Il kit comprende un set di
micropreparati già pronti allo studio. Rimuovere l’etichetta “Q.C. Passed” (controllo
qualità superato) dal fondo della seconda copertura della lente.
• Regolare la luminosità della retroilluminazione e la chiarezza dell’immagine
tramite la manopola di messa a fuoco grossolana.
Per salvare le immagini catturate e i video registrati è necessaria una scheda microSD
(da acquistare separatamente). Spegnere lo strumento e inserire la scheda microSD nel
corrispondente slot sul corpo del microscopio, no a bloccarla in posizione con un clic.
Non applicare una forza eccessiva quando si inserisce la scheda microSD. Provare a
ruotare la scheda nel caso in cui non si blocchi facilmente in posizione.
In caso di blocco dello schermo LCD, cercare il pulsante “Reset” sul retro dello schermo.
Premere il pulsante utilizzando un oggetto sottile, come l’estremità di una graetta
aperta. Così facendo, verranno ripristinate le impostazioni di fabbrica e lo schermo LCD
verrà riavviato. Le foto e i video salvati non saranno cancellati.
Inserto in vetro per il tavolino
• È possibile utilizzare un inserto in vetro satinato per l’osservazione di campioni
trasparenti o tagliati in sezioni sottili. L’inserto va posizionato sul tavolino e ssato
30
Attenzione: Per informazioni riguardo la corretta tensione di rete, fare
riferimento alla tabella delle speciche; non cercare assolutamente di
collegare un dispositivo a 220 V a una presa di corrente a 110 V e viceversa
senza utilizzare un convertitore di tensione. Si tenga presente che la
tensione di rete è di 220–240 V nella maggior parte dei paesi europei e di
110 V negli Stati Uniti e in Canada.
con la vite di bloccaggio. Si consiglia di utilizzare l’illuminazione dal basso per
eettuare osservazioni tramite questo inserto in vetro.
• Ulteriori vetrini bianchi e neri sono forniti assieme al microscopio. Se il campione
è bianco o luminoso, allora è consigliato usare un vetrino nero per migliorare il
contrasto e illuminarlo solo dall’alto. In caso contrario, usare un vetrino bianco.
Menù dell’applicazione
Modalità video
Registrazione video
Modalità foto
Cattura un’immagine
Ingrandimento digitale
Durante le osservazioni, premere il pulsante “Up” (Su) per ingrandire l’immagine e
“Down” (Giù) per rimpicciolirla.
Cattura di un’immagine
1. Accendi il microscopio e posiziona un campione sul tavolino.
2. Posizionare l’obiettivo all’altezza desiderata usando la manopola di messa a fuoco
grossolana.
3. Regolare la luminosità, in modo che il campione sia illuminato uniformemente.
4. Regolare l’ingrandimento e la nitidezza dell’immagine ruotando la manopola di
messa a fuoco grossolana e l’anello dello zoom ottico.
5. Per scattare una foto, premere il pulsante “Capture” (Cattura).
6. In modalità “Freeze” (Blocco), tenere premuto brevemente il pulsante “OK” per
scattare una foto (tranne DM500).
TF
Icona stato microSD
Modalità fermo immagine
Modalità riproduzione

Registrazione di un video
1. Premere il pulsante “Video” per passare in modalità video. L’icona nell’angolo
superiore sinistro dello schermo cambierà di conseguenza.
2. Premere il pulsante “OK” per iniziare la registrazione. Nota: non tenere premuto il
pulsante “OK”: esercitare una pressione veloce e quindi rilasciare il pulsante.
3. Premere nuovamente il pulsante “OK” per fermare la registrazione.
4. Premere il pulsante “Capture” (Cattura) per scattare una foto mentre il microscopio
sta registrando un video. L’immagine scattata in questo modo potrebbe non avere
la stessa risoluzione del video: la qualità dell’immagine risulterà inferiore.
Visualizzare foto e video
1. Inserire la scheda microSD nell’apposito slot.
2. Premere due volte il pulsante “Video” per passare alla modalità di visualizzazione.
3. Premere i pulsanti “Right” (Destra) e “Le” (Sinistra) per scorrere tra le foto e i
video. Premere il pulsante “OK” per riprodurre un video.
4. Usare il pulsante “Menu” (Menù) per avere accesso a ulteriori opzioni durante la
riproduzione di un’immagine o un video. Tenere premuto il pulsante “Menù” no
alla comparsa delle opzioni.
Setup
Premere il pulsante “Menu” (Menù) per entrare nel menù impostazioni dello schermo
LCD. Usare i pulsanti di controllo per selezionare i parametri necessari. Premere di
nuovo il pulsante “Menu” (Menù) per salvare i parametri selezionati. Non spegnere il
microscopio mentre è in corso il salvataggio delle impostazioni. Riavviare il microscopio
dopo aver applicato le impostazioni.
Data e ora
Selezionare “Date/Time“ (Data/Ora) dal menù principale premendo il pulsante “Down“
(Giù) e quindi impostare data e ora correnti. È possibile usare i pulsanti “Le” (Sinistra) e
“Right” (Destra) sul telecomando per selezionare i dati desiderati (solo DM500).
Speciche
ID prodotto 76826 76825
Modello
Ingrandimento digitale 7–200x 10–200х
Ingrandimento ottico 7–50х 10–50х
Materiale delle ottiche vetro ottico
Corpo plastica
Tavolino 120х180 mm
Blocco mobile 83х43mm, con portacampione
Sistema di messa a fuoco grossolana, 50 mm grossolana, 90 mm
Illuminazione superiore e inferiore, LED
Schermo LDC a colori e girevole 5" 7"
Megapixel (sensore/immagine)
Risoluzione massima (immagine/
video)
Immagine/formato video *.jpg/ *.avi
Sensore 1/2,9
Dimensione pixel 2,8 μm
Sensibilità 3800 mV/Lux·s
Range spettrale 410–1100nm
Impostazioni manuali bilanciamento del bianco, controllo esposizione
Uscite (connettori) microSD, miniUSB
Alimentazione (microscopio)
Alimentazione (telecomando IR) batterie AAA 2 pz. (non incluso)
Levenhuk Rainbow DM500
LCD
4032x3024/1920x1080 px
110–220 V; 5 V, 1 A tramite
cavo USB
Levenhuk Rainbow DM700
LCD
2/12
110–220 V; 5 V, 1 A
tramite cavo USB;
batteria incorporata
da 2200 mAh (durata: 4 ore;
tempo di ricarica: 20 ore)
31

Intervallo temperature di
funzionamento
Levenhuk si riserva il diritto di modicare qualsiasi prodotto o sospenderne la
produzione senza alcun preavviso.
–20…+70 °C
Cura e manutenzione
• Non utilizzare in nessun caso questo apparecchio per guardare
direttamente il sole, un’altra sorgente di luce ad alta luminosità o un laser,
perché ciò potrebbe provocare DANNI PERMANENTI ALLA RETINA e
portare a CECITÀ.
• Nel caso si utilizzi l’apparecchio in presenza di bambini o altre persone che non
siano in grado di leggere o comprendere appieno queste istruzioni, prendere le
precauzioni necessarie.
• Dopo aver disimballato il microscopio e prima di utilizzarlo per la prima volta,
vericare l’integrità e lo stato di conservazione di tutte le componenti e le
connessioni.
• Non cercare per nessun motivo di smontare autonomamente l’apparecchio. Per
qualsiasi intervento di riparazione e pulizia, contattare il centro di assistenza
specializzato di zona.
• Proteggere l’apparecchio da urti improvvisi ed evitare che sia sottoposto ad
eccessiva forza meccanica. Durante la messa a fuoco, non applicare una forza
eccessiva. Non stringere eccessivamente le viti di bloccaggio.
• Non toccare le superci ottiche con le dita. Per pulire l’esterno dell’apparecchio,
utilizzare soltanto le salviette apposite e gli strumenti di pulizia dell’ottica appositi
oerti da Levenhuk. Non utilizzare uidi corrosivi o a base di acetone per pulire
l’ottica del dispositivo.
• Per rimuovere eventuali particelle abrasive, ad esempio sabbia, dalle lenti, non
stronare, ma soare oppure utilizzare una spazzola morbida.
• Non utilizzare il dispositivo per lunghi periodi e non lasciarlo incustodito sotto i
raggi diretti del sole. Non esporre il dispositivo all’acqua o a elevata umidità.
• Prestare attenzione durante le osservazioni e, una volta terminato, rimettere
sempre il coperchio protettivo per proteggere l’apparecchio da polvere e macchie.
• Se non si intende utilizzare il microscopio per periodi prolungati, conservare le
lenti obiettivo e gli oculari separatamente dal microscopio.
• Conservare l’apparecchio in un posto fresco e asciutto, al riparo da acidi pericolosi
e altri prodotti chimici, da apparecchi di riscaldamento, da amme libere e da altre
fonti di calore.
• Cercare di non utilizzare il microscopio in prossimità di materiali o sostanze
inammabili (benzene, carta, cartone ecc), poiché la base potrebbe riscaldarsi
durante l’utilizzo e rappresentare un rischio di incendio.
• Disconnettere sempre il microscopio dall’alimentazione prima di aprire la base o
32
sostituire la lampadina di illuminazione. Indipendentemente dal tipo di lampadina
(alogena o a incandescenza), attendere che si sia rareddata prima di cercare di
sostituirla e sostituirla sempre con una lampadina dello stesso tipo.
• Utilizzare sempre un’alimentazione di tensione adeguata, cioè quella indicata nelle
speciche del microscopio. Collegare lo strumento a una presa di alimentazione
dierente potrebbe provocare il danneggiamento dei circuiti elettrici del
microscopio, bruciare la lampadina o addirittura causare un corto circuito.
• In caso di ingestione di una parte di piccole dimensioni o di una batteria,
richiedere immediatamente assistenza medica.
Istruzioni di sicurezza per le batterie
• Acquistare batterie di dimensione e tipo adeguati per l’uso di destinazione.
• Sostituire sempre tutte le batterie contemporaneamente, evitando accuratamente
di mischiare batterie vecchie con batterie nuove oppure batterie di tipo dierente.
• Prima della sostituzione, pulire i contatti della batteria e quelli dell’apparecchio.
• Assicurarsi che le batterie siano state inserite con la corretta polarità (+ e –).
• Se non si intende utilizzare l’apparecchio per lungo periodo, rimuovere le batterie.
• Rimuovere subito le batterie esaurite.
• Non cortocircuitare le batterie, perché ciò potrebbe provocare forte riscaldamento,
perdita di liquido o esplosione.
• Non tentare di riattivare le batterie riscaldandole.
• Dopo l’utilizzo, non dimenticare di spegnere l’apparecchio.
• Per evitare il rischio di ingestione, soocamento o intossicazione, tenere le
batterie fuori dalla portata dei bambini.
Garanzia internazionale Levenhuk
Tutti i telescopi, i microscopi i binocoli e gli altri prodotti ottici Levenhuk, ad eccezione
degli accessori, godono di una garanzia a vita per i difetti di fabbricazione o dei
materiali. Garanzia a vita rappresenta una garanzia per la vita del prodotto sul mercato.
Tutti gli accessori Levenhuk godono di una garanzia di due anni a partire dalla data
di acquisto per i difetti di fabbricazione e dei materiali. Levenhuk riparerà o sostituirà
i prodotti o relative parti che, in seguito a ispezione eettuata da Levenhuk, risultino
presentare difetti di fabbricazione o dei materiali. Condizione per l’obbligo di riparazione
o sostituzione da parte di Levenhuk di tali prodotti è che il prodotto venga restituito
a Levenhuk unitamente ad una prova d’acquisto la cui validità sia riconosciuta da
Levenhuk.
Questa garanzia non copre le parti consumabili, come le lampadine (elettriche, LED,
alogene, a risparmio energetico o altri tipi di lampadine), batterie (ricaricabili e non
ricaricabili), parti elettriche consumabili, ecc.
Per maggiori dettagli, visitare il nostro sito web: eu.levenhuk.com/warranty
Per qualsiasi problema di garanzia o necessità di assistenza per l’utilizzo del prodotto,
contattare la liale Levenhuk di zona.

Mikroskopy cyfrowe
Uwaga: Prosimy zapoznać się z tabelą z danymi technicznymi i sprawdzić
poprawną wartość napięcia sieciowego. Nie należy podłączać urządzenia
Levenhuk z serii
Rainbow DM LCD
o napięciu 220 V do gniazdka o napięciu 110 V ani na odwrót bez użycia
przetwornika. Należy pamiętać, że napięcie sieciowe w większości państw
europejskich wynosi 220–240 V, natomiast w USA i Kanadzie – 110 V.
PL
Szczegółowe informacje podano na rys. 1 (urządzenie), 2 (ekran LCD), 3 (panel
sterowania) i 4 (akcesoria). Znajdź swój model mikroskopu i zobacz wszystkie szczegóły
dotyczące urządzenia.
Rozpakowanie i pierwsze kroki
• Ostrożnie wyjmij mikroskop z opakowania i umieść go na płaskiej powierzchni.
• Podłącz przewód zasilający do odpowiednich złączy w podstawie oraz w ekranie
LCD. Podświetlenie i ekran włączą się wtedy automatycznie.
• Naciśnij i przytrzymaj przez 2 sekundy przycisk „Power on/o” (Wł./wył. zasilania)
na ekranie, aby włączyć lub wyłączyć ekran.
• Umieść preparat mikroskopowy na ruchomym bloku i zamocuj go w uchwytach
do preparatów. Umieść ruchomy blok pod obiektywem. Zestaw zawiera gotowe
preparaty do badania. Wyjmij osłonę soczewki oznaczoną symbolem „Q.C. passed”
(kontrola jakości zaakceptowana) z dna osłony drugiej soczewki.
• Wyreguluj jasność podświetlenia i ustaw ostrość obrazu przy użyciu pokrętła
zgrubnej regulacji ostrości.
Na (dostępnej osobno) karcie microSD zapisywane są zdjęcia i nagrane lmy. Wyłącz
mikroskop i wsuwai kartę microSD to odpowiedniego gniazda w obudowie mikroskopu
aż do momentu jej zablokowania (odgłos kliknięcia). Podczas umieszczania karty
microSD w gnieździe nie wywierać na nią nadmiernej siły. Jeżeli umieszczenie karty w
gnieździe sprawia trudności, należy ją obrócić.
Jeśli ekran LCD zawiesi się, poszukaj przycisku „Reset” (Resetuj) z tyłu ekranu LCD.
Użyj wąskiego przedmiotu, takiego jak wyprostowany spinacz do papieru, aby nacisnąć
przycisk. Spowoduje to zresetowanie wszystkich ustawień do domyślnych ustawień
fabrycznych i ponowne uruchomienie ekranu LCD. Zapisane zdjęcia oraz lmy nie
zostaną usunięte.
Szklany stolik
• Stolik ze szkła matowego może być wykorzystywany do obserwacji
przezroczystych preparatów lub preparatów w formie cienkich warstw materiału.
Umieść preparat na stoliku i unieruchom go za pomocą śruby blokującej. Podczas
obserwacji z użyciem szklanego stolika należy korzystać z dolnego źródła światła.
• Wraz z mikroskopem są dostarczane dodatkowe czarne i białe szkiełka
mikroskopowe. Jeżeli preparat jest biały lub jasny, w celu uzyskania lepszego
kontrastu obrazu należy użyć czarnego szkiełka mikroskopowego z włączonym
tylko górnym oświetleniem. W przeciwnym razie należy użyć białego szkiełka.
Menu aplikacji
Tryb wideo
Nagrywanie lmów
Tryb zdjęć
Rejestruj obraz
Powiększenie cyfrowe
Podczas obserwacji naciśnij przycisk „Up” (W górę), aby powiększyć obraz lub „Down” (W
dół), aby zmniejszyć jego powiększenie.
Przechwytywanie obrazu
1. Włącz mikroskop i umieść preparat na stoliku.
2. Ustaw obiektyw na żądanej wysokości przy użyciu pokrętła zgrubnej regulacji ostrości.
3. Wyreguluj jasność oświetlenia, aby próbka była równo oświetlona.
4. Wyreguluj powiększenie i ostrość obrazu, obracając pokrętło zgrubnej regulacji
ostrości oraz pierścień powiększenia optycznego.
5. Aby zrobić zdjęcie, naciśnij przycisk „Capture” (Rejestrowanie).
6. W trybie wstrzymania nagrywania, naciśnij krótko przycisk „OK”, aby zrobić
zdjęcie (oprócz DM500).
TF
Ikona stanu karty
microSD
Tryb obrazu
nieruchomego
Tryb przeglądania
33

Nagrywanie lmu
1. Naciśnij przycisk „Video” (Wideo), aby przejść do trybu wideo. Ikona w lewym
górnym rogu ekranu zmieni się.
2. Naciśnij przycisk „OK”, aby rozpocząć nagrywanie. Uwaga: nie przytrzymuj
wciśniętego przycisku „OK”; zamiast tego, naciśnij go krótko i zwolnij.
3. Naciśnij ponownie przycisk „OK”, aby wstrzymać nagrywanie.
4. Naciśnij przycisk „Capture” (Rejestrowanie), aby zrobić zdjęcie, gdy mikroskop
jest w trybie nagrywania lmów. Zdjęcie zrobione w ten sposób może nie mieć tak
wysokiej rozdzielczości jak rozdzielczość lmu – jakość obrazu będzie niższa.
Wyświetlanie zdjęć i lmów
1. Włóż kartę pamięci microSD do gniazda SD.
2. Dwukrotnie naciśnij przycisk „Video” (Filmy), aby przejść do trybu wyświetlania.
3. Naciskaj przyciski „Right” (W prawo) i „Le” (W lewo), aby wyświetlać zdjęcia oraz
lmy. Naciśnij przycisk „OK”, aby rozpocząć odtwarzanie lmu.
4. Naciśnij przycisk „Menu”, aby wyświetlić dodatkowe opcje podczas oglądania
nieruchomych obrazów lub lmów. Naciśnij i przytrzymaj przycisk „Menu” do
momentu pojawienia się opcji.
Konguracja
Naciśnij przycisk „Menu”, aby przejść do menu ustawień ekranu LCD. Użyj przycisków
sterowania, aby wybrać żądane parametry. Naciśnij ponownie przycisk „Menu”, aby
zapisać wybrane parametry. Nie wyłączać zasilania mikroskopu podczas zapisywania
ustawień. Po zastosowaniu ustawień uruchom ponownie mikroskop.
Data i czas
Wybierz „Data/Czas w” menu głównym przyciskiem w „Down” (Dół) i ustaw bieżącą
datę i godzinę. Możesz używać przycisków „Le” (W lewo) i „Right” (W prawo) na pilocie,
aby wybrać żądane dane (pouze DM500).
34
Dane techniczne
Identykator produktu 76826 76825
Model
Powiększenie cyfrowe 7–200x 10–200х
Powiększenie optyczne 7–50х 10–50х
Materiał układu optycznego szkło optyczne
Korpus plastikowy
Stolik 120х180 mm
Ruchomy blok 83х43 mm, z zaczepami do preparatów
Mechanizm regulacji ostrości zgrubne, 50 mm zgrubne, 90mm
Oświetlenie górne i dolne, LED
Obracany kolorowy ekran LCD 5" 7"
Megapiksele (matryca/obraz)
Maks. rozdzielczość (obraz/lm) 4032x3024/1920x1080 px
Format obraz/lm *.jpg/ *.avi
Czujnik 1/2,9
Rozmiar pikseli 2,8 μm
Czułość 3800 mV/Lux·s
Zakres spektralny 410–1100 nm
Ustawienia ręczne balans bieli, kontrola ekspozycji
Wyjście (złącza) microSD, miniUSB
Zasilanie (mikroskop)
Zasilanie (pilot na podczerwień) 2 szt., baterie AAA (sprzedawany osobno)
Zakres temperatury pracy –20…+70 °C
Levenhuk Rainbow DM500
LCD
110–220 V; 5 V, 1 A via
przewód USB
Levenhuk zastrzega sobie prawo do modykowania lub zakończenia produkcji
dowolnego produktu bez wcześniejszego powiadomienia.
Levenhuk Rainbow DM700
LCD
2/12
110–220 V; 5 V, 1 A via przewód
USB; wbudowany akumulator
2200 mAh (czas pracy: 4 godziny,
czas ładowania: 20 godzin)

Konserwacja i pielęgnacja
• Pod żadnym pozorem nie wolno kierować przyrządu bezpośrednio na
słońce, światło laserowe lub inne źródło jasnego światła, ponieważ może
to spowodować TRWAŁE USZKODZENIE SIATKÓWKI lub doprowadzić do
ŚLEPOTY.
• Zachowaj szczególną ostrożność, gdy urządzenia używają dzieci lub osoby,
które nie w pełni zapoznały się z instrukcjami.
• Po rozpakowaniu mikroskopu i przed jego pierwszym użyciem należy sprawdzić
stan i prawidłowość podłączenia każdego elementu.
• Nie podejmuj prób samodzielnego demontażu urządzenia, nawet w celu
wyczyszczenia lustra. W celu wszelkich napraw i czyszczenia skontaktuj się z
punktem serwisowym.
• Chroń przyrząd przed upadkami z wysokości i działaniem nadmiernej siły
mechanicznej. Nie należy używać nadmiernej siły podczas ustawiania ostrości. Nie
należy dokręcać zbyt mocno śrub blokujących.
• Nie dotykaj powierzchni optycznych palcami. Do czyszczenia zewnętrznych
powierzchni przyrządu używaj tylko specjalnych ściereczek i narzędzi do
czyszczenia optyki Levenhuk. Nie czyść układu optycznego za pomocą środków
żrących lub zawierających aceton.
• Cząsteczki ścierające, takie jak ziarna piasku, powinny być zdmuchiwane z
powierzchni soczewek lub usuwane za pomocą miękkiej szczotki.
• Nie wystawiaj przyrządu na długotrwałe działanie promieni słonecznych. Trzymaj
z dala od wody. Nie należy przechowywać w warunkach wysokiej wilgoci.
• Podczas obserwacji należy zachować ostrożność. Po zakończeniu obserwacji
założ osłonę przeciwpyłową w celu zabezpieczenia mikroskopu przed kurzem i
zanieczyszczeniami.
• W przypadku korzystania z mikroskopu przez dłuższy czas soczewki obiektywowe
i okulary oraz mikroskop należy przechowywać osobno.
• Przyrząd powinien być przechowywany w suchym, chłodnym miejscu, z dala od
kurzu, niebezpiecznych kwasów oraz innych substancji chemicznych, grzejników,
otwartego ognia i innych źródeł wysokiej temperatury.
• Staraj się nie korzystać z mikroskopu w pobliżu łatwopalnych materiałów lub
substancji (benzenu, papieru, kartonu, tworzywa sztucznego itp.), ponieważ
nagrzewająca się podczas użytkowania podstawa może powodować ryzyko pożaru.
• Przed każdym otwarciem podstawy lub wymianą lampy odłączaj mikroskop od
źródła zasilania. Przed wymianą lampy, niezależnie od jej rodzaju (halogenowa
lub żarowa), zaczekaj, aż jej temperatura spadnie. Lampy wymieniaj zawsze na
modele tego samego typu.
• Pamiętaj, aby moc zasilania była dopasowana do napięcia – jest ono podane w
danych technicznych nowego mikroskopu. Podłączenie do gniazda zasilającego
o innej mocy może spowodować uszkodzenie zespołu obwodów elektrycznych
przyrządu, spalenie lampy, a nawet zwarcie.
• W przypadku połknięcia małej części lub baterii należy natychmiast zwrócić
się o pomoc medyczną.
Instrukcje dotyczące bezpiecznego obchodzenia się z
bateriami
• Należy używać baterii odpowiedniego typu i w odpowiednim rozmiarze.
• Należy wymieniać wszystkie baterie jednocześnie; nie należy łączyć starych i
nowych baterii ani baterii różnych typów.
• Przed włożeniem baterii należy wyczyścić styki baterii i urządzenia.
• Podczas wkładania baterii należy zwracać uwagę na ich bieguny (znaki + i –).
• Jeśli sprzęt nie będzie używany przez dłuższy czas, należy wyjąć baterie.
• Zużyte baterie należy natychmiast wyjąć.
• Nie doprowadzać do zwarcia baterii, ponieważ wiąże się to z ryzykiem powstania
wysokich temperatur, wycieku lub wybuchu.
• Nie ogrzewać baterii w celu przedłużenia czasu ich działania.
• Należy pamiętać o wyłączeniu urządzenia po zakończeniu użytkowania.
• Baterie przechowywać w miejscu niedostępnym dla dzieci, aby uniknąć ryzyka
połknięcia, uduszenia lub zatrucia.
Gwarancja międzynarodowa Levenhuk
Wszystkie teleskopy, mikroskopy, lornetki i inne przyrządy optyczne Levenhuk, za
wyjątkiem akcesoriów, posiadają dożywotnią gwarancję obejmującą wady materiałowe
i wykonawcze. Dożywotnia gwarancja to gwarancja na cały okres użytkowania produktu.
Wszystkie akcesoria Levenhuk są wolne od wad materiałowych i wykonawczych i
pozostaną takie przez dwa lata od daty zakupu detalicznego. Firma Levenhuk naprawi
lub wymieni produkty lub ich części, w przypadku których kontrola prowadzona przez
Levenhuk wykaże obecność wad materiałowych lub wykonawczych. Warunkiem
wywiązania się przez rmę Levenhuk z obowiązku naprawy lub wymiany produktu
jest dostarczenie danego produktu rmie razem z dowodem zakupu uznawanym przez
Levenhuk.
Niniejsza gwarancja nie obejmuje części eksploatacyjnych, takich jak żarówki
(elektryczne, LED, halogenowe, energooszczędne i inne), baterie (akumulatory i zwykłe),
akcesoria elektryczne itd.
Więcej informacji na ten temat znajduje się na stronie: pl.levenhuk.com/gwarancja
W przypadku wątpliwości związanych z gwarancją lub korzystaniem z produktu, proszę
skontaktować się z lokalnym przedstawicielem Levenhuk.
35

Microscópios digitais da série
Levenhuk Rainbow DM LCD
PT
Consulte a Fig. 1 (dispositivo), 2 (ecrã LCD), 3 (painel de controlo) e 4 (acessórios).
Encontre o modelo do seu microscópio e veja todos os detalhes do dispositivo.
Iniciar
• Remova o microscópio da embalagem cuidadosamente e coloque-o numa
superfície plana.
• Insira o cabo de alimentação nos conectores correspondentes na base e no ecrã
LCD e, em seguida, a luz de fundo e o ecrã acendem-se automaticamente.
• Prima sem soltar o botão “Power on/o” (Ligar/desligar) durante 2 segundos no
ecrã para ligar e desligar o ecrã.
• Coloque a micropreparação no bloco amovível e xe-a com os suportes para
espécimes. Coloque o bloco amovível debaixo da objetiva. O kit inclui um conjunto
de micropreparações prontas para estudo. Retire a tampa da lente com a etiqueta
“Q.C. passed” (controlo de qualidade aprovado) a partir da parte inferior da
segunda tampa da lente.
• Ajuste a luminosidade da luz de fundo e ajuste a claridade da imagem com o botão
de focagem aproximada.
É necessário um cartão microSD (comprado em separado) para guardar imagens
capturadas e vídeos gravados. Desligue o microscópio e insira o cartão microSD na
ranhura correspondente no corpo do microscópio até que que encaixado com um
clique. Não aplique força excessiva ao inserir o cartão microSD. Tente rodar o cartão, se
não car encaixado com facilidade.
Se o ecrã LCD bloquear, procure o botão “Reset” (Repor) na parte de trás do ecrã LCD.
Utilize um objeto estreito, como, por exemplo, um clipe esticado, para premir o botão.
Assim, todas as denições serão repostas para as predenições de fábrica e o ecrã LCD
será reiniciado. As fotograas ou os vídeos guardados não serão eliminados.
Área de inserção de vidro da platina.
• A área de inserção de vidro fosco da platina pode ser usada para observações de
espécimes transparentes ou amostras nas de objetos. Coloque-a na platina e
36
Atenção: Consulte a tabela de especicações para a voltagem correta.
Nunca tente conectar um dispositivo 110V a uma saída 220V, e vice-versa,
sem o uso de um transformador. Lembre-se que a voltagem nos EUA e
no Canadá é 110V e que, na maioria dos países europeus, a voltagem é
220–240V.
xe-a no devido lugar com o parafuso de bloqueio. A fonte de iluminação inferior
deve ser usada durante observações com esta área de inserção de vidro da platina.
• As lâminas de vidro pretas e brancas adicionais são fornecidas com o microscópio.
Se o espécime for branco ou brilhante, para um melhor contraste de imagem,
utilize uma lâmina de vidro preta apenas com a iluminação superior acesa. Caso
contrário, utilize uma lâmina de vidro branca.
Menu da aplicação
Modo de vídeo
Gravação de vídeo
Modo de fotograa
Capturar uma
imagem
Ampliação digital
Durante as observações, prima o botão “Up” (Para cima) para ampliar a imagem e o
botão “Down” (Para baixo) para reduzir a imagem.
Capturar uma imagem
1. Ligue o microscópio e coloque uma amostra na platina.
2. Dena a objetiva para a altura desejada utilizando o botão de focagem
aproximada.
3. Ajuste o brilho da iluminação, de modo a que o espécime esteja uniformemente
iluminado.
4. Ajuste a ampliação e a nitidez da imagem rodando o botão de focagem
aproximada e o anel de zoom ótico.
5. Para tirar uma fotograa, prima o botão “Capture” (Capturar).
6. No modo “Freeze” (Fixar), prima brevemente o botão “OK” para tirar uma
fotograa (exceto DM500).
TF
Ícone de estado de
microSD
Modo de imagem estática
Modo de revisão

Gravar um vídeo
1. Prima o botão de “Video” (Vídeo) para mudar para o modo de vídeo. O ícone no
canto superior esquerdo do ecrã será alterado ao conrmar.
2. Prima o botão de “OK” para iniciar a gravação. Nota: não mantenha o botão “OK”
premido; em vez disso, prima brevemente o botão e solte-o.
3. Prima novamente o botão “OK” para parar a gravação.
4. Prima o botão “Capture” (Capturar) para tirar uma fotograa enquanto o
microscópio está a gravar um vídeo. Se tirar uma fotograa desta forma, a
resolução de imagem poderá não ser tão elevada como a resolução de vídeo – a
qualidade de imagem será inferior.
Ver fotograas e vídeos
1. Insira o cartão microSD na ranhura SD.
2. Prima o botão “Vídeo” duas vezes para ativar o modo de visualização.
3. Prima os botões “Right” (Para a direita) e “Le” (Para a esquerda) para ver as
imagens e os vídeos. Prima o botão “OK” para começar a reproduzir o vídeo.
4. Utilize o botão “Menu” para aceder a opções adicionais quando visualizar uma
imagem estática ou vídeo. Prima sem soltar o botão “Menu” até aparecerem as
opções.
Congurar
Prima o botão “Menu” para aceder ao menu de denições do ecrã LCD. Utilize os
botões de controlo para selecionar os parâmetros necessários. Prima novamente o
botão “Menu” para guardar os parâmetros selecionados. Não desligue a alimentação
do microscópio enquanto guarda as denições. Reinicie o microscópio após aplicar as
congurações.
Data e hora
Selecione “Date/Time” (Data/hora) no menu principal com o botão para baixo e dena
a data e hora atuais. Pode utilizar os botões “Le” (Esquerda) e “Direita” (Right) no
controlo remoto para selecionar os dados necessários (nur DM500).
Especicações
ID de produto 76826 76825
Modelo
Ampliação digital 7–200x 10–200х
Ampliação ótica 7–50х 10–50х
Material ótico vidro ótico
Corpo plástico
Platina 120х180 mm
Bloco móvel 83х43 mm, om suportes de espécimes
Foco grosso, 50 mm grosso, 90 mm
Iluminação superior e inferior, LED
Ecrã LCD a cores com rotação 5" 7"
Megapixels (sensor/imagem)
Máx. resolução (imagem/vídeo) 4032x3024/1920x1080 px
Formato de imagem/vídeo *.jpg/ *.avi
Sensor 1/2,9
Tamanho do pixel 2,8 μm
Sensibilidade 3800 mV/Lux·s
Faixa espectral 410–1100nm
Denições manuais equilíbrio de brancos, controlo de exposição
Saída (conectores) microSD, miniUSB
Fonte de alimentação
(microscópio)
Fonte de alimentação (IR remoto) batterie AAA 2 pz. (non incluso)
Levenhuk Rainbow DM500
LCD
110–220 V; 5 V, 1 A através
do cabo USB
Levenhuk Rainbow DM700
LCD
2/12
110–220 V; 5 V, 1 A através
do cabo USB;
bateria de 2200 mAh
incorporada (tempo de
funcionamento: 4 horas,
tempo de carregamento:
20 horas)
37

Intervalo de temperaturas de
funcionamento
Levenhuk se reserva no direito de fazer alterações na variedade e nas especicações dos
produtos sem noticação prévia.
–20…+70 °C
Cuidado e manutenção
• Nunca, em qualquer circunstância, olhe diretamente para o Sol, ou para outra
fonte de luz intensa, ou para um laser através deste dispositivo, pois isso pode
causar DANOS PERMANENTES À RETINA e pode levar à CEGUEIRA.
• Tome as precauções necessárias quando usar o dispositivo com crianças, ou com
outras pessoas que não leram, ou não compreenderam totalmente estas instruções.
• Após desembalar o microscópio e antes de utilizá-lo pela primeira vez, verique a
integridade e a durabilidade de todos os componentes e ligações.
• Não tente desmontar o dispositivo por conta própria por qualquer motivo. Para fazer
consertos de qualquer tipo, por favor entre em contato com seu centro de serviços
especializados.
• Proteja o dispositivo de impactos súbitos e de força mecânica excessiva. Não aplique
pressão excessiva quando estiver ajustando o foco. Não aperte demasiado os
parafusos de bloqueio.
• Não toque nas superfícies ópticas com seus dedos. Para limpar o exterior do
dispositivo, use apenas lenços especiais para limpeza e ferramentas especiais de
limpeza óptica da Levenhuk. Não utilize uidos corrosivos, nem baseados em acetona
para limpar as partes ópticas.
• Partículas abrasivas, como areia, não devem ser removidas com um pano. Em vez
disso, sopre-as, ou retire-as com um pincel suave.
• Não use o dispositivo por períodos de tempo muito longos, nem o deixe abandonado
sob a luz direta do Sol. Mantenha longe de água e alta umidade.
• Tenha cuidado durante as suas observações, substitua sempre a capa protetora
antipoeira quando concluir as observações de modo a proteger o equipamento contra
poeiras e manchas.
• Se não utilizar o microscópio durante muito tempo, guarde as objetivas e os oculares
separadamente do microscópio.
• Guarde o dispositivo em um local seco e fresco, longe de ácidos perigosos e outros
produtos químicos, de aquecedores, de fogo e de outras fontes de altas temperaturas.
• Ao utilizar o microscópio, não o faça próximo de materiais ou substâncias inamáveis
(benzeno, papel, cartão, plástico, etc.), uma vez que a base pode aquecer durante o uso
e provocar um incêndio.
• Desligue sempre o microscópio de uma fonte de alimentação antes de abrir a base ou
mudar de lâmpada de iluminação. Independentemente do tipo de lâmpada (halogéneo
ou incandescente), deixe arrefecer durante algum tempo antes de a substituir por uma
lâmpada do mesmo tipo.
38
• Utilize sempre a fonte de alimentação com uma tensão adequada, isto é, indicada nas
especicações do novo microscópio. A ligação do equipamento a uma tomada diferente pode
danicar o circuito elétrico do microscópio, fundir a lâmpada ou provocar um curto-circuito.
• Procure um médico imediatamente se uma peça pequena ou uma pilha for
engolida.
Instruções de segurança da bacteria
• Compre sempre baterias do tamanho e grau mais adequados para o uso pretendido.
• Substitua sempre o conjunto de baterias de uma só vez; tome cuidado para não
misturar baterias antigas com novas, ou baterias de tipos diferentes.
• Limpe os contactos da bateria, e também os do dispositivo, antes da instalação da
bateria.
• Certique-se de que as baterias estão instaladas corretamente no que respeita à sua
polaridade (+ e −).
• Remova as baterias do equipamento se este não for ser usado por um período
prolongado de tempo.
• Remova as baterias usadas prontamente.
• Nunca tente recarregar baterias primárias, pois isso pode causar derrame,
incêndio ou explosão.
• Nunca coloque as baterias em curto-circuito, pois isso pode causar altas temperaturas,
derrame ou explosão.
• Nunca aqueça as baterias com o intuito de as reanimar. Não desmonte as baterias.
• Lembre-se de desligar os dispositivos após a utilização.
• Mantenha as baterias fora do alcance das crianças, para evitar o risco de ingestão,
sufocação ou envenenamento.
• Use as baterias da forma prescrita pelas leis do seu país.
Garantia vitalícia internacional Levenhuk
Todos os telescópios, microscópios, binóculos ou outros produtos ópticos Levenhuk, exceto
seus acessórios, são acompanhados de garantia vitalícia contra defeitos dos materiais e
acabamento. A garantia vitalícia é uma garantia para a vida útil do produto no mercado. Todos
os acessórios Levenhuk têm garantia de materiais e acabamento livre de defeitos por dois
anos a partir da data de compra. A Levenhuk irá reparar ou substituir o produto ou sua parte
que, com base em inspeção feita pela Levenhuk, seja considerado defeituoso em relação aos
materiais e acabamento. A condição para que a Levenhuk repare ou substitua tal produto é
que ele seja enviado à Levenhuk juntamente com a nota scal de compra.
Esta garantia não cobre partes consumíveis, tais como lâmpadas (elétricas, de LED,
de halogênio, econômicas e outros tipos de lâmpadas), baterias (recarregáveis e não
recarregáveis), consumíveis elétricos etc.
Para detalhes adicionais, visite nossa página na internet: www.levenhuk.eu/warranty
Se surgirem problemas relacionados à garantia ou se for necessária assistência no uso do
produto, contate a lial local da Levenhuk.

Цифровые микроскопы
Внимание: помните, что напряжение сети в России и большинстве
европейских стран составляет 220–240 В. Если вы хотите использовать
Levenhuk Rainbow DM LCD
устройство в стране с другим стандартом сетевого напряжения,
необходимо включать его в розетку только через соответствующий
конвертер (преобразователь напряжения).
RU
Рассмотрите рисунки 1 (устройство), 2 (ЖК-экран), 3 (пульт управления) и 4 (аксессуары).
Найдите свою модель микроскопа и ознакомьтесь со всеми деталями устройства.
Подготовка микроскопа к работе
• Аккуратно распакуйте микроскоп и установите его на ровную поверхность.
• Вставьте кабель питания в соответствующие разъемы в основании и на ЖК-
экране, подсветка и экран включатся автоматически.
• Для последующего включения и выключения экрана нажмите на экране
кнопку вкл./выкл. и удерживайте в течение 2 секунд.
• Поместите на подвижный блок микропрепарат и зафиксируйте его
держателями. Расположите подвижный блок под объективом. В комплекте
есть набор готовых микропрепаратов для изучения. Снимите крышку объектива
с надписью «Q.C. passed» с нижней части второй крышки объектива.
• Настройте яркость подсветки и отрегулируйте четкость изображения при
помощи ручки грубой фокусировки.
Для создания снимков и видеороликов потребуется карта microSD (нет в
комплекте). Выключите микроскоп и вставьте карту microSD в соответствующий
разъем на корпусе микроскопа до щелчка. Не прикладывайте излишних усилий,
чтобы не повредить микроскоп или карту microSD. Если у вас не получается вставить
карту, убедитесь, что она расположена верно.
Если ЖК-экран зависнет, найдите на его задней панели кнопку «Перезагрузка».
Для нажатия кнопки используйте узкий предмет, например, разогнутую скрепку.
Это сбросит все настройки до заводских значений и перезапустит ЖК-экран.
Сохраненные фото или видео не будут удалены.
Выбор предметного стекла
• Прозрачное предметное стекло используйте для наблюдений прозрачных
препаратов и тонких срезов, установив его в специальную полость в
предметном столике. Для данного типа наблюдений рекомендуется
использовать только нижнюю подсветку.
• В комплекте с микроскопом поставляются дополнительные черное и белое
предметные стекла. Если препарат имеет белую или яркую окраску, тогда
для лучшего контраста изображения используйте черное предметное стекло,
включив только верхнюю подсветку. В иных случаях используют белое
предметное стекло.
Значки основного интерфейса
Режим видео
Запись видео
Режим фото
Создание снимка
Цифровое увеличение
Во время наблюдений нажмите кнопку «Вверх», чтобы увеличить изображение,
кнопку «Вниз» — чтобы уменьшить.
Как сделать снимок
1. Включите микроскоп и поместите препарат на предметный столик.
2. Установите объектив на нужной высоте при помощи ручки грубой
фокусировки.
3. Настройте яркость системы освещения так, чтобы объект был равномерно
освещен.
4. Настройте увеличение и резкость изображения, вращая колесо фокусировки и
кольцо оптического увеличения.
5. Нажмите кнопку «Съемка», чтобы сделать снимок.
6. В режиме «Стоп-кадр» кратковременно нажмите кнопку «OK», чтобы сделать
снимок (только DM500).
TF
Индикатор установки
карты microSD
Режим неподвижного
изображения
Режим обзора
39

Как записать видео
1. Нажмите кнопку «Видео», чтобы перейти в режим видео. Значок в левом
верхнем углу дисплея изменится в подтверждение перехода.
2. Нажмите кнопку «ОК», чтобы начать запись. Примечание: не зажимайте
кнопку «ОК», кратковременно нажмите и отпустите.
3. Нажмите кнопку повторно, чтобы остановить запись.
4. Нажмите кнопку «Съемка», чтобы сделать снимок, пока микроскоп записывает
видео. Если вы делаете фото таким образом, разрешение изображения не
может быть таким же высоким, как разрешение видео — качество снимка
будет ниже.
Просмотр фотографий и видеозаписей
1. Вставьте карту microSD в разъем.
2. Дважды нажмите кнопку «Видео», чтобы включить режим просмотра.
3. Для просмотра сделанных снимков и видеозаписей нажимайте кнопки
«Вправо» и «Влево». Чтобы начать воспроизведение видео, нажмите кнопку «ОК».
4. При просмотре неподвижного изображения или видео кнопку «Меню» можно
использовать для предоставления дополнительных параметров. Нажмите
кнопку меню и удерживайте некоторое время, пока не появятся параметры.
Настройка
Чтобы перейти в меню настроек ЖК-экрана, дважды нажмите кнопку «Меню».
Используйте кнопки управления для выбора необходимых параметров. Для
сохранения выбранных параметров нажмите кнопку «Меню» повторно. При
сохранении настроек не отключайте питание микроскопа. После применения
настроек рекомендовано перезагрузить микроскоп.
Дата и время
В главном меню при помощи кнопки «Вниз» перейдите в раздел «Дата/Время» и
настройте дату и время. Или вы можете использовать кнопки «Влево» и «Вправо» на
пульте управления, чтобы выбрать необходимые данные (только DM500).
Технические характеристики
Артикул 76826 76825
Модель
Цифровое увеличение 7–200 крат 10–200 крат
Оптическое увеличение 7–50 крат 10–50 крат
Материал оптики оптическое стекло
Корпус пластик
Предметный столик 120х180 мм
Подвижный блок 83х43 мм, с держателями препарата
Фокусировка грубая, 50 мм грубая, 90 мм
Подсветка светодиодная, верхняя и нижняя
Поворотный цветной ЖК-экран 5" 7"
Число мегапикселей (сенсор/
изображение)
Максимальное разрешение
изображение/видео
Формат изображения/видео *.jpg/*.avi
Чувствительный элемент 1/2,9
Размер пикселя 2,8 мкм
Чувствительность 3800 мВ/лк·с
Спектральный диапазон 410–1100 нм
Ручные настройки баланс белого, контроль экспозиции
Выход (разъемы) microSD, miniUSB
Источник питания пульта
управления
Levenhuk Rainbow DM500
LCD
4032x3024/1920x1080 пикс
110–220 В; 5 В, 1 А через
USB-кабель
Levenhuk Rainbow DM700
LCD
2/12
110–220 В; 5 В, 1 А через
USB-кабель;
встроенный аккумулятор
2200 мА∙ч (время работы:
4 часа, время зарядки:
20 часов)
40

Источник питания пульта
управления
Диапазон рабочих температур –20…+70 °C
Компания Levenhuk оставляет за собой право вносить любые изменения или
прекращать производство изделия без предварительного уведомления.
2 батарейки типа ААА (нет в комплекте)
Уход и хранение
• Никогда не смотрите в прибор на Солнце, на источник яркого света и
лазерного излучения — ЭТО ОПАСНО ДЛЯ ЗРЕНИЯ И МОЖЕТ ПРИВЕСТИ
К СЛЕПОТЕ!
• Будьте внимательны, если пользуетесь прибором вместе с детьми или людьми, не
ознакомленными с инструкцией.
• После вскрытия упаковки и установки микроскопа проверьте каждый компонент.
• Не разбирайте прибор. Сервисные и ремонтные работы могут проводиться только
в специализированном сервисном центре.
• Оберегайте прибор от резких ударов и чрезмерных механических воздействий.
Не прикладывайте чрезмерных усилий при настройке фокуса. Не затягивайте
стопорные и фиксирующие винты слишком туго.
• Не касайтесь пальцами поверхностей линз. Для внешней очистки прибора
используйте специальную салфетку и специальные чистящие средства Levenhuk
для чистки оптики. Не используйте для чистки средства с абразивными или
коррозионными свойствами и жидкости на основе ацетона.
• Абразивные частицы (например, песок) следует не стирать, а сдувать или
смахивать мягкой кисточкой.
• Не подвергайте прибор длительному воздействию прямых солнечных лучей. Не
используйте прибор в условиях повышенной влажности и не погружайте его в
воду.
• Работайте с микроскопом аккуратно, надевайте на него пылезащитный чехол
после работы, чтобы защитить его от пыли и масляных пятен.
• Если объективы и окуляры не используются долгое время, храните их
упакованными в сухую коробку, отдельно от микроскопа.
• Храните прибор в сухом прохладном месте, недоступном для пыли, влияния
кислот или других активных химических веществ, вдали от отопителей (бытовых,
автомобильных), открытого огня и других источников высоких температур.
• Не используйте микроскоп рядом с воспламеняемыми материалами, так как
основание микроскопа может нагреться во время работы.
• Всегда отключайте микроскоп от электросети, прежде чем открывать батарейный
отсек или менять лампу подсветки. Перед заменой лампы дайте ей остыть и всегда
меняйте ее на лампу того же типа.
• Используйте источник питания, соответствующий напряжению сети, иначе может
сгореть лампа, повредиться электросхема микроскопа или произойти короткое
замыкание.
• Если деталь прибора или элемент питания были проглочены, срочно
обратитесь за медицинской помощью.
Использование элементов питания
• Всегда используйте элементы питания подходящего размера и соответствующего
типа.
• При необходимости замены элементов питания меняйте сразу весь комплект, не
смешивайте старые и новые элементы питания и не используйте элементы питания
разных типов одновременно.
• Перед установкой элементов питания очистите контакты элементов и контакты в
корпусе прибора.
• Устанавливайте элементы питания в соответствии с указанной полярностью (+ и −).
• Если прибор не используется длительное время, следует вынуть из него элементы
питания.
• Оперативно вынимайте из прибора использованные элементы питания.
• Не пытайтесь перезаряжать гальванические элементы питания — они могут
протечь, воспламениться или взорваться.
• Никогда не закорачивайте полюса элементов питания — это может привести к их
перегреву, протечке или взрыву.
• Не пытайтесь нагревать элементы питания, чтобы восстановить их
работоспособность.
• Не разбирайте элементы питания.
• Выключайте прибор после использования.
• Храните элементы питания в недоступном для детей месте, чтобы избежать риска
их проглатывания, удушья или отравления.
• Утилизируйте использованные батарейки в соответствии с предписаниями закона.
Международная пожизненная гарантия Levenhuk
Компания Levenhuk гарантирует отсутствие дефектов в материалах конструкции
и дефектов изготовления изделия. Продавец гарантирует соответствие качества
приобретенного вами изделия компании Levenhuk требованиям технической
документации при соблюдении потребителем условий и правил транспортировки,
хранения и эксплуатации изделия. Срок гарантии: на аксессуары — 6 (шесть) месяцев
со дня покупки, на остальные изделия — пожизненная гарантия (действует в течение
всего срока эксплуатации прибора). Гарантия не распространяется на комплектующие с
ограниченным сроком использования, в том числе лампы (накаливания, светодиодные,
галогенные, энергосберегающие и прочие типы ламп), электрокомплектующие,
расходные материалы, элементы питания и прочее. Подробнее об условиях
гарантийного обслуживания см. на сайте www.levenhuk.ru/support
По вопросам гарантийного обслуживания вы можете обратиться в ближайшее
представительство компании Levenhuk.
41

Levenhuk prepared slides sets
The Levenhuk slides sets include thoroughly prepared specimens of various biomaterials as well as blank slides and cover glasses for you
to make your own specimens. Prepared slides, blank slides and cover slips can be used with any microscope model.
The original Levenhuk cleaning accessories
Levenhuk Cleaning Pen LP10
Levenhuk Worldwide:
USA: www.levenhuk.com
Azerbaijan: www.levenhuk.az
Bulgaria: www.levenhuk.bg
Canada: www.levenhuk. ca
Czech Rep.: www.levenhuk.cz
Estonia: www.levenhuk.ee
The so tip is treated with a special cleaning uid that removes greasy stains
Finland: .levenhuk.com
Germany: www.levenhuk.de
Hungary: www.levenhuk
Iceland: www.levenhuk.is
Does not damage optical coatings of the lenses
India: www.levenhuk.in
Italy: www.levenhuk.it
Removes dust with a brush
Leaves no smudges or stains
Latvia: www.levenhuk.lv
Lithuania: www.levenhuk.lt
Netherlands: www.levenhuk.nl
Poland: www.levenhuk.pl
Romania: www.levenhuk.ro
Russia: www.levenhuk.ru
Slovakia: www.levenhuk.sk
Spain: www.levenhuk.es
Turkey: www.levenhuk.tr
Ukraine: www.levenhuk.ua
United Kingdom: www.levenhuk.uk
EU: www.levenhuk.eu
levenhuk.com
levenhuk.com
Levenhuk, Inc. 928 E 124 Ave Ste D, Tampa, FL 33612 USA
Levenhuk, Inc. 928 E 124 Ave Ste D, Tampa, FL 33612 USA
Levenhuk® is a registered trademark of Levenhuk, Inc. © 2006
Levenhuk® is a registered trademark of Levenhuk, Inc. © 2006
20200824
20201002
–2020 Levenhuk, Inc. All rights reserved.
–2020 Levenhuk, Inc. All rights reserved.
 Loading...