

Page 1
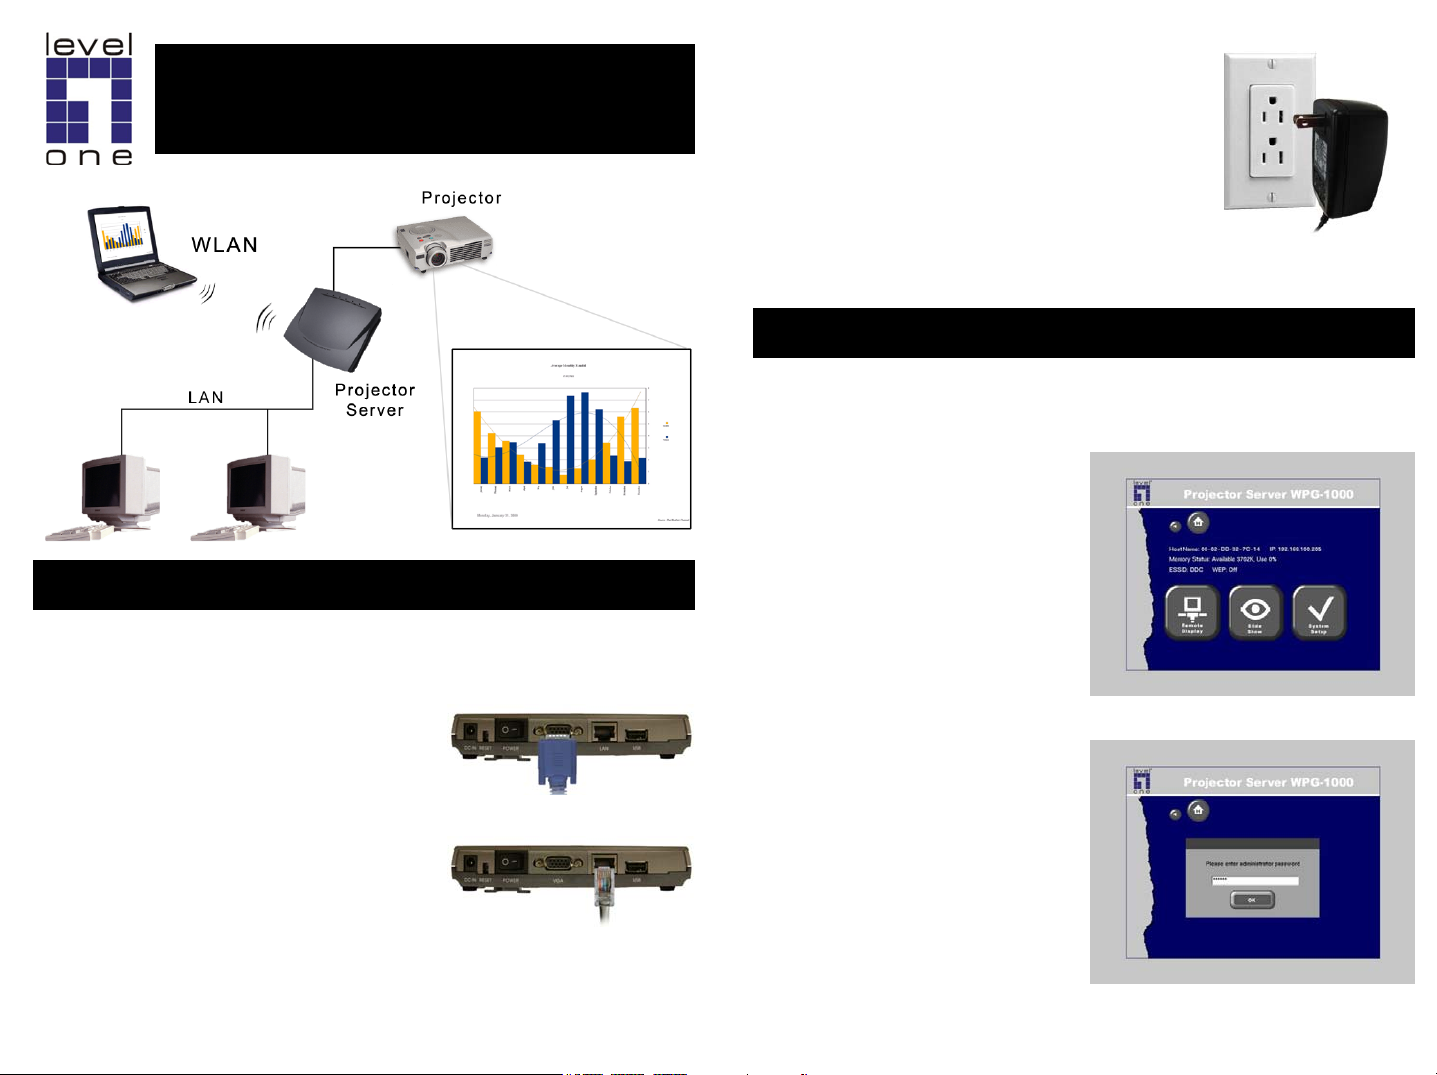
Wireless Projector Server
Quick Start Guide
A) Connect the Projector Server
The Projector Server’s USB port currently does not support hotplugging function for a USB mouse . If you wish to use it, make
sure to plug it in before booting the system.
1. Connect your projector to the
Wireless Projector Server's VGA port
(Fig. 1) with the VGA cable from your
projector.
2. If you wish to connect the Projector
Server to your network, plug one end
of a standard UTP Ethernet cable
(RJ45) into the Projector Server's
LAN Port (Fig. 2). Connect the other
end of the Ethernet cable into a
networked hub or switch.
Fig. 1
Fig. 2
3. Plug the power adapter cord into the
Projector Server's power port and the
other end to a power outlet (Fig. 3).
4. Press the Power Switch to turn on the
Projector Server.
5. Power on the projector and select its
respective input. The Projector Server's
on-screen menu (fig. 4) will show on the
projected image.
Fig. 3
B) Configure the Projector Server
To configure the Projector Server at the on-screen menu, you will
need the IR remote controller or a USB keyboard and mouse
connected to the Projector Server.
1. Select the System Setup
from the menu (Fig. 4).
Fig. 4
2. Enter the administrator
password (default is
654321) from the
prompted screen (Fig. 5)
pg 2pg 1
Fig. 5
Page 2
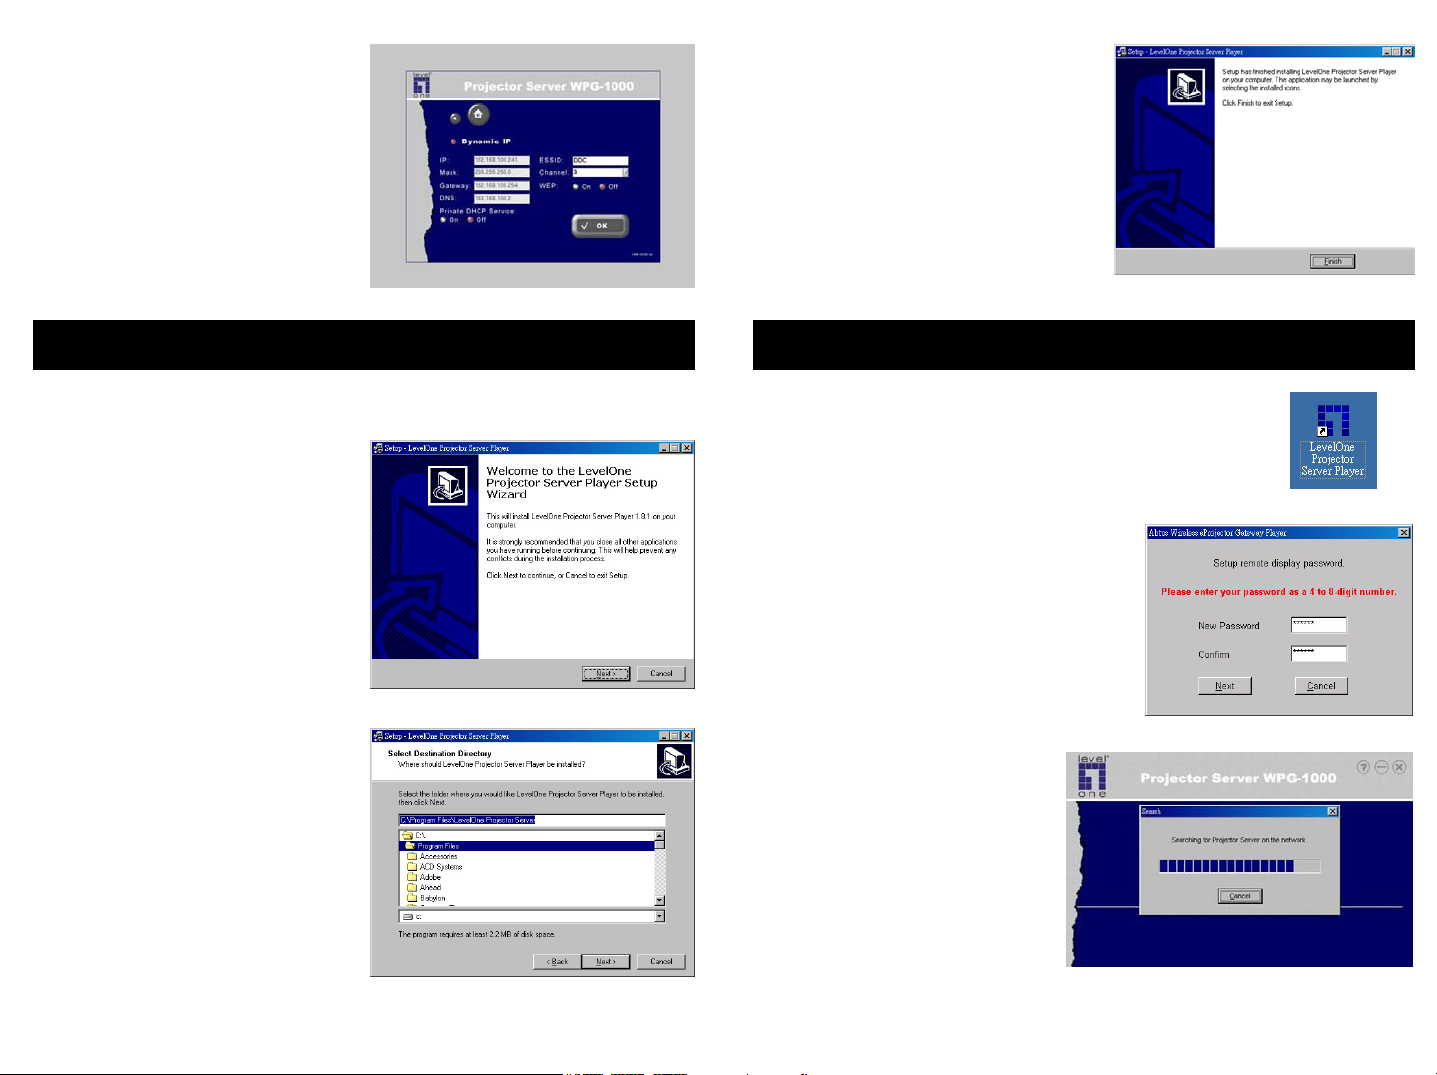
3. The IP setting window
appear as Fig. 6. Change the
IP settings to valid values for
your Local Area Network
(LAN).
4. Change the wireless settings
(ESSID, Channel, WEP) if
necessary. Use a different
name and channel from
nearby Access Points.
Fig. 6
5. The Projector Server Player
utility is now installed.
Select Yes to launch the
player after the installation.
Click the Finish button (Fig.
9). An Projector Server
Player icon will show on
your desktop.
Fig. 9
C) Install the Player Utility
You need the Player Utility installed on your computer in order to
use the Wireless Projector Server.
1. Load the utilities CD-ROM in
your computer.
2. The setup utility will start
with the welcome screen
(Fig. 7), click the Next button
to continue.
3. The setup utility will choose
a default folder to install the
utility files (Fig. 8). Click
Browse if you want to
choose a different folder.
Click Next to continue.
4. When install under Windows
®
XP
environment, the system
may prompt to ask if
installation shall continue,
simply click Continue
Anyway.
Fig. 7
Fig. 8
D) Use the Projector Server Utility
1. Double click on the program icon of the
“LevelOne Projector Server Player“ (Fig.
10) on your computer’s desktop.
Fig. 10
2. The first time when the Player
utility starts, it will ask you to set
a password (Fig. 11). Enter the
password and click Next to
continue. You can change the
password afterward in the
Advanced Panel (Fig. 16).
Fig. 11
3. The player utility will
start searching for the
Projector Server on your
local area network (Fig.
12).
Fig. 12
pg 4pg 3
Page 3
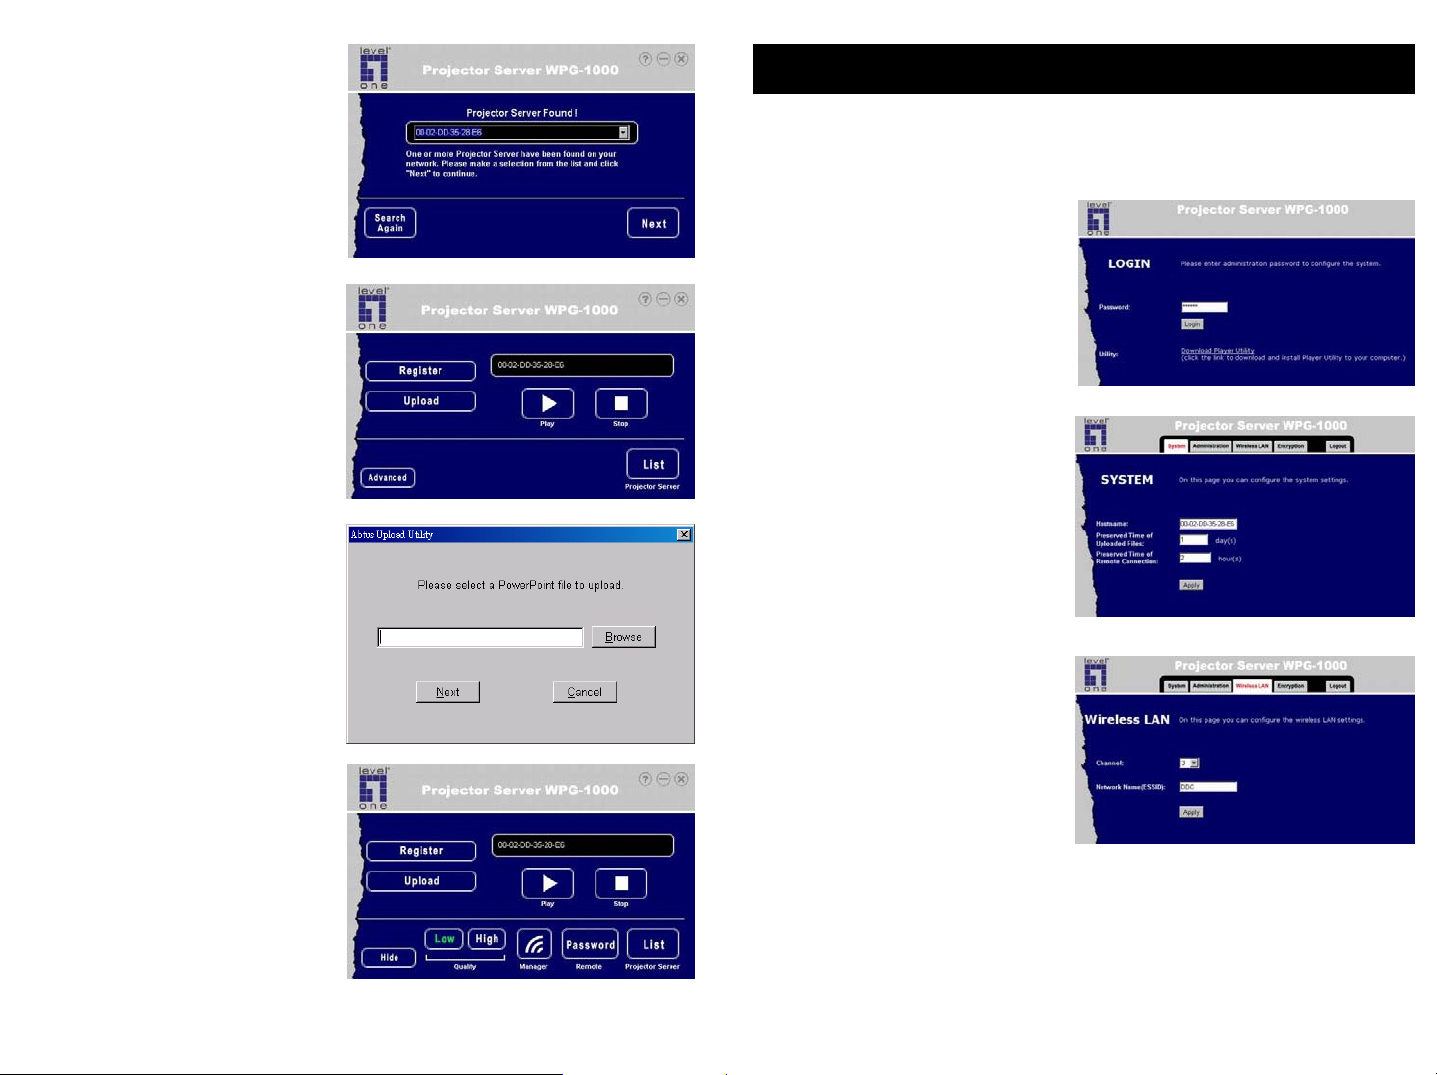
4. After the search, the List
Panel will appear (Fig. 13).
E) Advanced Configuration
5. Click on the drop down
button at the right side of
the entry box to see the list
of all Projector Servers
found.
6. Highlight one of the
available Projector Server
(if there are multiple
Projector Servers around)
and select it to use.
7. Click Next to enter the
Player Panel (Fig. 14).
z Click Play will start
sending the computer's
screen to the projection
image.
z Click Stop to stop sending
screen updates to the
projector.
z Click Upload to upload
PowerPoint files to the
Projector Server. A file
selection dialog box will
appear (Fig. 15).
z Click Browse to select a
PowerPoint file to upload.
After selection, click Next
to continue.
8. Click Advanced from the
Player Panel (Fig. 14) to
open the Advanced
panel (Fig. 16) with more
options.
Fig. 13
Fig. 14
Fig. 15
Fig. 16
The administration utility allows you to change the name,
password, wireless security and other settings of the Projector
Server from a computer with a web browser.
1. Click the Manager button
in the Advanced Panel
(Fig. 16).
2. The Administration Utility
will start in your web
browser (Fig. 17). Enter
the administrator
password (default is
"654321") and click on the
Fig. 17
Login button to login.
3. Click the System tab and
enter the "Hostname” the name to identify this
Projector Server (Fig. 18).
After entry, click Apply to
confirm the entry.
Fig. 18
4. Click the Wireless LAN tab
to select channel and
network name (Fig. 19).
After entry, click Apply to
confirm.
Channel - Select a wireless
channel to use from the list.
Fig. 19
Network Name (ESSID) - The Network Name is for other
wireless devices to identify and join the Projector Server. If
there is other Projector Server nearby, you should set a unique
name for each Projector Server.
pg 6pg 5
Page 4
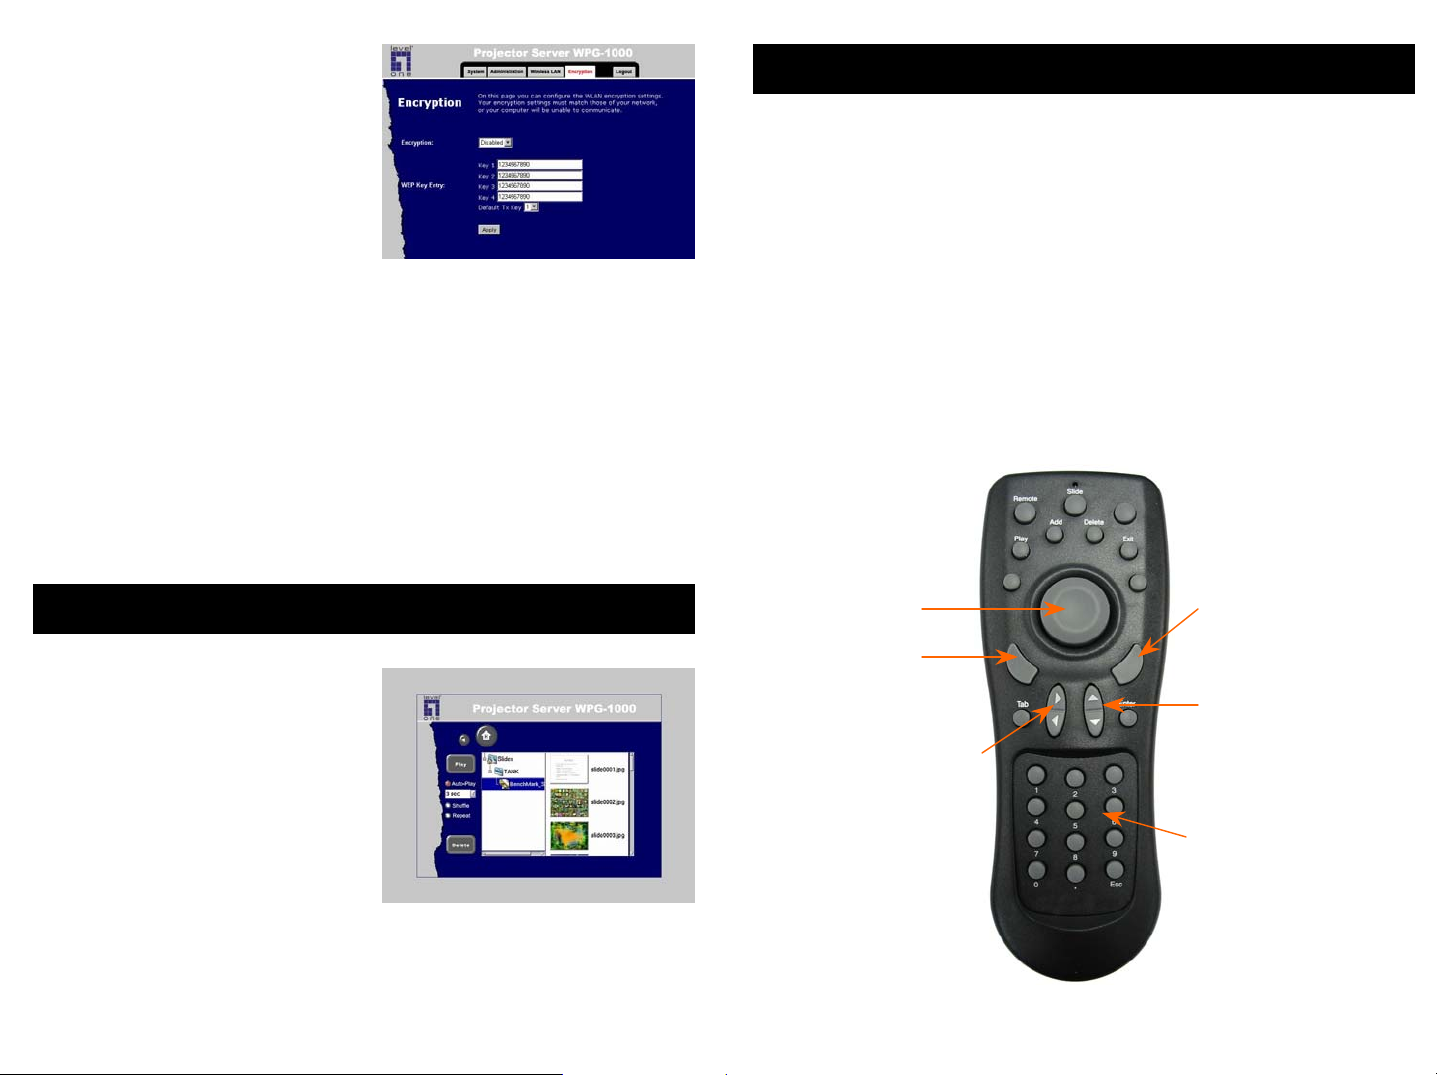
5. Click the Encryption tab to
enable/disable the WEP (Wired
Equivalent Privacy) encryption
and to set its keys (Fig. 20).
Click Apply after entry for
confirmation.
If you turn on the WEP function
of the Projector Server, all
other wireless devices want to
connect to it should also
enable WEP function and use
the same encryption keys.
Encryption (Disable/64Bits/128Bits) - Select Disable for no WEP
encryption. Select 64 or 128 Bits to enable WEP encryption.
Some wireless device may not support 128 Bits encryption.
WEP Key Entry - Manually enter a set of four keys. If you are
using 64 Bits encryption, then each key must consist of exactly
10 hexadecimal characters in length. f you are using 128 Bits
encryption, then each key must consist of exactly 26
hexadecimal characters in length.
Fig. 20
F) Slide Show of Stored Presentation
G) The Infra-red Remote Controller
The Infra-Red remote control allows you to remotely operate the
on-screen menu of the Projector Server.
Remote to call up the Remote Display menu
Slide to call up the Remote Display menu
Laser to turn on the Laser pointer
Play to press the Play button of the displayed menu
Add to press the Add button of the displayed menu
Delete to press the Delete button of the displayed menu
Exit to exit from the current menu or screen
Tab to move to the next functional block on the menu
Enter the Enter key
Right mouse key
Mouse Cursor
1. On the Projector Server's onscreen menu (Fig. 4), select
the Slide Show menu to enter
the Slide Show mode (Fig. 21).
2. Select the folder under the
name of your computer, and
press Play to display your
presentation slides.
3. Use the Forward/Backward on
the remote controller or
PgUp/PgDn on the keyboard
to move to next/previous slide.
Fig. 21
Left mouse key
Forward & Backward:
move one slide forward
or backward in the
Slide Show.
Up&Dn: move up
or down to
selected item
Numeric Keypad: to
enter IP or password
pg 8pg 7
 Loading...