

Page 1

WAP-6102
300Mbps N_Max
Wireless Ceiling PoE Access Point
User Manual
V1.0
Page 2

I
Notice
FCC Warning
Changes or modifications to this unit not expressly approved by the party responsible for
compliance could void the user authority to operate the equipment.
This device complies with Part 15 of the FCC Rules. Operation is subject to the following
two conditions: (1) This device may not cause harmful interference, and (2) this device
must accept any interference received, including interference that may cause undesired
operation.
The user’s manual or instruction manual for an intentional or unintentional radiator shall
caution the user that changes or modifications not expressly approved by the party
responsible for compliance could void the user’s authority to operate the equipment.
FCC Statement
This equipment has been tested and found to comply with the limits for a Class B digital
device, pursuant to Part 15 of the FCC Rules. These limits are designed to provide
reasonable protection against harmful interference in a residential installation. This
equipment generates uses and can radiate radio frequency energy and, if not installed and
used in accordance with the instructions, may cause harmful interference to radio
communications.
However, there is no guarantee that interference will not occur in a particular installation. If
this equipment does cause harmful interference to radio or television reception, which can
be determined by turning the equipment off and on, the user is encouraged to try to correct
the interference by one or more of the following measures:
Reorient or relocate the receiving antenna.
Increase the separation between the equipment and receiver.
Connect the equipment into an outlet on a circuit different from that to which the receiver
is connected.
Consult the dealer or an experienced radio/TV technician for help.
FCC RF Radiation Exposure Statement
This equipment complies with FCC radiation exposure limits set forth for an uncontrolled
environment. This equipment should be installed and operated with minimum distance
20cm between the radiator & your body. For product available in the USA/Canada market,
only channel 1~11 can be operated. Selection of other channels is not possible. The
antenna(s) used for this transmitter must not be co-located or operating in conjunction with
any other antenna or transmitter. Shielded interface cables must be used in order to comply
with emission limits.
Page 3

II
CE Statement
LEVEL ONE hereby declares that this device is in compliance with the essential
requirement and other relevant provisions of the R&TTE Directive 1999/5/EC.
This device will be sold in the following EEA countries:Austria, Italy, Belgium, Liechtenstein,
Denmark, Luxembourg, Finland, Netherlands, France, Norway, Germany, Portugal, Greece,
Spain, Iceland, Sweden, Ireland, United Kingdom, Cyprus, Czech Republic, Estonia,
Hungary, Latvia, Lithuania, Malta, Slovakia, Poland, Slovenia, Bulgaria, Romania.
Preface
This guide is for the experienced user who installs and manages the N_Max WAP-6010
product hereafter referred to as the “device”. To use this guide, you should have experience
working with the TCP/IP configuration and be familiar with the concepts and terminology of
wireless local area networks.
Page 4

III
Table of Content
1. Introduction..................................................................................................................................1
1.1. Features and Benefits.......................................................................................................1
1.2. Package Contents.............................................................................................................2
1.3. System Requirement........................................................................................................2
2. Web Configuration.......................................................................................................................3
2.1. System..............................................................................................................................3
2.1.1. Operation Mode ...................................................................................................3
2.1.2. Status....................................................................................................................4
2.1.3. DHCP...................................................................................................................5
2.1.4. Schedule...............................................................................................................5
2.1.5. Event Log.............................................................................................................6
2.1.6. Monitor ................................................................................................................7
2.2. Wireless............................................................................................................................9
2.2.1 Access Point Configuration .................................................................................9
2.2.2 WDS Bridge Configuration ...............................................................................22
2.2.3 Universal Repeater Configuration .....................................................................27
2.3. Network..........................................................................................................................36
2.3.1. Status..................................................................................................................36
2.3.2. LAN ...................................................................................................................37
2.4. Management...................................................................................................................40
2.4.1. Admin ................................................................................................................40
2.4.2. SNMP.................................................................................................................41
2.4.3. Firmware............................................................................................................42
2.4.4. Configure ...........................................................................................................42
2.4.5. Reset...................................................................................................................43
2.5. Tools...............................................................................................................................44
2.5.1. Time Setting.......................................................................................................44
2.5.2. Power Saving .....................................................................................................45
2.5.3. Diagnosis............................................................................................................45
2.5.4. LED Control.......................................................................................................46
2.6. Logout............................................................................................................................46
Appendix A – SPECIFICATIONS.....................................................................................................47
Appendix B – FCC INTERFERENCE STATEMENT......................................................................48
Appendix C – IC Interference Statement...........................................................................................49
Page 5

1
1. Introduction
WAP-6102 is a powerful and multi-functioned 11n Access Point and it can act three modes
AP/WDS/Universal Repeater. Smoke detector appearance will minimize visibility. So this model can work
properly at Hotel or public area.
WAP-6102 is a Wireless Network device that delivers up to 6x faster speeds and 7x extended coverage than
802.1 1g devices. Product’s RF performance is finely tuned so it will bring best wireless signal for each client.
WAP-6102 supports home network with superior throughput, performance and unparalleled wireless range.
To protect data during wireless transmissions, WAP-6102 encrypts all wireless transmissions through WEP
data encryption and supports WPA/WP A 2. Its MAC address filter all ows users to select st ations with access to
connect network. WAP-6102 thus is the best product to ensure network quality for hotspots.
1.1. Features and Benefits
Features Benefits
High Speed Dat a Rate Up to 300Mbp s Capable of handling heavy data payloads such as MPEG
video streaming
IEEE 802.11n draft Compliant and
backward compatible with 802.11b/g
Fully compatible with IEEE 802.11b/g/n devices
Multi-modes selectable Allowing users to select AP/WDS/Univ ersal Repeater
mode in various application
Point-to-point, Point-to-multipoint
Wireless Connectivity
Allowing to transfer data from buildings to buildings
WDS (Wireless Distributed System) Making wireless AP and Bridge mode simultaneously as
a wireless repeater
Universal Repeater The easiest way to your wireless network's coverage
Support Multi-SSID function (4
SSID) in AP mode
Allowing clients to access different networks through a
single access point and to assign different policies and
functions for each SSID by manager
WPA2/WPA Powerful data security
MAC address filtering in AP mode Ensuring secure network connection
User isolation support (AP mode) Protecting the private network between client users.
Power-over-Ethernet (IEEE802.3af) Flexible Access Point locations and sav ing cost
Keep personal setting Keeping the latest setting when firmware upgrade
SNMP Remote Configuration
Management
Helping administrators to remotely configure or manage
the Access Point easily
QoS (WMM) support Enhancing user performance and density
Page 6

2
1.2. Package Contents
The package contains the following items. In case of return, please keep the original box
set, and the complete box set must be included for full refund.
1 WAP-6102
1 12V/1A 100V~240V Power Adapter
1 CD-ROM with User’s Manual
1 Quick Installation Guide
1 Cat5 UTP Cable
2 Mounting Bracket
2 Screws
1.3. System Requirement
The following are the minimum system requirements in order to configure the device.
PC/AT compatible computer with an Ethernet interface.
Operating system that supports HTTP web-browser
Page 7
2. Web Configuration
2.1. System
2.1.1. Operation Mode
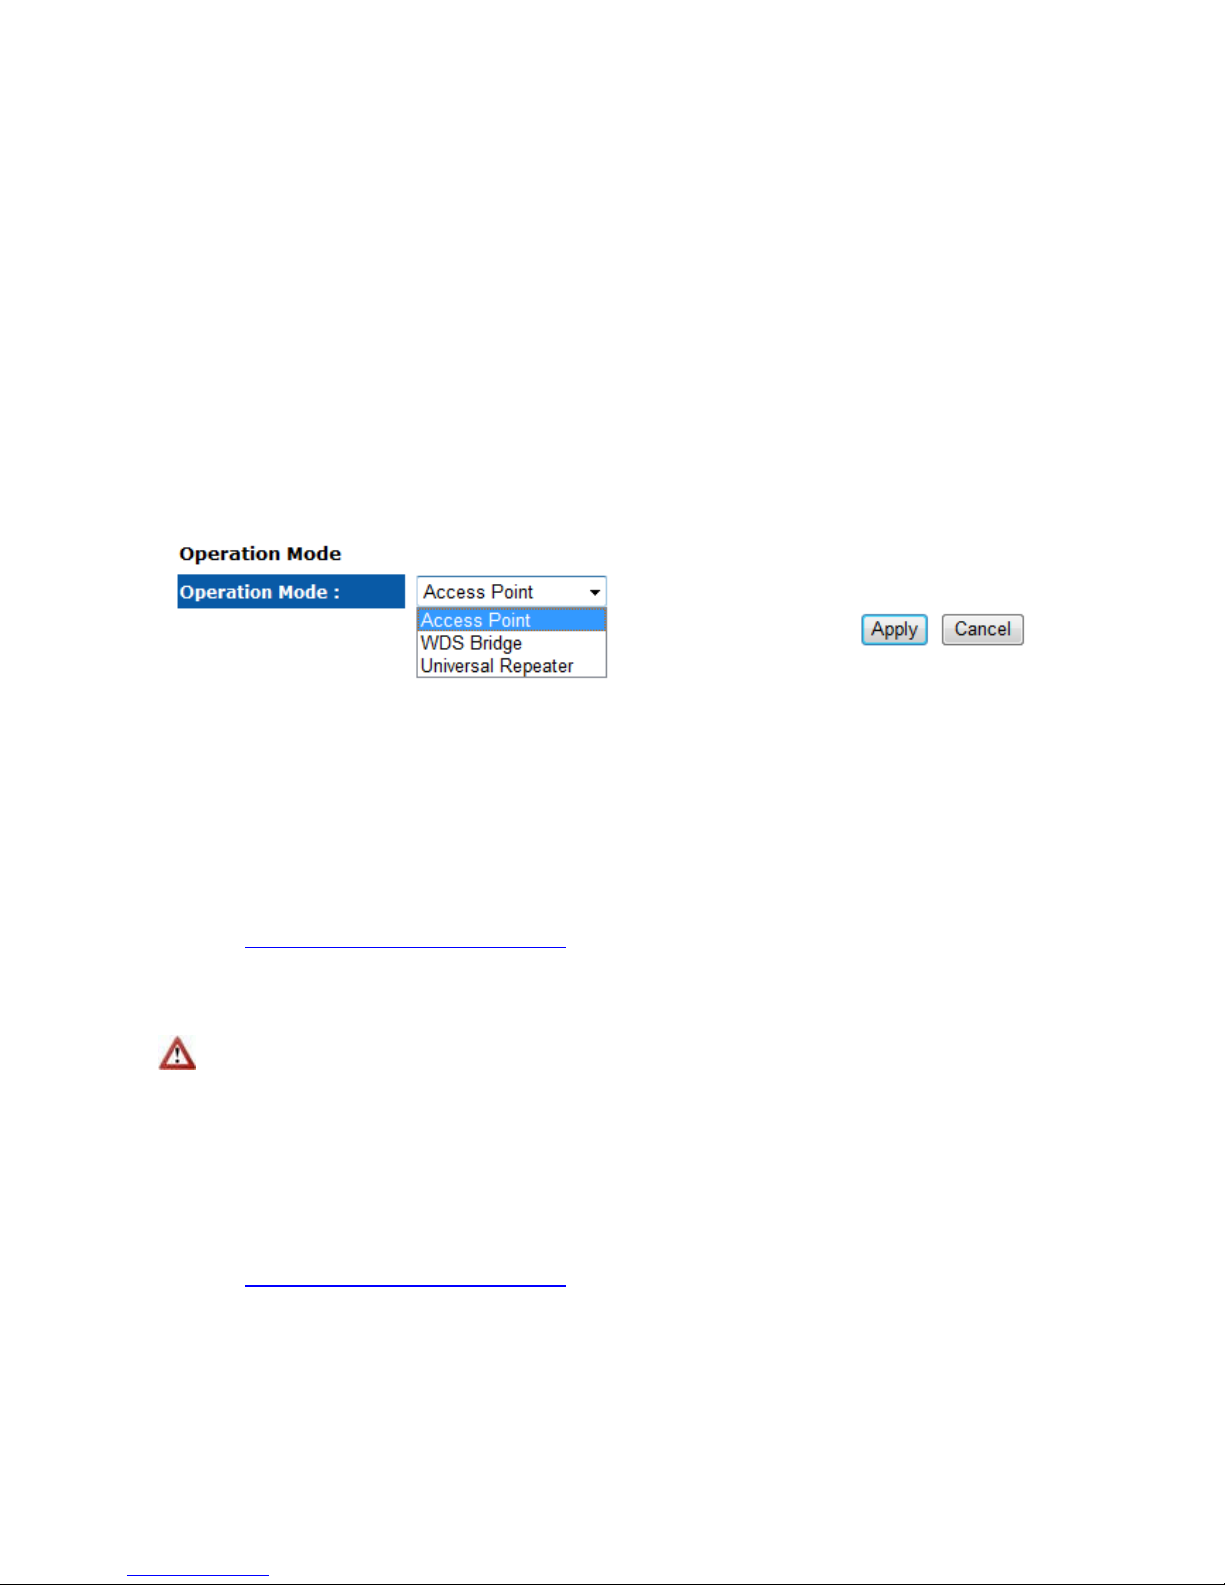
You are allowed to configure WAP-6102 into different modes: AP, WDS Bridge and
Universal Repeater.
AP/WDS/Universal Repeater
Access Point
In AP (Access Point) mode, your device acts as a communication hub for users with a
wireless device to connect to a wired LAN/WAN.
Please refer to:
Chapter 2.2.1Access Point Configuration (Page. 9) for operation under AP Mode
WDS Bridge
You can only connect to the device via Wireless Client
WDS (Wireless Distribution System) allows AP to communicate with one another wirelessly.
This capability is critical in providing a seamless experience for roaming clients and for
managing multiple wireless networks.
Please refer to:
Chapter 2.2.2 WDS Bridge Configuration
(Page. 22) for operation under WDS Mode
3
Page 8
Universal Repeater
Repeater is used to regenerate or replicate signals that are weakened or distorted by
transmission over long distances and through areas with high levels of electromagnetic
interference (EMI). Universal Repeater (AP) mode on one radio channel is usually
configured along with Universal Repeater (STA) mode on another radio channel.
Please refer to:
Chapter 2.2.3 Universal Repeater Configuration (Page. 27) for operation under Repeater
Mode
2.1.2. Status
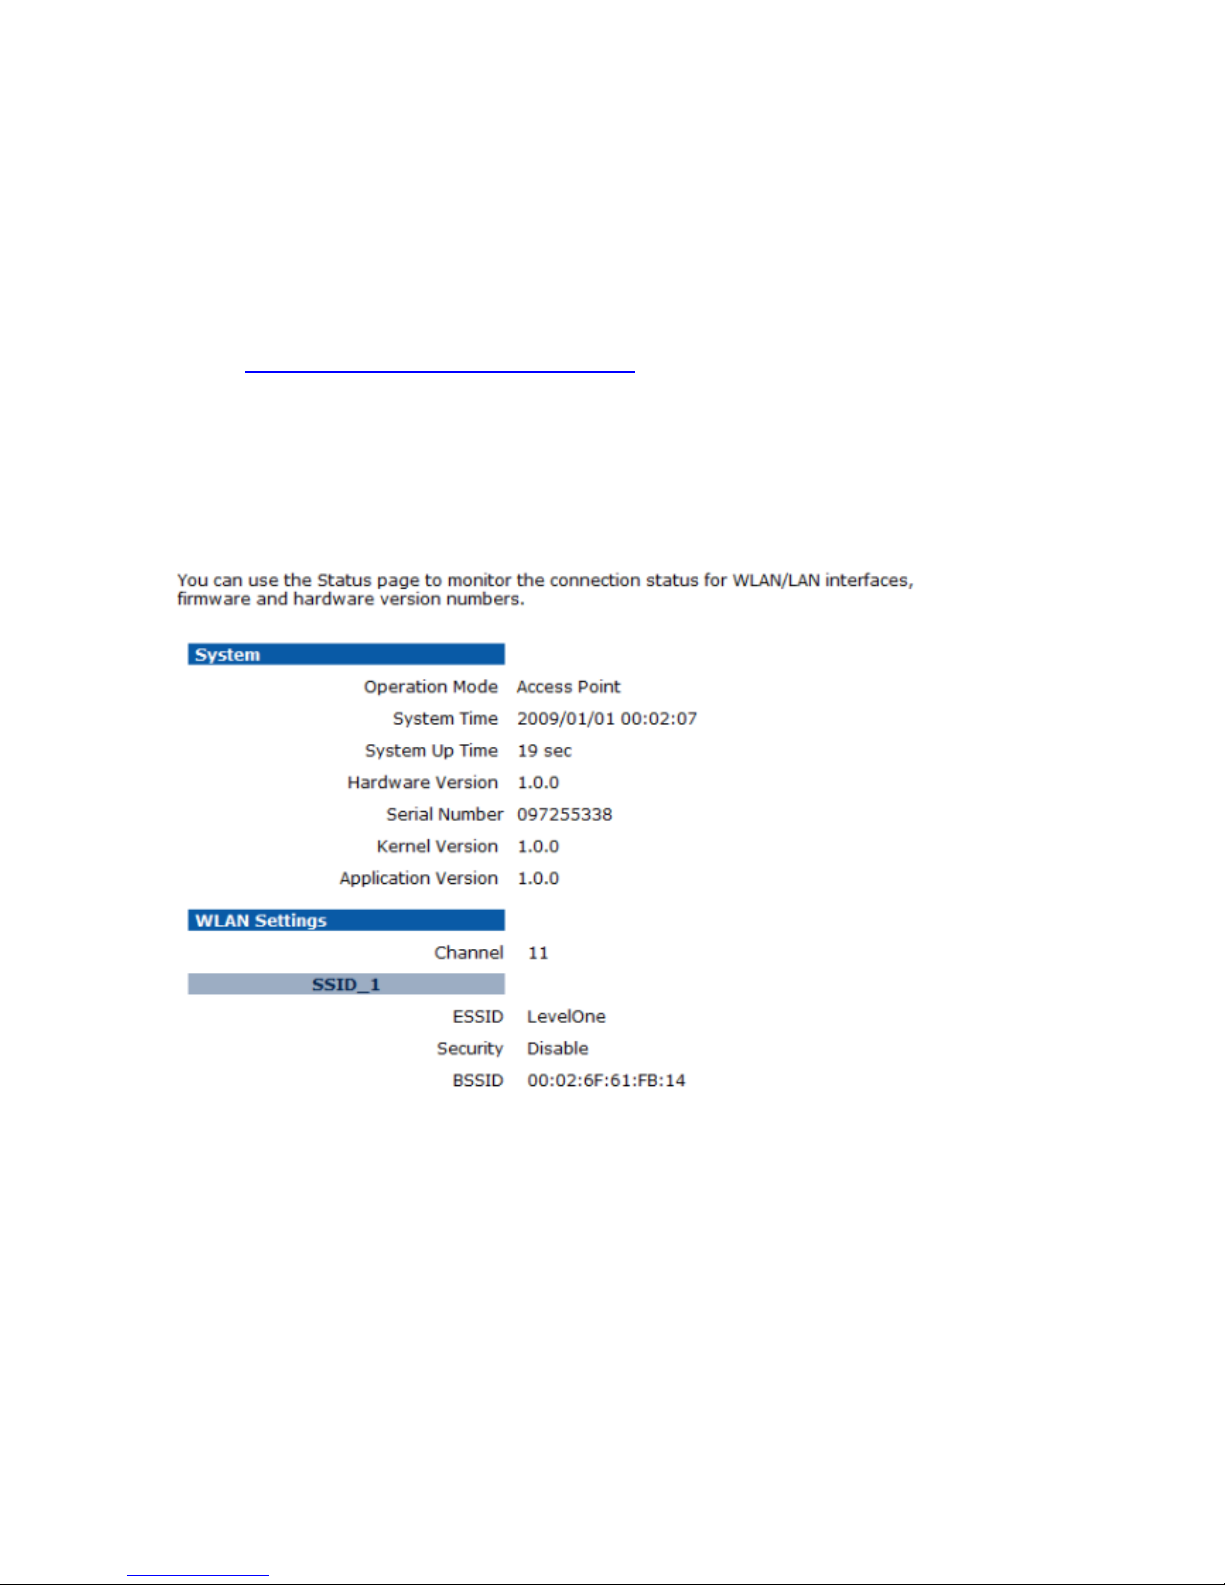
System: Basic information of the device.
WLAN Settings: WLAN channel.
SSID_1: SSID information.
4
Page 9
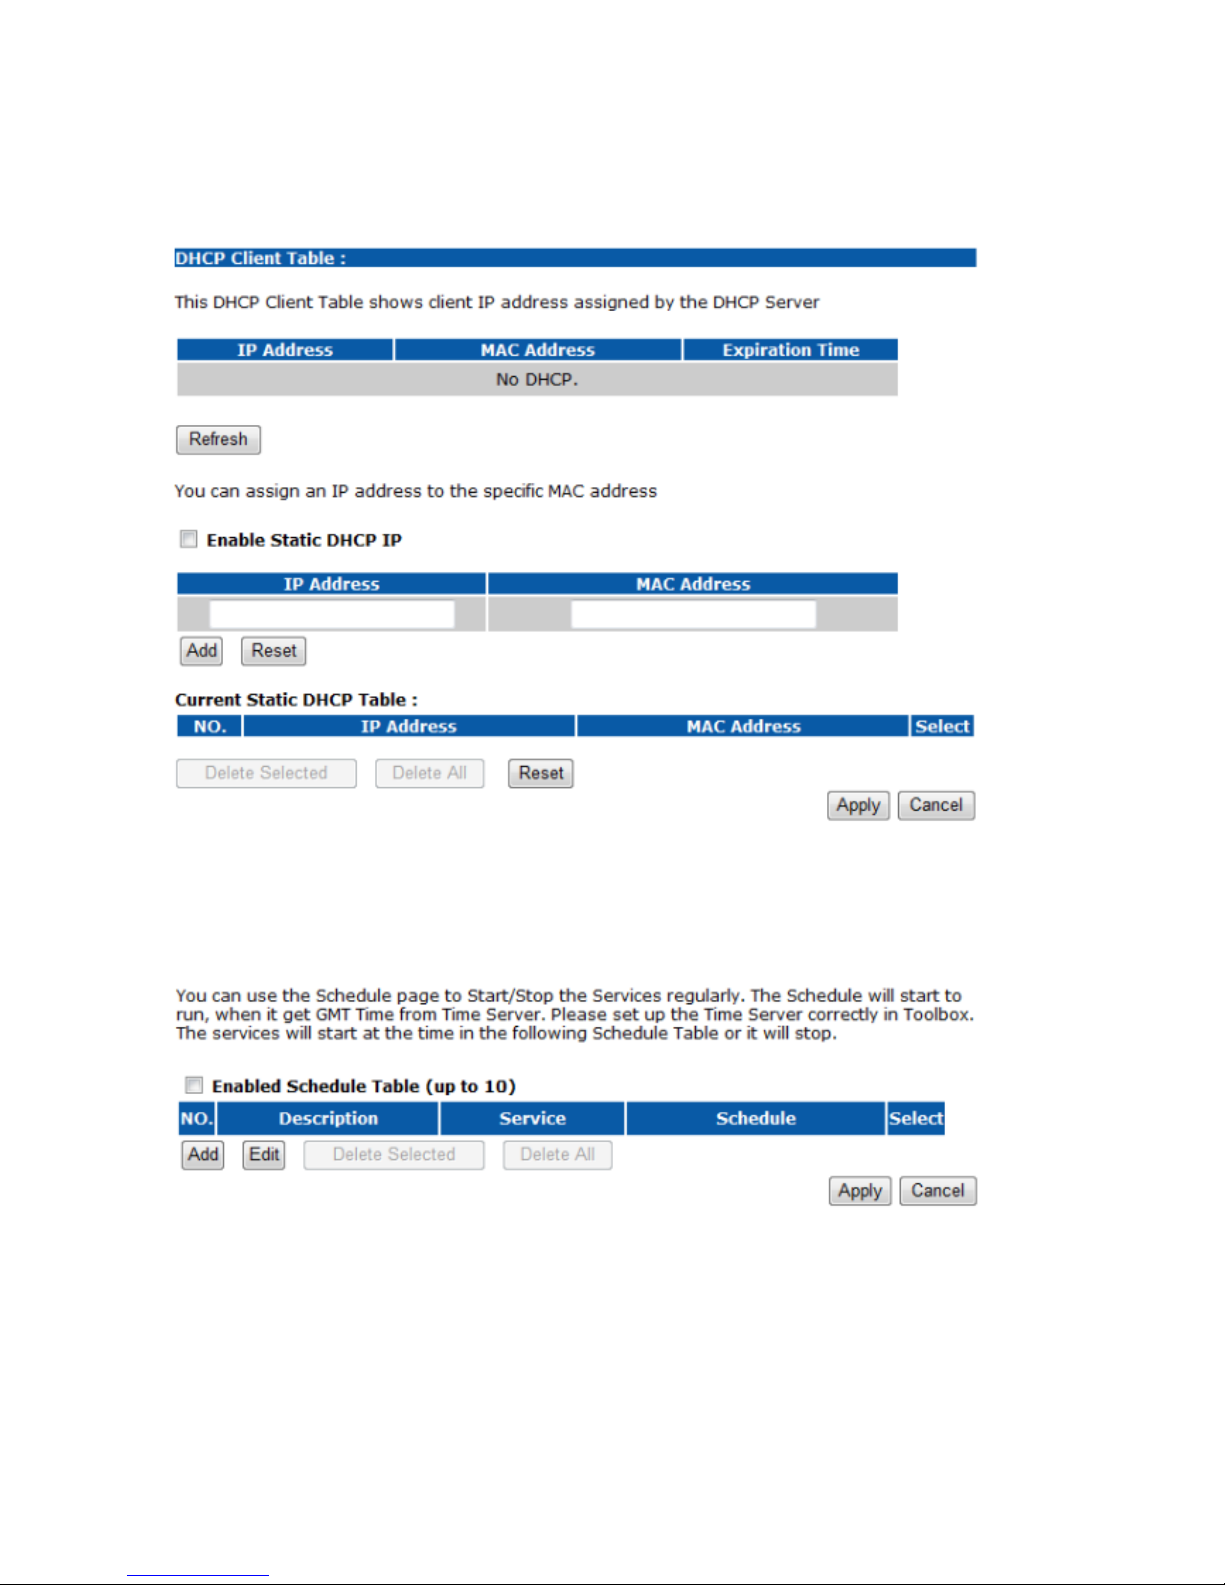
2.1.3. DHCP
2.1.4. Schedule
5
Page 10
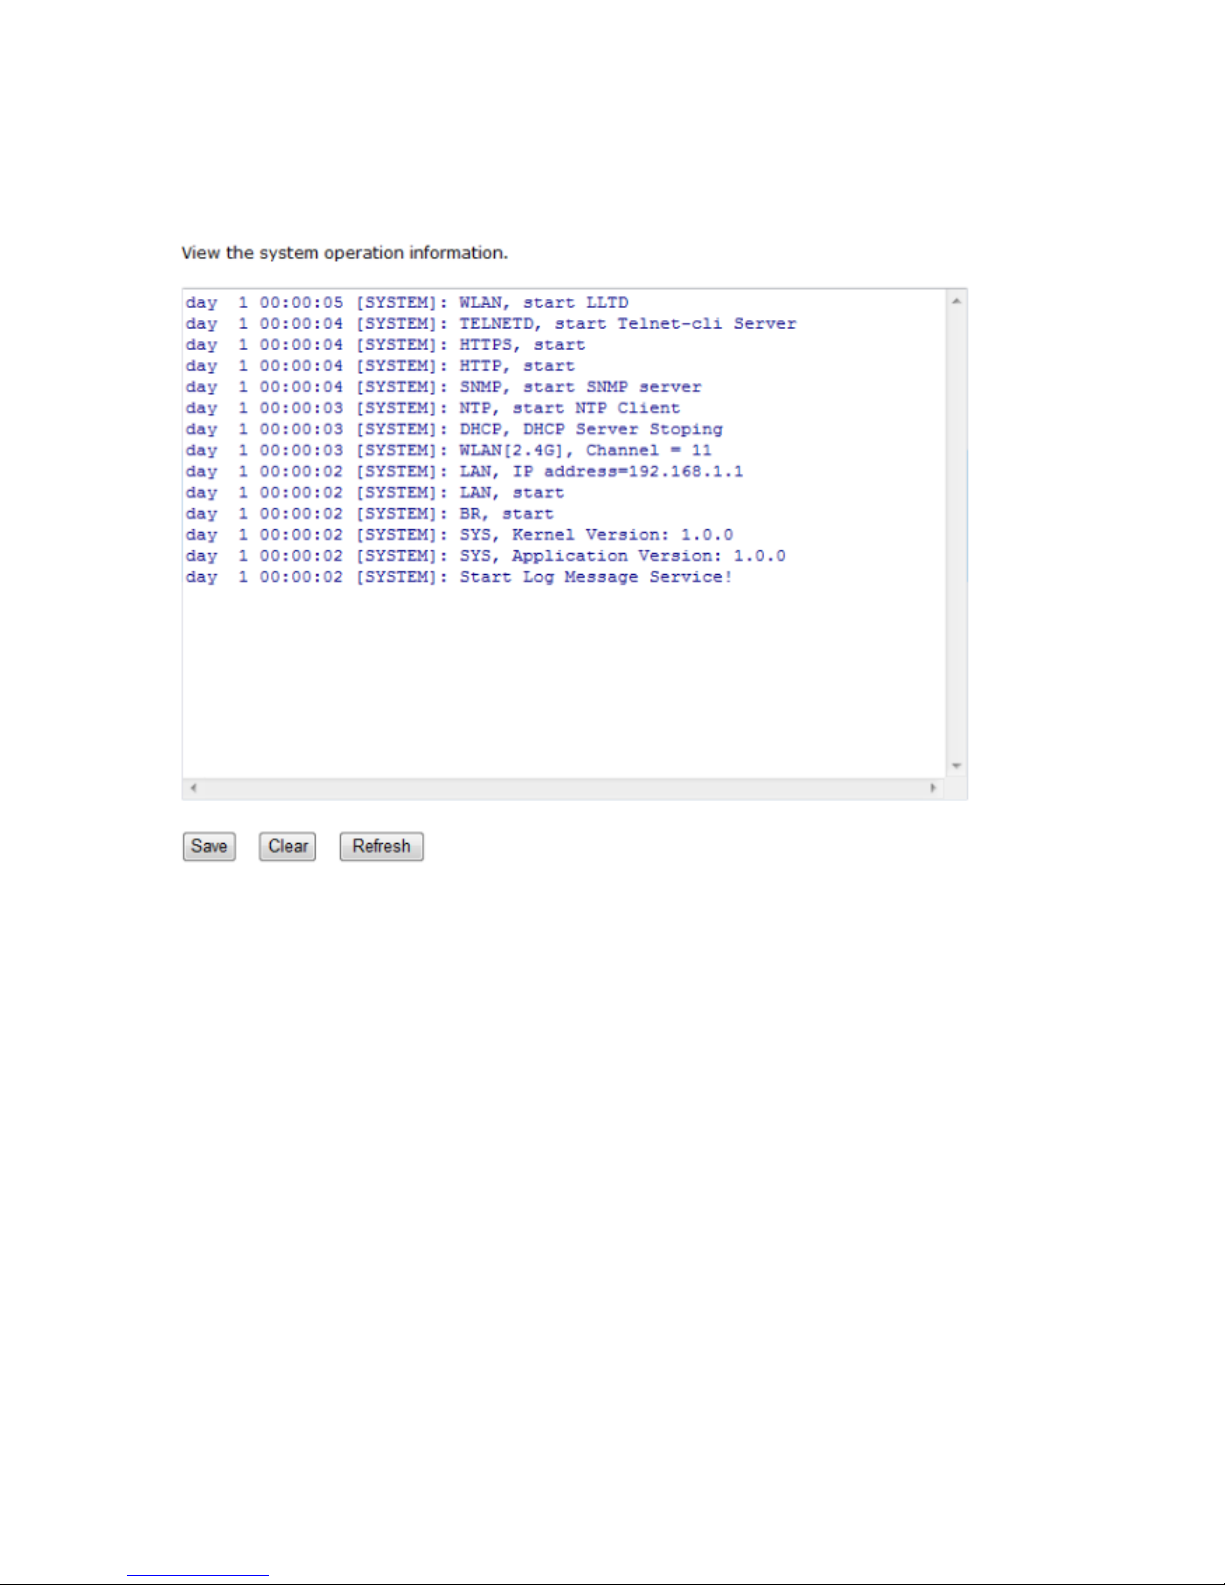
2.1.5. Event Log
6
Page 11
2.1.6. Monitor
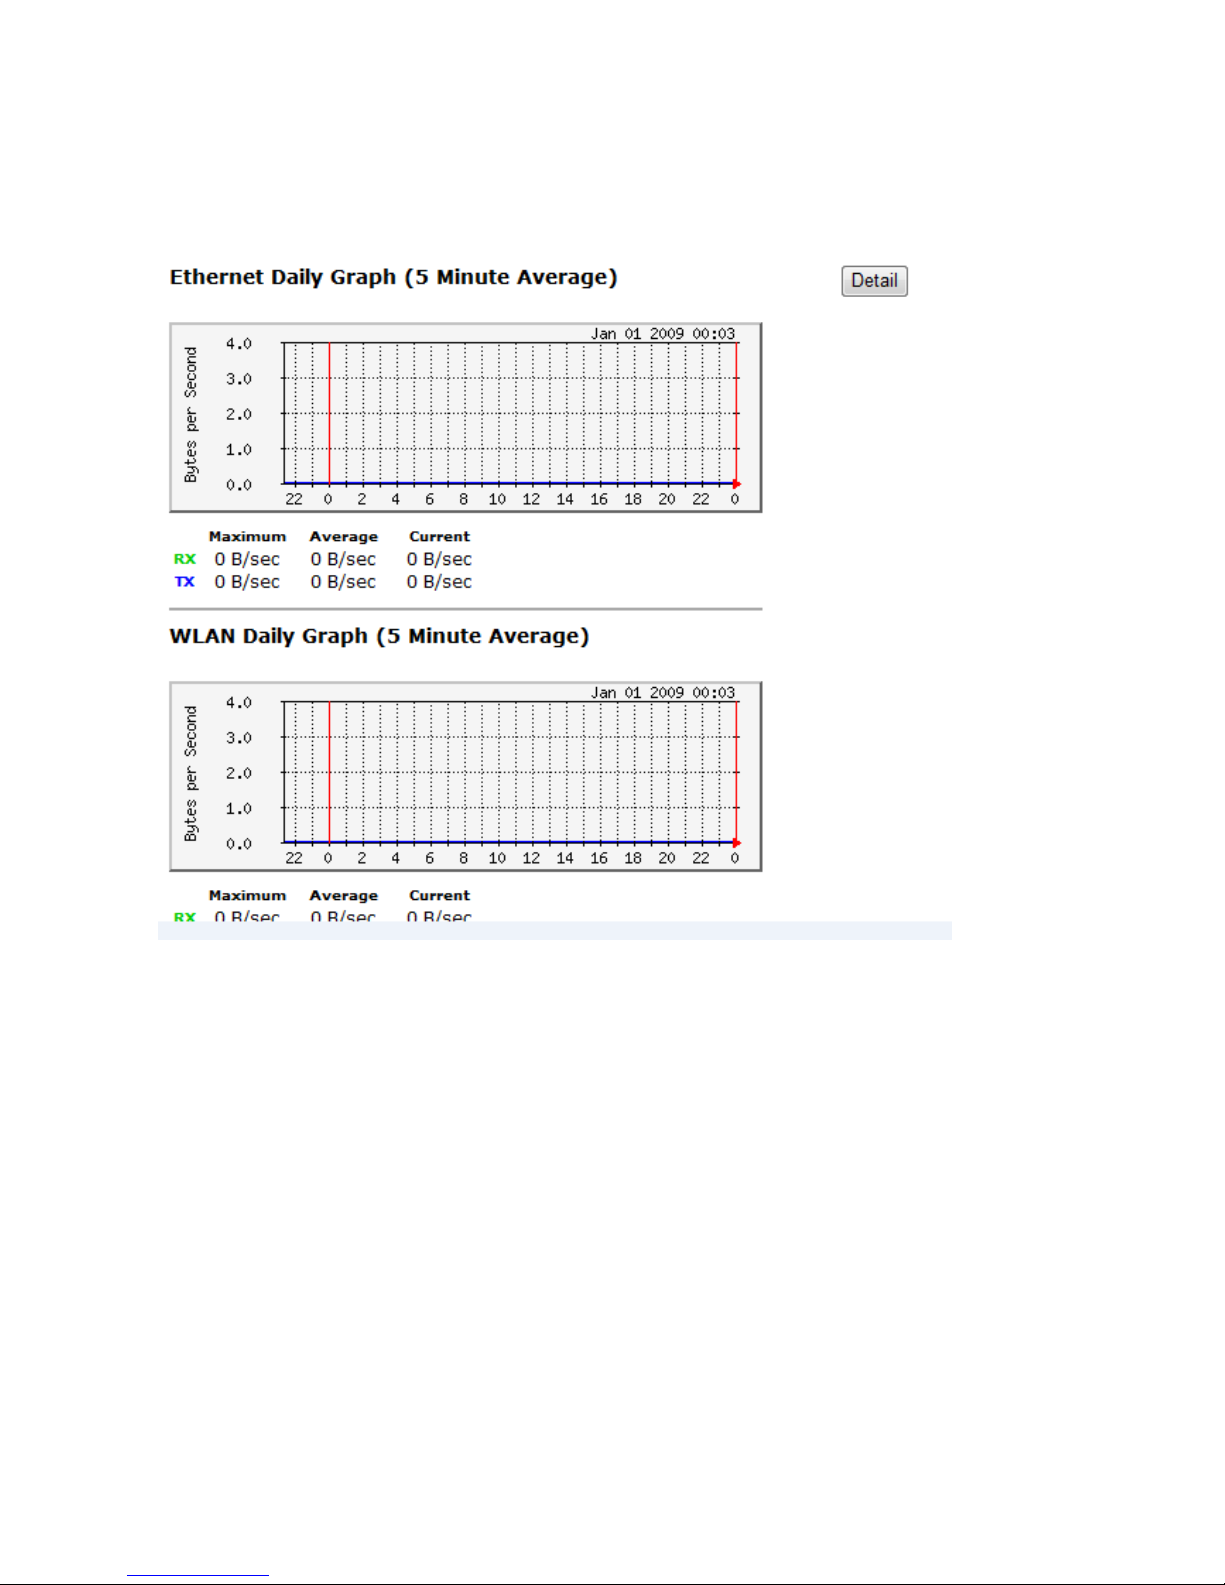
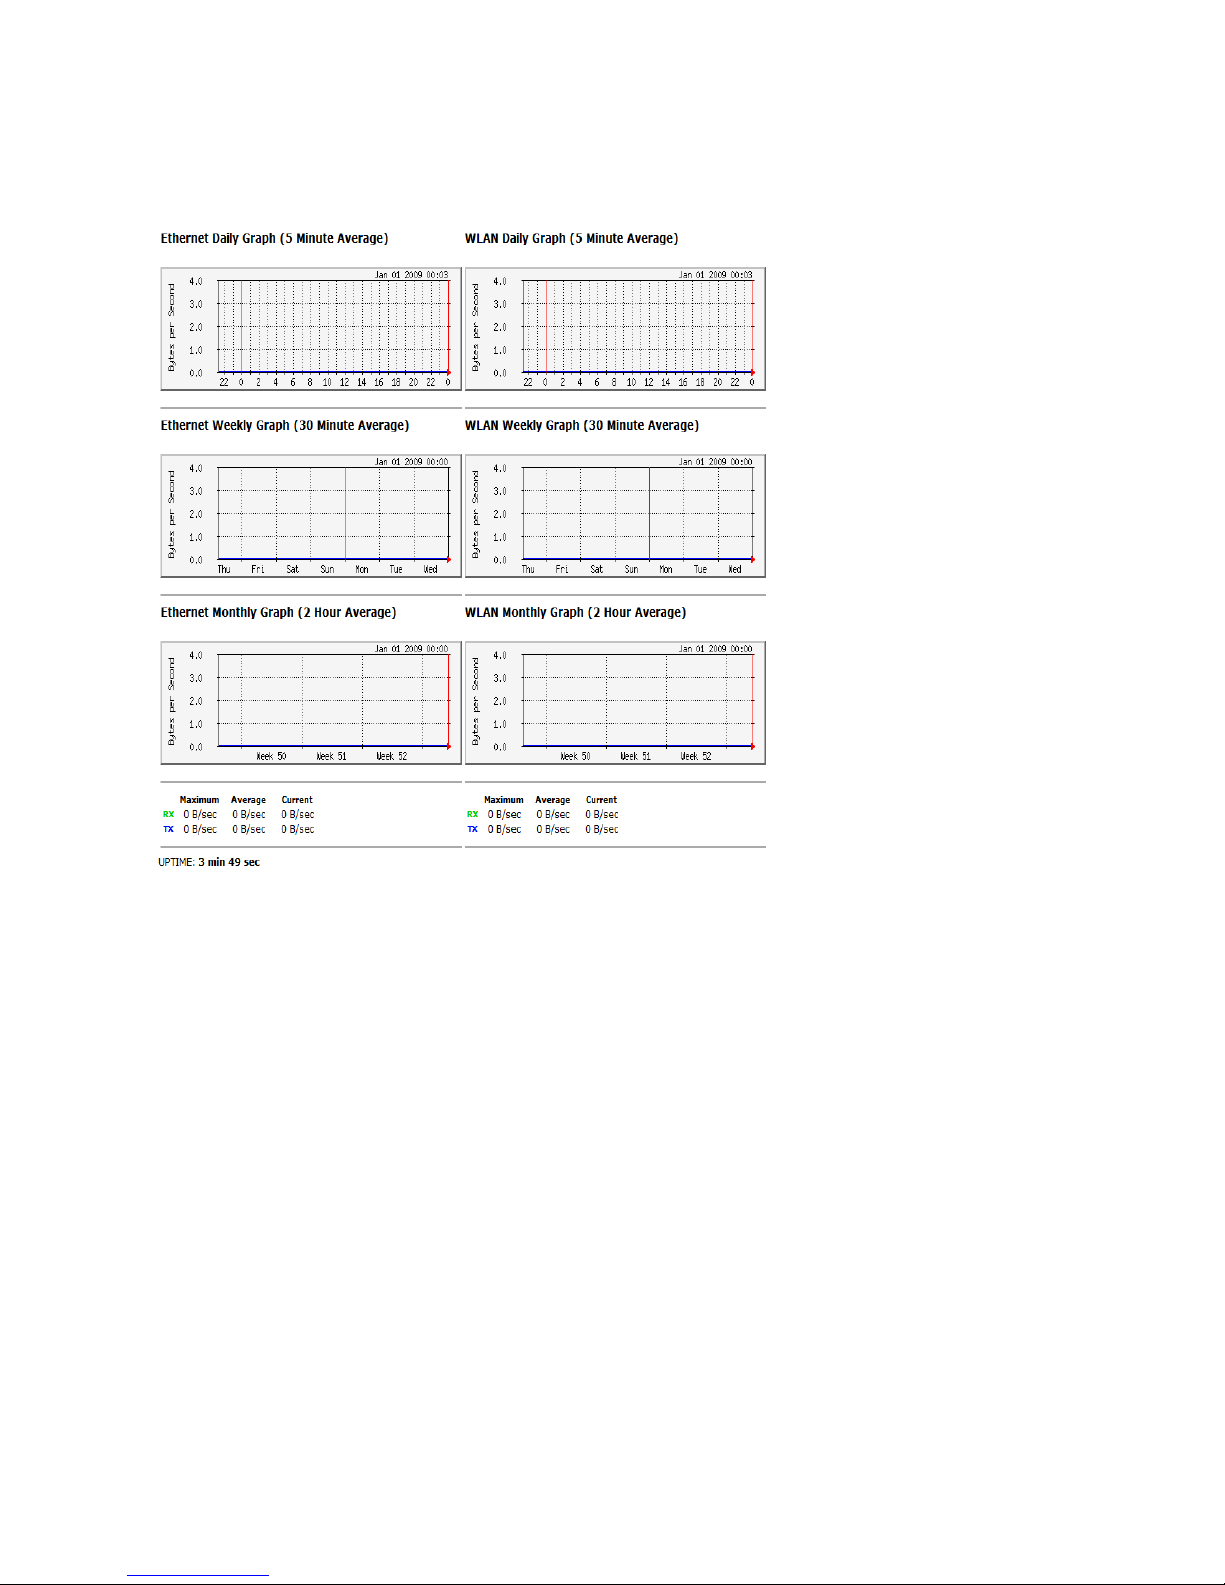
The device will record the router transmission status in a time span.
Detail: Click into detail to see historical record.
7
Page 12
Detail:
8
Page 13
2.2. Wireless
2.2.1 Access Point Configuration
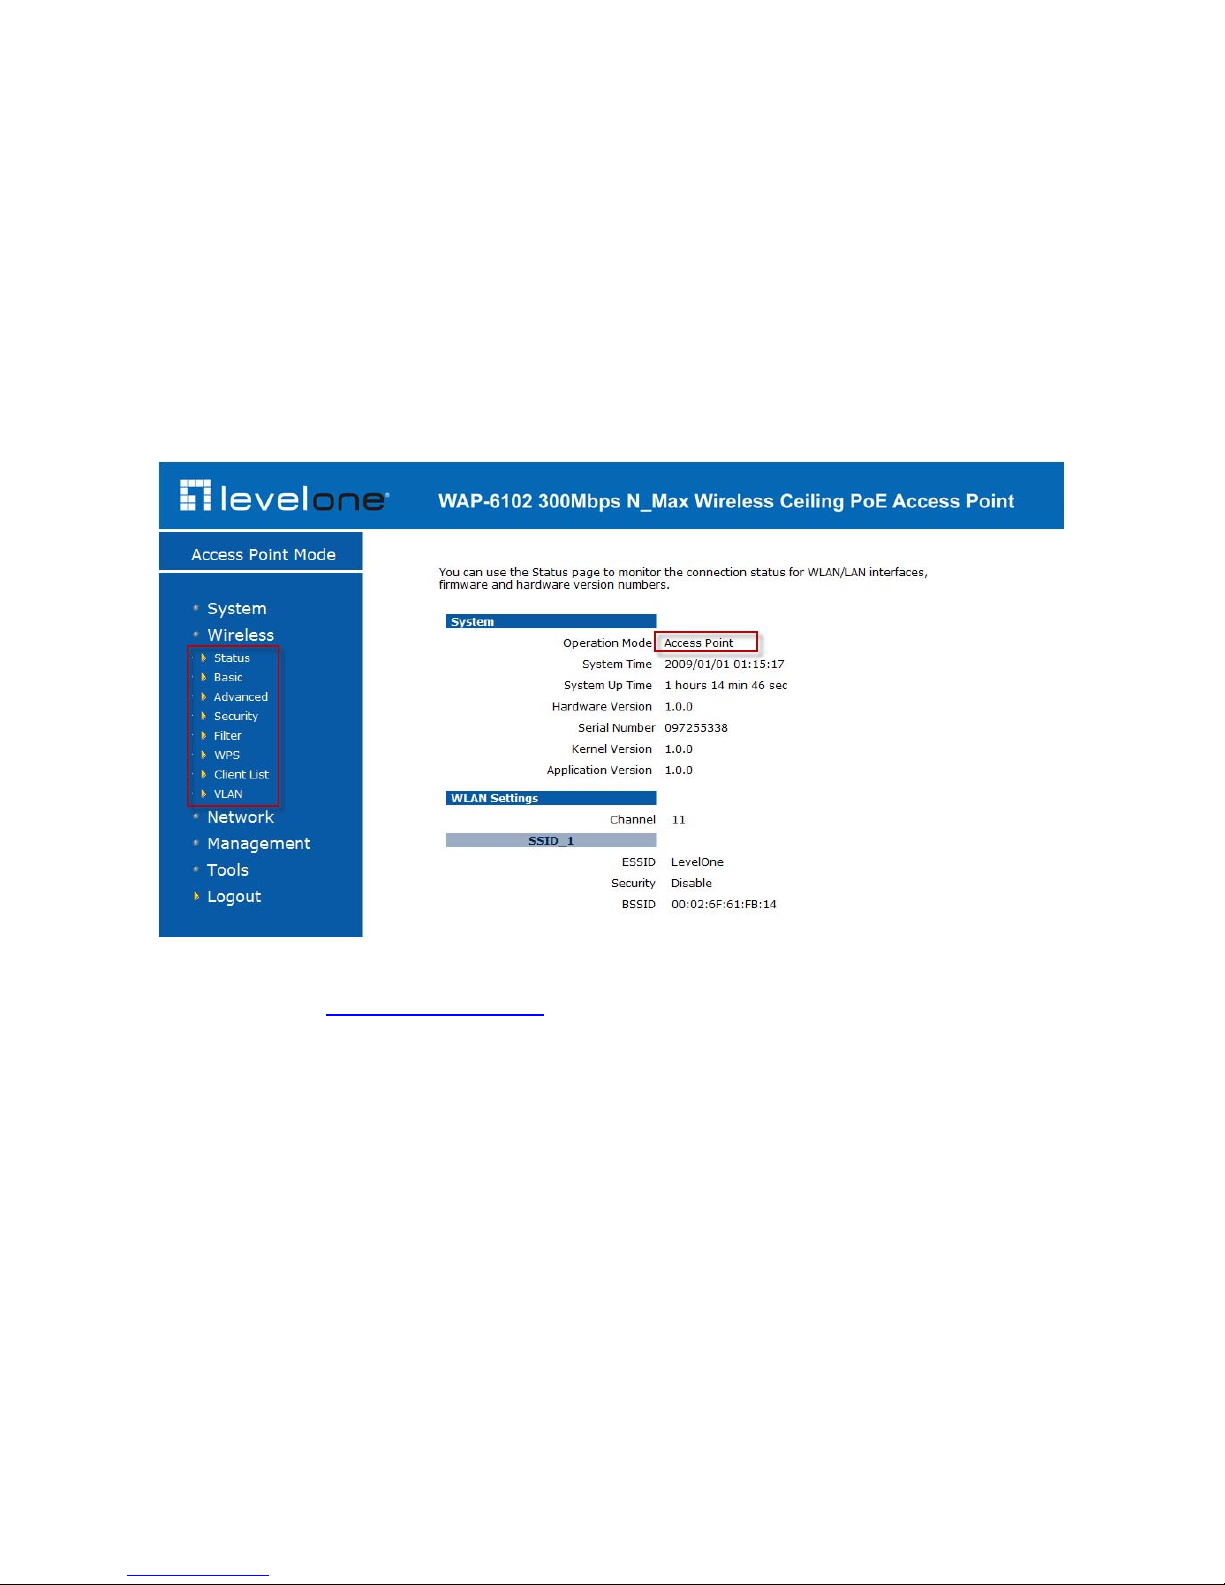
Please click System Operation Mode and Select Access Point before you start the
configuration
AP Mode
To configure AP Mode, please select Access Point in (System Operation Mode)
(Please refer to: 2.1.1 Operation Mode in Page.3)
9
Page 14
Status
Basic
10
Page 15
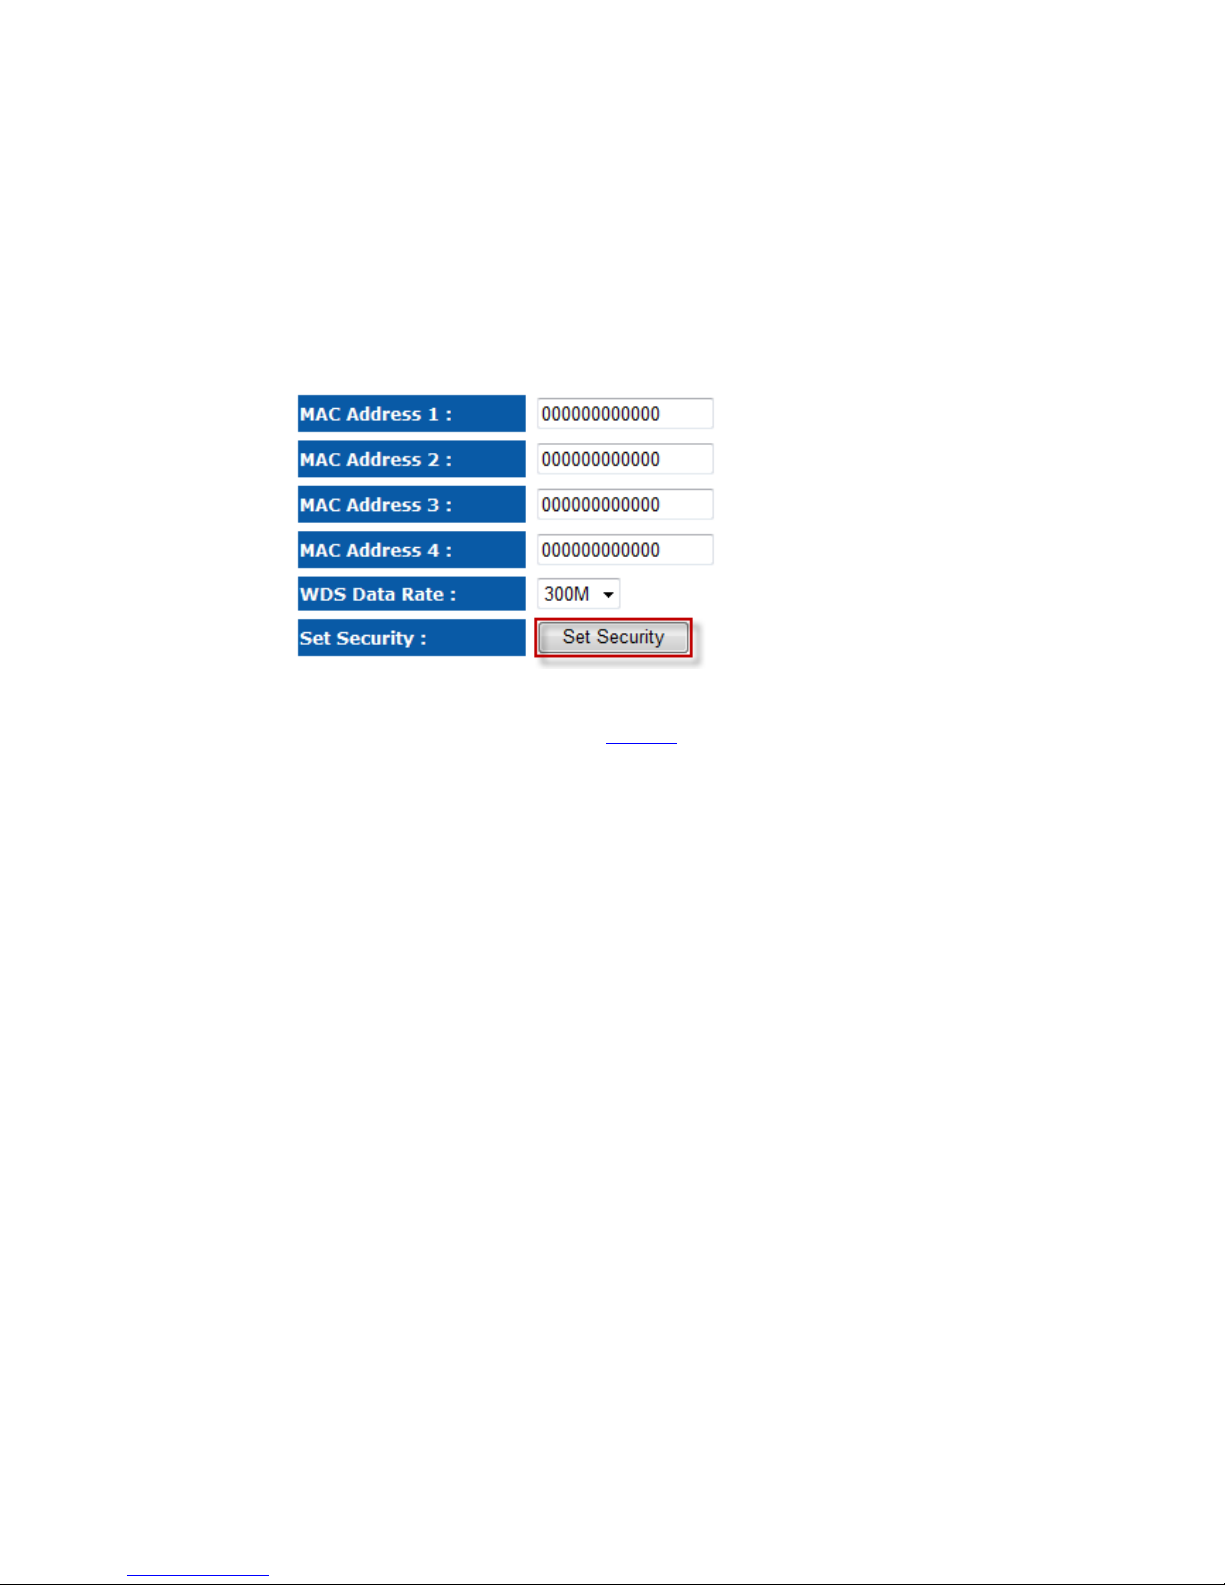
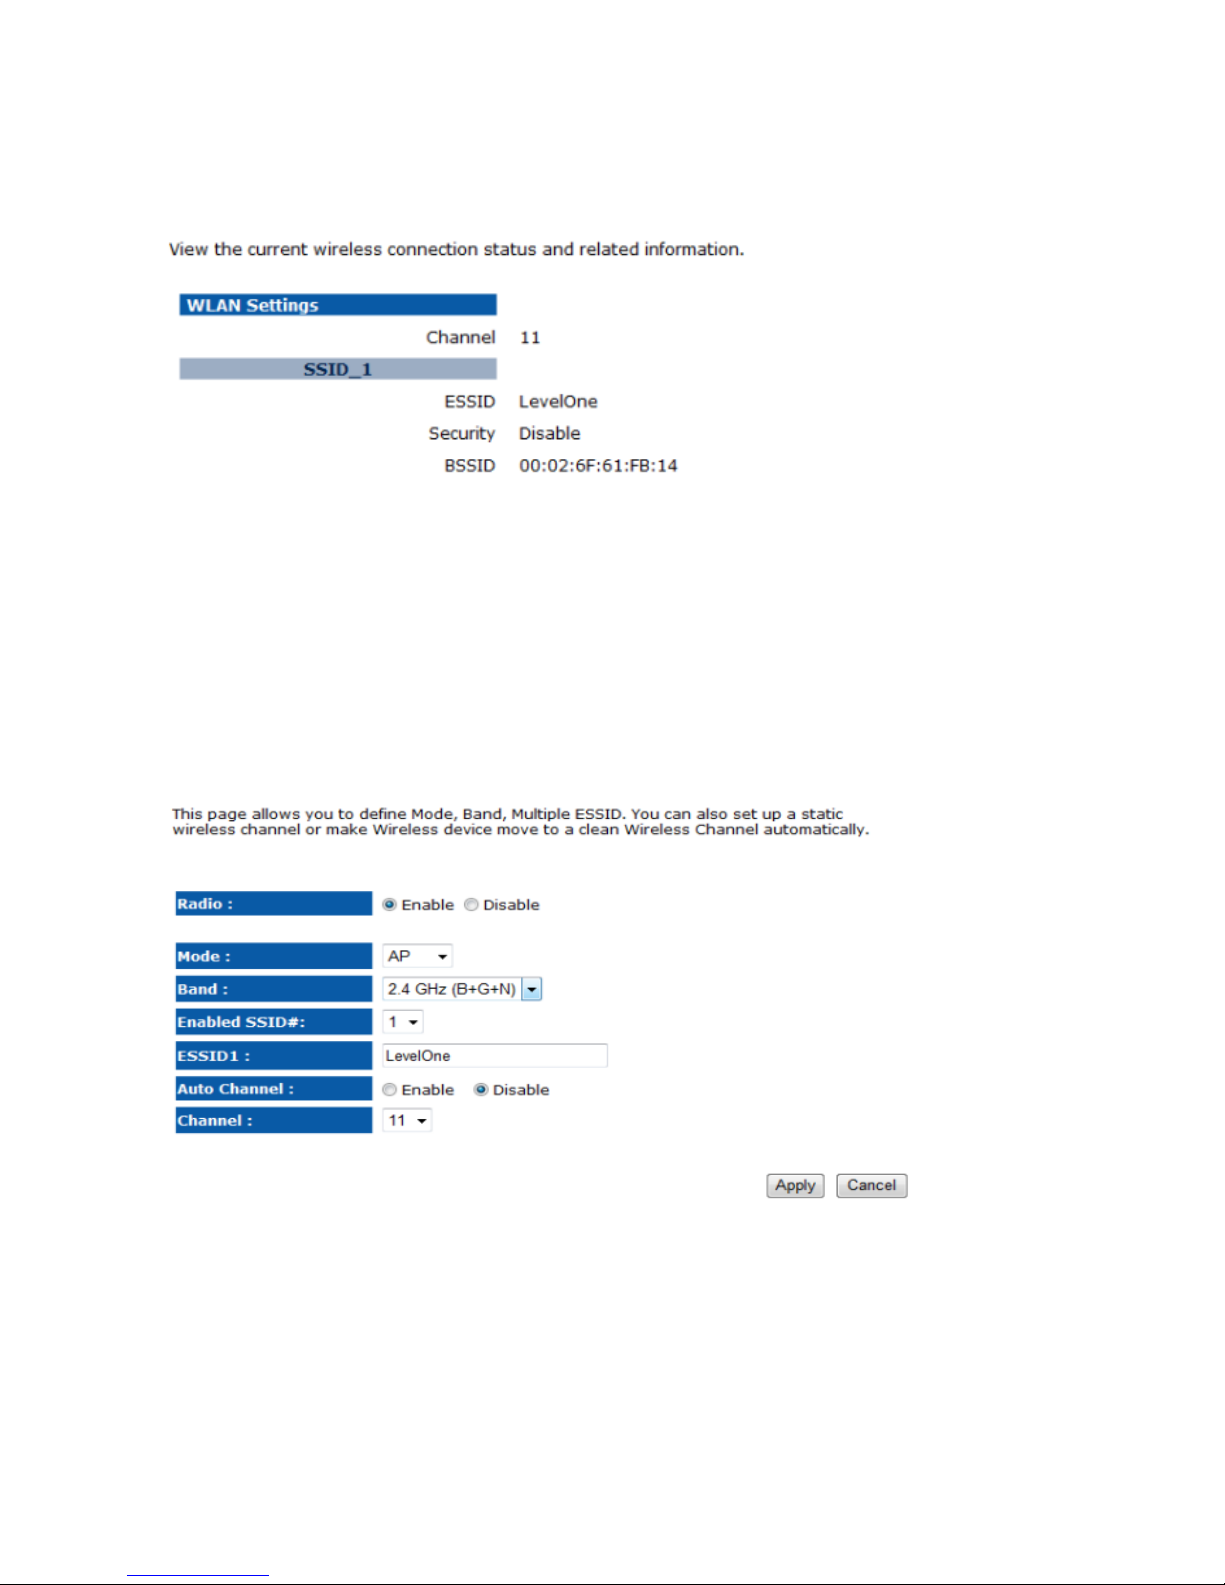
Radio: To enable/disable radio frequency.
Mode: Select and define your device in AP mode or WDS mode
Mode: AP
To define your AP as a regular AP
Mode: WDS (AP+WDS)
To define your device work in WDS + AP function, this mode is to interlink this device with
other AP devices in Wireless Distribution System. Once you select this mode the table as
below will shows up.
You are allowed to set MAC address and encryption algorithm
Set Security: (Please refer to Security
in Page. 25 for encryption configuration)
Band: Configure the device into different wireless modes.
2.4 GHz (B)
2.4 GHz (N)
2.4 GHz (B+G)
2.4 GHz (G)
2.4 GHz (B+G+N)
Enabled SSID#: The device allows you to add up to 4 unique SSID
ESSID#: Description of each configured SSID
Auto Channel: To enable/disable devices auto-detect channel used
Check Cannel Time (Channel): When Auto Channel is enabled; you can configure the channel
detection interval. When Auto Channel is disabled; you can manually configure a channel to be
used.
11
Page 16
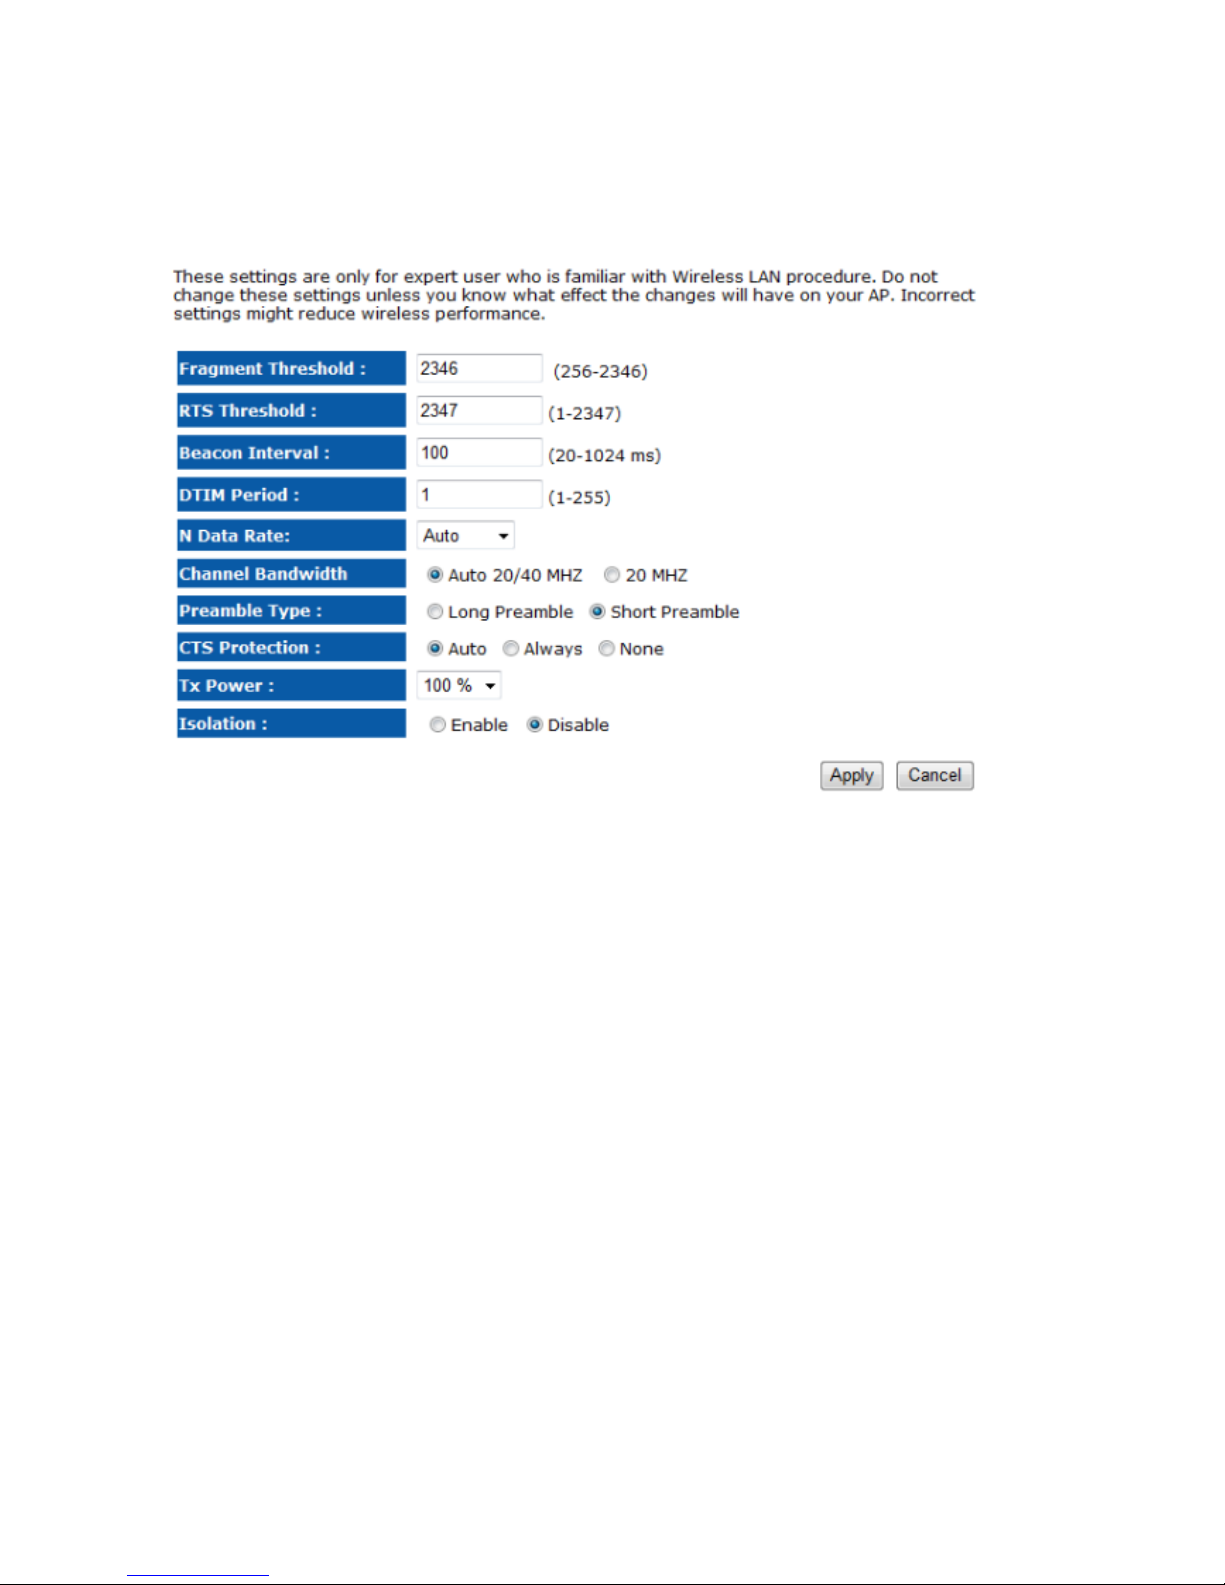
Advanced
12
Page 17

13
Fragment Threshold: Packets over the specified size will be fragmented in order to improve
performance on noisy networks. Specify a value between 256 and 2346. The default value is
2346.
RTS Threshold: Packets over the specified size will use the RTS/CTS mechanism to maintain
performance in noisy networks and preventing hidden nodes from degrading the performance.
Specify a value between 0 and 2347. The default value is 2347.
Beacon Interval: Beacons are packets sent by a wireless Access Point to synchronize wireless
devices. Specify a Beacon Interval value between 24 and 1024. The default value is set to 100
milliseconds.
DTIM Period: A DTIM is a countdown informing clients of the next window for listening to
broadcast and multicast messages. When the wireless Access Point has buffered broadcast or
multicast messages for associated clients, it sends the next DTIM with a DTIM Period value.
Wireless clients detect the beacons and awaken to receive the broadcast and multicast
messages. The default value is 1. Valid settings are between 1 and 10.
N Data Rate: You may select N data rate from the drop-down list, however, it is recommended
to select auto.
Channel Bandwidth: Select channel bandwidth.
Preamble Type: Select a short or long preamble. For optimum performance it is recommended
to also configure the client device as the same preamble type.
CTS Protection: CTS (Clear to Send) can be always enabled, auto, or disabled. By enabled
CTS, the Access Point and clients will wait for a ‘clear’ signal before transmitting. It is
recommended to select auto.
Tx Power: You may control the transmit output power of the device by selecting a value from the
drop-down list. This feature can be helpful in restricting the coverage area of the wireless
network.
Isolation: Protect the private network between client users
Page 18
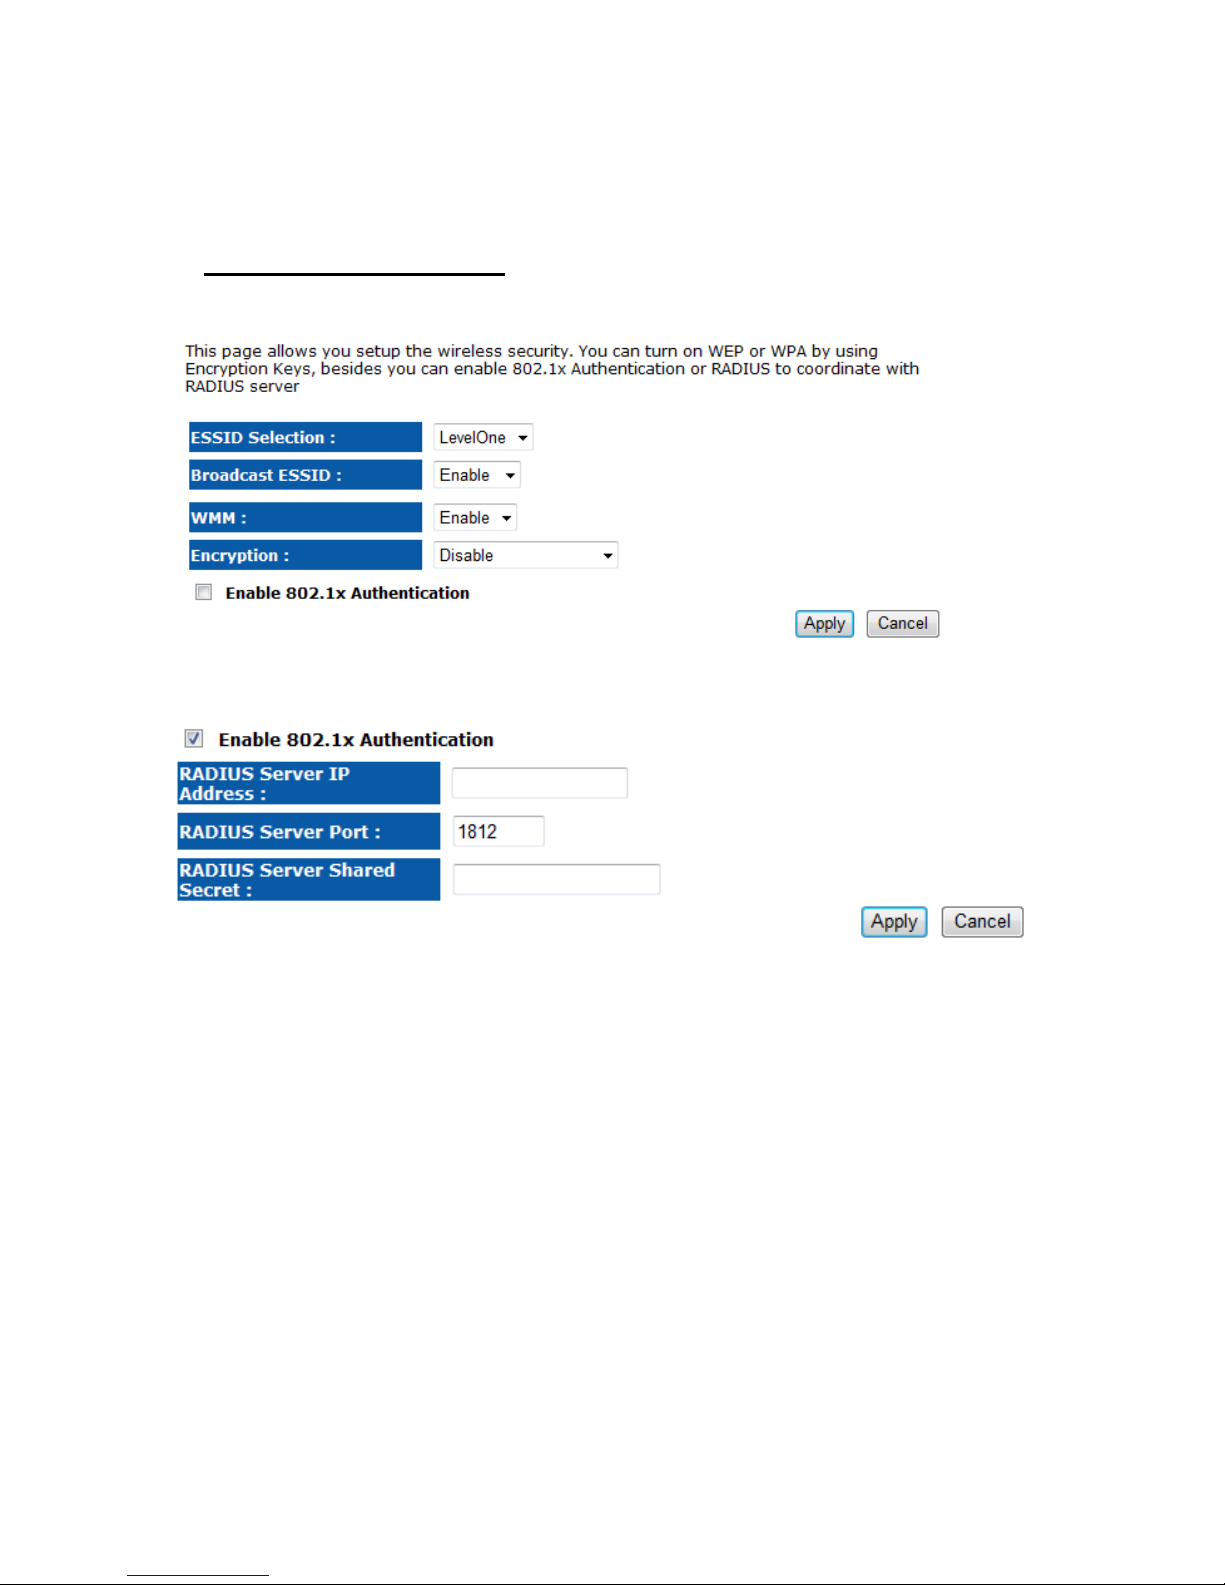
Security
Encryption: Disabled
14
Page 19
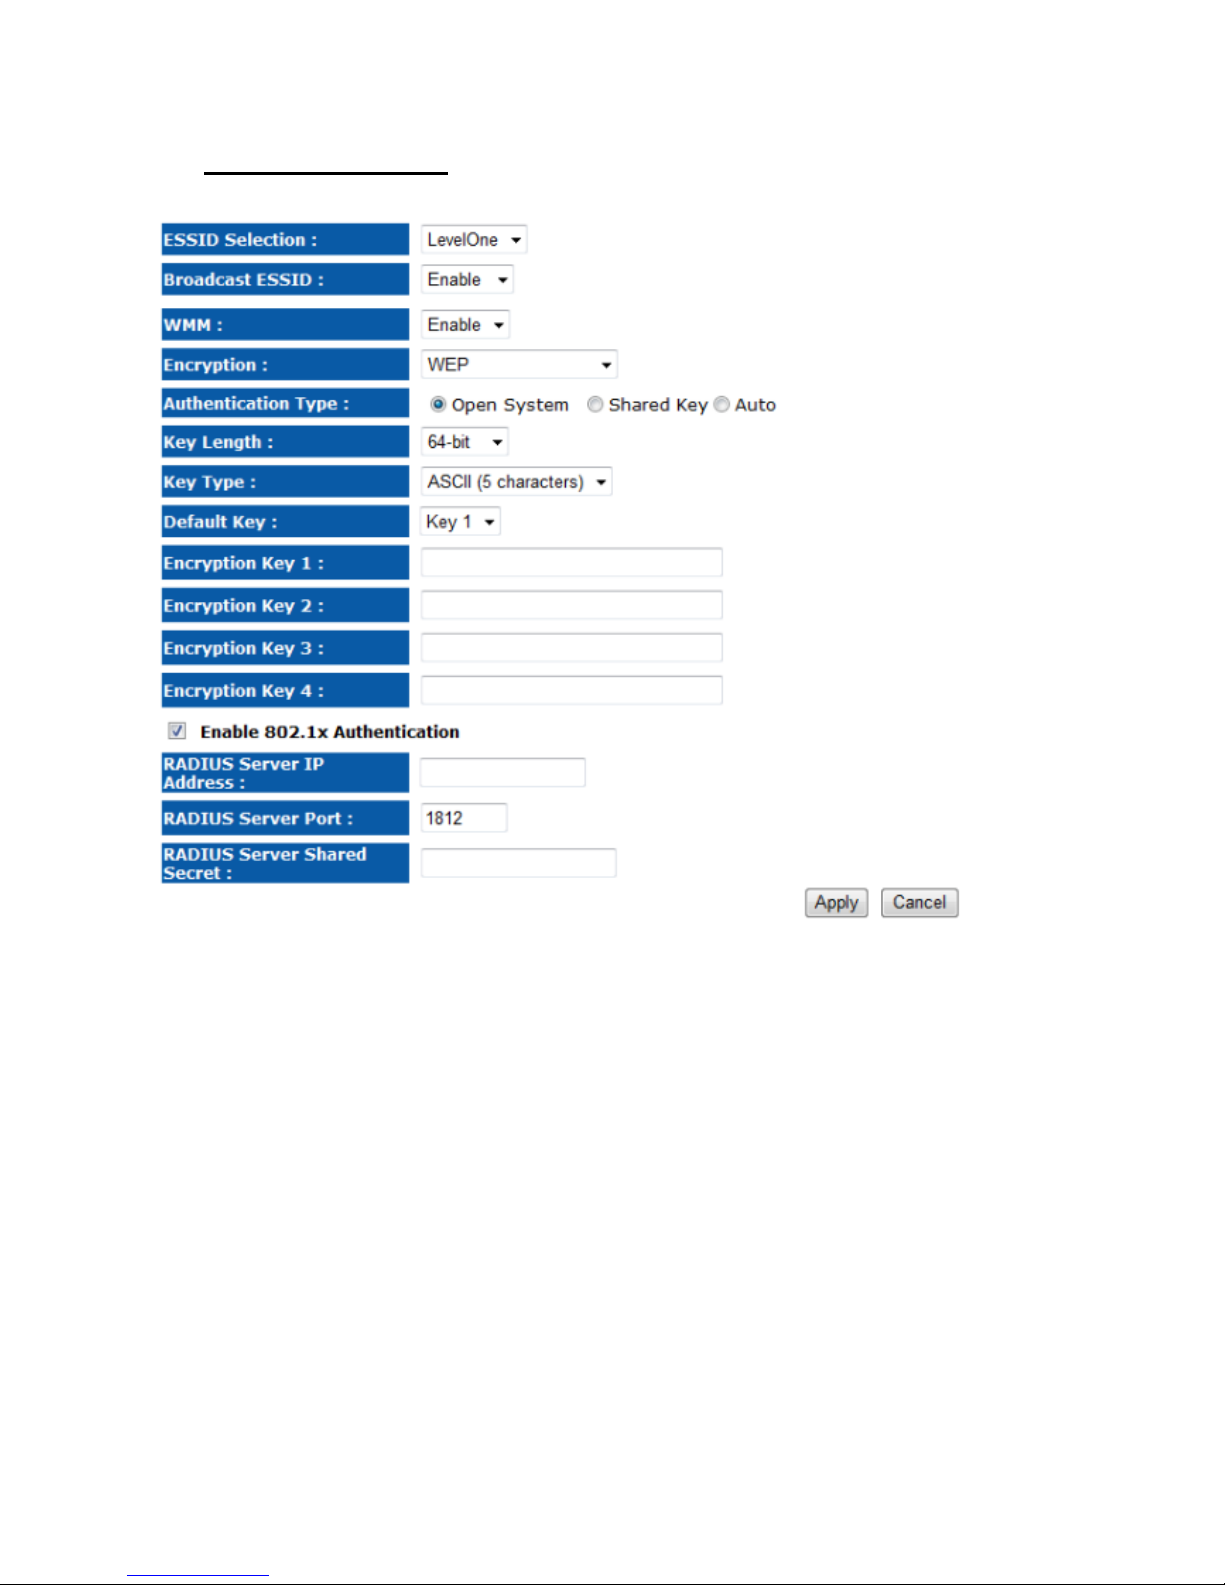
Encryption: WEP
15
Page 20

16
ESSID Selection: As this device supports multiple SSIDs, it is possible to configure a different
security mode for each SSID (profile). Select an SSID from the drop-down list.
Broadcast SSID: Select Enable or Disable from the drop-down list. This is the SSID broadcast
feature.
When this option is set to Enable, your wireless network name is broadcast to anyone within the
range of your signal
. If you're not using encryption then they could connect to your network. When
this is disabled, you must enter the Wireless Network Name (SSID) on the client manually to
connect to the network.
WMM: Choose to Enable or Disable WMM. This is the Quality of Service (QoS) feature for
prioritizing voice and video applications.
Encryption: Select WEP from the drop-down list.
Authentication Type: Select Open System, Shared Key, or auto. Authentication method
from the drop-down list. An open system allows any client to authenticate as long as it conforms
to any MAC address filter policies that may have been set. All authentication packets are
transmitted without encryption. Shared Key sends an unencrypted challenge text string to any
device attempting to communicate with the AP. The device requesting authentication encrypts
the challenge text and sends it back to the access point. If the challenge text is encrypted
correctly, the access point allows the requesting device to authenticate. It is recommended to
select Auto if you are not sure which authentication type is used.
Key Length: Select a 64-bit or 128-bit WEP key length from the drop-down list.
Key Type: Select a key type from the drop-down list. 128-bit encryption requires a longer key
than 64-bit encryption. Keys are defined by entering in a string in HEX (hexadecimal - using
characters 0-9, A-F) or ASCII (American Standard Code for Information Interchange alphanumeric characters) format. ASCII format is provided so you can enter a string that is
easier to remember.
Default Key: You may choose one of your 4 different WEP keys from below.
Encryption Key 1-4: You may enter four different WEP keys.
Enable 802.1x Authentication: Place a check in this box if you would like to use RADIUS
authentication. This option works with a RADIUS Server to authenticate wireless clients.
Wireless clients should have established the necessary credentials before attempting to
authenticate to the Server through this Gateway. Furthermore, it may be necessary to configure
the RADIUS Server to allow this Gateway to authenticate users. You will then be required to
specify the RADIUS Server’s IP address, port, and password.
Page 21
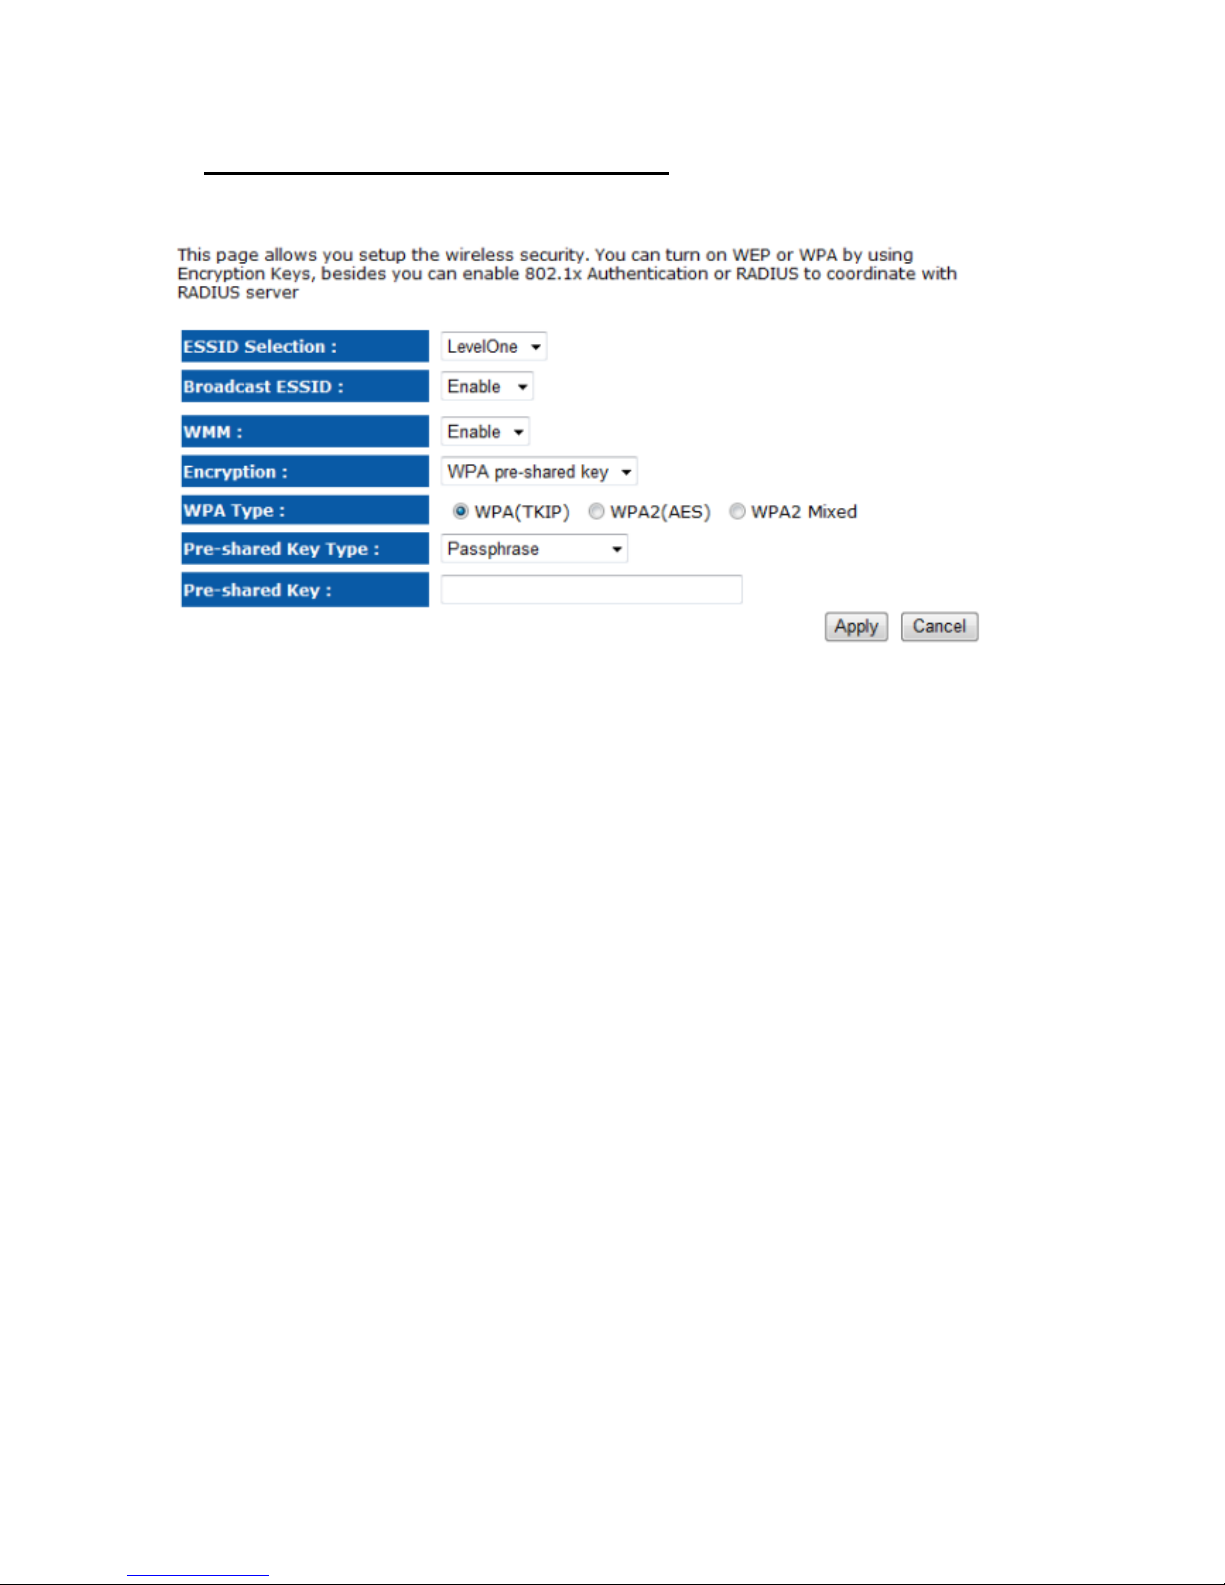
Encryption: WPA pre-shared key
ESSID Selection: As this device supports multiple SSIDs, it is possible to configure a different
security mode for each SSID (profile). Select an SSID from the drop-down list.
Broadcast SSID: Select Enable or Disable from the drop-down list. This is the SSID broadcast
feature.
When this option is set to Enable, your wireless network name is broadcast to anyone within the
range of your signal
. If you're not using encryption then they could connect to your network. When
this is disabled, you must enter the Wireless Network Name (SSID) on the client manually to
connect to the network.
WMM: Choose to Enable or Disable WMM. This is the Quality of Service (QoS) feature for
prioritizing voice and video applications.
Encryption: Select WPA pre-shared key from the drop-down list.
WPA Type: Select TKIP, AES, or WPA2 Mixed. The encryption algorithm used to secure the
data communication. TKIP (Temporal Key Integrity Protocol) provides per-packet key
generation and is based on WEP. AES (Advanced Encryption Standard) is a very secure block
based encryption. Note that, if the bridge uses the AES option, the bridge can associate with the
access point only if the access point is also set to use only AES.
Pre-shared Key Type: The Key Type can be passphrase or Hex format.
Pre-Shared Key: The key is entered as a pass-phrase of up to 63 alphanumeric characters in
ASCII (American Standard Code for Information Interchange) format at both ends of the wireless
connection. It cannot be shorter than eight characters, although for proper security it needs to be
of ample length and should not be a commonly known phrase. This phrase is used to generate
session keys that are unique for each wireless client.
17
Page 22
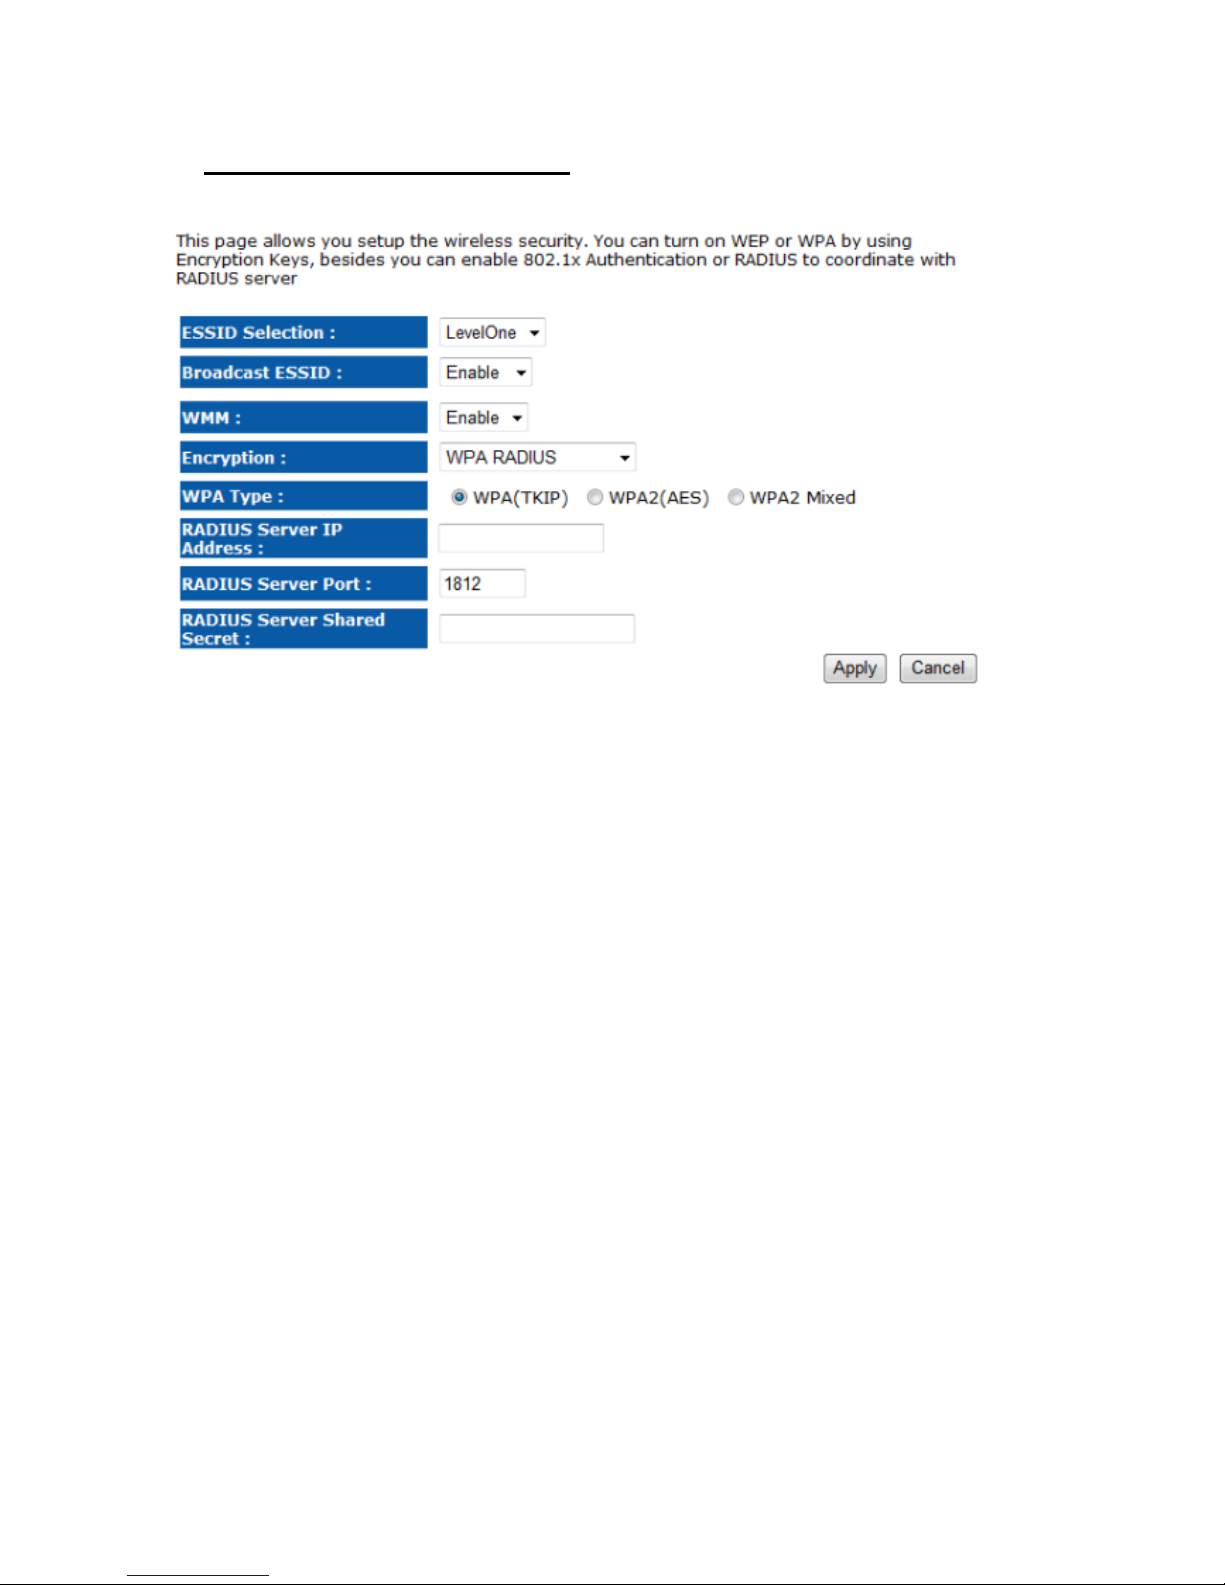
Encryption: WPA RADIUS
ESSID Selection: As this device supports multiple SSIDs, it is possible to configure a different
security mode for each SSID (profile). Select an SSID from the drop-down list.
Broadcast SSID: Select Enable or Disable from the drop-down list. This is the SSID broadcast
feature.
When this option is set to Enable, your wireless network name is broadcast to anyone within the
range of your signal
. If you're not using encryption then they could connect to your network. When
this is disabled, you must enter the Wireless Network Name (SSID) on the client manually to
connect to the network.
WMM: Choose to Enable or Disable WMM. This is the Quality of Service (QoS) feature for
prioritizing voice and video applications.
Encryption: Select WPA RADIUS from the drop-down list.
WPA Type: Select TKIP, AES, or WPA2 Mixed. The encryption algorithm used to secure the
data communication. TKIP (Temporal Key Integrity Protocol) provides per-packet key
generation and is based on WEP. AES (Advanced Encryption Standard) is a very secure block
based encryption. Note that, if the bridge uses the AES option, the bridge can associate with the
access point only if the access point is also set to use only AES.
RADIUS Server IP Address: Specify the IP address of the RADIUS server.
RADIUS Server Port: Specify the port number of the RADIUS server, the default port is 1812.
RADIUS Server Password: Specify the pass-phrase that is matched on the RADIUS Server.
18
Page 23
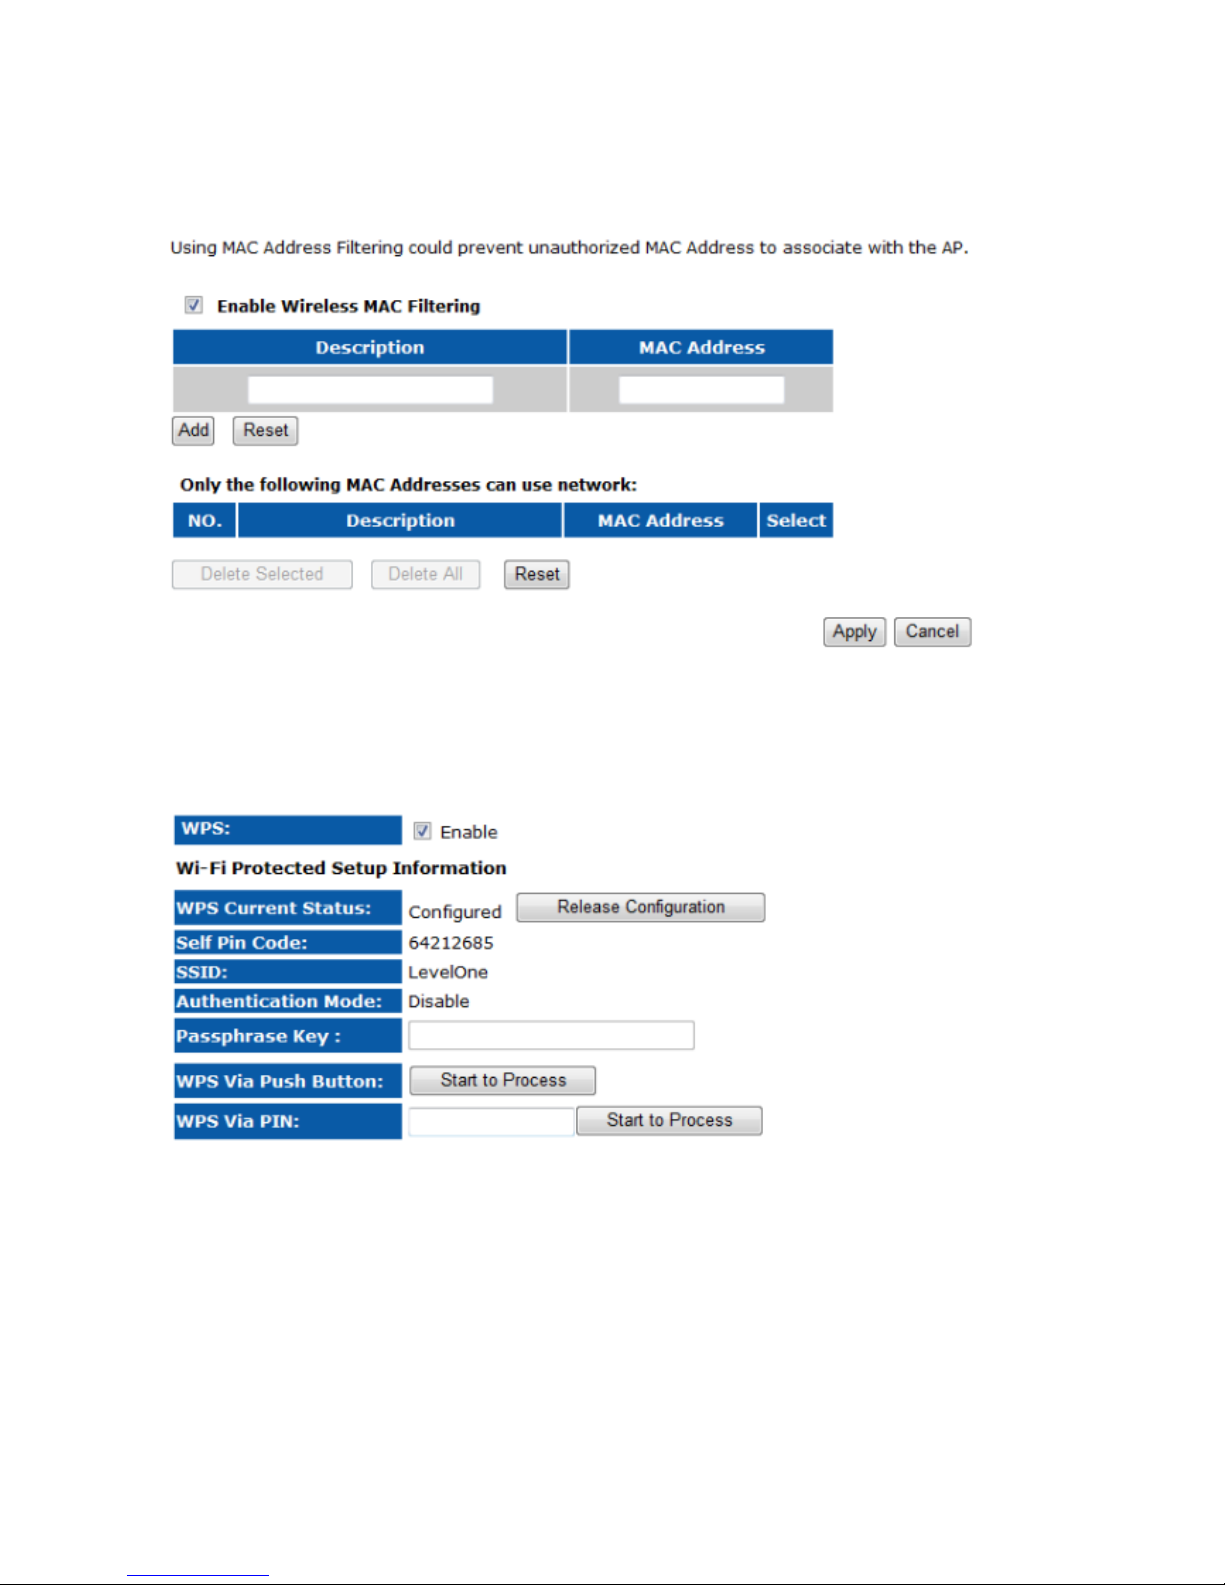
Filter
WPS
19
Page 24

20
WPS Current Status: Display current configuration is configured or un-configured.
The default setting will display un-configured status but if any of following occur
will display configured status: 1. Configuration by an external registrar. 2.
Automatic configuration by internal registrar. 3. Manual configuration by user.
Self Pin Code: Pin code is unique and automatically generated.
SSID: Display wireless network name
Authentication Mode: Display wireless network authentication types
Passphrase Key: Display wireless network authentication password
WPS Via Push Button: Start WPS function from webpage.
WPS Via PIN: Specify wireless client’s PIN code to start WPS function.
Page 25
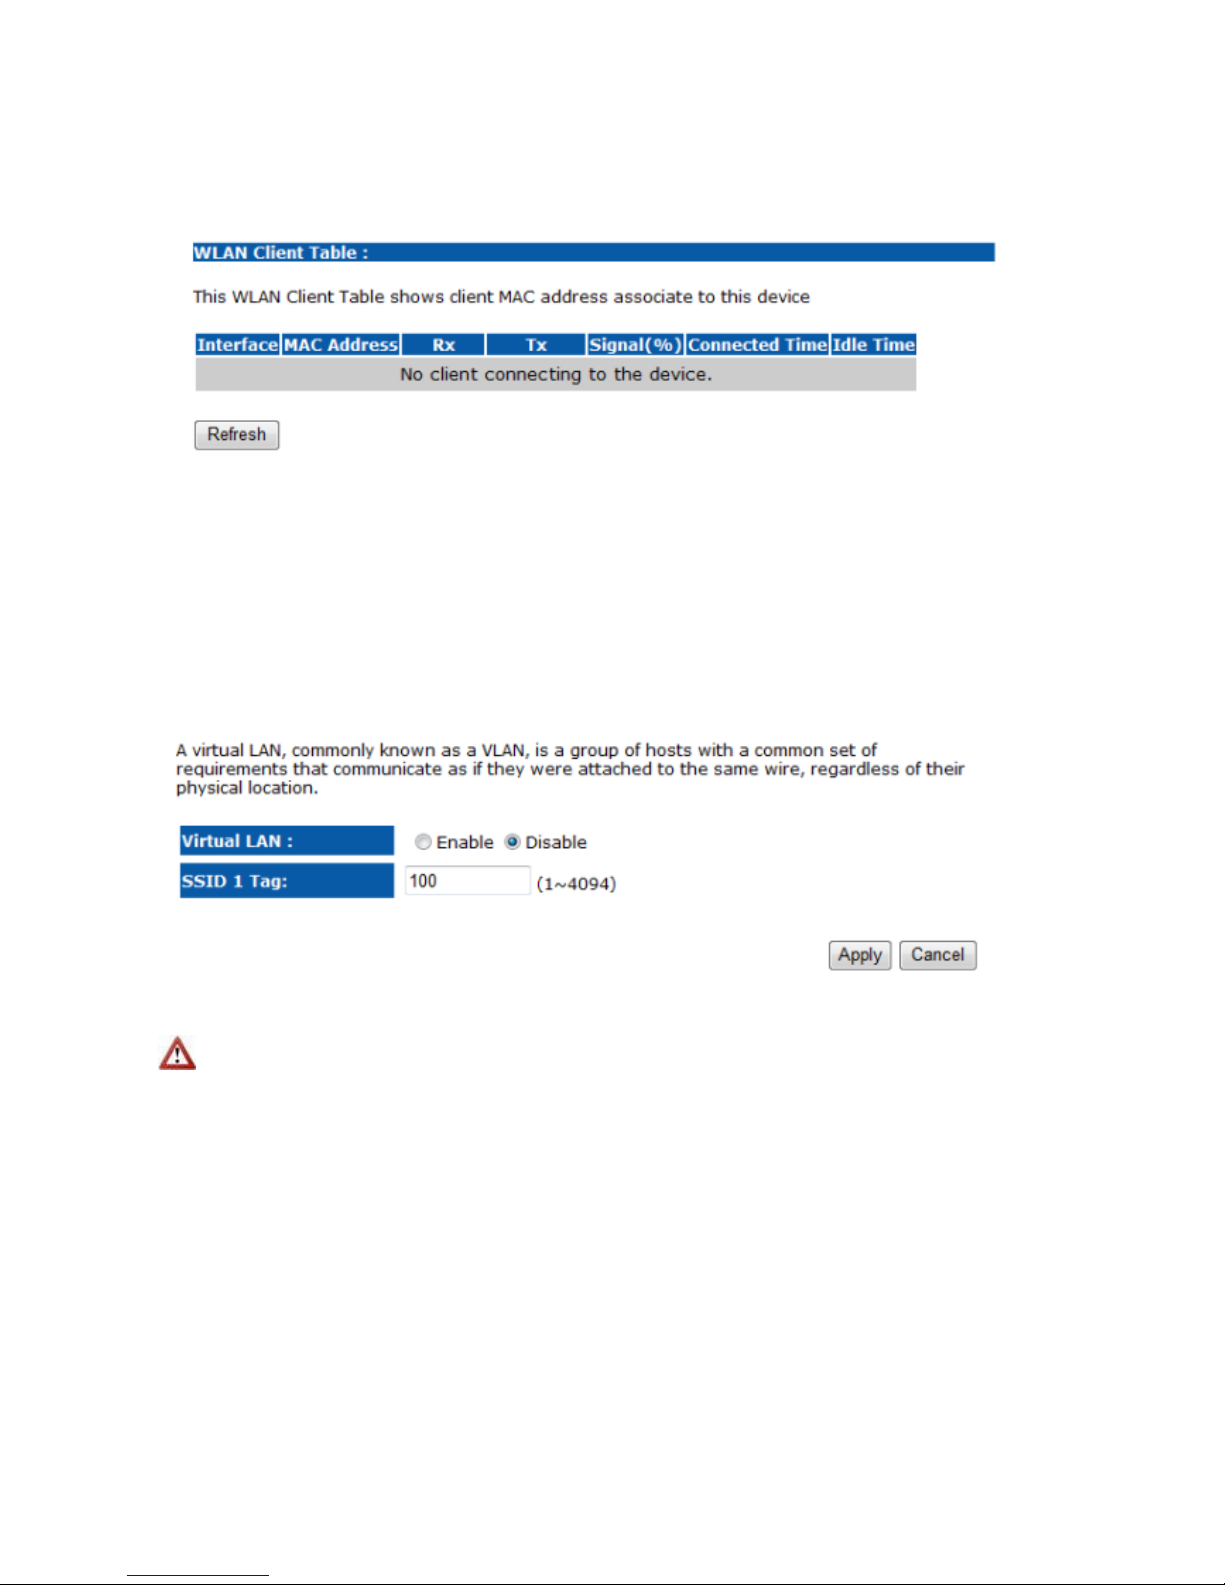
Client List
VLAN
Only Available in AP mode
Virtual LAN: Choose to Enable or Disable the VLAN features.
SSID1 Tag: Specify the VLAN tag.
21
Page 26
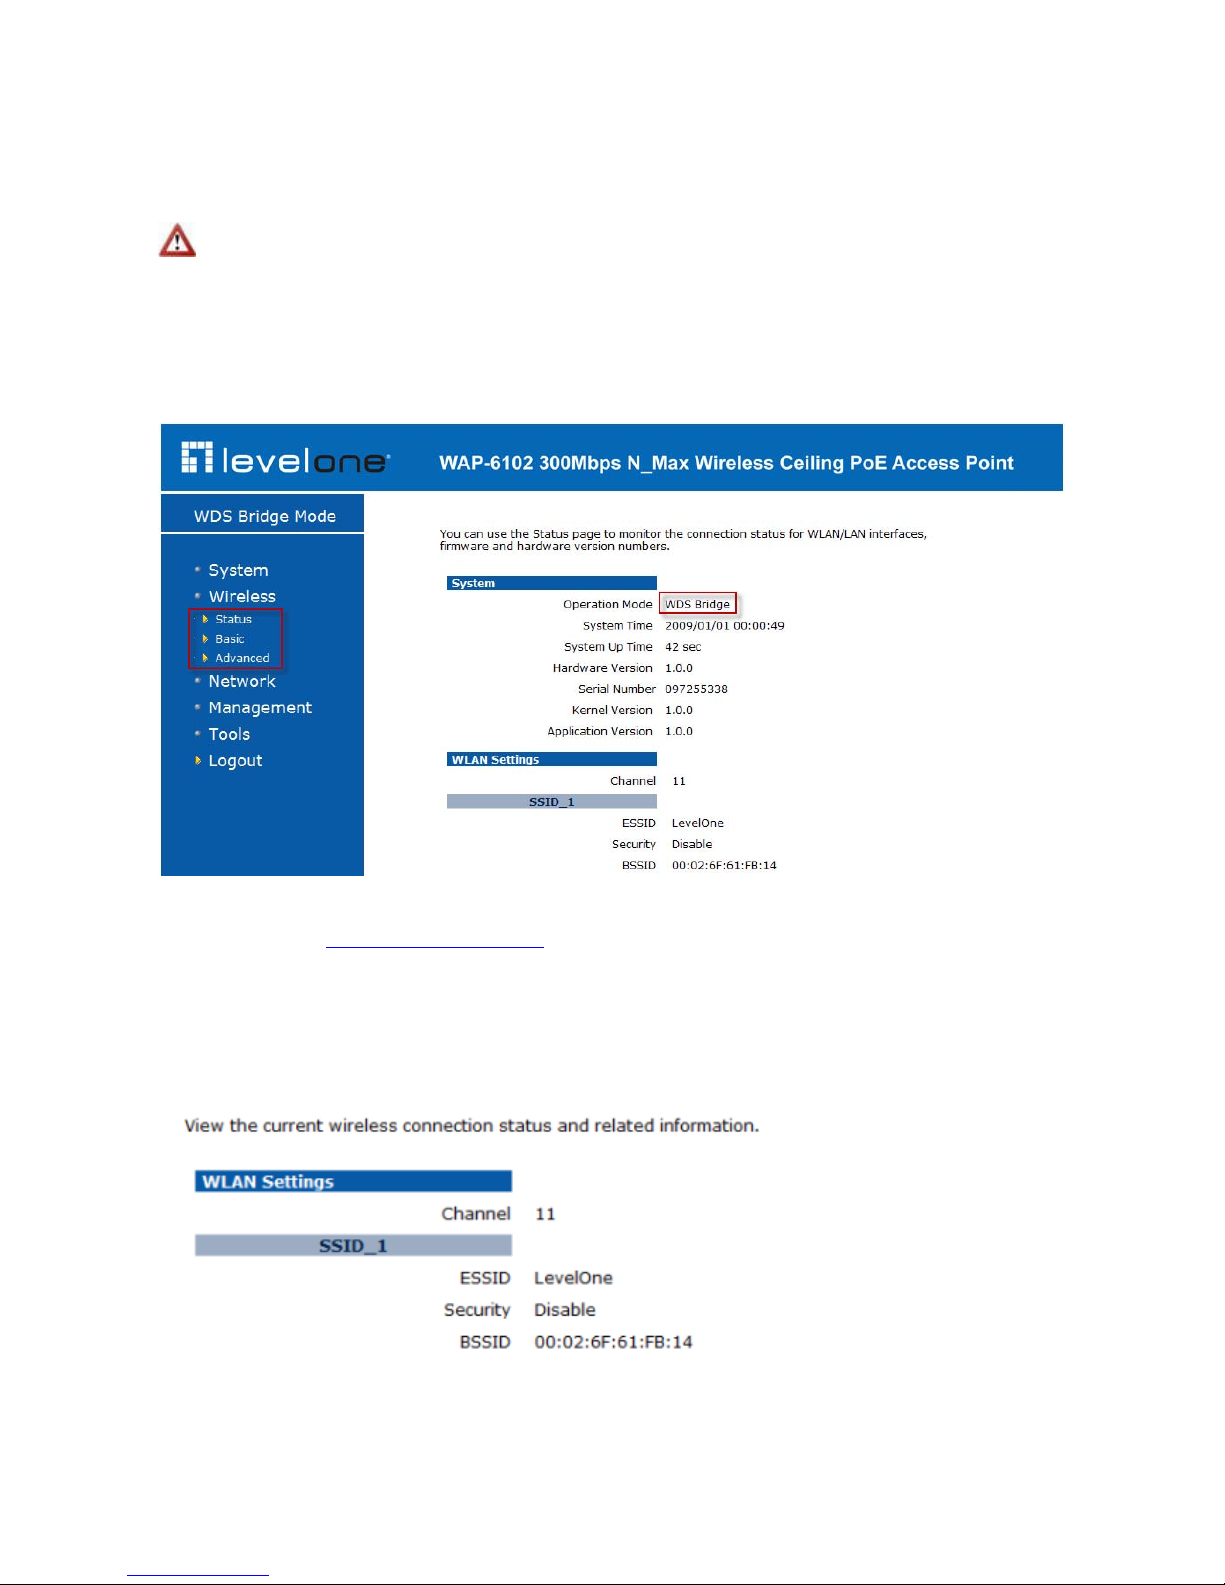
2.2.2 WDS Bridge Configuration
You can only connect to the device via Wireless Client
Please click System Operation Mode and Select WDS Bridge before you start the
configuration
WDS Mode
To configure WDS Mode, please select WDS Bridge in (System Operation Mode)
(Please refer to: 2.1.1 Operation Mode in Page.3)
Status
22
Page 27
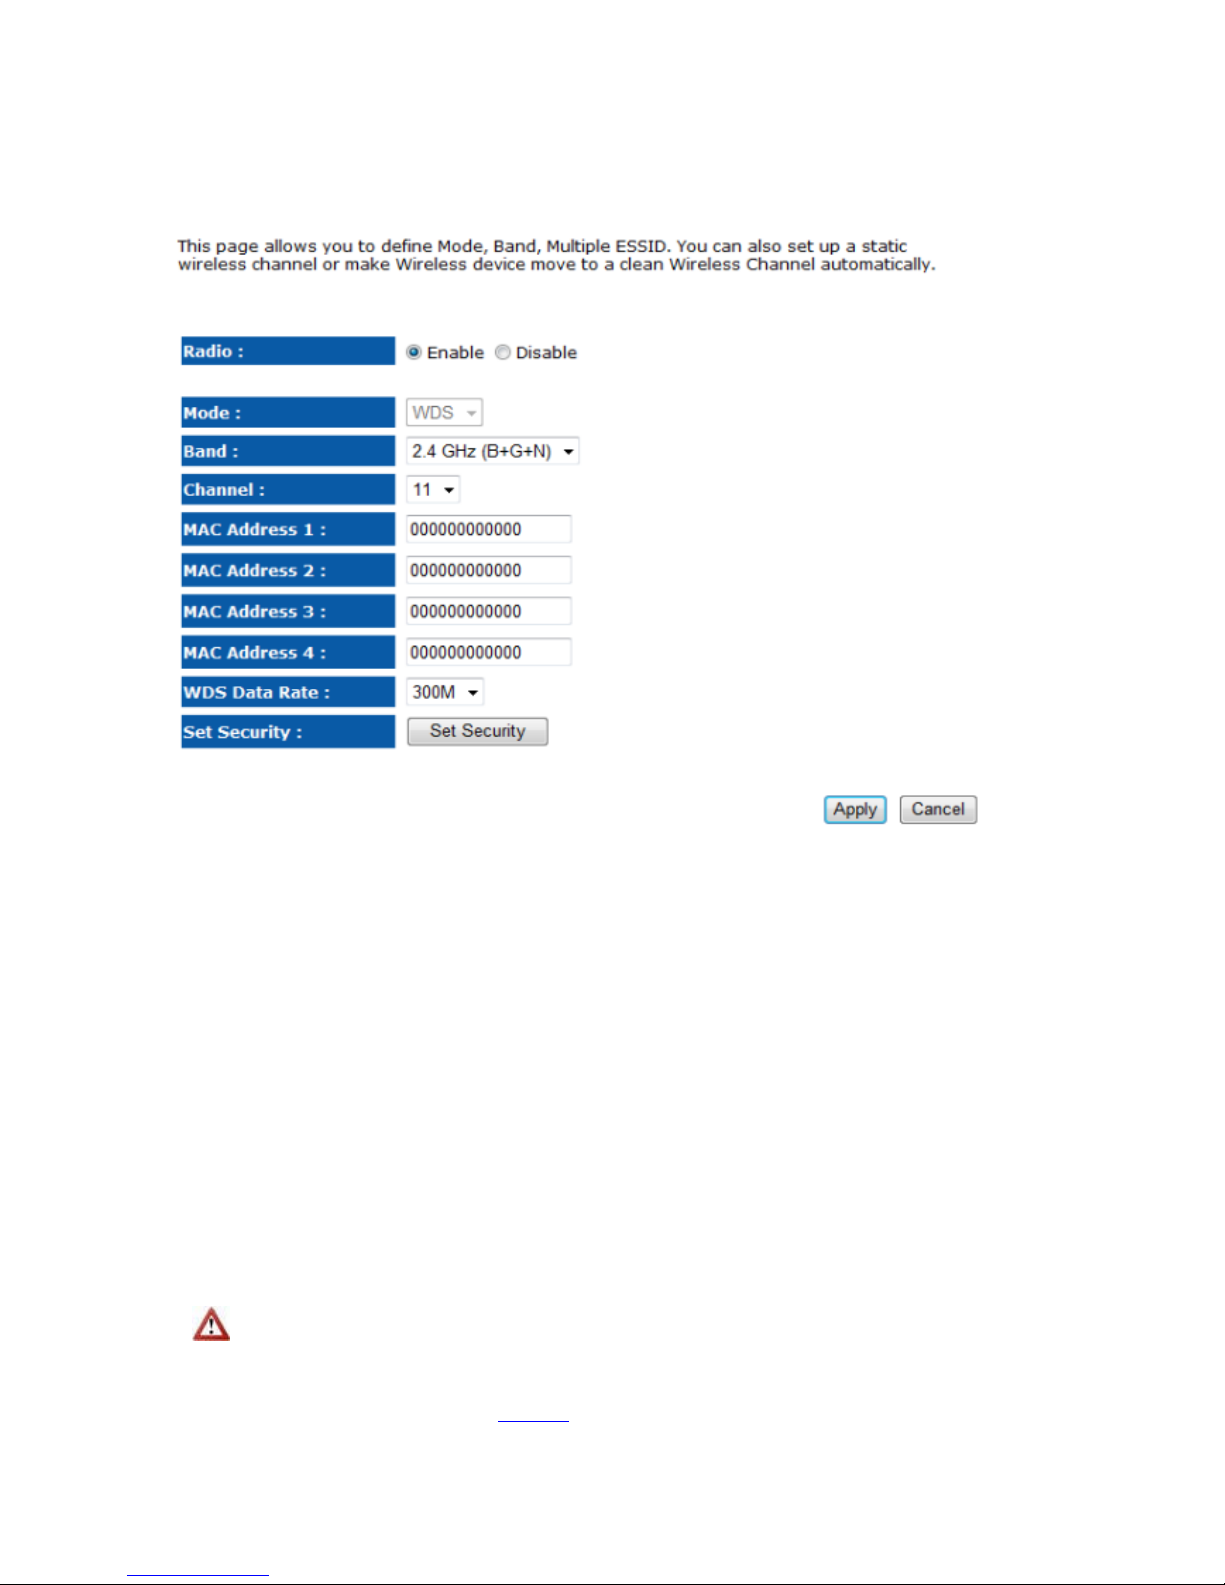
Basic
Radio: To enable/disable radio frequency.
Mode: WDS mode allows you to interlink with other AP devices. Setting MAC address and
encryption algorithm.
Band: Configure the device into different wireless modes.
2.4 GHz (B)
2.4 GHz (N)
2.4 GHz (B+G)
2.4 GHz (G)
2.4 GHz (B+G+N)
Enabled SSID#: The device allows you to add up to 4 unique SSID
ESSID#: Description of each configured SSID
Channel: You can manually configure a channel to be used.
MAC Address 1~4: To specify MAC address of other AP devices.
MAC address will only shows when configured in WDS AP mode.
WDS Data Rate: select a data rate from the drop-down list,
Set Security: Please refer to Security for encryption configuration
23
Page 28
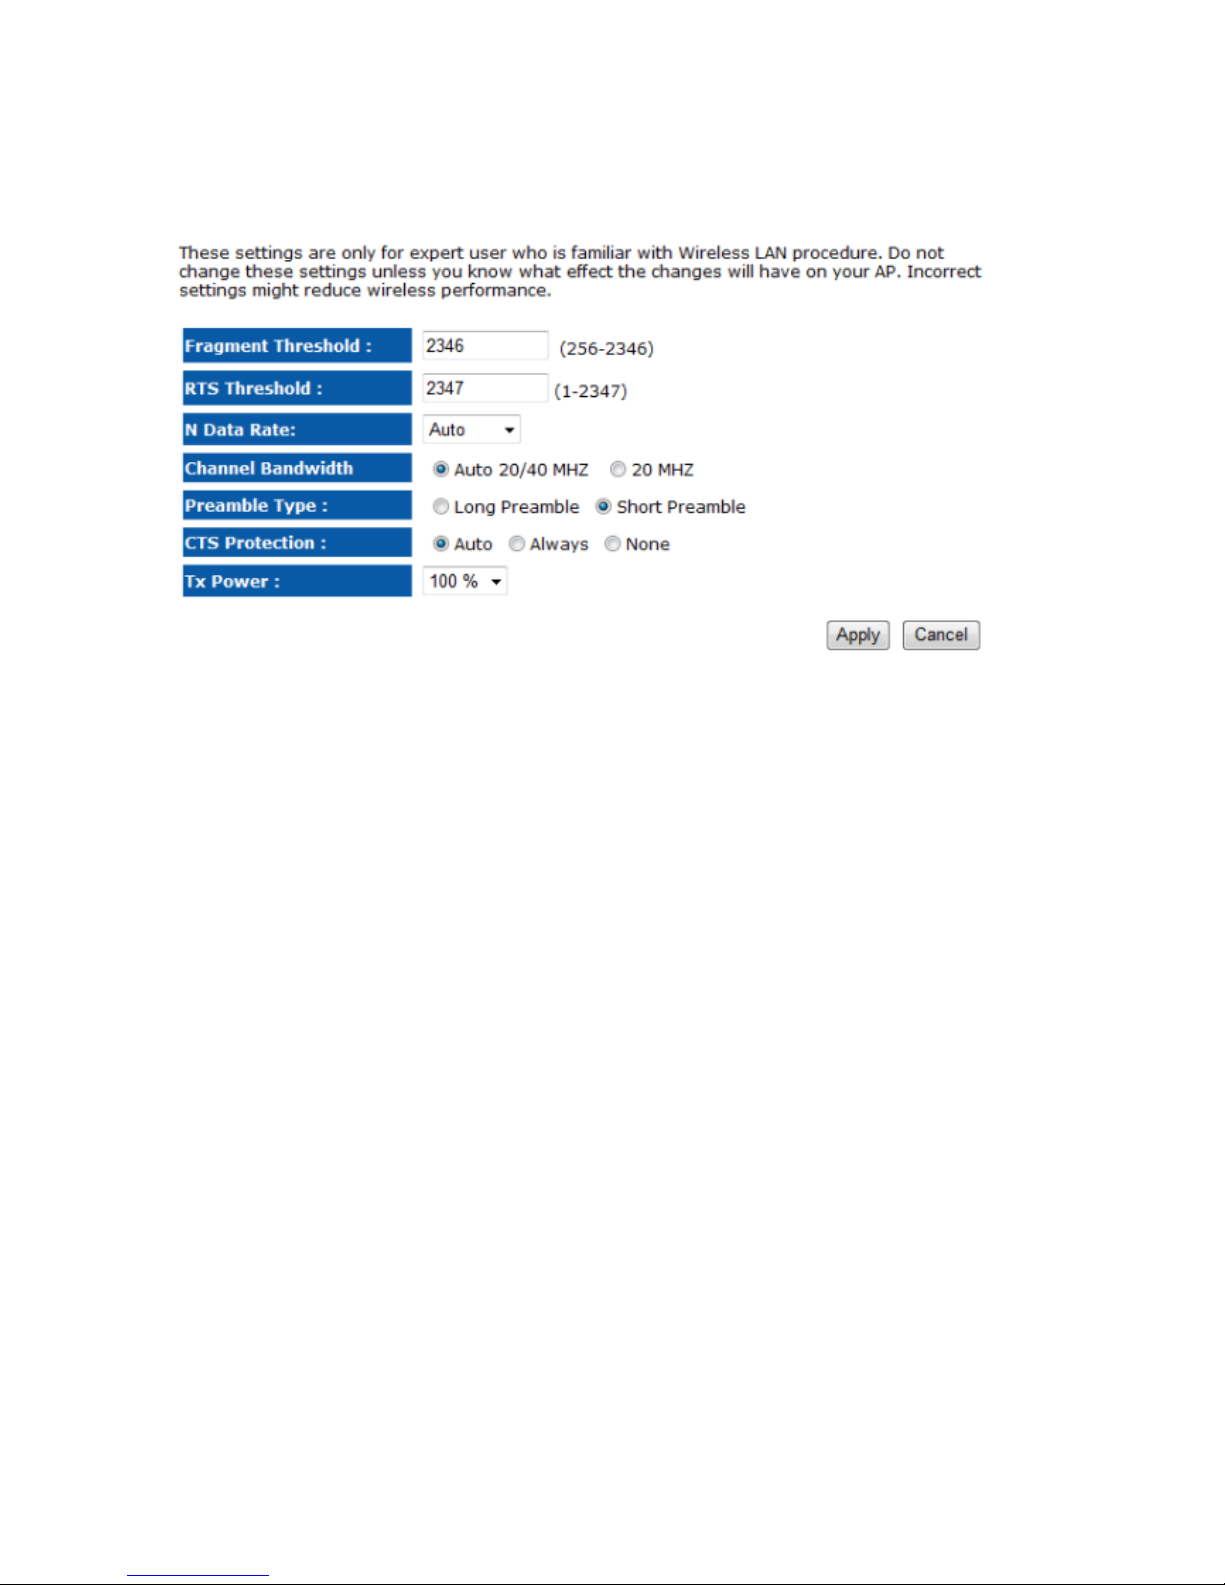
Advanced
Fragment Threshold: Packets over the specified size will be fragmented in order to improve
performance on noisy networks. Specify a value between 256 and 2346. The default value is
2346.
RTS Threshold: Packets over the specified size will use the RTS/CTS mechanism to maintain
performance in noisy networks and preventing hidden nodes from degrading the performance.
Specify a value between 0 and 2347. The default value is 2347.
N Data Rate: You may select N data rate from the drop-down list, however, it is recommended
to select auto.
Channel Bandwidth: Select channel bandwidth.
Preamble Type: Select a short or long preamble. For optimum performance it is recommended
to also configure the client device as the same preamble type.
CTS Protection: CTS (Clear to Send) can be always enabled, auto, or disabled. By enabled
CTS, the Access Point and clients will wait for a ‘clear’ signal before transmitting. It is
recommended to select auto.
Tx Power: You may control the transmit output power of the device by selecting a value from the
drop-down list. This feature can be helpful in restricting the coverage area of the wireless
network.
24
Page 29
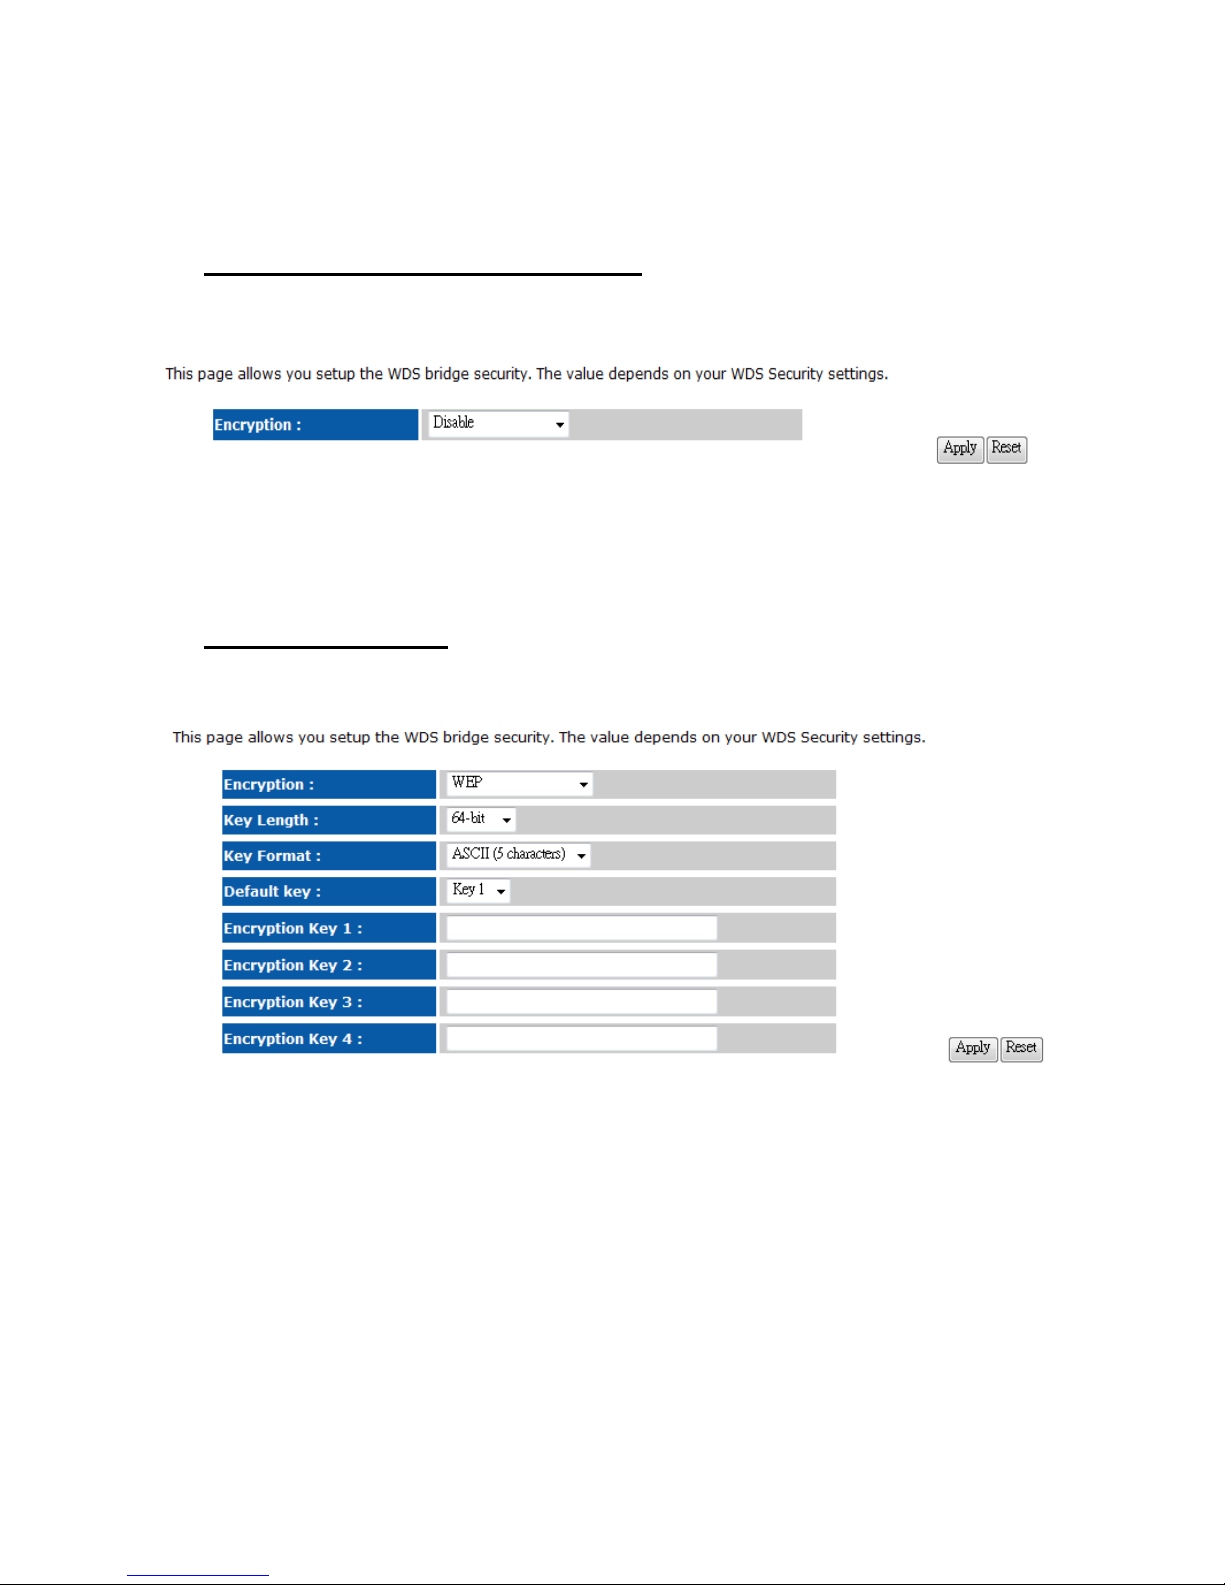
Security
Encryption: Security: Disabled
Encryption: WEP
Key Length: Select a 64-bit or 128-bit WEP key length from the drop-down list.
a longer key
may choose one of your 4 different WEP keys from below.
Key Format: Select a key type from the drop-down list. 128-bit encryption requires
than 64-bit encryption. Keys are defined by entering in a string in HEX (hexadecimal - using
characters 0-9, A-F) or ASCII (American Standard Code for Information Interchange alphanumeric characters) format. ASCII format is provided so you can enter a string that is
easier to remember.
Default Tx Key: You
Encryption Key 1-4: You may enter four different WEP keys.
25
Page 30
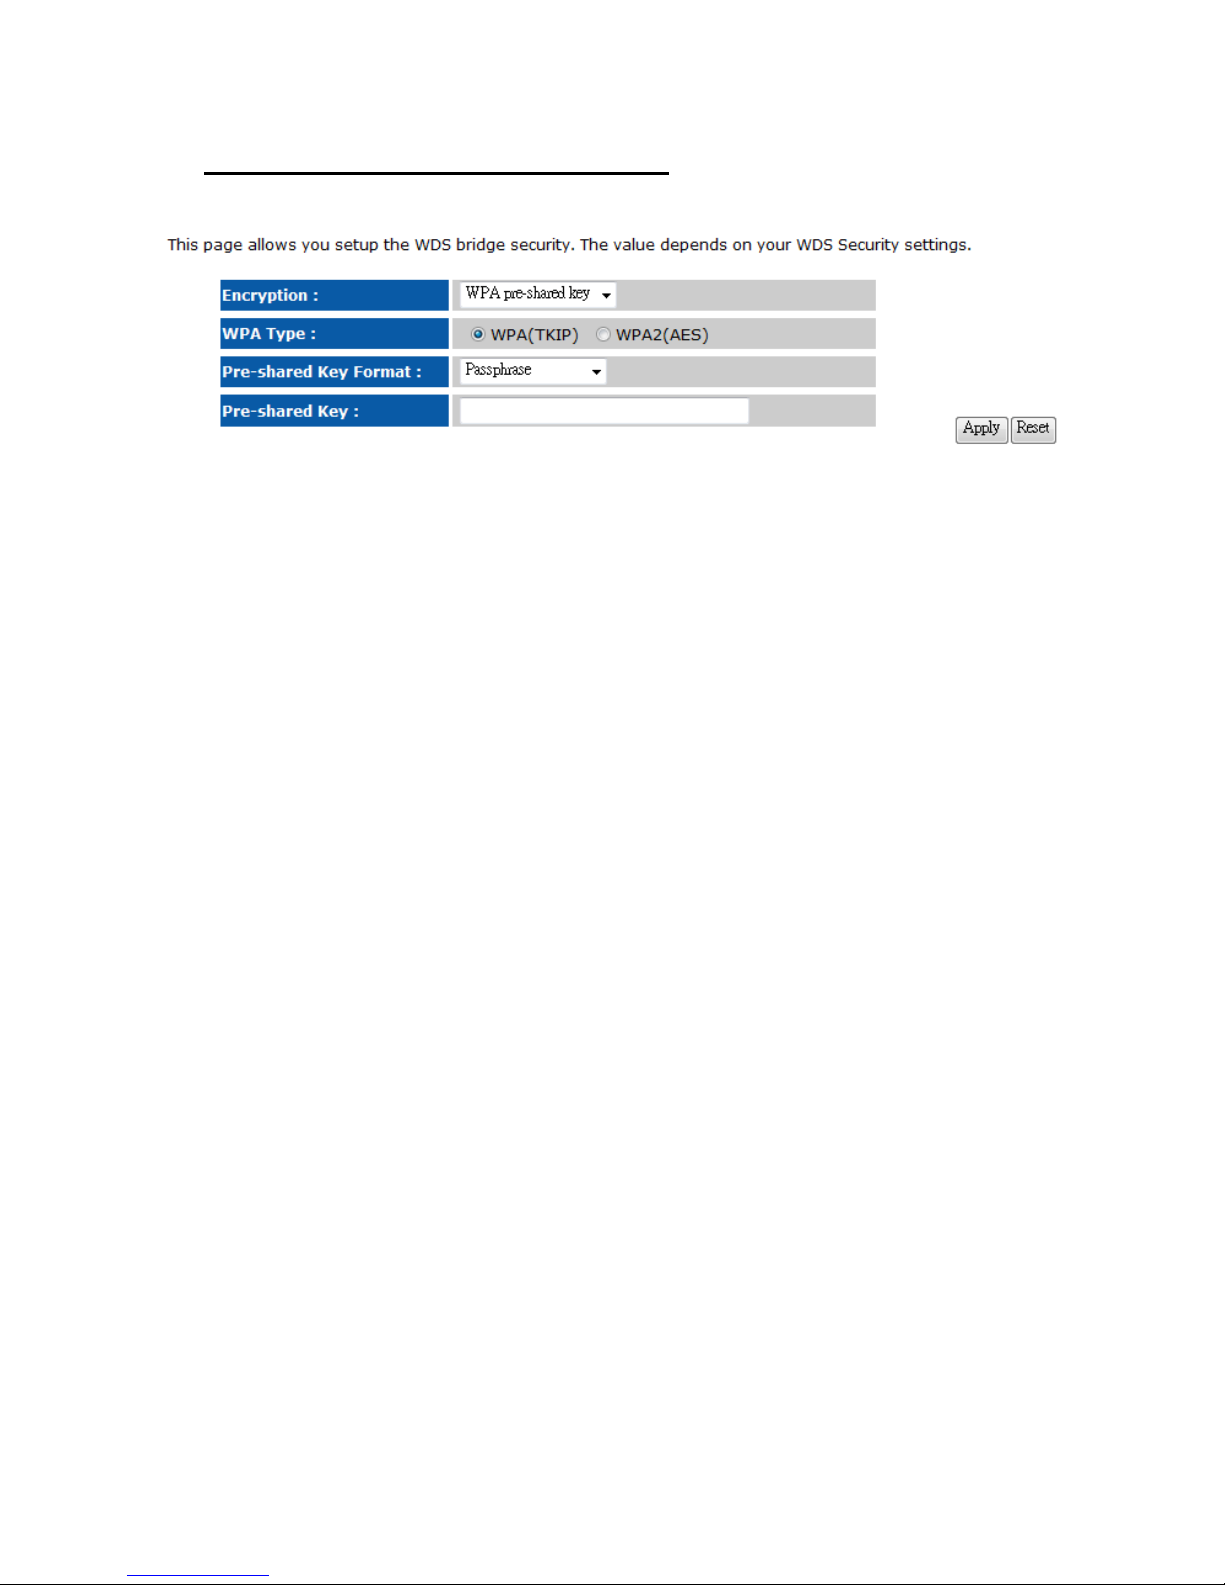
Encryption: WPA pre-shared key
WPA Type: Select TKIP, AES, or WPA2 Mixed. The encryption algorithm used to secure the
data communication. TKIP (Temporal Key Integrity Protocol) provides per-packet key
generation and is based on WEP. AES (Advanced Encryption Standard) is a very secure block
based encryption. Note that, if the bridge uses the AES option, the bridge can associate with the
access point only if the access point is also set to use only AES.
Pre-shared Key Type: The Key Type can be passphrase or Hex format.
Pre-Shared Key: The key is entered as a pass-phrase of up to 63 alphanumeric characters in
ASCII (American Standard Code for Information Interchange) format at both ends of the wireless
connection. It cannot be shorter than eight characters, although for proper security it needs to be
of ample length and should not be a commonly known phrase. This phrase is used to generate
session keys that are unique for each wireless client.
26
Page 31
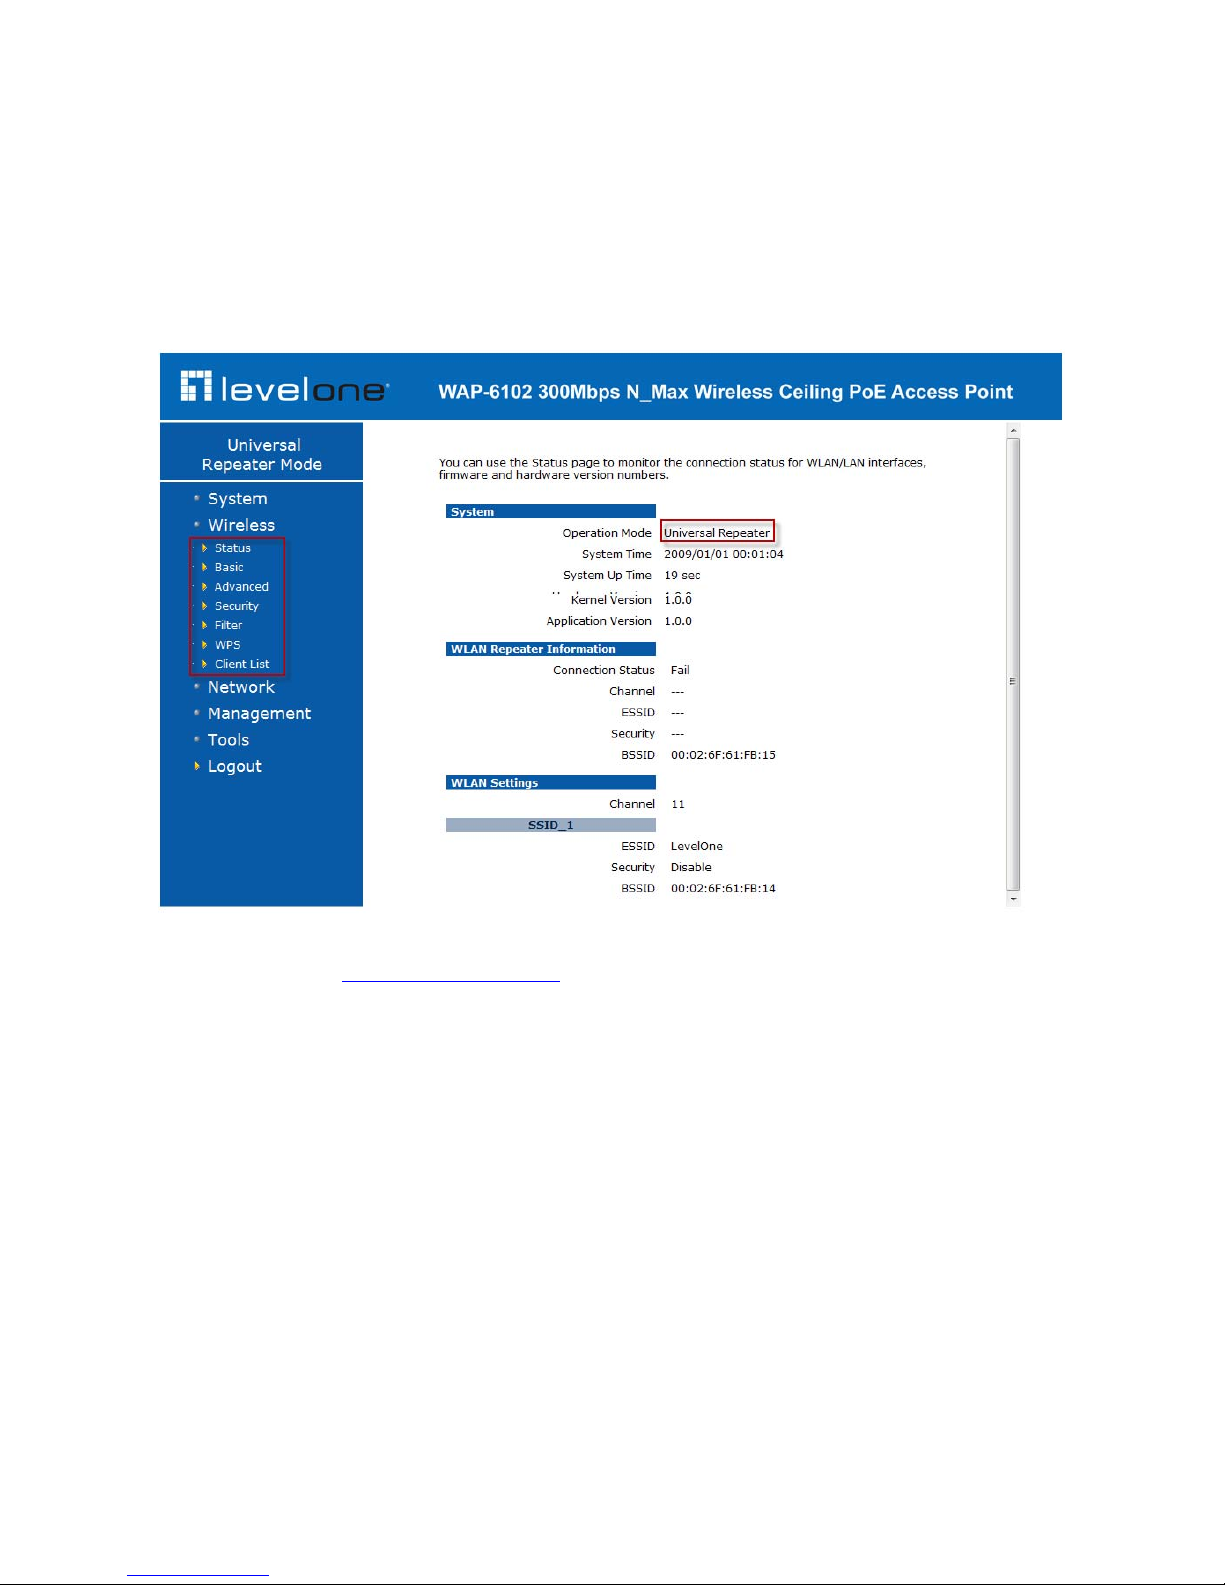
2.2.3 Universal Repeater Configuration
Please click System=> Operation Mode and Select Universal Repeater Before you start
the configuration
Repeater Mode
To configure Repeater Mode, please select Universal Repeater in (System Operation Mode)
(Please refer to: 2.1.1 Operation Mode)
27
Page 32
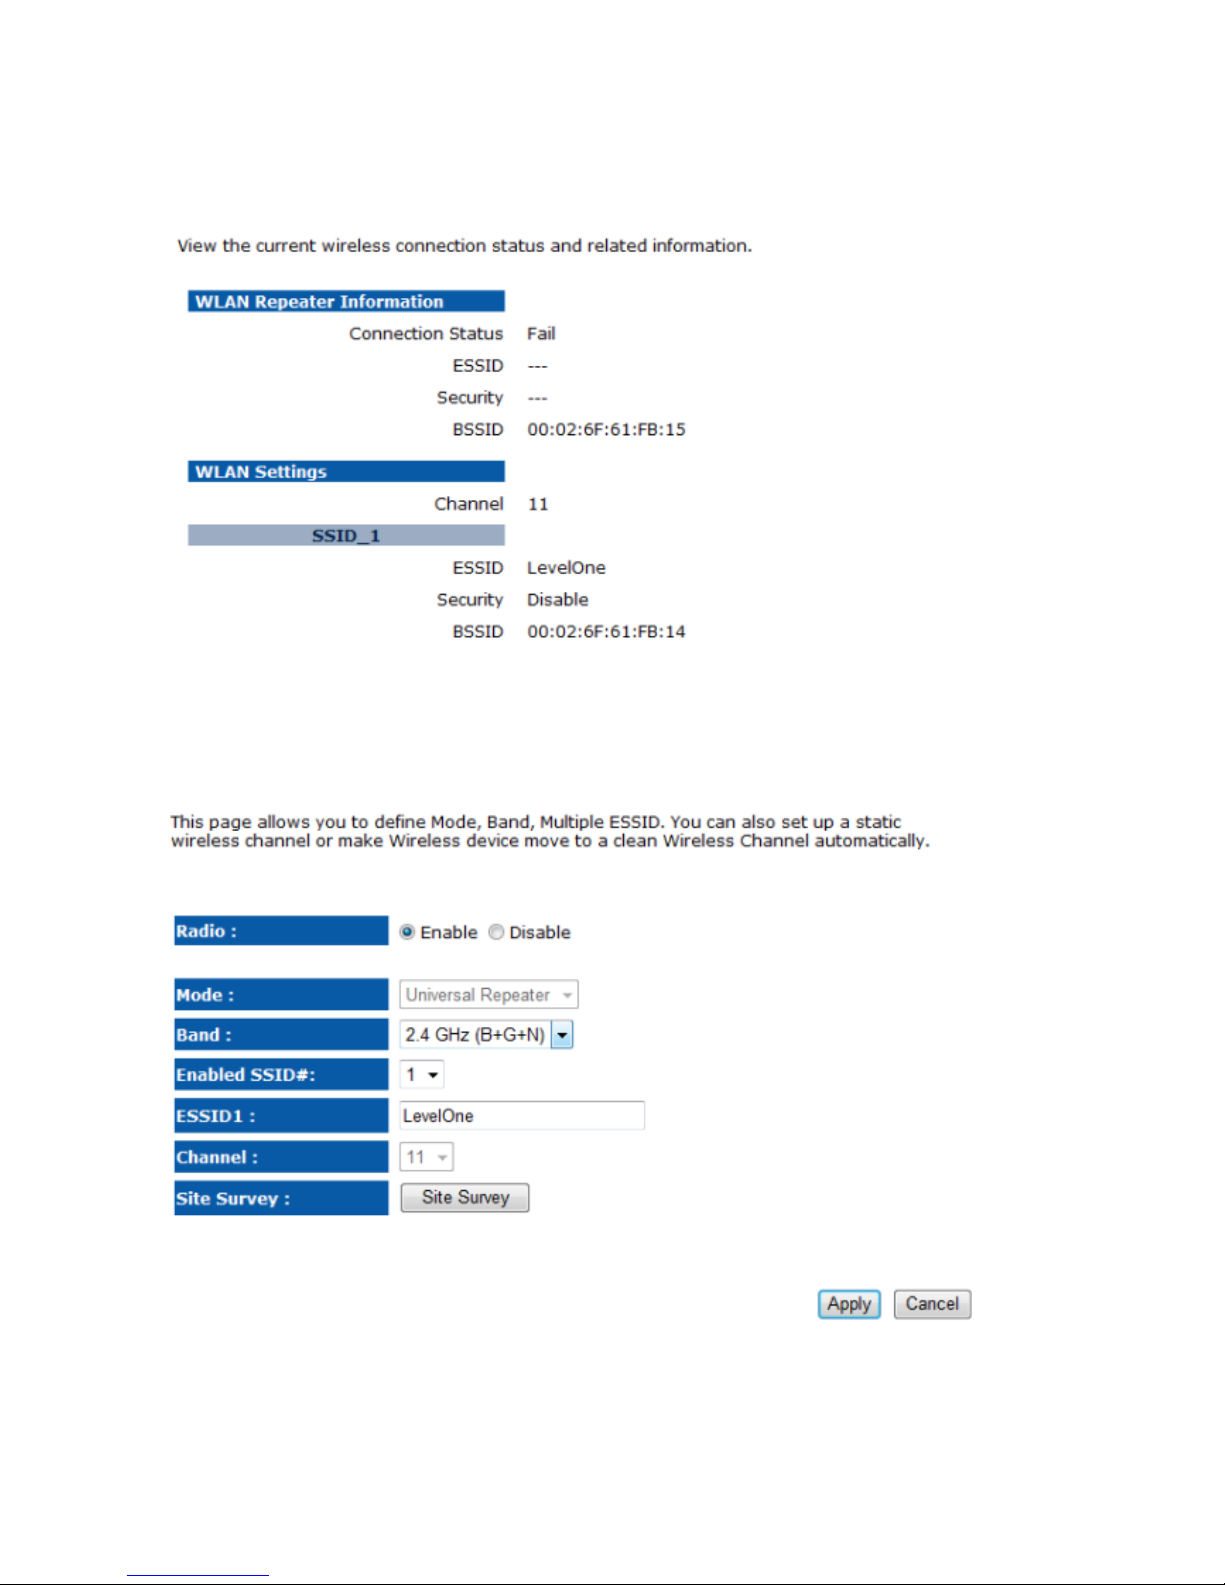
Status
Basic
28
Page 33
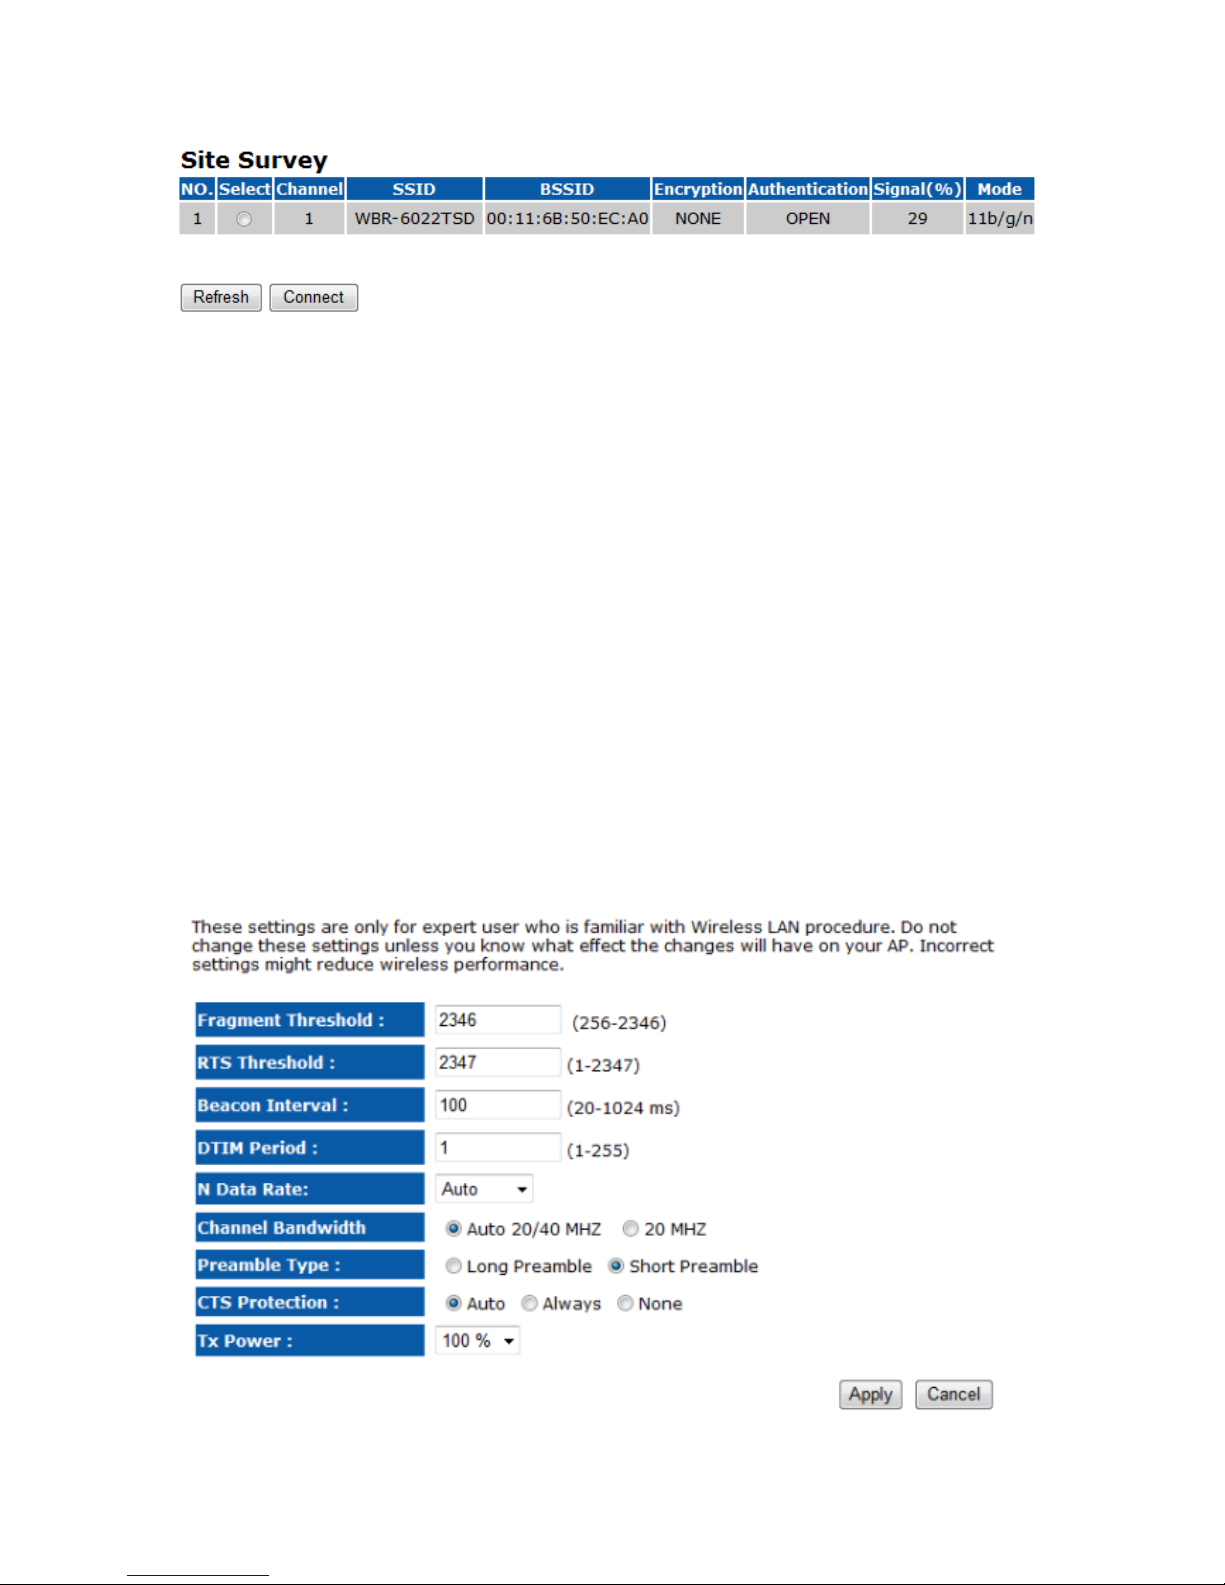
Radio: To enable/disable radio frequency.
Mode: Universal Repeater
Band: Configure the device into different wireless modes.
2.4 GHz (B)
2.4 GHz (N)
2.4 GHz (B+G)
2.4 GHz (G)
2.4 GHz (B+G+N)
Enabled SSID#: The device allows you to add up to 4 unique SSID
ESSID#: Description of each configured SSID
Channel: You can manually configure a channel to be used.
Site Survey: List out all connected devices.
Advanced
29
Page 34

30
Fragment Threshold: Packets over the specified size will be fragmented in order to improve
performance on noisy networks. Specify a value between 256 and 2346. The default value is
2346.
RTS Threshold: Packets over the specified size will use the RTS/CTS mechanism to maintain
performance in noisy networks and preventing hidden nodes from degrading the performance.
Specify a value between 0 and 2347. The default value is 2347.
Beacon Interval: Beacons are packets sent by a wireless Access Point to synchronize wireless
devices. Specify a Beacon Interval value between 25 and 1000. The default value is set to 100
milliseconds.
DTIM Period: A DTIM is a countdown informing clients of the next window for listening to
broadcast and multicast messages. When the wireless Access Point has buffered broadcast or
multicast messages for associated clients, it sends the next DTIM with a DTIM Period value.
Wireless clients detect the beacons and awaken to receive the broadcast and multicast
messages. The default value is 1. Valid settings are between 1 and 10.
N Data Rate: You may select N data rate from the drop-down list, however, it is recommended
to select auto.
Channel Bandwidth: Select channel bandwidth
Preamble Type: Select a short or long preamble. For optimum performance it is recommended
to also configure the client device as the same preamble type.
CTS Protection: CTS (Clear to Send) can be always enabled, auto, or disabled. By enabled
CTS, the Access Point and clients will wait for a ‘clear’ signal before transmitting. It is
recommended to select auto.
Tx Power: You may control the transmit output power of the device by selecting a value from the
drop-down list. This feature can be helpful in restricting the coverage area of the wireless
network.
Page 35
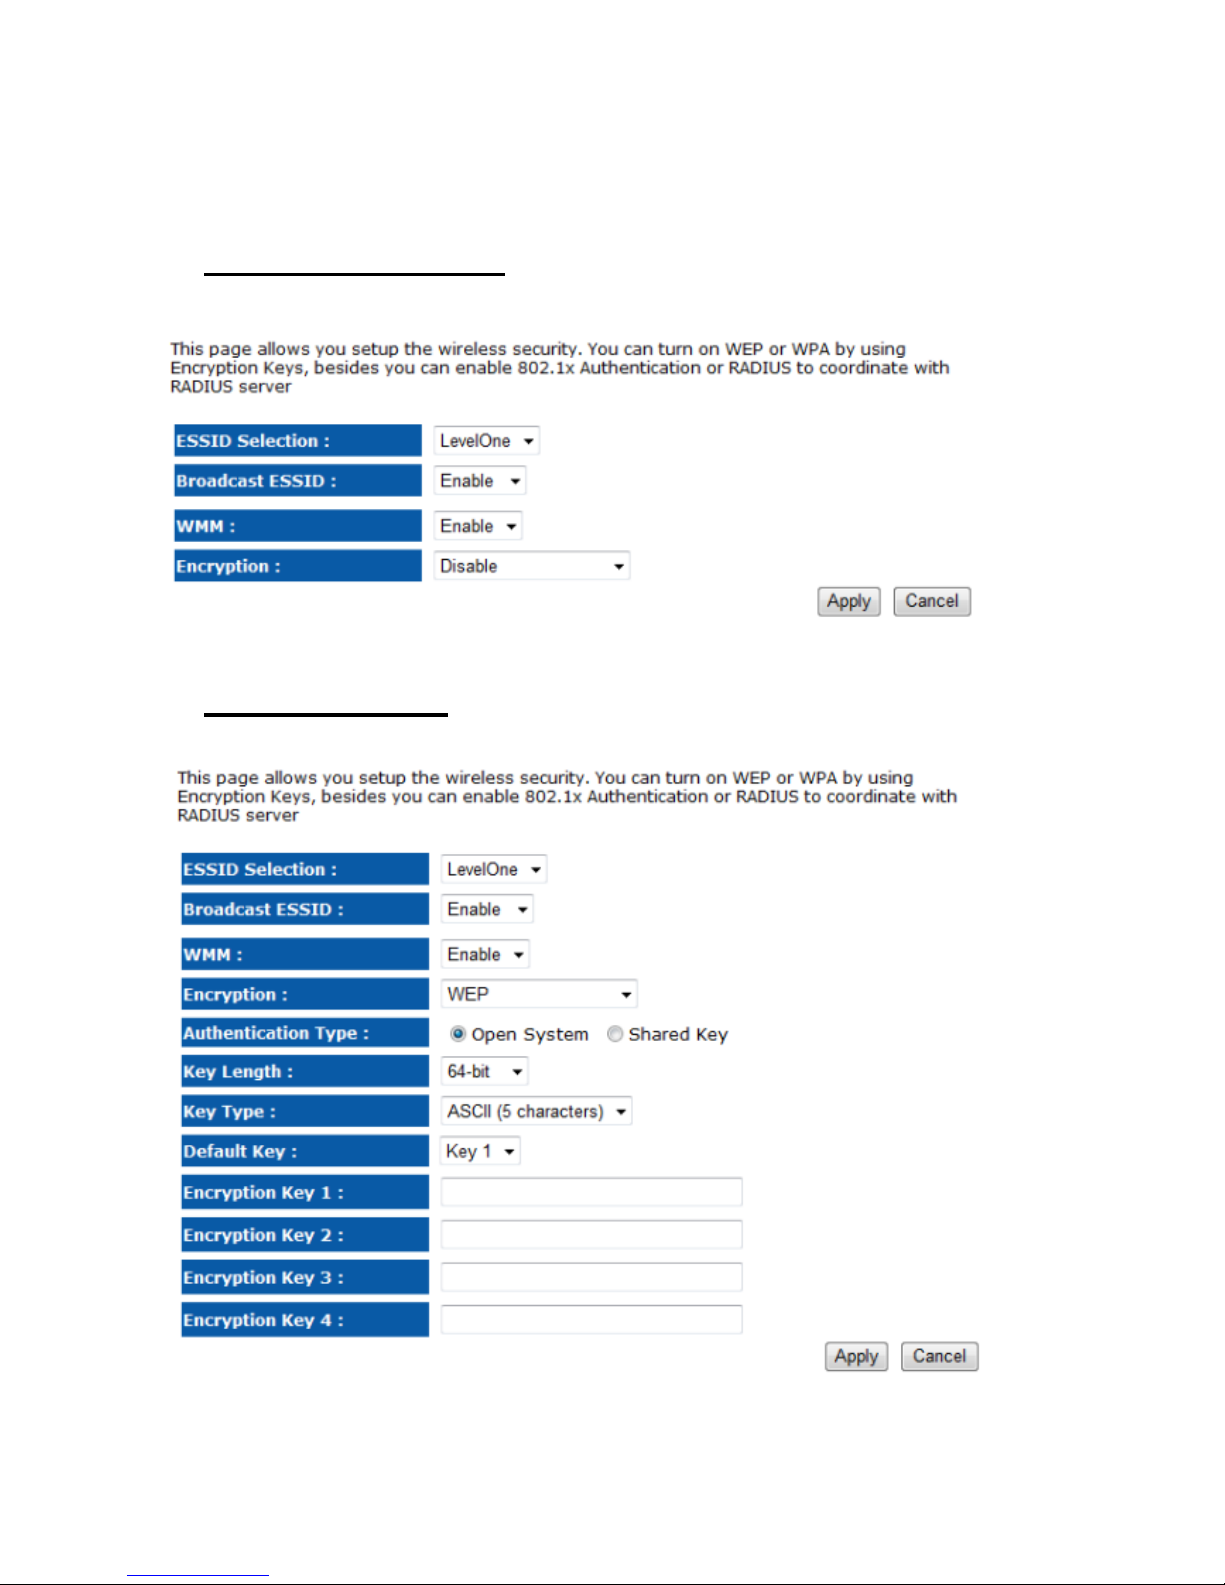
Security
Encryption: Disabled
Encryption: WEP
31
Page 36

32
ESSID Selection: As this device supports multiple SSIDs, it is possible to configure a different
security mode for each SSID (profile). Select an SSID from the drop-down list.
Broadcast SSID: Select Enable or Disable from the drop-down list. This is the SSID broadcast
feature.
When this option is set to Enable, your wireless network name is broadcast to anyone within the
range of your signal
. If you're not using encryption then they could connect to your network. When
this is disabled, you must enter the Wireless Network Name (SSID) on the client manually to
connect to the network.
WMM: Choose to Enable or Disable WMM. This is the Quality of Service (QoS) feature for
prioritizing voice and video applications.
Encryption: Select WEP from the drop-down list.
Authentication Type: Select Open System, Shared Key, or auto. Authentication method
from the drop-down list. An open system allows any client to authenticate as long as it conforms
to any MAC address filter policies that may have been set. All authentication packets are
transmitted without encryption. Shared Key sends an unencrypted challenge text string to any
device attempting to communicate with the AP. The device requesting authentication encrypts
the challenge text and sends it back to the access point. If the challenge text is encrypted
correctly, the access point allows the requesting device to authenticate. It is recommended to
select Auto if you are not sure which authentication type is used.
Key Length: Select a 64-bit or 128-bit WEP key length from the drop-down list.
Key Type: Select a key type from the drop-down list. 128-bit encryption requires a longer key
than 64-bit encryption. Keys are defined by entering in a string in HEX (hexadecimal - using
characters 0-9, A-F) or ASCII (American Standard Code for Information Interchange alphanumeric characters) format. ASCII format is provided so you can enter a string that is
easier to remember.
Default Key: You may choose one of your 4 different WEP keys from below.
Encryption Key 1-4: You may enter four different WEP keys.
Page 37
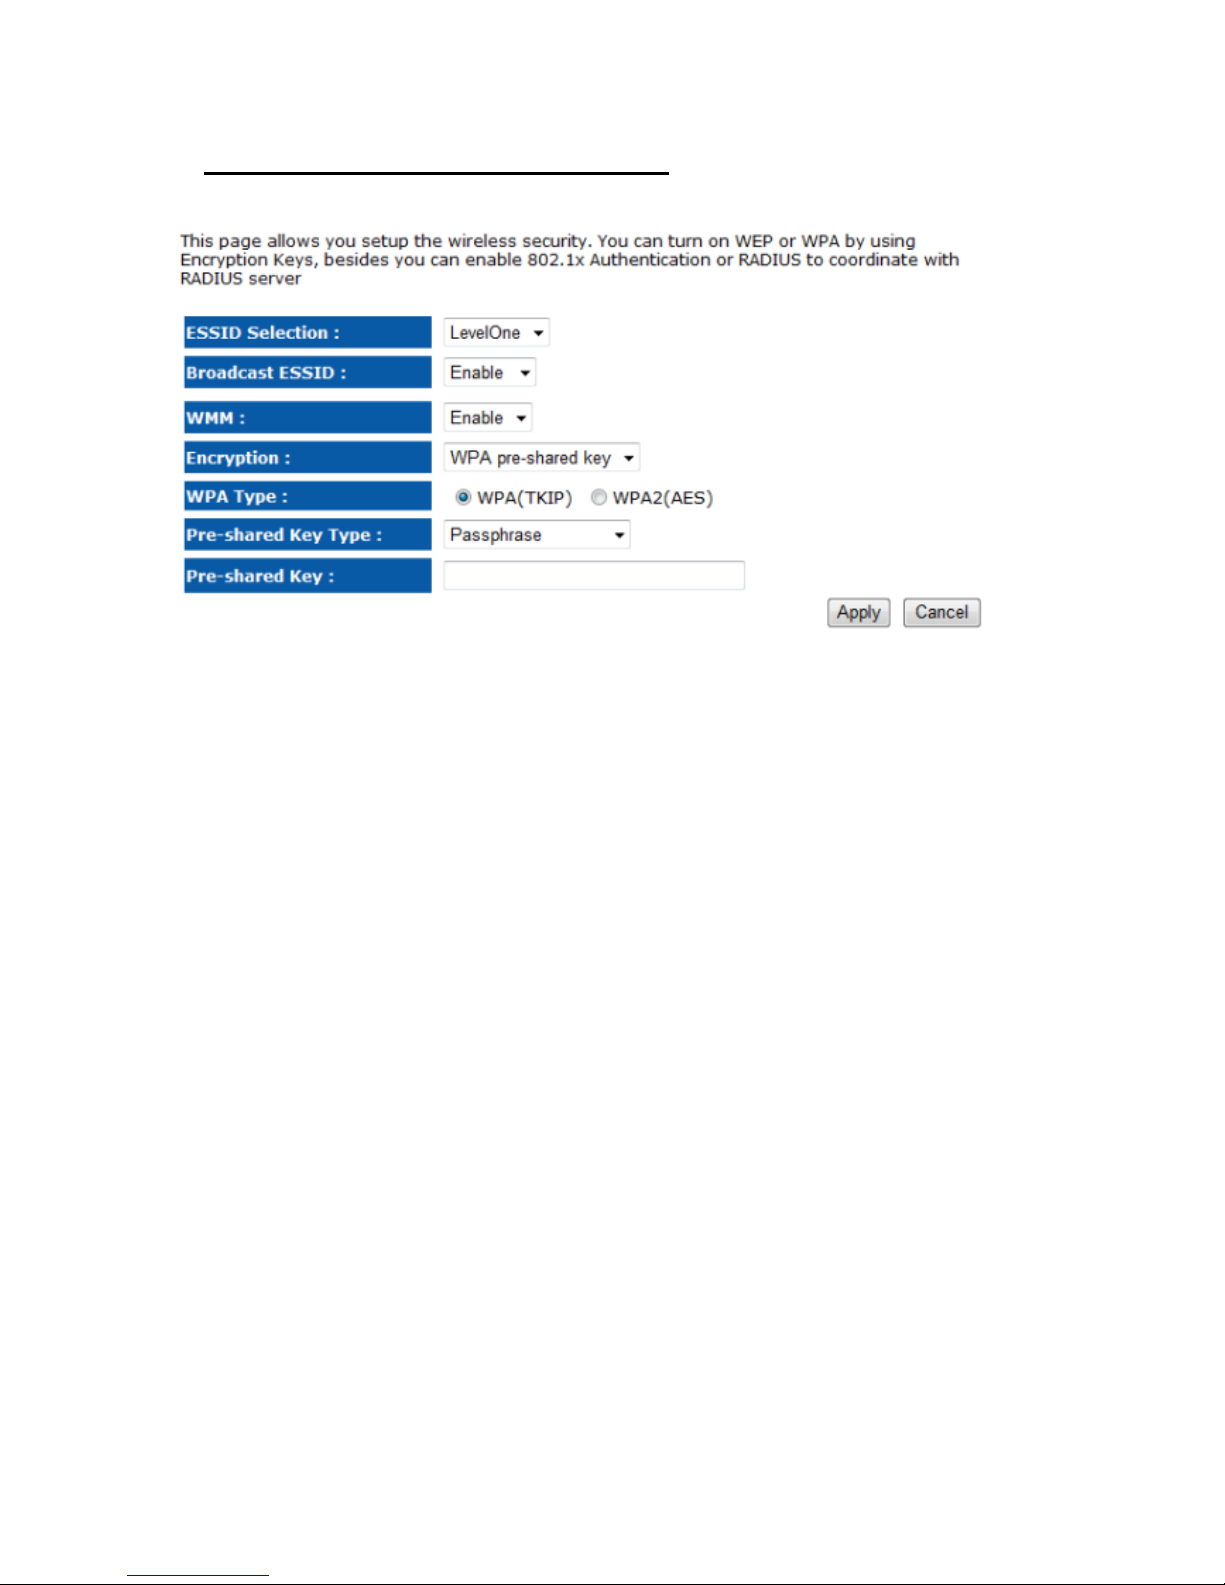
Encryption: WPA pre-shared key
ESSID Selection: As this device supports multiple SSIDs, it is possible to configure a different
security mode for each SSID (profile). Select an SSID from the drop-down list.
Broadcast SSID: Select Enable or Disable from the drop-down list. This is the SSID broadcast
feature.
When this option is set to Enable, your wireless network name is broadcast to anyone within the
range of your signal
. If you're not using encryption then they could connect to your network. When
this is disabled, you must enter the Wireless Network Name (SSID) on the client manually to
connect to the network.
WMM: Choose to Enable or Disable WMM. This is the Quality of Service (QoS) feature for
prioritizing voice and video applications.
Encryption: Select WPA pre-shared key from the drop-down list.
WPA Type: Select TKIP, AES, or WPA2 Mixed. The encryption algorithm used to secure the
data communication. TKIP (Temporal Key Integrity Protocol) provides per-packet key
generation and is based on WEP. AES (Advanced Encryption Standard) is a very secure block
based encryption. Note that, if the bridge uses the AES option, the bridge can associate with the
access point only if the access point is also set to use only AES.
Pre-shared Key Type: The Key Type can be passphrase or Hex format.
Pre-Shared Key: The key is entered as a pass-phrase of up to 63 alphanumeric characters in
ASCII (American Standard Code for Information Interchange) format at both ends of the wireless
connection. It cannot be shorter than eight characters, although for proper security it needs to be
of ample length and should not be a commonly known phrase. This phrase is used to generate
session keys that are unique for each wireless client.
33
Page 38
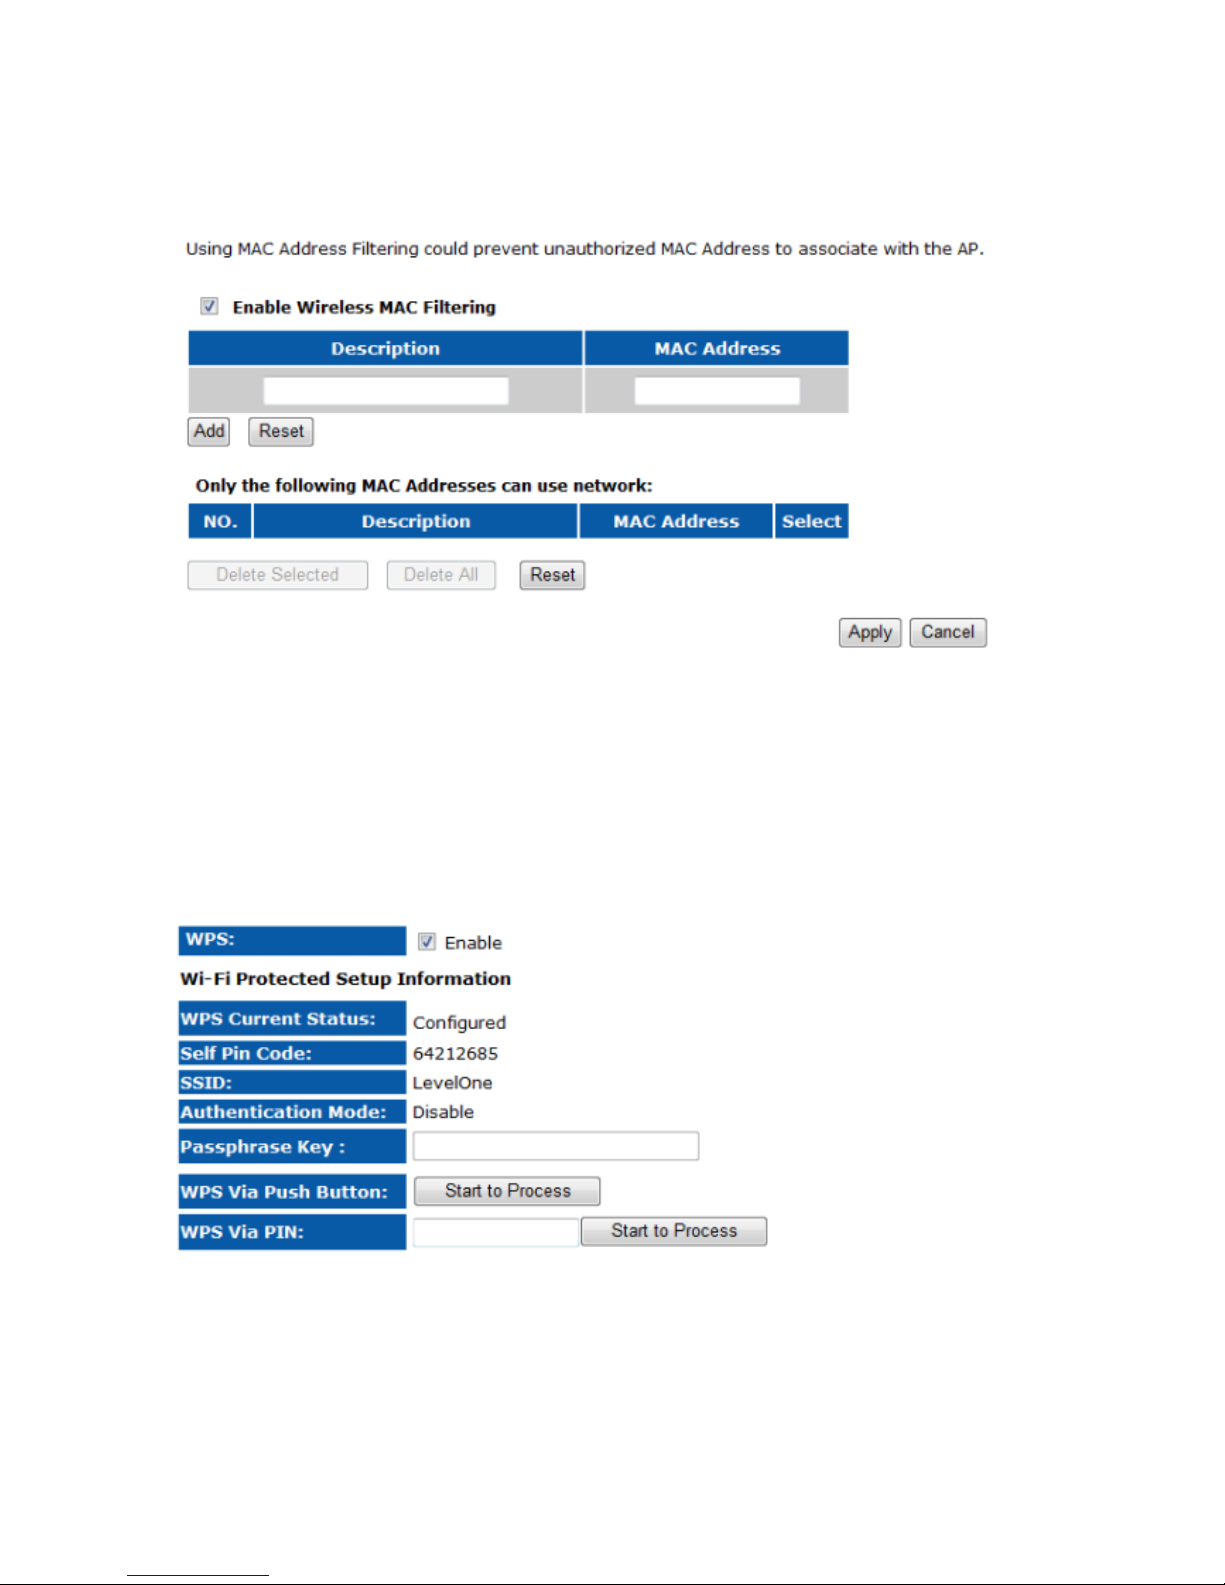
Filter
WPS
34
Page 39
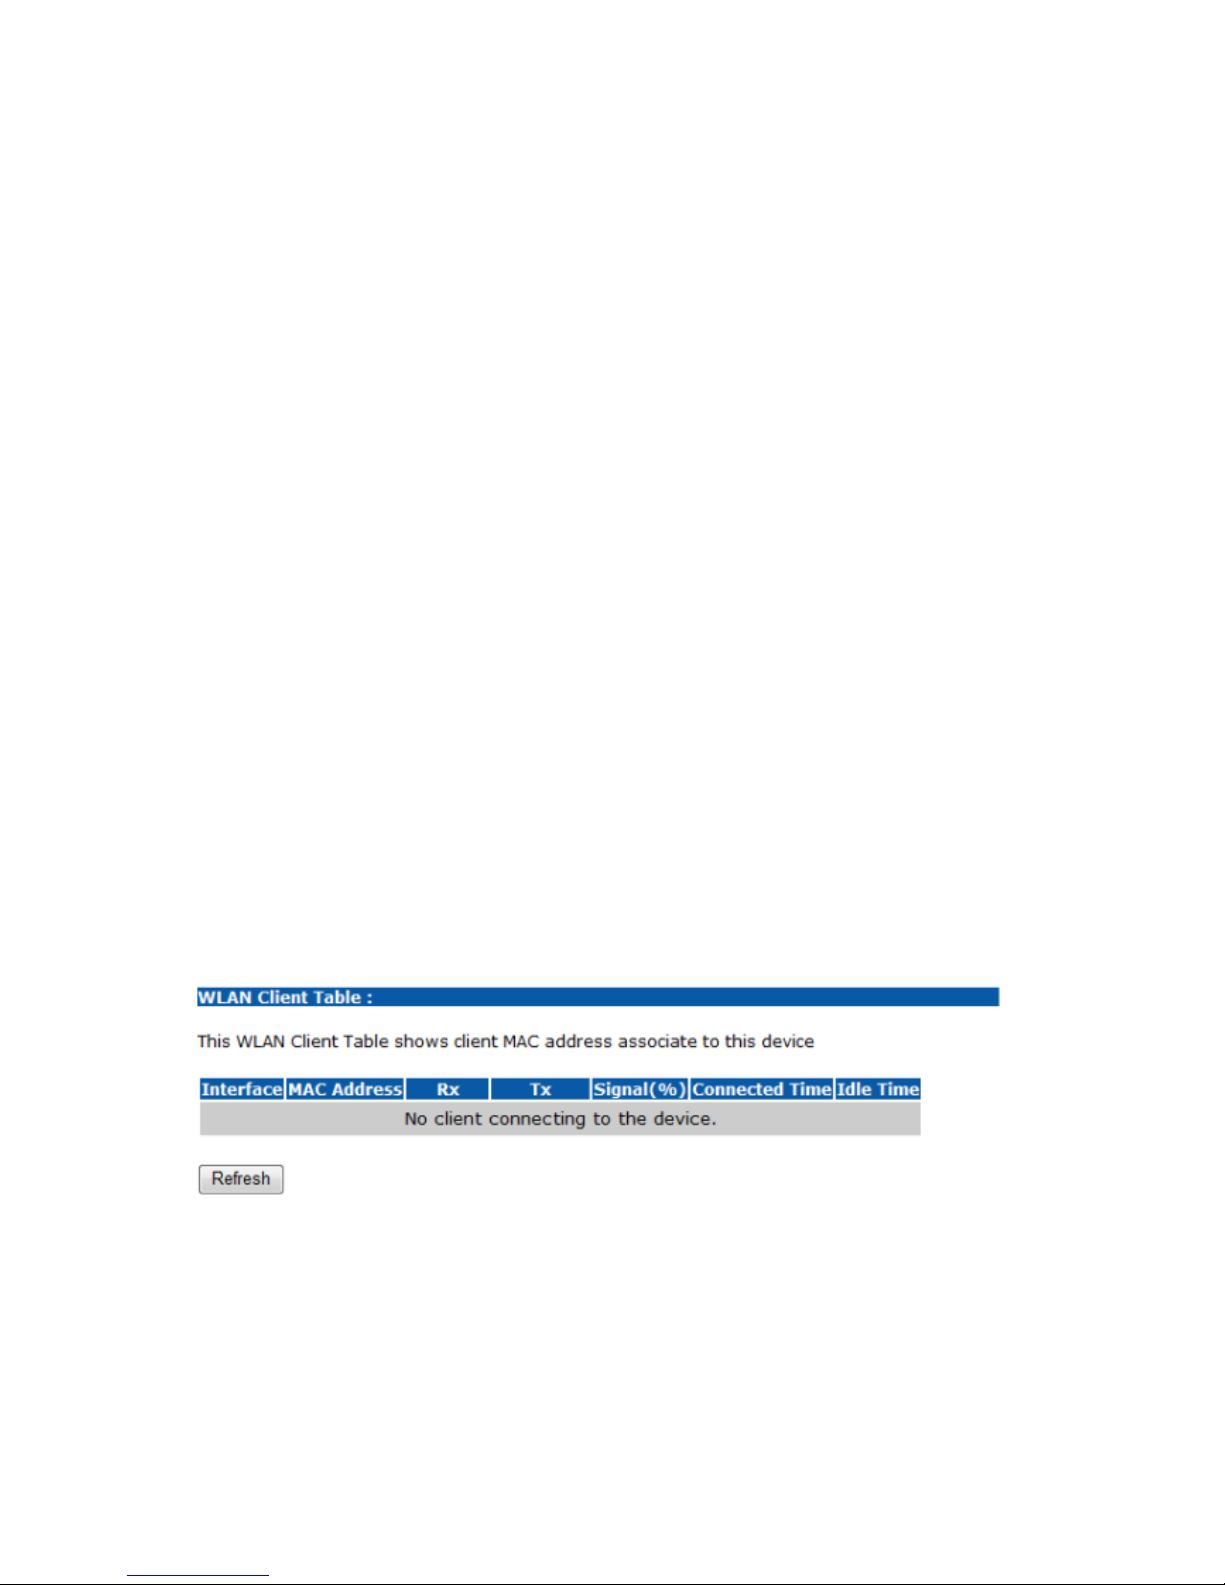
WPS Current Status: Display current configuration is configured or un-configured.
The default setting will display un-configured status but if any of following occur
will display configured status: 1. Configuration by an external registrar. 2.
Automatic configuration by internal registrar. 3. Manual configuration by user.
Self Pin Code: Pin code is unique and automatically generated.
SSID: Display wireless network name
Authentication Mode: Display wireless network authentication types
Passphrase Key: Display wireless network authentication password
WPS Via Push Button: Start WPS function from webpage.
WPS Via PIN: Specify wireless client’s PIN code to start WPS function.
Client List
35
Page 40
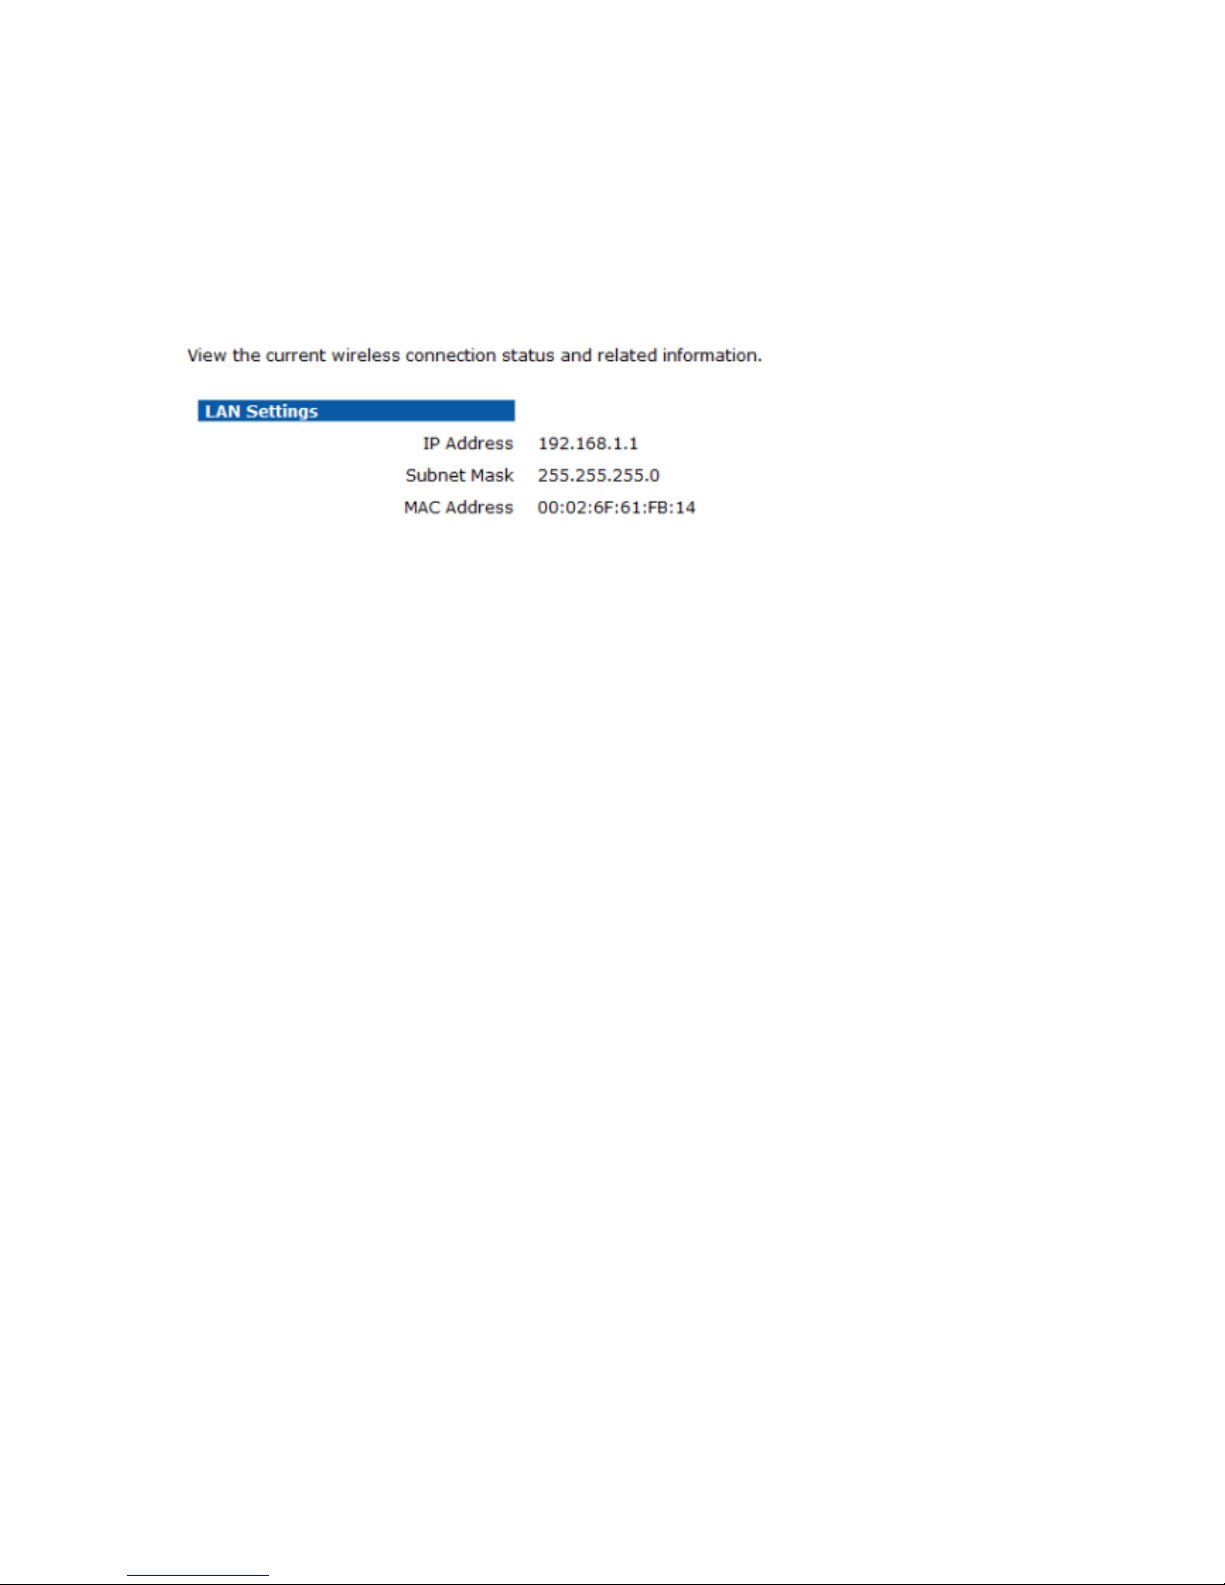
2.3. Network
2.3.1. Status
36
Page 41
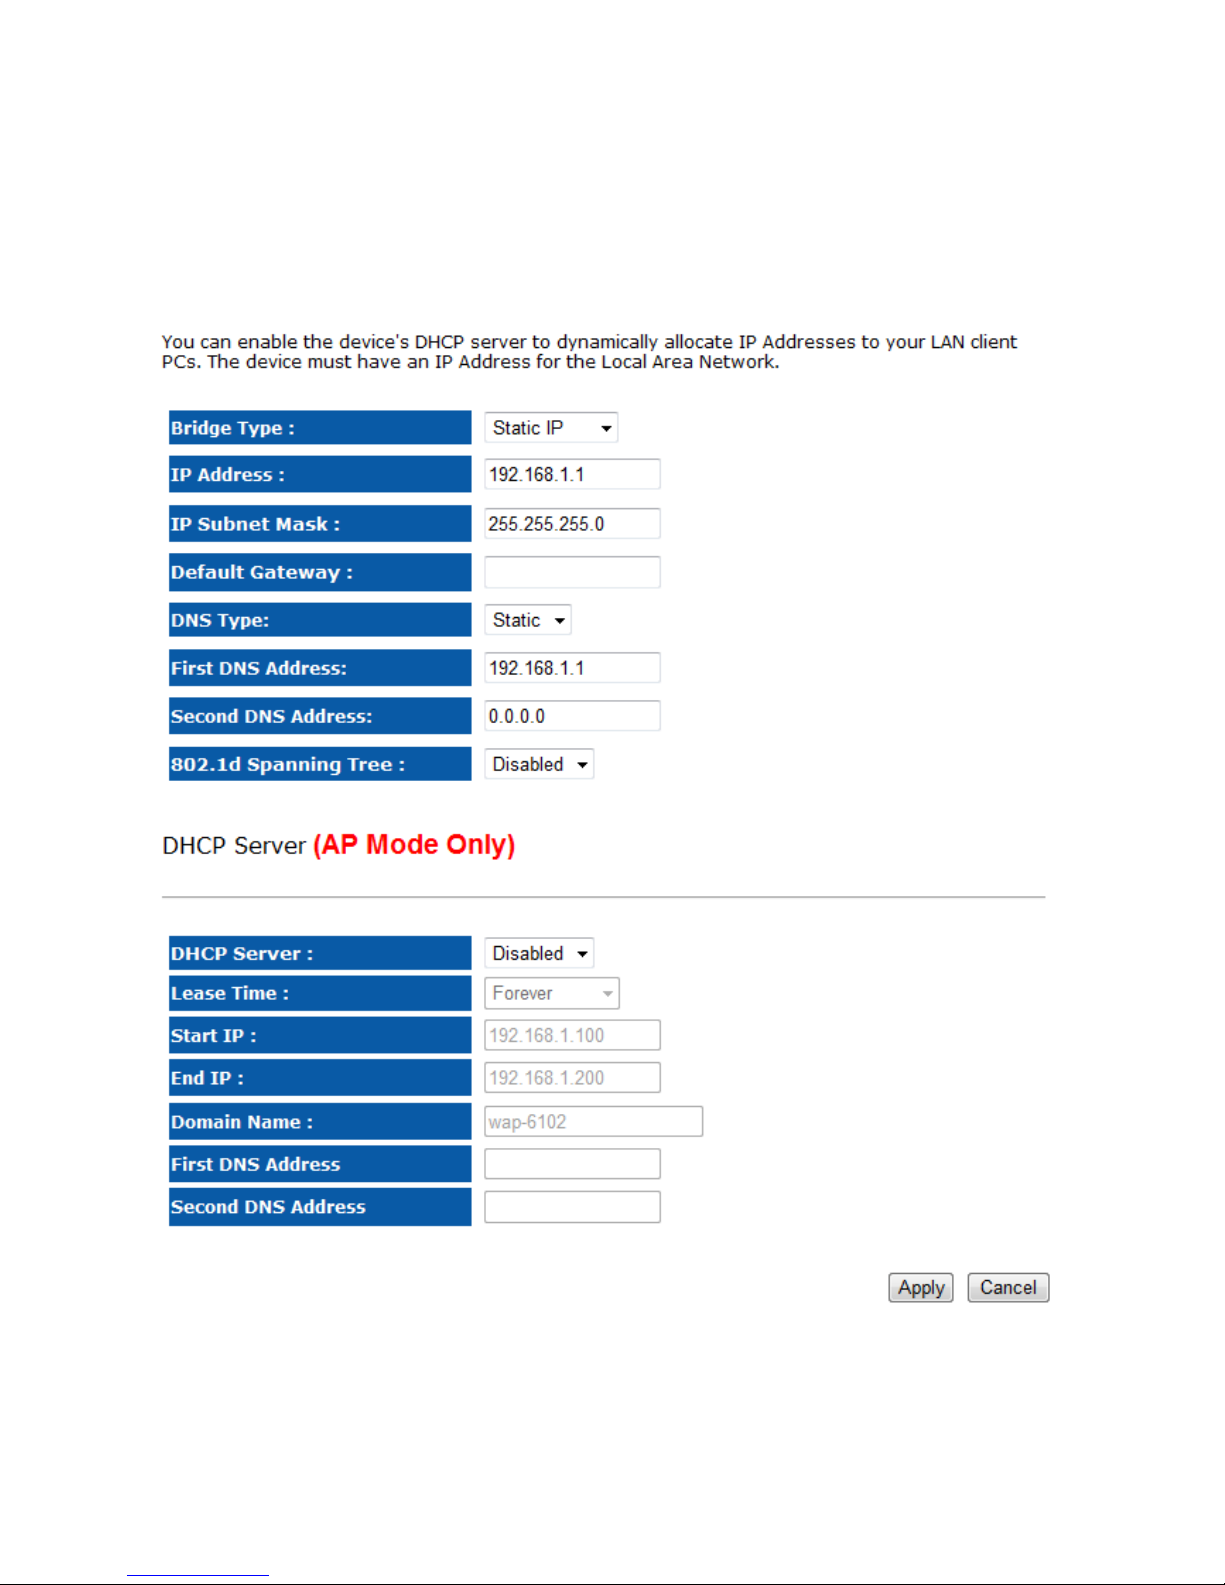
2.3.2. LAN
37
Page 42

38
Bridge Type: Select Static IP or Dynamic IP from the drop-down list. If you select
Static IP, you will be required to specify an IP address and subnet mask. If Dynamic
IP is selected, then the IP address is received automatically from the external DHCP
server.
IP Address: Specify an IP address.
IP Subnet Mask: Specify a subnet mask for the IP address.
Default Gateway: Specify the router IP address which is used to route TCP/IP
traffic destined to other network/subnet addresses not listed in local routing table.
DNS Type: Select Dynamic for automatic retrieve DNS IP address or select Static
for manually defined.
First DNS Address: Specify the primary DNS IP address.
Second DNS Address: Specify the secondary DNS IP address.
802.1d Spanning Tree: Select Enable or Disable from the drop-down list. Enabling
spanning tree will avoid redundant data loops.
DHCP server: You may Enable of Disable DHCP server.
Lease Time: Define the maximum usage.
Start IP: Specify the first IP address for the DHCP range.
End IP: Specify the last IP address for the DHCP range.
Domain Name: Specify the last IP address for DHCP range.
First DNS Address: Specify the primary DNS IP address for DHCP server.
Second DNS Address: Specify the secondary DNS IP address for DHCP server.
Page 43
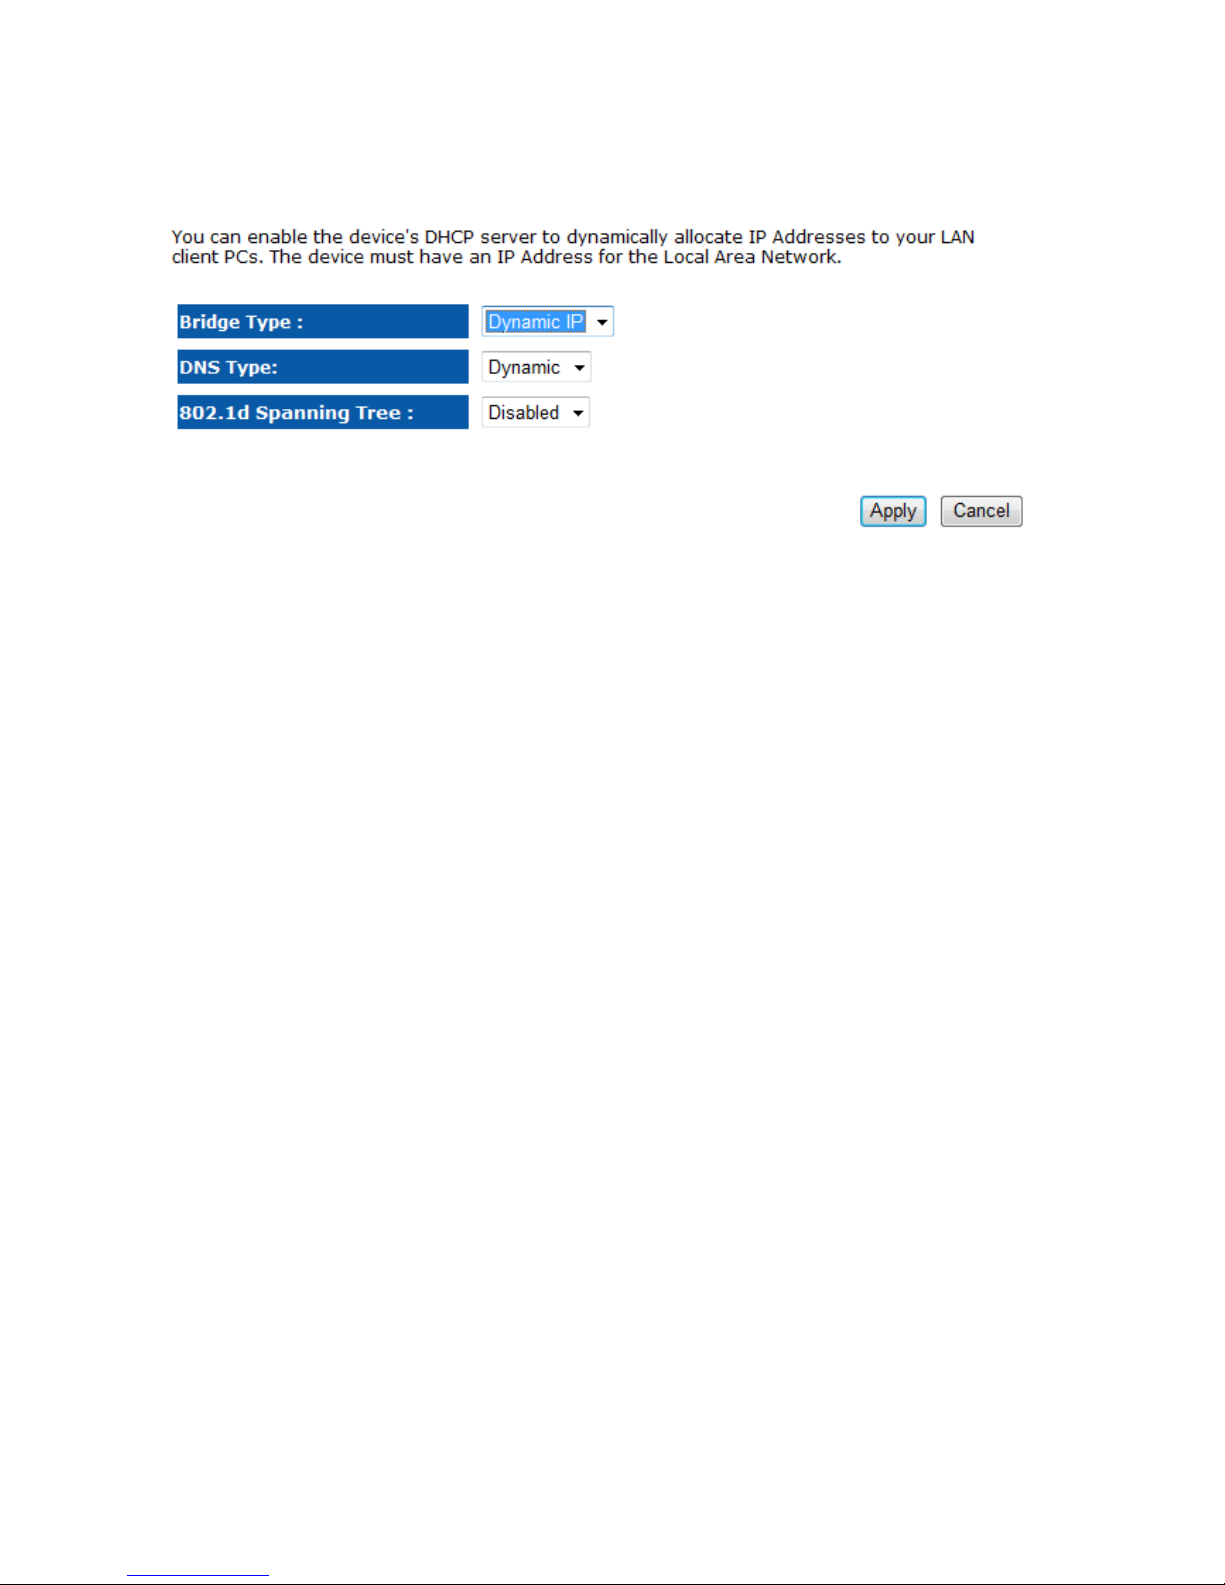
Dynamic IP
(Only work with AP Mode)
Bridge Type: Select Static IP or Dynamic IP from the drop-down list. If you select
Static IP, you will be required to specify an IP address and subnet mask. If Dynamic
IP is selected, then the IP address is received automatically from the external DHCP
server.
DNS Type: Select Dynamic to automatic retrieve DNS IP address or select Static
for manually defined.
802.1d Spanning Tree: Select Enable or Disable from the drop-down list. Enabling
spanning tree will avoid redundant data loops.
39
Page 44
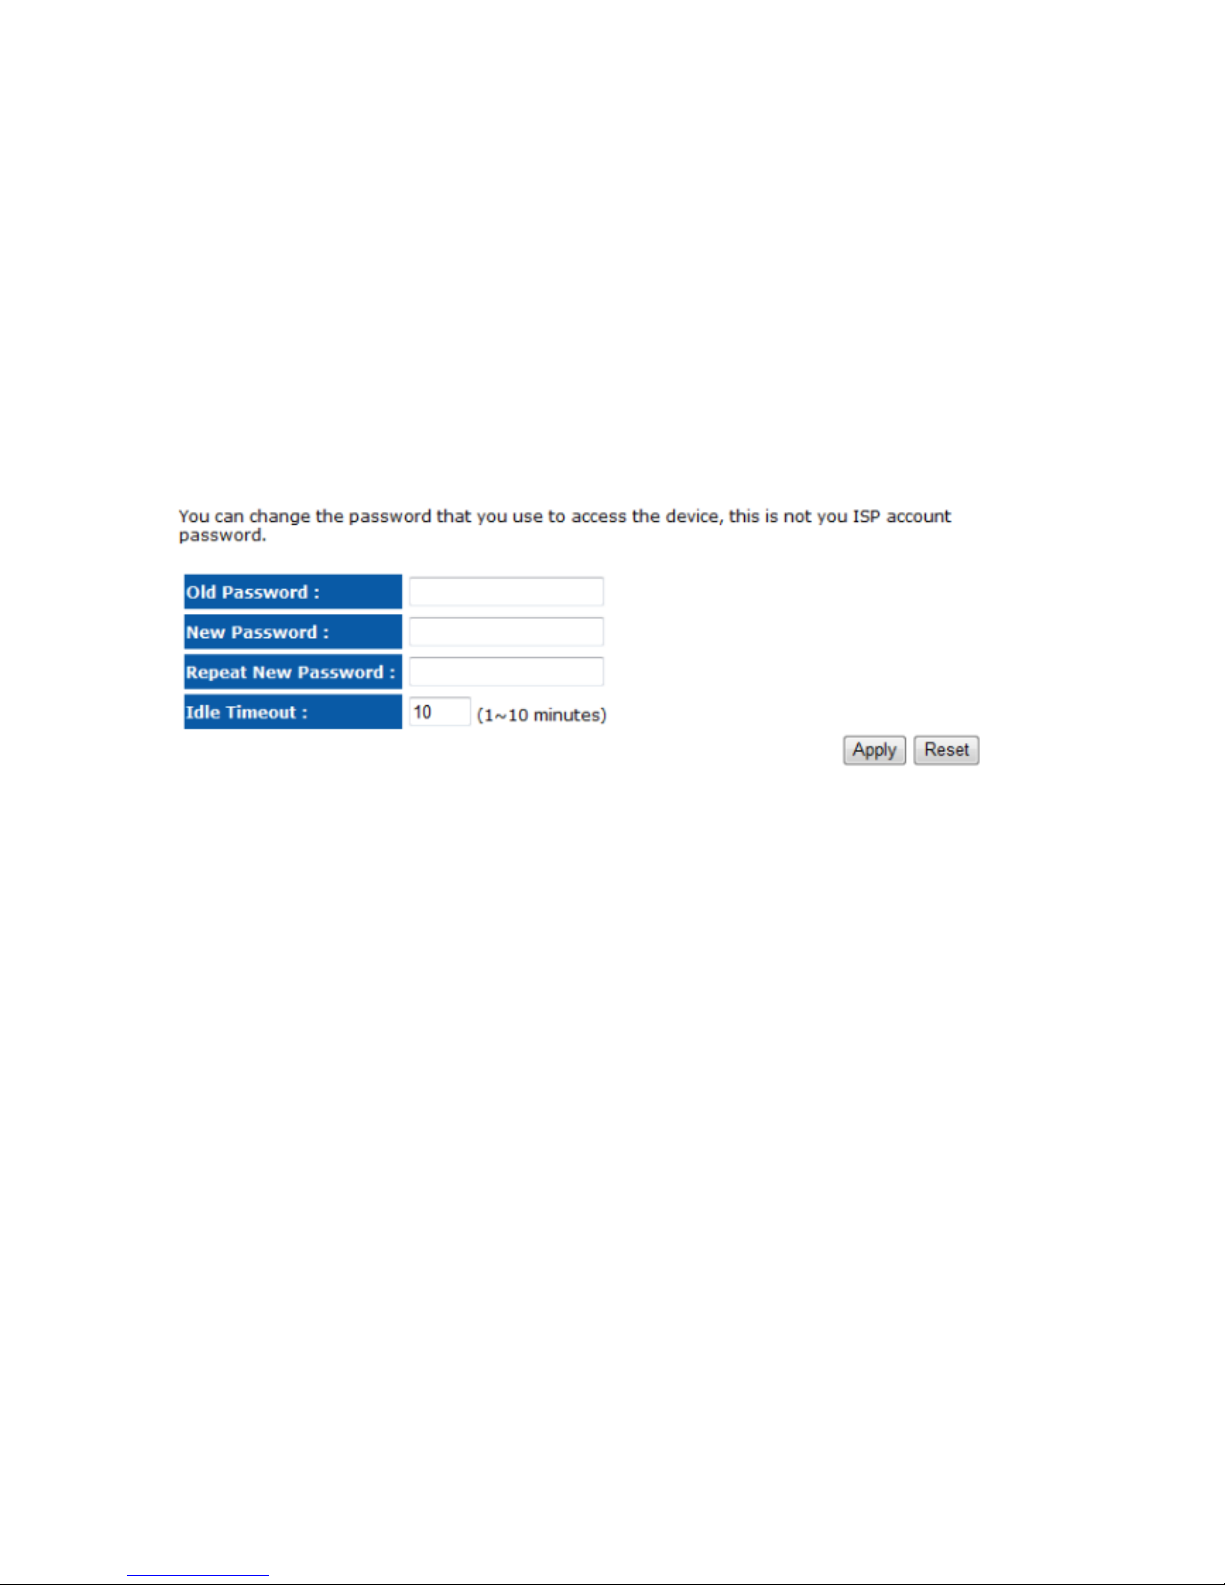
2.4. Management
2.4.1. Admin
Change current login password of the device. It is recommended to change the default
password for security reasons.
40
Page 45
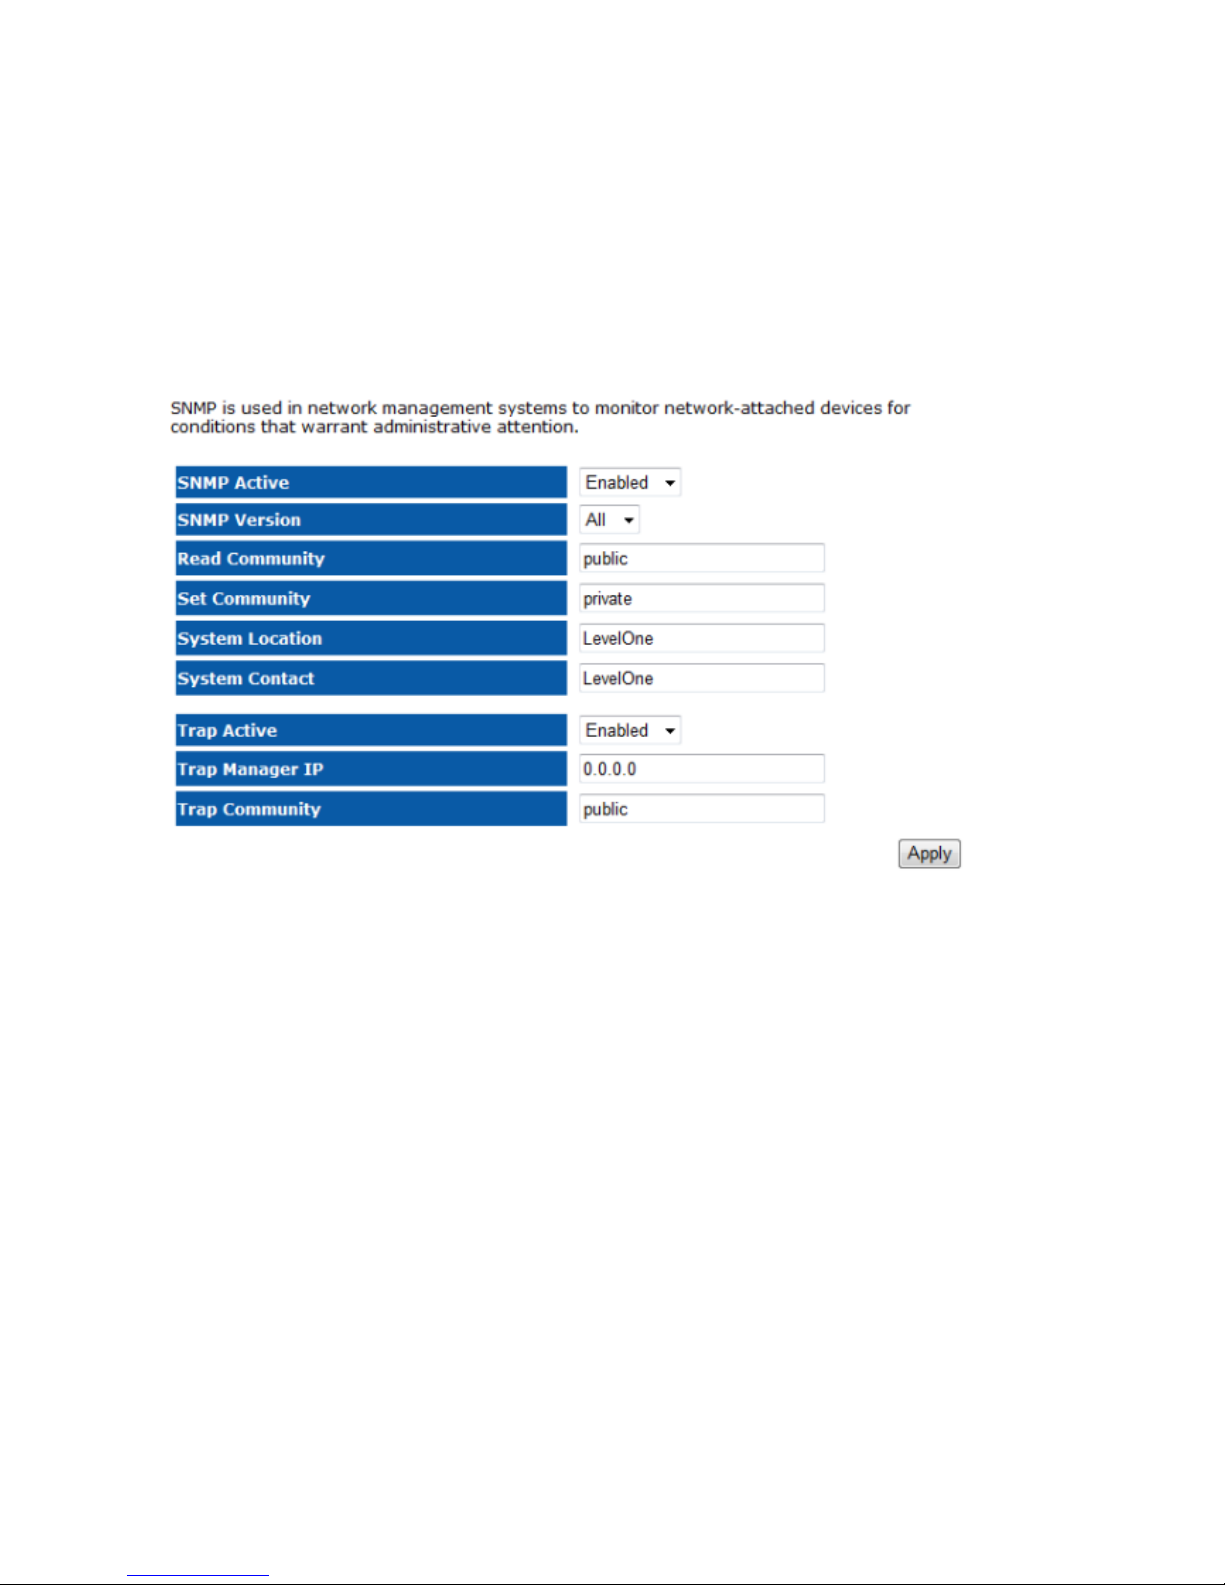
2.4.2. SNMP
Allows you to assign the contact details, location, community name and trap settings for
SNMP. This is a networking management protocol used to monitor network-attached
devices. SNMP allows messages (called protocol data units) to be sent to various p art s of a
network. Upon receiving these messages, SNMP-compatible devices (called agents) return
data stored in their Management Information Bases.
SNMP Active: Choose to enable or disable the SNMP feature.
SNMP Version: You may select a specific version or select All from the drop-down list.
Read Community: Specify the password for access the SNMP community for read only access.
Set Community: Specify the password for access to the SNMP community with read/write
access.
System Location: Specify the location of the device.
System Contact: Specify the contact details of the device.
Trap Active: Choose to enable or disable the SNMP trapping feature. .
Trap Manager IP: Specify the password for the SNMP trap community.
Trap Community: Specify the name of SNMP trap community.
41
Page 46
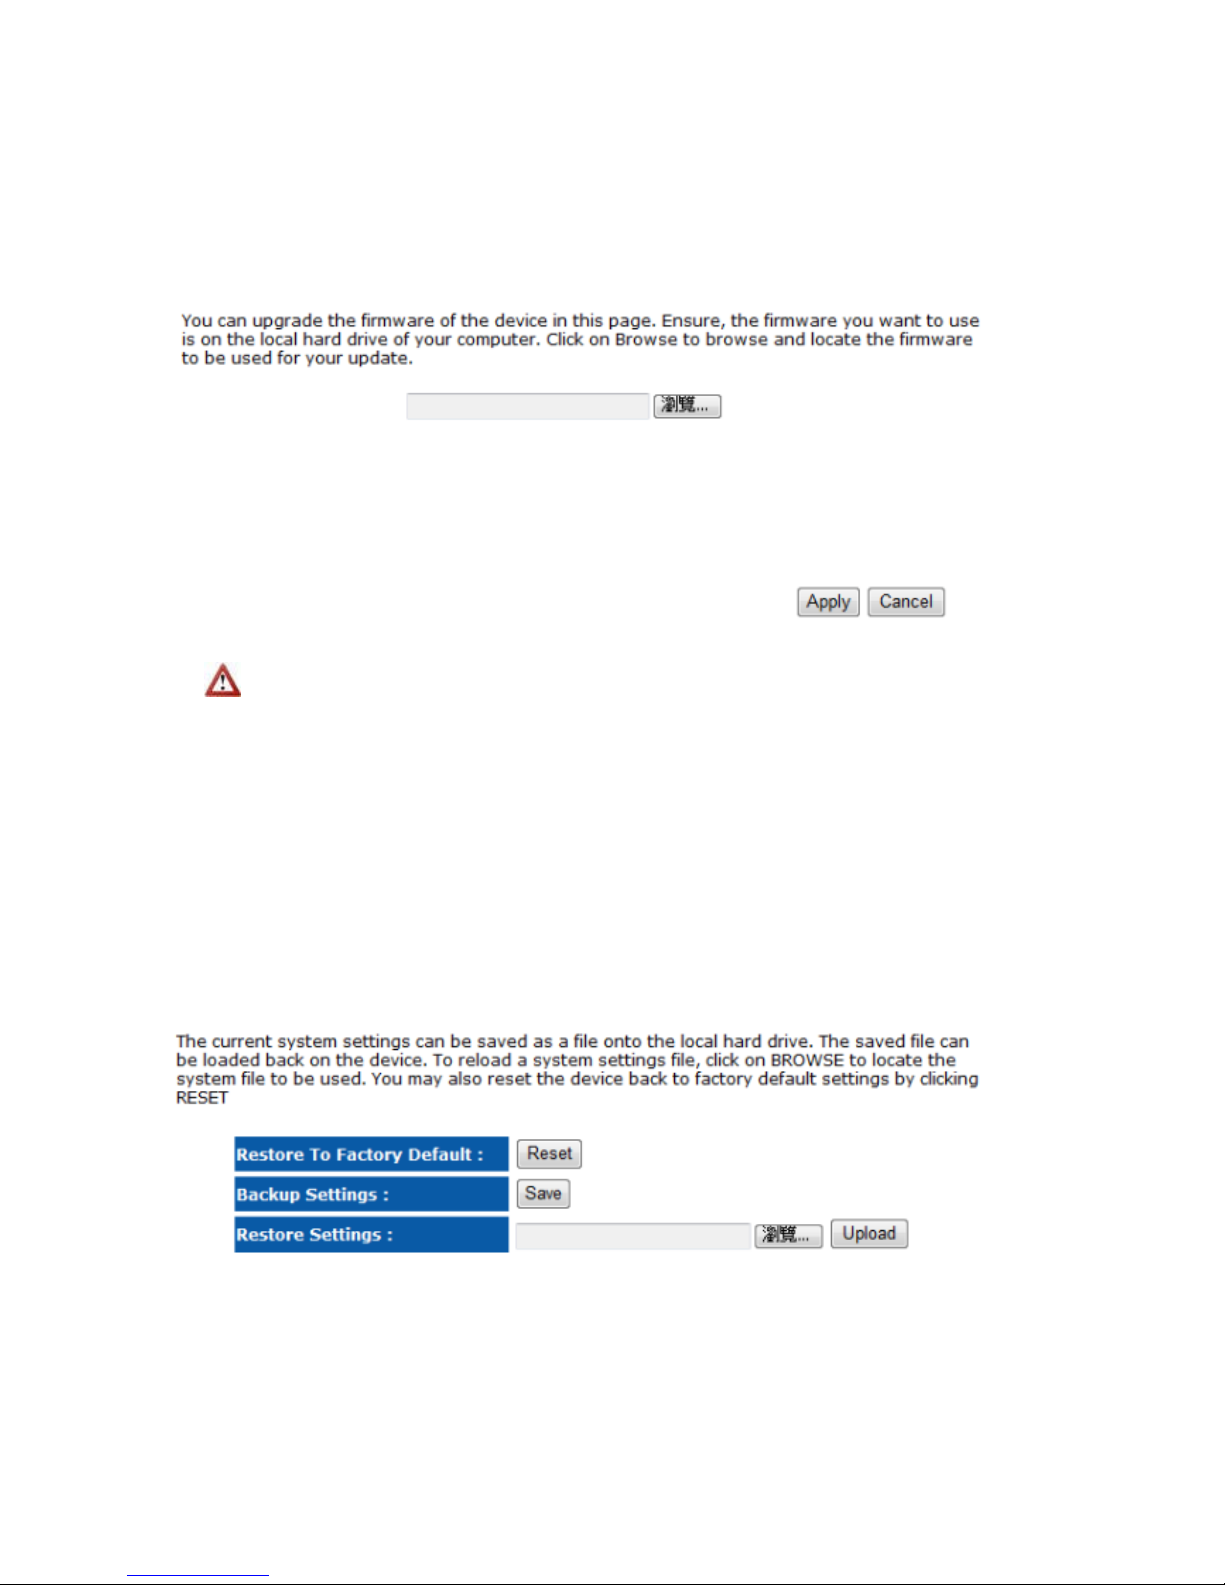
2.4.3. Firmware
Allows you to upgrade the firmware of the device in order to improve the functionality and
performance.
Ensure that you have downloaded the appropriate firmware from the vendor’s
website.
Connect the device to your PC using an Ethernet cable, as the firmware cannot be
upgraded with wireless interface.
2.4.4. Configure
This allows you to restore to factory default setting or backup/restore your current setting.
42
Page 47

2.4.5. Reset
This will only reset you devices with current configuration unaffected.
43
Page 48
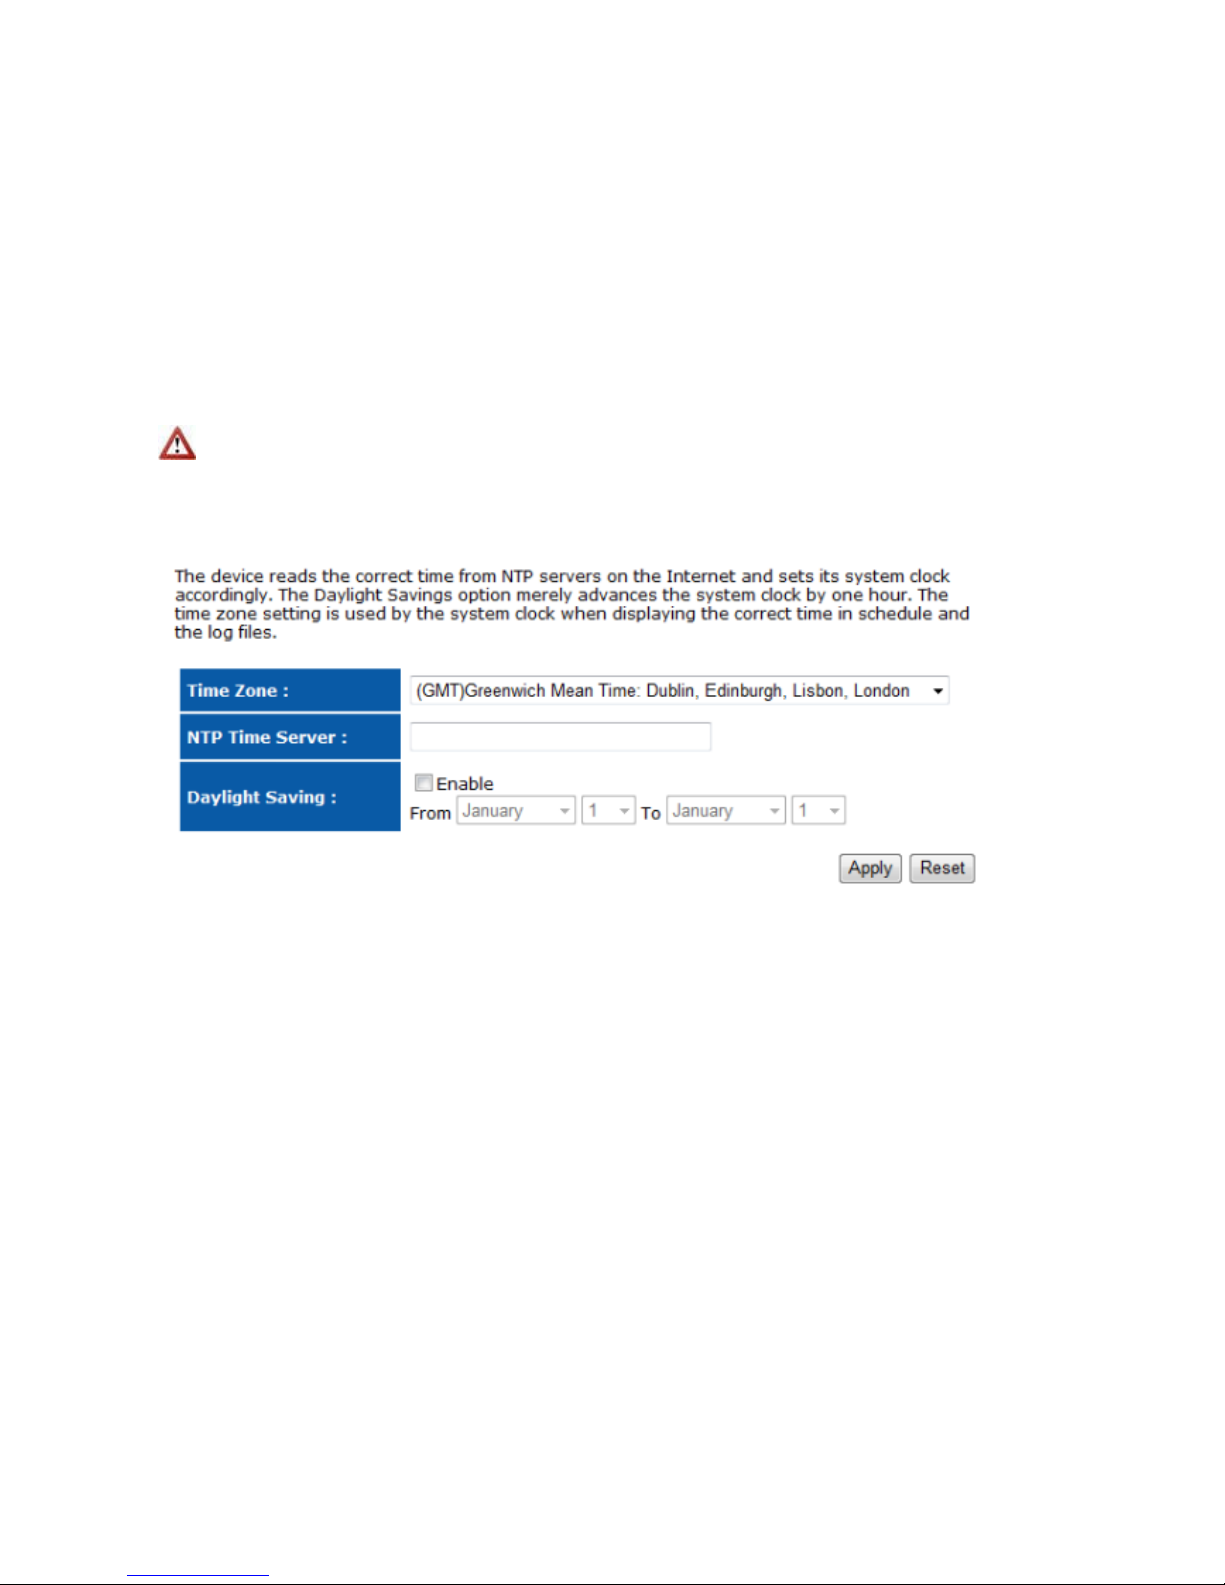
2.5. Tools
2.5.1. Time Setting
This feature allows you to configure, update, and maintain the correct time on the device’s
internal system clock as well as configure the time zone. The date and time of the device
can be configured manually or by synchronizing with a time server.
If the device losses power for any reason, it will not be able to keep its clock running,
and will not display the correct time once the device has been restarted. Therefore, you
must re-enter the correct date and time.
Time Zone: Select time zone.
NTP Time Server: Specify the NTP server’s IP address for time synchronization.
Daylight Saving: To enable daylight savings time.
44
Page 49
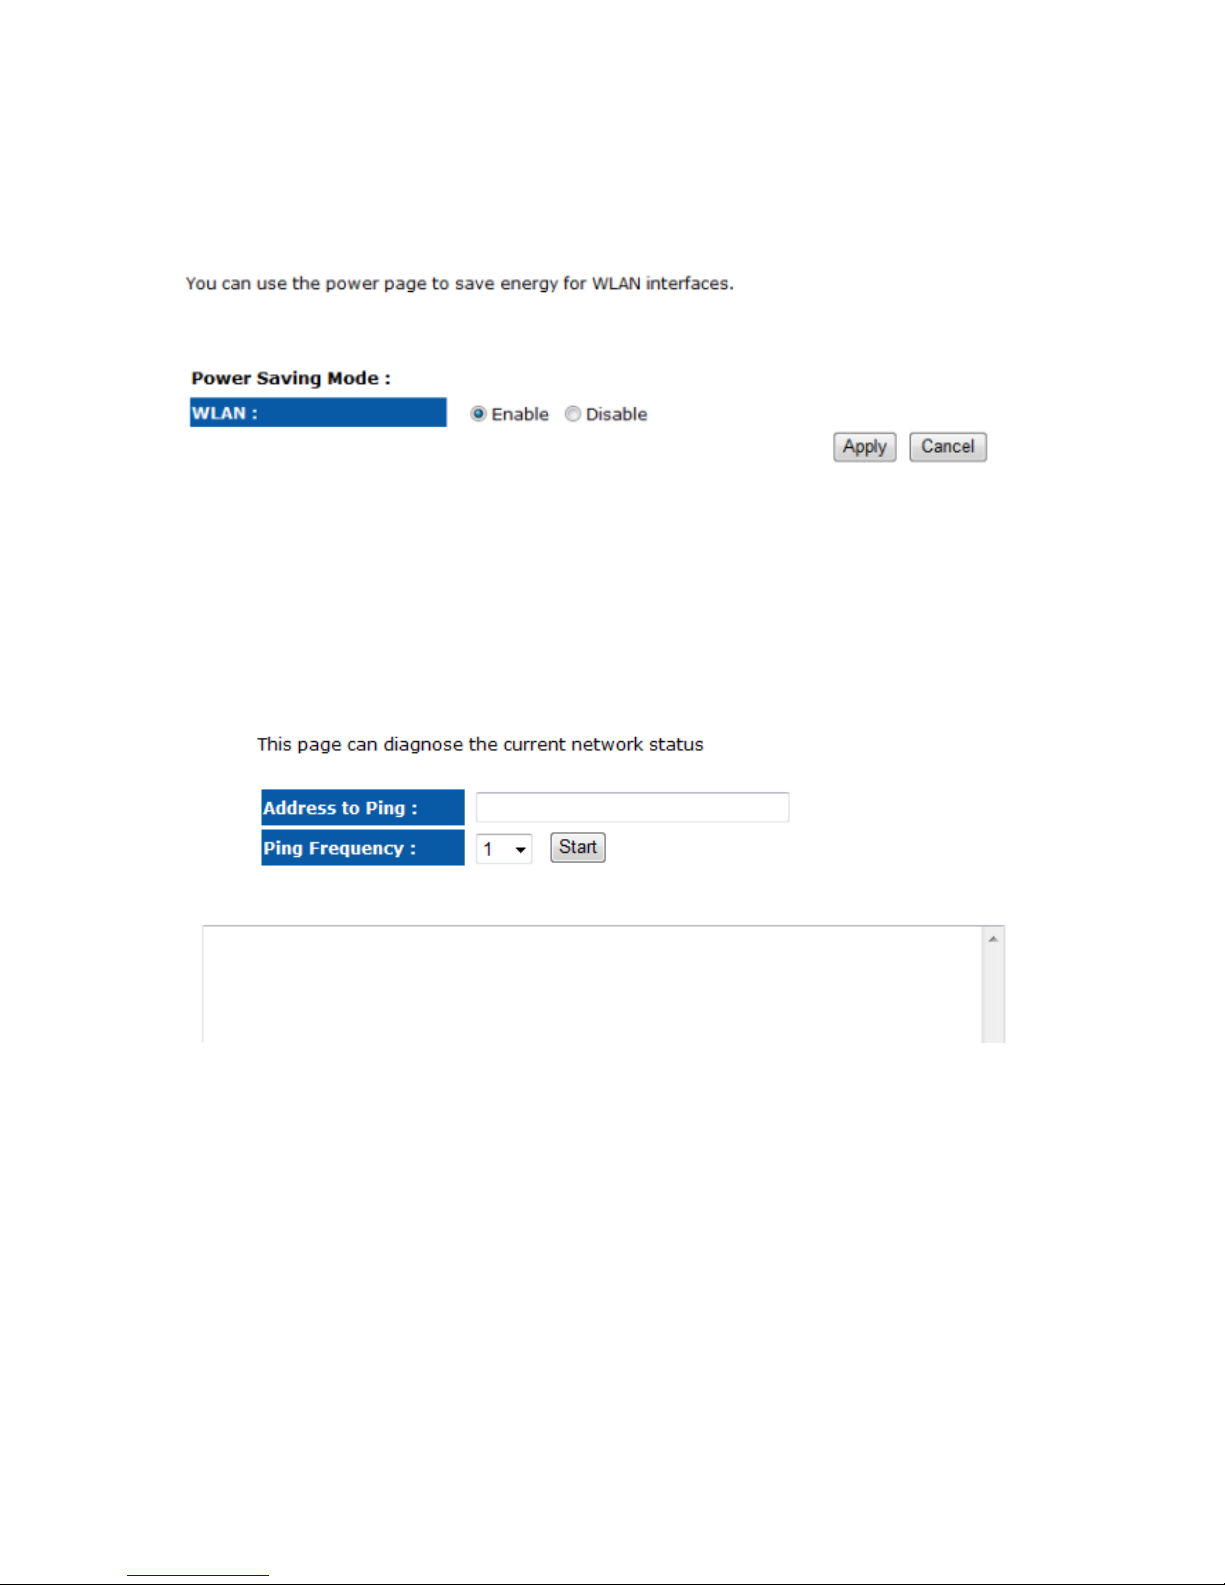
2.5.2. Power Saving
(Only work with AP Mode)
2.5.3. Diagnosis
Check whether a network destination is reachable with ping service.
45
Page 50
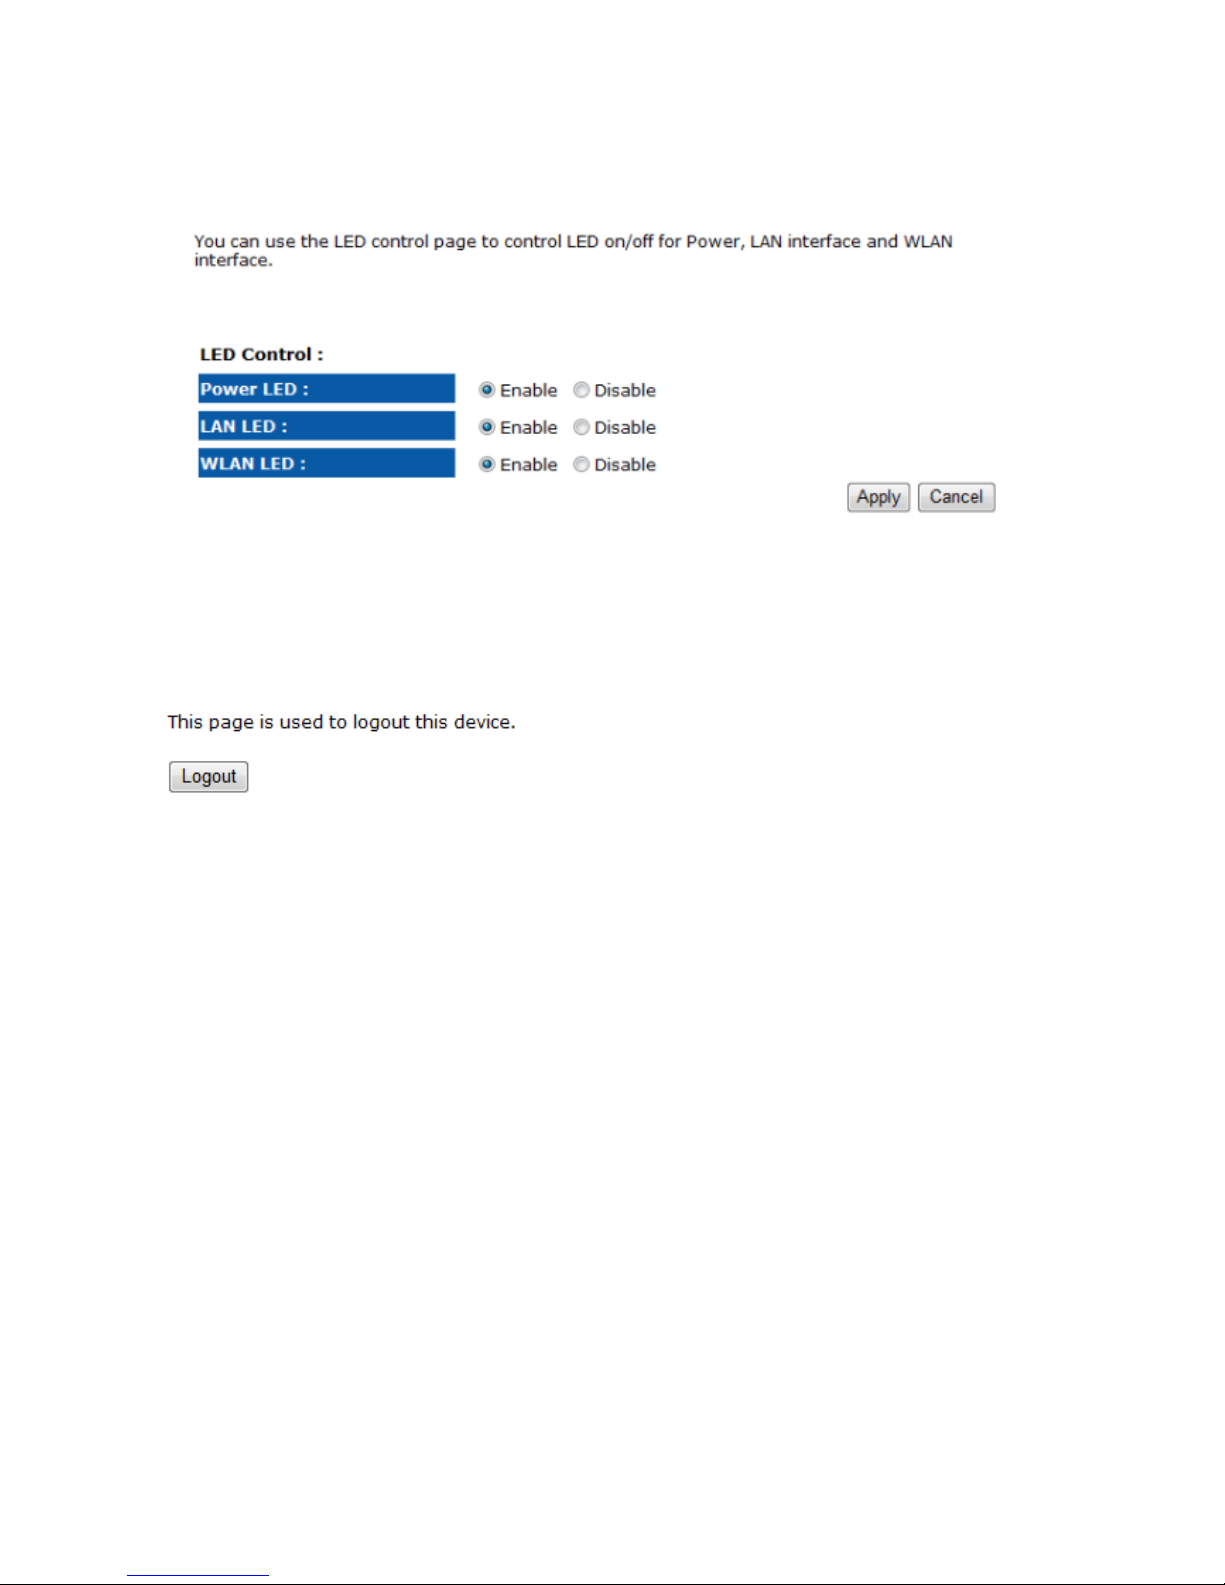
2.5.4. LED Control
2.6. Logout
46
Page 51

47
Appendix A – SPECIFICATIONS
Frequency Band 2.400~2.484 GHz
Media Access Protocol
Carrier sense multiple access with collision avoidance (CSMA/CA)
Modulation Technology
- OFDM: BPSK, QPSK, 16-QAM, 64-QAM
- DBPSK, DQPSK, CCK
Operating Channels 11 for North America, 14 for Japan, 13 for Europe
Receive Sensitivity
(Typical)
- IEEE802.11n
MCS8 @ -90dBm
MCS15 @ -70dBm
- IEEE802.11g
6Mbps@ -92dBm
54Mbps@ -72dBm
- IEEE802.11b
1Mbps@ -93dBm
11Mbps@ -89dBm
Available transmit power Maximum 16dBm
Antenna *2
Directional internal antenna
TNC type; Peak Gain = 4dBi
Page 52

48
Appendix B – FCC INTERFERENCE STATEMENT
Federal Communication Commission Interference Statement
This equipment has been tested and found to comply with the limits for a Class B digital device, pursuant to Part 15 of the FCC
Rules. These limits are designed to provide reasonable protection against harmful interference in a residential installation.
This equipment generates, uses and can radiate radio frequency energy and, if not installed and used in accordance with the
instructions, may cause harmful interference to radio communications. However, there is no guarantee that interference will
not occur in a particular installation. If this equipment does cause harmful interference to radio or television reception, which
can be determined by turning the equipment off and on, the user is encouraged to try to correct the interference by one of the
following measures:
Reorient or relocate the receiving antenna.
Increase the separation between the equipment and receiver.
Connect the equipment into an outlet on a circuit different from that to which the receiver is connected.
Consult the dealer or an experienced radio/TV technician for help.
This device complies with Part 15 of the FCC Rules. Operation is subject to the following two conditions: (1) This device may
not cause harmful interference, and (2) this device must accept any interference received, including interference that may cause
undesired operation.
FCC Caution: Any changes or modifications not expressly approved by the party responsible for compliance could void the
user's authority to operate this equipment.
IMPORTANT NOTE:
FCC Radiation Exposure Statement:
This equipment complies with FCC radiation exposure limits set forth for an uncontrolled environment. This equipment should
be installed and operated with minimum distance 20cm between the radiator & your body.
We declare that the product is limited in CH1~CH11 by specified firmware controlled in the USA.
This transmitter must not be co-located or operating in conjunction with any other antenna or transmitter.
Page 53

49
Appendix C – IC Interference Statement
Industry Canada statement:
This device complies with RSS-210 of the Industry Canada Rules. Operation is subject to the following two conditions:
(1) This device may not cause harmful interference, and (2) this device must accept any interference received, including
interference that may cause undesired operation.
IMPORTANT NOTE:
Radiation Exposure Statement:
This equipment complies with IC radiation exposure limits set forth for an uncontrolled environment. This equipment
should be installed and operated with minimum distance 20cm between the radiator & your body.
This device has been designed to operate with an antenna having a maximum gain of 2 dBi. Antenna having a higher gain
is strictly prohibited per regulations of Industry Canada. The required antenna impedance is 50 ohms.
 Loading...