

Page 1

LevelOne
VOI-7010 / VOI-7011
SIP IP Telephone
User Manual
Ver. 1.0 - 0707
Page 2

ii
Page 3

Safety
FCC WARNING
This equipment may generate or use radio frequency energy. Changes or
modifications to this equipment may cause harmful interference unless the
modifications are expressly approved in the instruction manual. The user could
lose the authority to operate this equipment if an unauthorized change or
modification is made.
This equipment has been tested and found to comply with the limits for a Class
B digital device, pursuant to Part 15 of the FCC Rules. These limits are
designed to provide reasonable protection against harmful interference in a
residential installation. This equipment generates, uses, and can radiate radio
frequency energy and, if not installed and used in accordance with the
instructions, may cause harmful interference to radio communications.
However, there is no guarantee that interference will not occur in a particular
installation. If this equipment does cause harmful interference to radio or
television reception, which can be determined by turning the equipment off and
on, the user is encouraged to try to correct the interference by one or more of
the following measures:
1) Reorient or relocate the receiving antenna.
2) Increase the separation between the equipment and receiver.
3) Connect the equipment into an outlet on a circuit different from that to
which the receiver is connected.
4) Consult the dealer or an experienced radio/TV technician for help.
CE Declaration of conformity
This equipment complies with the requirements relating to electromagnetic
compatibility, EN 55022 class B for ITE, the essential protection requirement of
Council Directive 89/336/EEC on the approximation of the laws of the Member
States relating to electromagnetic compatibility.
iii
Page 4

Table of Contents
1. INTRODUCTION ............................................................. 1
1.1. FEATURES.................................................................. 2
1.2. PACKING CONTENTS.................................................... 3
1.3. OPTIONAL................................................................... 3
2. HARDWARE DESCRIPTION.......................................... 5
2.1. LCD DISPLAY AND KEYPADS........................................ 5
2.2. FRONT PANEL ............................................................. 6
2.3. CONNECTION DIAGRAM ............................................... 8
2.4. INSTALLATION.............................................................. 9
2.5. DEFAULT SETTING..................................................... 10
2.6. RESET TO DEFAULT................................................... 10
3. WEB CONFIGURATION................................................ 12
3.1. PHONE BOOK............................................................ 14
Speed Dial Setting ......................................................... 16
3.2. PHONE SETTING ....................................................... 18
Call Forward................................................................... 19
SNTP ............................................................................. 21
Volume........................................................................... 22
Ringer ............................................................................ 24
DND (Do Not Disturb) .................................................... 25
Auto Answer................................................................... 26
Dial Plan......................................................................... 28
Flash Time..................................................................... 33
Call Waiting.................................................................... 34
Soft-key.......................................................................... 35
Hot line........................................................................... 36
Alarm.............................................................................. 37
3.3. NETWORK................................................................. 38
iv
Page 5

Network Status............................................................... 39
WAN Settings................................................................. 40
LAN Settings.................................................................. 42
DDNS Setting................................................................. 43
VLAN Settings................................................................ 45
DMZ............................................................................... 47
Virtual Server................................................................. 48
PPTP.............................................................................. 50
3.4. SIP SETTINGS .......................................................... 52
Service Domain.............................................................. 54
Codec............................................................................. 58
Codec ID........................................................................ 61
Other Settings................................................................ 62
3.5. OTHERS ................................................................... 63
Auto Config.................................................................... 64
FXO Port........................................................................ 65
MAC Clone..................................................................... 66
Tones ............................................................................. 67
Advanced....................................................................... 68
3.6. USER PASSWORD...................................................... 70
3.7. SAVE CHANGE.......................................................... 70
3.8. UPDATE.................................................................... 71
Update Firmware ........................................................... 72
Auto Update Settings..................................................... 74
Default Setting ............................................................... 75
3.9. REBOOT ................................................................... 76
4. LCD DISPLAY AND KEYPAD ....................................... 77
4.1. KEYPAD DESCRIPTIONS ............................................. 78
4.2. LCD MENU............................................................... 80
1. Phone Book......................................................... 80
2. Call History.......................................................... 80
3. Call setting .......................................................... 81
4. Network............................................................... 83
v
Page 6

5. SIP Settings......................................................... 84
6. NAT Transversal.................................................. 86
7. Administrator....................................................... 86
5. APPLICATION EXAMPLE............................................. 87
5.1. PSTN CALLING......................................................... 88
5.2. SIP-TO-SIP CALLING ................................................ 89
5.3. SIP-TO-PSTN CALLING............................................. 91
5.4. PSTN-TO-SIP CALLING............................................. 93
5.5. 3-WAY CONFERENCE CALLING................................... 95
5.6. DIRECT IP TO DIRECT IP CALLING .............................. 97
5.7. FREEWORLD DIALUP (FWD) ..................................... 98
SIP Settings................................................................... 99
Codec Setting .............................................................. 100
6. SPECIFICATION.......................................................... 101
7. TROUBLE SHOOTING ............................................... 103
7.1. DO NOT HEAR DIAL TONE?........................................ 103
7.2. CAN NOT ACCESS WEB PAGE?.................................. 103
vi
Page 7

1. Introduction
The VOI-7010 / VOI-7011 IP Phone are an LCD VoIP Phone
with SIP Protocols for Voice over IP (VoIP) applications. IP
Phone can make a VoIP call over the ADSL Internet connection,
and it provides one RJ45 WAN port for ADSL Internet
connections plus one RJ45 LAN port for Notebook PC
connection. With the embedded NAT/DHCP server, IP Phone
can be easily configured for different network diagrams by PC
Web browser and telephone keypads. This is very suitable for
ITSP (Internet Telephony Service Providers) and SOHO users
to make VoIP calls.
Moreover, with PPTP VPN client supported, user can create
secured tunnel between central office and IP Phone, make
sure your communication is safe.
VOI-7011 provides one FXO port to connect to traditional
telephone line, it allows forwarding calls from traditional
telephone line to VoIP, or vice versa.
1
Page 8

1.1. Features
SIP v1 (RFC2543), v2 (RFC3261) with MD5
authentication (RFC2069 and RFC 2617)
RJ45 x 2 for Ethernet WAN and LAN ports
ITU-T G.711, G.723, G.726, G.729A/B, VAD and CNG for
Speech Codec
ITU-T G.165/168 Echo Cancellation
LCD Display for registered IP phone number
Configurations by Web Browser and Telephone Keypads
Embedded NAT/DHCP Server
PPPoE/DHCP Client for Dynamic IP plus NAT, DNS, and
DDNS Clients
Support STUN server for NAT Traversal
Speed Dial, Call Forward/Waiting/Transfer/Hold, and
3-Way Conference Call features
Direct IP/URL Dial without SIP Proxy or Dial number via
SIP server
Phone book stores up to 140 records
VPN PPTP Client embedded
One FXO port to forwarding calls *
* Only VOI-7011 provides FXO port
2
Page 9

1.2. Packing Contents
Open the shipping cartons of the Switch and carefully unpacks
its contents. The carton should contain the following items:
¡ SIP IP Telephone
¡ Power Adaptor (12VDC/1A)
¡ Cat.5 Cable
¡ CD User Manual
If any item is found missing or damaged, please contact your
local reseller for replacement
1.3. Optional
DHM-1000 Lightweight Single Headset with Microphone
3
Page 10

4
Page 11
2. Hardware Description
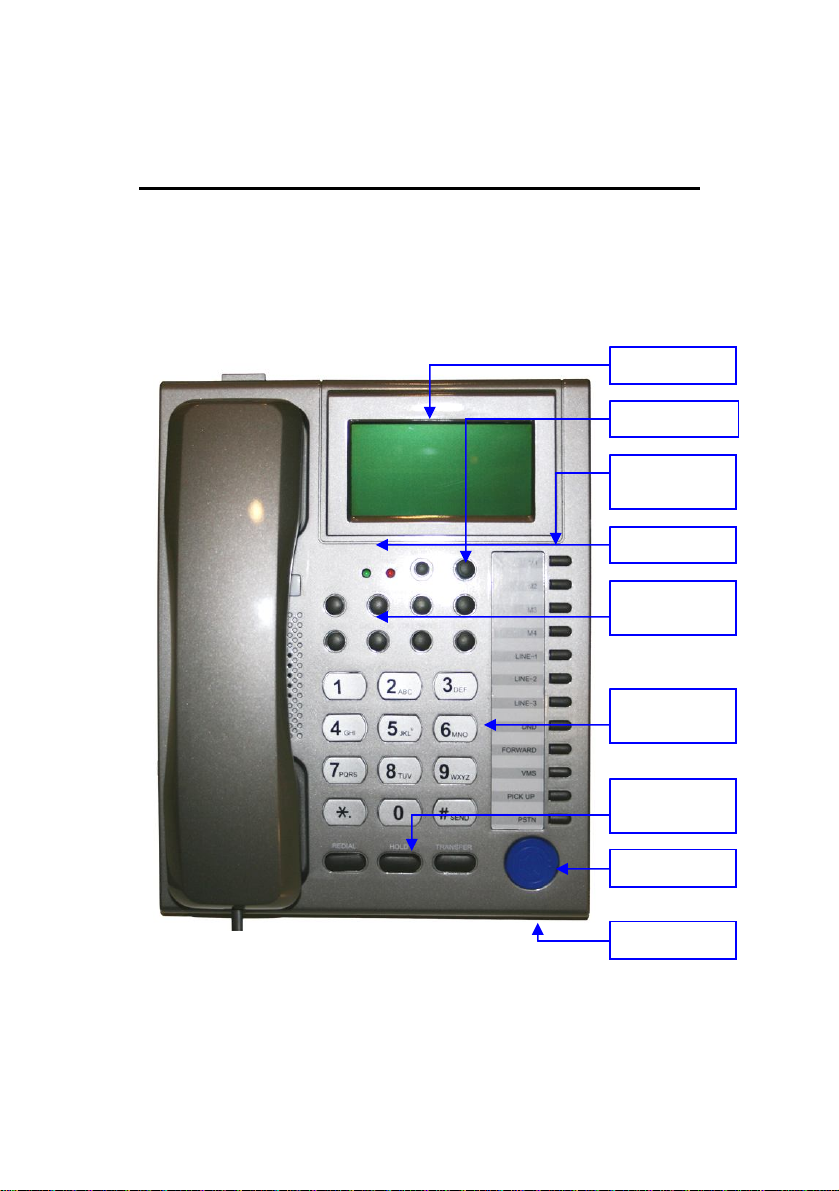
2.1. LCD Display and Keypads
The LCD display and keypads of IP Phone are as the following.
LCD Display
Menu Key
Speed Dial
Function Key
REG / VMS
Volume
Up / Down
Number
Keypads
Redial / Hold
Transfer
Handsfree
5
Microphone
Page 12
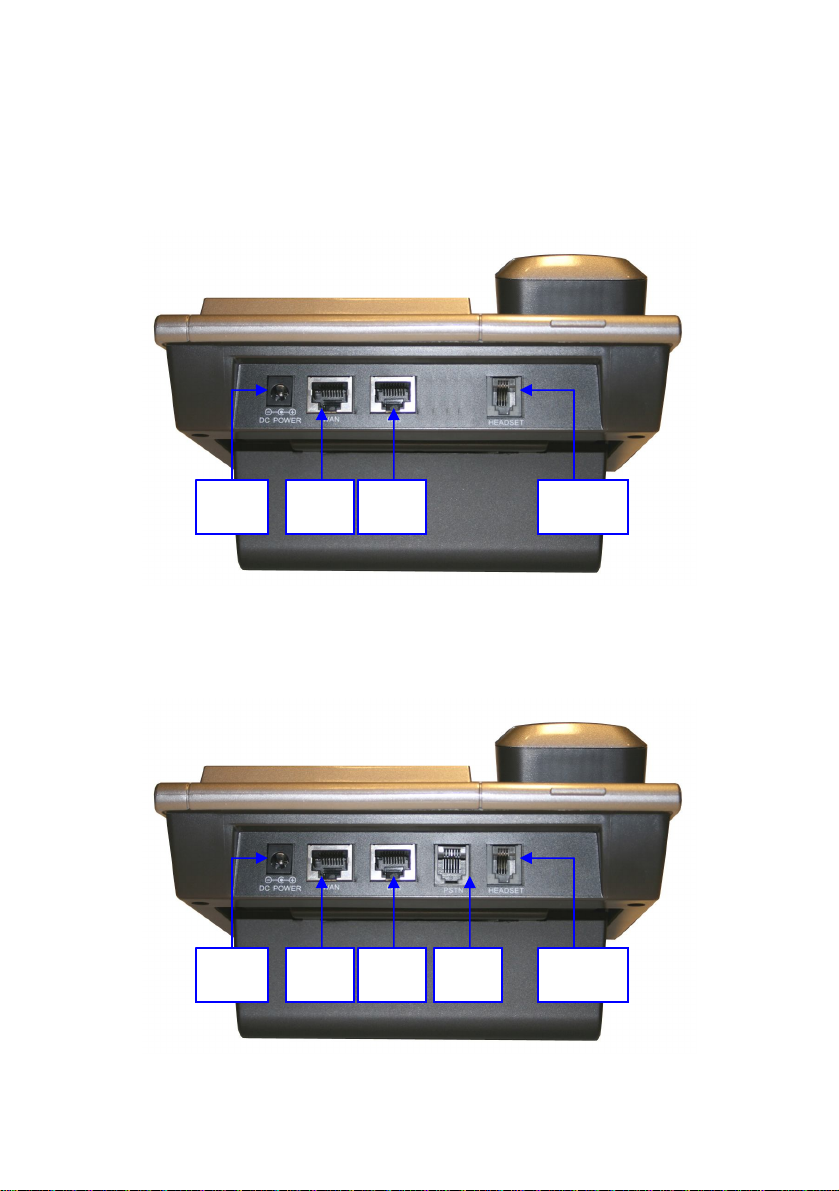
2.2. Front Panel
VOI-7010
Power
VOI-7011
Power
LAN
RJ45
LAN
RJ45
WAN
RJ45
WAN
RJ45
Headset
FXO
6
Headset
Page 13
Memory Card
Use the memory card as a name index for speed dialler or
extensions.
7
Page 14
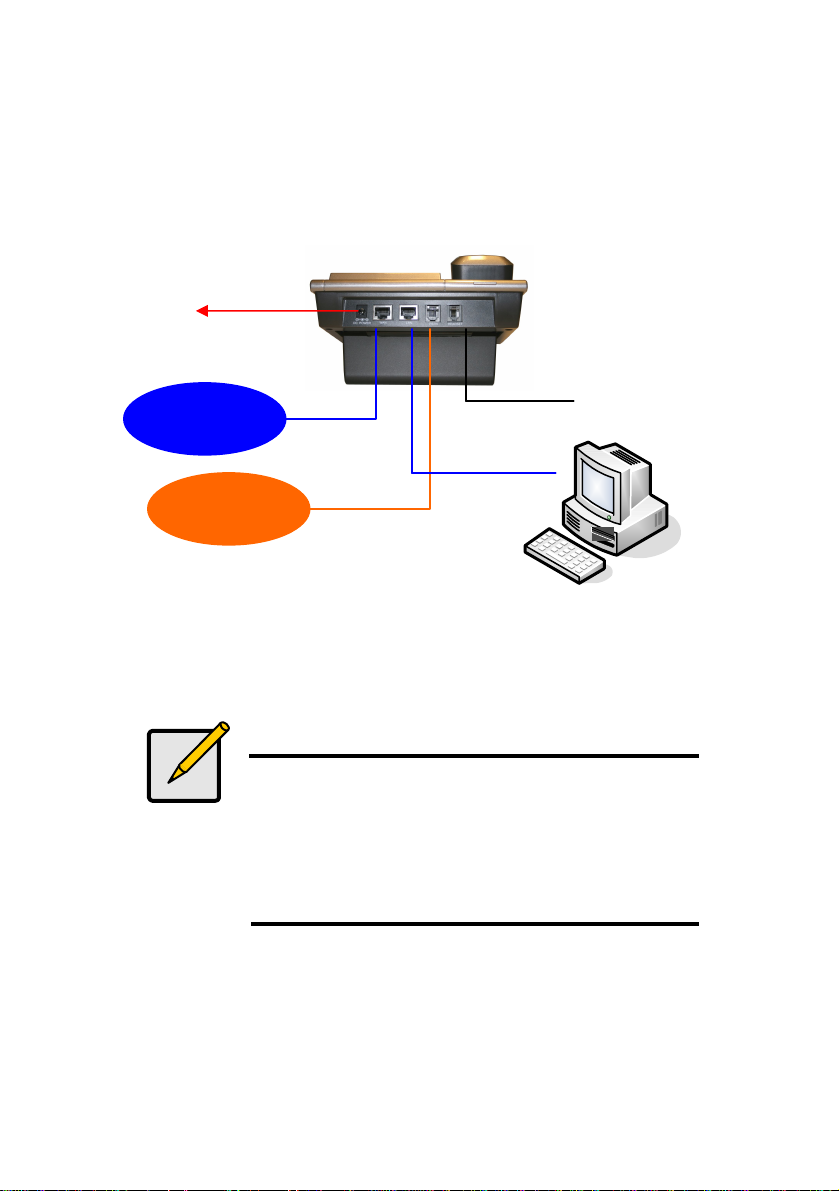
2.3. Connection Diagram
which refers to the international telephone system
Power
Internet
WAN
Optional
Headset
PSTN
LAN
Note
Public Switched Telephone Network (PSTN),
based on copper wires carrying analog voice data
Telephone service carried by the PSTN is often
called plain old telephone service (POTS).
8
Page 15

2.4. Installation
1. Connect IP Phone RJ45 WAN port to NAT Router using a
Category 5 LAN cable.
2. Connect IP Phone RJ45 LAN port to Notebook PC using
a Category 5 LAN cable.
3. Connect DC power adaptor, and the LCD panel will start
showing Loading Program! and System Initialized.
4. The LCD panel will show Date, Time and No service
without SIP registration, or <phone number> after
successful SIP registration.
5. Pick up the phone, and the LCD panel will show IP
Dialling.., and you should hear a dial tone. Please hang
up. If not, please check if the RJ45 WAN port is
connected.
6. Press MENU / 4.Network / 2.Status from the keypad to
check the IP address for IP Phone. The MENU key is
used for escape, and the ENTER key for selection. The
default IP address is 192.168.1.100. You need this IP
address for Web configurations in Chapter 7.
7. Please refer to VoIP applications examples of SIP
registrations, and register IP Phone into your SIP server.
8. The LCD panel will show Date, Time and registered
<phone number> after successful SIP registration.
9. Press the Hand-Free key, and you should hear a dial tone.
Press 123456# to call the party with the number 123456
9
Page 16

registered in the SIP server. Note that # will dial out the
number immediately. Dialling without # will not dial out
until the auto dial timer (default=5 seconds) elapsed. In a
moment, you should hear a ring back tone, and wait for
answer.
2.5. Default Setting
IP Address : 192.168.1.100 (LAN)
Login Name : root
Password : root
2.6. Reset to Default
Press MENU / 7.Administrator / 2.Default setting / 1.Load
default by using Menu and arrow keys to reset back to factory
defaults, and the LCD panel will start showing Loading
Program and System Initialized. Please use the MENU key
for escape, and the ENTER key for selection.
Press MENU / 7.Administrator / 6.Restart to reboot IP Phone.
10
Page 17

11
Page 18
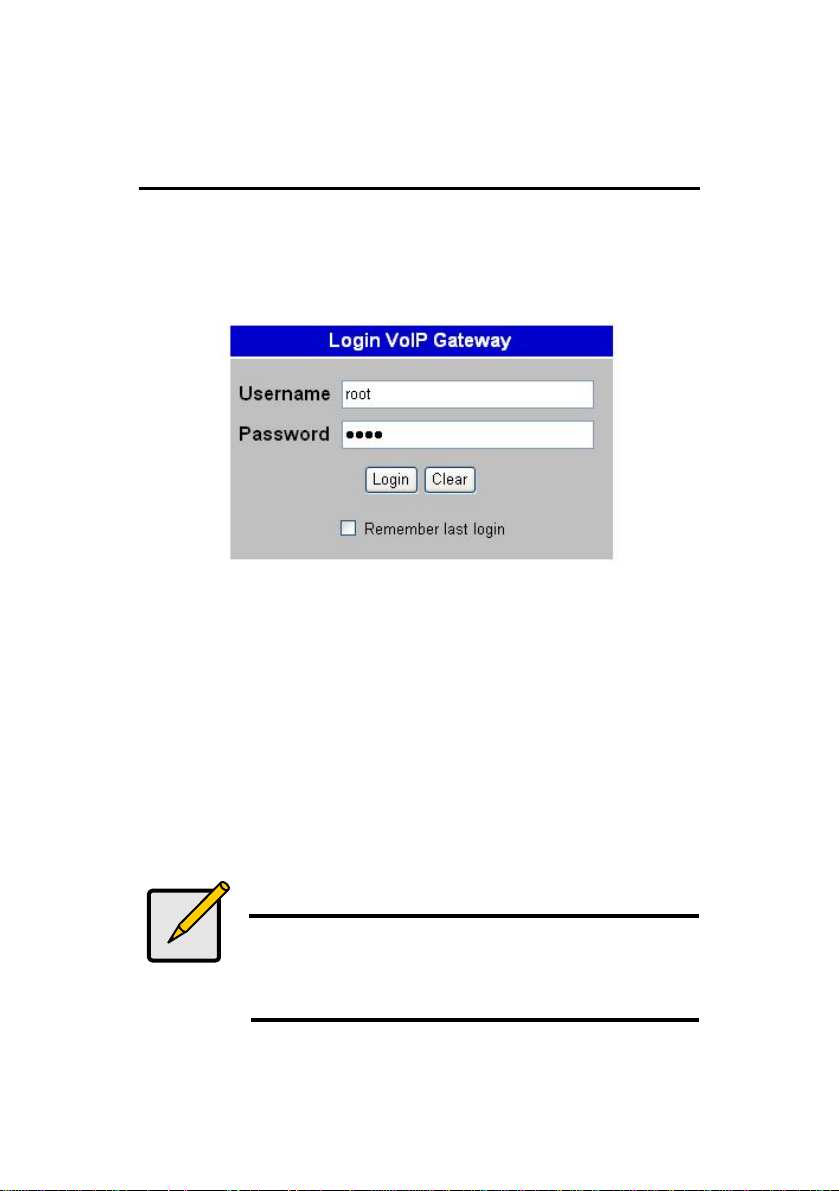
3. Web Configuration
You may enter the IP address from PC Web browser to
configure IP Phone. For example, enter http://192.168.1.100
from Web browser to display login page as follows.
Enter the username and password into the blank field. The
default settings are:
Username: root
Password: root
Click the ¡Login¡ button will enter the management information
page for system setup.
Note
Whenever you change the setting in each Web page, please
remember to click the ¡Submit¡ button in the page, and click
the ¡Save¡ button to save into the non-volatile memory and
click the ¡Reboot¡ button to activate the new settings.
12
Page 19
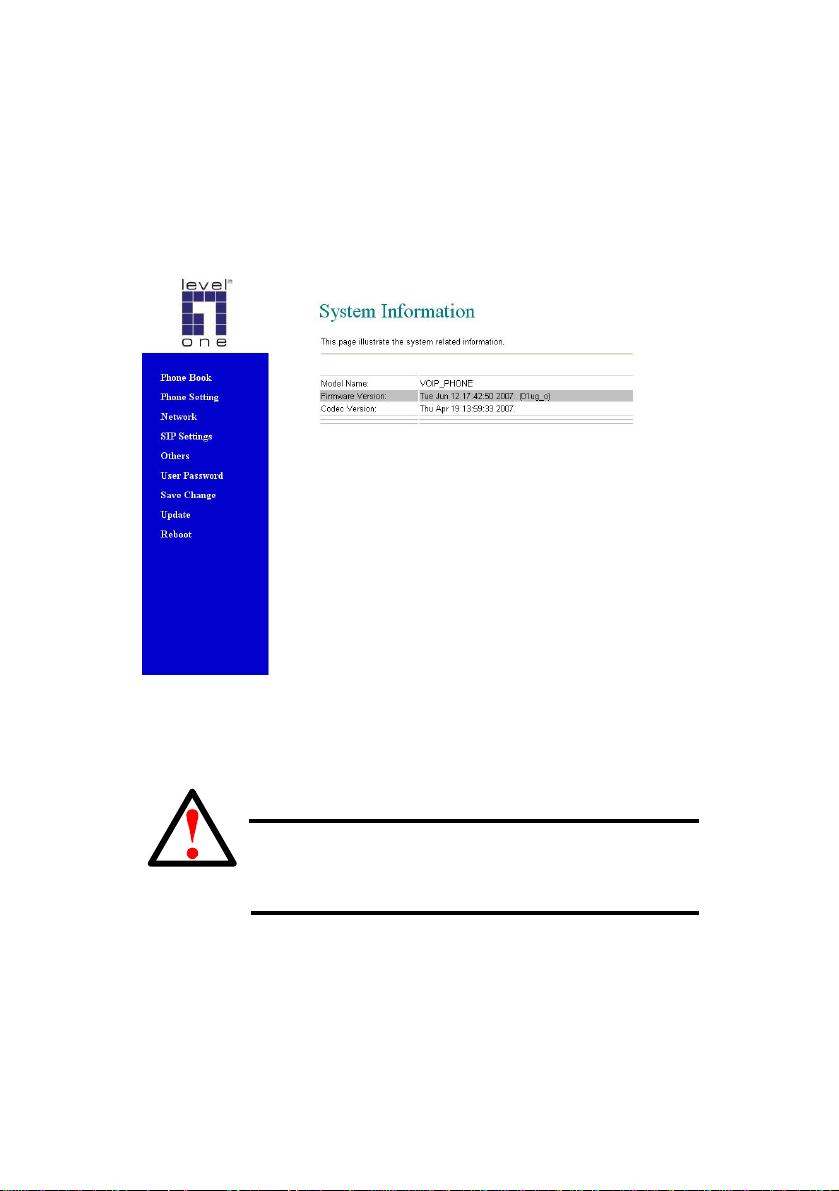
System Information
After login, you will see the system information like firmware
version, Codec, etc in this page. You may click the button list at
the left hand side to configure the IP Phone.
Caution
VOI-7010 and VOI-7011 use different firmware
format, check it carefully before upgrade
13
Page 20
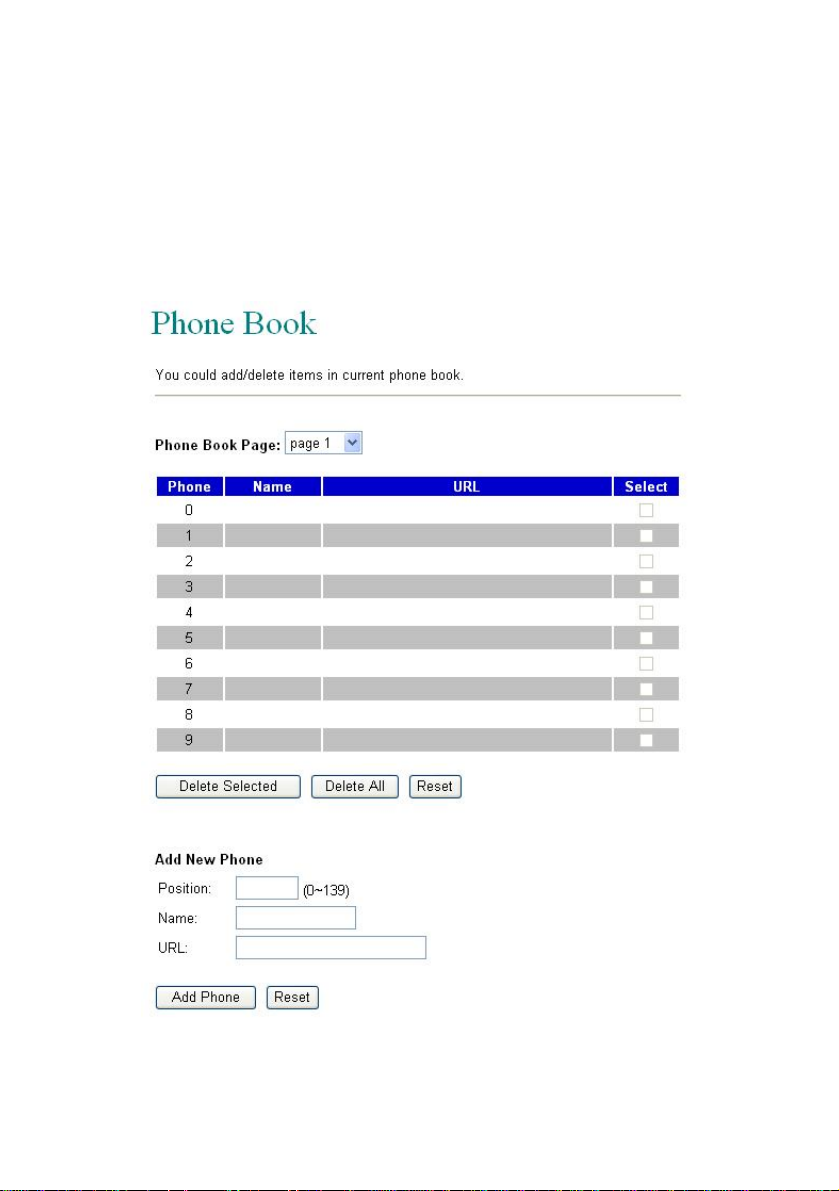
3.1. Phone Book
The Phone Book specifies pre-record phone list and speed
dialling function, it allows up to 140 records on the phone book.
14
Page 21
Input the Position (0~139), Name and URL, then click the ¡Add
Phone¡ button to enter.
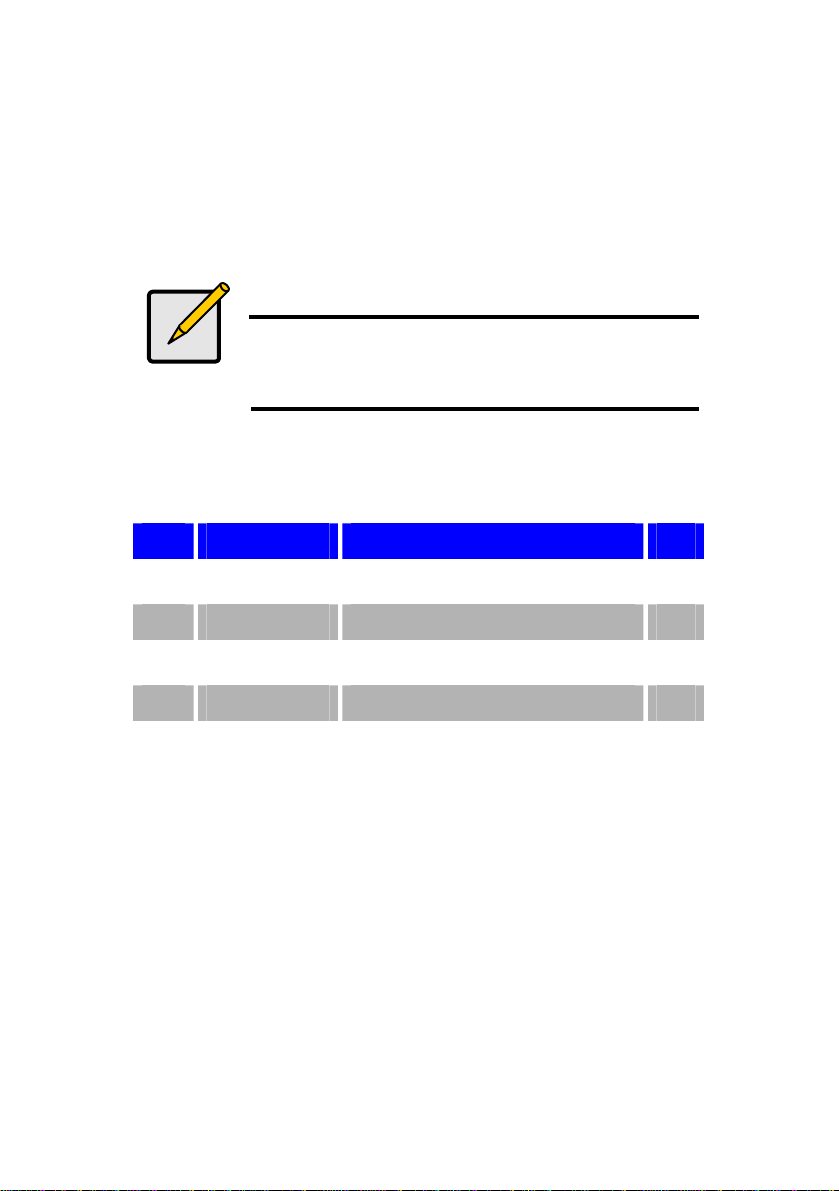
Note
URL can be either complete strings or numbers
only, it depends on your service provider.
Example
Phone
1 David 221 □
2 Bill 221090@sipcall.org □
3 Jone 221080@192.168.12.234 □
4
Name URL Select
15
Page 22

Speed Dial Setting
For Speed Dial function you can add/delete Speed Dial number
up to maximum 10 entries in Speed Dial Phone List.
16
Page 23

If you need to add a phone number into the Speed Dial list, you
need to enter the position, the name, and the phone number
(by URL type). When you finished a new phone list, just click
the ¡Add Phone¡ button.
If you want to delete a phone number, please select the phone
number you want to delete then click ¡Delete Selected¡ button.
If you want to delete all phone numbers, please click ¡Delete
All¡ button.
Example
Press [2] [#] on telephone to Speed Dial the phone number 2
immediately.
17
Page 24

3.2. Phone Setting
The sub pages are as follows; Call Forward, SNTP, Volume,
Melody (Ringer), DND, Auto Answer, Dial Plan, Flash Time,
Call Waiting, Soft-key, Hotline and Alarm functions.
Phone Setting
Call Forward
SNTP
Volume
Melody
DND
Auto Answer
Dial Plan
Flash Time
Call Waiting
Soft-key
Hot line
Alarm
18
Page 25
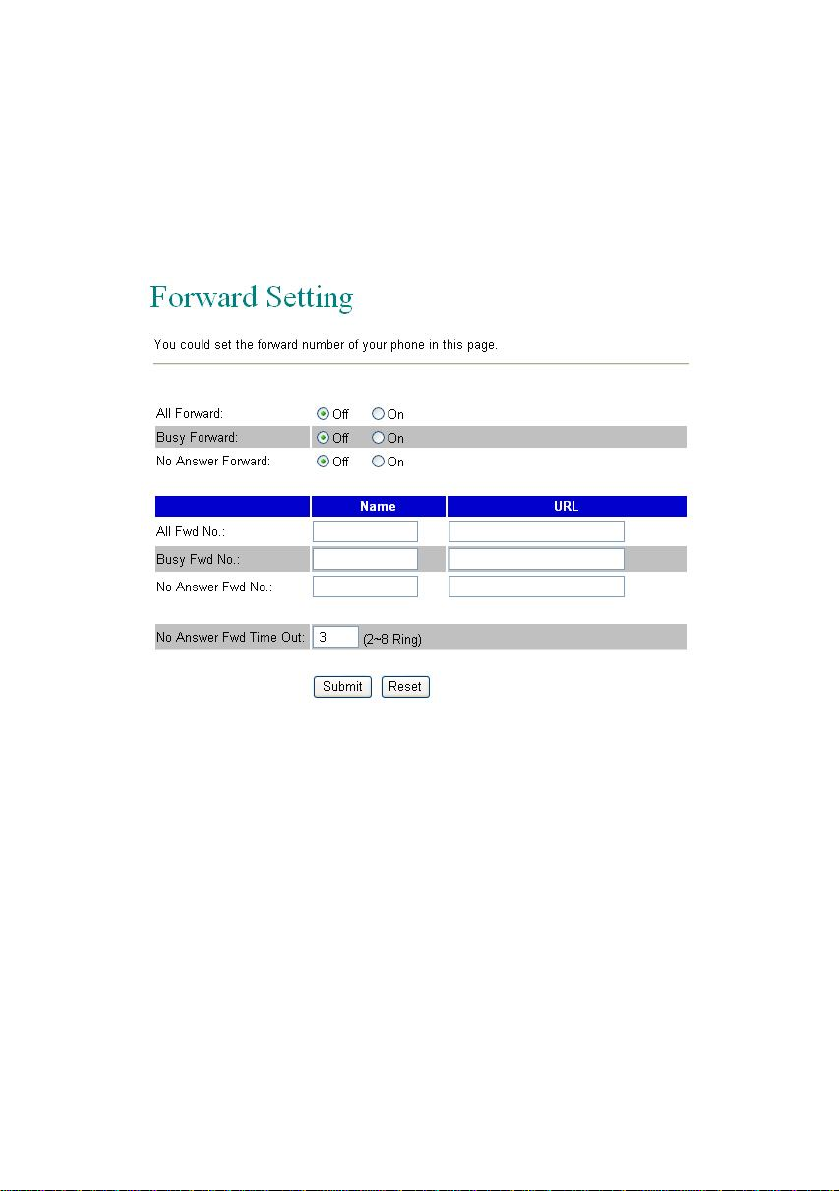
Call Forward
You can have your incoming calls forwarded to a specified
destination. You can select the forward mode and enter the
forward URL.
All Forward All incoming calls are forwarded to the
URL you choose.
Busy Forward The incoming calls are forwarded to the
URL when your line is busy.
No Answer
Forward
All incoming calls are forwarded when you
do not answer the call within specified
time period
19
Page 26

All Fwd No Specify All Forward number
Busy Fwd No Specify Busy Forward number
No Answer Fwd
No
No Answer Fwd
Time Out
Specify No Answer Forward number
Specify the time period before forward
calls
Note
You have to set the Time Out Timer to start to
forward the calls. It requires ¡Submit¡, ¡Save¡ and
¡Reboot¡ to activate new settings
20
Page 27
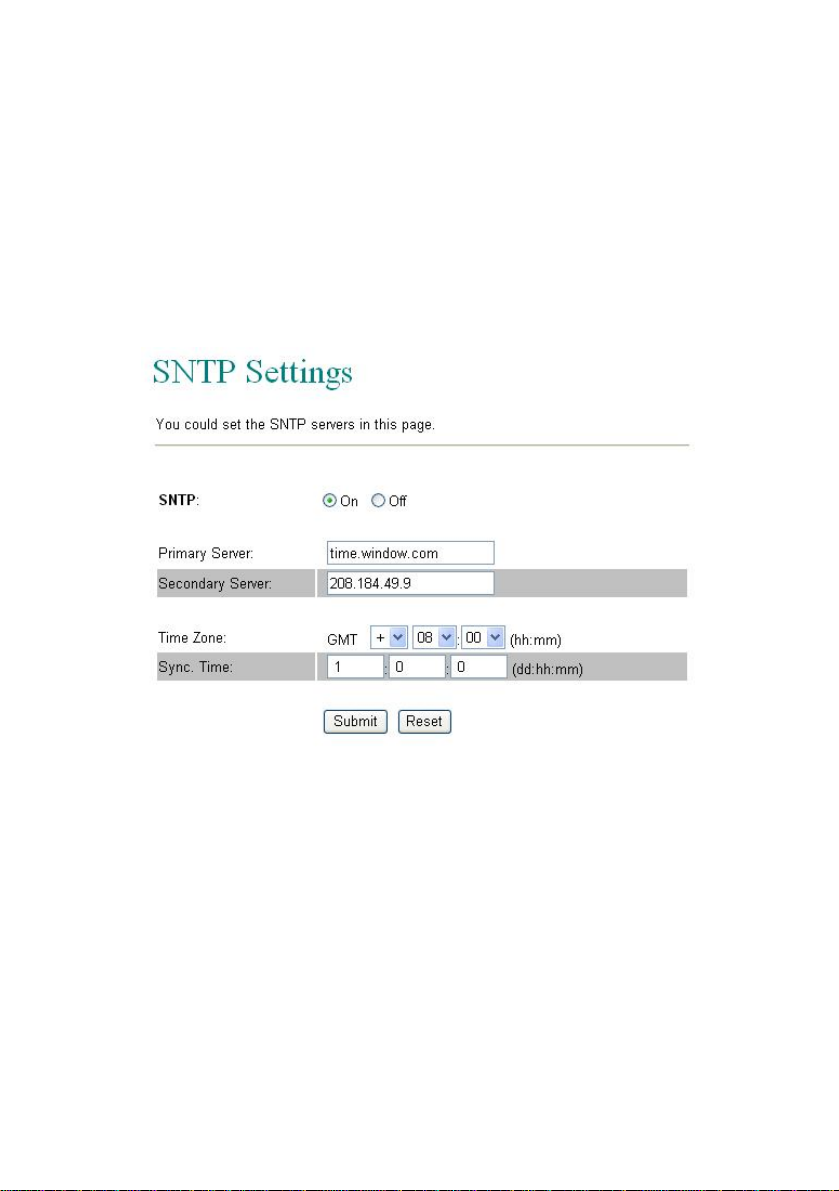
SNTP
You can setup the primary and second SNTP Server IP
Address, to get the date/time information. You may also set the
Time Zone, and how long need to synchronize again. When
you finished the setting, please click the ¡Submit¡ button.
SNTP (Simple Network Time Protocol)
SNTP is an acronym that stands for Simple Network Time
Protocol. SNTP enables IP Phone to synchronizing the clocks
over Internet Time Servers which it is very precise timekeeping
21
Page 28
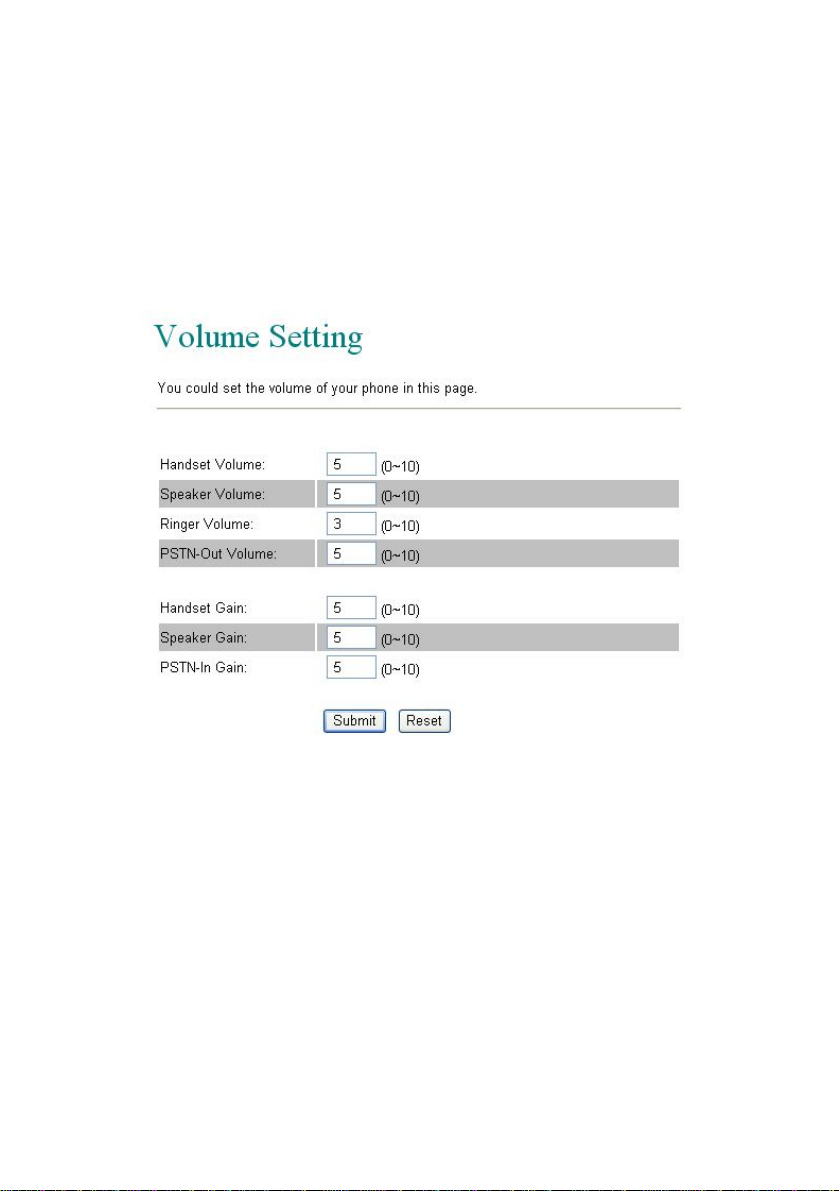
Volume
Raise or lower the sound level by using the Volume Control.
For example, if it is difficult to hear the other party's voice;
raise the Handset Volume, or If the other party has difficulty
hearing you; raise the Handset Gain level.
22
Page 29

Handset Vol. Set the volume to hear from the handset
Speaker Vol. Set the volume to hear from the Speaker
Ringer Vol. Set the volume of ringer
PSTN-Out Vol. Set the PSTN volume for you to hear
Handset Gain Set the volume send out to the other side¡s
handset
Speaker Gain Set the volume send out to the other side¡s
speaker
PSTN-In Gain Set the volume send out to the other side¡s
handset.
Note
PSTN function is only available on VOI-7011
23
Page 30
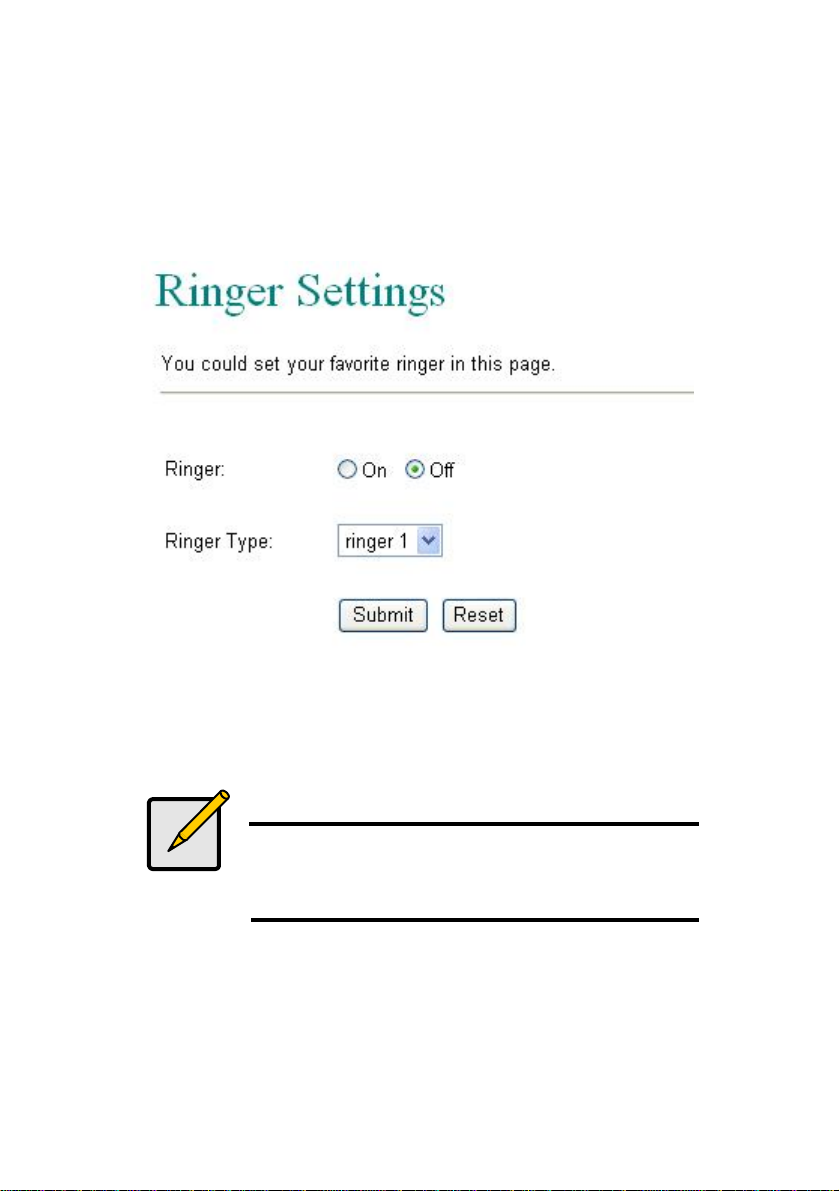
Ringer
You may set ON the ringer and select different ringer type for
Melody settings.
Note
Because the default ringer is ringer 1, it means
the setting will remain as off if you switch On and
select ringer 1
24
Page 31

DND (Do Not Disturb)
You can setup the DND (Do Not Disturb) to keep the phone
silence. You may set this feature when you are in a meeting or
busy.
DND Always All incoming call will be blocked when
enabled
DND Period Set a time period and the phone will be
blocked during the time period
When the time in ¡From¡ is greater than
¡To¡, the Block time will be from Day 1 to
Day 2.
25
Page 32

Auto Answer
You may enable the Auto Answer function to answer the
incoming call by FXO port. When the ring count exceeds the
number set in Auto Answer Counter, the FXO port will auto
answer and allow for extension calls from PSTN to VoIP and
vice versa.
For the incoming call from the Internet, the FXO port will
answer with a PSTN dial tone and allow caller to redial to
PSTN phone number. For the incoming call from PSTN, the
FXO port will answer with a short beep tone and allow caller to
redial to VoIP number. PIN Code is used to prevent from call
piracy. The caller needs to enter the right PIN code followed by
¡#¡ to get the PSTN dial tone. Incorrect PIN Code will result in
call disconnect. The Auto Answer is disabled at default.
26
Page 33

Auto Answer Enable this function to answer the
incoming calls from PSTN line
automatically. It allows user to place call to
Internet again.
Auto Answer
Counter
PIN Code
Enabled
PIN Code Set the PIN code. User requires to enter
Set time period before phone pick up the
calls automatically
Enable the call restriction from PSTN line
to VoIP or vice versa.
correct code which correspond with before
get second dial tone.
Note
This function is only available on VOI-7011
27
Page 34

Dial Plan
Dial plan and auto dial timer settings can be set in this page.
The dial plan allows you to map the dialling into an
easy-to-remember phone number system. The auto dial timer
specifies the elapse time between the dialling digits.
28
Page 35

When Drop prefix is ON and the dialling prefix is matched, the
prefix will be dropped and replaced by the rule digits and
followed by the rest of dialling digits. When Drop prefix is OFF
and the dialling prefix is matched, the rule digits will be added
before the dialling digits in accord with the settings.
Dialling Prefix Example
Note
Symbol x equals 0,1,2,3,4,5,6,7,8,9
Symbol + equals or
29
Page 36

Example 1
Drop Prefix No
Replace Rule 1 002, 8613+8662
Result:
a) Pressing 8613xxx will result in dialling out 002 8613 xxx
b) Pressing 8662xxx will result in dialling out 002 8662 xxx
Example 2
Drop Prefix Yes
Replace Rule 2 006, 002+003+004+005+007+009
Result:
a) Pressing 002xxx will result in dialling out 006 xxx
b) Pressing 003xxx will result in dialling out 006 xxx
Example 3
Drop Prefix No
Replace Rule 3 009, 12
Result:
a) Pressing 12xxx will result in dialling out 009 12 xxx
30
Page 37

Example 4
Drop Prefix No
Replace Rule 4 007, 5xxx+35xx+21xx
Result:
a) Pressing 5xxx will result in dialling out 007 5 xxx
b) Pressing 534 will result in dialling out 534 (Not matched)
c) Pressing 35xx will result in dialling out 007 35 xxx
d) Pressing 356 will result in dialling out 356 (Not matched)
e) a) Pressing 35668 will result in dialling out 35668 (Not matched)
Example 5
Dial Now: *xx+#xx+11x+xxxxxxxx
1) Pressing *00, *01, *02, ..., *99 will result in dialling out the
same *xx immediately.
2) Pressing #00, #01, #02, ..., #99 will result in dialling out the
same #xx immediately.
3) Pressing 110, 111, ..., 119 will result in dialling out the same
11x immediately.
4) Pressing 12345678 (8 digits) will result in dialling out
12345678 immediately. This implies that the phone
numbers with 9 or more digits are prohibited.
31
Page 38

Auto dial Timer The inter-digit timer. Default is 5 seconds
Use # as send
key
Use * for IP
dialling
Enable or disable ¡#¡ key as send key
Enable or disable ¡*¡ key as IP dialling key
32
Page 39

Flash Time
Pressing quick on and off-hook (Flash) allows you to use
special features of your host PBX such as transferring an
extension call, or accessing optional telephone services such
as Call Waiting. The flash time depends on your telephone
exchange or host PBX.
Note
The Flash Time depends on your telephone
exchange or Telephone Company. Check system
administrator for more information
33
Page 40

Call Waiting
You can enable the call waiting function in this page. It allows
answering another coming call by pressing flash key while
holding the current call. You may switch back to previous call
by pressing flash key again.
Note
Flash key means On-hook and Off-hook in short
period without hanging up the call.
34
Page 41

Soft-key
You can configure the pickup and VMS key setting to co-work
with IP PBX in this page. These keys are corresponding with
Function keys [VMS] and [Pick Up].
IP Phone may pick up the incoming call for another IP Phone
when registered in the same IP PBX. When you hear other IP
Phone is ringing, you may pick up you phone and press [Pick
Up] function key to answer for that IP Phone. You may press
the [Speaker Phone] key then [Pick Up] function key as well.
When registered in IP PBX with incoming voice message, the
LED VMS will start flashing. To hear the message you may
press the [Speaker Phone] key then [VMS] function key. You
may also pick up the handset and press [VMS] function key.
35
Page 42

Hot line
When Hot Line mode is enabled, you just lift up the handset
and the IP Phone will call the Hot line number immediately. The
default for Hot Line mode is disabled.
Note
Hot-Line Mode is very convenient for IP calling to
Public Switching Telephone Network (PSTN)
number through FXO Gateway
36
Page 43

Alarm
You can set the IP Phone as Alarm clock, default is disabled.
IP Phone starts ringing at time you configured, turn it off by
press [Speaker Phone] or Off-hook.
Note
IP Phone rings different frequency while Alarm
goes off.
37
Page 44

3.3. Network
You can check the Network status, and configure the WAN,
LAN, DDNS, VLAN, DMZ, Virtual Server and PPTP settings in
this section.
Network
Status
WAN
LAN
DDNS
VLAN
DMZ
Virtual Server
PPTP
38
Page 45

Network Status
You can check and show the current Network settings in this
page. Interface 0 shows WAN port status, and Interface 1
shows LAN port status.
39
Page 46

WAN Settings
The WAN setting is used to configure the Ethernet port
connects to the ADSL Modem/Router, or Ethernet switch.
40
Page 47

LAN Model The default setting is NAT mode for IP
Phone, and this enables the embedded
NAT router between the LAN port and PC
port. You may change to Bridge Mode if
you need NOT use the embedded NAT
router. When setting to Bridge Mode, the
WAN and the LAN ports will be bridged.
IP Type There are three selections for WAN: Fixed
IP, DHCP Client, and PPPoE modes. This
WAN setting is for the LAN port when set
in NAT mode. The WAN default is at
DHCP Client Mode.
For Fix IP Mode, please make sure the IP
address. Net Mask, Gateway, and DNS
settings are suitable in your current
network environment.
For PPPoE Mode, you have to enter
correct username and password to get the
IP address from your Internet Service
Provider.
41
Page 48

LAN Settings
This embedded NAT is useful for ADSL users without NAT
router, and it separates the WAN port from the LAN port to
perform router IP address translation. Connect your PC to the
LAN port, set your PC as DHCP Client mode, and then the PC
will get an IP address from the IP Phone automatically.
Note
You must set LAN Mode as NAT under WAN
Settings, otherwise the DHCP Server will not work
42
Page 49

DDNS Setting
DDNS (Dynamic DNS) A service that lets anyone on the
Internet gain access to resources on your local network when
the Internet address of that network is constantly changing.
When it detects that the IP address of the cable or DSL modem
has changed, it notifies the DDNS service provider of the new
address.
43
Page 50

You need to have a DDNS account before configuring the
DDNS setting. Usually, most of the VoIP applications are
working with a SIP Proxy Server. Nonetheless, you may have a
DDNS account with a public IP address, and others can call
you via the DDNS account.
Example
In this example, the other user can place VoIP calls to your IP
Phone directly by your domain address.
44
Page 51

VLAN Settings
This function provides packets control over LAN, it must work
with Ethernet switch supported. 802.1Q-compliant can be
configured to transmit tagged or untagged frames. A tag field
containing VLAN (and/or 802.1p priority) information can be
inserted into an Ethernet frame.
VLAN Packets If you enable VLAN Packets and set the
VID, User Priority, and CFI, then all the
incoming packets will be checked with the
IP Address and the VID.
VID
(802.1Q/TAG)
VLAN identifier (VID) between one and
4,094 into each frame. A VID must be
assigned for each VLAN.
45
Page 52

User Priority
(802.1P)
CFI CFI (Canonical format indicator). A 1-bit
Eight classes are defined by 802.1p.
Highest priority is seven, which might go
to network-critical traffic such as Routing
Information Protocol.
Values five and six might be for
delay-sensitive applications such as
interactive video and voice
indicator that is always set to zero for
Ethernet switches. CFI is used for
compatibility between Ethernet and Token
Ring networks. If a frame received at an
Ethernet port has a CFI set to 1, then that
frame should not be bridged to an
untagged port.
Note
The prioritization specification works at the media
access control (MAC) framing layer of the OSI
model. To be compliant with 802.1p, Layer 2
switches must be capable of grouping incoming
LAN packets into separate traffic classes.
46
Page 53

DMZ
In computer networks, a DMZ (demilitarized zone) is a
computer host or small network inserted as a "neutral zone"
between a company's private network and the outside public
network
Enable the DMZ and enter the Host IP address into DMZ Host
IP.
47
Page 54

Virtual Server
The IP Phone can be configured as a virtual server. This
function is ideal for that remote users accessing Web or FTP
services via the public IP address can be automatically
redirected to local servers in the LAN. It also capable of
port-redirection, when incoming traffic to a particular port may
be redirected to a different port on the server computer.
48
Page 55

For example, if use runs ftp server on the LAN, IP address is
192.168.1.8, port number is 21 as ftp standard. In this case,
you can access your local network ftp server via Internet
through Virtual Server enabled IP Phone.
Application Diagram
49
Page 56

PPTP
Point-to-Point Tunnelling Protocol (PPTP) is a network protocol
that enables the secure transfer of data from a remote client to
a private enterprise server by creating a virtual private network
(VPN) across TCP/IP-based data networks. PPTP supports
on-demand, multi-protocol, virtual private networking over
public networks, such as the Internet. This IP Phone has
built-in PPTP Client which allows connection to a PPTP based
Virtual Private Network (VPN), such as VPN Broadband Router
or IP-PBX with PPTP function built-in.
50
Page 57

PPTP Select On to enable PPTP function
PPTP Server Enter PPTP Server¡s IP address or URL
PPTP
Username
PPTP
Password
Enter login user name
Enter password
Application Diagram
Note
This PPTP function is designed to connect to
VOI-9300 which enables secured tunnel between
the Phone and IP PBX.
51
Page 58

3.4. SIP Settings
You can setup the Service Domain, Port Settings, Codec
Settings, RTP Setting, RPort Setting and Other Settings for SIP
Proxy Server registrations in this page.
SIP Setting
Service Domain
Codec
Codec ID
Other
52
Page 59

Understanding the SIP
SIP, the Session Initiation Protocol, is a signalling protocol for
Internet conferencing, telephony, presence, events notification
and instant messaging. SIP was developed within the IETF
MMUSIC (Multiparty Multimedia Session Control) working
group, with work proceeding since September 1999 in the IETF
SIP working group.
SIP enabled PBXes and/or SIP User Agents utilize the Session
Initiation Protocol(SIP) to interconnect and to establish voice
sessions between each other over an IP Network. SIP
Telephony has emerged as a viable alternative to legacy (TDM)
and fixed-line circuits for the establishment and transmission of
voice communications.
53
Page 60

Service Domain
You may register up to three SIP accounts in the IP Phone. You
can call your friends via firstly enabled SIP account and receive
the phone calls from all the three SIP accounts. It supports 3
services, allow user register on different service providers.
Click ¡Active¡ ON to enable the Service Domain, then enter the
following items:
54
Page 61

Realm (1 ~ 3)
Active Enable the SIP account
Display Name Enter the name you want to display
User Name Enter the User Name given by your ITSP
Register Name Enter the Register Name given by your
ITSP
Register
Password
Domain Server Enter the Domain Server given by your
Proxy Server Enter the Proxy Server given by your ITSP
Outbound
Proxy
Status Shows register status
When it shows ¡Registered¡ in the Register Status, it indicates
a successful registration to the ITSP, and the ¡REG¡ LED will
On. The IP Phone is then ready for VoIP call. If you have more
Enter the Register Password given by
your ITSP
ITSP
Enter the Outbound Proxy of ITSP. If not
provided, you may skip this
than one SIP account, please follow the steps to register to
other ITSPs.
Note
After you finished the setting, please click the
¡Submit¡ button and click Save Change
55
Page 62

DTMF Setting You can setup the options for DTMF
function in this page. The options include
RFC2833 (Outband DTMF), Inband
DTMF, and Send DTMF SIP info. The
default is set at Inband DTMF. If you are
making two-stage callings for extension to
PSTN, you may need to select Outband
DTMF option.
Port Setting The SIP Port and RTP Port numbers are
default at 5060 and 60000, respectively.
The RTP port number must be even
number. If you have more than one VoIP
phones under the same NAT router, it is
recommended that different RTP port
numbers be assigned to each of IP
Phones.
56
Page 63

STUN Setting The STUN function must be enabled to
work properly behind NAT when
registered in SIP server. You may enter
the STUN server IP address and the
STUN port number. Please check your
ITSP for STUN information.
57
Page 64

Codec
You can setup the Codec priority, RTP packet length, and VAD
function in this page. Codecs basically convert analog signals
to digital form and vice versa.
58
Page 65

Codec Priority Adjust Codec priority to meet your
requirement, lower number shows higher
priority.
RTP Packet
Length
G.723 5.3K Enables 5.3K bit/s rate when use g723
Voice VAD VAD (Voice Activity Detection) is used to
One of the most important factors is how much bandwidth is
used for each VoIP call. The higher the CODEC bandwidth is,
the higher the cost of each call across the network will be.
Following is a list of CODECs and their associated bandwidth:
G.711 The G.711 pulse code modulation (PCM) coding scheme
Adjust Codec g711, g729 and g723 packet
length
reduce the transmission rate during
inactive speech periods. VAD classifies
the input signal into active speech,
inactive speech or background noise.
Based on the VAD decisions.
uses the most bandwidth. G.711 takes samples 8000 times per
second, each of which is 8 bits in length, for a total bandwidth
of 64,000 bps.
G.726 The G.726 adaptive differential pulse code modulation
(ADPCM) coding schemes use somewhat less bandwidth.
While each coding scheme takes samples 8000 times per
second like PCM, G.726 ADPCM uses 4, 3, or 2 bits for each
59
Page 66

sample, thereby resulting in total required bandwidths of
32,000, 24,000, or 16,000 bps.
G.729 The G.729 and G.729A conjugate structure algebraic
code excited linear prediction (CS-ACELP) coding scheme
also compresses PCM using advanced codebook technology.
It uses 8000 bps of total bandwidth.
G.723 The G.723 and G.723A multipulse maximum likelihood
quantization (MPMLQ) coding schemes use a look-ahead
algorithm. These compression schemes result in a required
bandwidth of 6300 or 5300 bps.
GSM GSM (Global System for Mobile communications) is a
cellular phone system standard popular outside the USA. The
speech signal is divided into blocks of 20 ms. These blocks are
then passed to the speech codec, which has a rate of 13 kbps,
in order to obtain blocks of 260 bits.
Note
The network administrator should balance the
need for voice quality against the cost of
bandwidth in the network when choosing
CODECs.
60
Page 67

Codec ID
You can setup the Codec ID in this page. You need to follow
the ITSP suggestion to setup these items.
Note
Two VoIP devices with different Codec ID will
cause the interoperability issue. If you are talking
with others got some problems, you may ask the
other one what kind of Codec ID he use, then you
can change your Codec ID.
61
Page 68

Other Settings
features, please ask your network administrator or
You can setup the Hold by RFC and QoS in this page. To
change these settings please follows your ITSP information.
The QoS is used to set the voice packet priority. Higher value
other than zero will get higher priority for the voice packets in
Internet. However, the QoS function still needs to cooperate
with the other Internet devices. SIP Expire Time depends on
your ITSP required.
For more information about these advanced
service provider help desk.
62
Note
Page 69

3.5. Others
Auto Configuration function can be used to download the
original configurations stored in the TFTP or FTP server.
Others
Auto Config
FXO Port
MAC Clone
Tones
Advanced
63
Page 70

Auto Config
This feature allows service provider to provision their
customer's IP Phone, end-to-end. By employing a TFTP / FTP /
HTTP server, the provisioning server writes the configuration
files needed to automatically configure the IP Phone. Before
enabling this auto configuration, you must select Bridge ON
and Fixed IP type in Network settings.
Note
Auto Config is idea for ITSP or large network
group to deploy VoIP devices easily
64
Page 71

FXO Port
The FXO Port is to configure and match the PSTN line
impedance for each country. This setting relates to your local
telecom or Private Branch eXchange (PBX) system
Note
FXO Port setting is for the VOI-7011 only
65
Page 72

MAC Clone
It is not recommended that you change the default
The MAC Clone function is to clone the MAC when only one
MAC is available from ITSP. Enable it to copy the MAC address
of the Ethernet Card installed by your ISP and replace the
WAN MAC address with the MAC address of the IP Phone.
MAC address unless required by your ISP
66
Note
Page 73

Tones
To meet your current system tone settings, please
The Tone setting can be adjusted to generate Dial tone, Ring
tone, Ring Back tone, and Busy tone for different countries
refer to PBX technical manual or ask telecom
technician.
67
Note
Page 74

Advanced
The advanced settings might be useful for some network
requirements. The ICMP function is to echo when someone
ping this device. This can prevent from hacker attacking the
device by not echoing.
ICMP Not Echo ICMP is used to acknowledge and echo
for the Ping request. IP Phone will echo
for the IP Ping request at default.
Selecting ON for ICMP Not Echo will
ignore the IP Ping request and keep silent.
This is sometime useful for network
security.
68
Page 75

Send
Anonymous
CID
Management
from WAN
Send Flash
Event
SIP Encrypt This feature only work with ITSP required.
PPPoE Retry
Period
System Log
Server
System Log
Type
Select No if you subscribe to CallerID
service on your PSTN line, otherwise Yes
Select Yes to allow user manage the IP
Phone from WAN
Select DTMF Event, the Flash will be sent
as a DTMF event. Select SIP INFO, Flash
is transmitted by SIP INFO messages
Set Re-connect time period when DSL
PPPoE connection is disconnected.
Enter IP address or URL of log server
To set the log type, it depends on your
network administrator requirement.
69
Page 76

3.6. User Password
You may create the login name and password in this page.
3.7. Save Change
You must save the changes you have made, and click the Save
button. After clicking the ¡Save¡ button, the IP Phone will save
the new settings into ROM and reboot it automatically
70
Page 77

3.8. Update
User can update the IP Phone firmware when new firmware is
available. Make sure no power off during the firmware upgrade.
Update
New Firmware
Auto Update
Default
Caution
VOI-7010 and VOI-7011 use different firmware
format, check it carefully before upgrade
71
Page 78

Update Firmware
The IP Phone provides two methods, HTTP or TFTP, to update
new firmware as the following steps:
1. Select the firmware code type, Risc or DSP code. (mostly
for Risc code)
2. Click the ¡Browse¡ button to choose the updated file
location for HTTP download, or
3. Select TFTP and enter the IP address of TFTP server for
firmware download, then click the ¡Update¡ button.
72
Page 79

Caution
VOI-7010 and VOI-7011 use different firmware
format, check it carefully before upgrade
Do Not power off during the upgrade processing,
it may damage the IP Phone
For update firmware by TFTP, the TFTP server is
required. Contact your network administrator for
more information
73
Page 80

Auto Update Settings
The IP Phone provides three methods, TFTP, FTP or HTTP, to
update new firmware as the following steps
74
Page 81

ask your network administrator before change any
Note
This function is mainly for your ISP settings only,
parameters.
Default Setting
You can restore the IP Phone to factory default in this page. By
clicking the ¡Restore¡ button, the IP Phone will restore to
default and automatically restart again.
75
Page 82

3.9. Reboot
You may click the Reboot button to restart, then IP Phone will
automatically reboot with the stored configurations.
76
Page 83

4. LCD Display and Keypad
You can use keypad to configure and to check the status of IP
Phone. Make sure that the WAN port is connected to ADSL
Ethernet, or you may hear a busy tone from the telephone.
77
Page 84

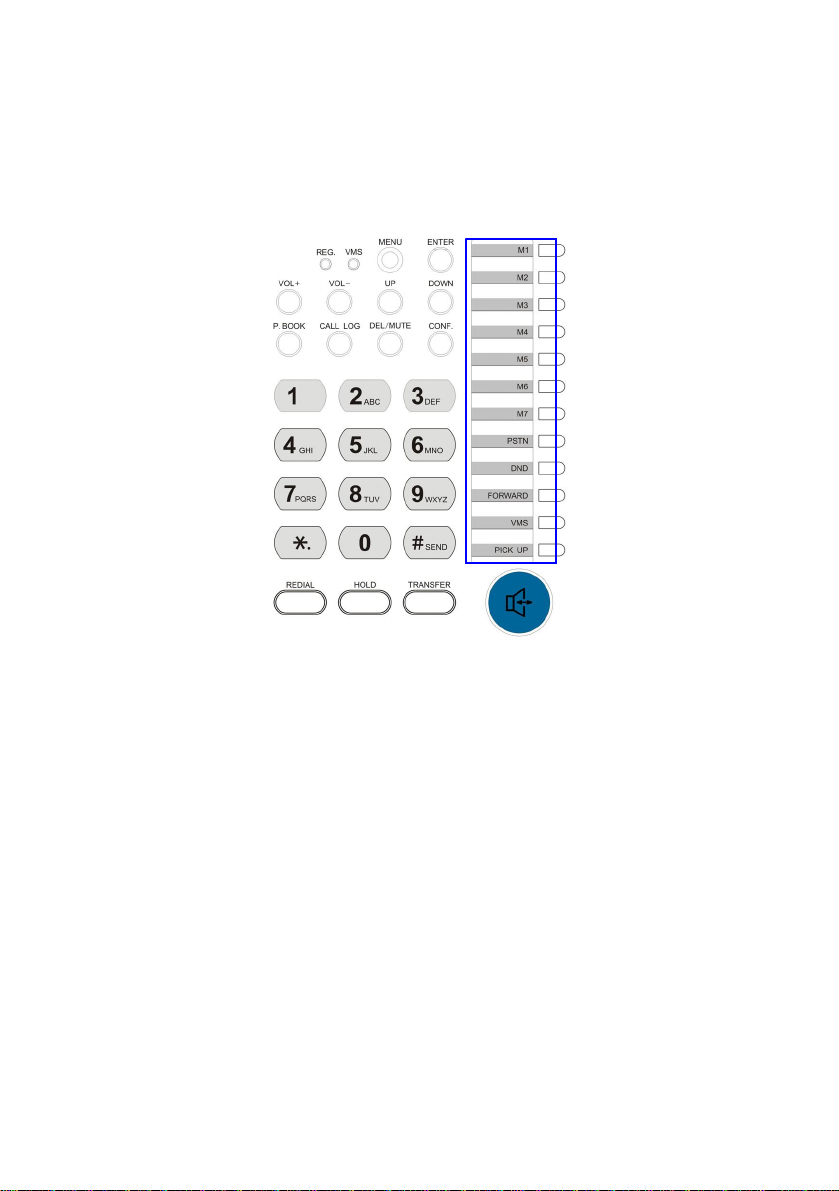
4.1. Keypad Descriptions
Key Descriptions
1 ¡1¡, ¡-¡, ¡٫¡, ¡!¡, ¡?¡
2 ¡2¡, ¡a¡, ¡b¡, ¡c¡, ¡A¡, ¡B¡, ¡C¡
3 ¡3¡, ¡d¡, ¡e¡, ¡f¡, ¡D¡, ¡E¡, ¡F¡
4 ¡4¡, ¡g¡, ¡h¡, ¡I¡, ¡G¡, ¡H¡, ¡I¡
5 ¡5¡, ¡j¡, ¡k¡, ¡l¡, ¡J¡, ¡K¡, ¡L¡
6 ¡6¡, ¡m¡, ¡n¡, ¡o¡, ¡M¡, ¡N¡, ¡O¡
7 ¡7¡, ¡p¡, ¡q¡, ¡r¡, ¡s¡, ¡P¡, ¡Q¡, ¡R¡, ¡S¡
8 ¡8¡, ¡t¡, ¡u¡, ¡v¡, ¡T¡, ¡U¡, ¡V¡
9 ¡9¡, ¡w¡, ¡x¡, ¡y¡, ¡z¡, ¡W¡, ¡X¡, ¡Y¡, ¡Z¡
0 ¡0¡, ¡space¡
* ¡*¡, ¡¡¡, ¡:¡, ¡@¡
# Start dialling process.
REDIAL ¡REDIAL¡ the last previous number again.
HOLD ¡HOLD¡ the current call.
TRANSFER ¡Transfer¡ to the other phone number.
MENU The ¡Menu¡ key is to set the IP Phone
ENTER The ¡Enter¡ is for setting selections.
78
Page 85

Key Name Descriptions
VOL +/- This is for phone volume settings.
UP/DOWN Up↑ and Down↓ keys for LCD display.
P. BOOK To show the phone book list.
CALL LOG To show Incoming/outgoing calls history.
DEL/MUTE To delete or to mute IP phone.
CONF. For 3-Way Conference Calls.
M1~M4 These are for 4 speed dial numbers.
LINE1~LINE3 For Realm 1 to Realm 3 SIP registrations.
DND To enable/disable DND for call reject.
FORWARD This is for forward function.
VMS This is for voice messages.
PICK UP To pick up incoming call for other IP Phones.
PSTN Press the key to switch to PSTN line.
SPK This is for Speaker Phone.
79
Page 86

4.2. LCD Menu
1. Phone Book
1.Search Search Phone Book
2.Add entry Add new phone number to phone book
3.Speed dial Add speed dial phone number
4.Erase all Erase all phone number
2. Call History
1.Incoming calls Show all incoming call.
2.Dialed numbers Show all dialled call.
3.Erase record Delete call history.
1 All: Delete all call history.
2 Incoming: Delete all incoming call.
3 Dialled: Delete all dialled out call.
80
Page 87

3. Call setting
1 Call forward
1.All Forward:
Activation: To Enabled/Disabled this function.
Number: Forward to a registered or URL Number.
2.Busy Forward.
Activation: To Enabled/Disabled this function.
Number: Forward to a registered or URL Number.
3.No Answer Forward.
Activation: To Enabled/Disabled this function.
Number: Forward to a registered or URL Number.
4.Ring Timeout: Set the Ring times to start the
2 Do not Disturb
1.Allways: Block all calls
2.By Period: Block calls by the period time
3.Period Time: Set the start time and end
time to Block calls.
3 Alarm Setting
1.Activation: Enable/Disable alarm
2.Alarm Time: Set the alarm time
4 Date/Time setting
Forward function (2 ~ 8
Rings)
1.Date & Time: Set the IP Phone Date and Time.
2.SNTP setting:
SNTP: Enabled / Disable SNTP.
Primary SNTP: Set Primary SNTP server IP address
or URL.
Secondary SNTP: Set Secondary SNTP server IP
address or URL.
Time zone: Set Time zone.
Adjustment Time: Set adjustment time period.
81
Page 88

5 Volume and Gain
1.Handset volume: Set Handset volume from
0~15 (max.) for you to hear.
2.Speaker volume: Set Speaker phone volume
from 0~15 (max.) for you to
hear.
3.Handset Gain: Set Handset Gain from 0~15
(max.) for remote site to hear.
4.Speaker Gain: Set Speakerphone Gain from
0~15 (max.) for remote site to
hear.
6 Ringer
1.Ringer volume: Ringer volume selection from
0~15 (max.).
2.Ringer type: Ringer tone selection from
1~4.
7 Auto Dial Auto Dial time selection from 3~9
seconds.
82
Page 89

4. Network
1 WAN Setup
1 IP Type:
Fixed IP client
DHCP client:
PPPoE client:
2 Fixed IP setting:
Host IP
Subnet mask
Gateway IP
3 PPPoE setting:
User name
Password
2 LAN Setup
1 Bridge
2 NAT
3 DNS Server
1 Primary DNS
2 Secondary DNS
4 VLAN
1 Activation
2 VID
3 Priority
4 CFI
5 Status: Show IP addresses of WAN, LAN and MAC
address (use UP/Down keys).
83
Page 90

5. SIP Settings
To set the SIP setting from keypad, you have to
press Menu_7_4 (Administrator → System
Authent) input the password first, or the SIP
setting may not be allowed to access.
The default password is root
1 Service Domain
1 First realm
Activation:
User name:
Display name:
Register name:
Register password:
Proxy server: Proxy Server IP Address
Domain server: Domain Server IP Address
Outbound proxy: Outbound Proxy IP Address
2 Second realm
3 Third realm
Note
84
Page 91

2 Codec
1 Codec type
G.711 uLaw: G.711 uLaw
G.711 aLaw: G.711 aLaw
G.723: G.723.1
G.729: G.729A
G.726-16: G.726 16Kbps
G.726-24: G.726 24Kbps
G.726-32: G.726 32Kbps
G.726-40: G.726 40Kbps
2 VAD Voice Activity Detection Enable/Disable.
3 RTP Setting
1 Outband DTMF: Outband DTMF Enabled/Disabled
2 Duplicate RTP
No duplicate: No resend voice packets.
One duplicate: Resend voice packets once.
Two duplicate: Resend voice packets twice.
4 RPort Setting RPort Enabled/Disabled.
5 Hold by RFC Hold by RFC3261 Enabled/Disabled.
6 Status Use Up/Down keys to show the SIP
Proxy register status.
85
Page 92

6. NAT Transversal
1 STUN setting
1.STUN: STUN Enabled/Disabled
2.STUN server: Server IP Address
7. Administrator
1 Auto Config
1 Config Mode: Select Disable/TFTP/FTP/HTTP for
auto config function with server.
2 TFTP server: Set the TFTP server IP address.
3 FTP server: Set the FTP server IP address.
4 FTP Login Name: Set the login name to the FTP server.
5 FTP Password: Set the Password to the FTP server.
2 Upgrade System You can restore to the default setting
1 Upgrade Now: Select Yes/No to upgrade with the
upgrade Server.
2 Upgrade via: Select Disable/TFTP/FTP/HTTP to do
upgrade.
3 Status:
4 Reset Time: Set Yes/No to reset time.
3 Default setting To load/abort the default setting
4 System Authority Must enter the password first for SIP
setting. Default is ¡root¡.
5 Version This shows the firmware version.
6 Watch Dog This enables Watch Dog function for
debugging.
7 Restart This function will restart your IP Phone
86
Page 93

5. Application Example
You can use PC Web browser to configure IP Phone. For
example, enter http://192.168.1.100 from PC web browser.
A. ADSL Connections with NAT enabled in IP Phone
B. ADSL Connections with external NAT Router
87
Page 94

5.1. PSTN Calling
Applications:
VOI-7011 is default at the VoIP mode. For PSTN calls, you
may just pick up the phone, press 0* key or PSTN function key,
and dial directly to the PSTN number like a normal telephone.
Configurations:
The ¡Auto Answer¡ is OFF at default, and the function of
extension call from SIP to PSTN is disabled. The FXO port is
for PSTN only and no configuration is needed.
Calling/Answering:
1. Pick up the phone and press PSTN function key, and you
should hear a dial tone.
2. Press, e.g. 7654321, to call the PSTN party with 7654321.
In a moment, you should hear a ring back tone, and wait
for the called PSTN party to answer.
3. For receiving PSTN incoming calls, you just pick up the
phone to answer when ringing.
88
Page 95

5.2. SIP-to-SIP Calling
Applications:
The SIP-to-SIP calling works when both calling and answering
parties are registered to SIP server with given registered phone
numbers. The ADSL connections can be as in either Diagrams
A or B. Both parties are registered to SIP server under NAT
router. For Diagram A without NAT router, you may select
NAT mode to enable the embedded NAT router. For Diagram
B with external NAT router, you may select Bridge mode to
disable the embedded NAT.
Configurations:
1. Select either ¡NAT¡ or ¡Bridge¡ in accord with your
network in ¡WAN settings¡ page,
2. Select ¡DHCP Client¡ to automatically get an IP address
from NAT router.
3. Remember to click the ¡Submit¡ button,
4. Select Active ¡ON¡ in the ¡SIP settings / Service Domain¡
page,
5. Enter the Register Name, Register Password, Proxy
Server, and Outbound Proxy,
6. Select ¡ON¡ in the ¡STUN setting¡, if Outbound Proxy is
NOT available.
89
Page 96

7. Upon successful SIP registration, the REG LED indicator
will be ON and the LCD will show registered <phone
number>.
Callings:
8. Pick up the phone, and you should hear a dial tone for
VoIP mode.
9. Press 1688# or 1688 to call the party with the registered
SIP phone number 1688. Note that # key will dial out the
number immediately. Dialling without # will not dial out
until the auto dial timer (default=5 seconds) elapsed.
90
Page 97

5.3. SIP-to-PSTN Calling
Applications:
The SIP-to-PSTN calling works when both calling and
answering parties are registered to SIP server with given
registered phone numbers. The ADSL can be as in both
Diagrams A and B. Both parties are registered to SIP server
with either fixed real IP or private IP under NAT router.
Configurations:
1. Same as in Example 2.
2. Select ¡ON¡ in the ¡SIP settings / STUN setting¡ page, if
Outbound Proxy is NOT available.
3. Select ¡ON¡ for the ¡Auto Answer¡ and ¡PIN Code¡ in Call
settings. Set the Auto Answer Ring Counter, e.g. 3, and
the PIN code, e.g. 1234
4. Upon successful SIP registration, the REG LED indicator
will be ON.
Callings:
5. Pick up the phone for VoIP mode, and press 1688# or
1688 to call another IP Phone with registered SIP phone
number 1688.
6. After 3 rings for Auto Answer, the FXO port will auto
answer with a ¡dodo¡ tone (not dial tone). Press 1234# for
PIN code and then you will hear a PSTN dial tone. Note
91
Page 98

you must add the postfix ¡#¡. PIN Code is used to
prevent from call piracy. Incorrect PIN Code will result in
call disconnect. If PIN code is OFF, the caller may press
PSTN number directly.
7. Press 7654321 to call the PSTN party number of
7654321.
92
Page 99

5.4. PSTN-to-SIP Calling
Applications:
The applications can be for ADSL connections as in both
Diagrams A and B. Both parties are registered to SIP server
with either fixed real IP or private IP under NAT router.
Configurations:
1. Same as in Example 2.
2. Select ¡ON¡ in the ¡SIP settings / STUN setting¡ page, if
Outbound Proxy is NOT available.
3. Select ¡ON¡ for the ¡Auto Answer¡ and ¡PIN Code¡ in Call
settings. Set the Auto Answer Ring Counter, e.g. 3, and
the PIN code, e.g. 1234.
4. Make sure the REG LED is ON for a successful SIP
registration.
Callings:
5. Call from PSTN line to the IP PHONE FXO number, e.g.
7654321. In a moment, you should hear a ring back
tone, and wait for the IP PHONE to answer. After 3 rings,
the VoIP mode will auto answer with a ¡dodo¡ tone (not
dial tone). Press 1234# for PIN code and then you will
hear a dial tone for VoIP mode. Incorrect PIN Code will
result in call disconnect. If PIN code is OFF, there will be
93
Page 100

not ¡dodo¡ tone and the caller may press SIP number
directly.
6. Press 1688# or 1688 to call the party with the registered
SIP phone number 1688. In a moment, you should hear a
ring back tone, and wait for the VoIP called party to
answer.
94
 Loading...