

Page 1
™
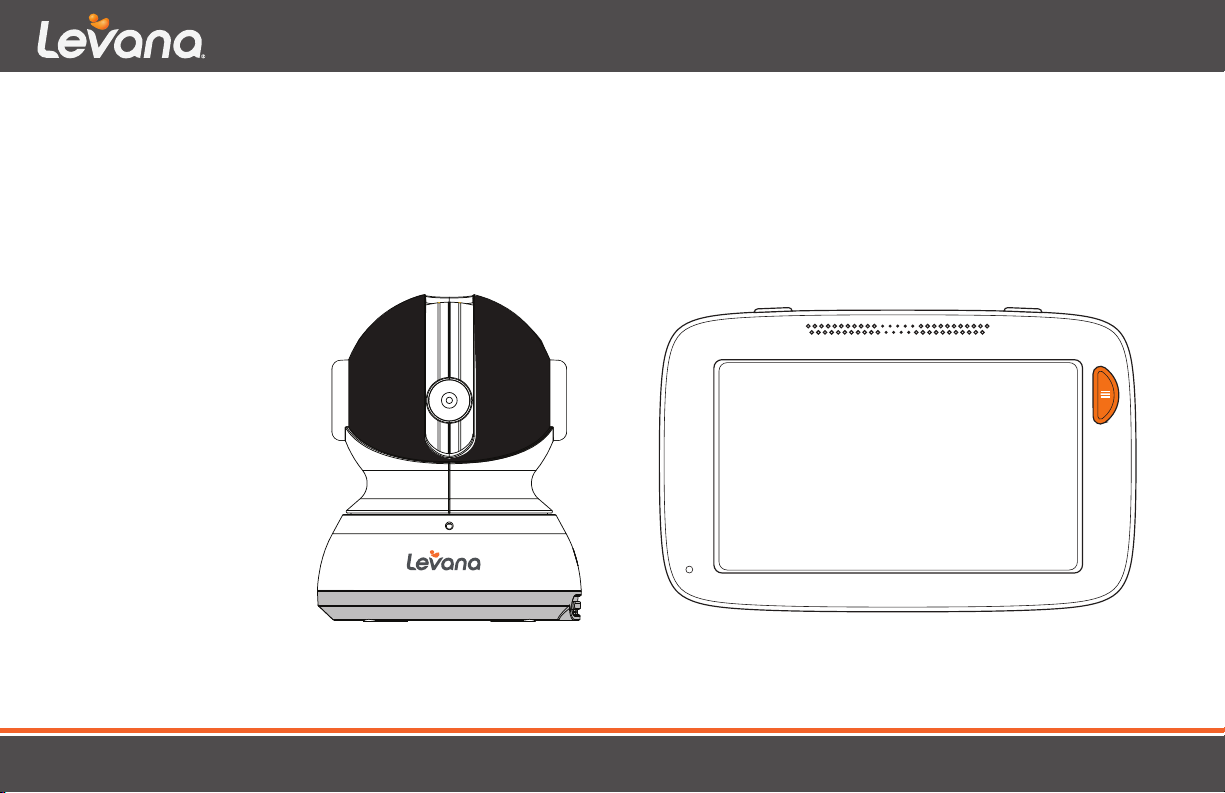
Willow
MANUAL
CAUTION: Keep small parts away from children.
Digital Baby Video Monitor
Page 2

SAFETY INSTRUCTIONS & DISCLAIMERS
Caution: Keep small parts away from children.
Strangulation Hazard: Children can become entangled in cords. Power cords should be kept more than 3 feet away from the crib and baby’s
reach at all times. Baby monitors and cameras with power cords should never be hung on or near the crib.
This product is not a toy and should be kept out of children’s reach.
This product contains small parts. Exercise care when unpacking and assembling the product.
Read and Keep Instructions: All the safety and operating instructions should be read before operating the video baby monitor.
This product cannot replace responsible adult supervision.
Water and Moisture: This product is designed for indoor use only. The unit should not be exposed to rain, moisture, dripping or splashing. No
objects filled with liquid should be placed on top of, or beside the product, such as a glass or vase. This item should not be used near water.
Non-Use Periods: Always unplug the AC adapters from the wall outlets during long periods of non-use.
Ventilation: This baby monitor should not be used on a bed, sofa, rug or similar surface that may block the ventilation openings. Do not place in
an enclosed area, such as a book case or drawer that may impede air flow.
Keep Away from Sources of Heat: This unit should not be exposed to direct heat sources such as a candle, fireplace, radiator, heat register, stove
or other appliances that emit heat. The unit should not be left in direct sunlight.
Power Source: This unit should only be used with the AC power adapters included in this package (rated 5.9v/6v 800mA).
2
Page 3

SAFETY INSTRUCTIONS & DISCLAIMERS
Damage Requiring Service: This unit should be serviced by qualified personnel only when:
A. Objects have fallen or liquid has been spilled into the unit.
B. The units have been exposed to liquids or moisture.
C. The units do not appear to operate normally or exhibit a distinct change in performance.
D. The units have been dropped or the enclosure damaged.
Please note that the above mentioned are not covered under the unit warranty.
Disclaimers
Optimum range is 150 ft when signal is passing through walls or floors. Microwave ovens (when in use) may cause signal disruption at close range.
Buildings with metal frames may also cause signal disruption. Maximum transmission range is 500 ft.
Night vision range is up to 12 ft under ideal conditions. Objects at or beyond this range may be partially or completely obscured, depending on
the camera application.
Battery life of 12 hours based on Power Save mode. Battery lasts an average of 8 hours with continuous audio/video usage.
Strangulation Hazard: Children can become entangled in cords. Power cords should be kept more than 3 feet away from the crib and baby’s
reach at all times. Failure to do so could be fatal. Baby monitors/cameras with power cords should never be hung on or near the crib.
3
Page 4
FCC STATEMENT
FCC CAUTION:
Any Changes or modifications not expressly approved by the party responsible for compliance could void the user’s
authority to operate the equipment. This device complies with part 15 of the FCC Rules. Operation is subject to the
following two conditions:
(1) This device may not cause harmful interference, and
(2) This device must accept any interference received, including interference that may cause undesired operation.
FCC RADIATION EXPOSURE STATEMENT:
This equipment complies with FCC radiation exposure limits set forth for an uncontrolled environment .
This equipment should be installed and operated with minimum distance 20cm between the radiator & your body.
This transmitter must not be co-located or operating in conjunction with any other antenna or transmitter.
4
Page 5

IC STATEMENT
IC WARNING
This device complies with CNR Industry Canada license-exempt devices. Operation is subject to the following two conditions:
(1) this device may not cause interference, and
(2) this device must accept any interference, including interference that may cause undesired operation of the device.
The device is compliance with RF exposure guidelines, users can obtain Canadian information on RF exposure and compliance.
The minimum distance from body to use the device is 20cm.
5
Page 6

SUPPORT
We take quality very seriously. This is why all of our products come with a one-year warranty from the original purchase date against
defects in workmanship and materials. If you have warranty or support issues please contact us using any of the following methods:
Web: www.mylevana.com
Support: www.mylevana.com/Support_Center.eng.html
LEVANA Canada
4080 Montrose Road
Niagara Falls, ON
Canada L2H 1J9
LEVANA USA
840 Aero Drive
Cheektowaga, NY
USA 14225
6
Page 7

WARRANTY TERMS
LEVANA® products are guaranteed for a period of one year from the date of purchase against defects in workmanship and materials.
This warranty is limited to the repair, replacement or refund of the purchase price at LEVANA®’s options.
This warranty becomes void if the product shows evidence of having been misused, mishandled or tampered with contrary to the applicable
instruction manual.
Routine cleaning, normal cosmetic and mechanical wear and tear are not covered under the terms of this warranty.
The warranty expressly provided for herein is the sole warranty provided in connection with the product itself and no other warranty,
expressed or implied is provided. LEVANA assumes no responsibilities for any other claims not specifically mentioned in this warranty.
This warranty does not cover the shipping cost, insurance or any other incidental charges.
You MUST contact LEVANA at www.mylevana.com/Support_Center.eng.html before sending any product back for repair. You will be sent
a Return Authorization form with return instructions. When returning the product for warranty service, please pack it carefully in the original
box with all supplied accessories, and enclose your original receipt or copy, and a brief explanation of the problem (include RA #).
This warranty is valid only in Canada and the continental U.S.
This warranty cannot be re-issued.
Please visit our website at www.mylevana.com for additional information about your product’s warranty.
7
Page 8

TABLE OF CONTENTS
Safety Instructions & Disclaimers ............................................................................................................................................................................................2
Support ......................................................................................................................................................................................................................................... 6
Warranty Terms ........................................................................................................................................................................................................................... 7
What’s Included ........................................................................................................................................................................................................................10
Let’s Get Started ........................................................................................................................................................................................................................11
Did You Know? .........................................................................................................................................................................................................................................11
Monitor ......................................................................................................................................................................................................................................................11
Cameras .....................................................................................................................................................................................................................................................11
Monitor and Camera Features ............................................................................................................................................................................................................12
Battery Installation .................................................................................................................................................................................................................................13
Getting The Most Out Of Your Rechargeable Battery .................................................................................................................................................................. 13
Connecting Power To The Monitor / Charging The Battery .....................................................................................................................................................14
Connecting Power To The Camera ...................................................................................................................................................................................................14
Set Up ......................................................................................................................................................................................................................................... 14
Placement Of The Monitor...................................................................................................................................................................................................................15
Placement Of The Camera ...................................................................................................................................................................................................................15
Mounting The Camera On A Wall Safely .........................................................................................................................................................................................16
Night Vision ..............................................................................................................................................................................................................................................17
Turning On The Monitor ......................................................................................................................................................................................................................17
Pairing .......................................................................................................................................................................................................................................................17
Operations .................................................................................................................................................................................................................................17
8
Page 9

TABLE OF CONTENTS
Talk To Babytm ..........................................................................................................................................................................................................................................19
Camera Views ......................................................................................................................................................................................................................................... 20
Pan/Tilt/Zoom ..........................................................................................................................................................................................................................................21
Menu Functions ........................................................................................................................................................................................................................22
Menu Icons .............................................................................................................................................................................................................................................. 22
Menu .......................................................................................................................................................................................................................................................... 23
Feed/Nap Timer ...................................................................................................................................................................................................................................... 24
Lullabies .................................................................................................................................................................................................................................................... 26
Temperature ............................................................................................................................................................................................................................................ 28
Pairing .......................................................................................................................................................................................................................................................31
Unpairing ...................................................................................................................................................................................................................................................33
Settings ...................................................................................................................................................................................................................................................... 35
Support ...................................................................................................................................................................................................................................................... 45
Troubleshooting ..................................................................................................................................................................................................................................... 49
Support .......................................................................................................................................................................................................................................49
Specifications ............................................................................................................................................................................................................................51
9
Page 10
+
-
+
-
22°c
BACK
22°c
BACK
WHAT’S INCLUDED
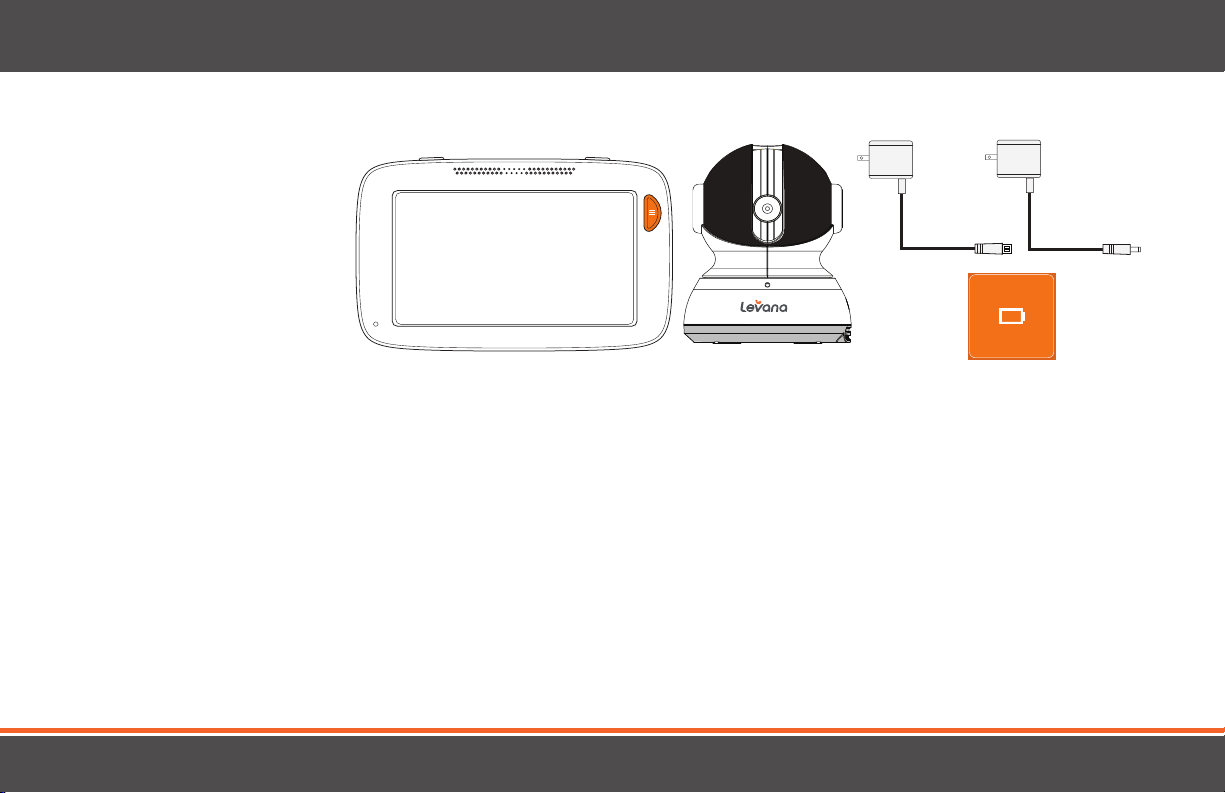
• Baby Video Monitor
• Night Vision Camera
• Rechargeable Battery
• 2 Power Adapters
• 1 Camera Angle Wedge
• 1 Year Warranty
• Lifetime Customer Support
This product is not a toy.
Product Intended for indoor use only.
This product contains small parts. Exercise care when unpacking and assembling the product. Failure to do so can result in choking or death.
This product does not replace responsible adult supervision. Check on your child at regular intervals and make sure your monitor is always
adequately charged. Failure to do so can be fatal.
We reserve the right to change models, configuration, or specifications without notice or liability. Product may not be exactly as shown.
This is not a medical product. If there is a problem with the child/baby, please call 911 immediately. ©2016 LEVANA®. All rights reserved. LEVANA®,
the LEVANA® logo, Willow ™ and other LEVANA® marks may be registered. All other Trademarks are the property of their respective owners.
10
Page 11
+
-
+
-
+
-
22°c
22°c
BACK
LET’S GET STARTED
DID YOU KNOW?
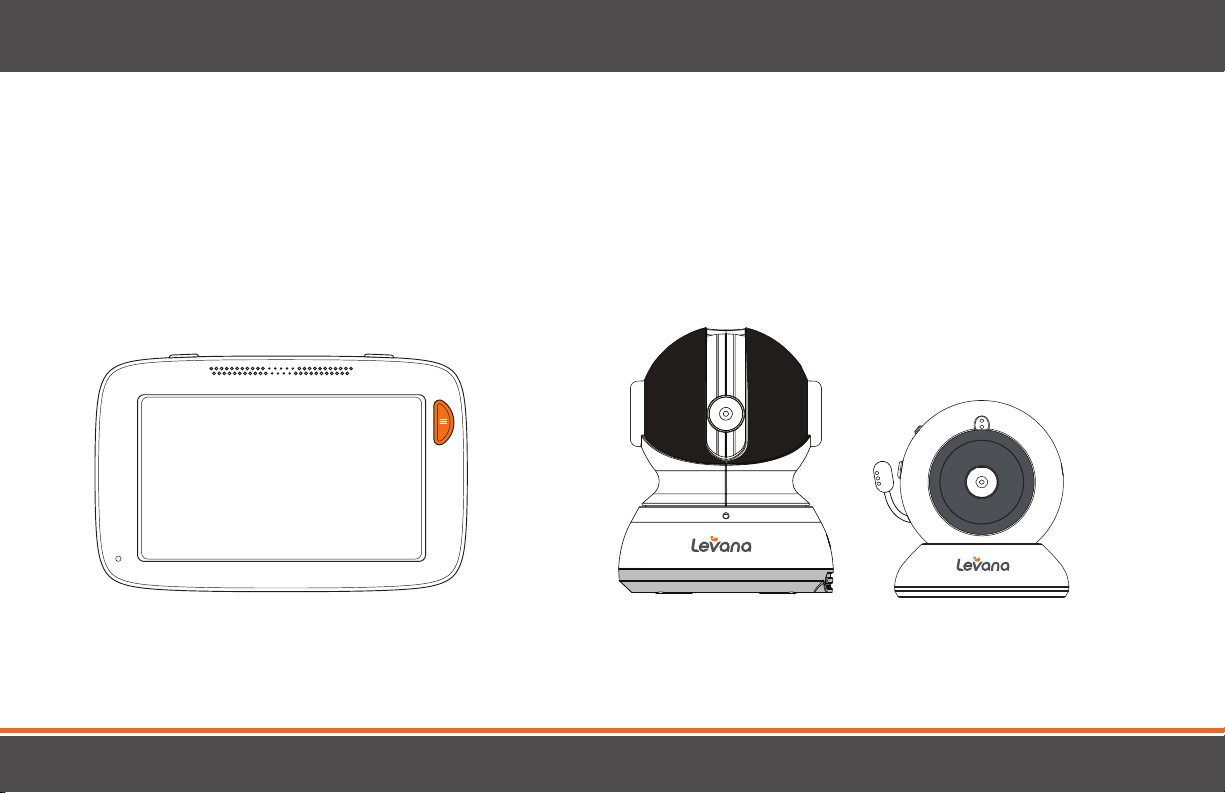
Your Willow monitor is compatible with 2 dierent types of cameras! To learn more about adding additional cameras, please visit our
website at www.mylevana.com.
MONITOR CAMERAS
11
Page 12
LET’S GET STARTED
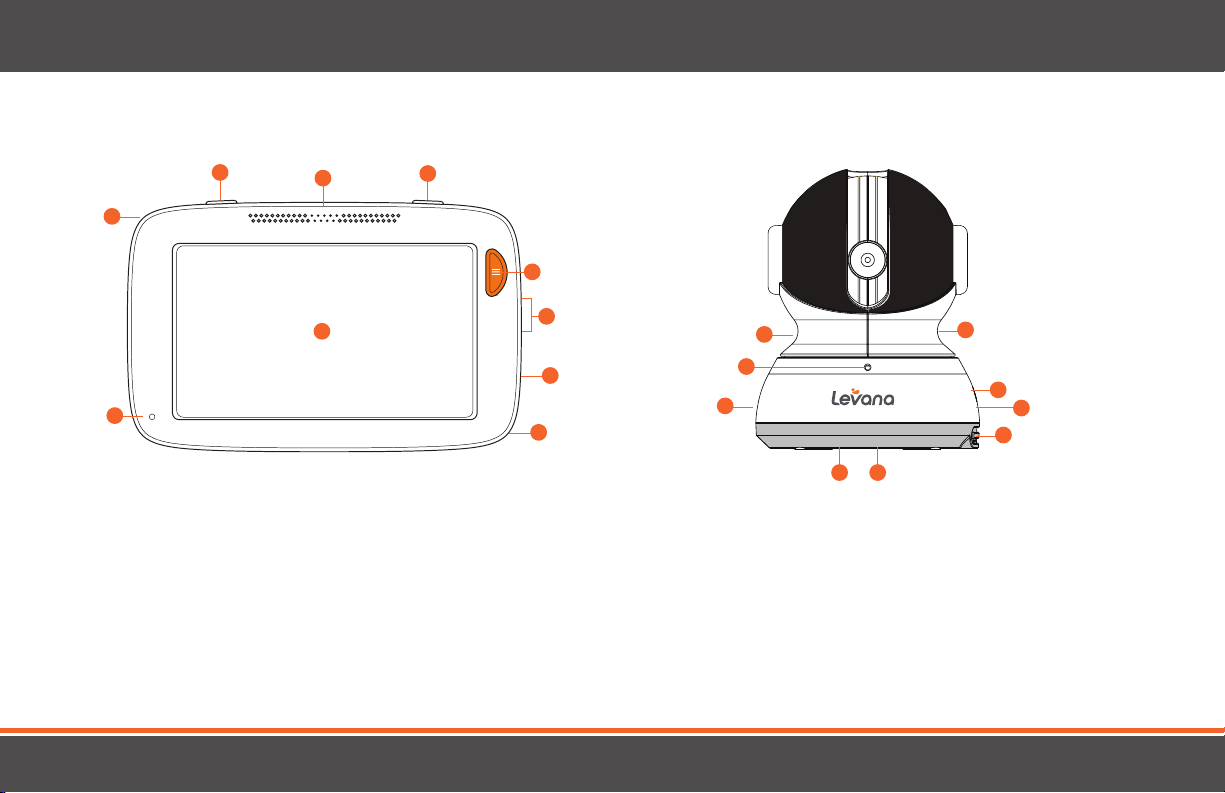
MONITOR AND CAMERA FEATURES
1
10
9
1. Power Button
2. Push to Talk Button
3. Menu Button
4. Speaker
5. Volume
4
8
2
6. Stand
7. Battery Compartment
8. LCD Screen
9. Microphone
10. Antenna
3
5
7
6
1. Microphone
5
2
1
7 9
6. Power Input
2. Power LED
3. Night Vision Light Sensor
4. Temperature Sensor
4
8
3
6
7. Power On/O
8. Speaker
9. Pairing Button
5. Antenna
12
Page 13
LET’S GET STARTED
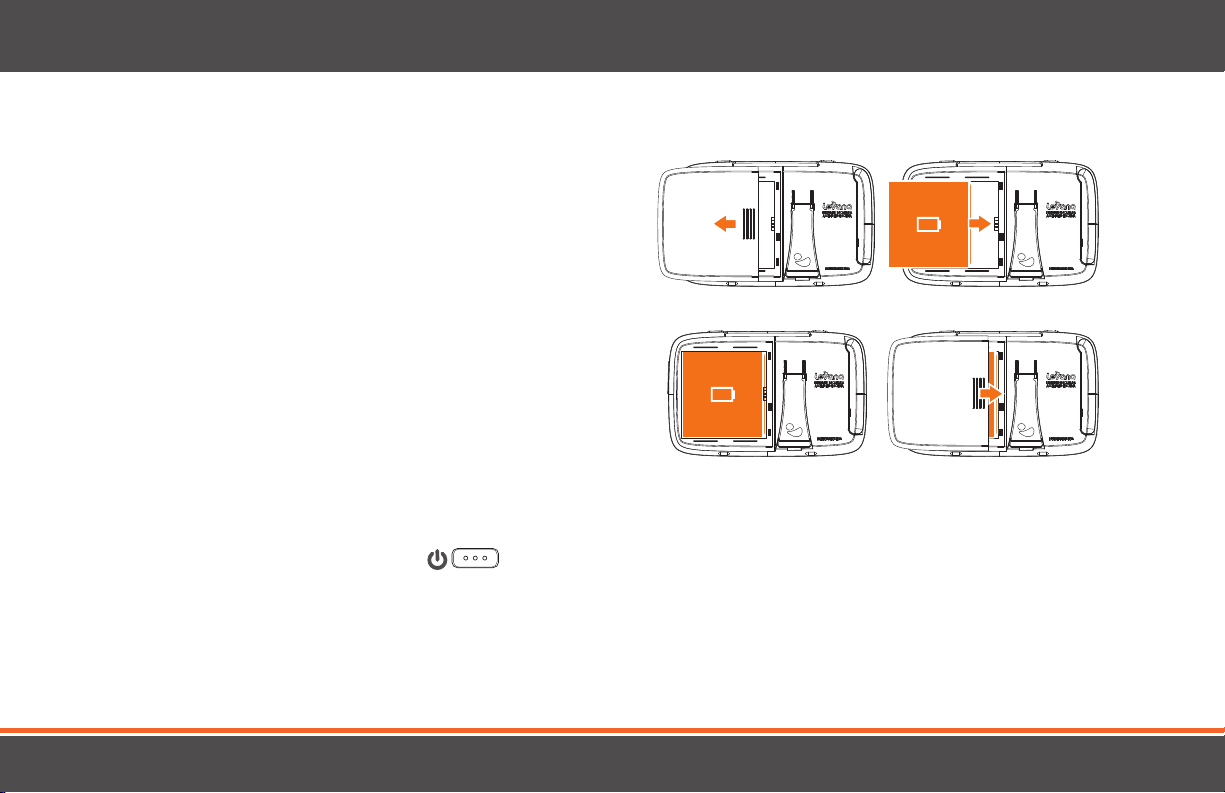
BATTERY INSTALLATION
1. Slide the battery compartment
cover to the left to remove.
2. Insert the battery. The battery
connectors will line up with the
connectors inside the battery
compartment.
NOTE: For extended periods of non-use, Levana recommends removing
the battery from the monitor.
3. Slide the battery
compartment cover back in
to lock it into place.
GETTING THE MOST OUT OF YOUR RECHARGEABLE BATTERY
• Fully charge the battery (3-7 hours) before first use
• To maximize battery life, charge the battery before the battery is fully drained
• Avoid extreme heat or cold as this will aect the life of the battery
• Turn the LCD screen o; press the power
Sleep Mode: When sleep mode is enabled, the monitor automatically sleeps after 20 seconds of inactivity.
Adjustable Brightness: Decreasing the screen brightness will extend the battery life.
button on the top of the monitor once
13
Page 14
+
-
+
-
22°c
Tap to pair additional camera Tap to pair additional camera
Tap to pair additional cameraPress pairing button on camera now
12:45 am
22°c
1
3
2
4
BACK
+
-
+
-
Feed/Nap Timer Lullabies Temperature
Settings Support
12:45 am
22°c
1
Pair Camera
Feed/Nap Timer Lullabies Temperature
Settings Support
12:45 am
22°c
1
Pair Camera
Feed/Nap Timer Lullabies Temperature
Settings Support
12:45 am
22°c
1
Pair Camera
Introduction FAQ Customer Support
12:45
am
22°c
1
BACK
Introduction FAQ Customer Support
12:45
am
22°c
1
BACK
22°c
BACK
22°c
BACK
SET UP
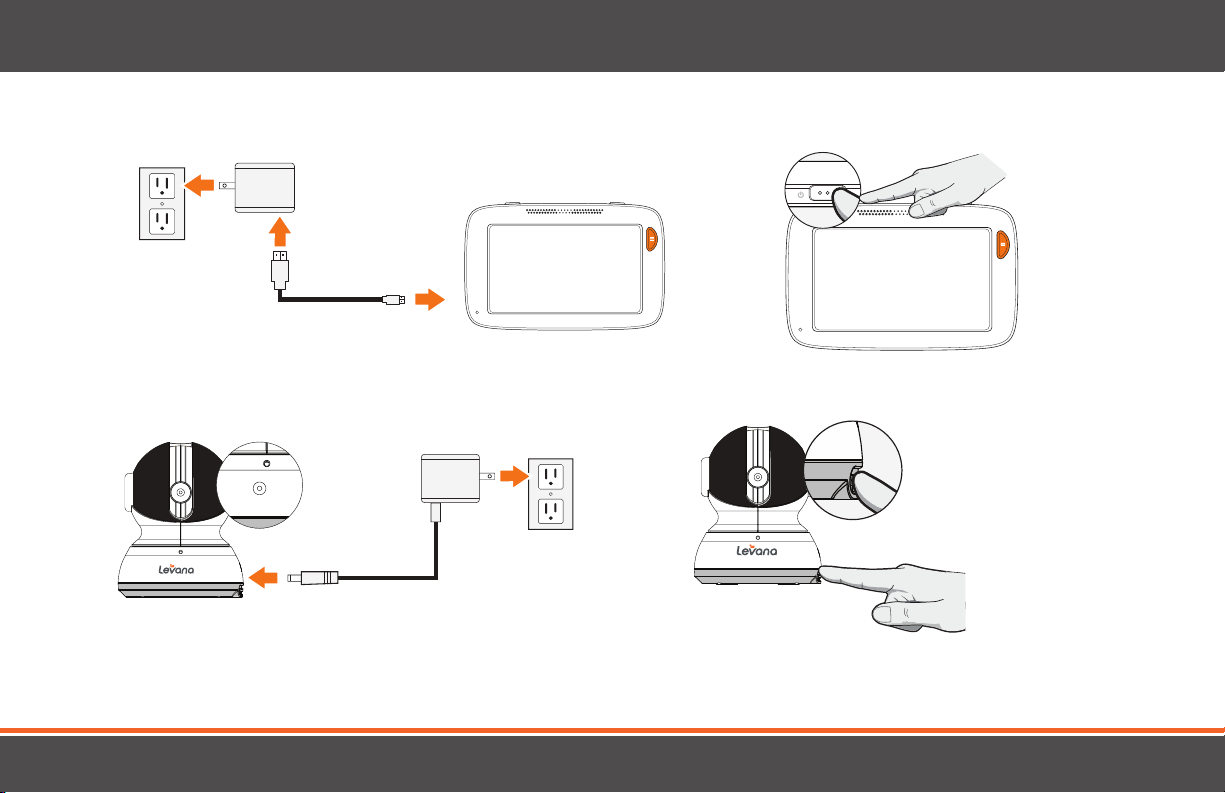
CONNECTING POWER TO THE MONITOR / CHARGING THE BATTERY
CONNECTING POWER TO THE CAMERA
Warning: Baby monitors and cameras with power cords should never be hung on or near the crib as it is a strangulation hazard. Power cords
should be kept no less than 3 feet away from the crib and the baby’s reach at all times.
14
Page 15
SET UP
3
ft
+
-
+
-
22°c
BACK
22°c
BACK
PLACEMENT OF THE MONITOR
You can place the monitor on a tabletop using the retractable
table stand on the back of the monitor. When not in use,
simply tuck the table stand away into the back of the monitor.
The stand will sit flush against the back of the monitor.
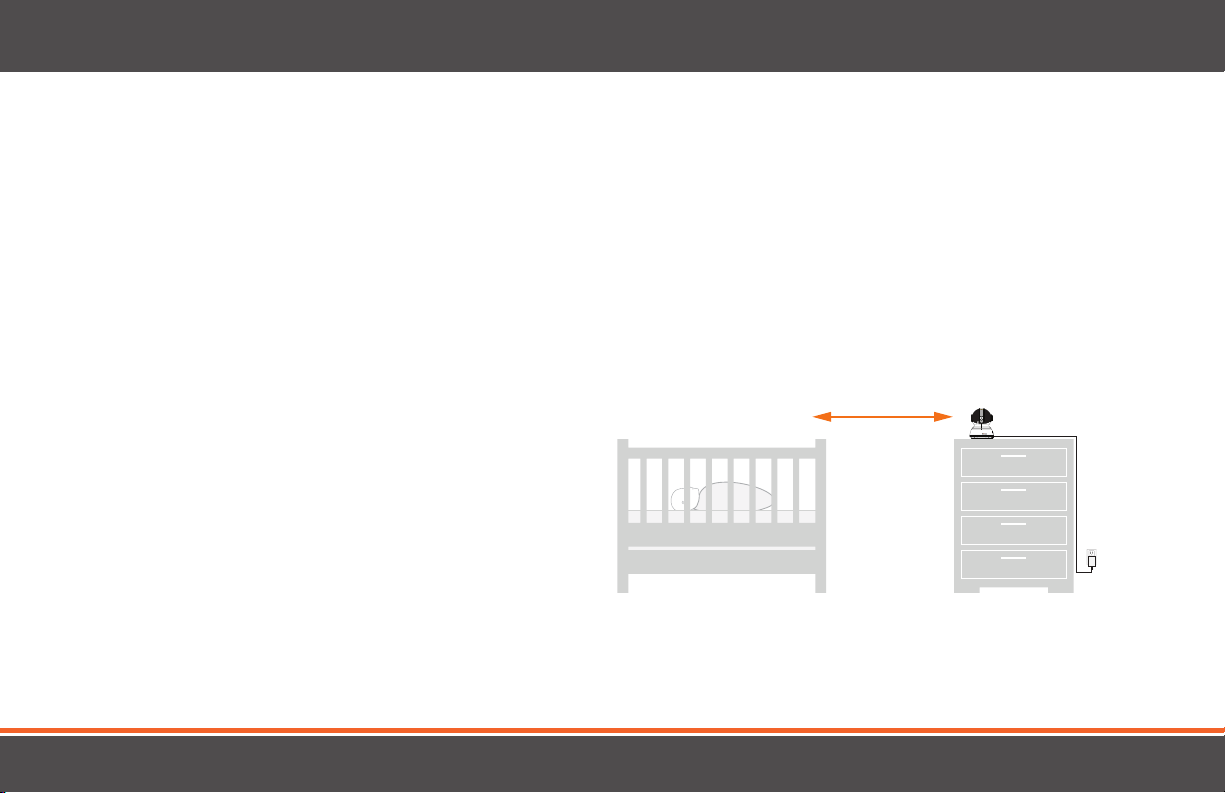
PLACEMENT OF THE CAMERA
The camera can be placed on a tabletop or hung on the wall above the
area being monitored.
• Place the camera within 15 feet of the area being monitored for
best picture results
• Do not place objects within 2 feet of the field of vision of the cam-
era as the night vision will not activate correctly if objects are too
close
To increase the downward viewing angle of the camera, use the Pan/Tilt/Zoom feature to move the camera to the desired angle.
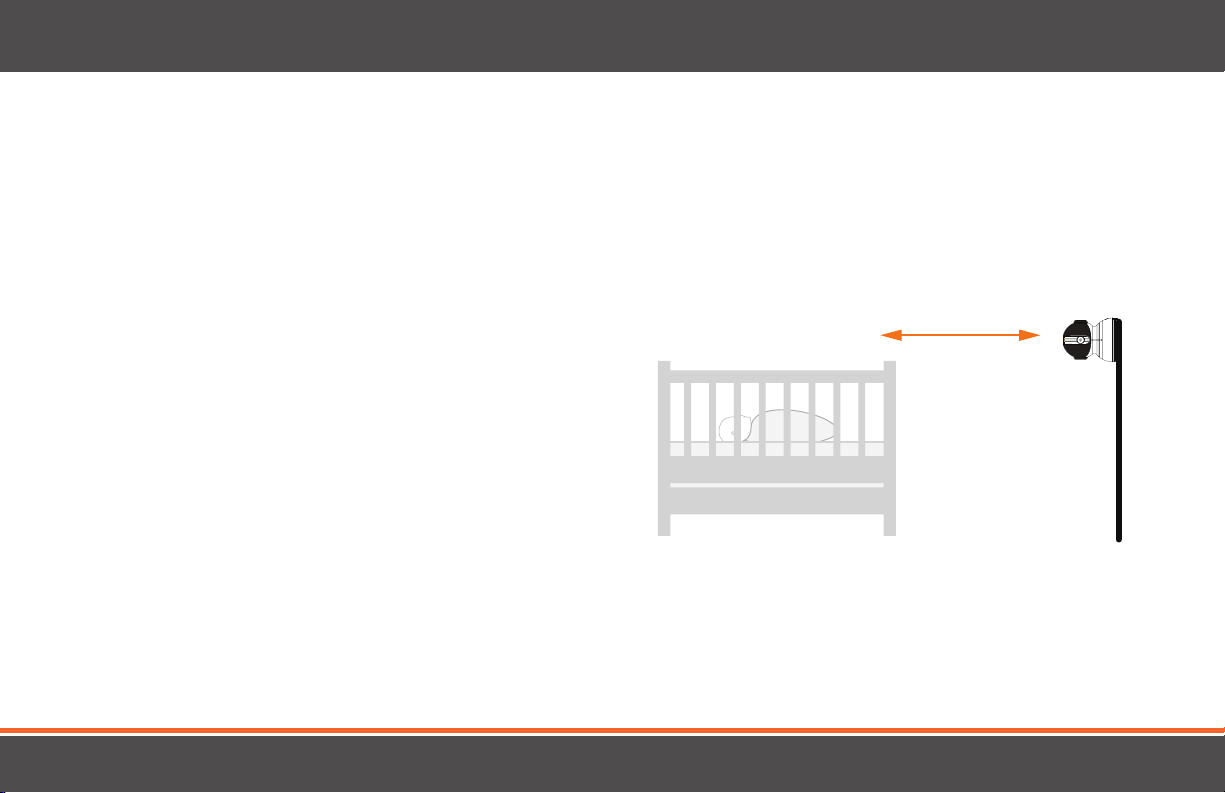
1. Place the camera on a tabletop no less than 3 feet away
from your baby’s crib.
2. Feed the power cord down the back of the table or use
wall clips (not included) to secure the cord away so the
baby cannot reach it.
3. Plug in the power cord, check the monitor to ensure
that you are getting a good view of your child and there
are no obstructions.
Warning: Baby monitors and cameras with power cords should never be hung on or near the crib as it is a strangulation hazard.
Power cords should be kept no less than 3 feet away from the crib and the baby’s reach at all times.
pi
pies
15
Page 16
3
ft
pi
pies
3
ft
+
-
+
-
22°c
BACK
22°c
BACK
SET UP
MOUNTING THE CAMERA ON A WALL SAFELY
Before drilling the holes, it is important to check the reception and camera positioning in the intended location on the wall. Ensure you
are hanging the camera no less than 3 feet away from baby’s crib.
1. Pre-drill two holes in the wall using a 3/16”, 4.8mm drill bit.
2. Insert wall anchors (not included) into each hole and tap
gently with a hammer until the anchors are flush with the wall.
3. Insert a screw (not included) into each wall anchor and tighten
until the screws only stick out approximately ½”.
4. Plug the power cord into the power input of the camera.
5. Locate the wall mounting holes on the bottom of the camera base.
6. Slide the holes over the screws sticking out of the wall.
7. Confirm that the camera is secure; if it is loose you may have to
tighten the screws more.
8. Use wall clips (not included) to secure the power cord away
from the crib or the baby’s reach.
9. Connect the other end of the adapter into an available wall outlet.
Warning: Baby monitors and cameras with power cords should never be hung on or near the crib as it is a strangulation hazard. Power
cords should be kept no less than 3 feet away from the crib and the baby’s reach at all times.
pi
pies
16
Page 17
OPERATIONS
NIGHT VISION
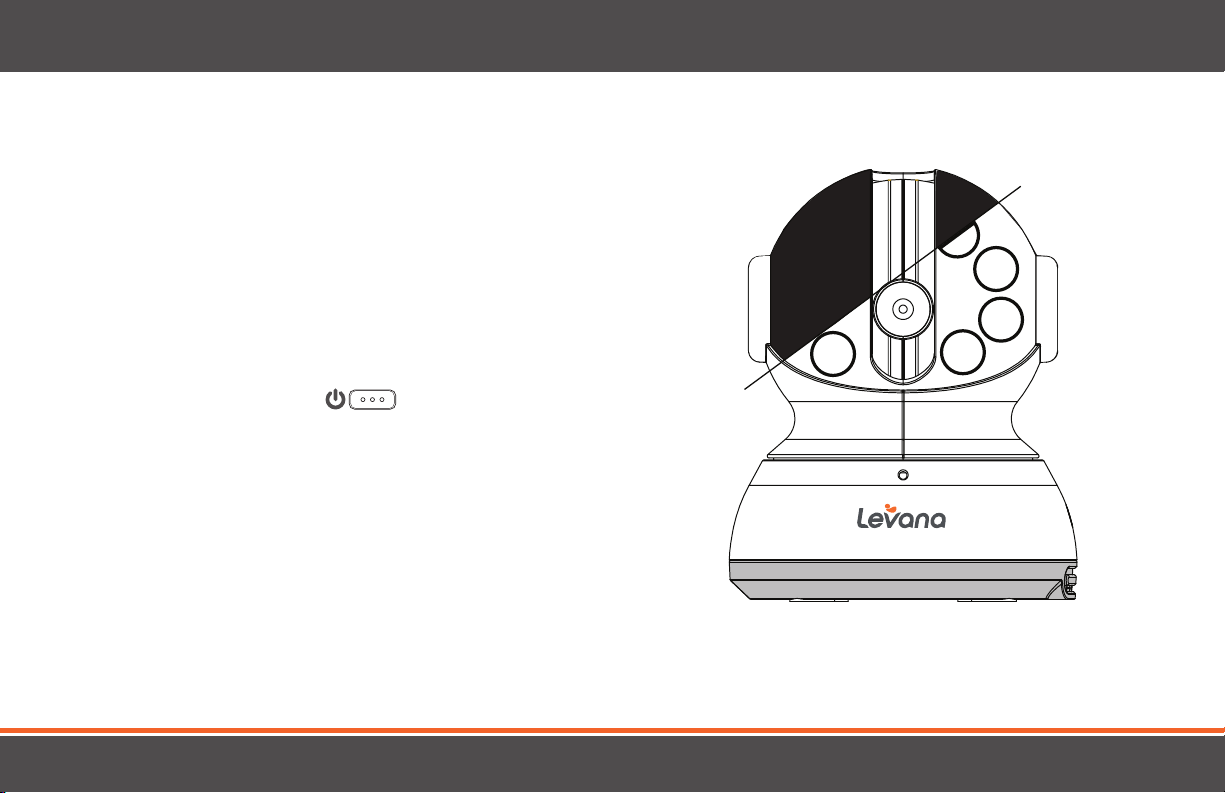
The camera is equipped with invisible IR (Infrared) LEDs which keep the nursery
dark. The LEDs are located on the front of the camera and allow you to see up to
12 feet in complete darkness so you can check on your baby at any time of night.
The night vision LEDs will activate automatically when the light sensor on the
camera detects that the light levels are too low.
TURNING ON THE MONITOR
Press and hold the Power button on the top left of the monitor.
PAIRING
The camera and monitor come paired (connected) to each other. If after setup
the camera and monitor are not automatically paired, you will need to connect
them manually. Please see page 31 for full instructions on pairing.
17
Page 18
12:45
am
22°c
1
1
1
1
OPERATIONS
VOLUME
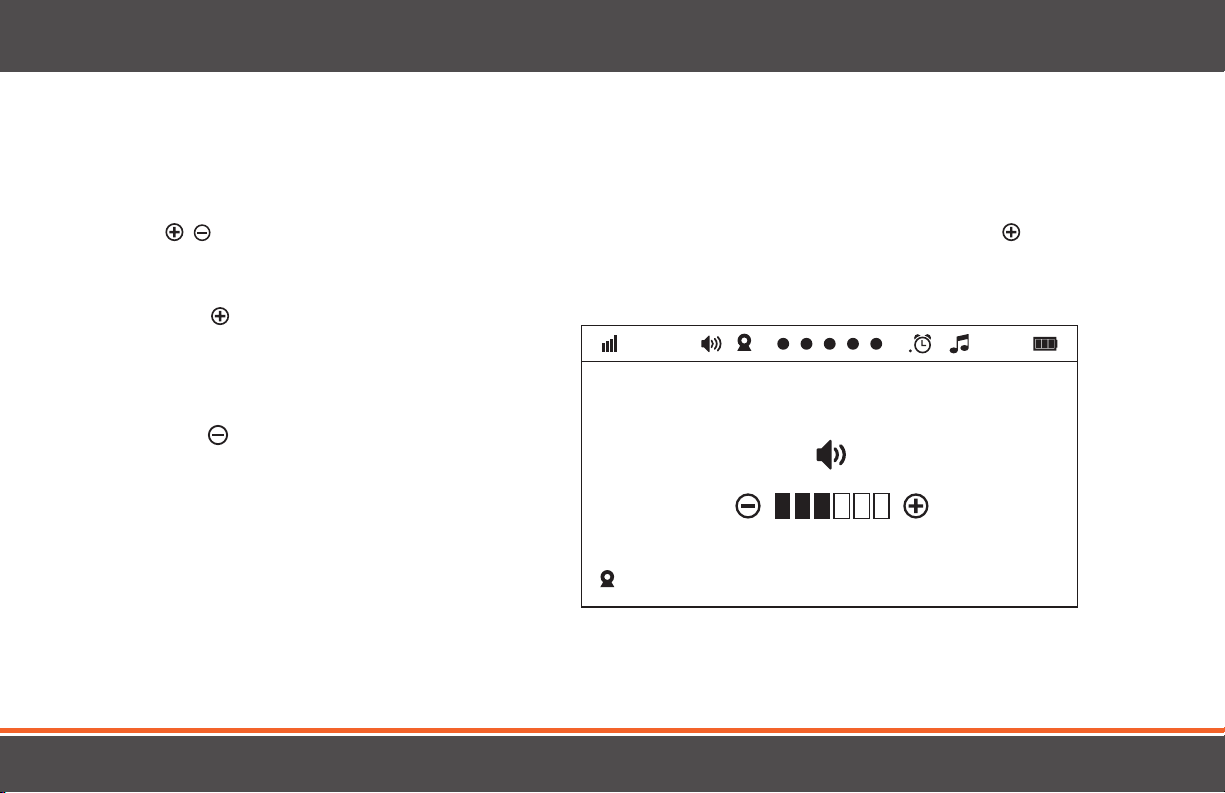
Use the / icons on the right side of the monitor to increase/decrease/mute the volume. If you press and hold the button,
the option to change the volume on the touch screen will appear on the screen.
•
Press the icon to increase the volume in live view;
the volume icon will display the volume level in the
top corner of the screen
• Press the icon to decrease the volume; to mute,
decrease the volume until the icon appears in the top
left corner of the screen
18
Page 19
12:45
am
22°c
1
12:45
am
22°c
1
1
12:45
am
22°c
1
2
3
4
1
+
-
+
-
Introduction FAQ Customer Support
Introduction FAQ Customer Support
12:45
am
22°c
1
BACK
22°c
BACK
22°c
BACK
OPERATIONS
TALK TO BABY
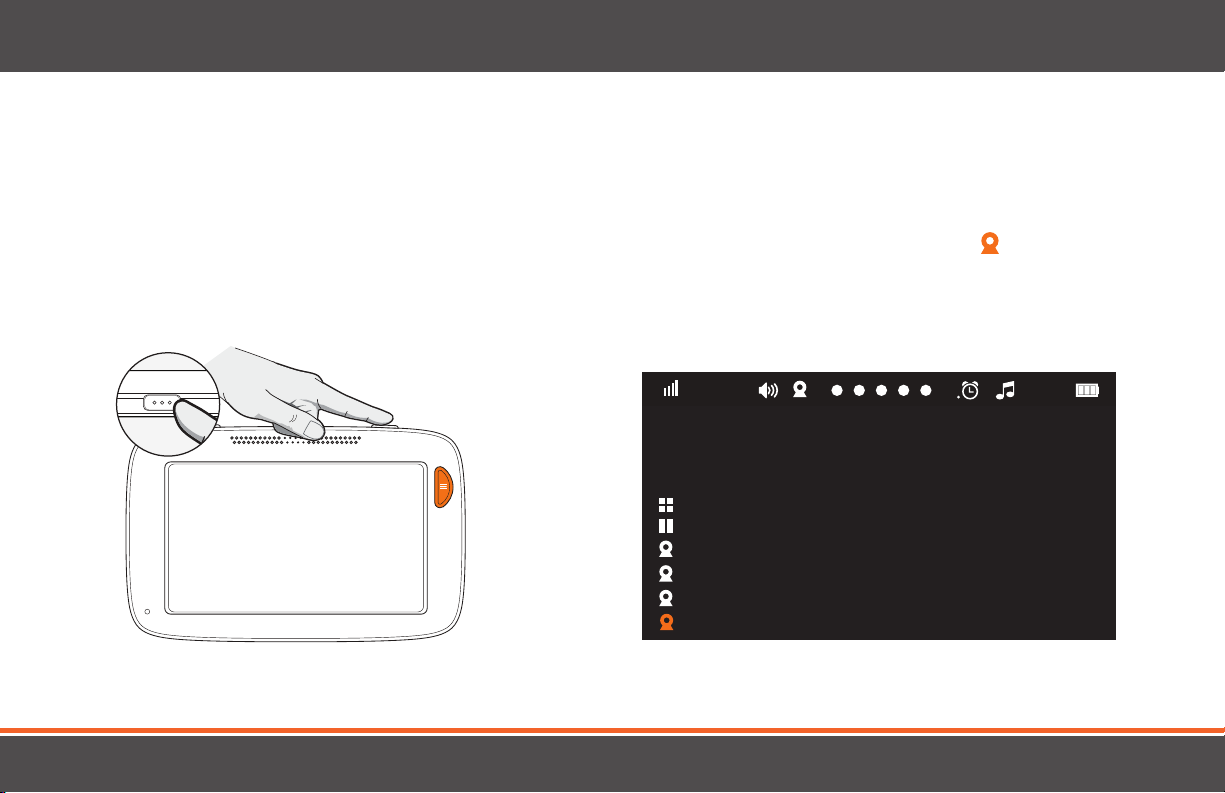
With the simple press of a button, you can talk to your child at any time without entering the nursery.
1. To talk, press and hold the button on the top right corner of
the monitor and release to listen. You can adjust the volume
coming from the camera in the lullaby Menu.
TM
2. To talk when using multiple cameras, tap the on the
bottom left corner of the screen to view all cameras and
tap the desired camera, from the icons that show on screen.
Tap the desired camera.
19
Page 20
12:45
am
22°c
1
1
12:45
am
22°c
1
12:45
am
22°c
1
12:45
am
22°c
1
12:45
am
22°c
1
OPERATIONS
CAMERA VIEWS
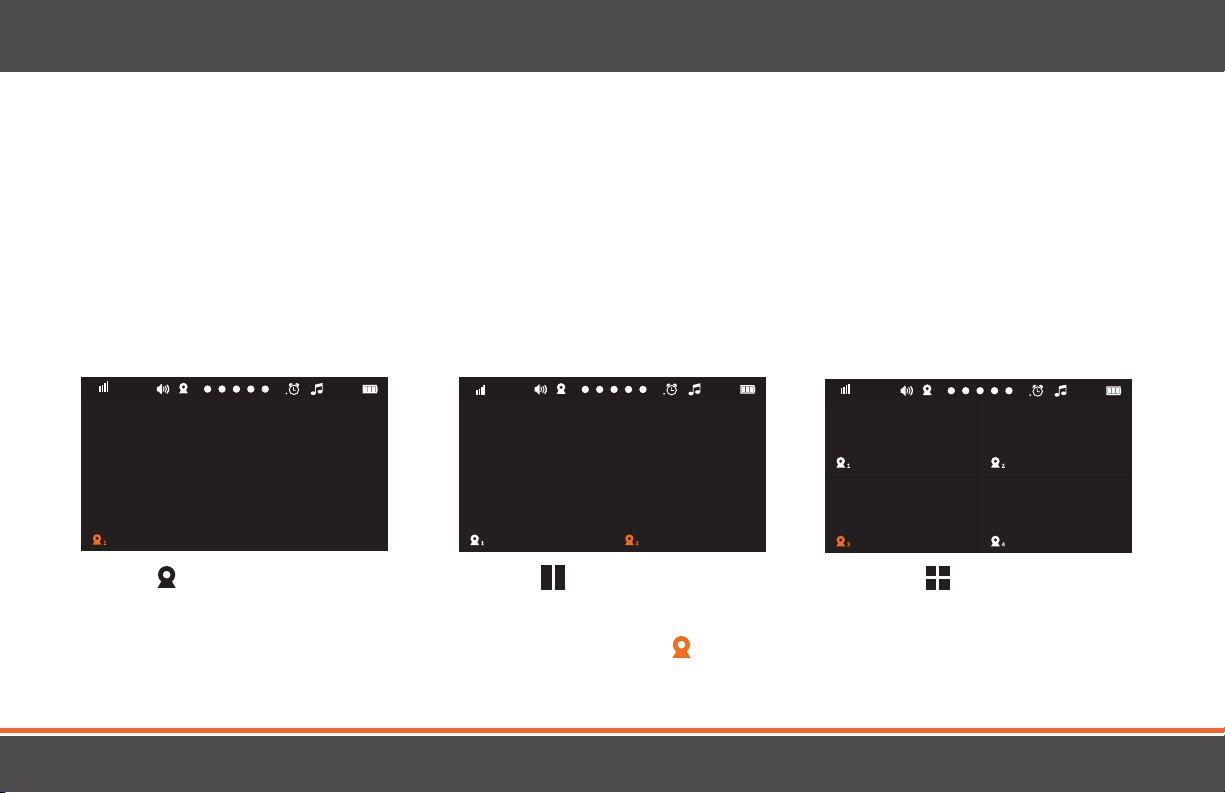
Camera views allow you to choose how you view your cameras. You can choose from single, split screen (for cameras 1 & 2 only),
and quad screen view.
1. To change the camera view when you have paired multiple
cameras, tap the camera 1 icon shown on the bottom left
hand corner of the screen.
Single Screen Split Screen
NOTE: In split screen or quad screen, the volume defaults to the active camera
2. The available cameras will be shown on the screen.
The Menu will only show the available cameras.
Quad Screen
20
Page 21
12:45
am
22°c
1
1
12:45
am
22°c
1
12:45
am
22°c
1
12:45
am
22°c
1
1
1
1
OPERATIONS
PAN/TILT/ZOOM
PTZ
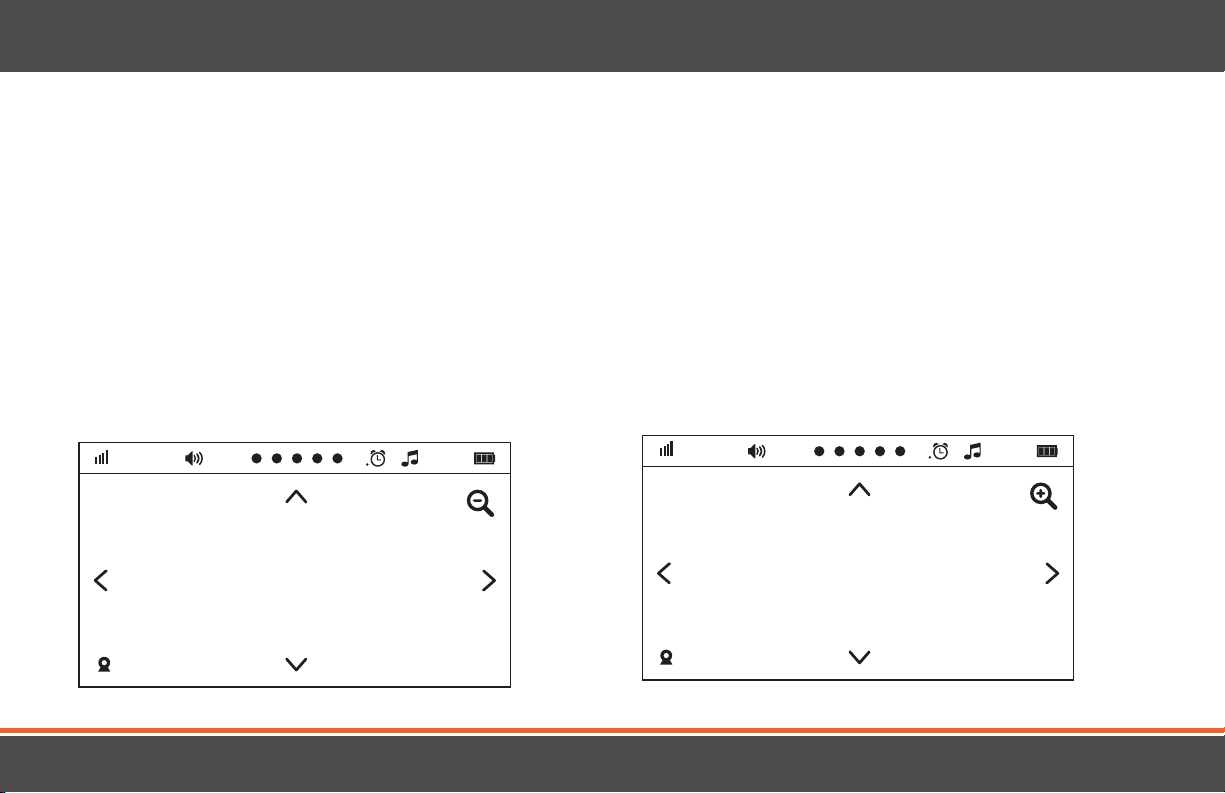
The camera is equipped with Pan/Tilt/Zoom (PTZ). You can adjust
the angle 300° degrees horizontal and 110° degrees vertical from the
center position.
1. Tap the touch screen. The navigational arrows will appear on
the screen.
2. Using the navigational arrows, move the camera to the desired
position.
3. The PTZ arrows will automatically be removed from the screen
after 5 seconds when the screen is not touched.
Zoom
The zoom function allows you to zoom in 2X on the image
shown on the screen.
1. Tap the touch screen. The navigational arrows will appear
on the screen.
2. Tap the magnifying glass icon in the top right corner to
zoom in on the image.
21
Page 22
MENU FUNCTIONS
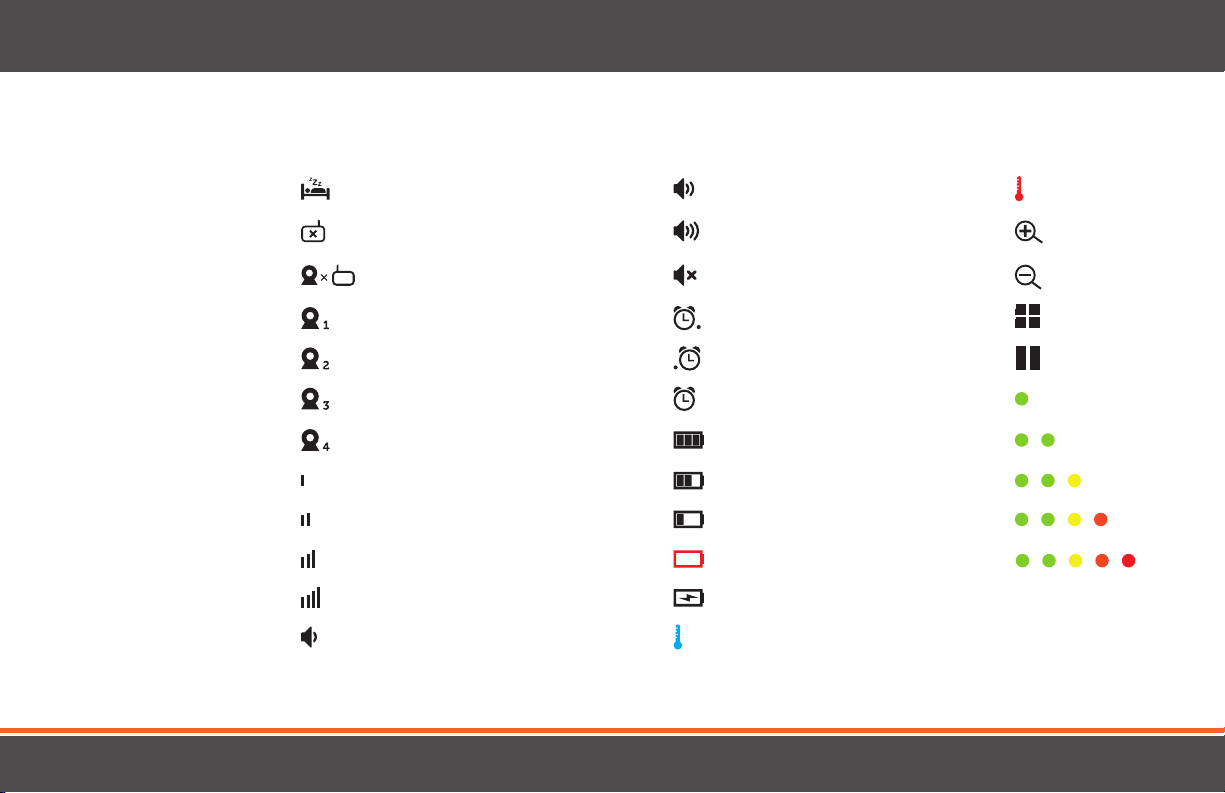
MENU ICONS
Sleep Mode Volume - 2 Temperature Hot
Audio Only Volume - 3 Zoom Lens
Unpair Camera Volume - /O / Mute Zoom Lens
Camera - 1 Timer - Last feed right Quad Screen
Camera - 2 Timer - Last feed left Split Screen
Camera - 3
Camera - 4 Battery - 100% LED Indicator - 2
Signal - 1 Battery - 50-75% LED Indicator - 3
Signal - 2 Battery - 25-50% LED Indicator - 4
Signal - 3 Battery - 0-25% LED Indicator - 5
Signal - 4
Volume - 1 Temperature Cold
Timer - ON LED Indicator - 1
Battery - Charging
22
Page 23
+
+
Feed/Nap Timer Lullabies Temperature
Settings Support
12:45 am
22°c
1
Pair Camera
+
-
+
-
Feed/Nap Timer Lullabies Temperature
Settings Support
12:45 am
22°c
1
Pair Camera
Feed/Nap Timer Lullabies Temperature
Settings Support
12:45 am
22°c
1
Pair Camera
Feed/Nap Timer Lullabies Temperature
Settings Support
12:45 am
22°c
1
Pair Camera
12:45
am
22°c
1
BACK
22°c
BACK
22°c
BACK
MENU FUNCTIONS
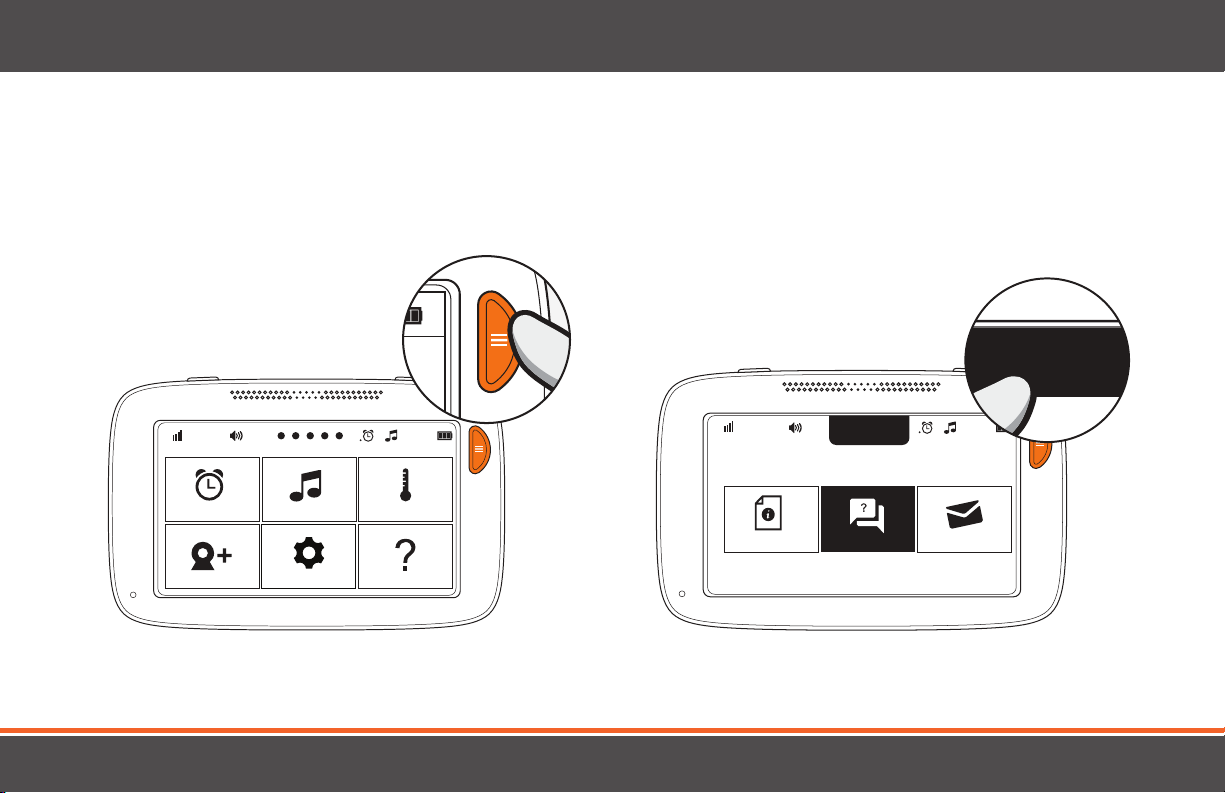
MENU
1. To access the Menu press the orange Menu button.
2. To go back to camera view, tap the back icon.
12:45 am
Feed/Nap Timer Lullabies Temperature
Pair Camera
1
Settings Support
22°c
12:45
am
Introduction FAQ Customer Support
23
BACK
1
22°c
Page 24
Feed/Nap Timer Lullabies Temperature
Pair Camera Settings Support
Set Timer
03 :
00
Camera 1
Alert Settings
START
REPEAT
AUDIBLE
ON SCREEN
LEFT RIGHT
Last Feed
Hr Min
Battery - 100%
Battery - 50-75%
Battery - 25-50%
Battery - 0-25%
Battery - Charging
LED indicator - 5
LED indicator - 4
LED indicator - 3
LED indicator - 2
LED indicator - 1
Dont Show Again
Timer - Last feed right
Timer - Last feed left
Timer - ON
Volume - 2
Volume - 1
Volume - /O / Mute
Camera 2
Camera 3
Camera 4
12:45 am
22°c
12:45 am
22°c
BACK
Set Timer
03 :
00
Camera 1
Alert Settings
START
REPEAT
AUDIBLE
ON SCREEN
LEFT RIGHT
Last Feed
Hr Min
Camera 2
Camera 3
Camera 4
12:45
am
1
12:45
am
22°c
BACK
MENU FUNCTIONS
FEED/NAP TIMER
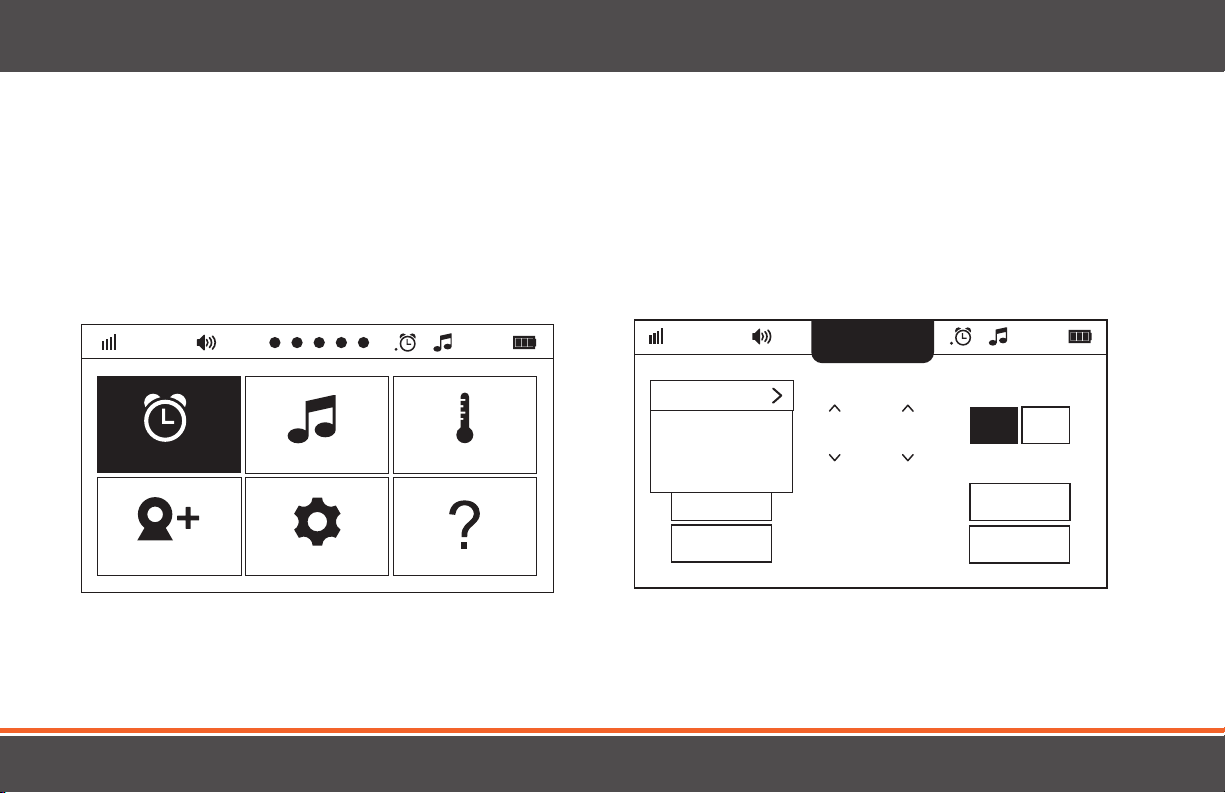
After feeding your baby or when putting your baby down for a nap you can set a timer that alerts you when it’s time for another feeding
or for baby to wake up.
1. Open the Menu and tap the Feed/Nap Timer icon.
2. The Feed/Nap Timer Menu has options to set timers for
each camera.
24
Page 25
Set Timer
03 :
00
Camera 1
Alert Settings
START
REPEAT
AUDIBLE
ON SCREEN
LEFT RIGHT
Last Feed
Hr Min
Camera 2
Camera 3
Camera 4
12:45
am
1
12:45
am
22°c
BACK
MENU FUNCTIONS
FEED/NAP TIMER CONTINUED
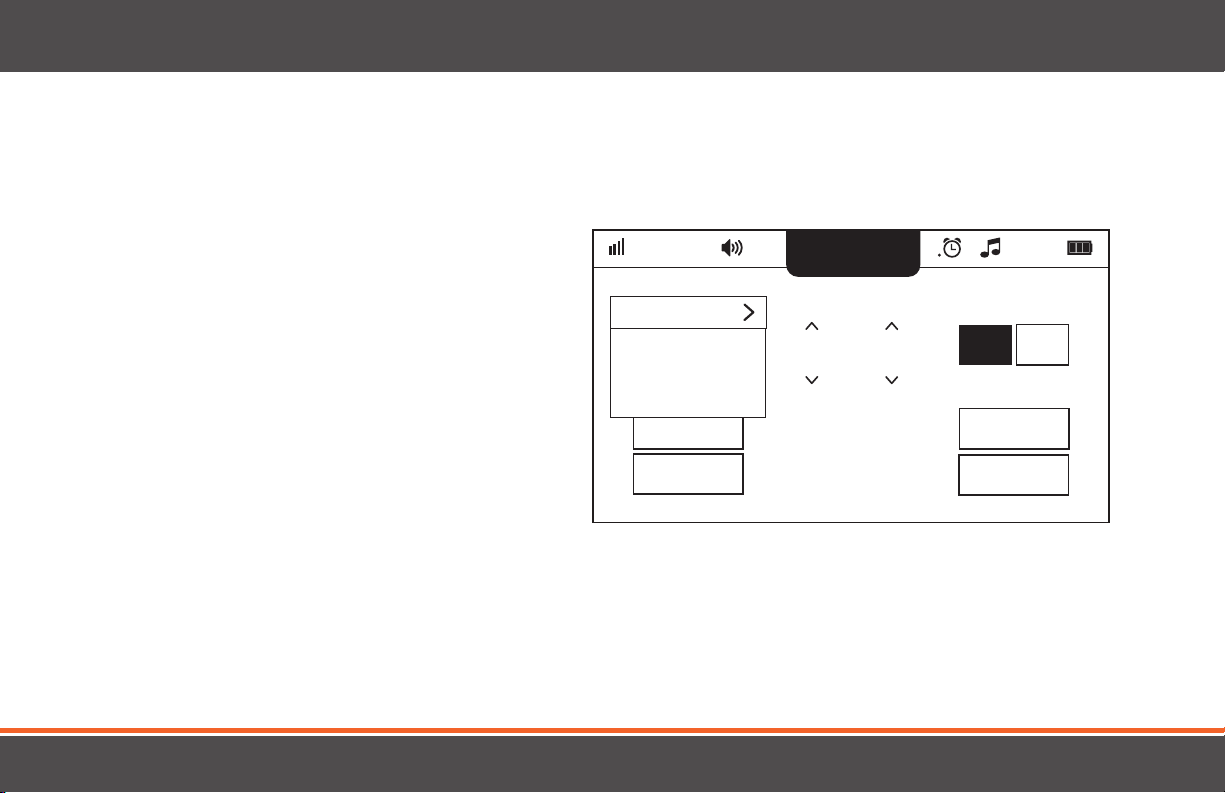
Camera Selection: The drop down Menu will allow you to set
a timer for each camera connected. The Menu will only show
multiple camera selections if more than one camera is paired
with the monitor.
Set Timer: Allows you to set the time interval for the alert
between feeding or naps.
Last Feed: When selecting LEFT or RIGHT for Last Feed, a small
dot will be shown as an icon on the top Menu. If on screen alerts
are enabled the alert will appear for easy reference when breast
feeding.
Alert Setting: You can choose to have the following types of alerts:
• Audible - Audible alert will sound
• On Screen - An icon will flash on the screen
• Audible & On Screen - Will play an audible alert and
flash the icon on the screen
Start/Repeat: Tapping this on screen icon, allows you to start the
timer or to repeat the timer.
25
Page 26
Feed/Nap Timer Lullabies Temperature
Pair Camera Settings Support
Feed/Nap Timer Lullabies Temperature
Pair Camera Settings Support
Lullaby 1
Set Duration
:01
15
Set Timer
03 :
00
Camera Volume
Camera 1
Camera 1
Alert Settings
START
REPEAT
AUDIBLE
ON SCREEN
LEFT RIGHT
Last Feed
ON OFF
Timer
Hr Min
Hr Min
LED indicator - 4
LED indicator - 3
LED indicator - 2
LED indicator - 1
Dont Show Again
Camera 2
Camera 3
Camera 4
12:45
am
22°c
12:45
am
22°c
12:45
am
22°c
12:45
am
22°c
BACK
BACK
Lullaby 1
STOPPLAY
Set Duration
:01
15
Set Timer
03 :
00
Camera Volume
Camera 1
Camera 1
Alert Settings
START
REPEAT
AUDIBLE
ON SCREEN
LEFT RIGHT
Last Feed
ON OFF
Timer
Hr Min
Hr Min
Camera 2
Camera 3
Camera 4
12:45
am
1
12:45
am
22°c
12:45
am
22°c
BACK
BACK
MENU FUNCTIONS
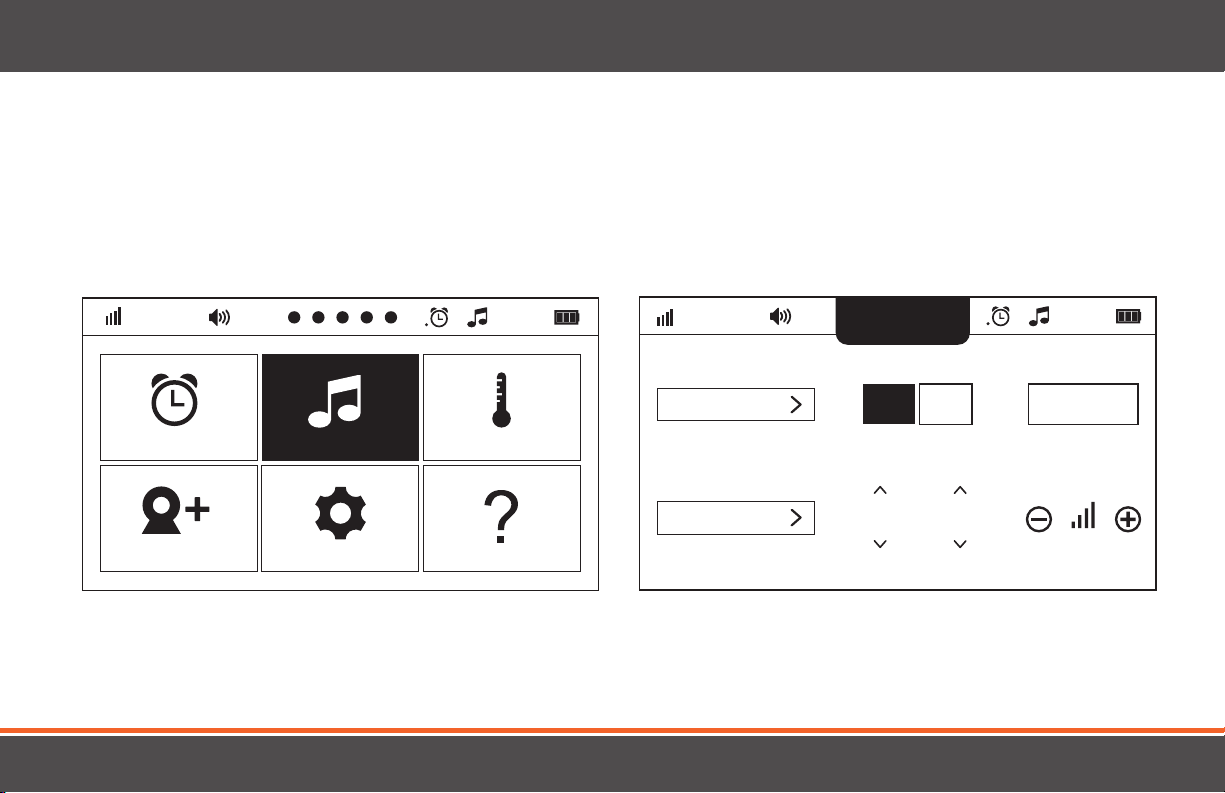
2. The Lullabies Menu has options to set Lullabies for
each camera.
LULLABIES
The Lullabies Menu allows you to choose from 5 dierent Lullabies that will help soothe your baby to sleep. Within this Menu, you can select
each lullaby, turn Lullabies on/o for each connected camera, and adjust the volume.
1. Open the Menu and tap the Lullabies icon.
26
Page 27
Lullaby 1
STOPPLAY
Set Duration
:01
15
Set Timer
03 :
00
Camera Volume
Camera 1
Camera 1
Alert Settings
START
REPEAT
AUDIBLE
ON SCREEN
LEFT RIGHT
Last Feed
ON OFF
Timer
Hr Min
Hr Min
Camera 2
Camera 3
Camera 4
12:45
am
1
12:45
am
22°c
12:45
am
22°c
BACK
BACK
MENU FUNCTIONS
LULLABIES CONTINUED
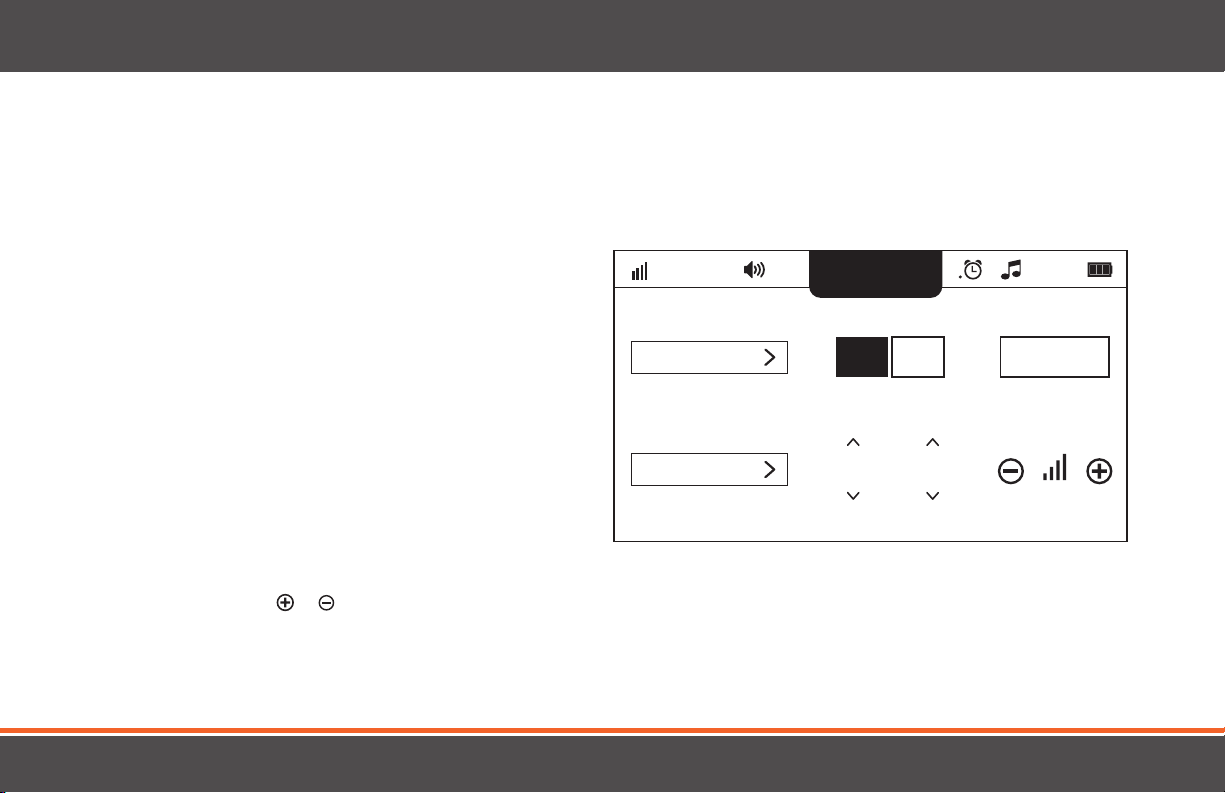
Camera Selection: This drop down will allow you to choose
which camera you would like to play lullabies on.
Lullaby Selection: This drop down will allow you to choose
1 of 5 lullabies to play.
• White Noise
• Ocean Sounds
• Brahms Lullaby
• Discovering the World
• Chopin Nocturne
Timer: You can set the timer to turn ON or OFF.
Set Duration: You can select a duration time for the lullabies
to play. Once this time has passed, lullabies will turn o.
PLAY/OFF: Tapping this icon will allow you to manually turn the
lullabies on. When turned on, PLAY will change to OFF. When
displaying OFF tapping the icon will turn the lullabies o.
Camera Volume: Tap the or icons to adjust the volume of
the lullaby being played from the camera. This will also adjust
the volume of the camera when using the Talk to Baby feature.
27
Page 28
Feed/Nap Timer Lullabies Temperature
Pair Camera Settings Support
Feed/Nap Timer Lullabies Temperature
Pair Camera Settings Support
Feed/Nap Timer Lullabies Temperature
Pair Camera Settings Support
Lullaby 1
Set Duration
:01
15
Camera Volume
Camera 1
Temperature
C°
F°
Alert Settings
Alert Settings
AUDIBLE
ON SCREEN
START
REPEAT
AUDIBLE
ON SCREEN
ON OFF
Timer
ON
Alert
OFF
Temp. Range
Low Hi
Hr Min
Hr Min
Camera 3
Camera 4
12:45
am
22°c
12:45
am
22°c
20
24
12:45
am
22°c
12:45
am
22°c
BACK
BACK
Lullaby 1
STOPPLAY
Set Duration
:01
15
Camera Volume
Camera 1
Temperature
C°
F°
Alert Settings
Alert Settings
AUDIBLE
ON SCREEN
START
REPEAT
AUDIBLE
ON SCREEN
ON OFF
Timer
ON
Alert
OFF
Temp. Range
Low Hi
Hr Min
Hr Min
Camera 4
12:45
am
1
20
24
12:45
am
22°c
12:45
am
22°c
BACK
BACK
MENU FUNCTIONS
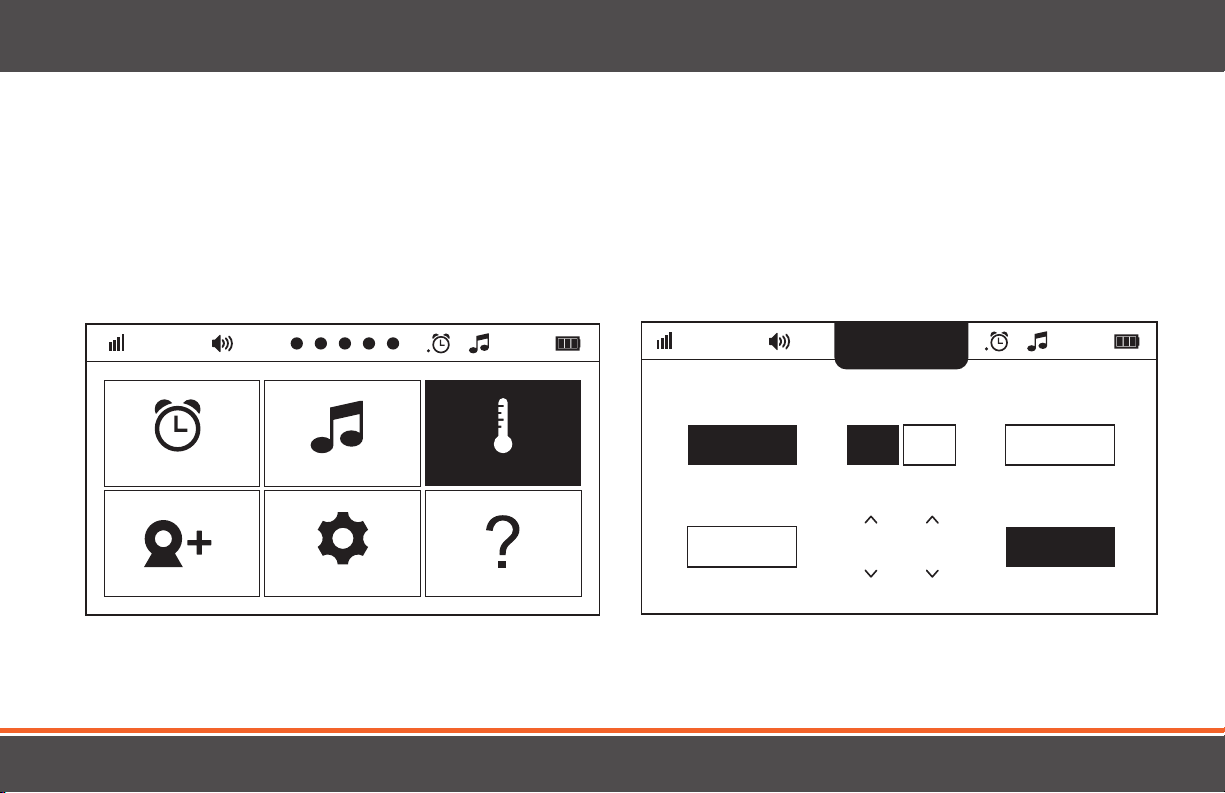
TEMPERATURE
The Temperature Menu allows you to set up audible and/or visual alerts when the temperature in the room becomes too low or too
high. This is monitored by the camera.
1. Open the Menu and tap the Temperature icon.
2. The Temperature Menu has options to set alerts and
temperature ranges.
28
Page 29

MENU FUNCTIONS
TEMPERATURE CONTINUED
Temperature: Tapping °C or °F will determine how the temperature units will display in the top
Menu bar in the camera view screen.
Alert: Tapping ON or OFF will turn the alerts on or o.
Temperature Range: You can set a temperature range to alert you if the temperature where the camera
is becomes too low or too high. This setting allows you to choose a minimum
temperature and a maximum temperature to ensure the room is just right for baby.
Alert Settings: You can set a temperature alert type to indicate when the temperature is too low
or too high. Select to review an audible alert on screen alert or both. The color will
change from white to orange indicating it is on.
• By tapping Audible you will hear 3 beeps to alert you of high or low temperatures
• By tapping the On Screen icon, you will see the temperature alert appear/flash
on screen every 3 seconds
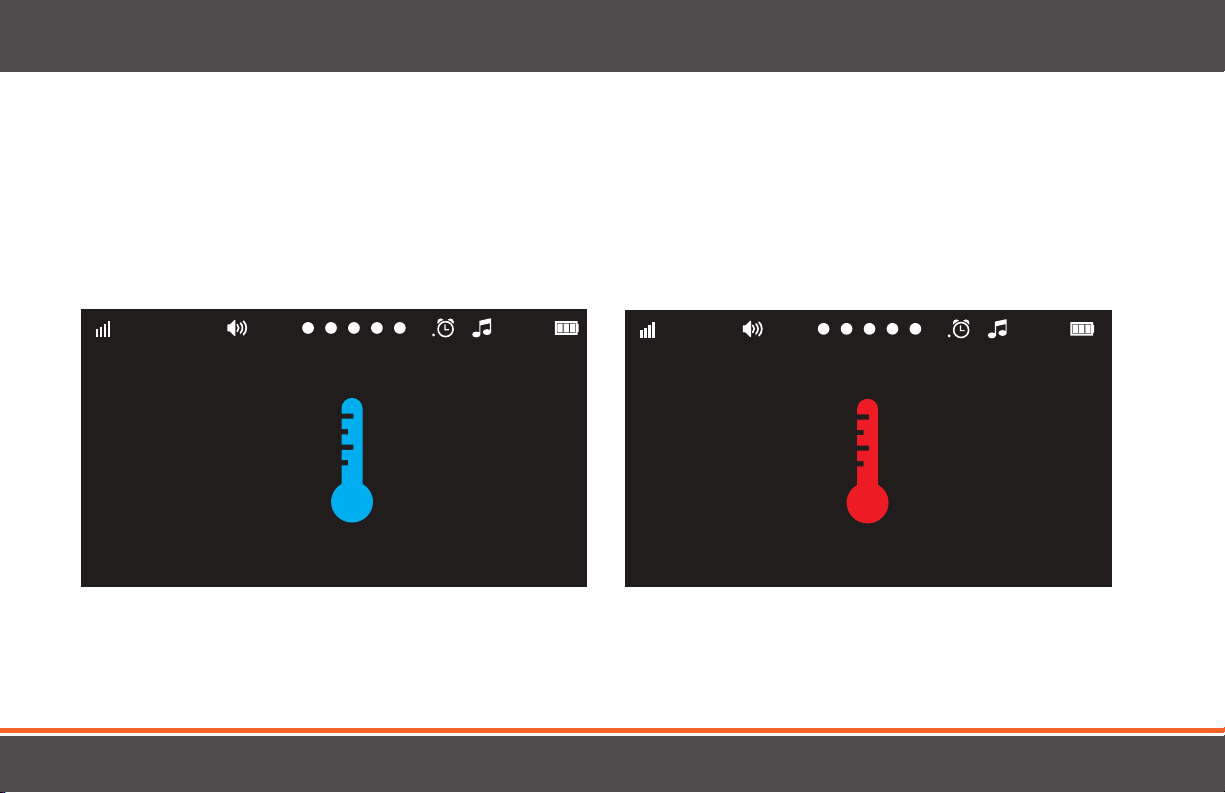
• By tapping both Audible and On Screen you will hear the alert and the blue or red
thermometer will flash on screen every 3 seconds
29
Page 30
12:45
am
22°c
1
12:45
am
22°c
1
12:45
am
22°c
1
12:45
am
22°c
1
12:45
am
22°c
1
MENU FUNCTIONS
TEMPERATURE CONTINUED
1. When the temperature is too low a blue thermometer
will flash on screen.
2. When the temperature is too high a red thermometer
will flash on screen.
30
Page 31
Pair Camera Settings Support
Feed/Nap Timer Lullabies Temperature
Pair Camera Settings Support
Temperature
C°
F°
Alert Settings
AUDIBLE
ON SCREEN
Feed/Nap Timer Lullabies Temperature
Settings Support
ON
Alert
OFF
Temp. Range
Low Hi
Hr Min
12:45
am
22°c
12:45
am
22°c
20
24
12:45
am
22°c
BACK
Tap to pair additional camera Tap to pair additional camera
Tap to pair additional camera Tap to pair additional camera
Press pairing button on camera now
12:45
am
22°c
1
3
2
4
Pair Camera
BACK
BACK
Temperature
C°
F°
Alert Settings
AUDIBLE
ON SCREEN
ON
Alert
OFF
Temp. Range
Low Hi
Hr Min
12:45
am
1
20
24
12:45
am
22°c
BACK
Tap to pair additional camera Tap to pair additional camera
Tap to pair additional camera Tap to pair additional camera
Tap to pair additional camera Tap to pair additional camera Tap to pair additional camera
Tap to pair additional camera
Press pairing button on camera now
12:45
am
22°c
1
3
2
4
12:45
am
22°c
1
3
2
4
BACK
BACK
MENU FUNCTIONS
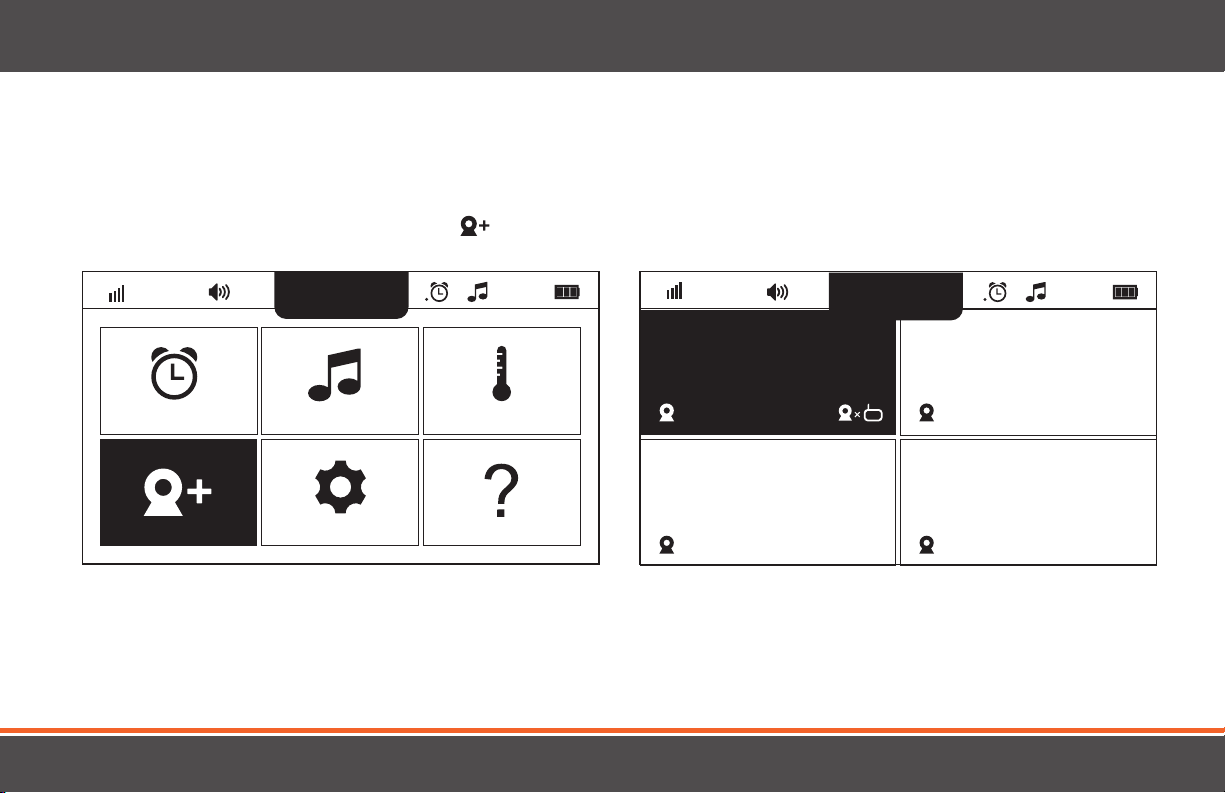
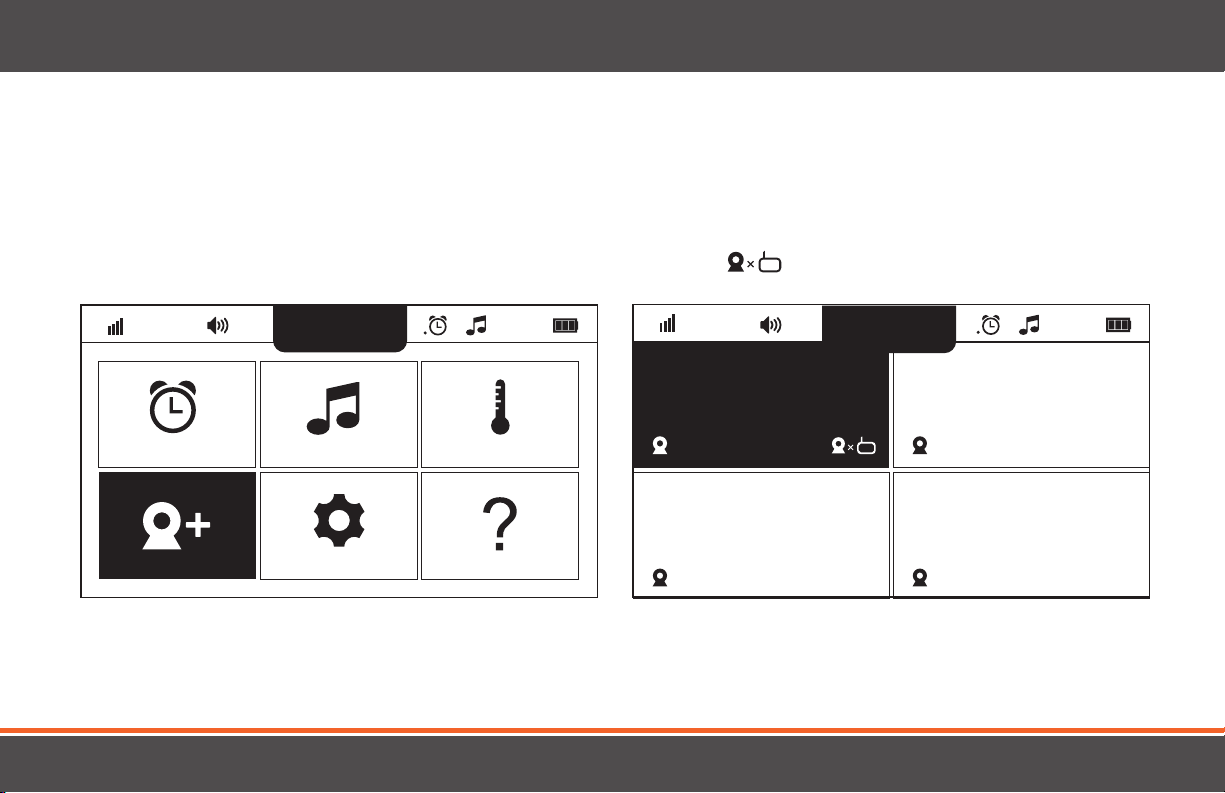
PAIRING
The pairing Menu allows you to pair or unpair cameras.
1. Open the Menu and tap the Pair Camera icon
.
2. The Pair Camera Menu has the option to pair up to 4 cameras.
3. To pair a camera tap one of the grid squares that shows “Tap to pair additional camera”. Press the pairing button on the side of the camera
when the message on the screen reads “Press pairing button on the camera now”.
31
Page 32
12:45
am
22°c
1
Tap to pair additional camera Tap to pair additional camera Tap to pair additional camera
Tap to pair additional camera
Tap to pair additional camera
12:45
am
1
3
2
4
12:45
am
22°c
1
3
2
4
12:45
am
1
12:45
am
1
BACK
BACK
Tap to pair additional camera
12:45
am
22°c
1
3
2
4
12:45
am
22°c
1
12:45
am
22°c
1
BACK
MENU FUNCTIONS
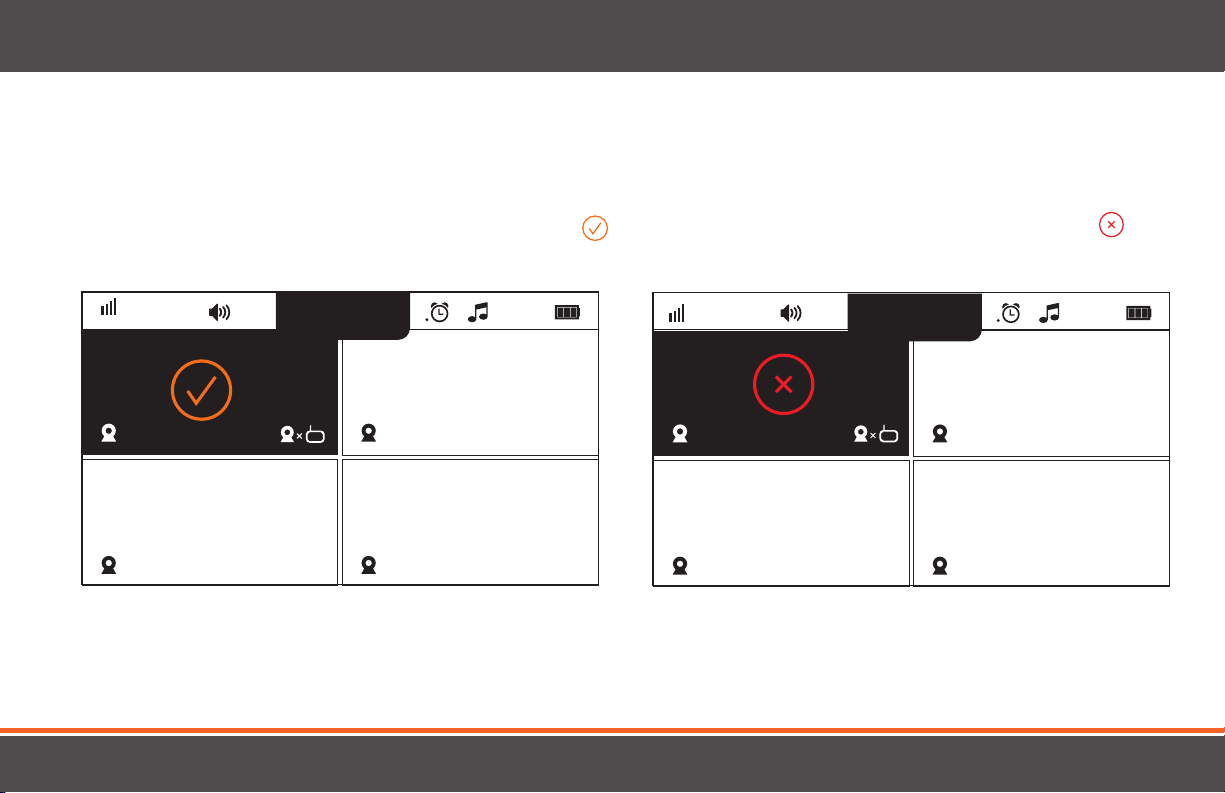
PAIRING CONTINUED
1. If the camera successfully pairs to the monitor, you will see a
on the screen.
2. If the camera fails to pair to the monitor, you will see an
on the screen. If shown, repeat the pairing steps.
32
Page 33
Pair Camera Settings Support
Feed/Nap Timer Lullabies Temperature
Pair Camera Settings Support
Temperature
C°
F°
Alert Settings
AUDIBLE
ON SCREEN
Feed/Nap Timer Lullabies Temperature
Settings Support
ON
Alert
OFF
Temp. Range
Low Hi
Hr Min
12:45
am
22°c
12:45
am
22°c
20
24
12:45
am
22°c
BACK
Tap to pair additional camera Tap to pair additional camera
Tap to pair additional camera Tap to pair additional camera
Press pairing button on camera now
12:45
am
22°c
1
3
2
4
Pair Camera
BACK
BACK
Temperature
C°
F°
Alert Settings
AUDIBLE
ON SCREEN
ON
Alert
OFF
Temp. Range
Low Hi
Hr Min
12:45
am
1
20
24
12:45
am
22°c
BACK
Tap to pair additional camera Tap to pair additional camera
Tap to pair additional camera Tap to pair additional camera
Tap to pair additional camera Tap to pair additional camera Tap to pair additional camera
Tap to pair additional camera
Press pairing button on camera now
12:45
am
22°c
1
3
2
4
12:45
am
22°c
1
3
2
4
BACK
BACK
MENU FUNCTIONS
UNPAIRING
Unpairing the camera allows you to remove a camera that is paired to the monitor.
1. Open the Menu, and tap the Pair Camera icon.
2. Tap the to unpair the camera.
33
Page 34
Are you sure you want to unpair camera?
YESNO
Settings Support
12:45
am
22°c
1
Tap to pair additional camera Tap to pair additional camera
12:45
am
22°c
1
3
4
Pair Camera
Camera unpairing successful!
BACK
BACK
Pair Camera Settings Support
Are you sure you want to unpair camera?
YESNO
Feed/Nap Timer Lullabies Temperature
Settings Support
Low Hi
12:45
am
22°c
12:45
am
22°c
1
Tap to pair additional camera Tap to pair additional camera
Tap to pair additional camera Tap to pair additional camera
Press pairing button on camera now
12:45
am
22°c
1
3
2
4
Pair Camera
BACK
BACK
BACK
MENU FUNCTIONS
UNPAIRING CONTINUED
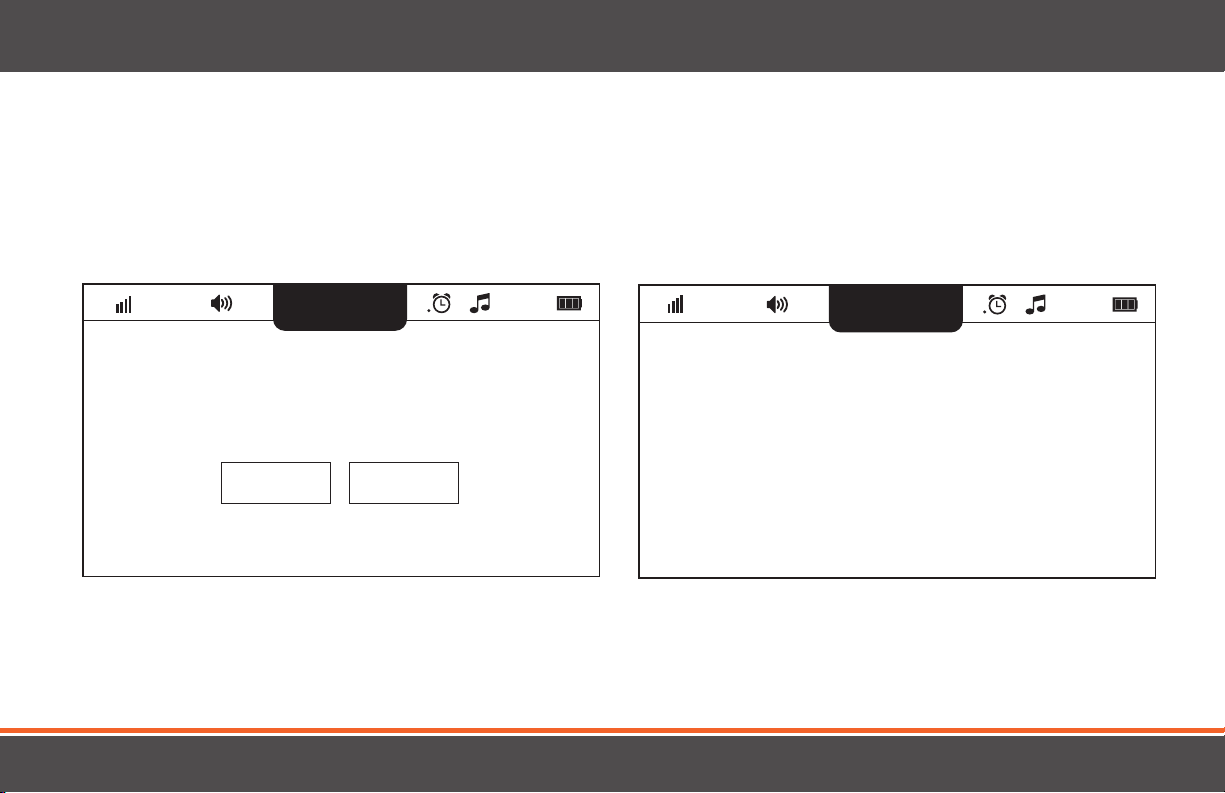
3. Once tapped, a confirmation message will appear on the screen.
4. Select YES to unpair the camera or NO to go back to the
previous screen. If YES is selected you will see a success
message when it is unpaired.
34
Page 35
Feed/Nap Timer Lullabies Temperature
Settings Support
12:45
am
22°c
1
3
4
Pair Camera
Feed/Nap Timer Lullabies Temperature
Settings Support
12:45
am
22°c
1
Power Save Brightness
Time Set
Calibration
Factory Reset
12:45
am
22°c
1
Language
Pair Camera
BACK
MENU FUNCTIONS
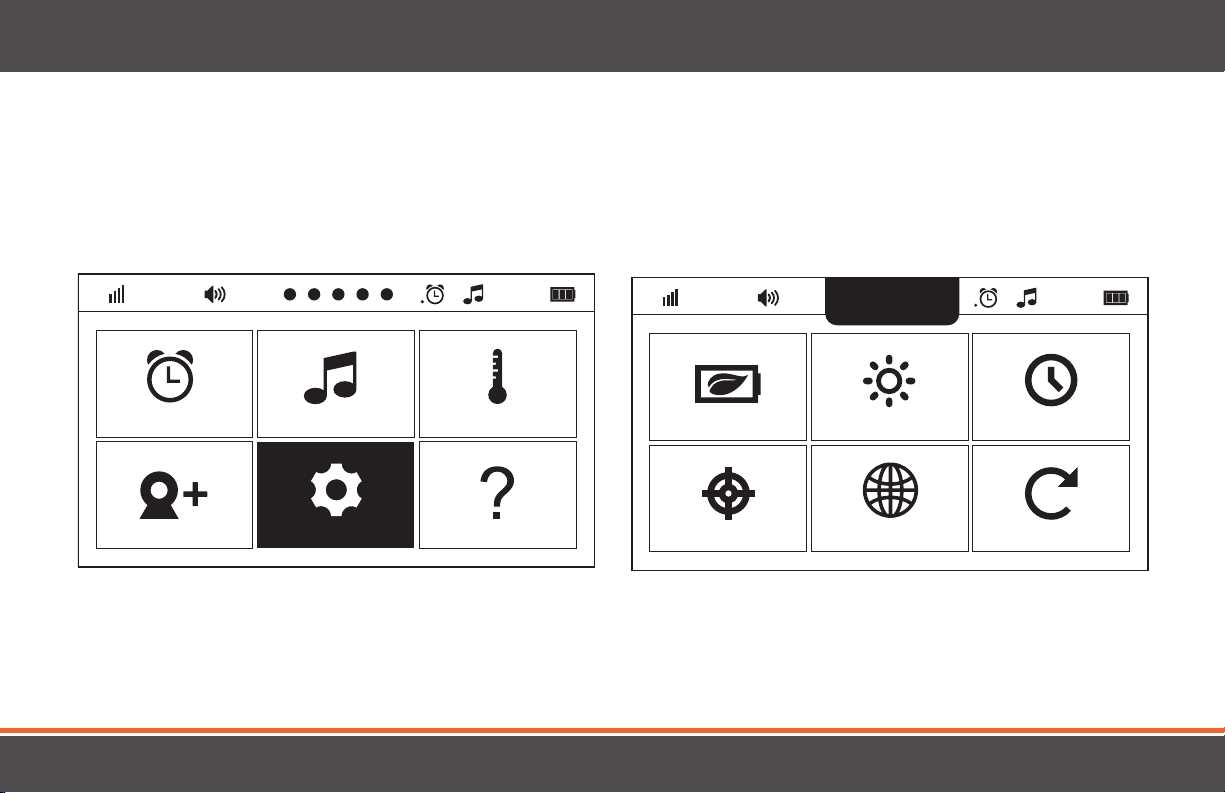
SETTINGS
1. Open the Menu and tap the Settings icon.
2. The Settings Menu has 6 submenu options.
35
Page 36
BACK
Power Save Brightness
Time Set
Calibration
Factory Reset
Sensitivity
Audio Only Sleep Mode
12:45
am
22°c
1
12:45
am
22°c
1
Power Save Brightness
Time Set
Calibration
Factory Reset
Language
Language
BACK
BACK
Sensitivity
Audio Only Sleep Mode
12:45
am
22°c
1
Time Set
Factory Reset
BACK
MENU FUNCTIONS
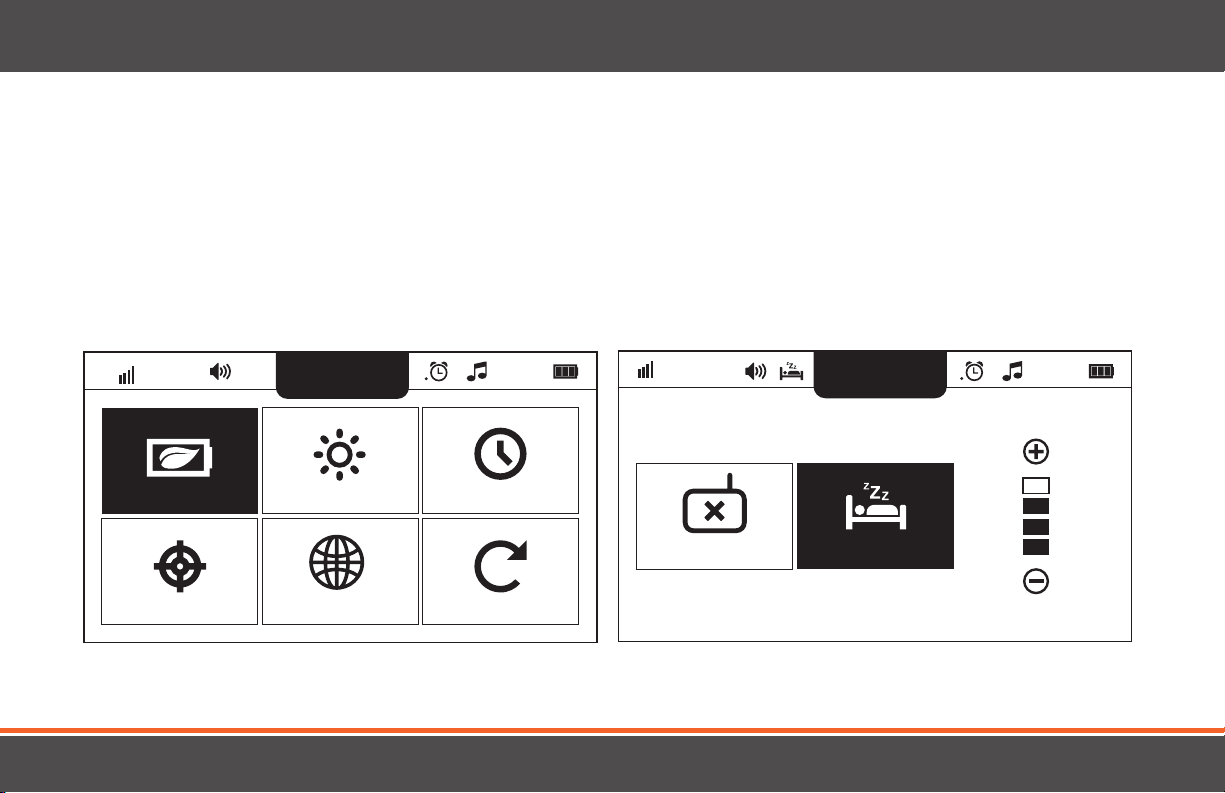
Power Save
When enabled Power Save helps to extend battery life by shutting o the screen when no sound is heard or by making the monitor an
audio only monitor.
1. Tap the Power Save Icon to enter the sub Menu.
2. The Power Save Menu has the option to select Audio only
or Sleep Mode to increase battery life.
36
Page 37
MENU FUNCTIONS
Power Save Continued
Audio Only: By tapping Audio Only, the icon will turn orange and the monitor screen will shut o in 20 seconds.
Sound can still be heard from the monitor. To turn the monitor screen back on, press the power button. To turn
o the Audio Only function tap the Audio Only icon again, in the Power Save Menu.
Sleep Mode: By tapping Sleep Mode, the icon will turn orange and the monitor screen will shut o in 20 seconds.
No audio will be heard from the monitor.
on. There are 4 sensitivity settings to choose from. To adjust tap the and icons on the screen.
NOTE: Power Save does not function with multiple cameras. Only the camera selected with the orange camera
indicator, will detect sound and activate the screen.
When a sound is heard through the camera the monitor will turn back
37
Page 38
Sensitivity
Audio Only Sleep Mode
12:45
am
22°c
1
12:45
am
22°c
1
BACK
BACK
BACK
Power Save Brightness
Time Set
Calibration
Factory Reset
Power Save Brightness
Time Set
Calibration
Factory Reset
Sensitivity
Audio Only Sleep Mode
12:45
am
22°c
1
12:45
am
22°c
1
12:45
am
22°c
1
12:45
am
22°c
1
Language
Language
BACK
BACK
BACK
BACK
MENU FUNCTIONS
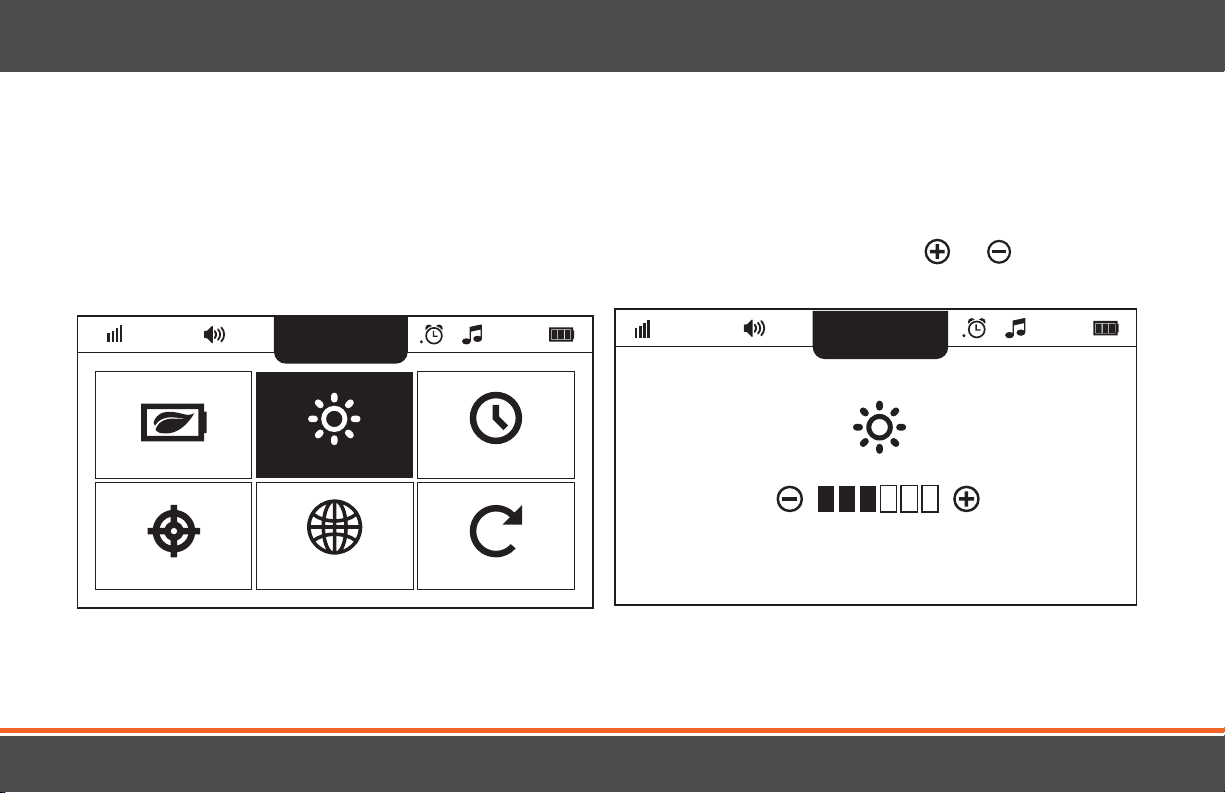
Brightness
Brightness will allow you to control how dim or bright the picture on the monitor appears.
1. Tap the Brightness icon to enter the submenu.
2. Adjust the brightness by tapping the and icon on the screen.
The lower the setting the darker the image will be.
38
Page 39
Time
12hr
24hr
am
12 :
45
Sensitivity
Audio Only Sleep Mode
12:45
am
22°c
1
12:45
am
22°c
1
BACK
BACKBACK
Time
12hr
24hr
am
12 :
45
Power Save Brightness
Time Set
Calibration
Factory Reset
Power Save Brightness
Time Set
Calibration
Factory Reset
Power Save Brightness
Time Set
Calibration
Factory Reset
Sensitivity
Audio Only Sleep Mode
12:45
am
22°c
1
12:45
am
22°c
1
12:45
am
22°c
1
12:45
am
22°c
1
Language
Language
Language
BACK
BACK
BACKBACK
MENU FUNCTIONS
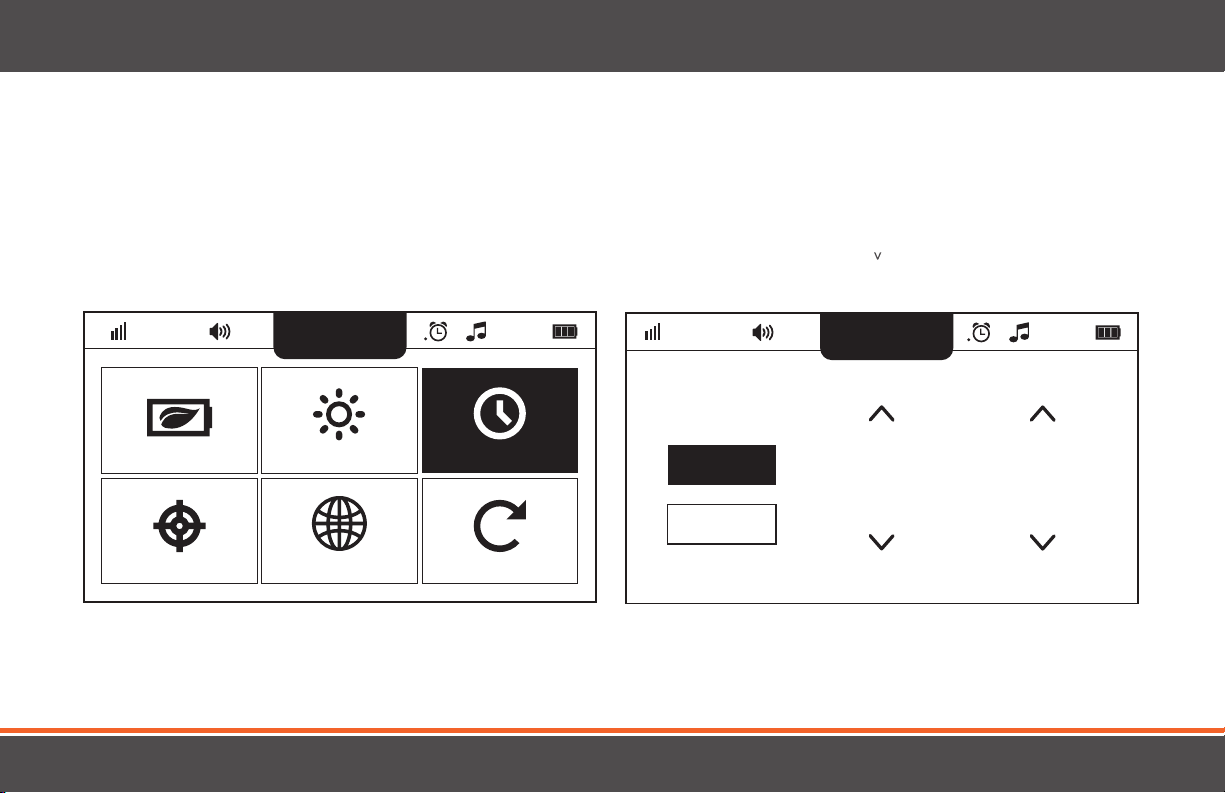
Time Set
Time Set allows you to set the time that is shown on your monitor.
1. Tap the Time Set icon to enter the submenu.
2. The Time Set Menu allows you to choose a 12H or
24H clock. Using the ^ and arrow icons, you can adjust
the hour and minutes.
39
Page 40
Time
12hr
24hr
am
12 :
45
Do you want to calibrate the screen?
NO YES
Calibration
Factory Reset
Power Save Brightness
Time Set
Calibration
Factory Reset
Power Save Brightness
Time Set
Calibration
Factory Reset
12:45
am
22°c
1
12:45
am
22°c
1
12:45
am
22°c
1
12:45
am
22°c
1
Language
Language
Language
BACKBACK
BACK BACK
Time
12hr
24hr
am
12 :
45
Do you want to calibrate the screen?
NO YES
12:45
am
22°c
1
12:45
am
22°c
1
BACKBACK
MENU FUNCTIONS
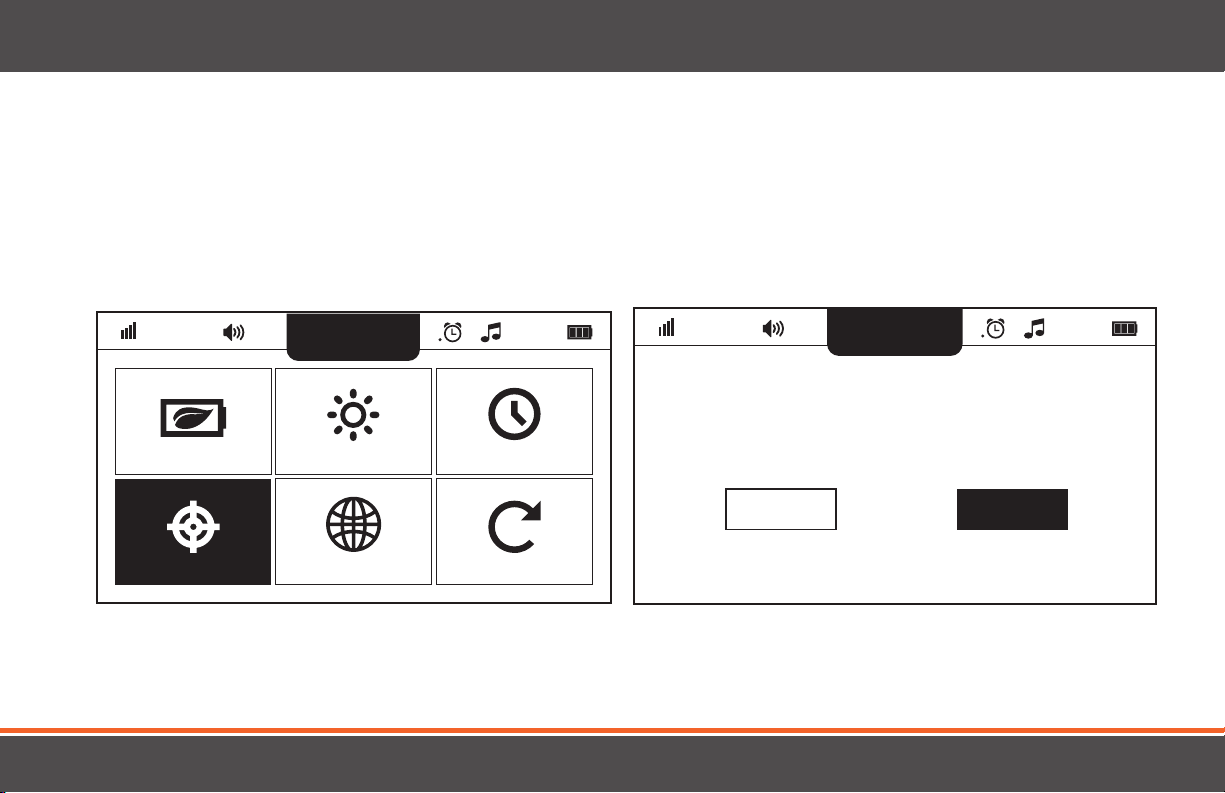
Calibration
The Calibration Menu allows to you calibrate the touch screen to ensure the touch is accurate.
1. Tap the Calibration icon to enter the submenu.
2. Tap YES to proceed with the calibration or NO to go back
to the Settings Menu.
40
Page 41
Do you want to calibrate the screen?
NO YES
Please tap the X Please tap the X Please tap the X Please tap the X
12:45
am
22°c
1
12:45
am
22°c
1
12:45
am
22°c
1
12:45
am
BACK
BACK BACK
NO YES
Please tap the X Please tap the X Please tap the X Please tap the X
Screen successfully calibrated!
12:45
am
22°c
1
12:45
am
22°c
1
12:45
am
BACK
12:45
am
22°c
1
BACK
BACK BACK
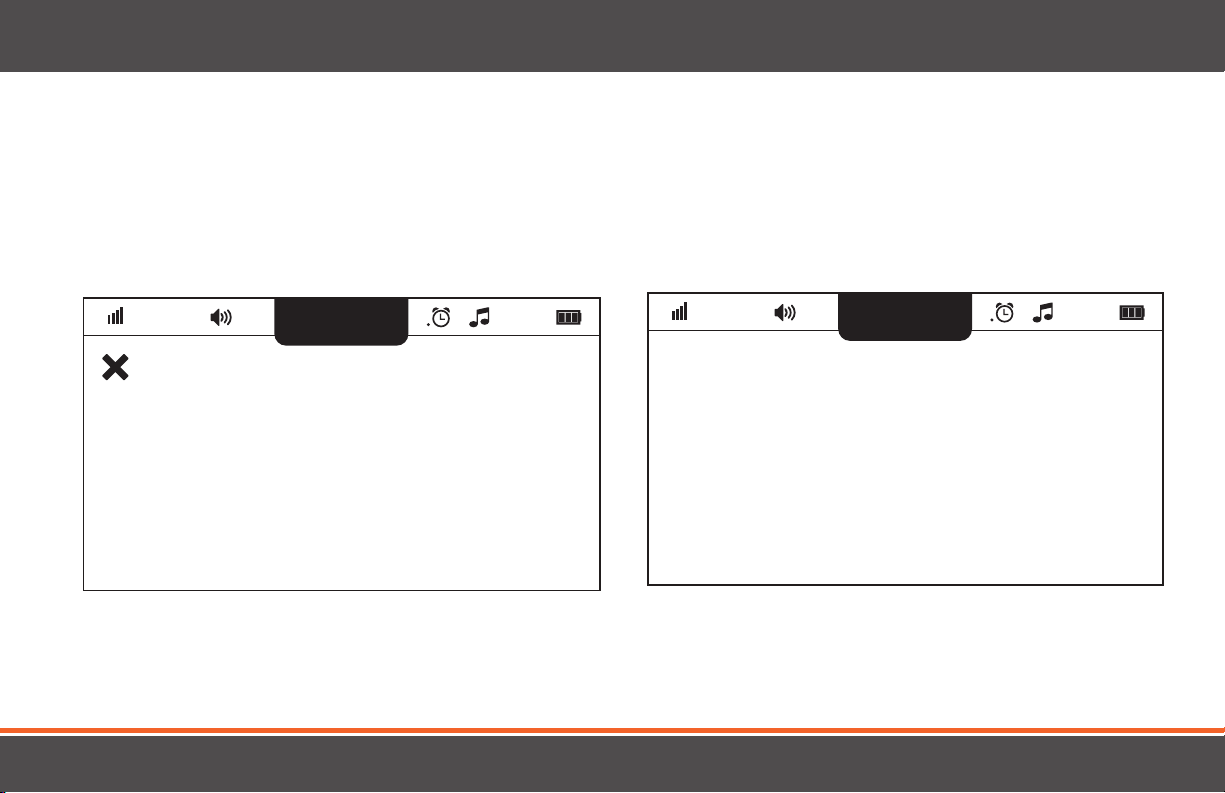
MENU FUNCTIONS
Calibration Continued
1. Follow the on screen prompts by tapping the X when
it appears on the screen.
2. Once completed, a message will show “Screen
successfully calibrated!”
41
Page 42
Screen successfully calibrated!
EXIT
Power Save Brightness
Time Set
Calibration
Factory Reset
12:45
am
22°c
1
12:45
am
22°c
1
Language
FRENCH
ESPANOL
ENGLISH
12:45
am
22°c
1
BACK
BACK
BACK
Screen successfully calibrated!
EXIT
12:45
am
22°c
1
FRENCH
ESPANOL
ENGLISH
12:45
am
22°c
1
BACK
BACK
MENU FUNCTIONS
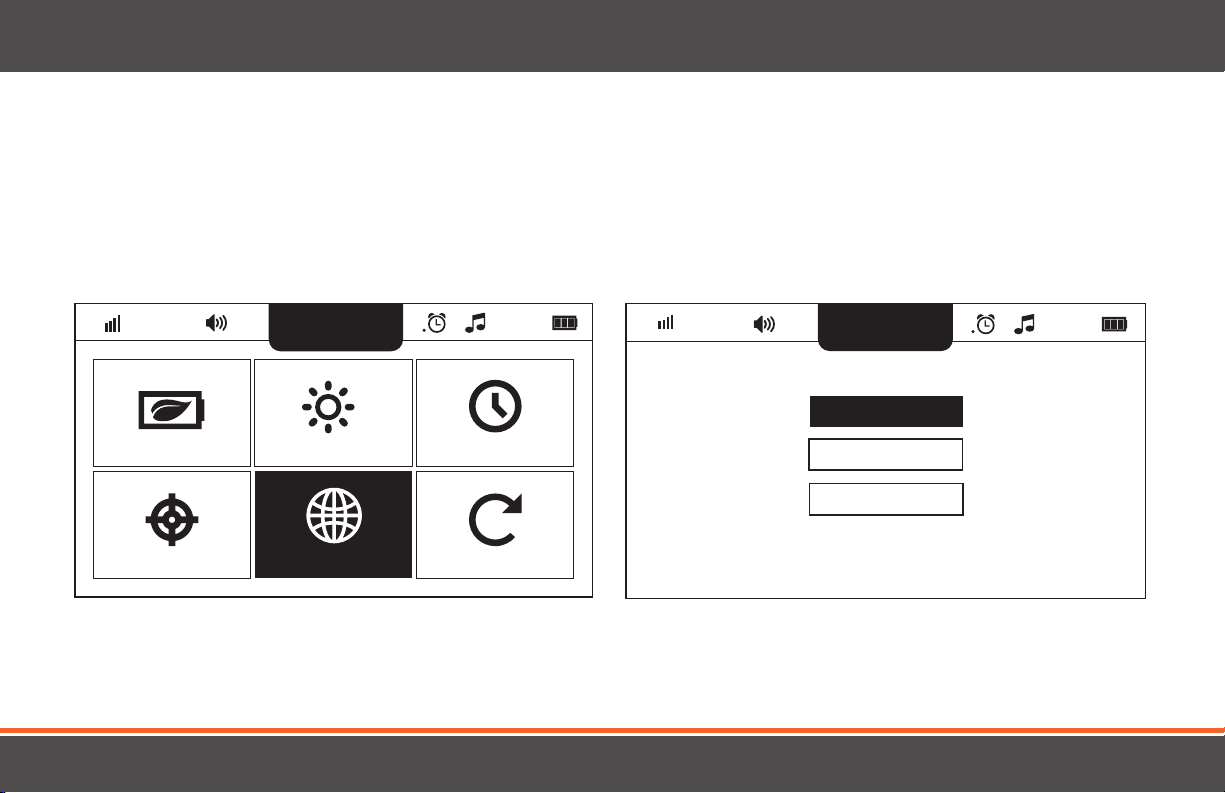
Language
The Language Menu will allow you to choose the language setting for your monitor.
1. Tap the Language icon to enter the submenu.
2. You can select English, French, or Spanish.
42
Page 43
Are you sure you want to reset to factory default settings?
This action cannot be undone.
OK
Power Save Brightness
Time Set
Calibration
Factory Reset
12:45
am
22°c
1
12:45
am
22°c
1
Language
BACK
BACK
Are you sure you want to reset to factory default settings?
This action cannot be undone.
OK
12:45
am
22°c
1
BACK
MENU FUNCTIONS
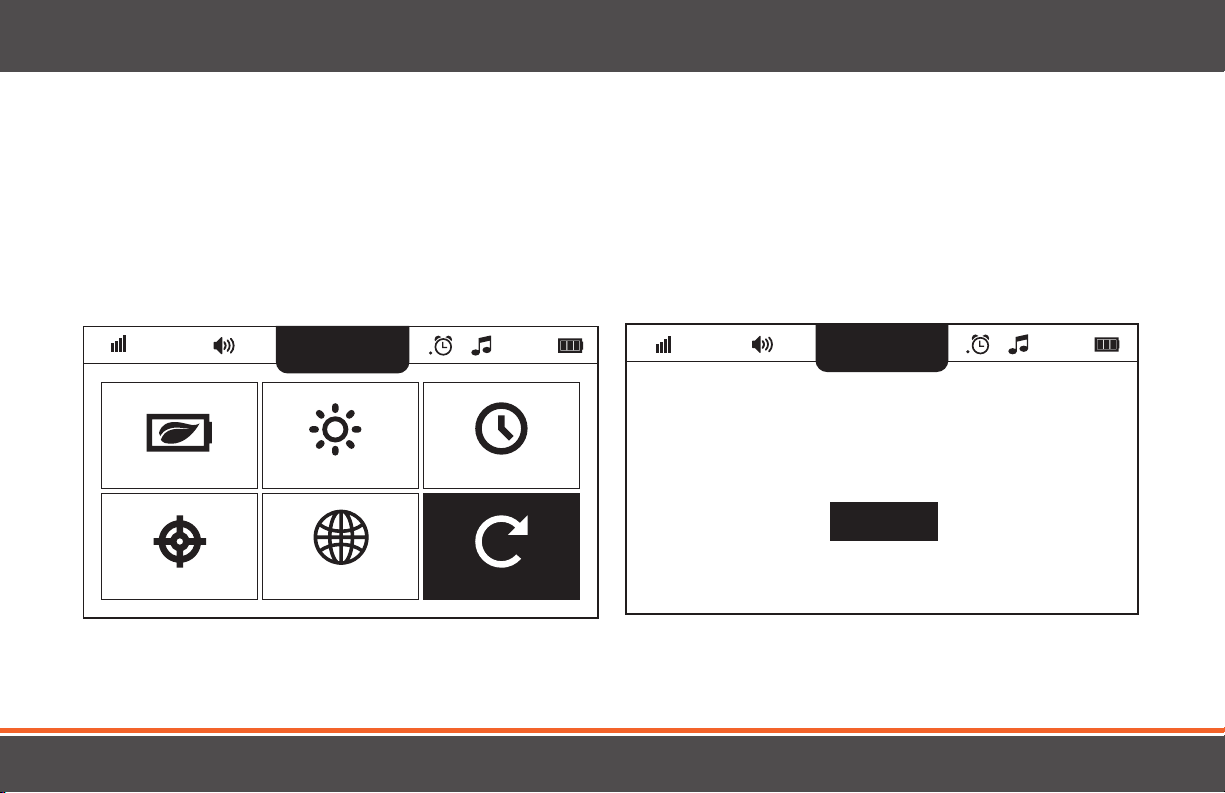
Factory Reset
The Factory Reset allows you to restore the monitor back to the factory default settings.
1. Tap the Factory Reset icon to enter the submenu.
2. A message will be shown on the screen stating “Are you sure you
want to reset the factory default settings? This action cannot be
undone”. Tap OK to confirm the factory reset or BACK to return
to the previous Menu.
43
Page 44
Are you sure you want to reset to factory default settings?
This action cannot be undone.
OK
Your monitor has been restored to it’s factory default.
12:45
am
22°c
1
12:45
am
22°c
1
BACK
BACK
MENU FUNCTIONS
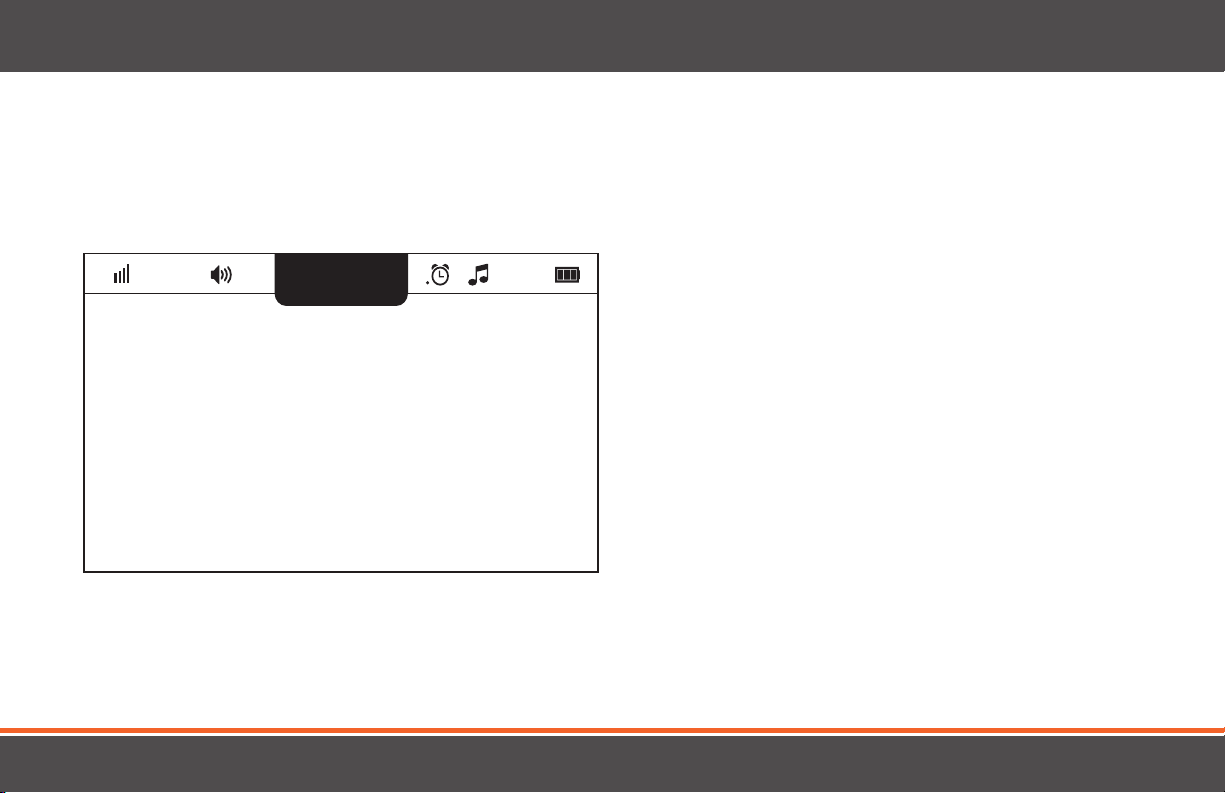
Factory Reset Continued
1. When successfully reset you will see a confirmation message on screen.
44
Page 45
Introduction FAQ Customer Support
12:45
am
1
Feed/Nap Timer Lullabies Temperature
Settings Support
12:45
am
22°c
1
Pair Camera
BACK
BACK
Introduction FAQ Customer Support
12:45
am
22°c
1
12:45
am
22°c
1
ON
Introduction on start up
OFF
BACK
BACK
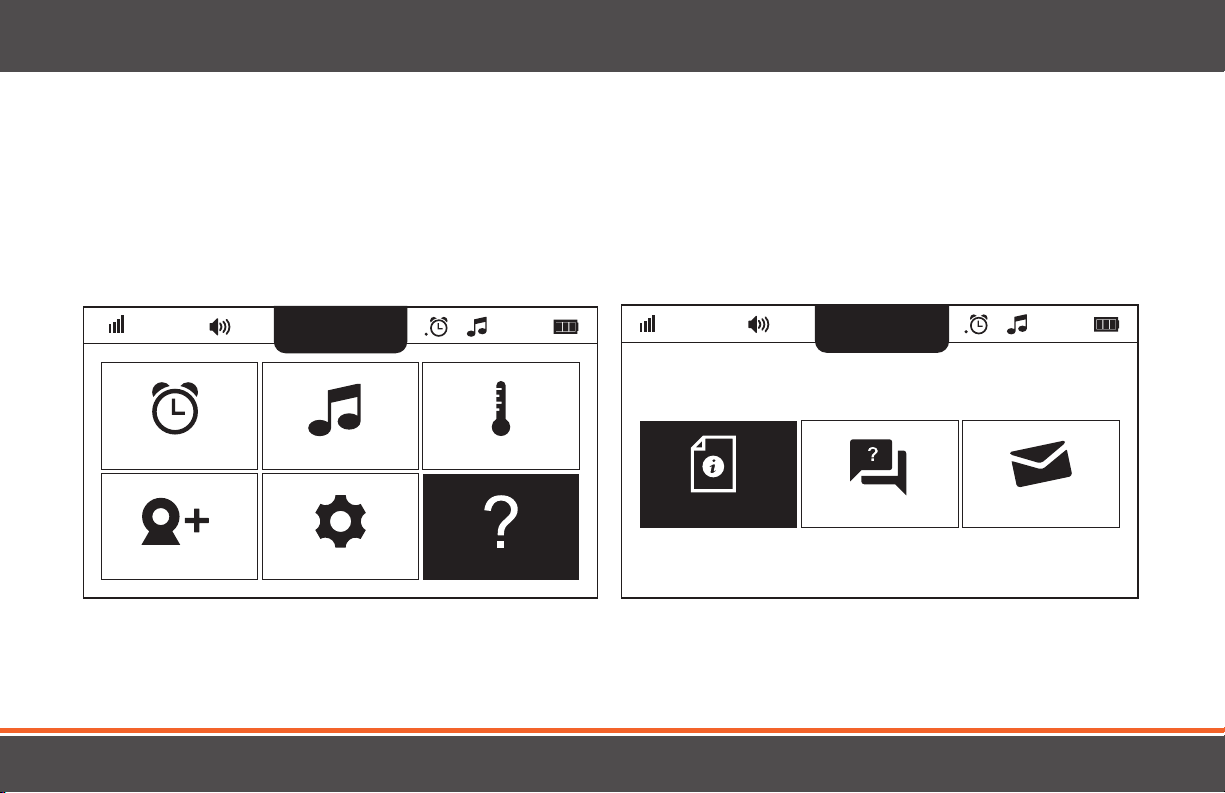
MENU FUNCTIONS
SUPPORT
The Support Menu has 3 options available.
Introduction
1. Tap the Support icon to enter the submenu.
2. Tap Introduction.
45
Page 46
12:45
am
22°c
1
ON
Introduction on start up
OFF
Introduction
BACK
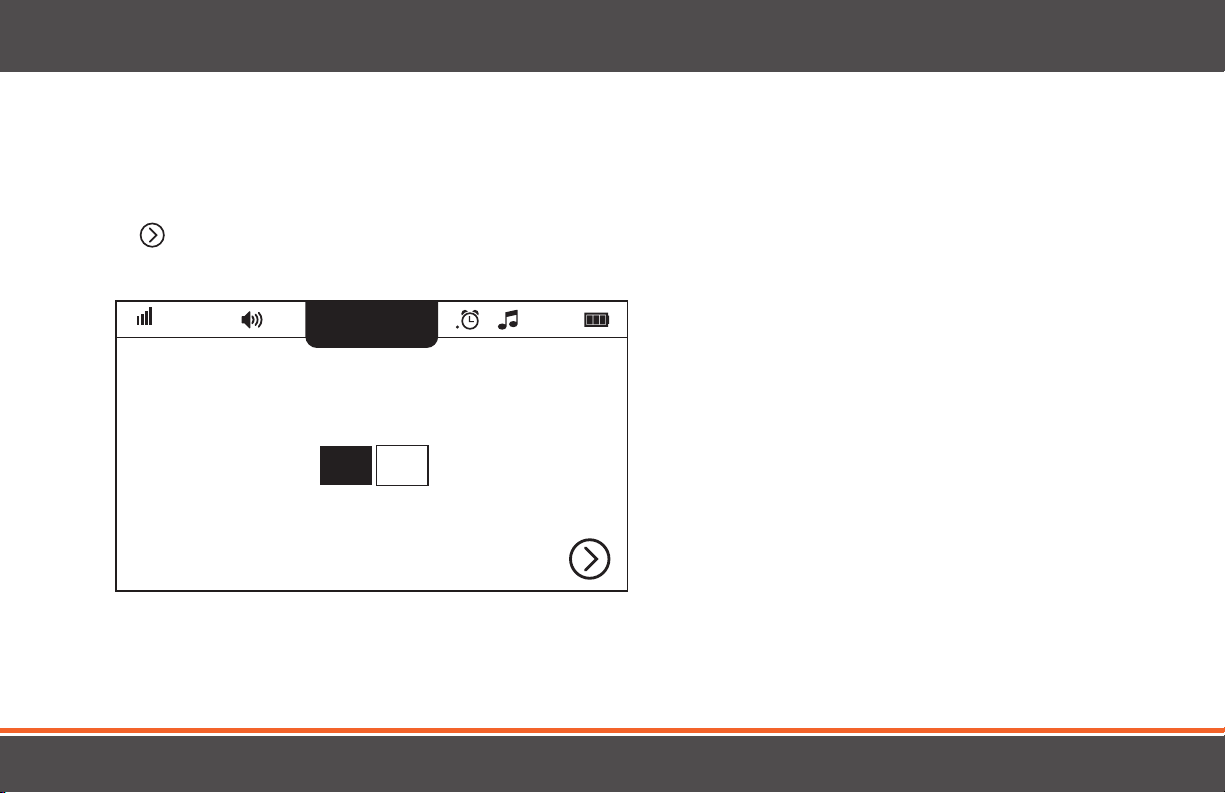
MENU FUNCTIONS
Introduction Continued
3. Within the Introduction Menu, you can choose to turn the Introduction mode ON or OFF during start up. By tapping
the
icon, you can go through the introduction again to review the features and functions of the monitor.
46
Page 47
Introduction FAQ Customer Support
Introduction FAQ Customer Support
12:45 am
22°c
1
12:45 am
22°c
1
12:45 am
22°c
1
12:45 am
22°c
1
ON
Introduction on start up
OFF
BACK
BACK
BACK
BACK
12:45
am
22°c
1
12:45
am
22°c
1
ON
Introduction on start up
OFF
Introduction
FAQ
BACK
BACK
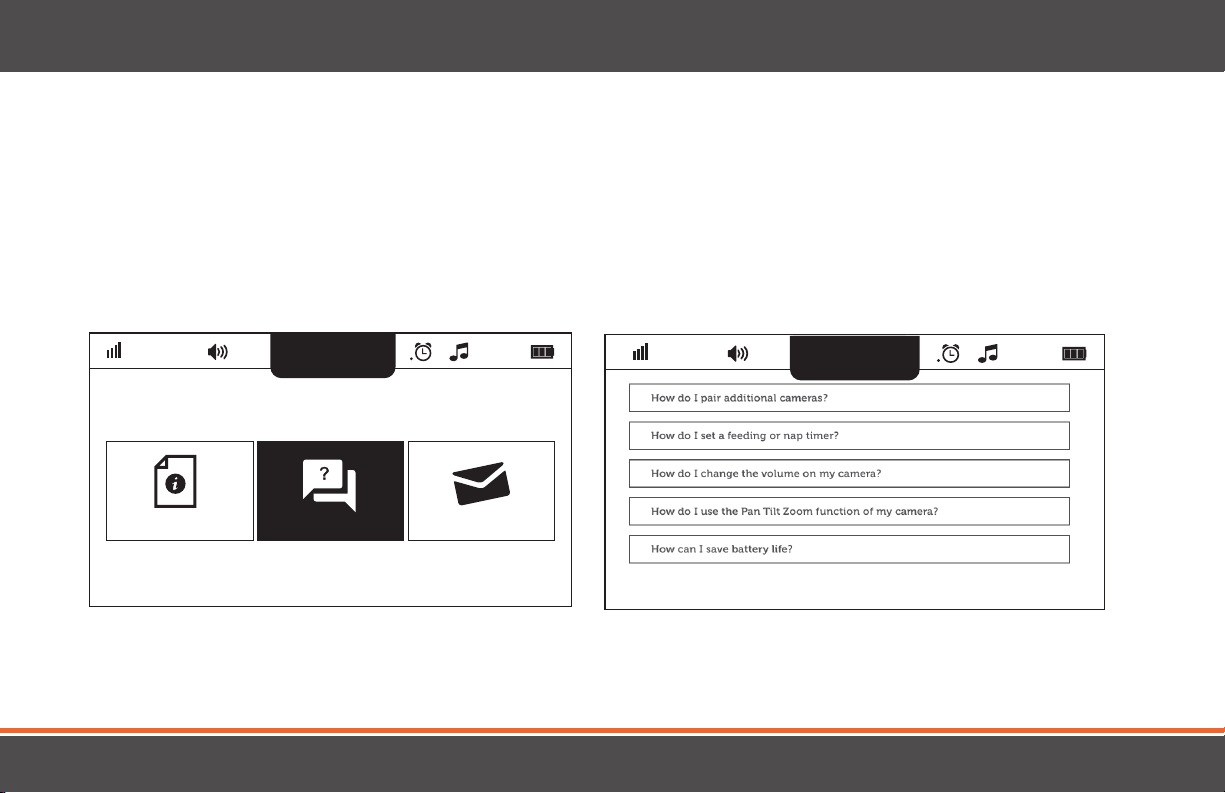
MENU FUNCTIONS
FAQ
The FAQ Menu will take you to list of the most frequently asked questions.
1. Tap the FAQ icon.
2. A list of the most frequently asked questions will appear on
the screen. For example, by selecting “How do I pair an additional camera?” You will see step by step instructions on how
to pair your camera.
Note: You cannot pair a camera while in the FAQ.
47
Page 48
www.mylevana.com/support
Introduction FAQ Customer Support
Introduction FAQ Customer Support
Introduction FAQ Customer Support
12:45
am
22°c
1
12:45
am
22°c
1
12:45
am
22°c
1
12:45
am
22°c
1
ON
OFF
BACK
BACK
BACK
BACK
www.mylevana.com/support
12:45
am
22°c
1
12:45
am
22°c
1
ON
OFF
FAQ
BACK
BACK
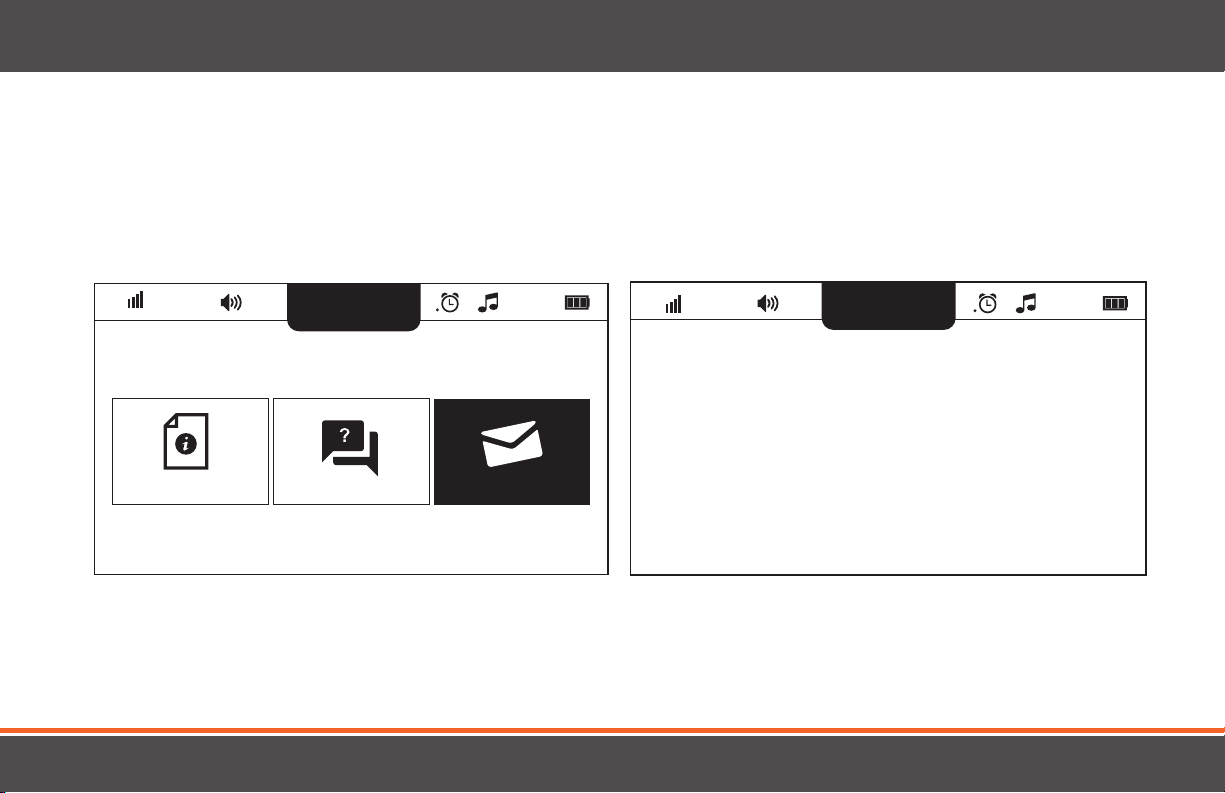
MENU FUNCTIONS
Customer Support
The Customer Support option will provide you with the website address to contact our customer support team via Live Chat or using
our Contact Us form.
1. Tap Customer Support.
2. The web address will be shown on the screen.
48
Page 49

SUPPORT
TROUBLESHOOTING
Monitor/Camera does not function
• Confirm that the camera and monitor are on.
• The battery may be depleted; try recharging the battery.
• The power adapters may not be properly connected.
No reception
• The camera and monitor may not be properly paired;
follow pairing instructions to repair the camera and
monitor.
• The camera may be too far away from the monitor; try to
move the units closer together.
• Extend the antenna on the monitor for better reception.
Lullabies are greyed out
• Ensure a PTZ camera is paired to the unit.
• Try unpairing and repairing a PTZ camera.
• Fixed cameras do not play lullabies.
Reception interference (static)
• The camera and monitor may be too far apart; try to move the unit
closer together.
• The battery power may be too low; try recharging the battery.
• Other electronic devices such as wireless routers or microwaves may
be interfering with the signal; try moving the position of the unit.
• The camera or monitor may be placed too close to many metal objects;
try moving the position of the unit.
Feedback (screeching, static)
• The camera and monitor may be too close together; try moving the
position of the unit.
• The volume on the monitor may be set too high; adjust the volume to
a lower setting to prevent feedback.
Touchscreen
• If touch screen seems slow to respond, perform a screen calibration:
this tool is used to improve the responsiveness of the screen to the
user’s touch.
49
Page 50

SUPPORT
Noise (static, beeping)
• The battery power may be too low; try recharging the battery.
Picture works but there is no sound
• Volume setting may be too low.
Audio works but there is no picture
• The Power Save settings may be enabled. Press the power
button to turn the monitor screen back on. Press the orange
Menu button and tap Settings Power Save and tap the Audio
Only icon to turn the feature o.
Picture is black and white
• Night vision LEDs may be ON; try increasing the amount of light
in the room being monitored.
Split Screen
• If trying to using the split screen feature but when tapping the
camera icon the option is not there ensure that the you have
2 cameras paired to the monitor and that these 2 cameras are
paired to position 1 & 2. Split screen will only be available when
cameras are paired to position 1 & 2.
Day/night vision is whitewashed
• Ensure that night vision light sensor is pointed away from a wall
and is not covered.
• A white or reflective surface could be causing light to bounce
back into the camera; try moving the position of the camera.
The rechargeable battery will not charge
• The power adapters may not be connected.
• The battery may not be properly connected inside the battery
compartment.
Maintenance
• Clean the surfaces of the camera and monitor with a soft,
flu-free cloth.
• If the units become dirty, use a lightly dampened cloth to wipe
surfaces, taking care to not allow water into any openings.
• Never use cleaning agents or solvents.
50
Page 51
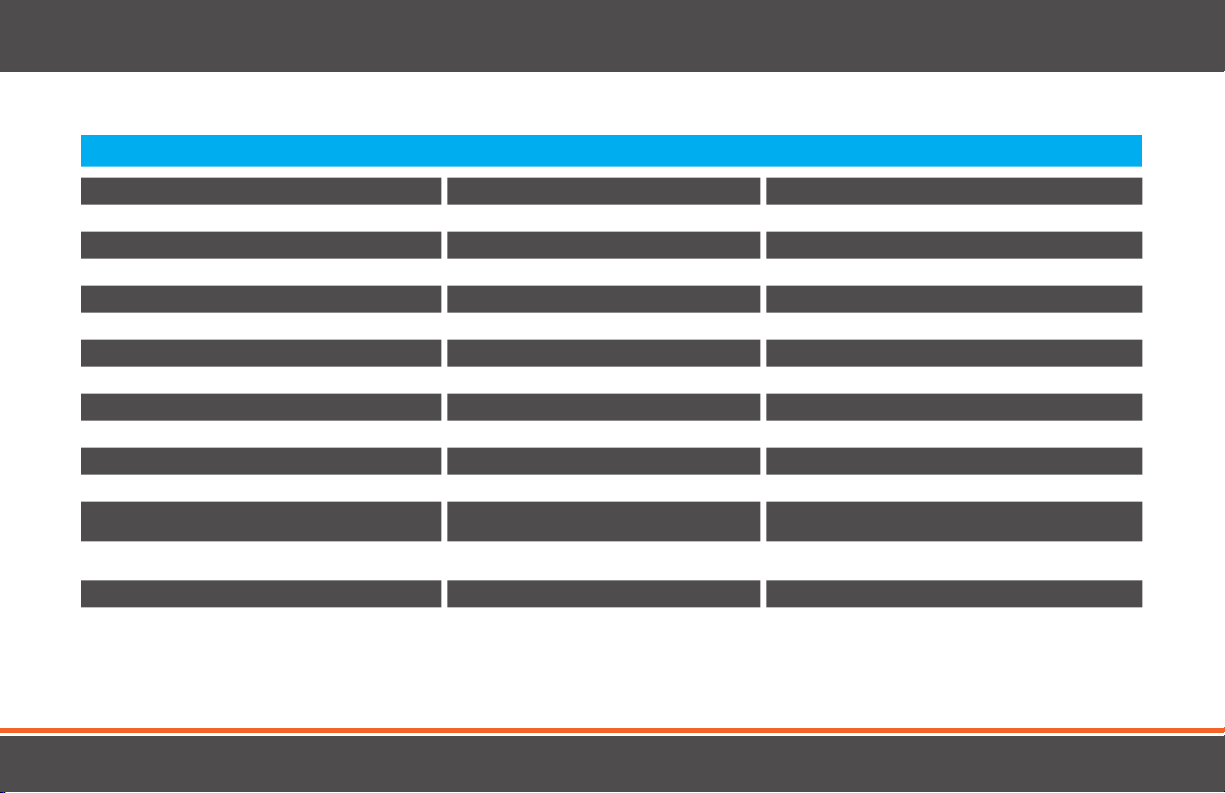
SPECIFICATIONS
MONITOR
Monitor Type TFT LCD Touchscreen Expandable Up to 4 Cameras Battery Capacity 2400 mAh
Screen Size 5” Micro SD Recording No Battery Connection Charging Contact
Resolution 800 x 480 Micro SD Capacity No Battery Life (Video + Audio On) 8 hrs
Frame Rate 25 FPS Record Photo No Battery Life (Sleep/Audio Only Mode) Up to 12 hrs
LCD Brightness Adjustable - 5 Levels Record Video No Battery Low - Visual Warning Ye s
Frequency 2.4GHz Zoom 1x Battery Low - Audible Warning Ye s
Frequency Range 2.4 to 2.483GHz (19 Channels) Quad Screen Yes Volume Indicator LED Yes
Private Signal Yes Split Screen Ye s Key Lock No
Technology Digital FHSS Scan View No Housing Material ABS Plastic
No. of hop/sec 300 Speaker Ye s Power Adapter Input 100~240VAC
No. of hopping channels 19 Microphone Yes Power Adapter 5V 1000mA USB
Channel Bandwidth 3.375 MHz Talk to Baby Ye s Operating Temperature 0 C to 45 C ~ 32 F to 122 F
Data Rate 3 Mbps Lullabies Ye s Dimensions
Max Transmission Range 750 ft Feeding Timer Yes (User Defined) Weight
Optimum Transmission Range 150 ft Battery Type Li-Polymer
3.66in x .59in x 5.79in
93m m x 15mm x 147mm
0.45 lbs (battery inserted)
0.35 lbs (battery removed)
51
Page 52
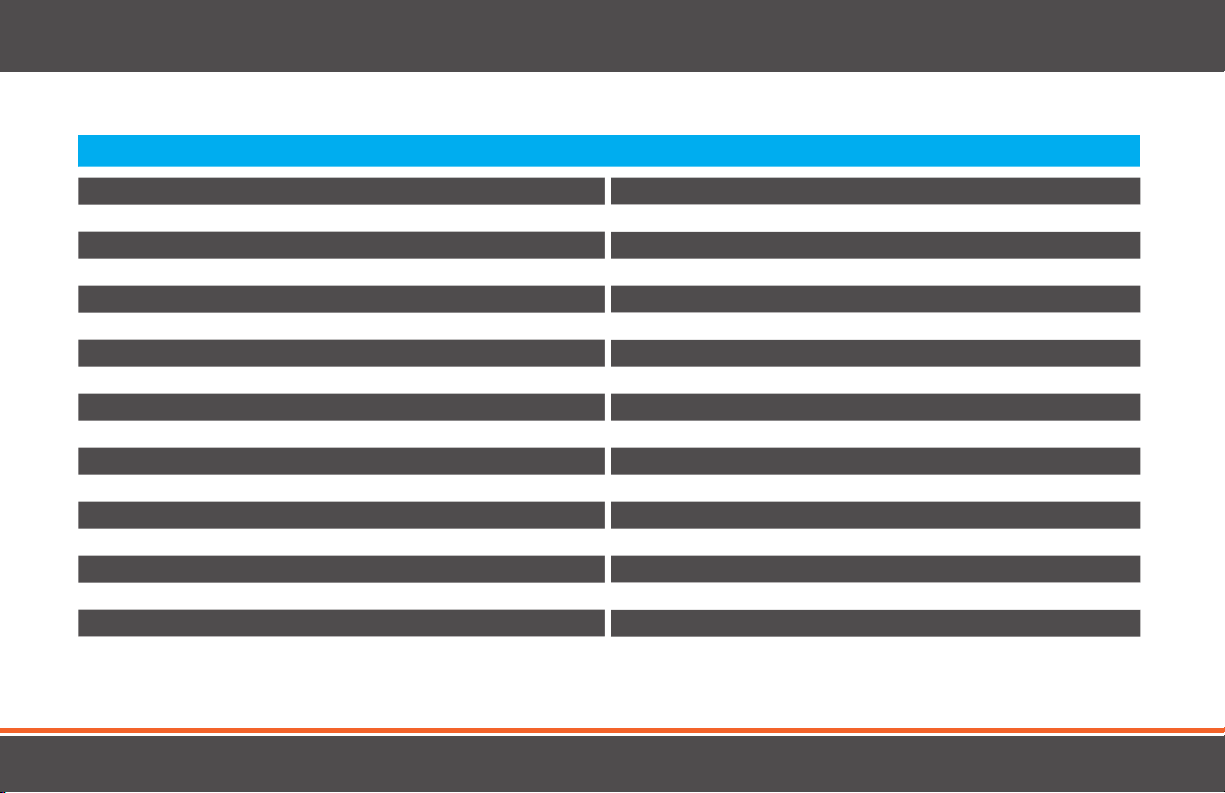
SPECIFICATIONS
CAMERA
Image sensor CMOS Speaker Ye s
Resolution 640 x 480 Housing Material ABS Plastic
Viewing Angle 50 Degrees Wall Mountable Yes
Focal Length 3.0 mm Power Adapter Input 100~240VAC
Optimal Focal Distance 2-10 ft Power Adapter 3.5mm, 6VDC 800mA
PTZ Yes Operating Temperature 0 to 45 Degree Celsius ~ 32 to 113 Degrees Fahrenheit
Range of Motion - Horizontal 300 Degrees Dimensions 3.5”x 4.0”x 4.5”
Range of Motion – Vertical 110 Degrees Weight 0.55 lbs
Frequency 2.4 GHz
Private Signal Ye s
Technology Digital FHSS
Max Transmission Range 500 ft
Optimum Transmission Range 150 ft
Number of IR LEDs 8
IR Wavelength 940 nm
Night Vision Distance 12 ft
Battery Operable No
Microphone Yes
52
Page 53

Thank you for choosing Levana!
To learn more about our products and accessories, please visit
WWW.MYLEVANA.COM
 Loading...