

Page 1

USER MANUAL
Page 2

2
Contents
Introduction ..........................................................................................................3
Things you need to get started ............................................................................4
Controller Setup ...................................................................................................5
Camera Setup ..................................................................................................... 10
Battery Guideline ............................................................................................... 11
Camera Operation Setup .................................................................................... 12
Camera Setup with Preset Modes ...................................................................... 13
DST (Dual Sensor Technology) ........................................................................... 14
Camera Mounting .............................................................................................. 15
Custom Camera Setup ........................................................................................ 18
Using an External Power Source ........................................................................21
Downloading Images .........................................................................................22
Troubleshooting ................................................................................................. 24
Page 3

3
Introduction
The RCX Trail Camera System is
designed to support the use of many
cameras and a single controller. The
camera is simple, high quality and
durable so you can place many cameras
in the field, and quickly and easily
access them to change setups, use Real
Time Video Alignment and to download
images. The system works by the
camera capturing images and storing
them on an SD card that you install.
The controller also takes an SD card up
to 32 GB.
When you connect the controller to the
camera with the USB cable, you can
download images from the camera to
the controller with just a couple of quick
menu selections. You are then able
view the images right there in the field
and make any changes to the setup you
want. The controller also allows you to
view photos from other trail cameras
when the SD cards are inserted. The
camera can be aligned using Real Time
Video Alignment™ that permits you to
see what the camera sees. Settings
can also be changed to get more or less
pictures by selecting one of 4 preset
modes, or you may access the powerful
custom menu for settings such as
multipicture, event delay, time lapse,
etc. See
“Custom Camera Setup”
on
page 18 for more information.
Page 4

4
Things you need to get started
1. Camera
2. Controller
(Included in RCX Kit. Li-Ion
battery included.)
3. 8 AA Batteries
(Leupold strongly
recommends Energizer Ultimate Lithium
AA batteries, especially for use in below
freezing temperatures.)*
4. 2 SD or SDHC cards: one for the
controller, one for the camera, up to
32 GB capacity.
Accessories:
5. Mounting strap
(Comes with camera
or kit.)
6. USB Cable
(Included with kits and with
controllers.)
7. Standoffs
(Included with cameras and
kits. These are used to solidly position
the camera on uneven surfaces.)
Optional:
RCX Lockdown Security Plate
(Comes installed on RCX-2 only; for use with
Master Lock® Python™ cable or for mounting
with a single nail. Available separately for
RCX-1.)
*Alkaline batteries can leak and damage
the camera if left unattended for extended
periods, especially during below freezing
temperatures. The RCX Trail Camera
Warranty does not cover damage from battery
leakage.
Page 5

5
Controller Set-Up
Lanyard Hole
Battery Door
Battery Door
Screw
Mini USB Port Cover Power Button
SD Card Slot Door3” TFT
(Thin Film Transistor)
Screen
Page 6

6
A controller must only be set once, but
is necessary to set date and time, and to
access the features of your RCX Camera.
Every time a new camera is set up, the
time synchronizes with the controller
as soon as it is plugged in with the USB
cable.
The first time the controller is powered
up, the first screen presented is the
“Time/Date”
screen. To access this
screen again later, you will find this
selection in the
“Setup Controller”
Menu. This screen will again be the first
screen presented any time you allow
the battery to go dead for more than
24 hours.
The Lithium Ion battery is already
installed in the controller. The
controller battery should be charged
for a minimum of 2 hours before use;
however, it is preferable to charge it at
least 16 hours to ensure long hours of
use and to prevent short battery life.
To charge the RCX Controller Battery,
plug the Mini USB end of the USB cable
into the controller, then plug the other
end into a computer, the wall charger or
the car charger provided. Before going
into the field, verify that the controller is
properly charged.
Page 7
7
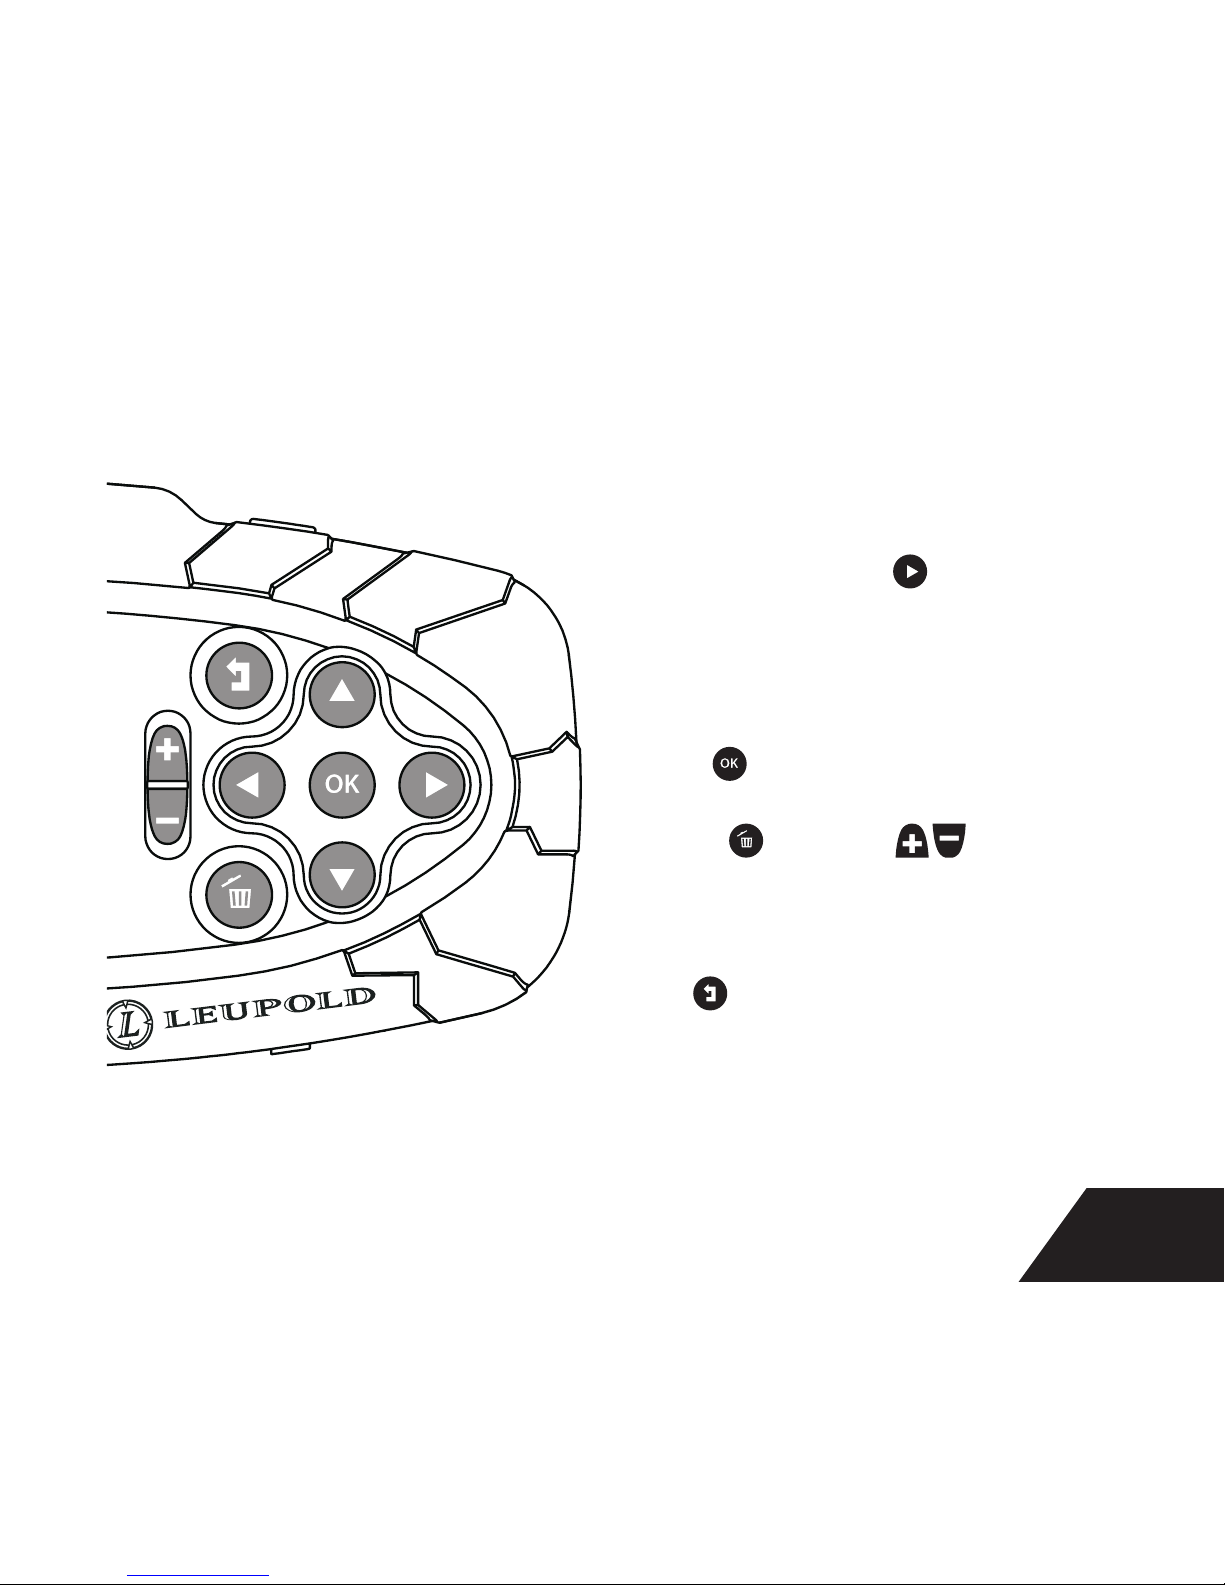
Navigate through the controller
menus by arrowing to the desired
selection.
On menu items with to the right
of the text, press the right arrow to
access the next level down in the
menu .
Press to select a menu choice.
Delete and zoom
are used
only when viewing images on the
SD card.
Use to back out one menu level.
Page 8

8
Brightness: The display brightness of
the controller can be adjusted. This is
recommended when lighting condition
change dramatically.
Time/Date: Time is in 24-hour time
only. The default date format is YYYY/
DD/MM but can be changed to other
formats.
Temp Unit: Switch between °F or °C.
Hemisphere: Set the appropriate hemisphere. The United States and Canada are
in the Northern Hemisphere. Australia, New Zealand and South Africa are in the
Southern Hemisphere.. This makes the orientation of the moon phase images correct
for your location.
Language: The controller menus can be displayed in any of the following
languages: English, German, Finnish, French, Italian, Russian, Spanish or Swedish.
6HWXS&RQWUROOHU
%ULJKWQHVV
7LPH'DWH
+HPLVSKHUH
7HPS8QLW
&RQWUROOHU9HUVLRQ
/DQJXDJH
(QJOLVK
)RUPDW6'&DUG
1RUWKHUQ
Page 9
9
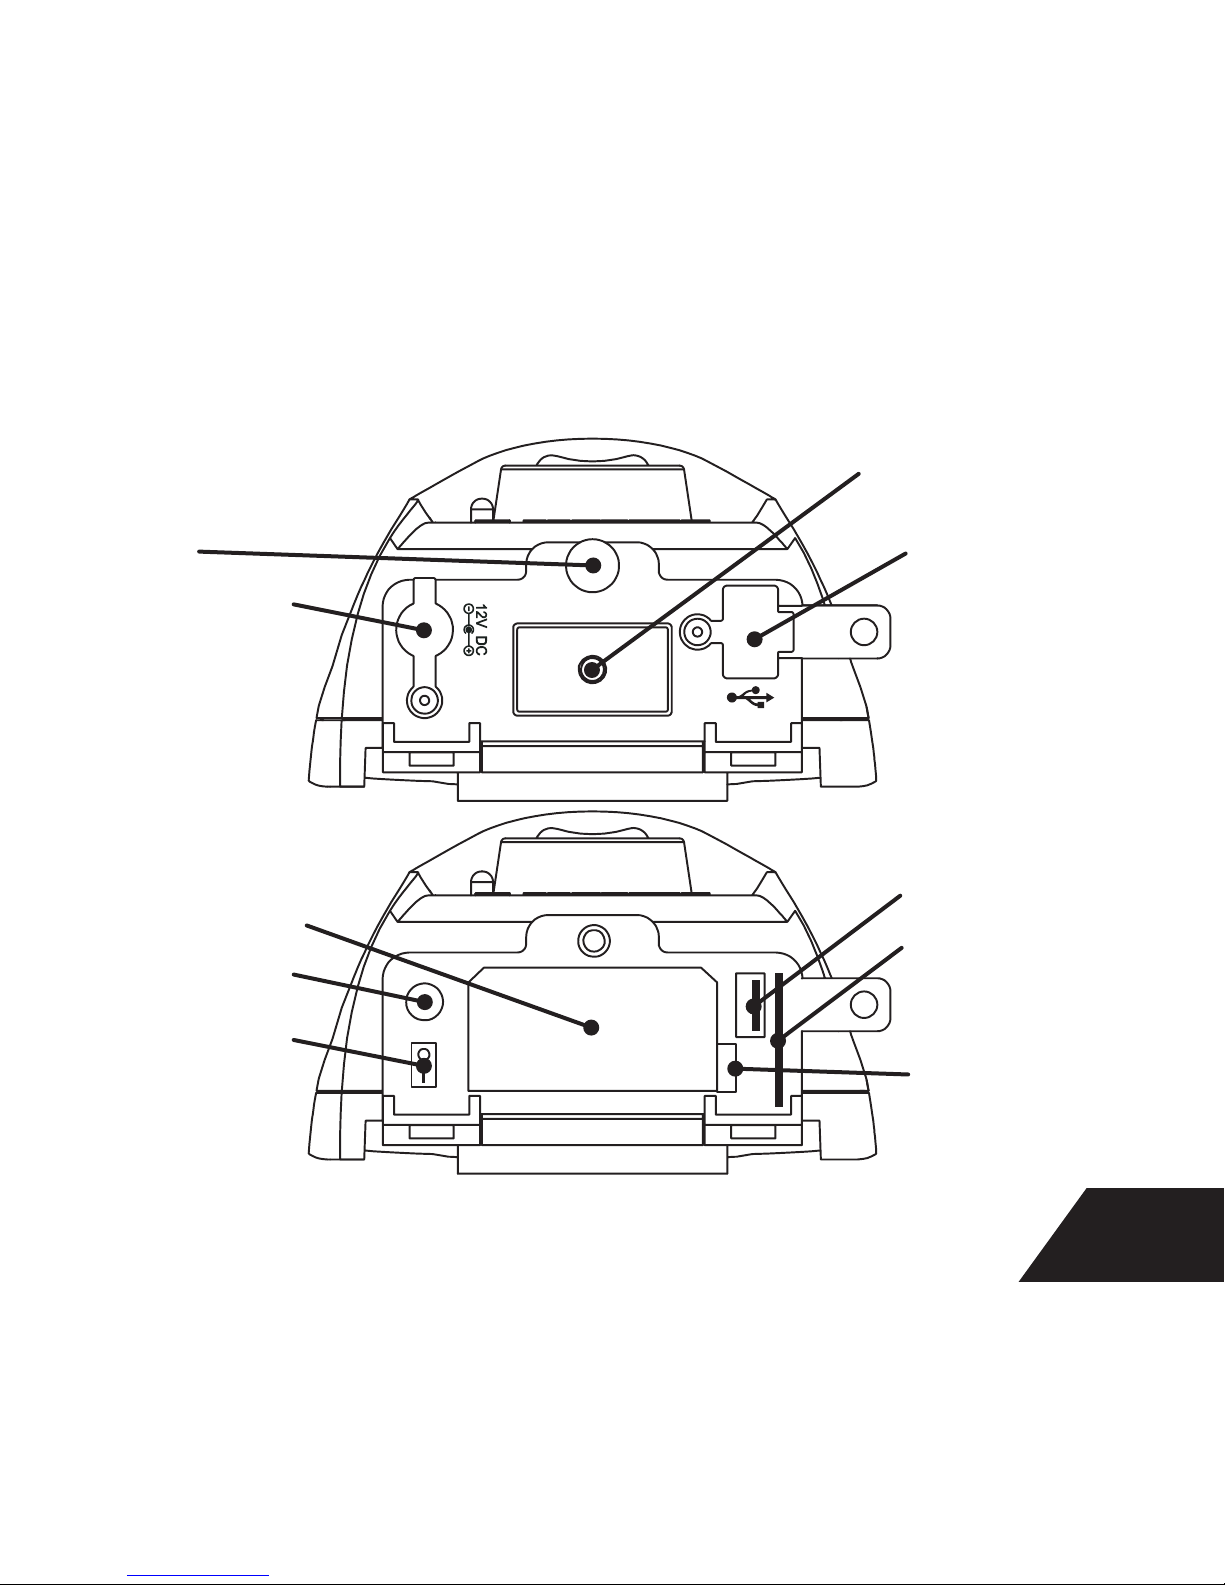
USB Port Cover
1/4-20 Tripod
Stud Mount
BOTTOM ACCESS
DOOR OPEN
BOTTOM ACCESS
DOOR CLOSED
USB Port
SD Card Slot
Battery Pack
Latch
Cover Retaining
Screw
Battery Pack
12V Jack Cover
12V Jack
Power Switch
Page 10
10
1. Install an SD card. An SD card from
another device may already contain
files that will reduce the number of
photos you can take. To optimize the
operation of the camera’s SD card,
format it using the controller. This
can be done in the controller setup
menu and by selecting
“Format SD
Card”
from the bottom of the menu.
This will erase all SD Card contents.
Once the SD card is formatted,
insert it into the camera.
2. Open the access door and remove
the AA battery cartridge.
3. Insert 8 batteries with the negative
(flat) end against the contact spring.
4. Insert the loaded battery cartridge
into the camera with the contact
side going in first until the catch
snaps into place. Be sure to close
the bottom door securely after all
setup is complete to ensure good
contact pressure.
Camera Setup
;;;;;;;;
3RZHU6DYHU0RGH
5&;&DPHUD,QIR %UDG
6HWXS&DPHUD
Camera Status
Page 11

11
5. Turn power on (“I” position). The
camera won’t take pictures for 30
seconds after powered on or with
the USB cable still connected to
both the controller and the camera.
6. Connect the controller to the
camera with the USB cable. Allow
several seconds for the controller
to recognize the camera. When
properly connected, the controller
will show a camera status box at the
bottom of the screen.
• Ideally, use only Energizer® Ultimate
Lithium AA batteries or the RCX
Rechargeable Battery Pack,
especially for cold weather use and
night time photos & video. Alkaline
batteries are adversely affected by
freezing temperatures, and high
power drain applications, regardless
of what device they are used in.
• Never mix battery types (Alkaline,
Ni-MH, Lithium) or mAh rating.
• Never try to recharge a battery that
is not labeled as rechargeable.
• Use only the recommended charger
for rechargeable batteries.
• Always replace all batteries at the
same time.
• Do not attempt to use only 4
batteries. 8 batteries are required
for the RCX Cameras to function.
• Follow the battery manufacturer’s
recommendations for storage,
handling and disposal.
Battery Guideline
Page 12

12
If you are using multiple RCX Cameras,
it is recommended to give each camera
a unique name the first time it is set
up. This will name the folder where
the photos are stored (which includes
the camera name) for easy sorting after
downloading from multiple cameras.
Naming camera
1. With the camera powered on,
connect the controller to the camera
with the USB cable.
2. Select “Setup Camera”from the
main menu. Press
3. Press until “Custom Setting” is
highlighted. Press .
4. Press twice to move to “Page
2”, then Press to move to menu.
Press to select “Camera Name”,
then press .
5. Select characters from the keyboard
by using , and use
to input the character. The
name must be between 3 and
10 characters long.
(Be sure the
first 3 characters are unique between
cameras to ensure all folders are easy to
differentiate.)
6. Select “Save”and press .
7. Press . As you exit the custom
settings, an
“Update camera?”
alert window appears. Press to
upload the changes you made. This
will be confirmed with the message
“Camera Setup Complete”
.
Camera Operation Setup
Page 13

13
Camera Setup with Preset Modes
Automatically
Selected Settings
with Preset Modes
*DST only available
with RCX-2
Image Quality
Multipicture
Event delay
(time between photos)
RCX-2 Sensor
(RCX-1 is 45° only)
RCX-2 Flash
(RCX-1 is 36 LED only)
Sensitivity
Best Picture Mode RCX- 1: 8MP
RCX-2: 10MP
OFF OFF DST 48 LED Auto
Most Picture Mode 3MP 3 photos OFF DST 48 LED Super High
Power Saver Mode
(Day/Night)
3MP OFF 5 min DST 36 LED Auto
Normal Video Mode 640x480,
30fps, 5 sec
OFF 5 min DST 36 LED Auto
1. Go to Camera Setup
2. Press .
3. Select from the 4 preset modes the
setting that is closest to what you
want. Press .
For custom camera settings, see “Custom Camera Setup” on page 18.
Page 14

14
DST (Dual Sensor Technology)
45ft
10°
45°
54° Camera
Lens Angle
90ft
MAXIMUM TRIGGER RANGES
Dual Sensor Technology (DST™)
delivers a more complete picture
of game activity in your area.
Select the wider 45° sensor from
“Custom Menu” with a range of
45 feet (ideal for larger areas) or
select the narrower 10° sensor
with a range of 90 feet (for
use with a specific landmark or
feeder). Both sensors can also
be active at the same time by
selecting DST. Only the RCX-2
features this ground-breaking
technology.
Page 15

15
Select a place to mount the camera
(usually a tree). Avoid or remove any
obstructions.
1. Locate the camera where sun does
not shine directly into the camera
for best exposure results.
2. Mount the camera at a distance
above the ground at a height similar
to that of the target and with the
camera view parallel to the ground.
This is especially important when
using the 10° sensor alone. The
sensor zone is a cone so if you angle
it toward the ground, the sensor
range may end on the ground short
of where your targets will pass.
3. It is best to set the camera up where
the most likely target movement
is not coming straight toward the
camera, since the PIR sensors
work by comparing changes in
temperature between 2 side-by-side
elements.
The Lock-Down Security Plate attached
to the RCX-2 is for use with a Master
Lock® Python™ cable to prevent theft.
A Lock-Down Security Plate for
the RCX-1 is available and is sold
separately from the unit.
4. Run the strap through the slots.
5. Separate the buckle and thread the
loose end of the strap through the
loose buckle half.
6. Preadjust to a little larger than the
Camera Mounting
Page 16

16
selected tree.
7. If the surface against the camera
is very uneven, use the included
standoffs to adjust the contact
points on the back of the camera as
needed. Three points of contact are
best for stability and adjustment.
Stack them for more height and
fine-tune the final angle with the
adjusting screw at the top of the
camera after mounting.
8. Wrap the strap around the tree,
and connect the buckle. Pull the
straps just snug enough to keep the
camera in place but to still allow the
camera position to be adjusted.
9. Connect the controller to the camera
with the USB cable.
10. Select the “Preview Camera”
Icon (the red deer) from the main
menu to activate Real Time Video
Alignment. You can now check the
framing of your picture through the
controller by seeing exactly where
the camera is pointed. Think about
how tall antlers might be and make
sure to not cut them off at the top of
the frame. Avoid framing too much
sky in the picture as the exposure of
the camera will compensate for this
brightness and foreground images
will be dark. This will also set the
night time IR filter to the proper
position to start taking photos.
11. Unplug the USB cable from the
camera. You can verify that the
camera is working properly by
covering the light sensor, which is
in the small hole above the Leupold
Page 17

17
medallion on the front left side the
camera. Wave your hand in front
of the camera and you’ll see the IR
LEDs illuminate. A click of the IR
filter moving into position for night
pictures may also be heard. This
movement typically occurs only
twice per day: once in the morning
and once at night.
The camera will not start taking photos
until the USB cable is unplugged from
the controller.
NOTE: The camera has to have been
powered up for 30 seconds before it
will take pictures. This does include
time during set up, so after alignment,
it is usually ready to go. If you want to
avoid taking pictures of yourself leaving
the area, power the camera off and on
before securing the door and walking
away. This uses the 30 second power
buffer to allow time to get out of the
camera’s sensor reach.
Page 18

18
Use the custom mode to refine settings.
Night & day settings are modified
seperately, so be sure to set them both.
Automatic Camera Type Detection:
The controller will automatically detect
the type of camera and will only offer
settings that are available with that
model. If there is no camera connected,
RCX-1 or RCX-2 can be chosen on the
opening screen.
Video/Picture: Select whether the
camera will take video or still pictures.
Resolution:
.3MP* to 10 MP for RCX-2,
.3MP* to 8 MP for RCX-1.
Video: 320x240* or 640x480
Video settings
Video FPS: 15* or 30 Video frames
per second determines how smoothly
the video runs. The higher the number,
the better the video, but the greater the
file size.
Video Length: 5* to 30 seconds
*Lower values are recommended for smaller
SD cards and for quick field downloads.
Dual Sensor Technology (DST)
Only the RCX-2 has DST, which uses
both a 45° sensor and a 10° sensor.
The 10° sensor provides the longest
Custom Camera Setup
Page 19

19
range and the 45° sensor provides a
more forgiving wide sensor angle that
nearly covers the 54° field of view of
the camera. The camera can be setup
to use either of the sensors or both
in combination. Activate both when
you want to maximize the number of
pictures.
The RCX-1 is equipped with only a 45° sensor
Sensitivity
Auto: Adjusts to higher sensitivity in
hot weather when the air temperature
is closer to that of a deer’s body. It
automatically sets to lower sensitivity
when it is cooler to avoid small target
triggers, like birds and squirrels.
Manual: Super high, high, medium
and low.
• Set to super high sensitivity for
maximum picture count. 32GB
SD cards and efficient power
consumption can take more than
10,000 10MP images. While taking
many pictures is possible, it will
make field downloading slower.
In instances where the SD card is
nearly full, it may make more sense
to change cards rather than to
download.
• Set to a lower setting if you are
getting false triggers or pictures of
animals farther away than you want.
Operation Hours
The camera can be set to run for a
specific period of time to save batteries
and to avoid triggers during periods
Page 20

20
where there is a lot of activity that you
don’t want to capture. For example,
people and pets in your yard during
the day when you are trying to capture
night activity. The camera can be set to
run during only daylight hours to avoid
the power consumption of night pictures
that require the IR LED flash.
Night Pictures
The camera automatically activates
night mode when the light sensor tells
it that there is not enough light for
pictures without the IR flash. It will
then activate the IR LEDs and take black
and white night images. Set different
night settings for your camera by
selecting the night tab in the custom
menu, and selecting settings to be
applied during these night shots only.
For ease of operation, some settings
cannot be customized separately for
night shots.
Time Lapse
The Time Lapse feature allows the
camera to automatically take a picture
at intervals you select in the “input”
menu. This allows movement to be
captured beyond the trigger range. In
addition, the very long intervals can
be used for documenting changes
like a plant growing, or the change of
seasons. Time Lapse is great for food
plots where there is constant activity
and you don’t want to miss far targets
or take multiple pictures of the same
animal.
Page 21

21
Event Delay
The Event Delay feature sets the camera
to ignore triggers for a time after a
picture is triggered. This is to avoid
taking too many pictures of one animal.
Tip: use with multipicture mode to snap a
couple of pictures to make sure you get a
good one, then wait for the next animal. Time
Lapse and Event Delay cannot be used at the
same time.
Camera Name
Enter a unique name for each camera.
Your picture folder names will
incorporate a part of the camera name.
This will make organizing your picture
files easier when you get home.
(See
“Download” section on page 22)
Picture Stamp
Set each piece of information to stamp
on your picture individually:
1. Camera Name
2. Moon Phase
3. Date/Time
4. Barometric Pressure (RCX-2 only)
5. Temperature
6. File Name
Using an External Power Source
A cable for connecting an external 12V
battery to a camera is included in the
kits. A car or motorcycle battery can be
used, provided that produces 12V and
has external terminals that can be safely
connected with the provided clamps.
Insert the plug into the bottom of the
camera by opening the rubber sealed
Page 22

22
12V jack cover. Be sure to connect the
red clamp to the positive (+) terminal
and the black clamp to the negative (-)
terminal.
Downloading Images
Camera to Controller
Connect the controller to the camera
with the USB cable. Select the
“Download Images from Camera” icon
and press . The next menu will show
you two options: “Download” which
downloads the photos and leaves them
on the camera, or “Download and
Delete” which downloads the photos
and deletes them from the camera.
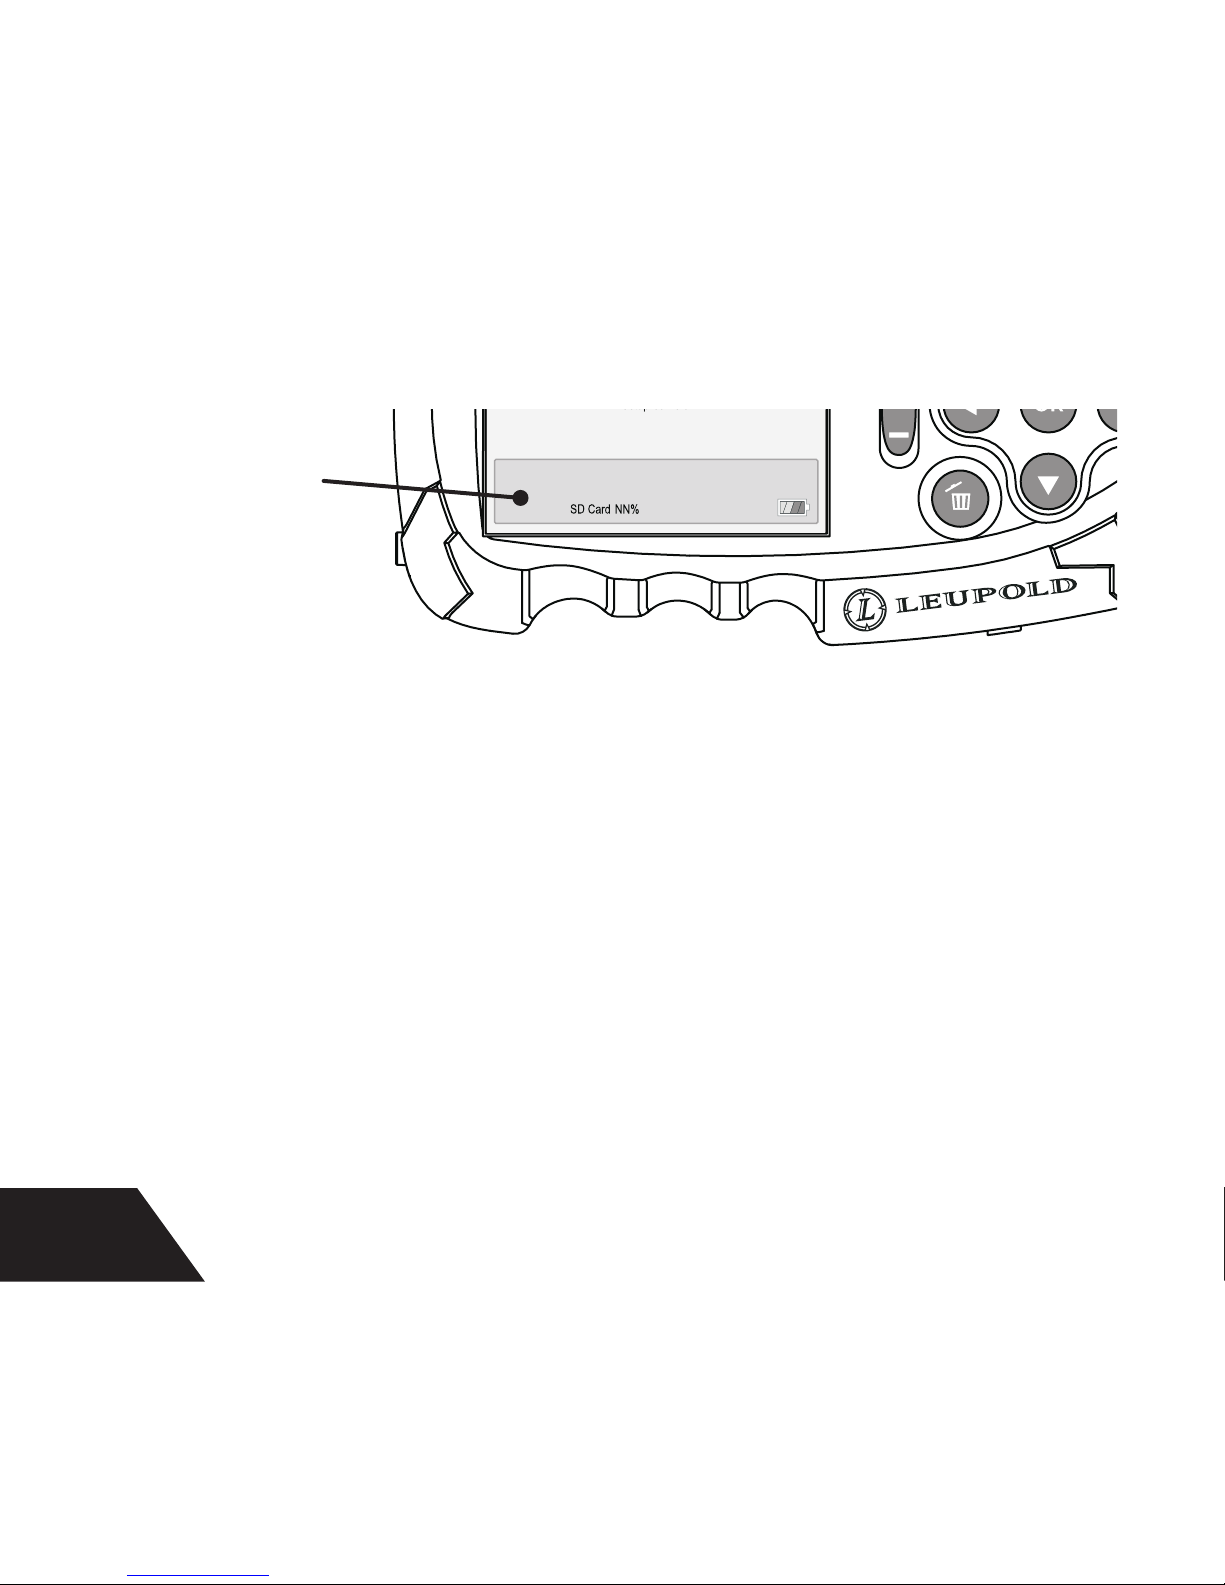
Once one of the options is selected,
press . The controller will begin
downloading and will show a count
of how many pictures there are to
download and the percent complete. If
it appears downloading is going to take
longer than you want to wait, open the
bottom door and remove the SD card.
Insert it into the controller for viewing
and sorting the pictures, or change SD
cards and wait until you get home to
view pictures. Select the “View SD” icon
to view pictures stored on the SD card
installed in the controller.
Controller to Computer
Plug the USB into a computer and
view the pictures taken on a computer
screen. The controller acts as an
external drive and allows you to move
files from the controller to a computer in
the same way.
Page 23

23
Viewing Images on a TV
Plug the USB cable into a TV or any
other device with a USB port that
supports mass storage devices and use
the TV controls to navigate through
pictures to view them on the TV.
Viewing Pictures on SD Cards from
Other Cameras.
The controller can be used to view any
pictures in the field that are stored on
an SD card using the industry standard
DCIM file storage format. Simply
insert the SD Card from another brand
camera, and select select the “View
SD” icon.
Page 24

24
The camera is not taking pictures or is only taking pictures some of the
time.
1. Connect the controller to the camera and and look at the camera status window.
This shows the camera’s battery status and SD capacity remaining. Replace
batteries if needed. Empty, format, or replace SD card if needed.
2. If the custom mode was used to set up the camera, make sure you entered both
day and night settings have been set for the menu items that allow this.
3. Ensure the hours of operation are set to 24hr.
4. Try a different SD card. A faulty SD card will cause either the controller or the
camera to not function properly. See our web site for a list of approved SD card
models. It is possible for an approved SD card model to fail. Try reformatting
the SD card as well, using the controller setup menu. Format SD card is at the
bottom of this menu.
5. Try new batteries. It is possible (though unlikely) for new batteries to be faulty.
Troubleshooting
Page 25

25
The controller does not recognize the camera when the USB cable is
plugged in.
1. Verify that the camera is powered on. “I” is the “On” position of the switch.
2. If the batteries are not fresh, replace the batteries.
3. Verify that all batteries are installed in the correct orientation. The flat,
negative end of the batteries should all be placed against the coil spring side in
the battery cartridge.
4. Verify that all batteries are of the same type.
5. Be sure the battery cartridge is completely installed and the latch is snapped
into place. The bottom door should be securely closed to ensure good contact.
My pictures are foggy.
1. Check to make sure the sun is not shining directly into the camera lens. Realign as needed.
2. At about the same time of day when the foggy pictures are occurring, connect
the controller to the camera and select the “View Camera” icon to activate
Real Time Video Alignment.
Page 26

26
3. Check the camera lens window to see if it is dirty. Clean if needed with a soft
cloth or a cotton swab with alcohol or lens cleaning fluid applied. DO NOT USE
ACETONE OR ANY OTHER SOLVENT. DOING SO WILL DAMAGE THE VIEWING
WINDOW AND VOID YOUR WARRANTY.
My pictures are black & white and overexposed.
1. Check the light sensor to and make sure it is unobstructed. The light sensor
is located on the front of the camera, on the left side, just above the Leupold
medallion. If it is obstructed, the camera will set itself to always take night
pictures.
My camera is taking the correct type of pictures in day or night only
but not both?
1. Verify that you entered both day and night settings for the menu items that
allow this.
Page 27

27
My flash range is getting shorter over time.
1. The RCX Camera System is designed to reduce IR LED power when the batteries
get low in order to extend the life of the batteries. To restore a longer flash
range, install fresh batteries.
My camera is not taking night pictures or videos.
1. Use Energizer Ultimate Lithium batteries or an external power source when
taking night video or when using the 48 LED setting in the RCX-2.
2. When batteries get very low, The RCX Trail Camera is designed to take only day
pictures in order to extend the useful life of the batteries. Replace the batteries
to restore full functionality.
Page 28

28
One Year Limited Warranty
Leupold RCX Trail Camera is warranted by the Leupold Electronics Warranty, and
are protected from defects in materials and workmanship for ONE YEAR from the
date of purchase. The warranty is void if damage results from unauthorized repair,
alteration, misuse, or battery leakage. The warranty is given solely to the original
owner and is not transferable.
Leupold & Stevens, Inc. requires that after 30 days of purchase, any customer
returns of RCX Trail Cameras or Camera Components
(other than those still in sealed
factory packaging)
be sent directly to Leupold & Stevens, Inc. for warranty inspection
and evaluation.
For warranty service please contact Technical Services first at 1-800 LEUPOLD.
When instructed to do so, send your product to:
Leupold & Stevens, Inc.
ATTN: Product Service
14400 NW Greenbrier Parkway
Beaverton, OR 97006
Page 29

29
Page 30

30
Page 31

31
Page 32

Leupold & Stevens, Inc.
1-800-LEUPOLD » 1-503-646-9171 » www.leupold.com
PO Box 688, Beaverton, OR 97075-0688
14400 NW Greenbrier Parkway, Beaverton, OR 97006-5790 USA
Part# 112161 Artwork#112163
 Loading...