

Page 1

RXB-IV ™
Digital Laser
Range Finding
Binoculars
OPERATING INSTRUCTIONS
Page 2
Thank you for choosing the Leupold® Green Ring™ RXB-IV™ 9x32mm digital laser range finding
binoculars. Before using the product, we recommend that you read this entire instruction manual.
This will ensure that you obtain the maximum benefit from its use and that you are aware of the
safety precautions that are important to remember when using it.
THIS MANUAL WAS WRITTEN IN ORDER TO PROVIDE YOU WITH ALL THE INFORMATION NEEDED TO
PROPERLY OPERATE AND OBTAIN YEARS OF BENEFICIAL USE FROM THE RXB-IV. KEEP IT IN A SAFE PLACE
AND REFER TO IT AS NEEDED.
SAFETY AND OPERATION PRECAUTIONS
The Leupold RXB-IV 9x32mm range finding binoculars does employ
an EyeSafe FDA Class 1 and CE Class 3A laser in its operation.
Because of this, there are a few precautions that are important
to remember:
• Do not depress the POWER button while aiming at a human eye
or while looking into the optics from the objective side
• Do not leave the RXB-IV within the reach of small children
• Do not take the product apart as it has a self-protection device
in the electronic control module and may cause an electric shock
• Do not attempt to use any power source other than a CR123A
battery (or equivalent) — the RXB-IV is designed to prohibit
accessing any other external power supply
Features of the RXB-IV™ at a Glance
• Laser Radiation:
FDA Class 1 / CE Class 3A
• Measurement Range:
10 yards – 1,500 yards
(9 meters – 1,372 meters)
• Measuring Time: 1 – 3 seconds
• Auto Power Off after 9 seconds
• Power: CR123A battery or
equivalent
• Battery Life: approximately 2,000 measurements
• The RXB-IV is waterproof and nitrogen filled
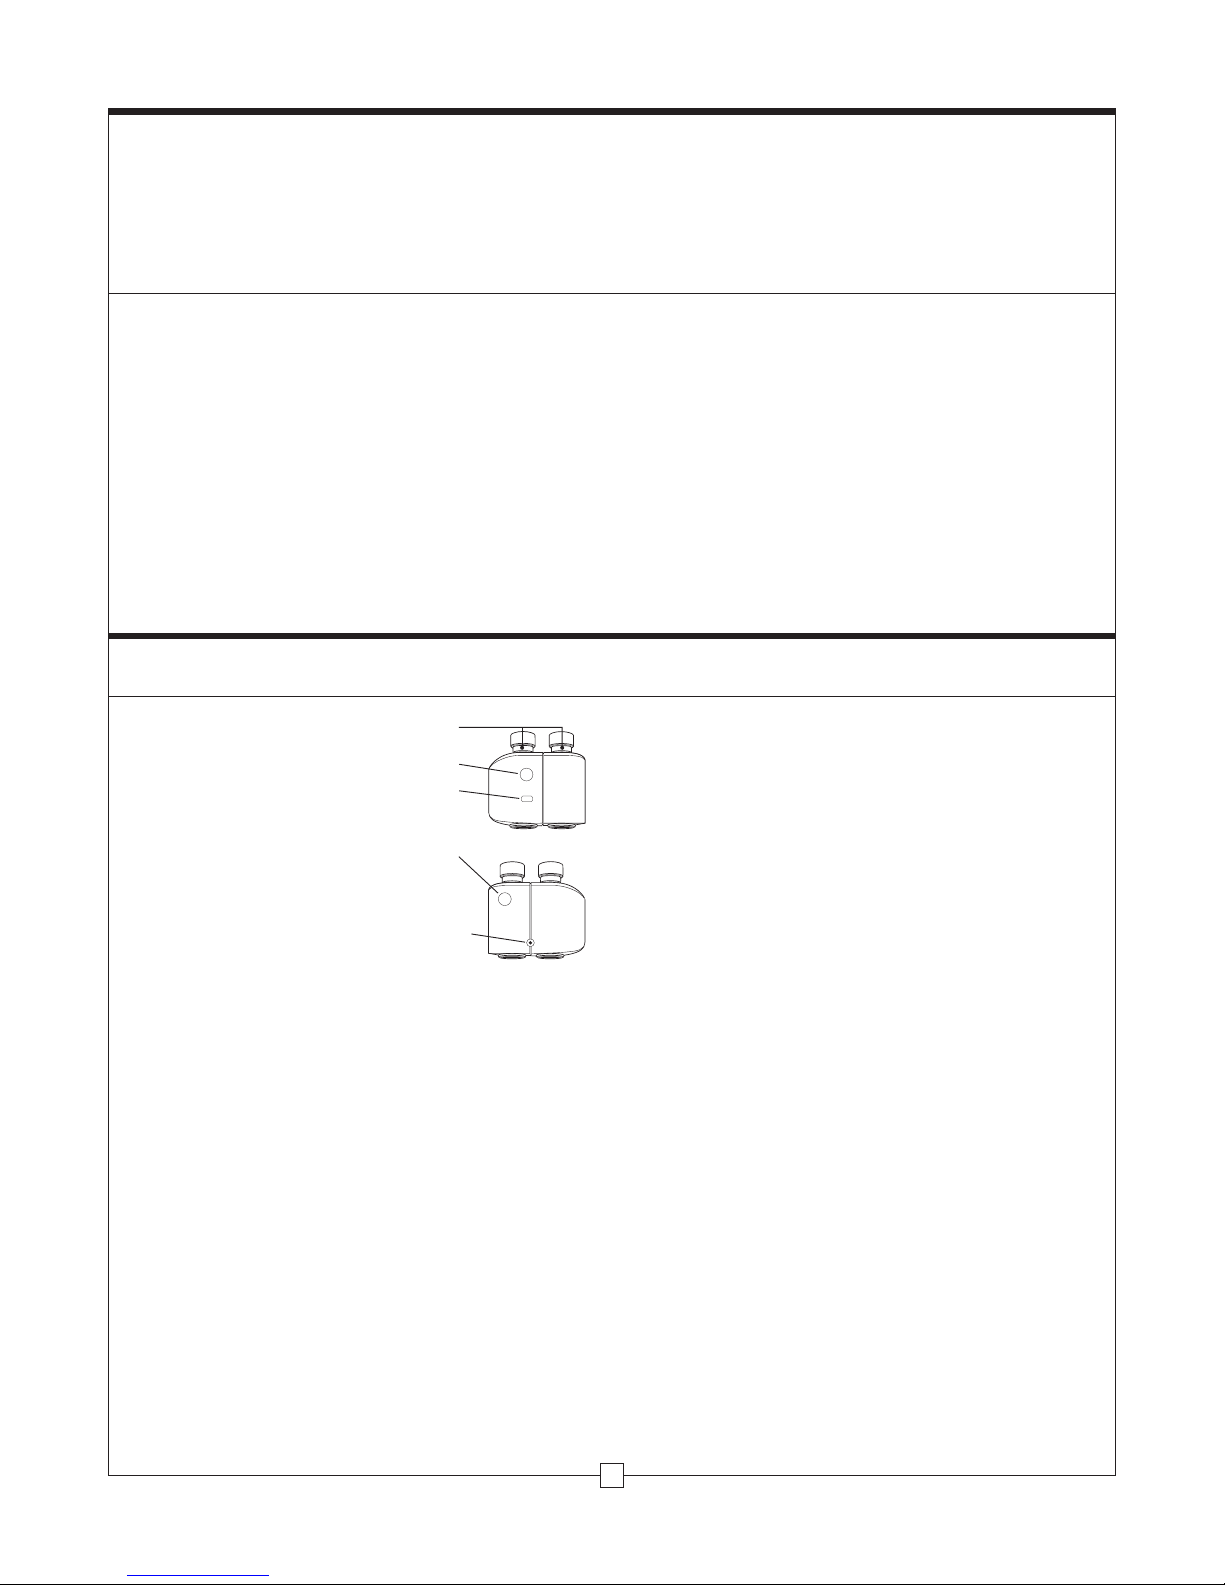
FOCUS
POWER
MODE
BATTERY
CHAMBER
TRIPOD
ADAPTER
TOP VIEW
BOTTOM VIEW
HOW THE RXB-IV WORKS
The RXB-IV is a top-quality 9x32mm binocular that incorporates
the additional benefit of a state-of-the-art laser range finder
capable of instantaneously and accurately measuring the distance
of a deer-sized animal from 10 yards to 700 yards (9 meters to
640 meters), an inanimate object from 10 yards to 800 yards
(9 meters to 732 meters), and a reflective target from 10 yards to
1,500 yards (9 meters to 1,372 meters). It emits a series of invisible,
infrared energy pulses that are reflected off the selected target
back to the optical unit. State-of-the-art circuitry and precision
computing circuits are used to calculate the distance instantaneously
by measuring the time it takes for each pulse to travel from the
RXB-IV to the object and back.
1
Page 3
Using the Leupold
®
RXB-IV
SETTING THE FOCUS
The RXB-IV uses an independent focus design; therefore each eyepiece
is focused independently of the other. To set the focus for the unit:
1.
View an object at 200 or more yards (183 or more meters) away.
2. Cover the right objective lens.
3. Focus the image you see with your left eye using the left
eyepiece.
4.
Uncover the right objective lens and cover the left objective lens.
5. Focus the image you see with your right eye using the right
eyepiece.
6. The RXB-IV is now focused clearly for most distances.
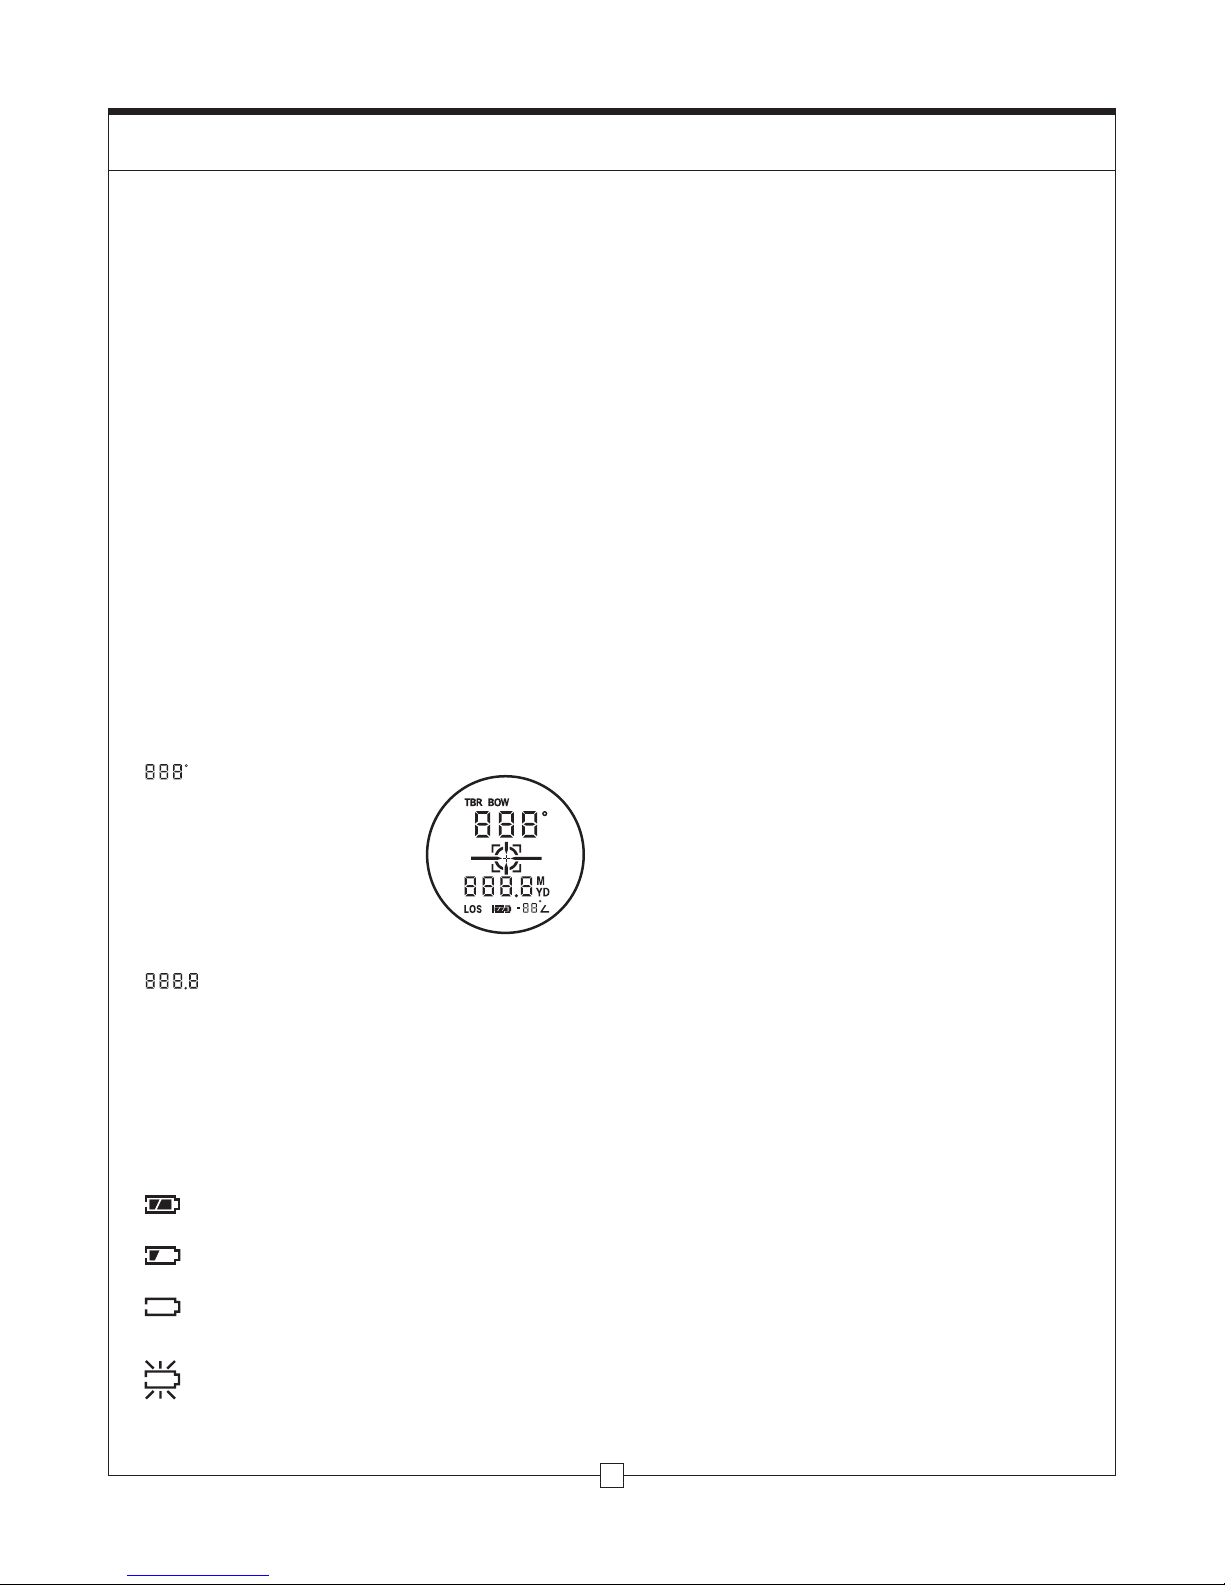
READING THE INTERNAL DISPLAY
The Organic Light Emitting Diode (OLED) designed into the optical
path can be manually switched between ranging modes, as measured
in meters (M) or yards (YD), or used to obtain distance readouts
while simultaneously viewing the target. (The RXB-IV can also
simply be used as a 9x binocular without activating the OLED.)
INTERNAL DISPLAY AS SEEN THROUGH THE RXB-IV
WHEN THE POWER BUTTON IS DEPRESSED
– TBR™, BOW or Compass readout –
Indicates one of the following:
MEASUREMENT OF DISTANCE WITH THE RXB-IV IS A VERY SIMPLE
OPERATION:
1. View the object of which the distance is to be determined
2. Depress and hold the POWER button for more than one
3. Align the reticle over the object being viewed.
4. Depress the POWER button again – this will cause the
5. Read the distance as shown in the image field.
CONTINUOUS MEASUREMENT OF A MOVING TARGET:
1.
2. Once the target has been measured, continue to hold
3. The distance will automatically update as long as the POWER
4. This procedure can also be used to obtain the range of
MEASURING DISTANCE WITH THE RXB-IV
through the binocular.
(1) second to illuminate the display.
laser to activate.
Follow the instructions for “Measuring distance…” as explained
previously.
down the POWER button and follow the object as it moves.
button is continuously depressed.
multiple animals or objects; simply move the reticle from one
target to another while holding down the POWER button.
• True Ballistic Range™ to the target in
either yards (YD) or meters (M) based
on the ballistics group selected
• The direction of the target in a 360°
compass direction (0° representing North,
180° representing South, etc.)
– LOS readout indicates one of the following:
• The line-of-sight distance to the target in either yards (YD) or
meters (M); this does not account for the angle or ballistics
• Calibration and declination adjustment mode
BATTERY POWER STATUS INDICATOR
To determine your battery’s power level, look for the following
indicators:
FULL – A full battery bar indicates your battery is at or near
peak capacity.
HALF – A half-full bar indicates your battery has reached
half-capacity.
LOW – If the battery bar is empty, yet there is still data
displayed above the bar, the battery is low, and nearing
the end of its life.
NO POWER – If the battery bar is empty, and there is NO
data display shown above the bar, your battery is dead and
you must replace it. The battery status bar will flash and
the unit will shut down when no power remains.
CLEARING THE LAST DISTANCE OBTAINED:
The last range reading taken, does not need to be cleared before
reading another object’s distance. For that reason, there is no reset
button. Simply aim at the new object using the reticle, depress the
POWER button and hold until the new range reading is displayed.
2
Page 4

Operation
When you initially push and hold the POWER button, for more
than one (1) second, the unit is ready for scanning. Pressing and
releasing the MODE button begins navigation of the menu.
To set or activate a function, you must advance the mode selector
by pressing the MODE button until that function is flashing. To
activate or deactivate that function, press the POWER button.
When a function is activated, the icon and the word “ON” will be
displayed. When a function is deactivated, the icon will disappear
and the word “OFF” will be displayed. Repeatedly pressing the
POWER button will repeatedly toggle that function ON/OFF.
TOP VIEW
FOCUS
POWER
MODE
FUNCTION 1: TRUE BALLISTIC RANGE
TBR calculates the equivalent horizontal
range (level fire range) from which
you can determine the correct aim
for the conditions. For example,
if you are shooting a .270 caliber,
130 grain (8.4 grams) bullet at 3,050 feet
(930 meters) per second up a 30° incline at 400 yards (366 meters),
direct line of sight, the TBR output will be 364 yards (333 meters).
State-of-the-art processing algorithms, developed by the same
engineers who developed Sierra Infinity© Exterior Ballistics Software
and who developed ballistics algorithms for many space vehicles
over the last 40 years, determine the True Ballistic Range with
incredible accuracy, eliminating potential errors that could cause
you to miscalculate your aiming point. The first step in correctly
using TBR is to Practice, Practice, Practice. Anytime you handle a
firearm or bow, you are ultimately responsible for your projectile.
The inclinometer output is shown in the lower portion of the display,
just right of the battery power status indicator.
For rifle users, adjustment or holdover
information can also be displayed. The
available settings are as follows: MOA
displays the minute of angle correction,
HOLD displays the inches or centimeters
to holdover the intended point of impact,
and BAS outputs the equivalent range to
use with Leupold’s Ballistics Aiming System
horizontal range. TBR for rifle settings is effective to 800 yards
(732 meters) for most cartridges.
™
™
reticles or equivalent
For rifle users, TBR mode is comprised of three functions: Hold,
MOA, and BAS. One of these modes must be selected. To select
the desired function, activate TBR, then proceed through the
menu (by pressing the MODE button), past the BOW and Compass
functions, until the appropriate TBR function is flashing; use the
POWER button to activate the appropriate TBR function.
For information regarding BOW settings, please see page 5.
BAS (displayed as bAS) displays the equivalent
horizontal range. This is the range you
will want to use when shooting, rather
than the line of sight distance, which
may contain gross errors depending
upon the shot angle. Returns will be
displayed with equivalent horizontal range.
HOLD (displayed as HOLd) will display your
holdover for that target at that distance,
which is based upon the ballistics group
and sight-in distance you will choose in
a later mode. The upper digits display
holdover in inches if yards is the chosen
measurement output. Centimeters will
be displayed if meters is chosen for your
measurement output. Your hold will be
shown as “HI 999” or “LO 999”.
MOA Mode will show the minute of
angle adjustment for your target,
accounting for the True Ballistic Range.
The upper display will show MOA
adjustment as “UP 999” and “dn 999”.
SEVEN RIFLE BALLISTICS GROUPS
TBR includes ballistics settings for seven
cartridge groups specifically formulated
for the three functions of TBR, which
are displayed as A, B, C, AB, AC, BC,
and ABC. For example, if your cartridge
group is in Group A, the return in Function 1
will account for the shot angle and provide the proper distance for
holdover purposes (see Cartridge Table on page 4). You must choose
one of
the seven groups, based on your cartridge and ballistics
information.
a way that
(1/2 minute of angle) of error in aiming out to 500 yards (457 meters).
The cartridge table shows a common assortment of factory loads
organized in their TBR performance groups. If you are shooting a
similar bullet weight and muzzle velocity that falls into the provided
selections, you can use that mode with full confidence.
TBR performance groups organize load performance in
generally provides less than 2.5 inches (6.35 centimeters)
3
Page 5

400 Yards (366 Meters) (line of sight) at a 40° Incline
Aim as if the target is 335 yards (306 meters) away
TBR
Sight-In
Group
Distance
300 Yards /
A
274 Meters
300 Yards /
B
274 Meters
200 Yards /
C
183 Meters
200 Yards /
AB
183 Meters
200 Yards /
AC
183 Meters
200 Yards /
BC
183 Meters
200 Yards /
ABC
183 Meters
For hand loads or any other unique loads not shown in the above list, the
table on the next page provides a guideline for selecting the appropriate
TBR performance group. Check the ballistics performance of your load by
consulting your reloading manual, ballistics software, or by referring to
literature or Web sites provided by your cartridge manufacturer. You may
also visit the Leupold Web site at www.leupold.com for more assistance in
selecting your group. If you have your ballistics performance data, select your
performance group from the table on the next page based on the bullet
path at 500 yards (457 meters). Be sure not to confuse bullet path with bullet
drop. Bullet path will be related back to your sight-in range whereas bullet
drop relates only to the total drop of the bullet, regardless of sight-in range.
TBR PERFORMANCE GROUPS: CARTRIDGE TABLE
Cartridge Name
.270 Weatherby Magnum
Lazzeroni 7.21 Firebird
.30-.378 Weatherby
.30-.378 Weatherby
.300 Weatherby Magnum
.240 Weatherby
.240 Weatherby
.270 Weatherby Magnum
.270 Weatherby Magnum
.270 Winchester Short Magnum
7mm Shooting Times Westerner
7mm Shooting Times Westerner
7mm Weatherby Magnum
7mm Weatherby Magnum
7mm Winchester Short Magnum
.300 Remington Ultra Magnum
.300 Remington Ultra Magnum
.300 Weatherby Magnum
.300 Winchester Magnum
.300 Winchester Magnum
.300 Winchester Short Magnum
.300 Winchester Short Magnum
.338 Remington Ultra Magnum
.204 Ruger
.204 Ruger
.22-250 Remington
.223 Remington
.223 Winchester Super Short Magnum
.223 Winchester Super Short Magnum
.243 Winchester Super Short Magnum
.243 Winchester Super Short Magnum
.25 Winchester Super Short Magnum
.25-06 Remington
.25-06 Remington
.260 Remington
.270 Winchester
.270 Winchester
.270 Winchester Short Magnum
7mm Winchester Short Magnum
.280 Remington
.280 Remington
.243 Winchester
.243 Winchester
7mm-08
7mm-08
.338 Remington Ultra Magnum
.338 Winchester Magnum
.25 Winchester Super Short Magnum
.260 Remington
6.5x55mm Swedish
7mm Remington Magnum
.280 Remington
.300 H&H Magnum
.300 Weatherby Magnum
.30-06 Springfi eld
.30-06 Springfi eld 180 11.7 2700 823
.308 Winchester 150 9.7 2820 860
.308 Winchester 168 10.9 2670 814
.338 Winchester Magnum 210 13.6 2830 863
.338 Winchester Magnum 250 16.2 2650 808
.378 Weatherby Magnum 300 19.4 2800 853
.460 Weatherby Magnum 450 29.2 2700 823
.378 Weatherby Magnum 300 19.4 2925 892
.223 Remington 64 4.1 3020 920
.378 Weatherby Magnum 300 19.4 2920 890
Bullet Weight
(grains) (grams)
100 6.5 3760 1146
140 9.1 3640 1109
165 10.7 3500 1067
180 11.7 3450 1052
150 9.7 3450 1059
87 5.6 3520 1073
100 6.5 3400 1036
130 8.4 3200 975
150 9.7 3245 989
130 8.4 3250 991
140 9.1 3330 1015
160 10.4 3050 930
139 9.0 3340 1018
175 11.3 3070 936
140 9.1 3310 1009
180 11.7 3250 991
200 13.0 3025 922
180 11.7 3250 991
150 9.7 3280 1000
180 11.7 2960 902
150 9.7 3300 1006
180 11.7 3025 922
180 11.7 3030 924
32 2.1 4225 1288
40 2.6 3090 942
55 3.6 3650 1113
40 2.6 3700 1128
55 3.6 3850 1173
64 4.1 3600 1097
55 3.6 4060 1237
100 6.5 3110 948
85 5.5 3470 1058
115 7.5 2990 911
120 7.8 2990 911
120 7.8 2890 881
130 8.4 2910 887
150 9.7 2850 869
150 9.7 3275 998
160 10.4 2990 911
140 9.1 2990 911
150 9.7 2890 881
100 6.5 2950 899
100 6.5 2960 902
120 7.8 3000 914
140 9.1 2800 853
250 16.2 2660 811
210 13.6 2829 862
120 7.8 2990 911
115 7.5 2750 838
140 9.1 2630 802
175 11.3 3150 960
160 10.4 2940 896
180 11.7 2880 878
200 13.0 2700 823
125 8.1 3140 957
Muzzle Velocity
(feet p er second) (mete rs per second )
TBR PERFORMANCE GROUP SELECTION TABLE: FOR BEST FIT UP TO 500 YARDS (457 METERS)
TBR Group 500 Yards (457 Meters) Bullet Path Sight-in R ange
Less than -20 inches (-51 cm) of path height 300 Yards / 274 Meters
A
-20 to -25 inches (-51 to -64 cm) 300 Yards / 274 Meters
B
-35 to -41 inches* (-89 to -104 cm) 200 Yards / 183 Meters
C
-41 to -42.5 inches (-104 to -108 cm) 200 Yards / 183 Meters
AB
-42.5 to -49.5 inches (-108 to -126 cm) 200 Yards / 183 Meters
AC
-49.5 to -52 inches (-126 to -132 cm) 200 Yards / 183 Meters
BC
More than -52 inches (-132 cm) of path height
[if the path height is more than 64 inches (163 cm),
ABC
performance will be reduced by the difference]
* If your bullet path height is less than -20 inches (-51 cm) at 500 yards (457 meters) with a
200 yard (183 meter) sight-in, consider sighting-in at 300 yards (274 meters) and selecting
group A or B. Alternately, you can use group C with a 200 yard (183 meter) sight-in, but
the TBR will be less accurate at extreme long ranges.
200 Yards / 183 Meters
Extreme Long Range Group Selection — If you intend to shoot
varmints or targets at ranges beyond 500 yards (457 meters), selecting
your group based on 800 yard (732 meters) performance will provide
a better performance match throughout this working range. Select
your group for extreme long-range shooting from the table below.
TBR PERFORMANCE GROUP SELECTION TABLE: FOR BEST FIT UP TO 800 YARDS (732 METERS)
TBR Group 800 Yards (732 Meters) Bullet Path Sight-in R ange
Less than -96 inches (-244 cm) of path height 300 Yards / 274 Meters
A
-96 to -120 inches (-244 to -305 cm) 300 Yards / 274 Meters
B
-139 to -164 inches** (-353 to -417 cm) 200 Yards / 183 Meters
C
-164 to -189 inches (-417 to -480 cm) 200 Yards / 183 Meters
AB
-189 to -212 inches (-480 to -538 cm) 200 Yards / 183 Meters
AC
-212 to -236 inches (-538 to -599 cm) 200 Yards / 183 Meters
BC
More than -236 inches (-599 cm) of path height
[if the path height is more than 250 inches (635 cm),
ABC
performance will be reduced by the difference]
** If your bullet path height is less than -139 inches (-353 cm) at 800 yards (732 meters) with
a 200 yard (183 meter) sight-in, consider sighting-in at 300 yards (274 meters) and selecting
group A or B. Alternately, you can use group C with a 200 yard (183 meter) sight-in, but
the TBR will be less accurate at extreme long ranges.
200 Yards / 183 Meters
REMEMBER: Knowing your theoretical bullet path at long ranges
does not provide a license to take shots beyond ranges at which
you have practiced, particularly at game animals or where stray shots
could hit unintended targets. It is your responsibility to have intimate
familiarity with the performance of your firearm and take full
responsibility for the projectile. The RXB-IV digital laser range finding
binoculars may serve best as a tool for learning performance during
practice at a secure range so you are ready for that critical shot.
TBR™ (TRUE BALLISTIC RANGE™): RIFLE
TRUE BALLISTIC RANGE
™
4
Page 6

FUNCTION 2: BOW MODE
40 Yards (37 Meters) (line of sight) at a 40° Incline
Aim as if the target is 34 yard
s (31 meters) away
This mode, when activated, works with
TBR to provide the correct ballistics range
for arrows. Selecting the BOW mode
automatically deactivates the rifle mode.
The displayed range incorporates three
different ballistics groups (Group A, B, or
C) depending on the particular arrow drop.
You must choose one of the three groups, based on your bow and
arrow selection. Only one group can be selected at a time. Selecting
a new group deactivates all other groups. Most importantly, using
TBR effectively means to Practice, Practice, Practice. Anytime you
handle a bow, you are ultimately responsible for your projectile.
BOW GROUP DATA
Initial Arrow
Bow
Velocity
Group
(feet/meter
per second)
Less than 215 ft/
A
Less than 66 m
215 to 250 ft/
B
66 to 76 m
250 or more ft/
C
76 m or more
For best results, measure the drop of your arrow at 40 yards
(37 meters) when using your 20 yard (18 meter) aiming point.
1. Set up a small target point such as a two-inch (5.1 cm) circle of
paper high on a large, safe background, such as a stack of bales
backed by a solid backstop. Be sure to allow for three feet or
more of drop to avoid arrow damage.
2. Shoot 2 or 3 arrows at the target from 40 yards (37 meters),
using your 20 yard (18 meter) pin on the small target.
3. Measure the distance from the small target to the center
of the group of arrows.
4. Select your TBR bow group from the “Drop from 20 yard
(18 meter) pin at 40 yards (37 meters)” column in the
“BOW Group Data” chart shown above.
Initial velocity should only be used if an arrow speed chronograph
measurement has been obtained. Manufacturer’s published data
such as IBO speed is based on standard draw length and weight that
is likely to vary with your bow, therefore the actual performance
may not be the same.
Drop from
20 yard
(18 meter) pin
at 40 yards
(37 meters)
30 or more inches/
76 or more cm
20 to 30 inches/
51 to 76 cm
Less than 20 inches/
Less then 51 cm
Typical Bow Descri ption
Older bows shooting aluminum arrows and newer
bows set at draw weights below 50 lb (23 kg)
Quality, newer bows shooting carbon arrows at
50-65 lb (23-29 kg) draw weight
Fast bows with draw weights in excess of
65 lb (29 kg)
UNIT OF MEASUREMENT OPTIONS
Unit of Measurement Indicators:
—Indicates distance measured in meters
—Indicates distance measured in yards
The RXB-IV can be used to measure distances in yards or meters.
The unit of measurement indicator is located near the lower right
portion of the OLED. To select between yards and meters, look
through the binoculars, depress the MODE button and hold it
down for approximately 2 seconds. If you are changing from yards
to meters, a change in unit of measure will be indicated by the
illumination of the METER indicator while the YARD indicator is
turned off. If you are changing from meters to yards, the opposite
will occur.
NOTE: The RXB-IV will return to the last setting used each time
the unit is turned on.
FUNCTION 3: MATCH 13™ RETICLE SYSTEM
By selecting this mode, any one of 13 preloaded reticles can be
chosen as the primary aiming point for the RXB-IV digital laser range
finding binoculars. To select a reticle, press MODE repeatedly until
you approach the end of the menu options (just after selecting
meters or yards as the desired unit of output). Each successive time
MODE is pressed will change the reticle style. Press SET to select a
reticle. The reticle choices are as follows:
Plus PointTM: Ideal for varmints and other small
targets. Small open center avoids coverage of
very small or distant targets.
Duplex®: Familiar reticle to shooters from
riflescopes; draws eye to the center, easy to
see, does not cover the target in the center
where aiming is most critical.
Bracket Square Duplex®:
at 40 yards (37 meters) or a deer torso at 30
yards (27 meters). Provides easy aiming on 3D
targets and game for archers. Duplex provides
bold contrast for low light.
™
Brackets an elk torso
(TRUE BALLISTIC RANGE
TRUE BALLISTIC RANGE
™
TBR™
ARCHERY
™
):
Bracket Circle Duplex®: Provides bolder
aiming for low-light/low-contrast situations.
Brackets small game and 3D targets at 40 yards
(37 meters). Brackets a deer at 50 yards
(46 meters). Excellent for muzzleloaders.
German #4: A favorite of European hunters.
Provides bold aiming and is free from
obstructions in the upper half of the field
of view.
Bracket SquareTM:
40 yards (37 meters) or a deer torso at 30
yards (27 meters). Provides easy aiming on 3D
targets and game for archers.
Bracket CircleTM:
targets and game at 40 yards (37 meters).
Brackets a deer at 50 yards (46 meters).
Great choice for muzzleloaders. Open compass
points draw the eye to the center.
Brackets an elk torso at
Brackets small game 3D
5
Page 7

FUNCTION 4: COMPASS MODE
The RXB-IV is equipped with a compass to allow for instantaneous
determination of direction as well as distance to an object.
ACTIVATING THE COMPASS MODE:
To use the compass feature of the RXB-IV, it is necessary to activate
compass mode by pressing MODE until the degree symbol is flashing,
then pressing POWER until the icon and the word “ON” is displayed.
CALIBRATING THE COMPASS:
Before using the compass for the first time at different places,
it is necessary to calibrate the RXB-IV in order to obtain a realistic
database and detect more accurate related azimuths.
To calibrate the compass for horizontal direction reading:
1. Press MODE until the degree symbol is blinking, and press
POWER to activate the compass mode.
2. Continue through the menu options selecting the unit of
measure and preferred reticle.
3.
After selecting the type of reticle, “dEC” will flash. Press the
MODE button
displayed. The numbers will start at the current declination
angle (Ø if this is the first time setting this feature) ascending
repeatedly until the proper declination angle is
Troubleshooting
until 30 is reached. After 30 has been reached, the next number
displayed will be -30, continuing to ascend each time the MODE
button is pressed. Press the POWER button to select the
appropriate declination setting.
After the declination angle has been set by pressing POWER, “CAL”
4.
will begin flashing, indicating it is time to calibrate the compass.
To calibrate the compass, press POWER while “CAL” is flashing.
5.
The number “1” will flash briefly, then display steadily. While “1”
is displayed steadily, rotate the RXB-IV one full revolution around
the Y-axis. Once this has been completed, press the MODE button
again, causing the number “2” to flash briefly, then display steadily.
While “2” is displayed steadily, rotate the RXB-IV one full revolution
around the Z-axis. Once this has been completed, press the MODE
button again and the RXB-IV has been properly calibrated.
The Leupold Green Ring RXB-IV is designed to be as easy to
operate as it is effective. However, there are times when minor
troubleshooting may be required.
UNIT DOES NOT TURN ON – OLED DOES NOT ILLUMINATE:
• Depress POWER button for more than one (1) second
• Check battery; replace if necessary
Care and Maintenance
CHANGING BATTERY:
Changing the CR-123A battery is a simple operation on the RXB-IV.
The battery chamber cover is located on the underside of the unit
on the left-hand side. To change the battery:
1. Lift the battery chamber cover handle.
2. Twist the handle counterclockwise by one quarter of a turn.
3. Pull the handle away from the RXB-IV and the battery
chamber cover will open.
4. Remove the old battery.
5. Insert the new battery (positive “+” end down).
6. Replace the battery chamber cover, paying attention to align
the lugs of the cover with those inside the chamber.
7. Twist the handle clockwise by one quarter of a turn to lock
the cover into place.
8. Fold the handle back down to keep it out of the way.
NOTE: Batteries should be removed when exhausted or when the
RXB-IV will not be used for more than 10 days.
CLEANING THE LENSES:
When removing dust on the lens surface, use a soft oil-free brush.
When removing stains or smudges like fingerprints from the lens
DISTANCE READING CANNOT BE OBTAINED:
• Make sure that the POWER button is being depressed
(as opposed to MODE button)
• Make sure that nothing, such as your hand or finger, is blocking
the objective lenses — as this could interfere with the emission
and reception of the laser pulses
•
Make sure unit is held steadily while depressing the POWER button
• When using BOW mode, it is important to note that TBR returns
are limited to 60 yards (55 meters); returns greater than 60 yards
(55 meters) will be displayed in the LOS display
surface, wipe the lenses very gently with a soft, clean cotton cloth
or quality, oil-free lens tissue. Use a small quantity of pure alcohol
(not denatured) to wipe stubborn smudges. Do not use velvet cloth
or ordinary tissue, as it may scratch the lens surface. Once the cloth
has been used for cleaning the body, it should not be used again
for the lens surface.
CLEANING THE MAIN BODY:
Clean the body surface with a soft, clean cloth and a dry cloth. Do not
use
benzene, thinner, or other organic agents because they may cause
discoloration
the main body.
STORAGE:
It is always recommended that when the RXB-IV is not in use that it is
stored in the case provided.
Water condensation may occur on the exterior lens surface during
periods of high humidity. Therefore, store the RXB-IV in a cool, dry
place. After use on a rainy day or at night, thoroughly dry it at room
temperature, then store in a cool, dry place.
Do not leave the RXB-IV in a vehicle on a hot or sunny day, or near
heat-generating equipment, as this may damage or negatively affect it.
6
or rubber degeneration. Do not use alcohol for cleaning
Page 8

Leupold Product Service
If your Leupold Green Ring RXB-IV fails to perform in any way, you
may return it directly to the factory (or one of our international
service centers) for service.
It is not necessary for your dealer to ship the product; however, they
can be very helpful in determining if factory service is necessary.
Please follow these shipping instructions:
1. Remove the case and any other accessories from the product.
2. Record the serial number of the product and keep it for your
records.
3. Include a note with your name, address, telephone number,
e-mail, and a description of the problem.
4. Pack the product in its original box (if you have it), as this is
the safest shipping container. Wrap the package securely
using filament-strapping tape on the outside.
5. Ship the product by parcel or mail service (insured, if possible)
to one of the following addresses:
IN THE UNITED STATES:
BY PARCEL SERVICE:
Leupold Product Service
14400 NW Greenbrier Parkway
Beaverton, OR 97006-5791 USA
Our Product Service telephone numbers are (503) 526-1400 or
1-800-LEUPOLD (538-7653). We can also be contacted through our
eb site at www.leupold.com.
W
BY POSTAL SERVICE:
Leupold Product Service
P.O. Box 688
Beaverton, OR 97075 USA
The Leupold Green Ring Two Year Limited Warranty
Leupold Green Ring electronic products are warranted for two years.
We warrant them to be free of defects in materials and workmanship,
and to function satisfactorily under normal use conditions. All Leupold
Green Ring products are completely waterproof; however, all quality
optics, if submerged, should always be retrieved as quickly as possible.
If at any time during the warranty period a Leupold Green Ring electronic
product is found to have a defect in materials or workmanship, Leupold
will, at our discretion, repair or replace it free of charge, when
requested by the original owner.
T
he warranty is void if damage results from unauthorized repair,
alteration, or misuse. It is given solely to the original owner and is
not transferable. To activate the warranty, register the product
on-line at www.leupold.com or complete the enclosed warranty
card and mail as addressed.
This is considered a Limited Warranty, and should not be confused
with the Leupold Full Lifetime Guarantee, which covers Leupold
Golden Ring® products, or the Leupold Green Ring Limited Lifetime
Warranty, which covers Leupold Green Ring non-electronic products.
Leupold & Stevens, Inc. • P.O. Box 688 • Beaverton, OR 97075 • www.leupold.com
Tel: 1-800-LEUPOLD (538-7653)
Leupold & Stevens, Inc. reserves all other rights. ALUMINA; AMERICA’S OPTICS AUTHORITY; CQ/T; DESIGN ONLY (GOLDEN RING); DUPLEX; GOLDEN RING; INDEX MATCHED LENS SYSTEM; KATMAI; LEUPOLD; LPS; LR/T;
MADE RIGHT, MADE HERE; MARK 4; MR/T; MULTICOAT 4; PERFORMANCE STARTS ON THE INSIDE; RAINCOTE; RIFLEMAN; SCOPESMITH; VARI-X; VX; and ZERO POINT are registered trademarks of Leupold & Stevens,
Inc., Beaverton, Oregon. ADVANCED IMAGE OPTIMIZATION; BALLISTICS AIMING SYSTEM; BLACK RING; BOONE AND CROCKETT; BUILT FOR GENERATIONS; BZ; CASCADES; CLEAR FIELD; DARK EARTH; DIAMONDCOAT;
DIAMONDCOAT 2; DIGITAL INSTRUMENT PANEL; DUAL DOVETAIL; ER/T; FX; GREEN RING; INFINITE POWER BAND; INTENSIFIER; L-COAT; LIGHT OPTIMIZATION PROFILE; LX; MARK 2; MATCH 13 RETICLE SYSTEM; MESA;
OG; OLYMPIC; ONE-TIME FOCUS; OP; OPTIMIZER; PINNACLES; PLUS POINT; PRW; QR; QRW; QUICK RELEASE; QUICK SET ROTARY MENU; RAIN SHED; RX; SEQUOIA; SPEEDIAL; SPR; STD; SWITCH/POWER; TBR; TMR;
TOTAL LIGHT THROUGHPUT; TROPHY SCALE; TRUE BALLISTIC RANGE; TURKEY PLEX; VX-L; XTENDED TWILIGHT LENS SYSTEM; X-TREME; YL; and YOSEMITE are trademarks of Leupold & Stevens, Inc., Beaverton, Oregon.
Note: We reserve the right to make design and/or material modifications without prior notice.
This publication may not be reprinted or otherwise reproduced without the expressed written consent of Leupold & Stevens, Inc. Copyright © 2007 Leupold & Stevens, Inc. All rights reserved.
www.leupold.com
7
 Loading...