

Page 1

®
CQ/T
Close Quarter/
Tactical Scope
Page 2
The Leupold® Mark 4® 1-3x14mm CQ/T® Scope
Congratulations! You are now the proud owner of one of the finest
tactical riflescopes ever produced. We trust that you will receive years
of exemplary service from it.
The development of the Leupold® Mark 4® CQ/T® drew upon the
collective wisdom of not only Leupold’s finest product developers
and engineers, but that of various branches of U.S. law enforcement
and military agencies as well. The Mark 4 product group itself began
in the mid 1980s with the creation of the Leupold Ultra scope for
the M-24 sniper weapons system. The present CQ/T, or Close Quarter/
Leupold Mark 4 CQ/T
2
3
4
5
1
16
6
7
15
14
12
13
Tactical, scope had its genesis with the first Leupold Military and
Tactical Conference of 1995. It was determined that a small, variable
magnification scope was needed by the various U.S. military and law
enforcement agencies.
The scope you now have before you is the product of many years
of research, design, and development –– all performed with the
intention of creating the most reliable, versatile, and responsive
tool for both military and law enforcement personnel. We put our
complete faith in this scope as we know the importance of its uses.
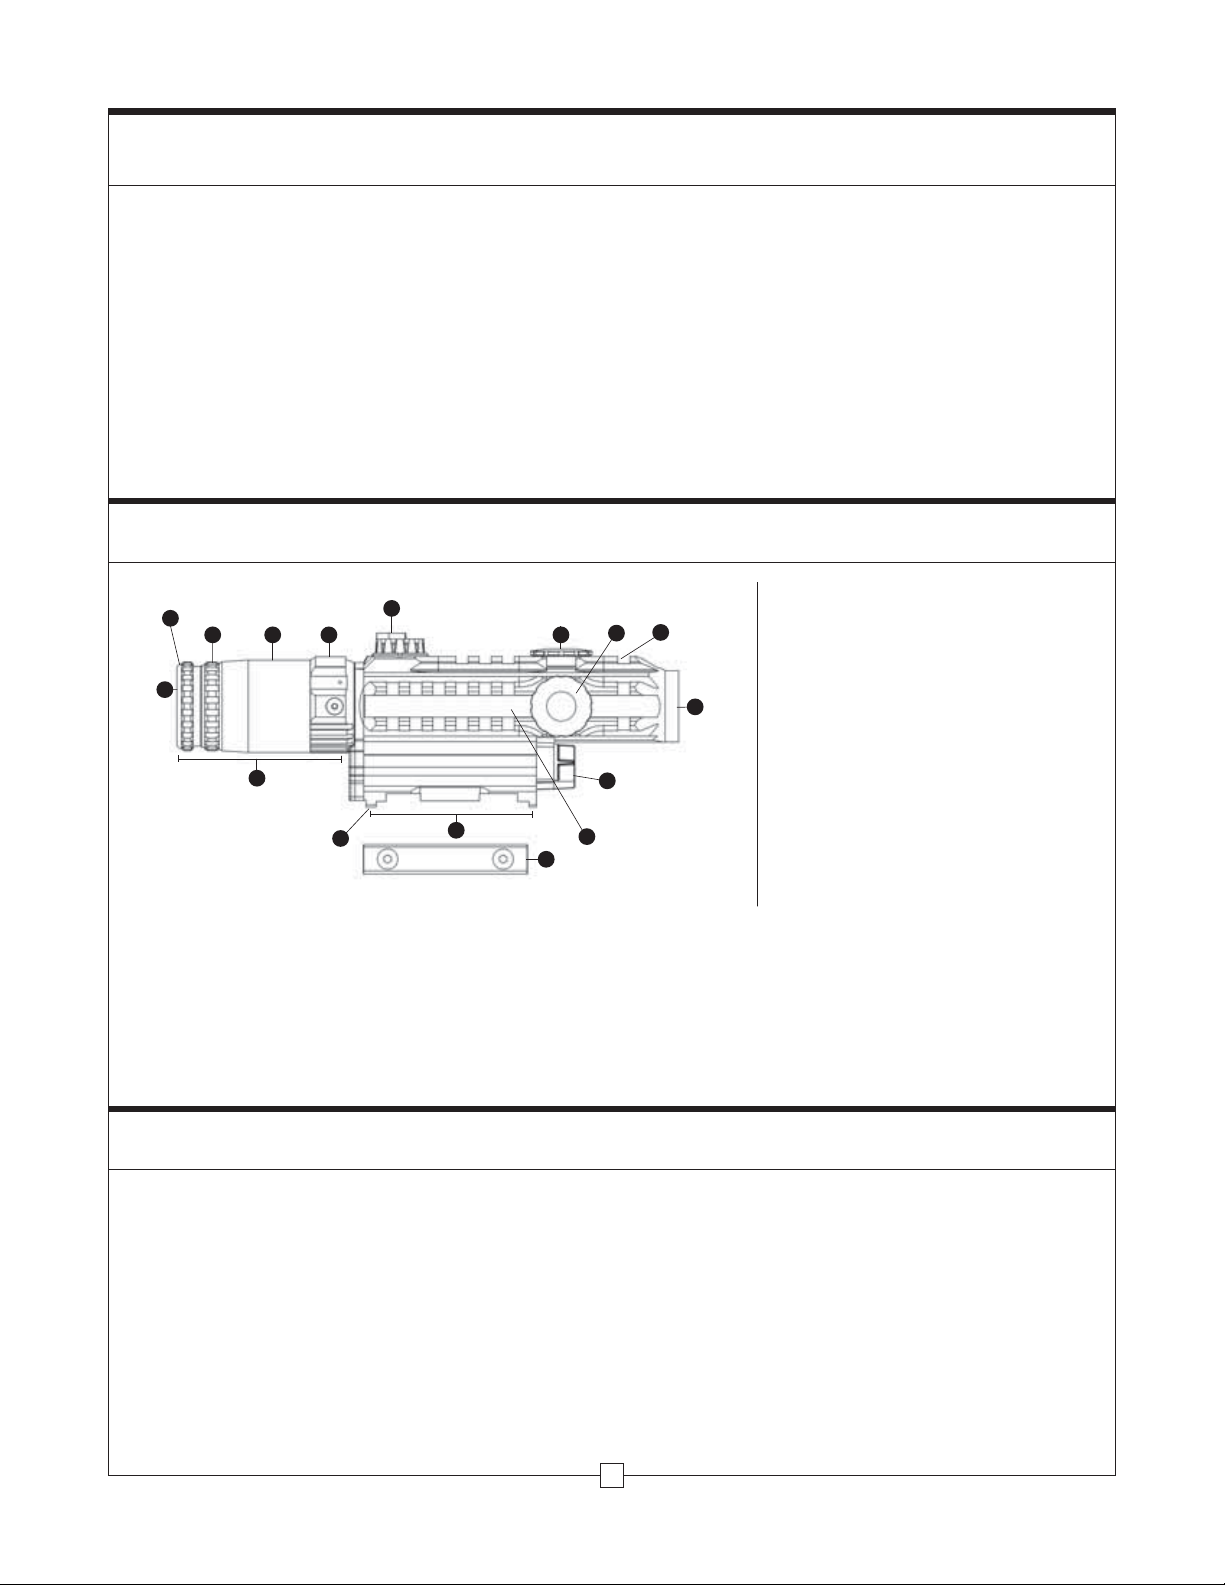
1. Ocular Lens
2. Diopter Adjustment Ring
9
8
10
11
3. Diopter Adjustment Lockring
4. Eyepiece Shell
5. Magnification Selector
6. Illumination Control Dial
7. Elevation Adjustment Dial
8. Windage Adjustment Dial
9. MIL-STD-1913 Accessory Rail
10. Objective Lens
11. Battery Pack (Battery Tube & Battery Cap)
12. MIL-STD-1913 Accessory Rail
13. Flat-Top Mounting Bracket
14. Mounting Foot
15. Mounting Foot Lug
16. Combination Eyepiece / Magnification Selector
YOUR LEUPOLD MARK 4 1-3x14mm CQ/T PACKAGE CONTAINS THE FOLLOWING ITEMS:
• 1 Leupold Mark 4 1-3x14mm CQ/T scope
• 1 carry handle mounting stud with hex nut
• 1 battery tube
• 1 battery tube cap
Installing the Battery
PREPARING THE BATTERY PACK
1. Insert the AA battery positive (+) end first into the battery tube.
2. Close the tube with the battery cap, threading it into the tube
until the tube is firmly sealed.
2
• 1 AA battery
• 1 flip-up ocular lens cover
• 1 flip-up objective lens cover
• 1 flat-top mounting bracket
INSTALLING THE BATTERY PACK
IN THE SCOPE’S BATTERY CHAMBER
1. Insert the battery pack positive (+) end first into the scope’s
battery chamber.
2. Firmly press the battery pack all the way into the chamber until it
will not go any further and the battery cap lip is in line with the
adjacent battery pack seating notch in the scope’s maintube.
3. Rotate the battery pack by the battery cap until the battery cap lip
seats in the battery pack seating notch and will turn no further.
Page 3

Mounting the Scope
FLAT-TOP MOUNTING PROCEDURE
Preparing the Leupold Mark 4 1-3x14mm CQ/T scope for flat-top
(MIL-STD-1913) mounting:
1. Loosen the 1/2-inch hex nuts of the mounting bracket until
they are near the end of its cross bolts.
Mounting the Leupold Mark 4 1-3x14mm CQ/T scope on a
flat-top (MIL-STD-1913) mounting rail:
1. Place the Leupold Mark 4 1-3x14mm CQ/T scope atop the
MIL-STD-1913 mounting rail so that the mounting foot lugs
of the mounting foot engage the cross slots of the rail.
2. Holding the scope in place, check the eye relief of the scope;
adjust the position of the scope as necessary until the mounting
foot lugs engage the rail’s cross slots in a position that allows
for a full sight picture when the firearm is shouldered. Note
this position.
3. Remove the scope from the rail and attach the flat-top
mounting bracket to the mounting foot of the scope so that
the hex nuts are on the same side of the scope as the windage
dial, the longer points of the mounting bracket rails engage
the mounting grooves on each side of the mounting foot, and
the cross bolts are seated between the cross braces. (The mount
rails can be mounted with the hex nuts on the opposite side
but the suggested configuration avoids snagging of clothing
during operation.)
4. Return the scope with the mounting bracket to the
MIL-STD-1913 mounting rail in the same position noted
for a full sight picture.
5. Make certain that both mounting foot lugs engage the
MIL-STD-1913 mounting rail cross slots and that the mounting
bracket rails hook over each side of the MIL-STD-1913
mounting rail.
6. With one hand atop the scope pressing down and forward
to ensure a solid mount engagement, finger tighten the hex
nuts of the mounting bracket until the assembly is snug.
7. Using a 1/2-inch hex wrench or socket, alternately tighten
each nut until the mounting bracket is secure.
8. Complete the installation by using a torque wrench and
1/2-inch socket to apply 65 inch-pounds of torque to
each hex nut. (The use of the Mark 4 Torque Wrench is
recommended for this procedure.)
CARRY HANDLE MOUNTING PROCEDURE
Preparing the Leupold Mark 4 1-3x14mm CQ/T scope for carry
handle mounting:
1. Insert the carry handle mounting stud into the center hole
in the scope mounting foot and make it snug using only your
fingers. This stud will be securely tightened when the stud
nut is tightened.
Mounting the Leupold Mark 4 1-3x14mm CQ/T scope on a
carry handle:
1. Insert the mounting foot into the sight groove of the carry
handle so that the scope’s mounting stud passes through
the carry handle’s mounting stud hole and the foot rests firmly
in the sight groove of the handle.
2. Thread the carry handle mounting stud nut onto the
mounting stud.
3. Place the firearm to the shoulder to ensure that full eye
relief is available. If lesser or greater eye relief distance is
required, return to Step 1 under “Preparing the Leupold
Mark 4 1-3x14mm CQ/T scope for carry handle mounting”
and place the stud in either the first (as measured from
the eyepiece, to mount the scope further forward) or third
(to mount the scope further back) mounting foot hole and
repeat the procedure.
4. Secure the mounting stud nut using a wrench or other
appropriate tool until it is firmly seated against the carry handle.
3
Page 4

Preparing the Leupold Mark 4 CQ/T Scope for Use
FOCUSING THE RETICLE
With the scope held an appropriate distance from your eye to
achieve a full sight picture, the reticle should appear sharp and
crisp; if it does not, it is necessary to adjust the focus by means of
the eyepiece.
1. Grasp the eyepiece with one hand and back the diopter
adjustment lockring away from it by twisting the lockring
counterclockwise with the other hand. Once the lockring is
free from the eyepiece, turn it counterclockwise away from
the eyepiece to keep it out of the way during the adjustment.
2. If you tend to hold things away from yourself to see them clearly
(i.e.,
presbyopic or farsighted), turn the diopter adjustment ring
counterclockwise
yourself to see them clearly (i.e., myopic or nearsighted), turn the
diopter adjustment ring clockwise by three of four turns.
by three or four turns. If you hold things close to
3.
Look away at the sky and allow your eye focus to relax, then take
a few quick glances through the scope at the reticle. The focus of
the reticleshould be noticeably different from when you started.
Continue this process, turning the diopter adjustment ring until the
reticle appears clear and sharp.
4. When you are satisfied with the image of the reticle, turn the
lockring clockwise so that it rests firmly against the eyepiece.
5. Grasping the eyepiece firmly with one hand and the lockring and
diopter adjustment ring with the other, give them both one final
clockwise turn to secure the lockring firmly in place.
If your eyesight changes, readjust the diopter adjustment ring. As
eyesight changes with age, you may want to check the sharpness of
the reticle on your scope every few years to ensure it is still adjusted
correctly for your eye.
Operating the Scope
MAGNIFICATION
The magnification selector of the Leupold Mark 4 1-3x14mm CQ/T
scope is joined to the eyepiece to form a large gripping surface.
This, combined with the knurled ring with two pronounced ridges
separated by a groove large enough for a finger to rest within
located at the 1x position to allow the magnification level of the
scope to be changed without the necessity of looking directly at
the scope.
CHANGING THE MAGNIFICATION LEVEL OF THE SCOPE
1. Grasp the eyepiece firmly, placing the index finger or thumb
between the two large ridges of the magnification selector.
2. Turn the eyepiece clockwise until it stops and the thumb or index
finger rests against the lower right side of the scope. That position
is 3x magnification.
3. Turn the eyepiece counterclockwise until it stops and the thumb
or index finger rests just behind the illumination control dial of
the scope. That position is 1x magnification.
ILLUMINATION
The illumination of the reticle of the Leupold Mark 4 1-3x14mm CQ/T
scope is controlled through the illumination control dial, located
atop the scope just in front of the magnification selector. It features,
rotating clockwise, twelve positions:
1. OFF
2. Illumination settings one and two (indicated by the two smallest
dots on the dial) for use with night vision equipment.
3. Illumination settings three through ten (indicated on the dial by
dots of increasing size).
4. A battery check setting (indicated on the dial by the image of a
As the dial is composed of elevated rays emanating from its center,
each being one specific setting, illumination settings can be made
without the necessity of looking at the scope. The OFF setting,
indicated by a ray that is raised above all the others, can be located
tactilely. As the illumination control dial setting indicator is directly in
front of the power selector, the proximity of this OFF setting to the
power selector or its position away from it in a clockwise orientation
tactilely indicates the intensity setting of the reticle.
The windage and elevation adjustment dials of the Leupold Mark 4
1-3x14mm CQ/T scope are located on the top and right side of
the scope respectively. These dials are covered with a knurled,
threaded cover, the lip of which can be used to make adjustments
to the slotted head of the dial if no other tools are available. Both
adjustment dials are marked in 1/2 minute of angle increments and
click into position at each of these markings.
The Circle Dot reticle of the Leupold Mark 4 1-3x14mm CQ/T scope
is designed to offer fast target acquisition in any environment.
Dot Size: 3 MOA at 3x, 9 MOA at 1x
Circle Size: Edge to edge, the subtension of the circle is 18 inches at 25
Circle Line: The width of the line creating the circle is large enough to be
battery) that will illuminate the reticle only if the battery contains
1.2 volts of charge or more.
WINDAGE AND ELEVATION
THE CIRCLE DOT RETICLE
yards, or 6 feet at 100 yards when set on 3x. From the center of the dot to
the edge of the circle, the subtension is 6 feet at 200 yards when set on 3x.
easily visible but thin enough so as not to obliterate an 18-inch object at
500 yards when set on 3x.
4
Page 5

Zeroing the Scope
BORESIGHTING
To save time and ammunition, the use of a boresighting
collimator to “get on the paper” is recommended. Remember that
adjustments made during boresighting will appear to move in the
opposite direction than that indicated by the adjustment dial. As
the Leupold Mark 4 1-3x14mm CQ/T scope is sometimes mounted
atop a carry handle, boresighting using a collimatoris not always
possible. In these cases, it is best to use the traditional method
(“Traditional Boresighting,” on the next page) of sighting down the
barrel to the target.
Using a boresighter:
1. Attach the boresighter to the barrel.
2. Look through the scope to assess the position of the scope’s
reticle relative to the boresighting grid. The center of the scope
reticle is sometimes some distance away from the center of the
boresighting grid.
3. Begin with the windage adjustment. Turn the windage adjustment
dial until the center of the scope’s reticle is in horizontal alignment
with the center point of the boresighting grid. Note that when
using a boresighter the windage needs to be turned in the “R”
(right) direction to make the reticle move left in relation to the
target. Also note that the knurl on the top edge of the cap can be
used as an adjustment tool.
4. Now turn the elevation adjustment dial until the center of the
scope’s reticle aligns with the center point of the boresighting
grid. Note that the elevation adjustment needs to be turned in the
“D” (down) direction to make the reticle move up in relation to
the target.
5. Remove the collimator from the barrel.
NOTE: Boresighting alone is not sufficient to sight-in a scope. You
must make final adjustments by shooting the firearm using the same
ammunition you use in the field.
Traditional boresighting of AR-15 and M-16 firearms using a target
from 20 to 50 yards away:
1. Position the firearm on the bench, using sandbags to steady the
firearm as necessary.
2. Release the rear receiver pin of the firearm.
3. Separate the upper and lower receiver halves.
4. Remove the bolt.
5. Position the firearm with the muzzle facing the target.
6. Looking through the bore itself, move the firearm to center the
bull’s-eye of the target inside the barrel.
7. Hold the rifle steady. With the bull’s-eye centered when viewed
through the bore, make windage and elevation adjustments to
the scope until the very center of the reticle is aligned with the
bull’s-eye of the target.
Regardless of which boresighting method was used, the next steps
are the same on the firing range. To ensure reliable results, always
fire from a rested position when performing these steps.
1. Fire a shot or two.
2. If you are several inches off center, make an appropriate amount
3. Carefully fire a three-shot group.
4. Use the center of that group as a reference point for the final
Leupold Mark 4 1-3x14mm CQ/T scopes feature adjustment dials
that can be repositioned to align the marked zero of the dial with
the position indicator without changing the adjustment setting
of the scope that was achieved when sighting in. This allows
the original zero of the rifle to be known in the event further
adjustments are made in the field.
Both the windage and elevation adjustment dials have a pointer
dial atop the increment dial that moves with the slotted adjustment
screw. This dial also can be moved independently to align with the
zero on the outermost dial. To reposition this dial, simply rotate it
using a small flat bladed screw driver, knife blade, or other tool until
the pointer is aligned with the zero position of the increment dial.
LIVE FIRE ZEROING USING THREE-SHOT GROUPS
of adjustment to move the reticle to the center of the target.
adjustments to windage and elevation.
ZEROING THE WINDAGE AND
ELEVATION DIALS AFTER SIGHTING IN
5
Page 6

Scope Accessories
MOUNTING ACCESSORIES TO THE SCOPE
The Leupold Mark 4 1-3x14mm CQ/T scope is designed with two
MIL-STD-1913 rails, one running along the top and one running
along the right side of the scope. These rails are intended for use
in the mounting of additional accessories to the scope, such as
flashlights, lasers, and other tactical equipment as needed. An
accessory should be mounted to the scope following the instructions
provided by the accessory’s manufacturer.
Maintenance
LENSES
The Leupold Mark 4 1-3x14mm CQ/T scope lenses are coated with
anti-reflective ion assist DiamondCoat™ coatings to prevent
reflection, light scattering, and to increase their scratch resistance.
Ideally, they should be cleaned in the same way as a camera lens.
Begin by using a standard lens brush to remove dust, and then pure
alcohol, high-grade glass cleaner or pure water on a cotton swab
to remove any smudges.
LENS COVERS
The Leupold Mark 4 1-3x14mm CQ/T scope is standardly equipped
with both ocular and objective flip-up lens covers. The use of these
lens covers is left to the discretion of the scope user. These covers
simply seat over the objective ring
the scope after all mounting and initial adjustment procedures have
been completed.
As the eyepiece of the Leupold Mark 4 1-3x14mm CQ/T scope rotates
when magnification adjustment is made, the ocular lens cover should
be seated with the magnification set at 1x and the open ocular cover
lid at the 11 o’clock position. This will prevent the opened cover from
getting in the way when the magnification level is increased to 3x.
and eyepiece adjustment ring of
EYEPIECE
This adjustment is permanently lubricated. There is no need to
lubricate it. The eyepiece can be rotated as far as it will go in
either direction. It will not detach from the scope because of an
internal lock ring.
SEALS
Leupold scopes are sealed from within by several methods. All seals
are permanent and require no maintenance.
WINDAGE AND ELEVATION ADJUSTMENTS
These adjustments are permanently lubricated. There is no need
to lubricate them. Keep turret caps on, except when adjusting,
to keep out dust and dirt. (It’s worth noting that, unlike
competitive brands, Leupold scopes are waterproof even without
the caps in place.)
Troubleshooting
Before you ship a scope back to the factory for service or repair,
please check the following items to make sure that the problem is
really with the scope, and not the rifle or mount system.
1. Check the mount. Make sure the scope is mounted securely to
the rifle. Try, with bare hands only, to twist the scope or see if
anything moves when you jiggle it. If there is any movement,
retighten the mounting system according to mounting
instructions.
2. Make sure the action of your rifle is properly bedded in the stock,
and that all receiver screws are tight and have been tightened in
the sequence recommended by the manufacturer. A loosely fitted
stock can cause changes to the point-of-impact.
SCOPE EXTERIOR
Leupold Mark 4 1-3x14mm CQ/T scopes are made of rugged 6061-T6
aircraft aluminum alloy. No maintenance of any kind is required;
simply wipe off any dirt or fingerprints that accumulate with a
clean, dry cloth.
MAGNIFICATION SELECTOR
No lubrication is ever required on the power selector ring. DO NOT
LOOSEN OR REMOVE THE SCREW IN THE POWER SELECTOR RING.
3. When test firing a rifle to check the point-of-impact relative to
windage and elevation adjustments, be sure to fire from a solid
bench with sandbags supporting the forearm and buttstock.
4. Be sure to use factory-loaded ammunition of the same bullet type,
weight, and preferably, lot number. If one type of ammunition
does not shoot well, try another brand or bullet weight.
5. Be certain that both the barrel and chamber are clean. Heavy
factory grease on a new rifle and copper fouling on an older
one can diminish the accuracy of the firearm.
6
Page 7

Leupold Product Service
If your Leupold Mark 4 CQ/T scope fails to perform in any
way, you may return it directly to the factory for service.
It is not necessary for your dealer to ship the scope to Leupold;
however, they can be very helpful in determining if factory
service is necessary. Please follow these shipping instructions:
1. Remove any accessories from the scope.
2. Record the serial number of the scope and keep it
for your records.
3. Include a note with your name, address, telephone
number, e-mail, and a description of the problem.
4. Pack the scope in its original box (if you have it), as this
is the safest shipping container. Wrap the package
securely using filament strapping tape on the outside.
5. Ship the scope by insured parcel or mail service to one
of the following addresses:
In the United States:
Parcel Service: By Mail:
Leupold & Stevens, Inc. Leupold & Stevens, Inc.
Attn: Product Service Dept. Attn: Product Service Dept.
14400 N.W. Greenbrier Parkway P.O. Box 688
Beaverton, OR 97006-5791 Beaverton, OR 97075-0688
USA USA
Outside the United States:
All Leupold CQ/T Scopes must be serviced by our factory in the
United States. Certain regulations require very specific procedures
when sending this product for service; we strongly recommend
contacting us directly prior to sending any CQ/T from outside the
United States.
The Leupold Product Service telephone number is
1 800 LEUPOLD (538-7653) or (503) 526-1400. They can also
be contacted through our Web site at www.leupold.com.
The Best Consumer Protection in the Business
All Leupold Golden Ring® products are manufactured in the USA. Equally important, they are made with your absolute satisfaction in mind.
THE LEUPOLD ELECTRONICS WARRANTY
Certain Leupold scopes are equipped with electronic components, which operate independently of the mechanical and optical systems of
the scopes. These electronic components are warranted for a full two years against all material and manufacturing defects. This warranty
is effective from the date of purchase of the scope. If, within the course of normal usage, the electronic components of any Leupold scope
malfunction within this period, we will, at our option, repair or replace it.
Leupold Makes More than Scopes
See our complete line of mounting systems, binoculars, spotting scopes, and accessories at your nearest Leupold dealer.
For a free Leupold catalog, write to: Leupold & Stevens, Inc., P.O. Box 688, Beaverton, OR 97075-0688; call 1 800 LEUPOLD (538-7653)
or (503) 526-1400; or send us an e-mail through our Web site at www.leupold.com.
Leupold & Stevens, Inc. reserves all other rights. ALUMINA; AMERICA’S OPTICS AUTHORITY; CQ/T; DESIGN ONLY (GOLDEN RING); DUPLEX; GOLDEN RING; INDEX MATCHED LENS SYSTEM; KATMAI; LEUPOLD; LPS; LR/T;
MADE RIGHT, MADE HERE; MARK 4; MR/T; MULTICOAT 4; PERFORMANCE STARTS ON THE INSIDE; RAINCOTE; RIFLEMAN; SCOPESMITH; VARI-X; VX; and ZERO POINT are registered trademarks of Leupold & Stevens, Inc.,
Beaverton, Oregon. ADVANCED IMAGE OPTIMIZATION; BALLISTICS AIMING SYSTEM; BLACK RING; BOONE AND CROCKETT; BUILT FOR GENERATIONS; BZ; CASCADES; CLEAR FIELD; DARK EARTH; DIAMONDCOAT; DIAMONDCOAT
2; DIGITAL INSTRUMENT PANEL; DUAL DOVETAIL; ER/T; FX; GREEN RING; INFINITE POWER BAND; INTENSIFIER; L-COAT; LIGHT OPTIMIZATION PROFILE; LX; MARK 2; MATCH 13 RETICLE SYSTEM; MESA; OG; OLYMPIC; ONE-TIME
FOCUS; OP; OPTIMIZER; PINNACLES; PRW; QR; QRW; QUICK RELEASE; QUICK SET ROTARY MENU; RAIN SHED; RX; SEQUOIA; SPEEDIAL; SPR; STD; SWITCH/POWER; TBR; TMR; TOTAL LIG HT THROUGHPUT; TRUE BALLISTIC RANGE;
TURKEY PLEX; VX-L; XTENDED TWILIGHT LENS SYSTEM; X-TREME; YL; and YOSEMITE are trademarks of Leupold & Stevens, Inc., Beaverton, Oregon. Note: We reserve the right to make design and/or material modifications without
prior notice.
Leupold products are manufactured under one or more of the following patents: U.S. Patents: 5,035,487; 5,231,535; 5,671,088; 5,866,048; 6,005,711; 6,279,259; 6,295,754; 6,351,907; 6,359,418; 6,469,829; 6,519,890,
6,691,447; 6,816,305; 7,088,506; D347,441; D403,393; D413,153; D414,835; D415,546; D416,972; D420,718; D420,807; D421,286; D427,658; D490,097; D506,520; D512,449; D517,153; D519,537. Foreign Patents:
BX30938-00; CA-Rd./Enr.1999-88472; DE49903766.9; DE69216763T; DE-M9304093.8; DE202005017276U1; EP0540368; GB0540368; IL31338; IT75604; JP1074623; SE55201; TW148948; EM59613; EM393467.
This publication may not be reprinted or otherwise reproduced without the expressed written consent of Leupold & Stevens, Inc. Copyright © 2007 Leupold & Stevens, Inc. All rights reserved.
www.leupold.com
7
 Loading...