

Page 1
Quick Start Guide
The Automotive Internet Experience
Page 2

Table of Contents
System Requirements
Package Contents
Overview – Wi2U router
Vehicle Installation
Start-up
Display
Settings
Regulatory Information
Technical Data and Important Notes
Device-specic data
2 3
4
4
5
6
10
13
14
19
20
23
Page 3
System Requirements
Computer with Internet Browser (Internet Explorer 6.0 and higher,
Firefox, Opera or Safari) and WLAN 802.11 b/g.
Package Contents
Please check the package contents.
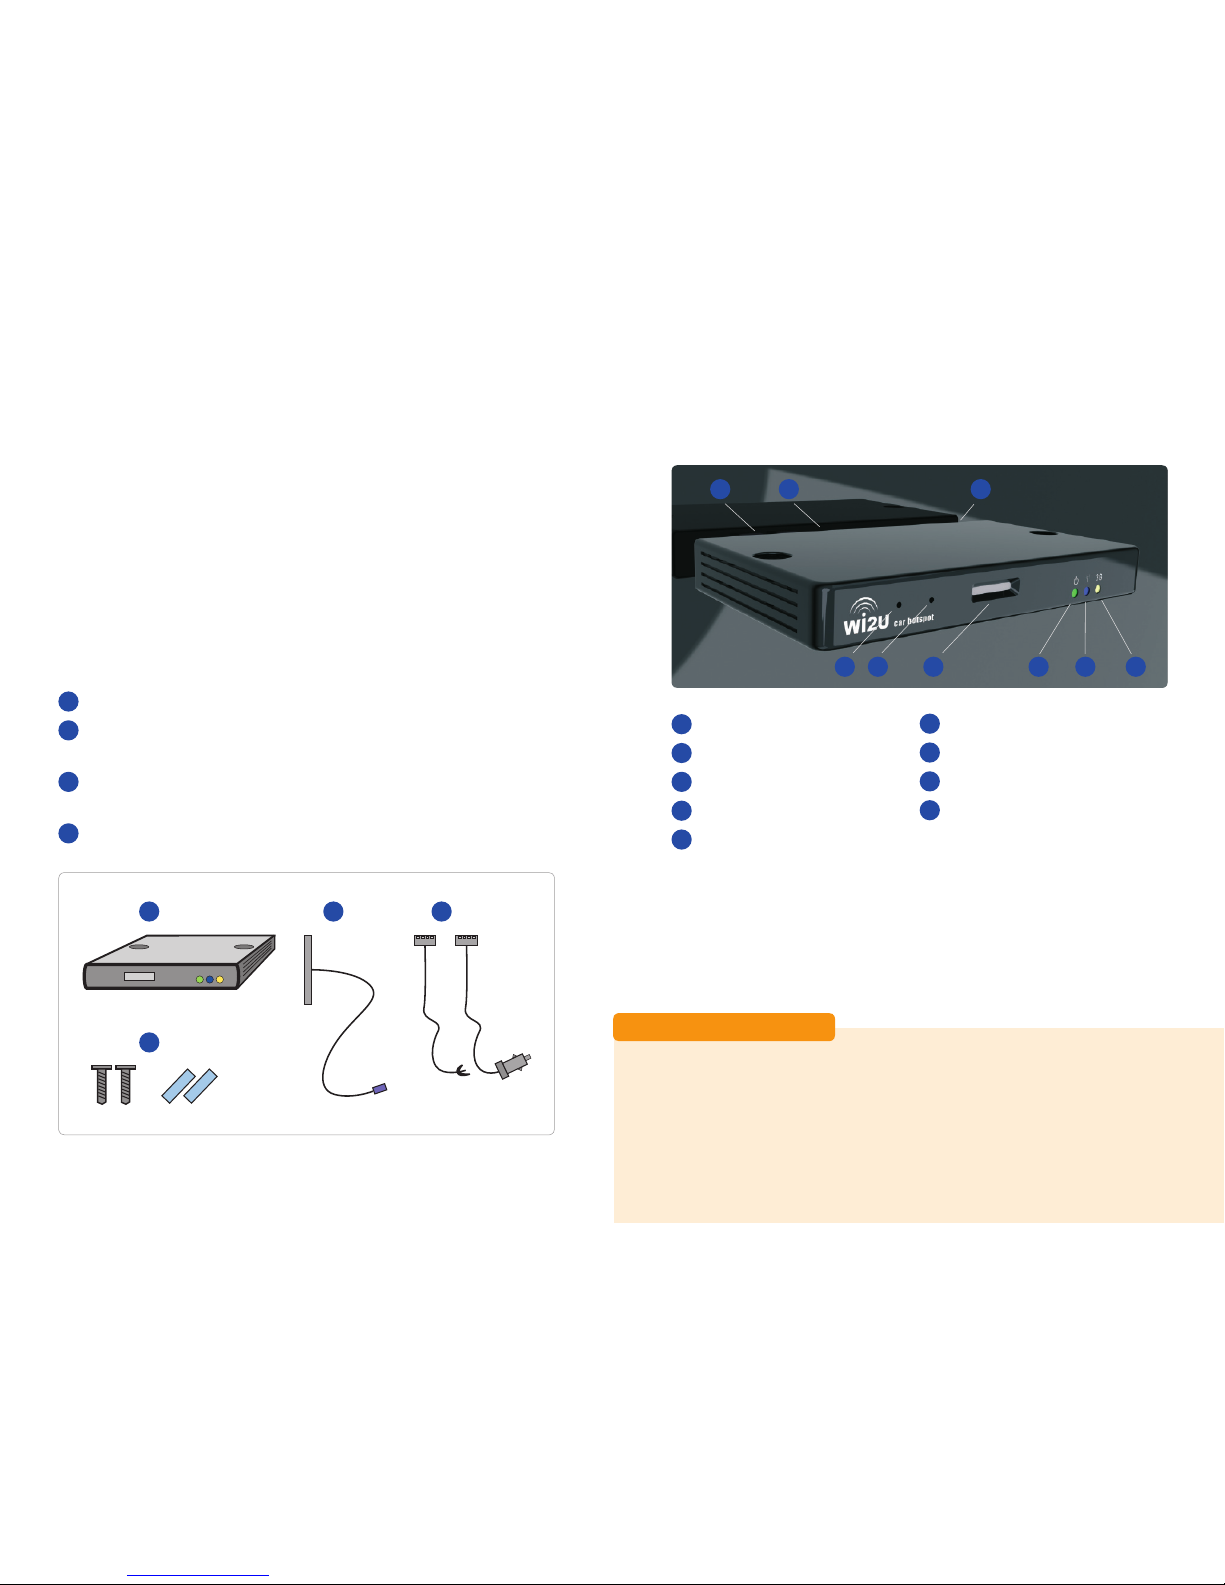
The following items should be included in the package:
Wi2U router
Internal UMTS antenna for the windscreen, with Fakra connec-
tor (purple colour)
Cable set for connecting to on-board electronics (a) Connector
for on-board electronics (b) Connector for cigarette lighter
Fastening materials (2 screws, 2 Velcro strips)
1
2
3
4
4
1
3
2
4
(a) (b)
5
Overview – Wi2U router
Power LED
WLAN LED
Internet / 3G LED
SIM card slot
Firmware reset button
Vehicle Installation
Before you can connect the Wi2U to your computer, you must rst
install the Wi2U in your vehicle.
Important Note
Installation can also be carried out by a suitable workshop. For information on potential workshops, please visit www.wi2u.de
1
2
3
4
5
1 2 3456
7
8 9
Reset button (restart)
GPS antenna connection
UMTS antenna connection
12V / 24V connection
6
7
8
9
5
Page 4
6
A) Installation in the glove compartment
Antenna and cabling installation
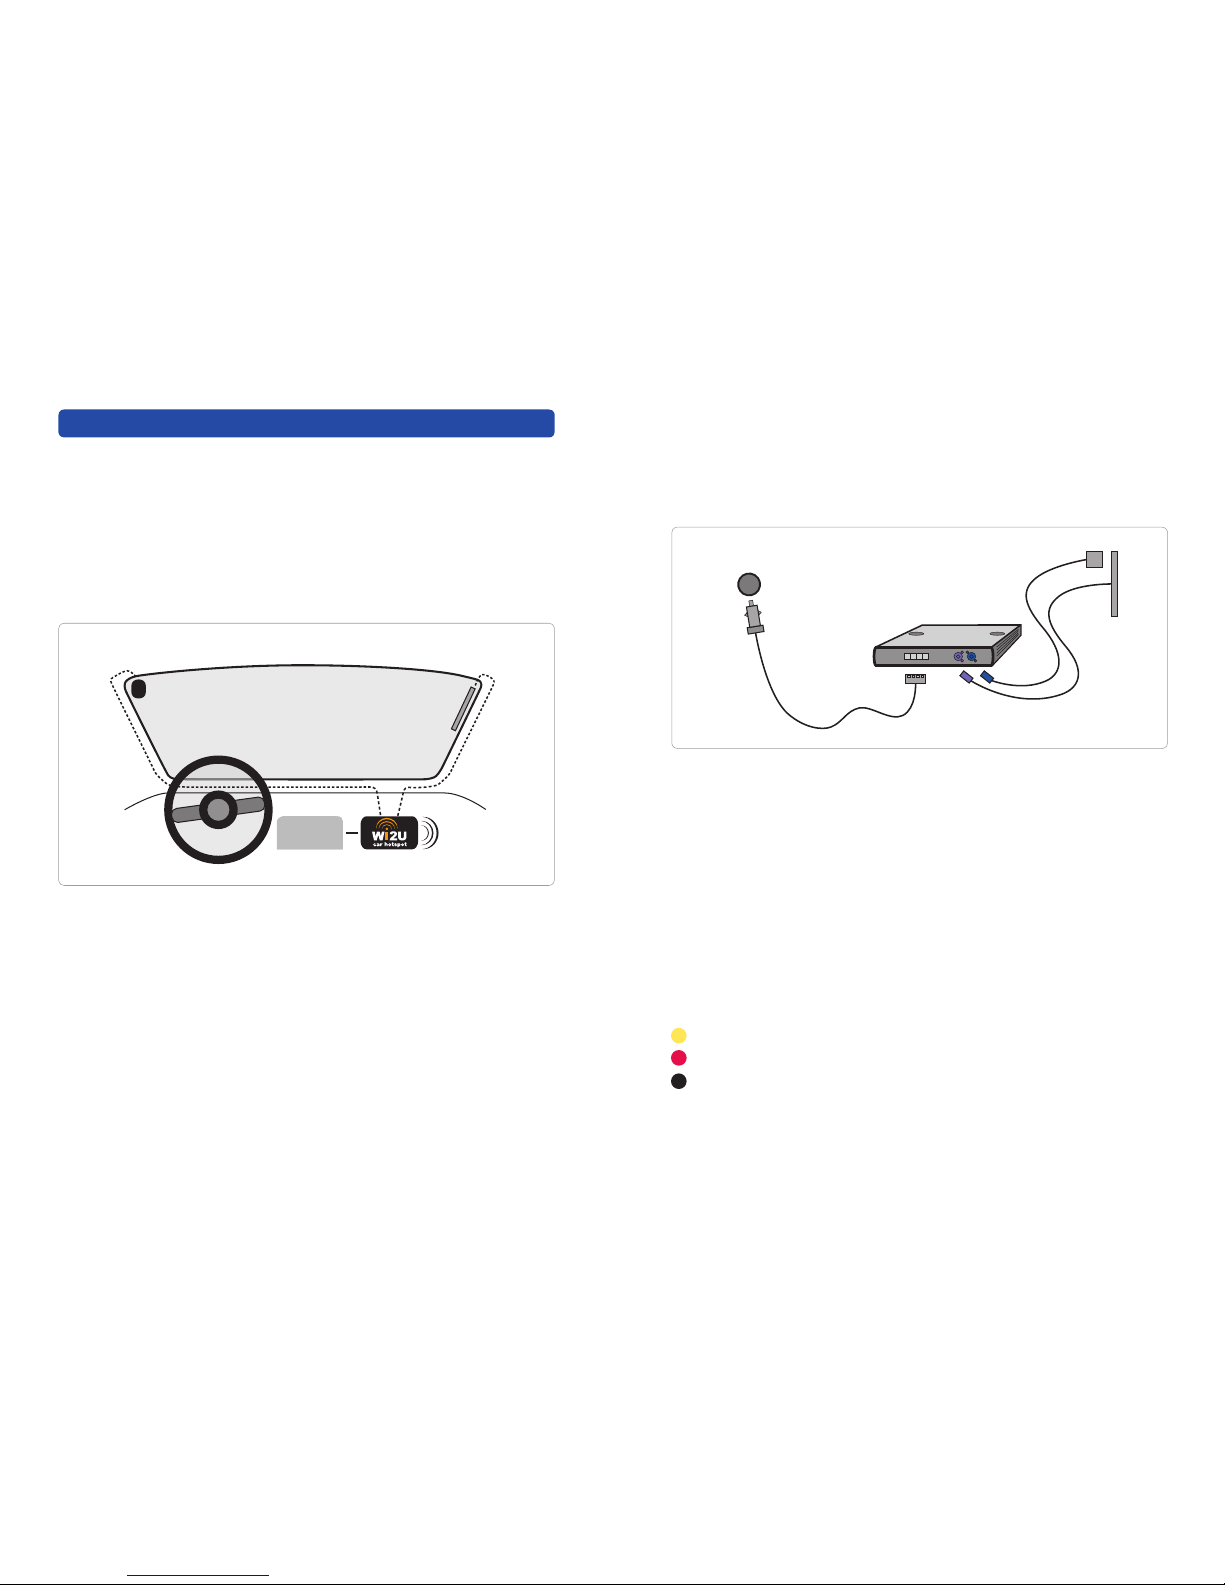
It is recommended to install the antennas as shown in the following
diagram below (please ensure to use the adhesive pads provided).
All connection cables mentioned are to be laid in the glove compartment.
The Wi2U is delivered with a cable set for connection to the on-board
electronics (12V or 24V) and a connection for the cigarette lighter.
Select the right cable and connect it to the corresponding connections in the vehicle. Please ensure that ignition on/off recognition
does not function when connected via the cigarette lighter.
Option 1: (Connection to the cigarette lighter)
Connect the UMTS antenna, and, if required, the optional GPS antenna according to the colour coding of the Fakra connector to the
GPS (optional) UMTS
WLAN
Strom-
versorgung
Do not obstruct the eld of vision
appropriate connector socket on the Wi2U. Take the cable for the
cigarette lighter and insert the 4-pin connector into the corresponding
socket of the Wi2U. Plug the other end of the cable into the cigarette
lighter socket of your vehicle.
Option 2: (Connection directly to vehicle on-board electrical
system)
Connect the UMTS antenna and the optional GPS antenna according to the colour coding of the Fakra connector to the appropriate
connector socket on the Wi2U. Take the cable for the on-board electronics and insert the 4-pin connector into the corresponding socket
of the Wi2U. Connect the other cable to the on-board electronics of
your vehicle. When doing so, please observe the following connections:
Yellow cable to terminal 15 (ignition on/off)
Red cable to terminal 30 (vehicle battery 12V or 24V)
Black cable to ground
For details about the connection to vehicle on-board electrical system please refer to Chapter Technical Data and Important Notes.
7
Cigarette lighter
UMTS
GPS (optional)
Power
supply
Page 5
Wi2U mounting
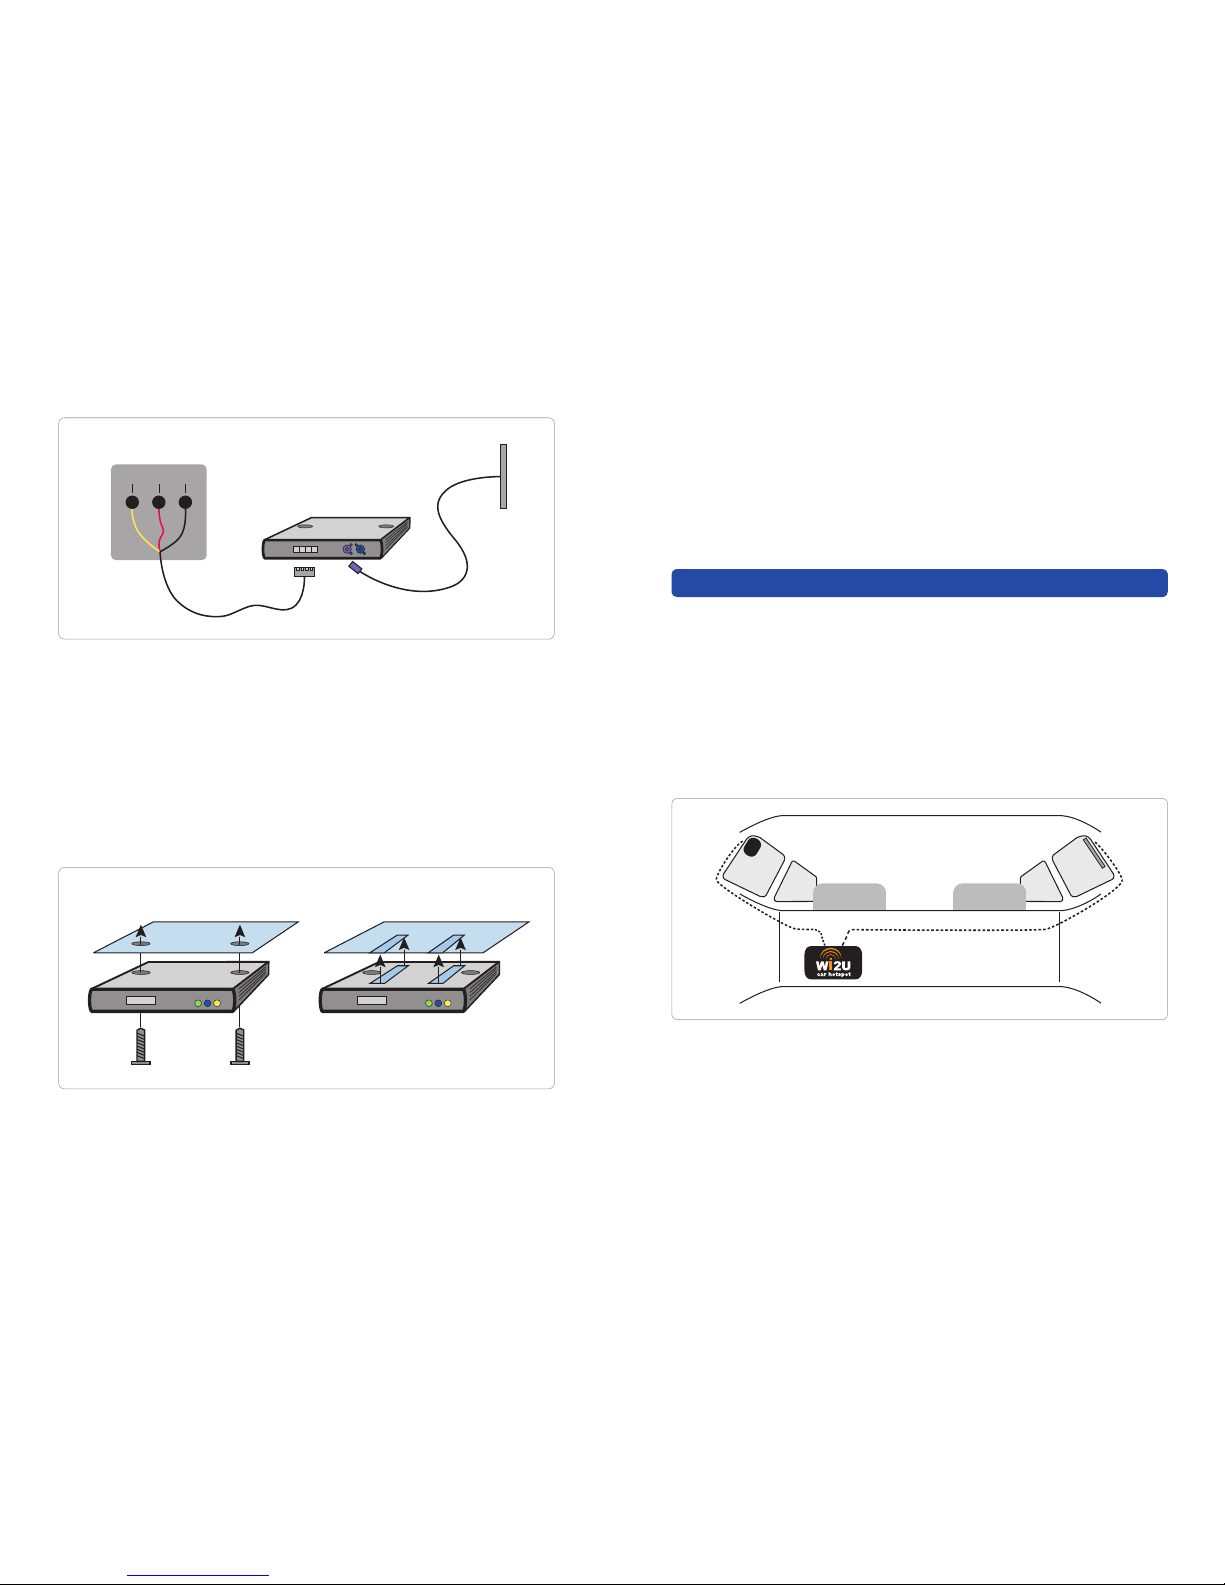
The Wi2U router can either be afxed in the glove compartment by
using the Velcro strips provided, or screwed through the housing bore
in the plastic casing using the screws. When mounting the Wi2U with
the screws provided, the existing device screws must be removed
beforehand. When using the Velcro strips ensure the surface is free
from grease and apply the Velcro strips with high pressure.
Vehicle on-board electrical system
Glove compartment Glove compartment
8
Before mounting, please disconnect all connection cables according
to the drawing on the Wi2U router above.
The Wi2U router is precongured to operate only when the ignition is
switched on. The start-up time is approximately 30 seconds.
B) Installation in the boot
The Wi2U router can alternatively be installed in the boot of the vehicle.
1. Afx the UMTS antenna and optional GPS antenna to the inside
of each side window (if possible, one antenna on the left side of the
vehicle, the other on the right side of the vehicle to prevent mutual
interference).
2. Further installation procedures for connections and mounting are
identical to glove compartment installation.
9
GPS (optional) UMTS
KL15 KL30 Ground
Page 6
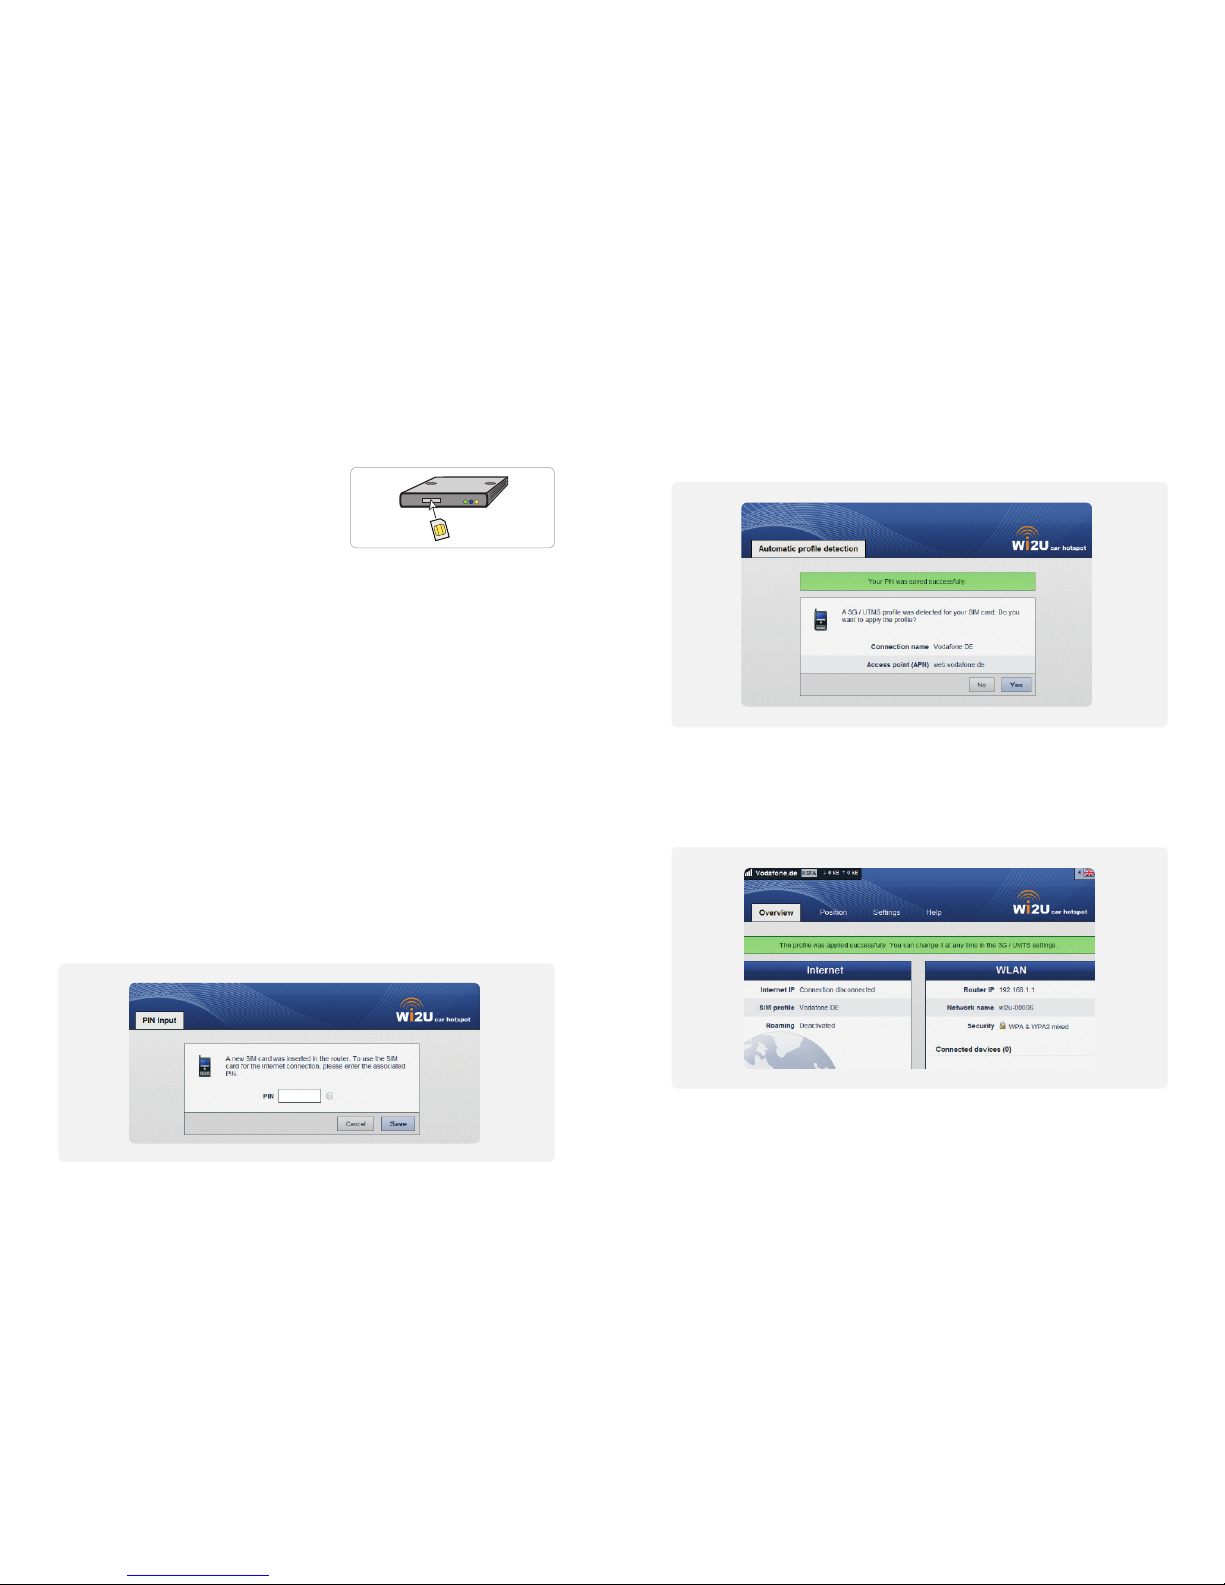
Start-up
1. Insert the SIM card into the
SIM card slot (pictured on the right).
2. Switch on the ignition.
Wi2U will start (Power LED and WLAN LED light up).
3. Establish a WLAN connection to the Wi2U.
The Wi2U is precongured with the following settings:
SSID (Network name)
WPA (TKIP) / WPA2 (AES) (WLAN key)
The device-specic settings can be found on page 23 of this manual
and also labelled on the underside of the device. Use the normal
WLAN application on your computer to connect. Search for a network and click on Connect with the SSID of the Wi2U router. Enter
the WPA2 key.
4. Launch the Internet Browser on your computer and enter the following address http://192.168.1.1 or http://router.wi2u.
The start window of the Wi2U web server will open and you will be
prompted to enter the PIN for your SIM card.
10
After clicking on the „Save“ button, the PIN will be automatically
stored.
This is followed by automatic provider recognition. When you accept
the settings by clicking on the „Yes“ button, these settings are automatically saved to your SIM card and the overview page is displayed.
The settings for the SIM card can later be changed under menu item
Settings/3G UMTS.
11
Page 7
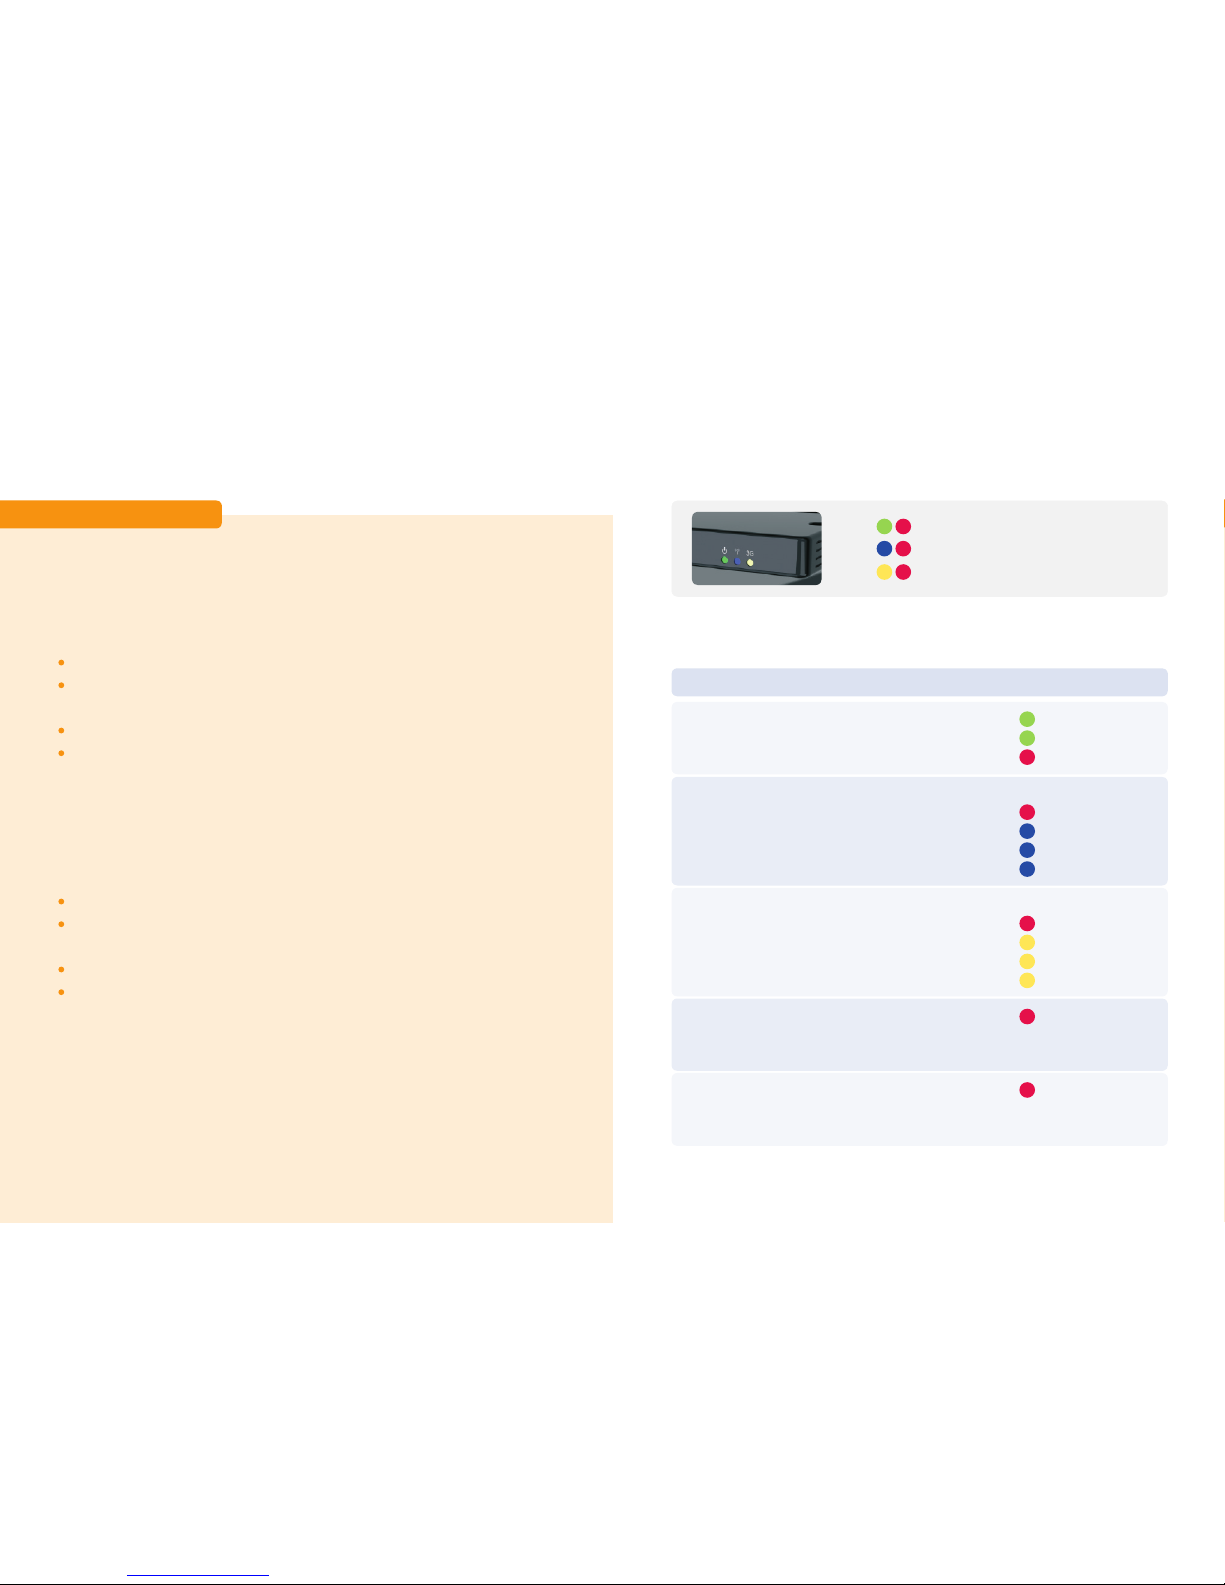
Your router is now ready for mobile internet access (3G LED lights
up). For further conguration settings, refer to chapter Settings.
Important Notes
Internet Settings / Provider Data
If your provider is not recognised by the router, you can request the
APN settings, and, if necessary, further settings directly from your
provider and enter them manually.
Connect to the Wi2U via WLAN
Logon to the Wi2U router by launching the Internet Browser, enter
the address http://192.168.1.1 and select menu item Settings.
Enter the system password: admin
Under submenu item 3G/UMTS you can enter the APN settings,
and, if required, enter and save other settings in the advanced
menu.
Roaming is deactivated by default.
Changes to this setting can be made as follows:
Connect to the Wi2U via WLAN
Logon to the Wi2U router by launching the Internet Browser, enter
the address http://192.168.1.1 and select menu item Settings.
Enter the system password: admin
You can activate roaming under the submenu item 3G/UMTS
12
Display
The Wi2U router is equipped with three two-coloured LEDs.
Power supply
WLAN activity
UMTS/3G activity
The following LED codes are associated with the device:
Function
Power
WLAN
Activity
3G
Aktivität
Firmware
update
Reset to
factory
settings
13
Colour / LED code
slow ashing
Off
slow ashing
ashing
Off
slow ashing
ashing
alternate ashing,
each with 1 Hz (for the
duration of the update)
simultaneous
ashing, each with 1 Hz
State
Generated voltage within admissible range
Device in sleep mode
Problem with power supply
WLAN not started
WLAN Error
WLAN access point powers up
WLAN available but no data transfer
WLAN data transfer
3G not started
3G Error
Establishing 3G connection
3G available but no data transfer
3G transfer
WLAN and 3G illuminate alternate red
when the rmware update is running. After
restart, normal LED code resumes.
WLAN and 3G ash simultaneous red –
for a period of 10 seconds
Page 8
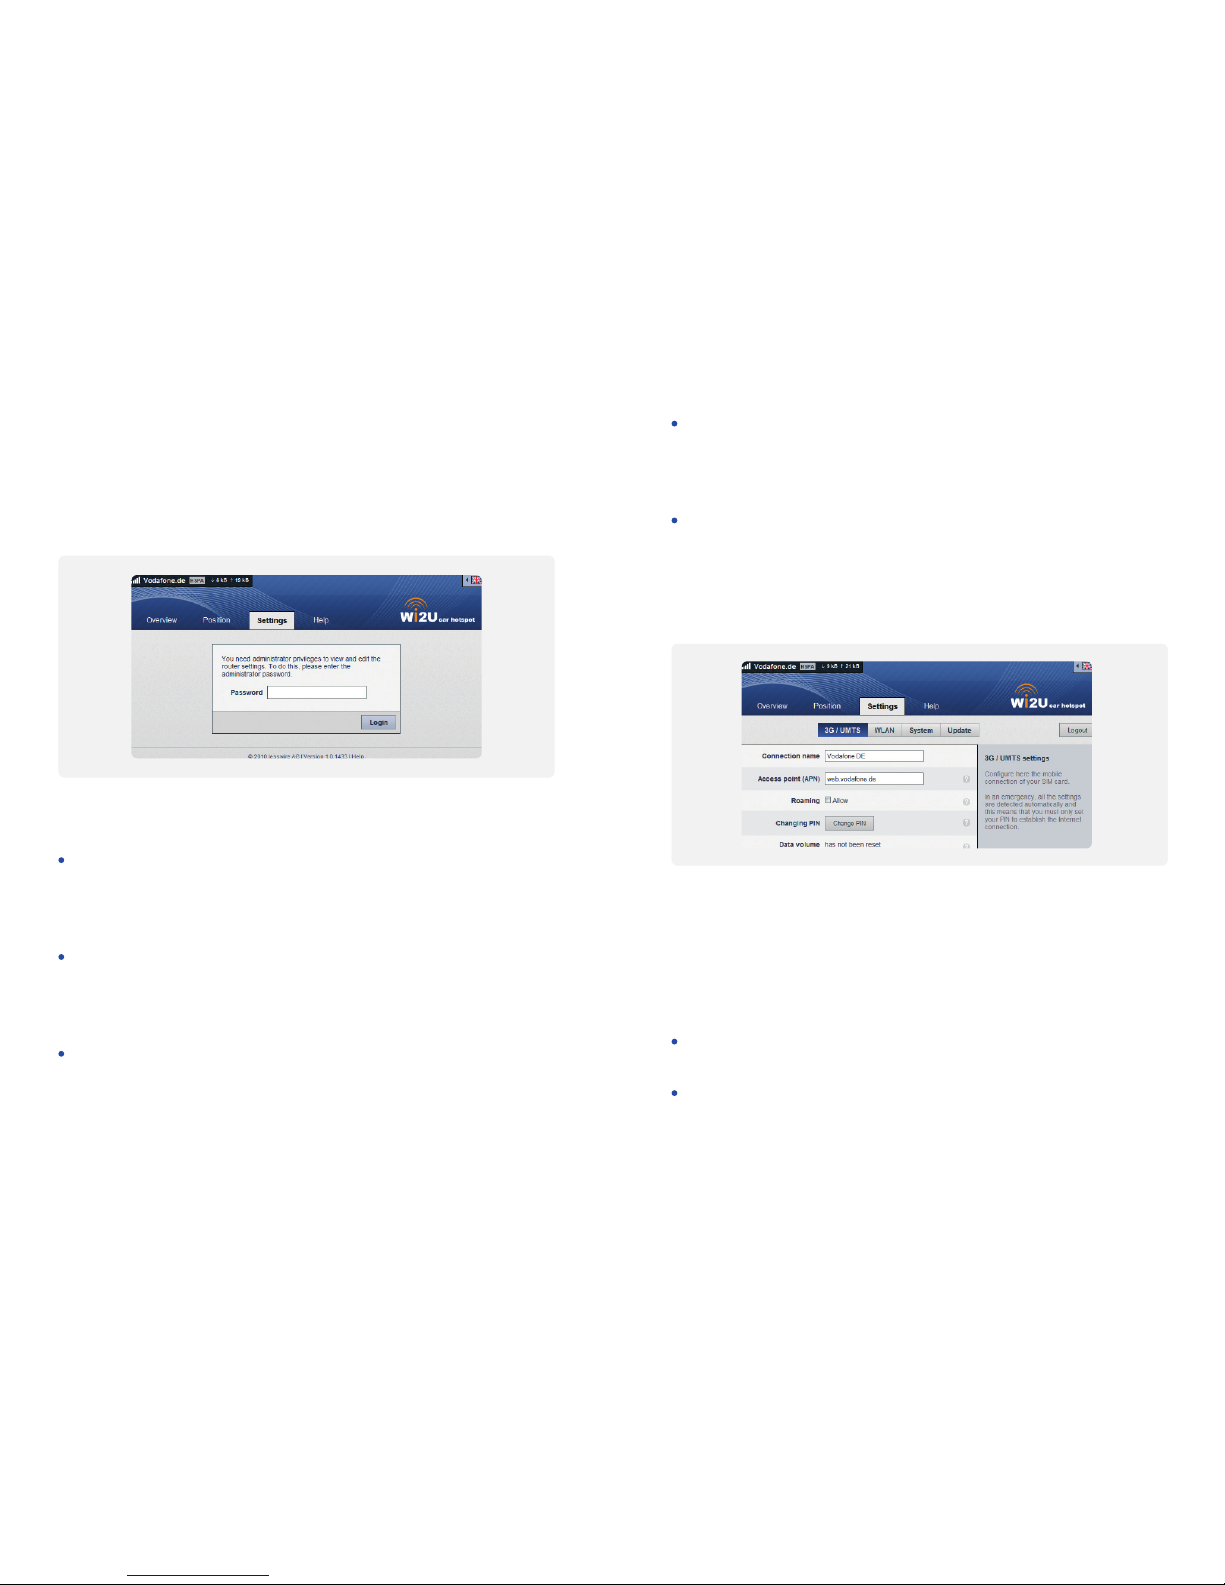
Settings
Select the Settings menu. You will be prompted for a password. The
default password is „admin“. For security reasons, the default password should be changed to an individual password.
3G / UMTS
Connection name
The settings for your SIM card are administered under a freely denable connection name. By default, this is usually the name of your
provider. The connection name can be changed manually.
Access Point Name (APN)
The Wi2U tries to determine the access settings automatically based
on your SIM card and stores them in the SIM card prole. You can
change the settings here manually.
Roaming
You can switch on data roaming by activating the check box. With
data roaming switched off, the router will not establish a connection
when you are located outside of your home network. By default, roaming is deactivated.
14
PIN
The PIN is requested when you rst insert the SIM card and generally must not be changed. If needed, you can change or set the PIN of
your SIM card using the PIN dialog.
Counter
The volume counter displayed in the status bar at the top indicates
the amount of data transferred with the SIM card in MB (downloaded/uploaded) since the last reset. The counters can be reset from
within this setting.
Advanced 3G / UMTS settings
For some providers it is necessary to make advanced setting changes. For most providers, these settings are not required. You can
access advanced settings by clicking on the „Advanced“ link.
User
Entering a user name for dial-in to the UMTS network
Password
Entering a password for dial-in to the UMTS network
15
Page 9

Authentication
Authentication procedure selection (PAP, CHAP, no authentication)
DNS1
Specifying a static domain name server
DNS2
Specifying a second static domain name server
WLAN
Under the WLAN tab you can adjust all the WLAN specic settings.
SSID (Network name)
Here you can change the SSID if you wish. Default setting:
wi2u-nnnnn (see sticker on the underside of the device or on the
back of this Quick Start Guide). Transmission of the SSID can be
suppressed by marking the check box. In this case, the WLAN network is no longer visible.
Region
Here you can determine the regulatory domain (EU, U.S., Japan).
16
Depending on the region, specic channels are faded in or hidden.
Channel
Here you can choose which channel the integrated WLAN access point of the Wi2U router should send. The default setting is
Channel 1.
Verschlüsselung
Here you can select what encryption your Wi2U router should use.
Default setting: WPA & WPA2 mixed.
Key
Here you can enter the WPA/WPA2 key. The default key can also be
found on the underside of the Wi2U router and on the last page of
this Quick Start Guide. Please note: the key must be suitable for the
encryption method.
Repeat key
This eld is used for repeated entry of a new WPA/WPA2 key to
prevent incorrect entries.
IP
Here you can set the IP address of the Wi2U router. Default setting:
192.168.1.1
Subnet mask
Here you can specify the subnet mask. Default setting:
255.255.255.0
System
New password
Here you can change the system password.
Repeat password
The system password must be entered repeatedly to conrm any
changes.
17
Page 10

Theft protection by e-mail
You can activate theft protection by e-mail in the check box. An e-mail
address must be entered in the text eld. Every time the Wi2U router
is switched on or off, the GPS coordinates are sent to the specied
e-mail address.
Theft protection by SMS
You can activate theft protection by SMS in the check box. A mobile
number must be entered in the text eld. Every time the Wi2U router
is switched on or off, the GPS coordinates are sent by SMS to the
specied mobile number.
Homepage
Here you can choose whether the information page or position page
should be displayed as the homepage.
18
Regulatory Information
CE Approval
The Wi2U router is tested in accordance with the regulatory requirements of the European Union (EU) according to the R&TTE Directive
(1999/5/EC) and complies with all CE marking requirements.
E-Mark Approval
The Wi2U router is certied in accordance with the regulatory
requirements of the European Union (EU) under the EMC Directive
72/245/EEC and 2009/19/EC, as well as the standard ECE R10 324
Rev. 3 for use in vehicles and complies with all E-marking requirements.
The Wi2U router sends out radio signals in normal operation that
can produce interference with other radio-based devices. The device
should therefore be operated only as described in the handbook. The
manufacturer gives no guarantee that interference will not occur with
other devices.
19
Page 11
Technical Data and Important Notes
WLAN standards IEEE 802.11 b/g
Connectivity 3G / 2G Multimode HSUPA / HSDPA / UMTS / EDGE / GPRS /
GSM
UMTS Dual-band (900 / 2100)
GSM / GPRS Quad-band (850 / 900 / 1800 / 1900)
Positioning A-GPS/S-GPS
Processor ARM9 @ 400MHz
Operating system Linux 2.6.32
Firmware update via Internet
Antenna connector UMTS (Fakra D, bordeaux),
GPS (Fakra C, blue),
WLAN internal antenna
Power supply 4-pin power connector
12 VDC / 24 VDC from vehicle supply
Operating temperature Operating temperature range -10°C to +55°C,
Extended operating temperature range -25°C to +75°C
Storage temperature -40°C to +105°C
Reset function Firmware reset for factory settings, hardware reset for
Wi2U system reboot
Protection class DIN 40050-9 according to IP30
Security / encryption WPA (TKIP, AES), WPA2 (CCMP, AES)
Certicates CE, E-Mark
Dimensions (L x W x H) 134 x 81 x 17.5 mm
20
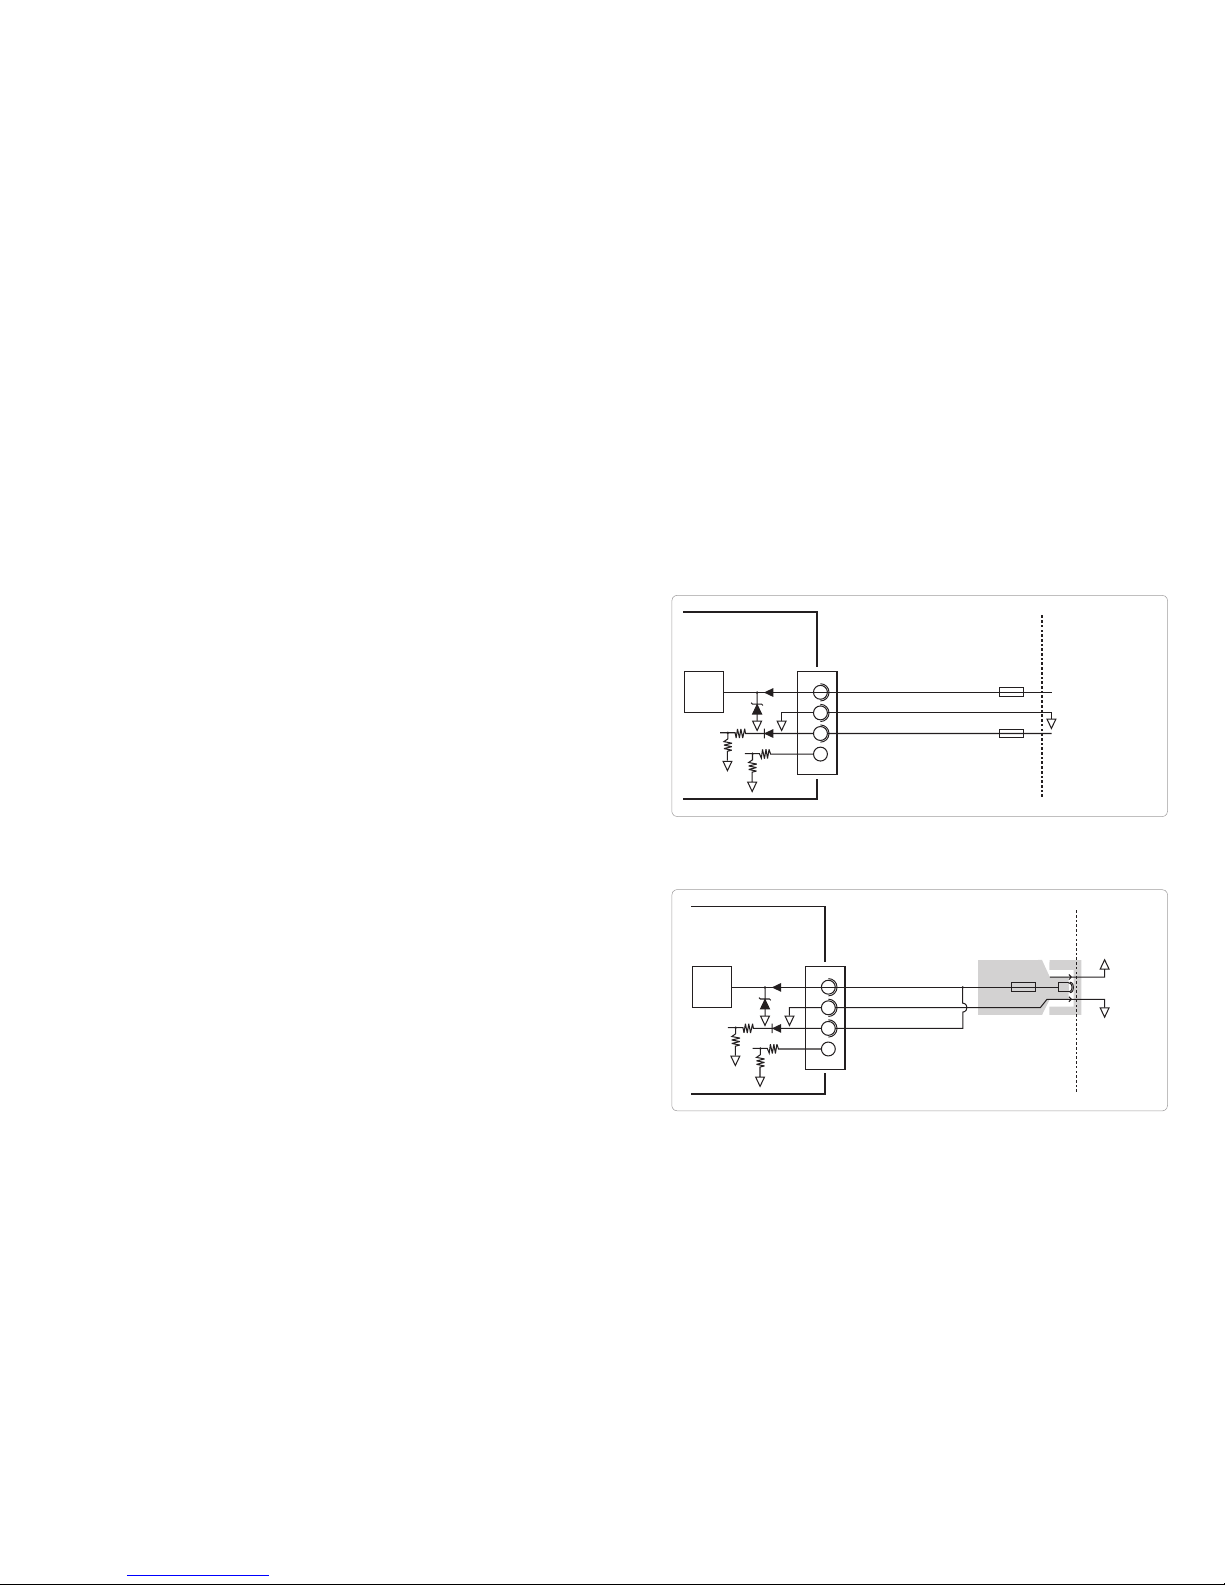
Power supply / fuse protection
The Wi2U router comes with an integrated overvoltage protection
and reverse voltage protection. Additionally, the device is protected
against short circuit by a 2 ampere fuse.
1. Connection to vehicle on-board electrical system:
2. Connection to the cigarette lighter:
21
Connection to
supply voltage
DC/DC
3.3V
Wi2U
WLAN-UMTS router
CAR
12V / 24V
1
2
3
4
red
black
yellow
2A
2A
Cable to connect to
on-board electronics (1.5m)
CAR30 (Term.30)
CAR31 (Term.31)
CAR15 (Term.15)
33V
18k
100k
10k
62k
(+)
(+)
( - )
Connection to
supply voltage
DC/DC
3.3V
Wi2U
WLAN-UMTS router
CAR
12V / 24V
1
2
3
4
red
black
yellow
2A
Cable to connect
cigarette lighter (1.5m)
33V
18k
100k
10k
62k
Cigarette lighter
(+)
(+)
( - )
Page 12

Important Notes
Notes for end user: Any change or modication to the Wi2U router,
which was not explicitly released by an authorised certication body
as conforming to regulatory requirements, may terminate the operating license of the device.
Safety guidelines: Do not operate the Wi2U router in any area where medical equipment, life-saving devices or other devices are used
which are sensitive to interference from radio signals.
Operation in the vehicle: The driver or person operating the vehicle
should not operate the Wi2U router while driving. The operation of
the Wi2U router diverts the attention of the driver from trafc ahead
and control of the vehicle. In some countries, the use of such communication devices while operating a motor vehicle is prohibited. Please observe the country-specic conditions.
Please note: the position of the UMTS antenna should not be operated near another antenna. The UMTS antenna should have a minimum distance of 2 cm from metal and 20 cm distance from the body.
The correct antenna position in the vehicle has a signicant inuence
on connection quality. The existence of an Internet connection is dependent on the use of a mobile tariff with integrated data option.
The transmission speed depends on the infrastructure of the network
operator, the current signal strength and the number of users in a radio cell. The Wi2U router does not have a SIM lock and can therefore
be used with any SIM card with a data tariff.
Device-specic data
22 23
Page 13

lesswire AG
Germany
www.wi2u.com
 Loading...