

Page 1
Assembly Instructions
Leaders in Reception Seating
Lesro Industries, Inc.
1 Grifn Road South
Bloomeld, CT
06002
Phone
860.243.3226
Fax
860.243.5392
www.lesro.com
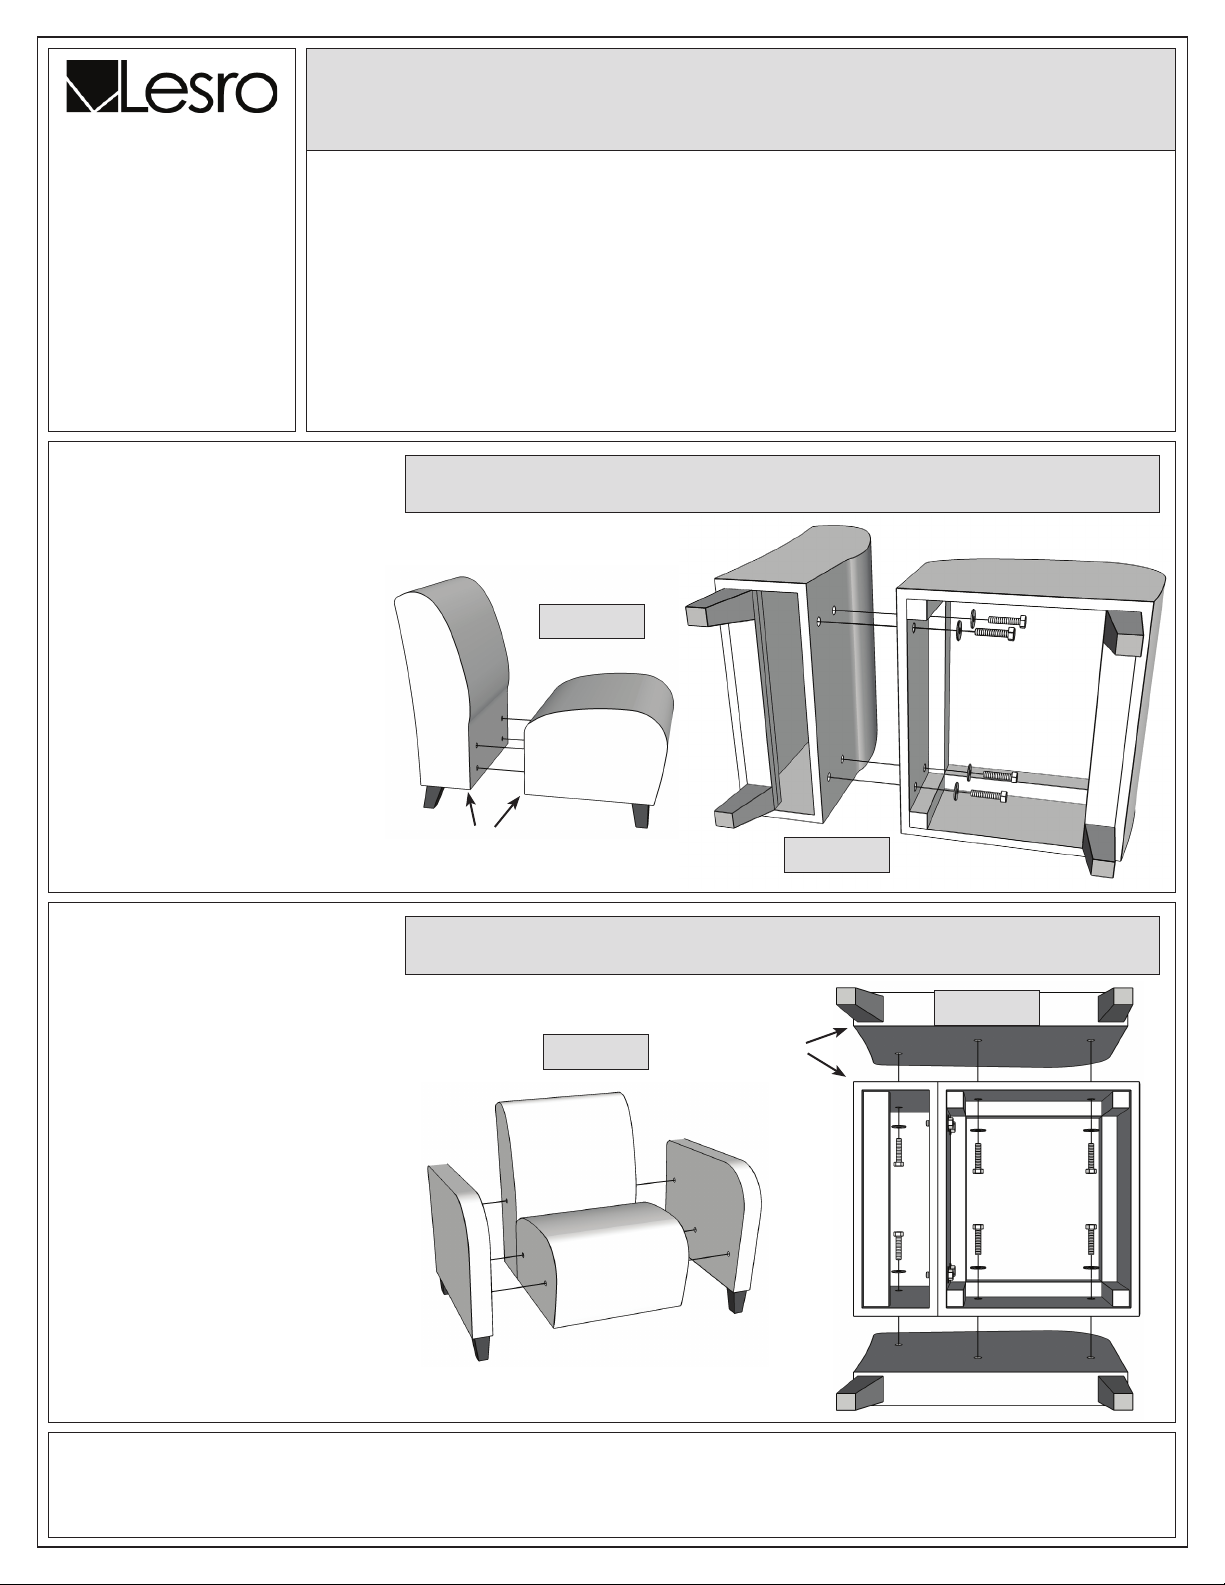
1. Unpack and identify all parts.
2. Attach seat to back using 2”
bolts and washers into threaded
inserts, as shown in gures 1
and 2. Keep bolts slightly loose
for now.
3. Place chair upright on a level
surface and align bottom edge
of seat with bottom edge of
back.
Tools required: 9/16” ratchet or wrench. (Ratchet recommended.)
Note: These instructions are intended for various models and congurations. Your products may not
look exactly as those shown in the diagrams.
Important: The assembly process requires that some hardware be kept loose until later in the
sequence. Follow these instructions closely to ensure correct assembly.
Recommendation: Retighten all bolts on a seasonal basis to ensure your product remains strong and
stable for many years of use.
Weight Capacity: All guest chairs in these series have a weight capacity of 400 lbs. per seat, oversize
chairs 500 lbs., and loveseats 550 lbs., unless otherwise stated.
For Siena & Ravenna Chairs, Loveseats and Sofas
Section 1 - Chairs & Loveseats without Arms
Figure 1
4. Tighten all bolts securely.
5. Your product is now assembled
and ready to use.
1. Follow instructions in Section 1 to
attach seat to back. Align bottom
edge of seat with bottom edge of
back and tighten bolts securely.
2. Attach arms to seat and back
using 2” bolts and washers into
threaded inserts, as shown in
gures 3 and 4. Start each bolt
rst, until all have caught a few
threads, then nger tighten only.
Hint: start with bolt in back
cushion rst, followed by front
seat bolt, then middle bolt last.
3. Place chair upright on a level
surface and align bottom edges of
seat, back and arms.
4. Tighten all bolts securely.
Align edges when
tightening bolts
Figure 2
Section 2 - Chairs & Loveseats with Arms
Figure 3
Align
edges
when
tightening
bolts
Figure 4
5. Your product is now assembled
and ready to use.
Thank you for purchasing a Lesro product.
Need assistance with assembly? Call Lesro customer service 1-800-275-7545.
© 2014 Lesro Industries, Inc. June 2014
Visit us on-line at www.lesro.com
Page 2
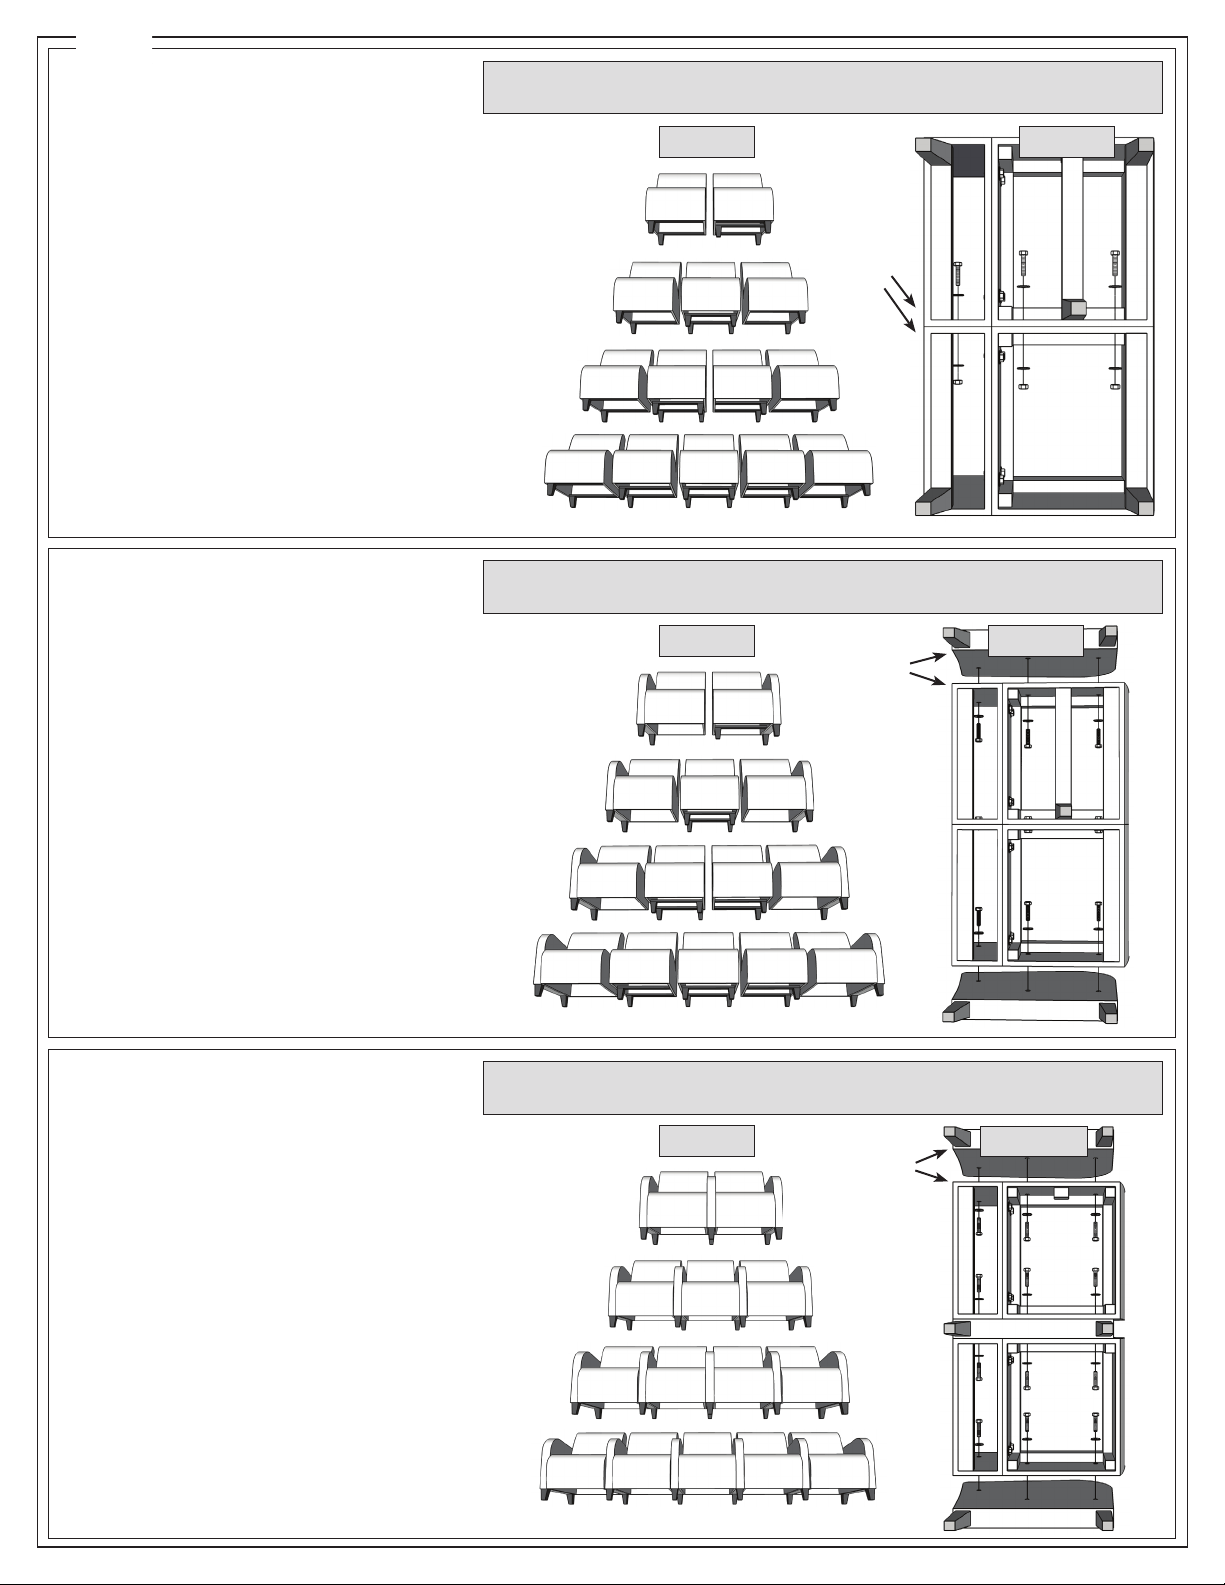
1. Follow instructions in Section 1 to attach
each seat to each back. Cushions inside
each carton belong together. Do not
intermix. Align edges and tighten bolts
securely.
Section 3 - Sofas without Arms
Figure 5 Figure 6
2. Orient chairs side-by-side, as shown in gures 5
and 6. Pay close attention to correct leg positions.
Note that center chairs have bolt holes on both
sides. End chairs have bolt holes on one side only.
3. Connect adjoining chairs using bolts, washers and
nuts. Use 2” bolts between seats and 3” bolts
between backs. Finger tighten only. Hint: start
with bolt in back cushion rst, followed by front
seat bolt, then middle bolt last.
4. Place chair assembly upright on a level surface and
align bottom edges of adjoining seats and backs.
5. Tighten all bolts securely.
6. Your product is now assembled and ready to use.
1. Follow instructions in Section 3 to
attach each seat to each back and to
connect adjoining sections. Pay close
attention to correct leg positions, as
shown in gure 7. Align edges and tighten
bolts securely.
2. Attach arms to seats and backs using 2” bolts
and washers into threaded inserts, as shown
in gure 8. Start each bolt rst, until all have
caught a few threads, then nger tighten only.
Hint: start with bolt in back cushion rst,
followed by front seat bolt, then middle
bolt last.
Align
edges
when
tightening
bolts
See www.lesro.com for an enlarged view of this gure
Section 4 - Sofas with End Arms
Figure 7
edges
tightening
Align
when
bolts
Figure 8
3. Place chair assembly upright on a level
surface and align bottom edges of adjoining
seats, backs, and arms. Tighten all bolts
securely.
4. Your product is now assembled and ready
to use.
1. Follow instructions in Section 1 to attach
seats to backs. Align edges and tighten
Section 5 - Connecting Chairs with Center Arms
bolts securely.
2. Identify left, right, and center arm pieces. Center
arms have bolt holes on both sides. Left and right
arms have bolt holes on one side only.
3. Orient chairs and arms side-by-side, as shown in
gures 9 and 10.
4. Attach arms to seats and backs using 2” bolts and
washers into threaded inserts. Start each bolt rst,
until all have caught a few threads, then nger
tighten only. Hint: start with bolt in back cushion
rst, followed by front seat bolt, then middle bolt.
5. Place chair assembly upright on a level surface and
align bottom edges of adjoining seats, backs, and
arms. Tighten all bolts securely.
See www.lesro.com for an enlarged view of this gure
Figure 9
tightening
Align
edges
when
bolts
Figure 10
6. Your product is now assembled and ready to use.
© 2014 Lesro Industries, Inc.
Page 3
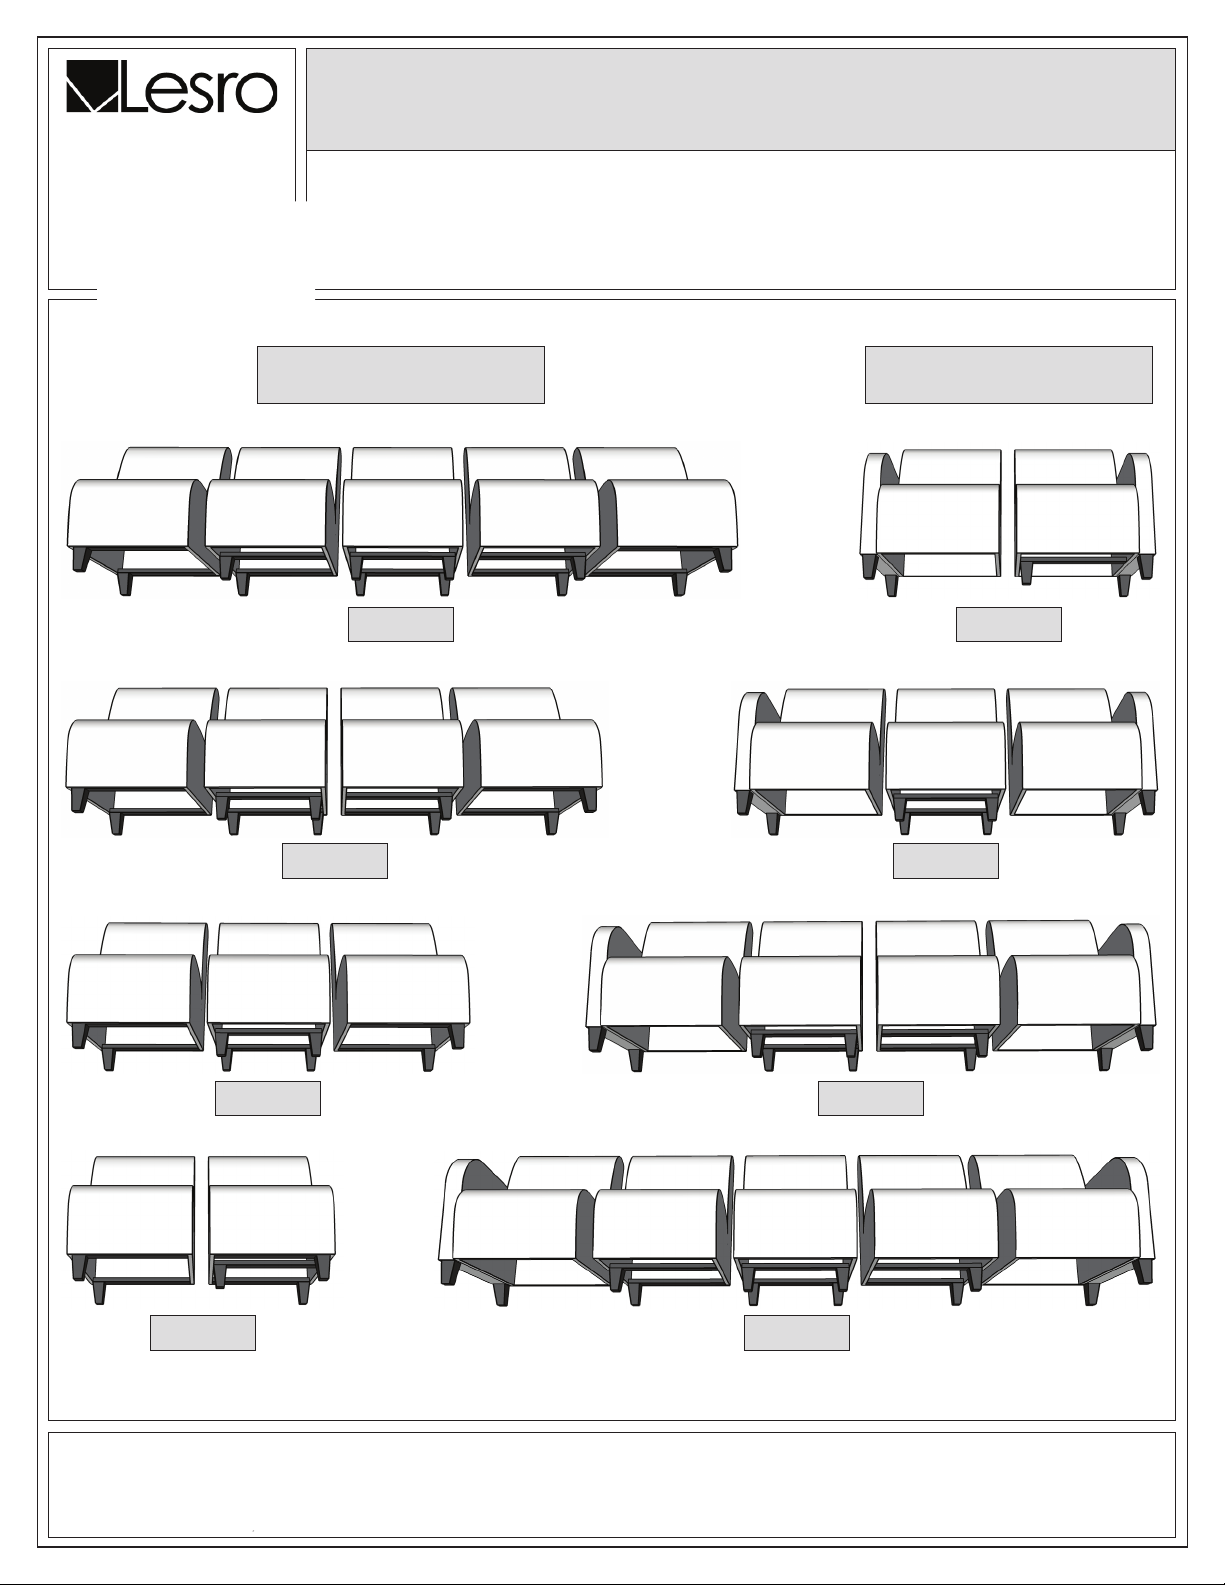
Leg Positions
Leaders in Reception Seating
Lesro Industries, Inc.
1 Grifn Road South
Bloomeld, CT
06002
For Siena & Ravenna Series Sofas
Recommendation: Retighten all bolts on a seasonal basis to ensure your product remains strong and
stable for many years of use.
Weight Capacity: All chairs in these series have a weight capacity of 350 lbs. per seat, unless
otherwise stated.
Without Arms
5-Seat 2-Seat
With Arms
2-Seat
3-Seat
4-Seat
3-Seat
4-Seat
5-Seat
Thank you for purchasing a Lesro product.
Need assistance with assembly? Call Lesro customer service 1-800-275-7545.
© 2014 Lesro Industries, Inc. June 2014
Visit us on-line at www.lesro.com
 Loading...